Embed Size (px)
DESCRIPTION
A savvy guide to Office 2011 for Mac users
Citation preview

Click here to buy the book.
Sample Chapter
Office 2011 for MacPortable Genius
Chapter 1What Are the First Things I Need to Know?
ISBN: 978-0-470-61019-0
Copyright of Wiley Publishing, Inc.Indianapolis, Indiana
Posted with Permission
Click here to buy the book.

1
What Are the First Things I Need to Know?
04_610190-ch01.indd 2 10/19/10 10:12 PM
COPYRIG
HTED M
ATERIAL
Click here to buy the book.
1 2 3 4 5 6 7 8 9 10 11 12 13 14 15 16 17
There’s something in the air. It’s that time again. Time for the next release of
Microsoft Office for Mac! This version offers plenty to be excited about, and
that’s part of what this chapter discusses. Along with new features, I also
explain how to install the latest incarnation of Office for Mac, and how to get
started from the ground floor in case you’re new to Office.
Installing Office for Mac 2011 . . . . . . . . . . . . . . . . . . . . . . . . . . . . . . . . . . . . . . 4
The Latest and Greatest: Cool New Features in Office 2011 . . . . . . . . . . . 8
Using Office for Mac 2011 Programs . . . . . . . . . . . . . . . . . . . . . . . . . . . . . . . 11
04_610190-ch01.indd 3 10/19/10 10:12 PMClick here to buy the book.
4
Office for Mac 2011 Portable Genius
Installing Office for Mac 2011It’s time to get moving with your new copy of Office 2011 for Mac! First things first, however; you
need to get those legendary Office applications installed on your trusty Mac before you can go too
far into anything else. So, insert the Microsoft Office 2011 Installation DVD and get this party started.
Installing using the Office InstallerMicrosoft has automated almost the entire installation process for you, so this will be a breeze.
Follow these steps:
1. Insert the Microsoft Office 2011 Installation DVD into your Mac’s disc drive.
2. In the Microsoft Office 2011 window, double-click the Office Installer program.
3. Click Continue in the Welcome to the Microsoft Office for Mac 2011 Installer window.
4. Read the license agreement, click Continue, and then click Agree. If you don’t click
Agree then you are at an impasse.
5. Select the destination on your Mac for your Office installation.
6. At the next window, you have to decide whether to install the entire Office suite of
applications or perform a custom installation.
l To install the entire Office suite, skip to step 9.
l To install only portions of the Office suite, continue with the next step.
7. Click the Customize button at the bottom of the window.
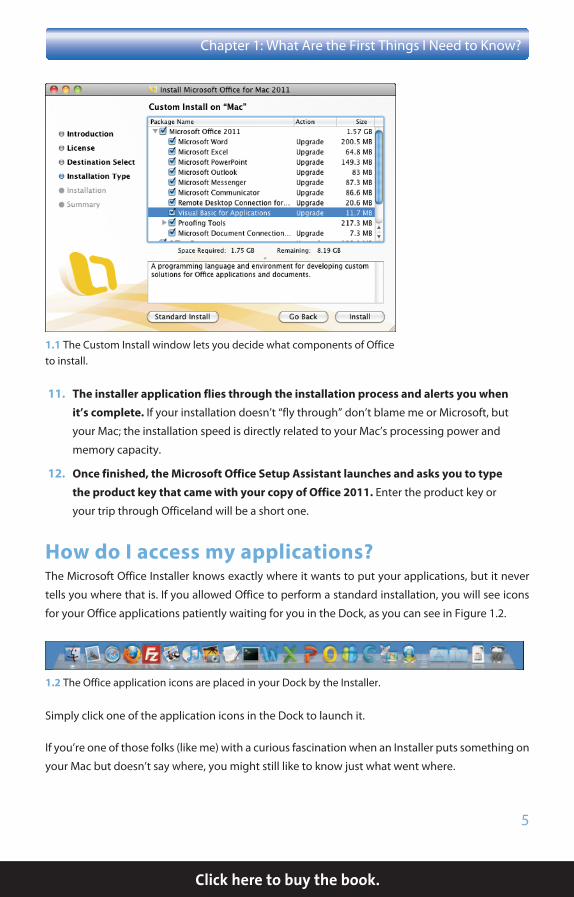
8. In the Custom Install window, seen in Figure 1.1, determine which items you want
to install:
l To install an item, select the check box to its left.
l To find out more about an item, click it once to highlight it, and a description will
appear in the window below.
If you see the word Upgrade next to the name of some of the items in the custom
installation list, this just means that those items are already installed on your Mac.Note
9. Click Install.
10. When prompted, type the username and password you use to log in to your
account on the Mac, and click OK.
04_610190-ch01.indd 4 10/19/10 10:12 PMClick here to buy the book.
5
Chapter 1: What Are the First Things I Need to Know?
1.1 The Custom Install window lets you decide what components of Office to install.
11. The installer application flies through the installation process and alerts you when
it’s complete. If your installation doesn’t “fly through” don’t blame me or Microsoft, but
your Mac; the installation speed is directly related to your Mac’s processing power and
memory capacity.
12. Once finished, the Microsoft Office Setup Assistant launches and asks you to type
the product key that came with your copy of Office 2011. Enter the product key or
your trip through Officeland will be a short one.
How do I access my applications?The Microsoft Office Installer knows exactly where it wants to put your applications, but it never
tells you where that is. If you allowed Office to perform a standard installation, you will see icons
for your Office applications patiently waiting for you in the Dock, as you can see in Figure 1.2.
1.2 The Office application icons are placed in your Dock by the Installer.
Simply click one of the application icons in the Dock to launch it.
If you’re one of those folks (like me) with a curious fascination when an Installer puts something on
your Mac but doesn’t say where, you might still like to know just what went where.
04_610190-ch01.indd 5 10/19/10 10:12 PMClick here to buy the book.

6
Office for Mac 2011 Portable Genius
The Office Installer dumps everything you need into the default Applications directory on your
Mac. To find your applications, follow these steps:
1. Open a Finder window.
2. Press Ô+Shift+A to jump straight to the Applications folder (which is located at the
root of your hard drive).
3. Scroll through the list of applications and you will find a few new Microsoft guys
waiting on you: Microsoft Communicator, Microsoft Messenger, and a folder called
Microsoft Office 2011. The Microsoft Office 2011 folder is where Word, Excel,
PowerPoint, and Outlook are hiding, along with Microsoft Document Connection and
Remote Desktop Connection.
I don’t care for having all the Office application icons lurking in my Dock. While I
enjoy the fast access, they take up too much real estate. However, I’ve found a way
to have my cake and eat it, too: Add Microsoft Office 2011 folder to the Dock instead
of each individual application. Just open a Finder window to the Applications folder,
and drag and drop the Microsoft Office 2011 folder into the right side of the Dock. To
access your Office applications simply click the folder and click the application you
want from the pop-up menu.
Genius
How do I install additional templates?You may be an Office power user who has been a whiz at Office applications for years. If that’s the
case, you may have saved years’ worth of templates to help you perform your work more effi-
ciently. Well, now you’ve got the latest Office for Mac and want to use those tried-and-true tem-
plates in it, too.
Office 2011 stores its own templates in the /Applications/Microsoft Office 2011/Office/Media/
Templates directory, but that’s not where you should put your personal or additional ones. The
Office Installer has created a nice, new home for your templates. To see it, follow these steps:
1. Open a new Finder window.
2. Click the hard drive icon in the upper-left corner of the sidebar.
3. Browse to the following directory: /Users/username/Library/Application Support/
Microsoft/Office/User Templates/My Templates. Figure 1.3 gives you a bird’s-eye
04_610190-ch01.indd 6 10/19/10 10:12 PMClick here to buy the book.
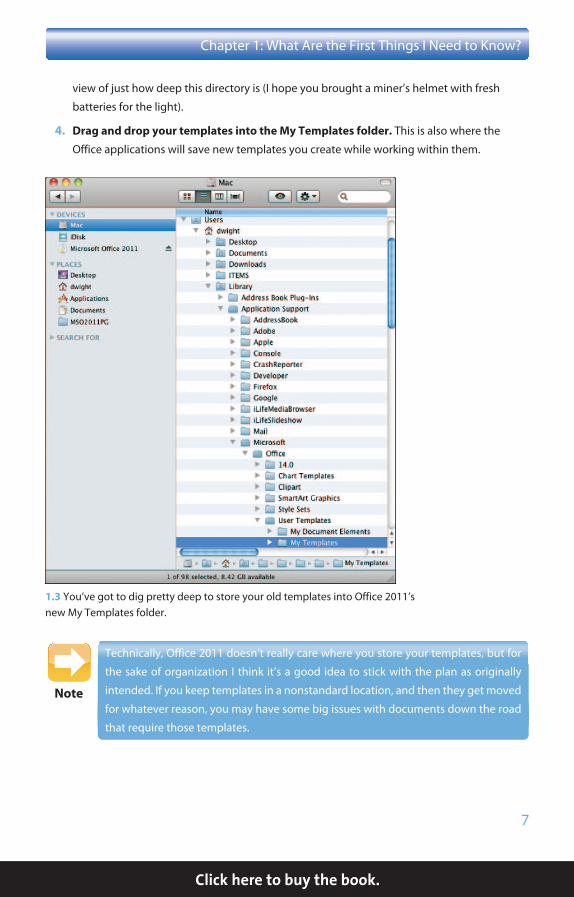
7
Chapter 1: What Are the First Things I Need to Know?
view of just how deep this directory is (I hope you brought a miner’s helmet with fresh
batteries for the light).
4. Drag and drop your templates into the My Templates folder. This is also where the
Office applications will save new templates you create while working within them.
1.3 You’ve got to dig pretty deep to store your old templates into Office 2011’s new My Templates folder.
Technically, Office 2011 doesn’t really care where you store your templates, but for
the sake of organization I think it’s a good idea to stick with the plan as originally
intended. If you keep templates in a nonstandard location, and then they get moved
for whatever reason, you may have some big issues with documents down the road
that require those templates.
Note
04_610190-ch01.indd 7 10/19/10 10:12 PMClick here to buy the book.
8
Office for Mac 2011 Portable Genius
The Latest and Greatest: Cool New Features in Office 2011There are lots of new goodies for us all to play with in Office 2011 for Mac, so let’s jump right in and
learn the tantalizing details of new functionality that awaits.
What’s new in Office?There are lots of new features in Office 2011, and the most important one in my eyes is feature par-
ity with Office for Windows. That covers a very broad base, but let it suffice to say that the new
version of Office for Mac is ready to stand toe to toe with its Windows cousin, and even has some
features that Windows versions don’t have yet.
There’s a new e-mail client in town this go around: Outlook! (More on that later in this chapter.)
Ever heard of a little thing called the ribbon? If you’ve used Microsoft Office on a Windows-based
PC and it was version 2007 or newer, you’ve definitely heard of it and interacted with it. If you are
a Mac user who has strictly used Mac versions of Office, you may have heard of it at some point,
but you’ve certainly never used it. Well, get ready, because the ribbon has arrived for the Mac with
the advent of Office 2011.
I hear an odd mix of sounds ranging from rapturous joy to muffled groans of disgust. Some of you
who have used the ribbon before may have had a less-than-stellar experience with it, but I’m sure
that many others (myself included) have been quite happy with the ribbon.
But I digress; I should explain just what the ribbon is for the uninitiated. The ribbon is a new set of
tabs that are visible just underneath the toolbar. These tabs are organized in a very intuitive fash-
ion, and each tab includes easy-to-access buttons that correspond to the functions that people
use the most. Of course, the ribbon has somewhat different functionality depending on which of
the four main Office applications (Word, Excel, PowerPoint, or Outlook) you are running.
As I mentioned earlier, some love the ribbon and others not so much. I think it’s a very valuable
addition to Office 2011, so buck up, kick in, and I urge you to give it a fair shake.
As with anything new, there will be detractors, and I’ll be honest when I say that the Office button
in the Windows versions of Office isn’t my favorite item in the world, but here’s some news that
may alleviate the moans and groans: There is no Office button in Office 2011 for Mac. That’s right.
04_610190-ch01.indd 8 10/19/10 10:12 PMClick here to buy the book.

9
Chapter 1: What Are the First Things I Need to Know?
The Office button took many of the familiar menu items that one would normally find under File,
Edit, View, and so on, and placed them all in one button, which caused no small amount of confu-
sion. It seems as though Microsoft wanted to wisely avoid such confusion with this latest Mac ver-
sion of Office.
What’s new in Word?Word 2011 is a great update from Word 2008 and earlier versions. For example, features new
to Word 2011 include
The ribbon. The ribbon makes it easier than ever to work with the most common tools
for building new documents.
Publishing layout. As seen in Figure 1.4, this essentially turns Word into a desktop-
publishing application.
1.4 Publishing layout converts Word from a simple word processor to a robust desktop-publishing app.
Full screen view. This allows you to work with a document in full-screen mode.
04_610190-ch01.indd 9 10/19/10 10:12 PMClick here to buy the book.
10
Office for Mac 2011 Portable Genius
Dynamic reordering. This allows you to reorder contents of a document by dragging
them in front of or behind one another in a three-dimensional layout that looks like
something out of Star Trek.
Visual style guides. These make building the perfect document that much simpler.
Templates. Even more have been created to help you build documents, and you can
access tons more via the Internet.
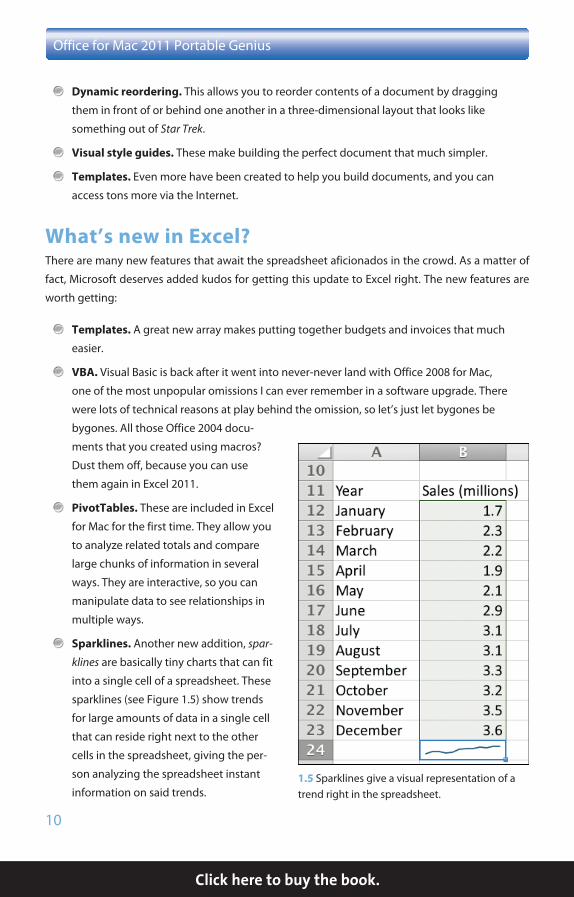
What’s new in Excel?There are many new features that await the spreadsheet aficionados in the crowd. As a matter of
fact, Microsoft deserves added kudos for getting this update to Excel right. The new features are
worth getting:
Templates. A great new array makes putting together budgets and invoices that much
easier.
VBA. Visual Basic is back after it went into never-never land with Office 2008 for Mac,
one of the most unpopular omissions I can ever remember in a software upgrade. There
were lots of technical reasons at play behind the omission, so let’s just let bygones be
bygones. All those Office 2004 docu-
ments that you created using macros?
Dust them off, because you can use
them again in Excel 2011.
PivotTables. These are included in Excel
for Mac for the first time. They allow you
to analyze related totals and compare
large chunks of information in several
ways. They are interactive, so you can
manipulate data to see relationships in
multiple ways.
Sparklines. Another new addition, spar-
klines are basically tiny charts that can fit
into a single cell of a spreadsheet. These
sparklines (see Figure 1.5) show trends
for large amounts of data in a single cell
that can reside right next to the other
cells in the spreadsheet, giving the per-
son analyzing the spreadsheet instant
information on said trends.1.5 Sparklines give a visual representation of a trend right in the spreadsheet.
04_610190-ch01.indd 10 10/19/10 10:12 PMClick here to buy the book.
11
Chapter 1: What Are the First Things I Need to Know?
What’s new in PowerPoint?PowerPoint is the iconic presentation tool that you all know and love. There are a couple of new
features in PowerPoint 2011 that are really cool:
Using Presenter Tools, Excel can now help you rehearse your presentation before
you give it, and even keep up with how long each slide should take to present.
You can record audio directly into your presentations.
PowerPoint 2011 now has the capability to broadcast your slide show to anyone in
the world, assuming that person has an Internet connection. This feature alone is
pretty awesome.
What’s new in Outlook?What’s new in Outlook? Well, the whole thing! This is the first appearance on the Mac for Outlook
in quite some time (about ten years, as a matter of fact), and this is the first time it’s ever made it in
a native Mac OS X format.
Outlook replaces the pretty good, but not quite good enough, Entourage. Entourage was a decent
e-mail and scheduling client, but lacked the functionality of a full-blown Outlook. Now Outlook is
capable of operating side by side with its Windows counterpart and provides you full, unfettered
access to your company’s Exchange Server.
Using Office for Mac 2011 ProgramsWhile each of the applications in the Office 2011 suite performs its own unique tasks, it is precisely
the things they have in common that make using them such a great experience. Even though each
application has its own role, there are still many tasks that are performed in a similar fashion; if you
are familiar with one application, you are never truly a novice at the others.
Get to know the ribbonLet’s take a moment to get a quick rundown of the ribbon so that it’s not entirely foreign (there’s
more on the ribbon in upcoming chapters throughout the book).
Go ahead and open one of the Office applications by clicking its icon in the Dock. If you moved the
icon, you can click the Apple menu, hold your mouse over recent items, and see if an Office appli-
cation is listed there. If not, you need to browse through the Finder to /Applications/Microsoft
Office 2011 to find one to launch.
04_610190-ch01.indd 11 10/19/10 10:12 PMClick here to buy the book.
12
Office for Mac 2011 Portable Genius
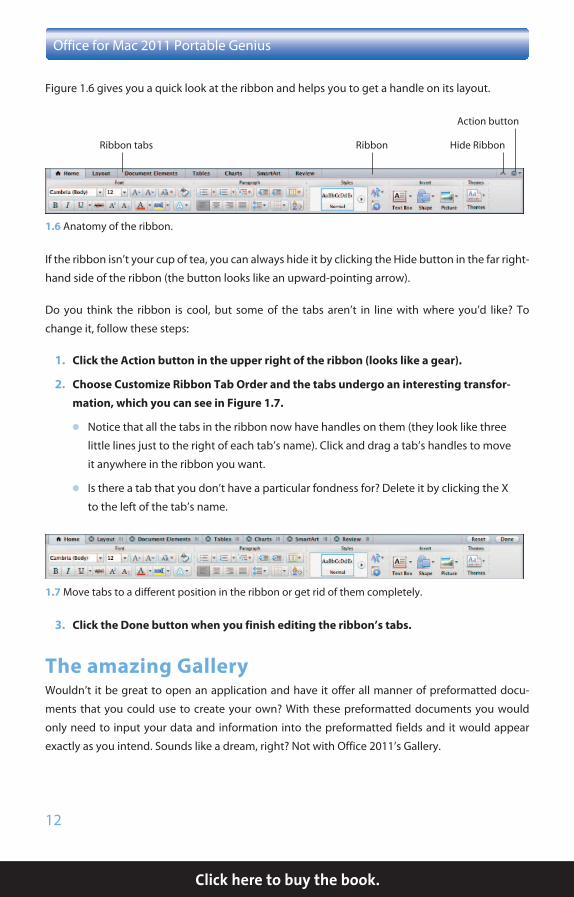
Figure 1.6 gives you a quick look at the ribbon and helps you to get a handle on its layout.
Ribbon tabs Ribbon
Action button
Hide Ribbon
1.6 Anatomy of the ribbon.
If the ribbon isn’t your cup of tea, you can always hide it by clicking the Hide button in the far right-
hand side of the ribbon (the button looks like an upward-pointing arrow).
Do you think the ribbon is cool, but some of the tabs aren’t in line with where you’d like? To
change it, follow these steps:
1. Click the Action button in the upper right of the ribbon (looks like a gear).
2. Choose Customize Ribbon Tab Order and the tabs undergo an interesting transfor-
mation, which you can see in Figure 1.7.
l Notice that all the tabs in the ribbon now have handles on them (they look like three
little lines just to the right of each tab’s name). Click and drag a tab’s handles to move
it anywhere in the ribbon you want.
l Is there a tab that you don’t have a particular fondness for? Delete it by clicking the X
to the left of the tab’s name.
1.7 Move tabs to a different position in the ribbon or get rid of them completely.
3. Click the Done button when you finish editing the ribbon’s tabs.
The amazing GalleryWouldn’t it be great to open an application and have it offer all manner of preformatted docu-
ments that you could use to create your own? With these preformatted documents you would
only need to input your data and information into the preformatted fields and it would appear
exactly as you intend. Sounds like a dream, right? Not with Office 2011’s Gallery.
04_610190-ch01.indd 12 10/19/10 10:12 PMClick here to buy the book.
13
Chapter 1: What Are the First Things I Need to Know?
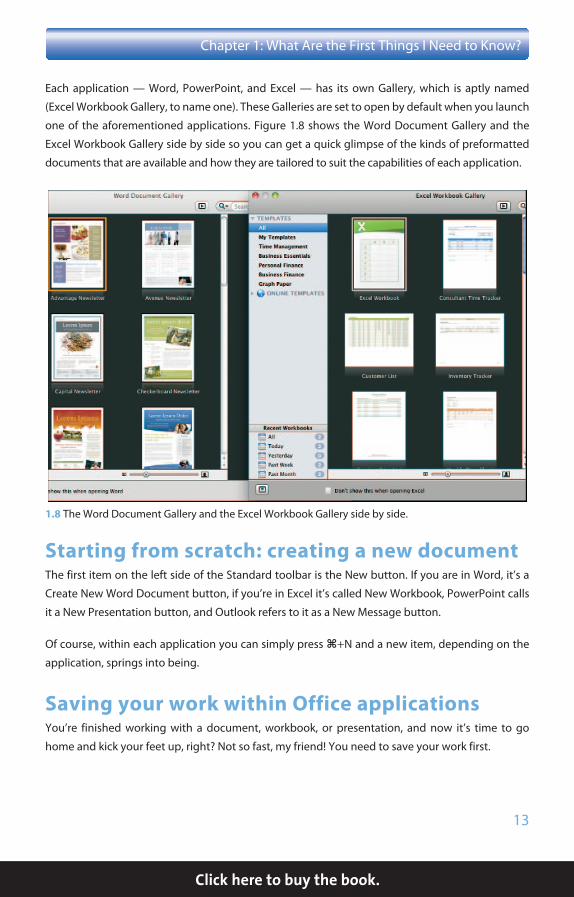
Each application — Word, PowerPoint, and Excel — has its own Gallery, which is aptly named
(Excel Workbook Gallery, to name one). These Galleries are set to open by default when you launch
one of the aforementioned applications. Figure 1.8 shows the Word Document Gallery and the
Excel Workbook Gallery side by side so you can get a quick glimpse of the kinds of preformatted
documents that are available and how they are tailored to suit the capabilities of each application.
1.8 The Word Document Gallery and the Excel Workbook Gallery side by side.
Starting from scratch: creating a new documentThe first item on the left side of the Standard toolbar is the New button. If you are in Word, it’s a
Create New Word Document button, if you’re in Excel it’s called New Workbook, PowerPoint calls
it a New Presentation button, and Outlook refers to it as a New Message button.
Of course, within each application you can simply press Ô+N and a new item, depending on the
application, springs into being.
Saving your work within Office applicationsYou’re finished working with a document, workbook, or presentation, and now it’s time to go
home and kick your feet up, right? Not so fast, my friend! You need to save your work first.
04_610190-ch01.indd 13 10/19/10 10:12 PMClick here to buy the book.
14
Office for Mac 2011 Portable Genius
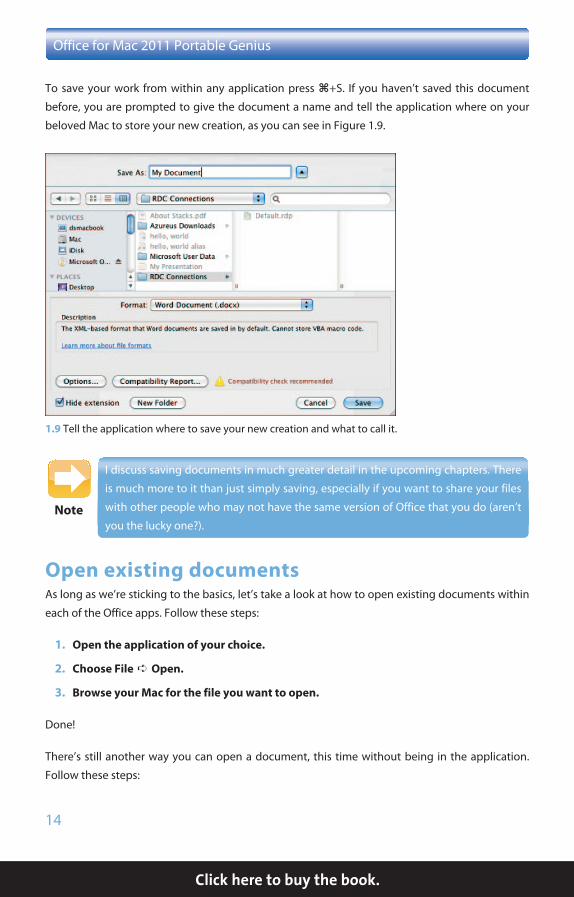
To save your work from within any application press Ô+S. If you haven’t saved this document
before, you are prompted to give the document a name and tell the application where on your
beloved Mac to store your new creation, as you can see in Figure 1.9.
1.9 Tell the application where to save your new creation and what to call it.
I discuss saving documents in much greater detail in the upcoming chapters. There
is much more to it than just simply saving, especially if you want to share your files
with other people who may not have the same version of Office that you do (aren’t
you the lucky one?).Note
Open existing documentsAs long as we’re sticking to the basics, let’s take a look at how to open existing documents within
each of the Office apps. Follow these steps:
1. Open the application of your choice.
2. Choose File ➪ Open.
3. Browse your Mac for the file you want to open.
Done!
There’s still another way you can open a document, this time without being in the application.
Follow these steps:
04_610190-ch01.indd 14 10/19/10 10:12 PMClick here to buy the book.

15
Chapter 1: What Are the First Things I Need to Know?
1. Right-click the document to open a contextual menu.
2. Hold your mouse pointer over the Open With menu.
3. Choose the application you want to use to open your document from the sugges-
tions in the submenu, as shown in Figure 1.10.
1.10 Choose an application to open your document from the Open With submenu.
You can always open a document by dragging and dropping it onto the appropriate
application’s icon in the Dock, or if the icon isn’t in the Dock you can find the applica-
tion in a Finder window and drag and drop the document onto its icon.Genius
Sharing with other Office usersI want to take a moment to answer the question that I hear most often from those who are switch-
ing from Office for Windows to Office for Mac: Will the documents, workbooks, and presentations
I create in Word, Excel, and PowerPoint for Mac work with Word, Excel, and PowerPoint for
Windows? The short and sweet answer is yes.
In some instances you may need to be careful about what format you are saving documents in. For
example, if you send your Word document to someone who has an older version of Word (whether
on a Mac or PC), you will probably want to save the document in .doc format, which is compatible
with all versions of Office. Word 2011 for Mac and newer versions of Word for Windows save docu-
ments in the .docx format by default, and older versions of Word are unable to open this format.
04_610190-ch01.indd 15 10/19/10 10:12 PMClick here to buy the book.