Embed Size (px)
Citation preview
A
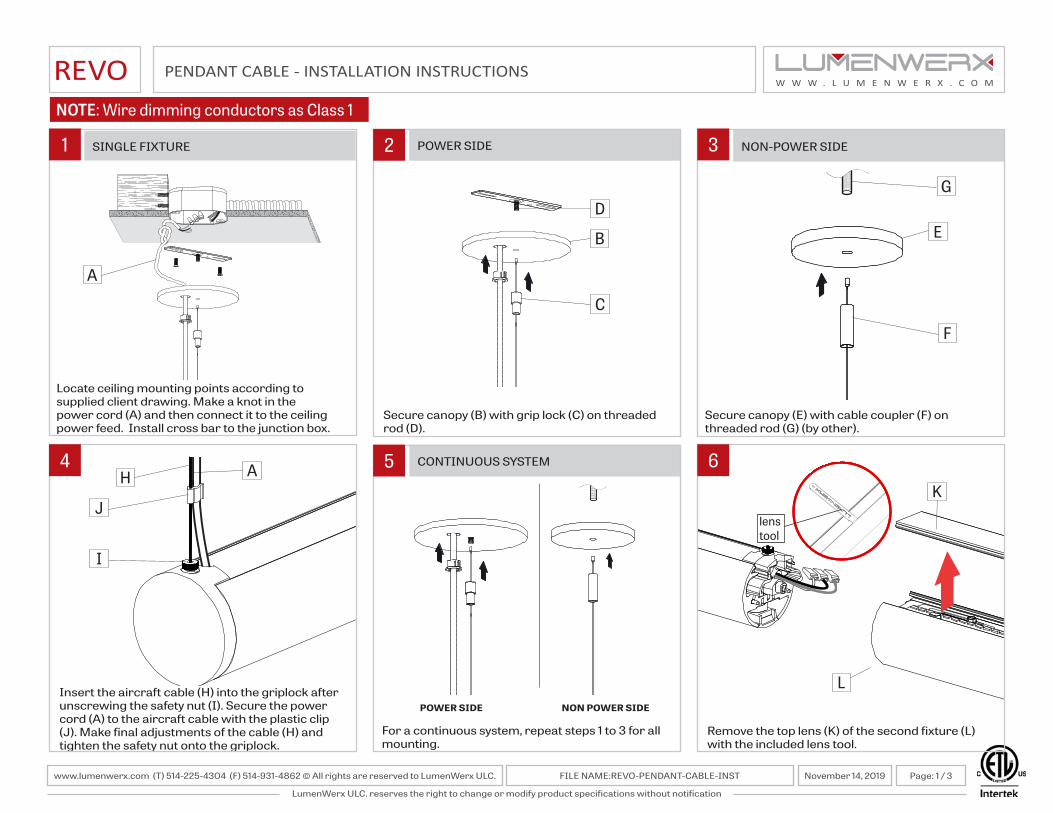
SINGLE FIXTURE
D
B
C
POWER SIDE
G
E
F
NON-POWER SIDE
POWER SIDE NON POWER SIDE
For a continuous system, repeat steps 1 to 3 for all mounting.
CONTINUOUS SYSTEM
lens tool
K
L
H A
J
I
Secure canopy (B) with grip lock (C) on threaded rod (D).
Locate ceiling mounting points according to supplied client drawing. Make a knot in the power cord (A) and then connect it to the ceiling power feed. Install cross bar to the junction box.
Secure canopy (E) with cable coupler (F) on threaded rod (G) (by other).
Remove the top lens (K) of the second fixture (L) with the included lens tool.
Insert the aircraft cable (H) into the griplock after unscrewing the safety nut (I). Secure the power cord (A) to the aircraft cable with the plastic clip (J). Make final adjustments of the cable (H) and tighten the safety nut onto the griplock.
PENDANT CABLE - INSTALLATION INSTRUCTIONSW W W . L U M E N W E R X . C O M
www.lumenwerx.com (T) 514-225-4304 (F) 514-931-4862 © All rights are reserved to LumenWerx ULC. FILE NAME:REVO-PENDANT-CABLE-INST November 14, 2019 Page: 1 / 3
LumenWerx ULC. reserves the right to change or modify product specifications without notification
REVO NOTE: Wire dimming conductors as Class 1
1
4
2
5
3
6
L
M
N
H
N
L
Q
PO
R
T
S
M
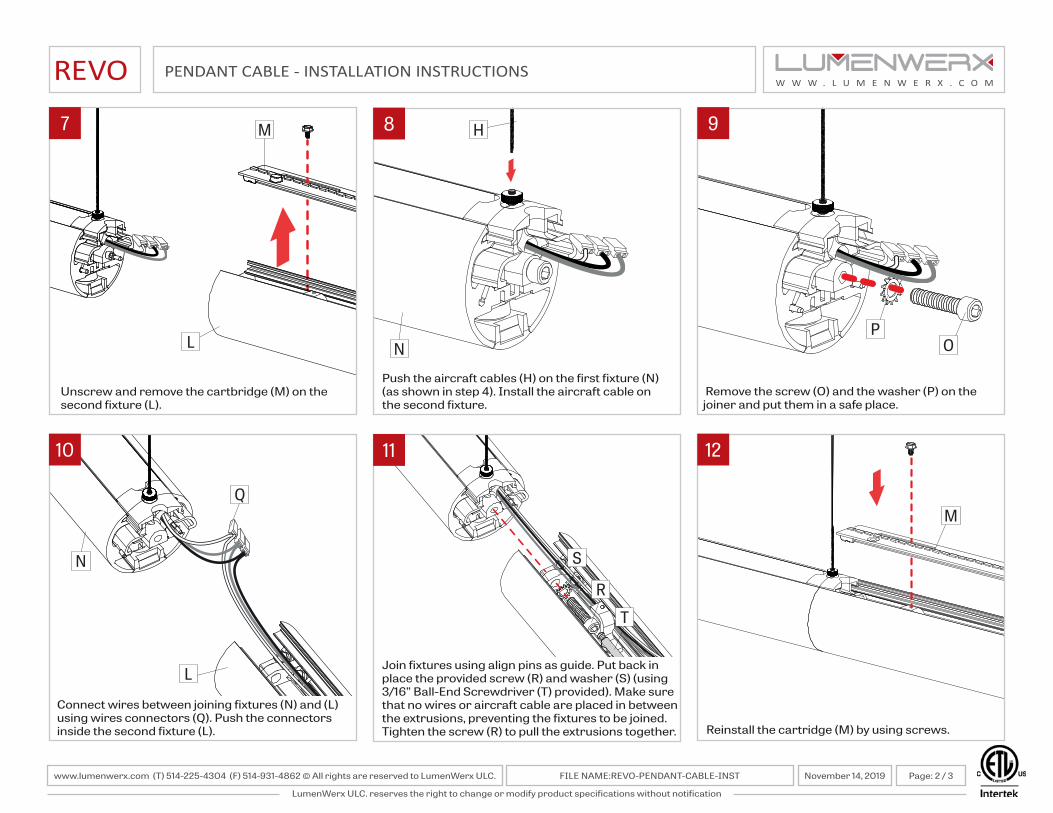
Unscrew and remove the cartbridge (M) on the second fixture (L).
Push the aircraft cables (H) on the first fixture (N) (as shown in step 4). Install the aircraft cable on the second fixture.
Connect wires between joining fixtures (N) and (L) using wires connectors (Q). Push the connectors inside the second fixture (L).
Remove the screw (O) and the washer (P) on the joiner and put them in a safe place.
Join fixtures using align pins as guide. Put back inplace the provided screw (R) and washer (S) (using 3/16” Ball-End Screwdriver (T) provided). Make sure that no wires or aircraft cable are placed in between the extrusions, preventing the fixtures to be joined. Tighten the screw (R) to pull the extrusions together. Reinstall the cartridge (M) by using screws.
W W W . L U M E N W E R X . C O M
7
10
8
11
9
12
www.lumenwerx.com (T) 514-225-4304 (F) 514-931-4862 © All rights are reserved to LumenWerx ULC. FILE NAME:REVO-PENDANT-CABLE-INST November 14, 2019 Page: 2 / 3
LumenWerx ULC. reserves the right to change or modify product specifications without notification
PENDANT CABLE - INSTALLATION INSTRUCTIONSREVO
K
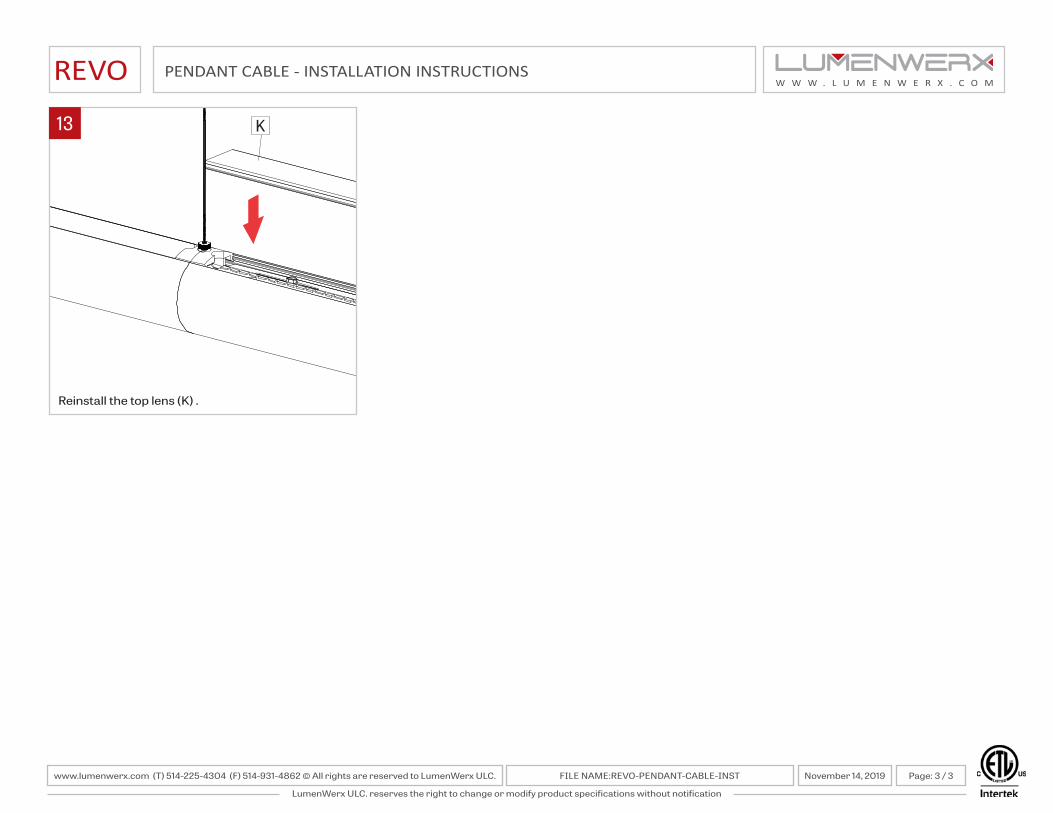
Reinstall the top lens (K) .
W W W . L U M E N W E R X . C O M
13
www.lumenwerx.com (T) 514-225-4304 (F) 514-931-4862 © All rights are reserved to LumenWerx ULC. FILE NAME:REVO-PENDANT-CABLE-INST November 14, 2019 Page: 3 / 3
LumenWerx ULC. reserves the right to change or modify product specifications without notification
PENDANT CABLE - INSTALLATION INSTRUCTIONSREVO