Embed Size (px)
Citation preview

VISIT OUR WEBSITE: WWW.LIBERTYGARDENPRODUCTS.COM OR CALL US TOLL FREE AT 1-866-820-5805
IMPORTANT: READ THE OWNER’S MANUAL BEFORE ASSEMBLING
Model 703 Hose Reel Owner’s Manual
™
1161 SOUTH PARK DRIVE, KERNERSVILLE NC 27284LIBERTY GARDEN PRODUCTS, INC.

TOOLS REQUIRED
PARTS LIST
Estimated Assembly time: 5 minutes (Not including mounting)
A. STAKES (4) E. HOSE REEL (1) (Not pictured)
C. GRIP HANDLE (1)
2
1. Remove the top flange nut on the grip handle (C). Attach the handle and lower nut to the steel crank. Using adjustable wrench or your hand, tighten nuts on the front and back of the steel crank. - The two nuts may be adjusted to allow the handle to rotate freely. Figure 1
Note: If you have trouble with the swivel turning and kinking the leader hose, try spraying a silicone spray inside to lubricate the O-rings. The O-rings located inside the swivel may be dry. You can reach the O-rings by taking off the retaining clip or spraying inside the opening of the swivel.
4. Attach your garden hose to the hose connection and wind around the hose reel spool (E). Figure 3
FIGURE 2
• DO NOT leave water running through the hose reel unsupervised.
• DO NOT expose the reel to freezing temperatures with water remaining in the unit.
• Turn the water off after each use.
ASSEMBLY INSTRUCTIONS
IMPORTANT: LAY OUT ALL PARTS AND FASTENERS. MAKE SURE ALL PARTS ARE ACCOUNTED FOR. IF ANY PART IS MISSING PLEASE CONTACT LIBERTY GARDEN PRODUCTS AT 1-866-820-5805. DO NOT CONTACT THE RETAILER. YOU CAN ALSO VISIT OUR WEBSITE, WWW.LIBERTYGARDENPRODUCTS.COM, FOR MORE INSTRUCTIONS PICTURES AND HELPFUL HINTS.
Adjustable Wrench (Not Included)
FIGURE 3
FIGURE 1
C
E
D
A B
C
D
2. Attach the leader hose (D) to the swivel connector. Figure 2
B. BUMPERS (4)
E

B
BE
3
INSTALLATION
NOTE: The following hardware (not included)is recommended for installation.
NOTE: The following hardware (not included)is recommended for installation.
Insert the four bumpers (B) provided into the mounting holes on the hose reel base (E). To secure the unit to the lawn or earth place the four stakes (A) through the holes on the base of the unit (E).
MOUNTING ON BRICK, MASONRY WALL or FLOOR
MOUNTING ON FLAT WOOD FRAME WALL
(4) 7 or 8 mm x 60 mm masonry wall anchors (5/16” x 2 1/2”)(4) Anchor sleeves(4) Washers(4) Lock washers(4) Nuts
(4) 7 or 8 mm lag screws with washers (5/16” x 2 1/2”)
GROUND MOUNTING
This hose reel MUST be mounted to a solid masonry wall or to wall studs
Note: Remember to use the correct size and quantity of hardware to properly support the total weight of the unit. A standard 100' length of garden hose weighs approximately 15 lbs. Filled with water, the additional weight can exceed 20 lbs. The mounting hardware must be able to support the combined weight of the unit, garden hose, plus water.
Mounting Hole Size 10mm
• Position and hold your hose reel against the brick masonry wall at a convenient height. Mark the position of each suspension hole on the wall. Remove the hose reel.
• Using an electric drill, drill holes 9/16” in diameter and 1 5/8” deep at the marked positions on the wall. • Insert the masonry wall anchors into the anchor sleeve. Next, insert the anchor and sleeve into the drilled holes until the steel sleeve is completely in the wall. • Place the hose reel on the masonry wall anchors.
• Install a washer, lock washer, and nut over each wall anchor and tighten securely.
• Position and hold your hose reel against the wood wall at a convenient height. Mark the position of each suspension hole on the wall. Remove the hose reel.
• Using an electric drill, drill pilot holes 1/4” in diameter and 2 1/2” deep at the marked positions on the wall. • Align the hose reel suspension holes with the pilot holes.
• Attach the hose reel to the wall using the lag screws with washers and tighten securely.
Mounting Hole Size 10mm
Note: Lubricating the bumpers with water or a light lubricant will ease the insertion.

4
CARE INSTRUCTIONS
Rust Your hose reel will give you many seasons of reliable and functional hose storage. As with any steel product, there is always the chance for rust developing over time. Your hose reel finish is designed for industrial applications, but even the toughest of coatings can be compromised by scratches. Such minor surface damage can occur in shipping despite our best efforts. We have found that most scratches occur during assembly and/or installation (in the case of wall mounted hose reels). If the base metal is exposed to the elements long enough, rust will develop. In the case of wall-mounted reels, be sure to use stainless steel mounting hardware. We recommend that you periodically inspect your reel for any surface damage. Scratches can easily be repaired by using standard automotive touch-up body paint. Some of our most loyal customers recommend that at the end of each season, the unit be cleaned and painted with a clear acrylic paint.
Leaks Your hose reel is manufactured with the finest quality components available. All components are manufactured to rigorous quality standards not common in other consumer grade hose reels available today. When you install your hose reel, be sure the hose washers are in place and all fittings are secure. DO NOT OVER TIGHTEN as you might damage the components. If you live in more temperate climates, be sure to drain the unit of any residual water before storing. DO NOT EXPOSE THE UNIT TO FREEZING TEMPERATURES while water remains in the plumbing system.
Troubleshooting GuideProblem: Swivel head is not rotating,causing the leader hose to kink up.Solution: Remove leader hose and turn the square head of the swivel several times; apply lubricant.
Problem: Leaking Fixtures (galvanized tee; brass coupling; swivel)Solution: Apply Teflon/Plumber's Tape or/and make sure fixtures are tightened.

5
CURING A LEAKING SWIVEL
Problem:Your new Liberty hose reel is leaking at the swivel. Solution:It is normal for the swivel to leak slightly until the O-rings are wet and have seated. If the leaking continues, you don’t need to take the cart back to the store. This is a simple problem and is easily fixed by a simple procedure. 1. If the leader hose is attached to the swivel, unscrew the hose and look inside the swivel.
2. Using either a hex key or a large screw driver, insert the tool into the hex opening and gently tighten the threaded insert. DO NOT OVER TIGHTEN!
3. This should stop the leaking.
4. If the unit still leaks, please check that the hose washer is inside the nut. You may contact Liberty for a new hose washer or obtain one at any hardware store.
5. If your swivel is old, the O-rings may be worn, please contact us for a new set of O-rings. 6. If these steps do not solve your leaking problem, then contact Liberty Garden Products.
CALL US AT 1-866-820-5805 IF YOU HAVE ANY QUESTIONS REGARDING TROUBLESHOOTING AND WARRANTY

WARRANTY & CARE Our guarantee is as functional and straight-forward as our products. Since we design and build our products to provide you with many years of satisfaction, all Liberty™ products are guaranteed against defects in materials and workmanship. In the unlikely event that a problem arises as a result of a defect in our materi-als or workmanship, we will promptly repair or replace the item at our expense. All we require is that you contact us first and we'll take it from there. It is important to note that our guarantee is not an unconditional guarantee for the life of the product. Liberty™ hose stands and reels are made from the finest materials available under our exacting manufacturing standards. But, like any other product, it is not indestructible. Therefore, our guarantee does not cover:
• Product damage that is a result of abuse, misuse, or mishandling. (Exposing the unit to freezing tempera-tures with water remaining in the reel plumbing system voids the unit warranty.)
• Rust. Despite the industrial quality coating and our best efforts, steel will rust over time.
• Incidental damage or consequential damages or injury to persons or to other property not purchased from us due to the use of our product.
• DO NOT consume water from garden hose; not fit for human consumption.
If there is damage to the product that occurred as a result of shipping, you should file a damage claim with the carrier.
• DO NOT leave water running though the reel while not in-use or unsupervised.
As with any product, it should be expected that component parts - particularly moving parts, seals, o-rings, wheels, hose, and connectors will wear with use and over time, and eventually may need to be replaced or refur-bished. This type of normal wear and tear is naturally not covered by our guarantee, but we will always be happy to provide you with prompt, high quality service and replacement parts at a nominal cost. This warranty gives you specific legal rights, and you may also have other rights which vary from state to state. (Some states do not allow the exclusion or limitation of incidental or consequential damages, so the above limitation may not apply to you). You will find that we apply the same standard of excellence to our customer service as we do to our products. Warning! This product contains one or more chemicals known to the State of California to cause cancer and birth defects or other reproductive harm. Wash hands after handling.
Updated 10/6/2013
6
™
“Liberty” is a registered trademark of Liberty Garden Products, Inc. Kernersville, NC. All Rights Reserved 2013

IMPORTANTE: LEA EL MANUAL DE INSTRUCCIONES ANTES DE ARMARLO. SI TIENE ALGUNA PREGUNTA POR FAVOR LLAME AL 866-820-5805 DE LUNES A VIERNES de 9 AM a 5 PM HORA DEL ESTE, USA
™
7
1161 SOUTH PARK DRIVE, KERNERSVILLE NC 27284LIBERTY GARDEN PRODUCTS, INC.
Modelo 703 Carrete de manguera
Manual de Instrucciones
VISITA NUESTRO SITIO WEB: WWW.LIBERTYGARDENPRODUCTS.COM

HERRAMIENTAS NECESARIAS
LISTA DE PARTES
Tiempo estimado para ensamblar: 5 minutos (No incluye el montaje)
A. Estacas (4) E. Carrete para manguera (1)(No esta en la foto)
C. Agarradera (1)
8
1. Remueva la arandela superior de la agarradera (C) Junte la agarradera y la tuerca inferior a la manivela de acero. Usando la llave ajustable, o su mano, ajuste las tuercas en las partes de adelante y de atras de la agarradera. Las dos tuercas deben ser ajustadas para permitir que la agarradera se mueva o rote libremente. Figura 1
Nota: Si tiene dificultad para quie gire el soporte giratorio y la manguera se enrosca, es possible que los anillos interiores esten secos. Rocie silicon con aerosol dentro de la abertura de la plataforma giratoria o retire la presilla de retencion paralubricar las juntas.
4. Conecte su manguera de jardin a la coneccion de la mangu-era y enrosque esta sobre el carrete (E). Figure 3
FIGURA 2
INSTRUCCIONES PARA EMSAMBLAR
Llave Ajustable, (No incluidos)
FIGURA 3
D. Tornillo de la manivela con arandela (1)
FIGURA 1
C
E
D
A B
C
D
2. Una la manguera inicial (C) al conector giratorio del carrete para manguera. Figura 2
B. Parachoques (4)
E
• NO deje el agua corriendo sin supervision .
• NO exponga el carrete para manguera a temperaturas de congelamiento si queda agua dentro del sistema de bombeo del carrete.
• Cada vez, despues de usarla, cierre el agua.
IMPORTANTE: ASEGÚRESE DE QUE TODAS LAS PARTES ESTAN INCLUIDAS. SI ALGUNA PARTE FALTA POR FAVOR CONTACTE A LIBERTY GARDEN PRODUCTS AL 1-866-820-5805. NO CONTACTE AL VENDEDOR. USTED TAMBIÉN PUEDE VISITAR NUESTRO SITIO WEB WWW.LIBERTYGARDENPRODUCTS.COM PARA MÁS INFORMACIÓN Y CONSEJOS ÚTILES.

• Coloque y sostenga la repisa del contra la pared solida a una altura conveniente. Marque en la pared la posicion de cada agujero de suspension. Retire la repisa.
• Usando el taladro, perfore agujeros de 9/16” de diamet-ro y 1 5/8 “ de profundidad en los puntos marcados en la pared. • Inserte los anclajes para pared en las fundas correspon-dientes. En seguida inserte el anclaje y su funda dentro de los agujeros perforados hasta que la funda de acero este completamente dentro. • Coloque la repisa sobre los anclajes para pared.
9
INSTALACION
NOTA: El siguiente herraje (no incluido) es recomendado para instalarlo
NOTA: El siguiente herraje (no incluido) es recomendado para instalarlo
• Coloque la repisa de la manguera del contra la pared a una altura conveniente. Marque en la pared la posicion de cada orificio. Retire la repisa.
• Con el taladro electrico, perfore orificios de 1/4 “ de diametro y 2 1/2” de profundidad en los puntos marcados en la pared. • Alinie los agujeros del carrete con los agujeros piloto.
• Fije la repisa a la pared usando los tornillos con las arandelas y aprete firmemente.
INSTALACION EN PARED SOLIDA INSTALACION EN PARED DE MADERA
(4) 7 o 8 mm x 60 mm anclajes de mamposteria de pared (5/16” X 2 1/2”) (4) Fundas para anclaje(4) Arandelas(4) Arandelas de seguridad(4) Tuercas
(4) tornillos de 7 o 8 mm con arandelas (5/16” x 2 1/2 “)
Este carrete para manguera tiene que ser montado en una pared solida o en los montajes de la pared.
B
BE
Inserte los cuatro parachoques (B) incluidos, en los agujeros de la base del carrete de manguera (E). Para asegurar la unidad a la tierra o cesped coloque las cuatro estacas (A) a travez de los agujeros en la base de la unidad (E).
PARA MONTARLO SOBRE LA TIERRA
Nota: Recuerde usar los taman'os y cantidades correctas de herraje para sostener apropiadamente el peso total de la unidad. Una manguera estandard de jardin de100 pies de largo pesa aproximadamente 15 libras. Llena de agua, el peso adicional puede exceder 20 libras. El herraje de montaje tiene que poder sostener el peso combinado de la unidad, manguera de jardin, mas el agua.
Nota: Lubricando los parachoques con agua o un lubricante liviano se facilitara la insercion..
Agujero demontaje de 10 mm
Agujero demontaje de 10 mm

10
INSTRUCCIONES PARA SU CUIDADO
Oxidacion Su carrete de manguera le dara muchas temporadas de almacenamiento seguro y confiable. Como con cualquier otro producto de acero, hay siempre la posibilidad que se desarrolle oxido al pasar el tiempo. Su carrete de manguera esta disen’ado para aplicaciones industriales, pero aun la mas fuerte capa protectora puede ser dan’ada por rasgun’os. Estos dan’os menores a la superficie pueden ocurrir durante el envio a pesar de nuestros mejores deseos. Hemos encontrado que la mayoria de los rasgun’os ocurren durante el ensamblaje y/o instalacion (en el caso de carretes de manguera montados en la pared). Si la base de metal es expuesta a los elementos por algun tiempo, la oxidacion se va a desarollar. En el caso de carretes montados en la pared, asegurese de usar partes de montaje de acero inoxidable. Recomen-damos que usted inspeccione periodicamente su carrete por algun dan’o a la superficie. Los rasgun’os pueden ser reparados facilmente utilizando pintura automotriz de retoque. Algunos de nuestros clientes mas leales recomiendan que a finales de cada temporada, la unidad debe ser limpiada y pintada con pintura clara de acrilico.
GoteosSu carrete esta fabricado con los componentes de la major calidad que se pueden encontrar. Todos sus componentes son fabricadoss con los mas rigurosos estandares de calidad, no encontrados en otros carretes de manguera que existen hoy. Cuando instale su carrete, asegurese que las arandelas en las mangueras estan en su lugar y todas los uniones asegura-das. NO APRETE DEMASIADO ya que usted podria dan’ar sus components. Si usted vive en climas mas templados, asegurese de botar toda el agua que queda antes de guardar la unidad. NO EXPONGA LA UNIDAD A TEMPERATURAS DE CONGELACION si hay agua en el sistema. Guia de ProblemasProblema: La cabeza movediza no gira, causando que la manguera de inicio se enrosque. Solucion: Mueva la manguera inicial y gire la cabeza algunas veces; appliqué lubricante.
Problema: Partes que gotean agua (codo, acoplamiento de cobre, parte giratoria).Solucion: Aplique cinta de Teflon usada por plomeros y asegurese que todo este apretado.
11
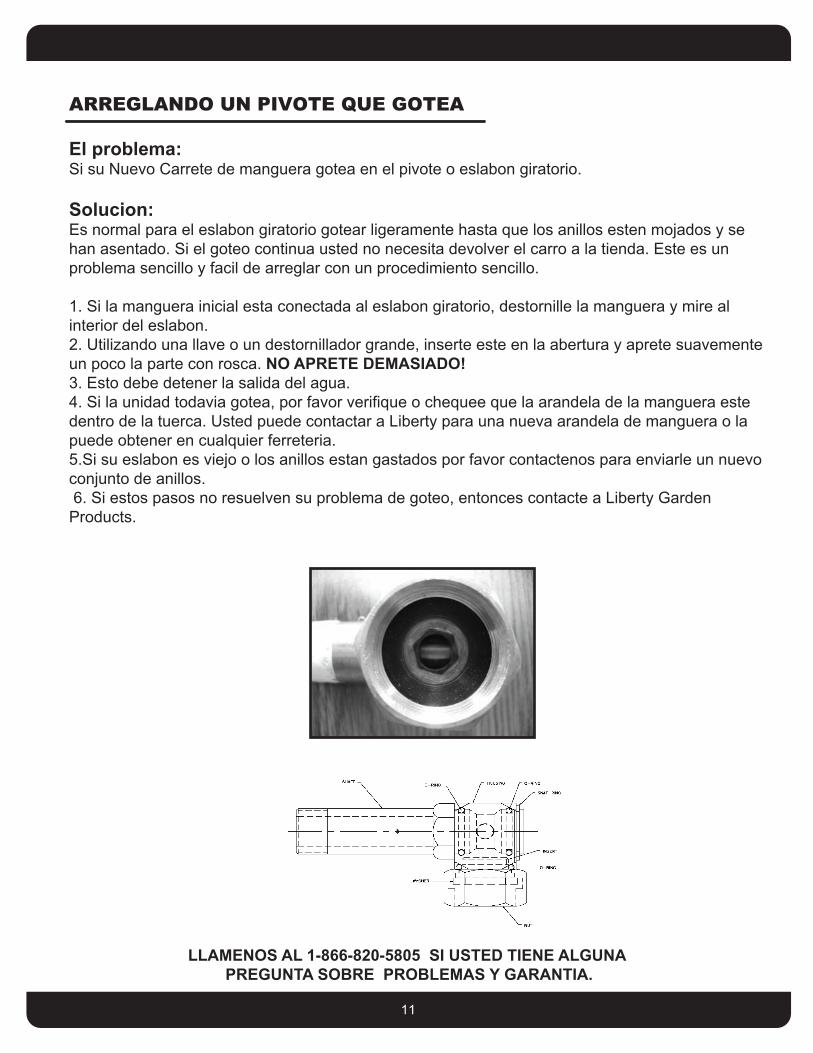
ARREGLANDO UN PIVOTE QUE GOTEA
El problema:Si su Nuevo Carrete de manguera gotea en el pivote o eslabon giratorio.
Solucion:Es normal para el eslabon giratorio gotear ligeramente hasta que los anillos esten mojados y se han asentado. Si el goteo continua usted no necesita devolver el carro a la tienda. Este es un problema sencillo y facil de arreglar con un procedimiento sencillo. 1. Si la manguera inicial esta conectada al eslabon giratorio, destornille la manguera y mire al interior del eslabon.2. Utilizando una llave o un destornillador grande, inserte este en la abertura y aprete suavemente un poco la parte con rosca. NO APRETE DEMASIADO! 3. Esto debe detener la salida del agua. 4. Si la unidad todavia gotea, por favor verifique o chequee que la arandela de la manguera este dentro de la tuerca. Usted puede contactar a Liberty para una nueva arandela de manguera o la puede obtener en cualquier ferreteria.5.Si su eslabon es viejo o los anillos estan gastados por favor contactenos para enviarle un nuevo conjunto de anillos. 6. Si estos pasos no resuelven su problema de goteo, entonces contacte a Liberty Garden Products.
LLAMENOS AL 1-866-820-5805 SI USTED TIENE ALGUNA PREGUNTA SOBRE PROBLEMAS Y GARANTIA.

GARANTIA & CUIDADO
Nuestra garantía es tan directa y funcional como nuestros productos. Ya que nosotros diseñamos y construi-mos nuestros productos para proporcionarle muchos an’os de satisfacción, todos los productos de Liberty (tm ) estan garantizados contra defectos de materials y mano de obra. En el improbable evento que un problema surja como resultado de un defecto en nuestros materials o fabricacion, nosotros repararemos o reemplazaremos el artículo por cuenta nuestra. Todo lo que requerimos es que usted nos contacte primero y nosotros hacemos el resto. Es importante notar que nuestra garantía no es una garantía incondicional por la vida del producto. Los carretes Liberty son fabricados con los mejores materials disponibles bajo nuestros exactos estandares de manufactura. Pero, al igual que cualquier otro producto no es indestructible. Por lo tanto nuestra garantia no cubre:
• Dan’os al producto que es el resultado de abuso, mal uso, o manejo indebido. (El exponer la unidad a temperaturas de congelacion con agua que quedo en el carrete de desague del sistema anula la garantia).
• Oxidación. A pesar de la calidad industrial de la capa que lo reviste y nuestros mejores esfuerzos, el acero se oxidara con el paso del tiempo.
• Dan’o incidental o dan’o a consecuencia o heridas a personas u otra propiedad nocomprada de nosotros a causa del uso de nuestro producto.
• NO CONSUMA agua de la manguera; no es apta para el consumo humano. Si hay un daño al producto que ocurrió a consecuencia del envío, usted debe presentar un reclamo de daño con quien trasporto el articulo.
NO DEJE que corra agua a travez del carrete si no esta en uso o sin ser supervisado.
Como con cualquier producto, debe ser esperado que las partes que lo mueven y lo integran, los sellos, los anillos, ruedas, mangueras se dan’an con el uso y el paso del tiempo y eventualmente tendran que ser reemplazadas o remanufacturadas. Esta forma de uso y dan’o normal es natural y no esta cubierta por nuestra garantia, pero nosotros estaremos siempre dispuestos a darle servicio de calidad y partes de zrepuesto, a un costo nominal. Esta garantía le da derechos legales específicos y usted también puede tener otros derechos que varían de estado a estado. (Agunos estados no permiten la exclusion o limitacion de incidents o dan’os de consecuen-cia, por lo que la limitacioin indicada arriba puede que no sea applicable a usted). Usted encontrará que aplicamos el mismo estándar de excelencia a nuestro servicio de atención al cliente como lo hacemos con nuesros productos. Advertencia! Este producto contiene una o más sustancias químicas conocidas en el Estado de California por causar cáncer y defectos de nacimiento u otro daño reproductivo. Lavase las manos luego de usar este equipo.
Updated 10/6/2013
™
“Liberty” is a registered trademark of Liberty Garden Products, Inc. Kernersville, NC. All Rights Reserved 2013
12