Embed Size (px)
Citation preview
Lastprinted7/28/099:17AM
Migrating to Entourage and Microsoft Exchange on the Mac
Bronwen Heuer
Information Services and Technology This document will focus on key differences when moving to Exchange. For a review of email basics please refer to the Resource list at the end of this document.
What is Microsoft Exchange? ..................................................................... 1
Configuring Entourage ............................................................................ 2
Launching Entourage on Exchange for the First Time ....................................... 2
Basic Mail Handling Tasks ........................................................................ 5
Creating a Signature .............................................................................. 5
The Out of Office Assistant ...................................................................... 6
Symantec Brightmail Spam Quarantine ........................................................ 7
Rules................................................................................................. 8
Managing your Email in Entourage with Exchange........................................... 10
Working with your Calendar in Entourage and Exchange................................... 13
Sharing Calendars................................................................................. 22
Sharing Permissions .............................................................................. 25
Delegate Access................................................................................... 26
Permission Levels for Delegates................................................................ 28
Using Outlook Web Access (OWA) and Exchange ............................................ 29
Configuring LDAP for Entourage ............................................................... 32
Resources .......................................................................................... 34
Issues and FAQs…… ............................................................................... 35
Notes on Best Practices for Out of Office Messages......................................... 36

Lastprinted7/28/099:17AM
Lastprinted7/28/099:17AM 1
What is Microsoft Exchange?
Exchange is a Microsoft server environment which is an alternative to the IMAP server configuration. The goal is to have one program that integrates calendaring and email in our Office workflow. For Windows, users will be using Outlook, on the Mac, users will be using Entourage. For users who wish to access mail via a web client, access to Exchange is available via Outlook Web Access (OWA) or Outlook Web Access Light. Mobile devices can also access Exchange data. Platforms currently supported include Windows Mobile 5 or higher and Apple iPhone 2, and the Blackberry. Advantages of using Exchange over current email and TechTime services include:
• more stable environment with full Microsoft support • email and calendar integration • use with Mobile devices (including Blackberry) • 2gb of server storage
Migrating to Exchange involves many steps:
• your department will schedule your migration • you will need to prepare for the migration of your data • IS&T will set up your Exchange account and migrate your mail and then your calendar
data • you must’ve changed your password within the last 6 months • Entourage must be configured to work with Exchange • you will need to learn new features and new ways of doing things
The following data does not get automatically moved to the exchange server during migration. You will need to recreate some items and import others. Try to export, print, or take screen shots so you'll know how to re-create these.
• Spam screening settings and allow/deny lists (copy and paste) - Read on to learn about the new Spam Quarantine Program MIT has implemented.
• Signatures (re-create) • Vacation away message in the Auto-responder (re-create). This is now known as the
Out of Office Assistant. • Rules and Filters (test carefully/or re-create) • Delegate Access Rights (re-create) • Forward and reply-to flags for email messages (re-create) • Task/to do list information (re-create if stored in TechTime) • Locally saved data (e.g., contacts, calendars, tasks and notes) (import) • Locally stored mail folders (import to Exchange or open and view locally)
Lastprinted7/28/099:17AM 2
Configuring Entourage
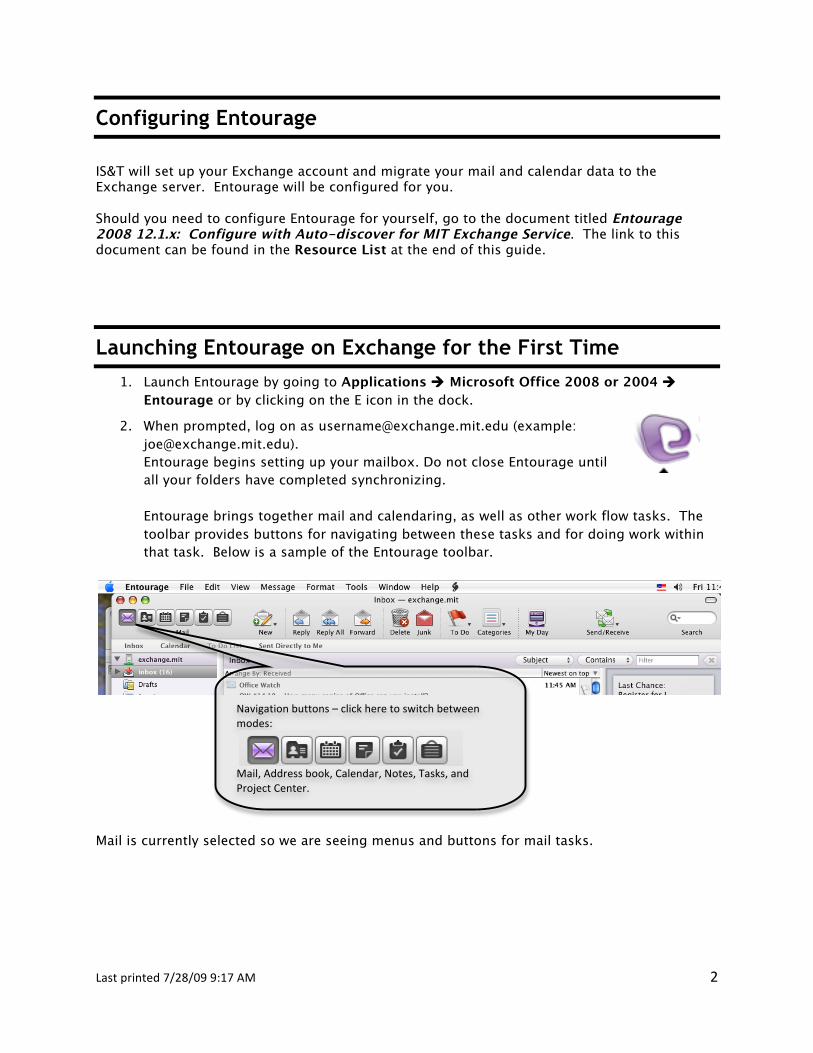
IS&T will set up your Exchange account and migrate your mail and calendar data to the Exchange server. Entourage will be configured for you. Should you need to configure Entourage for yourself, go to the document titled Entourage 2008 12.1.x: Configure with Auto-discover for MIT Exchange Service. The link to this document can be found in the Resource List at the end of this guide.
Launching Entourage on Exchange for the First Time 1. Launch Entourage by going to Applications Microsoft Office 2008 or 2004
Entourage or by clicking on the E icon in the dock.
2. When prompted, log on as [email protected] (example: [email protected]). Entourage begins setting up your mailbox. Do not close Entourage until all your folders have completed synchronizing. Entourage brings together mail and calendaring, as well as other work flow tasks. The toolbar provides buttons for navigating between these tasks and for doing work within that task. Below is a sample of the Entourage toolbar.
Mail is currently selected so we are seeing menus and buttons for mail tasks.
Navigationbuttons–clickheretoswitchbetweenmodes:
Mail,Addressbook,Calendar,Notes,Tasks,andProjectCenter.
Lastprinted7/28/099:17AM 3
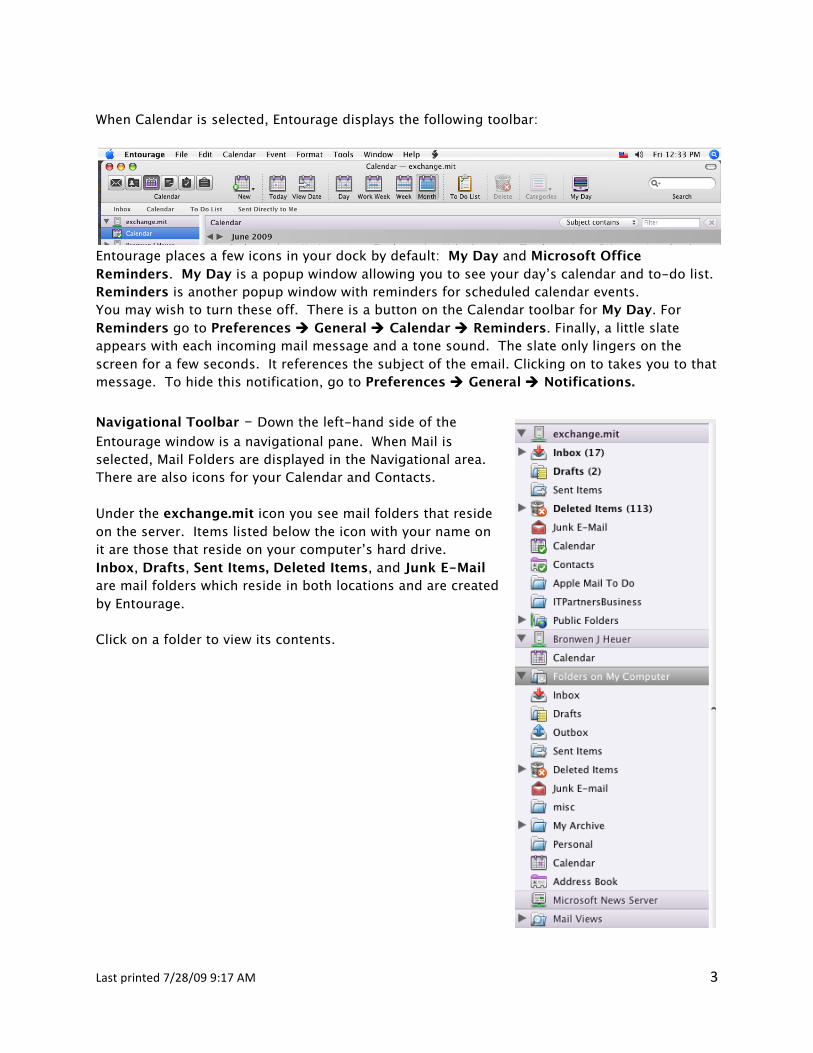
When Calendar is selected, Entourage displays the following toolbar:
Entourage places a few icons in your dock by default: My Day and Microsoft Office Reminders. My Day is a popup window allowing you to see your day’s calendar and to-do list. Reminders is another popup window with reminders for scheduled calendar events. You may wish to turn these off. There is a button on the Calendar toolbar for My Day. For Reminders go to Preferences General Calendar Reminders. Finally, a little slate appears with each incoming mail message and a tone sound. The slate only lingers on the screen for a few seconds. It references the subject of the email. Clicking on to takes you to that message. To hide this notification, go to Preferences General Notifications. Navigational Toolbar – Down the left-hand side of the Entourage window is a navigational pane. When Mail is selected, Mail Folders are displayed in the Navigational area. There are also icons for your Calendar and Contacts. Under the exchange.mit icon you see mail folders that reside on the server. Items listed below the icon with your name on it are those that reside on your computer’s hard drive. Inbox, Drafts, Sent Items, Deleted Items, and Junk E-Mail are mail folders which reside in both locations and are created by Entourage. Click on a folder to view its contents.
Lastprinted7/28/099:17AM 4
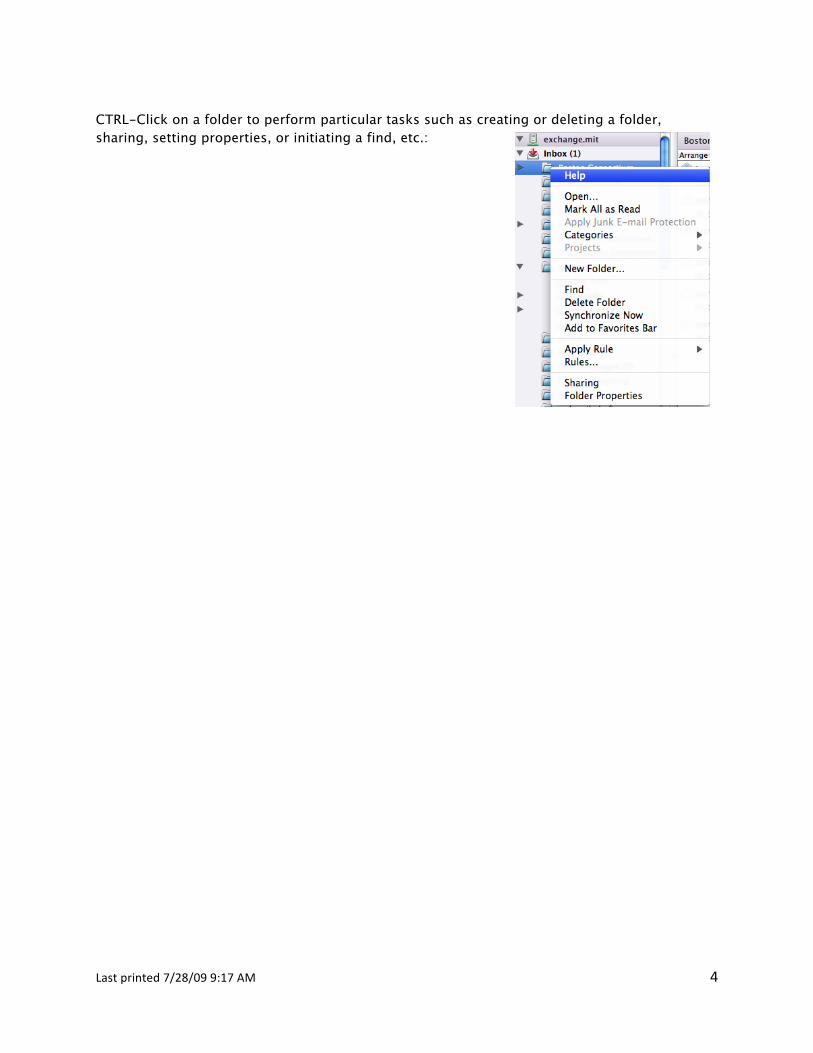
CTRL-Click on a folder to perform particular tasks such as creating or deleting a folder, sharing, setting properties, or initiating a find, etc.:
Lastprinted7/28/099:17AM 5
Basic Mail Handling Tasks As many of the tasks in Mail are the same as in previous mail applications, only key tasks and differing features will be discussed. Use the built-in help from the toolbar menu: Go to Help Entourage Help. You can browse help topics by clicking the Topics button. For more information on using Mail, consult Resources at the end of this manual. In this section we will look at three basic tasks in the handling of Mail:
1. Creating a Signature 2. Setting up away messages using the Out of Office Assistant 3. Symantec Brightmail Spam Quarantine 4. Rules
Creating a Signature
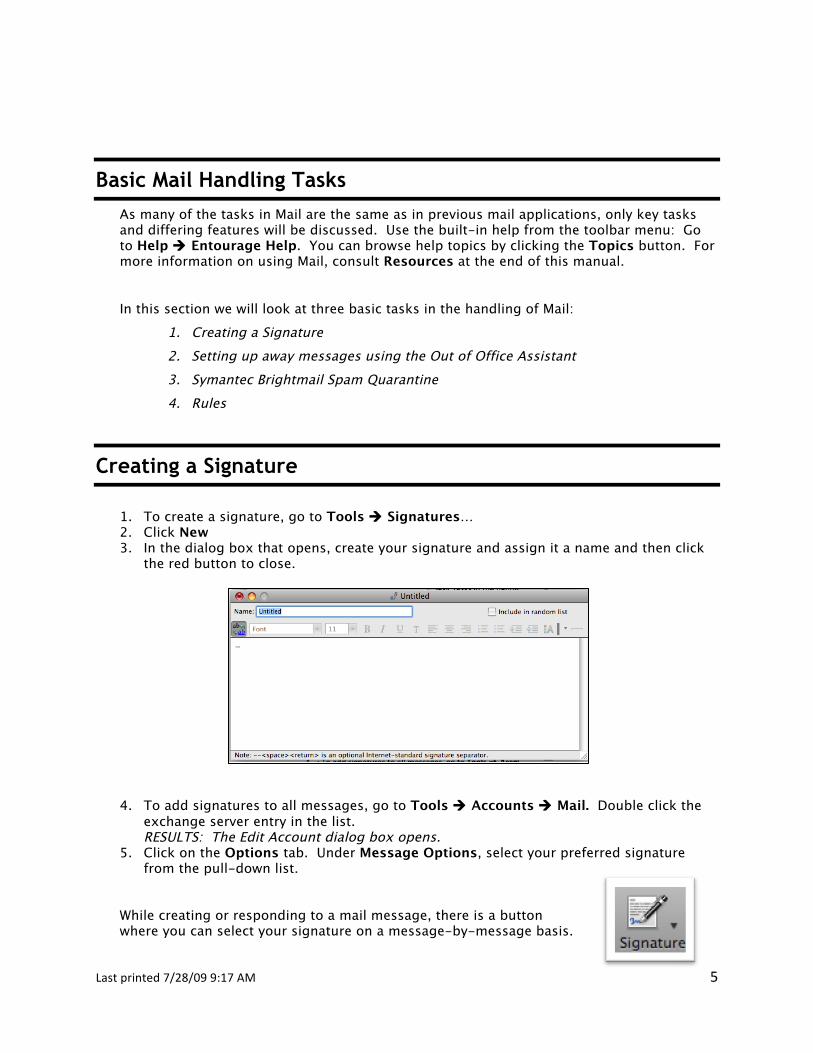
1. To create a signature, go to Tools Signatures… 2. Click New 3. In the dialog box that opens, create your signature and assign it a name and then click
the red button to close.
4. To add signatures to all messages, go to Tools Accounts Mail. Double click the exchange server entry in the list. RESULTS: The Edit Account dialog box opens.
5. Click on the Options tab. Under Message Options, select your preferred signature from the pull-down list.
While creating or responding to a mail message, there is a button where you can select your signature on a message-by-message basis.
Lastprinted7/28/099:17AM 6
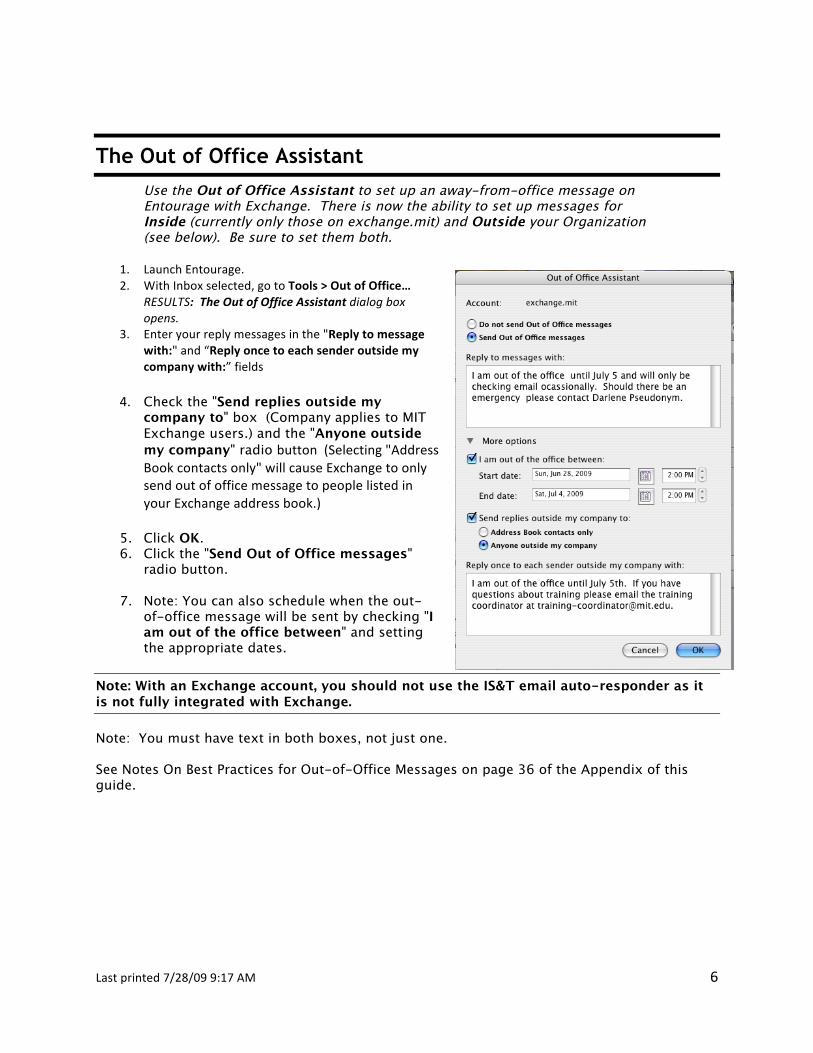
The Out of Office Assistant Use the Out of Office Assistant to set up an away-from-office message on Entourage with Exchange. There is now the ability to set up messages for Inside (currently only those on exchange.mit) and Outside your Organization (see below). Be sure to set them both.
1. LaunchEntourage.2. WithInboxselected,gotoTools > Out of Office…
RESULTS: The Out of Office Assistant dialog box opens.
3. Enteryourreplymessagesinthe"Reply to message with:"and“Reply once to each sender outside my company with:”fields
4. Check the "Send replies outside my
company to" box (Company applies to MIT Exchange users.) and the "Anyone outside my company" radio button(Selecting"AddressBookcontactsonly"willcauseExchangetoonlysendoutofofficemessagetopeoplelistedinyourExchangeaddressbook.)
5. Click OK. 6. Click the "Send Out of Office messages"
radio button. 7. Note: You can also schedule when the out-
of-office message will be sent by checking "I am out of the office between" and setting the appropriate dates.
Note: With an Exchange account, you should not use the IS&T email auto-responder as it is not fully integrated with Exchange. Note: You must have text in both boxes, not just one. See Notes On Best Practices for Out-of-Office Messages on page 36 of the Appendix of this guide.
Lastprinted7/28/099:17AM 7
Symantec Brightmail Spam Quarantine By default, MIT Exchange accounts are created with Symantec Brightmail spam filtering enabled. This program replaces the Spam Assassin program used on the IMAP server, so you will no longer need your Spamscreen folder. Brightmail is extremely accurate in placing spam in quarantine on the server. IS&T recommends turning off Junk Mail filtering in your email programs. Using both systems can cause inconsistent results and prevent your allow/deny lists from working as intended. Turn Off your Junk E‐mail Filtering
1. InEntourage,gototheToolsJunk E‐mail Protection.
2. SelectNone.
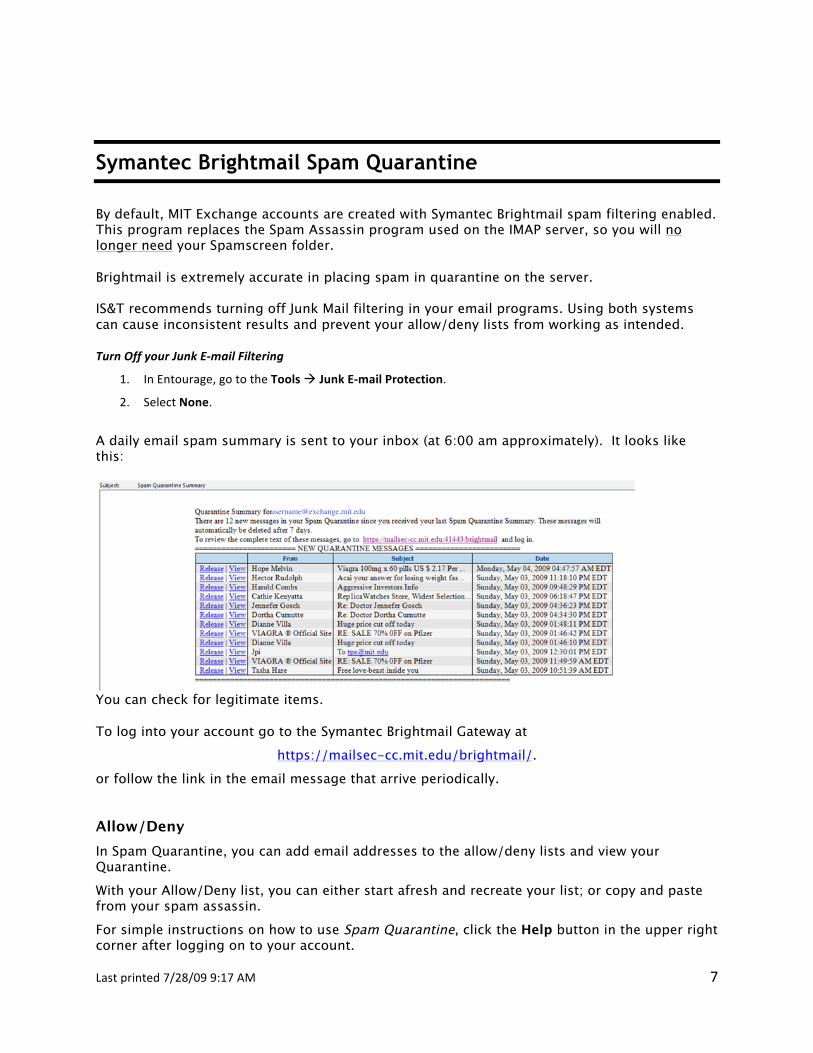
A daily email spam summary is sent to your inbox (at 6:00 am approximately). It looks like this:
You can check for legitimate items. To log into your account go to the Symantec Brightmail Gateway at
https://mailsec-cc.mit.edu/brightmail/. or follow the link in the email message that arrive periodically.
Allow/Deny In Spam Quarantine, you can add email addresses to the allow/deny lists and view your Quarantine. With your Allow/Deny list, you can either start afresh and recreate your list; or copy and paste from your spam assassin. For simple instructions on how to use Spam Quarantine, click the Help button in the upper right corner after logging on to your account.
Lastprinted7/28/099:17AM 8
Move your allow and deny lists to Spam Quarantine
1. Copy your list to a Word or plain text document 2. Separate entries with a comma 3. Delete any spaces. Use email addresses or domain names but drop @ from domain
names (e.g., google.com not @google.com) 4. Paste list into User Preferences Bad Senders/ Good Senders Add Good (Bad)
Senders box and click Add.
Notice you have the ability to filter out Spam by language.
FormoreinformationseeExchange Email and Calendaring: Spam Quarantinehttp://web.mit.edu/ist/topics/email/exchange/spamquarantine.html.
Rules You will need to recreate your rules for the filtering of messages. Be aware that in Entourage, you are creating rules on the client machine. If you use multiple machines, you will need to create rules in each place for messages to be consistently filtered across machines. So to create server-based rules which work whenever you access your mail, create them logging into owa.mit.edu through IE on a windows computer. Setting up Rules
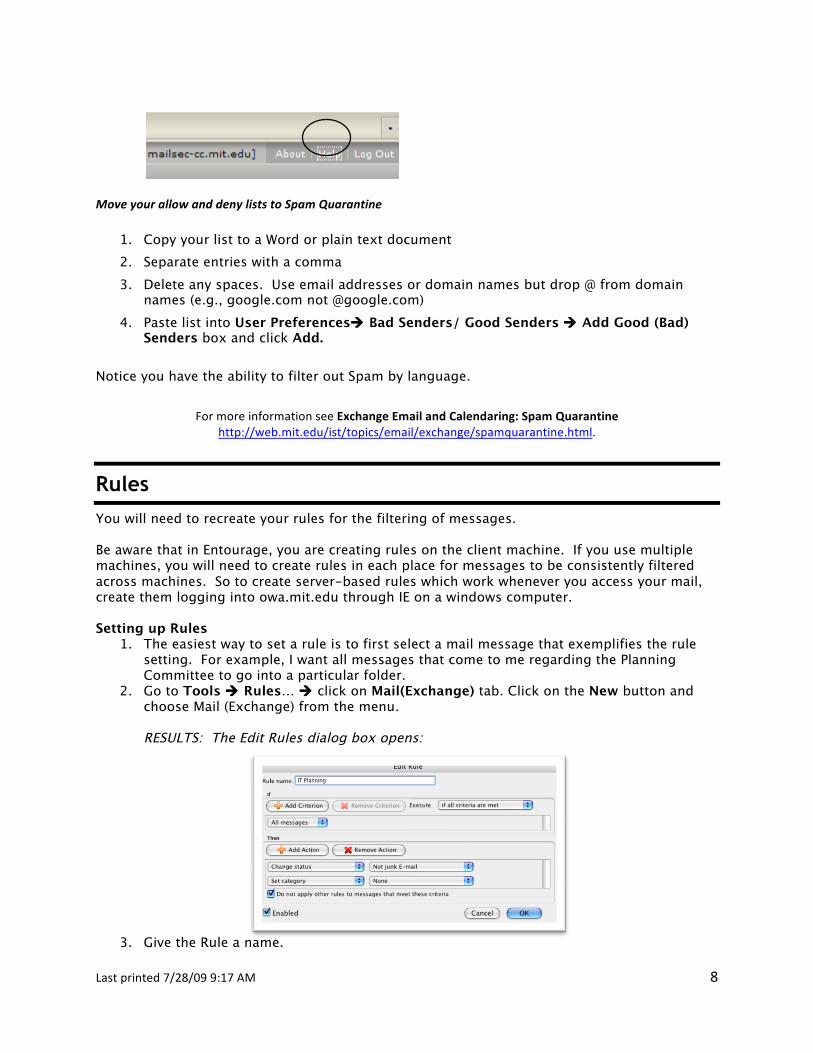
1. The easiest way to set a rule is to first select a mail message that exemplifies the rule setting. For example, I want all messages that come to me regarding the Planning Committee to go into a particular folder.
2. Go to Tools Rules… click on Mail(Exchange) tab. Click on the New button and choose Mail (Exchange) from the menu.
RESULTS: The Edit Rules dialog box opens:
3. Give the Rule a name.
Lastprinted7/28/099:17AM 9
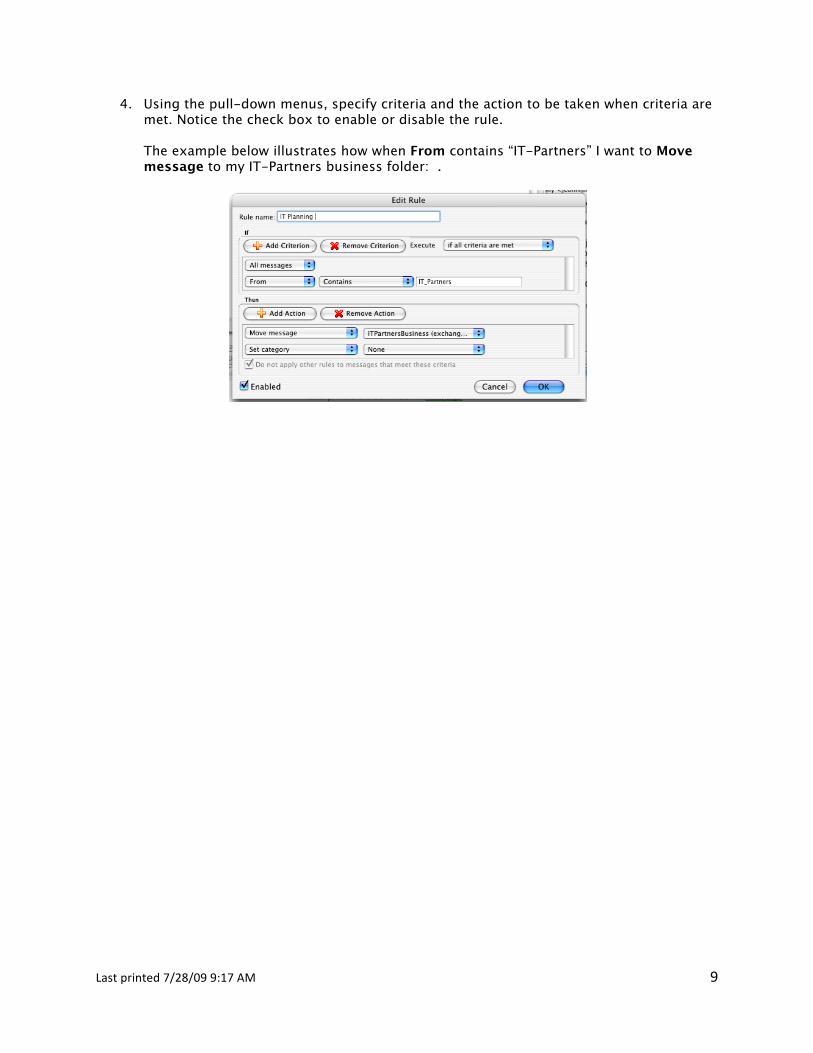
4. Using the pull-down menus, specify criteria and the action to be taken when criteria are met. Notice the check box to enable or disable the rule. The example below illustrates how when From contains “IT-Partners” I want to Move message to my IT-Partners business folder: .
Lastprinted7/28/099:17AM 10
Managing your Email in Entourage with Exchange
This section will cover the following topics: 1. Your quota (space) on Exchange 2. Backing up and archiving data 3. Deleting and retrieving email 4. The Global Address List (GAL)
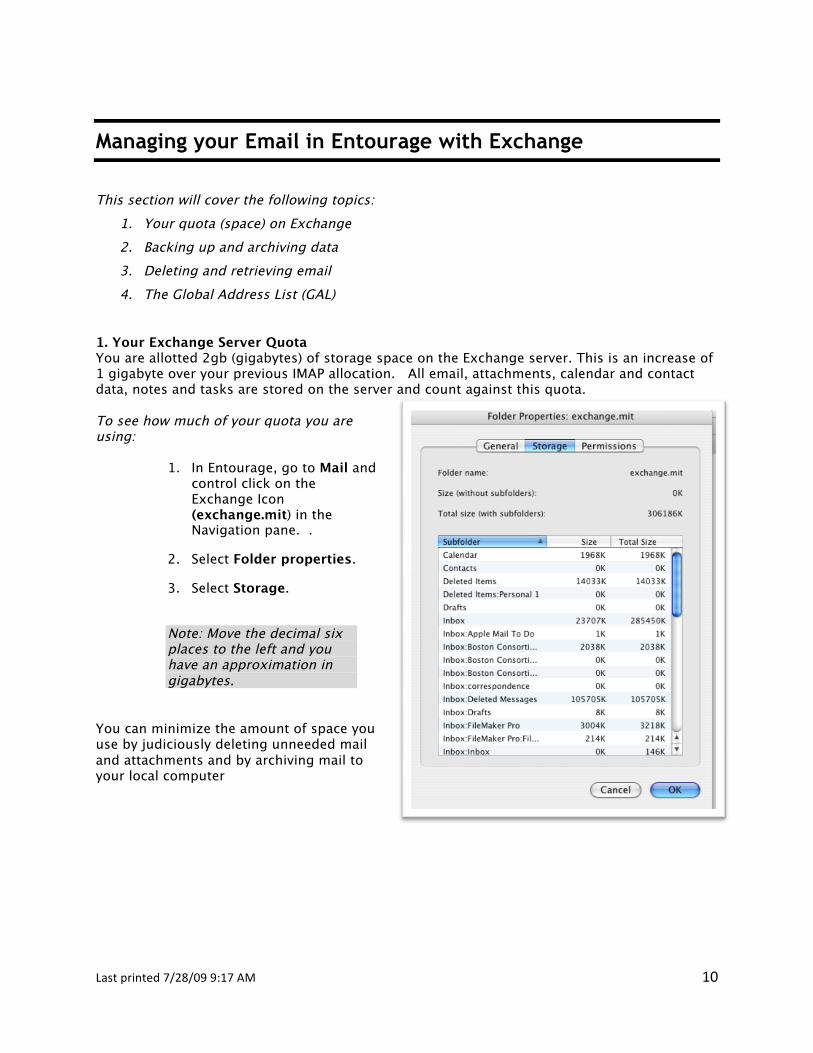
1. Your Exchange Server Quota You are allotted 2gb (gigabytes) of storage space on the Exchange server. This is an increase of 1 gigabyte over your previous IMAP allocation. All email, attachments, calendar and contact data, notes and tasks are stored on the server and count against this quota. To see how much of your quota you are using:
1. In Entourage, go to Mail and control click on the Exchange Icon (exchange.mit) in the Navigation pane. .
2. Select Folder properties.
3. Select Storage.
Note: Move the decimal six places to the left and you have an approximation in gigabytes.
You can minimize the amount of space you use by judiciously deleting unneeded mail and attachments and by archiving mail to your local computer
Lastprinted7/28/099:17AM 11
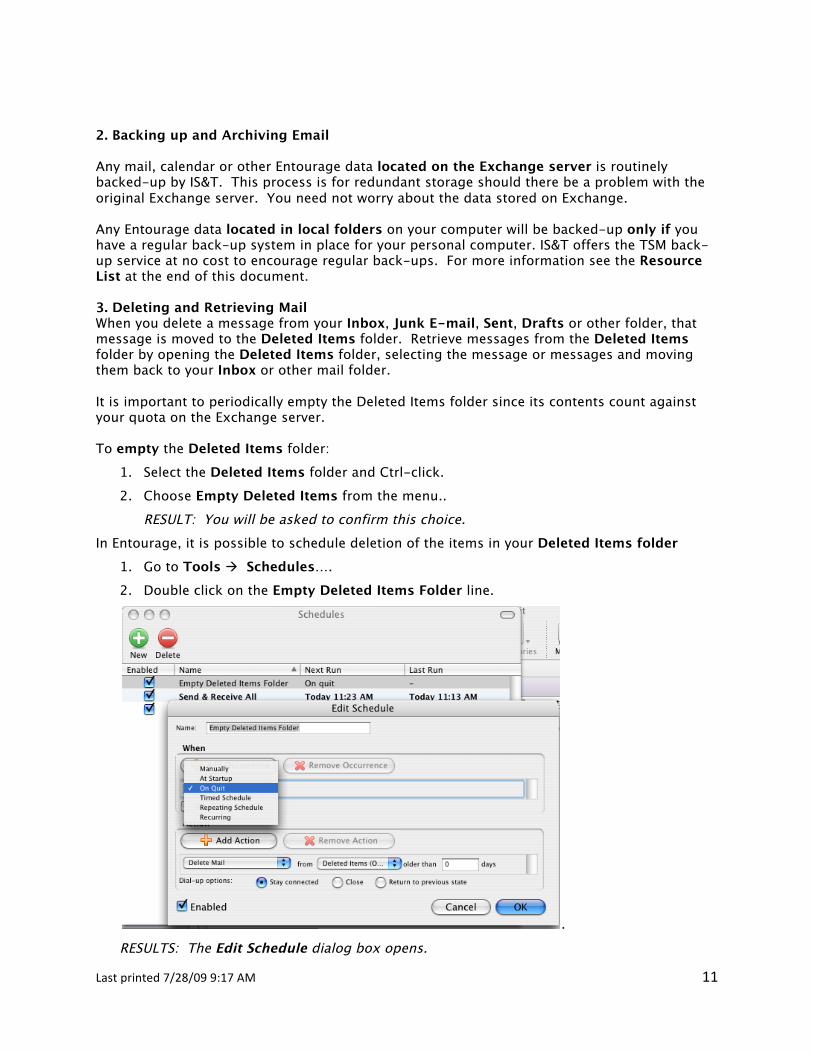
2. Backing up and Archiving Email Any mail, calendar or other Entourage data located on the Exchange server is routinely backed-up by IS&T. This process is for redundant storage should there be a problem with the original Exchange server. You need not worry about the data stored on Exchange. Any Entourage data located in local folders on your computer will be backed-up only if you have a regular back-up system in place for your personal computer. IS&T offers the TSM back-up service at no cost to encourage regular back-ups. For more information see the Resource List at the end of this document. 3. Deleting and Retrieving Mail When you delete a message from your Inbox, Junk E-mail, Sent, Drafts or other folder, that message is moved to the Deleted Items folder. Retrieve messages from the Deleted Items folder by opening the Deleted Items folder, selecting the message or messages and moving them back to your Inbox or other mail folder. It is important to periodically empty the Deleted Items folder since its contents count against your quota on the Exchange server. To empty the Deleted Items folder:
1. Select the Deleted Items folder and Ctrl-click. 2. Choose Empty Deleted Items from the menu..
RESULT: You will be asked to confirm this choice. In Entourage, it is possible to schedule deletion of the items in your Deleted Items folder
1. Go to Tools Schedules…. 2. Double click on the Empty Deleted Items Folder line.
. RESULTS: The Edit Schedule dialog box opens.
Lastprinted7/28/099:17AM 12
3. Choose a frequency from the When pull-down list and an Action. By default, Entourage is initially set to Manually.
4. Click OK. Unlike Outlook, Entourage and OWA-Light do not allow for the retrieval of Deleted Items once the folder has been emptied. If you desperately need to retrieve mail after emptying the folder AND you can get to an Internet Explorer browser on a PC, go to owa.mit.edu, log on. Click on Options and then in the panel on the left, choose Deleted Items. Remember, as stated these will only remain for 14 days.
The Global Address List (GAL)
The Global Address List does not work with the current version of Entourage for the Mac. Alternatively, you can set your client to work with LDAP. Go to page 32 in this manual for the instructions for setting up LDAP for use with Entourage.
Lastprinted7/28/099:17AM 13
Working with your Calendar in Entourage and Exchange
This section will cover: 1. The Entourage calendar interface 2. Creating an appointment on your calendar 3. Scheduling a meeting with one or more people 4. Setting delegate access rights
Note: Using the Entourage Calendaring feature, you will only be able to work with those people’s calendars who are also on Exchange.
On the Mac, in order to view others calendars off campus, you must have VPN installed. Launch Exchange and go to calendaring by:
• Clicking on the toolbar icon:
• Clicking on the calendar icon in the Navigational pane: • In the menu bar, go to View Go To Calendar. • Use the keystroke +3
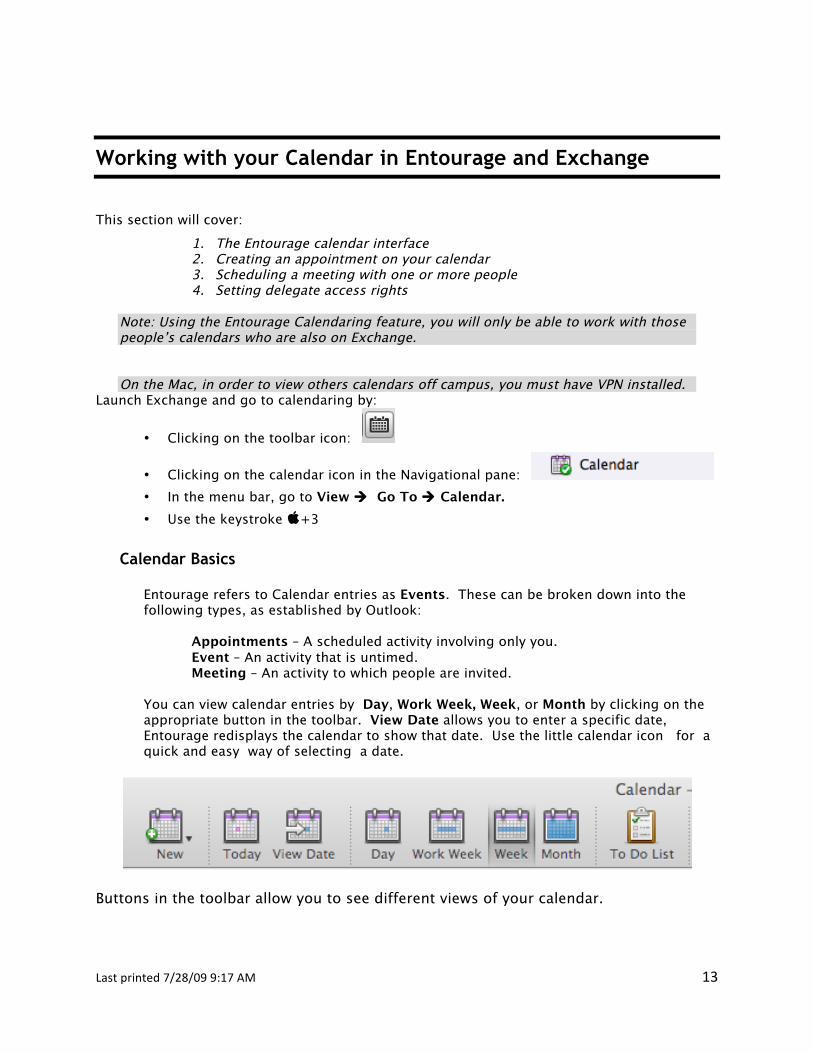
Calendar Basics
Entourage refers to Calendar entries as Events. These can be broken down into the following types, as established by Outlook:
Appointments – A scheduled activity involving only you. Event – An activity that is untimed. Meeting – An activity to which people are invited.
You can view calendar entries by Day, Work Week, Week, or Month by clicking on the appropriate button in the toolbar. View Date allows you to enter a specific date, Entourage redisplays the calendar to show that date. Use the little calendar icon for a quick and easy way of selecting a date.
Buttons in the toolbar allow you to see different views of your calendar.
Lastprinted7/28/099:17AM 14
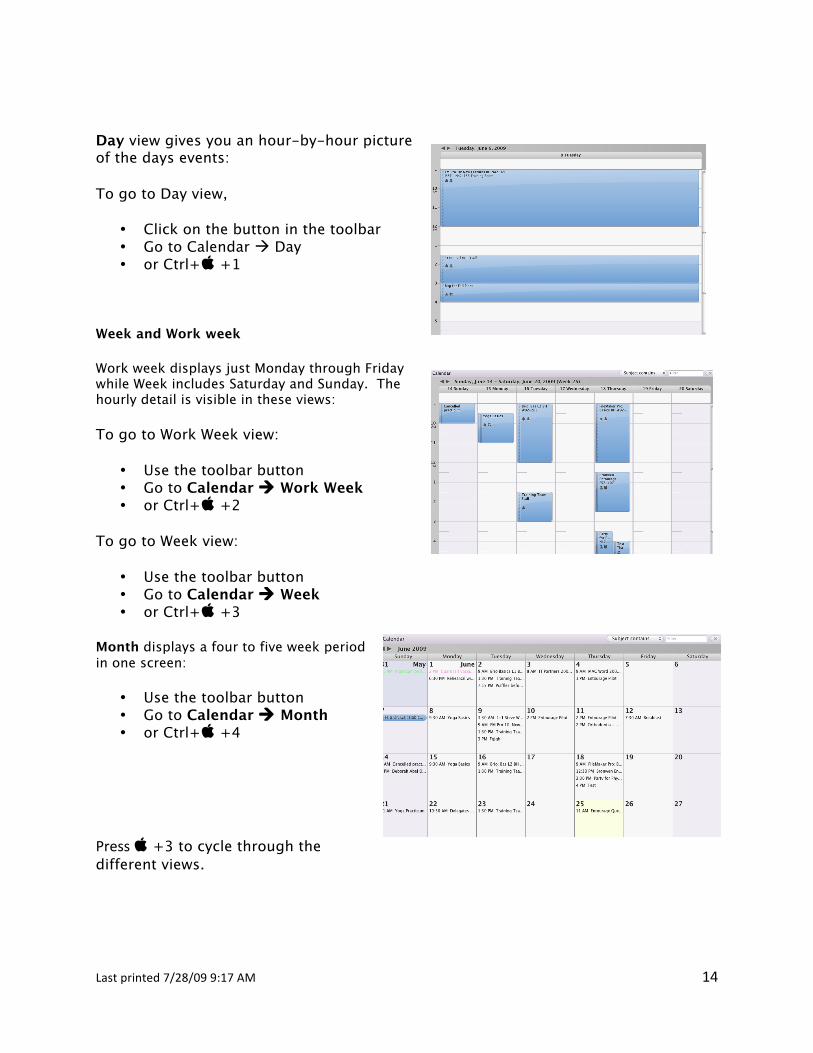
Day view gives you an hour-by-hour picture of the days events:
To go to Day view,
• Click on the button in the toolbar • Go to Calendar Day • or Ctrl+ +1
Week and Work week
Work week displays just Monday through Friday while Week includes Saturday and Sunday. The hourly detail is visible in these views:
To go to Work Week view:
• Use the toolbar button • Go to Calendar Work Week • or Ctrl+ +2
To go to Week view:
• Use the toolbar button • Go to Calendar Week • or Ctrl+ +3
Month displays a four to five week period in one screen:
• Use the toolbar button • Go to Calendar Month • or Ctrl+ +4
Press +3 to cycle through the different views.
Lastprinted7/28/099:17AM 15
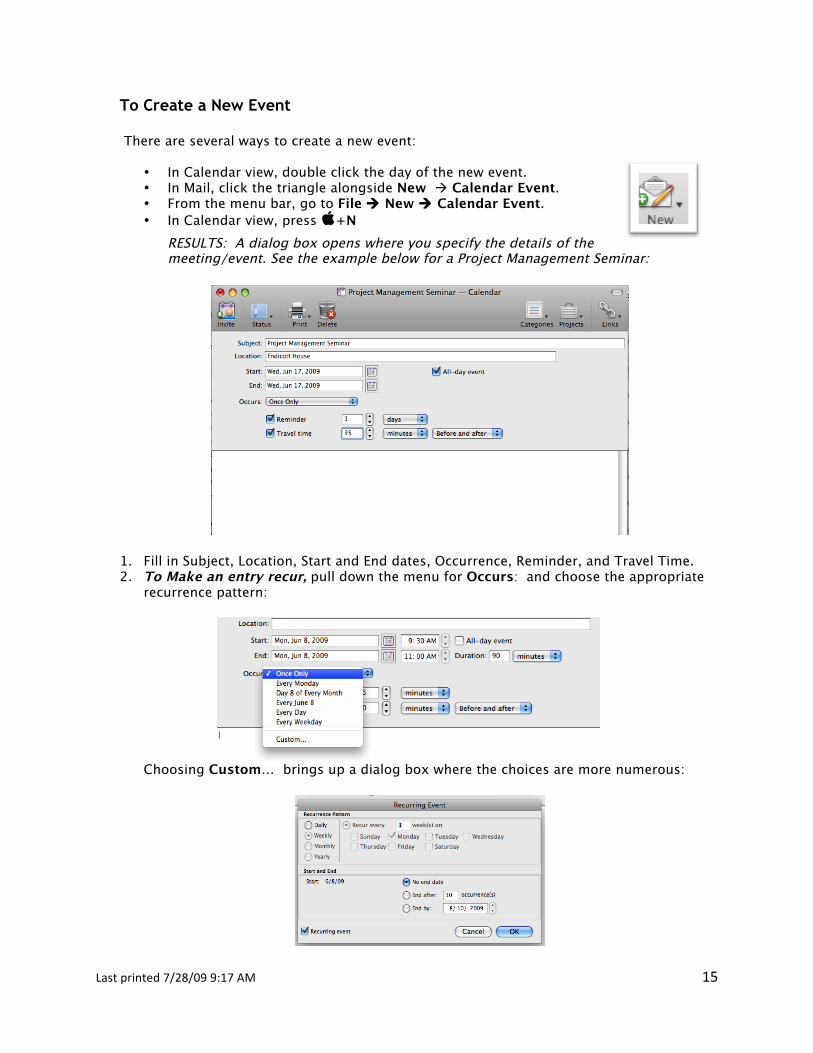
To Create a New Event There are several ways to create a new event:
• In Calendar view, double click the day of the new event. • In Mail, click the triangle alongside New Calendar Event. • From the menu bar, go to File New Calendar Event. • In Calendar view, press +N
RESULTS: A dialog box opens where you specify the details of the meeting/event. See the example below for a Project Management Seminar:
1. Fill in Subject, Location, Start and End dates, Occurrence, Reminder, and Travel Time. 2. To Make an entry recur, pull down the menu for Occurs: and choose the appropriate
recurrence pattern:
Choosing Custom… brings up a dialog box where the choices are more numerous:

Lastprinted7/28/099:17AM 16
3. Click OK when finished.
At this point, you have created an Appointment. As defined above, an appointment is an event involving only you.
RESULTS: Once you schedule an event, it is plotted on your calendar. Small icons on an event indicate that a reminder is set (bell), other people are invited (silhouette), and the event recurs (pisces-like arrows).
To Delete an Event
Note: You can only delete those entries which you created or have been given permission to delete.
1. Click on the entry in the calendar to select it.
2. Click in the toolbar, or go to Edit Delete Event.
Opening the event, there is also a Delete in the toolbar.
RESULT: If there had been invitees for the event, you will be asked whether:
Meeting and Invites
A meeting is an event that includes other people.
To include other people in your event, you must “Invite” them.
1. Inside the Event dialog box, click on the Invite button in the toolbar.
RESULTS: A dialog box opens where you enter your invitees’ email addresses.
2. Click on the Add button. Addresses must currently include @exchange.mit.edu.
Lastprinted7/28/099:17AM 17
3. When finished entering invitee, click the small close box in the upper-left corner of the window.
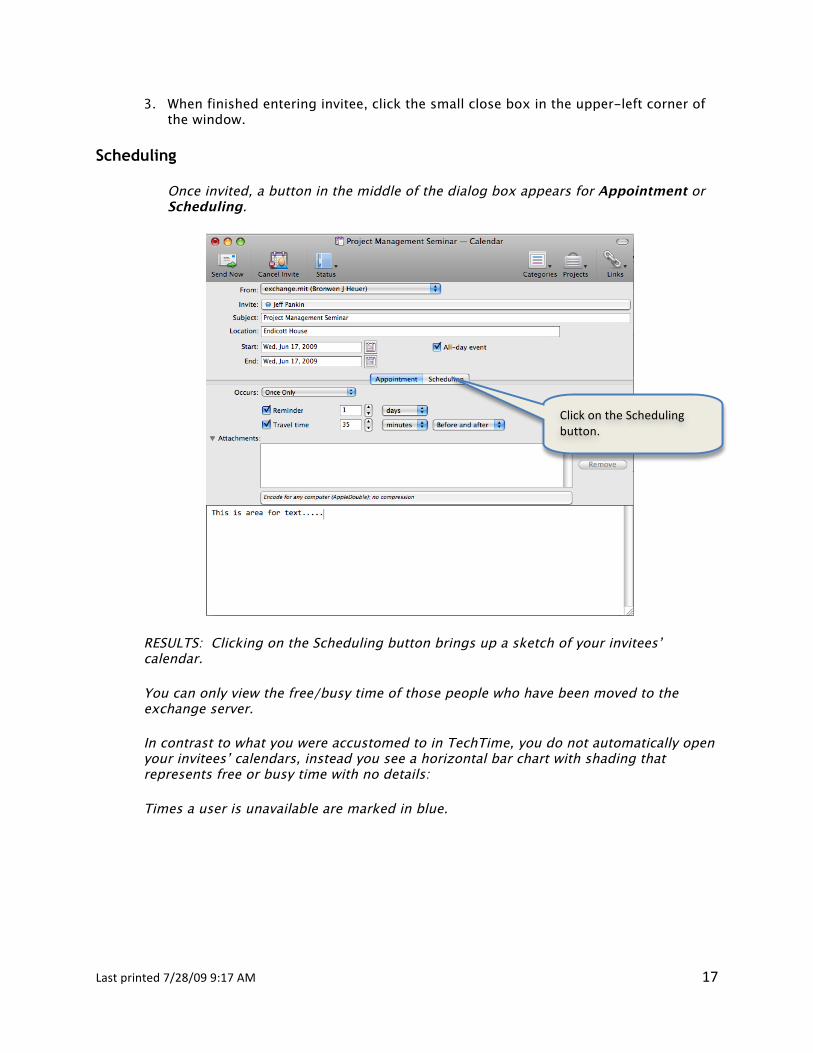
Scheduling
Once invited, a button in the middle of the dialog box appears for Appointment or Scheduling.
RESULTS: Clicking on the Scheduling button brings up a sketch of your invitees’ calendar.
You can only view the free/busy time of those people who have been moved to the exchange server.
In contrast to what you were accustomed to in TechTime, you do not automatically open your invitees’ calendars, instead you see a horizontal bar chart with shading that represents free or busy time with no details:
Times a user is unavailable are marked in blue.
ClickontheSchedulingbutton.
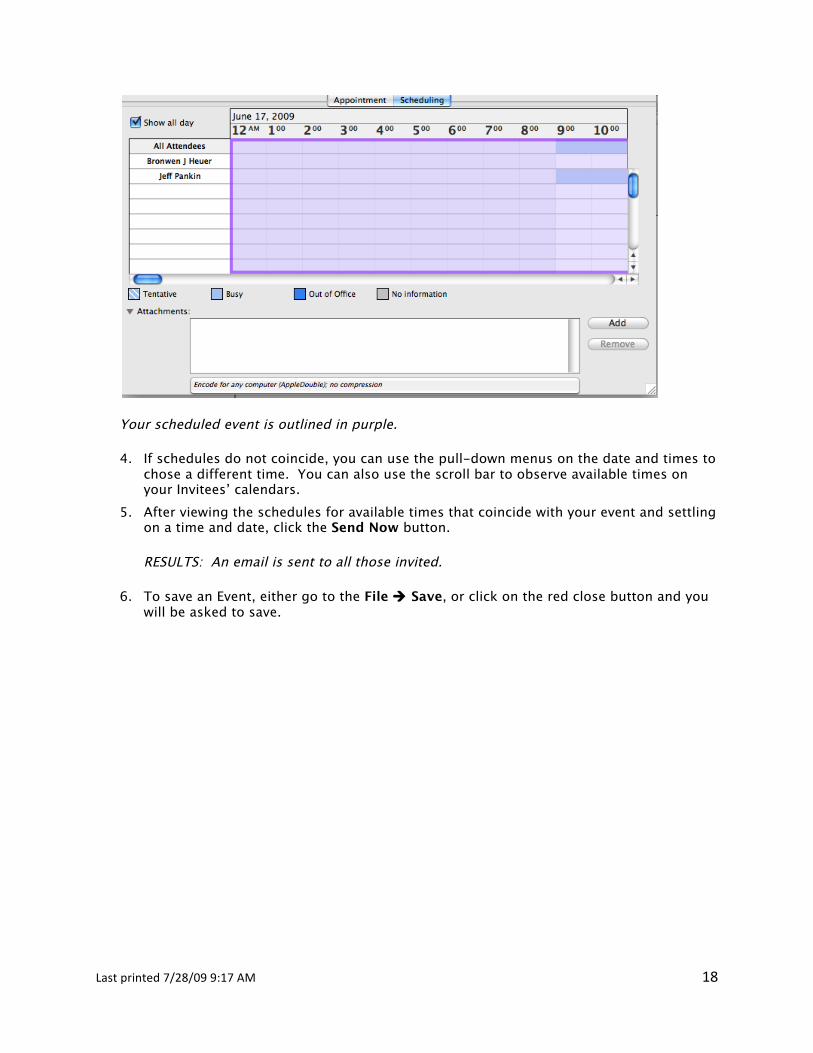
Lastprinted7/28/099:17AM 18
Your scheduled event is outlined in purple.
4. If schedules do not coincide, you can use the pull-down menus on the date and times to chose a different time. You can also use the scroll bar to observe available times on your Invitees’ calendars.
5. After viewing the schedules for available times that coincide with your event and settling on a time and date, click the Send Now button.
RESULTS: An email is sent to all those invited.
6. To save an Event, either go to the File Save, or click on the red close button and you will be asked to save.
Lastprinted7/28/099:17AM 19
An Event as an Untimed Activity
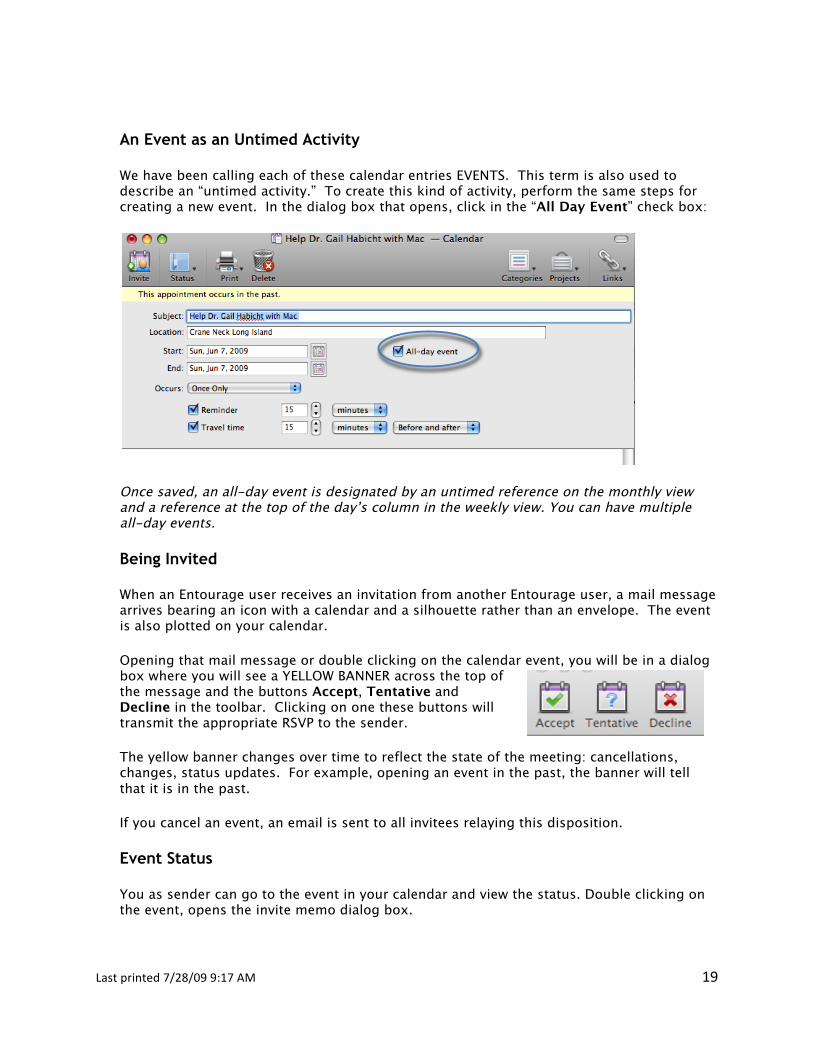
We have been calling each of these calendar entries EVENTS. This term is also used to describe an “untimed activity.” To create this kind of activity, perform the same steps for creating a new event. In the dialog box that opens, click in the “All Day Event” check box:
Once saved, an all-day event is designated by an untimed reference on the monthly view and a reference at the top of the day’s column in the weekly view. You can have multiple all-day events.
Being Invited
When an Entourage user receives an invitation from another Entourage user, a mail message arrives bearing an icon with a calendar and a silhouette rather than an envelope. The event is also plotted on your calendar.
Opening that mail message or double clicking on the calendar event, you will be in a dialog box where you will see a YELLOW BANNER across the top of the message and the buttons Accept, Tentative and Decline in the toolbar. Clicking on one these buttons will transmit the appropriate RSVP to the sender.
The yellow banner changes over time to reflect the state of the meeting: cancellations, changes, status updates. For example, opening an event in the past, the banner will tell that it is in the past.
If you cancel an event, an email is sent to all invitees relaying this disposition.
Event Status
You as sender can go to the event in your calendar and view the status. Double clicking on the event, opens the invite memo dialog box.
Lastprinted7/28/099:17AM 20
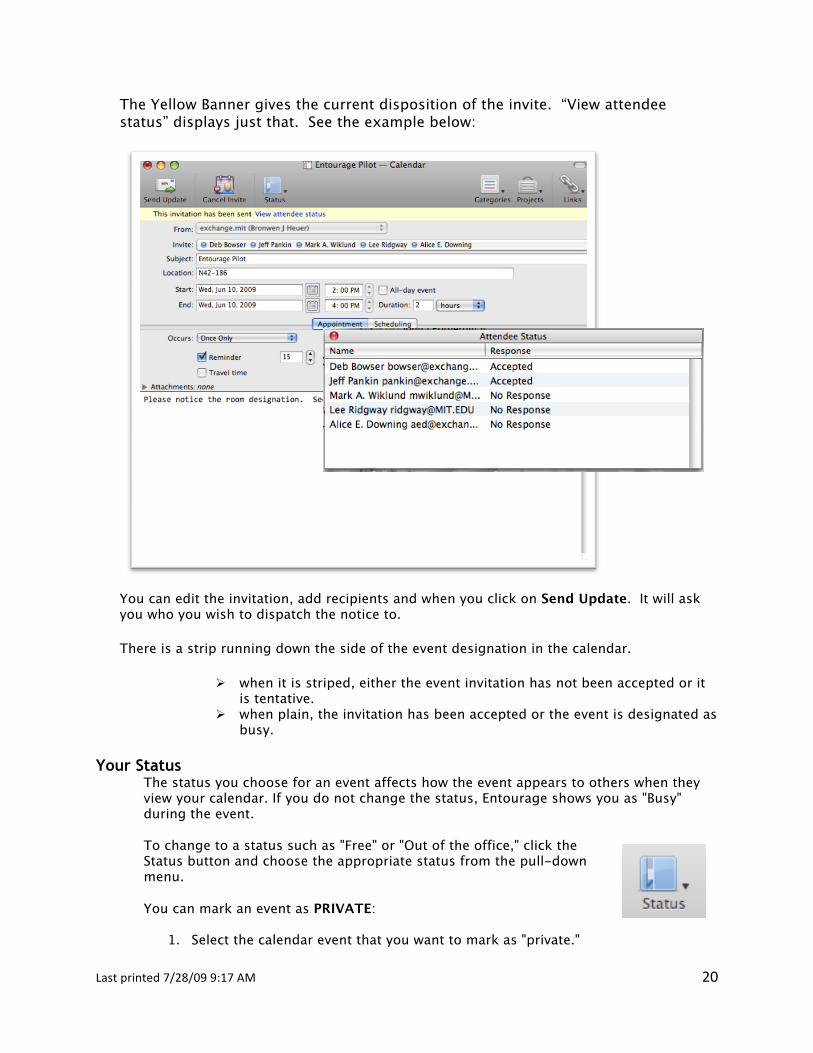
The Yellow Banner gives the current disposition of the invite. “View attendee status” displays just that. See the example below:
You can edit the invitation, add recipients and when you click on Send Update. It will ask you who you wish to dispatch the notice to.
There is a strip running down the side of the event designation in the calendar.
when it is striped, either the event invitation has not been accepted or it is tentative.
when plain, the invitation has been accepted or the event is designated as busy.
Your Status The status you choose for an event affects how the event appears to others when they view your calendar. If you do not change the status, Entourage shows you as "Busy" during the event. To change to a status such as "Free" or "Out of the office," click the Status button and choose the appropriate status from the pull-down menu. You can mark an event as PRIVATE:
1. Select the calendar event that you want to mark as "private."
Lastprinted7/28/099:17AM 21
2. Go to the Event menu, Private. When others view of your calendar, the event appears as PRIVATE.
Lastprinted7/28/099:17AM 22
Sharing Calendars
By using sharing, you can give another user access to your Microsoft Exchange calendars, address books, or mail folders. In order to share a calendar1, both you and the user that you want to share with must have Microsoft Exchange accounts. If you wish to have access to another person’s calendar, send email to that person and request sharing permission. When sharing your calendar, you control how much detail others may see and the tasks they can perform. The default setting for an individual is “None.”
Note When you delegate or share an address book, calendar, or mail folder, delegates or users who share those folders could view your private contacts, events, or e-mail messages by using other software applications. To help protect your privacy, put private items in a separate, non-shared address book, calendar, or mail folder.
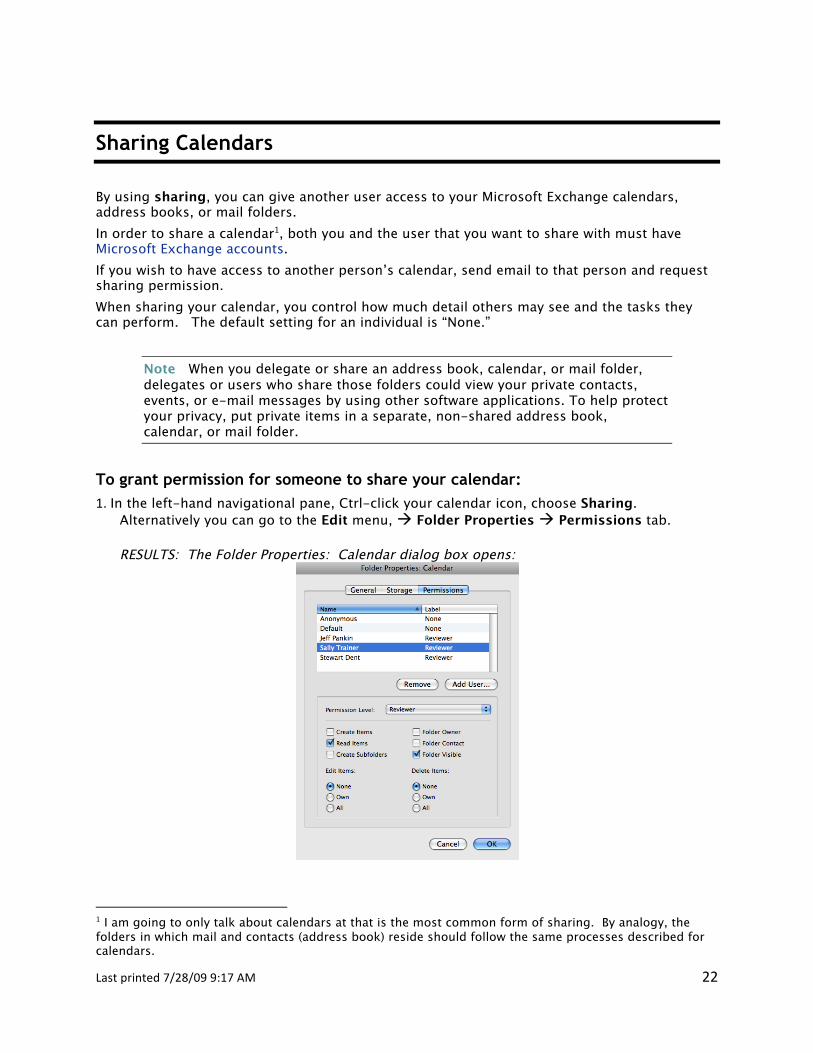
To grant permission for someone to share your calendar: 1. In the left-hand navigational pane, Ctrl-click your calendar icon, choose Sharing.
Alternatively you can go to the Edit menu, Folder Properties Permissions tab.
RESULTS: The Folder Properties: Calendar dialog box opens:
1 I am going to only talk about calendars at that is the most common form of sharing. By analogy, the folders in which mail and contacts (address book) reside should follow the same processes described for calendars.
Lastprinted7/28/099:17AM 23
2. Click Add User. 3. Type the name of the user, and then click Find.
RESULT: This searches for the user on the Exchange server. 4. In the search results, select the appropriate user's name and click OK. If the user's name
does not appear in the search results check that you have configured LDAP for your Entourage application. RESULT: You are returned to the Permissions window.
5. In the Permissions list, select the user's name. On the Permission Level menu, select the access level you want. For the majority of situations at MIT and for simplicity, IS&T recommends Reviewer, Author or Editor. RESULTS: The check boxes and radio buttons below will reflect the tasks permitted by that level .
6. To customize the user's permission levels, select or clear the check boxes. Change the options for Edit Items and Delete Items as appropriate.
7. Click OK.
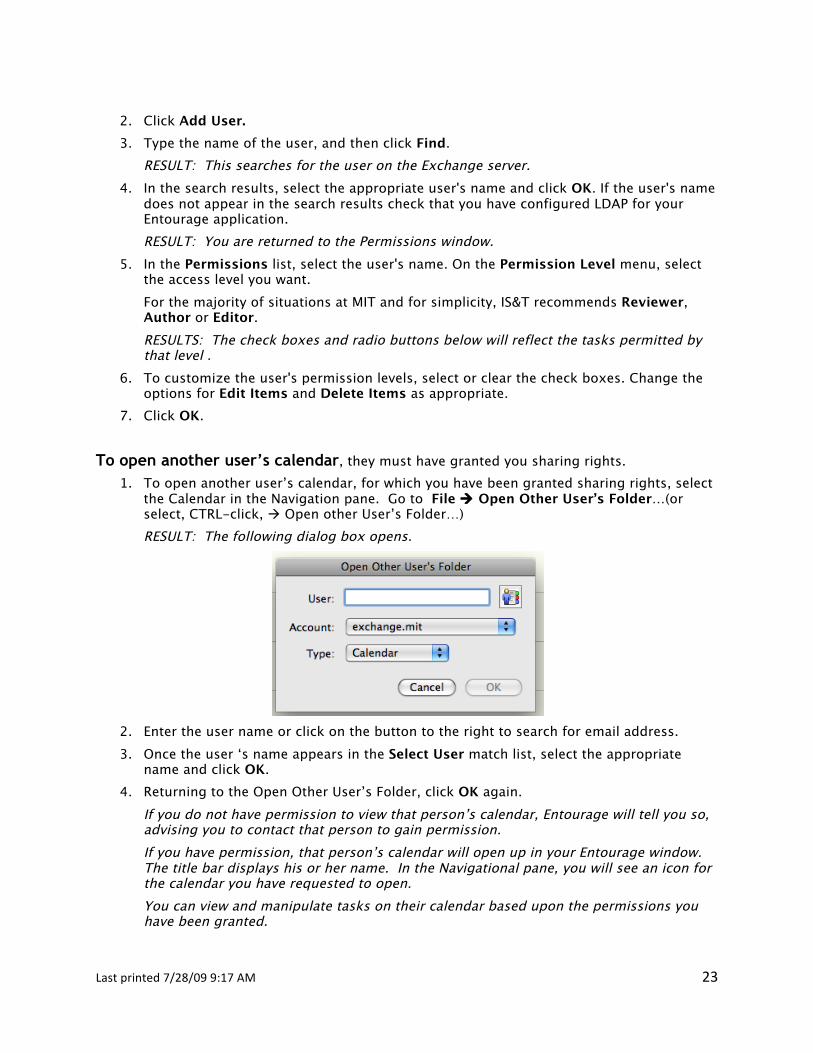
To open another user’s calendar, they must have granted you sharing rights. 1. To open another user’s calendar, for which you have been granted sharing rights, select
the Calendar in the Navigation pane. Go to File Open Other User’s Folder…(or select, CTRL-click, Open other User’s Folder…) RESULT: The following dialog box opens.
2. Enter the user name or click on the button to the right to search for email address. 3. Once the user ‘s name appears in the Select User match list, select the appropriate
name and click OK. 4. Returning to the Open Other User’s Folder, click OK again.
If you do not have permission to view that person’s calendar, Entourage will tell you so, advising you to contact that person to gain permission. If you have permission, that person’s calendar will open up in your Entourage window. The title bar displays his or her name. In the Navigational pane, you will see an icon for the calendar you have requested to open. You can view and manipulate tasks on their calendar based upon the permissions you have been granted.
Lastprinted7/28/099:17AM 24
Unlike Outlook, there is not the facility for displaying multiple calendars, side-by-side in a single window.
Lastprinted7/28/099:17AM 25
Sharing Permissions When you share a folder, you can set permissions that define what each user sharing the folder can do:
Permission level Activities a sharing user can perform
Owner Create, read, modify, and delete all calendar, address book, private and public folder, and mail folder items. As an owner, a user can change the permission levels others have for the folder.
Reviewer Read items only. Author Create and read items, and modify and delete items you create. Editor Create, read, modify, and delete all items. Publishing Editor Create, read, modify, and delete all items, and create subfolders. Publishing Author Create and read items, create subfolders, and modify and delete
items you create. Nonediting Author Create and read items, and delete items that you create. Contributor Create items only. Custom Perform activities defined by the folder owner.
None Not perform any activity. The user remains on the permissions list
but has no permission and cannot open the folder.
1. Once permission for sharing has been granted repeat steps 1, 2, 3, and 4 under Open another user’s calendar and you will be viewing the shared calendar. RESULT: You will see a striped progress bar at the bottom of the Entourage window as the server resolves your share request.
Note: The default is for view only. The person sharing their calendar will have to adjust the permissions to give you greater access.
To remove another person’s calendar from your view
1. Select the calendar icon for that person. 2. Either Ctrl-click and choose Remove from view or go to Edit Remove from view.
To change the permissions for someone to access your calendar
1. Ctrl-click your calendar in the Navigation panel and choose Folder Properties. 2. Click the Permissions tab and make any additional functions available.
Lastprinted7/28/099:17AM 26
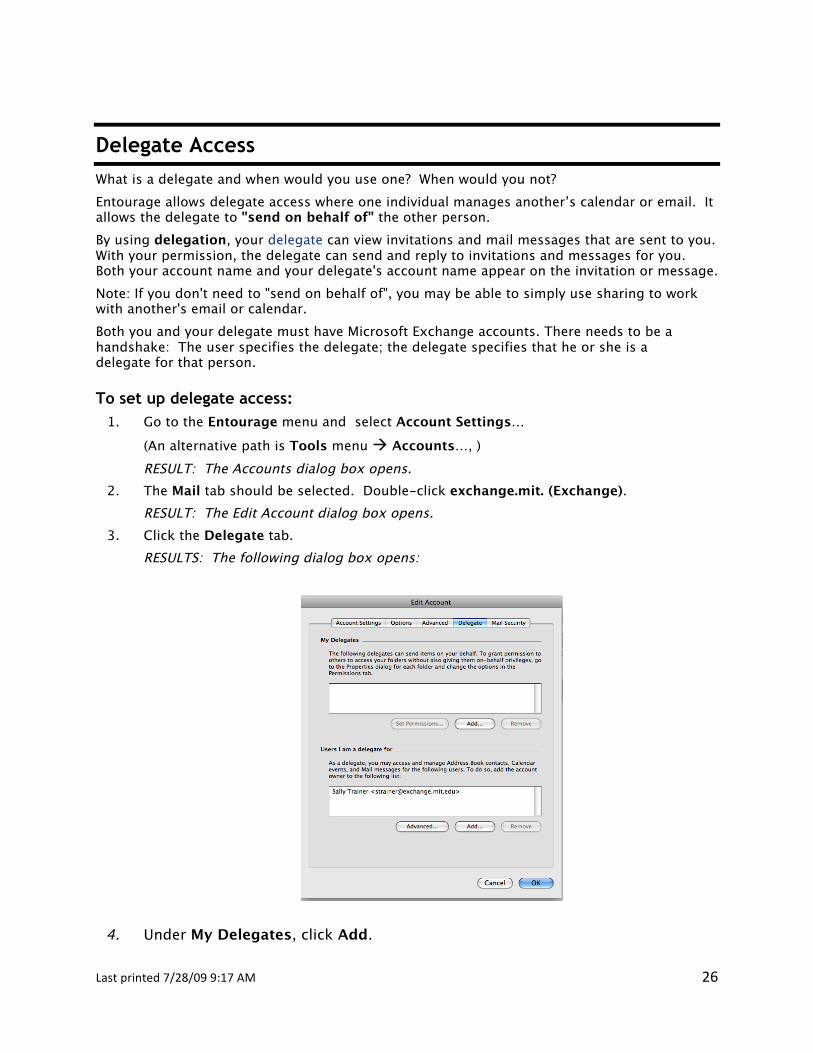
Delegate Access What is a delegate and when would you use one? When would you not? Entourage allows delegate access where one individual manages another’s calendar or email. It allows the delegate to "send on behalf of" the other person. By using delegation, your delegate can view invitations and mail messages that are sent to you. With your permission, the delegate can send and reply to invitations and messages for you. Both your account name and your delegate's account name appear on the invitation or message. Note: If you don't need to "send on behalf of", you may be able to simply use sharing to work with another's email or calendar. Both you and your delegate must have Microsoft Exchange accounts. There needs to be a handshake: The user specifies the delegate; the delegate specifies that he or she is a delegate for that person.
To set up delegate access: 1. Go to the Entourage menu and select Account Settings…
(An alternative path is Tools menu Accounts…, ) RESULT: The Accounts dialog box opens.
2. The Mail tab should be selected. Double-click exchange.mit. (Exchange). RESULT: The Edit Account dialog box opens.
3. Click the Delegate tab. RESULTS: The following dialog box opens:
4. Under My Delegates, click Add.
Lastprinted7/28/099:17AM 27
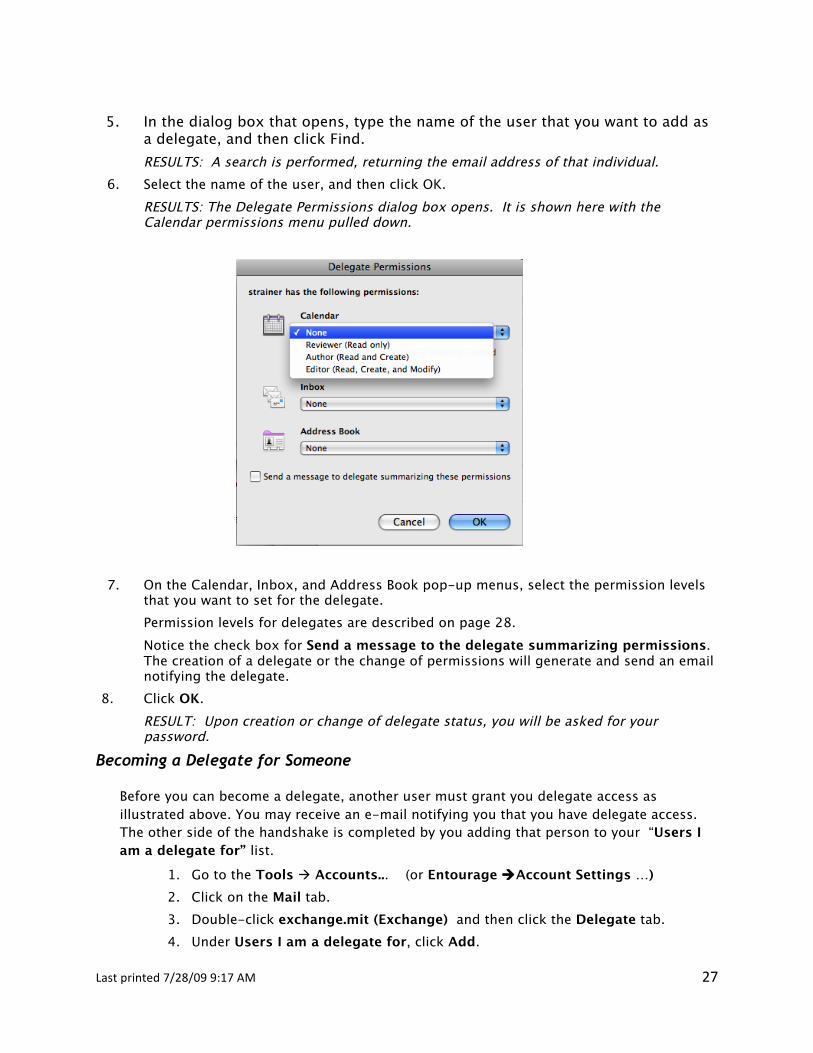
5. In the dialog box that opens, type the name of the user that you want to add as
a delegate, and then click Find. RESULTS: A search is performed, returning the email address of that individual.
6. Select the name of the user, and then click OK. RESULTS: The Delegate Permissions dialog box opens. It is shown here with the Calendar permissions menu pulled down.
7. On the Calendar, Inbox, and Address Book pop-up menus, select the permission levels that you want to set for the delegate. Permission levels for delegates are described on page 28. Notice the check box for Send a message to the delegate summarizing permissions. The creation of a delegate or the change of permissions will generate and send an email notifying the delegate.
8. Click OK. RESULT: Upon creation or change of delegate status, you will be asked for your password.
Becoming a Delegate for Someone
Before you can become a delegate, another user must grant you delegate access as illustrated above. You may receive an e-mail notifying you that you have delegate access. The other side of the handshake is completed by you adding that person to your “Users I am a delegate for” list.
1. Go to the Tools Accounts... (or Entourage Account Settings …) 2. Click on the Mail tab. 3. Double-click exchange.mit (Exchange) and then click the Delegate tab. 4. Under Users I am a delegate for, click Add.
Lastprinted7/28/099:17AM 28
5. Type the name of the user who has added you as a delegate, and then click Find. 6. Click the name of the user, and then click OK.
To Stop Being a Delegate or to terminate Delegate Permissions
1. Go to Tools Accounts… Double click the exchange server name. RESULT: The Edit Account dialog box opens.
2. Select and Remove the delegate from the My Delegates list or the other user’s name from the Users I am a delegate for list.
Permission Levels for Delegates
When you add a delegate, you can give the delegate separate permission levels for your calendar, inbox, and address book folders:
Permission level Activities a delegate can perform Author Read and create items, and modify and delete items he or she
creates. For example, a delegate with Author permissions can create meeting requests directly in the account owner's calendar and respond to meeting requests on the account owner's behalf.
Editor Full access. The delegate can do everything an author can do, plus modify and delete items that the account owner created.
Reviewer Read items only. The delegate can only read messages in the account owner's inbox, but not edit, create, or delete items.
None No access is allowed. Granting Delegate Access Permissions
1. As described above, select the appropriate levels of delegate access for the chosen areas by selecting from the drop down lists.
2. Click OK to accept these permissions. 3. Click OK again to close Edit Account dialog box.
RESULT: You will be asked to log in again to verify this act of granting permissions.
Lastprinted7/28/099:17AM 29
Using Outlook Web Access (OWA) and Exchange
What is OWA? Outlook Web Access (OWA) is a web-based alternative to your Entourage Desktop client. There are two versions of OWA – OWA Premium which runs on Internet Explorer 6 or higher and OWA Light which runs on multiple browsers and platforms. We Macintosh users, using Safari and Firefox, only have access to OWA Light. OWA Comparisons Despite the fact we only have OWA light available to us, I am going to leave in the comparison chart below so that it is clear that things are not available rather than being confounded by not finding it:
Feature Premium Light
Modules mail, calendar, contacts, tasks no tasks module
Printing prints individual message, click printer icon on toolbar to print all pages
prints Navigation Pane with message
Mail Features
search, reading pane, drag and drop, rules, categories and flags, spell check, multiple signatures, customize interface, out of office settings, mobile device wipe opens mail in new tab/window
search, out of office settings, mobile device wipe opens mail in same tab/window
Calendar Features
day, month week, delegate access, reminders
day view only
For more complete information on using OWA and OWA Light see: Outlook Web Access (OWA) at MIT –
http://web.mit.edu/ist/topics/email/exchange/owa/index.html.
1. To access OWA Light, type the url owa.mit.edu into your web browser. RESULTS: The following dialog box appears, soliciting a login.
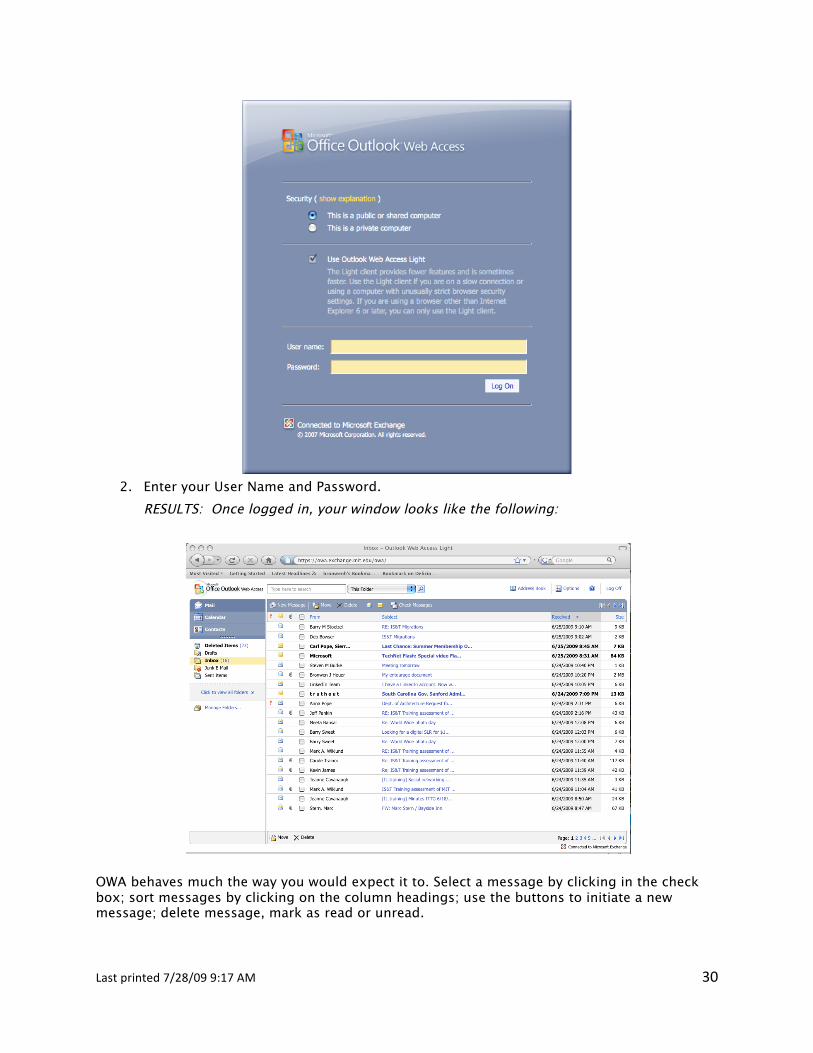
Lastprinted7/28/099:17AM 30
2. Enter your User Name and Password.
RESULTS: Once logged in, your window looks like the following:
OWA behaves much the way you would expect it to. Select a message by clicking in the check box; sort messages by clicking on the column headings; use the buttons to initiate a new message; delete message, mark as read or unread.
Lastprinted7/28/099:17AM 31
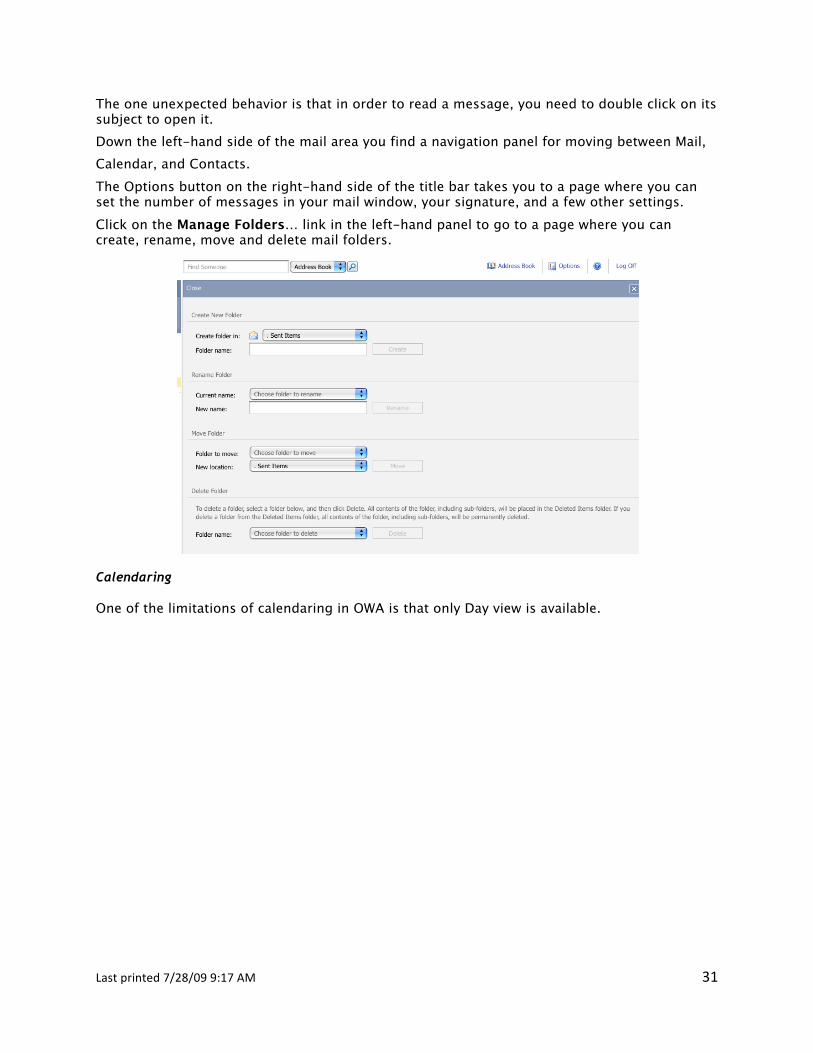
The one unexpected behavior is that in order to read a message, you need to double click on its subject to open it. Down the left-hand side of the mail area you find a navigation panel for moving between Mail, Calendar, and Contacts. The Options button on the right-hand side of the title bar takes you to a page where you can set the number of messages in your mail window, your signature, and a few other settings. Click on the Manage Folders… link in the left-hand panel to go to a page where you can create, rename, move and delete mail folders.
Calendaring One of the limitations of calendaring in OWA is that only Day view is available.
Lastprinted7/28/099:17AM 32
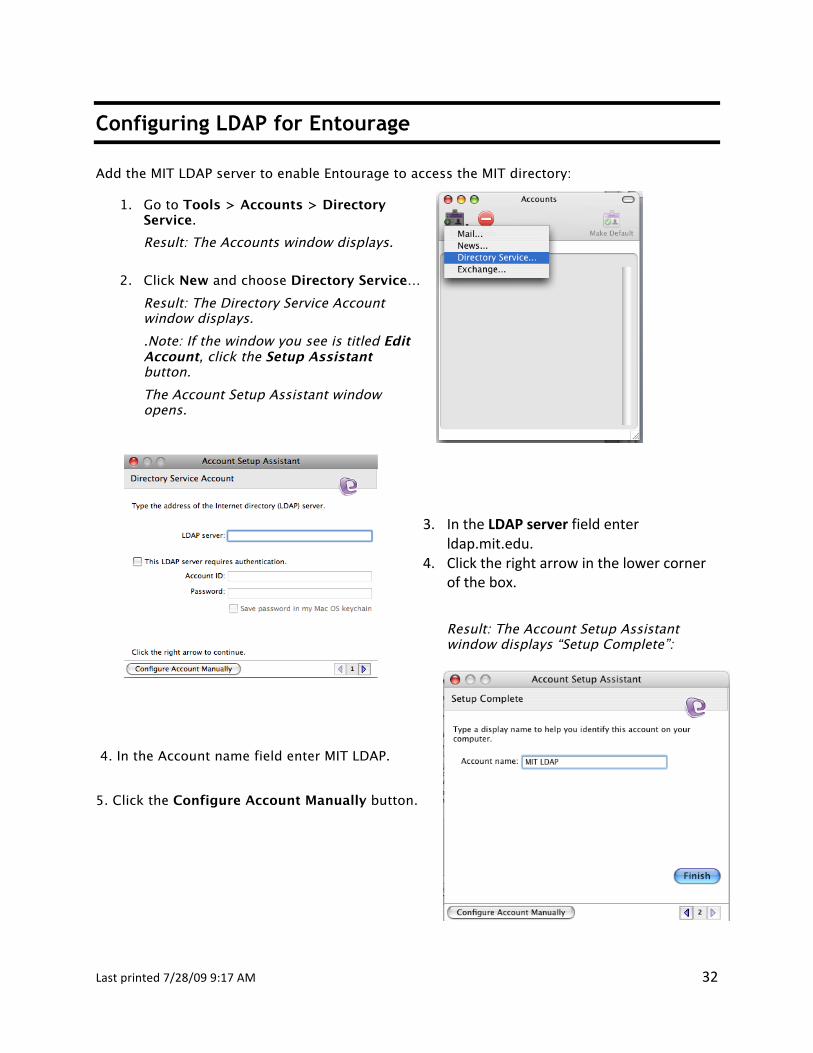
Configuring LDAP for Entourage Add the MIT LDAP server to enable Entourage to access the MIT directory:
1. Go to Tools > Accounts > Directory Service. Result: The Accounts window displays.
2. Click New and choose Directory Service…
Result: The Directory Service Account window displays. .Note: If the window you see is titled Edit Account, click the Setup Assistant button. The Account Setup Assistant window opens.
3. IntheLDAP serverfieldenterldap.mit.edu.
4. Clicktherightarrowinthelowercornerofthebox.
Result: The Account Setup Assistant window displays “Setup Complete”:
4. In the Account name field enter MIT LDAP. 5. Click the Configure Account Manually button.
Lastprinted7/28/099:17AM 33
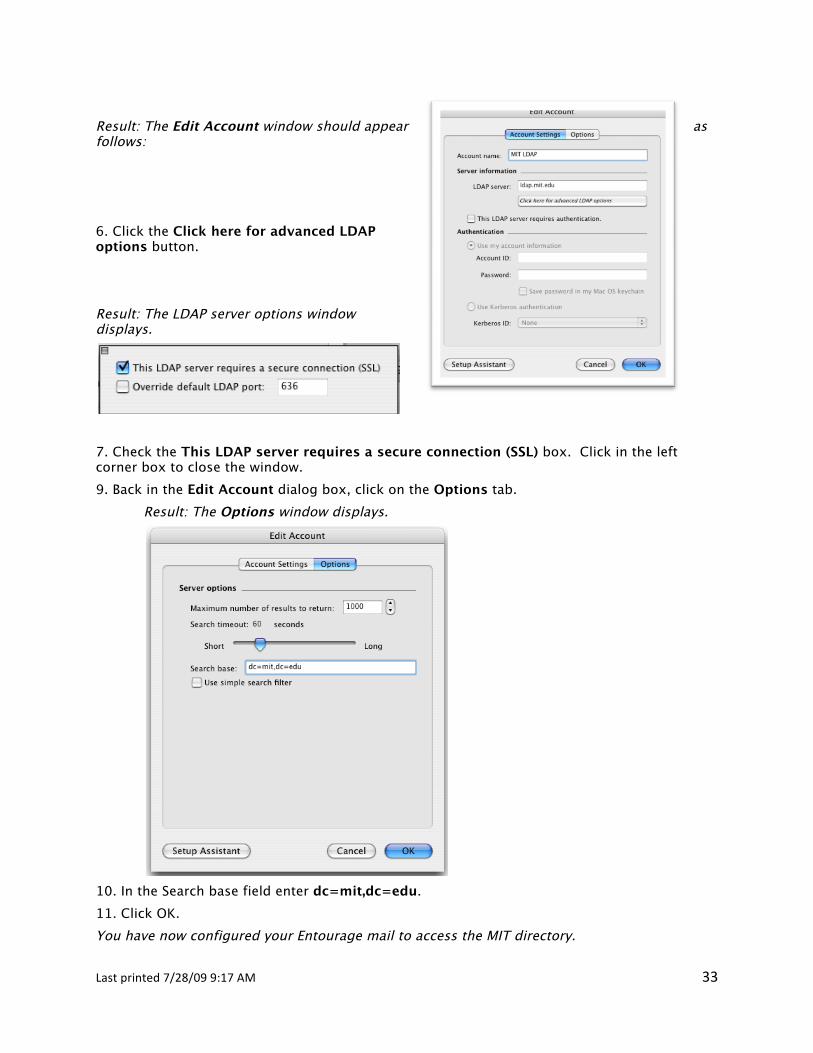
Result: The Edit Account window should appear as follows: 6. Click the Click here for advanced LDAP options button. Result: The LDAP server options window displays.
7. Check the This LDAP server requires a secure connection (SSL) box. Click in the left corner box to close the window. 9. Back in the Edit Account dialog box, click on the Options tab.
Result: The Options window displays.
10. In the Search base field enter dc=mit,dc=edu. 11. Click OK. You have now configured your Entourage mail to access the MIT directory.
Lastprinted7/28/099:17AM 34
Resources
Entourage Help A wealth of information on Entourage can be found in the Help, whether you go online or not. Go to the Help menu Entourage Help. The Topics button on the tool bar opens a pane a list of topics. Drill down to find specific details for Mail, Calendaring, etc. Return to Entourage Help Home by clicking on Home button. A second site of value is Mactopia. This is Microsoft’s website for Macintosh information. Either google Mactopia or go to http://www.microsoft.com/mac. Follow the links for Help and How Tos Entourage The Missing Manual Series has issued a book on Office 2008 for Macintosh, by Jim Elferdink. It is readable through MIT Libraries VERA Safari books.
Classes at MIT: Quick Start classes on Entourage, an hour and a half in length, are being scheduled for the N42-Demo Center beginning the week of July 27. See the schedule by following the link: <http://web.mit.edu/ist/topics/training/training-QS.pdf> Contact the IS&T Training Team at [email protected] to arrange a class for your department.
Hands-on classes for Word, Excel or PowerPoint 2008 are held in W92. There is no fee for these classes but they do require registration.
See schedule - <http://web.mit.edu/ist/topics/training/training-HO.pdf> Register - <http://web.mit.edu/sapwebss/PS1/training_home.shtml>
IS&T Web Exchange Web Pages: Email and Calendaring: Exchange - http://web.mit.edu/ist/topics/email/exchange/ From this page, follow the link to Entourage or http://itinfo.mit.edu/product.php?vid=818Here you will find links under Using and Related links.
IS&T Software Product Front Door http://ist.mit.edu/services/software/entourage/2008#using
Details and links for acquiring, installing, and using Entourage in the MIT environment.
Hermes, the Help desk FAQ and knowledge base also contains information on Entourage and Exchange: http://kb.mit.edu/confluence/display/home/Hermes or simply google Hermes at the MIT home page. At the Hermes home page, type in a relevant search string for the information you seek.
Configuring LDAP for Exchange http://ist.mit.edu/services/software/entourage/2008/configure‐ldap
On-line learning at MIT: Element-K - self-paced, on-line classes do not exist for Entourage. IS&T On-line training demos have currently not been developed for Entourage. However don’t hesitate to check our site: - http://web.mit.edu/ist/topics/training/demos/ as some may be developed soon.
Lastprinted7/28/099:17AM 35
Issues and FAQs…… Information on TSM and Backups can be found: http://itinfo.mit.edu/product.php?vid=786 Question: How do I change the name or email address displayed in the FROM field by Exchange email service? Answer: By default, your FROM address is your official name (from MIT records) and your MIT mailing address. You can change one or both using this web form (certificates required):
https://nic-too.mit.edu/cgi-bin/exchange This change will appear on email messages and OOF (out-of-office) messages. It is effective within approximately five minutes. Downloaded attachments go to : user:Documents:Microsoft User Data: Saved Attachments: Issues: Entourage users report having duplicate email and/or calendar items. Solution: Microsoft recommends that ALL Entourage users change their anti-virus configuration on ALL their Entourage client machines (office and home) to exclude the ‘Microsoft User Data’ folder from auto scanning. The steps for McAfee VirusScan for Mac are listed below.
Launch VirusScan for Mac Under VirusScan menu, choose Preferences Note: you may need to ‘Click the lock in the lower left corner to make changes’ and authenticate. Choose more options Under “Exclude File or Folder”, click “Add” Navigate to Users>Username>Documents>Microsoft User Data Click Select Location Click on lock to prevent changes and authenticate and close Quit VirusScan
Lastprinted7/28/099:17AM 36
Notes on Best Practices for Out of Office Messages Out of Office Assistant" will auto-reply to any message you receive, including any junk mail or messages from spammers. For this reason, it is advisable not to give too many details in your auto-reply message. For example, you may not wish to give specifics such as that you will be out of town, on vacation, or at a conference. Instead you could use generic terminology such as: "I will be out of the office until xxx, and will not be checking email. If you need immediate assistance, please send a message to xxx, or call xxx." or " I will not be checking my email until xxx. If you need immediate assistance contact xxx." While you can set "Out of Office Assistant" to automatically forward your messages to an associate while you are gone; you can not have it forward your mail to any e-mail account which is not part of the HSC Exchange system. This means that mail cannot be forwarded to an AOL, Hotmail, Yahoo or any other e-mail account with a domain other than mit.edu. (Note: Due to MIT requirements, automatically forwarding e-mail off of the MIT Exchange e-mail system is not allowed anyhow.) For example, if you are project lead on a specific project and you are expecting e-mails which require immediate response, you might designate someone in the office to handle all inquires or communication regarding the project. In this case, the "Out of Office Assistant" is a excellent tool to use. If your account has subscriptions to any listservs or mailing lists, it is advisable to suspend any mail you will be receiving from those lists during those periods where you are going to use the "Out of Office Assistant". By doing this, you avoid the risk of auto replying to any mailing lists. Usually listservs have features which allow you to suspend receiving e-mail for a time. If your listserv has a web site, try accessing that web site or else you could send an e-mail to the administrator of the list. When someone sends you a message and you have the "Out of Office Assistant" turned on, they will receive the reply you have specified only once, no matter how many times they send you a message during the period of time you have specified. Remember: When you return make sure you turn off the "Out of Office Assistant."