Embed Size (px)
Citation preview

MBTC 2017Customer Master: Tips and Tricks

Jeopardy Game Rules
• There are five categories with five questions each. • Each question is up for grabs … raise your hand to answer.• Players receive beaded necklaces for correct answers.• Individual with the correct answer selects the next category and point value question.
• We will start with Reports Suite 10.
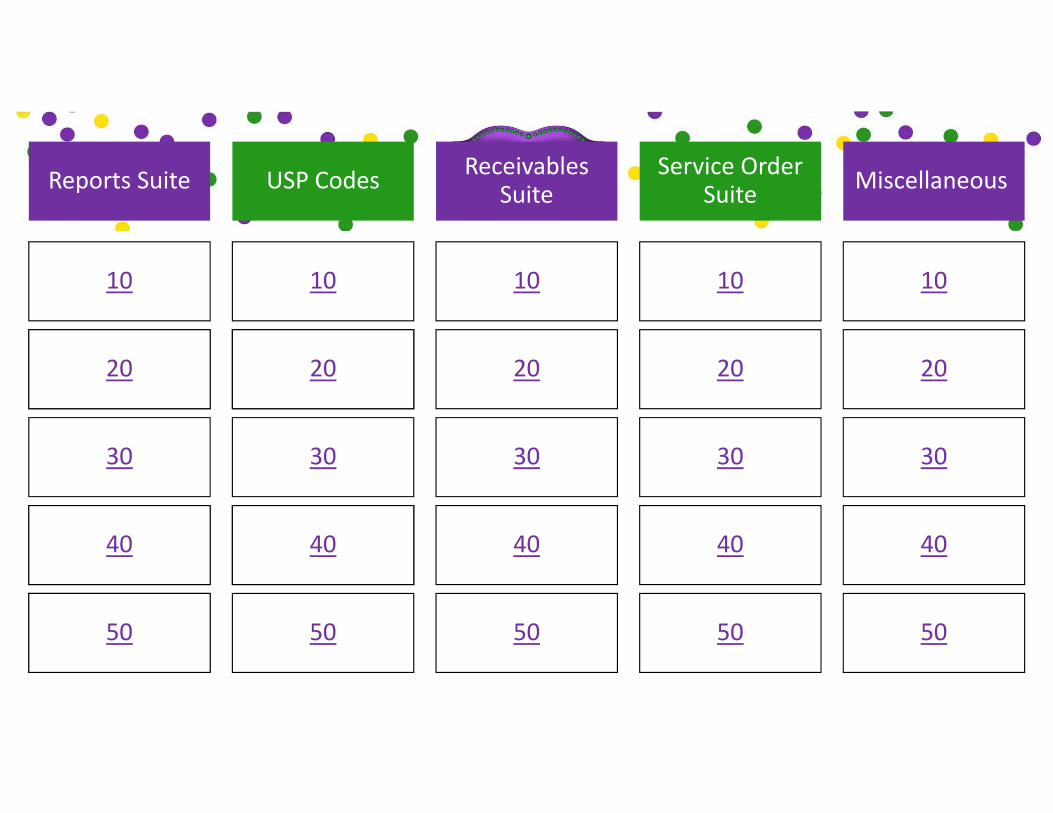
Reports Suite
10
20
30
40
50
USP Codes
10
20
30
40
50
Receivables Suite
10
20
30
40
50
Service Order Suite
10
20
30
40
50
Miscellaneous
10
20
30
40
50
20
40
50
20
40
Billing Suite
60
70
80
90
100
Service Order Suite
60
70
80
90
100
Tools & Options
60
70
80
90
100
Reports Suite
60
70
80
90
100
Miscellaneous
60
70
80
90
100

What report will show accounts currently in a suspend state?
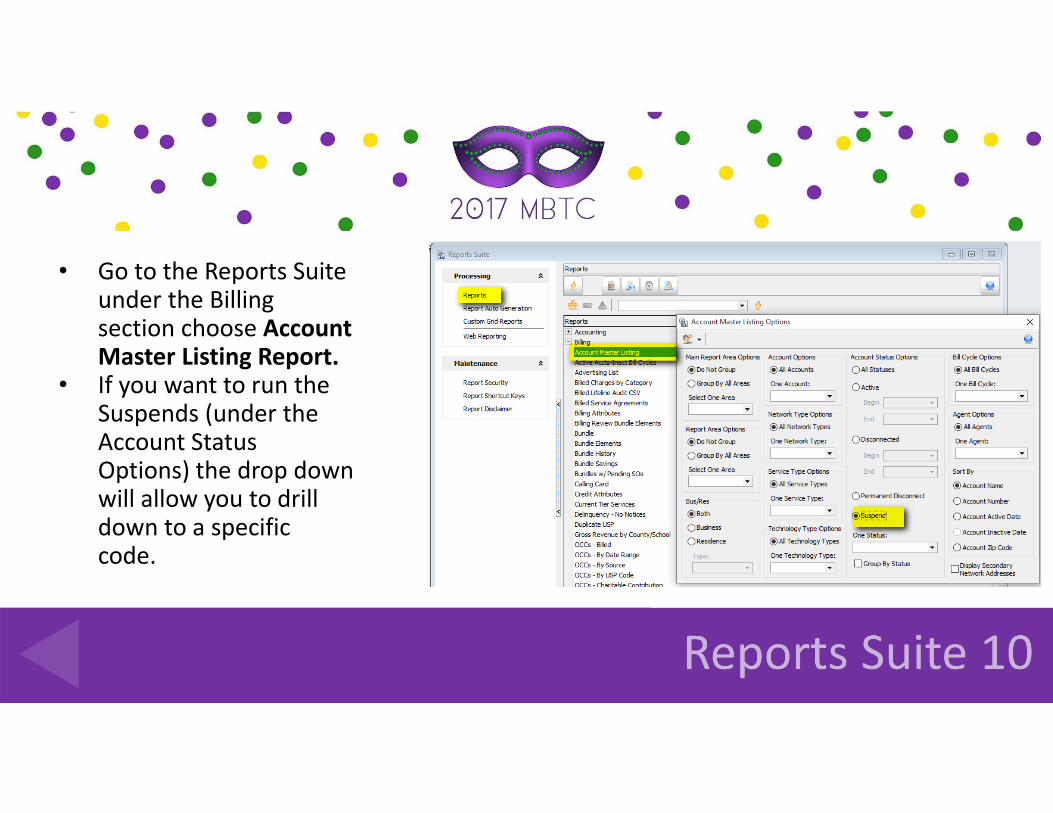
• Go to the Reports Suite under the Billing section choose Account Master Listing Report.
• If you want to run the Suspends (under the Account Status Options) the drop down will allow you to drill down to a specific code.
What report will show me accounts currently on vacation?
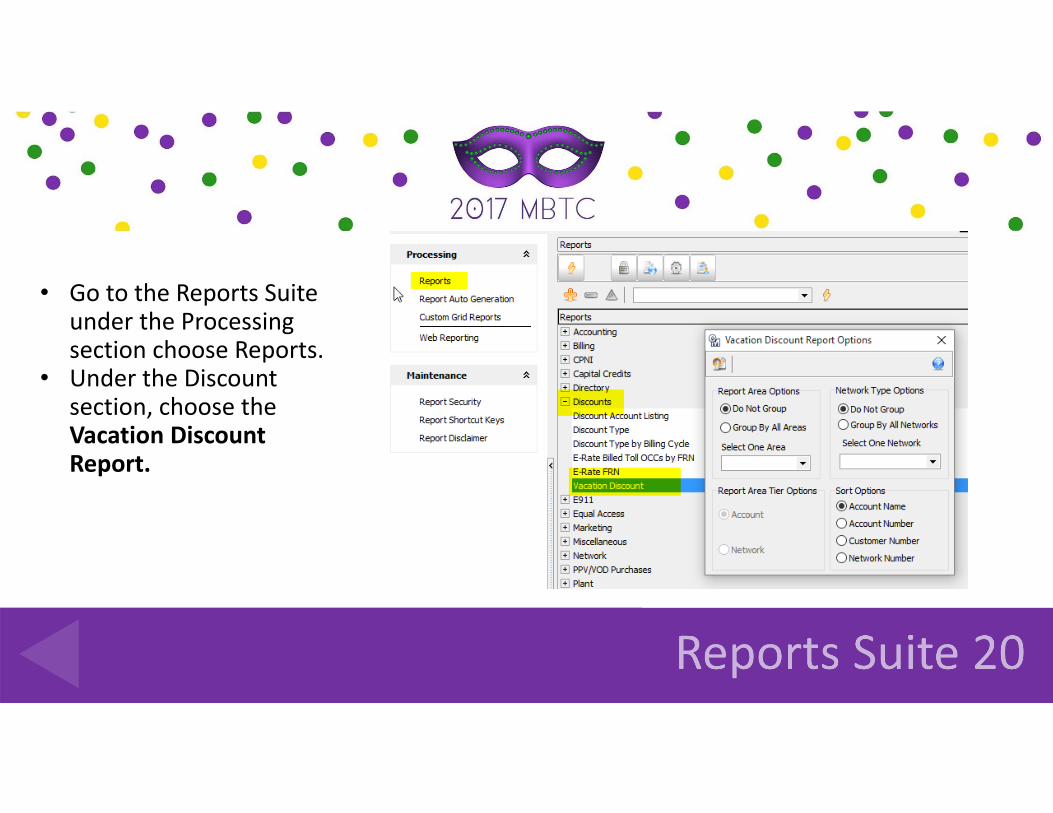
• Go to the Reports Suite under the Processing section choose Reports.
• Under the Discount section, choose the Vacation Discount Report.
Where can you save your favorite reports in one place?
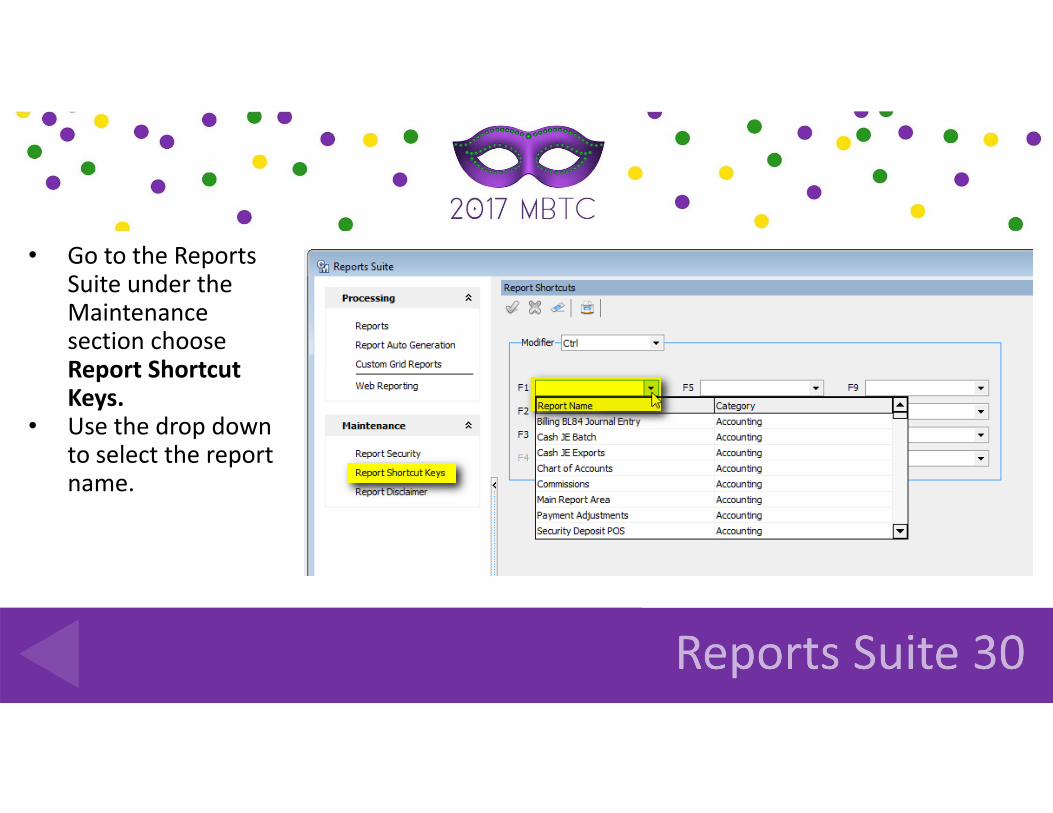
• Go to the Reports Suite under the Maintenance section choose Report Shortcut Keys.
• Use the drop down to select the report name.
What report will show accounts with a co‐applicant?
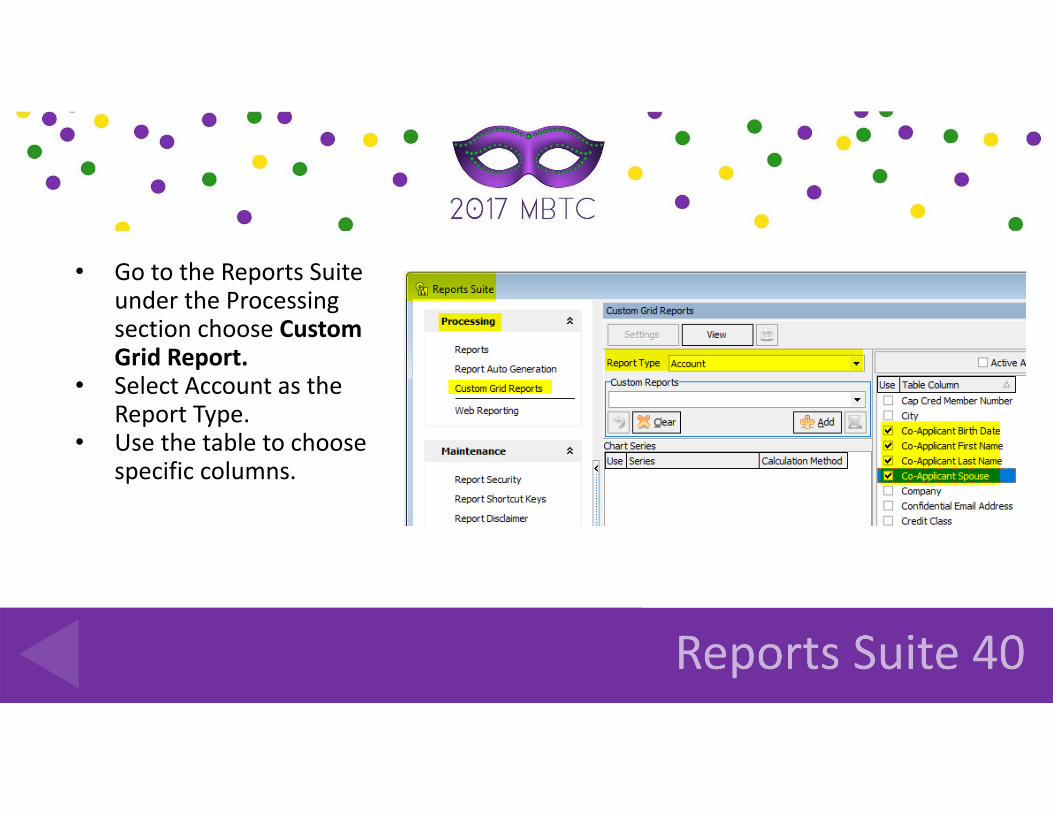
• Go to the Reports Suite under the Processing section choose Custom Grid Report.
• Select Account as the Report Type.
• Use the table to choose specific columns.
What report will list accounts by network and network address?

• Go to the Reports Suite under the Processing section choose Custom Grid Reports.
• Choose Address By Network as the Report Type.
• Use the table to select specific columns.

How can I get a zero dollar USP code to print on a bill?

• Within the USP Code Editor Screen, under Service Options, choose Print if Zero.
• Make sure the USP code is on a tier with other dollar amount USP codes.

My USP code has the wrong outdate. How do I correct the account prior to billing?

• Remove the code from history. This will move it back to the current tab.
• Out‐date the code with the correct date.
I added a new USP code to an account and it has the wrong effective date. How do I remove the code?
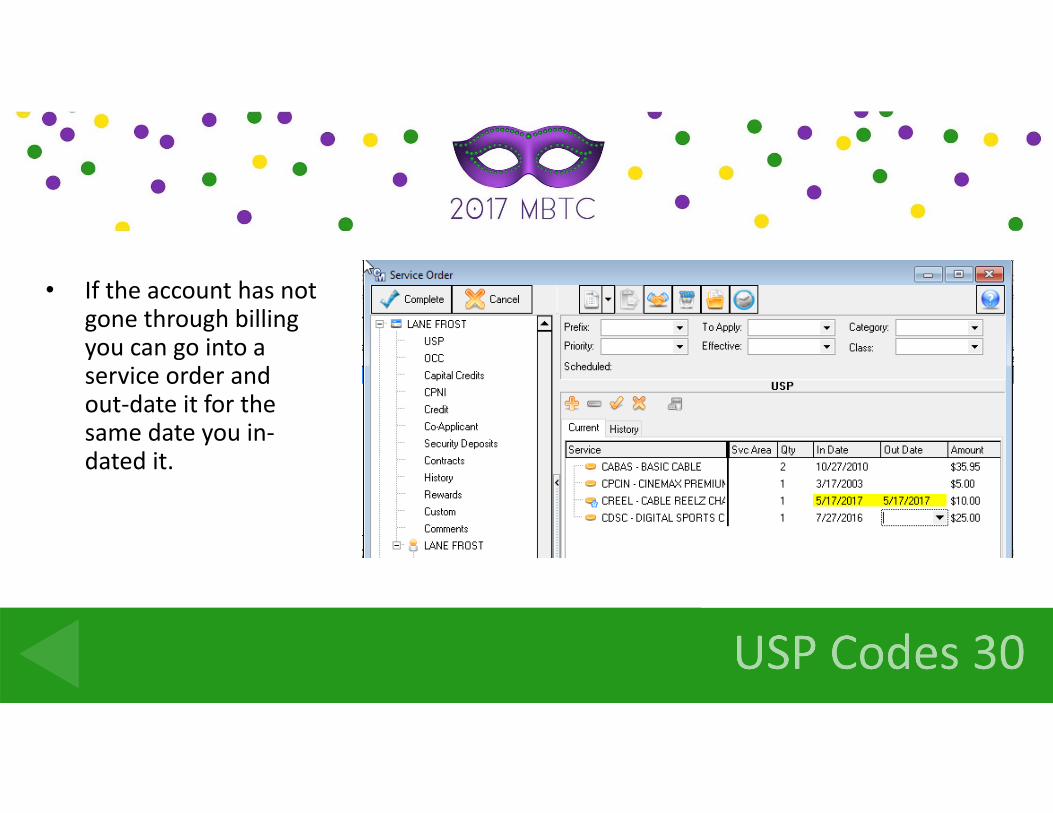
• If the account has not gone through billing you can go into a service order and out‐date it for the same date you in‐dated it.

What is the little blue star next to the USP code in the service order screen?

• It is a variable rate USP code.
I have done a USP code rate change with the wrong effective date. How do I correct this?
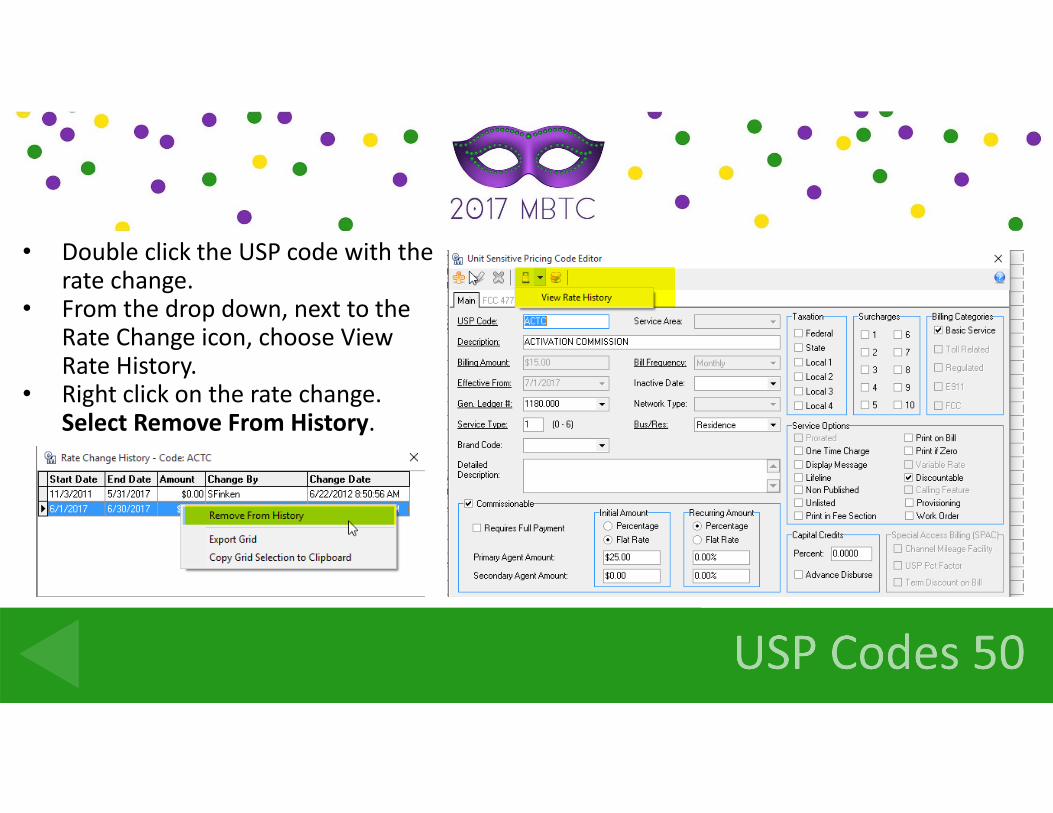
• Double click the USP code with the rate change.
• From the drop down, next to the Rate Change icon, choose View Rate History.
• Right click on the rate change. Select Remove From History.

I posted a pre‐payment with an incorrect payment amount. How do I correct this?
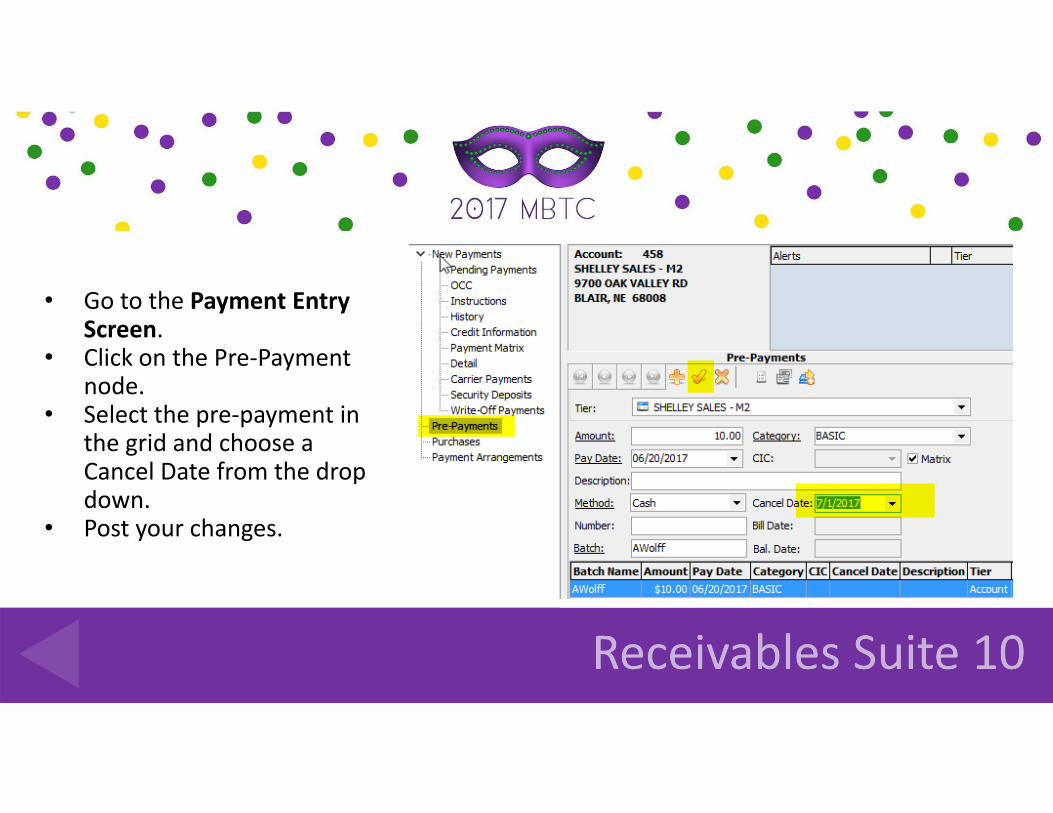
• Go to the Payment Entry Screen.
• Click on the Pre‐Payment node.
• Select the pre‐payment in the grid and choose a Cancel Date from the drop down.
• Post your changes.

I have added a pre‐payment to an account and it will not let me apply it. Why not?
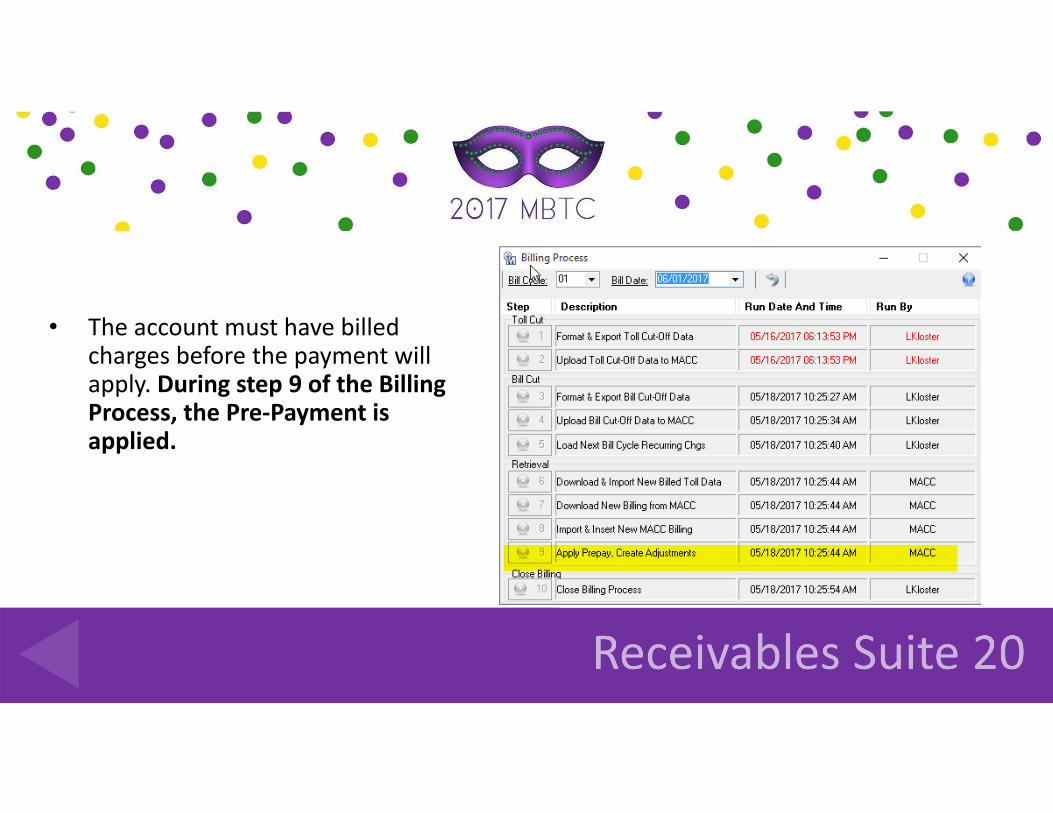
• The account must have billed charges before the payment will apply. During step 9 of the Billing Process, the Pre‐Payment is applied.

A customer needs a printout of their payment history for the last twelve months. Where can I find this?
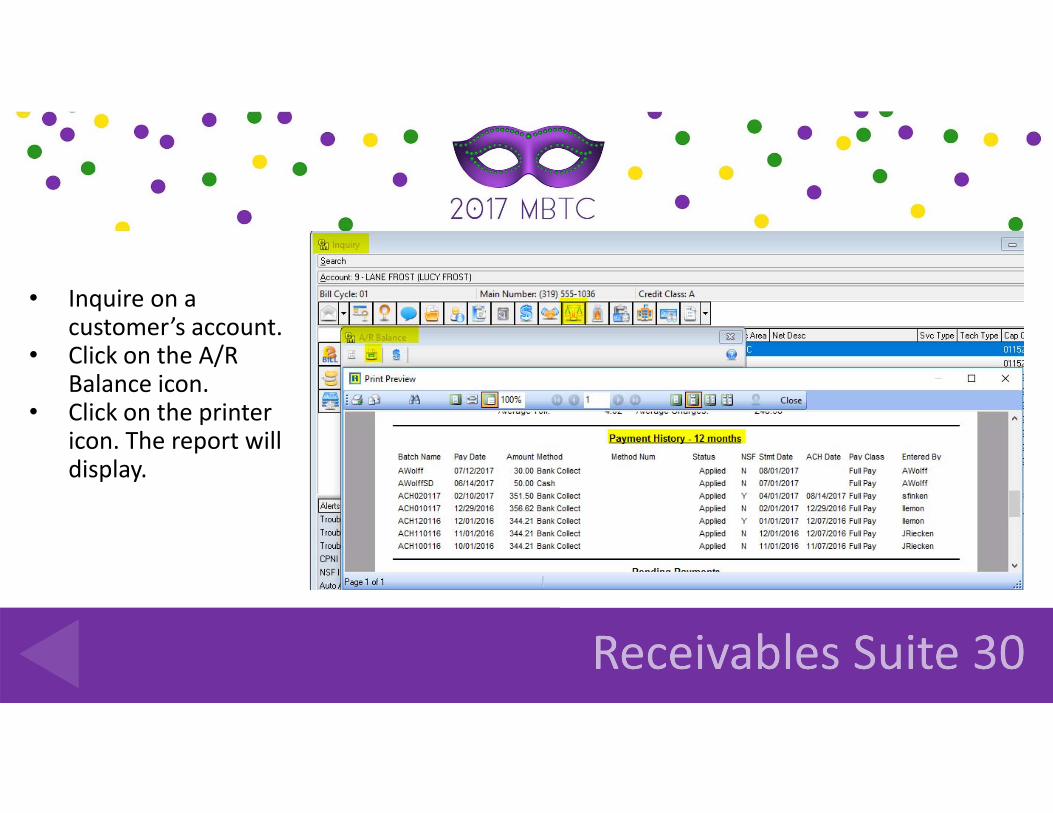
• Inquire on a customer’s account.
• Click on the A/R Balance icon.
• Click on the printer icon. The report will display.

My payment batch is still pending but the batch name is incorrect. How can I change it?

• Go to the Receivables Suite. • In the Processing section
select Payment Alter Tool. • Enter the batch name. Load
Pending Payments. • In the right hand section,
enter the correct batch name. • Click the lightning bolt to
execute.
How do I e‐mail a payment receipt to my customer?
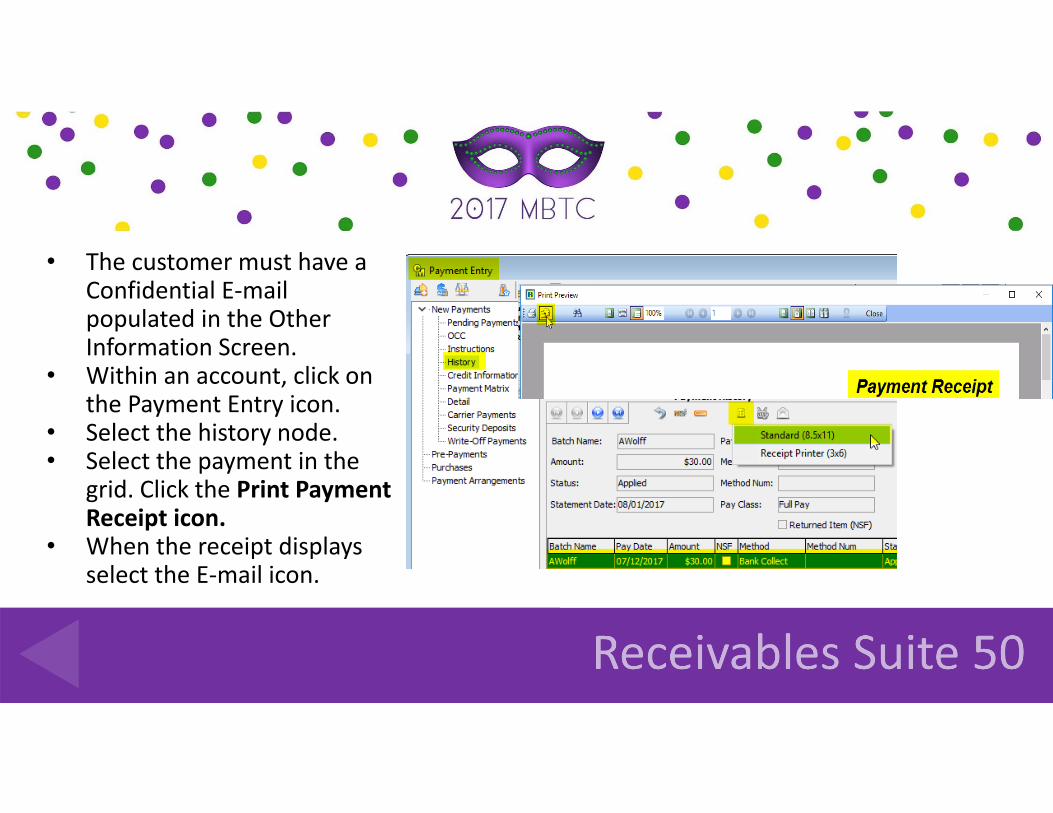
• The customer must have a Confidential E‐mail populated in the Other Information Screen.
• Within an account, click on the Payment Entry icon.
• Select the history node. • Select the payment in the
grid. Click the Print Payment Receipt icon.
• When the receipt displays select the E‐mail icon.

How can I make sure a customer does not receive a delinquent notice?
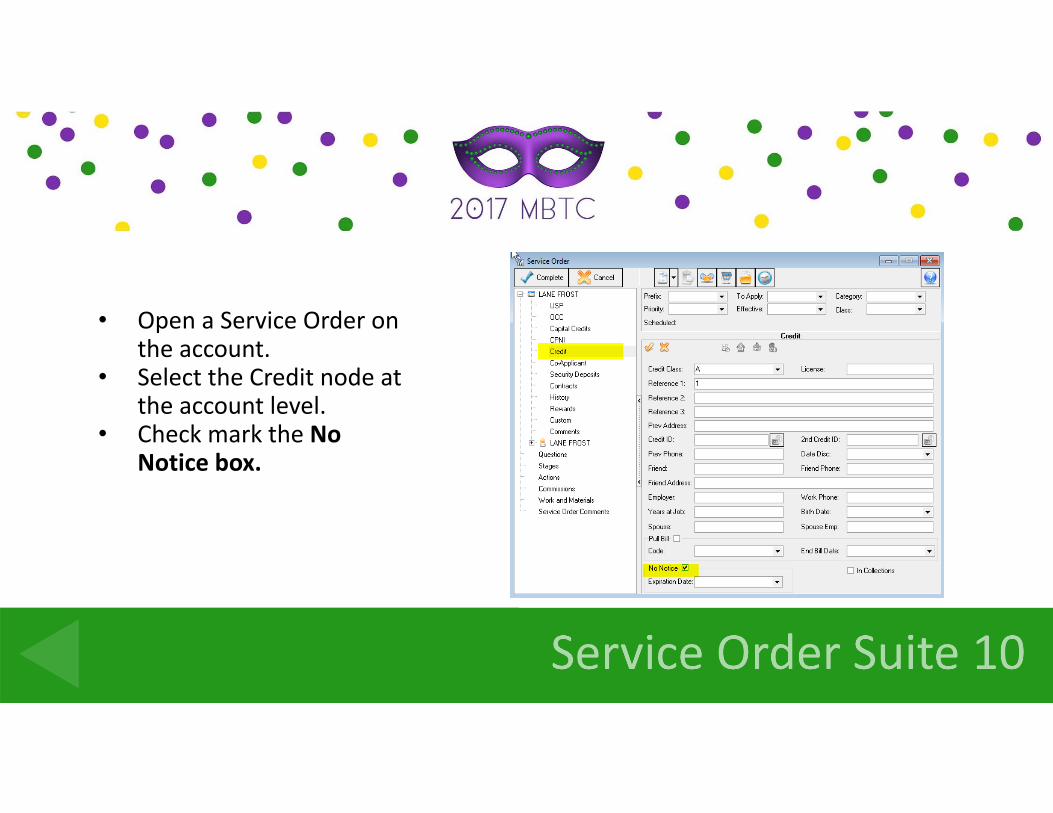
• Open a Service Order on the account.
• Select the Credit node at the account level.
• Check mark the No Notice box.
How do I make an account a pull bill?
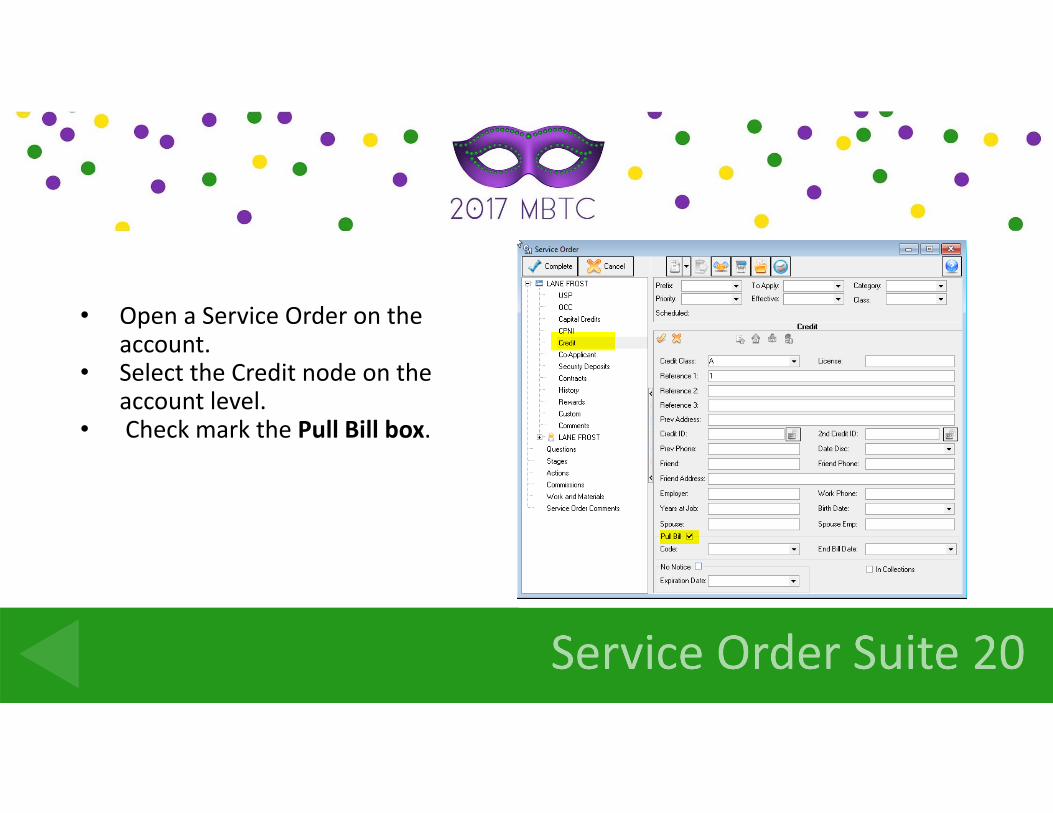
• Open a Service Order on the account.
• Select the Credit node on the account level.
• Check mark the Pull Bill box.
I want to send an e‐mail notification. Where do you populate the customer’s e‐mail address?
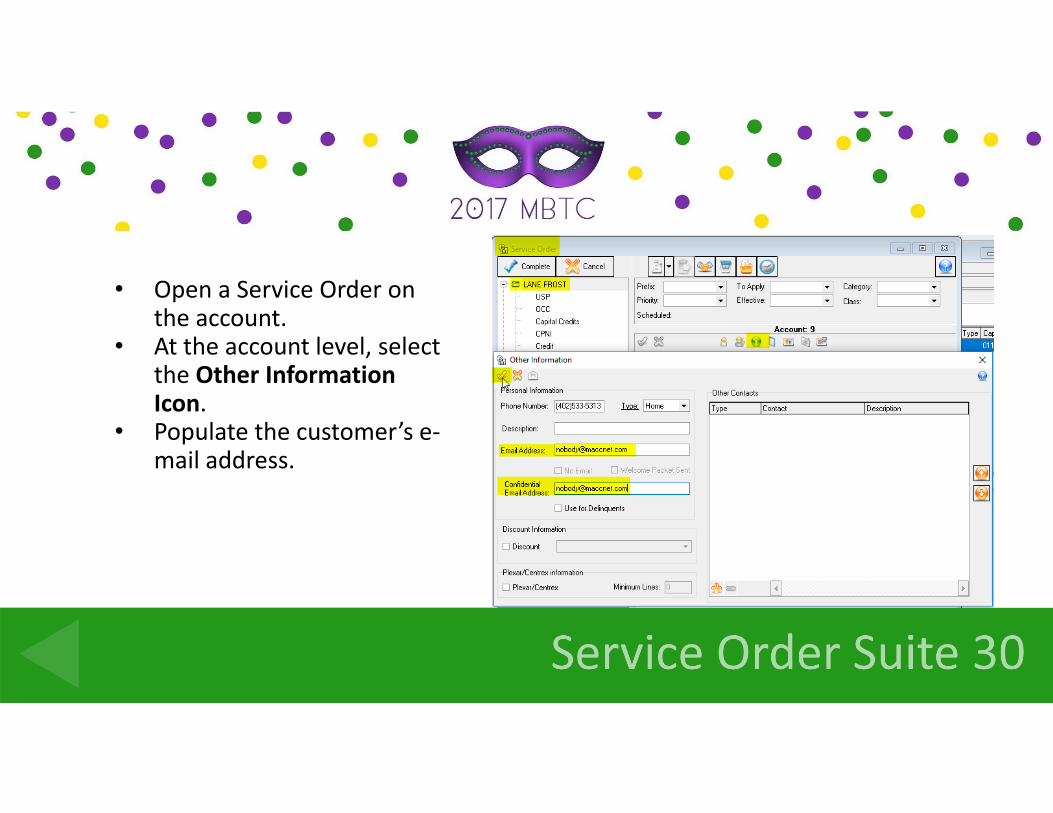
• Open a Service Order on the account.
• At the account level, select the Other Information Icon.
• Populate the customer’s e‐mail address.
How do I return equipment to inventory?
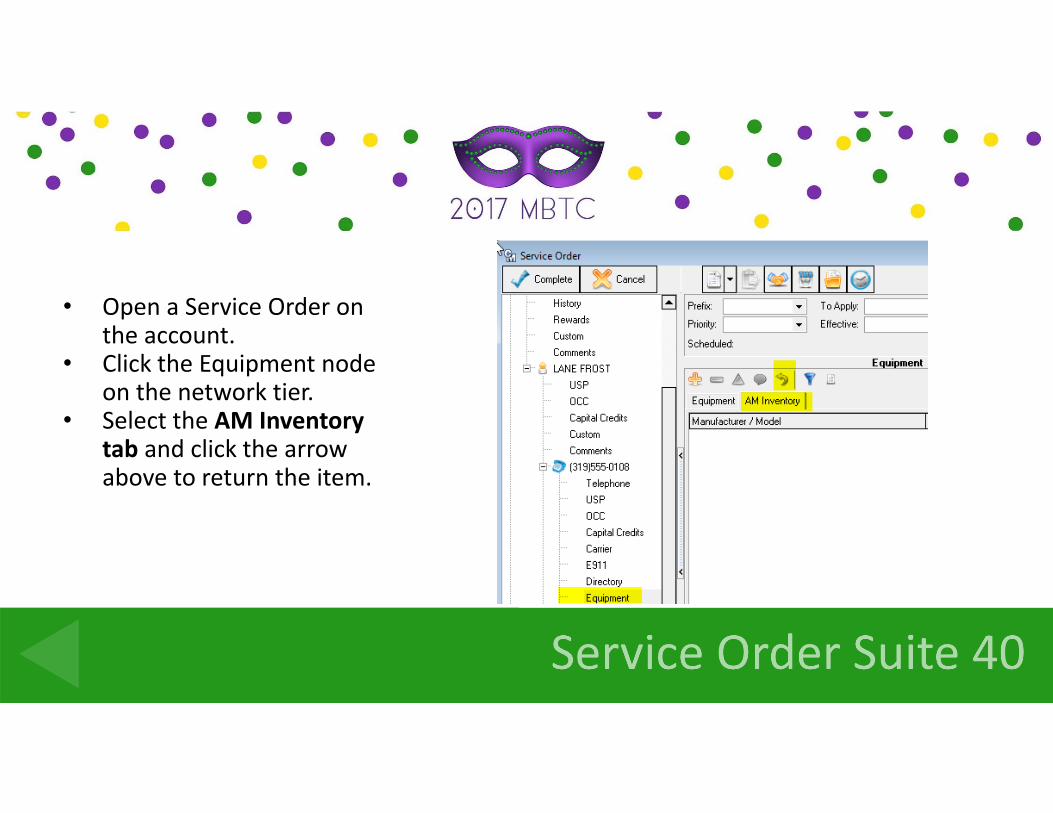
• Open a Service Order on the account.
• Click the Equipment node on the network tier.
• Select the AM Inventory tab and click the arrow above to return the item.
How do I remove the name in parentheses on the account?
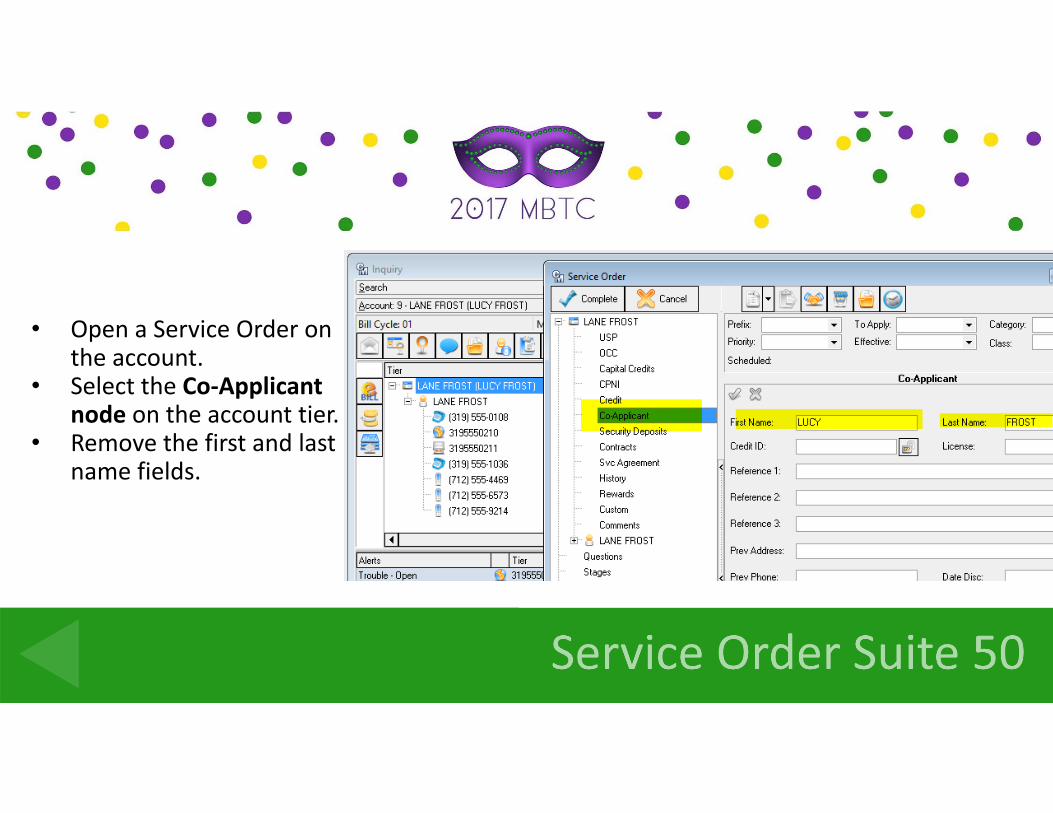
• Open a Service Order on the account.
• Select the Co‐Applicant node on the account tier.
• Remove the first and last name fields.

How can I get a USP code to print on a trouble ticket?

• Go to the Trouble Suite. • Under the Maintenance section
select Trouble Preferences. • Double click to open the Trouble
Preference Editor. • Select codes within the grid.
A customer’s account has been written‐off. I would like to reverse it. How do I do that?
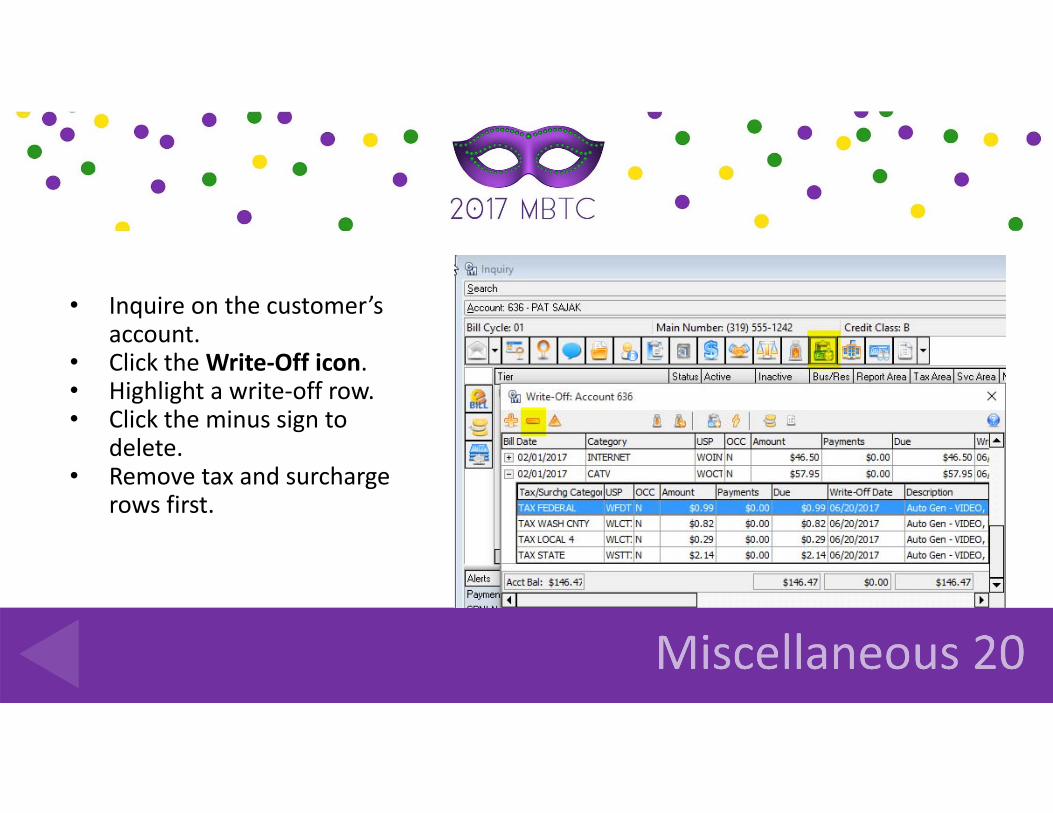
• Inquire on the customer’s account.
• Click the Write‐Off icon. • Highlight a write‐off row. • Click the minus sign to
delete. • Remove tax and surcharge
rows first.

How do I remove plant detail from an address?
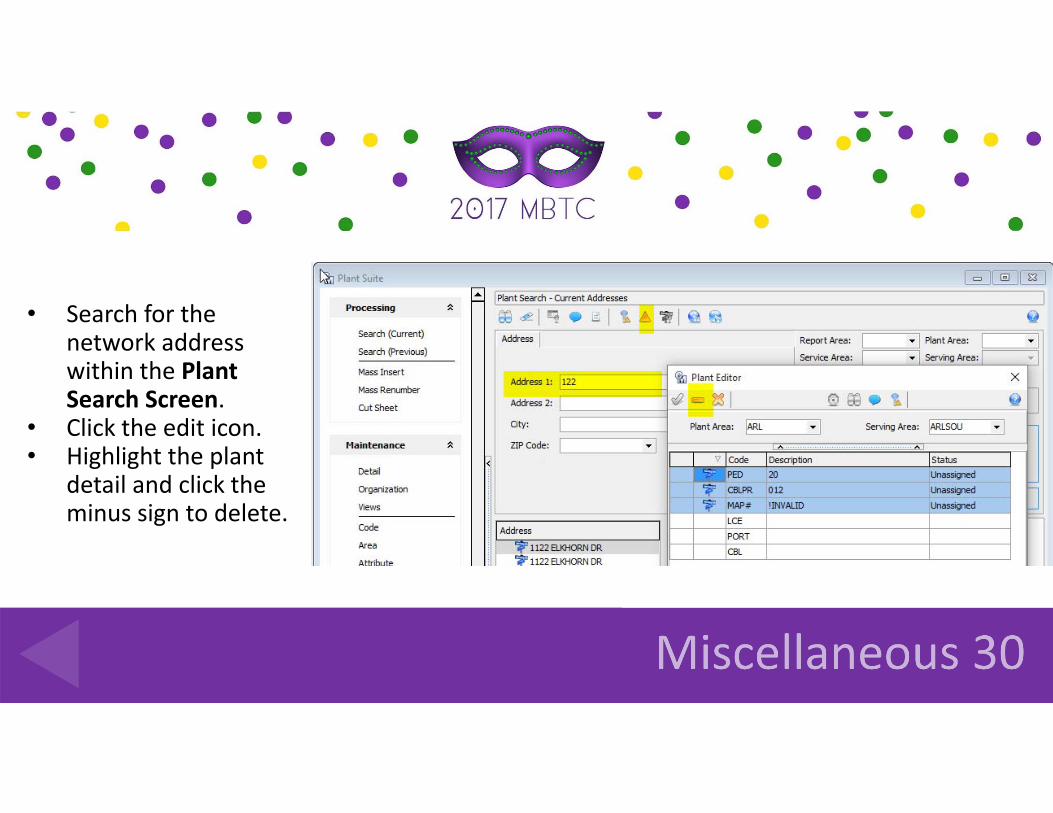
• Search for the network address within the Plant Search Screen.
• Click the edit icon. • Highlight the plant
detail and click the minus sign to delete.

How do I print multiple CPNI letters at one time?
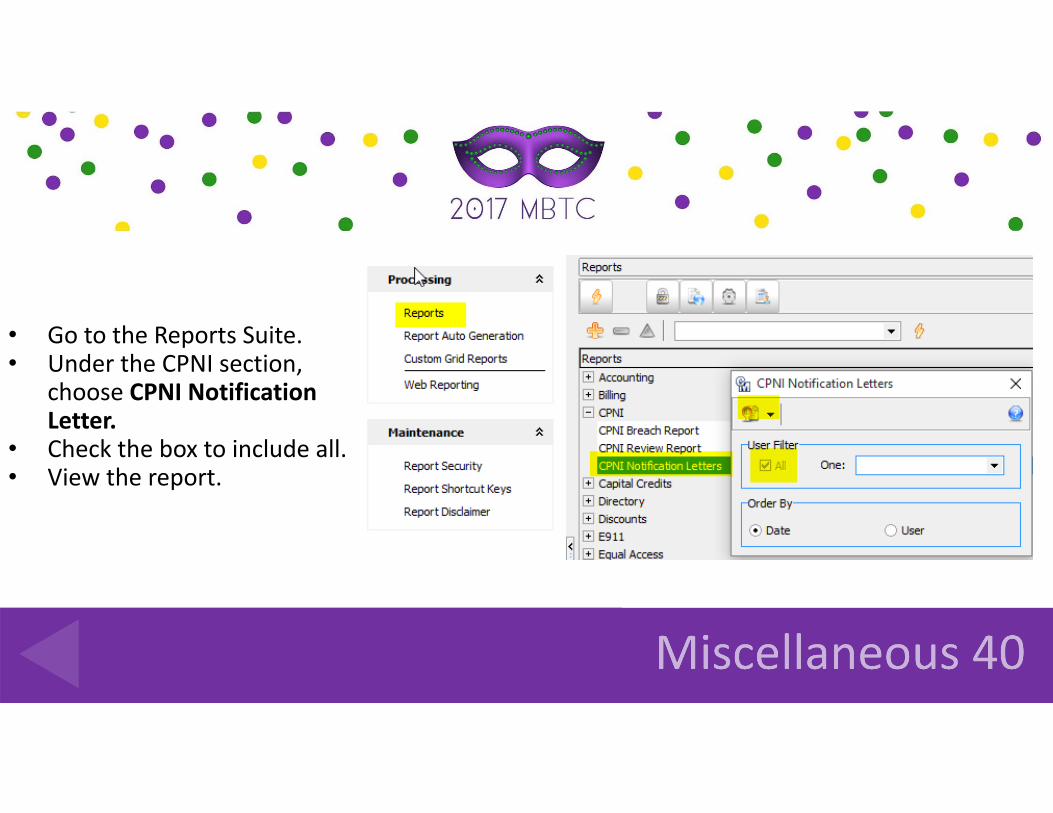
• Go to the Reports Suite. • Under the CPNI section,
choose CPNI Notification Letter.
• Check the box to include all. • View the report.
How do I inactivate an employee in Customer Master?

• Go to the Messenger Suite. Under the Maintenance section select Employee.
• Click the edit button. • Check mark the Inactive box
and post. • The employee will move to
your inactive table.

I requested two separate estimated bills. Why did I not receive the first bill?
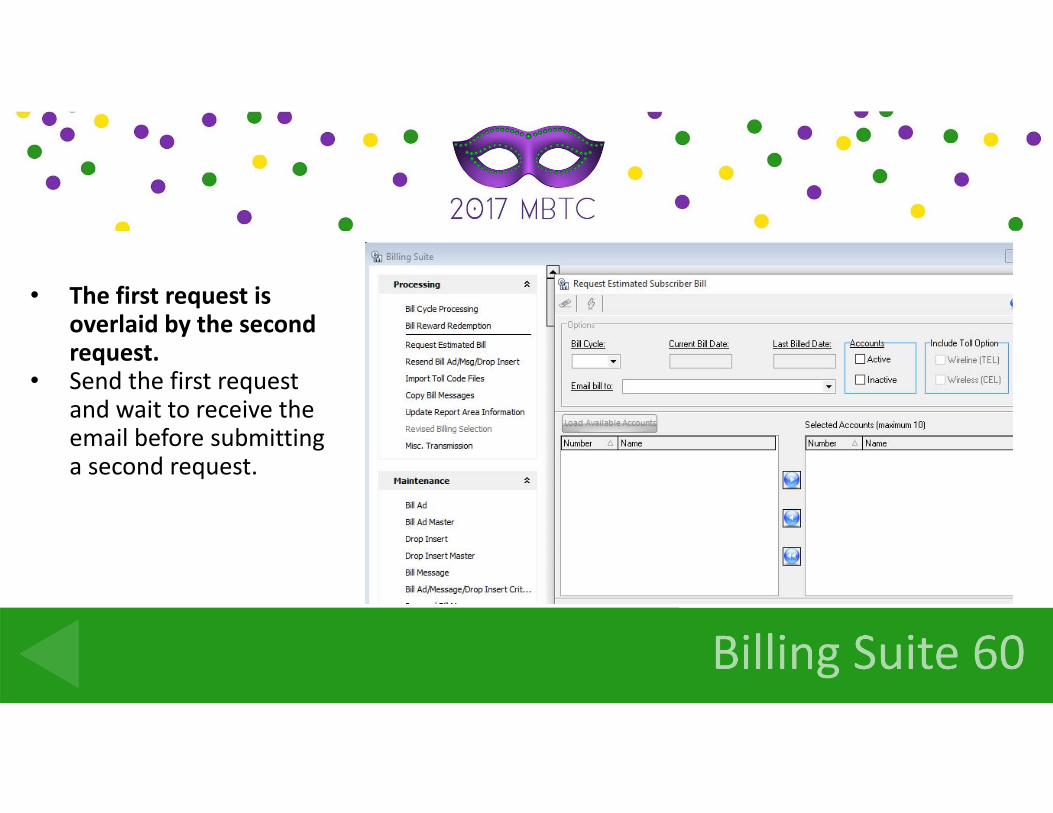
• The first request is overlaid by the second request.
• Send the first request and wait to receive the email before submitting a second request.
Where can I change the company’s web address on the customer’s bill?

• Go to the Receivables Suite under the Maintenance section choose Report Area.
• Double click on the report area.
• Edit the web address.

I would like to review a customer’s bill before it goes through billing. Where would you go in Customer Master to view this?
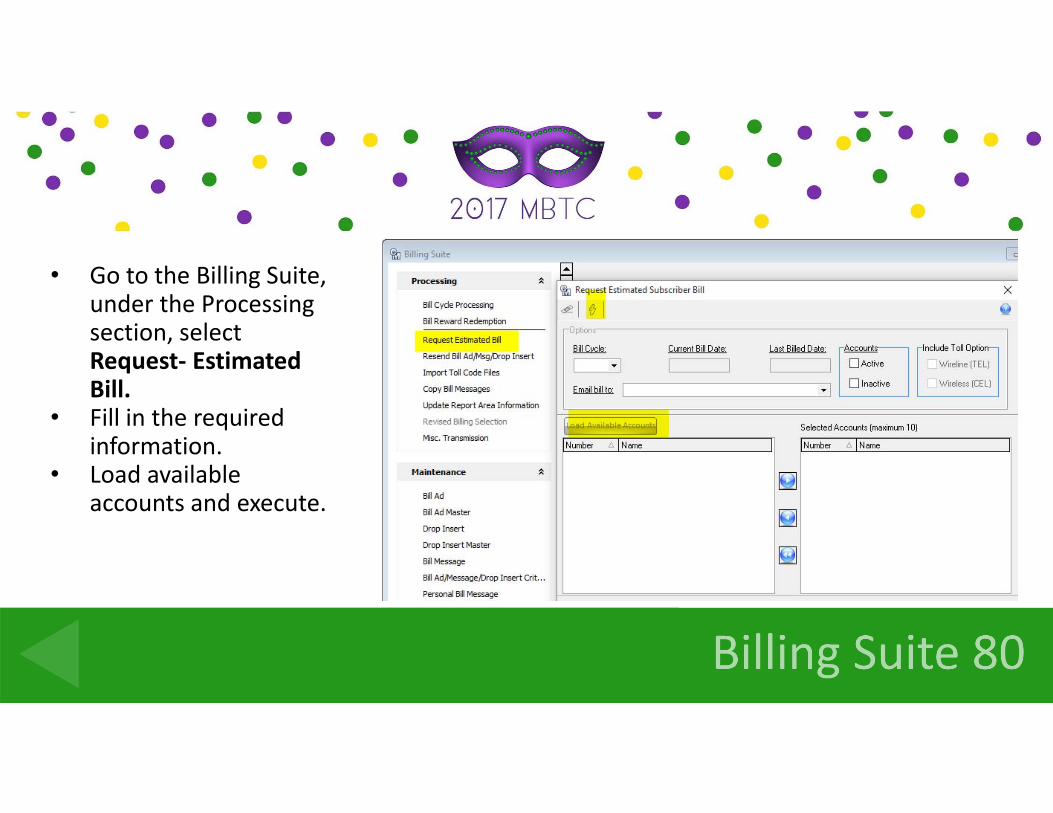
• Go to the Billing Suite, under the Processing section, select Request‐ Estimated Bill.
• Fill in the required information.
• Load available accounts and execute.
I have made several changes to our billing and would like to review my bills before they are completed. How do I set our company up to be on print notify?
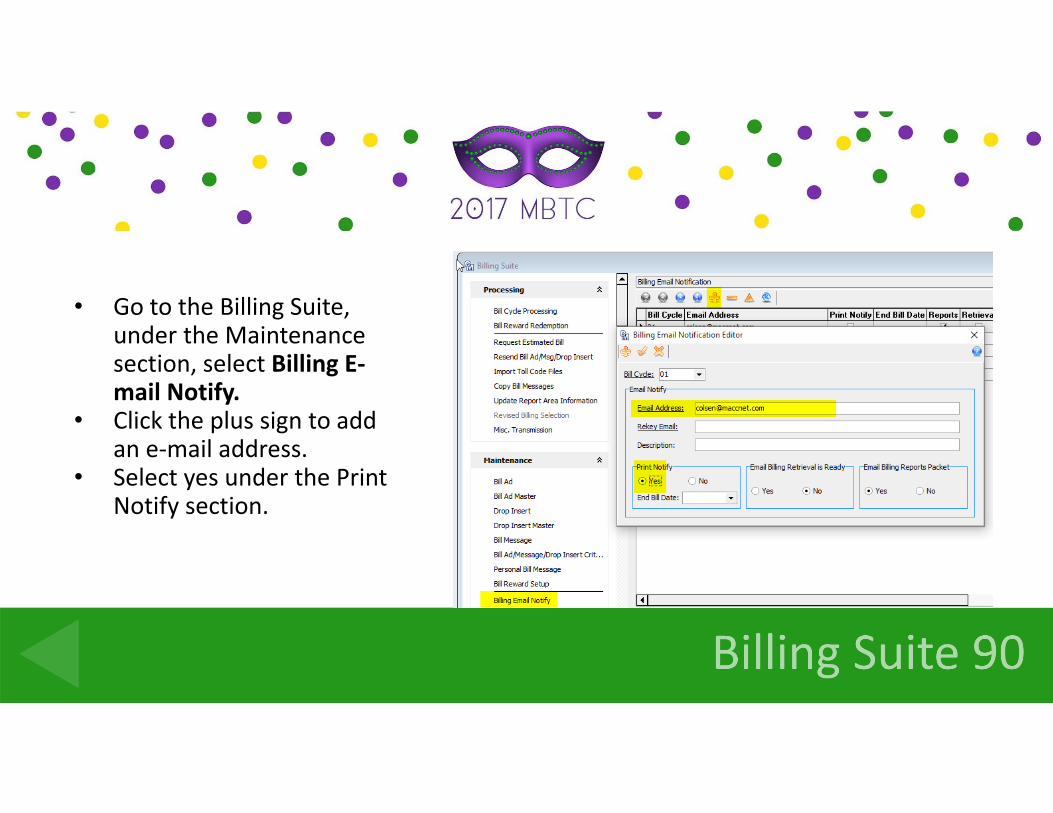
• Go to the Billing Suite, under the Maintenance section, select Billing E‐mail Notify.
• Click the plus sign to add an e‐mail address.
• Select yes under the Print Notify section.
How do I check the status of my Billing?

• Go to the MACC website and select the billing status page.
• You will see the status of each step of the billing processing.
• GREEN is for completed.• RED is for not completed.

How can I make an effective date required for every service order?

• Go to the Tools drop down. Select Options.
• Click Service Order Options.
• In the Require section, flag Service Order Effective Date.
I need to track information (that is not a service or USP code) on our video networks. Where can I add this information?
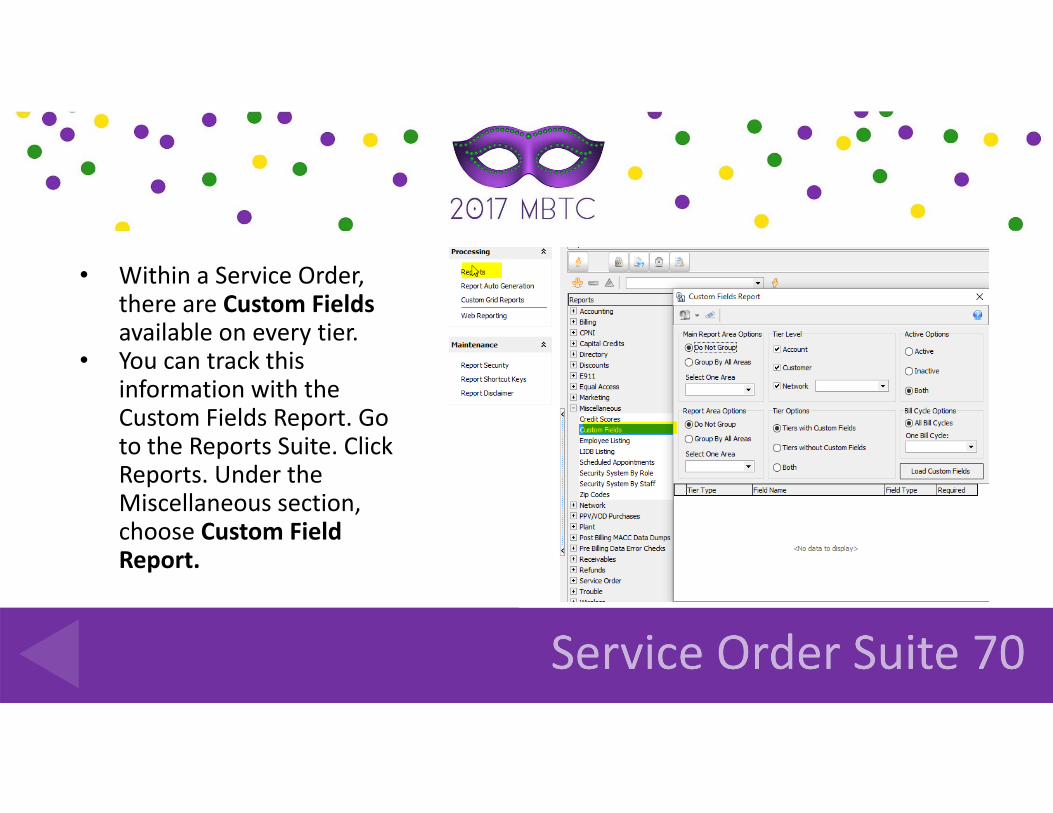
• Within a Service Order, there are Custom Fields available on every tier.
• You can track this information with the Custom Fields Report. Go to the Reports Suite. Click Reports. Under the Miscellaneous section, choose Custom Field Report.

According to MACC, all service orders should have?

• Comments• Open a Service Order
on an account. • Click on the Service
Order Comments node.
• Type your comment. Post to save.
What is the easiest way to change a customer’s phone number?

• Copy the network. • Open a Service Order on the
account. Click on the network tier you wish to copy.
• Click on the Copy Network icon.
• Choose which Modules you would like to copy. Click OK to post.
I am viewing service order history on an account. I only want to display changes made in a specific service order. How can I do this?
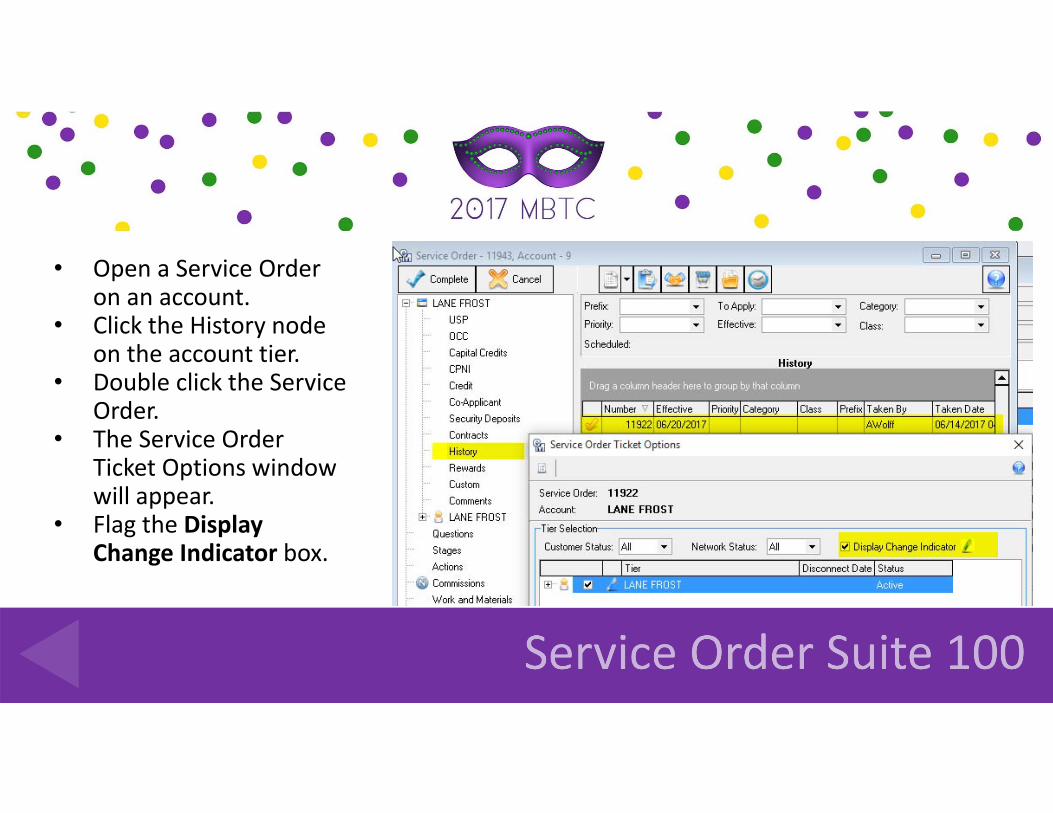
• Open a Service Order on an account.
• Click the History node on the account tier.
• Double click the Service Order.
• The Service Order Ticket Options window will appear.
• Flag the Display Change Indicator box.

We are trying to restructure an account and some networks are not showing in the account restructure tool. Why is the network not displaying?

• Go to the Service Order Suite under the Processing section choose Account Restructure.
• If the account has equipment, contracts, or an open service order, you cannot use the restructure tool.
My main menu bar has disappeared. How do I return it?

• Right click in the ribbon and choose More Commands.
• Under the Toolbars tab, check Main Menu.
• Your Main Menu bar will appear.
• Drag the bar to the appropriate area.
Where can I select Alerts I would like displayed on the account overview and inquiry screen?

• Go to the Service Order Suite, under the Maintenance section, select Alerts.
• Flag the desired alerts and post to save changes.
What is the benefit of running the automatically adjust tier balance tool?
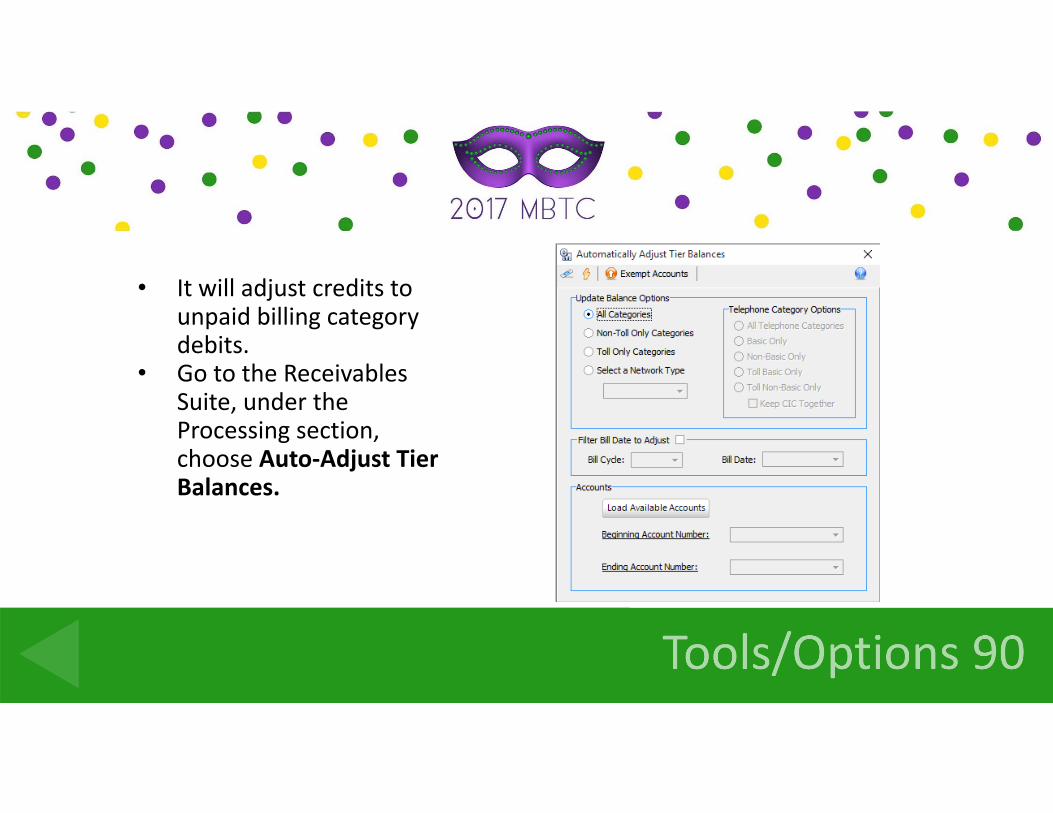
• It will adjust credits to unpaid billing category debits.
• Go to the Receivables Suite, under the Processing section, choose Auto‐Adjust Tier Balances.
What is the easiest way to look at both the MSAG and the E911 address table?
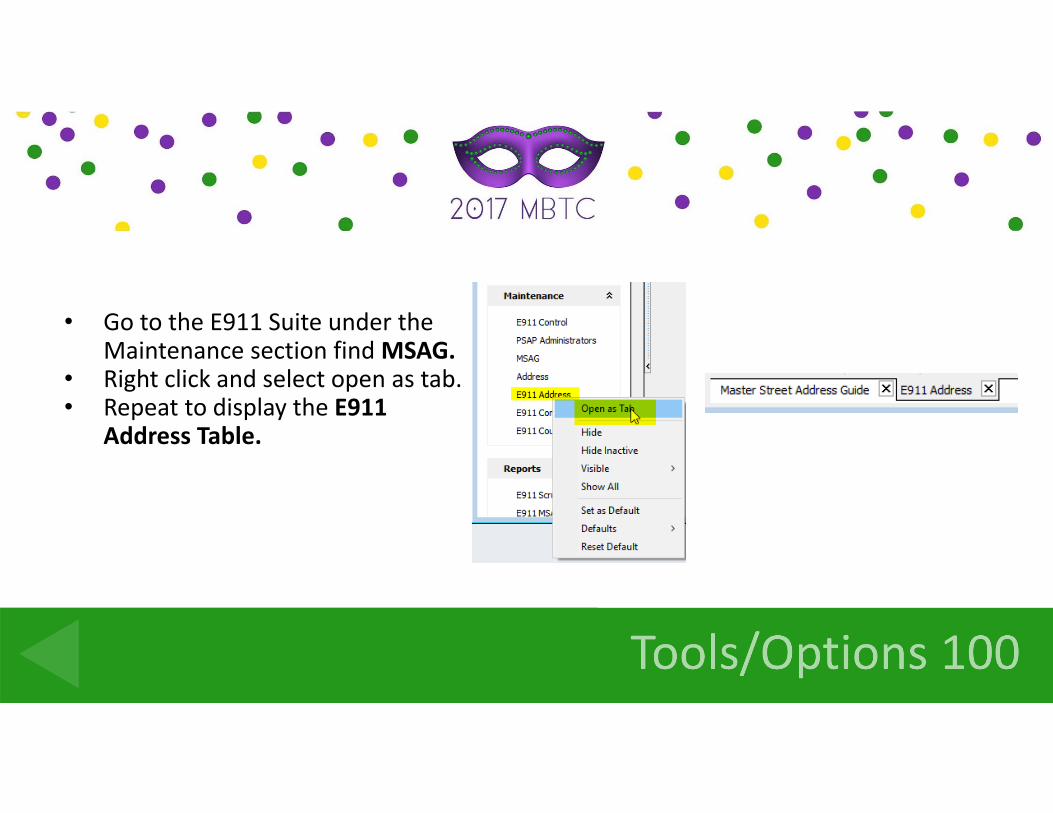
• Go to the E911 Suite under the Maintenance section find MSAG.
• Right click and select open as tab. • Repeat to display the E911
Address Table.

What is an easy way to search for a report in Customer Master?

• Go to the Report Suite, under the Processing section, click on Reports.
• Use the Quick Line Search Field to select a report.
• Click the lightning bolt to execute.

I have an account that is not showing up on the delinquent list report. How do I find out why?
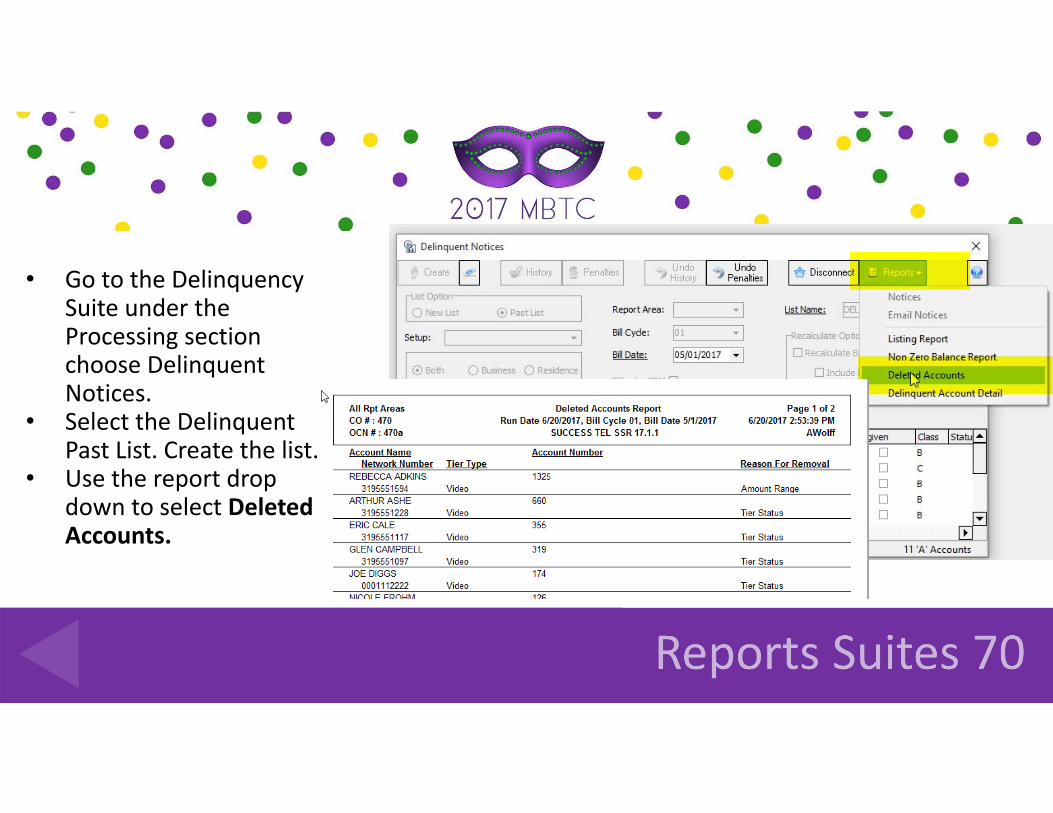
• Go to the Delinquency Suite under the Processing section choose Delinquent Notices.
• Select the Delinquent Past List. Create the list.
• Use the report drop down to select Deleted Accounts.
What report will allow me to choose specific columns?
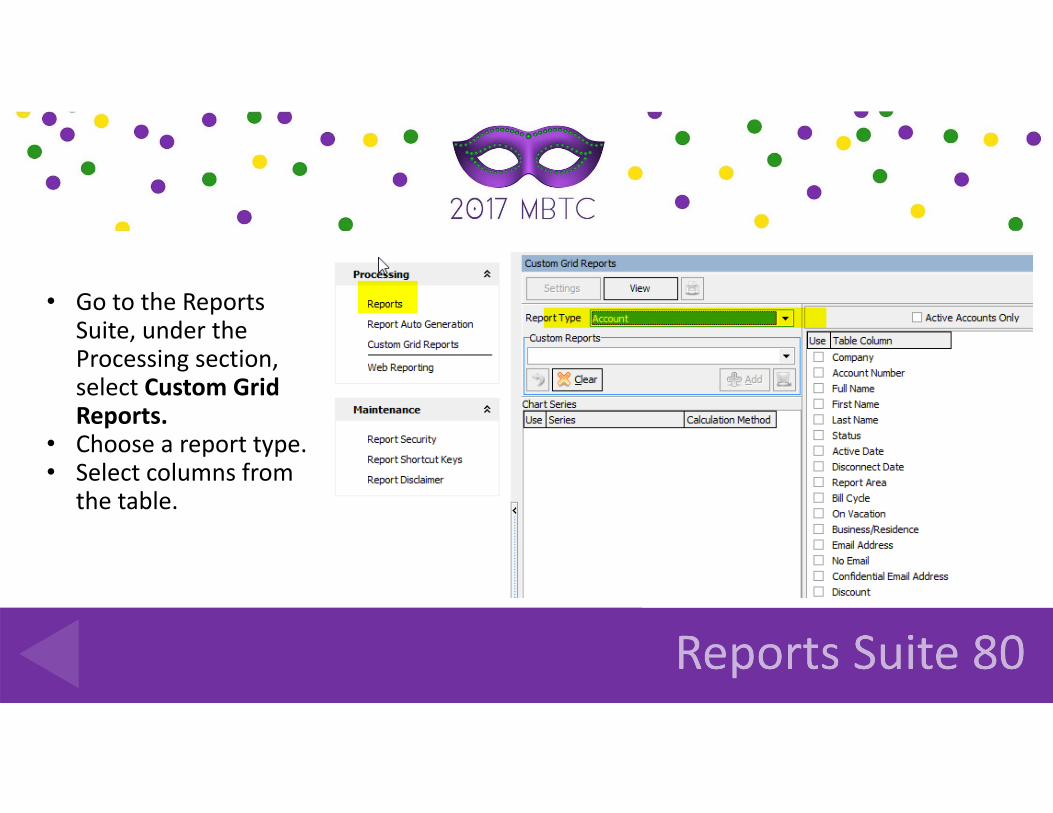
• Go to the Reports Suite, under the Processing section, select Custom Grid Reports.
• Choose a report type. • Select columns from
the table.

What report can I run to see if any of my active telephone numbers are missing a directory listing?
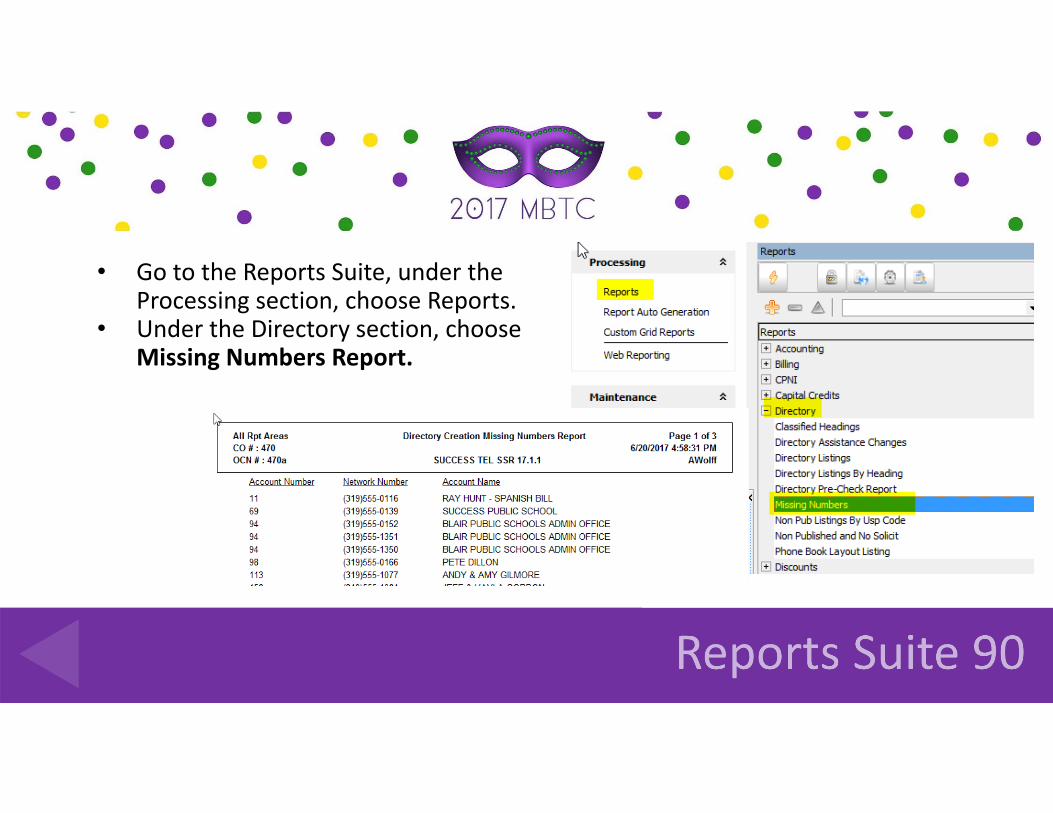
• Go to the Reports Suite, under the Processing section, choose Reports.
• Under the Directory section, choose Missing Numbers Report.
How can I verify that my bill message for the current billing is linked and active?
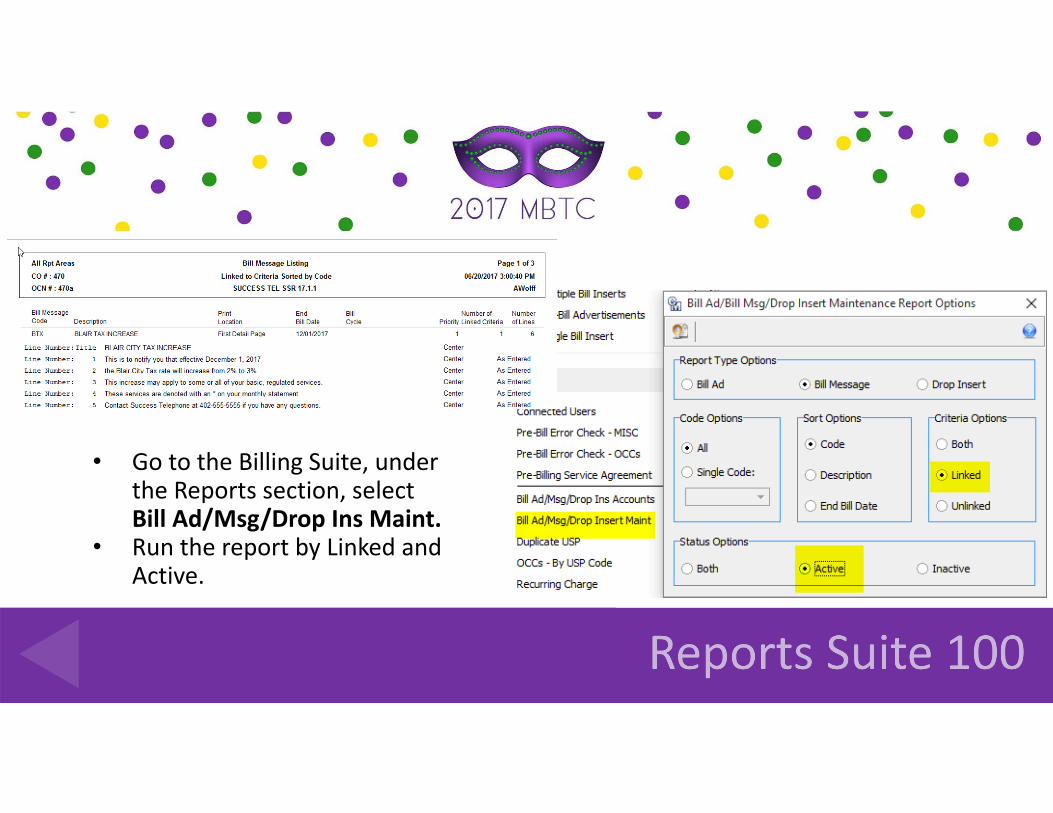
• Go to the Billing Suite, under the Reports section, select Bill Ad/Msg/Drop Ins Maint.
• Run the report by Linked and Active.
Where can I now store my HUBB reporting information?

• Go to the Address Suite under the Processing section choose Address.
• Double click the network address. Click on the tab entitled‐Internet Deployment.
• Enter the Deployment Date and the Max Download and Upload speed.

How do I look up a special circuit in Customer Master with an open trouble ticket?

• Go to the Trouble Suite, under the Processing section, choose Trouble Search.
• Search by Network Type and Network Number.

How do I resend a disconnected phone number to my PSAP provider?

• Go to the E911 suite under the maintenance section choose E911 address.
• Double click the address to open up the E911 address editor.
• Check the Resend Address box and post to save.

How can I create a “pop‐up” message when I inquire on an account?

• Inquire on an account. • Click on the Client
Relationship Management icon.
• Check the Inquiry Note box.
• Type your note in the result verbiage box.
How do you create a bill message for one account?
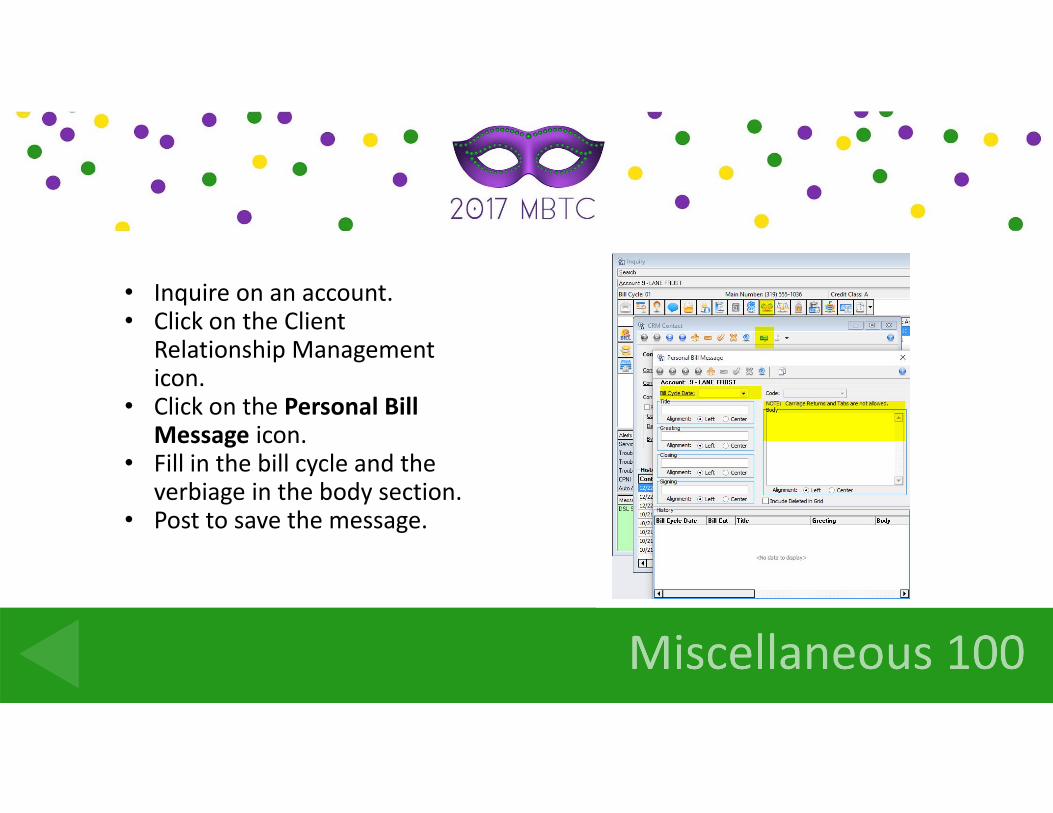
• Inquire on an account. • Click on the Client
Relationship Management icon.
• Click on the Personal Bill Message icon.
• Fill in the bill cycle and the verbiage in the body section.
• Post to save the message.