Embed Size (px)
Citation preview

MYPC SETUP AND INSTALLATION GUIDE
B ios
TODAY’S BUSINESS SOLUTIONS, INC. 2016
Setup and Installation GuideVersion 6.1

MYPC SETUP AND INSTALLATION GUIDE NVD01022016
2
ContentsContents....................................................................................................................................................................................................................................................................................................................................... 2Help and Support .................................................................................................................................... 3
UK and Europe ............................................................................................................................... 3North America................................................................................................................................. 3
MyPC Forum ....................................................................................................................................... 3Installation Information ............................................................................................................................ 4
Prerequisites ....................................................................................................................................... 4MyPC 6.1 Server Components.............................................................................................................................................................................................................................. 5How MyPC Components Fit Together ................................................................................................ 5MyPC Network Diagrams ................................................................................................................... 6
TripleA Installation................................................................................................................................... 8Configuring TripleA for Active Directory ........................................................................................... 11Configuring TripleA to Authenticate against a Text File ................................................................... 17Performing Service Tests ................................................................................................................. 30
Group Import Test ........................................................................................................................ 32Authenticate Test.......................................................................................................................... 33Authenticate and Import Test ....................................................................................................... 35
Viewing Current Providers ................................................................................................................ 36Cire Server Installation .......................................................................................................................... 38
A Cire Database Already Exists (Not applicable for a Fresh Install) ................................................ 45Configuring Cire Mail Components ....................................................................................................... 47Cire Integrated Mode ............................................................................................................................ 53
Create New App Pools ..................................................................................................................... 53Checking the Application Pool is set to Network Service ..................................................................... 55MyPC Server Installation....................................................................................................................... 58
A MyPC Database Already Exists (Not applicable for a New Install) ............................................... 66MyPC Web Components Installation .................................................................................................... 67
Forum Feed Proxy Settings .............................................................................................................. 69MyPC Integrated Mode ......................................................................................................................... 70
Create New App Pools ..................................................................................................................... 70Checking the Application Pool is set to Network Service ..................................................................... 72Convert MyPC to an Application.................................................................................................................................................................... 74Allow ISAPI and CGI Restrictions for ASP.NET 4 ................................................................................ 76Switching to Integrated mode using the new AppPool ......................................................................... 78
IIS Reset in Windows 2012 R2 Server ............................................................................................. 80Testing................................................................................................................................................... 81
Other Settings ................................................................................................................................... 81Client Installation (Manual).................................................................................................................... 82
Manual Installation of .NET Framework 4.5 ..................................................................................... 82Manual Installation of the MyPC Client ........................................................................................ 82Installation Types.......................................................................................................................... 86Allow Local Logon On This Computer.......................................................................................... 87
Client Uninstallation (Manual) ............................................................................................................... 90Client Installation (Silent) ...................................................................................................................... 91
Installation of .NET Framework 4.5 .................................................................................................. 91Silent Installation of the MyPC 6.x Client.......................................................................................... 91
Creating an Admin MSI Package ................................................................................................. 91Installing an Admin Package on a Client Computer ..................................................................... 91
Silent Uninstall ...................................................................................................................................... 93Client Installation via Group Policy ....................................................................................................... 94
Disable the “Allow the computer to turn off this device to save power” ............................................ 99TripleA Uninstallation .......................................................................................................................... 100Cire Uninstallation ............................................................................................................................... 102MyPC Server Uninstallation ................................................................................................................ 104MyPC Web Uninstallation ................................................................................................................... 106
© TODAY’S BUSINESS SOLUTIONS, INC. 2016
MYPC SETUP AND INSTALLATION GUIDE NVD01022016
3
Help and SupportWe hope that your use of MyPC is trouble free. If you have any issues or questions, help is at hand from TBS Technical Support. You can contact TBS Technical Support by any of the following methods.
E-mail: [email protected]: www.singlecard.com/support.htmTelephone: 630-537-1374
Technical Support is available Monday to Friday 08:00 AM -6:00 PM CST
© TODAY’S BUSINESS SOLUTIONS, INC. 2016

MYPC SETUP AND INSTALLATION GUIDE NVD01022016
4
Installation InformationPrerequisitesThe MyPC Server requires the following:
Microsoft Windows 2008 / 2012 Server with all the latest Service Packs and updates (32-bit &64-bit)
Microsoft .NET Framework 2.0 and 4.0 Microsoft Internet Information Services (IIS) with ASP.NET installed and enabled. You may
need to add this as a feature in the Web Server Role. Microsoft SQL Server 2005 / 2008 / 2012 / 2014 (including the free Express Editions*) with
the latest Service Pack, installed in Mixed Authentication Mode
Please note Windows 2000 Server, Microsoft SQL 2000 and MSDE are not supported and cannot be used as either a server platform or data store for both MyPC and TBS Cire Components module.
The MyPC Client requires the following:
Please note that in Public Library environments there is a known limitation with 4/8/12 character NetBIOS names with the MyPC custom credential provider. Once the MyPC Client is installed the custom credential provider does not function as expected causing issues with users at time of logon. For further information on this please contact [email protected].
Active Directory Environments (Classic Client) (32-bit & 64-bit) Windows 7 (excluding Home Editions), Windows 8/8.1 (Desktop Mode Only) or Windows 10
(excluding Home Editions) with all the latest Service Packs and updates. Microsoft .NET Framework 4.5 Mac OS 10.6, 10.7, 10.8, 10.9, 10.10
Novell eDirectory Environments (Classic Client) (32-bit & 64-bit) Windows 7 (excluding Home Editions), Windows 8/8.1 (Desktop Mode Only) or Windows 10
(excluding Home Editions) with all the latest Service Packs and updates. Microsoft .NET Framework 4.5
Windows Terminal Server / Citrix Environments (32-bit only)(Active Directory and Novell eDirectory only)
Windows 2003 or 2008 Server with all the latest Service Packs and updates. (Not supported inPublic Library environments)
Microsoft .NET Framework 4.5
RM Environments (Classic Client) (32-bit & 64-bit) Windows 7 (excluding Home Editions), Windows 8/8.1 (Desktop Mode Only) or Windows 10
(excluding Home Editions) with all the latest Service Packs and updates. Microsoft .NET Framework 4.5
Public Library Environments (32-bit & 64-bit)(authentication against a text file / ODBC-compliant database / LDAP / SIP2 compliant system)
Windows 7 (excluding Home Editions), Windows 8/8.1 (Desktop Mode Only) or Windows 10 (excluding Home Editions) with all the latest Service Packs and updates.
Microsoft .NET Framework 4.5 Mac OS 10.6, 10.7, 10.8, 10.9, 10.10
Virtualized Desktop Environments (VDI) (32- and 64bit)(Active Directory and Novell eDirectory only)
© TODAY’S BUSINESS SOLUTIONS, INC. 2016

MYPC SETUP AND INSTALLATION GUIDE NVD01022016
5
VMWare VDI via RDP connecting to virtualized Windows 7 (excluding Home Editions), Windows 8/8.1 (Desktop Mode Only) or Windows 10 (excluding Home Editions) with all the latest Service Packs and updates. (Not supported in Public Library environments).
Microsoft .NET Framework 4.5
Virtualized Desktop Environments (VDI) via PCoIP (32-bit and Windows 7 64bit ActiveDirectory supported only)
VMware VDI via PCoIP connecting to virtualized Windows 7 (excluding Home Editions), Windows 8/8.1 (Desktop Mode Only) or Windows 10 (excluding Home Editions) with all the latest Service Packs and updates. (Not supported in Public Library environments).
Microsoft .NET Framework 4.5
MyPC 6.1 Server ComponentsMyPC 6.1 Server consists of four separate server components.
TripleA Authentication Module Cire MyPC Server Service MyPC Web Components
This document will take you through step-by-step installation of each of the components.
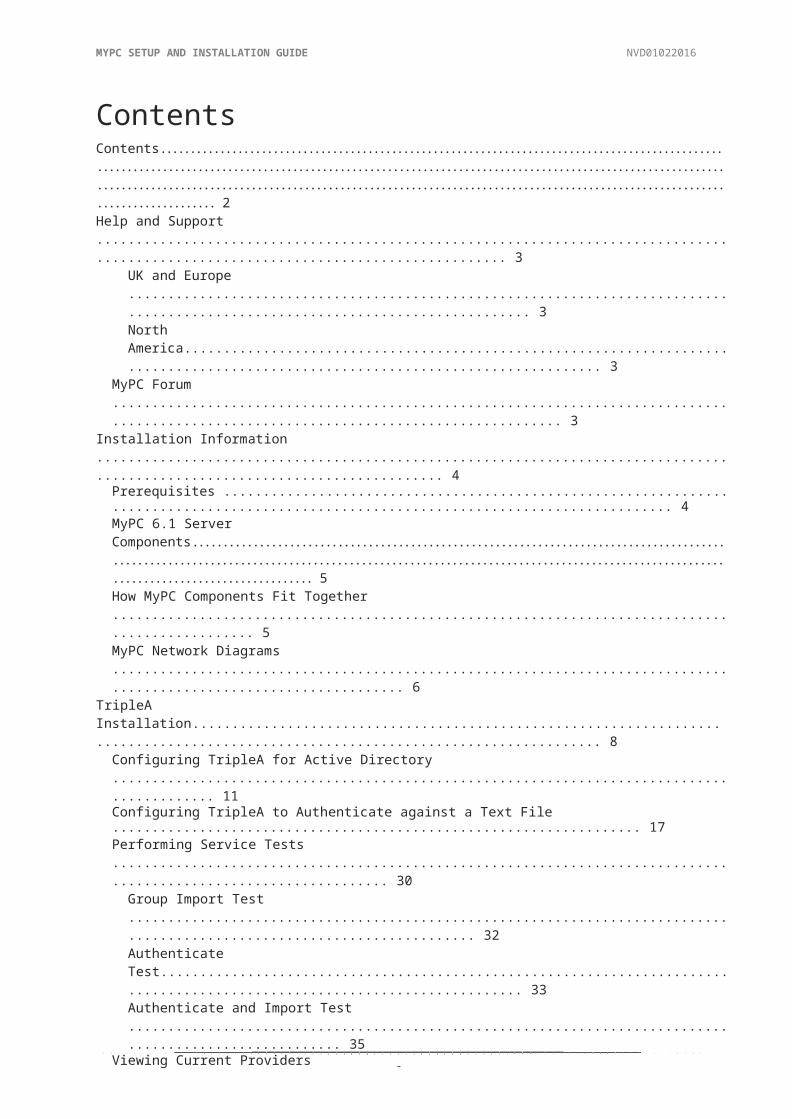
How MyPC Components Fit TogetherBelow is a diagram representing how the components that make up MyPC fit together.
MyPC is composed of discreet components, each of which has a specific purpose.
© TODAY’S BUSINESS SOLUTIONS, INC. 2016

MYPC SETUP AND INSTALLATION GUIDE NVD01022016
6
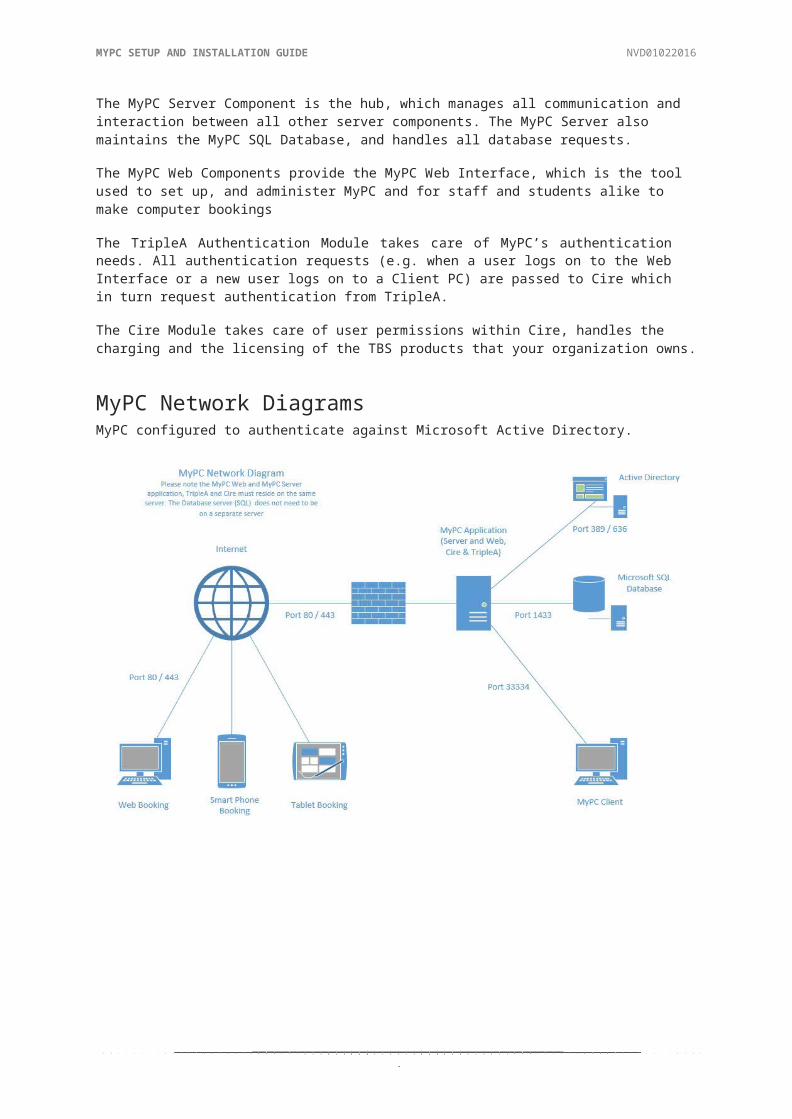
The MyPC Server Component is the hub, which manages all communication and interaction between all other server components. The MyPC Server also maintains the MyPC SQL Database, and handles all database requests.
The MyPC Web Components provide the MyPC Web Interface, which is the tool used to set up, and administer MyPC and for staff and students alike to make computer bookings
The TripleA Authentication Module takes care of MyPC’s authentication needs. All authentication requests (e.g. when a user logs on to the Web Interface or a new user logs on to a Client PC) are passed to Cire which in turn request authentication from TripleA.
The Cire Module takes care of user permissions within Cire, handles the charging and the licensing of the TBS products that your organization owns.
MyPC Network DiagramsMyPC configured to authenticate against Microsoft Active Directory.
© TODAY’S BUSINESS SOLUTIONS, INC. 2016

MYPC SETUP AND INSTALLATION GUIDE NVD01022016
7
MyPC configured to authenticate against a Public Library Management System.
© TODAY’S BUSINESS SOLUTIONS, INC. 2016

MYPC SETUP AND INSTALLATION GUIDE NVD01022016
8
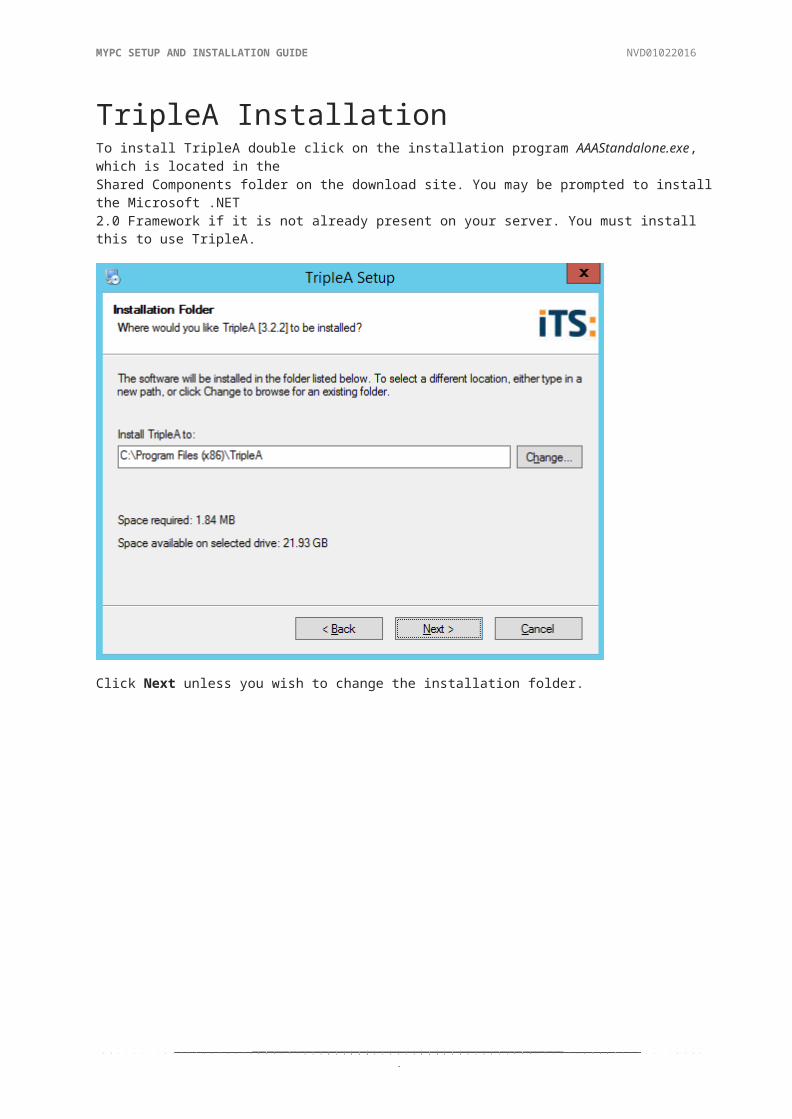
TripleA InstallationTo install TripleA double click on the installation program AAAStandalone.exe, which is located in theShared Components folder on the download site. You may be prompted to install the Microsoft .NET2.0 Framework if it is not already present on your server. You must install this to use TripleA.
Click Next unless you wish to change the installation folder.
© TODAY’S BUSINESS SOLUTIONS, INC. 2016
MYPC SETUP AND INSTALLATION GUIDE NVD01022016
9
Click Next to start the installation.
Upon completion, the above screen will be shown. Click Finish.
© TODAY’S BUSINESS SOLUTIONS, INC. 2016

MYPC SETUP AND INSTALLATION GUIDE NVD01022016
1
After installation the TripleA Service will be installed, by default the service will listen on port 7889 on the installed computer. This is only used for internal communications within the server so firewalls should not be an issue. If you wish to change this port you should edit the AAA.exe.config file and change this line:
<add key="listenPort" value="7889"/> value
Once TripleA is installed, it is necessary to configure it to authenticate against either Novell or Active Directory, depending on the directory you have in use at your organization. Please observe the following steps when configuring TripleA for either Active Directory or Novell eDirectory.
If you intend to configure TripleA to authenticate against LDAP, SIP2 or an ODBC-compliant database please contact TBS S uppo r t .
© TODAY’S BUSINESS SOLUTIONS, INC. 2016
MYPC SETUP AND INSTALLATION GUIDE NVD01022016
1
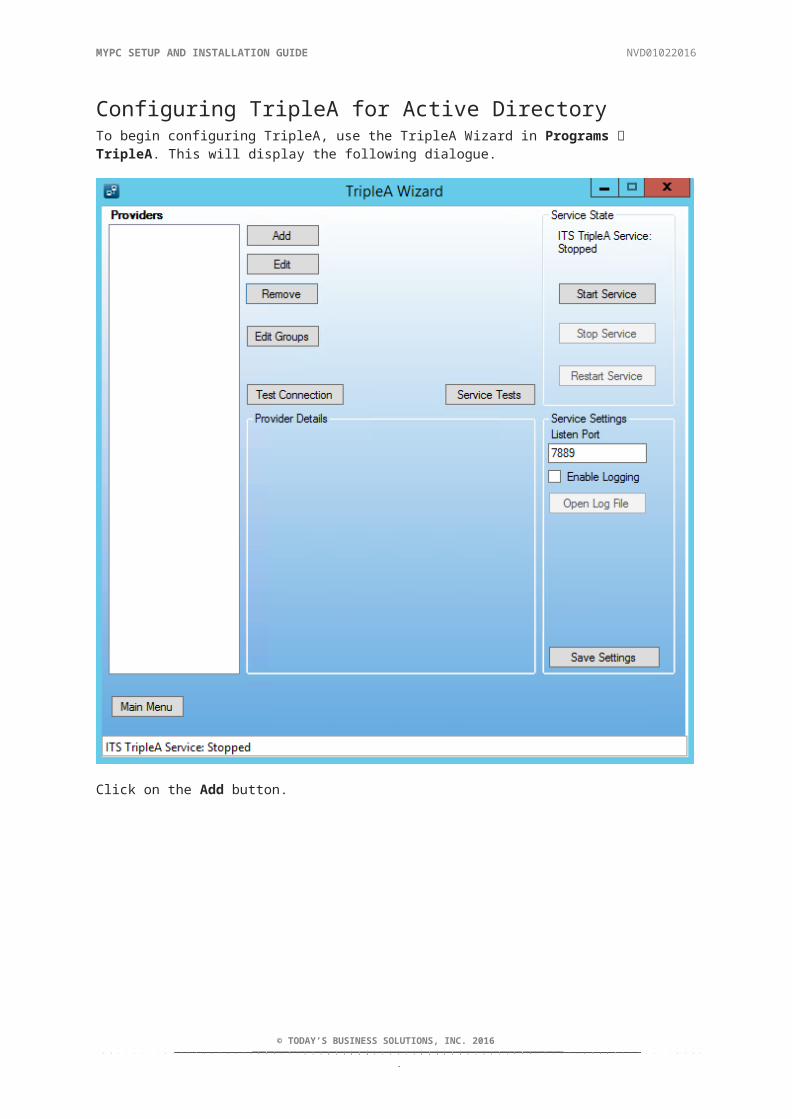
Configuring TripleA for Active DirectoryTo begin configuring TripleA, use the TripleA Wizard in Programs TripleA. This will display the following dialogue.
Click on the Add button.
© TODAY’S BUSINESS SOLUTIONS, INC. 2016

MYPC SETUP AND INSTALLATION GUIDE NVD01022016
1
Select Active Directory from default configurations.
© TODAY’S BUSINESS SOLUTIONS, INC. 2016

MYPC SETUP AND INSTALLATION GUIDE NVD01022016
1
Fill in the remaining details.
Provider Name This is a friendly title and can be anything you want.
Server The IP address or NetBIOS name of the server (click Add to add it to the list of servers).
You can add multiple servers per provider, they will all have the same connection details (apart from IP address or NetBIOS name) this is for use when you have alternative directory servers that you want to use if the primary server is not available.
Click Next to continue.
© TODAY’S BUSINESS SOLUTIONS, INC. 2016
MYPC SETUP AND INSTALLATION GUIDE NVD01022016
1
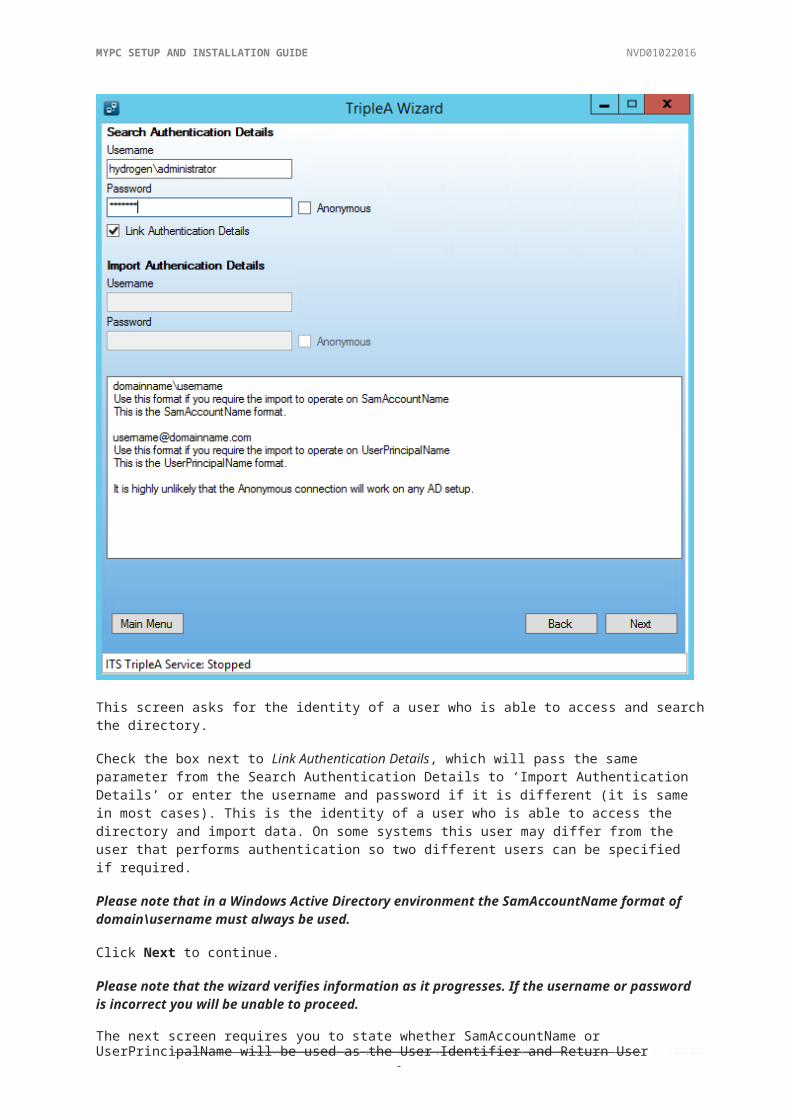
This screen asks for the identity of a user who is able to access and search the directory.
Check the box next to Link Authentication Details, which will pass the same parameter from the Search Authentication Details to ‘Import Authentication Details’ or enter the username and password if it is different (it is same in most cases). This is the identity of a user who is able to access the directory and import data. On some systems this user may differ from the user that performs authentication so two different users can be specified if required.
Please note that in a Windows Active Directory environment the SamAccountName format of domain\username must always be used.
Click Next to continue.
Please note that the wizard verifies information as it progresses. If the username or password is incorrect you will be unable to proceed.
The next screen requires you to state whether SamAccountName or UserPrincipalName will be used as the User Identifier and Return User Identifier values.
© TODAY’S BUSINESS SOLUTIONS, INC. 2016

MYPC SETUP AND INSTALLATION GUIDE NVD01022016
1
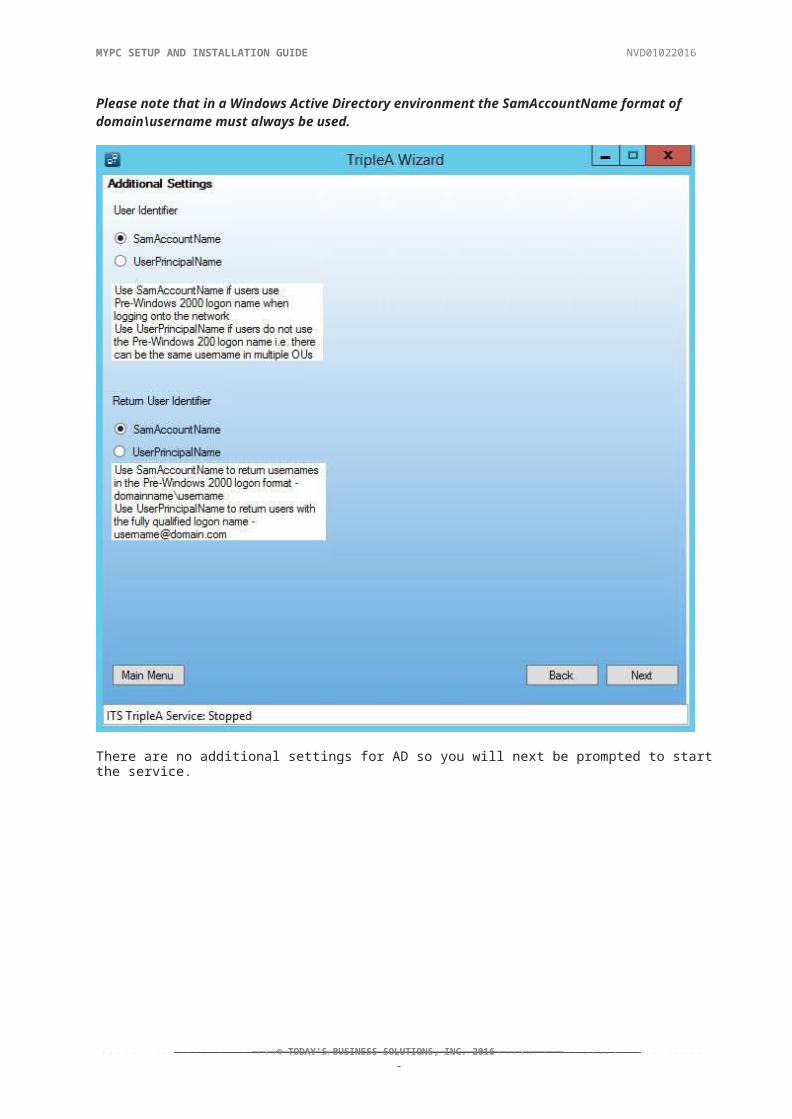
Please note that in a Windows Active Directory environment the SamAccountName format of domain\username must always be used.
There are no additional settings for AD so you will next be prompted to start the service.
© TODAY’S BUSINESS SOLUTIONS, INC. 2016

MYPC SETUP AND INSTALLATION GUIDE NVD01022016
1
Click Start Service or Restart Service to start or restart the TripleA service.
Please note that when any Configuration settings for a provider are changed the service must be restarted. The service is created to auto start but is not initially running.
© TODAY’S BUSINESS SOLUTIONS, INC. 2016
0
0
MYPC SETUP AND INSTALLATION GUIDE NVD01022016
1
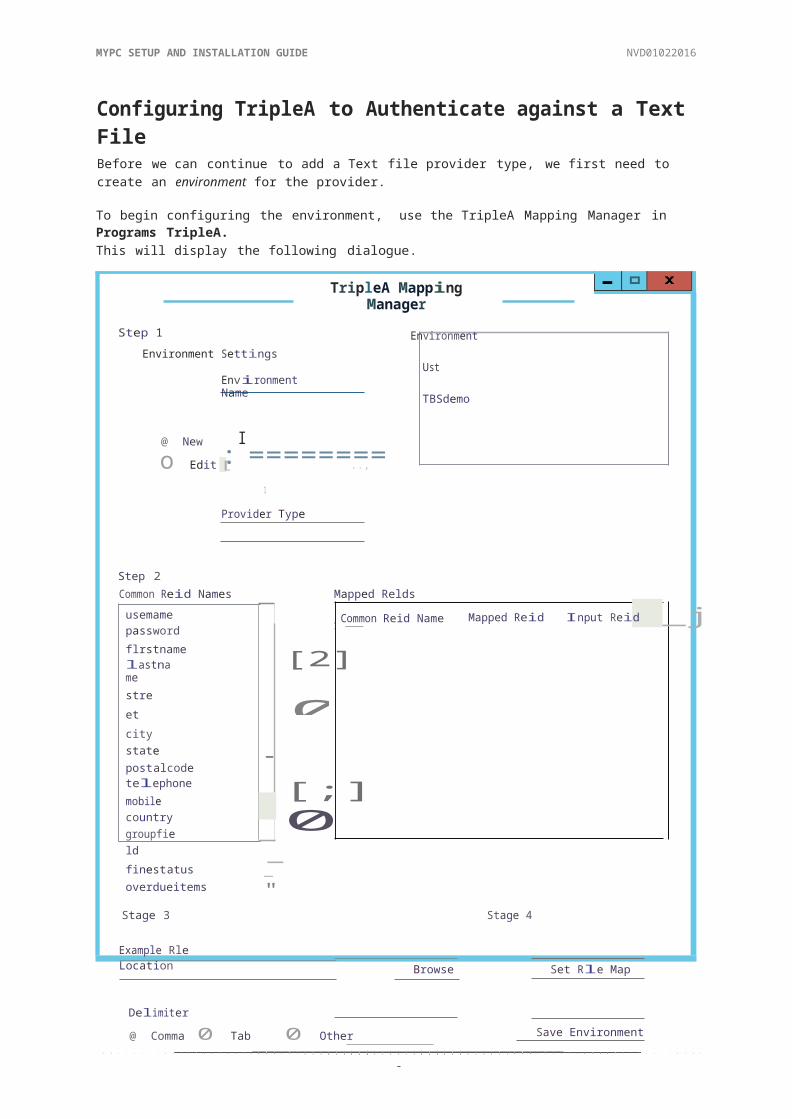
Configuring TripleA to Authenticate against a Text FileBefore we can continue to add a Text file provider type, we first need to create an environment for the provider.
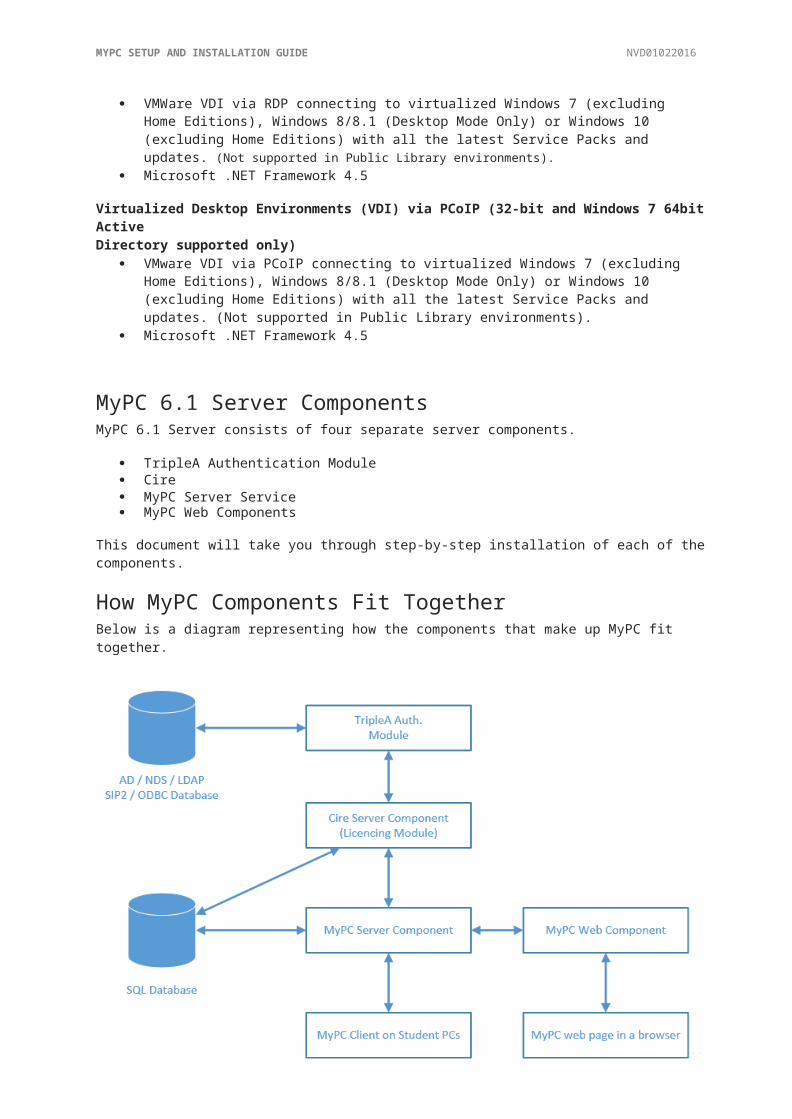
To begin configuring the environment, use the TripleA Mapping Manager in Programs TripleA.This will display the following dialogue.
TripleA Mapping Manager
Step 1
Environment Settings
Environment Name
Environment Ust
TBSdemo
@ New:I========o Edit [ .., 1
Provider Type
Step 2Common Reid Names Mapped Relds
usemame Common Reid Name Mapped Reid Input Reid _jpassword 1-
flrstnamelastname [2]street citystate -postalcodetelephone [;]mobilecountry groupfieldfinestatus -overdueitems
-"
Stage 3 Stage 4
Example Rle Location
Browse Set Rle Map
Delimiter
@ Comma 0 Tab 0 Other Save Environment
© TODAY’S BUSINESS SOLUTIONS, INC. 2016

MYPC SETUP AND INSTALLATION GUIDE NVD01022016
1
Step 1 Enter a new name for the environment in the Environment Name field. This can be any friendly name.
Step 2 Select the Common Field Names that applies in your environment. The text file should contain details such as the Username, Password, Groupname, Finestatus, etc. Please ensure that you select all that apply.
Stage 3: Allows you to browse to the folder on your server where the file is located.
Stage 4: The mapping for the selected file is set at this stage.
Once you have entered an Environment Name of your choice you are in the position to continue mapping the file.Select the names under the Common Field Names. By clicking the arrow button it moves the selectedfields from the Common Field Names section to the Mapped Fields section.
Please note that you can also select multiple field names by holding down the CTRL key and clicking the required fields and then you can us the double arrow button to move the selected field files to the ‘Mapped Fields’ section.
Once this task is completed the screen will look similar to the one shown below.
© TODAY’S BUSINESS SOLUTIONS, INC. 2016
MYPC SETUP AND INSTALLATION GUIDE NVD01022016
1
Click on the Browse button.
© TODAY’S BUSINESS SOLUTIONS, INC. 2016

MYPC SETUP AND INSTALLATION GUIDE NVD01022016
2
Browse to the file and once located and click open. This will apply the location of the text file in the Example File Location’ field. Select the delimiter used in the text file from the options, comma, tab or other.
© TODAY’S BUSINESS SOLUTIONS, INC. 2016

MYPC SETUP AND INSTALLATION GUIDE NVD01022016
2
Click on the Set File Map button to set the mapping for the selected file.
© TODAY’S BUSINESS SOLUTIONS, INC. 2016

MYPC SETUP AND INSTALLATION GUIDE NVD01022016
2
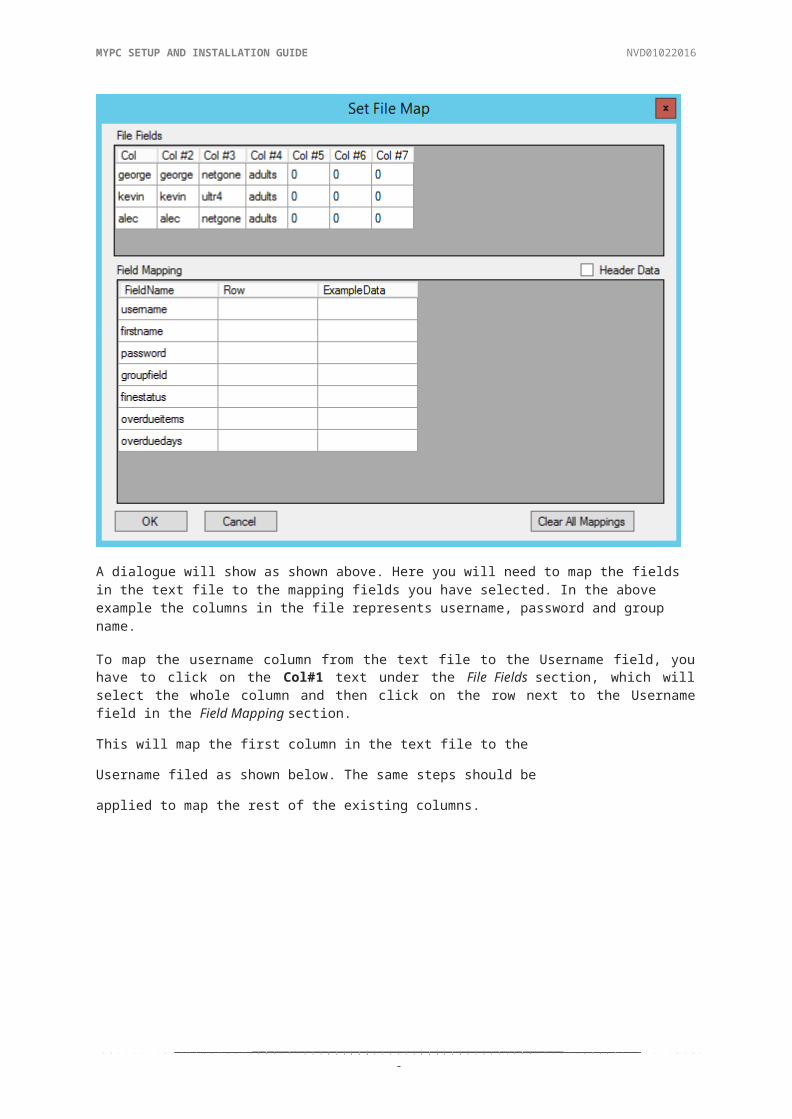
A dialogue will show as shown above. Here you will need to map the fields in the text file to the mapping fields you have selected. In the above example the columns in the file represents username, password and group name.
To map the username column from the text file to the Username field, you have to click on the Col#1 text under the File Fields section, which will select the whole column and then click on the row next to the Username field in the Field Mapping section.
This will map the first column in the text file to the Username filed as shown below.
The same steps should be applied to map the rest of the existing columns.
© TODAY’S BUSINESS SOLUTIONS, INC. 2016
MYPC SETUP AND INSTALLATION GUIDE NVD01022016
2
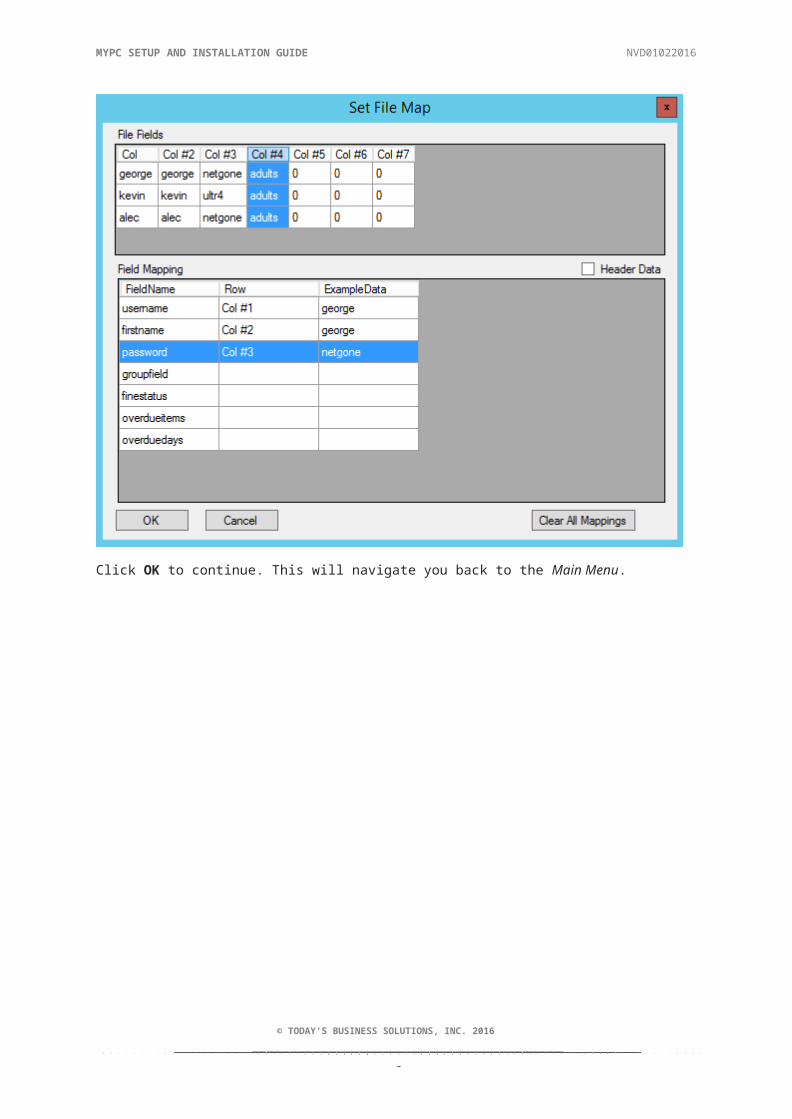
Click OK to continue. This will navigate you back to the Main Menu.
© TODAY’S BUSINESS SOLUTIONS, INC. 2016

MYPC SETUP AND INSTALLATION GUIDE NVD01022016
2
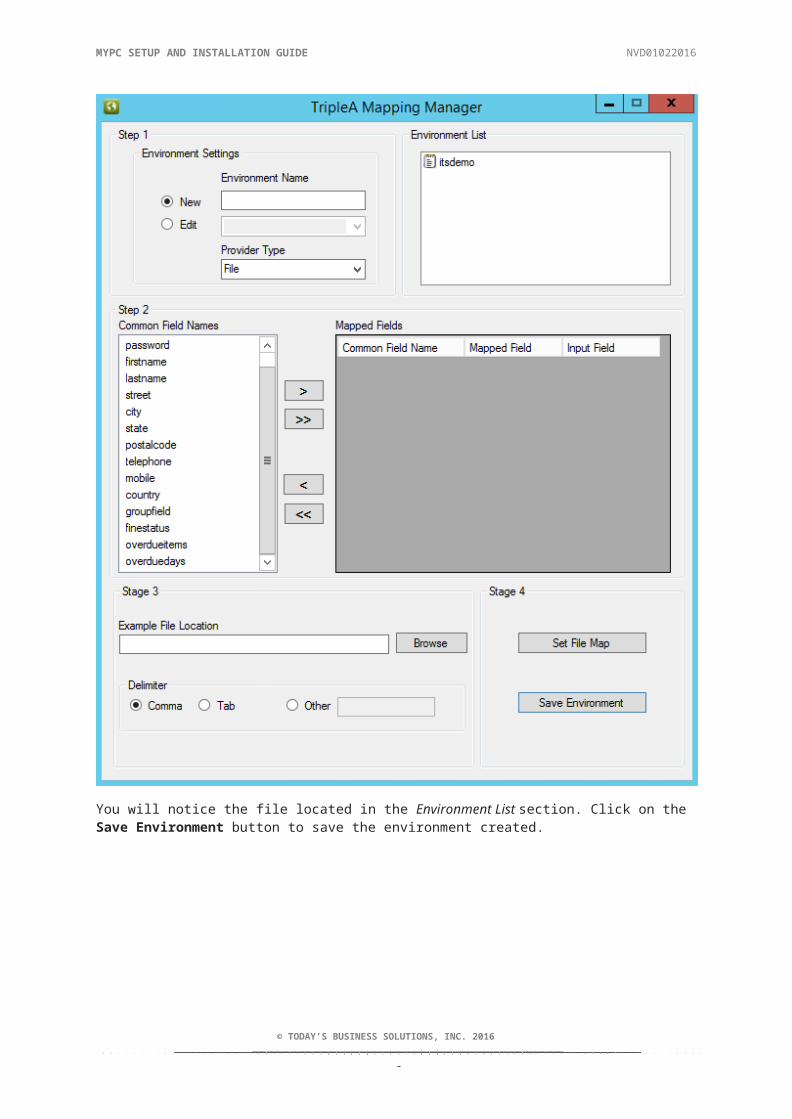
You will notice the file located in the Environment List section. Click on the Save Environment button to save the environment created.
© TODAY’S BUSINESS SOLUTIONS, INC. 2016
MYPC SETUP AND INSTALLATION GUIDE NVD01022016
2
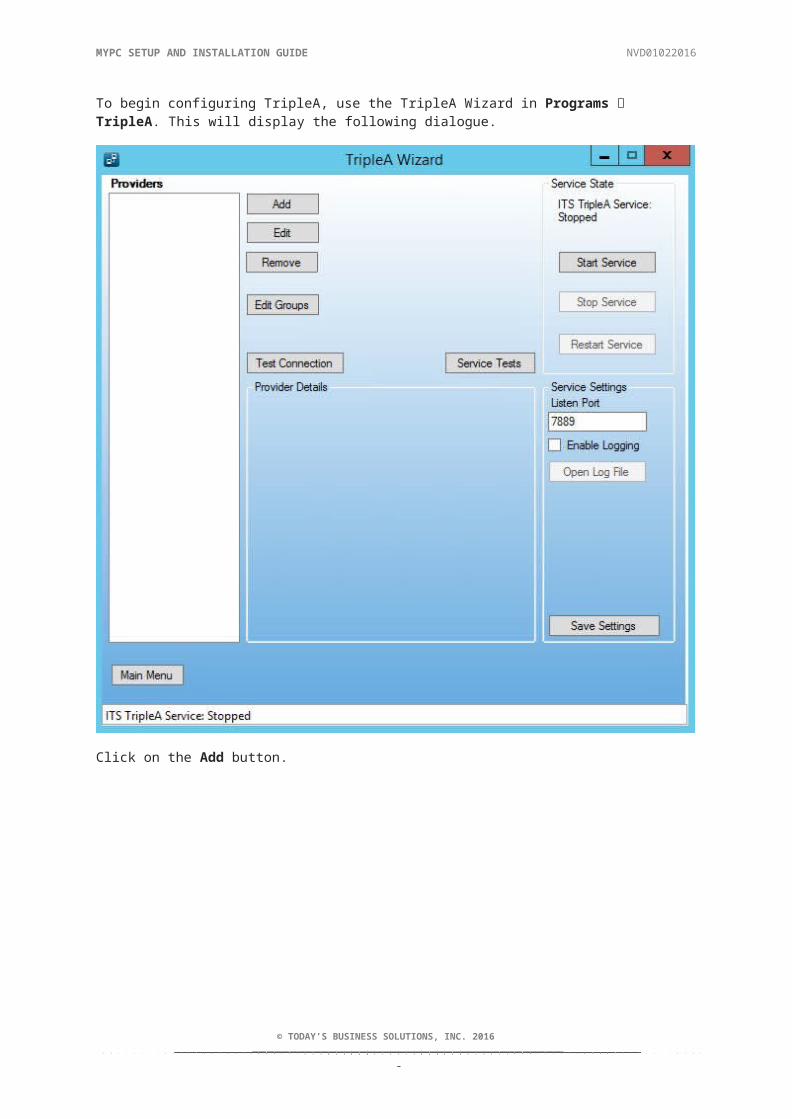
To begin configuring TripleA, use the TripleA Wizard in Programs TripleA. This will display the following dialogue.
Click on the Add button.
© TODAY’S BUSINESS SOLUTIONS, INC. 2016

MYPC SETUP AND INSTALLATION GUIDE NVD01022016
2
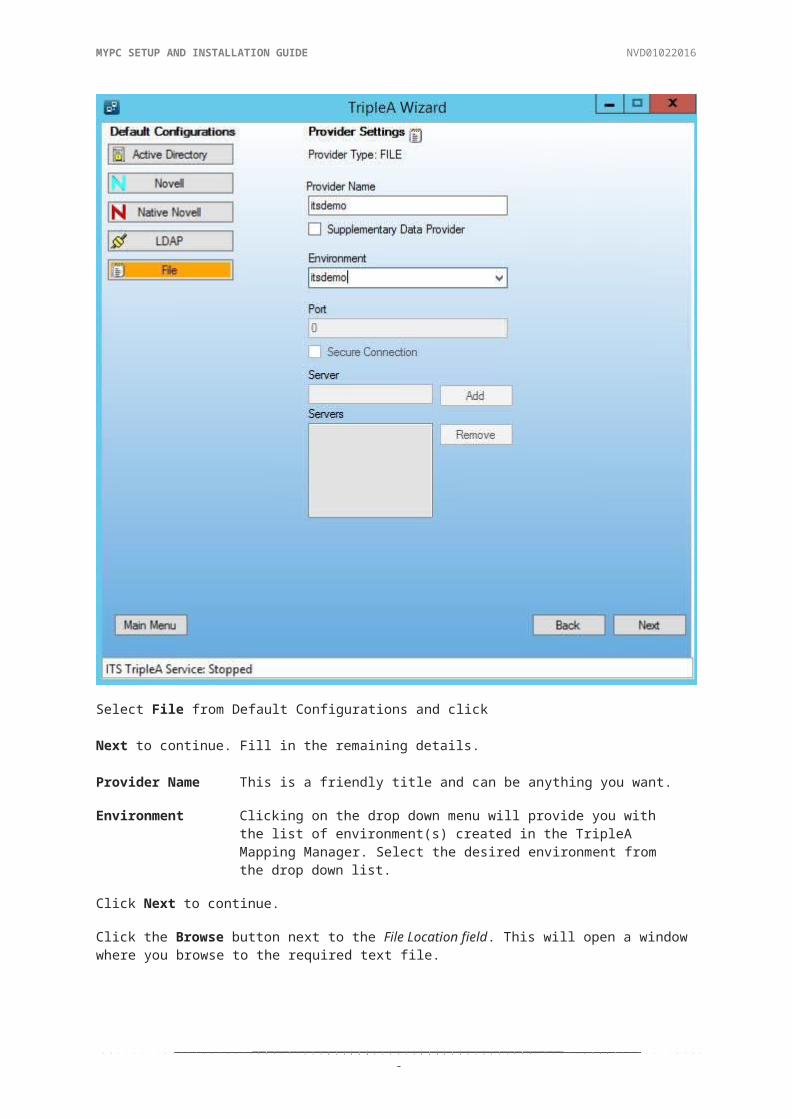
Select File from Default Configurations and click Next to continue.
Fill in the remaining details.
Provider Name This is a friendly title and can be anything you want.
Environment Clicking on the drop down menu will provide you with the list of environment(s) created in the TripleA Mapping Manager. Select the desired environment from the drop down list.
Click Next to continue.
Click the Browse button next to the File Location field. This will open a window where you browse to the required text file.
© TODAY’S BUSINESS SOLUTIONS, INC. 2016
MYPC SETUP AND INSTALLATION GUIDE NVD01022016
2
Click Open after selecting the text file.
© TODAY’S BUSINESS SOLUTIONS, INC. 2016

MYPC SETUP AND INSTALLATION GUIDE NVD01022016
2
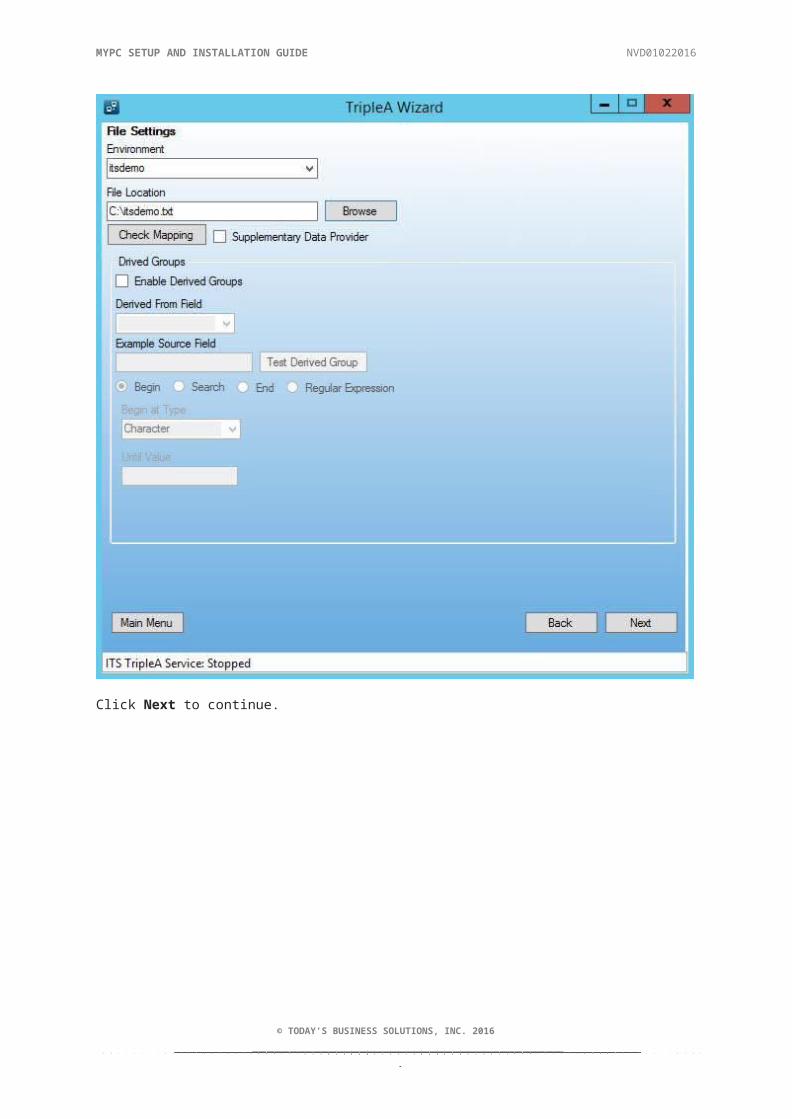
Click Next to continue.
© TODAY’S BUSINESS SOLUTIONS, INC. 2016
MYPC SETUP AND INSTALLATION GUIDE NVD01022016
2
Click Start Service or Restart Service to start or restart the TripleA service.
Please note that when any Configuration settings for a provider are changed the service must be restarted. The service is created to auto start but is not initially running.
© TODAY’S BUSINESS SOLUTIONS, INC. 2016

MYPC SETUP AND INSTALLATION GUIDE NVD01022016
3
Performing Service Tests
Click on the listed provider (shown above as Universe) and then the Service Tests button.
© TODAY’S BUSINESS SOLUTIONS, INC. 2016

MYPC SETUP AND INSTALLATION GUIDE NVD01022016
3
Import User TestSelect Import User to perform this test and enter a username you would like to search for, as shown below.
Click on Run Service Test to start the test. If successful you should see returned XML from theTripleA service in a similar format as shown above. The XML will clearly state if the import failed.
© TODAY’S BUSINESS SOLUTIONS, INC. 2016

I Open II Save I
MYPC SETUP AND INSTALLATION GUIDE NVD01022016
3
Group Import TestThe Group Import Test confirms that users groups are successfully found. The screenshot below shows the result of a successful Group Import Test.
II Service Test
0 Import User
® Import Groups
0 Authenticate
0 Authenticate and Import
I Run Service Test
I Main Menu IITBS TripleA Service:
Running
TripleA Wizard
<?xrnl version="1.0"?><response:xmlns:xsi="http:1lv.rv.'W .w3.org/2001/XMLSchema-instance" xrnlns:xsd=''http:1/V\'WW.w3.org/2001/XMLSchema":xmlns="um:responseschema"><importresponse><groups><group>
<name>Administrators<lname><context>Hydrogen<lcontext>
</group><group>
<name>Domain Admins<lname><context>Hydrogen</context>
</group><group><name>Domain Guests<lname><context>Hydrogen<lcontext>
</group><group>
<name>Domain Users<lname><context>Hydrogen<lcontext>
</group><group>
<name>Enterprise Admins<lname><context>Hydrogen<lcontext>
</group></groups>
<limportresponse></response>
© TODAY’S BUSINESS SOLUTIONS, INC. 2016

MYPC SETUP AND INSTALLATION GUIDE NVD01022016
3
Authenticate TestThis is an example of a successful Authenticate Test.
TripleA Wizard
Password
0 Import User
0 Import Groups
® Authenticate
0 Authenticate and Import
Run Service Test
Open
Save
Main Menu
<?xrnl version="1.0"?><response:xmlns:xsi="http:1lv.rv.'W .w3.orgi2001/XMLSchema-instance" xrnlns:xsd=''http://wv.'W.w3.org/2001/XMLSchema":xmlns="um:responseschema">
<authenticateresponse><userisauthenticated>true<luserisauthenticated>
</authenticateresponse></response>
TBS TripleA Service: Running
© TODAY’S BUSINESS SOLUTIONS, INC. 2016
MYPC SETUP AND INSTALLATION GUIDE NVD01022016
3
Below is what happens when the wrong password is entered.
TripleA Wizard
Usemame
Idavid
Password
0 Import User
0 Import Groups
® Authenticate
0 Authenticate and Import
Run Service Test
Open
Save
Main Menu
<?xml version="1.0"?><response:xmlns:xsi="http:1/W¥.rw.w3.org/2001/XMLSchemanstance"xmlns:xsd=''http://V1rwrw.w3.org/2001/XMLSchema":xmlns="um:responseschema">
<authenticateresponse><userisauthenticated>false</userisauthenticated>
</authenticateresponse></respons>
TBS TripleA Service: Running
© TODAY’S BUSINESS SOLUTIONS, INC. 2016

MYPC SETUP AND INSTALLATION GUIDE NVD01022016
3
Authenticate and Import TestThis test will run the authenticate and import user test for the mentioned user at the same time.
TripleA Wizard
Password
0 Import User
0 Import Groups
® Authenticate
0 Authenticate and Import
Run Service Test
Open
Save
TBS TripleA Service: Running
<?.xrnl version="1.0"?><response:xmlns:xsi="http:1lv.rww.w3.org/2001/XMLSchema1nstance" xrnlns:xsd=''http:1/www.w3.org/2001/XMLSchema":xmlns="um:responseschema">
<authenticateresponse><userisauthenticated>false<luserisauthenticated>
</authenticateresponse></respons>
© TODAY’S BUSINESS SOLUTIONS, INC. 2016
MYPC SETUP AND INSTALLATION GUIDE NVD01022016
3
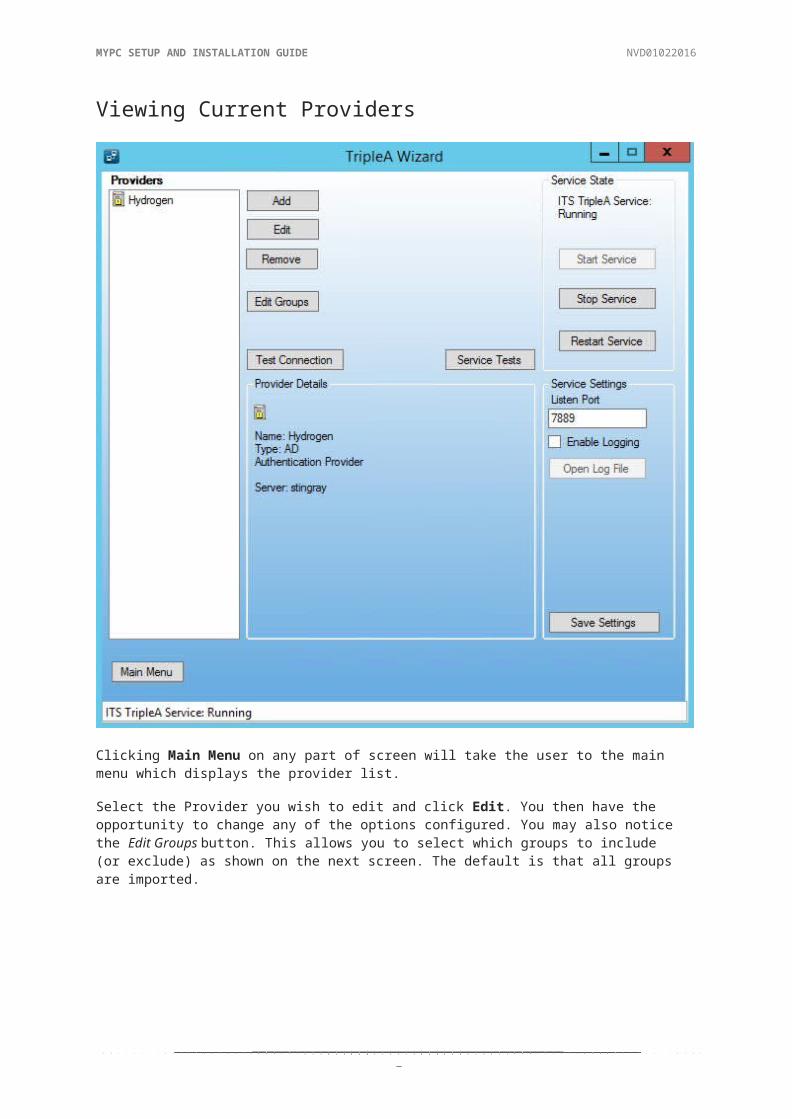
Viewing Current Providers
Clicking Main Menu on any part of screen will take the user to the main menu which displays the provider list.
Select the Provider you wish to edit and click Edit. You then have the opportunity to change any of the options configured. You may also notice the Edit Groups button. This allows you to select which groups to include (or exclude) as shown on the next screen. The default is that all groups are imported.
© TODAY’S BUSINESS SOLUTIONS, INC. 2016
MYPC SETUP AND INSTALLATION GUIDE NVD01022016
3
You can EITHER exclude or include groups you cannot use a combination of both.
Alternatively, clicking Use ONLY Default Group will totally ignore all groups defined in the directory and put all users into a group called _general.
Please note that in an Active Directory environment you may wish to eliminate the display of numerous user groups by configuring TripleA to only include Domain Users.
If you have made any changes to the configuration you must ensure that you restart the service before performing tests again.
© TODAY’S BUSINESS SOLUTIONS, INC. 2016
MYPC SETUP AND INSTALLATION GUIDE NVD01022016
3
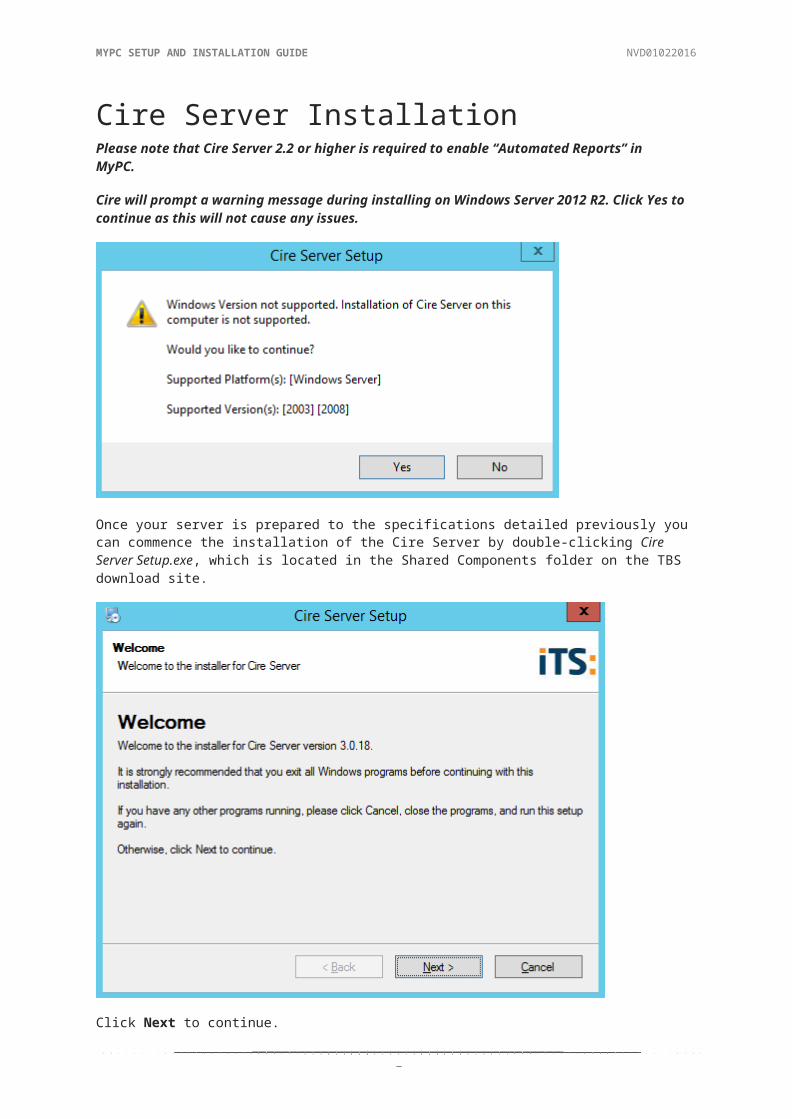
Cire Server InstallationPlease note that Cire Server 2.2 or higher is required to enable “Automated Reports” inMyPC.
Cire will prompt a warning message during installing on Windows Server 2012 R2. Click Yes to continue as this will not cause any issues.
Once your server is prepared to the specifications detailed previously you can commence the installation of the Cire Server by double-clicking Cire Server Setup.exe, which is located in the Shared Components folder on the TBS download site.
Click Next to continue.
© TODAY’S BUSINESS SOLUTIONS, INC. 2016
MYPC SETUP AND INSTALLATION GUIDE NVD01022016
3
The subsequent screen shows the End User License Agreement, which must be accepted if the installation is to continue.
Click Next to continue. A dialog will then be shown asking you to select the drive and path where Cire will be installed. It also shows the amount of disk space required and the amount of space available.
Use the change button to change the Drive and Path if required.
© TODAY’S BUSINESS SOLUTIONS, INC. 2016

MYPC SETUP AND INSTALLATION GUIDE NVD01022016
4
Click Next to continue.
Select the option Install all Cire Components. Click Next to continue.
Please note that you should NOT select the option Install only “Cire Mail Components” as
© TODAY’S BUSINESS SOLUTIONS, INC. 2016

MYPC SETUP AND INSTALLATION GUIDE NVD01022016
4
this will install the Cire Mail Service only. MyPC requires ALL Cire components to be installed.
This screen requests three pieces of information.
Database Server The name of the server that is running Microsoft SQL Server that Cire will use to host its database. Often this will be the name of the server on which you are installing the Cire Server software.
Database Username The user name that Cire should use to connect to SQL Server to install the Cire Database. This username is normally ‘sa’, so this is pre-filled as the default value.
Database Password The Password for the Database administrator name specified above.
Please note that if you have installed the preconfigured version of Microsoft SQL Server2005 Express Edition included in the Shared Components folder on the download site thenyour ‘sa’ password will be “manager”.
On clicking Next the Cire installer will check the credentials specified and test whether it can successfully connect to your SQL server.
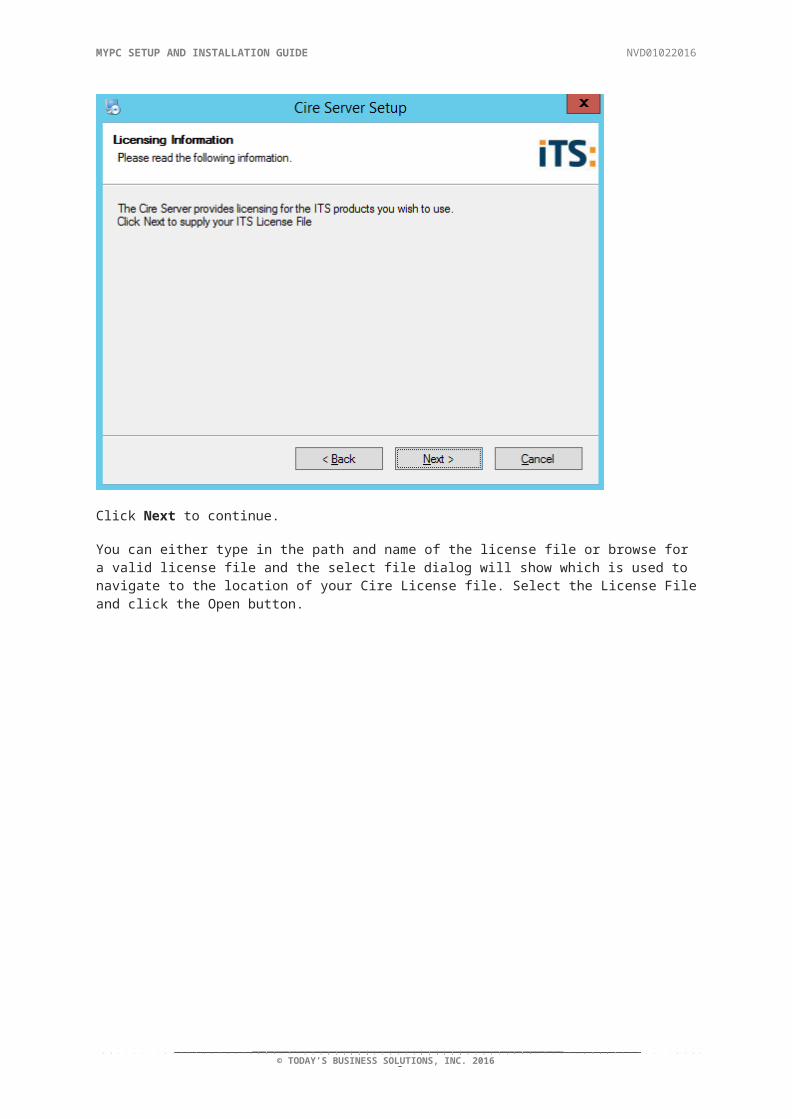
Next you will be asked to supply your Cire Product License File.
© TODAY’S BUSINESS SOLUTIONS, INC. 2016
MYPC SETUP AND INSTALLATION GUIDE NVD01022016
4
Click Next to continue.
You can either type in the path and name of the license file or browse for a valid license file and the select file dialog will show which is used to navigate to the location of your Cire License file. Select the License File and click the Open button.
© TODAY’S BUSINESS SOLUTIONS, INC. 2016

MYPC SETUP AND INSTALLATION GUIDE NVD01022016
4
A confirmation dialog will then show displaying all the options selected.
Click on Next when you are happy to proceed.
© TODAY’S BUSINESS SOLUTIONS, INC. 2016

MYPC SETUP AND INSTALLATION GUIDE NVD01022016
4
If anything is incorrect, please use the Back button to return to the appropriate dialog and make any necessary changes.
If you are happy to proceed click Next to begin the installation.
The Cire database will be created. During this period it is normal to see a Command Prompt runningOSQL.exe for a significant amount of time while the Cire database is being created.
Do not close the command prompt window!
You will be notified that Cire is being configured.
In order for IIS to function correctly click Yes. If you click No, IIS will have to be restarted manually or the server rebooted.
When the installation has finished a confirmation screen will be displayed.
© TODAY’S BUSINESS SOLUTIONS, INC. 2016

MYPC SETUP AND INSTALLATION GUIDE NVD01022016
4
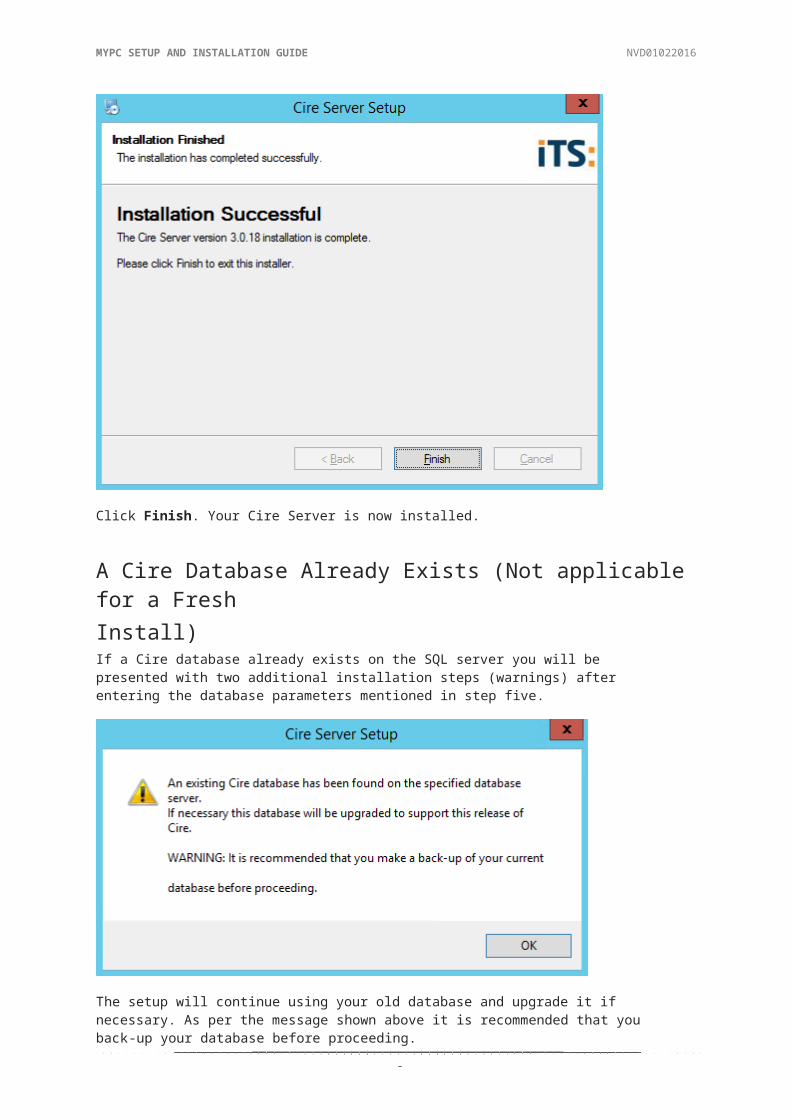
Click Finish. Your Cire Server is now installed.
A Cire Database Already Exists (Not applicable for a FreshInstall)If a Cire database already exists on the SQL server you will be presented with two additional installation steps (warnings) after entering the database parameters mentioned in step five.
The setup will continue using your old database and upgrade it if necessary. As per the message shown above it is recommended that you back-up your database before proceeding.
If you do not wish to use your old Cire database please contact TBS Support or your reseller to discuss the implications of dropping your Cire database.
© TODAY’S BUSINESS SOLUTIONS, INC. 2016

MYPC SETUP AND INSTALLATION GUIDE NVD01022016
4
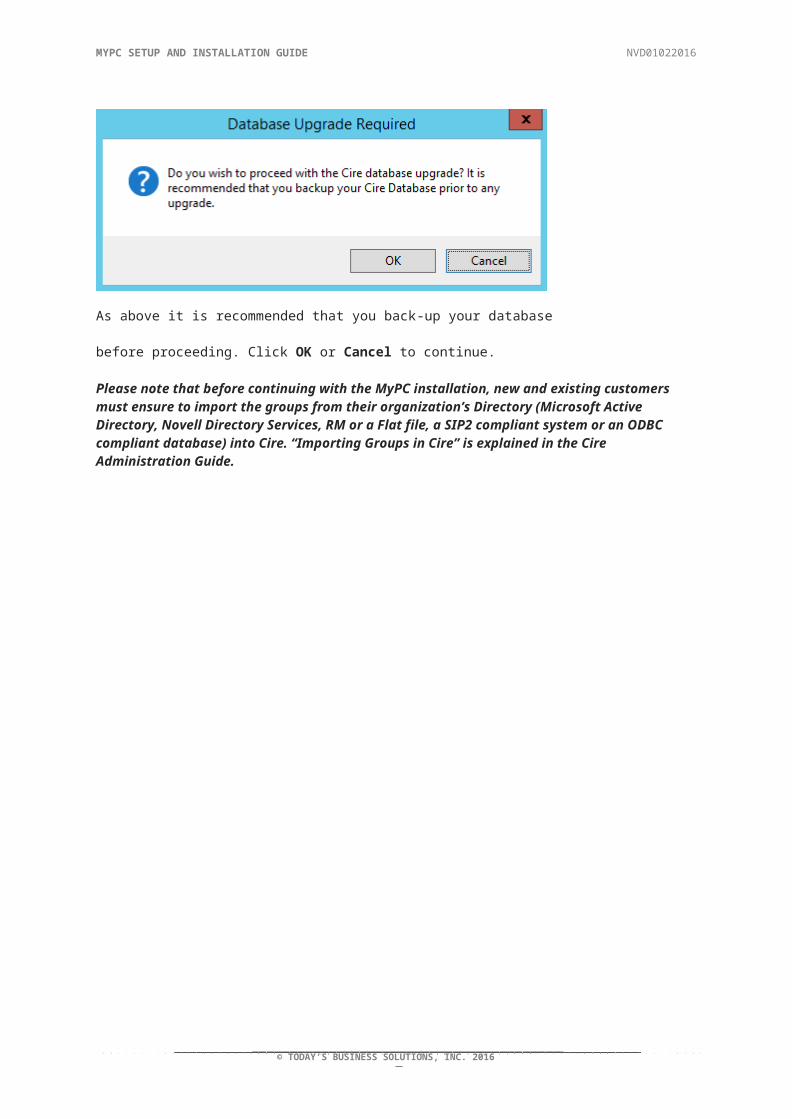
As above it is recommended that you back-up your database before proceeding.
Click OK or Cancel to continue.
Please note that before continuing with the MyPC installation, new and existing customers must ensure to import the groups from their organization’s Directory (Microsoft Active Directory, Novell Directory Services, RM or a Flat file, a SIP2 compliant system or an ODBC compliant database) into Cire. “Importing Groups in Cire” is explained in the Cire Administration Guide.
© TODAY’S BUSINESS SOLUTIONS, INC. 2016

MYPC SETUP AND INSTALLATION GUIDE NVD01022016
4
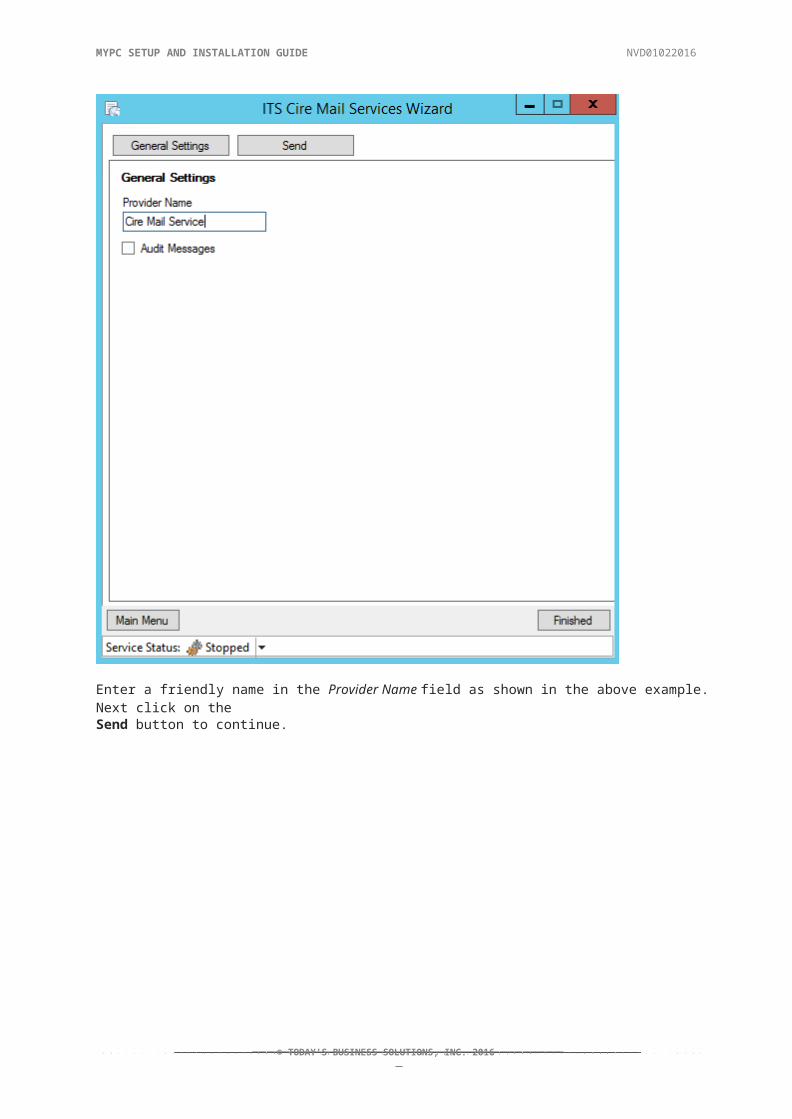
Configuring Cire Mail ComponentsOnce the Cire Server is installed you can continue to configure the Cire Mail Components.
To start the please go to:Start Menu > Programs > Cire Server > Cire Mail Services
Click on the Add button.
© TODAY’S BUSINESS SOLUTIONS, INC. 2016

MYPC SETUP AND INSTALLATION GUIDE NVD01022016
4
Enter a friendly name in the Provider Name field as shown in the above example. Next click on theSend button to continue.
© TODAY’S BUSINESS SOLUTIONS, INC. 2016

MYPC SETUP AND INSTALLATION GUIDE NVD01022016
4
Select the Enable Send box, the following fields in will must be completed.
E-mail Address The e-mail address entered here must be a valid e-mail address. All e-mail booking receipts will be sent from this e-mail address.
Server The Server name to enter here will be your preferred mail server.
E-mail Name The e-mail Name can be a friendly name. This name will be displayed in the user’s e-mail client when they receive an e-mail- mailed booking receipt.
Port Port 25 is the default SMTP port however if your mail server uses a different port you can enter it here.
Authentication Type The authentication type provides you with three options. Anonymous, PAP and SSL.
Username A username allowed to logon to your e-mail server and send e-mail from the E-mail address specified.
© TODAY’S BUSINESS SOLUTIONS, INC. 2016

MYPC SETUP AND INSTALLATION GUIDE NVD01022016
5
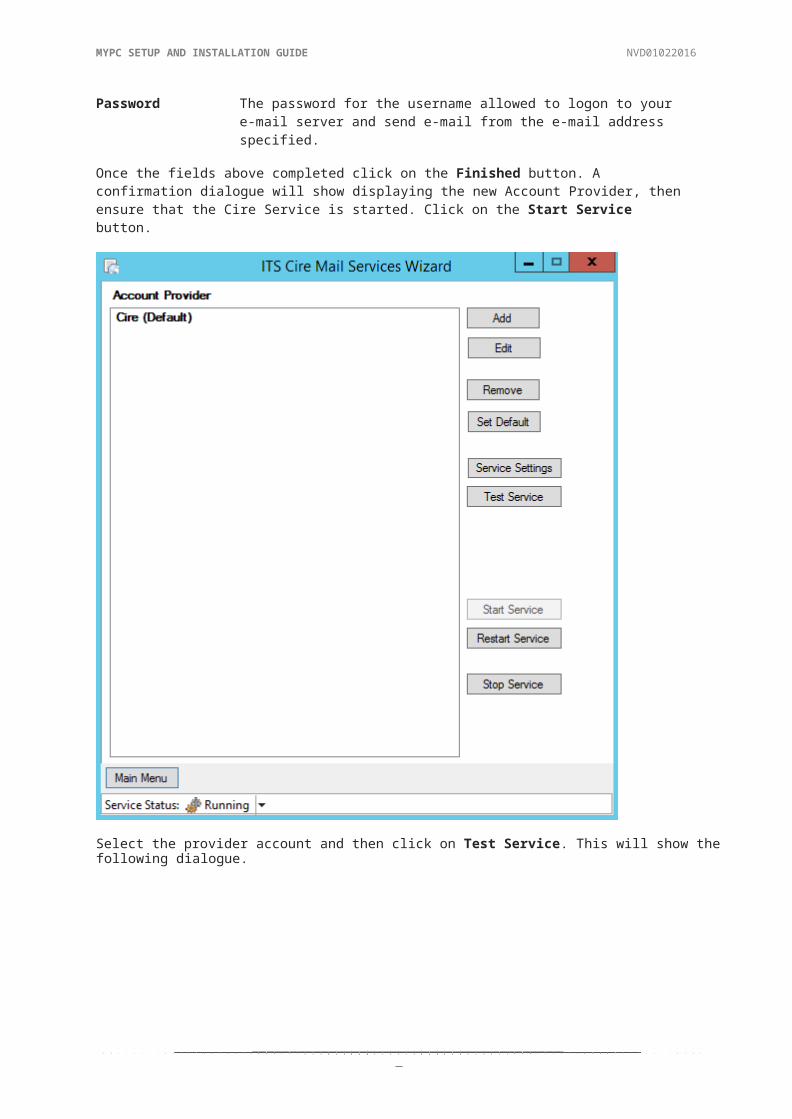
Password The password for the username allowed to logon to your e-mail server and send e-mail from the e-mail address specified.
Once the fields above completed click on the Finished button. A confirmation dialogue will show displaying the new Account Provider, then ensure that the Cire Service is started. Click on the Start Service button.
Select the provider account and then click on Test Service. This will show the following dialogue.
© TODAY’S BUSINESS SOLUTIONS, INC. 2016

MYPC SETUP AND INSTALLATION GUIDE NVD01022016
5
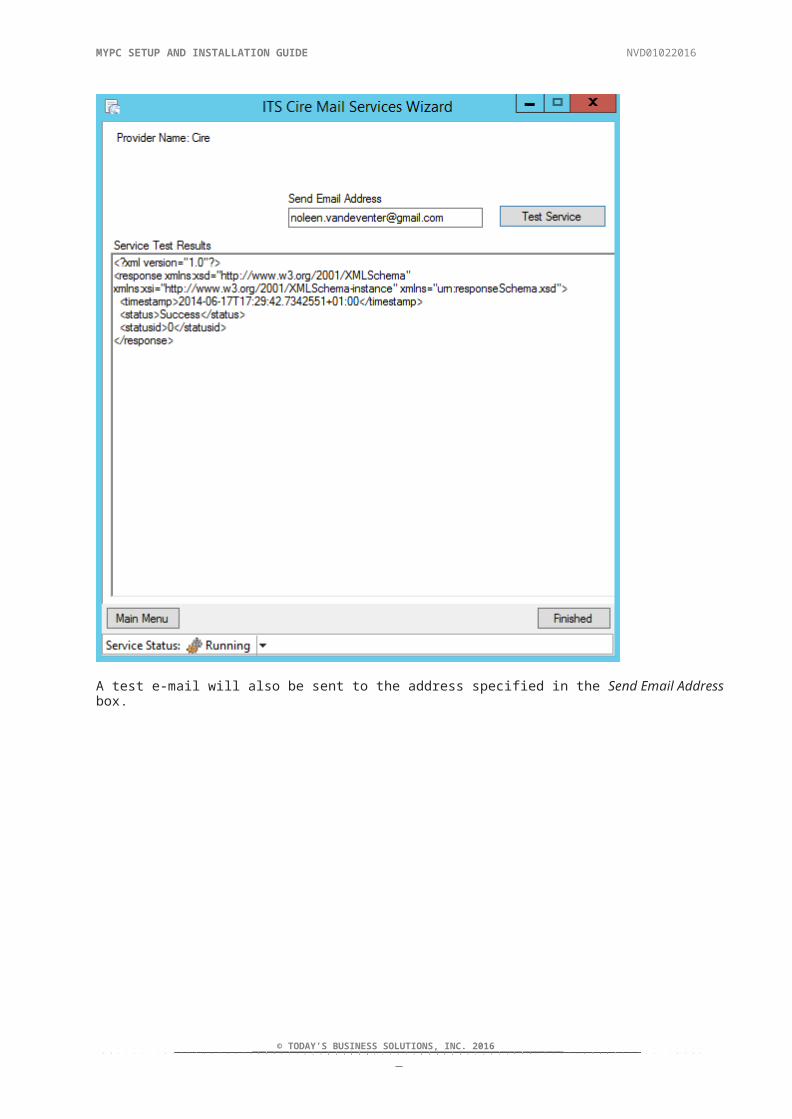
Check if the e-mail address is correct and click Test Service.
© TODAY’S BUSINESS SOLUTIONS, INC. 2016

MYPC SETUP AND INSTALLATION GUIDE NVD01022016
5
A test e-mail will also be sent to the address specified in the Send Email Address box.
© TODAY’S BUSINESS SOLUTIONS, INC. 2016

MYPC SETUP AND INSTALLATION GUIDE NVD01022016
5
Cire Integrated ModeWhen Cire is installed on a Windows 2008 / 2012 R2 Server by default it is usually configured to use the Classic AppPool. This is a mode which makes later versions of IIS behave like IIS6.0 (2003Server). While Cire will work with this configuration, it will not take advantage of the performance enhancements offered by the newer versions of IIS.
Follow the instructions below that show how to update the IIS Server configuration so that the newerIntegrated mode is used instead.
Create New App PoolsThe first step is to create a new Application Pool and then be configured appropriately to work inIntegrated mode.
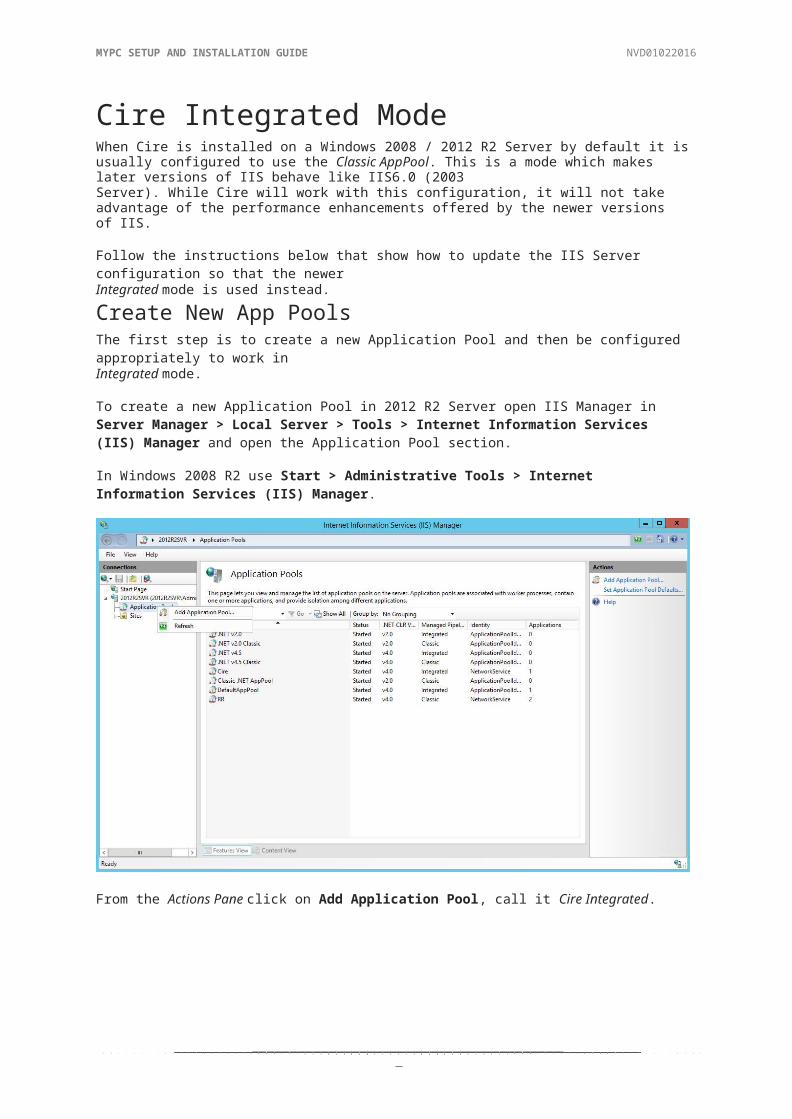
To create a new Application Pool in 2012 R2 Server open IIS Manager in Server Manager > Local Server > Tools > Internet Information Services (IIS) Manager and open the Application Pool section.
In Windows 2008 R2 use Start > Administrative Tools > Internet Information Services (IIS) Manager.
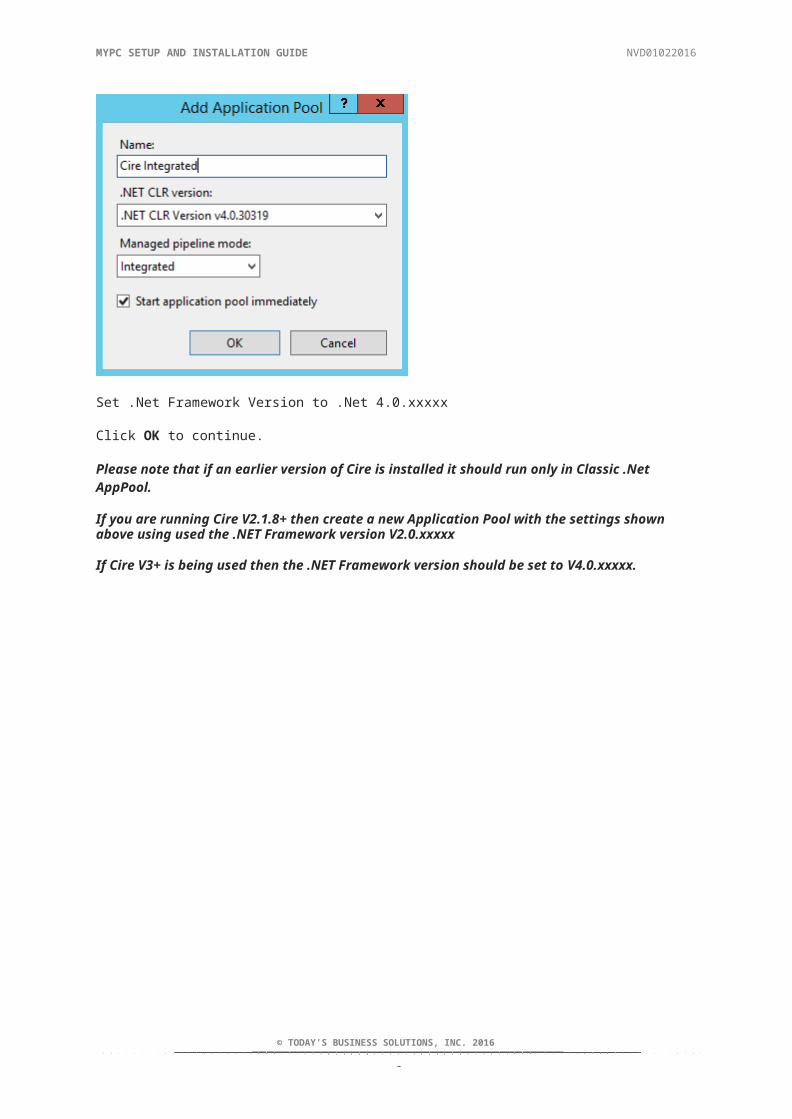
From the Actions Pane click on Add Application Pool, call it Cire Integrated.
© TODAY’S BUSINESS SOLUTIONS, INC. 2016

MYPC SETUP AND INSTALLATION GUIDE NVD01022016
5
Set .Net Framework Version to .Net 4.0.xxxxx
Click OK to continue.
Please note that if an earlier version of Cire is installed it should run only in Classic .NetAppPool.
If you are running Cire V2.1.8+ then create a new Application Pool with the settings shown above using used the .NET Framework version V2.0.xxxxx
If Cire V3+ is being used then the .NET Framework version should be set to V4.0.xxxxx.
© TODAY’S BUSINESS SOLUTIONS, INC. 2016
MYPC SETUP AND INSTALLATION GUIDE NVD01022016
5
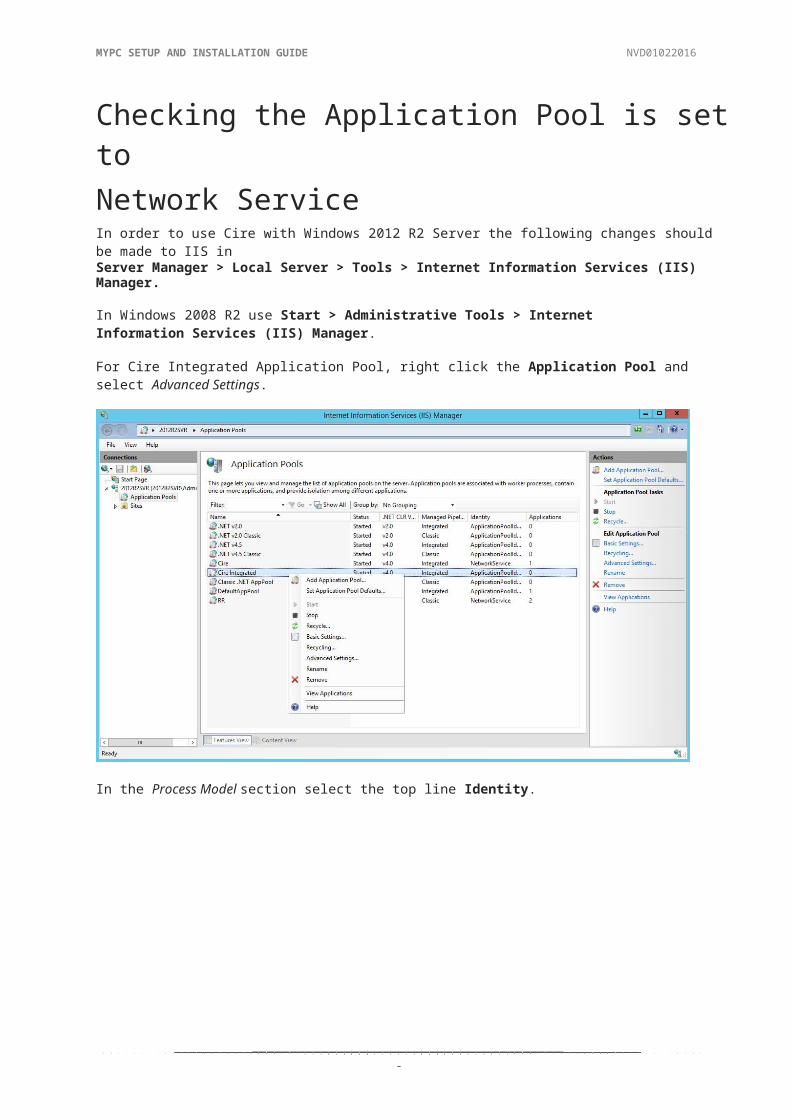
Checking the Application Pool is set toNetwork ServiceIn order to use Cire with Windows 2012 R2 Server the following changes should be made to IIS inServer Manager > Local Server > Tools > Internet Information Services (IIS) Manager.
In Windows 2008 R2 use Start > Administrative Tools > Internet Information Services (IIS) Manager.
For Cire Integrated Application Pool, right click the Application Pool and select Advanced Settings.
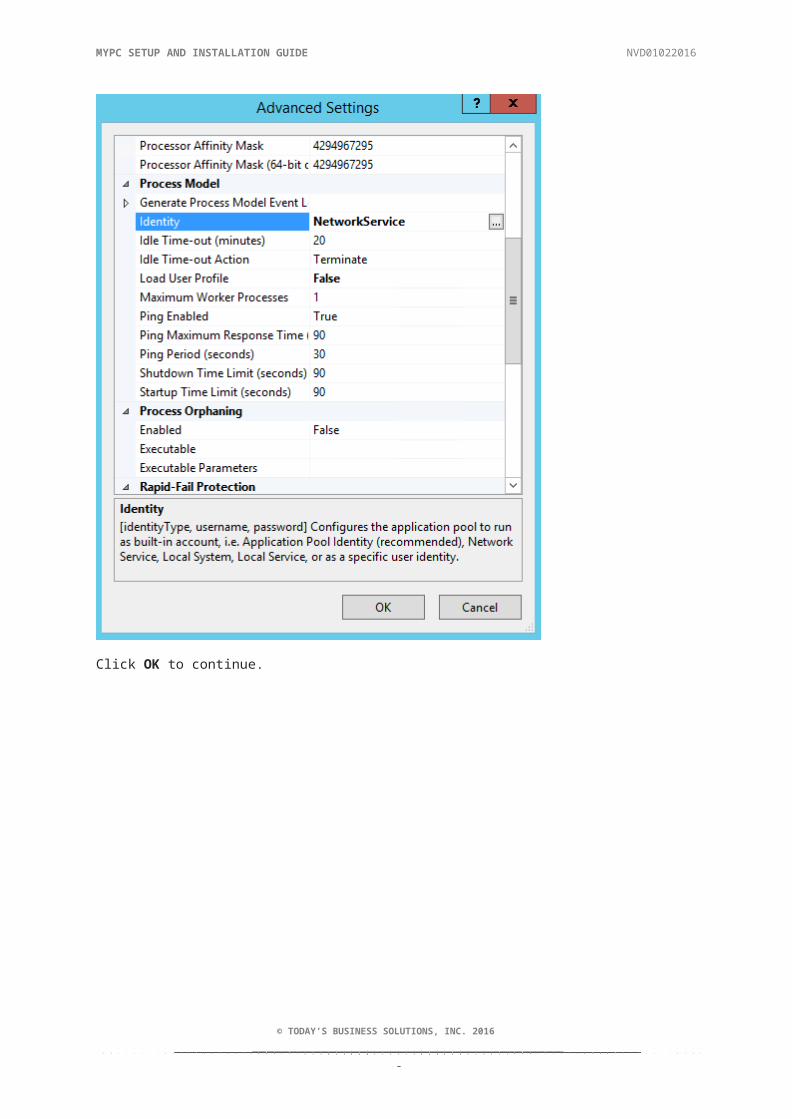
In the Process Model section select the top line Identity.
© TODAY’S BUSINESS SOLUTIONS, INC. 2016

MYPC SETUP AND INSTALLATION GUIDE NVD01022016
5
Next use the picker (three dots) to change the value to Built-in Account > NetworkService.
Now change the ApplicationPoolIdentity to NetworkService. Click OK to continue.
© TODAY’S BUSINESS SOLUTIONS, INC. 2016

MYPC SETUP AND INSTALLATION GUIDE NVD01022016
5
Click OK to continue.
© TODAY’S BUSINESS SOLUTIONS, INC. 2016

MYPC SETUP AND INSTALLATION GUIDE NVD01022016
5
MyPC Server InstallationPlease note that customers upgrading from MyPC 4.1 or lower please contact our Helpdesk team via [email protected].
Once your server is prepared to the specifications detailed previously you can commence the installation of the MyPC Server by double-clicking MyPC Server Setup.exe, which is located in the Shared Components folder on the TBS download site.
Click Next to continue.
© TODAY’S BUSINESS SOLUTIONS, INC. 2016
MYPC SETUP AND INSTALLATION GUIDE NVD01022016
5
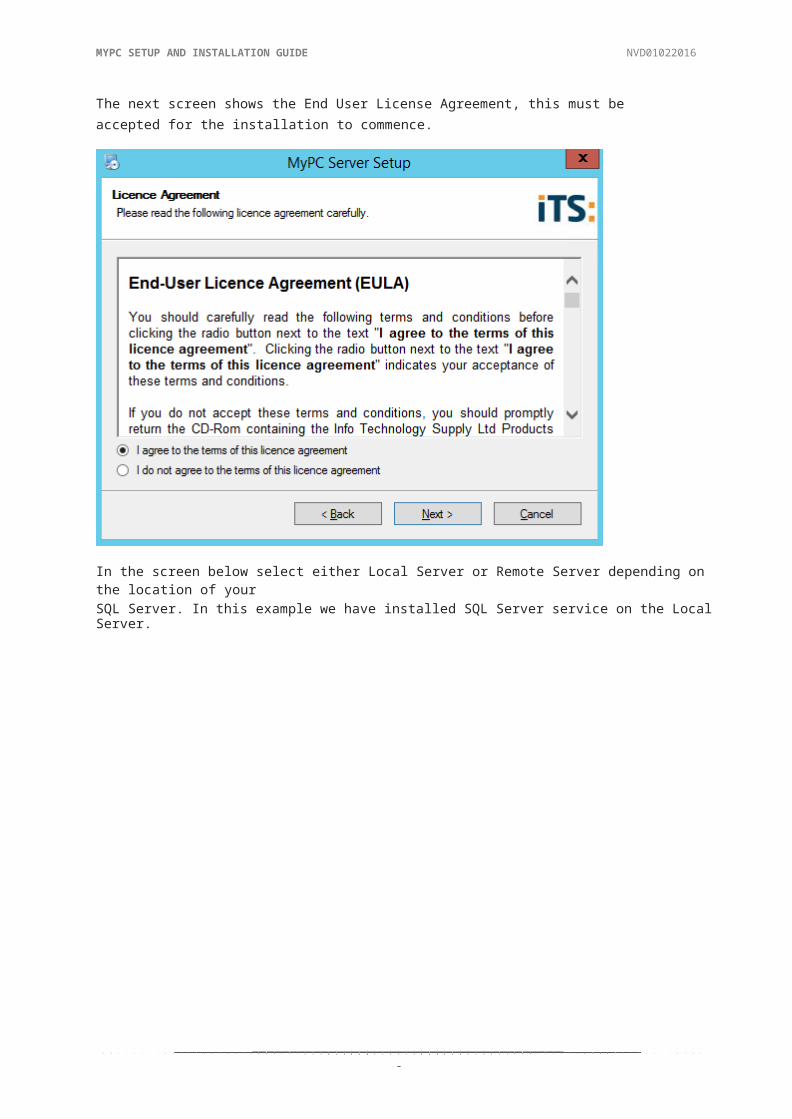
The next screen shows the End User License Agreement, this must be accepted for the installation to commence.
In the screen below select either Local Server or Remote Server depending on the location of yourSQL Server. In this example we have installed SQL Server service on the Local Server.
© TODAY’S BUSINESS SOLUTIONS, INC. 2016

MYPC SETUP AND INSTALLATION GUIDE NVD01022016
6
Click Next to continue. The Database Parameters screen will then be shown.
© TODAY’S BUSINESS SOLUTIONS, INC. 2016

MYPC SETUP AND INSTALLATION GUIDE NVD01022016
6
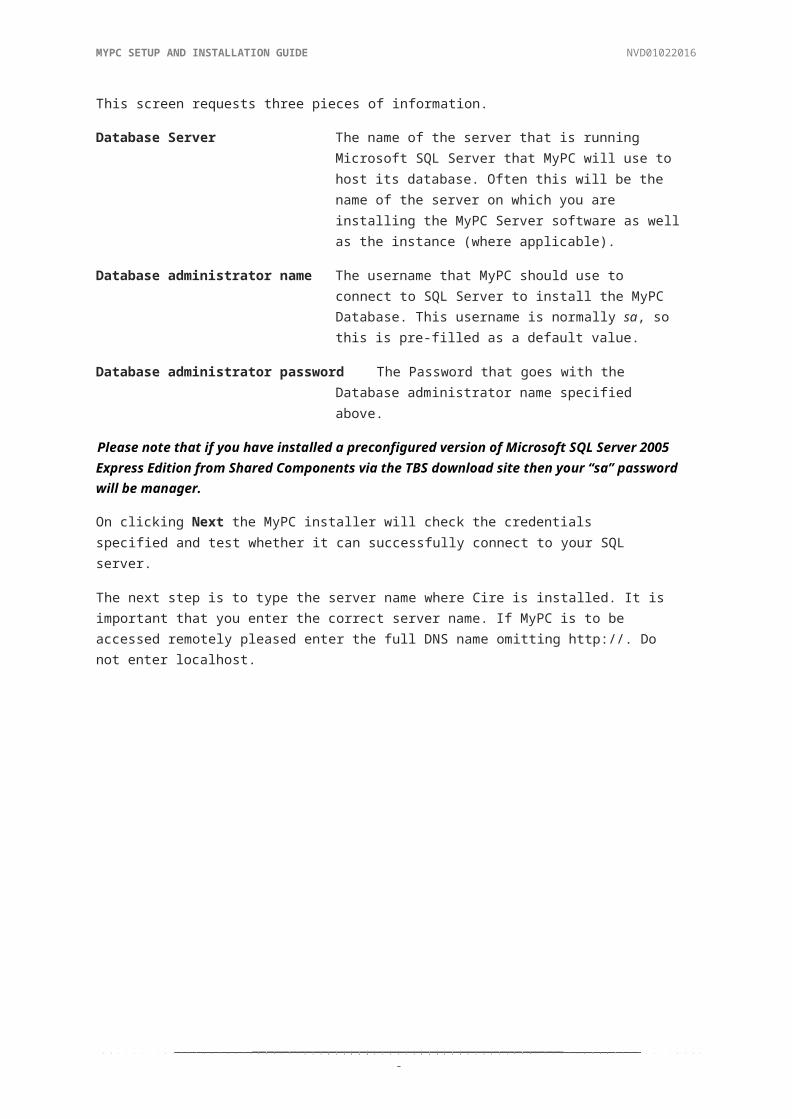
This screen requests three pieces of information.
Database Server The name of the server that is running Microsoft SQL Server that MyPC will use to host its database. Often this will be the name of the server on which you are installing the MyPC Server software as well as the instance (where applicable).
Database administrator name The username that MyPC should use to connect to SQL Server to install the MyPC Database. This username is normally sa, so this is pre-filled as a default value.
Database administrator password The Password that goes with the Database administrator name specified above.
Please note that if you have installed a preconfigured version of Microsoft SQL Server 2005Express Edition from Shared Components via the TBS download site then your “sa” passwordwill be manager.
On clicking Next the MyPC installer will check the credentials specified and test whether it can successfully connect to your SQL server.
The next step is to type the server name where Cire is installed. It is important that you enter the correct server name. If MyPC is to be accessed remotely pleased enter the full DNS name omitting http://. Do not enter localhost.
Click Next to continue.
It is important that you get this information correct. If the details entered are incorrect when you first logon you will find that you do not have administrative permissions within MyPC. If this happens please contact TBS Support or your local reseller.
© TODAY’S BUSINESS SOLUTIONS, INC. 2016

MYPC SETUP AND INSTALLATION GUIDE NVD01022016
6
Selecting Yes on the first option shown below will install MyPC for environments where users do not have unique user accounts in Active Directory or Novell eDirectory and instead credentials from a Library Management System will be used for authentication purposes.
Selecting Yes on the second option will install the Library Fines and Overdue Items module that warns users about library fines and overdue items and can prevent them from logging accordingly on if required.
Selecting Yes on the third option will enable email booking receipts functionality. Please note that this option requires the installation and correct configuration of C i r e M a i l S er v i c e s .
Selecting Yes on the fourth option will enable the MyPC 6.1 client-server communication protocol that is not supported by MyPC 3.x clients. The MyPC 6.1 client-server protocol allows clients to state, where applicable, that they are configured for Queued Booking Only. Queuing functionality is also available when using 3.x client without the MyPC 6.1 client-server communication protocol enabled but in situations where clients are configured for Queued Booking Only they will state misleadingly Book with Staff.
Click Next to continue.
© TODAY’S BUSINESS SOLUTIONS, INC. 2016

MYPC SETUP AND INSTALLATION GUIDE NVD01022016
6
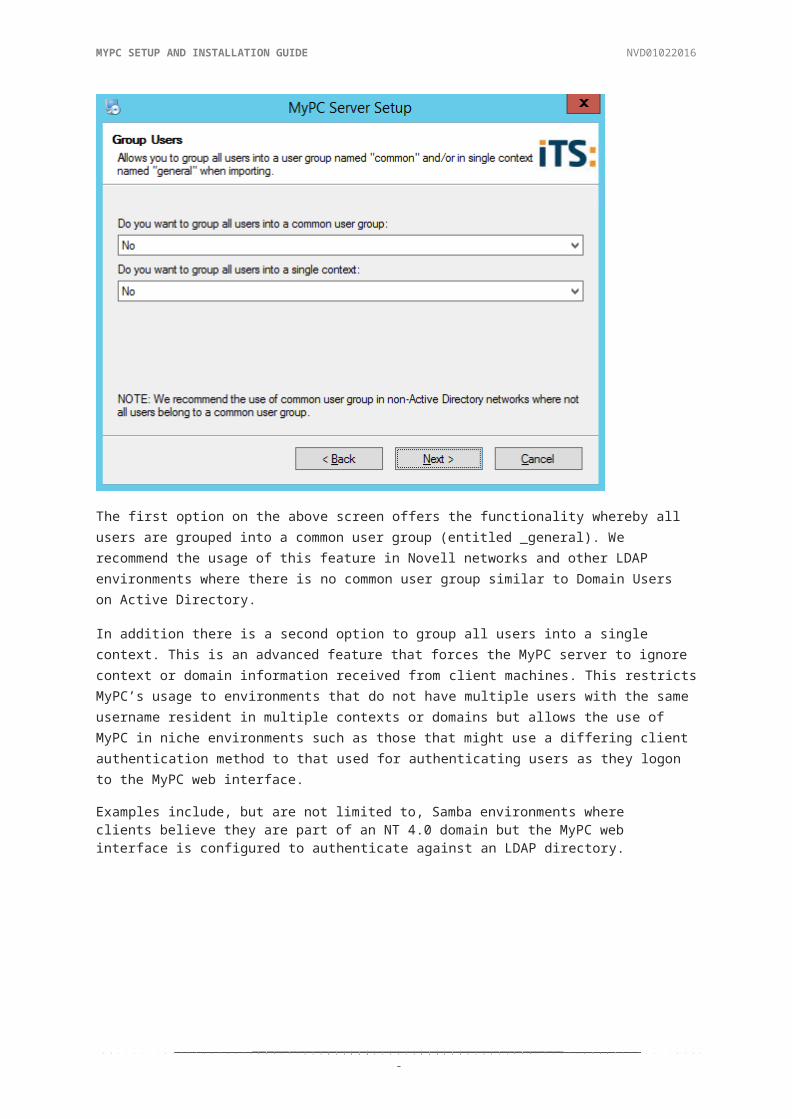
The first option on the above screen offers the functionality whereby all users are grouped into a common user group (entitled _general). We recommend the usage of this feature in Novell networks and other LDAP environments where there is no common user group similar to Domain Users on Active Directory.
In addition there is a second option to group all users into a single context. This is an advanced feature that forces the MyPC server to ignore context or domain information received from client machines. This restricts MyPC’s usage to environments that do not have multiple users with the same username resident in multiple contexts or domains but allows the use of MyPC in niche environments such as those that might use a differing client authentication method to that used for authenticating users as they logon to the MyPC web interface.
Examples include, but are not limited to, Samba environments where clients believe they are part of an NT 4.0 domain but the MyPC web interface is configured to authenticate against an LDAP directory.
© TODAY’S BUSINESS SOLUTIONS, INC. 2016

MYPC SETUP AND INSTALLATION GUIDE NVD01022016
6
A default Drive and Path are shown, along with the amount of disk space required and the amount free. Use the Change button to change the Drive and Path if required.
Click on Next when you are happy to proceed. A confirmation dialog will then be shown displaying all the options selected.
© TODAY’S BUSINESS SOLUTIONS, INC. 2016
MYPC SETUP AND INSTALLATION GUIDE NVD01022016
6
If anything is incorrect, please use the Back button to return to the appropriate dialog and make any necessary changes. When everything is correct please click Next to begin the installation.
Immediately after clicking Next the MyPC database will be created. During this period it is normal to see a Command Prompt box running OSQL.exe for a significant amount of time while the MyPC database is created.
Do not close the command prompt window!
When the installation has finished a confirmation screen will be displayed.
© TODAY’S BUSINESS SOLUTIONS, INC. 2016

MYPC SETUP AND INSTALLATION GUIDE NVD01022016
6
Click Finish. MyPC Server is now installed.
A MyPC Database Already Exists (Not applicable for a NewInstall)If a MyPC database already exists on the SQL server you will be presented with an additional installation step (warning) after entering the database parameters mentioned in step five.
The setup will continue using your old database and upgrade it if necessary (Recommended). If you do not wish to use your old MyPC database please contact TBS Support or your reseller to discuss the implications of dropping your MyPC database.
Click OK or X to continue.
© TODAY’S BUSINESS SOLUTIONS, INC. 2016

MYPC SETUP AND INSTALLATION GUIDE NVD01022016
6
MyPC Web Components InstallationPlease note that customers upgrading from MyPC 4.1 or lower please contact our Helpdesk team via [email protected].
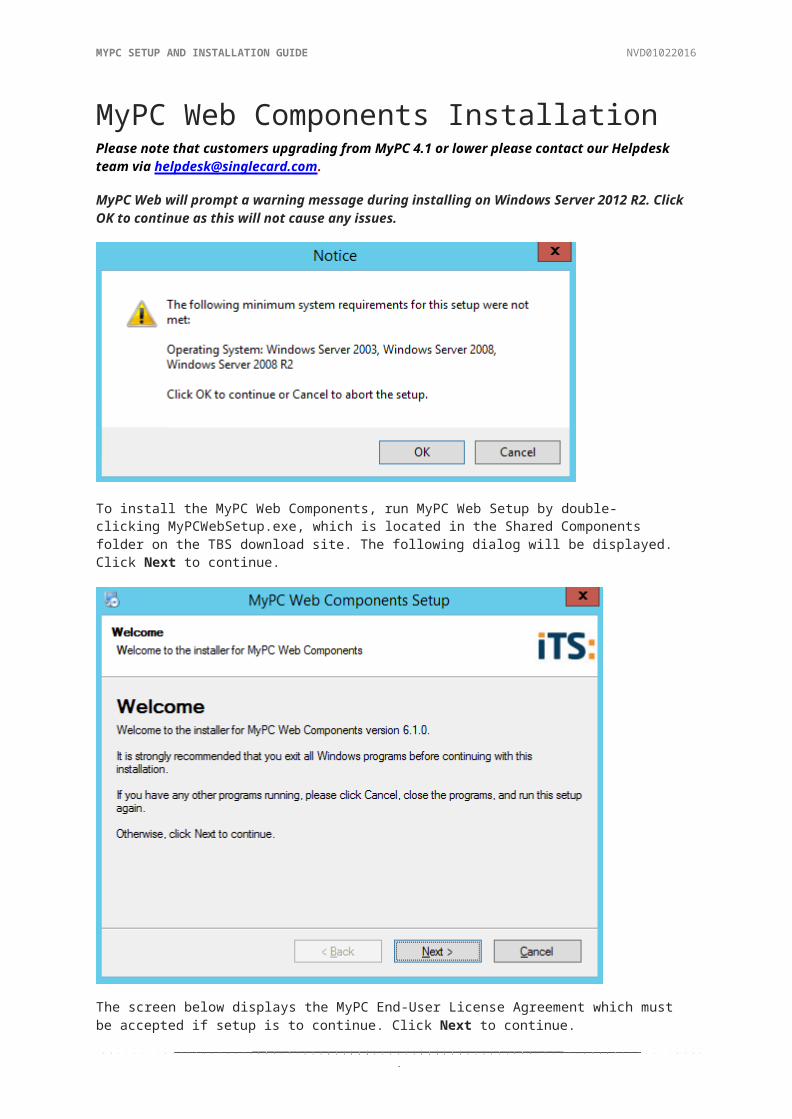
MyPC Web will prompt a warning message during installing on Windows Server 2012 R2. ClickOK to continue as this will not cause any issues.
To install the MyPC Web Components, run MyPC Web Setup by double-clicking MyPCWebSetup.exe, which is located in the Shared Components folder on the TBS download site. The following dialog will be displayed. Click Next to continue.
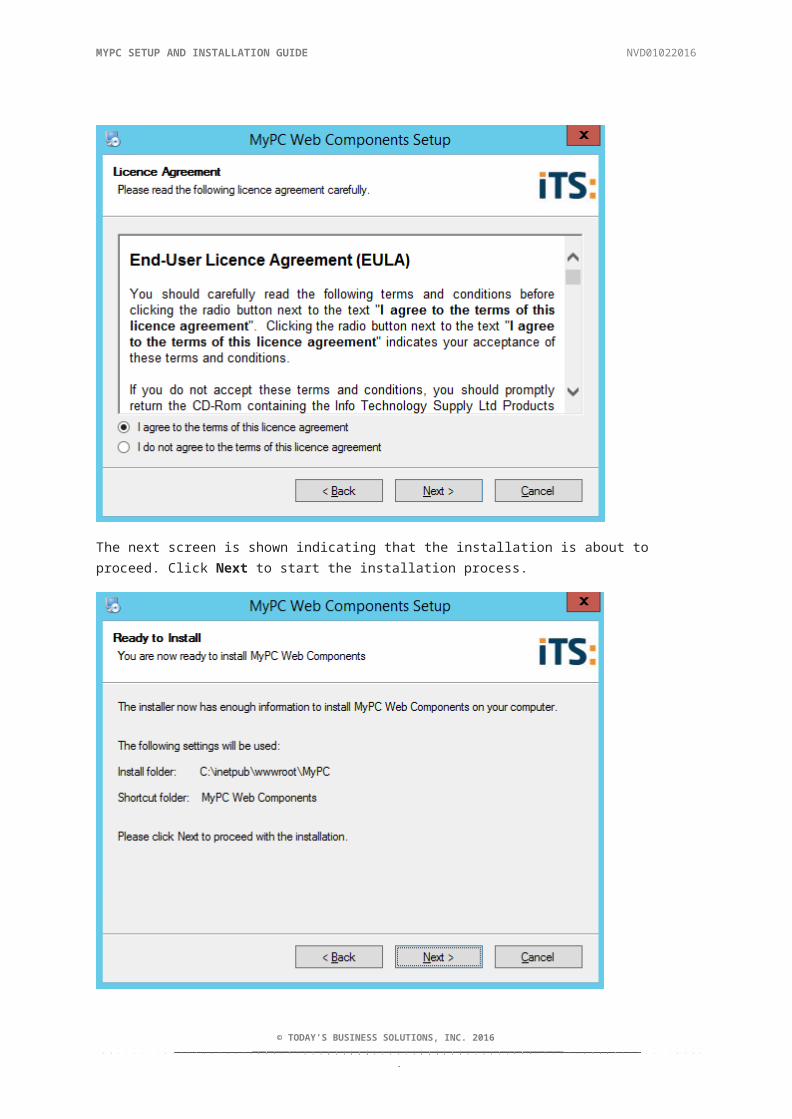
The screen below displays the MyPC End-User License Agreement which must be accepted if setup is to continue. Click Next to continue.
© TODAY’S BUSINESS SOLUTIONS, INC. 2016

MYPC SETUP AND INSTALLATION GUIDE NVD01022016
6
The next screen is shown indicating that the installation is about to proceed. Click Next to start the installation process.
© TODAY’S BUSINESS SOLUTIONS, INC. 2016
MYPC SETUP AND INSTALLATION GUIDE NVD01022016
6
On successful completion of the installation the following final screen is shown. Click Finish to dismiss this screen.
Click Finish. The MyPC Web Components has now been installed.
Forum Feed Proxy SettingsPlease note that if you are using a proxy server and receive any errors (TLS/SSL) the reason is most probably down to forum feed. Please add the following registry key which will allow access to the web.
HKEY_LOCAL_MACHINE\SOFTWARE\TBS\MyPC 3\MyPC Web
If MyPC Web does not exist please create the key.
EnableProxyServer REG_SZ True/False ProxyServer REG_SZ IP of Proxy
Optional if using an Authenticated Proxy: AuthenticatedProxy REG_SZ True ProxyUsername REG_SZ username ProxyPassword REG_SZ Password
© TODAY’S BUSINESS SOLUTIONS, INC. 2016

MYPC SETUP AND INSTALLATION GUIDE NVD01022016
7
MyPC Integrated ModeWhen MyPC is installed on a Windows 2008 R2 / 2012 R2 Server by default it is usually configured to use Classic AppPool. This is a mode which makes later versions of IIS behave like IIS6.0 (2003Server). While MyPC will work with this configuration, it will not take advantage of the performance enhancements offered by the newer versions of IIS.
Follow the instructions below that show how to update the IIS Server configuration so that the newerIntegrated mode is used instead.
Create New App PoolsThe first step is to create a new Application Pool and then be configured appropriately to work inIntegrated mode.
To create a new Application Pool in 2012 R2 Server open IIS Manager in Server Manager > Local Server > Tools > Internet Information Services (IIS) Manager and open the Application Pool section.
In Windows 2008 R2 use Start > Administrative Tools > Internet Information Services (IIS) Manager.
From the Actions Pane click on Add Application Pool, call it MyPC Integrated.
© TODAY’S BUSINESS SOLUTIONS, INC. 2016
MYPC SETUP AND INSTALLATION GUIDE NVD01022016
7
Set .Net Framework Version to .Net 4.0.xxxxx
Click OK to continue.
© TODAY’S BUSINESS SOLUTIONS, INC. 2016

MYPC SETUP AND INSTALLATION GUIDE NVD01022016
7
Checking the Application Pool is set toNetwork ServiceIn order to use MyPC with Windows 2012 R2 Server the following changes should be made to IIS inServer Manager > Local Server > Tools > Internet Information Services (IIS) Manager.
For MyPC Integrated Application Pool, right click the Application Pool and select Advanced Settings.
In the Process Model section select the top line Identity.
© TODAY’S BUSINESS SOLUTIONS, INC. 2016
MYPC SETUP AND INSTALLATION GUIDE NVD01022016
7
Next use the picker (three dots) to change the value to Built-in Account > NetworkService.
Now change the ApplicationPoolIdentity to NetworkService. Click OK to continue.
© TODAY’S BUSINESS SOLUTIONS, INC. 2016

MYPC SETUP AND INSTALLATION GUIDE NVD01022016
7
Convert MyPC to an ApplicationIn some instances when installing MyPC Server and Web components on Windows Server 2012 R2 the MyPC website under Default Web Site in Internet Information Services (IIS) Manager is shown as a folder and not a website and needs to be converted manually.
From the Actions Pane right click on the MyPC folder then select Convert to Application Pool.
© TODAY’S BUSINESS SOLUTIONS, INC. 2016

MYPC SETUP AND INSTALLATION GUIDE NVD01022016
7
Click on the Select button to select MyPC Integrated Pool created earlier.
Click OK to continue.
You will now see MyPC websites are converted to Applications.
© TODAY’S BUSINESS SOLUTIONS, INC. 2016
MYPC SETUP AND INSTALLATION GUIDE NVD01022016
7
Allow ISAPI and CGI Restrictions forASP.NET 4In order for Cire Web Components to work correctly, the Cire must be configured to Allow the ISAPIand CGI Restrictions or the web interface will not function correctly. To check this, follow these steps.
Once you have installed MyPC on the Windows 2012 R2 Server, open Internet Information Services Manager. This is located in Server Manager > Tools > Internet Information Services (IIS) Manager.
Click the Server name. Click on the ISAPI and CGI Restrictions icon which will show the screen below.
© TODAY’S BUSINESS SOLUTIONS, INC. 2016

MYPC SETUP AND INSTALLATION GUIDE NVD01022016
7
Ensure that ASP.NET v4.0 is set to Allow.
© TODAY’S BUSINESS SOLUTIONS, INC. 2016

MYPC SETUP AND INSTALLATION GUIDE NVD01022016
7
Switching to Integrated mode using the newAppPoolUp until now we have been doing the groundwork to switch Cire from using Classic mode to using the newer Integrated mode of running applications in IIS. Cire is still running in Classic mode therefore the next step is to switch over to the new configuration.
In an ideal world this should be done outside office hours as all access will temporarily be suspended to the server following the transition.
To switch over, open IIS Manager in Server Manager > Tools > Internet Information Services (IIS) Manager
In the left hand pane open Sites and locate the Cire entry. Right click on Cire and select ManageApplication > Advanced Settings.
Change the Application Pool to MyPC Integrated.
© TODAY’S BUSINESS SOLUTIONS, INC. 2016
MYPC SETUP AND INSTALLATION GUIDE NVD01022016
7
You need to perform the same steps as above to create and apply a new application pool for MyPC3.
Once this is complete reset IIS by performing an IIS reset.
© TODAY’S BUSINESS SOLUTIONS, INC. 2016
8
MYPC SETUP AND INSTALLATION GUIDE NVD01022016
IIS Reset in Windows 2012 R2 ServerClick on the Start button and select Run.
Type cmd in the field provided and click OK.
The Command Prompt window will open as shown below. Type iisreset and click Enter.
After a few seconds the message Internet services successfully restarted will show.
© TODAY’S BUSINESS SOLUTIONS, INC. 2016

MYPC SETUP AND INSTALLATION GUIDE NVD01022016
8
TestingFollowing the switch you should immediately test that Cire is performing correctly.
1. In a browser connect to ht t p: / / Y O U R _ SE R V E R/ c i r e You should see the Cire Logon screen.
2. Logon as and Admin userYou should see the Cire web interface.
If any of these tests fail, you can revert to the previous configuration by configuring the CireApplication Pool to use the Classic .Net AppPool and performing an IIS reset again.
Should you experience problems switching to Integrated mode you should consult with the TBS Technical Support via [email protected] for assistance.
Other SettingsNow that Cire is running in its own Application Pool, it is possible to alter other settings to change the behavior of the Cire server.
For example, by default Application Pools recycle every 29 hours (1740 minutes). This means that a clean-up happens at a different time every day. You may wish to change this behavior so that a clean-up is performed outside of office hours rather than a different time each day as this may affect your users’ experience on any TBS product installed in your environment.
A TechNet article at h t tp : / /t e c h n et . m i cr o s o f t. c o m /e n - u s / li bra r y / cc 7 4 5 9 5 5 . a s px explains more about the options available to fine tune and configure Application Pools in IIS 7.
© TODAY’S BUSINESS SOLUTIONS, INC. 2016
MYPC SETUP AND INSTALLATION GUIDE NVD01022016
8
Client Installation (Manual)Please note that .NET Framework 4.5 is required on client PCs to be controlled by MyPC. If Microsoft .NET 4.5 Framework is not present on client machines MyPC will fail to function. Before continuing with the installation of the MyPC 6.x Client .NET Framework 4.5 MUST installed!
Manual Installation of .NET Framework 4.5.NET Framework 4.5 can be downloaded from Windows Update or the Microsoft web site.
For instructions on how to automatically deploy the MyPC Client across a network please refer to the chapter entitled Cl i ent Ins t al l ati o n ( S il e n t ) .
If you are looking to use iSPY please refer to the iSPY UltraVNC document.
Manual Installation of the MyPC ClientTo install the MyPC 6.x Client double click on the installation program MyPC 6.x Client Setup.msi.
Click Next to continue.
© TODAY’S BUSINESS SOLUTIONS, INC. 2016
MYPC SETUP AND INSTALLATION GUIDE NVD01022016
8
In addition you can check the Disk Usage of each component or reset the installation options by clicking the Reset button.
Click Next to continue.
© TODAY’S BUSINESS SOLUTIONS, INC. 2016

MYPC SETUP AND INSTALLATION GUIDE NVD01022016
8
The above screen displays the MyPC End-User License Agreement which must be accepted if setup is to continue.
Click Next to continue.
© TODAY’S BUSINESS SOLUTIONS, INC. 2016

MYPC SETUP AND INSTALLATION GUIDE NVD01022016
8
The Server Details screen requires that you enter the NetBIOS name of your MyPC Server. By defaultMyPC Clients and the server communicate on TCP port 33334, we do not recommend that you change this value unless port 33334 is in use on your network. Click Next to continue.
© TODAY’S BUSINESS SOLUTIONS, INC. 2016
MYPC SETUP AND INSTALLATION GUIDE NVD01022016
8
This Installation Type screen prompts you to select the type of the client you wish to install. Please select the required installation type by clicking on the relevant radio button. Each installation type is discussed below.
Installation TypesClassic ClientThe Classic Client should be selected in Active Directory, Novell and RM environments where users have their own unique accounts in the user directory and traditional fat PCs are used as opposed to thin-client devices.
Public LibraryThe Public Library option should be selected if you are installing MyPC in an environment where users do not have unique accounts in Active Directory or Novell eDirectory such as public library environments where users’ accounts for authentication reside in a library management system.
Terminal ServicesThe Terminal Services option should be selected in Active Directory and Novell environments where users have their own unique accounts in the user directory and thin-client devices are used to access remote desktops running on Windows Terminal Servers or Windows-based Citrix Servers.
Virtual Desktop Infrastructure – One-to-OneThe Virtual Desktop Infrastructure – One-to-One option should be selected in Active Directory and Novell environments where users have their own unique accounts in the user directory and thin-client devices are used to access virtualized Windows 7 desktops running on solutions such as VMware. This option assumes that thin-client devices always connect to the same desktop therefore forming aone-to-one relationship between thin-client devices and virtual desktops.
© TODAY’S BUSINESS SOLUTIONS, INC. 2016

MYPC SETUP AND INSTALLATION GUIDE NVD01022016
8
Virtual Desktop Infrastructure – One-to-ManyThe Virtual Desktop Infrastructure – One-to-Many option should be selected in Active Directory and Novell environments where users have their own unique accounts in the user directory and thin-client devices are used to access virtualized Windows 7 desktops running on solutions such as VMware. This option assumes that thin-client devices connects to any available desktop therefore forming a one-to-many relationship between thin-client devices and virtual desktops.
If you select either the Terminal Services or Virtual Desktop Infrastructure – One-to-Many option the installation will continue as shown below. After installation please refer to the M y P C B e h a v i o r i n a T e r m i n a l S e r v er / Vi r t u a l D e s k top I n f r a s tru c ture – O n e - to - M a n y E n vi r o n m e n t and M y P C S er v e r - S i de Con f i g u r a t i o n i n a T er m i n a l S e r v er / Vi r t u al De s k top I n f r a s tru c ture – O ne - t o - M an y E n vi r o n m e n t chapters.
Allow Local Logon On This ComputerThe option Allow local logon on this computer determines whether logging in locally will be possible or not.
In MyPC 6.1 and above by default the MyPC Client will not start if users, typically administrators, logon locally. In Active Directory environments this would occur when logging on to the local PC (This Computer) as opposed to logging into a domain. In Novell environments this would occur when logging on to Windows (either the local PC (This Computer) or a domain) hence bypassing the Novell logon.
When you have finalized your selection click Next to continue.
© TODAY’S BUSINESS SOLUTIONS, INC. 2016

MYPC SETUP AND INSTALLATION GUIDE NVD01022016
8
Click Install to proceed with the installation.
© TODAY’S BUSINESS SOLUTIONS, INC. 2016
MYPC SETUP AND INSTALLATION GUIDE NVD01022016
8
The screen above indicates that the installation has completed successfully. Click Finish.
This final screen asks whether you wish to restart the computer. The computer must be rebooted for the MyPC Client to become active.
© TODAY’S BUSINESS SOLUTIONS, INC. 2016

MYPC SETUP AND INSTALLATION GUIDE NVD01022016
9
Client Uninstallation (Manual)This chapter details the uninstallation of the MyPC 6.x Client. On Windows 7, Windows 8/8.1 and Windows 10. navigate to Programs and Features. Locate the entry for the MyPC 6.x Client and click Remove or Uninstall, doing so will produce the screen shown below.
Click Yes to continue.
You will now be prompted to reboot your computer.
Click Yes to reboot your computer and complete the uninstallation.
© TODAY’S BUSINESS SOLUTIONS, INC. 2016

MYPC SETUP AND INSTALLATION GUIDE NVD01022016
9
Client Installation (Silent)Please note that .NET Framework 4.5 is required on Client PCs to be controlled by MyPC. If Microsoft .NET 4.5 Framework is not present on client machines MyPC will fail to function. Before continuing with the installation of the MyPC 6.x Client .NET Framework 4.5 MUST installed!
Installation of .NET Framework 4.5.NET Framework 4.5 can be downloaded from the Microsoft web site:http:// www.m icr os of t.c om /en - gb/do wn loa d/d eta ils .aspx ?id =3 065 3
Silent Installation of the MyPC 6.x ClientThe MyPC 6.x Client installer can be used normally as an interactive installer or settings can be preconfigured using the MSI admin mode to create an Admin MSI package.
Creating an Admin MSI PackageUsing the MSI admin mode allows you to pre-configure the MyPC 6.x Client MSI options so that installation is easier on multiple machines. The basic command to do this is:
msiexec.exe -a "COMPLETE PATH\MyPC 6 Client Setup.msi" TARGETDIR=”COMPLETE PATHOUTPUT”
-a denotes admin mode
TARGETDIR denotes the location where the resulting output will be placed. It must be configured as a complete path to a folder (the folder will be created)
The admin mode does not work using the installer screens, so any options you wish to change have to form part of the command line when you use admin mode. If they are not specified the default values from the Parameter Reference table below will be used.
As a minimum you should configure the parameter for the SERVER_NAME. A complete configuration would look like this:
msiexec -a "c:\MyPC 6 Client Setup 64bit-w7.msi" TARGETDIR="C:\admin_install" INSTALLATION_TYPE=0 LOCAL_LOGON=1 VDI_OPTION=1 SERVER_PORT=33334SERVER_NAME="XXXXServer" IMMEDIATE_REBOOT=0 DELAYED_START=30
N.B. You will notice that there is no option to specify the installation folder. This is because the installation folder must be specified when installing the client on any particular computer. See below.
Installing an Admin Package on a Client ComputerThe command line to install the MyPC 6.x Client on a computer is:
msiexec -i "c:\admin_install\MyPC 6 Client Setup.msi" /qn INSTALLDIR="C:\Program Files\
TBS" INSTALLDIR denotes the destination installation folder
-i denotes that the package will be installed
© TODAY’S BUSINESS SOLUTIONS, INC. 2016
MYPC SETUP AND INSTALLATION GUIDE NVD01022016
9
Parameter DescriptionParameter DescriptionINSTALLATION_TYPE Client TypeLOCAL_LOGON Enables Local Logon to bypass MyPCVDI_OPTION Virtualization OptionSERVER_PORT Client-Server Communication PortSERVER_NAME NETBIOS name of the MyPC ServerIMMEDIATE_REBOOT Determines if the client machine will
restart at the end of the installationINSTALLDIR Root folder where MyPC will be installedDELAYED_START This can be set in seconds
Parameter ReferenceParameter Default AlternativeINSTALLATION_TYPE 0 – Classic Client 1 – Public Library
2 – Terminal Services / Virtual Desktop Infrastructure
(VDI)LOCAL_LOGON 1 – Enabled 0 – DisabledVDI_OPTION 1 – One-to-Many 0 – One-to-OneSERVER_PORT 33334 Any available portSERVER_NAME NETBIOS name of the
serverIMMEDIATE_REBOOT 1 – Reboot after install 0 – Do not reboot after
installINSTALLDIRDELAYED_START 15 – Seconds Value can be set in
seconds
© TODAY’S BUSINESS SOLUTIONS, INC. 2016

MYPC SETUP AND INSTALLATION GUIDE NVD01022016
9
Silent UninstallTo perform a silent uninstall please configure your software deployment mechanism to run msiexec with the following switches ensuring that the uninstall process is given administrative privileges.
Place the MyPC Client MSI (MyPC 6.x Client Setup.msi) installer in an easily accessible path. Uninstalling the MyPC Client in silent mode suppresses all user interface screens, which would appear during the manual un-installation process. You can run uninstall in silent mode via the use of the following command line parameters:
msiexec /x "COMPLETE PATH TO MSI \MyPC 6 Client Setup.msi " /quietIMMEDIATE_REBOOT="1"
The following is an explanation of all available uninstallation switches.
IMMEDIATE_REBOOT
Determines whether the client will reboot post-uninstallation.
To suppress a reboot use IMMEDIATE_REBOOT=”0”
To force a reboot use IMMEDIATE_REBOOT=”1” or alternatively omit this switch.
© TODAY’S BUSINESS SOLUTIONS, INC. 2016

MYPC SETUP AND INSTALLATION GUIDE NVD01022016
9
Client Installation via Group PolicyIn this section we show how MyPC can be deployed via Group Policy Management.
Please note that a Admin MSI installer first needs to be created using the C r e a t ing an A d min M S I P a c k a g e procedure outlined previously. Once created place your Admin MSI installer in a shared folder on your preferred server in order to continue with this method of deployment.
Please note MST files are no longer required when installing MyPC via Group Policy.
You can access Active Directory by clicking on Start Menu > Control Panel > Administrative Tools> Active Directory Users and Computers
Add UNC Path to .msi File
Create new GPO (e.g. MyPC installation) and link it to an OU for testing:
Right-click Edit on the GPO and navigate to Computer Configuration > Policies > SoftwareSettings > Software Installation.
Right-click Software Installation and select New > Package.
© TODAY’S BUSINESS SOLUTIONS, INC. 2016

MYPC SETUP AND INSTALLATION GUIDE NVD01022016
9
Navigate to the MyPC Client.msi in UNC path, then click Open.
© TODAY’S BUSINESS SOLUTIONS, INC. 2016
MYPC SETUP AND INSTALLATION GUIDE NVD01022016
9
Select Advanced, then click OK.
© TODAY’S BUSINESS SOLUTIONS, INC. 2016

MYPC SETUP AND INSTALLATION GUIDE NVD01022016
9
Click OK to continue. The configuration is now complete. MyPC will be deployed on the selected client PCs.
You should now see the following screen:
© TODAY’S BUSINESS SOLUTIONS, INC. 2016

MYPC SETUP AND INSTALLATION GUIDE NVD01022016
9
© TODAY’S BUSINESS SOLUTIONS, INC. 2016

MYPC SETUP AND INSTALLATION GUIDE NVD01022016
9
Disable the “Allow the computer to turn off this device to savepower”When deploying the MyPC 6.x Client on Windows 7, Windows 8 and Windows 10, we recommend that you disable the Allow the computer to turn off this device to save power network adapter power management setting.
The Allow the computer to turn off this device to save power setting controls how the network card is handled when the computer enters sleep and can be used if a driver misrepresents how it handles sleep states. Windows never turns off the network card due to inactivity. When this setting is checked (enabled), Windows puts the network card to sleep and when it resumes it puts it back to D0. When this setting is not checked (disabled), Windows completely halts the device and on resume reinitializes.
You can use Device Manager to change the power management settings for a network adapter. To disable this setting in Device Manager, expand Network Adapters, right-click the adapter, click Properties, click the Power Management tab, and then clear the Allow the computer to turn off this device to save power check box.
© TODAY’S BUSINESS SOLUTIONS, INC. 2016

MYPC SETUP AND INSTALLATION GUIDE NVD01022016
1
TripleA UninstallationThis chapter details the uninstallation of TripleA. On Windows 2003 Server navigate to Control Panel, Add or Remove Programs on Windows 2008 / 2012 R2 Server this is called Programs and Features. Locate the entry for TripleA and click Remove or Uninstall, doing so will produce the screen shown below.
Click Next to continue.
© TODAY’S BUSINESS SOLUTIONS, INC. 2016

MYPC SETUP AND INSTALLATION GUIDE NVD01022016
1
The screen shown below will show shortly after confirming that TripleA has been removed.
Click Finish. Your TripleA Server is now uninstalled.
© TODAY’S BUSINESS SOLUTIONS, INC. 2016

MYPC SETUP AND INSTALLATION GUIDE NVD01022016
1
Cire UninstallationThis chapter details the uninstallation of Cire. On Windows 2003 Server navigate to Control Panel, Add or Remove Programs on Windows 2008 / 2012 R2 Server this is called Programs and Features. Locate the entry for Cire and click Remove or Uninstall, doing so will produce the screen shown below.
Click Next to continue.
© TODAY’S BUSINESS SOLUTIONS, INC. 2016
MYPC SETUP AND INSTALLATION GUIDE NVD01022016
1
The screen shown below will show shortly after confirming that Cire has been removed.
Click Finish. Your Cire Server is now uninstalled.
© TODAY’S BUSINESS SOLUTIONS, INC. 2016

MYPC SETUP AND INSTALLATION GUIDE NVD01022016
1
MyPC Server UninstallationThis chapter details the uninstallation of the MyPC Server. On Windows 2003 Server navigate to Control Panel, Add or Remove Programs on Windows 2008 Server this is called Programs and Features. Locate the entry for MyPC Server and click Remove or Uninstall, doing so will produce the screen shown below.
Click Next to continue.
© TODAY’S BUSINESS SOLUTIONS, INC. 2016
MYPC SETUP AND INSTALLATION GUIDE NVD01022016
1
The screen shown below will appear shortly after confirming that MyPC Server has been removed.
Click Finish. Your MyPC Server is now uninstalled.
© TODAY’S BUSINESS SOLUTIONS, INC. 2016

MYPC SETUP AND INSTALLATION GUIDE NVD01022016
1
MyPC Web UninstallationThis chapter details the uninstallation of MyPC Web Components. On Windows 2003 Server navigate to Control Panel, Add or Remove Programs on Windows 2008 Server this is called Programs and Features. Locate the entry for MyPC Web and click Remove or Uninstall, doing so will produce the screen shown below.
Click Finish to continue. Your MyPC Web Components is now uninstalled.
© TODAY’S BUSINESS SOLUTIONS, INC. 2016