Embed Size (px)
Citation preview
Le s s o n ov e rv i e w
Miss ion to Mer
cu
ry
MESSEN
GE
R
LessonOverview
StandardsBenchmarks
Science Overview
LessonPlan
�
Grade LeveL9 - �2
duration2 weeks - 2 months
essentiaL QuestionHow can the scientific method be used to come up with a solution to the problem of protecting an item exposed to a high
temperature?
Design Challenge
Design ChallengeHow to keep items cooL in boiLinG water?
De s i g n Ch a L L e n g e su m m a ry
Students will design and construct a container that will keep items cool
when placed in boiling water. A pat of butter will be placed in the container.
The goal is to keep the temperature inside the container as cool as possible
and prevent the butter from melting.
ob j e C t i v e s
Students will be able to:
▼ Design a solution to the challenge using the scientific method.
Co n C e p t s
▼ The scientific method can be used to find solutions to many
problems.
▼ There can be more than one solution to a problem.
▼ Food, equipment and tools need to be kept at certain
temperatures in order to maximize their effectiveness and
maintain their structural integrity.
messenger mi s s i o n Co n n e C t i o n
The MESSENGER mission designers have come up with various ways to
keep the temperatures on the spacecraft tolerable in the hot Mercurian
environment.
LessonOverview
StandardsBenchmarks
Science Overview
LessonPlan
MESSENG
ER
2Design Challenge
in t r o D u C t i o n t o De s i g n Ch a L L e n g e s
Design Challenges are intended to focus on real-life situations that give students the chance to deal
with many of the same issues with which scientists, engineers, and researchers are confronted in
laboratories and offices.
Design Challenges provide motivating experiences for children by incorporating problem-solving,
scientific approach, and cooperative teamwork into a standards-based activity. Students will discover
their own and others’ strengths as they take on different roles on a team, and they will witness
firsthand the importance of both successes and failures, for they can learn from both.
Each member of the Design Challenge team is responsible for his or her part of the final project,
whether it be research, drawing, building, analyzing, testing, or whatever may be required. There
must be support and back-up from all team members to ensure the success of the whole team and
of each individual member. The value in this type of a cooperative arrangement is its ability to allow
for creativity and independence within a supportive environment, to teach responsibility, and to keep
all students engaged in learning. Yet we do not lose sight of the value of healthy competition, and
encourage teachers to use our criteria for judging each team’s work, awarding the most successful in
age- and grade-appropriate ways.
The Design Challenge may be used to prompt theoretical discussions in the classroom and further
research only, or it may be used in its entirety, including the actual building of a working model. We
recommend that at least one Design Challenge per year be assigned to the students, to give them the
unparalleled experience of working together on applying the scientific process in their daily lives; it
is sure to change their way of thinking in the years to come.
The Design Challenge is meant to encourage students to use a trustworthy scientific process for
which they can provide a rationale, and which will yield verifiable results or answers to a question.
While the scientific method has traditionally been taught in fairly rigid terms, we maintain that
much creativity is, in fact, necessary within the basic methodology to best pursue any investigation
thoroughly.
A scientist must be able to create research and design processes to fit an investigation, and keep well-
documented records of each step so that the experiment and the results are verifiable by others. We
include a guideline to help your students move through the scientific process, while providing for
variations necessary to fit their individual designs and inventions.
Version 2.4, June 20�0
This lesson was developed by the National Center for Earth and Space Science Education (http://ncesse.org).
Science Overview
LessonPlan
MESSENG
ER
�
sta n D a r D s & be n C h m a r k s
LessonOverview
StandardsBenchmarks
Design Challenge
nat i o n a L sC i e n C e eD u C at i o n sta n D a r D s
Standard A2 Understandings about scientific inquiry
▼ Scientists usually inquire about how physical, living, or designed systems function.
Conceptual principles and knowledge guide scientific inquiries. Historical and current
scientific knowledge influence the design and interpretation of investigations and the
evaluation of proposed explanations made by other scientists.
Standard E� Abilities of technological design
▼ Identify a problem or design an opportunity: Students should be able to identify new
problems or needs and to change and improve current technological designs.
▼ Propose designs and choose between alternative solutions: Students should demonstrate
thoughtful planning for a piece of technology or technique. Students should be introduced
to the roles of models and simulations in these processes.
▼ Implement a proposed solution: A variety of skills can be needed in proposing a solution
depending on the type of technology that is involved. The construction of artifacts can
require the skills of cutting, shaping, treating, and joining common materials—such as
wood, metal, plastics, and textiles. Solutions can also be implemented using computer
software.
Science Overview
LessonPlan
MESSENG
ER
4Standards
BenchmarksLesson
OverviewDesign Challenge
am e r i C a n as s o C i at i o n f o r t h e aD va n C e m e n t o f sC i e n C e, pr o j e C t 2061
Benchmark �B2 Hypotheses are widely used in science for choosing what data to pay attention
to and what additional data to seek, and for guiding the interpretation of data (both new and
previously available.)
Benchmark �B4 There are different traditions in science about what is investigated and how,
but they all have in common certain basic beliefs about the value of evidence, logic, and good
arguments. And there is agreement that progress in all fields of science depends on intelligence,
hard work, imagination, and even chance.
Benchmark �2A� Know why curiosity, honesty, openness, and skepticism are so highly regarded
in science and how they are incorporated into the way science is carried out; exhibit those traits
in their own lives and value them in others.
Benchmark �2A2 View science and technology thoughtfully, being neither categorically
antagonistic nor uncritically positive.
StandardsBenchmarks
LessonPlan
MESSENG
ER
�
sC i e n C e ov e rv i e w
MESSENGER in Space
The concept of keeping comfortable in a hot
environment is central to the success of
the MESSENGER mission to Mercury. The
MESSENGER spacecraft will venture into the
inner parts of the Solar System, where radiation
from the Sun will reach levels that are �-�� times as
high as they are near Earth, depending on where
Mercury is on its orbit around the Sun. Since the
Earth’s atmosphere stops about half of all solar
radiation from reaching the surface, the spacecraft
will be exposed to more than 20 times the amount
of solar radiation as it would on the surface of
Earth. Infrared radiation emitted from the sunlit
side of Mercury adds to the high-temperature
environment. This has created a great engineering
challenge for the mission design team: how can the
spacecraft be protected from temperatures of over
400˚C (7�0˚F)?
The solution employed by the MESSENGER
design team involves using heat-resistant
materials, building a sunshade to protect the
instruments from the Sun, and planning an orbit
around Mercury that minimizes the amount of
infrared radiation received from the planet’s
surface. As a result, MESSENGER instruments
are in a thermal environment comparable to room
temperature: during Mercury’s orbit around the
Sun, the temperature on the instrument deck
of MESSENGER is expected to vary from a few
degrees below 0˚C (�2˚F) to ��˚C (9�˚F).
High-Temperature Problems on Earth
Here on Earth, there are situations where we need
to be able to withstand high heat. For example,
firefighters have to stand and work right next
to an intense fire. In today’s world, there are
many places where we need to have machinery
and humans operate in high temperatures, from
making steel to flying aircraft at high speeds.
The purpose of this discussion is to provide a
glimpse of some of the science behind designing
operations that take place in high temperatures.
The question of how to keep things comfortable
in a hot environment requires understanding
such basic physical properties and processes as
what temperature is, how heat moves from one
place to another, and how this movement can be
controlled.
Temperature and Heat
An object’s temperature is a measurement that
describes the level of motion and vibration in the
atoms and molecules of which it is composed (that
is, the internal energy of the atoms and molecules).
The higher the temperature of an object, the more
vigorously its atoms and molecules vibrate and
bounce off each other, and the more disorderly is
their motion. This means that heat flowing into an
object increases the internal energy and disorder
in that object, while heat flowing out of it decreases
its internal energy and disorder. For example, the
water molecules in a snowflake are arranged in an
LessonOverview
Science Overview
Design Challenge
StandardsBenchmarks
LessonPlan
MESSENG
ER
�
orderly pattern. If you hold a snowflake in your
hand, it will melt and become a drop of water.
While it melts, the orderly pattern of the snowflake
changes into the more disorderly form of liquid
water.
Thermodynamics
The science of thermodynamics studies the
relationships between various forms of energy,
such as heat and mechanical work. There are three
basic laws of thermodynamics:
�) Energy may change form, but it is never created
or destroyed ("conservation of energy"). For
example, heat and chemical energy can be changed
into mechanical energy by steam turbines and by
automobile gasoline engines.
2) Heat energy flows from hotter to colder
substances unless work is done.
�) There is a theoretical temperature at which
matter would have the least possible internal
energy and no disorder. However, it is impossible
to reduce the temperature of any system to this
absolute zero, 0 K (-27�˚C; -4�9˚F).
Transmitting Heat
If you hold a snowflake in your hand, it will melt
because the heat from your hand travels to the
snowflake and causes its temperature to rise. In
general, heat passes from one substance or an
object to another by:
�) Conduction
▼ Heat moves through material without any
of the material moving.
▼ E.g., the tip of a metal pitchfork placed in a
fire: vibration of atoms is transmitted from
the tip throughout the pitchfork, but none
of the atoms move from the tip to other
parts of the pitchfork.
2) Convection
▼ Heated material moves and carries heat with
it.
▼ E.g., heating water in a pot on a stove: hot
liquid from the bottom of the pot rises up,
while cold water sinks down to be heated.
�) Radiation
▼ Heat is transmitted via electromagnetic
radiation, either through a medium (such
as air) or without need for material (e.g.,
through space).
▼ E.g., infrared rays, visible sunlight.
How Heat Changes a Substance
There are three basic ways in which heat can
change materials:
�) Change in temperature
▼ The internal energy of the atoms and
molecules of the material increases. This is
the most common result of heat interacting
with matter.
Science Overview
LessonOverview
Design Challenge
StandardsBenchmarks
LessonPlan
MESSENG
ER
7
▼ The amount of heat needed to raise the
temperature of one kilogram of a substance
one degree Celsius is called the specific
heat capacity (or just specific heat) of the
substance.
▼ Two substances with the same mass but
different specific heats require different
amounts of heat to reach the same
temperature.
▼ The specific heat of water is 4�8� joules per
kilogram per degree Celsius.
2) Change in size
▼ Since the motion of the atoms and molecules
in a substance increases when heat flows into
it, the atoms and molecules need more space
and the substance expands in most cases.
▼ In contrast, when heat flows out of a
substance, the atoms and molecules move
more slowly and require less space; the
substance contracts in most cases.
▼ All gases and most liquids and solids
expand when heated. An important
exception is water, which contracts when
its temperature rises from 0˚C (�2˚F) to 4˚C
(�9˚F), and only then starts expanding as it
is heated. The same is also true when water
changes phase from solid to liquid: water
contracts when heated from ice to liquid.
This property is caused by the way water
molecules bond with each other in different
phases; for example, in the solid state of
water (ice), there is more empty space
between molecules than in liquid water.
▼ The change in size is the basis for bulb-type
thermometers, among other things.
▼ This effect must be taken into account
when building bridges, buildings, and other
structures, so that materials can expand and
contract without causing severe problems.
�) Changes in the physical state (phase)
▼ Freezing: loss of heat causes a substance to
change from liquid to solid.
▼ Melting: heat causes a substance to change
from solid to liquid.
▼ Boiling: heat causes a substance to change
from liquid to gas.
▼ Condensation: loss of heat causes a
substance to change from gas to liquid.
▼ Sublimation: absorbing heat causes a solid
to change directly into gas.
▼ Deposition: loss of heat causes gas to
change directly into solid.
▼ Melting and freezing occur at the same
temperature: melting and freezing point.
▼ Boiling and condensation occur at the same
temperature: condensation and boiling
point.
▼ The amount of energy that needs to be
added or removed to change the state of a
material is called latent heat.
LessonOverview
Science Overview
Design Challenge
StandardsBenchmarks
LessonPlan
MESSENG
ER
8
Keeping Heat at Bay
In order to keep items cool, we need to keep heat
from interacting with them. The movement of
heat from one place to another can be restricted
by insulation: by keeping heat from entering or
flowing out of an object.
To combat the three ways in which heat can travel,
there are three basic methods of insulation:
�) To fight conduction, some materials are used as
insulators.
▼ E.g., many pots and pans have plastic or wood
handles.
2) To fight convection, the space between hot and
cold areas can be filled with "dead air."
▼ E.g., double-pane window: the layer of air
between the outer and the inner windows stops
the convection from transferring heat between
them; narrow dead air space is better than wide
since it makes the formation of convective air
circulation currents more difficult.
�) To fight radiation, reflective or blocking materials
can be used.
▼ E.g., reflective car sunshades placed against
a windshield to prevent the inside of the car
from heating up; sunscreen spread on skin to
prevent sunburn.
Oftentimes, insulators are designed to combine
different ways with which they can act to make
them as efficient insulators as possible. For
example, insulating material may be composed of
poorly conducting material, have cell-like spaces to
reduce the motion of cold or hot air, and be coated
with reflective material.
Insulating material can be purchased in a variety of
forms, such as blankets, paper, or in a loose, crumb-
like form, and it may be composed of cellulose,
fiberglass, gypsum, metal foil, perlite (glassy lava),
rock wool (also called mineral wool), or plastics, for
example. The type of insulation used depends on
the specific needs of the application.
Insulation is used in houses to reduce the flow
of heat outward during cold weather and inward
during hot weather. Insulation is also used in
many industrial applications to keep temperatures
at a desired level in various processes. For example,
industrial furnaces are sometimes lined with
insulating blankets made of ceramic fibers so
that high temperatures can be maintained inside
it without damaging the surrounding equipment.
Insulation is also used for fire-fighting suits and
wherever high temperatures are encountered.
Insulation is also essential for spaceflight. For
example, astronauts wear space suits composed
of multiple layers of insulating material to shield
them from the cold vacuum of space and the
broiling heat of sunlight. Insulating materials can
also be used to protect sensitive spacecraft systems
and instruments, as necessary. For example, the
MESSENGER mission to Mercury will have to
operate in an environment where the temperature
Science Overview
LessonOverview
Design Challenge
StandardsBenchmarks
LessonPlan
MESSENG
ER
9Lesson
OverviewScience
OverviewDesign Challenge
can reach over 400ºC (7�0ºF), and various methods
are employed during the mission to keep the
temperatures tolerable
Future
The use of insulation will allow us to employ ever
more complicated tools and processes and allow
us to venture ever more exotic environments. The
development in this field is rapid, and new and
better products are introduced constantly. This
Design Challenge prepares students for these
new developments, by having them explore the
creative and scientific aspects of designing and
making objects that can withstand high heat.
StandardsBenchmarks
LessonPlan
MESSENG
ER
�0
Professional scientists and researchers follow
the scientific process when conducting scientific
research and developing new concepts. The
strength of the scientific method is that it takes
away guesswork, beliefs and opinions. By following
the process, a scientist or engineer can determine
whether the proposed solution is robust enough
to meet the standards set forth by hundreds of
years of scientific progress. Although the steps
are numbered for convenience, many scientists
must return to previous work to reformulate a
question, redesign a procedure, re-examine a plan,
retest a hypothesis, etc. It would therefore not be
unusual to have even more steps in an individual
investigation. This overview has been designed
to help students understand how the steps they
take to come up with solution of the Design
Challenge parallels the process a professional
scientist, researcher, or engineer follows.
Using the scientific process, a scientist or an
engineer:
�) States the problem or asks a question;
2) Conducts research to see what is already
known, if an answer or solution already exists;
�) Proposes a possible solution;
4) Tests the proposed solution by building a
prototype, conducting an experiment or making
observations, and recording the results;
�) Analyzes results, then revises, rejects, or accepts
the hypothesis, and reports conclusions.
The following steps describe what steps you would
typically take to solve the Design Challenge by
following the scientific method.
1) State the problem or ask a question
What Professional Scientists and Researchers Do:
Scientists and engineers spend a lot of time
becoming familiar with a research area. They
do this by studying specific areas in college,
reading current research on the topic, and having
discussions with other experts in the field. All of
this happens before they embark on the process
of developing informed questions about the topic.
These questions then need to be answered through
experimentation.
What You and Your Students Can Do:
The topic of the Design Challenge is to keep
comfortable in a hot environment. You can have
students research the ways with which scientists
and engineers have grappled with the issue in
various circumstances, from keeping food from
spoiling in the kitchen to insulating industrial
furnaces or keeping spacecraft comfortable when
flying through Earth’s atmosphere. After sharing
information about their preliminary research,
students should brainstorm. By doing this, students
will formulate the critical questions which drive
how they design and build their models later
during the Design Challenge. Brainstorming gives
students the opportunity to think of many ideas
related to a particular topic. By brainstorming as a
a br i e f gu i D e o n us i n g t h e sC i e n t i f i C pr o C e s s i n t h e De s i g n Ch a L L e n g e
LessonOverview
Science Overview
Design Challenge
StandardsBenchmarks
LessonPlan
MESSENG
ER
��
team, they can listen to each other’s ideas and come
up with even more ideas. Frequently, students
will get more ideas when hearing and seeing the
ideas of their teammates. Before beginning the
brainstorming activity, make sure you lay out these
basic rules to your students:
▼ Students must speak one at a time.
▼ Students must listen to each other.
▼ The ideas must relate to the question.
▼ There are no wrong ideas.
▼ The teams should come up with as many ideas
as possible.
Students can keep track of their ideas by keeping
a Brainstorming Journal. You can set the students
in the spirit of brainstorming with the following
question: How have previous generations grappled
with the problem of keeping items (or people)
comfortable in a hot environment?
After becoming familiar with the current state
of research in their chosen topic, scientists and
engineers typically develop an informed question
that cannot be reasonably answered except
through experimentation, research, or observation.
To follow this procedure, the students could pick a
specific topic proposed during the brainstorming
session and refine it into a specific question to
follow further. However, for this particular Design
Challenge, the MESSENGER program provides
the problem to be solved. The problem was chosen
to be similar to what the MESSENGER engineering
team had to grapple with: keeping comfortable in
a hot environment. You can have the students
come up with something similar to the following
challenge by leading questions, such as "What
kind of hot environments can we encounter during
our daily lives—such as in a kitchen?" (if students
suggest an oven, you may lead them to the idea
of boiling water by suggesting that you might not
have an oven available for testing—what would be
another hot environment?) Or you can just pose to
students the Design Challenge:
"How to keep items cool in boiling water?"
2) Conduct research to see what is already known
and if an answer or solution already exists.
What Professional Scientists and Researchers Do:
Scientists and researchers conduct research not
merely to determine if an acceptable solution
has already been found to a problem, but to be
inspired by the ideas of others who have attempted
and failed. In this stage, they build upon their own
experiences and those of persons before them to
guide their investigation. By studying what did not
work, you can learn without having to experience
the failure yourself; this is one reason why it is so
important to study history—so we don’t make the
same mistakes as our forefathers.
What You and Your Students Can Do:
Where to do research and gain insight into the
attempted solutions by others depends on the
nature of the original problem. For the proposed
Design Challenge, we suggest that you start in the
LessonOverview
Science Overview
Design Challenge
StandardsBenchmarks
LessonPlan
MESSENG
ER
�2
following places, but that you go beyond these few
suggestions: Web sites, books, journals, magazines,
and experts.
3) Propose a possible solution.
What Professional Scientists and Researchers Do:
With the necessary background information
gathered, scientists and engineers can come up
with a suggestion how to answer the question
or solve a problem. Often, there are several
external factors that play a part in their designs,
such as a budget limitations, available technology,
and sometimes even nature itself. This is when
engineers and scientists use their ingenuity to
find creative solutions. This is also the time when
scientists and engineers come to a fundamental
understanding of their solution. It is not enough
to simply come up with a design—to be able to
test and interpret the results correctly requires
knowing exactly how it works.
What You and Your Students Can Do:
Have students brainstorm in their teams solutions
to the Design Challenge based on the specific
requirements and constraints set for the solution.
4) Test the proposed solution by constructing
a prototype, conducting an experiment or
observations and recording the results.
What Professional Scientists and Researchers Do:
Once a scientist or an engineer has come up with
a proposed solution to the problem, the proposal
can be tested. If the solution is a physical object,
a prototype (the first of a kind of object) may be
built based on the design, so that it is possible to
quickly determine what works, and why in a real
situation. Scientists and engineers must be able
to deal with any unexpected challenges that may
crop up during the testing of the solution. Not
every test goes flawlessly, and often people rely
on their creativity and ingenuity to help them
overcome obstacles. At the same time, scientists
and engineers are (ideally) rewarded with the
first glimpses of their creation in action. This stage
can be the most exhilarating part of the process,
because it can be a chance to see the solution
work—or, if it does not work, provide invaluable
further insight into the problem.
What You and Your Students Can Do:
In order to see if your students’ solution works,
they must test it by building the model and
following the testing procedures described in this
Design Challenge. Make sure that the students
write a plan that includes:
▼ Specific protocols and detailed procedures
you intend to follow so you can answer the
question (be prepared to explain why each
step is necessary). You may have to make rough
sketches of your invention.
▼ A list of the materials you will need, including
tools for testing the success of your solution.
LessonOverview
Science Overview
Design Challenge
StandardsBenchmarks
LessonPlan
MESSENG
ER
��
Charts and tables may be helpful in organizing
your ideas.
▼ A calendar to schedule deadlines that you
agree to meet, in order to efficiently complete
your investigation.
Make sure that you check the students’ proposed
solution to ensure that they are following reliable,
safe, rational, and reasonable procedures that
account for or control unwanted intervening
variables.
After the students have come up with a proposed
solution, have them write a plan on how to test
their solution, following the testing procedures
described in the Student Worksheets. Have them
include in their plan steps such as:
▼ The materials they will need.
▼ The steps of the experiment.
▼ A data table for collecting the measurements.
▼ Prediction of what will happen.
Whatever happens during this part of the process,
be sure to record every step of the way, since it may
be important in the final analysis of your results.
When possible, you may want to repeat this part of
the process to verify your results.
5) Interpret and analyze results; revise, reject,
or accept the proposed solution; and report
conclusions.
What Professional Scientists and Researchers Do:
Once testing provides information, scientists and
engineers can begin interpreting the results. Some
interpretations of the results are immediately
obvious, while others can take years of analysis to
interpret. Sometimes, after the information has
been looked at and shared with other scientists,
("peer review"), there is disagreement on what
the information means. Who is right or wrong
might not be determined until more tests are
performed, but all points of view are important to
consider. Regardless of the results or how they are
interpreted, new questions invariably arise from
such investigations, bringing us full circle in the
scientific process.
An important aspect of the scientific process is
sharing with other scientists your results and a
description of the design and the testing your
solution went through. Your solution can then
be tested by others, if they so choose. This ability
to replicate an experiment is at the heart of the
scientific process—if an experiment or its results
cannot be independently verified, the original
results are deemed to have been wrong, because
of over-interpreting the results, a glitch in the
experiment or, in rare cases, due to forging of data
or results. This is how real scientific results can be
separated from forgeries and wishful thinking.
What You and Your Students Can Do:
Once your students have completed their tests,
they need to look at the data they collected.
LessonOverview
Science Overview
Design Challenge

StandardsBenchmarks
LessonPlan
MESSENG
ER
�4
Make sure the students look objectively at their test
results. Sometimes people want their solutions to
work so much that they imagine more success than
there really is. Be careful to base your conclusions
only on what can be demonstrated from the actual
object, testing, or calculations.
Have students hold a symposium to discuss their
proposed solutions and results from testing. Have
students contemplate improvements on their
design after seeing their solution in action. If the
design solution worked, are there ways to improve
it? If the model did not work, what improvements
could be made to make it work? Make sure other
teams have a chance to contribute ideas to other
teams’ solutions. Teams can make improvements
and then retest their designs. Or, you may choose
to have the students work together, combine best
elements from different teams’ solutions and come
up with the final class solution to the Design
Challenge.
LessonOverview
Science Overview
Design Challenge
StandardsBenchmarks
Science Overview
MESSENG
ER
��
Le s s o n pL a n
Materials
Per group:
▼ Materials for build-
ing the container—the
solution to the Design
Challenge: Chosen by
the group within an
assigned budget
▼ Thermometer
▼ Heat source
▼ Beaker capable of
holding a �0 cm x �0
cm container
▼ Water: Enough to fill
the beaker
▼ A skewer or a chop-
stick
▼ �/8 c. of butter (2 tbsp.)
▼ Scissors or X-acto
knives for making
holes
▼ Scale or triple beam
balance
▼ 2 ring stands
▼ 2 clamps
Teaching Tip
Remind the students to remember some basic rules of brainstorming as
described in "A Brief Guide on Using the Scientific Process in the Design
Challenge."
LessonPlan
LessonOverview
Design Challenge
pr e pa r at i o n
▼ Divide the class into teams, or allow students to form
their own. Ensure that each team has a variety of abilities
represented evenly so that the team will be able to work well
together.
▼ Decide how long you will give the students to design and
build their projects, and if you want to use classroom time.
This can be a project that takes a month or more, and for
which you expect high-quality work, such as for a science
fair. Alternatively, the project could proceed at a faster pace,
perhaps in two weeks, and include time in class or during
lunch to help certain groups.
▼ You may want to construct the testing apparatus in advance
of the activity (see Student Worksheet for description of the
testing procedures).
wa r m-u p & pr e-a s s e s s m e n t
�. Pose one or two of the following problems to students: If you are hiking
in the desert and want to stop and cool off a bottle of water you have
been carrying, how can you do it? If you have dropped an object in a
fireplace, how can you rescue it? How can you keep something hot
once it is removed from a stove or oven? Help them come up with
a clearly-worded, critical question about the object or circumstances
under discussion.
StandardsBenchmarks
Science Overview
MESSENG
ER
��LessonPlan
LessonOverview
Design Challenge
pr o C e D u r e s
�. Help the students understand the scientific process as described in "A Brief Guide on
Using the Scientific Process in the Design Challenge." You may want to modify the depth
of the tasks undertaken by the students in following the scientific process, depending on
how much time you want to spend on the Design Challenge. The guidelines are intended
to provide a comprehensive overview of the scientific process.
2. Go through the basic design requirements and the testing procedure with the students
so that they understand what they need to design. These requirements and testing
procedures are described in the Student Worksheet.
�. Remind students to keep clear journals of their design process. The documentation of
the design needs to be comprehensible by anyone not associated with the project. In this
manner, the design could be reproduced and re-tested by anyone interested. Adequate
documentation is essential for maintaining the integrity of the scientific process in all
endeavors.
4. Students will then test their platform design by following the directions on the Student
Worksheet.
�. Make sure the water in the testing containers is boiling before the tests begin.
Note: You may want to have a fire extinguisher available during testing, in case there are any
mishaps during testing.
2. Have the students brainstorm ideas related to the topic. Help them look for other
categories or places in which the topic may have an effect. Based on their ideas, have
students think up questions that they would really want to have answered but which are
initially difficult to answer.
StandardsBenchmarks
Science Overview
MESSENG
ER
�7LessonPlan
LessonOverview
Design Challenge
Di s C u s s i o n & re f L e C t i o n
Once a winner has been established, gather the students for an open discussion. Ask them
to list ideas as to why the winning team was successful. Ask students to analyze methods or
procedures that failed. Understanding why something did not work can provide as valuable
insight into the problem as understanding why something else did work. Have the groups
discuss how they could have improved their designs, and have a representative from each
group explain their ideas to the class. Brainstorm ways in which the students could keep the
container in the boiling water longer, if there were no budget constraints.
Cu r r i C u L u m Co n n e C t i o n s
▼ Health: Discuss the implications of getting burned, heat exhaustion, dehydration, other heat-related problems and their remedies.
CL o s i n g Di s C u s s i o n
Discuss with students the connection between what they have done and the MESSENGER
mission to Mercury. Ask them how their challenge was similar to or different from the one
that the mission engineers faced. Ask them how, even though their solutions were very
different, were the processes similar?
StandardsBenchmarks
Science Overview
MESSENG
ER
�8LessonPlan
LessonOverview
Design Challenge
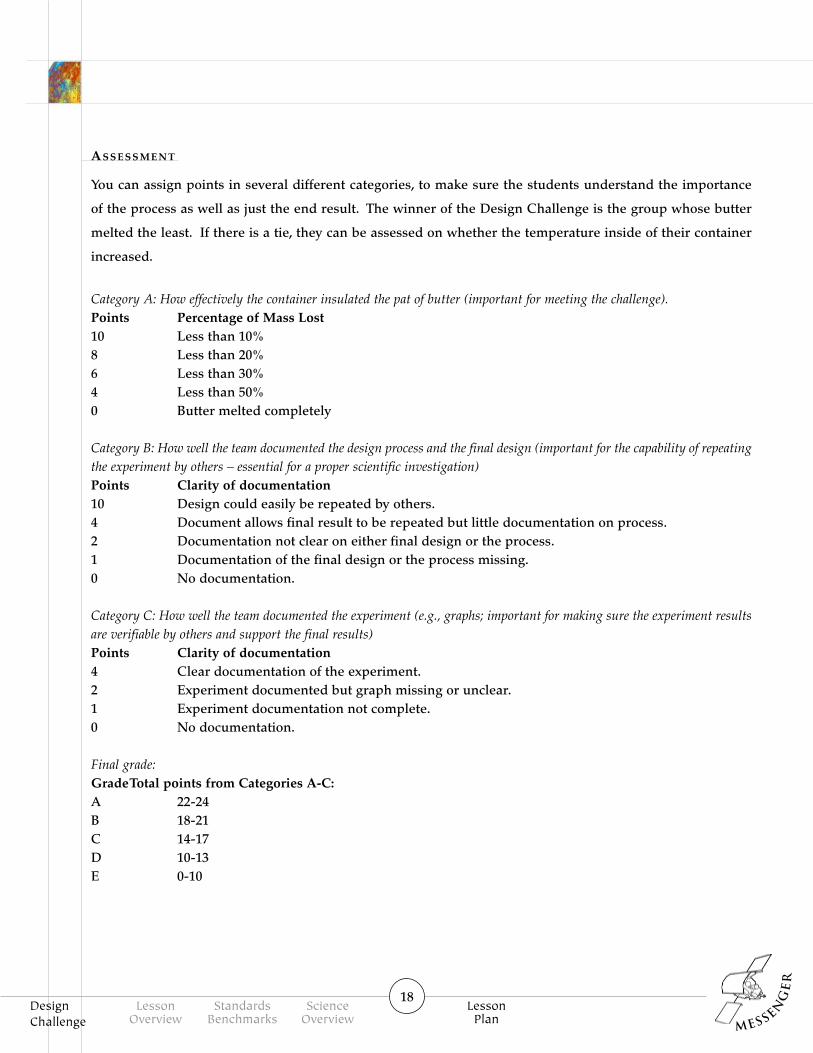
as s e s s m e n t
You can assign points in several different categories, to make sure the students understand the importance
of the process as well as just the end result. The winner of the Design Challenge is the group whose butter
melted the least. If there is a tie, they can be assessed on whether the temperature inside of their container
increased.
Category A: How effectively the container insulated the pat of butter (important for meeting the challenge).Points Percentage of Mass Lost�0 Less than �0%8 Less than 20%� Less than �0%4 Less than �0%0 Butter melted completely
Category B: How well the team documented the design process and the final design (important for the capability of repeating the experiment by others – essential for a proper scientific investigation)Points Clarity of documentation�0 Design could easily be repeated by others.4 Document allows final result to be repeated but little documentation on process.2 Documentation not clear on either final design or the process.� Documentation of the final design or the process missing.0 No documentation.
Category C: How well the team documented the experiment (e.g., graphs; important for making sure the experiment results are verifiable by others and support the final results)Points Clarity of documentation4 Clear documentation of the experiment.2 Experiment documented but graph missing or unclear.� Experiment documentation not complete.0 No documentation.
Final grade:Grade Total points from Categories A-C:A 22-24B �8-2�C �4-�7D �0-��E 0-�0
Student Worksheet Miss io
n to Mercury
ME
SSE
NGER
Name
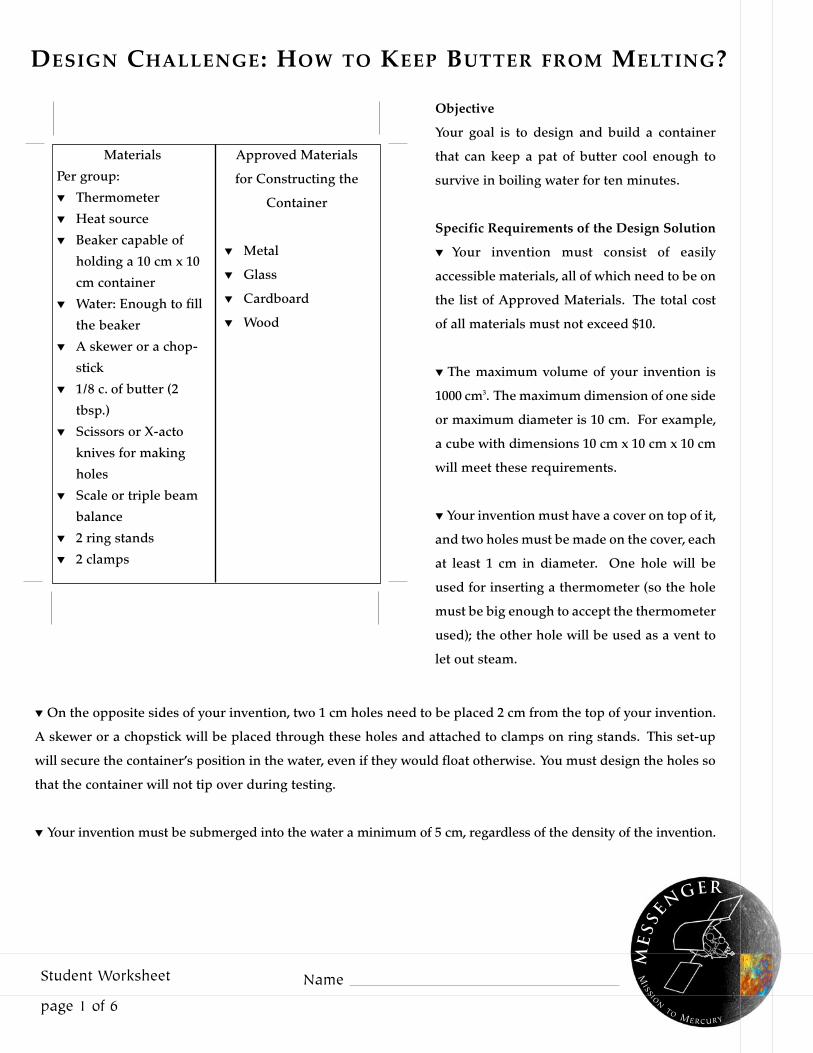
Materials
Per group:
▼ Thermometer
▼ Heat source
▼ Beaker capable of
holding a �0 cm x �0
cm container
▼ Water: Enough to fill
the beaker
▼ A skewer or a chop-
stick
▼ �/8 c. of butter (2
tbsp.)
▼ Scissors or X-acto
knives for making
holes
▼ Scale or triple beam
balance
▼ 2 ring stands
▼ 2 clamps
Approved Materials
for Constructing the
Container
▼ Metal
▼ Glass
▼ Cardboard
▼ Wood
Design ChaLLenge: how to keep butter from meLting?
Objective
Your goal is to design and build a container
that can keep a pat of butter cool enough to
survive in boiling water for ten minutes.
Specific Requirements of the Design Solution
▼ Your invention must consist of easily
accessible materials, all of which need to be on
the list of Approved Materials. The total cost
of all materials must not exceed $�0.
▼The maximum volume of your invention is
�000 cm�. The maximum dimension of one side
or maximum diameter is �0 cm. For example,
a cube with dimensions �0 cm x �0 cm x �0 cm
will meet these requirements.
▼Your invention must have a cover on top of it,
and two holes must be made on the cover, each
at least � cm in diameter. One hole will be
used for inserting a thermometer (so the hole
must be big enough to accept the thermometer
used); the other hole will be used as a vent to
let out steam.
▼On the opposite sides of your invention, two � cm holes need to be placed 2 cm from the top of your invention.
A skewer or a chopstick will be placed through these holes and attached to clamps on ring stands. This set-up
will secure the container’s position in the water, even if they would float otherwise. You must design the holes so
that the container will not tip over during testing.
▼Your invention must be submerged into the water a minimum of � cm, regardless of the density of the invention.
page 1 of 6
Student Worksheet
MESSENG
ER
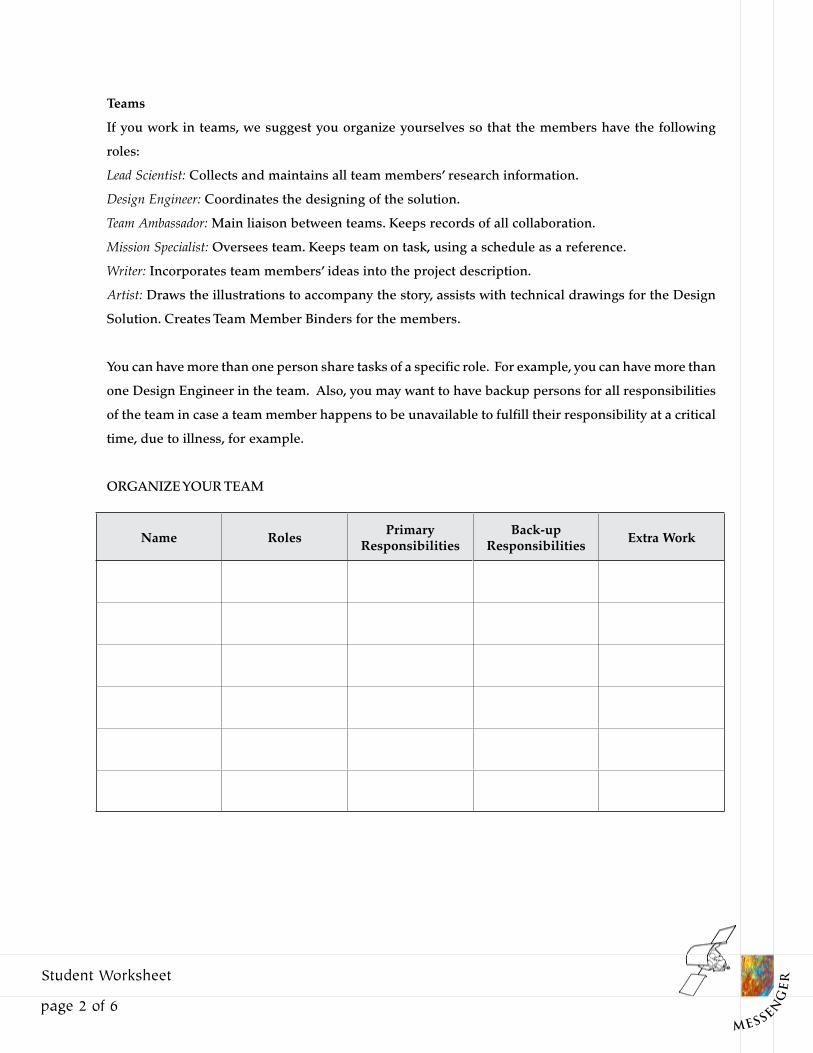
Teams
If you work in teams, we suggest you organize yourselves so that the members have the following
roles:
Lead Scientist: Collects and maintains all team members’ research information.
Design Engineer: Coordinates the designing of the solution.
Team Ambassador: Main liaison between teams. Keeps records of all collaboration.
Mission Specialist: Oversees team. Keeps team on task, using a schedule as a reference.
Writer: Incorporates team members’ ideas into the project description.
Artist: Draws the illustrations to accompany the story, assists with technical drawings for the Design
Solution. Creates Team Member Binders for the members.
You can have more than one person share tasks of a specific role. For example, you can have more than
one Design Engineer in the team. Also, you may want to have backup persons for all responsibilities
of the team in case a team member happens to be unavailable to fulfill their responsibility at a critical
time, due to illness, for example.
ORGANIZE YOUR TEAM
page 2 of 6
Name Roles PrimaryResponsibilities
Back-upResponsibilities Extra Work
Student Worksheet
MESSENG
ER
In your team, remember to
▼ COLLABORATE
All team members can collaborate with other teams, asking questions as to how they might approach
the problem, but the team ambassador should be informed when anyone does so. You may want to
consider your invention as a "trade secret," until you put it into action, so be sure that your team is
aware of how much you share with other teams.
▼ COOPERATE
Your team will come up with a better solution if you cooperate with each other. As a team member,
make sure that you complete your tasks and then cooperate with the other members by sharing
information, ideas, work, and compliments.
page 3 of 6
Student Worksheet
Sample text.
MESSENG
ER
Guidelines
�. Your solution must be guided by the scientific process as well as by your own creativity.
2. If you work in teams, see Page 2 of the Worksheet for description of suggested tasks.
�. Research materials that are good insulators. Use a variety of sources (books, magazines,
scientific and engineering journals, Web sites, CD-roms, DVDs) for research. Make notes of your
research.
4. Based on your research and your ingenuity, choose a design solution.
�. You must write and illustrate a full description of your design solution. Keep in mind the
following points:
▼ Include a section on how you made certain choices, decided to choose certain materials, if you
conducted any preliminary testing, if you had to change plans, and at least two labeled diagrams
or photographs of the solution.
▼ If you refer to information from a specific source which you encountered during your research
and which influenced your design, make sure you cite it properly in your description.
▼ Comprehensive description of the invention and the design process is important so that others
may evaluate your design at a later time.
�. Collect required materials.
7. Build your invention.
8. Test your device in class according to the testing procedures described on Page � of the Student
Worksheet.
9. Write your final report. Write about your observations during the testing, what conclusions you
made about the effectiveness of your solution, what you learned, and what your next investigation
might be, based on your conclusions. Again, this is important so that others may evaluate your
design at a later time or repeat your testing procedures and verify your results.
page 4 of 6
Student Worksheet
Sample text.
MESSENG
ER
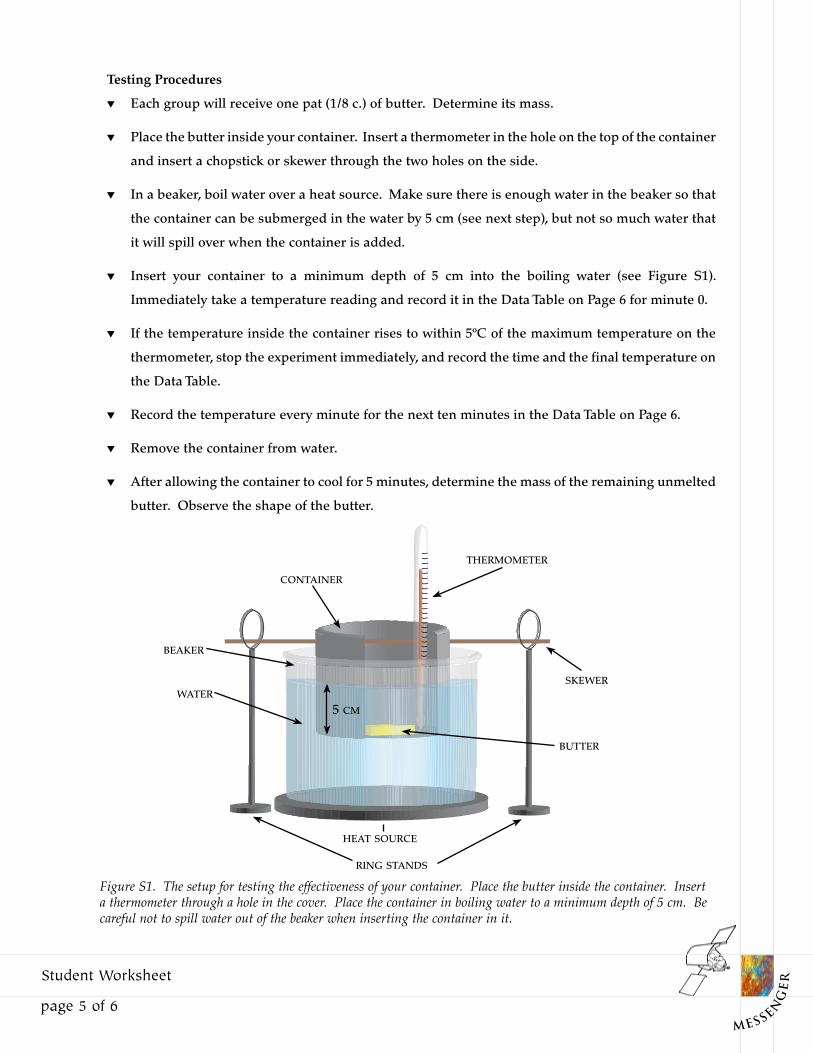
Testing Procedures
▼ Each group will receive one pat (�/8 c.) of butter. Determine its mass.
▼ Place the butter inside your container. Insert a thermometer in the hole on the top of the container
and insert a chopstick or skewer through the two holes on the side.
▼ In a beaker, boil water over a heat source. Make sure there is enough water in the beaker so that
the container can be submerged in the water by � cm (see next step), but not so much water that
it will spill over when the container is added.
▼ Insert your container to a minimum depth of � cm into the boiling water (see Figure S�).
Immediately take a temperature reading and record it in the Data Table on Page � for minute 0.
▼ If the temperature inside the container rises to within �ºC of the maximum temperature on the
thermometer, stop the experiment immediately, and record the time and the final temperature on
the Data Table.
▼ Record the temperature every minute for the next ten minutes in the Data Table on Page �.
▼ Remove the container from water.
▼ After allowing the container to cool for � minutes, determine the mass of the remaining unmelted
butter. Observe the shape of the butter.
Figure S1. The setup for testing the effectiveness of your container. Place the butter inside the container. Insert a thermometer through a hole in the cover. Place the container in boiling water to a minimum depth of 5 cm. Be careful not to spill water out of the beaker when inserting the container in it.
rinG stands
tHermometer
skewer
container
butter
Heat source
water
beaker
5 cm
page 5 of 6

Student Worksheet
MESSENG
ER
Observations: The shape of the butter
Make a graph of the temperature of the container versus time.
Data Table
page 6 of 6
Minute Temperature
0
�
2
�
4
�
�
7
8
9
�0
Mass of Butter (g)
Before Entering the Boiling Water
After �0 minutes in Boiling Water
Difference in Mass