Embed Size (px)
Citation preview
Registration Guide for Students
08-Nov-2016 11:40 Version 20 Page of 1 18
Log In To My Portal
Open web browser and type myportal.fhda.edu
Enter Campuswide ID (8 digits, no dashes).
New students received it by email when your application was accepted.
Continuing students have the same ID as the prior year. Social Security numbers are no longer
accepted as student IDs.
International students go to International Student Program Office
De Anza - Registration and Student Services Building, 2nd Floor (above the Bookstore)
Foothill - Administration Building, office number 1933
AB540 students go to Admissions & Records office or send email to
De Anza - A & R Help Form
Foothill - A & R Help Form
Important Information
Each student must have a address. Two people who are taking classes cannot have the unique email
same email address. An application will also not be processed if another student is already in Banner
with the same email, whether the existing student is registered for the current quarter or not. Each
student really must have a unique email to apply.
Registration and record . All holds must be cleared to allow registration, to add or holds are districtwide
drop a class, or to release academic records. Check and resolve holds prior to registering. A hold at De
Anza will keep you from registering at Foothill and visa versa.
Registration Guide for Students
08-Nov-2016 11:40 Version 20 Page of 2 18
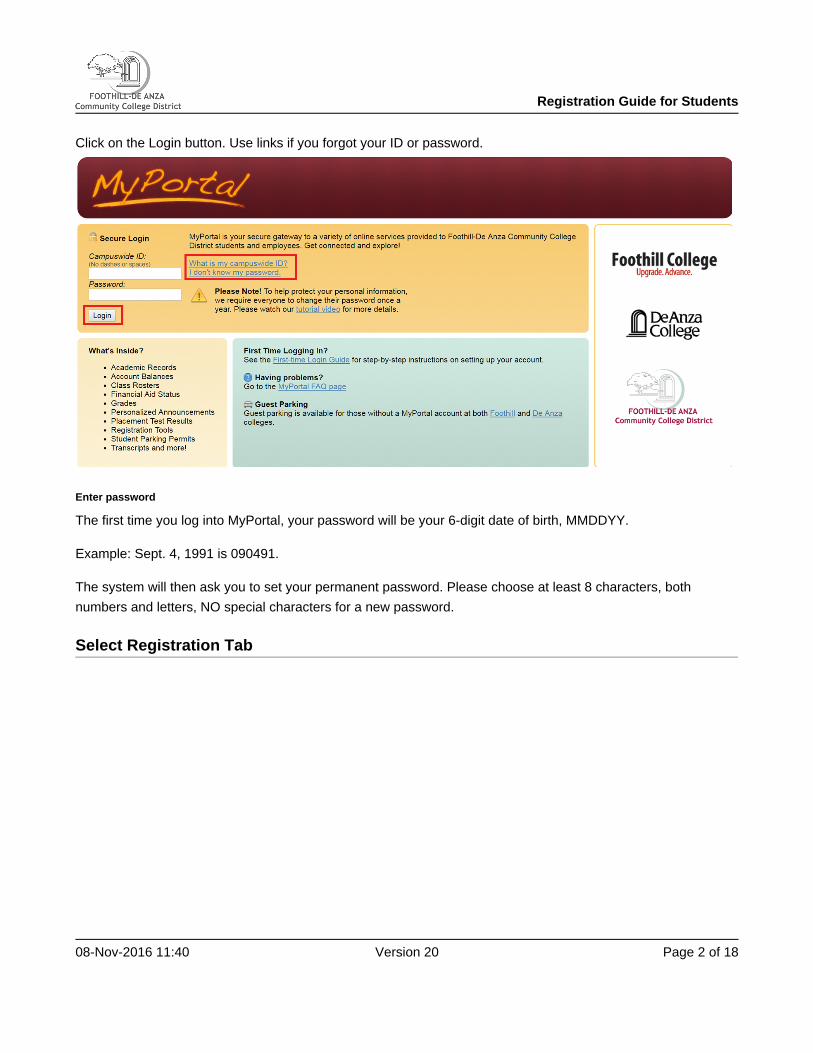
Click on the Login button. Use links if you forgot your ID or password.
Enter password
The first time you log into MyPortal, your password will be your 6-digit date of birth, MMDDYY.
Example: Sept. 4, 1991 is 090491.
The system will then ask you to set your permanent password. Please choose at least 8 characters, both
numbers and letters, NO special characters for a new password.
Select Registration Tab
Registration Guide for Students
08-Nov-2016 11:40 Version 20 Page of 3 18
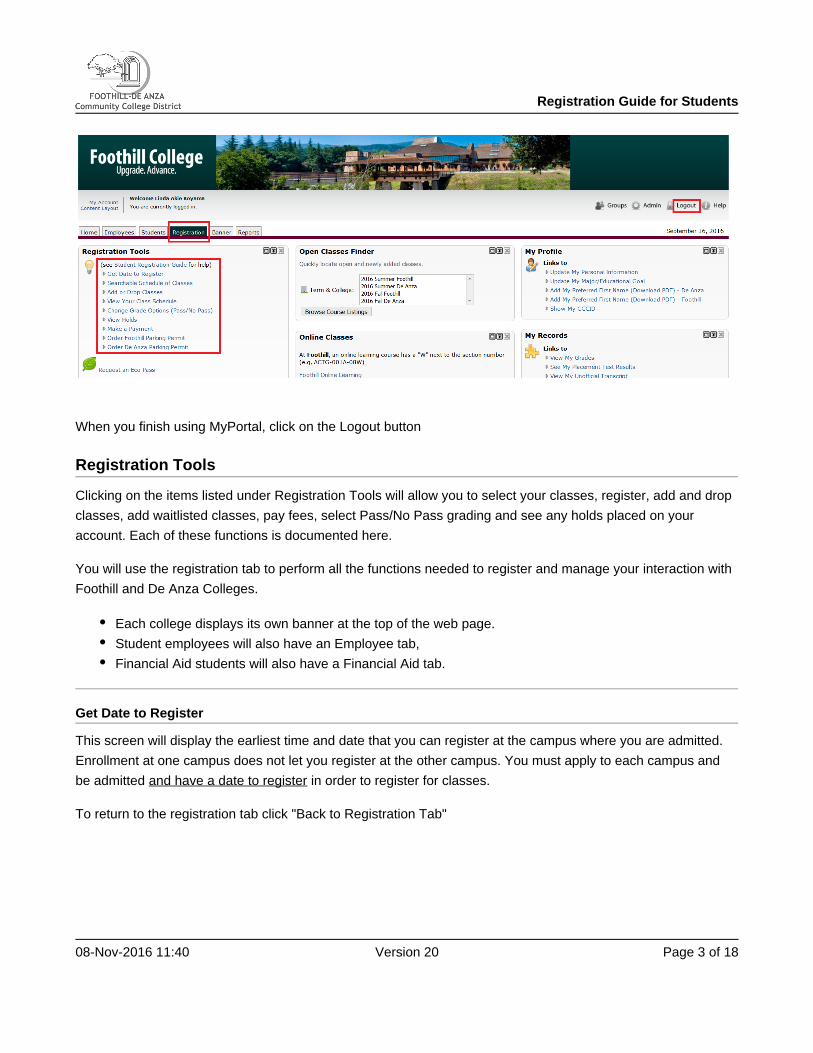
When you finish using MyPortal, click on the Logout button
Registration Tools
Clicking on the items listed under Registration Tools will allow you to select your classes, register, add and drop
classes, add waitlisted classes, pay fees, select Pass/No Pass grading and see any holds placed on your
account. Each of these functions is documented here.
You will use the registration tab to perform all the functions needed to register and manage your interaction with
Foothill and De Anza Colleges.
Each college displays its own banner at the top of the web page.
Student employees will also have an Employee tab,
Financial Aid students will also have a Financial Aid tab.
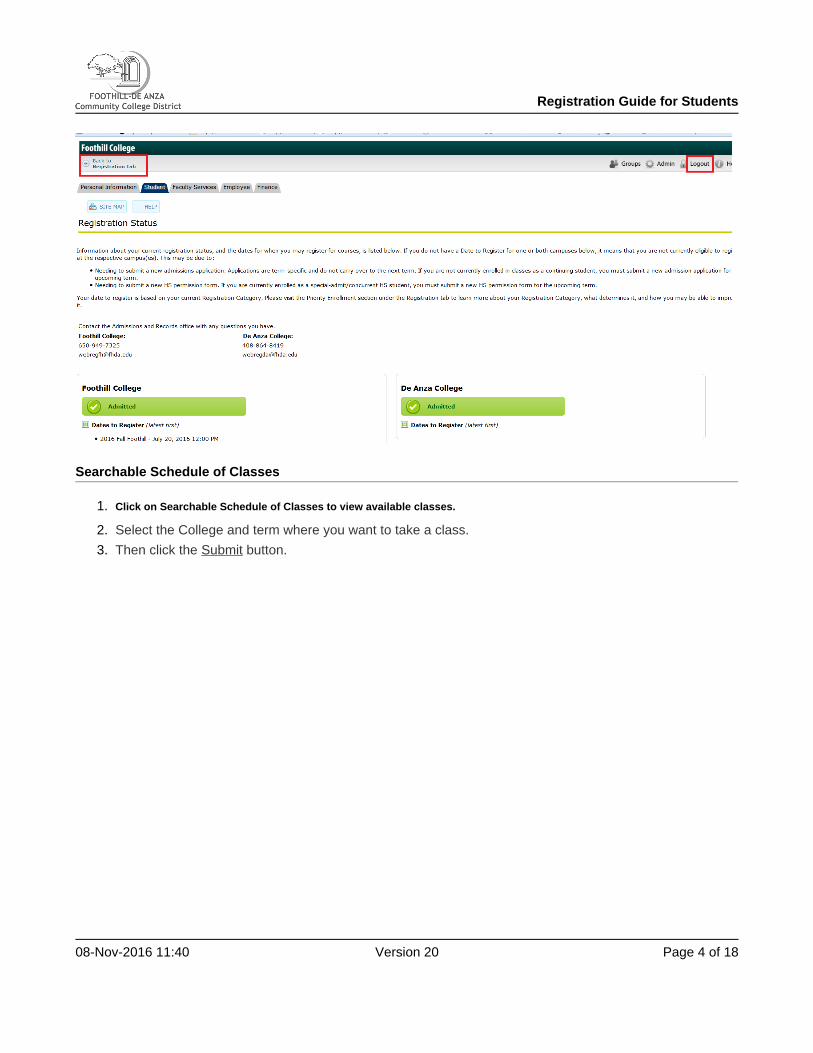
Get Date to Register
This screen will display the earliest time and date that you can register at the campus where you are admitted.
Enrollment at one campus does not let you register at the other campus. You must apply to each campus and
be admitted in order to register for classes.and have a date to register
To return to the registration tab click "Back to Registration Tab"
Registration Guide for Students
08-Nov-2016 11:40 Version 20 Page of 4 18
1.
2.
3.
Searchable Schedule of Classes
Click on Searchable Schedule of Classes to view available classes.
Select the College and term where you want to take a class.
Then click the button.Submit
Registration Guide for Students
08-Nov-2016 11:40 Version 20 Page of 5 18
1.
2.
3.
4.
5.
6.
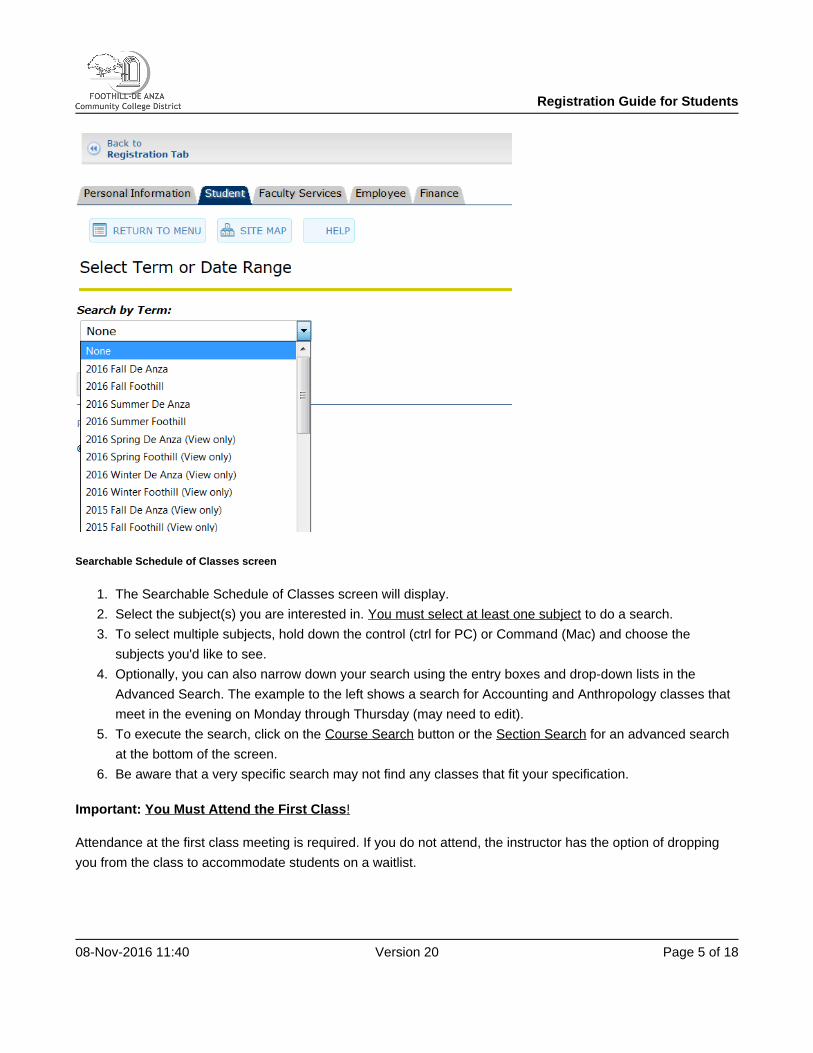
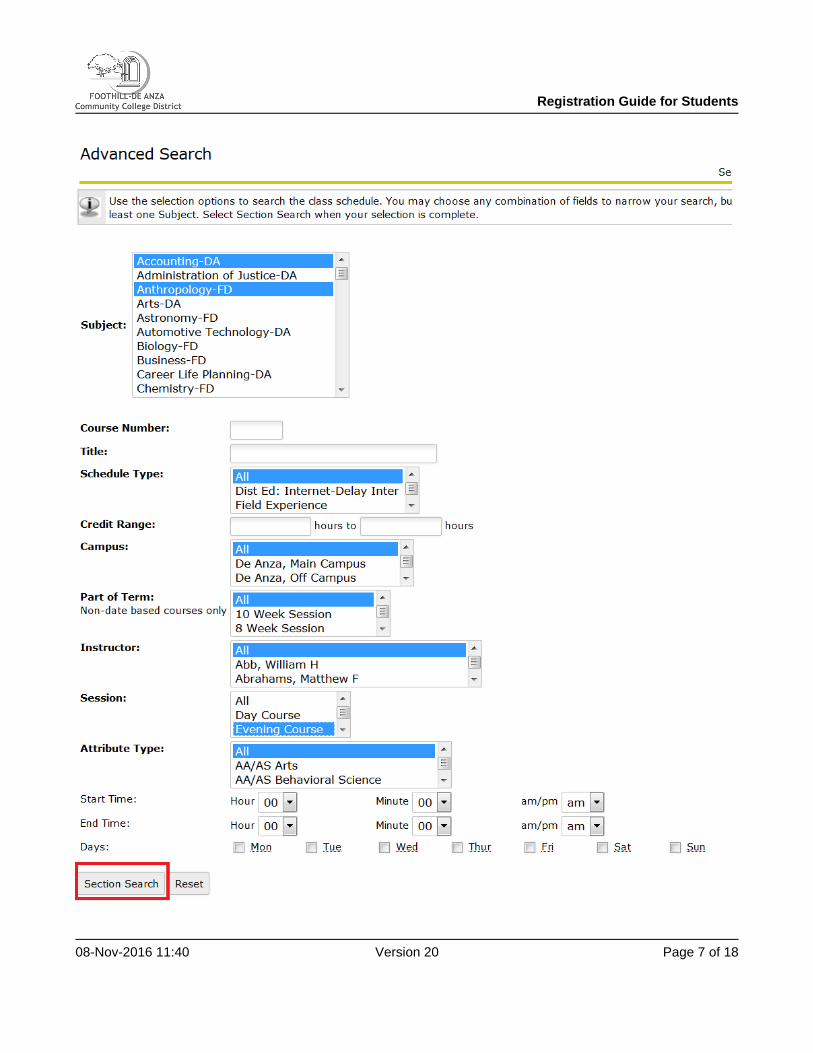
Searchable Schedule of Classes screen
The Searchable Schedule of Classes screen will display.
Select the subject(s) you are interested in. to do a search.You must select at least one subject
To select multiple subjects, hold down the control (ctrl for PC) or Command (Mac) and choose the
subjects you'd like to see.
Optionally, you can also narrow down your search using the entry boxes and drop-down lists in the
Advanced Search. The example to the left shows a search for Accounting and Anthropology classes that
meet in the evening on Monday through Thursday (may need to edit).
To execute the search, click on the button or the for an advanced search Course Search Section Search
at the bottom of the screen.
Be aware that a very specific search may not find any classes that fit your specification.
Important: You Must Attend the First Class!
Attendance at the first class meeting is required. If you do not attend, the instructor has the option of dropping
you from the class to accommodate students on a waitlist.
Registration Guide for Students
08-Nov-2016 11:40 Version 20 Page of 6 18
It is not the responsibility of the instructor to drop a student. The student must officially drop classes in Please check for the final date(s) to drop on MyPortal to ensure . which s/he no longer wishes to be enrolled
that you have been removed from the course before the last date to drop with a refund or the last day to drop
with a "W".
Registration Guide for Students
08-Nov-2016 11:40 Version 20 Page of 7 18
Registration Guide for Students
08-Nov-2016 11:40 Version 20 Page of 8 18
1.
2.
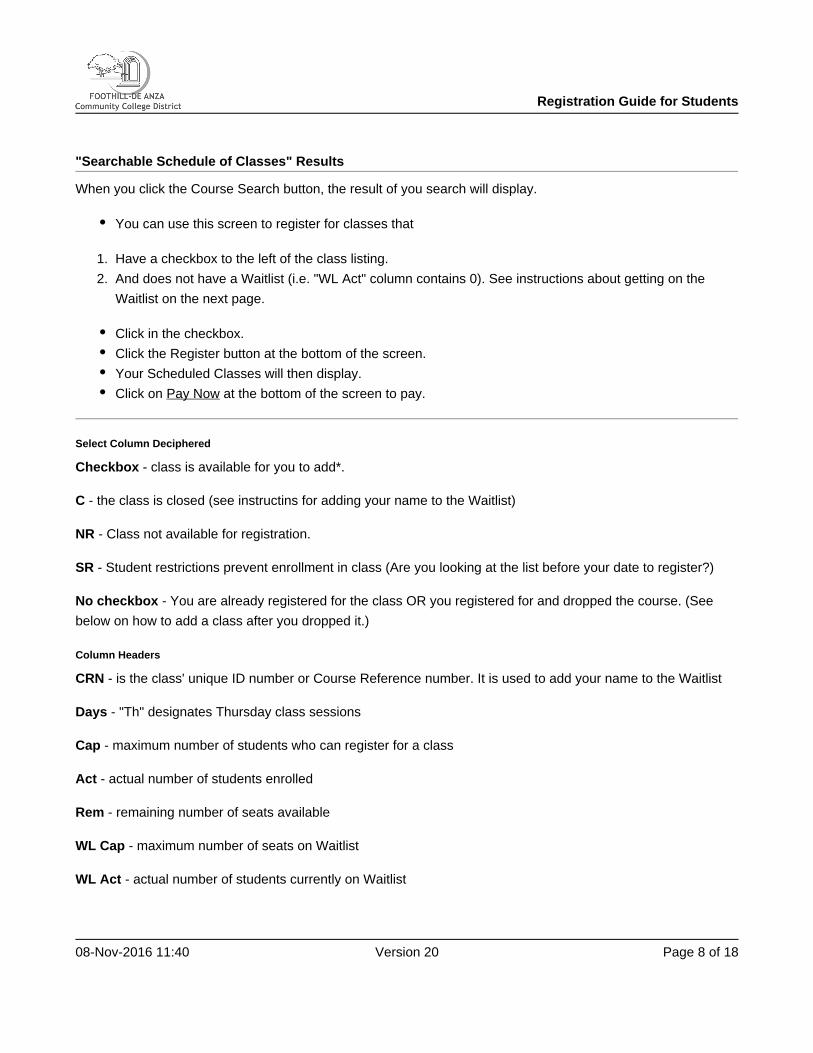
"Searchable Schedule of Classes" Results
When you click the Course Search button, the result of you search will display.
You can use this screen to register for classes that
Have a checkbox to the left of the class listing.
And does not have a Waitlist (i.e. "WL Act" column contains 0). See instructions about getting on the
Waitlist on the next page.
Click in the checkbox.
Click the Register button at the bottom of the screen.
Your Scheduled Classes will then display.
Click on at the bottom of the screen to pay.Pay Now
Select Column Deciphered
- class is available for you to add*.Checkbox
- the class is closed (see instructins for adding your name to the Waitlist)C
- Class not available for registration.NR
- Student restrictions prevent enrollment in class (Are you looking at the list before your date to register?)SR
- You are already registered for the class OR you registered for and dropped the course. (See No checkbox
below on how to add a class after you dropped it.)
Column Headers
- is the class' unique ID number or Course Reference number. It is used to add your name to the WaitlistCRN
- "Th" designates Thursday class sessionsDays
- maximum number of students who can register for a classCap
- actual number of students enrolledAct
- remaining number of seats availableRem
- maximum number of seats on WaitlistWL Cap
- actual number of students currently on WaitlistWL Act
Registration Guide for Students
08-Nov-2016 11:40 Version 20 Page of 9 18
- remaining number of Waitlist Seats availableWL Rem
- first and last day of class(MM/DD)
- college and room number for on campus classesLocation
*When a Checkbox isn't really a Checkbox
Classes with students on the "Waitlist" may display a checkbox and 1 or 2 "Rem" (remaining) seats. However,
those seats are reserved for Waitlisted students who have not yet added the class. If you check the checkbox
and then click Register, you will get an error message. If the Waitlist has remaining seats, use the Waitlist
process to add your name to the list.
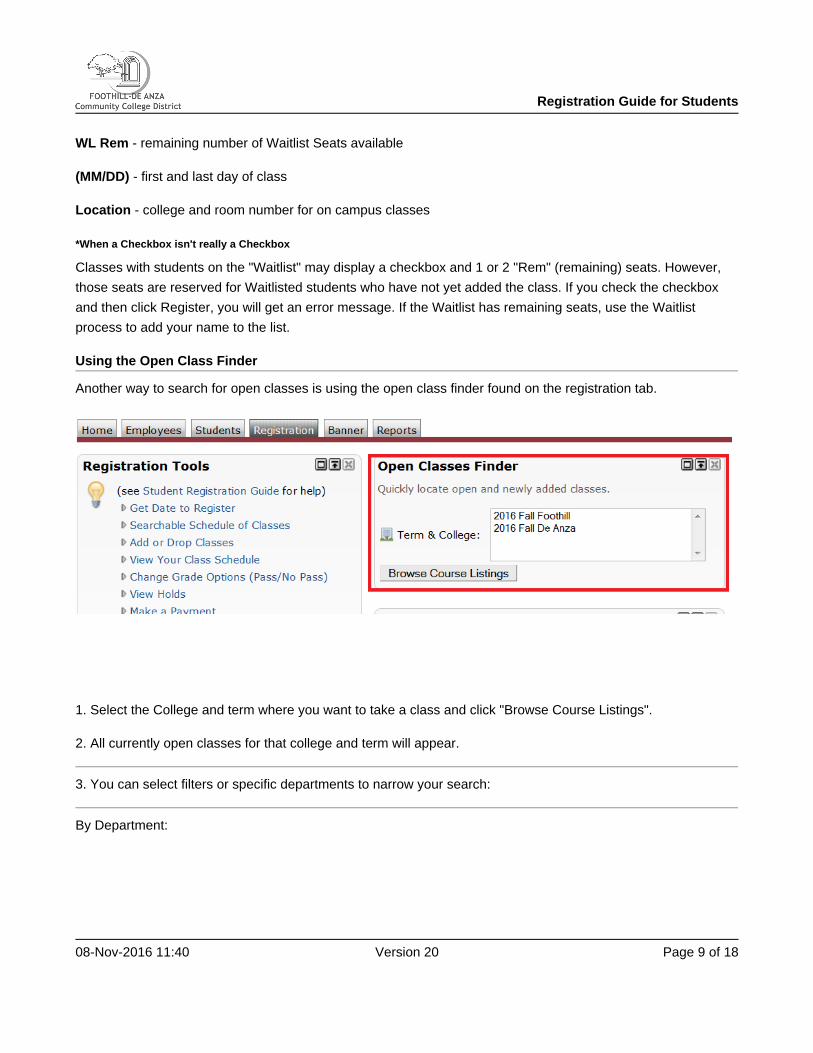
Using the Open Class Finder
Another way to search for open classes is using the open class finder found on the registration tab.
1. Select the College and term where you want to take a class and click "Browse Course Listings".
2. All currently open classes for that college and term will appear.
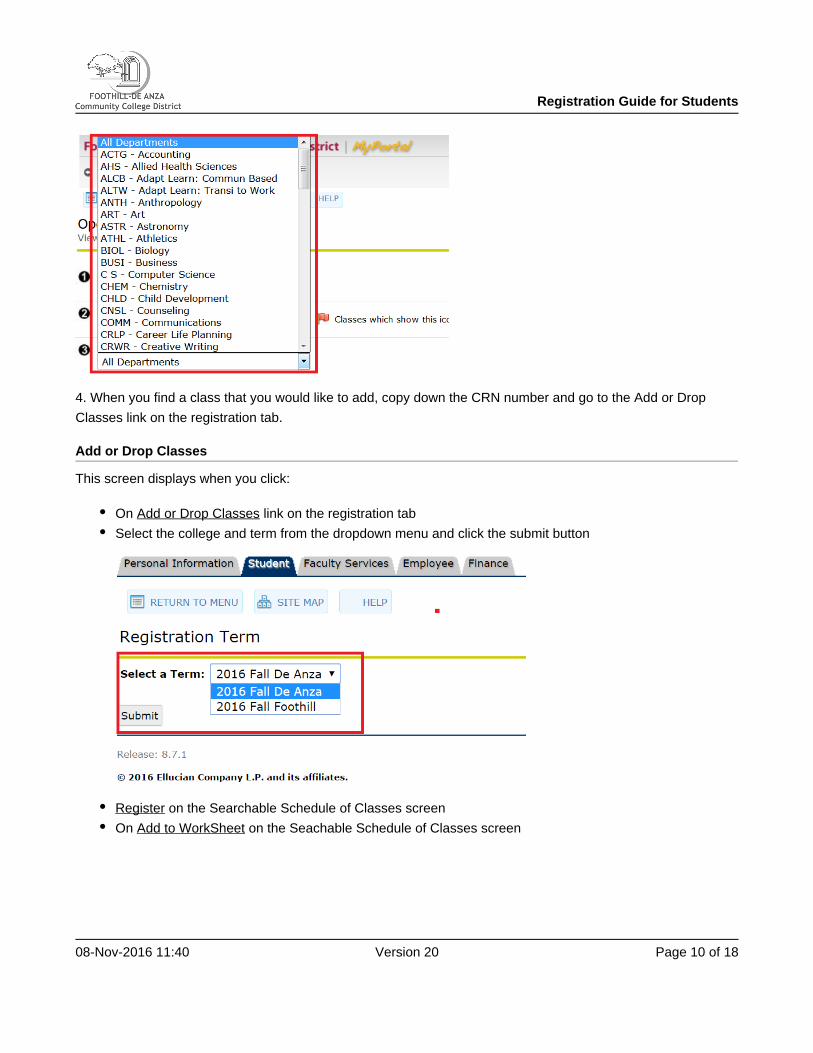
3. You can select filters or specific departments to narrow your search:
By Department:
Registration Guide for Students
08-Nov-2016 11:40 Version 20 Page of 10 18
4. When you find a class that you would like to add, copy down the CRN number and go to the Add or Drop
Classes link on the registration tab.
Add or Drop Classes
This screen displays when you click:
On link on the registration tabAdd or Drop Classes
Select the college and term from the dropdown menu and click the submit button
Register on the Searchable Schedule of Classes screen
On on the Seachable Schedule of Classes screenAdd to WorkSheet

Registration Guide for Students
08-Nov-2016 11:40 Version 20 Page of 11 18
DROP a class
Select one of the options available in the pull-down list.
Click Submit Changes
ADD a class
Enter the Course Reference Number (CRN) in the Add Classes Worksheet section.
Click .Submit Changes
Click at the bottom of the screen.Pay Now
Note: If you want to ADD a class after you dropped it, or were dropped for non-payment, come back to this
page and select "Web Registered" from the drop-down list. If the class is closed, "Web Registered" will not be
an option. However, you can add your name to the Waitlist if there are seats available.
Waitlist Process
Registration Guide for Students
08-Nov-2016 11:40 Version 20 Page of 12 18
1.
2.
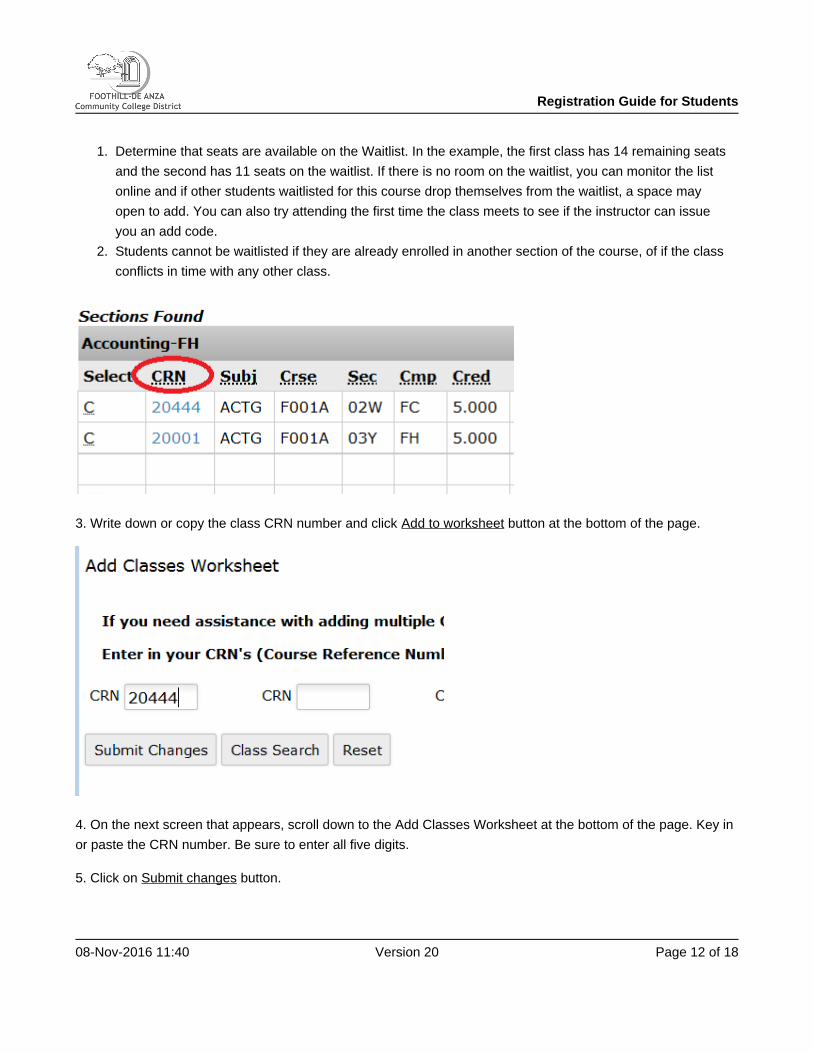
Determine that seats are available on the Waitlist. In the example, the first class has 14 remaining seats
and the second has 11 seats on the waitlist. If there is no room on the waitlist, you can monitor the list
online and if other students waitlisted for this course drop themselves from the waitlist, a space may
open to add. You can also try attending the first time the class meets to see if the instructor can issue
you an add code.
Students cannot be waitlisted if they are already enrolled in another section of the course, of if the class
conflicts in time with any other class.
3. Write down or copy the class CRN number and click button at the bottom of the page.Add to worksheet
4. On the next screen that appears, scroll down to the Add Classes Worksheet at the bottom of the page. Key in
or paste the CRN number. Be sure to enter all five digits.
5. Click on button.Submit changes

Registration Guide for Students
08-Nov-2016 11:40 Version 20 Page of 13 18
6. You will see message in the middle of the screen. This is normal.Registration Add Errors
7. To be Added to the Waitlist, select waitlisted from the drop down menu and click submit changes.
8. The system will then display your updated schedule.

Registration Guide for Students
08-Nov-2016 11:40 Version 20 Page of 14 18
1.
2.
IMPORTANT: Waitlisted students must be present at the first meeting of the class. If you are accepted into the
class and receive an add code after classes begin, you must process the add code before the quarter's add
deadline.
Adding a Class with an Add Code
For regular 12-week courses, the add period is the first two weeks of the quarter. Add codes will not work prior
to the first day of the class. Add codes are required after the first day of class (or after the first day of the quarter
for online courses) in order to register. In addition, some courses require completion of prerequisite classes and
some are only open to students already approved for special programs. See Class Schedule for class dates.
Students can add classes once school starts by:
Attending the first day of the class and
Receiving an Add Code from the instructor if there is room in the class
To add a class if you were not on the waitlist:
From the Registration Tab in MyPortal, click on Add or Drop Classes under Registration Tools.
Select the college and term from the drop-down menu and click the Submit button.
Registration Guide for Students
08-Nov-2016 11:40 Version 20 Page of 15 18
3.
4.
5.
6.
1.
2.
3.
4.
5.
6.
If you are not on the class' Waitlist, enter the 5-digit class CRN into the Add Classes Worksheet at the
bottom of the screen. If you are on the class' Waitlist, see section below, "To add a class if you were on
the waitlist".
Click the button.Submit Changes
A screen to enter the Add Code will pop up. Follow the instructions.
Payment in full is due immediately at the time of registration, or before the drop date for nonpayment.
Payment installment schedules are available as well.
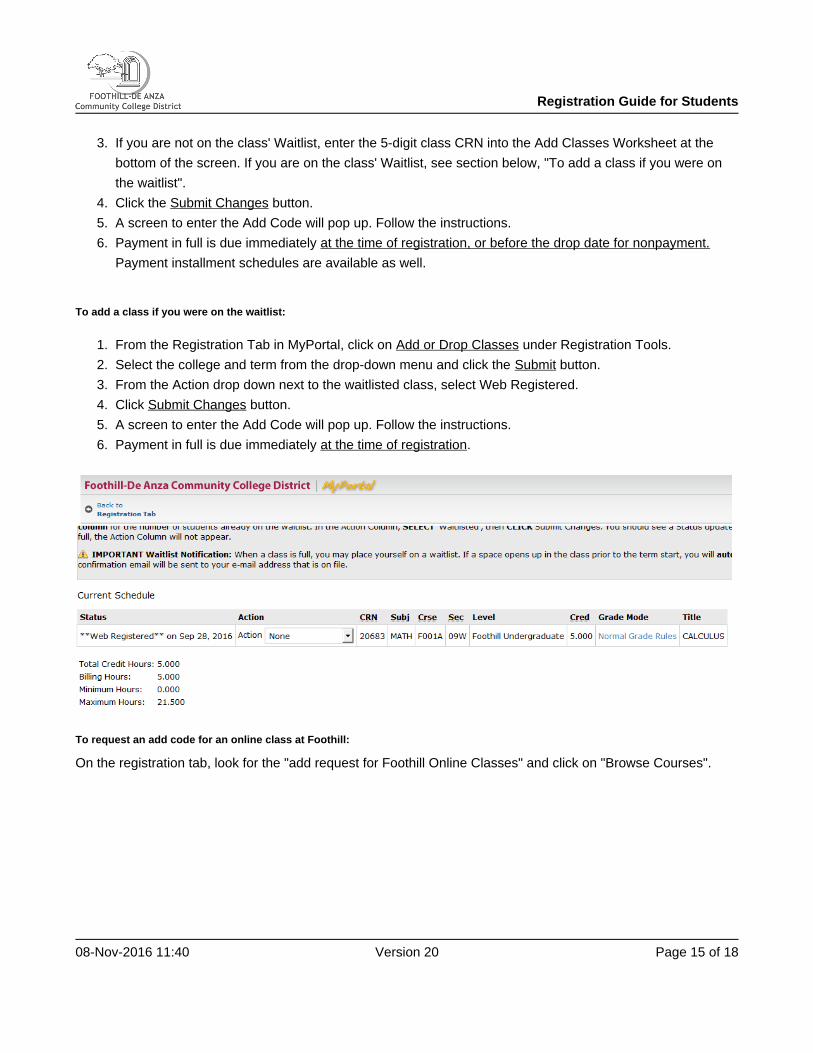
To add a class if you were on the waitlist:
From the Registration Tab in MyPortal, click on under Registration Tools.Add or Drop Classes
Select the college and term from the drop-down menu and click the button.Submit
From the Action drop down next to the waitlisted class, select Web Registered.
Click button.Submit Changes
A screen to enter the Add Code will pop up. Follow the instructions.
Payment in full is due immediately .at the time of registration
To request an add code for an online class at Foothill:
On the registration tab, look for the "add request for Foothill Online Classes" and click on "Browse Courses".

Registration Guide for Students
08-Nov-2016 11:40 Version 20 Page of 16 18
After choosing the term, browse through the selection of online classes. Once you find one you wish to add,
click on the box next to the class and click on "Request to add Selected Courses" and follow the directions.
Changing Grading Options

Registration Guide for Students
08-Nov-2016 11:40 Version 20 Page of 17 18
Students may select the Pass/No Pass option instead of a letter grade (A, B, C, etc), as long as s/he makes the
change no later than the Friday of the fourth week of the term. For courses shorter than 12 weeks, it is the third
week of the term. Timing determines how this change is made:
Before the first day of the class: Use the Registration tab on MyPortal and select Change Grade Options
(Pass/No Pass).
Once the class starts: You will need to download, fill out and print the . You will not be Pass/No Pass form
able to save the completed form. Print it once you filled it out. Then sign it and deliver it to Admissions
and Records to request the change.
There are a couple of things you should consider before selecting Pass/No Pass as a grading option:
Once a student has selected the Pass/No Pass option, the resulting grade will be final.
Some courses are designed as P/NP courses. A letter grade is not available in these courses.
Students selecting the P/NP option must complete all course work and attendance requirements
assigned by the instructor.
This is not a request to audit a class.
Check with you college as to the number of allowable units that may be taken P/NP and can be applied
toward an AA or AS degree.
Registration Guide for Students
08-Nov-2016 11:40 Version 20 Page of 18 18
No "P" grades may be applied toward a major or English and Math courses used to fulfill General
Education transfer requirements.
If you plan to transfer, some four-year institutions require a letter grade for transfer. Check with
counseling or the four-year institution requirements prior to choosing P/NP.