Embed Size (px)
Citation preview

Kart Programming François Corthay | Charles Praplan
Christopher Metrailler | Patrice Rudaz | Michael Clausen | Yoan Rossier

Goals
Use basic elements seen in ELN course.
Use basic elements seen in INF I course.

Goals
Smartphone KartBluetooth
Android App
Drive PWM | Steering STM

ELN

On/Off
Charger
Batteries
Steering Logic
Communication Logic
I/O LogicDrive PWM Logic
Kart i2c interconnect bus
Power Supply
Drive PWM Analog Frontend
IO Breakout Board
Bluetooth Communication
Steering STM Analog Frontend
Modular concept
FPGA FPGA FPGA FPGA
Generic FPGA Board
FPGA
Kart i2c interconnect bus ports
FPGA programming connector
Mezzanine connector

Stepper Motor
FPGA +Kart i2c interconnect bus
Stepper motor control
Stepper motor
Limit switch
Programming |4
Logic circuit IGLOO FPGA
coil 3
coil 2
coil 4
coil 1
step
Coil sequence

Drive Motor
FPGA +Kart i2c interconnect bus
Drive PWM control
Drive motor

IO Board
Ultrasonic ranger
12 V !open collector
driveDigital Outputs
Secondary End of turn
Hall Sensors
Proximity / Light Sensors

Avoid Hardware Damages
FPGA
JTAG Programmer
!
!
! Power Supply
Check that the JTAG cable is connected correctly!
Disconnect the module you are actually programming from the I2C bus!
Never connect a I2C bus cable to this connector!
Power the circuit using a laboratory power supply.
The batteries should never be connected during development!
Double-check that the cable/connector are connected correctly.
Never connect JTAG connector cable here.
If you connect something wrong, the FPGA might be damaged.
The costs to change a FPGA are about 50 SFr.
You will be charged for the reparation if you did not follow this guidelines!
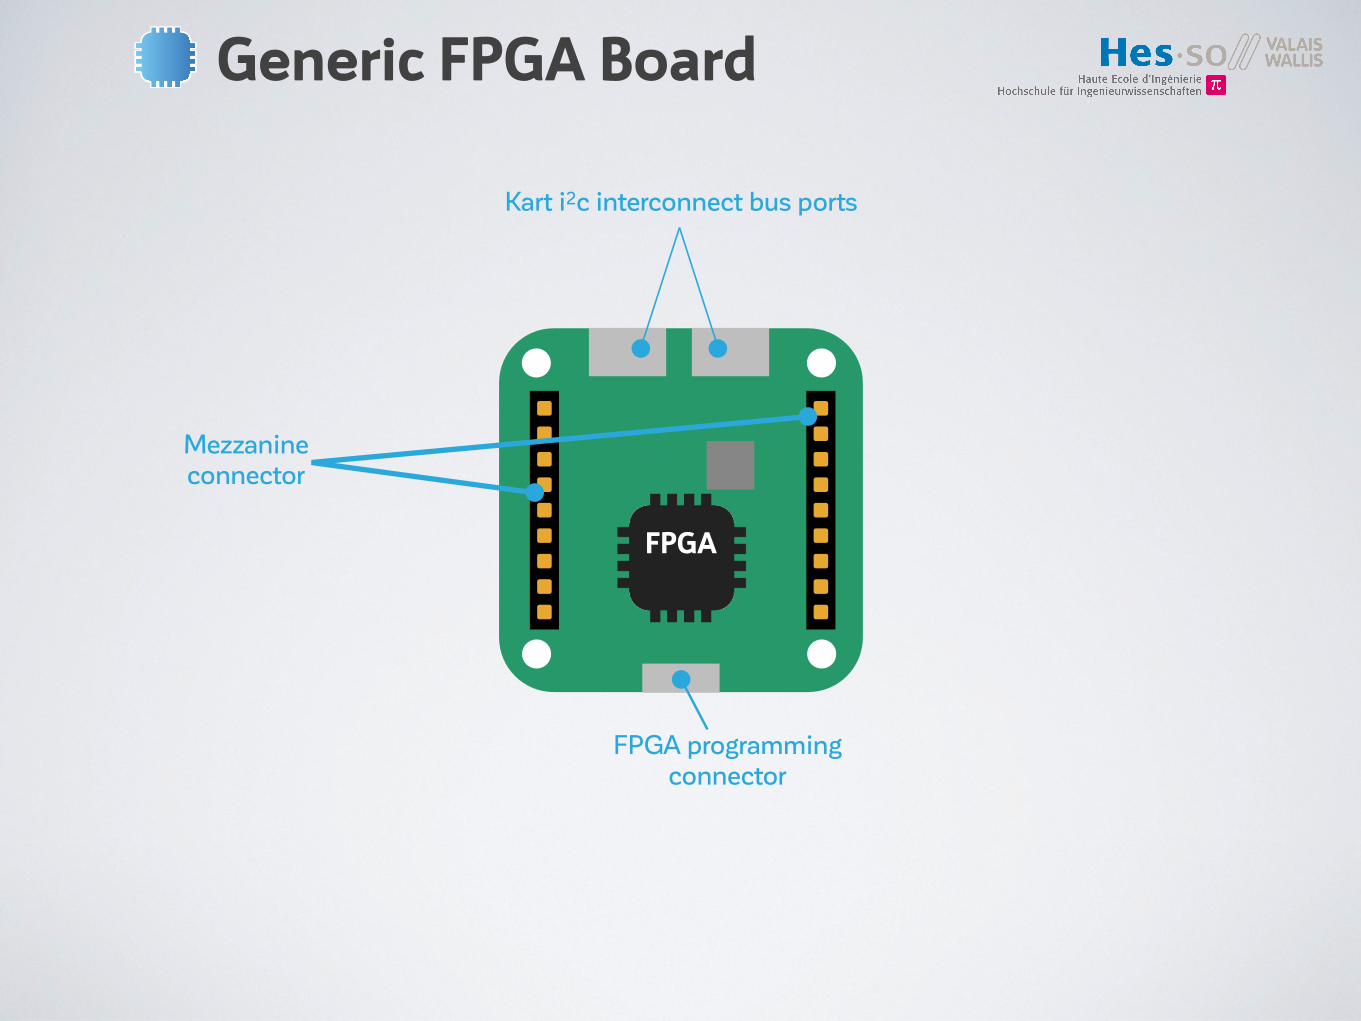
• Control block for DC motor
• Pulse Width Modulation (PWM) generator
• Control block for stepper motor
• 4 Coil forward/backward sequence generator
• Hall-Sensor Counter
• Various additional sensors and actuators
• Personal ideas are welcome
Hardware Goals

Hardware Grade
4.0All mandatory features
Direction Stepper control Speed PWM control Hall sensor counter
Grade
Per optional feature Ultrasound sensor Emergency Stop (Proximity sensor) Other improvements
1+
=
Presentation of blocks and simulation results during morning of the last day

INF

Remote Control Protocol
Kart Protocol PDUs

Android Java API
Remote Control Protocol
Your code
Kartlib
Android system libraries and services
Linux Kernel
Phone Hardware
Bluetooth stack
Bluetooth hardware
Co
mp
lexi
ty
Kart AbstractKartActivity

Remote Control Android App
Android App
PC + Android SDK honor 10 Lite
USB

Android
• Mobile Operating System developed by Alphabet (Google)
• Abstracts hardware from different manufacturers to a common API
• Applications are written in Java or Kotlin and run on a Virtual Machine (ART)
• Android is open source, based on Linux
• The SDK & Android Studio (based on IntelliJ IDEA) are free to use and allow everyone to build applications for Android

Android
• UI layouts can be designed using an editor integrated into Android Studio.
• Layouts are serialized to XML files.
• Those Layouts can be loaded in code.
Android Application lifecycle
Layouts

Remote Control Android App
Kart scan activity ch.hevs.kart.ui.EntityScanActivity
Demo 1
Kart App
android.intent.action.MAINA
C android.intent.category.LAUNCHER
android.intent.action.RUNA
ch.hevs.kart.RCAC
✓Demo 2
Your activity…
KKart entity
Remote Control Android App
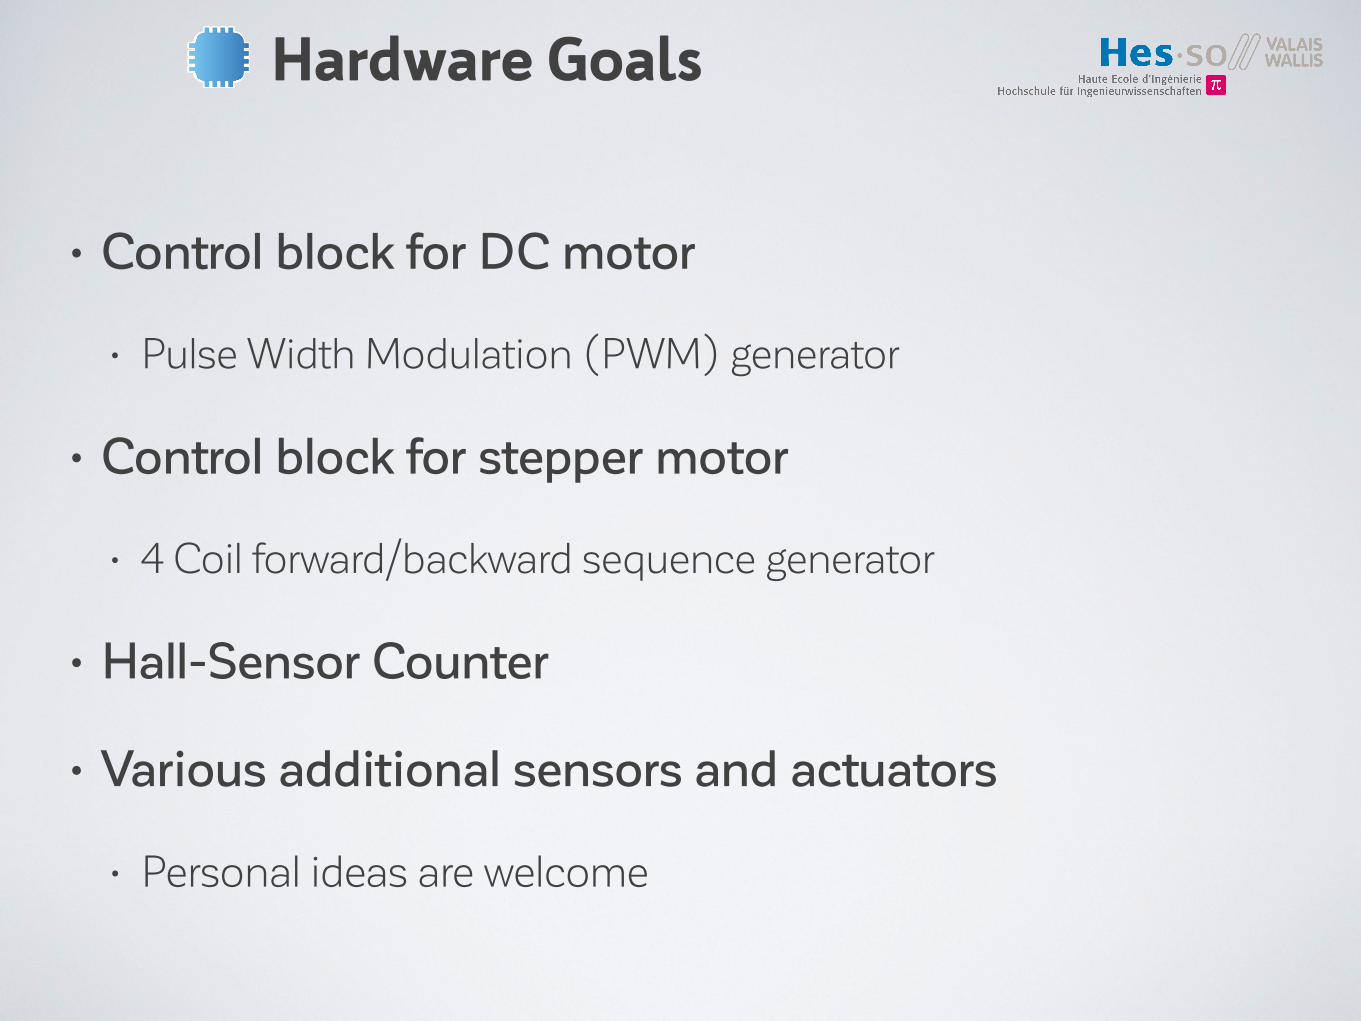
AbstractKartControlActivity
onCreate() onResume() onPause() requestFullscreen() showKartSetupPopup()
<Your Activity>
Kart
setSteeringPosition() setDriveSpeed() …
protected attribute
✓ ✓
Command direction
extends

Remote Control Android App
<Your Activity>
Kart
✓
Status direction
KartListener
steeringPositionChanged() steeringPositionHasReached() batteryVoltageChanged() connectionStatusChanged() message()
Interface
implements
listener

Remote Control Android App
<Your Activity> Kart
✓setup()
KartSetup
drivePwmPeriod(int) steeringMaxPosition(int) steeringStepPeriod(int)
steeringEndSwitchAddress(int) hardwareSettings(HardwareSettings)
updateInterval(float)
void onCreate(Bundle savedInstanceState) { … kart.setup() .drivePwmPeriod(80) .steeringStepPeriod(120); … }
void onCreate(Bundle savedInstanceState) { … showKartSetupPopup(); … }
Manual kart setup in code:
Using the provided kart setup UI:

• Slider control
• Direction
• Speed
• Progress Bar status
• Battery level
• Steering position
• Accelerometer (Orientation) control
• Button to enable orientation control
• Device orientation controls sliders or kart
Software Goals

Software Grade
All mandatory features Direction control
Speed control Battery display
Direction display Per optional feature LED’s Ultrasound sensor Proximity sensor Hall sensor Steering assistant Other improvements
+
=
Functional blackbox tests during morning of the last day
4.0
Grade
0.5

Android Studio
Download the Kart project template from the wiki
Extract the archive to the local disk
Open the extracted folder in Android Studio
1
2
3

Select New > Activity > Gallery…
Android Studio
4
Select Empty Activity5
Configure Activity6

Modify Activity Java code7
package ch.hevs.ss1;
import android.os.Bundle;
import ch.hevs.kart.AbstractKartControlActivity; import ch.hevs.kart.Kart;
public class MyKartRemote extends AbstractKartControlActivity {
@Override protected void onCreate(Bundle savedInstanceState) { super.onCreate(savedInstanceState); setContentView(R.layout.activity_my_kart_remote); }
@Override public void steeringPositionChanged(Kart kart, int i, float v) { }
@Override public void steeringPositionReachedChanged(Kart kart, boolean b) { }
@Override public void batteryVoltageChanged(Kart kart, float v) { }
@Override public void sequenceCompleted(Kart kart) { }
@Override public void connectionStatusChanged(Kart kart, boolean b) { }
@Override public void message(Kart kart, String s) { } }
<?xml version="1.0" encoding="utf-8"?> <manifest xmlns:android="http://schemas.android.com/apk/res/android" xmlns:tools="http://schemas.android.com/tools" package="ch.hevs.ss1">
<application android:allowBackup="false" android:label="@string/app_name" android:supportsRtl="true" tools:ignore="GoogleAppIndexingWarning">
<activity android:name=".MyKartRemote"> <intent-filter> <action android:name="android.intent.action.RUN" /> <category android:name="ch.hevs.kart.RCA" /> </intent-filter> </activity> </application>
</manifest>
Modify AndroidManifest.xml8
Android Studio

10 Lite
• Connect Phone to PC’s USB port
• Power on the phone
• Use default configurations during setup wizard
• Enable developer mode: Go to Settings > System > About Phone and press 7 times on „Build Number“
• Enable USB debugging: Go to Settings > System > Developer options and check „USB debugging“
• Install and start your Android application: • In Android Studio, press green button and select honor 10 Lite phone
from the list.
• On the phone, answer yes to allow USB debugging in popup.
• Now your application should be running on the phone.

Virtual Kart
Download for Windows Download for macOS

Install & Run Demo
Download Kart.apk from: http://wiki.hevs.ch/fsi/index.php5/Kart
Install it using the adb command line tool:
c:\Users\your.account> c:\devel\Android\sdk\platform-tools\adb install Downloads\Kart.apk 3979 KB/s (937315 bytes in 0.230s) pkg: /data/local/tmp/Kart.apk Success

Tipp #1: Read the docs
• You find all information needed here:
• Your copy of the kart project documentation and tasks document • Kart wiki: http://wiki.hevs.ch/fsi/index.php5/Kart • Kart project JavaDoc: http://kart-javadoc.hevs.ch • Android: https://developer.android.com/index.html
Ask us, we kindly like to help you!
vrniup7MS Teams code:

Tipp #2: Pair with your kart
You need to pair with your kart before it will be listed by the Kart app
Open “Settings”
Go to “Device connectivity” > “Bluetooth”
Select your kart in “Available Devices”

Tipp #3: No infinite loops
// Blink a led try { while (true) { kart.setLed(0, true); Thread.sleep(500); kart.setLed(0, false); Thread.sleep(500); } } catch (InterruptedException e) { e.printStackTrace(); }
If you add infinite loops to the main thread, your application will crash!

Tipp #4: Periodic Timer
private Timer ledBlinker = new Timer() { @Override public void onTimeout() { kart.toggleLed(0); } };
Inside your Activity, add the attribute:
ledBlinker.schedulePeriodically(500);
You can start the timer using:
ledBlinker.stop();
You can stop the timer with:
Documentation:
http://kart-javadoc.hevs.ch/ch/hevs/kart/utils/Timer.html

Tipp #5: Doing something later
Timer doLater = new Timer() { @Override public void onTimeout() { kart.setLed(0, true); } }; doLater.scheduleOnce(5000);
This code snippet will turn the LED 0 on after 5 seconds.
Documentation:
http://kart-javadoc.hevs.ch/ch/hevs/kart/utils/Timer.html

Tipp #6: Animations
Animation animation = Animation.Builder(kart) .ledOn(0).ledOff(1).wait(100) .ledOff(0).ledOn(1).wait(100) .build(); animation.loop();
The animation will turn LED 0 on and LED 1 off, then wait for 0.1s. Next it will turn LED 0 off and LED 1 on and
then wait again for 0.1s. The animation is looped until the method cancel() is called…
Documentation: http://kart-javadoc.hevs.ch/ch/hevs/kart/utils/Animation.html
http://kart-javadoc.hevs.ch/ch/hevs/kart/utils/Animation.Builder.html