Embed Size (px)
Citation preview
1
Congratulations! You have purchasedone of the most sophisticated cordlesstelephones on the market! The SBC9030has been designed to offer a newstandard in cordless telephonetechnology.
Unlike most other cordless phones,the SBC9030 digitizes your voice usingadvanced digital voice coding to providenoise and distortion free performance.In most conditions you will not be able totell you are using a cordless phone.Gone are the annoyances of static,interference and having to listen to otherpeople’s conversations on your cordlessphone.
The SBC9030 scrambles your voicebefore it transmits it. This allows you thesecurity of knowing that no one can tunein and eavesdrop on your conversations.
The SBC9030 decodes and displaysname and number Caller ID (CID)information where available and whensubscribed to. The alpha-numericdisplay will show both the name andnumber of the calling party (whenavailable). Up to 15 name charactersand/or 11 phone number digits can bedisplayed on the LCD.
With the SBC9030, the user can easilyanswer a call by pressing any key otherthan the OFF, VOLUME keys or 3 PPUkeys. In addition, the handset keypadand LCD illuminate while the handsetrings to signal an incoming call. This isvery useful in a dark environment.
The SBC9030 includes aSpeakerphone and keypad on the BaseUnit. This enables you to make andreceive calls hands-free at the Base. In
INTRODUCTION
addition, the Intercom feature allows two-way communication between theHandset and Base Unit. PressingINTERCOM on the Base can also assistyou in locating a misplaced Handset.
The SBC9030 uses special memoryin both the Base Unit and Handset whichis not susceptible to power failures. Thisprovides permanent storage of all speeddial numbers, CID information as well asthe Base Unit and Handset securitycodes.
When a spare battery(not included) isinstalled in the Base Unit, the SBC9030uses this battery to provide operationalbackup in case of power failure. In thisway, you have access to all normalphone functions during a total poweroutage. Calls can still be placed andreceived without interruption. More than4 hours backup will be possible with afully charged battery in the Base Unit.
The phone will also alert you whenyou are Out of Range even when you'renot using the phone!
2
SPECIAL FEATURES• 900 MHz Operation.• Direct Sequence Spread Spectrum
- Digital Cordless Telephone.• Digitally-Scrambled Voice
Communication.• Simultaneous display of Name,
Number, and Time/Date stamp forCaller ID.
• 50 Caller ID memory locations.• Voice announce Caller ID• 4-row by 16-character dot matrix
alphanumeric display.• Backlit display on handset.• Backlit handset keypad.• Three Soft Keys which allow the user
to access different functions,depending on which mode the phoneis currently in (i.e. Caller ID, MemoryProgramming, etc.).
• Smart Dialing from Caller ID memoryeliminates the need to pre-programyour local area code.
• 25 locations Programmable Memoryfor 16-Digit Phone Number. Eachlocation can also be assigned up toa 15 character name.
• Out of Range indication while thehandset is in use or in standby mode.
• Handset speakerphone.• Speakerphone and keypad on the
Base Unit.• Two-way intercom between Handset
and Base Unit.• Removable handset battery pack.• Spare battery charger in the base
unit.• Complete battery back-up in case of
power failure (with additional batterypack installed in base).
• Face up or down Handset charging.• Easy answer - When the phone
INTRODUCTION
rings, simply press any key otherthan OFF, the Volume keys or the3 PPU keys on the handset toanswer.
• Pressing the OFF key on handsetduring incoming ring will stop theringing.
• Auto hang up when returning thehandset to the base cradle.
• 24-Bit Digital Security Code.• Low Battery Detect and Warning
indicator.• Tone or Pulse dialing.• Visual Message Waiting Indication
(VMWI) for use with voicemailservice.
• Up to 7 hours of continuous talk timeor 14 days standby time.
• 8-level Volume control on Handset.• Programmable Ringer Tones and
Volume.• Headset Compatible, for use with
2.5mm headsets.
This manual is designed to familiarizeyou with the SBC9030. We stronglyrecommend you read the manual beforeusing your phone.
3
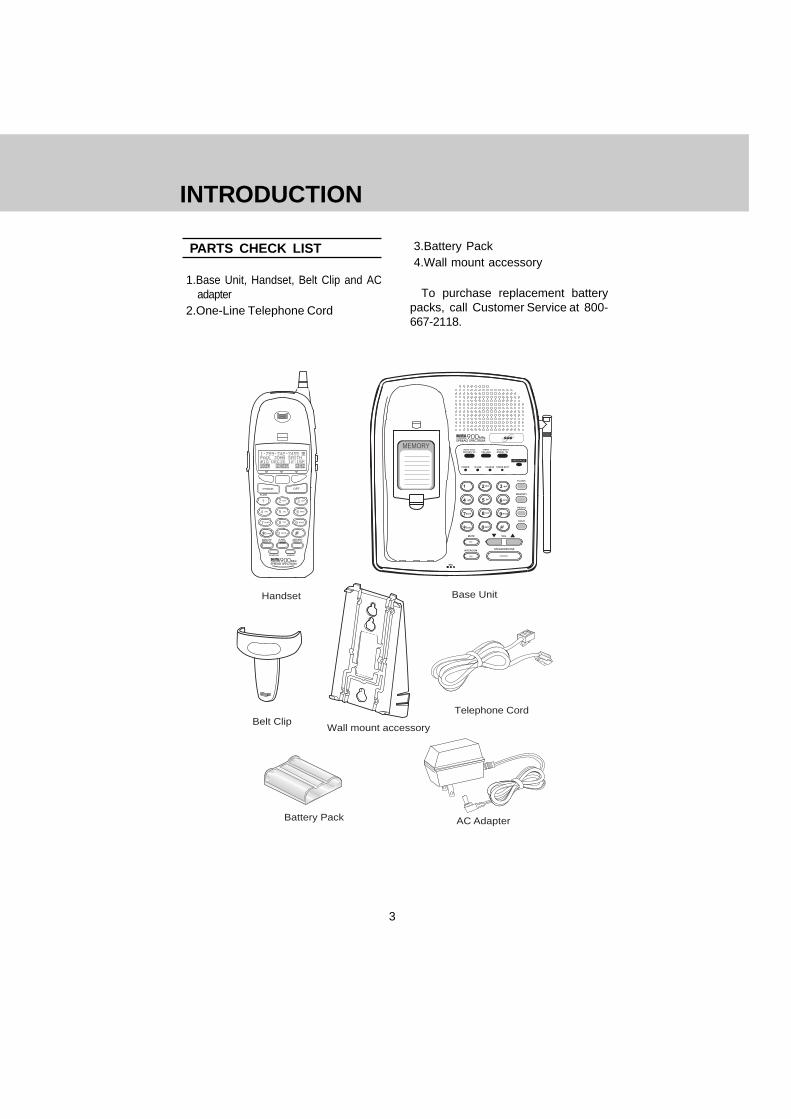
PARTS CHECK LIST
1.Base Unit, Handset, Belt Clip and ACadapter
2.One-Line Telephone Cord
3.Battery Pack4.Wall mount accessory
To purchase replacement batterypacks, call Customer Service at 800-667-2118.
INTRODUCTION
Battery Pack AC Adapter
Telephone CordBelt Clip
Wall mount accessory
Base UnitHandset
PHONE OFF
FLASH
1 2 ABC 3 DEF
4 GHI 5 JKL 6 MNO
7 PQRS
TONE 0 OPER
8 TUV 9 WXYZ
AUTO CALLRETURN *69
3-WAYCALLING
AUTO BUSYREDIAL *66
INTERCOM SPEAKER
POWER IN-USE CHARGE SPARE BATT
MESSAGE
AUTO CALLRETURN *69
3-WAYCALLING
AUTO BUSYREDIAL *66
7pqrs 8 tuv 9wxyz
4 ghi 5 jkl 6mno
1 3 def2 abc
tone 0oper
MIC
MUTE VOL
INTERCOMSPEAKERPHONE
FLASH
MEMORY
REDIAL
HOLD
MEMORY
4
FCC REGULATIONS
This equipment complies with Parts15 and 68 of the FederalCommunications Commission (FCC)rules for the United States. Operation issubject to the following two conditions:(1) this device may not causeinterference, and (2) this device mustaccept any interference, includinginterference that may cause undesiredoperation of the device.
The underside of the Base Unitcontaining engravements of either theFCC registration number and RingerEquivalence Number (REN), or the ICregistration number . You must, uponrequest, provide this information to yourlocal telephone company.
This equipment is compatible withinductively coupled hearing aids.
Should you experience trouble withthis telephone equipment, pleasecontact:
Customer Service at 800-667-2118
The telephone company may ask youto disconnect this equipment from theline network until the problem has beencorrected.
FCC Part 15
Warning: Changes or modificationsto this unit not expressly approved bythe party responsible for compliance'scould void the user’s authority to operatethe equipment.
The equipment has been tested andfound to comply with part 15 of the FCC
rules. These limits are designed toprovide reasonable protection againstharmful interference in a residentialinstallation. This equipment generates,uses and can radiate radio frequencyenergy and, if not installed and used inaccordance with the instructions, maycause harmful interference to radiocommunications. However, there is noguarantee that interference will not occurin a particular installation. If thisequipment does cause harmfulinterference to radio or televisionreception, which can be determined byturning the equipment off and on, theuser is encouraged to try and correct theinterference by one or more of thefollowing measures:
- Reorient or relocate the receivingantenna.
- Increase the separation between theequipment and receiver.
- Connect the equipment into an outletor on a circuit different from that towhich the receiver is connected.
- Consult the dealer or an experiencedradio/TV technician for help.
5
FCC REGULATIONS
FCC Part 68
The FCC requires that you connectyour cordless telephone to thenationwide telephone network througha modular telephone jack (USOCRJ11C, RJ11W or RJ14).
Your telephone company maydiscontinue your service if your equip-ment causes harm to the telephonenetwork. They will notify you in ad-vance of disconnection, if possible.During notification, you will be informedof your right to file a complaint with theFCC.
Occasionally, your telephonecompany may make changes in its fa-cilities, equipment, operation, or proce-dures that could affect the operation ofyour equipment. If so, you will be givenadvance notice of the change to giveyou an opportunity to maintainuninterrupted service.
The Base Unit contains no userserviceable parts. The Handset containsa user replaceable battery pack.
If it is determined that your telephoneequipment is malfunctioning, the FCCrequires that it not be used and that it beunplugged from the modular jack untilthe problem has been corrected.Repairs to this telephone equipment canonly be made by the manufacturer or itsauthorized agents or by others whomay be authorized by the FCC. Forrepair procedures, follow the instructionsoutlined under the Limited Warranty.
This equipment may not be used oncoin service provided by the phonecompany or Party Lines.
The REN is useful in determining thenumber of devices you may connect toyour telephone line and still enable thedevices to ring when you receive a call.The general rule is that the REN valueshould not exceed 5.0 total; however,contact your local telephone companyfor the specific number in your area.
6
When using your telephoneequipment, basic safety precautionsshould always be followed to reduce therisk of fire, electric shock and injury topersons, including the following:
1.Read and understand all instructions.
2.Follow all warnings and instructionsmarked on the product.
3. Unplug this product from the walloutlet before cleaning. Do not useliquid cleaners or aerosol cleaners.Use a damp cloth for cleaning.
4.Do not use this product near water(for example, near a bath tub, kitchensink, or swimming pool).
5. Do not place this product on anunstable cart, stand, or table. Theproduct may fall, causing seriousdamage to the product.
6.Slots and openings in the cabinet onthe back or bottom are provided forventilation.To protect it fromoverheating, these openings mustnot be blocked by placing the producton a bed, sofa, rug, or other similarsurface. This product should neverbe placed near or over a radiator orheat register. This product should notbe placed in a built-in installationwhere proper ventilation is notprovided.
7.This product should be operated onlyfrom the type of power sourceindicated on the marking label. If youare not sure of the type of powersupply to your home, consult yourdealer or local power company.
IMPORTANT SAFETY INSTRUCTIONS
8.Do not allow anything to rest on thepower cord. Do not locate thisproduct where the cord will beabused by persons walking on it.
9.Never push objects of any kind intothis product through cabinet slots asthey may touch dangerous voltagepoints or short out parts that couldresult in a risk of fire or electric shock.Never spill liquid of any kind on theproduct.
10.To reduce the risk of electric shock,do not disassemble this product, buttake it to an authorized servicefacility. Opening or removing cabinetparts other than specified accessdoors may expose you to dangerousvoltage or other risks. Incorrectreassembling can cause electricshock when the appliance issubsequently used.
11.Do not overload wall outlets andextension cords as this can result inthe risk of fire or electric shock.
12. Unplug this product from the walloutlet and refer servicing to anauthorized service facility under thefollowing conditions:
A. When the power supply cord or plugis damaged or frayed.
B. If liquid has been spilled into theproduct.
C.If the product has been exposed torain or water.
7
IMPORTANT SAFETY INSTRUCTIONS
SAVE THESE INSTRUCTIONS
D.If the product does not operatenormally by following the operatinginstructions. Adjust only thosecontrols that are covered by theoperating instructions, becauseimproper adjustment of other controlsmay result in damage and will oftenrequire extensive work by anauthorized technician to restore theproduct to normal operation.
E. If the product has been dropped andthe cabinet has been damaged.
F. If the product exhibits a distinctchange in performance.
13.Avoid using a telephone (other thana cordless type) during an electricalstorm. There may be a remote riskof electric shock from lighting.
14.Do not use the telephone to reporta gas leak in the vicinity of the leak.
CTIONS
8
The Handset of your SBC9030 ispowered by a rechargeable battery pack.It charges automatically whenever theHandset is in the Base Unit. You shouldcharge the battery pack for 16 hourswhen you first receive your phone. You’llknow the battery pack needs chargingwhen:
• The low battery message is displayed:
• The Handset seems completely dead,the LCD is completely clear and doesnot activate when you press thekeys.
TO CHARGE THE BATTERYPACK
To charge the battery pack, place theHandset in the Base Unit. TheCHARGING indicator will light to showthe Handset is seated properly and thebattery pack is charging. It isrecommended that the battery pack becharged for at least 16 hours initially.Afterwards, 8 hours of maintenancecharging should be sufficient. You canuse your telephone before that with di-minished capacity, but it is best to chargethe battery pack fully. It will take severalrecharge cycles to maximize the chargecapacity of your battery pack. Themaximum battery life between chargesis 7 hours of continuous talk time or 14days of stand by.
INSTALLING THE BATTERY PACK
Alternatively, if a spare battery packhas been charging in the Base Unit,simply exchange the drained Handsetbattery pack with the fully chargedreplacement battery pack from the BaseUnit charger. Place the drained Handsetbattery pack into the Base Unit chargerso that it will charge.
The Base Unit spare battery chargerdoes NOT charge a battery pack asquickly as the main Handset batterycharger. A full charge requires 24 hours.
A WORD ABOUTRECHARGEABLE BATTERIES
Your Ni-Cd battery pack rechargeswhenever the Handset is returned to theBase Unit.
IT’S IMPOSSIBLE TOOVERCHARGE THE BATTERYPACK
The battery pack can be rechargedmany times but if you get a low-batterysignal even after 8 hours of charging inthe Base Unit cradle (or 24 hours in theBase Unit spare battery charger), thebattery pack(s) should be replaced.
To purchase replacement batterypacks, call Customer Service at800-667-2118.
9
INSTALLING THE BATTERY PACK
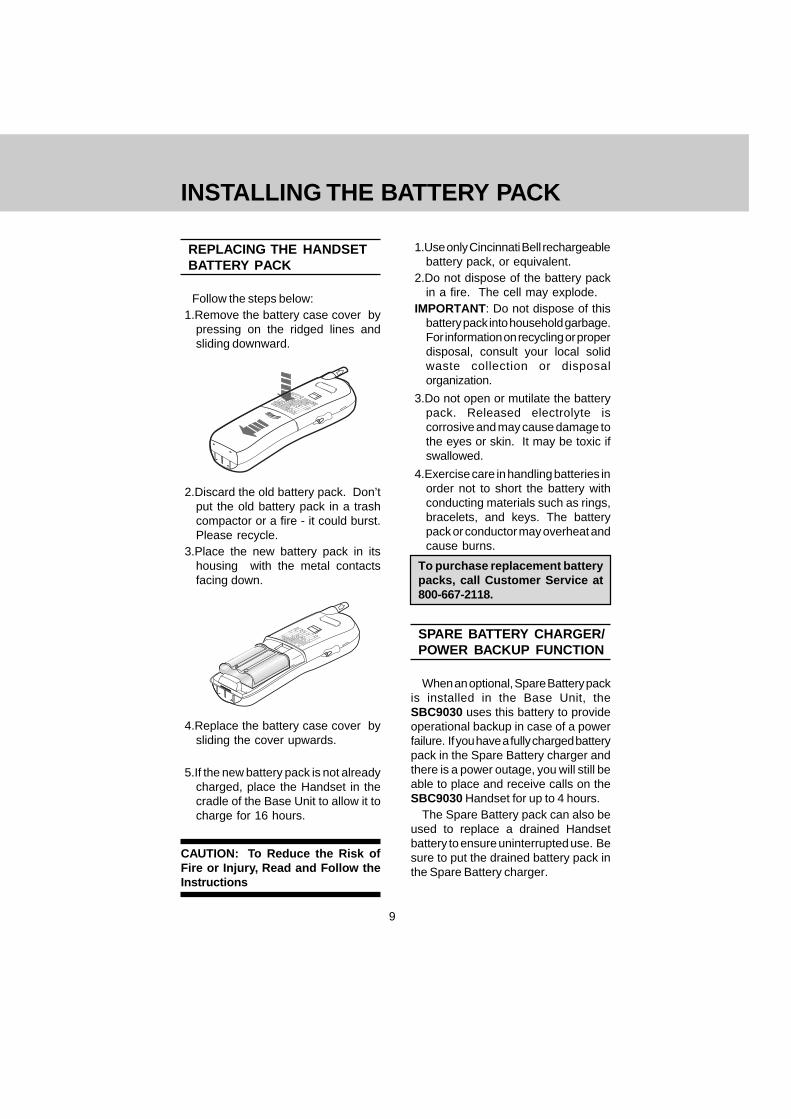
REPLACING THE HANDSETBATTERY PACK
Follow the steps below:1.Remove the battery case cover by
pressing on the ridged lines andsliding downward.
2.Discard the old battery pack. Don’tput the old battery pack in a trashcompactor or a fire - it could burst.Please recycle.
3.Place the new battery pack in itshousing with the metal contactsfacing down.
+-
4.Replace the battery case cover bysliding the cover upwards.
5.If the new battery pack is not alreadycharged, place the Handset in thecradle of the Base Unit to allow it tocharge for 16 hours.
CAUTION: To Reduce the Risk ofFire or Injury, Read and Follow theInstructions
1.Use only Cincinnati Bell rechargeablebattery pack, or equivalent.
2.Do not dispose of the battery packin a fire. The cell may explode.
IMPORTANT: Do not dispose of thisbattery pack into household garbage.For information on recycling or properdisposal, consult your local solidwaste collection or disposalorganization.
3.Do not open or mutilate the batterypack. Released electrolyte iscorrosive and may cause damage tothe eyes or skin. It may be toxic ifswallowed.
4.Exercise care in handling batteries inorder not to short the battery withconducting materials such as rings,bracelets, and keys. The batterypack or conductor may overheat andcause burns.
To purchase replacement batterypacks, call Customer Service at800-667-2118.
SPARE BATTERY CHARGER/POWER BACKUP FUNCTION
When an optional, Spare Battery packis installed in the Base Unit, theSBC9030 uses this battery to provideoperational backup in case of a powerfailure. If you have a fully charged batterypack in the Spare Battery charger andthere is a power outage, you will still beable to place and receive calls on theSBC9030 Handset for up to 4 hours.
The Spare Battery pack can also beused to replace a drained Handsetbattery to ensure uninterrupted use. Besure to put the drained battery pack inthe Spare Battery charger.
1 0
GETTING STARTED
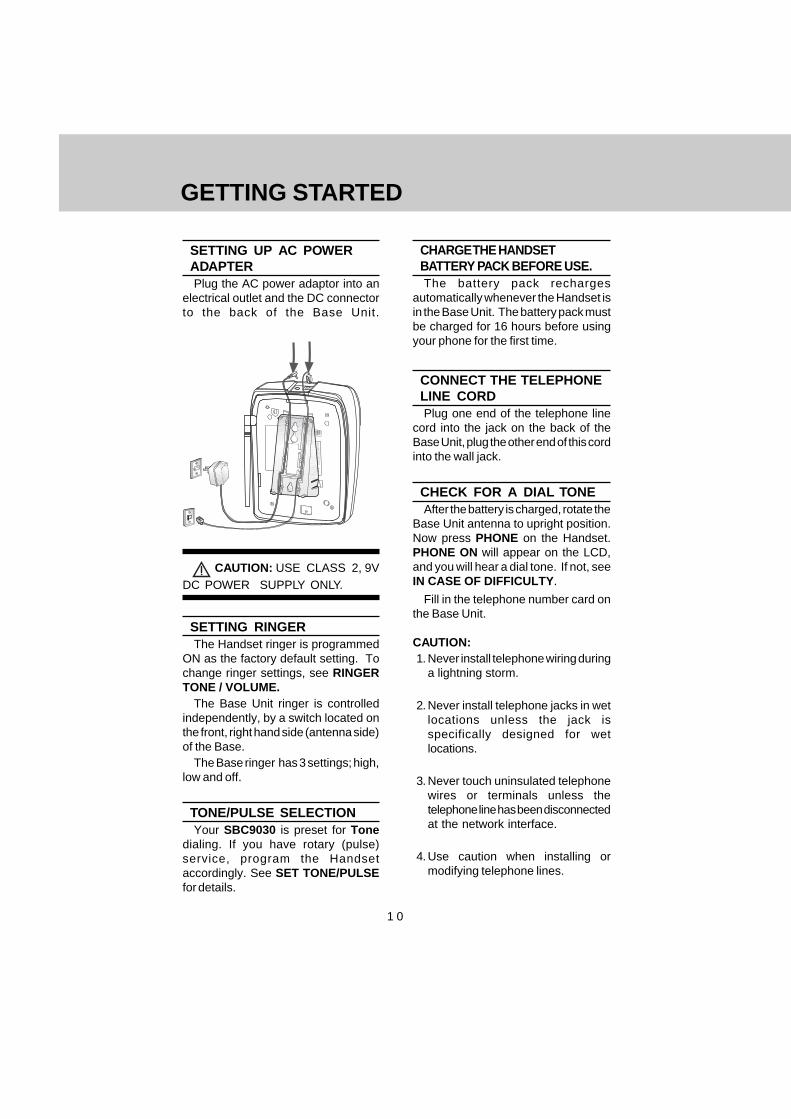
SETTING UP AC POWERADAPTERPlug the AC power adaptor into an
electrical outlet and the DC connectorto the back of the Base Unit.
xxx xx xx xxxxxx xxx
PR
OD
UC
T C
ON
TAIN
S N
ICK
EL-
CA
DM
IUM
BAT
TER
Y:
MU
ST
BE
RE
CY
CLE
D O
R D
ISP
OS
ED
OF
PR
OP
ER
LY.
DO
NO
T B
UR
N O
R P
UN
CTU
RE
BAT
TER
Y. L
IKE
OTH
ER
BAT
TER
IES
OF
THIS
TY
PE
. IF
IT IS
BU
RN
ED
OR
PU
NC
TU
RE
D.
IT C
OU
LD R
ELE
AS
E T
OX
IC
MAT
ER
IAL
WH
ICH
CO
ULD
CA
US
E
INJU
RY.
Cd
CAUTION: USE CLASS 2, 9VDC POWER SUPPLY ONLY.
SETTING RINGERThe Handset ringer is programmed
ON as the factory default setting. Tochange ringer settings, see RINGERTONE / VOLUME.
The Base Unit ringer is controlledindependently, by a switch located onthe front, right hand side (antenna side)of the Base.
The Base ringer has 3 settings; high,low and off.
TONE/PULSE SELECTIONYour SBC9030 is preset for Tone
dialing. If you have rotary (pulse)service, program the Handsetaccordingly. See SET TONE/PULSEfor details.
CHARGE THE HANDSETBATTERY PACK BEFORE USE.The battery pack recharges
automatically whenever the Handset isin the Base Unit. The battery pack mustbe charged for 16 hours before usingyour phone for the first time.
CONNECT THE TELEPHONELINE CORDPlug one end of the telephone line
cord into the jack on the back of theBase Unit, plug the other end of this cordinto the wall jack.
CHECK FOR A DIAL TONEAfter the battery is charged, rotate the
Base Unit antenna to upright position.Now press PHONE on the Handset.PHONE ON will appear on the LCD,and you will hear a dial tone. If not, seeIN CASE OF DIFFICULTY .
Fill in the telephone number card onthe Base Unit.
CAUTION:1. Never install telephone wiring during
a lightning storm.
2. Never install telephone jacks in wetlocations unless the jack isspecifically designed for wetlocations.
3. Never touch uninsulated telephonewires or terminals unless thetelephone line has been disconnectedat the network interface.
4. Use caution when installing ormodifying telephone lines.
1 1
USING THE WALL MOUNTADAPTOR
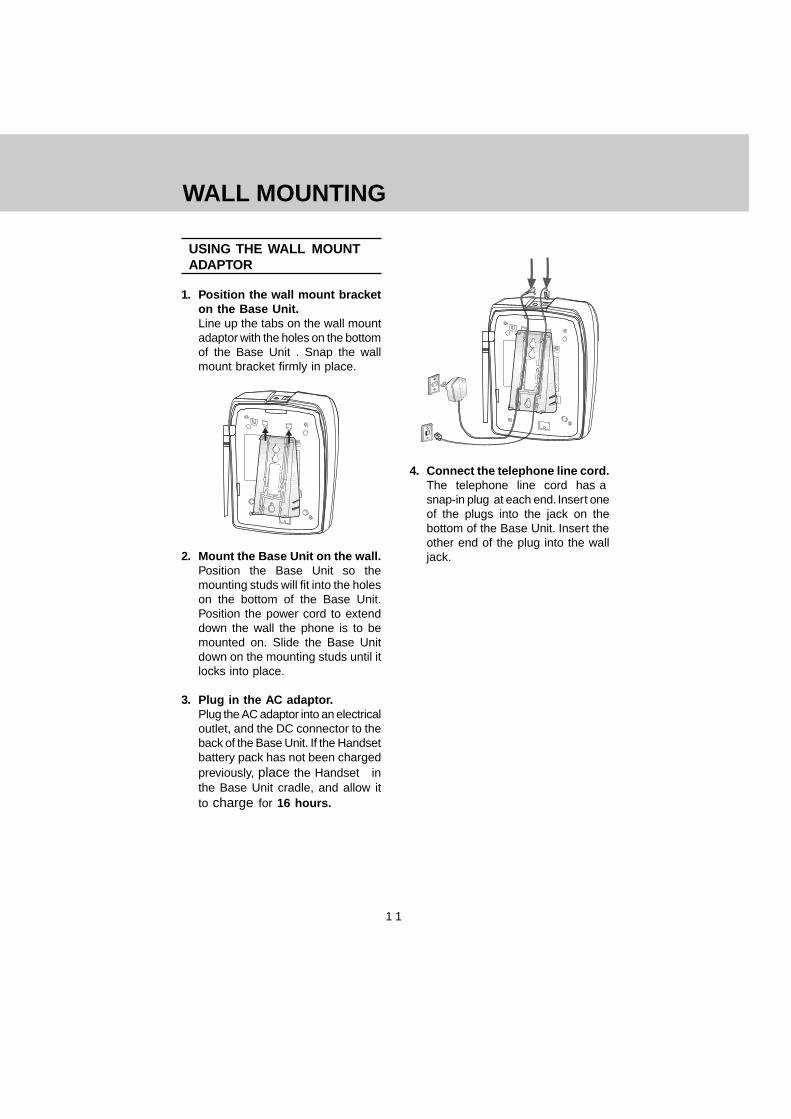
1. Position the wall mount bracketon the Base Unit.Line up the tabs on the wall mountadaptor with the holes on the bottomof the Base Unit . Snap the wallmount bracket firmly in place.
xxx xx xx xxxxxx xxx
PR
OD
UC
T C
ON
TAIN
S N
ICK
EL-
CA
DM
IUM
BAT
TER
Y:
MU
ST
BE
RE
CY
CLE
D O
R D
ISP
OS
ED
OF
PR
OP
ER
LY.
DO
NO
T B
UR
N O
R P
UN
CTU
RE
BAT
TER
Y. L
IKE
OTH
ER
BAT
TER
IES
OF
THIS
TY
PE
. IF
IT IS
BU
RN
ED
OR
PU
NC
TU
RE
D.
IT C
OU
LD R
ELE
AS
E T
OX
IC
MAT
ER
IAL
WH
ICH
CO
ULD
CA
US
E
INJU
RY.
Cd
2. Mount the Base Unit on the wall.Position the Base Unit so themounting studs will fit into the holeson the bottom of the Base Unit.Position the power cord to extenddown the wall the phone is to bemounted on. Slide the Base Unitdown on the mounting studs until itlocks into place.
3. Plug in the AC adaptor.Plug the AC adaptor into an electricaloutlet, and the DC connector to theback of the Base Unit. If the Handsetbattery pack has not been chargedpreviously, place the Handset inthe Base Unit cradle, and allow itto charge for 16 hours.
WALL MOUNTING
xxx xx xx xxxxxx xxx
PR
OD
UC
T C
ON
TAIN
S N
ICK
EL-
CA
DM
IUM
BAT
TER
Y:
MU
ST
BE
RE
CY
CLE
D O
R D
ISP
OS
ED
OF
PR
OP
ER
LY.
DO
NO
T B
UR
N O
R P
UN
CTU
RE
BAT
TER
Y. L
IKE
OTH
ER
BAT
TER
IES
OF
THIS
TY
PE
. IF
IT IS
BU
RN
ED
OR
PU
NC
TU
RE
D.
IT C
OU
LD R
ELE
AS
E T
OX
IC
MAT
ER
IAL
WH
ICH
CO
ULD
CA
US
E
INJU
RY.
Cd
4. Connect the telephone line cord.The telephone line cord has asnap-in plug at each end. Insert oneof the plugs into the jack on thebottom of the Base Unit. Insert theother end of the plug into the walljack.
1 2
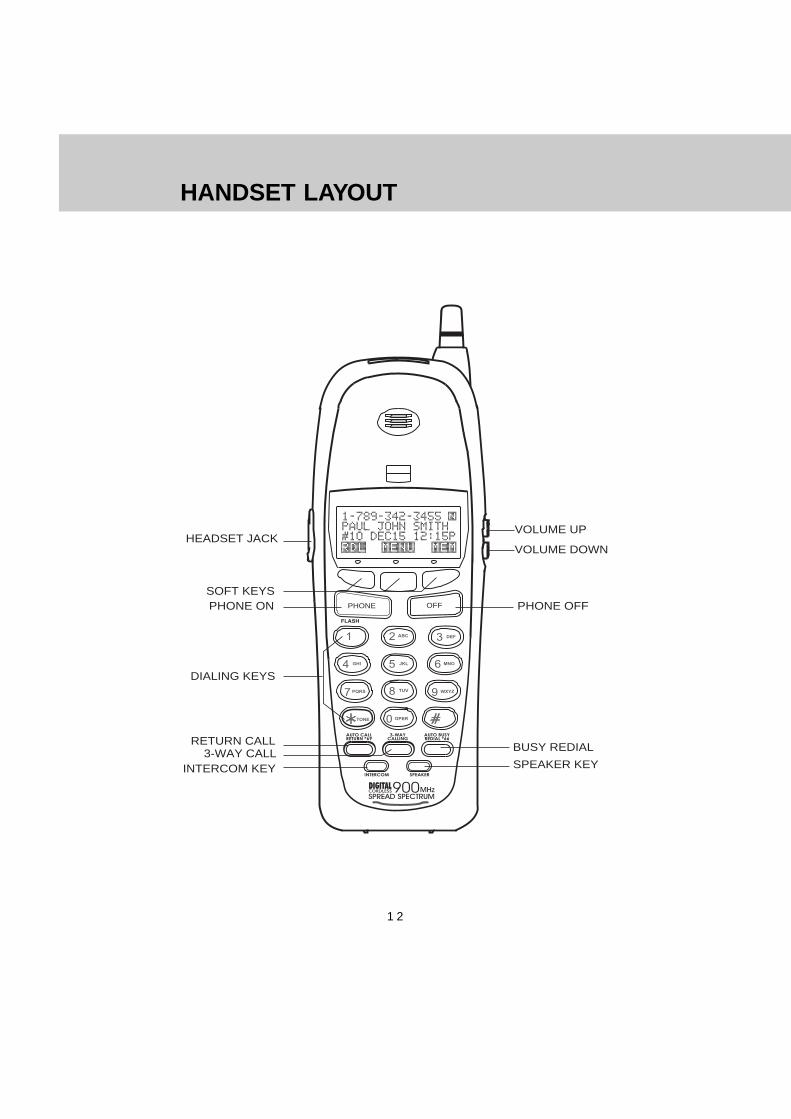
HANDSET LAYOUT
3-WAY CALL
PHONE OFF
FLASH
1 2 ABC 3 DEF
4 GHI 5 JKL 6 MNO
7 PQRS
TONE 0 OPER
8 TUV 9 WXYZ
SOFT KEYS
DIALING KEYS
HEADSET JACK
RETURN CALL BUSY REDIAL
VOLUME UP
VOLUME DOWN
SPEAKER KEYINTERCOM KEY
PHONE ON PHONE OFF
AUTO CALLRETURN *69
3-WAYCALLING
AUTO BUSYREDIAL *66
INTERCOM SPEAKER
1 3
BASE LAYOUT
9V DC TEL LINE
PHONE CORD JACK
AC POWER JACK
POWER IN-USE CHARGE SPARE BATT
MESSAGE
AUTO CALLRETURN *69
3-WAYCALLING
AUTO BUSYREDIAL *66
7pqrs 8 tuv 9wxyz
4 ghi 5 jkl 6mno
1 3 def2 abc
tone 0oper
MIC
MUTE VOL
INTERCOMSPEAKERPHONE
FLASH
MEMORY
REDIAL
HOLD
SPARE BATT. LEDCHARGE LEDIN USE LEDPOWER LEDFLASH KEYMEMORY KEY
REDIAL KEYHOLD KEY
DIALING KEYS
VOLUME UP/DOWN KEYMUTE KEY/LEDSPEAKERPHONE KEY
INTERCOM KEY
SPARE BATTERYCHARGERCOMPARTMENT
AUTO CALL RETURN *693-WAY CALLING KEY
MESSAGE INDICATORAUTO BUSY REDIAL *66 KEYMEMORY
1 4
QUICK REFERENCE GUIDE
Here is a brief guide to the featuresand functions of your SBC9030 cordlesstelephone:
SET-UP
• Plug AC adaptor into a standardelectrical outlet.
• Let Handset battery pack charge for16 hours before first use.
• Set Dial Mode setting in MENU toPULSE or TONE. The unit is factoryset to TONE.
• Connect telephone line cord to BaseUnit and telephone jack.
SETTING TIME
With the Handset in the idle (off) mode:• Press MENU
1.
• Use the / soft keys to scrolluntil 5. Set Time is highlighted
• Press ENTER
2.3.
• Enter the current hour . A single-digithour must be preceded by a 0.
• Next, enter the minute .
• Next, select the Hour Presentation(12-hour or 24-hour format) bypressing the key directly below the12 or 24 icon in the handset display.
• Press SAVE. The display will confirmthat the time has been updated.
4. Or
• The time setting will alsoautomatically be updated when Time/Date information is received fromCaller ID.
MAKING CALLS
FROM THE HANDSET
• Press PHONE. The Handset willbriefly display CONNECTING, thenPHONE ON. Listen for dial tone.Using the keypad, dial the desirednumber. To end your call, pressOFF, or return the handset to thebase unit.
-OR-
• First, dial the desired number. Then,press PHONE. After accessing dialtone, the phone number will bedialed. To end your call, press OFF,or return the handset to the baseunit.
1 5
When you end your call by pressingOFF or returning the handset to thebase unit, the phone will return tothe rotary (PULSE) mode.
VOLUME CONTROL
FROM THE HANDSET
• The phone must be ON.
• Located on the side of the Handset,press the VOLUME UP or VOLUMEDOWN keys to raise or lower theearpiece volume. There are 8volume levels.
FROM THE BASE• The Base Unit has its own volume
control. The VOL Up and Downkeys are located directly above theSPEAKERPHONE key.
RINGER CONTROL
FROM THE HANDSETWith the Handset in the idle (off) mode:
• Press MENU
• Using the / soft keys, scrolluntil 3. Ringer Tone/Vol ishighlighted.
FROM THE BASE• Press SPEAKERPHONE, then wait
for dial tone. Dial the desired phonenumber.
• To end your call, pressSPEAKERPHONE again.
ANSWERING CALLS
• When there is an incoming phonecall, pressing OFF key on thehandset can stop the ringing.You canalso answer the call simply bypressing any key except OFF,VOLUME, INTERCOM and the 3PPU keys.
FROM THE HANDSET:• Press any key except OFF, Volume,
INTERCOM and the 3 PPU keys.
• Press OFF to end your call.
FROM THE BASE:• Press SPEAKERPHONE . To end
your call, press SPEAKERPHONEagain.
TEMPORARY TONE
• If your local telephone servicerequires rotary (PULSE) dialing,you can temporarily switch to TONEdialing for such purposes asaccessing answering machines,bank-by-phone services, and usingcalling cards.
• To switch from rotary to tone dialing
during a call, press the *TONE key.
QUICK REFERENCE GUIDE
1 6
• Press ENTER• Use the RING soft key to select the
Ringer Type (there are 4 ring styles)and Vol soft key to select the ringervolume (High, Low or Off).
3. 2.
• Press SAVE to store your ringersettings
4.
• To exit programming mode at anytime, press OFF key .
FROM THE BASE• The Base Unit ringer is controlled
independently, by a switch locatedon the front, right hand side (antennaside) of the Base.
• The Base ringer has (3) settings:High, Low and Off.
HOLD
FROM THE HANDSET
• Press the HOLD soft key to placean active call on hold. Press theTALK soft key or the PHONE keyto return to your call.
• If an extension phone is activatedwhile the SBC9030 has a call onHOLD, the SBC9030 will releasethe call and turn itself OFF.
FROM THE BASE
• During a Speakerphone call, pressHOLD on the Base Unit. The redlight (LED) buit into theSPEAKERPHONE key, will flash
rapidly while your call is on hold.
• Press either HOLD orSPEAKERPHONE to return toyour call.
MUTE
FROM THE HANDSET• Press the MUTE soft key to disable
the Handset microphone during anactive call. Press the TALK softkey to return to normal 2-wayconversation.
FROM THE BASE• During a Speakerphone call, press
MUTE to disable the Base Unitmicrophone. The red light (LED) buitinto the MUTE key, will glow.
• Press MUTE again to return to atwo-way conversation.
REDIAL WITH THE HANDSETON (OFF HOOK)
• Press the RDL soft key to displaythe last three telephone numbersyou dialed.
QUICK REFERENCE GUIDE
1 7
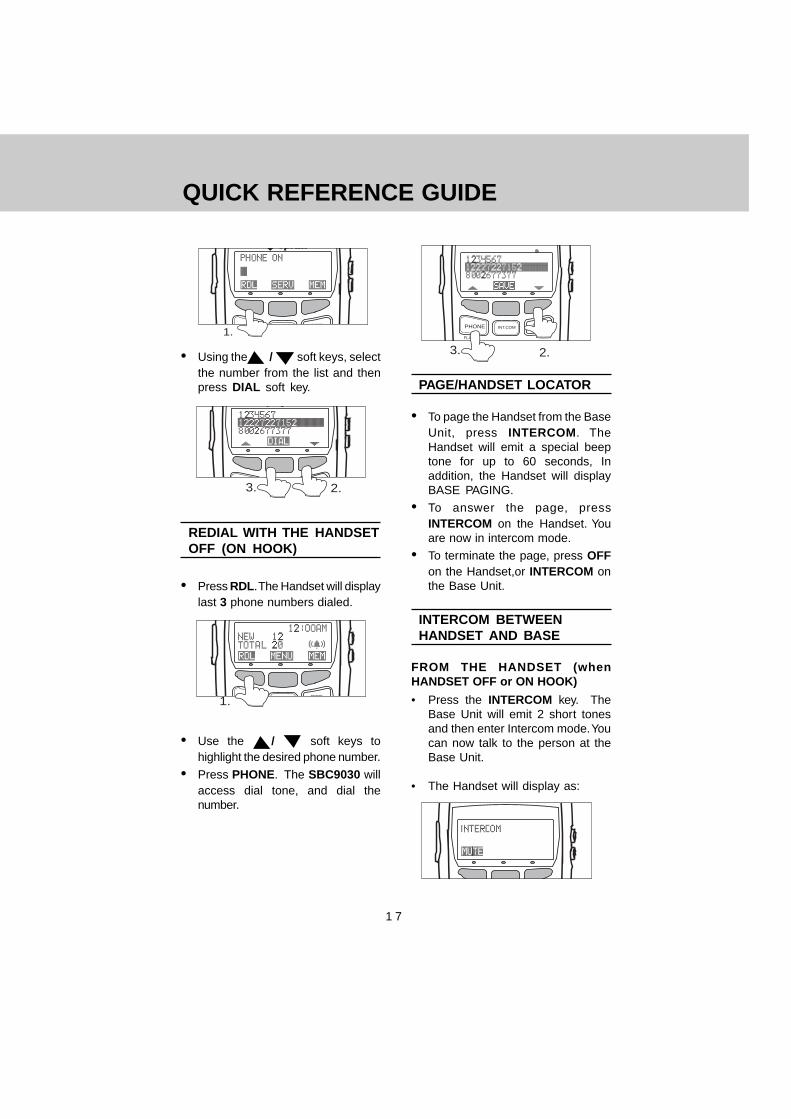
OFF1.
• Using the / soft keys, selectthe number from the list and thenpress DIAL soft key.
3. 2.
REDIAL WITH THE HANDSETOFF (ON HOOK)
• Press RDL. The Handset will displaylast 3 phone numbers dialed.
PHONE OFF1.
• Use the / soft keys tohighlight the desired phone number.
• Press PHONE. The SBC9030 willaccess dial tone, and dial thenumber.
PHONE OFFINT.COM
FLASH
3. 2.
PAGE/HANDSET LOCATOR
• To page the Handset from the BaseUnit, press INTERCOM. TheHandset will emit a special beeptone for up to 60 seconds, Inaddition, the Handset will displayBASE PAGING.
• To answer the page, pressINTERCOM on the Handset. Youare now in intercom mode.
• To terminate the page, press OFFon the Handset,or INTERCOM onthe Base Unit.
INTERCOM BETWEENHANDSET AND BASE
FROM THE HANDSET (whenHANDSET OFF or ON HOOK)
• Press the INTERCOM key. TheBase Unit will emit 2 short tonesand then enter Intercom mode. Youcan now talk to the person at theBase Unit.
• The Handset will display as:
QUICK REFERENCE GUIDE
R
1 8
• Press the MUTE softkey to mute thehandset microphone. But you canstill hear the speaking from the Base.
• You can return the intercomconversation with the Base by pressthe TALK softkey.
• Press the OFF key to end theintercom mode.
FROM THE HANDSET (withHANDSET ON or OFF HOOK)
• You can use the intercom when youare in a call.
• Press the INTERCOM key, then youcan talk to the Base unit.
• At the same time, your active call willbe placed on HOLD.
• You can press the MUTE softkey tomute the handset microphone. Butyou can still hear the speaking fromthe Base.
• You can return the intercomconversation with the Base bypressing the TALK soft key.
• Press the OFF key to end theintercom mode. But, at this time, yourcall still on hold. You need to pressthe TALK softkey or the PHONEkey to return to your call.
• Anytime in the intercom mode, youcan press the PHONE key to endthe intercom and return to your call.
QUICK REFERENCE GUIDE
FROM THE BASE (withSPEAKERPHONE OFF)
• Press INTERCOM key to page theHandset.
• After the Handset receives the pagefrom the Base, press the INTERCOMkey on the Handset to establishconversatiion.
• During the intercom, you can pressthe MUTE key to mute themicrophone on the Base. But youcan still hear the speaking from theHandset.
• Press the MUTE key once again torelease the mute function.
• Press INTERCOM key to exit theintercom mode.
FROM THE BASE (withSPEAKERPHONE ON)
• You can use intercom during a call• Press INTERCOM key to page the
Handset. You will be on hold.• After the Handset receives the page
from the Base, press the INTERCOMkey on the Handset to establishconversation.
• During the intercom, you can pressthe MUTE key to mute themicrophone on the Base. But youcan still hear the speaking from theHandset.
• Press the MUTE key once again torelease the mute function.
• Press INTERCOM and thenSPEAKERPHONE key to exit theintercom mode and return to the call.
• Or simply press SPEAKERPHONEto exit the intercom mode and returnto the call.
1 9
QUICK REFERENCE GUIDE
CONFERENCE
Your SBC9030 allows you to establisha 3 party conference between theHandset, Base and the incoming call:1) Use either the Base or the Handset
to make a call.2) If you are using the Base to make
the call, the Handset can join theconference by pressing PHONE.Or, press the SPEAKERPHONEkey on the Base if you use theHandset to make the call.
3) If either the Handset or the Baseparties want to leave the conference,either side can press OFF (on theHandset) or SPEAKERPHONE (onthe Base) to leave.
REVIEWING CALLER IDRECORDS
NOTE: Caller ID and Call Waiting IDare subscription services, availablethrough most local telephone serviceproviders. These are optional services;you are not required to subscribe tothem. However, to receive Caller ID onyour SBC9030, subscription throughyour local phone company is required.
With the Handset in the OFF (on hook)mode:• Press MENU
1.
• Using the / soft keys scrolluntil 1. Caller ID is highlighted
• Press the ENTER soft key.
OFF2.
• Use the / soft keys to scrollthrough the Caller ID records. TheSBC9030 will store the last 50Caller ID records to come in.Thelatest one will be in #01.
• Press OFF to exit Caller ID mode.
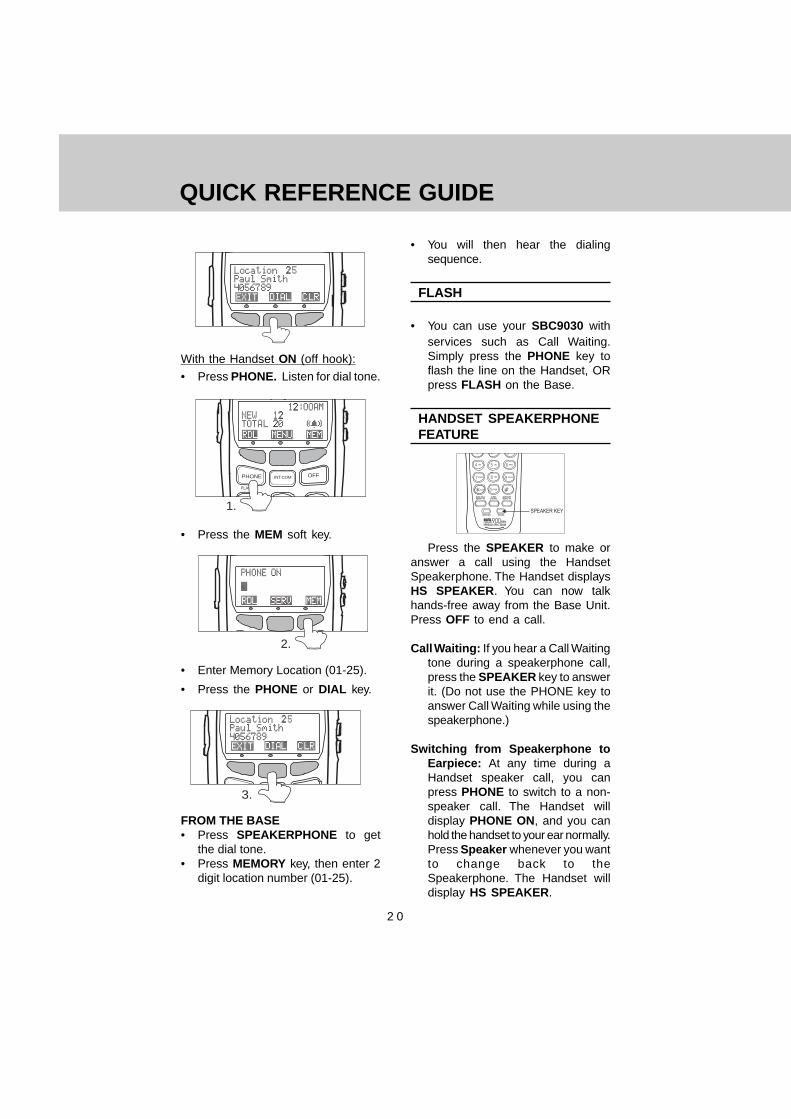
MEMORY DIALING
FROM THE HANDSETWith the Handset OFF (on hook):
• Press the MEM soft key.
1.
• Enter Memory Location (01-25).Assoon as you enter the second digit,the contents of the selected MemoryLocation will be displayed.
• Press PHONE key or the DIAL softkey to dial the displayed phonenumber.
2 0
QUICK REFERENCE GUIDE
With the Handset ON (off hook):
• Press PHONE. Listen for dial tone.
PHONE OFFINT.COM
FLASH
1 21.
• Press the MEM soft key.
2.
• Enter Memory Location (01-25).
• Press the PHONE or DIAL key.
3.
FROM THE BASE• Press SPEAKERPHONE to get
the dial tone.• Press MEMORY key, then enter 2
digit location number (01-25).
• You will then hear the dialingsequence.
FLASH
• You can use your SBC9030 withservices such as Call Waiting.Simply press the PHONE key toflash the line on the Handset, ORpress FLASH on the Base.
HANDSET SPEAKERPHONEFEATURE
1 2 3 DEF
4 GHI 5 JKL 6 MNO
7 PQRS
TONE 0 OPER
8 TUV 9 WXYZ
AUTO CALLRETURN *69
3-WAYCALLING
AUTO BUSYREDIAL *66
INTERCOM SPEAKERSPEAKER KEY
Press the SPEAKER to make oranswer a call using the HandsetSpeakerphone. The Handset displaysHS SPEAKER . You can now talkhands-free away from the Base Unit.Press OFF to end a call.
Call Waiting: If you hear a Call Waitingtone during a speakerphone call,press the SPEAKER key to answerit. (Do not use the PHONE key toanswer Call Waiting while using thespeakerphone.)
Switching from Speakerphone toEarpiece: At any time during aHandset speaker call, you canpress PHONE to switch to a non-speaker call. The Handset willdisplay PHONE ON, and you canhold the handset to your ear normally.Press Speaker whenever you wantto change back to theSpeakerphone. The Handset willdisplay HS SPEAKER .
2 1
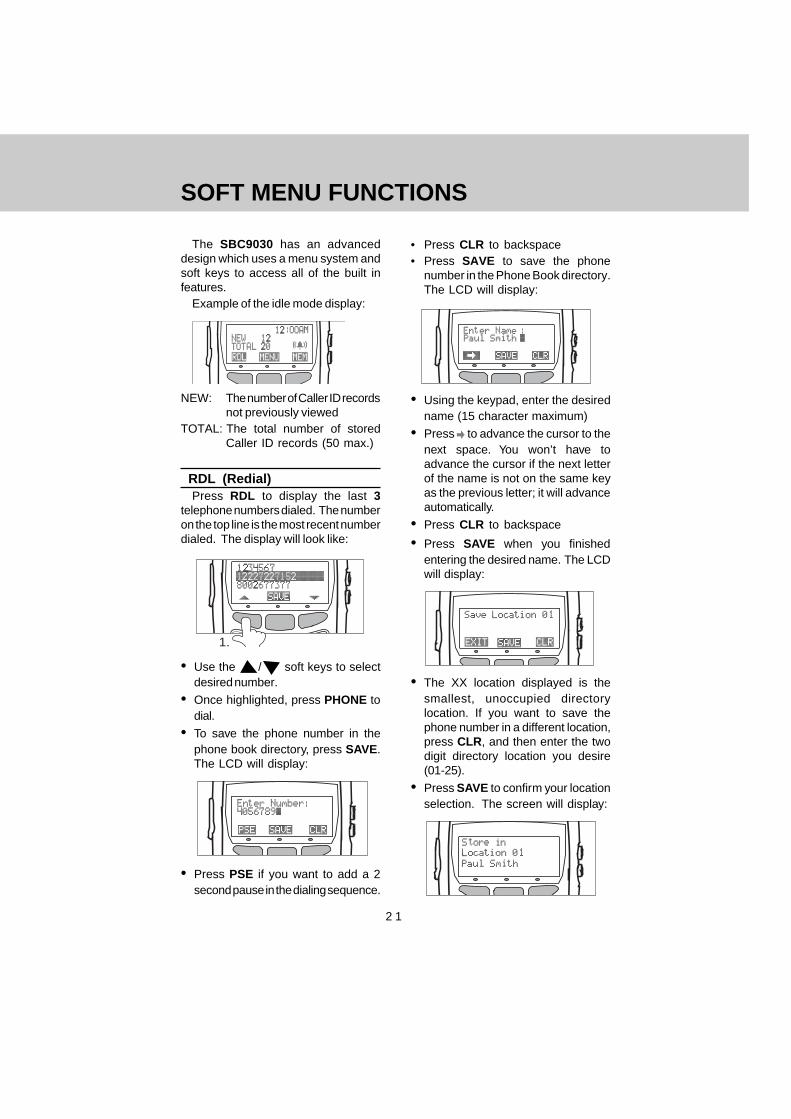
SOFT MENU FUNCTIONS
The SBC9030 has an advanceddesign which uses a menu system andsoft keys to access all of the built infeatures.
Example of the idle mode display:
NEW: The number of Caller ID recordsnot previously viewed
TOTAL: The total number of storedCaller ID records (50 max.)
RDL (Redial)Press RDL to display the last 3
telephone numbers dialed. The numberon the top line is the most recent numberdialed. The display will look like:
1.
• Use the / soft keys to selectdesired number.
• Once highlighted, press PHONE todial.
• To save the phone number in thephone book directory, press SAVE.The LCD will display:
• Press PSE if you want to add a 2second pause in the dialing sequence.
• Press CLR to backspace• Press SAVE to save the phone
number in the Phone Book directory.The LCD will display:
• Using the keypad, enter the desiredname (15 character maximum)
• Press to advance the cursor to thenext space. You won’t have toadvance the cursor if the next letterof the name is not on the same keyas the previous letter; it will advanceautomatically.
• Press CLR to backspace
• Press SAVE when you finishedentering the desired name. The LCDwill display:
• The XX location displayed is thesmallest, unoccupied directorylocation. If you want to save thephone number in a different location,press CLR, and then enter the twodigit directory location you desire(01-25).
• Press SAVE to confirm your locationselection. The screen will display:
2 2
SOFT MENU FUNCTIONS
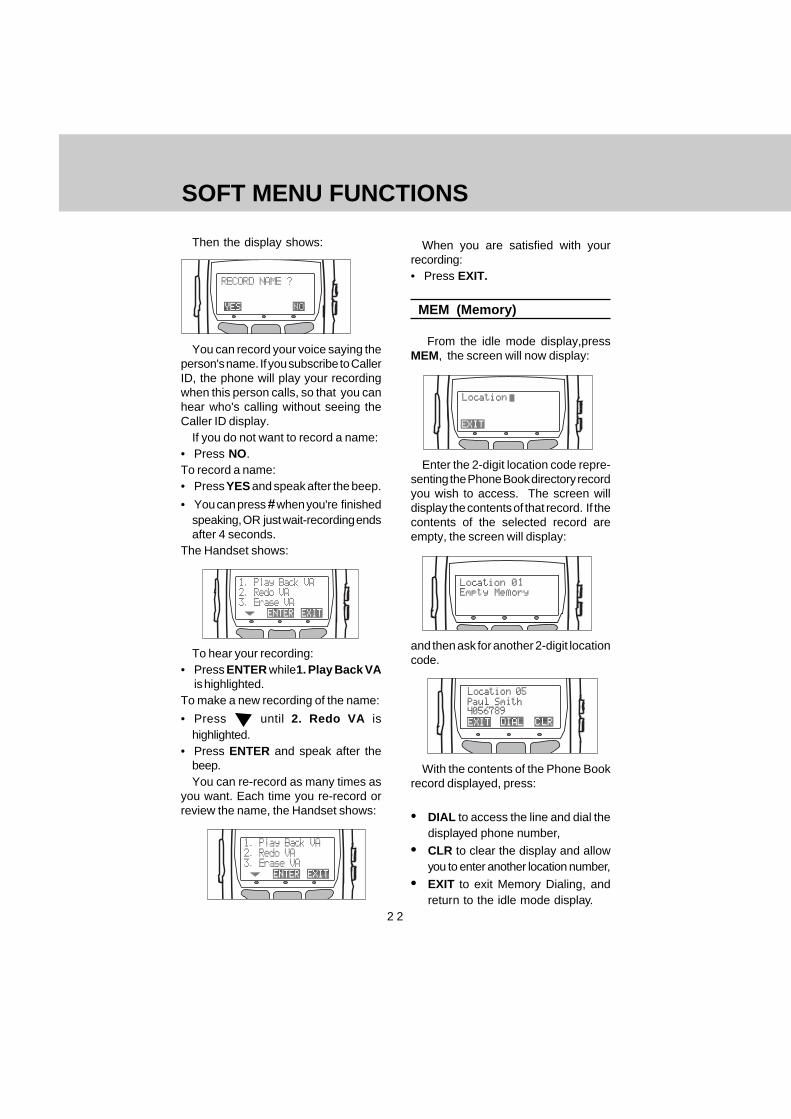
Then the display shows:
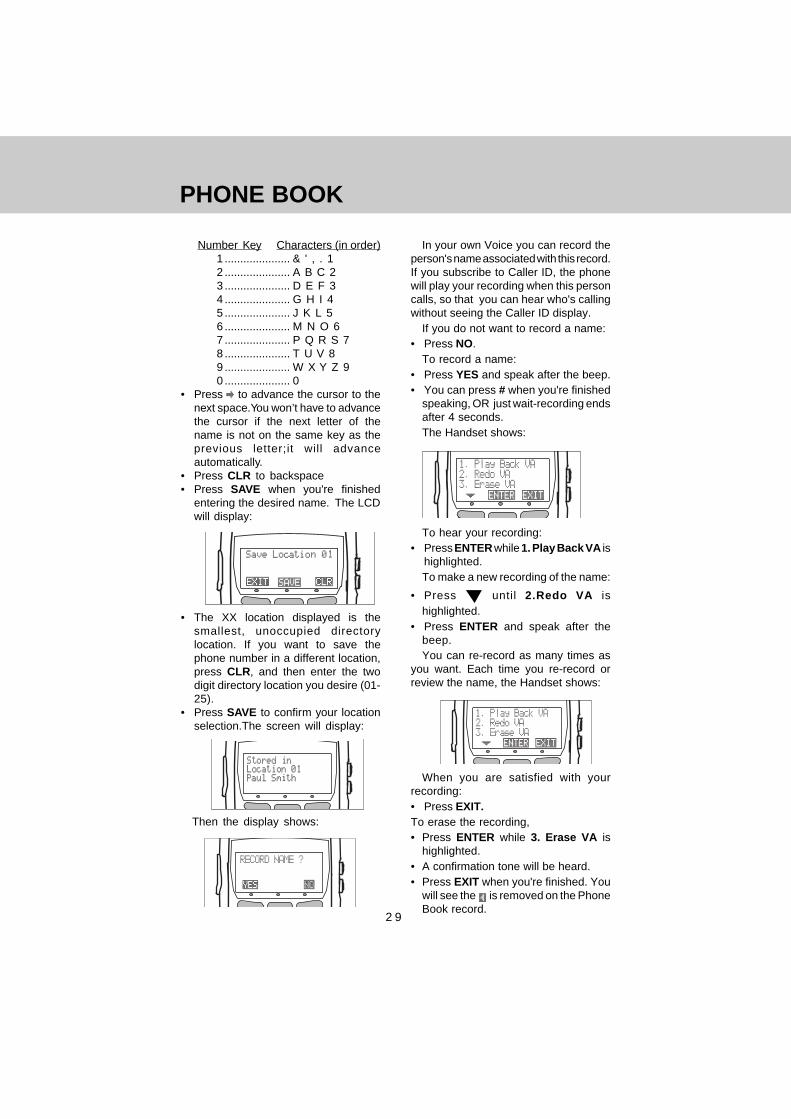
You can record your voice saying theperson's name. If you subscribe to CallerID, the phone will play your recordingwhen this person calls, so that you canhear who's calling without seeing theCaller ID display.
If you do not want to record a name:• Press NO.To record a name:• Press YES and speak after the beep.
• You can press # when you're finishedspeaking, OR just wait-recording endsafter 4 seconds.
The Handset shows:
To hear your recording:• Press ENTER while1. Play Back VA
is highlighted.To make a new recording of the name:
• Press until 2. Redo VA ishighlighted.
• Press ENTER and speak after thebeep.You can re-record as many times as
you want. Each time you re-record orreview the name, the Handset shows:
When you are satisfied with yourrecording:• Press EXIT.
MEM (Memory)
From the idle mode display,pressMEM, the screen will now display:
Enter the 2-digit location code repre-senting the Phone Book directory recordyou wish to access. The screen willdisplay the contents of that record. If thecontents of the selected record areempty, the screen will display:
and then ask for another 2-digit locationcode.
With the contents of the Phone Bookrecord displayed, press:
• DIAL to access the line and dial thedisplayed phone number,
• CLR to clear the display and allowyou to enter another location number,
• EXIT to exit Memory Dialing, andreturn to the idle mode display.
2 3
SOFT MENU FUNCTIONS
You can also access directory recordsby entering the name of the desiredparty. See PHONE BOOK for details.
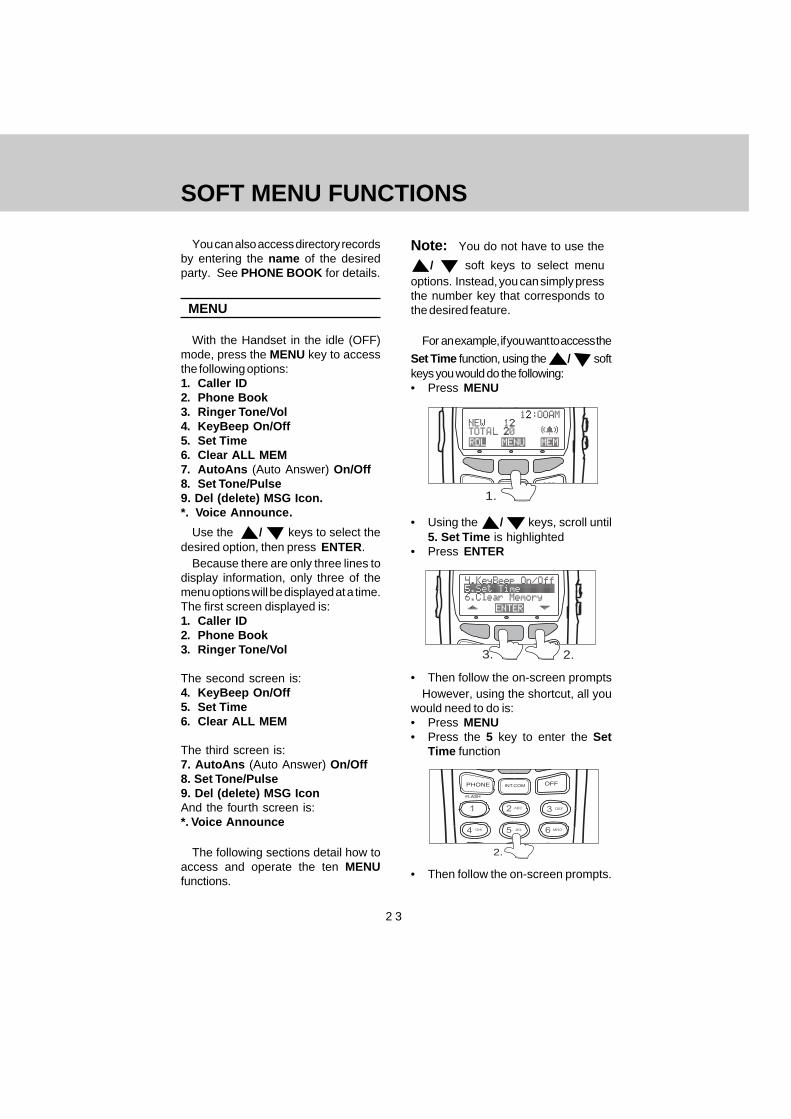
MENU
With the Handset in the idle (OFF)mode, press the MENU key to accessthe following options:1. Caller ID2. Phone Book3. Ringer Tone/Vol4. KeyBeep On/Off5. Set Time6. Clear ALL MEM7. AutoAns (Auto Answer) On/Off8. Set Tone/Pulse9. Del (delete) MSG Icon.*. Voice Announce.
Use the / keys to select thedesired option, then press ENTER.
Because there are only three lines todisplay information, only three of themenu options will be displayed at a time.The first screen displayed is:1. Caller ID2. Phone Book3. Ringer Tone/Vol
The second screen is:4. KeyBeep On/Off5. Set Time6. Clear ALL MEM
The third screen is:7. AutoAns (Auto Answer) On/Off8. Set Tone/Pulse9. Del (delete) MSG IconAnd the fourth screen is:*. Voice Announce
The following sections detail how toaccess and operate the ten MENUfunctions.
Note: You do not have to use the
/ soft keys to select menuoptions. Instead, you can simply pressthe number key that corresponds tothe desired feature.
For an example, if you want to access the
Set Time function, using the / softkeys you would do the following:• Press MENU
OFF
1.
• Using the / keys, scroll until5. Set Time is highlighted
• Press ENTER
2.3.
• Then follow the on-screen promptsHowever, using the shortcut, all you
would need to do is:• Press MENU• Press the 5 key to enter the Set
Time function
PHONE OFFINT.COM
FLASH
1 2 ABC 3 DEF
4 GHI 5 JKL 6 MNO
2.
• Then follow the on-screen prompts.
2 4
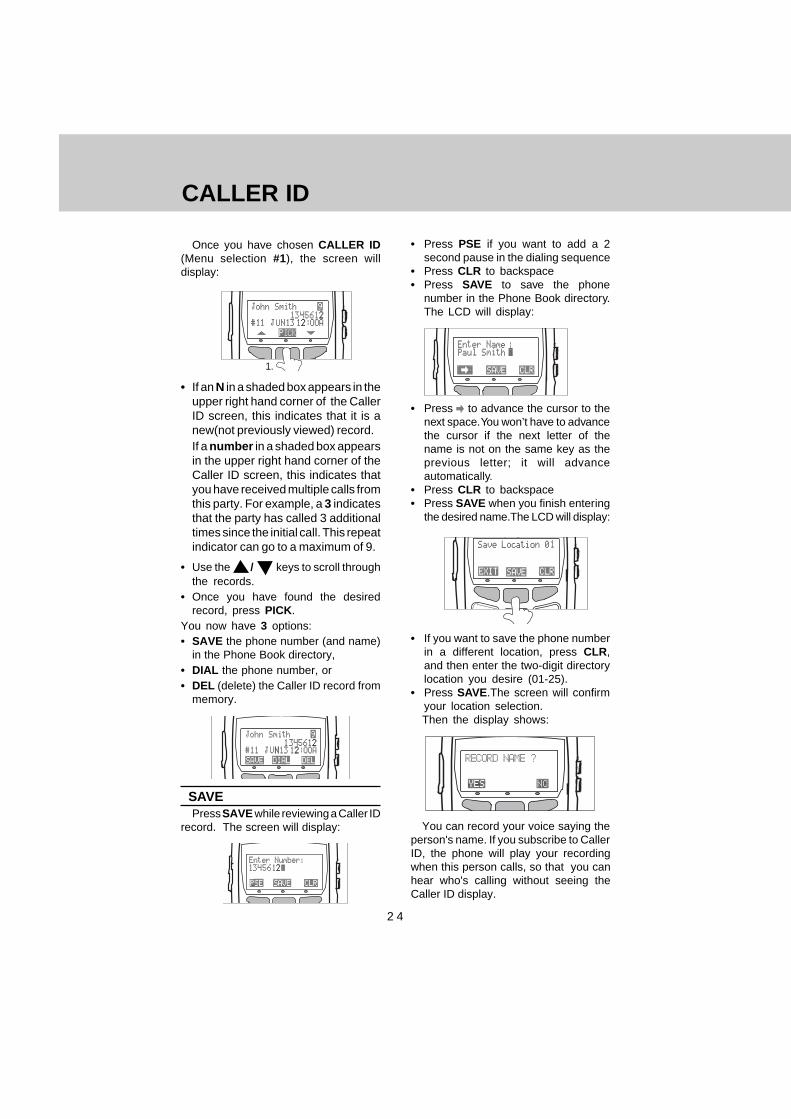
CALLER ID
Once you have chosen CALLER ID(Menu selection #1), the screen willdisplay:
1.
• If an N in a shaded box appears in theupper right hand corner of the CallerID screen, this indicates that it is anew(not previously viewed) record.If a number in a shaded box appearsin the upper right hand corner of theCaller ID screen, this indicates thatyou have received multiple calls fromthis party. For example, a 3 indicatesthat the party has called 3 additionaltimes since the initial call. This repeatindicator can go to a maximum of 9.
• Use the / keys to scroll throughthe records.
• Once you have found the desiredrecord, press PICK.
You now have 3 options:• SAVE the phone number (and name)
in the Phone Book directory,• DIAL the phone number, or• DEL (delete) the Caller ID record from
memory.
SAVEPress SAVE while reviewing a Caller ID
record. The screen will display:
• Press PSE if you want to add a 2second pause in the dialing sequence
• Press CLR to backspace• Press SAVE to save the phone
number in the Phone Book directory.The LCD will display:
• Press to advance the cursor to thenext space. You won’t have to advancethe cursor if the next letter of thename is not on the same key as theprevious letter; it will advanceautomatically.
• Press CLR to backspace• Press SAVE when you finish entering
the desired name.The LCD will display:
• If you want to save the phone numberin a different location, press CLR,and then enter the two-digit directorylocation you desire (01-25).
• Press SAVE.The screen will confirmyour location selection.Then the display shows:
You can record your voice saying theperson's name. If you subscribe to CallerID, the phone will play your recordingwhen this person calls, so that you canhear who's calling without seeing theCaller ID display.
2 5
If you do not want to record a name:• Press NO.
To record a name:• Press YES and speak after the beep.• You can press # when you're finished
speaking, OR just wait-recording endsafter 4 seconds.The Handset shows:
To hear your recording:• Press ENTER while 1. Play Back VA is
highlighted.To make a new recording of the name:
• Press until 2. Redo VA ishighlighted.
• Press ENTER and speak after thebeep.You can re-record as many times as
you want. Each time you re-record orreview the name, the Handset shows:
When you are satisfied with yourrecording:• Press EXIT.
NOTE: To cancel the operation,press EXIT to return to the idle modedisplay at any time. The screen willdisplay:
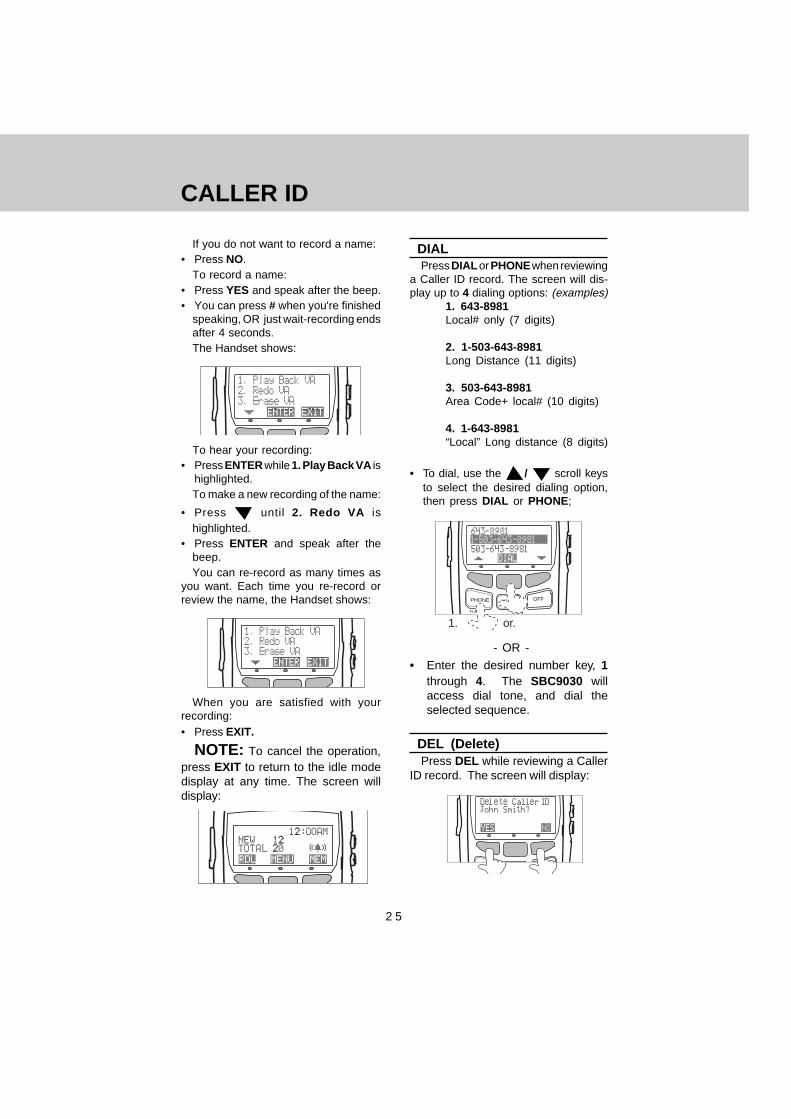
DIALPress DIAL or PHONE when reviewing
a Caller ID record. The screen will dis-play up to 4 dialing options: (examples)
1. 643-8981Local# only (7 digits)
2. 1-503-643-8981Long Distance (11 digits)
3. 503-643-8981Area Code+ local# (10 digits)
4. 1-643-8981“Local” Long distance (8 digits)
• To dial, use the / scroll keysto select the desired dialing option,then press DIAL or PHONE;
PHONE OFFINT.COM
FLASH
1. or.
- OR -
• Enter the desired number key, 1through 4. The SBC9030 willaccess dial tone, and dial theselected sequence.
DEL (Delete)Press DEL while reviewing a Caller
ID record. The screen will display:
CALLER ID
• Press YES to delete the displayedCaller ID record. The screen will say:
• Press NO to cancel the deletion, andreturn to the main display.
CALLER ID - CALL WAITINGIDYour SBC9030 is capable of display-
ing the name and/or number of the partycalling before you answer the phone(Caller ID ). It is also capable of displayingCaller ID information in conjunction with aCall Waiting alert signal (Call WaitingID). With Call Waiting ID, the Caller IDdata will help you decide whether to switchto the incoming call, or continue with yourcurrent conversation.
NOTES ABOUT CALLER ID& CALL WAITING IDThese are subscription services,
provided by most regional telephoneservice providers. You must subscribe tothese services to get the benefits of thesefeatures. If you do not subscribe to CallerID services, you can still use yourSBC9030 and the other features it offers.
Due to regional incompatibilities, CallerID information may not be available forevery call you receive. In addition, thecalling party may block their name andphone number from being sent.
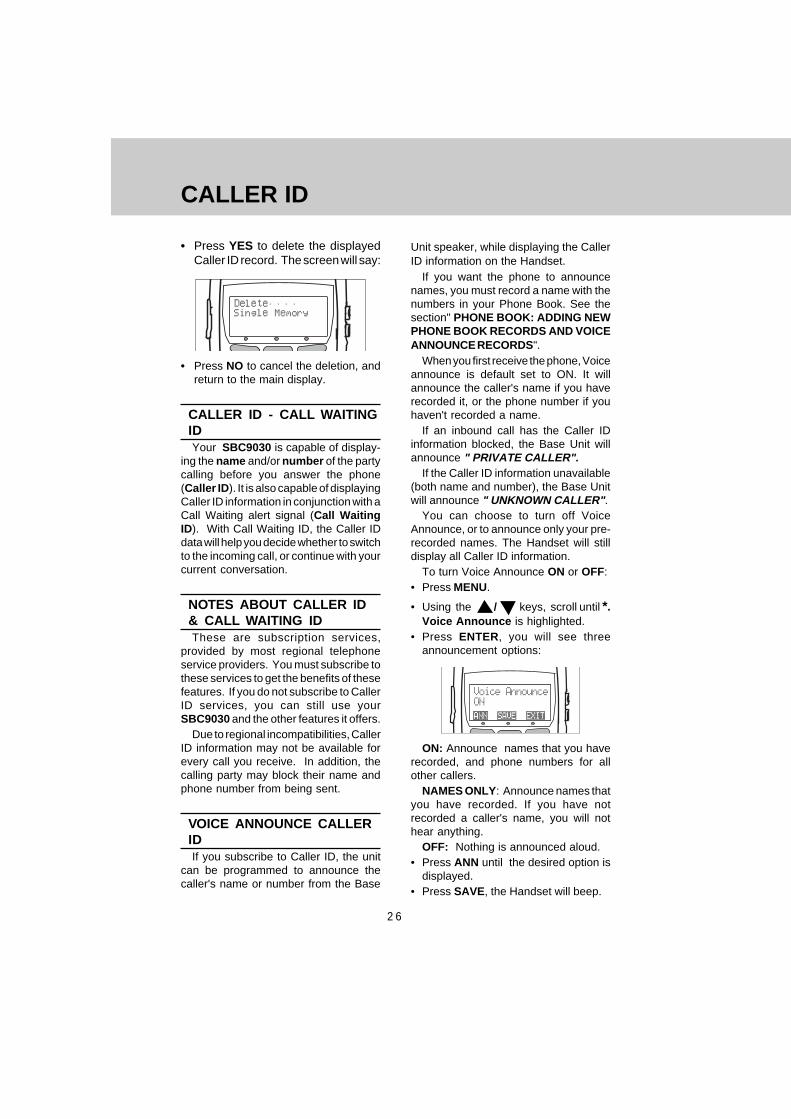
VOICE ANNOUNCE CALLERIDIf you subscribe to Caller ID, the unit
can be programmed to announce thecaller's name or number from the Base
CALLER ID
Unit speaker, while displaying the CallerID information on the Handset.
If you want the phone to announcenames, you must record a name with thenumbers in your Phone Book. See thesection" PHONE BOOK: ADDING NEWPHONE BOOK RECORDS AND VOICEANNOUNCE RECORDS".
When you first receive the phone, Voiceannounce is default set to ON. It willannounce the caller's name if you haverecorded it, or the phone number if youhaven't recorded a name.
If an inbound call has the Caller IDinformation blocked, the Base Unit willannounce " PRIVATE CALLER".
If the Caller ID information unavailable(both name and number), the Base Unitwill announce " UNKNOWN CALLER" .
You can choose to turn off VoiceAnnounce, or to announce only your pre-recorded names. The Handset will stilldisplay all Caller ID information.
To turn Voice Announce ON or OFF:• Press MENU.
• Using the / keys, scroll until *.Voice Announce is highlighted.
• Press ENTER, you will see threeannouncement options:
ON: Announce names that you haverecorded, and phone numbers for allother callers.
NAMES ONLY : Announce names thatyou have recorded. If you have notrecorded a caller's name, you will nothear anything.
OFF: Nothing is announced aloud.• Press ANN until the desired option is
displayed.• Press SAVE, the Handset will beep.
2 6
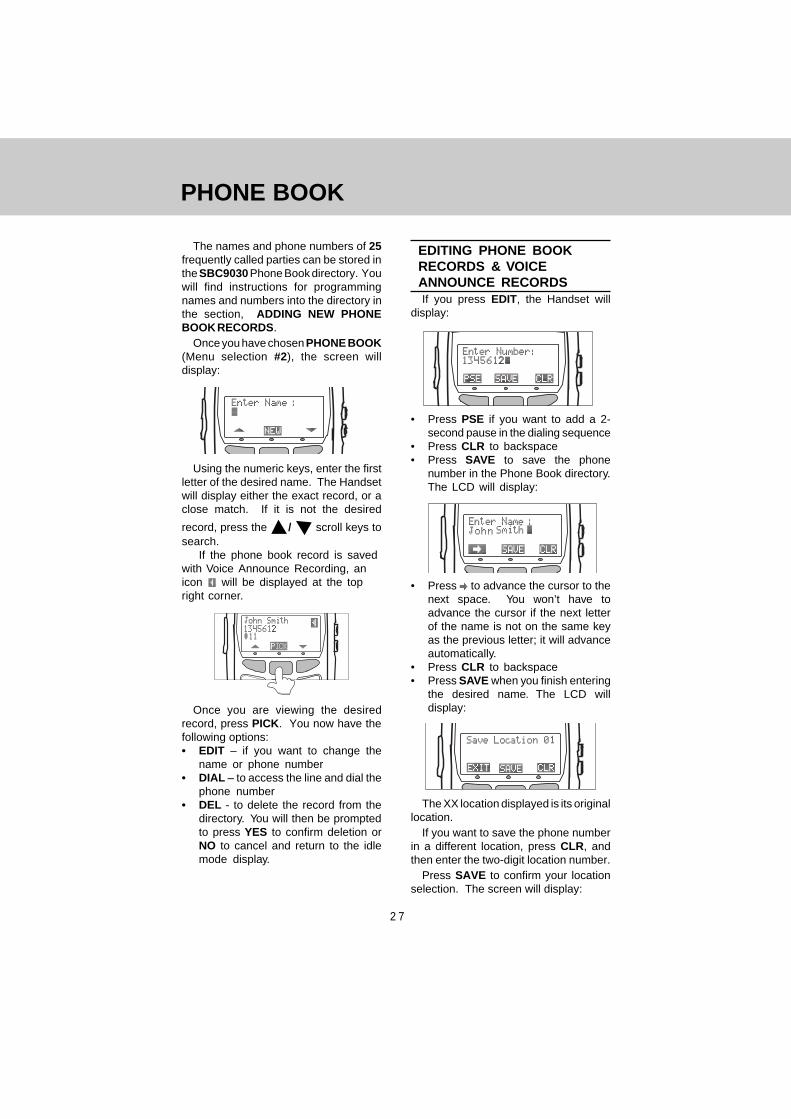
PHONE BOOK
The names and phone numbers of 25frequently called parties can be stored inthe SBC9030 Phone Book directory. Youwill find instructions for programmingnames and numbers into the directory inthe section, ADDING NEW PHONEBOOK RECORDS .
Once you have chosen PHONE BOOK(Menu selection #2), the screen willdisplay:
Using the numeric keys, enter the firstletter of the desired name. The Handsetwill display either the exact record, or aclose match. If it is not the desired
record, press the / scroll keys tosearch.
If the phone book record is savedwith Voice Announce Recording, anicon will be displayed at the topright corner.
Once you are viewing the desiredrecord, press PICK. You now have thefollowing options:• EDIT – if you want to change the
name or phone number• DIAL – to access the line and dial the
phone number• DEL - to delete the record from the
directory. You will then be promptedto press YES to confirm deletion orNO to cancel and return to the idlemode display.
EDITING PHONE BOOKRECORDS & VOICEANNOUNCE RECORDSIf you press EDIT, the Handset will
display:
• Press PSE if you want to add a 2-second pause in the dialing sequence
• Press CLR to backspace• Press SAVE to save the phone
number in the Phone Book directory.The LCD will display:
• Press to advance the cursor to thenext space. You won’t have toadvance the cursor if the next letterof the name is not on the same keyas the previous letter; it will advanceautomatically.
• Press CLR to backspace• Press SAVE when you finish entering
the desired name. The LCD willdisplay:
The XX location displayed is its originallocation.
If you want to save the phone numberin a different location, press CLR, andthen enter the two-digit location number.
Press SAVE to confirm your locationselection. The screen will display:
2 7
PHONE BOOK
2 8
If you are saving an edited record in itsoriginal directory location, you will seethe following message after pressingSAVE:
If you press NO, the Handset will returnto:
You can choose a new location, orpress EXIT to return to the idle modedisplay.
If you press YES, the Handset willdisplay:
If the phone book record has a VoiceAnnounce Recording, after you havesaved the edited record, the LCD willdisplay :
You can playback, redo or erase therecording by selecting from the abovemenu. For detail operation, please seepage 29.
For a phone book record without aVoice Announce Recording, the Handsetwill prompt you:
Press YES if you want to record a nameor NO if you do not.
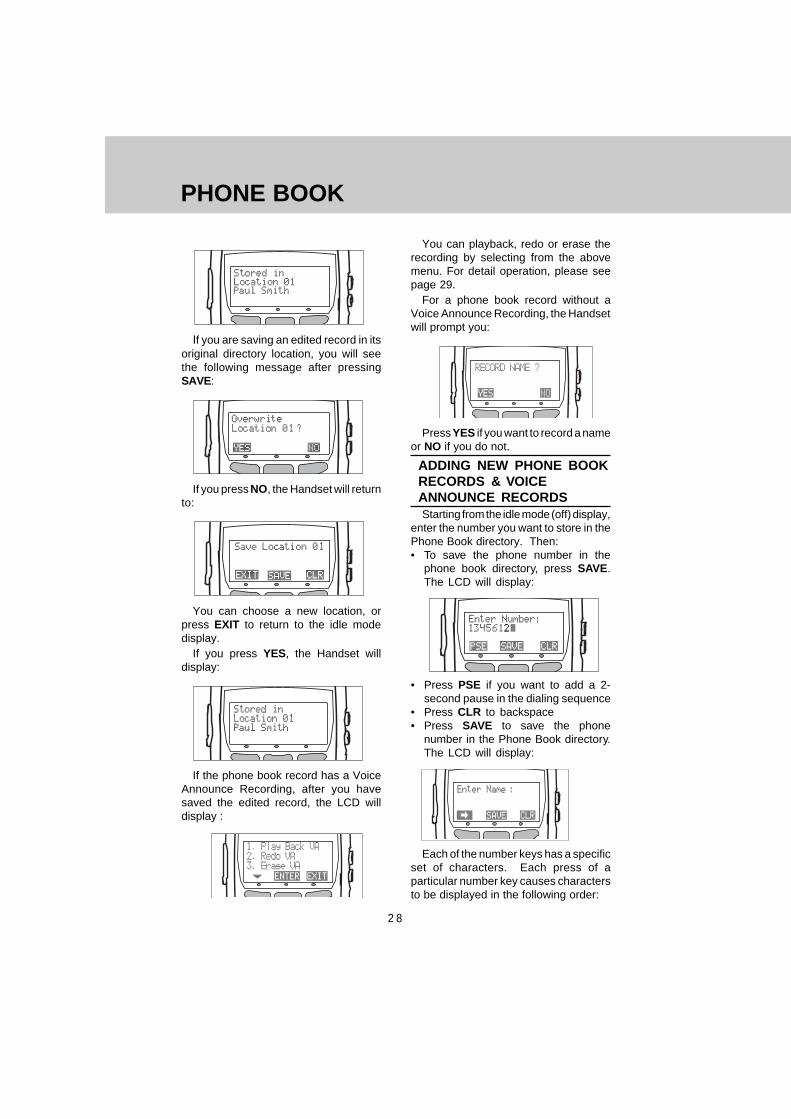
ADDING NEW PHONE BOOKRECORDS & VOICEANNOUNCE RECORDSStarting from the idle mode (off) display,
enter the number you want to store in thePhone Book directory. Then:• To save the phone number in the
phone book directory, press SAVE.The LCD will display:
• Press PSE if you want to add a 2-second pause in the dialing sequence
• Press CLR to backspace• Press SAVE to save the phone
number in the Phone Book directory.The LCD will display:
Each of the number keys has a specificset of characters. Each press of aparticular number key causes charactersto be displayed in the following order:
PHONE BOOK
2 9
Number Key Characters (in order)1 ..................... & ' , . 12 ..................... A B C 23 ..................... D E F 34 ..................... G H I 45 ..................... J K L 56 ..................... M N O 67 ..................... P Q R S 78 ..................... T U V 89 ..................... W X Y Z 90 ..................... 0
• Press to advance the cursor to thenext space.You won’t have to advancethe cursor if the next letter of thename is not on the same key as theprevious letter;it will advanceautomatically.
• Press CLR to backspace• Press SAVE when you're finished
entering the desired name. The LCDwill display:
• The XX location displayed is thesmallest, unoccupied directorylocation. If you want to save thephone number in a different location,press CLR, and then enter the twodigit directory location you desire (01-25).
• Press SAVE to confirm your locationselection.The screen will display:
Then the display shows:
In your own Voice you can record theperson's name associated with this record.If you subscribe to Caller ID, the phonewill play your recording when this personcalls, so that you can hear who's callingwithout seeing the Caller ID display.
If you do not want to record a name:• Press NO.
To record a name:• Press YES and speak after the beep.• You can press # when you're finished
speaking, OR just wait-recording endsafter 4 seconds.The Handset shows:
To hear your recording:• Press ENTER while 1. Play Back VA is
highlighted.To make a new recording of the name:
• Press until 2.Redo VA ishighlighted.
• Press ENTER and speak after thebeep.You can re-record as many times as
you want. Each time you re-record orreview the name, the Handset shows:
When you are satisfied with yourrecording:• Press EXIT.To erase the recording,• Press ENTER while 3. Erase VA is
highlighted.• A confirmation tone will be heard.• Press EXIT when you're finished. You
will see the is removed on the PhoneBook record.
OTHER MENU SETTINGS
RINGER TONE / VOLUME
You can adjust the Handset ringerstyle and volume level. There are 4ringer styles and 3 volume levels: HI,LO, and OFF.
Once you have selected RINGERTONE/VOL (Menu selection #3), theHandset will display:
To select a ringer style, press theRING soft key.
To adjust ringer volume, press theVOL soft key.
Press SAVE to confirm yourselections. The screen will display Set-ting Updated , and return to the idlemode display.
If you select Ringer Volume HI , theidle mode screen will display'' ''.
If you select Ringer Volume LO, theidle mode screen will display'' ''.
If you select Ringer Volume OFF,the idle mode screen will display '' ''.
KEY BEEP ON/OFF
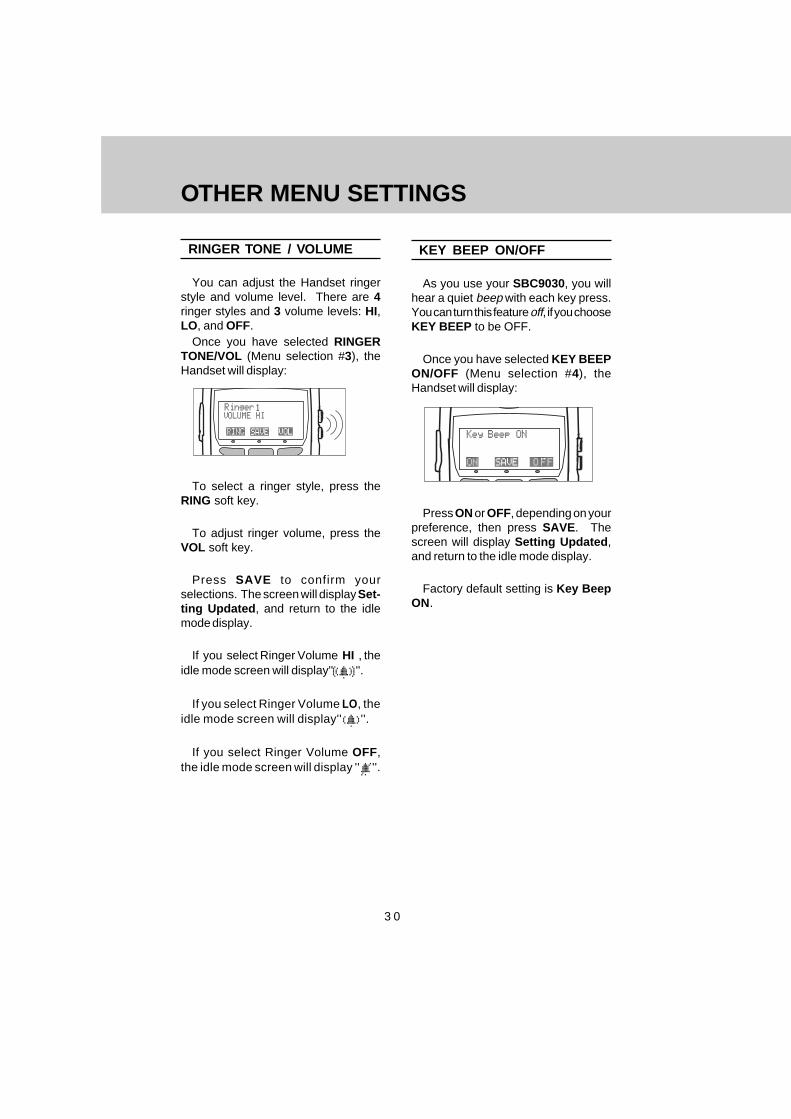
As you use your SBC9030, you willhear a quiet beep with each key press.You can turn this feature off, if you chooseKEY BEEP to be OFF.
Once you have selected KEY BEEPON/OFF (Menu selection #4), theHandset will display:
Press ON or OFF, depending on yourpreference, then press SAVE. Thescreen will display Setting Updated ,and return to the idle mode display.
Factory default setting is Key BeepON.
3 0
SET TIME
Once you have selected SET TIME(Menu selection #5), the Handset willdisplay:
For detail operation, please see" SettingTime" on Page 14.
After pressing SAVE to confirm yourselections, the Handset will displaySetting Updated , and return to the idlemode display.
CLEAR ALL MEM
This feature allows you to erase theentire contents of the PHONE BOOKand/or CALLER ID memory.
Once you have chosen CLEAR ALLMEM, (Menu selection #6), the Handsetwill display:
1.2.
Use the / scroll keys to makeyour selection, then press ENTER.
The screen will ask you to confirmyour decision to delete the entire contentsof Caller ID or Phone Book memory; forexample:
3 1
OTHER MENU SETTINGS
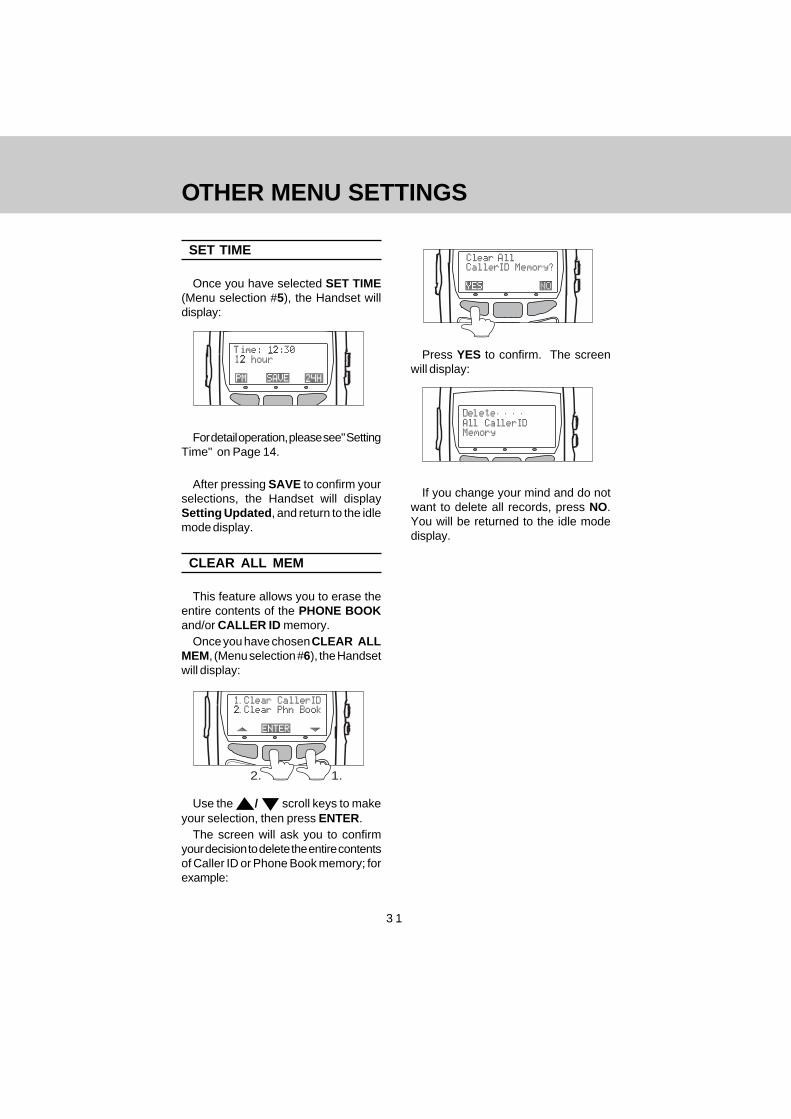
Press YES to confirm. The screenwill display:
If you change your mind and do notwant to delete all records, press NO.You will be returned to the idle modedisplay.
AUTO ANSWER ON/OFF
Factory default setting is AutoAnswer OFF.
With Auto Answer set to OFF,when the phone is on cradle, youcannot simply pick up the phone toanswer incoming call, you must pressPHONE to answer the call. This allowsyou to review the Caller ID informationbefore answering. However, if youprefer to have your Handsetautomatically answer the call whenremoved from the Base cradle:
Select AutoAns On/Off (Menuselection #7). The Handset will display:
Press ON (or OFF if you’re cancelingAuto Answer), then SAVE. The screenwill display Setting Updated , and returnto the idle mode display.
SET TONE /PULSE
Your SBC9030 is preset for tonedialing.To change the dialing modesetting, choose SET TONE/PULSE(Menu selection #8), the screen willdisplay:
Press TONE or PULSE, dependingon the requirements of your localtelephone provider.If you are not sure,contact your local phone company.
Press SAVE. The screen will confirmthat the dialing mode is updated, andthen return to the idle mode display.
DELETE MSG ICON
Refer to MESSAGE WAITINGINDICATOR for explanation of thisfeature.
3 2
OTHER MENU SETTINGS
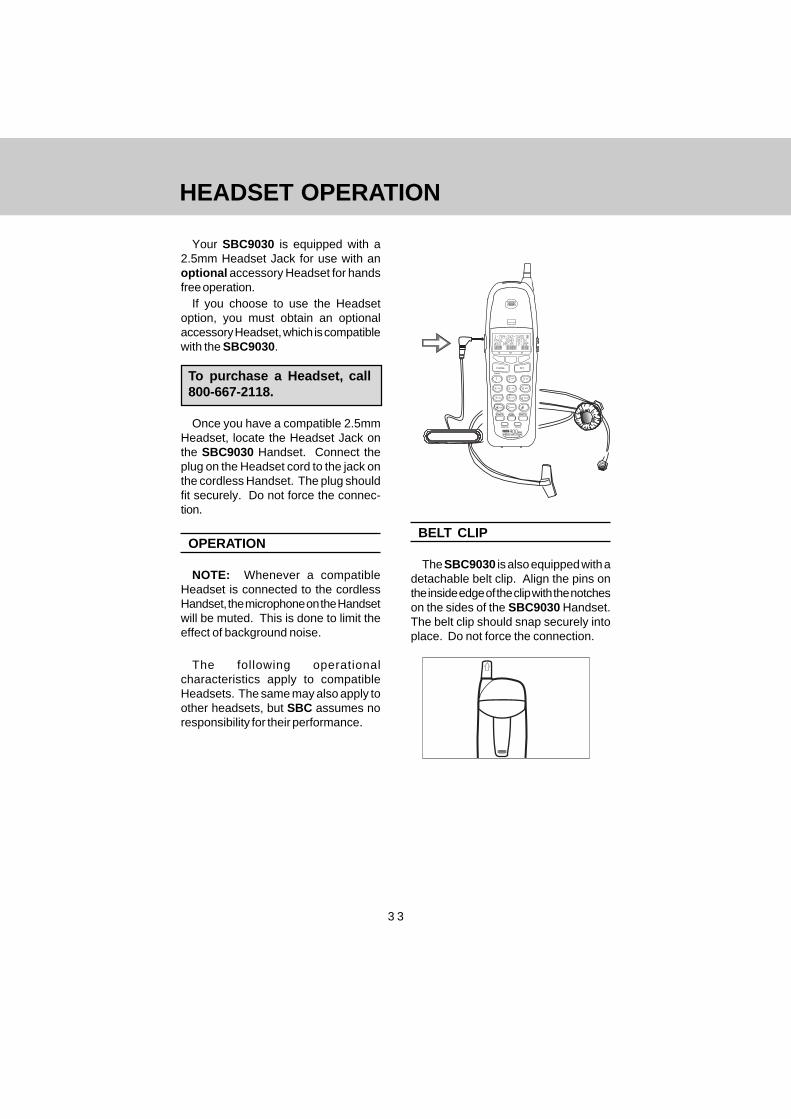
HEADSET OPERATION
Your SBC9030 is equipped with a2.5mm Headset Jack for use with anoptional accessory Headset for handsfree operation.
If you choose to use the Headsetoption, you must obtain an optionalaccessory Headset, which is compatiblewith the SBC9030.
To purchase a Headset, call800-667-2118.
Once you have a compatible 2.5mmHeadset, locate the Headset Jack onthe SBC9030 Handset. Connect theplug on the Headset cord to the jack onthe cordless Handset. The plug shouldfit securely. Do not force the connec-tion.
OPERATION
NOTE: Whenever a compatibleHeadset is connected to the cordlessHandset, the microphone on the Handsetwill be muted. This is done to limit theeffect of background noise.
The following operationalcharacteristics apply to compatibleHeadsets. The same may also apply toother headsets, but SBC assumes noresponsibility for their performance.
PHONE OFF
FLASH
1 2 ABC 3 DEF
4 GHI 5 JKL 6 MNO
7 PQRS
TONE 0 OPER
8 TUV 9 WXYZ
AUTO CALLRETURN *69
3-WAYCALLING
AUTO BUSYREDIAL *66
INTERCOM SPEAKER
BELT CLIP
The SBC9030 is also equipped with adetachable belt clip. Align the pins onthe inside edge of the clip with the notcheson the sides of the SBC9030 Handset.The belt clip should snap securely intoplace. Do not force the connection.
3 3
ADDITIONAL OPERATING TIPS
OUT OF RANGE INDICATION
When the handset is in Phone Onmode and moved to a point where it andthe Base Unit can no longercommunicate, the Handset will beeptwice and display OUT OF RANGE:
and attempt to re-link with the Base. Ifthis occurs while you’re on a call, movecloser to the Base Unit.
If the Handset does not re-establishcontact with the Base within 30 secondsof losing contact, the Handset willautomatically drop the call and turn off.
If you walk out of range while theHandset is not in use, the Handset willbeep twice and display OUT OFRANGE until the user presses any key.
NOTE: If the Base Unit is withoutpower, the Handset will behave as if itis out of range. Therefore, if thehandset beeps, the display OUT OFRANGE occurs, and moving closer tothe Base does not help, check theBase Unit to make sure it has power.
MESSAGE WAITINGINDICATOR (for use withVoicemail)
Your SBC9030 is capable of detect-ing a visual Message Waiting signal,generated by many phone service pro-
viders. If you subscribe to Voicemailservice from your local telephonecompany, and a visual message waitingsignal is provided, the SBC9030 willdisplay on the right side of the HandsetLCD to alert you to new, unplayedmessages.
On the Base, the red MESSAGE LEDwill light up to alert you to new unplayedmessages.
Once you have reviewed all of yournew voicemail messages and hang upthe phone, the SBC9030 will turn off theHandset and Base indicatorsautomatically. Note that there is a delayfor the indicators to turn off, as theSBC9030 is waiting for an update signalfrom the telephone network.
After all new voicemail messages havebeen reviewed, if the MESSAGEWAITING indicator (icon or Base LED)remains on, you can manually clear theindications as follows:
• Press MENU, scroll to 9. Del MSGIcon . Press ENTER
• Press YES to turn off the Handseticon and Base LED.
3 4
ADDITIONAL OPERATING TIPS
NOTE: Message Waiting indicatorworks in conjunction with Voicemailservice from many local phonecompanies. This is an optionalservice; you are not required tosubscribe to it.
CUSTOM PAY-PER-USE(PPU) FEATURES
Your SBC9030 gives you easyaccess to 5 popular custom features,offered by many telephone companies:
1. Return Call2. Repeat Dial3. No Call Wait4. Call FWD ON5. Call FWD OFF
To use a custom Pay-Per-Use feature,do the following:
• Press PHONE. Listen for dial tone.• Press the SERVE soft key.• Using the / soft keys, scroll
until the desired custom feature ishighlighted.
• Press ENTER.
In addition, 3 custom pay-per-useservices are accessible using one-touch keys located both the SBC9030Handset and Base Unit;Specifically:
AUTO CALL RETURN *693-WAY CALLINGAUTO BUSY REDIAL *66
AUTO CALL RETURN *69 dials thelast party who called you, whether ornot you answered the call. A charge isadded to your phone bill each time youuse this feature.
3-WAY Calling allows you to talk with2 separate parties from a single line.The set-up procedure is as follows:
1) Call your first party; after the partyanswers,
2) Press 3-WAY Calling . Wait for dialtone.
3) Call your second party; after the callis answered.
4) Press 3-WAY Calling again.
A charge is added to your phone billeach time this service is used.
AUTO BUSY REDIAL *66 repeatedlydials the last number you called, overa time interval determined by your localcompany. This is useful in reaching aparty whose line is busy A charge isadded to your phone bill each time thisservice is used.
NOTE: It is likely that your localtelephone company will assess chargesto use custom features. You shouldcheck with your local service providerregarding which custom services areavailable in your area, and theassociated costs for the intentional orunintentional use of Pay Per Useservices.
Your local telephone company mayprovide a monthly subscription to anindividual service or a package ofservices which gives you unlimitedusage for a small monthly fee.
3 5
ADDITIONAL OPERATING TIPS
LOW BATTERY INDICATION
During a Low Battery condition, theHandset LCD will display:
When this occurs, you should eitherreturn the Handset to the Base Unit forrecharging, or exchange the drainedHandset battery with a fully chargedbattery from the Spare Battery charger.
CHECK AC POWERINDICATION
A charged battery installed in the BaseUnit will allow you to make and receivecalls from the Handset in the event of apower failure, for approximately 4hours.During power back-up mode, theHandset will display:
If your SBC9030 displays thismessage, and AC power is present,check the electrical outlet and the ACadapter, ensuring that it is firmlyconnected to the outlet and the BaseUnit.
3 6
MAINTENANCE
TAKING CARE OF YOURTELEPHONE.
Your SBC cordless telephone containssophisticated electronic parts, so itmust be treated with care.
AVOID ROUGH TREATMENTPlace the Handset down gently. Savethe original packing materials to protectyour telephone if you ever need toship it.
AVOID WATERYour telephone can be damaged if it getswet. Do not use the Handset outdoorsin the rain, or handle it with wet hands.Do not install your Base Unit near a sink,bathtub or shower.
ELECTRICAL STORMSElectrical storms can sometimes causepower surges harmful to electronicequipment.For your own safety, be cautious whenusing electrical appliances duringstorms.
CLEANING YOURTELEPHONEYour telephone has a durable plastic
casing that should retain its luster formany years. Clean it only with a softcloth slightly dampened with water or amild soap. Do not use excess water orcleaning solvents of any kind.
Remember that electrical appliancescan cause serious injury if used whenyou are wet or standing in water. If yourbase unit should fall into water, DO NOTRETRIEVE IT UNTIL YOU UNPLUGTHE POWER CORD AND TEL-EPHONE LINE CORDS FROM THEWALL . Then pull the unit out by theunplugged cords.
3 7
3 8
IN CASE OF DIFFICULTY
If you have difficulty operating yourphone, the suggestions below shouldsolve the problem. If you still have difficultyafter trying these suggestions, call theCustomer Service at 800-667-2118.
THE PHONE DOESN’T WORK ATALL.
• Make sure the Power Cord is pluggedin.
• Make sure the telephone line cord isplugged firmly into the Base Unit andthe telephone wall jack.
• Make sure the battery pack is properlycharged. If the "LOW BATTERY"message is shown, the battery packneeds charging.
NO DIAL TONE.• First check all the suggestions above.• If you still don’t hear a dial tone,
disconnect the Base Unit from thetelephone jack and connect a differentphone. If there is no dial tone on thatphone either, the problem is in yourwiring or local service. Call your localtelephone company.
YOU GET NOISE, STATIC, OR AWEAK SIGNAL EVEN WHENYOU’RE NEAR THE BASE UNIT.
• Household appliances plugged intothe same circuit as the Base Unit cansometimes cause interference. Trymoving the appliance or the BaseUnit to another outlet.
YOU GET NOISE, STATIC, OR AWEAK SIGNAL WHEN YOU’REAWAY FROM THE BASE UNIT.
• You may be out of range.Either moveclose to or relocate the Base Unit.
• The layout of your home may belimiting the range. Try moving theBase Unit to another position.
THE HANDSET DOES NOT RINGWHEN YOU RECEIVE A CALL.
• Make sure you have the Handsetringer activated.
• Make sure the telephone line cord isplugged firmly into the Base Unit andthe telephone jack. Make sure thepower cord is plugged in.
• You may be too far from the BaseUnit. And the "OUT OF RANGE"message is shown on LCD.
• You may have too many extensionphones on your telephone line toallow all of them to ring.Try unpluggingsome of the other phones.
YOU HEAR OTHER CALLS WHILEUSING YOUR PHONE.
• Disconnect your Base Unit from thetelephone jack, and plug in a regulartelephone. If you still hear other calls,the problem is probably in your wiringor local service. Call your localtelephone company.
YOU HEAR NOISE IN THEHANDSET, AND NONE OF THEKEYS OR BUTTONS WORK.
• Make sure the power cord is pluggedin.
COMMON CURE FORELECTRONIC EQUIPMENTIf the unit does not seem to be
responding normally, then try putting theHandset in the cradle. If it does notseem to respond, do the following(in theorder listed):1. Disconnest the power to the base.2. Disconnect the Handset battery, and
spare battery pack, if applicable.3. Wait a few minutes.4. Connect power to the Base.5. Re-install the battery pack(s).6. Try using your phone again.
3 9
WARRANTY STATEMENT
WHAT DOES OUR WARRANTY COVERS?• Any defect in material or workmanship.FOR HOW LONG AFTER THE ORIGINAL PURCHASE?• To the original purchaser only - ONE YEAR.WHAT WILL WE DO?• At our option, repair or replace your unit.WHO DO I SEND MY UNIT, IN OR OUT OF WARRANTY?• In the U.S. Call Customer Service for Return Authorization
at: 800-667-2118.• Properly pack your unit. Include any cables & accessories which were
originally provided with the product. We recommend using the originalcarton and packing materials.
• Include in the package a copy of the sales receit or other evidence of dateof original pruchase(if the unit was purchased within the last twelvemonths).
• Print your name and address, along with a description of the defect, andinclude this in the package.
• Include payment for any service or repair not by warranty, as determinedby SBC Customer Service.
• Ship the unit via UPS insured, or equivalent to the address provided bySBC Customer Service.
SBC assumes no responsibility for units sentwithout prior Return Authorization.
WHAT DOES OUR WARRANTY NOT COVER?• Batteries• Damage from misuse, neglect, or acts of nature (lightning, floods, power
surges, etc.)• Products with may have been modified or incorporated into other products• Products purchased and/or operated outside the USA, its territories.• Products serviced by the owner or a service facility not expressly authorized
by SBC Customer Service.• Products purchased more than 12 months from current date• Units purchased in "US IS" condition, or units purchased as "Distressed
Merchandise".HOW DOES STATE LAW OR PROVINCIAL LAW RELATE TO THIS WARRANTY?• This warranty gives you specific rights. You may also have other rights
which vary from state to state.
4 0
TECHNICAL SPECIFICATIONS
FREQUENCY CONTROLCrystal Controlled Dual PLL Synthesizer
TRANSMIT FREQUENCYHandset :
904.20 MHz to 925.80 MHz( All 20 channels within thisrange)
Base Unit:904.20 MHz to 925.80 MHz(All 20 channels within thisrange)
RECEIVE FREQUENCYHandset :
904.20 MHz to 925.80 MHz( All 20 channels within thisrange)
Base Unit:904.20 MHz to 925.80MHz( All 20 channels within thisrange)
NOMINAL EFFECTIVERANGEMaximum power allowed by FCC and
IC. Actual operating range may varyaccording to environmental conditionsat the time of use.
SIZEHandset :
19 x 6 x 3.5cm (L x W xT)Maximum (Antennaexcluded)
Base Unit:21.5 x 16.5 x 5cm (L x W xT) Maximum (Antennaexcluded)
WEIGHTHandset :
250 grams
Base Unit:415 grams
POWER REQUIREMENTSHandset :
Self-contained nickel-cadmium rechargeablebattery supply, 3.6V nominal,600mAh capacity.
Base Unit:9VDC @ 500mA
MEMORYSpeed Dial:
25 Memory locations16 digits and 15 charactersper location.
CID:Alpha Numeric Display 50Memory locations
SPECIFICATIONS ARETYPICAL AND MAY CHANGEWITHOUT NOTICE.

4 1
91-5152-10-00ISSUE 0Printed in China
4 2
INTRODUCTION.. . . . . . . . . . . . . . . . . . . . . . . . . . . . . . . . . . . . . . . . . . . . . . . . . . . . . . . . . . . . . . . . . . . . .1SPECIAL FEATURES...........................................................................2
PARTS CHECKLIST... . . . . . . . . . . . . . . . . . . . . . . . . . . . . . . . . . . . . . . . . . . . . . . . . . . . . . . . . . . . . . . . . . . . . . . .3
FCC REGULATIONS. . . . . . . . . . . . . . . . . . . . . . . . . . . . . . . . . . . . . . . . . . . . . . . . . . . . . . . . . . 4IMPORTANT SAFETY INSTRUCTIONS..... . . . . . . . . . . . . . . . . . . . . . . . . . . . . . . . . . . . .6INSTALLING THE BATTERY PACK.. . . . . . . . . . . . . . . . . . . . . . . . . . . . . . . . . . . . . . . . . .8
TO CHARGE THE BATTERY PACK. . . . . . . . . . . . . . . . . . . . . . . . . . . . . . . . . . . . . . . . . . . . . . 8A WORD ABOUT RECHARGEABLE BATTERIES. . . . . . . . . . . . . . . . . . . . . . . . . . . . . .8REPLACING THE HANDSET BATTERY PACK. . . . . . . . . . . . . . . . . . . . . . . . . . . . . . . . .9
SPARE BATTERY CHARGER/POWER BACK UP FUNCTION...... . . . . . . . . . . . . .9
GETTING STARTED..............................................................................10WALL MOUNTING.. . . . . . . . . . . . . . . . . . . . . . . . . . . . . . . . . . . . . . . . . . . . . . . . . . . . . . . . . . . . . . .11HANDSET LAYOUT. . . . . . . . . . . . . . . . . . . . . . . . . . . . . . . . . . . . . . . . . . . . . . . . . . . . . . . . 12BASE LAYOUT... . . . . . . . . . . . . . . . . . . . . . . . . . . . . . . . . . . . . . . . . . . . . . . . . . . . . . . . . . . . . . . . . . . .13QUICK REFERENCE GUIDE....... . . . . . . . . . . . . . . . . . . . . . . . . . . . . . . . . . . . . . . . . . . . . . . . .14
SET-UP.... . . . . . . . . . . . . . . . . . . . . . . . . . . . . . . . . . . . . . . . . . . . . . . . . . . . . . . . . . . . . . . . . . . . . . . . . . . . . . . . . . . . . . . .14SETTING TIME.. . . . . . . . . . . . . . . . . . . . . . . . . . . . . . . . . . . . . . . . . . . . . . . . . . . . . . . . . . . . . . . . . . . . . . . . . . . . .14MAKING CALLS..................................................................................14ANSWERING CALLS................................................................................15TEMPORARY TONE.. . . . . . . . . . . . . . . . . . . . . . . . . . . . . . . . . . . . . . . . . . . . . . . . . . . . . . . . . . . . . . . . . . .15VOLUME CONTROL..............................................................................15RINGER CONTROL...... . . . . . . . . . . . . . . . . . . . . . . . . . . . . . . . . . . . . . . . . . . . . . . . . . . . . . . . . . . . . . . . . . . . . .15H O L D . . . . . . . . . . . . . . . . . . . . . . . . . . . . . . . . . . . . . . . . . . . . . . . . . . . . . . . . . . . . . . . . . . . . . . . . . . . . . . . . . 1 6MUTE.. . . . . . . . . . . . . . . . . . . . . . . . . . . . . . . . . . . . . . . . . . . . . . . . . . . . . . . . . . . . . . . . . . . . . . . . . . . . . . . . . . . . . . . . .16REDIAL WITH THE HANDSET ON(OFF HOOK).........................................16REDIAL WITH THE HANDSET OFF(ON HOOK).....................................17PAGE/HANDSET LOCATOR... . . . . . . . . . . . . . . . . . . . . . . . . . . . . . . . . . . . . . . . . . . . . . . . . . . . . . . . . .17INTERCOM BETWEEN THE HANDSET AND THE BASE .. . . . . . . . . . . . . . . . . . . . .17CONFERENCE.... . . . . . . . . . . . . . . . . . . . . . . . . . . . . . . . . . . . . . . . . . . . . . . . . . . . . . . . . . . . . . . . . . . . . . . . . . . . .19REVIEWING THE CALLER ID RECORDS..................................................19MEMORY DIALING....... . . . . . . . . . . . . . . . . . . . . . . . . . . . . . . . . . . . . . . . . . . . . . . . . . . . . . . . . . . . . . . . . . . . . .19FLASH................................................................................... ......................20
HANDSET SPEAKERPHONE FEATURE.. . . . . . . . . . . . . . . . . . . . . . . . . . . . . . . . . . . . . . . . .20
SOFT MENU FUNCTIONS..................................................................21RDL(Redia l ) . . . . . . . . . . . . . . . . . . . . . . . . . . . . . . . . . . . . . . . . . . . . . . . . . . . . . . . . . . . . . . . . . . . . . . . . . . . . . . . .21MEM(Memory)......................................................................................22
MENU. . . . . . . . . . . . . . . . . . . . . . . . . . . . . . . . . . . . . . . . . . . . . . . . . . . . . . . . . . . . . . . . . . . . . . . . . . . . . . . . . . . . .22
CALLER ID. . . . . . . . . . . . . . . . . . . . . . . . . . . . . . . . . . . . . . . . . . . . . . . . . . . . . . . . . . . . . . . . . . . . . . .24S A V E . . . . . . . . . . . . . . . . . . . . . . . . . . . . . . . . . . . . . . . . . . . . . . . . . . . . . . . . . . . . . . . . . . . . . . . . . . . 2 4D IAL . . . . . . . . . . . . . . . . . . . . . . . . . . . . . . . . . . . . . . . . . . . . . . . . . . . . . . . . . . . . . . . . . . . . . . . . . . . . . . . . . . . . 25D E L ( D e l e t e ) . . . . . . . . . . . . . . . . . . . . . . . . . . . . . . . . . . . . . . . . . . . . . . . . . . . . . . . . . . . . . . . . . . 2 5CALLER ID - CALL WAIT ING ID . . . . . . . . . . . . . . . . . . . . . . . . . . . . . . . . . . . . . . . . . . . . . . . . . 26NOTES ABOUT CALLER ID & CALL WAITING ID. . . . . . . . . . . . . . . . . . . . . . . . . . . .26
TABLE OF CONTENTS
4 3
V O I C E A N N O U N C E C A L L E R I D . . . . . . . . . . . . . . . . . . . . . . . . . . . . . . . . . . . . . . . 2 6
P H O N E B O O K . . . . . . . . . . . . . . . . . . . . . . . . . . . . . . . . . . . . . . . . . . . . . . . . . . . . . . . . . . . . . . 2 7EDITING PHONE BOOK RECORDS& VOICE ANNOUNCE RECORDS........27
ADDING NEW PHONE BOOK RECORDS & VOICE ANNOUNCE RECORDS......28
O T H E R M E N U S E T T I N G S . . . . . . . . . . . . . . . . . . . . . . . . . . . . . . . . . . . . . . . . . . . 3 0R I N G E R T O N E / V O L U M E . . . . . . . . . . . . . . . . . . . . . . . . . . . . . . . . . . . . . . . . . . . . . . . . . . 3 0K E Y B E E P O N / O F F . . . . . . . . . . . . . . . . . . . . . . . . . . . . . . . . . . . . . . . . . . . . . . . . . . . . . . . . . . . . 3 0SET TIME. . . . . . . . . . . . . . . . . . . . . . . . . . . . . . . . . . . . . . . . . . . . . . . . . . . . . . . . . . . . . . . . . . . . . . . . . . . . . . . .31CLEAR ALL MEMORY. . . . . . . . . . . . . . . . . . . . . . . . . . . . . . . . . . . . . . . . . . . . . . . . . . . . . . . . . . . . . . .31AUTO ANSWER ON/OFF. . . . . . . . . . . . . . . . . . . . . . . . . . . . . . . . . . . . . . . . . . . . . . . . . . . . . . . . . . .32S E T T O N E / P U L S E . . . . . . . . . . . . . . . . . . . . . . . . . . . . . . . . . . . . . . . . . . . . . . . . . . . . . . . . . . . . . 3 2
D E L E T E M S G I C O N . . . . . . . . . . . . . . . . . . . . . . . . . . . . . . . . . . . . . . . . . . . . . . . . . . . . . . . . . . . . . 3 2
HEADSET OPERATION. . . . . . . . . . . . . . . . . . . . . . . . . . . . . . . . . . . . . . . . . . . . . . . . . . . . . . .33ADDIT IONAL OPERATING T IPS . . . . . . . . . . . . . . . . . . . . . . . . . . . . . . . . . . . . . . . . 34
OUT OF RANGE INDICATION.. . . . . . . . . . . . . . . . . . . . . . . . . . . . . . . . . . . . . . . . . . . . . . . . . . . . . . .34MESSAGE WAITING INDICATOR(for use with Voicemail)........................34CUSTOM PAY-PER-USE (PPU) FEATURES...............................................35LOW BATTERY INDICATION....................................................................36
CHECK AC POWER INDICATION.............................................................36
MAINTENANCE....... . . . . . . . . . . . . . . . . . . . . . . . . . . . . . . . . . . . . . . . . . . . . . . . . . . . . . . . . . . . . . . . . . .37IN CASE OF DIFFICULTY............................................................38WARRANTY STATEMENT....... . . . . . . . . . . . . . . . . . . . . . . . . . . . . . . . . . . . . . . . . . . . . . . . . . . .39TECHNICAL SPECIFICATIONS.......................................................40
TABLE OF CONTENTS


![962 Chemistry [PPU] Semester 1 Topics](https://img.pdfslide.us/doc/110x75/544a0fcdaf79594d088b4572/962-chemistry-ppu-semester-1-topics.jpg)


![964 Biology [PPU] Semester 2 Topics-Syllabus](https://img.pdfslide.us/doc/110x75/54528269af79591d308b4ff5/964-biology-ppu-semester-2-topics-syllabus.jpg)