Embed Size (px)
Citation preview

1
Congratulations! You have pur-chased one of the most sophisticatedcordless telephones on the market!The CB 1733 has been designed tooffer a new standard in cordlesstelephone technology.
Unlike most other cordless phones,the CB 1733 digitizes your voice usingadvanced digital voice coding to pro-vide noise and distortion free perform-ance. In most conditions you will not beable to tell you are using a cordlessphone. Gone are the annoyances ofstatic, interference and having to listento other people’s conversations on yourcordless phone.
The CB 1733 scrambles your voicebefore it transmits it. This allows youthe security of knowing that no one cantune in and eavesdrop on your conver-sations.
The CB 1733 decodes and displaysname and number Caller ID (CID)information where available and whensubscribed to. The alpha-numericdisplay will show both the name andnumber of the calling party (whenavailable). Up to 15 name charactersand/or 11 phone number digits can bedisplayed on the LCD.
With the CB 1733, the user can easilyanswer a call by pressing any key otherthan the OFF, VOLUME keys or 3 PPUkeys. In addition, the handset keypadand LCD illuminate while the handsetrings to signal an incoming call. This isvery useful in a dark environment.
The CB 1733 includes aSpeakerphone and keypad on theBase Unit. This enables you to make
INTRODUCTION
and receive calls hands-free at theBase. In addtion, the Intercom featureallows two-way communicationbetween the Handset and Base Unit.Pressing INTER.COM on the Base canalso assist you in locating a misplacedHandset.
The CB 1733 uses special memoryin both the Base Unit and Handsetwhich is not susceptible to powerfailures. This provides permanentstorage of all speed dial numbers, CIDinformation as well as the Base Unitand Handset security codes.
When the spare battery is installed inthe Base Unit, the CB 1733 uses thisbattery to provide operational backupin case of power failure. In this way, youhave access to all normal phonefunctions during a total power outage.Calls can still be placed and receivedwithout interruption. More than 4 hoursbackup will be possible with a fullycharged battery in the Base Unit.
The phone will also alert you whenyou are Out of Range even when you'renot using the phone!

2
SPECIAL FEATURES• 900 MHz Operation.• Direct Sequence Spread Spec-
trum - Digital Cordless Telephone.• Digitally-Scrambled Voice Com-
munication.• Simultaneous display of Name,
Number, and Time/Date stamp forCaller ID.
• 50 Caller ID memory locations.• 4-row by 16-character dot matrix
alphanumeric display.• Backlit display on handset.• Backlit handset keypad.• Three Soft Keys which allow the
user to access different functions,depending on which mode thephone is currently in (i.e. Caller ID,Memory Programming, etc.).
• Smart Dialing from Caller IDmemory eliminates the need topre-program your local area code.
• 25 locations ProgrammableMemory for 16-Digit PhoneNumber. Each location can alsobe assigned up to a 15 charactername.
• Out of Range indication while thehandset is in use or in standbymode.
• Speakerphone and keypad on theBase Units.
• Two-way intercom betweenHandset and Base Unit.
• Removable handset battery pack.• Spare battery charger in the base
unit.• Complete battery back-up in case
of power failure (with additionalbattery pack installed in base).
• Face up or down Handset charg-ing.
• Easy answer - When the phone
INTRODUCTION
rings, simply press any key otherthan OFF, the Volume keys or the3 PPU key on the handset toanswer.
• Pressing the OFF key on handsetduring incoming ring will stop theringing.
• Auto hang up when returning thehandset to the base cradle.
• 24-Bit Digital Security Code.• Low Battery Detect and Warning
indicator.• Tone or Pulse dialing.• Visual Message Waiting Indication
(VMWI) for use with voicemailservice.
• Up to 7 hours of continuous talktime or 14 days standby time.
• 8-level Volume control on Hand-set.
• Programmable Ringer Tones andVolume.
• Headset Compatible, for use with2.5mm headsets.
This manual is designed to familiar-ize you with the CB 1733. We stronglyrecommend you read the manualbefore using your phone.
3
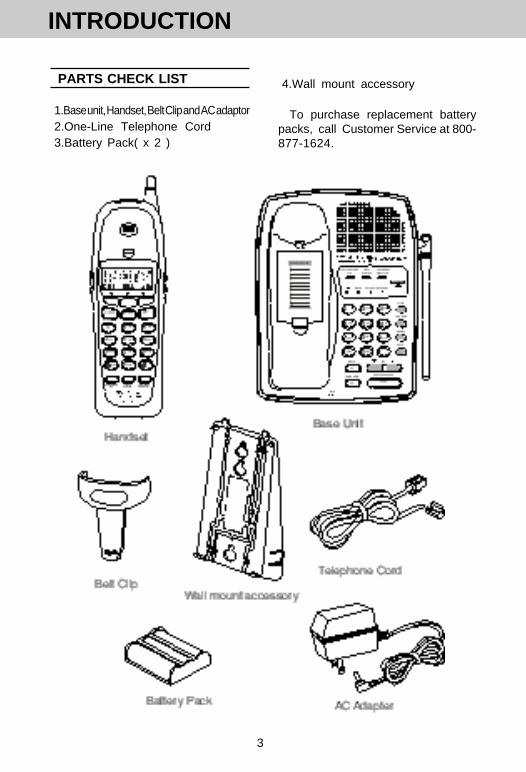
PARTS CHECK LIST
1.Base unit, Handset, Belt Clip and AC adaptor2.One-Line Telephone Cord3.Battery Pack( x 2 )
4.Wall mount accessory
To purchase replacement batterypacks, call Customer Service at 800-877-1624.
INTRODUCTION

4
FCC REGULATIONS
This equipment complies with Parts15 and 68 of the Federal Communi-cations Commission (FCC) rules forthe United States. It also complies withregulations RSS210 and CS-03 of In-dustry and Science Canada. Opera-tion is subject to the following two con-ditions: (1) this device may not causeinterference, and (2) this device mustaccept any interference, including in-terference that may cause undesiredoperation of the device.
The underside of the Base Unit con-taining engravements of either the FCCregistration number and Ringer Equiva-lence Number (REN), or the IC regis-tration number . You must, uponrequest, provide this information to yourlocal telephone company.
This equipment is compatible withinductively coupled hearing aids.
Should you experience trouble withthis telephone equipment, please con-tact:
Customer Service at 800-877-1624
The telephone company may askyou to disconnect this equipment fromthe line network until the problem hasbeen corrected.
FCC Part 15
Warning: Changes or modificationsto this unit not expressly approved bythe party responsible for compliance'scould void the user’s authority to oper-ate the equipment.
The equipment has been tested andfound to comply with part 15 of the FCCrules. These limits are designed toprovide reasonable protection againstharmful interference in a residentialinstallation. This equipment gener-ates, uses and can radiate radio fre-quency energy and, if not installed andused in accordance with the instruc-tions, may cause harmful interferenceto radio communications. However,there is no guarantee that interferencewill not occur in a particular installa-tion. If this equipment does causeharmful interference to radio or televi-sion reception, which can be deter-mined by turning the equipment off andon, the user is encouraged to try andcorrect the interference by one or moreof the following measures:
- Reorient or relocate the receivingantenna.
- Increase the separation between theequipment and receiver.
- Connect the equipment into an outletor on a circuit different from that towhich the receiver is connected.
- Consult the dealer or an experiencedradio/TV technician for help.

5
FCC REGULATIONS
FCC Part 68
The FCC requires that you connectyour cordless telephone to the nation-wide telephone network through amodular telephone jack (USOCRJ11C, RJ11W or RJ14).
Your telephone company may dis-continue your service if your equip-ment causes harm to the telephonenetwork. They will notify you in ad-vance of disconnection, if possible.During notification, you will be informedof your right to file a complaint with theFCC.
Occasionally, your telephone com-pany may make changes in its facili-ties, equipment, operation, or proce-dures that could affect the operation ofyour equipment. If so, you will be givenadvance notice of the change to giveyou an opportunity to maintain unin-terrupted service.
The Base Unit contains no user serv-iceable parts. The Handset contains auser replaceable battery pack.
If it is determined that your telephoneequipment is malfunctioning, the FCCrequires that it not be used and that itbe unplugged from the modular jackuntil the problem has been corrected.Repairs to this telephone equipmentcan only be made by the manufactureror its authorized agents or by otherswho may be authorized by the FCC.For repair procedures, follow the in-structions outlined under the LimitedWarranty.
This equipment may not be used oncoin service provided by the phonecompany or Party Lines.
The REN is useful in determining thenumber of devices you may connect toyour telephone line and still enable thedevices to ring when you receive a call.The general rule is that the REN valueshould not exceed 5.0 total; however,contact your local telephone companyfor the specific number in your area.
6
When using your telephone equip-ment, basic safety precautions shouldalways be followed to reduce the risk offire, electric shock and injury to per-sons, including the following:
1.Read and understand all instruc-tions.
2.Follow all warnings and instruc-tions marked on the product.
3.Unplug this product from the walloutlet before cleaning. Do not useliquid cleaners or aerosol clean-ers. Use a damp cloth for cleaning.
4.Do not use this product near water(for example, near a bath tub,kitchen sink, or swimming pool).
5.Do not place this product on anunstable cart, stand, or table. Theproduct may fall, causing seriousdamage to the product.
6.Slots and openings in the cabineton the back or bottom are providedfor ventilation. To protect it fromoverheating, these openings mustnot be blocked by placing theproduct on a bed, sofa, rug, orother similar surface. This productshould never be placed near orover a radiator or heat register.This product should not be placedin a built-in installation whereproper ventilation is not provided.
7.This product should be operatedonly from the type of power sourceindicated on the marking label. Ifyou are not sure of the type of
IMPORTANT SAFETY INSTRUCTIONS
power supply to your home, con-sult your dealer or local powercompany.
8.Do not allow anything to rest on thepower cord. Do not locate thisproduct where the cord will beabused by persons walking on it.
9.Never push objects of any kind intothis product through cabinet slotsas they may touch dangerousvoltage points or short out partsthat could result in a risk of fire orelectric shock. Never spill liquid ofany kind on the product.
10.To reduce the risk of electricshock, do not disassemble thisproduct, but take it to an authorizedservice facility. Opening or remov-ing cabinet parts other than speci-fied access doors may expose youto dangerous voltage or otherrisks. Incorrect reassembling cancause electric shock when theappliance is subsequently used.
11.Do not overload wall outlets andextension cords as this can resultin the risk of fire or electric shock.
12. Unplug this product from the walloutlet and refer servicing to anauthorized service facility underthe following conditions:
A. When the power supply cord orplug is damaged or frayed.
B. If liquid has been spilled into theproduct.

7
IMPORTANT SAFETY INSTRUCTIONS
SAVE THESE INSTRUCTIONS
C. If the product has been exposedto rain or water.
D. If the product does not operatenormally by following the operat-ing instructions. Adjust only thosecontrols that are covered by theoperating instructions, becauseimproper adjustment of other con-trols may result in damage and willoften require extensive work by anauthorized technician to restorethe product to normal operation.
E. If the product has been droppedand the cabinet has been dam-aged.
F. If the product exhibits a distinctchange in performance.
13.Avoid using a telephone (otherthan a cordless type) during anelectrical storm. There may be aremote risk of electric shock fromlighting.
14.Do not use the telephone toreport a gas leak in the vicinity ofthe leak.

8
The Handset of your CB 1733 ispowered by a rechargeable batterypack. It charges automatically when-ever the Handset is in the Base Unit.You should charge the battery pack for16 hours when you first receive yourphone. You’ll know the battery packneeds charging when:
• The low battery message isdisplayed:
• The Handset seems completelydead, the LCD is completely clearand does not activate when youpress the keys.
TO CHARGE THE BATTERYPACK
To charge the battery pack, place theHandset in the Base Unit. TheCHARGING indicator will light to showthe Handset is seated properly and thebattery pack is charging. It is recom-mended that the battery pack becharged for at least 16 hours initially.Afterwards, 8 hours of maintenancecharging should be sufficient. You canuse your telephone before that withdiminished capacity, but it is best tocharge the battery pack fully. It will takeseveral recharge cycles to maximizethe charge capacity of your batterypack. The maximum battery life be-tween charges is 7 hours of continuoustalk time or 14 days of stand by.
INSTALLING THE BATTERY PACK
Alternatively, if the spare battery packhas been charging in the Base Unit,simply exchange the drained Handsetbattery pack with the fully charged re-placement battery pack from the BaseUnit charger. Place the drainedHandset battery pack into the BaseUnit charger so that it will charge.
The Base Unit spare battery chargerdoes NOT charge a battery pack asquickly as the main Handset batterycharger. A full charge requires 24hours.
A WORD ABOUT RECHARGE-ABLE BATTERIES
Your Ni-Cd battery pack rechargeswhenever the Handset is returned tothe Base Unit.
IT’S IMPOSSIBLE TO OVER-CHARGE THE BATTERY PACK
The battery pack can be rechargedmany times but if you get a low-batterysignal even after 8 hours of charging inthe Base Unit cradle (or 24 hours in theBase Unit spare battery charger), thebattery pack(s) should be replaced.
To purchase replacement batterypacks, call Customer Service at800-877-1624.

9
INSTALLING THE BATTERY PACK
REPLACING THE HANDSETBATTERY PACK
Follow the steps below:1.Remove the battery case cover by
pressing on the ridged lines andsliding downward.
2.Discard the old battery pack. Don’tput the old battery pack in a trashcompactor or a fire - it could burst.Please recycle.
3.Place the new battery pack in itshousing with the metal contactsfacing down.
4.Replace the battery case cover bysliding the cover upwards.
5.If the new battery pack is notalready charged, place the Hand-set in the cradle of the Base Unitto allow it to charge for 16 hours.
CAUTION: To Reduce the Risk ofFire or Injury to Persons, Read andFollow the Instructions
1.Use only Cincinnati Bell recharge-able battery pack, or equivalent.
2.Do not dispose of the battery packin a fire. The cell may explode.
IMPORTANT: Do not dispose of thisbattery pack into household gar-bage. For information on recyclingor proper disposal, consult yourlocal solid waste collection ordisposal organization.
3.Do not open or mutilate the batterypack. Released electrolyte is cor-rosive and may cause damage tothe eyes or skin. It may be toxicif swallowed.
4.Exercise care in handling batteriesin order not to short the battery withconducting materials such as rings,bracelets, and keys. The batterypack or conductor may overheatand cause burns.
To purchase replacement batterypacks, call Customer Service at800-877-1624.
SPARE BATTERY CHARGER /POWER BACKUP FUNCTION
When the Spare Battery pack isinstalled in the Base Unit, the CB 1733uses this battery to provide operationalbackup in case of a power failure. If youhave a fully charged battery pack in theSpare Battery charger and there is apower outage, you will still be able toplace and receive calls on the CB 1733Handset for up to 4 hours.
The Spare Battery pack can also beused to replace a drained Handsetbattery to ensure uninterrupted use.Be sure to put the drained battery packin the Spare Battery charger.

1 0
GETTING STARTED
SETTING UP AC POWERADAPTERPlug the AC power adaptor into an
electrical outlet and the DC connectorto the back of the Base Unit.
CAUTION: USE CLASS 2, 9VDC POWER SUPPLY ONLY.
SETTING RINGERThe Handset ringer is programmed
ON as the factory default setting. Tochange ringer settings, see RINGERTONE / VOLUME.
The Base Unit ringer is controlledindependently, by a switch located onthe front, right hand side (antennaside) of the Base.
The Base ringer have 3 settings,High, Low and Off.
TONE/PULSE SELECTIONYour CB 1733 is preset for Tone
dialing. If you have rotary (pulse)service, program the Handsetaccordingly. See SET TONE/PULSEfor details.
CHARGE THE HANDSET BATTERYPACK BEFORE USE. The battery pack recharges
automatically whenever the Handsetis in the Base Unit. The battery packmust be charged for 16 hours beforeusing your phone for the first time.
CONNECT THE TELEPHONELINE CORDPlug one end of the telephone line
cord into the jack on the back of theBase Unit, plug the other end of thiscord into the wall jack.
CHECK FOR A DIAL TONEAfter the battery is charged, rotate
the Base Unit antenna to upright posi-tion. Now press PHONE on the Hand-set. PHONE ON will appear on theLCD, and you will hear a dial tone. Ifnot, see IN CASE OF DIFFICULTY .
Fill in the telephone number card onthe Base Unit.
CAUTION:1.Never install telephone wiring dur-
ing a lightning storm.
2.Never install telephone jacks inwet locations unless the jack isspecifically designed for wet loca-tions.
3.Never touch uninsulated tel-ephone wires or terminals unlessthe telephone line has been dis-connected at the network inter-face.
4.Use caution when installing ormodifying telephone lines.

1 1
USING THE WALL MOUNTADAPTOR
1. Position the wall mount bracketon the Base Unit.Line up the tabs on the wallmount adaptor with the holes onthe bottom of the Base Unit . Snapthe wall mount bracket firmly inplace.
2. Mount the Base Unit on the wall.Position the Base Unit so themounting studs will fit into theholes on the bottom of the BaseUnit. Position the power cord toextend down the wall the phoneis to be mounted on. Slide theBase Unit down on the mountingstuds until it locks into place.
3. Plug in the AC adaptor.Plug the AC adaptor into anelectrical outlet, and the DCconnector to the back of the BaseUnit. If the Handset battery packhas not been chargedpreviously, place the Handset inthe Base Unit cradle, and allow itto charge for 16 hours.
WALL MOUNTING
4. Connect the telephone line cord.The telephone line cord has asnap-in plug at each end. Insertone of the plugs into the jack onthe bottom of the Base Unit. Insertthe other end of the plug into thewall jack.

1 2
HANDSET LAYOUT

1 3
BASE LAYOUT

1 4
QUICK REFERENCE GUIDE
Here is a brief guide to the featuresand functions of your CB 1733 cordlesstelephone:
SET-UP
• Plug AC adaptor into a standardelectrical outlet.
• Set Dial Mode setting in MENU toPULSE or TONE, The unit is factoryset to TONE.
• Let Handset battery pack chargefor 16 hours before first use.
• Connect telephone line cord toBase Unit and telephone jack.
SETTING TIME
With the Handset in the idle (off)mode:• Press MENU
• Use the / soft keys to scrolluntil 5. Set Time is highlighted
• Press ENTER
• Enter the current hour . A single-
digit hour must be preceded by a0.
• Next, enter the minute .
• Next, select the Hour Presenta-tion (12-hour or 24-hour format)by pressing the key directly belowthe 12 or 24 icon in the handsetdisplay.
• Press SAVE. The display willconfirm that the time has beenupdated.
• The time setting will also auto-matically be updated when Time/Date information is received fromCaller ID.
MAKING CALLS
FROM THE HANDSET
• Press PHONE. The Handset willbriefly display CONNECTING,then PHONE ON. Listen for dialtone. Using the keypad, dial thedesired number. To end your call,press OFF, or return the handsetto the base unit.
-OR-
• First, dial the desired number.Then, press PHONE. After ac-cessing dial tone, the phonenumber will be dialed. To endyour call, press OFF, or return thehandset to the base unit.

1 5
*TONE key. When you end yourcall by pressing OFF or returningthe handset to the base unit, thephone will return to the rotary(PULSE) mode.
VOLUME CONTROL
FROM THE HANDSET
• The phone must be ON.
• Located on the side of the Hand-set, press the VOLUME UP orVOLUME DOWN keys to raise orlower the earpiece volume. Thereare 8 volume levels.
FROM THE BASE• The Base Unit has its own volume
control. The VOL Up and Downkeys are located directly abovethe SPEAKERPHONE key.
RINGER CONTROL
FROM THE HANDSETWith the Handset in the idle (off)
mode:• Press MENU
FROM THE BASE• Press SPEAKERPHONE, then
wait for dial tone. Dial the desiredphone number.
• To end your call, pressSPEAKERPHONE again.
ANSWERING CALLS
• When there is an incoming phonecall, pressing OFF key on thehandset can stop the ringing.Youcan also answer the call simply bypressing any key except OFF,VOLUME, INT.COM keys and 3PPU keys.
FROM THE HANDSET:• Press any key except OFF,
Volume, INT.COM keys and 3PPU keys.
• Press OFF to end your call.
FROM THE BASE:• Press SPEAKERPHONE . To end
your call, press SPEAKERPHONEagain.
TEMPORARY TONE
• If your local telephone servicerequires rotary (PULSE) dialing,you can temporarily switch toTONE dialing for such purposesas accessing answering ma-chines, bank-by-phone services,and using calling cards.
• To switch from rotary to tonedialing during a call, press the
QUICK REFERENCE GUIDE

1 6
• Using the / soft keys,scroll until 3. Ringer Tone/Vol ishighlighted
• Press ENTER• Use the RING soft key to select
the Ringer Type (there are 4 ringstyles) and Vol soft key to selectthe ringer volume (High, Low orOff).
• Press SAVE to store your ringersettings
• To exit programming mode at anytime, press OFF key .
FROM THE BASE• The Base Unit ringer is controlled
independently, by a switch locatedon the front, right hand side(antenna side) of the Base.
• The Base ringer has (3) settings:High, Low and Off.
HOLD
FROM THE HANDSET
• Press the HOLD soft key to placean active call on hold. Press theTALK soft key or the PHONE keyto return to your call.
• If an extension phone is activated
while the CB 1733 has a call onHOLD, the CB 1733 will releasethe call and turn itself OFF.
FROM THE BASE
• During a Speakerphone call,press HOLD on the Base Unit.The red light (LED) buit into theSPEAKERPHONE key, will flash
rapidly while your call is on hold.
• Press either HOLD orSPEAKERPHONE to return toyour call.
MUTE
FROM THE HANDSET• Press the MUTE soft key to dis-
able the Handset microphoneduring an active call. Press theTALK soft key or the PHONE keyto return to normal 2-wayconversation.
FROM THE BASE• During a Speakerphone call,
press MUTE to disable the BaseUnit microphone. The red light(LED) buit into the MUTE key, willglow.
• Press MUTE again to return to atwo-way conversation.
REDIAL WITH THE HANDSETON (OFF HOOK)
QUICK REFERENCE GUIDE

1 7
• Press the RDL soft key to displaythe last three telephone numbersyou dialed.
• Using the / soft keys,select the number from the listand then press DIAL soft key.
REDIAL WITH THE HANDSETOFF (ON HOOK)
• Press RDL. The Handset will thedisplay last 3 phone numbersdialed.
• Use the / soft keys tohighlight the desired phonenumber.
• Press PHONE. The CB 1733 willaccess dial tone, and dial thenumber.
PAGE/HANDSET LOCATOR
• To page the Handset from theBase Unit, press INTER.COM. TheHandset and Base Unit will emit aspecial beep tone for up to 60seconds, In addition, the Handsetwill display BASE PAGING.
• To answer the page, pressINT.COM on the Handset. You arenow in intercom mode.
• To terminate the page, press OFFon the Handset,or INTER.COMon the Base Unit.
INTERCOM BETWEENHANDSET AND BASE
FROM THE HANDSET (whenHANDSET OFF or ON HOOK)
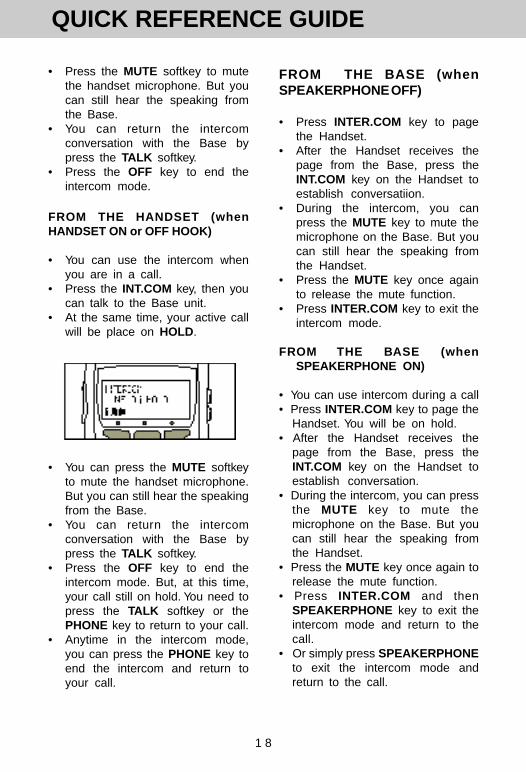
• Press the INT.COM key. The BaseUnit will emit 2 short tones andthen enter Intercom mode. Youcan now talk to the person at theBase Unit.
• The Handset will display as:
QUICK REFERENCE GUIDE
1 8
• Press the MUTE softkey to mutethe handset microphone. But youcan still hear the speaking fromthe Base.
• You can return the intercomconversation with the Base bypress the TALK softkey.
• Press the OFF key to end theintercom mode.
FROM THE HANDSET (whenHANDSET ON or OFF HOOK)
• You can use the intercom whenyou are in a call.
• Press the INT.COM key, then youcan talk to the Base unit.
• At the same time, your active callwill be place on HOLD.
• You can press the MUTE softkeyto mute the handset microphone.But you can still hear the speakingfrom the Base.
• You can return the intercomconversation with the Base bypress the TALK softkey.
• Press the OFF key to end theintercom mode. But, at this time,your call still on hold. You need topress the TALK softkey or thePHONE key to return to your call.
• Anytime in the intercom mode,you can press the PHONE key toend the intercom and return toyour call.
QUICK REFERENCE GUIDE
FROM THE BASE (whenSPEAKERPHONE OFF)
• Press INTER.COM key to pagethe Handset.
• After the Handset receives thepage from the Base, press theINT.COM key on the Handset toestablish conversatiion.
• During the intercom, you canpress the MUTE key to mute themicrophone on the Base. But youcan still hear the speaking fromthe Handset.
• Press the MUTE key once againto release the mute function.
• Press INTER.COM key to exit theintercom mode.
FROM THE BASE (whenSPEAKERPHONE ON)
• You can use intercom during a call• Press INTER.COM key to page the
Handset. You will be on hold.• After the Handset receives the
page from the Base, press theINT.COM key on the Handset toestablish conversation.
• During the intercom, you can pressthe MUTE key to mute themicrophone on the Base. But youcan still hear the speaking fromthe Handset.
• Press the MUTE key once again torelease the mute function.
• Press INTER.COM and thenSPEAKERPHONE key to exit theintercom mode and return to thecall.
• Or simply press SPEAKERPHONEto exit the intercom mode andreturn to the call.

1 9
QUICK REFERENCE GUIDE
CONFERENCE
Your CB 1733 allows you to establisha 3 party conference between theHandset, Base and the incomingcall:
1) Use either the Base or the Handsetto make a call.
2) If you are using the Base to makethe call, the Handset can join theconference by pressing PHONE.Or, press the SPEAKERPHONEkey on the Base if you use theHandset to make the call.
3) If either the Handset or the Baseparties want to leave theconference, either side can pressOFF (or SPEAKERPHONE) toleave.
REVIEWING CALLER IDRECORDS
NOTE: Caller ID and Call Waiting IDare subscription services, availablethrough most local telephone serviceproviders. These are optional serv-ices; you are not required to subscribeto them. However, to receive Caller IDon your CB 1733, subscription throughyour local phone company is required.
With the Handset in the OFF (onhook) mode:
• Press MENU
• Using the / soft keys scrolluntil 1. Caller ID is highlighted
• Press the ENTER soft key.
• Use the / soft keys toscroll through the Caller IDrecords. The CB 1733 will storethe last 50 Caller ID records tocome in.The latest one will be in#01.
• Press OFF to exit Caller ID mode.
MEMORY DIALING
FROM THE HANDSETWith the Handset OFF (on hook):
• Press the MEM soft key.

2 0
QUICK REFERENCE GUIDE
• Enter Memory Location (01 – 25).As soon as you enter the seconddigit, the contents of the selectedMemory Location will bedisplayed.
• Press PHONE key or the DIALsoft key to dial the displayedphone number.
With the Handset ON (off hook):
• Press PHONE. Listen for dialtone.
• Press the MEM soft key.
• Enter Memory Location (01 – 25).The displayed phone number willbe dialed.
• Press the PHONE or DIAL key.
FROM THE BASE
• Press the SPEAKERPHONE toget the dial tone.
• Press MEMORY key, then enter 2digit location number (01-25).
• You will then hear the dialingsequence.
FLASH
• You can use your CB 1733 withservices such as Call Waiting.Simply press the PHONE key toflash the line on the Handset, ORpress FLASH on the Base.

2 1
SOFTMENU FUNCTIONS
The CB 1733 has an advanced de-sign which uses a menu system andsoft keys to access all of the built-infeatures.
Example of the idle mode display:
NEW: The number of Caller ID recordsnot previously viewed
TOTAL: The total number of storedCaller ID records (50 max.)
RDL (Redial)
Press RDL to display the last 3 tel-ephone numbers dialed. The numberon the top line is the most recent numberdialed. The display will look like:
• Use the / soft keys toselect desired number.
• Once highlighted, press PHONEto dial.
• To save the phone number in thephone book directory, press SAVE.The LCD will display:
• Press PSE if you want to add a 2-second pause in the dialing se-quence
• Press CLR to backspace• Press SAVE to save the phone
number in the Phone Book direc-tory. The LCD will display:
• Using the keypad, enter thedesired name (15 charactermaximum)
• Press to advance the cursor tothe next space. You won’t have toadvance the cursor if the nextletter of the name is not on thesame key as the previous letter; itwill advance automatically.
• Press CLR to backspace
• Press SAVE when you finishedentering the desired name. TheLCD will display:
• The XX location displayed is thesmallest, unoccupied directorylocation. If you want to save thephone number in a different loca-tion, press CLR, and then enterthe two-digit directory location youdesire (01 – 25).
• Press SAVE to confirm your loca-tion selection. The screen willdisplay:

2 2
MEM (Memory)
From the idle mode display,pressMEM, the screen will now display:
Enter the 2-digit location code rep-resenting the Phone Book directoryrecord you wish to access. The screenwill display the contents of that record.If the contents of the selected recordare empty, the screen will display:
and then ask for another 2-digit loca-tion code.
With the contents of the Phone Bookrecord displayed, press:
• DIAL to access the line and dialthe displayed phone number,
• CLR to clear the display andallow you to enter another loca-tion number,
• EXIT to exit Memory Dialing, andreturn to the idle mode display.
You can also access directoryrecords by entering the name of thedesired party. See PHONE BOOK fordetails.
MENU
With the Handset in the idle (OFF)mode, press the MENU key to accessthe following options:
1. Caller ID2. Phone Book3. Ringer Tone/Vol4. KeyBeep On/Off5. Set Time6. Clear ALL MEM7. AutoAns (Auto Answer) On/Off8. Set Tone/Pulse9. Del (delete) MSG Icon.
Use the / keys to select thedesired option, then press ENTER.
Because there are only three lines todisplay information, only three of themenu options will be displayed at atime. The first screen displayed is:1. Caller ID2. Phone Book3. Ringer Tone/Vol
The second screen is:4. KeyBeep On/Off5. Set Time6. Clear ALL MEM
SOFTMENU FUNCTIONS

2 3
And the third screen is:7. AutoAns (Auto Answer) On/Off8. Set Tone/Pulse9. Del (delete) MSG Icon
The following sections will detailhow to access and operate the nineMENU functions.
Note: You do not have to use the
/ soft keys to select menuoptions. Instead, you can simplypress the number key that corre-sponds to the desired feature.
For an example, if you want to access
the Set Time function, using the / soft keys you would do the following:
• Press MENU
• Using the / keys, scrolluntil 5. Set Time is highlighted
• Press ENTER
• Then follow the on-screenprompts
SOFTMENU FUNCTIONS
However, using the shortcut, all youwould need to do is:
• Press MENU• Press the 5 key to enter the Set
Time function
• Then follow the on-screenprompts.

2 4
CALLER ID
Once you have chosen CALLER ID(Menu selection #1), the screen willdisplay:
• If an N in a shaded box appearsin the upper right hand corner ofthe Caller ID screen, this indicatesthat it is a new (not previouslyviewed) record.
If a number in a shaded boxappears in the upper right handcorner of the Caller ID screen, thisindicates that you have receivedmultiple calls from this party. Forexample, a 3 indicates that theparty has called 3 additional timessince the initial call. This repeatindicator can go to a maximum of9.
• Use the / keys to scrollthrough the records.
• Once you have found the desiredrecord, press PICK.
You now have 3 options:
• SAVE the phone number (andname) in the Phone Book direc-tory,
• DIAL the phone number, or• DEL (delete) the Caller ID record
from memory.
SAVE
Press SAVE while reviewing a CallerID record. The screen will display:
• Press PSE if you want to add a 2-second pause in the dialing se-quence
• Press CLR to backspace• Press SAVE to save the phone
number in the Phone Book direc-tory. The LCD will display:
• Press to advance the cursor tothe next space. You won’t have toadvance the cursor if the nextletter of the name is not on thesame key as the previous letter; itwill advance automatically.
• Press CLR to backspace
• Press SAVE when you finish en-tering the desired name. TheLCD will display:

2 5
• If you want to save the phonenumber in a different location,press CLR, and then enter thetwo-digit directory location youdesire (01 – 25).
• Press SAVE .The screen willconfirm your location selection.
- OR -• Press EXIT to cancel the opera-
tion and return to the idle modedisplay. The screen will display:
DIAL
Press DIAL or PHONE when re-viewing a Caller ID record. The screenwill display up to 4 dialing options:(examples)
1. 643-8981Local# only (7 digits)
2. 1-503-643-8981Long Distance (11 digits)
3. 503-643-8981Area Code+ local# (10 digits)
4. 1-643-8981“Local” Long distance (8 dig-its)
• To dial, use the / scrollkeys to select the desired dialingoption, then press DIAL orPHONE;
- OR -
• Enter the desired number key, 1through 4. The CB 1733 willaccess dial tone, and dial theselected sequence.
DEL (Delete)
Press DEL while reviewing a CallerID record. The screen will display:
• Press YES to delete the dis-played Caller ID record. Thescreen will say:
• Press NO to cancel the deletion,and return to the main display.
CALLER ID

CALLER ID - CALL WAITINGID
Your CB 1733 is capable of display-ing the name and/or number of theparty calling before you answer thephone (Caller ID ). It is also capable ofdisplaying Caller ID information in con-junction with a Call Waiting alert signal(Call Waiting ID ). With Call Waiting ID,the Caller ID data will help you decidewhether to switch to the incoming call,or continue with you current conversa-tion.
NOTES ABOUT CALLER ID &CALL WAITING ID
These are subscription services,provided by most regional telephoneservice providers. You must subscribeto these services to get the benefits ofthese features. If you do not subscribeto Caller ID services, you can still useyour CB1733 and the other features itoffers.
Due to regional incompatibilities,Caller ID information may not be avail-able for every call you receive. Inaddition, the calling party may blocktheir name and phone number frombeing sent.
CALLER ID

PHONE BOOK
The names and phone numbers of25 frequently called parties can bestored in the CB 1733 Phone Bookdirectory. You will find instructions forprogramming names and numbers intothe directory in the section, ADDINGNEW PHONE BOOK RECORDS .
Once you have chosen PHONEBOOK (Menu selection #2), the screenwill display:
Using the numeric keys, enter thefirst letter of the desired name. TheHandset will display either the exactrecord, or a close match. If it is not the
desired record, press the / scrollkeys to search.
Once you are viewing the desiredrecord, press PICK. You now have thefollowing options:
• EDIT – if you want to change thename or phone number
• DIAL – to access the line and dialthe phone number
• DEL - to delete the record fromthe directory. You will then beprompted to press YES to confirmdeletion or NO to cancel andreturn to the idle mode display.
EDITING PHONE BOOKRECORDS
If you press EDIT, the Handset willdisplay:
• Press PSE if you want to add a 2-second pause in the dialing se-quence
• Press CLR to backspace• Press SAVE to save the phone
number in the Phone Book direc-tory. The LCD will display:
• Press to advance the cursor tothe next space. You won’t have toadvance the cursor if the nextletter of the name is not on thesame key as the previous letter; itwill advance automatically.
• Press CLR to backspace
• Press SAVE when you finishedentering the desired name. TheLCD will display:
28

The XX location displayed is its origi-nal location.
If you want to save the phone numberin a different location, press CLR, andthen enter the two-digit location number.
Press SAVE to confirm your locationselection. The screen will display:
If you are saving an edited record inits original directory location, you willsee the following message after press-ing SAVE:
If you press YES, the Handset willdisplay:
If you press NO, the Handset willreturn to:
PHONE BOOK
You can choose a new location, orpress EXIT to return to the idle modedisplay.
ADDING NEW PHONE BOOKRECORDS
Starting from the idle mode (off) dis-play, enter the number you want tostore in the Phone Book directory.Then:
• To save the phone number in thephone book directory, press SAVE.The LCD will display:
• Press PSE if you want to add a 2-second pause in the dialing se-quence
• Press CLR to backspace
• Press SAVE to save the phonenumber in the Phone Book direc-tory. The LCD will display:
Each of the number keys has a spe-cific set of characters. Each press of aparticular number key causes charac-ters to be displayed in the followingorder:
29

PHONE BOOK
Number Key Characters (in order)1 ................... & ' , . 12 ................... a b c 23 ................... d e f 34 ................... g h i 45 ................... j k l 56 ................... m n o 67 ................... p q r s 78 ................... t u v 89 ................... w x y z 90 ................... 0
• Press to advance the cursor tothe next space. You won’t have toadvance the cursor if the nextletter of the name is not on thesame key as the previous letter; itwill advance automatically.
• Press CLR to backspace
• Press SAVE when you finishedentering the desired name. TheLCD will display:
• The XX location displayed is thesmallest, unoccupied directorylocation. If you want to save thephone number in a different loca-tion, press CLR, and then enterthe two-digit directory location youdesire (01 – 25).
• Press SAVE to confirm your loca-tion selection. The screen willdisplay:
3 0

RINGER TONE / VOLUME
You can adjust the Handset ringerstyle and volume level. There are 4ringer styles and 3 volume levels: HI,LO, and OFF.
Once you have selected RINGERTONE/VOL (Menu selection #3), theHandset will display:
To select a ringer style, press theRING soft key.
To adjust ringer volume, press theVOL soft key.
Press SAVE to confirm your selec-tions. The screen will display SettingUpdated , and return to the idle modedisplay.
If you select Ringer Volume HI , theidle mode screen will display'' ''.
If you select Ringer Volume LO, theidle mode screen will display'' ''.
If you select Ringer Volume OFF,the idle mode screen will display'' ''.
KEY BEEP ON/OFF
As you use your CB 1733, you willhear a quiet beep with each key press.You can turn this feature off, if youchoose KEY BEEP to be OFF.
Once you have selected KEY BEEPON/OFF (Menu selection #4), the Hand-set will display:
Press ON or OFF, depending onyour preference, then press SAVE. Thescreen will display Setting Updated ,and return to the idle mode display.
Factory default setting is Key BeepON.
3 1
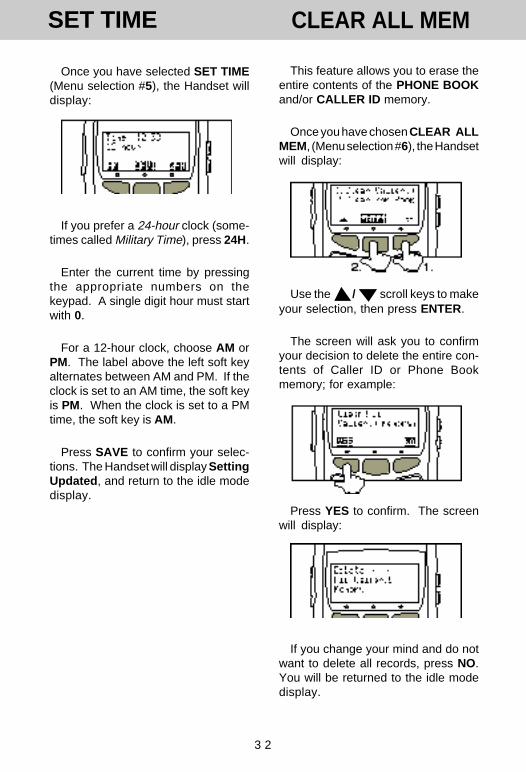
SET TIME
Once you have selected SET TIME(Menu selection #5), the Handset willdisplay:
If you prefer a 24-hour clock (some-times called Military Time), press 24H.
Enter the current time by pressingthe appropriate numbers on thekeypad. A single digit hour must startwith 0.
For a 12-hour clock, choose AM orPM. The label above the left soft keyalternates between AM and PM. If theclock is set to an AM time, the soft keyis PM. When the clock is set to a PMtime, the soft key is AM.
Press SAVE to confirm your selec-tions. The Handset will display SettingUpdated , and return to the idle modedisplay.
CLEAR ALL MEM
This feature allows you to erase theentire contents of the PHONE BOOKand/or CALLER ID memory.
Once you have chosen CLEAR ALLMEM, (Menu selection #6), the Handsetwill display:
Use the / scroll keys to makeyour selection, then press ENTER.
The screen will ask you to confirmyour decision to delete the entire con-tents of Caller ID or Phone Bookmemory; for example:
Press YES to confirm. The screenwill display:
If you change your mind and do notwant to delete all records, press NO.You will be returned to the idle modedisplay.
3 2

AUTO ANSWER ON/OFF
Factory default setting is AutoAnswer OFF.
With Auto Answer set to OFF,when the phone is on cradle, youcannot simply pick up the phone toanswer incoming call, you must pressPHONE to answer the call. Thisallows you to review the Caller IDinformation before answering. How-ever, if you prefer to have yourHandset automatically answer thecall when removed from the Basecradle:
Select AutoAns On/Off (Menu se-lection #7). The Handset will display:
Press ON (or OFF if you’re cancelingAuto Answer), then SAVE. The screenwill display Setting Updated , and re-turn to the idle mode display.
Your CB 1733 is preset for tonedialing.To change the dialing modesetting, choose SET TONE/PULSE(Menu selection #8), the screen willdisplay:
Press TONE or PULSE, dependingon the requirements of your localtelephone provider.If you are not sure,contact your local phone company.
Press SAVE. The screen will confirmthat the dialing mode is updated, andthen return to the idle mode display.
Delete MSG IconRefer to MESSAGE WAITNG .
INDICATIOR for an explanation of thisteature.
SET TONE /PULSE
3 3

HEADSET OPERATION
Your CB 1733 is equipped with a2.5mm Headset Jack for use with anoptional accessory Headset for hands-free operation.
If you choose to use the Headsetoption, you must obtain an optionalaccessory Headset, which is compat-ible with the CB 1733.
To purchase a Headset, call800-877-1624.
Once you have a compatible 2.5mmHeadset, locate the Headset Jack onthe CB 1733 Handset. Connect theplug on the Headset cord to the jack onthe cordless Handset. The plug shouldfit securely. Do not force the connec-tion.
OPERATION
NOTE: Whenever a compatibleHeadset is connected to the cordlessHandset, the microphone on the Hand-set will be muted. This is done to limitthe effect of background noise.
The following operational charac-teristics apply to compatible Headsets.The same may also apply to otherheadsets, but Cincinnati Bell assumesno responsibility for their performance.
BELT CLIP
The CB 1733 is also equipped witha detachable belt clip. Align the pins onthe inside edge of the clip with thenotches on the sides of the CB 1733Handset. The belt clip should snapsecurely into place. Do not force theconnection.
3 4

ADDITIONAL OPERATING TIPS
OUT OF RANGE INDICATION
When the handset is in Phone Onmode and moved to a point where itand the Base Unit can no longer com-municate, the Handset will beep twiceand display OUT OF RANGE:
and attempt to re-link with the Base. Ifthis occurs while you’re on a call, movecloser to the Base Unit.
If the Handset does not re-establishcontact with the Base within 30 sec-onds of losing contact, the Handset willautomatically drop the call and turn off.
If you walk out of range while theHandset is not in use, the Handset willbeep twice and display OUT OFRANGE until the user press any key.
NOTE: If the Base Unit is withoutpower, the Handset will behave as ifit is out of range. Therefore, if thehandset beeps, the display OUT OFRANGE occurs, and moving closerto the Base does not help, check theBase Unit to make sure it has power.
MESSAGE WAITINGINDICATOR (for use withVoicemail)
Your CB 1733 is capable of detect-ing a visual Message Waiting signal,generated by many phone service pro-viders. If you subscribe to Voicemail
service from your local telephone com-pany, and a visual message waitingsignal is provided, the CB 1733 willdisplay on the right side of theHandset LCD to alert you to new,unplayed messages.
On the Base, the red MESSAGE LEDwill light up to alert you to new unplayedmessages.
Once you have reviewed all of yournew voicemail messages and hung upthe phone, the CB 1733 will usuallyturn off the Handset and Base indicatorsautomatically. Note that there is a delayfor the indicators to turn off, as the CB1733 is waiting for an update signalfrom the telephone network.
After all new voicemail messageshave been reviewed, if the MESSAGEWAITING indicator (icon or Base LED)remains on, you can manually clearthe indications as follows:
• Press MENU, scroll to 9. Del MSGIcon . Press ENTER
• Press YES to delete the icon andBase LED.
3 5

ADDITIONAL OPERATING TIPS
NOTE: Message Waiting indicatorworks in conjunction with Voicemailservice from many local phonecompanies. This is an optionalservice; you are not required tosubscribe to it.
CUSTOM PAY-PER-USE (PPU)FEATURES
Your CB 1733 gives you easy ac-cess to 5 popular custom features, of-fered by many telephone companies:
1. Return Call2. Repeat Dial3. No Call Wait4. Call FWD ON5. Call FWD OFF
To use a custom Pay-Per-Use fea-ture, do the following:
• Press PHONE. Listen for dialtone.
• Press the SERV soft key.• Using the / soft keys,
scroll until the desired customfeature is highlighted.
• Press ENTER.
In addition 3 custom pay-pay-useservises are accessible using one-touch keys located both the CB 1733Handset and Base Unit;Specifically:
AUTO CALL RETURN *693-WAY CALLINGAUTO BUSY REDIAL *66
AUTO CALL RETURN *69 dials thelast party who called you, whether ornot you answered the call. A charge
is added to your phone bill each timeyou use this feature.
3-WAY CALLING allow you to talkwith 2 separate parties from a singleline. The set-up procedure is asfollows:
1) Call your first party; after the partyanswers,
2) Press 3-WAY CALLING . Wait fordial tone.
3) Call your second party; after thecall is answered.
4) Press 3-WAY CALLING again.
A charge is added to your phone billeach time this service is used.
AUTO BUSY REDIAL *66 repeatedlydials the last number your called,over a time interval determined byyour local company. This is useful inreaching a party whose line is busyA charge is added to your phone billeach time this service is used.
NOTE: It is likely that your localtelephone company will assesscharges to use custom features. Youshould check with your local serviceprovider regarding which custom serv-ices are available in your area, and theassociated costs for the intentional orunintentional use of Pay Per Useservices.
Your local telephone company mayprovide a monthly subscription to anindividual service or a package ofservices which gives you unlimitedusage for a small monthly fee.
3 6

ADDITIONAL OPERATING TIPS
LOW BATTERY INDICATION
During a Low Battery condition, theHandset LCD will display:
When this occurs, you should eitherreturn the Handset to the Base Unit forrecharging, or exchange the drainedHandset battery with a fully chargedbattery from the Spare Battery charger.
CHECK AC POWERINDICATION
A charged battery installed in theBase Unit will allow you to make andreceive calls from the Handset in theevent of a power failure, forapproximately 4 hours.During powerback-up mode, the Handset will display:
If your CB 1733 displays thismessage, and AC power is present,check the electrical outlet and the ACadapter, ensuring that it is firmlyconnected to the outlet and the BaseUnit.
3 7

MAINTENANCE
TAKING CARE OF YOURTELEPHONE.
Your Cincinnati Bell cordlesstelephone contains sophisticatedelectronic parts, so it must be treatedwith care.
AVOID ROUGH TREATMENTPlace the Handset down gently. Savethe original packing materials toprotect your telephone if you everneed to ship it.
AVOID WATERYour telephone can be damaged if itgets wet. Do not use the Handsetoutdoors in the rain, or handle it withwet hands. Do not install your BaseUnit near a sink, bathtub or shower.
ELECTRICAL STORMSElectrical storms can sometimes causepower surges harmful to electronicequipment.For your own safety, be caution whenusing electrical appliances duringstorms.
CLEANING YOUR TELEPHONEYour telephone has a durable plas-
tic casing that should retain its luster formany years. Clean it only with a softcloth slightly dampened with water ora mild soap. Do not use excess wateror cleaning solvents of any kind.
Remember that electrical appliancescan cause serious injury if used whenyou are wet or standing in water. Ifyour base unit should fall into water,DO NOT RETRIEVE IT UNTIL YOUUNPLUG THE POWER CORD ANDTELEPHONE LINE CORDS FROMTHE WALL . Then pull the unit out bythe unplugged cords.
3 8

3 8
IN CASE OF DIFFICULTY
If you have difficulty operating yourphone, the suggestions below shouldsolve the problem. If you still havedifficulty after trying these suggestions,call the Customer Service at 800-877-1624.
THE PHONE DOESN’T WORKAT ALL.
• Make sure the Power Cord isplugged in.
• Make sure the telephone linecord is plugged firmly into theBase Unit and the telephone walljack.
• Make sure the battery pack isproperly charged. If the "LOWBATTERY" message is shown,the battery pack needs charging.
NO DIAL TONE.• First check all the suggestions
above.• If you still don’t hear a dial tone,
disconnect the Base Unit from thetelephone jack and connect adifferent phone. If there is no dialtone on that phone either, theproblem is in your wiring or localservice. Call your local telephonecompany.
YOU GET NOISE, STATIC, ORA WEAK SIGNAL EVENWHEN YOU’RE NEAR THEBASE UNIT.
• Household appliances pluggedinto the same circuit as the BaseUnit can sometimes causeinterference. Try moving theappliance or the Base Unit toanother outlet.
YOU GET NOISE, STATIC, ORA WEAK SIGNAL WHENYOU’RE AWAY FROM THEBASE UNIT.
• You may be out of range. Eithermove close to or relocate theBase Unit.
• The layout of your home may belimiting the range. Try moving theBase Unit to another position.
THE HANDSET DOES NOTRING WHEN YOU RECEIVE ACALL.
• Make sure you have the Handsetringer activated.
• Make sure the telephone linecord is plugged firmly into theBase Unit and the telephone jack.Make sure the power cord isplugged in.
• You may be too far from the BaseUnit. And the "OUT OF RANGE"message is shown on LCD.
• You may have too many extensionphones on your telephone line toallow all of them to ring. Tryunplugging some of the otherphones.
YOU HEAR OTHER CALLSWHILE USING YOUR PHONE.
• Disconnect your Base Unit fromthe telephone jack, and plug in aregular telephone. If you still hearother calls, the problem isprobably in your wiring or localservice. Call your local telephonecompany.
3 9

3 9
WARRANTY STATEMENT
WHAT DOES OUR WARRANTY COVERS?Any defect in material or workmanship.
FOR HOW LONG AFTER THE ORIGINAL PURCHASE?To the original purchaser only - ONE YEAR.
WHAT WILL WE DO?At our option, repair or replace your unit.
WHO DO I SEND MY UNIT, IN OR OUT OF WARRANTY?In the U.S. Call Customer Service for Return Authorizationat: 800-877-1624.Properly pack your unit. Include any cables & accessories which wereoriginally provided with the product. We recommend using the originalcarton and packing materials.Include in the package a copy of the sales receit or other evidence of dateof original pruchase(if the unit was purchased within the last twelvemonths).Print your name and address, along with a description of the defect, andinclude this in the package.Include payment for any service or repair not by warranty, as determinedby Cincinnati Bell Customer Service.Ship the unit via UPS insured, or equivalent to the address provided byCincinnati Bell. Customer Service.
Cincinnati Bell assumes no responsibility for units sentwithout prior Return Authorization.
WHAT DOES OUR WARRANTY NOT COVER?BatteriesDamage from misuse, neglect, or acts of nature (lightning, floods, powersurges, etc.)Products with may have been modified or incorporated into other productsProducts purchased and/or operated outside the USA, its territories.Products serviced by the owner or a service facility not expressly authorizedby Cincinnati Bell Customer Service.Products purchased more than 12 months from current dateUnits purchased in "US IS" condition, or units purchased as "DistressedMerchandise".
HOW DOES STATE LAW OR PROVINCIAL LAW RELATE TO THIS WARRANTY?This warranty gives you specific rights. You may also have other rightswhich wary from state or province to province.

4 0
TECHNICAL SPECIFICATIONS
FREQUENCY CONTROLCrystal Controlled Dual PLL Synthe-sizer
TRANSMIT FREQUENCYHandset :
904.20 MHz to 925.80 MHz( All 20 channels within thisrange)
Base Unit:904.20 MHz to 925.80 MHz(All 20 channels within thisrange)
RECEIVE FREQUENCYHandset :
904.20 MHz to 925.80MHz( All 20 channels within thisrange)
Base Unit:904.20 MHz to 925.80MHz( All 20 channels within thisrange)
NOMINAL EFFECTIVE RANGEMaximum power allowed by FCC
and IC. Actual operating range mayvary according to environmental con-ditions at the time of use.
SIZEHandset :
19 x 6 x 3.5cm (L x W xT)Maximum (Antenna ex-
cluded)
Base Unit:21.5 x 16.5 x 5cm (L x Wx T) Maximum (Antennaexcluded)
WEIGHTHandset :
250 grams
Base Unit:415 grams
POWER REQUIREMENTSHandset :
Self-contained nickel-cad-mium rechargeable bat-tery supply, 3.6V nominal,600mAh capacity.
Base Unit:9VDC @ 500mA
MEMORYSpeed Dial:
25 Memory locations16 digits and 15 charactersper location.
CID:Alpha Numeric Display 50Memory locations
SPECIFICATIONS ARE TYPI-CAL AND MAY CHANGEWITHOUT NOTICE.

4 1
91-5105-10-00ISSUE 0Printed in China

4 2
INTRODUCTION.. . . . . . . . . . . . . . . . . . . . . . . . . . . . . . . . . . . . . . . . . . . . . . . . . . . . . . . . . . . . . . . . . . . . .1SPECIAL FEATURES...........................................................................2
PARTS CHECKLIST... . . . . . . . . . . . . . . . . . . . . . . . . . . . . . . . . . . . . . . . . . . . . . . . . . . . . . . . . . . . . . . . . . . . . . . .3
FCC REGULATIONS. . . . . . . . . . . . . . . . . . . . . . . . . . . . . . . . . . . . . . . . . . . . . . . . . . . . . . . . . . 4IMPORTANT SAFETY INSTRUCTIONS..... . . . . . . . . . . . . . . . . . . . . . . . . . . . . . . . . . . . .6INSTALLING THE BATTERY PACK.. . . . . . . . . . . . . . . . . . . . . . . . . . . . . . . . . . . . . . . . . .8
TO CHARGE THE BATTERY PACK. . . . . . . . . . . . . . . . . . . . . . . . . . . . . . . . . . . . . . . . . . . . . . 8A WORD ABOUT RECHARGEABLE BATTERIES. . . . . . . . . . . . . . . . . . . . . . . . . . . . . .8REPLACING THE HANDSET BATTERY PACK. . . . . . . . . . . . . . . . . . . . . . . . . . . . . . . . .9
SPARE BATTERY CHARGER/POWER BACK UP FUNCTION...... . . . . . . . . . . . . .9
GETTING STARTED..............................................................................10WALL MOUNTING.. . . . . . . . . . . . . . . . . . . . . . . . . . . . . . . . . . . . . . . . . . . . . . . . . . . . . . . . . . . . . . .11HANDSET UNIT LAYOUT.. . . . . . . . . . . . . . . . . . . . . . . . . . . . . . . . . . . . . . . . . . . . . . . . . . . . . . .12BASE UNIT LAYOUT......................................................................13QUICK REFERENCE GUIDE....... . . . . . . . . . . . . . . . . . . . . . . . . . . . . . . . . . . . . . . . . . . . . . . . .14
SET-UP.... . . . . . . . . . . . . . . . . . . . . . . . . . . . . . . . . . . . . . . . . . . . . . . . . . . . . . . . . . . . . . . . . . . . . . . . . . . . . . . . . . . . . . . .14SETTING TIME.. . . . . . . . . . . . . . . . . . . . . . . . . . . . . . . . . . . . . . . . . . . . . . . . . . . . . . . . . . . . . . . . . . . . . . . . . . . . .14MAKING CALLS..................................................................................14ANSWERING CALLS................................................................................15TEMPORARY TONE.. . . . . . . . . . . . . . . . . . . . . . . . . . . . . . . . . . . . . . . . . . . . . . . . . . . . . . . . . . . . . . . . . . .15VOLUME CONTROL..............................................................................15RINGER CONTROL...... . . . . . . . . . . . . . . . . . . . . . . . . . . . . . . . . . . . . . . . . . . . . . . . . . . . . . . . . . . . . . . . . . . . . .15H O L D . . . . . . . . . . . . . . . . . . . . . . . . . . . . . . . . . . . . . . . . . . . . . . . . . . . . . . . . . . . . . . . . . . . . . . . . . . . . . . . . . 1 6MUTE.. . . . . . . . . . . . . . . . . . . . . . . . . . . . . . . . . . . . . . . . . . . . . . . . . . . . . . . . . . . . . . . . . . . . . . . . . . . . . . . . . . . . . . . . .16REDIAL WITH THE HANDST OFF(ON HOOK).........................................16REDIAL WITH THE HANDST ON(OFF HOOK)... . . . . . . . . . . . . . . . . . . . . . . . . . . . . . . . . . .17PAGE/HANDSET LOCATOR... . . . . . . . . . . . . . . . . . . . . . . . . . . . . . . . . . . . . . . . . . . . . . . . . . . . . . . . . .17INTERCOM BETWEEN THE HANDSET AND THE BASE .. . . . . . . . . . . . . . . . . . . . .17CONFERENCE.... . . . . . . . . . . . . . . . . . . . . . . . . . . . . . . . . . . . . . . . . . . . . . . . . . . . . . . . . . . . . . . . . . . . . . . . . . . . .19REVIEW THE CALLER ID RECORDS.....................................................19MEMORY DIALLING............................................................................19
FLASH................................................................................... ......................19
SOFT MENU FUNCTIONS..................................................................21RDL(Redia l ) . . . . . . . . . . . . . . . . . . . . . . . . . . . . . . . . . . . . . . . . . . . . . . . . . . . . . . . . . . . . . . . . . . . . . . . . . . . . . . . .21MEM(Memory)......................................................................................22
MENU. . . . . . . . . . . . . . . . . . . . . . . . . . . . . . . . . . . . . . . . . . . . . . . . . . . . . . . . . . . . . . . . . . . . . . . . . . . . . . . . . . . . .22
CALLER ID. . . . . . . . . . . . . . . . . . . . . . . . . . . . . . . . . . . . . . . . . . . . . . . . . . . . . . . . . . . . . . . . . . . . . . .24S A V E . . . . . . . . . . . . . . . . . . . . . . . . . . . . . . . . . . . . . . . . . . . . . . . . . . . . . . . . . . . . . . . . . . . . . . . . . . . 2 4D IAL . . . . . . . . . . . . . . . . . . . . . . . . . . . . . . . . . . . . . . . . . . . . . . . . . . . . . . . . . . . . . . . . . . . . . . . . . . . . . . . . . . . . 25D E L ( D e l e t e ) . . . . . . . . . . . . . . . . . . . . . . . . . . . . . . . . . . . . . . . . . . . . . . . . . . . . . . . . . . . . . . . . . . 2 5CALLER ID - CALL WAIT ING ID . . . . . . . . . . . . . . . . . . . . . . . . . . . . . . . . . . . . . . . . . . . . . . . . . 26
NOTES ABOUT CALLER ID & CALL WAITING ID. . . . . . . . . . . . . . . . . . . . . . . . . . . .26
TABLE OF CONTENTS

4 3
P H O N E B O O K . . . . . . . . . . . . . . . . . . . . . . . . . . . . . . . . . . . . . . . . . . . . . . . . . . . . . . . . . . . . . . 2 7E D I T I N G P H O N E B O O K R E C O R D S . . . . . . . . . . . . . . . . . . . . . . . . . . . . . . . . . . . . 2 7
A D D I N G N E W P H O N E B O O K R E C O R D S . . . . . . . . . . . . . . . . . . . . . . . . . . . . . . . 2 8
RINGER TONE / VOLUME. . . . . . . . . . . . . . . . . . . . . . . . . . . . . . . . . . . . . . . . . . . . . . . . . . 30KEY BEEP ON / OFF. . . . . . . . . . . . . . . . . . . . . . . . . . . . . . . . . . . . . . . . . . . . . . . . . . . . . . . . . . . .30SET TIME.... . . . . . . . . . . . . . . . . . . . . . . . . . . . . . . . . . . . . . . . . . . . . . . . . . . . . . . . . . . . . . . . . . . . . . . . . . . . .31CLEAR ALL MEMORY..... . . . . . . . . . . . . . . . . . . . . . . . . . . . . . . . . . . . . . . . . . . . . . . . . . . . . . . . . . .31AUTO ANSWER ON/OFF.... . . . . . . . . . . . . . . . . . . . . . . . . . . . . . . . . . . . . . . . . . . . . . . . . . . . . . . .32SET TONE /PULSE. . . . . . . . . . . . . . . . . . . . . . . . . . . . . . . . . . . . . . . . . . . . . . . . . . . . . . . . . . . . .32HEADSET OPERATION. . . . . . . . . . . . . . . . . . . . . . . . . . . . . . . . . . . . . . . . . . . . . . . . . . . . . . .33ADDIT IONAL OPERATING T IPS . . . . . . . . . . . . . . . . . . . . . . . . . . . . . . . . . . . . . . . . 34
OUT OF RANGE INDICATION.. . . . . . . . . . . . . . . . . . . . . . . . . . . . . . . . . . . . . . . . . . . . . . . . . . . . . . .34MESSAGE WAITING INDICATOR(for use with Voicemail)........................34CUSTOM PAY-PER-USE (PPU) FEATURES...............................................35LOW BATTERY INDICATION....................................................................36
CHECK AC POWER INDICATION.............................................................36
MAINTENANCE....... . . . . . . . . . . . . . . . . . . . . . . . . . . . . . . . . . . . . . . . . . . . . . . . . . . . . . . . . . . . . . . . . . .37IN CASE OF DIFFICULTY............................................................38WARRANTY STATEMENT....... . . . . . . . . . . . . . . . . . . . . . . . . . . . . . . . . . . . . . . . . . . . . . . . . . . .39TECHNICAL SPECIFICATIONS.......................................................40
TABLE OF CONTENTS


![962 Chemistry [PPU] Semester 2 Topics-Syllabus](https://img.pdfslide.us/doc/110x75/5452826ab1af9f76248b5198/962-chemistry-ppu-semester-2-topics-syllabus.jpg)


![962 Chemistry [PPU] Semester 1 Topics](https://img.pdfslide.us/doc/110x75/544a0fcdaf79594d088b4572/962-chemistry-ppu-semester-1-topics.jpg)
![960 Physics [PPU] Semester 2 Topics-Syllabus](https://img.pdfslide.us/doc/110x75/5452826aaf795904308b4e78/960-physics-ppu-semester-2-topics-syllabus.jpg)


![954 Mathematics T [PPU] Semester 1 Topics](https://img.pdfslide.us/doc/110x75/577d1e101a28ab4e1e8da8da/954-mathematics-t-ppu-semester-1-topics.jpg)
![964 Biology [PPU] Semester 2 Topics-Syllabus](https://img.pdfslide.us/doc/110x75/54528269af79591d308b4ff5/964-biology-ppu-semester-2-topics-syllabus.jpg)