Embed Size (px)
Citation preview

8/8/2019 IBJSC.com | I-WEB.com.vn - Og Lsvclass Lstclass Setup Guide En2
http://slidepdf.com/reader/full/ibjsccom-i-webcomvn-og-lsvclass-lstclass-setup-guide-en2 1/18
LIFESTYLE®
V35/V25 HOME ENTERTAINMENT SYSTEMS
LIFESTYLE®
T20/ T10 HOME THEATER SYSTEMS
Setup Guide | Guía de instalación | Guide d'installation

8/8/2019 IBJSC.com | I-WEB.com.vn - Og Lsvclass Lstclass Setup Guide En2
http://slidepdf.com/reader/full/ibjsccom-i-webcomvn-og-lsvclass-lstclass-setup-guide-en2 2/18
ii
EnglishTAB 6TAB 8 TAB 7 TAB 3TAB 5 TAB 2TAB 4
S AFETY INFORMATION
Please read this guidePlease take the time to follow the instructions in this guidecarefully. They will help you set up and use your system properlyso you can enjoy its advanced features. Please save this guide forfuture reference.
The lightning flash with arrowhead symbol within anequilateral triangle alerts the user to the presence ofuninsulated, dangerous voltage within the system enclosurethat may be of sufficient magnitude to constitute a risk of
electric shock.The exclamation point within an equilateral triangle alertsthe user to the presence of important operating andmaintenance instructions in this guide.
WARNINGS:
To reduce the risk of fire or electrical shock, do not expose the product to rain or moisture.
• Do not expose this apparatus to dripping or splashing, and do not place objects filled with liquids, such as vases, on or near the apparatus. As with any electronic products, use care not to spill liquids into any part of the system. Liquids can cause a failure
and/or a fire hazard.• Do not place any naked flame sources, such as lighted candles,
on or near the apparatus.
• Keep the remote control battery away from children. It may cause afire or chemical burn if mishandled. Do not recharge, disassemble,
heat above 100ºC (212ºF), or incinerate. Dispose of used batteries promptly. Replace only with a battery of the correct type and model number.
• Contains small parts that may be a choking hazard.Not suitable for children under age 3.
CAUTIONS:
• Make no modifications to the system or accessories. Unauthorized alterations may compromise safety, regulatory compliance, and system performance, and may void the warranty.
• Long-term exposure to loud music may cause hearing damage.It is best to avoid extreme volume when using headphones,especially for extended periods.
Notes:
• Where the mains plug or appliance coupler is used as the discon- nect device, such disconnect device shall remain readily operable.
• The product must be used indoors. It is neither designed nor tested for use outdoors, in recreation vehicles, or on boats.
• This product is intended to be used only with the power supply provided.
• The product label is located on the bottom of the product.
Additional safety informationSee the additional instructions on the Important Safety Informationsheet enclosed in the shipping carton.
Batteries
Please dispose of used batteries properly, following anylocal regulations. Do not incinerate.
Class B emissionsThis device complies with FCC and Industry Canada RF radiationexposure limits set forth for general population. It must not be
co-located or be operating in conjunction with any other antennasor transmitters.
This product conforms to all EU Directive requirements asapplicable by law. The complete Declaration of Conformitycan be found at www.Bose.com/compliance.
©2010 Bose Corporation. No part of this work may be reproduced,modified, distributed, or otherwise used without prior written permission.

8/8/2019 IBJSC.com | I-WEB.com.vn - Og Lsvclass Lstclass Setup Guide En2
http://slidepdf.com/reader/full/ibjsccom-i-webcomvn-og-lsvclass-lstclass-setup-guide-en2 3/18
1
TAB 5TAB 4 TAB 6 TAB 8TAB 7English TAB 3TAB 2
TAB 5TAB 4 TAB 6 TAB 8TAB 7English TAB 3TAB 2
S YSTEM SETUP
Welcome
Thank you for choosing a Bose® LIFESTYLE® system
for your home. This guide provides step-by-stepinstructions for setting up your new system. Thereare two phases to the setup process:
Physical setup phase: Placing the systemcomponents and connecting them together.
Interactive setup phase: Completing your setupfollowing the interactive steps on your TV screenprovided by the UnifyTM intelligent integration system.
Unpacking
The parts of your new system are packaged in fournumbered kits plus a small box containing theappropriate power cords:
• Control console kit
• Acoustimass® module kit
• Speaker kit
• Interactive kit
• Power cord kit (used with kits 1 and 2)
Starting with Kit 1, unpack each kit and set up itscontents before unpacking the next one.
Be sure to save all of the packing materials. These
provide the safest means for any necessary shippingor transporting.
If any part appears damaged, do not attempt to useit. Notify Bose or your authorized Bose dealerimmediately. For Bose contact information, referto the address sheet included in Kit 4.
1
1
2
3
4

8/8/2019 IBJSC.com | I-WEB.com.vn - Og Lsvclass Lstclass Setup Guide En2
http://slidepdf.com/reader/full/ibjsccom-i-webcomvn-og-lsvclass-lstclass-setup-guide-en2 4/18
2
S YSTEM SETUP
EnglishTAB 6TAB 8 TAB 7 TAB 3TAB 5 TAB 2TAB 4
Control console kit
What you need for the following steps:
1. Place the control console on a flat, stable surfacenear your TV.
Note: Until your system is completely installed, it may be helpful to keep the control console positioned for easy access to its rear connection panel.
11
Control console
Power cord
Power supply
HDMI cable Audio input cable
From thepowercord kit
From Kit 1
Controlconsole

8/8/2019 IBJSC.com | I-WEB.com.vn - Og Lsvclass Lstclass Setup Guide En2
http://slidepdf.com/reader/full/ibjsccom-i-webcomvn-og-lsvclass-lstclass-setup-guide-en2 5/18
3
S YSTEM SETUP
TAB 5TAB 4 TAB 6 TAB 8TAB 7English TAB 3TAB 2
2. Plug one end of the HDMI cable into an HDMIINPUT connector on your TV.
If an HDMI cable is already connected to an
HDMI input on your TV, you can use this one.Just disconnect the other end.
3. Plug the other end of the HDMI cable you are usinginto the connector labeled HDMI OUT Video toTV on the control console.
HDMI OUT Video to TV
E li hTAB 6TAB 8 TAB 7 TAB 3TAB 5 TAB 2TAB 4

8/8/2019 IBJSC.com | I-WEB.com.vn - Og Lsvclass Lstclass Setup Guide En2
http://slidepdf.com/reader/full/ibjsccom-i-webcomvn-og-lsvclass-lstclass-setup-guide-en2 6/18
4
S YSTEM SETUP
EnglishTAB 6TAB 8 TAB 7 TAB 3TAB 5 TAB 2TAB 4
4. Plug one end of the audio input cable into the Acoustimass® Module connector on the controlconsole.
Make sure the flat surface with the arrow on theplug faces up.
Leave the other end of the cable on the floor.You will be asked to connect it while setting upthe next kit.
5. Plug the power supply output cord into the controlconsole Power connector.
6. Remove a power cordfrom the power cord kit.
7. Plug one end of the power cord into the powersupply. Make sure you push the plug in as far as
it can go.
8. Plug the other end of the power cord into a live AC (mains) power outlet.
9. Continue with Kit on the next page.
AcoustimassModule
Power supplyoutput cord
AC
powercord
Power
Powersupply
2
TAB 5TAB 4 TAB 6 TAB 8TAB 7E li h TAB 3TAB 2

8/8/2019 IBJSC.com | I-WEB.com.vn - Og Lsvclass Lstclass Setup Guide En2
http://slidepdf.com/reader/full/ibjsccom-i-webcomvn-og-lsvclass-lstclass-setup-guide-en2 7/18
5
S YSTEM SETUP
TAB 5TAB 4 TAB 6 TAB 8TAB 7English TAB 3TAB 2
Acoustimass® module kit
What you need for the following steps:
1. Place the Acoustimass module on the floor at thesame end of the room as the TV. Make sure there isa live AC outlet nearby.
2. Lay the module on its side and locate theconnector panel.
2
Acoustimass module
Power cord
From the
powercord kit
From Kit 2
Acoustimassmodule
Connectorpanel
EnglishTAB 6TAB 8 TAB 7 TAB 3TAB 5 TAB 2TAB 4

8/8/2019 IBJSC.com | I-WEB.com.vn - Og Lsvclass Lstclass Setup Guide En2
http://slidepdf.com/reader/full/ibjsccom-i-webcomvn-og-lsvclass-lstclass-setup-guide-en2 8/18
6
S YSTEM SETUP
EnglishTAB 6TAB 8 TAB 7 TAB 3TAB 5 TAB 2TAB 4
CAUTION: DO NOT stand the Acoustimass ® module on its front or
back end.
3. Plug the free end of the audio input cable into theMedia Center connector on the Acoustimassmodule.
Make sure the flat surface with the arrow faces thefront of the module.
4. Remove a power cordfrom the power cord kit.
5. Plug one end of the power cord into the AC Power connector on the Acoustimass module. Make sure
you push the plug in as far as it can go.
6. Plug the other end of the power cord into a live AC (mains) power outlet.
7. Continue with Kit on the next page.
Media Center
AC Power
3
TAB 5TAB 4 TAB 6 TAB 8TAB 7English TAB 3TAB 2

8/8/2019 IBJSC.com | I-WEB.com.vn - Og Lsvclass Lstclass Setup Guide En2
http://slidepdf.com/reader/full/ibjsccom-i-webcomvn-og-lsvclass-lstclass-setup-guide-en2 9/18
7
S YSTEM SETUP
TAB 5TAB 4 TAB 6 TAB 8TAB 7English TAB 3TAB 2
Speaker kit
What you need for the following steps:
From Kit 3: System speakers(one set of the three types shown)
Note: You can place system speakers on wall brackets or floor stands. To purchase these accessories, contact your local Bose dealer or visit www.Bose.com.
3
Jewel Cube® speakers
(5) Left or right, front or rear, and center front speaker
(1) Center front speaker
Direct/Reflecting® cube speaker arrays
Virtually Invisible® single cube speakers
(4) Left or right, frontor rear speaker
(1) Center front speaker(4) Left or right, frontor rear speaker
Left front (L)White
Center front (C)Brown
Rear speaker cables
Left rear (LR)Light green
Right rear (RR)Purple
Front speaker cables
Right front (R)Light blue
EnglishTAB 6TAB 8 TAB 7 TAB 3TAB 5 TAB 2TAB 4

8/8/2019 IBJSC.com | I-WEB.com.vn - Og Lsvclass Lstclass Setup Guide En2
http://slidepdf.com/reader/full/ibjsccom-i-webcomvn-og-lsvclass-lstclass-setup-guide-en2 10/18
8
S YSTEM SETUP
EnglishTAB 6TAB 8 TAB 7 TAB 3TAB 5 TAB 2TAB 4
1. Place the center front speaker on a stable and levelsurface directly above or below the center of yourTV screen as in the following example.
2. Place one speaker to the left and one to the right ofthe TV.
• Keep each speaker within 3 ft (1 m) of the TVscreen to prevent too much separation of thesound from the picture. Vary this distance to suityour room conditions and personal preference.
• If placing the speakers in an enclosed bookcaseshelf, position them at the front edge of the shelf.
• If you have Jewel Cube® or Direct/Reflecting® cube speakers, rotate the cubes so that onecube of each speaker points forward into theroom and the other points at a side wall to
create reflected sound.
Center front
(C)
Right front (R)
Left front (L)
TAB 5TAB 4 TAB 6 TAB 8TAB 7English TAB 3TAB 2
8/8/2019 IBJSC.com | I-WEB.com.vn - Og Lsvclass Lstclass Setup Guide En2
http://slidepdf.com/reader/full/ibjsccom-i-webcomvn-og-lsvclass-lstclass-setup-guide-en2 11/18
9
S YSTEM SETUP
TAB 5TAB 4 TAB 6 TAB 8TAB 7English TAB 3TAB 2
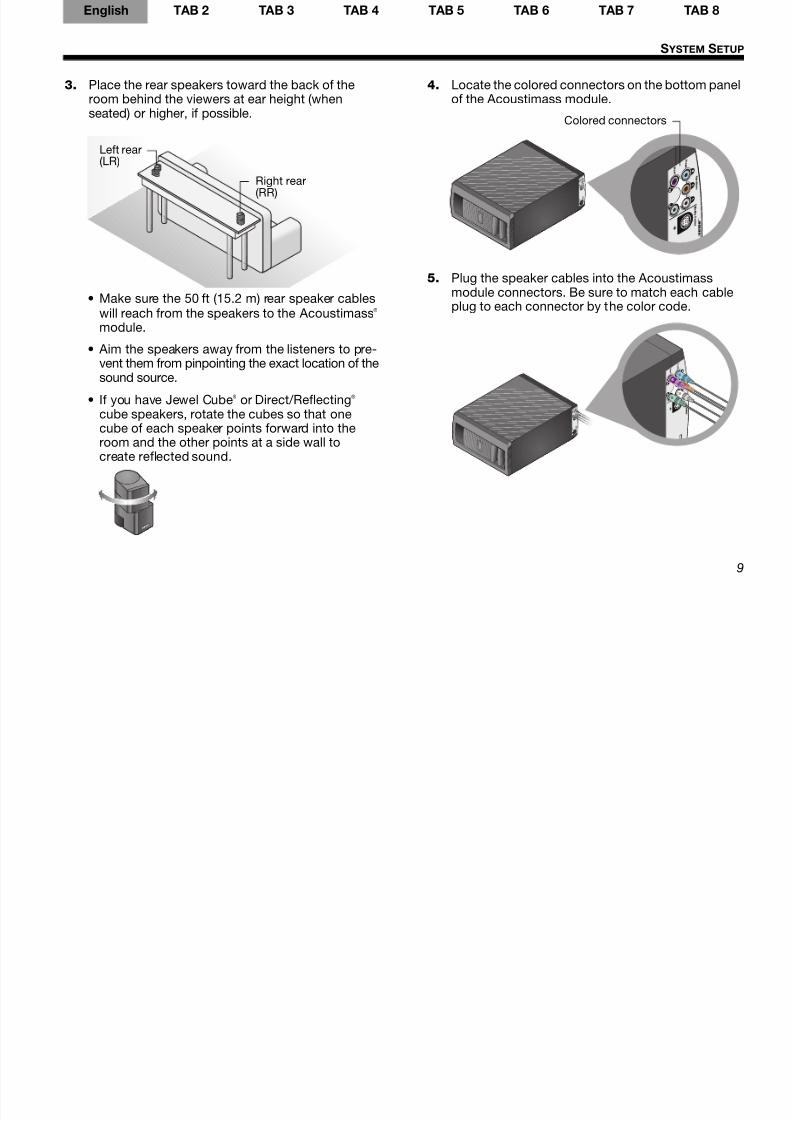
3. Place the rear speakers toward the back of theroom behind the viewers at ear height (whenseated) or higher, if possible.
• Make sure the 50 ft (15.2 m) rear speaker cableswill reach from the speakers to the Acoustimass® module.
• Aim the speakers away from the listeners to pre-vent them from pinpointing the exact location of thesound source.
• If you have Jewel Cube® or Direct/Reflecting®
cube speakers, rotate the cubes so that onecube of each speaker points forward into theroom and the other points at a side wall tocreate reflected sound.
4. Locate the colored connectors on the bottom panelof the Acoustimass module.
5. Plug the speaker cables into the Acoustimassmodule connectors. Be sure to match each cableplug to each connector by the color code.
Left rear(LR)
Right rear(RR)
Colored connectors
EnglishTAB 6TAB 8 TAB 7 TAB 3TAB 5 TAB 2TAB 4

8/8/2019 IBJSC.com | I-WEB.com.vn - Og Lsvclass Lstclass Setup Guide En2
http://slidepdf.com/reader/full/ibjsccom-i-webcomvn-og-lsvclass-lstclass-setup-guide-en2 12/18
10
S YSTEM SETUP
g
6. Locate the speaker position markings on the freeends of the speaker cables.
7. Using the speaker position markings, run eachcable out to its respective speaker as in thefollowing setup example of a room.
Speaker position marking(L, C, R, LR, or RR)
FRONTSPEAKERS
REARSPEAKERS
TAB 5TAB 4 TAB 6 TAB 8TAB 7English TAB 3TAB 2

8/8/2019 IBJSC.com | I-WEB.com.vn - Og Lsvclass Lstclass Setup Guide En2
http://slidepdf.com/reader/full/ibjsccom-i-webcomvn-og-lsvclass-lstclass-setup-guide-en2 13/18
11
S YSTEM SETUP
g
8. Connect the speaker cable to the type of speakeryou have.
9. Put the Acoustimass® module in its final position:
• Upright (BEST) or on either side (ALTERNATE).
• With the front opening facing into the room.
• At least 18 in (45 cm) from any TV to avoidmagnetic interference with the TV image. Moveit farther away if you still notice interference.
CAUTION: Do not put electronic media, such as video or audio tapes, on or next to the module for long periods of time. The magnetic field surrounding the module may erase some or all of the recorded material.
CAUTION: DO NOT BLOCK the
ventilation openings on the module.This can cause it to overheat.
10. Continue with Kit on the next page.
For Jewel Cube® speakers:
Insert the plug into the speakerconnector.
For Direct/Reflecting® and
Virtually Invisible® single
cube speakers:
Press the button and insert thewires. Connect the red-collaredwire to the red connector.Connect the other wire to theblack connector.
Note: The rear speaker cablesfor Direct/Reflecting® and
Virtually Invisible® cube speakers are webbed together. You can pull them apart as needed.
ALTERNATEBEST
4
EnglishTAB 6TAB 8 TAB 7 TAB 3TAB 5 TAB 2TAB 4

8/8/2019 IBJSC.com | I-WEB.com.vn - Og Lsvclass Lstclass Setup Guide En2
http://slidepdf.com/reader/full/ibjsccom-i-webcomvn-og-lsvclass-lstclass-setup-guide-en2 14/18
12
S YSTEM SETUP
Interactive kit
What you need for the following steps:
Congratulations! At this point you have set up thecontrol console, the Acoustimass® module, and thespeakers. You are now ready to turn on your systemand enter the interactive phase of the setup processusing the UnifyTM intelligent integration system.
IMPORTANT!
• Before you start, make sure your speakers and Acoustimass module are in their finalpositions.
• Do not connect any devices to the controlconsole at this time. The instructions providedon your TV will tell you when to do this.
1. Slide the battery compartment cover off the backof the remote control.
2. Install four AA (IEC LR6) batteries, matching thepolarity markings (+ and –) to the markings insidethe battery compartment.
3. Slide the battery cover back into place.
4
Remote controlwith batteries
ADAPTiQ®
audiocalibrationheadset
From Kit 4
AA (IEC LR6) batteries (4)
Battery compartment cover
TAB 5TAB 4 TAB 6 TAB 8TAB 7English TAB 3TAB 2

8/8/2019 IBJSC.com | I-WEB.com.vn - Og Lsvclass Lstclass Setup Guide En2
http://slidepdf.com/reader/full/ibjsccom-i-webcomvn-og-lsvclass-lstclass-setup-guide-en2 15/18
13
S YSTEM SETUP
4. Press the power button ( ) on the control consoleto turn on your system.
Because the system is in a low power state when
in standby, it takes several seconds to start. Whenthe power light changes from blinking to steadygreen, your system is ready to use.
5. Turn on your TV.
6. Using the remote that came with your TV, changethe TV input to the one that is connected to yourLIFESTYLE® system.
7. Follow the instructions on your TV screen. You willbe prompted to do the following:
• Select your language.
• Optimize the audio from your system using the ADAPTiQ® audio calibration system.
• Connect audio/video devices to thecontrol console.
• Configure your Bose® remote to control yourconnected devices.
Other Kit 4 items
The remaining items in Kit 4 may or may not berequired to set up your LIFESTYLE® system. For moreinformation on using these accessories or adding otherdevices to your system at another time, see theoperating guide.
Powerlight
L I F E S T Y L E ® V 3 5 / V 2 5
H O M
E E N T E R T A I N M E N T
S Y S T E M S
L I F E S T Y L E ® T 2 0 / T 1 0
H O M E T H E A T E R
S Y S T E M S
O p e r a t in g G u i d e | G u ía d e l u s u a r i o | G u i d e d ’ u t i l i s a t i o n
L I F E S T Y L E ® V 3 5 / V 2 5
H O M
E E N T E R T A I N M E N T
S Y S T E M S
L I F E S T Y L E ® T 2 0 / T 1 0
H O M
E T H E A T E R S Y S T E M
S
O p e r a t i n g G u i d e | G u í a d e l u s u a r i o | G u i d e d ’ u t i l i s a t i o n
L I F E S T Y L E ® V 3 5 / V 2 5
H O M E E N T E R T A I N M
E N T
S Y S T E M S
L I F E S T Y L E ® T 2 0 / T 1 0
H O M
E T H E A T E R S Y S T E M
S
O p e r a t i n g G u i d e | G u í a d e l u s u a r i o | G u i d e
d ’ u t i l i s a t i o n
L I F E S T Y L E ® V 3 5 / V 2 5
H O M
E E N T E R T A I N M E N T
S Y S T E M S
L I F E S T Y L E ® T 2 0 / T 1 0
H O M E T H E A T E R
S Y S T E M S
O p e r a t i n g G u i d e | G u í a d e l u s u a r i o | G u i d e d ’ u t i l i s a t io n
L I F E S T Y L E ® V 3 5 / V 2 5
H O M
E E N T E R T A I N M E N T
S Y S T E M S
L I F E S T Y L E ® T 2 0 / T 1 0
H O M
E T H E A T E R S Y S T E M
S
O p e r a t i n g G u i d e | G u í a d e l u s u a r i o | G u i d e d ’ u t i l i s a t i o n
L I F E S T Y L E ® V 3 5 / V 2 5
H O M E E N T E R T A I N M
E N T S Y S T E M
S
L I F E S T Y L E ® T 2 0 / T 1 0
H O M
E T H E A T E R S Y S T E M
S
O p e r a t i n g G u i d e | G u í a d e l u s u a r i o | G
u i d e d ’ u t i l i s a t i o n
L I F E S T Y L E ® V 3 5 / V 2 5
H O M
E E N T E R T A I N M E N T S Y S T E M S
L I F E S T Y L E ® T 2 0 / T 1 0
H O M E T H E A T E R
S Y S T E M S
O p e r a t i n g G u i d e | G u í a d e l u s u a r i o
| G u i d e d ’ u t i l i s a t io n
L I F E S T Y L E ® V 3 5 / V 2 5
H O M
E E N T E R T A I N M E N T
S Y S T E M S
L I F E S T Y L E ® T 2 0 / T 1 0
H O M
E T H E A T E R S Y S T E M
S
O p e r a t i n g G u i d e | G u í a d e l u s u a r i o | G u i d e d ’ u t i l i s a t i o n
L I F E S T Y L E ® V 3 5 / V 2 5
H O M E E N T E R T A I N M
E N T S Y S T E M
S
L I F E S T Y L E ® T 2 0 / T 1 0
H O M
E T H E A T E R S Y S T E M
S
O p e r a t i n g G u i d e | G u í a d e l u s u a r i o | G
u i d e d ’ u t i l i s a t i o n
Stereo audio cableIR emitter cable AM antenna*
FM antenna*
iPod/iPhone-compatibledock*
USB flash drive(for systemupdating only)
Operating guide
Rubber feetfor Acoustimass® module
Rubber feetfor front centerspeaker
*For LIFESTYLE® V25 and V35 systems only.
EnglishTAB 6TAB 8 TAB 7 TAB 3TAB 5 TAB 2TAB 4

8/8/2019 IBJSC.com | I-WEB.com.vn - Og Lsvclass Lstclass Setup Guide En2
http://slidepdf.com/reader/full/ibjsccom-i-webcomvn-og-lsvclass-lstclass-setup-guide-en2 16/18
14
S YSTEM SETUP
Applying rubber feet
When placing the Acoustimass® module on bare floors,you can attach the included rubber feet to the bottomof the module for greater stability and to protect yourfloor.
Vibration can cause speakers to move, particularly ifplaced on a smooth surface like glass or highlypolished wood. If you are placing the center speaker onsuch a surface, you can attach the included rubber feetto the bottom of the speaker for greater stability.
If you have setup problems
If you experience any difficulties during the setupprocess, such as an unrecognized device remote ora connection error, you can reactivate the interactivesetup mode at any time and correct or change part ofyour system setup. See “Using the Setup Mode” inyour system operating guide.
For help in trying to resolve any problems, see thetroubleshooting table in your system operating guide.
Contacting customer service
For additional help in solving problems, contact Bose® Customer Service. See the address sheet included inKit 4.
Bottom panelRubber feetfor
Acoustimassmodule
Rubber feet
forfront centerspeaker
Bottom panel
of centerspeaker
Applicable only for LIFESTYLE® V25 and V35home entertainment systems
“Made for iPod” means that an electronicaccessory has been designed to connectspecifically to iPod and has been certified bythe developer to meet Apple performancestandards.
Apple is not responsible for the operation of this device or itscompliance with safety and regulatory standards.
iPod and iPhone are trademarks of Apple, Inc., registered inthe U.S. and other countries. All other marks are registeredtrademarks and trademarks of Bose Corporation.
TAB 5TAB 4 TAB 6 TAB 8TAB 7English TAB 3TAB 2

8/8/2019 IBJSC.com | I-WEB.com.vn - Og Lsvclass Lstclass Setup Guide En2
http://slidepdf.com/reader/full/ibjsccom-i-webcomvn-og-lsvclass-lstclass-setup-guide-en2 17/18
15

8/8/2019 IBJSC.com | I-WEB.com.vn - Og Lsvclass Lstclass Setup Guide En2
http://slidepdf.com/reader/full/ibjsccom-i-webcomvn-og-lsvclass-lstclass-setup-guide-en2 18/18
©2010 Bose Corporation, The Mountain,Framingham, MA 01701-9168 USA
AM324443 Rev.00