Embed Size (px)
Citation preview

Google Calendar – advanced.
Edward Hartley
Grazyna Whalley,
May 2011 AP-GC 2
University of Sheffield
Google Calendar
3
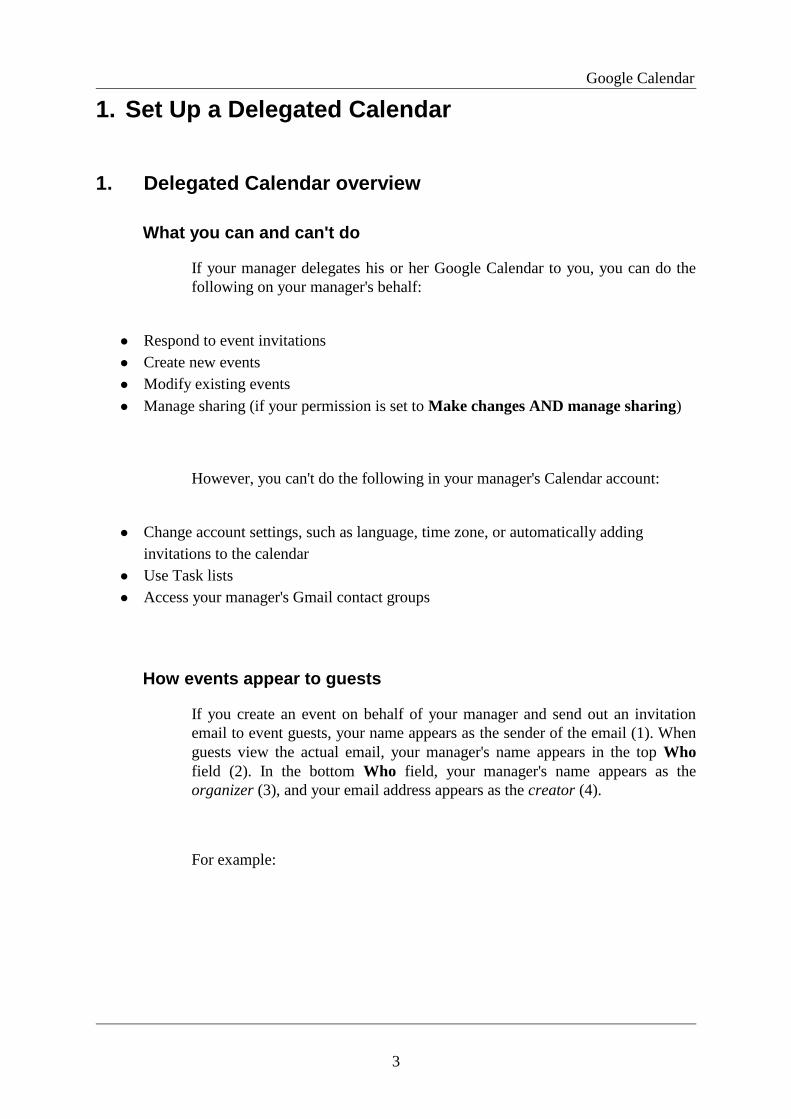
1. Set Up a Delegated Calendar
1. Delegated Calendar overview
What you can and can't do
If your manager delegates his or her Google Calendar to you, you can do the
following on your manager's behalf:
● Respond to event invitations
● Create new events
● Modify existing events
● Manage sharing (if your permission is set to Make changes AND manage sharing)
However, you can't do the following in your manager's Calendar account:
● Change account settings, such as language, time zone, or automatically adding
invitations to the calendar
● Use Task lists
● Access your manager's Gmail contact groups
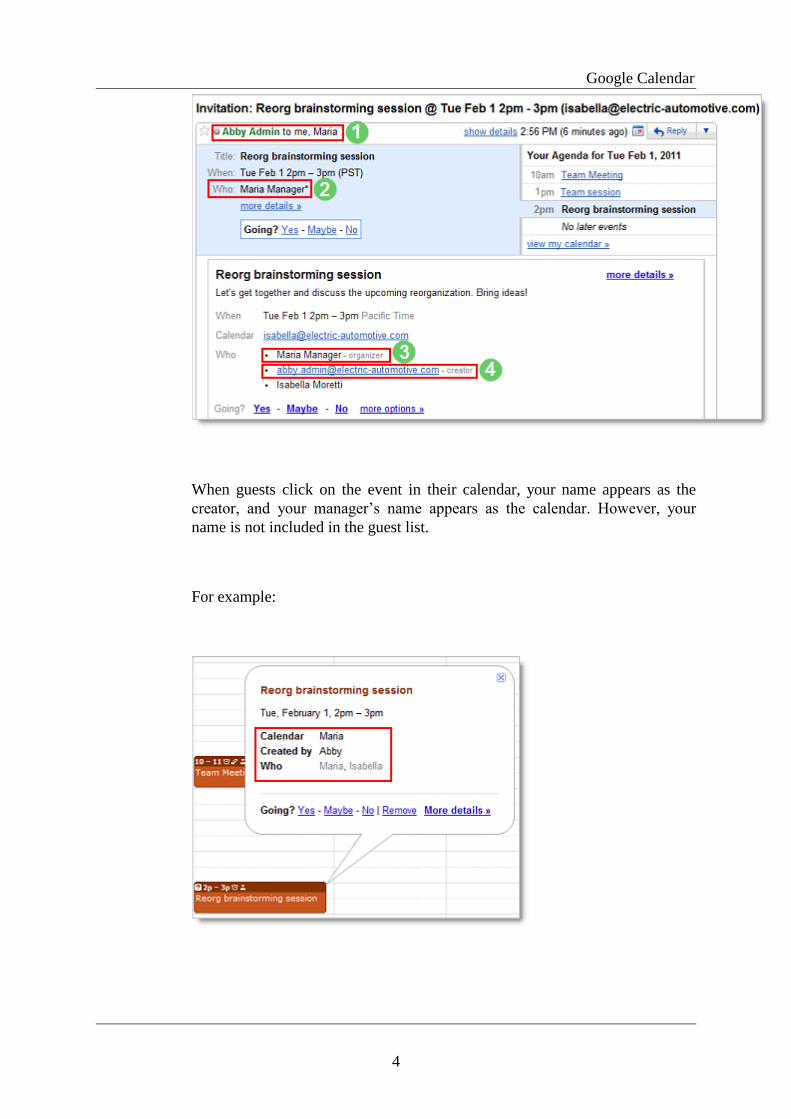
How events appear to guests
If you create an event on behalf of your manager and send out an invitation
email to event guests, your name appears as the sender of the email (1). When
guests view the actual email, your manager's name appears in the top Who
field (2). In the bottom Who field, your manager's name appears as the
organizer (3), and your email address appears as the creator (4).
For example:
Google Calendar
4
When guests click on the event in their calendar, your name appears as the
creator, and your manager’s name appears as the calendar. However, your
name is not included in the guest list.
For example:
Google Calendar
5
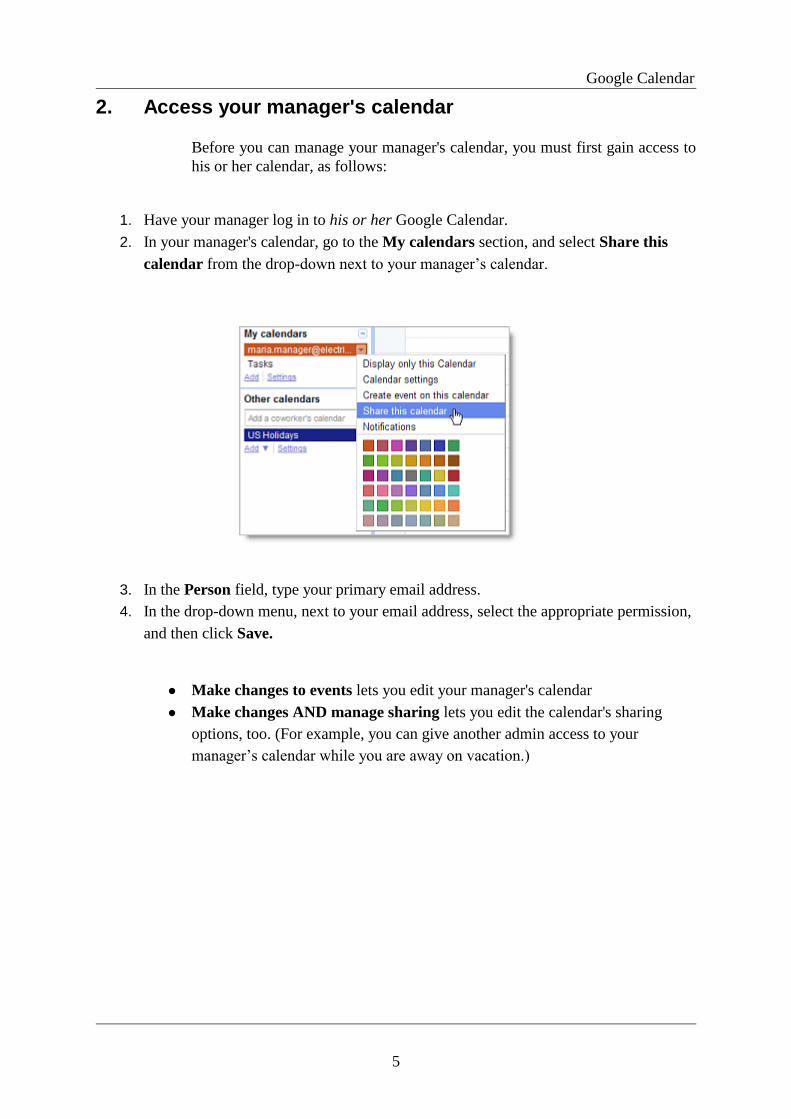
2. Access your manager's calendar
Before you can manage your manager's calendar, you must first gain access to
his or her calendar, as follows:
1. Have your manager log in to his or her Google Calendar.
2. In your manager's calendar, go to the My calendars section, and select Share this
calendar from the drop-down next to your manager’s calendar.
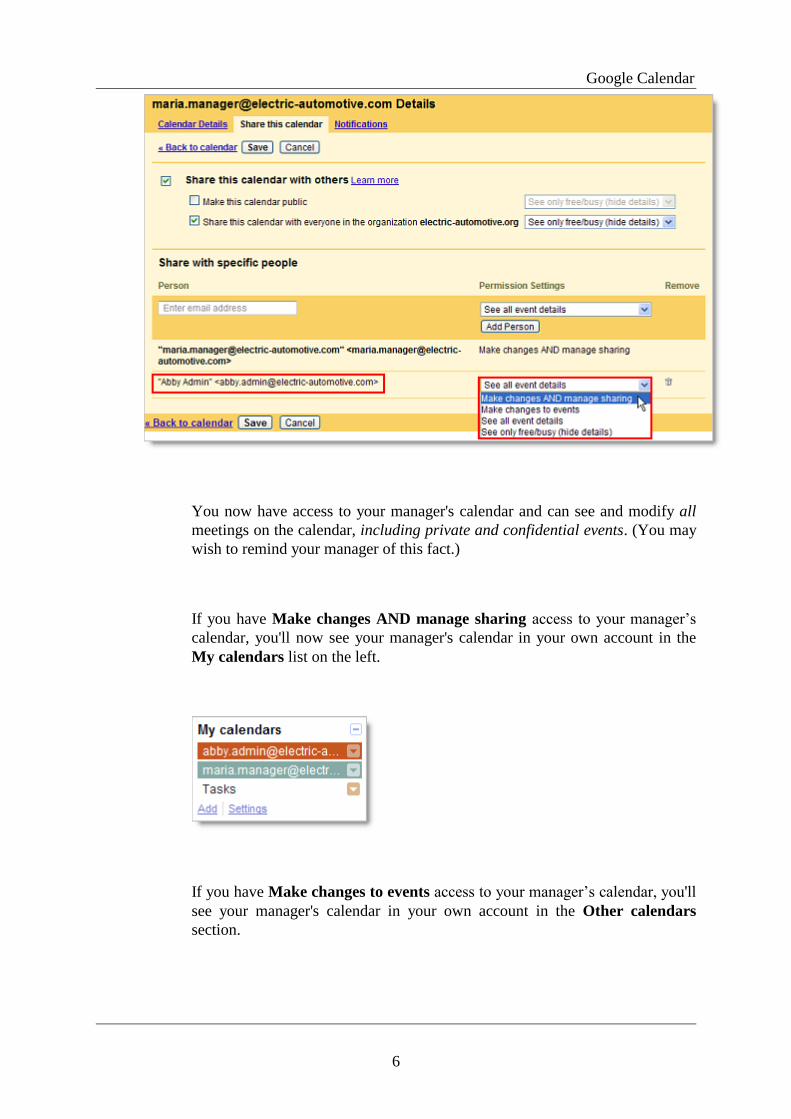
3. In the Person field, type your primary email address.
4. In the drop-down menu, next to your email address, select the appropriate permission,
and then click Save.
● Make changes to events lets you edit your manager's calendar
● Make changes AND manage sharing lets you edit the calendar's sharing
options, too. (For example, you can give another admin access to your
manager’s calendar while you are away on vacation.)
Google Calendar
6
You now have access to your manager's calendar and can see and modify all
meetings on the calendar, including private and confidential events. (You may
wish to remind your manager of this fact.)
If you have Make changes AND manage sharing access to your manager’s
calendar, you'll now see your manager's calendar in your own account in the
My calendars list on the left.
If you have Make changes to events access to your manager’s calendar, you'll
see your manager's calendar in your own account in the Other calendars
section.
Google Calendar
7
Tip: To easily distinguish your calendar from your manager’s calendar, choose
very distinct colors for each calendar, such as red and blue. You can change
the color of a calendar by clicking the drop-down next to the calendar and
clicking a color in the grid.
3. Receive notifications for your manager’s calendar
Notifications for your manager’s calendar are disabled by default--if you want
to receive notifications for your manager’s calendar events, you must manually
enable them.
Note: When you enable notifications for a calendar shared with you, you are
not enabling notifications for the calendar owner. (That is, when you enable
notifications for your delegated view of your manager’s calendar, you’re the
only one who receives notifications; your manager doesn’t, unless he or she
has personally set up notifications.)
To receive email and pop-up notifications for your manager's calendar, follow
these steps:
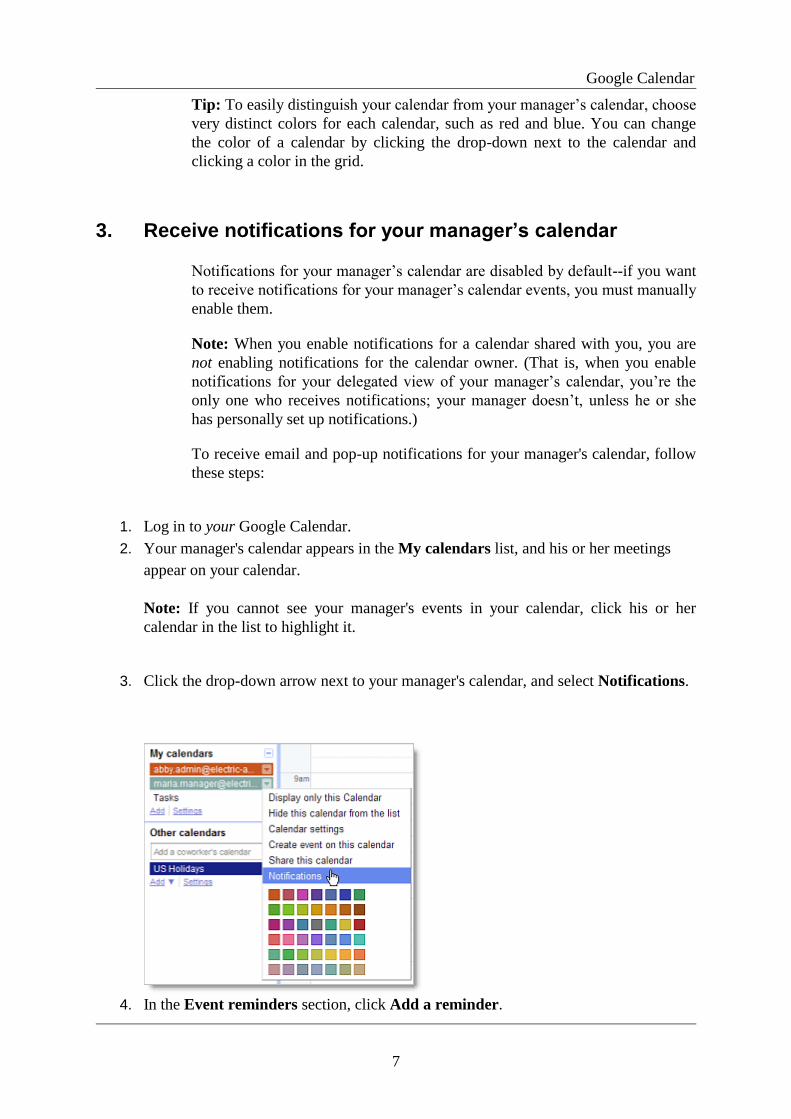
1. Log in to your Google Calendar.
2. Your manager's calendar appears in the My calendars list, and his or her meetings
appear on your calendar.
Note: If you cannot see your manager's events in your calendar, click his or her
calendar in the list to highlight it.
3. Click the drop-down arrow next to your manager's calendar, and select Notifications.
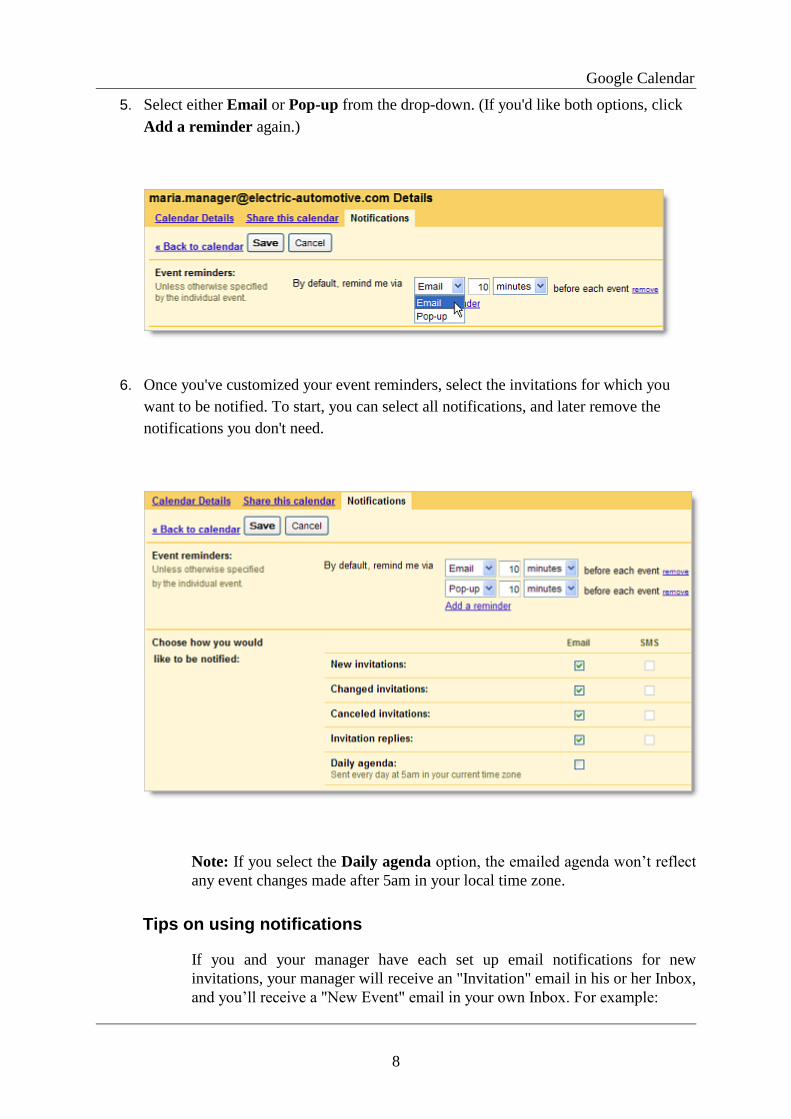
4. In the Event reminders section, click Add a reminder.
Google Calendar
8
5. Select either Email or Pop-up from the drop-down. (If you'd like both options, click
Add a reminder again.)
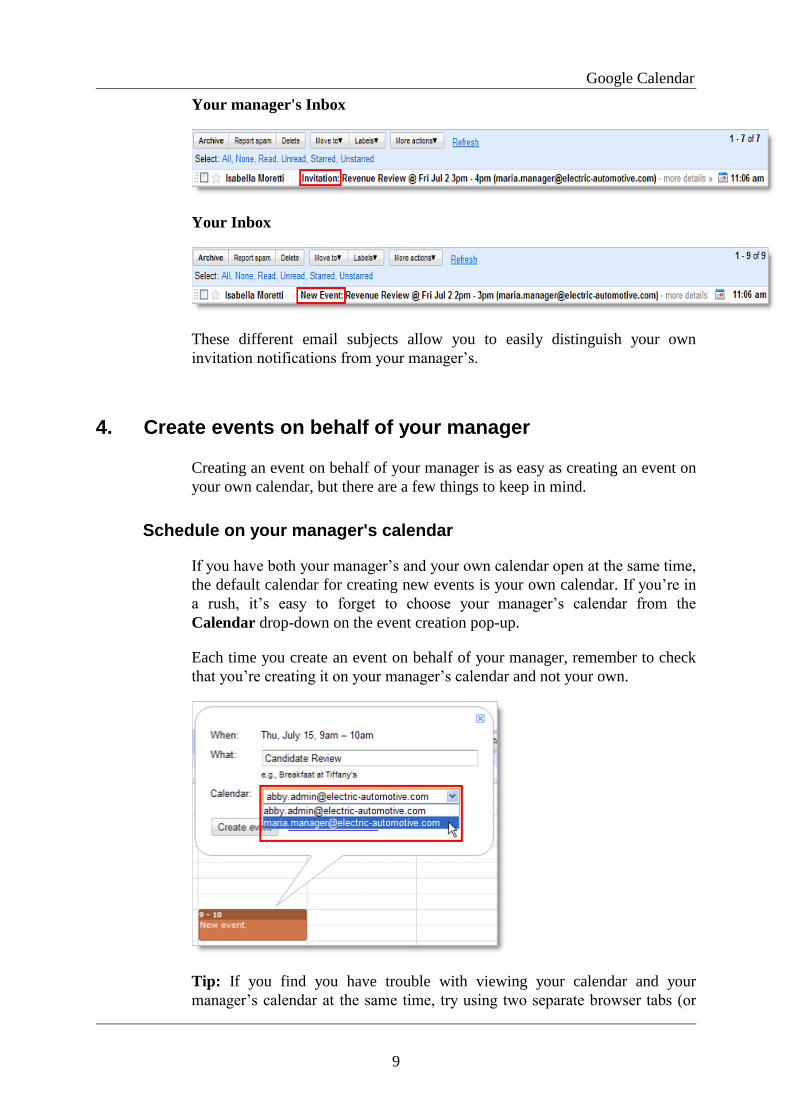
6. Once you've customized your event reminders, select the invitations for which you
want to be notified. To start, you can select all notifications, and later remove the
notifications you don't need.
Note: If you select the Daily agenda option, the emailed agenda won’t reflect
any event changes made after 5am in your local time zone.
Tips on using notifications
If you and your manager have each set up email notifications for new
invitations, your manager will receive an "Invitation" email in his or her Inbox,
and you’ll receive a "New Event" email in your own Inbox. For example:
Google Calendar
9
Your manager's Inbox
Your Inbox
These different email subjects allow you to easily distinguish your own
invitation notifications from your manager’s.
4. Create events on behalf of your manager
Creating an event on behalf of your manager is as easy as creating an event on
your own calendar, but there are a few things to keep in mind.
Schedule on your manager's calendar
If you have both your manager’s and your own calendar open at the same time,
the default calendar for creating new events is your own calendar. If you’re in
a rush, it’s easy to forget to choose your manager’s calendar from the
Calendar drop-down on the event creation pop-up.
Each time you create an event on behalf of your manager, remember to check
that you’re creating it on your manager’s calendar and not your own.
Tip: If you find you have trouble with viewing your calendar and your
manager’s calendar at the same time, try using two separate browser tabs (or
Google Calendar
10
windows, if your browser doesn’t have tabs). Use one tab (or window) for your
calendar and a different one for your manager’s.
5. Invite guests to events
Invite guests to events
To add one or more guests to an event, do the following:
1. Go to the event details page of your event.
2. In the Add: Guests section on the right side of the page, type your first guest’s email
address.
3. Continue adding your guests’ email addresses one by one
4. If desired, fill in the rest of the fields on the page.
5. Click Save.
Check availability of guests
When you want to invite guests to events, you have two options to see when
each guest is available.
Option 1. Check availability in an event.
In the event details page, click the Find a time tab.
Google Calendar
11
Then, add guests to view their availability.
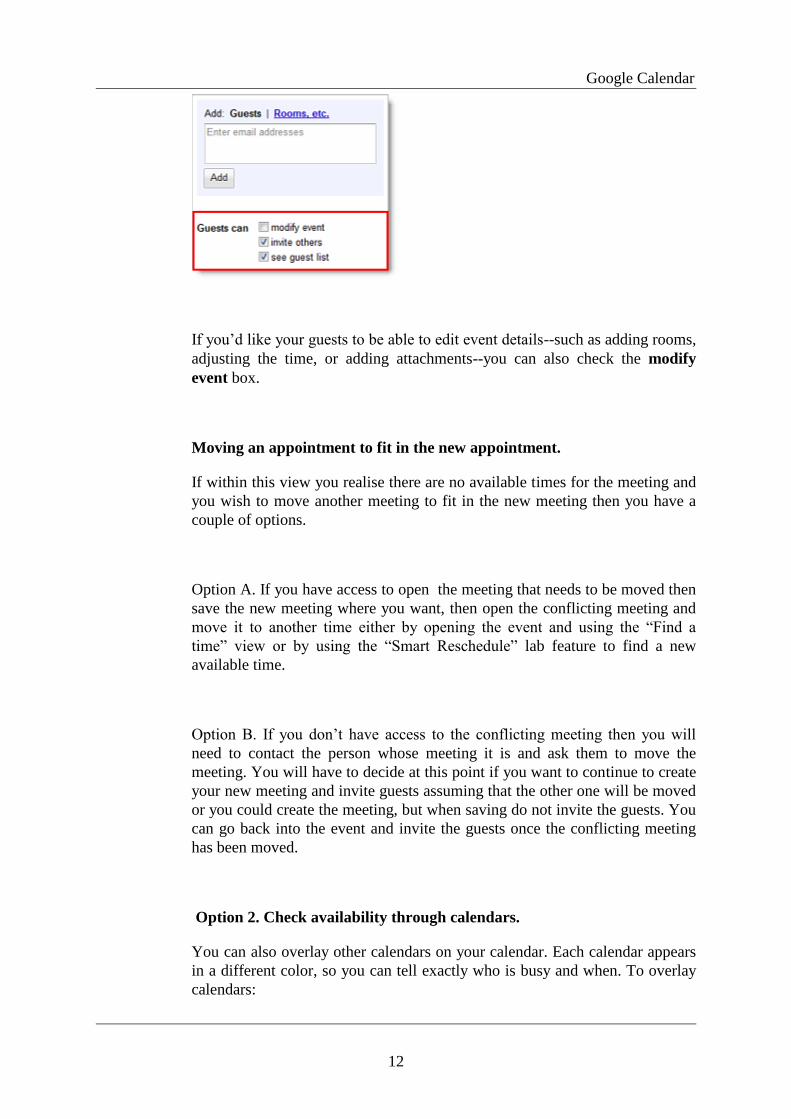
Select options for your guests in the “Guests can” section
When you invite guests to events, the invite others and see guest list boxes
are checked by default.
Google Calendar
12
If you’d like your guests to be able to edit event details--such as adding rooms,
adjusting the time, or adding attachments--you can also check the modify
event box.
Moving an appointment to fit in the new appointment.
If within this view you realise there are no available times for the meeting and
you wish to move another meeting to fit in the new meeting then you have a
couple of options.
Option A. If you have access to open the meeting that needs to be moved then
save the new meeting where you want, then open the conflicting meeting and
move it to another time either by opening the event and using the ―Find a
time‖ view or by using the ―Smart Reschedule‖ lab feature to find a new
available time.
Option B. If you don’t have access to the conflicting meeting then you will
need to contact the person whose meeting it is and ask them to move the
meeting. You will have to decide at this point if you want to continue to create
your new meeting and invite guests assuming that the other one will be moved
or you could create the meeting, but when saving do not invite the guests. You
can go back into the event and invite the guests once the conflicting meeting
has been moved.
Option 2. Check availability through calendars.
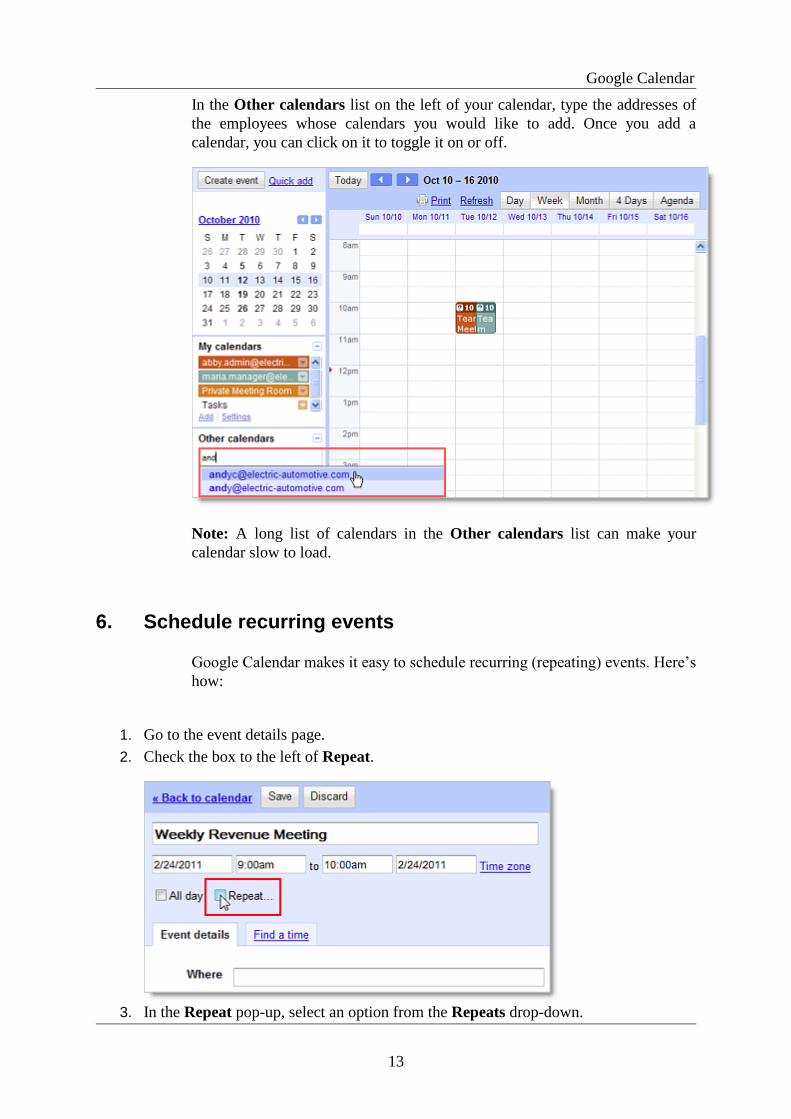
You can also overlay other calendars on your calendar. Each calendar appears
in a different color, so you can tell exactly who is busy and when. To overlay
calendars:
Google Calendar
13
In the Other calendars list on the left of your calendar, type the addresses of
the employees whose calendars you would like to add. Once you add a
calendar, you can click on it to toggle it on or off.
Note: A long list of calendars in the Other calendars list can make your
calendar slow to load.
6. Schedule recurring events
Google Calendar makes it easy to schedule recurring (repeating) events. Here’s
how:
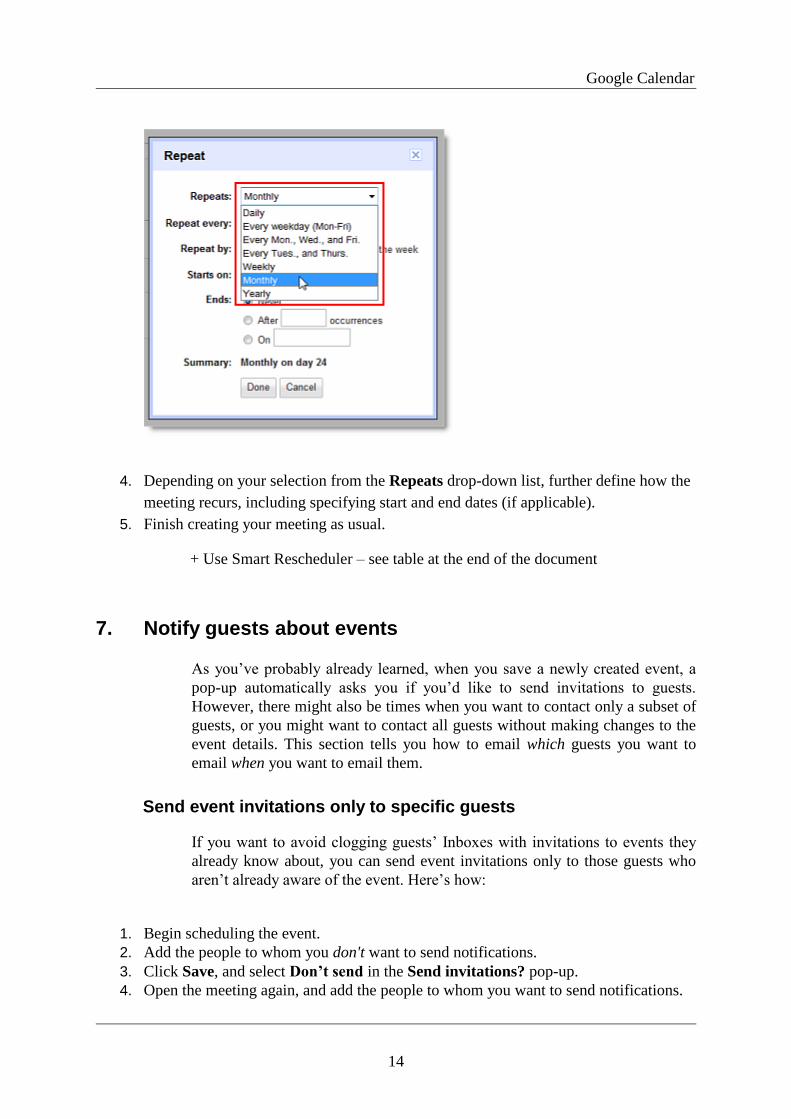
1. Go to the event details page.
2. Check the box to the left of Repeat.
3. In the Repeat pop-up, select an option from the Repeats drop-down.
Google Calendar
14
4. Depending on your selection from the Repeats drop-down list, further define how the
meeting recurs, including specifying start and end dates (if applicable).
5. Finish creating your meeting as usual.
+ Use Smart Rescheduler – see table at the end of the document
7. Notify guests about events
As you’ve probably already learned, when you save a newly created event, a
pop-up automatically asks you if you’d like to send invitations to guests.
However, there might also be times when you want to contact only a subset of
guests, or you might want to contact all guests without making changes to the
event details. This section tells you how to email which guests you want to
email when you want to email them.
Send event invitations only to specific guests
If you want to avoid clogging guests’ Inboxes with invitations to events they
already know about, you can send event invitations only to those guests who
aren’t already aware of the event. Here’s how:
1. Begin scheduling the event.
2. Add the people to whom you don't want to send notifications.
3. Click Save, and select Don’t send in the Send invitations? pop-up.
4. Open the meeting again, and add the people to whom you want to send notifications.
Google Calendar
15
5. Don't make any other modifications to the meeting before you save it. If you change
the time, room, description, etc., Google Calendar will send the updated notification
to all guests on the meeting list. The only time Google Calendar sends an update to
only new guests is if your only change to a meeting is to add guests.
6. Click Save, and select Send in the Send invitations? pop-up to send invitations to
new guest.
7. Only the newly added guests will receive the email notification.
Note: Individual users can set a preference to not receive notifications.
Email guests about event
Occasionally, you might want to email all or some guests after you’ve already
created and saved an event. For example, you might want to remind people
who haven’t responded to an event to respond. Or you might also want to
email instructions to all guests who replied Yes. It’s easy to email guests with
Google Calendar.
1. Go to the event details page of the event.
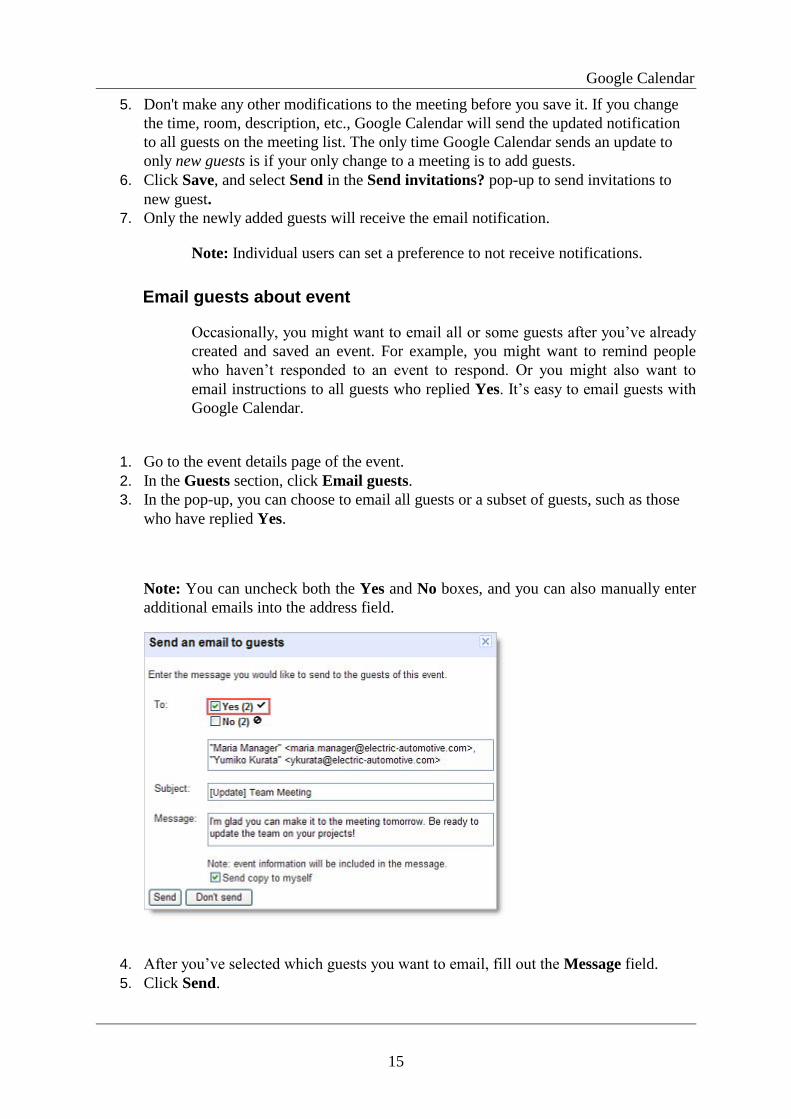
2. In the Guests section, click Email guests.
3. In the pop-up, you can choose to email all guests or a subset of guests, such as those
who have replied Yes.
Note: You can uncheck both the Yes and No boxes, and you can also manually enter
additional emails into the address field.
4. After you’ve selected which guests you want to email, fill out the Message field.
5. Click Send.
Google Calendar
16
Create event reminders only your manager can see
In previous calendar applications, you might have been used to adding event
notes that only your manager could see. However, in Google Calendar, if you
are the meeting organizer, any note you add in the event’s Description field
appears in the event on every guest's calendar.
If you want to create meeting reminders that appear only on your manager’s
calendar, you have a few different options:
● If someone else is the meeting organizer, you can add a note in the event’s
Description field on your manager’s calendar. This note will only appear on your
manager’s calendar, but depending on the privacy settings for your manager’s
calendar, people who view your manager’s calendar may be able to see the note. (To
make the note private, select the Private radio button in the Privacy section of the
event details page.)
Important: If the meeting organizer updates the Description field in which you put
the note, your note will be overwritten.
● On your manager’s calendar, you can create a separate event at the same time as the
original event. In the new event’s Description field, you can add all of the essential
information your manager needs to know. You can even add attachments. (If any of
this information is sensitive, remember to select the Private radio button in the
Privacy section.)
Alternatively, you can always email or chat event reminders to your manager
with Gmail.
8. Edit event details after initial creation of event
There are many reasons why you may need to change event details after you’ve
already created an event--you may need to change the time or day, or you may
even need to duplicate the event or transfer ownership to another person.
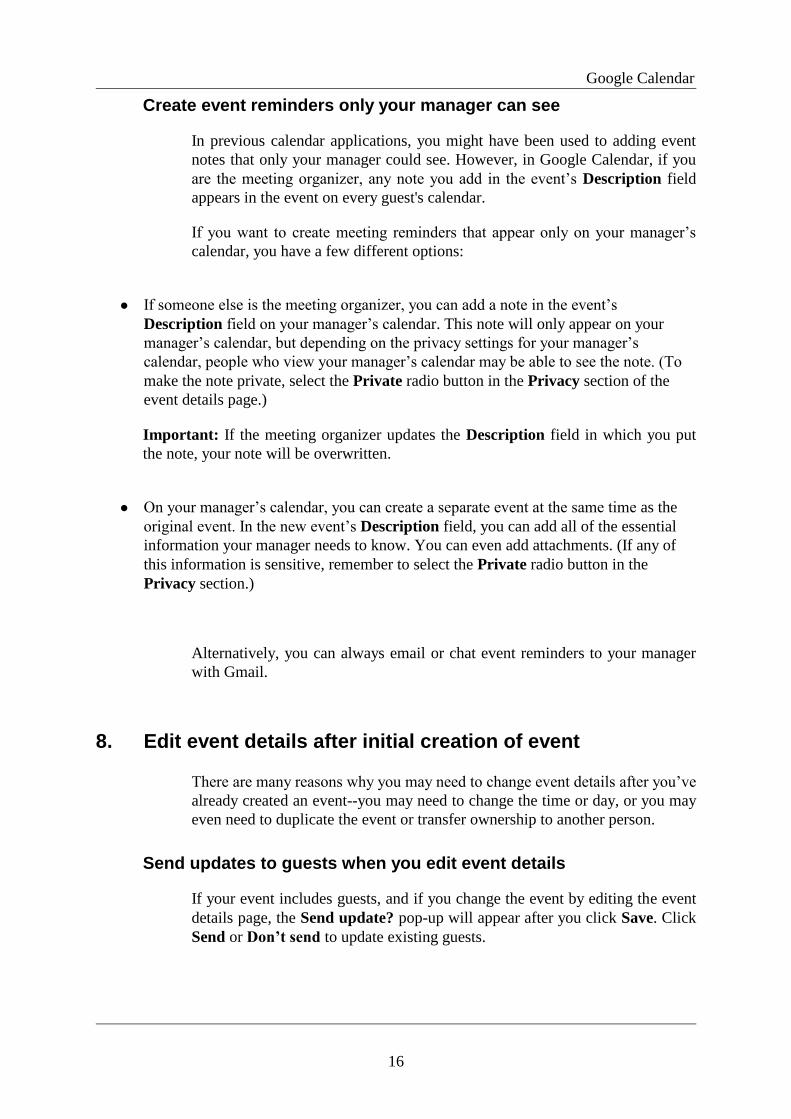
Send updates to guests when you edit event details
If your event includes guests, and if you change the event by editing the event
details page, the Send update? pop-up will appear after you click Save. Click
Send or Don’t send to update existing guests.
Google Calendar
17
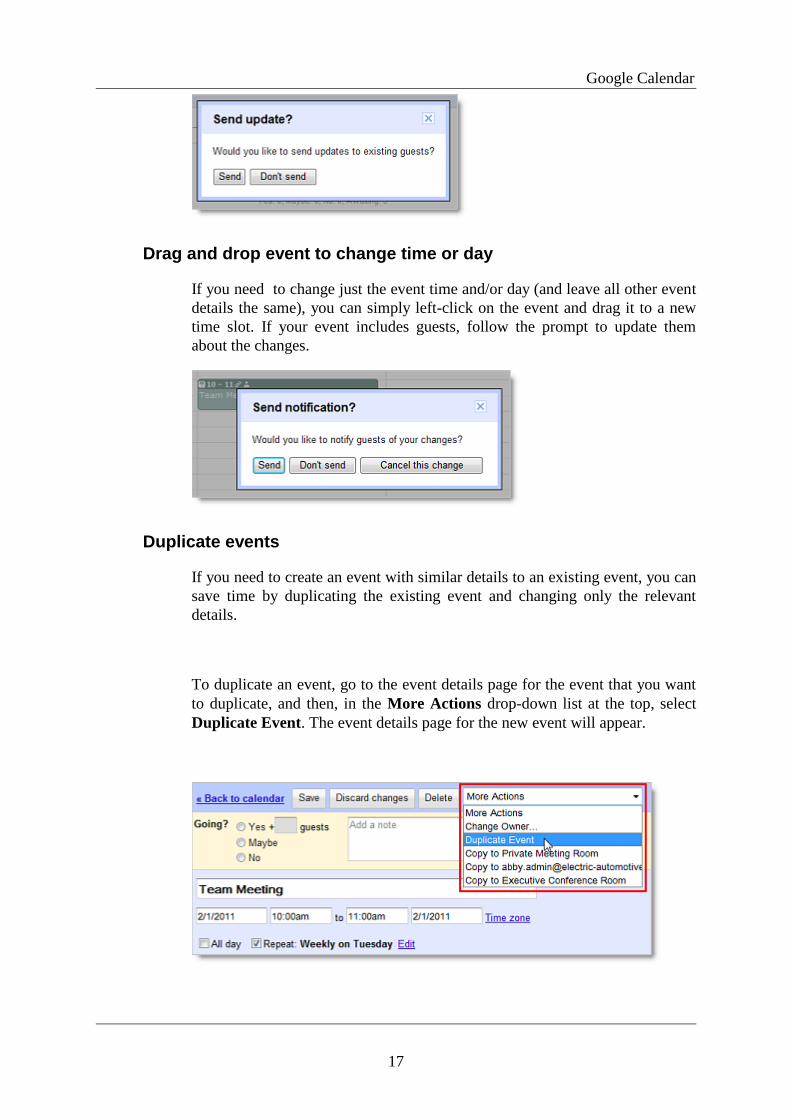
Drag and drop event to change time or day
If you need to change just the event time and/or day (and leave all other event
details the same), you can simply left-click on the event and drag it to a new
time slot. If your event includes guests, follow the prompt to update them
about the changes.
Duplicate events
If you need to create an event with similar details to an existing event, you can
save time by duplicating the existing event and changing only the relevant
details.
To duplicate an event, go to the event details page for the event that you want
to duplicate, and then, in the More Actions drop-down list at the top, select
Duplicate Event. The event details page for the new event will appear.
Google Calendar
18
Transfer ownership of an event
If someone else takes over responsibility for an event you created (such as a
recurring meeting), you can transfer the ownership of the event. This means
that the new person ―owns‖ the event and can make changes to it.
To transfer ownership:
1. Open the event you want to transfer from the calendar of the original owner.
2. Select Change Owner from the More Actions drop-down menu (next to the Delete
button).
3. Type the email address of the new owner in the New Owner field.
4. If desired, customize the email message.
5. Click Change Owner.
The new owner will receive a notification email, and he or she should click the
included link to accept ownership of the event.
Note: Even though the new owner now controls the event, the original owner’s
name will still appear in the Created by field.
When guests edit event details on their own calendars
Unless you’ve allowed guests to modify events (see Select options for your
guests in the “Guests can” section above), only the person who created the
event can make changes that appear on all guests’ calendars. If guests change
details about an event, their changes show up only on their calendars.
Additionally, if the event creator modifies an event, the creator’s updates
override any changes that guests have made to their own calendars.
For example, if you create an event and invite John, and then John adds a new
room, the room change will show up only on John's calendar. If, however, you
later change the time of the event, the event will be moved to a different time
on John's calendar, and the room change that John made will no longer appear
on his calendar.
Google Calendar
19
2. Common Calendar Tasks
1. Accept or decline events on behalf of your manager
Accept or decline from email notifications
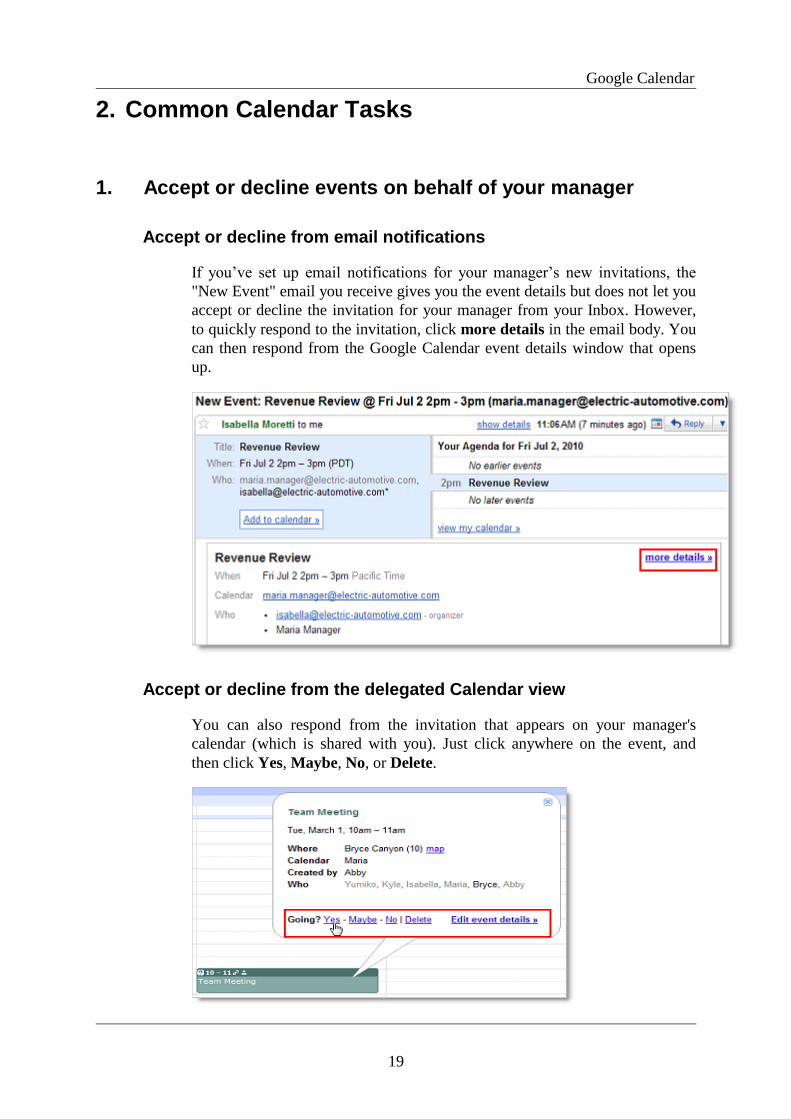
If you’ve set up email notifications for your manager’s new invitations, the
"New Event" email you receive gives you the event details but does not let you
accept or decline the invitation for your manager from your Inbox. However,
to quickly respond to the invitation, click more details in the email body. You
can then respond from the Google Calendar event details window that opens
up.
Accept or decline from the delegated Calendar view
You can also respond from the invitation that appears on your manager's
calendar (which is shared with you). Just click anywhere on the event, and
then click Yes, Maybe, No, or Delete.

Google Calendar
20
Add note to invitation response
If you want to add a note to your response to an event, go to the event details
page. You can do this by:
● Clicking the actual event name (such as Team Meeting in the example above)
● Double-clicking anywhere on the event
● Clicking anywhere on the event, and then clicking Edit event details
On the event details page, you can add your note to the Going? section near
the top of the screen, and click Save. Because not all people choose to get
notifications, you may also want to email the meeting owner with any
important messages.
See meeting status at a glance (invitation, accepted, declined)
You can quickly view your meeting status without going into the event details
page.
Event invitations or events with a “Maybe” response
Event invitations to which you (a) haven’t yet responded or (b) have responded
Maybe have a question mark before the meeting time.
Accepted events
Accepted events don’t have a question mark.
Declined event
Google Calendar
21
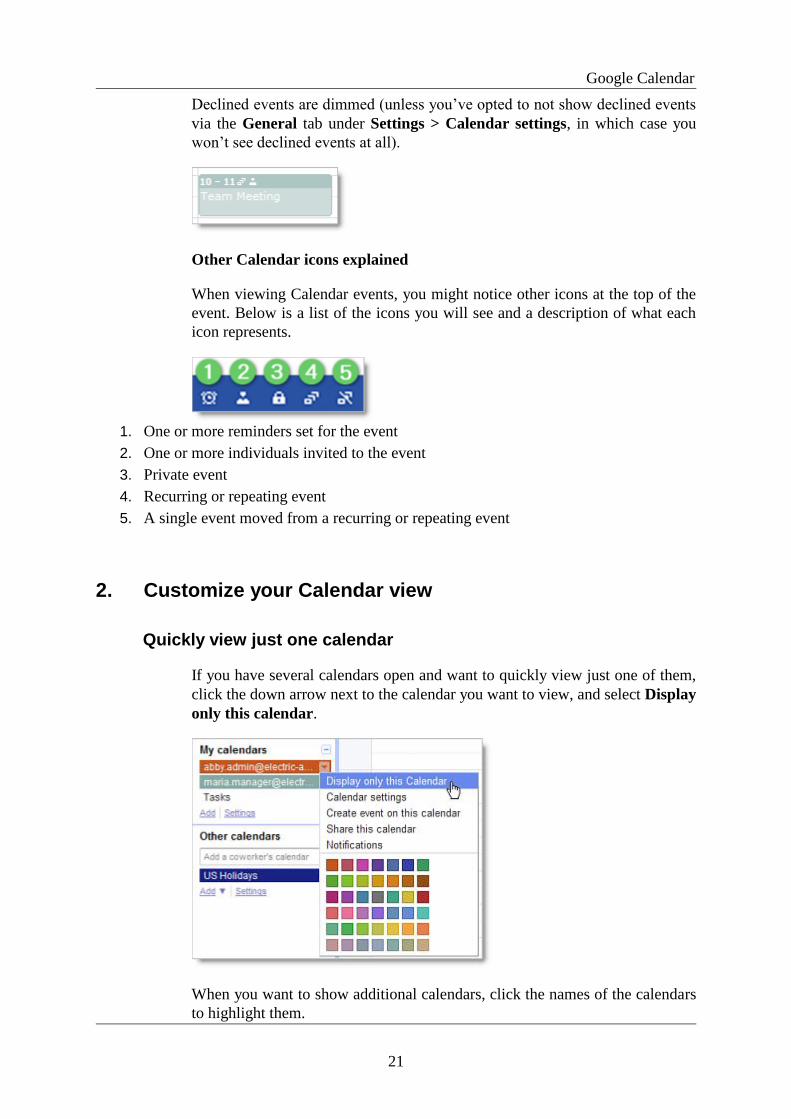
Declined events are dimmed (unless you’ve opted to not show declined events
via the General tab under Settings > Calendar settings, in which case you
won’t see declined events at all).
Other Calendar icons explained
When viewing Calendar events, you might notice other icons at the top of the
event. Below is a list of the icons you will see and a description of what each
icon represents.
1. One or more reminders set for the event
2. One or more individuals invited to the event
3. Private event
4. Recurring or repeating event
5. A single event moved from a recurring or repeating event
2. Customize your Calendar view
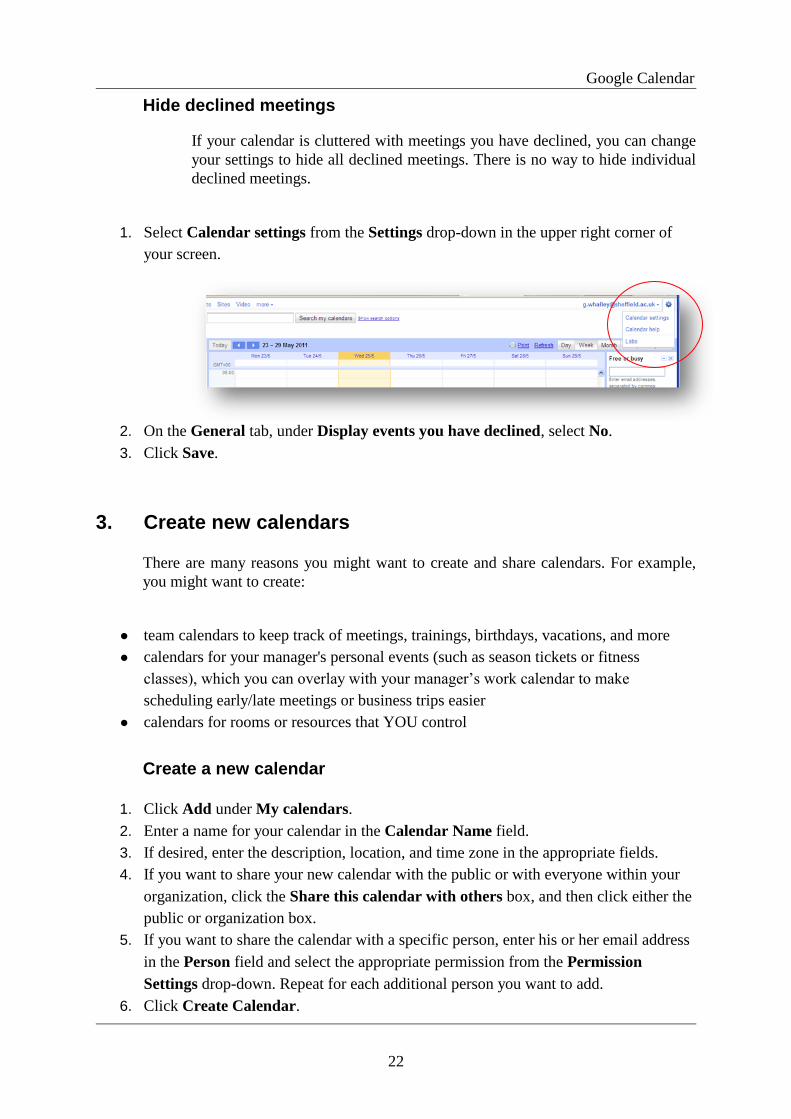
Quickly view just one calendar
If you have several calendars open and want to quickly view just one of them,
click the down arrow next to the calendar you want to view, and select Display
only this calendar.
When you want to show additional calendars, click the names of the calendars
to highlight them.
Google Calendar
22
Hide declined meetings
If your calendar is cluttered with meetings you have declined, you can change
your settings to hide all declined meetings. There is no way to hide individual
declined meetings.
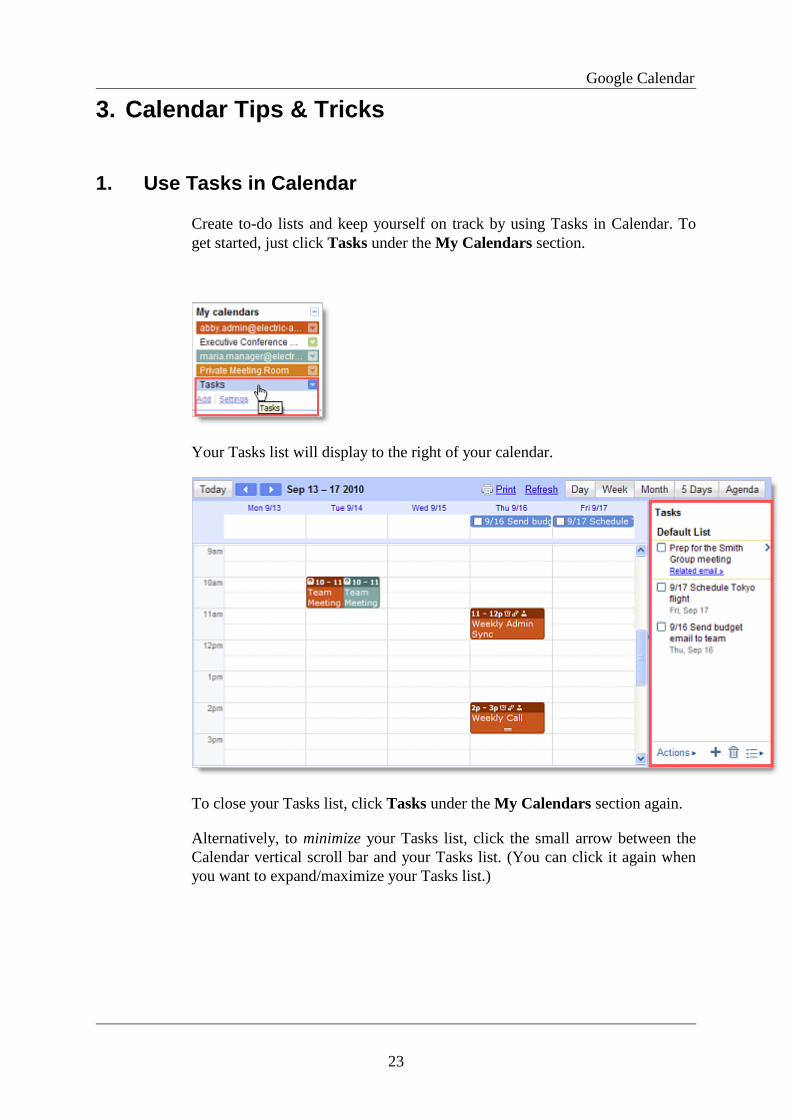
1. Select Calendar settings from the Settings drop-down in the upper right corner of
your screen.
2. On the General tab, under Display events you have declined, select No.
3. Click Save.
3. Create new calendars
There are many reasons you might want to create and share calendars. For example,
you might want to create:
● team calendars to keep track of meetings, trainings, birthdays, vacations, and more
● calendars for your manager's personal events (such as season tickets or fitness
classes), which you can overlay with your manager’s work calendar to make
scheduling early/late meetings or business trips easier
● calendars for rooms or resources that YOU control
Create a new calendar
1. Click Add under My calendars.
2. Enter a name for your calendar in the Calendar Name field.
3. If desired, enter the description, location, and time zone in the appropriate fields.
4. If you want to share your new calendar with the public or with everyone within your
organization, click the Share this calendar with others box, and then click either the
public or organization box.
5. If you want to share the calendar with a specific person, enter his or her email address
in the Person field and select the appropriate permission from the Permission
Settings drop-down. Repeat for each additional person you want to add.
6. Click Create Calendar.
Google Calendar
23
3. Calendar Tips & Tricks
1. Use Tasks in Calendar
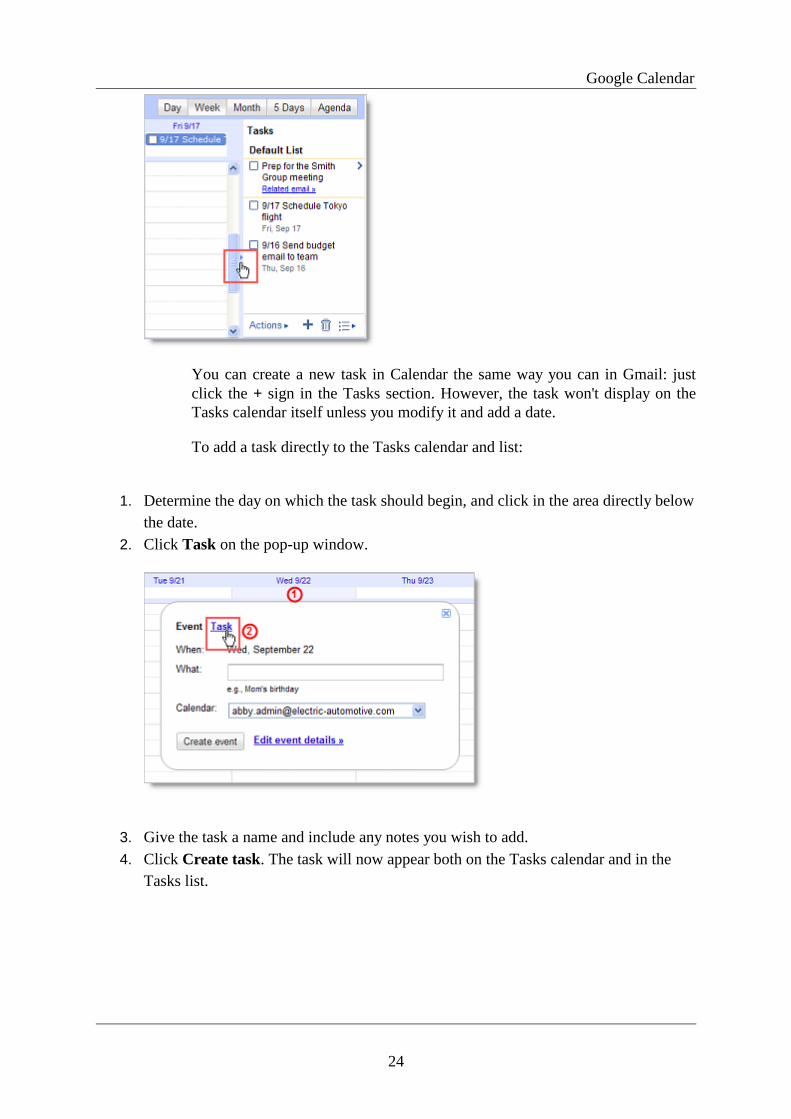
Create to-do lists and keep yourself on track by using Tasks in Calendar. To
get started, just click Tasks under the My Calendars section.
Your Tasks list will display to the right of your calendar.
To close your Tasks list, click Tasks under the My Calendars section again.
Alternatively, to minimize your Tasks list, click the small arrow between the
Calendar vertical scroll bar and your Tasks list. (You can click it again when
you want to expand/maximize your Tasks list.)
Google Calendar
24
You can create a new task in Calendar the same way you can in Gmail: just
click the + sign in the Tasks section. However, the task won't display on the
Tasks calendar itself unless you modify it and add a date.
To add a task directly to the Tasks calendar and list:
1. Determine the day on which the task should begin, and click in the area directly below
the date.
2. Click Task on the pop-up window.
3. Give the task a name and include any notes you wish to add.
4. Click Create task. The task will now appear both on the Tasks calendar and in the
Tasks list.

Google Calendar
25
2. Add calendars for favourite resources (conference rooms)
If there are certain conference rooms you frequently use, you can add their calendars
to your list of Other calendars for fast and convenient viewing.
To add these (and other) calendars to your own account:
1. At the bottom of the Other calendars section, click Add, and then choose Browse
Interesting Calendars from the drop-down.
2. Click the More tab, and then click Resources for [your domain].
3. To the right of the resource name, click the arrow (>).
4. Click Subscribe to add specific calendars to your Other calendars list.
3. Print calendars 1. Make sure only the calendars you want to print are highlighted in your list under My
Calendars. If not, simply click the calendars to select or deselect them.
2. At the top of the calendar view, select the time frame you want to print; for example,
select Day or Week.
3. Click Print. In the Calendar Print Preview window, you can select a font size, page
orientation, and other options.
4. Select the options you want, and then click Print.
Google Calendar
26
4. Calendar Labs
Calendar Labs options for your domain have been included. You can add key
business functionality to your email and calendar with these experimental, pre-
release features. The stress is on ―experimental‖ and might get deleted by
Google.
To help you get started, we've put together a list of the labs we think you'll find
useful (some are real time savers!). It's important to remember, though, that a
lab can become unstable, stop working, or disappear at any time—they are
experiments, after all!
1. Enable Labs
You can enable or disable a lab whenever you like. Here's how:
1. In Google Calendar, click Settings > Labs.
2. For each lab you want to use, click Enable. If you want to stop using a lab, click
Disable.
3. Click Save Changes at the bottom on the page.
2. Suggested Calendar Labs
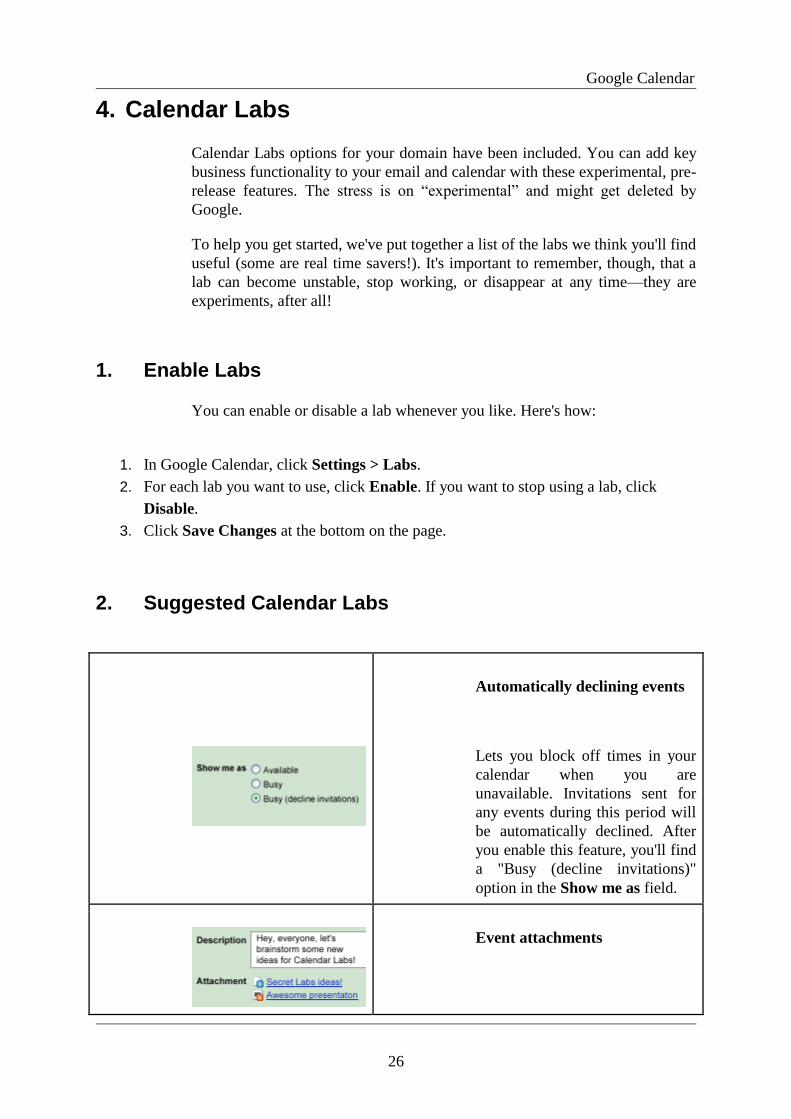
Automatically declining events
Lets you block off times in your
calendar when you are
unavailable. Invitations sent for
any events during this period will
be automatically declined. After
you enable this feature, you'll find
a "Busy (decline invitations)"
option in the Show me as field.
Event attachments
Google Calendar
27
Attach a Google document,
spreadsheet or presentation to
your event, or upload a file from
your computer. Important: guests
do not automatically have
permission to view Google Docs
attachments. You must share each
attached document. Learn more
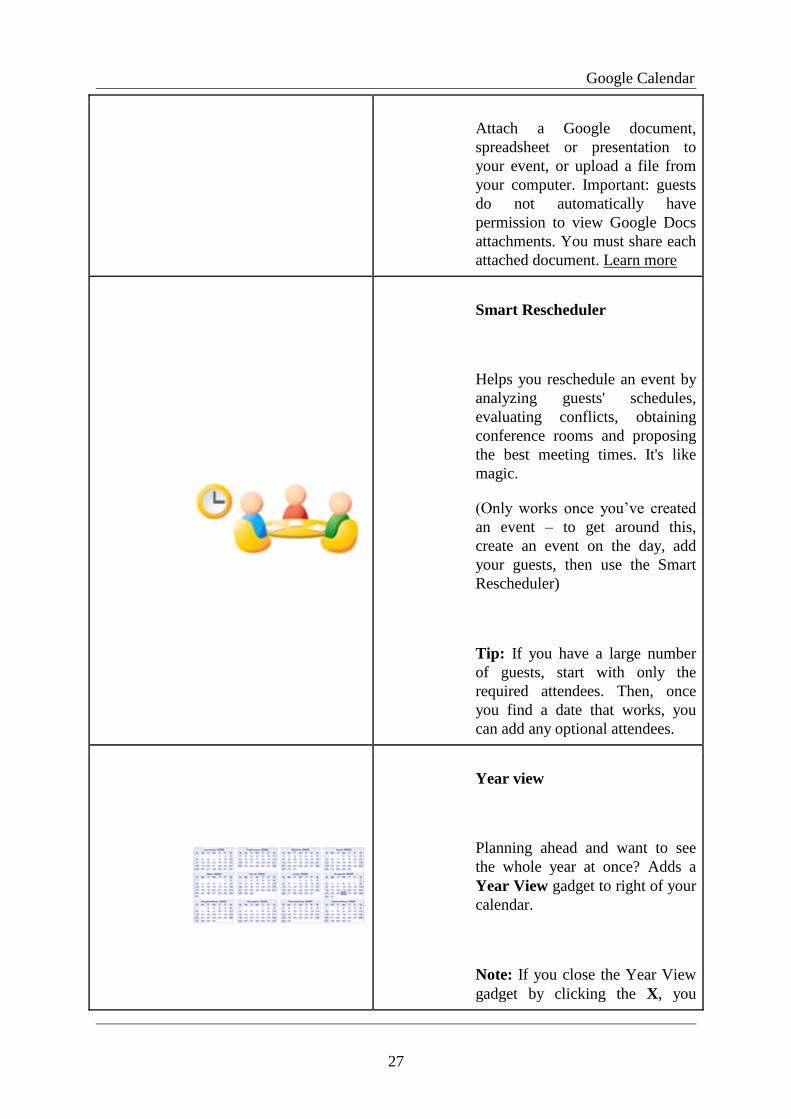
Smart Rescheduler
Helps you reschedule an event by
analyzing guests' schedules,
evaluating conflicts, obtaining
conference rooms and proposing
the best meeting times. It's like
magic.
(Only works once you’ve created
an event – to get around this,
create an event on the day, add
your guests, then use the Smart
Rescheduler)
Tip: If you have a large number
of guests, start with only the
required attendees. Then, once
you find a date that works, you
can add any optional attendees.
Year view
Planning ahead and want to see
the whole year at once? Adds a
Year View gadget to right of your
calendar.
Note: If you close the Year View
gadget by clicking the X, you
Google Calendar
28
disable the lab and will have to re-
enable it.
Who's my one-on-one with?
Having a hard time figuring out
who scheduled that event called
"Lunch" on your calendar? This
feature displays the attendee's
name right on the calendar if it's
just you and one other person.
World clock
Keep track of the time around the
world. Plus: When you click an
event, you'll see the start time in
each time zone as well.
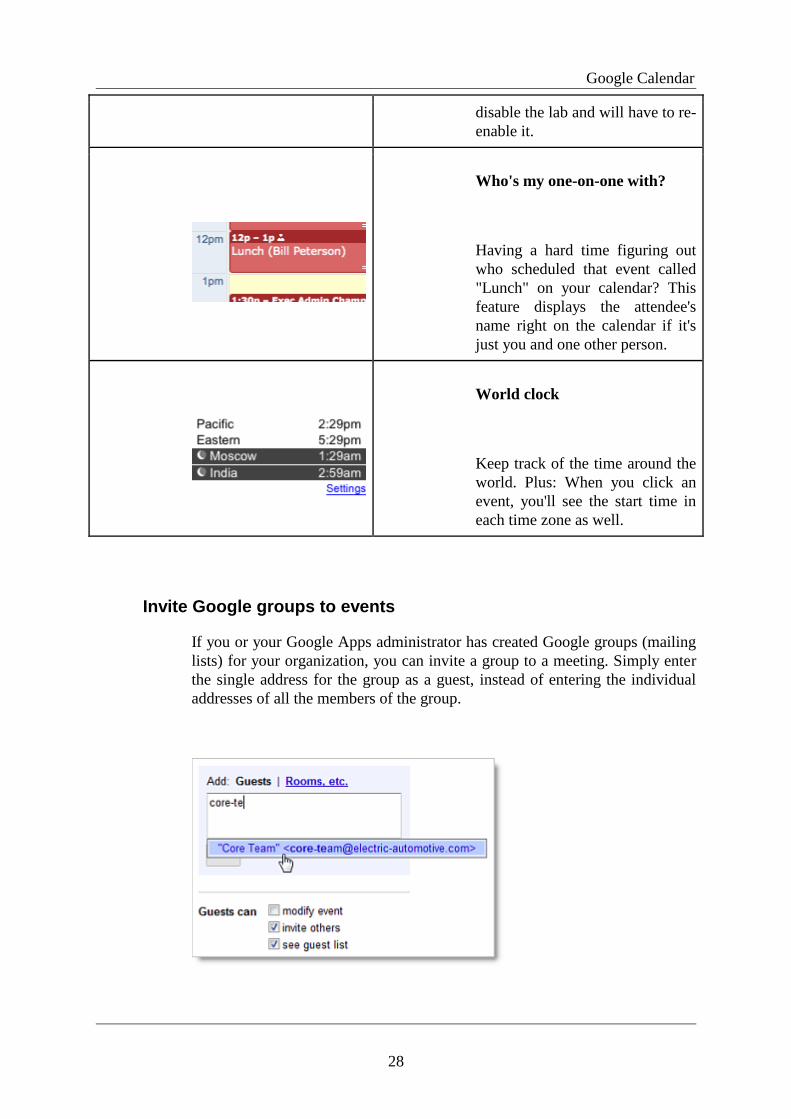
Invite Google groups to events
If you or your Google Apps administrator has created Google groups (mailing
lists) for your organization, you can invite a group to a meeting. Simply enter
the single address for the group as a guest, instead of entering the individual
addresses of all the members of the group.

Google Calendar
29
After you’ve entered the group’s address, the Guests field will populate with
the addresses of the group members, as seen below. If you want to exclude any
group members, you can click the ―X‖ to the right of their names.
Note: If the group is updated (new members, deleted members, etc.) after the Google
Calendar invitation has been created, the invitation does not capture those
changes
What is a Google Group?
A Google Group is a user-owned group created using the Google Groups
service. Google Groups not only allows you to manage and archive your
mailing list, but also provides a method for true communication and
collaboration with group members. Unlike other free mailing list services,
Google Groups offers generous storage limits, customisable pages and unique
management options. Most importantly it allows you to invite everyone in a
Google Group to an event in Google Calendar or Share a Google Document
with everyone in a Google Group.
Google Calendar
30
Create Google Groups
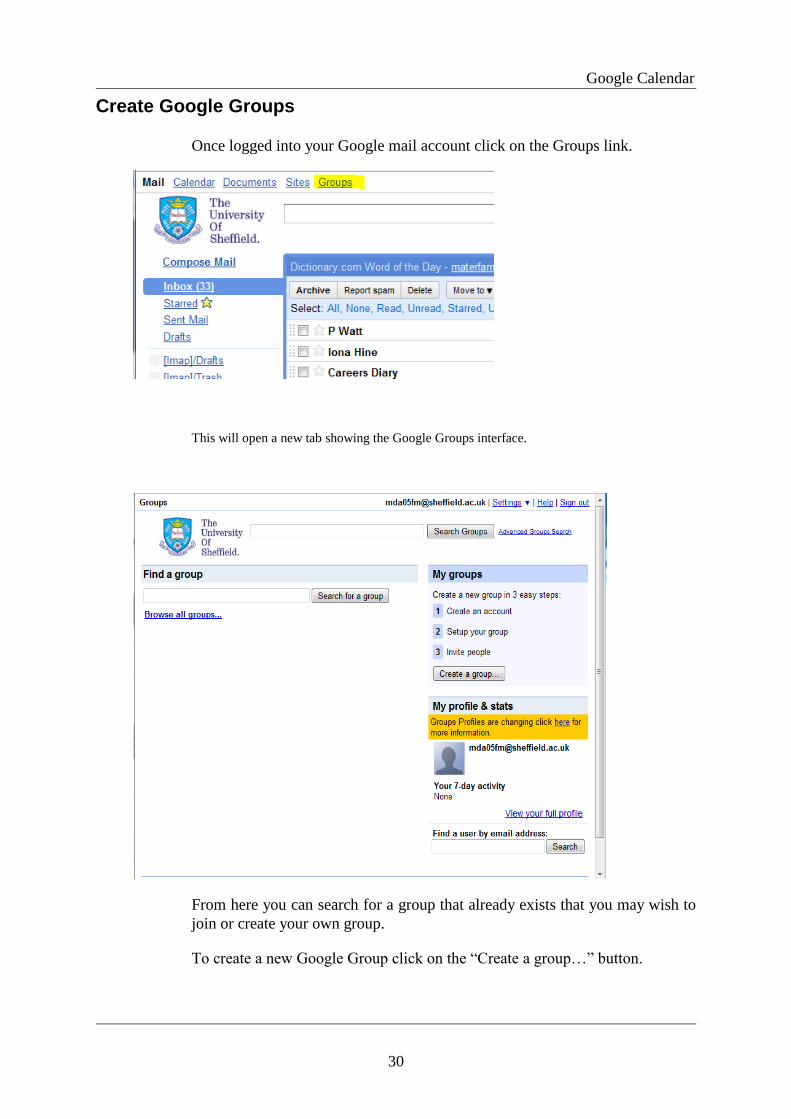
Once logged into your Google mail account click on the Groups link.
This will open a new tab showing the Google Groups interface.
From here you can search for a group that already exists that you may wish to
join or create your own group.
To create a new Google Group click on the ―Create a group…‖ button.
Google Calendar
31
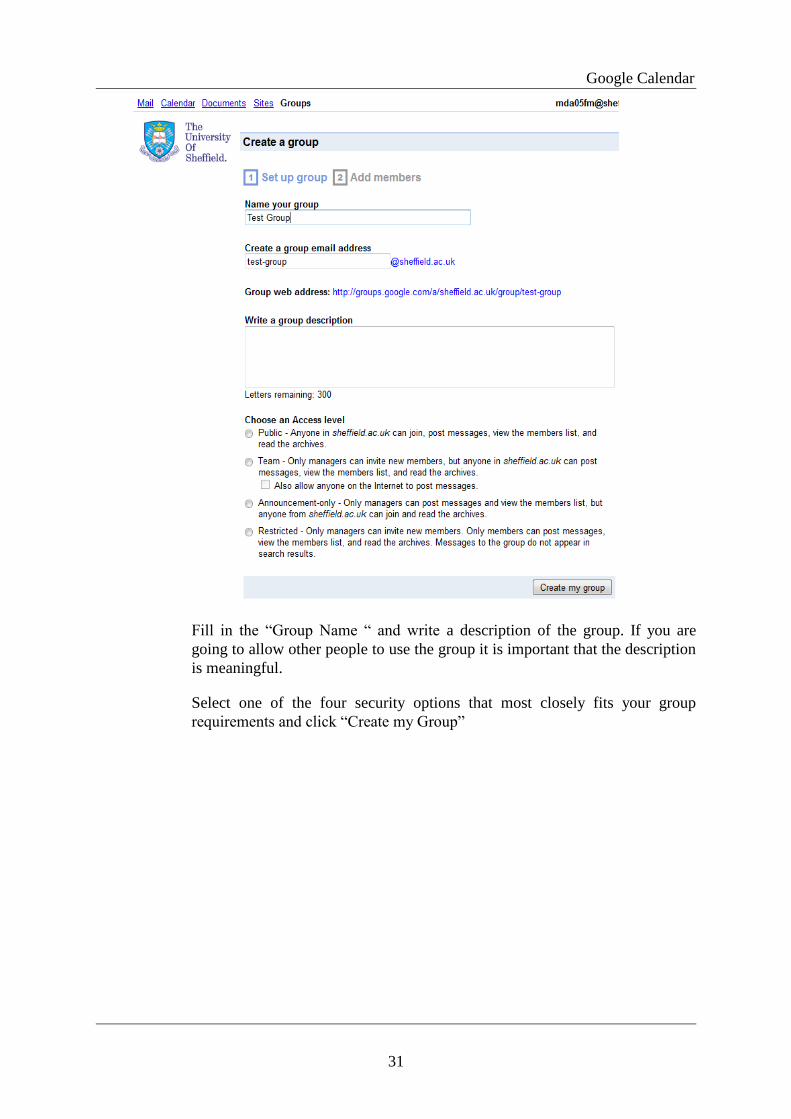
Fill in the ―Group Name ― and write a description of the group. If you are
going to allow other people to use the group it is important that the description
is meaningful.
Select one of the four security options that most closely fits your group
requirements and click ―Create my Group‖

Google Calendar
32
You now have a choice of inviting menbers to join your group or choosing
members that will immediately be added to your group.
If you chose to add members directly you also have a choice of setting the
types of E-mail they recive when people post messages to your group.
Once this step has been completed it may take a little while before you can use
the group to share a document or invite people to a meeting.


![[ 2 ] Calendar Popular - 1. Calendar Agricol](https://img.pdfslide.us/doc/110x75/55cf99dd550346d0339f920e/-2-calendar-popular-1-calendar-agricol.jpg)