Embed Size (px)
Citation preview
HP Business Service ManagementFor the Windows and Linux operating systems
Software Version: 9.23
Getting Started With BPM - Best Practices
Document Release Date: January 2014
Software Release Date: December 2013
Legal Notices
WarrantyThe only warranties for HP products and services are set forth in the express warranty statements accompanying such products and services. Nothing herein should beconstrued as constituting an additional warranty. HP shall not be liable for technical or editorial errors or omissions contained herein.
The information contained herein is subject to change without notice.
Restricted Rights LegendConfidential computer software. Valid license from HP required for possession, use or copying. Consistent with FAR 12.211 and 12.212, Commercial ComputerSoftware, Computer Software Documentation, and Technical Data for Commercial Items are licensed to the U.S. Government under vendor's standard commerciallicense.
Copyright Notice© Copyright 2005 - 2013 Hewlett-Packard Development Company, L.P.
Trademark NoticesAdobe® and Acrobat® are trademarks of Adobe Systems Incorporated.
AMD and the AMD Arrow symbol are trademarks of AdvancedMicro Devices, Inc.
Google™ andGoogleMaps™ are trademarks of Google Inc.
Intel®, Itanium®, Pentium®, and Intel® Xeon® are trademarks of Intel Corporation in the U.S. and other countries.
iPod is a trademark of Apple Computer, Inc.
Java is a registered trademark of Oracle and/or its affiliates.
Microsoft®, Windows®, Windows NT®, Windows® XP, andWindows Vista® are U.S. registered trademarks of Microsoft Corporation.
Oracle is a registered trademark of Oracle Corporation and/or its affiliates.
UNIX® is a registered trademark of TheOpenGroup.
Adobe® and Acrobat® are trademarks of Adobe Systems Incorporated.
Intel®, Pentium®, and Intel® Xeon® are trademarks of Intel Corporation in the U.S. and other countries.
iPod is a trademark of Apple Computer, Inc.
Java is a registered trademark of Oracle and/or its affiliates.
Microsoft®, Windows®, Windows NT®, andWindows® XP are U.S registered trademarks of Microsoft Corporation.
Oracle is a registered trademark of Oracle Corporation and/or its affiliates.
UNIX® is a registered trademark of TheOpenGroup.
AcknowledgementsThis product includes software developed by the Apache Software Foundation (www.apache.org).
This product includes software developed by the JDOM Project (www.jdom.org).
This product includes software developed by theMX4J project (mx4j.sourceforge.net).
Documentation UpdatesThe title page of this document contains the following identifying information:
l Software Version number, which indicates the software version.l Document Release Date, which changes each time the document is updated.l Software Release Date, which indicates the release date of this version of the software.
To check for recent updates or to verify that you are using themost recent edition of a document, go to: http://h20230.www2.hp.com/selfsolve/manuals
This site requires that you register for an HP Passport and sign in. To register for an HP Passport ID, go to: http://h20229.www2.hp.com/passport-registration.html
Or click theNew users - please register link on the HP Passport login page.
You will also receive updated or new editions if you subscribe to the appropriate product support service. Contact your HP sales representative for details.
PDF Version of Online Help
This document is a PDF version of the online help. This PDF file is provided so you can easily print multiple topics from the help information or read the online help inPDF format.
Getting StartedWith BPM - Best Practices
HP Business ServiceManagement (9.23) Page 2 of 46
SupportVisit the HP Software Support Online web site at: http://www.hp.com/go/hpsoftwaresupport
This web site provides contact information and details about the products, services, and support that HP Software offers.
HP Software online support provides customer self-solve capabilities. It provides a fast and efficient way to access interactive technical support tools needed tomanageyour business. As a valued support customer, you can benefit by using the support web site to:
l Search for knowledge documents of interestl Submit and track support cases and enhancement requestsl Download software patchesl Manage support contractsl Look up HP support contactsl Review information about available servicesl Enter into discussions with other software customersl Research and register for software training
Most of the support areas require that you register as an HP Passport user and sign in. Many also require a support contract. To register for an HP Passport ID, go to:
http://h20229.www2.hp.com/passport-registration.html
To findmore information about access levels, go to:
http://h20230.www2.hp.com/new_access_levels.jsp
HP Software Solutions Now accesses the HPSW Solution and Integration Portal Web site. This site enables you to explore HP Product Solutions tomeet yourbusiness needs, includes a full list of Integrations between HP Products, as well as a listing of ITIL Processes. The URL for this Web site ishttp://h20230.www2.hp.com/sc/solutions/index.jsp
Getting StartedWith BPM - Best Practices
HP Business ServiceManagement (9.23) Page 3 of 46
ContentsContents 4
Chapter 1: Introduction 5
Scope andMotivation 5
Why Use BPM? 5
Chapter 2: Installing BPM 7
Chapter 3: Connecting BPM to BSM 17
Chapter 4: Creating Scripts in TruClient and Defining Transactions 19
Chapter 5: Creating Business Applications 25
Chapter 6: Configuring Alerts 29
Chapter 7: Configuring Transaction Thresholds 34
Chapter 8: Viewing Data in BSM 36
Viewing Data in Service Health 36
Viewing Data in BPM PerformanceOver TimeReport 36
Viewing Data in Scheduled Reports 37
Chapter 9: BPM Report Recommendation 44
We appreciate your feedback! 46
Getting StartedWith BPM - Best PracticesContents
HP Business ServiceManagement (9.23) Page 4 of 46
Chapter 1: IntroductionThis section introduces the Getting StartedWith BPM - Best Practices and includes the followingtopics:
n "Scope andMotivation" below
n "Why Use BPM?" below
Scope and MotivationBusiness Process Monitor (BPM) is one of the HP Business ServiceManagement (BusinessServiceManagement) data collectors. BPM proactively monitors enterprise applications in realtime, identifying performance and availability problems before users experience them. It enablesyou tomonitor sites from various locations, emulating the end-user experience, and so assess siteperformance from different client perspectives.
The purpose of this document is to provide BPM users with an understanding of how to deploy BPMquickly and correctly, and how to realize value in a short time.
The target audience for this guide is customers who are new implementers of BPM, or HP partnerswho already have Business ServiceManagement (Business ServiceManagement) knowledge, butare new to BPM. While no deep networking/encryption knowledge is needed, you will need to knowthe protocol and encryption used by themonitored application.
Why Use BPM?BPM should be used to gather data during inactive hours of the users, so you will be able to detectproblems before a real user encounters them. In addition, BPM is the basic monitor for buildingSLAs, because it has the same transactionmonitored at the same time intervals.
Getting StartedWith BPM - Best PracticesChapter 1: Introduction
HP Business ServiceManagement (9.23) Page 5 of 46

Page 6 of 46HP Business ServiceManagement (9.23)
Getting StartedWith BPM - Best PracticesChapter 1: Introduction

Chapter 2: Installing BPMThe following provides instructions for installing BPM.
Before beginning the installation, verify that you have Java version 1.7 or above installed on yourcomputer. If not, download themost recent Java version from the Java website.
1. Download your BPM from the HP Software Support Online web site(http://www.hp.com/go/hpsoftwaresupport). Go to Software Support Online > Downloads >Software Patches and select Application Performance Management as the product. Foreach version, check for Business Process Monitor as a sub-product.
2. Save the file under: C:\Temp.
3. Click the executable installation file: BPM_9.23_setup.exe. The BPM Setup wizard appears.
4. In the first screen, select your language and click OK.
5. In the Initialization screen, select Partial Installation and click Next.
HP Business ServiceManagement (9.23) Page 7 of 46
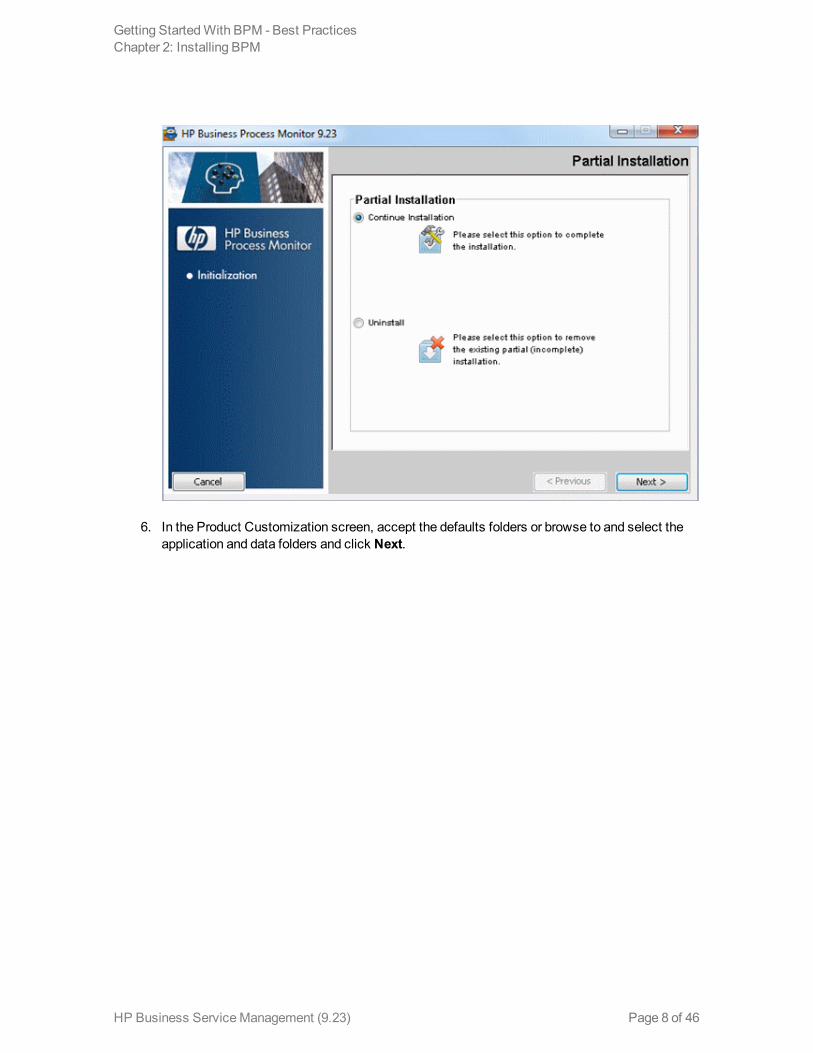
6. In the Product Customization screen, accept the defaults folders or browse to and select theapplication and data folders and click Next.
Getting StartedWith BPM - Best PracticesChapter 2: Installing BPM
HP Business ServiceManagement (9.23) Page 8 of 46
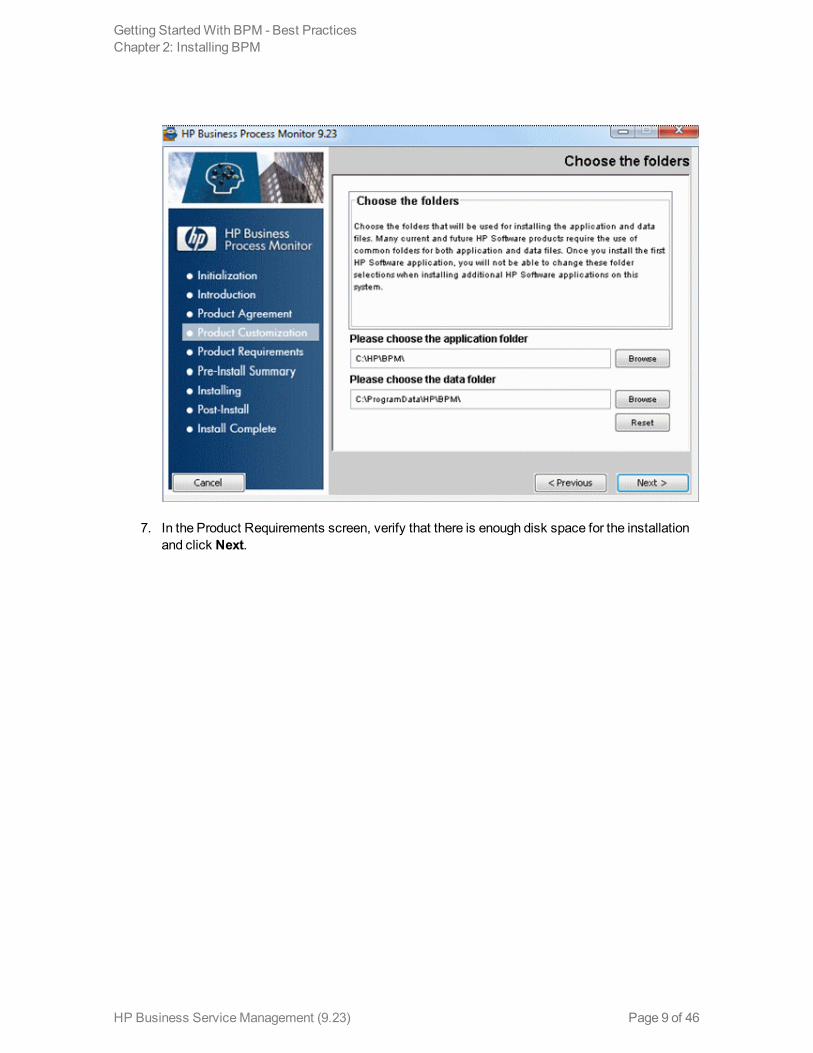
7. In the Product Requirements screen, verify that there is enough disk space for the installationand click Next.
Getting StartedWith BPM - Best PracticesChapter 2: Installing BPM
HP Business ServiceManagement (9.23) Page 9 of 46
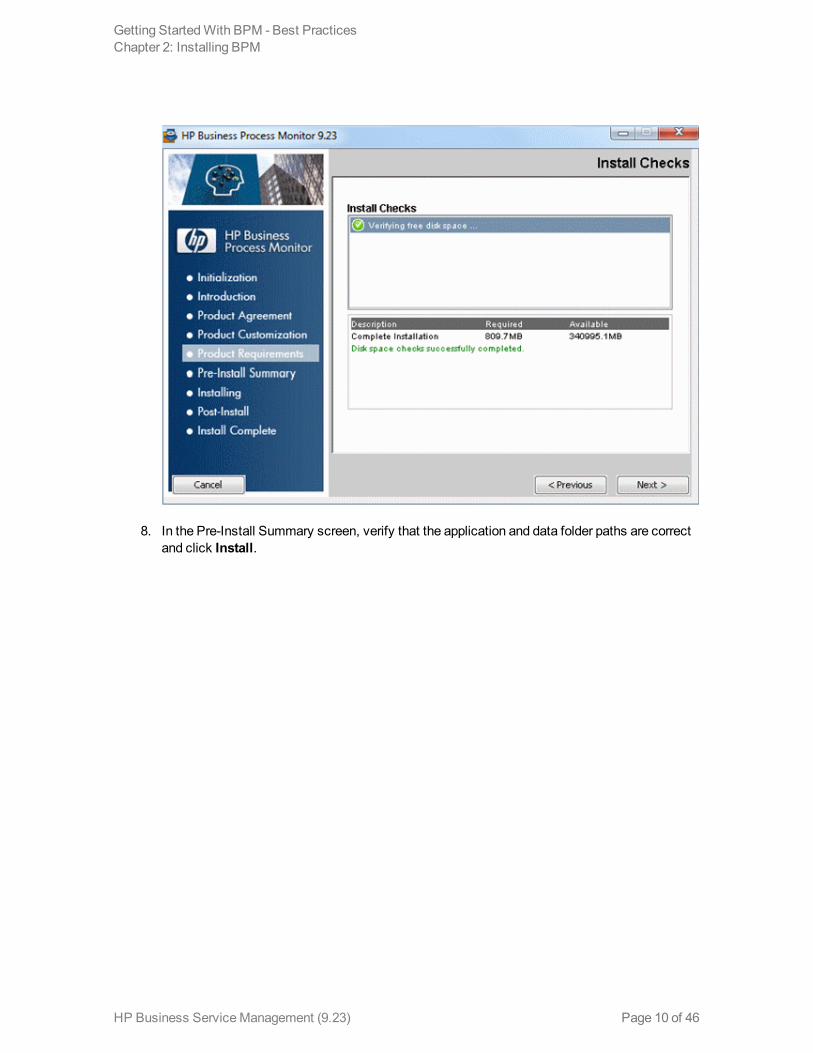
8. In the Pre-Install Summary screen, verify that the application and data folder paths are correctand click Install.
Getting StartedWith BPM - Best PracticesChapter 2: Installing BPM
HP Business ServiceManagement (9.23) Page 10 of 46
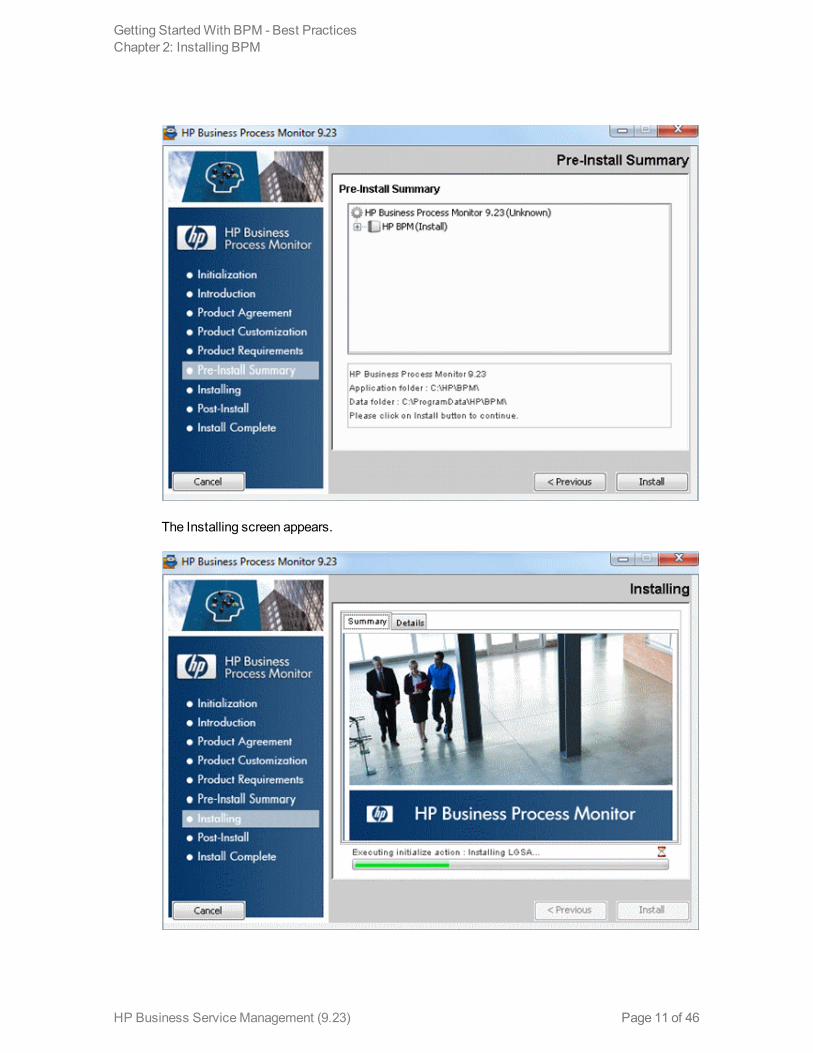
The Installing screen appears.
Getting StartedWith BPM - Best PracticesChapter 2: Installing BPM
HP Business ServiceManagement (9.23) Page 11 of 46
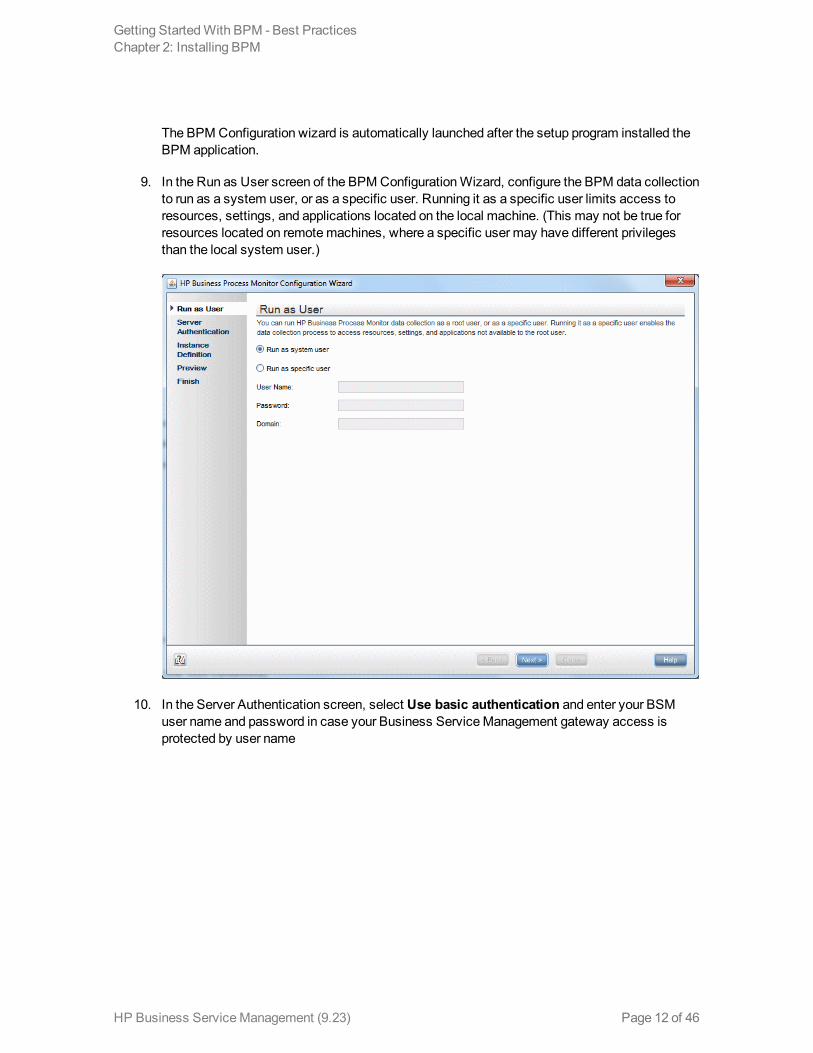
The BPMConfiguration wizard is automatically launched after the setup program installed theBPM application.
9. In the Run as User screen of the BPMConfigurationWizard, configure the BPM data collectionto run as a system user, or as a specific user. Running it as a specific user limits access toresources, settings, and applications located on the local machine. (This may not be true forresources located on remotemachines, where a specific user may have different privilegesthan the local system user.)
10. In the Server Authentication screen, select Use basic authentication and enter your BSMuser name and password in case your Business ServiceManagement gateway access isprotected by user name
Getting StartedWith BPM - Best PracticesChapter 2: Installing BPM
HP Business ServiceManagement (9.23) Page 12 of 46

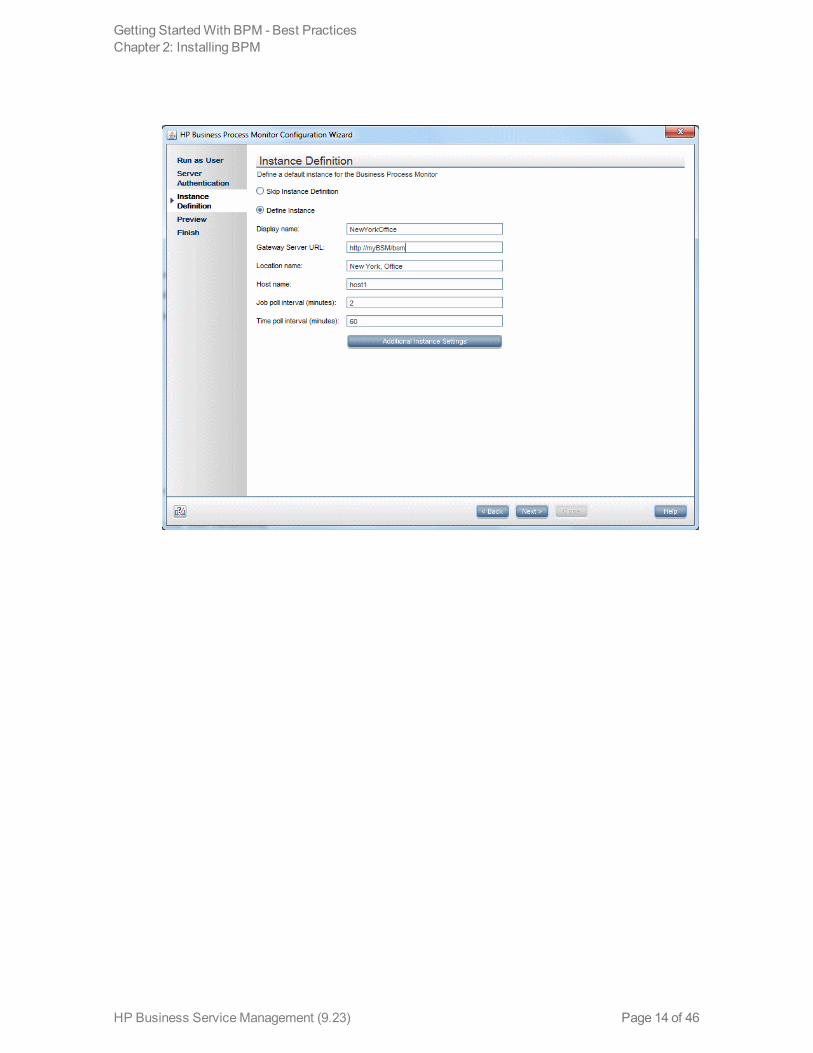
11. In the Instance Definition screen, select Define Instance and type your BSM details. TheLocation name is used for script assignment, so give it a meaningful name (for example, NewYork, Office).
Getting StartedWith BPM - Best PracticesChapter 2: Installing BPM
HP Business ServiceManagement (9.23) Page 13 of 46
Getting StartedWith BPM - Best PracticesChapter 2: Installing BPM
HP Business ServiceManagement (9.23) Page 14 of 46
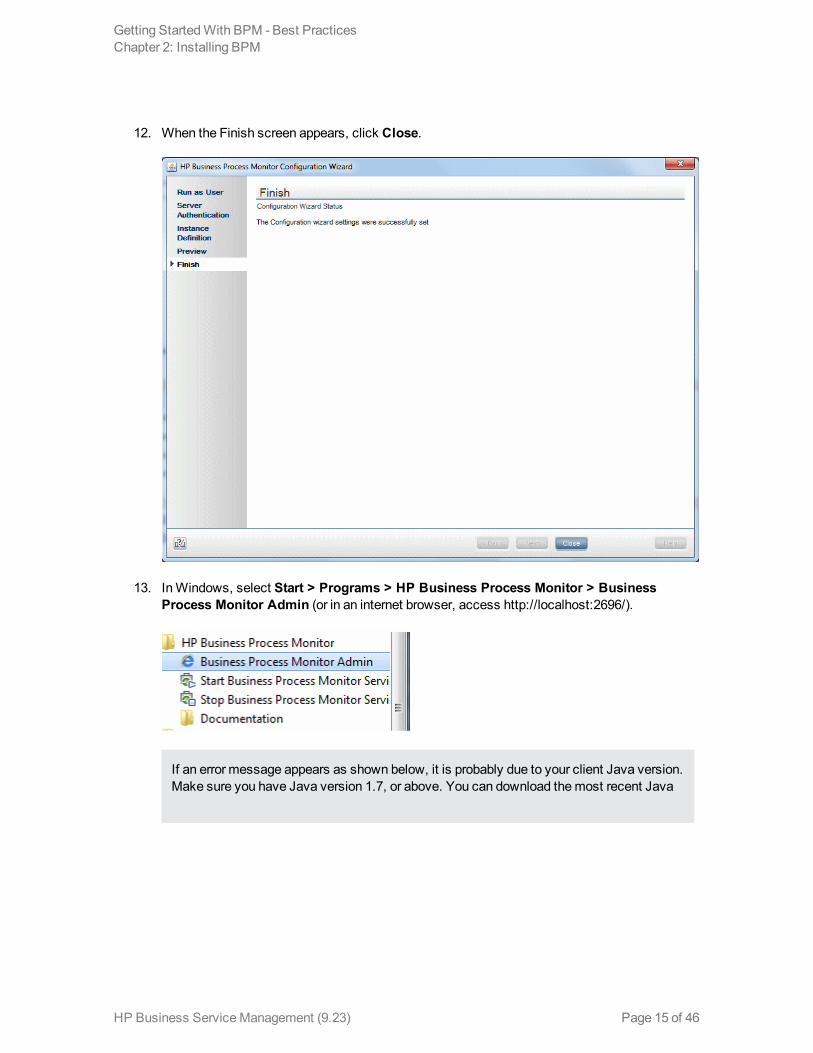
12. When the Finish screen appears, click Close.
13. InWindows, select Start > Programs > HP Business Process Monitor > BusinessProcess Monitor Admin (or in an internet browser, access http://localhost:2696/).
If an error message appears as shown below, it is probably due to your client Java version.Make sure you have Java version 1.7, or above. You can download themost recent Java
Getting StartedWith BPM - Best PracticesChapter 2: Installing BPM
HP Business ServiceManagement (9.23) Page 15 of 46
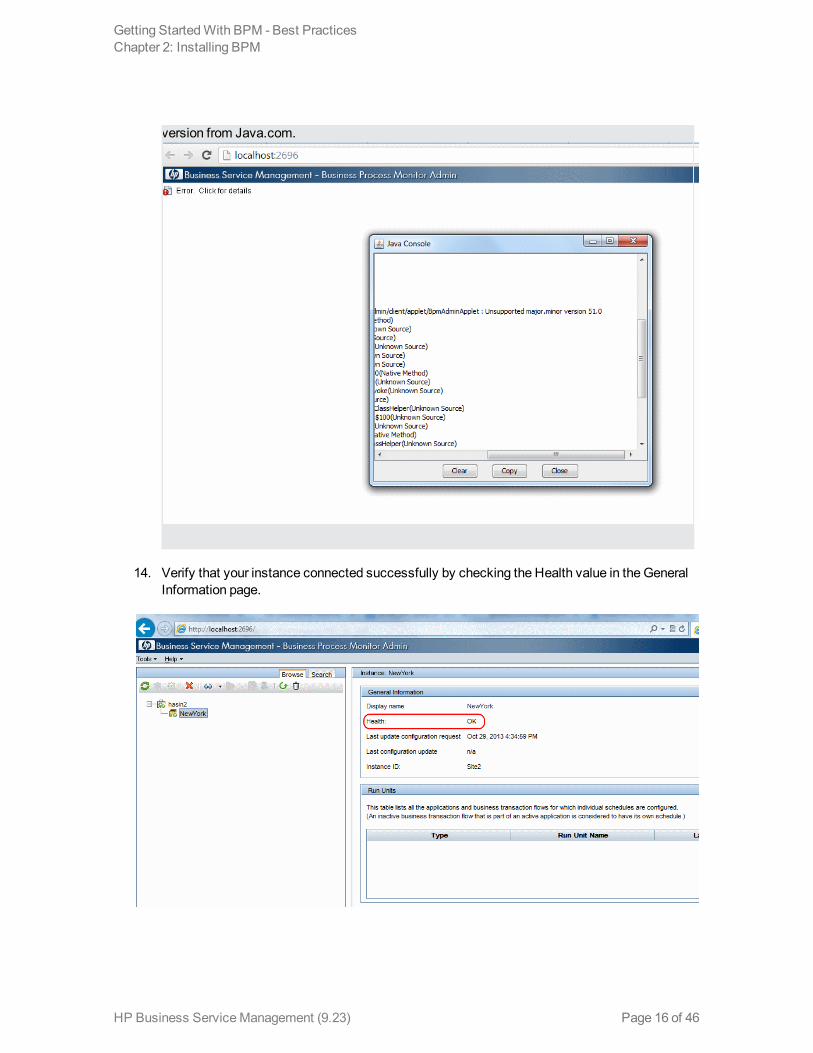
version from Java.com.
14. Verify that your instance connected successfully by checking the Health value in the GeneralInformation page.
Getting StartedWith BPM - Best PracticesChapter 2: Installing BPM
HP Business ServiceManagement (9.23) Page 16 of 46
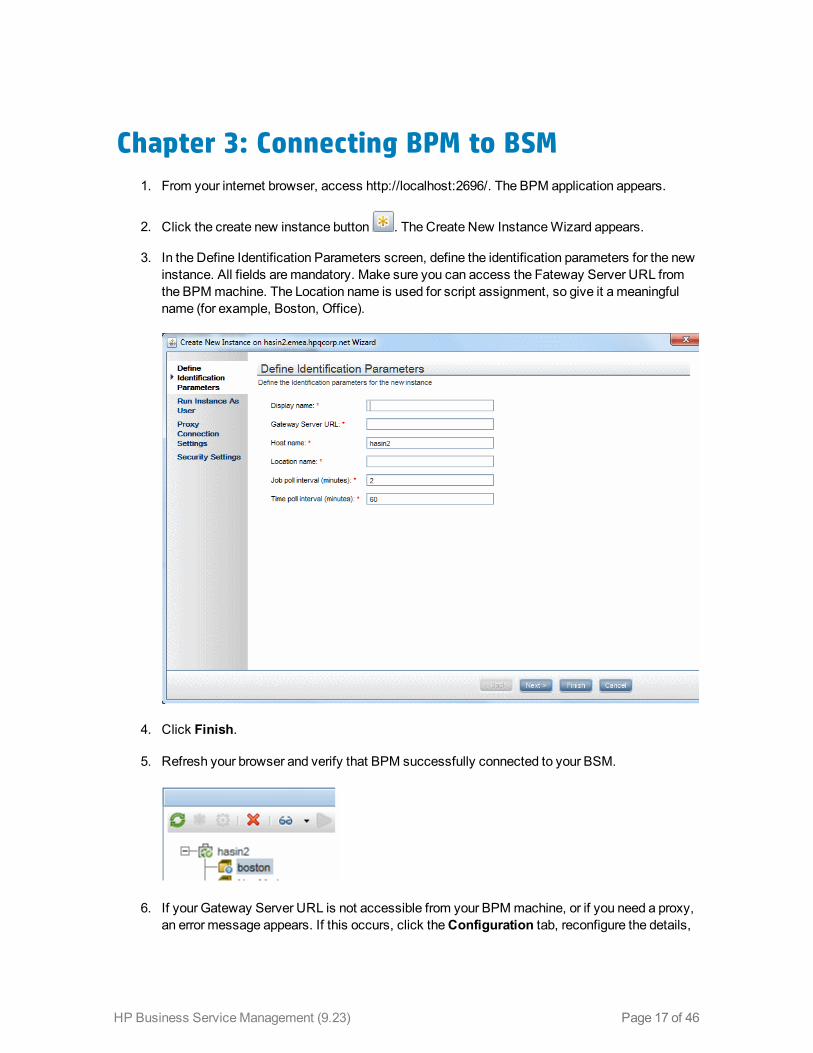
Chapter 3: Connecting BPM to BSM1. From your internet browser, access http://localhost:2696/. The BPM application appears.
2. Click the create new instance button . The Create New InstanceWizard appears.
3. In the Define Identification Parameters screen, define the identification parameters for the newinstance. All fields aremandatory. Make sure you can access the Fateway Server URL fromthe BPMmachine. The Location name is used for script assignment, so give it a meaningfulname (for example, Boston, Office).
4. Click Finish.
5. Refresh your browser and verify that BPM successfully connected to your BSM.
6. If your Gateway Server URL is not accessible from your BPMmachine, or if you need a proxy,an error message appears. If this occurs, click theConfiguration tab, reconfigure the details,
HP Business ServiceManagement (9.23) Page 17 of 46
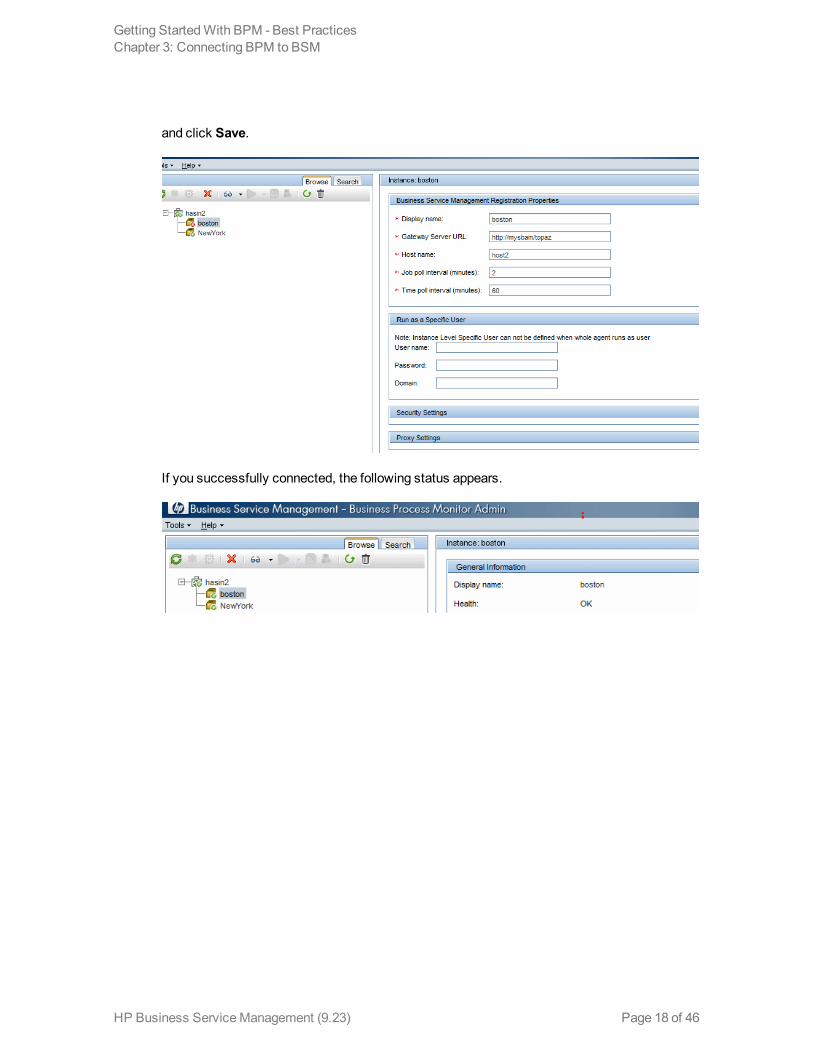
and click Save.
If you successfully connected, the following status appears.
Getting StartedWith BPM - Best PracticesChapter 3: Connecting BPM to BSM
HP Business ServiceManagement (9.23) Page 18 of 46
Chapter 4: Creating Scripts in TruClient andDefining Transactions
Note: If you are using script services from other teammembers or companies, you candownload the Business Process Template for BPM Scripting Requests from the HP SoftwareSupport Online (SSO)Manuals site (http://www.hp.com/go/hpsoftwaresupport) to define yourscript requirements.
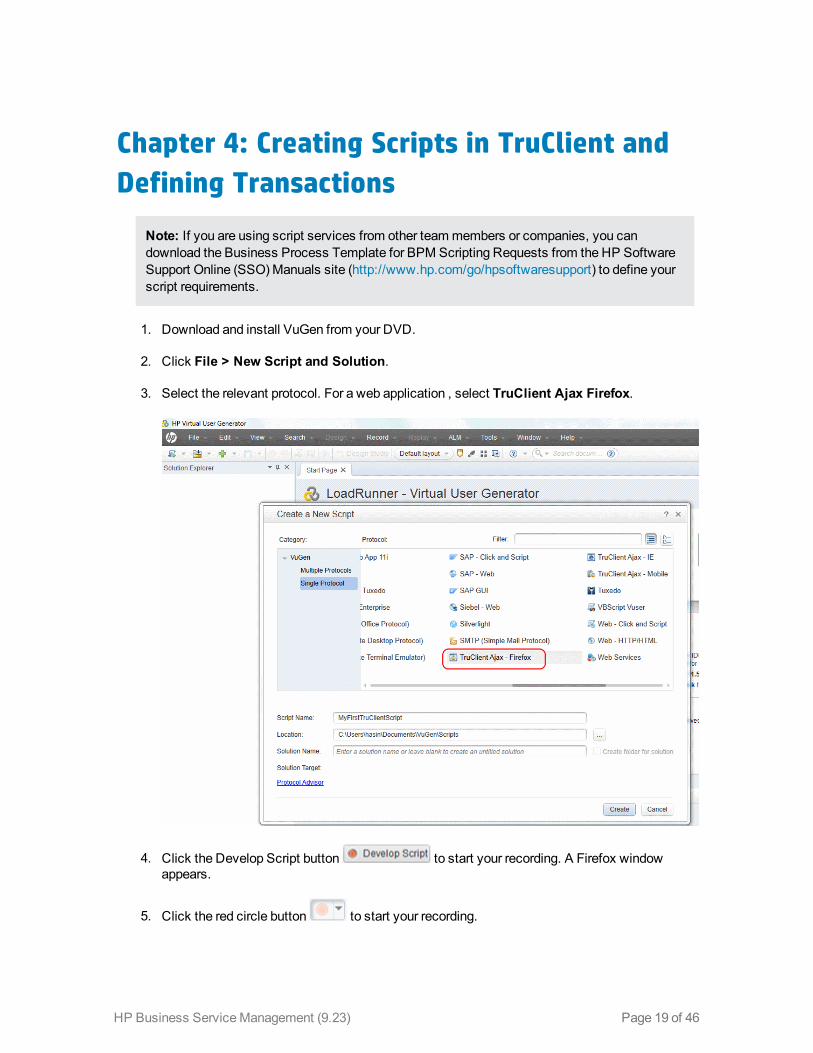
1. Download and install VuGen from your DVD.
2. Click File > New Script and Solution.
3. Select the relevant protocol. For a web application , select TruClient Ajax Firefox.
4. Click the Develop Script button to start your recording. A Firefox windowappears.
5. Click the red circle button to start your recording.
HP Business ServiceManagement (9.23) Page 19 of 46
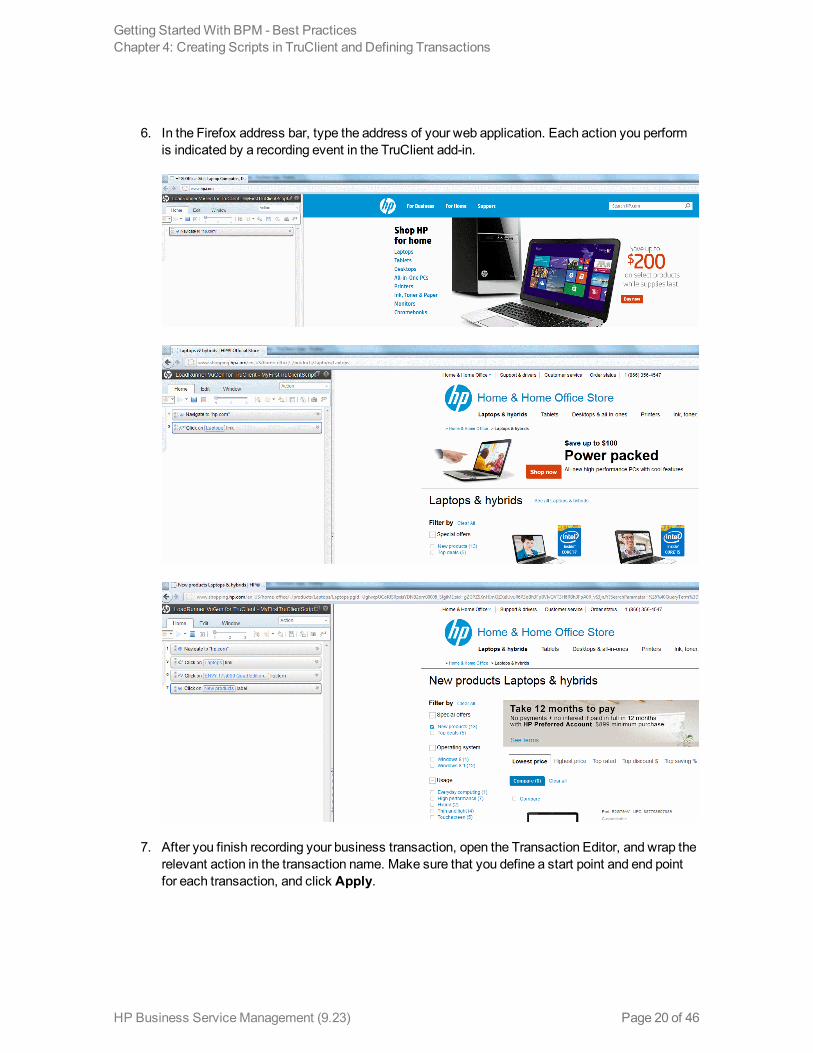
6. In the Firefox address bar, type the address of your web application. Each action you performis indicated by a recording event in the TruClient add-in.
7. After you finish recording your business transaction, open the Transaction Editor, and wrap therelevant action in the transaction name. Make sure that you define a start point and end pointfor each transaction, and click Apply.
Getting StartedWith BPM - Best PracticesChapter 4: Creating Scripts in TruClient and Defining Transactions
HP Business ServiceManagement (9.23) Page 20 of 46
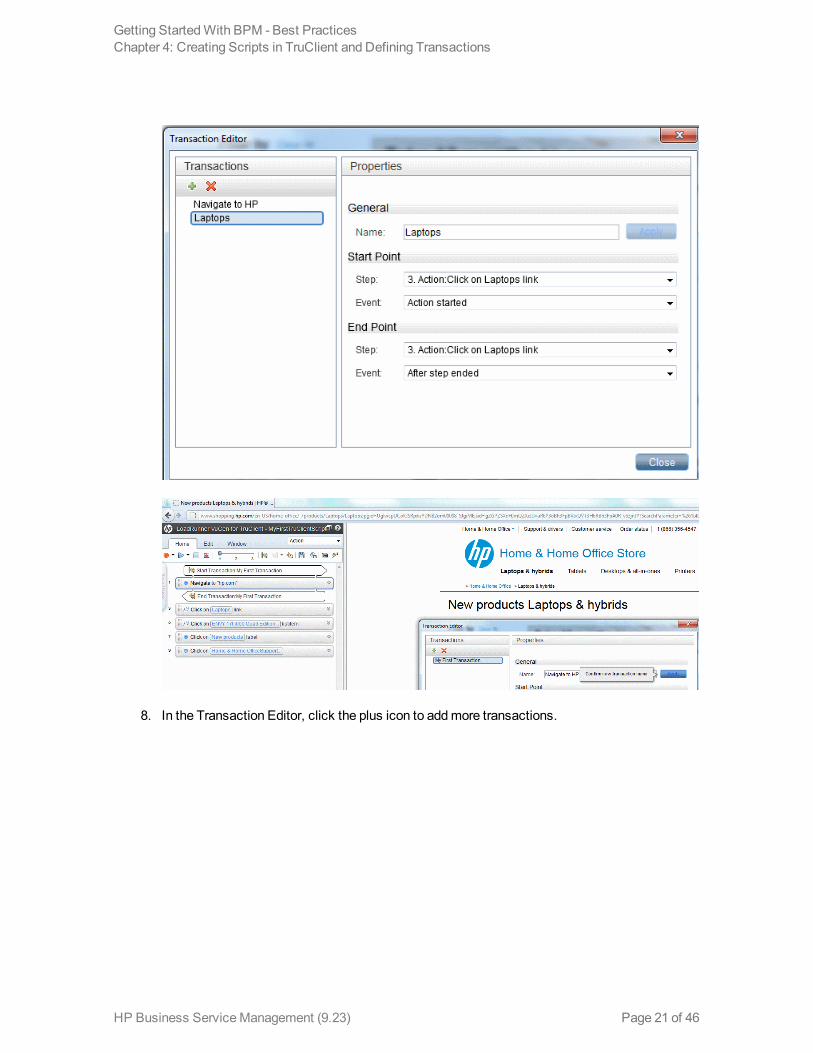
8. In the Transaction Editor, click the plus icon to addmore transactions.
Getting StartedWith BPM - Best PracticesChapter 4: Creating Scripts in TruClient and Defining Transactions
HP Business ServiceManagement (9.23) Page 21 of 46
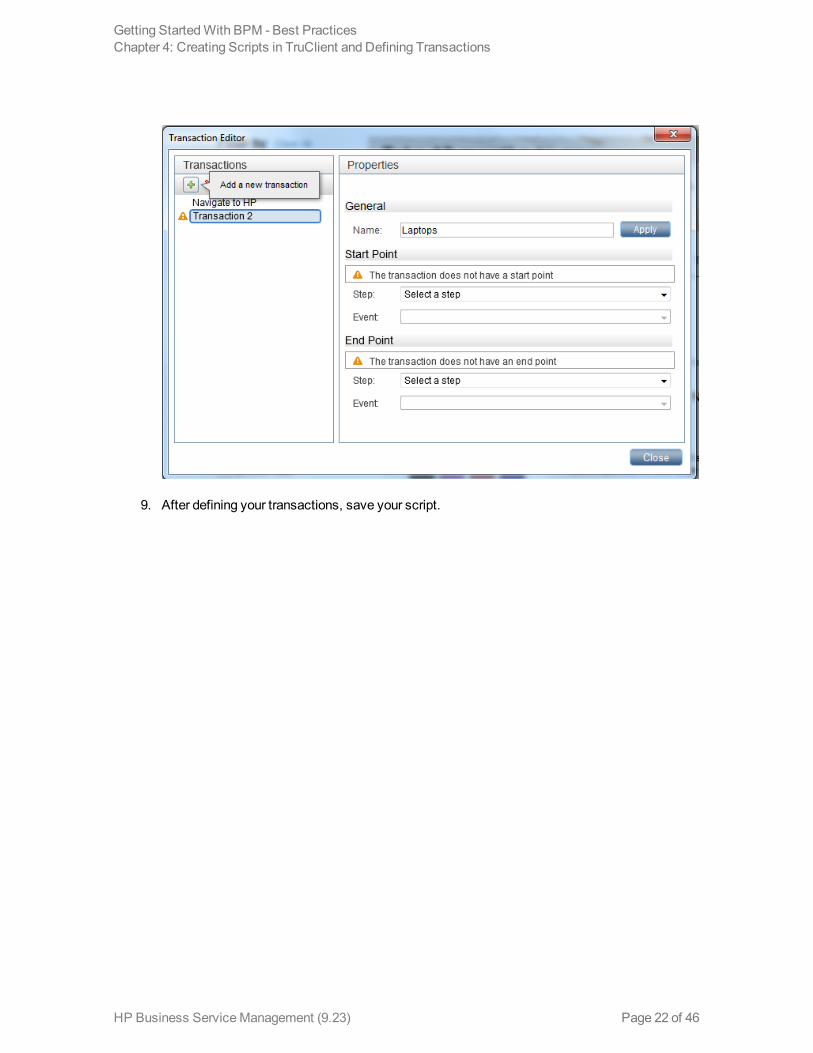
9. After defining your transactions, save your script.
Getting StartedWith BPM - Best PracticesChapter 4: Creating Scripts in TruClient and Defining Transactions
HP Business ServiceManagement (9.23) Page 22 of 46
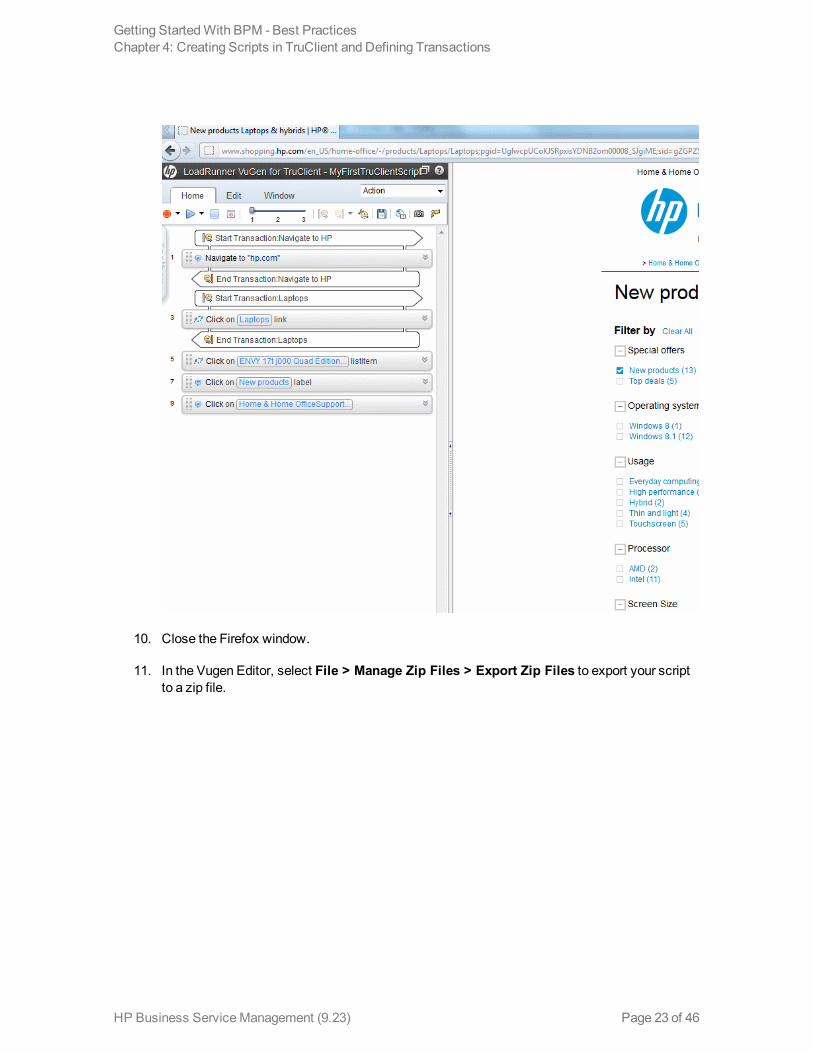
10. Close the Firefox window.
11. In the Vugen Editor, select File > Manage Zip Files > Export Zip Files to export your scriptto a zip file.
Getting StartedWith BPM - Best PracticesChapter 4: Creating Scripts in TruClient and Defining Transactions
HP Business ServiceManagement (9.23) Page 23 of 46
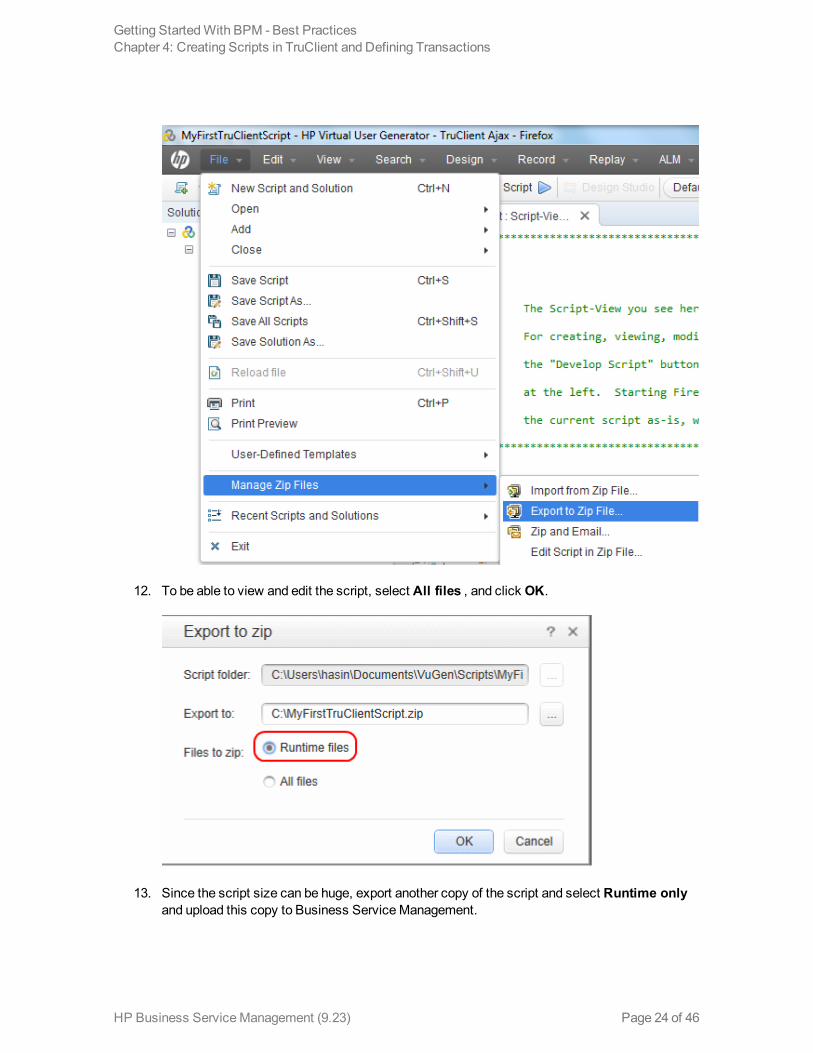
12. To be able to view and edit the script, select All files , and click OK.
13. Since the script size can be huge, export another copy of the script and select Runtime onlyand upload this copy to Business ServiceManagement.
Getting StartedWith BPM - Best PracticesChapter 4: Creating Scripts in TruClient and Defining Transactions
HP Business ServiceManagement (9.23) Page 24 of 46
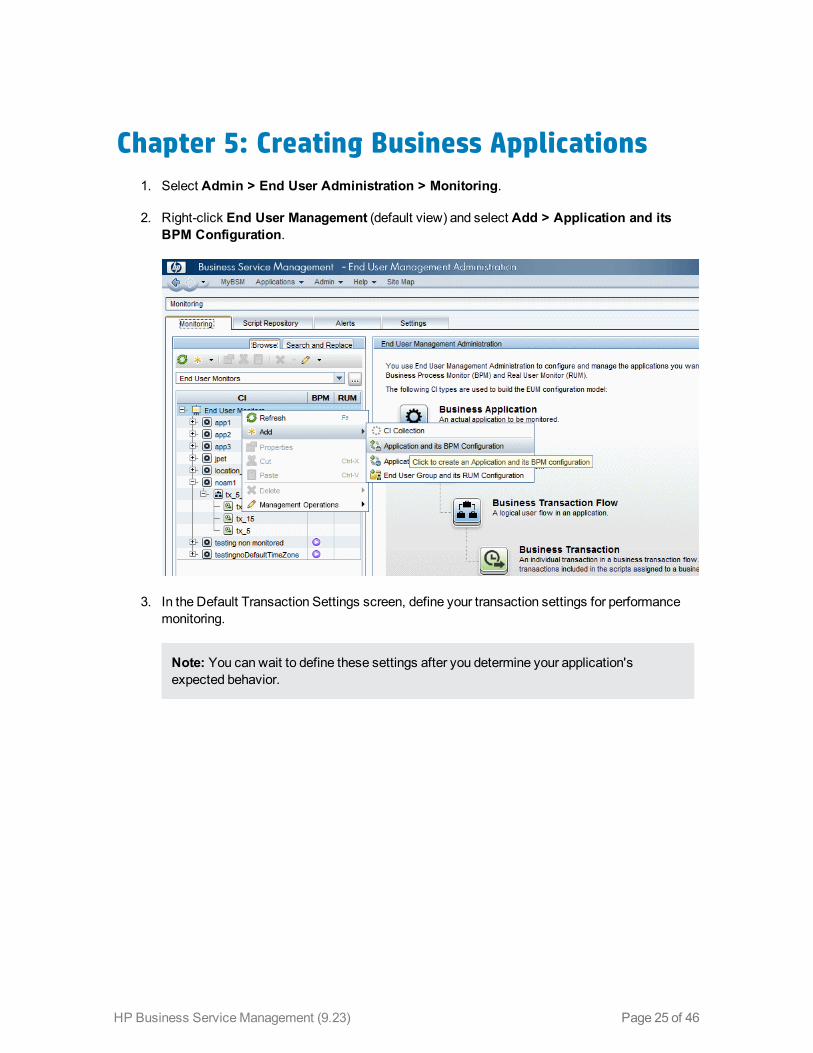
Chapter 5: Creating Business Applications1. Select Admin > End User Administration > Monitoring.
2. Right-click End User Management (default view) and select Add > Application and itsBPM Configuration.
3. In the Default Transaction Settings screen, define your transaction settings for performancemonitoring.
Note: You can wait to define these settings after you determine your application'sexpected behavior.
HP Business ServiceManagement (9.23) Page 25 of 46
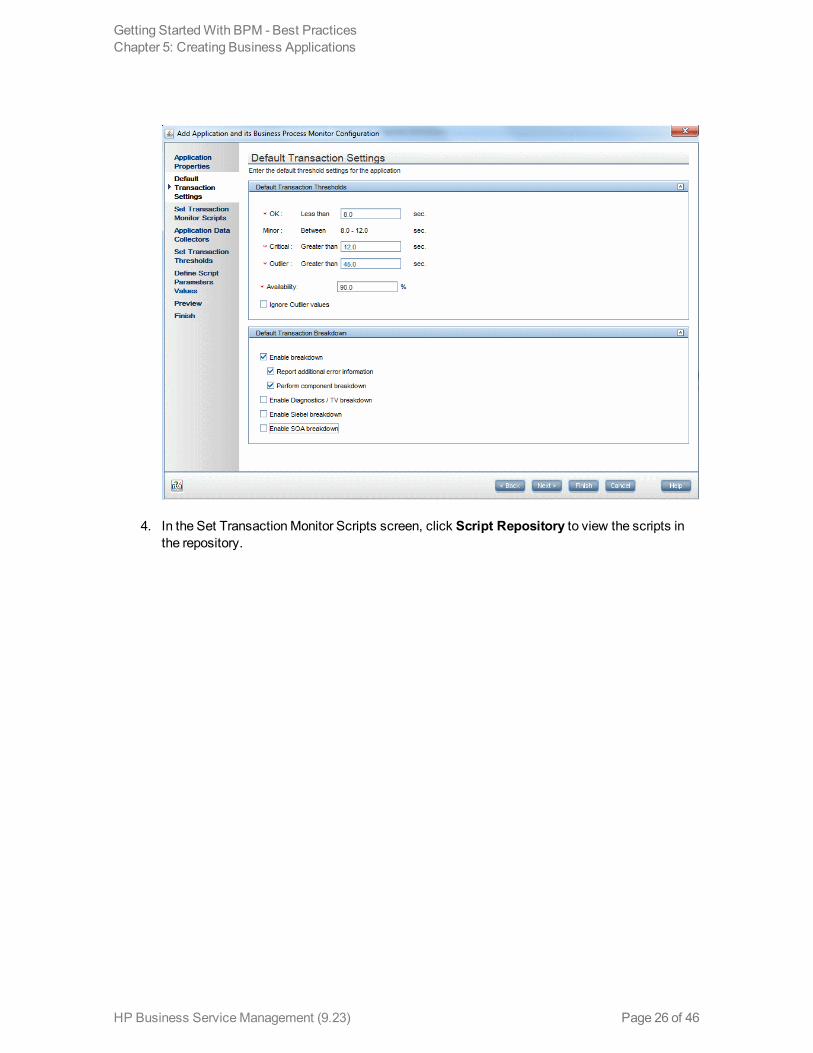
4. In the Set TransactionMonitor Scripts screen, click Script Repository to view the scripts inthe repository.
Getting StartedWith BPM - Best PracticesChapter 5: Creating Business Applications
HP Business ServiceManagement (9.23) Page 26 of 46
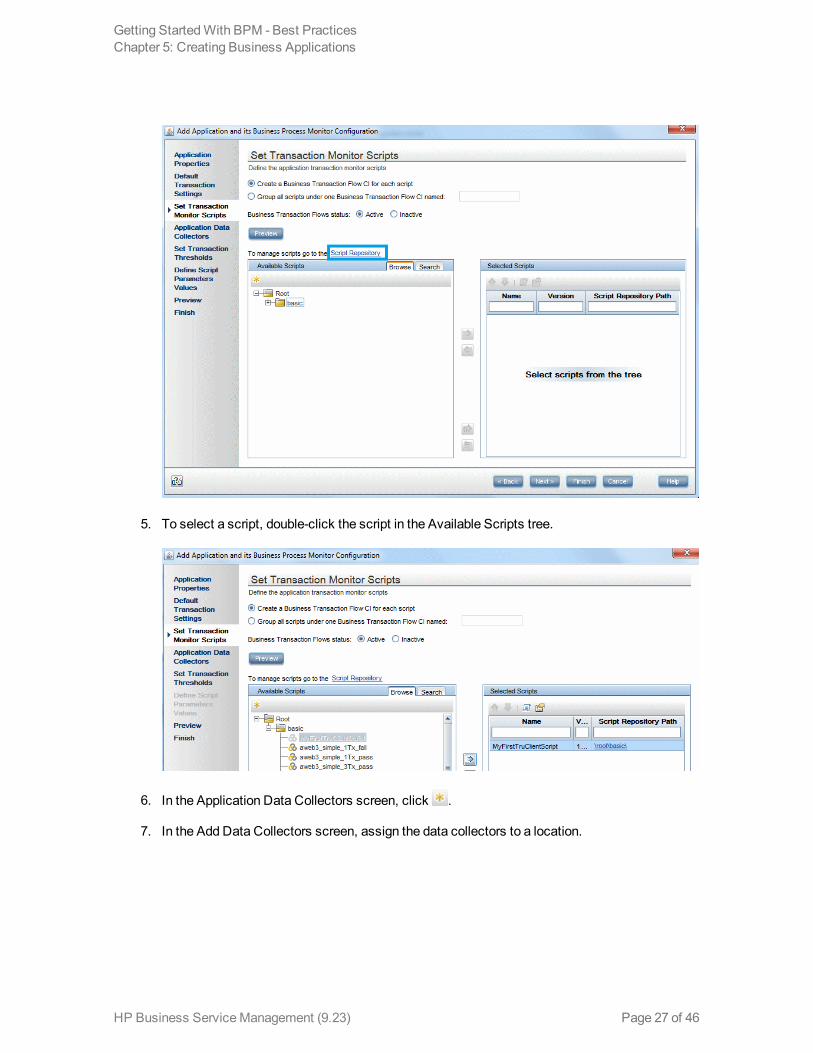
5. To select a script, double-click the script in the Available Scripts tree.
6. In the Application Data Collectors screen, click .
7. In the Add Data Collectors screen, assign the data collectors to a location.
Getting StartedWith BPM - Best PracticesChapter 5: Creating Business Applications
HP Business ServiceManagement (9.23) Page 27 of 46
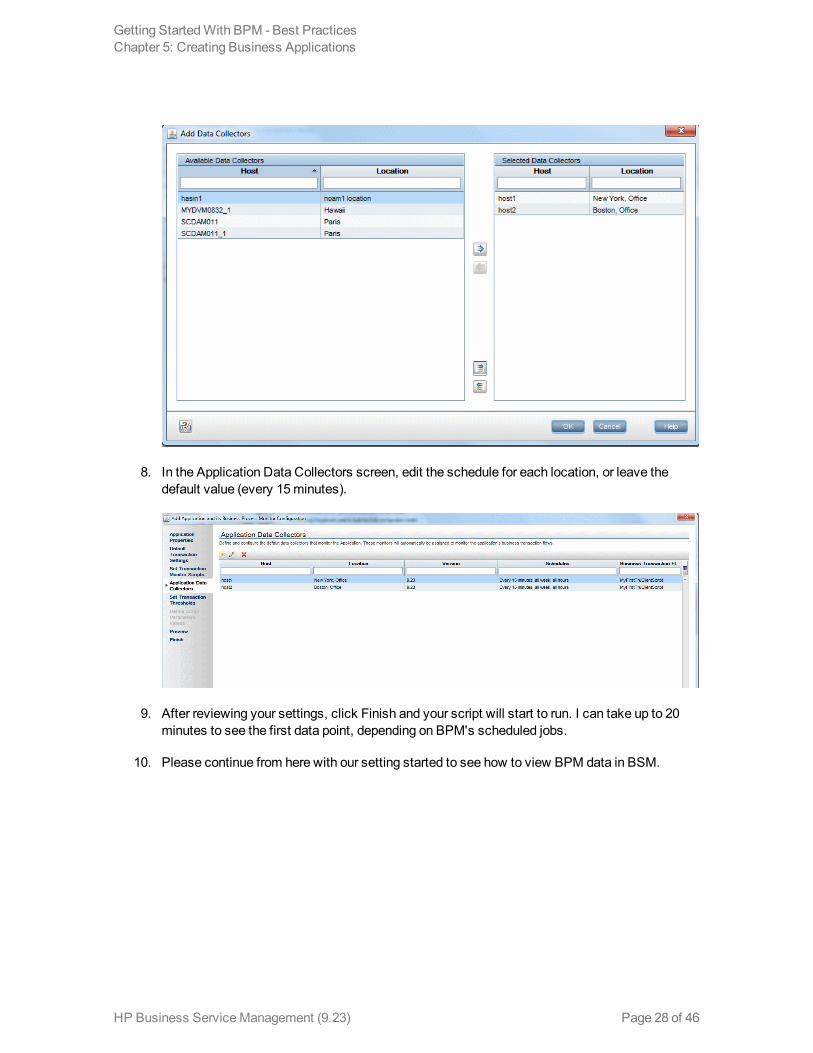
8. In the Application Data Collectors screen, edit the schedule for each location, or leave thedefault value (every 15minutes).
9. After reviewing your settings, click Finish and your script will start to run. I can take up to 20minutes to see the first data point, depending on BPM's scheduled jobs.
10. Please continue from here with our setting started to see how to view BPM data in BSM.
Getting StartedWith BPM - Best PracticesChapter 5: Creating Business Applications
HP Business ServiceManagement (9.23) Page 28 of 46
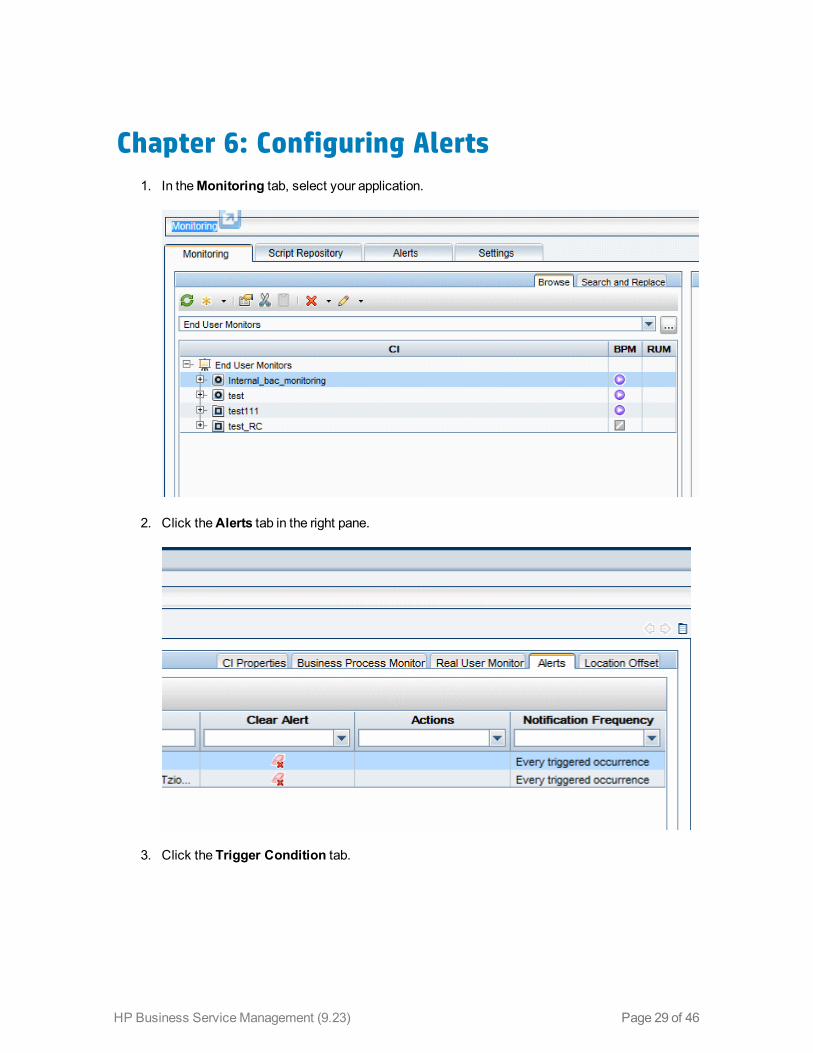
Chapter 6: Configuring Alerts1. In theMonitoring tab, select your application.
2. Click theAlerts tab in the right pane.
3. Click the Trigger Condition tab.
HP Business ServiceManagement (9.23) Page 29 of 46
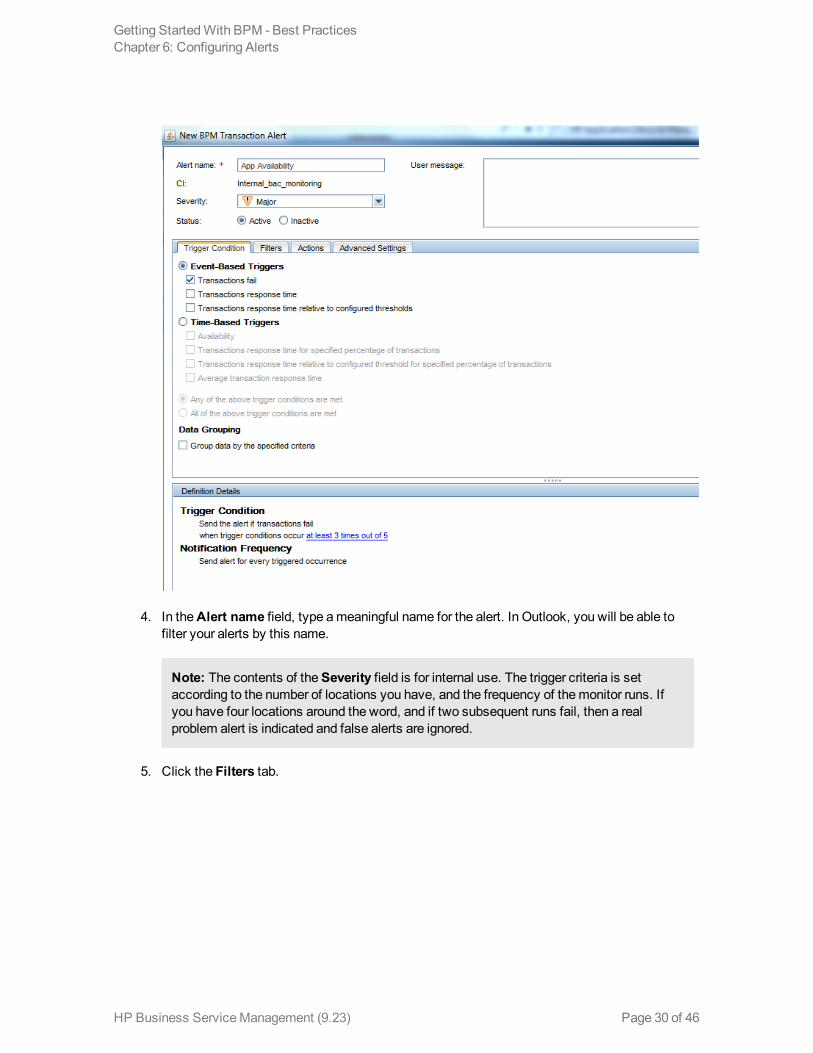
4. In theAlert name field, type ameaningful name for the alert. In Outlook, you will be able tofilter your alerts by this name.
Note: The contents of theSeverity field is for internal use. The trigger criteria is setaccording to the number of locations you have, and the frequency of themonitor runs. Ifyou have four locations around the word, and if two subsequent runs fail, then a realproblem alert is indicated and false alerts are ignored.
5. Click the Filters tab.
Getting StartedWith BPM - Best PracticesChapter 6: Configuring Alerts
HP Business ServiceManagement (9.23) Page 30 of 46
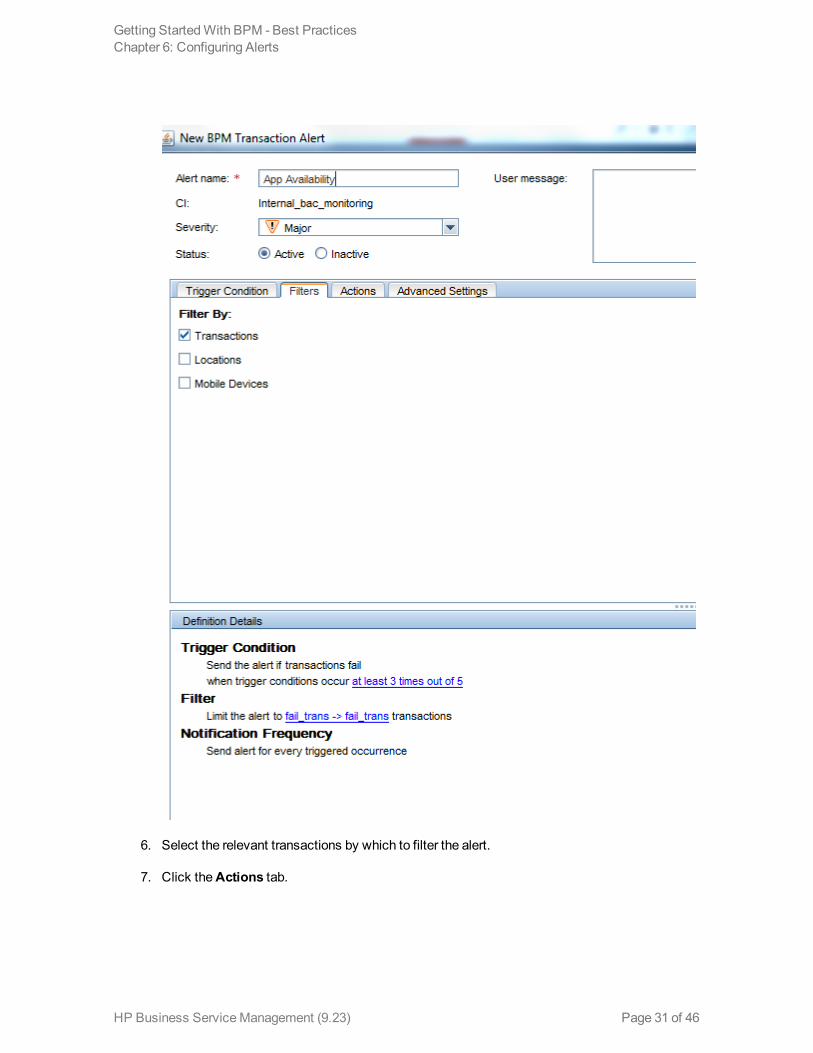
6. Select the relevant transactions by which to filter the alert.
7. Click theActions tab.
Getting StartedWith BPM - Best PracticesChapter 6: Configuring Alerts
HP Business ServiceManagement (9.23) Page 31 of 46
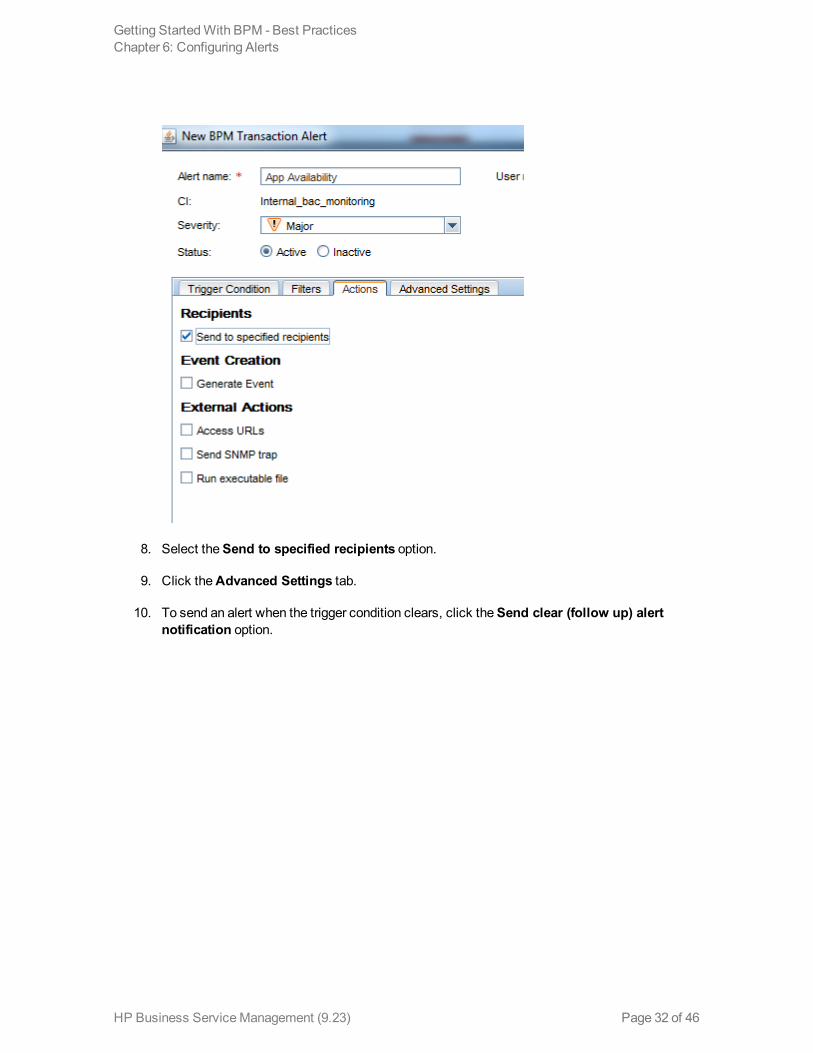
8. Select theSend to specified recipients option.
9. Click theAdvanced Settings tab.
10. To send an alert when the trigger condition clears, click theSend clear (follow up) alertnotification option.
Getting StartedWith BPM - Best PracticesChapter 6: Configuring Alerts
HP Business ServiceManagement (9.23) Page 32 of 46
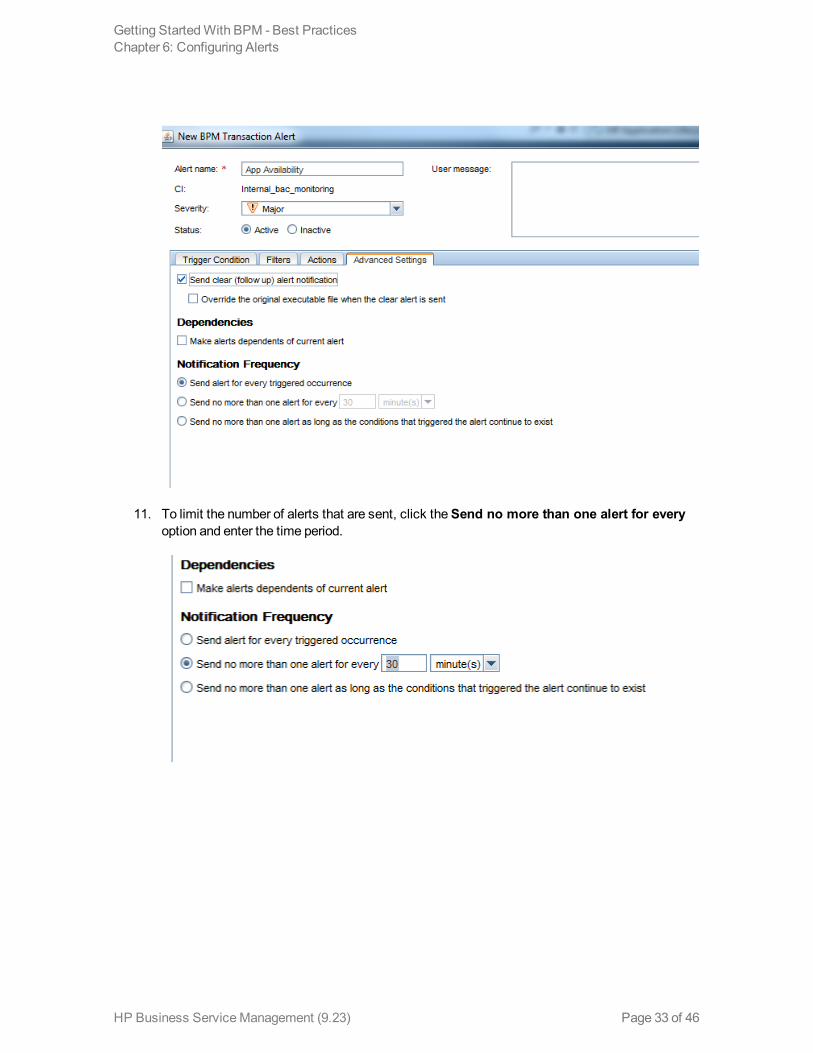
11. To limit the number of alerts that are sent, click theSend no more than one alert for everyoption and enter the time period.
Getting StartedWith BPM - Best PracticesChapter 6: Configuring Alerts
HP Business ServiceManagement (9.23) Page 33 of 46
Chapter 7: Configuring TransactionThresholds
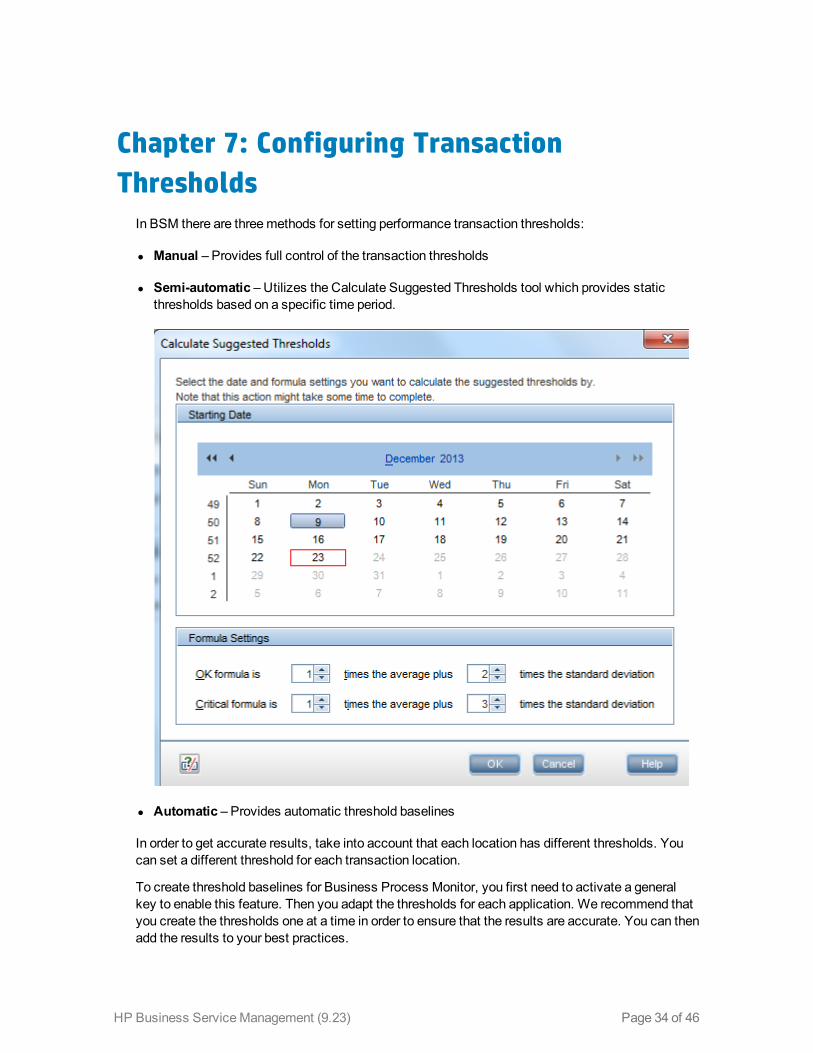
In BSM there are threemethods for setting performance transaction thresholds:
l Manual – Provides full control of the transaction thresholds
l Semi-automatic – Utilizes the Calculate Suggested Thresholds tool which provides staticthresholds based on a specific time period.
l Automatic – Provides automatic threshold baselines
In order to get accurate results, take into account that each location has different thresholds. Youcan set a different threshold for each transaction location.
To create threshold baselines for Business Process Monitor, you first need to activate a generalkey to enable this feature. Then you adapt the thresholds for each application. We recommend thatyou create the thresholds one at a time in order to ensure that the results are accurate. You can thenadd the results to your best practices.
HP Business ServiceManagement (9.23) Page 34 of 46

Formore information, see the Business Process Monitor Administration Guide which is availablefor download from the SSO site: http://support.openview.hp.com/selfsolve/manuals.
Getting StartedWith BPM - Best PracticesChapter 7: Configuring Transaction Thresholds
HP Business ServiceManagement (9.23) Page 35 of 46
Chapter 8: Viewing Data in BSMYou can view your monitored application data by accessing the 360° View in System Health or byrunning the BPM PerformanceOver Time report.
Viewing Data in Service HealthThe BPM checks if there is a new configuration every 2minutes. If you schedule your script to runan application every 15minutes, the first data point arrives within 17minutes.
If a script fails, a red icon appears near the relevant transaction CI, You need to fix the script,and upload it again.
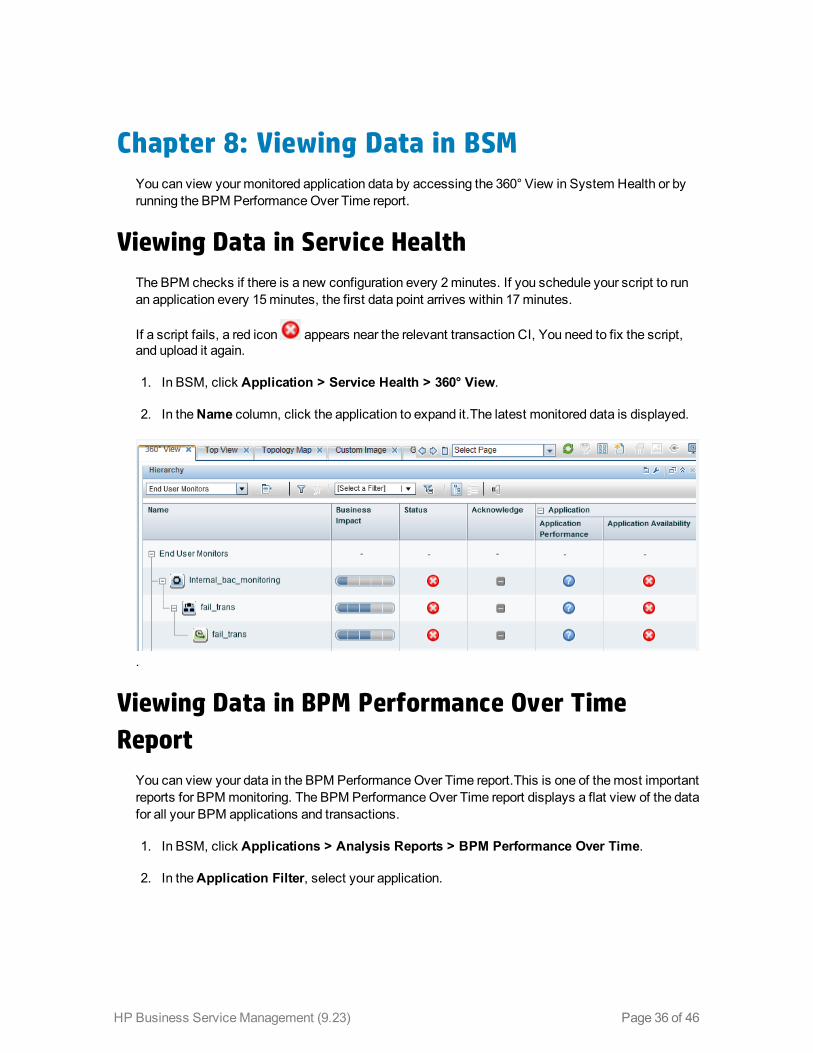
1. In BSM, click Application > Service Health > 360° View.
2. In theName column, click the application to expand it.The latest monitored data is displayed.
.
Viewing Data in BPM Performance Over TimeReport
You can view your data in the BPM PerformanceOver Time report.This is one of themost importantreports for BPMmonitoring. The BPM PerformanceOver Time report displays a flat view of the datafor all your BPM applications and transactions.
1. In BSM, click Applications > Analysis Reports > BPM Performance Over Time.
2. In theApplication Filter, select your application.
HP Business ServiceManagement (9.23) Page 36 of 46
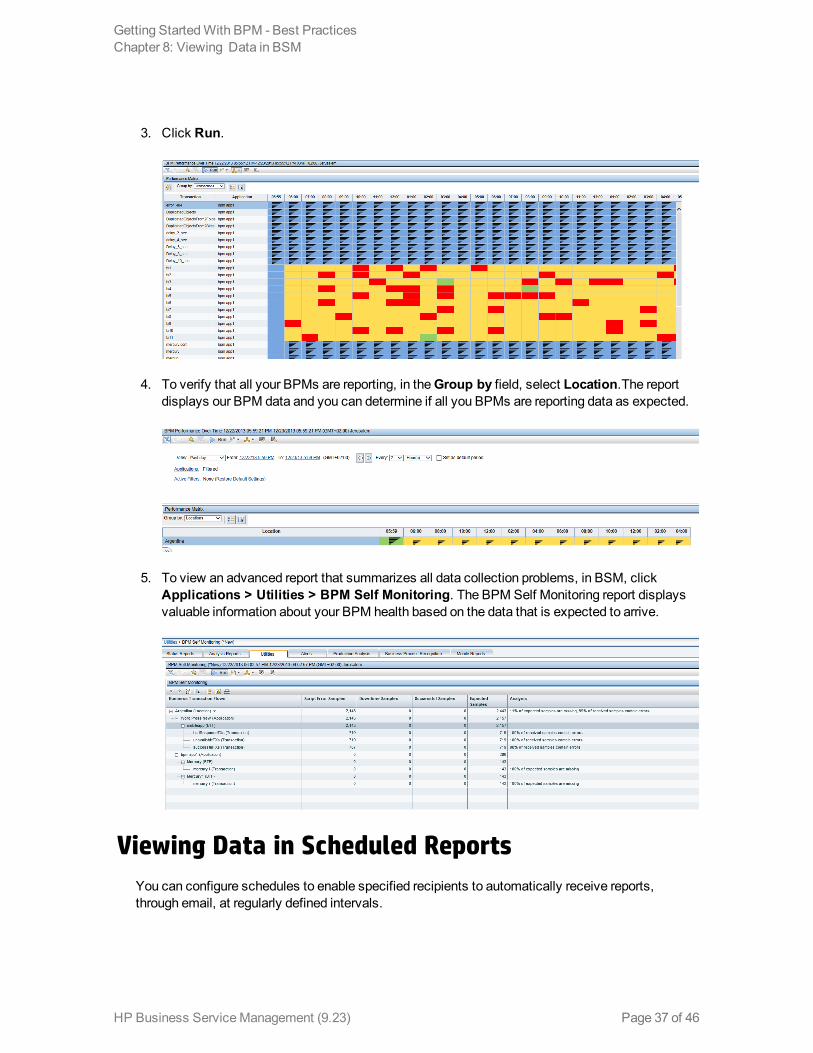
3. Click Run.
4. To verify that all your BPMs are reporting, in theGroup by field, select Location.The reportdisplays our BPM data and you can determine if all you BPMs are reporting data as expected.
5. To view an advanced report that summarizes all data collection problems, in BSM, clickApplications > Utilities > BPM Self Monitoring. The BPM Self Monitoring report displaysvaluable information about your BPM health based on the data that is expected to arrive.
Viewing Data in Scheduled ReportsYou can configure schedules to enable specified recipients to automatically receive reports,through email, at regularly defined intervals.
Getting StartedWith BPM - Best PracticesChapter 8: Viewing Data in BSM
HP Business ServiceManagement (9.23) Page 37 of 46
You can schedule Custom Reports, Trend Reports, and Service Reports defined in the ReportManager, or reports saved from the specific report page. You can also schedule Favorite Filterreports.
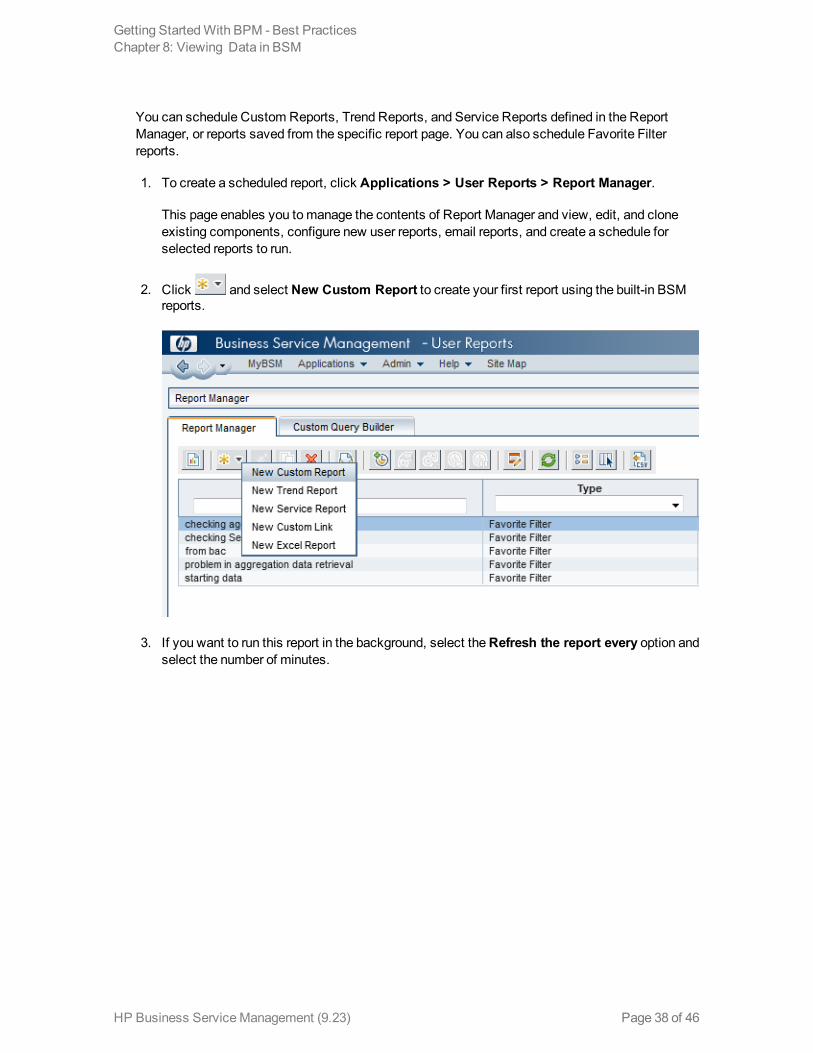
1. To create a scheduled report, click Applications > User Reports > Report Manager.
This page enables you tomanage the contents of Report Manager and view, edit, and cloneexisting components, configure new user reports, email reports, and create a schedule forselected reports to run.
2. Click and select New Custom Report to create your first report using the built-in BSMreports.
3. If you want to run this report in the background, select theRefresh the report every option andselect the number of minutes.
Getting StartedWith BPM - Best PracticesChapter 8: Viewing Data in BSM
HP Business ServiceManagement (9.23) Page 38 of 46

4. Click Next.
5. In theReport Components page, click . TheAdd Component page appears.
6. All BPM report are located in theEnd User Management folder.
Getting StartedWith BPM - Best PracticesChapter 8: Viewing Data in BSM
HP Business ServiceManagement (9.23) Page 39 of 46

7. Expand the contents of theEnd User Management folder and click Status Reports.
8. From theReport drop down list, select BPM Performance Overtime By Transaction.
Getting StartedWith BPM - Best PracticesChapter 8: Viewing Data in BSM
HP Business ServiceManagement (9.23) Page 40 of 46
9. Click OK.
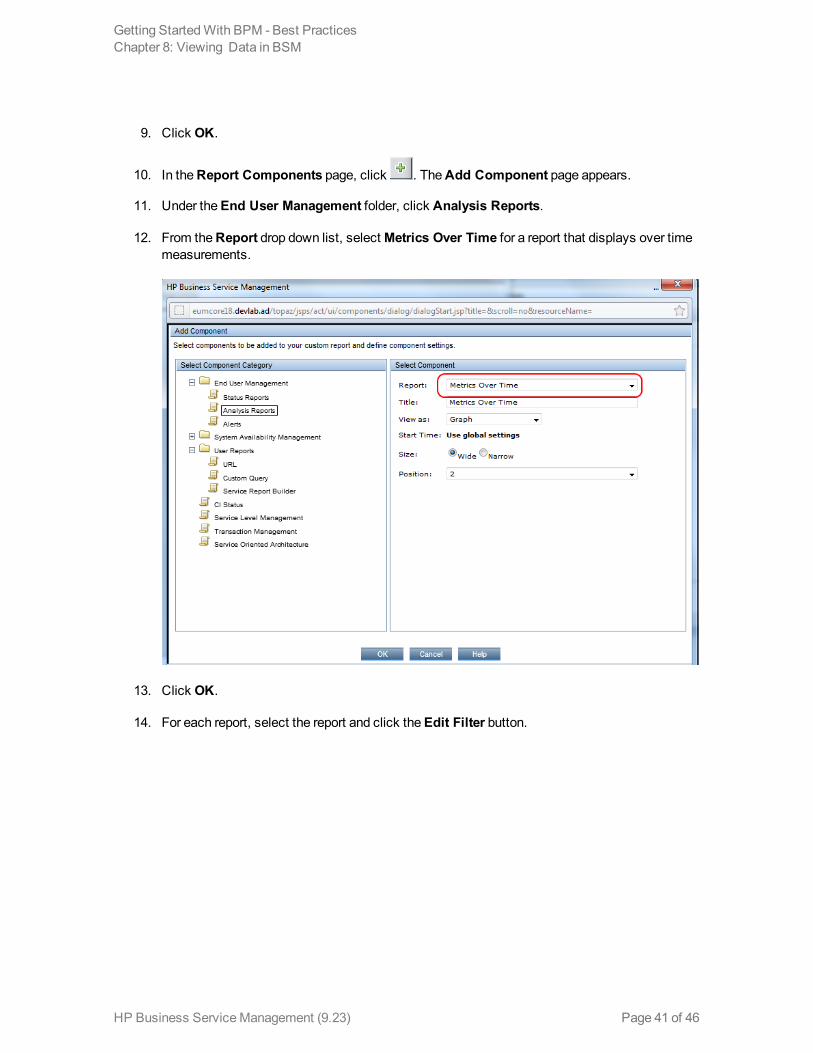
10. In theReport Components page, click . TheAdd Component page appears.
11. Under theEnd User Management folder, click Analysis Reports.
12. From theReport drop down list, selectMetrics Over Time for a report that displays over timemeasurements.
13. Click OK.
14. For each report, select the report and click theEdit Filter button.
Getting StartedWith BPM - Best PracticesChapter 8: Viewing Data in BSM
HP Business ServiceManagement (9.23) Page 41 of 46
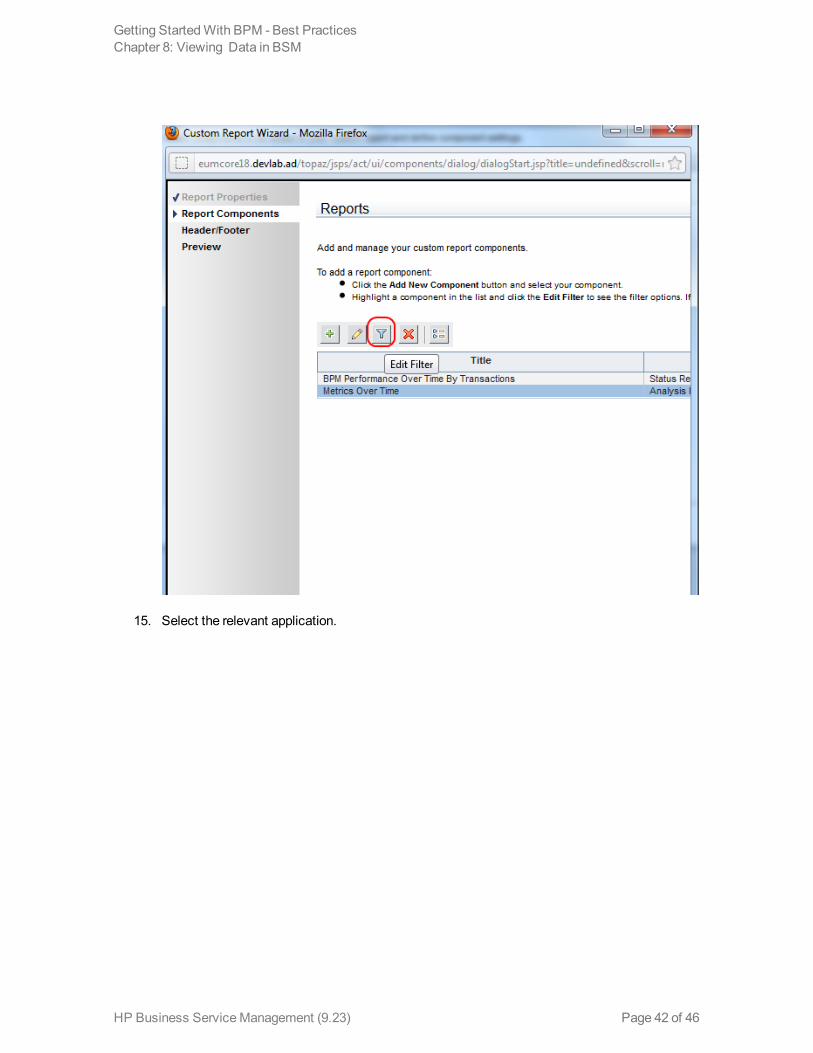
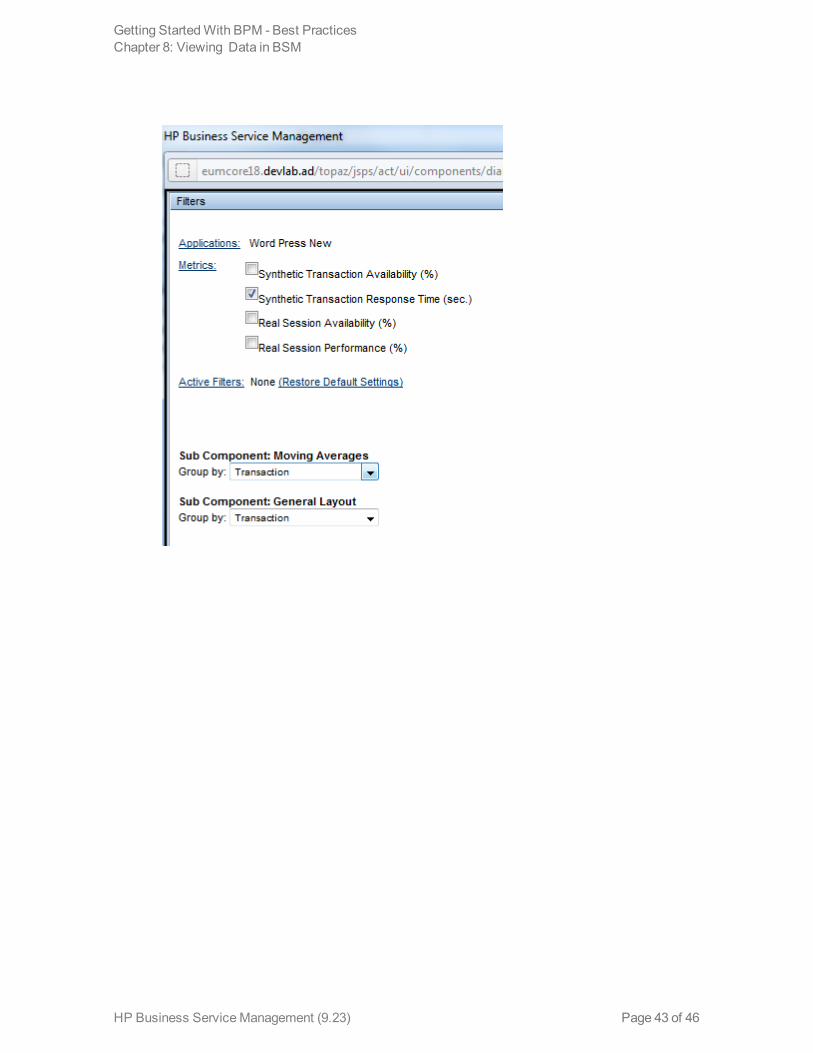
15. Select the relevant application.
Getting StartedWith BPM - Best PracticesChapter 8: Viewing Data in BSM
HP Business ServiceManagement (9.23) Page 42 of 46
Getting StartedWith BPM - Best PracticesChapter 8: Viewing Data in BSM
HP Business ServiceManagement (9.23) Page 43 of 46
Chapter 9: BPM Report RecommendationUse the following reports for isolating problems:
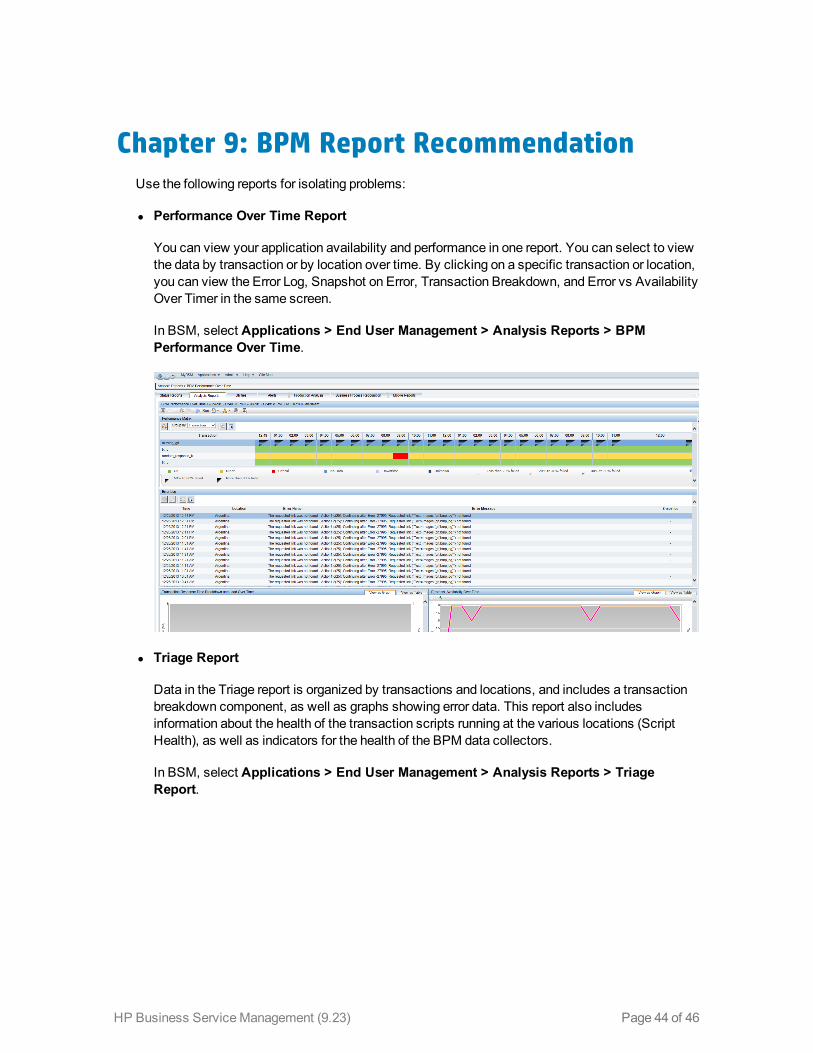
l Performance Over Time Report
You can view your application availability and performance in one report. You can select to viewthe data by transaction or by location over time. By clicking on a specific transaction or location,you can view the Error Log, Snapshot on Error, Transaction Breakdown, and Error vs AvailabilityOver Timer in the same screen.
In BSM, select Applications > End User Management > Analysis Reports > BPMPerformance Over Time.
l Triage Report
Data in the Triage report is organized by transactions and locations, and includes a transactionbreakdown component, as well as graphs showing error data. This report also includesinformation about the health of the transaction scripts running at the various locations (ScriptHealth), as well as indicators for the health of the BPM data collectors.
In BSM, select Applications > End User Management > Analysis Reports > TriageReport.
HP Business ServiceManagement (9.23) Page 44 of 46
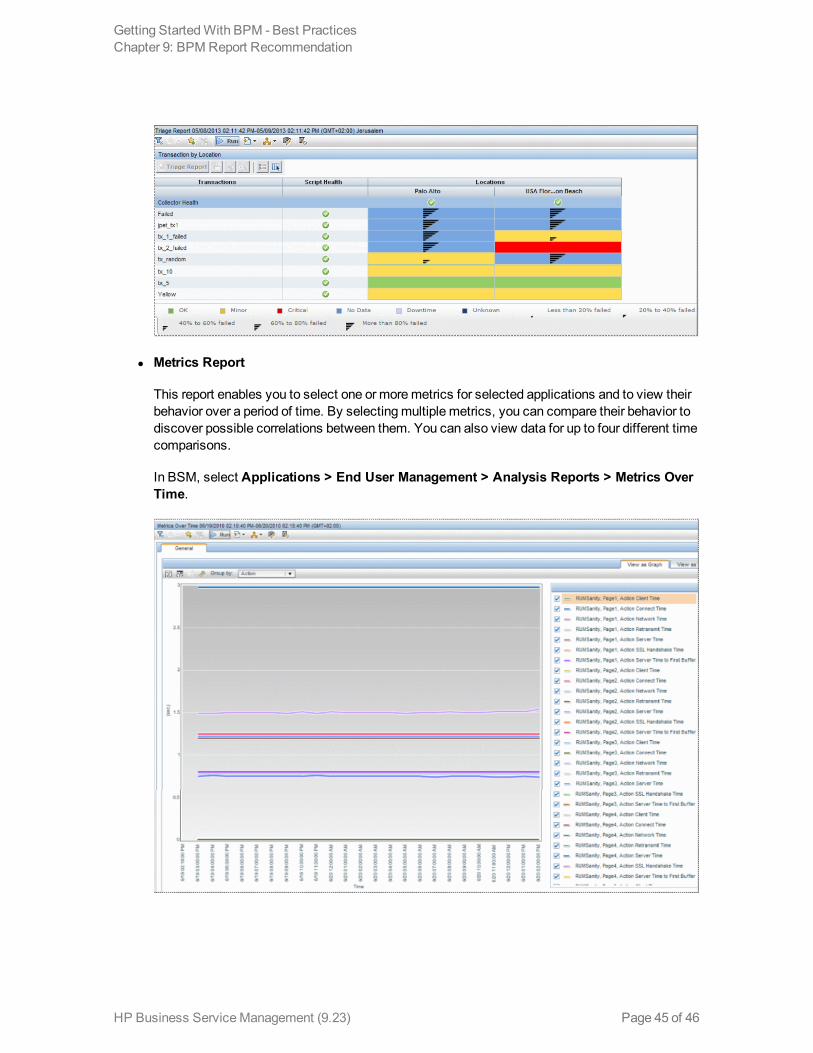
l Metrics Report
This report enables you to select one or moremetrics for selected applications and to view theirbehavior over a period of time. By selectingmultiple metrics, you can compare their behavior todiscover possible correlations between them. You can also view data for up to four different timecomparisons.
In BSM, select Applications > End User Management > Analysis Reports > Metrics OverTime.
Getting StartedWith BPM - Best PracticesChapter 9: BPM Report Recommendation
HP Business ServiceManagement (9.23) Page 45 of 46

We appreciate your feedback!If you have comments about this document, you can contact the documentation team by email. Ifan email client is configured on this system, click the link above and an email window opens withthe following information in the subject line:
Feedback on Getting Started With BPM - Best Practices (Business Service Management9.23)
Just add your feedback to the email and click send.
If no email client is available, copy the information above to a new message in a webmail client,and send your feedback to [email protected].
HP Business ServiceManagement (9.23) Page 46 of 46