Embed Size (px)
Citation preview
INSTALLATION GUIDE
Foundation Fieldbus Hardware and NI-FBUS SoftwareThis guide contains installation and configuration instructions for the PCI-FBUS, PCMCIA-FBUS, and USB-8486.
Note Install the NI-FBUS software before you install the hardware.
ContentsInstalling the Software.............................................................................................................. 1Installing the Hardware ............................................................................................................ 2
Install Your PCI-FBUS Card............................................................................................ 2Install Your PCMCIA-FBUS Card................................................................................... 3Install Your USB-8486..................................................................................................... 4
Installing the SoftwareComplete the following steps to install the NI-FBUS software.
Caution If you are reinstalling the NI-FBUS software over a previous version, write down your card configuration and any port configuration parameters you changed from their defaults. Reinstalling the software may cause you to lose any existing card and port configuration information.
1. Log in as Administrator or as a user that has Administrator privileges.
2. Insert the NI-FBUS Software media into the computer.
If the installer does not launch automatically, use Windows Explorer to navigate to the installation media and launch the autorun.exe file.
3. The interactive setup program guides you through the necessary steps to install the NI-FBUS software. You may go back and change values where appropriate by clicking Back. You can exit the setup where appropriate by clicking Cancel.
4. Power down your computer when the setup is complete.
5. Continue to the Installing the Hardware section to configure and install your hardware.
™
2 | ni.com | Foundation Fieldbus Hardware and NI-FBUS Software Installation Guide
Installing the HardwareThis section describes how to install your PCI-FBUS, PCMCIA-FBUS, and USB-8486.
Note Here, the term PCI-FBUS represents PCI-FBUS/2; the term PCMCIA-FBUS represents PCMCIA-FBUS, PCMCIA-FBUS/2, PCMCIA-FBUS Series 2, and PCMCIA-FBUS/2 Series 2.
Install Your PCI-FBUS Card
Caution Before you remove the card from the package, touch the antistatic plastic package to a metal part of the system chassis to discharge electrostatic energy, which can damage several components on the PCI-FBUS card.
To install the PCI-FBUS card, complete the following steps.
1. Shut down and power off the computer. Keep the computer plugged in so that it remains grounded while you install the PCI-FBUS card.
2. Remove the top cover or access port of the I/O channel.
3. Remove the expansion slot cover on the back panel of the computer.
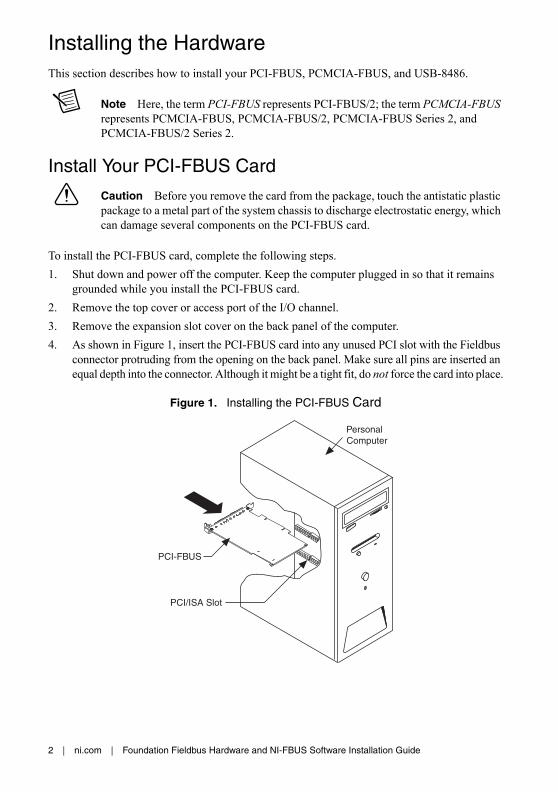
4. As shown in Figure 1, insert the PCI-FBUS card into any unused PCI slot with the Fieldbus connector protruding from the opening on the back panel. Make sure all pins are inserted an equal depth into the connector. Although it might be a tight fit, do not force the card into place.
Figure 1. Installing the PCI-FBUS Card
PersonalComputer
PCI/ISA Slot
PCI-FBUS
Foundation Fieldbus Hardware and NI-FBUS Software Installation Guide | © National Instruments | 3
5. Screw the mounting bracket of the PCI-FBUS card to the back panel rail of the computer.
6. Keep the top cover or access port off until you have verified that the hardware resources do not conflict.
7. Power on the computer.
8. Launch the Interface Configuration Utility. Find the PCI-FBUS card and right-click to enable.
9. Close the Interface Configuration Utility and start the NI-FBUS Communications Manager or NI-FBUS Configurator.
Install Your PCMCIA-FBUS Card
Caution Before you remove the card from the package, touch the antistatic plastic package to a metal part of the system chassis to discharge electrostatic energy, which can damage several components on the PCMCIA-FBUS card.
To install the PCMCIA-FBUS card, complete the following steps.
1. Power on the computer and allow the operating system to boot.
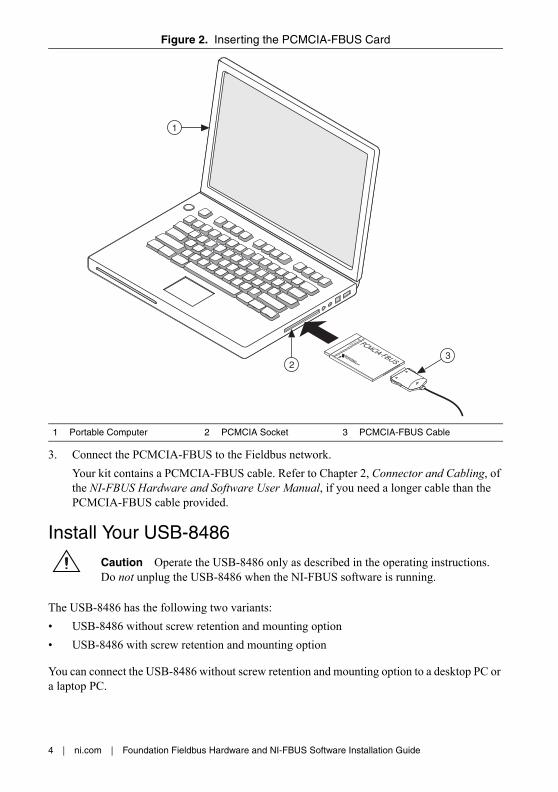
2. Insert the card into a free PCMCIA (or Cardbus) socket. The card has no jumpers or switches to set. Figure 2 shows how to insert the PCMCIA-FBUS and how to connect the PCMCIA-FBUS cable and connector to the PCMCIA-FBUS card. However, the PCMCIA-FBUS/2 cable has two connectors. Refer to Chapter 2, Connector and Cabling, of the NI-FBUS Hardware and Software User Manual, for more information about these two connectors.
4 | ni.com | Foundation Fieldbus Hardware and NI-FBUS Software Installation Guide
Figure 2. Inserting the PCMCIA-FBUS Card
3. Connect the PCMCIA-FBUS to the Fieldbus network.
Your kit contains a PCMCIA-FBUS cable. Refer to Chapter 2, Connector and Cabling, of the NI-FBUS Hardware and Software User Manual, if you need a longer cable than the PCMCIA-FBUS cable provided.
Install Your USB-8486
Caution Operate the USB-8486 only as described in the operating instructions. Do not unplug the USB-8486 when the NI-FBUS software is running.
The USB-8486 has the following two variants:
• USB-8486 without screw retention and mounting option
• USB-8486 with screw retention and mounting option
You can connect the USB-8486 without screw retention and mounting option to a desktop PC or a laptop PC.
1 Portable Computer 2 PCMCIA Socket 3 PCMCIA-FBUS Cable
1
233

Foundation Fieldbus Hardware and NI-FBUS Software Installation Guide | © National Instruments | 5
Figure 3. Connecting the USB-8486 to a Desktop PC
Figure 4. Connecting the USB-8486 to a Laptop PC
1 Desktop PC 2 USB-8486 3 DB-9 Connector
1 Portable Computer 2 USB Port 3 USB-8486 4 DB-9 Connector
1
3
2
1
2
3
4
6 | ni.com | Foundation Fieldbus Hardware and NI-FBUS Software Installation Guide
To install the USB-8486, complete the following steps.
1. Power on the computer and allow the operating system to boot.
2. Insert the USB-8486 into a free USB port, as shown in Figure 3 and Figure 4.
3. Connect the USB-8486 to the Fieldbus network. Refer to the NI-FBUS Hardware and Software User Manual for more information about the connectors.
4. Launch the Interface Configuration Utility.
5. Right-click the USB-8486 to enable if it is disabled.
6. Close the Interface Configuration Utility and start the NI-FBUS Communications Manager or NI-FBUS Configurator.
Mount and Connect Your USB-8486You can attach the USB-8486 with screw retention and mounting option to a CompactRIO. This device provides the following mounting options:
• DIN mount using the unthreaded DIN rail mounting holes
• Panel mount using the panel mount notch and tab
Foundation Fieldbus Hardware and NI-FBUS Software Installation Guide | © National Instruments | 7
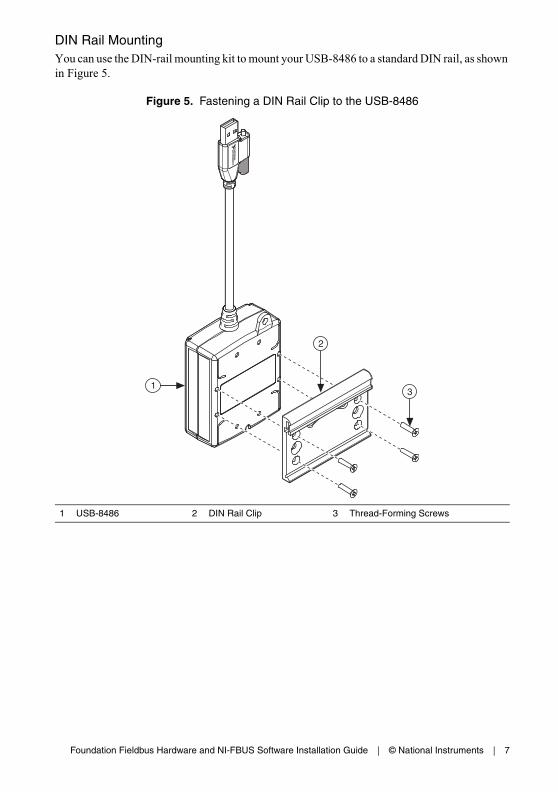
DIN Rail MountingYou can use the DIN-rail mounting kit to mount your USB-8486 to a standard DIN rail, as shown in Figure 5.
Figure 5. Fastening a DIN Rail Clip to the USB-8486
1 USB-8486 2 DIN Rail Clip 3 Thread-Forming Screws
13
2
8 | ni.com | Foundation Fieldbus Hardware and NI-FBUS Software Installation Guide
Complete the following steps to mount the device to a DIN rail vertically by using the unthreaded mounting holes.
1. Fasten a DIN rail clip to the device using a #1 Phillips screwdriver and four thread-forming screws included in the DIN-rail mounting kit. Tighten the screws to a torque of 0.76 N · m (6.7 lb · in.). Figure 5 shows a DIN rail clip being attached to the device.
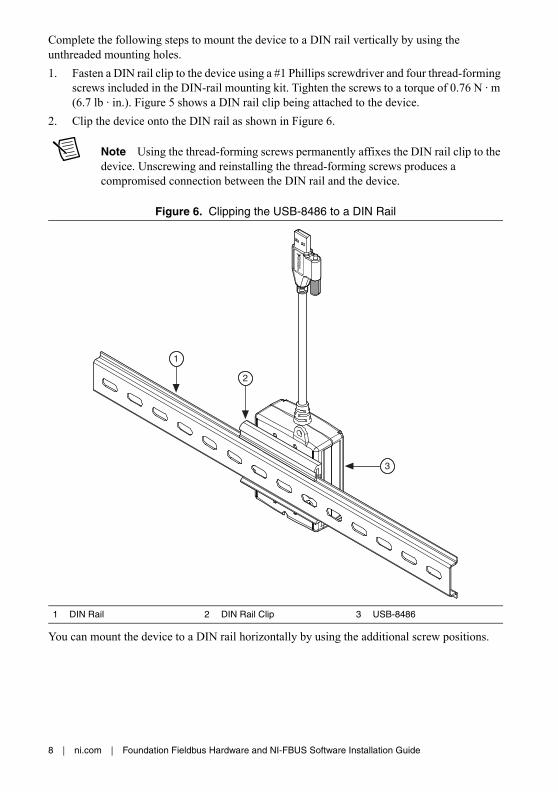
2. Clip the device onto the DIN rail as shown in Figure 6.
Note Using the thread-forming screws permanently affixes the DIN rail clip to the device. Unscrewing and reinstalling the thread-forming screws produces a compromised connection between the DIN rail and the device.
Figure 6. Clipping the USB-8486 to a DIN Rail
You can mount the device to a DIN rail horizontally by using the additional screw positions.
1 DIN Rail 2 DIN Rail Clip 3 USB-8486
1
2
3

Foundation Fieldbus Hardware and NI-FBUS Software Installation Guide | © National Instruments | 9
Panel MountingYou can use #8 or M4 pan head screws to mount the USB-8486 to a board or panel, as shown in Figure 7.
Figure 7. Mounting the USB-8486 to a Broad or Panel
To mount the USB-8486 to a board or panel, complete the following steps:
1. Screw a #8 or M4 pan head screw into the lower point on the panel.
2. Set the USB-8486 on the screw by fitting the screw head into the bottom screw notch on the underside of the enclosure.
3. Screw a #8 or M4 pan head screw through the upper mounting tab on the USB-8486.
1 #8 or M4 Pan Head Screw 2 USB-8486 3 #8 or M4 Pan Head Screw
1
2 3
10 | ni.com | Foundation Fieldbus Hardware and NI-FBUS Software Installation Guide
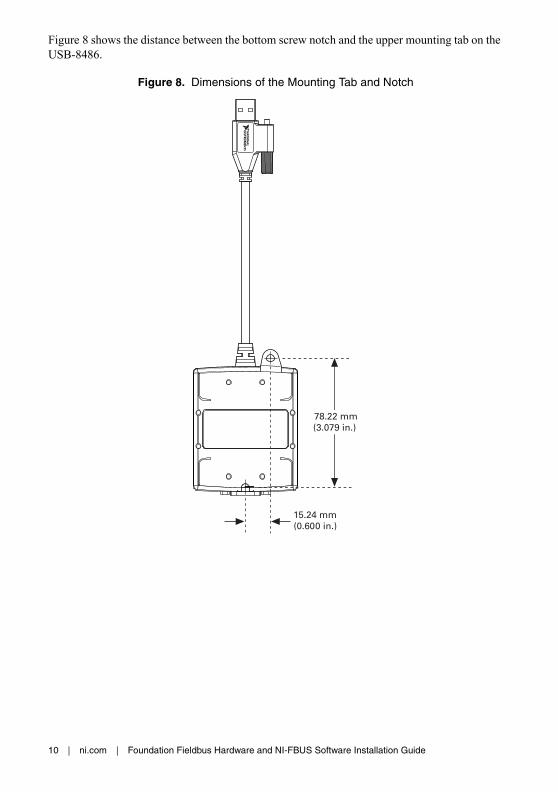
Figure 8 shows the distance between the bottom screw notch and the upper mounting tab on the USB-8486.
Figure 8. Dimensions of the Mounting Tab and Notch
15.24 mm(0.600 in.)
78.22 mm(3.079 in.)
Foundation Fieldbus Hardware and NI-FBUS Software Installation Guide | © National Instruments | 11
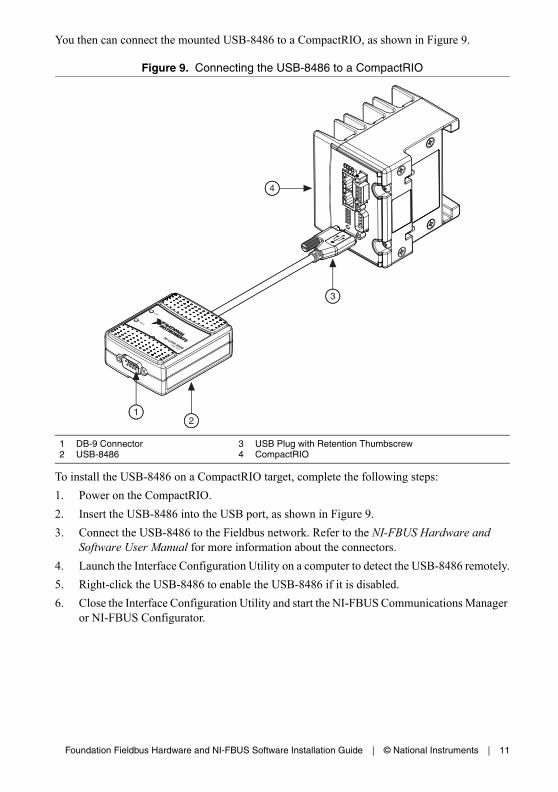
You then can connect the mounted USB-8486 to a CompactRIO, as shown in Figure 9.
Figure 9. Connecting the USB-8486 to a CompactRIO
To install the USB-8486 on a CompactRIO target, complete the following steps:
1. Power on the CompactRIO.
2. Insert the USB-8486 into the USB port, as shown in Figure 9.
3. Connect the USB-8486 to the Fieldbus network. Refer to the NI-FBUS Hardware and Software User Manual for more information about the connectors.
4. Launch the Interface Configuration Utility on a computer to detect the USB-8486 remotely.
5. Right-click the USB-8486 to enable the USB-8486 if it is disabled.
6. Close the Interface Configuration Utility and start the NI-FBUS Communications Manager or NI-FBUS Configurator.
1 DB-9 Connector2 USB-8486
3 USB Plug with Retention Thumbscrew4 CompactRIO
12
3
4

© 2002–2014 National Instruments. All rights reserved.
372456F-01 Jan14
Refer to the NI Trademarks and Logo Guidelines at ni.com/trademarks for more information on National Instruments trademarks. Other product and company names mentioned herein are trademarks or trade names of their respective companies. For patents covering National Instruments products/technology, refer to the appropriate location: Help»Patents in your software, the patents.txt file on your media, or the National Instruments Patents Notice at ni.com/patents. You can find information about end-user license agreements (EULAs) and third-party legal notices in the readme file for your NI product. Refer to the Export Compliance Information at ni.com/legal/export-compliance for the National Instruments global trade compliance policy and how to obtain relevant HTS codes, ECCNs, and other import/export data.