Embed Size (px)
Citation preview
Entertainm
ent Robot A
IBO
ER
S-210
English
Français
Deutsch
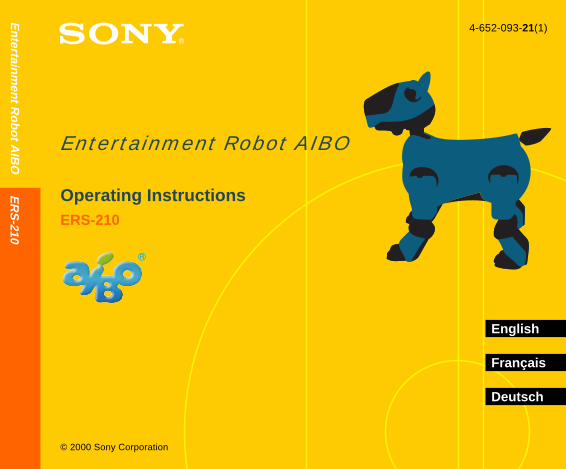
Entertainment Robot AIBO
© 2000 Sony Corporation
Operating InstructionsERS-210
4-652-093-21(1)
Printed in Japan * 4 6 5 2 0 9 3 2 1 (1)*
Safety Information
WARNING• To prevent fire or shock hazard, do not expose the robot to rain or moisture.• To avoid electrical shock, do not open the cabinet. Refer servicing to
qualified personnel only. (Contact the AIBO Customer Link.) (page 5)• Parents and Guardians—Periodically examine the transformer for conditions
that may result in the risk of fire, electric shock, or injury to persons (such asdamage to the cords, blades, housing) and that in the event of suchconditions, the transformer should not be used until properly replaced.
• Toy is not intended or recommended for children under 8 years old.• The robot connected to the AC adapter should not be connected to more than
the recommended number of power supplies.• The robot must only be used with the recommended AC adapter (ERA-
201P1).• The AC adapter is not a toy.• Small parts can be swallowed.• If the external flexible cable or cord is damaged, it shall be replaced or
repaired only by the manufacturer, his authorised service agent or a similarqualified person in order to avoid a hazard.
• All material for fastening or packing purposes are not part of the toy andshould be disregarded for children’s safety.
• For information regarding AC adapter, station, and lithium ion battery pack,please refer to the manuals provided separately.
• This product is Class 1 Laser Product.
2
DISPOSAL OF LITHIUM ION BATTERY! Do not handle damaged or leaking lithium ion batteries.! Danger of explosion if the battery is incorrectly replaced. Replace only with
the ERA-201B1 or equivalent type recommended by the manufacture.Discard used batteries according to the manufacturer’s instructions.
! The battery pack used in this device may present a fire or chemical burnhazard if mistreated. Do not disassemble, heat above 60 °C(140 °F ) or incinerate. Dispose of used battery promptly. Keep away fromchildren. Do not disassemble and do not dispose of in fire.
Voor de Klanten in NederlandBij dit produkt zijn batterijen geleverd. Wanneer deze leeg zijn,moet u ze niet weggooien maar inleveren als KCA.
Regulatory InformationThis product has been tested and found to conform to the following SafetyStandards.
Toy Directive 88/378/EEC, EN50088/96 + A1/96 + A2/97, EN71-1/98,EN71-2/93, EN71-3/94
EMC Directive 89/336/EECEMI EN55022/94+A1/95+A2/97, EN55014/93 + A1/97+A2/99, EN50081-1/92EMS : EN55024/98, EN55014-2/97, EN61000-3-2/95, EN61000-3-3/95,EN50082-1/97
EN60825-1/94 3
En
4
AC Adapter and Lithium Ion Batteries have been tested all together as asystem and found to conform to the following Safety Standards.
LVD 73/23/EEC + 93/68/EECEN60950/92 + A1/93 + A2/93 + A3/95 + A4/97 + A11/97EN60065/98EN61558-1/97 + A1/98EN61558-2-7/97
CE (EMC) Marking Conformity Remarks
a) This equipment complies with EN55022. Class B digital for use in following areas : residential, business, and light-industrial.b) This product conforms with the following European Directive: 89/336/EEC (EMC directive)
Sony Corporation6-7-35 Kitashinagawa, Shinagawa-ku, Tokyo 141-0001 JAPANPlease keep all information for future reference.
5
Customer SupportHow can you contact the AIBO Customer Link?In Europe:
English line: +44(0)-20-7365-2938German line: +49(0)-69-9508-6310French line: +33(0)-1-5569-5118E-mail address: [email protected]
In Hong Kong:+852-2345-2966E-mail address: [email protected]
In Singapore:+65-473-8500E-mail address: [email protected]
Reproduction in whole or in part without written permission is prohibited.All rights reserved.

6

7

8

9
10
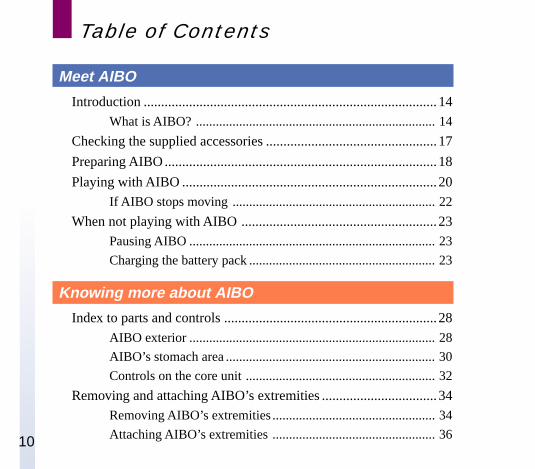
Table of Contents
Meet AIBO
Introduction ....................................................................................14What is AIBO? ........................................................................ 14
Checking the supplied accessories .................................................17
Preparing AIBO..............................................................................18
Playing with AIBO .........................................................................20If AIBO stops moving ............................................................. 22
When not playing with AIBO ........................................................23Pausing AIBO .......................................................................... 23
Charging the battery pack ........................................................ 23
Knowing more about AIBO
Index to parts and controls .............................................................28
AIBO exterior .......................................................................... 28
AIBO’s stomach area ............................................................... 30
Controls on the core unit ......................................................... 32
Removing and attaching AIBO’s extremities .................................34Removing AIBO’s extremities ................................................. 34
Attaching AIBO’s extremities ................................................. 36

11
Replacing the battery pack .............................................................37
Inserting or removing a “Memory Stick” .......................................40Inserting a “Memory Stick” ..................................................... 40
Removing the “Memory Stick” ............................................... 41
Inserting the optional PC card ........................................................43
Making various settings .................................................................45Selecting the time zone ............................................................ 45
Setting the clock ...................................................................... 47
Setting the date ........................................................................ 48
Setting the volume level of the musical tone ........................... 50
Checking the battery pack level ............................................... 51
Time zone table ..............................................................................52
Additional information
Notes on use ...................................................................................56On handling AIBO................................................................... 56
Moisture condensation ............................................................. 57
On handling the AC adapter .................................................... 58
On handling the battery pack ................................................... 58
On cleaning .............................................................................. 58
12
Troubleshooting .............................................................................59
Specifications .................................................................................63
Index ...............................................................................................66
13
Meet A
IBO
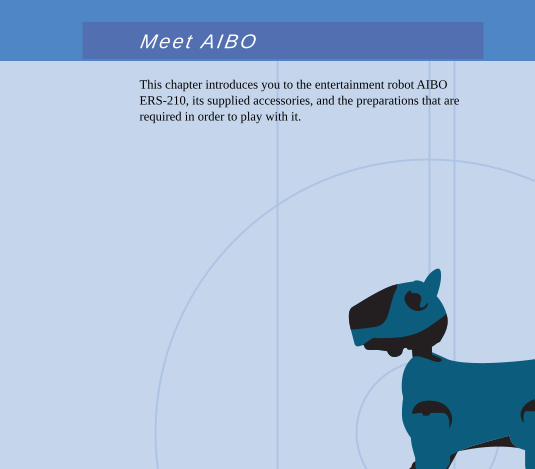
Meet AIBO
This chapter introduces you to the entertainment robot AIBOERS-210, its supplied accessories, and the preparations that arerequired in order to play with it.
14
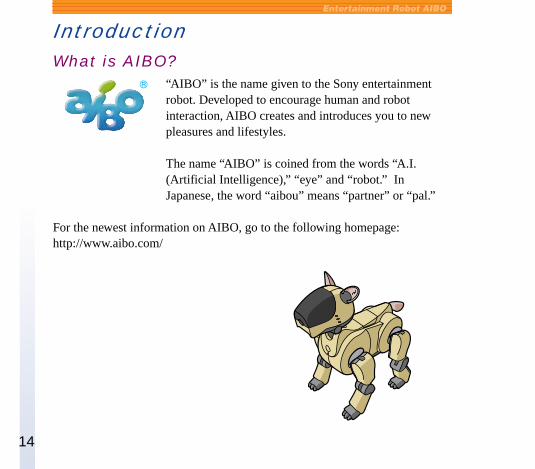
IntroductionWhat is AIBO?
“AIBO” is the name given to the Sony entertainmentrobot. Developed to encourage human and robotinteraction, AIBO creates and introduces you to newpleasures and lifestyles.
The name “AIBO” is coined from the words “A.I.(Artificial Intelligence),” “eye” and “robot.” InJapanese, the word “aibou” means “partner” or “pal.”
For the newest information on AIBO, go to the following homepage:http://www.aibo.com/
15
Meet A
IBO
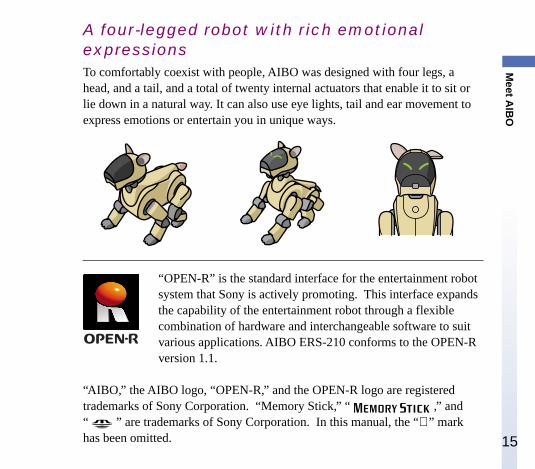
A four-legged robot with rich emotionalexpressionsTo comfortably coexist with people, AIBO was designed with four legs, ahead, and a tail, and a total of twenty internal actuators that enable it to sit orlie down in a natural way. It can also use eye lights, tail and ear movement toexpress emotions or entertain you in unique ways.
“OPEN-R” is the standard interface for the entertainment robotsystem that Sony is actively promoting. This interface expandsthe capability of the entertainment robot through a flexiblecombination of hardware and interchangeable software to suitvarious applications. AIBO ERS-210 conforms to the OPEN-Rversion 1.1.
“AIBO,” the AIBO logo, “OPEN-R,” and the OPEN-R logo are registeredtrademarks of Sony Corporation. “Memory Stick,” “ ,” and“ ” are trademarks of Sony Corporation. In this manual, the “” markhas been omitted.
16
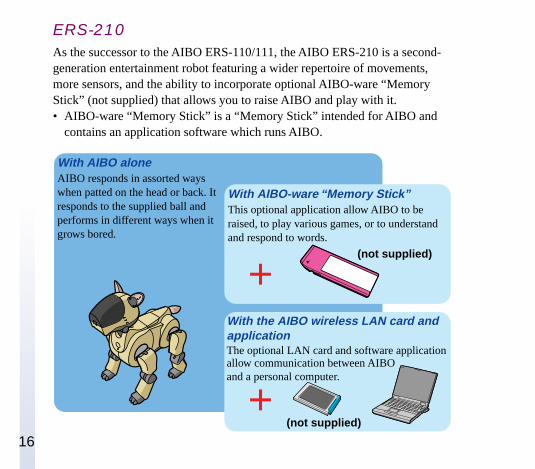
ERS-210As the successor to the AIBO ERS-110/111, the AIBO ERS-210 is a second-generation entertainment robot featuring a wider repertoire of movements,more sensors, and the ability to incorporate optional AIBO-ware “MemoryStick” (not supplied) that allows you to raise AIBO and play with it.• AIBO-ware “Memory Stick” is a “Memory Stick” intended for AIBO and
contains an application software which runs AIBO.
With AIBO aloneAIBO responds in assorted wayswhen patted on the head or back. Itresponds to the supplied ball andperforms in different ways when itgrows bored.
With AIBO-ware “Memory Stick”This optional application allow AIBO to beraised, to play various games, or to understandand respond to words.
With the AIBO wireless LAN card andapplicationThe optional LAN card and software applicationallow communication between AIBOand a personal computer.
(not supplied)
(not supplied)
17
Meet A
IBO
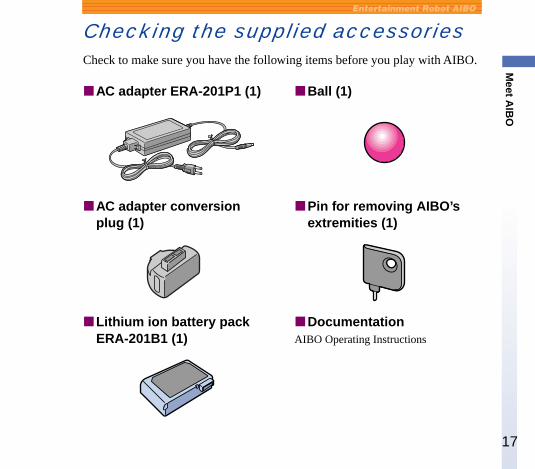
Checking the supplied accessoriesCheck to make sure you have the following items before you play with AIBO.
xAC adapter ERA-201P1 (1)
xAC adapter conversionplug (1)
xLithium ion battery packERA-201B1 (1)
xBall (1)
xPin for removing AIBO’sextremities (1)
xDocumentationAIBO Operating Instructions
18
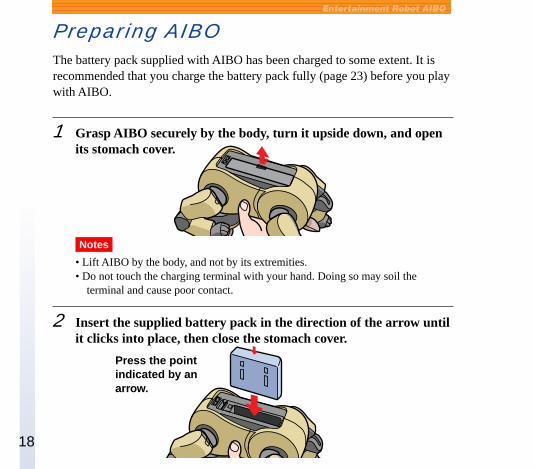
Preparing AIBOThe battery pack supplied with AIBO has been charged to some extent. It isrecommended that you charge the battery pack fully (page 23) before you playwith AIBO.
1 Grasp AIBO securely by the body, turn it upside down, and openits stomach cover.
Notes
• Lift AIBO by the body, and not by its extremities.• Do not touch the charging terminal with your hand. Doing so may soil the
terminal and cause poor contact.
2 Insert the supplied battery pack in the direction of the arrow untilit clicks into place, then close the stomach cover.
Press the pointindicated by anarrow.
19
Meet A
IBO
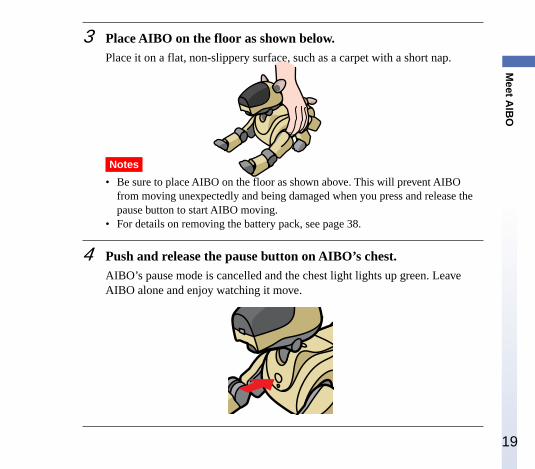
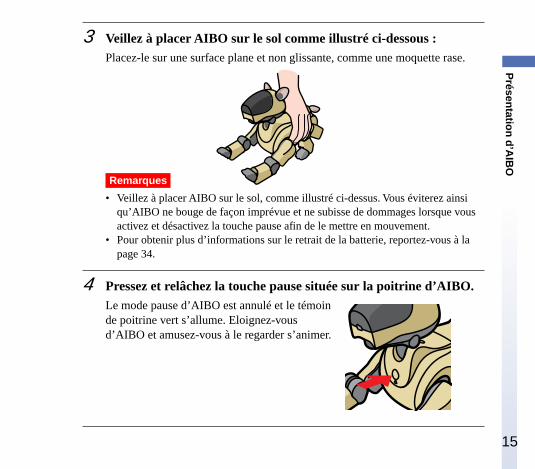
3 Place AIBO on the floor as shown below.Place it on a flat, non-slippery surface, such as a carpet with a short nap.
Notes
• Be sure to place AIBO on the floor as shown above. This will prevent AIBOfrom moving unexpectedly and being damaged when you press and release thepause button to start AIBO moving.
• For details on removing the battery pack, see page 38.
4 Push and release the pause button on AIBO’s chest.AIBO’s pause mode is cancelled and the chest light lights up green. LeaveAIBO alone and enjoy watching it move.
20
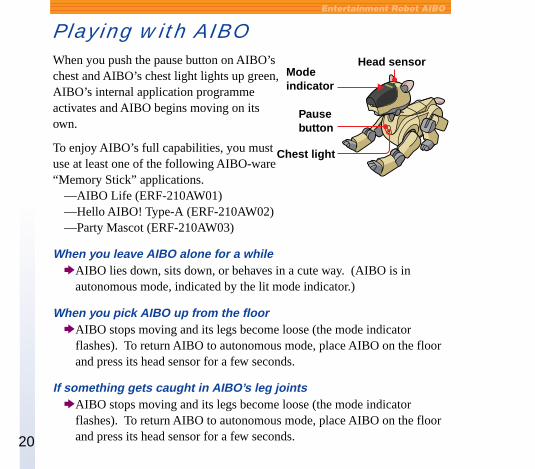
Playing with AIBOWhen you push the pause button on AIBO’schest and AIBO’s chest light lights up green,AIBO’s internal application programmeactivates and AIBO begins moving on itsown.
To enjoy AIBO’s full capabilities, you mustuse at least one of the following AIBO-ware“Memory Stick” applications.
—AIBO Life (ERF-210AW01)—Hello AIBO! Type-A (ERF-210AW02)—Party Mascot (ERF-210AW03)
When you leave AIBO alone for a whilebAIBO lies down, sits down, or behaves in a cute way. (AIBO is in
autonomous mode, indicated by the lit mode indicator.)
When you pick AIBO up from the floorbAIBO stops moving and its legs become loose (the mode indicator
flashes). To return AIBO to autonomous mode, place AIBO on the floorand press its head sensor for a few seconds.
If something gets caught in AIBO’s leg jointsbAIBO stops moving and its legs become loose (the mode indicator
flashes). To return AIBO to autonomous mode, place AIBO on the floorand press its head sensor for a few seconds.
Modeindicator
Pausebutton
Head sensor
Chest light
21
Meet A
IBO
When you press AIBO’s head too forcefullybAIBO will show anger through its eye lights.
When you pet AIBO’s head from back to front a few timesbAIBO’s eye lights show joy.
When you keep pressing AIBO’s head for a few secondsbAIBO emits a musical tone and its eye lights light up.
When you touch AIBO’s chinbAIBO emits a musical tone.
When you show AIBO the supplied ballbAIBO sits down and its tail light lights up.
When you touch AIBO’s back sensorbAIBO does the following sequence of actions: Takes 5 steps forward c
Takes 5 steps backward c Kicks with its right leg c Kicks with its left leg.
When you place AIBO on top of the Energy Station (not supplied)bAIBO stops moving.
22
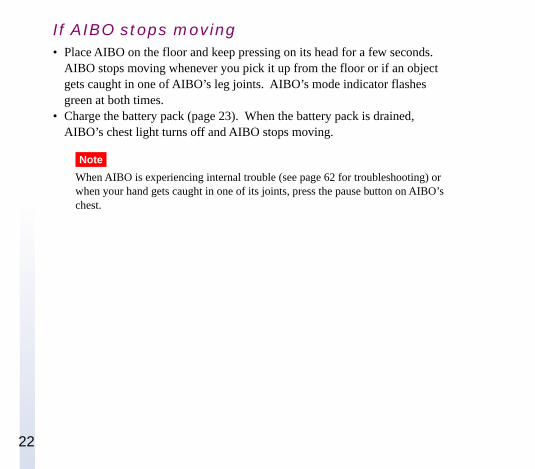
If AIBO stops moving• Place AIBO on the floor and keep pressing on its head for a few seconds.
AIBO stops moving whenever you pick it up from the floor or if an objectgets caught in one of AIBO’s leg joints. AIBO’s mode indicator flashesgreen at both times.
• Charge the battery pack (page 23). When the battery pack is drained,AIBO’s chest light turns off and AIBO stops moving.
Note
When AIBO is experiencing internal trouble (see page 62 for troubleshooting) orwhen your hand gets caught in one of its joints, press the pause button on AIBO’schest.
23
Meet A
IBO
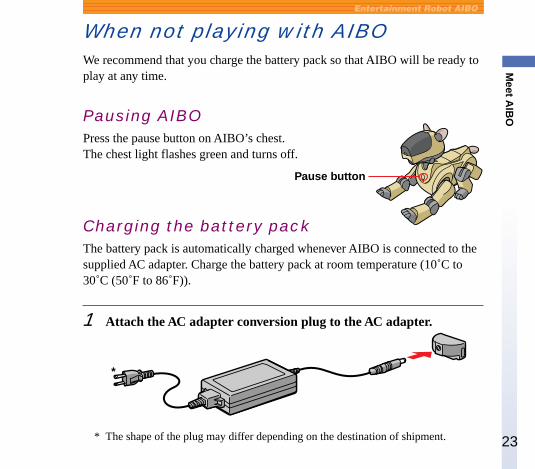
When not playing with AIBOWe recommend that you charge the battery pack so that AIBO will be ready toplay at any time.
Pausing AIBOPress the pause button on AIBO’s chest.The chest light flashes green and turns off.
Charging the battery packThe battery pack is automatically charged whenever AIBO is connected to thesupplied AC adapter. Charge the battery pack at room temperature (10˚C to30˚C (50˚F to 86˚F)).
1 Attach the AC adapter conversion plug to the AC adapter.
* The shape of the plug may differ depending on the destination of shipment.
Pause button
*
24
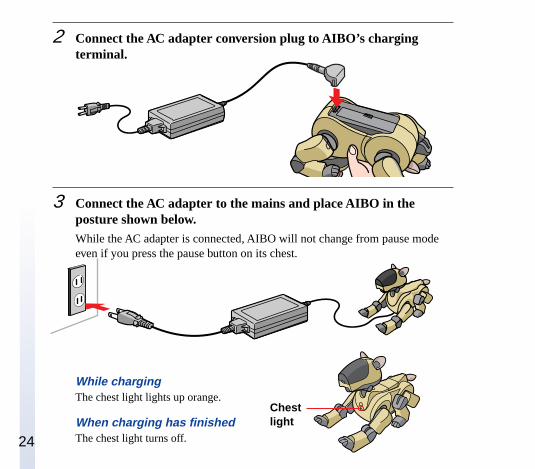
2 Connect the AC adapter conversion plug to AIBO’s chargingterminal.
3 Connect the AC adapter to the mains and place AIBO in theposture shown below.While the AC adapter is connected, AIBO will not change from pause modeeven if you press the pause button on its chest.
While chargingThe chest light lights up orange.
When charging has finishedThe chest light turns off.
Chestlight
25
Meet A
IBO
Notes
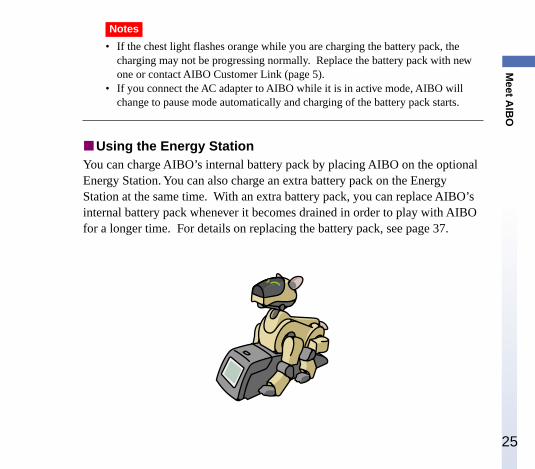
• If the chest light flashes orange while you are charging the battery pack, thecharging may not be progressing normally. Replace the battery pack with newone or contact AIBO Customer Link (page 5).
• If you connect the AC adapter to AIBO while it is in active mode, AIBO willchange to pause mode automatically and charging of the battery pack starts.
xUsing the Energy StationYou can charge AIBO’s internal battery pack by placing AIBO on the optionalEnergy Station. You can also charge an extra battery pack on the EnergyStation at the same time. With an extra battery pack, you can replace AIBO’sinternal battery pack whenever it becomes drained in order to play with AIBOfor a longer time. For details on replacing the battery pack, see page 37.

26
27
Know
ing more about A
IBO
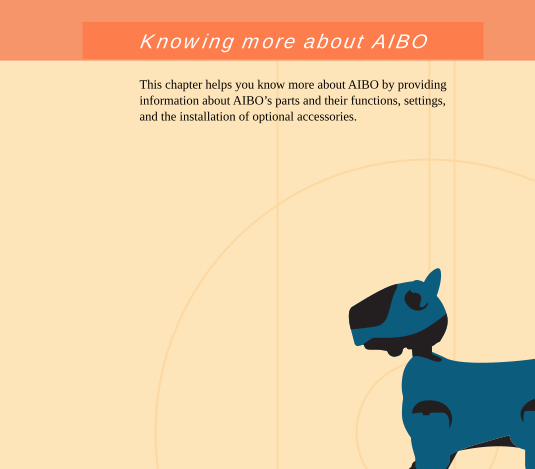
Knowing more about AIBO
This chapter helps you know more about AIBO by providinginformation about AIBO’s parts and their functions, settings,and the installation of optional accessories.
28
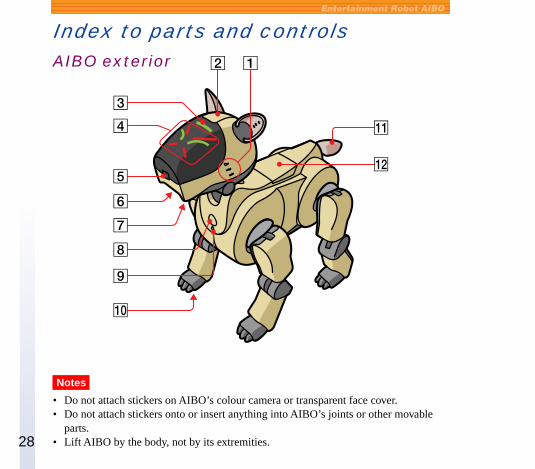
Index to parts and controlsAIBO exterior
Notes
• Do not attach stickers on AIBO’s colour camera or transparent face cover.• Do not attach stickers onto or insert anything into AIBO’s joints or other movable
parts.• Lift AIBO by the body, not by its extremities.
29
Know
ing more about A
IBO
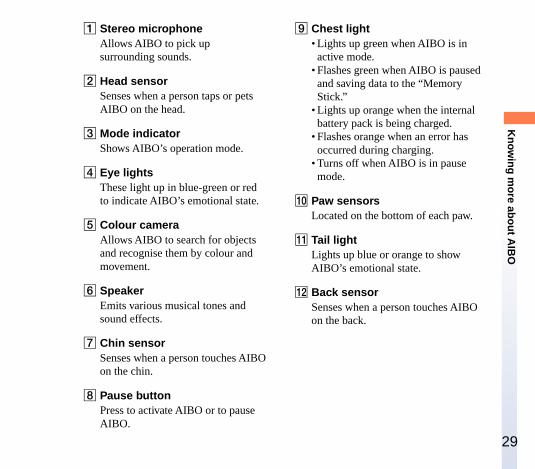
1 Stereo microphoneAllows AIBO to pick upsurrounding sounds.
2 Head sensorSenses when a person taps or petsAIBO on the head.
3 Mode indicatorShows AIBO’s operation mode.
4 Eye lightsThese light up in blue-green or redto indicate AIBO’s emotional state.
5 Colour cameraAllows AIBO to search for objectsand recognise them by colour andmovement.
6 SpeakerEmits various musical tones andsound effects.
7 Chin sensorSenses when a person touches AIBOon the chin.
8 Pause buttonPress to activate AIBO or to pauseAIBO.
9 Chest light• Lights up green when AIBO is inactive mode.
• Flashes green when AIBO is pausedand saving data to the “MemoryStick.”
• Lights up orange when the internalbattery pack is being charged.
• Flashes orange when an error hasoccurred during charging.
• Turns off when AIBO is in pausemode.
q; Paw sensorsLocated on the bottom of each paw.
qa Tail lightLights up blue or orange to showAIBO’s emotional state.
qs Back sensorSenses when a person touches AIBOon the back.
30
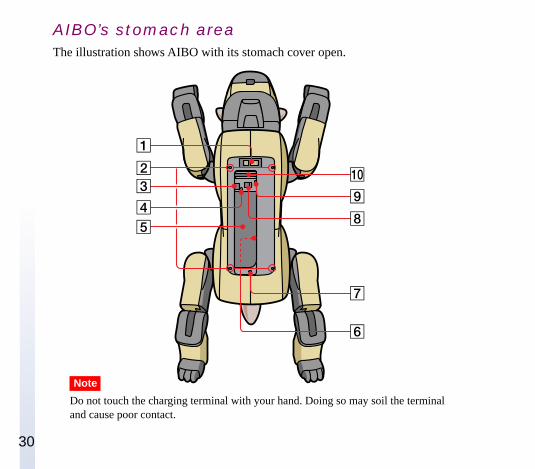
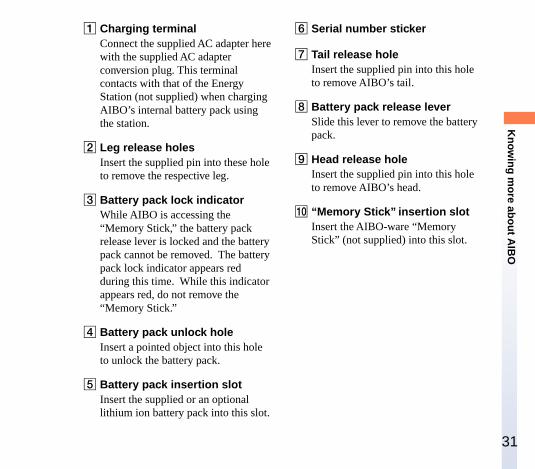
AIBO’s stomach areaThe illustration shows AIBO with its stomach cover open.
Note
Do not touch the charging terminal with your hand. Doing so may soil the terminaland cause poor contact.
31
Know
ing more about A
IBO
1 Charging terminalConnect the supplied AC adapter herewith the supplied AC adapterconversion plug. This terminalcontacts with that of the EnergyStation (not supplied) when chargingAIBO’s internal battery pack usingthe station.
2 Leg release holesInsert the supplied pin into these holeto remove the respective leg.
3 Battery pack lock indicatorWhile AIBO is accessing the“Memory Stick,” the battery packrelease lever is locked and the batterypack cannot be removed. The batterypack lock indicator appears redduring this time. While this indicatorappears red, do not remove the“Memory Stick.”
4 Battery pack unlock holeInsert a pointed object into this holeto unlock the battery pack.
5 Battery pack insertion slotInsert the supplied or an optionallithium ion battery pack into this slot.
6 Serial number sticker
7 Tail release holeInsert the supplied pin into this holeto remove AIBO’s tail.
8 Battery pack release leverSlide this lever to remove the batterypack.
9 Head release holeInsert the supplied pin into this holeto remove AIBO’s head.
q; “Memory Stick” insertion slotInsert the AIBO-ware “MemoryStick” (not supplied) into this slot.
32
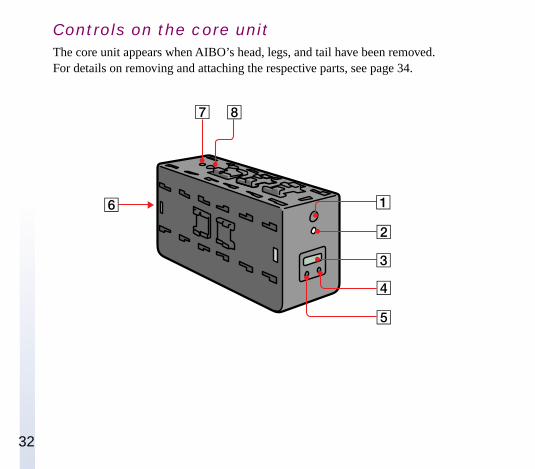
Controls on the core unitThe core unit appears when AIBO’s head, legs, and tail have been removed.For details on removing and attaching the respective parts, see page 34.

33
Know
ing more about A
IBO
1 Pause button A (chest)This button functions in the sameway as 8 pause button on page 29.
2 Operation status indicator A(chest)This functions in the same way as thechest light.
3 Display panelShows the current time, batterycharging status, or volume level ofAIBO’s musical tones.
4 + buttonUse to increase the setting values.
5 MODE buttonPress to change the item to be set.
6 PC card insertion slotInsert the PC card (not supplied) intothis slot.
7 Operation status indicator B(back)This indicator functions in the sameway as 2 operation status indicatorA. Additional functions may beadded to this indicator in the future.
8 Pause button B (back)This button functions in the sameway as 1 pause button A.Additional functions may be added tothis button in the future.
34
Removing and attaching AIBO’sextremitiesYou need to remove AIBO’s legs, head, and tail to set the clock or volumelevel of the musical tone, and to insert a PC card (not supplied). You can alsoreplace each part of AIBO’s body with new parts which may be available innear future to give AIBO a different appearance.
Removing AIBO’s extremities
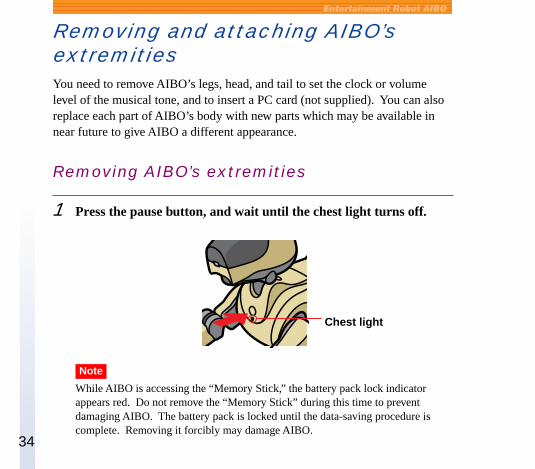
1 Press the pause button, and wait until the chest light turns off.
Note
While AIBO is accessing the “Memory Stick,” the battery pack lock indicatorappears red. Do not remove the “Memory Stick” during this time to preventdamaging AIBO. The battery pack is locked until the data-saving procedure iscomplete. Removing it forcibly may damage AIBO.
Chest light
35
Know
ing more about A
IBO
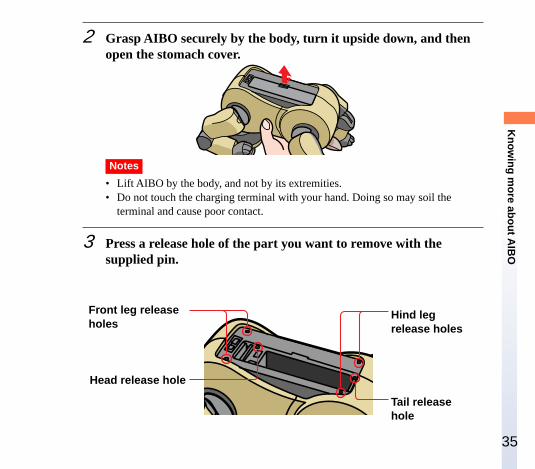
2 Grasp AIBO securely by the body, turn it upside down, and thenopen the stomach cover.
Notes
• Lift AIBO by the body, and not by its extremities.• Do not touch the charging terminal with your hand. Doing so may soil the
terminal and cause poor contact.
3 Press a release hole of the part you want to remove with thesupplied pin.
Front leg releaseholes
Head release hole
Tail releasehole
Hind legrelease holes
36
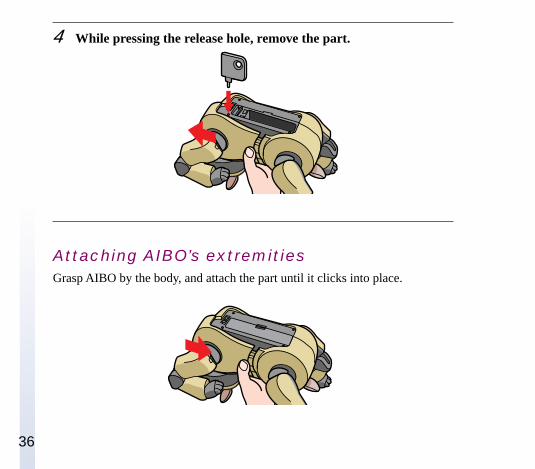
4 While pressing the release hole, remove the part.
Attaching AIBO’s extremitiesGrasp AIBO by the body, and attach the part until it clicks into place.
37
Know
ing more about A
IBO
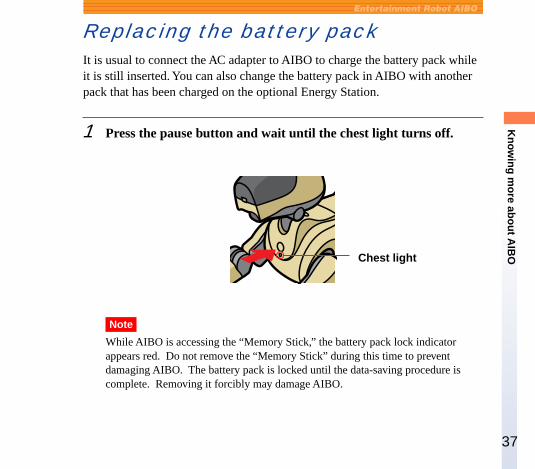
Replacing the battery packIt is usual to connect the AC adapter to AIBO to charge the battery pack whileit is still inserted. You can also change the battery pack in AIBO with anotherpack that has been charged on the optional Energy Station.
1 Press the pause button and wait until the chest light turns off.
Note
While AIBO is accessing the “Memory Stick,” the battery pack lock indicatorappears red. Do not remove the “Memory Stick” during this time to preventdamaging AIBO. The battery pack is locked until the data-saving procedure iscomplete. Removing it forcibly may damage AIBO.
Chest light
38
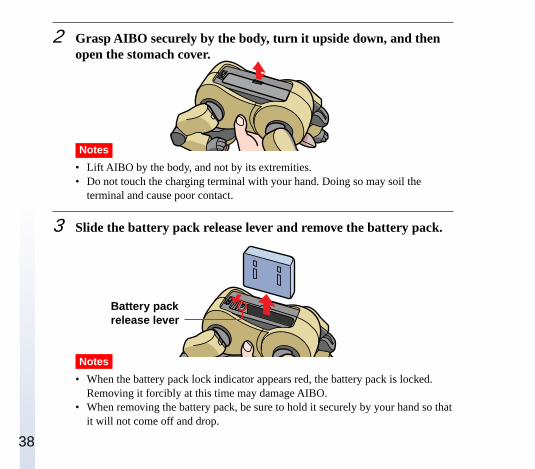
2 Grasp AIBO securely by the body, turn it upside down, and thenopen the stomach cover.
Notes
• Lift AIBO by the body, and not by its extremities.• Do not touch the charging terminal with your hand. Doing so may soil the
terminal and cause poor contact.
3 Slide the battery pack release lever and remove the battery pack.
Notes
• When the battery pack lock indicator appears red, the battery pack is locked.Removing it forcibly at this time may damage AIBO.
• When removing the battery pack, be sure to hold it securely by your hand so thatit will not come off and drop.
Battery packrelease lever
39
Know
ing more about A
IBO
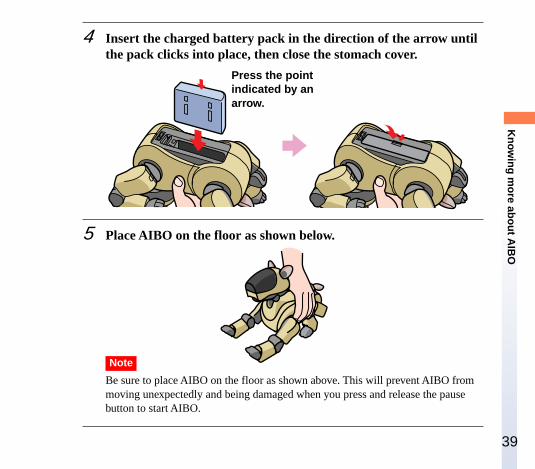
4 Insert the charged battery pack in the direction of the arrow untilthe pack clicks into place, then close the stomach cover.
5 Place AIBO on the floor as shown below.
Note
Be sure to place AIBO on the floor as shown above. This will prevent AIBO frommoving unexpectedly and being damaged when you press and release the pausebutton to start AIBO.
Press the pointindicated by anarrow.
40
Inserting or removing a “MemoryStick”Be sure to insert or remove the “Memory Stick” only after pressing the pausebutton on AIBO’s chest to make AIBO pause.
Inserting a “Memory Stick”
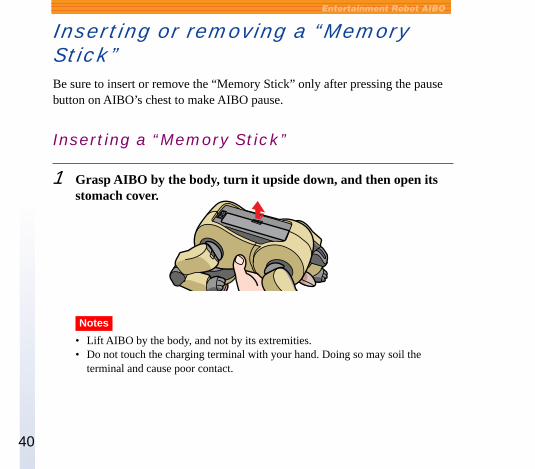
1 Grasp AIBO by the body, turn it upside down, and then open itsstomach cover.
Notes
• Lift AIBO by the body, and not by its extremities.• Do not touch the charging terminal with your hand. Doing so may soil the
terminal and cause poor contact.
41
Know
ing more about A
IBO
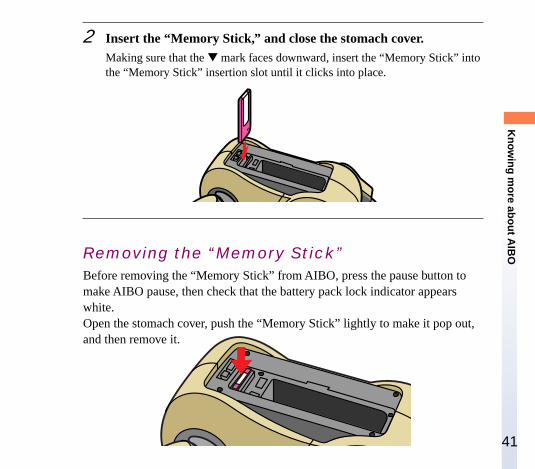
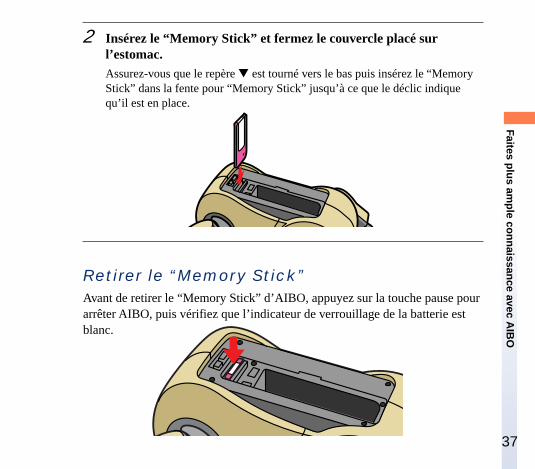
2 Insert the “Memory Stick,” and close the stomach cover.Making sure that the ▼ mark faces downward, insert the “Memory Stick” intothe “Memory Stick” insertion slot until it clicks into place.
Removing the “Memory Stick”Before removing the “Memory Stick” from AIBO, press the pause button tomake AIBO pause, then check that the battery pack lock indicator appearswhite.Open the stomach cover, push the “Memory Stick” lightly to make it pop out,and then remove it.
42
Notes
• To prevent damaging AIBO, do not remove the “Memory Stick” while thebattery pack lock indicator appears red.
• If you set the safety switch in the “Memory Stick” to LOCK, AIBO will not beable to save data to the “Memory Stick.”
43
Know
ing more about A
IBO
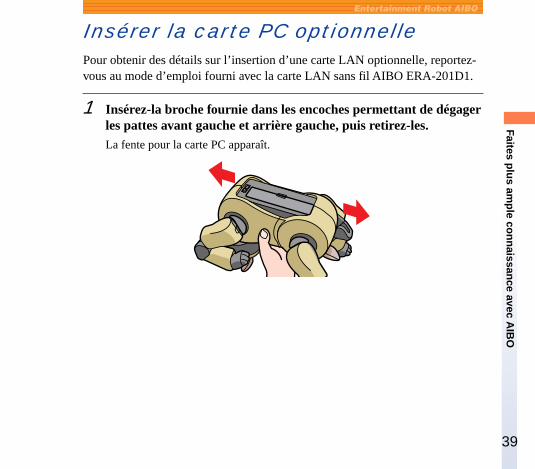
Inserting the optional PC cardBe sure to insert the PC card only after pressing the pause button on AIBO’schest to make it pause. For details on inserting an optional LAN card, refer tothe operating instructions supplied with ERA-201D1 AIBO Wireless LANCard.
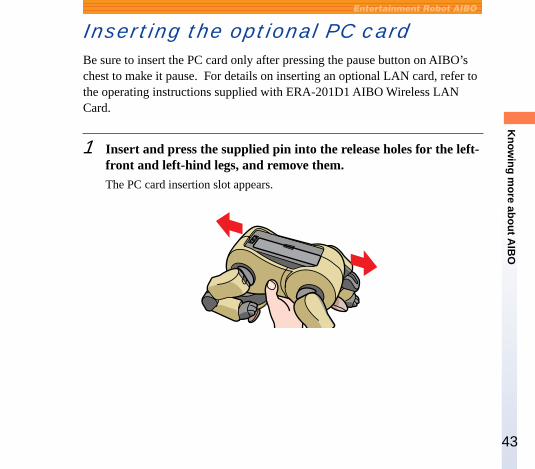
1 Insert and press the supplied pin into the release holes for the left-front and left-hind legs, and remove them.The PC card insertion slot appears.

44
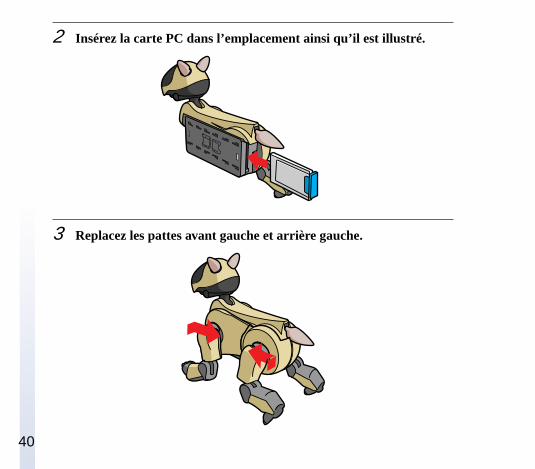
2 Push the PC card firmly into the slot as illustrated.
3 Replace the left-front and left-hind hind legs.
45
Know
ing more about A
IBO
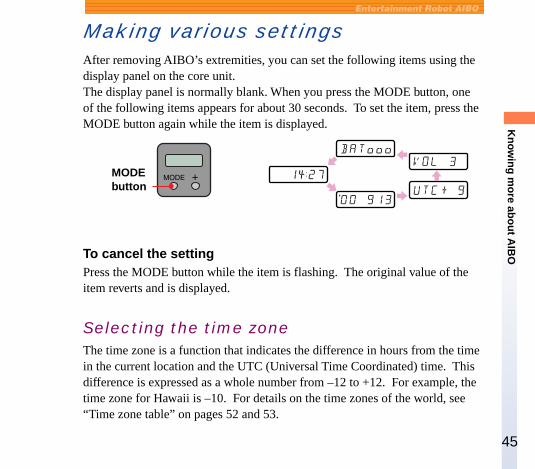
Making various settingsAfter removing AIBO’s extremities, you can set the following items using thedisplay panel on the core unit.The display panel is normally blank. When you press the MODE button, oneof the following items appears for about 30 seconds. To set the item, press theMODE button again while the item is displayed.
To cancel the settingPress the MODE button while the item is flashing. The original value of theitem reverts and is displayed.
Selecting the time zoneThe time zone is a function that indicates the difference in hours from the timein the current location and the UTC (Universal Time Coordinated) time. Thisdifference is expressed as a whole number from –12 to +12. For example, thetime zone for Hawaii is –10. For details on the time zones of the world, see“Time zone table” on pages 52 and 53.
MODEbutton
46
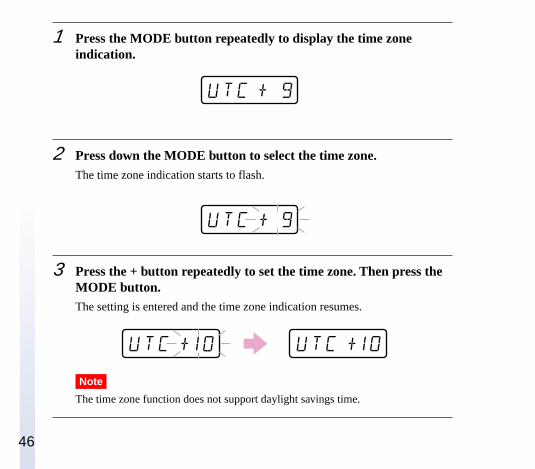
1 Press the MODE button repeatedly to display the time zoneindication.
2 Press down the MODE button to select the time zone.The time zone indication starts to flash.
3 Press the + button repeatedly to set the time zone. Then press theMODE button.The setting is entered and the time zone indication resumes.
Note
The time zone function does not support daylight savings time.
47
Know
ing more about A
IBO
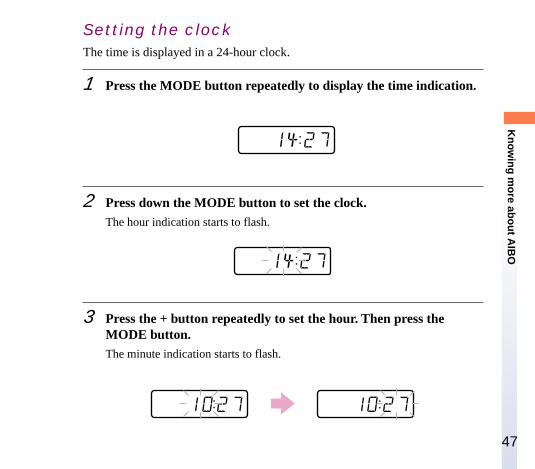
Setting the clockThe time is displayed in a 24-hour clock.
1 Press the MODE button repeatedly to display the time indication.
2 Press down the MODE button to set the clock.The hour indication starts to flash.
3 Press the + button repeatedly to set the hour. Then press theMODE button.The minute indication starts to flash.
48
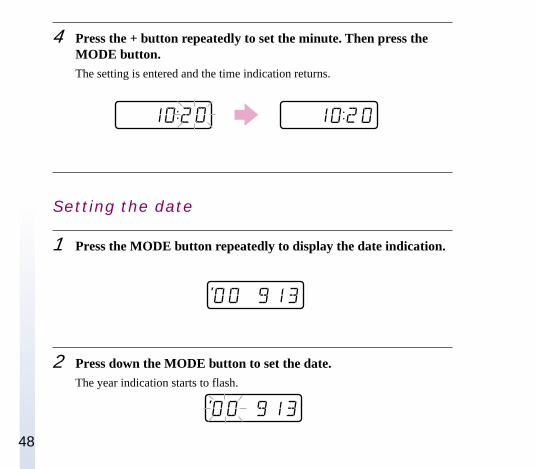
4 Press the + button repeatedly to set the minute. Then press theMODE button.The setting is entered and the time indication returns.
Setting the date
1 Press the MODE button repeatedly to display the date indication.
2 Press down the MODE button to set the date.The year indication starts to flash.
49
Know
ing more about A
IBO
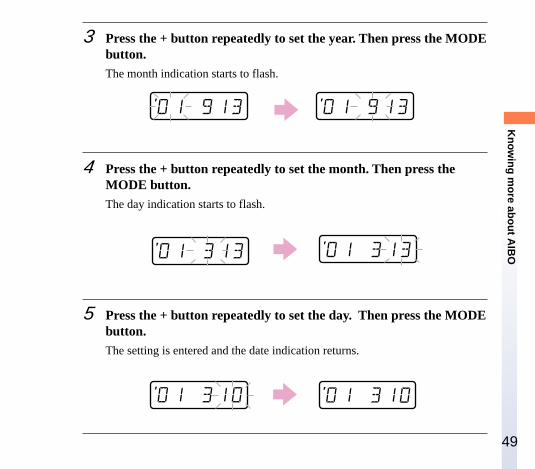
3 Press the + button repeatedly to set the year. Then press the MODEbutton.The month indication starts to flash.
4 Press the + button repeatedly to set the month. Then press theMODE button.The day indication starts to flash.
5 Press the + button repeatedly to set the day. Then press the MODEbutton.The setting is entered and the date indication returns.
50
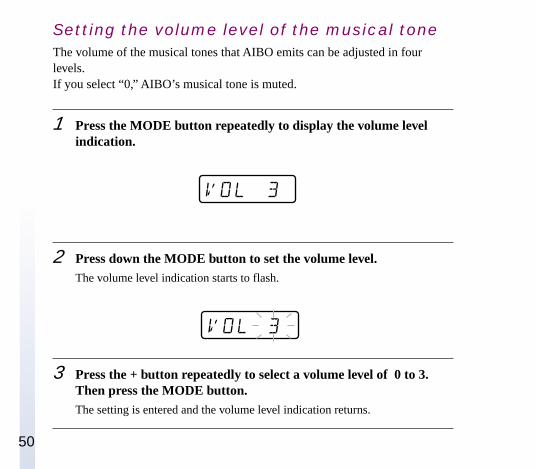
Setting the volume level of the musical toneThe volume of the musical tones that AIBO emits can be adjusted in fourlevels.If you select “0,” AIBO’s musical tone is muted.
1 Press the MODE button repeatedly to display the volume levelindication.
2 Press down the MODE button to set the volume level.The volume level indication starts to flash.
3 Press the + button repeatedly to select a volume level of 0 to 3.Then press the MODE button.The setting is entered and the volume level indication returns.
51
Know
ing more about A
IBO
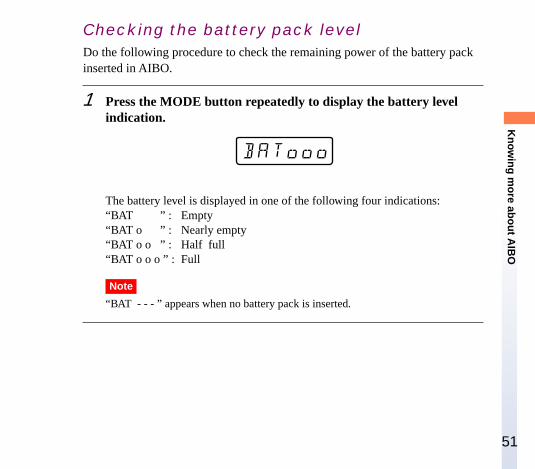
Checking the battery pack levelDo the following procedure to check the remaining power of the battery packinserted in AIBO.
1 Press the MODE button repeatedly to display the battery levelindication.
The battery level is displayed in one of the following four indications:“BAT ” : Empty“BAT o ” : Nearly empty“BAT o o ” : Half full“BAT o o o ” : Full
Note
“BAT - - - ” appears when no battery pack is inserted.

52
Time zone tableUse this table to enter the time zone.

53
Know
ing more about A
IBO

54
55
Additional inform
ation
Additional information
This chapter provides notes on usage, a troubleshooting guide,and other information concerning AIBO.
56
Notes on useTo prevent AIBO and its accessories from being damaged, observe thefollowing precautions.
On handling AIBO• Do not use AIBO in places subject to vibrations, on an incline, or at a place
where it might drop.• Do not press down hard on AIBO with your hand or elbow.• Do not drop or shake AIBO as this may damage AIBO or cause data saved
to the “Memory Stick” to be lost.• Do not touch the charging terminal directly with your hand. Doing so may
soil the terminal and cause poor contact.• Lift AIBO by the body, and not by its extremities, such as the head, ears, tail
or legs. Do not swing or twist AIBO.• Do not leave AIBO in very hot places, such as a car parked in the sun, as this
may deform or damage it.• Do not allow foreign things, such as paper clips, get into AIBO or its joints.• Do not use AIBO outdoors. If you do, moisture or other foreign matter may
enter AIBO and cause damage.• Do not use AIBO on concrete or other hard surface as this may damage
AIBO.• Do not allow AIBO to get wet.• Do not touch the lens of the colour camera directly with your hand.• Do not allow AIBO’s head cover to be scratched.
57
Additional inform
ation• Do not apply stickers to the colour camera or the head cover.• Do not point the colour camera at the sun, no matter whether AIBO is turned
on or off, as this may damage the camera.• Do not oil AIBO’s joints or other movable parts.• Do not apply stickers to AIBO’s movable parts or insert anything between
them as this may interfere with AIBO’s movement.• Do not disassemble or modify AIBO except specifically set forth in this
manual.• When transporting AIBO, put it in a cushioned box like the one it came in to
protect its body, head, tail and legs from damage. You may also use theoptional AIBO Carrying Bag ERA-210C1 to transport AIBO.
• Do not use AIBO in a place subject to strong electromagnetic waves or X-rays.
• The AIBO-ware applications designed for ERS-110/111 cannot be used withERS-210.
• ERS-210 is not operable with a “Memory Stick” which does not conform toOPEN-R ver. 1.1.
Moisture condensationIf AIBO is brought directly from a cold place to a warm place, moisture maycondense on AIBO’s inside or outside surface, causing damage. If moisturecondensation has occurred, wait for about one hour before operating AIBO.
58
On handling the AC adapter• Be sure to use only the supplied AC adapter to charge AIBO’s battery pack.
Using any other adapter may cause damage to AIBO.• Do not connect the AC adapter to electronic transformers designed for use
by travellers, as this may cause AIBO to heat up or become damaged.
On handling the battery pack• Do not expose the battery pack to temperatures above 45 °C (113 °F), such
as in a car parked in the sun.• Be careful not to let foreign matter like dust or sand get into the terminals. If
it does, remove it with a soft stick, etc.• If you are not going to play with AIBO for a long period, remove the battery
pack and store it in a dry, cool place.• The battery pack is constantly discharging even when it is not in use. Charge
the battery pack right before using AIBO.• Do not drop the battery pack or place heavy object on it. Do not apply
strong pressure or physical shock to the battery pack.
On cleaning• Clean AIBO with a clean, dry, soft cloth.• Do not use volatile solvents that may damage AIBO’s surface finish.
59
Additional inform
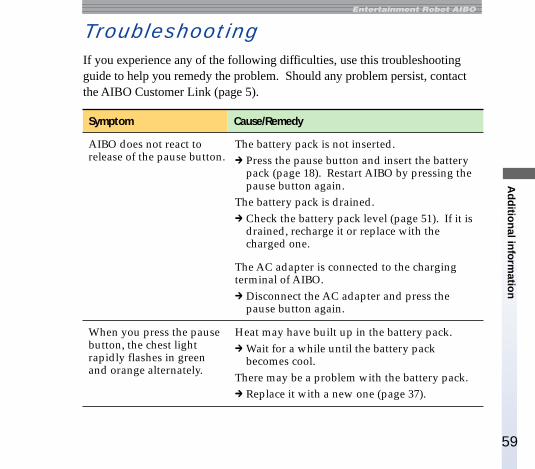
ationTroubleshootingIf you experience any of the following difficulties, use this troubleshootingguide to help you remedy the problem. Should any problem persist, contactthe AIBO Customer Link (page 5).
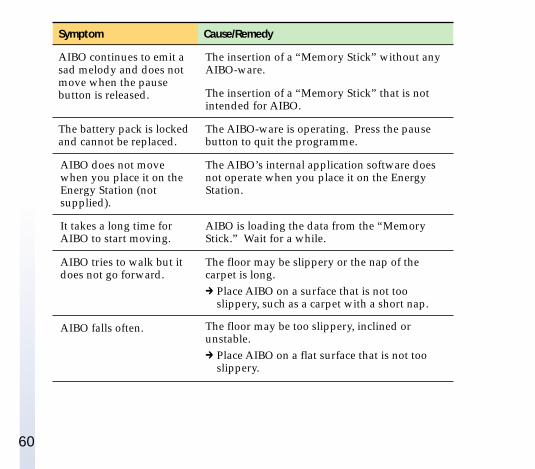
Symptom Cause/Remedy
AIBO does not react torelease of the pause button.
The battery pack is not inserted.c Press the pause button and insert the battery
pack (page 18). Restart AIBO by pressing thepause button again.
The battery pack is drained.c Check the battery pack level (page 51). If it is
drained, recharge it or replace with thecharged one.
The AC adapter is connected to the chargingterminal of AIBO.c Disconnect the AC adapter and press the
pause button again.
When you press the pausebutton, the chest lightrapidly flashes in greenand orange alternately.
Heat may have built up in the battery pack.c Wait for a while until the battery pack
becomes cool.There may be a problem with the battery pack.c Replace it with a new one (page 37).
60
Symptom Cause/Remedy
AIBO continues to emit asad melody and does notmove when the pausebutton is released.
The insertion of a “Memory Stick” without anyAIBO-ware.
The insertion of a “Memory Stick” that is notintended for AIBO.
The battery pack is lockedand cannot be replaced.
The AIBO-ware is operating. Press the pausebutton to quit the programme.
AIBO does not movewhen you place it on theEnergy Station (notsupplied).
The AIBO’s internal application software doesnot operate when you place it on the EnergyStation.
It takes a long time forAIBO to start moving.
AIBO is loading the data from the “MemoryStick.” Wait for a while.
AIBO tries to walk but itdoes not go forward.
The floor may be slippery or the nap of thecarpet is long.c Place AIBO on a surface that is not too
slippery, such as a carpet with a short nap.
AIBO falls often. The floor may be too slippery, inclined orunstable.c Place AIBO on a flat surface that is not too
slippery.
61
Additional inform
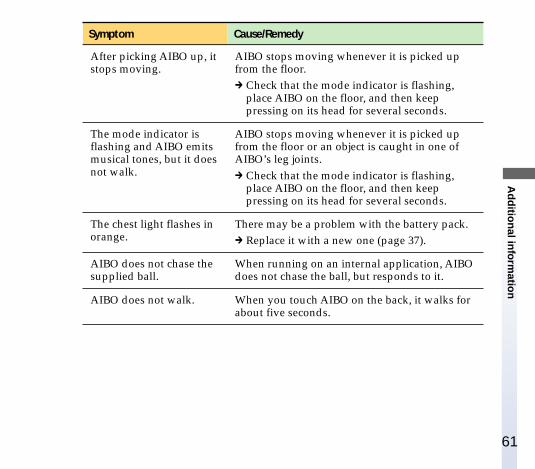
ationSymptom Cause/Remedy
After picking AIBO up, itstops moving.
AIBO stops moving whenever it is picked upfrom the floor.c Check that the mode indicator is flashing,
place AIBO on the floor, and then keeppressing on its head for several seconds.
The mode indicator isflashing and AIBO emitsmusical tones, but it doesnot walk.
AIBO stops moving whenever it is picked upfrom the floor or an object is caught in one ofAIBO’s leg joints.c Check that the mode indicator is flashing,
place AIBO on the floor, and then keeppressing on its head for several seconds.
The chest light flashes inorange.
There may be a problem with the battery pack.c Replace it with a new one (page 37).
AIBO does not chase thesupplied ball.
When running on an internal application, AIBOdoes not chase the ball, but responds to it.
AIBO does not walk. When you touch AIBO on the back, it walks forabout five seconds.
62
Symptom Cause/Remedy
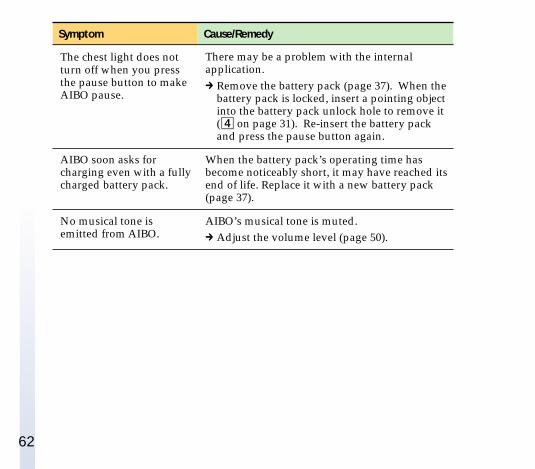
The chest light does notturn off when you pressthe pause button to makeAIBO pause.
There may be a problem with the internalapplication.c Remove the battery pack (page 37). When the
battery pack is locked, insert a pointing objectinto the battery pack unlock hole to remove it(4 on page 31). Re-insert the battery packand press the pause button again.
AIBO soon asks forcharging even with a fullycharged battery pack.
When the battery pack’s operating time hasbecome noticeably short, it may have reached itsend of life. Replace it with a new battery pack(page 37).
No musical tone isemitted from AIBO.
AIBO’s musical tone is muted.c Adjust the volume level (page 50).
63
Additional inform
ationSpecifications
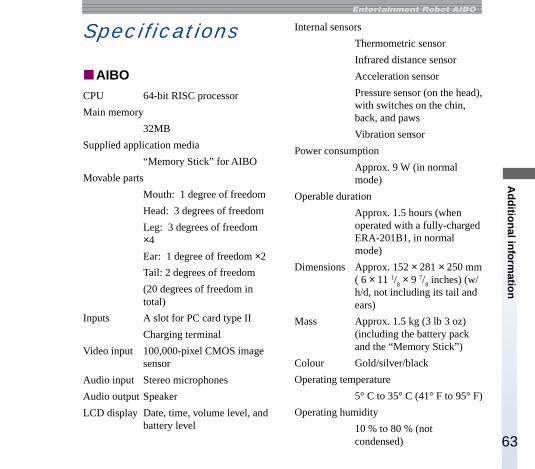
xAIBOCPU 64-bit RISC processor
Main memory
32MB
Supplied application media
“Memory Stick” for AIBO
Movable parts
Mouth: 1 degree of freedom
Head: 3 degrees of freedom
Leg: 3 degrees of freedom×4
Ear: 1 degree of freedom ×2
Tail: 2 degrees of freedom
(20 degrees of freedom intotal)
Inputs A slot for PC card type II
Charging terminal
Video input 100,000-pixel CMOS imagesensor
Audio input Stereo microphones
Audio output Speaker
LCD display Date, time, volume level, andbattery level
Internal sensors
Thermometric sensor
Infrared distance sensor
Acceleration sensor
Pressure sensor (on the head),with switches on the chin,back, and paws
Vibration sensor
Power consumption
Approx. 9 W (in normalmode)
Operable duration
Approx. 1.5 hours (whenoperated with a fully-chargedERA-201B1, in normalmode)
Dimensions Approx. 152 × 281 × 250 mm( 6 × 11 1/
8 × 9 7/
8 inches) (w/
h/d, not including its tail andears)
Mass Approx. 1.5 kg (3 lb 3 oz)(including the battery packand the “Memory Stick”)
Colour Gold/silver/black
Operating temperature
5° C to 35° C (41° F to 95° F)
Operating humidity
10 % to 80 % (notcondensed)
64
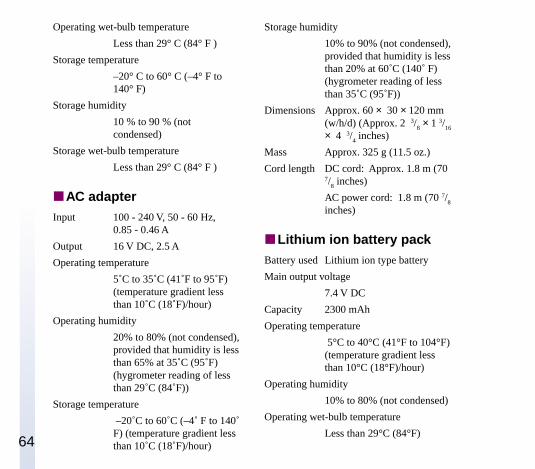
Operating wet-bulb temperature
Less than 29° C (84° F )
Storage temperature
–20° C to 60° C (–4° F to140° F)
Storage humidity
10 % to 90 % (notcondensed)
Storage wet-bulb temperature
Less than 29° C (84° F )
xAC adapterInput 100 - 240 V, 50 - 60 Hz,
0.85 - 0.46 A
Output 16 V DC, 2.5 A
Operating temperature
5˚C to 35˚C (41˚F to 95˚F)(temperature gradient lessthan 10˚C (18˚F)/hour)
Operating humidity
20% to 80% (not condensed),provided that humidity is lessthan 65% at 35˚C (95˚F)(hygrometer reading of lessthan 29˚C (84˚F))
Storage temperature
–20˚C to 60˚C (–4˚ F to 140˚F) (temperature gradient lessthan 10˚C (18˚F)/hour)
Storage humidity
10% to 90% (not condensed),provided that humidity is lessthan 20% at 60˚C (140˚ F)(hygrometer reading of lessthan 35˚C (95˚F))
Dimensions Approx. 60 × 30 × 120 mm(w/h/d) (Approx. 2 3/
8 × 1 3/
16
× 4 3/4 inches)
Mass Approx. 325 g (11.5 oz.)
Cord length DC cord: Approx. 1.8 m (707/
8 inches)
AC power cord: 1.8 m (70 7/8
inches)
xLithium ion battery packBattery used Lithium ion type battery
Main output voltage
7.4 V DC
Capacity 2300 mAh
Operating temperature
5°C to 40°C (41°F to 104°F)(temperature gradient lessthan 10°C (18°F)/hour)
Operating humidity
10% to 80% (not condensed)
Operating wet-bulb temperature
Less than 29°C (84°F)
65
Additional inform
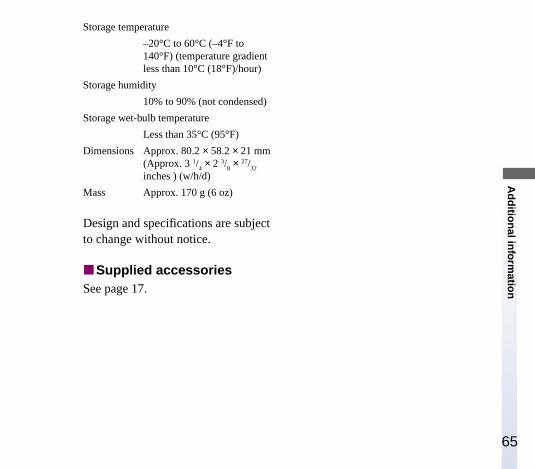
ationStorage temperature
–20°C to 60°C (–4°F to140°F) (temperature gradientless than 10°C (18°F)/hour)
Storage humidity
10% to 90% (not condensed)
Storage wet-bulb temperature
Less than 35°C (95°F)
Dimensions Approx. 80.2 × 58.2 × 21 mm(Approx. 3 1/
4 × 2 3/
8 × 27/
32
inches ) (w/h/d)
Mass Approx. 170 g (6 oz)
Design and specifications are subjectto change without notice.
xSupplied accessoriesSee page 17.
66
Index
AAC adapter .................................. 17, 23
Handling ..................................... 58AC adapter conversion plug ..... 17, 23AIBO
Cleaning ...................................... 58Handling ..................................... 56Pausing ........................................ 23Playing with ............................... 20Preparing .................................... 18
AIBO Customer Link ......................... 5AIBO-ware ................................... 16, 20
BBall ...................................................... 17Battery pack ....................................... 17
Charging ..................................... 23Checking the level ..................... 51Handling ..................................... 58Replacing .................................... 37
Battery pack lock indicator................................................ 31, 38, 41
Battery pack release lever .......... 31, 38Battery pack unlock hole ................. 31
CCharging terminal ...................... 24, 31Chest light .............................. 20, 29, 34Colour camera ................................... 29Customer support ............................... 5
DDisplay panel .................................... 33
EEnergy Station ................................... 25Entertainment robot ......................... 14Extremities
Attaching .................................... 36Removing .................................... 34
Eye lights ...................................... 21, 29
IInsertion slots
Battery pack insertion slot ........ 31“Memory Stick” insertion slot..................................................... 31
PC card insertion slot............................................... 33, 43
67
Additional inform
ationM
“Memory Stick”Inserting ...................................... 40Removing .................................... 41
Mode indicator .................................. 29MODE button ........................ 33, 46-51Musical tone ................................ 21, 50
OOPEN-R .............................................. 15Operation status indicator A/B ...... 33
PPause button .. 19, 20, 23, 29, 33, 34, 37Pause mode........................................ 23PC card ......................................... 16, 43
Inserting ...................................... 43Pin for removing AIBO’sextremities .............................. 17, 35, 43+ button .................................. 33, 46-50
RRelease holes
Head release hole ................. 31, 35Leg release holes .................. 31, 35Tail release hole .................... 31, 35
SSensors
Back sensor ................................. 29Chin sensor ................................. 29Head sensor ................................ 29Paw sensors ................................ 29
SettingClock ............................................ 47Date .............................................. 48musical tone level ...................... 50
Speaker ............................................... 29Stereo microphone ............................ 29Supplied accessories ......................... 17
TTail light ............................................. 29Time zone ..................................... 45, 52
Informations de sécuritéAVERTISSEMENT• Pour prévenir tout risque d’incendie ou d’électrocution, ne pas exposer ce
robot à la pluie ni à l’humidité.• Pour éviter tout risque d’électrocution, n’ouvrez pas le boîtier. Confiez
l’entretien de ce robot exclusivement à un personnel qualifié. (Consultez lecentre d’assistance clientèle AIBO.) (page 5)
• Parents et tuteur, vérifiez périodiquement si le transformateur ne présentepas des conditions susceptibles de provoquer un incendie, des déchargesélectriques ou des blessures aux personnes (câbles, oreilles ou boîtierendommagés) et, en présence de telles conditions, le transformateur ne peutplus être utilisé avant son remplacement.
• Ce jouet n’est pas destiné ou n’est pas recommandé pour les enfants demoins de 8 ans.
• Le robot raccordé à l’adaptateur secteur ne doit pas être raccordé à unnombre d’alimentations supérieur à celui recommandé.
• Le robot doit uniquement être utilisé avec l’adaptateur secteur recommandé(ERA-201P1).
• L’adaptateur secteur n’est pas un jouet.• Les petites pièces peuvent être avalées.• Si le câble flexible externe ou le cordon est endommagé, il doit être
remplacé ou réparé par le fabricant, son agent d’entretien habilité ou toutepersonne de qualification similaire, afin de prévenir tout danger.
• Tous les matériaux destinés à attacher et emballer AIBO ne font pas partiedu jouet et ne doivent pas être laissés à la portée des enfants.
2
• Pour plus d’informations concernant l’adaptateur secteur, la station et labatterie ion lithium, veuillez vous référer aux manuels fournis séparément.
• Ce produit appartient aux produits Laser classe 1.
ELIMINATION DES BATTERIES ION LITHIUM! Ne manipulez pas des batteries ion lithium qui fuient ou sont endommagées.! Risque d’explosion si la batterie n’est pas remplacée correctement.
Remplacez-la uniquement par une batterie ERA-201B1 ou une batterie detype équivalent recommandée par le fabricant. Eliminez les batteries usagéesconformément aux instructions du fabricant.
! La batterie utilisée dans ce robot présente un risque d’incendie ou de brûlurepar des substances chimiques si elle insert : est manipulée de manièreinappropriée. Ne la désassemblez pas, ne l’exposez pas à des températuressupérieures à 60 °C et ne l’incinérez pas. Eliminez les piles usagéesrapidement. Ne la désassemblez pas et ne la jetez pas au feu.
Voor de Klanten in NederlandBij dit produkt zijn batterijen geleverd. Wanneer deze leeg zijn,moet u ze niet weggooien maar inleveren als KCA.
3
Fr
4
Informations sur les réglementationsCe produit a été testé et jugé conforme aux normes de sécurité suivantes.
Directive sur les jouets 88/378/EEC, EN50088/96 + A1/96 + A2/97, EN71-1/98, EN71-2/93, EN71-3/94
Directive EMC 89/336/EECEMI EN55022/94+A1/95+A2/97, EN55014/93 + A1/97 + A2/99, EN50081-1/92EMS : EN55024/98, EN55014-2/97, EN61000-3-2/95, EN61000-3-3/95,EN50082-1/97
EN60825-1/94
L’adaptateur secteur et les piles aux ions lithium ont été testés ensemble entant que système et se sont révélés conformes aux normes de sécuritésuivantes:
LVD 73/23/EEC + 93/68/EECEN60950/92 + A1/93 + A2/93 + A3/95 + A4/97 + A11/97EN60065/98EN61558-1/97 + A1/98EN61558-2-7/97
5
Remarques concernant la conformité du marquage (EMC)a) Cet appareil est conforme à EN55022. Appareil numérique de Classe B digital pour une utilisation dans les zones suivantes :
résidentielle, commerciale et industrielle légère.b) Ce produit est conforme à la Directive européenne suivante : 89/336/EEC (Directive EMC)
Sony Corporation6-7-35 Kitashinagawa, Shinagawa-ku, Tokyo 141-0001 JAPANVeuillez conserver toutes ces informations pour référence.
Assistance clientèleComment contacter le service clientèle AIBO?En Europe :
Contact anglais : +44(0)-20-7365-2938Contact allemand : +49(0)-69-9508-6310Contact français : +33(0)-1-5569-5118Adresse E-mail : [email protected]
A Hong Kong+852-2345-2966Adresse E-mail : [email protected]
A Singapour :+65-473-8500Adresse E-mail : [email protected]
Toute reproduction totale ou partielle sans autorisation écrite préalable estinterdite. Tous droits réservés.
6
Table des matières
Présentation d’AIBO
Introduction ....................................................................................10Présentation d’AIBO ............................................................... 10
Vérification des accessoires fournis ...............................................13
Préparation d’AIBO .......................................................................14
Jouer avec AIBO ............................................................................16Si AIBO cesse de bouger ......................................................... 18
Lorsque vous ne jouez pas avec AIBO...........................................19Mettre AIBO en mode pause ................................................... 19
Charge de la batterie ................................................................ 19
Faites plus ample connaissance avec AIBO
Index des composants et des commandes ......................................24
Apparence d’AIBO .................................................................. 24
Zone de l’estomac d’AIBO ..................................................... 26
Commandes de l’unité centrale ............................................... 28
Montage et démontage des membres d’AIBO ...............................30Démontage des membres d’AIBO........................................... 30
Montage des membres d’AIBO ............................................... 32
7
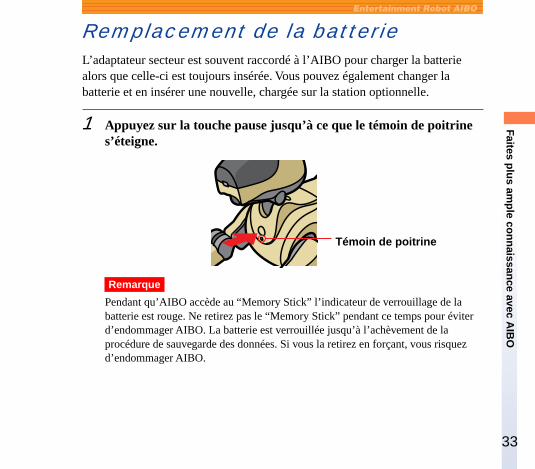
Remplacement de la batterie ..........................................................33
Insérer ou retirer un “Memory Stick” ............................................36Insérer un “Memory Stick” ..................................................... 36
Retirer le “Memory Stick” ....................................................... 37
Insérer la carte PC optionnelle .......................................................39
Effectuer différents réglages ..........................................................41Sélection du fuseau horaire ..................................................... 41
Réglage de l’horloge................................................................ 43
Réglage de la date .................................................................... 44
Réglage du niveau sonore des tonalités musicales .................. 46
Contrôle du niveau de charge de la batterie............................. 47
Tableau des fuseaux horaires .........................................................48
Informations complémentaires
Remarques sur l’utilisation ............................................................52A propos de l’utilisation d’AIBO ............................................ 52
Condensation d’humidité ......................................................... 53
A propos de l’utilisation de l’adaptateur secteur ..................... 54
A propos de l’utilisation de la batterie d’alimentation ............ 54
Nettoyage ................................................................................. 55
Dépannage ......................................................................................56
8
Spécifications .................................................................................60
Index ...............................................................................................63
9
Présentation d’A
IBO
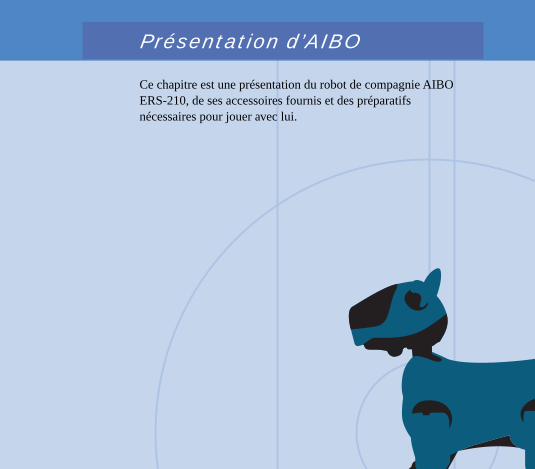
Présentation d’AIBO
Ce chapitre est une présentation du robot de compagnie AIBOERS-210, de ses accessoires fournis et des préparatifsnécessaires pour jouer avec lui.

10
IntroductionPrésentation d’AIBO
“AIBO” est le nom donné au robot de divertissementcompagnie conçu par Sony. Développé pour encouragerl’interaction entre l’homme et le robot, AIBO crée etvous initie à de nouveaux plaisirs et à de nouveauxmodes de vie.
Le nom “AIBO” est un acronyme formé avec les mots“A.I. (Artificial Intelligence, intelligence artificielle enfrançais),” “eye”(yeux) et “robot.” En japonais, le terme“aibou” signifie “partenaire” ou “copain.”
Consultez la page d’accueil : http://www.aibo.com/ pour prendre connaissancedes nouveautés concernant AIBO.
11
Présentation d’A
IBO
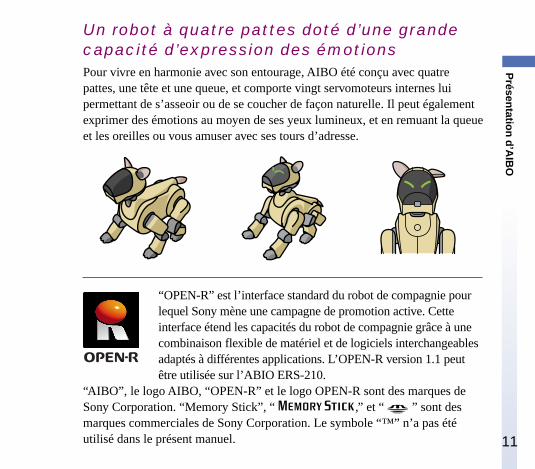
Un robot à quatre pattes doté d’une grandecapacité d’expression des émotionsPour vivre en harmonie avec son entourage, AIBO été conçu avec quatrepattes, une tête et une queue, et comporte vingt servomoteurs internes luipermettant de s’asseoir ou de se coucher de façon naturelle. Il peut égalementexprimer des émotions au moyen de ses yeux lumineux, et en remuant la queueet les oreilles ou vous amuser avec ses tours d’adresse.
“OPEN-R” est l’interface standard du robot de compagnie pourlequel Sony mène une campagne de promotion active. Cetteinterface étend les capacités du robot de compagnie grâce à unecombinaison flexible de matériel et de logiciels interchangeablesadaptés à différentes applications. L’OPEN-R version 1.1 peutêtre utilisée sur l’ABIO ERS-210.
“AIBO”, le logo AIBO, “OPEN-R” et le logo OPEN-R sont des marques deSony Corporation. “Memory Stick”, “ ,” et “ ” sont desmarques commerciales de Sony Corporation. Le symbole “™” n’a pas étéutilisé dans le présent manuel.
12
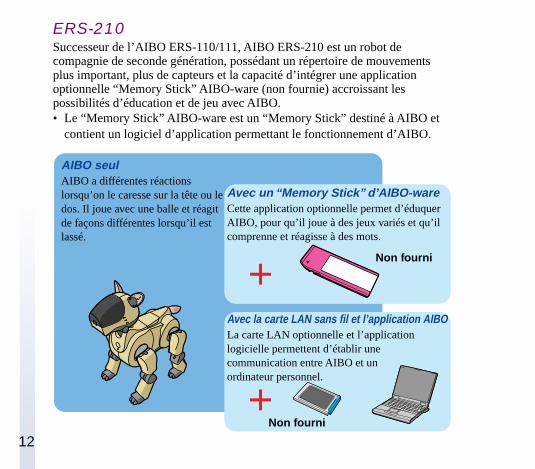
ERS-210Successeur de l’AIBO ERS-110/111, AIBO ERS-210 est un robot decompagnie de seconde génération, possédant un répertoire de mouvementsplus important, plus de capteurs et la capacité d’intégrer une applicationoptionnelle “Memory Stick” AIBO-ware (non fournie) accroissant lespossibilités d’éducation et de jeu avec AIBO.• Le “Memory Stick” AIBO-ware est un “Memory Stick” destiné à AIBO et
contient un logiciel d’application permettant le fonctionnement d’AIBO.
AIBO seulAIBO a différentes réactionslorsqu’on le caresse sur la tête ou ledos. Il joue avec une balle et réagitde façons différentes lorsqu’il estlassé.
Avec un “Memory Stick” d’AIBO-wareCette application optionnelle permet d’éduquerAIBO, pour qu’il joue à des jeux variés et qu’ilcomprenne et réagisse à des mots.
Avec la carte LAN sans fil et l’application AIBOLa carte LAN optionnelle et l’applicationlogicielle permettent d’établir unecommunication entre AIBO et unordinateur personnel.
Non fourni
Non fourni
13
Présentation d’A
IBO
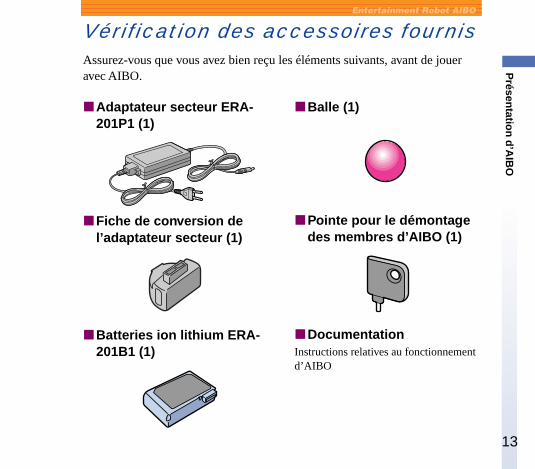
xAdaptateur secteur ERA-201P1 (1)
xFiche de conversion del’adaptateur secteur (1)
xBatteries ion lithium ERA-201B1 (1)
xBalle (1)
xPointe pour le démontagedes membres d’AIBO (1)
xDocumentationInstructions relatives au fonctionnementd’AIBO
Vérification des accessoires fournisAssurez-vous que vous avez bien reçu les éléments suivants, avant de joueravec AIBO.
14
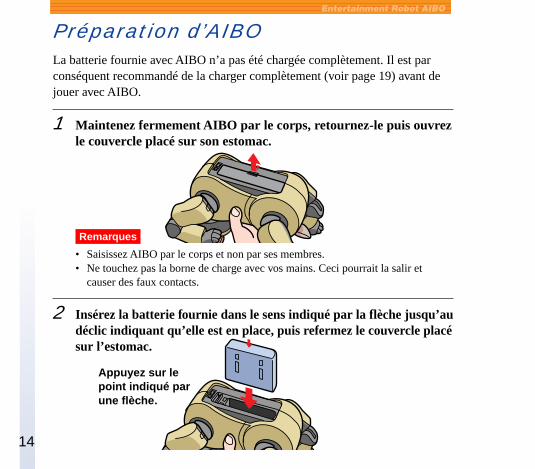
Préparation d’AIBOLa batterie fournie avec AIBO n’a pas été chargée complètement. Il est parconséquent recommandé de la charger complètement (voir page 19) avant dejouer avec AIBO.
1 Maintenez fermement AIBO par le corps, retournez-le puis ouvrezle couvercle placé sur son estomac.
Remarques
• Saisissez AIBO par le corps et non par ses membres.• Ne touchez pas la borne de charge avec vos mains. Ceci pourrait la salir et
causer des faux contacts.
2 Insérez la batterie fournie dans le sens indiqué par la flèche jusqu’audéclic indiquant qu’elle est en place, puis refermez le couvercle placésur l’estomac.
Appuyez sur lepoint indiqué parune flèche.
15
Présentation d’A
IBO
3 Veillez à placer AIBO sur le sol comme illustré ci-dessous :Placez-le sur une surface plane et non glissante, comme une moquette rase.
Remarques
• Veillez à placer AIBO sur le sol, comme illustré ci-dessus. Vous éviterez ainsiqu’AIBO ne bouge de façon imprévue et ne subisse de dommages lorsque vousactivez et désactivez la touche pause afin de le mettre en mouvement.
• Pour obtenir plus d’informations sur le retrait de la batterie, reportez-vous à lapage 34.
4 Pressez et relâchez la touche pause située sur la poitrine d’AIBO.Le mode pause d’AIBO est annulé et le témoinde poitrine vert s’allume. Eloignez-vousd’AIBO et amusez-vous à le regarder s’animer.
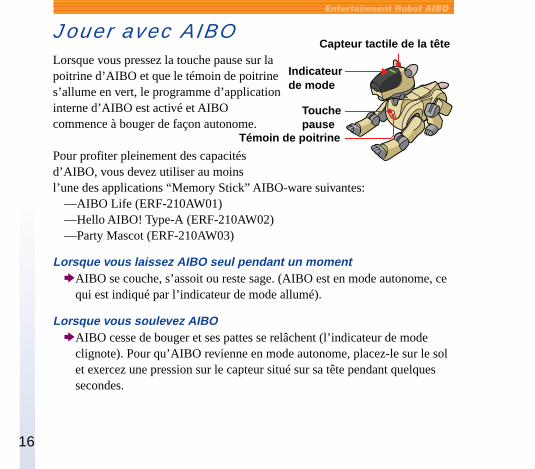
16
Jouer avec AIBOLorsque vous pressez la touche pause sur lapoitrine d’AIBO et que le témoin de poitrines’allume en vert, le programme d’applicationinterne d’AIBO est activé et AIBOcommence à bouger de façon autonome.
Pour profiter pleinement des capacitésd’AIBO, vous devez utiliser au moinsl’une des applications “Memory Stick” AIBO-ware suivantes:
—AIBO Life (ERF-210AW01)—Hello AIBO! Type-A (ERF-210AW02)—Party Mascot (ERF-210AW03)
Lorsque vous laissez AIBO seul pendant un momentbAIBO se couche, s’assoit ou reste sage. (AIBO est en mode autonome, ce
qui est indiqué par l’indicateur de mode allumé).
Lorsque vous soulevez AIBObAIBO cesse de bouger et ses pattes se relâchent (l’indicateur de mode
clignote). Pour qu’AIBO revienne en mode autonome, placez-le sur le solet exercez une pression sur le capteur situé sur sa tête pendant quelquessecondes.
Indicateurde mode
Touchepause
Capteur tactile de la tête
Témoin de poitrine
17
Présentation d’A
IBO
Si un élément se coince entre les articulations des pattes d’AIBObAIBO cesse de bouger et ses pattes se relâchent (l’indicateur de mode
clignote). Pour qu’AIBO revienne en mode autonome, placez-le sur le solet exercez une pression sur le capteur tactile situé sur sa tête pendantquelques secondes.
Lorsque la pression exercée sur la tête d’AIBO est trop fortebAIBO exprime un mécontentement avec ses yeux lumineux.
Lorsque vous caressez la tête d’AIBO de l’arrière vers l’avantplusieurs fois
bLes yeux lumineux d’AIBO expriment de la joie.
Lorsque vous exercez une pression sur la tête d’AIBO pendantquelques secondes
bAIBO émet une tonalité musicale et les yeux lumineux s’allument.
Lorsque vous touchez le menton d’AIBObAIBO émet une tonalité musicale.
Lorsque vous montrez à AIBO la balle fourniebAIBO s’assoit et sa queue lumineuse s’allume.
Lorsque vous touchez les capteurs situés sur le dos d’AIBObAIBO effectue la séquence d’actions suivantes : 5 pas vers l’avant c 5 pas
vers l’arrière c donne un coup avec sa patte droite c donne un coup avecsa patte gauche.
Lorsque vous placez AIBO sur la station d’alimentation (non fournie)bAIBO cesse de bouger.
18
Si AIBO cesse de bouger• Placez AIBO sur le sol et exercez une pression sur sa tête pendant quelques
secondes. AIBO cesse de bouger lorsque vous le soulevez ou si un objet secoince dans l’une des articulations de ses pattes. L’indicateur de moded’AIBO clignote deux fois avec une lumière verte.
• Chargez la batterie (voir page 19). Si la batterie est vide, le témoin depoitrine d’AIBO s’éteint et AIBO cesse de bouger.
Remarque
Lorsqu’AIBO présente des problèmes internes (voir page 59 pour le dépannage) oulorsque votre main reste coincée dans l’une de ses articulations, appuyez sur latouche pause située sur la poitrine d’AIBO.
19
Présentation d’A
IBO
Touche de pause
Lorsque vous ne jouez pas avecAIBONous vous recommandons de recharger la batterie pour qu’AIBO soit prêt àjouer à tout moment.
Mettre AIBO en mode pausePressez la touche pause située sur la poitrine d’AIBO.Le témoin de poitrine clignote en vert puis s’éteint.
Charge de la batterieLa batterie se charge automatiquement lorsque AIBO est raccordé àl’adaptateur secteur. Chargez la batterie à température ambiante (10°C à30°C).
1 Raccordez la fiche de conversion de l’adaptateur secteur à celui-ci.
20
2 Raccordez la fiche de conversion de l’adaptateur secteur à laborne de charge d’AIBO.
3 Raccordez l’adaptateur secteur sur une prise murale et placezAIBO dans la position indiquée ci-dessous :AIBO reste en mode pause tant que l’adaptateur secteur est raccordé, même sivous pressez la touche pause de sa poitrine.
Pendant le chargementLe témoin de poitrine s’allume en orange.
Lorsque le chargement estterminéLe témoin de poitrine s’éteint.
Témoin depoitrine
21
Présentation d’A
IBO
Remarques
• Si le témoin de poitrine clignote en orange pendant le chargement de la batterie,il est possible que le chargement ne se déroule pas normalement. Remplacez labatterie par une nouvelle batterie ou contactez le centre d’assistance clientèleAIBO (voir page 5).
• Si vous raccordez l’adaptateur secteur à AIBO alors qu’il est en mode actif,AIBO passe automatiquement en mode pause et la charge de la batteriecommence.
xUtilisation de la station d’alimentationVous pouvez charger la batterie interne d’AIBO en le plaçant sur la stationd’alimentation optionnelle. Vous pouvez également charger une batteriesupplémentaire sur la station d’alimentation en même temps. La batteriesupplémentaire vous permet de remplacer la batterie interne d’AIBO dès quecelle-ci est vide, et ainsi de continuer à jouer plus longtemps avec AIBO. Pourobtenir plus d’informations sur le remplacement de la batterie, voir page 33.

22
23
Faites plus ample connaissance a
vec AIB
OFaites plus ampleconnaissance avec AIBO
Ce chapitre vous aide à connaître AIBO et vous donne desinformations concernant les composants d’AIBO ainsi que leurfonction, leur réglage et l’installation des accessoiresoptionnels.
24
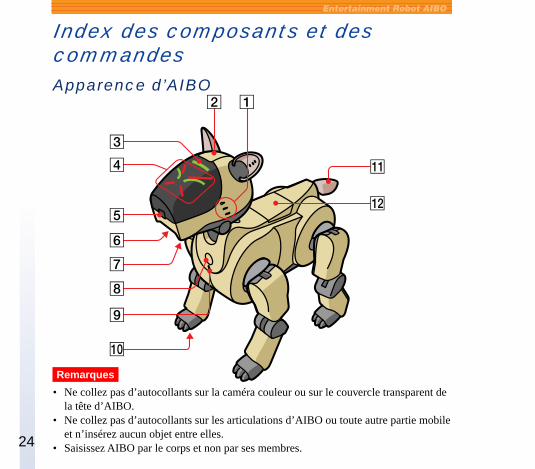
Index des composants et descommandesApparence d’AIBO
Remarques
• Ne collez pas d’autocollants sur la caméra couleur ou sur le couvercle transparent dela tête d’AIBO.
• Ne collez pas d’autocollants sur les articulations d’AIBO ou toute autre partie mobileet n’insérez aucun objet entre elles.
• Saisissez AIBO par le corps et non par ses membres.
25
Faites plus ample connaissance a
vec AIB
O1 Microphone stéréo
Permet à AIBO de distinguer les sonsenvironnants.
2 Capteur tactile de la têteDétecte qu’une personne tapote oucaresse la tête d’AIBO.
3 Indicateur de modeIndique le mode de fonctionnementd’AIBO.
4 Yeux lumineuxIls s’allument en vert-bleu ou enrouge afin d’indiquer l’étatémotionnel d’AIBO.
5 Caméra couleurPermet à AIBO de chercher desobjets et de les reconnaître enfonction de leur couleur, de leursmouvements.
6 Haut-parleurEmet différentes tonalités musicaleset des effets sonores.
7 Capteur tactile du mentonCapte lorsqu’une personne touche lementon d’AIBO.
8 Touche pausePressez cette touche pour activerAIBO ou pour le mettre en modepause.
9 Témoin de poitrine• S’allume en vert lorsque AIBO esten mode actif.
• Clignote en vert lorsqu’AIBO est enmode pause ou enregistre desdonnées sur le “Memory Stick.”
• S’allume en orange lorsque labatterie interne est en charge.
• Clignote en orange lorsqu’uneerreur est survenue pendant de lacharge.
• S’éteint lorsqu’AIBO est en modepause.
q; Capteurs des pattesSitués sous chaque patte.
qa Queue lumineuseS’allume en bleu ou orange afind’indiquer l’état émotionnel d’AIBO.
qs Capteur tactile du dosCapte lorsqu’une personne touche ledos d’AIBO.
26
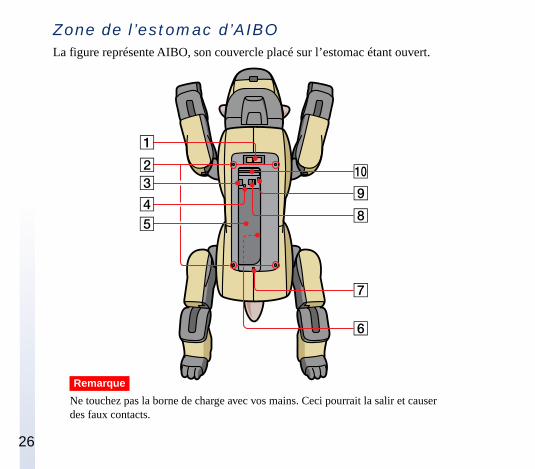
Zone de l’estomac d’AIBOLa figure représente AIBO, son couvercle placé sur l’estomac étant ouvert.
Remarque
Ne touchez pas la borne de charge avec vos mains. Ceci pourrait la salir et causerdes faux contacts.
27
Faites plus ample connaissance a
vec AIB
O1 Borne de charge
Raccordez la fiche de conversion del’adaptateur secteur à celui-ci. Cetteborne est en contact avec celle de lastation d’alimentation (non fournie)pendant le chargement de la batterieinterne d’AIBO avec la station.
2 Orifices de séparation despattesInsérez la pointe fournie dans cesorifices afin de retirer la pattecorrespondante.
3 Témoin d’accès de la batterieLorsqu’AIBO accède au “MemoryStick”, le levier libérant la batterie estbloqué et la batterie ne peut pas êtreretirée. L’indicateur de verrouillagede la batterie est rouge pendant cettepériode. Ne retirez pas le “MemoryStick” tant que cet indicateur estrouge.
4 Orifice de déblocage de labatterieInsérez un objet pointu dans cetorifice afin de débloquer la batterie.
5 Logement de la batterieInsérez la batterie fournie ou unebatterie ion lithium optionnelle dansce logement.
6 Etiquette portant le numéro desérie
7 Orifice de séparation de laqueueInsérez la pointe fournie dans cetorifice afin d’enlever la queued’AIBO.
8 Taquet de sécurité de la batterieFaites glisser le taquet pour retirer labatterie.
9 Orifice de séparation de la têteInsérez la pointe fournie dans cetorifice afin de retirer la tête d’AIBO.
q; Fente pour “Memory Stick”Insérez l’AIBO-ware “Memory Stick”(non fourni) dans l’emplacementprévu à cet effet.
28
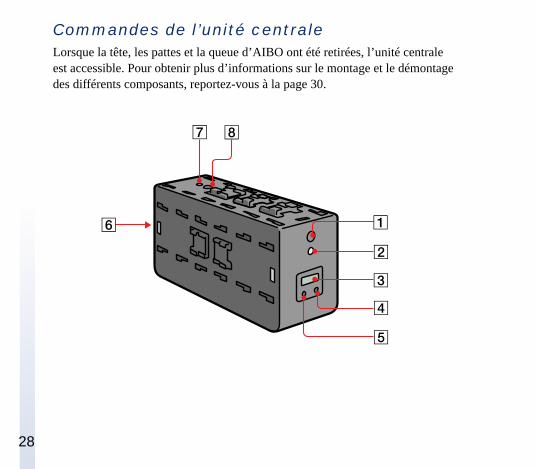
Commandes de l’unité centraleLorsque la tête, les pattes et la queue d’AIBO ont été retirées, l’unité centraleest accessible. Pour obtenir plus d’informations sur le montage et le démontagedes différents composants, reportez-vous à la page 30.
29
Faites plus ample connaissance a
vec AIB
O1 Touche pause A (poitrine)
Cette touche fonctionne de la mêmefaçon que la touche pause 8 de lapage 25.
2 Indicateur d’état defonctionnement A (poitrine)Fonctionne de la même manière quele témoin de poitrine.
3 Panneau d’affichageIndique l’heure actuelle, l’état decharge de la batterie ou le niveausonore des tonalités musicalesd’AIBO.
4 Touche +Permet d’incrémenter les valeurs deréglage.
5 Touche MODELors du réglage, appuyez sur cettetouche pour changer d’élément.
6 Fente pour la carte PCInsérez la carte PC (non fournie) danscette fente.
7 Indicateur d’état defonctionnement B (dos)Cet indicateur fonctionne de la mêmemanière que l’indicateur d’état defonctionnement A 2. Des fonctionssupplémentaires pourront êtreajoutées à cet indicateurultérieurement.
8 Touche pause B (dos)Cette touche fonctionne de la mêmemanière que la touche de pause A 1.Des fonctions supplémentairespourront être ajoutées à cette toucheultérieurement.
30
Montage et démontage desmembres d’AIBOVous pouvez également remplacer chaque partie du corps d’AIBO par despièces neuves qui seront bientôt disponibles afin de donner une apparencedifférente à AIBO.
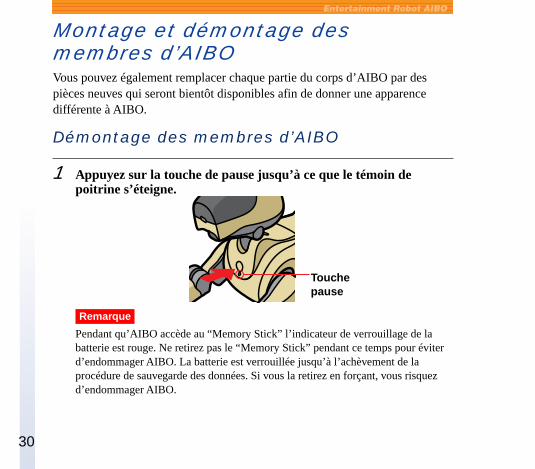
Démontage des membres d’AIBO
1 Appuyez sur la touche de pause jusqu’à ce que le témoin depoitrine s’éteigne.
Remarque
Pendant qu’AIBO accède au “Memory Stick” l’indicateur de verrouillage de labatterie est rouge. Ne retirez pas le “Memory Stick” pendant ce temps pour éviterd’endommager AIBO. La batterie est verrouillée jusqu’à l’achèvement de laprocédure de sauvegarde des données. Si vous la retirez en forçant, vous risquezd’endommager AIBO.
Touchepause
31
Faites plus ample connaissance a
vec AIB
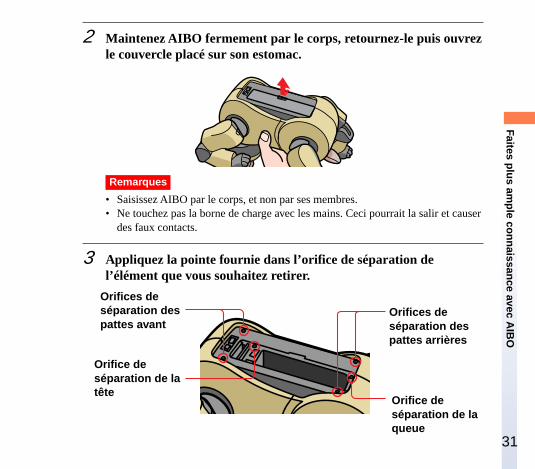
O2 Maintenez AIBO fermement par le corps, retournez-le puis ouvrez
le couvercle placé sur son estomac.
Remarques
• Saisissez AIBO par le corps, et non par ses membres.• Ne touchez pas la borne de charge avec les mains. Ceci pourrait la salir et causer
des faux contacts.
3 Appliquez la pointe fournie dans l’orifice de séparation del’élément que vous souhaitez retirer.
Orifices deséparation despattes avant
Orifice deséparation de latête
Orifice deséparation de laqueue
Orifices deséparation despattes arrières

32
4 Retirez l’élément tout en maintenant la pression dans l’orifice deséparation.
Montage des membres d’AIBOMaintenez AIBO par le corps et montez l’élément en l’encliquettant.
33
Faites plus ample connaissance a
vec AIB
ORemplacement de la batterieL’adaptateur secteur est souvent raccordé à l’AIBO pour charger la batteriealors que celle-ci est toujours insérée. Vous pouvez également changer labatterie et en insérer une nouvelle, chargée sur la station optionnelle.
1 Appuyez sur la touche pause jusqu’à ce que le témoin de poitrines’éteigne.
Remarque
Pendant qu’AIBO accède au “Memory Stick” l’indicateur de verrouillage de labatterie est rouge. Ne retirez pas le “Memory Stick” pendant ce temps pour éviterd’endommager AIBO. La batterie est verrouillée jusqu’à l’achèvement de laprocédure de sauvegarde des données. Si vous la retirez en forçant, vous risquezd’endommager AIBO.
Témoin de poitrine
34
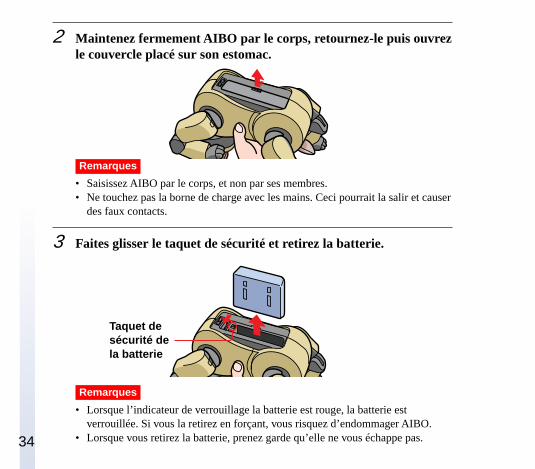
2 Maintenez fermement AIBO par le corps, retournez-le puis ouvrezle couvercle placé sur son estomac.
Remarques
• Saisissez AIBO par le corps, et non par ses membres.• Ne touchez pas la borne de charge avec les mains. Ceci pourrait la salir et causer
des faux contacts.
3 Faites glisser le taquet de sécurité et retirez la batterie.
Remarques
• Lorsque l’indicateur de verrouillage la batterie est rouge, la batterie estverrouillée. Si vous la retirez en forçant, vous risquez d’endommager AIBO.
• Lorsque vous retirez la batterie, prenez garde qu’elle ne vous échappe pas.
Taquet desécurité dela batterie
35
Faites plus ample connaissance a
vec AIB
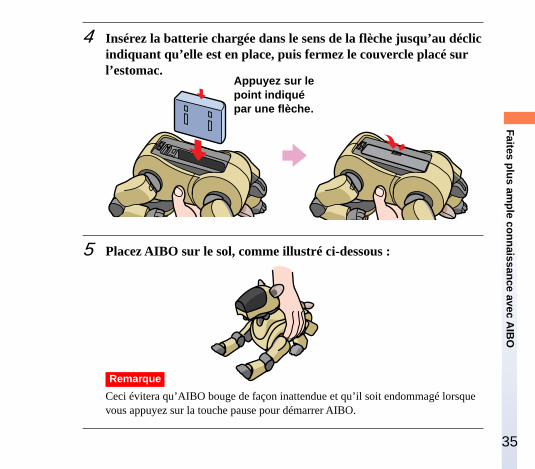
O4 Insérez la batterie chargée dans le sens de la flèche jusqu’au déclic
indiquant qu’elle est en place, puis fermez le couvercle placé surl’estomac.
5 Placez AIBO sur le sol, comme illustré ci-dessous :
Remarque
Ceci évitera qu’AIBO bouge de façon inattendue et qu’il soit endommagé lorsquevous appuyez sur la touche pause pour démarrer AIBO.
Appuyez sur lepoint indiquépar une flèche.
36
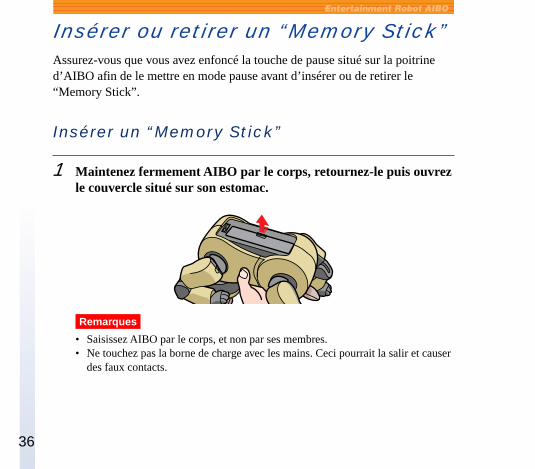
Insérer ou retirer un “Memory Stick”Assurez-vous que vous avez enfoncé la touche de pause situé sur la poitrined’AIBO afin de le mettre en mode pause avant d’insérer ou de retirer le“Memory Stick”.
Insérer un “Memory Stick”
1 Maintenez fermement AIBO par le corps, retournez-le puis ouvrezle couvercle situé sur son estomac.
Remarques
• Saisissez AIBO par le corps, et non par ses membres.• Ne touchez pas la borne de charge avec les mains. Ceci pourrait la salir et causer
des faux contacts.
37
Faites plus ample connaissance a
vec AIB
O2 Insérez le “Memory Stick” et fermez le couvercle placé sur
l’estomac.Assurez-vous que le repère ▼ est tourné vers le bas puis insérez le “MemoryStick” dans la fente pour “Memory Stick” jusqu’à ce que le déclic indiquequ’il est en place.
Retirer le “Memory Stick”Avant de retirer le “Memory Stick” d’AIBO, appuyez sur la touche pause pourarrêter AIBO, puis vérifiez que l’indicateur de verrouillage de la batterie estblanc.
38
Remarques
• Pour éviter d’endommager AIBO, ne retirez pas le “Memory Stick” alors quel’indicateur de verrouillage de la batterie est rouge.
• Si vous réglez le taquet de sécurité du “Memory Stick” sur LOCK, AIBO ne serapas en mesure de sauvegarder les données sur le “Memory Stick.”
39
Faites plus ample connaissance a
vec AIB
OInsérer la carte PC optionnellePour obtenir des détails sur l’insertion d’une carte LAN optionnelle, reportez-vous au mode d’emploi fourni avec la carte LAN sans fil AIBO ERA-201D1.
1 Insérez-la broche fournie dans les encoches permettant de dégagerles pattes avant gauche et arrière gauche, puis retirez-les.La fente pour la carte PC apparaît.
40
2 Insérez la carte PC dans l’emplacement ainsi qu’il est illustré.
3 Replacez les pattes avant gauche et arrière gauche.
41
Faites plus ample connaissance a
vec AIB
OEffectuer différents réglagesAprès avoir démonté les extrémités d’AIBO, vous pouvez régler les élémentssuivants à l’aide du panneau d’affichage situé sur l’unité centrale.Le panneau d’affichage est normalement vierge. Lorsque vous appuyez sur latouche de MODE, l’un des éléments suivants apparaît au bout de 30 secondes.Sélectionnez l’élément à régler en appuyant à plusieurs reprises sur la toucheMODE.
Pour annuler le réglageAppuyez sur la touche de MODE lorsque l’élément clignote. La valeur initialede l’élément s’affiche à nouveau.
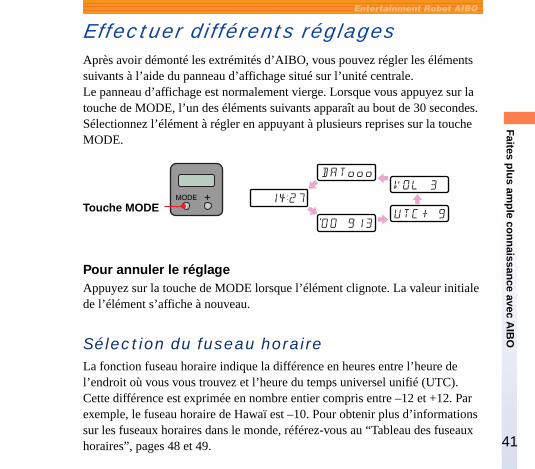
Sélection du fuseau horaireLa fonction fuseau horaire indique la différence en heures entre l’heure del’endroit où vous vous trouvez et l’heure du temps universel unifié (UTC).Cette différence est exprimée en nombre entier compris entre –12 et +12. Parexemple, le fuseau horaire de Hawaï est –10. Pour obtenir plus d’informationssur les fuseaux horaires dans le monde, référez-vous au “Tableau des fuseauxhoraires”, pages 48 et 49.
Touche MODE
42
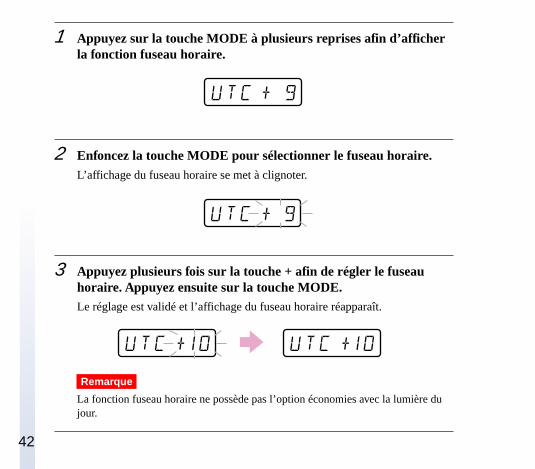
1 Appuyez sur la touche MODE à plusieurs reprises afin d’afficherla fonction fuseau horaire.
2 Enfoncez la touche MODE pour sélectionner le fuseau horaire.L’affichage du fuseau horaire se met à clignoter.
3 Appuyez plusieurs fois sur la touche + afin de régler le fuseauhoraire. Appuyez ensuite sur la touche MODE.Le réglage est validé et l’affichage du fuseau horaire réapparaît.
Remarque
La fonction fuseau horaire ne possède pas l’option économies avec la lumière dujour.
43
Faites plus ample connaissance a
vec AIB
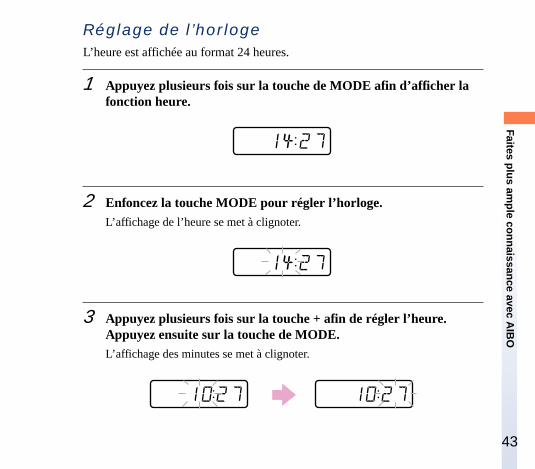
ORéglage de l’horlogeL’heure est affichée au format 24 heures.
1 Appuyez plusieurs fois sur la touche de MODE afin d’afficher lafonction heure.
2 Enfoncez la touche MODE pour régler l’horloge.L’affichage de l’heure se met à clignoter.
3 Appuyez plusieurs fois sur la touche + afin de régler l’heure.Appuyez ensuite sur la touche de MODE.L’affichage des minutes se met à clignoter.
44
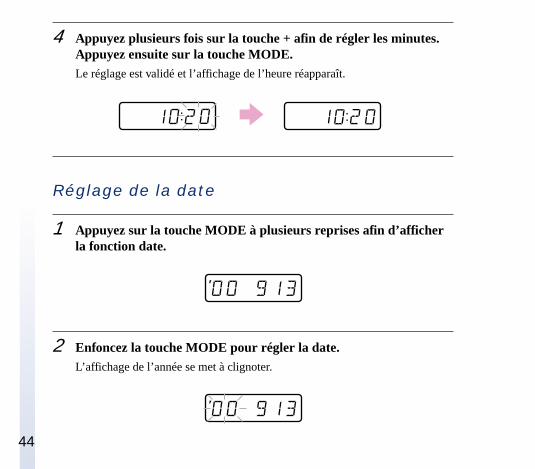
4 Appuyez plusieurs fois sur la touche + afin de régler les minutes.Appuyez ensuite sur la touche MODE.Le réglage est validé et l’affichage de l’heure réapparaît.
Réglage de la date
1 Appuyez sur la touche MODE à plusieurs reprises afin d’afficherla fonction date.
2 Enfoncez la touche MODE pour régler la date.L’affichage de l’année se met à clignoter.
45
Faites plus ample connaissance a
vec AIB
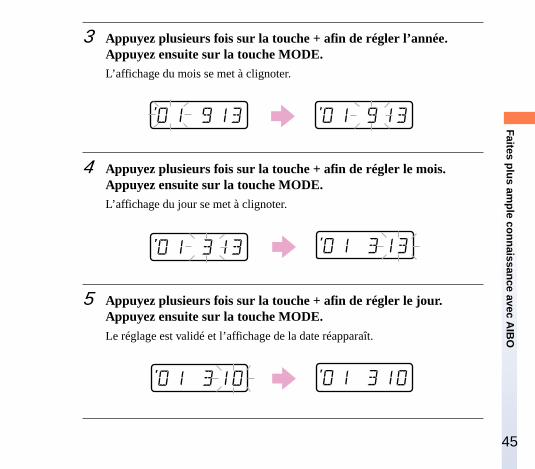
O3 Appuyez plusieurs fois sur la touche + afin de régler l’année.
Appuyez ensuite sur la touche MODE.L’affichage du mois se met à clignoter.
4 Appuyez plusieurs fois sur la touche + afin de régler le mois.Appuyez ensuite sur la touche MODE.L’affichage du jour se met à clignoter.
5 Appuyez plusieurs fois sur la touche + afin de régler le jour.Appuyez ensuite sur la touche MODE.Le réglage est validé et l’affichage de la date réapparaît.
46
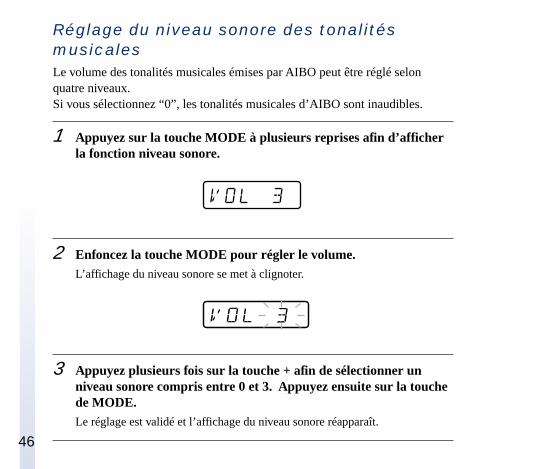
Réglage du niveau sonore des tonalitésmusicalesLe volume des tonalités musicales émises par AIBO peut être réglé selonquatre niveaux.Si vous sélectionnez “0”, les tonalités musicales d’AIBO sont inaudibles.
1 Appuyez sur la touche MODE à plusieurs reprises afin d’afficherla fonction niveau sonore.
2 Enfoncez la touche MODE pour régler le volume.L’affichage du niveau sonore se met à clignoter.
3 Appuyez plusieurs fois sur la touche + afin de sélectionner unniveau sonore compris entre 0 et 3. Appuyez ensuite sur la touchede MODE.Le réglage est validé et l’affichage du niveau sonore réapparaît.
47
Faites plus ample connaissance a
vec AIB
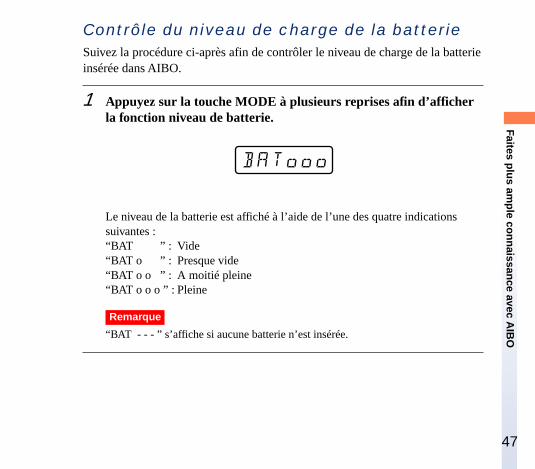
OContrôle du niveau de charge de la batterieSuivez la procédure ci-après afin de contrôler le niveau de charge de la batterieinsérée dans AIBO.
1 Appuyez sur la touche MODE à plusieurs reprises afin d’afficherla fonction niveau de batterie.
Le niveau de la batterie est affiché à l’aide de l’une des quatre indicationssuivantes :“BAT ” : Vide“BAT o ” : Presque vide“BAT o o ” : A moitié pleine“BAT o o o ” : Pleine
Remarque
“BAT - - - ” s’affiche si aucune batterie n’est insérée.

48
Tableau des fuseaux horairesUtilisez ce tableau pour saisir lefuseau horaire.

49
Faites plus ample connaissance a
vec AIB
O

50

51
Informations com
plémentaires
Informations complémentaires
Ce chapitre fournit des remarques sur l’utilisation d’AIBO, unguide de dépannage ainsi que d’autres informations concernantAIBO.
52
Remarques sur l’utilisationPour empêcher toute détérioration d’AIBO et de ses accessoires, prenez lesprécautions suivantes.
A propos de l’utilisation d’AIBO• Ne pas utiliser AIBO dans des endroits soumis à des vibrations, sur un plan
incliné ou à un endroit d’où il pourrait tomber.• Ne pas appuyer fortement sur AIBO avec la main ou le coude.• Ne pas faire tomber et ne pas secouer AIBO car cela peut l’endommager ou
provoquer la perte des données sauvegardées dans le “Memory Stick”.• Ne pas toucher directement avec la main la borne de chargement car cela
peut la salir et empêcher un bon contact.• Soulevez AIBO par le corps et non par les extrémités, comme la tête, les
oreilles, la queue ou les pattes. Ne balancez pas et ne tordez pas AIBO.• Ne pas laisser AIBO dans des endroits surchauffés, comme une voiture garée
en plein soleil, car cela peut le déformer ou le détériorer.• Ne laisser aucun corps étranger, comme des trombones, pénétrer dans AIBO
ou ses articulations.• Ne pas utiliser AIBO en extérieur. Si c’est le cas, l’humidité ou un corps
étranger peuvent pénétrer dans AIBO et l’abîmer.• Ne pas utiliser AIBO sur du ciment ou toute autre surface dure car cela peut
l’abîmer.• Ne pas mouiller AIBO.• Ne pas toucher l’objectif de la caméra couleur directement avec la main.
53
Informations com
plémentaires
• Ne pas érafler la tête d’AIBO.• Ne pas appliquer de sticker sur la caméra couleur ou la tête.• Ne pas pointer la caméra couleur en direction du soleil, que AIBO soit sous
tension ou non, car cela peut endommager la caméra.• Ne pas huiler les articulations ou d’autre parties mobiles d’AIBO.• Ne pas appliquer de sticker sur les parties mobiles d’AIBO et ne rien insérer
entre ces parties car cela peut empêcher AIBO de bouger.• Ne démontez pas ou ne modifiez pas AIBO à moins que ce ne soit
spécifié dans ce manuel.• Lorsque vous transportez AIBO, mettez-le dans une boîte capitonnée
comme celle dans laquelle il est livré pour protéger son corps, sa tête,sa queue et ses pattes de tout dommage éventuel. Vous pouvezégalement utiliser le sac de transport optionnel AIBO ERA-210C1.
• Ne pas utiliser AIBO dans un endroit soumis à de puissantes ondesélectromagnétiques ou des rayons X.
• Les applications AIBO-ware développées pour l’ERS-110/111 ne peuventpas être utilisées avec l’ERS-210.
• L’ERS-210 ne peut pas fonctionner avec le “Memory Stick” qui n’est pascompatible avec l’OPEN-R ver. 1.1.
Condensation d’humiditéSi AIBO est amené directement d’un endroit froid à un endroit chaud, celapeut provoquer une condensation d’humidité à l’intérieur et à l’extérieurd’AIBO causant ainsi des dommages. En cas de condensation d’humidité,attendez environ une heure avant de le mettre en marche.
54
A propos de l’utilisation de l’adaptateursecteur• Assurez-vous de n’utiliser que l’adaptateur secteur fourni pour recharger la
batterie d’alimentation d’AIBO. L’utilisation de tout autre adaptateurpourrait endommager AIBO.
• Ne pas brancher l’adaptateur secteur sur des transformateurs électroniquesconçus pour les voyageurs, car cela pourrait avoir pour conséquence lasurchauffe ou la dégradation d’AIBO.
A propos de l’utilisation de la batteried’alimentation• Na pas exposer la batterie d’alimentation à des températures supérieures à
45 °C, comme par exemple dans une voiture garée en plein soleil.• Assurez-vous de ne pas laisser des corps étrangers, comme de la poussière
ou du sable, être en contact avec les bornes. Si cela se produit, retirez cescorps étrangers à l’aide d’un bâtonnet doux.
• Si vous vous apprêtez à ne pas jouer avec AIBO pendant une longue période,retirez la batterie d’alimentation et conservez-la dans un endroit sec et frais.
• Ne faites pas tomber la batterie ou ne la recouvrez pas d’objets lourds. Nesoumettez pas la batterie à une forte pression ni à un choc physique.

55
Informations com
plémentaires
Nettoyage• Nettoyez AIBO avec un chiffon propre, sec et doux.• Ne pas utiliser de solvants volatiles qui peuvent endommager la finition de
la surface d’AIBO.
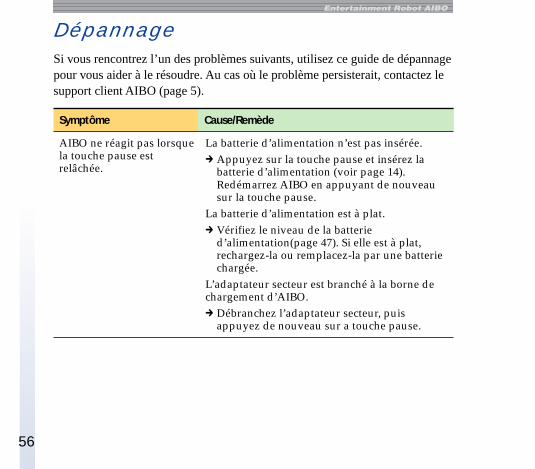
56
DépannageSi vous rencontrez l’un des problèmes suivants, utilisez ce guide de dépannagepour vous aider à le résoudre. Au cas où le problème persisterait, contactez lesupport client AIBO (page 5).
Symptôme Cause/Remède
AIBO ne réagit pas lorsquela touche pause estrelâchée.
La batterie d’alimentation n’est pas insérée.c Appuyez sur la touche pause et insérez la
batterie d’alimentation (voir page 14).Redémarrez AIBO en appuyant de nouveausur la touche pause.
La batterie d’alimentation est à plat.c Vérifiez le niveau de la batterie
d’alimentation(page 47). Si elle est à plat,rechargez-la ou remplacez-la par une batteriechargée.
L’adaptateur secteur est branché à la borne dechargement d’AIBO.c Débranchez l’adaptateur secteur, puis
appuyez de nouveau sur a touche pause.
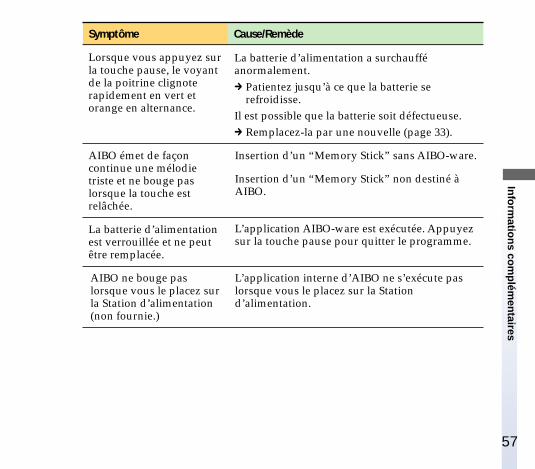
57
Informations com
plémentaires
Symptôme Cause/Remède
AIBO émet de façoncontinue une mélodietriste et ne bouge paslorsque la touche estrelâchée.
Insertion d’un “Memory Stick” sans AIBO-ware.
Insertion d’un “Memory Stick” non destiné àAIBO.
La batterie d’alimentationest verrouillée et ne peutêtre remplacée.
L’application AIBO-ware est exécutée. Appuyezsur la touche pause pour quitter le programme.
AIBO ne bouge paslorsque vous le placez surla Station d’alimentation(non fournie.)
L’application interne d’AIBO ne s’exécute paslorsque vous le placez sur la Stationd’alimentation.
Lorsque vous appuyez surla touche pause, le voyantde la poitrine clignoterapidement en vert etorange en alternance.
La batterie d’alimentation a surchaufféanormalement.c Patientez jusqu’à ce que la batterie se
refroidisse.Il est possible que la batterie soit défectueuse.c Remplacez-la par une nouvelle (page 33).
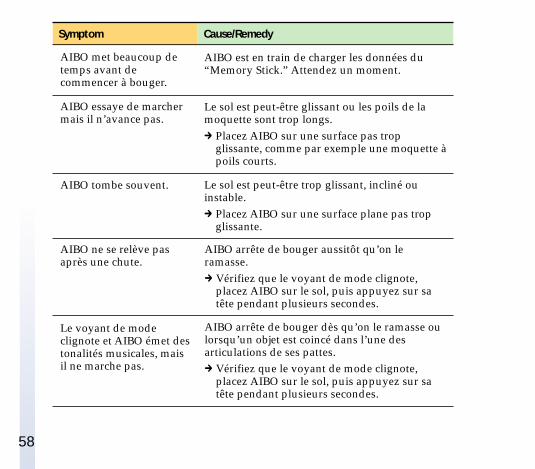
58
Symptom Cause/Remedy
AIBO ne se relève pasaprès une chute.
AIBO arrête de bouger aussitôt qu’on leramasse.c Vérifiez que le voyant de mode clignote,
placez AIBO sur le sol, puis appuyez sur satête pendant plusieurs secondes.
Le voyant de modeclignote et AIBO émet destonalités musicales, maisil ne marche pas.
AIBO arrête de bouger dès qu’on le ramasse oulorsqu’un objet est coincé dans l’une desarticulations de ses pattes.c Vérifiez que le voyant de mode clignote,
placez AIBO sur le sol, puis appuyez sur satête pendant plusieurs secondes.
AIBO met beaucoup detemps avant decommencer à bouger.
AIBO est en train de charger les données du“Memory Stick.” Attendez un moment.
AIBO essaye de marchermais il n’avance pas.
Le sol est peut-être glissant ou les poils de lamoquette sont trop longs.c Placez AIBO sur une surface pas trop
glissante, comme par exemple une moquette àpoils courts.
AIBO tombe souvent. Le sol est peut-être trop glissant, incliné ouinstable.c Placez AIBO sur une surface plane pas trop
glissante.
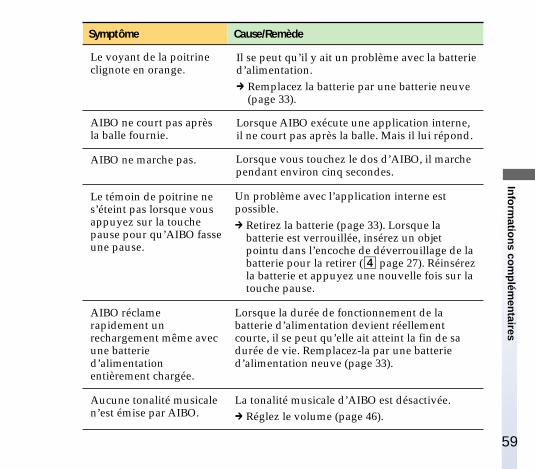
59
Informations com
plémentaires
Symptôme Cause/Remède
Le témoin de poitrine nes’éteint pas lorsque vousappuyez sur la touchepause pour qu’AIBO fasseune pause.
Un problème avec l’application interne estpossible.c Retirez la batterie (page 33). Lorsque la
batterie est verrouillée, insérez un objetpointu dans l’encoche de déverrouillage de labatterie pour la retirer (4 page 27). Réinsérezla batterie et appuyez une nouvelle fois sur latouche pause.
AIBO réclamerapidement unrechargement même avecune batteried’alimentationentièrement chargée.
Lorsque la durée de fonctionnement de labatterie d’alimentation devient réellementcourte, il se peut qu’elle ait atteint la fin de sadurée de vie. Remplacez-la par une batteried’alimentation neuve (page 33).
Aucune tonalité musicalen’est émise par AIBO.
La tonalité musicale d’AIBO est désactivée.c Réglez le volume (page 46).
Le voyant de la poitrineclignote en orange.
Il se peut qu’il y ait un problème avec la batteried’alimentation.c Remplacez la batterie par une batterie neuve
(page 33).
AIBO ne court pas aprèsla balle fournie.
Lorsque AIBO exécute une application interne,il ne court pas après la balle. Mais il lui répond.
AIBO ne marche pas. Lorsque vous touchez le dos d’AIBO, il marchependant environ cinq secondes.
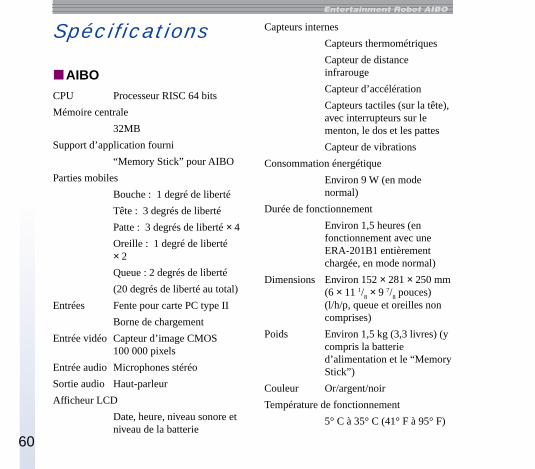
60
Spécifications
xAIBOCPU Processeur RISC 64 bits
Mémoire centrale
32MB
Support d’application fourni
“Memory Stick” pour AIBO
Parties mobiles
Bouche : 1 degré de liberté
Tête : 3 degrés de liberté
Patte : 3 degrés de liberté × 4
Oreille : 1 degré de liberté× 2
Queue : 2 degrés de liberté
(20 degrés de liberté au total)
Entrées Fente pour carte PC type II
Borne de chargement
Entrée vidéo Capteur d’image CMOS100 000 pixels
Entrée audio Microphones stéréo
Sortie audio Haut-parleur
Afficheur LCD
Date, heure, niveau sonore etniveau de la batterie
Capteurs internes
Capteurs thermométriques
Capteur de distanceinfrarouge
Capteur d’accélération
Capteurs tactiles (sur la tête),avec interrupteurs sur lementon, le dos et les pattes
Capteur de vibrations
Consommation énergétique
Environ 9 W (en modenormal)
Durée de fonctionnement
Environ 1,5 heures (enfonctionnement avec uneERA-201B1 entièrementchargée, en mode normal)
Dimensions Environ 152 × 281 × 250 mm(6 × 11 1/
8 × 9 7/
8 pouces)
(l/h/p, queue et oreilles noncomprises)
Poids Environ 1,5 kg (3,3 livres) (ycompris la batteried’alimentation et le “MemoryStick”)
Couleur Or/argent/noir
Température de fonctionnement
5° C à 35° C (41° F à 95° F)
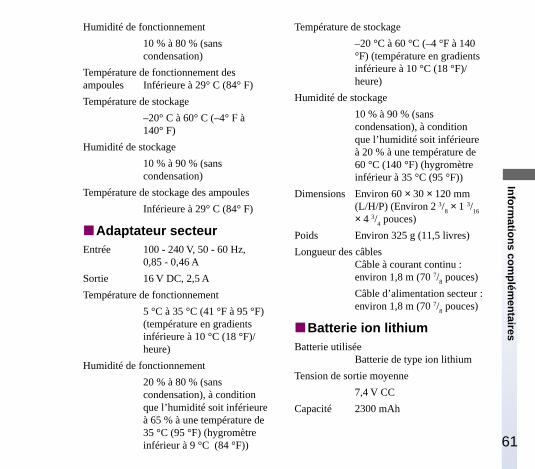
61
Informations com
plémentaires
Humidité de fonctionnement
10 % à 80 % (sanscondensation)
Température de fonctionnement desampoules Inférieure à 29° C (84° F)
Température de stockage
–20° C à 60° C (–4° F à140° F)
Humidité de stockage
10 % à 90 % (sanscondensation)
Température de stockage des ampoules
Inférieure à 29° C (84° F)
xAdaptateur secteurEntrée 100 - 240 V, 50 - 60 Hz,
0,85 - 0,46 A
Sortie 16 V DC, 2,5 A
Température de fonctionnement
5 °C à 35 °C (41 °F à 95 °F)(température en gradientsinférieure à 10 °C (18 °F)/heure)
Humidité de fonctionnement
20 % à 80 % (sanscondensation), à conditionque l’humidité soit inférieureà 65 % à une température de35 °C (95 °F) (hygromètreinférieur à 9 °C (84 °F))
Température de stockage
–20 °C à 60 °C (–4 °F à 140°F) (température en gradientsinférieure à 10 °C (18 °F)/heure)
Humidité de stockage
10 % à 90 % (sanscondensation), à conditionque l’humidité soit inférieureà 20 % à une température de60 °C (140 °F) (hygromètreinférieur à 35 °C (95 °F))
Dimensions Environ 60 × 30 × 120 mm(L/H/P) (Environ 2 3/
8 × 1 3/
16
× 4 3/4 pouces)
Poids Environ 325 g (11,5 livres)
Longueur des câblesCâble à courant continu :environ 1,8 m (70 7/
8 pouces)
Câble d’alimentation secteur :environ 1,8 m (70 7/
8 pouces)
xBatterie ion lithiumBatterie utilisée
Batterie de type ion lithium
Tension de sortie moyenne
7,4 V CC
Capacité 2300 mAh
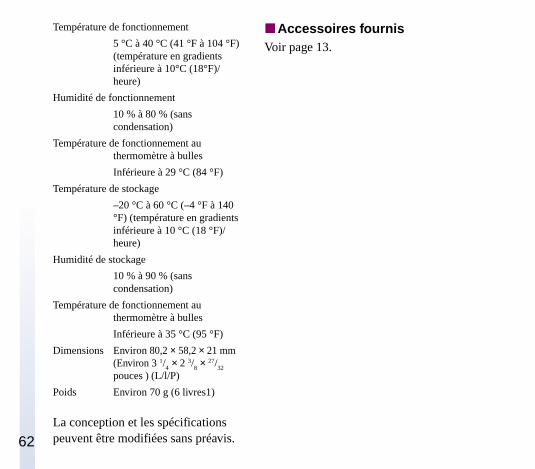
62
Température de fonctionnement
5 °C à 40 °C (41 °F à 104 °F)(température en gradientsinférieure à 10°C (18°F)/heure)
Humidité de fonctionnement
10 % à 80 % (sanscondensation)
Température de fonctionnement authermomètre à bulles
Inférieure à 29 °C (84 °F)
Température de stockage
–20 °C à 60 °C (–4 °F à 140°F) (température en gradientsinférieure à 10 °C (18 °F)/heure)
Humidité de stockage
10 % à 90 % (sanscondensation)
Température de fonctionnement authermomètre à bulles
Inférieure à 35 °C (95 °F)
Dimensions Environ 80,2 × 58,2 × 21 mm(Environ 3 1/
4 × 2 3/
8 × 27/
32
pouces ) (L/l/P)
Poids Environ 70 g (6 livres1)
La conception et les spécificationspeuvent être modifiées sans préavis.
xAccessoires fournisVoir page 13.
63
Informations com
plémentaires
Index
AAccessoires fournis ........................... 13Adaptateur secteur ..................... 13, 19
Utilisation ................................... 54AIBO
Jouer avec .................................... 16Nettoyage .................................... 55Pause ............................................ 19Préparation ................................. 14Utilisation ................................... 52
AIBO-ware ................................... 12, 16Assistance clientèle ............................. 5
BBalle .................................................... 13Batterie d’alimentation .................... 13
Chargement ................................ 19Remplacement ........................... 33Utilisation ................................... 54Vérification du niveau .............. 47
Borne de chargement ................. 20, 27
CCaméra couleur ................................. 25Capteurs
Capteur tactile de la tête ........... 25Capteur tactile du dos ............... 25Capteur tactile du menton ....... 25Capteurs tactiles des pattes ...... 25
Carte PC ....................................... 12, 39Insertion ...................................... 39
FFentes d’insertion
Fente de la carte PC ............. 29, 39Fente d’insertion de la batteried’alimentation ........................... 27
Fente d’insertion“Memory Stick” ........................ 27
Fuseau horaire ............................. 41, 48
HHaut-parleur ...................................... 25
IIndicateur d’état de foncionnement A/B ......................................................... 29
64
LLumière de la queue ......................... 25Lumières de yeux ............................. 25
MMembres
Fixation........................................ 30Retrait .......................................... 32
”Memory Stick”Insertion ...................................... 36Retrait .......................................... 37
Microphone stéréo ............................ 25Mode Pause ....................................... 19
OOPEN-R .............................................. 11Orifices de démontage
Orifice de démontage batteried’alimentation ........................... 27
Orifice de démontage de lapatte ...................................... 27, 31
Orifice de démontage de laqueue .................................... 27, 31
Orifice de démontage de la tête ........................................ 27, 31
PPanneau d’affichage ......................... 29Prise du transformateur de l’adaptateursecteur ......................................... 13, 20
Pointe pour le démondage desmembres d’AIBO ................. 13, 31, 39
RRéglage
date .............................................. 44horloge ........................................ 43niveau de la tonalitémusicale ..................................... 46
Robot de divertissement .................. 10
SStation d’alimentation ...................... 21Support client AIBO ........................... 5
TTaquet de sécurité de labatterie ........................................ 27, 34
Témoin d’accès de la batterie................................................ 27, 33, 37
Tonalité musicale ........................ 17, 46Touche de MODE ................. 29, 42-26Touche Pause........................ 15, 16, 19, 25, 29, 30, 33
Touche + ................................. 29, 42-26
VVoyant de mode ................................ 25Voyant de poitrine ................ 16, 20, 30

SicherheitsinformationenACHTUNG• Um Feuergefahr und die Gefahr eines elektrischen Schlags zu vermeiden,
setzen Sie den Roboter weder Regen noch sonstiger Feuchtigkeit aus.• Um einen elektrischen Schlag zu vermeiden, öffnen Sie das Gehäuse nicht.
Überlassen Sie Wartungsarbeiten stets nur qualifiziertem Fachpersonal.Wenden Sie sich bitte an die AIBO-Kundendienst-Hotline. (Seite 5)
• Hinweis an erwachsene Benutzer bzw. Eltern und Erziehungsberechtigte -Überprüfen Sie den Transformator bitte regelmäßig auf Defekte, wie zumBeispiel Beschädigungen an den Kabeln, den Stiften oder am Gehäuse.Solche Beschädigungen können zu Feuergefahr, der Gefahr eineselektrischen Schlags oder Verletzungen führen. Ist der Transformatorbeschädigt, darf er nicht mehr benutzt und muss ausgetauscht werden.
• Dieses Spielzeug ist nicht für Kinder unter 8 Jahrem gedacht und wird fürKinder unter 8 Jahren nicht empfohlen.
• Der an das Netzteil angeschlossene Roboter darf an nicht mehr als dieempfohlene Anzahl von Stromquellen angeschlossen werden.
• Der Roboter darf ausschließlich mit dem empfohlenen Netzteil (ERA-201P1) verwendet werden.
• Das Netzteil ist kein Spielzeug.• Es besteht die Gefahr, dass Kinder kleine Teile verschlucken.• Wenn das externe Netz- oder Anschlusskabel beschädigt wird, muss es
ausgetauscht oder repariert werden. Wenden Sie sich dazu nur an denHersteller, seinen autorisierten Kundendienst oder ähnliches Fachpersonal,um potenzielle Gefahren zu vermeiden.
2
• Die zu Befestigungs- und Verpackungszwecken verwendeten Materialiensind nicht Teil des Spielzeugs. Diese Materialien stellen einSicherheitsrisiko für Kinder dar.
• Informationen zum Netzteil, zur Station und zum Lithium-Ionen-Akkufinden Sie in den gesondert erhältlichen Anleitungen.
• Dieses Produkt ist ein Laser-Gerät der Klasse 1.
ENTSORGUNG DES LITHIUM-IONEN-AKKUS! Berühren Sie beschädigte oder auslaufende Lithium-Ionen-Akkus nicht.! Bei einem falschen oder falsch eingelegten Akku besteht Explosionsgefahr.
Tauschen Sie den Akku nur gegen einen Akku ERA-201B1 oder einenvergleichbaren Akkutyp aus, der vom Hersteller empfohlen wird. EntsorgenSie gebrauchte Akkus nach den Angaben des Herstellers.
! Bei unsachgemäßem Gebrauch des Akkus besteht Feuergefahr oder dieGefahr von Verätzungen. Zerlegen Sie den Akku nicht, erhitzen Sie ihn nichtüber 60 °C und versuchen Sie nicht, ihn zu verbrennen. Zerlegen Sie Akkusnicht und werfen Sie ihn nicht ins Feuer.
Entsorgungshinweis: Bitte werfen Sie nur entladene Batterien in dieSammelboxen beim Handel oder den Kommunen. Entladen sind Batterien in derRegel dann, wenn das Gerät abschaltet und „Batterie leer“ signalisiert oder nachlängerer Gebrauchsdauer der Batterien nicht mehr einwandfrei funktioniert. Umsicherzugehen, kleben Sie die Batteriepole z.B. mit einem Klebestreifen ab odergeben Sie die Batterien einzeln in einen Plastikbeutel.
3
De
4
Voor de Klanten in NederlandBij dit produkt zijn batterijen geleverd. Wanneer deze leeg zijn,moet u ze niet weggooien maar inleveren als KCA.
Gesetzliche VorschriftenDieses Gerät wurde geprüft und erfüllt folgende Sicherheitsstandards:
Spielzeug-Richtlinie 88/378/EEC, EN50088/96 + A1/96 + A2/97, EN71-1/98,EN71-2/93, EN71-3/94
EMV-Richtlinie 89/336/EWGEMI EN55022/94+A1/95+A2/97, EN55014/93+A1/97+A2/99, EN50081-1/92EMS: EN55024/98, EN55014-2/97, EN61000-3-2/95, EN61000-3-3/95,EN50082-1/97
EN60825-1/94
Netzteil und Lithium-Ionen-Akkus wurden zusammen als System geprüft underfüllen folgende Sicherheitsstandards:
LVD 73/23/EWG + 93/68/EWGEN60950/92 + A1/93 + A2/93 + A3/95 + A4/97 + A11/97EN60065/98EN61558-1/97 + A1/98EN61558-2-7/97
5
Hinweise zur Konformität mit dem CE-Zeichen (EMV)a) Dieses Gerät entspricht der europäischen Norm EN55022 Klasse B (digital) für die
Verwendung in folgenden Gebieten: Wohngebiete, Gewerbegebiete undLeichtindustriegebiete.
b) Dieses Gerät erfüllt die folgende europäische Richtlinie: 89/336/EWG (EMV-Richtlinie)
Sony Corporation6-7-35 Kitashinagawa, Shinagawa-ku, Tokyo 141-0001 JAPANBitte bewahren Sie alle Informationen zum späteren Nachschlagen auf.
KundendienstEuropa:
Für Großbritannien: +44(0)-20-7365-2938Für Deutschland: +49(0)-69-9508-6310Für Frankreich: +33(0)-1-5569-5118E-Mail-Adresse: [email protected]
Die Reproduktion ganz oder auszugsweise ist ohne schriftlicheGenehmigung untersagt. Alle Rechte vorbehalten.
6
Inhalt
AIBO stellt sich vor
Einführung .....................................................................................10Was ist AIBO? ......................................................................... 10
Überprüfen des mitgelieferten Zubehörs .......................................13
Vorbereiten von AIBO....................................................................14
Spielen mit AIBO ...........................................................................16Wenn AIBO sich nicht mehr bewegt ....................................... 18
Wenn Sie nicht mit AIBO spielen ..................................................19Anhalten von AIBO ................................................................. 19
Laden des Akkus...................................................................... 19
Weitere Informationen zu AIBO
Lage und Funktion der Teile und Bedienelemente.........................24
AIBOs Äußeres ....................................................................... 24
AIBOs Bauch........................................................................... 26
Bedienelemente am Rumpf ..................................................... 28
Abnehmen und Anbringen von AIBOs Körperteilen .....................30Abnehmen von AIBOs Körperteilen ....................................... 30
Anbringen von AIBOs Körperteilen ........................................ 32
7
Austauschen des Akkus ..................................................................33
Einsetzen und Herausnehmen eines „Memory Sticks“ ..................36Einsetzen eines „Memory Sticks“ ........................................... 36
Herausnehmen des „Memory Sticks“ ...................................... 37
Einsetzen einer gesondert erhältlichen PC-Karte ...........................39
Vornehmen verschiedener Einstellungen .......................................41Auswählen der Zeitzone .......................................................... 42
Einstellen der Uhr .................................................................... 43
Einstellen des Datums ............................................................. 44
Einstellen des Lautstärkepegels der Töne ............................... 46
Überprüfen des Akkuladezustands .......................................... 47
Tabelle der Zeitzonen .....................................................................48
Weitere Informationen
Hinweise zum Umgang mit AIBO und seinem Zubehör ...............52Umgang mit AIBO .................................................................. 52
Feuchtigkeitskondensation ...................................................... 54
Umgang mit dem Netzteil ....................................................... 54
Umgang mit dem Akku ........................................................... 54
Reinigung ................................................................................ 55
Störungsbehebung ..........................................................................56
8
Technische Daten ...........................................................................60
Index ...............................................................................................63
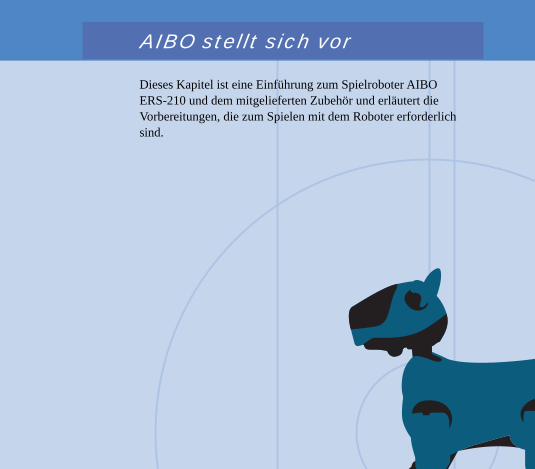
9
AIB
O stellt sich vor
AIBO stellt sich vor
Dieses Kapitel ist eine Einführung zum Spielroboter AIBOERS-210 und dem mitgelieferten Zubehör und erläutert dieVorbereitungen, die zum Spielen mit dem Roboter erforderlichsind.
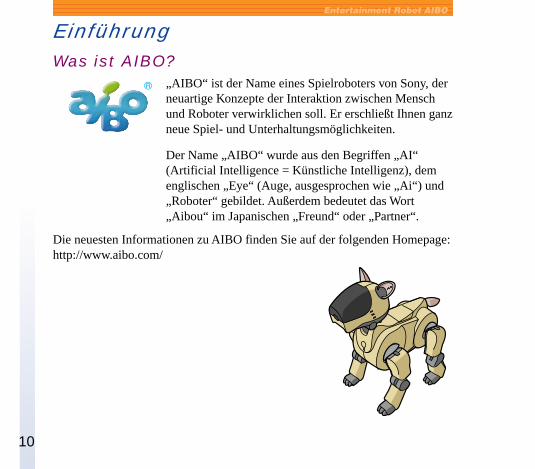
10
EinführungWas ist AIBO?
„AIBO“ ist der Name eines Spielroboters von Sony, derneuartige Konzepte der Interaktion zwischen Menschund Roboter verwirklichen soll. Er erschließt Ihnen ganzneue Spiel- und Unterhaltungsmöglichkeiten.
Der Name „AIBO“ wurde aus den Begriffen „AI“(Artificial Intelligence = Künstliche Intelligenz), demenglischen „Eye“ (Auge, ausgesprochen wie „Ai“) und„Roboter“ gebildet. Außerdem bedeutet das Wort„Aibou“ im Japanischen „Freund“ oder „Partner“.
Die neuesten Informationen zu AIBO finden Sie auf der folgenden Homepage:http://www.aibo.com/
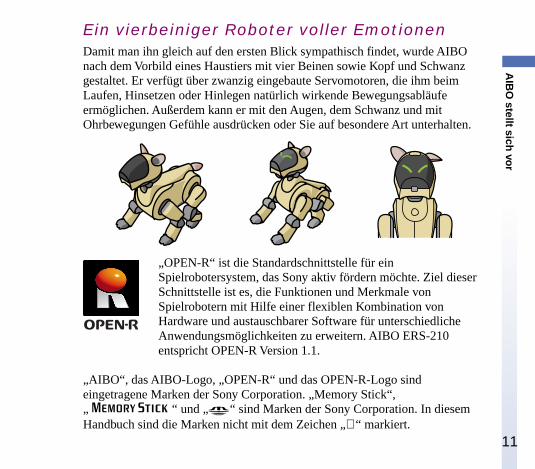
11
AIB
O stellt sich vor
Ein vierbeiniger Roboter voller EmotionenDamit man ihn gleich auf den ersten Blick sympathisch findet, wurde AIBOnach dem Vorbild eines Haustiers mit vier Beinen sowie Kopf und Schwanzgestaltet. Er verfügt über zwanzig eingebaute Servomotoren, die ihm beimLaufen, Hinsetzen oder Hinlegen natürlich wirkende Bewegungsabläufeermöglichen. Außerdem kann er mit den Augen, dem Schwanz und mitOhrbewegungen Gefühle ausdrücken oder Sie auf besondere Art unterhalten.
„OPEN-R“ ist die Standardschnittstelle für einSpielrobotersystem, das Sony aktiv fördern möchte. Ziel dieserSchnittstelle ist es, die Funktionen und Merkmale vonSpielrobotern mit Hilfe einer flexiblen Kombination vonHardware und austauschbarer Software für unterschiedlicheAnwendungsmöglichkeiten zu erweitern. AIBO ERS-210entspricht OPEN-R Version 1.1.
„AIBO“, das AIBO-Logo, „OPEN-R“ und das OPEN-R-Logo sindeingetragene Marken der Sony Corporation. „Memory Stick“,„ “ und „ “ sind Marken der Sony Corporation. In diesemHandbuch sind die Marken nicht mit dem Zeichen „“ markiert.
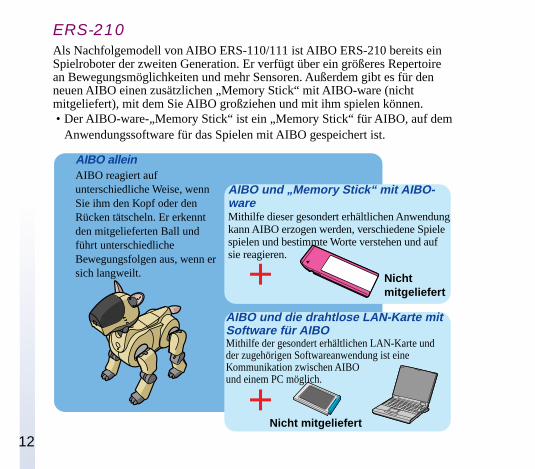
12
Nichtmitgeliefert
ERS-210Als Nachfolgemodell von AIBO ERS-110/111 ist AIBO ERS-210 bereits einSpielroboter der zweiten Generation. Er verfügt über ein größeres Repertoirean Bewegungsmöglichkeiten und mehr Sensoren. Außerdem gibt es für denneuen AIBO einen zusätzlichen „Memory Stick“ mit AIBO-ware (nichtmitgeliefert), mit dem Sie AIBO großziehen und mit ihm spielen können. • Der AIBO-ware-„Memory Stick“ ist ein „Memory Stick“ für AIBO, auf dem
Anwendungssoftware für das Spielen mit AIBO gespeichert ist.
AIBO und die drahtlose LAN-Karte mitSoftware für AIBOMithilfe der gesondert erhältlichen LAN-Karte undder zugehörigen Softwareanwendung ist eineKommunikation zwischen AIBOund einem PC möglich.
AIBO und „Memory Stick“ mit AIBO-wareMithilfe dieser gesondert erhältlichen Anwendungkann AIBO erzogen werden, verschiedene Spielespielen und bestimmte Worte verstehen und aufsie reagieren.
AIBO alleinAIBO reagiert aufunterschiedliche Weise, wennSie ihm den Kopf oder denRücken tätscheln. Er erkenntden mitgelieferten Ball undführt unterschiedlicheBewegungsfolgen aus, wenn ersich langweilt.
Nicht mitgeliefert
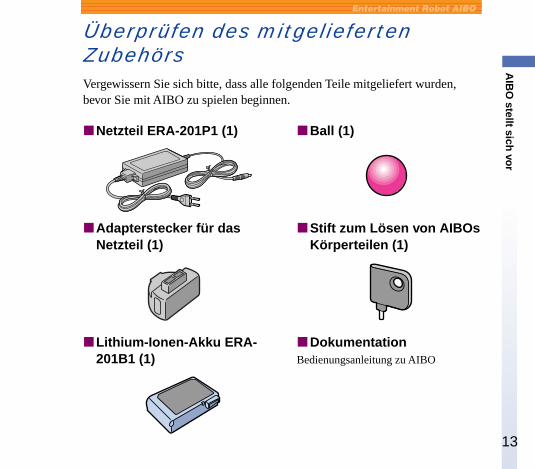
13
AIB
O stellt sich vor
Überprüfen des mitgeliefertenZubehörsVergewissern Sie sich bitte, dass alle folgenden Teile mitgeliefert wurden,bevor Sie mit AIBO zu spielen beginnen.
xNetzteil ERA-201P1 (1)
xAdapterstecker für dasNetzteil (1)
xLithium-Ionen-Akku ERA-201B1 (1)
xBall (1)
xStift zum Lösen von AIBOsKörperteilen (1)
xDokumentationBedienungsanleitung zu AIBO
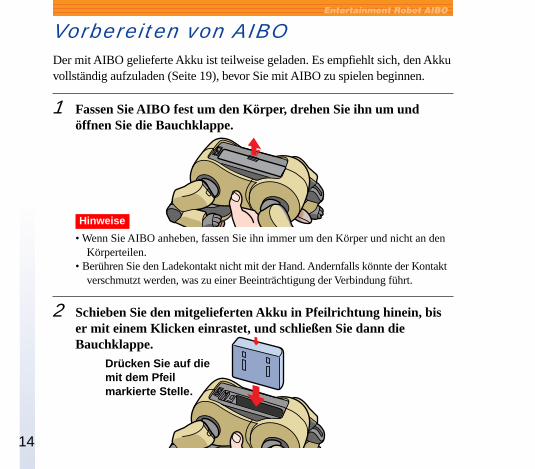
14
Vorbereiten von AIBODer mit AIBO gelieferte Akku ist teilweise geladen. Es empfiehlt sich, den Akkuvollständig aufzuladen (Seite 19), bevor Sie mit AIBO zu spielen beginnen.
1 Fassen Sie AIBO fest um den Körper, drehen Sie ihn um undöffnen Sie die Bauchklappe.
Hinweise
• Wenn Sie AIBO anheben, fassen Sie ihn immer um den Körper und nicht an denKörperteilen.
• Berühren Sie den Ladekontakt nicht mit der Hand. Andernfalls könnte der Kontaktverschmutzt werden, was zu einer Beeinträchtigung der Verbindung führt.
2 Schieben Sie den mitgelieferten Akku in Pfeilrichtung hinein, biser mit einem Klicken einrastet, und schließen Sie dann dieBauchklappe.
Drücken Sie auf diemit dem Pfeilmarkierte Stelle.
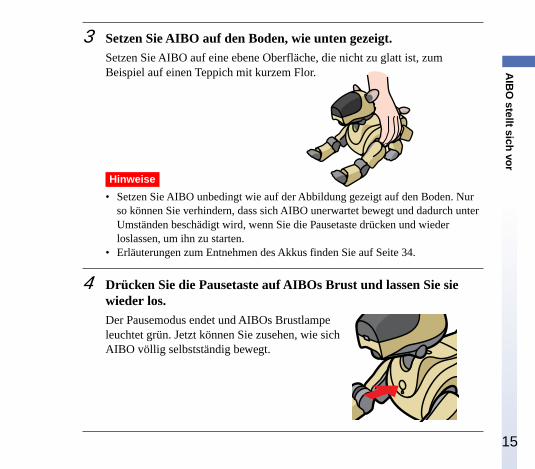
15
AIB
O stellt sich vor
3 Setzen Sie AIBO auf den Boden, wie unten gezeigt.Setzen Sie AIBO auf eine ebene Oberfläche, die nicht zu glatt ist, zumBeispiel auf einen Teppich mit kurzem Flor.
Hinweise
• Setzen Sie AIBO unbedingt wie auf der Abbildung gezeigt auf den Boden. Nurso können Sie verhindern, dass sich AIBO unerwartet bewegt und dadurch unterUmständen beschädigt wird, wenn Sie die Pausetaste drücken und wiederloslassen, um ihn zu starten.
• Erläuterungen zum Entnehmen des Akkus finden Sie auf Seite 34.
4 Drücken Sie die Pausetaste auf AIBOs Brust und lassen Sie siewieder los.Der Pausemodus endet und AIBOs Brustlampeleuchtet grün. Jetzt können Sie zusehen, wie sichAIBO völlig selbstständig bewegt.
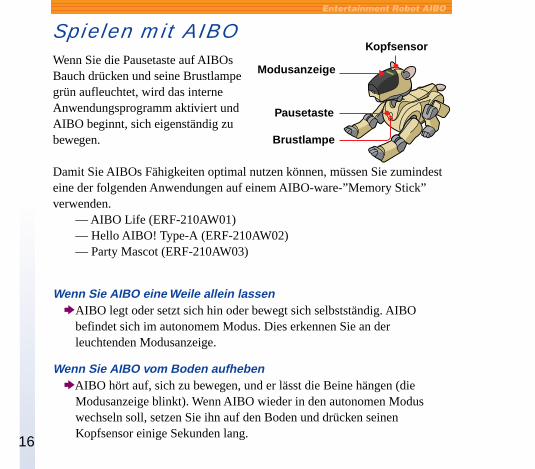
16
Spielen mit AIBOWenn Sie die Pausetaste auf AIBOsBauch drücken und seine Brustlampegrün aufleuchtet, wird das interneAnwendungsprogramm aktiviert undAIBO beginnt, sich eigenständig zubewegen.
Damit Sie AIBOs Fähigkeiten optimal nutzen können, müssen Sie zumindesteine der folgenden Anwendungen auf einem AIBO-ware-”Memory Stick”verwenden.
— AIBO Life (ERF-210AW01)— Hello AIBO! Type-A (ERF-210AW02)— Party Mascot (ERF-210AW03)
Wenn Sie AIBO eine Weile allein lassenbAIBO legt oder setzt sich hin oder bewegt sich selbstständig. AIBO
befindet sich im autonomem Modus. Dies erkennen Sie an derleuchtenden Modusanzeige.
Wenn Sie AIBO vom Boden aufhebenbAIBO hört auf, sich zu bewegen, und er lässt die Beine hängen (die
Modusanzeige blinkt). Wenn AIBO wieder in den autonomen Moduswechseln soll, setzen Sie ihn auf den Boden und drücken seinenKopfsensor einige Sekunden lang.
Modusanzeige
Pausetaste
Kopfsensor
Brustlampe
17
AIB
O stellt sich vor
Wenn ein Fremdkörper in AIBOs Beingelenke gerätbAIBO hört auf, sich zu bewegen, und er lässt die Beine hängen (die
Modusanzeige blinkt). Wenn AIBO wieder in den autonomen Moduswechseln soll, setzen Sie ihn auf den Boden und drücken seinenKopfsensor einige Sekunden lang.
Wenn Sie zu stark auf AIBOs Kopf drückenbAIBO zeigt mit seinen Augen, dass er wütend ist.
Wenn Sie AIBOs Kopf ein paar Mal von hinten nach vorne streichelnbAIBO zeigt mit seinen Augen Freude an.
Wenn drücken Sie AIBOs ein paar Sekunden lang auf den KopfbAIBO gibt Lautäußerungen von sich und die Augen leuchten auf.
Wenn Sie AIBO am Kinn berührenbAIBO gibt Lautäußerungen von sich.
Wenn Sie AIBO den mitgelieferten Ball hinhaltenbAIBO setzt sich hin und die Schwanzlampe leuchtet auf.
Wenn Sie AIBOs Rückensensor berührenbAIBO führt folgende Bewegungsfolge aus: Läuft 5 Schritte vorwärts c
Läuft 5 Schritte rückwärts c Kickt mit dem rechten Bein c Kickt mit demlinken Bein.
Wenn Sie AIBO auf die Energiestation (nicht mitgeliefert) setzenbAIBO hört auf, sich zu bewegen.
18
Wenn AIBO sich nicht mehr bewegt• Stellen Sie AIBO auf den Boden und drücken Sie ihm ein paar Sekunden
lang auf den Kopf. AIBO hört auf, sich zu bewegen, wenn Sie ihn vomBoden hochheben oder wenn ein Fremdkörper in eins seiner Beingelenkegerät. In beiden Fällen blinkt AIBOs Modusanzeige grün.
• Laden Sie den Akku (Seite 19). Wenn der Akku leer ist, schaltet sich AIBOsBrustlampe aus und AIBO bewegt sich nicht mehr.
Hinweis
Wenn AIBO eine Störung hat (siehe Seite 59 zur Störungsbehebung) oder wenn Siemit der Hand in eins seiner Gelenke geraten, drücken Sie die Pausetaste an AIBOsBrust.
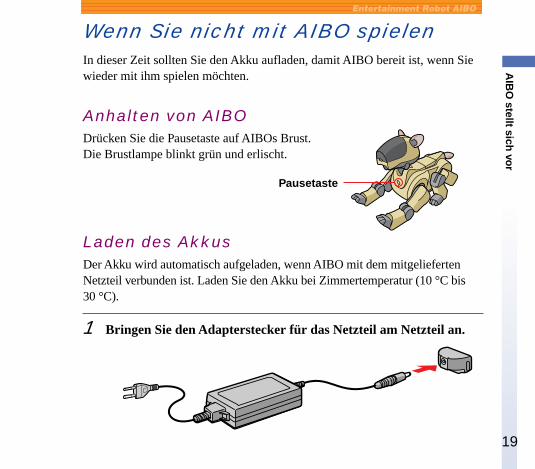
19
AIB
O stellt sich vor
Wenn Sie nicht mit AIBO spielenIn dieser Zeit sollten Sie den Akku aufladen, damit AIBO bereit ist, wenn Siewieder mit ihm spielen möchten.
Anhalten von AIBODrücken Sie die Pausetaste auf AIBOs Brust.Die Brustlampe blinkt grün und erlischt.
Laden des AkkusDer Akku wird automatisch aufgeladen, wenn AIBO mit dem mitgeliefertenNetzteil verbunden ist. Laden Sie den Akku bei Zimmertemperatur (10 °C bis30 °C).
1 Bringen Sie den Adapterstecker für das Netzteil am Netzteil an.
Pausetaste
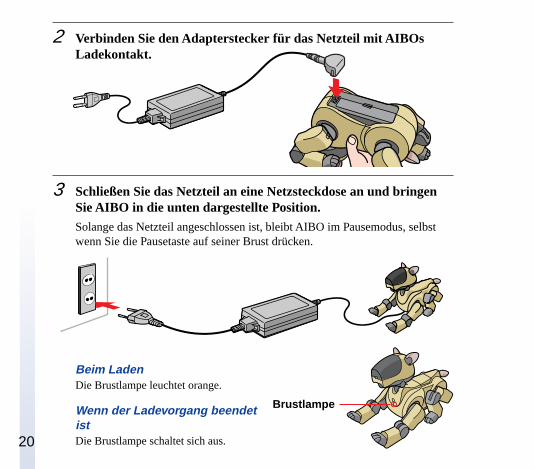
20
2 Verbinden Sie den Adapterstecker für das Netzteil mit AIBOsLadekontakt.
3 Schließen Sie das Netzteil an eine Netzsteckdose an und bringenSie AIBO in die unten dargestellte Position.Solange das Netzteil angeschlossen ist, bleibt AIBO im Pausemodus, selbstwenn Sie die Pausetaste auf seiner Brust drücken.
Beim LadenDie Brustlampe leuchtet orange.
Wenn der Ladevorgang beendetistDie Brustlampe schaltet sich aus.
Brustlampe
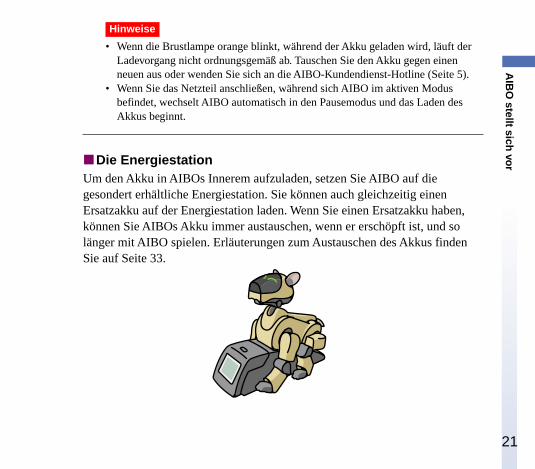
21
AIB
O stellt sich vor
Hinweise
• Wenn die Brustlampe orange blinkt, während der Akku geladen wird, läuft derLadevorgang nicht ordnungsgemäß ab. Tauschen Sie den Akku gegen einenneuen aus oder wenden Sie sich an die AIBO-Kundendienst-Hotline (Seite 5).
• Wenn Sie das Netzteil anschließen, während sich AIBO im aktiven Modusbefindet, wechselt AIBO automatisch in den Pausemodus und das Laden desAkkus beginnt.
xDie EnergiestationUm den Akku in AIBOs Innerem aufzuladen, setzen Sie AIBO auf diegesondert erhältliche Energiestation. Sie können auch gleichzeitig einenErsatzakku auf der Energiestation laden. Wenn Sie einen Ersatzakku haben,können Sie AIBOs Akku immer austauschen, wenn er erschöpft ist, und solänger mit AIBO spielen. Erläuterungen zum Austauschen des Akkus findenSie auf Seite 33.

22
23
Weitere Inform
ationen zu AIB
O
Weitere Informationen zu AIBO
In diesem Kapitel finden Sie technische Erläuterungen zuAIBO. Hier werden seine Komponenten und deren Funktion,verschiedene Einstellungen und die Installation von zusätzlicherhältlichem Zubehör erklärt.

24
Lage und Funktion der Teile undBedienelementeAIBOs Äußeres
Hinweise
• Bringen Sie keine Aufkleber an AIBOs Farbkamera oder auf AIBOs Gesicht (dertransparenten Abdeckung) an.
• Bringen Sie keine Aufkleber an AIBOs Gelenken oder anderen beweglichen Teilen anund führen Sie auch keine Fremdkörper ein.
• Wenn Sie AIBO anheben, fassen Sie ihn immer um den Körper und nicht an denKörperteilen.
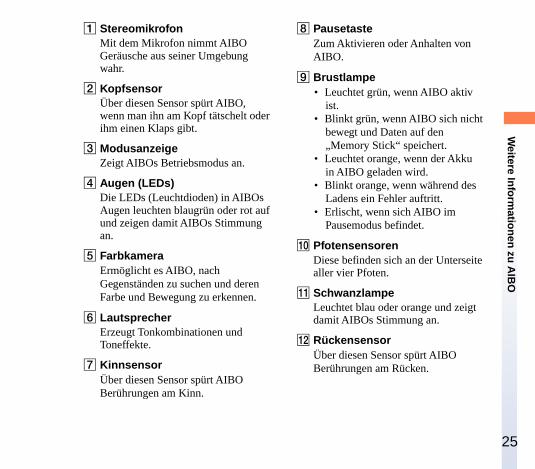
25
Weitere Inform
ationen zu AIB
O1 Stereomikrofon
Mit dem Mikrofon nimmt AIBOGeräusche aus seiner Umgebungwahr.
2 KopfsensorÜber diesen Sensor spürt AIBO,wenn man ihn am Kopf tätschelt oderihm einen Klaps gibt.
3 ModusanzeigeZeigt AIBOs Betriebsmodus an.
4 Augen (LEDs)Die LEDs (Leuchtdioden) in AIBOsAugen leuchten blaugrün oder rot aufund zeigen damit AIBOs Stimmungan.
5 FarbkameraErmöglicht es AIBO, nachGegenständen zu suchen und derenFarbe und Bewegung zu erkennen.
6 LautsprecherErzeugt Tonkombinationen undToneffekte.
7 KinnsensorÜber diesen Sensor spürt AIBOBerührungen am Kinn.
8 PausetasteZum Aktivieren oder Anhalten vonAIBO.
9 Brustlampe• Leuchtet grün, wenn AIBO aktiv
ist.• Blinkt grün, wenn AIBO sich nicht
bewegt und Daten auf den„Memory Stick“ speichert.
• Leuchtet orange, wenn der Akkuin AIBO geladen wird.
• Blinkt orange, wenn während desLadens ein Fehler auftritt.
• Erlischt, wenn sich AIBO imPausemodus befindet.
q; PfotensensorenDiese befinden sich an der Unterseitealler vier Pfoten.
qa SchwanzlampeLeuchtet blau oder orange und zeigtdamit AIBOs Stimmung an.
qs RückensensorÜber diesen Sensor spürt AIBOBerührungen am Rücken.
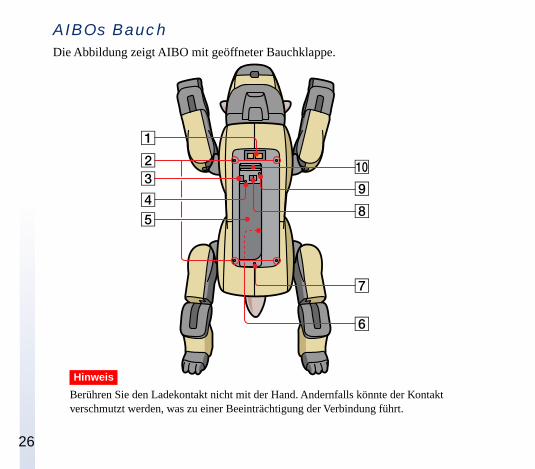
26
AIBOs BauchDie Abbildung zeigt AIBO mit geöffneter Bauchklappe.
Hinweis
Berühren Sie den Ladekontakt nicht mit der Hand. Andernfalls könnte der Kontaktverschmutzt werden, was zu einer Beeinträchtigung der Verbindung führt.
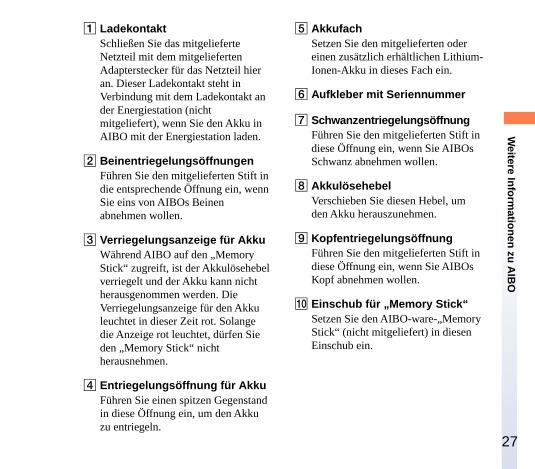
27
Weitere Inform
ationen zu AIB
O1 Ladekontakt
Schließen Sie das mitgelieferteNetzteil mit dem mitgeliefertenAdapterstecker für das Netzteil hieran. Dieser Ladekontakt steht inVerbindung mit dem Ladekontakt ander Energiestation (nichtmitgeliefert), wenn Sie den Akku inAIBO mit der Energiestation laden.
2 BeinentriegelungsöffnungenFühren Sie den mitgelieferten Stift indie entsprechende Öffnung ein, wennSie eins von AIBOs Beinenabnehmen wollen.
3 Verriegelungsanzeige für AkkuWährend AIBO auf den „MemoryStick“ zugreift, ist der Akkulösehebelverriegelt und der Akku kann nichtherausgenommen werden. DieVerriegelungsanzeige für den Akkuleuchtet in dieser Zeit rot. Solangedie Anzeige rot leuchtet, dürfen Sieden „Memory Stick“ nichtherausnehmen.
4 Entriegelungsöffnung für AkkuFühren Sie einen spitzen Gegenstandin diese Öffnung ein, um den Akkuzu entriegeln.
5 AkkufachSetzen Sie den mitgelieferten odereinen zusätzlich erhältlichen Lithium-Ionen-Akku in dieses Fach ein.
6 Aufkleber mit Seriennummer
7 SchwanzentriegelungsöffnungFühren Sie den mitgelieferten Stift indiese Öffnung ein, wenn Sie AIBOsSchwanz abnehmen wollen.
8 AkkulösehebelVerschieben Sie diesen Hebel, umden Akku herauszunehmen.
9 KopfentriegelungsöffnungFühren Sie den mitgelieferten Stift indiese Öffnung ein, wenn Sie AIBOsKopf abnehmen wollen.
q; Einschub für „Memory Stick“Setzen Sie den AIBO-ware-„MemoryStick“ (nicht mitgeliefert) in diesenEinschub ein.
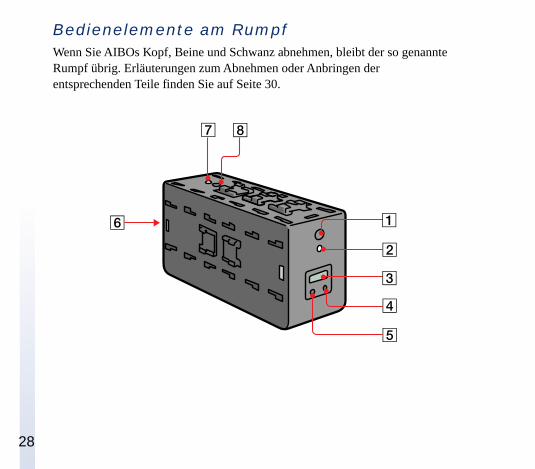
28
Bedienelemente am RumpfWenn Sie AIBOs Kopf, Beine und Schwanz abnehmen, bleibt der so genannteRumpf übrig. Erläuterungen zum Abnehmen oder Anbringen derentsprechenden Teile finden Sie auf Seite 30.
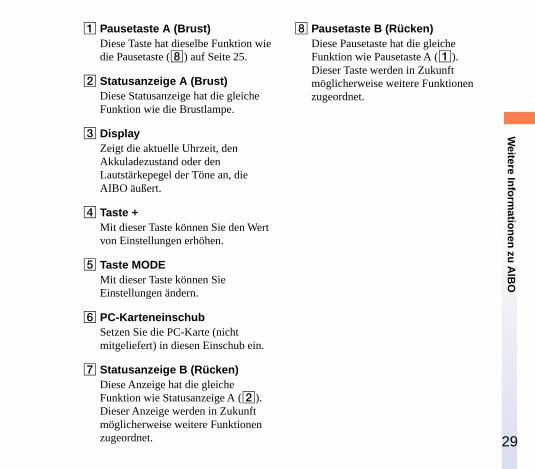
29
Weitere Inform
ationen zu AIB
O1 Pausetaste A (Brust)
Diese Taste hat dieselbe Funktion wiedie Pausetaste (8) auf Seite 25.
2 Statusanzeige A (Brust)Diese Statusanzeige hat die gleicheFunktion wie die Brustlampe.
3 DisplayZeigt die aktuelle Uhrzeit, denAkkuladezustand oder denLautstärkepegel der Töne an, dieAIBO äußert.
4 Taste +Mit dieser Taste können Sie den Wertvon Einstellungen erhöhen.
5 Taste MODEMit dieser Taste können SieEinstellungen ändern.
6 PC-KarteneinschubSetzen Sie die PC-Karte (nichtmitgeliefert) in diesen Einschub ein.
7 Statusanzeige B (Rücken)Diese Anzeige hat die gleicheFunktion wie Statusanzeige A (2).Dieser Anzeige werden in Zukunftmöglicherweise weitere Funktionenzugeordnet.
8 Pausetaste B (Rücken)Diese Pausetaste hat die gleicheFunktion wie Pausetaste A (1).Dieser Taste werden in Zukunftmöglicherweise weitere Funktionenzugeordnet.
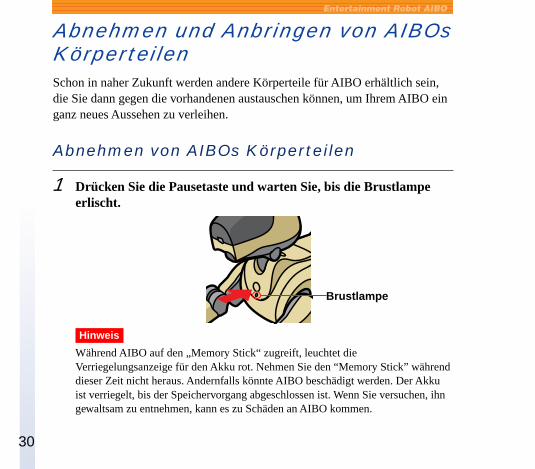
30
Brustlampe
Abnehmen und Anbringen von AIBOsKörperteilenSchon in naher Zukunft werden andere Körperteile für AIBO erhältlich sein,die Sie dann gegen die vorhandenen austauschen können, um Ihrem AIBO einganz neues Aussehen zu verleihen.
Abnehmen von AIBOs Körperteilen
1 Drücken Sie die Pausetaste und warten Sie, bis die Brustlampeerlischt.
Hinweis
Während AIBO auf den „Memory Stick“ zugreift, leuchtet dieVerriegelungsanzeige für den Akku rot. Nehmen Sie den “Memory Stick” währenddieser Zeit nicht heraus. Andernfalls könnte AIBO beschädigt werden. Der Akkuist verriegelt, bis der Speichervorgang abgeschlossen ist. Wenn Sie versuchen, ihngewaltsam zu entnehmen, kann es zu Schäden an AIBO kommen.
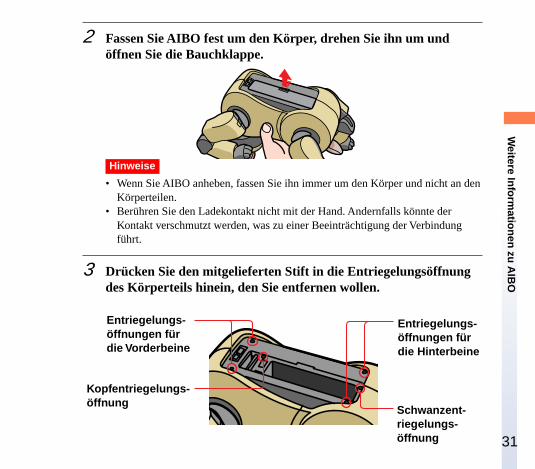
31
Weitere Inform
ationen zu AIB
O2 Fassen Sie AIBO fest um den Körper, drehen Sie ihn um und
öffnen Sie die Bauchklappe.
Hinweise
• Wenn Sie AIBO anheben, fassen Sie ihn immer um den Körper und nicht an denKörperteilen.
• Berühren Sie den Ladekontakt nicht mit der Hand. Andernfalls könnte derKontakt verschmutzt werden, was zu einer Beeinträchtigung der Verbindungführt.
3 Drücken Sie den mitgelieferten Stift in die Entriegelungsöffnungdes Körperteils hinein, den Sie entfernen wollen.
Entriegelungs-öffnungen fürdie Vorderbeine
Kopfentriegelungs-öffnung
Schwanzent-riegelungs-öffnung
Entriegelungs-öffnungen fürdie Hinterbeine
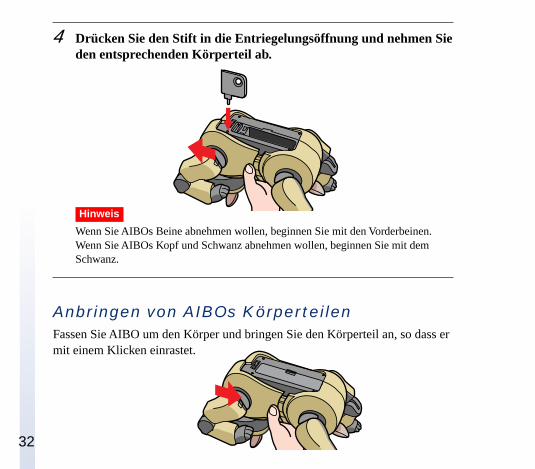
32
4 Drücken Sie den Stift in die Entriegelungsöffnung und nehmen Sieden entsprechenden Körperteil ab.
Hinweis
Wenn Sie AIBOs Beine abnehmen wollen, beginnen Sie mit den Vorderbeinen.Wenn Sie AIBOs Kopf und Schwanz abnehmen wollen, beginnen Sie mit demSchwanz.
Anbringen von AIBOs KörperteilenFassen Sie AIBO um den Körper und bringen Sie den Körperteil an, so dass ermit einem Klicken einrastet.
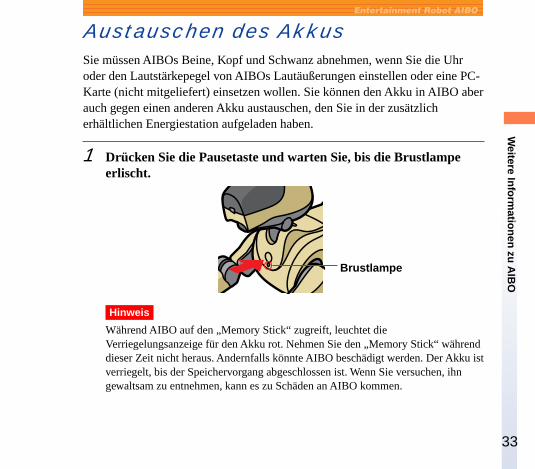
33
Weitere Inform
ationen zu AIB
OAustauschen des AkkusSie müssen AIBOs Beine, Kopf und Schwanz abnehmen, wenn Sie die Uhroder den Lautstärkepegel von AIBOs Lautäußerungen einstellen oder eine PC-Karte (nicht mitgeliefert) einsetzen wollen. Sie können den Akku in AIBO aberauch gegen einen anderen Akku austauschen, den Sie in der zusätzlicherhältlichen Energiestation aufgeladen haben.
1 Drücken Sie die Pausetaste und warten Sie, bis die Brustlampeerlischt.
Hinweis
Während AIBO auf den „Memory Stick“ zugreift, leuchtet dieVerriegelungsanzeige für den Akku rot. Nehmen Sie den „Memory Stick“ währenddieser Zeit nicht heraus. Andernfalls könnte AIBO beschädigt werden. Der Akku istverriegelt, bis der Speichervorgang abgeschlossen ist. Wenn Sie versuchen, ihngewaltsam zu entnehmen, kann es zu Schäden an AIBO kommen.
Brustlampe
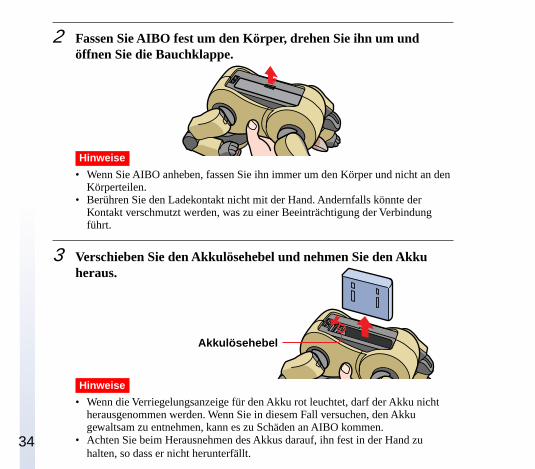
34
2 Fassen Sie AIBO fest um den Körper, drehen Sie ihn um undöffnen Sie die Bauchklappe.
Hinweise
• Wenn Sie AIBO anheben, fassen Sie ihn immer um den Körper und nicht an denKörperteilen.
• Berühren Sie den Ladekontakt nicht mit der Hand. Andernfalls könnte derKontakt verschmutzt werden, was zu einer Beeinträchtigung der Verbindungführt.
3 Verschieben Sie den Akkulösehebel und nehmen Sie den Akkuheraus.
Hinweise
• Wenn die Verriegelungsanzeige für den Akku rot leuchtet, darf der Akku nichtherausgenommen werden. Wenn Sie in diesem Fall versuchen, den Akkugewaltsam zu entnehmen, kann es zu Schäden an AIBO kommen.
• Achten Sie beim Herausnehmen des Akkus darauf, ihn fest in der Hand zuhalten, so dass er nicht herunterfällt.
Akkulösehebel
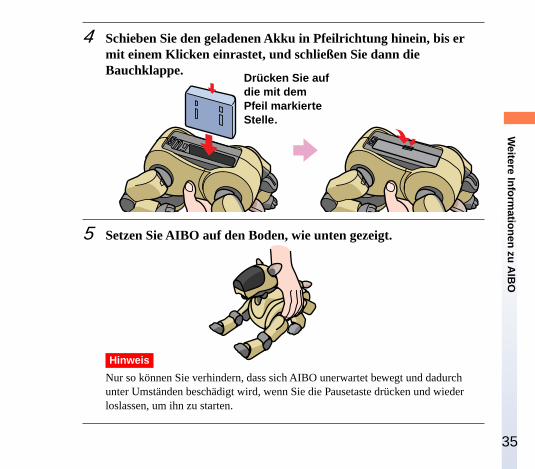
35
Weitere Inform
ationen zu AIB
O4 Schieben Sie den geladenen Akku in Pfeilrichtung hinein, bis er
mit einem Klicken einrastet, und schließen Sie dann dieBauchklappe.
5 Setzen Sie AIBO auf den Boden, wie unten gezeigt.
Hinweis
Nur so können Sie verhindern, dass sich AIBO unerwartet bewegt und dadurchunter Umständen beschädigt wird, wenn Sie die Pausetaste drücken und wiederloslassen, um ihn zu starten.
Drücken Sie aufdie mit demPfeil markierteStelle.
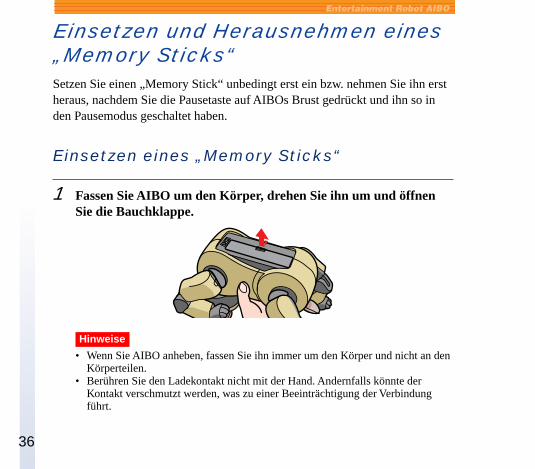
36
Einsetzen und Herausnehmen eines„Memory Sticks“Setzen Sie einen „Memory Stick“ unbedingt erst ein bzw. nehmen Sie ihn erstheraus, nachdem Sie die Pausetaste auf AIBOs Brust gedrückt und ihn so inden Pausemodus geschaltet haben.
Einsetzen eines „Memory Sticks“
1 Fassen Sie AIBO um den Körper, drehen Sie ihn um und öffnenSie die Bauchklappe.
Hinweise
• Wenn Sie AIBO anheben, fassen Sie ihn immer um den Körper und nicht an denKörperteilen.
• Berühren Sie den Ladekontakt nicht mit der Hand. Andernfalls könnte derKontakt verschmutzt werden, was zu einer Beeinträchtigung der Verbindungführt.
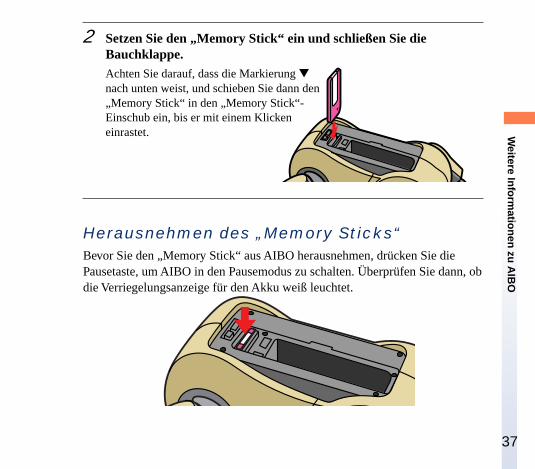
37
Weitere Inform
ationen zu AIB
O2 Setzen Sie den „Memory Stick“ ein und schließen Sie die
Bauchklappe.Achten Sie darauf, dass die Markierung ▼
nach unten weist, und schieben Sie dann den„Memory Stick“ in den „Memory Stick“-Einschub ein, bis er mit einem Klickeneinrastet.
Herausnehmen des „Memory Sticks“Bevor Sie den „Memory Stick“ aus AIBO herausnehmen, drücken Sie diePausetaste, um AIBO in den Pausemodus zu schalten. Überprüfen Sie dann, obdie Verriegelungsanzeige für den Akku weiß leuchtet.
38
Hinweise
• Nehmen Sie den „Memory Stick“ nicht heraus, solange dieVerriegelungsanzeige für den Akku rot leuchtet. Andernfalls könnte AIBObeschädigt werden.
• Wenn Sie den Schutzschalter auf dem „Memory Stick“ auf LOCK stellen, kannAIBO keine Daten auf dem „Memory Stick“ speichern.
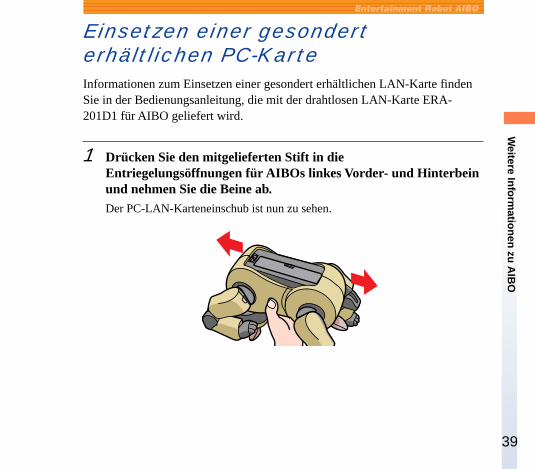
39
Weitere Inform
ationen zu AIB
OEinsetzen einer gesonderterhältlichen PC-KarteInformationen zum Einsetzen einer gesondert erhältlichen LAN-Karte findenSie in der Bedienungsanleitung, die mit der drahtlosen LAN-Karte ERA-201D1 für AIBO geliefert wird.
1 Drücken Sie den mitgelieferten Stift in dieEntriegelungsöffnungen für AIBOs linkes Vorder- und Hinterbeinund nehmen Sie die Beine ab.Der PC-LAN-Karteneinschub ist nun zu sehen.
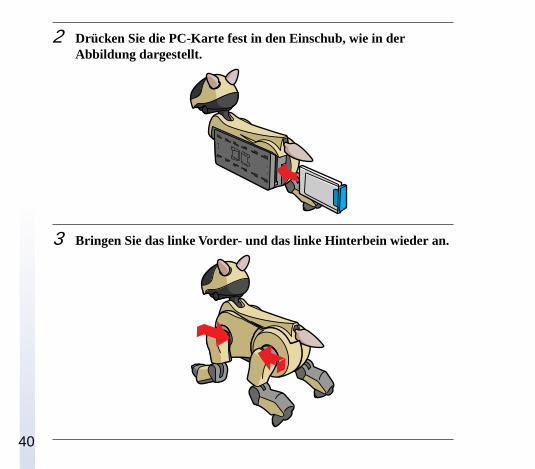
40
2 Drücken Sie die PC-Karte fest in den Einschub, wie in derAbbildung dargestellt.
3 Bringen Sie das linke Vorder- und das linke Hinterbein wieder an.
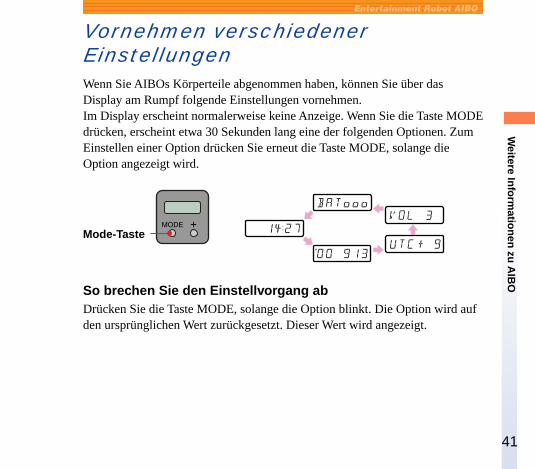
41
Weitere Inform
ationen zu AIB
OVornehmen verschiedenerEinstellungenWenn Sie AIBOs Körperteile abgenommen haben, können Sie über dasDisplay am Rumpf folgende Einstellungen vornehmen.Im Display erscheint normalerweise keine Anzeige. Wenn Sie die Taste MODEdrücken, erscheint etwa 30 Sekunden lang eine der folgenden Optionen. ZumEinstellen einer Option drücken Sie erneut die Taste MODE, solange dieOption angezeigt wird.
So brechen Sie den Einstellvorgang abDrücken Sie die Taste MODE, solange die Option blinkt. Die Option wird aufden ursprünglichen Wert zurückgesetzt. Dieser Wert wird angezeigt.
Mode-Taste
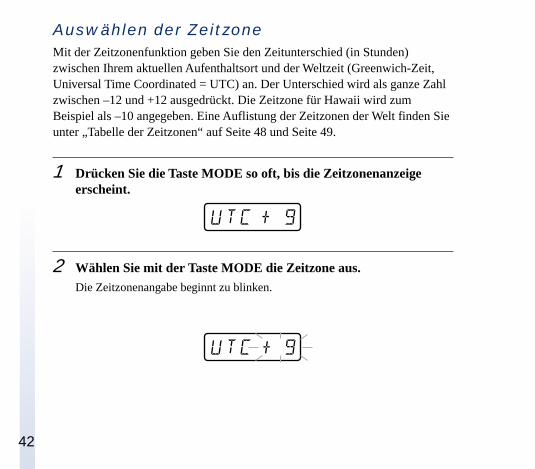
42
Auswählen der ZeitzoneMit der Zeitzonenfunktion geben Sie den Zeitunterschied (in Stunden)zwischen Ihrem aktuellen Aufenthaltsort und der Weltzeit (Greenwich-Zeit,Universal Time Coordinated = UTC) an. Der Unterschied wird als ganze Zahlzwischen –12 und +12 ausgedrückt. Die Zeitzone für Hawaii wird zumBeispiel als –10 angegeben. Eine Auflistung der Zeitzonen der Welt finden Sieunter „Tabelle der Zeitzonen“ auf Seite 48 und Seite 49.
1 Drücken Sie die Taste MODE so oft, bis die Zeitzonenanzeigeerscheint.
2 Wählen Sie mit der Taste MODE die Zeitzone aus.Die Zeitzonenangabe beginnt zu blinken.
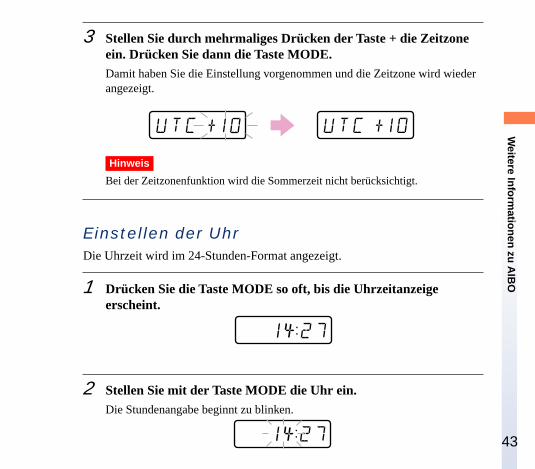
43
Weitere Inform
ationen zu AIB
O3 Stellen Sie durch mehrmaliges Drücken der Taste + die Zeitzone
ein. Drücken Sie dann die Taste MODE.Damit haben Sie die Einstellung vorgenommen und die Zeitzone wird wiederangezeigt.
Hinweis
Bei der Zeitzonenfunktion wird die Sommerzeit nicht berücksichtigt.
Einstellen der UhrDie Uhrzeit wird im 24-Stunden-Format angezeigt.
1 Drücken Sie die Taste MODE so oft, bis die Uhrzeitanzeigeerscheint.
2 Stellen Sie mit der Taste MODE die Uhr ein.Die Stundenangabe beginnt zu blinken.
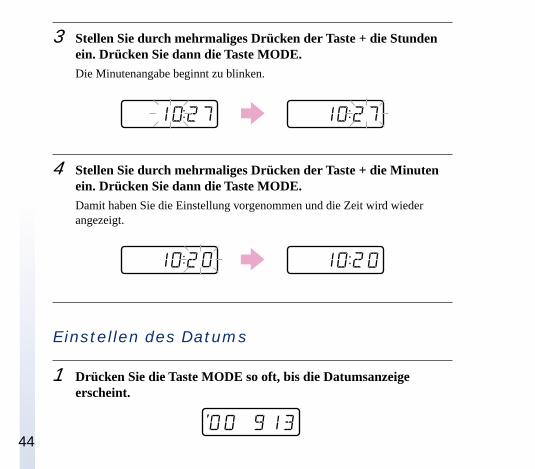
44
3 Stellen Sie durch mehrmaliges Drücken der Taste + die Stundenein. Drücken Sie dann die Taste MODE.Die Minutenangabe beginnt zu blinken.
4 Stellen Sie durch mehrmaliges Drücken der Taste + die Minutenein. Drücken Sie dann die Taste MODE.Damit haben Sie die Einstellung vorgenommen und die Zeit wird wiederangezeigt.
Einstellen des Datums
1 Drücken Sie die Taste MODE so oft, bis die Datumsanzeigeerscheint.
45
Weitere Inform
ationen zu AIB
O2 Stellen Sie mit der Taste MODE das Datum ein.
Die Jahresangabe beginnt zu blinken.
3 Stellen Sie durch mehrmaliges Drücken der Taste + das Jahr ein.Drücken Sie dann die Taste MODE.Die Monatsangabe beginnt zu blinken.
4 Stellen Sie durch mehrmaliges Drücken der Taste + den Monatein. Drücken Sie dann die Taste MODE.Die Tagesangabe beginnt zu blinken.
46
5 Stellen Sie durch mehrmaliges Drücken der Taste + den Tag ein.Drücken Sie dann die Taste MODE.Damit haben Sie die Einstellung vorgenommen und das Datum wird wiederangezeigt.
Einstellen des Lautstärkepegels der TöneDie Lautstärke der Töne, die AIBO äußert, kann auf vier verschiedene Pegeleingestellt werden.Wenn Sie „0“ einstellen, ist AIBO stummgeschaltet.
1 Drücken Sie die Taste MODE so oft, bis die Anzeige für denLautstärkepegel erscheint.
2 Stellen Sie mit der Taste MODE den Lautstärkepegel ein.Die Anzeige für den Lautstärkepegel beginnt zu blinken.
47
Weitere Inform
ationen zu AIB
O3 Drücken Sie mehrmals die Taste +, und wählen Sie damit einen
Lautstärkepegel zwischen 0 und 3 aus. Drücken Sie dann die TasteMODE.Damit haben Sie die Einstellung vorgenommen und der Lautstärkepegel wirdwieder angezeigt.
Überprüfen des AkkuladezustandsWenn Sie den Ladezustand des Akkus in AIBO überprüfen wollen, gehen Siefolgendermaßen vor.
1 Drücken Sie die Taste MODE so oft, bis die Akkuladungsanzeigeerscheint.
Die Akkuladung wird in Form der folgenden vier Ladestufen angezeigt:„BAT “ : Leer„BAT o “ : Fast leer„BAT o o “ : Zur Hälfte geladen„BAT o o o “ : Voll
Hinweis
Wenn kein Akku eingelegt ist, erscheint die Anzeige „BAT - - - “.

48
Tabelle der ZeitzonenGeben Sie anhand dieser Tabelle dieZeitzone ein.

49
Weitere Inform
ationen zu AIB
O

50

51
Weitere Inform
ationenWeitere Informationen
Dieses Kapitel enthält Hinweise zum Umgang mit AIBO undseinem Zubehör, Hinweise zur Störungsbehebung und andereInformationen zu AIBO.
52
Hinweise zum Umgang mit AIBO undseinem ZubehörUm Beschädigungen an AIBO und seinem Zubehör zu vermeiden, beachtenSie bitte folgende Hinweise.
Umgang mit AIBO• Verwenden Sie AIBO nicht an Orten, an denen er Vibrationen ausgesetzt ist,
auf einer schiefen Ebene oder an Orten, an denen er herunterfallen könnte.• Drücken Sie mit der Hand oder dem Ellenbogen nicht zu fest auf AIBO.• Lassen Sie AIBO nicht fallen und schütteln Sie ihn nicht. Dadurch könnte er
beschädigt werden oder Daten auf dem „Memory Stick“ könnten verlorengehen.
• Berühren Sie den Ladekontakt nicht mit der Hand. Andernfalls könnte derKontakt verschmutzt werden, was zu einer Beeinträchtigung der Verbindungführt.
• Wenn Sie AIBO anheben, fassen Sie ihn immer um den Körper und nicht amKopf, an den Ohren, am Schwanz oder an den Beinen. Schwingen oderverdrehen Sie AIBO nicht.
• Setzen Sie AIBO keinen sehr hohen Temperaturen aus, wie sie zum Beispielin einem in der Sonne geparkten Auto entstehen können. Andernfalls könnteer sich verformen oder anderweitig beschädigt werden.
• Achten Sie darauf, dass keine Fremdkörper, zum Beispiel Büroklammern, inAIBO oder in seine Gelenke hineingeraten.
53
Weitere Inform
ationen• Verwenden Sie AIBO nicht im Freien. Andernfalls könnten Feuchtigkeit
oder Fremdkörper in AIBO hineingeraten und Beschädigungen verursachen.• Lassen Sie AIBO nicht auf einem Betonboden oder einem anderen sehr
harten Boden herumlaufen. Auf einem solchen Boden könnte AIBObeschädigt werden.
• Schützen Sie AIBO vor Feuchtigkeit.• Berühren Sie das Objektiv der Farbkamera nicht mit der Hand.• Achten Sie darauf, dass die Abdeckung auf AIBOs Kopf nicht zerkratzt
wird.• Kleben Sie nichts auf die Farbkamera oder die Abdeckung auf AIBOs Kopf.• Richten Sie die Farbkamera nicht direkt auf die Sonne, ganz gleich, ob
AIBO ein- oder ausgeschaltet ist. Andernfalls könnte die Kamera beschädigtwerden.
• Ölen Sie AIBOs Gelenke oder andere bewegliche Teile nicht.• Kleben Sie nichts auf AIBOs Gelenke und führen Sie nichts in die Gelenke
ein. Andernfalls könnte AIBOs Beweglichkeit beeinträchtigt werden.• Zerlegen oder modifizieren Sie AIBO ausschließlich so, wie in dieser
Anleitung angegeben.• Wenn AIBO transportiert werden muss, verpacken Sie ihn in einem
gepolsterten Karton wie dem, in dem er geliefert wurde, damit es nicht zuBeschädigungen an Körper, Kopf, Schwanz oder Beinen kommt. Sie könnenihn auch in der gesondert erhältlichen AIBO-Tragetasche ERA-210C1transportieren.
• Schützen Sie AIBO vor starken elektromagnetischen Wellen undRöntgenstrahlen.
54
• Die AIBO-ware-Anwendungen für den ERS-110/111 können mit demERS-210 nicht verwendet werden.
• Der ERS-210 ist nur mit „Memory Sticks“ kompatibel, die dem OPEN-R-Standard Version 1.1 entsprechen.
FeuchtigkeitskondensationWird AIBO direkt von einem kalten an einen warmen Ort gebracht, kann sichin seinem Inneren oder an der Außenseite Feuchtigkeit niederschlagen und zuBeschädigungen führen. Warten Sie in diesem Fall etwa eine Stunde lang ab,bevor Sie ihn aktivieren.
Umgang mit dem Netzteil• Verwenden Sie zum Laden von AIBOs Akku ausschließlich das mitgelieferte
Netzteil. Bei anderen Netzteilen kann es zu Schäden an AIBO kommen.• Verbinden Sie das Netzteil nicht mit Elektrotransformatoren, wie sie zum
Beispiel auf Reisen verwendet werden. Andernfalls könnte sich AIBOerhitzen oder anderweitig beschädigt werden.
Umgang mit dem Akku• Setzen Sie den Akku keinen Temperaturen über 45 °C aus, wie sie z. B. in
einem in der Sonne geparkten Auto auftreten können.• Schützen Sie die Kontakte vor Fremdkörpern wie Staub oder Sand. Falls die
Kontakte doch verschmutzen, reinigen Sie sie mit einem weichenWattestäbchen o. Ä.
55
Weitere Inform
ationen• Wenn Sie längere Zeit nicht mit AIBO spielen wollen, nehmen Sie den Akku
heraus und bewahren ihn kühl und trocken auf.• Lassen Sie den Akku nicht fallen, und stellen Sie keine schweren
Gegenstände darauf. Drücken Sie nicht zu fest auf den Akku und schützenSie ihn vor Stößen.
Reinigung• Reinigen Sie AIBO mit einem sauberen, trockenen, weichen Tuch.• Verwenden Sie keine flüchtigen Lösungsmittel. Diese könnten AIBOs
Oberfläche angreifen.
56
StörungsbehebungSollten an AIBO Störungen auftreten, versuchen Sie, diese anhand der folgendenCheckliste zu beheben. Sollte sich ein Problem auf diese Weise nicht lösenlassen, wenden Sie sich bitte an die AIBO-Kundendienst-Hotline (Seite 5).
Symptom Ursache/Abhilfe
AIBO reagiert nicht aufdas Loslassen derPausetaste.
Der Akku wurde nicht eingesetzt.c Drücken Sie die Pausetaste und setzen Sie den
Akku ein (siehe Seite 14). Starten Sie AIBOneu, indem Sie die Pausetaste nochmalsdrücken.
Der Akku ist leer.c Überprüfen Sie den Akkuladezustand (Seite
47). Wenn der Akku leer ist, laden Sie ihn neuoder setzen Sie einen geladenen Akku ein.
Das Netzteil ist an AIBOs Ladekontaktangeschlossen.c Lösen Sie das Netzteil und drücken Sie
nochmals die Pausetaste.
Wenn Sie die Pausetastedrücken, blinkt dieBrustlampe abwechselndschnell in grün undorange.
Im Akku kann sich ein Wärmestau gebildet haben.c Warten Sie eine Weile, bis der Akku sich
abgekühlt hat.Der Akku ist möglicherweise defekt.c Tauschen Sie ihn gegen einen neuen aus (Seite
33).
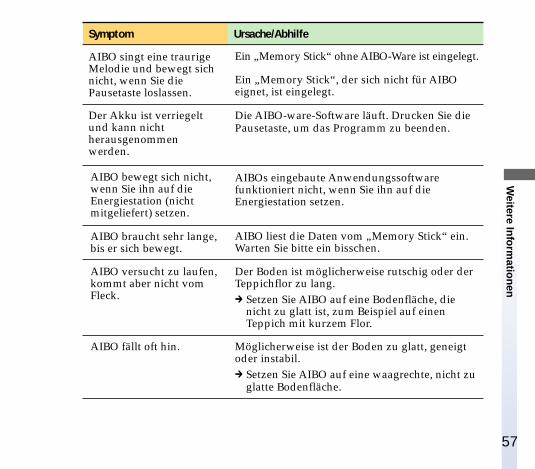
57
Weitere Inform
ationenSymptom Ursache/Abhilfe
AIBO singt eine traurigeMelodie und bewegt sichnicht, wenn Sie diePausetaste loslassen.
Ein „Memory Stick“ ohne AIBO-Ware ist eingelegt.
Ein „Memory Stick“, der sich nicht für AIBOeignet, ist eingelegt.
Der Akku ist verriegeltund kann nichtherausgenommenwerden.
Die AIBO-ware-Software läuft. Drucken Sie diePausetaste, um das Programm zu beenden.
AIBO bewegt sich nicht,wenn Sie ihn auf dieEnergiestation (nichtmitgeliefert) setzen.
AIBOs eingebaute Anwendungssoftwarefunktioniert nicht, wenn Sie ihn auf dieEnergiestation setzen.
AIBO braucht sehr lange,bis er sich bewegt.
AIBO liest die Daten vom „Memory Stick“ ein.Warten Sie bitte ein bisschen.
AIBO versucht zu laufen,kommt aber nicht vomFleck.
Der Boden ist möglicherweise rutschig oder derTeppichflor zu lang.c Setzen Sie AIBO auf eine Bodenfläche, die
nicht zu glatt ist, zum Beispiel auf einenTeppich mit kurzem Flor.
AIBO fällt oft hin. Möglicherweise ist der Boden zu glatt, geneigtoder instabil.c Setzen Sie AIBO auf eine waagrechte, nicht zu
glatte Bodenfläche.
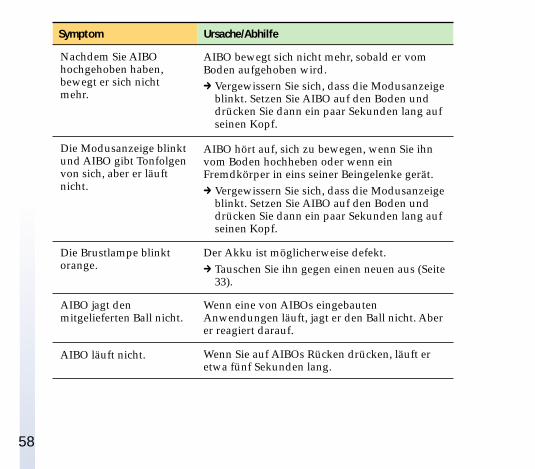
58
Symptom Ursache/Abhilfe
Nachdem Sie AIBOhochgehoben haben,bewegt er sich nichtmehr.
AIBO bewegt sich nicht mehr, sobald er vomBoden aufgehoben wird.c Vergewissern Sie sich, dass die Modusanzeige
blinkt. Setzen Sie AIBO auf den Boden unddrücken Sie dann ein paar Sekunden lang aufseinen Kopf.
Die Modusanzeige blinktund AIBO gibt Tonfolgenvon sich, aber er läuftnicht.
AIBO hört auf, sich zu bewegen, wenn Sie ihnvom Boden hochheben oder wenn einFremdkörper in eins seiner Beingelenke gerät.c Vergewissern Sie sich, dass die Modusanzeige
blinkt. Setzen Sie AIBO auf den Boden unddrücken Sie dann ein paar Sekunden lang aufseinen Kopf.
Die Brustlampe blinktorange.
Der Akku ist möglicherweise defekt.c Tauschen Sie ihn gegen einen neuen aus (Seite
33).
AIBO jagt denmitgelieferten Ball nicht.
Wenn eine von AIBOs eingebautenAnwendungen läuft, jagt er den Ball nicht. Aberer reagiert darauf.
AIBO läuft nicht. Wenn Sie auf AIBOs Rücken drücken, läuft eretwa fünf Sekunden lang.
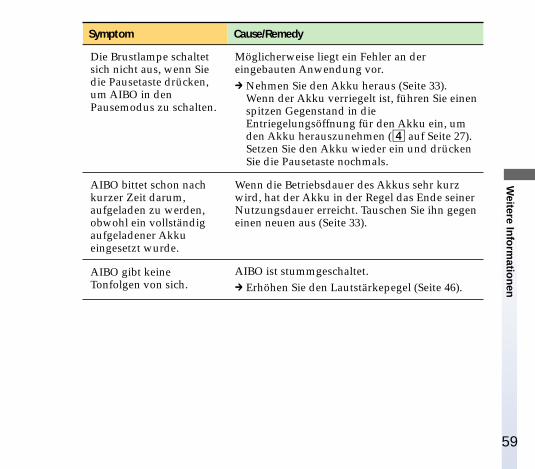
59
Weitere Inform
ationenSymptom Cause/Remedy
Die Brustlampe schaltetsich nicht aus, wenn Siedie Pausetaste drücken,um AIBO in denPausemodus zu schalten.
Möglicherweise liegt ein Fehler an dereingebauten Anwendung vor.c Nehmen Sie den Akku heraus (Seite 33).
Wenn der Akku verriegelt ist, führen Sie einenspitzen Gegenstand in dieEntriegelungsöffnung für den Akku ein, umden Akku herauszunehmen (4 auf Seite 27).Setzen Sie den Akku wieder ein und drückenSie die Pausetaste nochmals.
AIBO bittet schon nachkurzer Zeit darum,aufgeladen zu werden,obwohl ein vollständigaufgeladener Akkueingesetzt wurde.
Wenn die Betriebsdauer des Akkus sehr kurzwird, hat der Akku in der Regel das Ende seinerNutzungsdauer erreicht. Tauschen Sie ihn gegeneinen neuen aus (Seite 33).
AIBO gibt keineTonfolgen von sich.
AIBO ist stummgeschaltet.c Erhöhen Sie den Lautstärkepegel (Seite 46).
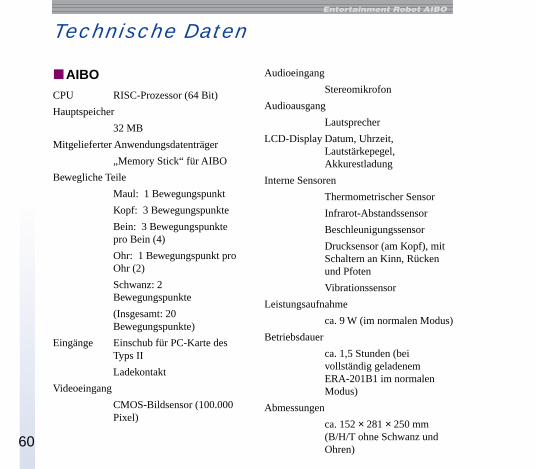
60
Technische Daten
xAIBOCPU RISC-Prozessor (64 Bit)
Hauptspeicher
32 MB
Mitgelieferter Anwendungsdatenträger
„Memory Stick“ für AIBO
Bewegliche Teile
Maul: 1 Bewegungspunkt
Kopf: 3 Bewegungspunkte
Bein: 3 Bewegungspunktepro Bein (4)
Ohr: 1 Bewegungspunkt proOhr (2)
Schwanz: 2Bewegungspunkte
(Insgesamt: 20Bewegungspunkte)
Eingänge Einschub für PC-Karte desTyps II
Ladekontakt
Videoeingang
CMOS-Bildsensor (100.000Pixel)
Audioeingang
Stereomikrofon
Audioausgang
Lautsprecher
LCD-Display Datum, Uhrzeit,Lautstärkepegel,Akkurestladung
Interne Sensoren
Thermometrischer Sensor
Infrarot-Abstandssensor
Beschleunigungssensor
Drucksensor (am Kopf), mitSchaltern an Kinn, Rückenund Pfoten
Vibrationssensor
Leistungsaufnahme
ca. 9 W (im normalen Modus)
Betriebsdauer
ca. 1,5 Stunden (beivollständig geladenemERA-201B1 im normalenModus)
Abmessungen
ca. 152 × 281 × 250 mm(B/H/T ohne Schwanz undOhren)
61
Weitere Inform
ationenGewicht ca. 1,5 kg (einschließlich
Akku und „MemoryStick“)
Farbe gold/silber/schwarz
Betriebstemperatur
5 °C bis 35 °C
Luftfeuchtigkeit bei Betrieb
10 % bis 80 % (nichtkondensierend)
Feuchtkugeltemperatur bei Betrieb
unter 29 °C
Lagertemperatur
–20 °C bis +60 °C
Luftfeuchtigkeit bei Lagerung
10 % bis 90 % (nichtkondensierend)
Feuchtkugeltemperatur bei Lagerung
unter 29 °C
xNetzteilLeistungsaufnahme
100 - 240 V, 50 - 60 Hz,0,85 - 0,46 A
Leistungsabgabe
16 V Gleichstrom, 2,5 A
Betriebstemperatur
5 °C bis 35 °C(Temperaturschwankungenvon unter 10 °C/Stunde)
Luftfeuchtigkeit bei Betrieb
20 % bis 80 % (nichtkondensierend). Bei einerTemperatur von 35 °C mussdie Luftfeuchtigkeit unter65 % liegen (Hygrometerstandunter 29 °C)
Lagertemperatur
–20 °C bis 60 °C(Temperaturschwankungenvon unter 10 °C/Stunde)
Luftfeuchtigkeit bei Lagerung
10 % bis 90 % (nichtkondensierend). Bei einerTemperatur von 60 °C mussdie Luftfeuchtigkeit unter20 % liegen (Hygrometerstandunter 35 °C)
Abmessungen
ca. 60 × 30 × 120 mm(B/H/T)
Gewicht ca. 325 g
Kabellänge Gleichstromkabel: ca. 1,8 m
Netzkabel: ca. 1,8 m
62
xLithium-Ionen-AkkuAkku-Typ Lithium-Ionen-Akku
Durchschnittliche Ausgangsspannung
7,4 V Gleichstrom
Kapazität 2300 mAh
Betriebstemperatur
5 °C bis 40 °C(Temperaturschwankungenvon unter 10 °C/Stunde)
Luftfeuchtigkeit bei Betrieb
10 % bis 80 % (nichtkondensierend)
Feuchtkugeltemperatur bei Betrieb
unter 29 °C
Lagertemperatur
–20 °C bis 60 °C(Temperaturschwankungenvon unter 10 °C/Stunde)
Luftfeuchtigkeit bei Lagerung
10 % bis 90 % (nichtkondensierend)
Feuchtkugeltemperatur bei Lagerung
unter 35 °C
Abmessungen
ca. 80,2 × 58,2 × 21 mm(B/H/T)
Gewicht ca. 170 g
Änderungen, die dem technischenFortschritt dienen, bleibenvorbehalten.
Mitgeliefertes ZubehörSiehe Seite 13.
63
Weitere Inform
ationenIndex
AAdapterstecker für dasNetzteil ........................................ 13, 20
AIBOPausemodus ............................... 19Reinigung .................................... 57Spielen mit .................................. 16Umgang mit ................................ 52Vorbereitungen ........................... 14
AIBO-Kundendienst-Hotline ............ 5AIBO-ware ................................... 12, 16Akku ................................................... 13
austauschen ................................ 33laden ............................................ 19Ladezustand überprüfen .......... 47Umgang mit ................................ 54
Akkulösehebel ............................. 27, 34Augen (LEDs) ..................................... 25
BBall ...................................................... 13Brustlampe ............................. 16, 25, 30
DDisplay ............................................... 29
EEinschub
für Akku ...................................... 27für „Memory Stick“ ................... 27für PC-Karte ......................... 29, 39
EinstellungenDatum .......................................... 44Lautstärkepegel ......................... 46Uhr ............................................... 43
Energiestation .................................... 21Entriegelungsöffnungen
für Akku ...................................... 27für den Kopf ......................... 27, 31für den Schwanz .................. 27, 31für die Beine ......................... 27, 31
FFarbkamera ........................................ 25
KKörperteile
abnehmen ................................... 30anbringen .................................... 32
Kundendienst ...................................... 5

LLadekontakt ................................. 20, 27Lautäußerungen ................................ 39Lautsprecher ...................................... 25
M„Memory Stick“
einsetzen ..................................... 36entnehmen .................................. 37
Mitgeliefertes Zubehör .................... 13MODE, Taste .......................... 29, 41-47Modusanzeige ................................... 25
NNetzteil ......................................... 13, 19
Umgang mit ................................ 54
OOPEN-R .............................................. 11
PPausemodus ...................................... 19Pausetaste ...... 15, 16, 19, 25, 29, 30, 33PC-Karte ....................................... 12, 39
SSchwanzlampe .................................. 25Sensoren
Kinnsensor .................................. 25Kopfsensor .................................. 25Pfotensensoren ........................... 25Rückensensor ............................. 25
Spielroboter ....................................... 10Statusanzeige A/B ............................ 29Stereomikrofon .................................. 25Stift zum Lösen von AIBOsKörperteilen ......................... 13, 31, 39
TTaste + ..................................... 39, 43-47
VVerriegelungsanzeige für Akku................................................ 27, 34, 37
ZZeitzone ........................................ 42, 48
64


Entertainm
ent Robot A
IBO
ER
S-210
English
Français
Deutsch
Entertainment Robot AIBO
© 2000 Sony Corporation
Operating InstructionsERS-210
4-652-093-21(1)
Printed in Japan * 4 6 5 2 0 9 3 2 1 (1)*