Embed Size (px)
Citation preview
Educare - Wound & Skin Care Education
Hi. I’m Margaret Falconio-West, Vice President of Clinical Education for Medline. I’d like to welcome you to the Educare educational seminars.
This educational series consists of four modules which were developed to assist you in learning research-based concepts of wound and skin care. This program is appropriate for the healthcare practitioner who is new to wound management, as well as those more experienced in wound care. The information presented is appropriate for wound care providers in all care settings, including acute care, long-term care, rehab, home healthcare, wound clinics and doctor’s offices. We are confident you will be able to put this information to immediate use in your respective practice settings.
This program includes the following modules:
Module 1: Anatomy and physiology of the skin, normal wound healing and factors that affect wound healing.
Module 2: Presser ulcer prevention, a comprehensive approach and wound assessment and documentation.
Module 3: Cleansing and debridement, management of bio burden in wounds.
Module 4: Topical dressing selection.
Each module is presented by one of a team of certified enterostomal therapy, wound ostomy, continence nurses.

1: Anatomy and physiology of the skin, normal wound healing, and factors affecting wound healing.
This module is presented by Janet Jones. Janet is a board-certified wound ostomy continence nurse, and is a diplomat in the American Professional Wound Care Association. She is well-versed in reimbursement issues and also lectures extensively across the United States in all areas of wound, ostomy, and continence care.
The objectives of this module are: name the three layers of skin, identify two functions of the skin, identify three phases of wound healing, identify three factors affecting wound healing.
Hi. I’m Janet Jones. Welcome to the Educare Module on anatomy and physiology of the skin, wound healing, and factors affecting wound healing.
I’d like to start out by talking about the functions of the skin. You know, we all have skin and sometimes, we forget how important it is at protecting us from what’s on the outside, giving us sensation, helping us to retain water and not lose it all over the day’s time, helping us to keep our temperature regulated, helping us to synthesize vitamin D, and then, helping us, also, to express emotion.
Let’s look at the epidermis for a moment. The epidermis is the outmost of the three layers of skin. We have five layers of epidermis that actually are in specialized stratified layers. We aren’t going to go into detail on those layers, but just understand that it normally takes about 32 days for a layer of epidermis that begins at the base to come out on the top, which is called – the very topmost layer, actually, is called the stratum corneum.
There are no blood vessels in the epidermal layer of skin and that’s important to understand because, without blood vessels, that means those cells get all their nutrition from the dermal layer, from the underneath layer of skin that’s under the epidermis. Now, the epidermis can be in some areas of the body up to seven millimeters thick.
Now the next deeper layer of skin is the dermal layer of skin. The dermis actually is made of a mesh collagen and elastin fibers that weave together very compactly to give you bulk, strength and elasticity of your tissue. That allows you to bend and have recoil of your tissues as well.

Now, down in the dermal layer of skin is where we find structures. We find blood vessels. We find nerves, hair follicles, sebaceous glands, sweat glands and the like. Some of the appendages are lined with epidermal cells. Now, that’s important to understand when we go on to learn more about wound healing. We’ll be talking about that a little later in this section.
Now let’s look at the subcutaneous tissue. The subq tissue, of course, is a layer of fat. We all have a little bit of fat, at least, but the subq tissue is there not just for cosmetic appearances, but it gives us cushioning, insulation and support for other tissues. The subq tissue is our nutritional storage for excess calories that we take into our body, so subq tissue is very important to be there and also, to give us cushioning for that skin. Then we’ve also got a very abundant vascular supply in that subq tissue.
Now, let’s talk about keeping skin healthy. Your body does a good job at this. If left to itself, the substances in your perspiration and in your sebum actually maintain that pH balance slightly to the acidic level at a pH of about 4.5 to 5.5.
Now, we’ve talked about skin. Now we’re going to kind of change directions and look at wounds. A wound, the definition is, any breach in the skin where the blood supply to the dermal tissue is lost. Now, we know that wounds actually occur any time you have
damage into the capillaries of the dermis that automatically starts the body in a healing process. Damage into the dermis, a breach in the skin that starts healing, that’s what a wound is.
Now, a pressure ulcer is another kind of wound. These are more of a chronic type wound, but they’re defined as a localized area of tissue necrosis that develops when soft tissues are compressed between a bony prominence and an external surface for a prolonged period of time.
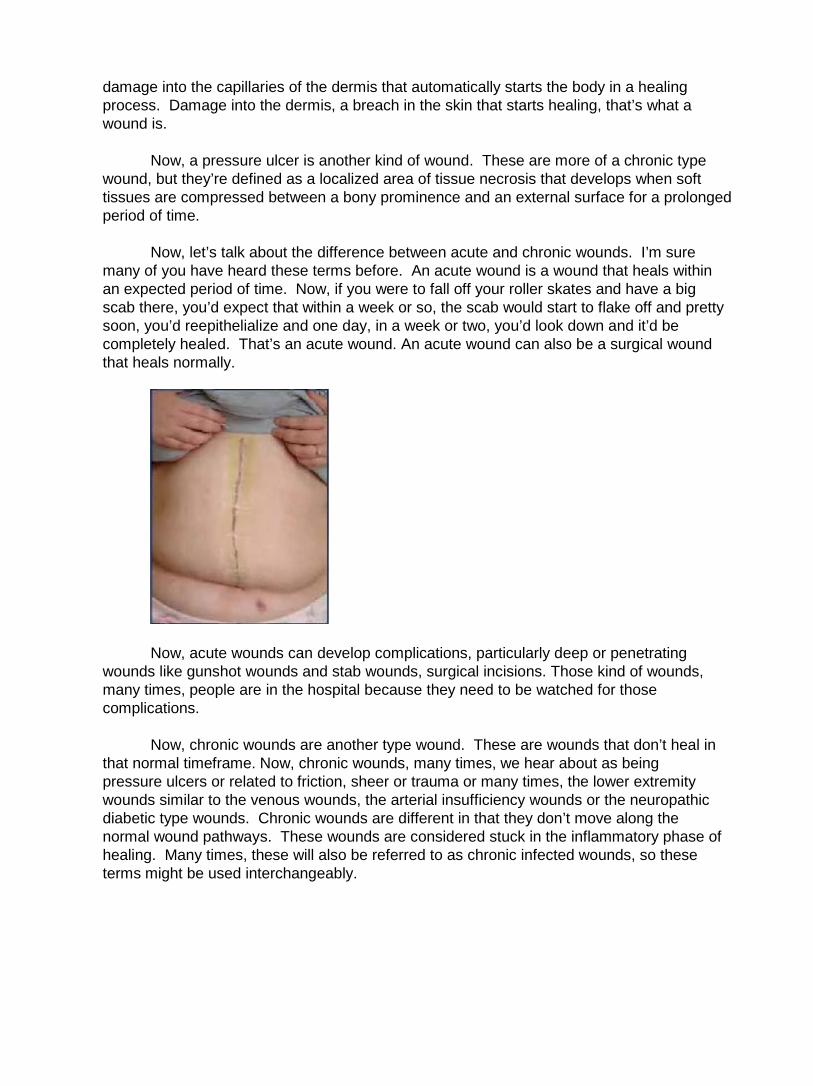
Now, let’s talk about the difference between acute and chronic wounds. I’m sure many of you have heard these terms before. An acute wound is a wound that heals within an expected period of time. Now, if you were to fall off your roller skates and have a big scab there, you’d expect that within a week or so, the scab would start to flake off and pretty soon, you’d reepithelialize and one day, in a week or two, you’d look down and it’d be completely healed. That’s an acute wound. An acute wound can also be a surgical wound that heals normally.
Now, acute wounds can develop complications, particularly deep or penetrating wounds like gunshot wounds and stab wounds, surgical incisions. Those kind of wounds, many times, people are in the hospital because they need to be watched for those complications.
Now, chronic wounds are another type wound. These are wounds that don’t heal in that normal timeframe. Now, chronic wounds, many times, we hear about as being pressure ulcers or related to friction, sheer or trauma or many times, the lower extremity wounds similar to the venous wounds, the arterial insufficiency wounds or the neuropathic diabetic type wounds. Chronic wounds are different in that they don’t move along the normal wound pathways. These wounds are considered stuck in the inflammatory phase of healing. Many times, these will also be referred to as chronic infected wounds, so these terms might be used interchangeably.

Now, let’s talk for a moment about several types of wound closure. Primary wound closure is if someone has an incision or a laceration or maybe has surgery and the wound is irrigated out, sewed or stapled closed or maybe even glued closed these days. Within maybe 72 hours or so, that epidermis has sealed close. The cells have knit back together and when you look at that wound, you’d say, “Ah, this wound looks like it’s closed.” That is primary closure.
Now, delayed primary closure is the exact same thing, but there is a time lag between the time of injury and the time when the wound is brought together with sutures or staples or glue. That’s delayed primary closure.
Secondary intention closure is a different kind of closure. Someone might have a chronic wound like an arterial ulcer or a pressure ulcer or a venous ulcer, or maybe they have had surgery. Maybe the surgeon has left the wound open intentionally or perhaps the wound was initially closed with sutures, but dehisced.
Now we’ve got this open wound with a tissue deficit. With secondary intention closure, these wounds are allowed to heal by granulation from the bottom, reepithelialization from the edge and contraction.
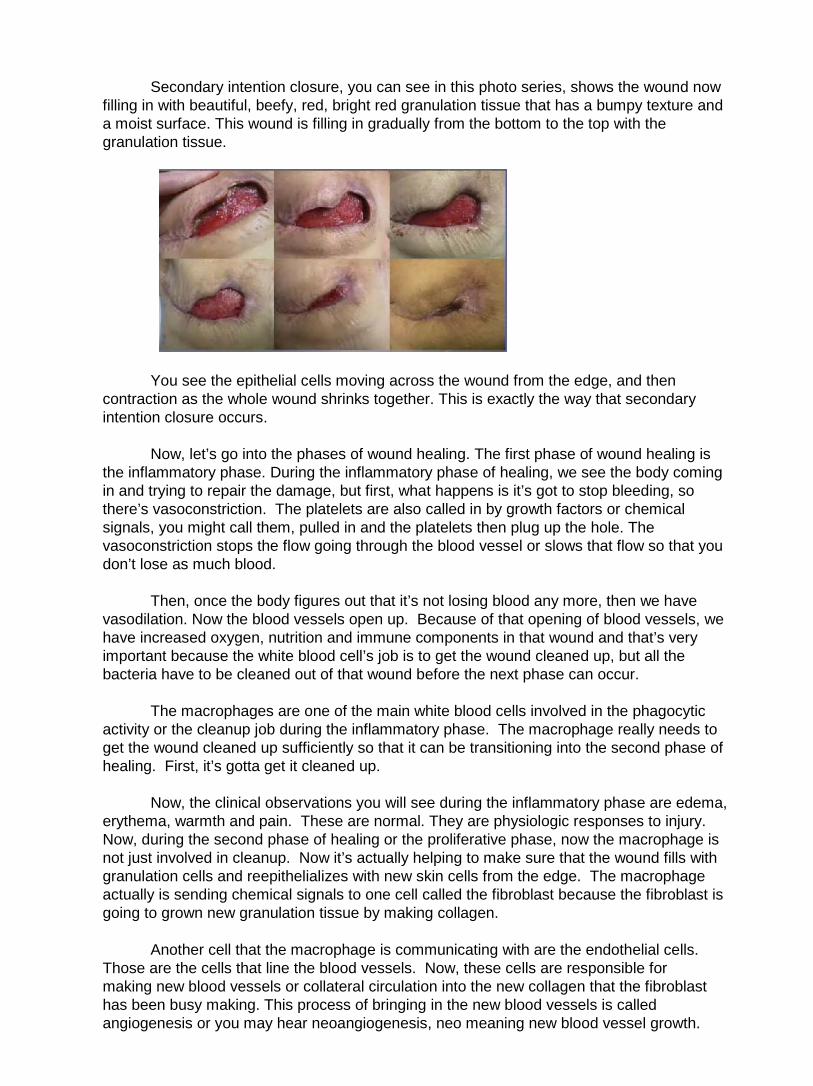
Secondary intention closure, you can see in this photo series, shows the wound now filling in with beautiful, beefy, red, bright red granulation tissue that has a bumpy texture and a moist surface. This wound is filling in gradually from the bottom to the top with the granulation tissue.
You see the epithelial cells moving across the wound from the edge, and then contraction as the whole wound shrinks together. This is exactly the way that secondary intention closure occurs.
Now, let’s go into the phases of wound healing. The first phase of wound healing is the inflammatory phase. During the inflammatory phase of healing, we see the body coming in and trying to repair the damage, but first, what happens is it’s got to stop bleeding, so there’s vasoconstriction. The platelets are also called in by growth factors or chemical signals, you might call them, pulled in and the platelets then plug up the hole. The vasoconstriction stops the flow going through the blood vessel or slows that flow so that you don’t lose as much blood.
Then, once the body figures out that it’s not losing blood any more, then we have vasodilation. Now the blood vessels open up. Because of that opening of blood vessels, we have increased oxygen, nutrition and immune components in that wound and that’s very important because the white blood cell’s job is to get the wound cleaned up, but all the bacteria have to be cleaned out of that wound before the next phase can occur.
The macrophages are one of the main white blood cells involved in the phagocytic
activity or the cleanup job during the inflammatory phase. The macrophage really needs to get the wound cleaned up sufficiently so that it can be transitioning into the second phase of healing. First, it’s gotta get it cleaned up.
Now, the clinical observations you will see during the inflammatory phase are edema, erythema, warmth and pain. These are normal. They are physiologic responses to injury. Now, during the second phase of healing or the proliferative phase, now the macrophage is not just involved in cleanup. Now it’s actually helping to make sure that the wound fills with granulation cells and reepithelializes with new skin cells from the edge. The macrophage actually is sending chemical signals to one cell called the fibroblast because the fibroblast is going to grown new granulation tissue by making collagen.
Another cell that the macrophage is communicating with are the endothelial cells. Those are the cells that line the blood vessels. Now, these cells are responsible for making new blood vessels or collateral circulation into the new collagen that the fibroblast has been busy making. This process of bringing in the new blood vessels is called angiogenesis or you may hear neoangiogenesis, neo meaning new blood vessel growth.
Now, during this proliferative phase, the clinical observation that you will see is the formation of beefy, red granulation tissue. Now, also during the proliferative phase, we have epithelialization occurring. Now, this is when the new cells begin to migrate across the new granulation tissue. We are getting new skin. Another activity that’s happening is contraction of the wound. This is when the wound is actually pulling together and shrinking, so during the proliferative phase, not only do we see the development of granulation from the base of the wound. We see the new, thin epithelial cells starting to move across the wound from the edge and the wound is beginning to shrink. This is the proliferative phase.
Now, let’s look at this wound in the proliferative phase. The first thing that you can see is beefy, bumpy, moist, red granulation tissue in the base of this wound. You can see that it’s starting to epithelialize from the edges and contraction. You’re actually seeing the wound may be looking like it’s starting to squeeze in. This is a wound in the proliferative phase.
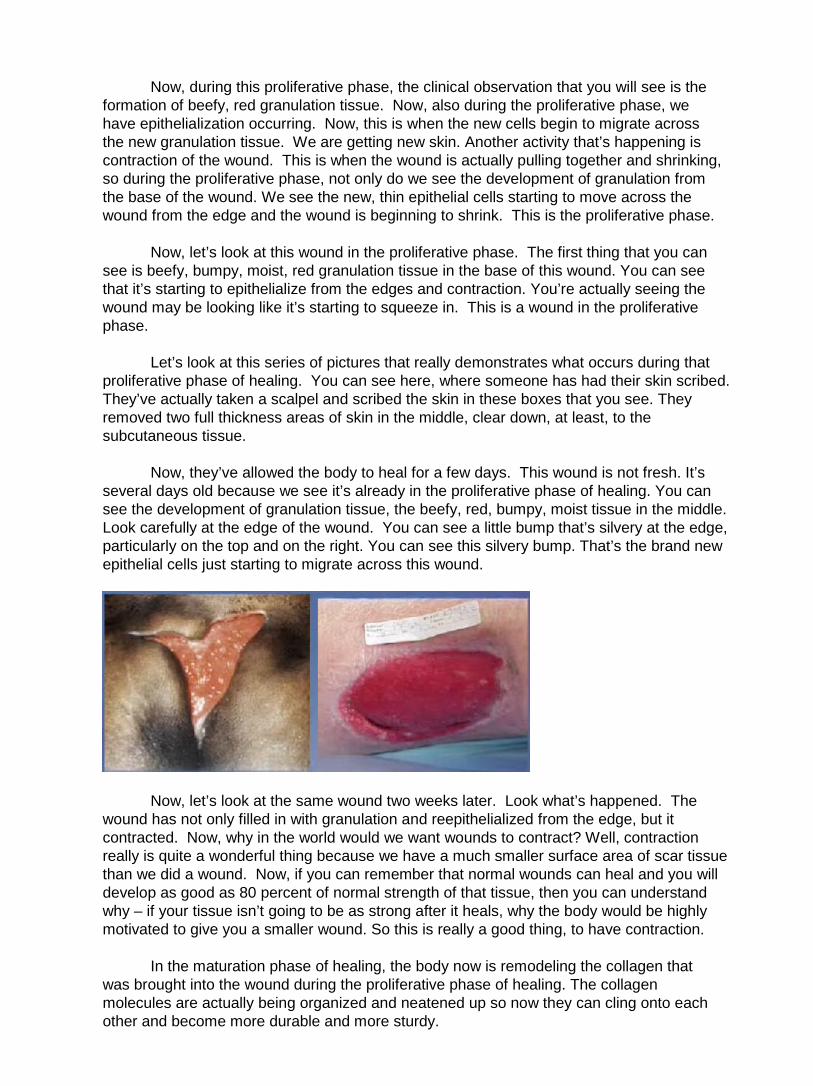
Let’s look at this series of pictures that really demonstrates what occurs during that proliferative phase of healing. You can see here, where someone has had their skin scribed. They’ve actually taken a scalpel and scribed the skin in these boxes that you see. They removed two full thickness areas of skin in the middle, clear down, at least, to the subcutaneous tissue.
Now, they’ve allowed the body to heal for a few days. This wound is not fresh. It’s
several days old because we see it’s already in the proliferative phase of healing. You can see the development of granulation tissue, the beefy, red, bumpy, moist tissue in the middle. Look carefully at the edge of the wound. You can see a little bump that’s silvery at the edge, particularly on the top and on the right. You can see this silvery bump. That’s the brand new epithelial cells just starting to migrate across this wound.
Now, let’s look at the same wound two weeks later. Look what’s happened. The wound has not only filled in with granulation and reepithelialized from the edge, but it contracted. Now, why in the world would we want wounds to contract? Well, contraction really is quite a wonderful thing because we have a much smaller surface area of scar tissue than we did a wound. Now, if you can remember that normal wounds can heal and you will develop as good as 80 percent of normal strength of that tissue, then you can understand why – if your tissue isn’t going to be as strong after it heals, why the body would be highly motivated to give you a smaller wound. So this is really a good thing, to have contraction.
In the maturation phase of healing, the body now is remodeling the collagen that was brought into the wound during the proliferative phase of healing. The collagen molecules are actually being organized and neatened up so now they can cling onto each other and become more durable and more sturdy.
The capillaries that had opened up and caused vasodilation during that inflammatory phase of healing now are starting to get back to normal size. Because of all these events, the strength of the wound is increasing. We are going to lose the purplish-red color of the scar tissue and the scar tissue is going to get thinner and it’s going to shrink down. You’re going to see it becoming more pale. All this events happen over time. Now, many authors do say that the last phase of healing can last up to three to four years, so it can go on for quite a long time.
Now, one important concept that I hope you take out of this today is that there really are two kinds of wounds. Partial thickness wounds are one of the kinds of wounds and those partial thickness wounds heal by reepithelializing. They regenerate the new epidermal cells and dermal cells from within. This is a partial thickness wound.
The other kind of wound that we will see are full thickness wounds. Now, these wounds are different because they heal by a different mechanism. Full thickness wounds heal by formation of granulation, reepithelialization from the edge and contraction. We do not ever get dermal tissue back. We don’t ever get muscle or subq back if that was the tissue that was replaced. All we have is granulation tissue with skin on top.
Since the dermis never comes back – remember, the dermis was that very strong
web of collagen. We never get that back. Because of that, the scar tissue is never going to be as strong as the original native tissue was. There’s also not going to be sweat glands or hair follicles, so you’ll have bald scar tissue, no hair growing on it and it’ll be dry. Many people complain of itching, long-term on scar tissue because there’s no sebaceous gland activity.
Remember, a wound considered healed when continuity of the skin is reestablished and tissue strength is sufficient for normal activity. This means someone should be able to resume sitting, standing, walking where there wounds have previously been without having them break down.
Now, let’s move on to factors affecting wound healing. One of the factors that effects healing in all situations is effective communication or lack of effective communication.
Please remember, we need to be clear and concise and very, very complete when we communicate with physicians and other clinicians regarding our patients with wounds. We need to be able to state our case with a possible solution instead of just telling the physician or the caregiver, “The wound isn’t doing well. What do you want me to do?” Well, if you know what you want to do already, give that suggestion. Give your solution and many times, that other clinician will be grateful, recognize your professionalism and your experience with this and allow you to do exactly what your suggestion is.
Please remember, though, many times, you will have difficulties communicating with physicians and other clinicians. It can be challenging. Many times, you may need to move on to having your Director of Nursing or your physician liaison for your agency or for your facility approach that physician about making changes. Please don’t ever feel like there are two stubborn mules working together because our goal is to be there for the patient as a patient advocate.
Let’s go through some extrinsic factors that can affect wound healing. The biggest factor that’s going to impact healing is the circulation. If you don’t have circulation going into the area, you won’t have oxygen, nutrition and immune components going into the wound.

Without those, healing is going to stall or the wound will even deteriorate. The first thing to do is make sure you assess circulation.
Another factor that can impact healing is mechanical stressors like pressure, friction and sheer. Imagine the physical stressors of people that are laying in bed and sliding down. That’s why so many pressure ulcers occur on the back of the body or on the sacral area, because of the weight, the friction and the sheering courses all occurring in that area of the body.
Debris in the wound can make a major difference as well. Debris harbors bacteria and excess bacteria in the wound are going to cause infection and delay healing. We need to be assessing the wound and making sure that when we assess the wound, we are doing a really good job of cleaning. Clean it out all the necrotic material, old dressing residue that you might see in that wound, any old sutures that might be hiding. Sometimes, you need to find those and alert the physicians that there are sutures remaining to make sure that it’s okay to remove them. Many times, in home care situations in particular, you might find dog or cat hair or pet fur or other blanket debris in the wounds. Make sure you are cleaning the wound well and that you’re training family members, if necessary, to really do a really good job of cleaning the wound.
Wound temperature should be, ideally, as close to normal body temperature as you possibly can keep it. We want to keep that wound temperature as constant as possible. Some of the problems that can occur with frequent dressing changes is the fact that it may take the wound up to four hours to return to normal body temperature after you clean it, after you’ve exposed it to ambient temperature and the more frequently you do dressing changes, the longer it’s gonna take for the wound to get the temperature back up to normal and resume it’s healing process.
Drying out of a wound is a really bad situation because, remember, dry cells are dead cells. Our goal is we want optimal moisture of wounds. Maceration is when you have excessive moisture from the wound and it’s going to affect the surrounding skin. The moisture isn’t going to harm the wound itself, but it will affect that surrounding skin, make it look white, puffy, yellowish, the patient might complain of hurting around the wound because of that and it might be more delicate and easily injured. These are some factors you need to be aware of.
Moist wound healing really is our goal with any of the wound care that we do, so our goal is to allow the body’s own fluids to keep the wound moist. There’s been some research done in the past, especially some of the research by Dr. George Winter who published in Nature in 1962 that wounds that were kept moist actually healed more rapidly than wounds that were kept dry.
Another factor is infection. Infection is the point where the bacterial load of the wound prolongs healing or even stalls healing completely, or possibly, makes the wound deteriorate. Bacteria and infection prolong the inflammatory phase of healing. We don’t want to do that. We want to shorten that inflammatory phase, so our goal really is to get bacteria out of the wound as rapidly as possible so you have a shortened inflammatory phase and less risk for infection. We don’t want the additional tissue destruction that is caused by having infection and we don’t want the fact that the wound is going to take a longer period of time to heal with infection as well. Infection is a major cause of prolonged healing and tissue destruction.

Please remember, what you permit, you promote. If you permit toxic chemicals to be used in wounds, you are promoting poor healing of the wound. When we think about some of the chemicals that we may use in wounds, some of the more common ones are things like povidone iodine, hydrogen peroxide, sodium hypochlorite solution, alcohol, acidic acid, iodophor, and trypsin balsam of Peru.
These sound like fairly commonly used ingredients to many clinicians, but they actually have been tested and been found to be toxic to fibroblasts. Now, remember the role of the fibroblast in wound healing is to help to grow the collagen for the granulation tissue. If we are using toxic chemicals, we’re killing off the fibroblasts, delaying healing, and making our wound go backwards, so that’s why we really want to avoid using these chemical stressors.
Some other factors that can delay healing are medications such as antiinflammatories, anticoagulants, chemotherapeutic agents and antibiotics. When you think about the antiinflammatories, remember that antiinflammatories include medications like Motrin or Celebrex or even Decadron or Solu-Medrol, Solu-Cortef. The reason why these would delay healing is because they are antiinflammatory agents. Remember, the first phase of healing is the inflammatory phase. If you give someone an antiinflammatory, they don’t have a normal inflammatory phase. They are unable to move into the proliferative phase of healing, so it really wreaks havoc with the phases of healing.
If possible, take people off antiinflammatory medications. Make sure you check with your physicians, talk to the pharmacists and see what you need to do to get people off medications or if you can. Anticoagulants, chemotherapeutics, antibiotics, as I said, can all delay healing as well.
Some of the inside factors that can delay healing are related to health status. Remember that the more chronic health problems you have, the more likely it is that you are going to have poor healing. Any kind of chronic disease state that you have or even acute disease state that impacts your oxygenation, your nutrition and your immune capabilities of your body are all going to impact your ability to heal, whether it’s local or systemic. Things like diabetes, any kind of problem that would cause immuno compromise and anything that is going to decrease your local or your systemic circulatory status are all going to cause problems with healing.
Nutrition is another factor that can delay healing. If we don’t have enough protein, calories, vitamins, you’re not going to have normal healing. Please remember, it’s also important to have trace elements and fluids. Did you realize that water is also a nutrient and if someone is dehydrated, they’re actually, also, malnourished? You can’t get oxygen delivery; you can’t get nutrient delivery if you’re dehydrated, so water is imperative.
Another intrinsic factor is aging. Aging does lots of things to people. You have a decreased inflammatory response. You don’t have as vibrant an inflammatory response when you’re aged and that’s why those people have more problems cleaning up their wound. That’s why they need more debridement. You’re going to have delayed angiogenesis with aging. Remember, angiogenesis is the growing of new blood vessels into your collagen and your granulation tissue and that’s going to be a problem because that means your granulation tissue’s growing more slowly.
You have slower epithelialization. Remember, epithelialization is when your skin is moving across the granulation tissue. Your sebaceous glands are decreased functioning. Your sebaceous glands are the oil glands and so the skin is going to be dryer. You’ll have decreased collagen synthesis. Again, more delay to the granulation tissue growth. Your melanocytes alter. That means your skin is going to take on different colors. Maybe you get age spots. You’re going to have thinning and less durability of all skin layers. Aging really has a major impact on healing.
Well, body build also has a major impact for some people. In particular, obese people have a lot of problems with wound dehiscence. Their adipose tissue is very poorly vascularized. Their adipose cells get larger. They don’t get more blood supply to it and so, they’ve got the same capillaries feeding a much larger cell, so it’s a lot more difficult for obese people to heal up that adipose tissue. Thin people also have problems because they have less adipose tissue, thereby, less cushioning to protect them from pressure ulcers when they’re immobile.
Oxygen availability to tissue can also have a major compromise. If you don’t have oxygen, you’re not going to get that wound to heal.
What we really need to remember is we are here in our positions, whatever we are doing, as patient advocates. Our job is to do the right thing, to know the national standard of care, to make sure the treatments that we’re providing are reasonable, necessary and appropriate to provide interventions within the standard of care and document the right thing. Proper documentation is imperative because we need to have legally defensible documentation.
Some issues that come up many times are billing issues. Elizabeth Hogue wrote, last year in the Remington Report, an article on fraudulent billing. Please remember, when you send a bill in to CMS, there’s only, basically, two kinds of bills. There’s a correct bill and there’s a fraudulent bill.
If you send in a bill and let’s say your home health agency has been doing Betadine
wet to dry dressings for an entire episode of care, you send the bill in. Well, when their reviewers look over your Oasis documentation and compare it to your billing, they will see that you were doing long-term Betadine, which is not the standard of care. Thereby, they would say that the care you provided was inappropriate. Since it was not reasonable, necessary or appropriate, then the fact that you sent in a bill made the bill fraudulent.
Some other ineffective treatments to remember include things like aloe vera, shortening, sugar, clay, wool, liquid antacids, bag balm. There’s lots of different things that have been described as being ineffective. It doesn’t mean they don’t work. It means they’ve never been shown that they work as well as or better than the current standard of care or perhaps there’s been no research whatsoever. If there’s no research, you can’t say it’s affective, so you’ve gotta have an evidence-base. Remember that with your treatments. You need to have legally defensible care. You don’t want to get yourself in trouble.

I think, since this came out of a book called Nursing Home Litigation published by Lawyers and Judges Publishing Company, I believe that the lawyers are looking for something here to be able to pull out of a chart and say, “Look here. I see they’ve been using bag balm. That’s ineffective. We can get some money here.” We don’t want to put ourselves or our agencies or our facilities in a position where we might get in some trouble legally. Remember these ineffective treatments.
That concludes the Educare Module on anatomy and physiology of the skin, wound healing, and factors affecting wound healing.
Module Two: Pressure Ulcer Prevention, A Comprehensive Approach, and
Wound Assessment and Documentation
This module is presented by Janet Jones. Janet is a board-certified wound ostomy continence nurse, and is a diplomat in the American Professional Wound Care Association. She is well-versed in reimbursement issues and also lectures extensively across the United States in all areas of wound, ostomy, and continence care.
The objectives for this module are identify the purpose of the AHCPR – pressure ulcers in adults, prediction and prevention guideline, identify three interventions to maintain and improve tissue tolerance to pressure in order to prevent injury, list three criteria used during assessment and documentation, identify three signs or symptoms of wound infection.
Hi, my name is Janet Jones. Welcome to the Educare module Pressure Ulcer Prevention, A Comprehensive Approach
The Agency for Healthcare Policy and Research, also known as the AHCPR, which was created by OBRA in 1989, and its purpose was to disseminate health services research results. This provided a national guideline to help balance good care and manage costs. It is now called the Agency for Health Research and Quality, also known as AHRQ.
. Prevention is extremely important – it's the most important thing that you can do for your skincare program. If you look at prevention as early intervention, you’ve really already lost the battle. You really need to look at prevention as a treatment to keep your skin healthy.
There was a Healthy People 2000 initiative. The objective was to reduce the number of nursing home patients with pressure ulcers by 50 percent. This baseline was 16 persons per 1,000 in 1997, with the target being in 2010 of eight pressure ulcers per 1,000 patients. So we certainly know that we have a lot more work to do, so let's look at some of those terms.
Prevalence – prevalence merely means a cross-sectional count of cases at a specified point in time. This means all pressure ulcers. It's the incidence cases that we're really concerned with. These are new cases appearing during a specified period of time. This means pressure ulcers that develop after admission.
So let's take a look at the highest risk population. They include spinal cord injuries, elders and very young, elderly with femoral fractures, and patients who are critically ill. The NPUAP reported that the incidents of pressure ulcer development in long-term care was between 3 percent and 29 percent. In the acute care arena, it was 1 percent to 21 percent, and in the home care arena, it was 1 percent to 11 percent.
Looking at the cost of treating pressure ulcers – it's a $5 billion annual industry in the United States. This equates to $2,000.00 to $50,000.00 per pressure ulcer. Not only does this cost include the cost of dressings, but it also includes fines that might be levied against the home care, the long-term care, or the acute care institution.
Sixty thousand deaths per year are attributed secondary to pressure ulcer complications. Hospice patients tend to die an average of three weeks after the development of pressure ulcers. The majority of litigation is related to patients and families who sue for negligence. Seventy-five percent of these cases are taken to court and are settled in favor of the patient or the family. The median award is $250,000.000. In Texas in 2002, the highest award was levied at $312 million.
From a clinical perspective, prevention is very important because prevention saves lives. The reduction in the incidence of pressure ulcers is a national concern, and is considered a major patient safety issue. CMS, which is the Center for Medicare and Medicaid Services, and the AHRQ, which is the Agency for Healthcare Research and Quality, find this to be of national concern.
So I guess the biggest question you have to ask yourself is do you have a formal prevention program? If you do, your prevention program needs to include four key elements, as outlined by the Agency for Healthcare Policy and Research in their prevention guideline, and they include risk assessment, skincare and early treatment, mechanical loading and support surfaces, and education.
We're going to go over those now. So let's look at risk assessment – what is the goal? The goal is to identify at-risk individuals needing prevention, and the specific factors placing them at risk. What this really means is that each individual patient needs to be addressed specifically, and their concerns need to be addressed specifically based on their specific needs.
So what are all of those pressure ulcer risk factors? They include medications, dehydration, diminished mental status, age, obesity, sustained pressure, infection, malnutrition, poor sensation, incontinence, decreased body movement, shear, friction, low body weight, immobility, temperature elevation, low diastolic blood pressure, certain medical diagnoses, ischemia.
How is it that we determine the patient's risk for pressure ulcers? We need to use a validated risk assessment tool. These include the Norton scale, which was developed in 1961 and was based on clinical judgment, or the Braden scale, developed in 1987, or now we have the Braden Q, which is specifically for assessment of pressure ulcer risk in pediatrics.
What is the frequency that we need to look at for performing these risk assessments?
In the acute care arena, every 48 hours. Remember that the first two weeks following admission are the highest risk for ulcer development. In long-term care, we need to do it weekly times four, then quarterly.
Fifteen percent of elders in long-term care develop ulcers within the first four weeks of admission. In home health care, these risk assessments need to be repeated every visit.

So what is it that we do with these scores? Well, our goal is to improve the score in each category, provide interventions based on the total score. But one thing that's extremely important – don't just look at the score, look at the whole patient. Remember that the risk assessment scores are somewhat subjective, so if you merely based your care planning program on your risk assessment score, you may miss the opportunity to provide the necessary prevention.
Our next goal is to maintain and improve tissue tolerance to pressure in order to prevent injury. This means that we need to inspect the skin at least daily and document our findings. And what is it that we're assessing? We're assessing all areas of the skin that are at risk for breakdown – and remember, pressure ulcers are not always over a bony prominence.
Please notice that you can develop a pressure ulcer on the perineum. Remember, if you’ve ever cared for a contracted patient, it often takes two clinicians to pry the legs apart. Can you imagine the amount of pressure being applied in that area? And then you add moisture, and you’ve got the recipe for skin breakdown.
The inspection of the skin and the documentation of the skin daily is extremely important. This offers the nurse maybe their one and only opportunity to identify early breakdown. And remember that you're inspecting all areas of the skin, not only medial and lateral malleolus, perineal areas, the ears, the backs of the head, the sacral areas, the heels, the ischial tuberosities, the trochanters, but you're also looking at areas when the patient is lying prone, which might be the genitalia in the male, the breasts, the head, the tops of the hands.
And when the patient is sitting, the highest-risk areas for injury are the ischial tuberosities, and when they're sitting in the chair, please remember the importance of inspecting the bottoms of the feet and the backs of the knees where the knees hit the chair, especially if the patient is positioned improperly in the chair. They can develop those pressure ulcers readily on the backs of those knees.
The illustration that you see before you is the pelvis. The bones at the bottom are the ischial tuberosities. These are the bones that are at great risk for injury upon sitting. Three of the pointy bones in this pelvis region take 75 percent of the weight of the body. Therefore, it is extremely important to find the appropriate seating surface to help to reduce the pressure off of this area.
What about those patients with altered postures, patients with contractures? They will have more skin touching skin under pressure; therefore, there will be more moisture. And remember, moisture plus pressure equals rapid skin breakdown. This group of patients therefore offers a unique challenge in appropriate and proper positioning.
So what is it that we're assessing? We're assessing change of condition. What are changes of condition? Redness, discoloration, breaks in the skin, skin that has been denuded, which is superficial stripping or laying bare of the upper layer of the epidermis, desiccated or dry skin, macerated, which is oversoaked or waterlogged, and areas that are being assaulted by urine and stool. So we need a very strong skincare program. your skincare program, in order to be complete, must include cleansing, moisturizing, protecting, and nourishing.
Let's begin with individualized bathing frequency. Remember that we need to provide for bathing at the patient's convenience, beginning with cleansing of the entire body utilizing pH-balanced products. Why? Because we need to protect the acid mantle, or that pH that runs about 4.5 to 5.5 on the skin. We need to provide for products that support the acid mantle.
We may be cleansing in a tub, a shower, or in a bed. We're then going to assess and treat incontinence. Cleansing is a very important component in the care of the incontinent patient. Oftentimes, soap and water is not recommended. Why? Because soap has a very alkaline pH, and soap can actually strip the acid mantle from the surface of the skin, thereby allowing those naturally populating microorganisms to enter and potentially cause a problem.
Commercial cleansers are available and they offer a pH balance. They come in sprays and foams. These pH-balance cleansing products also come in wipes, which offer great convenience to the caregiver.
We also need to prevent and treat dry skin, and we need to do that with lotions, creams, or ointments. Let's talk a minute about the importance of providing hydration to the skin. If you look at this list, which product category offers the most water in the product, and which product by design offers or has no water? Lotions will have the most water, and ointments, by design, are anhydrous, which means they have no water.
So what is the function of moisturizing the body? Well, we want to apply these products to prevent what's known as trans-epidermal water loss. In other words, you want to provide a coating on the skin because everybody, as we sit, move around, talk, provide our activities of daily living.
We basically evaporate moisture off of our skin. So by applying a lotion, cream, or an ointment to the top surface of our skin, we actually prevent that natural loss of water from occurring, thereby holding our own moisture back onto our skin, and that actually provides for the moisturization. Therefore, by design, ointments would prevent the least amount of water from transpiring off of the skin.
Do you have a lot of skin tears in your patient population? If so, this is one of the easiest tenants of prevention that you can get your staff excited about correcting, because remember, skin tears are directly related to dry skin, dehydration, and some medications such as steroids will always make patients at risk for injury.

However, there is a remedy, and the remedy is goobing and lubing. Make your prevention program fun. Goobing and lubing makes the statement of we need to keep these arms and legs well greased with lotions, creams, ointments. Have you ever asked your staff, "Where's your emollient?" Are they using it?
Not only are we going to topically emolliate, but we're also going to provide for internal hydration. If you walked into a facility and saw skin in good repair, arms and legs well hydrated, that makes a very good statement about the care that you provide, versus if you were to walk into a facility as a visitor and see arms and legs wrapped in roll gauze. That would make a negative statement about the kind of care that you provide.
So remember goobing and lubing in your skincare program. However, when you apply that lotion, cream, or ointment, please avoid vigorous massage, specifically over those reddened areas, because vigorous massage over those reddened areas can further damage already-compromised capillaries.
Now let's look at protection with primary barriers. We have multiple different types of barriers, from sealants to creams and ointments. Let's for a moment look at sealants. Sealants are things like skin prepping wipes. They do protect, but what don't they do? They don't emolliate. However, creams and ointments will both protect and emolliate at the same time, and remember, your skincare program must do three things: cleanse, moisturize, and protect.
We can also protect with a type of product category called a second generation barrier. These are products that remain in contact with the skin and are not absorbed. They are wonderful because they allow for repeated chemical assault, yet the urine or the stood or the G-tube effluent will not penetrate through the product and cause damage to the skin.
What makes them unique is that they contain zinc, caria, and often cornstarch. What does this do? These ingredients cause a bonding of the product to the skin, and it actually creates a physical barrier where you couldn’t put a physical barrier.
For instance, in these pictures, you could see why you might want to use a physical barrier – for instance, a hydrocolloid, but you can't because of the patient's level of incontinence. So you have to have a dressing to protect that injured skin even while the patient is incontinent, and in this case, second generation barriers work beautifully. They're basically a dressing in a tube.

They're great for denuded skin, patients that are chronically oozing stool, patients who have acute diarrhea. And we all have that challenge of treating those patients with those G-tubes that are constantly leaking that G-tube effluent that is very acidic from the hydrochloric acid in their belly, and it really erodes their belly skin. Well, using a second generation barrier not only for the treatment but then prophylactically after it's healed, you'll never have that injury occur again around that peri G-tube site.
What about nutrition? Let's look at assessment and intervention. Remember that malnutrition occurs in 30 to 40 percent of patients in acute care – 50 percent of patients in sub-acute care, and up to 85 percent of residents in nursing homes.
So let's look at what are those factors that provide for compromised nutrition? What are the red flags? Patients with unintentional weight loss or weight gain, patients with problems with dehydration, serum albumens of less than 3.5, pre-albumens of less than 15, patients with total lymphocyte counts of less than 1,800 meters triple, total protein of less than six, patients who are taking nothing by mouth, patients who have current or history of alcoholism.
How about patients with diseases or injuries that cause increased nutrient losses? What could be better than a very large, draining pressure ulcer to increase nutrient losses? How about patients with issues that cause increased metabolic needs? Again, a large pressure ulcer that's draining, and certain medications, can cause compromised nutrition.
So what are we going to do with all of those factors that place patients at risk for compromised nutrition? We're going to perform a good nutritional assessment. We're going to utilized a registered dietician.
How many people actually read the registered dietician's assessment? If you don't, you're shortchanging yourself and your patient. Remember, clinicians, we have to work as a team, and you need to make sure that you're very aware of what is going on nutritionally with that patient. And oftentimes, those nutritional assessments can get lost in the shuffle, so it's very important that the clinician view that nutritional assessment along with the registered dietician.
You're also going to look at monitoring lab values. You're going to look at monitoring those albumens, those pre-albumens, lymphocyte counts, possibly hemoglobin hematocrits. You're going to look at providing vitamin and mineral supplementation, possibly adding vitamin C, zinc, and a multivitamin with mineral in accordance to the physician's plan of care.
What about additional supplementation? And I guess the question also is what does supplementation mean to you and your patient? If you're in home care, the patient's idea of supplementation might be cheese puffs and a Fresca. Well, that's a start, but maybe we want to move that patient towards a glass of milk and a peanut butter and jelly sandwich – fluid balance.
Water is a nutrient, and lack of water means dehydration. Oftentimes, you want to look at providing 32 ounces of fluid in addition to what comes with the patient's meal. Fluid balance can mean everything in terms of wound healing.
An important aspect of care with patients with pressure ulcers is pain management. Remember to assess all patients for pain related to pressure ulcers or its treatment. That does not just mean providing for analgesia. That might be looking at
different treatment modalities that provide better comfort upon the treatment of the patient's wound. However, our goal always is to eliminate or control the source of pain if possible, provide analgesia as needed and when it's appropriate.
It's very important to improve mobility and activity in our patients. Remember that even if a patient is already contracted, it's very, very important to then do passive range of motion so that those contractures do not become greater. One of the best places to do range of motion is when we're giving a bath or providing emolliation or when the patient is in the tub or a whirlpool.
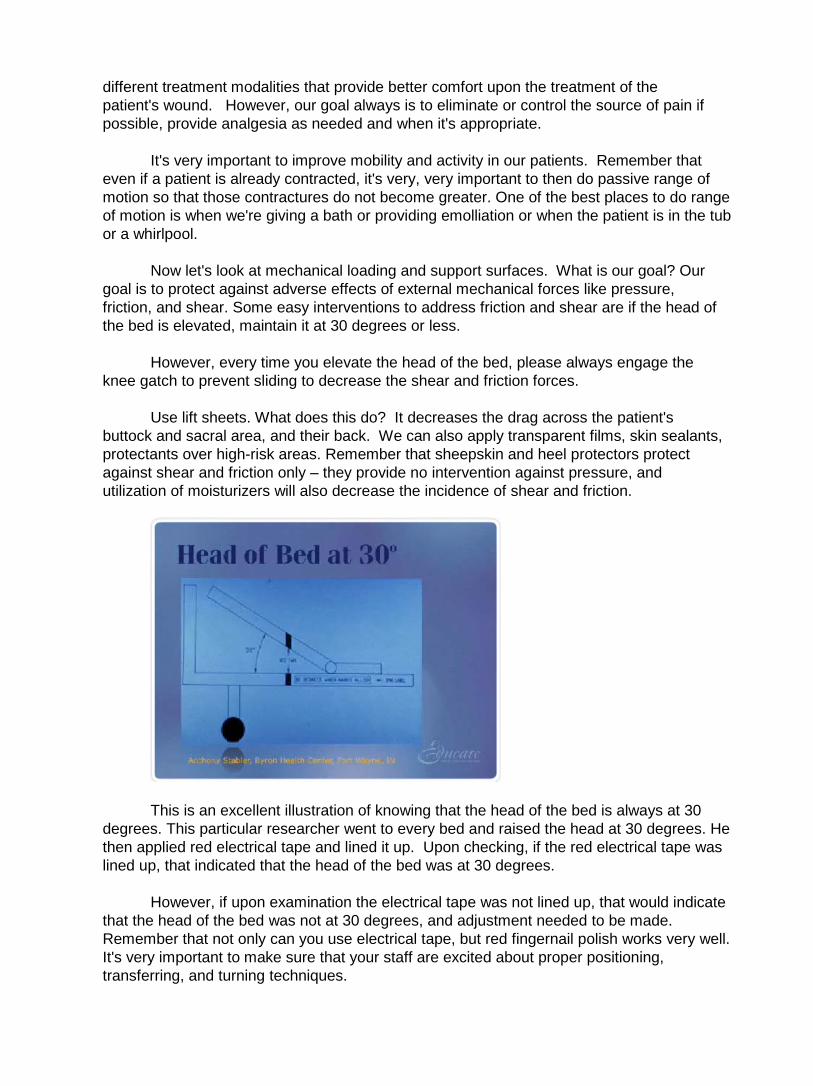
Now let's look at mechanical loading and support surfaces. What is our goal? Our goal is to protect against adverse effects of external mechanical forces like pressure, friction, and shear. Some easy interventions to address friction and shear are if the head of the bed is elevated, maintain it at 30 degrees or less.
However, every time you elevate the head of the bed, please always engage the
knee gatch to prevent sliding to decrease the shear and friction forces.
Use lift sheets. What does this do? It decreases the drag across the patient's buttock and sacral area, and their back. We can also apply transparent films, skin sealants, protectants over high-risk areas. Remember that sheepskin and heel protectors protect against shear and friction only – they provide no intervention against pressure, and utilization of moisturizers will also decrease the incidence of shear and friction.
This is an excellent illustration of knowing that the head of the bed is always at 30 degrees. This particular researcher went to every bed and raised the head at 30 degrees. He then applied red electrical tape and lined it up. Upon checking, if the red electrical tape was lined up, that indicated that the head of the bed was at 30 degrees.
However, if upon examination the electrical tape was not lined up, that would indicate that the head of the bed was not at 30 degrees, and adjustment needed to be made. Remember that not only can you use electrical tape, but red fingernail polish works very well. It's very important to make sure that your staff are excited about proper positioning, transferring, and turning techniques.

Are they transferring and turning patients at least every two hours? What's their motivation? Clinicians, are you motivating your bedside caregivers? Are you going back behind them, and are you checking to see if these patients are being turned correctly? Are they being positioned correctly?
In the home environment, however, transferring and turning techniques may be somewhat of a challenge for a single caregiver. Remember that a formal program may be very, very helpful, whether it is that you have a turning schedule on the back of your nametag and it reads "Window back and door," maybe on the even or the odd hour, and maybe you offer 15 minutes prior to and 15 minutes after the hour in order to be in compliance with this program.
Remember: pressure comes from immobility, so positioning is one of the most important components of this program, so you have to engage every staff member. That also might include utilizing non-clinical staff to help monitor these programs. Remember, you really don't have formal programming of any type unless you have the ability to monitor the outcomes.
Let's look at some terminology about support surfaces. The National Pressure Ulcer Advisory Panel Support Surface Initiative – they talk about pressure reduction and pressure relief. Now these are terms that we're all used to talking about. However, they consider them to be outdated terms. In other words, there's really no such thing as pressure relief.
In order to have complete pressure relief, basically you would have to suspend the
patient basically by their fingers and toes so that they would be free-swinging, and we all know that that's not realistic. But let's look at it a little more closely – we want to reduce the inner face pressure to less than capillary closing, so where do we come up with this theoretical number of 32 millimeters of mercury pressure? How did they come up with this 32 millimeters of mercury pressure?
Basically, they took a roomful of healthy medical students and they went to determine how much pressure against the dermis before the capillaries were compressed, and it was 32 millimeters of mercury. But how many patients do you have that could tolerate necessarily that much pressure?
For instance, a patient in bed A, he might get a reddened stage one on his buttocks, and he only was in that position maybe four hours, whereas his roommate could be in the identical position for eight hours and not get a reddened area.
That would mean that the patient in bed A's capillary closing pressure was much higher. So not everybody has the same capillary closing pressure. Pressure leaving surfaces are often used for stage three and four pressure ulcers and flaps.
And how are you going to do that? You really want to look at using something other than a standard hospital mattress. That is what is considered pressure reduction. These types of support surfaces are often used for prevention, comfort, stage one, and stage two pressure ulcers.
So let's look at pressure reduction versus pressure relief, and what do they really mean? Well, when we talk about the redistribution of pressure, what we're really doing is we're taking the pressure from those bony prominences and spreading it along the surfaces of the soft tissue.
Remember that you want to avoid excess layers of linen. You want to also avoid skin to skin contact, because the support surface will not do that for you, so you have to do that with proper positioning. And whether it's pressure reduction or pressure relief, you have to address the areas whether the patient is on a mattress, in a chair, and you always have to address the support surfaces to the feet, because they are at great risk for injury, no matter what the support surface is that you have chosen.
Extrinsic factors are those factors that you can control, and they are pressure, shear,
friction, moisture, heat, and immobility. The first type of support surface we'd like to talk about is air fluidized therapy. This is a rather unique support surface in that what appears to look like the bathtub component of the bed is filled with a siliconized type of sand. The very bottom of the bed is a very powerful blower.
So what happens is air is actually blown up through this very light sand, but it doesn’t keep going because there's a top cloth cover, and air actually moves directly through the cover. So what does that do to the patient? First of all, it helps to keep the skin dry, and oftentimes if you've got a very heavily draining wound, it will actually help to control some of that fluid in the wound.
However, the product itself is very hot – that air that is blown through in the support surface can run anywhere from 95 to 98 degrees. The support surface is also very soft, so the patient will develop contractures. Therefore, passive range of motion is a very important component of the therapy while the patient is on this bed. The air fluidized therapy product, according to many clinicians, is felt to provide the lowest pressure.
The other types of support surfaces are what we call low air loss products, or alternating air products. Now these are all considered to be dynamic surfaces. Just like an air fluidized therapy product is dynamic, so is a low air loss product.
So when we talk about low air loss, all we're really talking about is that that air that's coming through those pillows hits the backside of the cover and if the patient is diaphoretic or has a wound with a little bit too much moisture, as soon as moisture hits the top surface of the cover, what happens to it? It evaporates because of the air that is coming from the back side of the cover.
Now, these can be as fancy as digitalized programmings where you insert the patient's height, their weight; the product can lose air and alternate at the same time, or it can just alternate or it can lose air, or it can be as simple as dialing a knob with the patient's weight.
You want to look at your support surfaces, however, when you're using low air loss, and you want to make sure that you have at least four inches of air, because you don't want the patient to bottom out. This patient was on a dynamic air surface, yet they still broke down. Why? Because the clinicians did not address the specific support surface needs of the patient's extremities.

They should have elevated these extremities on pillows. Even though these patients were on high tech surfaces, they still broke down on their feet. Remember that low air loss surfaces address the extrinsic factors of pressure, shear, friction, moisture, and heat, because that air is moving through, and as it moves through it's also going to cool the skin.
Checking for proper inflation is extremely important and it should be done daily with a hand check, and it can be done several ways. If the patient is laying on a static surface, which might resemble a pool float, that would give you a visual.
Place your hand underneath the support surface, in between where their butt or hip is laying on the flat of your hand, and if you feel their butt or hip resting on the flat of your hand, that is called bottoming out, and you know that you need to add more air to the support surface.
Now what about if they're on a low air loss product where the pillows are running horizontally? So what you want to do is you want to take your fingers, your four fingers, and you want to slide them horizontally in between those two pillows, right underneath where the patient's butt or hip is. If you have to move two fingers out of the way because their butt is resting on two fingers, you know there's not enough air.
If they're sitting way above your four fingers, then that means the support surface is too hard, and too hard of a support surface can have the opposite response – in other words, it could be as if they were laying on nothing, because the support surface is too hard, therefore, it could create injury.
There is a myriad of pressure reduction devices. According to the AHCPR guideline, any individual assessed to be at risk should be placed on a pressure-reducing device. They come in all shapes and sizes. They cover beds, they cover chairs, they cover geri chairs, they come in foams, air, high-density foam, mattress replacements.
Remember that convoluted foam overlays, also known as egg crates, they're best known for comfort and camping. They really have no therapeutic benefit at all, and really shouldn’t be used, because oftentimes if you put an egg crate on top of a bed, the clinician will have the impression that they're providing some sort of therapeutic benefit, and they do not. They will give you a false sense of security.
What about bariatric surfaces? What are they? These are special support surfaces, whether they be mattresses or frames, for patients that are greater than 350 pounds or have a BMI of greater than 40.
Now let's talk about this. One of the most important things about a patient who's greater than 350 pounds in a standard bed is that you can't turn them, and also, standard beds have weight limits, and they don't include weight limits for 350-pound patients.
And if you don't use a special support surface, you're going to have a very difficult time turning these patients, and if you can't turn them, skin breakdown will occur very rapidly.
What about doughnuts? Doughnuts have been encouraged to be used by clinicians it seems for centuries, but we know that doughnuts are a no-no. In the doughnut itself, the space in the middle, it will actually remove the pressure, but where does it redistribute the pressure? It redistributes the pressure to the doughnut area itself.
So what do we know about doughnuts? The only good place for a doughnut is on the top of our child's head as a headdress for Halloween. Remember, position carefully utilizing good posture.
If able, teach your patient to weight shift every 15 minutes of chairbound. Now, if the patient isn’t able to weight shift, basically we have to teach our staff to reposition our patients at least every hour, or to be put back to bed more frequently.
Oftentimes, patients who are at great risk for injury, we'll allow them to be up for meals only, and then be put back to bed in between.
Lifting devices do three things: they help to reduce back injury of the person doing the lifting; they help to reduce shear and friction injuries of the patient being lifted; and they also provide security of the patient being lifted.
Pillows are one of the most important positioning devices you could possibly have. They help to separate bony prominences. Do you know about the pillow rule? In your hospital or institution, for every patient that you have, you should have three pillows. So therefore, if you have a 300-bed hospital, you should have 900 pillows. What does that equate to?
One-third of the population will use only one pillow behind their head. The second third will use two. But that third third might use three or more – those patients who are contracted, those patients who are tight with their arms, those patients who need pillows behind their knees. Pillows are very cost-effective, and they're universally useful.
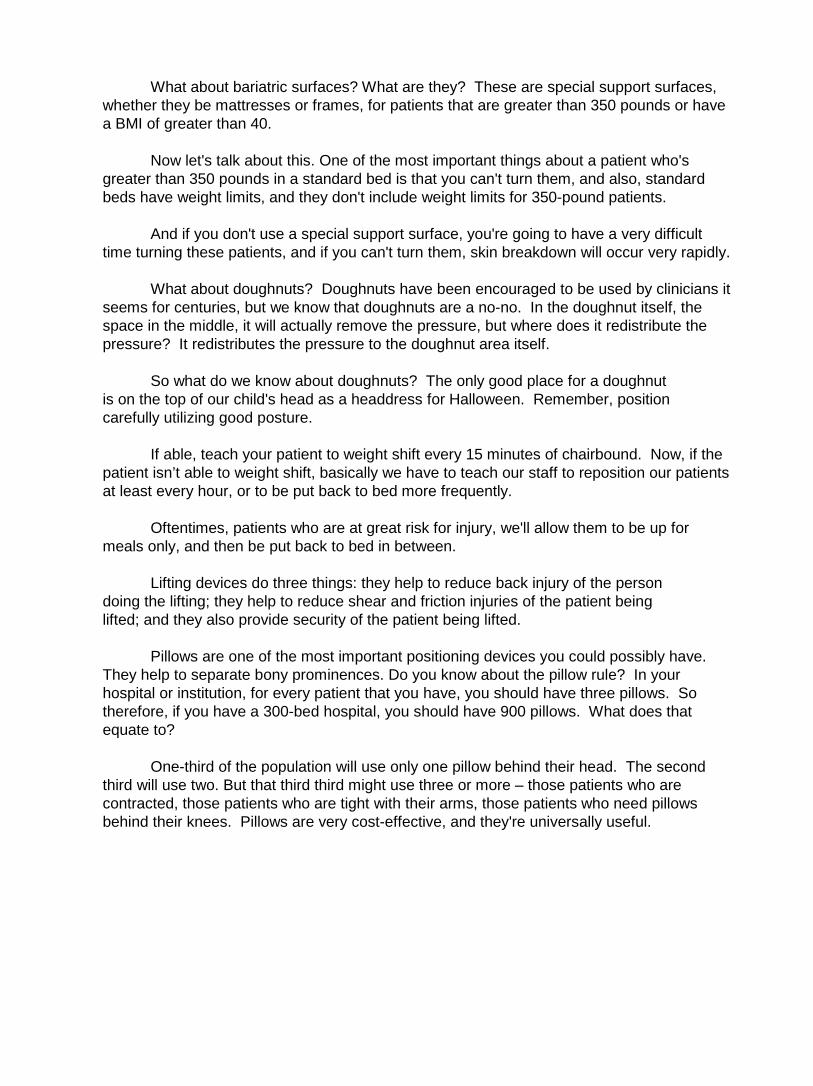
Please notice that if you purchase a pillow, you don't want to purchase the ones that are flat. You want to purchase a puffy pillow that when placed underneath the calf will completely off-weight or free-swing that heel. Look at the heel in the picture – there's absolutely no pressure being applied.
You can also use that pillow behind their head. You could use it behind their back to help position them on their side. Again, very cost effective, very universally useful.
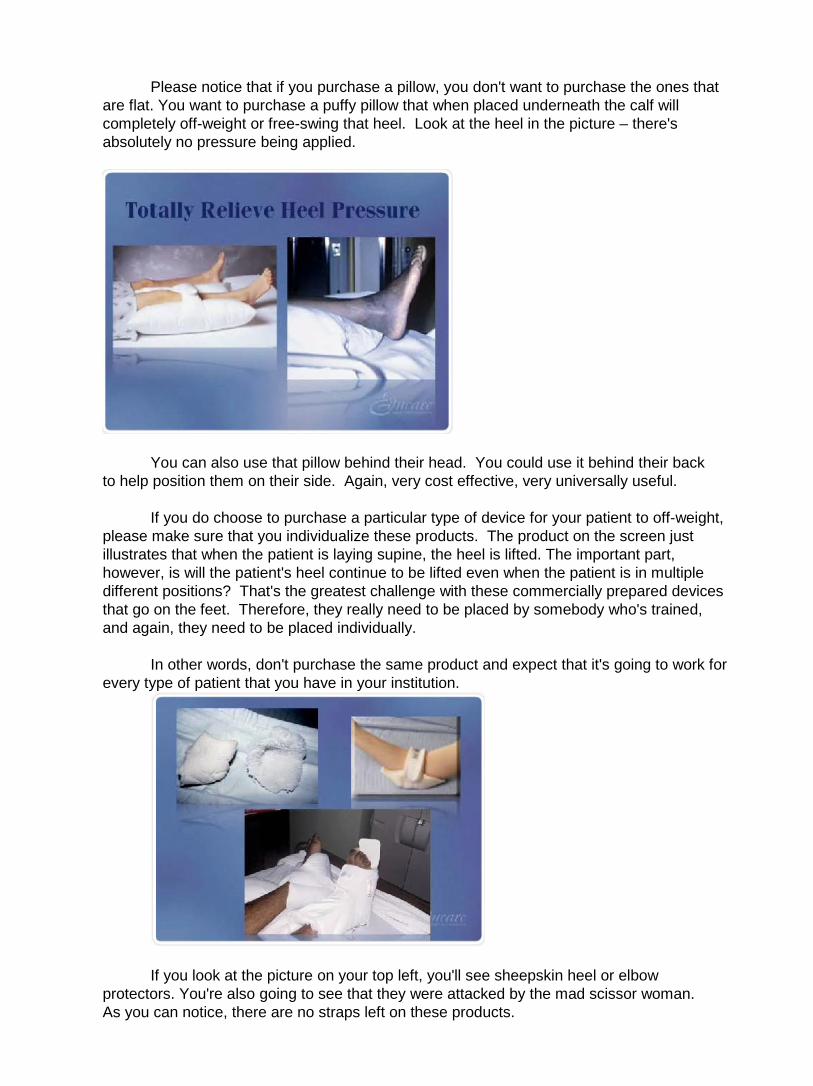
If you do choose to purchase a particular type of device for your patient to off-weight, please make sure that you individualize these products. The product on the screen just illustrates that when the patient is laying supine, the heel is lifted. The important part, however, is will the patient's heel continue to be lifted even when the patient is in multiple different positions? That's the greatest challenge with these commercially prepared devices that go on the feet. Therefore, they really need to be placed by somebody who's trained, and again, they need to be placed individually.
In other words, don't purchase the same product and expect that it's going to work for every type of patient that you have in your institution.
If you look at the picture on your top left, you'll see sheepskin heel or elbow protectors. You're also going to see that they were attacked by the mad scissor woman. As you can notice, there are no straps left on these products.
First of all, these products address shear and friction only, yet the majority of our staffs still think that they address pressure relief or pressure reduction.
The other problem with the strap is after the first time, what happens to the strap? It gets knotted. It then goes to the laundry, and the knot becomes tighter and tighter and tighter, so we now slip the product over the patient's heel, and what ends up happening? Have you all ever seen those dorsal injuries starting to occur on the tops of the feet because the strap being too tight?
Look at the bottom right. You see that blue bunny boot on the left? People oftentimes think that those blue bunny boots are pressure-relieving. Please, take one the next time you’ve got one and put it on your elbow. Put your elbow on the table, and ask yourself what do you feel. You're going to feel the table. So they only provide for pressure reduction. What they really provide for is padding around that bony foot. Again, you don't want to just use that product. You still need to put that pillow underneath the calf to off-weight the heel.
Now you see the commercially prepared orthotic on the right. One of the biggest problems that we have with these is proper fit. Please ensure that they are fitted and assessed by trained personnel, your physical therapists. One of the things that happens all too frequently is we put these products on and they are too big.
Have you ever started to see ulcerations occur on the medial and lateral aspect of the feet, or on the heel? Well, if there's too much give or play with the boot, you get that friction going on the boot, and then you get those injuries on the medial and lateral aspect, and if the boot is too big, where does the heel sit? It sits on that metal bar. So it's very, very important that they are fitted correctly.
Remember that when you side-lie a patient, they should be at no more than 30 degrees lateral position. Why? Because if you put them at greater than 30 degrees, you're actually going to be applying too much pressure on the opposite hip, and that's not your goal. Your goal is to remove pressure, as in the illustration, off of the left side, without applying too much pressure on the right.
And when we conclude with prevention, we really begin with education, because the goal is to reduce the incidence of pressure ulcers through educational programs.
Remember that your education program should include ideology and risk factors, utilizing those risk assessment tools, like the Norton or the Braden scale.
Looking at the skin, assessing the skin for injury, making sure you're checking between the fingers and the toes – web spacings – behind the ears, the tops of the scalp. You want to make sure that the program is individualized. You do not want every single patient to have the same prevention programming. You want to see individualization in their care plan.
Support surface – are you utilizing them, and are you utilizing them correctly? And are you taking credit for your prevention with good documentation?
Remember, educational programs should identify who is responsible for prevention of pressure ulcers. Describe each caregiver's role. Remember the role of the licensed caregiver may not be the same as the role of the non-licensed caregiver. The caregiver in
the home may be much more inclusive than the caregiver in a long-term care or in an acute care setting.
And always provide information at the appropriate level, and update your prevention program on a regular basis. And what does that mean? Prevention should be updated every shift of every day of every week of every month of every year. Make sure you monitor and document your interventions and your outcomes.
This concludes the Educare module Pressure Ulcer Prevention: A Comprehensive
Approach
.
Carol Postian: Hello, I'm Carol Postian. I'd like to welcome you to the Educare module for Wound Assessment and Documentation
This module will be going specifically over wound assessment, but it's just as important to remember assess the whole patient also. Please remember that many times, the type of wound is related to the location of the wound and the ideology, such as those that we find in moist areas of the body and below the knee, such as the arterial insufficiency ulcers, venous statis ulcers, and neuropathic ulcers.
. We need to remember it's imperative to assess the entire patient – assess the whole patient, not just the hole in the patient.
Many times also we will find pressure ulcers, and those are wounds that are over bony prominences that we'll be discussing a little bit more later on.
Let's talk about first some of the complications of excessively moist skin, such as maceration, denudation, and fungal infections.
What is maceration? Maceration is a puffed-up outermost layer of skin. The stratum corneum cells on the most outside layer of skin get excessively hydrated, and since they're dead, they get puffed, they turn white – it looks pretty scary. But remember, maceration affects the skin surrounding the wound, not the wound itself. The skin isn’t injured, but it is more prone to injury from pressure, friction, or shear if it's macerated.
Well, what is denudation, then? Well, a denudation is a partial thickness injury of the skin where the wound goes partially through the skin into the epidermis or the dermis, but not completely through the dermis. These denuded wounds typically are related to friction and shearing forces and chemical irritation, such as that from urine or stool.
There are several types of fungal infections that we might see related to some of the wounds that we care for. You might see ringworm or candida. Now, tinea is a kind of fungi that can affect the skin and make blotchy little circles. Candida can affect the mucous membranes and the intertriginous areas, or areas where skin touches skin.
The lower extremity wounds of the different types, whether they are venous leg ulcers, arterial insufficiency ulcers, diabetic ulcers or pressure ulcers, any time you have a wound on the lower extremities your first assessment focus is to determine is the arterial profusion going to be adequate to allow that wound to heal.

If you don't have blood, you're not bringing oxygen, nutrition, and immune components into the wound, so healing won't occur in a very good way unless you have that circulation going.
I want to just very briefly review the skin. The top layer is the epidermis – that's the outside layer. Underneath the epidermis is the dermis. This is where we find blood vessels, hair follicles, nerves, sweat glands, and organs of that nature. And then underneath the dermis is the subcutaneous tissue.
Please remember when we are classifying wounds we first start out initially describing any wound as either partial or full thickness. Partial thickness wounds are wounds that may go into or completely through the epidermis and partially through the dermis, but not completely through the dermis.
If these wounds are caused primarily by pressure, then they'd be called a stage two pressure ulcer. Full thickness wounds are wounds that go fully through the skin – completely through the epidermis, completely through the dermis, and now we're down into the subcutaneous or deeper tissues. These full thickness wounds, if primarily caused by pressure, would be called a stage three or a stage four.
Pressure ulcers, remember, are lesions caused by unrelieved pressure, usually over a bony prominence, and I think "usually" is an important word to remember here. If someone is lying on an object, they might get a pressure ulcer in an area other than a bony prominence.
Let's go over some of the typical staging criteria. Now I think everyone is very familiar with the old stage one pressure ulcer criteria of non-blanchable erythema of intact skin. This has actually been changed in the last few years, because it was found that that definition was only about 58 percent accurate in predicting people who actually had stage one pressure ulcers.
They’ve changed that definition, and now are able to say that we are 78 percent accurate in finding actual stage one pressure ulcers. Because we couldn’t find these stage one pressure ulcers very well in dark-skinned people, there was a greatly increased incidence of stage three and four pressure ulcers in people with dark skin pigmentation, so we have a new stage one definition that really helps to find pressure ulcers in people of all skin colors.
Now the stage one definition that was developed by the National Pressure Ulcer Advisory Panel in 1997 was that a stage one is an observable pressure-related alteration of intact skin whose indicators are compared to adjacent or opposite areas on the body, and may include changes in one or more of the following.
You may see an alteration in skin temperature. When you feel the skin over the
potentially injured area, it might feel warmer or cooler than the normal skin on the opposite side of the body. The tissue consistency might be altered. The patient's skin might feel firm or indurated, or might feel boggy on that potentially injured area, where it doesn’t feel that way on the other side that's normal of their body.
You might also notice that the patient is complaining of pain or itching in the area, and this stage one definitely really takes into consideration let's ask the patient how the area feels. We never thought to do that with the old definition.
The definition also says the ulcer will appear as a defined area of persistent redness in lightly pigmented skin tones, whereas in darker skin tones, the ulcer might appear with persistent red, blue, or purple hues. This is going to allow us to pick up skin changes in people of all skin colors, not just in lightly pigmented people, but also in those people with very dark skin.
But the biggest challenge is that we must learn to touch our patients. We must also learn to ask our patients how the area feels. Get used to touching what normal feels like so that you can define what abnormal feels like – just like the first time you listened to lung sounds.
Do you remember how everybody's lungs sounded strange, and now you're able to determine the smallest changes in peoples' breath sounds? Well, the same things with skin. If you get used to feeling what normal human tissue feels like, then you'll be able to understand when it is abnormal.
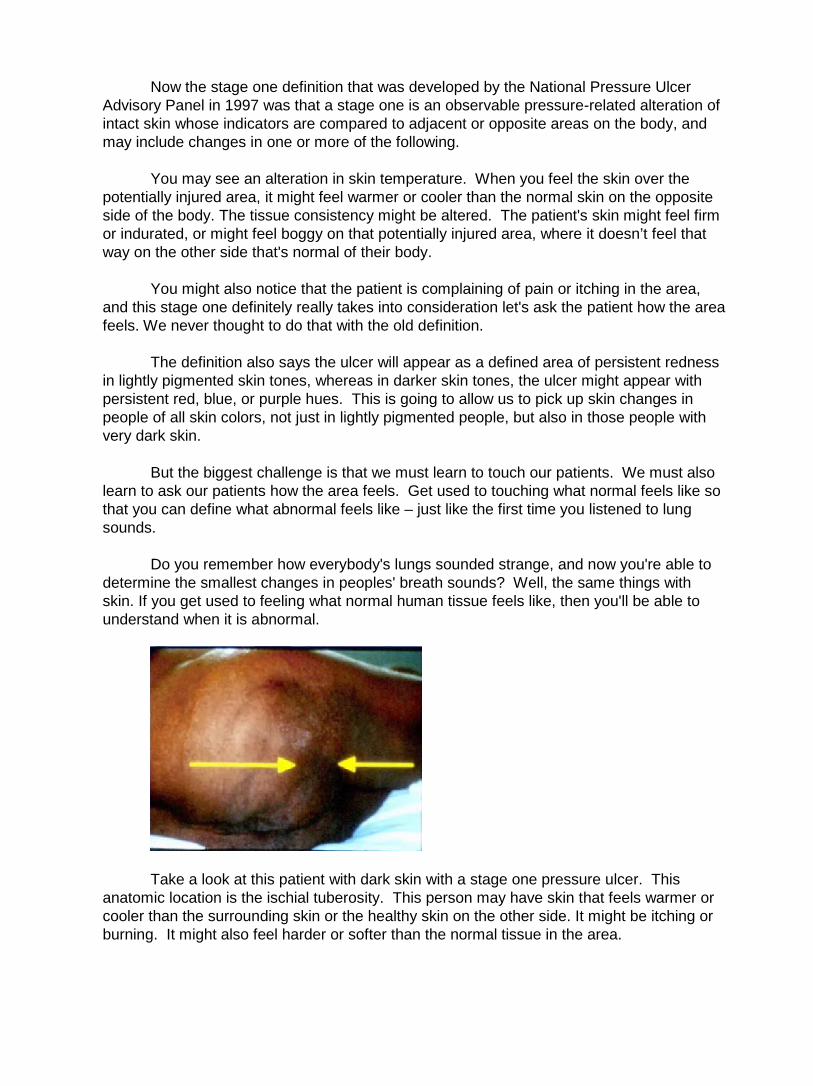
Take a look at this patient with dark skin with a stage one pressure ulcer. This anatomic location is the ischial tuberosity. This person may have skin that feels warmer or cooler than the surrounding skin or the healthy skin on the other side. It might be itching or burning. It might also feel harder or softer than the normal tissue in the area.
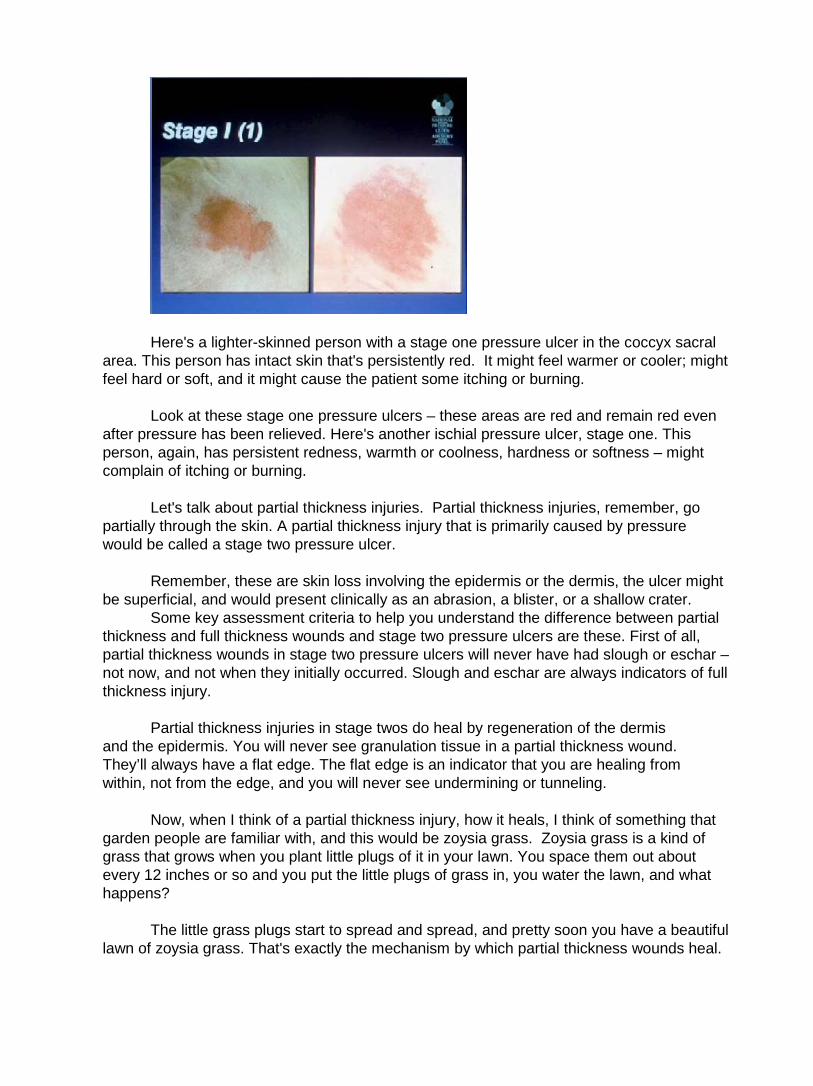
Here's a lighter-skinned person with a stage one pressure ulcer in the coccyx sacral area. This person has intact skin that's persistently red. It might feel warmer or cooler; might feel hard or soft, and it might cause the patient some itching or burning.
Look at these stage one pressure ulcers – these areas are red and remain red even after pressure has been relieved. Here's another ischial pressure ulcer, stage one. This person, again, has persistent redness, warmth or coolness, hardness or softness – might complain of itching or burning.
Let's talk about partial thickness injuries. Partial thickness injuries, remember, go partially through the skin. A partial thickness injury that is primarily caused by pressure would be called a stage two pressure ulcer.
Remember, these are skin loss involving the epidermis or the dermis, the ulcer might
be superficial, and would present clinically as an abrasion, a blister, or a shallow crater. Some key assessment criteria to help you understand the difference between partial
thickness and full thickness wounds and stage two pressure ulcers are these. First of all, partial thickness wounds in stage two pressure ulcers will never have had slough or eschar – not now, and not when they initially occurred. Slough and eschar are always indicators of full thickness injury.
Partial thickness injuries in stage twos do heal by regeneration of the dermis and the epidermis. You will never see granulation tissue in a partial thickness wound. They’ll always have a flat edge. The flat edge is an indicator that you are healing from within, not from the edge, and you will never see undermining or tunneling.
Now, when I think of a partial thickness injury, how it heals, I think of something that garden people are familiar with, and this would be zoysia grass. Zoysia grass is a kind of grass that grows when you plant little plugs of it in your lawn. You space them out about every 12 inches or so and you put the little plugs of grass in, you water the lawn, and what happens?
The little grass plugs start to spread and spread, and pretty soon you have a beautiful lawn of zoysia grass. That's exactly the mechanism by which partial thickness wounds heal.
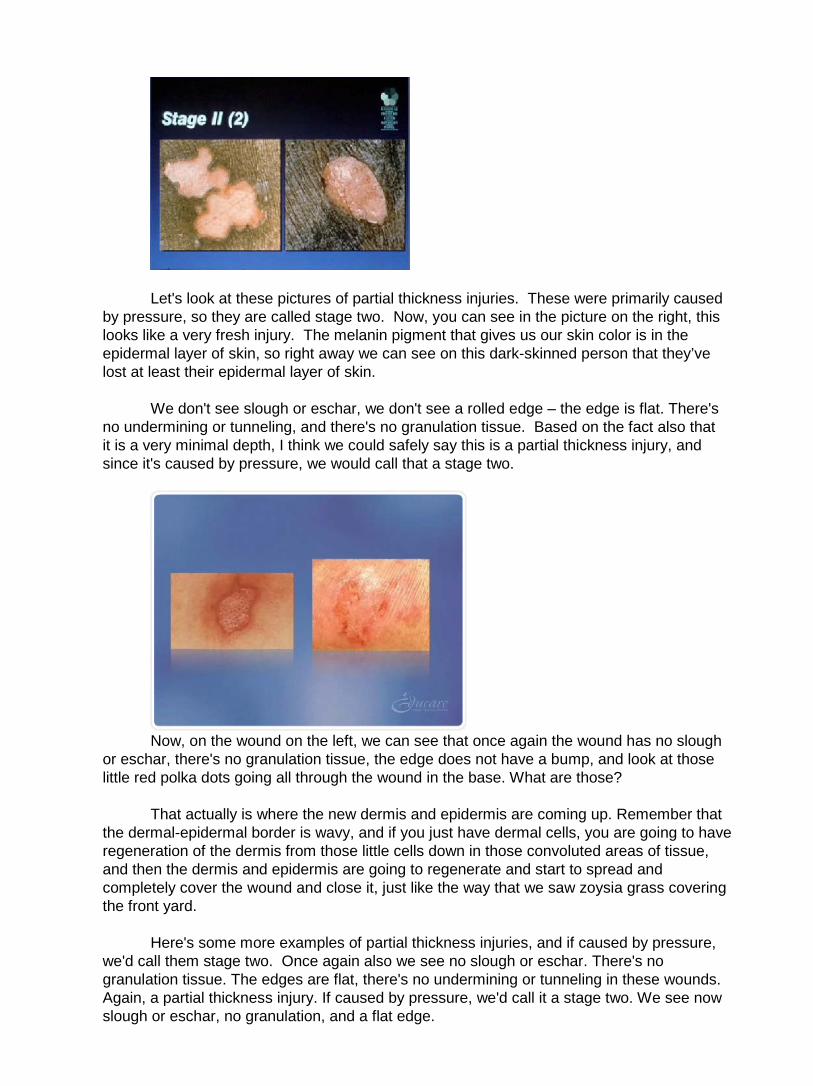
Let's look at these pictures of partial thickness injuries. These were primarily caused by pressure, so they are called stage two. Now, you can see in the picture on the right, this looks like a very fresh injury. The melanin pigment that gives us our skin color is in the epidermal layer of skin, so right away we can see on this dark-skinned person that they’ve lost at least their epidermal layer of skin.
We don't see slough or eschar, we don't see a rolled edge – the edge is flat. There's no undermining or tunneling, and there's no granulation tissue. Based on the fact also that it is a very minimal depth, I think we could safely say this is a partial thickness injury, and since it's caused by pressure, we would call that a stage two.
Now, on the wound on the left, we can see that once again the wound has no slough
or eschar, there's no granulation tissue, the edge does not have a bump, and look at those little red polka dots going all through the wound in the base. What are those?
That actually is where the new dermis and epidermis are coming up. Remember that
the dermal-epidermal border is wavy, and if you just have dermal cells, you are going to have regeneration of the dermis from those little cells down in those convoluted areas of tissue, and then the dermis and epidermis are going to regenerate and start to spread and completely cover the wound and close it, just like the way that we saw zoysia grass covering the front yard.
Here's some more examples of partial thickness injuries, and if caused by pressure, we'd call them stage two. Once again also we see no slough or eschar. There's no granulation tissue. The edges are flat, there's no undermining or tunneling in these wounds. Again, a partial thickness injury. If caused by pressure, we'd call it a stage two. We see now slough or eschar, no granulation, and a flat edge.

Heel blisters would also be called a stage two if they were primarily caused by the effects of pressure, friction, or shear. You can see the picture on the right – this person looks like they’ve been wet and have been sliding down in bed. Looks like partial thickness injury over there. Once again, we don't have granulation tissue, no slough or eschar.
Moving on into full thickness injuries, remember, full thickness injuries are injuries that go completely or fully through the skin. If those full thickness injuries are primarily caused by pressure, they'd then be called a stage three pressure ulcer.
The stage three pressure ulcer definition says that it would be a full thickness skin loss that includes damage or necrosis, and remember, necrosis is tissue death of subcutaneous tissue. They're assuming that you already know that you have lost epidermis and dermis, and now we're down into the subcutaneous tissue that would extend down to but not through the underlying fascia. The ulcer would present clinically as a deep crater, with or without undermining of adjacent tissue.
Now, please understand also that the fascia is a membrane that goes between the bottom of the sub-Q tissue and the muscle. So this is inferring that we have not broken through that fascia.
Full thickness injuries that are primarily caused by pressure and go below the fascia down to the deeper tissues such as muscle or tendon would be called a stage four pressure ulcer. Now, notice that there are full thickness injuries and then stage three and four pressure ulcers. So if the injury is caused by pressure, you'd go a little more detail on staging it a stage three or a four, where if it's a full thickness injury not caused by pressure, then you'd just stop at full thickness.
Now, a full thickness or a stage four pressure ulcer will have damage down past that
fascia, down into the muscle, exposing those deeper tissues, such as the tendon and the joint capsule, or possibly even bone.
Some of the key assessment criteria to help you figure out if you have a full thickness wound or a stage three or four pressure ulcer are that a full thickness wound will have slough or eschar. Maybe they had it initially when the injury first occurred; maybe they have it now. Slough or eschar are the dead giveaway, so if you’ve got dead tissue, it's the dead giveaway you’ve got a full thickness injury.
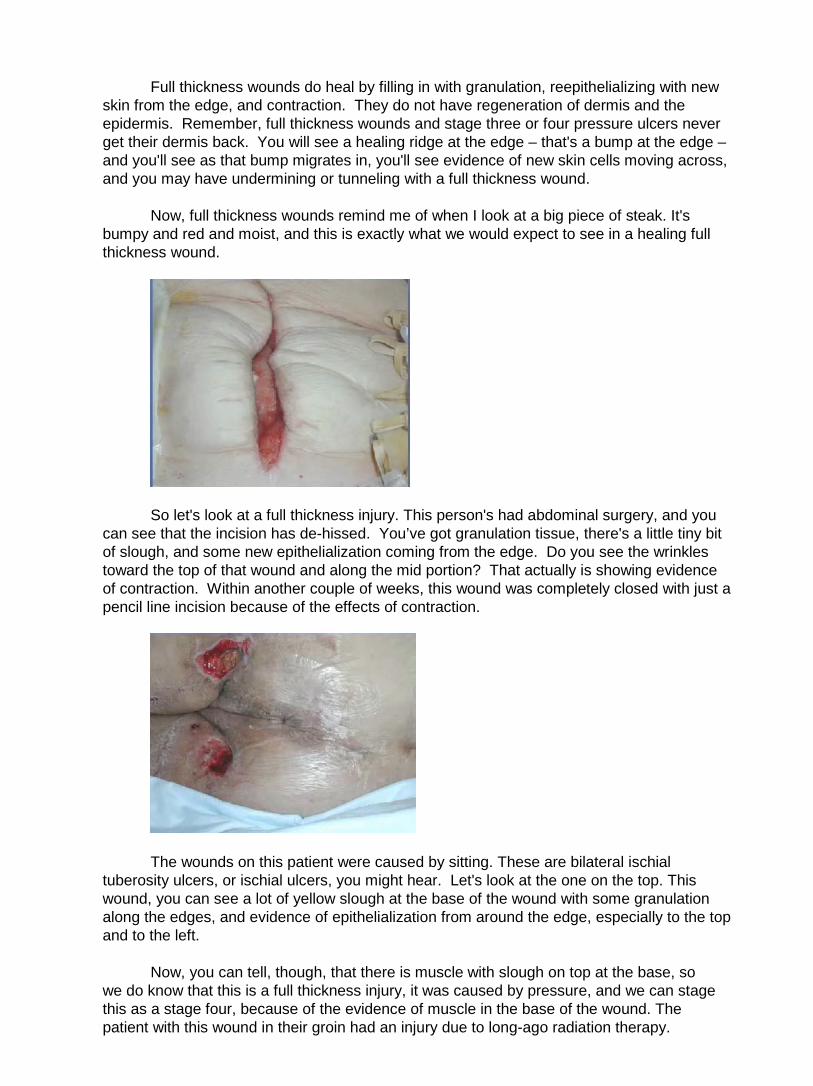
Full thickness wounds do heal by filling in with granulation, reepithelializing with new skin from the edge, and contraction. They do not have regeneration of dermis and the epidermis. Remember, full thickness wounds and stage three or four pressure ulcers never get their dermis back. You will see a healing ridge at the edge – that's a bump at the edge – and you'll see as that bump migrates in, you'll see evidence of new skin cells moving across, and you may have undermining or tunneling with a full thickness wound.
Now, full thickness wounds remind me of when I look at a big piece of steak. It's bumpy and red and moist, and this is exactly what we would expect to see in a healing full thickness wound.
So let's look at a full thickness injury. This person's had abdominal surgery, and you can see that the incision has de-hissed. You’ve got granulation tissue, there's a little tiny bit of slough, and some new epithelialization coming from the edge. Do you see the wrinkles toward the top of that wound and along the mid portion? That actually is showing evidence of contraction. Within another couple of weeks, this wound was completely closed with just a pencil line incision because of the effects of contraction.
The wounds on this patient were caused by sitting. These are bilateral ischial tuberosity ulcers, or ischial ulcers, you might hear. Let's look at the one on the top. This wound, you can see a lot of yellow slough at the base of the wound with some granulation along the edges, and evidence of epithelialization from around the edge, especially to the top and to the left.
Now, you can tell, though, that there is muscle with slough on top at the base, so we do know that this is a full thickness injury, it was caused by pressure, and we can stage this as a stage four, because of the evidence of muscle in the base of the wound. The patient with this wound in their groin had an injury due to long-ago radiation therapy.
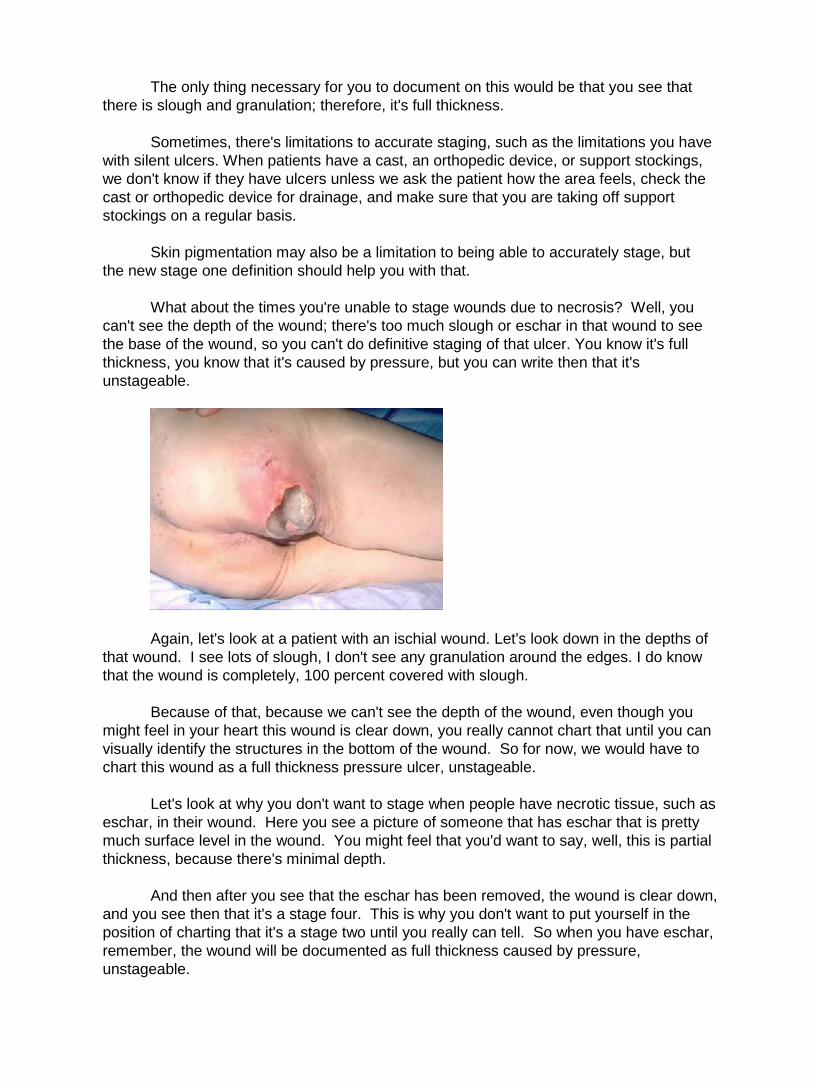
The only thing necessary for you to document on this would be that you see that there is slough and granulation; therefore, it's full thickness.
Sometimes, there's limitations to accurate staging, such as the limitations you have with silent ulcers. When patients have a cast, an orthopedic device, or support stockings, we don't know if they have ulcers unless we ask the patient how the area feels, check the cast or orthopedic device for drainage, and make sure that you are taking off support stockings on a regular basis.
Skin pigmentation may also be a limitation to being able to accurately stage, but the new stage one definition should help you with that.
What about the times you're unable to stage wounds due to necrosis? Well, you can't see the depth of the wound; there's too much slough or eschar in that wound to see the base of the wound, so you can't do definitive staging of that ulcer. You know it's full thickness, you know that it's caused by pressure, but you can write then that it's unstageable.
Again, let's look at a patient with an ischial wound. Let's look down in the depths of that wound. I see lots of slough, I don't see any granulation around the edges. I do know that the wound is completely, 100 percent covered with slough.
Because of that, because we can't see the depth of the wound, even though you might feel in your heart this wound is clear down, you really cannot chart that until you can visually identify the structures in the bottom of the wound. So for now, we would have to chart this wound as a full thickness pressure ulcer, unstageable.
Let's look at why you don't want to stage when people have necrotic tissue, such as eschar, in their wound. Here you see a picture of someone that has eschar that is pretty much surface level in the wound. You might feel that you'd want to say, well, this is partial thickness, because there's minimal depth.
And then after you see that the eschar has been removed, the wound is clear down, and you see then that it's a stage four. This is why you don't want to put yourself in the position of charting that it's a stage two until you really can tell. So when you have eschar, remember, the wound will be documented as full thickness caused by pressure, unstageable.

Heel ulcers can present some special assessment situations. The AHCPR guidelines have recommended that heel ulcers with dry or stable eschar need not be debrided if there's no edema, erythema, fluctulence, or drainage. Let's take a look at some of these.
I am going to start with the wound in the upper left-hand corner. You can see this one has a dry, stable top. If you were to press on it, there's no drainage that would be squeezing out from the edges, and when you look at the dressing you can't see any drainage there.
Now, these would be considered stable, or this particular one would be considered stable and you wouldn’t need to do any debridement on it. That doesn’t say that you can't do debridement on it, but you could if you wanted to.
It really is helping you to make smart decisions. We know that many people that have pressure ulcers with bone exposed wind up getting osteomyelitis in that bone or a bone infection, and we know that if you can keep that stable eschar in place over the pressure ulcer, then they're not as likely to get bone infection, or osteomyelitis, and then even potentially lose a leg.
So with a stable ulcer like these, if we can keep that top covering intact without getting bacteria underneath it, we can take a lot more efficient care of the person. They don't need as many frequent dressing changes, it's less painful, and they are less likely to have osteomyelitis.
The two eschars on the bottom two pictures, you can see black, stable eschar on the left. You can see an old, dry, stable eschar on the right. Both of these, again, would be considered stable, and you need not debride those.
Sometimes, we may see patients that develop areas that really don't look like a stage one, a two, a three, or a four – we can't tell what they are. I'm sure some of you have seen wounds like this in particular areas that may look to be very dark purple.

The National Pressure Ulcer Advisory Panel has been advising nurses when they see these deep, dark, purple areas to document them as deep tissue injury. Now, let's look at some of these.
In the upper left-hand corner, you see someone with a dark, dark, purplish area on their heel. This isn’t anything like the stage ones that were just persistently red. This is a deep, dark, purplish color that really looks pretty scary to me, actually, and these are the kind that we would document as deep tissue injury.
It would be great if this got better, and it could, but many times, something like this is going to just continue to necrose and turn into an eschar that would eventually, perhaps, need to be debrided.
The picture in the middle is a patient that actually I saw that patient and took the picture at about 9:00 that morning, and the patient passed away about two hours later. This again was deep tissue injury.
The side of the foot on the upper right-hand corner – this person also has that very deep, dark purple coloration, not a stage one, but certainly not a three or a four at this point, either. Again, we would document this as deep tissue injury.
The picture on the lower left hand, where you can see the sacrum, has a very dark purplish coloring – again, deep tissue injury, the same as the heel that you see on the lower right. These are definitely not stage ones, because they're not just persistently red. This is a persistently dark purple to black color, so this would be documented deep tissue injury.
Here's another example of deep tissue injury – this wound, though, the edges are beginning to separate just a bit, and you can see they're turning slightly yellow.
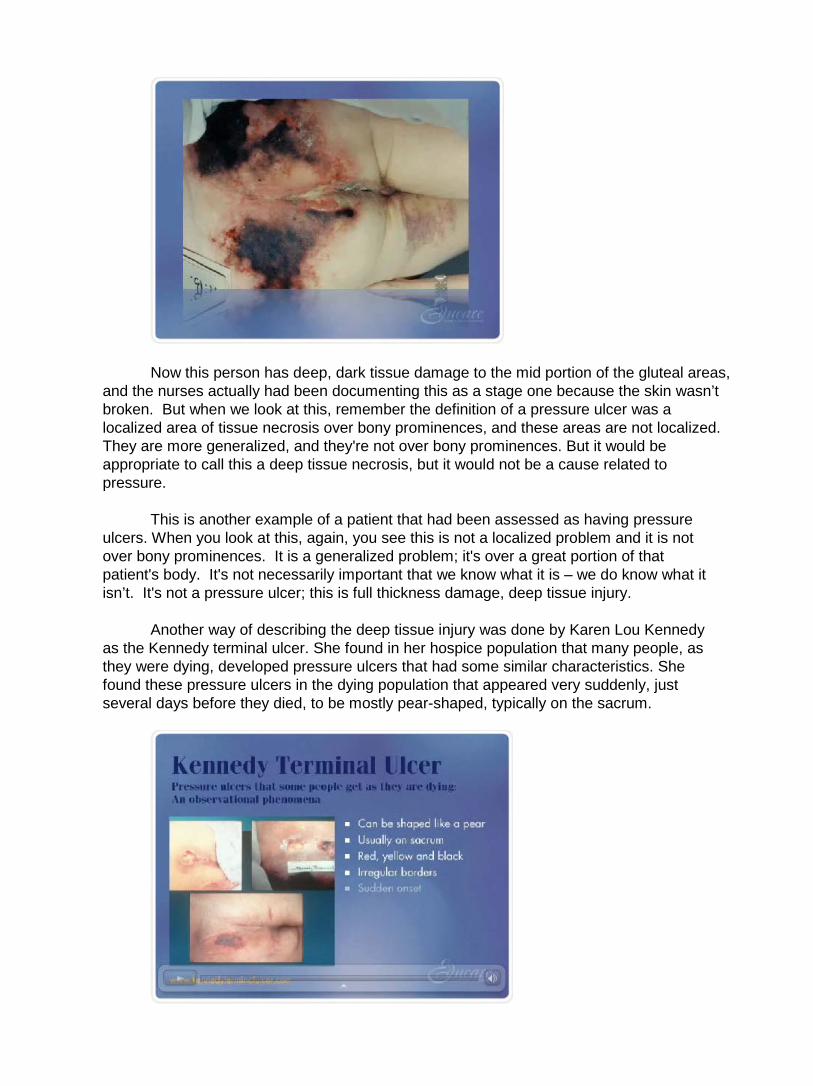
Now this person has deep, dark tissue damage to the mid portion of the gluteal areas, and the nurses actually had been documenting this as a stage one because the skin wasn’t broken. But when we look at this, remember the definition of a pressure ulcer was a localized area of tissue necrosis over bony prominences, and these areas are not localized. They are more generalized, and they're not over bony prominences. But it would be appropriate to call this a deep tissue necrosis, but it would not be a cause related to pressure.
This is another example of a patient that had been assessed as having pressure ulcers. When you look at this, again, you see this is not a localized problem and it is not over bony prominences. It is a generalized problem; it's over a great portion of that patient's body. It's not necessarily important that we know what it is – we do know what it isn’t. It's not a pressure ulcer; this is full thickness damage, deep tissue injury.
Another way of describing the deep tissue injury was done by Karen Lou Kennedy as the Kennedy terminal ulcer. She found in her hospice population that many people, as they were dying, developed pressure ulcers that had some similar characteristics. She found these pressure ulcers in the dying population that appeared very suddenly, just several days before they died, to be mostly pear-shaped, typically on the sacrum.
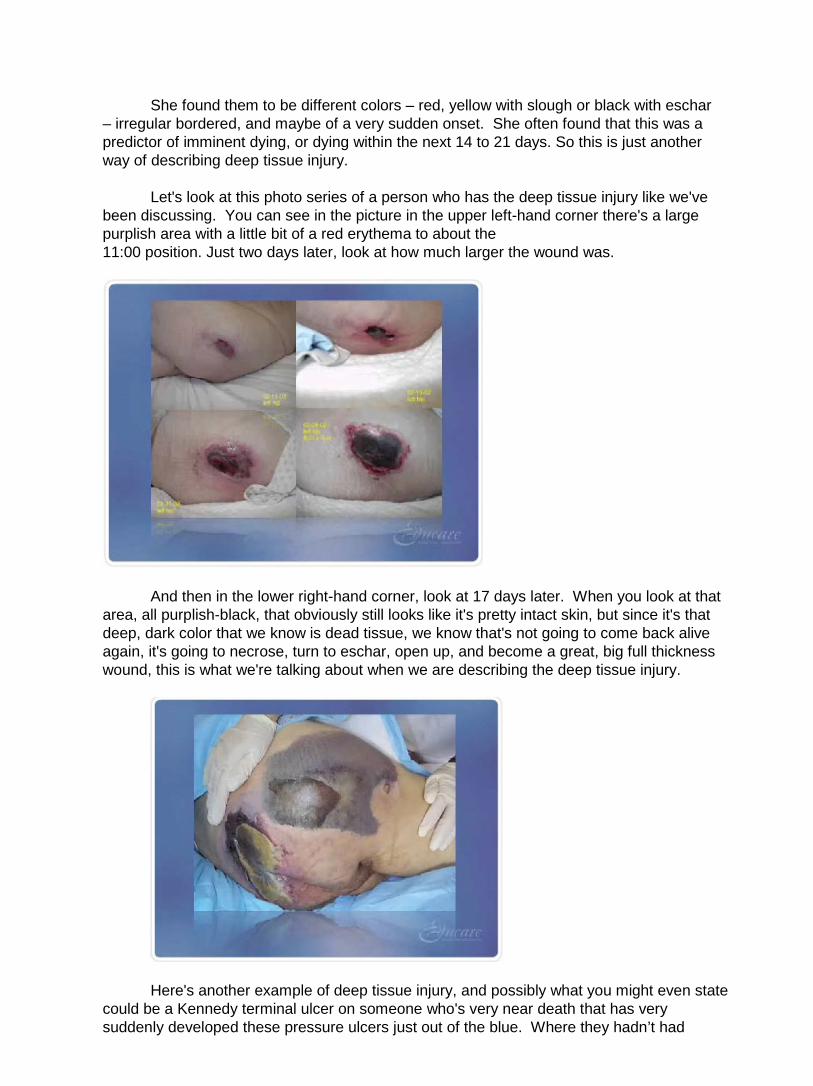
She found them to be different colors – red, yellow with slough or black with eschar
– irregular bordered, and maybe of a very sudden onset. She often found that this was a predictor of imminent dying, or dying within the next 14 to 21 days. So this is just another way of describing deep tissue injury.
Let's look at this photo series of a person who has the deep tissue injury like we've been discussing. You can see in the picture in the upper left-hand corner there's a large purplish area with a little bit of a red erythema to about the 11:00 position. Just two days later, look at how much larger the wound was.
And then in the lower right-hand corner, look at 17 days later. When you look at that area, all purplish-black, that obviously still looks like it's pretty intact skin, but since it's that deep, dark color that we know is dead tissue, we know that's not going to come back alive again, it's going to necrose, turn to eschar, open up, and become a great, big full thickness wound, this is what we're talking about when we are describing the deep tissue injury.
Here's another example of deep tissue injury, and possibly what you might even state could be a Kennedy terminal ulcer on someone who's very near death that has very suddenly developed these pressure ulcers just out of the blue. Where they hadn’t had

problems with pressure ulcers before, now they’ve got them in many different areas. This would again be described as deep tissue injury.
Now, what about back-staging and reverse staging of pressure ulcers? Many nurses over their careers have learned to back-stage pressure ulcers because that was the way you described healing, that wounds healed from a stage four to a stage three to a stage two to a stage one, where in actuality we know that partial and full thickness wounds heal differently.
A full thickness wound, or a stage four or four pressure ulcer, does not back-stage. Those are going to be described as a healing stage three or four ulcer clear up until when it's closed, and when it's closed, they are called healed stage three or four pressure ulcers. A stage two pressure ulcer, or a partial thickness injury, does resume back to normal tissue, so you do back-stage from a two to a one, but you don't go from a three or a four to a two to a one.
So that we don't feel the need to do back-staging, the National Pressure Ulcer Advisory Panel has developed what they call the PUSH tool 3.0. PUSH stands for pressure ulcer scale for healing, and this is a scale that's been validated that helps you to demonstrate healing of your pressure ulcers without feeling the need to backstage.
Now, there are only four categories included on the PUSH tool – length, width, the amount of exudate, and the type of tissue in the wound, and it's very simple then to be able to write on this and put down if you’ve got a big wound, big, new wound, very large, very wide, with lots of exudate, lots of dead material and very little living material, and then as the weeks go by you see that the size is getting smaller, the exudate is decreasing, and the tissue type is moving from necrotic to living tissue in the wound.
You put scores with each of those categories, and it's a great way of being able to quantify how that wound is healing instead of just saying it looks better than last week. So the National Pressure Ulcer Advisory Panel is advising everyone to get the PUSH tool, to try to build this into your current documentation system, so that you are able to document without having to back-stage for your pressure ulcers.
Another important assessment parameter is pain. With pressure ulcers and with any kinds of wounds, pain management and pain documentation is a major focus with OBRA and with joint commission. We do know the research has shown that in a study where 59 percent of people with pressure ulcers experienced pain, only 2 percent of those 59 percent were given analgesics. So we do need to remember to document pain, assess pain, and manage the patient's pain.
We do need to remember that pressure ulcers and other wounds are painful. Pain can change. Make sure you are working to quantify your pain using a validated pain assessment tool, and we'll show some of those in a moment.
Implement measures to eliminate or control the source of the pain. Remember too if the dressing change is causing pain, are you using the appropriate type product on that wound? It's not just about giving them medication, it's about, well, what can we use that won't stick and hurt when we pull it off? What can we use that won't sting and burn when we insert it? Are you using appropriate support surfaces for your patient? Are you using analgesics appropriately? And are you referring to pain clinics as necessary?
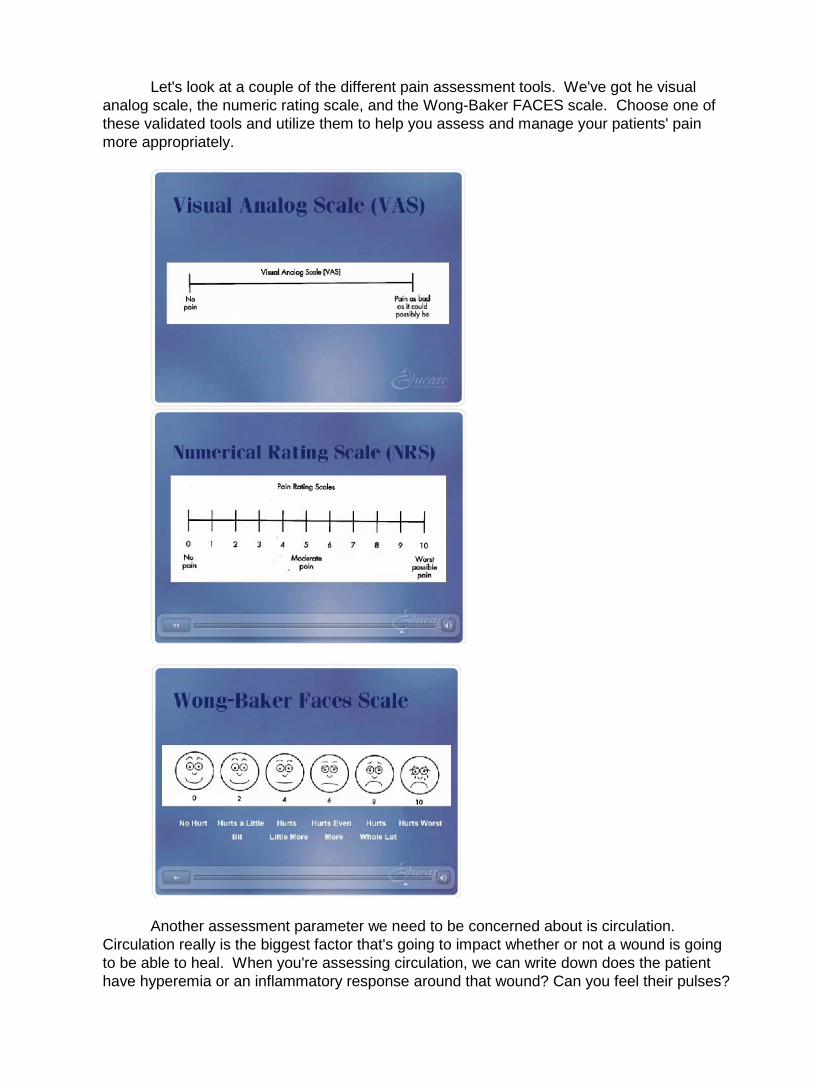
Let's look at a couple of the different pain assessment tools. We've got he visual analog scale, the numeric rating scale, and the Wong-Baker FACES scale. Choose one of these validated tools and utilize them to help you assess and manage your patients' pain more appropriately.
Another assessment parameter we need to be concerned about is circulation. Circulation really is the biggest factor that's going to impact whether or not a wound is going to be able to heal. When you're assessing circulation, we can write down does the patient have hyperemia or an inflammatory response around that wound? Can you feel their pulses?

Have diagnostic studies been done that would help you to quantify the amount of blood flow? Have you done a bedside ankle brachial pressure index, or ABI? You might want to consider doing that, just as a simple screening tool to be able to help you predict whether or not that person is going to be able to heal.
We know if they’ve got less than 80 percent of normal circulation to the area, that they probably will have a lot of difficulty healing and may need further referrals.
Another important assessment parameter is measurement. Many nurses have learned different methods of measuring, and within your institution or your agency, you need to ensure, first of all, that you have a measuring policy and procedure to help you to be able to do your measuring consistently.
It's important to make sure that as you are measuring your patients' wounds that they are in the same position each time they are measured. Are they laying on their back? Are they sitting on their – are they laying on their side? Are they sitting up in a chair? Is their head of the bed up 30 degrees? Is the head flat? Make sure you have a way to document that, so everyone can be consistent.
We want tissues to be in a neutral position. If you’ve got a helper, make sure they're not pulling on the patient's tissues and stretching the wound out. The standard of care is to measure the wound in centimeters, not in inches, so everyone should be talking centimeters when they're talking wound measurement.
We are going to measure the length, the width, and the depth of the wound, and remember that the length and the width need to be perpendicular. Many nurses have learned that the correct way of measuring is the longest length of the wound, and then perpendicular to that at the widest point is the width. Other nurses have learned that the head-to-toe measurement is always the length of the wound, and perpendicular to that, or the arm-to-arm measurement, is the width. Either way is correct. The real trick is to make sure that everyone within your institution or your facility is going it consistently.
Another important assessment parameter is measuring depth. We do that with cotton-tipped applicators – I think every facility uses these. You would use a cotton-tipped applicator and put it down into the wound, to the deepest part of the wound.
Undermining and tunneling is something else that needs to be assessed. Once again, you'd use your little friend, the cotton-tipped applicator. Please be sure that you are probing the edges of deep wounds with your cotton-tipped applicators. Many nurses and clinicians do not feel comfortable probing the wounds, but you're not going to hurt the patient or hurt the wound by doing that. You're doing this when you measure, not every time you change the dressing.

Just probe gently along the edges at different surface levels at different depths to see if there's any tunneling or undermining, and then document that by using the clock. If someone has four centimeters of undermining from 9:00 to 12:00, you would document it just as that. And everyone really understands the clock faces, so that's a good way of communicating if there's problems with undermining or tunneling.
Another way is to trace the wound. That would be for the people with the more extensive undermining or tunneling, and that would be the way to be able to monitor if they're getting better or if the wound is deteriorating.
Here you can see using cotton-tipped applicators to place under the surface of the wound, you can see that if we didn’t do that, the wound would just look like a shallow opening, but since we put the cotton-tipped applicators down, explored the edge of the wound, we can see that there's extensive undermining there, and now we can provide appropriate care, because if we didn’t provide appropriate care, there'd be bacteria teeming underneath that undermined area.
We wouldn’t be cleaning it, we wouldn’t be putting packing material or dressing material in it. It does need to be addressed, so make sure you are checking for undermining when you're assessing your wounds.
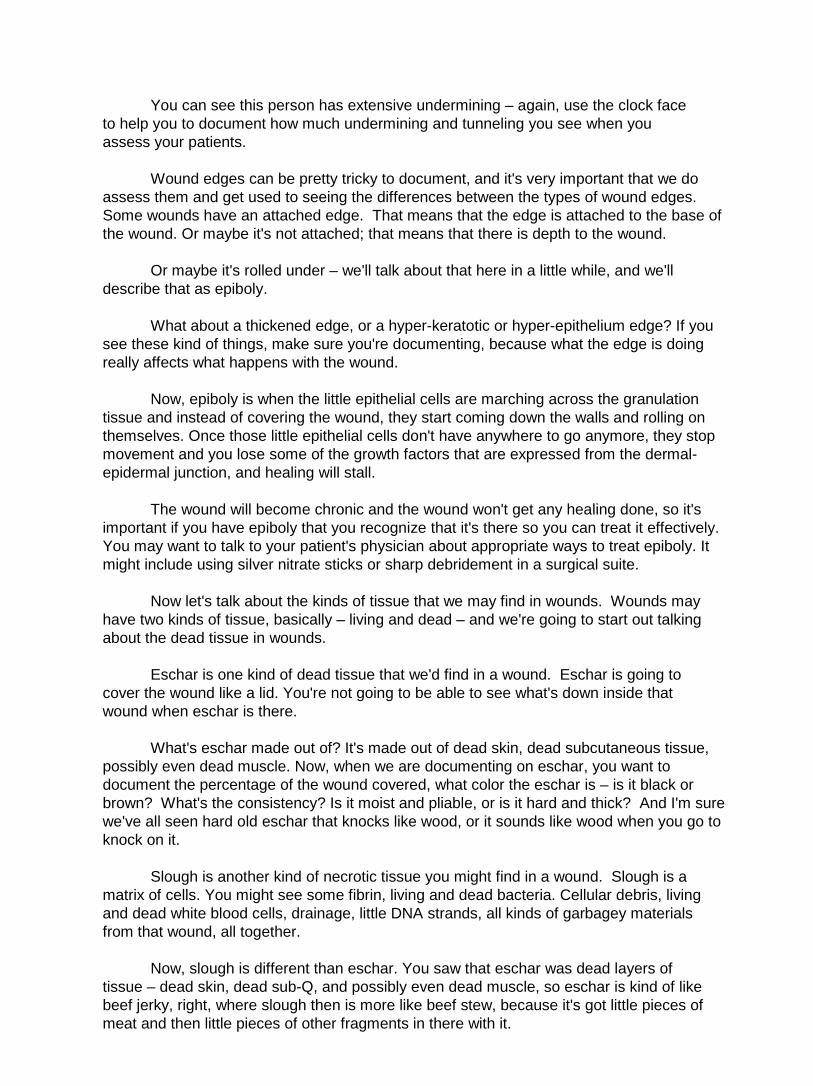
You can see this person has extensive undermining – again, use the clock face
to help you to document how much undermining and tunneling you see when you assess your patients.
Wound edges can be pretty tricky to document, and it's very important that we do assess them and get used to seeing the differences between the types of wound edges. Some wounds have an attached edge. That means that the edge is attached to the base of the wound. Or maybe it's not attached; that means that there is depth to the wound.
Or maybe it's rolled under – we'll talk about that here in a little while, and we'll describe that as epiboly.
What about a thickened edge, or a hyper-keratotic or hyper-epithelium edge? If you see these kind of things, make sure you're documenting, because what the edge is doing really affects what happens with the wound.
Now, epiboly is when the little epithelial cells are marching across the granulation tissue and instead of covering the wound, they start coming down the walls and rolling on themselves. Once those little epithelial cells don't have anywhere to go anymore, they stop movement and you lose some of the growth factors that are expressed from the dermal-epidermal junction, and healing will stall.
The wound will become chronic and the wound won't get any healing done, so it's important if you have epiboly that you recognize that it's there so you can treat it effectively. You may want to talk to your patient's physician about appropriate ways to treat epiboly. It might include using silver nitrate sticks or sharp debridement in a surgical suite.
Now let's talk about the kinds of tissue that we may find in wounds. Wounds may have two kinds of tissue, basically – living and dead – and we're going to start out talking about the dead tissue in wounds.
Eschar is one kind of dead tissue that we'd find in a wound. Eschar is going to
cover the wound like a lid. You're not going to be able to see what's down inside that wound when eschar is there.
What's eschar made out of? It's made out of dead skin, dead subcutaneous tissue, possibly even dead muscle. Now, when we are documenting on eschar, you want to document the percentage of the wound covered, what color the eschar is – is it black or brown? What's the consistency? Is it moist and pliable, or is it hard and thick? And I'm sure we've all seen hard old eschar that knocks like wood, or it sounds like wood when you go to knock on it.
Slough is another kind of necrotic tissue you might find in a wound. Slough is a matrix of cells. You might see some fibrin, living and dead bacteria. Cellular debris, living and dead white blood cells, drainage, little DNA strands, all kinds of garbagey materials from that wound, all together.
Now, slough is different than eschar. You saw that eschar was dead layers of tissue – dead skin, dead sub-Q, and possibly even dead muscle, so eschar is kind of like beef jerky, right, where slough then is more like beef stew, because it's got little pieces of meat and then little pieces of other fragments in there with it.

So you can see eschar and slough are both necrotic, they're both dead, they both contain a ton of bacteria, they're both bad, but they are different tissues.
When you're describing slough, you want to describe the percentage of the wound covered with slough, what color it is. Really, the color is going to be based on what kind of bacteria is growing in it, so you might see slough on ten different patients be ten different colors, just because of what their individual wounds are colonized with.
When you're documenting on slough, you also want to document what the consistency is, because the consistency is going to help you understand what the moisture level of that wound is. We want to make sure we're keeping wounds optimally moist.
Sometimes, if you are having a difficult time documenting or determining how much slough is in a wound or how much eschar is in the wound, you might call in another qualified wound care caregiver to help you out to figure out how much slough or eschar is in that wound.
Another kind of tissue that we'll look for in wounds is living tissue. There's actually several different kinds of living tissue that we will assess for in wounds, and the first kind is viable granular tissue.
Now, viable granular tissue is living tissue that has a granular quality about it. You're going to see a bumpy quality – it's not just going to be flat. If you have to have a wound, you want it to have granulation tissue in it. That's great stuff, it's evidence that the wound is in the second phase of healing, the proliferative phase.
Another kind of living tissue you may see in a wound is viable, non-granular tissue. Again, this is living, viable tissue, but non-granular means that there's no evidence of active tissue growth. Remember, the proliferation phase is where you grow the granulation and reepithelialize.
When you see this kind of tissue, make sure you document it, and then make sure you document what percentage of the wound is covered with the viable non-granular tissue, the color, and the consistency.
Now here's another kind of living tissue – hyper-granulation tissue. This is like granulation tissue on speed. It's big. Now, when you’ve got hyper granulation tissue, there's a couple things – hyper-granulation tissue first of all doesn’t reepithelialize well, because epithelial cells don't like to go uphill. They have to go above the skin surface level to cover this wound, so they don't resurface very well.
These wounds typically are said to be hyper-granular for one of two reasons. First of all, because of excessive moisture; second of all, because of excessive bacteria. So this is when many clinicians will take silver nitrate sticks or a foam dressing and put compression on top of it, or even use some kind of a silver antimicrobial product to keep the bacteria down.
So when you’ve got hyper-granulation tissue, that means you’ve got a little bit of work to do, because you’ve got to get rid of it so the wound will heal normally.
Some signs and symptoms that may lead clinicians to identify wounds as infected are drainage and odor. Now, drainage and odor can a lot of times make us think ooh, infection –

this is bad. But drainage isn’t necessarily bad. Drainage is actually dead cells and liquefied necrotic debris, but also in that drainage there's active white blood cells, growth factors that help to stimulate normal healing processes, and natural enzymes that stimulate autolysis and healing.
The drainage is really an effect of the body having this big inflammatory response. It's opening up blood vessels, it's sending in blood flow to get rid of the bacteria, so the body is really trying to heal its own wound by creating and maintaining an optimal moist wound environment, so drainage is not necessarily a bad thing.
Odor means that there's decay in the wound, a lot of times, or bacteria from dead tissue, but remember, too, that even without dead tissue, even without slough or eschar, wounds are still going to be many times contaminated with bacteria and will have odor, so it's really the bacteria that causes it, the type of bacteria, the amount of bacteria, sulfur compounds coming off the bacteria. That's really what the odor means, so it's not necessarily always a bad thing.
A dramatic increase in drainage and odor, along with localized signs and symptoms of infection, like erythema or cellulitis around the wound, increasing pain complaints from the patient, that might indicate infection. But odor by itself is not necessarily an indicator of something bad going on.
Patient advocacy really is the reason why we all are clinicians. We're here to do the right thing. And in order to do the right thing, we need to be familiar with the national standards of care for whatever we are doing with our patients.
Here we're doing wound care, so we need to be familiar with the standard of care for wound care. We want to make sure any treatments we provide are reasonable, necessary, and appropriate, and then make sure that we are providing all the interventions that we are within the standards of care, and then documenting the right thing.
Correct assessment is part of patient advocacy. You are going to make sure that
your treatments are reasonable, necessary, and appropriate if you are able, first of all, to assess the wound appropriately, and then communicate that assessment to the person who's going to be ordering the wound care.
Thank you for watching the Educare module Wound Assessment and Documentation
[End EDUCARE_MODULE_2]
.
[Begin EDUCARE_MODULE_3]
This is module three: Cleansing and Debridement, Management of Bioburden in Wounds
Carol Postian: Hi, I'm Carol Postian. Welcome to the Edgecare module for
. This module is presented by Carol Postian. The objectives for this module are define debridement, list three methods of debridement, and describe the action of three methods of debridement.
Cleansing and Debridement, Management of Bioburden in Wounds.
When we think about what we need for a wound to heal normally, the biggest factor is early control of the bacterial bioburden in the wound. We also need early and appropriate intervention. If the wound needs debridement, keeping the wound moist – all the other factors about healing taken care of.
We also need a functioning immune system, and adequate blood flow to the area. Without immune system factors like white blood cells, and without blood flow, you're not getting the necessary nutrients to the wound.
We also need to tune the patient up and get all their chronic diseases under control as we possibly can. Then the last thing is an understanding of the expected timing of healing for that particular individual and for the wound.
Now, some individuals do tend to be slow healers, and some wounds tend to heal more slowly than others, but the most aggressive treatment early on, as soon as the wound has happened, really is very important to assure early wound healing.
Now, the basics of wound care we've all learned in our clinical programs, whether you're a physical therapist or an occupational therapist or a nurse – we've all learned how important it is to clean, to debride, to maintain the wound optimally moist, and to assess the wound and reassess and keep changing your treatment, but how much detail did our programs go into about these basics? Probably not very much.
So the purpose of this program today is to go into more detail so that you have a better understanding of what your responsibilities are with cleaning and debriding of wounds so we can get wounds moving on and healing more rapidly.
Let's talk first about wound cleansing. When we clean a wound, our biggest goal is the removal of bacteria and the surface contamination from the top of the wound. By early removal of that bacteria and debris from the wound, we're going to allow that wound to move more rapidly from the inflammatory phase of healing on to the proliferation phase, where we get granulation, reepithelialization, and contraction.
Our goal also is to protect the wound from infection. Too much bacteria is going to
allow the wound to become infected, so we want to keep that from even happening. Along with that, our goal is we need to minimize chemical and mechanical trauma to the wound. There are many chemicals that can be traumatizing, and too much scrubbing and too much mechanical work on the top of the wound can also be very stressful to living cells, so we really don't want to harm the wound.
When we clean wounds, I think everyone is most familiar with normal saline as the most common wound cleanser, but according to some of the work of Dr. George Rodeheaver, he shows that normal saline really is sufficient for clean, granulating wounds.
Think of normal saline more as a wetting solution. When you go to take a shower, how do you do it? Do you dump a bucket of water over your head? Probably not. You go in, and not only are you having water coming down on you, you're using mechanical action and surfactants to help get the debris and the bacteria off of your skin.
That's where commercial cleansers really come in. If you need mechanical action with a surfactant to help release the surface tension and get the bacteria and debris off the wound, that's where commercial wound cleansers come in.
Now, along with use of appropriate cleansers, we need to think about the type of pressure that we're using. Some of the research that was written up in the AHCPR pressure ulcer treatment guidelines showed that irrigation pressures between four and 15 psi were pretty optimal to remove the contamination from the wound, to get rid of the debris, and at the same time not harm the living tissue. They also showed that right around eight psi is optimal.
Now, some other ways of doing wound irrigation besides with commercial wound cleansers is to use a 35cc syringe and a 19-gauge needle. This might be difficult in today's age, since we are trying to go needle-less because of needle stick injury problems, but that system does deliver eight psi.
A bulb syringe will deliver about two psi, so very sub-therapeutic for actually getting rid of the bacteria and the debris from the surface of the wound.
A commercial cleanser spray bottle typically is going to deliver about the right amount and be therapeutic – check with your manufacturers before you assume that your spray bottles are delivering the right psi.
Pulse lavage systems are a way for the physical therapist to clean and debride your wound, using a special device with a long tip that can go into deep or tunneling wounds. Those pulse lavage systems do have adjustable pressures to deliver therapeutic amounts of psi.
Now, whirlpools have been used for hydrotherapy for quite a long time, but they really have fallen out of favor in the last few years due to the increased risk of nosocomial infections. When you put someone in a recirculating whirlpool with a recirculating turbine, what happens is your bacteria gets mixed with my bacteria when I hop in the tub after you, and that's not a good thing.
So if you’ve got someone who's immunocompromised, you put them in a whirlpool that's already been full of bacteria from other patients with gnarly wounds, you're really putting that person at risk, because now they’ve got new bacteria to deal with besides. So whirlpools have really fallen out of favor.
There are some newer kinds of tanks that are bubble tanks that are used that don't recirculate with a turbine, so those really are preferable.
As far as the use of antiseptics in wound care, in the AHCPR pressure ulcer treatment guidelines published in 1994, it was written that things like povidone iodine, sodium hyperchloride, or Dakin's solution, Iodifor, hydrogen peroxide, acetic acid, benzalkonium chloride, and Granulex were all found to be cytotoxic to normal, living wound tissue.
So we all know that we'd like to say to our clinicians we're not going to use those things anymore, but the reality of it is sometimes, we do come into situations where we need to use those kind of cleansers. Some of the recent research, though, has shown that if you do choose to use those potentially cytotoxic topical antiseptics, it's best to use the lowest possible concentrations.
Check with your pharmacist to see what the lowest concentration is that will still be toxic to bacteria but the least cytotoxic to living tissue. Reevaluate your wounds in a week or

so, and see if you're making good progress with the wound. If so, when you’ve eradicated that bacteria from the wound, now you can move on to cleansing the wound with something that is non-cytotoxic. Remember, if you permit cytotoxic chemicals to be used in wounds, you promote poor healing.
Dr. Peacock said, many years ago, “Don't put any chemical into a wound that you wouldn’t be willing to put into your own eye”, and that still is a good idea to remember.
Biofilm is a rather new term in the wound care industry. What is biofilm? Take a look at these pictures on your right. Take a look especially at those teeth. How do your teeth feel right now? Have you been into the Krispy Kremes today? Have you been eating sweets?
Maybe not even sweets, but do you have little wooly sweaters on your teeth? You
know what that stuff is? Guess. Yeah, it's biofilm. How about that top picture. Do you see the wound there that looks kind of slimy and slippery? What's that stuff? Well, it looks like slough, but that slimy, slippery coating on top you see could very possibly be biofilm.
Well, now that you all want to go out and brush your teeth, let's talk about what biofilm really is. Biofilm is a whole bunch of different kinds of bacteria that all settle in on non-viable tissue like slough or eschar, or on your teeth – teeth aren't living, they're inert.
What those bacteria all do is they make good friends with each other and they all decide to get together on a building project. They're going to build a rooftop over all this massive bacteria, to protect them from outside influences like your saliva or like external antibiotics.
So they all get together and build a polysaccharide matrix over the top, and this polysaccharide matrix protects them from all kinds of things. Now, biofilm bacteria don't only grow in your mouth or on wounds. Biofilm bacteria actually grow anywhere on Earth where there's moist environments.
Did you know that 90 percent of the bacteria on Earth are in moist environments? The ocean, lakes and streams – anything that's moist is going to have biofilm development wherever there's a non-living material to support its growth.
But what about biofilm? Why are they such a big problem? Well, first of all, they're impermeable to any topical or systemic antimicrobials or antibiotics you might think about using. You can squirt Betadine on biofilm all day and you're not going to be able to kill it because of that impermeable polysaccharide roof that they built over the top of themselves.
Now, the bacteria that are under that coating are busy, and they're underneath that coating, exchanging information on how to be resistant to antibiotics. They're exchanging the DNA information and genetic information, and that really is pretty scary, because we know that the CDC is telling us that there is a rapid change in the way that bacteria are becoming resistant to antibiotics, and in the next 10 years we may have very few antibiotics available to us. So that tells us we need to become good stewards of antibiotics – use them when there is clear need and actual systemic infection. We don't want to use antibiotics just for localized infection.
Now, biofilm also is a problem because your own white blood cells, your macrophages and your phagocytes, don't recognize biofilm bacteria as bacteria. All they see is the slimy coating. So if your white blood cells go out looking for lunch, they don't see the bacteria down there, and can't see them to eat them, and so they go off looking for lunch somewhere else, and the bacteria just sits there laughing at them – ha, ha, you can't find us.
So if you suspect that you have biofilm bacteria or excessive bacterial contamination in your wounds, first of all increase the frequency and appropriate aggressive wound cleansing. Please – pouring normal saline over a wound is not the way that you clean, just the same way as how do you get bacterial biofilm off your teeth?
You're not just going to be rinsing your mouth out and spitting, because the bacteria are going to stay put. You want to use appropriate amounts of pressure. You can use a commercial wound cleanser. You also want to monitor closely for improvement, because it's unacceptable to see that wounds are deteriorating and not increase your efforts at cleansing that wound.
Cleansing coupled with debridement is very important to prevent our wounds from becoming colonized and then getting clinically infected after that. It's very important to clean and debride early on, as soon as you recognize that there's debris or necrosis in the wound.
Let's talk for a little while about debridement. We talked about cleansing, and cleansing is the cleansing of the surface of the wound. Now debridement is the removal of foreign material, devitalized or nonviable tissue from the wound, until only healthy tissue is exposed.
Now, there are a couple different kinds of nonviable tissue. You might have thought that eschar and slough were both just dead stuff, but they actually are two different kinds of dead materials.
Eschar is actually dried-out or desiccated, compressed dead tissue. Think of it like beef jerky. It's dried out, organized tissue layers – skin, sub-Q, and possibly even muscle.
Now, slough is another kind of dead or nonviable tissue. Slough is a composite of multiple things, like soup. This has fibrin, living and dead bacteria, cellular debris, old dressing residue, living and dead white blood cells, and a little bit of drainage all around it.
So we've got eschar, we've got slough, they're both dead, they are both bad, they both harbor tremendous amounts of bacteria, and they both greatly increase the risk of the wound becoming infected.
Now, why in the world would you think that you want to debride a wound? Well, first of all, you can't assess the wound bed. The one thing you do know, though – if there's dead material in the wound like slough or eschar, that you have a full thickness wound. That's the only assessment you're able to make.
Now, necrotic tissue harbors tremendous amounts of bacteria, as I just said.
Necrotic tissue also greatly increases the risk of having an infection in that wound, and necrotic tissue greatly delays the healing process.
What happens is your white blood cells that are trying to clean the wound up are overwhelmed by the sheer numbers of bacteria. Plus, the other way that necrotic tissue delays healing is that it physically splints the wound open, so the wound is unable to contract.
Now while we're talking about eschar, I always like to discuss a little bit about how is an eschar and a scab different. Many times I hear all kinds of clinicians using scab and eschar as interchangeable terms, and actually, eschar is dead, dried tissue. When you lose eschar, you have a tissue deficit.
Now a scab indicates that there's dried blood and dried exudate typically over a partial thickness injury. When you have a partial thickness injury, you're going to have a scab. If I fell off my roller skates and skinned my knee, I'd probably have a scab. Next week, there'd probably be a scab there, and if I could resist picking it off, probably the next week it would fall off by itself, and I'd have no tissue deficit.
So a scab is different than eschar, and please don't ever use those terms interchangeably, because they really do indicate two different things.
What is significant debridement? Most of the clinicians that I have spoken to personally in the last few years tend to feel that about 30 to 40 percent per week sis appropriate, meaning that wound that's completely necrotic should be debrided within two, three, or four weeks.
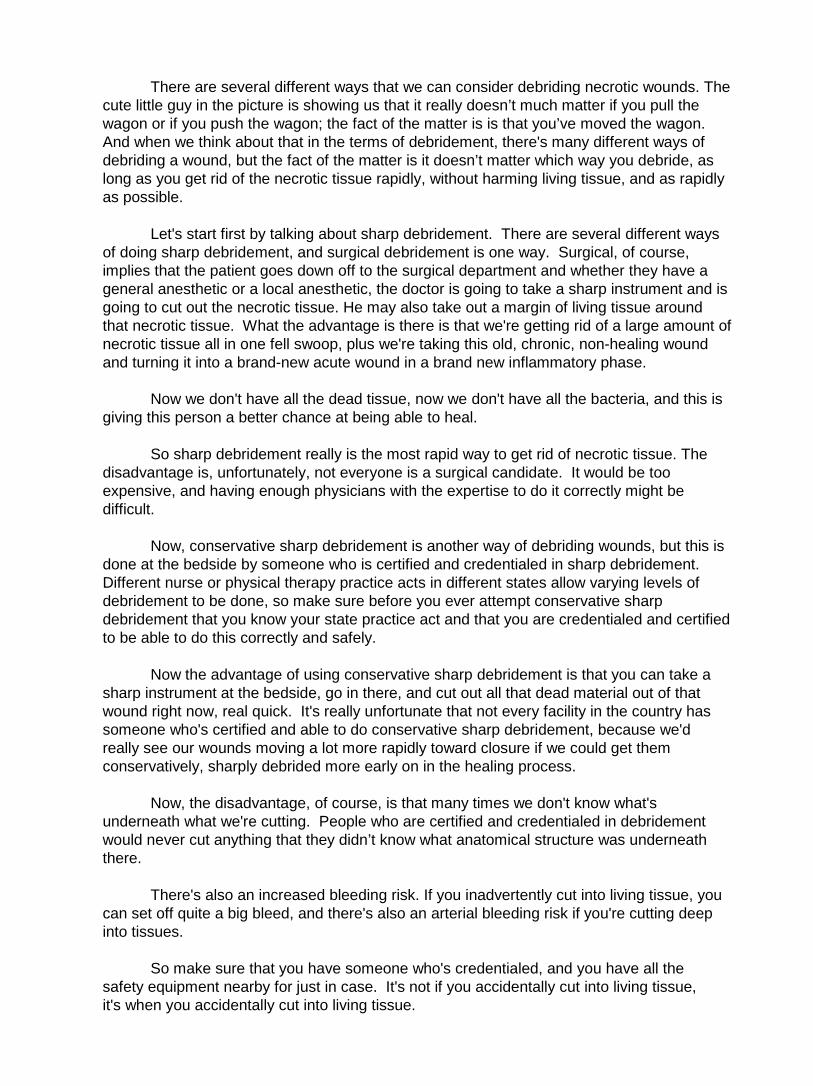
There are several different ways that we can consider debriding necrotic wounds. The cute little guy in the picture is showing us that it really doesn’t much matter if you pull the wagon or if you push the wagon; the fact of the matter is is that you’ve moved the wagon. And when we think about that in the terms of debridement, there's many different ways of debriding a wound, but the fact of the matter is it doesn’t matter which way you debride, as long as you get rid of the necrotic tissue rapidly, without harming living tissue, and as rapidly as possible.
Let's start first by talking about sharp debridement. There are several different ways of doing sharp debridement, and surgical debridement is one way. Surgical, of course, implies that the patient goes down off to the surgical department and whether they have a general anesthetic or a local anesthetic, the doctor is going to take a sharp instrument and is going to cut out the necrotic tissue. He may also take out a margin of living tissue around that necrotic tissue. What the advantage is there is that we're getting rid of a large amount of necrotic tissue all in one fell swoop, plus we're taking this old, chronic, non-healing wound and turning it into a brand-new acute wound in a brand new inflammatory phase.
Now we don't have all the dead tissue, now we don't have all the bacteria, and this is giving this person a better chance at being able to heal.
So sharp debridement really is the most rapid way to get rid of necrotic tissue. The disadvantage is, unfortunately, not everyone is a surgical candidate. It would be too expensive, and having enough physicians with the expertise to do it correctly might be difficult.
Now, conservative sharp debridement is another way of debriding wounds, but this is done at the bedside by someone who is certified and credentialed in sharp debridement. Different nurse or physical therapy practice acts in different states allow varying levels of debridement to be done, so make sure before you ever attempt conservative sharp debridement that you know your state practice act and that you are credentialed and certified to be able to do this correctly and safely.
Now the advantage of using conservative sharp debridement is that you can take a sharp instrument at the bedside, go in there, and cut out all that dead material out of that wound right now, real quick. It's really unfortunate that not every facility in the country has someone who's certified and able to do conservative sharp debridement, because we'd really see our wounds moving a lot more rapidly toward closure if we could get them conservatively, sharply debrided more early on in the healing process.
Now, the disadvantage, of course, is that many times we don't know what's underneath what we're cutting. People who are certified and credentialed in debridement would never cut anything that they didn’t know what anatomical structure was underneath there.
There's also an increased bleeding risk. If you inadvertently cut into living tissue, you can set off quite a big bleed, and there's also an arterial bleeding risk if you're cutting deep into tissues.
So make sure that you have someone who's credentialed, and you have all the safety equipment nearby for just in case. It's not if you accidentally cut into living tissue, it's when you accidentally cut into living tissue.

It's also not a good idea to do sharp conservative debridement when someone has poor perfusion, because they are most likely not going to be able to heal the wound, so make sure that perfusion studies are done prior to debridement.
In this photo, we see an example of conservative sharp debridement. The clinician
has a scalpel and they are cutting off the debris and the necrotic tissue just very rapidly. Now, we can't say that this is not painful for the patient, because remember, even though we're cutting into dead tissue, the dead tissue is attached to living tissue, so we don't want to overtax the patient, we want to make sure that they have been possibly pre-medicated, and you don't want to do it for too long of a period of time. Many times, conservative sharp debridement needs to be done in a series of times over a several-day period.
Here's another example of conservative sharp debridement – taking what looks like a rather benign-looking callus. Taking that callus off reveals that there's a weepy, suppurating wound underneath it, so it's a good idea to get that off of there so we can get on with appropriate wound care and get wound healing moving on.
Another type of debridement is mechanical debridement. I think we've all been involved with mechanical debridement at some point in time, whether it be by using wet-to-dry dressings, giving someone a whirlpool, or using some type of wound irrigation. Mechanical debridement just implies that there is some mechanical cause getting rid of the necrotic tissue.

And in general, mechanical debridement is very low-cost. Wet-to-dry dressings seem to be very inexpensive when you first look at the cost of a piece of gauze, and typically, wet-to-dry dressings and putting somebody in a whirlpool is pretty easy to do. Whirlpool may be less painful for some patients with large areas of necrotic material.
Some disadvantages of mechanical debridement include that it may be very painful for patients or cause tissue damage, such as with wet-to-dry dressings. Wet-to-dry dressings can also be time-consuming, since they need to be done multiple times per day.
Whirlpool, or hydrotherapy, may dry out skin because if they don't have lotions or creams put on right after they get out of the whirlpool bath, their skin will dehydrate with the constant soaking and drying. Wet-to-dry dressings, if you are going to do them appropriately, first of all are not done to clean wounds. Wet-to-dry dressings are non-selective debriders. They take everything they attach with them.
So if you use a wet-to-dry dressing on a wound with living tissue, when you go to yank out that gauze you are taking our living tissue with you. If you're going to do a wet-to-dry dressing appropriately to a necrotic wound, first you'd wet the gauze, you would fill the wound loosely.
The goal is that the wound will be able to dry out so you just cover it with one piece
of an open mesh gauze, and then put a little bit of tape on top. Do not create an occlusive cover.
Then you're going to remove that gauze. Now when you remove the gauze, it's important not to wet it first, because that wouldn’t be a wet-to-dry dressing. Now, if I were a patient, I don't think I'd like wet-to-dry dressings very much because how many times do you hear patients saying, "Ooh, that feels good," when you take that dressing off? It doesn't – it hurts. So we really need to be thinking about patient advocacy and doing no harm to our patients.
Look what happens when you remove the gauze – it has stuck to some of the slough, you can see that. But what happens to the eschar? Nothing. Wetto-dry gauze does nothing to eschar because it is not able to adhere.
Now we discussed whirlpool already a little bit ago. Whirlpool can be another way of wound debridement, but we talked about some of the complications – nosocomial infection
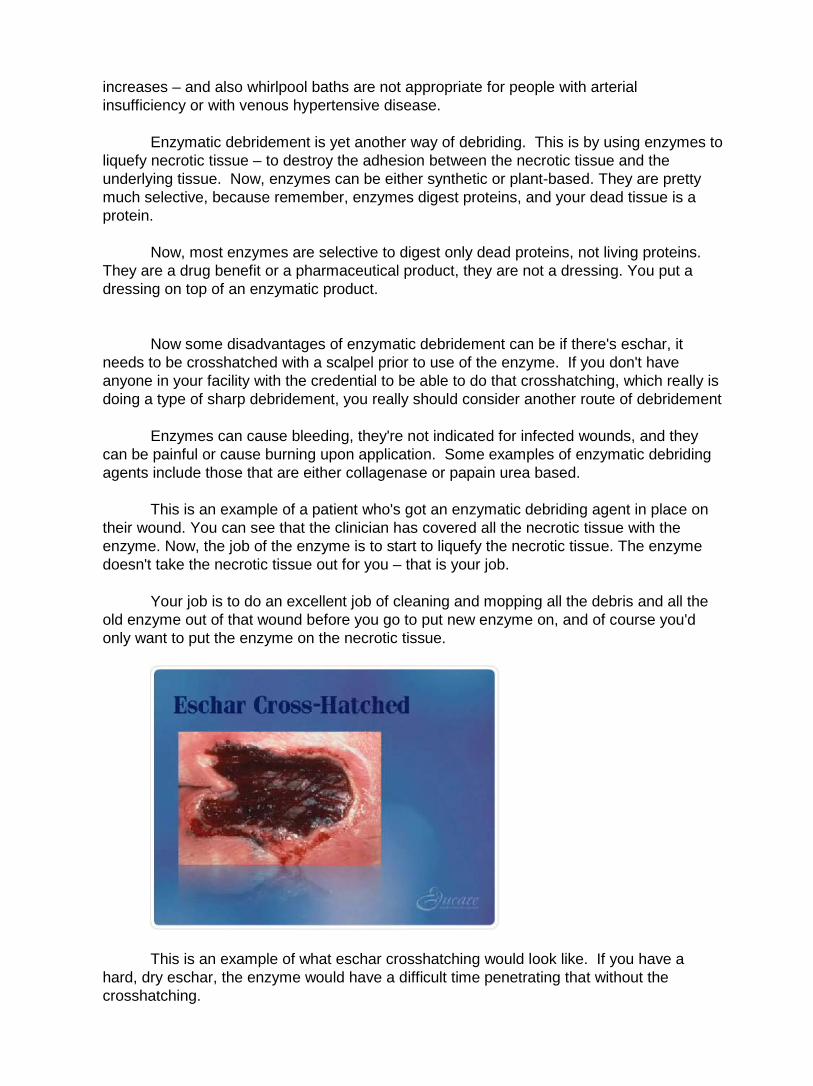
increases – and also whirlpool baths are not appropriate for people with arterial insufficiency or with venous hypertensive disease.
Enzymatic debridement is yet another way of debriding. This is by using enzymes to liquefy necrotic tissue – to destroy the adhesion between the necrotic tissue and the underlying tissue. Now, enzymes can be either synthetic or plant-based. They are pretty much selective, because remember, enzymes digest proteins, and your dead tissue is a protein.
Now, most enzymes are selective to digest only dead proteins, not living proteins. They are a drug benefit or a pharmaceutical product, they are not a dressing. You put a dressing on top of an enzymatic product.
Now some disadvantages of enzymatic debridement can be if there's eschar, it
needs to be crosshatched with a scalpel prior to use of the enzyme. If you don't have anyone in your facility with the credential to be able to do that crosshatching, which really is doing a type of sharp debridement, you really should consider another route of debridement
Enzymes can cause bleeding, they're not indicated for infected wounds, and they can be painful or cause burning upon application. Some examples of enzymatic debriding agents include those that are either collagenase or papain urea based.
This is an example of a patient who's got an enzymatic debriding agent in place on their wound. You can see that the clinician has covered all the necrotic tissue with the enzyme. Now, the job of the enzyme is to start to liquefy the necrotic tissue. The enzyme doesn't take the necrotic tissue out for you – that is your job.
Your job is to do an excellent job of cleaning and mopping all the debris and all the old enzyme out of that wound before you go to put new enzyme on, and of course you'd only want to put the enzyme on the necrotic tissue.
This is an example of what eschar crosshatching would look like. If you have a hard, dry eschar, the enzyme would have a difficult time penetrating that without the crosshatching.

Another type of debridement that we've all been doing all along and probably didn’t even realize we've been doing is autolytic debridement. Autolytic debridement occurs when moisture allows the body's own white blood cells and autolytic enzymes called lysozymes to break down necrotic fluid and liquefy it.
We didn’t even realize, probably, that any dressing that we use that keeps a wound optimally moist facilitates autolytic debridement, so any advanced wound care product, like a transparent film, a hydrocolloid, a hydrogel, an algenate, a foam – any of those kind of dressings, when used to keep the wound optimally moist, facilitates autolytic debridement.
Now, autolytic debridement, of course, is going to be low-cost because we're doing it by using the dressings that we've probably been using all along. There's minimal discomfort, because we aren't yanking dry things off a patient's wound and causing pain, and it really takes minimal expertise – all you have to do is know how to put on a moist dressing that maintains moisture.
Now the disadvantages are that autolytic debridement can take longer than other methods, particularly in patients with a decreased white count or with a decreased blood flow to an area that would decrease the amount of white blood cells getting into the area.
So we wouldn’t want to use autolytic debridement for extremely heavily draining or infected wounds, because we'd need to do something different in those cases.
Now, biological debridement is an interesting way of debridement. This is using medical grade maggots to digest the necrotic material out of the wound.
Now, the researchers say that the enzymes that the maggots secrete also help to break down the necrotic tissue in the wound, as well as enhancing healing. Now, those same enzymes also may show that there is some damage around the periwound skin of you allow that drainage to leak out from the wound, so it's a real challenge to corral the maggots and the fluid that they create to stay inside the wound without letting the maggots escape or without letting the drainage escape onto that periwound skin. You have to be very cautious about that.
Polyacrylate debridement is a more recently described method of debridement. This is using dressings containing specific polymers called polyacrylates to help debride the wound. Now I'm sure that you're all familiar with polymers – polymers are the absorbative materials that we find in things like baby diapers, adult incontinent garments, and sanitary products.
Now, polyacrylates are a special kind of polymer that not only has an absorption ability but an ability to attract and retain protein molecules. Now where would we find proteins in wounds? Well, the slough and the eschar in wounds are proteinaceous; so is the bacteria.
Toxins in wounds are also proteins, especially the protein toxins that we find in old, chronic, non-healing wounds. Polyacrylate debridement products do help to facilitate autolytic debridement because they are already moistened with ringers solution. Polyacrylate products have the ability to break up bacterial biofilms, which is a big help when you’ve got large amounts of bacteria.
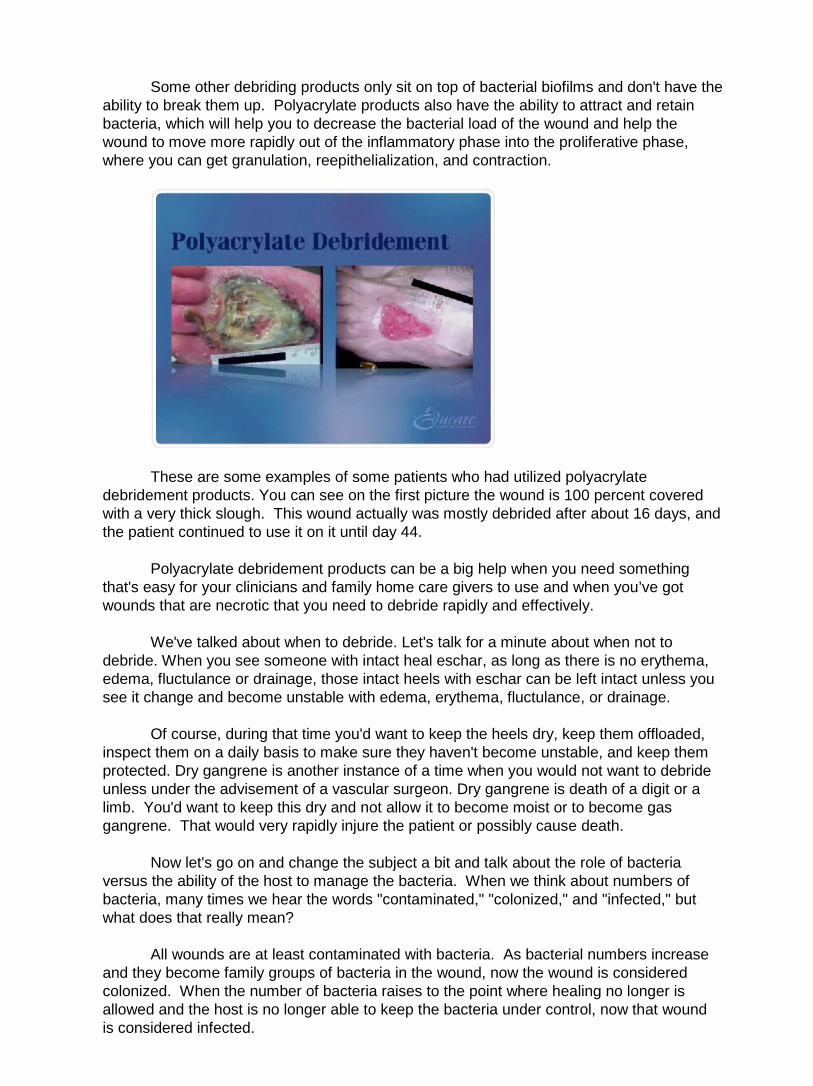
Some other debriding products only sit on top of bacterial biofilms and don't have the ability to break them up. Polyacrylate products also have the ability to attract and retain bacteria, which will help you to decrease the bacterial load of the wound and help the wound to move more rapidly out of the inflammatory phase into the proliferative phase, where you can get granulation, reepithelialization, and contraction.
These are some examples of some patients who had utilized polyacrylate debridement products. You can see on the first picture the wound is 100 percent covered with a very thick slough. This wound actually was mostly debrided after about 16 days, and the patient continued to use it on it until day 44.
Polyacrylate debridement products can be a big help when you need something that's easy for your clinicians and family home care givers to use and when you’ve got wounds that are necrotic that you need to debride rapidly and effectively.
We've talked about when to debride. Let's talk for a minute about when not to debride. When you see someone with intact heal eschar, as long as there is no erythema, edema, fluctulance or drainage, those intact heels with eschar can be left intact unless you see it change and become unstable with edema, erythema, fluctulance, or drainage.
Of course, during that time you'd want to keep the heels dry, keep them offloaded, inspect them on a daily basis to make sure they haven't become unstable, and keep them protected. Dry gangrene is another instance of a time when you would not want to debride unless under the advisement of a vascular surgeon. Dry gangrene is death of a digit or a limb. You'd want to keep this dry and not allow it to become moist or to become gas gangrene. That would very rapidly injure the patient or possibly cause death.
Now let's go on and change the subject a bit and talk about the role of bacteria versus the ability of the host to manage the bacteria. When we think about numbers of bacteria, many times we hear the words "contaminated," "colonized," and "infected," but what does that really mean?
All wounds are at least contaminated with bacteria. As bacterial numbers increase and they become family groups of bacteria in the wound, now the wound is considered colonized. When the number of bacteria raises to the point where healing no longer is allowed and the host is no longer able to keep the bacteria under control, now that wound is considered infected.
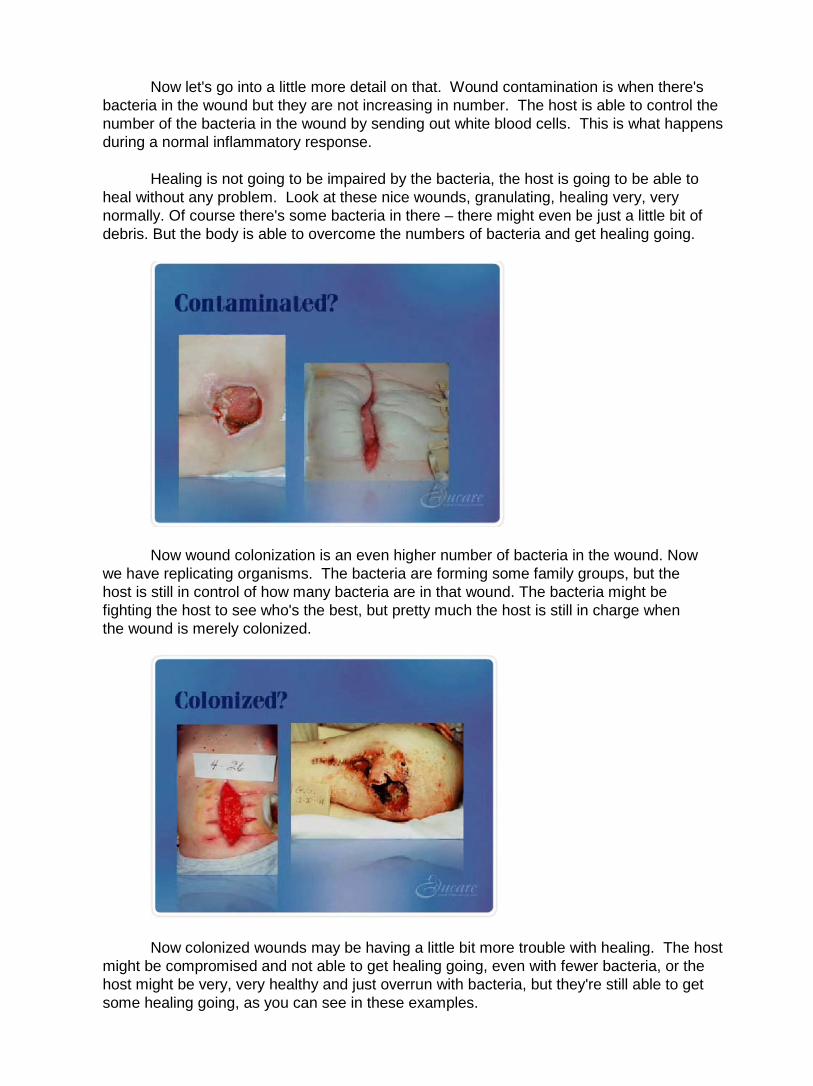
Now let's go into a little more detail on that. Wound contamination is when there's bacteria in the wound but they are not increasing in number. The host is able to control the number of the bacteria in the wound by sending out white blood cells. This is what happens during a normal inflammatory response.
Healing is not going to be impaired by the bacteria, the host is going to be able to heal without any problem. Look at these nice wounds, granulating, healing very, very normally. Of course there's some bacteria in there – there might even be just a little bit of debris. But the body is able to overcome the numbers of bacteria and get healing going.
Now wound colonization is an even higher number of bacteria in the wound. Now we have replicating organisms. The bacteria are forming some family groups, but the host is still in control of how many bacteria are in that wound. The bacteria might be fighting the host to see who's the best, but pretty much the host is still in charge when the wound is merely colonized.
Now colonized wounds may be having a little bit more trouble with healing. The host might be compromised and not able to get healing going, even with fewer bacteria, or the host might be very, very healthy and just overrun with bacteria, but they're still able to get some healing going, as you can see in these examples.
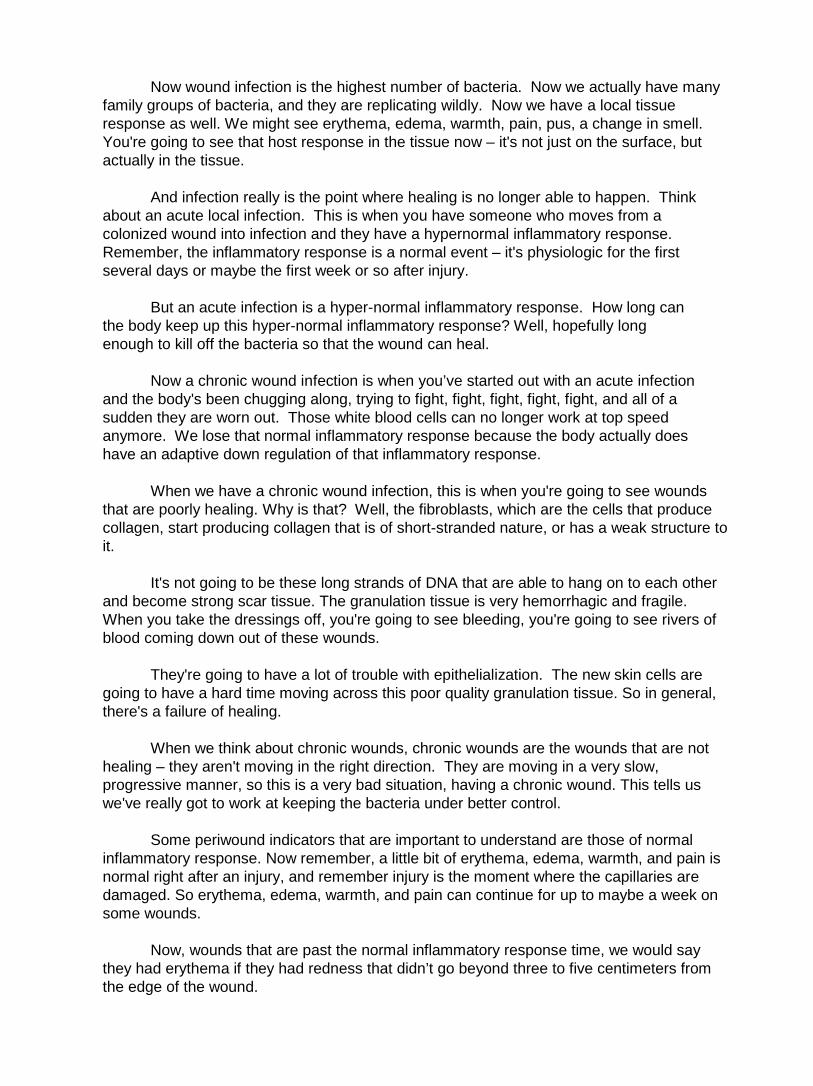
Now wound infection is the highest number of bacteria. Now we actually have many family groups of bacteria, and they are replicating wildly. Now we have a local tissue response as well. We might see erythema, edema, warmth, pain, pus, a change in smell. You're going to see that host response in the tissue now – it's not just on the surface, but actually in the tissue.
And infection really is the point where healing is no longer able to happen. Think about an acute local infection. This is when you have someone who moves from a colonized wound into infection and they have a hypernormal inflammatory response. Remember, the inflammatory response is a normal event – it's physiologic for the first several days or maybe the first week or so after injury.
But an acute infection is a hyper-normal inflammatory response. How long can the body keep up this hyper-normal inflammatory response? Well, hopefully long enough to kill off the bacteria so that the wound can heal.
Now a chronic wound infection is when you’ve started out with an acute infection and the body's been chugging along, trying to fight, fight, fight, fight, fight, and all of a sudden they are worn out. Those white blood cells can no longer work at top speed anymore. We lose that normal inflammatory response because the body actually does have an adaptive down regulation of that inflammatory response.
When we have a chronic wound infection, this is when you're going to see wounds that are poorly healing. Why is that? Well, the fibroblasts, which are the cells that produce collagen, start producing collagen that is of short-stranded nature, or has a weak structure to it.
It's not going to be these long strands of DNA that are able to hang on to each other and become strong scar tissue. The granulation tissue is very hemorrhagic and fragile. When you take the dressings off, you're going to see bleeding, you're going to see rivers of blood coming down out of these wounds.
They're going to have a lot of trouble with epithelialization. The new skin cells are going to have a hard time moving across this poor quality granulation tissue. So in general, there's a failure of healing.
When we think about chronic wounds, chronic wounds are the wounds that are not healing – they aren't moving in the right direction. They are moving in a very slow, progressive manner, so this is a very bad situation, having a chronic wound. This tells us we've really got to work at keeping the bacteria under better control.
Some periwound indicators that are important to understand are those of normal inflammatory response. Now remember, a little bit of erythema, edema, warmth, and pain is normal right after an injury, and remember injury is the moment where the capillaries are damaged. So erythema, edema, warmth, and pain can continue for up to maybe a week on some wounds.
Now, wounds that are past the normal inflammatory response time, we would say
they had erythema if they had redness that didn’t go beyond three to five centimeters from the edge of the wound.
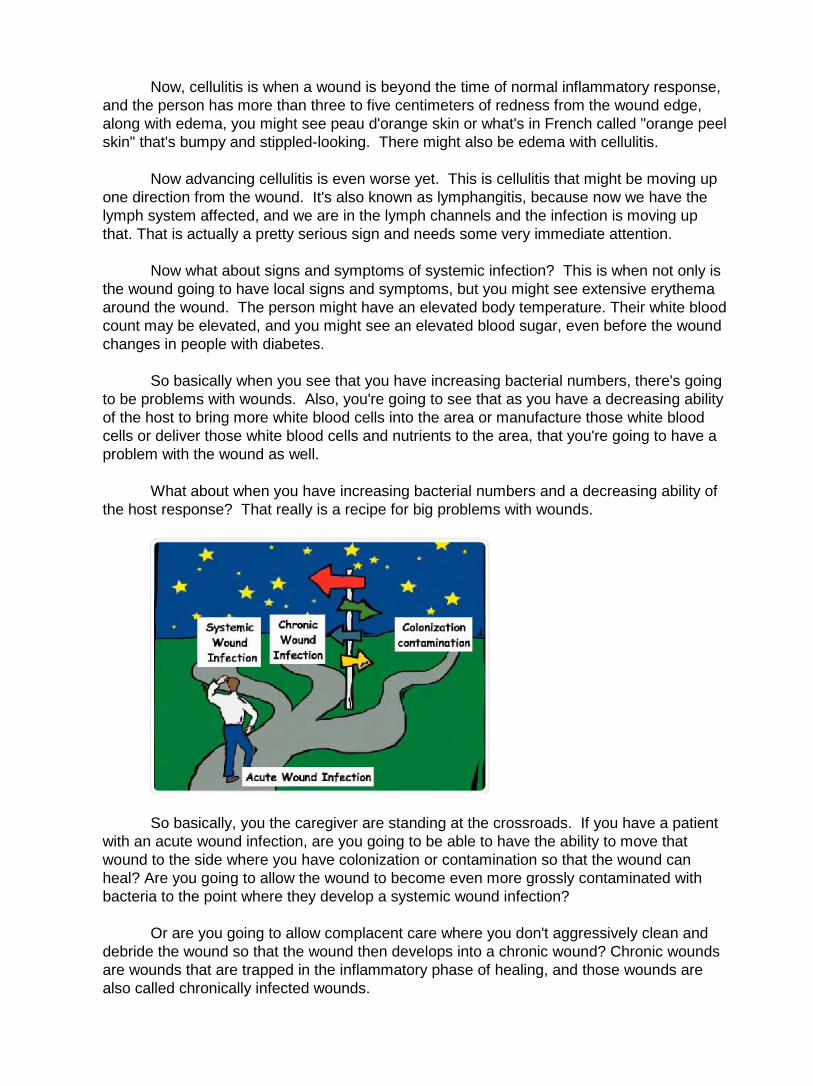
Now, cellulitis is when a wound is beyond the time of normal inflammatory response, and the person has more than three to five centimeters of redness from the wound edge, along with edema, you might see peau d'orange skin or what's in French called "orange peel skin" that's bumpy and stippled-looking. There might also be edema with cellulitis.
Now advancing cellulitis is even worse yet. This is cellulitis that might be moving up one direction from the wound. It's also known as lymphangitis, because now we have the lymph system affected, and we are in the lymph channels and the infection is moving up that. That is actually a pretty serious sign and needs some very immediate attention.
Now what about signs and symptoms of systemic infection? This is when not only is the wound going to have local signs and symptoms, but you might see extensive erythema around the wound. The person might have an elevated body temperature. Their white blood count may be elevated, and you might see an elevated blood sugar, even before the wound changes in people with diabetes.
So basically when you see that you have increasing bacterial numbers, there's going to be problems with wounds. Also, you're going to see that as you have a decreasing ability of the host to bring more white blood cells into the area or manufacture those white blood cells or deliver those white blood cells and nutrients to the area, that you're going to have a problem with the wound as well.
What about when you have increasing bacterial numbers and a decreasing ability of the host response? That really is a recipe for big problems with wounds.
So basically, you the caregiver are standing at the crossroads. If you have a patient with an acute wound infection, are you going to be able to have the ability to move that wound to the side where you have colonization or contamination so that the wound can heal? Are you going to allow the wound to become even more grossly contaminated with bacteria to the point where they develop a systemic wound infection?
Or are you going to allow complacent care where you don't aggressively clean and debride the wound so that the wound then develops into a chronic wound? Chronic wounds are wounds that are trapped in the inflammatory phase of healing, and those wounds are also called chronically infected wounds.
You the caregiver truly have the ability to help move your patients down the path of healing. If you suspect that your patient has an infection in their wound, you’ve already done all the cleaning and all the debriding that you possibly can and you still see that they're not healing, you may want to consider a two-week trial of topical antibiotics or antimicrobials such as silver dressings for wounds that are not healing or continuing to produce exudate.
Use of these antimicrobial agents will help to reduce the bacterial load, help to allow that wound to move from the inflammatory phase to the proliferative phase, where you can see granulation, epithelialization, and contraction, and will help the wound move in the right direction and heal in a shorter period of time.
It really is all about balance. It's the bacteria versus the ability of the host to respond. What do you need to do to tune up your host so that they can fight that bacteria? What do you need to do to clean and debride the wound to reduce the place where the bacteria can thrive in the wound?
When we think about the historical definition of infection, we think of the work of Dr. Martin Robson, who found that in wounds that had more than 100,000 or 10 to the fifth bacteria per gram of tissue, no longer were able to heal. So that really became the level at which we thought about infection.
But when we think about some of our severely immunocompromised patients with all the co-morbidities, malnutrition, diabetes, poor nutrient and white blood cell transport in the local and systemic area, we really have to think infection isn’t just a number; infection is a point in time when the bacteria exceed the ability of the host's ability to heal.
Now when we think about counting bacteria, sometimes we do need to do cultures. It's been found that swab cultures have been shown to be the least reliable way to culture a wound. They really only find surface contamination and surface colonization, so they really aren't all that helpful, and we also find many times they're done incorrectly.
I remember when I first graduated from nursing school in the 1970s, we were taught to do a 10-point culture technique – a swab culture technique. I've been told by some infection control nurses that that's ten good opportunities for a poor culture.
Now, another way of culturing a wound is by needle aspiration, or by punch biopsy or tissue biopsy. Typically, that is much more accurate and it's recommended by the CDC. Typically, you're going to need a physician, a nurse practitioner, or a physician's assistant to do a needle aspiration or a punch biopsy, so this makes it so that it's not feasible in very many settings.
But the reality of it is if you're going to have to culture, what is the most accurate way
for you to be able to culture? The semi-quantitative swab culture has been described by multiple authors in the last few years as being almost as specific and accurate as the punch biopsy or the needle aspiration.
The technique to do this is that you would first rinse copiously with normal saline, debride and mop that wound out – get rid of any superficial yuck off the surface of that wound that you possibly can, rinse it again really well with normal saline. Now, you need to identify a patch of living tissue. We aren't going to be culturing the slough or the pus; we don't want to know about slough or eschar or drainage. We want living tissue.
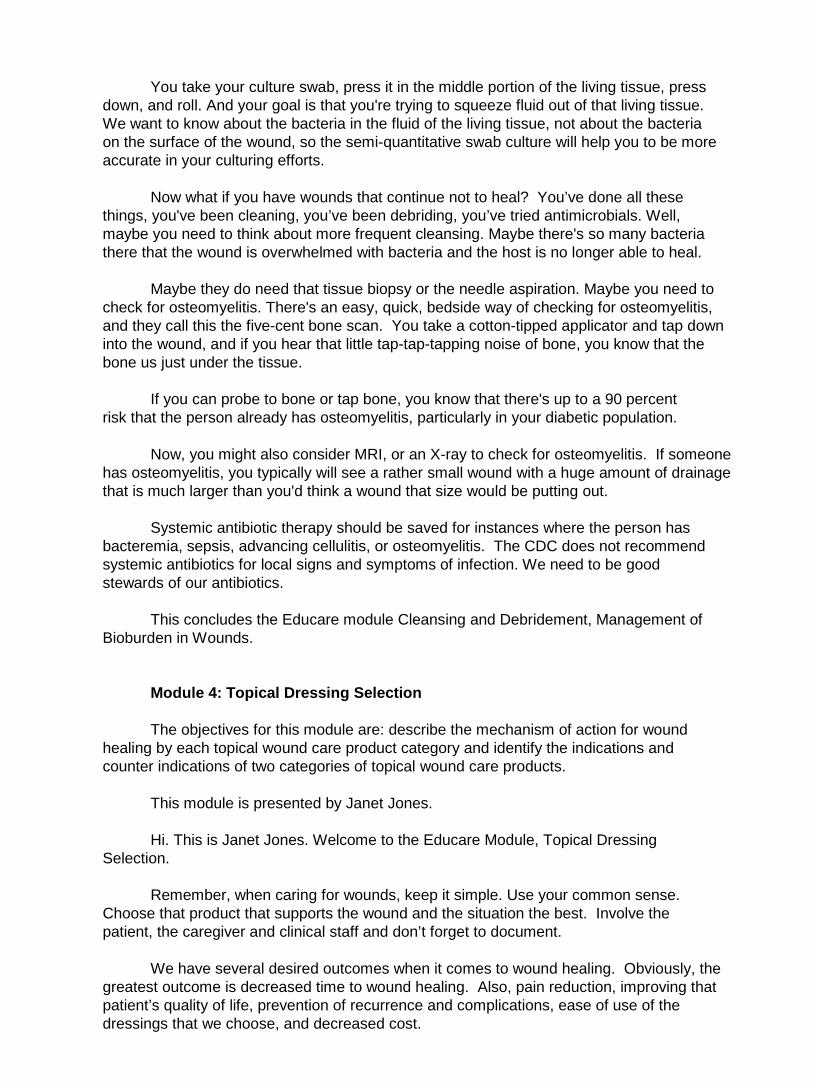
You take your culture swab, press it in the middle portion of the living tissue, press down, and roll. And your goal is that you're trying to squeeze fluid out of that living tissue. We want to know about the bacteria in the fluid of the living tissue, not about the bacteria on the surface of the wound, so the semi-quantitative swab culture will help you to be more accurate in your culturing efforts.
Now what if you have wounds that continue not to heal? You’ve done all these things, you've been cleaning, you’ve been debriding, you’ve tried antimicrobials. Well, maybe you need to think about more frequent cleansing. Maybe there's so many bacteria there that the wound is overwhelmed with bacteria and the host is no longer able to heal.
Maybe they do need that tissue biopsy or the needle aspiration. Maybe you need to check for osteomyelitis. There's an easy, quick, bedside way of checking for osteomyelitis, and they call this the five-cent bone scan. You take a cotton-tipped applicator and tap down into the wound, and if you hear that little tap-tap-tapping noise of bone, you know that the bone us just under the tissue.
If you can probe to bone or tap bone, you know that there's up to a 90 percent risk that the person already has osteomyelitis, particularly in your diabetic population.
Now, you might also consider MRI, or an X-ray to check for osteomyelitis. If someone has osteomyelitis, you typically will see a rather small wound with a huge amount of drainage that is much larger than you'd think a wound that size would be putting out.
Systemic antibiotic therapy should be saved for instances where the person has bacteremia, sepsis, advancing cellulitis, or osteomyelitis. The CDC does not recommend systemic antibiotics for local signs and symptoms of infection. We need to be good stewards of our antibiotics.
This concludes the Educare module Cleansing and Debridement, Management of
Bioburden in Wounds. Module 4: Topical Dressing Selection
The objectives for this module are: describe the mechanism of action for wound
healing by each topical wound care product category and identify the indications and counter indications of two categories of topical wound care products.
This module is presented by Janet Jones.
Hi. This is Janet Jones. Welcome to the Educare Module, Topical Dressing Selection.
Remember, when caring for wounds, keep it simple. Use your common sense. Choose that product that supports the wound and the situation the best. Involve the patient, the caregiver and clinical staff and don’t forget to document.
We have several desired outcomes when it comes to wound healing. Obviously, the greatest outcome is decreased time to wound healing. Also, pain reduction, improving that patient’s quality of life, prevention of recurrence and complications, ease of use of the dressings that we choose, and decreased cost.
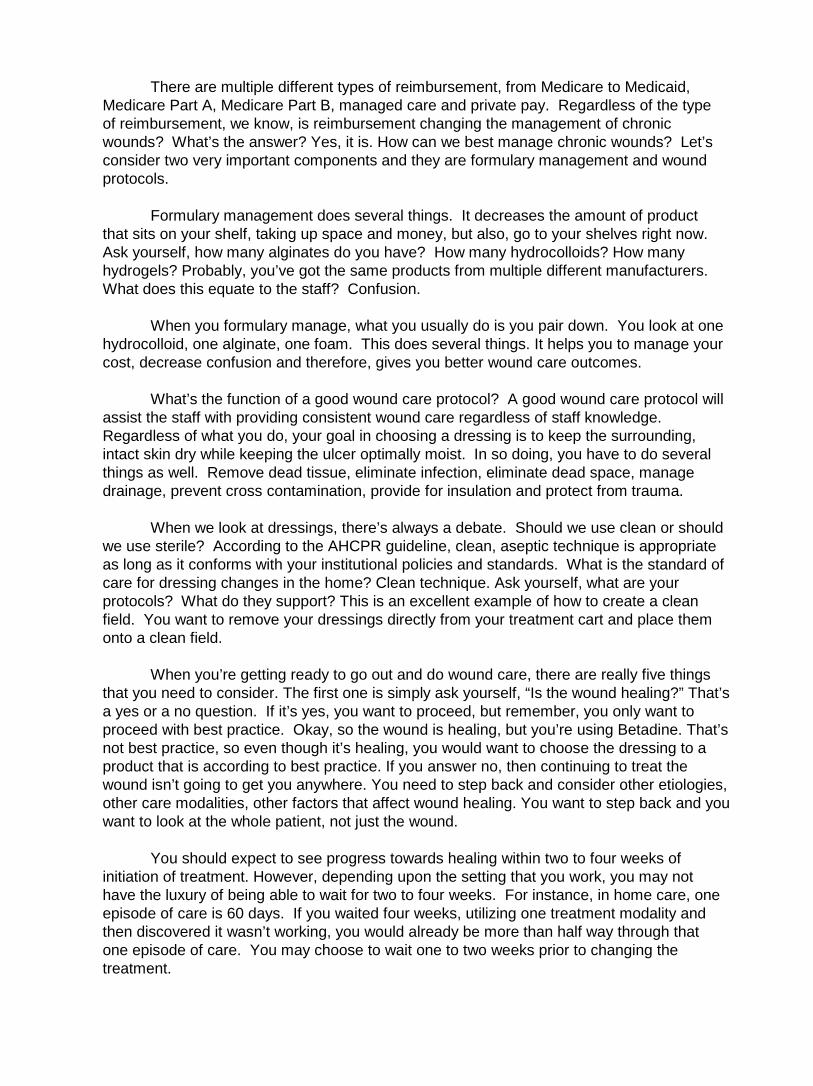
There are multiple different types of reimbursement, from Medicare to Medicaid, Medicare Part A, Medicare Part B, managed care and private pay. Regardless of the type of reimbursement, we know, is reimbursement changing the management of chronic wounds? What’s the answer? Yes, it is. How can we best manage chronic wounds? Let’s consider two very important components and they are formulary management and wound protocols.
Formulary management does several things. It decreases the amount of product that sits on your shelf, taking up space and money, but also, go to your shelves right now. Ask yourself, how many alginates do you have? How many hydrocolloids? How many hydrogels? Probably, you’ve got the same products from multiple different manufacturers. What does this equate to the staff? Confusion.
When you formulary manage, what you usually do is you pair down. You look at one hydrocolloid, one alginate, one foam. This does several things. It helps you to manage your cost, decrease confusion and therefore, gives you better wound care outcomes.
What’s the function of a good wound care protocol? A good wound care protocol will assist the staff with providing consistent wound care regardless of staff knowledge. Regardless of what you do, your goal in choosing a dressing is to keep the surrounding, intact skin dry while keeping the ulcer optimally moist. In so doing, you have to do several things as well. Remove dead tissue, eliminate infection, eliminate dead space, manage drainage, prevent cross contamination, provide for insulation and protect from trauma.
When we look at dressings, there’s always a debate. Should we use clean or should we use sterile? According to the AHCPR guideline, clean, aseptic technique is appropriate as long as it conforms with your institutional policies and standards. What is the standard of care for dressing changes in the home? Clean technique. Ask yourself, what are your protocols? What do they support? This is an excellent example of how to create a clean field. You want to remove your dressings directly from your treatment cart and place them onto a clean field.
When you’re getting ready to go out and do wound care, there are really five things that you need to consider. The first one is simply ask yourself, “Is the wound healing?” That’s a yes or a no question. If it’s yes, you want to proceed, but remember, you only want to proceed with best practice. Okay, so the wound is healing, but you’re using Betadine. That’s not best practice, so even though it’s healing, you would want to choose the dressing to a product that is according to best practice. If you answer no, then continuing to treat the wound isn’t going to get you anywhere. You need to step back and consider other etiologies, other care modalities, other factors that affect wound healing. You want to step back and you want to look at the whole patient, not just the wound.
You should expect to see progress towards healing within two to four weeks of initiation of treatment. However, depending upon the setting that you work, you may not have the luxury of being able to wait for two to four weeks. For instance, in home care, one episode of care is 60 days. If you waited four weeks, utilizing one treatment modality and then discovered it wasn’t working, you would already be more than half way through that one episode of care. You may choose to wait one to two weeks prior to changing the treatment.
The second principle of wound healing is, is the tissue viable or necrotic? Is it alive or dead? If it’s viable, support it. If it’s necrotic, debride it, but only if debridement is the goal.
Let’s talk about a couple of instances where debridement may not be the goal. Stable eschar on a heel. How about if you have a necrotic area on a lower extremity and you have arterial profusion below threshold for healing? Would debridement be the goal then? Maybe, maybe not. Maybe amputation is the goal. Maybe revascularization might be the goal, but remember, always ask the question, is debridement the goal?
The third healing principle, which really is the principle which all topical dressings are based upon and that is, an optimal amount of moisture. Remember that a dry cell is a dead cell. Dr. George Winter published in Nature, 1962, that wounds healed much more readily in a moist environment. He found that epidermal cells divided and migrated where there was moisture as opposed to dry healing. How do you know if the wound is moist enough? Wait until you remove the dressing. Do not make any conclusions based on what the dressing looks like. Look at the wound after you’ve removed the dressing.
Remember, when you think of an optimal amount of moisture, think of a balanced set of scales. If the wound is optimally moist, the scales are balanced. If the wound is wet, the scale will tip. What is the burden of the clinician now? To apply a product that absorbs excess moisture bringing it back into balance. If the wound is too dry, the scale tips the other way. Now, what’s the burden of the clinician? To apply a product that moistens. If the wound is already optimally moist, your goal is to maintain. Here’s Elvis. He’s demonstrating a balanced approach to moisture.
The fourth wound healing principle is, is there dead space? Now, what is dead space? Dead space is that space from the top edge of the wound to the base of the wound. In other words, if you had space, you wouldn’t just cover the top of the wound. You would need to fill the wound first. If it’s deep, you fill it. If it’s flat, you cover it.
The fifth wound healing principle; what is the condition of the peri wound skin? What do you think the goal would be? Obviously, when we’re choosing topical dressings or when we’re looking at wound healing, our goal is to maintain perfect peri wound skin. Why? Because if the peri wound skin becomes compromised, what does that oftentimes mean about the wound? That the wound will oftentimes enlarge. When we look at topical dressing selection, if the peri wound skin is compromised, what types of products might we avoid? Adhesives. Why? Because adhesives being pulled off of skin that’s already compromised will do what? Further compromise the already compromised skin. If the peri wound skin is not compromised, adhesives may be acceptable. Please, always consider the use of protective products like a skin prepping type of product and an adhesive remover.
What are we going to do with all of this information? Let’s look at that. We’re going to begin looking at these five questions in terms of wound assessment. Alright, let’s look at a wound. It’s dead, it’s wet, and it’s deep. What are your initial goals? Well, if it’s dead, you debride. By the way, the wound is not on the lower extremity so debridement would be the goal. If it’s dead, you debride. If it’s wet, we do what? Absorb. If it’s deep, we fill it. Very good. Your initial goals are, for a wound that’s dead, wet and deep, it’s to debride, absorb and fill.

Now, let’s push the patient aside and let’s look at the treatment that’s been chosen. Please ask yourself, “What is that treatment?” If you don’t know what that treatment is or what that treatment does, clinically, should you be touching it onto the wound? The answer is no. You need to assess the treatment, know what it does and then ask yourself, “Will this treatment that I’m recommending or will this treatment that has been ordered, will it achieve the goals?” If the answer is no, you want to stop then and get your order changed. Remember, the farther you get away from the initial day of injury, the longer it’s going to take that wound to heal, so it’s extremely important to jump out of the box. When you come upon that wound for the first time, you want to try to treat it as appropriately as possible.
Have you ever wondered around in a sea of confusion, not knowing which way to turn because, when you opened up your wound care closet, it looked like this? And you said, “Oh my goodness, whatever will I do?” Let’s see if we can make some sense out of all of these dressing categories. They include advanced technologies, transparent films, hydrocolloids, hydrogels, alginates, foams, composite dressings and compression dressings.
Let’s look at silver-containing dressings. As you can see, there’s a myriad of silver-containing dressings. They come in all different types of forms, from transparent films to non-absorptive fabrics, to sheet polymers, powdered alginates, hydrogels, hydrocolloids, products with carboxymethylcellulose and foams. Obviously, the thing they all have in common is that they all contain silver. However, the most important feature in looking and choosing your silver dressing is how is the silver delivered? Is it delivered continuously or does it bolus silver into the wound? Is there enough silver to kill the bacteria, but not too much silver to be cytotoxic to the wound and to the host? What about the time that it takes for the caregiver to apply these products? Is there extra work or are these dressings fairly easy to apply and remove?
All silver dressings require moisture to activate their silver release. Now, this moisture can come from three different places; moisture from the skin, moisture from the atmosphere or moisture that is externally added to the dressing.
Now, how is it that these silver products work against the bacteria? The biggest difference between silver and antibiotics are that antibiotics only react to bacteria in one or two different ways whereas silver is active against bacteria in multiple different ways. It affects the cell wall, membrane transport, RNA function, DNA synthesis, and protein function.
An excellent example of the use of silver is on this young man’s lower extremity.
Primarily, he had a problem with poison oak, but you can see that he developed a secondary infection, a bacterial infection. The wound was very wet, so they applied a calcium alginate to the wound and covered it with a silver transparent film. You can see the edge of the silver transparent film at the top, just below his knee. They left the product in place for seven days.
At the end of seven days, they removed the product and this is what the leg looked like:
If you look at this case study of a patient with a venous stasis ulcer, we know that
venous stasis ulcers are extremely contaminated. They have a very high bio burden of bacteria. Oftentimes, this bacteria will impair healing. Silver did three things with this wound. It provided for autolytic debridement. It reduced the bio burden. It helped move the wound from the inflammatory phase to the proliferative phase where you are able to see granulation, contraction and epithelialization.
Next, let’s look at collagen containing dressings. Collagen is a major protein found in
human tissue and patients within sufficient protein stores or who have systemic impediments to healing can actually benefit from topical collagen. Collagen is involved in all phases of wound healing. Collagen supports growth of granulation tissue. It enhances reepithelialization and contraction.
There are several forms of collagen-containing products on the market. As clinicians, one of the things that we need to be aware of is when we choose a collagen-containing product, is that collagen in a form that is bioavailable to the tissue?

Growth factors. Growth factors are responsible for enhancing a single cellular process. Currently, there is one commercially prepared growth factor on the market; Regranex. Just by the name, what one single cellular process do you think this product enhances? Granulation. There are others. The market is moving back to taking one’s own blood and spinning out your own growth factors, and then putting them back onto your wound.
Regranex is a recombinant, off the shelf, platelet derived growth factor. Its intention
is to enhance the formation of granulation tissue on a lower extremity, neuropathic diabetic ulcer that is full thickness has been surgically debrided and has adequate blood supply.
There are also bioengineered skin substitutes. I think that as clinicians, we’re going to see more and more bioengineered skin substitutes becoming available on the market and this is going to be a whole new era in wound healing. The idea behind bioengineered skin substitutes are that they do provide an extra cellular matrix of a natural growth factor and collagen. Think of it, simply, as a trellis or, you’re applying a skin graft out of a box that creates a trellis, like a vine – a trellis or a rose on a vine that allows the tissue to grow into, using it as a structural support.
Bioengineered skin substitutes come in all different types including porcine, human infant foreskin, and bovine collagen and cadaver skin.
There’s also negative pressure therapy. Negative pressure therapy enhances granulation and contraction. It assists closure of wounds with large defects and decrease peri wound lymphedema allowing for better blood flow. It’s not intended for use in untreated infection or wounds that are necrotic.
Polyacrylate dressings are basically a polymer gel encased in a polypropylene material. This polymer is activated with ringer solution. The function is that the polymer on the inside of the dressing attracts and retains protein molecules from the wound. This case study shows how the polyacrylate debrided and moved the wound all the way to closure. Please notice how the dressing overlaps onto the peri wound skin.
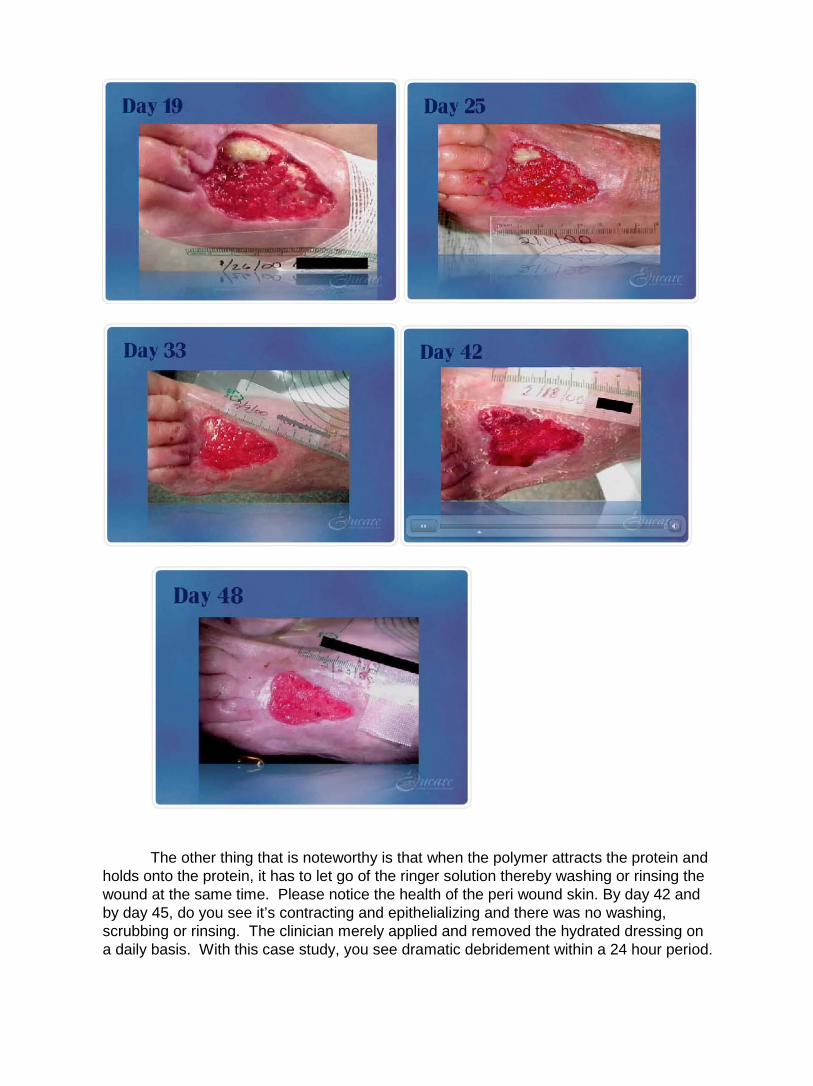
The other thing that is noteworthy is that when the polymer attracts the protein and holds onto the protein, it has to let go of the ringer solution thereby washing or rinsing the wound at the same time. Please notice the health of the peri wound skin. By day 42 and by day 45, do you see it’s contracting and epithelializing and there was no washing, scrubbing or rinsing. The clinician merely applied and removed the hydrated dressing on a daily basis. With this case study, you see dramatic debridement within a 24 hour period.
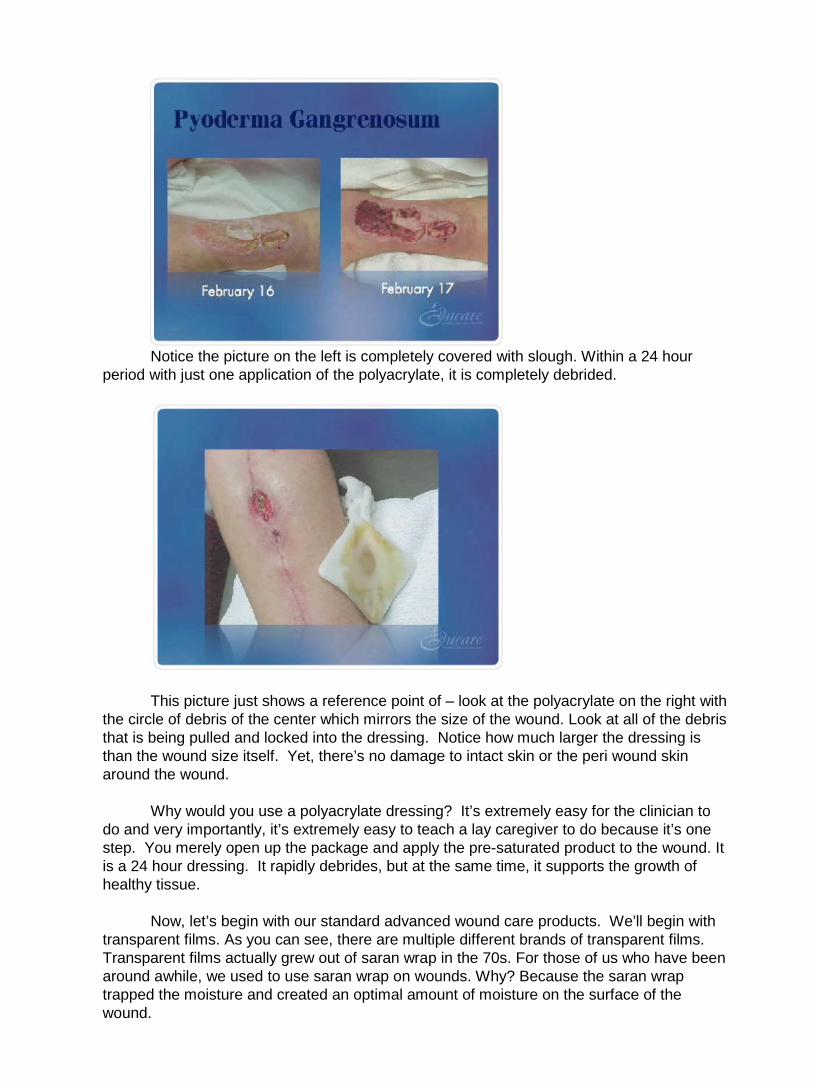
Notice the picture on the left is completely covered with slough. Within a 24 hour
period with just one application of the polyacrylate, it is completely debrided.
This picture just shows a reference point of – look at the polyacrylate on the right with
the circle of debris of the center which mirrors the size of the wound. Look at all of the debris that is being pulled and locked into the dressing. Notice how much larger the dressing is than the wound size itself. Yet, there’s no damage to intact skin or the peri wound skin around the wound.
Why would you use a polyacrylate dressing? It’s extremely easy for the clinician to
do and very importantly, it’s extremely easy to teach a lay caregiver to do because it’s one step. You merely open up the package and apply the pre-saturated product to the wound. It is a 24 hour dressing. It rapidly debrides, but at the same time, it supports the growth of healthy tissue.
Now, let’s begin with our standard advanced wound care products. We’ll begin with transparent films. As you can see, there are multiple different brands of transparent films. Transparent films actually grew out of saran wrap in the 70s. For those of us who have been around awhile, we used to use saran wrap on wounds. Why? Because the saran wrap trapped the moisture and created an optimal amount of moisture on the surface of the wound.

A transparent film, think of it as sticky saran wrap. In terms of optimal moisture, we know that a transparent film is appropriate for a dry to a moist wound. That means it’ll create an optimal amount of moisture in a wound that is dry to moist, which means it will provide for autolytic debridement in a dead wound that is dry to moist. It also supports growth of living tissue in a wound that is dry to moist. It is waterproof and has a bacterial barrier. It’s adhesive. It has 100 percent memory. This means, you don’t want to stretch it and then stick it down on the skin because if you do, it’ll shrivel up and go back to its original size and can cause sheer injuries across the surface of the skin.
All transparent films are semipermeable. That means that they breathe. They transpire moisture from the wound, through the dressing, into the atmosphere. All transparent films are, obviously, transparent.
The wear time of a transparent film is up to seven days. This is actually a fairly simple dressing to know if you’re doing it correctly because when you apply a transparent film, specifically, over a wound that’s dry or a wound that has moisture, if that bubble of moisture stays just towards the outside margins of the wound, you know the dressing is working within its drainage level. But if that moisture bleeds all the way underneath the entire transparent film, basically, that’s an “oops”. “Oops, I need another dressing that will accommodate for more absorbancy.”
The brand specific differences between them, there really aren’t a lot, other than
maybe a slight difference in how the product is applied. They do come in different sizes and shapes. Some have different ways where the carrier sheet on the back comes off or the release mechanism of that carrier sheet may be different.
As far as that moisture/vapor transmission rate, let’s make sure that we all know what that means. That is the amount of moisture that is transpired from the skin, through the dressing, into the atmosphere. If you’re interested, it is actually expressed in a math equation of grams per meter square in a 24 hour period. For instance, the average transparent films, they transpire approximately 7 to 850 grams per meter square of fluid in a 24 hour period. What does that tell you? That they do create an optimal amount of moisture, but they do transpire some moisture up away from the wound.

Also, there might be a difference in cost between one brand and another. You see here, on the left buttock cheek, eschar. Please notice the rim of peri wound erythema. Now initially, you might look at that and say, “Oh my goodness, that’s infected, based on that rim of peri wound erythema,” but remember the hallmark of the inflammatory phase is erythema, edema, heat and pain. If you merely looked at the peri wound erythema and said, “It’s infected,” you might begin a cascade of events that you can no longer control.
Let’s look at this wound and ask ourselves, “What is our initial goal?” Our goal is to debride the eschar, so we applied a transparent film to this eschar. You’ll notice in the next picture, in just a few days, you can see that the moisture that naturally transpires away from the skin is now trapped on top of that eschar and what happened? The eschar became soft. Within a couple of days, they removed the product and look what happened.
Let’s go back. Did we debride the eschar? Absolutely. What happened to the rim of
peri wound erythema? It’s gone because the wound is now moving into the proliferative phase. You’ll also notice that the transparent film can be an excellent secondary dressing. One of the things that you need to make sure you address, however, when you dress the sacral area of the body, and that is to completely spread those buttock cheeks apart so that the product will nicely conform to that area. Otherwise, when the patient is repositioned, the product will pop off.

Now lets look at hydrocolloids. When the hydrocolloid came along in 1983, if you look at the structure of the product in comparison to the transparent film, in terms of optimal moisture, what does it look like that that hydrocolloid does that the transparent film didn’t do? The hydrocolloid absorbs. A thin hydrocolloid is appropriate for a dry to a moist wound and a standard thickness hydrocolloid is appropriate for a dry to a moderately draining wound.
From there, you’re going to start noticing that there’s a pattern that’s very similar. A
hydrocolloid is appropriate for a dry to a moderately draining wound and it will create an optimal amount of moisture. That means if the wound is dry, the hydrocolloid will donate moisture. If it’s optimally moist, it will maintain. If it’s moderately draining, the hydrocolloid will absorb the excess moisture and spread the drainage across the surface of the dressing. It will support both autolytic debridement, as well as growth of viable tissue as long as it’s dry to moderately draining.
Now, this product is waterproof. It has a bacterial barrier and it’s extremely adhesive, so please be very mindful when you remove the dressing to use an adhesive remover, otherwise, you can provide for significant damage to the peri wound skin. Has anybody ever seen satellite lesions starting to appear around the primary ulcer? Absolutely. It’s not additional areas of pressure. It’s injury from the removal of the product.
Also, research has shown that with the use of hydrocolloids, there’s a decreased rate of infection. Why? Because that product is so adhesive, it doesn’t allow any migration of bacteria into the surface of the wound.
The wear time issues of hydrocolloids - you can wear them up to seven days, but you shouldn’t change them more than three times per week. There’s two reasons why. Number one, if you change them more than three times per week, you are going to further destroy the peri wound skin. Remember, that adhesive is very aggressive. The second reason for not changing it more than three times per week is it will become cost prohibitive. This particular dressing was designed for the ability to decrease the frequency of dressing changes as opposed to increasing. If you need to change the dressing more than three times per week, we recommend that you consider another option.
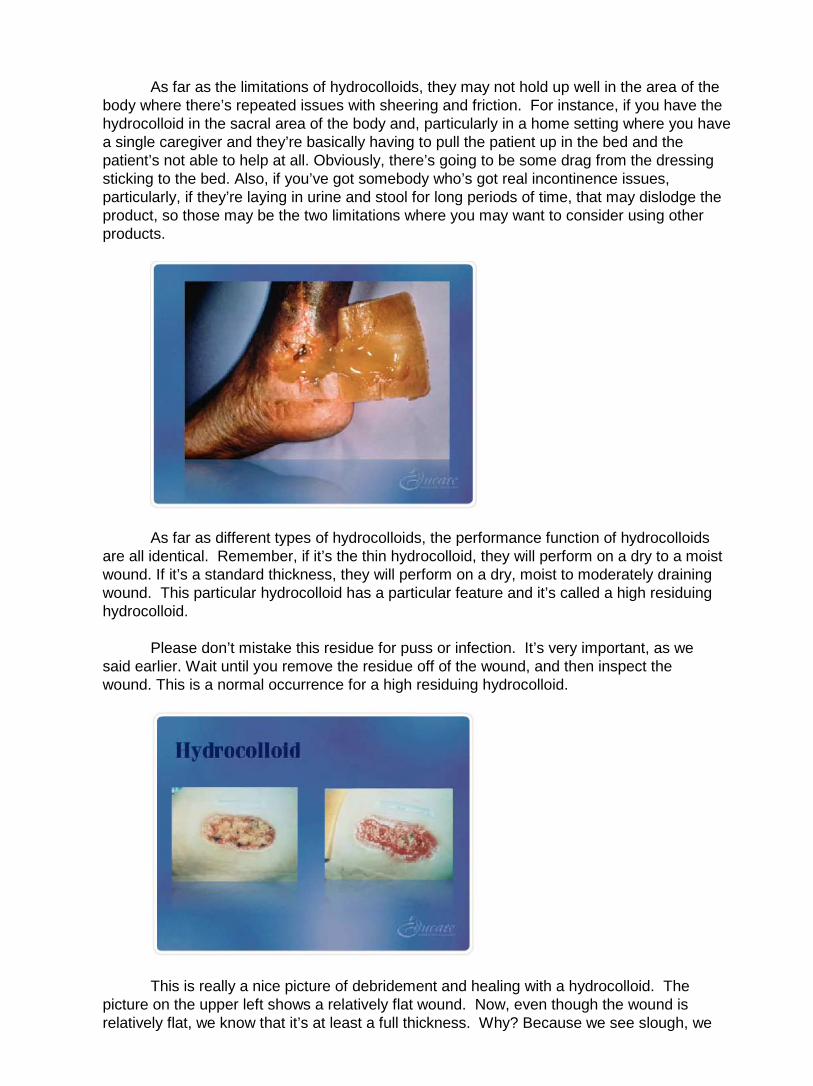
As far as the limitations of hydrocolloids, they may not hold up well in the area of the body where there’s repeated issues with sheering and friction. For instance, if you have the hydrocolloid in the sacral area of the body and, particularly in a home setting where you have a single caregiver and they’re basically having to pull the patient up in the bed and the patient’s not able to help at all. Obviously, there’s going to be some drag from the dressing sticking to the bed. Also, if you’ve got somebody who’s got real incontinence issues, particularly, if they’re laying in urine and stool for long periods of time, that may dislodge the product, so those may be the two limitations where you may want to consider using other products.
As far as different types of hydrocolloids, the performance function of hydrocolloids are all identical. Remember, if it’s the thin hydrocolloid, they will perform on a dry to a moist wound. If it’s a standard thickness, they will perform on a dry, moist to moderately draining wound. This particular hydrocolloid has a particular feature and it’s called a high residuing hydrocolloid.
Please don’t mistake this residue for puss or infection. It’s very important, as we said earlier. Wait until you remove the residue off of the wound, and then inspect the wound. This is a normal occurrence for a high residuing hydrocolloid.
This is really a nice picture of debridement and healing with a hydrocolloid. The picture on the upper left shows a relatively flat wound. Now, even though the wound is relatively flat, we know that it’s at least a full thickness. Why? Because we see slough, we

see some eschar, and we see some viable tissue, but the fact that we see some slough and/or eschar makes it at least a full thickness. At this point, we don’t know if this was a pressure ulcer, so at the very least, it’s full thickness.
What’s our goal? Well, in terms of optimal moisture, we need to hydrate the wound. Remember, if it’s wet, we absorb. If it’s dry, we hydrate. If it’s optimally moist, we maintain. This wound is completely dry, so we need to hydrate. In the process of hydration, we need to autolytically debride the slough and autolytically debride the eschar. They applied the hydrocolloid. They left it in place for seven days because it was a very flat area. The location of the wound was not in an area where sheer and friction was an issue, so in seven days, they removed the dressing.
Now, please look at the picture on the bottom right. Now, it did not look like this when they immediately took off the product. What would you have imagined this would have looked like? Slimy, gooey, sort of “beigey”, wavy guck. Well, they remove that with a gauze and good cleansing. Now notice what happened. Wonderful autolytic debridement of the slough, almost complete debridement except for that bottom right portion. You see a little bit of slough, a little bit of eschar, but look at the granulation tissue. Not only do we see granulation, but there’s contraction and epithelialization.
Would we say that we were a success in hydration and debridement? Absolutely. Now you must ask yourself, what is your new goal? Your new goal is to continue to maintain an optimal amount of moisture, to continue the granulation process and continue that little bit of debridement autolytically that needs to occur. You ask yourself, can you continue to do that with a hydrocolloid? The answer is yes.
If we look at the brand specific differences in a list, they are quite large. As a matter of fact, the brand specific differences between one hydrocolloid and another probably is the greatest with that product category than any other product category. Some hydrocolloids residue, some don’t. Some have immediate tack adhesives, some have heat activated adhesives. That means that you may need to apply your hand to the product once it’s on the patient’s skin to warm it up to activate the adhesive.
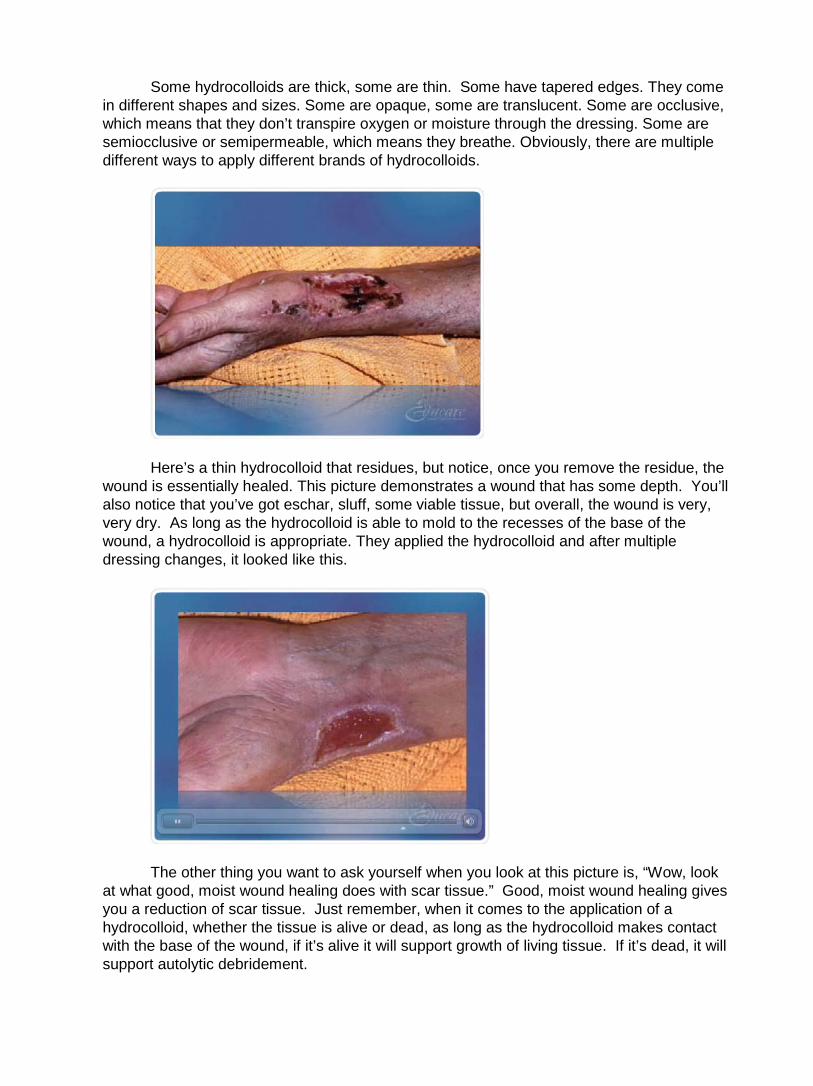
Some hydrocolloids are thick, some are thin. Some have tapered edges. They come in different shapes and sizes. Some are opaque, some are translucent. Some are occlusive, which means that they don’t transpire oxygen or moisture through the dressing. Some are semiocclusive or semipermeable, which means they breathe. Obviously, there are multiple different ways to apply different brands of hydrocolloids.
Here’s a thin hydrocolloid that residues, but notice, once you remove the residue, the wound is essentially healed. This picture demonstrates a wound that has some depth. You’ll also notice that you’ve got eschar, sluff, some viable tissue, but overall, the wound is very, very dry. As long as the hydrocolloid is able to mold to the recesses of the base of the wound, a hydrocolloid is appropriate. They applied the hydrocolloid and after multiple dressing changes, it looked like this.
The other thing you want to ask yourself when you look at this picture is, “Wow, look at what good, moist wound healing does with scar tissue.” Good, moist wound healing gives you a reduction of scar tissue. Just remember, when it comes to the application of a hydrocolloid, whether the tissue is alive or dead, as long as the hydrocolloid makes contact with the base of the wound, if it’s alive it will support growth of living tissue. If it’s dead, it will support autolytic debridement.

Now, this hydrocolloid is one of the original styles of hydrocolloid where the machine took the hydrocolloid and cut it straight off, so those edges are sticky. I’m sure you’ve been familiar with those because your biggest complaint has been, the hydrocolloid keeps getting stuck to the sheet, the bed, the gown, the brief and it keeps getting pulled off the skin. You’re absolutely right because those edges are sticky. To get around that issue, take a single piece of tape and apply it to each edge of the hydrocolloid, creating a picture frame. This will obliterate the sticky edge of the hydrocolloid, preventing it from sticking to the bed, sheet, the gown or the brief.
Let’s move into amorphus hydrogels. The technical term for a hydrogel is amorphus, meaning, amorphus being without form. An amorphus hydrogel, basically, will take any shape. If you’re not familiar with a hydrogel, I want you to think KY Jelly. That will give you a fairly good visual of what a hydrogel looks like. Again, you can see that there are multiple hydrogels on the market. Some of them come dispensed in a spray bottle. Some come dispensed in a tube. Some come dispensed in a accordion type of delivery system. Some come pre-impregnated in a gauze.
As far as where does a hydrogel fit in terms of optimal moisture, a hydrogel is
appropriate for a dry to a slightly greater than moist wound. Now, what does that mean? Again, notice the pattern. The hydrogel is appropriate for a dry wound to a slightly greater than moist wound, so will it autolitically debride a wound that is dry to slightly greater than moist? Yes. Will it support the growth of living tissue in a dry to slightly greater than moist wound? Absolutely.
What are the wear time issues with a hydrogel? They should be changed at least every three days or as necessary to maintain an optimal moist environment to the wound bed.
Now, you can apply them several different ways. If you’ve got a wound with depth, you merely line the wound bed with the hydrogel and then you fill the dead space with a damp, fluffed gauze. Now, why wouldn’t you fill it with a dry gauze? Because if you fill the dead space with a dry gauze, where would all the hydrogel go? It would wick into the dry gauze and no longer be available to the wound bed. Or, if you use a hydrogel impregnated gauze, you could take the hydrogel impregnated gauze, merely open it up, line the wound bed and still fill the dead space with a damp gauze.

Please expect the necrotic tissue to hydrate and become soft and/or mushy every time you change the dressing. Remember, to some clinicians, this moving of the dead tissue from dry and intact to gooey and mushy oftentimes signals what in their mind? That the wound is infected. It’s very, very important that you communicate to your colleague what your expectation is when you’re doing these dressing changes.
What are the brand specific differences from one hydrogel to another? The biggest is viscosity, which is the thickness. Pretty much, the rule of thumb is that, if you’ve got more body to a hydrogel, it tends to stay around a bit longer. In other words, it’s not gonna dry out quite as readily. Also, they’re either glycerin or starch-based. These are the two ingredients that give them their viscosity. Some are hydrophilic versus hydrophobic. What does that mean? Well, hydrophobic is water hating. Hydrophilic is water loving.
Even though we don’t ever put a hydrogel in a wound to absorb, if you’ve chosen a hydrophilic hydrogel and you put it on top of a wound with dead tissue, what is it supposed to do? It will infuse moisture into the dead tissue causing that dry, dead tissue to become what? More moist. If you’ve chosen a hydrophilic hydrogel, some of that moisture will be able to wick into the hydrogel and the hydrogel will still maintain its body.
Now, please understand, you can’t keep pumping fluid into a hydrophilic hydrogel because eventually, it will break down. But the flipside of that is, is if you’ve chosen a hydrophobic hydrogel, as the hydrogel hydrates that dead tissue creating moisture, even that little bit of moisture that is created and it turns that dry, dead tissue into moist, dead tissue, that moisture will actually break the hydrogel down and it will become more runny and therefore, it will dry out much more quickly.
There are sterile hydrogels and there are preserved. Sterile hydrogels really are intended for single use only because they have no preservative. Preserved hydrogels could be multi-dispensed as long as you did not contaminate the opening of the tube or the squeeze bottle or whatever, the end where the hydrogel came out.
This is a picture and a case study of a very brittle diabetic who had pain, erythema, edema and heat to the foot. She went to the doctor and upon a plain x-ray, there showed significant osteo. The surgeon initially had suggested a transmetatarsal amputation. The patient refused. They agreed upon an eight centimeter resection of the second toe. This picture was taken 30 days after the surgeon removed 8 centimeters of that second toe, so remember, this a through and through wound, right? It goes all the way through.
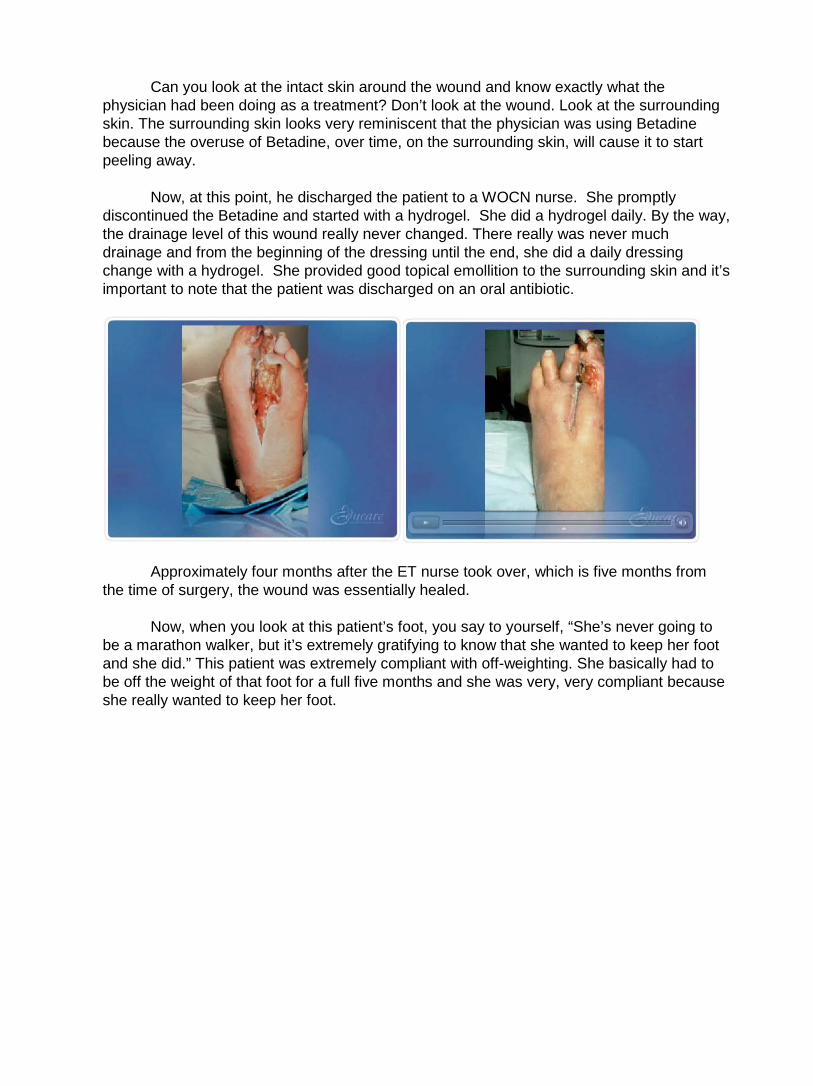
Can you look at the intact skin around the wound and know exactly what the physician had been doing as a treatment? Don’t look at the wound. Look at the surrounding skin. The surrounding skin looks very reminiscent that the physician was using Betadine because the overuse of Betadine, over time, on the surrounding skin, will cause it to start peeling away.
Now, at this point, he discharged the patient to a WOCN nurse. She promptly discontinued the Betadine and started with a hydrogel. She did a hydrogel daily. By the way, the drainage level of this wound really never changed. There really was never much drainage and from the beginning of the dressing until the end, she did a daily dressing change with a hydrogel. She provided good topical emollition to the surrounding skin and it’s important to note that the patient was discharged on an oral antibiotic.
Approximately four months after the ET nurse took over, which is five months from the time of surgery, the wound was essentially healed.
Now, when you look at this patient’s foot, you say to yourself, “She’s never going to be a marathon walker, but it’s extremely gratifying to know that she wanted to keep her foot and she did.” This patient was extremely compliant with off-weighting. She basically had to be off the weight of that foot for a full five months and she was very, very compliant because she really wanted to keep her foot.

This is a dehisced abdominal wound. It gives us a nice example of the different types of tissue that we can see in one wound. You’ll see at the base of the wound, it’s nicely filled with slough You can also see those little black hash marks, which are sutures. At 9:00, you see eschar and the remaining upper sides of the wound, you see viable tissue, but what’s wrong with the whole entire wound? It’s bone dry. We obviously know, in terms of optimal moisture, we need to hydrate this wound and while we hydrate, we will autolytically debride both the slough and the eschar.
Is what they chose was, they lined the wound bed with the hydrogel. They filled the dead space with a damp gauze. They covered it with an ABD. They changed it every day with good irrigation in between and after ten dressing changes, this is what it looked like. Please notice that just after ten dressing changes, not only did it debride, but you see wonderful contraction. So you never just get debridement, then granulation, that contraction and epithelialization. They sort of all work together.
What’s the goal now? To continue to maintain an optimal amount of moisture. Could you continue to use a hydrogel? Absolutely, but they decrease the frequency to three times per week.
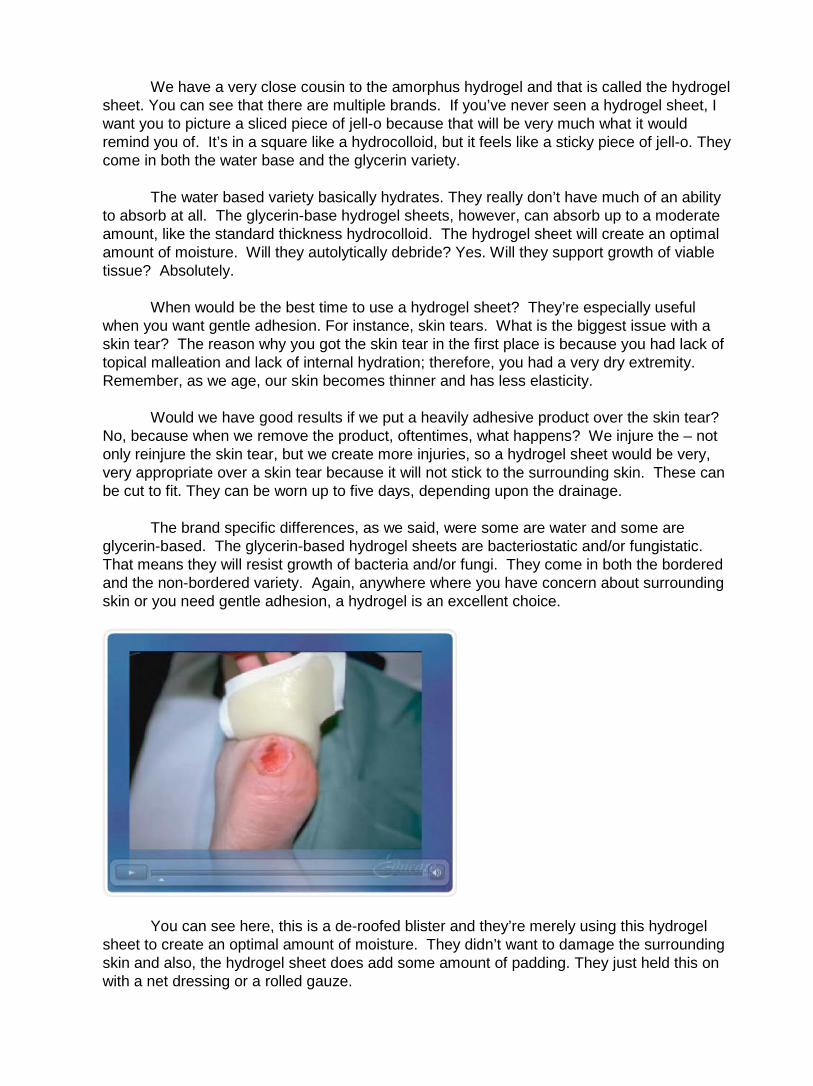
We have a very close cousin to the amorphus hydrogel and that is called the hydrogel sheet. You can see that there are multiple brands. If you’ve never seen a hydrogel sheet, I want you to picture a sliced piece of jell-o because that will be very much what it would remind you of. It’s in a square like a hydrocolloid, but it feels like a sticky piece of jell-o. They come in both the water base and the glycerin variety.
The water based variety basically hydrates. They really don’t have much of an ability to absorb at all. The glycerin-base hydrogel sheets, however, can absorb up to a moderate amount, like the standard thickness hydrocolloid. The hydrogel sheet will create an optimal amount of moisture. Will they autolytically debride? Yes. Will they support growth of viable tissue? Absolutely.
When would be the best time to use a hydrogel sheet? They’re especially useful when you want gentle adhesion. For instance, skin tears. What is the biggest issue with a skin tear? The reason why you got the skin tear in the first place is because you had lack of topical malleation and lack of internal hydration; therefore, you had a very dry extremity. Remember, as we age, our skin becomes thinner and has less elasticity.
Would we have good results if we put a heavily adhesive product over the skin tear? No, because when we remove the product, oftentimes, what happens? We injure the – not only reinjure the skin tear, but we create more injuries, so a hydrogel sheet would be very, very appropriate over a skin tear because it will not stick to the surrounding skin. These can be cut to fit. They can be worn up to five days, depending upon the drainage.
The brand specific differences, as we said, were some are water and some are glycerin-based. The glycerin-based hydrogel sheets are bacteriostatic and/or fungistatic. That means they will resist growth of bacteria and/or fungi. They come in both the bordered and the non-bordered variety. Again, anywhere where you have concern about surrounding skin or you need gentle adhesion, a hydrogel is an excellent choice.
You can see here, this is a de-roofed blister and they’re merely using this hydrogel sheet to create an optimal amount of moisture. They didn’t want to damage the surrounding skin and also, the hydrogel sheet does add some amount of padding. They just held this on with a net dressing or a rolled gauze.

Alginates. If you think of an alginate, what does it look like? Looks like a piece of cotton. Alginates come in multiple different brand names, just as any other product. They are delivered in both sheets and cavity varieties. They are appropriate for moderate to heavy drainage. Will they support autolytic debridement? Yes, as long as you have moderate to heavy drainage. Will they support growth of living tissue? Yes, as long as you have moderate to heavy drainage.
What about wear time? Well, you know it’s time to change an alginate when the drainage actually strikes through and is visible on the top of the secondary dressing or at least every five days. Now, depending upon the setting that you work in, you might be able to decrease your frequency of dressing change by choosing a different secondary. For instance, in home care where you’re trying to maximize the use of your product. To decrease the nurse being in the home, you might fill the dead space of this wet wound with an alginate rope, and then you might cover it with a foam, thereby taking a daily dressing change to a three time per week dressing change.
Alginates do have some limitations. They should not be used on dry to minimally draining wounds. For instance, if you assess that the wound is moderately draining and you apply an alginate and then you go back to change the alginate and there was only a small amount of drainage, that little bit of drainage will cause the initial fibers to adhere to the wound. It’s very, very difficult to remove them. You actually would have to pick them off with tweezers, so you do not want to put an alginate in a wound that is not moderate to heavily draining.
Please, do not add saline or sterile water to an alginate if you do not have enough drainage. If that indeed is the case, then just use a hydrogel. It’s a much more cost-effective product. Never put an alginate into a hole, cavity or a tunnel or dead space unless you can realistically retrieve it. In other words, if you have small opening, don’t take an alginate rope and stuff it in there with a cotton tip applicator because you’re not going to be able to retrieve it, so be realistic when it comes to the use of an alginate. If you’ve got a hole of that size, the best thing you could put in there would be a gauze packing strip, where you were able to leave the tail sticking out of the wounds so that you could realistically retrieve it.
As far as differences from one brand to the next, they all come in sheets versus ropes. Some do have different textures. Some may absorb a little more. Some may absorb a little less. Some become gel-like when saturated. Some alginates wick laterally versus horizontally. What this means, if you have a horizontally wicking alginate and you’re using a sheet, and the sheet sits onto the peri wound skin, if it wicks horizontally, that means the drainage will continue to wick even past the edge of the wound. Potentially, you would have some wound drainage sitting onto the alginate on the intact skin versus a laterally wicking alginate.
Even though the alginate sits onto the peri wound skin, as soon as the drainage hits the edge of the wound, it will stop. It will not go past the edge of the wound.
This next series of pictures will show wounds that are appropriate for alginates, whether they be viable, viable or necrotic. As long as the wounds are moderate to heavily draining, they will both autolytically debride and support growth of living tissue.

Foams. Again, please notice the multiple different manufacturers who manufacture foams. When you think of a foam, think of a sponge. In terms of optimal moisture, what does a foam do? It absorbs. Foams are appropriate for moderate to heavy drainage. It will support both autolytic debridement and growth of viable tissue.
The wear time issues; you can wear a foam up to seven days or as indicated by the strike through. Again, up to seven days or when the drainage strikes through to the top of the dressing and it shows that the dressing is significantly saturated with drainage then it would also be time to change. Again, please remember to think of foams in use of combinations with other dressings to increase the frequencies of their wear time.
Limitations. Please do not use a foam while you use a hydrogel. What do you think would happen if you put a hydrogel down first, and then a foam on top? Of course, the hydrogel will wick into the foam and foams are not appropriate for dry wounds. Again, moderate to heavy.
Brand specific differences; some foams are adhesive, some are nonadhesive. Some foams have an adhesive border. Some foams are non-bordered. Some are thick, some are thin. Some come fenestrated for trachs. Some come in different shapes or sizes. They come in rolls or in a cavity variety.

You can see here, by the visualization of the strike through on the top of the foam,
how much drainage this product holds. It’s very, very absorptive.
This is a patient in a home care environment where the nurse was not able to get in there frequently and so they needed a product that was very, very absorptive. If you would please look at the top right, which is towards the patient’s head, I’m going to show you two more pictures of those two wounds.
You see that there is slough in the upper wound and now you see both of them almost completely healed and obviously debrided with the use of a foam because the wound was moderate to heavily draining.
Composite dressings. Composite dressings, again, come created by multiple different manufacturers. When you think of a composite dressing, I want you to think of a couple of things. First of all, in order for a product to be called a composite dressing, it must contain at least four things. Number one, it must contain and adhesive border. Number two, it must contain a semi-adherent to a non-adherent surface to the pad. Number three, it must contain an absorptive quality to the pad. Number four, it must contain a bacterial barrier.
Composite dressings basically can be used as primary or secondary dressings, depending upon what products are being used. The ease of use of a composite dressing is that composite dressings are delivered like big Band-Aids. Basically, they’re peel and stick and they are bordered in that soft cloth retention dressing tape. They mold very well in those crevices near the sacral and the anal areas and the gluteal folds.
The wear time issues are very dependent upon the frequency of the primary dressing. If the primary dressing is being changed every three days, then obviously, the whole dressing, including the composite dressing, will be changed. It’s very, very dependent upon what you’re using the product for.
There are some brand specific differences, however. Some composite dressings are not bordered by that soft cloth retention dressing tape. They’re actually bordered by a transparent film, but they’re still called composite dressings. To date, all composite dressings known are waterproof.
Border gauzes. Bordered gauzes are almost identical to composite dressings. They have an absorptive pad. They have an adhesive border. They have a semi-adherent to a non-adherent surface to the pad. The one thing that they’re missing is they are not waterproof, but they do have that Band-Aid application. When you’re making your assessment as to what to use, please consider your options. If you don’t have issues with incontinence or you’re not needing waterproofing, please choose a bordered gauze. If you’re needing to waterproof, then you might choose a composite dressing.
Again, the wear time issues with a bordered gauze are going to be very
individualized. If you’re using them as a secondary dressing, the frequency may be dependent upon the primary dressing. If you’re using them as a primary dressing, it’s going to depend on what’s going on with the wound at the time. Again, they come in different sizes, shapes. All bordered gauzes are bordered in that soft cloth retention dressing tape.
Let’s change gears here for a moment. Let’s talk about compression.
Compression is typically used to treat edema and also, patients with venous stasis ulcers, venous stasis disease. There are many different forms of compression. As a clinician, it’s extremely important to know the differences between therapeutic amounts of compression and non-therapeutic amounts of compression. Remember that compression does require training.
You have to make sure, if you’re going to use therapeutic amounts of compression, that you have enough arterial flow. If you’re using an ABI or an ankle brachial index, you need to have an ABI of 0.8 or greater. Remember, if you’ve got a patient who is a diabetic who possibly has a duel diagnosis of venous insufficiency and some atherosclerosis, an ankle brachial pressure index may not be appropriate. Why? Because the vessel would be calcified and you wouldn’t get an accurate reading, therefore, you might need to do another test.
Remember that there is a great potential for over or under compression, not only with the product that you choose, but how you apply the product. We cannot stress enough; arterial profusion must be adequate if therapeutic amounts of compression are going to be applied. If you can’t use regular tape, think about using self-adherent wraps, elastic netting, dressing retention sheets, tubular net bandages. Specifically, these tubular bandages are very, very helpful on extremities or on the trunks of patients that don’t move unless you move them.
In review, evaluate and treat the whole patient first. Remember, don’t merely zero in on that wound. Look at the whole patient first, then treat the wound. Remember, an optimal moist environment is best. Choose the dressing to match the wound, but be prepared to change the choice as the wound progresses. Don’t feel as if you have done something incorrect if you use multiple different dressing options during the treatment of the particular wound you are looking at. Utilize you available resources to assist you with optimal wound healing.
Look to your physicians for appropriate diagnosis. Utilize your physical therapists and your occupational therapists. Your OT’s will help you with splinting and your PT’s will help you with seating surfaces and other modalities. Look to your advanced practitioners, you clinical specialists, like you ET wound ostomy, continence nurses. Look to your wound product manufacturers when you have specific issues regarding – or questions regarding particular products and how they work.
This concludes the Educare Module, topical dressing selection.


![Skin integrity and wound care [autosaved]](https://img.pdfslide.us/doc/110x75/554b5a28b4c9051b458b4cd6/skin-integrity-and-wound-care-autosaved.jpg)