Embed Size (px)
Citation preview

Document Generation System
Merge Workform User Guide
Current as of 3/1/2017

i
Table of Contents
1 Overview .................................................................................................................................. 1
2 Login to DGS ............................................................................................................................ 1
3 Merge Workform ..................................................................................................................... 1
4 Viewing Merged Document ..................................................................................................... 2
4.1 Show Sub Items ................................................................................................................ 3
4.2 Show Prescription ............................................................................................................ 4
4.3 Show Fields ....................................................................................................................... 5
4.3.1 Edit Fields .................................................................................................................. 6
4.3.2 Save Fields ................................................................................................................. 7
5 Comparing Merged Documents .............................................................................................. 7
6 Editing Merged Document .................................................................................................... 10
6.1 Copy Item Before ........................................................................................................... 10
6.2 Copy Item After .............................................................................................................. 12
6.3 Edit Document Item ....................................................................................................... 14
6.4 Add Document Item ....................................................................................................... 15
6.5 Delete Document Item ................................................................................................... 15
6.6 View and Edit Document Property ................................................................................. 16
7 Icons that Denote Changes .................................................................................................... 17
NIH OAMP Merge Workform
1
1 Overview
The Document Generation System (DGS) allows document owners the ability to merge workform updates into their draft document. The merge process applies to RFPs and Contracts. RFP Amendments are excluded from this process. The Merge Workform feature is accessible to an existing document after updates are made to the Workforms and published to DGS.
2 Login to DGS
1. Open Internet Explorer browser and type in the URL http://dgs.nci.nih.gov/ in the address bar of your browser. The NIH Login screen appears.
2. Enter your NIH user name and password or PIN followed by clicking on the Log in button.
3. After successful login, the View Documents screen displays.
3 Merge Workform
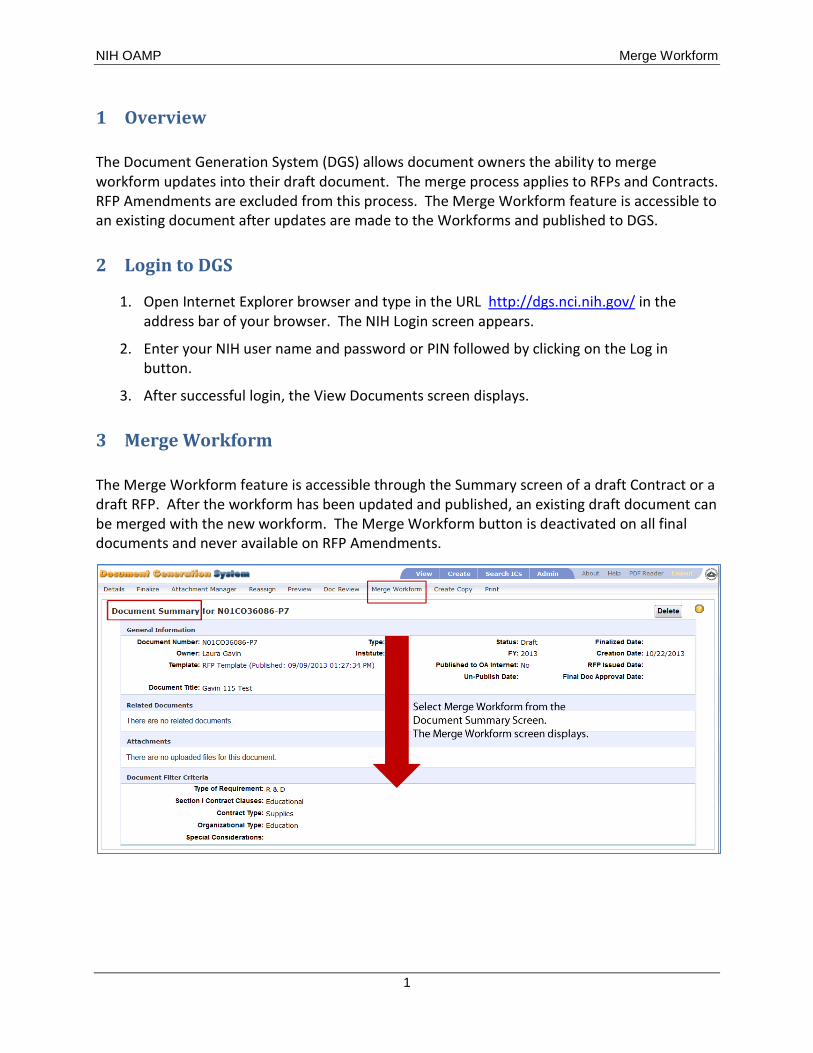
The Merge Workform feature is accessible through the Summary screen of a draft Contract or a draft RFP. After the workform has been updated and published, an existing draft document can be merged with the new workform. The Merge Workform button is deactivated on all final documents and never available on RFP Amendments.
NIH OAMP Merge Workform
2
1. Open an exisitng draft RFP or draft Contract document after the workform has been updated and published.
2. From the document Summary screen, select Merge Workform. The Merge Workform selection screen appears.
3. You can select from the following options:
a. Merge Workform – select to merge your current document with the latest published workform.
b. Resume Last Merge – select Resume Last Merge after you have begun merging your document, but were unable to complete the updates. This feature is only available if you have previously selected Merge Workform.
c. Cancel – Select Cancel to terminate the merge process.
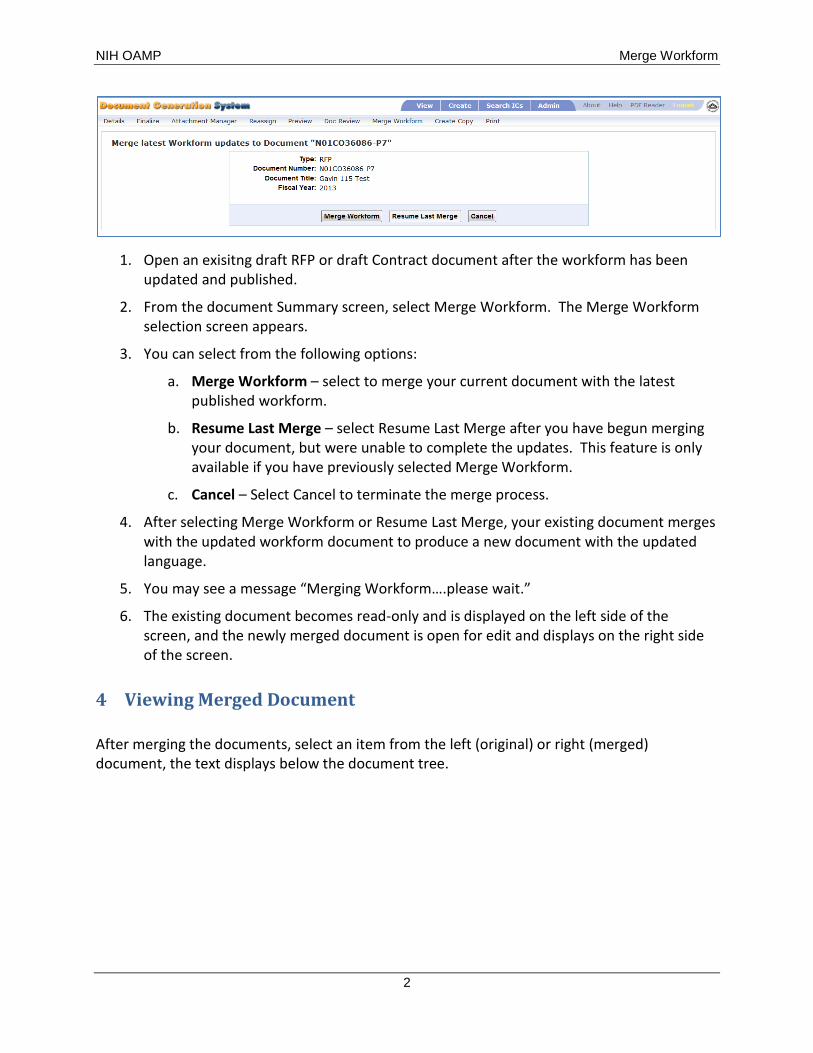
4. After selecting Merge Workform or Resume Last Merge, your existing document merges with the updated workform document to produce a new document with the updated language.
5. You may see a message “Merging Workform….please wait.”
6. The existing document becomes read-only and is displayed on the left side of the screen, and the newly merged document is open for edit and displays on the right side of the screen.
4 Viewing Merged Document
After merging the documents, select an item from the left (original) or right (merged) document, the text displays below the document tree.

NIH OAMP Merge Workform
3
Once the text displays under the document trees, you can alter how you are viewing the text. Just above the item content is a menu bar that allows you to Show/hide Sub Items, Show/hide Prescription, Show/hide input fields, and edit the input fields.
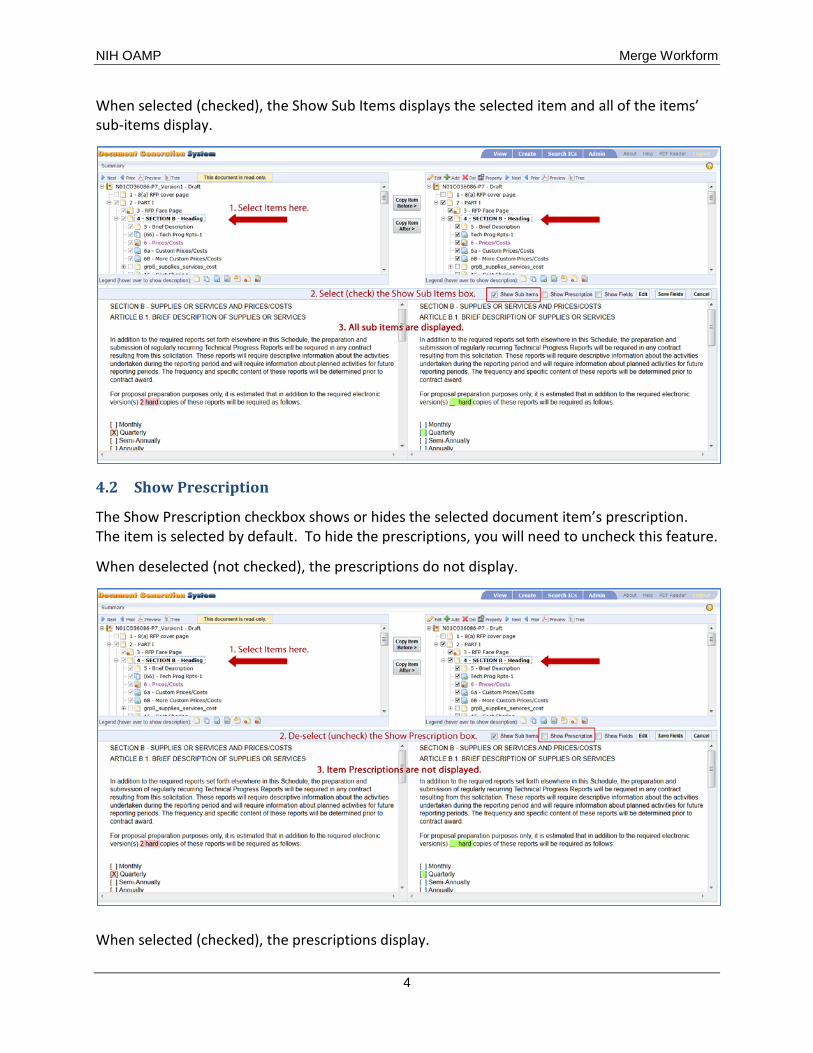
4.1 Show Sub Items
The Show Sub Items checkbox shows or hides the selected document item and any sub-items for that document item. The Show Sub Items box is deselected (unchecked) by default. To see the sub-items, you will need to check this feature.
When deselected (not checked), the Show Sub Items displays only the selected item and none of the sub-items display.
NIH OAMP Merge Workform
4
When selected (checked), the Show Sub Items displays the selected item and all of the items’ sub-items display.
4.2 Show Prescription
The Show Prescription checkbox shows or hides the selected document item’s prescription. The item is selected by default. To hide the prescriptions, you will need to uncheck this feature.
When deselected (not checked), the prescriptions do not display.
When selected (checked), the prescriptions display.

NIH OAMP Merge Workform
5
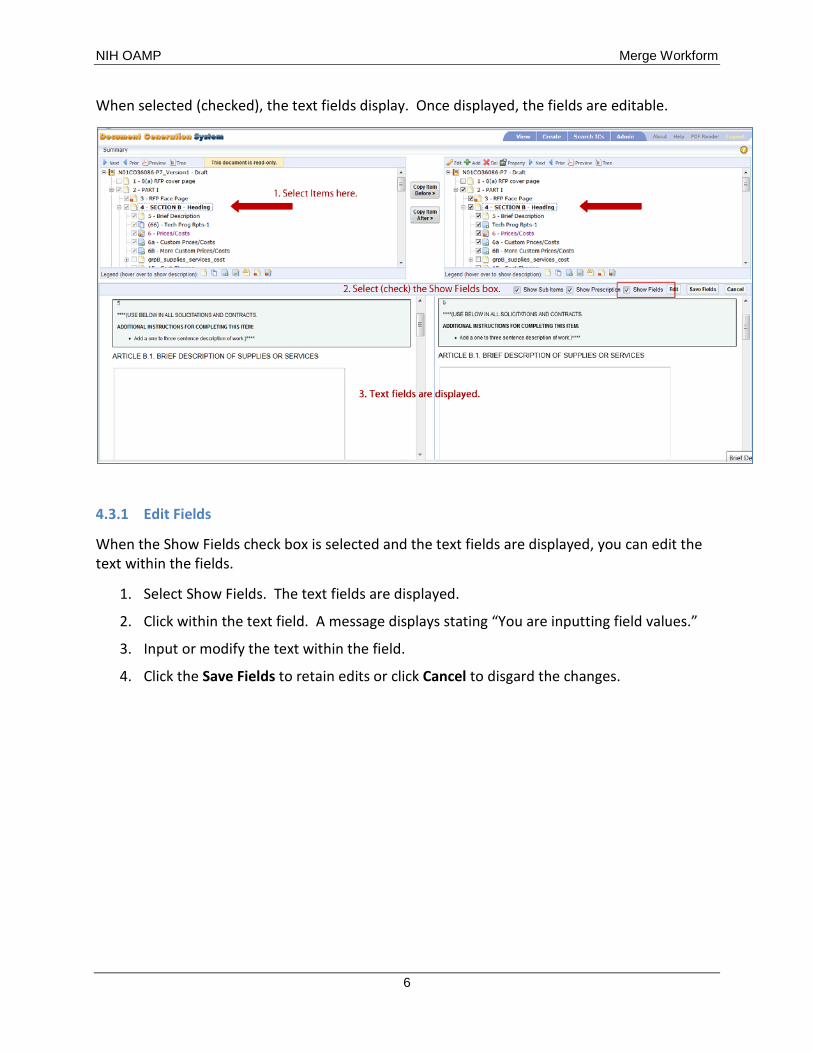
4.3 Show Fields
The Show Fields checkbox shows or hides the selected document item’s text fields. The Show Fields item is deselected by default. To view the text fields, you will need to check this feature.
When deselected (not checked), the text fields do not display.
NIH OAMP Merge Workform
6
When selected (checked), the text fields display. Once displayed, the fields are editable.
4.3.1 Edit Fields
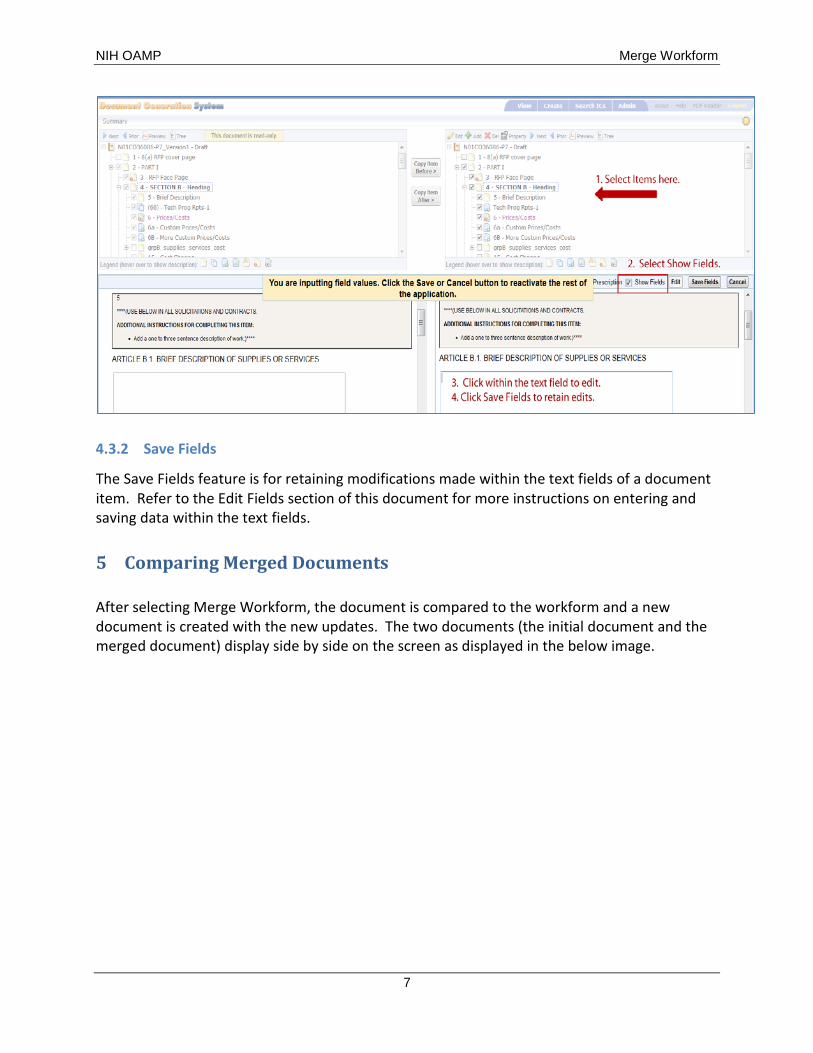
When the Show Fields check box is selected and the text fields are displayed, you can edit the text within the fields.
1. Select Show Fields. The text fields are displayed.
2. Click within the text field. A message displays stating “You are inputting field values.”
3. Input or modify the text within the field.
4. Click the Save Fields to retain edits or click Cancel to disgard the changes.
NIH OAMP Merge Workform
7
4.3.2 Save Fields
The Save Fields feature is for retaining modifications made within the text fields of a document item. Refer to the Edit Fields section of this document for more instructions on entering and saving data within the text fields.
5 Comparing Merged Documents
After selecting Merge Workform, the document is compared to the workform and a new document is created with the new updates. The two documents (the initial document and the merged document) display side by side on the screen as displayed in the below image.

NIH OAMP Merge Workform
DGS Merge Workform User Guide 8 | P a g e
The below image displays a sample of the DGS data screen after selecting the Merge Workform.
The left side of the screen displays your original document. This document is set to read-only, so no changes can be made to the original document, but items can be copied from this document into the new document.
The right side of the screen displays the new document with the workform updates merged into your original document.
You can compare your original document on the left with the new document on the right. You can modify, add items and delete items to this document.

NIH OAMP Merge Workform
DGS Merge Workform User Guide 9 | P a g e
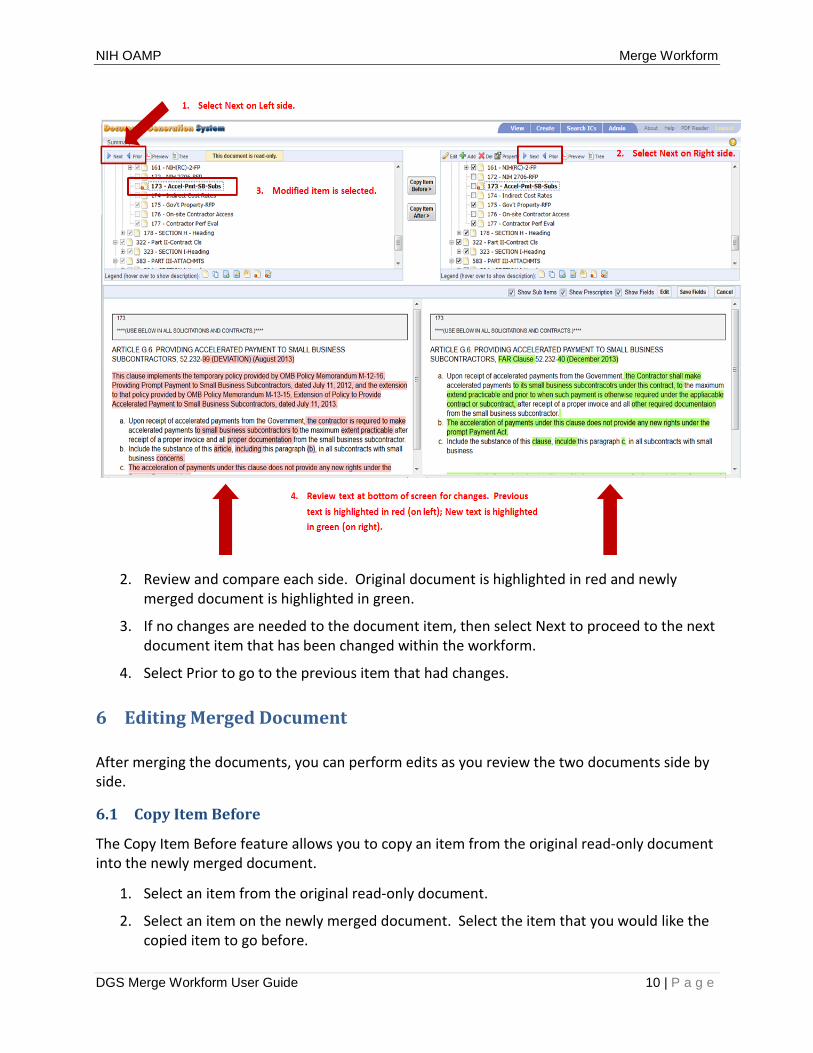
To begin the review process, you can scroll through the item tree, or you can use the navigation features available at the top of the document tree:
• Next – Select Next to find the next item within the document tree that has modified information.
• Prior – Select Prior to find the previous item within the document that has modified information.
• Preview – Generates a PDF display of the selected item, or the entire document if the document number is selected.
• Tree – Generates a PDF of the document tree.
1. Select Next from the Left document; select Next from the Right document. The next document item that has modifications is selected and displayed.
NIH OAMP Merge Workform
DGS Merge Workform User Guide 10 | P a g e
2. Review and compare each side. Original document is highlighted in red and newly merged document is highlighted in green.
3. If no changes are needed to the document item, then select Next to proceed to the next document item that has been changed within the workform.
4. Select Prior to go to the previous item that had changes.
6 Editing Merged Document
After merging the documents, you can perform edits as you review the two documents side by side.
6.1 Copy Item Before
The Copy Item Before feature allows you to copy an item from the original read-only document into the newly merged document.
1. Select an item from the original read-only document.
2. Select an item on the newly merged document. Select the item that you would like the copied item to go before.

NIH OAMP Merge Workform
DGS Merge Workform User Guide 11 | P a g e
3. Select Copy Item Before.
a. A message appears confirming you would like to copy the item to the new document.
b. Select OK to continue.
c. Select Cancel to terminate the request.
4. Once OK is selected, then the item is copied to the new document.
5. You can now edit the item within the new document.
6. If you copied the item to an incorrect area, you can move the item within the new document. To move the item, use one of these options:
a. Cut and Paste:
i. Select the newly copied item, right click, and select Cut.
ii. Navigate to the new area, select an item and select Paste.
iii. The item can be pasted on the same level or on a sub-level below the selected item.
b. Drag and Drop:
i. Select the newly copied item. Click and hold the item.
ii. Drag the item to the new location.
iii. Release the mouse and the item is moved under the selected item.

NIH OAMP Merge Workform
DGS Merge Workform User Guide 12 | P a g e
Copy Item Before – Image displays document tree before copying an item to the new document:
Copy Item Before – Image displays document tree after copying an item to the new document.
6.2 Copy Item After
The Copy Item After feature allows you to copy an item from the original read-only document into the new merged document.
1. Select item from the original read-only document.
2. Select item on the newly merged document. Select the item that you would like the copied item to go after.
3. Select Copy Item After.
a. A message appears confirming you would like to copy the item to the new document.

NIH OAMP Merge Workform
DGS Merge Workform User Guide 13 | P a g e
b. Select OK to continue.
c. Select Cancel to terminate the request.
4. Once OK is selected, then the item is copied to the new document.
5. You can now edit the item within the new document.
Copy Item After – this image displays the document tree before copying an item to the new document.
Copy Item After – this image displays the document tree after copying an item to the new document.
6. If you copied the item to an incorrect area, you can move the item within the new document. To move the item, use one of these options:
a. Cut and Paste:
i. Select the newly copied item, right click, and select Cut.

NIH OAMP Merge Workform
DGS Merge Workform User Guide 14 | P a g e
ii. Navigate to the new area, select an item and select Paste.
iii. The item can be pasted on the same level or on a sub-level below the selected item.
b. Drag and Drop:
i. Select the newly copied item. Click and hold the item.
ii. Drag the item to the new location.
iii. Release the mouse and the item is moved under the selected item.
6.3 Edit Document Item
While comparing the documents, you can edit the newly merged document.
1. Select an item from the new document on the right.
2. Select Edit from the top menu bar on the right.
3. The DGS Editor opens and allows full edit of the selected item. Once edits are complete, select Save & Exit from the DGS Editor screen. The editor screen closes and the merge workform screens continue to display.

NIH OAMP Merge Workform
DGS Merge Workform User Guide 15 | P a g e
6.4 Add Document Item
You can add an item from within the Merge Workform screen. This feature works the same as when you are in the Details screen.
1. Select an item within the new document on the right. The new item will go below the selected item, so select an item that you wish the new item to go below.
2. Select Add from the top menu bar.
3. Choose either On Same Level or On Sub Level.
4. Input the Short Title, Long Title, TOC Title and the Prescription.
5. Click within the large text area to add content.
6. Select Save to save information and continue editing.
7. Select Save & Exit to retain the data and exit the Add Item screen.
8. Select Cancel to terminate the add process.
6.5 Delete Document Item
Delete is used to remove any custom items – those are items created by you. No items from the Workform can be deleted, but you can uncheck those items to remove them from view within the document.
1. Select a custom item within the new document on the right.
2. Select Delete from the top menu bar.
NIH OAMP Merge Workform
DGS Merge Workform User Guide 16 | P a g e
3. An alert message appears confirming the delete request.
a. Select OK to continue.
b. Select Cancel to terminate request.
4. After selecting OK, the item is permenatly deleted from the document.
6.6 View and Edit Document Property
You can view and edit the document properties.
1. Select an item within the new document on the right.
2. Select Property from the top menu bar. The Item Properties screen displays.
3. You can make the following selections:
a. Insert page break (before selected item).
b. Do not output TOC Title in PDF or HTML.
c. Show TOC Title in table of contents.
d. Set TOC Indentation Level.
4. Select Save to retain changes; select Cancel to terminate change request.

NIH OAMP Merge Workform
DGS Merge Workform User Guide 17 | P a g e
7 Icons that Denote Changes
When changes are made to the template or the document, the document item is marked with an icon to alert the document owner that changes have been made.
• This icon represents a document item.
• The icon with two pages represents an item that was copied from another document.
• When a new item is added to the document or the workform, the new item is marked with a plus sign icon.
• When the document owner modifies the content of an item, the item is marked with a pencil icon.
• When the template administrator modifies the Prescriptions or Title within the Workform, after selecting Merge Workform these changes are marked with a Yield Sign icon.
• When the template administrator modifies the content within the Workform, and after selecting Merge Workform, these changes are marked with an Exclamation Point icon.
• When an item has been modified within the original document by the user, and the same item has been updated within the template by the template administrator.