Embed Size (px)
Citation preview

This document contains essential information – please read it carefully before makingany attempt to upgrade the system
82BCXR01C
Check List
Please ensure that you have the following items before attempting any part of the upgrade:
1 V2.0/1 Update Notes (this document)
1 C10 HD Software Disk Image (website download)
1 Software Licence String(Redundant systems will require two licence strings)
If any of the listed items are missing, please contact your local SSL representative before attempting theupgrade
Digital Broadcast Console
V2.0/1 Software Update and Install NotesApplicable to upgrades from V1.2/17 onwards
Solid State LogicS V I S I NOO U N D
As research and development is a continual process, Solid State Logic reserves the rightto change the features and specifications described herein without notice or obligation
E&OE
Initial Release (Rev 0): June 2010Added additional bug fixes/feature notes, corrected typos (Rev 1): July 2010
Begbroke, Oxford, England, OX5 1RU • +44 (0)1865 842300
320West 46th Street, 2nd Floor, NewYork, NY 10036, USA • +1 (1) 212 315 11113700Wilshire Blvd, Suite 720, Los Angeles, CA 900310, USA • +1 (1) 323 549 9090
3-55-14 Sendagaya, Shibuya-Ku,Tokyo 151-0051, Japan • +81 (0)3 5474 11447 bis, rue de la Victoire, le Blanc Mesnil, Paris 93150, France • +33 (0)1 48 67 84 85
Via Timavo 34, 20124 Milano, Italy • +39 (0)39 2328 094
Visit SSL at URL: http://www.solid-state-logic.com
© Solid State LogicAll Rights reserved under International and Pan-American Copyright Conventions
C10 HD, C100 HD, C100 HDS, C200 HD, C300 HD, Blackrock, RIO, NetBridge,Solid State Logic and SSL are trademarks of Solid State Logic
All other product names and trademarks are the property of their respective owners
No part of this publication may be reproduced in any form orby any means, whether mechanical or electronic, without thewritten permission of Solid State Logic, Oxford, England
Solid State LogicS V I S I NOO U N D

Page 1
V2.0/1 Software Update
IntroductionThis document describes the new features and fixes incorporated in V2.0/1 software, and details the software installationprocedure required to update your system to this latest release of C10 HD software.
Please note that this release is only applicable to those systems that have previously been installed with V1.2/17 software.If you have any questions about this release, please contact your local SSL office or distributor.
AssumptionsThe following points are assumed in these installation instructions:
A1. This installation procedure details installation of new software on a running system, not a fresh installation
A2. During commissioning/installation of the C10 HD system, at least one networked computer within the studio facility– ideally located in the same room as the console – will have been configured to communicate with the system.Access to one of these computers will be required to run the software installation process. This will be referred toin the following text as the ‘networked computer’.
A3. The network IP Address that has been assigned to the C10 HD system will be required. If you do not know thesedetails, please contact your IT or Studio Maintenance Department.
A4. The networked computer used for this installation should have an SSH client installed (‘PuTTY’, for example).This program will be used to communicate with the C10 HD system – login as ‘sbc’ using ‘server’ as the password.If you are unsure how to run this program, or the default password has been changed, please contact your IT or StudioMaintenance Department.
A5. Back up of the current system and installation of the new software will require that the networked computerhas access to the folders exported by the C10 HD system. This can be achieved as follows:
a. Click on ‘Run’ in the Windows Start menu.
b. In the ‘Run’ box, type ‘\\<IP_Address> <CR>’Where: ‘\\’ indicates that we wish to mount a file share,
‘<IP_Address>’ is the IP Address of the C100 HDS system,‘<CR>’ indicates the ‘Return’ key on the computer keyboard.
c. At the resulting login prompt, enter the username (‘sbc’) and password (the default for this login being ‘sbc123’).This will result in a view of the shared folders on the C10 HD system, similar to that shown below:
Support software is placed in here
System backups appear in here

C10 HD Software Update
Page 2
Software Installation on a Single Blackrock System
This installation procedure applies to single Blackrock systems only – the process for redundant systems is slightly differentand so is detailed separately on page 4.
1. Ensure that you have all of the items shown in the Check List at the begining of this document; if you are unsureabout any item, please contact your local SSL office before proceeding further.
Archiving the System Disk2. As with all software installations, we strongly advise you to generate a ‘mirror’ copy of the C10 HD System Disk
before proceeding. Open the SSH client on the networked computer and login to the C10 HD system(ref. Assumption A4.). Once you are logged in (as user ‘sbc’), type:
backup_system_disk <CR> This will create a time and date stamped backup file in the‘system_backup’ folder.
The backup process copies the entire C10 HD System Disk and so will take a considerable time (≈15min) to complete.It is of course also recommended that any backups created are stored off-line elsewhere.
3. To ensure that sufficient space is still available to contain the upgrade, type:
df -h /home <CR> Check that the percentage used is less than about 90%. If itis higher, consider removing any old backups from the‘system_backup’ folder.
Installing the Support Software4. Connect the USB memory device containing the V2.0/1 Software Disk image to the networked computer and
open a window to display the contents of the USB device.
5. Locate the ‘updates’ folder within the folders exported by the C10 HD system (ref. Assumption A5.).
6. On the USB device, open the ‘C10_V2.0/1_Updates’ folder and drag the following three .rpm files from the USB deviceinto the ‘Updates’ folder:
• kernel SBC kernel and associated modules
• ssl_console_files Blackrock system software and files
• ssl_host_tools SBC support files and applications
7. Once the .rpm files have been copied, return to the SSH client and type:
install_updates <CR>. This will unwrap and install one of the .rpm archives. Followthe on-screen instructions to install it.

V2.0/1 Software Update
Page 3
Installing the C10 HD System Software8. Once the files are installed the system
code will need to be copied to the flashmemory on the Blackrock processor’sPCIe card. At the terminal prompt typingload_console_code <CR> will result in alist of software versions similar to thatshown here.
Select the version of code you wish toinstall by entering the number next tothe software version, eg. 1 <CR> in theillustration opposite. The system codewill now be copied to the flash device onthe PCIe card. A percentage indicator onthe terminal will provide an indication asto how far through the process thesystem is. On completion a prompt will request a key on the keyboard be pressed to shutdown ‘p’ or reboot ‘r’ theBlackrock processor – it is recommended that at this point the C10 HD console be shutdown and re-powered ifpossible.
Enabling the New System9. When the system has fully booted, a pop-up will appear on screen inviting you to enter a Software Licence string and
so enable the software.
You will not be able to use the console until the Software Licence has been accepted.
Carefully enter the Software Licence using the on-screen keyboard. Once the system has verified the validity of theLicence, a Software Licence Agreement will appear on-screen. Stab on the ‘I Agree’ box at the top of the pop-up tocomplete the licensing procedure. Reboot the processor to ensure the licence is correctly read.
10. Remember to store the Software Licence string in a safe place along with the C10 HD Software.
Once the update is complete and the console has rebooted, any Windows workgroup the Blackrock has been assigned tomay need to be reassigned (updates performed by the SSL Host Tools package may erase various parts of the networkintegration settings) – you may need to contact your IT or Studio Maintenance personnel to check this.

Software Installation on a Redundant Blackrock System1. Ensure that you have all of the items shown in the Check List at the begining of this document; if you are unsure
about any item, please contact your local SSL office before proceeding further.
Archiving the System Disk2. As with all software installations, we strongly advise you to generate a ‘mirror’ copy of the C10 HD System Disk
before proceeding. Open the SSH client on the networked computer and login to the C10 HD system(ref. Assumption A4.). Once you are logged in (as user ‘sbc’), type:
backup_system_disk <CR> This will create a time and date stamped backup file in the‘system_backup’ folder.
The backup process copies the entire C10 HD System Disk and so will take a considerable time (≈15min) to complete.It is of course also recommended that any backups created are stored off-line elsewhere. This must be done separatelyfor both Blackrock processors – but this can be done on both processors simultaneously.
3. To ensure that sufficient space is still available to contain the upgrade, on each system type:
df -h /home <CR> Check that the percentage used is less than about 90%. If itis higher, consider removing any old backups from the‘system_backup’ folder.
Installing the Support Software4. Connect the USB memory device containing the V2.0/1 Software Disk image to the networked computer and
open a window to display the contents of the USB device.
5. Locate the ‘updates’ folder within the folders exported by the C10 HD system (ref. Assumption A5.).
6. On the USB device, open the ‘C10_V2.0/1_Updates’ folder and drag the following three .rpm files from the USB deviceinto the ‘Updates’ folder:
• kernel SBC kernel and associated modules
• ssl_console_files Blackrock system software and files
• ssl_host_tools SBC support files and applications
7. Once the .rpm files have been copied, return to the SSH client and type:
install_updates <CR>. This will unwrap and install one of the .rpm archives. Followthe on-screen instructions to install it.
C10 HD Software Update
Page 4

V2.0/1 Software Update
Page 5
Installing the C10 HD System Software8. Once the files are installed the system
code will need to be copied to the flashmemory on the Blackrock processor’sPCIe card. At the terminal prompt typingload_console_code <CR> will result in alist of software versions similar to thatshown here.
Select the version of code you wish toinstall by entering the number next tothe software version, eg. 1 <CR> in theillustration opposite. The system codewill now be copied to the flash device onthe PCIe card. A percentage indicator onthe terminal will provide an indication asto how far through the process thesystem is. On completion a prompt will request a key on the keyboard be pressed to shutdown ‘p’ or reboot ‘r’ theBlackrock processor – it is recommended that at this point the C10 HD console be shutdown and re-powered ifpossible.
Enabling the New System9. When the system has fully booted, a pop-up will appear on screen inviting you to enter a Software Licence string and
so enable the software.
You will not be able to use the console until the Software Licence has been accepted.
Each processor will have a different licence; match the 5 digit PAL id. given with the licence to the Blackrock networkID shown on the screen and type this in carefully using the on-screen keyboard. Once the system has verified the validityof the Licence, a Software Licence Agreement will appear on-screen. Stab on the ‘I Agree’ box at the top of the pop-up to complete the licensing procedure. Reboot the processor to ensure the licence is correctly read.
10. Repeat this process from Step 2. for the slave processor.
11. Once all updates have been performed, re-boot both processors together.
12. Remember to store the Software Licence strings in a safe place along with the C10 HD Software.
Once the update is complete and the console has rebooted, any Windows workgroup the Blackrock has been assigned tomay need to be reassigned (updates performed by the SSL Host Tools package may erase various parts of the networkintegration settings) – you may need to contact your IT or Studio Maintenance personnel to check this.

C10 HD Software Update
Page 6

Update Contents
New Features 9Snapshots 9GPIO 9Front Panel Replacement 9Software Fault Diagnosis 9Pan Formats 9
Optional Features 11
SSL Broadcast Automation Interface 11
Simultaneous Automation and Operator Control 11The User Interface 12Ross Overdrive 13Sony ELC Interface 14Technical Set-up Information 15Hardware 15Software 15Automation Support Features 17
Bug Fixes 18
Software Licence Agreement 19
V2.0/1 Software Update
Page 7
C10 HD Software Update
Page 8

New FeaturesThe following new features are introduced with this C10 HD V2 software update.
SnapshotsThe Snapshot feature has been enhanced with the introduced of Replace. This option allows the user to update existingsnapshots; simply highlight the snapshot you wish to update and press ‘Replace’.
GPIOSupport has been added for the new Ethernet GPIO boxes.
Front Panel ReplacementA ‘Refresh’ function in the Spanner/Etherpanel menu has been added – to be used when replacing control surface tiles.
Software Fault DiagnosisAn ssl_diags.sh command has been introduced. This command, run from the SBC terminal, will collect all of the log filesand other system information necessary for software fault diagnosis into a single file for easy return to SSL. The resultantarchive will be placed in the following locations:
• On the Desktop of the SBC user
• Into the Transfers folder – accessible via the Samba shares
This command can only be run from the ‘root’ account and the archive produced will be a gnu-zipped tar file, named inthe form of ‘diag_log_<Serial_No>.tar.gz’.
Pan FormatsUser defined pan formats are now available when creating IO groups.
V2.0/1 Software Update
Page 9

C10 HD Software Update
Page 10

V2.0/1 Software Update
Page 11
Optional FeaturesThe following features are chargeable options introduced with this C10 HD V2 software update.
SSL Broadcast Automation InterfaceC10 HD V2 software adds support for remote control from both the Ross Overdrive and Sony ELC automation systems.Both systems connect to an RS422 port on the C10 HD console control surface and use serial communication to send andreceive data to and from the console. (In the case of the Sony system, their Ethernet based control is converted to Serialwith a Linksys Ethernet to Serial convertor.) Information about the wiring of these interfaces can be found in the relevantConsole Installation Guide. For the purposes of these notes, we’ll assume the wiring and any necessary ancillaryhardware is in place and working.
Switching Automation OnAutomation capability is enabled through a software licence and is set-up in an editable text file stored with the other systemset-up files. This file specifies whether the automation is enabled or disabled, the format for the serial communication (baudrate etc.) and the number of channels under automation control. The number of channels always starts with the console’sfirst channel and counts up from there.
Channels & Formatted ChannelsAutomation always controls ‘formatted channel 1 and up’. In the C10 a ‘formatted channel’ is a single fader strip (this maybe mono, stereo or 5.1 format). Therefore, if the automation asks to raise channel 1 in the console and channel 1 is set tobe a 5.1 formatted channel, all 5.1 signals will change level. To understand how the C10 HD console configures its channels,please refer to:
• C10 HD Operator’s Manual, Section 2, Page 5
Simultaneous Automation and Operator ControlUsing custom layers, the channel faders under control can be hidden from the operator’s view of the surface so that theconsole can be used simultaneously by both an operator and the automation system without distraction.
Automation control size can be specified from a single channel to all channelsof the console but typically eg. 16 of 64 channel (not fader strips; see below).

C10 HD Software Update
Page 12
The User InterfaceFrom the console, the operator interface for automation control is a simple ‘soft key’ command labelled ‘REMOTE ON’ thatcan be programmed onto a centre section switch. This enables the control of the processing from the automation system.The status of this soft key is saved with the console project data, so that when a project is recalled with Automation controlenabled, this function is also enabled.
CommandsAlthough largely the same, there are some minor differences in the console control functions that the Ross and Sonyinterfaces can support, as listed below.
In UseFundamentally the SSL Broadcast Automation interface provides the Ross or Sony automation system with a remotecontrolled mixer. This mixer follows commands issued from the automation system (or the vision mixer/switcher) and thuscontrols the audio mix of the production.
The Automation System works in parallel with the console’s physical controls, so if you adjust the level of a channel underautomation control, the audio will change level. The fact that the level has changed will also be flagged to the automationsystem.
The limited abilities of the automation system (fader level, on/off etc.) mean that the console will most likely have to be pre-configured for a specific show, to set mic gains, EQ, master bus settings etc. This can all be simplified by the creation ofprojects to work with specific automated productions, other advantages are listed at the end of this section.
Function Ross Overdrive Sony ELCMaster (Program) Fader Level � �
Channel Fader Level � �
Channel Pan � �
Channel On/Off � �
Channel PFL On/Off � �
Mix Minus Feeds � �

V2.0/1 Software Update
Page 13
Ross Overdrive
For the Ross Overdrive to SSL Console interface to operate, the Ross Large Audio Mixer Interface option and the SSLBroadcast Automation Interface option need to be purchased from their respective manufacturers (Ross & SSL) andinstalled as part of the automation system and console configuration.
ConnectionThe C10 HD console connects directly to the Ross video switcher/mixer using an RS422 serial communication link betweenthe primary connector panel of the console and the communication ports on the rear of the vision switcher/mixer.
Rear view of the Ross Vision Switcher Control Panel;the RS422 cable can connect to any of these ports.
Vision Switcher to SSL Console cable (Pin to Pin 9-way D-type)
ConfigurationInformation on how to set-up the Audio Mixer control is detailed in the Ross ‘Vision Audio Mixer’ document. This is beingupdated to include specific information about SSL, but largely the current set-up information for Calrec consoles is verysimilar, with the exception of the cable wiring as detailed above.
If the system is configured and connected correctly, enabling ‘REMOTE ON’ in the SSL console (via the ‘soft-key’) willconnect the system and faders, PFL etc. will respond as described in the Ross documentation. The soft-key label for thisfunction appears as ‘RAP’ on the key label and on the touch screen key. Remember that the channels ‘under remote control’will be from console channel 1 up, as defined by the CONTROLLED_CHANS parameter in the ross_config file described in theTechnical Set-Up Information section of this document.
OperationFor information on how to use the Automation Interface, please refer to:
• Ross Vision Operator’s Manual (Ross Part No. 4800DR-403), Ops Section 10, Pages 10 to 12.
Vision Switcher SSL Console
Remote Port Signal RS422 Port Signal1 n/c
2 RxA (Rx–) � 2 TxA (Tx–)
3 TxB (Tx+) � 3 RxB (Rx+)
4 Gnd 4 Gnd
5 Gnd
6 n/c 6 Gnd
7 RxB (Rx+) � 7 TxB (Tx+)
8 TxA (Tx–) � 8 RxA (Rx–)
9 n/c

C10 HD Software Update
Page 14
Sony ELC Interface
For the Sony to SSL Console Interface to operate, the Sony ELC-MVS01 system will need to have both the Sony BZEL-MVS41 Sony Audio Mixer I/F Software option and the SSL Broadcast Automation Interface option purchased from theirrespective manufacturers (Sony & SSL) and installed as part of the automation system and console configuration.
ConnectionThe C10 HD console uses an RS422 Serial Connection to communicate with the Sony ELC automation system. The SonyELC interconnection uses a Lantronix UDS1100 External Device Server to translate between its native Ethernetcommunication and RS422 Serial protocol. (www.lantronix.com/device-networking/external-device-servers/uds1100.html)
This unit is configured using the Lantronix Device Installer application provided on the CD-ROM that ships with the unit. This application scans the local network and returns the IPaddress of any connected Lantronix UDS1100 interfaces. Selecting the appropriate ‘found’interface, then displays a screen which allows configuration of the Serial Port (interfaceformat, baud rate, parity etc.). This should be set to match the default settings as detailedin the ‘ross_config’ file in the Technical Set-Up Information section of thisdocument.
The Lantronix UDS1100 ships with a 9-pin to 25-pin D-type cable. This is wired for RS232 and is therefore not useable inthis application. A custom RS422 9-pin to 25-pin cable will be required. The RS422 25 way pin-out is detailed in the LantronixUser Documentation supplied with the unit whilst the SSL 9-pin wiring is detailed in the appropriate Console InstallationGuide.
ConfigurationInformation on how to set-up and use the Audio Mixer control is detailed in the Sony Live Production ControlSoftware ELC-MVS01 User’s Guide. At the time of writing, this is at 1st revision for software V1.2.0 and later.Useful page references are:
• Pages 11 & 12, System Configuration How the automation system and audio mixer work together
• Page 20, Audio Mixer Settings Window Configuring the audio mixer within the ELC software
• Pages 47 to 53, Making the Audio Mixer Settings Describes how the audio mixer is controlled in detail
• Pages 148 to 151, Controlling the Audio Level Manually Describes control of the mixer via ELC when On-Air
If the system is configured and connected correctly, enabling ‘REMOTE ON’ in the SSL console (via the ‘soft-key’) willconnect the system and faders, PFL etc. will respond as described in the Sony documentation. Remember that the channels‘under remote control’ will be from console channel 1 up, as defined by the CONTROLLED_CHANS parameter in the ross_configfile described in the Technical Set-Up section of this document.

V2.0/1 Software Update
Page 15
Technical Set-up Information
HardwareBoth the Ross Overdrive and Sony ELC Broadcast Automation Systems connect to an RS422 serial connector, normallylocated on the underside of the C10 HD console. Further connection information is detailed in the latest ConsoleInstallation Guide for the relevant console.
Broadcast Automation is only supported by C10 HD V2 – or later – software.
Software
SSL System ConfigurationBroadcast Automation is a software licence enabled feature. If the software option for the console has been purchased,there will be a licence string for the console that enables the feature.
If either the licence string or the feature is missing, please contact SSL Support for assistance.
If the feature is enabled, there will be a plain text file located in the sysfiles directory named ross_config. This file controlsthe configuration of the interface and is usually set-up on system installation and shouldn’t need to be changed.
This file is called ross_config for both Ross and Sony interfaces.
The ross_config file should normally contain the following:
<Ross_Setup>ENABLED 1PORT 12BAUD_RATE 115200PARITY ODDDATA_BITS 8STOP_BITS 1TX_TIMEOUT 25SEND_ACKS 1EXPECT_ACKS 0REPORT_CHANGES 1MAX_UPDATES_PER_SEC 10CONTROLLED_CHANS 256/<Ross_Setup>
The table on the page opposite provides details each of these entries.
Page 16
C10 HD Software Update
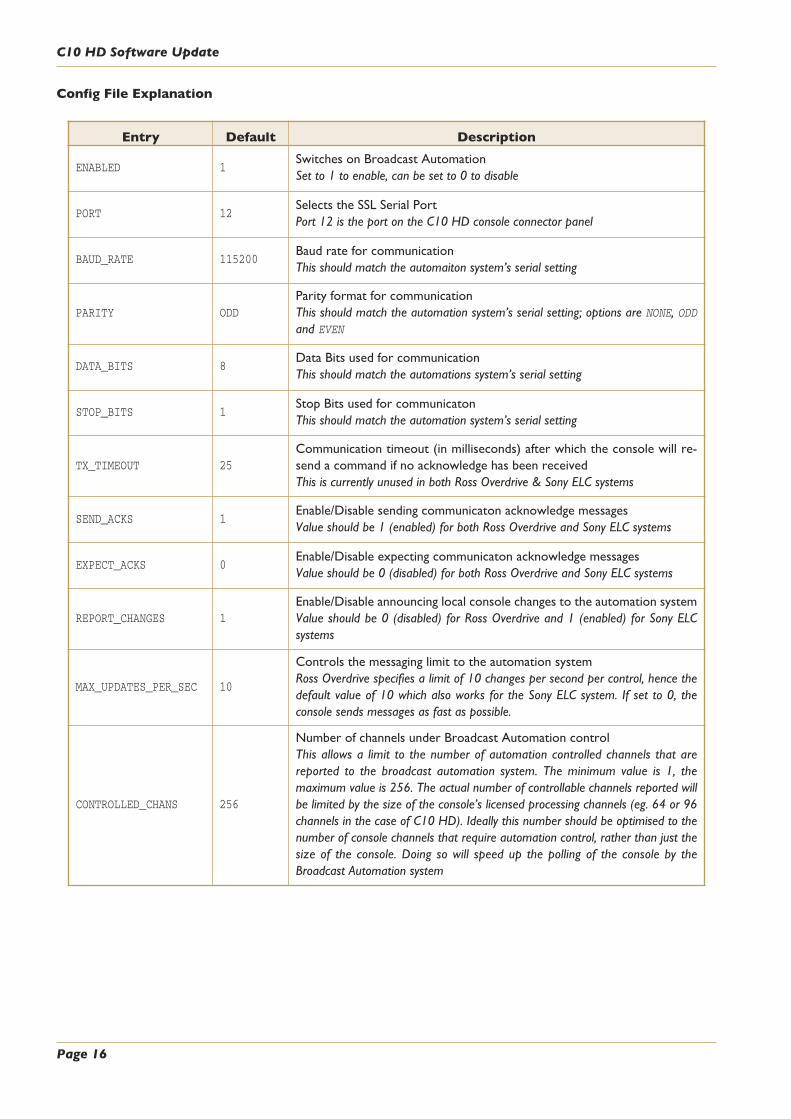
Config File Explanation
Entry Default Description
ENABLED 1Switches on Broadcast AutomationSet to 1 to enable, can be set to 0 to disable
PORT 12Selects the SSL Serial PortPort 12 is the port on the C10 HD console connector panel
BAUD_RATE 115200Baud rate for communicationThis should match the automaiton system’s serial setting
PARITY ODDParity format for communicationThis should match the automation system’s serial setting; options are NONE, ODDand EVEN
DATA_BITS 8Data Bits used for communicationThis should match the automations system’s serial setting
STOP_BITS 1Stop Bits used for communicatonThis should match the automation system’s serial setting
TX_TIMEOUT 25Communication timeout (in milliseconds) after which the console will re-send a command if no acknowledge has been receivedThis is currently unused in both Ross Overdrive & Sony ELC systems
SEND_ACKS 1Enable/Disable sending communicaton acknowledge messagesValue should be 1 (enabled) for both Ross Overdrive and Sony ELC systems
EXPECT_ACKS 0Enable/Disable expecting communicaton acknowledge messagesValue should be 0 (disabled) for both Ross Overdrive and Sony ELC systems
REPORT_CHANGES 1Enable/Disable announcing local console changes to the automation systemValue should be 0 (disabled) for Ross Overdrive and 1 (enabled) for Sony ELCsystems
MAX_UPDATES_PER_SEC 10
Controls the messaging limit to the automation systemRoss Overdrive specifies a limit of 10 changes per second per control, hence thedefault value of 10 which also works for the Sony ELC system. If set to 0, theconsole sends messages as fast as possible.
CONTROLLED_CHANS 256
Number of channels under Broadcast Automation controlThis allows a limit to the number of automation controlled channels that arereported to the broadcast automation system. The minimum value is 1, themaximum value is 256. The actual number of controllable channels reported willbe limited by the size of the console’s licensed processing channels (eg. 64 or 96channels in the case of C10 HD). Ideally this number should be optimised to thenumber of console channels that require automation control, rather than just thesize of the console. Doing so will speed up the polling of the console by theBroadcast Automation system

V2.0/1 Software Update
Page 17
Automation Support FeaturesThe following is a list of the SSL Broadcast Console features that can help the smooth workflow of an automated productionenvironment.
Feature Benefit
Project System ConfigurationAllows a preset show to be recalled for the whole console, ready for theautomation system to control the show with no set-up.
Delay Compensation ToolsDelay Compensation in the console allows video and audio to be synchronised,even with complex production chains that include graphics and caption insertiondevices.
Source LinkingSelection of a channel’s source sets up the console processing automatically withpreset values – “This is Sandy’s Mic and here are the normal EQ, Dynamics etcsettings that this uses” – all achieved at the press of a button.
Mix Minus BussesWith show set-ups that have multiple presenters or external sources, the abilityto create audio monitoring feeds including mixes ‘minus’ the source feed areessential.
5.1 Capable
With the commonplace use of High Definition production, consistent 5.1performance is important. The C10 HD have a complete set of surround toolsincluding dedicated channel configurations and monitoring. The console alsohandles down-mixing to stereo automatically too.
Dialogue Automix
This sophisticated tool option allows the console to manage the opening andclosing of multiple presenter microphones automatically to achieve a consistent,professional output with minimal leakage noise and no missed cues, hands free.Super fast cuts from mic to mic!
5.1 Up-Mix
Many viewer’s complaints in surround are to do with the collapsing of thesurround audio when stereo feeds are selected. This option provides the abilityto up-mix automatically without the need for additional processing. A furtherbenefit is that the algorithm will also seamlessly down-mix without artefacts if thesignal is folded to stereo later in the production signal chain.

C10 HD Software Update
Page 18
Bug FixesThe following is a list of the major bugs fixed or resolved in this release:
• Console no longer hangs when clearing a project
• The Write Protect option no longer disappears
• A delay is no longer applied to channels or groups if the value is anything else but 0 and Delay is switched out
• The pop-up to manage quick routes now refreshes correctly
• AFV settings are now synced across on redundant systems
• When a 5.1 channel is spilled out and one of the elements EQ’ed the audio no longer clicks
• Licence status is now reported in System/Status
• The front panel frame ID is now read correctly
• MORSE output routes are now refreshed before the MORSE input routes to solve issue with routes not being madeon changeover
• MORSE static routes are no longer remade on changeover
• AFV values now synchronise between master and slave machines
• DHD stageboxes with more than 5 cards of the same type (but less than 12) are now read correctly
• When changing between PGM1 and PGM2 in the PGM page now refreshs meters correctly
• Console responds to MORSE router restart by resending mic gain, pad etc values
• Support added for MORSE router card changeover when network to the active MORSE controller card fails
• Indication in the MORSE setup page showing if a spare MORSE controller card fitted
• Improved speed of routing list refresh
• Locks correctly to AES sync
• Added System Dormant and System Slave functions to match the System Active and System Master ones

V2.0/1 Software Update
Page 19
Software Licence AgreementSolid State Logic (‘SSL’) is willing to license this C10 HD software and accompanying documentation for this product (the‘Software’) to the customer (the entity that purchased the product and software) on the condition that you read and acceptall of the terms in this agreement. Please read the terms below carefully. By continuing to install the software and using theenclosed information to license the software you acknowledge that you have read and understood the agreement and agreeto be bound by its terms and conditions. If you do not agree to these terms then do not open this package, discontinue theinstallation process and contact your local SSL representative for advice.
LicenceSSL hereby grants you a non-exclusive licence to install and use the Software in machine-readable form on a single console.You may copy the software only for backup purposes, provided that you reproduce all copyright and other proprietarynotices that are on the original copy of the Software.
RestrictionsSSL retains the right, title and interest in and to the Software, and any rights not granted to you herein are reserved by SSL.You may not reverse engineer, disassemble, decompile, or translate the Software, or otherwise attempt to derive the sourcecode for the Software, except to the extent allowed under applicable law. If applicable law permits such activities, anyinformation so discovered must be promptly disclosed to SSL and shall be deemed to be the confidential proprietaryinformation of SSL. Any attempt to transfer any of the rights, duties or obligations hereunder is void. You may not rent, lease,loan or resell for profit the Software, or any part thereof. You may not reproduce, distribute or create derivative works ofthe Software.
Limitation of LiabilityIn no event will SSL or it’s suppliers be liable for profits or other consequential, incidental or special damages howeverarising, including negligence, in connection with the software or this agreement, even if SSL has been advised of the possibilityof such damages. In no event will SSL’s liability in connection with the Software, regardless of the form of action, exceed £100.
IndemnityYou agree to defend and indemnify SSL against all claims, losses, liabilities, damages costs and expenses, including legal fees,which SSL may incur in connection with your breach of this Agreement.
GeneralThe Software is a commercial item. This Agreement is governed and interpreted in accordance with the laws of the UnitedKingdom.

Page 20
C10 HD Software Update

Introduction 1
Assumptions 1
Software Installation on a Single Blackrock System 2
Archiving the System Disk 2Installing the Support Software 2Installing the C10 HD System Software 3Enabling the New System 3
Software Installation on a Redundant Blackrock System 4
Archiving the System Disk 4Installing the Support Software 4Installing the C10 HD System Software 5Enabling the New System 5
New Features 9Snapshots 9GPIO 9Front Panel Replacement 9Software Fault Diagnosis 9Pan Formats 9
Optional Features 11
SSL Broadcast Automation Interface 11
Simultaneous Automation and Operator Control 11The User Interface 12Ross Overdrive 13Sony ELC Interface 14Technical Set-up Information 15Hardware 15Software 15Automation Support Features 17
Bug Fixes 18
Software Licence Agreement 19