Embed Size (px)
Citation preview
�
Copies of the I/B. Please reproduce them without any changes except under special instruction from Team International BELGIUM. The pages must be reproduced and folded in order to obtain a booklet A5 (+/- 148.5 mm width x 210 mm height). When folding, make sure you keep the good numbering when you turn the pages of the I/B. Don’t change the page numbering. Keep the language integrity. Print only what is inside the frame.
� Front cover page (first page)
Assembly page 1/48
Fax +32 2 359 95 50
Digital Airfryer
Freidora de aire digital
Friteuse à air
chaud digitale
FT 42174 120V~ 60Hz 1400 W (11.7A) www.KALORIK.com
�
Copies of the I/B. Please reproduce them without any changes except under special instruction from Team International BELGIUM. The pages must be reproduced and folded in order to obtain a booklet A5 (+/- 148.5 mm width x 210 mm height). When folding, make sure you keep the good numbering when you turn the pages of the I/B. Don’t change the page numbering. Keep the language integrity. Print only what is inside the frame.
2 FT 42174 - 160331
Assembly page 2/48
Fax +32 2 359 95 50
IMPORTANT SAFEGUARDS When using electrical appliances, basic safety precautions should always be followed, including the following: 1. READ ALL INSTRUCTIONS BEFORE USE! 2. Check that the voltage in your hope corresponds to that stated on the
appliance. 3. Do not touch hot surfaces. Use handles or knobs. 4. To protect against electrical shock, fire or personal injury, do not
immerse cord, plugs, or the appliance in water or other liquid. 5. Close supervision is necessary when any appliance is used by or near
children. As a rule, this appliance is not intended to be used by children. 6. Unplug from outlet when not in use and before cleaning. Allow to cool
before putting on or taking off parts. 7. Do not operate any appliance with a damaged cord or plug or after
the appliance malfunctions or has been damaged in any manner. Return the appliance to the nearest authorized service facility for examination, repair, or adjustment.
8. The use of accessory attachments not recommended by the appliance manufacturer may cause injuries.
9. Do not use outdoors. 10. Do not let the cord hang over the edge of a table or counter, or touch
hot surfaces. 11. Do not place on or near a hot gas or electric burner, or in a heated
oven. 12. Extreme caution must be used when moving an appliance containing
hot oil or other hot liquids. 13. To disconnect, turn any control to “off” (or 0), then remove the plug
from wall outlet. 14. Do not use the appliance for anything other than intended use. 15. Oversize foods or metal utensils must not be inserted in the airfryer as
they may create a fire or risk of electric shock. 16. A fire may occur if the appliance is covered or touching flammable
material, including curtains, draperies, walls, and the like, when in operation. Do not store any item on top of the appliance when in operation.
17. Do not clean with metal scouring pads. Pieces can break off the pad and touch electrical parts involving a risk of electric shock.
18. Extreme caution should be exercised when using containers constructed of other than metal or glass.

�
Copies of the I/B. Please reproduce them without any changes except under special instruction from Team International BELGIUM. The pages must be reproduced and folded in order to obtain a booklet A5 (+/- 148.5 mm width x 210 mm height). When folding, make sure you keep the good numbering when you turn the pages of the I/B. Don’t change the page numbering. Keep the language integrity. Print only what is inside the frame.
3 FT 42174 - 160331
Assembly page 3/48
Fax +32 2 359 95 50
19. Do not store any materials, other than manufacturers recommended accessories, in this appliance when not in use.
20. Do not place any of the following materials in the appliance: paper, cardboard, plastic, and the like.
21. Do not cover the cooking basket or any part of the airfryer with metal foil. This causes overheating of the airfryer.
22. Do not leave unit unattended when in use. 23. Use extreme caution when removing the basket or basket holder and
disposing of hot grease. 24. The airfryer can be turned off while using any of the functions by
pressing the on/off button. 25. During hot air frying, hot steam is released through the air outlet
openings. Keep your hands and face at a safe distance from the steam and from the air outlet openings. Also be careful of hot steam and air when you remove the pan from the appliance.
26. Immediately unplug the appliance if you see dark smoke coming out of the appliance. Wait for the smoke emission to stop before you remove the pan from the appliance.
27. Do not place the appliance against a wall or against other appliances. 28. Leave at least 4 inches (10 cm) of free space on the back, sides and
above the appliance.
Caution!! • Always place the appliance on a horizontal, level, heat resistant and
stable surface. • This appliance is intended for normal household use only. • Always unplug the appliance after use. • Let the appliance cool down for approximately 30 minutes before
handling or cleaning it. • The appliance is equipped with a safety micro switch inside that will shut
the appliance off automatically if the basket is removed during cooking. • Never press the release button unless the basket holder is resting on a
flat, level, and heat resistant surface!
SAVE THESE INSTRUCTIONS HOUSEHOLD USE ONLY

�
Copies of the I/B. Please reproduce them without any changes except under special instruction from Team International BELGIUM. The pages must be reproduced and folded in order to obtain a booklet A5 (+/- 148.5 mm width x 210 mm height). When folding, make sure you keep the good numbering when you turn the pages of the I/B. Don’t change the page numbering. Keep the language integrity. Print only what is inside the frame.
4 FT 42174 - 160331
Assembly page 4/48
Fax +32 2 359 95 50
POLARIZED PLUG INSTRUCTIONS
This appliance is equipped with a polarized plug (one blade is wider than the other). To reduce the risk of electric shock, this plug will fit into the polarized outlet only one way. If the plug does not properly fit into the outlet at first, reverse it. If it still does not fit, contact a competent qualified electrician. Do not attempt to modify the plug in any way.
SHORT CORD INSTRUCTIONS
A short power supply cord is provided to reduce the hazards resulting from becoming entangled in, or tripping over a longer cord. Extension cords may be used if care is exercised in their use.
• The electrical rating of the extension cord should be at least that of the appliance. If the electrical rating of the extension cord is too low, it could overheat and burn.
• The resulting extended cord should be arranged so that it will not drape over the counter top or tabletop where it can be pulled on by children or tripped over.
KNOW YOUR AIRFRYER
Prepare your favorite foods and snacks in a quick, healthy, and easy way with your new airfryer. This airfryer combines heat with high-speed air circulation and a top grill to cook your ingredients from all sides, simultaneously! It also allows you to prepare a variety of tasty dishes without the addition of excess oils or fats to most ingredients. This airfryer features: • A touch-sensitive control panel with 7 preset menus. • A digital control of the cooking time and temperature. • A temperature control range of 170°F – 400°F (76°C – 200°C) • A timer range from 0 to 60 minutes, which is equipped with an auto
shut-off feature. Once the timer reaches “0:00”, the unit will beep five times and turn itself off.
Other great advantages provided by your Kalorik airfryer include:
• Fast cooking, with little to no preheating required. • Quick and easy clean-up: the non-stick coated parts are conveniently
sized to fit in the dishwasher. • Hassle-free frying—no spatters, no mess, and no oil smell! • Versatility—with its frying, baking, grilling, and roasting capacities, this
unit serves as a great cooking tool for a busy kitchen. • No assembly required—very easy and safe to use! • Also features a dual-layer rack and 3 skewers to maximize the cooking
capacity and versatility of your airfryer.
�
Copies of the I/B. Please reproduce them without any changes except under special instruction from Team International BELGIUM. The pages must be reproduced and folded in order to obtain a booklet A5 (+/- 148.5 mm width x 210 mm height). When folding, make sure you keep the good numbering when you turn the pages of the I/B. Don’t change the page numbering. Keep the language integrity. Print only what is inside the frame.
5 FT 42174 - 160331
Assembly page 5/48
Fax +32 2 359 95 50
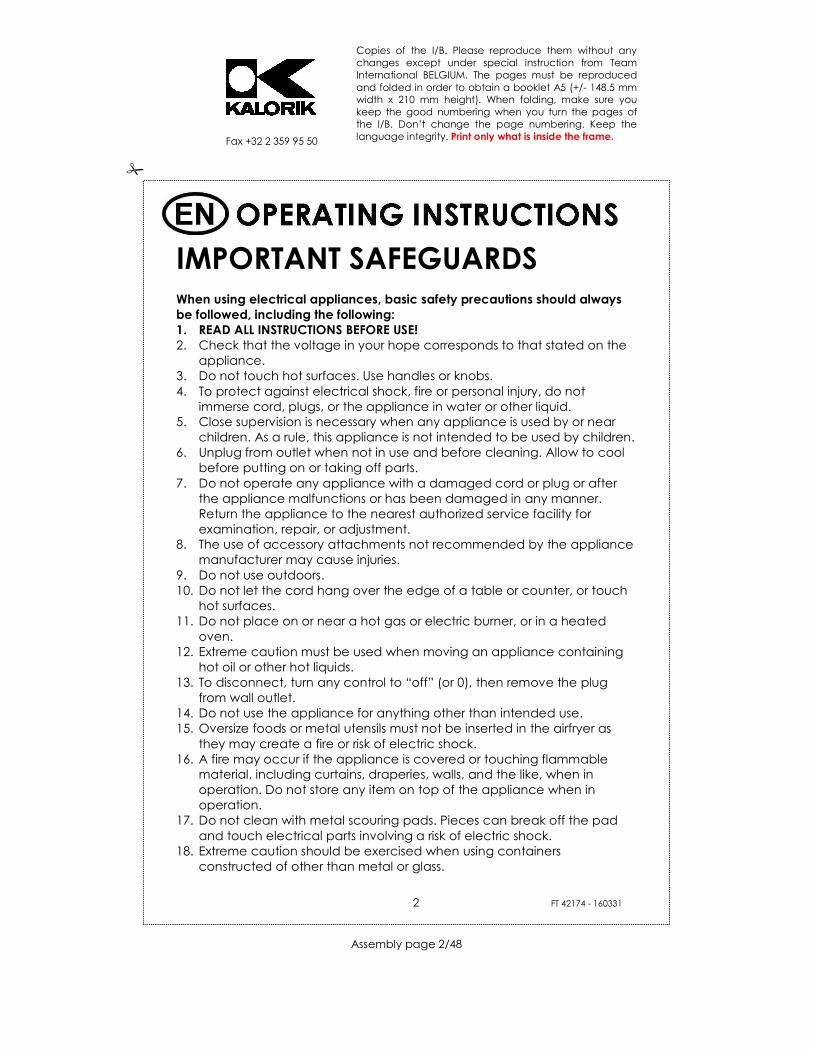
PARTS AND CONTROLS DESCRIPTION
1. Touchscreen digital control panel 2. Food basket 3. Food basket holder 4. Handle
5. Food basket release button with safety cover
6. Main Housing 7. Air inlet ring
a. Menu/Preset icons b. Heating up signal (red dot) c. +/- temperature adjustment keys d. Menu selection key
e. +/- cooking time adjustment keys f. On/off key g. Temperature and time display h. Fan/hot air circulation icon
b
c
d
e
f
a
g
2
3
4
5
6
1
7
h

�
Copies of the I/B. Please reproduce them without any changes except under special instruction from Team International BELGIUM. The pages must be reproduced and folded in order to obtain a booklet A5 (+/- 148.5 mm width x 210 mm height). When folding, make sure you keep the good numbering when you turn the pages of the I/B. Don’t change the page numbering. Keep the language integrity. Print only what is inside the frame.
6 FT 42174 - 160331
Assembly page 6/48
Fax +32 2 359 95 50
BEFORE THE FIRST USE
• Unpack the appliance and its accessories (food basket, food basket holder, rack). Wash the accessories in hot, soapy water and then wipe them dry. Wipe the interior of the frying cavity with a damp cloth or sponge, and then dry with a paper towel. Make sure the cavity is dry before operating the unit.
• Position the airfryer on a flat, level and heat-resistant surface, making sure that it is also positioned at least 4 inches (10cm) away from any surrounding objects.
• It is recommended to let the airfryer heat for about 20 minutes without any food in it. This helps to eliminate grease that may have adhered during manufacturing, and to eliminate the "new" appliance smell.
• Ventilate the room during this period. When your airfryer is heated for the first time, it may emit slight smoke or odor. This is normal with many heating appliances. This does not affect the safety of your appliance.
Caution: When moving the airfryer, make sure that you hold it securely and support the base—do not rely on the food basket handle when moving the fryer!
OPERATING INSTRUCTIONS
1. Preparing for use
• Place the appliance on a stable, horizontal, and level surface. Make sure that the surface is heat resistant and that the airfryer is also positioned at least 4 inches (10cm) away from any surrounding objects.
• Make sure that the food basket is securely placed inside the basket holder.
• Insert the power plug into a wall socket. Your airfryer is now ready for use!
Caution! • Do not fill the food basket or basket holder with oil or any other liquid, as this may cause a fire hazard. • Never use the airfryer without the food basket in place. • Keep all ingredients in the basket to prevent any contact with the appliance’s heating elements. Do not overfill the food basket. • Do not cover the air inlet on the top or the air outlet on the back of the unit while the appliance is in use. • Do not touch the inside of the appliance while it is operating. • Never immerse the unit’s housing in water or rinse it under the tap.
�
Copies of the I/B. Please reproduce them without any changes except under special instruction from Team International BELGIUM. The pages must be reproduced and folded in order to obtain a booklet A5 (+/- 148.5 mm width x 210 mm height). When folding, make sure you keep the good numbering when you turn the pages of the I/B. Don’t change the page numbering. Keep the language integrity. Print only what is inside the frame.
7 FT 42174 - 160331
Assembly page 7/48
Fax +32 2 359 95 50
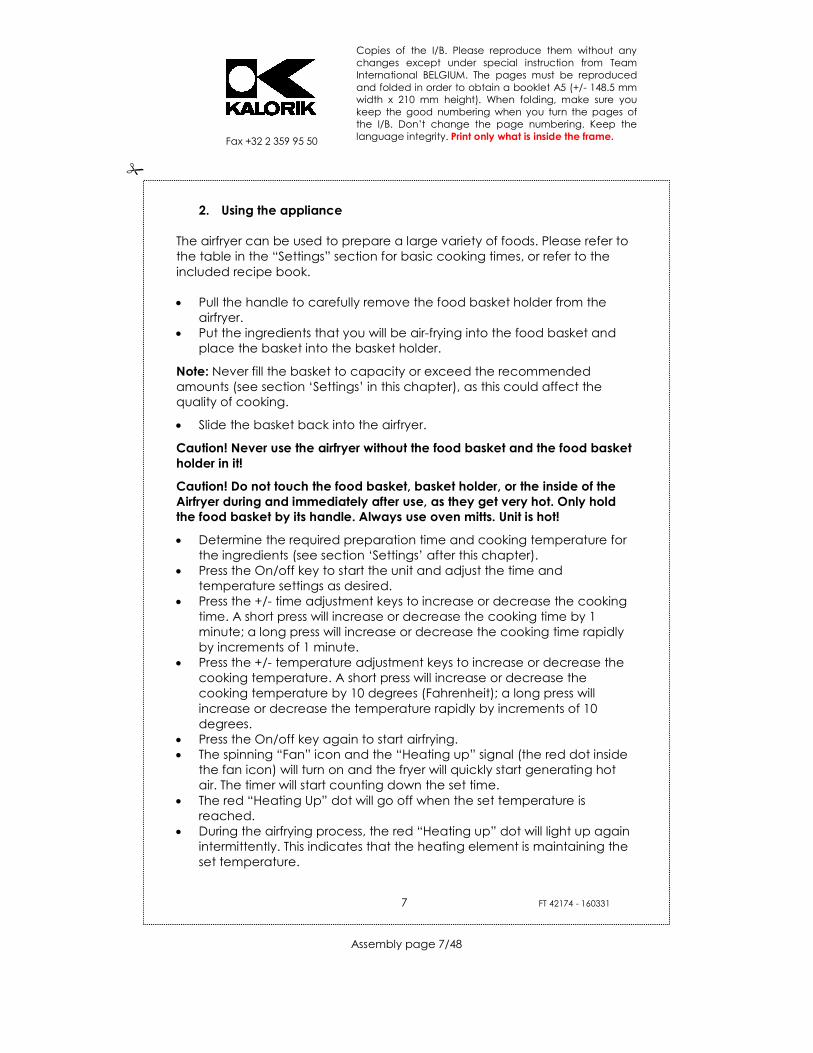
2. Using the appliance The airfryer can be used to prepare a large variety of foods. Please refer to the table in the “Settings” section for basic cooking times, or refer to the included recipe book. • Pull the handle to carefully remove the food basket holder from the
airfryer. • Put the ingredients that you will be air-frying into the food basket and
place the basket into the basket holder.
Note: Never fill the basket to capacity or exceed the recommended amounts (see section ‘Settings’ in this chapter), as this could affect the quality of cooking.
• Slide the basket back into the airfryer.
Caution! Never use the airfryer without the food basket and the food basket holder in it!
Caution! Do not touch the food basket, basket holder, or the inside of the Airfryer during and immediately after use, as they get very hot. Only hold the food basket by its handle. Always use oven mitts. Unit is hot!
• Determine the required preparation time and cooking temperature for the ingredients (see section ‘Settings’ after this chapter).
• Press the On/off key to start the unit and adjust the time and temperature settings as desired.
• Press the +/- time adjustment keys to increase or decrease the cooking time. A short press will increase or decrease the cooking time by 1 minute; a long press will increase or decrease the cooking time rapidly by increments of 1 minute.
• Press the +/- temperature adjustment keys to increase or decrease the cooking temperature. A short press will increase or decrease the cooking temperature by 10 degrees (Fahrenheit); a long press will increase or decrease the temperature rapidly by increments of 10 degrees.
• Press the On/off key again to start airfrying. • The spinning “Fan” icon and the “Heating up” signal (the red dot inside
the fan icon) will turn on and the fryer will quickly start generating hot air. The timer will start counting down the set time.
• The red “Heating Up” dot will go off when the set temperature is reached.
• During the airfrying process, the red “Heating up” dot will light up again intermittently. This indicates that the heating element is maintaining the set temperature.
�
Copies of the I/B. Please reproduce them without any changes except under special instruction from Team International BELGIUM. The pages must be reproduced and folded in order to obtain a booklet A5 (+/- 148.5 mm width x 210 mm height). When folding, make sure you keep the good numbering when you turn the pages of the I/B. Don’t change the page numbering. Keep the language integrity. Print only what is inside the frame.
8 FT 42174 - 160331
Assembly page 8/48
Fax +32 2 359 95 50
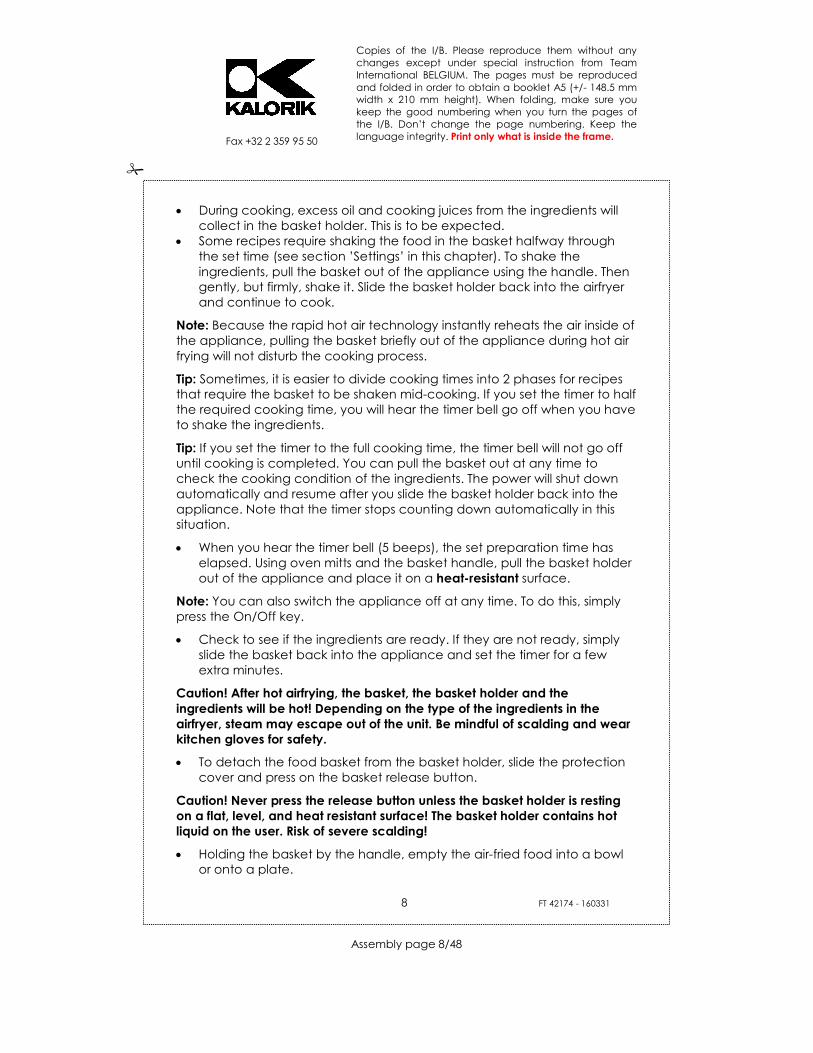
• During cooking, excess oil and cooking juices from the ingredients will collect in the basket holder. This is to be expected.
• Some recipes require shaking the food in the basket halfway through the set time (see section ’Settings’ in this chapter). To shake the ingredients, pull the basket out of the appliance using the handle. Then gently, but firmly, shake it. Slide the basket holder back into the airfryer and continue to cook.
Note: Because the rapid hot air technology instantly reheats the air inside of the appliance, pulling the basket briefly out of the appliance during hot air frying will not disturb the cooking process.
Tip: Sometimes, it is easier to divide cooking times into 2 phases for recipes that require the basket to be shaken mid-cooking. If you set the timer to half the required cooking time, you will hear the timer bell go off when you have to shake the ingredients.
Tip: If you set the timer to the full cooking time, the timer bell will not go off until cooking is completed. You can pull the basket out at any time to check the cooking condition of the ingredients. The power will shut down automatically and resume after you slide the basket holder back into the appliance. Note that the timer stops counting down automatically in this situation.
• When you hear the timer bell (5 beeps), the set preparation time has elapsed. Using oven mitts and the basket handle, pull the basket holder out of the appliance and place it on a heat-resistant surface.
Note: You can also switch the appliance off at any time. To do this, simply press the On/Off key.
• Check to see if the ingredients are ready. If they are not ready, simply slide the basket back into the appliance and set the timer for a few extra minutes.
Caution! After hot airfrying, the basket, the basket holder and the ingredients will be hot! Depending on the type of the ingredients in the airfryer, steam may escape out of the unit. Be mindful of scalding and wear kitchen gloves for safety.
• To detach the food basket from the basket holder, slide the protection cover and press on the basket release button.
Caution! Never press the release button unless the basket holder is resting on a flat, level, and heat resistant surface! The basket holder contains hot liquid on the user. Risk of severe scalding!
• Holding the basket by the handle, empty the air-fried food into a bowl or onto a plate.

�
Copies of the I/B. Please reproduce them without any changes except under special instruction from Team International BELGIUM. The pages must be reproduced and folded in order to obtain a booklet A5 (+/- 148.5 mm width x 210 mm height). When folding, make sure you keep the good numbering when you turn the pages of the I/B. Don’t change the page numbering. Keep the language integrity. Print only what is inside the frame.
9 FT 42174 - 160331
Assembly page 9/48
Fax +32 2 359 95 50
Tip: To remove large or fragile ingredients, you may use a pair of tongs to lift the ingredients out of the basket. Use tongs or utensils with heat-resistant plastic tips, as metallic tips or utensils may scratch the coating of the basket.
• When a batch of food is ready, the airfryer is instantly ready for preparing another batch.
3. Using the preset menus
7 “short-cut” preset functions are provided: FRIES, CHICKEN, PORK CHOPS, SHRIMP, STEAK, CAKE and FISH. To select a preset, press the M function key repeatedly until the desired icon is selected. Press the On/Off key to start airfrying. The time and temperature settings can be adjusted at any time when using the preset menus.
4. Using the dual layer rack and skewers
The Kalorik Airfryer includes a dual layer rack that increases the versatility of your appliance. You can use the rack to increase your airfryer’s cooking surface by layering food both underneath it and on top of it. You can also use it to cook or reheat 2 types of food simultaneously, cooking one type of food underneath the rack and another type of food on top. To use the rack, place it into the food basket, place your ingredients on top and/or underneath it, and airfry as usual. We recommend placing your bottom layer of ingredients into the basket before setting the rack on top. Tip: To avoid excess liquids dripping onto the bottom layer of food, place the drier ingredients on the top layer and the wetter ingredients on the bottom. This rack is also ideal for increasing the capacity of “flatter” foods, such as hamburgers and fish, which can be cooked at once. You can place these kinds of ingredients both under and on top of the rack. The dual layer rack can also be used to cook with as many as 3 of the included metal skewers. The skewers can placed on the upper part of the rack’s frame and are great for airfrying meat, fruits, and vegetables.

�
Copies of the I/B. Please reproduce them without any changes except under special instruction from Team International BELGIUM. The pages must be reproduced and folded in order to obtain a booklet A5 (+/- 148.5 mm width x 210 mm height). When folding, make sure you keep the good numbering when you turn the pages of the I/B. Don’t change the page numbering. Keep the language integrity. Print only what is inside the frame.
10 FT 42174 - 160331
Assembly page 10/48
Fax +32 2 359 95 50
MAKING HOME-MADE FRIES
To make home-made fries, follow the steps below:
• Peel the potatoes and cut them into sticks. • Wash the potato sticks thoroughly and dry them with paper towels. • Pour 1/2 tablespoon of canola oil in a bowl, put the sticks on top and
mix until they are coated with oil. • Remove the sticks from the bowl with your hands or a kitchen utensil so
that excess oil stays behind in the bowl. Put the sticks in the basket.
Note: Do not tilt the bowl to pour the potato sticks into the basket. Transfer them with your hands or a kitchen utensil in smaller batches to prevent excess oil from collecting on the bottom of the pan.
Airfry the potato sticks according to the instructions above. For best results, do not fry more than 1.2 lb. of fries per batch.

�
Copies of the I/B. Please reproduce them without any changes except under special instruction from Team International BELGIUM. The pages must be reproduced and folded in order to obtain a booklet A5 (+/- 148.5 mm width x 210 mm height). When folding, make sure you keep the good numbering when you turn the pages of the I/B. Don’t change the page numbering. Keep the language integrity. Print only what is inside the frame.
11 FT 42174 - 160331
Assembly page 11/48
Fax +32 2 359 95 50
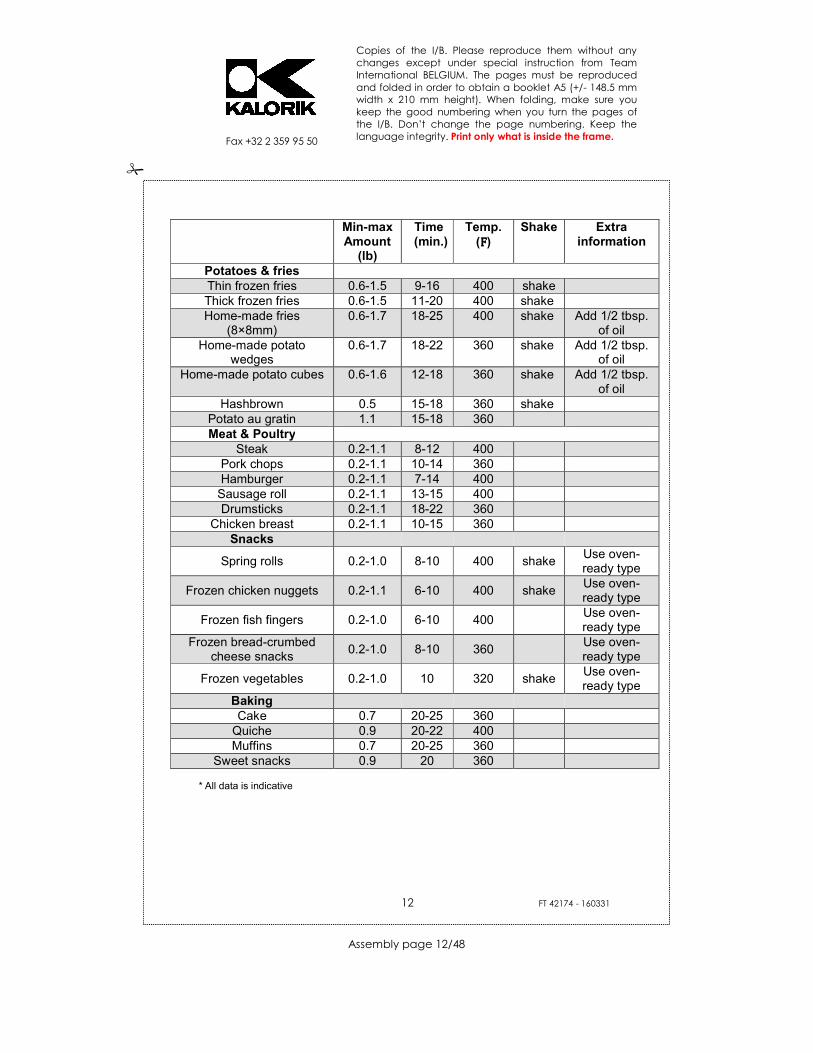
SETTINGS
The table below will help you select the basic settings for the ingredients you want to prepare.
Note: Keep in mind that these settings are suggestions.
Tips: - Any food that can be prepared in a traditional oven can also be
prepared in the airfryer. - Shaking smaller ingredients halfway through the preparation time
optimizes the end result and can help prevent unevenly air-fried food. - A larger amount of ingredients only requires a slightly longer preparation
time, a smaller amount of ingredients only requires a slightly shorter preparation time.
- Shaking smaller ingredients halfway through the preparation time optimizes the end result and can help prevent unevenly fried food.
- Do not prepare very greasy ingredients, such as sausages, in the airfryer as the grease could catch fire.
- If some foodstuffs tend to stick at the bottom of the basket, think to add some cooking oil spray in the basket prior to adding the ingredients to cook.
- Add a bit of oil to fresh potatoes for crispy results. Fry your ingredients in the airfryer within a few minutes of adding the oil.
- The optimal amount of potatoes for preparing crispy fries is 500 grams / 1.2 lbs.
- Use pre-made dough to prepare filled snacks quickly and easily. Pre-made dough also requires a shorter preparation time than home-made dough.
- Place a baking tin or oven dish in the airfryer basket if you want to bake a cake or quiche or if you want to fry fragile or filled ingredients.
- You can also use the airfryer to reheat food. To reheat ingredients, set the temperature to 290℉ for up to 10 minutes.
�
Copies of the I/B. Please reproduce them without any changes except under special instruction from Team International BELGIUM. The pages must be reproduced and folded in order to obtain a booklet A5 (+/- 148.5 mm width x 210 mm height). When folding, make sure you keep the good numbering when you turn the pages of the I/B. Don’t change the page numbering. Keep the language integrity. Print only what is inside the frame.
12 FT 42174 - 160331
Assembly page 12/48
Fax +32 2 359 95 50
Min-max
Amount (lb)
Time (min.)
Temp. (FFFF)
Shake Extra information
Potatoes & fries Thin frozen fries 0.6-1.5 9-16 400 shake Thick frozen fries 0.6-1.5 11-20 400 shake Home-made fries
(8×8mm) 0.6-1.7 18-25 400 shake Add 1/2 tbsp.
of oil Home-made potato
wedges 0.6-1.7 18-22 360 shake Add 1/2 tbsp.
of oil Home-made potato cubes 0.6-1.6 12-18 360 shake Add 1/2 tbsp.
of oil Hashbrown 0.5 15-18 360 shake
Potato au gratin 1.1 15-18 360 Meat & Poultry
Steak 0.2-1.1 8-12 400 Pork chops 0.2-1.1 10-14 360 Hamburger 0.2-1.1 7-14 400
Sausage roll 0.2-1.1 13-15 400 Drumsticks 0.2-1.1 18-22 360
Chicken breast 0.2-1.1 10-15 360 Snacks
Spring rolls 0.2-1.0 8-10 400 shake Use oven-ready type
Frozen chicken nuggets 0.2-1.1 6-10 400 shake Use oven-ready type
Frozen fish fingers 0.2-1.0 6-10 400 Use oven-ready type
Frozen bread-crumbed cheese snacks
0.2-1.0 8-10 360 Use oven-ready type
Frozen vegetables 0.2-1.0 10 320 shake Use oven-ready type
Baking Cake 0.7 20-25 360
Quiche 0.9 20-22 400 Muffins 0.7 20-25 360
Sweet snacks 0.9 20 360 * All data is indicative

�
Copies of the I/B. Please reproduce them without any changes except under special instruction from Team International BELGIUM. The pages must be reproduced and folded in order to obtain a booklet A5 (+/- 148.5 mm width x 210 mm height). When folding, make sure you keep the good numbering when you turn the pages of the I/B. Don’t change the page numbering. Keep the language integrity. Print only what is inside the frame.
13 FT 42174 - 160331
Assembly page 13/48
Fax +32 2 359 95 50
CLEANING AND MAINTENANCE
• Make sure to clean the appliance after each use! • Switch the appliance off. Before cleaning, unplug the appliance from
outlet and allow it to cool down completely. • The rack, basket and basket holder can be cleaned in hot water with
mild detergent / dish soap, or in the dishwasher. Do not use metal kitchen utensils or abrasive cleaning materials to clean them, as this may damage the non-stick coating. Rinse and dry thoroughly after cleaning.
• To remove baked-on food, fill the basket holder with hot, soapy water. Put the food basket in the pan and let the pan and the basket soak for about 10 minutes before cleaning in the sink.
Cleaning inside the cavity:
• Wipe the cavity with a damp cloth or sponge. Dry with a paper towel. • Never use abrasive products in the cavity! • Never immerse the appliance in water and make sure that no water or
moisture penetrates the upper part of the airfryer. • Clean the heating element inside the airfryer with a cleaning brush to
remove any food residue.
Cleaning the airfryer’s exterior
• Wipe clean with a damp sponge or cloth. Wipe dry. • NEVER use steel wool, metal scouring pads or abrasive cleaners, as they
may damage the finish. • Do not let any liquids enter the air inlet on the top of the airfryer.
Any other servicing should be performed by an authorized service representative.
DO NOT IMMERSE THE FRYER IN WATER OR ANY OTHER LIQUID!
�
Copies of the I/B. Please reproduce them without any changes except under special instruction from Team International BELGIUM. The pages must be reproduced and folded in order to obtain a booklet A5 (+/- 148.5 mm width x 210 mm height). When folding, make sure you keep the good numbering when you turn the pages of the I/B. Don’t change the page numbering. Keep the language integrity. Print only what is inside the frame.
14 FT 42174 - 160331
Assembly page 14/48
Fax +32 2 359 95 50
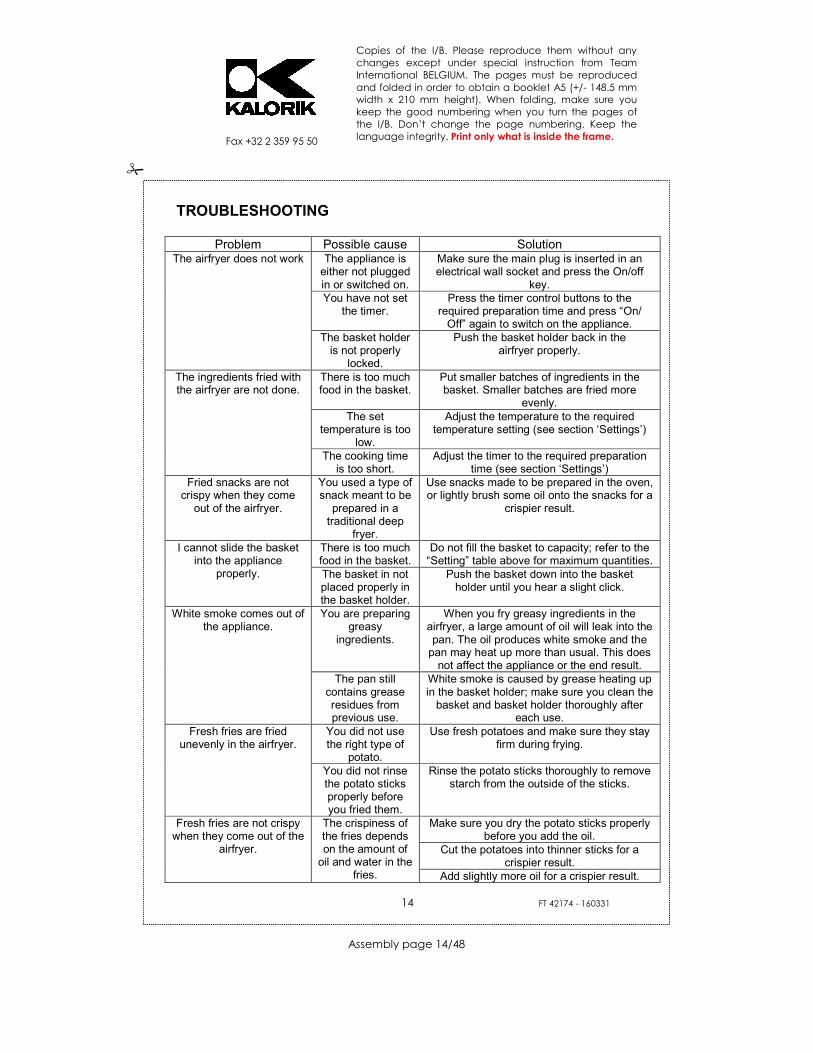
TROUBLESHOOTING
Problem Possible cause Solution The airfryer does not work The appliance is
either not plugged in or switched on.
Make sure the main plug is inserted in an electrical wall socket and press the On/off
key. You have not set
the timer. Press the timer control buttons to the
required preparation time and press “On/ Off” again to switch on the appliance.
The basket holder is not properly
locked.
Push the basket holder back in the airfryer properly.
The ingredients fried with the airfryer are not done.
There is too much food in the basket.
Put smaller batches of ingredients in the basket. Smaller batches are fried more
evenly. The set
temperature is too low.
Adjust the temperature to the required temperature setting (see section ‘Settings’)
The cooking time is too short.
Adjust the timer to the required preparation time (see section ‘Settings’)
Fried snacks are not crispy when they come
out of the airfryer.
You used a type of snack meant to be
prepared in a traditional deep
fryer.
Use snacks made to be prepared in the oven, or lightly brush some oil onto the snacks for a
crispier result.
I cannot slide the basket into the appliance
properly.
There is too much food in the basket.
Do not fill the basket to capacity; refer to the “Setting” table above for maximum quantities.
The basket in not placed properly in the basket holder.
Push the basket down into the basket holder until you hear a slight click.
White smoke comes out of the appliance.
You are preparing greasy
ingredients.
When you fry greasy ingredients in the airfryer, a large amount of oil will leak into the pan. The oil produces white smoke and the
pan may heat up more than usual. This does not affect the appliance or the end result.
The pan still contains grease residues from previous use.
White smoke is caused by grease heating up in the basket holder; make sure you clean the
basket and basket holder thoroughly after each use.
Fresh fries are fried unevenly in the airfryer.
You did not use the right type of
potato.
Use fresh potatoes and make sure they stay firm during frying.
You did not rinse the potato sticks properly before you fried them.
Rinse the potato sticks thoroughly to remove starch from the outside of the sticks.
Fresh fries are not crispy when they come out of the
airfryer.
The crispiness of the fries depends on the amount of
oil and water in the fries.
Make sure you dry the potato sticks properly before you add the oil.
Cut the potatoes into thinner sticks for a crispier result.
Add slightly more oil for a crispier result.

�
Copies of the I/B. Please reproduce them without any changes except under special instruction from Team International BELGIUM. The pages must be reproduced and folded in order to obtain a booklet A5 (+/- 148.5 mm width x 210 mm height). When folding, make sure you keep the good numbering when you turn the pages of the I/B. Don’t change the page numbering. Keep the language integrity. Print only what is inside the frame.
15 FT 42174 - 160331
Assembly page 15/48
Fax +32 2 359 95 50
WARRANTY We suggest that you complete and return the enclosed Product Registration Card promptly to facilitate verification of the date of original purchase. However, return of the Product Registration Card is not a condition of these warranties. You can also fill out this warranty card online, at the following address: www.KALORIK.com This KALORIK product is warranted in the U.S.A. for 1 year from the date of purchase against defects in material and workmanship. This warranty is not transferable. Keep the original sales receipt. Proof of purchase is required to obtain warranty performance. During this period, if the KALORIK product, upon inspection by KALORIK, is proven defective, it will be repaired or replaced, at Kalorik’s option, without charge to the customer. If a replacement product is sent, it will carry the remaining warranty of the original product. This warranty does not apply to any defect arising from a buyer's or user's misuse of the product, negligence, failure to follow KALORIK instructions noted in the user’s manual, use on current or voltage other than that stamped on the product, wear and tear, alteration or repair not authorized by KALORIK, or use for commercial purposes. There is no warranty for glass parts, glass containers, filter basket, blades and agitators, and accessories in general. There is also no warranty for parts lost by the user. ANY WARRANTY OF MERCHANTABILITY OR FITNESS WITH RESPECT TO THIS PRODUCT IS ALSO LIMITED TO THE ONE YEAR LIMITED WARRANTY PERIOD. Some states do not allow limitation on how long an implied warranty lasts or do not allow the exclusion of incidental or consequential damages, so the above limitations may not apply to you. This warranty gives you specific legal rights, and you may also have other rights which vary from state to state. If the appliance should become defective within the warranty period and more than 30 days after date of purchase, do not return

�
Copies of the I/B. Please reproduce them without any changes except under special instruction from Team International BELGIUM. The pages must be reproduced and folded in order to obtain a booklet A5 (+/- 148.5 mm width x 210 mm height). When folding, make sure you keep the good numbering when you turn the pages of the I/B. Don’t change the page numbering. Keep the language integrity. Print only what is inside the frame.
16 FT 42174 - 160331
Assembly page 16/48
Fax +32 2 359 95 50
the appliance to the store: often, our Customer Service Representatives can help solve the problem without having the product serviced. If servicing is needed, a Representative can confirm whether the product is under warranty and direct you to the nearest service location. If this is the case, bring the product, or send it, postage prepaid by the user (all Kalorik customers are responsible for the initial shipment back to the warranty center), along with proof of purchase and a return authorization number indicated on the outer package, given by our Customer Service Representatives. Send to the authorized KALORIK Service Center (please visit our website at www.KALORIK.com or call our Customer Service Department for the address of our authorized KALORIK Service Center). When sending the product, please include a letter explaining the nature of the claimed defect. If you have additional questions, please call our Customer Service Department (please see below for complete contact information), Monday through Thursday from 9:00am - 5:00pm (EST) and Friday from 9:00am - 4:00pm (EST). Please note hours are subject to change. If you would like to write, please send your letter to: KALORIK Customer Service Department Team International Group of America Inc. 1400 N.W 159th Street, Suite 102 Miami Gardens, FL 33169 USA Or call: Toll Free: +1 888-521-TEAM / +1 888-KALORIK Only letters can be accepted at this address above. Shipments and packages that do not have a return authorization number will be refused.
�
Copies of the I/B. Please reproduce them without any changes except under special instruction from Team International BELGIUM. The pages must be reproduced and folded in order to obtain a booklet A5 (+/- 148.5 mm width x 210 mm height). When folding, make sure you keep the good numbering when you turn the pages of the I/B. Don’t change the page numbering. Keep the language integrity. Print only what is inside the frame.
17 FT 42174 - 160331
Assembly page 17/48
Fax +32 2 359 95 50
IMPORTANTES MEDIDAS DE PRECAUCIÓN
Al utilizar aparatos eléctricos se deben tener siempre en cuenta las siguientes medidas básicas de precaución:
¡LEER LAS INSTRUCCIONES ANTES DE USAR! 1. Verifique que el voltaje de su hogar corresponda al que está indicado
en el aparato. 2. No toque las superficies calientes. Utilice asas o perillas. 3. Para protegerse de choques eléctricos, incendio o lesiones personales,
no sumerja el cable, los enchufes, o el aparato, dentro del agua ni cualquier otro líquido.
4. Siempre preste atención al aparato cuando el mismo sea utilizado por niño o cerca de ellos. Como norma, este aparato no ha sido fabricado para que ser utilizado por niños.
5. Desconéctelo del tomacorriente cuando no esté en uso, y antes de limpiarlo. Déjelo enfriar antes de colocar o retirar de él las partes.
6. No poner en funcionamiento ningún aparato cuando su cable o enchufe esté dañado, o luego de detector alguna falla en el funcionamiento o si el aparato no funciona correctamente. Devuelva el aparato al servicio autorizado más cercano para su chequeo, reparación, o ajuste.
7. El uso de accesorios no recomendados por el fabricante del aparato puede causar lesiones.
8. No utilizarlo en el exterior. 9. No deje que el cable cuelgue fuera del borde de una mesa o de una
mesada, o que entre en contacto con superficies calientes. 10. No coloque el aparato encima o cerca de una cocina a gas caliente,
o de una hornalla caliente, o en un horno caliente. 11. Se debe tener sumo cuidado al mover un aparato que contiene aceite
u otros líquidos calientes. 12. Para desconectar, mueva el control a la posición “Off” [o 0 -cero-), y
luego desconecte el cable del tomacorriente. 13. No utilice el aparato para nada que no sea lo indicado. 14. No se deben colocar en el aparato alimentos/ trozos demasiado
grandes, o utensilios de metal en la freidora de aire, ya que esto podría causar un incendio o el riesgo de choque eléctrico.
�
Copies of the I/B. Please reproduce them without any changes except under special instruction from Team International BELGIUM. The pages must be reproduced and folded in order to obtain a booklet A5 (+/- 148.5 mm width x 210 mm height). When folding, make sure you keep the good numbering when you turn the pages of the I/B. Don’t change the page numbering. Keep the language integrity. Print only what is inside the frame.
18 FT 42174 - 160331
Assembly page 18/48
Fax +32 2 359 95 50
15. Si el aparato está cubierto o en contacto con algún material combustible, incluyendo cortinas, tapicería, paredes, y objetos similares, durante su funcionamiento, esto podría provocar un incendio. No apoye ningún objeto sobre el aparato mientras esté en funcionamiento.
16. No limpiar con lanas de acero/estropajos. Éstos podrían romperse, entrar en contacto con partes eléctricas y causar un choque eléctrico.
17. Se debe tener mucho cuidado al utilizar contenedores que no sean ni de metal ni de vidrio.
18. No almacenar ningún material, fuera de los accesorios recomendados por el fabricante sobre el aparato, cuando no esté en uso.
19. No colocar en el aparato ninguno de los materiales que enumeramos a continuación: papel, cartón, plástico, y/o similares.
20. No cubrir la canasta de cocción o ninguna parte de la freidora de aire con papel de aluminio. Esto produce el recalentamiento del aparato.
21. No descuidar el aparato mientras esté en funcionamiento. 22. Se debe tener gran precaución al retirar la canasta o el soporte de la
canasta y quitar la grasa caliente. 23. La freidora de aire puede ser apagada en cualquier momento mientras
esté en cualquiera de las funciones, llevando la perilla de control de tiempo al 0 [cero] o a la posición Off.
24. Durante el freído de aire caliente, el vapor es expulsado a través de las aberturas de salida de aire. Mantenga las manos y su cara a una distancia prudencial del vapor y de las salidas de aire. También, tenga cuidado con el vapor y el aire caliente cuando retire la sartén del aparato.
25. Si usted ve humo negro saliendo del aparato apáguelo inmediatamente. Espere a que el humo cese antes de retirar la sartén del aparato.
26. No coloque el aparato en contra la pared o contra otros aparatos. 27. Deje por lo menos 4 pulgadas (10 cm) de espacio en la parte posterior,
en los lados, y en la parte superior del aparato.
¡¡Cuidado!! • SIEMPRE coloque el aparato en una superficie horizontal, resistente al
calor y estable. • Este aparato es para uso hogareño exclusivamente. • Desconecte el aparato siempre después de usarlo. • Deje que el aparato se enfríe durante 30 minutos aproximadamente
antes de manipularlo o limpiarlo. • El aparato está equipado con un micro-interruptor interno que apagará
la freidora automáticamente si la canasta es movida durante la cocción.

�
Copies of the I/B. Please reproduce them without any changes except under special instruction from Team International BELGIUM. The pages must be reproduced and folded in order to obtain a booklet A5 (+/- 148.5 mm width x 210 mm height). When folding, make sure you keep the good numbering when you turn the pages of the I/B. Don’t change the page numbering. Keep the language integrity. Print only what is inside the frame.
19 FT 42174 - 160331
Assembly page 19/48
Fax +32 2 359 95 50
• ¡Nunca oprima el botón de retiro de la canasta si el soporte de la misma no está colocado en una superficie horizontal y resistente al calor
GUARDE ESTAS INSTRUCCIONES
PARA USO HOGAREÑO EXCLUSIVAMENTE
INSTRUCCION SOBRE EL ENCHUFE POLARIZADO Este aparato está equipado con un enchufe polarizado (una clavija es más ancha que la otra). Para reducir el riesgo de descarga eléctrica, este enchufe entra en el tomacorriente polarizado en un solo sentido. Si el enchufe no entra de inicio completamente en el tomacorriente, gire el enchufe. Si aun así no encaja, contacte a un técnico electricista calificado. No intente modificar el enchufe de ninguna manera.
INSTRUCCIONES SOBRE EL CABLE CORTO Se proporciona un cable de alimentación corto para reducir los riesgos de que se enrede o tropiece con un cable largo. Los cables de extensión pueden usarse si se tiene cuidado en su uso. • La clasificación eléctrica del cable de extensión debe ser al menos
igual a la del aparato. Si la clasificación eléctrica del cable de extensión es demasiado baja, este podría recalentarse e incendiarse.
• El cable extendido resultante debe colocarse de manera que no cuelgue del mostrador o mesa en donde los niños pudieran halarlo o tropezar con él.
CONOZCA SU FREIDORA DE AIRE
Prepare sus comidas y refrigerios favoritos de un modo rápido, saludable y fácil con su nueva freidora de aire. Esta freidora de aire combina el calor con la circulación de aire a alta velocidad, y una parrilla superior para cocción de los ingredientes de todos los lados, ¡simultáneamente! También le permite preparar una variedad de sabrosos platos sin tener que agregar demasiado aceite o grasa a la mayoría de los ingredientes. Tiene los siguientes elementos:

�
Copies of the I/B. Please reproduce them without any changes except under special instruction from Team International BELGIUM. The pages must be reproduced and folded in order to obtain a booklet A5 (+/- 148.5 mm width x 210 mm height). When folding, make sure you keep the good numbering when you turn the pages of the I/B. Don’t change the page numbering. Keep the language integrity. Print only what is inside the frame.
20 FT 42174 - 160331
Assembly page 20/48
Fax +32 2 359 95 50
• Un panel de control sensible al tacto con 7 menús preestablecidos. • Un control digital del tiempo de cocción y temperatura. • Un rango de control de temperatura de 170°F – 400°F (76°C – 200°C) • El rango del medidor de tiempo es de 0 a 30 minutos, y está equipado
con un sistema de apagado automático. Una vez que el medidor de tiempo llegue a “0:00”, el aparato sonará cinco veces y se apagará.
Otras de las ventajas que le brinda su freidora de aire Kalorik son:
• Cocción rápida, y solamente se necesita un mínimo [o ningún] tiempo
de pre-calentamiento. • Fácil y rápida limpieza: las partes –que son anti-adherentes- tienen un
tamaño apropiado para lavarlas en la lava-vajilla. • Fritura cómoda—sin espátulas, sin complicaciones, y sin olor a aceite. • Versatilidad—con la capacidad de freír, hornear, asar y rostizar, esta
unidad es una excelente herramienta en una cocina activa. • No necesita ser armada -- ¡muy segura y fácil de usar! • También cuenta con un doble estante y 3 brochetas para maximizar la
capacidad de cocción y la versatilidad de su freidora de aire.

�
Copies of the I/B. Please reproduce them without any changes except under special instruction from Team International BELGIUM. The pages must be reproduced and folded in order to obtain a booklet A5 (+/- 148.5 mm width x 210 mm height). When folding, make sure you keep the good numbering when you turn the pages of the I/B. Don’t change the page numbering. Keep the language integrity. Print only what is inside the frame.
21 FT 42174 - 160331
Assembly page 21/48
Fax +32 2 359 95 50
DESCRIPCIÓN DE PARTES Y CONTROLES
1. Panel de control digital con pantalla
táctil 2. Canasta de alimentos 3. Soporte de canasta de alimentos 4. Asa
5. Botón para retirar la canasta de alimentos, con tapa
6. Carcasa Principal 7. Anillo de entrada de aire
a. Menú/iconos predefinidos b. Icono de circulación de aire
caliente c. Teclas de ajuste de temperatura +/-
d. Tecla de selección de menu e. Teclas de ajuste de tiempo +/- c f. Tecla de encendido/apagado g. Pantalla de temperature y tiempo
2
3
4
5
6
1
7
b
c
d
e
f
a
g
�
Copies of the I/B. Please reproduce them without any changes except under special instruction from Team International BELGIUM. The pages must be reproduced and folded in order to obtain a booklet A5 (+/- 148.5 mm width x 210 mm height). When folding, make sure you keep the good numbering when you turn the pages of the I/B. Don’t change the page numbering. Keep the language integrity. Print only what is inside the frame.
22 FT 42174 - 160331 �
Back cover page (last page)
Assembly page 22/48
Fax +32 2 359 95 50
ANTES DE USAR POR PRIMERA VEZ
• Retire el aparato del paquete junto con sus accesorios (canasta de alimentos, soporte de canasta de alimentos, estante). Lave los accesorios en agua caliente con jabón, enjuague y seque. Limpie el interior de la cavidad de freír, con un trapo húmedo o esponja, y luego seque con una toalla de papel. Asegúrese que la cavidad esté seca antes de poner el aparato en funcionamiento.
• Coloque la freidora de aire en una superficie plana, horizontal y resistente al calor, asegurándose de que esté colocada a 4 pulgadas de distancia (10 cm) de cualquier objeto cercano a ella.
• Se recomienda dejar la freidora calentándose sin ningún alimento en su interior durante aproximadamente 20 minutos. Esto ayudará a eliminar la grasa que pudiera haberse adherido durante su fabricación, y eliminar el olor a” a nuevo” del aparato.
• Ventilar la habitación durante esta etapa. Cuando su freidora de aire se calienta por primera vez, puede emitir ligeramente humo u olor. Es normal que esto ocurra con muchos aparatos nuevos. Esto no afectará la seguridad de su aparato.
Precaución: Al mover la freidora, asegúrese se sostenerla de sus asas o sosténgala por la base, — ¡no se fíe del asa de la canasta de alimentos cuando mueva la freidora!
INSTRUCCIONES OPERATIVAS
1. Preparación del aparato para su uso
• Coloque el aparato en una superficie estable, horizontal. Asegúrese de que la superficie sea resistente al calor y que la freidora esté ubicada como mínimo a 4 pulgadas (10 cm) de distancia de cualquier objeto u objetos circundantes.
• Asegúrese de que la canasta de alimentos esté bien colocada dentro del soporte de la canasta.
• Conecte el cable del aparato en un tomacorriente de pared. ¡Su freidora ya está lista para usar!
¡Cuidado! • No llene la canasta de alimentos o el soporte de la canasta con aceite o con ningún otro líquido, ya que esto podría causar un incendio. • Nunca use la freidora sin que la canasta de alimentos esté colocada en el aparato. • Mantenga todos los ingredientes en la canasta para evitar que los mismos entren en contacto con los elementos calientes del aparato. No llene la canasta de alimentos en exceso.

�
Copies of the I/B. Please reproduce them without any changes except under special instruction from Team International BELGIUM. The pages must be reproduced and folded in order to obtain a booklet A5 (+/- 148.5 mm width x 210 mm height). When folding, make sure you keep the good numbering when you turn the pages of the I/B. Don’t change the page numbering. Keep the language integrity. Print only what is inside the frame.
23 FT 42174 - 160331 �
Back cover page (last page)
Assembly page 23/48
Fax +32 2 359 95 50
• No tape la entrada de aire que está en la parte superior, o la salida de aire en la parte posterior de la unidad mientras el aparato esté en funcionamiento. • No toque el interior del aparato mientras esté trabajando. • Nunca sumerja la carcasa del aparato en el agua ni la enjuague debajo de la canilla.
2. Uso del aparato La freidora puede ser utilizada para preparar una amplia variedad de comidas. Por favor, vea la tabla en la sección “Ajustes” para obtener el tiempo básico de cocción, o vea el libro de recetas incluido. • Tire del asa para quitar cuidadosamente el soporte de la canasta de
alimentos de la freidora. • Coloque los ingredientes que usted quiera freír dentro de la canasta de
alimentos y coloque la canasta en el soporte de la canasta.
Nota: Nunca llene la canasta totalmente ni exceda las cantidades recomendados (ver sección “Ajustes” en este capítulo), ya que esto podría afectar la calidad de la cocción.
• Deslice la canasta nuevamente dentro de la freidora.
¡Cuidado! ¡Nunca use la freidora sin la canasta de alimentos o sin el soporte de la canasta de alimentos!
¡Cuidado! No toque la canasta de alimentos, ni el soporte de canasta, ni el interior de la Freidora durante su uso ni inmediatamente después de usarla, ya que todas sus partes estarán muy calientes. Sostenga el aparato sólo del asa. Siempre use guantes para horno. ¡La unidad está caliente!
• Determine el tiempo necesario de preparación y temperatura de cocción de los ingredientes (consulte la sección 'Configuración' después de este capítulo).
• Presione la tecla de encendido/apagado para encender la unidad y ajustar el tiempo y la temperatura.
• Presione las teclas de ajuste de tiempo +/- para aumentar o disminuir el tiempo de cocción. Una pulsación corta aumentará o disminuirá el tiempo de cocción 1 minuto; una pulsación larga aumentará o disminuirá rápidamente el tiempo de cocción en incrementos de 1 minuto.
• Presione las teclas de ajuste de la temperatura +/- para aumentar o disminuir el tiempo de cocción. Una pulsación corta aumentará o disminuirá la temperatura de cocción de 10 grados (Fahrenheit); una pulsación larga aumentará o disminuirá la temperatura rápidamente en incrementos de 10 grados.

�
Copies of the I/B. Please reproduce them without any changes except under special instruction from Team International BELGIUM. The pages must be reproduced and folded in order to obtain a booklet A5 (+/- 148.5 mm width x 210 mm height). When folding, make sure you keep the good numbering when you turn the pages of the I/B. Don’t change the page numbering. Keep the language integrity. Print only what is inside the frame.
24 FT 42174 - 160331 �
Back cover page (last page)
Assembly page 24/48
Fax +32 2 359 95 50
• Presione la tecla de encendido/apagado de nuevo para iniciar la cocción.
• El icono del ventilador giratorio y la señal de calentamiento (el punto rojo dentro del icono del ventilador) se encenderán y la freidora comenzará en seguida a generar aire caliente. El medidor de tiempo comenzará a contar regresivamente el tiempo que se ajustó.
• La señal de calentamiento se apagara cuando la unidad alcance la temperatura seleccionada.
• Durante el proceso de freído de aire, la señal de calentamiento se encenderá y apagará intermitentemente. Esto indica que el elemento de calor se mantiene en la temperatura ajustada.
• Durante la cocción, parte del aceite y de los jugos de los alimentos se acumularán en el soporte de la canasta. Esto es de esperar.
• Algunas recetas requieren que la comida deba ser agitada en la canasta en la mitad del tiempo de cocción (ver sección “Ajustes” en este capítulo). Para agitar los ingredientes, quite la canasta fuera del aparato, usando el asa y suavemente, pero con firmeza, agítelos. Deslice nuevamente la canasta dentro del aparato y continúe la cocción.
Nota: Debido a que la tecnología de aire rápida calienta instantáneamente el aire dentro del aparato, si se retira la canasta brevemente durante el freído de aire, el proceso de cocción no se verá afectado.
Consejo: En algunos casos es más fácil dividir el tiempo de cocción en 2 fases, para las recetas que requieren que se agite la canasta en la mitad de la cocción. Si usted ajusta el medidor de tiempo en la mitad del tiempo requerido de cocción, escuchará la campana del medidor de tiempo avisándole que tiene que agitar los ingredientes. Por favor, recuerde que luego de agitarlos, debe ajustar el medidor de tiempo nuevamente para el tiempo de cocción restante.
Consejo: Si usted ajusta el medidor de tiempo en el tiempo completo, la campana no sonará hasta que la cocción haya finalizado. Puede quitar la canasta en cualquier momento para verificar el estado de la cocción de los ingredientes. El aparato se apagará automáticamente y luego continuará luego de que usted vuelva a colocar el soporte de canasta nuevamente en la unidad. Recuerde que el medidor de tiempo cesa de contar regresivamente automáticamente en esta situación.
• Cuando la campana del medidor de tiempo suena (5 pitidos), significa que el tiempo ajustado de cocción ha terminado. Con la ayuda de guantes para horno y el asa, retire el soporte de canasta fuera del aparato y colóquelo en una superficie resistente al calor.
�
Copies of the I/B. Please reproduce them without any changes except under special instruction from Team International BELGIUM. The pages must be reproduced and folded in order to obtain a booklet A5 (+/- 148.5 mm width x 210 mm height). When folding, make sure you keep the good numbering when you turn the pages of the I/B. Don’t change the page numbering. Keep the language integrity. Print only what is inside the frame.
25 FT 42174 - 160331 �
Back cover page (last page)
Assembly page 25/48
Fax +32 2 359 95 50
Nota: También se puede apagar la unidad [OFF] en cualquier momento. Para ello, presione la tecla de encendido/apagado.
• Revise si los ingredientes están listos. Si no lo están, simplemente vuelva a deslizar la canasta en el aparato y ajuste el medidor de tiempo por algunos minutos más.
¡Cuidado! ¡Luego del freído de aire, la canasta y el soporte de canasta, como también los ingredientes estarán calientes! Dependiendo del tipo de ingredientes que haya dentro de la freidora, puede haber escape de vapor. Tenga cuidado con ello, y utilice guantes para horno para su seguridad.
• Para retirar la canasta fuera del soporte de la misma, deslice la tapa de protección y oprima el botón destinado a ello.
¡Cuidado! ¡Nunca oprima el botón de retiro de la canasta si el soporte de canasta no se encuentra en una superficie plana, horizontal, y resistente al calor! El soporte de canasta contiene líquidos calientes generados en el uso. ¡Riesgo de severas quemaduras!
• Tomando la canasta por el asa, vacíe la comida del aparato en un bol o en un plato.
Consejo: Para quitar ingredientes grandes o frágiles, deben usarse un par de pinzas para quitar los ingredientes de la canasta. Utilice pinzas o utensilios con extremos plásticos resistentes al calor, ya que los utensilios metálicos pueden rayar el revestimiento de la canasta.
• Cuando una tanda de comida esté lista, la freidora estará instantáneamente lista para preparar otra tanda.
3. Uso de los menús preestablecidos
7 funciones predefinidas se proporcionan: papas fritas, pollo, chuleta de cerdo, camarones, bistec, pasteles, y pescado. Para seleccionar una función predefinida, pulse la tecla de función M repetidamente hasta llegar al icono deseado. Pulse la tecla de encendido/apagado de nuevo para iniciar la cocción. Las configuraciones de tiempo y temperatura se pueden ajustar en cualquier momento mientras se están utilizando los menús preestablecidos.

�
Copies of the I/B. Please reproduce them without any changes except under special instruction from Team International BELGIUM. The pages must be reproduced and folded in order to obtain a booklet A5 (+/- 148.5 mm width x 210 mm height). When folding, make sure you keep the good numbering when you turn the pages of the I/B. Don’t change the page numbering. Keep the language integrity. Print only what is inside the frame.
26 FT 42174 - 160331 �
Back cover page (last page)
Assembly page 26/48
Fax +32 2 359 95 50
4. Uso del estante doble y de las brochetas
La Freidora de Aire Kalorik incluye un estante doble que aumenta la versatilidad de su aparato. Usted puede usar el estante doble para incrementar la superficie de cocción de la freidora, colocando alimentos en la parte superior y en la inferior. También puede usarlo para cocinar o calendar 2 tipos de comida a la vez, cocinando un tipo de comida debajo del estante, y otro en la parte superior. Para utilizar el estante, colóquelo dentro de la canasta de alimentos, ponga los ingredientes en la parte superior y en la inferior, y fríalos normalmente. Le recomendamos colocar primero el estante inferior con ingredientes, antes de colocar el estante en la parte superior. Consejo: Para evitar que el exceso de líquidos gotee en la capa inferior de comida, coloque los ingredientes más secos en la parte superior, y los más húmedos en la parte inferior. Este estante es también ideal para incrementar la capacidad de los alimentos “más planos/chatos”, tales como hamburguesas y pescado, que pueden ser cocinados de una vez. Puede colocar este tipo de ingredientes tanto debajo como encima del estante. El estante doble puede ser usado también para cocinar con hasta 3 de las brochetas metálicas incluidas. Las brochetas pueden ubicarse en la parte superior del marco del estante, y son muy buenas para freír carne, frutas, y vegetales.

�
Copies of the I/B. Please reproduce them without any changes except under special instruction from Team International BELGIUM. The pages must be reproduced and folded in order to obtain a booklet A5 (+/- 148.5 mm width x 210 mm height). When folding, make sure you keep the good numbering when you turn the pages of the I/B. Don’t change the page numbering. Keep the language integrity. Print only what is inside the frame.
27 FT 42174 - 160331 �
Back cover page (last page)
Assembly page 27/48
Fax +32 2 359 95 50
CÓMO PREPARAR PAPAS FRITAS CASERAS
Para preparar papas fritas caseras, vea las siguientes instrucciones:
• Pele las papas y córtelas en bastones. • Lave bien las papas cortadas y séquelas con toalla de papel. • Vierta ½ cucharada de aceite de canola en un bol, coloque las papas y
mezcle hasta que las mismas se impregnen de aceite. • Quite las papas del bol con las manos o con un utensilio de cocina, de
modo que el exceso de aceite quede en el bol. Ponga las papas en la canasta.
Nota: No incline el bol para poner las papas en la canasta. Hágalo con las manos, o con algún utensilio, en pequeños lotes para evitar que el exceso de aceite de deposite en el fondo de la sartén.
Fría los bastones de papas de acuerdo a las instrucciones recién dadas. Para obtener los mejores resultados, no fría más de 1.2 libra de papas por lote.
AJUSTES
La tabla que damos a continuación servirá de ayuda para seleccionar los ajustes básicos según los ingredientes que desee preparar.
Nota: Recuerde que estos ajustes son sólo sugerencias.
Consejos: • Toda comida que puede ser preparada en un horno tradicional puede ser
preparada también en la freidora de aire. • Agitar los ingredientes pequeños al alcanzar la mitad del tiempo de
cocción ayuda a obtener mejores resultados y ayuda a evitar que la comida no se fría uniformemente.
• Una cantidad mayor de ingredientes solamente requiere un tiempo de preparación levemente más largo, Una cantidad menor de ingredientes solamente requiere un tiempo de preparación levemente más corto.
• No prepare ingredientes muy grasosos, en la freidora, tales como salchichas, ya que la grasa podría causar incendios.
• Agregue un poco de aceite a las papas frescas para que salgan más crocantes. Fría sus ingredientes en la freidora dentro de unos pocos minutos luego de agregar el aceite.
• La cantidad de papas óptima para preparar papas fritas es 500 gramos / 1.2 libra
• Use masa pre-hecha para preparar bocadillos rellenos fáciles y rápidos. La masa pre-hecha también requiere un tiempo de cocción más breve que la masa casera.
• Coloque una plancha de hornear o una fuente de horno en la canasta de la freidora si quiere cocinar una torta o una tarta, o si quiere freír ingredientes frágiles o rellenos.
• También puede usar la freidora para calentar la comida. Para calentar ingredientes, ajuste la temperatura en a 290℉ durante 10 minutos.

�
Copies of the I/B. Please reproduce them without any changes except under special instruction from Team International BELGIUM. The pages must be reproduced and folded in order to obtain a booklet A5 (+/- 148.5 mm width x 210 mm height). When folding, make sure you keep the good numbering when you turn the pages of the I/B. Don’t change the page numbering. Keep the language integrity. Print only what is inside the frame.
28 FT 42174 - 160331 �
Back cover page (last page)
Assembly page 28/48
Fax +32 2 359 95 50
Cantidad
Mín-máx (libras)
Tiempo (min.)
Temp. (FheitFheitFheitFheit)
Agitar Información Extra
Papas & Papas fritas Papas fritas finas
congeladas 0.6-1.5 9-16 400 agitar
Papas fritas gruesas congeladas
0.6-1.5 11-20 400 agitar
Papas fritas caseras (8×8mm)
0.6-1.7 18-25 400 agitar Agregar 1/2 cucharada
aceite Cortezas de papas
caseras 0.6-1.7 18-22 360 agitar Agregar 1/2
cucharada aceite
Cubos de papas caseros 0.6-1.6 12-18 360 agitar Agregar 1/2 cucharada
aceite Hashbrown 0.5 15-18 360 agitar
Papas al gratin 1.1 15-18 360 Carne y Aves
Bife 0.2-1.1 8-12 400 Chuletas de cerdo 0.2-1.1 10-14 360
Hamburguesa 0.2-1.1 7-14 400 Rollo de salchicha 0.2-1.1 13-15 400
Muslos 0.2-1.1 18-22 360 Pechuga de pollo 0.2-1.1 10-15 360
Aperitivos
Rollitos de Primavera 0.2-1.0 8-10 400 agitar Usar tipo
horno Pepitas de pollo
congeladas 0.2-1.1 6-10 400 agitar
Usar tipo horno
Dedos de pescado congelados
0.2-1.0 6-10 400 Usar tipo
horno Aperitivos de queso
apanados congelados 0.2-1.0 8-10 360
Usar tipo horno
Vegetales congelados 0.2-1.0 10 320 agitar Usar tipo
horno Hornear
Torta 0.7 20-25 360 Quiche 0.9 20-22 400
Muffins [bollos] 0.7 20-25 360 Aperitivos dulces 0.9 20 360
* Toda la data es indicativa
�
Copies of the I/B. Please reproduce them without any changes except under special instruction from Team International BELGIUM. The pages must be reproduced and folded in order to obtain a booklet A5 (+/- 148.5 mm width x 210 mm height). When folding, make sure you keep the good numbering when you turn the pages of the I/B. Don’t change the page numbering. Keep the language integrity. Print only what is inside the frame.
29 FT 42174 - 160331 �
Back cover page (last page)
Assembly page 29/48
Fax +32 2 359 95 50
LIMPIEZA Y MANTENIMIENTO
• No olvide limpiar el aparato después de uso, cada vez que lo utilice • Apague la unidad. Antes de limpiarla, desconecte la unidad del
tomacorriente y deje que se enfríe completamente. • El estante, la canasta y el soporte de canasta pueden lavarse con
agua caliente con detergente/jabón de vajilla, o en el lava-platos. No utilice utensilios de cocina metálicos para limpiarla, ya que esto podría dañar el revestimiento anti-adhesivo. Enjuague y seque cuidadosamente luego de limpiar.
• Para remover los residuos de comida, llene el soporte de canasta con agua caliente jabonosa. Ponga la canasta de alimentos en la sartén y sumerja ambas cosas por 10 minutos antes de limpiarlas en el lavabo de la cocina.
Limpieza dentro de la cavidad:
• Limpie la cavidad con un trapo húmedo o esponja. Seque con una toalla de papel.
• ¡Nunca use productos abrasivos en la cavidad! • Nunca sumerja el aparato en agua y asegúrese de que el agua o
humedad penetren en la parte superior de la freidora. • Limpie los elementos de calor que están adentro de la freidora con un
cepillo limpiador para quitar cualquier residuo de comida.
Limpieza del exterior de la freidora:
• Limpie con una esponja o trapo húmedo. Seque. • NUNCA use lana de acero, almohadillas de metal raspantes o
limpiadores abrasivos, ya que podría dañarse el acabado/revestimiento.
• No permita que los líquidos entran a través de la entrada de aire en la parte superior de la unidad.
Cualquier otro tipo de servicio debe ser proporcionado por un representante autorizado de servicio.
¡NO SUMERJA LA FREIDORA EN AGUA NI EN NINGÚN OTRO LÍQUIDO!
�
Copies of the I/B. Please reproduce them without any changes except under special instruction from Team International BELGIUM. The pages must be reproduced and folded in order to obtain a booklet A5 (+/- 148.5 mm width x 210 mm height). When folding, make sure you keep the good numbering when you turn the pages of the I/B. Don’t change the page numbering. Keep the language integrity. Print only what is inside the frame.
30 FT 42174 - 160331 �
Back cover page (last page)
Assembly page 30/48
Fax +32 2 359 95 50
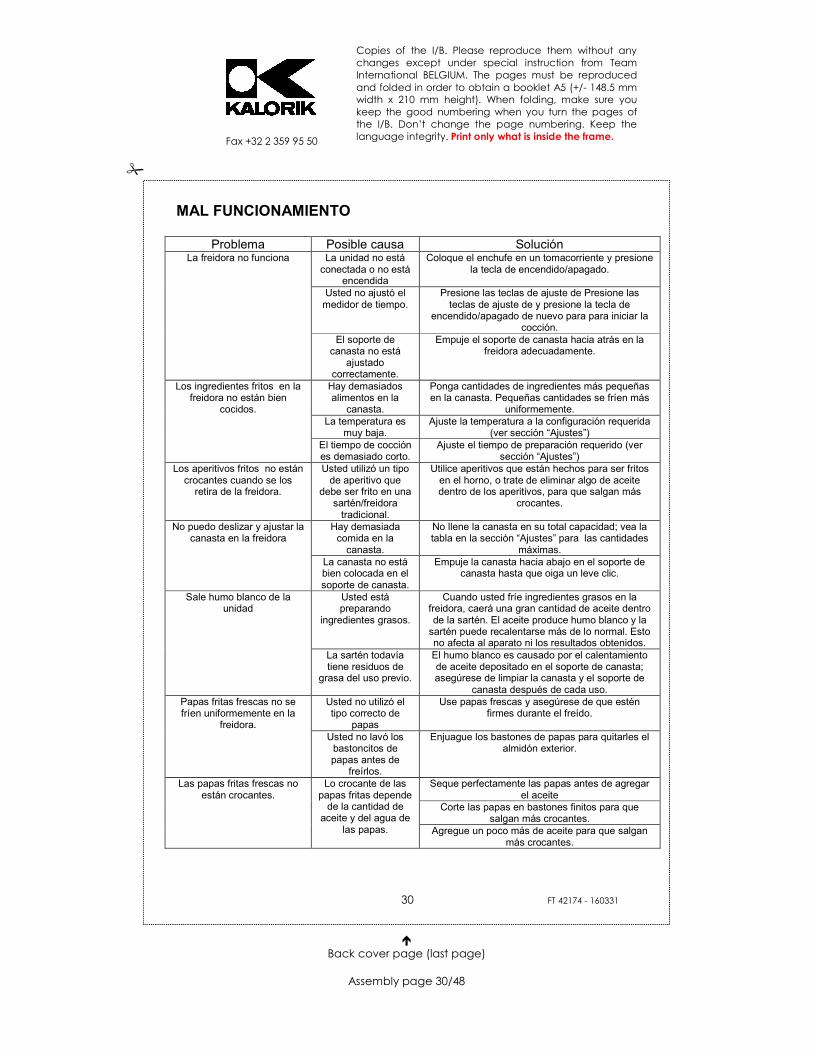
MAL FUNCIONAMIENTO
Problema Posible causa Solución La freidora no funciona La unidad no está
conectada o no está encendida
Coloque el enchufe en un tomacorriente y presione la tecla de encendido/apagado.
Usted no ajustó el medidor de tiempo.
Presione las teclas de ajuste de Presione las teclas de ajuste de y presione la tecla de
encendido/apagado de nuevo para para iniciar la cocción.
El soporte de canasta no está
ajustado correctamente.
Empuje el soporte de canasta hacia atrás en la freidora adecuadamente.
Los ingredientes fritos en la freidora no están bien
cocidos.
Hay demasiados alimentos en la
canasta.
Ponga cantidades de ingredientes más pequeñas en la canasta. Pequeñas cantidades se fríen más
uniformemente. La temperatura es
muy baja. Ajuste la temperatura a la configuración requerida
(ver sección “Ajustes”) El tiempo de cocción es demasiado corto.
Ajuste el tiempo de preparación requerido (ver sección “Ajustes”)
Los aperitivos fritos no están crocantes cuando se los
retira de la freidora.
Usted utilizó un tipo de aperitivo que
debe ser frito en una sartén/freidora
tradicional.
Utilice aperitivos que están hechos para ser fritos en el horno, o trate de eliminar algo de aceite dentro de los aperitivos, para que salgan más
crocantes.
No puedo deslizar y ajustar la canasta en la freidora
Hay demasiada comida en la
canasta.
No llene la canasta en su total capacidad; vea la tabla en la sección “Ajustes” para las cantidades
máximas. La canasta no está bien colocada en el soporte de canasta.
Empuje la canasta hacia abajo en el soporte de canasta hasta que oiga un leve clic.
Sale humo blanco de la unidad
Usted está preparando
ingredientes grasos.
Cuando usted fríe ingredientes grasos en la freidora, caerá una gran cantidad de aceite dentro de la sartén. El aceite produce humo blanco y la
sartén puede recalentarse más de lo normal. Esto no afecta al aparato ni los resultados obtenidos.
La sartén todavía tiene residuos de
grasa del uso previo.
El humo blanco es causado por el calentamiento de aceite depositado en el soporte de canasta; asegúrese de limpiar la canasta y el soporte de
canasta después de cada uso. Papas fritas frescas no se fríen uniformemente en la
freidora.
Usted no utilizó el tipo correcto de
papas
Use papas frescas y asegúrese de que estén firmes durante el freído.
Usted no lavó los bastoncitos de papas antes de
freírlos.
Enjuague los bastones de papas para quitarles el almidón exterior.
Las papas fritas frescas no están crocantes.
Lo crocante de las papas fritas depende
de la cantidad de aceite y del agua de
las papas.
Seque perfectamente las papas antes de agregar el aceite
Corte las papas en bastones finitos para que salgan más crocantes.
Agregue un poco más de aceite para que salgan más crocantes.
�
Copies of the I/B. Please reproduce them without any changes except under special instruction from Team International BELGIUM. The pages must be reproduced and folded in order to obtain a booklet A5 (+/- 148.5 mm width x 210 mm height). When folding, make sure you keep the good numbering when you turn the pages of the I/B. Don’t change the page numbering. Keep the language integrity. Print only what is inside the frame.
31 FT 42174 - 160331 �
Back cover page (last page)
Assembly page 31/48
Fax +32 2 359 95 50
GARANTÍA Le sugerimos rellenen y nos envíen rápidamente la Tarjeta de Registro de Producto adjunta para facilitar la verificación de la fecha de compra. Por lo tanto, la devolución de esa Tarjeta de Registro de Producto no es una condición imprescindible para la aplicación de esa garantía. Puede también rellenar dicha tarjeta de garantía en línea en la dirección siguiente: www.KALORIK.com A partir de la fecha de compra, este producto KALORIK está garantizado un año contra los defectos materiales y de fabricación, en los Estados Unidos. Esta garantía no es transferible. Conserve la prueba de compra original. Se exige una prueba de compra para obtener la aplicación de la garantía. Durante este período, si el producto KALORIK después de una inspección por parte de KALORIK, se manifiesta defectuoso, será reparado o remplazado, según lo que decida KALORIK, sin gastos para el consumidor. Si se envía un producto de remplazo, se aplicará la garantía que queda del producto original. Esta garantía no se aplica a los defectos causados por una mala utilización por parte del comprador o del usuario, o una negligencia al no respeto del manual de instrucciones KALORIK, o una utilización en un circuito eléctrico cuyo voltaje es diferente al que figura en el producto, o un desgaste normal, o modificaciones o reparaciones no autorizadas por KALORIK, o por un uso con fines comerciales. No existe garantía por las partes de cristal, jarras de cristal, filtros, cestos, cuchillas y accesorios en general. No existe tampoco garantía por las piezas perdidas por el usuario. Toda garantía de valor comercial o de adaptabilidad a este producto está limitada a un año también. Algunos estados no ponen límites a la duración de la garantía tácita o no autorizan la exclusión de daños y perjuicios accesorios o indirectos, por lo que puede que las restricciones anteriormente mencionadas no le sean aplicables a Usted. Esta garantía le otorga derechos legales particulares, pero usted puede tener también otro
�
Copies of the I/B. Please reproduce them without any changes except under special instruction from Team International BELGIUM. The pages must be reproduced and folded in order to obtain a booklet A5 (+/- 148.5 mm width x 210 mm height). When folding, make sure you keep the good numbering when you turn the pages of the I/B. Don’t change the page numbering. Keep the language integrity. Print only what is inside the frame.
32 FT 42174 - 160331 �
Back cover page (last page)
Assembly page 32/48
Fax +32 2 359 95 50
derechos que varían de un estado a otro y algunos derechos pueden variar de un estado a otro. Si el aparato tuviera un defecto durante el periodo de garantía y / o más de 30 días después de que se compró, no devuelva el aparato en la tienda donde le compró: a menudo, nuestro Servicio al Consumidor puede ayudar a resolver el problema sin que el producto tenga que ser reparado. Si hace falta una reparación, uno de nuestros representantes puede confirmar si el producto está bajo garantía y dirigirle al servicio post-venta más próximo. Si fuera el caso, traiga el producto (o envíelo, correctamente franqueado) con la prueba de compra que mencione el número de autorización de devolución indicado por nuestro Servicio al Consumidor, al servicio post-venta KALORIK más próximo. (Visite nuestra web www.KALORIK.com o llame al Servicio al Consumidor para obtener la dirección del Servicio post-venta KALORIK exclusivo más próximo). Si envía el producto, le rogamos añadan una carta explicando la naturaleza del defecto. Si tiene preguntas adicionales, por favor llame al Servicio al Consumidor (véase abajo para los datos completos), de lunes a jueves, de las 9:00 a las 17:00 (EST), y el viernes de las 9:00 a las 16:00 (EST). Note que las horas pueden ser modificadas. Si quiere escribirnos, puede hacerlo a la dirección siguiente: KALORIK Servicio al Consumidor Team International Group of America Inc. 1400 N.W 159th Street, Suite 102 Miami Gardens, FL 33169 USA O llame gratuitamente (U.S.A.) al +1 888-521-TEAM / +1 888-KALORIK Las cartas se aceptan solamente en la dirección anteriormente mencionada. Los envíos y paquetes que no tengan número de autorización de devolución serán rechazados.
�
Copies du I/B. Please reproduce them without any changes except under special instruction from Team International BELGIUM. The pages must be reproduced and folded in order to obtain a booklet A5 (+/- 148.5 mm width x 210 mm height). When folding, make sure you keep the good numbering when you turn the pages of the I/B. Don’t change the page numbering. Keep the language integrity. Print only what is inside the frame.
33 FT 42174 - 160331
Page de Montage 33/48
Fax +32 2 359 95 50
CONSIGNES DE SÉCURITÉ Pour utiliser des appareils électriques, il est important de toujours suivre des précautions basiques de sécurité et des précautions d’usages, comme indiquées ci-après: 1. LISEZ TOUTES LES INSTRUCTIONS AVANT D’UTILISER! 2. Vérifier que le voltage chez vous correspond bien à celui indiqué sur
votre appareil. 3. Ne pas toucher les surfaces chaudes. Utiliser les boutons ou les
poignées. 4. Pour vous protéger contre un choc électrique, ou ne pas vous blesser,
ne pas immerger le câble, la fiche de courant ou l’appareil dans l’eau ou dans d’autres liquides.
5. Il est nécessaire de faire très attention quand l’appareil est utilisé par des enfants ou près d’eux. En règle générale, cet appareil ne doit pas être utilisé par des enfants.
6. Débrancher l’appareil quand il n’est pas utilisé et avant de le nettoyer. Laisser refroidir avant d’y mettre ou d’en enlever les pièces/éléments.
7. Ne pas faire fonctionner l’appareil quand le cordon ou la fiche de courant sont endommagés, ou dans le cas de mauvais fonctionnement, ou si l’appareil est endommagé de n’importe quelle manière. Retournez l’appareil au centre de réparation autorisé le plus proche, pour révision, réparation, ou ajustement.
8. L’usage d’accessoires qui ne sont pas recommandés par le fabriquant peut causer des blessures personnelles.
9. Ne pas utiliser en extérieur. 10. Ne pas laisser le câble pendre par-dessus le rebord d’une table ou d’un
comptoir, ou le laisser toucher des surfaces chaudes. 11. Ne pas placer l’appareil sur ou près d’une cuisine électrique ou à gaz,
ni dans un four préchauffé. 12. Une extrême prudence est de mise lorsque l’on déplace un appareil qui
contient de l’huile chaude ou d’autres liquides chauds. 13. Pour débrancher, tourner tous les contrôles à la position “OFF” (ou 0), et
ensuite débrancher l’appareil. 14. Ne pas utiliser l’appareil pour d’autres choses que l’utilisation prévue. 15. On ne doit pas insérer des morceaux d’aliments trop grands ou des
ustensiles de métal dans la friteuse à air chaud: cela pourrait créer un incendie ou le danger d’un choc électrique.
16. Un incendie pourrait survenir si l’appareil est couvert ou en contact avec du matériel inflammable, y compris des rideaux, des draperies,
�
Copies du I/B. Please reproduce them without any changes except under special instruction from Team International BELGIUM. The pages must be reproduced and folded in order to obtain a booklet A5 (+/- 148.5 mm width x 210 mm height). When folding, make sure you keep the good numbering when you turn the pages of the I/B. Don’t change the page numbering. Keep the language integrity. Print only what is inside the frame.
34 FT 42174 - 160331
Page de Montage 34/48
Fax +32 2 359 95 50
des murs, etc., quand l’appareil est en fonctionnement. Ne pas placer des objets sur l’appareil pendant le fonctionnement.
17. Ne pas nettoyer avec une brosse métallique : des parties métalliques pourraient se détacher de la brosse et entrer en contact avec des parties électriques et créer un risque de choc électrique.
18. Une extrême prudence est de mise lorsqu’on emploie des récipients fabriqués en matériaux autres que du métal ou du verre.
19. Ne pas placer ou entreposer des matériels autre que les accessoires recommandés par le fabriquant, quand on n’utilise pas l’appareil.
20. Ne pas placer aucun de ces matériaux dans l’appareil: papier, carton, plastique, et autres matériaux similaires.
21. Ne pas couvrir le panier ni aucune partie de la friteuse à air chaud avec des feuilles métalliques. Ça pourrait causer une surchauffe de la friteuse.
22. Ne pas laisser l’appareil sans surveillance lorsqu’on l’utilise. 23. Une extrême prudence est de mise quand on enlève le panier ou le
porte-panier pour retirer la graisse chaude. 24. On peut arrêter la friteuse à tout moment en appuyant sur le bouton
Marche/Arrêt. 25. Pendant la friture, de la vapeur chaude est dégagée par les ouvertures
de sortie. Il est important de garder vos mains et votre visage loin de la vapeur et des ouvertures de sortie de la friteuse. Faire attention à la vapeur et à l’air chaud quand vous retirez le plat de l’appareil.
26. Débrancher immédiatement l’appareil si vous voyez de la fumée noire sortir de l’appareil. Attendre jusqu’à l’arrêt du dégagement de fumée avant d’enlever le plat de l’appareil.
27. Ne pas placer l’appareil contre un mur ou contre d’autres appareils. 28. Laisser au moins 4 pouces (10 cm) d’espace libre à l’arrière, sur les côtés
et au-dessus de l’appareil.
Attention!! • Placer toujours l’appareil sur une surface horizontale, régulière,
résistante à la chaleur et horizontale. • Cet appareil a été fabriqué seulement pour l’usage domestique. • Toujours débrancher après usage. • Laisser refroidir l’appareil pendant environ 30 minutes avant de le
manipuler ou le nettoyer. • L’appareil est équipé d’un micro-interrupteur de sécurité, qui arrête
l’appareil automatiquement si le panier est retiré pendant la cuisson. • Ne jamais presser le bouton de séparation du panier, sauf si le porte-
panier est posé sur une surface plate et résistante à la chaleur!
GARDEZ CES INSTRUCTIONS USAGE DOMESTIQUE UNIQUEMENT
�
Copies du I/B. Please reproduce them without any changes except under special instruction from Team International BELGIUM. The pages must be reproduced and folded in order to obtain a booklet A5 (+/- 148.5 mm width x 210 mm height). When folding, make sure you keep the good numbering when you turn the pages of the I/B. Don’t change the page numbering. Keep the language integrity. Print only what is inside the frame.
35 FT 42174 - 160331
Page de Montage 35/48
Fax +32 2 359 95 50
INSTRUCTIONS POUR UNE PRISE DE COURANT POLARISÉE
Cet appareil est équipé avec une fiche polarisée (une lame et plus large que l’autre). À fin de réduire le danger de choc électrique, cette fiche s’adapte dans la prise de courant d’une seule manière. Si la fiche ne s’adapte pas correctement dans la prise de courant, renversez-la. Il est impossible de rentrer la fiche dans la prise de courant, contactez un électricien certifié. N’essayez d’aucune façon de modifier la fiche.
INSTRUCTIONS POUR LE CÂBLE COURT
Un cordon électrique court est inclus, pour diminuer les risques d’accidents résultants d’un cordon enchevêtré, ou de trébucher sur un cordon long. Un cordon d’extension peut être utilisé, pourvu qu’on le fasse avec précaution.
• Si la puissance électrique du cordon d’extension est trop basse, ceci pourrait causer la surchauffe et/ou un risque d’incendie de l’appareil.
• Le cordon d’extension doit être arrangé de façon à ne pas pendre du comptoir ou de la table, où il pourrait être tiré par des enfants ou vous faire trébucher.
CONNAÎTRE VOTRE FRITEUSE A AIR CHAUD
Vous pouvez préparer vos repas et snacks préférés d’une façon rapide, saine, et facile, avec votre nouvelle friteuse à air chaud. Cette friteuse combine la chaleur avec la circulation rapide d’air, et un grill, pour cuire vos ingrédients de tous les côtés simultanément! L’appareil vous permet aussi de préparer une variété de plats savoureux sans ajouter une quantité excessive d’huile ou de graisse. La friteuse à air chaud offre: • Un panneau de contrôle tactile, avec 7 menus préréglés. • le contrôle digital du temps de cuisson et de la température. • Une plage de température de 170°F à 400°F (75°C – 200°C) • Un minuteur de 0 à 60 minutes, qui est équipé d’une fonction d’arrêt
automatique. Une fois que le minuteur est arrivé à “0:00”, l’unité sonne 5 fois et s’éteint automatiquement.
D’autres grands avantages de votre Friteuse à air chaud Kalorik sont:
• Une cuisson rapide, avec un temps de préchauffage bref ou même sans aucun préchauffage.
• Un nettoyage rapide et facile: les surfaces antiadhésives sont adaptées au nettoyage au lave-vaisselle.
• Une friture sans complications —pas de spatules, pas de désordre, et pas d’odeur d’huile!
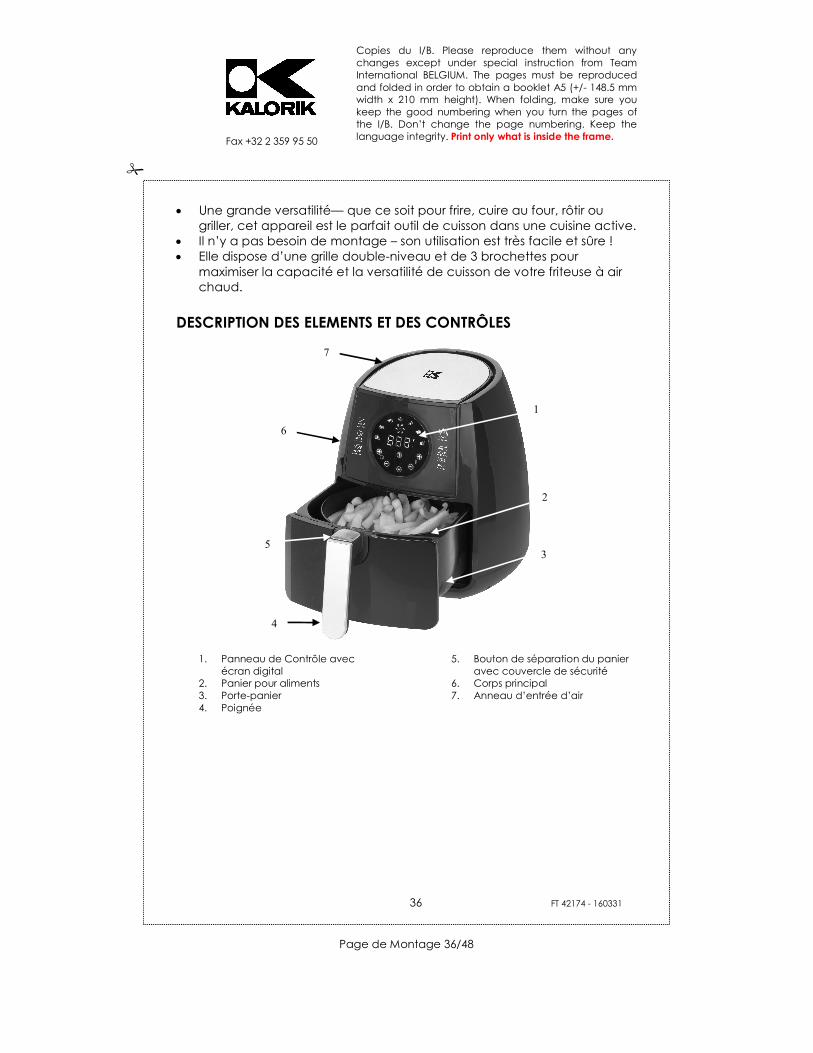
�
Copies du I/B. Please reproduce them without any changes except under special instruction from Team International BELGIUM. The pages must be reproduced and folded in order to obtain a booklet A5 (+/- 148.5 mm width x 210 mm height). When folding, make sure you keep the good numbering when you turn the pages of the I/B. Don’t change the page numbering. Keep the language integrity. Print only what is inside the frame.
36 FT 42174 - 160331
Page de Montage 36/48
Fax +32 2 359 95 50
• Une grande versatilité— que ce soit pour frire, cuire au four, rôtir ou griller, cet appareil est le parfait outil de cuisson dans une cuisine active.
• Il n’y a pas besoin de montage – son utilisation est très facile et sûre ! • Elle dispose d’une grille double-niveau et de 3 brochettes pour
maximiser la capacité et la versatilité de cuisson de votre friteuse à air chaud.
DESCRIPTION DES ELEMENTS ET DES CONTRÔLES
1. Panneau de Contrôle avec
écran digital 2. Panier pour aliments 3. Porte-panier 4. Poignée
5. Bouton de séparation du panier avec couvercle de sécurité
6. Corps principal 7. Anneau d’entrée d’air
2
3
4
5
6
1
7

�
Copies du I/B. Please reproduce them without any changes except under special instruction from Team International BELGIUM. The pages must be reproduced and folded in order to obtain a booklet A5 (+/- 148.5 mm width x 210 mm height). When folding, make sure you keep the good numbering when you turn the pages of the I/B. Don’t change the page numbering. Keep the language integrity. Print only what is inside the frame.
37 FT 42174 – 160331
� Back cover page (last page)
Assembly page 37/48
Fax +32 2 359 95 50
a. Icônes des menus prédéfinis b. Voyant de chauffe (point rouge) c. Touches d’ajustement +/- de la
température d. Touche de sélection des menus e. Touches d’ajustement +/- du
temps de cuisson
f. Bouton Marche/Arrêt g. Ecran d’affichage de la
température et du temps de cuisson
h. Icône de ventilation /circulation d’air chaud
AVANT LE PREMIER USAGE
• Déballer l’appareil et ses accessoires (panier pour aliments, porte-panier, grille). Laver les accessoires dans de l’eau chaude savonneuse, et sécher-les bien. Essuyer l’intérieur de la cavité de la friteuse avec un chiffon humide ou une éponge, et sécher avec une serviette en papier ou un torchon sec. Assurez-vous que la cavité soit sèche avant d’opérer l’appareil.
• Placer l’appareil sur une surface plane, et résistante à la chaleur, en vous assurant qu’il soit placé à une distance d’au moins 4 pouces (10 cm) de tous les objets autour de lui.
• Nous recommandons de faire fonctionner la friteuse à air chaud une première fois pendant environ 20 minutes sans aucun aliment à l’intérieur. Ceci aidera à éliminer la graisse qui pourrait avoir adhéré pendant la fabrication, et à éliminer l’odeur « de neuf » de l’appareil.
• Ventiler la pièce pendant cette période. La première fois que votre friteuse à air chaud commence à chauffer, cela pourrait causer l’émission de fumée ou d’odeur. Ceci est normal pour beaucoup d’appareils chauffants. Ceci n’affecte en rien la sécurité de votre appareil.
Attention: En déplaçant la friteuse à air chaud, assurez-vous de bien la soutenir par sa base – ne pas soutenir l’appareil par la poignée du panier pour déplacer la friteuse!!
b
c
d
e
f
a
g
h
�
Copies du I/B. Please reproduce them without any changes except under special instruction from Team International BELGIUM. The pages must be reproduced and folded in order to obtain a booklet A5 (+/- 148.5 mm width x 210 mm height). When folding, make sure you keep the good numbering when you turn the pages of the I/B. Don’t change the page numbering. Keep the language integrity. Print only what is inside the frame.
38 FT 42174 – 160331
� Back cover page (last page)
Assembly page 38/48
Fax +32 2 359 95 50
MODE D’EMPLOI - INSTRUCTIONS DE FONCTIONNEMENT
1. Préparation pour l’usage
• Placer l’appareil sur une surface stable, horizontale, et plane. Assurez-vous que la surface soit résistante à la chaleur et que la friteuse à air chaud soit au moins à une distance de 4 pouces (10 cm) des objets qui l’entoure.
• Assurez-vous que le panier soit bien placé dans le porte-panier. • Brancher dans la prise de courant. Votre friteuse est prête à l’usage!
Attention! • Ne pas remplir le panier ou le porte-panier avec de l’huile ou n’importe quel autre liquide: ceci pourrait causer un incendie. • Ne jamais utiliser la friteuse à air chaud si le panier n’est pas correctement placé. • Assurez-vous que les ingrédients soient dans l’appareil et qu’ils n’entrent pas en contact avec l’élément chauffants de la friteuse. Ne pas trop remplir le panier avec les aliments. • Ne pas couvrir l’entrée d’air qui se trouve dans la partie supérieure, ou la sortie d’air qui se trouve dans la partie arrière de l’appareil, quand la friteuse est en fonctionnement. • Ne pas toucher l’intérieur de l’appareil quand celui-ci est en fonctionnement. • Ne jamais immerger le corps de l’appareil dans de l’eau ou le laver sous le robinet d’eau.
2. Utiliser l’appareil
La friteuse à air chaud peut être utilisée pour préparer une grande diversité de plats. Merci de vous référer à la table dans la section “Réglages” pour les temps de cuisson, ou au livre de recettes inclus. • Tirer sur la poignée pour retirer soigneusement le porte-panier de la
friteuse. • Placer les ingrédients à frire dans le panier et placer le panier dans le
porte-panier.
Note: Ne jamais remplir le panier à ras-bord et ne jamais excéder les quantités recommandées (voir dans la section « Réglages » après ce chapitre), car cela pourrait affecter la qualité de la cuisson.
• Insérer de nouveau le panier dans la friteuse à air chaud.
�
Copies du I/B. Please reproduce them without any changes except under special instruction from Team International BELGIUM. The pages must be reproduced and folded in order to obtain a booklet A5 (+/- 148.5 mm width x 210 mm height). When folding, make sure you keep the good numbering when you turn the pages of the I/B. Don’t change the page numbering. Keep the language integrity. Print only what is inside the frame.
39 FT 42174 – 160331
� Back cover page (last page)
Assembly page 39/48
Fax +32 2 359 95 50
Attention! Ne jamais utiliser la friteuse à air chaud sans son panier ou sans placer le panier dans le porte-panier!
Attention! Ne pas toucher le panier, ni l’intérieur de la friteuse à air chaud, pendant son usage ou immédiatement après son usage, parce qu’ils seront très chauds. Manipulez le panier seulement par sa poignée. Utiliser toujours des gants de cuisine. L’appareil est très chaud!
• Déterminer le temps correct de préparation et la température de cuisson pour les ingrédients (voir la section « Réglages » après ce chapitre).
• Presser le bouton marche/arrêt pour mettre l’unité en marche, et ajuster le temps et la température désirés.
• Presser les boutons +/- du temps pour augmenter ou diminuer le temps de cuisson. Une pression courte augmentera ou diminuera le temps de cuisson d’1 minute; une pression longue augmentera ou diminuera le temps de cuisson rapidement, par des incréments d’1 minute.
• Presser les touches d’ajustement de la température +/- pour augmenter ou diminuer la température de cuisson. Une pression courte augmentera ou diminuera température de cuisson de 10 degrés (Fahrenheit); Une pressure longue augmentera ou diminuera la température rapidement par incréments de 10 degrés.
• Presser le bouton marche/arrêt une fois de plus pour mettre la friteuse en marche.
• L’icône du “Ventilateur” tournant et le signal de chauffe (le point rouge dans l’icône du ventilateur) s’allument et la friteuse commence immédiatement à générer de l’air chaud. Le minuteur commencera le compte à rebours du temps prévu pour la cuisson.
• Le point rouge indiquant la chauffe s’éteindra lorsque la température désirée sera atteinte.
• Pendant la cuisson, le point rouge “Chauffage” s’illuminera de nouveau de façon intermittente. Ceci indique que l’élément chauffant maintient la température désirée.
• Pendant la cuisson, l’excédent d’huile et les jus de cuisson des ingrédients seront collectés dans le porte-panier. Ceci est normal.
• Il y a des recettes qui demandent de secouer les aliments dans le panier à mi-cuisson (voir la section “Réglage » dans ce chapitre). Pour agiter les ingrédients, retirer le panier de la friteuse par sa poignée. Agiter le soigneusement, mais fermement. Glisser le panier de nouveau dans la friteuse et continuer la cuisson.
Note: Parce que la technologie de circulation rapide d’air chaud réchauffe instantanément l’air dans l’appareil, retirer le panier brièvement hors de l’appareil pendant la friture d’air chaud ne dérangera pas le procès de la cuisson.

�
Copies du I/B. Please reproduce them without any changes except under special instruction from Team International BELGIUM. The pages must be reproduced and folded in order to obtain a booklet A5 (+/- 148.5 mm width x 210 mm height). When folding, make sure you keep the good numbering when you turn the pages of the I/B. Don’t change the page numbering. Keep the language integrity. Print only what is inside the frame.
40 FT 42174 – 160331
� Back cover page (last page)
Assembly page 40/48
Fax +32 2 359 95 50
Conseil: Parfois, il est plus facile de diviser les temps de cuisson en 2 phases, pour des recettes qui demandent de secouer le panier à la moitié du temps de cuisson. Si on règle/ajuste le minuteur à la moitié du temps de cuisson demandé, on pourra entendre un bip indiquant que l’on doit secouer les ingrédients.
Conseil: Si vous réglez le minuteur sur le temps de cuisson total, le minuteur ne fera pas de bip jusqu’à la complétion de la cuisson. Vous pouvez retirer le panier à tout moment pour vérifier l’état de la cuisson des ingrédients. L’appareil arrêtera le décompte du temps de cuisson automatiquement et recommencera quand vous aurez remis le panier dans l’appareil.
• Quand vous entendrez le minuteur (5 bips), le temps de préparation est écoulé. Utiliser des gants de cuisine et la poignée du panier, retirer celui-
ci de l’appareil et le mettre sur une surface résistante à la chaleur.
Note: vous pouvez arrêter l’appareil à tout moment. Pour ce faire, presser simplement le bouton MARCHE/ARRET.
• Vérifier si les ingrédients sont prêts. S’ils ne sont pas cuits, insérez tout simplement le panier de nouveau dans l’appareil et ajustez le temps de cuisson pour quelques minutes additionnelles.
Attention! Après la friture à l’air chaud, le panier, le porte-panier et les ingrédients seront chauds! Et selon le type d’ingrédients mis à cuire dans la friteuse à air chaud, de la vapeur pourrait se dégager de l’appareil. Prenez soin d’utiliser des gants de cuisine par sécurité.
• Pour retirer le panier du porte-panier, glissez le couvercle de protection et pressez le bouton de séparation.
Attention! Ne jamais presser sur le bouton de séparation si le porte-panier n’est pas sur une surface plate et résistante à la chaleur! Le porte-panier contient des liquides chauds. Risque de brûlures graves!!
• Prenez le panier par sa poignée, et versez les aliments frits dans un bol ou dans un plat.
Conseil: Pour retirer des ingrédients grands ou fragiles du panier, vous pouvez utiliser des pinces. Utiliser des pinces ou des outils en plastique résistant à la chaleur. Des ustensiles métalliques pourraient rayer le revêtement du panier.
• Quand une fournée d’aliments est finie, la friteuse est immédiatement prête pour en préparer une autre.
3. Utiliser les menus préréglés.
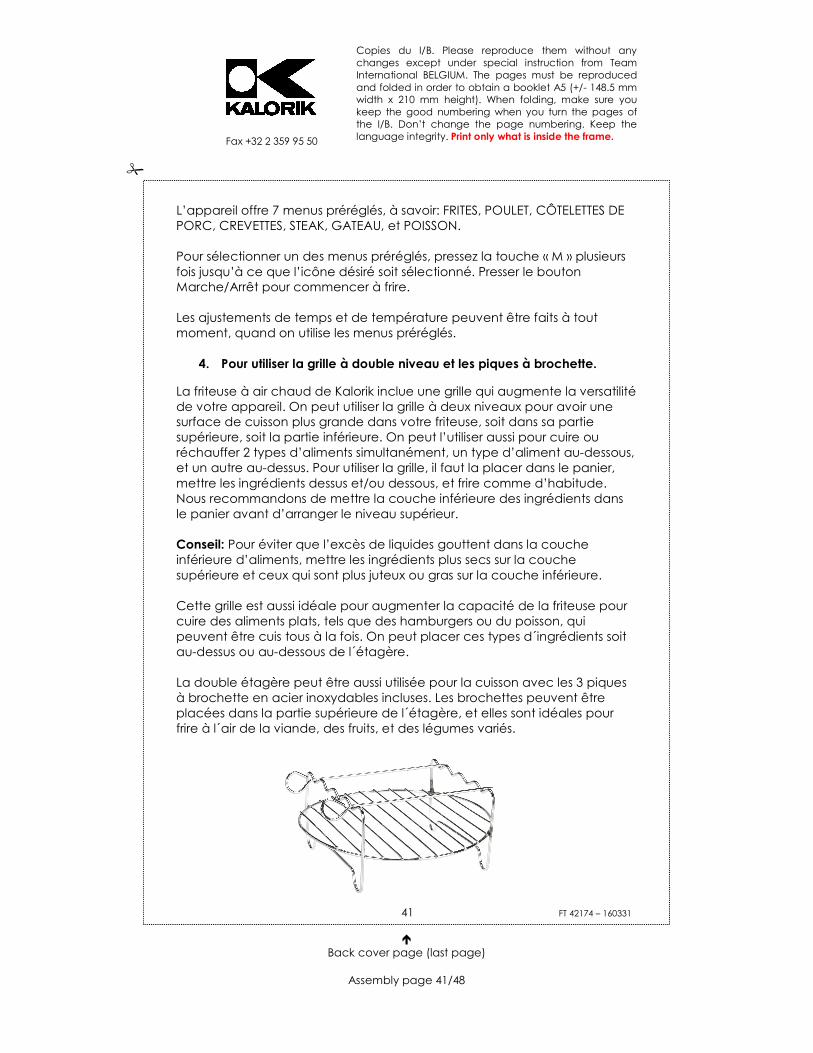
�
Copies du I/B. Please reproduce them without any changes except under special instruction from Team International BELGIUM. The pages must be reproduced and folded in order to obtain a booklet A5 (+/- 148.5 mm width x 210 mm height). When folding, make sure you keep the good numbering when you turn the pages of the I/B. Don’t change the page numbering. Keep the language integrity. Print only what is inside the frame.
41 FT 42174 – 160331
� Back cover page (last page)
Assembly page 41/48
Fax +32 2 359 95 50
L’appareil offre 7 menus préréglés, à savoir: FRITES, POULET, CÔTELETTES DE PORC, CREVETTES, STEAK, GATEAU, et POISSON. Pour sélectionner un des menus préréglés, pressez la touche « M » plusieurs fois jusqu’à ce que l’icône désiré soit sélectionné. Presser le bouton Marche/Arrêt pour commencer à frire. Les ajustements de temps et de température peuvent être faits à tout moment, quand on utilise les menus préréglés.
4. Pour utiliser la grille à double niveau et les piques à brochette.
La friteuse à air chaud de Kalorik inclue une grille qui augmente la versatilité de votre appareil. On peut utiliser la grille à deux niveaux pour avoir une surface de cuisson plus grande dans votre friteuse, soit dans sa partie supérieure, soit la partie inférieure. On peut l’utiliser aussi pour cuire ou réchauffer 2 types d’aliments simultanément, un type d’aliment au-dessous, et un autre au-dessus. Pour utiliser la grille, il faut la placer dans le panier, mettre les ingrédients dessus et/ou dessous, et frire comme d’habitude. Nous recommandons de mettre la couche inférieure des ingrédients dans le panier avant d’arranger le niveau supérieur. Conseil: Pour éviter que l’excès de liquides gouttent dans la couche inférieure d’aliments, mettre les ingrédients plus secs sur la couche supérieure et ceux qui sont plus juteux ou gras sur la couche inférieure. Cette grille est aussi idéale pour augmenter la capacité de la friteuse pour cuire des aliments plats, tels que des hamburgers ou du poisson, qui peuvent être cuis tous à la fois. On peut placer ces types d´ingrédients soit au-dessus ou au-dessous de l´étagère. La double étagère peut être aussi utilisée pour la cuisson avec les 3 piques à brochette en acier inoxydables incluses. Les brochettes peuvent être placées dans la partie supérieure de l´étagère, et elles sont idéales pour frire à l´air de la viande, des fruits, et des légumes variés.
�
Copies du I/B. Please reproduce them without any changes except under special instruction from Team International BELGIUM. The pages must be reproduced and folded in order to obtain a booklet A5 (+/- 148.5 mm width x 210 mm height). When folding, make sure you keep the good numbering when you turn the pages of the I/B. Don’t change the page numbering. Keep the language integrity. Print only what is inside the frame.
42 FT 42174 – 160331
� Back cover page (last page)
Assembly page 42/48
Fax +32 2 359 95 50
COMMENT PRÉPARER DES FRITES FAITES MAISON
Pour faire des frites fait maison, il faut procéder comme suit:
• Peler les pommes de terre et les couper en bâtonnets. • Rincez bien les bâtonnets à l’eau et les sécher avec une serviette en
papier. • Mettre 1/2 c. à soupe d´huile dans un bol, mettre les frites par-dessus et
mélanger jusqu´à les enduire d´huile. • Enlever les bâtonnets du bol avec les mains ou avec un ustensile de
cuisine, de façon que l´excès d´huile reste dans le bol. Mettre les bâtonnets dans le panier de cuisson.
Note: Ne versez pas le contenu du bol directement dans le panier, pour permettre à l´excès d´huile de restes dans le fond du bol.
Frire les frites selon les instructions ci-dessous. Pour obtenir les meilleurs résultats, ne pas frire plus de 1.2 livres de frites à chaque fois.
RÉGLAGES
Le tableau suivant vous aidera à sélectionner les réglages de base pour les ingrédients que vous voulez préparer.
Note: N’oubliez pas que ces réglages sont seulement des suggestions.
Conseils: - Tout aliment qui peut être préparé dans un four traditionnel peut être aussi
préparé dans la friteuse à air chaud. - On peut optimiser les résultats de la cuisson en secouant les ingrédients à la
moitié de la cuisson, et cela peut aussi éviter une cuisson irrégulière. - Une grande quantité d’ingrédients a besoin seulement d’une préparation
un peu plus longue, et une petite quantité d’ingrédients a besoin seulement d’une préparation un peu plus courte.
- Ne pas préparer des ingrédients trop gras, tels que des saucisses, dans la friteuse à air chaud, parce que la vapeur de graisse pourrait s’enflammer.
- Si des ingrédients attachent au fond du panier, utilisez un vaporisateur d’huile de cuisine au fond du panier avant d’y ajouter les ingrédients à cuire
- Ajouter un petit peu d’huile aux pommes de terre fraîches pour qu’elles soient plus croustillantes. Commencez à frire les ingrédients seulement quelques minutes après avoir ajouté de l’huile.
- La quantité optimale de pommes de terre pour obtenir des frites croustillantes est 500 grammes / 1 livre.
- Utilisez une pâte préfabriquée pour préparer des snacks fourrés rapidement et facilement. La préparation avec de la pâte préfabriquée est plus rapide qu’avec une pâte-maison.
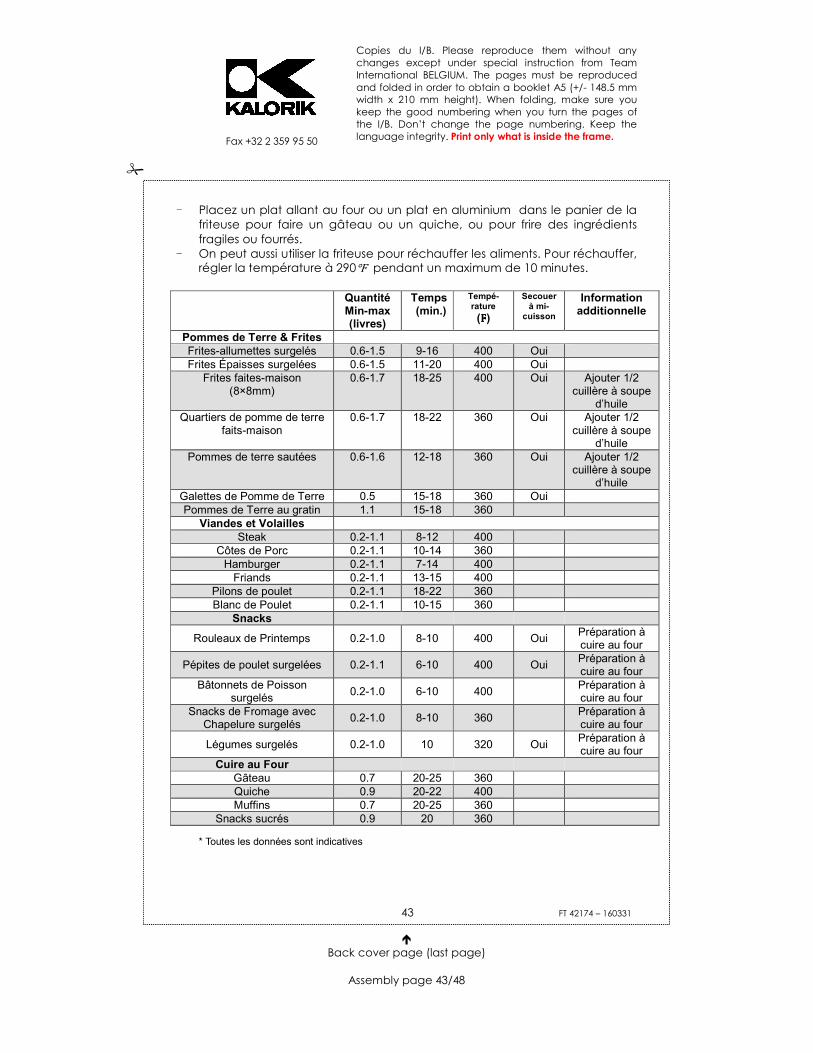
�
Copies du I/B. Please reproduce them without any changes except under special instruction from Team International BELGIUM. The pages must be reproduced and folded in order to obtain a booklet A5 (+/- 148.5 mm width x 210 mm height). When folding, make sure you keep the good numbering when you turn the pages of the I/B. Don’t change the page numbering. Keep the language integrity. Print only what is inside the frame.
43 FT 42174 – 160331
� Back cover page (last page)
Assembly page 43/48
Fax +32 2 359 95 50
- Placez un plat allant au four ou un plat en aluminium dans le panier de la friteuse pour faire un gâteau ou un quiche, ou pour frire des ingrédients fragiles ou fourrés.
- On peut aussi utiliser la friteuse pour réchauffer les aliments. Pour réchauffer, régler la température à 290℉ pendant un maximum de 10 minutes.
Quantité
Min-max (livres)
Temps (min.)
Tempé-rature (FFFF)
Secouer à mi-
cuisson
Information additionnelle
Pommes de Terre & Frites Frites-allumettes surgelés 0.6-1.5 9-16 400 Oui Frites Épaisses surgelées 0.6-1.5 11-20 400 Oui
Frites faites-maison (8×8mm)
0.6-1.7 18-25 400 Oui Ajouter 1/2 cuillère à soupe
d’huile Quartiers de pomme de terre
faits-maison
0.6-1.7 18-22 360 Oui Ajouter 1/2 cuillère à soupe
d’huile Pommes de terre sautées 0.6-1.6 12-18 360 Oui Ajouter 1/2
cuillère à soupe d’huile
Galettes de Pomme de Terre 0.5 15-18 360 Oui Pommes de Terre au gratin 1.1 15-18 360
Viandes et Volailles Steak 0.2-1.1 8-12 400
Côtes de Porc 0.2-1.1 10-14 360 Hamburger 0.2-1.1 7-14 400
Friands 0.2-1.1 13-15 400 Pilons de poulet 0.2-1.1 18-22 360 Blanc de Poulet 0.2-1.1 10-15 360
Snacks
Rouleaux de Printemps 0.2-1.0 8-10 400 Oui Préparation à cuire au four
Pépites de poulet surgelées 0.2-1.1 6-10 400 Oui Préparation à cuire au four
Bâtonnets de Poisson surgelés
0.2-1.0 6-10 400 Préparation à cuire au four
Snacks de Fromage avec Chapelure surgelés
0.2-1.0 8-10 360 Préparation à cuire au four
Légumes surgelés 0.2-1.0 10 320 Oui Préparation à cuire au four
Cuire au Four Gâteau 0.7 20-25 360 Quiche 0.9 20-22 400 Muffins 0.7 20-25 360
Snacks sucrés 0.9 20 360 * Toutes les données sont indicatives
�
Copies du I/B. Please reproduce them without any changes except under special instruction from Team International BELGIUM. The pages must be reproduced and folded in order to obtain a booklet A5 (+/- 148.5 mm width x 210 mm height). When folding, make sure you keep the good numbering when you turn the pages of the I/B. Don’t change the page numbering. Keep the language integrity. Print only what is inside the frame.
44 FT 42174 – 160331
� Back cover page (last page)
Assembly page 44/48
Fax +32 2 359 95 50
NETTOYAGE ET ENTRETIEN
• Nettoyez l´appareil après chaque usage! • Éteignez l´appareil (bouton Marche/Arrêt). Avant de nettoyer,
débrancher l´appareil de la prise de courant et laisser froidir complètement.
• La grille, le panier et le porte-panier peuvent être nettoyés soit dans l´eau chaude avec du détergent, soit au lave-vaisselle. Ne pas utiliser des ustensiles métalliques ni des produits abrasifs pour nettoyer ces parties, parce que cela pourrait en abîmer le revêtement anti-adhérant. Rincez et séchez bien après le nettoyage.
• Pour enlever les ingrédients brulés ou tenaces, remplissez le porte-panier avec de l´eau chaude et du liquide-vaisselle. Placer le panier dans le porte-panier, et laissez-les tremper dans l´eau pendant au moins 10 minutes avant de les laver dans l´évier.
Nettoyer l´intérieur de la friteuse:
• Essuyez la cavité avec un chiffon humide ou une éponge. Séchez avec une serviette en papier.
• Ne jamais utiliser de produits abrasifs dans la cavité !! • Ne jamais immerger dans l´eau et assurez-vous que ni eau ni humidité
ne puisse pénétrer dans la partie supérieure de la friteuse. • Nettoyez l´élément chauffant à l´intérieur de la friteuse avec une brosse
de nettoyage pour enlever tout résidu d´aliments.
Nettoyer l´extérieur de la friteuse
• Essuyez le corps de l’appareil avec un chiffon humide ou une éponge. Séchez immédiatement.
• NE JAMAIS utiliser de laine d´acier, ni d´éponges ou tampons à récurer métalliques, ni de produits de nettoyage abrasifs, parce que cela pourrait abîmer la finition.
• Ne pas laisser aucun liquide pénétrer dans l´arrivée d´air, située dans la partie supérieure de la friteuse.
Tout autre service doit être accompli par un représentant autorisé pour le service de cet appareil.
NE PAS IMMERGER LA FRITEUSE DANS L´EAU NI DANS AUCUN AUTRE LIQUIDE !!

�
Copies du I/B. Please reproduce them without any changes except under special instruction from Team International BELGIUM. The pages must be reproduced and folded in order to obtain a booklet A5 (+/- 148.5 mm width x 210 mm height). When folding, make sure you keep the good numbering when you turn the pages of the I/B. Don’t change the page numbering. Keep the language integrity. Print only what is inside the frame.
45 FT 42174 – 160331
� Back cover page (last page)
Assembly page 45/48
Fax +32 2 359 95 50
RESOLUTION DES PROBLÈMES
Problème Cause Probable Solution La friteuse ne fonctionne pas L’appareil n’est pas
branché ou pas mis sous tension
Assurer que la fiche de courant soit insérée dans une prise courant électrique et pressez le bouton
Marche/Arrêt. Le temps de cuisson
n’est pas défini Réglez le temps de cuisson et pressez le bouton
Marche/Arrêt une fois de plus pour mettre l’appareil en marche.
Le porte-panier n’est pas bien mis en
place
Insérez le porte-panier de nouveau dans la friteuse.
Les ingrédients frits avec la friteuse ne sont pas bien cuits
Il y a trop d’aliments dans la corbeille.
Mettez des fournées plus petites dans le panier. Les lots plus petits sont frits d’une façon plus
homogène. La température réglée est trop
basse.
Ajustez la température comme indiqué (voir section “Réglage »)
Le temps de cuisson est trop court.
Ajustez le temps de cuisson comme indiqué (voir section « Réglage »)
Les snacks frits de sont pas croustillants quand on les
retire de la friteuse.
Le type de snack utilisé est conçu pour
être préparé à la poêle.
Utilisez des snacks conçus pour être cuits au four, ou badigeonnez-les avec de l’huile pour obtenir
des snacks plus croustillants.
On ne peut pas glisser le panier correctement dans
l’appareil.
Il y a trop d’aliments dans la corbeille.
Ne pas remplir la corbeille à ras-bord; voir la table « Réglage » ci-dessus, pour les quantités
maximum. Le panier n’est pas correctement placé
dans le porte-panier.
Mettre le panier dans le porte-panier jusqu’à entendre le clic.
Il y a une fumée blanche qui sorte de l’appareil.
Vous préparez des ingrédients gras.
Quand on frit des ingrédients gras dans le panier, une quantité grande d’huile gouttera dans le porte-panier. L’huile peut produire une fumée blanche et le plat peut se réchauffer plus que d’habitude. Ceci
n’affectera pas l’appareil ni le résultat final. Le plat a encore des résidus de graisse
de l’usage antérieur.
La fumée blanche est due au réchauffage de la graisse dans le porte-panier; assurez-vous de bien nettoyer le panier et le porte-panier complètement
après chaque usage. Les pommes de terre sont
frites inégalement Vous n’avez pas
utilisé le type correct de pommes de terre.
Utiliser des pommes de terre fraiches et assurez-vous qu’elles restent fermes pendant la friture.
Vous n’avez pas bien rincé les
bâtonnets avant de les frire
Rincez les bâtonnets pour enlever l’amidon sur la partie extérieure des bâtonnets.
Les frites fraiches ne sont pas croustillantes.
Obtenir des frites croustillantes dépend de la
quantité d’huile et d’eau dans les frites
Assurez-vous de bien sécher les bâtonnets avant d’ajouter l’huile.
Couper les pommes de terre en bâtonnets plus minces pour qu’ils soient plus croustillants.
Ajouter un petit peu plus d’huile pour qu’ils soient plus croustillants.
�
Copies du I/B. Please reproduce them without any changes except under special instruction from Team International BELGIUM. The pages must be reproduced and folded in order to obtain a booklet A5 (+/- 148.5 mm width x 210 mm height). When folding, make sure you keep the good numbering when you turn the pages of the I/B. Don’t change the page numbering. Keep the language integrity. Print only what is inside the frame.
46 FT 42174 – 160331
� Back cover page (last page)
Assembly page 46/48
Fax +32 2 359 95 50
GARANTIE
Nous vous suggérons de remplir et de nous renvoyer rapidement la Carte d’Enregistrement Produit ci-jointe afin de faciliter la vérification de la date d’achat. Cependant, le renvoi de la Carte d’Enregistrement Produit n’est pas une condition indispensable à l’application de la présente garantie. Vous pouvez aussi remplir cette carte de garantie en ligne à l’adresse suivante : www.KALORIK.com.
A compter de la date d’achat, ce produit KALORIK est garanti un an, sur le territoire des Etats-Unis, contre les défauts matériels et de fabrication. Cette garantie n’est pas transférable. Conservez la preuve d’achat originelle. Une preuve d’achat est exigée pour obtenir l’application de la garantie.
Durant cette période, le produit KALORIK qui, après inspection par KALORIK, s’avère défectueux, sera réparé ou remplacé, au choix de KALORIK, sans frais pour le consommateur. Si un produit de remplacement est envoyé, c’est la garantie restante du produit originel qui s’appliquera.
La présente garantie ne s’applique pas aux défauts dus à une mauvaise utilisation de la part de l’acheteur ou de l’utilisateur, à une négligence, au non-respect des consignes du manuel d’utilisation KALORIK, à une utilisation sur un circuit électrique au voltage différent de celui renseigné sur le produit, à une usure normale, à des modifications ou réparations non autorisées par KALORIK, ou par un usage à des fins commerciales. Il n’existe pas de garantie pour les parties en verre, récipients en verre, filtres, paniers, lames et accessoires en général. Il n’existe également pas de garantie pour les pièces perdues par l’utilisateur.
Toute garantie de valeur commerciale ou d’adaptabilité à ce produit est également limitée à la garantie d’un an.
Certains états ne limitent pas la longueur de la garantie tacite ou n’autorisent pas l’exclusion de dommages-intérêts accessoires ou indirects, les restrictions ci-dessus peuvent donc ne pas s’appliquer à
�
Copies du I/B. Please reproduce them without any changes except under special instruction from Team International BELGIUM. The pages must be reproduced and folded in order to obtain a booklet A5 (+/- 148.5 mm width x 210 mm height). When folding, make sure you keep the good numbering when you turn the pages of the I/B. Don’t change the page numbering. Keep the language integrity. Print only what is inside the frame.
47 FT 42174 – 160331
� Back cover page (last page)
Assembly page 47/48
Fax +32 2 359 95 50
vous. Cette garantie vous donne des droits légaux particuliers, et certains droits peuvent varier d’un état à l’autre. Si l’appareil devait présenter un défaut durant la période de garantie et plus de 30 jours après l’achat, ne ramenez pas l’appareil au magasin : souvent, notre Service Clientèle peut aider à résoudre le problème sans que le produit ne doive être réparé. Si une réparation est nécessaire, un représentant peut confirmer si le produit est sous garantie et vous rediriger vers notre centre de réparation.
Le cas échéant, ramenez le produit (ou envoyez-le, dûment affranchi), ainsi qu’une preuve d’achat, en mentionnant le numéro d’autorisation de retour, indiqué par notre service clientèle, au service après-vente KALORIK agrée (visitez notre site internet www.KALORIK.com ou appelez notre département Service Clientèle pour obtenir l’adresse du service après-vente KALORIK agréé).
Si vous envoyez le produit, veuillez y joindre une lettre expliquant la nature du défaut.
Si vous avez des questions complémentaires, veuillez appeler notre département Service Clientèle (voyez plus bas pour les coordonnées complètes), du Lundi au Jeudi de 9h à 17h (EST) et le Vendredi de 9h à 16h (EST). Veuillez noter que les heures sont sujettes à modification.
Si vous souhaitez nous écrire, adressez votre courrier à:
KALORIK Customer Service Department Team International Group of America Inc. 1400 N.W 159th Street, Suite 102 Miami Gardens, FL 33169 USA
Ou appelez (Gratuitement des Etats-Unis): +1 888-521-TEAM ou +1 888-KALORIK.
Seules les lettres seront acceptées à l’adresse ci-dessus. Les envois et colis n’ayant pas de numéro d’autorisation de retour seront refusés.

�
Copies du I/B. Please reproduce them without any changes except under special instruction from Team International BELGIUM. The pages must be reproduced and folded in order to obtain a booklet A5 (+/- 148.5 mm width x 210 mm height). When folding, make sure you keep the good numbering when you turn the pages of the I/B. Don’t change the page numbering. Keep the language integrity. Print only what is inside the frame.
48 FT 42174 – 160331
� Back cover page (last page)
Assembly page 48/48
Fax +32 2 359 95 50
NOTES :