Embed Size (px)
Citation preview
Culvert Inspection and RepairBy Marisa DiBiaso, Project Assistant
In the autumn water levels are usually low,making it a great time to inspect culverts and perform routine maintenance. This article will coverinspections to determine needed cleaning, repairor replacement, and methods to minimize erosion.
Inspections
Thorough inspection is essential to effectivemaintenance. Knowledge of culvert material canpredict the types of problems a culvert may have .Each material has specific weaknesses.• Steel culverts are subject to corrosion and
abrasion, and have a shorter life span thanother materials.
• Aluminum culverts can sustain abrasion andhave less strength.
• Plastic culverts bend easily and are subject toultraviolet degradation. They are subject toimpact damage at low temperatures.
• Concrete is the most durable material, but concrete and reinforcing steel still deteriorate.
Cleaning
Inspections frequently show that culvertsrequire cleaning. During cleaning, certain maintenance tasks should be performed:• Remove obstructions and clean inside the pipe.• Examine the culvert for visible cracks ,
changes in shape, corrosion or abrasion.• Check upstream for trees, dead branches, and
other debris that may obstruct the pipe .• Cut vegetation that may hinder flow near inlet
and outlet.• Look for evidence of past overflow to indicate
whether the culvert is the correct size.• Remove debris and sediment, or add material
to make the ditch bottom level with the culvertinvert elevation.
Road Business, Fall 2000, Vol. 15, No.3
Repairs
Bent or broken culvert ends should berepaired for smooth water flow. Repair headwallcracks, loose mortar, and displaced stones. Thechart on the facing page will help to diagnoseother problems and choose a repair.
Replacements
The most important reason to replace a culvert is to minimize the possibility of structuralfailure. Weak culverts beneath a road are especially dangerous. Replace a culvert if it cannothandle the expected water flow. Water and debrislines above the culvert indicate a larger culvert isneeded. Area residents and town records can indicate water levels of past storms and the maximumlevel to expect.
Replacing a culvert with one only slightlylarger significantly increases the capacity of flow.For example, an 18" culvert has about 50% morecapacity than a IS" culvert. Before installing alarger culvert, check culverts downstream toensure they can handle the increased flow.
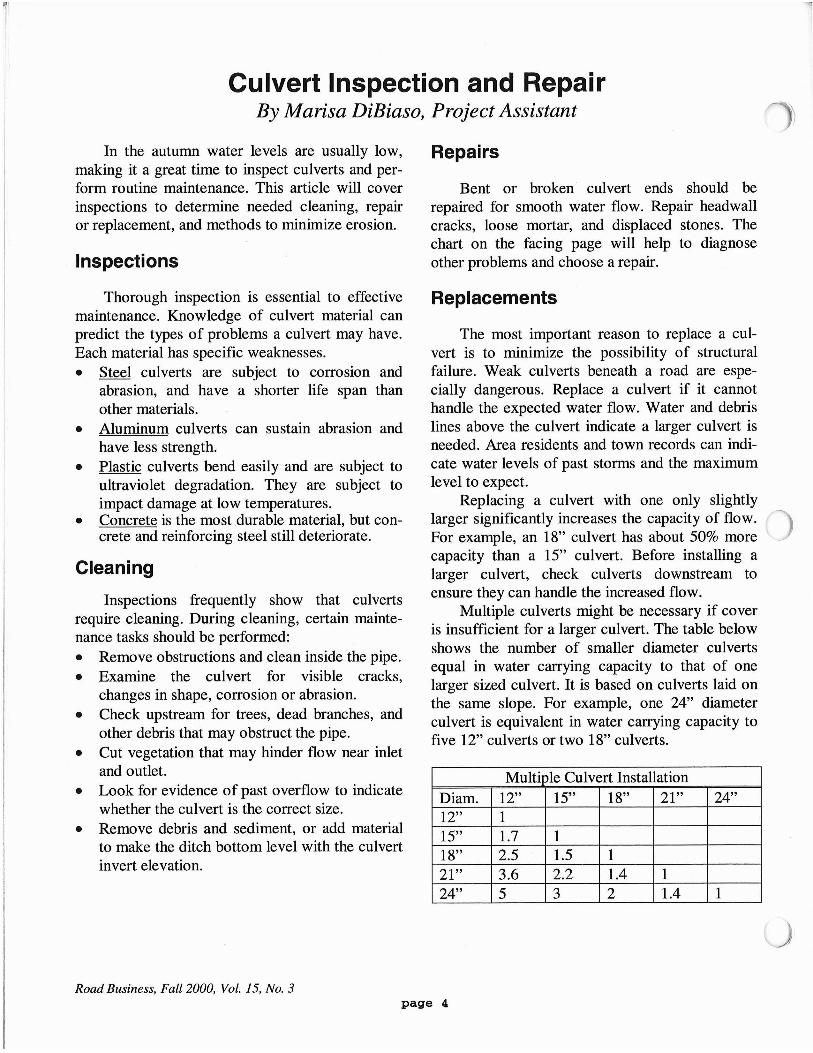
Multiple culverts might be necessary if coveris insufficient for a larger culvert. The table belowshows the number of smaller diameter culvertsequal in water carrying capacity to that of onelarger sized culvert. It is based on culverts laid onthe same slope. For example, one 24" diameterculvert is equivalent in water carrying capacity tofive 12" culverts or two 18" culverts.
Multiple Culvert InstallationDiam. 12" 15" 18" 21" 24"12" 1IS" 1.7 118" 2.5 1.5 121" 3.6 2.2 1.4 124" 5 3 2 1.4 1
page 4
~
(
Erosion
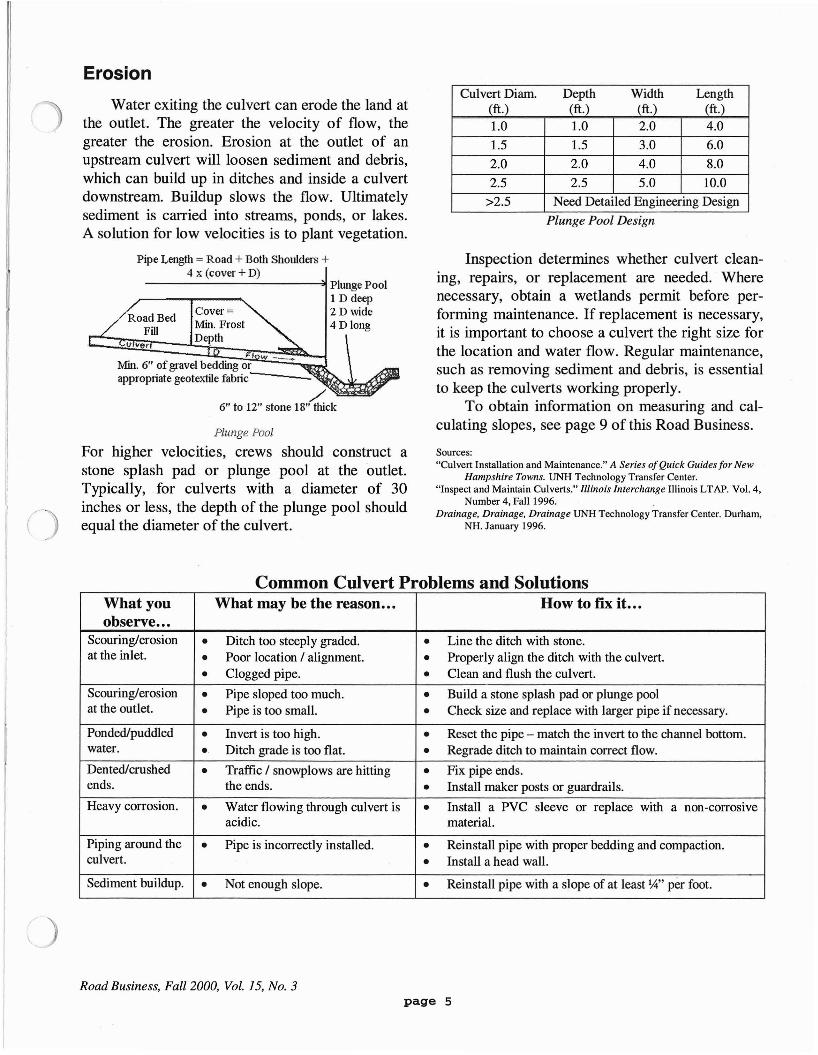
Water exiting the cu lvert can erode the land atthe outlet. The greater the velocity of flow, thegreater the erosion. Erosion at the outlet of anupstream culvert will loo sen sediment and debris,which can build up in ditches and inside a culvertdownstream. Buildup slows the flow. Ultimatelysediment is carried into streams, ponds, or lakes.A solution for low velocities is to plant vegetation.
Pipe Length = Road +Both Shoulders +4 x (cover + D)
Road Bed Cover =Fill Min. Frost
U li", DepthP I w :..
Min. 6" of gravel bedding orappropriate geotextile fabtlc-----
./6" to 12" stone 18" thick
Plunge Pool
For higher velocities, crews should construct astone splash pad or plunge pool at the outlet.Typically, for culverts with a diameter of 30inches or less, the depth of the plunge pool shouldequal the diameter of the culvert.
Culvert Diam. Depth Width Length(ft.) (ft.) (ft .) (ft.)
1.0 1.0 2.0 4.01.5 1.5 3.0 6.02.0 2.0 4.0 8.02.5 2.5 5.0 10.0
>2.5 Need Detailed Engineering Design
Plunge Pool Design
Inspection determines whether culvert cleaning, repairs, or replacement are needed. Wherenecessary, obtain a wetlands permit before performing maintenance. If replacement is necessary,it is important to choose a culvert the right size forthe location and water flow . Regular maintenance,such as removing sediment and debris, is essentialto keep the culverts working properly.
To obtain information on measuring and calculating slopes, see page 9 of this Road Business.
Sources:"Culvert Installation and Maintenance." A Series ofQuick Guides for New
Hampshire Towns. UNH Technology Transfe r Center."Inspect and Maintain Culverts." Illinois Interchange Illinois LTAP. Vol. 4,
Number 4, Fall 1996. .Draina ge, Drainage. Drainage UNH Technology Transfer Center. Durham,
NH. January 1996.
Common Culvert Problems and SolutionsWhat you What may be the reason... How to fix it...observe...
Scouring/erosion • Ditch too steeply graded. • Line the ditch with stone.at the inlet. • Poor location / alignment. • Properly align the ditch with the culvert.
• Clogged pipe. • Clean and flush the culvert.
Scouring/erosion • Pipe sloped too much . • Build a stone splash pad or plunge poolat the outlet. • Pipe is too small. • Check size and replace with larger pipe if necessary.
Ponded/puddled • Invert is too high. • Reset the pipe - match the invert to the chann el bottom.water. .. Ditch grade is too flat. • Regrade ditch to maintain correct flow.
Dented/crushed • Traffic / snowplows are hitting • Fix pipe ends.ends. the ends. • Install maker posts or guardrails.
Heavy corrosion. • Water flowing through culvert is • Install a PVC sleeve or replace with a non-corrosrveacidic. material.
Piping around the • Pipe is incorrectly installed. • Reinstall pipe with proper bedding and compaction.culvert. • Install a head wall.
Sediment buildup. • Not enough slope. • Reinstall pipe with a slope of at least J.,4" per foot.
Road Business, Fall 2000, Vol. J5, No.3page 5