Embed Size (px)
Citation preview
here is always a spot for a wall cabinet, especially a smallone. This Craftsman-style piece is modeled after a clock,and at a little more than a foot wide it fits well in almost any
tight, vertical space. I made it out of butternut, an underused,medium-toned wood that works easily. Because this cabinet wasdestined for a kitchen, I outfitted the inside to accommodatespices, but the same-sized cabinet could hold anything from pot-tery to small books. The shelves, in this case, are spaced to fit off-the-rack spice bottles, with the bottom shelf roomy enough forlarger, bulk-sized decanters. The tilting drawer at the bottom ismade to fit large packages of tea.
When it comes to construction, the simplest answers are oftenbest. On this small, vertical cabinet, I could have dovetailed thecase, but I saw no need to spend the time when countersunk andplugged screws would do. And on such a simple piece, I didn’twant anything to detract attention from the door, where I spentmost of the design and construction energy. I used a flat panel atthe bottom of the door to cover the drawer and bulk items, but at the top I installed glass to show off the nicer-looking spice bot-tles and to make the piece a bit more interesting. Over the singlepiece of glass, I installed muntins, giving the appearance of two-
over-two panes of glass.Begin by milling up the lumber: The top and bottom are 1 in.thick; the sides, door rails and stiles are 3⁄4 in. thick; the drawer
T
Craftsman Wall CabinetA simple construction
with a refined door and a tilting drawer
B Y I A N I N G E R S O L L
52 F I N E W O O D W O R K I N G Photos, except where noted: Matthew Teague; this page: Michael Pekovich
J A N U A R Y / F E B R U A R Y 2 0 0 0 53Drawings: Vince Babak
parts are 5⁄8 in. thick; the back and shelves are 1⁄2 in. thick; themuntins and door panel are 1⁄4 in. thick.
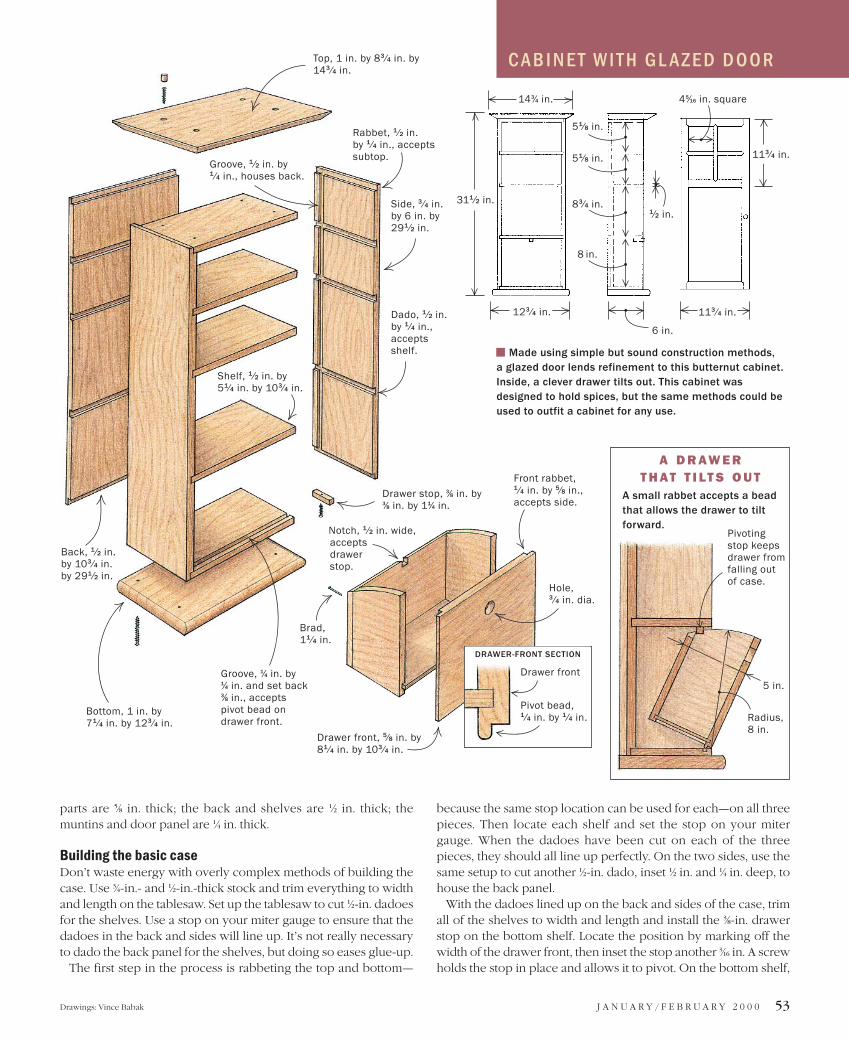
Building the basic case Don’t waste energy with overly complex methods of building thecase. Use 3⁄4-in.- and 1⁄2-in.-thick stock and trim everything to widthand length on the tablesaw. Set up the tablesaw to cut 1⁄2-in. dadoesfor the shelves. Use a stop on your miter gauge to ensure that thedadoes in the back and sides will line up. It’s not really necessaryto dado the back panel for the shelves, but doing so eases glue-up.
The first step in the process is rabbeting the top and bottom—
because the same stop location can be used for each—on all threepieces. Then locate each shelf and set the stop on your mitergauge. When the dadoes have been cut on each of the threepieces, they should all line up perfectly. On the two sides, use thesame setup to cut another 1⁄2-in. dado, inset 1⁄2 in. and 1⁄4 in. deep, tohouse the back panel.
With the dadoes lined up on the back and sides of the case, trimall of the shelves to width and length and install the 3⁄8-in. drawerstop on the bottom shelf. Locate the position by marking off thewidth of the drawer front, then inset the stop another 3⁄16 in. A screwholds the stop in place and allows it to pivot. On the bottom shelf,
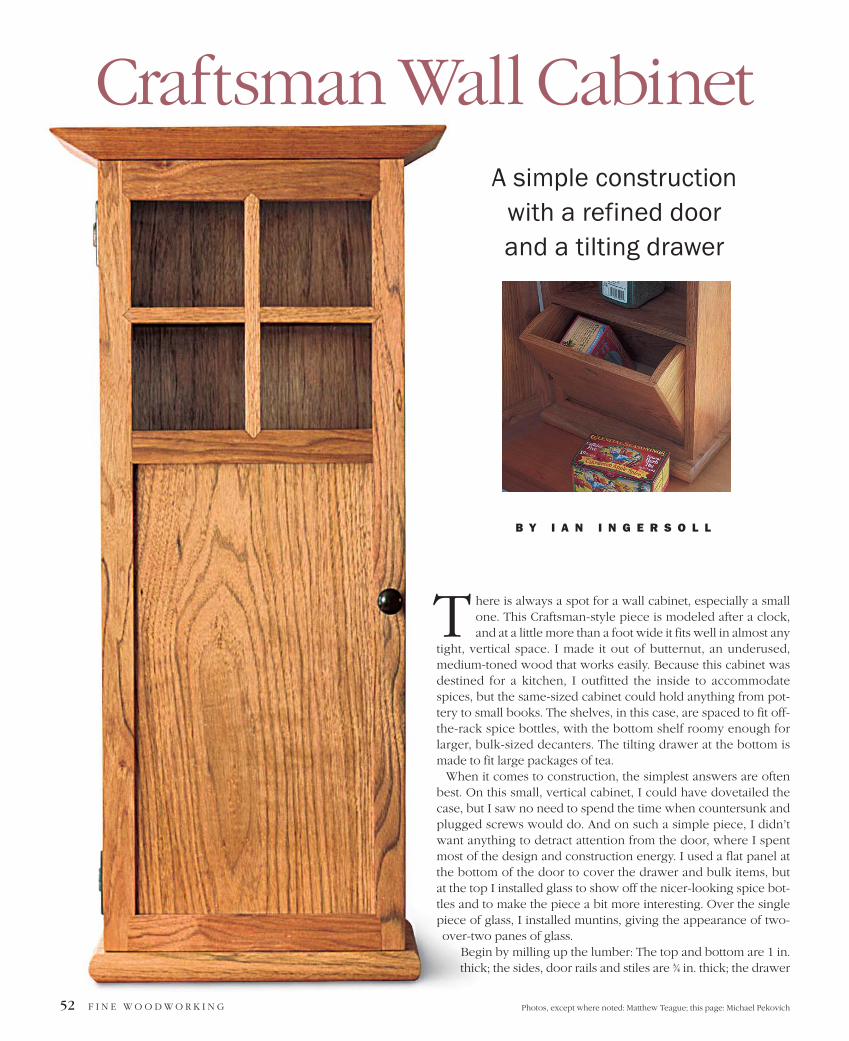
Made using simple but sound construction methods, a glazed door lends refinement to this butternut cabinet.Inside, a clever drawer tilts out. This cabinet wasdesigned to hold spices, but the same methods could beused to outfit a cabinet for any use.
C A B I N E T W I T H G L A Z E D D O O R
6 in.
A D R AW E R T H AT T I LT S O U T
A small rabbet accepts a beadthat allows the drawer to tiltforward.
51⁄8 in.
51⁄8 in.
83⁄4 in. 1⁄2 in.
8 in.
113⁄4 in.
113 ⁄4 in.
45⁄16 in. square143⁄4 in.
123 ⁄4 in.
Back, 1 ⁄2 in. by 103 ⁄4 in. by 291 ⁄2 in.
Bottom, 1 in. by71 ⁄4 in. by 123 ⁄4 in.
Groove, 1⁄4 in. by 1⁄4 in. and set back3⁄8 in., acceptspivot bead ondrawer front.
Brad,11 ⁄4 in.
Top, 1 in. by 83 ⁄4 in. by143 ⁄4 in.
Groove, 1 ⁄2 in. by 1 ⁄4 in., houses back.
Rabbet, 1 ⁄2 in. by 1 ⁄4 in., acceptssubtop.
311 ⁄2 in.Side, 3 ⁄4 in.by 6 in. by291 ⁄2 in.
Dado, 1 ⁄2 in.by 1 ⁄4 in.,acceptsshelf.
Shelf, 1 ⁄2 in. by 51⁄4 in. by 103⁄4 in.
Drawer stop, 3⁄8 in. by3⁄8 in. by 11⁄4 in.
Notch, 1 ⁄2 in. wide,acceptsdrawerstop.
Drawer front, 5⁄8 in. by81 ⁄4 in. by 103 ⁄4 in.
Front rabbet, 1 ⁄4 in. by 5⁄8 in.,accepts side.
Hole, 3 ⁄4 in. dia.
DRAWER-FRONT SECTION
Drawer front
Pivot bead,1 ⁄4 in. by 1 ⁄4 in.
Pivotingstop keepsdrawer fromfalling outof case.
5 in.
Radius,8 in.
cut a 1⁄4-in. by 1⁄4-in. groove with the dado setup on the tablesaw.This groove will work as a hinging mechanism for the tilting draw-er. With the drawer stop installed and the groove cut, you can glueup the case, which should go smoothly on such a small piece.
Installing the top and bottom Making the bottom of this case out of 1-in.-thick stock gives thepiece a grounded look. Just remember to leave a 1⁄2-in. overhangon the front and sides, and make sure you account for the door.Rout a 1-in. bullnose on the edges of the bottom and leave the dec-oration for the top.
The treatment for the top is one I regularly use on tabletops. Itlends the piece a nice, finished look and helps draw your attentionto the glass panels in the door. Start by cutting a 1⁄4-in. bead on theoutside edge at the front and sides. Then establish the overhang, inthis case 11⁄2 in., and mark a line there. If it feels safe, use the table-saw. With the piece held upright, sight down the raised blade andadjust the angle until it enters at the bottom of the bead and exitsat the overhang line. You can achieve the same results by cuttingto the line with a handplane. The result is a rounded top edge thatangles back sharply toward the case. Both the top and bottom aresimply screwed onto the case and pegged.
Building the drawer When you open this case, the drawer at the bottom is a nice sur-prise. Instead of sliding as a normal drawer would, this tall drawertilts forward and down so that you can reach in for tea or whatev-er you decide to store inside. The sides and back are rounded sothat the drawer slides open easily with the pull—nothing morethan a 3⁄4-in.-dia. hole in the front—but the stop keeps the drawerfrom falling out on the floor. By twisting the stop you can easily re-move the whole drawer for easy cleaning or restocking.
The four sides of the drawer are cut to size and dadoed with a 1⁄4-in. blade to accept the plywood bottom. Make sure you cut thefront 1⁄4 in. wider so that there will be enough material to form the pivoting bead along the bottom. The side edges of the frontand back are rabbeted to accept the sides. The two sides and theback are all shaped on the bandsaw, and a small notch is removedfrom the top center of the back to allow for the drawer stop.
54 F I N E W O O D W O R K I N G
A N E A S Y A N D E L E G A N T D O O R
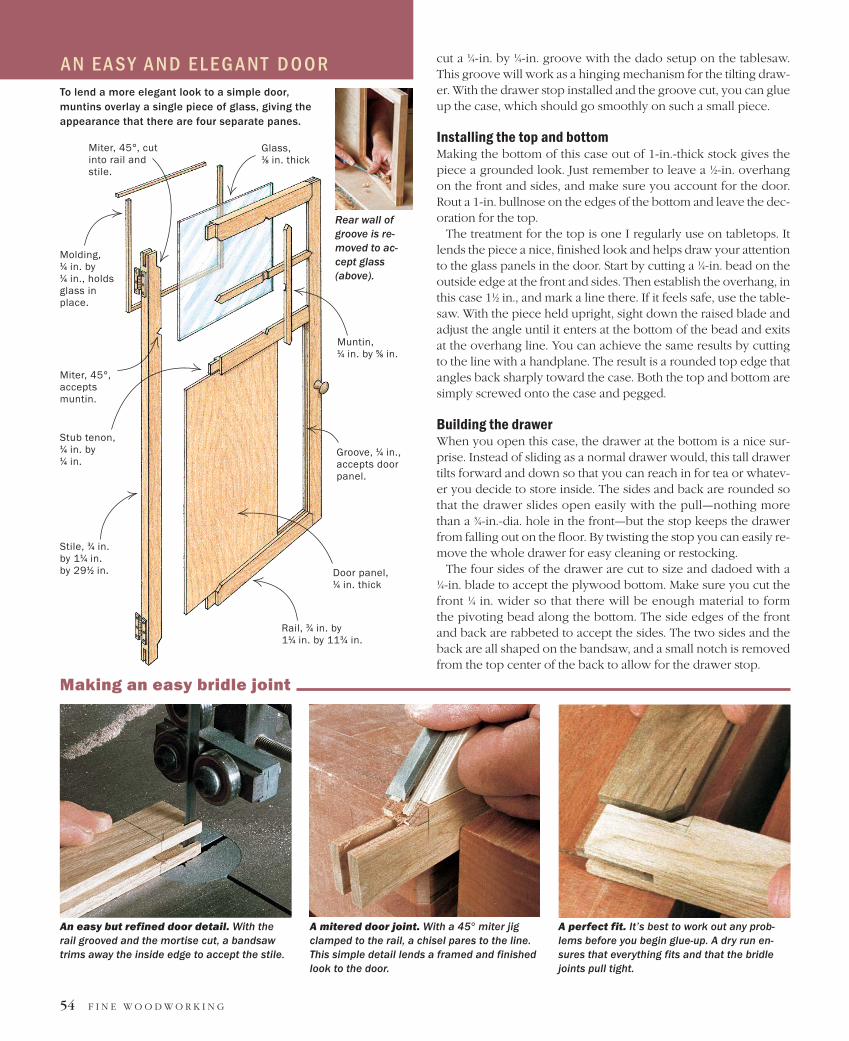
Making an easy bridle joint
An easy but refined door detail. With therail grooved and the mortise cut, a bandsawtrims away the inside edge to accept the stile.
A mitered door joint. With a 45° miter jigclamped to the rail, a chisel pares to the line.This simple detail lends a framed and finishedlook to the door.
A perfect fit. It’s best to work out any prob-lems before you begin glue-up. A dry run en-sures that everything fits and that the bridlejoints pull tight.
To lend a more elegant look to a simple door,muntins overlay a single piece of glass, giving theappearance that there are four separate panes.
Glass, 1⁄8 in. thick
Molding, 1⁄4 in. by 1⁄4 in., holdsglass inplace.
Miter, 45°, cutinto rail andstile.
Stub tenon,1⁄4 in. by 1⁄4 in.
Stile, 3⁄4 in.by 11⁄4 in.by 291⁄2 in.
Rail, 3⁄4 in. by 11⁄4 in. by 113⁄4 in.
Door panel,1⁄4 in. thick
Groove, 1⁄4 in.,accepts doorpanel.
Muntin, 1⁄4 in. by 5⁄8 in.
Miter, 45°,acceptsmuntin.
Rear wall ofgroove is re-moved to ac-cept glass(above).
J A N U A R Y / F E B R U A R Y 2 0 0 0 55
To provide the tilting action, the bottom of the front of the draw-er has a 1⁄4-in. bead that protrudes down into the groove cut intothe bottom of the case. Rout this bead on the inside of the drawerfront, then use a dado blade to remove the front edge. This beadshould fit nicely into the groove on the bottom of the case and al-low the drawer to fall forward. The drawer is glued up with thebottom floating in the dadoes, and a few brads in the sides andback hold everything in place.
Building and glazing the doorThe bulk of the work on this small piece involves the cabinet’snatural focal point: the door. First, cut the rails and stiles to 11⁄4 in.wide and trim them to length. Use bridle joints to frame the door.Bridle joints not only offer plenty of strength, but they also makeeasy work of measuring. Because the tenons run the full width ofthe door, simply mark the length of each piece off the case itself.The center rail is the one exception, and it is cut with small tenonsthat fit into 1⁄4-in. by 1⁄4-in. grooves on the stiles.
By cutting the tenons and mortises 1 in. deep instead of 11⁄4 in.deep (the full width of the rails and stiles), you leave material tocut the 45° haunches at the joints. These haunched tenons not on-ly look more refined, but they also allow you to rip the rail and stilegrooves full length on the tablesaw.
Use a 1⁄4-in. dado setup to cut the grooves on the inside faces ofthe rails and stiles. For the median and upper rails, you also re-move the inside portion of the groove so that the glass can slideinto place after the door has been assembled.
Using the same dado setup and a simple jig that fits over the ta-blesaw to hold the stiles upright, raise the blade to 1 in. and cut atenon slot on the ends of the rails. Adjust the fence so that in twopasses you’re able to leave the 1⁄4-in.-thick tenon. At the bandsaw,trim down the width on the inside of the tenon by 1⁄4 in. You’ll no-tice that this leaves the tenon length 1⁄4 in. shy of mating correctly.A simple miter jig clamped onto the rails and stiles helps guide thechisel for the 45° cuts.
Once you’ve milled and trimmed a center panel for the bottomof the door, the door can be glued up. When the glue dries, you’llstill have to remove the inside of the groove on the upper portionof the door where the glass will be installed. Do this with astraightedge and a box knife, then clean it up with a chisel.
The final touch to this door is to install the muntins. Cut them 5⁄8 in. wide and center them on the square upper portion of thedoor. Then use a small gentleman’s saw to cut the 45° miters thataccommodate the muntins. Once the two pieces press-fit intoplace, lay one across the other and mark the centers. Cut a 1⁄8-in.groove where the two cross each other. When installed, a fewdrops of glue at the groove and on the mitered ends, along with alittle tension from the door itself, hold everything in place.
Once the glass slides in, small pieces of molding are used to se-cure it. All that’s left to do is to hang the door and apply the finishand hardware. I used an oil varnish from Waterlox to give thispiece a natural look and to provide protection. The hinges I usedare antiqued, solid brass H-hinges from Horton Brass (860-635-4400), and the knob is a Shaker-style bronze knob from ColonialBronze (860-489-9233). After you’re done, open the cabinet, reachin the drawer, and fix yourself a cup of tea. �
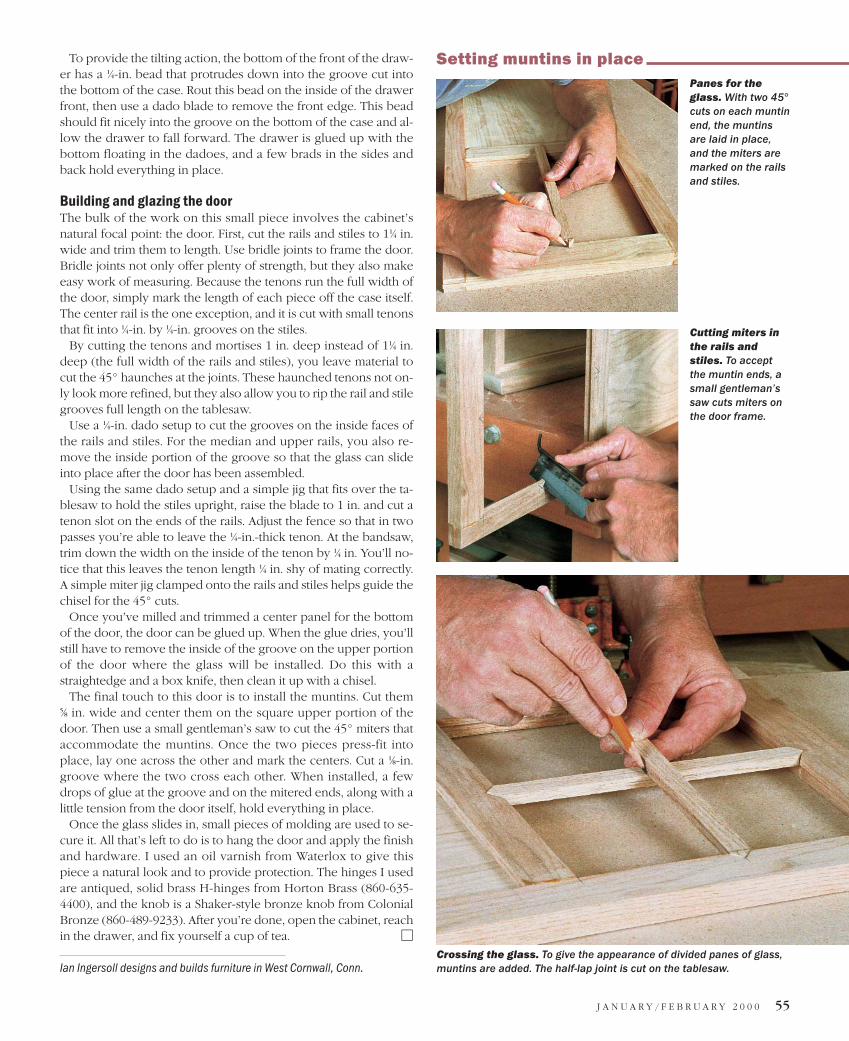
Ian Ingersoll designs and builds furniture in West Cornwall, Conn.Crossing the glass. To give the appearance of divided panes of glass,muntins are added. The half-lap joint is cut on the tablesaw.
Cutting miters inthe rails andstiles. To acceptthe muntin ends, asmall gentleman’ssaw cuts miters onthe door frame.
Setting muntins in placePanes for theglass. With two 45°cuts on each muntinend, the muntinsare laid in place,and the miters aremarked on the railsand stiles.