Embed Size (px)
Citation preview
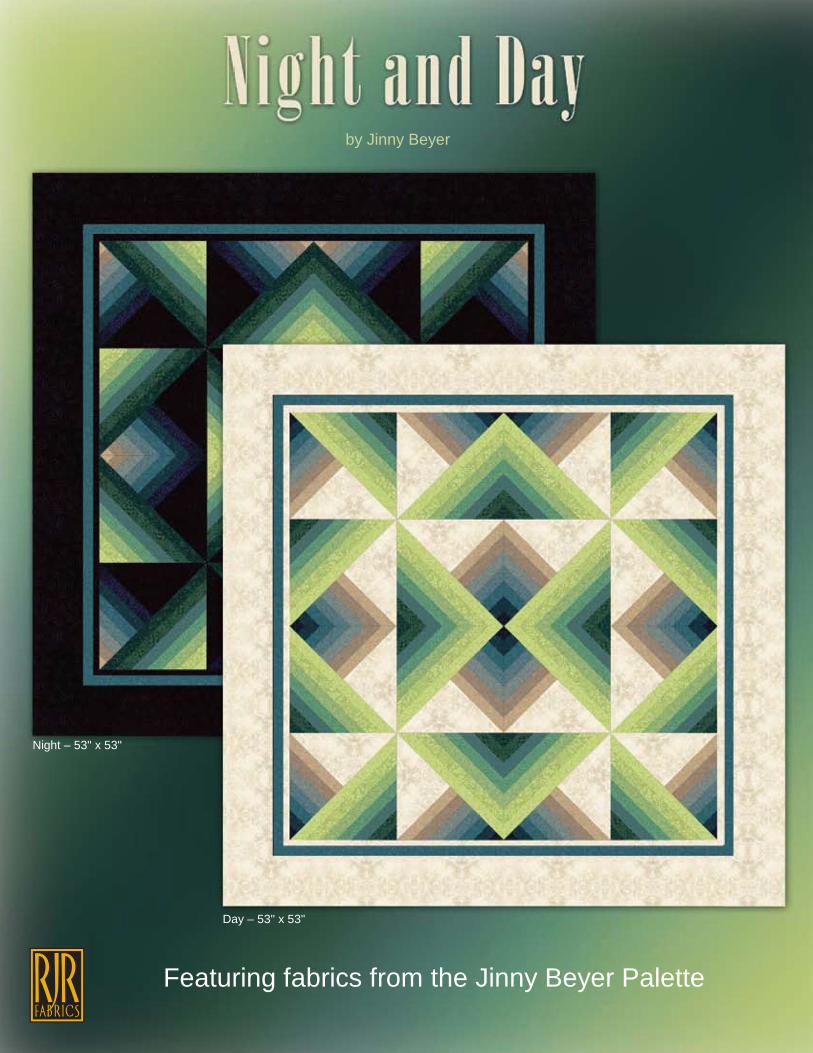
by Jinny Beyer
Night – 53" x 53"
Day – 53" x 53"
Featuring fabrics from the Jinny Beyer Palette
Night and DayDesigned by Jinny BeyerFinished Quilt: 53" x 53"
Instructions by Shannon MurrayPlease read the pattern instructions carefully before you begin.
All seams are 1/4".Skill Level: BeginnerAn original design by Jinny Beyer, Night and Day are eye catching quilts that maximize use of fabric. The two quilts aremade from only two strip-pieced sets. Fabric that would generally be set aside as scrap when making the Night quilt isutilized for use in a second quilt, Day. By changing the orientation of the strip sets and changing the background and borderfrom dark to light, you get two quilts with dramatically different results.
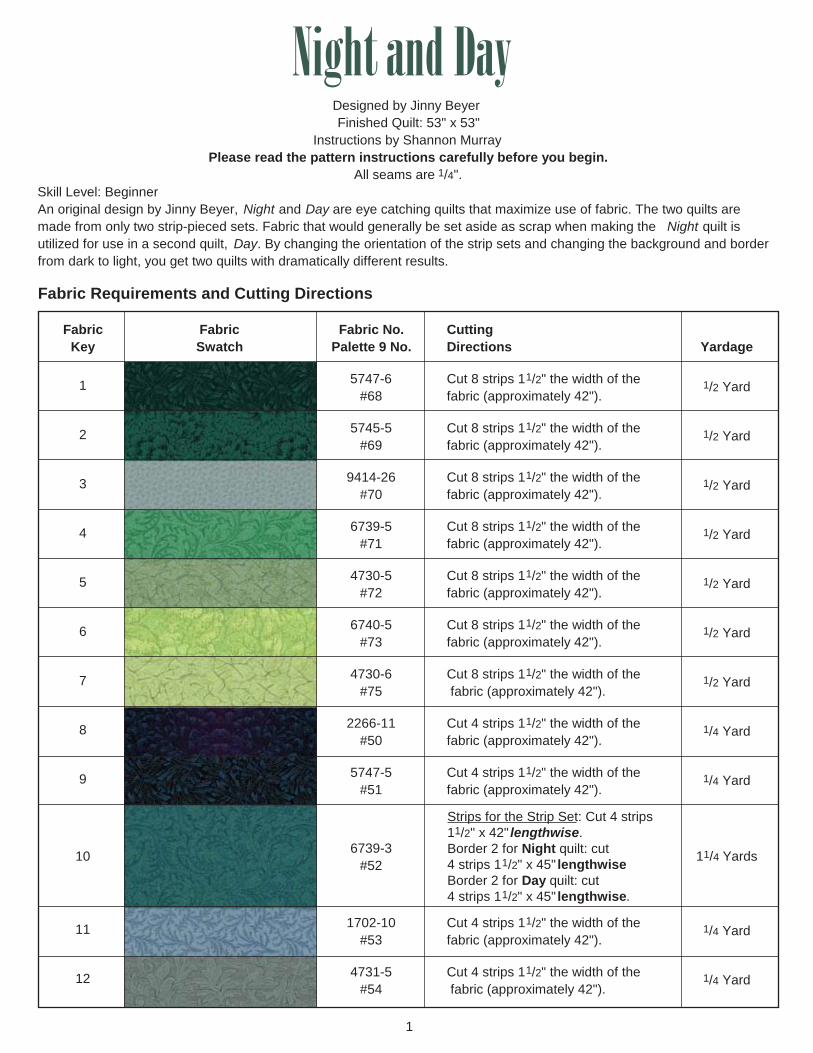
Fabric Fabric Fabric No. CuttingKey Swatch Palette 9 No. Directions Yardage
1 5747-6 Cut 8 strips 11/2" the width of the#68 fabric (approximately 42").
1/2 Yard
2 5745-5 Cut 8 strips 11/2" the width of the#69 fabric (approximately 42").
1/2 Yard
3 9414-26 Cut 8 strips 11/2" the width of the#70 fabric (approximately 42").
1/2 Yard
4 6739-5 Cut 8 strips 11/2" the width of the#71 fabric (approximately 42").
1/2 Yard
5 4730-5 Cut 8 strips 11/2" the width of the#72 fabric (approximately 42").
1/2 Yard
6 6740-5 Cut 8 strips 11/2" the width of the#73 fabric (approximately 42").
1/2 Yard
7 4730-6 Cut 8 strips 11/2" the width of the#75 fabric (approximately 42").
1/2 Yard
8 2266-11 Cut 4 strips 11/2" the width of the#50 fabric (approximately 42").
1/4 Yard
9 5747-5 Cut 4 strips 11/2" the width of the#51 fabric (approximately 42").
1/4 Yard
10 6739-3 11/4 Yards#52
11 1702-10 Cut 4 strips 11/2" the width of the#53 fabric (approximately 42").
1/4 Yard
12 4731-5 Cut 4 strips 11/2" the width of the#54 fabric (approximately 42").
1/4 Yard
Fabric Requirements and Cutting Directions
1
Strips for the Strip Set: Cut 4 strips11/2" x 42" lengthwise.Border 2 for Night quilt: cut4 strips 11/2" x 45" lengthwiseBorder 2 for Day quilt: cut4 strips 11/2" x 45" lengthwise.
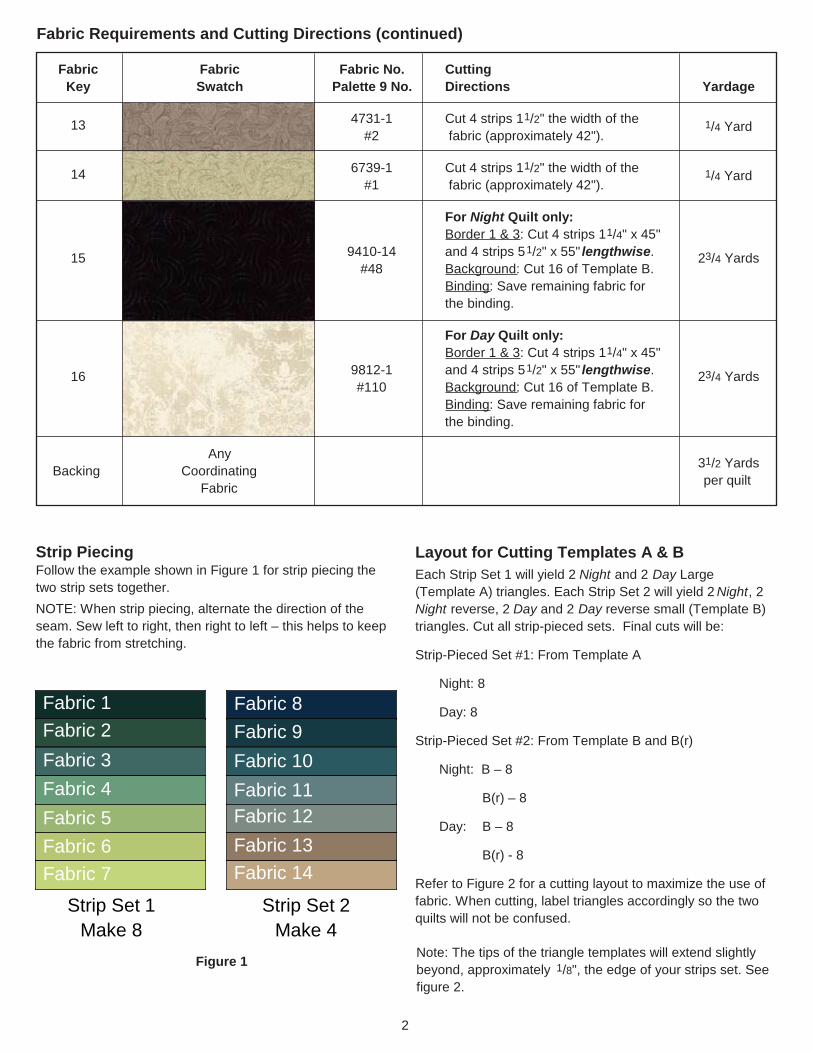
Fabric Requirements and Cutting Directions (continued)
Fabric Fabric Fabric No. CuttingKey Swatch Palette 9 No. Directions Yardage
13 4731-1 Cut 4 strips 11/2" the width of the#2 fabric (approximately 42").
1/4 Yard
14 6739-1 Cut 4 strips 11/2" the width of the#1 fabric (approximately 42").
1/4 Yard
For Night Quilt only:Border 1 & 3: Cut 4 strips 11/4" x 45"
15 9410-14 and 4 strips 51/2" x 55" lengthwise. 23/4 Yards#48 Background: Cut 16 of Template B.
Binding: Save remaining fabric forthe binding.
For Day Quilt only:Border 1 & 3: Cut 4 strips 11/4" x 45"
16 9812-1 and 4 strips 51/2" x 55" lengthwise. 23/4 Yards#110 Background: Cut 16 of Template B.
Binding: Save remaining fabric forthe binding.
AnyBacking Coordinating 31/2 Yards
Fabric per quilt
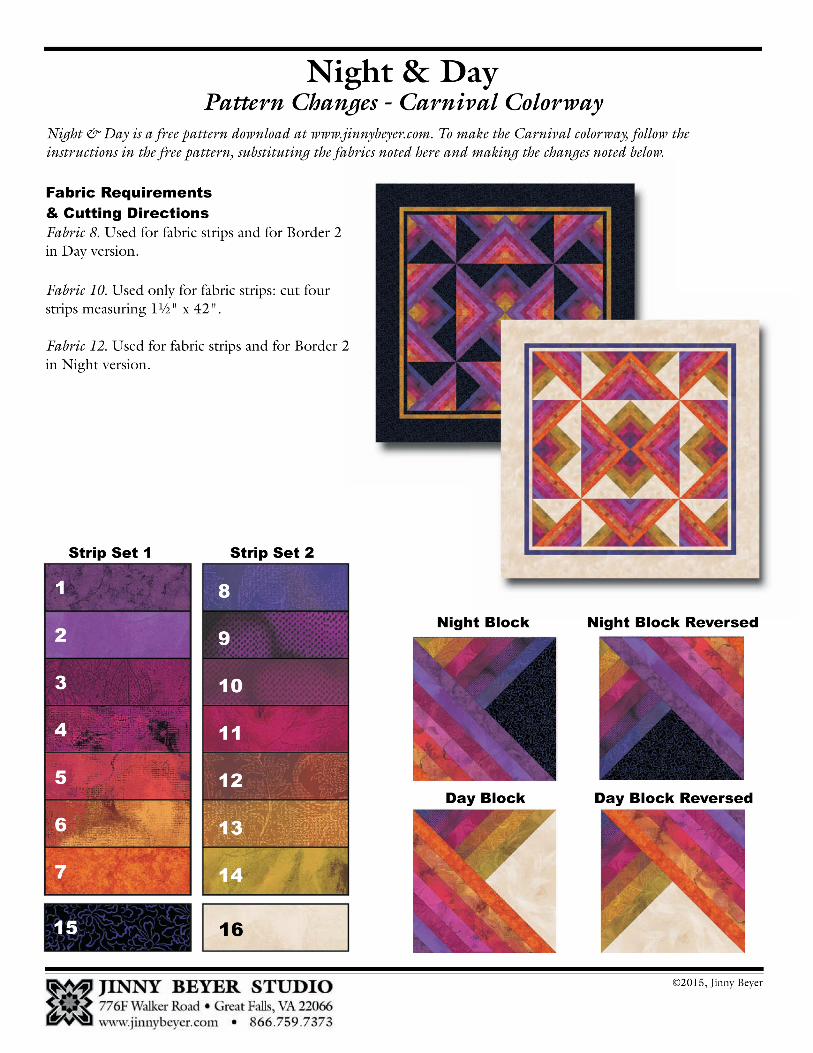
Fabric 8Fabric 9Fabric 10Fabric 11Fabric 12Fabric 13Fabric 14
Fabric 1Fabric 2Fabric 3Fabric 4Fabric 5Fabric 6Fabric 7
Strip Set 1 Strip Set 2Make 8 Make 4
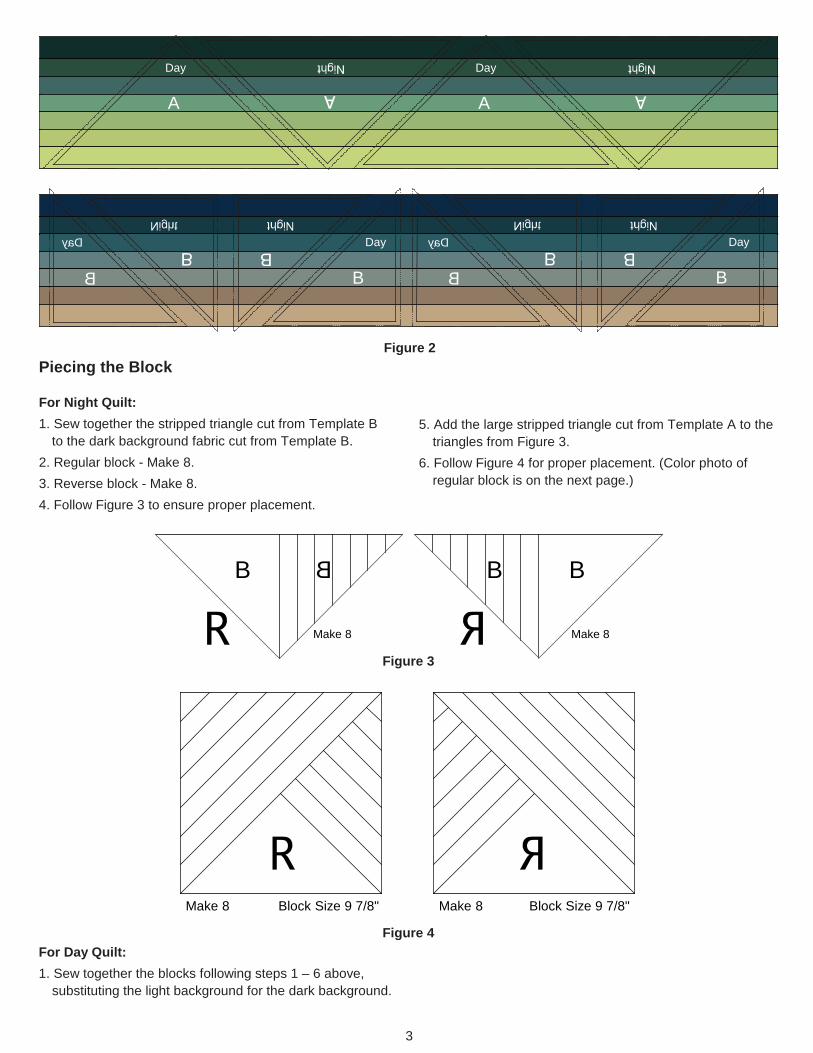
Strip PiecingFollow the example shown in Figure 1 for strip piecing thetwo strip sets together.NOTE: When strip piecing, alternate the direction of theseam. Sew left to right, then right to left – this helps to keepthe fabric from stretching.
Layout for Cutting Templates A & BEach Strip Set 1 will yield 2 Night and 2 Day Large(Template A) triangles. Each Strip Set 2 will yield 2 Night, 2Night reverse, 2 Day and 2 Day reverse small (Template B)triangles. Cut all strip-pieced sets. Final cuts will be:
Strip-Pieced Set #1: From Template A
Night: 8
Day: 8
Strip-Pieced Set #2: From Template B and B(r)
Night: B – 8
B(r) – 8
Day: B – 8
B(r) - 8
Refer to Figure 2 for a cutting layout to maximize the use offabric. When cutting, label triangles accordingly so the twoquilts will not be confused.
Figure 1
2
Note: The tips of the triangle templates will extend slightlybeyond, approximately 1/8", the edge of your strips set. Seefigure 2.
Make 8Make 8 Block Size 9 7/8" Block Size 9 7/8"
Make 8Make 8
B B BB
B B
DDay Dayay
B B
Day
A
Day
A
Day
Piecing the Block
For Night Quilt:1. Sew together the stripped triangle cut from Template B
to the dark background fabric cut from Template B.2. Regular block - Make 8.3. Reverse block - Make 8.4. Follow Figure 3 to ensure proper placement.
5. Add the large stripped triangle cut from Template A to thetriangles from Figure 3.
6. Follow Figure 4 for proper placement. (Color photo ofregular block is on the next page.)
For Day Quilt:1. Sew together the blocks following steps 1 – 6 above,
substituting the light background for the dark background.
Figure 2
Figure 3
Figure 4
3
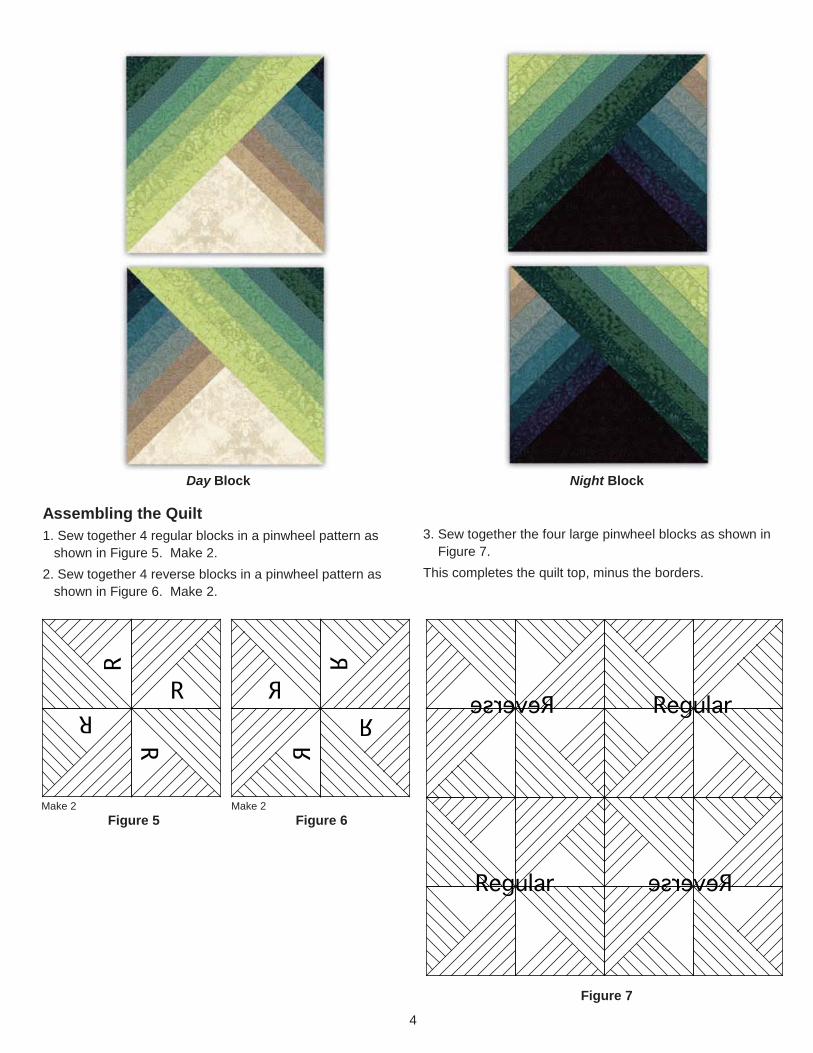
Assembling the Quilt1. Sew together 4 regular blocks in a pinwheel pattern as
shown in Figure 5. Make 2.2. Sew together 4 reverse blocks in a pinwheel pattern as
shown in Figure 6. Make 2.
3. Sew together the four large pinwheel blocks as shown inFigure 7.
This completes the quilt top, minus the borders.
Figure 7
Figure 5 Figure 6Make 2 Make 2
Day Block Night Block
4
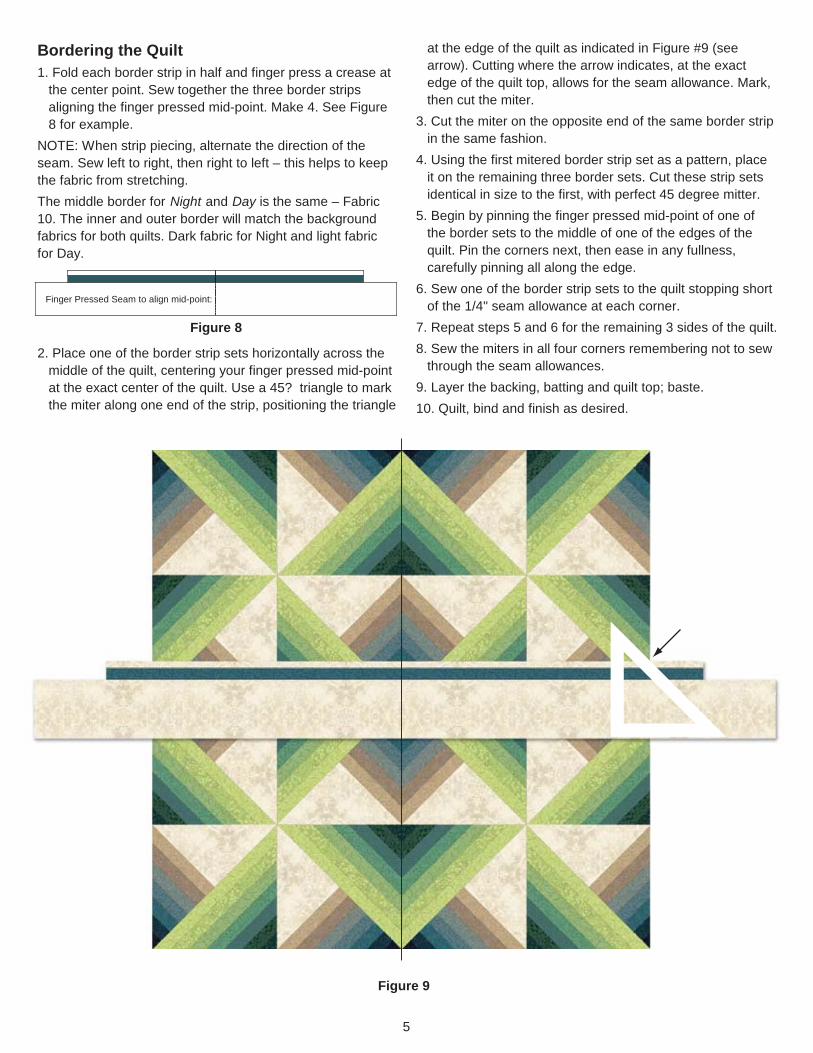
Bordering the Quilt1. Fold each border strip in half and finger press a crease at
the center point. Sew together the three border stripsaligning the finger pressed mid-point. Make 4. See Figure8 for example.
NOTE: When strip piecing, alternate the direction of theseam. Sew left to right, then right to left – this helps to keepthe fabric from stretching.The middle border for Night and Day is the same – Fabric10. The inner and outer border will match the backgroundfabrics for both quilts. Dark fabric for Night and light fabricfor Day.
2. Place one of the border strip sets horizontally across themiddle of the quilt, centering your finger pressed mid-pointat the exact center of the quilt. Use a 45? triangle to markthe miter along one end of the strip, positioning the triangle
at the edge of the quilt as indicated in Figure #9 (seearrow). Cutting where the arrow indicates, at the exactedge of the quilt top, allows for the seam allowance. Mark,then cut the miter.
3. Cut the miter on the opposite end of the same border stripin the same fashion.
4. Using the first mitered border strip set as a pattern, placeit on the remaining three border sets. Cut these strip setsidentical in size to the first, with perfect 45 degree mitter.
5. Begin by pinning the finger pressed mid-point of one ofthe border sets to the middle of one of the edges of thequilt. Pin the corners next, then ease in any fullness,carefully pinning all along the edge.
6. Sew one of the border strip sets to the quilt stopping shortof the 1/4" seam allowance at each corner.
7. Repeat steps 5 and 6 for the remaining 3 sides of the quilt.8. Sew the miters in all four corners remembering not to sew
through the seam allowances.9. Layer the backing, batting and quilt top; baste.10. Quilt, bind and finish as desired.
Figure 9
Figure 8
Finger Pressed Seam to align mid-point:
5
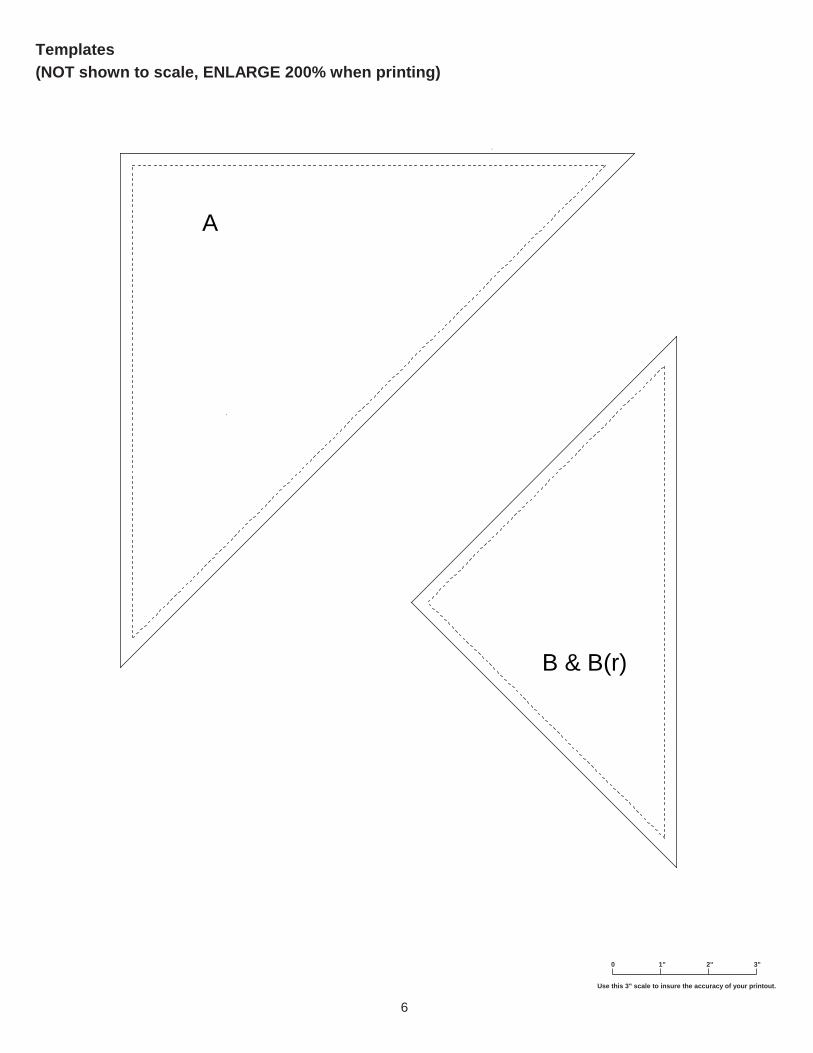
B & B(r)
A
Templates(NOT shown to scale, ENLARGE 200% when printing)
Use this 3" scale to insure the accuracy of your printout.
0 1" 2" 3"
6

8
9
10
11
12
13
14
16
1
2
3
4
5
6
7
Strip Set 1
15
Strip Set 2
Fabric Requirements& Cutting DirectionsFabric 10. Used only for fabric strips: cut fourstrips measuring 1½" x 42".
Fabric 12. Used for fabric strips and for Border 2.(The kit includes sufficient fabric for both theNight and Day quilts.)
Night & DayPattern Changes - Lagoon Colorway
Night & Day is a free pattern download at www.jinnybeyer.com. To make the Lagoon colorway, follow the instructionsin the free pattern, substituting the fabrics noted here and making the changes noted below.
©2012, Jinny Beyer
Night Block Night Block Reversed
Day Block Day Block Reversed