Embed Size (px)
Citation preview

Finishes 75½" x 84"
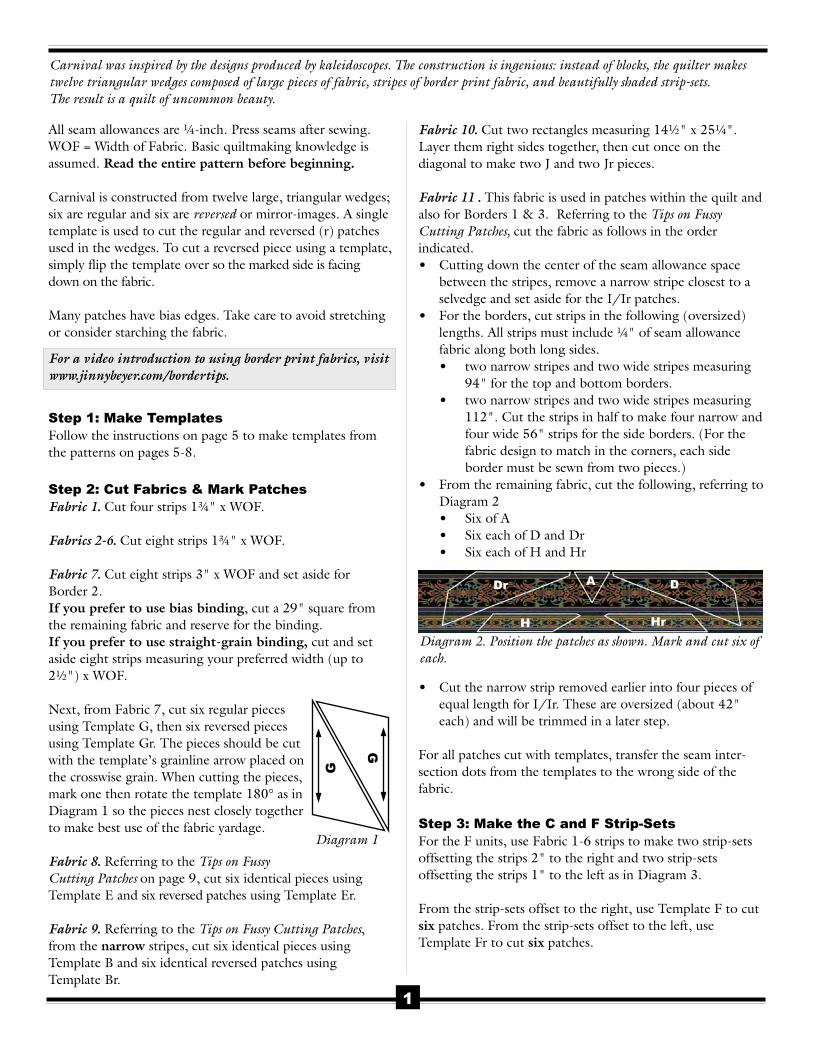
Fabric 10. Cut two rectangles measuring 14½" x 25¼".Layer them right sides together, then cut once on thediagonal to make two J and two Jr pieces.
Fabric 11 . This fabric is used in patches within the quilt andalso for Borders 1 & 3. Referring to the Tips on FussyCutting Patches, cut the fabric as follows in the orderindicated.• Cutting down the center of the seam allowance space
between the stripes, remove a narrow stripe closest to aselvedge and set aside for the I/Ir patches.
• For the borders, cut strips in the following (oversized)lengths. All strips must include ¼" of seam allowancefabric along both long sides.• two narrow stripes and two wide stripes measuring
94" for the top and bottom borders.• two narrow stripes and two wide stripes measuring
112". Cut the strips in half to make four narrow andfour wide 56" strips for the side borders. (For thefabric design to match in the corners, each sideborder must be sewn from two pieces.)
• From the remaining fabric, cut the following, referring toDiagram 2• Six of A• Six each of D and Dr• Six each of H and Hr
• Cut the narrow strip removed earlier into four pieces ofequal length for I/Ir. These are oversized (about 42"each) and will be trimmed in a later step.
For all patches cut with templates, transfer the seam inter-section dots from the templates to the wrong side of thefabric.
Step 3: Make the C and F Strip-SetsFor the F units, use Fabric 1-6 strips to make two strip-setsoffsetting the strips 2" to the right and two strip-setsoffsetting the strips 1" to the left as in Diagram 3.
From the strip-sets offset to the right, use Template F to cutsix patches. From the strip-sets offset to the left, useTemplate Fr to cut six patches.
A
H
Dr D
HrDiagram 2. Position the patches as shown. Mark and cut six ofeach.
For a video introduction to using border print fabrics, visitwww.jinnybeyer.com/bordertips.
Carnival was inspired by the designs produced by kaleidoscopes. The construction is ingenious: instead of blocks, the quilter makestwelve triangular wedges composed of large pieces of fabric, stripes of border print fabric, and beautifully shaded strip-sets.The result is a quilt of uncommon beauty.
All seam allowances are ¼-inch. Press seams after sewing.WOF = Width of Fabric. Basic quiltmaking knowledge isassumed. Read the entire pattern before beginning.
Carnival is constructed from twelve large, triangular wedges;six are regular and six are reversed or mirror-images. A singletemplate is used to cut the regular and reversed (r) patchesused in the wedges. To cut a reversed piece using a template,simply flip the template over so the marked side is facingdown on the fabric.
Many patches have bias edges. Take care to avoid stretchingor consider starching the fabric.
Step 1: Make TemplatesFollow the instructions on page 5 to make templates fromthe patterns on pages 5-8.
Step 2: Cut Fabrics & Mark PatchesFabric 1. Cut four strips 1¾" x WOF.
Fabrics 2-6. Cut eight strips 1¾" x WOF.
Fabric 7. Cut eight strips 3" x WOF and set aside forBorder 2.If you prefer to use bias binding, cut a 29" square fromthe remaining fabric and reserve for the binding.If you prefer to use straight-grain binding, cut and setaside eight strips measuring your preferred width (up to2½") x WOF.
Next, from Fabric 7, cut six regular piecesusing Template G, then six reversed piecesusing Template Gr. The pieces should be cutwith the template’s grainline arrow placed onthe crosswise grain. When cutting the pieces,mark one then rotate the template 180° as inDiagram 1 so the pieces nest closely togetherto make best use of the fabric yardage.
Fabric 8. Referring to the Tips on FussyCutting Patches on page 9, cut six identical pieces usingTemplate E and six reversed patches using Template Er.
Fabric 9. Referring to the Tips on Fussy Cutting Patches,from the narrow stripes, cut six identical pieces usingTemplate B and six identical reversed patches usingTemplate Br.
1
G
G
Diagram 1

1"1"
1"
1"
1"
2"2"
2"
2"2"
Diagram 3. The F strip-sets are illustrated here; the C strip-setsare identical but do not include the top (Fabric 1) strip. Thestrip-sets offset to the right (top) are used to cut the regularpatches. Those offset to the left (bottom) are used for the reversedpatches.
2
Step 4: Make the Regular & Reversed WedgesWorking with the regular patches, make six regular wedgesby following the illustrations below. Carefully match theseam intersection dots and pin before sewing. Sew with theborder print patches on top, following a printed line on thefabric at the edge of the seam allowance. Handle bias edgescarefully to prevent stretching.
G
H
4a) Sew a G and H together,then add an E patch.
E
C
B
4b) Sew a C to a B.
F
D4c) Sew an F toa D.
Sew the units together as indicated in Diagram 4d below.Repeat to make six regular wedges.
Next, using the reversed patches, follow the same process tomake six reversed wedges (Diagram 4d).
When all the wedges are complete, sew a regular to areversed wedge as in Diagram 4e, carefully matching theseams. Sew an A triangle to the bottom of the wedge. Repeatto make a total of six units.
Sew the six units together to complete the design. Start/stopthe stitching at the dot at the point of A so you can press theseam allowances open and flat at the center.
4d) Regular Wedge.Sew the F-D unit tothe G-H-E unit,then add the C-Bunit.
Repeat using Fabric 2-6 strips and Template C/Cr, makingsix C and six Cr patches. Before cutting, press the regularstrip-sets towards the darker fabric and the reversed strip-setstowards the lighter.
ReversedWedge. Sew the
reversed unitstogether in the same
order as that used forthe Regular Wedge.
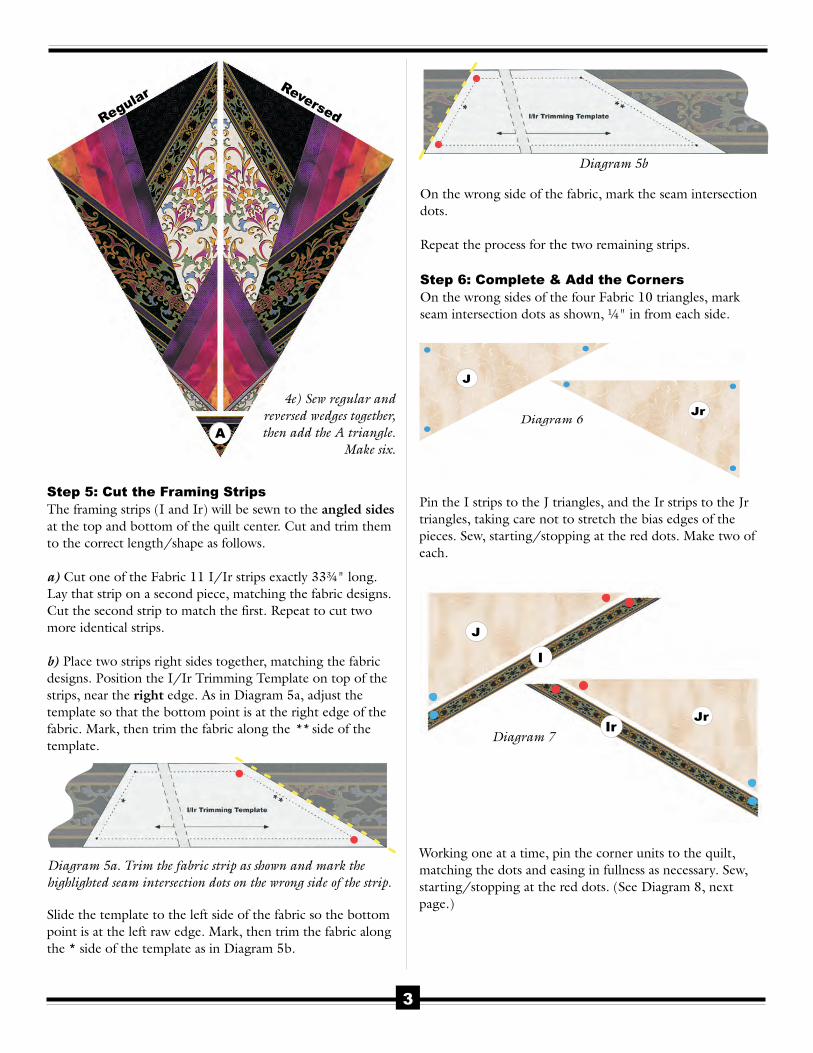
Diagram 5a. Trim the fabric strip as shown and mark thehighlighted seam intersection dots on the wrong side of the strip.
Diagram 5b
On the wrong side of the fabric, mark the seam intersectiondots.
Repeat the process for the two remaining strips.
Step 6: Complete & Add the CornersOn the wrong sides of the four Fabric 10 triangles, markseam intersection dots as shown, ¼" in from each side.
Step 5: Cut the Framing StripsThe framing strips (I and Ir) will be sewn to the angled sidesat the top and bottom of the quilt center. Cut and trim themto the correct length/shape as follows.
a) Cut one of the Fabric 11 I/Ir strips exactly 33¾" long.Lay that strip on a second piece, matching the fabric designs.Cut the second strip to match the first. Repeat to cut twomore identical strips.
b) Place two strips right sides together, matching the fabricdesigns. Position the I/Ir Trimming Template on top of thestrips, near the right edge. As in Diagram 5a, adjust thetemplate so that the bottom point is at the right edge of thefabric. Mark, then trim the fabric along the ** side of thetemplate.
Slide the template to the left side of the fabric so the bottompoint is at the left raw edge. Mark, then trim the fabric alongthe * side of the template as in Diagram 5b.
Jr
J
Diagram 6
Jr
J
I
IrDiagram 7
3
A
Regular Reversed
4e) Sew regular andreversed wedges together,then add the A triangle.
Make six.
Pin the I strips to the J triangles, and the Ir strips to the Jrtriangles, taking care not to stretch the bias edges of thepieces. Sew, starting/stopping at the red dots. Make two ofeach.
Working one at a time, pin the corner units to the quilt,matching the dots and easing in fullness as necessary. Sew,starting/stopping at the red dots. (See Diagram 8, nextpage.)

4
Step 7: Make & Add the BordersBorder 2. Sew pairs of reserved Fabric 7 strips together endto end to make four border strips.
Add Borders 1-3 to the quilt using Jinny’s no-math methodby following the instructions for a rectangular quilt andAdding Multiple Borders in Framing a Quilt the JinnyBeyer Way.
For a video demonstration of Jinny’s border technique,visit www.jinnybeyer.com/bordertips.
Step 8: Quilt & BindLayer the quilt as follows: backing (wrong side up), batting,quilt top (right side up). Baste the layers together and quiltas desired.
When the quilting is completed, trim the backing andbatting even with edges of quilt top. Make binding stripsusing the reserved fabric and bind using your favoritebinding method or by following the instructions atwww.jinnybeyer.com/promos/binding.
Diagram 8
JrJ
Mirror Line
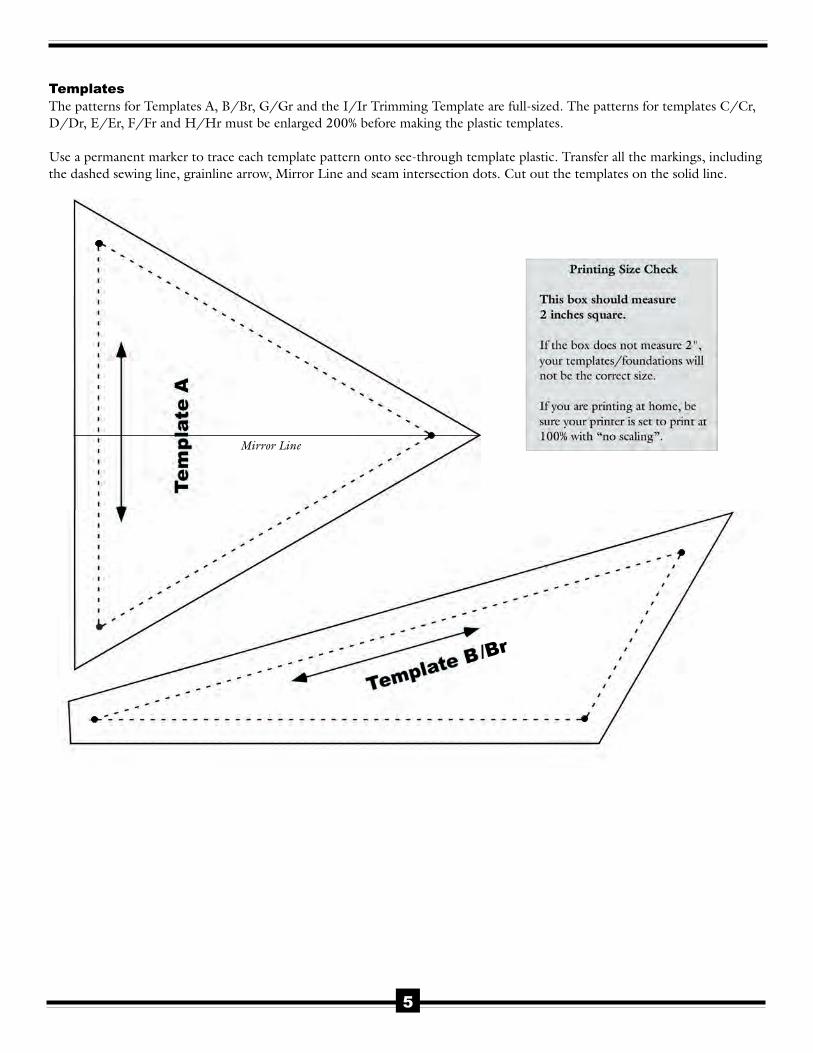
TemplatesThe patterns for Templates A, B/Br, G/Gr and the I/Ir Trimming Template are full-sized. The patterns for templates C/Cr,D/Dr, E/Er, F/Fr and H/Hr must be enlarged 200% before making the plastic templates.
Use a permanent marker to trace each template pattern onto see-through template plastic. Transfer all the markings, includingthe dashed sewing line, grainline arrow, Mirror Line and seam intersection dots. Cut out the templates on the solid line.
/Br
5

6
I/Ir Trimm
ingTem
plate ***

/Er
/Dr
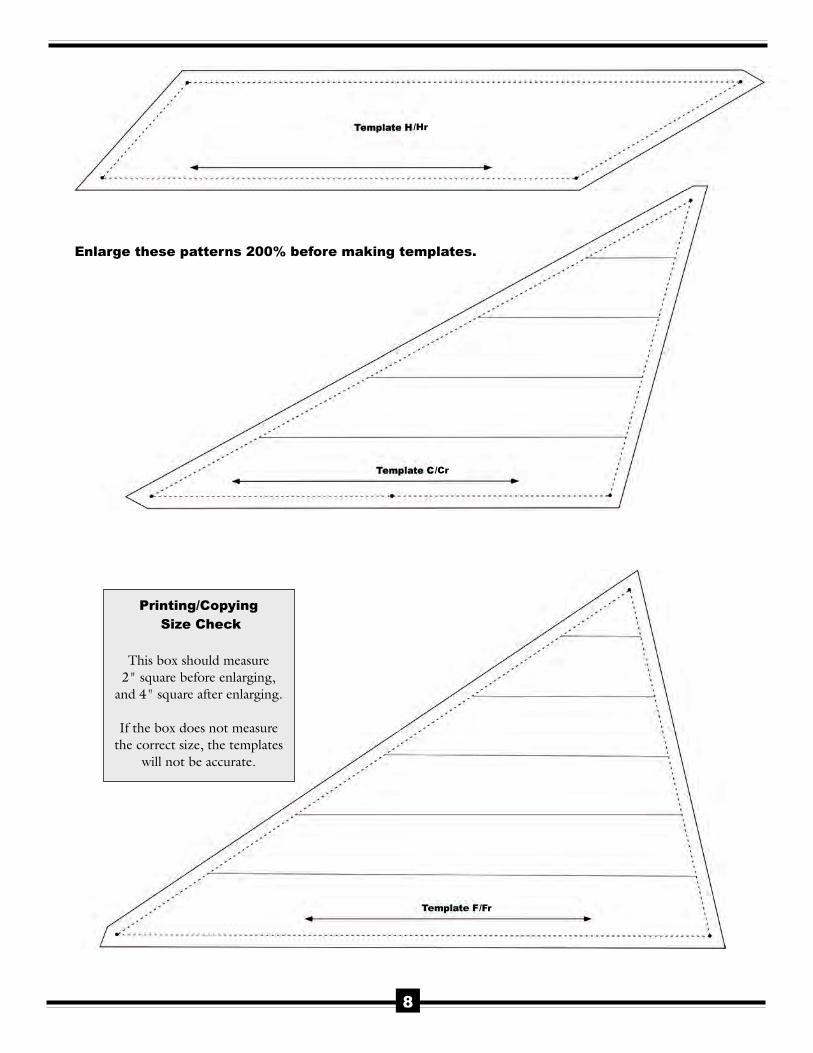
Enlarge these patterns 200% before making templates.
Printing/CopyingSize Check
This box should measure2" square before enlarging,
and 4" square after enlarging.
If the box does not measurethe correct size, the templates
will not be accurate.
7
/Cr
/Hr
/Fr
Enlarge these patterns 200% before making templates.
Printing/CopyingSize Check
This box should measure2" square before enlarging,
and 4" square after enlarging.
If the box does not measurethe correct size, the templates
will not be accurate.
8

E ErE Er
Tips on Fussy Cutting Patches
Jinny achieves many spectacular effects in her quilts by fussy cutting patches from fabric. In Carnival, she uses templates tofussy cut patches from Fabric 8 (the large-scale paisley) and Fabrics 9 and 11 (the border prints). The process is as simple aspositioning templates on these fabrics, marking part of the fabric design on them, then cutting regular and mirror-image (orreversed) patches.
Fabric 8 (Paisley)The E patches are cut from identical portions of fabric so the design will be the same for each patch. Mark a few of the designelements onto the template so that you can find the same motif elsewhere on the fabric. The Er patches are cut from exactlythe reversed portions so they will appear to mirror each other when sewn together. To find that part of the fabric design, turnthe template with the marked side down on the fabric and move it around until the marks match the fabric. Two of each patchcan be cut across the width of fabric.
Fabrics 9 & 11 (Border Print)The process of marking and cutting regular and reversed patchesis the same when using border print fabric. However there aretwo additional things to keep in mind.
Mirror Lines. Some patches, such as those cut with Template Aneed to be positioned with the Mirror Line placed in the centerof mirror-image motif. (Others, such as those cut with B, D andH, do not have a mirror line.)
Defining the Outside Edge. With all templates cut from borderprint fabric, align the dotted sewing line near the grainline arrowjust outside a printed line on the border print fabric. This willcreate a defining edge when the patch is sewn.
9
Wide Stripe
Narrow Stripe
Seam Allowance
10
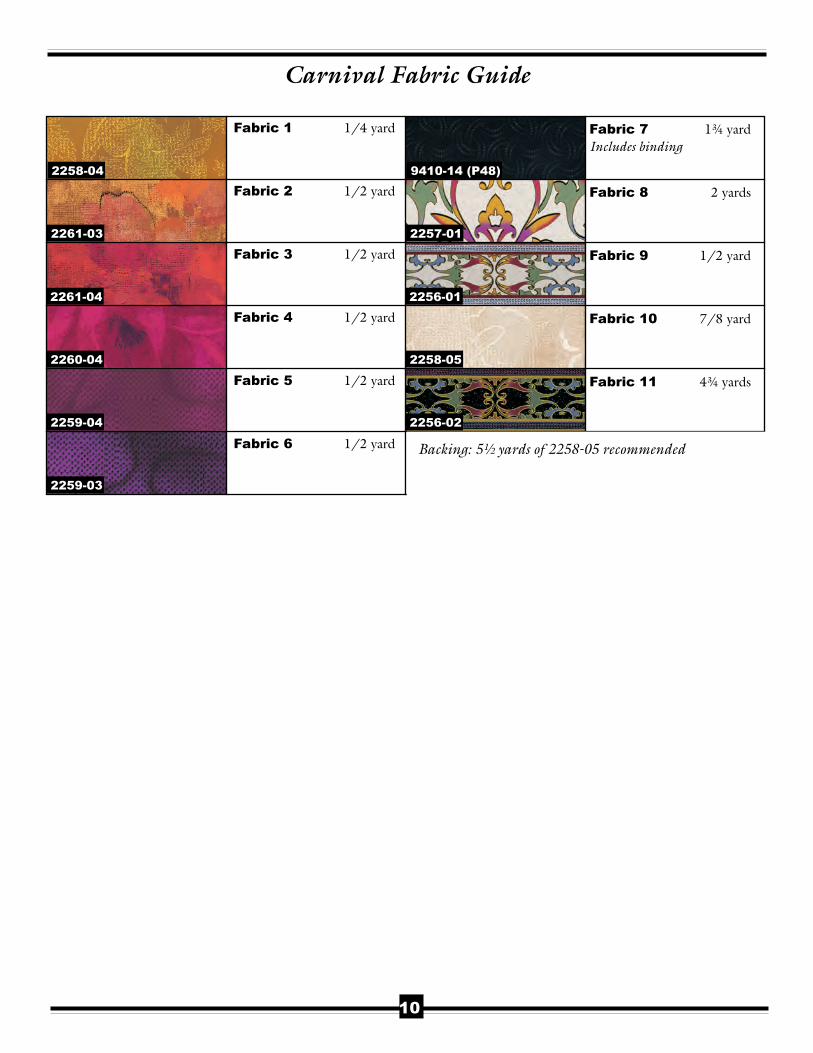
Carnival Fabric Guide
Fabric 1 1/4 yard
Fabric 2 1/2 yard
Fabric 3 1/2 yard
Fabric 4 1/2 yard
Fabric 5 1/2 yard
Fabric 6 1/2 yard
Fabric 7 1¾ yardIncludes binding
Fabric 8 2 yards
Fabric 9 1/2 yard
Fabric 10 7/8 yard
Fabric 11 4¾ yards
Backing: 5½ yards of 2258-05 recommended
2258-04
2261-03
2261-04
2260-04
2259-04
2259-03
9410-14 (P48)
2257-01
2256-01
2258-05
2256-02

Diagram 3: Correctly cut and sewn borderswill have designs that “flow” around the corners.
Diagram 2: Cut three pieces identical to the first.
Jinny Beyer’s border prints are designed specifically with the quilter in mind. Each fabric has a wide and a narrow stripe whichcoordinate in both design and color. Both stripes have mirror-image motifs which are essential for perfectly mitered corners.In addition, the two different stripes in the border print are separated by at least a half-inch so that a 1/4" seam allowance isprovided for on both sides of the stripes. From selvage to selvage, there are always at least four repeats of each stripe across thefabric so calculating the yardage needed to border a quilt is easy: you need the length of the longest side of the quilt plus anadditional half-yard to match design elements and allow for the miters at the corners.
For a video demonstration of this bordering technique, visitwww.jinnybeyer.com/bordertips
Framing a Square Quilt1. Place a strip of the border print across the middle of the quilt, centeringa motif from the border at the exact center of the quilt. (Because of minordifferences in seam allowances taken and stretching that can occur on biasedges, opposite edges of a quilt often measure slightly differently. Using ameasurement taken from the middle of the quilt will help keep the quiltfrom “ruffling” at the edges.)
2. To mark the first miter, position a right-angle triangle so that one of thesides of the right angle runs along the bottom edge of the border print. Then carefullymove the triangle until the angled side touches the point where the top edge ofthe border print meets the edge of the quilt. (See arrow in Diagram 1.) Mark,then cut the miter line. (Because the miter is cut right at the edge of the quilt,the seam allowance is already included.)
3. Carefully pick up the mitered side of the border strip and lay it on top of thestrip on the opposite side of the quilt, right-sides together, placing the top edgeof the strip at the edge of the quilt. If necessary, adjust the top strip so that thedesign motifs on the top and bottom match exactly. If you have centered a motiffrom the border print in the middle of the quilt, the designs should match at theedges. Cut the second miter. (Using the cut edge as a guide, rather than the tri-angle, ensures that your design motifs will be an exact match.)
4. Using this first mitered strip as a guide, cut three more identical pieces, mak-ing sure that the design on the border print is exactly the same on all four pieces.
5. Mark seam intersection dots on the short side of each of your border strips. Tofind the spot, simply draw a short line 1/4-inch inside the mitered edge and theshort edge of the border strip. Mark the dot where the two lines intersect. Do thesame for each corner of your quilt.
6. To sew the borders to the quilt, pin the mid-point of one of the border pieces tothe middle of one of the edges of the quilt. Next, match and pin the dots on eachside of your border with the dots on the quilt corners. Continue pinning the borderto the quilt, easing in any fullness. (The edge of the quilt is usually a little widerthan the center because of bias edges or seams.) Sew the border to the quilt, start-ing and stopping at the dots. Sew the mitered seams last, starting from the insidedot. When pinning the edges together, be sure to match the design elements onboth pieces.
Diagram 1: Mark the miter.
©2010, Jinny Beyer
Adding Borders the Jinny Beyer Way
1
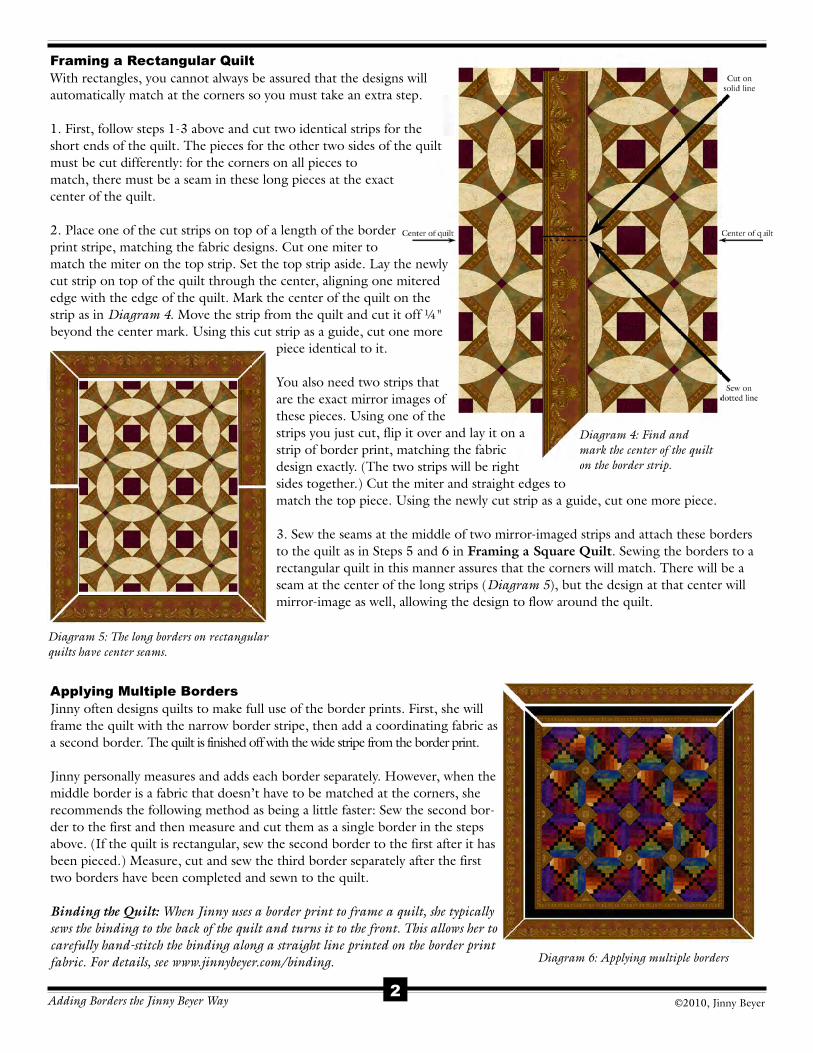
Diagram 4: Find andmark the center of the quilton the border strip.
Framing a Rectangular QuiltWith rectangles, you cannot always be assured that the designs willautomatically match at the corners so you must take an extra step.
1. First, follow steps 1-3 above and cut two identical strips for theshort ends of the quilt. The pieces for the other two sides of the quiltmust be cut differently: for the corners on all pieces tomatch, there must be a seam in these long pieces at the exactcenter of the quilt.
2. Place one of the cut strips on top of a length of the borderprint stripe, matching the fabric designs. Cut one miter tomatch the miter on the top strip. Set the top strip aside. Lay the newlycut strip on top of the quilt through the center, aligning one miterededge with the edge of the quilt. Mark the center of the quilt on thestrip as in Diagram 4. Move the strip from the quilt and cut it off ¼"beyond the center mark. Using this cut strip as a guide, cut one more
piece identical to it.
You also need two strips thatare the exact mirror images ofthese pieces. Using one of thestrips you just cut, flip it over and lay it on astrip of border print, matching the fabricdesign exactly. (The two strips will be rightsides together.) Cut the miter and straight edges tomatch the top piece. Using the newly cut strip as a guide, cut one more piece.
3. Sew the seams at the middle of two mirror-imaged strips and attach these bordersto the quilt as in Steps 5 and 6 in Framing a Square Quilt. Sewing the borders to arectangular quilt in this manner assures that the corners will match. There will be aseam at the center of the long strips (Diagram 5), but the design at that center willmirror-image as well, allowing the design to flow around the quilt.
Applying Multiple BordersJinny often designs quilts to make full use of the border prints. First, she willframe the quilt with the narrow border stripe, then add a coordinating fabric asa second border. The quilt is finished off with the wide stripe from the border print.
Jinny personally measures and adds each border separately. However, when themiddle border is a fabric that doesn’t have to be matched at the corners, sherecommends the following method as being a little faster: Sew the second bor-der to the first and then measure and cut them as a single border in the stepsabove. (If the quilt is rectangular, sew the second border to the first after it hasbeen pieced.) Measure, cut and sew the third border separately after the firsttwo borders have been completed and sewn to the quilt.
Binding the Quilt: When Jinny uses a border print to frame a quilt, she typicallysews the binding to the back of the quilt and turns it to the front. This allows her tocarefully hand-stitch the binding along a straight line printed on the border printfabric. For details, see www.jinnybeyer.com/binding.
Diagram 5: The long borders on rectangularquilts have center seams.
Diagram 6: Applying multiple borders
g
Adding Borders the Jinny Beyer Way ©2010, Jinny Beyer2


![OS009272 QC Responsible Investment Brochure[2]...t: 020 7150 4320 2 RESPONSIBLE INVESTMENT AT QUILTER CHEVIOT RESPONSIBLE INVESTMENT AT QUILTER CHEVIOT As a responsible investor Quilter](https://img.pdfslide.us/doc/110x75/5f7f18f0b357da471c3ab1ae/os009272-qc-responsible-investment-brochure2-t-020-7150-4320-2-responsible.jpg)