Embed Size (px)
Citation preview
Banzai!!
The Newsletter of the Austin ASL Club
August, 2002 Volume 7, Number 2
Banzai!!
August, 2002 This newsletter is FREE! Don't let anyone charge you for it.
The Newsletter of the Austin ASL Club
In this Issue
Editor's Corner 2 ASL Team Tournament Report 2 BDF7: Baraque de Fraiture 3 Player Profile: Tom Gillis 10 Favorite Scenarios Units: Aaron Schwoebel 11 SP73: Seregelyes Slug-Out 13 Club Notes 15 Club Ladder 16 Next Issue 16 Ladder Results Since Last Issue 17
Editor's Corner Sam Tyson
My turn to wax (non) poetically here this time. There are a couple of Texas topics that deserve attention, so I’ll cover them here for your amusement.
The CTASL Ladder has undergone a change recently. I will maintain the ladder and player databases, and will post all of the Texas scenario results to the ladder as I get them. You can still see the ladder from Matt’s web page, or from mine. Send new game reports to me if you can using the New Report button from the ladder page, or send reports via email to [email protected]. I will try to update ASAP and return a reply to you.
The other big news locally is that Bryan Register will join in the monthly hosting fun and hold every third month’s event at his house, starting in August. He is more centrally located in Austin than Matt or me, so it should be easy for everybody to get there. Stay tuned for details thru the web.
ASL Team Tournament Report Mike Seningen
Excellent turnout -- we had 46 players at last count -- I'll have to check the logs if any others snuck in over the weekend. We had about 8 from Dallas/Ft. Worth and another 8 or so from Houston, and folks as far away as Georgia, Florida, and Maryland. And making their third annual road trip were the warriors from Kansas. I'd brag about them, but they're so much fun to play and just great guys to have around, I'd hate to see anyone else but us monopolizing their road trips!
The big story of the weekend was John Garlic of Weslaco, Texas, a skipping stone's toss across the Rio Grande from Mexico. John had an insane weekend of ASL -- not only was John undefeated and undisputed champion of the Individual tournament. John beat the top two seeds in Austin, top seed in Ft Worth and anybody else who was foolish enough to even think they belonged in his league this past weekend. As if that wasn't impressive enough -- not counting the losses John doled out with a vengeance -- his opponents were a combined 20-1, an incredible strength of schedule, not likely to be repeated again.
But wait there's more. John not only trashed the best, he walked away with the Major Johnson Trophy as well. The Major Johnson Trophy is awarded to the player who played the most ASL measured by the number and size of the scenarios played -- No Strayer's Strays for John -- he was knocking off the best in some pretty good sized slugfests. It just boggles my mind.
Rumors have it the hotel staff was complaining about tons of candles, shrines, and incense, and an awful lot of chicken bones tossed around his hotel room. But nobody ever saw him leave his dice or table so we're not sure when this alleged voodoo activities occurred.
Personally, I think it was the home atmosphere and good home cooking his wife and 3 kids who were staying with him provided! Run, don't walk away from John the next time he shows up on your ASL opponent list!
The Team Tournament is often won by one of the grognards having a great weekend and his junior partner hanging tough. Not this weekend. Scott McFarlane, allegedly a newcomer to the game, worked his way into the semi-finals and toted previous team champion Russell Mueller to his second team title in 10 years! Scott for his efforts claimed the 8-1 award for the best performance as an up and comer. I guess he's no longer on that list! Congrats to Russell and Scott, with only one blemish between them on their 7-1 combined score.
Tactical Tip OBA vs AFV: Don’t forget that OBA can be reasonablyeffective against AFV, even heavily armored ones. Sometimesyour OBA module represents the best antitank weapon in yourOB. For example, let’s say you’re the Americans with a105mm OBA module facing a German Panther. Drop an OBAFFE concentration on that tank, and you’ll shock or immobilizeit on an IFT DR of 5 or 4 and kill it on a 3 or 2. Not great odds,but the odds of you getting that tank from the front with aSherman’s puny gun are far worse. If that Panther is in woods(even in bypass), you get a -1 to that IFT DR which greatlyimproves your chances of an effect. OBA against lightlyarmored and/or open-topped AFV is even more powerful.Consider the 105mm OBA module again, this time vs. aGerman SPW 251/1 halftrack in the open. You’ll shock orimmobilize it on an IFT DR of 7 or 6 and kill it on a 5 or less.
The Newsletter of the Austin ASL Club August, 2002 Volume 7, Number 2
August, 2002 Page 3 of 18
In the midst of the weekend battles, there was a mini-tournament on Saturday. One of the glorious leaders of the Southern Kansas ASL group, Mike Rose, walked away with 1st Place in the Texas HEAT mini. Second place was awarded to a player who pleaded anonymity, since he is a big shot in the land of SL, and would be ostracized by his colleagues if he was even known to show his face at an ASL event, let alone nearly win one. Don't worry Bill Thomson, I won't tell anyone.
Thanks for a great turnout and great camaraderie. I met a lot of new faces, and nearly got my but whipped by a true up and comer from the DC group, barely new to the teenage ranks -- look out for 13 year old Spencer Tyson. He'll be using his Dad and uncle as whipping boys in no time!
Our local paper the Austin-American Statesman even covered the tournament!
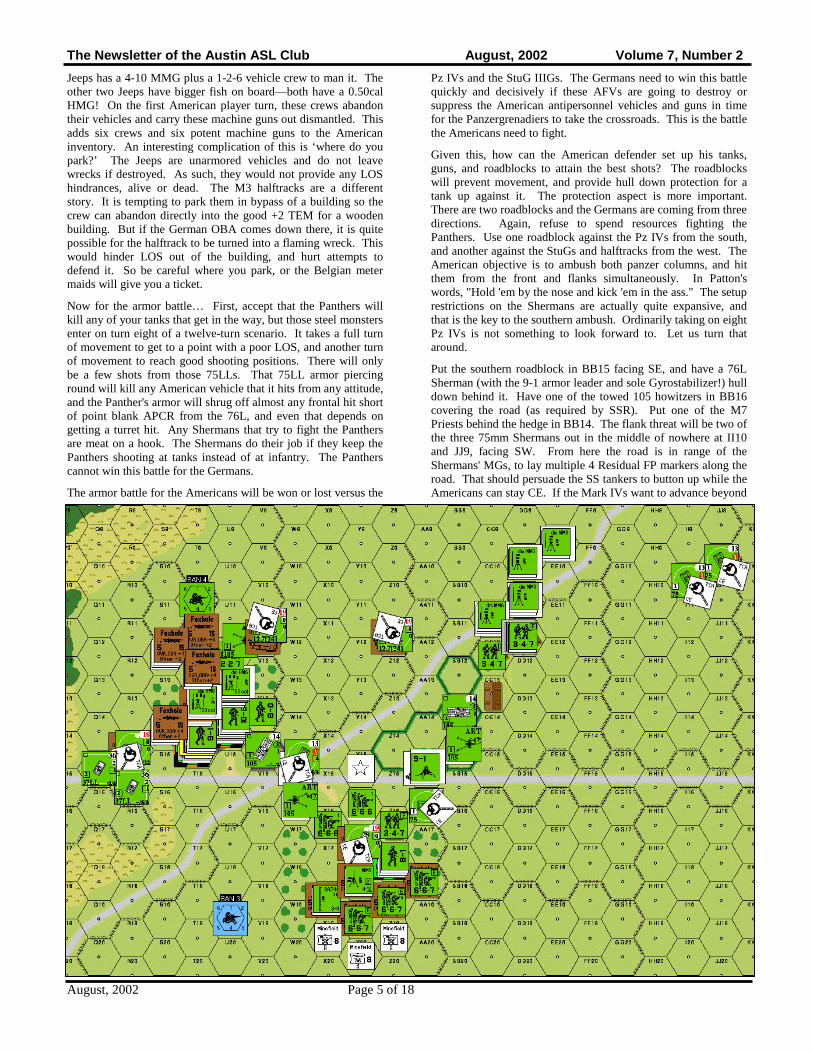
BDF7: Baraque de Fraiture Playing in the Snow Scenario analysis by Jim Torkelson The Baraque de Fraiture module was first published in 1996 by Front Line Productions, and was an excellent addition to the ASL system. Their follow-up module on the Bloody Ridge battles at Guadalcanal was the basis for the Edson's Ridge part of the Operation Watchtower Guadalcanal Historical Study. I’ve been intrigued by these scenarios since I got mine for Christmas in ’96, from my mother-in-law no less, and then won another copy at the Nor’easter II as the award for the best ROF string (my HMG in Bread Factory #2 went 7 shots, breaking one Russian squad and pinning another…☺). So here is my analysis of the monster of the group, scenario BdF 7, Baraque de Fraiture. It was late December 1944. After the German offensive began in the Ardennes, numerous American units had fallen back before the onrushing tide. In several locations, the scattered units had coalesced under effective leadership to form ad hoc roadblocks. At the key crossroads of Baraque de Fraiture, elements of the 106th Infantry and the 7th Armored Divisions were reinforced by the 3rd Armored and the 82nd Airborne Divisions to hold back the Germans. Initial attacks by the 560th Volksgrenadier Division were stopped cold with heavy casualties. The 2nd SS Panzer Division Das Reich was next. On December 23rd, after a delay in obtaining fuel, the Germans were approaching the American positions from three sides. An infiltrating grenadier force had cut the road to the north, denying the Americans any further support.
The Victory Conditions are fairly simple. The SS need to achieve total victory. The German player wins at game end by controlling all the buildings, and by amassing more CVPs than the Americans. Captured American vehicles are worth quadruple, not double, their normal value (probably due to their full fuel tanks). The game is eleven and a half turns in length, a very long time, but the Germans have reinforcements entering at various times during the scenario.
The map covers the clearing at the crossroads of Baraque de Fraiture with its few houses and barns, plus the surrounding
woods. The woods are closest to the buildings on the west and northeast sides, only four hexes away. There are 9 buildings on the map, broken up by the roads into three blocks. There is one stone building, two hexes in size and with a second level, from which one can see over some of the LOS obstacles and hindrances. This building also has a cellar location in each hex, similar to those from Red Barricades, but not treated as fortified locations. On the west side of the crossroads there is a row of orchard hexes, forming a north-south line between the forest and civilization.
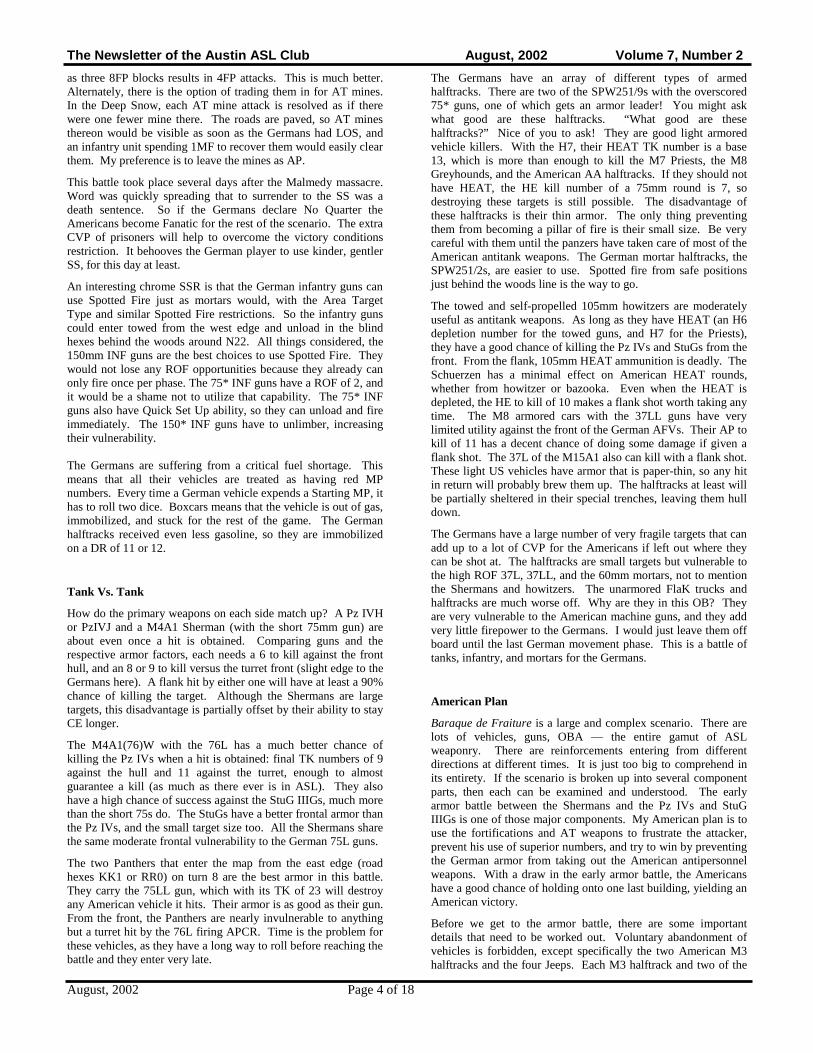
There are a number of SSRs for this scenario. The one that jumps out first is the existence of Deep Snow. Deep Snow’s greatest effect is upon visibility. No ordnance or discharger smoke may be placed during Deep Snow, and smoke grenades are only allowed inside buildings. This author believes that WP may be fired during Deep Snow for its WP NMC and concealment stripping effects, but no SMOKE counter is placed. Other rules lawyers may dispute this. The next effect of Deep Snow is on movement. It costs infantry an extra 1/2 MF per hexside unless entering woods, building, or rubble, or if moving along a plowed road. Here the roads are plowed, so that makes things easier. Deep Snow makes the road movement rate not applicable, and vehicles pay 1MP even on the plowed roads. Off-road, tracked vehicles pay one extra MP and non-tracked vehicles pay two extra MP. Being off-road also allows each vehicle a chance to bog in the snow. This is a Secret DR situation, with the third die designating in which hex entered the vehicle will bog. The chances of a bog result are described below: A vehicle moving through a barbed wire fence also has a small chance to bog, and that is included also.
Deep Snow/Wire Bog Table
Vehicle Type Barbed Wire Bog DR
Snow Bog DR
M7 Priest 12 10-12
Other Tanks
M8 AC
12
11-12
9-12
9-12
Halftracks 11-12 8-12
Trucks 9-12 7-12
Jeeps 9-12 8-12
One other effect of the Deep Snow is that the German Winter Camouflage becomes useful. The most important effect of Winter Camouflage is that German infantry can assault move/advance in Open Ground without losing their concealment. Considering how few hexes separate the edge of the forest from the cover of the buildings, this is extremely important. Winter Camouflage also degrades fire at long ranges. Shots at ranges beyond eight hexes get an extra +1 LV Hindrance DRM when the target is infantry, provided the infantry is not PRC. Against vehicles the +1 LV Hindrance kicks in beyond 16 hexes.
Deep Snow also affects combat. Due to the cushioning effect, HE ordnance attacks against targets in Open Ground get an extra +1TEM. This can make those foxholes even more popular. Residual FP due to ordnance is reduced by one IFT column. Minefield clearances DR get an extra +1 DRM. All AP minefield attacks are resolved at half FP. The Americans get 24 factors of AP mines. Placing them as 6FP blocks means that they are resolved as 2FP attacks. This is wasteful. Instead, placing them
The Newsletter of the Austin ASL Club August, 2002 Volume 7, Number 2
August, 2002 Page 4 of 18
as three 8FP blocks results in 4FP attacks. This is much better. Alternately, there is the option of trading them in for AT mines. In the Deep Snow, each AT mine attack is resolved as if there were one fewer mine there. The roads are paved, so AT mines thereon would be visible as soon as the Germans had LOS, and an infantry unit spending 1MF to recover them would easily clear them. My preference is to leave the mines as AP.
This battle took place several days after the Malmedy massacre. Word was quickly spreading that to surrender to the SS was a death sentence. So if the Germans declare No Quarter the Americans become Fanatic for the rest of the scenario. The extra CVP of prisoners will help to overcome the victory conditions restriction. It behooves the German player to use kinder, gentler SS, for this day at least.
An interesting chrome SSR is that the German infantry guns can use Spotted Fire just as mortars would, with the Area Target Type and similar Spotted Fire restrictions. So the infantry guns could enter towed from the west edge and unload in the blind hexes behind the woods around N22. All things considered, the 150mm INF guns are the best choices to use Spotted Fire. They would not lose any ROF opportunities because they already can only fire once per phase. The 75* INF guns have a ROF of 2, and it would be a shame not to utilize that capability. The 75* INF guns also have Quick Set Up ability, so they can unload and fire immediately. The 150* INF guns have to unlimber, increasing their vulnerability. The Germans are suffering from a critical fuel shortage. This means that all their vehicles are treated as having red MP numbers. Every time a German vehicle expends a Starting MP, it has to roll two dice. Boxcars means that the vehicle is out of gas, immobilized, and stuck for the rest of the game. The German halftracks received even less gasoline, so they are immobilized on a DR of 11 or 12.
Tank Vs. Tank
How do the primary weapons on each side match up? A Pz IVH or PzIVJ and a M4A1 Sherman (with the short 75mm gun) are about even once a hit is obtained. Comparing guns and the respective armor factors, each needs a 6 to kill against the front hull, and an 8 or 9 to kill versus the turret front (slight edge to the Germans here). A flank hit by either one will have at least a 90% chance of killing the target. Although the Shermans are large targets, this disadvantage is partially offset by their ability to stay CE longer.
The M4A1(76)W with the 76L has a much better chance of killing the Pz IVs when a hit is obtained: final TK numbers of 9 against the hull and 11 against the turret, enough to almost guarantee a kill (as much as there ever is in ASL). They also have a high chance of success against the StuG IIIGs, much more than the short 75s do. The StuGs have a better frontal armor than the Pz IVs, and the small target size too. All the Shermans share the same moderate frontal vulnerability to the German 75L guns.
The two Panthers that enter the map from the east edge (road hexes KK1 or RR0) on turn 8 are the best armor in this battle. They carry the 75LL gun, which with its TK of 23 will destroy any American vehicle it hits. Their armor is as good as their gun. From the front, the Panthers are nearly invulnerable to anything but a turret hit by the 76L firing APCR. Time is the problem for these vehicles, as they have a long way to roll before reaching the battle and they enter very late.
The Germans have an array of different types of armed halftracks. There are two of the SPW251/9s with the overscored 75* guns, one of which gets an armor leader! You might ask what good are these halftracks. “What good are these halftracks?” Nice of you to ask! They are good light armored vehicle killers. With the H7, their HEAT TK number is a base 13, which is more than enough to kill the M7 Priests, the M8 Greyhounds, and the American AA halftracks. If they should not have HEAT, the HE kill number of a 75mm round is 7, so destroying these targets is still possible. The disadvantage of these halftracks is their thin armor. The only thing preventing them from becoming a pillar of fire is their small size. Be very careful with them until the panzers have taken care of most of the American antitank weapons. The German mortar halftracks, the SPW251/2s, are easier to use. Spotted fire from safe positions just behind the woods line is the way to go.
The towed and self-propelled 105mm howitzers are moderately useful as antitank weapons. As long as they have HEAT (an H6 depletion number for the towed guns, and H7 for the Priests), they have a good chance of killing the Pz IVs and StuGs from the front. From the flank, 105mm HEAT ammunition is deadly. The Schuerzen has a minimal effect on American HEAT rounds, whether from howitzer or bazooka. Even when the HEAT is depleted, the HE to kill of 10 makes a flank shot worth taking any time. The M8 armored cars with the 37LL guns have very limited utility against the front of the German AFVs. Their AP to kill of 11 has a decent chance of doing some damage if given a flank shot. The 37L of the M15A1 also can kill with a flank shot. These light US vehicles have armor that is paper-thin, so any hit in return will probably brew them up. The halftracks at least will be partially sheltered in their special trenches, leaving them hull down.
The Germans have a large number of very fragile targets that can add up to a lot of CVP for the Americans if left out where they can be shot at. The halftracks are small targets but vulnerable to the high ROF 37L, 37LL, and the 60mm mortars, not to mention the Shermans and howitzers. The unarmored FlaK trucks and halftracks are much worse off. Why are they in this OB? They are very vulnerable to the American machine guns, and they add very little firepower to the Germans. I would just leave them off board until the last German movement phase. This is a battle of tanks, infantry, and mortars for the Germans.
American Plan
Baraque de Fraiture is a large and complex scenario. There are lots of vehicles, guns, OBA — the entire gamut of ASL weaponry. There are reinforcements entering from different directions at different times. It is just too big to comprehend in its entirety. If the scenario is broken up into several component parts, then each can be examined and understood. The early armor battle between the Shermans and the Pz IVs and StuG IIIGs is one of those major components. My American plan is to use the fortifications and AT weapons to frustrate the attacker, prevent his use of superior numbers, and try to win by preventing the German armor from taking out the American antipersonnel weapons. With a draw in the early armor battle, the Americans have a good chance of holding onto one last building, yielding an American victory.
Before we get to the armor battle, there are some important details that need to be worked out. Voluntary abandonment of vehicles is forbidden, except specifically the two American M3 halftracks and the four Jeeps. Each M3 halftrack and two of the
The Newsletter of the Austin ASL Club August, 2002 Volume 7, Number 2
August, 2002 Page 5 of 18
Jeeps has a 4-10 MMG plus a 1-2-6 vehicle crew to man it. The other two Jeeps have bigger fish on board—both have a 0.50cal HMG! On the first American player turn, these crews abandon their vehicles and carry these machine guns out dismantled. This adds six crews and six potent machine guns to the American inventory. An interesting complication of this is ‘where do you park?’ The Jeeps are unarmored vehicles and do not leave wrecks if destroyed. As such, they would not provide any LOS hindrances, alive or dead. The M3 halftracks are a different story. It is tempting to park them in bypass of a building so the crew can abandon directly into the good +2 TEM for a wooden building. But if the German OBA comes down there, it is quite possible for the halftrack to be turned into a flaming wreck. This would hinder LOS out of the building, and hurt attempts to defend it. So be careful where you park, or the Belgian meter maids will give you a ticket.
Now for the armor battle… First, accept that the Panthers will kill any of your tanks that get in the way, but those steel monsters enter on turn eight of a twelve-turn scenario. It takes a full turn of movement to get to a point with a poor LOS, and another turn of movement to reach good shooting positions. There will only be a few shots from those 75LLs. That 75LL armor piercing round will kill any American vehicle that it hits from any attitude, and the Panther's armor will shrug off almost any frontal hit short of point blank APCR from the 76L, and even that depends on getting a turret hit. Any Shermans that try to fight the Panthers are meat on a hook. The Shermans do their job if they keep the Panthers shooting at tanks instead of at infantry. The Panthers cannot win this battle for the Germans.
The armor battle for the Americans will be won or lost versus the
Pz IVs and the StuG IIIGs. The Germans need to win this battle quickly and decisively if these AFVs are going to destroy or suppress the American antipersonnel vehicles and guns in time for the Panzergrenadiers to take the crossroads. This is the battle the Americans need to fight.
Given this, how can the American defender set up his tanks, guns, and roadblocks to attain the best shots? The roadblocks will prevent movement, and provide hull down protection for a tank up against it. The protection aspect is more important. There are two roadblocks and the Germans are coming from three directions. Again, refuse to spend resources fighting the Panthers. Use one roadblock against the Pz IVs from the south, and another against the StuGs and halftracks from the west. The American objective is to ambush both panzer columns, and hit them from the front and flanks simultaneously. In Patton's words, "Hold 'em by the nose and kick 'em in the ass." The setup restrictions on the Shermans are actually quite expansive, and that is the key to the southern ambush. Ordinarily taking on eight Pz IVs is not something to look forward to. Let us turn that around.
Put the southern roadblock in BB15 facing SE, and have a 76L Sherman (with the 9-1 armor leader and sole Gyrostabilizer!) hull down behind it. Have one of the towed 105 howitzers in BB16 covering the road (as required by SSR). Put one of the M7 Priests behind the hedge in BB14. The flank threat will be two of the three 75mm Shermans out in the middle of nowhere at II10 and JJ9, facing SW. From here the road is in range of the Shermans' MGs, to lay multiple 4 Residual FP markers along the road. That should persuade the SS tankers to button up while the Americans can stay CE. If the Mark IVs want to advance beyond
The Newsletter of the Austin ASL Club August, 2002 Volume 7, Number 2
August, 2002 Page 6 of 18
the woods at PP15 past MM15, the flanks of part of the column will be vulnerable to these Shermans. If the Pz IVs stop and turn to meet that threat, the hull down 76L Sherman at the roadblock will work his way down the column flaming German tanks. If anything, his success will hinder his LOS to the tail of the column. It is nice when the American tank commander can have the same sort of problem that Michael Wittman usually had. The two 105s will support with HEAT and HE fires. This kill zone is an area of convergence of five significant antitank weapons.
We need to go through some of the to hit numbers for the ambush forces to prove the feasibility of this plan. In the south, the flanking vehicles engage at a range of between 7 and 10 hexes. A CE Sherman needs a 7 or less to hit a moving vehicle (9 base: Case J +2) that has expended at least 3MP in his LOS. A BU Pz IV firing back after stopping needs a 5 or less to hit a large target (9 base: Case C +4, Case I +1, Case P -1) in the open. A gamble? Damn right it is. But it is better than sitting back and being overwhelmed piecemeal without trying. The Sherman 75s should use Intensive fire in both DFPh (don't forget Multiple Hits!) and in Prep Fire of the first turn of contact, as there is no point in saving the barrels for the future.
Don't forget the APCR (depletion number of 4) that the 76L Shermans have. You just might have one round in the breech, and there is no point in waiting to use it. The 76L Sherman behind the roadblock facing south can try to fire on the lead Pz IV as soon as it clears the orchard hindrances and has spent more than 1MP in its LOS in hex SS15 (8 base to hit for 17 hex range, +1 for L gun and -1 for APCR for a modified 8, then DRMs of +1 for Winter Camouflage, -1 for the armor leader and +3 to the DR for Case J1) would yield a hit on a 5 or less, but the APCR is only good on a 4 or less. Sometimes you can't make the numbers work out exactly right. I hate to waste what would be a hit with normal ammunition but not with the special ammo, but sometimes it is justified. The 22 to kill is modified by -1 for the long range, but still perforates the frontal armor of the Pz IV. On the bright side, the wreck or blazing wreck on the road will slow down the rest of the column. Another gamble, but no reason not to take it. For standard AP rounds, the firing range will be 15 hexes or less. There is no need to wait for the range to close to under 12 hexes, because a firer with an L gun has the same chance to hit at range 7-12 as it does at 13-18 hex range (both have a modified to hit number of 9 before DRMs). Once the lead panzer has spent more than 3 MP on the road, closed to within the Winter Camouflage modifier range, and cleared the hexside orchard hindrance, take the shot. This usually means hex QQ15. The shot yields a hit on an eight or less (base 8 to hit for 15 hex range, up to 9 for L gun: then -1 for the armor leader and Case J +2). Nice. Plus there is the chance of ROF. The kill probability is very high. As this tank is more survivable, I am not sure about Intensive Fire on the first Defensive Fire Phase. It depends on how many other panzers die and how aggressively they move up. If you don't think he will survive the Advancing Fire Phase, take the shot now.
There is not a whole lot the Germans can do about this ambush aside from running right through it. Deploying off road is difficult due to the Bog Checks from the barbed wire fences and the Deep Snow. Each Deep Snow hex costs the panzers 2MP. Changing from column to a totally unhindered line abreast is not possible in only one movement phase, and still leaves some flank shots possible for the 75mm Shermans. Deploying to the west enables the Pz IVs to shoot around the roadblock hexside at the 76L Sherman, negating the hull down advantage. Each panzer has A4, enabling fire from quick halts with low risk but low
chance of success. Use that APCR now, for in another week the stuff is gone forever (no German 75L has APCR in 1945).
The flanking Shermans are at least three movement phases from being threatened by tank-killer teams from the SS infantry of Kampfgruppe Schulzer entering from the south or east. A PSK has a range of 4 but really needs to be three or less hexes away for a decent chance to hit. By that time, the ambush will be over one way or another. Infantry that are fighting that far south will be far from the buildings, and still vulnerable to the other American anti-infantry weapons (one 105 must set up covering that area by SSR) and the AAMGs on the tanks themselves. The panzers could wait until the SS infantry that enter on the east or south edge drive the flanking Shermans away, but that uses up a lot of precious time, at least three movement phases. Kampfgruppe Schulzer will already be entering crews carrying dismantled 81mm mortars on the south and east edges. Allocating tank-killing teams to the south and middle east edges reduces the number of squads headed for the covered approaches to the buildings in the northeast. Meanwhile, the Shermans and 105s can get area acquisition on the key road choke point, and pick up the Pz IVs when they come rolling through. A -2 acquisition enhances the probabilities of a kill significantly.
The western ambush is trickier to achieve. The terrain is more congested, engagement ranges are shorter, and the Americans want to avoid having the vehicles and the roadblock hinder or block the LOS of the antipersonnel weapons. The SS infantry that start on board are only six hexes away. With the StuGs not entering until turn two, the infantry can easily complicate the situation. The StuGs have better armor and, being small targets, are also more difficult to hit; the infantry counter fire available will persuade most tank crews to button up. The open topped Priest and armored car crews don't have that option if they want to shoot. On a general note, the Americans are not going to skulk. Instead, they will shoot every chance they get.
There are many antitank weapons available in this region. One each of the 76L and 75mm Shermans are here, along with both of the M8 armored cars. The M15A1 can be used against both infantry and vehicles in this area. One towed 105 howitzer must be here by SSR, and the other self-propelled 105 can be aimed here too. The region is close enough to the buildings that one or both BAZ 44 can be nearby. A good amount of firepower is here for the complicated melee about to take place. One thing the American needs to be careful of is the positioning of his vehicles and the LOS of supporting antitank and anti-infantry weapons. Try not to put a vehicle that could turn into a burning wreck where the smoke will hinder friendly fires. This is where it gets messy.
The other roadblock is around U16 facing northwest, with a 76L Sherman hull down behind it. The last 75mm Sherman backs up this tank from P15, and also threatens the infantry around the western woods line. The flank threat is done by moving the two M8 armored cars north along the road to the area around J15 and K15. The armored cars are required to set up within eight hexes of Y13, a northern limit of hexrow Q. This is not far enough north to see the western road entry hex L28, much less get a flank shot on a StuG coming on board there. This maneuver is tricky because it depends on the Germans holding the halftracks offboard, being afraid of entering very thin skinned halftracks on turn one along the western road. The 75*s of the SPW Stummels can kill the armored cars with HEAT, but not the Shermans (from the front anyway). The armored cars cannot cause any damage to the front of the StuGs, but there might be some skulking halftracks asking for AP shells around the western map edge.

The Newsletter of the Austin ASL Club August, 2002 Volume 7, Number 2
August, 2002 Page 7 of 18
The balance of the heavy weapons are the two 105 howitzers and the M15A1 AA halftrack, plus bazookas. The towed 105 can be emplaced in V16 facing NW. The Priest can be behind the wall hexsides in V14 facing NW as well. Their initial mission will be antipersonnel. The Priest's LOS will be degraded by the roadblock and the tank hindrance in U16, but that cannot be helped. The M15A1 will be hull down in the special trench at R14. The VCA through which the armament cannot fire will be due south. Start out with the TCA facing southwest towards the western wood line. Again the priority target is infantry, but if a side shot shows up on the StuGs, take it. The ambush will not work as a tank killer if the StuGs stop out of LOS of the 76L Sherman and concentrate on killing the armored cars and the 75mm Sherman. It will work as a delay however, and time is on your side.
It is time to examine the assault guns' to hit numbers against the armored cars. The M8s are small targets. The range will be about 10 hexes, and assuming that the StuGs are buttoned up and not paying any Bounding Fire penalties, they need a seven or less to get a hit. Not good for the armored cars, but they serve their purpose. The 76L Sherman firing buttoned up at a moving StuG at close range (0-6 hexes) needs a six or less to hit. At least there are only three of the assault guns. This engagement could hurt. A trade of both armored cars and both Shermans for the three StuGs is one that I would gladly make. It is not very good CVP-wise, but for the rest of the game it works out well for the Americans.
One of the reasons for the exposed positioning here is to give the Germans priority targets at which to fire. If the 105mm OBA and infantry FP are drawn to these vehicles and guns, that means the 10-2-led HMG firebase and the M16 Meat Choppers are relatively unpressured. They are the true infantry killers here. In any big operation there are going to be some losses, and these guys are on the top of the list. Remember that the M4A1 Shermans, the M7 Priest, and the 105mm howitzers have white phosphorus shells, WP7 and WP8. While due to the Deep Snow there is no possibility of placing SMOKE counters, a WP hit does strip concealment and supply the terrain-modified NMC. This can be useful as a prelude to a big fire group or kill stack shot.
The German tanks and assault guns will probably enter buttoned up. Being CE with all those American MGs around is dangerous. There can be a lot of Residual FP left on the roads. The M15A1 or M16 halftracks could decide to shoot at the tank crews. If the 105 howitzers run out of HEAT the temptation to fire HE at the tank commander's head is very large. A 21FP+2 is not to be sneezed at, even with an eight-morale crew, plus you get to roll on the HE kill table as well. You could roll low and get the shock or immobilization (stranger things have happened). The US tank crews have the option of staying up and being CE, at least for the first turn. After their first Advance Phase under fire, it is time to button up and dog the hatches.
What about the rest of the American infantry? The foxholes provide excellent cover from the German OBA, especially when the Open Ground Deep Snow +1 modifier is included. A block of 1S foxholes in the orchard area around Y18, and another block around the level two building around T13 allow for good dispersion and protection. Putting more than one foxhole per hex is an invitation to the SS infantry to come in and use those foxholes against the Americans. The attacker usually needs to stack more than the defender. The 7-4-7s and 6-6-6s can spread out in these foxholes and form fire groups as necessary to hit the Germans. The bulk of the heavy weaponry along with the –2 leader will stand back in the buildings. When the Jeeps and M3
halftracks are abandoned, the vehicle crews with their MMGs and 0.50cal HMGs are available for use. The 0.50cal HMGs should be transferred to better troops with a real morale, while the MMGs can be put in the outlying buildings. The self-rally capability is very helpful here.
By engaging the German tanks before they can deploy and utilize their superior numbers, the Americans can take the initiative away from the attackers. In some scenarios, the defender sits back and plays a very passive role. Here, the defender has the chance to take the battle to the enemy. The SS infantry might still overrun the defenders, but it will not be by using Armored Assault because the armor will have more pressing concerns. Instead, they will have to fight their way through streams of MG fire. With all this firepower around, it will not be a pleasant task. The American commander needs a lot of faith in the ability of the hull down 76L Shermans to survive. Being hull down reduces the vulnerability of the target by just over half. It is not a magical shield, but can help. Sometimes you do what you can, and hope for the best.
German plan
The German dilemma is one of time. Although they have a great order of battle by the end of this scenario, they might not have the time to bring it properly to bear. The problem is that the starting forces are out of position and facing a huge amount of firepower. The western infantry force is just beyond the woods line, out of view of the Americans. The panzers are entering from the south, but have Americans waiting for them to come into view. Infantry and heavy weapon support is entering from the east and south, but they will be at least a couple of turns before being ready to engage the Americans. Like we did for the Americans, let’s break this up into the component parts.
When does the German player bring on the PzIVs? This panzer company is entering from the southern map edge, along a single road hex. I’ve gone through the problems inherent for this group, especially if the Americans are obviously waiting. It could very well be that waiting until game turn 2 is the way to go, as that allows some time for the distracting efforts to be successful, or at least worry the American player. Too many factors to go into, too many variables. Pick one and good luck.
The infantry Kampfgruppe that enters from the east and south edges (Kampfgruppe Schulzer) has three missions. First, they need to get the four 81mm mortars operational. That means carrying them dismantled either to the woods line or to the hexes just in back of the woods line. The choice of spotted fire or direct fire is interesting. Spotted fire gets the +2 to hit and reduces the ROF by one. It also depends on a good order spotter being there. Direct fire greatly increases the vulnerability of the mortar crews. With all the firepower the Americans can throw, spotted fire is probably the way to go. Remember that one spotter can direct the fire of all the mortars in the hex as long as they are shooting at the same target. This leads to an interesting stacking situation, three crews and three mortars all in the same hex. And surrounding that hex are three SS half squads, hopefully concealed, out on the woods line. The mortars have to designate a spotting unit, and until that unit is broken or moves away they are partners. The reason for the other two half squads is apparent after the first American fire phase. Hopefully, one of those original half squads is still there and in good order. Then the German mortars let fly, primarily targeting the M16 or M15A1 Meat Choppers first. They are very vulnerable to mortar fire, and being hull down does not help them at all against
The Newsletter of the Austin ASL Club August, 2002 Volume 7, Number 2
August, 2002 Page 8 of 18
indirect fire. But how soon can these mortars get set up and firing? It is a leader-intensive operation, but Kampfgruppe Schulzer is rich in low-level leaders. A crew carrying a 5PP dismantled mortar has a base movement allowance of 2MF. When a leader helps out, using his IPC, the movement allowance is up to 5MF. If the crew uses Double Time and the leader does not, the allowance goes up to 6MF. This is what is needed to get where they need to be. Here is the sequence: On turn one, three leaders (!) and three crews each carrying a dismantled mortar set up offboard at a hex like W0 or Y0. During the MPh, they move together to W3 or Y3. Three spotter friends move to X4 or Z4, remaining concealed. In the APh, the mortar crews and heavy objects advance to X4 or Z4, while the spotters advance in a star pattern to the woods line. Next player turn, the German DFPh is filled with the sound of metallic clicking as the mortars are assembled. And in the PFPh of German turn two (provided a spotter is still alive), the mortars start to fire. The preferred position involves using the path, as that way the crews are not CX for German turn two. Then new spotters are cycled into the woods line as the old ones are mangled and rout back to be rallied. This starts the attrition process, using the SS strengths of many leaders plus good broken morale, and starts grinding down the American firepower.
The second mission is to enter tank-killer teams from the south edge with PSKs to drive any Shermans away from those woods. This is a debatable effort, as troops coming in from the south have a very long way to go before reaching the buildings. Still, if the Pz IVs are going to be held offboard until the situation is more favorable, some support to help them is not a bad idea. Time and distance, as always, are important. Without a leader to help the PSK teams run onto the board, the rocket launchers can be to the southern woods line at hexrow PP on German turn two. If a leader comes along, the teams can assault move to the woods line and remain concealed. That Winter Camouflage is nice sometimes, as it can help the PSK teams creep out into the clearing to close the range on any Shermans.
The third mission, and arguably the most important, is the assault element that will plod through the woods from the east until reaching their jump-off positions close to the American lines. Double timing with leader support through the forest trails, a concealed German force can be at the woods line at P10-P11-P12 at the end of German turn three. If desired, a HMG/MMG fire group can be on the woods line somewhat farther east at the end of turn two. Once the firepower duel begins, the great advantage of covered rally areas will show up. The German units, once broken, can rout back into the forest to their waiting leaders, where they can lose their DM counters in peace and quiet. Broken Americans have no such refuge.
The western force, the 3rd Battalion of the SS Panzergrenadier Regiment, has some tough decisions ahead of it. How does the German player use the radio to call down that desperately needed 105mm OBA? The Germans do not have any concealment counters at start. To start unconcealed but within sight of the American enclave is to eat lead. Lots of it. The only area where this is even possible is far to the northwest. There the LOS is limited to part of the crossroads. This is not a good way to go. The other alternative is to hide the radio in the initial German setup in the forest, gain concealment at start, and then advance to the woods line on German turn one. Since lots of other German units will be doing the same thing (it is the only way I can figure out how to avoid dying in large numbers), the first series of shots from the Americans is at least degraded somewhat. A few German half squads do need to start out in the far northwest forest woods line to keep the entire American force from gaining
concealment pre-game. Once the Germans have made it to the western woods line, then the duel begins. The Americans get the first shot in their US turn one Prep Fire, but the German Defensive Fire should be fun. That eight morale will be tested.
Then there are the halftracks of Kampfgruppe Werner. When does the German player bring in the halftracks from the western edge? Do they come in loaded with 6-5-8 SS squads? Or do the squads walk in, while the halftracks remain off-board? The mortar and gun halftracks, SPW251/2s and SPW251/9s, should come on board to perform their respective roles of spotted fire and Meat Chopper/Greyhound killing. The personnel-carrying halftracks, the SPW251/1s, should probably be kept off board in reserve with the squads still loaded until the roadblocks are found and the American tanks suppressed. SS squads with LMGs mounted aboard LMG-armed halftracks make for extremely nasty fire groups. The deep snow bog check uncertainty reduces the off-road mobility of the halftracks, but at this point in the scenario the roads should be available for movement that is free from risk of bogging. They force on the Americans the important decision of whether to use their machine guns as antipersonnel weapons or to use them for TK attempts. Survivability is still an important consideration. At least the crew survival numbers for the SPW251/1s are not bad so if the vehicle dies, there is a chance for the passengers and crew. The infantry guns should come on board as soon as possible to reach their firing positions. The west edge is preferable for the 150mm big guns, but the south edge might work out for the 75* INF.
Conclusion This is a great scenario. There is something very attractive about last-ditch stands. The Americans are fighting for time, but they also know that the Germans cannot be allowed to break, reform, and then attack again. German units need to die for the Americans to win at game end. By winning the first exchange of fire, by killing PzIVs and converting the woods line to a kill zone, the balance of forces can be irrevocably shifted in favor of the Americans. But the American force consists of eggshells armed with hammers. The AA halftracks have massive firepower but little staying power. Shermans die when PzIVs and StuGs duel with them on an even basis. The American infantry have no protected sites where they can lose DM and rally back again. Once the Americans are down, they have little chance to pull themselves back up again. The key question for the Germans is how much can they lose to strip away the American assets. And that can only be determined on the mapboard.
Please consider that these are the author’s opinions, and if you have a comment or complaint, send them to me at [email protected] I would greatly enjoy debating the merits of one tactic over another. Thanks, JET
The Newsletter of the Austin ASL Club August, 2002 Volume 7, Number 2
August, 2002 Page 9 of 18
I’ve found that if I have all the armor factors and special ammo numbers of the vehicles and ordnance involved in a scenario beforehand, it makes it much easier to keep track of. Think of it as a shorter version of the old 3” by 5” vehicle cards. Here is my listing as a player aid for the scenario BdF 7, “Baraque de Fraiture”. JET
German Ordnance and Vehicles MTR 81* ROF3: Small: Base 4DR vs. armored vehicle target INF 75* ROF2: HEAT TK13, HE TK 7 Small: No AP H8 INF 150* No IF: HEAT TK21, HE TK16 Large: H8 SPW 251/2 NT81* ROF3 MP16 ht 1 1 small Base 4DR vs. armored vehicle SPW 251/9 NT75* ROF2: HEAT TK13, HE TK 7 MP16 ht 1 1 small H7 Pz IVH T75L ROF1: APCR TK 20, AP TK17 MP13 8/6 3/4 A4 Sz 3/5/2 Pz IVJ ST75L ROF1: APCR TK 20, AP TK17 MP13 8/6 3/4 A4 Sz sN9 3/5/2 StuG IIIG NT75L ROF1: APCR TK 20, AP TK17 MP13 8 3 small A5 AAMG VCA only -/-/2* PzVG ST75LL ROF1: AP TK23 MP15* 18/14 6 large sN7 Stalls 3/5/2 SdKfz 10/4 T20L(4) ROF3: AP TK6 MP14 ht * * FlaK LKW T20L(4) ROF3: AP TK6 MP24 tr * * SPW 251sMG CMG ROF3: MG TK4 MP16 ht 1 1 small AAMG dm HMG removable -/7*/3* PF 10/8 6 TK31 PSK 11/9 8 7 4 TK26 OBA 105mm (20FP) Scarce Ammo (+1 red chit), radio contact 8 Base 5DR vs. armored vehicles
American Ordnance and Vehicles ART 105 ROF1: HEAT TK15 HE TK10 Normal H6 WP8 No AP M8 ST37LL ROF2: AP TK 11 MP36 ac 2 1/2 OT C7 -/4/4 M3 AAMG ROF1: MG TK4 MP20 ht MA: MMG removable OT -/-/4 Jeep AAMG ROF1: MG TK4 MP37 tr * * very small MA: MMG removable -/-/2 Jeep AAMG ROF2: 0.50calMG TK5 MP37 tr * * very small MA: 0.50calHMG removable -/-/4 M7 HMC NT105 ROF1: HEAT TK15 HE TK10 MP14 3/2 1 OT LGP WP8 H7 No AP -/-/4 M4A1(76)W T76L ROF1: APCR TK22 AP TK17 MP13 11/8 4/6 Large A4 2/4/4 M4A1 T75 ROF1: AP TK14 MP13 11/8 4/6 Large WP7 2/4/4 M16 MGMC T12.7(24) ROF3: MG TK5 MP19 1/0 0 ? CE+1 SRT; VCA NA OT M15 MGMC T37L(8) ROF3: AP TK10 MP18 1/0 0 ? Turret R*; VCA NA OT -/12 0.50cal HMG TK5 MMG TK5 Baz44 11/9 8 7 4 TK16 MTR 60* ROF: 3 [3-45] Base DR3 vs. armored vehicles
The Newsletter of the Austin ASL Club August, 2002 Volume 7, Number 2
August, 2002 Page 10 of 18
Player Profile: Tom Gillis
Banzai: Tell us a little bit about your gaming background. How long have you been gaming? What was your first game? Are there any particular games that stood out over the years?
Tom Gillis: My first game was the old standard Tactics II from Avalon Hill. I got it in the early 70s when I was probably in the 6th or 7th grade. I had been interested in military history for a while, and saw the game in a hobby shop so I bought it. Unfortunately, it was hard to find opponents, as most of my friends at that time were not interested in anything harder than Monopoly. I played it a few times with my Dad, but not much more. After that I got Afrika Korps, and liked that. But mostly I played solo due to lack of opponents. Later on, about '74 or '75 I got Panzer Leader and Panzer Blitz, and the gaming world changed for me. I absolutely loved those games. They seemed so exciting. By now I did have one regular face-to-face opponent and we played a lot of those two games during summer vacations.
Banzai: When and how did you discover ASL?
TG: I was in a hobby shop in Amherst, NY with my Panzer Leader buddy and we saw SL. I forget what year it was, maybe early '77. I saw that baby and I fell in love. Alas, my buddy didn't get into it as much as me, and soon after I moved out of state. I played mostly solo through the rest of my high school years. I liked it a lot, and bought all the gamettes that followed but didn't play it much, and not at all in college. I joined the Army in 1980 and did play it a few times, but not seriously. After my stint in the Army I ended up in Houston, TX, and quickly fell into a gaming group of friends. We mainly played AD&D, but did play some SL. One day one of the guys said something about seeing a new rulebook for SL. Of course it was ASL. He bought the book, but never really got into it. I was a traditionalist and said I wasn't going to go for this new ASL. But someone in my group did eventually read the ASLRB and he kept saying that it was a better system. It made the game better. So finally I checked it out, got my own copy and started to learn it. I quickly realized it is a better game than SL. This must have been about '86 or '87.
Banzai: What would you say were your ASL strengths and weaknesses?
TG: Well, strengths for one are whenever I play the Italians. I seem to pass 2MCs regularly with my 3-4-6s. Just ask my opponents. Seriously though, I think I am a fun opponent, and can really help make a good ASL experience, win or lose. That is my greatest strength. As for weaknesses, I still tend to be a little rash on questionable decisions. Especially on the attack. I see what I think is a golden opportunity and make a move, and bam,
another flaming wreck or broken MMC. I have gotten much better at analyzing all the angles of a move.
Banzai: What is the best part of ASL? The worst?
TG: The best part is meeting people who share the same intense passion for military history as represented by this game. ASL is the most comprehensive war game out there that I've seen. I love the detail of the vehicles and the various nationalities. It is complex, but when things are clicking together it can be the smoothest gaming experience I've found. The worst part of ASL is, in my humble opinion, unnecessarily, excessively slow play. This is when the game becomes tedious. I admit I am a faster player than many, and I can respect deliberate play. But when the play is taking more than an hour a turn, on relatively low counter density scenarios, I can become frustrated. I recently played three relatively low counter density scenarios. One was 6 turns, one was 5 and1/2 turns and one was 7 turns. All about the same counter density, mixed OBs with AFVs, guns and infantry. We finished the 6 turner in just over 3 hours. Things went smoothly, we hardly hit the book up. I had a blast! The 5 1/2 turner, though, took my opponent and I 10 hours! It was tense, but tedious. We didn't even hit the book up much. The 7 turner took us an incredible 12 hours! This is just too much for me. Lots of rule checking, lots of disagreements. Not really fun.
Banzai: What are you looking forward to in regard to ASL?
TG: I really want to improve my play. Not just to win, but also to understand the game better to give my opponent and myself a better ASL experience. I'm a scenario player mostly, but in the last year or so I've played two Tarawa CGs, KGP3, RB4, and currently Ruweisat Ridge. CGs are a different, though similar animal than scenario ASL. I'm learning to conserve my forces more in the CGs, because the battle continues. (Well, my American opponents in KGP would argue about me conserving forces!)
Banzai: What was your most enjoyable moment in ASL? Your worst?
TG: My most enjoyable moment was last year winning the mini tournament at the Austin event. There was a lot of good talent there, and I really tried to buckle down and play my best game. My worst is also my funniest because of the irony involved. I was playing Bret Smith here in Houston in Panthers in the Mist. He had this Panther set up that was just causing me all kinds of grief. I couldn't hurt it for nothing. MMCs would fail their PAATC. Mortars were bouncing off it. Finally I had got a Sherman around on one of its flanks. He turned the turret and missed me on a DFF shot. I took a BFF shot and rolled the dice, declaring for APCR first. Dice fall into the cup and
The Newsletter of the Austin ASL Club August, 2002 Volume 7, Number 2
August, 2002 Page 11 of 18
its: snakes! A critical hit! I think the TK was 42 and it was a turret hit against his 14 AF, so it was like a 27 TK, 28 to shock. Yep, you guessed it; I rolled boxcars for the result. Dud round! Needless to say, Bret won that one handily. ASL is a fickle mistress.
Banzai: What advice would you give players who are just starting out?
TG: Well, for one I'd say stick to it. Don't let getting beaten keep you away. That's how you become a better player, by learning from your mistakes. I try to regularly play good players like Jay Harms, Walter Eardley, and Roy Casagranda here in Houston. They all have shown me a lot of moves and rules I was unaware of or had misplayed. Don't get discouraged. I lost 7 games in a row a couple of years ago. It was disheartening to some effect, but I plugged on and I think I'm a better player because of it.
Banzai: What is your favorite AFV in ASL? What is your favorite nationality to play?
TG: Well, I know its almost everybody's fave, but I have to go with the Panther. Great gun, good speed, and armor. Against some of the late war Russians AFVs it’s out of its element. But against almost all others it’s the real king panzer. I only wish they had smoke rounds! I like to play the Americans the most. I know some ASLers belittle the Amis, but they can really put it on their opponents if played right. All that SMOKE, and firepower. Plus the Shermans are better than people realize with the fast turrets and chance for two hits with a roll of doubles.
Banzai: What are your interests outside of gaming?
TG: I like to read a lot. Military history, sci fi, fantasy, you name it. My current favorite author is Haruki Murakami. I'd recommend anything by him. He's a Japanese writer who blends current everyday events with a little bit of the supernatural. I also am very interested in music. I don't play any instruments, but I am an avid listener. I like classical music, progressive rock, and new age. Groups or artists I'd recommend are Debussey, Ravel, King Crimson, Amon Dul II, Steve Roach, and Robert Rich.
Banzai: Any last comments?
TG: I'm really proud of the way the Houston Half Squad has grown in the last few years since Jay and Walter formed it. I guess I was member #3 and like to think of myself as the cheerleader of the group. We have a good rivalry in our group between the Westside guys and the Eastside guys. We're hoping to take a big contingent up to the Austin tourney in June and see how we do. I like competition, but think the fun factor should be utmost in ASL. That's what I try to bring to my matches. An attitude
of competitiveness, but a spirit of enjoyment also. I have to tip my hat to you Austin guys though. You guys have led the way in Texas with ASL. I've learned much, playing against some of you. I hope we continue our friendly relationship with your group. But watch out, there's a new dog on the block and he's hungry!
Favorite Scenarios Units: Aaron Schwoebel A lot of great ASL players have written in this ‘zine about their favorite scenarios. I feel unqualified to do so, as I spend most of my time playing campaign games (BR:T, PB, RB) and haven’t played a ton of scenarios. [Author’s note: Don’t take it personally if I haven’t played against you—Jeff Toreki lives only 100 yards down the street from me and tolerates me canceling on ten minutes notice because I have a girlfriend or work-emergency, and it’s hard to compete with that kind of convenience.] So instead of discussing scenarios, I’d like to rant about my favorite ASL counters/units—not necessarily the best units, but the most colorful or illustrative. Those of you who spend hours reading Chapter H for the fun of it, like myself, may not find any big surprise here. But if you haven’t, perhaps it’ll encourage you to take a peek at more than just the units you’re about to use in a scenario. There are so many thousands of scenarios out there nowadays that I didn’t endeavor to list which ones included some of the more obscure units I’ve picked. Just hunt through your own collection, eh?
1. American first-line half-squad 3-4-6
An obviously unorthodox choice. What’s so special about the 3-4-6? Well, it’s the only ASL half-squad with exactly the same numbers as someone else’s full squad (the Italian first line squad). How else to point out that quality is often very much more important than quantity? Have you often looked at a scenario card and thought: he gets 20 squads and I get 10? And I’m on the attack? If you look at the quality of the squads, this ratio may be meaningless.
2. American light mortar (60mm)
I have, too often, overlooked this one, but for sheer power it is the king of light mortars (excepting the similar French one, but its usage only spans a few months of the war). With a range of 3-45, it clearly outclasses most of its peers. There is hardly a scenario where you’ll have to worry about its range. Its ROF of three is obviously as good as you can do. But what makes it most unique is that its firepower, after Area halving, is 4, as opposed to the normal 2 (unless you’re using the Incremental IFT). You even get WP in 1945! Don’t make the mistake of shoving this off to some half-squad you forget to move most of the game.
The Newsletter of the Austin ASL Club August, 2002 Volume 7, Number 2
August, 2002 Page 12 of 18
3. British A9 CS tank (vehicle note 6)
Ahhh. Very unique and very effective. I don’t know if this tank is in any scenarios, but back when a lot of DYO was played (before many scenarios had been published), I bought these whenever I could. Some would be troubled by the 1/1 armor and the lack of HE and AP. Well, you’re only going to use it early-war, so the armor isn’t soooo bad. And look at the advantages you get. Unlimited Smoke. That’s right. Stop worrying about bad luck and having all of your S6 or S7 guns fail their depletion rolls. You get all the Smoke shots you want with this baby. Plus, you get two 4 FP bow MGs, and a 6 FP coaxial. The A10, A13, and A15 CS have better armor (and in the last case, some ammo besides smoke), but none have the A9’s machine-gun firepower. Do you want to bother with a To Hit roll in order to get a 6 or 8 or 12 IFT effect, or do you just want a 14 FP effect? Huh?
4. Italian L3 lf (vehicle note 5)
The Italians put a flamethrower on a radioless tankette (very small, +2 to hit) with 1/0 armor. Just imagine three of those in platoon movement making their way towards you. Rarely have I seen such an intriguing mixture of strengths and weaknesses (well, maybe the Elefant). The British Wasp is just as small a flame-thrower, but at least it doesn’t have to move in groups.
5. British AEC III armored car (vehicle note 53)
The British made tons of odd vehicles, so I could pretty much make a separate list from just their part of Chapter H. This one is a beauty. An armored car with the Sherman’s 75 gun, possessing S8 and WP8 (we’ll throw in a SM8 as well), not to mention 6/3 armor and a fast turret traverse. You pay for such tank-like qualities, though: only 24 MPs on the AC table, and normal size to hit. The AEC II, with a 57L gun but otherwise quite similar, has Russian-colored versions included in Doomed Battalions for the Yugoslav partisans. Other British vehicles to check out: Ram and Kangaroo APC, Stuart Reece, Churchill AVRE, the oft-mentioned Crocodile, and the Deacon SP-ATG (319 degree traverse!).
6. Russian 1-2-6 half squad (conscript)
There is no unit that gets called out by name as much in ASL as the Russian conscript half-squad; or, more accurately, the broken Russian conscript half-squad. Obviously, Russians get played a lot, and when they do, how often do you find yourself whimpering in the rally phase to your opponent (who is certainly beating you because of the dice, not because of any unwise moves on your part) “well, I got this broken conscript half-squad over here…” Variations to the end of this phrase include “…he’s DM, there’s no point in trying to rally him” and “…no use sending a leader over to rally him” and “…c’mon baby [sound of dice shaking], I need you to rally so you can capture that last stone building.” Rarely do you hear a player mutter something about his “first-line British full-squad” or “second-line German half-squad”—but I guarantee you’ve heard the expression “broken Russian conscript half-squad” more than once.
7. Italian LMG
I’m really trying not to pick on the Italians here, because it isn’t very sporting. But a 2-5 LMG? With a B11? I mean, at least
with all those 2-6 LMGs out there you can match the range of an opposing squad (Russian LMG versus German 467, Japanese LMG versus American 666 or Marine 668), but the Italians can actually get in a duel at long range with normal range rifles! And don’t tell me “the Americans and Germans get 6 range because of their inherent automatic weapons.” They wouldn’t get full FP if they were relying on a weapon or two, the rifles are contributing strongly. The Italian LMG is one of those counters which really stood out when you first opened the module and looked with interest to see what numbers the AH design crew chose. “We’ve seen plenty of 2-6s, but 2-5?” It’s like seeing a 3-2-6 conscript squad.
8. German Pz M15/42 (vehicle note 28)
The Germans get played so often in ASL that it’s hard to think of a counter that ASLers aren’t incredibly familiar with—and thus would have difficulty taking a step back and saying “that’s strange.” I’ve got to point out the confiscated Italian M15/42s, though. It’s one thing if you’re some Bulgarian or Romanian running around in a completely outclassed AFV against the Russians, or an Italian versus the Western Allies. You’re used to it, you’ve never seen better stuff in your unit. But who is the poor German soldier who comes out of armor training, or gets his tank destroyed and needs to get re-fitted, starts drooling about a Panther or Tiger, and the supply clerk shows him to his spanking new M15/42? “Uh, yeah, I hear those new JS-2s are a real bitch. But this little M15, she… uh…. Well, the 47mm gun will pick off those Russian light tanks real nice, assuming you can move around to their rear. And don’t mind the weird sights so much. You won’t be burdened with any odd smoke or APCR rounds, just good old AP and HE. Not so fast that you’ll miss the views of the countryside. Everything moves by nice and slow at 13MP.” Some were used by the SS in Hungary? You mean like the battles in Hungary with 122L and 88LL rounds going back and forth? And you’re sitting in 3/3 armor thinking “I thought I joined an elite unit”?
9. Japanese light mortar
Nothing to mock here. It’s got WP and Smoke from the start of the war, and it can fire at a one hex range. I know I said nice things about the American 60mm, but this one is quite special to. Take it lightly in your own OB or your opponent’s at your own peril.
10. American 203mm Howitzer
I’ve never played a scenario with this one, but I’d have to imagine that after you take your first shot and miss, whatever is in that hex…. leaves. I did have the fun of having a couple 140L Japanese naval guns in the BR:T campaign (uh, AP To Kill of 32), and I do believe there were about 428 smoke rounds lobbed their way.
The Newsletter of the Austin ASL Club August, 2002 Volume 7, Number 2
August, 2002 Page 13 of 18
SP73: Seregelyes Slug-Out Carl Kusch
Mike Seningen and I recently had the opportunity to play this scenario. Mike served as Commander German Forces, CB (Card Board) while I pushed Russian counters around some.
Russian Setup: I read Schwerepunkt’s analysis of the scenario and took most of their suggestions for my initial setup. Because of all the hills and buildings on boards 41 and 50, I was as careful about LOS issues as I could be. However, I didn’t catch the significance of the level 2 building at 41FF2 until I was setting things up for the game, and made a couple of last minute adjustments. Generally speaking, my initial deployment was as follows:
a. I set up most of my board 41 assets as far north and west (hexrow P and hexgrain 7) as possible. I had T-34s at each of 41P7 and 41O8 to defend against any German incursion down the road, as well as to be poised for future operations (either to take the bridge at 41U5 or to help reinforce the bridge at 50Q2). Those two T-34s were backed up by a MG stack (MMG, LMG plus 9-1 leader) at 41O8 and flanked by a couple of ATRs at 41N7. I left a T-34 and a couple MMCs (with 2 DCs) down by the bridge at 41I6. I had two 4-5-8s with DCs and a leader poised (41M7) to run over to board 50 hoping to get a chance to blow the bridge at 50Q2 if possible. My intent was to blow the bridge at 41I6, send one T-34 over to help the Stalins fight the German armor, send a couple of squads over to the tree line in the vicinity of 41O1 to help in the defense of the bridge at 50Q2 and wait to see what happened from there.
b. My tank defense of board 50 centered around blocking the road between the two hills. I figured that my Stalins were best used if massed as opposed to being spread out in an attempt to cover the entire length of board 50. To that end, I placed three Stalins on either hill flanking the stream and road that went between them. One Stalin was at 50W3 and another at 50T5 pulling double duty by lending fire support to the defense of the bridge at 50Q2. Finally, I placed one squad with each of the two Stalin groups in order to help shield them from German infantry.
c. The defense of the bridge at 50Q2 was a difficult matter for me. Since the Germans had OBA, I did not want to center my defense around the woods hexes. Also, because the eastern face of the hill mass and the woods line in the vicinity of 50U1 could be easily viewed, those positions were extremely vulnerable to German OBA and 10-2-led MG fire group attacks. Therefore, I decided to position my main fire group on the valley floor in the vicinity of 50O1 hoping to be able to dig them in before the German attacking forces arrived on the scene. The shift of my HMG fire group from the woods at 50U1 to the Open Ground hex behind the woods at 50O1 was one of two last-minute changes that I made on game day resulting from my taking a closer look at that level 2 building at 41FF2. (FYI, Mike did not use that building – there were other LOSs that I missed " ).
d. The other last-minute change I made was to move the Russian Forward Observer (FO) from the 50U1 woods hex to the building hex of 50X6 under the watchful eyes of two of my Stalins and a squad of Russian infantry. While I thought the Stalins might draw some unwanted enemy fire toward the FO, I could not see any better location for him – especially since he
could not set up HIP and was initially exposed until we started placing concealment counters on our unobserved units prior to the game commencing. Since I was trying to keep most of my guys low and unseen, I placed a 5-2-7 in hex 50M4 (level 4) in an attempt to prevent the Germans from growing too many concealment counters. I scattered three or four more 5-2-7s around the valley floor in front of the bridge at 50Q2 in order to give my HMG fire group some protection and to serve as “speed bumps” in the face of the ensuing German attack.
e. As stated before, my Russian FO was in a building location at 50X6. For obvious reasons, Mike placed his German Sniper in an adjacent hex. Mike’s German FO was at level 1 in the stone building at 41X2. And of course, my Russian sniper found a home right next door.
A critical point here: reading in the SSR that the stream was deep, my first impression was that it was not fordable – like a deep river. Fortunately, I took the time to read the rules and realized that the stream would not be a complete barrier to tactical operations. Colored by the comments of the Schwerepunkt article, what I did not consider was that the stream could still be used as a major avenue of approach like a gully or wadi. However, this oversight did not escape my opponent’s attention. I'll have more to say about this later.
German Attack: Starting the German PFPh, Mike had set up one of his PSW 234/4s on hill 513 (board 41) which took a smoke shot at my FO over in the building at 50X6. The shot was successful but since Mike rolled the depletion number, I wouldn’t have to worry about that vehicle throwing smoke my way again. Although my FO was now smoked-in, all that that really meant was that any mission he called for would automatically be inaccurate.
Mike was observant enough to place his German 10-2 MG kill stack in 41BB2 where he could get a shot at my Russian HMG fire group trying to hide behind the trees in 50O1. Mike found an angle. To make a short story short, the very first Prep Fire DR of the game ended up being a 3 KIA shot thus completely wiping out my 8-1 leader and two 5-2-7 squads. Not a very good way to start the game. But Lady Luck is fickle. Mike next tried a shot from a Panther in the vicinity of 18Z7 vs. one of my Stalins near 50W7 hoping to catch the turret with a side target facing. The first shot missed, but because of the opportunity, Mike decided to make an IF attempt. To my great fortune, the IF attempt ended up malfunctioning the MA of the Panther.
One of the last-minute decisions I made in adjusting my defense of the bridge at 50Q2 (because of the level 2 building at 41FF3) was to place a 5-2-7 in the stream at 50K1. What I had momentarily overlooked in the rush to adjust my defense was that the southern limit of the German setup area on board 41 came out to the W hex row – just opposite my squad in 50K1. You can imagine my surprise when I saw three stacks of German infantry sitting adjacent to my 5-2-7 when I returned to the room. Sure enough, Mike planned to use the river as his primary attack route. And after wiping out my HMG stack with his opening Prep Fire, there was not much more than this one 5-2-7 standing between him and the bridge at 50Q2. That 5-2-7 did manage to withstand an opening Prep Fire attack. That same intrepid 5-2-7 even repulsed an overrun attempt breaking the German leader, squad and inherent crew of the halftrack that was barreling down on him. But there were just too many Germans and they just kept coming. Our brave Russian 5-2-7 was not able to repulse a
The Newsletter of the Austin ASL Club August, 2002 Volume 7, Number 2
August, 2002 Page 14 of 18
second overrun attempt made on his position by yet another German halftrack. Now there was nothing standing between the Germans and the bridge at 50Q2.
The second phase of Mike’s attack was to prepare for the arrival of the King Tigers back on board 50. To that end, Mike sent a couple of halftracks and an armored car along the far north edge of board 50 and onto its paved road. None of these vehicles bogged in the mud. He also sent the remaining two Panthers around to link up with these vehicles in the vicinity of 50I9. And that would be the core of Mike’s strategy: defend the bridges at 41U5 and 50Q2 (which he secured by turn 2) and attempt to get the Tigers along with some infantry support through to 50Q2 via the road 50U9 – 50U5. The two Panthers were to take up overwatch positions on the level 4 hexes of the big hill on board 50. As it would turn out, Mike maneuvered one of the Panthers up onto the hilltop but did not see my Stalin over at 50W3. That Stalin was lucky enough to flame the Panther with one shot. But I am getting ahead of myself, this didn’t occur until about turn 3.
Combat Action: After gaining acquisitions during my turn 1 DFPh, I was able to knock out the German Panther with the malfunctioned MA at 18Z7. Next the Stalin at 50W3 was able to break every member of the German 10-2 MG fire group at 41BB2. Although that fire group had the TEM protection of a halftrack, a K/ result wreaked havoc: a half squad was eliminated by the K/ result, the 10-2 could not pass his MC, the other half-squads broke, the HMG that was removed from the German SPW 251/sMG was destroyed and the SPW was sent packing with a K/ result due to a General Collateral attack – which, although I couldn’t give you the details now, I think we played properly. As it would turn out, the 10-2 would take a couple of game turns before he could rally himself. He rolled badly enough not to rally — 11 — but never got the 12 that would have eliminated him. That was some small payback for the loss of my HMG fire group. The Germans may have been without the services of their 10-2 leader for a couple of turns, but Mike still had possession of the bridge at 50Q2 by turn 2 and that was the important factor.
Before I could make a move at trying to retake the bridge at 50Q2, I thought I would have to win the tank battle against the Tigers first. And that battle raged around 50U8. Because Mike had brought some German infantry to support his Tigers, I felt compelled to swing my OBA over to that sector of the battlefield to protect my Stalins from PF, PSK and CC attacks. As it would turn out, Mike was able to maneuver a half squad up for a PSK shot at one of my Stalins only to have the PSK malfunction. I was finally able to call in a fire mission of harassing fire and brought it down right on target – which happened to include hitting my own tanks. I didn’t think that would be much of an issue since it was only harassing fire and my vehicles were pretty tough. This harassing fire caused one of my tanks to become immobilized. I didn’t think that would be much of an issue either because with the Tigers at hand and not being able to get around this particular Stalin, I didn’t think it would need to move anywhere anytime in the near future. The only problem came when the crew failed its immobilization task check and had to bail out. It did however, survive its entry into the artillery barrage. That same artillery mission eliminated the German half squad that had tried the PSK attack.
It was about this time that Mike tried a couple more IF shots, but this time with his Tigers. The dice gods were not smiling on Mike that day as far as his IF shots were concerned. Both shots ended up malfunctioning the MAs of both Tigers. With the loss of those two Tigers, it was clear that I was winning the tank
battle. But would it be in enough time to make a difference in the outcome of the scenario – which Mike was winning at the time?
When my harassing fire mission was over, I was able to call in another fire mission that I brought down at full strength. It ended up immobilizing the remaining two Tigers but happened to knock out my unmanned Stalin – oh well, the Stalin wasn’t going anywhere without a crew anyway. By the way, that crew survived the scenario. One of the immobilized Tigers was adjacent — literally nose-to-nose, gun-barrel-to-gun-barrel — to one of my Stalins. We had been trading shots with no results for a couple of fire phases. The Tiger as it would turn out, got the first break and bagged the Stalin. Mike was then able to maneuver one of the PSW 234/4 75Ls into a firing position waaaaaaaay back on one of the hills on board 41. The PSW was able to kill one of my Stalins with a long shot.
As a side note: I had a 5-2-7 running amok behind this tank battle in the vicinity of 50P7. He was successful in eliminating the German SPW 251/10 and two vehicle crews that had abandoned their halftracks in an attempt to take out this Russian squad. The actions of this squad were inconsequential in terms of the scenario but fun for me.
Back on board 41, I kept two T-34s and the Russian 9-1-led MMG fire group in position to keep the German FO broken, suppressed and otherwise harried as much as possible. They were successful in doing so. The only effect the German OBA had on this game was to battle harden that Russian 9-1 to a 9-2 leader. However, one of the T-34s got whacked by a Panther that was finally able to take up a firing position on one of the level 4 hexes over on board 50. That same Panther scored snakes on a MG shot at my 9-2 MMG fire group. As it would turn out, the 9-2 leader again battle hardened to a 10-2. Tough Russian SOB he was! At any rate, there was a lot of cross-board shooting going on out there.
By this late stage of the game, the Germans only had one Panther that was still combat effective. The other Panthers were killed, as was one of the Tigers. Two of the Tigers had malfunctioned MAs and two of the Tigers were immobilized at the foot of the large hill on board 50. I had two Stalins left along with one functional T-34/85 and one T-34/85 that also had a malfunctioned MA. With these meager forces, I made a weak, last-turn, suicidal attempt to retake the bridge at 50Q2. But by that time, Mike had his German defenders too well organized and I had too few assets left to be able to effectively mount a major attack. The game ended as a German victory.
Flow of the Game: There were a few things that were, I think uncharacteristically, really not much of a factor in this game:
a. Snipers: Although there were many Sniper rolls, they were only activated a couple of times with no significant results that I can remember.
b. Mud: I can only think of two times that any vehicle was bogged because of the mud – one German and one Russian. On average, I don’t think that players can expect mud to be that inconsequential during the course of a game.
c. OBA:
(1) While I was able to keep the Russian OBA quite active, I think that Mike was only able to bring down the German OBA for one fire mission. While I drew one red card, Mike drew the second red card near the end of the game. I was also able to break his FO on a couple of occasions, which
The Newsletter of the Austin ASL Club August, 2002 Volume 7, Number 2
August, 2002 Page 15 of 18
obviously kept the OBA out of the picture for a while. And I think each of us lost battery access once.
(2) Neither Mike nor I went “FO hunting” with our OBA. But then again, I can’t really tell you if the FOs had LOS to each other. I never checked. “FO hunting” however, is certainly a tactic that could be employed in the scenario. However, as a word of caution to any prospective Russian player that might read this, based on first shot and better terrain to hide in (i.e., stone buildings), I would think that the German FO may have the advantage in any FO duel.
d. PFs: Mike could not buy a PF. As many rolls as he made, I think he only got two or three of them and I can only think of one Stalin that he was able to kill with a PF. Obviously, a German player should be able to expect to get PFs much more easily than this.
e. IF shots: I think the MAs of German tanks were malfunctioned on three of four IF shots that Mike attempted. While they are a risk, I would think that a player could expect not to malfunction an MA quite as often as was our experience in this game.
Final Thoughts: I think this is a great scenario: late-war heavy tanks, a varied mix of other AFVs (at least as far as the Germans are concerned), heavy OBA for both sides, challenging lines of sight, EC that throws an element of uncertainty into maneuver, forces arriving from different directions, widespread objective sites and room to roam. The size of the battlefield, especially, gives players many options in the manner in which they choose to accomplish their missions. For this reason, I think there is a lot of replay value to this scenario. That being said, however, I think Mike’s attack is as close to the “textbook solution” as you are going to get. Why would the German player want to attack over the 41S2 hill mass taking fire from who knows how many different directions when he could use a much more covered, high-speed avenue of approach? The only problem with the stream is that it is open ground as far as fire combat is concerned. But what difference is a little open ground going to make if your enemy does not have a line of sight to you? Players should also be cautioned that fire originating from a deep stream hex is resolved as Area Fire (B20.6). All I know is that if I ever play the Russians again in this scenario, I most definitely will defend the bridge at 50Q2 differently than I did this time!
Club Notes
Biweekly Lunch Gathering! Don’t forget to join us every other Friday at 1300 hours down at Pok-E-Jo's on Fifth Street. The club sends out e-mail reminders, or you can call Matt for information on the next get-together.
Game Days The Austin, Houston, and Dallas groups have remained active, hosting various gatherings for club members to get together and knock cardboard heads. If you missed any of these you missed a lot of fun. It’s like a tournament atmosphere for a day. The Austin group now meets on the first Saturday of every month. To stay informed of upcoming club events, join our e-mail group. The site and host has changed recently: you can post a message at [email protected] or you can point your favorite browser to http://groups.yahoo.com/group/central-texas-asl and take a look. For those still not connected, give Matt, Mike, or Sam a call for club information.
Tactical Tip Never give up. At a recent Austin ASL Game Day, JeffTaylor was feeling down when a streak of bad luck left himwith only 1 Puma against his adversary’s five T-70s in ThePuma Prowls. Matt was sitting next to Jeff at the time, andMatt simply turned to him and said that he shouldn’t worry,because it would just be all that much more glorious when hislone Puma went on a rampage to win the scenario. Guesswhat happened?
The Newsletter of the Austin ASL Club August, 2002 Volume 7, Number 2
August, 2002 Page 16 of 18
Club Ladder (Our humble Club Ladder through July 25)
(Inactive players not listed)
# Player Points Record 1. Matt Shostak 1852 150-32 2. Mike Seningen 1822 88-26 3. Jeff Toreki 1728 62-22 4. Chas Smith 1640 56-13 5. Jim Ferrell 1533 51-14 6. Jay Harms 1455 27-9 7. Sam Tyson 1420 32-29 8. Phil Swanson 1335 12-5 9. John Garlic 1313 10-7 10. David Hailey 1298 35-30 11. Eric Gerstenberg 1269 63-75 12. Randy Shurtz 1246 10-5 13. Doyle Motes 1219 39-21 14. Tom Gillis 1149 40-41 15. Andy Milder 1145 21-34 16. Bob Chandler 1139 5-2 17. Dana Sandarusi 1127 7-4 18. Tom Lavan 1125 6-4 19. Walter Eardley 1113 14-14 20. Glen Gray 1105 11-11 21. Chris Kolenda 1100 3-0 22. Steve Eckhart 1088 9-12 23. Scott McFarlane 1088 7-9
24. Rick Reinesch 1084 10-13 25. Zeb Doyle 1079 3-1 26. Jeff Toney 1072 3-2 27. Roy Casagranda 1067 19-19 28. Bob Purnell 1065 22-16 29. Steve Desrosiers 1059 5-4 30. Todd Hively 1058 12-25 31. Ken Havlinek 1055 1-032. Rob Burton 1046 4-7 33. Stephane Graciet 1037 1-034. Mike Denson 1036 2-2 35. Rupert Cullum 1035 5-6 36. Kevin Keneally 1032 1-037. Jack O'Quin 1018 15-25 38. Greg Swantek 1011 7-9 39. Mike Sosa 1005 2-4 40. Ray Woloszyn 1002 2-3 41. Edward Beekman 997 2-4 42. Ed Mott 994 1-5 43. Bret Smith 993 16-22 44. Allen King 986 1-1 45. Jess Popp 982 2-3 46. Paul Thompson 978 0-147. Jeff Taylor 973 11-32 48. Aaron Schwoebel 973 8-21 49. Neal Ague 971 1-2 50. Duane Blocker 967 0-151. Hector Garcia 966 0-152. Matt Scheffrahn 959 0-253. Carl Kusch 947 18-45
54. Ryan Nelson 946 4-8 55. Kirk Woller 938 45-70 56. Dan Preston 936 3-9 57. John Hyler 934 6-18 58. James Rex 928 0-259. Chuck Lemons 924 0-360. Joe Schlichting 921 0-461. Matt Schwoebel 917 6-12 62. Jerry Blakemore 912 0-363. Clint Robinstein 911 4-8 64. Glenn Schools 909 7-23 65. Russell Mueller 902 2-7 66. Jake Henry 900 0-3 67. Bryan Register 893 10-23 68. Scott Hopkins 891 2-7 69. Bill Thomson 882 0-470. Steven Long 868 3-13 71. RJ Mate 856 11-21 72. Brian Roundhill 849 8-26 73. Jim Knatcher 849 0-874. David Finan 838 1-9 75. Charles Stampley 830 0-776. Bill Jennings 823 0-877. Mike Austin 817 6-19 78. Bill Dorre 788 4-16 79. Dirk Renshaw 717 2-13
The Banzai!! Staff Editor in Chief Matt Shostak
(512) 280-8414 [email protected]
Managing Editor and Keeper of the Ladder
Sam Tyson (512) 656-7250 [email protected]
Copy Editor Mike Austin [email protected]
Contributing Authors Carl Kusch, Aaron Schwoebel, Mike Seningen, Jim Torkelson
Publishing Schedule Whenever we feel like it! Club Information Matt Shostak or
Mike Seningen (512) 288-3778 [email protected]
Club Web Site www.kdi.com/~samtyson
Copyright © 2002 by the Austin ASL Club All Rights Reserved. You may reproduce this newsletter (in entirety only) for free distribution. Permission to reproduce individual articles must be obtained from the authors. ASL and all of its components, including module names, are copyrighted and trademarked by Hasbro. Thanks to Rodney Kinney for VASL, Carl Fung for his VASL counter images, and the VASL Map Cabals for their VASL map images. We use a combination of VASL counter and map images for scenario layouts with permission of use for that purpose.
Next Issue • More articles about ASL • Player Profile • Favorite Scenarios • Club Meeting Recaps • Club Ladder And much more!
The Newsletter of the Austin ASL Club March, 1999 Volume 4, Number 1
August, 2002 Page 17 of 18
Ladder Results Since Last Issue Jay Harms (Amer) def Tom Gillis (Germ) in Bad Luck Jay Harms (Russ) def Tom Gillis (Germ) in Silesian Interlude Doyle Motes (Brit) def Dana Sandarusi (Germ) in Faugh A' Ballagh! Dana Sandarusi (Germ) def Walter Eardley (Brit) in 3rd RTR in the Rain Scott Hopkins (Amer) def Dirk Renshaw (Germ) in Lost Opportunities Sam Tyson (Amer) def Steven Long (German) in Han-Sur-Neid Bob Purnell (Amer) def Eric G. (Germ) in Niscemi-Biscari Highway Eric Gerstenberg (Germ) def Bob Purnell (Amer) in Devil's Hill Matt Shostak (Germ) def Kirk Woller (Russ) in Nimm Das Jetzt Mike Seningen (Russ) def Carl Kusch (Germ) in Silesian Interlude Mike Seningen (Russ) def Carl Kusch (Germ) in Silesian Interlude Jim Ferrell (Germ) def Eric Gerstenberg (Amer) in Lost Opportunities Rick Reinesch (Amer) def Bryan Register (Germ) in Confusion Reigns Matt Shostak (Germ) def Carl Kusch (Russ) in Showtime Eric G. (Fren) def Jim Ferrell (Germ) in Strangers in a Strange Land David H. (Amer) def Charles Stampley (Germ) in Bizory Loves Company Randy Shurtz (Germ) def David Hailey (Amer) in Bizory Loves Company Dana Sandarusi (Germ) def Bill Dorre (Amer) in Trial by Fire Dana Sandarusi (Brit) def Walter Eardley (IJA) in A Stiff Fight Phil Swanson (Fren) def Doyle Motes (Germ) in Counterstroke at Stonne Dana Sandarusi (Germ) def Tom Gillis (Dane) in Good Night, Sweet Prince Matt Shostak (Germ) def Steven Long (Amer) in Shoot-N-Scoot Doyle Motes (Germ) def Phil Swanson (Amer) in No Better Spot to Die Sam Tyson (Brit) def Jeff Taylor (Germ) in Cold Crocodiles Tom Gillis (Jap) def Dana Sandarusi (Fren) in Ultimate Treachery Phil Swanson (Brit) def Tom Gillis (Jap) in Sword Play Rupert Cullum (Russ) def Jerry Blakemore (Germ) in Friday the 13th Ryan Nelson (Russ) def Dana Sandarusi (Germ) in Cream of the Crop Eric Gerstenberg (Germ) def Jeff Taylor (Russ) in Bad Luck Eric G. (Amer) def Bryan Register (Germ) in No Better Spot to Die Eric Gerstenberg (Amer) def Brian Roundhill (Jap) in Battlin' Buckeyes Dan Preston (Russ) def Steven Long (Germ) in Commando Schenke Matt Sh. (Russ) def Bryan R. (Germ) in First Crisis at Army Group North Tom Gillis (Ital/Germ) def Bret Smith (Brit) in Upham's Bar Doyle Motes (Germ) def Ryan Nelson (Amer) in Inhumaine Doyle Motes (Russ) def Phil Swanson (Germ) in Tiger, Tiger Phil Swanson (Russ) def Doyle Motes (Germ) in Tiger, Tiger Jim Ferrell (Germ) def Edward Beekman (Russ) in Hill 253.5 Randy Shurtz (Germ) def John Hyler (Russ) in A Stroke of Luck Eric Gerstenberg (Finn/Germ) def Jeff Taylor (Russ) in Forests of the North Eric Gerstenberg (Germ) def Steven Long (Part) in The Old Town Bryan R. (Germ) def Rick Reinesch (Russ) in The Czerniakow Bridgehead Jeff Toreki (Amer) def Sam Tyson (Germ) in Ace in the Hole Bryan Register (Russ) def Steven Long (Finn) in Fighting Withdrawal Eric Gerstenberg (Jap) def Mike Austin (Ghur*) in A Stiff Fight Bryan Register (Russ) def Dan Preston (Germ) in The Commissar's House Jim Ferrell (Belg) def Scott McFarlane (Germ) in Art Nouveau Dana Sandarusi (Egyp) def Tom Gillis (Isra) in The Archers of Um Sheham Mike Seningen (Russ) def Brian Roundhill (Germ) in Friday the 13th Doyle Motes (AlMn) def Rupert Cullum (AxMn) in Blood Enemies Scott Hopkins (Germ) def Bill Dorre (Amer) in No Better Spot to Die Matt Shostak (Germ) def Steven Long (Amer) in The Road to Wiltz Jay Harms (Germ) def Phil Swanson (Amer) in St. Barthelemy Bash Walter Eardley (Germ) def Ryan Nelson (Amer) in Buchholz Station Dana Sandarusi (Germ) def Bill Dorre (Amer) in Riposte Tom Gillis (Russ) def Doyle Motes (Germ) in A Burnt Out Case Doyle Motes (Dutc) def RJ Mate (Jap) in Strongpoint 11 Jim Ferrell (Ital) def John Hyler (Brit) in Half a Chance Jeff Taylor (Germ) def Bryan Register (Russ) in In Sight of the Volga Matt Shostak (Brit) def Roy Casagranda (Ital) in A High Price to Pay Jess Popp (Germ) def Dan Preston (Amer) in Silence that Gun Todd Hively (Jap) def Charles S. (Amer) in Last Stop Before Victory Mike Austin (Germ) def Brian Roundhill (Russ) in Urban Guerillas Eric Gerstenberg (Amer/Chin) def Sam Tyson (Jap) in Men From Mars Sam Tyson (Germ) def Bryan Register (Russ) in To the Square Rick Reinesch (Germ) def Mike Seningen (Amer) in The Mad Minute Doyle Motes (Amer) def RJ Mate (Germ) in Kurhaus Clash Doyle Motes (Russ) def Ryan Nelson (Germ) in The Guards Counterattack Tom Gillis (Russ) def RJ Mate (Germ) in Pomeranian Tigers Doyle Motes (Brit) def Roy Casagranda (Ital) in A High Price to Pay Matt Shostak (Germ) def Dan Preston (Brit) in Dorset Wood in the Rain
Aaron Schwoebel (Russ) def Matt Schwoebel (Germ) in Silesian Interlude Roy Casagranda (Germ) def Tom Gillis (Brit) in Taurus Pursuant Matt Shostak (Germ) def Dan Preston (Amer) in Under the Noel Trees Mike Seningen (Amer) def Rick Reinesch (Germ) in Under the Noel Trees Bryan Register (Germ) def Mike Austin (Russ) in Dash for the Bridge Sam Tyson (Germ) def Jeff Taylor (Amer) in Scouts Out Eric Gerstenberg (Amer) def Charles Stampley (Jap) in Munda Mash Jim Ferrell (Germ) def Edward Beekman (Russian) in A Burnt Out Case Jim Ferrell (Russ) def Glenn Schools (German) in Guryev's Headquarters John Hyler (Germ) def Edward Beekman (Russ) in Under Siege Matt Shostak (Jap) def Jeff Taylor (Amer) in The Jungleers Matt Shostak (Germ) def Bryan Register (Russ) in The Citadel Mike Seningen (Brit) def Bryan Register (Germ) in Point 270 Phil Swanson (Amer) def Doyle Motes (Germ) in Under the Noel Trees Tom Gillis (Amer) def Jerry Blakemore (NKor) in Seoul Brothers Roy Casagranda (Germ) def Tom Gillis (Russ) in The Last Tiger Tom Gillis (AlMn) def Rupert Cullum (Jap*) in Airborne Samurai Tom Gillis (Germ) def Bret Smith (Norw) in By Ourselves Doyle Motes (Germ) def Rupert Cullum (AlMn) in Grebbe End Ryan Nelson (Germ) def Jerry Blakemore (Russ) in Silesian Interlude Walter Eardley (Finn) def Bret Smith (Russ) in Surprise Encounter Jay Harms (Germ) def Scott Hopkins (Amer) in Kurhaus Clash Eric Gerstenberg (Germ) def Greg Swantek (Amer) in Kurhaus Clash Sam Tyson (Jap) def Eric Gerstenberg (Amer) in Bailey's Demise Jeff Taylor (Brit) def Mike Austin (Germ) in Panzer Graveyard Rick Reinesch (AxMn) def Bryan Register (Part) in Ambush! Bryan Register (Germ) def Rick Reinesch (Amer) in Strayer's Strays Matt Sh. (Germ) def Roy Casagranda (Norw) in The Bridge of Verdalsora Matt Shostak (Russ) def Roy Casagranda (Germ) in Silesian Interlude Tom Gillis (Germ) def Roy Casagranda (Amer) in The Hornet of Cloville Mike Seningen (Germ) def Jeff Taylor (Russ*) in Oh Joy! Mike Seningen (Germ) def Jeff Taylor (Russ) in The Golovchino Breakout Jim Ferrell (Russ) def Russell Mueller (Germ) in To the Rescue Bryan Register (Russ) def Eric Gerstenberg (Germ) in The Fugitives Matt Shostak (Fren) def Jeff Taylor (Germ*) in Chateau de Quesnoy Tom Gillis (Germ) def Scott Hopkins (Russ) in The Guards Counterattack Sam Tyson (Germ*) def Matt Sh. (Russ) in Crossing the Gniloi Tikitsch Scott McFarlane (Germ) def John Hyler (Russ) in With Flame and Shell Jim Ferrell (Germ) def John Hyler (Russ) in Fire on the Volga Steven Long (Russ) def Mike Austin (Germ) in Acts of Defiance Dan Preston (Part) def Hector Garcia (Germ) in Sylvan Death Sam Tyson (Amer) def Charles Stampley (Germ) in Bad Luck Matt Shostak (Germ) def Bryan Register (Pol) in The Weigh In Eric G. (Germ) def Brian Roundhill (Amer) in Lezongar Stronghold Rick Reinesch (Germ) def Jeff Taylor (Russ) in Kampfgruppe at Karachev Mike Seningen (Germ) def Carl Kusch (Russ) in Seregelyes Slug-out Jim Ferrell (Russ) def John Hyler (Germ) in Fire on the Volga Bret Smith (Germ) def Ryan Nelson (Amer) in Defiance on Hill 30 Rupert Cullum (Germ) def Phil Swanson (Amer) in Canicatti Tom Gillis (Russ) def Walter Eardley (Germ) in The Mius Trap Walter Eardley (Russ) def Bill Dorre (Germ) in First to Strike Jay Harms (Germ) def Doyle Motes (Fren) in Strangers in a Strange Land Doyle Motes (Germ) def Ryan Nelson (Amer) in Lost Opportunities Doyle Motes (Germ) def Bill Dorre (Amer) in Not Out of the Woods Yet Roy Casagranda (Brit) def Tom Gillis (Fren) in Lebanese Drama Matt Shostak (Russ) def Jeff Taylor (Germ) in The Agony of Doom Sam Tyson (Dutc) def Bryan Register (Germ) in Grebbe End Mike Seningen (Germ) def Dan Preston (Russ) in Big Cats at Bay Steven Long (Germ) def Bryan Register (Amer) in Gavin Take Bryan Register (Pol ) def Steven Long (Germ*) in A Bloody Harvest Eric Gerstenberg (Germ) def Rick Reinesch (Amer) in Canicatti Jeff Toreki (Germ) def David Hailey (Russ) in The Final Battle Jim Ferrell (Germ) def Randy Shurtz (Russ) in Seregelyes Slug-out Jim Ferrell (Russ) def Randy Shurtz (Germ) in Forest Fighting in Latvia Matt Shostak (Russ) def Steven Long (Germ*) in The Slaughterhouse Eric Gerstenberg (Germ*) def Dan Preston (Amer) in A Breezeless Day Tom Gillis (Germ) def Roy Casagranda (Russ) in The Corridor Scott McFarlane (Germ) def John Hyler (Amer) in Under the Noel Trees Roy Casagranda (Germ) def Rob Burton (Russ) in The Citadel Jess Popp (Germ) def Rob Burton (Russ) in To the Square Tom Gillis (Russ) def Doyle Motes (Germ) in The Golovchino Breakout Jay Harms (Russ) def Walter Eardley (Germ) in With Flame and Shell Jeff Taylor (Brit) def Steven Long (Germ) in Flaming of the Guard Zeb Doyle (Russ) def Carl Kusch (Germ) in Showtime
The Newsletter of the Austin ASL Club March, 1999 Volume 4, Number 1
August, 2002 Page 18 of 18
Sam Tyson (Germ) def Rick R. (Brit) in Assault on the Hotel Continental Brian Roundhill (Part) def Bryan R. (Germ*) in The Liberation of Tulle Mike Seningen (Germ) def Dan Preston (Russ*) in Panzers Marsche! Roy Casagranda (Germ) def Rob Burton (Russ*) in Panzers Marsche! Sam Tyson (Amer) def Jeff Taylor (Germ) in King of the Hill Sam Tyson (Russ) def Steven Long (Germ) in Surprise, Surprise!! Sam Tyson (Russ) def Roy Casagranda (Germ) in Silesian Interlude Randy Shurtz (Amer) def Jim Ferrell (Germ) in 88 Alley Matt Shostak (Germ) def Brian Roundhill (Russ) in Hill 621 Mike Seningen (Germ) def Bob Chandler (Amer) in The Roadblock Jeff Taylor (Brit) def Steven Long (Germ) in 3rd RTR in the Rain Roy Casagranda (Germ) def Rob Burton (US) in A War of Corporals Eric Gerstenberg (Germ) def Greg Swantek (Fren) in Last Defense Line Kirk Woller (Russ) def Carl Kusch (Germ) in Guryev's Headquarters Matt Shostak (Amer) def Bryan Register (Germ*) in Merzenhausen Zoo Phil Swanson (Russ) def Doyle Motes (Germ) in RB CGIII Chris Kolenda (Russ) def Rob Burton (Germany) in Berserk! Roy Casagranda (Germ) def Tom Gillis (Russ) in Urban Guerillas Jay Harms (Russ) def Roy Casagranda (Germ) in Hill 621 Rob Burton (Amer) def Jess Popp (Germ) in A Train for Arnhem Doyle M. (Russ) def Scott Hopkins (Germ) in The Czerniakow Bridgehead Chris Kolenda (Amer) def Bret Smith (Germ) in The Roadblock Roy Casagranda (Germ) def Jess Popp (Russ) in Wintergewitter Phil Swanson (Germ) def Tom Gillis (Russ) in Cream of the Crop Chris Kolenda (Amer) def Joe Schlichting (Germ) in Le Manoir Jeff Taylor (Germ) def Bryan Register (Nor) in Might Makes Right Jeff Taylor (Germ) def Bryan Register (Russ) in The Puma Prowls Jeff Taylor (Russ) def Bryan Register (Germ) in The Puma Prowls Rick Reinesch (Amer) def Steven Long (Germ) in Lost Opportunities Sam Tyson (Germ) def Mike Austin (Russ) in The Bitter End Eric Gerstenberg (Ind) def Brian Roundhill (Kash) in Hot in Kot Roy Casagranda (Germ) def Bill Dorre (Amer) in Last Act in Lorraine Roy Casagranda (Germ) def Rob Burton (French) in Balade a Champfleur Roy Casagranda (Amer) def Joe Schlichting (Germ) in Le Manoir Roy Casagranda (Germ) def Jess Popp (Russ) in Wintergewitter Carl K. (Amer) def Kirk Woller (Germ) in The Attempt to Relieve Peiper Matt Shostak (Jap) def Eric Gerstenberg (Amer) in Orange Ë Walawbum Roy Casagranda (Germ) def Joe Schlichting (Brit) in Bofors Bashing Roy Casagranda (Germ) def Joe Schlichting (Poles) in Round Two Tom Gillis (Russ) def Rupert Cullum (Germ) in The Slaughterhouse Bob Chandler (Germ) def Bill Dorre (Amer) in Silence that Gun Jeff Toreki (Germ) def Bryan Register (Russ) in The Citadel Carl Kusch (Germ) def Dan Preston (Russ) in Wintergewitter Dan Preston (Russ) def Bob Purnell (Germ) in The Dead of Winter Carl Kusch (Germ) def Kirk Woller (Amer) in Panthers in the Mist Matt Shostak (Germ) def Brian Roundhill (Brit) in Backs to the Orne Eric Gerstenberg (Germ) def Jeff Taylor (Russ) in The Capture of Balta Jeff Toreki (Germ) def Jeff Taylor (Russ) in The Liberators Matt Shostak (Germ) def Rick Reinesch (Russ) in The Predators Sam Tyson (Nat) def Eric Gerstenberg (Rep) in Mussolini's Soldiers Roy Casagranda (Jap ) def Tom Gillis (Amer) in Battlin' Buckeyes Bryan Register (Germ) def Eric Gerstenberg (Nor*) in By Ourselves Glen Gray (Russ) def Jim Ferrell (Germ) in The Last Tiger Carl K. (Germ) def Dan Preston (Amer) in The Attempt to Relieve Peiper Doyle Motes (Amer) def Scott Hopkins (Germ) in Riposte Doyle Motes (Germ) def Bret Smith (Russ) in The Roadblock Roy Casagranda (Germ) def Walter Eardley (Russ) in Smashing the 3rd Matt Shostak (Germ) def Rick Reinesch (Russ) in The Predators Jim Ferrell (Russ) def John Hyler (Germ) in One Down, Two to Go Roy Casagranda (Germ) def Rob Burton (Russ) in Silesian Interlude Rick Reinesch (Russ) def Bryan Register (Germ) in Shklov's Labors Lost Tom Gillis (Israel) def Roy Casagranda (Egypt) in Locust Swarm Doyle Motes (Germ) def Bill Jennings (Amer) in The Roadblock Jay Harms (Germ) def Glen Gray (Amer) in Wollerscheim! Tom Gillis (Germ) def Steven Long (Brit) in Green Jackets' Bridge Matt Shostak (Germ) def John Hyler (Russ) in Seregelyes Slug-Out Jack O'Quin (Amer) def Bryan Register (Germ) in Under The Noel Trees Zeb Doyle (Russ) def Glen Gray (Germ) in Wintergewitter John Garlic (Amer) def Rick Reinesch (Germ) in Directive Number Three Randy Shurtz (Germ) def Brian Roundhill (Russ) in Swamp Cats Walter Eardley (Jap) def Glenn Schools (Brit) in A Stiff Fight Walter Eardley (Jap) def Bill Jennings (Brit) in Jungle Fighters Roy Casagranda (Russ) def Eric G. (Germ) in A Bird In The Hand... Jim Ferrell (Germ) def Bob Chandler (Brit) in 3rd RTR in the Rain
Glenn Schools (Allied) def Robert Esparza (Germ) in Might Makes Right Scott Mcfarlane (Russ) def Bryan R. (Germ) in Guryev's Headquarters John Hyler (Germ) def Tom Gillis (Brit) in Cold Crocodiles Randy Shurtz (Axis) def Zeb Doyle (Allied) in Blood Enemies John Garlic (Russ) def Jack O'Quin (Germ) in Wintergewitter Roy Casagranda (Allied) def Bill J. (Germ) in Strength Through Unity Jeff Toreki (Russ) def Mike Denson (Germ) in The Last Tiger Phil Swanson (Germ) def David Hailey (Amer) in Riding Shotgun Jeff Taylor (Amer) def Carl Kusch (Germ) in Trial By Combat Rick Reinesch (Brit) def Doyle Motes (Germ) in Panzer Graveyard Bob Chandler (Allied) def Jeff Taylor (Germ) in A Bloody Harvest Glen Gray (Germ) def Brian Roundhill (Russ) in High Tide At Heiligenbeil Matt Shostak (Germ) def Jay Harms (Russ) in Urban Guerillas John Garlic (Germ) def Randy Shurtz (Russ) in Siberian Woods John Hyler (Russ) def Mike Denson (Germ) in Commando Schenke Bryan Register (Russ) def Scott Hopkins (Germ) in To The Rescue Kevin Keneally (Russ) def Glenn Schools (Germ) in To The Rescue Scott Mcfarlane (Germ) def Sam Tyson (Russ) in To The Rescue Mike Seningen (Germ) def Doyle Motes (Brit) in Among The Bravest Walter Eardley (Germ) def Jeff Taylor (Amer) in Bad Luck Jim Ferrell (Germ) def Roy Casagranda (Russ) in The Mius Trap Bret Smith (Axis) def Eric Gerstenberg (Allied) in Italian Brothers Phil Swanson (Germ) def Robert Esparza (Russ) in Bread Factory #2 Mike Denson (Russ) def Glen Gray (Germ) in Von Bodenhausen's Ride David Hailey (Germ) def Bret Smith (Amer) in The Pouppeville Exit Jay Harms (Russ) def John Hyler (Germ) in Sowchos 79 Jim Ferrell (Brit) def Walter Eardley (Germ) in High Danger David Hailey (Amer) def Matt Schwoebel (Jap) in Restoration Rick Reinesch (Germ) def Bill Jennings (Russ) in Smashing The 3rd Scott Mcfarlane (Germ) def Bill Thomson (Brit) in Among The Bravest John Garlic (Russ) def Matt Shostak (Germ) in The Liberators Jack O'Quin (Germ) def Brian Roundhill (Amer) in Patton's Prayers Randy Shurtz (Amer) def Doyle Motes (Germ) in Operation Nordwind Mike S. (Russ) def Roy Casagranda (Germ) in Send In The Sand Rabbits Russell Mueller (Germ) def Bryan Register (Brit) in Among The Bravest Jeff Toreki (Brit) def Carl Kusch (Germ) in Taurus Pursuant Sam Tyson (Brit) def Scott Hopkins (Germ) in Among The Bravest John Garlic (Amer) def Jeff Toreki (Germ) in Deadeye Smoyer Jim Ferrell (Germ) def Scott Mcfarlane (Russ) in Under Siege Bryan Register (Russ) def Roy Casagranda (Germ) in Friday The 13Th Mike Denson (Russ) def Carl Kusch (Germ) in The Mius Trap Mike Seningen (Brit) def David Hailey (Germ) in A Day By The Shore Matt Shostak (Germ) def Rick Reinesch (Russ) in Eye Of The Tiger Sam Tyson (Amer) def Roy Casagranda (Germ) in Deadeye Smoyer Robert Esparza (Russ) def Bill Jennings (Germ) in Commando Schenke Bob Chandler (Russ) def Brian Roundhill (Germ) in The Red Wave John Garlic (Allied) def Jim Ferrell (Germ) in By Ourselves Rob Burton (Germ) def Tom Gillis (Brit) in I remember Tom Gillis (Germ) def Roy Casagranda (Russ) in Big Cats at Bay Bob Chandler (Germ) def Scott Hopkins (Amer) in Among the Ruins Doyle Motes (Amer) def Roy Casagranda (Germ) in Deadeye Smoyer RJ Mate (Germ) def Bill Dorre (Amer) in First Action Matt Shostak (Russ) def Rick Reinesch (Germ) in Schwerepunkt Carl Kusch (Germ) def Matt Shostak (Russ) in The Last Tiger Matt Shostak (Germ) def Carl Kusch (Russ) in The Mius Trap Allen King (Russ*) def Bryan Register (Germ) in Shlkov's Labors Lost Ken Havlinek (Germ) def Doyle Motes (Amer) in Broich Bash Doyle Motes (Amer) def Bill Dorre (Germ) in Morgan's Stand Phil Swanson (Brit) def Roy Casagranda (Germ) in Lion's Share Bob Chandler (FrFr) def Tom Gillis (Germ) in Block at Ville-sur-Illon Jim Ferrell (Brit) def Glenn Schools (Germ) in A Bridge Too Far Matt Shostak (Amer*) def Jack O'Quin (Jap) in Matsumoto's Charge Eric Gerstenberg (Aust) def Sam Tyson (Jap) in Tough Nut to Crack Rob Burton (Germ) def Roy Casagranda (Russ) in Valhalla Bound Rob Burton (Russ) def Roy Casagranda (Germ) in Setting the Stage Glenn Schools (Russ) def Russell Mueller (Germ) in Tactical Doctrine Mike Seningen (Amer) def Roy Casagranda (Jap) in The Bushmasters Zeb Doyle (Germ) def Bryan Register (Russ) in The Citadel Kirk Woller (Germ) def Bob Purnell (Russ) in One Down, Two to Go Jack O'Quin (Amer) def Rick Reinesch (Jap) in Matsumoto's Charge Jim Ferrell (Germ) def Glenn Schools (Brit) in Tretten in Flames Steven Long (Germ) def Allen King (Russ) in The Hills of Lagonovo Matt Shostak (Amer) def Jeff Taylor (Jap) in Tangled Up in Blue Jim Ferrell (Russ) def Glenn Schools (Germ) in Run For Your Lives


![BANZAI!! - Texas ASLtexas-asl.com/banzai/banzai24_2.pdf · The Newsletter of Texas ASL March 2019 Volume 24, Number 2 Editor’s Foxhole 2 Scenario Analysis: Preliminary Move [BFP73]](https://img.pdfslide.us/doc/110x75/5f4aacde13a2547c746bff4a/banzai-texas-asltexas-aslcombanzaibanzai242pdf-the-newsletter-of-texas.jpg)