Embed Size (px)
Citation preview

Anolis Colony Care A manual developed for the Brodie laboratory at
University of Virginia
Updated May 2011
Michelle Formica [email protected]
Department of Biology University of Virginia
Charlottesville, VA 22904
with protocol contributions from Simon Pearish
Edmund D. Brodie III
1
Preface This manual was developed over several years as a mechanism to establish consistent and quality care for a large breeding colony of Anolis lizards. The manual was originally intended as a training guide for undergraduate students who worked as animal caregivers in the colony, and so contains some elaborate detail. The details of husbandry, including cage set ups, materials and procedures are particular to our specific lab and project goals. Nonetheless, we are making the manual public in hopes that some of the information may be of use to other reptile researchers. Butch Brodie May 2011

2
Table of Contents (in alphabetical order)
Cages, Adults ........................................................ 2 Cages, Juveniles ............................................................... 3 Cage Bleaching ..................................................... 4 Cage Exchange ..................................................... 5 Cage Washing ....................................................... 6 Carpet/Hammock Bleaching ................................. 6 Crickets ................................................................. 6 Cricket Bin Cleaning ............................................ 7 Cricket Bin Setup for Smaller Crickets ................ 7 Cricket Bin Setup for Large/Adult Crickets ......... 8 Cricket Calcium (see Feeding) ............................. 8 Cricket Cardboard................................................. 8 Cricket Feeding .................................................... 9 Cricket Growing Stages ........................................ 9 Cricket Hatching Tray .......................................... 9 Cricket Incubator .................................................. 10 Cricket Shelf Setup ............................................... 11 Cricket, Transferring ............................................ 11 Cricket, unpacking the shipment .......................... 12 Cricket Water Tubes ............................................. 12 Daily Check Lists ................................................. 12 Dates ..................................................................... 13 Dead Lizard .......................................................... 13 De-Ionized (DI Water) .......................................... 14 Dirt Containers ..................................................... 14 Dividers ................................................................ 14 Egg Check ............................................................ 15 Eggs, Dead ............................................................ 16 Eggs, Hatched (see Hatchling) ............................. 16 Egg Incubator ....................................................... 17 Egg Log ................................................................ 18 Egg, New .............................................................. 18
Evening Routine ................................................... 19 Feeding, All Anoles .............................................. 19 Feeding, Adults ..................................................... 20 Feeding, Juveniles ................................................ 20 Found Lizards ....................................................... 20 Hammock Bleaching: (See Carpet/ Hammock Bleaching) ................................ 21 Hatchling .............................................................. 21 Hatch Log ............................................................. 21 Health Check ........................................................ 22 Health Log ............................................................ 22 Herptivite: (See Feeding) ...................................... 22 ID Numbers .......................................................... 22 Lid Bleaching ....................................................... 23 Missing Lizards .................................................... 24 Morning Routine................................................... 24 Mopping ............................................................... 24 Newts, Feeding ..................................................... 24 Newts, Incubator ................................................... 25 Newts, Water Change ........................................... 25 Orange Tape ......................................................... 25 Perch Bleaching .................................................... 25 Plants, Growing .................................................... 25 Plants, Watering ................................................... 28 SaniPlex 128 ......................................................... 28 Shelf Labels .......................................................... 29 Species Abbreviations .......................................... 29 Sprayers ................................................................ 29 Stacking Cages ..................................................... 29 Tape Colors .......................................................... 29 Trash ..................................................................... 30 Vermiculite ........................................................... 30 Watering ............................................................... 30
2
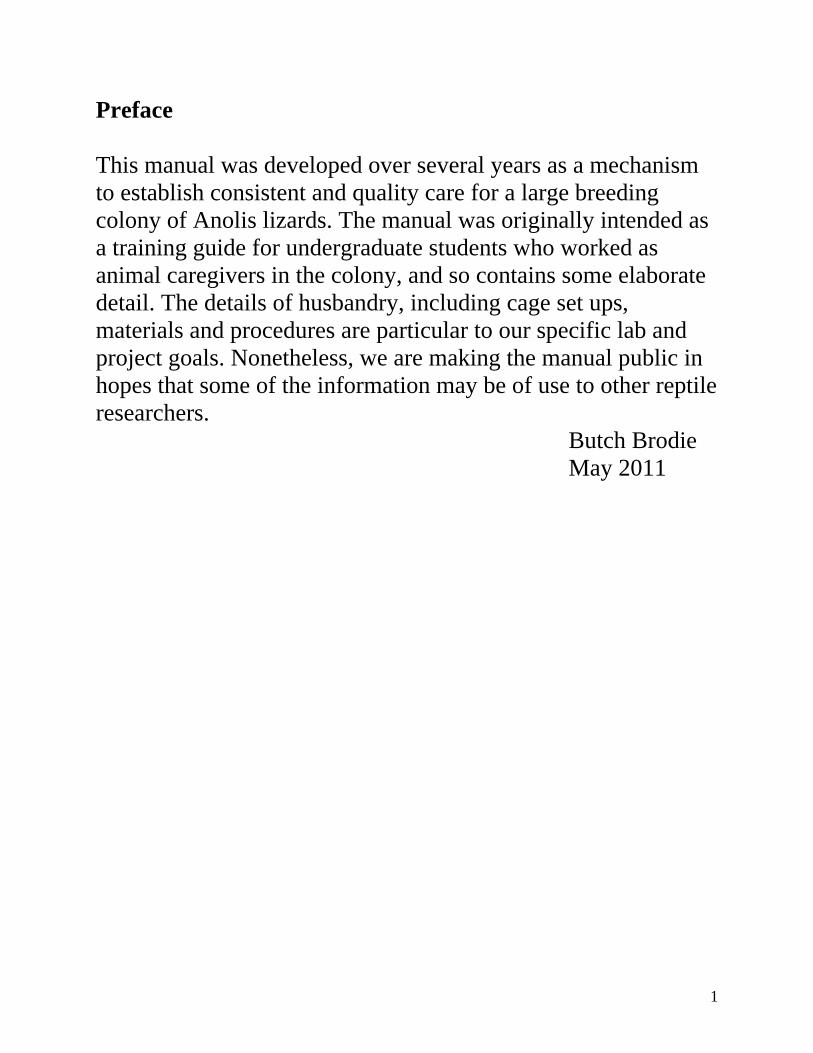
Cages, Adults: When constructing a cage for an Annolis there are several rules that need to be followed. There are two different sized cages. Smaller cages are for females, juveniles, and small males. Larger cages are usually for larger species, males, and paired lizards. The parts of a cage are as follows, see the photo below for the proper placement:
1. Cage 2. Lid 3. Carpet 4. Hammock 5. Perch 6. Plant
*** Very Important things to keep in mind***
1. Put the lid on so the opening is in the front of the cage (for small cages) 2. The plant goes in the front left corner (for small cages) of the cage because
you can’t water it if it is directly under the lid 3. Perches should have the highest point at the back of the cage 4. Hammocks go across the back of the cage (in the small cages)
Large Cage Set-up for Large Cages
Perches angle up with the highest point in the back under the light
The plant goes between the perches
but pushed against the back wall so it
can be watered
Hammocks can go across either side
Perches angle up with the highest point in the back. The front goes in the right corner)
The plant goes in the front left corner
under the circular indentation in the lid
Adult Cage Set-up for Small Cages Front View
3
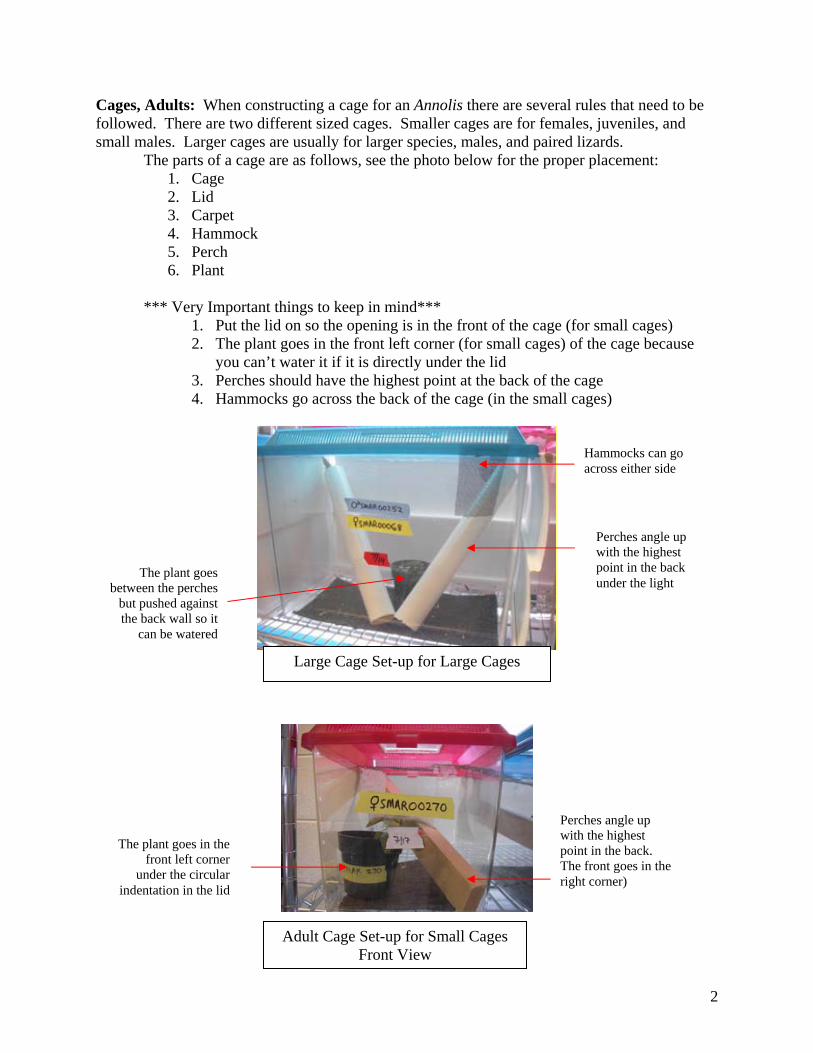
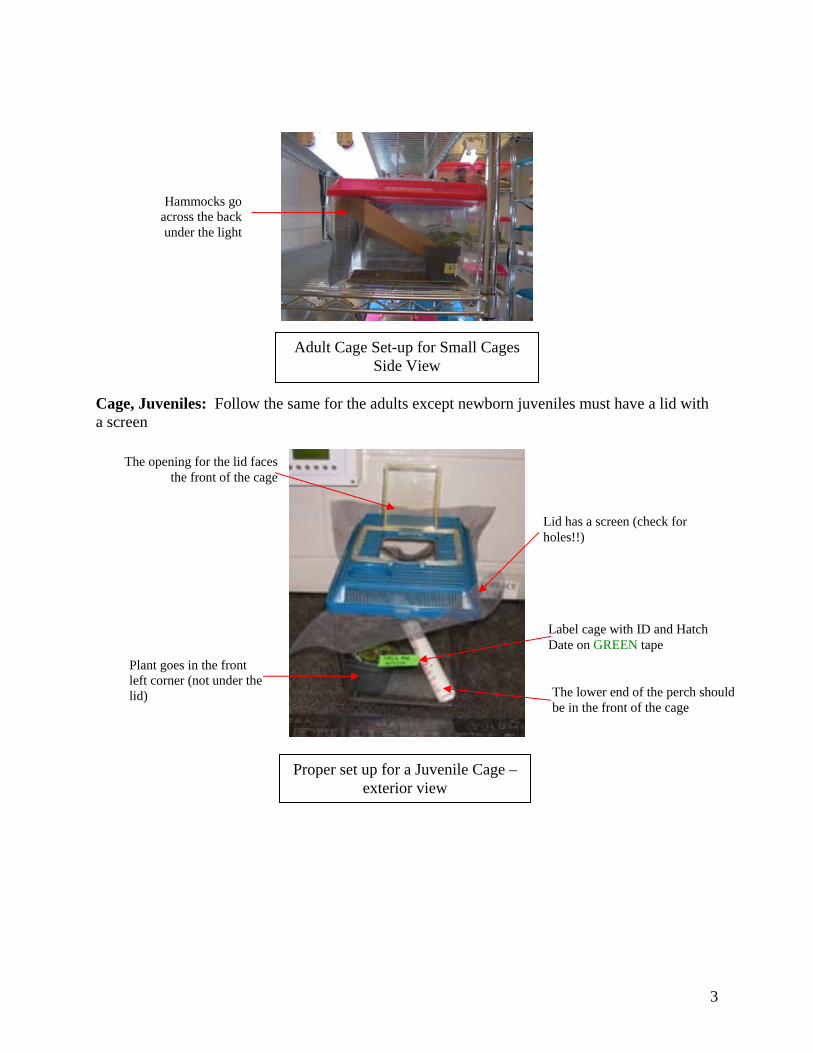
Cage, Juveniles: Follow the same for the adults except newborn juveniles must have a lid with a screen
The lower end of the perch should be in the front of the cage
Plant goes in the front left corner (not under the lid)
Lid has a screen (check for holes!!)
Label cage with ID and Hatch Date on GREEN tape
The opening for the lid faces the front of the cage
Proper set up for a Juvenile Cage – exterior view
Adult Cage Set-up for Small Cages Side View
Hammocks go across the back under the light
4
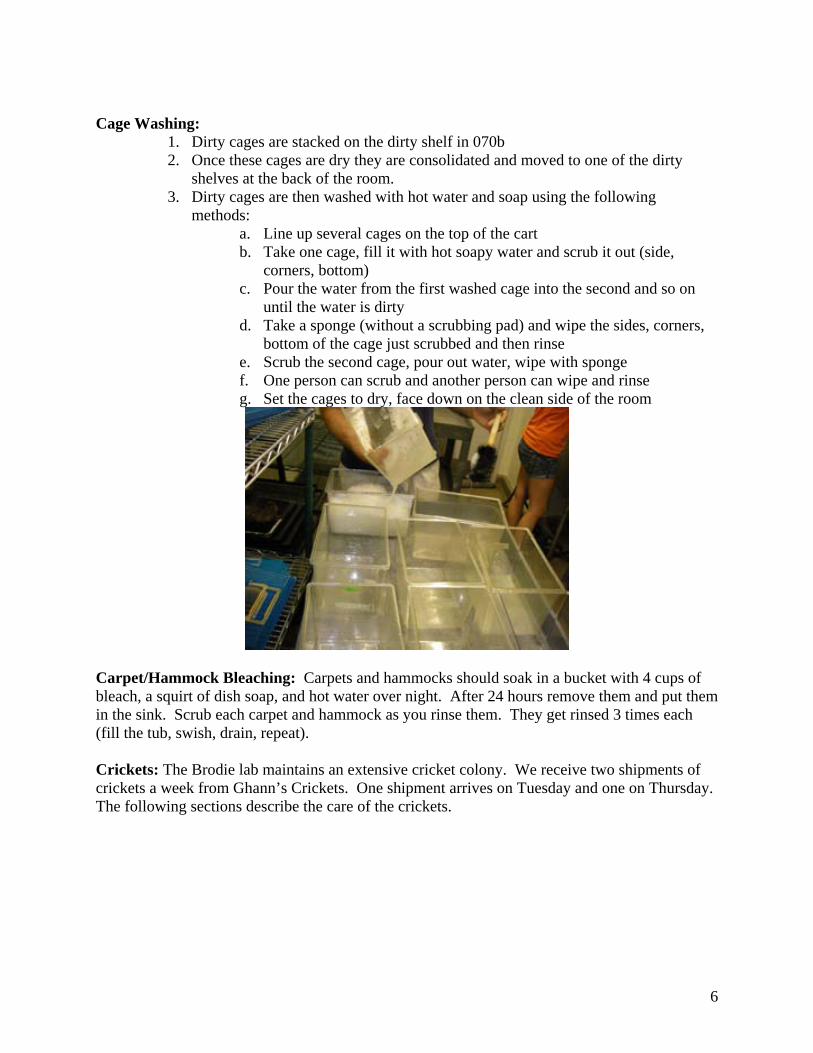
Cage Bleaching: Cages are bleached after they are washed with soap and water 1. Put on protective gear: gloves, apron, shoe covers, and goggles!! This is absolutely
necessary.
2. Take washed cages down to the bleaching room (make sure the cart is clean!) 3. Fill the cooler with water and one whole container of bleach 4. Bleach the sink and counters to sanitize
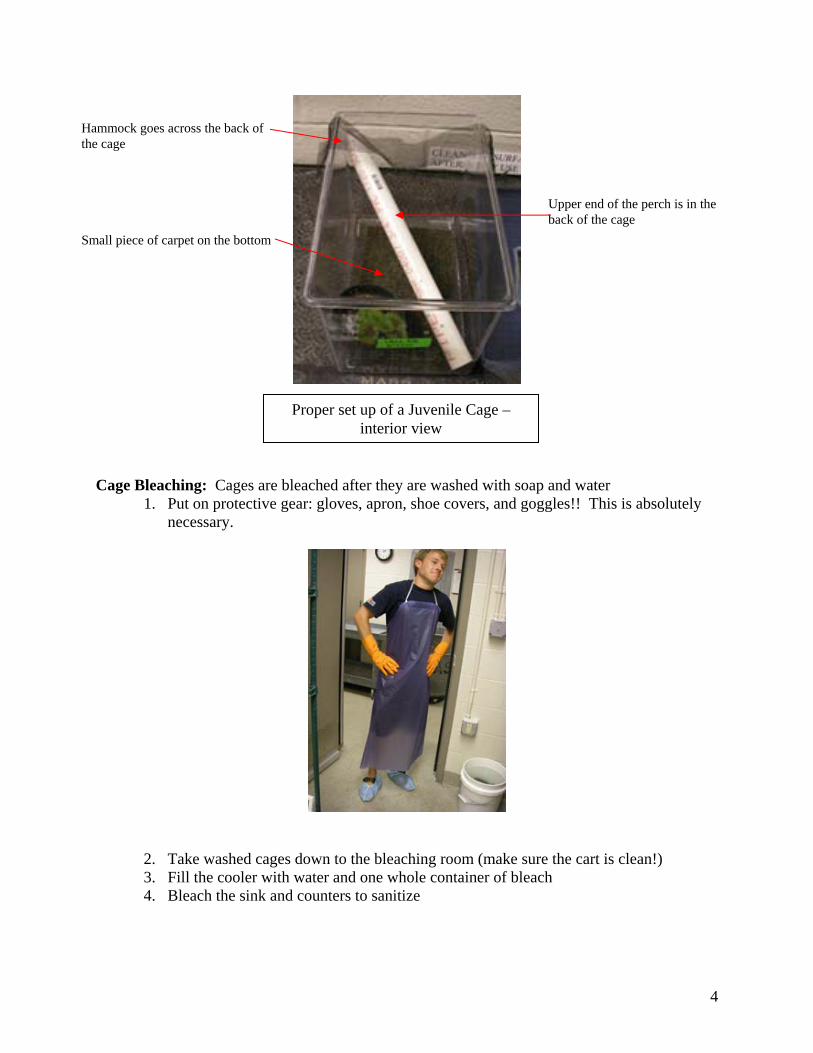
Proper set up of a Juvenile Cage – interior view
Upper end of the perch is in the back of the cage
Hammock goes across the back of the cage
Small piece of carpet on the bottom

5
5. Set cages in the bleach and let soak for several minutes
6. Remove the cages and rinse them thoroughly 7. Set cages face down on the drying rack for bleached items
Cage Exchange: Once a month each animal should be moved to a clean cage. To do this set up as many cages as you will need. Write out all the new labels for the shelf and temporarily stick them to the old cage. One at a time, transfer each anole to the new cage, take the new label and place it on the new cage. Break down the dirty cages and put in the appropriate areas to be washed. Fill out the cage exchange card that is hanging from each shelf in a zip lock. It should contain the shelf letter, the side of the shelf exchanged, the date of the exchange, your initials, and any notes you may need to make (ie only the top shelf, one cage didn’t need to be exchanged….)
Side – what side did you exchange? Left, right or both.
If you arrange the cages exactly like the above picture, you can fit 8 cages in the cooler at once.
6
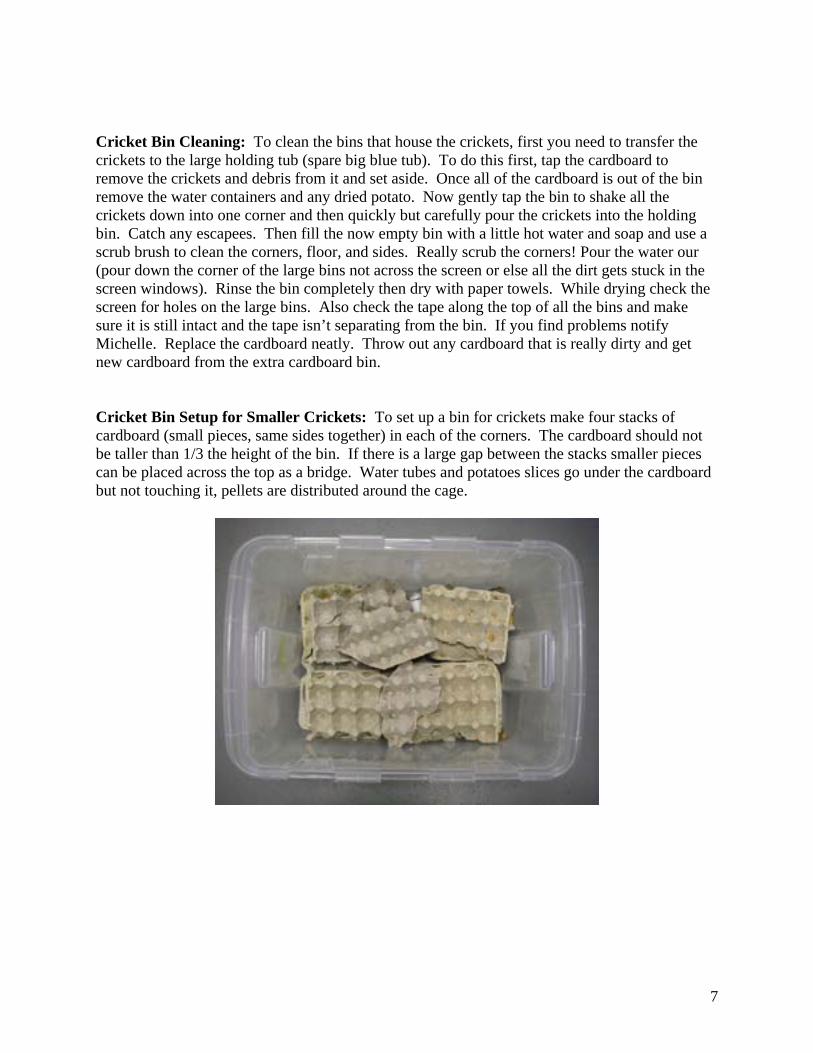
Cage Washing:
1. Dirty cages are stacked on the dirty shelf in 070b 2. Once these cages are dry they are consolidated and moved to one of the dirty
shelves at the back of the room. 3. Dirty cages are then washed with hot water and soap using the following
methods: a. Line up several cages on the top of the cart b. Take one cage, fill it with hot soapy water and scrub it out (side,
corners, bottom) c. Pour the water from the first washed cage into the second and so on
until the water is dirty d. Take a sponge (without a scrubbing pad) and wipe the sides, corners,
bottom of the cage just scrubbed and then rinse e. Scrub the second cage, pour out water, wipe with sponge f. One person can scrub and another person can wipe and rinse g. Set the cages to dry, face down on the clean side of the room
Carpet/Hammock Bleaching: Carpets and hammocks should soak in a bucket with 4 cups of bleach, a squirt of dish soap, and hot water over night. After 24 hours remove them and put them in the sink. Scrub each carpet and hammock as you rinse them. They get rinsed 3 times each (fill the tub, swish, drain, repeat). Crickets: The Brodie lab maintains an extensive cricket colony. We receive two shipments of crickets a week from Ghann’s Crickets. One shipment arrives on Tuesday and one on Thursday. The following sections describe the care of the crickets.
7
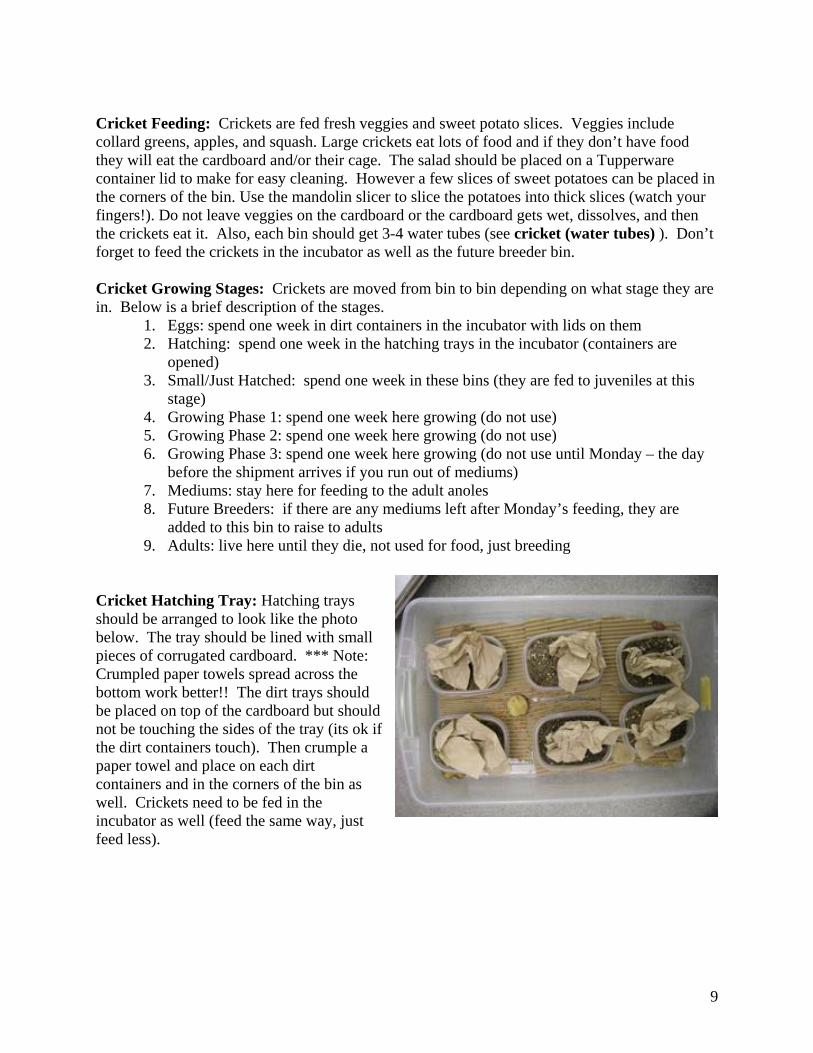
Cricket Bin Cleaning: To clean the bins that house the crickets, first you need to transfer the crickets to the large holding tub (spare big blue tub). To do this first, tap the cardboard to remove the crickets and debris from it and set aside. Once all of the cardboard is out of the bin remove the water containers and any dried potato. Now gently tap the bin to shake all the crickets down into one corner and then quickly but carefully pour the crickets into the holding bin. Catch any escapees. Then fill the now empty bin with a little hot water and soap and use a scrub brush to clean the corners, floor, and sides. Really scrub the corners! Pour the water our (pour down the corner of the large bins not across the screen or else all the dirt gets stuck in the screen windows). Rinse the bin completely then dry with paper towels. While drying check the screen for holes on the large bins. Also check the tape along the top of all the bins and make sure it is still intact and the tape isn’t separating from the bin. If you find problems notify Michelle. Replace the cardboard neatly. Throw out any cardboard that is really dirty and get new cardboard from the extra cardboard bin. Cricket Bin Setup for Smaller Crickets: To set up a bin for crickets make four stacks of cardboard (small pieces, same sides together) in each of the corners. The cardboard should not be taller than 1/3 the height of the bin. If there is a large gap between the stacks smaller pieces can be placed across the top as a bridge. Water tubes and potatoes slices go under the cardboard but not touching it, pellets are distributed around the cage.

8
Cricket Bin Setup for Large/Adult Crickets: Adult crickets are housed in larger bins and therefore get large/whole pieces of cardboard. They should be stacked in two piles same side to same side. However, make sure the notches line up so the dirt containers can be placed between the stacks of cardboard. Also, always check the screens on the cage to make sure the glue is holding and there are no holes.
Cricket Calcium (see Feeding): Crickets are dusted in two kinds of powder before feeding them to the anoles. See the Daily Tasks Checklist for the schedule. Cricket Cardboard: Cricket cardboard needs to be stacked same side to same side to allow for space for the crickets to get inside.
The correct way to stack cricket cardboard – alternating what side gets put down
The wrong way to stack cricket cardboard – with all the cardboard stacked in the same direction
9
Cricket Feeding: Crickets are fed fresh veggies and sweet potato slices. Veggies include collard greens, apples, and squash. Large crickets eat lots of food and if they don’t have food they will eat the cardboard and/or their cage. The salad should be placed on a Tupperware container lid to make for easy cleaning. However a few slices of sweet potatoes can be placed in the corners of the bin. Use the mandolin slicer to slice the potatoes into thick slices (watch your fingers!). Do not leave veggies on the cardboard or the cardboard gets wet, dissolves, and then the crickets eat it. Also, each bin should get 3-4 water tubes (see cricket (water tubes) ). Don’t forget to feed the crickets in the incubator as well as the future breeder bin. Cricket Growing Stages: Crickets are moved from bin to bin depending on what stage they are in. Below is a brief description of the stages.
1. Eggs: spend one week in dirt containers in the incubator with lids on them 2. Hatching: spend one week in the hatching trays in the incubator (containers are
opened) 3. Small/Just Hatched: spend one week in these bins (they are fed to juveniles at this
stage) 4. Growing Phase 1: spend one week here growing (do not use) 5. Growing Phase 2: spend one week here growing (do not use) 6. Growing Phase 3: spend one week here growing (do not use until Monday – the day
before the shipment arrives if you run out of mediums) 7. Mediums: stay here for feeding to the adult anoles 8. Future Breeders: if there are any mediums left after Monday’s feeding, they are
added to this bin to raise to adults 9. Adults: live here until they die, not used for food, just breeding
Cricket Hatching Tray: Hatching trays should be arranged to look like the photo below. The tray should be lined with small pieces of corrugated cardboard. *** Note: Crumpled paper towels spread across the bottom work better!! The dirt trays should be placed on top of the cardboard but should not be touching the sides of the tray (its ok if the dirt containers touch). Then crumple a paper towel and place on each dirt containers and in the corners of the bin as well. Crickets need to be fed in the incubator as well (feed the same way, just feed less).
10
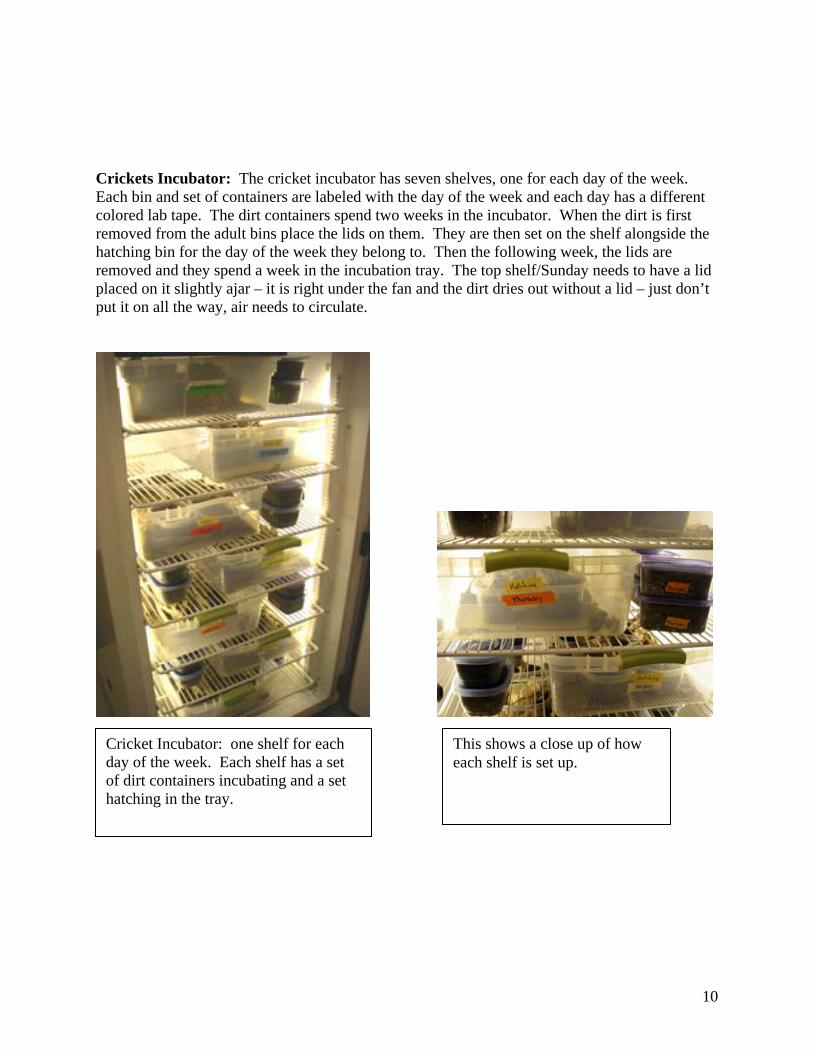
Crickets Incubator: The cricket incubator has seven shelves, one for each day of the week. Each bin and set of containers are labeled with the day of the week and each day has a different colored lab tape. The dirt containers spend two weeks in the incubator. When the dirt is first removed from the adult bins place the lids on them. They are then set on the shelf alongside the hatching bin for the day of the week they belong to. Then the following week, the lids are removed and they spend a week in the incubation tray. The top shelf/Sunday needs to have a lid placed on it slightly ajar – it is right under the fan and the dirt dries out without a lid – just don’t put it on all the way, air needs to circulate.
Cricket Incubator: one shelf for each day of the week. Each shelf has a set of dirt containers incubating and a set hatching in the tray.
This shows a close up of how each shelf is set up.
11
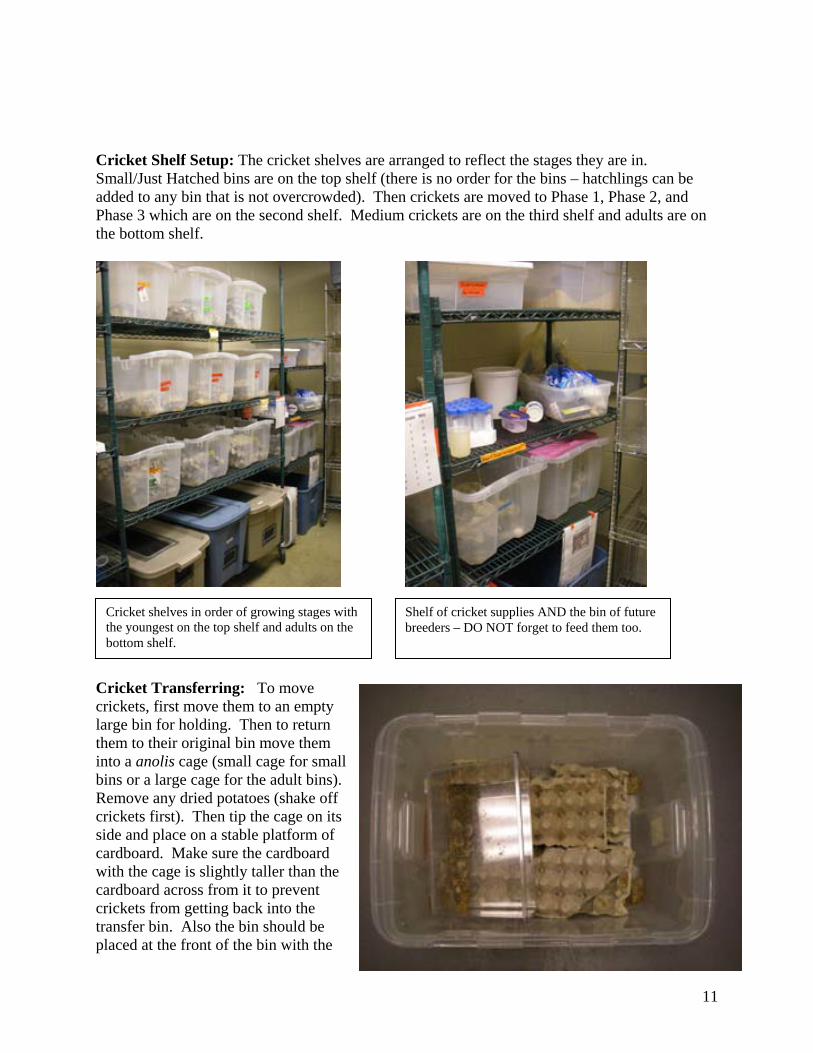
Cricket Shelf Setup: The cricket shelves are arranged to reflect the stages they are in. Small/Just Hatched bins are on the top shelf (there is no order for the bins – hatchlings can be added to any bin that is not overcrowded). Then crickets are moved to Phase 1, Phase 2, and Phase 3 which are on the second shelf. Medium crickets are on the third shelf and adults are on the bottom shelf.
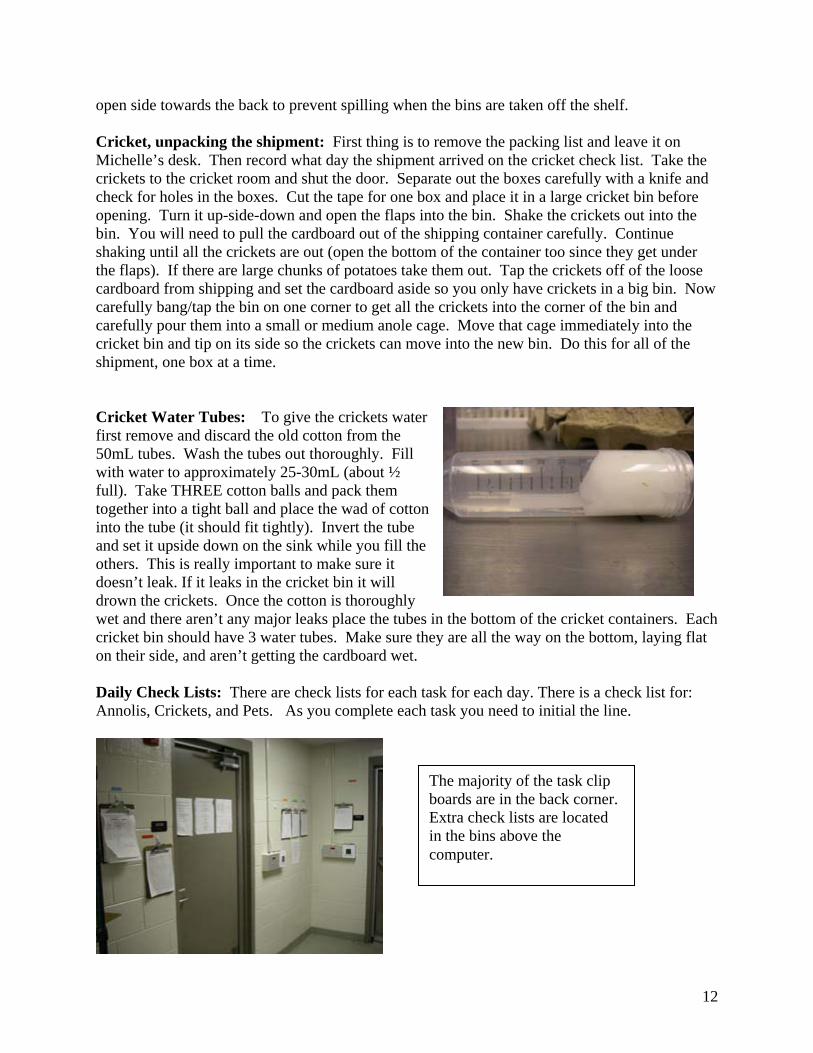
Cricket Transferring: To move crickets, first move them to an empty large bin for holding. Then to return them to their original bin move them into a anolis cage (small cage for small bins or a large cage for the adult bins). Remove any dried potatoes (shake off crickets first). Then tip the cage on its side and place on a stable platform of cardboard. Make sure the cardboard with the cage is slightly taller than the cardboard across from it to prevent crickets from getting back into the transfer bin. Also the bin should be placed at the front of the bin with the
Cricket shelves in order of growing stages with the youngest on the top shelf and adults on the bottom shelf.
Shelf of cricket supplies AND the bin of future breeders – DO NOT forget to feed them too.
12
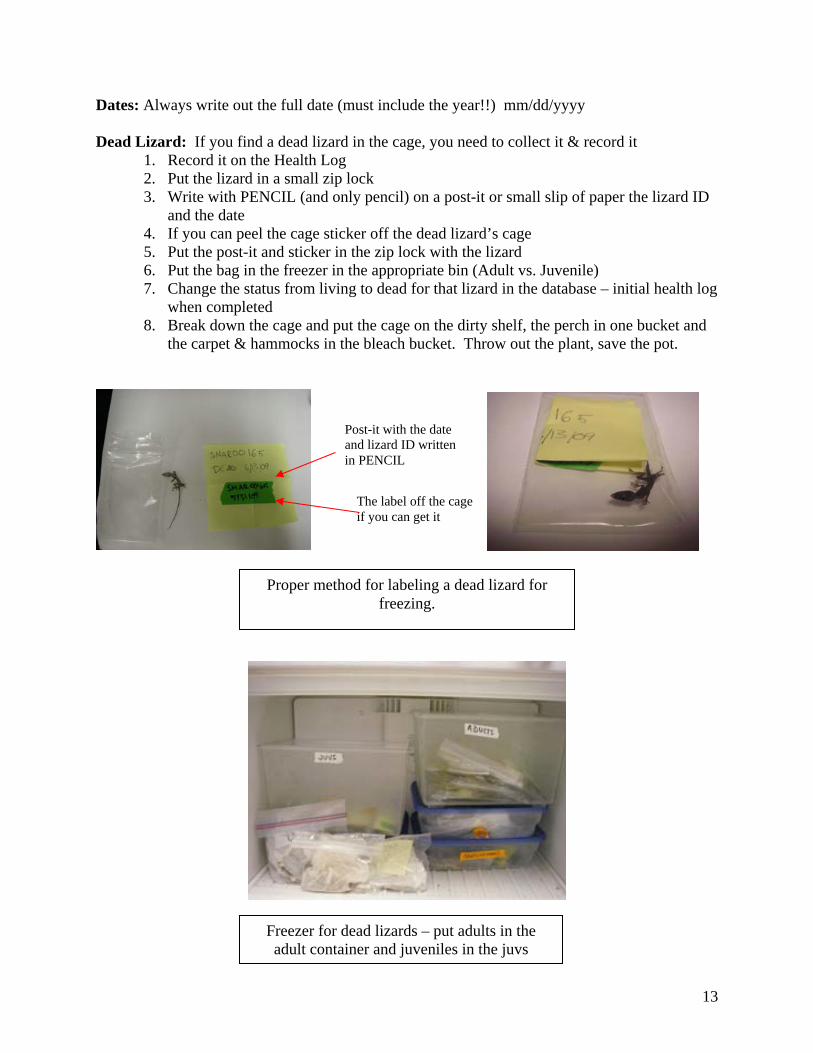
open side towards the back to prevent spilling when the bins are taken off the shelf. Cricket, unpacking the shipment: First thing is to remove the packing list and leave it on Michelle’s desk. Then record what day the shipment arrived on the cricket check list. Take the crickets to the cricket room and shut the door. Separate out the boxes carefully with a knife and check for holes in the boxes. Cut the tape for one box and place it in a large cricket bin before opening. Turn it up-side-down and open the flaps into the bin. Shake the crickets out into the bin. You will need to pull the cardboard out of the shipping container carefully. Continue shaking until all the crickets are out (open the bottom of the container too since they get under the flaps). If there are large chunks of potatoes take them out. Tap the crickets off of the loose cardboard from shipping and set the cardboard aside so you only have crickets in a big bin. Now carefully bang/tap the bin on one corner to get all the crickets into the corner of the bin and carefully pour them into a small or medium anole cage. Move that cage immediately into the cricket bin and tip on its side so the crickets can move into the new bin. Do this for all of the shipment, one box at a time. Cricket Water Tubes: To give the crickets water first remove and discard the old cotton from the 50mL tubes. Wash the tubes out thoroughly. Fill with water to approximately 25-30mL (about ½ full). Take THREE cotton balls and pack them together into a tight ball and place the wad of cotton into the tube (it should fit tightly). Invert the tube and set it upside down on the sink while you fill the others. This is really important to make sure it doesn’t leak. If it leaks in the cricket bin it will drown the crickets. Once the cotton is thoroughly wet and there aren’t any major leaks place the tubes in the bottom of the cricket containers. Each cricket bin should have 3 water tubes. Make sure they are all the way on the bottom, laying flat on their side, and aren’t getting the cardboard wet. Daily Check Lists: There are check lists for each task for each day. There is a check list for: Annolis, Crickets, and Pets. As you complete each task you need to initial the line.
The majority of the task clip boards are in the back corner. Extra check lists are located in the bins above the computer.
13
Dates: Always write out the full date (must include the year!!) mm/dd/yyyy Dead Lizard: If you find a dead lizard in the cage, you need to collect it & record it
1. Record it on the Health Log 2. Put the lizard in a small zip lock 3. Write with PENCIL (and only pencil) on a post-it or small slip of paper the lizard ID
and the date 4. If you can peel the cage sticker off the dead lizard’s cage 5. Put the post-it and sticker in the zip lock with the lizard 6. Put the bag in the freezer in the appropriate bin (Adult vs. Juvenile) 7. Change the status from living to dead for that lizard in the database – initial health log
when completed 8. Break down the cage and put the cage on the dirty shelf, the perch in one bucket and
the carpet & hammocks in the bleach bucket. Throw out the plant, save the pot.
Post-it with the date and lizard ID written in PENCIL
The label off the cage if you can get it
Proper method for labeling a dead lizard for freezing.
Freezer for dead lizards – put adults in the adult container and juveniles in the juvs
14
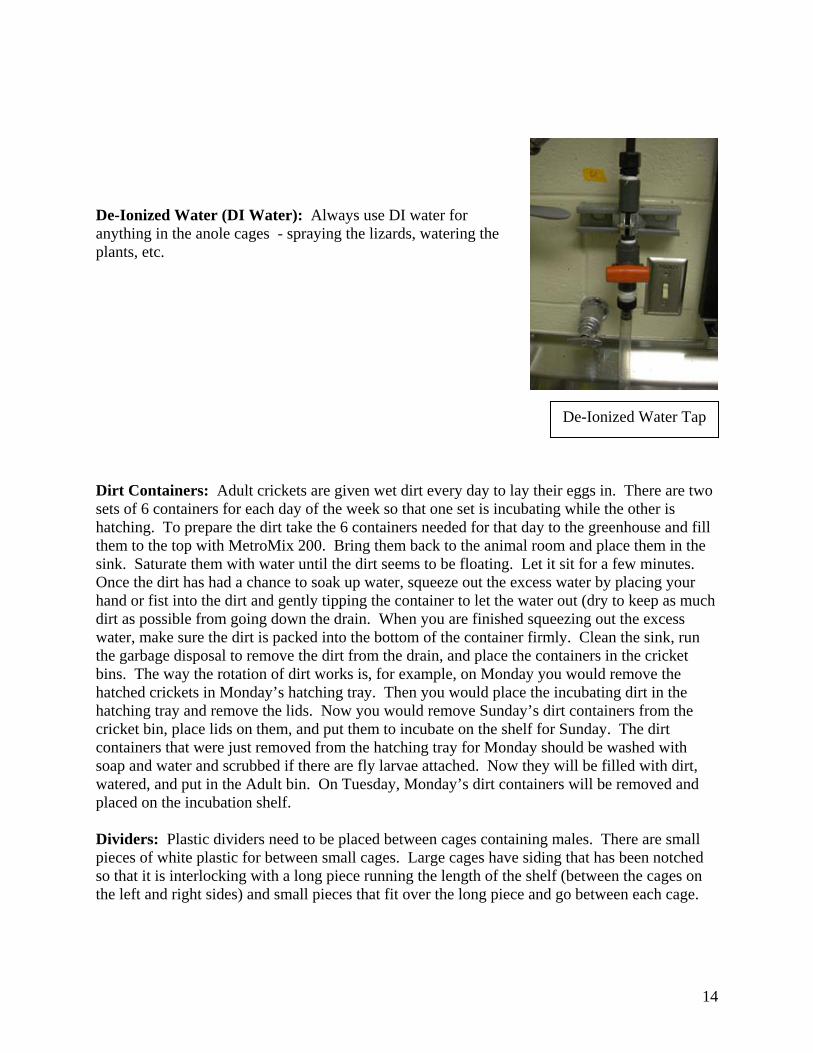
De-Ionized Water (DI Water): Always use DI water for anything in the anole cages - spraying the lizards, watering the plants, etc.
Dirt Containers: Adult crickets are given wet dirt every day to lay their eggs in. There are two sets of 6 containers for each day of the week so that one set is incubating while the other is hatching. To prepare the dirt take the 6 containers needed for that day to the greenhouse and fill them to the top with MetroMix 200. Bring them back to the animal room and place them in the sink. Saturate them with water until the dirt seems to be floating. Let it sit for a few minutes. Once the dirt has had a chance to soak up water, squeeze out the excess water by placing your hand or fist into the dirt and gently tipping the container to let the water out (dry to keep as much dirt as possible from going down the drain. When you are finished squeezing out the excess water, make sure the dirt is packed into the bottom of the container firmly. Clean the sink, run the garbage disposal to remove the dirt from the drain, and place the containers in the cricket bins. The way the rotation of dirt works is, for example, on Monday you would remove the hatched crickets in Monday’s hatching tray. Then you would place the incubating dirt in the hatching tray and remove the lids. Now you would remove Sunday’s dirt containers from the cricket bin, place lids on them, and put them to incubate on the shelf for Sunday. The dirt containers that were just removed from the hatching tray for Monday should be washed with soap and water and scrubbed if there are fly larvae attached. Now they will be filled with dirt, watered, and put in the Adult bin. On Tuesday, Monday’s dirt containers will be removed and placed on the incubation shelf. Dividers: Plastic dividers need to be placed between cages containing males. There are small pieces of white plastic for between small cages. Large cages have siding that has been notched so that it is interlocking with a long piece running the length of the shelf (between the cages on the left and right sides) and small pieces that fit over the long piece and go between each cage.
De-Ionized Water Tap
15
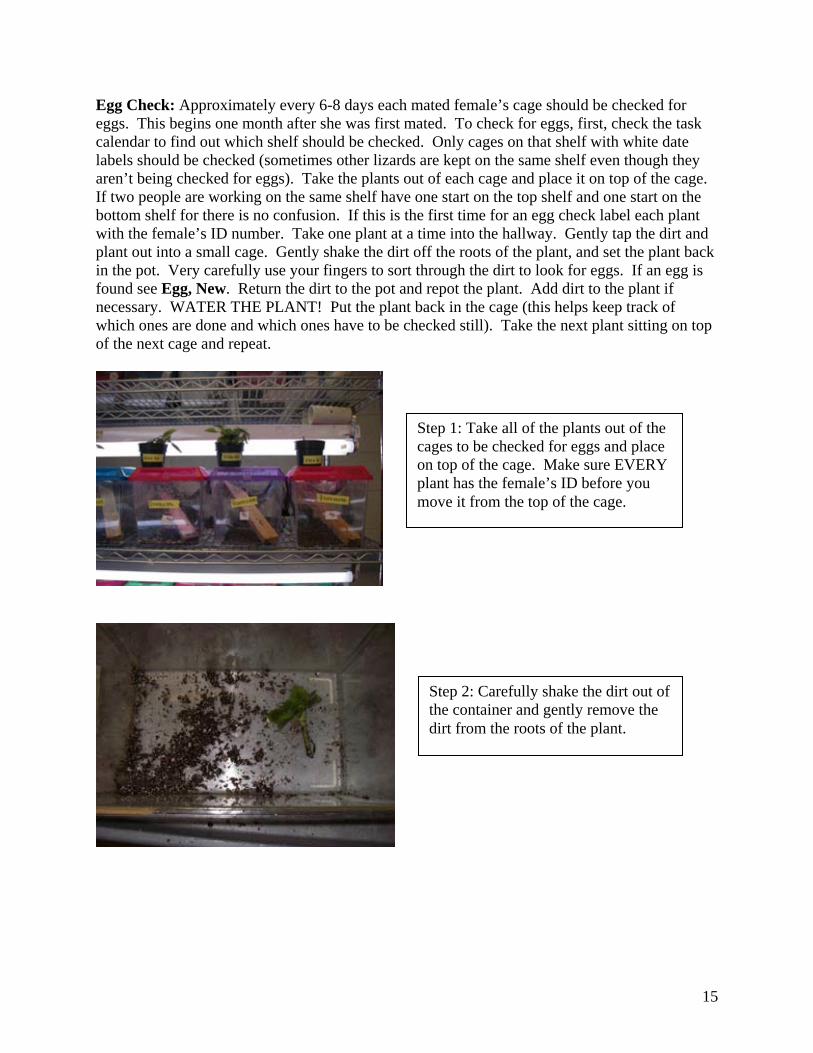
Egg Check: Approximately every 6-8 days each mated female’s cage should be checked for eggs. This begins one month after she was first mated. To check for eggs, first, check the task calendar to find out which shelf should be checked. Only cages on that shelf with white date labels should be checked (sometimes other lizards are kept on the same shelf even though they aren’t being checked for eggs). Take the plants out of each cage and place it on top of the cage. If two people are working on the same shelf have one start on the top shelf and one start on the bottom shelf for there is no confusion. If this is the first time for an egg check label each plant with the female’s ID number. Take one plant at a time into the hallway. Gently tap the dirt and plant out into a small cage. Gently shake the dirt off the roots of the plant, and set the plant back in the pot. Very carefully use your fingers to sort through the dirt to look for eggs. If an egg is found see Egg, New. Return the dirt to the pot and repot the plant. Add dirt to the plant if necessary. WATER THE PLANT! Put the plant back in the cage (this helps keep track of which ones are done and which ones have to be checked still). Take the next plant sitting on top of the next cage and repeat.
Step 1: Take all of the plants out of the cages to be checked for eggs and place on top of the cage. Make sure EVERY plant has the female’s ID before you move it from the top of the cage.
Step 2: Carefully shake the dirt out of the container and gently remove the dirt from the roots of the plant.
16
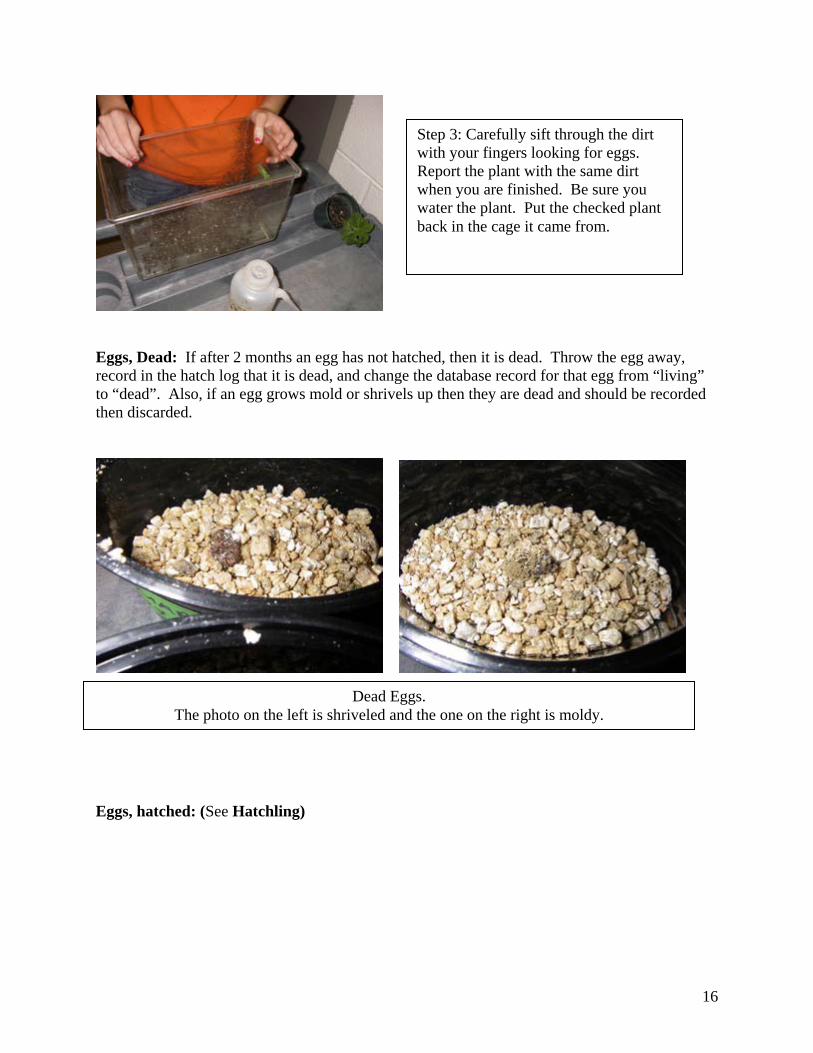
Eggs, Dead: If after 2 months an egg has not hatched, then it is dead. Throw the egg away, record in the hatch log that it is dead, and change the database record for that egg from “living” to “dead”. Also, if an egg grows mold or shrivels up then they are dead and should be recorded then discarded.
Eggs, hatched: (See Hatchling)
Step 3: Carefully sift through the dirt with your fingers looking for eggs. Report the plant with the same dirt when you are finished. Be sure you water the plant. Put the checked plant back in the cage it came from.
Dead Eggs. The photo on the left is shriveled and the one on the right is moldy.
17
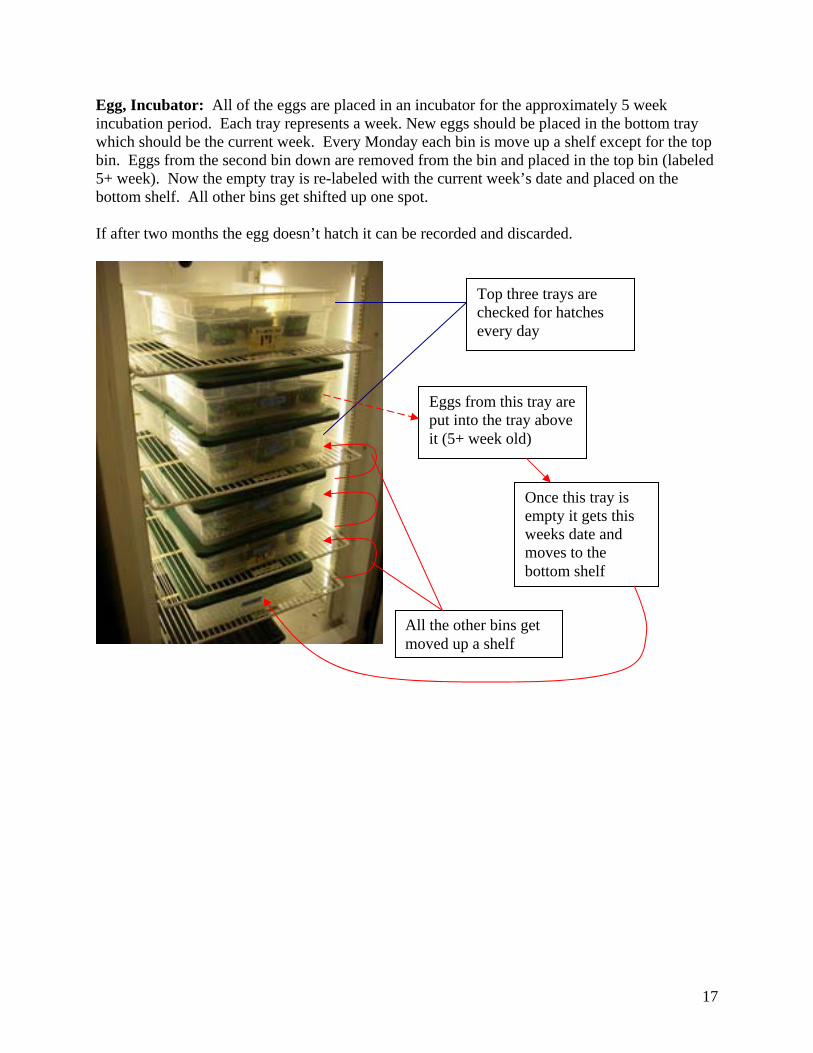
Egg, Incubator: All of the eggs are placed in an incubator for the approximately 5 week incubation period. Each tray represents a week. New eggs should be placed in the bottom tray which should be the current week. Every Monday each bin is move up a shelf except for the top bin. Eggs from the second bin down are removed from the bin and placed in the top bin (labeled 5+ week). Now the empty tray is re-labeled with the current week’s date and placed on the bottom shelf. All other bins get shifted up one spot. If after two months the egg doesn’t hatch it can be recorded and discarded.
Eggs from this tray are put into the tray above it (5+ week old)
Top three trays are checked for hatches every day
Once this tray is empty it gets this weeks date and moves to the bottom shelf
All the other bins get moved up a shelf
18
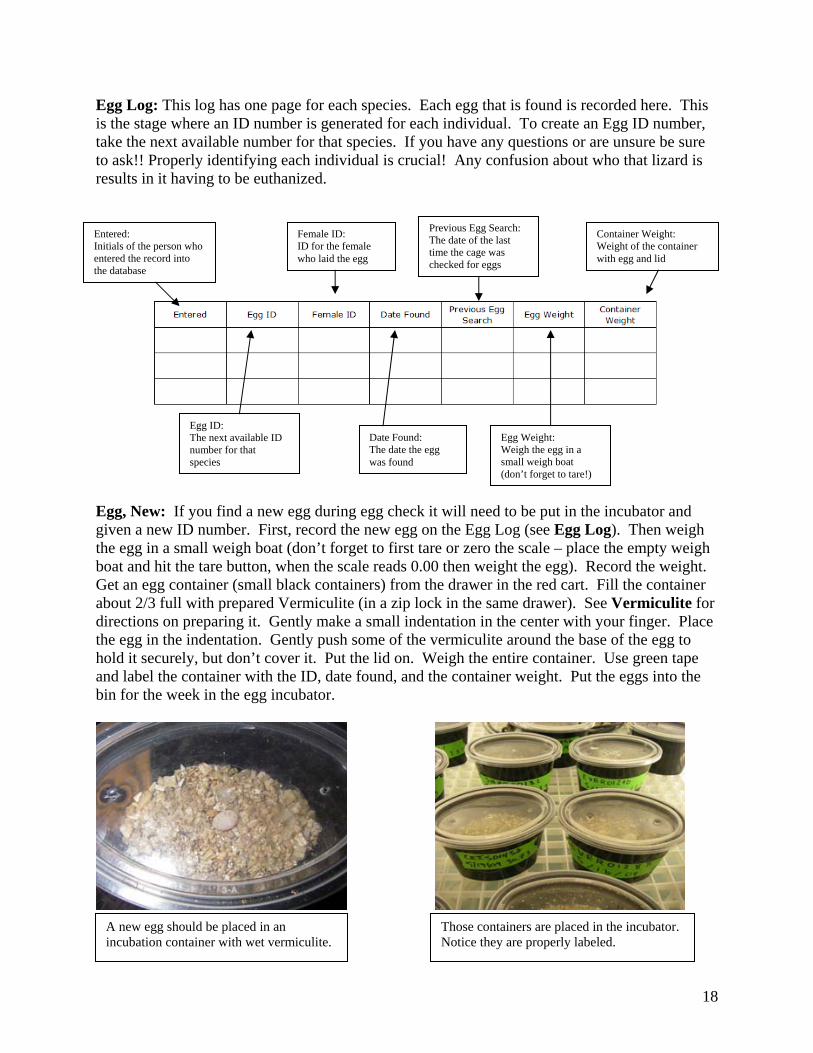
Egg Log: This log has one page for each species. Each egg that is found is recorded here. This is the stage where an ID number is generated for each individual. To create an Egg ID number, take the next available number for that species. If you have any questions or are unsure be sure to ask!! Properly identifying each individual is crucial! Any confusion about who that lizard is results in it having to be euthanized.
Egg, New: If you find a new egg during egg check it will need to be put in the incubator and given a new ID number. First, record the new egg on the Egg Log (see Egg Log). Then weigh the egg in a small weigh boat (don’t forget to first tare or zero the scale – place the empty weigh boat and hit the tare button, when the scale reads 0.00 then weight the egg). Record the weight. Get an egg container (small black containers) from the drawer in the red cart. Fill the container about 2/3 full with prepared Vermiculite (in a zip lock in the same drawer). See Vermiculite for directions on preparing it. Gently make a small indentation in the center with your finger. Place the egg in the indentation. Gently push some of the vermiculite around the base of the egg to hold it securely, but don’t cover it. Put the lid on. Weigh the entire container. Use green tape and label the container with the ID, date found, and the container weight. Put the eggs into the bin for the week in the egg incubator.
Entered: Initials of the person who entered the record into the database
Egg ID: The next available ID number for that species
Female ID: ID for the female who laid the egg
Previous Egg Search: The date of the last time the cage was checked for eggs
Egg Weight: Weigh the egg in a small weigh boat (don’t forget to tare!)
Container Weight: Weight of the container with egg and lid
Date Found: The date the egg was found
A new egg should be placed in an incubation container with wet vermiculite.
Those containers are placed in the incubator. Notice they are properly labeled.
19
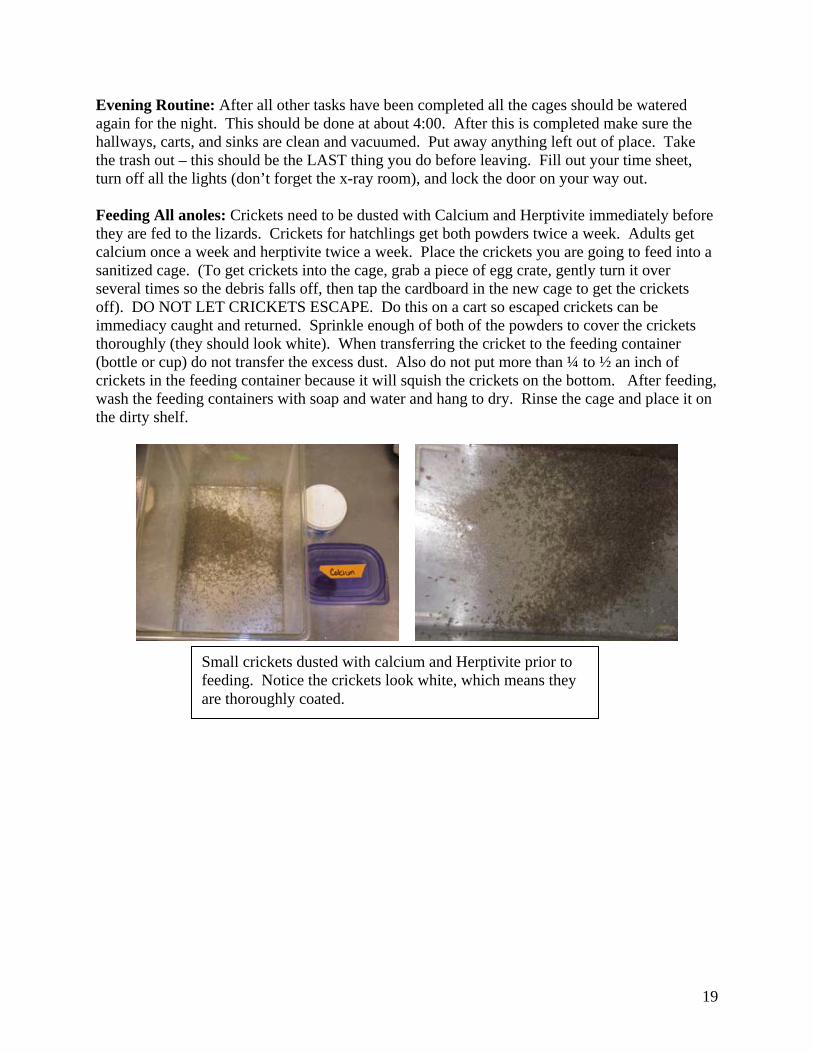
Evening Routine: After all other tasks have been completed all the cages should be watered again for the night. This should be done at about 4:00. After this is completed make sure the hallways, carts, and sinks are clean and vacuumed. Put away anything left out of place. Take the trash out – this should be the LAST thing you do before leaving. Fill out your time sheet, turn off all the lights (don’t forget the x-ray room), and lock the door on your way out. Feeding All anoles: Crickets need to be dusted with Calcium and Herptivite immediately before they are fed to the lizards. Crickets for hatchlings get both powders twice a week. Adults get calcium once a week and herptivite twice a week. Place the crickets you are going to feed into a sanitized cage. (To get crickets into the cage, grab a piece of egg crate, gently turn it over several times so the debris falls off, then tap the cardboard in the new cage to get the crickets off). DO NOT LET CRICKETS ESCAPE. Do this on a cart so escaped crickets can be immediacy caught and returned. Sprinkle enough of both of the powders to cover the crickets thoroughly (they should look white). When transferring the cricket to the feeding container (bottle or cup) do not transfer the excess dust. Also do not put more than ¼ to ½ an inch of crickets in the feeding container because it will squish the crickets on the bottom. After feeding, wash the feeding containers with soap and water and hang to dry. Rinse the cage and place it on the dirty shelf.
Small crickets dusted with calcium and Herptivite prior to feeding. Notice the crickets look white, which means they are thoroughly coated.
20
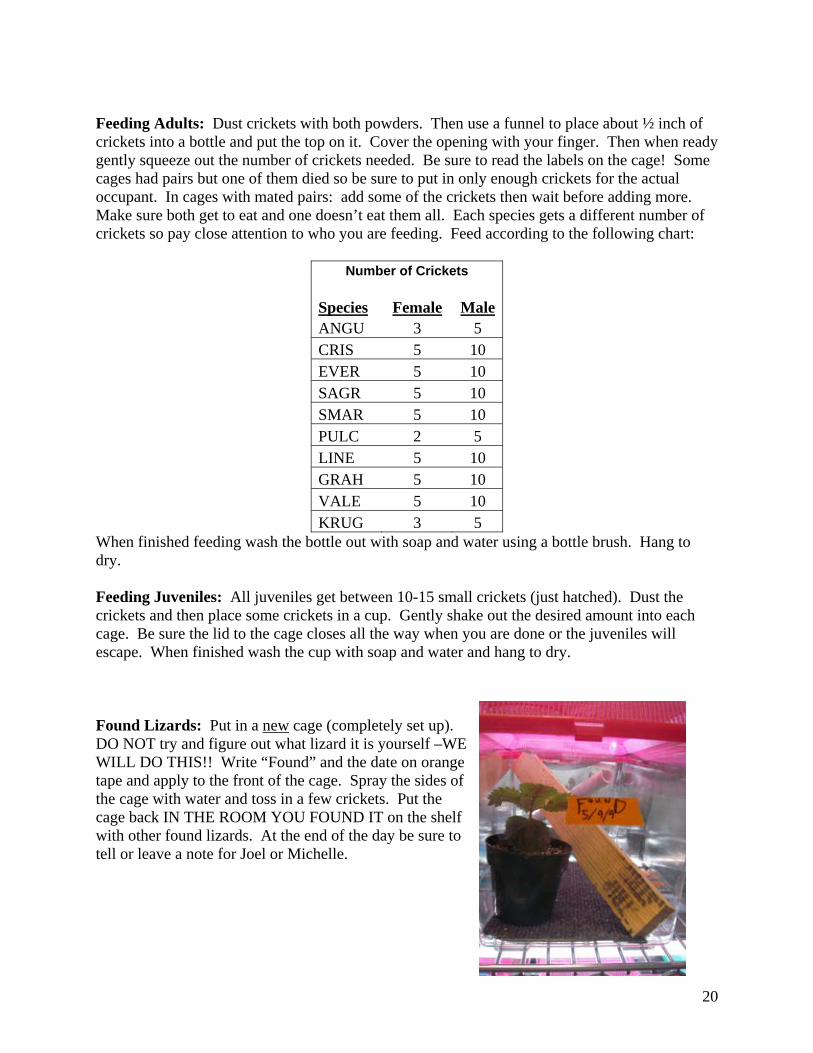
Feeding Adults: Dust crickets with both powders. Then use a funnel to place about ½ inch of crickets into a bottle and put the top on it. Cover the opening with your finger. Then when ready gently squeeze out the number of crickets needed. Be sure to read the labels on the cage! Some cages had pairs but one of them died so be sure to put in only enough crickets for the actual occupant. In cages with mated pairs: add some of the crickets then wait before adding more. Make sure both get to eat and one doesn’t eat them all. Each species gets a different number of crickets so pay close attention to who you are feeding. Feed according to the following chart:
Number of Crickets
Species Female MaleANGU 3 5 CRIS 5 10 EVER 5 10 SAGR 5 10 SMAR 5 10 PULC 2 5 LINE 5 10 GRAH 5 10 VALE 5 10 KRUG 3 5
When finished feeding wash the bottle out with soap and water using a bottle brush. Hang to dry. Feeding Juveniles: All juveniles get between 10-15 small crickets (just hatched). Dust the crickets and then place some crickets in a cup. Gently shake out the desired amount into each cage. Be sure the lid to the cage closes all the way when you are done or the juveniles will escape. When finished wash the cup with soap and water and hang to dry. Found Lizards: Put in a new cage (completely set up). DO NOT try and figure out what lizard it is yourself –WE WILL DO THIS!! Write “Found” and the date on orange tape and apply to the front of the cage. Spray the sides of the cage with water and toss in a few crickets. Put the cage back IN THE ROOM YOU FOUND IT on the shelf with other found lizards. At the end of the day be sure to tell or leave a note for Joel or Michelle.
21
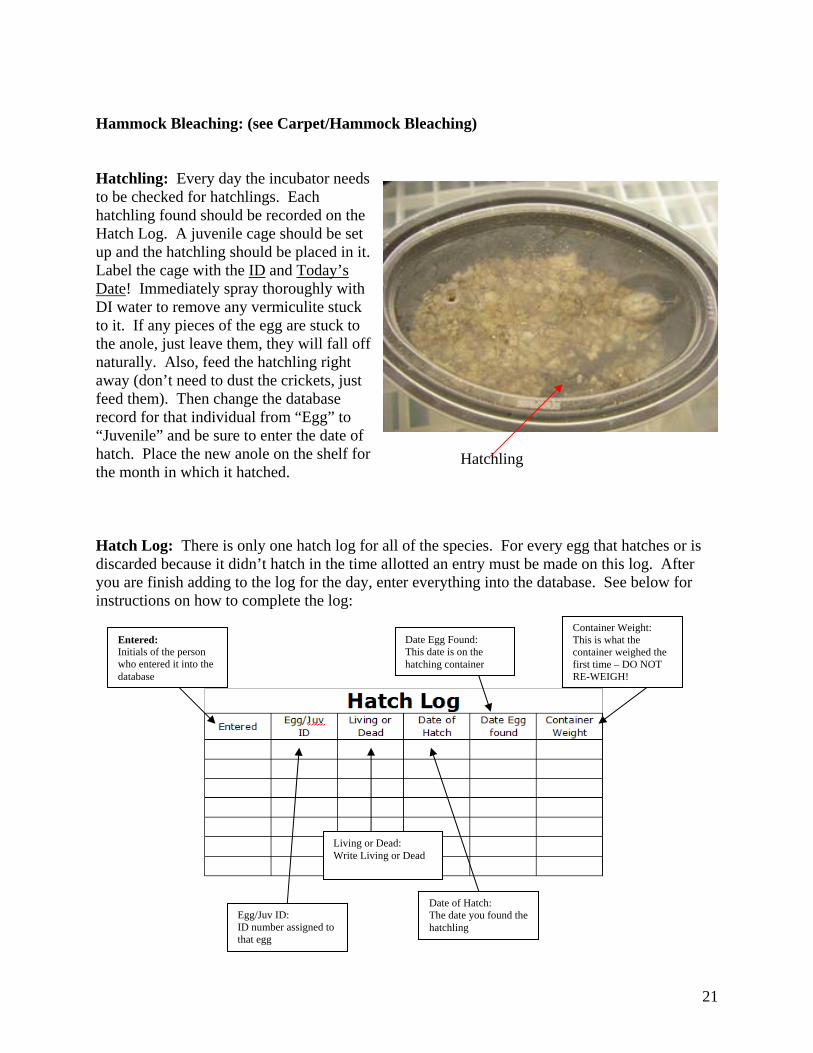
Hammock Bleaching: (see Carpet/Hammock Bleaching) Hatchling: Every day the incubator needs to be checked for hatchlings. Each hatchling found should be recorded on the Hatch Log. A juvenile cage should be set up and the hatchling should be placed in it. Label the cage with the ID and Today’s Date! Immediately spray thoroughly with DI water to remove any vermiculite stuck to it. If any pieces of the egg are stuck to the anole, just leave them, they will fall off naturally. Also, feed the hatchling right away (don’t need to dust the crickets, just feed them). Then change the database record for that individual from “Egg” to “Juvenile” and be sure to enter the date of hatch. Place the new anole on the shelf for the month in which it hatched. Hatch Log: There is only one hatch log for all of the species. For every egg that hatches or is discarded because it didn’t hatch in the time allotted an entry must be made on this log. After you are finish adding to the log for the day, enter everything into the database. See below for instructions on how to complete the log:
Entered: Initials of the person who entered it into the database
Egg/Juv ID: ID number assigned to that egg
Living or Dead: Write Living or Dead
Date of Hatch: The date you found the hatchling
Date Egg Found: This date is on the hatching container
Container Weight: This is what the container weighed the first time – DO NOT RE-WEIGH!
Hatchling
22
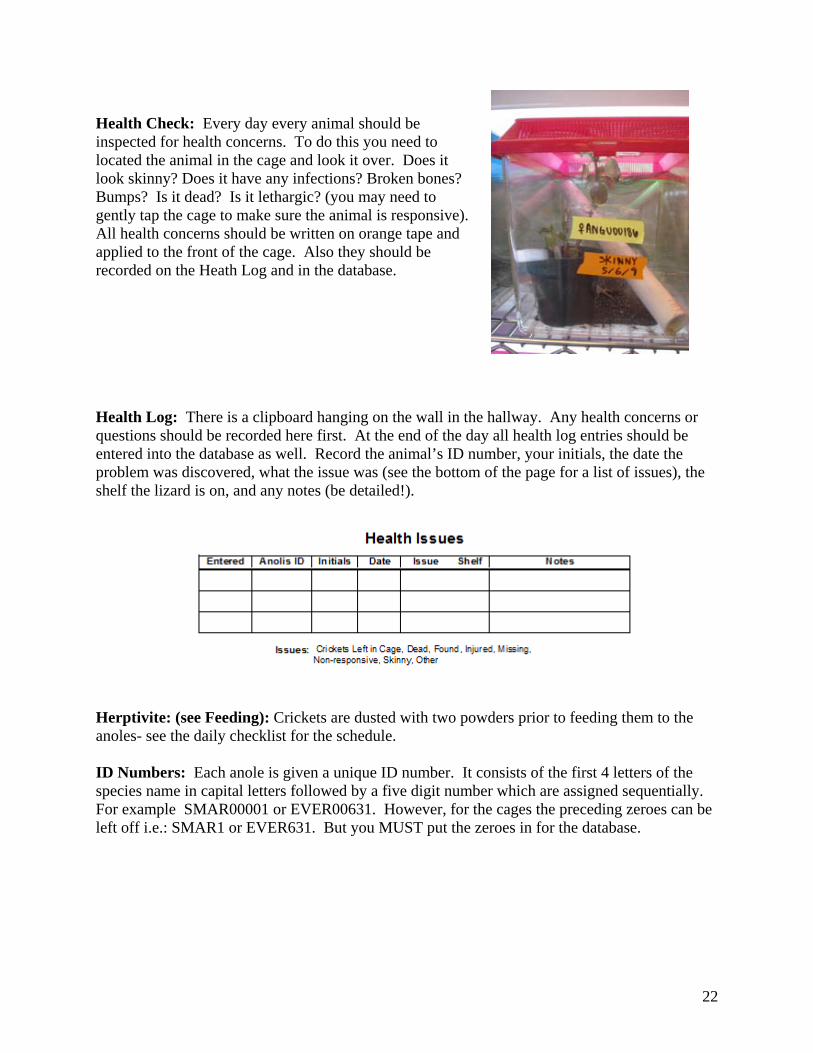
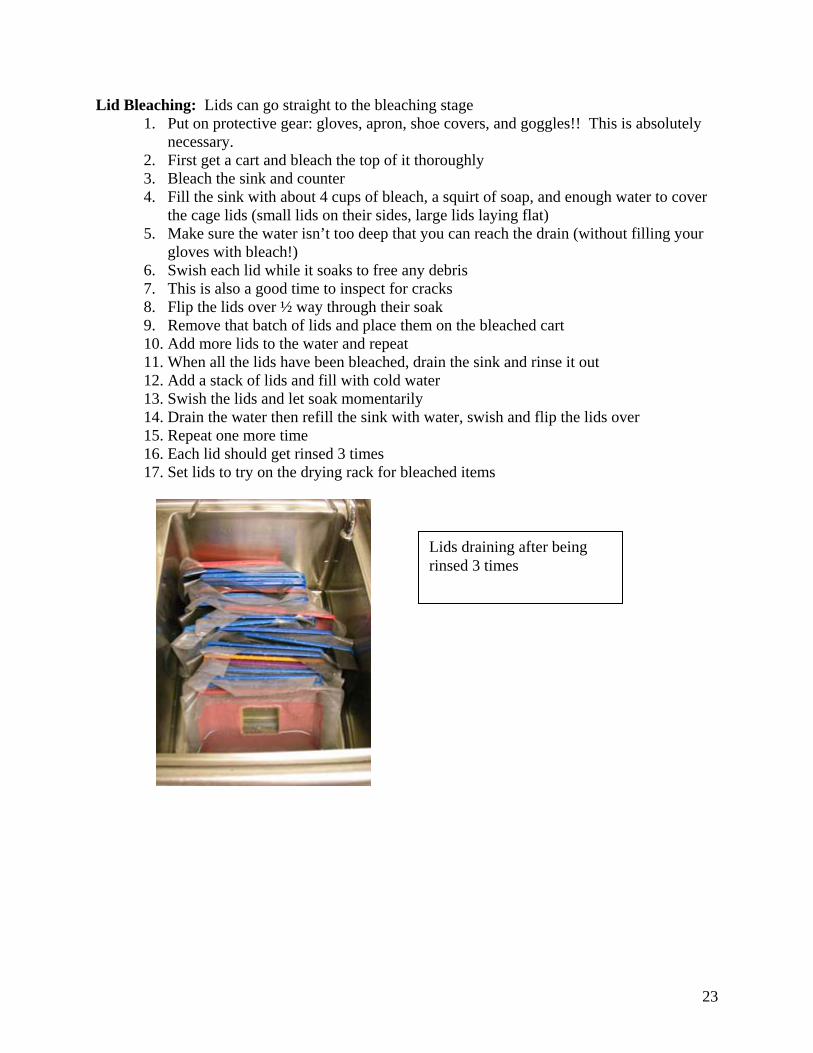
Health Check: Every day every animal should be inspected for health concerns. To do this you need to located the animal in the cage and look it over. Does it look skinny? Does it have any infections? Broken bones? Bumps? Is it dead? Is it lethargic? (you may need to gently tap the cage to make sure the animal is responsive). All health concerns should be written on orange tape and applied to the front of the cage. Also they should be recorded on the Heath Log and in the database. Health Log: There is a clipboard hanging on the wall in the hallway. Any health concerns or questions should be recorded here first. At the end of the day all health log entries should be entered into the database as well. Record the animal’s ID number, your initials, the date the problem was discovered, what the issue was (see the bottom of the page for a list of issues), the shelf the lizard is on, and any notes (be detailed!).
Herptivite: (see Feeding): Crickets are dusted with two powders prior to feeding them to the anoles- see the daily checklist for the schedule. ID Numbers: Each anole is given a unique ID number. It consists of the first 4 letters of the species name in capital letters followed by a five digit number which are assigned sequentially. For example SMAR00001 or EVER00631. However, for the cages the preceding zeroes can be left off i.e.: SMAR1 or EVER631. But you MUST put the zeroes in for the database.
23
Lid Bleaching: Lids can go straight to the bleaching stage 1. Put on protective gear: gloves, apron, shoe covers, and goggles!! This is absolutely
necessary. 2. First get a cart and bleach the top of it thoroughly 3. Bleach the sink and counter 4. Fill the sink with about 4 cups of bleach, a squirt of soap, and enough water to cover
the cage lids (small lids on their sides, large lids laying flat) 5. Make sure the water isn’t too deep that you can reach the drain (without filling your
gloves with bleach!) 6. Swish each lid while it soaks to free any debris 7. This is also a good time to inspect for cracks 8. Flip the lids over ½ way through their soak 9. Remove that batch of lids and place them on the bleached cart 10. Add more lids to the water and repeat 11. When all the lids have been bleached, drain the sink and rinse it out 12. Add a stack of lids and fill with cold water 13. Swish the lids and let soak momentarily 14. Drain the water then refill the sink with water, swish and flip the lids over 15. Repeat one more time 16. Each lid should get rinsed 3 times 17. Set lids to try on the drying rack for bleached items
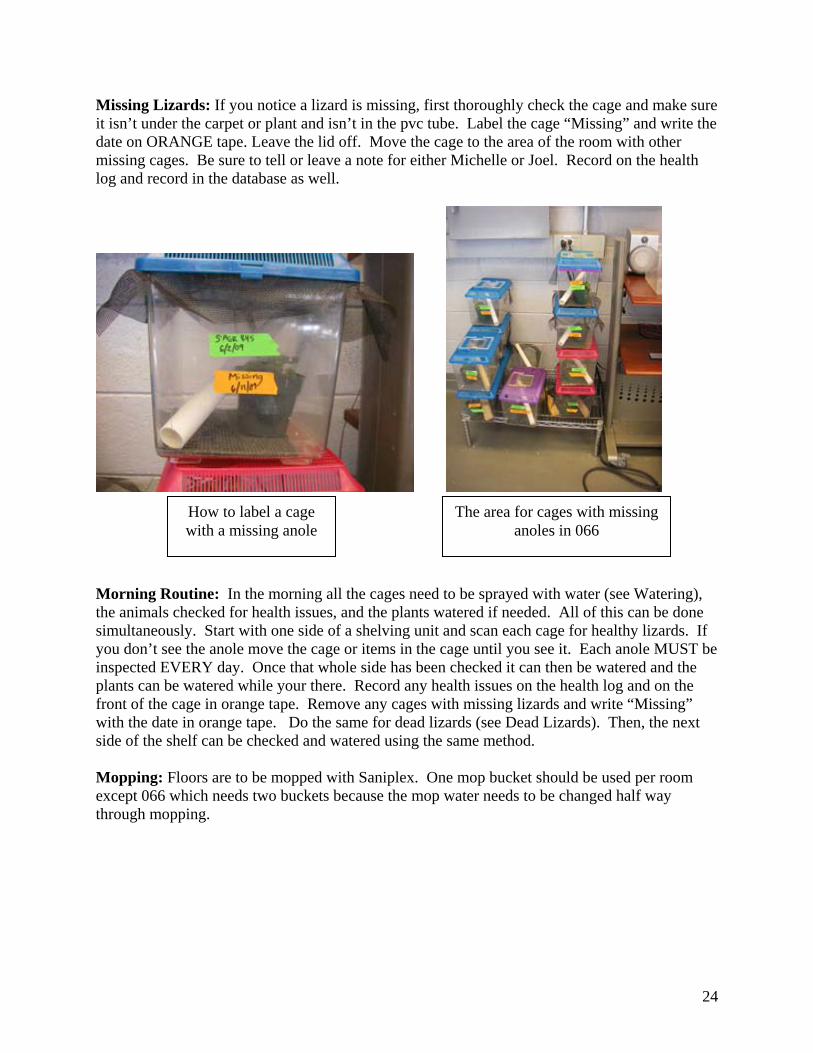
Lids draining after being rinsed 3 times
24
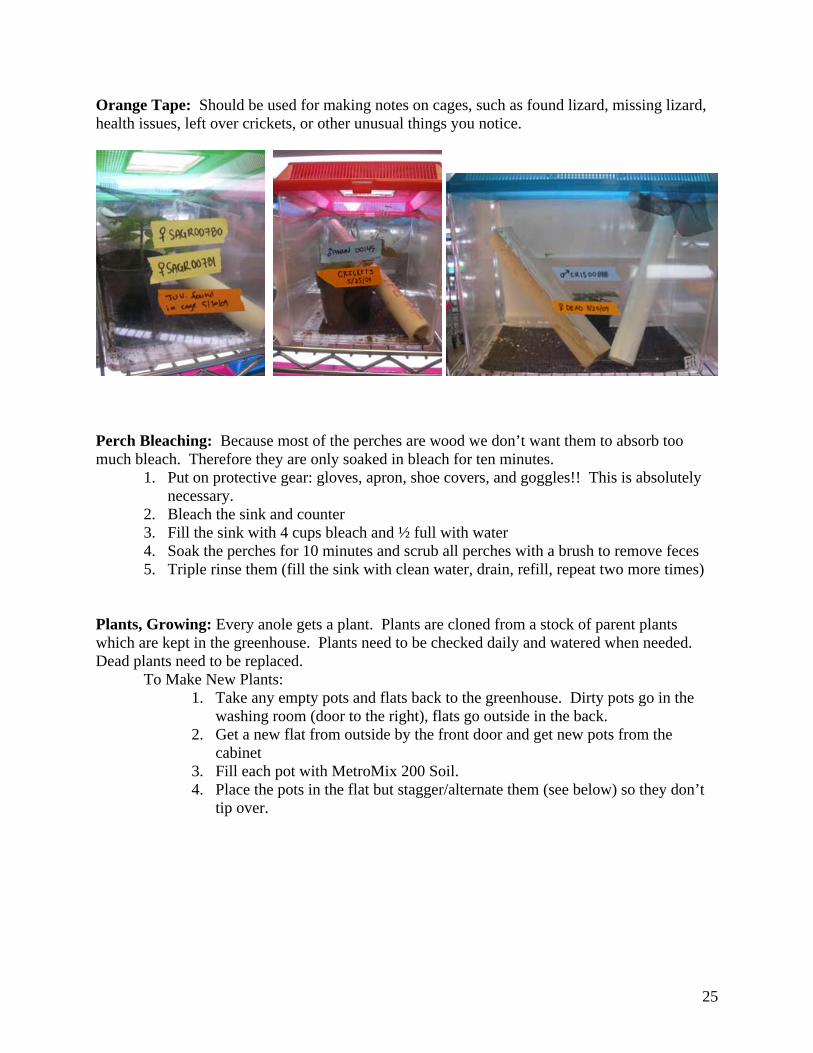
Missing Lizards: If you notice a lizard is missing, first thoroughly check the cage and make sure it isn’t under the carpet or plant and isn’t in the pvc tube. Label the cage “Missing” and write the date on ORANGE tape. Leave the lid off. Move the cage to the area of the room with other missing cages. Be sure to tell or leave a note for either Michelle or Joel. Record on the health log and record in the database as well.
Morning Routine: In the morning all the cages need to be sprayed with water (see Watering), the animals checked for health issues, and the plants watered if needed. All of this can be done simultaneously. Start with one side of a shelving unit and scan each cage for healthy lizards. If you don’t see the anole move the cage or items in the cage until you see it. Each anole MUST be inspected EVERY day. Once that whole side has been checked it can then be watered and the plants can be watered while your there. Record any health issues on the health log and on the front of the cage in orange tape. Remove any cages with missing lizards and write “Missing” with the date in orange tape. Do the same for dead lizards (see Dead Lizards). Then, the next side of the shelf can be checked and watered using the same method. Mopping: Floors are to be mopped with Saniplex. One mop bucket should be used per room except 066 which needs two buckets because the mop water needs to be changed half way through mopping.
How to label a cage with a missing anole
The area for cages with missing anoles in 066
25
Orange Tape: Should be used for making notes on cages, such as found lizard, missing lizard, health issues, left over crickets, or other unusual things you notice.
Perch Bleaching: Because most of the perches are wood we don’t want them to absorb too much bleach. Therefore they are only soaked in bleach for ten minutes.
1. Put on protective gear: gloves, apron, shoe covers, and goggles!! This is absolutely necessary.
2. Bleach the sink and counter 3. Fill the sink with 4 cups bleach and ½ full with water 4. Soak the perches for 10 minutes and scrub all perches with a brush to remove feces 5. Triple rinse them (fill the sink with clean water, drain, refill, repeat two more times)
Plants, Growing: Every anole gets a plant. Plants are cloned from a stock of parent plants which are kept in the greenhouse. Plants need to be checked daily and watered when needed. Dead plants need to be replaced. To Make New Plants:
1. Take any empty pots and flats back to the greenhouse. Dirty pots go in the washing room (door to the right), flats go outside in the back.
2. Get a new flat from outside by the front door and get new pots from the cabinet
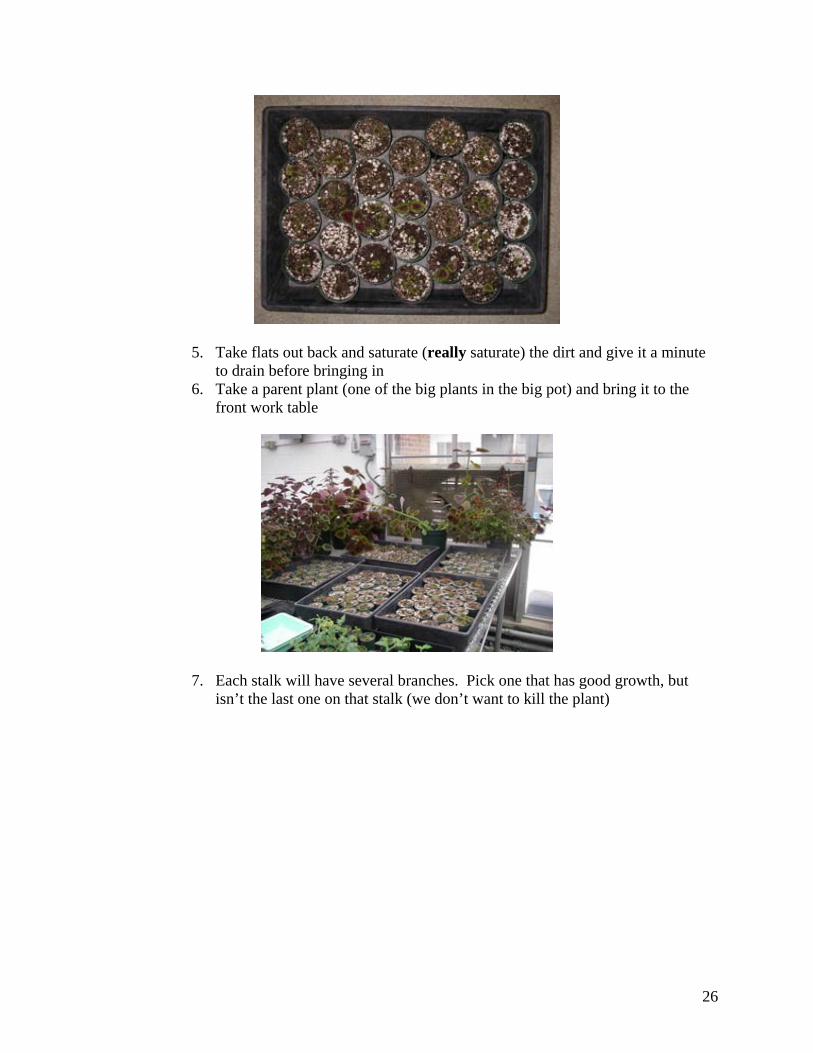
3. Fill each pot with MetroMix 200 Soil. 4. Place the pots in the flat but stagger/alternate them (see below) so they don’t
tip over.
26
5. Take flats out back and saturate (really saturate) the dirt and give it a minute to drain before bringing in
6. Take a parent plant (one of the big plants in the big pot) and bring it to the front work table
7. Each stalk will have several branches. Pick one that has good growth, but isn’t the last one on that stalk (we don’t want to kill the plant)
27
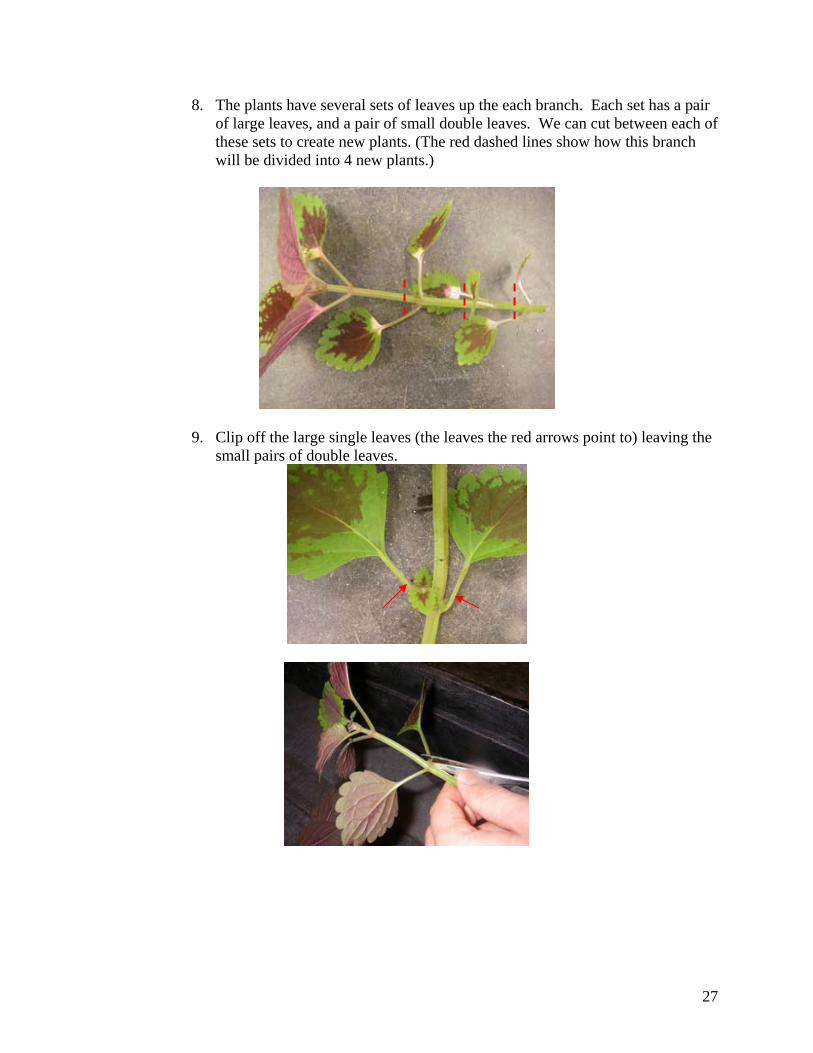
8. The plants have several sets of leaves up the each branch. Each set has a pair of large leaves, and a pair of small double leaves. We can cut between each of these sets to create new plants. (The red dashed lines show how this branch will be divided into 4 new plants.)
9. Clip off the large single leaves (the leaves the red arrows point to) leaving the small pairs of double leaves.
28
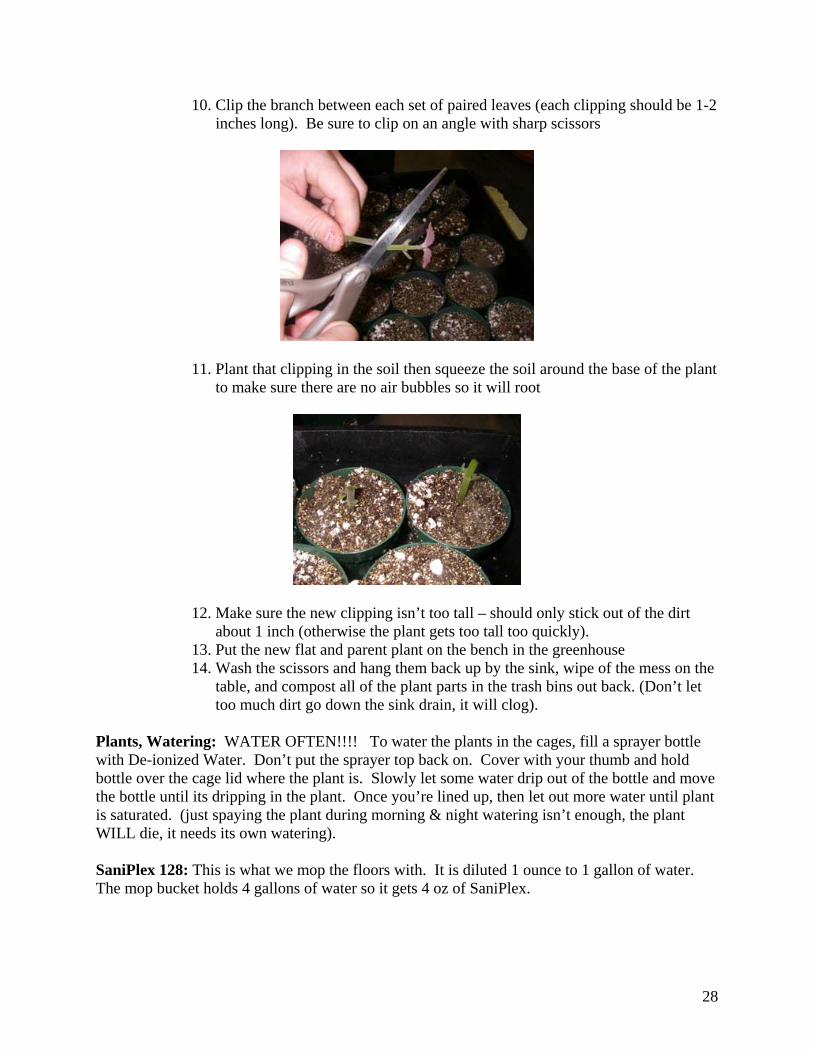
10. Clip the branch between each set of paired leaves (each clipping should be 1-2 inches long). Be sure to clip on an angle with sharp scissors
11. Plant that clipping in the soil then squeeze the soil around the base of the plant to make sure there are no air bubbles so it will root
12. Make sure the new clipping isn’t too tall – should only stick out of the dirt about 1 inch (otherwise the plant gets too tall too quickly).
13. Put the new flat and parent plant on the bench in the greenhouse 14. Wash the scissors and hang them back up by the sink, wipe of the mess on the
table, and compost all of the plant parts in the trash bins out back. (Don’t let too much dirt go down the sink drain, it will clog).
Plants, Watering: WATER OFTEN!!!! To water the plants in the cages, fill a sprayer bottle with De-ionized Water. Don’t put the sprayer top back on. Cover with your thumb and hold bottle over the cage lid where the plant is. Slowly let some water drip out of the bottle and move the bottle until its dripping in the plant. Once you’re lined up, then let out more water until plant is saturated. (just spaying the plant during morning & night watering isn’t enough, the plant WILL die, it needs its own watering). SaniPlex 128: This is what we mop the floors with. It is diluted 1 ounce to 1 gallon of water. The mop bucket holds 4 gallons of water so it gets 4 oz of SaniPlex.

29
Shelf Labels: Each shelf is assigned a unique letter (or 2 months in the juvenile room). Additionally, each shelf has its own cage exchange log. Species Abbreviations: ANGU = angusticeps CRIS = cristatellus EVER = evermanni SAGR = sagrei SMAR = smaragdinus
PULC = pulchellu LINE = lineatopus GRAH = grahami VALE = valencienni KRUG = krugi
Sprayers: Large sprayers are used to watering the cages. To operate, fill with DI water and replace cap. Pump the handle until you feel resistance. Adjust the sprayer so the water comes out in a slightly confined stream and not a fine mist. Squeeze the handle to spray. Pump the handle when pressure decreases. To refill the container, first you need to release the pressure though the valve on the side (each one is slightly different but usually you pull on it until the hissing stops). Then you are able to remove the cap.
Stacking Cages: Always stack cages on their sides. Having vertical columns of cages makes them get stuck together or broken. Tape Colors: Each color of lab tape has a specific use. The tape is hanging in the hallway with its main use labeled on the wall. Red = Date of Mating Green = Juveniles Blue = Male ID Yellow = Female ID White = Date of egg check Orange = Notes
3
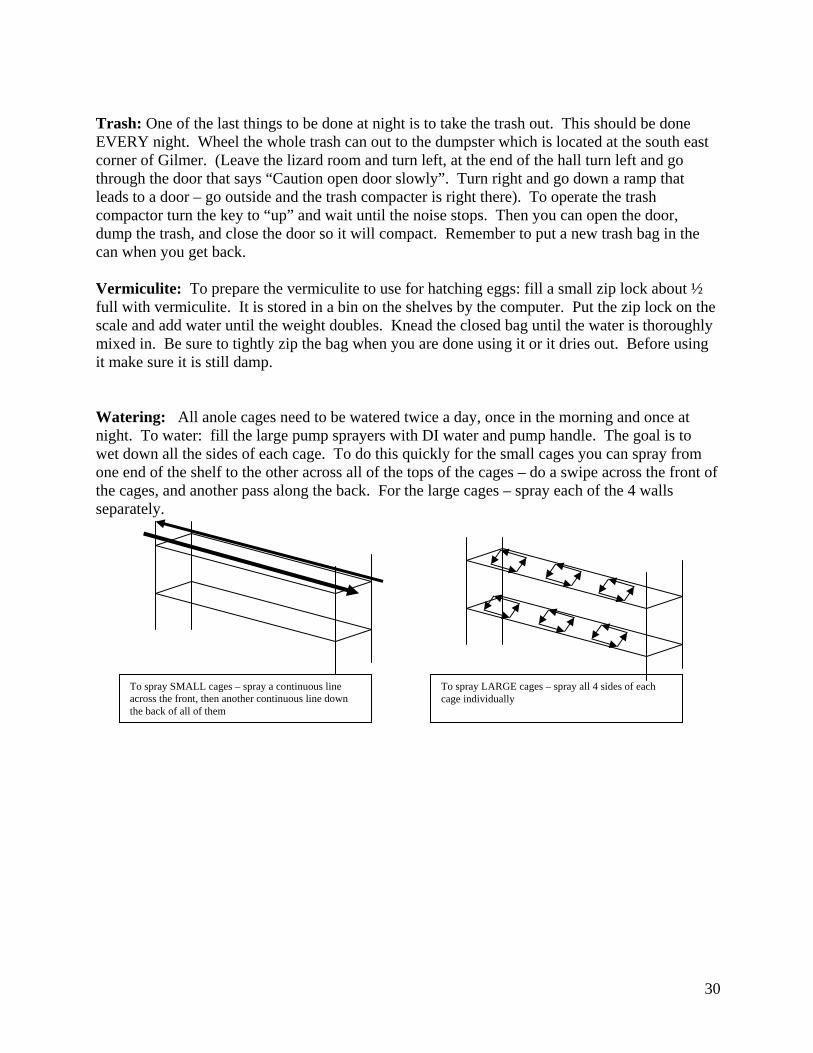
Trash: One of the last things to be done at night is to take the trash out. This should be done EVERY night. Wheel the whole trash can out to the dumpster which is located at the south east corner of Gilmer. (Leave the lizard room and turn left, at the end of the hall turn left and go through the door that says “Caution open door slowly”. Turn right and go down a ramp that leads to a door – go outside and the trash compacter is right there). To operate the trash compactor turn the key to “up” and wait until the noise stops. Then you can open the door, dump the trash, and close the door so it will compact. Remember to put a new trash bag in the can when you get back. Vermiculite: To prepare the vermiculite to use for hatching eggs: fill a small zip lock about ½ full with vermiculite. It is stored in a bin on the shelves by the computer. Put the zip lock on the scale and add water until the weight doubles. Knead the closed bag until the water is thoroughly mixed in. Be sure to tightly zip the bag when you are done using it or it dries out. Before using it make sure it is still damp. Watering: All anole cages need to be watered twice a day, once in the morning and once at night. To water: fill the large pump sprayers with DI water and pump handle. The goal is to wet down all the sides of each cage. To do this quickly for the small cages you can spray from one end of the shelf to the other across all of the tops of the cages – do a swipe across the front of the cages, and another pass along the back. For the large cages – spray each of the 4 walls separately.
To spray SMALL cages – spray a continuous line across the front, then another continuous line down the back of all of them
To spray LARGE cages – spray all 4 sides of each cage individually
30