Embed Size (px)
DESCRIPTION
Â
Citation preview

GIANT ARM KNIT BUNNY by anne weil
This pattern is for home use only, not for resale.Copyright 2015 Anne Weil www.flaxandtwine.com
Imagine riding a gigantic bunny across the country side? Your kiddo will be over the moon with this fabulous oversized bunny. Let her imagination run wild while she snuggles and plays with her new favorite pal.

pg 2
patternlarge bunnyBody: Cast on 14 sts, leaving two yds to seam up the bunny.Knit 2 rows.Row 3: Increase 1 stitch at each end (16 sts).Knit 3 rows.Row 7: Increase 1 stitch at each end (18 sts).Knit 3 rows.Row 11: Increase 1 stitch at each end (20 sts).Knit 3 rows.Row 15: Increase 1 stitch at each end (22 sts).Knit 15 rows. Bind off. Set aside body piece.
Head: Cast on 8 stitches.Knit for 7 rows. Dec. at each end of next row by knitting two sts tog (k2tog) (6 sts).Dec. at each end of following row by k2tog (4 sts).Knit 1 row.Increase at each end of next row (6 sts).Increase at each end of following row (8 sts). Knit 7 rows.Keep 8 stitches on your arm and continue pattern making ears.
This pattern is for home use only, not for resale.Copyright 2015 flax & twine
skill levelIntermediate
techniques:: Arm Knitting (See Arm Knitting How To PDF):: Increase stitches (see page 4) :: Decrease stitches (see page 4) :: Mattress stitch (see page 5)
materials :: Stuffing for head and body. Try quilting batting or old blanket or alternative down comforter in the color of yarn.:: 2 large black buttons:: 30-50 yds(27-47 m) of super bulky yarn for tail and nose. :: 5 yards 18 gauge wire for ears (optional)
large bunny730 yds (667m) of super bulky yarn (minimum of 2.0 stitches to the inch or fewer in traditional knitting gauge). Hold 4 strands at one time. 4 x 185 yard (169 m) lengths req’d (instructions how to add yarn mid-project in Arm Knitting How-To PDF)
small bunny360 yds (329m) of super bulky yarn that is a minimum of 2.0 stitches to the inch (or fewer) in traditional knitting gauge. Hold 4 strands. 4 x 90 yard (82 m) lengths for pattern.
tools:: darning needle:: piece of 4x5 inch cardboard for pom-pom tail:: scissors
GIANT ARM KNIT BUNNY yarn used large bunny:: 6 skeins Cascade Magnum in Ecru, 123 yd (112.5m), 8.82 oz (250g), 100% wool for large bunny:: 1 skein Madelinetosh ASAP in Molly Ringwald, 90 yd (82 m),3.5oz (100g)
small bunny:: 8 skeins Blue Sky Alpaca Bulky in Porcupine (45 yd [41m]/ 31⁄2 oz [100g]) 50% alpaca/ 50% wool
sizes and measurements20” widex36’” long x 18” high (o.6m w x 1.2m l x 0.5m h)
abbreviationsK: knit, P: purl; K1: knit 1 stitch, P1: purl 1 stitch; Sts: stitches; K2tog: knit 2 stitches together; Dec: Decrease
yarn preparationWork with 4 strands of super bulky yarn at the same time. With the cascade magnum, I wound all the skeins into balls at the beginning. The bunny body takes approximately 140-yards of 4 strands held together, so you will need the next two skeins before you’re done knitting the body. To create four strands from my two extra skeins, I knit with the strand from the center and the strand from the outside of the wound ball at the same time. If you can’t work directly from the skeins, it may be easiest to divide your additional skeins in half (by measuring or by weight) before you start, so you always have 4 strands of yarn at hand to work with .

pg 3
pattern ctd.Ears Remove the work from your arm and turn the piece around so the purl side is facing you. Put the first 4 sts onto a piece of scrap yarn or paper towel tube (A).
Place the next 4 sts onto your right arm with the working yarn at your hand (B). Knit 1 row.Knit 1, K2 tog, knit 1 (3 sts). Knit 1, increase 1 stitch, knit 1, increase 1 stitch, knit 1 (5 sts).Knit 4 rows.k2 tog, knit 1, k2tog (3 sts). Knit 1, k2tog (2 sts).Pull yarn through last two stitches (C).
Place the 4 sts on your holder back on to your right arm. Bring new yarn into your right hand (D) and follow the steps above for the second ear. Weave in all ends. Body Assembly:: Lay out body piece with purl side up with the wider part towards you (E).:: Fold center of bottom edge towards middle forming two legs (F).:: Seam bottom legs together with the mattress stitch, sewing underneath a stitch on the left (G) then a stitch on the right (H) up the length of the leg.:: Fold center of top edge towards middle forming two front legs (I).:: Seam front legs together with the mattress stitch.:: Stuff body with quilting batting or twin alternative down comforter in color of yarn (if desired, wrap batting or filling in fabric in color of yarn). Seam up belly with mattress stitch (J).:: Fold back legs up towards front of bunny and secure to body with yarn (K). :: Weave in all ends.
This pattern is for home use only, not for resale.Copyright 2015 flax & twine
GIANT ARM KNIT BUNNY A B C D
E F G H
IJ K L
M N O P
Head Assembly:: Fold head in half with ears in front (L). :: Use cast on tail to seam together sides of head with mattress stitch (M). :: Stuff head with quilting batting (wrap batting in fabric in color of yarn) and use mattress stitch to seam top of head (N).:: Use 4 strands of yarn to attach head to body by sewing around the head collecting a stitch from the head and a stitch from the body, creating a neck (O). Secure additionally to position head.:: Bring base of ears together with a loop of knotted yarn (P). Weave in all ends.:: Sew button eyes on to face. Embroider yarn in contrasting color multiple times across one stitch to create nose.:: Make a large pom pom for tail by wrapping 40 yards of yarn around 5” piece of cardboard. Remove cardboard. Tightly tie a short piece of yarn around center of bundle. Cut loop ends on both sides and trim to desired shape. Attach to bunny bottom.:: Optional: To allow ears to stand up and be shaped, thread wire in and around the stitches of the outside of each ear. Tuck in ends.
pg 4
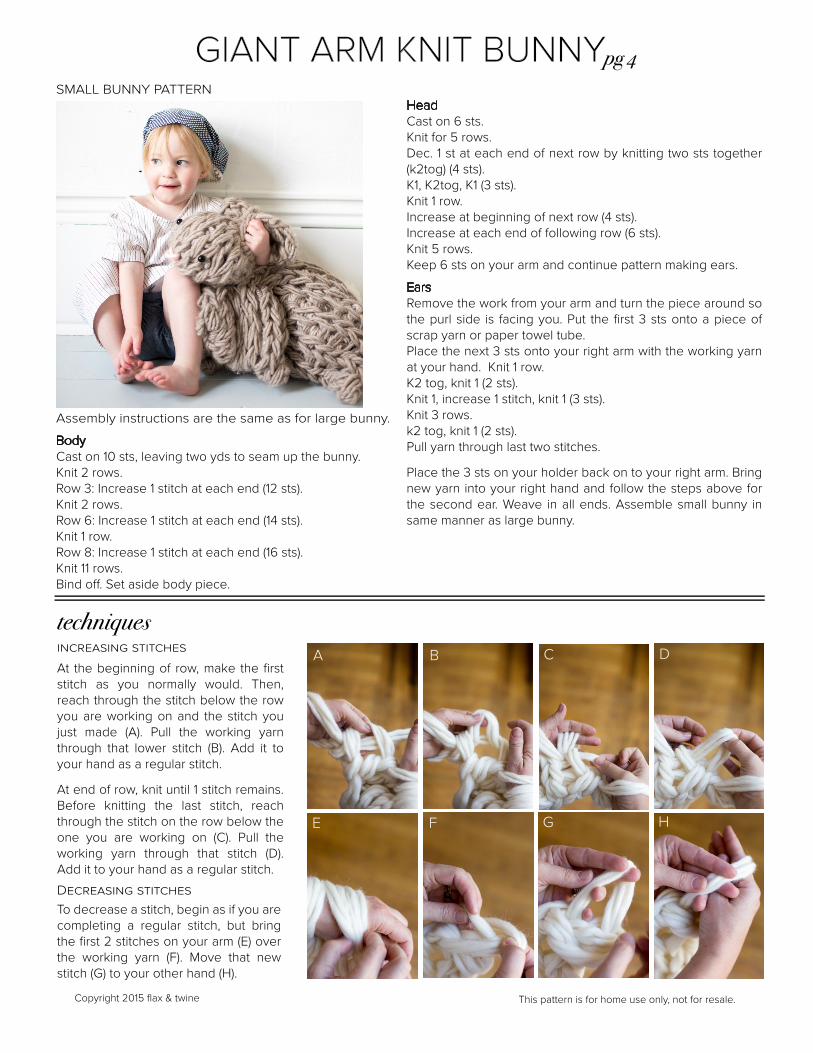
techniquesincreasing stitches
At the beginning of row, make the first stitch as you normally would. Then, reach through the stitch below the row you are working on and the stitch you just made (A). Pull the working yarn through that lower stitch (B). Add it to your hand as a regular stitch.
At end of row, knit until 1 stitch remains. Before knitting the last stitch, reach through the stitch on the row below the one you are working on (C). Pull the working yarn through that stitch (D). Add it to your hand as a regular stitch.
This pattern is for home use only, not for resale.Copyright 2015 flax & twine
GIANT ARM KNIT BUNNYSMALL BUNNY PATTERN
Assembly instructions are the same as for large bunny.
Body Cast on 10 sts, leaving two yds to seam up the bunny.Knit 2 rows.Row 3: Increase 1 stitch at each end (12 sts).Knit 2 rows.Row 6: Increase 1 stitch at each end (14 sts).Knit 1 row.Row 8: Increase 1 stitch at each end (16 sts).Knit 11 rows.Bind off. Set aside body piece.
A B C D
E F G H
Decreasing stitchesTo decrease a stitch, begin as if you are completing a regular stitch, but bring the first 2 stitches on your arm (E) over the working yarn (F). Move that new stitch (G) to your other hand (H).
Head Cast on 6 sts.Knit for 5 rows. Dec. 1 st at each end of next row by knitting two sts together (k2tog) (4 sts).K1, K2tog, K1 (3 sts).Knit 1 row.Increase at beginning of next row (4 sts).Increase at each end of following row (6 sts). Knit 5 rows.Keep 6 sts on your arm and continue pattern making ears.
Ears Remove the work from your arm and turn the piece around so the purl side is facing you. Put the first 3 sts onto a piece of scrap yarn or paper towel tube.Place the next 3 sts onto your right arm with the working yarn at your hand. Knit 1 row.K2 tog, knit 1 (2 sts). Knit 1, increase 1 stitch, knit 1 (3 sts).Knit 3 rows.k2 tog, knit 1 (2 sts). Pull yarn through last two stitches.
Place the 3 sts on your holder back on to your right arm. Bring new yarn into your right hand and follow the steps above for the second ear. Weave in all ends. Assemble small bunny in same manner as large bunny.

pg 5
techniques ctd.Mattress stitch End to EndJoin the bound-off and cast-on edge together with this invisible seam.
Line the two ends next to each other stitch for stitch (A). Bring the seaming yarn under and around the first stitch or V shape on the left hand edge. Bring yarn across and go under and around the first stitch on the right hand side (B). Bring your seaming yarn from side to side up the entire length of the fabric (C). Tighten the seaming yarn as desired (D). Either match the size of the stitches throughout the whole work or pull the seaming yarn taut to bring the two edges together (don’t pull too tight or it will bunch your end). Weave in ends.
Mattress Stitch End to SideJoin one side and one end of two knit pieces of fabric together with this invisible seam.
Line two pieces of knitting up side to end. Bring your seam-ing yarn under the bottom of the first stitch on one side. Then go under and around the V shape on the other side. Alternate your seaming stitches from side to side. Pull taut.
Mattress Stitch Side to SideJoin the sides of two knit pieces of fabric together with this invisible seam.
Line the two pieces up side by side, sitich for stitch (E). Bring your seaming yarn under the bottom of the first stitch on the left-hand edge, then go under the bottom of the first stitch on the right-hand side (F). Alternate your seaming stitches from side to side (G). Pull taut (H).
This pattern is for home use only, not for resale.Copyright 2015 flax & twine
GIANT ARM KNIT BUNNY
B
C D
A
AB
C
D
F
G H
E
Tips & Tricks
This pattern is for home use only, not for resale.Copyright 2015 Anne Weil www.flaxandtwine.com
how to open an unwound skein of yarnWhen you purchase an unwound skein of yarn, you have to open it up and rewind it.
1. Gently untwist the yarn and remove the label. The yarn will be in a large loop. Don’t try to use the yarn directly from the loop. You need to rewind the yarn into a ball you can knit from.2. The easiest way to rewind the yarn is to place the loop on a yarn swift (which basically holds the loop of yarn open to keep it from tangling) and then to rewind it into a ball. If you don’t have a swift, it’s easiest if you have a friend hold the loop on their hands while you wind the ball. Other options are to put the loop over a chair back. This helps keep the loop of yarn from tangling. Undo the ties that hold the loop.3.. If you don’t have a ball winder (which will make winding easier), start winding the yarn on your fingers. Start by wrapping the yarn around two or three of your fingers about 20 times. Once you get a bit of yarn wound around your fingers, slide the yarn off your fingers.4. Turn this small loop to the side and start to wrap the yarn around the middle of the loop.5. Turn the ball again and continue to wrap the yarn around the loop. 6. Turn the ball again and continue to wind the yarn until your starter loop is covered.7. Continue to wind the yarn turning the ball in all directions so you end up with a round shape until all the yarn is wound.
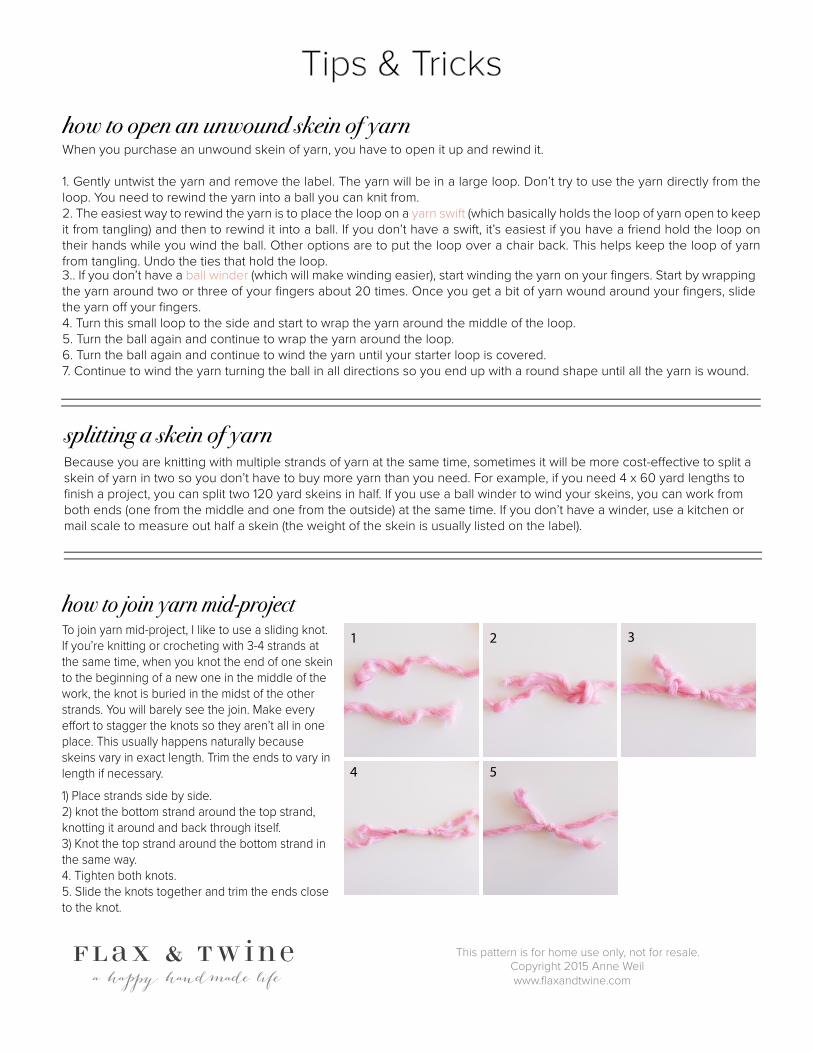
how to join yarn mid-projectTo join yarn mid-project, I like to use a sliding knot. If you’re knitting or crocheting with 3-4 strands at the same time, when you knot the end of one skein to the beginning of a new one in the middle of the work, the knot is buried in the midst of the other strands. You will barely see the join. Make every effort to stagger the knots so they aren’t all in one place. This usually happens naturally because skeins vary in exact length. Trim the ends to vary in length if necessary.
1) Place strands side by side.2) knot the bottom strand around the top strand, knotting it around and back through itself.3) Knot the top strand around the bottom strand in the same way.4. Tighten both knots.5. Slide the knots together and trim the ends close to the knot.
1 2 3
4 5
splitting a skein of yarnBecause you are knitting with multiple strands of yarn at the same time, sometimes it will be more cost-effective to split a skein of yarn in two so you don’t have to buy more yarn than you need. For example, if you need 4 x 60 yard lengths to finish a project, you can split two 120 yard skeins in half. If you use a ball winder to wind your skeins, you can work from both ends (one from the middle and one from the outside) at the same time. If you don’t have a winder, use a kitchen or mail scale to measure out half a skein (the weight of the skein is usually listed on the label).
Connect With Me!
Looking for a kit? www.flaxandtwineshop.com
Blog: www.flaxandtwine.com
Anne Weil designs knitting and crochet patterns as well as craft projects for the modern maker. She writes the blog Flax & Twine (www.flaxandtwine.com) and is author of the book Knitting Without Needles: A Stylish Introduction to Finger and Arm Knitting. Anne teaches how to apply traditional knitting and crochet techniques to by hand creations (no tools required! Anne is a freelance contributor for Mar-thaStewart.com. Her projects have been published in Woman’s Day, Sweet Paul Magazine and Mollie Makes. She has been featured on Design*Sponge, Camille Styles, Apartment Therapy and more. Anne teaches classes nationwide, as well as online at Creativebug.com.
Want the latest happenings at Flax & Twine? http://bit.ly/flaxandtwinenewsletter
Want more great patterns? buy my book: http://amzn.to/1QLjpPt
Do you prefer video tutorials? http://bit.ly/anneweilcreativebug
Searching for charming DIYs?www.flaxandtwine.com
Instagram: www.instagram/flaxandtwineFacebook: www.facebook.com/flaxandtwine
Twitter: www.twitter.com/flaxandtwineRavelry: www.ravelry.com/flaxandtwine
Pinterest: www.pinterest.com/flaxandtwine
Email: [email protected]


![HEARTLINE KNIT WRAP | KNIT · 2018. 5. 11. · HEARTLINE KNIT WRAP | KNIT 2 of 2 HEARTLINE KNIT WRAP | KNIT CAK0126-010003M measures approx 58" [147.5 cm], ending on a WS row with](https://img.pdfslide.us/doc/110x75/5fd034989f28e2726c32dbf7/heartline-knit-wrap-knit-2018-5-11-heartline-knit-wrap-knit-2-of-2-heartline.jpg)