Embed Size (px)
Citation preview
8/3/2019 Agila Owners Manual Jul06
http://slidepdf.com/reader/full/agila-owners-manual-jul06 1/168
AGILAOperation, Safety and Maintenance
Owner’s Manual

8/3/2019 Agila Owners Manual Jul06
http://slidepdf.com/reader/full/agila-owners-manual-jul06 2/168
VAUXHALL Agila
Owner’s Manual
8/3/2019 Agila Owners Manual Jul06
http://slidepdf.com/reader/full/agila-owners-manual-jul06 3/168
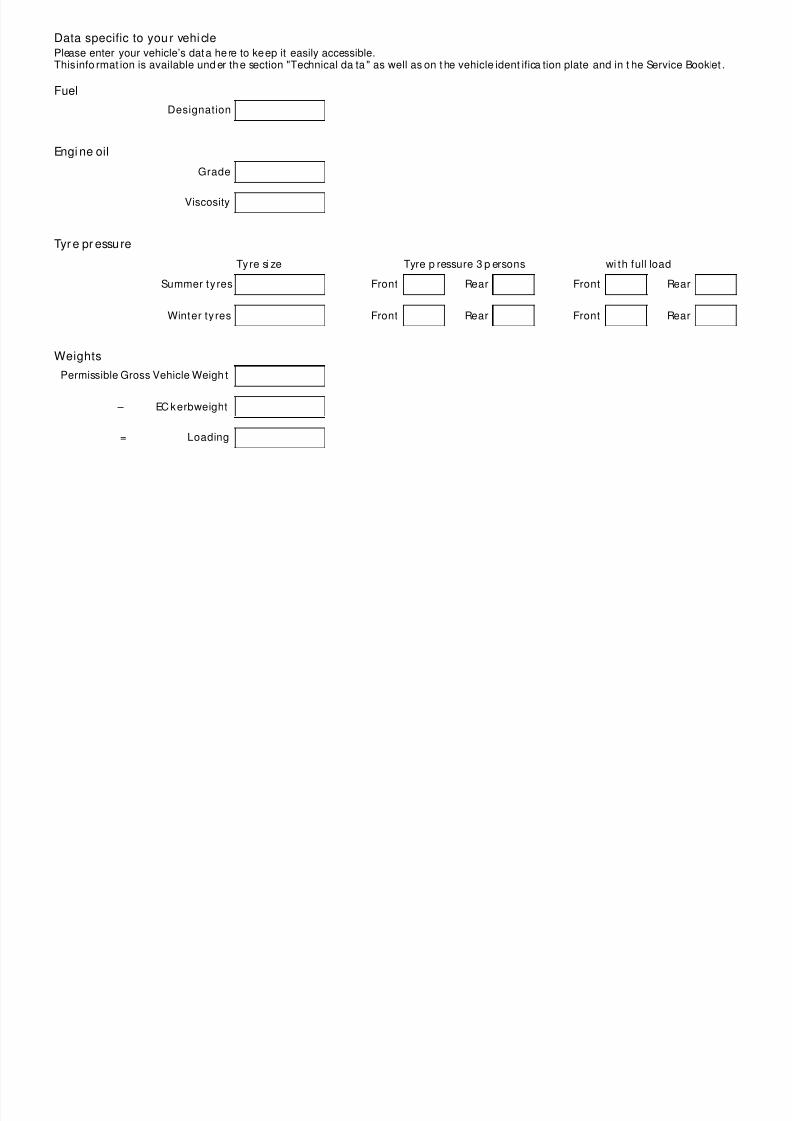
Data specific to you r vehicle
Please enter your vehicle’s data here to keep it easily accessible.This info rmat ion is available und er the section "Technical da ta " as well as on t he vehicle ident ifica tion plate and in t he Service Booklet .
Fuel
Designation
Engi ne oil
Grade
Viscosity
Tyr e pr essure
Tyre si ze Tyre p ressure 3 p ersons wi th full load
Summer ty res Front Rear Front Rear
Winter ty res Front Rear Front Rear
Weights
Permissible Gross Vehicle Weigh t
– EC kerbweight
= Loading
8/3/2019 Agila Owners Manual Jul06
http://slidepdf.com/reader/full/agila-owners-manual-jul06 4/168
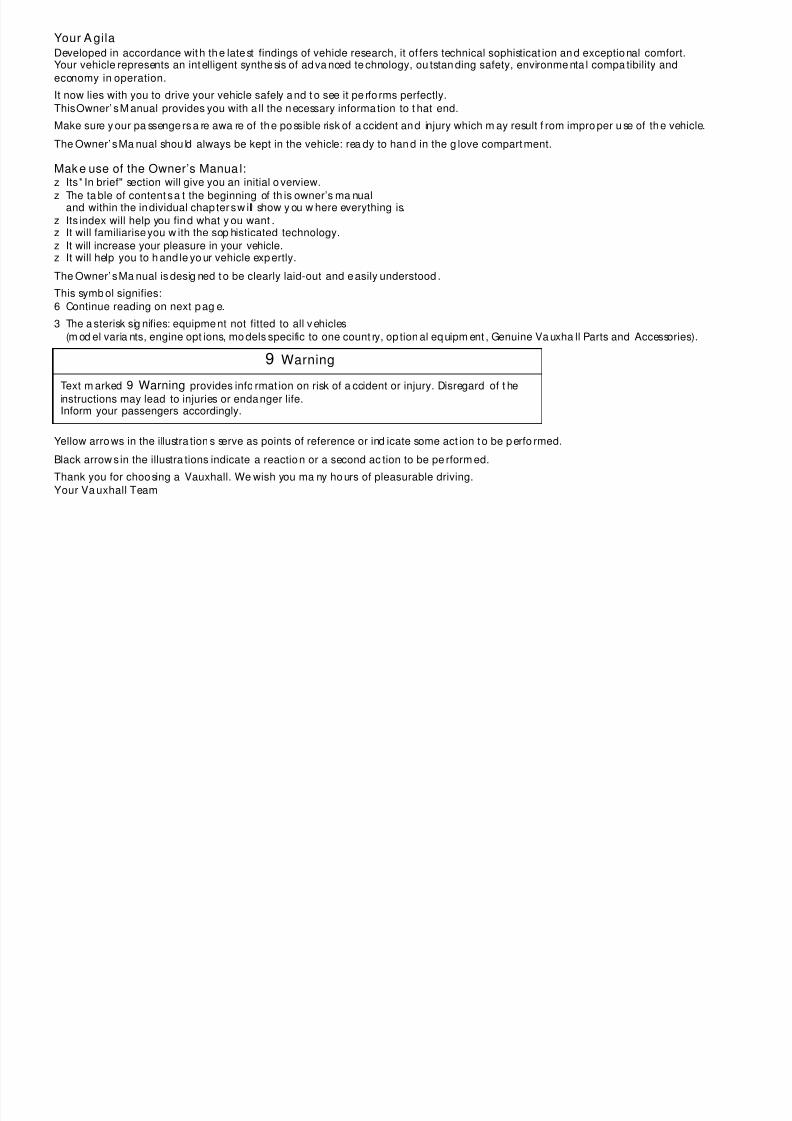
Your A gila
Developed in accordance with the latest findings of vehicle research, it of fers technical sophisticat ion and exceptional comfort.Your vehicle represents an intelligent synthesis of adva nced te chnology, ou tstan ding safety, environme nta l compa tibility and
economy in operation.
It now lies with you to drive your vehicle safely and t o see it pe rfo rms perfectly.
This Owner’ s M anual provides you with a ll the necessary informa tion to t hat end.
Make sure y our pa ssengers a re awa re of the possible risk of a ccident and injury which m ay result f rom impro per u se of the vehicle.
The Owner’ s Ma nual shou ld always be kept in the vehicle: rea dy to han d in the g love compartment.
Make use of the Owner’s Manua l:z Its " In brief" section will give you an initial o verview.
z The ta ble of content s a t the beginning of th is owner’s ma nualand within the individual chap ters w ill show y ou w here everything is.
z Its index will help you find what y ou want .z It will familiarise you w ith the sop histicated technology.
z It will increase your pleasure in your vehicle.z It will help you to h and le yo ur vehicle expertly.
The Owner’ s Ma nual is desig ned to be clearly laid-out and easily understood .This symb ol signifies:
6 Continue reading on next pag e.
3 The a sterisk sig nifies: equipment not fitted to all vehicles
(m od el varia nts, engine opt ions, mo dels specific to one count ry, op tion al equipm ent , Genuine Va uxha ll Parts and Accessories).
Yellow arrows in the illustra tion s serve as points of reference or ind icate some act ion to be perfo rmed.
Black arrow s in the illustra tions indicate a reaction or a second ac tion to be pe rform ed.
Thank you for choosing a Vauxhall. We wish you ma ny ho urs of pleasurable driving.
Your Va uxhall Team
9 Warning
Text m arked 9 Warning provides info rmat ion on risk of a ccident or injury. Disregard of t he
instructions may lead to injuries or endanger life.
Inform your passengers accordingly.
8/3/2019 Agila Owners Manual Jul06
http://slidepdf.com/reader/full/agila-owners-manual-jul06 5/168
8/3/2019 Agila Owners Manual Jul06
http://slidepdf.com/reader/full/agila-owners-manual-jul06 6/168
Contents Comm itment to customersatisfaction:Our aim: to k eep you happy with your
vehicle. All V auxhall Authorised Repa irersoffer first class service at compet itive
prices. Experienced, factory-trainedtechnicians w ork according to facto ry
instructions.Your Authorised Repairer cansupply you with GENUINE VAUXHALL-APPROVED PARTS, which hav e undergonestringent qualit y and precision checks, and
of course useful and a ttrac tiveVAUXHALL-APPROVED ACCESSORIES.
Our name is you r guara ntee!
For d eta ils of t he
Va uxha ll Aut horised Rep airer Networkplease ring t his number; 01582 - 427200
In Brief ........................................................ 2
Inst ruments ............................................. 18
Keys, Doors, Bonnet ............................. .. 28
Seat s, Interior ........................... .... ........... 39
Safety system s ......................... .... ........... 50
Light ing ..... ......... .... .... ............................. 66
Windows, Sun roof ................................. 69
Clim at e control ....................................... 72Driving Hint s ........................................... 82
Saving fuel,
Prote cting the environmen t ............... 84
Fuel consum pt ion,
Fue l, Refuelling ................................... 8 6
Cata lytic converter, Exhaust gases ...... 88
Brakes ........ ......... .... .... ............................. 9 2
Wheels, Tyres .......................................... 96
Roof racks,
Carava n and tra iler towing ............ 102Self -help ............. .... .... ........................... 106
If you have a prob lem .......................... 128
Maintenance,
Inspection System ............................. 130
Vehicle care .......................................... 140
Technical Dat a ..................................... 144
Inde x ..... .................................... .... ......... 158

8/3/2019 Agila Owners Manual Jul06
http://slidepdf.com/reader/full/agila-owners-manual-jul06 7/168
2 In Brief
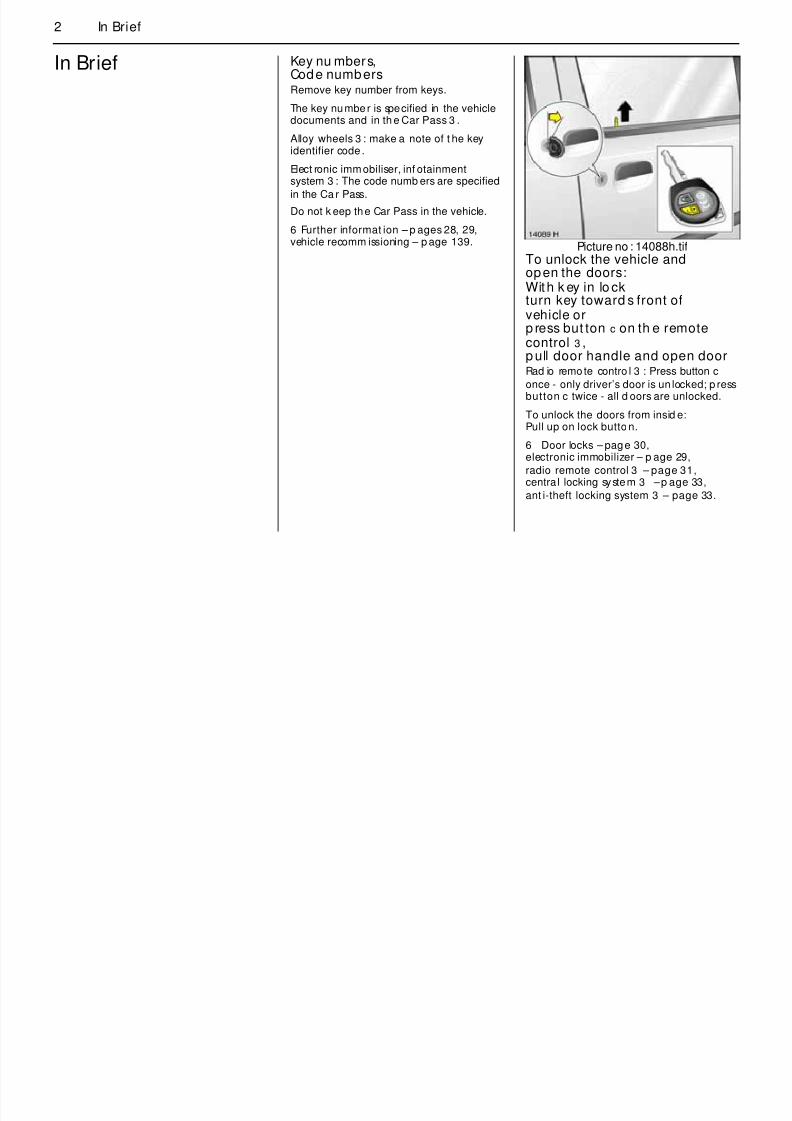
In Brief Key nu mbers,Code numbersRemove key number from keys.
The key number is specified in the vehicledocuments and in th e Car Pass 3 .
Alloy wheels 3 : make a note of t he keyidentifier code .
Elect ronic immobiliser, inf otainmentsystem 3 : The code numb ers are specified
in the Ca r Pass.
Do not k eep the Car Pass in the vehicle.
6 Further informat ion – p ages 28, 29,vehicle recomm issioning – p age 139. Picture no : 14088h.tif
To unlock the vehicle and
open the doors:With k ey in lo ckturn key toward s front ofvehicle orp ress but ton c on th e remotecontrol 3 ,p ull door handle and open doorRad io remote contro l 3 : Press button conce - only driver’s door is un locked; p ressbutton c twice - all d oors are unlocked.
To unlock the doors from insid e:Pull up on lock butto n.
6 Door locks – page 30,electronic immobilizer – p age 29,
radio remote control 3 – page 31,centra l locking system 3 – p age 33,
ant i-theft locking system 3 – page 33.
8/3/2019 Agila Owners Manual Jul06
http://slidepdf.com/reader/full/agila-owners-manual-jul06 8/168
3In Brief
Picture no: 13471h.tifTo unlock and o pen
the lugga ge compartm ent:Turn the key ant iclockwise t ohorizo ntal p osition and b ackto t he vertical positionAlternatively press butt on c on the remotecontrol 3 twice, press butt on an d ope n
tailgate
6 Mechanical unlocking – page 30,
radio remote control 3 – page 31,central locking system 3 – page 33,
tailgate – pag e 30.
Pict ure no: 13457h.tifFront sea t adjustment :
Pull hand le,slide seat,release handle,audibly engage seat in positionNever adjust t he seat while driving . It couldmove in a n uncont rolled mann er when th e
handle is pu lled.
6 Seat po sition – page 39,
sto rage t ray under seat 3 – page 46.
Picture no : 13458h.tifTo adjust t he front seat
backrest:Turn t he ha ndwheelMove seat bac krest to suit sea ting po sition .
Do not lea n on seat backrest whilst
adjusting it.
6 Sea t position – p age 39,
folding t he f ront passenger seat – page 42.
9 Warning
Do not sit nearer than 10 inches (25 cm)from the steering wheel, to p ermit safe
airbag deployment.
8/3/2019 Agila Owners Manual Jul06
http://slidepdf.com/reader/full/agila-owners-manual-jul06 9/168
4 In Brief
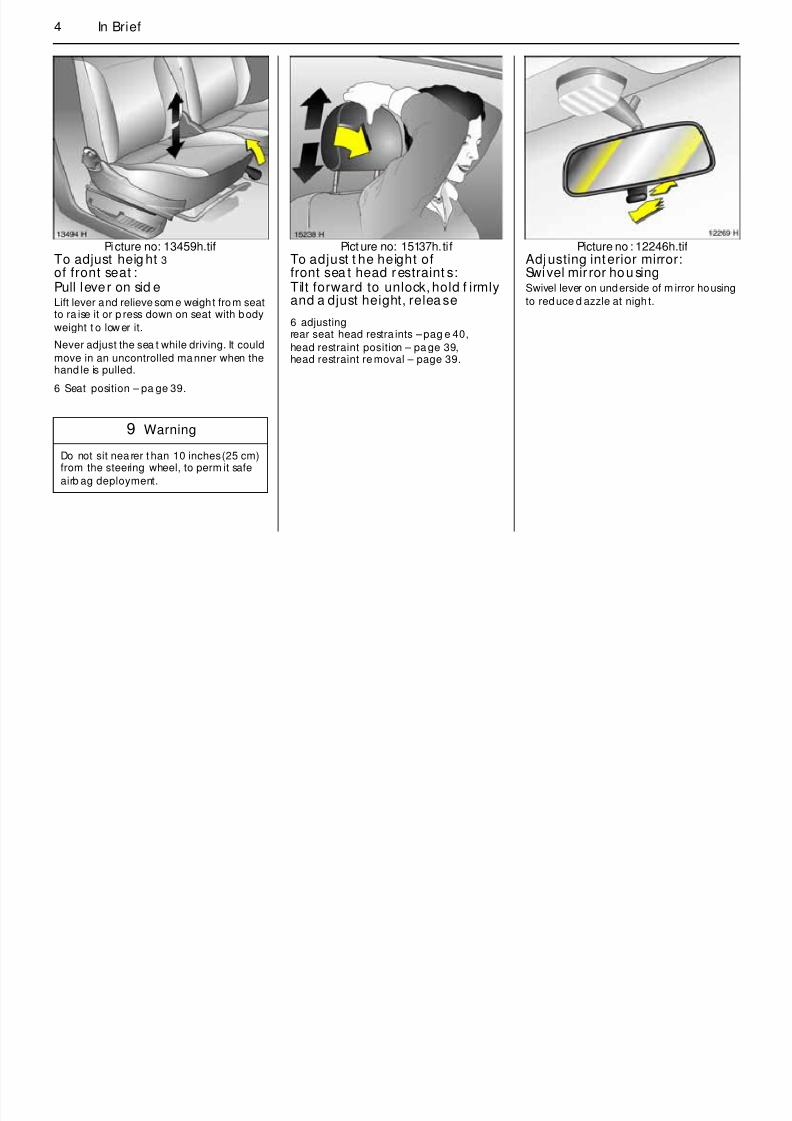
Picture no: 13459h.tifTo adjust heig ht 3
of front seat :Pull lever on sid eLift lever and relieve som e weight from seatto ra ise it or p ress down on seat with body
weight t o low er it.
Never adjust the sea t while driving. It could
move in an uncontrolled manner when thehand le is pulled.
6 Seat position – pa ge 39.
Pict ure no: 15137h.tifTo adjust t he height of
front sea t head restraint s:Tilt forward to unlock, hold f irmlyand a djust height, relea se
6 adjustingrear seat head restra ints – pag e 40,
head restraint position – pa ge 39,head restraint re moval – page 39.
Picture no : 12246h.tifAdjusting interior mirror:
Swivel mir ror hou singSwivel lever on underside of m irror housing
to reduce d azzle at nigh t.
9 Warning
Do not sit nea rer t han 10 inches (25 cm)from the steering wheel, to perm it safe
airb ag deployment.
8/3/2019 Agila Owners Manual Jul06
http://slidepdf.com/reader/full/agila-owners-manual-jul06 10/168
5In Brief
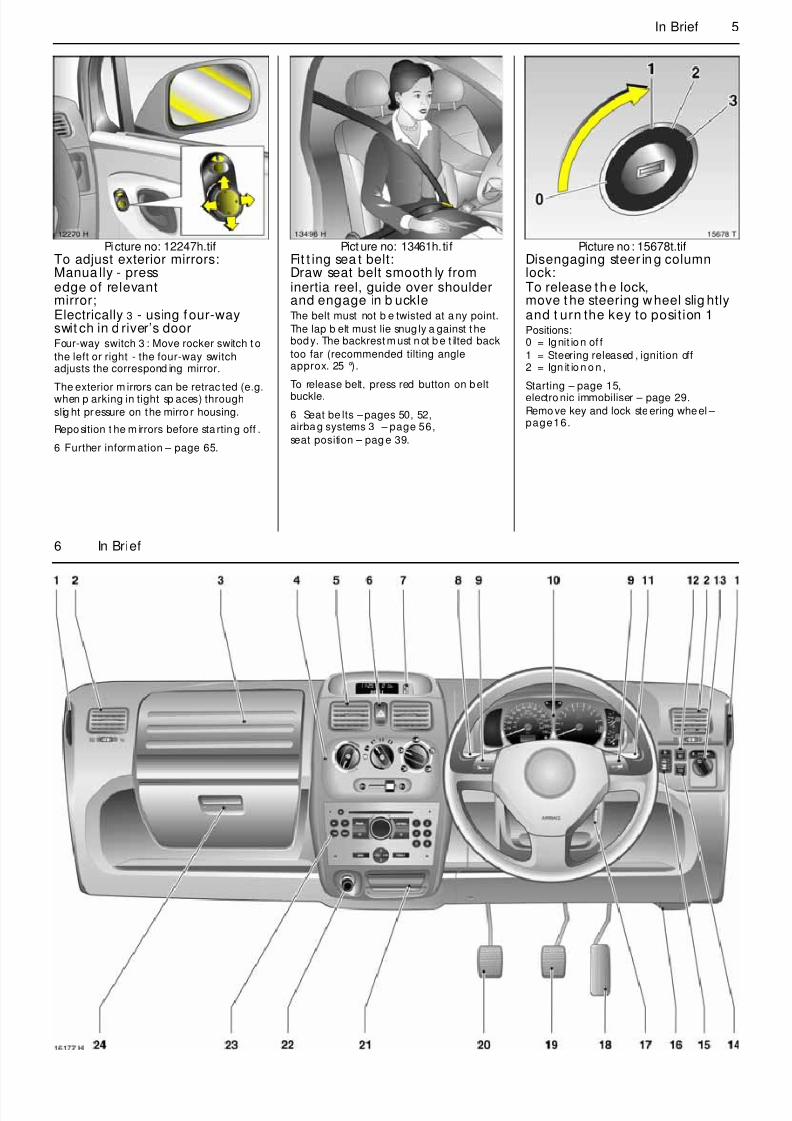
Picture no: 12247h.tifTo adjust exterior mirrors:
Manua lly - pressedge of relevantmirror;Electrically 3 - using four-wayswit ch in d river’s doorFour-way switch 3 : Move rocker switch t o
the left or right - the four-way switchadjusts the correspond ing mirror.
The exterior m irrors can be retrac ted (e.g.when p arking in tight sp aces) through
slig ht pressure on the mirro r housing.Reposition t he m irrors before sta rting off .
6 Further inform ation – page 65.
Pict ure no: 13461h.tifFit t ing sea t belt:
Draw seat belt smooth ly frominertia reel, guide over shoulderand engage in b uckleThe belt must not b e twisted at a ny point.
The lap b elt must lie snug ly a gainst t hebody. The backrest m ust n ot b e t ilted back
too far (recommended tilting angleapprox. 25 °).
To release belt, press red button on beltbuckle.
6 Seat be lts – pages 50, 52,airbag systems 3 – page 56,
seat position – pag e 39.
Picture no: 15678t.tifDisengaging steer in g column
lock:To release th e lock,move t he steering wheel slig htlyand t urn the key to position 1Positions:0 = Ignit ion of f
1 = Steering released , ignition off2 = Ign it io n o n ,
Starting – page 15,electro nic immobiliser – page 29.
Remove key and lock steering wheel – page16.
8/3/2019 Agila Owners Manual Jul06
http://slidepdf.com/reader/full/agila-owners-manual-jul06 11/168
6 In Brief

8/3/2019 Agila Owners Manual Jul06
http://slidepdf.com/reader/full/agila-owners-manual-jul06 12/168
7In Brief
Page
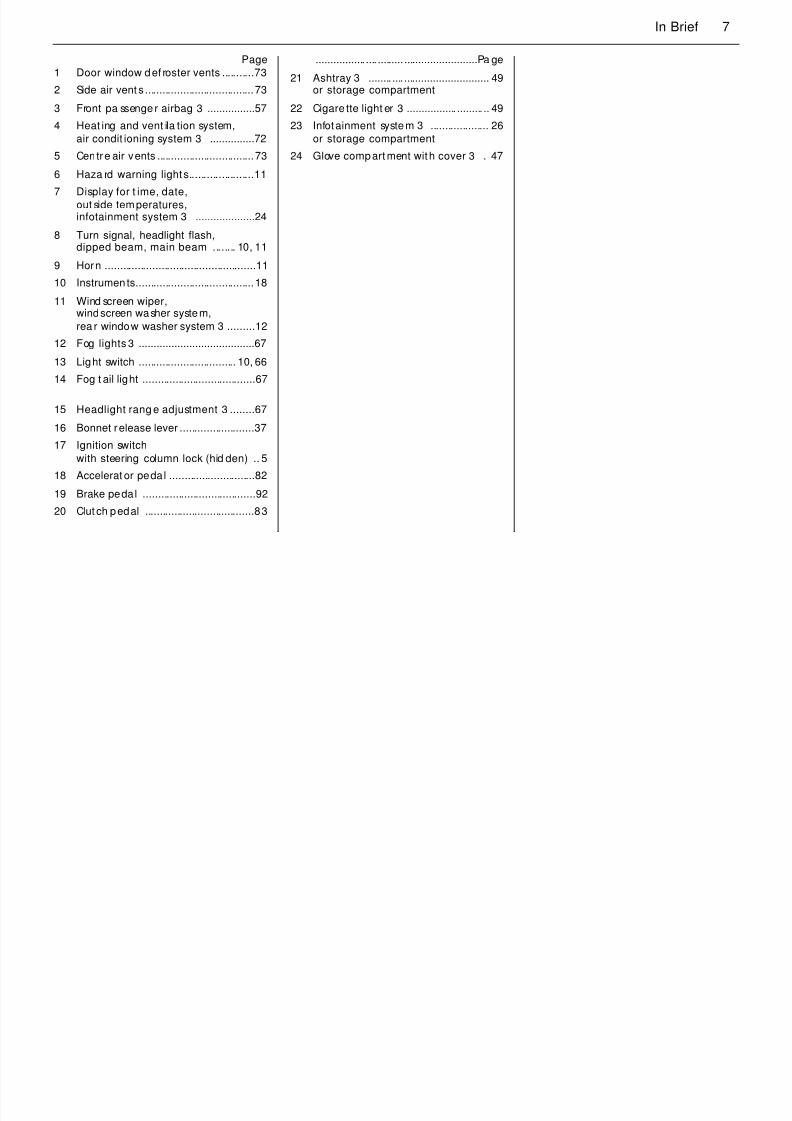
1 Door window def roster vents ...........73
2 Side air vent s .....................................73
3 Front pa ssenger airbag 3 ................57
4 Heat ing and vent ila tion system,
air condit ioning system 3 ...............725 Centre air vents .................................73
6 Haza rd warning lights......................11
7 Display for t ime, date,
out side temperatures,infotainment system 3 ....................24
8 Turn signal, headlight flash,dipped beam, main beam ........ 10, 11
9 Horn ...................................................11
10 Instrumen ts........................................18
11 Wind screen wiper,windscreen washer system,
rea r window washer system 3 .........12
12 Fog lights3 .......................................67
13 Light switch ................................. 10, 66
14 Fog t ail light ......................................67
15 Headlight rang e adjustment 3 ........67
16 Bonnet release lever .........................37
17 Ignition switch
with steering column lock (hid den) .. 5
18 Accelerat or pedal .............................82
19 Brake pedal ......................................92
20 Clut ch pedal .....................................83
................. .... ......... .........................Pa ge
21 Ashtray 3 ........ .... ............................. 49or storage compartment
22 Cigare tte light er 3 ................. ......... .. 49
23 Infotainment system 3 .................... 26
or storage compartment24 Glove compart ment with cover 3 . 47
7
8/3/2019 Agila Owners Manual Jul06
http://slidepdf.com/reader/full/agila-owners-manual-jul06 13/168
8 In Brief
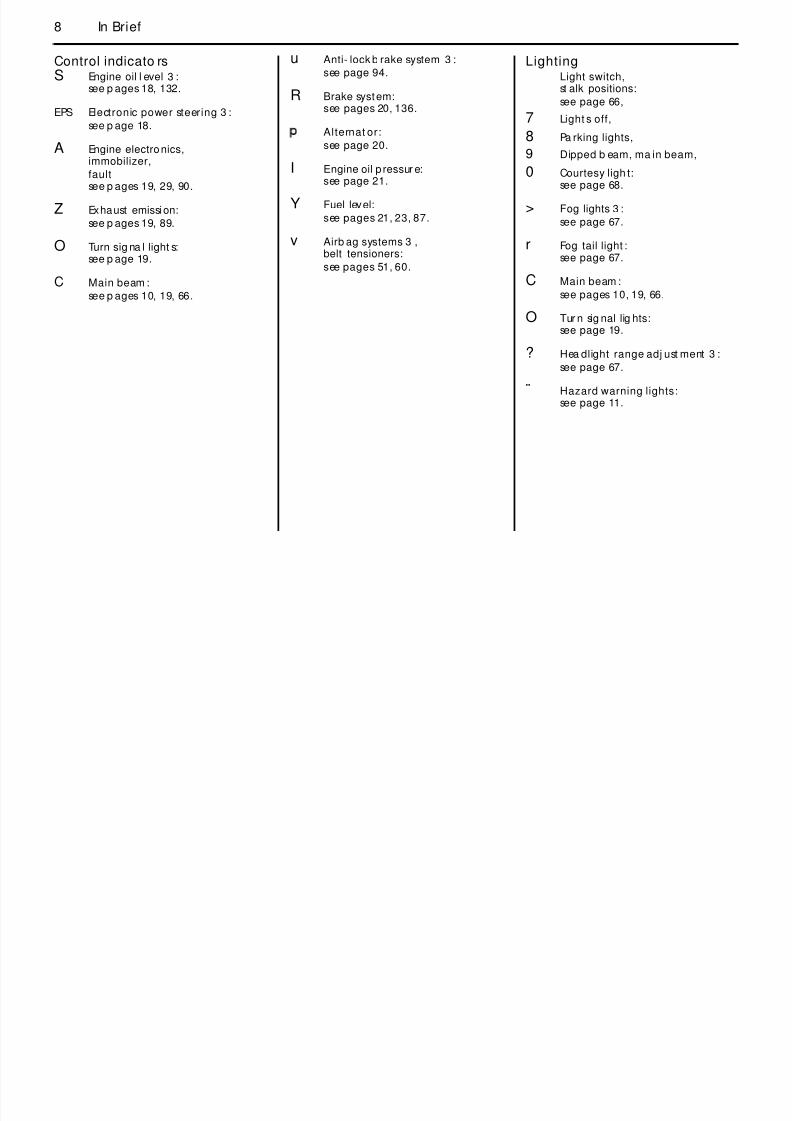
Control indicato rsS Engine oil l evel 3 :
see p ages 18, 132.
EPS Electronic power steering 3 :
see p age 18.
A Engine electronics,immobilizer,
faultsee p ages 19, 29, 90.
Z Exhaust emissi on:
see p ages 19, 89.
O Turn sig na l light s:see p age 19.
C Main beam :see p ages 10, 19, 66.
u Anti- lock b rake system 3 :
see page 94.
R Brake system:see pages 20, 136.
p Alternat or:
see page 20.
I Engine oil p ressur e:see page 21.
Y Fuel level:
see pages 21, 23, 87.
v Airb ag systems 3 ,belt tensioners:
see pages 51, 60.
LightingLight switch,st alk positions:
see page 66,
7 Light s off,
8 Pa rking lights,9 Dipped b eam, ma in beam,
0 Courtesy ligh t:see page 68.
> Fog lights 3 :
see page 67.
r Fog tail light :see page 67.
C Main beam :see pages 10, 19, 66.
O Tur n sig nal lig hts:see page 19.
? Hea dlight range adj ust ment 3 :
see page 67.
¨ Hazard warning lights:see page 11.
8/3/2019 Agila Owners Manual Jul06
http://slidepdf.com/reader/full/agila-owners-manual-jul06 14/168
9In Brief
Clima te controlx Air flow:
see p age 75.
Air distribution:
see p age 75,
K to foot well,
J to windscreen, frontdoor wind ow san d
foot well,
V to wind screen and
front door windows,
M to head area ab ove
adjustable air ven ts,
L to head area ab ove
adjustable air ventsand to f oot well.
Ü Hea ted rear window:
see p age 74.
4 Air recircula tion system:see p age 74.
5 Outside air intak e:
see p age 74.
n Air condit ioning system 3 :see p age 78.
Windscreen wipersSt alk p osi tions:see page 12,
§ Off,
$ Timed interval wipe,
% Sl ow,
& Fast
Date, t ime, informat ion d isp la y,infot a inment system
Triple infor mation d isplay 3 :
see page 24,
Ö On button for date
and time
; Sett ing butt ons for dat e and t ime
Miscellaneouse Cent ral l ocking system
with remote control 3
locking – see pag e 33.
c Cent ral l ocking system
with remote control 3 unlocking – see page 33.
m Central locking switch 3 :see page 34.
j Horn,
see page 11.

8/3/2019 Agila Owners Manual Jul06
http://slidepdf.com/reader/full/agila-owners-manual-jul06 15/168
10 In Brief
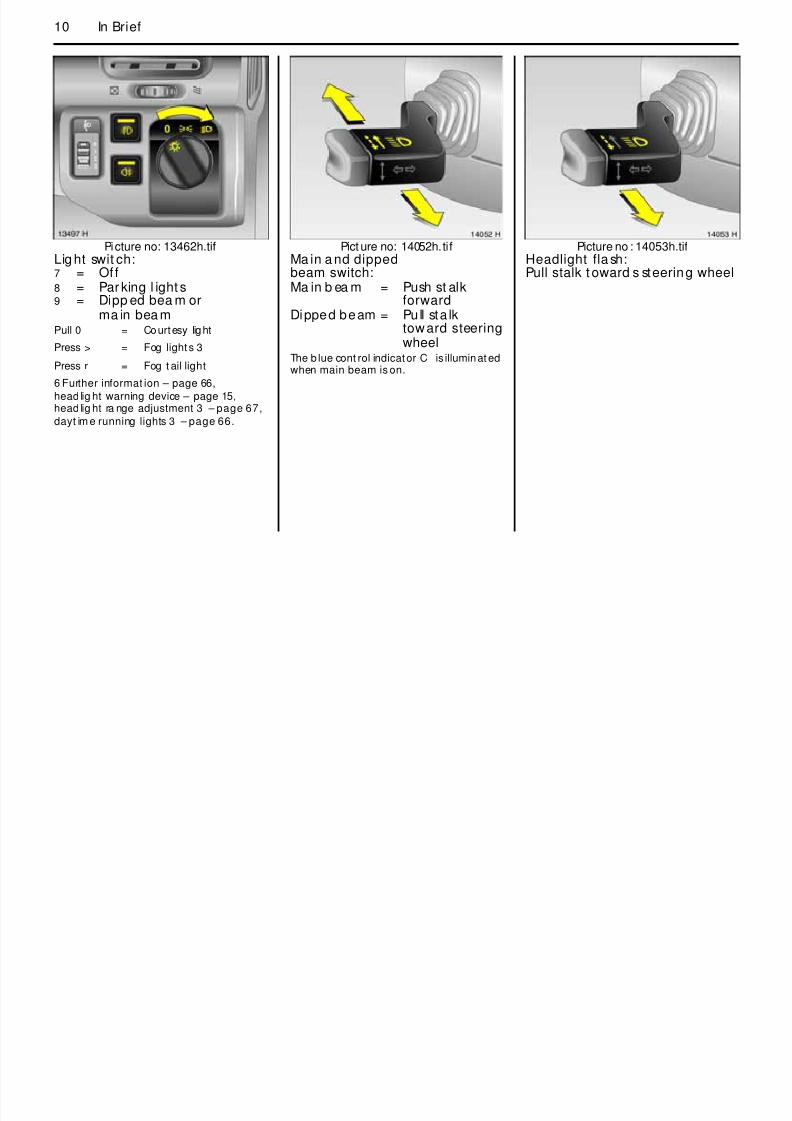
Picture no: 13462h.tifLig ht swit ch:7 = Of f8 = Par king l ight s9 = Dipp ed bea m or
ma in bea mPull 0 = Courtesy light
Press > = Fog lights 3
Press r = Fog t ail light
6 Further informat ion – page 66,
head lig ht warning device – page 15,head lig ht ra nge adjustment 3 – page 67,
dayt im e running lights 3 – page 66.
Pict ure no: 14052h.tifMa in a nd dippedbeam switch:Ma in b ea m = Push st alk
forwardDipped beam = Pull sta lk
toward steeringwheel
The b lue cont rol indicator C is illuminat edwhen main beam is on.
Picture no : 14053h.tifHeadlight fla sh:Pull stalk t oward s steering wheel

8/3/2019 Agila Owners Manual Jul06
http://slidepdf.com/reader/full/agila-owners-manual-jul06 16/168
11In Brief
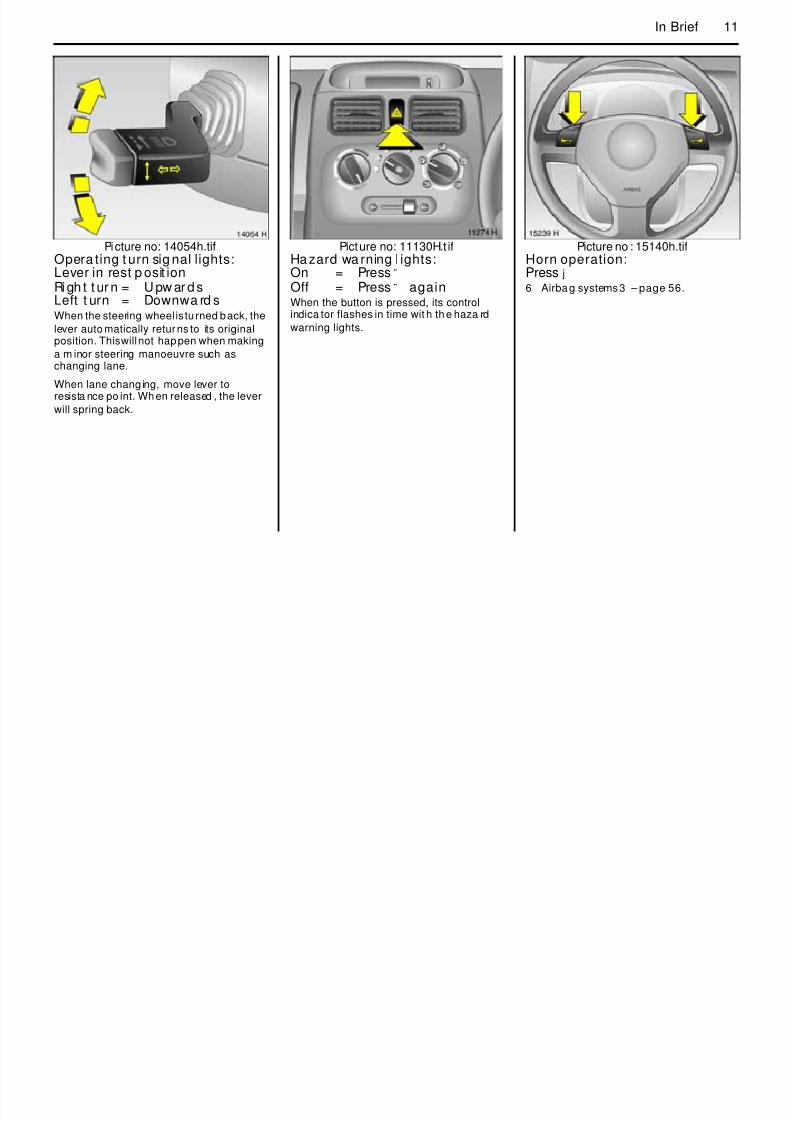
Picture no: 14054h.tifOpera ting t urn sig nal lights:Lever in rest p osit ionRi gh t t ur n = U pw ar d sLeft t urn = Downwa rd sWhen the steering wheel is tu rned back, the
lever auto matically returns to its originalposition. This will not happen when making
a m inor steering manoeuvre such aschanging lane.
When lane chang ing, move lever toresista nce po int. When released , the lever
will spring back.
Picture no: 11130H.t ifHa zard wa rning l ights:On = Press ¨Off = Press ¨ againWhen the button is pressed, its controlindica tor flashes in time wit h th e haza rd
warning lights.
Picture no : 15140h.tifHorn operation:Press j 6 Airba g systems3 – page 56.

8/3/2019 Agila Owners Manual Jul06
http://slidepdf.com/reader/full/agila-owners-manual-jul06 17/168
12 In Brief
Picture no: 14055h.tifWindscreen wipers:Move sta lk up§ = Of f$ = Timed interval wipe% = Slow& = Fast
Pict ure no: 14056h.tifOperating windscreen washersystem:Pull sta lk t owa rd s steering wheelThe wipers w ill swipe fo r a few strokes.
6 Further informat ion – page 137.
Picture no : 14057h.tifTo op era te rear windowwiper a nd washer systems:Wip er on = Push sta lk
forwardWiper o f f = Pu ll sta lk
towardssteering wheel
Washer = Push sta lkforward andhold
6 Further inform ation – page 137.

8/3/2019 Agila Owners Manual Jul06
http://slidepdf.com/reader/full/agila-owners-manual-jul06 18/168
13In Brief
Picture no: 11461H.t ifTo clea r misted o r icy windows:Turn t he rotary switc hes fortemperature andquanti ty of a ir clockwise,set ai r dist ribut ion to VTo switch on theair conditioning 3 ,pull temp era ture switch n Open side air vents as necessary and direct
them towards the door windows.
6 Climate control – page 72,
air conditioning system 3 – page 78.
Picture no: 11125H.t ifHeated rear window:On = Pull fan swi tch ÜOff = Press fan switch ÜSwitch of f as soon as rea r vision is clear.
6 Further informat ion – page 74.
14 I B i f
8/3/2019 Agila Owners Manual Jul06
http://slidepdf.com/reader/full/agila-owners-manual-jul06 19/168
14 In Brief
Picture no: 15141h.tifManua l t ransmissionEnga ging reverse gear on vehicles withrelease ring on gear lever: with vehicle
stat ionary, 3 seconds aft er dep ressing theclutch pedal lift r ing, mov e gear lever to the
left a nd engage gea r.
Enga ging reverse gea r on vehicles without
release ring on gear lever: with vehiclestat ionary, 3 seconds aft er dep ressing the
clutch peda l move gear lever to the rightand engag e gear.
If t he gear does not engag e, set the lever in
neutral, release the clutch pedal anddepress again; then repeat g ear selection.
Pict ure no: 16178h.tifExhaust gases a re poisonousExhaust ga ses cont ain carbon monoxide,which is ext remely poisonous b ut is
odourless and colou rless.
Therefore never inhale exhaust gases, and
never run the engine in an enclosed space.
Also avoid driving with t he lugga ge
compart ment op en. Ot herwise exhaustfumes could penet rate the vehicle interior.
Before start ing off, check:z Tyre pressure and condition - see
pages98, 152.
z Engine oil level a nd fluid levels in enginecompartment – see pages 131 to 137.
z All windows, mirrors, exterior lig htingand number plates are free from dirt,
snow and ice a nd operation al.
z Do not place any objects in front of the
rear window, on the instru ment panel orin the area in which the a irba gs inflat e.
z Seats, seat be lts and mirrors arecorrectly a djusted .
z Check bra kes.
15I B i f

8/3/2019 Agila Owners Manual Jul06
http://slidepdf.com/reader/full/agila-owners-manual-jul06 20/168
15In Brief
Picture no: 15582a.tifTo sta rt t he eng ine:Depress clutch and b rake ped als,do not accelerate,petrol eng ine: key to 3;release key once en gine isrunningBefore restar ting o r sw itching of f the
engine, turn key back to 0.
To switch on the ignition, only turn the key
t o 2 .
6 Electronic im mobilizer – p age 29, further
informat ion – page 106.
Pict ure no: 13463h.tifRelea sing the h and b ra ke:Raise lever slight ly,Press unlock b ut ton,Lower lever ful lyAnd now "Have a go od journey!"
Drive carefully, econom ica lly and w ith theenvironment in mind. While driving, d o not
do anything that could distract you.
Warning buzz ersWhen the vehicle is parked and the driver’sdoor is opened the warning buzzer w ill
sound if:z the ignition key is in t he ign ition switch 3
z parking lights or dipped b eam on 3 .
16 In Brief

8/3/2019 Agila Owners Manual Jul06
http://slidepdf.com/reader/full/agila-owners-manual-jul06 21/168
16 In Brief
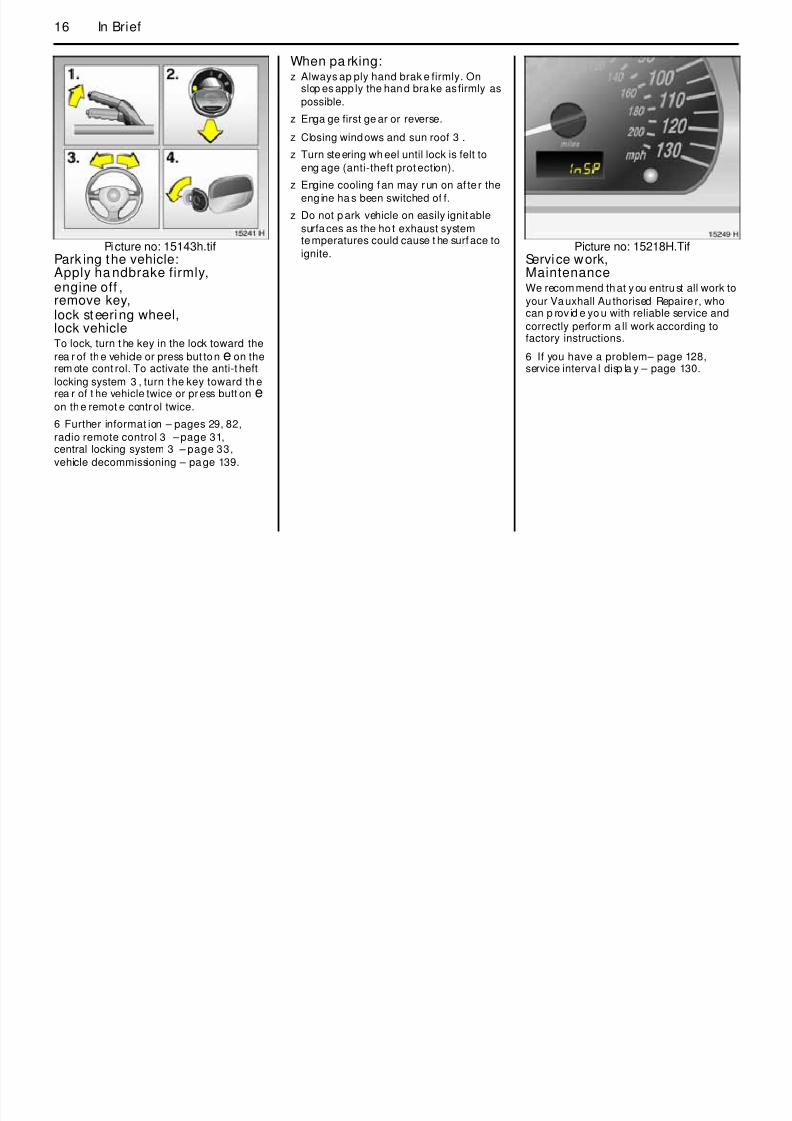
Picture no: 15143h.tifPark ing the vehicle:Apply ha ndbrake firmly,engine off ,remove key,lock steering wheel,lock vehicleTo lock, turn t he key in the lock toward the
rea r of the vehicle or press but ton e on therem ote cont rol. To activate the anti-t heft
locking system 3 , turn t he key toward th erea r of t he vehicle twice or press butt on e
on the remot e control twice.
6 Further informat ion – pages 29, 82,radio remote control 3 – page 31,central locking system 3 – page 33,
vehicle decommissioning – page 139.
When pa rking:z Always ap ply hand brak e firmly. On
slop es app ly the hand brake as firmly as
possible.
z Enga ge first ge ar or reverse.
z Closing windows and sun roof 3 .
z Turn steering wh eel until lock is felt to
eng age (anti-theft prot ection).
z Engine cooling fan may run on af te r the
eng ine ha s been switched of f.
z Do not p ark vehicle on easily ignitable
surfaces as the ho t exhaust systemtemperatures could cause t he surface to
ignite.Picture no: 15218H.Tif
Service work,MaintenanceWe recommend that you entrust all work to
your Vauxhall Au thorised Repaire r, whocan p rov id e yo u with reliable service and
correctly perform a ll work according tofactory instructions.
6 If you have a problem– page 128,service interva l disp la y – page 130.
17In Brief

8/3/2019 Agila Owners Manual Jul06
http://slidepdf.com/reader/full/agila-owners-manual-jul06 22/168
17In Brief
Genuine Vaux hall Pa rts andAccessoriesWe recommend that you use "Genuine
Vauxhall Parts and Accessories" andconversion parts released expressly for
your vehicle type. These parts have
undergone special t ests to establish theirreliab ility , safe ty and specific suitability f orVauxhall vehicles. Despite continuous
market mo nito ring, we cannot assess orguarant ee these at tributes for other
products, even if t hey have been grant edapprova l by the relevant au thorities or in
som e other form.
"Genuine Vauxhall Parts and Accessories"
and conversion part s approved b yVauxhall can be ob ta ined from your
Vauxhall Aut horised Repairer, w ho canalso provid e expert Va uxha ll advice on
permitted technical changes and ensurecorrect insta llation .
Tha t wa s a brief looka t the most import a ntinformati on for your f irst d rive inyour Agila.
The remaining chaptersof t he Owner’s Ma nualcont ain important information onoperation,safetya nd maintenancea s well as acomplete i ndex.
9 Warning
Carry out regularly the checksrecom mended in the individua l sections
of t his Owner’s M anual.
Ensure that your vehicle is serviced at the
service int ervals specified in the ServiceBooklet. We recommend that you entrust
this work t o your Vau xhall Authorised
Repairer.Have fault s remedied without d elay!Consult a w orkshop. We recommend your
Vauxhall Au thorised Repairer. Ifnecessary , interrupt your journey.
6 Maintenance – page 130.
18 In st ruments

8/3/2019 Agila Owners Manual Jul06
http://slidepdf.com/reader/full/agila-owners-manual-jul06 23/168
18 In st ruments
Instruments
Control ind icators ................................ 18
Instrumen t display ............................... 22
Information display 3 ......................... 24
Radio reception 3 ................................ 26
Infot ainment system 3 ........................ 26
Mobile telephones a nd radioequipment 3 ...................................... 26
Pict ure no: 15216h.tifControl ind icat orsThe con trol indica tors described here are
not p resent in all vehicles. The descriptio napp lies to all inst rument versions.
S Engine oil l evel 3
The engine oil level is checkedautomatically.
Illum inated: Engine oil level too low. Checkoil level and t op up as necessary. See
page 132.
Picture no:EPS1)
Electric power steering 3
The contro l indicator illuminat es fo r a fewseconds when the ign ition is switched on.Illuminat ion while driving indicate s a fault.
Driving ma y be continued. More force isrequired for steering. Consult a workshop .
We recommend your Vauxhall Aut horisedRepairer.
1) EPS= Electronic Power Steering.
19Instruments
8/3/2019 Agila Owners Manual Jul06
http://slidepdf.com/reader/full/agila-owners-manual-jul06 24/168
19Instruments
Picture no: 15217h.tifA
Engine electr onics, imm obilizer
The contro l indicator illumina tes for a f ewseconds when the ign ition is switched on.
Illuminates when the engine is running
Fault in the engin e electronics system. Theelectronics system sw itches to lim p-home
mode. Fuel consumption may increase andthe d riveability of t he vehicle m ay be
impaired – see p age 90. Consult aworkshop. We recommend your Vau xhall
Authorised Repairer.
If it flashes when t he ignition is on:Fault in the electronic immobilizer system;the engine cannot be sta rted – see
page 29.
Picture no:Z
Exhaust emission
Illum inates when the ignition is switchedon. Goes off short ly aft er t he engine starts.
Illum inates when the engine is running
Faul t in emission con trol system. Thepermitted emission limits m ay b e
exceeded. Consult a workshop. Werecommend your Vauxhall Aut horised
Repairer.
If it f lashes when th e engine is running:
Fault th at can lead t o d estruction of t he
catalytic convert er is indicated – seepage 89. Consult a workshop immediately.We recommend that you consult your
Vauxhall Au thorise Rep airer.
O
Turn signal lightsWhen the turn signal is activated, the
corresponding cont rol indica tor flashes.Rapid flash: A t urn signal bulb is fault y.
Bulb replacement – see page 122.
Both control indica tors flash when thehazard warning lights are activated.
C Main beam
The contro l indicator is illum ina ted whenma in b eam is on a nd d uring headlight
flash – see page 10.
u
Ant i -lock b rake system (ABS) 3
see page 94.
20 In st ruments
8/3/2019 Agila Owners Manual Jul06
http://slidepdf.com/reader/full/agila-owners-manual-jul06 25/168
20 In st ruments
Picture no: 15216h.tifR
Brake system
The contro l indicator illumina tes when theignition is switched on if the hand b rake isapplied or if the brake flu id level is too low.
Further information – see pa ge 136.
Picture no:
9 Warning
Illum inat ed when t he hand b rak e is not
app lied: Stop the vehicle; interrupt your journey immedia tely. Consult a
workshop. We recommend your Vauxhall
Authorised Repairer.
9 Warning
Illuminat ed t ogether with the cont rol
indicator for the Anti-lock BrakeSystem u : The b ra king force on the rear
wheels is not be ing reg ulat ed. The vehiclemay swerve during braking. Consult a
workshop. We recommend your Va uxha llAut horised Repairer.
p
Alternat orIlluminates when the ignition is switched
on. Goes off shortly a fter t he engine sta rts.
Illuminat es when t he eng ine is running
Stop the vehicle and switch off t he engine.
The bat tery is not being cha rged . Eng inecooling may be interrupted. Contact aworkshop. We recommend your Vauxhall
Auth orised Repa irer .
21Instruments
8/3/2019 Agila Owners Manual Jul06
http://slidepdf.com/reader/full/agila-owners-manual-jul06 26/168
st u e ts
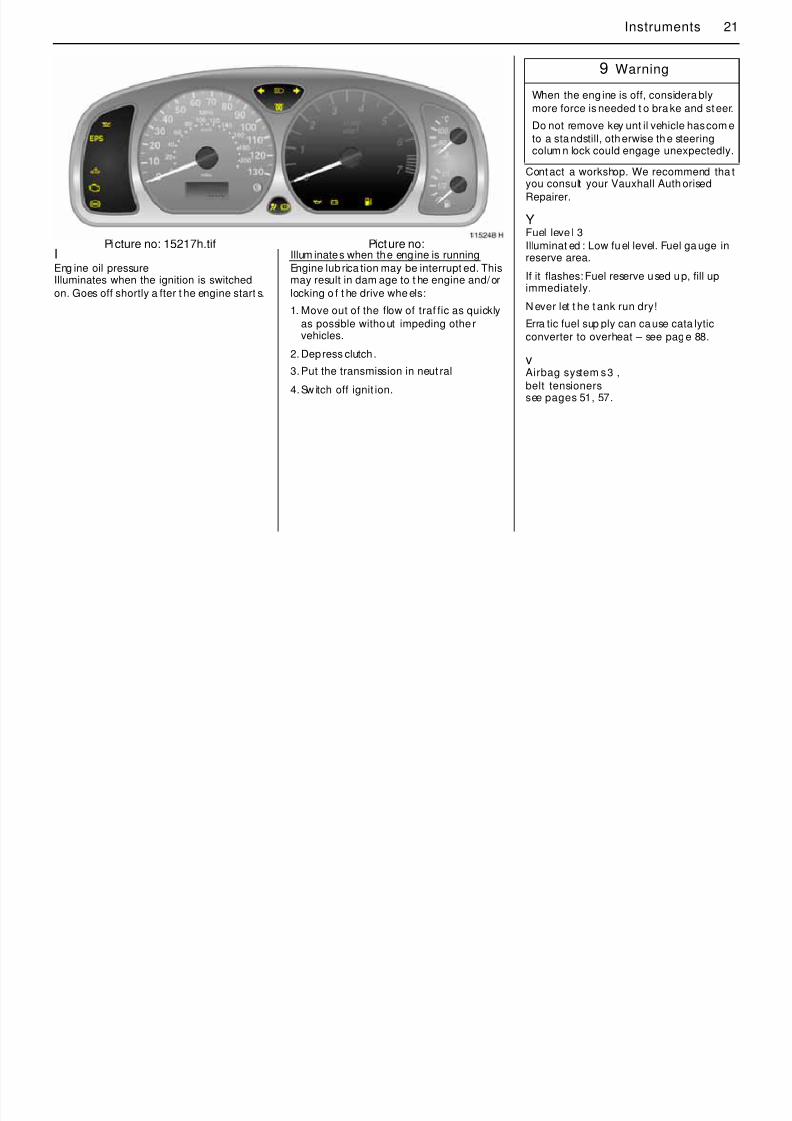
Picture no: 15217h.tifI
Eng ine oil pressure
Illuminates when the ignition is switchedon. Goes off shortly a fter t he engine start s.
Picture no:Illum inates when the engine is running
Engine lub rica tion may be interrupt ed. This
may result in dam age to t he engine and/orlocking o f t he drive whe els:
1. Move out of the flow of traf fic as quickly
as possible without impeding othe rvehicles.
2. Depress clutch.
3.Put the transmission in neut ral
4.Sw itch off ignit ion.
Contact a workshop. We recommend tha tyou consult your Vauxhall Auth orised
Repairer.
Y Fuel leve l 3
Illuminat ed : Low fuel level. Fuel ga uge inreserve area.
If it flashes: Fuel reserve used up, fill upimmediately.
N ever let t he t ank run dry!
Erra tic fuel sup ply can cause cata lytic
converter to overheat – see page 88.
v Airbag system s3 ,
belt tensionerssee pages 51, 57.
9 Warning
When the eng ine is off, considera bly
more force is needed t o bra ke and steer.
Do not remove key unt il vehicle has com e
to a standstill, otherwise the steeringcolum n lock could engage unexpectedly.
22 In st ruments

8/3/2019 Agila Owners Manual Jul06
http://slidepdf.com/reader/full/agila-owners-manual-jul06 27/168
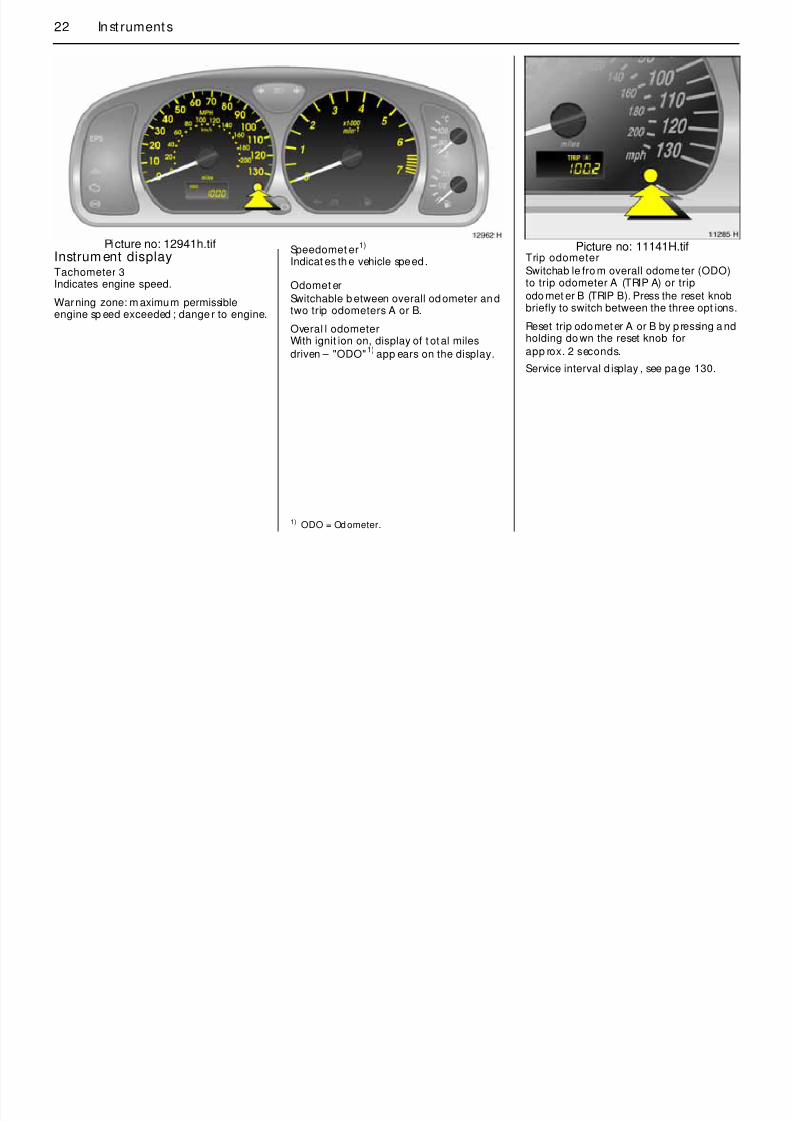
Picture no: 12941h.tifInstrum ent displayTachometer 3
Indicates engine speed.
Warning zone: m aximum permissibleengine sp eed exceeded ; danger to engine.
Speedomet er1)
Indicat es th e vehicle speed.
Odomet erSwitchable b etween overall odometer andtwo trip odometers A or B.
Overal l odometerWith ignit ion on, display of t otal miles
driven – "ODO"1)
app ears on the display.
Picture no: 11141H.tifTrip odometer
Switchab le fro m overall odometer (ODO)
to trip odometer A (TRIP A) or tripodo met er B (TRIP B). Press the reset knobbriefly to switch between the three opt ions.
Reset trip odometer A or B by p ressing a ndholding do wn the reset knob for
app rox. 2 seconds.
Service interval d isplay , see page 130.
23Instruments

8/3/2019 Agila Owners Manual Jul06
http://slidepdf.com/reader/full/agila-owners-manual-jul06 28/168
Picture no: 13465h.tifCoolant temperat ure display
For physical reasons, th e engine
temperat ure gauge shows the coolanttemperat ure only if th e coolant level is
adequate.
During operat ion the system is pressurised.
The t emperatu re may therefore rise brieflyto over 100 °C.
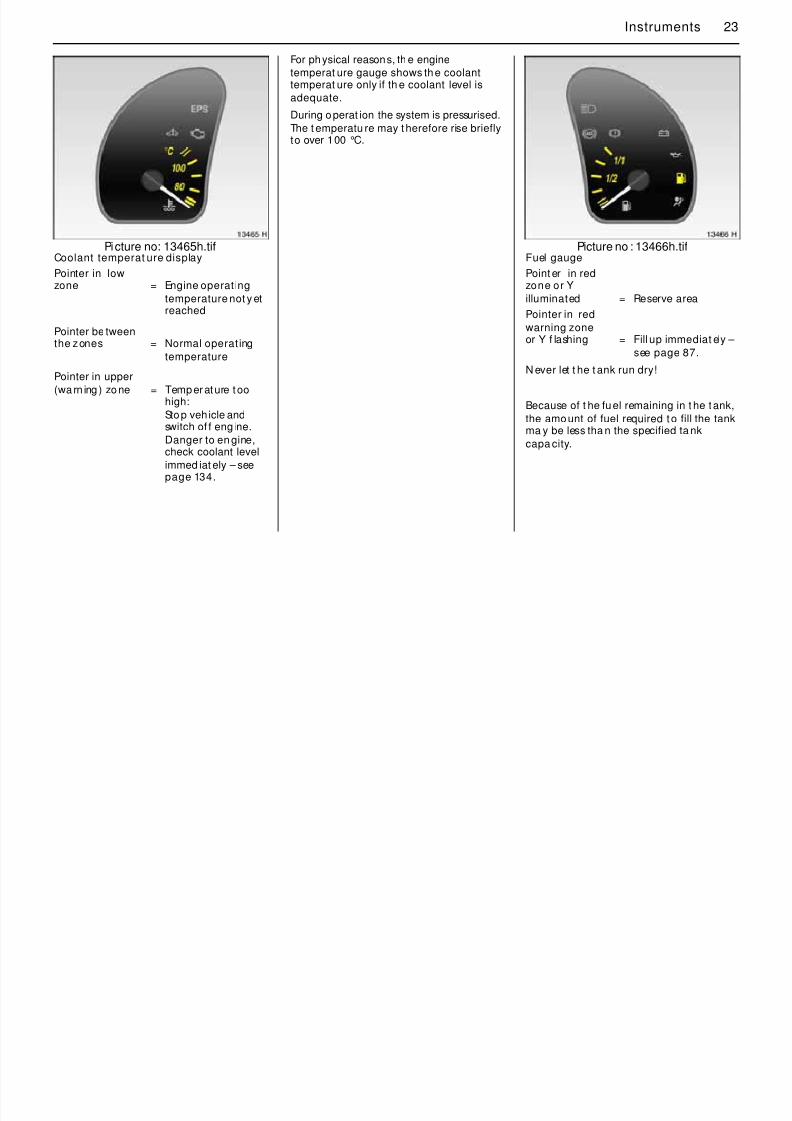
Picture no : 13466h.tifFuel gauge
N ever let t he t ank run dry!
Because of t he fuel remaining in t he tank,
the amount of fuel required to fill the tankma y be less tha n the specified ta nk
capa city.
Pointer in low
zone = Engine operat ingtemperature not y etreached
Pointer be tweenthe zones = Normal operat ing
temperature
Pointer in upper
(warn ing ) zone = Temperature toohigh:
Stop veh icle andswitch of f eng ine.Danger to en gine,check coolant level
immed iat ely – seepage 134.
Point er in red
zone or Y illuminated = Reserve area
Pointer in red
warning zoneor Y f lashing = Fill up immediat ely –
see page 87.
24 In st ruments

8/3/2019 Agila Owners Manual Jul06
http://slidepdf.com/reader/full/agila-owners-manual-jul06 29/168
Pict ure no: 17913s.t ifInformation display 3Tripl e inform ation d isp lay
Display of time, outside t empera ture anddat e/infot ainment system if it is switchedon.
When the ignition is of f, the time, date andoutside temperature can be made t o
appear for a pprox. 15 seconds by brieflypressing one of the two but tons on t he
right -hand side of the display .
Setting d ate and t ime
Date and time can either b e set manuallyor corrected a utom atically with an RDS
time signa l1) 3 .
Some RDS transmit ters do not send correct
time signa ls. If the incorrect time isdisplayed often, deactivate automat ic
time synchronisat ion 3 a nd set the timemanually.
The aut omatic sett ing is indicated by Ö inthe display.
Picture no: 17914s.t ifManual sett ing
Info ta inment system off. PressÖ and ;
next t o the d isplay as fo llows:Press Ö for a pprox. 2 seconds:
Day flashes
; : Set day
Ö : Month f lashes
; : Set mon th
Ö : Year f lashes
; : Set ye ar
Ö : Hours f la sh
; : Set ho urs
Ö : Minutes f lash
; : Set minutes
Ö : Clock is started.
12:01 17,0°C
FM 3 90,6MHzREG AS RDS T P
8:56 5,5°C
07.04.2004
25Instruments
8/3/2019 Agila Owners Manual Jul06
http://slidepdf.com/reader/full/agila-owners-manual-jul06 30/168
Dea ctivating and activating automa tic
setting function 3Infot ainment system of f. Press Ö and ;
next t o the display as follows:
Picture no : 17913s.tifOutside temp era ture
A fa ll in temp erature is indicated
immed iately and a rise in temperat ureafter a t ime delay.
If outside temp erature drops below 3 °C,
the symbol : appears in th e informationdisplay a s a w arning for icy roa d
conditions. When t emperatu re increases toat least 5 °C, the : symbol goes out.
Fault d isplay
An F in the display ind icates a fault. H avethe cause remedied. We recomm end that
you consult your Vauxhall Auth orisedRepairer.
hold down Ö fo r app rox. 2 sec., clock
display is now in sett ing mode,
Press Ö tw ice (unt il year f lashes).
Press Ö a nd hold down for approx.3 seconds until } flashes in d isplay and
tex t "RDS TIME" app ears (years flashduring t his time),
Press ; ; display o f:
RDS TIME 0 = Of f .Press ; ; display o f:
RDS TIME 1 = On
Press Ö th ree times.
9 Warning
Caution: The road surface ma y already
be icy even though the disp lay indicatesa few degrees above 0 °C.
8:56 -5,5°C
07.04.2004
:
26 In st ruments

8/3/2019 Agila Owners Manual Jul06
http://slidepdf.com/reader/full/agila-owners-manual-jul06 31/168
Radio reception 3 Ca r radio recept ion differs from domesticradio reception:
As the vehicle a ntenna is rela tively near t heground , the broadcasting compa nies
cannot gua rantee the same quality of
recept ion as obt ained with a dome sticradio using an overhead antenna.
z Chang es in distance from t he
transmitter,z multi-pa th recep tion due to reflect ion
andz shadowing
may cause h issing, noise, d isto rtion or lossof reception altogether.
In fota in men t system 3 The inf otainment system is opera ted asdescribed in the operat ing instructions
supplied.
Mob ile telephones a nd rad ioequipment 3 The Vauxhall installat ion instructions and
the operat ing guidelines provided by thetelephone manufa cturer m ust b e observed
when fitting and op erating a m obiletelephone. Fa ilure to do so could invalidat e
the vehicle’s ope rat ing permit (EU Directive95/54/EG).
Prerequisites for f ault -free operation :
z Profe ssionally installed exterior antenna
to obt ain the maximum range possible
z Maximum transmission powe r 10 Wat t,
z Installa tion of the telep hone in a suitab lespot (see information on p age 61).
27Instruments

8/3/2019 Agila Owners Manual Jul06
http://slidepdf.com/reader/full/agila-owners-manual-jul06 32/168
Obt ain advice on predetermined
insta llation locat ions fo r the externalantenna and equipment holder and ways
of using devices with t ransmission power o fmore tha n 10 Watt s. We recommend t hat
you consult your Vauxhall Aut horisedRepairer, who will ha ve brackets and
various installat ion kits available asaccessories and w ill install them in
accordance with reg ulations.
For rea sons of safety , we recomm end t hat
you do not use th e p hone wh ile driving.Even use of a ha nds-f ree set can be a
distra ction while d riving. Be sure to o bserveany count ry-specific reg ulations.
9 Warning
When used in t he vehicle int erior, mobiletelephones and radio equ ipment (CB)
with integrated ant enna m ay ca usemalfunctions in the vehicle electronics.
Mobile telephones and rad io equip ment(CB) should only be u sed with an antenna
fit ted on the vehicle exterior.
28 Keys, Doors, Bonnet

8/3/2019 Agila Owners Manual Jul06
http://slidepdf.com/reader/full/agila-owners-manual-jul06 33/168
Keys, Doors,
Bonnet
Replacement keysThe key is a constituent of the electronicimmobiliser. Ordering keys fro m a Va uxhall
Authorised Repa irer g uarante es problem-free op erat ion of t he electronic
immobiliser.
Keep th e sp are key in a safe spot.Locks – see page 143.
Lock cylindersDesigned t o fre e-wheel if they areforcefully rotated wit hout t he correct key or
if the correct key is not fully inserted.
To reset, tu rn cylinder with the correct key
until its slot is vertica l, remove key and thenre-in sert it. If the cylinder still f ree-wheels,
turn the key through 180°and rep eat
op eration.
Car PassThe Car Pass conta ins all of t he vehicle’sdata and should therefore not be kept in
the vehicle.
Have your Car Pass on hand when
consulting a Vauxhall Author ised Repa irer.
Elect ronic immob ilizer ......................... 29
Mecha nica l unlocking or lock ing of
ind ividua l doo rs................................. 30Radio remo te control 3 ....................... 31
Cent ral locking wit h vehicle key 3 ,central locking with remote
control 3 ............................................ 33
Child safety locks. ................................ 37
Bonnet ..... .... .... .................................... . 37
29Keys, Doors, Bonnet
8/3/2019 Agila Owners Manual Jul06
http://slidepdf.com/reader/full/agila-owners-manual-jul06 34/168
Picture no: 15761t.tifElect ronic immo bilizerThe system checks whether the vehicle may
be started using t he key that has beeninsert ed. If the key is " aut horised" , thevehicle can be sta rted. This check is ca rried
out via a tra nsponder housed in the key.
The electron ic immobiliser is aut omat ically
activate d when t he key is removed fromthe ig nition switch.
Pict ure no: 12943h.tifContro l indicator A for im mobilizer
Cont rol indica tor A illuminates briefly
when t he ignition is sw itched on.If the cont rol indicato r flashes w hen theignition is on, the re is a fa ult in the system;
the engine cannot be sta rted. Switch offthe ignition and t hen repeat th e start
attempt.
If control indicator A continues to f lash,
try to start the engine using the spare keyand consult a workshop . We recomm end
your Vauxhall Authorised Repairer.
If the cont rol indicator A illum ina tes after
the engine has been sta rted, t here is a faultin the engine electronics – see pag e 90.
NoteThe immobilizer does not lock the doors.
Af ter leaving t he vehicle, therefore, a lwayslock it – see page 33.
30 Keys, Doors, Bonnet

8/3/2019 Agila Owners Manual Jul06
http://slidepdf.com/reader/full/agila-owners-manual-jul06 35/168
Picture no: 18155h.tifMechanica l unlocking or lo ckingof ind ividual doors
(versions without ra dio remot e control 3and cen tra l locking system 3 )
Front doors
To unlock:Turn key in lock towards front of vehicle as
far a s it will go. Retu rn key to the verticalposition and remove. Pull door h and le.
To lock:With do or closed, turn key towards rea r of
vehicle as fa r a s it will go . Turn key ba ck to
vertical position and remove.
Operating from the insidePull or press the interior lock b utto n.
Pict ure no: 13506h.tifTa ilgat e
To unlock:
Turn the key t o the left as far as the stop,turn back to the vertical p osition andwithdra w.
The lock is released b y pressing the b utt on.
To lock:
Turn t he key to t he right as fa r a s the stop,turn back to the vertical p osition and
withdra w.
Picture no : 13746h.tifOpen luggage compart ment
There are t wo handles on t he inside of t he
tailgate t o aid in closing.
31Keys, Doors, Bonnet

8/3/2019 Agila Owners Manual Jul06
http://slidepdf.com/reader/full/agila-owners-manual-jul06 36/168
Note
z Fitt ing of accessories on the t ailgat e willincrease it s weig ht. If it b ecomes too
heavy, it will then not stay open.
z The number plate ca n only be clearly
seen if t he t ailgat e is closed. It istherefore not perm itt ed t o drive with the
tailg ate open.
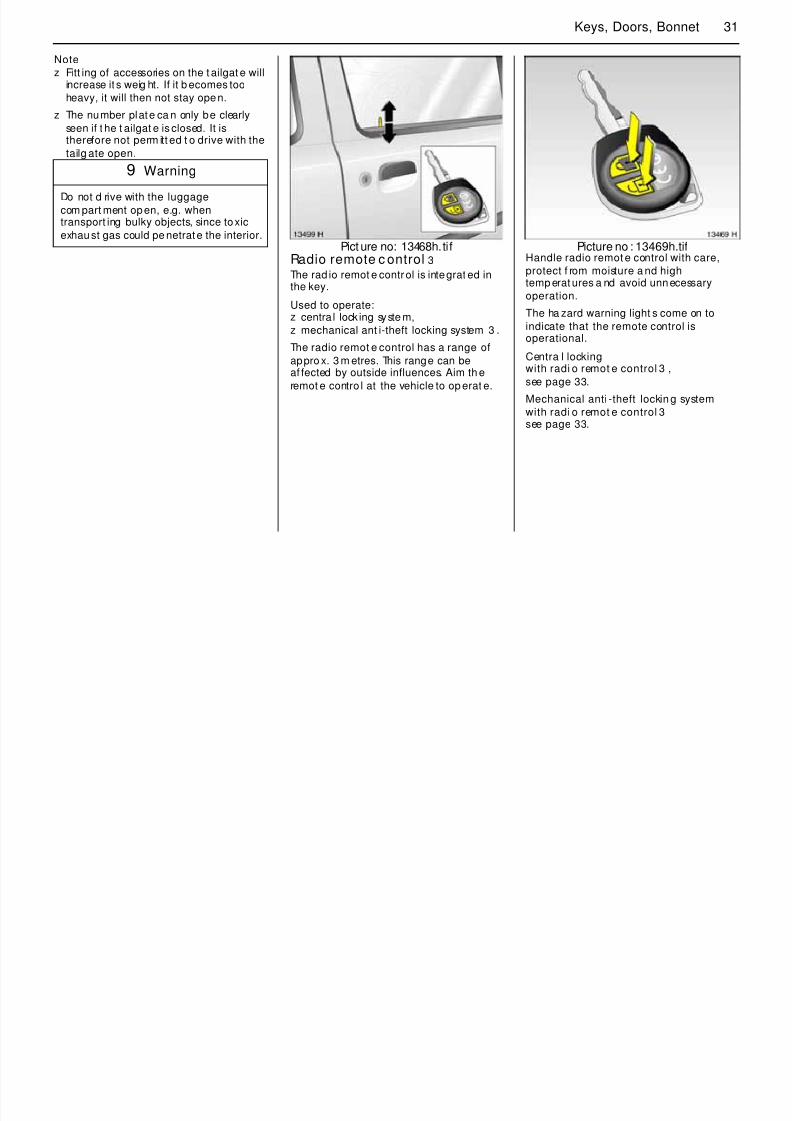
Pict ure no: 13468h.tifRadio remote c ontrol 3 The rad io remot e control is integrat ed in
the key.
Used to operate:z centra l lock ing syste m,
z mechanical ant i-theft locking system 3 .
The radio remot e control has a range of
appro x. 3 m etres. This range can beaf fected by outside influences. Aim th e
remot e contro l at the vehicle to op erat e.
Picture no : 13469h.tifHandle radio remot e control with care,
protect f rom moisture a nd high
temp erat ures a nd avoid unnecessaryoperation.
The ha zard warning light s come on to
indicate that the remote control isoperational.
Centra l lockingwith radi o remot e control 3 ,
see page 33.
Mechanical anti -theft lockin g system
with radi o remot e control 3
see page 33.
9 Warning
Do not d rive with the luggage
com part ment open, e.g. whentransport ing bulky objects, since toxic
exhaust gas could pe netrate the interior.
32 Keys, Doors, Bonnet

8/3/2019 Agila Owners Manual Jul06
http://slidepdf.com/reader/full/agila-owners-manual-jul06 37/168
Fault
If the central locking system cannot beopera ted with the ra dio rem ote cont rol, it
may be due to the follow ing:
z The range of the radio remot e control
has been exceed ed.
zThe ign ition key is in the ign ition lock.
z The doors are not closed prop erly.
z Remote control ba tt ery volta ge is too
low. Battery replacement - see nextcolumn.
z Inte rference from h igher-power rad iowaves from other sources.
To eliminate the cause of the fault , contactyour Vauxhall Authorised Repaire r.
Manual unlocking an d locking w ith thevehicle key - see page 30.
Pict ure no: 13470h.tifRem ote control ba tt ery rep lacement
Replace the battery as soon as the rangeof the radio remote cont rol begins to
shrink.
Remove screw o n the underside of the
remot e control key with a screwdriver andremove cover.
The transpond er fo r the immob iliser isloca ted in the key. Ensure t hat it is not
damaged or released.
Detach th e remote control unit f rom the
key section by pressing in t he butt ons.
App ly screwdriver and ope n rem ote cont rolon b oth sides b y ma king a slight t urningmovem ent. See f igure above.
Picture no:Open up remote control. Replace bat tery
(batt ery type - see pag e 154). Noteinsta lla tion position of ba tt ery (positive
term ina l points down) .
Close remote control and engage aud ibly.
Insert remot e cont rol unit in key section .Close the cover and screw in place.
Make sure tha t you dispose of old ba tt eriesin accordance with environment al
protection regulations.
33Keys, Doors, Bonnet
8/3/2019 Agila Owners Manual Jul06
http://slidepdf.com/reader/full/agila-owners-manual-jul06 38/168
Picture no: 15144h.tifCen tra l locking wit hvehicle key 3 ,
cent ral locking w ithremote cont rol 3 For doors and lugga ge com part ment.
To lock:Turn key in front d oor lock toward rear of
vehicle, turn key b ack to vert ical positionand remove.
– or –
Press button e on radio remote control 3
– or from the inside – With doors closed, press butt on m on
driver’s door a rm rest/ pull. See next pag e,figure 12273 H.
Pict ure no: 15146h.tifLocking wit h mechanical
anti-t heft loc king syst em 3
All d oors must be closed. A ft er locking, tu rnthe key in one of t he front door lockstowa rds the rear of the vehicle aga in, turn
it back to the horizontal p osition andremove.
– or –
no more t han 2 seconds aft er locking, press
button e on the remote control3 ag ain.
Interior lock but ton s on all doors are
blocked from opening.
Picture no : 15145h.tifTo unlock:
To unlock only the dr iver’ s d oor:
Turn key in driver’s doo r lock towards frontof vehicle once, then move ba ck to vert icalposition and remove.
– or –
Press but ton c on radio remot e control 3
once.
– or –
Press but ton m on driver’s door arm rest/ pull. See next page, figure 12273 H.
9 Warning
Do no t use the system if t here are peop le
in th e vehicle! The d oors can only b eunlocked from t he insid e if th e ignition
ison.
34 Keys, Doors, Bonnet
8/3/2019 Agila Owners Manual Jul06
http://slidepdf.com/reader/full/agila-owners-manual-jul06 39/168
To unlock entire vehicle:
Turn key in front d oor lock toward front ofvehicle twice, turn key bac k to vertical
position and remove.
– or –
Press button c on radio remote control 3
again within 5 seconds – or –
Press button m on driver’s d oor a rm rest/
pull. See figure 12273 H.
If the mechanical anti-theft locking
system 3 is engaged, the doors cannot beunlocked using button m on th e driver’s
door arm rest/pull. Pict ure no: 12250h.tifCentral l ocking switch for
locking and unlocking the doors frominsi de the vehicle
Press but to n m on driver’s doo r handle: alldoors are locked or unlocked.
If the mechanical anti-theft lockingsystem 3 is engaged, the doors cannot b e
unlocked with this button.
Note
z To prevent th e driv er from beingina dvertently locked out, th e button on
the driver’s door cannot be depressedwhen the door is open.
z The lock button will not spring up if t hedoor ha nd le is raised w hen t he door is
being closed .
z 30 seconds af ter unlocking using the
radio remote control 3 , the doors lockagain aut omat ically if no d oor is
opened .
35Keys, Doors, Bonnet
8/3/2019 Agila Owners Manual Jul06
http://slidepdf.com/reader/full/agila-owners-manual-jul06 40/168
z If the dr iver’s door is open or the ignit ion
is on, unlocking and lock ing with t hera dio remote control 3 is not possible.
z Unlocking is on ly possib le with t he key ifthe an ti-t hef t locking system is switched
on, so k eep t he spare key available in asafe place!
Central locking 3 the luggag e
compa rtmentThe luggage compart ment is locked and
unlocked via the central locking system.
The central locking system and a nti-t heft
lock ing system 3 for the doors cannot b eop erated via th e ta ilgate lock.
36 Keys, Doors, Bonnet
8/3/2019 Agila Owners Manual Jul06
http://slidepdf.com/reader/full/agila-owners-manual-jul06 41/168
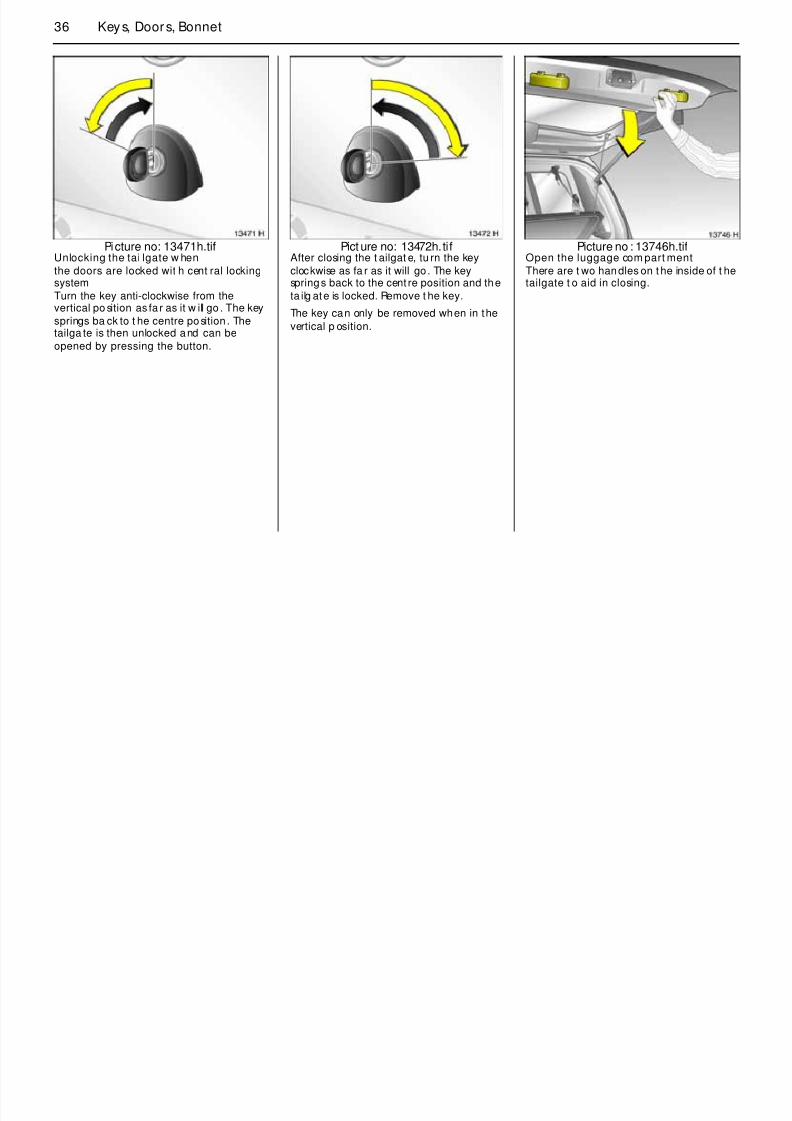
Picture no: 13471h.tifUnlocking the tai lgate w hen
the doors are locked wit h cent ral lockingsystem
Turn the key anti-clockwise from thevertical po sition as fa r as it w ill go . The key
springs ba ck to t he centre position . Thetailga te is then unlocked and can be
opened by pressing the button.
Pict ure no: 13472h.tifAfter closing the t ailgat e, tu rn the key
clockwise as fa r as it will go. The keysprings back to the cent re position and the
ta ilg ate is locked. Remove t he key.
The key can only be removed when in the
vertical p osition.
Picture no : 13746h.tifOpen the luggage com part ment
There are t wo handles on t he inside of t hetailgate t o aid in closing.
37Keys, Doors, Bonnet

8/3/2019 Agila Owners Manual Jul06
http://slidepdf.com/reader/full/agila-owners-manual-jul06 42/168
Note
z Fitt ing of accessories on the t ailgat e willincrease it s weig ht. If it b ecomes too
heavy, it will then not stay open.
z The number plate ca n only be clearly
seen if t he t ailgat e is closed. It istherefore not perm itt ed t o drive with the
tailg ate open.
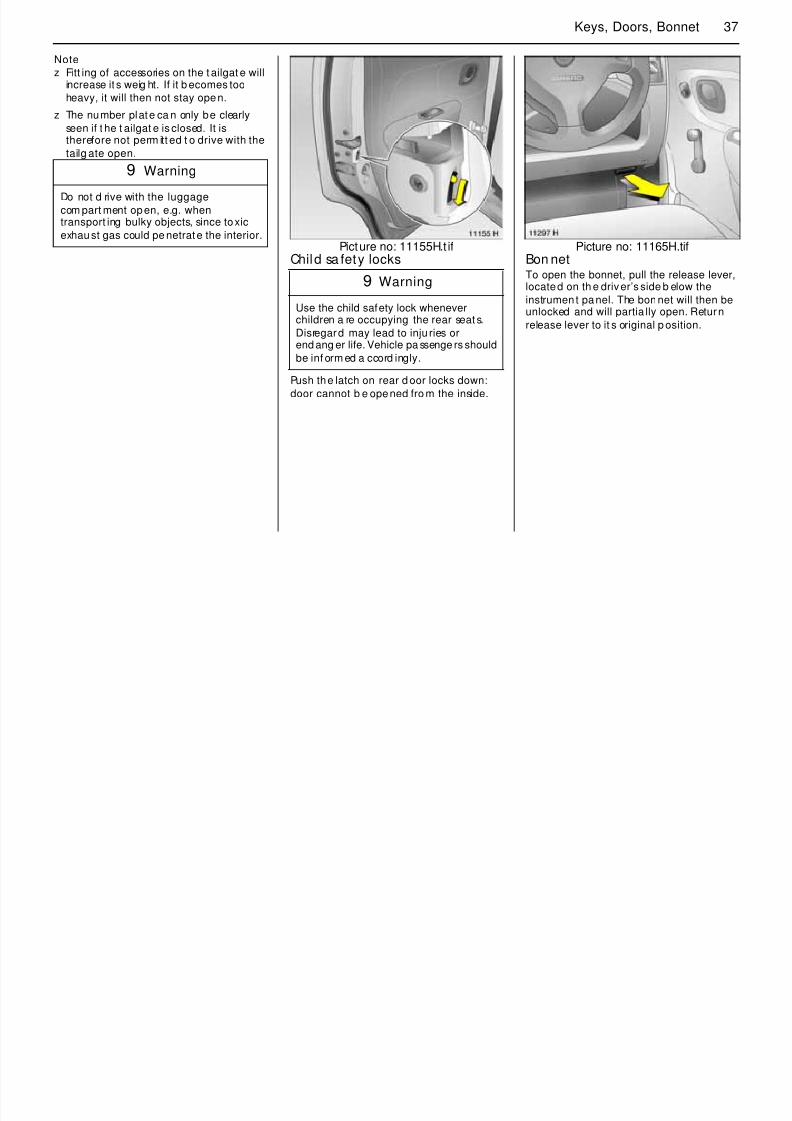
Picture no: 11155H.t ifChild sa fety locks
Push the latch on rear d oor locks down:
door cannot b e opened fro m the inside.
Picture no: 11165H.tifBon netTo open the bonnet, pull the release lever,
located on th e driver’s side b elow theinstrumen t panel. The bonnet will then beunlocked and will partia lly open. Return
release lever to it s original p osition.
9 Warning
Do not d rive with the luggage
com part ment open, e.g. whentransport ing bulky objects, since toxic
exhaust gas could pe netrate the interior.
9 Warning
Use the child safety lock wheneverchildren a re occupying the rear seat s.
Disregard may lead to inju ries orend ang er life. Vehicle pa ssenge rs should
be inf orm ed a ccord ingly.
38 Keys, Doors, Bonnet

8/3/2019 Agila Owners Manual Jul06
http://slidepdf.com/reader/full/agila-owners-manual-jul06 43/168
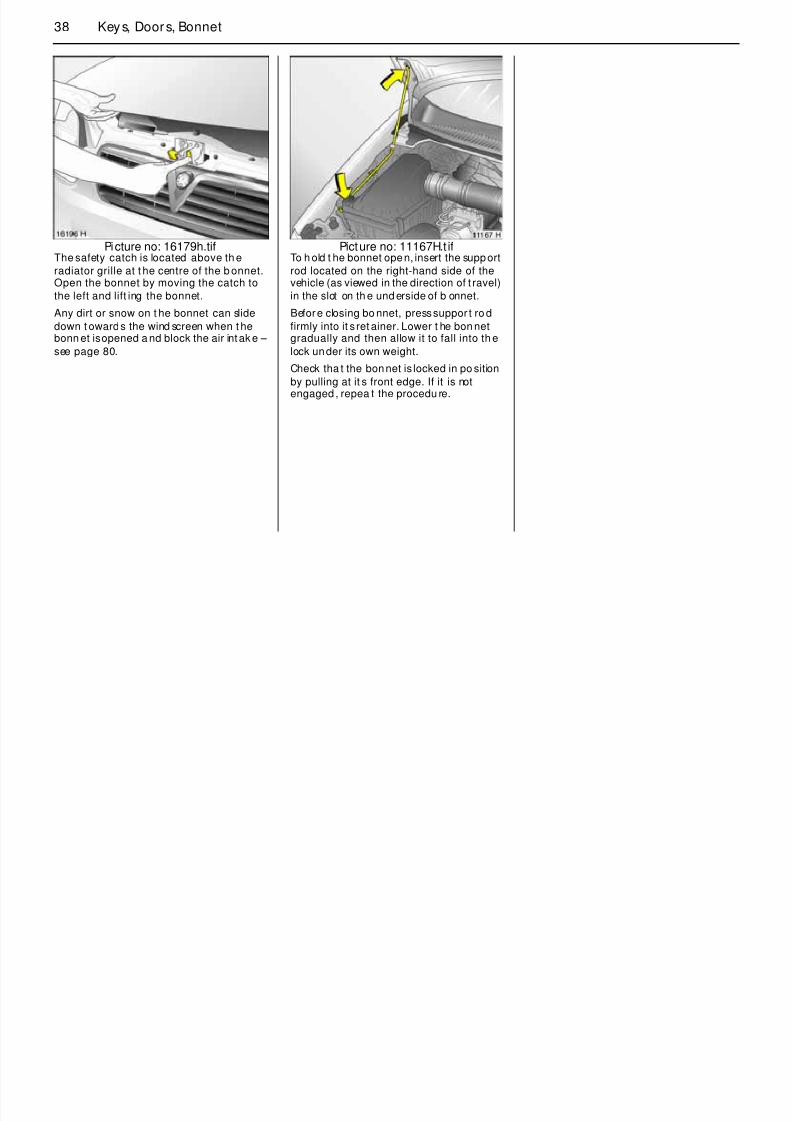
Picture no: 16179h.tifThe safety catch is located above th e
radiator grille at t he centre of the b onnet.Open the bonnet by moving the catch to
the left and lift ing the bonnet.
Any dirt or snow on t he bonnet can slide
down t owards the wind screen when t hebonn et is opened a nd block the air intak e –
see page 80.
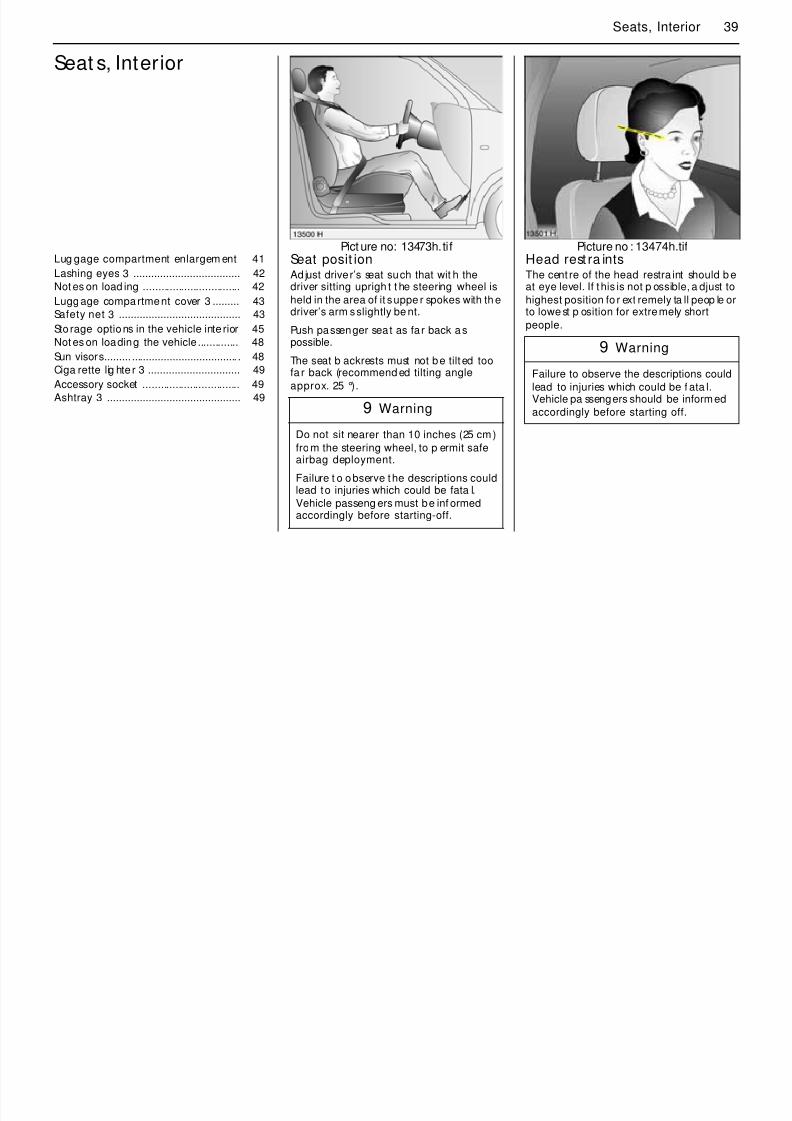
Picture no: 11167H.t ifTo h old t he bonnet open, insert the support
rod located on the right-hand side of thevehicle (as viewed in the direction of t ravel)
in the slot on th e und erside of b onnet.
Before closing bo nnet, press suppor t ro d
firmly into it s ret ainer. Lower t he bon netgradually and then allow it to fall into th e
lock under its own weight.
Check tha t the bonnet is locked in po sition
by pulling at it s front edge. If it is notengaged , repea t the procedu re.
39Seats, Interior
S
8/3/2019 Agila Owners Manual Jul06
http://slidepdf.com/reader/full/agila-owners-manual-jul06 44/168
Seat s, Interior
Pict ure no: 13473h.tifSeat posit ionAd just driver’s seat such that wit h the
driver sitting uprigh t t he steering wheel isheld in the area of it s uppe r spokes with th edriver’s arm s slightly be nt.
Push passenger seat as far back aspossible.
The seat b ackrests must not be tilt ed toofa r back (recommend ed tilting angle
approx. 25 °).
Picture no : 13474h.tifHead rest ra intsThe cent re of the head restra int should b e
at eye level. If t his is not p ossible, a djust tohighest position fo r ext remely ta ll peop le orto lowe st p osition for extremely short
people.
Lug gage compartment enlargem ent 41
Lashing eyes 3 .................................... 42
Not es on load ing ................................. 42Lugg age compartment cover 3 ......... 43
Safety net 3 ......................................... 43
Sto rage options in the vehicle inte rior 45
Not es on loading the vehicle .............. 48
Sun visors......... .................................... . 48
Ciga rette lig hte r 3 ............................... 49
Accessory socket ................................. 49
Ashtray 3 ............................................. 499 Warning
Do not sit nearer than 10 inches (25 cm)
from the steering wheel, to p ermit safeairbag deployment.
Failure t o observe the descriptions couldlead to injuries which could be fata l.
Vehicle passeng ers must be inf ormedaccordingly before starting-off.
9 Warning
Failure to observe the descriptions could
lead to injuries which could be f ata l.Vehicle pa ssengers should be informed
accordingly before starting off.
40 Seat s, Int erior

8/3/2019 Agila Owners Manual Jul06
http://slidepdf.com/reader/full/agila-owners-manual-jul06 45/168
Picture no: 15137h.tifFront hea d restraint a djustment
Adjust the head restra ints b y tipping t hemforward, holding and a djusting the height.
To improve visibility when the frontpassenger seat is unoccupied o r to f old
down the front passenger seat , push thehead restraint all the way down o r remove.
If the front p assenger seat is occupied,adjust the hea d restraint to t he
appropriate level for the occupa nt’ s b od y.
Pict ure no: 13741h.tifRea r hea d restraint a djustment
To impro ve visibilit y when the rear sea tsare unoccupied or to fold do wn the rear
seat backrests, press the deten t sprin gs onthe gu ide sleeves to release th e head
restra ints an d push them a ll the way downor remove them. See next column .
If the rear seats are occupied, a djust t herear hea d restraints to the occupant s’ body
size.
Picture no : 15148h.tifHead restra int removal
Press the two d etent springs on the guidesleeves to release, remove head restra int.
41Seats, Interior
L t t

8/3/2019 Agila Owners Manual Jul06
http://slidepdf.com/reader/full/agila-owners-manual-jul06 46/168
Luggag e comp artmentenlargementRemove the luggage compa rtm ent
cover 3 . See pag e 43.
Remove th e p ush-in sleeves 3 for mounting
the ISOFIX child restrain t system 3 ; see theseparat e instruct ions fo r the ISOFIX child
restra int system.
Remove the safety net 3 from the recess
und er th e rear seat cushions as necessary.
Picture no: 13742H.t ifFold ing rear seat ba ckrests
Press the deten t springs on the g uidesleeves to release th e rea r head restrain ts
and push them a ll t he way down or removethem (see previous pag e).
Disenga ge the cent re three-point seat beltfrom bo th buckles. The b elt will ret ract fully
– see page 55.
Disenga ge one or both rear seat bac krests
with the pushbutt on and fo ld down ontothe seat cushion.
Picture no: 13743H.tifRepositioni ng rear sea t bac krests
Pull the outer seat belt forwa rd so it is notdam aged when the backrest is retu rned to
an upright position.
Engage rear seat backrest audibly in
position.
Engage the tongue of the cent re three-
point seat b elt in the t wo buckles of t hecentre rea r seat .
Install the lugg age compart ment cover 3 -see page 43.
Install the push-in sleeves 3 for moun ting
the ISOFIX child restrain t system 3 .
42 Seat s, Int erior
Notes on load ing
8/3/2019 Agila Owners Manual Jul06
http://slidepdf.com/reader/full/agila-owners-manual-jul06 47/168
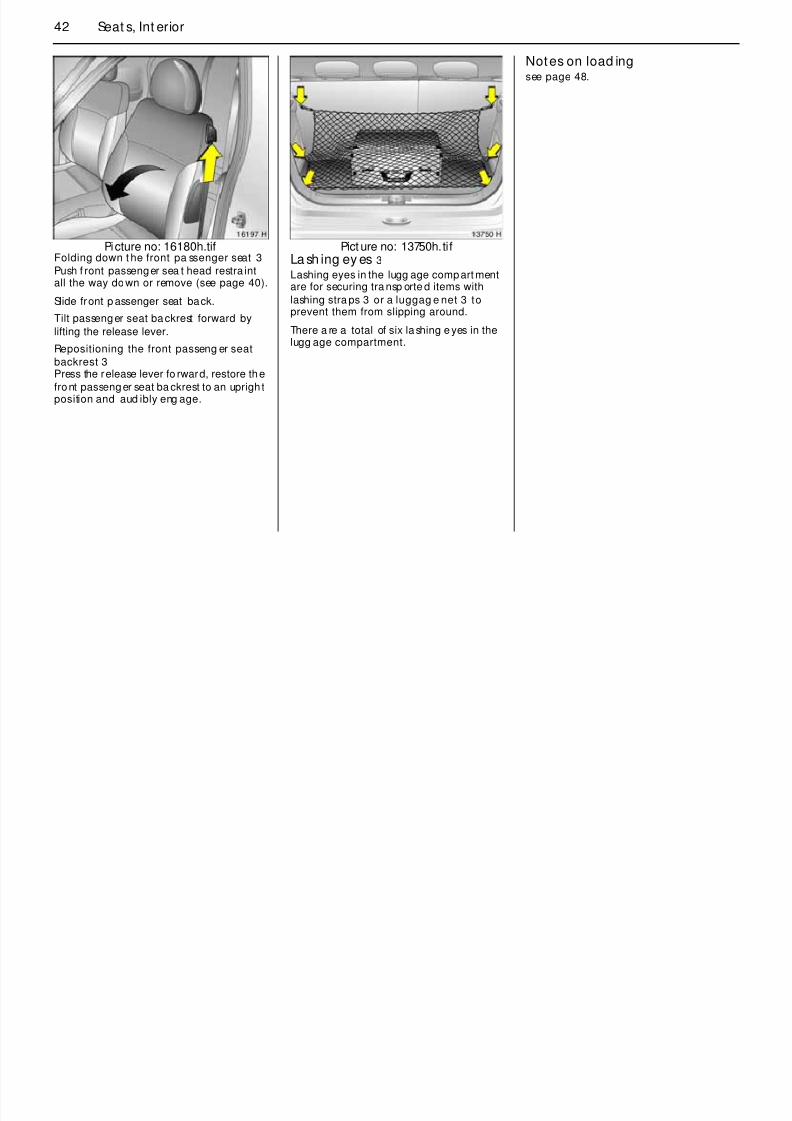
Picture no: 16180h.tifFolding down t he front pa ssenger seat 3
Push f ront passenger sea t head restra intall the way down or remove (see page 40).
Slide front p assenger seat back.
Tilt passenger seat backrest forward by
lifting the release lever.
Repositioning the front passeng er seat
backrest 3Press the release lever fo rward, restore the
front passenger seat ba ckrest to an uprigh tposition and aud ibly eng age.
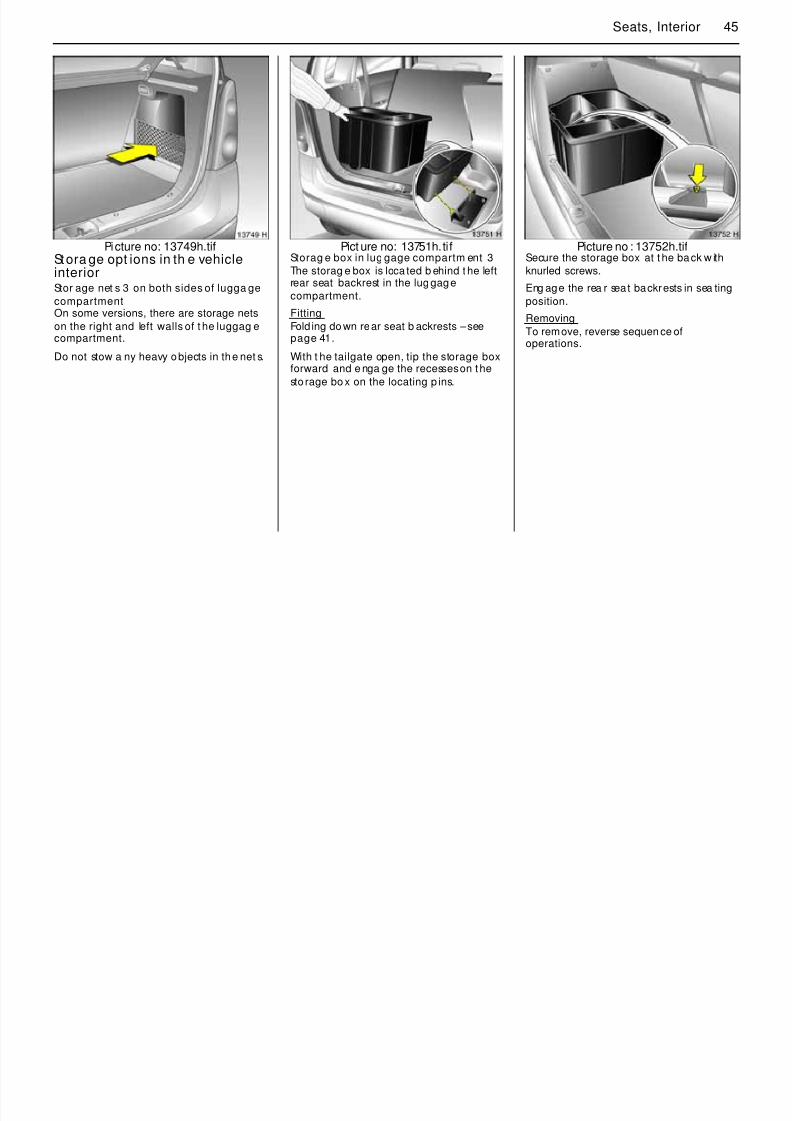
Pict ure no: 13750h.tifLa sh ing ey es 3 Lashing eyes in the lugg age compart ment
are for securing tra nsp orte d items withlashing stra ps 3 or a luggag e net 3 toprevent them from slipping around.
There a re a total of six lashing e yes in thelugg age compartment.
Notes on load ingsee page 48.
43Seats, Interior

8/3/2019 Agila Owners Manual Jul06
http://slidepdf.com/reader/full/agila-owners-manual-jul06 48/168
Picture no: 13744h.tifLuggage compartment cover 3
To rem ove, unhook the retaining strap s
from the ta ilg ate.Remove the cover from the side guides andplace it beh ind the seat backrests.
Fit in reverse order.
Do not place any heavy or sharp-edged
objects on the cover.
Pict ure no: 11453h.tifSafet y net 3 When the rear seat back rests a re folded
down, the safety net is mounted behind thefront seats.
Pa ssengers must not be ca rried behind t he
safety net.
Picture no : 11454h.tifFitting
Folding rear seat ba ckrests - see lugg agecompartm ent enlargement on page 41.
There are t wo insta llation a pert ures in theroof f rame abo ve the front seat s: Use the
ignition key t o unclip th e cover. Engageone side of t he upper net rod in one side
and t hen engag e in th e other side. Closethe cover.
6
44 Seat s, Int erior
Removing
8/3/2019 Agila Owners Manual Jul06
http://slidepdf.com/reader/full/agila-owners-manual-jul06 49/168
Picture no: 13748h.tifHook t he safety net t ensioning straps in the
lashing eyes in the floor behind the frontseat a nd t ension.
Removing
Swivel tensioning strap leng th ad juste rsupward and unhook straps from t he eyes in
the floor. Open the cover of the installa tionapertures 3 in the roof fra me. Unhook
upper net rod and close cover.
Picture no : 13505h.tifSt owage of safety net
Roll up t he removed safety net and secureit with Velcro strip.
Guide the safety net into the recess und erthe rear sea ts.
45Seats, Interior

8/3/2019 Agila Owners Manual Jul06
http://slidepdf.com/reader/full/agila-owners-manual-jul06 50/168
Picture no: 13749h.tifStora ge opt ions in th e vehicleinterior
Stor age net s3
on both sides of lugga gecompartmentOn some versions, there are storage nets
on the right and left walls of t he luggag ecompartment.
Do not stow a ny heavy objects in the net s.
Pict ure no: 13751h.tifStorag e box in lug gage compartm ent 3
The storag e box is loca ted b ehind t he leftrear seat backrest in the lug gage
compartment.
Fitting
Fold ing do wn rear seat b ackrests – seepage 41.
With t he tailgate open, tip the storage boxforward and e nga ge the recesses on the
sto rage bo x on the locating p ins.
Picture no : 13752h.tifSecure the storage box at t he back w ith
knurled screws.
Eng age the rea r seat backrests in sea tingposition.
Removing
To remove, reverse sequen ce ofoperations.
46 Seat s, Int erior

8/3/2019 Agila Owners Manual Jul06
http://slidepdf.com/reader/full/agila-owners-manual-jul06 51/168
Picture no: 13480h.tifStor age tray 3 under front p assenger
sea tLift tray by grasping recessed edge and
pull forwards. Max im um load: 1 kg. Toclose the tray push it in and lock it in place.
Pict ure no: 15149h.tifRucksack 3 on the ba ck of a front sea t
backrestFasten securing belt f or rucksack onto f ront
seat backrest: f eed bo th belt strap sbetween sea t a nd b ackrest. Feed belt
straps thro ugh la shing eyes and tighten.
Picture no : 11473h.tifAtt ach rucksack to b oth clips at top a nd
secure to snap fastener at b ott om.
47Seats, Interior
Glove compa rt ment Addit ion st orage options z in the luggage net 3 on the back of the
8/3/2019 Agila Owners Manual Jul06
http://slidepdf.com/reader/full/agila-owners-manual-jul06 52/168
p
Pull the handle to open.
g p
are foun d
z in the pockets 3 on the back of the front
seat b ackrests,
z in t he compart ments 3 a t the side of the
front seats,
zin the comp artments
3in the door innerpanelling,
z in th e stowage compa rtment 3 b eneath
the glove compart ment,
gg g
rear ba ckrest,
z in the stowage compartment 3 in the
cent re console in f ront of the g ear lever.
Drink holder 3
There are t wo drink holders located in thecentre console in f ront of t he gea r lever.
48 Seat s, Int erior
Notes on loading the vehicle z The load must not ob struct the operat ion
8/3/2019 Agila Owners Manual Jul06
http://slidepdf.com/reader/full/agila-owners-manual-jul06 53/168
gz Heav y objects in the luggage
com partment should be placed as far
forward as possible aga inst the engag edrear seat backrests or, if the rear seat
backrests are folded down, against thefront seat b ackrests. If objects a re to be
stacked, the heavier objects shou ld beplaced a t the bottom. Unsecured objects
in the luggage compartment would bethrown forward with great f orce in the
event of heavy bra king, for example.
z Secure heavy objects with lashing
straps 3 a ttached to lashing eyes3 – see page 42. If heavy loads slip when t he
vehicle is braked heavily or drivenaround a bend, t he handling of t he
vehicle may change.
z Loose ob jects in th e luggage
com part ment should be secured ag ainstslipping using a luggage n et 3 – see
page 42.
z Fit th e safe ty net wh en transp orting
ob jects in the luggage compa rtm entwith the rear seat back rests fold ed down
– see page 43.
z If the bac krests are not f olded down
when transport ing objects in thelugga ge com partment, t hey must be
engaged in t he upright po sition. Seepage 41.
Pict ure no: 13753h.tifz Do not allow the load to prot rude above
the upp er edge o f the rear seatback rests, or ab ove the upper ed ge of
the front seat b ackrests if the rear seatbackrests are folded down.
z The warning triangle 3 and first-aid kit(cushion) 3 m ust alway s be freely
accessible.
z Do not place any objects in front of t he
rea r window or on the instrument pa nel.They a re reflected in t he g lass, obstruct
the driver’s view and will be thrownth rough the vehicle, for insta nce in the
event of heavy bra king.
z Objects must not b e sto red in the airbag
infla tion area , beca use they could causeinjury if t he airbag infla tes.
of the hand brake and the gea rs orrestrict t he driver’s freed om of
movement.
z Do not drive with the luggage
compart ment op en, e.g. whentransport ing bulky ob jects, since toxic
exhaust g as could penetra te the interior.z Weight s, payload and roo f load – see
page 150.
z Roof load s increase th e vehicle’s
sensitivity to crosswinds and h as anegative af fect on d rivea bility due to an
raised centre of gravity.
Su n v isorsUse the sun visor to p rot ect from glare by
pulling it down and swivelling it to t heside 3 .
9 Warning
Disregard of t hese notes ca n lead toinjuries which ma y be f atal. Vehiclepassengers shou ld be in form ed
accordingly.
49Seats, Interior

8/3/2019 Agila Owners Manual Jul06
http://slidepdf.com/reader/full/agila-owners-manual-jul06 54/168
Picture no: 16181h.tifCig arett e lig hter 3
In front centre console:
Press cigarette light er with ignit ionswitched on . Switches of f au toma ticallywhen elem ent is glowing. Withd raw
cigarette lighter.
Accessory socketThe cigare tt e light er socket ca n be used t o
connect e lectr ical a ccessories.
Pict ure no: 16182h.tifThe socket is operational when the ignit ion
is switched on . Use of t he socket discha rg esthe batt ery if the engine is not ru nning.
Do not d amage th e sockets b y usingunsuita ble plugs.
The maximum power consumption ofelectrica l accessories must not exceed
120 watts.
Do not connect a ny current-delivering
accessories, e.g. electrical cha rgingdevices or batteries.
Elect rica l accessories connected t o the
socket must comply with theelectromagnetic comp at ibilityrequ irement s la id down in DIN standard
VDE 40 839. othe rwise vehicle malfunctionsmay occur.
Picture no : 16183h.tifAshtray 3 To be used only for ash and not forcomb ustible rubb ish.
To open:Withdraw ashtray.
To empty:Press ashtray cover do wn and wit hdra w
ashtray.
9 Warning
Disregard of t hese notes ca n lead toinjuries which ma y be f atal. Vehicle
passengers shou ld be in form edaccordingly.
50 Saf et y syst ems
Saf ety systems Three-stage rest raint system9 Warning
8/3/2019 Agila Owners Manual Jul06
http://slidepdf.com/reader/full/agila-owners-manual-jul06 55/168
Saf ety systemsComprising:
z th ree-point seat be lts
z belt t ensioners a t the fron t seat s
z airbag systems for d river a nd front
passenger seats 3 .
The th ree stag es are activated in sequencedepending on t he seriousness of t heaccident:
z The automa tic seat belt locking devicesprevent the belt stra p from being pu lled
out a nd thus ensure th at t he vehicleoccupants are retained in their seats.
z The seat belts on the front seats aretensioned on the aut om at ic retractors.
As a result, the seat belt s a re
instant aneously tightened and theoccupants are made aware of thedeceleration of t he vehicle at a v ery ea rly
stage. This reduces the stress placed onthe body.
z The airbag systems a re a lso trigg ered inthe event of serious accidents and form a
safety cushion for the occupants.
Read the instructions sup plied with th e
child restra int system!
Seat be lts......... .................................... . 51
Three-point seat belts ......................... 51
Belt tension ers................................ ...... 52
Using the belt s ..................................... 54
Vauxhall Full Size a irb ag system ....... 56
Use of child restraint systems 3 ......... 62
Mounting brackets 3 for ISOFIX child
restra int systems ............................... 62
Exterior mirrors.............. ......... .... .... ...... 65
Head restrain ts .................................... 65
Sun visors, glove compa rtment .......... 65
Saf ety accessories 3 ........................... 65
9 Warning
The airbag systems 3 serve to
supp lement the t hree-p oint sea t beltsand be lt t ensioners. The seat b elts must
therefore always be worn . Disregard ofthese instructions may lead to injuries or
endanger life. Vehicle passengers shouldbe info rmed accordingly.
51Safety systems
Sea t b elt s Testing the belt s
Plea se check all par ts of the belt system
8/3/2019 Agila Owners Manual Jul06
http://slidepdf.com/reader/full/agila-owners-manual-jul06 56/168
In the event of an accident , persons not
wearing seat belt s endanger their fellowoccupant s and t hemselves.
Seat belts are designed t o be used b y onlyone person a t a time. They are not suitable
for children under 12 years of age or150 cm u nless an a ppropria te child
restraint system is used.
For children up to 12 yea rs of ag e we
recom mend the Vauxhall child restraintsystem – see page 63.
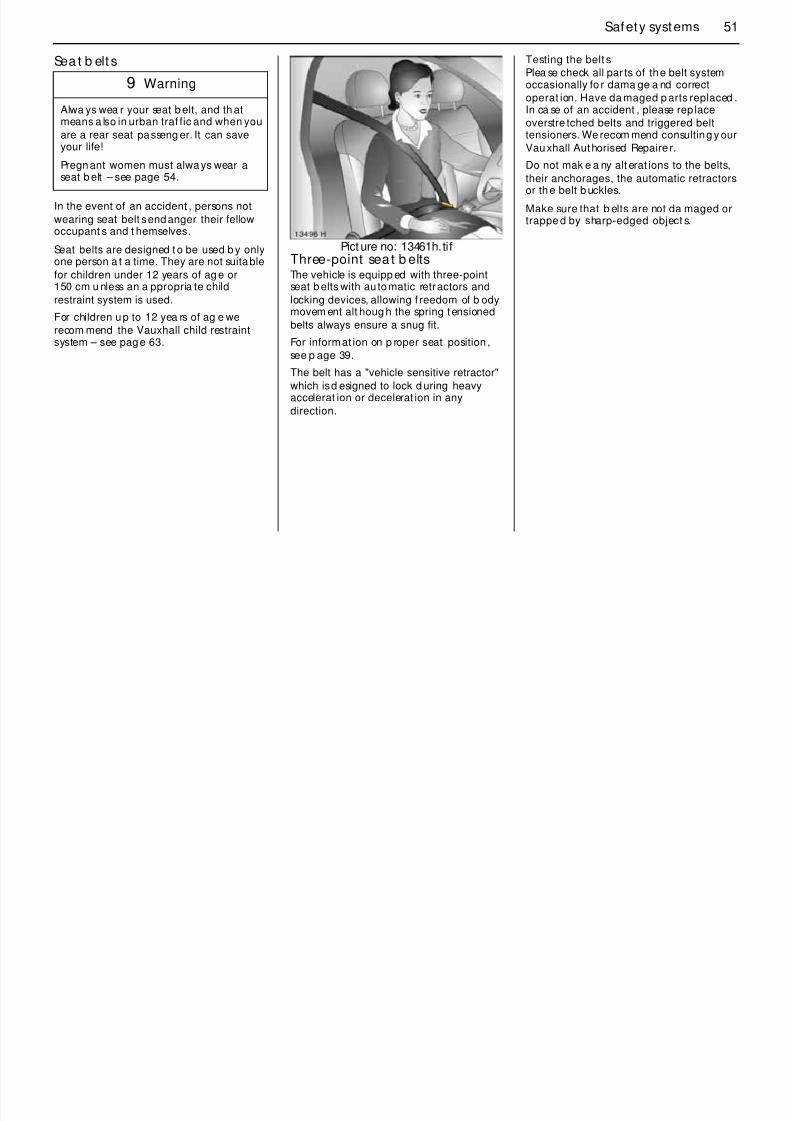
Pict ure no: 13461h.tifThree-point sea t b eltsThe vehicle is equipp ed with three-pointseat b elts with au tomatic retractors and
locking devices, allowing f reedom of b odymovem ent alt houg h the spring tensioned
belts always ensure a snug fit.
For informat ion on p roper seat position ,
see p age 39.
The belt has a "vehicle sensitive retractor"
which is d esigned to lock d uring heavyaccelerat ion or decelerat ion in any
direction.
Plea se check all par ts of the belt systemoccasionally fo r dama ge a nd correct
operat ion. Have da maged p arts replaced .In ca se of an accident , please rep lace
overstre tched belts and triggered belttensioners. We recom mend consulting y our
Vauxhall Authorised Repaire r.
Do not mak e a ny alt erat ions to the belts,
their anchorages, the automatic retractorsor the belt b uckles.
Make sure that b elts are not da maged ortrappe d by sharp-edged object s.
9 Warning
Alwa ys wea r your seat b elt, and th atmeans a lso in urban traf fic and when you
are a rear seat passeng er. It can saveyour life!
Pregnant women must alwa ys wear aseat b elt – see page 54.
52 Saf et y syst ems
Belt tension ers9 Warning

8/3/2019 Agila Owners Manual Jul06
http://slidepdf.com/reader/full/agila-owners-manual-jul06 57/168
The front seat belt systems incorpo rat e belttensioners. In th e event of a head -on
collision and d epending on the severity ofthe a ccident, the seat b elts are
instantaneously tightened by theautomat ic retractors.
Actuat ion of belt t ensionersis indicated b y illuminat ion of contro l
indicator v .
The belt tensioners must be replaced af te r
activation. We recomm end t hat y ouconsult your V auxhall A uthorised Repairer.
If the seat belts a re unda mag ed th eopera tion thereof is una ff ected, even if the
belt tensione rs hav e been t riggered.
Imp ortant information – see page 51.
Pict ure no: 12944h.tifContro l indicator v for belt t ensioners
Belt t ensioners are m onito red electronica llytog ether with t he airbag systems and t heir
operational sta tus is shown by cont rolindica tor v in the instrument panel. When
the ignition is switched on, the cont rolindica tor flashes for appro x. 4 seconds. If it
does not f lash, do es not go out a ft er 4second s, or illuminat es w hile driving, there
is a f ault in the belt t ensioning system or inthe airbag systems, see page 57. The belt
tensioners or airbag systems may f ail todeploy in the event of an a ccident.
Deploym ent o f t he belt tensioners isindicat ed b y continuous illum ination of v .
The system’s integrat ed self-d iagnostics
allows faults to be q uickly remed ied. Haveyour Car Pass on hand when consulting aVauxhall Authorised Repaire r.
9 Warning
Have the cause of the f ault remedied. We
recommend that you consult yourVauxhall Authorised Repa irer.
53Safety systems
Important z The belt tensioner and airbag system
control electronics can be fou nd in the

8/3/2019 Agila Owners Manual Jul06
http://slidepdf.com/reader/full/agila-owners-manual-jul06 58/168
z Do not fit ac cessorie s not specificallyreleased for your vehicle t ype or store
ob jects in the belt t ensioner op eratingarea due t o the risk of injury in the event
the belt tensioners are triggered.
z Do not m ake any modifications to the
com ponents of t he be lt tensioners, a sthis will render the vehicle unroadw orth y.
control electronics can be fou nd in thecentre console area . In order to avoid
malfu nctions, d o not store magneticobjects in this area.
z We recommend t hat you have the frontseats removed by a Va uxha ll Au thorised
Repairer.z The belt te nsioners only actua te once.
Please replace be lt t ensioners that havebeen triggered. We recommend that you
consult y our Vauxhall Au thorisedRepairer.
z App licable safe ty d irectives must alwa ysbe observed when d isposing of the
vehicle. For t his reason, dispo sal shouldbe p erfo rm ed by an authorised recycling
compa ny. We recommend that youconsult y our Vauxhall Au thorised
Repairer.
9 Warning
Improper handling (e .g. removal orinstallat ion) ca n activate the belt
tensioners – risk of in jury.
54 Saf et y syst ems

8/3/2019 Agila Owners Manual Jul06
http://slidepdf.com/reader/full/agila-owners-manual-jul06 59/168
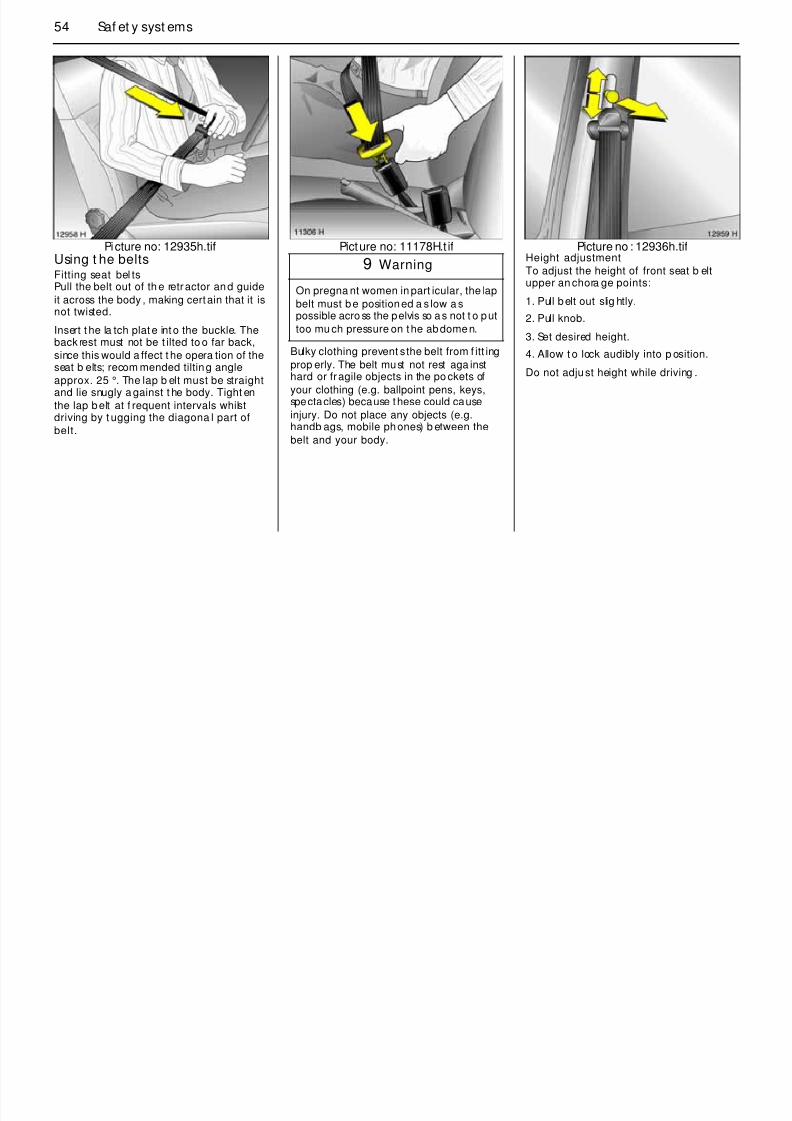
Picture no: 12935h.tifUsing t he beltsFitting seat bel tsPull the belt out of th e retractor and guide
it across the body , making certain that it isnot twisted.
Insert t he la tch plat e into the buckle. Theback rest must not be t ilted to o far back,
since this would a ffect t he opera tion of theseat b elts; recom mended tilting angle
approx. 25 °. The lap b elt must be straightand lie snugly a gainst t he body. Tight en
the lap belt at f requent intervals whilstdriving by t ugging the diagona l part of
belt.
Picture no: 11178H.t if
Bulky clothing prevent s the belt from f itt ing
prop erly. The belt must not rest aga insthard or fragile objects in the po ckets of
your clothing (e.g. ballpoint pens, keys,spectacles) because these could cause
injury. Do not place any objects (e.g.handb ags, mobile phones) b etween the
belt and your body.
Picture no : 12936h.tifHeight adjustment
To adjust the height of front seat b eltupper an chora ge points:
1. Pull belt out slig htly.
2. Pull knob.
3. Set desired height.
4. Allow t o lock audibly into p osition.
Do not adjust height while driving .
9 Warning
On pregna nt women in part icular, the lapbelt must be positioned a s low a spossible acro ss the pelvis so as not t o put
too mu ch pressure on the abdomen.
55Safety systems
8/3/2019 Agila Owners Manual Jul06
http://slidepdf.com/reader/full/agila-owners-manual-jul06 60/168
Picture no: 13461h.tifAdjust height such that t he belt p asses
over the wearer’s shoulder and restsagainst t he shou lder. It must n ot pass over
the neck or upper arm.
Picture no: 11180H.t ifRem oving t he b el t
To remove the belt, d epress th e redpushbu tt on on the buckle; the b elt will
retract automat ically.
Picture no : 15265h.tifThree- point seat belt
for centre rear seatPull belt from roof m ount ing by the latch
plates. Click low er latch pla te into th ema tching (smaller) right b elt buckle. Use
the upper latch plate to guide the belt overyour shoulder and stomach area withou t
twisting it , click lat ch plate into the leftouter b elt bu ckle.
The latch plate of the centra l belt onlyeng ages in the matching (left outer) belt
buckle. The lat ch plate can be inserted inall the ot her belt buckles but w ill not
eng age.
6
56 Saf et y syst ems
To remove the b elt, press the butto n on the
left -han d buckle. The belt will retract
8/3/2019 Agila Owners Manual Jul06
http://slidepdf.com/reader/full/agila-owners-manual-jul06 61/168
aut omat ically a nd will position it self ready
to han d on t he b ackrest.
When enlarging the luggage
compartment, disengag e the belt fro mbot h buckles; t he belt will retra ct fully.
Picture no: 11181H.t ifVauxha ll Full Size ai rba g syst emThe Vauxhall Full Size a irba g systemcomprises severa l ind ividua l syste ms.
Front a irbag systemThe front airb ag system is triggered in the
event of a serious accident involving afrontal impa ct and forms sa fety cushions
for the driver and f ront p assenger 3 . Theforward movement of the driver and f ront
passenger is checked a nd the risk ofinjuries to th e upper body and hea d
thereby substa nt ially reduced.
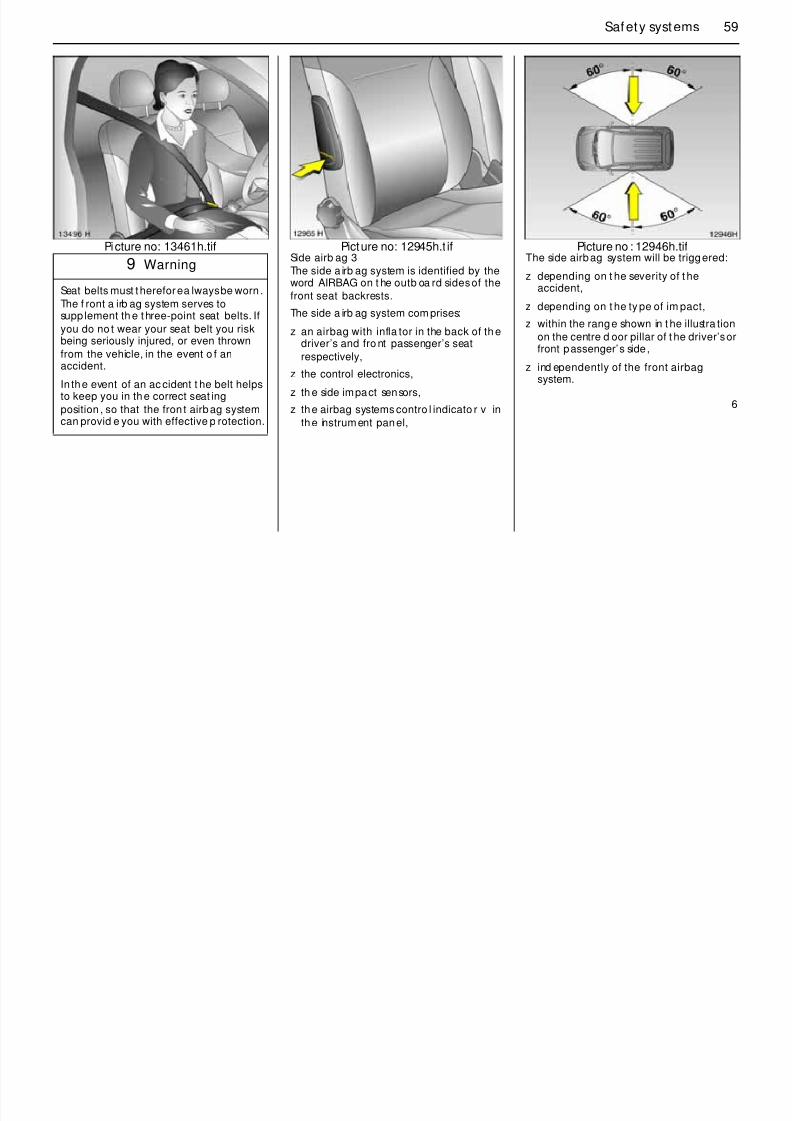
Picture no : 12947h.tifSi de airba g system 3
The side airbag system is triggered in th eevent of side-on collisions and forms sa fety
cushions for t he d river and front passengerin the respective fro nt doo r area. The risk of
injury t o the upp er body in the event of aside impact is thereby substa ntially
reduced.
57Safety systems
Examples of event s triggering t he fro nt
airbag system:

8/3/2019 Agila Owners Manual Jul06
http://slidepdf.com/reader/full/agila-owners-manual-jul06 62/168
Picture no: 15151H.t ifVauxha ll Full Size a irb ag systemFront airb agThe front airbag system is ident ified by the
word AIRBAG on t he steering wheel andabove the glove compart ment 3 .
The front airbag system comprises:
z an airbag with inf lato r in the steering
wheel and a second o ne behind t he trimpanel above the glove compar tment 3
z the cont rol electronics with impactsensor
z the a irba g system s control indicator v in
the instrument panel.
Pict ure no: 16184h.tifThe fro nt airb ag system will be trigg ered:
z depending on th e severity of t heaccident
z depending on the type of impact
z within the ra nge shown in the illustrat ion
z indep endently of t he side airb agsystem 3 .
z Impact a gainst a non-yielding obstacle:
the front airbags are trigg ered at lowvehicle speed.
z Impact ag a inst a y ielding obsta cle (suchas anot her vehicle): the fro nt airbags are
only trigg ered a t a hig her vehicle speed .
6
58 Saf et y syst ems
9 Warning

8/3/2019 Agila Owners Manual Jul06
http://slidepdf.com/reader/full/agila-owners-manual-jul06 63/168
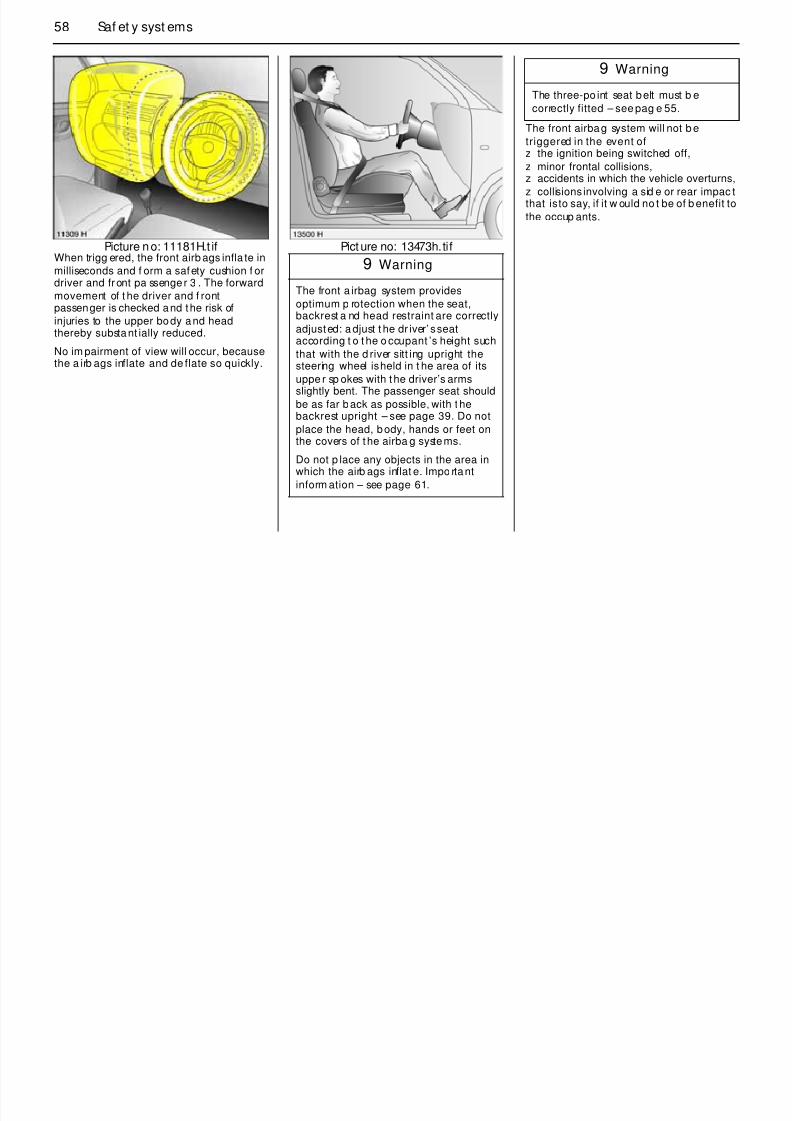
Picture no: 11181H.t ifWhen trigg ered, the front airb ags infla te in
milliseconds and f orm a safety cushion f ordriver and front pa ssenger 3 . The forward
movement of t he driver and f rontpassenger is checked and the risk of
injuries to the upper body and headthereby substant ially reduced.
No im pairment of view will occur, becausethe a irb ags inflate and de flate so quickly.
Pict ure no: 13473h.tif
The front airbag system will not b e
triggered in the event ofz
the ignition being switched off,z minor frontal collisions,z accidents in which the vehicle overturns,
z collisions involving a sid e or rear impac tthat is to say, if it w ould no t be of b enefit to
the occup ants.
9 Warning
The front a irbag system provides
optimum p rotection when the seat,backrest a nd head restraint are correctly
adjusted: a djust t he dr iver’ s seataccording t o t he o ccupant ’s height such
that with the d river sitt ing upright thesteering wheel is held in t he area of its
uppe r sp okes with the driver’s armsslightly bent. The passenger seat should
be as far back as possible, with t hebackrest upright – see page 39. Do not
place the head, body, hands or feet onthe covers of t he airba g systems.
Do not p lace any objects in the area inwhich the airb ags inflat e. Impo rtant
inform ation – see page 61.
The three-po int seat belt must b e
correctly fitted – see pag e 55.
59Safety systems
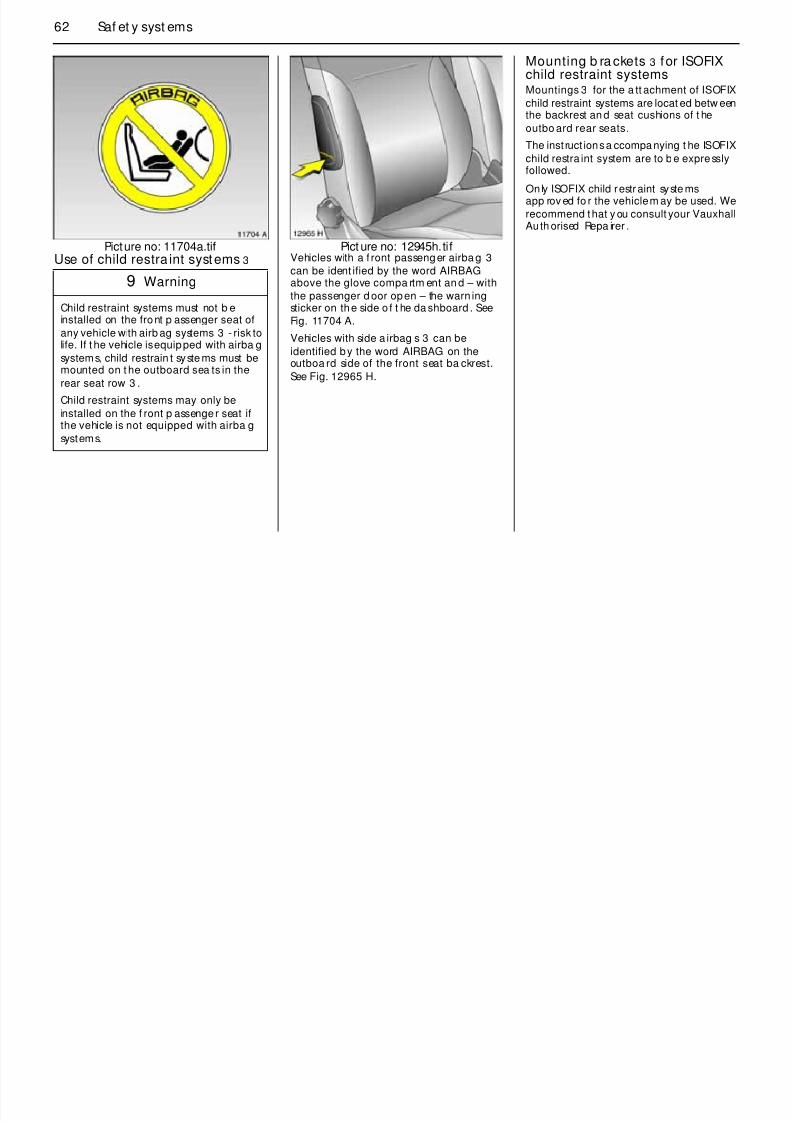
8/3/2019 Agila Owners Manual Jul06
http://slidepdf.com/reader/full/agila-owners-manual-jul06 64/168
Picture no: 13461h.tif Picture no: 12945h.t ifSide airb ag 3
The side a irb ag system is identified by theword AIRBAG on t he outb oa rd sides of the
front seat backrests.The side a irb ag system com prises:
z an airbag with infla tor in the back of th edriver’s and fro nt passenger’s seat
respectively,
z the control electronics,
z th e side impact sensors,
z the airbag systems contro l indicato r v in
the instrument panel,
Picture no : 12946h.tifThe side airbag system will be triggered:
z depending on t he severity of t heaccident,
z depending on t he ty pe of im pact,
z within the range shown in t he illustra tion
on the centre d oor pillar of t he driver’s orfront passenger’s side,
z ind ependently of the front airbagsystem.
6
9 Warning
Seat belts must therefore a lways be worn .
The f ront a irb ag system serves tosupp lement th e three-point seat belts. If
you do no t wear your seat belt you riskbeing seriously injured, or even thrown
from the vehicle, in the event o f anaccident.
In the event of an ac cident t he belt helpsto keep you in the correct seat ing
position , so that the fron t airbag systemcan provid e you with effective p rotection.
60 Saf et y syst ems
9 Warning

8/3/2019 Agila Owners Manual Jul06
http://slidepdf.com/reader/full/agila-owners-manual-jul06 65/168
Picture no: 12947h.tifWhen trigge red, the sid e airbag inflates in
milliseconds to f orm a safety cushion f orthe d river or fron t passenger in the
respective door area. This substantiallyred uces the risk of injury to the upper body
in the event of a sid e-on collision.
The side airba gs will not be triggered in theevent of
z the ig nition being sw itched of f,
z fronta l collisions,
z accidents in which t he vehicle overtu rns,
z collisions involving a rear impac t,
z collisions involving a side impa ct outsidethe passenger cell.
Contro l indicator v for a irbag systemsThe airbag systems are m onitored
electronically tog ether w ith t he belttensioners and their operation al stat us is
indica ted by cont rol ind icator v in theinstrument pa nel. When the ignition is
switched o n, the control indicat or flashes
for a pprox. 4 seconds.
Picture no : 12944h.tifIf it does not flash, does not go out
aft er 4 seconds or illumina tes while driving,there is a fault in the airba g systems or the
belt t ensioner system see p age 51. There isa possibility that t he systems will not be
triggered in the event o f an accid ent.
Deployed airbag systems are indicat ed
throug h constant illum ina tion of v ,
The system’s integrat ed self-d iagnosticsallows faults to be q uickly remed ied. Have
your Car Pass on hand when consulting aVauxhall Authorised Repaire r.
There must be no objects in the area in
which the airb ag inflat es or in the a reabet ween t he seat backs and the vehicle
body. Do not place t he hand s or arms onthe covers of t he airba g systems.
Imp ortant inf ormation – see page 61.The th ree-point sea t belt must a lw ays be
correctly fit ted – see page 54.
9 Warning
Have the cause of the f ault remedied. We
recommend that you consult yourVauxhall Authorised Repa irer.
61Safety systems
Important
z Accessories and other o bjects must notbe affixed or placed in the a rea in which
z Do not stick anything on th e steering
wheel, instrument pane l or front seatback rests in the vicinity of the airbags or
z Do not perform any a lteration s on the
components of the airbag system, as thiswould render the vehicle unro adwor thy

8/3/2019 Agila Owners Manual Jul06
http://slidepdf.com/reader/full/agila-owners-manual-jul06 66/168
be affixed o r placed in the a rea in which
the airbags infla te as they could causeinjury if the airbags are dep loy ed.
z Do not p la ce a ny objects between theairb ag systems and the vehicle
occupa nts; dang er of injury.
z The electronics controlling the airba gsystems and belt t ensioners are located
in t he centre console. To p reventmalfunction, do not place any magnetic
ob jects in the vicinity of this console .
z Use th e hoo ks 3 in the roof frame only to
hang u p light articles of clothing or coa thangers. Do not place an y objects in the
pockets of the hang ing it ems – risk ofinjury.
back rests in the vicinity of the airbags or
cover them with other mat eria ls.
z Use only a dry cloth or int erior cleaner to
clean the steering wheel, instrumentpanel and f ront seat b ackrests. Do not
use ab ra sive cleaning agents.
z Only pro tective covers which are
approved for your Agila with sideairbags 3 may be fitted on the front
seats. When fitt ing the protective covers,mak e sure tha t the airbag unit s on the
outbo ard sides of t he front seatback rests a re not covered.
z The airbag systems are triggeredindep endently o f each other based on
the severity of t he accident and the type
of impact.
z Each airba g can be t rig gered only once.Once triggered, an airbag must be
replaced wit hout delay. We recommendthat you consult your Vauxhall
Authorised Repairer.
z The speeds, d irections of movement a nd
def orm at ion p roperties of t he vehicles,and t he prop erties of the obstac le
concerned , determine the severity of t he
accident and triggering of the airbags.The degree of da mage t o your vehicleand t he resulting repa ir costs alone are
not ind icative tha t the criteria fortriggering of the airbags were met.
would render the vehicle unro adwor thy.
z We recommend ent rusting removal of
the steering wheel, the instrument pa nel,the front seats a nd the seat b elts to your
Vauxhall Authorised Repa irer.
z App licable safety directives must always
be observed when disposing of thevehicle. For t his reason, d isposal should
be performed by an aut horised recyclingcompany. We recommend t hat you
consult your V auxhall AuthorisedRepairer.
z Anyone weig hing less than 35 kg shouldsit in the rear seat s.
9 Warning
As with an y o ther object, child resta int
system s must not b e carried on apassenger ’s lap. Da ng er to life.
9 Warning
The systems can b e trigg ered abrup tlyand cause injury if they are hand led
improperly.
62 Saf et y syst ems
Mounting b ra ckets 3 for ISOFIXchild restraint systems

8/3/2019 Agila Owners Manual Jul06
http://slidepdf.com/reader/full/agila-owners-manual-jul06 67/168
Picture no: 11704a.tifUse of child restra int systems 3
Pict ure no: 12945h.tifVehicles with a f ront passenger airba g 3
can be ident ified by the word AIRBAG above the glove compa rtm ent an d – with
the passenger d oor open – the warn ingsticker on the side o f t he da shboard . See
Fig. 11704 A.
Vehicles with side a irbag s 3 can be
identified by the word AIRBAG on theoutboa rd side of the front seat ba ckrest.
See Fig. 12965 H.
Mountings 3 for the a tt achment of ISOFIX
child restraint systems are locat ed betw eenthe backrest an d seat cushions of t he
outbo ard rear seats.
The inst ruct ions a ccompanying t he ISOFIX
child restra int system are to b e expresslyfollowed.
Only ISOFIX child restraint syste msapp rov ed fo r the vehicle m ay be used. We
recommend that y ou consult your VauxhallAuth orised Repa irer .
9 Warning
Child restraint systems must not b einstalled on the front p assenger seat of
any vehicle with airb ag systems 3 - risk tolife. If t he vehicle is equipped with airba g
systems, child restrain t syste ms must bemounted on t he outboard sea ts in the
rear seat row 3 .
Child restraint systems may only be
installed on the f ront p assenger seat ifthe vehicle is not equipped with airba g
systems.
63Safety systems
Child rest ra int system 3 The Vauxhall child restra int system isdesigned specifica lly fo r your Va uxha ll and
Select ing th e rig ht system
Your child should be t ransported f acingrearward in the car as long as possible
Note
z Children under 12 yea rs or under 150 cmt ll h ld l t l i i t

8/3/2019 Agila Owners Manual Jul06
http://slidepdf.com/reader/full/agila-owners-manual-jul06 68/168
designed specifica lly fo r your Va uxha ll and
thu s provides opt imum saf ety f or your childin the event of im pact. If a dif ferent child
safety seat is used, follow themanufacturers’ instructions for f itting and
use.
The count ry in which you are d riving could
require the use of child restraint system sand spe cific seats. Follow a ll loca l and
nat ional regulat ions.
rearward in the car as long as possible.
Change the system when the height o f t hechild is such tha t the head extends over the
top of t he system and is no longersupported at eye level. The child’s cervical
vertebrae a re still very weak. In the event o f
an accident, they a re subjected to lessstress in t he sem i-prone rea rw ard positionthan w hen upright.
tall should only trav el in an a p prop ria te
child sa fety sea t.
z When t ransport ing c hildren, use the child
restra int systems suit able for the child’sweight.
z Ensure correct insta llat ion of childrestra int system, see the inst ruction s
enclosed with the system.
z The covers of the Vauxha ll child restraint
system can b e wiped clean .
z Do not stick anyt hing on the child
restra int systems and do not cover th emwith any other ma terials.
z Only allow children to enter and exit atthe side facing away from t he traf fic.
z A child restraint system which ha s beensubjected t o stress in an a ccident must
be replaced .
9 Warning
Child resta int systems must not be carriedon a p assenger’s lap. Danger to life.
64 Saf et y syst ems
Permissible opti ons for fi tt ing a child safety sea t
Weight On On On On
X = No child restraint system permitted.
U = Universal suitability in conjunction

8/3/2019 Agila Owners Manual Jul06
http://slidepdf.com/reader/full/agila-owners-manual-jul06 69/168
Weightand
age class1)
1) W d t h f h t til th hild h t h i ht l i it
Onfront
pa ssenger sea tof ve hi cle
witha irbag systems
Onfront
passeng er seatof vehicle
withoutairb ag systems
Onout er seat s
in rea r row
Oncent re seat
in rear row
0:up to 10 kg
or approx.10 months
0+:up to 13 kg
or approx.2 years
X U U+ X
I:9 to 18 kg
or approx.8 mont hs to
4 years
X U U+ X
II:
15 t o 25 kgor approx.
3 to 7 years
III:
22 t o 36 kgor approx.
6 to 12 years
X U U X
with t hree-point seat b elt.
+ = Seat with ISOFIX mountingavailab le. When mounting with
ISOFIX, only ISOFIX child restrain tsystems that ha ve been approved
fo r the vehicle m ay b e used. Werecom mend your Vauxhall
Authorised Repairer.
65Safety systems
Head restraint sAdjust the head restra ints to suit bo dysize 3 See pa ge 39
Sa fety a ccessories 3 The wide ra nge of Vauxhall accessoriesallows you t o equip your Agila in

8/3/2019 Agila Owners Manual Jul06
http://slidepdf.com/reader/full/agila-owners-manual-jul06 70/168
Picture no: 13481h.tifExter ior mirrorsFor the safety of pedestrians, the exteriormirrors will swing out of their normal
mounting p osition if t hey are bumped withsuff icient f orce. Reposition the m irror by
apply ing slight p ressure to t he mirrorhousing.
size 3 . See pa ge 39.
Do not m ount any ob jects or componentsnot specifica lly released fo r yo ur Agila on
the head restra int. They would hinder theprotective function of the head restraint
and could be thrown uncontrollablythrough t he vehicle in the event of heavy
braking or an accident.
Sun visors, glove com part mentThe mirro r cover in the sun visor a nd t he
glove compart ment should be closed whilstdriving.
allows you t o equip your Agila in
accorda nce with your own wishes. Inadd ition t o safety accessories, items for
improving comfort a nd a complete ra ngeof vehicle care p roducts you will find m any
art icles w hich will be of g reat va lue to you
when need ed.
"Genuine Vauxha ll Part s a nd Accessorie s"guarant ee high quality and accurate fit.
Your Vauxha ll Authorised Repa irer will behappy to a dvise you, for example with
regard to:z Vauxhall child restraint system s,
z Tow ropes,z Tow rod s,
z Jump leads,
z Spare bulb kit,z Spare f use kit,z Halogen f og light s,
z Mud flaps,z Magnetic lig ht,
z Wa rning t riang le,z First-aid kit,
z First-aid kit ( cushion).
66 Ligh t ing
Lighting Vehicles with d aytime running lights 3 :
With the ignition on and the lightswitch on 7, dipped beam without

8/3/2019 Agila Owners Manual Jul06
http://slidepdf.com/reader/full/agila-owners-manual-jul06 71/168
Pict ure no: 18156h.tifExt erior lightsTurn ligh t switch:
7 = Off
8 = Parkin g lig ht s9 = Dipped beam, ma in beam
Dip ped beam , main b eam and head lig htflash – see p age 10.
In positions 8 and 9 , the tail lights andnumber plate light a re also illuminated .
If the ignition is switched o ff while dipp edbeam or main b eam is on, the parking
lig hts come on 3 .
pp
instrumen t illum inat ion is on.
The dayt ime running ligh ts switch of f when
the ignition is switched of f.
Follow the regula tions of t he count ry in
which you a re driving w hen u sing da ytimerunning lig hts and fo g lights 3 .
Driving ab road – see pag e 68.
Headlight range adjustment ? .......... 67
Fog lights> 3 ..................................... 67
Fog tail ligh t ......................................... 67
Turn signals, haza rd warn ing lights... 67Reversing light s.... .... ............................ 67
Courtesy light 0 .................................. 68
Instrumen t illuminat ion ....................... 68
Information display illumination 3 ..... 68
Ashtray illum inat ion 3 ........................ 68
Headlights w hen driving abroad ....... 68
67Lighting
Fog t ail lightOn = Press r , r illuminates
in instrument panel
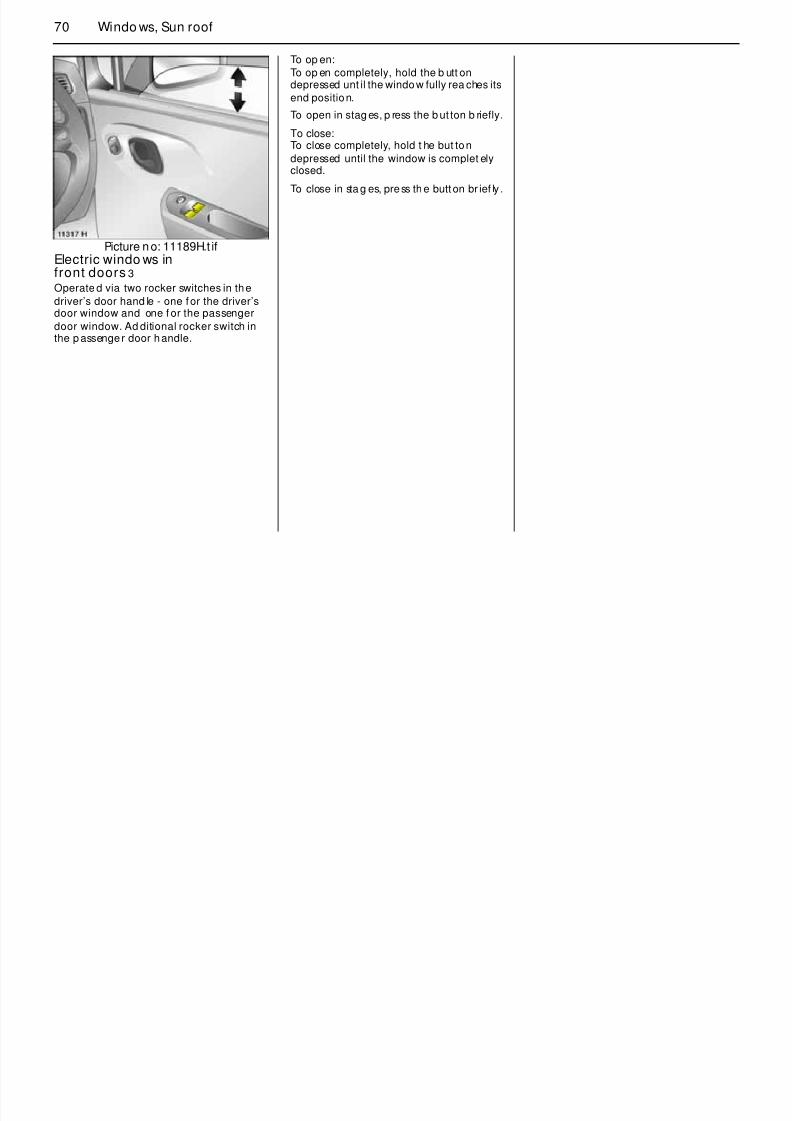
8/3/2019 Agila Owners Manual Jul06
http://slidepdf.com/reader/full/agila-owners-manual-jul06 72/168
Picture no: 18157h.tifHeadlight range adjustment ? Adjust headlight ra nge to four stage s ofvehicle load ing with dippe d b eam switched
on: turn knurled wheel to d esired position.Correct ad justment of the headlight range
reduces dazzle fo r ot her road users.
z Front seats occupied = 0
z All seat s occupied = 1
z All seat s occupied and
lu gg a ge c om p art ment lo ad = 2
z Driver’s seat occupied and
lu gg a ge c om p art ment lo ad = 3
Pict ure no: 11457h.tifFog l ights > 3 On = Press > , > illuminates
in instrument panel
Off = Press > ag ain orswitch ignit ion or ligh t off
The fog light s can on ly be switched onwhen bot h the ig nition and lights are on.
in instrument panel
Off = Press r again orswitch ignition or light of f
The fog t ail light can only be switched on,when the ignition and dipped beam/
park ing lig hts are on.The fog t ail lights on th e vehicle are
deactivated when towing a caravan/ trailer.
Turn sign als, hazard warninglightssee page 11.
Reversing lights
Com e on when reverse gear is engagedand ig nition is sw itched o n.
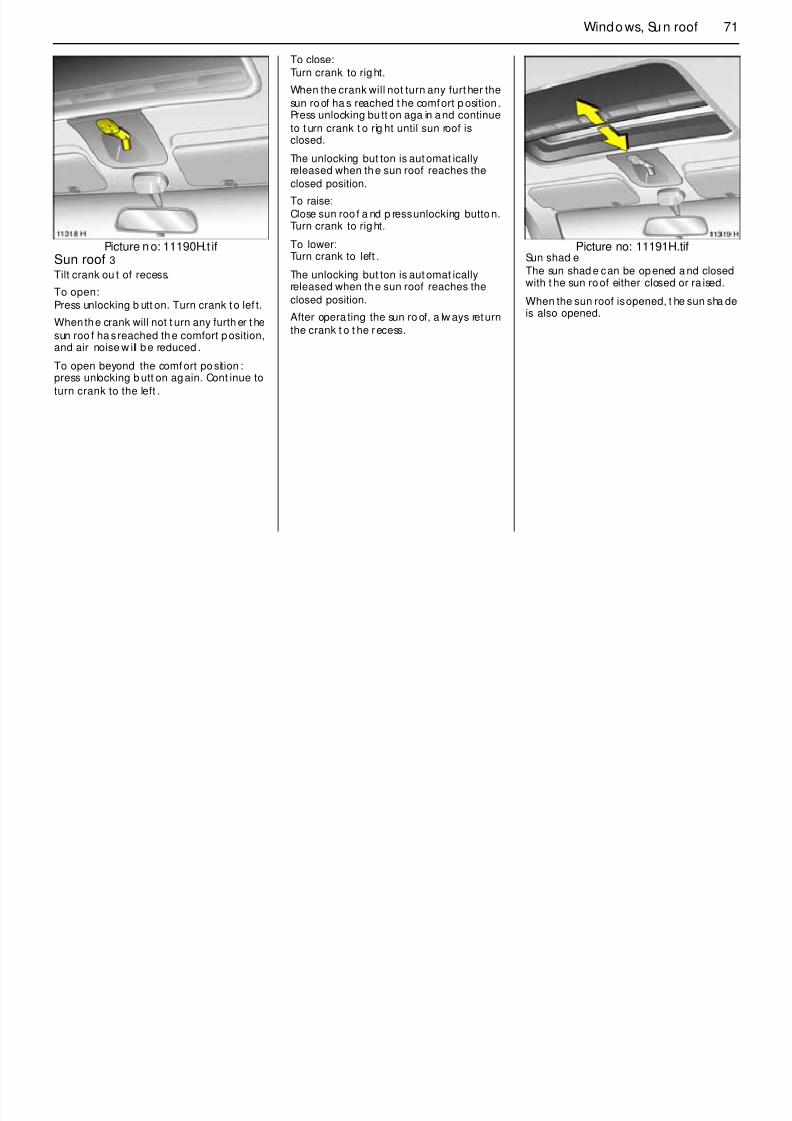
8/3/2019 Agila Owners Manual Jul06
http://slidepdf.com/reader/full/agila-owners-manual-jul06 73/168
69Windo ws, Su n roof
Windows,
Sun roof9 Warning
Take care when opera ting t he electric
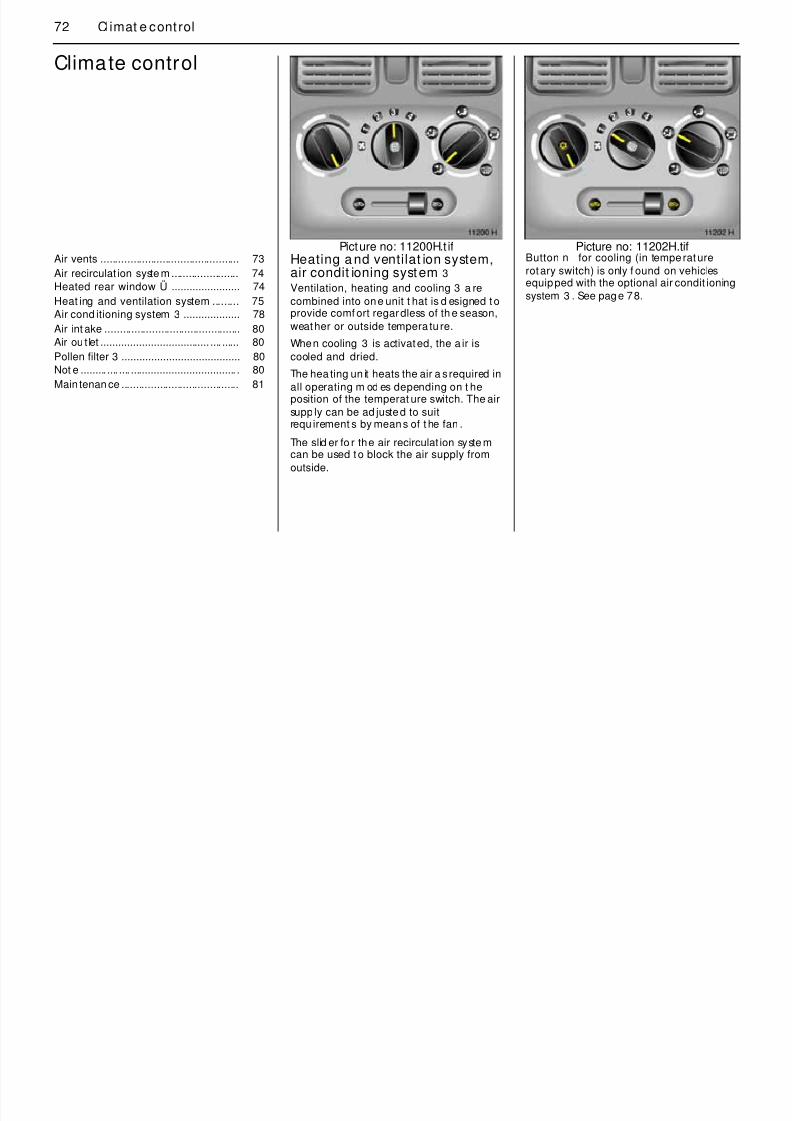
8/3/2019 Agila Owners Manual Jul06
http://slidepdf.com/reader/full/agila-owners-manual-jul06 74/168
Sun roof
Picture no: 11188H.tifDo or windowsTurn the hand crank clockwise oranticlockwise
Electric windows in f ront d oors 3 ....... 70
Sun roof 3 ............................................ 71
Take care when opera ting t he electric
windows 3 . Risk of injury, pa rt icula rly tochildren.
Vehicle passeng ers should be inf ormedaccordingly.
Keep a close watch on the windows whenclosing them. Ensure th at no thing
becomes trapped in the m as they move.
Before lea ving the vehicle, remove the
ignit ion key in ord er to p reventunauthorized opera tion of the windows
and sun roof.
70 Windo ws, Sun roof
To op en:
To op en completely, hold the b utt ondepressed unt il the window fully rea ches its
end position

8/3/2019 Agila Owners Manual Jul06
http://slidepdf.com/reader/full/agila-owners-manual-jul06 75/168
Picture no: 11189H.t ifElectric windo ws infront doors 3
Operate d via two rocker switches in the
driver’s door hand le - one for the driver’sdoor window and one f or the passenger
door window. Ad ditional rocker switch inthe p assenger door handle.
end position.
To open in stag es, p ress the b ut ton b riefly.
To close:To close completely, hold t he but ton
depressed until the window is complet elyclosed.
To close in sta g es, press th e button br ief ly .
71Windo ws, Su n roof
To close:
Turn crank to right.
When the crank will not turn any furt her the
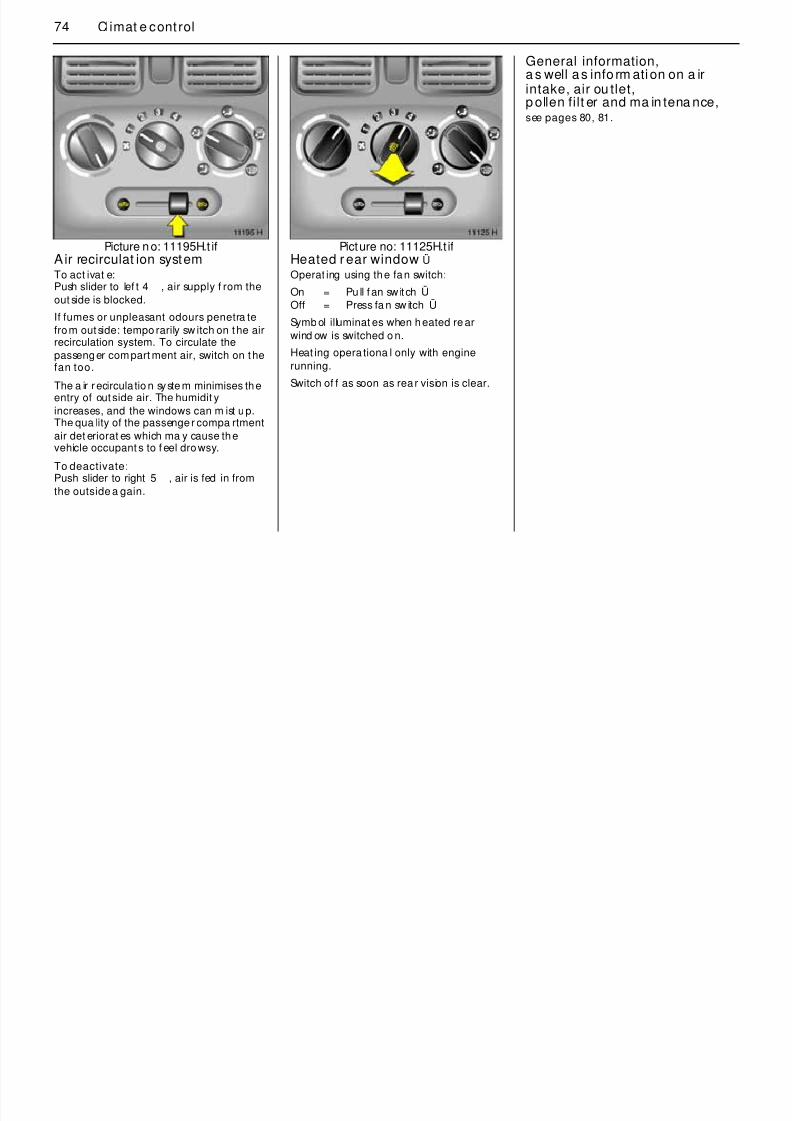
8/3/2019 Agila Owners Manual Jul06
http://slidepdf.com/reader/full/agila-owners-manual-jul06 76/168
Picture no: 11190H.t ifSun roof 3Tilt crank ou t of recess.
To open:
Press unlocking b utt on. Turn crank to lef t.
When the crank will not t urn any furth er t he
sun roo f ha s reached the comfort position,and air noise w ill be reduced .
To open beyond the comfort position :press unlocking b utt on again. Cont inue to
turn crank to the left .
sun roof ha s reached t he comfort p osition .Press unlocking bu tt on aga in and continue
to t urn crank t o rig ht until sun roof isclosed.
The unlocking but ton is aut omat icallyreleased when the sun roof reaches the
closed position.
To raise:
Close sun roo f a nd p ress unlocking button.Turn crank to right.
To lower:Turn crank to left .
The unlocking but ton is aut omat icallyreleased when the sun roof reaches the
closed position.After opera ting the sun ro of, a lw ays return
the crank t o t he recess.
Picture no: 11191H.tifSun shad e
The sun shad e can be opened a nd closedwith t he sun roof either closed or ra ised.
When the sun roof is opened, t he sun sha deis also opened.
72 Climat e cont rol
Climate control

8/3/2019 Agila Owners Manual Jul06
http://slidepdf.com/reader/full/agila-owners-manual-jul06 77/168
Picture no: 11200H.t ifHeating a nd ventilat ion system,air condit ioning system 3
Ventilation, heating and cooling 3 a re
combined into one unit t hat is d esigned toprovide comf ort regardless of th e season,
weather or outside tempera tu re.
When cooling 3 is activated, the a ir is
cooled and dried.
The hea ting un it heats the air a s required in
all operating m od es depending on t heposition of the temperat ure switch. The air
supp ly can be ad justed to suitrequ irement s by means of t he fan .
The slid er fo r the air recirculat ion syste mcan be used to block the air supply from
outside.
Picture no: 11202H.tifButton n for cooling (in temperature
rotary switch) is only f ound on vehiclesequipped with the optional air condit ioning
system 3 . See page 78.
Air vents ............................................... 73
Air recirculat ion syste m ....................... 74
Heated rear window Ü ....................... 74
Heat ing and ventilation system ......... 75Air cond itioning system 3 ................... 78
Air int ake .............................................. 80
Air ou t let ..................................... .... ...... 80
Pollen filter 3 ........................................ 80
Not e ......... .... .... .................................... . 80
Main tenan ce ........................................ 81
73Climat e control

8/3/2019 Agila Owners Manual Jul06
http://slidepdf.com/reader/full/agila-owners-manual-jul06 78/168
Picture no: 16185h.tifAir ventsPleasant vent ilation of t he head a rea isachieved, depending on t he p osition of the
temp erat ure switch a nd th e air distributionswitch (L or M).
To increase the air supply, set t he fan to ahigher speed a nd set t he a ir distribu tion
switch to M.
Centre a nd sid e air vents (1)
The a ir flow can be directed as desired bytilting and swivelling the sla ts.
Pict ure no: 11459h.tifOpen side vents: Turn k nurled wheel
clockwise.
To close the side vents, turn knurled wh eel
anticlockwise.
Picture no : 11460h.tifWindscreen def rost er nozz les (2)
Air distribution switch set to V or J :Air is directed on to the wind screen an d t he
door windows.
Additional vents
Located in front of t he windscreen, in fro ntof th e door wind ows a nd in the fro nt
footwell.
74 Climat e cont rol
General information,a s well as info rm ati on on a irintake, air ou tlet,p ollen filt er and ma in tena nce
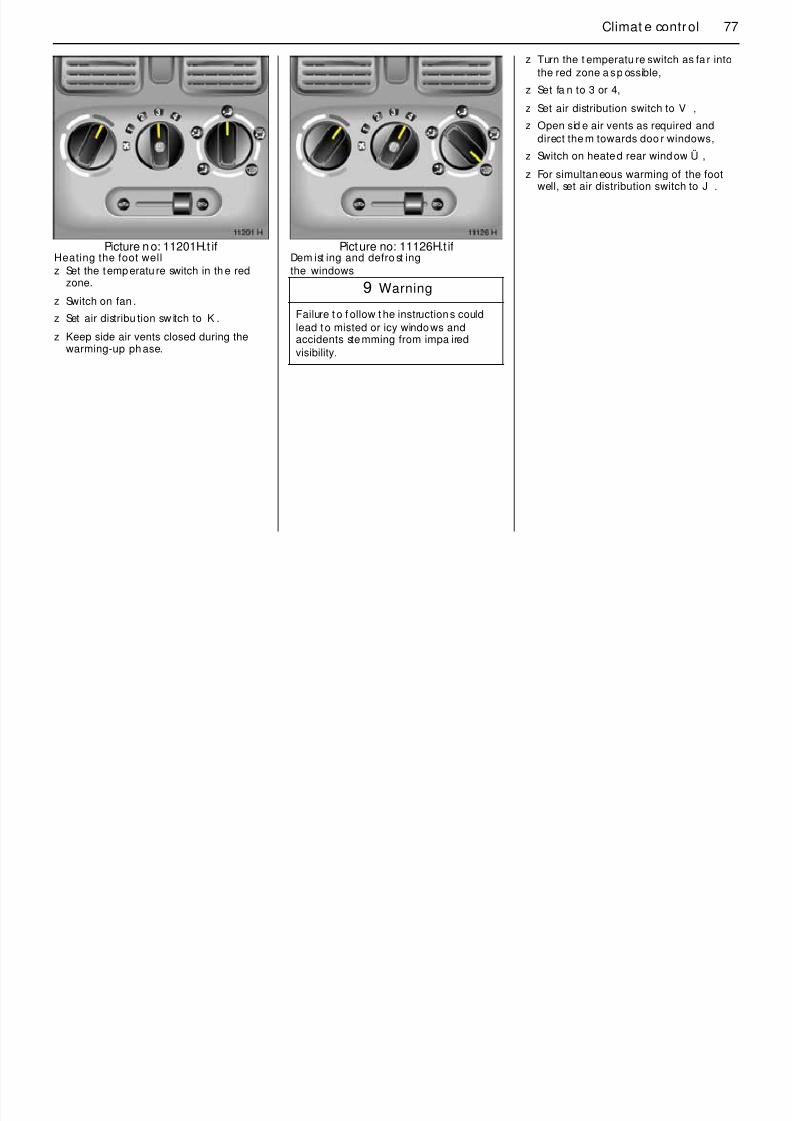
8/3/2019 Agila Owners Manual Jul06
http://slidepdf.com/reader/full/agila-owners-manual-jul06 79/168
Picture no: 11195H.t ifAir recirculat ion systemTo act ivat e:Push slider to lef t 4 , air supply f rom the
out side is blocked.If fumes or unpleasant odours penetra te
from outside: tempo rarily sw itch on the airrecirculation system. To circulate the
passenger compart ment air, switch on thefan too.
The a ir recircula tio n syste m minimises theentry of outside air. The humidit y
increases, and the windows can m ist up.The qua lity of the passenger compa rtment
air det eriorat es which ma y cause thevehicle occupant s to f eel drowsy.
To deactivate:Push slider to right 5 , air is fed in from
the outside a gain.
Picture no: 11125H.t ifHeated r ear window Ü Operat ing using the fan switch:
On = Pu ll f an sw it ch Ü
Off = Press fa n sw itch Ü
Symb ol illuminat es when heated re ar
wind ow is switched o n.
Heat ing opera tiona l only with engine
running.
Switch of f as soon as rea r vision is clear.
p ollen filt er and ma in tena nce,see pages 80, 81.
75Climat e control

8/3/2019 Agila Owners Manual Jul06
http://slidepdf.com/reader/full/agila-owners-manual-jul06 80/168
Picture no: 11192H.t ifHea tin g and venti lat ion systemLeft -hand rota ry switch: Temperaturered zone = warm
blue zone = cold
Picture no: 11193H.t ifCentre rot ary switch: Quanti ty of a ir
Four fa n speeds:x Off
4 Maximum air flow
The rat e of air flow is dete rmined b y the
fan. The fan should therefore also beswitched o n during a journey.
Picture no: 11194H.tifRight -hand rot ary switch: Air distribut ion
K to f oot well
J to wind screen,
front door windows andto f oot well
V to windscreen andfront doo r windows
M to head area
L to head area and
footwell,
Open the air vents when the switch is
set to L or M.
76 Climat e cont rol
Hea ting
The amount of heat is dependent o n theengine tempera ture and is thus not f ully
att ained u ntil t he engine is warm.
The com fort and general well-being of the
vehicle occupant s are to a large extentdependen t on a suitab le ventilat ion and
heat ing set ting.
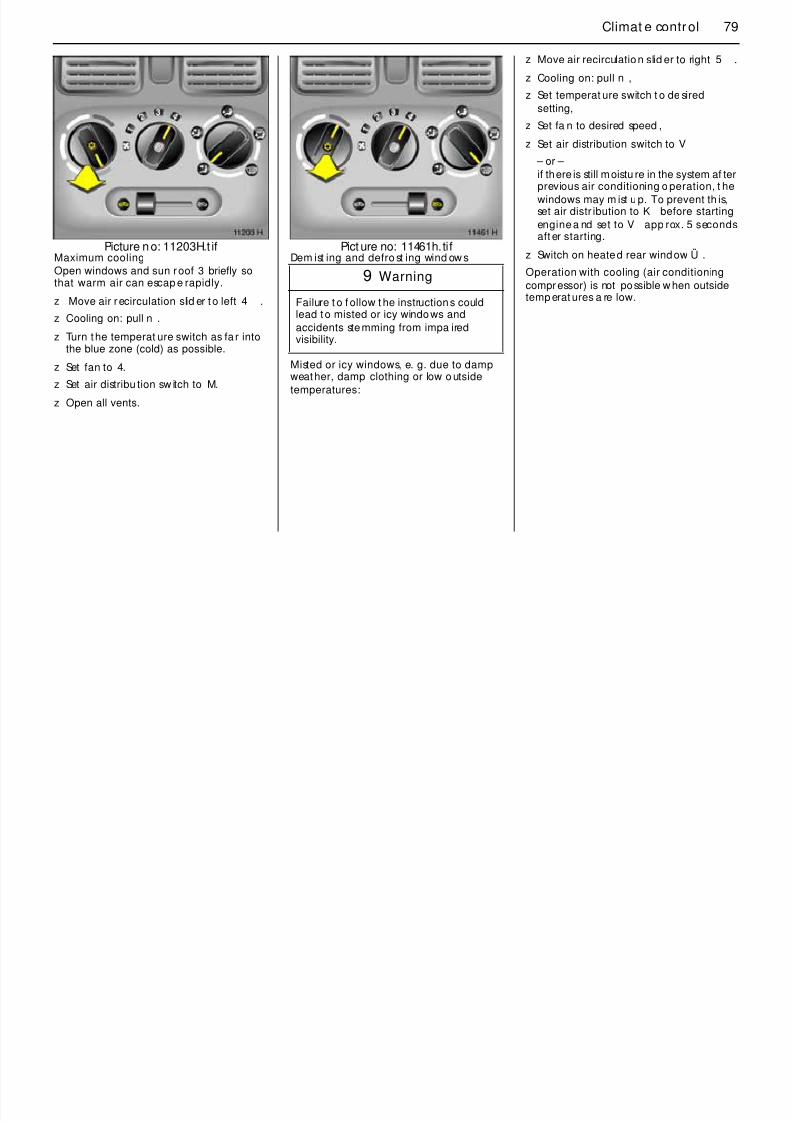
8/3/2019 Agila Owners Manual Jul06
http://slidepdf.com/reader/full/agila-owners-manual-jul06 81/168
Picture no: 11200H.t ifVent ilation
z Set temp era ture switch to desiredsetting.
z Switch fan on a t de sired sett ing.z For max imum ventilation in h ead a rea:
Set air d istrib ution sw itch to M a nd openall vents.
z For vent ila tion to f oot well: Set airdistribut ion switch to K .
z For simultan eous ventilation to the hea darea and the foot well: Set a ir
distribut ion switch to L .
g
For rapid warming of t he p assenger
compartment:
z Set t he temperatu re switch in the red
zone.
z Set the fan to speed 3.
z Set the air distr ibutio n sw itch to thedesired position – see page 75.
g g
77Climat e control
z Turn the t emperatu re switch as fa r into
the red zone a s p ossible,
z Set fa n to 3 or 4,
S t i di t ib ti it h t V

8/3/2019 Agila Owners Manual Jul06
http://slidepdf.com/reader/full/agila-owners-manual-jul06 82/168
Picture no: 11201H.t ifHeating the foot well
z Set the temperatu re switch in th e redzone.
z Switch on fan .z Set air distribu tion sw itch to K .
z Keep side air vents closed during thewarming-up phase.
Picture no: 11126H.t ifDem ist ing and defro st ing
the windows
z Set air distribution switch to V ,
z Open sid e air vents as required and
direct the m towards doo r windows,
z Switch on heated rear window Ü ,
z For simultaneous warming of the footwell, set air distribution switch to J .
9 Warning
Failure t o f ollow t he instructions could
lead to misted or icy windows andaccidents stemming from impa ired
visibility.
78 Climat e cont rol
Air conditioning system 3
As a supplement t o the heating andventilation system, t he air condition ing
system c ools and dehumidif ies (dries)
8/3/2019 Agila Owners Manual Jul06
http://slidepdf.com/reader/full/agila-owners-manual-jul06 83/168
y ( )inflowing air.
If cooling or de humidification is notdesired, switch off cooling in orde r to save
fuel.
At low ou tside te mpera tures the coo ling
unit (air conditioning compressor) switchesoff au tomat ically.
Pict ure no: 12986h.tifCooling n
Operat ional only when eng ine is running.On = Pull t emp erat ure swit ch n
Of f = Press t emp era tu re swit ch n
Cont rol indica tor in p ushbut ton.
Set the fan t o th e d esired setting.
Picture no : 13482h.tifComfort setting
z Move air recirculation slid er to right 5 .
z Activate cooling n as desired.
z Set temperat ure switch t o de siredsetting.
z Set fa n to desired speed .
z Set air distribution switch to M or L .
z Open sid e air vents as required .
79Climat e control
z Move air recirculation slid er to right 5 .
z Cooling on: pull n ,
z Set temperat ure switch t o de sired
setting

8/3/2019 Agila Owners Manual Jul06
http://slidepdf.com/reader/full/agila-owners-manual-jul06 84/168
Picture no: 11203H.t ifMaximum cooling
Open windows and sun roof 3 briefly sothat warm air can escap e rapidly.
z Move air recirculation slid er to left 4 .z Cooling on: pull n .
z Turn the temperat ure switch as fa r intothe blue zone (cold) as possible.
z Set fan to 4.
z Set air distribu tion sw itch to M.
z Open all vents.
Pict ure no: 11461h.tifDem ist ing and defro st ing wind ow s
Misted or icy windows, e. g. due to dampweather, damp clothing or low o utside
temperatures:
setting,
z Set fa n to desired speed ,
z Set air distribution switch to V
– or – if there is still moistu re in the system af terprevious air conditioning o peration, t he
windows may m ist up. To prevent th is,set air distr ibution to K before starting
engine a nd set to V app rox. 5 secondsaft er starting.
z Switch on heated rear window Ü .
Operation with cooling (air conditioning
compressor) is not possible w hen outsidetemp erat ures a re low.
9 Warning
Failure t o f ollow t he instructions couldlead to misted or icy windows and
accidents stemming from impa iredvisibility.
80 Climat e cont rol
Pollen fi lter 3 The pollen filter cleans th e air entering fromoutside, or if the air circulation system 3 is
switched on, f iltering du st, soot, p ollen and
NoteIf the windscreen mists up dur ing dam pweat her cond itions, set the system as
described und er "Window demisting". See
8/3/2019 Agila Owners Manual Jul06
http://slidepdf.com/reader/full/agila-owners-manual-jul06 85/168
Picture no: 11196H.t ifAir intakeThe air intakes in front of the windscreen onthe far left and right-h and sides of the
engine compartme nt must be kept free oflea ves, d irt and snow.
Air out letWhen t ransporting objects in th e luggag ecompartment, m ake sure the air outlets are
not covered.
spore s out of t he interior air.
The pollen filter must b e replaced at t heinterva ls specified in the Service Booklet.
pages77, 79.
The cooling system (air cond itioningcompressor) only ope ra tes when the
engine is running.
Cooling 3 functions most efficient ly when
the wind ow s a nd sun roo f 3 are closed. Ifthe passenger compa rtm ent has heated
up considerably a ft er a long period indirect sunlight , brief ly open the windows
and sun roof 3 so that t he hot air canesca pe q uickly.
81Climat e control
When cooling 3 (air conditioning
compressor) is switched on condensat ionforms, which is exp elled from the underside
of the vehicle.
MaintenanceIn order to ensure consistently goo doperation, the air cond itioning
compressor 3 must be switched on forl i t th
8/3/2019 Agila Owners Manual Jul06
http://slidepdf.com/reader/full/agila-owners-manual-jul06 86/168
At lea st one a ir vent must b e open while
cooling 3 (air condit ioning compressor) ison in order to prevent the evaporato r f rom
icing up due to lack of air movement.
several minutes once per month
irresp ective of the wea ther or time of year.Operat ion with cooling (air condit ioning
compressor) 3 is not possible when outside
temperat ures are low .In the event o f a fault, consult a w orkshop.We recommend your Vauxhall Aut horised
Repairer.
82 Driv in g Hints
Driving Hints The first 600 mi lesDrive yo ur vehicle at vario us speeds. Donot use full t hrottle . Never allow the engine
to lab our at low revs.
Driving in mo untainous terrain orwith a tra iler/caravanThe cooling f an is electrically opera ted. Its
cooling power is therefore independent ofth i d
8/3/2019 Agila Owners Manual Jul06
http://slidepdf.com/reader/full/agila-owners-manual-jul06 87/168
Make good use of all gears. In all gears
depress the accelera tor peda l a m aximumof around three quarters of the available
pedal t ra vel.
Do not d rive faster than three quarters of
maximum speed .
Do not b rake unnecessarily ha rd f or the
first 125 miles.
Never coast w ith engine notrunningMany units w ill not f unction in this situa tion(e.g. brake servo unit, po wer steering 3 ).
Driving in this ma nner is a danger toyourself and others.
Brake servo uni tWhen the engine is not running, the brakeservo unit is no longer effective once the
bra ke peda l has been depressed once ortwice. Braking effect is not reduced , but
signif icantly grea ter force is required forbraking.
Elect ric power steer ing3
If t he power-a ssisted steering f ails whenbeing towed with t he engine switched off,
the vehicle can still be st eered , butconsidera bly more f orce is required.
the engine speed.
Since a considerab le am ount of heat isgenerated at high engine speeds and less
at slower speeds, do not shift down whe n
climb ing hills whilst the vehicle is still copin gwith the g radient in th e hig her gear.
Driving with a roof loadDo not exceed the perm issible roof load
and m aximum loading height, seepag es 102, 150. For reasons of safety,
distribute the load evenly a nd secure itproperly with reta ining strap s so that it
cannot slip . Adjust the tyre p ressure tosuit the load. Do not drive faster than 75
mp h. Check and retighten th e strapsfrequently.
Swit ching off t he eng in eWhen you switch of f, fan s in the eng inecompartm ent may continue running for a
time to cool the engine.
If the engine temperature is very high, e.g.
aft er driving in moun ta inous terrain: allowthe engine to id le fo r approx im ately two
minutes in orde r to prevent heataccumulation.
83Driving Hints
Vehi cles w ith turb ocharged engine
Af ter running at hig h engine speeds or highengine loads, opera te the engine briefly
at a low load or run in neutral for approx.30 seconds before switching o ff in orde r to
Eng ine sp eedDrive in a low engine speed range for eachgear a s m uch as possible.
Warming up
PedalsDo not p lace any ob jects in the foot wellwhich could slip under the ped als and
inhibit the pedal trav el.

8/3/2019 Agila Owners Manual Jul06
http://slidepdf.com/reader/full/agila-owners-manual-jul06 88/168
30 seconds before switching o ff in orde r to
protect the turbocha rger.
Sa ve energy – mo re miles
Please observe the running-in hints on theprevious pag e and the tips for energysaving on the following pages.
Good, technica lly correct and economicaldriving ensures ma ximum durability a nd
performan ce for your vehicle.
OverrunThe fue l supp ly is autom at ically shut off
during overrun, e.g. when the vehicle isbeing dr iven down long gradien ts or when
braking. To enab le the overrun cut-off t otake effect, do not accelerate during
overrun and do not de-clutch. To preventdam age to the cata lyt ic converter, overrun
cut-off is temp orarily deactivated when th ecataly tic converter t empera ture is high.
Vehi cles w ith turb ocharged engineFlow -g enerat ed noises may be aud ible if
the a ccelerat or is released quickly due toair flow in the t urbocharger.
Warming upAllow the engine to wa rm up while driving.Do not warm it up by letting it run at idling
speed. Do not apply full throt tle until the
engine has reached op erat ingtemperature.
Correct gear select ionDo not race your engine whilst in neutra l or
with a low gear selected. Driving t oo fast inindiv idual gea rs as well as stop-a nd-g o
tra ffic increase eng ine wea r and f uelconsumption.
Change downWhen decreasing speed, shift down in tothe next lowest g ear. Do not slip th e clutch
with a high-revving engine. This isespecially impo rtant when hill climb ing.
Clutch operat ionAlw ays dep ress the clutch peda l hard tothe floor to prevent shift ing dif ficulties and
tra nsmission dam age.
When d riving do not use the pedal as a
foot rest; this will ca use substa nt ial clutchwear.
To ensure the pe dal t ravel is uninhib ited,
there must be no mats in the area of t hepedals.
Ba tt ery c areWhen driving slowly or when the vehicle isstationary, e.g. in slow urban t raff ic, stop-
and-go t raff ic or traf fic jams, turn off allunn ecessary electrica l load s w here
possible (e.g. heat ed rear window,auxiliary headligh ts, etc.).
Declutch w hen sta rting in orde r to relievethe strain on t he start er and the ba ttery.
84 Saving fuel, Protect ing the environment
Saving fuel,
Protecting theenvironment
New painting techniques employ wa ter as
a solvent .
End -of-l ife vehicle reco veryFor deta iled informa tion on Vauxha ll’ s
Warming upz Full throttle and w arming up at idle
speed increase wear, fuel consumpt ion,
exhaust em ission, t he amount ofpollutant in the exhaust and the am ount

8/3/2019 Agila Owners Manual Jul06
http://slidepdf.com/reader/full/agila-owners-manual-jul06 89/168
environment
Trend-setting technologyWhen d eveloping and manufacturing your
vehicle, Vauxhall used environment-friendly and pred om inant ly recycla ble
mate rials. The product ion me thods used tomake your vehicle are likewise
environme nta lly-compat ible.
Recycling of prod uction wastes keeps the
circulat ion of material closed. Reduction ofenergy and wa ter requirements a lso help s
to conserve natural resources.
A highly adva nced design mea ns that your
vehicle can be easily disassembled a t t heend o f its service life, and the ind ividual
mate rials separated fo r subsequent re-use.
Mate ria ls such as asbestos and cadmium
are not used . The refrigerant in the aircondit ioning system 3 is CFC-free.
For deta iled informa tion on Vauxha ll s
on-going comm itment to achieving anenvironmenta lly sustainab le fu ture,
including; design for recycling, take back of
End-of -Life Vehicle (ELVs) a nd therecycling of ELVs, viewwww.va uxha ll.co.uk/recycling fo r det ails.
Energy a nd environment -conscious drivingz High noise levels and exhau st emissions
are often a result of driving w ithout dueattention to saving energy and
protecting the environment.
z You should t herefore dr ive with energy in
mind – "more miles with less fuel".
Reduce the noise level an d exhaust
emissions b y adopt ing an environment-conscious driving st yle. This is ext remely
worthwhile and im proves the quality o flife.
Fuel consum ption d epend s to a greatextent on your own persona l d riving
style. The fo llow ing hints will help you toachieve fuel consumpt ion a s close as
possible t o the specified leve ls – seepages148 to 149.
Check your vehicle’s fuel consumptionevery time you refuel. This facilitates
early detection of any irregula ritiescausing increased fuel consumpt ion.
pollutant in the exhaust and the am ount
of noise.
z Drive off immediately after starting.
Wa rm up the engine b y running it a t
moderate eng ine speeds.
Uniform sp eedz Hectic driving significantly increases fuel
consumpt ion, the exhaust emissions, the
proportion of pollutant in the exhaustgas and the noise level.
z Do not accelerat e a nd brakeunnecessarily. Drive at uniform speed,
watching the road.
Avoid frequent start ing off and stopp inge.g . at t raf fic lights, in short distancetraffic and in qu eues of t raff ic by means
of clever plann ing. Select road s w ithgood traf fic flow.
Idlingz The eng ine a lso consumes fu el when
idling .
z If you have to wait for more t han one
minute, it is worthwhile switching off theengine. Five minutes of idlingcorresponds to ap proximat ely one 0.6
miles of driving.
85Savi ng fuel, Prot ecti ng the environment
Overrunz The f uel supply is automatically shut of f
during ov errun, e.g. when the vehicle is
being driven down long grad ients orwhen braking – see page 83
z Slight ly relea sing the accelerat or ped al
results in distinct fuel savings with nomajo r loss of speed.
Drive at no more t ha n around threequarters of maximum speed and you will
Rep air a nd maintenancez Improper repairs or adjustm ent and
maint enance work can increase fuel
consumption. Do not carry out w ork onthe eng ine yourself
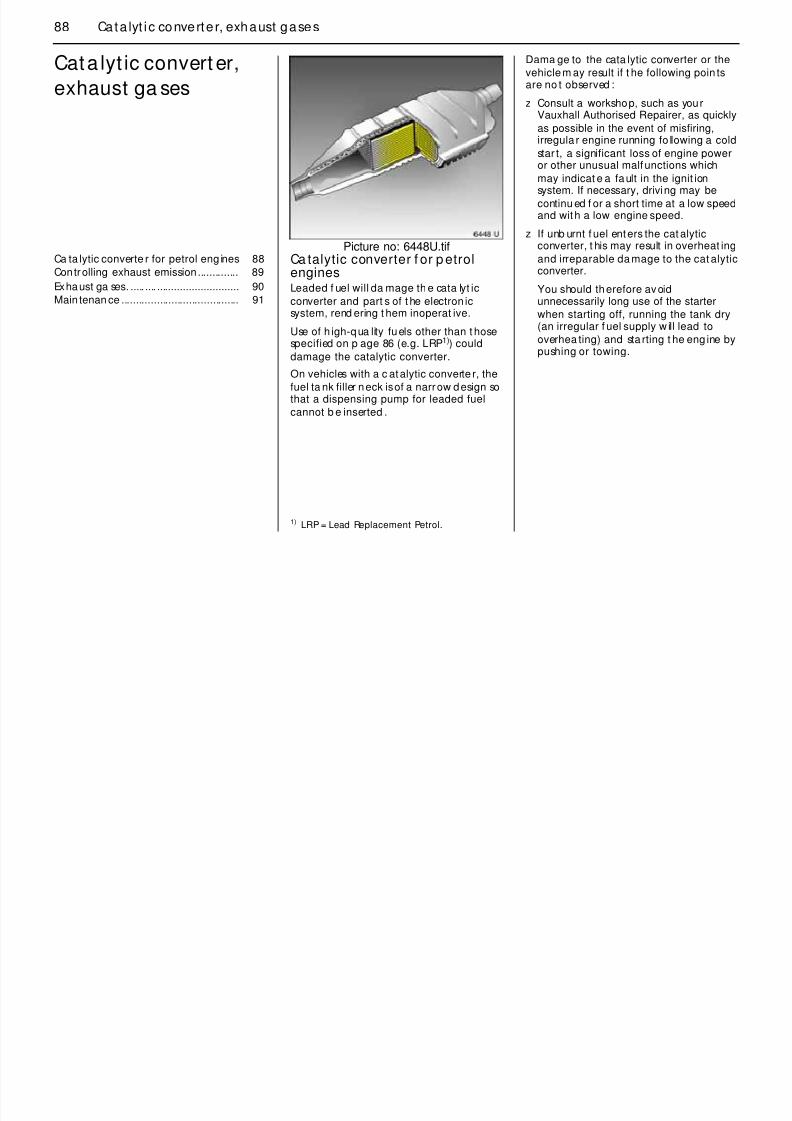
8/3/2019 Agila Owners Manual Jul06
http://slidepdf.com/reader/full/agila-owners-manual-jul06 90/168
when braking see page 83.
z To enab le the overrun cut -of f to comeinto action and sav e fuel, do not
accelerat e or d eclutch during overrun.
Correct gea r select ionz High revs increase engine wear and fue l
consumption.
z Do n ot race your engine. Avoid d riving at
high eng ine speeds.
Making use of the tachomet er 3 helps to
save fuel. Drive in a low engine speedra nge for each gear as much a s possible
with uniform engine speeds. Drive as
often as possible in top gear, select thenext higher gear a s soon as possible,and only chang e down whe n the engine
is no longer running perfectly smoothly.
High speedz The higher the speed , the higher the
consumpt ion and th e noise level. At topspeed, you consume a great deal of fuel
and produce excessive n oise a ndexhaust emissions.
quarters of maximum speed and you will
use up t o 50 % less fue l, without losing agreat de al of time.
Tyre p ressurez Inadequat e tyre pressure, leading to
higher road resista nce, costs m oney in
two wa ys: f or more fuel and increasedtyre wear.
z Regu lar checks (every 14 d ays) pay of f.
Elect rica l loadsz The power consum pt ion of e lectrical
equ ip ment increa ses fuel consumpt ion.
z Sw itch off all auxiliary electrical loads(e.g. air conditioning 3 , heated rearwindow) when not needed.
Roof ra cksz Due to a ir resistance, a roof load can
increase fuel consump tion by app rox.
3.5 ga ls/h.
z Remove them if t hey are not being used.
the eng ine you rself.
You may out of ignorance infringeenvironmental law s b y not disposing of
materials properly.
Appropria te part s might not b e recycled.
Contact with some of t he mat eria lsinvolved may p ose a health haz ard.
z We recom mend that repair andmaint enance be ent rusted t o your
Vauxhall Authorised Repa irer.
Extreme d rivin g conditi onsz Going up ste ep slopes, cornering, driving
on poor road s a nd winter driving a llincrease fuel consumption.
z Fuel consumpt ion increases dra mat icallyin urba n traffic and a t winter
temperat ures, especially on short t rip swhen the engine operating t empera ture
is not reached.
z Follow the hints given above to keep
consumption to a m inimum under suchcond itions.
86 Fuel consumption, fuel, re fuell ing
Fuel consumption,
fuel, refuelling
Fuel consum pt ionFuel consumption is determined underspecific driving condit ions – see page 148.
Fitting special equipment will increase thei ht f th hi l Thi i t i
Fuel for p et rol eng inesCom mercially availab le high-qualit y fuelwith a maximum ethanol content of 5% as
per DIN EN 228 (cat alyt ic converter - seepag e 88, octane numbers - see page 146).

8/3/2019 Agila Owners Manual Jul06
http://slidepdf.com/reader/full/agila-owners-manual-jul06 91/168
weight of the vehicle. This in turn increases
fuel consumpt ion and reduces thespecified maximum speed of t he vehicle.
For the first few thousand miles, frictionbetween the engine and transmission
component s is higher. This increases fuelconsumption.
pag e 88, octane numbers see page 146).
Fuel qua lity ha s a decisive influence onpower outp ut, running beha viour and
service life of the engine. The additives
contained in the fuel pla y an important rolein this regard. You should the refore onlyuse high-qua lity fuels conta ining additives.
Fuels with etha nol content gre ater than 5%do not comply with DIN EN 228 and m ust
not be used unless the vehicle has beenspecifically developed and ap proved for
use of such.
Fuel with too low an octane number can
cause ping ing. Va uxha ll cannot b e heldliable for resulting damage.
Petrol with a hig her octan e number canalways be used .
Pump nozzles for leade d fuel cannot beinserted into the filler neck of vehicles tha t
operat e on unlead ed f uel.
The ignition t iming is aut omat ically
adjusted according to t he grade of fu elused (octane num ber) – see page 146.
Use of petrol with an octan e rating o f 95
will ensure economical driving.
Fuel consump tion ................................ 86
Fuel fo r petro l engines ........................ 86
Fuel f iller ca p... ......... ............................ 87
Refuell ing ......... .................................... . 87
87Fuel consumpt ion, fuel, refuelling
Fuel filler capIf the f uel filler cap must be replaced, useonly the Genuine Vauxhall fuel filler cap
designed for your model t o ensure that fullfunctionalit y is retained. Vehicles with
The fuel tank filler neck with screw cap is
loca ted on t he left-ha nd side of th e vehiclein the rear qua rter panel.
Open the tank flap .
To open nlock the f el filler cap ith the

8/3/2019 Agila Owners Manual Jul06
http://slidepdf.com/reader/full/agila-owners-manual-jul06 92/168
y
diesel engine ha ve a sp ecial fuel filler cap.
Refuelling
To open, unlock the fuel filler cap with the
ignition key 3 and carefully unscrew sothat the excess pressure can slowly
dissipate.
Att ach filler ca p to b racket on flap and turn
to secure.
The f uel tank has a limiting system which
prevents ov erfilling of the tank.
Picture no : 12259h.tifCorrect filling depends to a large extent on
proper operation o f th e fuel disp ensingpump:
1. Fully insert t he pump nozzle and switch it
on.
2. After the autom atic cut-off, another two
litres (ma x.) can be topp ed up in stag es.
To close, replace filler ca p and tu rn,
overcoming the resistance, until t he lock onthe cap engages audibly . Lock filler cap
with ignit ion key 3 .
Close fuel tank cover.
Wipe off an y overflowing fuel immediat ely.
9 Warning
Care must b e tak en when ha ndling f uel.
Befo re ref uelling , switch off eng ine a nd
any external hea ters with combustioncha mbers before refuelling. Switch
mobile phones off.
Fuel is flamm able a nd explosive. avoid
naked flam es or sparks when han dlingfuel or just in its vicinity. Do not smoke.
This also applies where fuel is perceptib leonly from its charac teristic od our. If fuel
odours occur in the vehicle itself,eliminat e the cause im media tely. We
recommend your Vuxha ll AuthorisedRepairer.
88 Cata lyt i c converter, exhaust gases
Cata lyt ic convert er,
exhaust ga ses
Dama ge to the cata lytic converter or the
vehicle m ay result if t he following poin tsare no t observed :
z Consult a workshop, such as yourVauxhall Authorised Repairer, as quickly

8/3/2019 Agila Owners Manual Jul06
http://slidepdf.com/reader/full/agila-owners-manual-jul06 93/168
Picture no: 6448U.tifCa talytic converter f or p etrolenginesLeaded f uel will da mage th e cata lyt ic
converter and part s of t he electron icsystem, rend ering t hem inoperat ive.
Use of h igh-qua lity fuels other than t hosespecified on p age 86 (e.g. LRP1)) could
damage the catalytic converter.
On vehicles with a c atalytic converte r, the
fuel ta nk filler neck is of a narrow design sothat a dispensing pump for leaded fuel
cannot b e inserted .
p , q y
as possible in the event of misfiring,irregula r engine running fo llowing a cold
star t, a significant loss of engine power
or other unusual malfunctions whichmay indicat e a fault in the ignit ionsystem. If necessary, driving may be
continu ed f or a short time at a low speedand with a low engine speed.
z If unb urnt f uel enters the cat alyticconverter, t his may result in overheat ing
and irreparable da mage to the cat alyticconverter.
You should therefore avoidunnecessarily long use of the starter
when starting off, running the tank dry(an irregular f uel supply w ill lead to
overhea ting) and sta rting t he eng ine bypushing or towing.
Ca ta lytic converte r for petrol eng ines 88
Controlling exhaust emission.............. 89
Exhaust ga ses. ..... .... ............................ 90
Main tenan ce ........................................ 91
89Catalytic converter, exhaust gases
z If emission c ontrol ind icator Z flashes,
slow down un til th e flashing stop s andthe cont rol indicator shines with a stea dy
glow. Cont act a workshop im med ia tely.We recom mend y our Vauxhall
A thorised Repairer see Emission

8/3/2019 Agila Owners Manual Jul06
http://slidepdf.com/reader/full/agila-owners-manual-jul06 94/168
Authorised Repairer – see Emissioncontrol indicator Z .
Pict ure no: 16178h.tifCont rol ling exhaust em issionThrough d esign-relat ed measures – mainlyin the area o f th e fuel-injection and ignition
systems – the prop ortion of noxiousmaterials in the exhaust, such as carbonmonoxide (CO), hyd rocarbo ns (HC) andnitrogen oxides (NOx), is reduced to a
minim um .
Picture no : 12948h.tifCont rol indicato r Z for exha ust gases
Illuminat es when ignition is switched onand d uring start att empt. Goes out shortly
after engine starts.
If it illuminat es w hile the eng ine running
there is a fau lt in the emission cont rolsystem. The permit te d emission values may
be exceeded. Consult a wo rkshopimmediat ely. We recomm end y our
Vauxhall Authorised Repaire r.
Flashing wit h the engine runn ing indica tes
a fa ult that m ay damage the cata lyticconverter. You can cont inue to drive
without causing dam age by slowing down
unt il the flashing stop s and the controlindicato r is steady. Consult a workshopimmediately. We recomm end t hat you
consult a n Vauxhall Aut horised Repairer.
6

8/3/2019 Agila Owners Manual Jul06
http://slidepdf.com/reader/full/agila-owners-manual-jul06 95/168
91Catalytic converter, exhaust gases
MaintenanceHave all ma intenance work carried out atthe inte rva ls specified by Vauxhall. We
recom mend that y ou entrust th is work toyour Vauxhall Au thorised Repairer, who
h i t d t i d
You are t hereby mak ing an important
contribu tion towa rd s keep ing th e air cleanand compliance w ith emissions legislation .
Checking a nd adjustm ent of the fuel-injection and ignition system s is p art of the
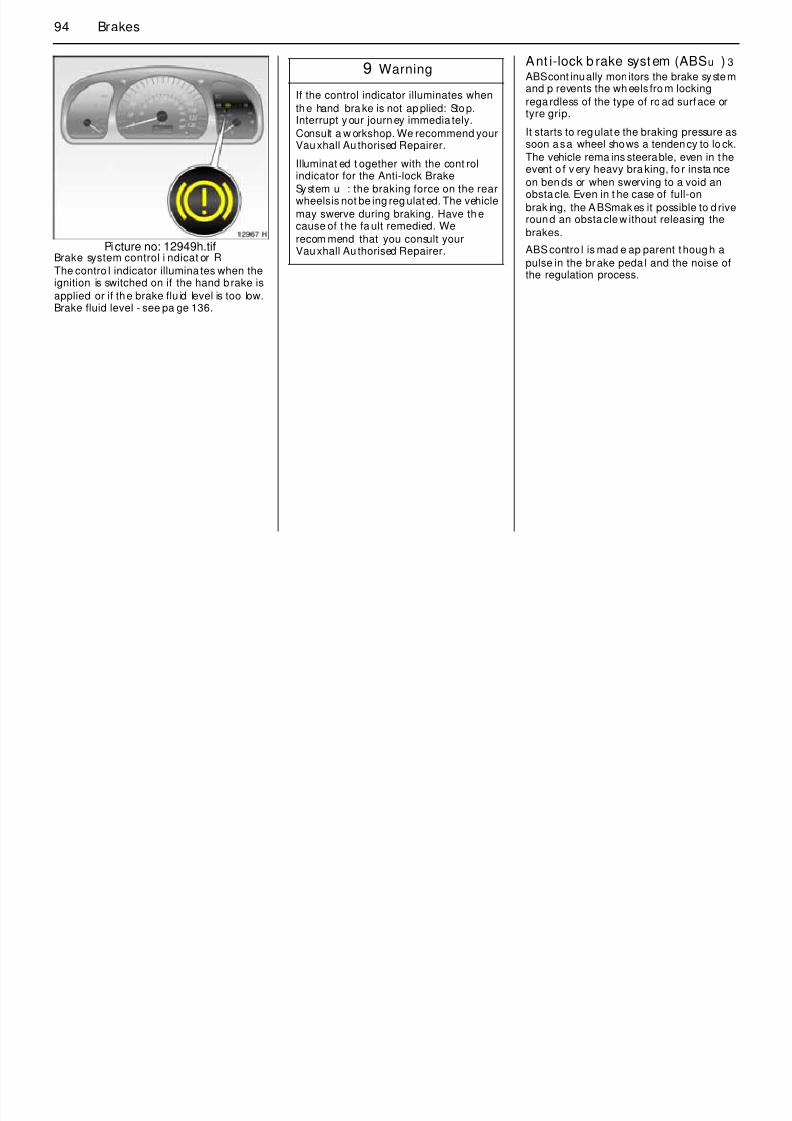
8/3/2019 Agila Owners Manual Jul06
http://slidepdf.com/reader/full/agila-owners-manual-jul06 96/168
has proper equipment and trainedpersonnel ava ilable. Electronic testing
systems permit rapid dia gnosis andremedy of faults. This way you can be
certa in t hat a ll comp onents of the vehicle’selectrical, injection and ignition systems
opera te correctly, tha t your vehicle has alow level of pollut ant emission and that the
cataly tic converter system will have a longservice life.
scope o f inspectio n. For this rea son youshou ld have all maint enance work carried
out at t he int ervals specified in your Service
Booklet.
92 Brakes
Brakes Brake systemThe brakes are a n important f actor fortraffic safety .
To improve effectiveness, do no t b rakeunnecessarily hard fo r the first 120 miles
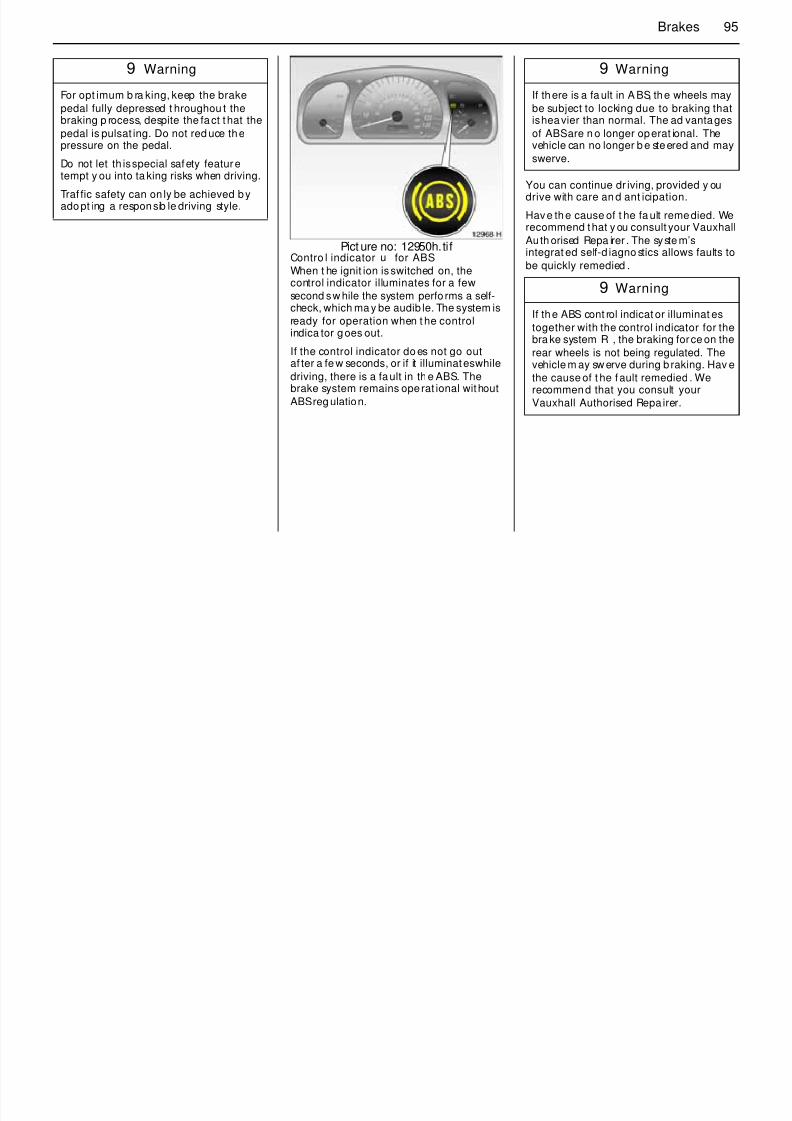
8/3/2019 Agila Owners Manual Jul06
http://slidepdf.com/reader/full/agila-owners-manual-jul06 97/168
y
(200 km) aft er new brak e p ads ha ve beenfitted.
Brake pad wear must no t exceed aspecified lim it. Reg ular maint enance asdetailed in the Service Booklet is thereforeof the utmost importa nce for traf fic sa fety.
Have worn brake p ads replaced. Werecommend that you consult your Vauxhall
Authorised Repa irer, who will fit pads tha tha ve b een tested a nd approved by
Vauxhall and gua rantee opt imum brakingpower.
Brake pads that have worn down to the
minimum thickness will squeal. Driv ing maybe continued. Have the b rake padsrep laced as soon as p ossible. Consult a
workshop f or bra ke pa d replacement. Werecommend your Vauxhall Aut horised
Repairer.
Picture no: 11209H.t ifFoot brake
The foot brake comprises two independentbrak e circuits.
If a brake circuit fa ils, the vehicle can still bebrak ed using the other brak e circuit. If this
occurs, however, the brake pe dal must bedepressed q uite f ar using considerab le
force before braking effect occurs. Thedistance required for b ra king will be
grea ter. Consult a workshop bef orecontinuing y our journey. We recommend
your Vauxhall Authorised Repaire r.
To ensure the fu ll p eda l travel can be
utilized, especially in case of a fault in one
of the bra ke circuits, there must be no ma tsin the vicinity of t he p edals – see p age 83.
Brake system ................. .... ......... .... ...... 92
Ant i-lock brake system (ABSu ) 3 .... 94
93Brakes
When the engine is not running, the
sup port of t he brake servo unit d isappearsonce the brake ped al has been depressed
once or tw ice. Bra king effe ct is notreduced, but b ra king requires significantly
grea ter fo rce. This is especially im portant
Shortly af ter sta rting ea ch journey the
effectiveness of the brake system shouldbe tested at low sp eed and witho ut
inconveniencing oth er traf fic, especially ifthe brakes are wet, e.g. af ter the vehicle
hasb een washed.

8/3/2019 Agila Owners Manual Jul06
http://slidepdf.com/reader/full/agila-owners-manual-jul06 98/168
grea ter fo rce. This is especially im portantto bea r in mind when towing.
Check the bra ke lights b efo re start ing outon a jou rney.
has b een washed.
The brake fluid level should be checked
regu larly. If the brak e fluid level is too lowand t he han d brake is not a pplied, control
indica tor R on the instrument panelilluminat es – see pag e 20.
Picture no : 13483h.tifHand brake
Alway s app ly hand b rak e firmly. On slopesapp ly t he hand bra ke as firm ly as possible.
The mechanical hand brake acts on thebrak es on the rea r wheels. It eng agesautomat ically when app lied.
To release t he hand brake pull t he lever up
slightly, press the rat chet knob, a nd fullylower the lever.
94 Brakes
Ant i-lock b rake system (ABSu ) 3ABS cont inually monitors the brake systemand p revents the wh eels fro m locking
regardless of the type of ro ad surface ortyre grip.
9 Warning
If the control indicator illuminates when
the hand bra ke is not ap plied: Stop.Interrupt y our journey immedia tely.

8/3/2019 Agila Owners Manual Jul06
http://slidepdf.com/reader/full/agila-owners-manual-jul06 99/168
Picture no: 12949h.tifBrake system control i ndicat or R
The contro l indicator illumina tes when theignition is switched on if the hand b rake is
applied or if the brake flu id level is too low.
Brake fluid level - see pa ge 136.
It starts to regulate the braking pressure assoon as a wheel shows a tendency to lo ck.
The vehicle rema ins steerable, even in the
event o f v ery heavy bra king, fo r insta nceon ben ds or when swerving to a void anobstacle. Even in t he case of full-on
brak ing, the ABS mak es it possible to d riveround an obsta cle w ithout releasing the
brakes.
ABS contro l is mad e ap parent thoug h a
pulse in the brake peda l and the noise ofthe regulation process.
Consult a w orkshop. We recommend yourVauxhall Au thorised Repairer.
Illuminat ed t ogether with the cont rolindicator for the Anti-lock Brake
System u : the braking force on the rearwheels is not be ing reg ulat ed. The vehicle
may swerve during braking. Have th ecause of t he fa ult remedied. We
recom mend that you consult yourVauxhall Au thorised Repairer.
95Brakes
9 Warning
For opt imum b ra king, keep the brake
pedal fully depressed t hroughou t thebraking p rocess, despite the fact t hat the
9 Warning
If there is a fa ult in A BS, the wheels may
be subject to locking due to braking thatis heavier than normal. The ad vantages

8/3/2019 Agila Owners Manual Jul06
http://slidepdf.com/reader/full/agila-owners-manual-jul06 100/168
Pict ure no: 12950h.tifContro l indicator u for ABS
When t he ignit ion is switched on, thecontrol indicator illuminates for a few
second s w hile the system perfo rms a self-
check, which ma y be audib le. The system isready for operation when t he controlindica tor goes out.
If the control indicator do es not go outaf ter a fe w seconds, or if it illuminates while
driving, there is a fault in the ABS. Thebrake system remains operat ional without
ABS reg ulation.
You can continue dr iving, provided y oudrive with care an d ant icipation.
Have the cause of t he fa ult remedied. Werecommend that y ou consult your Vauxhall
Auth orised Repa irer . The syste m’sintegrat ed self-d iagno stics allows faults to
be quickly remedied .
pedal is pulsat ing. Do not red uce thepressure on the pedal.
Do not let th is special safety featuretempt y ou into ta king risks when driving.
Traf fic safety can on ly be achieved byadopt ing a responsib le driving style.
of ABS are n o longer operat ional. Thevehicle can no longer b e steered and may
swerve.
9 Warning
If the ABS cont rol indicat or illuminat es
together with the control indicator for thebra ke system R , the braking force on the
rear wheels is not being regulated. Thevehicle m ay sw erve during b raking. Hav e
the cause of t he fault remedied . Werecommend that you consult your
Vauxhall Authorised Repa irer.
96 Wheels, Tyres
Wheels, Tyres TyresSee pa g e 152 for suitable ty res andrestrictions.
Tyres fitt ed in the factory are adapt ed tothe chassis and provid e opt imum driving
mf t d f t
Fitti ng new tyres
Fit t yres in pa irs or in sets, which is evenbet ter. Ensure t hat tyres on one axle are
z the same sizez the same d esign
z the same make
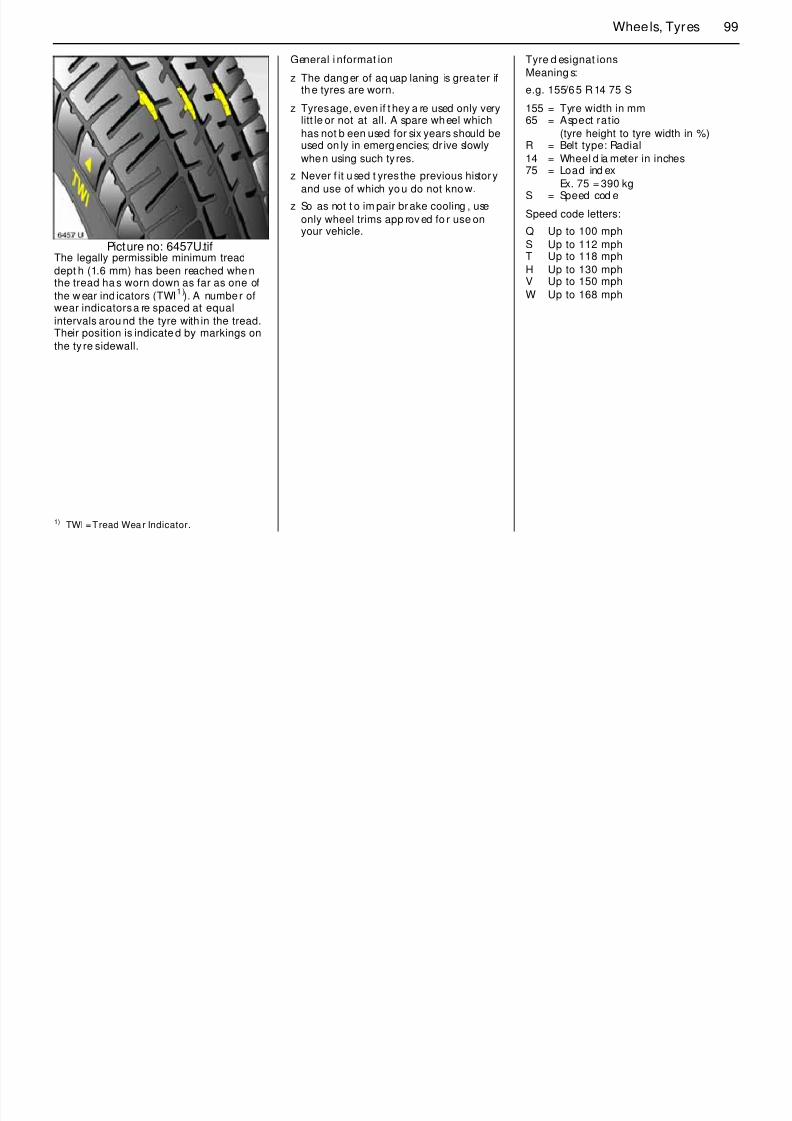
8/3/2019 Agila Owners Manual Jul06
http://slidepdf.com/reader/full/agila-owners-manual-jul06 101/168
comfort and sa fety.
Changing t yre/wheel t ype
Before switching to diff erent tyres orwheels, seek advice on t he technical
possibilities. We recommend t hat youconsult your Vauxha ll Auth orised Repairer,
who will be able to advise you of anynecessary mod ifica tio ns.
z and have the same tread patt ern.
Fit directional t yres such that they roll in thedirection of t rav el. The rolling direction is
indicate d by a symbol (e.g. an arrow) onthe sidewall.
Tyres fitted o pposing t he rolling direction(e.g. when a whe el is chang ed) should be
refit te d as soon as possible. This is th e onlyway t o benefit fully f rom the design
properties of the tyres.Tyre pressure................. .... ......... .... ...... 97
Tyre condit ion, wheel cond ition ......... 98
Winter tyres 3 ...................................... 100
Wheel covers 3 .................................... 100
Tyre chains 3 ....................................... 100
9 Warning
Use of unsuitab le tyres or wheels m aylead to acciden ts and render the vehicle
unroadworthy.
9 Warning
We recom mend that you have your tyreschanged b y your Vauxhall Auth orisedRepairer, who will be familiar w ith the
requirem ents of the law a s rega rdsdisposal of t yres and can thus help to
protect t he environment and your health.
97Wheels, Tyres
Some b rands of tyres have a b eaded edgefor a lloy wheels to prot ect aga inst
dam age. If wheel covers a re used on steelwheels with bead ed-edge tyres, th e
following requirem ents must be f ulfilled:
U f h l t i d t th t

8/3/2019 Agila Owners Manual Jul06
http://slidepdf.com/reader/full/agila-owners-manual-jul06 102/168
z Use of wheel trims and t yres that
approved by Vauxhall for t he vehicle inquestion and thereby fulfil all
requ irement s fo r the wheel and tyrecombination.
z If the wheel covers and tyres used arenot Va uxhall-approved , the tyres m ust
not have a bead ed edge.
Pict ure no: 13484h.tifTyre p ressureCheck tyre p ressures, including t he spa rewheel, at least every 14 days and prior t o
any long journey; the tyres should be
checked when cold. Don’t f orget t o checkthe spare.
For tyre pre ssures refer t o page 152 and
the adhe sive label on t he left-side f rontdoor f rame. Aft er changing t yre sizes, have
the label replaced.
Do not reduce tyre pressure when t he tyres
are wa rm. Otherwise the pressure ma ydrop b elow the perm issible minimum when
the tyres cool down.
Securely retig hten valve caps af te r
checking t he t yre pressure s.
Pict ure no: 9358T.tifIncorrect inflation pressures will impair
safety, vehicle ha ndling, comfort and f ueleconomy and w ill increase tyre wea r.
If the pressure is too low, this can result in
consid erable tyre warm-up and internaldam age, lead ing to tread separat ion andeven t o t yre blow-out at high speeds.
Hidden tyre dama ge is not eliminated byadjust ing inflat ion pressure.
9 Warning
Use of unsuita ble t yres or wheel covers
could lead to sudden pressure loss andthereby a ccidents.
9 Warning
Incorrect ty re pressure could lead t o a flattyre.
98 Wheels, Tyres
Check t yres regularly fo r dama ge (foreign
bodies, punctures, cuts, cracks, bu lg es insidewalls). Check wheels for damage. In
the event of dam age or abnormal wear,consult a workshop. We recommend your
Vauxhall Aut horised Repa irer.

8/3/2019 Agila Owners Manual Jul06
http://slidepdf.com/reader/full/agila-owners-manual-jul06 103/168
Pict ure no: 15941s.t ifTyre condition, wheel condit ionDrive over edges slowly and at a rig htangle if possible. Driving over sha rp edges
can lead to hidden ty re d amage a nd wheel
dam age which is only noticed lat er on.
When pa rking, ensure that t he tyres a re notpressed aga inst the ed ge of t he kerb .
Picture no: 6456U.tifTread dept h
Check tread depth regularly.
If wear in the front is greater than that in
the rear, move the rear wheels to t he fro nt
axle and vice versa.
Correct tyre pressure.
For reasons of safety , tyres shou ld be
replaced when their tread depth has worndown to 2 to 3 mm (winter tyres: 4 mm).
9 Warning
Dama ge m ay lead to t yre blow-out.
99Wheels, Tyres
General i nformat ion
z The danger of aq uap laning is grea ter ifthe tyres are worn.
z Tyres age, even if t hey a re used only verylitt le or not at all. A spare wheel which
has not b een used for six years should be
Tyre d esignat ions
Meaning s:
e.g. 155/65 R 14 75 S
155 = Tyre width in mm65 = Aspect ratio
(tyre height to tyre width in %)
8/3/2019 Agila Owners Manual Jul06
http://slidepdf.com/reader/full/agila-owners-manual-jul06 104/168
Picture no: 6457U.tifThe legally permissible minimum tread
dept h (1.6 mm) has been reached whenthe tread ha s worn down as far as one of
the w ear ind icators (TWI1)
). A number of
wear indicators a re spaced at equalintervals arou nd the tyre with in the tread.Their position is indicate d by markings on
the ty re sidewall.
has not b een used for six years should beused on ly in emerg encies; dr ive slowly
when using such ty res.
z Never f it used t yres the previous historyand use of which you do not know.
z So as not t o im pair brake cooling , use
only wheel trims app rov ed fo r use onyour vehicle.
(tyre height to tyre width in %)R = Belt type: Radial
14 = Wheel d ia meter in inches
75 = Load ind exEx. 75 = 390 kg
S = Speed cod e
Speed code letters:
Q Up to 100 mph
S Up to 112 mphT Up to 118 mph
H Up to 130 mphV Up to 150 mph
W Up to 168 mph
100 Wheels, Ty res
Winter t yres 3 Informa tion on fitting new t yres – seepage 96.
See page 152 for restrictions.
Winter t yres im prove safety at
t t b l 7 °C d h ld
Wheel covers 3 If the wheel trims and ty res used are notVauxhall-app roved, make sure t hat the
tyres do no t have a beaded edge – seepage 96.
8/3/2019 Agila Owners Manual Jul06
http://slidepdf.com/reader/full/agila-owners-manual-jul06 105/168
temp erat ures below 7 °C and shouldtherefore be f itted on all th e wheels.
The d esign of summ er tyre s mea ns th eyhave limited qualities for winter driving.
If the ma ximum p ermissible speed for t hewinter ty res is less than t hat of the vehicle,
a notice ind icating the ma ximumpermissible speed for the tyre s must be
aff ixed within the driver’s field of v ision1).
If you use the spare wheel when it is fitted
with a summer tyre, the vehicle’ sdriveability may be affect ed, especia lly on
slip pery road surfaces. Ob tain arep la cement f or the fault y tyre as soon a s
possible, and ha ve the wheel balan cedand f itted to t he vehicle.
Pict ure no: 6459u.tifTyre chains 3 See page 152 for restrictions.
Tyre chains are permitt ed on the front
wheels. They must be fitt ed t o th e ty ressymm etrically in orde r to achieve a
concentric fit .
Use fine mesh chain s. See page 152.
We recommend th at you consult yourVauxhall Authorised Repaire r.
1) Va ries fro m country to c ountry on account of
101Wheels, Tyres
Wheel tr im on steel wheels could come into
contact with parts of the chain and bedam aged. Rem ove the wheel trim – see
page 114.
Tyre chains may o nly be used at speed s up
to 30 mph and, when travelling on road sh f f h b d f
Tem porary sp are wheel 3
Tyre chains must not b e used on t hetemporary spa re wheel. If you need to use
tyre chains aft er suff ering a f lat fro nt t yre,fit the temp orary spare on the rear axle
and t ransfer o ne of the rear wheels to thefront ax le

8/3/2019 Agila Owners Manual Jul06
http://slidepdf.com/reader/full/agila-owners-manual-jul06 106/168
tha t a re free of snow, they may be used f or
brief periods only since they a re subject torapid wear on a hard road and may snap.
front ax le.
For not es on the temporary spare wheel – see page 111.
Wheel changing – see page 114.
Correctin g t yre pressure – see
pages 97, 152.
102 Roof racks, caravan and trai ler towing
Roof racks,
caravan and t railertowing
Roof racks 3 For reasons of saf ety and t o av oiddam aging the roof, w e recommend that
you use the Va uxh all roof ra ck systemapp rov ed for y our v ehicle. Consult y our
Vauxhall Authorised Repaire r.
9 Warning
Disregard of t hese not es can lead t o
injuries which may be fatal. Vehiclepassengers should be informed
accordingly.
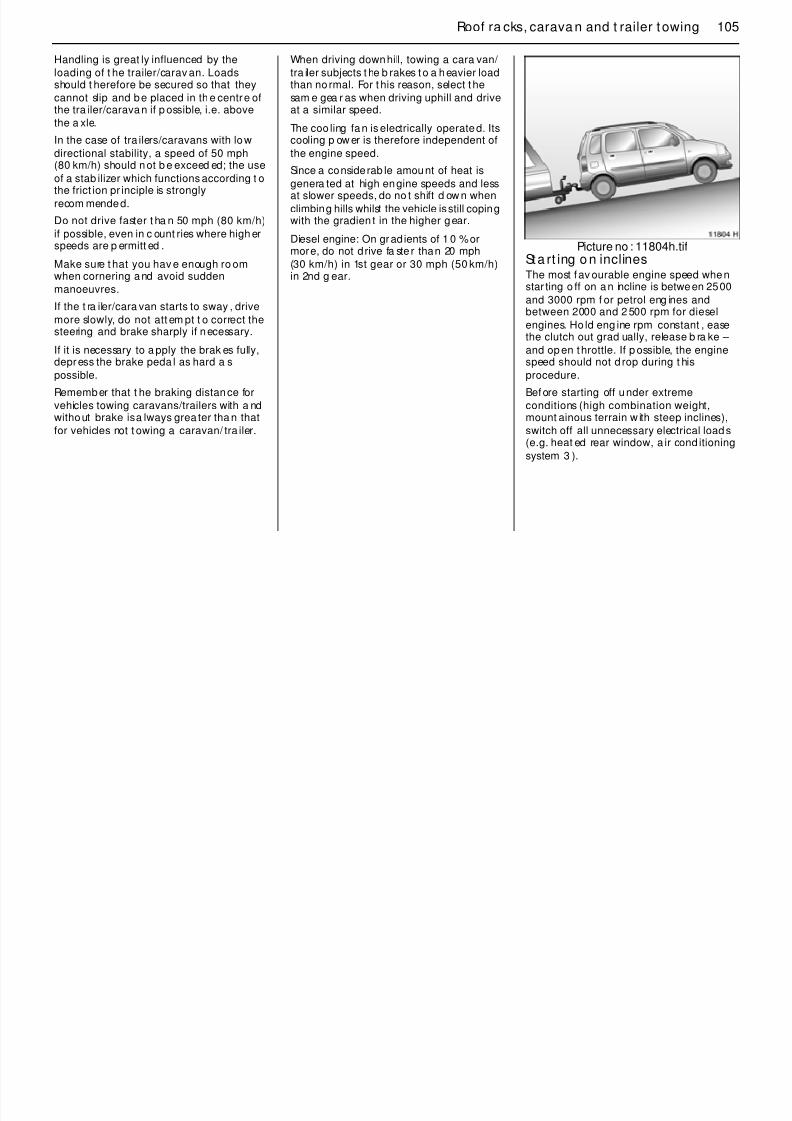
8/3/2019 Agila Owners Manual Jul06
http://slidepdf.com/reader/full/agila-owners-manual-jul06 107/168
Fasten the roof rack following th e
instruction s that accompany the system.
Driving hints – see page 82.
Towing eq uipm ent 3 ........................... 103
Ca ra van/t raile r loads .......................... 103
Coupling socket loa d........................... 104Rear axle load during towing ............. 104
Tyre pressure................. .... ......... .... ...... 104
Driving characte ristics, towing tips .... 104
Sta rt ing on inclines.. ............................ 105
g y
103Roof ra cks, carava n and t railer t owing
Towing equipment 3
Use only towing equipme nt tha t has b eenapproved f or your vehicle. We recommend
entrusting the retrofitting of towingequipm ent to your Vau xhall Authorised
Repairer, who will advise you on anypossible t owed load increases Your
Caravan/t railer loads1)
The pe rmissible caravan/ trailer loads arevehicle-dependent and eng ine-d ependent
maximum values which must not beexceeded. The actua l caravan/trailer load
is the dif ference bet ween t he actual g rossweight of the caravan/trailer and the
The permitt ed carava n and trailer load
app lies up to th e specified incline and up toan altit ude of 1000 metres above sea level.
Since engine power decreases as alt itud eincrea ses b ecause of th e air becoming
thinner, therefore reducing climb ing ability,the permitted towing weight also

8/3/2019 Agila Owners Manual Jul06
http://slidepdf.com/reader/full/agila-owners-manual-jul06 108/168
possible t owed load increases. Your
Vauxhall Authorised Repa irer hasinstru ctions on how to install the towing
equipment and m ake any necessarychanges to t he vehicle that af fect the
cooling system, heat shields or o therequipment.
Mounting d imensions of towing equipm ent – see pa ge 157.
weight of the caravan/trailer and the
actua l coup ling socket load w ith thecaravan/trailer coupled. When the
caravan/ trailer load is being checked,therefore, only the carava n/t railer wheels –
and n ot t he jockey wheel – must bestand ing on t he weighing app aratus.
The pe rmissible caravan/ trailer loads foryour vehicle are g iven in th e vehicle
docum ents. Unless otherwise stat ed, theyare valid fo r gradients up to ma x. 12 %.
The permissible caravan/ tra iler load shouldbe fully utilised only by d rivers who are
adeq uately experienced in to wing large orheavy caravans/trailers.
p g g
decreases by 10 % fo r every 1000 met res ofadd itiona l altit ude commenced. The
towing weight d oes not have to be reducedwhen d riving on roa ds with slight inclines
(less than 8%, e.g . motorways).
The actual caravan/trailer load p lus the
actua l g ross weight of t he towing vehiclemust not exceed the maximum permitted
towing weight . For example, if t hepermitted gross vehicle weight is utilised,
the trailer/carav an load must on ly be useduntil the ma ximum permitted towing
weight is reached . The maximum
permit ted towing weight is shown on theidentification plate, see page 144.
104 Roof racks, caravan and trai ler towing
Coupling socket loadThe coupling socket load is the loadexerted by the trailer/caravan on the
coupling ball. It can be varied by changingthe weight distribution when loa ding the
trailer/caravan.
Th i i ibl li k
Driving characteristics, towingtipsIn the ca se of t railers/caravans with b rake,
att ach breakaway stopp ing cable to eye atthe side on the coupling ba ll ba r.
Before att aching the trailer/caravan,

8/3/2019 Agila Owners Manual Jul06
http://slidepdf.com/reader/full/agila-owners-manual-jul06 109/168
The maximum permissible coup ling socket
load (35 kg) for t he towing vehicle is sta tedon the type plate of the t owing equipment
and in t he vehicle documents. Always aimfor this. The coupling load should never be
less than 25 kg.
When measuring the coupling socket load,
make sure that the dra wbar of t he loa dedtra iler/caravan is at t he sa me height as it
will be when th e tra iler/caravan is coupledwith the towing vehicle load ed. Particularly
important for trailers/caravans withtandem axle.
Rear ax le load d uring t o wingWhen the caravan/trailer is coupled andthe towing v ehicle fully loaded (including
all occupant s), t he p ermissible rea r axleload (see identification plate, pag e 144, or
vehicle documents) ma y be exceeded by15 kg and the perm issible gross vehicle
weight by 27 kg . If t he permissible rear axleload is exceeded, a m aximum speed of 50
mph (80 km/h) applies. If na tional
regulations specify a lower m aximumspeed for vehicles towing a caravan/ tra iler,this must be observed.
Picture no: 9358t.tifTyre p ressureIncrease the t yre pressure on the towingvehicle to the value specified fo r a full load
– see page 152. A lso check the p ressure of
the spare wheel and carava n/t railerwheels.
lubricate the ball of the trailer/caravan
towing d evice. However, do n ot lubricate
the b all if a stabiliser, which a cts on thecoupling ba ll, is b eing used to d ampsnaking.
Check caravan/trailer lighting beforestart ing to drive. The fog t ail lights on the
vehicle a re deactivated wh en towing acaravan o r tra iler.
Trailers with LED tu rn signa ls m ust ha ve aprovision enab les light m onitoring fo r
comm ercial bulbs.
Turn signal control indicator – see page 19.
105Roof ra cks, carava n and t railer t owing
Handling is great ly influenced by the
loading of t he trailer/carav an. Loadsshould t herefore be secured so that they
cannot slip and be placed in th e centre ofthe tra iler/caravan if p ossible, i.e. above
the a xle.
In the case of tra ilers/caravans with low
When driving downhill, towing a cara van/
tra iler subjects t he b rakes to a heavier loadthan no rmal. For t his reason, select t he
sam e gea r as when driving uphill and driveat a similar speed.
The coo ling fan is electrically operated. Itscooling p ow er is therefore independent of
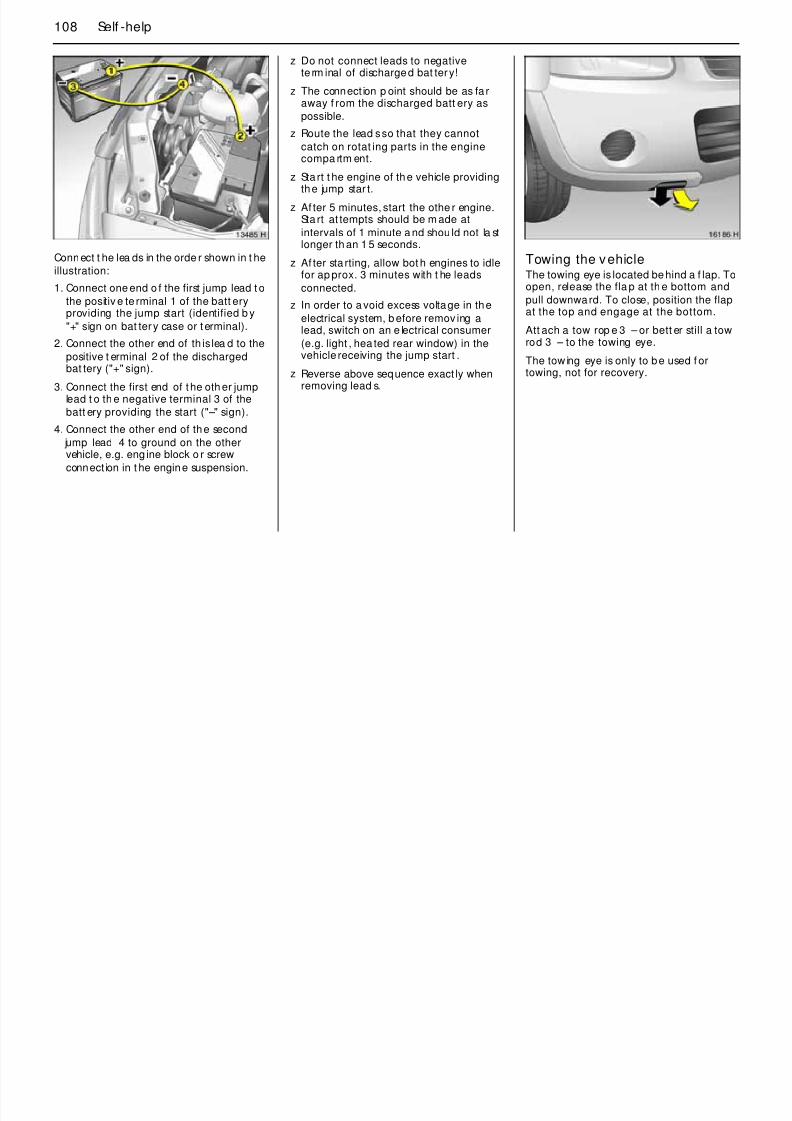
8/3/2019 Agila Owners Manual Jul06
http://slidepdf.com/reader/full/agila-owners-manual-jul06 110/168
In the case of tra ilers/caravans with low
directional stability, a speed of 50 mph(80 km/h) should not b e exceed ed; the use
of a stab ilizer which functions according t othe frict ion pr inciple is strongly
recom mended.
Do not drive faster t ha n 50 mph (80 km/h)
if possible, even in c ount ries where high erspeeds are p ermitt ed .
Make sure t hat you hav e enough ro omwhen cornering and avoid sudden
manoeuvres.
If the t ra iler/cara van starts to sway , drive
more slowly, do not att em pt t o correct thesteering and brake sharply if necessary.
If it is necessary to a pply the brak es fully,depress the brake peda l as hard a s
possible.
Remember that t he braking distance for
vehicles towing caravans/trailers with a ndwithout brake is a lways grea ter tha n that
for vehicles not t owing a caravan/ tra iler.
cooling p ow er is therefore independent of
the engine speed.
Since a considerab le amount of heat isgenera ted at high engine speeds and lessat slower speeds, do no t shift d ow n when
climbing hills whilst the vehicle is still copingwith the gradien t in the higher gear.
Diesel engine: On grad ients of 1 0 % ormore, do not drive fa ste r than 20 mph
(30 km/h) in 1st gear or 30 mph (50 km/h)in 2nd g ear.
Picture no : 11804h.tifSta rt ing o n inclinesThe most fav ourable engine speed whenstar ting o ff on an incline is between 2500
and 3000 rpm f or petrol eng ines and
between 2000 and 2 500 rpm for dieselengines. Ho ld eng ine rpm constant , easethe clutch out grad ually, release b ra ke –
and op en throttle. If p ossible, the enginespeed should not d rop during t his
procedure.
Before starting off under extreme
conditions (high combination weight,mount ainous terrain w ith steep inclines),
switch off all unnecessary electrical loads(e.g. heat ed rear window, a ir cond itioning
system 3 ).
106 Self -help
Self-help Sta rt ingDo not start with quick chargerThis prevents damage to electronic
components.
Do not start bypushing or t owing
9 Warning
Disregard of t hese not es can lead t o
injuries which may be fatal. Vehiclepassengers should be informed
accordingly.
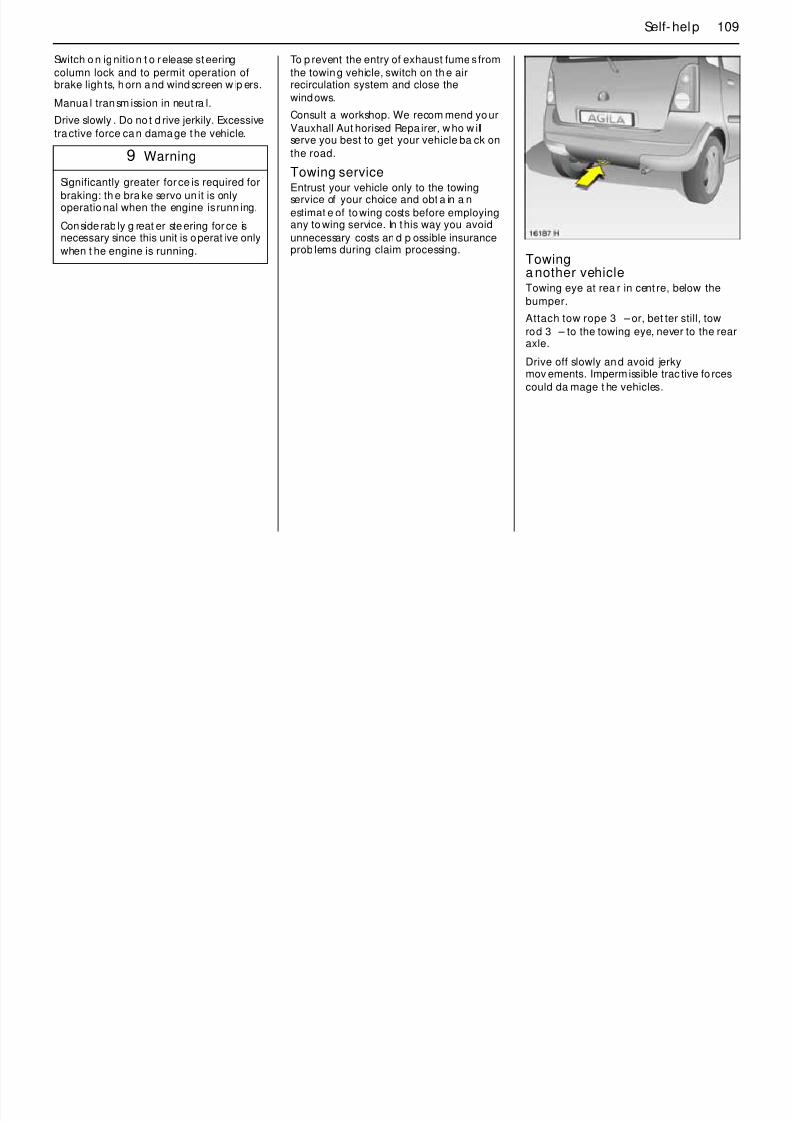
8/3/2019 Agila Owners Manual Jul06
http://slidepdf.com/reader/full/agila-owners-manual-jul06 111/168
p g g
Because your vehicle is fitted with acataly tic converter, it must not be star ted
by pu shing or to wing – see page 88.The vehicle can only be sta rte d using jum p
leads – see fo llow ing page .
Sta rting the engine with jum p leads 3 107
Towing t he vehicle............................... 108Towing service ..................................... 109
Towing anot her vehicle....................... 109
First-aid kit (cushion) + 3 andwarning triangle ¨ 3 ....................... 110
Vehicle tools .... ......... ............................ 111
Spa re wheel. .... ..................................... 111
Jack....................................................... 113
Changing wheels ................................. 114
Elect rical system .................................. 118
Fuses..................................................... 118Bulb rep lacement ................................ 122
Halogen headlight system.................. 122
Tail light s ......... .................................... . 124
Additional brake light 3 ..................... 125
Numb er pla te light .............................. 126
Court esy lig ht ............................. .... ...... 126
107Self-help
Sta rting t he engine with jumpleads 3 A vehicle with a discharged bat tery can be
started using jump lead s and the batt ery ofanot her vehicle.
z Use auxiliary bat tery with sam e vo ltag e
(12 volts). Its capacity (Ah) must not beconsidera bly less than that of the
discharged ba ttery. Voltage andcapacity informat ion can be found on
the batteries.
z Use jump leads with insulat ed terminals9 Warning

8/3/2019 Agila Owners Manual Jul06
http://slidepdf.com/reader/full/agila-owners-manual-jul06 112/168
z Never expose t he ba ttery to nak ed
flames or sparks.
z A discharged batt ery can f reeze at
temperatures below 0°C or as high as
0°C. Defrost t he ba ttery beforeconnecting jump leads.
z Do not allow batte ry fluid to come into
cont act with eyes, skin, fa brics orpaint ed surf aces. The fluid cont ains
sulp huric ac id which can cause injuriesand d amage in th e event of d irect
contact.
z Wear eye protection and p rotective
clothing when handling a b att ery.
j p
and a cross section of at least 16 mm2.
z
Do not disconnect the dischargedbat tery from t he vehicle.
z Switch o ff all unnecessary electrical
consumers.
z Do not lean over the ba ttery during jump
starting.
z Do not allow the terminals of one lead to
touch those of th e other lead .
z Do not touch the vehicles while jump
starting.
z App ly hand b ra ke. Transmission in
neutral.
g
This must be d one with extreme care. Any
deviation from the following instructionscould lead to personal injury or d amageresulting fro m ba ttery explosion, as well
as to dam age to the electrical systems inboth vehicles.
108 Self -help
z Do not connect leads to negativete rm inal of discharged bat tery!
z The connect ion p oint should be as fa raway f rom the discharged batt ery as
possible.
z Route the lead s so that they cannot
catch on rotat ing parts in the engine
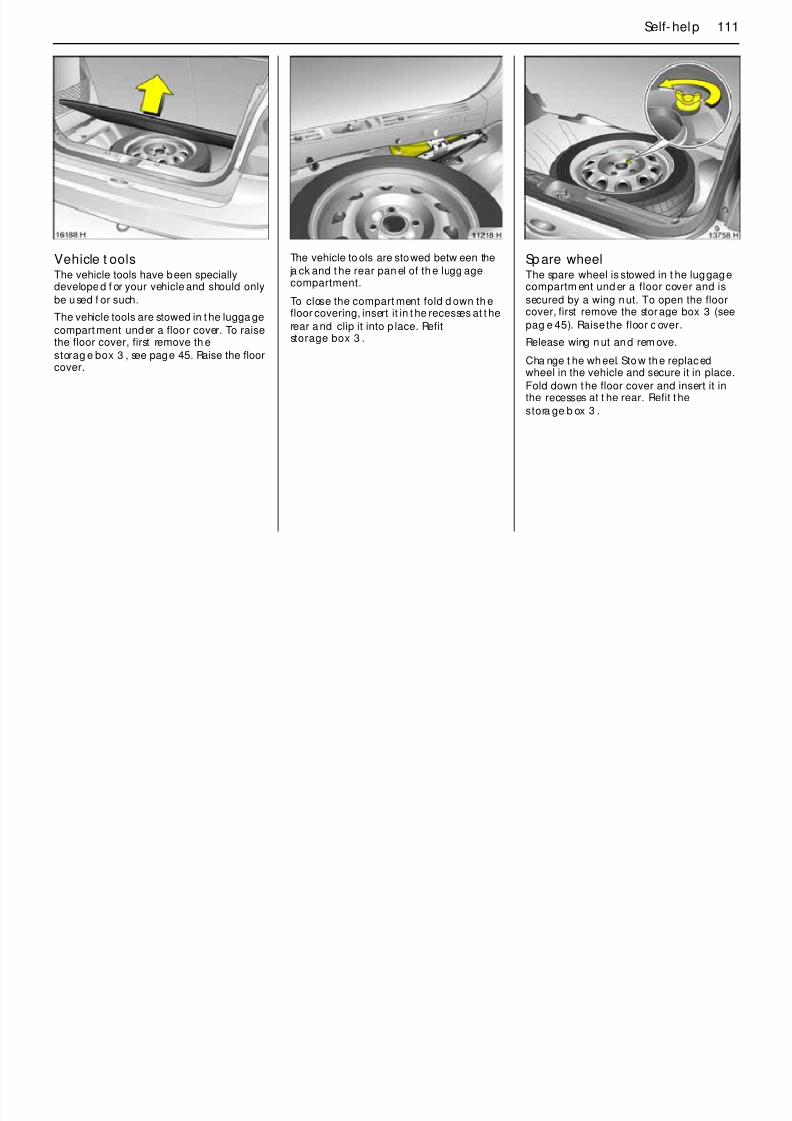
8/3/2019 Agila Owners Manual Jul06
http://slidepdf.com/reader/full/agila-owners-manual-jul06 113/168
Connect t he lea ds in the orde r shown in t he
illustration:
1. Connect one end o f the first jump lead t o
the positiv e te rminal 1 of the batt ery
providing the jump start (identified b y"+" sign on bat tery case or terminal).
2. Connect the other end of th is lea d to the
positive t erminal 2 of the dischargedbat tery ("+" sign).
3. Connect the first end of t he oth er jumplead t o th e negative terminal 3 of the
batt ery providing the start ("–" sign).
4. Connect the other end of the second
jump lead 4 to ground on the other
vehicle, e.g. eng ine block o r screwconnect ion in t he engine suspension.
catch on rotat ing parts in the enginecompa rtm ent.
z Sta rt t he engine of the vehicle providingthe jump star t.
z Af ter 5 minutes, start the othe r engine.Sta rt at tempts should be m ade at
intervals of 1 minute a nd shou ld not la stlonger th an 1 5 seconds.
z Af ter sta rting, allow bot h engines to idlefor ap prox. 3 minutes with t he leads
connected.
z In order to a void excess voltage in the
electrical system, b efore remov ing alead, switch on an e lectrical consumer
(e.g. light , hea ted rear window) in thevehicle receiving the jump start .
z Reverse above sequence exact ly whenremoving lead s.
Towing the vehicleThe towing eye is located behind a f lap. Toopen, release the fla p at th e bottom and
pull downward. To close, position the flap
at the top and engage at the bottom.Att ach a tow rop e 3 – or bett er still a towrod 3 – to the towing eye.
The tow ing eye is only to be used f ortowing, not for recovery.
109Self-help
Switch o n ignition t o release steering
column lock and to permit operation ofbrake ligh ts, horn and wind screen w ip ers.
Manua l transm ission in neut ra l.
Drive slowly . Do no t d rive jerkily. Excessive
tractive force can damage the vehicle.
To p revent the entry of exhaust fume s from
the towing vehicle, switch on th e airrecirculation system and close the
windows.
Consult a workshop. We recom mend your
Vauxhall Aut horised Repa irer, who w illserve you best to get your vehicle ba ck on
8/3/2019 Agila Owners Manual Jul06
http://slidepdf.com/reader/full/agila-owners-manual-jul06 114/168
the road.
Towing serviceEntrust your vehicle only to the towingservice of your choice and obt a in a n
estimat e of towing costs before employingany to wing service. In this way you avoid
unnecessary costs an d p ossible insuranceprob lems during claim processing.
Towinga nother vehicleTowing eye at rea r in cent re, below the
bumper.
Attach tow rope 3 – or, bet ter still, towrod 3 – to the towing eye, never to the rearaxle.
Drive off slowly and avoid jerkymov ements. Impermissible trac tive fo rces
could da mage t he vehicles.
9 Warning
Significantly greater force is required for
braking: th e bra ke servo un it is onlyoperational when the engine is runn ing.
Considerab ly g reat er steering force isnecessary since this unit is operat ive only
when t he engine is running.
110 Self -help
Not es on loading
see page 48.
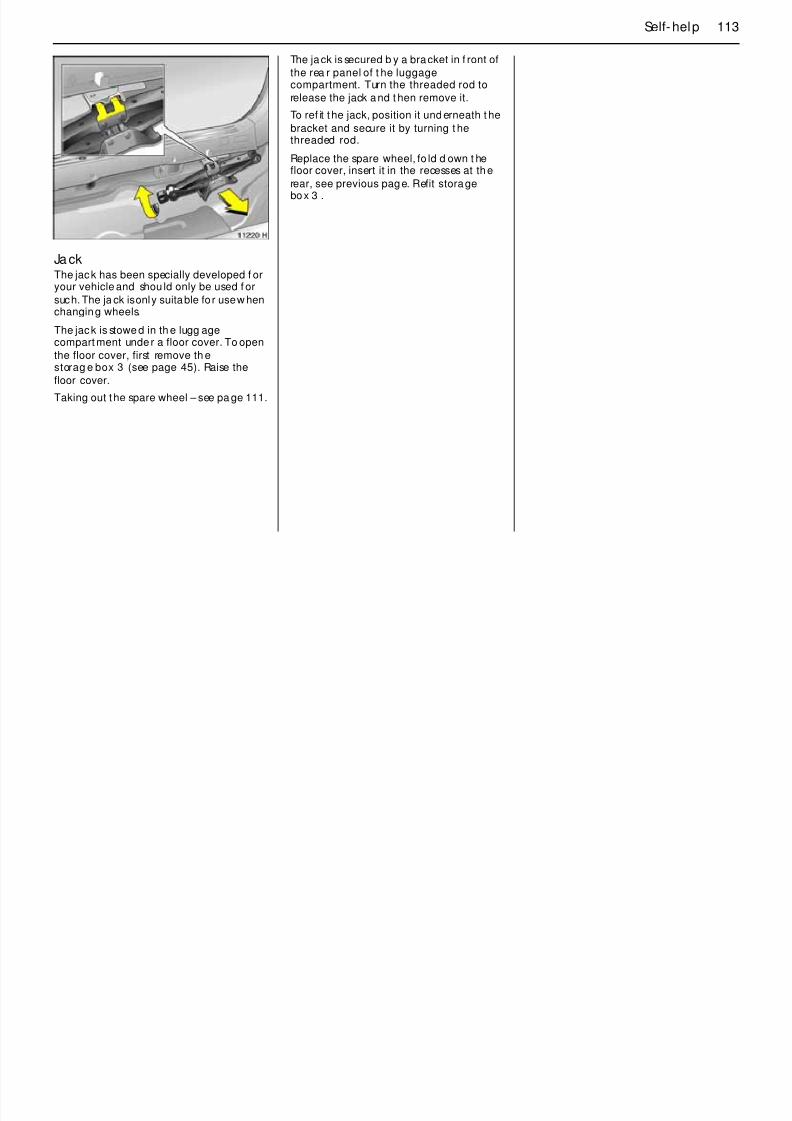
8/3/2019 Agila Owners Manual Jul06
http://slidepdf.com/reader/full/agila-owners-manual-jul06 115/168
First -aid kit (cushion) + 3
and warning triang le ¨ 3 Sto w the first-a id kit (cushion) in the
storag e net 3 on t he rig ht side panel of t he
luggage compartment.
The warning t riang le is stowed in a recess
on the rear p anel under the luggagecompart ment floor covering.
To ra ise the floor covering, f irst remove the
storage box 3 – see pa ge 45. Unclip thefloor covering and fold it f orward s – seenext pa ge.
To close the compart ment fold d own th efloor covering, insert it in t he recesses at t he
rear an d clip it into place – see next pa ge.Refit storag e box 3 .
When loa ding t he vehicle, always ma kesure the f irst-aid kit is accessible.
111Self-help
8/3/2019 Agila Owners Manual Jul06
http://slidepdf.com/reader/full/agila-owners-manual-jul06 116/168
Vehicle t oolsThe vehicle tools have been speciallydeveloped f or your vehicle and should only
be used f or such.
The vehicle tools are stowed in t he lugga gecompart ment under a floo r cover. To raisethe floor cover, first remove th e
storag e box 3 , see page 45. Raise the floorcover.
The vehicle to ols are stowed betw een the
ja ck and t he rear pan el of th e lugg agecompartment.
To close the compart ment fold d own th e
floor covering, insert it in t he recesses at t herear and clip it into p lace. Refitstorage box 3 .
Sp are wheelThe spare wheel is stowed in t he luggagecompartm ent und er a floor cover and is
secured by a wing nut. To open the floor
cover, first remove the storage box3
(seepag e 45). Raise the floor c over.
Release wing n ut and rem ove.
Cha nge t he wheel. Stow the replacedwheel in the vehicle and secure it in place.
Fold down the floor cover and insert it inthe recesses at t he rear. Refit t he
stora ge b ox 3 .
112 Self -help
General informa tion
On vehicles w ith a lloy wheels 3 the sparewheel may have a steel rim.
If you use winte r tyres 3 , the spare whe elmay still be fitted with a summer tyre. If you
use the spare wheel th e vehicle’s ha ndlingmay be a ltered. Obtain a rep lacement f or
th f lt t ibl d
The spare wheel may hav e a sm aller tyre
and a smaller rim tha n the wheels m ountedon the vehicle 1): Using t he spare wheel
may a lter vehicle hand ling. Have thedefective tyre replac ed as soon as possible,
balan ce the wheel and have it mounted onthe vehicle.
Not es on di rectional ty res 3 Directional tyres only provide maximumperformance when they are mount ed in the
correct direction of rot ation. If the tyres orspare wheel must be mounted opposing
the specified d irection of rota tion (e.g.aft er chang ing a f lat tyre), observe the
following :

8/3/2019 Agila Owners Manual Jul06
http://slidepdf.com/reader/full/agila-owners-manual-jul06 117/168
the fau lty tyre as soon as possible, an dhave the wheel b alanced a nd fitte d to t he
vehicle.
following :
z Vehicle handling may cha ng e. Ha ve the
defective tyre replaced as soon aspossible, and have th e wheel balanced
and moun ted on t he vehicle.
z Do not dr ive faster t han 50 mph
(80 km /h).
z Be especially careful wh en driving in rain
and snow.
Further information on directional tyres -
see page 96.
1) Country-specific version: The spare wheel is
113Self-help
The jack is secured b y a bracket in f ront of
the rea r panel of t he luggagecompartment. Turn the threaded rod to
release the jack and t hen remove it.
To ref it t he jack, position it und erneath t he
bracket and secure it by turning t hethreaded rod.

8/3/2019 Agila Owners Manual Jul06
http://slidepdf.com/reader/full/agila-owners-manual-jul06 118/168
Ja ckThe jack has been specially developed f oryour vehicle and shou ld only be used f or
such. The ja ck is only suitable for use w hen
changing wheels.The jack is stowe d in th e lugg agecompart ment under a floor cover. To open
the floor cover, first remove th estorag e box 3 (see page 45). Raise the
floor cover.
Taking out t he spare wheel – see pa ge 111.
Replace the spare wheel, fo ld d own t hefloor cover, insert it in the recesses at the
rear, see previous page. Refit storagebox 3 .
114 Self -help
Changing wheelsTo ensure your safety, ma ke the followingpreparations and observe the following
inform at ion w hen changing wheels:
z Park the vehicle on a level, firm and non-
skid surface.
z Switch on t he haza rd warning lights,
z Block the wheel diagona lly opp osite the
wheel to be changed by p lacing wedgeblocks or equivalent in fro nt a nd behind
the wheel.
z Use the jack only t o chang e wheels.
z If the ground on which the vehicle isstand ing is soft, a solid board (max. 1 cm
z No people or a nima ls m ay be in th e
vehicle when it is jacked up.
z Never cra wl und er a ja cked-up vehicle.
z Do not start or run t he engine while thevehicle is on the jack.
z Fully tight en t he wheel bolts af terlowering the vehicle.

8/3/2019 Agila Owners Manual Jul06
http://slidepdf.com/reader/full/agila-owners-manual-jul06 119/168
g g ,
apply the hand b rake, engage 1st gear
or reverse.z Correctly set up t he warning trian gle.
Warning t riang le – see page 110.
z Ta ke the spare w heel from the luggagecompartment.
z Befo re raising th e vehicle, set the frontwheels to the stra ight -ahead position .
z Slacken the wheel bolts one half tu rnbefore raising t he vehicle, but do n ot
totally unscrew the bolt s.
z Never change more than one wheel at
once.
th ick) should b e pla ced under the jack.Using a thicker b oard could da m age the
jack and the vehicle.
lowering the vehicle.
115Self-help
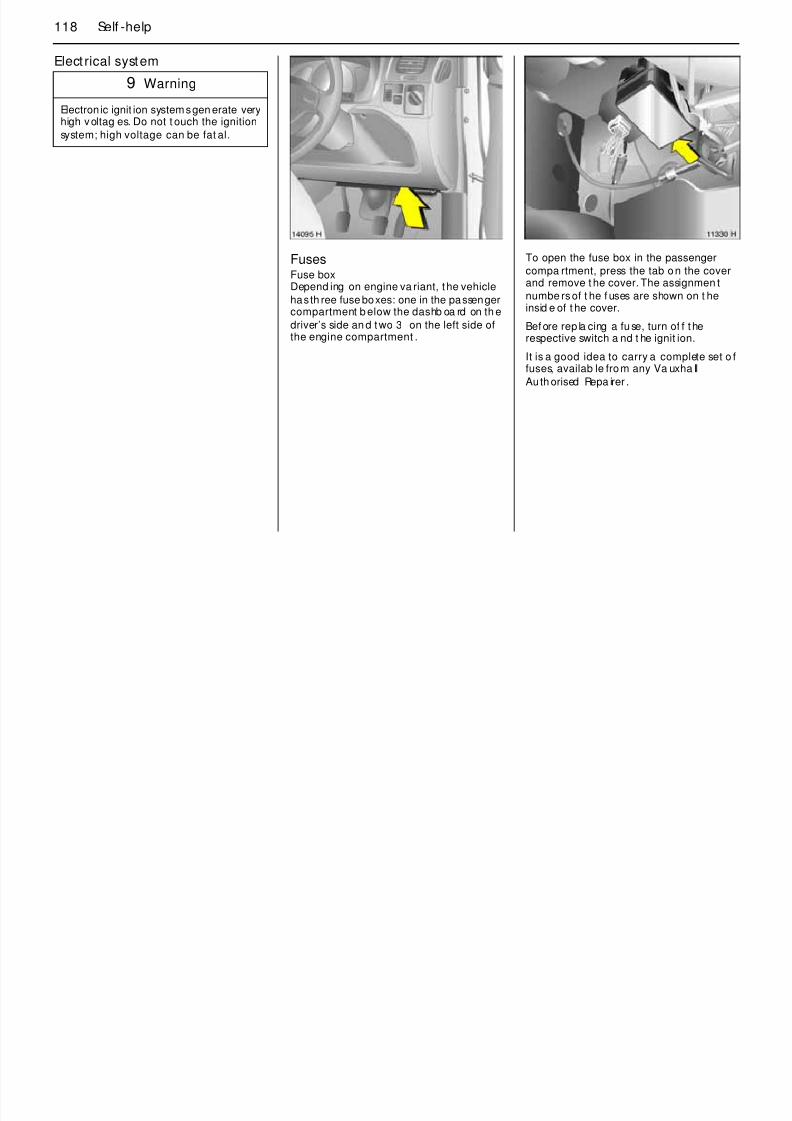
8/3/2019 Agila Owners Manual Jul06
http://slidepdf.com/reader/full/agila-owners-manual-jul06 120/168
1. Prise off the wheel cover 3 with the flat
end of the crank f rom th e vehicle tools.
Vehicle tools – see page 111.
Alloy w heels 3 : Disengage t he wheel bolt
caps with a screwdriver and re move fromth e wheel bol ts. Prot ect the wheel b y
insert ing a soft cloth between thescrewdriver and a lloy wheel.
Alloy wheels with ant i-theft lock 3 : Release
the hub cap using the key found in thevehicle too ls or in the glove compa rtm ent
and remove it.
116 Self -help

8/3/2019 Agila Owners Manual Jul06
http://slidepdf.com/reader/full/agila-owners-manual-jul06 121/168
2. Slacken wheel bolt s using a wheel bolt
socket wrench, putting socket wrench onas far as it will go.
3. Locators at the front and rear on the
vehicle underbod y – each b etween twomark ings – indicate the point s w here the
jack is to b e at tac hed.
4. Befo re position ing the jack, set it t o the
necessary height by rota ting the eye byha nd . Position t he jack at the f ront or
rear so that t he jac k claw spans thevertical b ase betw een the markings and
grips in the recess in th e vertica l base.Make sure it is properly positioned.
The jack ba se m ust be on the grou nddirectly below the jacking point in a
manner that prevents it from slipping.
117Self-help
10. Align and re fit wheel cover 3 .
Befo re refitt ing the wheel cover cleanthe w heel a round t he retaining clips.
Valve symb ol 3 on ba ck of wheel covermust point towa rds valve on wheel.
Alloy whe els 3 : Fit the wheel boltcaps 3 onto the wheel bolts.
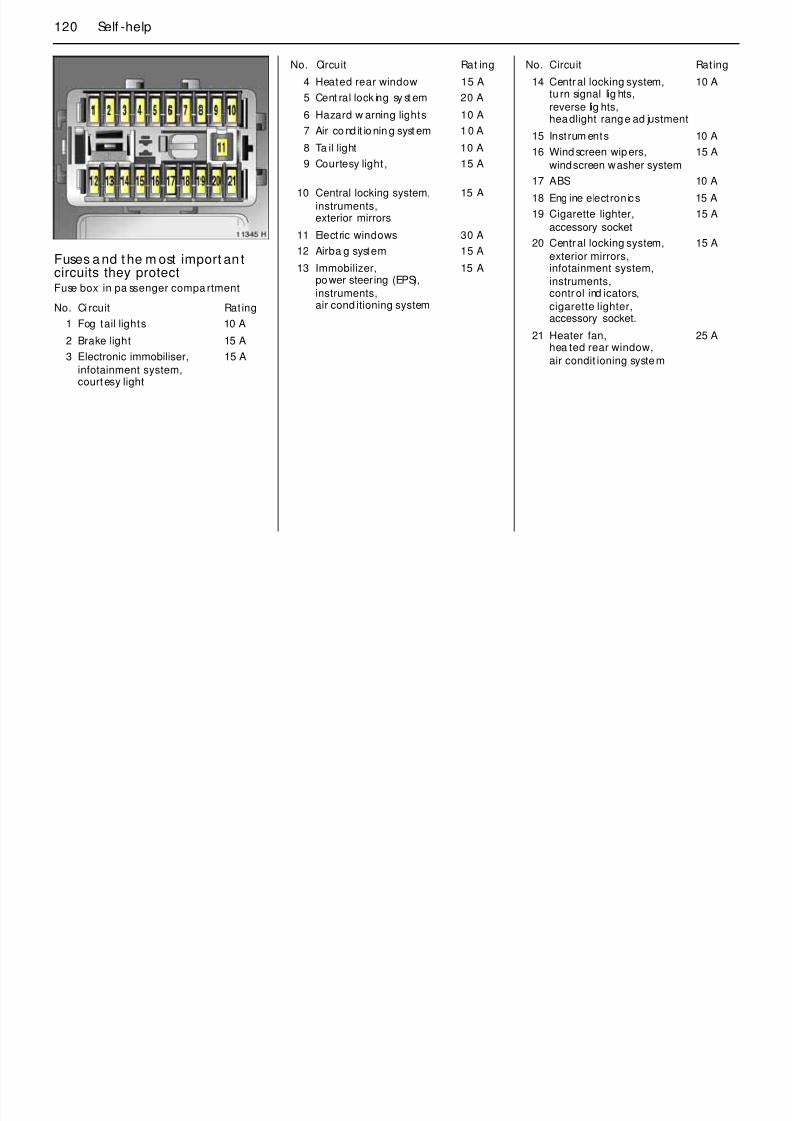
8/3/2019 Agila Owners Manual Jul06
http://slidepdf.com/reader/full/agila-owners-manual-jul06 122/168
Atta ch the crank in the hole in the
threaded rod a nd fit t he eye of the wheelbolt wrench on the cra nk.
Raise veh icle by turning cra nk.
If this is not the case, carefully low er thevehicle immedia tely and rep osition the ja ck.
5.Unscrew wheel bolts and pu t somewhere
where the t hread s will not b e soiled.
6.Change the wheel. For fu rth er
informat ion – see pages 96, 111, 114.
7.Screw in wheel bolts and t ig hten slight ly,insert ing the wheel bolt wrench as far a sthe stop.
8.Lower v ehicle.
9. Tight en wheel bolt s crosswise, put ting on
wheel bolt wrench as far as possible.
Alloy wheels with an ti-thef t lock 3
Insert pin o n back of hub cap intocorrespond ing h ole in wheel. Insert andtight en anti-t heft lock 3 .
11. Stow away replaced wheel, tools andwarning triangle in the luggage
compartment.
12. Check the pressure o f t he newly
moun ted ty re. Correct if ne cessa ry.
13. Have the tightening t orque of the wheel
bolts on the new wheel checked on thevehicle using a torqu e wrench as soon
as possib le and, if necessary, corrected.Tightening to rque – see page 152.
14. Replace the faulty tyre on t he wheelthat was rem oved.
118 Self -help
Elect rical system
9 Warning
Electron ic ignit ion systems gen erate veryhigh voltag es. Do not t ouch the ignition
system; high voltage can be fat al.

8/3/2019 Agila Owners Manual Jul06
http://slidepdf.com/reader/full/agila-owners-manual-jul06 123/168
FusesFuse boxDepend ing on engine va riant, t he vehicle
has th ree fuse boxes: one in the passengercompartment b elow the dashb oa rd on th e
driver’s side an d two 3 on the left side ofthe engine compartment .
To open the fuse box in the passenger
compa rtment, press the tab on the coverand remove t he cover. The assignmen t
numbe rs of t he f uses are shown on t heinsid e of t he cover.
Before rep la cing a fuse, turn of f t herespective switch a nd t he ignit ion.
It is a good idea to carry a complete set o ffuses, availab le from any Va uxha ll
Auth orised Repa irer .
119Self-help
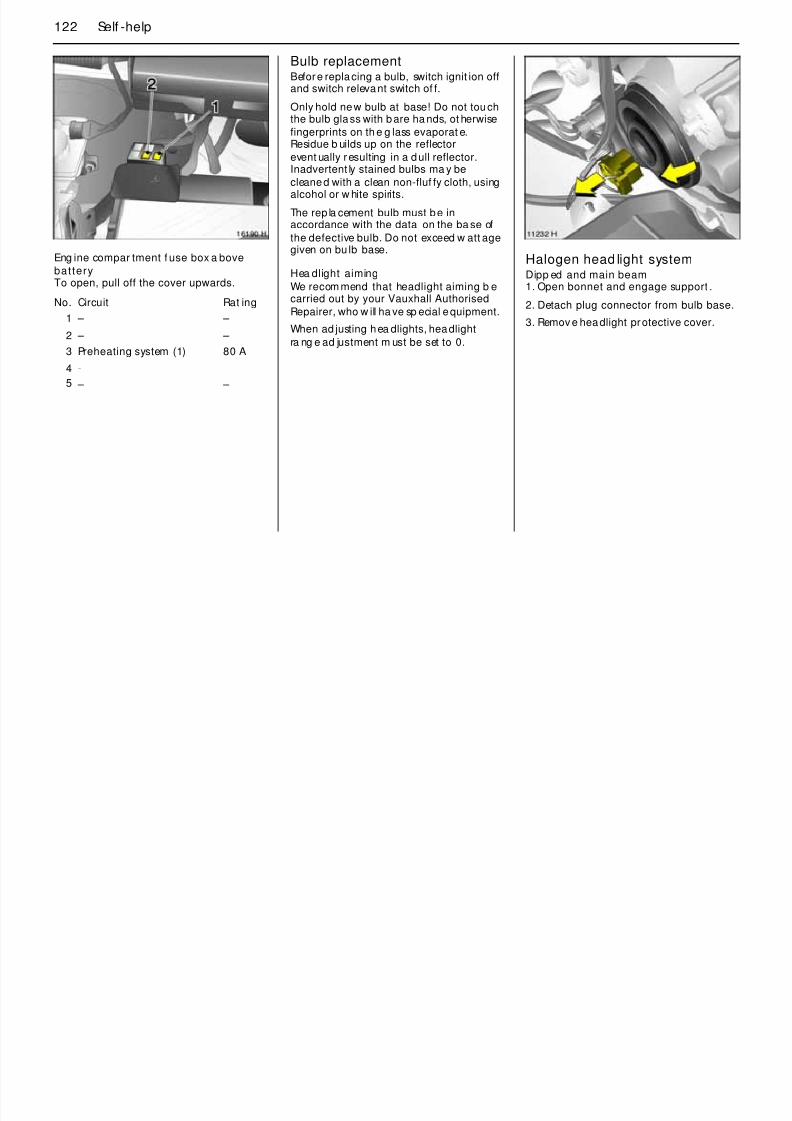
8/3/2019 Agila Owners Manual Jul06
http://slidepdf.com/reader/full/agila-owners-manual-jul06 124/168
Sto re spa re fuses 3 in the place provided
on t he inside of t he cover.
To help in replacing fuses, there is a spec ia l
fuse-gripp ing t ool in the fuse box (shown inyellow in illust rat ion).
A def ective fuse can b e recogn ized by its
melted wire. A new fuse should only beinsta lled af ter the cause of t he tro ub le has
been rectified.
Only fuses of the sp ecified rating should b einsta lled. The ra tin g is given on each fuseand can also be ident ified by t he fuse
colour.
Fuses Fuses
colour rat ing
Red
BlueYellow
White
Pink (Maxi-Fuse)Yellow (Maxi-Fuse)Black (Max i-Fuse)
10 A
15 A20 A
25 A
30 A60 A80 A
120 Self -help
No. Circuit Rat ing
4 Heated rear window 15 A
5 Cent ral lock ing sy st em 20 A
6 Hazard w arning lights 10 A
7 Air co nd it io nin g syst em 1 0 A
8 Ta il light 10 A
9 C t li ht 15 A
No. Circuit Rat ing
14 Central locking system,tu rn signal lig hts,
reverse lig hts,headlight range ad justment
10 A
15 Instrum ents 10 A
16 Wind screen wipers,
i d h
15 A
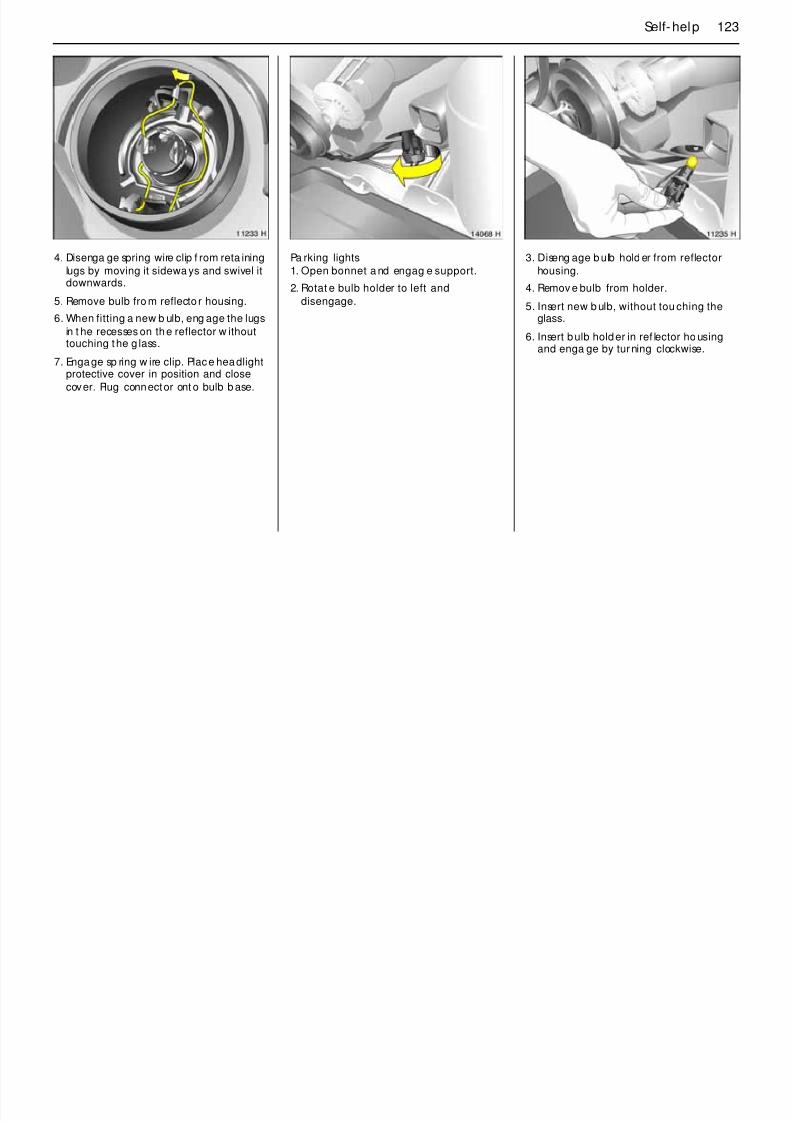
8/3/2019 Agila Owners Manual Jul06
http://slidepdf.com/reader/full/agila-owners-manual-jul06 125/168
Fuses a nd t he m ost import an tcircuits they protectFuse box in pa ssenger compa rtment
No. Ci rcuit Rat ing
1 Fog tail lights 10 A
2 Brake light 15 A
3 Electronic immobiliser,
infotainment system,courtesy light
15 A
9 Courtesy light, 15 A
10 Central locking system,
instruments,exterior mirrors
15 A
11 Electric windows 30 A
12 Airba g system 15 A
13 Immobilizer,power steering (EPS),
instruments,air cond itioning system
15 A
windscreen washer system
17 ABS 10 A
18 Eng ine electronics 15 A
19 Cigarette lighter,
accessory socket
15 A
20 Central locking system,
exterior mirrors,infotainment system,
instruments,control ind icators,
cigarette lighter,
accessory socket.
15 A
21 Heater fan,hea ted rear window,
air condit ioning system
25 A
121Self-help
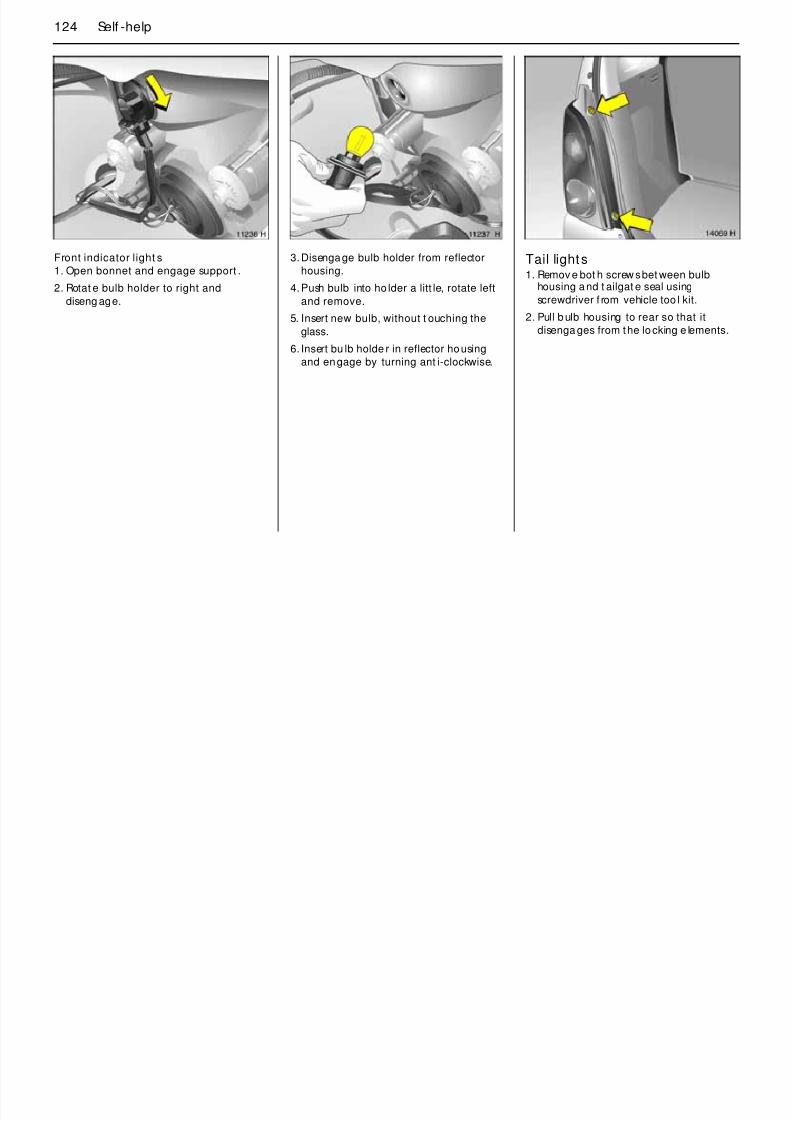
8/3/2019 Agila Owners Manual Jul06
http://slidepdf.com/reader/full/agila-owners-manual-jul06 126/168
Eng ine compart ment f use box b elow
wind screenTo open, press lugs a t sides and lif t cover.
No. Ci rcuit Rat ing
1 ABS 60 A2 Cooling fan 30 A
3 Power steering (EPS) 30 A
4 Starter 60 A
5 Lighting,
engine,infotainment system
60 A
No. Circuit Rat ing
6 Alternator:petrol engine 80 A
7 Dip ped beam (right),main beam (right)
15 A
8 Instruments,
contro l indicat ors,dipped beam (left),
main beam (left)
15 A
No. Circuit Rat ing
9 Rad ia tor fan,fuel injection system:
petrol engine
20 A
30 A
10 Fog lights 15 A
11 Horn 15 A
12 – –
122 Self -help
Bulb replacementBefore replacing a bulb, switch ignit ion offand switch relevant switch of f.
Only hold new bulb at base! Do not touchthe bulb glass with bare ha nds, ot herwise
fingerprints on th e g lass evaporat e.Residue b uilds up on the reflector
event ually resulting in a dull reflector.
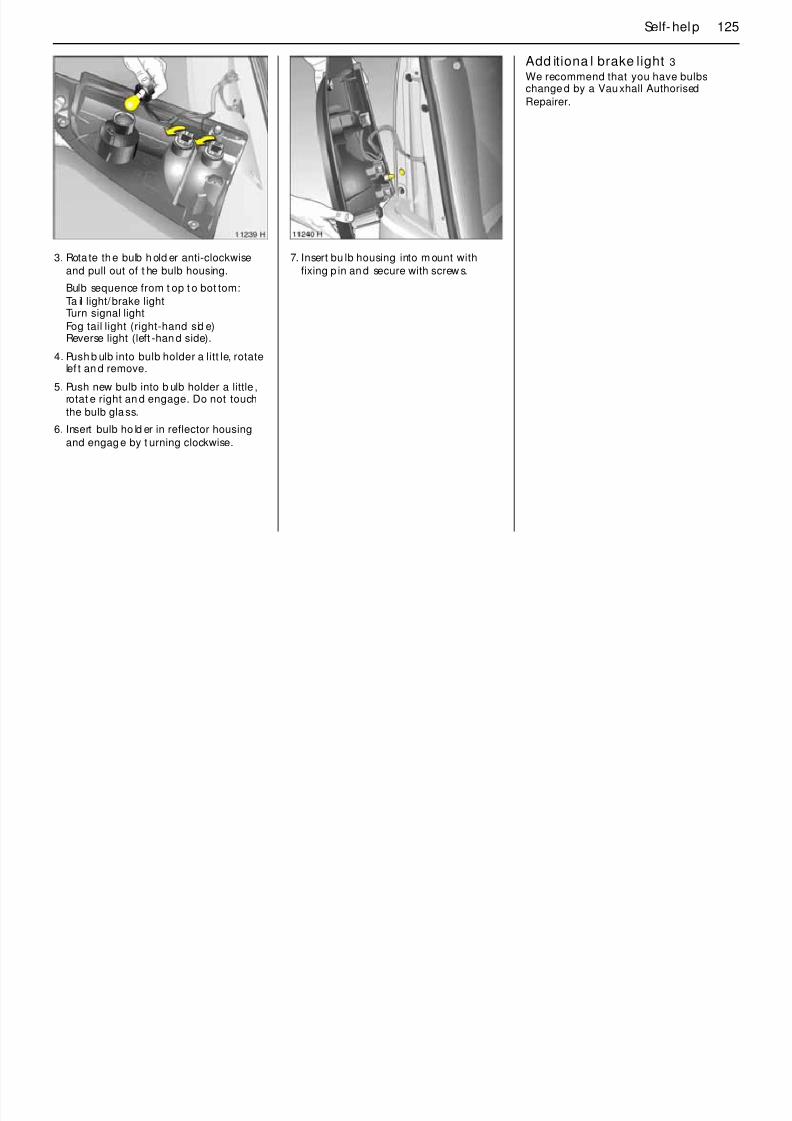
8/3/2019 Agila Owners Manual Jul06
http://slidepdf.com/reader/full/agila-owners-manual-jul06 127/168
Eng ine compar tment f use box a bove
batteryTo open, pull off the cover upwards.
Inadvertent ly stained bulbs ma y be
cleaned with a clean non-fluf fy cloth, usingalcohol or w hite spirits.
The rep la cement bulb must be inaccordance with the data on the ba se of
the defective bulb. Do not exceed w att agegiven on bu lb base.
Hea dlight aiming
We recom mend that headlight aiming b ecarried out by your Vauxhall Authorised
Repairer, who w ill ha ve sp ecial equipment.
When ad justing hea dlights, headlight
ra ng e ad justment m ust be set to 0.
Halogen head light systemDipp ed and main beam1. Open bonnet and engage support .
2. Detach plug connector from bulb base.
3. Remov e headlight protective cover.
No. Circuit Rat ing
1 – – 2 – –
3 Preheating system (1) 80 A
4 -
5 – –
123Self-help

8/3/2019 Agila Owners Manual Jul06
http://slidepdf.com/reader/full/agila-owners-manual-jul06 128/168
4. Disenga ge spring wire clip f rom reta ining
lugs by moving it sidewa ys and swivel itdownwards.
5. Remove bulb fro m reflecto r housing.
6. When fitting a new b ulb, eng age the lugsin t he recesses on the reflector w ithouttouching the g lass.
7. Engage sp ring w ire clip. Place headlightprotective cover in position and close
cover. Plug connector ont o bulb b ase.
Pa rking lights
1. Open bonnet a nd engag e support.
2. Rotat e bulb holder to left and
disengage.
3. Diseng age b ulb hold er from reflector
housing.
4. Remov e bulb from holder.
5. Insert new b ulb, without tou ching the
glass.6. Insert bulb holder in ref lector ho using
and enga ge by turning clockwise.
124 Self -help

8/3/2019 Agila Owners Manual Jul06
http://slidepdf.com/reader/full/agila-owners-manual-jul06 129/168
Front indicator light s
1. Open bonnet and engage support .
2. Rotat e bulb holder to right and
diseng age.
3.Disengage bulb holder from reflector
housing.
4.Push bulb into ho lder a litt le, rotate left
and remove.
5. Insert new bulb, without t ouching theglass.
6. Insert bu lb holde r in reflector housing
and engage by turning ant i-clockwise.
Tail lights1. Remov e bot h screw s bet ween bulb
housing and t ailgat e seal using
screwdriver f rom vehicle too l kit.
2. Pull b ulb housing to rear so that itdisenga ges from the locking e lements.
125Self-help
Add itiona l brake light 3
We recommend that you have bulbschanged by a Vauxhall Authorised
Repairer.

8/3/2019 Agila Owners Manual Jul06
http://slidepdf.com/reader/full/agila-owners-manual-jul06 130/168
3. Rota te the bulb h old er anti-clockwise
and pull out of t he bulb housing.
Bulb sequence from t op t o bot tom:
Ta il light/brake lightTurn signal light
Fog tail light (right-hand sid e)Reverse light (left -han d side).
4. Push b ulb into bulb holder a litt le, rotatelef t an d remove.
5. Push new bulb into b ulb holder a little ,rotat e right an d engage. Do not touch
the bulb glass.
6. Insert bulb ho ld er in reflector housing
and engage by t urning clockwise.
7. Insert bu lb housing into m ount with
fixing p in and secure with screw s.
126 Self -help

8/3/2019 Agila Owners Manual Jul06
http://slidepdf.com/reader/full/agila-owners-manual-jul06 131/168
Number plat e light1. Insert screwdriver vertically into number
plate light at right, rotate clockwise and
remove sp ring. Raise light insert on righ tand lift out.
2. Depress protruding tongu e and open
light housing.
3.Push bulb into bu lb housing a little,
rotate left and remove.
4.Push new bulb into bulb hou sing a litt le,rotat e rig ht a nd engage. Do not touchthe bulb g lass.
5.Close numb er plate light , insert andengage in position.
Courtesy lightClose doors or ho ld down c ontact switchbefore removing lights so t hat they are not
live.
1. Push lens to rear a nd pull down t oremove, a s shown in the illustra tion .
127Self-help
Instrument illumination,
Informat ion display illuminati on 3 We recommend that you have bulbs
cha ng ed b y a Vauxhall Auth orisedRepairer.

8/3/2019 Agila Owners Manual Jul06
http://slidepdf.com/reader/full/agila-owners-manual-jul06 132/168
2. Press bulb slight ly towards spring clip
and remove.
3. Insert new bulb, without t ouching the
glass.
4. Mount lens and engage in p osition.
128 If you ha ve a p robl em
If you have a problem The majo rity of a reas of concern can be
quickly resolved in this way.
Should you wish to pursue the matter
further, the Principal of t he VauxhallAuthor ised Repairer should be made
aware of your concern. It is ad visab le incases such as this to writ e to him t o confirm
your problem and the solutions that havebeen offered.
the Vauxhall Au thorised Repa irer will b e
adv ised accordingly. In any case, yourcontact will b e acknowledged confirming
Vauxhall Motors’ po sition in the mat ter.
If you are not satisfied with the outcome,
you ca n if you wish, seek advice fro m anindependent third p art y such as:
Automobile Association (A.A.)Fanum Ho use
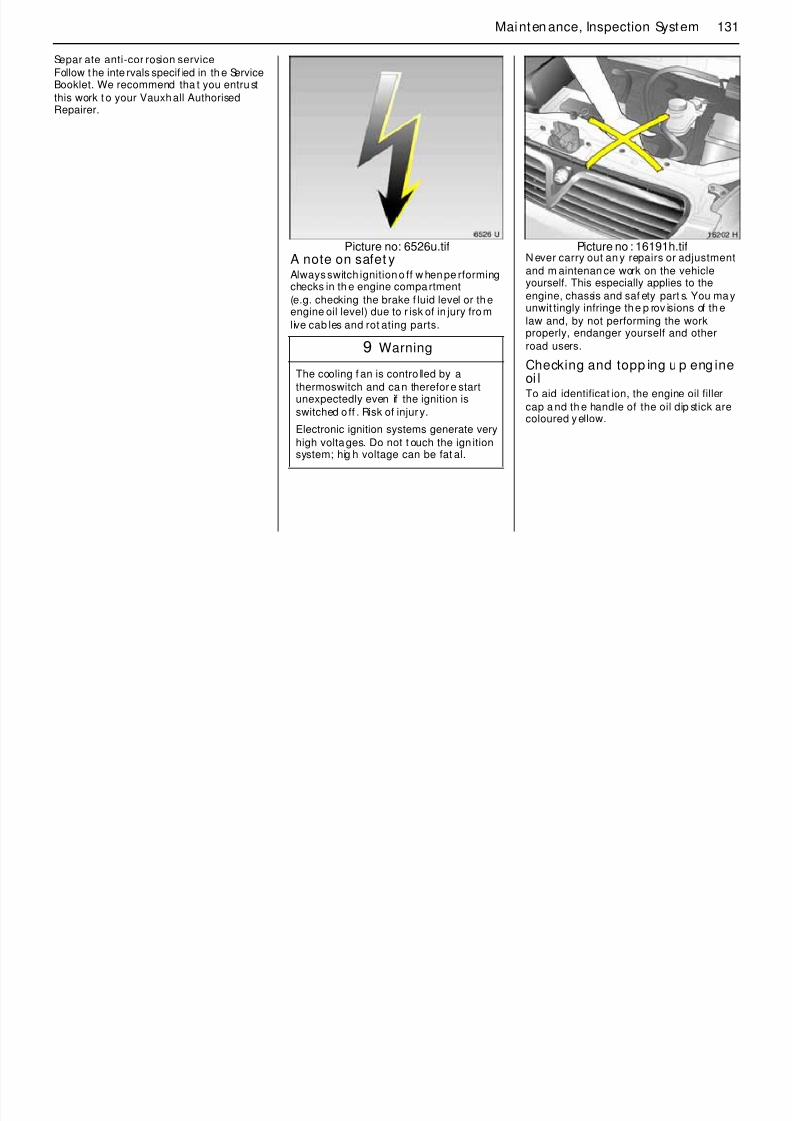
8/3/2019 Agila Owners Manual Jul06
http://slidepdf.com/reader/full/agila-owners-manual-jul06 133/168
In our experience t he most comm on ca useof a ll comp la ints is the result o f
misundersta nding or la ck ofcommunication b etween the customer an d
the Vauxha ll Authorised Rep airer.
We sincerely hop e you will never have
cause to c omplain abou t your vehicle.However, if t hings do g o wrong, the b est
course of action for you to t ake is tocontact your Vauxhall Authorised
Repairer’s Service Reception Sta ff andexplain the difficulty you are having. We
are confident they will do their utmost t oresolve the problem to your comp lete
satisfaction.
Sometimes, however, despite the best of
intentions of all concerned,
misundersta ndings can occur. If yourproblem has not been resolved to yoursatisfaction, please make an app ointme nt
to discuss the matt er with th e Manager ofthe depart ment concerned.
You can be assured the Aut horisedRepairer’s Principal will only be too anxious
to fully investiga te your p roblems andcorrect any errors m ade. Af ter all, they
have a large investment in th eir businessand are proud o f their reputa tion and
professionalism and fully realises thatsat isfied customers are the ir key to success.
In the unlikely event that you are st ill notha ppy with t he answer your Vauxhall
Authorised Repairer has given, or t heaction proposed to correct the problem ,
you may conta ct the Customer CareDepartment1) w here a team of Custom er
Care Consulta nts will spare no ef fort t oensure your comple te satisfaction.
Va uxha ll Motors Lt d.Customer Ca re,
Griffin House,Osborne Road,
LUTON,
Beds., LU1 3YTTelep hone: 01582 427200
They will review all the f acts invo lved. Then
if it is felt som e further action can be ta ken,
Fanum Ho use,
BASINGSTOKE,Hants., RG21 2EA
Roya l Auto m obile Cl ub (R.A.C.),R.A.C. Motoring Services Ltd .,
89-91 Pall Mall,LON DON, SW1Y S45
The Customer Relations Dep art ment ,Societ y of Mot or Manufact ur ers and
Trad ers Ltd. (S.M.M.T.),Forbes House, Halkin Street,
LONDON, SW1X 7DSCustomer Comp lain ts Service,
Scot tish Motor Trad e Associ ation, (S.M.T.A.),
3 Palmersto n Place,EDINBURGH, EH 12 5AQ
The Nat iona l Concilia tio n Service,Retai l Motor Indust ry Federation,
9 Nort h Street,RUGBY, CV21 2AB
If you have a problem whilst ab road:The
Service Depa rtments of Adam Op el A Gand General M oto rs branches everywhere
will provid e info rmat ion and a ssistance:1) Calls may be monito red and recorded fo r
129If yo u have a problem
Opel Austria Vert riebs GmbH
Groß-Enzersdorfer Str . 591220 Vienna – Austria
Tel. 00 43 1-2 88 77 444 or00 43-1-2 88 77 0
Opel Belgium N. V.Prins Boudewijnlaa n 30
2550 Konti ch – BelgiumTel. 00 32-34 50 63 11
ADAM OPEL AG
Bahnhof sp la tz 165423 Rüsselshe im – Germ any
Tel. 00 49-61 42-77 50 00 o r00 49-61 42-7 70
General Motors Hellas S.A.56 Kifisias Avenue & Delfo n str.
Amarousion151 25 At hens – Greece
General Motors Norge AS
Kjeller-Vest 62027 Kjeller – Norw ay
Tel. 00 47-23 50 01 04
Genera l Motors Poland Sp. z o. o.
Domaniewska 4106-672 Warsa w – Pola nd
Tel. 00 48-22-606 17 00
General Mo to rs Port ugal

8/3/2019 Agila Owners Manual Jul06
http://slidepdf.com/reader/full/agila-owners-manual-jul06 134/168
Opel C & S spo l. s.r.o .Na Pankrá ci 26
140 00 Pra gue 4 – Czech Repub licTel. 00 42 0-2-61 21-88 21
General Mot ors Da nmarkJaegersborg Alle 4
2920 Charlot tenlund – DenmarkTel. 00 45-39 97 85 00
Vauxhall Motors Ltd.Customer Care
Griffin H ouse, Osborn e RoadLut on, Bedf ordshire, LU1 3YT – Eng land
Tel. 00 44-15 82-42 72 00
General Mo to rs Finland O y
Pajuniityntie 500320 Helsink i – Finland
Tel. Helsinki 00 358-61 58 81
General Motors France
1 – 9, a venue d u Mara isAng le Qua i de Bezons
95101 Ar gent euil Cedex – Franc eTel. 00 33-1-34 26 30 00
Tel. 00 30-1-6 80 65 01Opel Sout heast Europe Ltd .
Szabad sag utca 1172040 Buda örs – Hunga ry
Tel. 00 36-23 446 100
General Motors India
Sixth Floor, Tower AGlobal Business Park
Mehrauli – Gurga on RoadGurgaon 122 022, Ha ryana – Indi a
Tel. 00 91-12 4 280 3333
Opel Irela nd Ltd .
Opel House, Unit 6 0, Heather RoadSandy ford, Dubli n 18 – Irela nd
Tel. 00 353-1 -216 10 00
General Motors Italia Srl
Piazzale dell’Industria 4000144 Rome – It aly
Tel. 00 39-6-5 46 51
Opel Nederland B.V.
Lage Mosten 49 – 634822 N K Breda – Neth erland s
Tel. 00 31-76-5 44 88 00
General Mo to rs Port ugal
Quinta da FonteEdificío Fernão Magalhães, Piso 2
2780-190 Paço d’ Arcos – Portuga lTel. 00 351-21 440 75 00
Genera l Mot ors España S.L.Paseo de la Castellana, 91
28046 Madrid – Sp ainTel. 00 34-902 25 00 25
Saab Opel Sverige ABEsboga tan 8
164 74 Kista – Sw edenTel. 00 46-8-63 2 85 00
Genera l Mot ors Suisse S.A.Stelzenstraße 4
8152 Glatt brugg – Swit zerlandTel. 00 41-44 828 28 80
Opel Türkiye Ltd. Sti.Kemalp asa yolu üzeri
35861 Torb ali/Izmir – TurkeyTel. 00 90-2 32-8 53-14 53
In Al bania, Bosnia -Her zegovina ,Bulga ria, Croatia , Macedonia ,
Rom ania, Slovenia and Yugoslaviaplease contact the Opel
Service Depa rtment in Budaörs – HungaryT l
130 Maintenance, Inspection System
Maintenance,
Inspect ion System
In order to guarant ee econom ical and safe
vehicle operation and t o m ainta in thevalue of your vehicle, it is of vital
importance that all maintenance work iscarried out at the proper intervals as
specified b y Vauxhall.
The dat e for the next service is determined
by time o r kilometre/mileage interva ls – whichever is reached f irst.
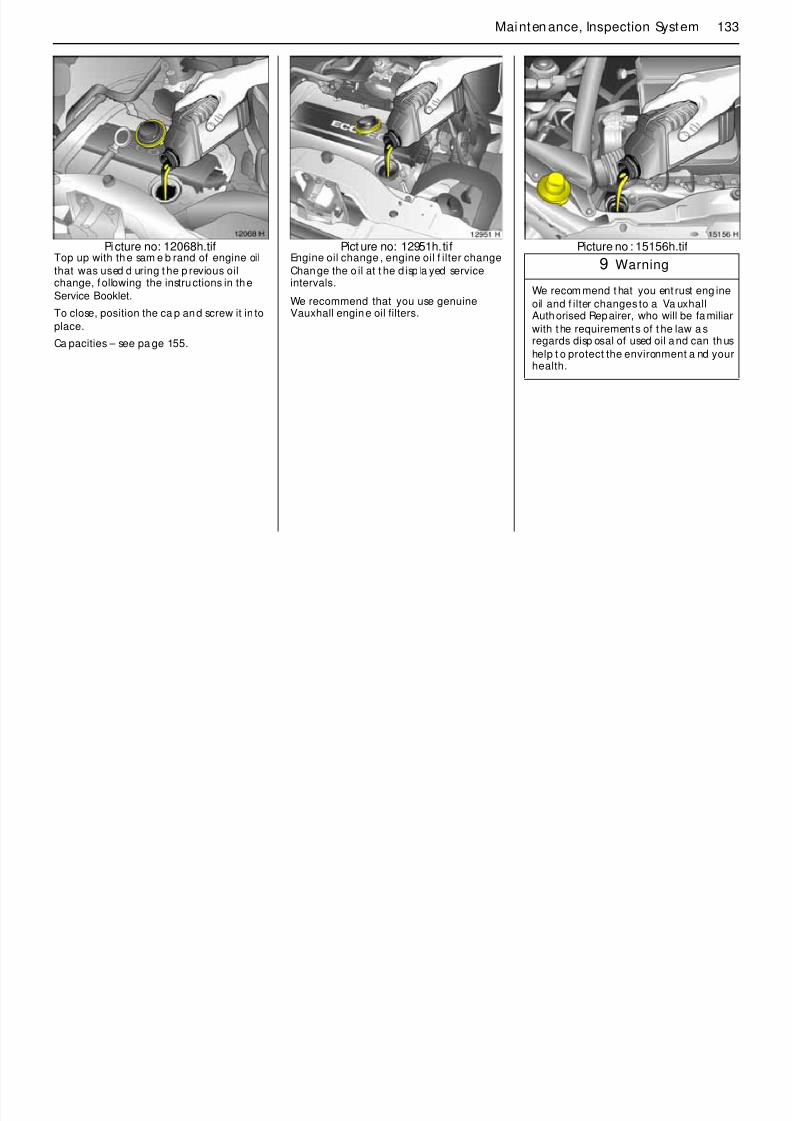
8/3/2019 Agila Owners Manual Jul06
http://slidepdf.com/reader/full/agila-owners-manual-jul06 135/168
InSP app ears in the trip odom eter displayaf ter the ig nition is sw itched on whe n it is
time fo r servicing: Have service workcarried out with in one week o r 300 miles
(500 km). We recommend that you consultyour Vauxhall Authorised Repairer.
The service interval display takes accountof off-t he-road p eriods during wh ich the
bat tery is d isconnected.
Further info rm ation on ma intenance and
the inspection system can be found in theservice bo oklet, which is in th e glove
compartment.
Picture no: 15218H.tifHave m aintenan ce w ork – as well as
repa irs to the bod ywork and power units – carried out by a p rofessional. We
recommend your Vaux hall AuthorisedRepa irer, who is w ell acq uaint ed with
Vauxhall vehicles and in po ssession of thespecia l tools required and the respective
latest service instructions from Vauxhall. Inorder to avoid inva lid ation o f any warranty
claim, it is especially import ant to entrustwork to a Vauxhall Authorised Repa irer
during t he warranty period. For fu rtherinformat ion, see the Service Booklet.
A note on safety .................................. 131
Checking and topp ing up engine oil .. 131
Eng ine oil ......... ..................................... 132
Coo lan t ................. ......... .... ................... 134
Coo lan t ................. ......... .... ................... 134
Brake flu id ............................................ 136
Windscreen wipe r ................................ 137
Windscreen wash system.................... 137
Battery ..... .... .... ......... ............................ 138
Prot ecting electro nic components ..... 139
Vehicle decomm issioning. ................... 139
Vehicle recommission ing..................... 139
131Mainten ance, Inspection System
Separ ate anti-cor rosion service
Follow the inte rvals specif ied in th e ServiceBooklet. We recommend tha t you entrust
this work t o your Vauxhall AuthorisedRepairer.

8/3/2019 Agila Owners Manual Jul06
http://slidepdf.com/reader/full/agila-owners-manual-jul06 136/168
Picture no: 6526u.tifA note on safet yAlways switch ignition o ff w hen pe rformingchecks in th e engine compartment
(e.g. checking the brake f luid level or theengine oil level) due to r isk of in jury from
live cab les and rot ating parts.
Picture no : 16191h.tifN ever carry out an y repairs or adjustment
and m aintenan ce work on the vehicleyourself. This especially applies to the
engine, chassis and saf ety part s. You mayunwit tingly infringe the p rov isions of th e
law and, by not performing the workproperly, endanger yourself and other
road users.
Checking and topp ing u p eng ineoi lTo aid identificat ion, the engine oil filler
cap a nd th e handle of the oil dip stick arecoloured yellow.
9 Warning
The cooling f an is contro lled by a
thermoswitch and can therefore startunexpectedly even if the ignition is
switched o ff . Risk of injury.
Electronic ignition systems generate very
high voltages. Do not t ouch the ign itionsystem; hig h voltage can be fat al.
132 Maintenance, Inspection System

8/3/2019 Agila Owners Manual Jul06
http://slidepdf.com/reader/full/agila-owners-manual-jul06 137/168
Picture no: 16192h.tifEngine oilInforma tion on engine oils is available inthe Service Bookle t.
Engine oil level, engine oil consump tion
Every engine consumes engine oil fo rtechnical reasons. The engine oilconsump tion canno t be assessed until a
fairly long d istance has been driven, a ndmay be a bove the specified value when t he
vehicle is first b eing d riven (run-in pe riod ).Frequent d riving at high revs increases
engine oil consumpt ion.
In vehicles with eng ine oil level check 3 , the
engine oil level is checked automat ically. Itis part icularly adv isable t o check the
engine oil level bef ore emb arking o n a long journey.
Pict ure no: 16193h.tifEngine oil l evel check,
topping up engine oilThe illustra tion s show checking and
top ping up of various petrol and dieselengines.
The o il level m ust be checked wit h thevehicle on a level surface and with t he
engine (which must be a t operat ingtemperat ure) switched off . Wait at least
5 minutes befo re checking the level toallow the normal engine oil accumulation
in the engine to drain into t he oil pan.
Picture no : 15155h.tifTo check the engine oil level, insert wiped
oil dipstick into h and le as fa r as it will go.Top engine oil up if t he level has droppe d
into the range of the top-up mark MIN.
The engine oil level must not exceed the
upper mark MAX on the dipstick. Excesseng ine oil must be drained off o r extracted.
If the engine oil level is above the M AX ma rk there is a risk of d amage to the
engine or the cata lytic converter.
The amount filled must be between the
MIN and MA X marks – see pag e 155.
9 Warning
Do not a llow the engine oil level to dro p
below the m inimum level!
9 Warning
It is the owner’s resp onsibility t o ma inta inthe correct level of an appropriat e qualityoil in the engine.
133Mainten ance, Inspection System
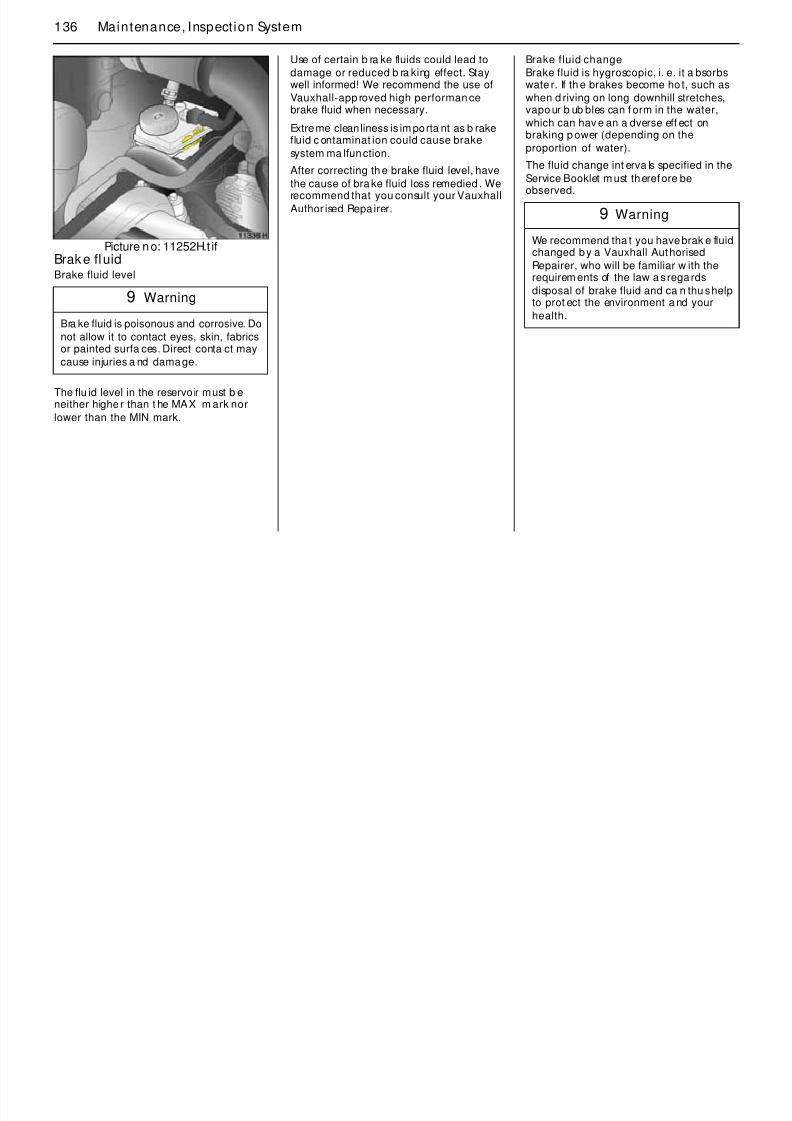
8/3/2019 Agila Owners Manual Jul06
http://slidepdf.com/reader/full/agila-owners-manual-jul06 138/168
Picture no: 12068h.tifTop up with the sam e b rand of engine oil
that was used d uring t he p revious oilchange, following the instructions in the
Service Booklet.
To close, position the ca p and screw it in to
place.
Ca pacities – see pa ge 155.
Pict ure no: 12951h.tifEngine oil change , engine oil f ilter change
Change the o il at t he d isp la yed serviceintervals.
We recommend that you use genuineVauxhall engine oil filters.
Picture no : 15156h.tif
9 Warning
We recom mend t hat you ent rust eng ine
oil and f ilter changes to a Va uxhallAuthorised Repairer, who will be familiar
with the requirements of t he law a sregards disp osal of used oil and can thus
help t o protect the environment a nd yourhealth.
134 Maintenance, Inspection System
CoolantDuring op era tion the syste m is pressurized.The tempera ture may therefore rise briefly
to over 100 °C.
The g lycol-based coolant p rovides
excellent corrosion pro tection for t heheating a nd cooling systems as well as
anti-freeze protection d ow n t o -28 °C. Itremains in the cooling system th roughout
9 Warning
Ant ifreeze is a d anger to health; it must
therefore be kept in the original conta inerand out of t he reach of children.
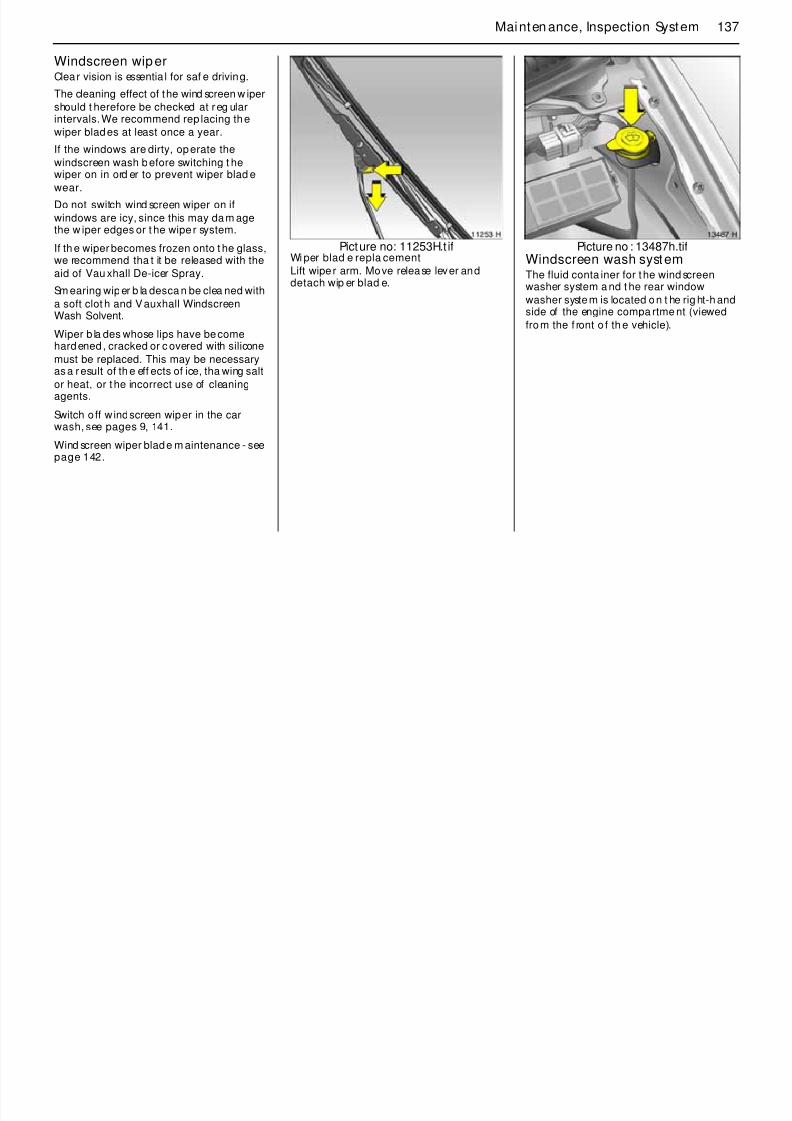
8/3/2019 Agila Owners Manual Jul06
http://slidepdf.com/reader/full/agila-owners-manual-jul06 139/168
the year and need not be changed.Cert ain ant i-freezes can lead t o engine
dam age. We therefore recommend t he useof a nti-freezes that h ave been ap proved
by Vauxhall.Picture no: 12952h.tif
Frost and c or rosi on p rotection
Before the sta rt of t he cold weather season,have the coolant checked for correct
concentra tion using a calibra tedhydrometer. We recommend that you
consult your Vauxha ll Autho rised Repa irer.The anti-freeze content must gua rant ee
frost protection down to approx. -28 °C. Aninsuff icient con centra tion will reduce frost
and corrosion protection. Add a nt i-freeze ifnecessary.
If coolant loss is topped up with wa ter,have an ti-f reeze concentrat ion checked
and a dd ant i-freeze if necessary.
135Mainten ance, Inspection System
Aft er to pping up with tap or distilled wa ter,
have the anti-freeze concentrationchecked , and ant i-freeze added if
necessary . Have the cause of the coolantloss remedied. We recommend tha t you
consult y our Vauxhall Authorised Repaire r.
To close, position the cap and screw it in to
place.
Coolant t emp era ture

8/3/2019 Agila Owners Manual Jul06
http://slidepdf.com/reader/full/agila-owners-manual-jul06 140/168
Picture no: 12519h.tifCoola nt level
Hard ly any losses occur since the coo lingsystem is sealed and it is thus rarely
necessary to top up t he coolant .
The coolant in the exp ansion tank should
be just abov e the marking KALT/COLD orbetween LOW and FU LL in diesel engines
with the cooling system cold. It rises whenthe engine has warmed up and drops
again a s the engine cools. If it f alls b elowthe marking KALT/COLD or b elowLOW
during this, top up to just a bove themarking KALT/COLD or bet ween LOW
and FULL.
Pict ure no: 16194h.tif
Top up an ti-freeze. If no anti-f reeze isavailable, top u p w ith c lean t ap water. If
tap water is unav ailable, distilled watercan be used.
If the t emp erature g auge is in the upp erwarning zone, coolant t emp erature is too
high. Check the coolan t level imm ediat ely.
z Coolan t level too low:
Top up coolant . Pay att ent ion to theinstructions given under "Ant i-fre eze and
corrosion prot ection" and " Coolan tlevel". Have the cause of coolant loss
remedied . We recommend tha t youconsult your V auxhall Authorised
Repairer.
z Coolant level OK:
Have the cause of increased coolanttemperat ure remed ied. Contact a
workshop . We recom mend that youconsult your V auxhall Authorised
Repairer.
9 Warning
Allow engine t o cool down b efore
removing coola nt filler cap . Rem ove fillercap carefully so that p ressure can escape
slowly, ot herwise there is a r isk ofscalding.
136 Maintenance, Inspection System
Use of certain b ra ke fluids could lead to
damage or reduced b ra king effect. Staywell informed! We recommend the use of
Vauxhall-app roved high performan cebrake fluid when necessary.
Extreme clean liness is im porta nt as b rakefluid c ontaminat ion could cause brake
system ma lfunction.
After correcting th e brake fluid level, have
Brake fluid change
Brake fluid is hygroscopic, i. e. it a bsorbswate r. If th e brakes become ho t, such as
when d riving on long downhill stretches,vapo ur b ub bles can f orm in the water,
which can hav e an a dverse eff ect onbraking p ower (depending on the
proportion of water).
The fluid change int erva ls specified in the
Service Booklet m ust therefore be

8/3/2019 Agila Owners Manual Jul06
http://slidepdf.com/reader/full/agila-owners-manual-jul06 141/168
Picture no: 11252H.t ifBrake fluidBrake fluid level
The flu id level in the reservo ir must b eneither highe r than t he MAX m ark nor
lower than the MIN mark.
the cause of bra ke fluid loss remedied . Werecommend that you consult your Vauxhall
Author ised Repa irer.
observed.
9 Warning
Bra ke fluid is poisonous and corrosive. Donot allow it to contact eyes, skin, fabricsor painted surfa ces. Direct conta ct may
cause injuries a nd damage.
9 Warning
We recommend tha t you have brak e fluidchanged by a Vauxhall Authorised
Repairer, who will be familiar w ith therequirem ents of the law a s rega rds
disposal of brake fluid and ca n thu s helpto prot ect the environment a nd your
health.
137Mainten ance, Inspection System
Windscreen wiperClear vision is essentia l for saf e driving.
The cleaning effect of the wind screen w iper
should t herefore be checked at reg ularintervals. We recommend rep lacing the
wiper blades at least once a year.
If the windows are dirty, operate the
windscreen wash before switching t hewiper on in ord er to prevent wiper blad e
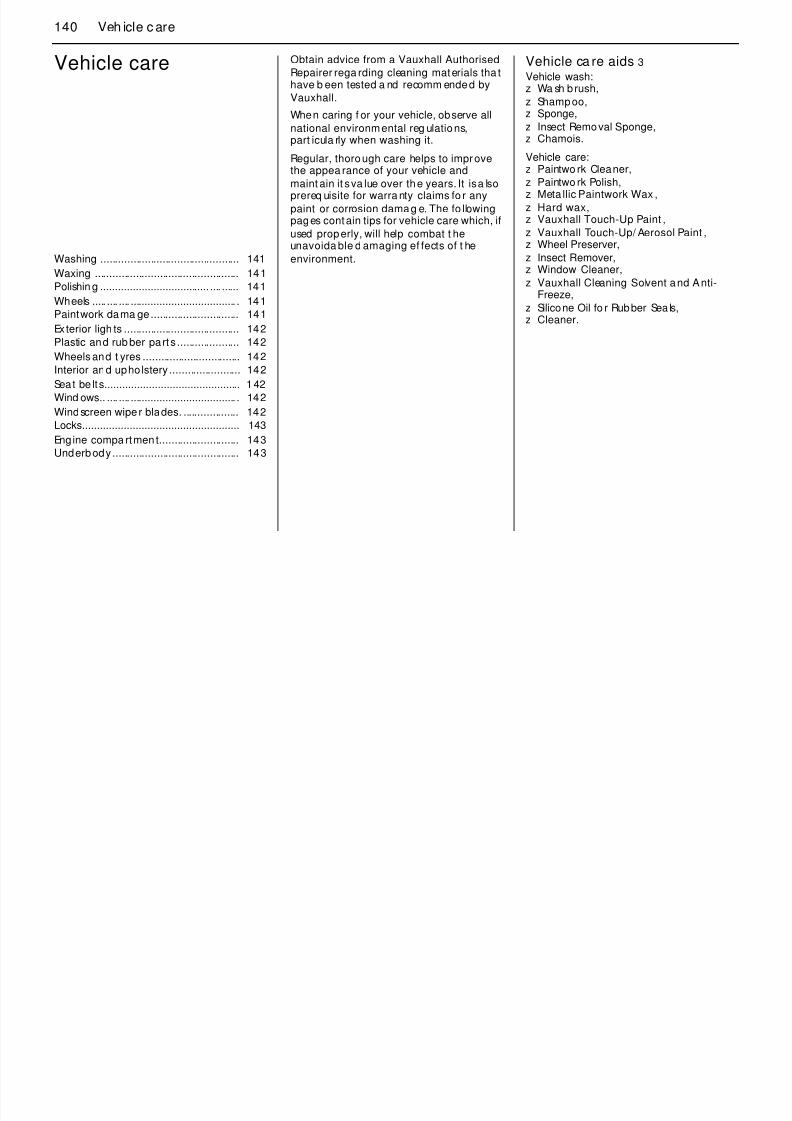
8/3/2019 Agila Owners Manual Jul06
http://slidepdf.com/reader/full/agila-owners-manual-jul06 142/168
wear.
Do not switch wind screen wiper on if
windows are icy, since this may dam agethe w iper edges or t he wipe r system.
If th e wiper becomes frozen onto t he glass,we recommend tha t it be released with the
aid of Vau xhall De-icer Spray.
Sm earing wiper b la des ca n be clea ned with
a soft clot h and Vauxhall WindscreenWash Solvent.
Wiper b la des whose lips have becomehardened , cracked or c overed with silicone
must be replaced. This may be necessaryas a result of th e eff ects of ice, tha wing salt
or heat, or t he incorrect use of cleaningagents.
Switch o ff w indscreen wiper in the carwash, see pages 9, 141.
Wind screen wiper blade m aintenance - see
page 142.
Picture no: 11253H.t ifWi per blad e repla cement
Lift wipe r arm. Move release lever anddetach wip er blad e.
Picture no : 13487h.tifWindscreen wash systemThe fluid conta iner for t he wind screenwasher system a nd t he rear window
washer system is located on t he rig ht-h andside of the engine compa rtme nt (viewed
from the f ront o f th e vehicle).
138 Maintenance, Inspection System
Fill o nly with clean wa ter to prevent the
nozzles from clogging. To impro vecleaning eff iciency, we recommend th at
you ad d a little Vauxhall Windscreen WashSolven t.
The w indscreen washer system will no tfreeze in winter:
Parking the vehicle for more than 4 weeks
can discharge t he bat tery. This ca n shortenthe lif e of the bat tery. Therefore d isconnect
the ba tt ery by disconnecting the nega tivetermina l from the on-board power sup ply.
Ensure that ig nition is switched o ff beforeconnecting ba ttery. Failure to do so could
result in t he engine not being ab le to startor engine opera ting p roblems. Time and
dat e must be set in the informat ion disp lay
Freezep rotection
Mixture strength – Vauxhall Windscreen
8/3/2019 Agila Owners Manual Jul06
http://slidepdf.com/reader/full/agila-owners-manual-jul06 143/168
When closing the container, press the lid
firmly over the beaded edge all the wayround.
Picture no: 13488a .tifBatteryThe ba tt ery is maintenance-free.
Retrofitted electrical or electronicaccessories can place an add ition al load
on the bat te ry or even discharge the
batt ery. We recommend that you consult aVauxhall Auth orised Repa irer regardingtechnical possibilities, such as fitting a
more powerful battery.
aft er the battery is reconnected.down to Wash Solvent: Water
– 5 °C
– 10 °C – 20 °C
– 30 °C
1 : 3
1 : 21 : 1
2 : 1
9 Warning
We recommend that you have batt erychanges carried out by a VauxhallAuthorised Repairer. The Vauxhall
Authorised Repairer knows the lawsconcerning the disposal o f used bat te ries
and t herefore prot ects the environmentand your health.
139Mainten ance, Inspection System
Protecting electronic componentsIn order to p revent f ault s in electro niccomponents in the electrical system, never
connect or disconnect ba ttery with eng inerunning o r ignition switched o n. N ever sta rt
engine with bat tery disconnected, e.g .when star ting u sing jump leads.
To avoid da maging t he vehicle, do notmake any modifications to the electrical
Veh icle d ecommissioningObserve national regulat ions.
If the vehicle is decommissioned fo r severa l
months, the following work m ust be carriedout in order t o prevent da m age. We
recommend that you consult your VauxhallAuthor ised Repa irer.
z Wash and p reserve the vehicle – seepage 141.
Vehicle storage
z Park vehicle in d ry and well-ventila tedpremises. Engage f irst gear or reverse.
Pla ce w heel chocks or such like underwheels to p revent vehicle f rom ro lling
away.
z Do not apply hand brake.
z Disconnect bat tery by disengag ingnega tive term inal f rom v ehicle electrical
8/3/2019 Agila Owners Manual Jul06
http://slidepdf.com/reader/full/agila-owners-manual-jul06 144/168
system, e. g. connecting ad ditionalconsumers or tampering with electronic
control units (chip tuning).
Disconnect/connect vehicle ba tt ery from/ to electrical system.
Disconnect the ba ttery from t he vehicleelectrical system before cha rg ing: First
det ach the nega tive and then the positivelea d. Do not reverse the polarity of the
bat te ry, i.e. d o not c onfuse the t erminalsfor t he positive and n egat ive leads. When
connecting, sta rt with the positiv e lead andthen connect the nega tive lead.
z Check prot ective coating in enginecompartm ent and on underbody and
rectify where necessary.
z Clean and p reserve rub ber seals on
bonnet and doors.
z Change engine oil – see pa ge 133.
z Check anti-f reeze an d corrosionprot ection – see page 134.
z Check the coolan t level, top u p with a nti-
freeze if necessary – see pag e 135.
z Drain t he windscreen washer system .
z Increase tyre p ressure t o value specified
for f ull loa d – see pa ge 152.
system – see p age 138.
Vehicle recommissioningObserve nat ional regu lations.
Carry out the following w ork bef ore puttinga vehicle back on the road.
z Connect ba ttery – see page 138.
z Check tyre pressure and correct if
necessary – see p age 152.
z Fill up w indscreen washer system – see
page 137.
z Check engine oil level – see page 132.
z Check t he coolant level; top up with ant i-freeze if necessa ry, see pa ge 135.
z Fit t he num ber p la te if necessary .
9 Warning
Electron ic ignit ion systems gen erate very
high voltag es. Do not t ouch the ignitionsystem; high voltage can be fat al.
140 Veh icle c are
Vehicle care Obtain advice from a Vauxhall Authorised
Repairer rega rding cleaning materials tha thave b een tested a nd recomm ended by
Vauxhall.
When caring f or your vehicle, observe all
national environmental reg ulations,part icula rly when washing it.
Regular, thorough care helps to improvethe appea rance of your vehicle and
Vehicle ca re aids 3
Vehicle wash:z Wa sh b rush,
z Shampoo,z Sponge,
z Insect Removal Sponge,z Chamois.
Vehicle care:z Paintwo rk Cleaner,
z
8/3/2019 Agila Owners Manual Jul06
http://slidepdf.com/reader/full/agila-owners-manual-jul06 145/168
maint ain it s va lue over the years. It is a lsoprereq uisite for warra nty claims fo r any
paint or corrosion damag e. The fo llowingpages contain tips for vehicle care which, if
used properly, will help combat t heunavoida ble d amaging ef fects of t he
environment.
Paintwo rk Polish,z Meta llic Paintwork Wax ,
z Hard wax,z Vauxhall Touch-Up Paint ,
z Vauxhall Touch-Up/ Aerosol Paint ,z Wheel Preserver,
z Insect Remover,z Window Cleaner,
z Vauxhall Cleaning Solvent and Anti-Freeze,
z Silicone Oil fo r Rubber Sea ls,z Cleaner.
Washing ............................................... 141
Waxing ................................................. 141
Polishin g ..................................... .... ...... 141
Wheels ..... .... .... .................................... . 141
Paintwork dama ge.............................. 141
Exterior ligh ts ....................................... 142Plastic and rub ber part s ..................... 142
Wheels and t yres ................................. 142
Interior and upholstery ........................ 142
Seat be lts.............................................. 142
Wind ows.. .... .... .................................... . 142
Windscreen wipe r blades. ................... 142
Locks..................................................... 143
Engine compa rtmen t........................... 143
Underbody........................................... 143
141Vehicle care
WashingThe paintwork of your vehicle is exposed toenvironme nta l influences, e.g . continuous
changes in weather conditions, industrialwaste gases and dust or thawing sa lts, so
wash and wax your v ehicle regular ly. Whenusing a utoma tic car washes, select a
programme which includes waxing.
Bird droppings, dead insects, resin, pollen
d t h lik h ld b l d f f
Clean edge s and folds on op ened doors
and f laps as well a s the area s they cover.
Thoroughly rinse of f and leat her-off t he
vehicle. Rinse leather frequently. Useseparat e leathers for paint and w indow
surfaces: remnants of wax on the wind owswill impair vision.
Observe national regulat ions.
WaxingW hi l l l i i l
WheelsUse a pH-neutral w heel cleaning agent t oclean t he wheels.
Wheels a re paint ed and ca n be treatedwith the same ag ents as the body. For alloy
wheels we recommend u se of Alloy WheelPreserver.
Pa intwork d amage
R i ll f i t d h

8/3/2019 Agila Owners Manual Jul06
http://slidepdf.com/reader/full/agila-owners-manual-jul06 146/168
and t he like shou ld be cleaned of fimmediat ely, as they cont ain aggressive
constit uents which can cause pain tdamage.
If using a car wa sh, comply w ith t hepertinent instructions of the car wash
manuf acturer. The windscreen w ipers andrear window wiper must be in the ir park
position – see pa ge 12. Remove ant enna 3
and roof rack 3 . Stand on t he doo r sill to
reach t hem more ea sily.
If you wash your vehicle by hand , make
sure t hat the insides of t he wing s a re alsotho roughly rinsed out .
Wax your vehicle regu larly, in pa rticularaf ter it has been washed using shampoo
and at the latest when wa ter no longerforms beads on the pa intwork, otherwise
the paintwork will d ry o ut.
Also wax edg es a nd f olds on opened doors
and f laps as well a s the area s they cover.
PolishingPolishing is necessa ry only if the pain t has
become dull or if solid depo sits havebecome att ached to it.
Pa intwork polish with silicone forms aprotective film , ma king waxing
unnecessary.
Plastic body p arts should not be t reated
with wax a nd polish.
Use Metallic Paintw ork Wa x on veh ic les
with a meta llic-eff ect p aint finish.
Repa ir small areas of paint damage suchas stone impacts, scratches etc.
immediately using an Va uxha ll t ouch-upapp lica tor or Vauxhall spray and touch-up
paint be fore rust can form. If rust h asalread y formed , have the cause remedied .
We recommend th at you consult yourVauxhall Authorised Repairer. Please also
pay att ention t o surfaces and edgesbeneath the vehicle where which rust m ay
have formed unnoticed for some time.
142 Veh icle c are
Exterior light sHeadligh t and other protective lig ht bezelsare made of plastic. If t hey require
additional cleaning after the vehicle hasbeen washed, clean them with Car
Shamp oo. Do not use any ab ra sive orcaustic agents, do not use an ice scraper,
and do not clean them dry.
Plastic a nd rubber pa rtsF ddit i l l i f l ti d
Wheels and tyresDo not use high-pressure jet cleaners.
In terior a nd upholsteryClea n t he vehicle interior, including the
instrument p anel fascia , using interiorcleaner.
The instru ment panel should only becleaned using a soft da mp cloth.
Cl f b i h l t it h
WindowsWhen cleaning t he hea ted rear window,
ma ke sure th at the heat ing element on theinsid e of t he window is not da maged.
Use a soft lint-free cloth or chamois leat herin conjunction wit h Window Cleaner a nd
Insect Remover .
Vauxhall Cleaning Solvent and A nt ifre eze
is suitable for de -icing windows.
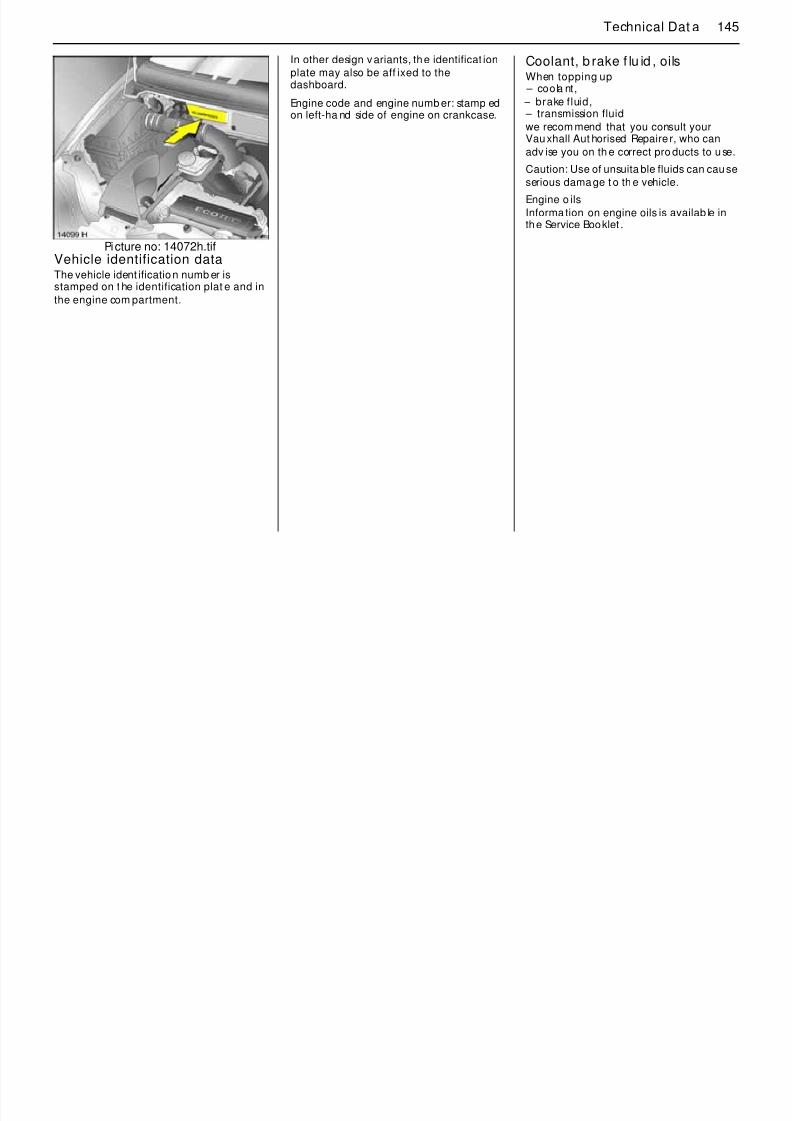
8/3/2019 Agila Owners Manual Jul06
http://slidepdf.com/reader/full/agila-owners-manual-jul06 147/168
For addit ional cleaning of p lastic andrubber parts use Interior Cleaner. Do notuse any other agent, and in particular do
not use solvents or petrol.
Do not use h igh-p ressure jet cleaners.
Clea n fa bric upholstery wit h a va cuumcleaner an d brush. To remove stains, use
cleaner that is suita ble for bot h fabrics a ndvinyl.
Do not use cleaners such as acetone,carbon tetrachloride, paint thinner, paint
remover, nail va rnish remover, w ashingpowder or bleach. Petrol is also unsuita ble.
Open velcro fastenings in your clothingcould damage the seat cushions. Close
velcro f astenings.
Seat belt sAlw ays keep seat belts clean and dry.
Clean only with lukewarm wate r or Cleane r.
For mechanical removal of ice, use a
comm ercially available sharp -edged icescraper. Press the scraper firmly against
the g lass so tha t no dirt can get under itand scratch the g lass.
Windscreen wiper bladesWax such as the wax used in car washescan c ause sm earing on t he wind screen
when the windscreen wipers are sw itched
on.
Smearing wiper b lades ca n be cleaned witha sof t cloth and Va uxhall Clea ning Solvent
and Ant ifreeze. Rep la ce them if necessary – see page 137.
143Vehicle care
LocksThe locks are lubricated with a high-g radelock cylinder grease at t he fa ctory.
Vauxhall lock cylinder grease prevent s thelocks from freezing up . Only use de-icing
agent in emergencies, as they have adegreasing eff ect and will impair t he
function o f the locks. Aft er using a de-icingagen t, have t he locks re-greased. We
recom mend that y ou ent rust th is to your
Vauxhall Au thorised Repairer
Protective wax that has been ap plied is
also remo ved dur ing t he engine wash. Forthis reason, ha ve the eng ine, brake system
components in the engine compartment,axle com ponents with steering, body part s
and cavities tho roug hly preserved withprotective wax after the wash. We
recommend that you consult your VauxhallAuthor ised Repa irer.
An engine w ash ca n be performed in the
spring in order t o remove dirt th at h as
On vehicles which are washed f requently in
automat ic car washes with underbodywashing facility, the protective wax
coating may be impaired by dirt-d issolvingadd itives, so check the underb od y after
washing and have it wa xed if necessary.Before the sta rt of t he cold weather season,
check the PVC coating and pro tective waxcoating a nd, if necessary, ha ve them
resto red to perfect condit ion.
Caution commercially available bitumen/
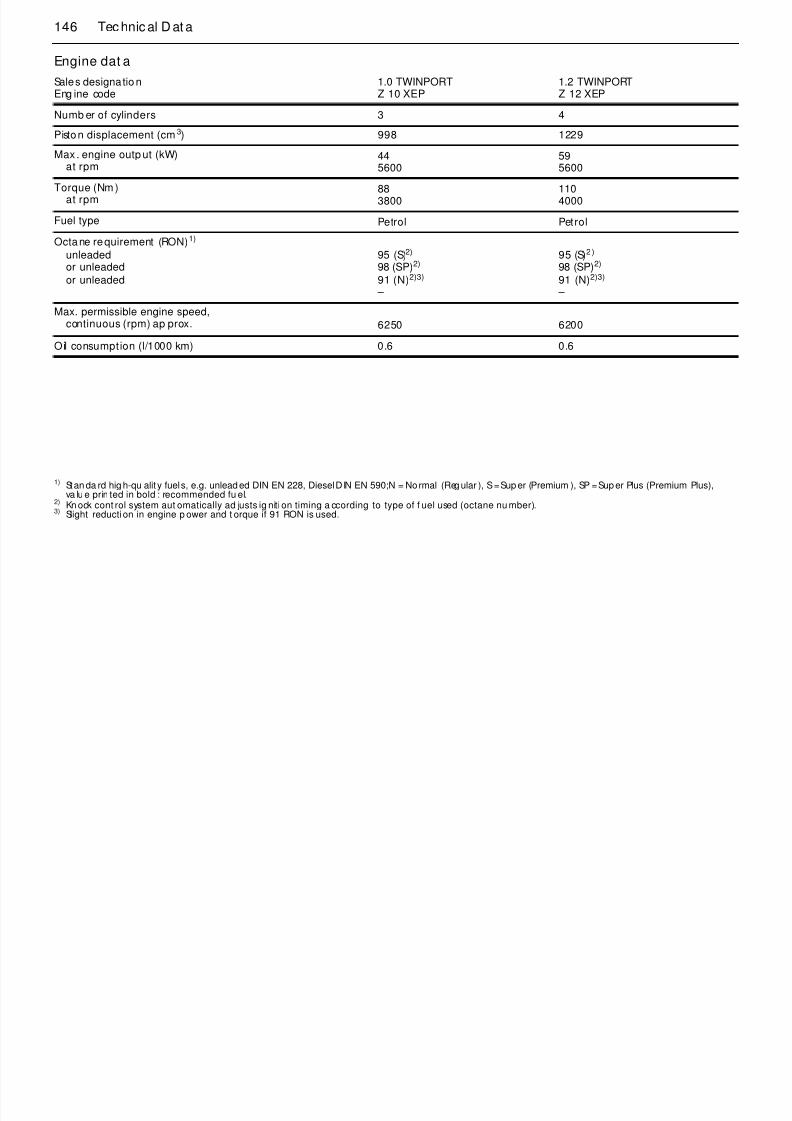
8/3/2019 Agila Owners Manual Jul06
http://slidepdf.com/reader/full/agila-owners-manual-jul06 148/168
Vauxhall Au thorised Repairer.
Engine compa rtmentAreas of t he engine compartment t hat arepaint ed in the same colour as the vehicle
must be looked aft er like any ot her p aintedsurface.
It is adv isable t o wash the enginecompartment before and af ter winter and
preserve it with wax. Cover alternat or and
brake fluid reservoir with plastic sheetsbefore washing the engine.
When washing t he engine with a steam-jet
cleaner, do not d irect the steam jet atcomponents of the Ant i-lock Brake
System 3 , t he auto matic a ir conditioningsystem 3 or the b elt drive and its
components.
spring in order t o remove dirt th at h asadhered to t he engine compa rtment,which ma y also have a high salt content.
Check prot ective wax layer and ma ke goodif necessary.
Do not use high-pressure jet cleaners.
UnderbodyYour vehicle has a facto ry-app lied PVC
undercoat ing in the wheel arches
(including th e longitudinal memb ers) whichprovides permanent protection and needsno special maintenance. The surfaces of
the vehicle underbody not covered by PVCare provided with a durable p rotective wax
coating in critica l areas.
Caution - commercially available bitumen/ rubber mat erials can damage the PVCcoating. We recommend that you ha ve
underbody work ca rried out by anVauxhall Authorised Repaire r, who knows
the p rescribed materials and hasexperience in the use thereof.
The underbody should b e washedfollowing the end of t he cold weather
season to remove any dirt adhering t o th e
underbody since this may also cont ain salt.Check p rote ctive wax coa ting and, ifnecessary , have it restored t o perfect
condition.
144 Tec hnic al D at a
Technical Data

8/3/2019 Agila Owners Manual Jul06
http://slidepdf.com/reader/full/agila-owners-manual-jul06 149/168
Pict ure no: 13489h.tifVeh icle documen ts, ident ifi cationplateThe technical d ata is determined in
accordance with European Commun itystandards. We reserve the right to ma ke
modifications. Specifications in the vehicledocuments always have priority over t hose
given in th is manual.
The identificat ion plate is af fixed to the
front right door frame.
Picture no: 13329j.t ifInformation on identification plate:
1 Manufacturer2 Type ap proval number
3 Vehicle identification number4 Permissible gro ss vehicle weight
5 Permissible gross train weight6 Maximum permissib le fro nt axle load
7 Maximum permissib le rear axle load8 Vehicle-specific or
count ry-specific dat a
Vehicle ident ifica tion d at a.................. 145
Coolant, b ra ke fluid, oils ..................... 145
Engine data. ......................................... 146
Performance......................................... 147
Fuel consump tion, CO2 emission........ 148
Weights, pay loa d and roof load ........ 150Tyres..................................................... 152
Elect rical system .................................. 154
Ca pacities ............................................ 155
Dimensions........................................... 156
Mounting dimensions of caravan/
tra iler towing equipment .................. 157
145Technical Dat a
In other design variants, the identificat ion
plate may also be aff ixed to thedashboard.
Engine code and engine numb er: stamp edon left-ha nd side of engine on crankcase.
Coolant, b rake f lu id , oilsWhen topping up – coola nt,
– brake fluid, – transmission fluid
we recom mend that you consult yourVauxhall Aut horised Repaire r, who can
adv ise you on th e correct pro ducts to use.
Caution: Use of unsuita ble fluids can cause
serious damage t o th e vehicle.
8/3/2019 Agila Owners Manual Jul06
http://slidepdf.com/reader/full/agila-owners-manual-jul06 150/168
Picture no: 14072h.tifVehicle identification dataThe vehicle ident ification numb er isstamped on t he identification plat e and in
the engine com partment.
Engine o ils
Informa tion on engine oils is availab le inthe Service Booklet .
146 Tec hnic al D at a
Engine dat a
Sales designatio nEng ine code
1.0 TWINPORTZ 10 XEP
1.2 TWINPORTZ 12 XEP
Numb er of cylinders 3 4
Piston displacement (cm3) 998 1229
Max . engine outp ut (kW)at rpm
445600
595600
Torque (Nm ) 88 110
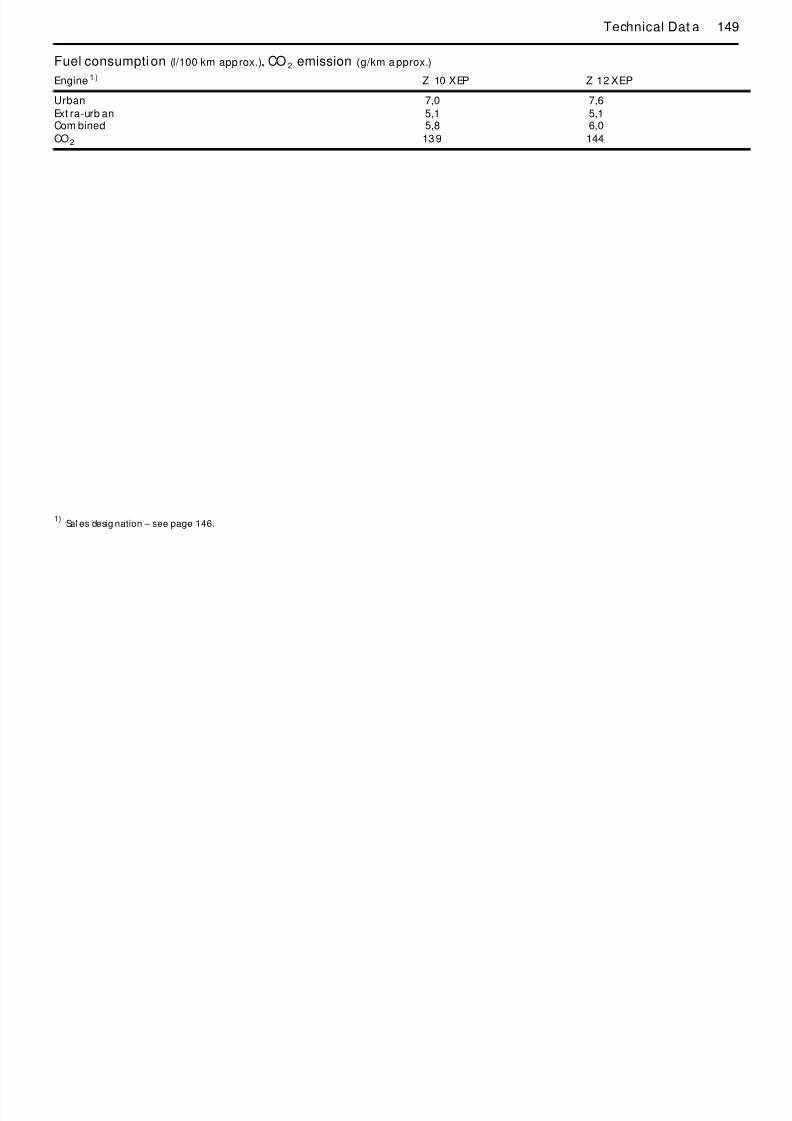
8/3/2019 Agila Owners Manual Jul06
http://slidepdf.com/reader/full/agila-owners-manual-jul06 151/168
Torque (Nm )at rpm
883800
1104000
Fuel type Petrol Petrol
Octane requirement (RON)1)
unleadedor unleaded
or unleaded
1) Stan da rd hig h-qu alit y fuels, e.g. unlead ed DIN EN 228, Diesel DIN EN 590;N = Normal (Reg ular ), S = Sup er (Premium ), SP = Sup er Plus (Premium Plus),va lu e prin ted in bold : recommended fu el.
95 (S)2)
98 (SP)2)
91 (N)2)3)
–
2) Kn ock cont rol system aut omatically ad justs ig niti on timing a ccording to type of f uel used (octane nu mber).3) Slight reducti on in engine p ower and t orque if 91 RON is used.
95 (S)2)
98 (SP)2)
91 (N)2)3)
–
Max. permissible engine speed,
continuous (rpm) ap prox. 6250 6200
Oil consumption (l/1000 km) 0.6 0.6
147Technical Dat a
Performance(approx. km/h)
Engine 1) Z 10 XEP Z 12 XEP
Maximum speed (mph ) 2) 90 100

8/3/2019 Agila Owners Manual Jul06
http://slidepdf.com/reader/full/agila-owners-manual-jul06 152/168
1)Sal es desig nation – see page 146.
2) The maximum speed is a ch ieva ble with a maximum of half p ayload. Opt ional equipment m ay reduce the specified maximum speed of the vehicle.
148 Tec hnic al D at a
Fuel consumpti on,CO2 emissionDirective 80/1268/EEC (last c hanged by
1999/100/EC) has ap plied for t hemeasurement o f f uel consumpt ion since
1996.
The d irective is oriented t o actual dr iving
pract ices: urban driving is ra ted at app rox.1 /
3and off -road driving with ap prox. 2 /
3
(urban a nd extra-urban consumption).Cold star ts and a ccelerat ion phases are
also ta ken into considera tion.
The specification of CO2
emission is also a
constituent of the directive.
The figures given m ust not b e taken as a
guarant ee f or the actual fuel consumptionof a p art icular vehicle.
All values are ba sed on the EU base mode lwith standard equ ipment.
The calculat ion of f uel consumption asspecified by directive 1 999/100/EC takes
account o f t he vehicle’ s kerb weight,ascerta ined in accordan ce with the said
regula tion. Optiona l ext ras may result inslightly higher fuel consumpt ion and CO
2

8/3/2019 Agila Owners Manual Jul06
http://slidepdf.com/reader/full/agila-owners-manual-jul06 153/168
slightly higher fuel consumpt ion and CO2
emission levels than those quoted.
Saving fuel, p rotecting t he environm ent -
see page 84.
149Technical Dat a
Fuel consumpti on (l/100 km approx.), CO 2 emission (g/km a pprox.)
Engine 1) Z 10 XEP Z 12 XEP
Urban
Ext ra-urb anCom bined
CO2
7,0
5,15,8
139
7,6
5,16,0
144

8/3/2019 Agila Owners Manual Jul06
http://slidepdf.com/reader/full/agila-owners-manual-jul06 154/168
1)
150 Tec hnic al D at a
Weig hts, payload a nd roof loadPayload is the dif ference bet ween thepermissible gross vehicle weight (see
identificat ion plat e) and t he EC kerbweight.
To calculate the kerb weight, enter th edat a for your vehicle below:
z Kerb weight f romTa ble 1,
page 151 + .............. kgW i h f h
The combined tot al of f ront a nd rear ax le
loa ds must not exceed the perm issiblegross vehicle weight . For exa mple, if t he
front ax le is bearing it s m aximumpermissib le load , t he rear axle can only
bear a load that is eq ua l to the grossvehicle weig ht m inus the fron t axle load .
When a t railer/caravan has been coupledand t he towing v ehicle is fully lad en
(including occupant s), t he p ermissible rear
axle load (see identificat ion plate forifi t i ) b d d b 15 k
Roof loa d
The permissible roof loa d is 35 kg. The roofload consists of the weight o f t he roof rack
plus the load carried.
The height of t he loa d – measured from th e
roof rail – m ust no t exceed 50 cm.
Driving hints – see page 82.
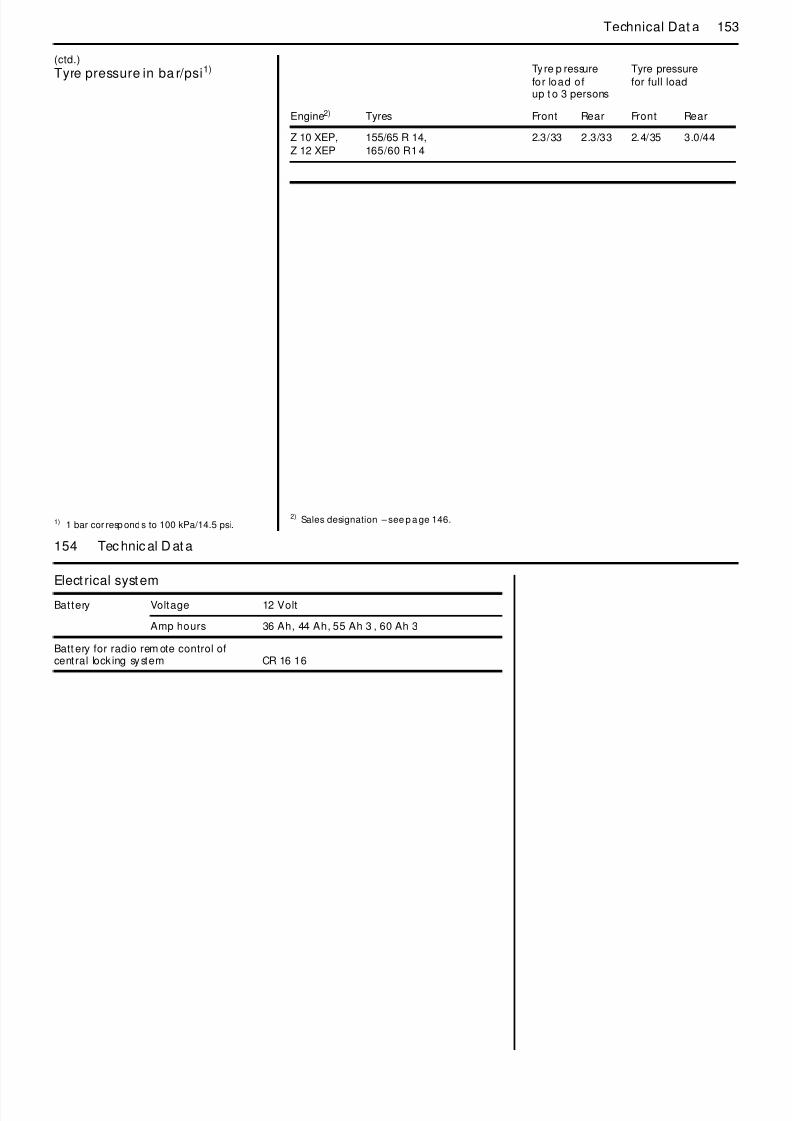
8/3/2019 Agila Owners Manual Jul06
http://slidepdf.com/reader/full/agila-owners-manual-jul06 155/168
p g gz Weight of heavy
accessories from Table 2,page 151 + .............. kg
The to ta l = .............. kg
is the EC kerb w eight .
Opt ional equ ipment and accessoriesincrease the kerb weight, which means that
the p ayload will a lso change slig htly.
Note the weight s given in t he vehicledocuments and the identification p late.
( pspecificat ion) may be exceeded b y 15 kgand the permissible gross vehicle weight
may b e exceeded by 27 kg. If thepermissib le rear a xle load is exceeded , a
maximum speed of 50 mph applies. Ifnational regulat ions specify a lower
maximum speed when towing, t his must beobserved.
See the identif ication p late or v ehicledocuments for permissib le ax le loads.
151Technical Dat a
Weights (kg): Table 1,Kerb weight 1)
Model Engine2)
Agil a Exp ression Z 10 XEP 1040
Z 12 XEP 1055
Agila
with air con.
Z 10 XEP 1052
Z 12 XEP 1067
Weights (kg): Table 2,Heavy a ccessories
Agila
Sun roof 15
Roof rail 12
Electron ic power steering (EPS) 5

8/3/2019 Agila Owners Manual Jul06
http://slidepdf.com/reader/full/agila-owners-manual-jul06 156/168
1) According to EC Directive 70/1 56/EC, in cluding assumed weigh ts for dr iver (68 kg), lugg age (7kg ) and a ll fluids (tank 90% f ull).
2) Sal es desig nation see page 146
Agil a Desig n Z 10 XEP 1105
Z 12 XEP 1120
Agil a Desig n
with air con.Z 10 XEP 1117
Z 12 XEP 1132
152 Tec hnic al D at a
TyresRestricti onsNot a ll t yres ava ila ble on the market
currently meet t he structural requirements.We recommend tha t you consult a
Vauxhall Au thorised Repairer concerningsuitab le tyre makes.
These tyres have undergone special teststo establish their reliab ility , safety and
specific suitab ility fo r V auxhall vehicles.
Despite continuous market mon itor ing, web l h ib f
Winter ty res 3 If you use winter t yres, the spa re wheel maystill be fit ted with a summer tyre. If you use
the spare w heel t he vehicle’s handling maybe a ltered. Ob ta in a rep la cement f or the
faulty tyre as soon a s possible, and ha vethe wheel balanced and fitt ed to t he
vehicle.
Further info rm ation – see page 100.
Tyre chains 3
Tyre pressure in ba r/psi2) The specified ty re pressures are valid forcold tyres. Increased t yre pressure resultin g
from extensive driving must not b ereduced. The specified pressures apply to
bot h summer and winter tyres.
Alway s inflat e the spare wheel to the tyre
pressure fo r fu ll load - see tab le onfollowing page.
Further informat ion – see pages 96 to 100.

8/3/2019 Agila Owners Manual Jul06
http://slidepdf.com/reader/full/agila-owners-manual-jul06 157/168
are unab le to assess these at tribu tes foroth er t yres, even if th ey hav e been g ra nted
approva l by the relevant au thorities or insom e other form.
Further informat ion – see pa ge 96.
yTyre chains may be used on the fro ntwheels only.
Only Vauxhall t yre chains,catalogueno. 47 05 448, may be used.
They should be fitted to th e front wheelsonly.
Further info rm ation – see page 100.
WheelsWheel bolt tight ening to rque: 110 N m.
On vehicles with alloy wheels 3 the sparewheel may ha ve a ste el rim .
The spare wheel may hav e a sm aller tyreand a smaller rim1): using the sp are wheel
may cause diff erent d riving behav iour.Replace defect ive ty re as soon as possible,
balance wheel and have it f itted to th evehicle.
1) Country-specific version: The spare wheel is 2) 1 bar corresp on ds to 100 kPa/14.5 psi.
153Technical Dat a
(ctd.)
Tyre pressure in ba r/psi1) Tyre p ressure
for load ofup t o 3 persons
Tyre pressure
for full load
Engine2) Tyres Front Rear Front Rear
Z 10 XEP,
Z 12 XEP
155/65 R 14,
165/60 R1 4
2.3/33 2.3/33 2.4/35 3.0/44
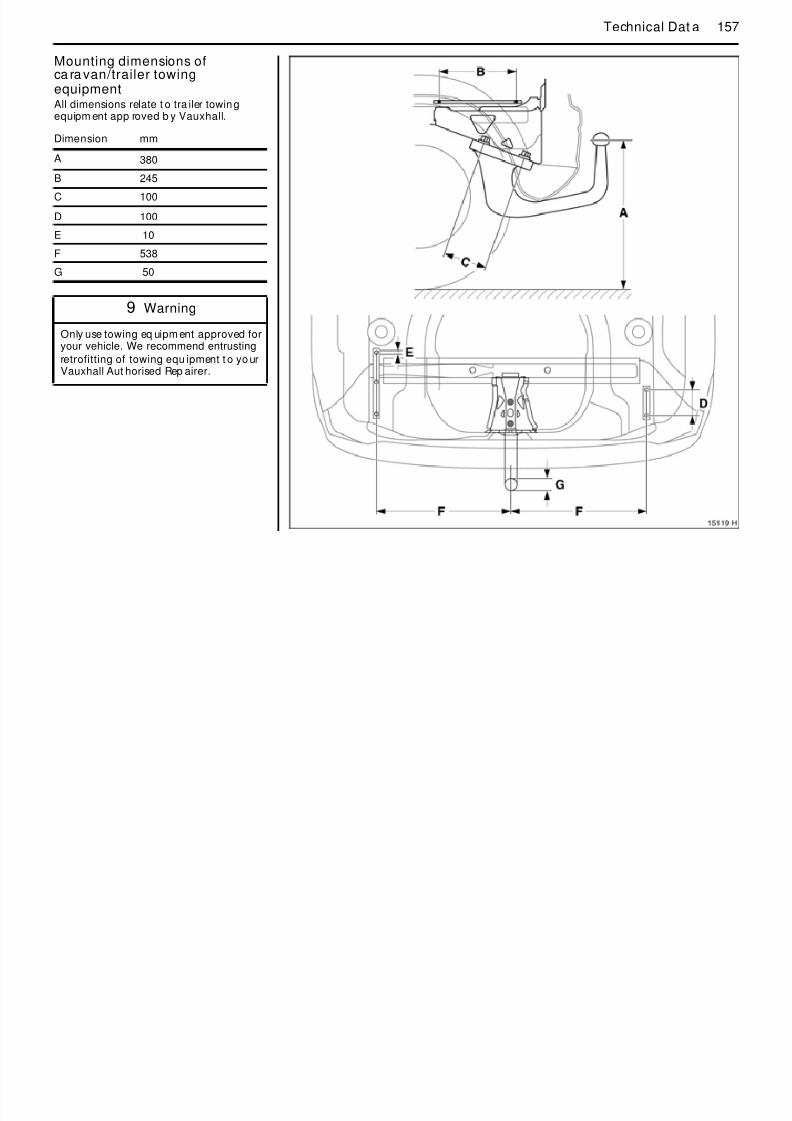
8/3/2019 Agila Owners Manual Jul06
http://slidepdf.com/reader/full/agila-owners-manual-jul06 158/168
2) Sales designation see p a ge 146
154 Tec hnic al D at a
Elect rical system
Battery Voltage 12 Volt
Amp hours 36 Ah, 44 Ah, 55 Ah 3 , 60 Ah 3
Batt ery for radio rem ote control ofcentral lock ing system CR 16 16
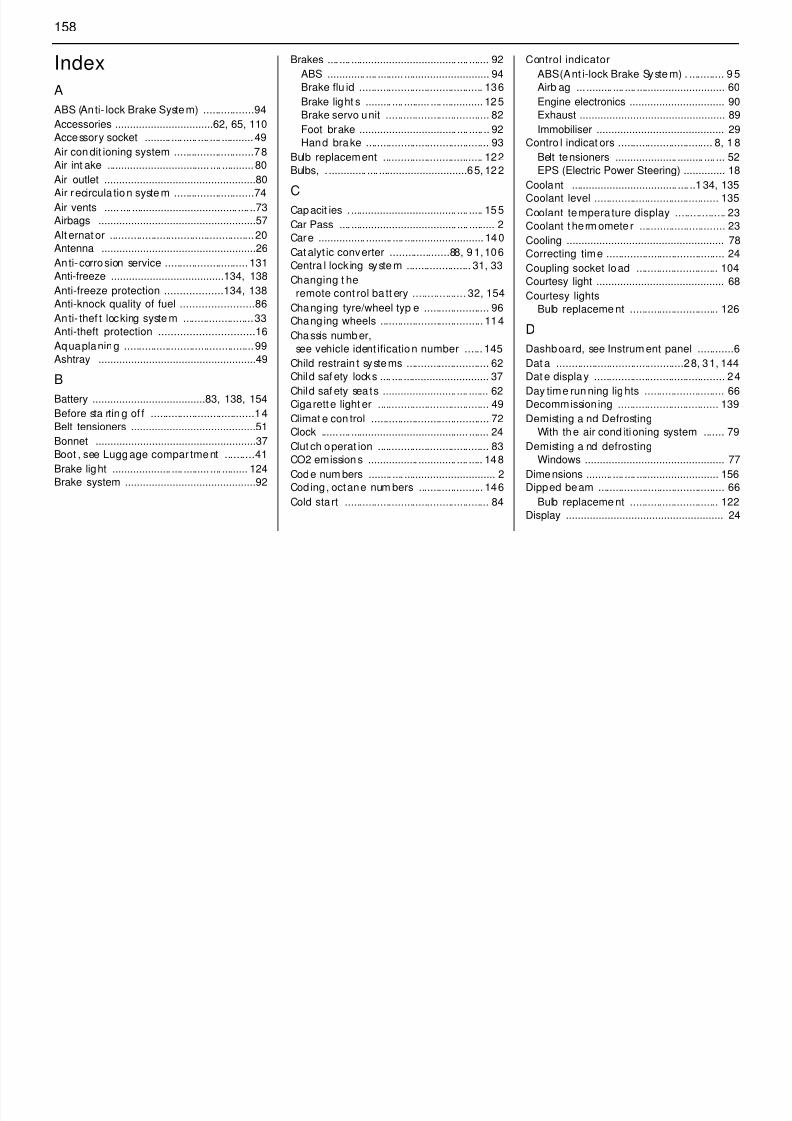
8/3/2019 Agila Owners Manual Jul06
http://slidepdf.com/reader/full/agila-owners-manual-jul06 159/168
155Technical Dat a
Capacities(a pprox. litre)
Engine1) Z 10 XEP Z 12 XEP
Fuel tank (nom inal content) 41 41
Engine oil with filt er chang e
between MIN and MAXon dipstick
3.0
1.0
3.5
1.0
Windscreen washer reservoir 2.2 2.2

8/3/2019 Agila Owners Manual Jul06
http://slidepdf.com/reader/full/agila-owners-manual-jul06 160/168
1)
156 Tec hnic al D at a
Dimensions(mm)
Agila
Overall lengt h 3540
Overall w id th 1625
Width with two ext erior mirrors 1940
Overall heigh t 1660
Height with roof rail 1695

8/3/2019 Agila Owners Manual Jul06
http://slidepdf.com/reader/full/agila-owners-manual-jul06 161/168
Lug gage compartment length at f loor 580 1) /10652)
1) To rear seat bac krest.2) Wit h folded rear seat b ackrest.
Lug gage compartment widthmaximum
between wheel housing
1364
1115
Height of lugg age compartment opening 935
Wheelba se 2360
Turning c ircle diam eter, wall to wall3)
3)
10.60
157Technical Dat a
Mounting dimensions ofca ra van/trailer towingequipmentAll dimensions relate t o tra iler towingequipm ent app roved b y Vauxhall.
Dimension mm
A 380
B 245
C 100
8/3/2019 Agila Owners Manual Jul06
http://slidepdf.com/reader/full/agila-owners-manual-jul06 162/168
D 100
E 10
F 538
G 50
9 Warning
Only use towing eq uipm ent approved foryour vehicle. We recommend entrusting
retrofitting of towing equ ipment t o yo urVauxhall Aut horised Rep airer.
158
Index
A
ABS (Anti- lock Brake System) .................94
Accessories .................................62, 65, 110
Accessory socket ......... .... ..... .... .... ........... 49
Air con dit ioning system ...........................78
Air int ake ................................... .... ........... 80
Air outlet ...................................................80
Air recircula tion syste m ...........................74Air vents ..... .... .................................... .... ..73
Brakes .... .... .................................... .... ....... 92
ABS ............. .... ......... ............................. 94
Brake flu id .......................................... 136
Brake light s ......... .... ......... .... .............. 125
Brake servo unit ................................... 82
Foot brake ................................. .... ..... .. 92
Hand brake .......................................... 93
Bulb replacement .................................. 122
Bulbs, . ............. .... ..............................65, 122
CCapacit ies 155
Control indicator
ABS (Ant i-lock Brake Syste m) . ............ 9 5
Airb ag ... ......... .... .... .............................. 60
Engine electronics ................................ 90
Exhaust ................................................. 89
Immobiliser ........................................... 29
Contro l indicat ors ................................ 8, 1 8
Belt tensioners ..................... ......... .... ... 52
EPS (Electric Power Steering) .............. 18
Coolant .................................... .... ..134, 135
Coolant level .......................................... 135
Coolant tempera ture display 23

8/3/2019 Agila Owners Manual Jul06
http://slidepdf.com/reader/full/agila-owners-manual-jul06 163/168
Airbags .....................................................57
Alt ernat or .................................................20
Antenna ....................................................26
Anti-corrosion service ............................ 131
Anti-freeze ......................................134, 138
Anti-freeze protection ...................134, 138
Anti-knock quality of fuel ........................86
Anti- thef t locking syste m ........................33
Anti-theft protection ...............................16Aquaplaning ............................................99
Ashtray .....................................................49
B
Battery ......................................83, 138, 154
Before sta rtin g of f ...................................14
Belt tensioners ..........................................51
Bonnet ......................................................37
Boot , see Lugg age compar tment ..........41
Brake light .................... .... ......... .... ......... 124Brake system ............................................92
Capacit ies . .................................... .... ..... 155
Car Pass .... .................................... .... ......... 2
Care ................ ......... .... ........................... 140
Cat alyt ic converter ....................88, 9 1, 106
Centra l lock ing syste m ...................... 31, 33
Changing t he
remote cont rol ba tt ery .................. 32, 154
Changing tyre/wheel typ e ...................... 96
Changing wheels ................................... 114
Chassis number,see vehicle ident ification number ...... 145
Child restrain t systems ............................ 62
Child saf ety locks .... .... ............................. 37
Child saf ety sea ts ......................... .... ....... 62
Cigarette light er ...................................... 49
Climat e con trol ........................................ 72
Clock ...... .... ........................................ ....... 24
Clut ch operat ion ...................................... 83
CO2 emission s ................. ............. .... ..... 148
Code num bers ........ .... ............................... 2
Coding, octane num bers ...................... 146
Cold start ................................................. 84
Coolant tempera ture display ................. 23
Coolant t herm omete r ............................. 23
Cooling ..................................................... 78
Correcting time ........................................ 24
Coupling socket load ............................ 104
Courtesy light ........................................... 68
Courtesy lights
Bulb replaceme nt .............................. 126
DDashboard, see Instrum ent panel ............6
Dat a ...........................................28, 31, 144
Dat e display ............................................ 24
Day time run ning lights ........................... 66
Decommission ing .................................. 139
Demisting a nd Defrosting
With the air cond itioning system ....... 79
Demisting a nd defrosting
Windows ............................................... 77
Dimensions ......... .... .... ............................ 156
Dipped beam ........................................... 66
Bulb replaceme nt .............................. 122
Display ..................................................... 24
159
Door locks ...............................2, 33, 37, 143
Driving ab roa d .................. 68, 86, 128, 129
Driving hints .............................................82
E
Economical driving ............................ 83, 84
Elect ric power ste ering ...................... 18, 82
Elect rical system ................... 118, 139, 154
Elect ronic compo nents .......................... 139
Elect ronic immob iliser .. ............................29
Eng ine code ................. ......... .... .... ......... 146Engine control indicato r .......................... 90
F
Fan ............................................72, 131, 132
Filling station
Bulb replacem ent .............................. 122
Capacit ies .......................................... 155
Engin e oil level ................................... 132
Fuel ............................... ............. ... 86 , 146
Ignit ion key ............................................. 2
Opening the bonnet ............................ 37
Tyre pressure .. .................................... 152Vehicle data ....................................... 144
G
Gears ........................................................ 14
Genera to r, see Alt ernator ....................... 20
Genuine Vauxhall
Parts and A ccessories ..................... 17, 65
Glove compartmen t ................................ 47
Gross vehicle weight ............................. 150
H
Halogen headligh t system ................... 122Hand bra ke .................................. 15, 16, 93

8/3/2019 Agila Owners Manual Jul06
http://slidepdf.com/reader/full/agila-owners-manual-jul06 164/168
Engine control indicato r .......................... 90
Eng ine oil ................. ............................... 132
Engine oil change .................................. 133
Engine o il consumptio n .................13 2, 146
Engine oil filter ....................................... 133
Eng ine oi l level ............. ......... .... .... ...18, 132
Engine oil pressure ...................................21
Eng ine sp eed ........... ........................... 82, 83
Eng ine wash ............ ............................... 143
Env iron menta l pro tection .............13 3, 140EPS ..... .................................... .... .... ...........18
Exhaust cont rol ind icator ........................89
Exhaust ga ses .................................... .... ..90
Exhaust system ........................................90
Exterior mirrors .....................................5, 65
Vehicle data ....................................... 144
Wind screen wa sh system (fill ing) ..... 137
First-a id kit (cushion) .. ..................... 65, 110
Flat ty re . .... .................................... .... ..... 114
Fluid conta iner
Wind screen wa sh system .................. 137
Fog light s ................................. ................ 67
Fog ta il light
Bulb replacem ent .............................. 124
Fog ta il lights . .... .................................... ..67Foot bra ke ................................................ 92
Fron t passenger a irba g .. ........................ 57
Fuel ................. .... ......... ..................... 86 , 146
Fuel consumpt ion ................83, 84, 86, 148
Fuel filter .......................... .... ......... .... ..... 134
Fuel level ........ ......... .... ............................. 23
Fuses .............................. 118, 120, 121, 122
, ,
Haz ard warning light s ............................ 11
Head restrain ts ........................................ 39
Headlight fla sh ........................................ 10
Headligh t range ad justment ............ 66, 67
Headlight switch ............................... 10, 66
Hea dligh ts ......... .... .... .............................. 10
Dayt ime running ligh ts ........................ 66
Driving abro ad .................................... 68
Fog lights ............................................. 67Reversing lig hts .. ......... .... ..................... 67
Wa rning device .................................... 15
Headlights
Chan ging bu lbs ................................. 122
Heated rear w indow ......................... 13, 74
Hea t ing .................................... .... 72, 76, 77
with the air condition ing system ........ 79
Heatin g the foot well .............................. 77
Height adjustm ent
Sea t belts ............................. .... ............ 54High-pressure cleaners ......................... 143
Horn .......................................................... 11
160
I
Ident ifica tio n plate ................................ 144
Ignition system ...................... 131, 138, 139
Imm ob iliser . .... .................................... .... ..29
Information display .................................24
Info ta inment system ................................24
Inspect ion system ........ ......... .... .... ......... 130
Instrumen t illum inat ion
Bulb repla ceme nt ............................... 127
Instrumen t panel ....................................... 6Instruments ..............................................18
L
Lashing eyes ................................. .... ..... .. 42
Leather t rim ........................................... 142
Light switch ........................................10, 66
Light ing ......................................10, 66, 122
Driving a broad ..................................... 68
Loading ....................................85, 103, 150
Loading the vehicle ............................... 150
Locking d oors ..............................28 , 30, 31
Locking from the inside .......................... 30Locks ................................. ............. .... ..... 143
M
Main b eam ......................................... 10, 66
Bulb replaceme nt .............................. 122
Control indica tor .... ......... ..................... 18
Main tenance .......................................... 130
Air cond itio ning system ...................... 81
Anti-freeze protection ...............134, 138
Brake fluid ................... ......... .... .......... 136
Brakes ................................................... 92
Catalytic converter .............................. 91Eng ine oil ........ .... .... ............................ 132

8/3/2019 Agila Owners Manual Jul06
http://slidepdf.com/reader/full/agila-owners-manual-jul06 165/168
Interior mirro r .......................................4, 65
ISOFIX ..... .... .... .................................... .... ..62
J
Jac k ...................... ......... .... ..... 113, 114, 116
Jump leads ................... .... ...................... 106
K
Key
Ignition lock .............. .... ....................5, 29
Locking d oors ...... ...............28, 29, 31, 33
Remove .................................................16
Sta rt ing t he engine .......................... 5, 15
Key numbers ................................. ............. 2
Keys ........ .... .... .................................... .... .... 2
Luggag e compa rtment
Cover . .... .................................... .... ....... 43
Extension ............. .... ............................. 41
Lashing eyes ............................. ......... .. 42
Loading .............................................. 103
Locking ........................................... 30, 36
Luggag e comp artment cover ................ 43
g
Fuel consumption ................................ 85
Tyre pressure ..... .... .............................. 97
Tyres ..................................................... 98
Windscreen wipe rs ............................ 137
Manual t ran smission ............................... 14
Mirrors ............................. ......... .... ........ 4, 65
Misted windows ....................................... 77
Mobile t elephone .................................... 26
N
N umber pla te light ............................ 31, 37
N um ber plate lights
Bulb replaceme nt .............................. 126
N um ber plate light ing ..............31, 37, 126
161
O
Octane numbers ..............................86, 146
Odometer .................................................22
Oil change ............................. ............. .... 133
Oil consumption .............................132, 146
Oil f ilte r change ..................................... 133
Oil level .................................. .... ......... .... 132
Oil pressure ..............................................21
Oils ..........................................................145
Operating temperature ...........................83Outside temperature ga uge ...................25
R
Radio ........................................................26
Radio eq uipment (CB) ............................. 26
Radio rem ote cont rol .............................. 31
Rear light cluster ................................ 10, 66
Bulb replacem ent .............................. 124
Rear window wa sh system .............. 12, 137
Rear w indow wiper .................................. 12
Refuelling ................................. ................ 87
Fuel filler ca p ........................................ 87Replace ment keys ................................. .. 28
Sid e airba gs ...................................... ....... 59Sig nal system ..... .... .... ........................ 10, 11
Silencer, see Exhaust system .................. 90
Spare keys . .... .................................... ....... 28
Spare w heel .......................................... . 111
Speed ................. .... .... ........................ 84, 85
Fuel consumpt ion .......................... 84, 85
Speedometer ........................................... 22
Starter switch ........................... .... ......... .... ..5
Sta rtin g the engine ...............5, 15, 29, 106
Self-he lp ............................................. 106
Steam-jet cleaners ................................ 143

8/3/2019 Agila Owners Manual Jul06
http://slidepdf.com/reader/full/agila-owners-manual-jul06 166/168
p g g
Overrun ... .... .... .................................... 83, 85
P
Paintwork dama ge . ............................... 141
Parking .....................................................16
Parking lights ..................................... 10, 66
Bulb repla ceme nt ............................... 123
Parking the vehicle ..................................16
Parts ..........................................................17Peda ls ..... .... .... .................................... .... ..83
Performance ................. .... ......... .... ......... 147
Petrol ................................................86, 146
Pinking ........................................... ........... 86
Pollen filter ...............................................80
Power assisted steering, see Electric power
steer ing . ............. .... ......... ..................18, 82
Protection against
unaut horized use ...................2, 5, 29, 37
Pushing, t owing ..................................... 106
p y
Reversing lights ............................. ......... .. 67
Bulb replacem ent .............................. 124
Roof load .................................... 82, 85, 150
Roof rack ................. .... ........................... 102
Roof rac ks ............... .... ......... .... ..82, 85 , 102
Rucksack .................................. ................ 46
Runnin g- in . .................................... .... ....... 82
Brakes .... .................................... .... ....... 92
S
Saf ety ............. ......... .... ............................. 50
Saf ety accessories ..................... 62, 65, 110
Saf ety net ....... ......... .... ............................. 43
Savin g energy ............................... .....83, 84
Sea t belts .. .................................... .... ... 5, 51
Seat height ad justment ............................ 4
Sea ts ............... ......... .... ......................... 5, 39
Self-dia gnost ics ................................. 60, 95
Self-help ........................... ............. .... ..... 106Radio remote contro l .......................... 32
Service interval disp lay ......................... 130
Service work ... ......... .... ............................. 16
Steam jet cleaners ................................ 143
Steering colu mn lock ........................... 5, 16
Storag e box .......................................... ... 45
Sun roof .................................................... 71
Sun shade . .... ......... .... .............................. 71
Sun v isors .. ......... .... .... ..... .... ..................... 48
T
Tachometer ............................................. 22
Tail lights .................................................. 66Bulb replaceme nt .............................. 124
Tailga te .............................................. 30, 35
Tank
Fuel gauge ........................................... 23
Technical dat a ...................................... 144
Telephone, see Mobile telephone .......... 26
Temporary spare wheel ........................101
The first 6 00 miles / 1000 km .. ................ 82
Tight ening torq ue . ................................ 117
Tools . .... ........................................ .......... 111Towing ...........................................10 8, 109
Towing equipment ................................ 103
Towing eye .................................... 108, 109
162
Trailer/caravan towin g .......................... 102Transmission ............................. .... ........... 14
Tray ...............................................45, 46, 47
Tread dep th .............................................98
Trip odometer ..........................................22
Triple information display .......................24
Turn sign al light s .... .................................1 1
Turn signals
Bulb repla ceme nt ............................... 124
Tyre chains .....................................100, 152
Tyre condition ..........................................98
Tyre pressure ..............................82, 97, 152
W
Warn ing b uzzers ..................................... 15
Warn ing tr iang le, .................................... 65
Weigh ts . .... .................................... .... ..... 150
Wheels ................................................96, 98
Wheels, tyres ................................. .... ..... .. 96
Windows .............................................69, 70
Demisting and defrosting .............77, 79
Windscreen wash system ........................ 12
Anti-freeze protection .......................138Capacit ies .......................................... 155

8/3/2019 Agila Owners Manual Jul06
http://slidepdf.com/reader/full/agila-owners-manual-jul06 167/168
y p , ,
U
Underbody wash ................................... 143
Unlead ed fue l ..................................86, 146
Used oil ... .... .... .................................... .... 133
V
Vauxhall Service . .... ..... .... ................16, 128
Vehicle care .... ......... ............................... 140Vehicle decomm issioning ...................... 139
Vehicle ident ifica tion numbe r ............... 144
Vehicle keys, see Keys . ......... .... .... ...........28
Vehicle recommission ing ....................... 139
Vehicle tools ................. .... ......... .... ......... 111
Vent ilat ion .......................................... 72, 76
wash bo tt le ........................................ 137
Windscreen wipers .. ......................... 12, 137
Winter op erat ion
Bat te ry ................. .... ............................. 83
Coolant , a nti-f reeze .......................... 134
Fuel consum pt ion ................................ 85
Heatin g ................................................. 72
Locks ..................................... .............. 143
Tyre cha ins . .... ......... ...................100, 152Window demisting and defrosting ..... 77
Wind screen wa sh system,
antif reeze p rot ection ......................... 138
Winter tyres ....................................100, 152

8/3/2019 Agila Owners Manual Jul06
http://slidepdf.com/reader/full/agila-owners-manual-jul06 168/168