Embed Size (px)
Citation preview
ADP Self Service Manager’s Guide
ADP Copyright InformationCopyright 1993–2010 by ADP, Inc.Portions copyright 1988–1998 PeopleSoft, Inc.
Third-Party Copyright InformationFor copyright information about the third-party software used in ADP’s HR/payroll solutions, click Copyright Information.
This manual supports ADP Self Service October 2010 Release and ADP Enterprise HR Version V4D (4.2005.2), V4.04 and higher, V5.0 and higher, as well as ADP HR Anytime Version 5.01 and higher. Published October 2010.
All rights reserved. The information contained in this document is proprietary and confidential to ADP. No part of this document may be reproduced or transmitted in any form or by any means, mechanical or electronic, including photography and recording, for any purpose without the express written permission of ADP.
The core software technology for ADP’s product offering has been acquired through a licensing agreement with PeopleSoft, Inc., Pleasanton, California. Portions of the following text have been copied by permission of PeopleSoft, Inc. Product specifications are subject to change without notice. No product warranty should be implied from this document.
ADP, the ADP Logo, Enterprise HR, and HR Anytime are registered trademarks of ADP of North America, Inc. Adobe is a registered trademark and Acrobat is a trademark of Adobe Systems Incorporated. Checks on Demand is a registered trademark of IPS of Boston. Lotus Notes is a registered trademark of Lotus Development Corporation. Intel is a registered trademark of Intel Corporation. Microsoft and Windows are registered trademarks and Internet Explorer is a trademark of
Microsoft Corporation. PeopleSoft is a registered trademark of PeopleSoft, Inc. JAVA is a registered trademark of Sun Microsystems, Inc. PCL is a registered trademark of Hewlett-Packard Company. SQR is a registered trademark of Hyperion Solutions Corporation.
Printed in the United States.
Contents
About This Guide
Introduction. . . . . . . . . . . . . . . . . . . . . . . . . . . . . . . . . . . . . . . . . . . . . . . . . . . . . . . . . . . . . . . . . . . . . . . . . .viiiAudience for This Guide . . . . . . . . . . . . . . . . . . . . . . . . . . . . . . . . . . . . . . . . . . . . . . . . . . . . . . . . . . . . . . .viiiWhat’s in This Book. . . . . . . . . . . . . . . . . . . . . . . . . . . . . . . . . . . . . . . . . . . . . . . . . . . . . . . . . . . . . . . . . . . .ixWhat’s New . . . . . . . . . . . . . . . . . . . . . . . . . . . . . . . . . . . . . . . . . . . . . . . . . . . . . . . . . . . . . . . . . . . . . . . . . . xRelated Documentation . . . . . . . . . . . . . . . . . . . . . . . . . . . . . . . . . . . . . . . . . . . . . . . . . . . . . . . . . . . . . . . . xiiDocumentation Conventions . . . . . . . . . . . . . . . . . . . . . . . . . . . . . . . . . . . . . . . . . . . . . . . . . . . . . . . . . . . .xiiiProviding Comments . . . . . . . . . . . . . . . . . . . . . . . . . . . . . . . . . . . . . . . . . . . . . . . . . . . . . . . . . . . . . . . . . . xv
1 Introducing Manager Self Service
Introduction. . . . . . . . . . . . . . . . . . . . . . . . . . . . . . . . . . . . . . . . . . . . . . . . . . . . . . . . . . . . . . . . . . . . . . . . . .1-2About the Self Service Manager Tasks . . . . . . . . . . . . . . . . . . . . . . . . . . . . . . . . . . . . . . . . . . . . . . . . . . . .1-3Using the Manager Direct Reports Page . . . . . . . . . . . . . . . . . . . . . . . . . . . . . . . . . . . . . . . . . . . . . . . . . . .1-7
Viewing Your Direct and Indirect Reports . . . . . . . . . . . . . . . . . . . . . . . . . . . . . . . . . . . . . . . . . . . . . .1-8Initiating Employee Events . . . . . . . . . . . . . . . . . . . . . . . . . . . . . . . . . . . . . . . . . . . . . . . . . . . . . . . . . .1-9
Using the Online Help . . . . . . . . . . . . . . . . . . . . . . . . . . . . . . . . . . . . . . . . . . . . . . . . . . . . . . . . . . . . . . . .1-12Touring Self Service . . . . . . . . . . . . . . . . . . . . . . . . . . . . . . . . . . . . . . . . . . . . . . . . . . . . . . . . . . . . . . . . . .1-14Registering for Self Service . . . . . . . . . . . . . . . . . . . . . . . . . . . . . . . . . . . . . . . . . . . . . . . . . . . . . . . . . . . .1-15Logging In to Self Service . . . . . . . . . . . . . . . . . . . . . . . . . . . . . . . . . . . . . . . . . . . . . . . . . . . . . . . . . . . . .1-21Managing Your Self Service Account . . . . . . . . . . . . . . . . . . . . . . . . . . . . . . . . . . . . . . . . . . . . . . . . . . . .1-22
2 Managing Approval Tasks and Notifications
Introduction . . . . . . . . . . . . . . . . . . . . . . . . . . . . . . . . . . . . . . . . . . . . . . . . . . . . . . . . . . . . . . . . . . . . . . . . .2-2Viewing Approvals and Notifications . . . . . . . . . . . . . . . . . . . . . . . . . . . . . . . . . . . . . . . . . . . . . . . . . . . . .2-3
Viewing Approval Tasks . . . . . . . . . . . . . . . . . . . . . . . . . . . . . . . . . . . . . . . . . . . . . . . . . . . . . . . . . . .2-3Viewing Notifications . . . . . . . . . . . . . . . . . . . . . . . . . . . . . . . . . . . . . . . . . . . . . . . . . . . . . . . . . . . . . .2-6Using Search Criteria to Filter Results . . . . . . . . . . . . . . . . . . . . . . . . . . . . . . . . . . . . . . . . . . . . . . . . .2-8
Managing Merit Compensation Approval Tasks . . . . . . . . . . . . . . . . . . . . . . . . . . . . . . . . . . . . . . . . . . . .2-10Viewing and Printing Merit Compensation Approval Worksheets . . . . . . . . . . . . . . . . . . . . . . . . . .2-10Processing Merit Compensation Approval Tasks . . . . . . . . . . . . . . . . . . . . . . . . . . . . . . . . . . . . . . . .2-13
Managing Bonus Compensation Approval Tasks . . . . . . . . . . . . . . . . . . . . . . . . . . . . . . . . . . . . . . . . . . .2-14Viewing and Printing Bonus Compensation Approval Worksheets . . . . . . . . . . . . . . . . . . . . . . . . . .2-15Processing Bonus Compensation Approval Tasks . . . . . . . . . . . . . . . . . . . . . . . . . . . . . . . . . . . . . . .2-17
Managing Performance Review Approval Tasks . . . . . . . . . . . . . . . . . . . . . . . . . . . . . . . . . . . . . . . . . . . .2-18Viewing and Printing Performance Approval Worksheets. . . . . . . . . . . . . . . . . . . . . . . . . . . . . . . . .2-19Processing Performance Review Approval Tasks . . . . . . . . . . . . . . . . . . . . . . . . . . . . . . . . . . . . . . .2-20
Processing Job Action Approval Tasks . . . . . . . . . . . . . . . . . . . . . . . . . . . . . . . . . . . . . . . . . . . . . . . . . . .2-22Managing Manager Event Tasks . . . . . . . . . . . . . . . . . . . . . . . . . . . . . . . . . . . . . . . . . . . . . . . . . . . . . . . .2-24Managing Employee Tasks. . . . . . . . . . . . . . . . . . . . . . . . . . . . . . . . . . . . . . . . . . . . . . . . . . . . . . . . . . . . .2-26
ContentsADP Self Service Manager’s Guide
iv Contents
Managing Proxy Assignments. . . . . . . . . . . . . . . . . . . . . . . . . . . . . . . . . . . . . . . . . . . . . . . . . . . . . . . . . . 2-28Viewing Proxy Assignments . . . . . . . . . . . . . . . . . . . . . . . . . . . . . . . . . . . . . . . . . . . . . . . . . . . . . . . 2-28Defining Proxy Assignments . . . . . . . . . . . . . . . . . . . . . . . . . . . . . . . . . . . . . . . . . . . . . . . . . . . . . . . 2-29Deleting a Proxy Assignment . . . . . . . . . . . . . . . . . . . . . . . . . . . . . . . . . . . . . . . . . . . . . . . . . . . . . . 2-32
3 Managing Approval History
Introduction . . . . . . . . . . . . . . . . . . . . . . . . . . . . . . . . . . . . . . . . . . . . . . . . . . . . . . . . . . . . . . . . . . . . . . . . 3-2Managing Approval History . . . . . . . . . . . . . . . . . . . . . . . . . . . . . . . . . . . . . . . . . . . . . . . . . . . . . . . . . . . . 3-3
Using Search Criteria to Filter Results . . . . . . . . . . . . . . . . . . . . . . . . . . . . . . . . . . . . . . . . . . . . . . . . 3-3Viewing Approval History. . . . . . . . . . . . . . . . . . . . . . . . . . . . . . . . . . . . . . . . . . . . . . . . . . . . . . . . . . 3-5Viewing Approval History Detail . . . . . . . . . . . . . . . . . . . . . . . . . . . . . . . . . . . . . . . . . . . . . . . . . . . . 3-7Deleting an Activity from Approval History. . . . . . . . . . . . . . . . . . . . . . . . . . . . . . . . . . . . . . . . . . . . 3-9Recalling an Event . . . . . . . . . . . . . . . . . . . . . . . . . . . . . . . . . . . . . . . . . . . . . . . . . . . . . . . . . . . . . . . 3-10
Viewing Employee Events Detail . . . . . . . . . . . . . . . . . . . . . . . . . . . . . . . . . . . . . . . . . . . . . . . . . . . . . . . 3-11Viewing and Printing Merit Compensation Event Detail . . . . . . . . . . . . . . . . . . . . . . . . . . . . . . . . . . . . . 3-14Viewing and Printing Bonus Compensation Event Detail . . . . . . . . . . . . . . . . . . . . . . . . . . . . . . . . . . . . 3-17Viewing and Printing Performance Event Detail . . . . . . . . . . . . . . . . . . . . . . . . . . . . . . . . . . . . . . . . . . . 3-20Viewing Job Action Detail . . . . . . . . . . . . . . . . . . . . . . . . . . . . . . . . . . . . . . . . . . . . . . . . . . . . . . . . . . . . 3-22Viewing Manager Event Detail . . . . . . . . . . . . . . . . . . . . . . . . . . . . . . . . . . . . . . . . . . . . . . . . . . . . . . . . . 3-24
4 Managing Compensation
Introduction . . . . . . . . . . . . . . . . . . . . . . . . . . . . . . . . . . . . . . . . . . . . . . . . . . . . . . . . . . . . . . . . . . . . . . . . . 4-2Completing Compensation Reviews . . . . . . . . . . . . . . . . . . . . . . . . . . . . . . . . . . . . . . . . . . . . . . . . . . . . . . 4-3
Completing Merit Compensation Worksheets. . . . . . . . . . . . . . . . . . . . . . . . . . . . . . . . . . . . . . . . . . . 4-4Completing Bonus Compensation Worksheets . . . . . . . . . . . . . . . . . . . . . . . . . . . . . . . . . . . . . . . . . 4-10Submitting Compensation Worksheets for Approval . . . . . . . . . . . . . . . . . . . . . . . . . . . . . . . . . . . . 4-14Viewing and Printing Compensation Planning Summary Information . . . . . . . . . . . . . . . . . . . . . . . 4-15
Viewing and Printing Compensation Planning Information . . . . . . . . . . . . . . . . . . . . . . . . . . . 4-16Viewing and Printing Consolidated Budget Information. . . . . . . . . . . . . . . . . . . . . . . . . . . . . . 4-19Viewing and Printing Compensation Worksheets . . . . . . . . . . . . . . . . . . . . . . . . . . . . . . . . . . . 4-20
Viewing and Printing Employee Compensation History . . . . . . . . . . . . . . . . . . . . . . . . . . . . . . . . . . . . . 4-22
5 Managing Performance Reviews
Introduction . . . . . . . . . . . . . . . . . . . . . . . . . . . . . . . . . . . . . . . . . . . . . . . . . . . . . . . . . . . . . . . . . . . . . . . . . 5-2Completing Performance Reviews . . . . . . . . . . . . . . . . . . . . . . . . . . . . . . . . . . . . . . . . . . . . . . . . . . . . . . . 5-3
Completing Performance Review Forms. . . . . . . . . . . . . . . . . . . . . . . . . . . . . . . . . . . . . . . . . . . . . . . 5-4Submitting Performance Worksheets for Approval. . . . . . . . . . . . . . . . . . . . . . . . . . . . . . . . . . . . . . 5-10Viewing and Printing Performance Information . . . . . . . . . . . . . . . . . . . . . . . . . . . . . . . . . . . . . . . . 5-11
Viewing and Printing Performance Worksheets . . . . . . . . . . . . . . . . . . . . . . . . . . . . . . . . . . . . 5-12Viewing and Printing Employee Performance Review Forms from Performance Planning. . . 5-14
Viewing and Printing Employee Performance History . . . . . . . . . . . . . . . . . . . . . . . . . . . . . . . . . . . . . . . 5-16Viewing and Printing Employee Performance Review Forms . . . . . . . . . . . . . . . . . . . . . . . . . . . . . . . . . 5-19Creating Performance Review Templates . . . . . . . . . . . . . . . . . . . . . . . . . . . . . . . . . . . . . . . . . . . . . . . . . 5-23
ContentsADP Self Service Manager’s Guide
Contents v
6 Managing Work Events
Introduction . . . . . . . . . . . . . . . . . . . . . . . . . . . . . . . . . . . . . . . . . . . . . . . . . . . . . . . . . . . . . . . . . . . . . . . . .6-2Search and Filtering Tips . . . . . . . . . . . . . . . . . . . . . . . . . . . . . . . . . . . . . . . . . . . . . . . . . . . . . . . . . . .6-3
Using Search Fields to Filter Results . . . . . . . . . . . . . . . . . . . . . . . . . . . . . . . . . . . . . . . . . . . . . .6-3Using the Searchable Drop-Down Fields . . . . . . . . . . . . . . . . . . . . . . . . . . . . . . . . . . . . . . . . . . .6-4
Managing Work Events . . . . . . . . . . . . . . . . . . . . . . . . . . . . . . . . . . . . . . . . . . . . . . . . . . . . . . . . . . . .6-5Updating Multiple Job Actions for a Single Employee . . . . . . . . . . . . . . . . . . . . . . . . . . . . . . . . . . . .6-6Updating Multiple Employees with a Single Job Action . . . . . . . . . . . . . . . . . . . . . . . . . . . . . . . . . .6-11
Viewing Employee Profiles . . . . . . . . . . . . . . . . . . . . . . . . . . . . . . . . . . . . . . . . . . . . . . . . . . . . . . . . . . . .6-15Viewing Employee Profiles from the Managing Work Events Page . . . . . . . . . . . . . . . . . . . . . . . . .6-16Viewing Employee Profiles from the Direct Reports Page . . . . . . . . . . . . . . . . . . . . . . . . . . . . . . . .6-18Viewing Employee Profiles from the Employee Selection Page . . . . . . . . . . . . . . . . . . . . . . . . . . . .6-20
Initiating the Hiring Process . . . . . . . . . . . . . . . . . . . . . . . . . . . . . . . . . . . . . . . . . . . . . . . . . . . . . . . . . . . .6-21Completing the Rehire Prompt Page. . . . . . . . . . . . . . . . . . . . . . . . . . . . . . . . . . . . . . . . . . . . . . . . . .6-23Completing the Rehire Start Page. . . . . . . . . . . . . . . . . . . . . . . . . . . . . . . . . . . . . . . . . . . . . . . . . . . .6-24Completing the New Hire Start Page . . . . . . . . . . . . . . . . . . . . . . . . . . . . . . . . . . . . . . . . . . . . . . . . .6-26Completing the Personal Data - Part A Page . . . . . . . . . . . . . . . . . . . . . . . . . . . . . . . . . . . . . . . . . . .6-28Completing the Personal Data - Part B Page . . . . . . . . . . . . . . . . . . . . . . . . . . . . . . . . . . . . . . . . . . .6-30Completing the Job Data - Part A Page . . . . . . . . . . . . . . . . . . . . . . . . . . . . . . . . . . . . . . . . . . . . . . .6-32Completing the Job Data - Part B Page . . . . . . . . . . . . . . . . . . . . . . . . . . . . . . . . . . . . . . . . . . . . . . .6-34Completing the Pay Information Page . . . . . . . . . . . . . . . . . . . . . . . . . . . . . . . . . . . . . . . . . . . . . . . .6-36Completing the Citizenship Page . . . . . . . . . . . . . . . . . . . . . . . . . . . . . . . . . . . . . . . . . . . . . . . . . . . .6-38Completing the Additional Hire Information Page. . . . . . . . . . . . . . . . . . . . . . . . . . . . . . . . . . . . . . .6-40Completing the Submit Page . . . . . . . . . . . . . . . . . . . . . . . . . . . . . . . . . . . . . . . . . . . . . . . . . . . . . . .6-42
Transferring Employees . . . . . . . . . . . . . . . . . . . . . . . . . . . . . . . . . . . . . . . . . . . . . . . . . . . . . . . . . . . . . . .6-44Transferring an Employee to a New Manager . . . . . . . . . . . . . . . . . . . . . . . . . . . . . . . . . . . . . . . . . .6-45Transferring an Employee to a New Department . . . . . . . . . . . . . . . . . . . . . . . . . . . . . . . . . . . . . . . .6-51Transferring an Employee to a New Location . . . . . . . . . . . . . . . . . . . . . . . . . . . . . . . . . . . . . . . . . .6-58
Changing an Employee’s Job Status . . . . . . . . . . . . . . . . . . . . . . . . . . . . . . . . . . . . . . . . . . . . . . . . . . . . .6-64Changing an Employee’s Job and Salary Information . . . . . . . . . . . . . . . . . . . . . . . . . . . . . . . . . . . . . . . .6-71
Promoting an Employee . . . . . . . . . . . . . . . . . . . . . . . . . . . . . . . . . . . . . . . . . . . . . . . . . . . . . . . . . . .6-72Demoting an Employee. . . . . . . . . . . . . . . . . . . . . . . . . . . . . . . . . . . . . . . . . . . . . . . . . . . . . . . . . . . .6-81Performing a Lateral Job Change . . . . . . . . . . . . . . . . . . . . . . . . . . . . . . . . . . . . . . . . . . . . . . . . . . . .6-89Changing an Employee’s Salary . . . . . . . . . . . . . . . . . . . . . . . . . . . . . . . . . . . . . . . . . . . . . . . . . . . . .6-96
Changing an Employee’s Employment Status . . . . . . . . . . . . . . . . . . . . . . . . . . . . . . . . . . . . . . . . . . . . .6-104Placing an Employee on Leave. . . . . . . . . . . . . . . . . . . . . . . . . . . . . . . . . . . . . . . . . . . . . . . . . . . . .6-105Returning an Employee from Leave . . . . . . . . . . . . . . . . . . . . . . . . . . . . . . . . . . . . . . . . . . . . . . . . .6-113Placing an Employee on Suspension . . . . . . . . . . . . . . . . . . . . . . . . . . . . . . . . . . . . . . . . . . . . . . . .6-120Returning an Employee from Suspension. . . . . . . . . . . . . . . . . . . . . . . . . . . . . . . . . . . . . . . . . . . . .6-128Terminating an Employee. . . . . . . . . . . . . . . . . . . . . . . . . . . . . . . . . . . . . . . . . . . . . . . . . . . . . . . . .6-134
Using the Comprehensive Employment Change . . . . . . . . . . . . . . . . . . . . . . . . . . . . . . . . . . . . . . . . . . .6-141Initiating a Comprehensive Employment Change for an Employee . . . . . . . . . . . . . . . . . . . . . . . .6-142Changing an Employee's Job Information . . . . . . . . . . . . . . . . . . . . . . . . . . . . . . . . . . . . . . . . . . . .6-144Changing an Employee's Employment Information . . . . . . . . . . . . . . . . . . . . . . . . . . . . . . . . . . . . .6-147Changing an Employee's Compensation Information. . . . . . . . . . . . . . . . . . . . . . . . . . . . . . . . . . . .6-150Changing an Employee's Payroll Information . . . . . . . . . . . . . . . . . . . . . . . . . . . . . . . . . . . . . . . . .6-153
ContentsADP Self Service Manager’s Guide
vi Contents
7 Managing Employee Career and Training Information
Introduction . . . . . . . . . . . . . . . . . . . . . . . . . . . . . . . . . . . . . . . . . . . . . . . . . . . . . . . . . . . . . . . . . . . . . . . . . 7-2Managing Employee Career Profiles. . . . . . . . . . . . . . . . . . . . . . . . . . . . . . . . . . . . . . . . . . . . . . . . . . . . . . 7-3
Adding or Changing Education Information . . . . . . . . . . . . . . . . . . . . . . . . . . . . . . . . . . . . . . . . . . . . 7-4Adding or Changing Language Information . . . . . . . . . . . . . . . . . . . . . . . . . . . . . . . . . . . . . . . . . . . 7-10Adding or Changing Skill Information . . . . . . . . . . . . . . . . . . . . . . . . . . . . . . . . . . . . . . . . . . . . . . . 7-12Adding or Changing License/Certificate Information . . . . . . . . . . . . . . . . . . . . . . . . . . . . . . . . . . . . 7-14
Enrolling Employees in Training . . . . . . . . . . . . . . . . . . . . . . . . . . . . . . . . . . . . . . . . . . . . . . . . . . . . . . . 7-17Viewing Available Training Activities . . . . . . . . . . . . . . . . . . . . . . . . . . . . . . . . . . . . . . . . . . . . . . . 7-17Checking Prerequisites for a Training Activity . . . . . . . . . . . . . . . . . . . . . . . . . . . . . . . . . . . . . . . . . 7-20Checking Availability and Enrolling in a Training Session . . . . . . . . . . . . . . . . . . . . . . . . . . . . . . . 7-22
Accessing Employee Training Summary Information . . . . . . . . . . . . . . . . . . . . . . . . . . . . . . . . . . . . . . . 7-24
8 Running Manager Reports
Introduction . . . . . . . . . . . . . . . . . . . . . . . . . . . . . . . . . . . . . . . . . . . . . . . . . . . . . . . . . . . . . . . . . . . . . . . . . 8-2Running Team Reports . . . . . . . . . . . . . . . . . . . . . . . . . . . . . . . . . . . . . . . . . . . . . . . . . . . . . . . . . . . . . . . . 8-3Running Employee History Reports . . . . . . . . . . . . . . . . . . . . . . . . . . . . . . . . . . . . . . . . . . . . . . . . . . . . . . 8-6
Index
ContentsADP Self Service Manager’s Guide
About This Guide
PAGE TOPIC
viii Introduction
viii Audience for This Guide
ix What’s in This Book
x What’s New
xi Related Documentation
xii Documentation Conventions
xiv Providing Comments
About This GuideADP Self Service Manager’s Guide
viii Introduction
Introduction
Use the ADP Self Service Manager’s Guide to complete manager tasks within the ADP Self Service application. Manager tasks include compensation and performance reviews, hiring and rehiring employees, changing employee job status, transferring employees, changing employee job and salary information, and changing employees employment status, as well as designating a proxy to complete tasks when you are unavailable. Manager tasks also include viewing approval history, task lists, and running reports.
As you work through the tasks in this chapter, you may have questions about fields. To
display a description of fields and related tasks in Self Service, click the (Help icon) provided in the right-hand corner of the Self Service web page.
Audience for This Guide
This guide is written for managers using ADP Self Service, whose HR/payroll system of record is ADP Enterprise HR or ADP HR Anytime. Information in this guide applies to both systems of record unless otherwise specified.
To take full advantage of this guide, we recommend that you have a basic understanding of how to use your HR/payroll system of record and Self Service. This guide is not intended to be a tutorial.
In addition, you should be comfortable with using a graphical user interface as well as a web-enabled application.
About This GuideADP Self Service Manager’s Guide
What’s in This Book ix
What’s in This Book
This guide, the ADP Self Service Manager’s Guide, covers the following topics:
Chapter 1, “Introducing Manager Self Service,” provides on overview of Manager Self Service, including how to access Self Service and manager tasks available within Self Service.
Chapter 2, “Managing Approval Tasks and Notifications,” provides detailed instructions on using the Manager’s Message Center to process approval tasks which have been sent to them, as well as view notifications concerning tasks in which they have been involved. This chapter also details setting up a proxy to complete assignments for managers who are unavailable to process tasks in a timely manner.
Chapter 3, “Managing Approval History,” provides detailed instructions on using Approval History to view details on any tasks in which a manager was involved, either as an originator and/or an approver.
Chapter 4, “Managing Compensation,” provides detailed instructions on managing direct reports compensation, including viewing compensation summary information, viewing the budget pool, viewing employee compensation history, and initiating a bonus or merit compensation proposed increase.
Chapter 5, “Managing Performance Reviews,” provides detailed instructions on viewing performance summary information, viewing employee performance history, initiating a performance review, as well as how to create custom performance view templates.
Chapter 6, “Managing Work Events,” provides detailed instructions on performing work events such as: hiring and rehiring; transferring a direct report to a new manager, department or location; changing an employee’s job status; promoting, demoting, performing a lateral move, and changing an employee’s salary; placing an employee on leave or returning an employee from leave; terminating an employee.
Chapter 7, “Managing Employee Career and Training Information,” provides information on managing employee career and training information, including updating employee career information and enrolling employees in training activities.
Chapter 8, “Running Manager Reports,” provides detailed instructions on running pre-defined reports for direct reports employment and compensation information.
An index is also provided.
About This GuideADP Self Service Manager’s Guide
x What’s New
What’s New
The following changes have been made to this guide since the last publication date:
• Made changes to Chapter 6, “Managing Work Events” as follows:
– A new confirmation message was added for salary changes to employee’s whose current salary already exceeds the established maximum salary amount. For more information, see “Changing an Employee’s Salary” on page 6-96.
– Employment actions for Suspend and Return from Suspend have been added to the Employment page as part of the Comprehensive Employee Change tabbed view when creating a comprehensive change event for an employee. For more information, see “Changing an Employee's Employment Information” on page 6-147. These actions have also been added to Change Employee Status. For more information, see “Placing an Employee on Suspension” on page 6-120 and “Placing an Employee on Suspension” on page 6-120.
– The search field filters for the Direct Reports page provided in a previous release for those whose HR/payroll system of record is ADP Enterprise HR 5.03 have been made available for those whose HR/payroll system of record is ADP Enterprise HR 5.01. For more information, see “Using Search Fields to Filter Results” on page 6-3.
About This GuideADP Self Service Manager’s Guide
Related Documentation xi
Related Documentation
This guide covers the information necessary for using the Manager tasks within ADP Self Service. You may need to refer to related documentation for other areas of the product. You can access the documentation in the following location:
• On the web at adp4me.adp.com, select Product Documentation
About This GuideADP Self Service Manager’s Guide
xii Documentation Conventions
Documentation Conventions
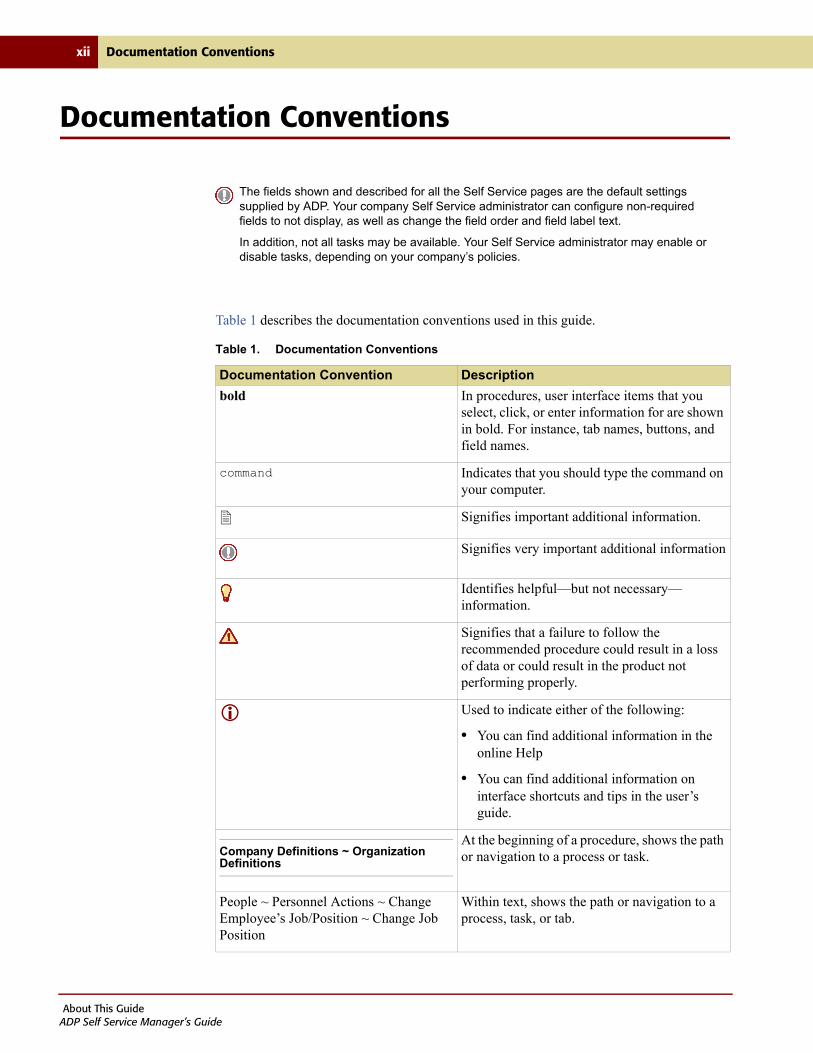
Table 1 describes the documentation conventions used in this guide.
The fields shown and described for all the Self Service pages are the default settings supplied by ADP. Your company Self Service administrator can configure non-required fields to not display, as well as change the field order and field label text.
In addition, not all tasks may be available. Your Self Service administrator may enable or disable tasks, depending on your company’s policies.
Table 1. Documentation Conventions
Documentation Convention Description
bold In procedures, user interface items that you select, click, or enter information for are shown in bold. For instance, tab names, buttons, and field names.
command Indicates that you should type the command on your computer.
Signifies important additional information.
Signifies very important additional information
Identifies helpful—but not necessary—information.
Signifies that a failure to follow the recommended procedure could result in a loss of data or could result in the product not performing properly.
Used to indicate either of the following:
• You can find additional information in the online Help
• You can find additional information on interface shortcuts and tips in the user’s guide.
Company Definitions ~ Organization Definitions
At the beginning of a procedure, shows the path or navigation to a process or task.
People ~ Personnel Actions ~ Change Employee’s Job/Position ~ Change Job Position
Within text, shows the path or navigation to a process, task, or tab.
About This GuideADP Self Service Manager’s Guide
Documentation Conventions xiii
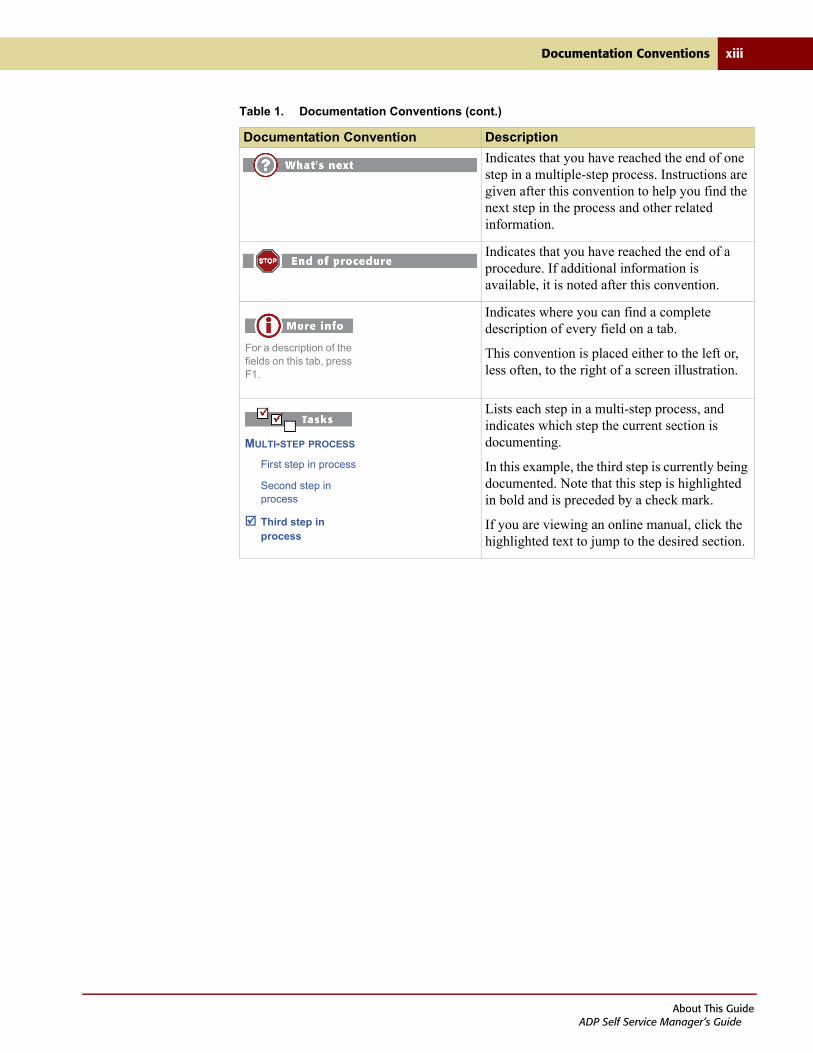
Indicates that you have reached the end of one step in a multiple-step process. Instructions are given after this convention to help you find the next step in the process and other related information.
Indicates that you have reached the end of a procedure. If additional information is available, it is noted after this convention.
Indicates where you can find a complete description of every field on a tab.
This convention is placed either to the left or, less often, to the right of a screen illustration.
Lists each step in a multi-step process, and indicates which step the current section is documenting.
In this example, the third step is currently being documented. Note that this step is highlighted in bold and is preceded by a check mark.
If you are viewing an online manual, click the highlighted text to jump to the desired section.
Table 1. Documentation Conventions (cont.)
Documentation Convention Description
For a description of the fields on this tab, press F1.
MULTI-STEP PROCESS
First step in process
Second step in process
Third step in process
About This GuideADP Self Service Manager’s Guide
xiv Providing Comments
Providing Comments
We welcome your comments and suggestions about all the documentation delivered with your HR/payroll system of record. That way, we can continue to improve the manuals and online Help. You can provide comments in one of the following ways:
• Select Help ~ Online Manuals from your HR/payroll system of record application and then click the link to submit your suggestions.
• Give us feedback by visiting the web at adp4me.adp.com ~ Product Documentation.
About This GuideADP Self Service Manager’s Guide
Chapter 1
Introducing Manager Self Service
PAGE TOPIC
1-2 Introduction
1-3 About the Self Service Manager Tasks
1-7 Using the Manager Direct Reports Page
1-12 Using the Online Help
1-14 Touring Self Service
1-15 Registering for Self Service
1-21 Logging In to Self Service
1-22 Managing Your Self Service Account
Chapter 1: Introducing Manager Self ServiceADP Self Service Manager’s Guide
1-2 Introduction
Introduction
The ADP Self Service solution is purchased separately from your HR/payroll system of record, and is based on portal technology allowing your employees, managers, practitioners, and administrators to perform tasks over the Internet.
The term “employee” in this guide can refer to a regular employee/associate, temporary
employee/associate, or a consultant or contractor, depending on your company’s organization.
Self Service is comprised of easy-to-use web pages that the user accesses with the user name and password selected during the initial registration process (see “Registering for Self Service” on page 1-15). Across the top of the Self Service web pages are tabs that categorize the information and tasks available in Self Service. Online Help is provided for the Self
Service pages. Simply click the (Help icon) provided in the right-hand corner of the web page to access the Help.
The Help reflects the default settings of the Self Service Web pages. If your administrator has
changed the default settings, the Help files may vary from the actual fields displayed in your Self Service pages.
Self Service accommodates several distinct users, as follows:
• Employees — employees can access the employee-level tasks
• Managers — managers access the manager-level tasks according to how they are set up in the Reports To Hierarchy feature of the HR/payroll system of record (see the Hiring, Staffing, and Job Maintenance Guide for information on using the Reports To Hierarchy feature.)
• Practitioners — these are ADP Enterprise HR or HR Anytime users who will access Enterprise HR or HR Anytime through Self Service
• Administrators — can define the approval and notification routing (workflow) through Self Service, as well as configure the Self Service pages for company-specific needs
This guide details the information and tasks available to managers.
This solution is for clients using one of the following HR/payroll systems of record as a hosting/outsourcing service solution for payroll processing:
• ADP Enterprise HR with Autolink Version 4.2005.2(D), 4.04 or higher, and 5.0 or higher
• ADP Enterprise HR with Enterprise Payroll (EPayroll) Version 4.2005.2(D), 4.04 or higher, and 5.0 or higher
• ADP HR Anytime Version 5.01 or higher
Some features are not available, depending on which version and HR/payroll system of record you are using. Differences are noted throughout this guide.
Chapter 1: Introducing Manager Self ServiceADP Self Service Manager’s Guide

About the Self Service Manager Tasks 1-3
About the Self Service Manager Tasks
Within your HR/payroll system of record, managers are set up using the Reports-To feature. The way managers are set up determines the tasks that they can view and perform within Self Service. For instance, managers may manage people and handle compensation and performance reviews. Or, managers could solely be compensation managers that need access to just the compensation details provided in Self Service. For information on the Reports-To feature, see the Hiring, Staffing, and Job Maintenance Guide.
Figure 1-1 illustrates the Manager Home Welcome portlets. The tabs that display across the top of the Self Service header area, depends on the role selected. If the user has more than one role, they can select a role from the role selector. Each role is associated with tasks specific for that role. The tasks detailed in this guide are those accessed when the Manager role is selected.
If a user is assigned both an Employee and Manager role, the Manager role will be selected
by default. If a user is also assigned a Practitioner role, the Practitioner role will always be the default. In this case, to access the Manager tasks, you would select Manager from the Role Selector.
Figure 1-1. Manager Home Welcome Portlets
Self Service Session Time Out Warning dialog box displays after 18 minutes of inactivity. The dialog box gives you the option of re-entering or logging out of Self Service.
The content in the Home Welcome portlets will be the same for all roles, unless your Portal administrator has added customized instructional content and assigned the content to specific groups (roles).
Role Selector
Chapter 1: Introducing Manager Self ServiceADP Self Service Manager’s Guide
1-4 About the Self Service Manager Tasks
The components of the Self Service Welcome Home portlets are as follows:
• What’s New
• Message Center at a Glance – This includes links to your Message Center Approvals, Notifications and Employee Activities (see Chapter 2, “Managing Approval Tasks and Notifications” for more information).
• Recommended Links
• Benefit News
• Forms Library
Your company administrator can configure the Self Service web pages to display certain
fields, rearrange fields, change the label text for the field, as well as change fonts and color
schemes. Online Help is provided for Self Service pages. Simply click the (Help icon) provided in the right-hand corner of the web page to access the online help. The help and this guide reflect the default settings of the Self Service web pages. If your administrator has changed the default settings, the online help and this guide may vary from the actual fields displayed in your Self Service pages.
Across the top of the Self Service header area, are tabs that categorize the information and tasks available for managers. Hover your mouse over the tabs to see and select the manager tasks. The following tabs and tasks may be available, depending on user setup details:
Tabs and tasks available for managers include the following:
• Home – This tab allows access to the following tasks:
– Welcome – Access the Welcome portlets.
– Company Directory – Access an employee directory search to find information for an employee within your organization.
– Message Center – Outstanding approval tasks that have been sent for approval are displayed on the Approvals page, and any notifications received through the Self Service approval and notification routing are displayed on the Notifications page. Once an approver has processed an approval task, it is removed from the Approvals page. In addition, if Event Configuration has been enabled for your company, users can access and complete activities, such as new hire, data verification, or company policy events.
You can view employee-level and manager-level tasks in either English or Spanish. The Language link in the header area allows you to select either English or Espanol. English is selected by default. Text on the employee-level and manager-level tabs, as well as the instructional text and labels on these web pages, will display the selected language. The data displayed in the fields, however, will be in English, since the fields are populated with data from your system of record.
Your security profile is managed by your administrator through Security Access. Your administrator must enable the Language option for your security group in order for you to view this option.
Chapter 1: Introducing Manager Self ServiceADP Self Service Manager’s Guide
About the Self Service Manager Tasks 1-5
– Approval History – Displays the approval processes and approval details which the manager has participated in, either as an originator or an approver. In addition, a user can recall an event, if they are the originator of the event and the event status is In Progress.
– Forms Library – Access company forms.
– Policies and Guidelines – Access company policies and procedures. The Company Policies portlet lists the policies your company has made available, based on the user’s security access. A red asterisk (*) indicates that it is a policy which the user needs to acknowledge. A green check mark shows that the user has already acknowledged the policy. This portlet displays a maximum of 10 policies at a time. If there are additional policies, a More link displays. Clicking More accesses the Policy Acknowledgement List page. You can also access the Policy Acknowledgement List page by clicking the Read and acknowledge all policies link.
– FAQs – Access FAQs posted by your administrator.
• Organization & Staffing – This tab allows access to the following tasks:
– Direct Reports – Displays a manager’s direct reports, as well as the direct reports of each of the managers reporting to them. The Direct Reports page provides the manager with quick access to initiate a number of employee events. These same employee events are also accessible through other manager tasks. The Direct Reports page, however, provides a single point through which a manager can do a number of employee-related events.
– Managing Work Events – The Managing Work Events page allows the manager to perform job actions, such as hires and rehires, transfers, job status changes, job and salary changes, and employment status changes.
The work events (hire, rehire, transfer, job status changes, job and salary changes, and
employment status changes) feature is available for all supported versions of ADP Enterprise HR with Autolink and ADP HR Anytime. However, the work events feature is not available for ADP Enterprise HR with EPayroll Version 4D (4.2005.2) or 5.0. At this time, EPayroll Versions 4.04, 4.05, and 5.01 and higher support the work events feature. The Comprehensive Employment Change is only available for ADP Enterprise HR and ADP HR Anytime Versions 5.03.
For new hires and rehires, once the job action has been approved within the Self Service application, the employee information entered in Self Service populates the Hire/Rehire Data tab in your HR/payroll system of record. The HR Practitioner must then complete the hire/rehire process within your HR/payroll system of record. See the Hiring, Staffing, and Job Maintenance Guide for additional information.
– Employee Career Profile – Managers can add and update career profile information for their employees. Career profile information includes education, languages, skills, and license/certification information.
– Enroll Employee in Training – Managers can check prerequisites and enroll their employees in training.
Chapter 1: Introducing Manager Self ServiceADP Self Service Manager’s Guide
1-6 About the Self Service Manager Tasks
– Employee Training Summary – Managers can view summary information for training activities for which their employees are enrolled, wait listed, or have completed. A manager can also cancel a scheduled training activity.
– Proxy Assignment – Displays the paths established for event proxy workflow. Workflow is the approval and notification routing of events, such as performance reviews, compensation proposals, work events, and employee events. Proxy assignment allows a manager to delegate alternative approval personnel in the event the manager is out of the office, or unable to process approvals for an extended period of time.
• Performance – This tab allows access to the following tasks:
– Performance Planning – View and print performance summary information and performance review forms for direct reports, as well as the direct reports of managers who report into them. Conduct the performance review, including submitting the completed review to the next approving manager.
– Performance History – View and print employee performance history.
– Performance Review Template – The Performance Review Template is used to create custom templates. Only modifiable templates can be used as a base to create customized templates. Managers can also modify any custom templates they have created.
Once the performance review has completed the approval process in Self Service, the
employee’s performance review information is updated in your HR/payroll system of record.
• Compensation – This tab allows access to the following tasks:
– Compensation Planning – View and print compensation planning information for direct reports, as well as the direct reports of managers who report into them, as well as view and print consolidated budget information. Complete the Compensation Worksheets to process the compensation review, including submitting the completed review to the next approving manager.
– Compensation History – View and print employee compensation history.
Once the proposed compensation increase has completed the approval process in Self
Service, the employee’s compensation information is updated in the HR/payroll system of record.
• Reports – This tab allows access to the following tasks:
– Manager Reports – Allows manager’s to access a variety of reports that contain their team's employment and compensation information. Managers only have access to information for their direct reports. The information available in each report is pre-defined. These reports include the effective-dated information for employees with the statuses of Active, Leave, Paid Leave, and Suspended. The team reports include all the direct reports for a manager. The employee history reports contain information about a single direct report. These history reports include all data of an employee based on tenure.
Chapter 1: Introducing Manager Self ServiceADP Self Service Manager’s Guide
Using the Manager Direct Reports Page 1-7
The number of reports available may vary. Your company administrator can configure
reports to not display, as well as change the report label text.
Using the Manager Direct Reports Page
The Direct Reports page is accessed through the Organization & Staffing tab and displays your direct reports, as well as the direct reports of each of the managers reporting to you. The Direct Reports page provides the manager with quick access to initiate a number of employee events. These same employee events are also accessible through other manager tasks. The Direct Reports page, however, provides a single point through which you can do a number of employee-related events.
Through the underline Name link on the Direct Reports page, you can do any of the following:
• View and print employee profiles
• Perform job actions, such as transfers, job and salary changes, employee and employment status changes
• Compensation reviews
• Performance reviews
• Employee career maintenance
• Employee training maintenance
Which employee events are available to you depends on how your administrator has configured your security access in Self Service. You can perform these employee events on your direct reports, as well as your indirect reports if your administrator has enabled the indirect report update option. If this option has not been enabled, you can initiate these employee events only for your direct reports.
Using the Manager Direct Reports page includes the following tasks:
• Viewing Your Direct and Indirect Reports
• Initiating Employee Events
Managers can update indirect and direct reports from either the Direct Reports page or through the Compensation Planning and Performance Planning pages. For job actions, managers can update indirect and direct reports through the Direct Reports page. However, they can only update direct reports if they access job actions from the Managing Work Events page, regardless of whether or not the indirect report update option is selected.
Chapter 1: Introducing Manager Self ServiceADP Self Service Manager’s Guide

1-8 Using the Manager Direct Reports Page
Viewing Your Direct and Indirect Reports
To view your direct and indirect reports, do the following:
1. Access your Self Service URL at https://portal.adp.com and log in to the Portal.
2. Make sure that the Manager role is selected.
3. From the Organization & Staffing tab, select Direct Reports. The Direct Reports page displays.
Employees reporting directly to you are displayed in the employee list area. Any of your
direct reports who also have employees reporting to them will have the (Direct Reports icon) displayed next to their name.
Figure 1-2. Manager Direct Reports Page
The search fields at the top of the Direct Reports page are only available if your
HR/payroll system of record is ADP Enterprise HR or ADP HR Anytime Version 5.03. Search fields allow you to enter criteria to filter your employee list.
The initial display of direct reports is limited by the HR/payroll system of record to 999. However, you can use the search fields to display direct reports beyond this initial display. For example, the page initially displays 999 direct reports but the direct report you want to use is John Steward in department 123 but he isn't listed. In the Last Name search field, enter Steward and click Apply Filter. John Steward should display in the filtered listing.
You can sort the columns in the employee list area in ascending or descending order. Click the arrow(s) beside the column name to sort. A single red arrow indicates which column is being used for sorting, as well as the sort order (ascending or descending).
Using the Manager Direct Reports Page
Viewing Your Direct and Indirect Reports
Initiating Employee Events
For a description of the fields on this page or for related tasks, click the
(Help icon) provided in the right-hand corner of the Self Service page
Chapter 1: Introducing Manager Self ServiceADP Self Service Manager’s Guide

Using the Manager Direct Reports Page 1-9
4. Click next to your direct report's name (if available) to drill down and view their direct reports.
As you click to drill down to the next level of direct reports, the Navigation Trail field
lists the starting manager name first, then subsequent managers in the order in which they were accessed.
5. To navigate back, click the appropriate underlined name in the Navigation Trail field.
You have finished viewing your direct and indirect reports. Next you will initiate an employee event.
Initiating Employee Events
Which employee events are available to you depends on how your administrator has configured your security access in Self Service. You can perform these employee events on your direct reports, as well as your indirect reports if your administrator has enabled the indirect report update option. If this option has not been enabled, you can initiate these employee events only for your direct reports.
To drill down to view and select your indirect reports, click next to your direct
report's name to view their direct reports. As you click to drill down to the next level of direct reports, the Navigation Trail field lists the starting manager name first, then subsequent managers in the order in which they were accessed. To navigate back, click the appropriate underlined name in the Navigation Trail field.
Using the Manager Direct Reports Page
Viewing Your Direct and Indirect Reports
Initiating Employee Events
Chapter 1: Introducing Manager Self ServiceADP Self Service Manager’s Guide

1-10 Using the Manager Direct Reports Page
To initiate an Employee Event, do the following:
1. On the Direct Reports page, locate the employee for whom you want to initiate an employee event and click their Name. The Employee Event selection menu displays.
Figure 1-3. Employee Event Selection Menu
2. Choose from the following:
• Employee Profile – Select this to access the selected employee's profile information.
• Comprehensive Employment Change – Select this to update employment information for an employee in a single, inclusive task that encompasses job, employment, compensation, and payroll (if appropriate) information. The feature is only available if your HR/payroll system of record is ADP Enterprise HR or ADP HR Anytime Versions 5.03. For details, see “Using the Comprehensive Employment Change” on page 6-141.
• Transfer Employee – Select this to transfer the employee to another manager, department, or location. For details on transferring an employee, see “Transferring Employees” on page 6-44.
• Change Job & Salary Information – Select this to promote, demote, make a lateral move, or change salary information for the selected employee. For details on changing an employee’s job and salary, see “Changing an Employee’s Job and Salary Information” on page 6-71.
• Change Job Status – Select this to change the employee's job status. For details on changing an employee’s job status, see “Changing an Employee’s Job Status” on page 6-64.
• Change Employment Status – Select this to terminate, place an employee or leave, or return an employee from leave. For details on changing an employee’s status, see “Changing an Employee’s Employment Status” on page 6-104.
For a description of the fields on this page or for related tasks, click the
(Help icon) provided in the right-hand corner of the Self Service page
Chapter 1: Introducing Manager Self ServiceADP Self Service Manager’s Guide
Using the Manager Direct Reports Page 1-11
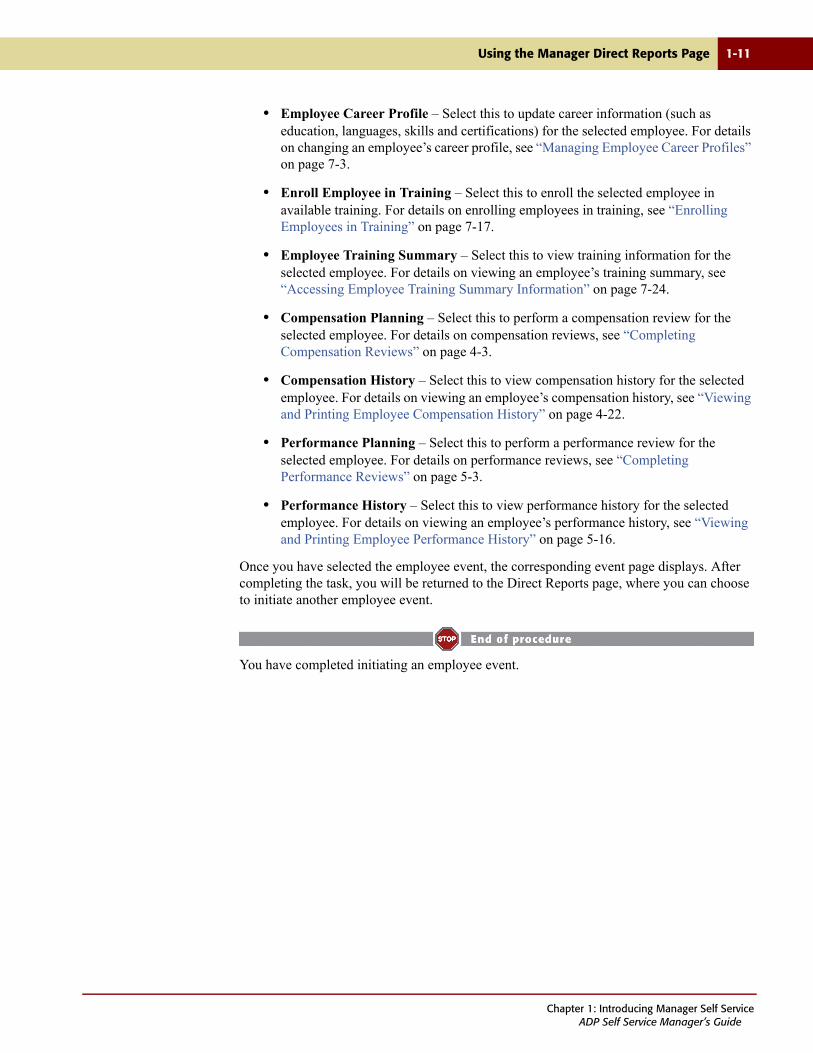
• Employee Career Profile – Select this to update career information (such as education, languages, skills and certifications) for the selected employee. For details on changing an employee’s career profile, see “Managing Employee Career Profiles” on page 7-3.
• Enroll Employee in Training – Select this to enroll the selected employee in available training. For details on enrolling employees in training, see “Enrolling Employees in Training” on page 7-17.
• Employee Training Summary – Select this to view training information for the selected employee. For details on viewing an employee’s training summary, see “Accessing Employee Training Summary Information” on page 7-24.
• Compensation Planning – Select this to perform a compensation review for the selected employee. For details on compensation reviews, see “Completing Compensation Reviews” on page 4-3.
• Compensation History – Select this to view compensation history for the selected employee. For details on viewing an employee’s compensation history, see “Viewing and Printing Employee Compensation History” on page 4-22.
• Performance Planning – Select this to perform a performance review for the selected employee. For details on performance reviews, see “Completing Performance Reviews” on page 5-3.
• Performance History – Select this to view performance history for the selected employee. For details on viewing an employee’s performance history, see “Viewing and Printing Employee Performance History” on page 5-16.
Once you have selected the employee event, the corresponding event page displays. After completing the task, you will be returned to the Direct Reports page, where you can choose to initiate another employee event.
You have completed initiating an employee event.
Chapter 1: Introducing Manager Self ServiceADP Self Service Manager’s Guide
1-12 Using the Online Help
Using the Online Help
Because the delivered Self Service solution is easy to use and self explanatory, the application has online Help as its primary means of employees, managers, practitioners, and administrators that are using Self Service. Since users may be using the application from home or remote offices, the online Help insures that the information is always available to the users.
Online Help is provided for ADP Self Service pages. Simply click the (Help icon) provided in the upper right-hand corner of the web page to access the Help. The Help reflects the default settings of the Self Service web pages.
Your company administrator can configure the Self Service web pages to display certain
fields, rearrange fields, change the label text for the field, as well as change fonts and color schemes. If your administrator has changed the default settings, the Help files may vary from the actual fields displayed in your Self Service pages.
Within the online Help, users may find the following information:
• Descriptions of the application pages, including its purpose and related field descriptions.
• A contents in the left pane specific to the ADP Self Service page that provides links to field descriptions, related tasks or guide.
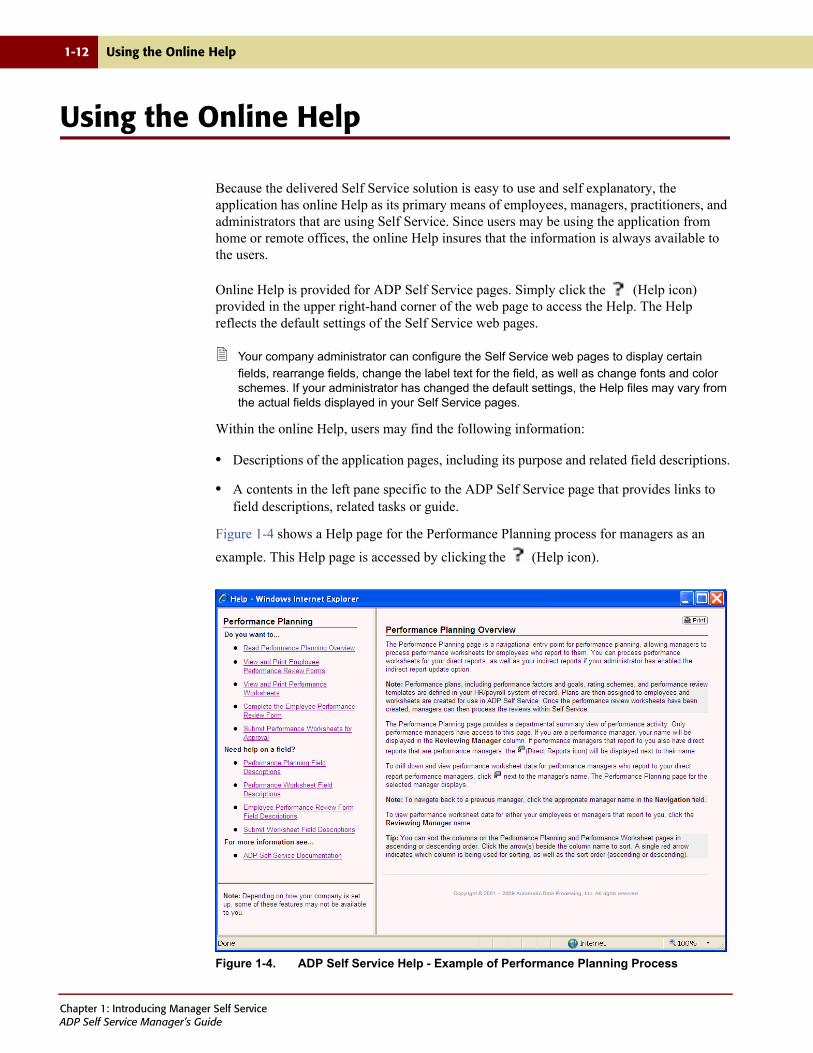
Figure 1-4 shows a Help page for the Performance Planning process for managers as an
example. This Help page is accessed by clicking the (Help icon).
Figure 1-4. ADP Self Service Help - Example of Performance Planning Process
Chapter 1: Introducing Manager Self ServiceADP Self Service Manager’s Guide
Using the Online Help 1-13
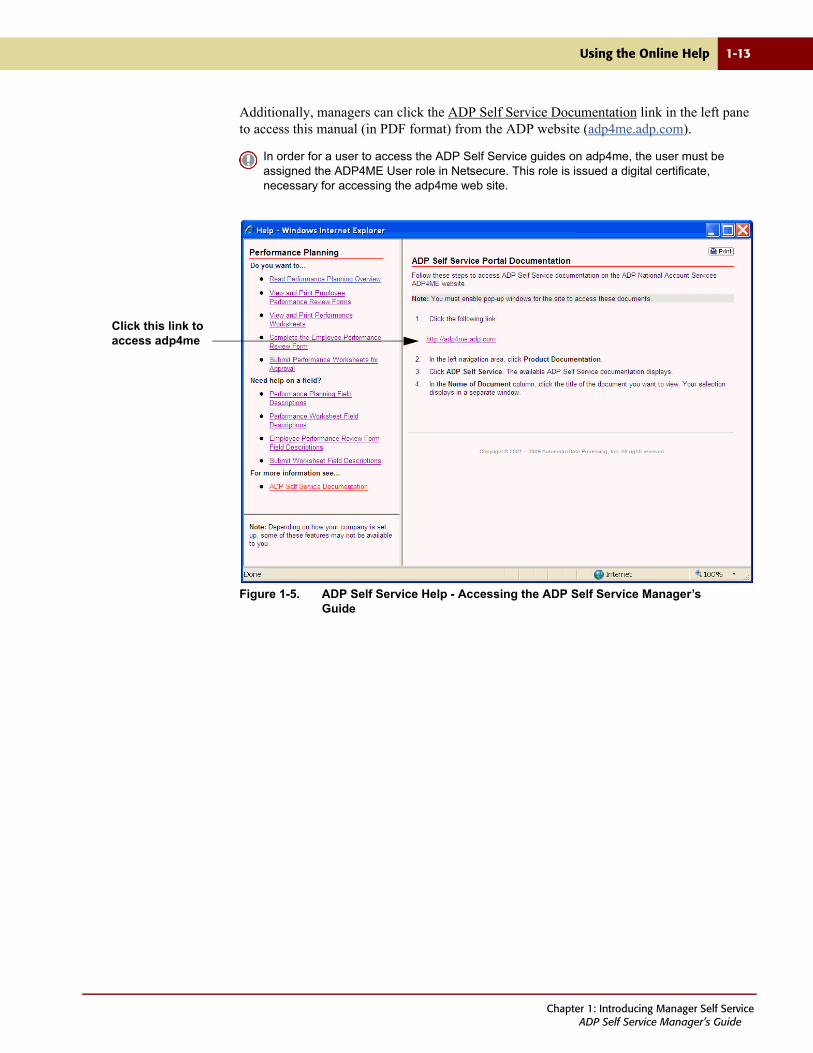
Additionally, managers can click the ADP Self Service Documentation link in the left pane to access this manual (in PDF format) from the ADP website (adp4me.adp.com).
Figure 1-5. ADP Self Service Help - Accessing the ADP Self Service Manager’s Guide
In order for a user to access the ADP Self Service guides on adp4me, the user must be assigned the ADP4ME User role in Netsecure. This role is issued a digital certificate, necessary for accessing the adp4me web site.
Click this link to access adp4me
Chapter 1: Introducing Manager Self ServiceADP Self Service Manager’s Guide
1-14 Touring Self Service
Touring Self Service
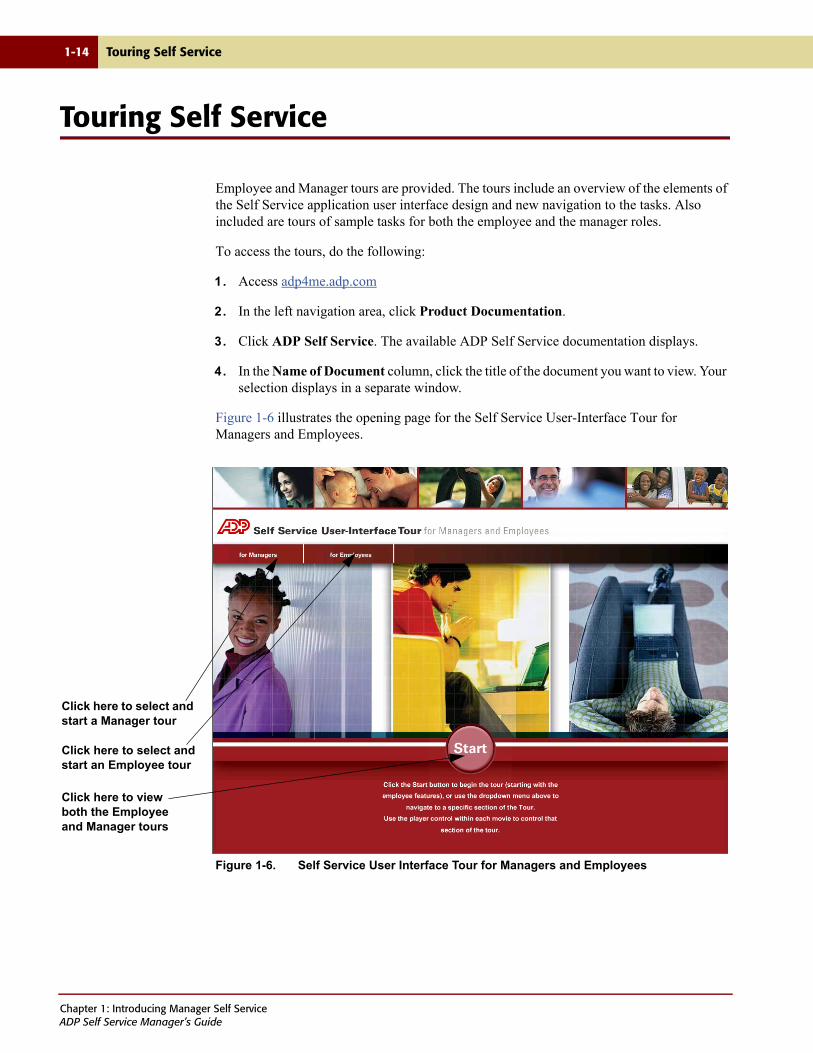
Employee and Manager tours are provided. The tours include an overview of the elements of the Self Service application user interface design and new navigation to the tasks. Also included are tours of sample tasks for both the employee and the manager roles.
To access the tours, do the following:
1. Access adp4me.adp.com
2. In the left navigation area, click Product Documentation.
3. Click ADP Self Service. The available ADP Self Service documentation displays.
4. In the Name of Document column, click the title of the document you want to view. Your selection displays in a separate window.
Figure 1-6 illustrates the opening page for the Self Service User-Interface Tour for Managers and Employees.
Figure 1-6. Self Service User Interface Tour for Managers and Employees
Click here to select and start a Manager tour
Click here to select and start an Employee tour
Click here to view both the Employee and Manager tours
Chapter 1: Introducing Manager Self ServiceADP Self Service Manager’s Guide

Registering for Self Service 1-15
Registering for Self Service
To begin using Self Service, you must first register for each of the services you wish to access. Your Human Resources Department will mail you a Self Service User ID Notice that includes all the information required for you to complete your Self Service Registration.
To register for Self Service if you are a standard user (rather than a practitioner or administrator), do the following:
1. Access the URL for Self Service, at https://portal.adp.com. The Self Service Portal Login page displays.
Figure 1-7. Self Service Portal Login Page
2. Click the First Time Users Register Here link on the Self Service login page. The Registration Welcome page displays.
Figure 1-8. Registration Welcome Page
Chapter 1: Introducing Manager Self ServiceADP Self Service Manager’s Guide
1-16 Registering for Self Service
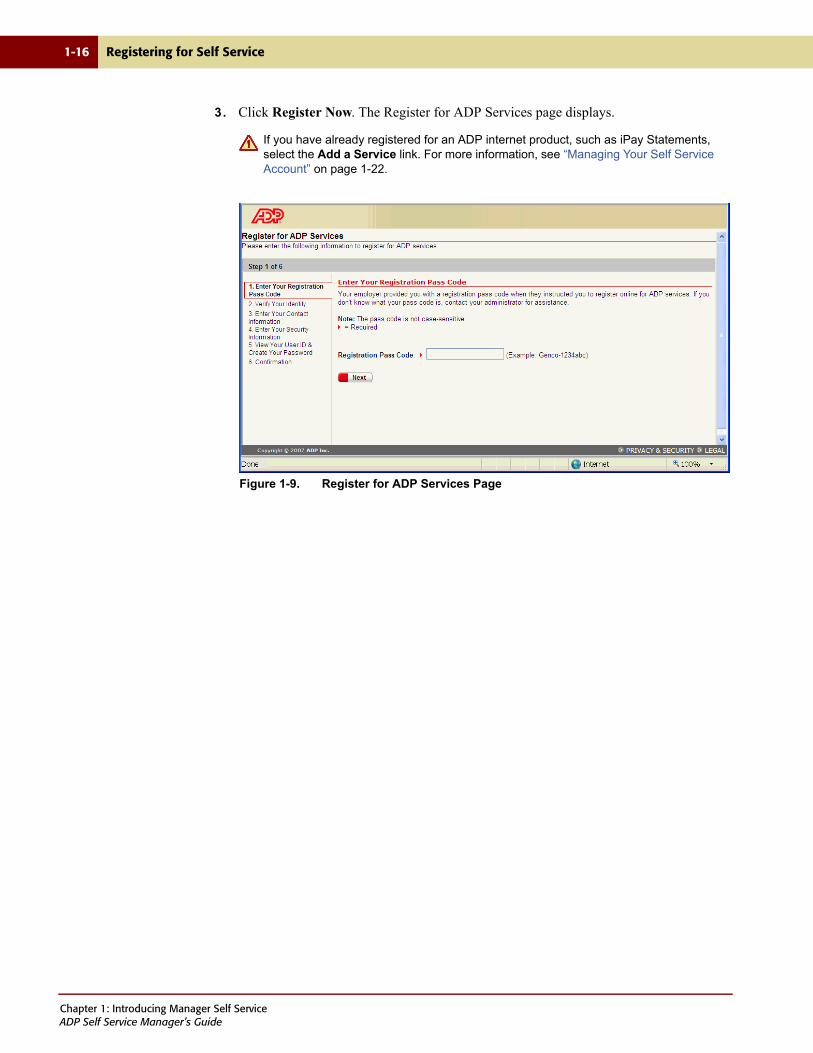
3. Click Register Now. The Register for ADP Services page displays.
Figure 1-9. Register for ADP Services Page
If you have already registered for an ADP internet product, such as iPay Statements, select the Add a Service link. For more information, see “Managing Your Self Service Account” on page 1-22.
Chapter 1: Introducing Manager Self ServiceADP Self Service Manager’s Guide
Registering for Self Service 1-17
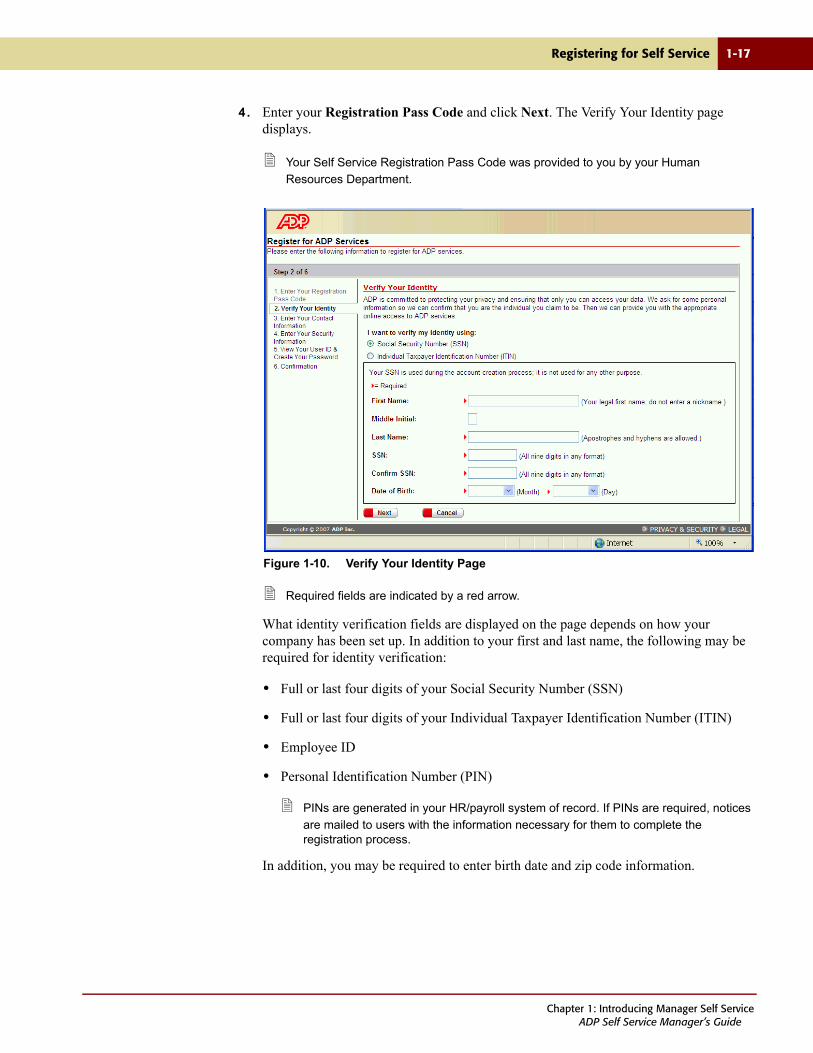
4. Enter your Registration Pass Code and click Next. The Verify Your Identity page displays.
Your Self Service Registration Pass Code was provided to you by your Human
Resources Department.
Figure 1-10. Verify Your Identity Page
Required fields are indicated by a red arrow.
What identity verification fields are displayed on the page depends on how your company has been set up. In addition to your first and last name, the following may be required for identity verification:
• Full or last four digits of your Social Security Number (SSN)
• Full or last four digits of your Individual Taxpayer Identification Number (ITIN)
• Employee ID
• Personal Identification Number (PIN)
PINs are generated in your HR/payroll system of record. If PINs are required, notices
are mailed to users with the information necessary for them to complete the registration process.
In addition, you may be required to enter birth date and zip code information.
Chapter 1: Introducing Manager Self ServiceADP Self Service Manager’s Guide

1-18 Registering for Self Service
The example shown in Figure 1-10, allows the user to select to verify with either their SSN or ITIN, using the full number of digits. In addition, it requires the user to enter their birth date information.
5. If available, select the option you want to use from the I want to verify my identity using area. In our example, we have selected Social Security Number (SSN).
6. Enter your First Name and Last Name.
7. In the SSN field, enter your Social Security Number. In our example, all digits are required.
8. Re-enter your Social Security Number in the Confirm SSN field.
9. If required, enter your birth date information in the Date of Birth area. Depending on your company setup, you may need to enter your full date of birth or just the birth month and day.
10. If required, enter your home zip/postal code information.
11. When you are finished entering information, click Next. The Enter Your Contact Information page displays.
Figure 1-11. Enter Your Contact Information Page
Some products require you to use product-specific data to register, rather than the identity verification options. Examples are Benefit Enrollment/HWSE, and Enterprise eTIME.
Chapter 1: Introducing Manager Self ServiceADP Self Service Manager’s Guide
Registering for Self Service 1-19
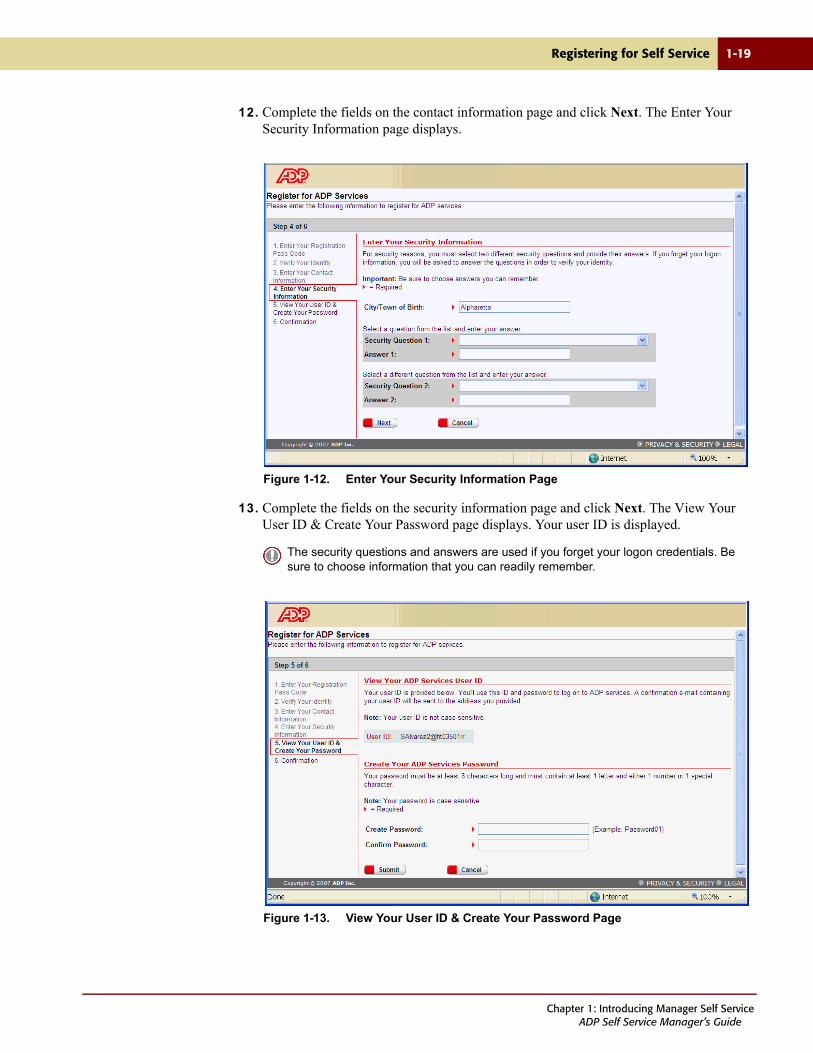
12. Complete the fields on the contact information page and click Next. The Enter Your Security Information page displays.
Figure 1-12. Enter Your Security Information Page
13. Complete the fields on the security information page and click Next. The View Your User ID & Create Your Password page displays. Your user ID is displayed.
Figure 1-13. View Your User ID & Create Your Password Page
The security questions and answers are used if you forget your logon credentials. Be sure to choose information that you can readily remember.
Chapter 1: Introducing Manager Self ServiceADP Self Service Manager’s Guide
1-20 Registering for Self Service
14. Enter your password in the Create Password field.
Your password must be a minimum of 8 characters and contain at least one alpha and
either one numeric or special character. Your password is case-sensitive.
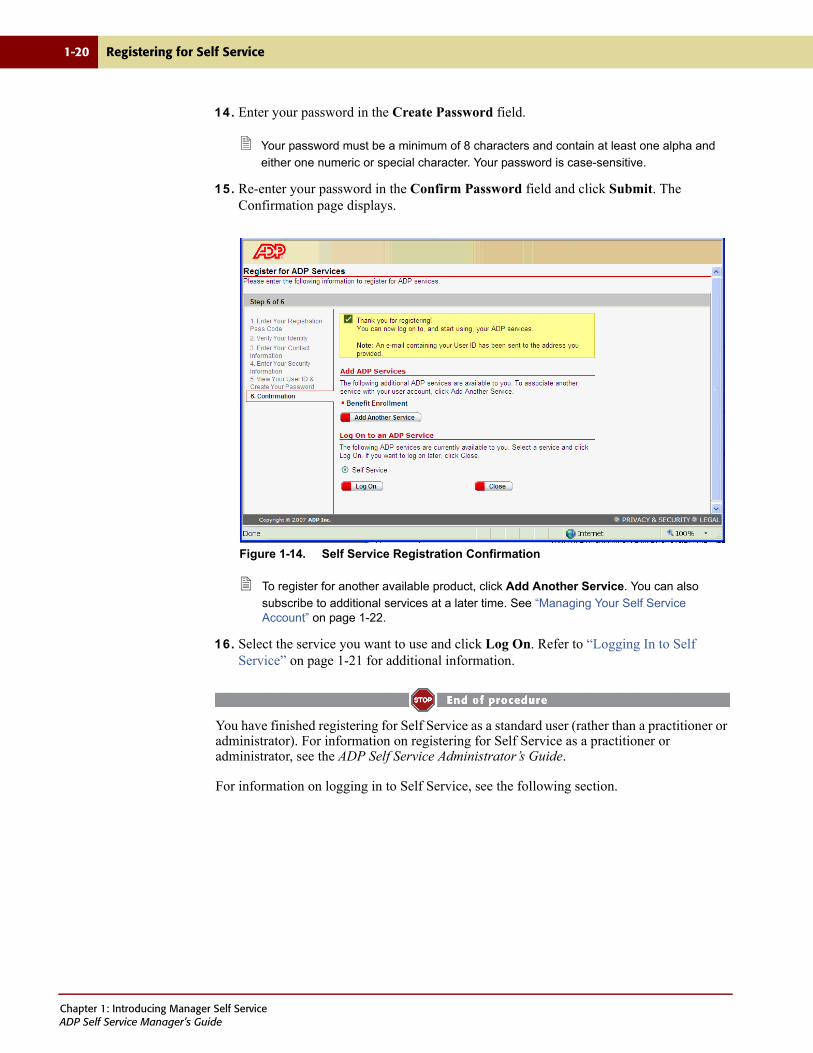
15. Re-enter your password in the Confirm Password field and click Submit. The Confirmation page displays.
Figure 1-14. Self Service Registration Confirmation
To register for another available product, click Add Another Service. You can also
subscribe to additional services at a later time. See “Managing Your Self Service Account” on page 1-22.
16. Select the service you want to use and click Log On. Refer to “Logging In to Self Service” on page 1-21 for additional information.
You have finished registering for Self Service as a standard user (rather than a practitioner or administrator). For information on registering for Self Service as a practitioner or administrator, see the ADP Self Service Administrator’s Guide.
For information on logging in to Self Service, see the following section.
Chapter 1: Introducing Manager Self ServiceADP Self Service Manager’s Guide
Logging In to Self Service 1-21
Logging In to Self Service
Before you can log in to Self Service, you must register for the products you want to access through the Self Service Portal. Refer to “Registering for Self Service” on page 1-15 for more information.
To log in to Self Service as a standard user, do the following:
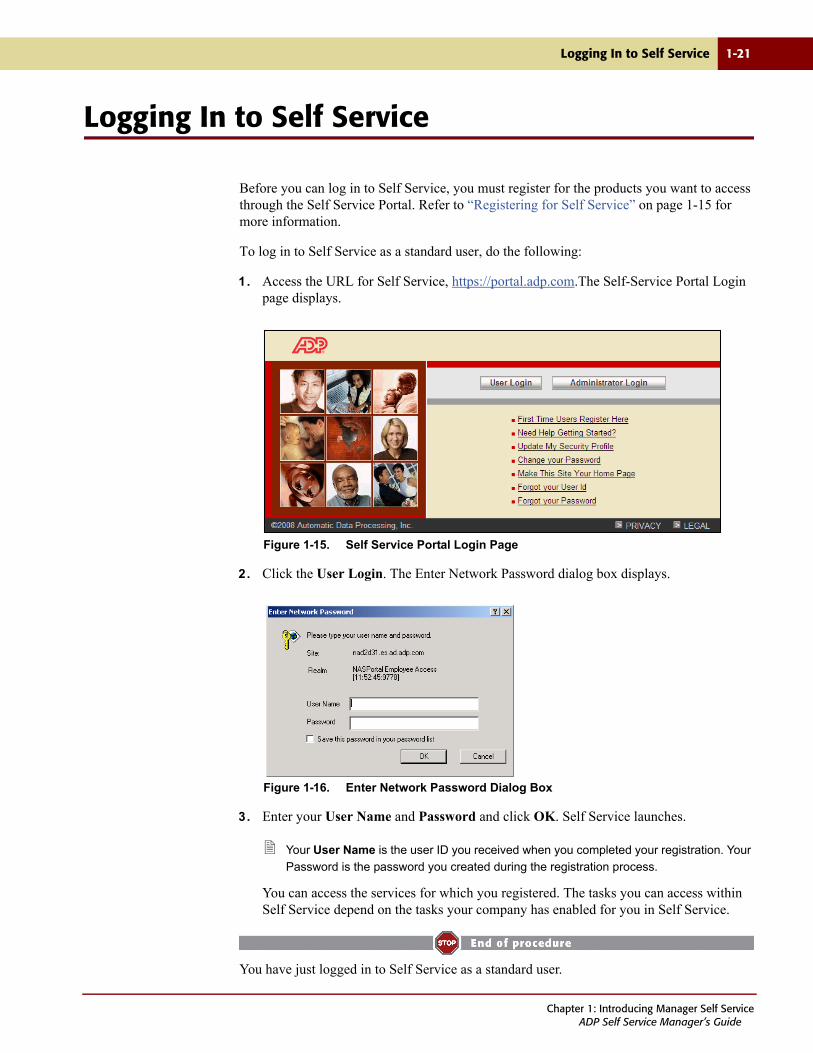
1. Access the URL for Self Service, https://portal.adp.com.The Self-Service Portal Login page displays.
Figure 1-15. Self Service Portal Login Page
2. Click the User Login. The Enter Network Password dialog box displays.
Figure 1-16. Enter Network Password Dialog Box
3. Enter your User Name and Password and click OK. Self Service launches.
Your User Name is the user ID you received when you completed your registration. Your
Password is the password you created during the registration process.
You can access the services for which you registered. The tasks you can access within Self Service depend on the tasks your company has enabled for you in Self Service.
You have just logged in to Self Service as a standard user.
Chapter 1: Introducing Manager Self ServiceADP Self Service Manager’s Guide
1-22 Managing Your Self Service Account
Managing Your Self Service Account
Once you have your user ID, you can manage your account information, including changing your profile, changing your password, subscribing to additional available services, as well as unsubscribing to services.
To manage your account information, do the following:
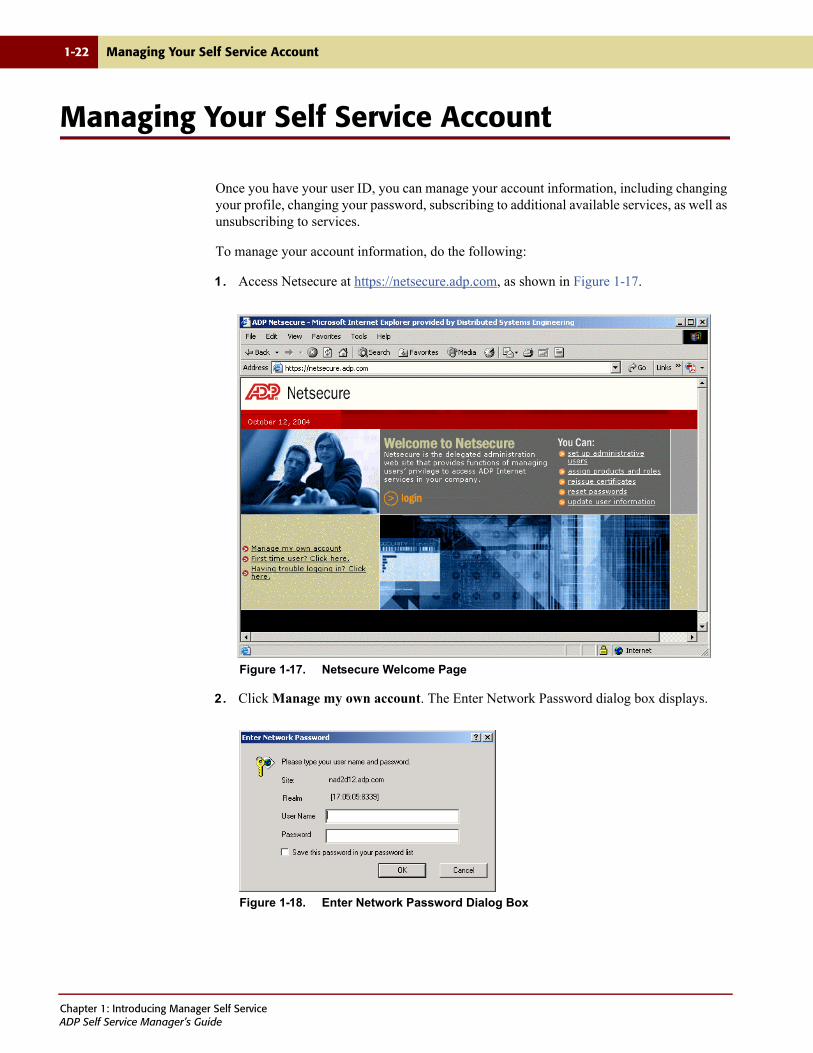
1. Access Netsecure at https://netsecure.adp.com, as shown in Figure 1-17.
Figure 1-17. Netsecure Welcome Page
2. Click Manage my own account. The Enter Network Password dialog box displays.
Figure 1-18. Enter Network Password Dialog Box
Chapter 1: Introducing Manager Self ServiceADP Self Service Manager’s Guide
Managing Your Self Service Account 1-23
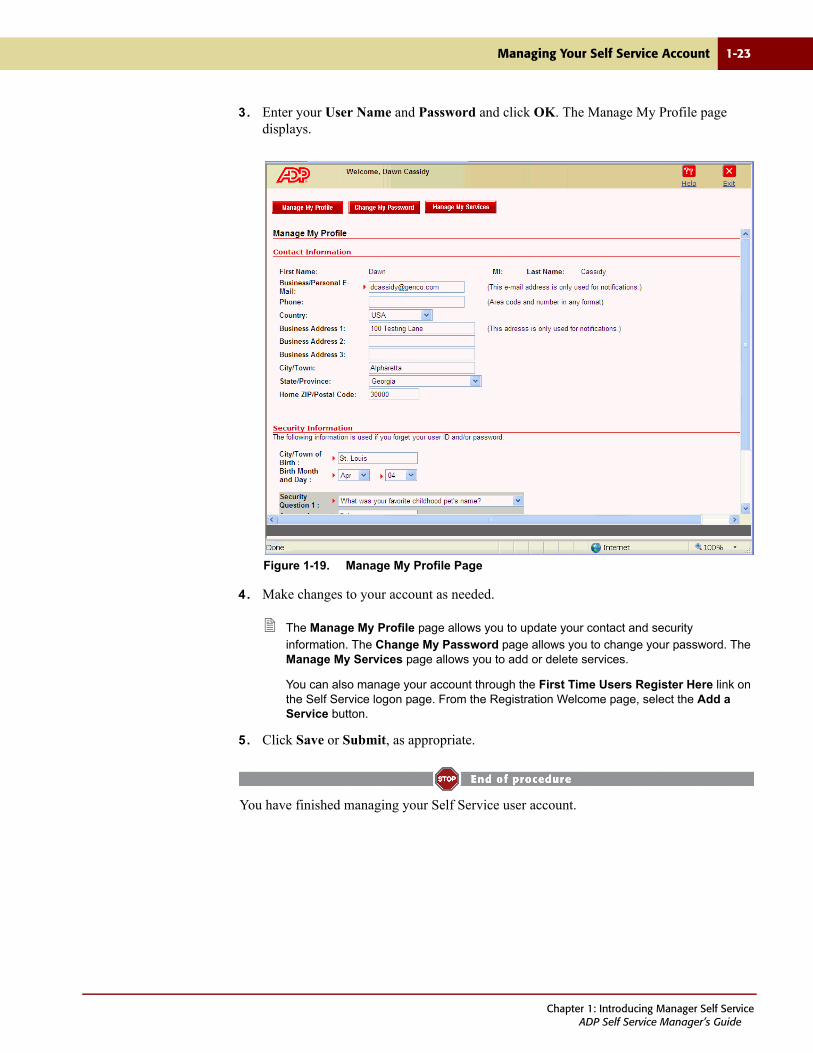
3. Enter your User Name and Password and click OK. The Manage My Profile page displays.
Figure 1-19. Manage My Profile Page
4. Make changes to your account as needed.
The Manage My Profile page allows you to update your contact and security
information. The Change My Password page allows you to change your password. The Manage My Services page allows you to add or delete services.
You can also manage your account through the First Time Users Register Here link on the Self Service logon page. From the Registration Welcome page, select the Add a Service button.
5. Click Save or Submit, as appropriate.
You have finished managing your Self Service user account.
Chapter 1: Introducing Manager Self ServiceADP Self Service Manager’s Guide

1-24 Managing Your Self Service Account
Chapter 1: Introducing Manager Self ServiceADP Self Service Manager’s Guide

Chapter 2
Managing Approval Tasks andNotifications
PAGE TOPIC
2-2 Introduction
2-3 Viewing Approvals and Notifications
2-10 Managing Merit Compensation Approval Tasks
2-14 Managing Bonus Compensation Approval Tasks
2-18 Managing Performance Review Approval Tasks
2-22 Processing Job Action Approval Tasks
2-24 Managing Manager Event Tasks
2-26 Managing Employee Tasks
2-28 Managing Proxy Assignments
Chapter 2: Managing Approval Tasks and NotificationsADP Self Service Manager’s Guide

2-2 Introduction
Introduction
The Message Center includes an Approvals, a Notifications, and an Employee Activities tab.
The Employee Activities tab is available only if Event Configuration (Configuration ~ Set
Up Employee Activities) has been enabled for your company. In addition, whether or not the Approvals, Notifications, and Employee Activities tabs are available depends on your Portal role and your security access setting.
When you click the tab, the corresponding page (either approvals, notifications, or employee activities) is displayed. You can sort columns on the Approvals, Notifications, and Employee Activities pages in ascending/descending order by clicking the up/down arrows in the column headings. A red single arrow indicates which column is being used as the sort.
For Employees, any rejections you have received through the Self Service approval and notification routing are displayed on the Notifications page. The Approvals page does not apply to employees. Approvals are viewed through Approval History. The Employee Activities page displays any activities you need to complete. Activities can include new hire, data verification, and company policy events.
For Managers and Practitioners, outstanding approval tasks that have been sent to you for approval are displayed on the Approvals page, and any notifications received through the Self Service approval and notification routing are displayed on the Notifications page. Once you have processed an approval task, it is removed from the Approvals page.
This chapter details how to process bonus and merit compensation, performance review, work event, and employee event tasks that have been sent to you for approval. This chapter also details setting up a proxy to complete your approval tasks for you in the event you are unavailable to process them in a timely manner.
The Approvals, Notifications, and Employee Activities pages can be accessed from any of the following ways: from the Home tab, you can select Welcome, then click the Approvals, Notifications, or the Employee Activities link in the Message Center at a Glance portlet; or you can select Message Center from the Home tab.
An Activity Wizard is provided for completing employee activities. For more information, see the Self Service online help.
Chapter 2: Managing Approval Tasks and NotificationsADP Self Service Manager’s Guide
Viewing Approvals and Notifications 2-3
Viewing Approvals and Notifications
Viewing Approvals and Notifications includes the following tasks:
• Viewing Approval Tasks
• Viewing Notifications
• Using Search Criteria to Filter Results
Viewing Approval Tasks
The Message Center Approvals page displays tasks that have been sent to you for approval. The page initially displays with all pending approvals displayed. You can use the search fields to filter your results. Once you have processed an approval task, it is removed from the Approvals page.
To view your approval details, do the following:
1. From the Home tab, select Message Center.
2. Click the Approvals tab (if not already selected.) The list of approval tasks displays. Use the search criteria to filter your results, if needed. See “Using Search Criteria to Filter Results” on page 2-8 for more information.
The Approvals page can also be accessed from the Approvals link on the Message Center at a Glance portlet.
Chapter 2: Managing Approval Tasks and NotificationsADP Self Service Manager’s Guide
2-4 Viewing Approvals and Notifications
You can sort columns on the Approvals page in ascending/descending order by clicking
the up/down arrows in the column headings. A red single arrow indicates which column is being used as the sort.
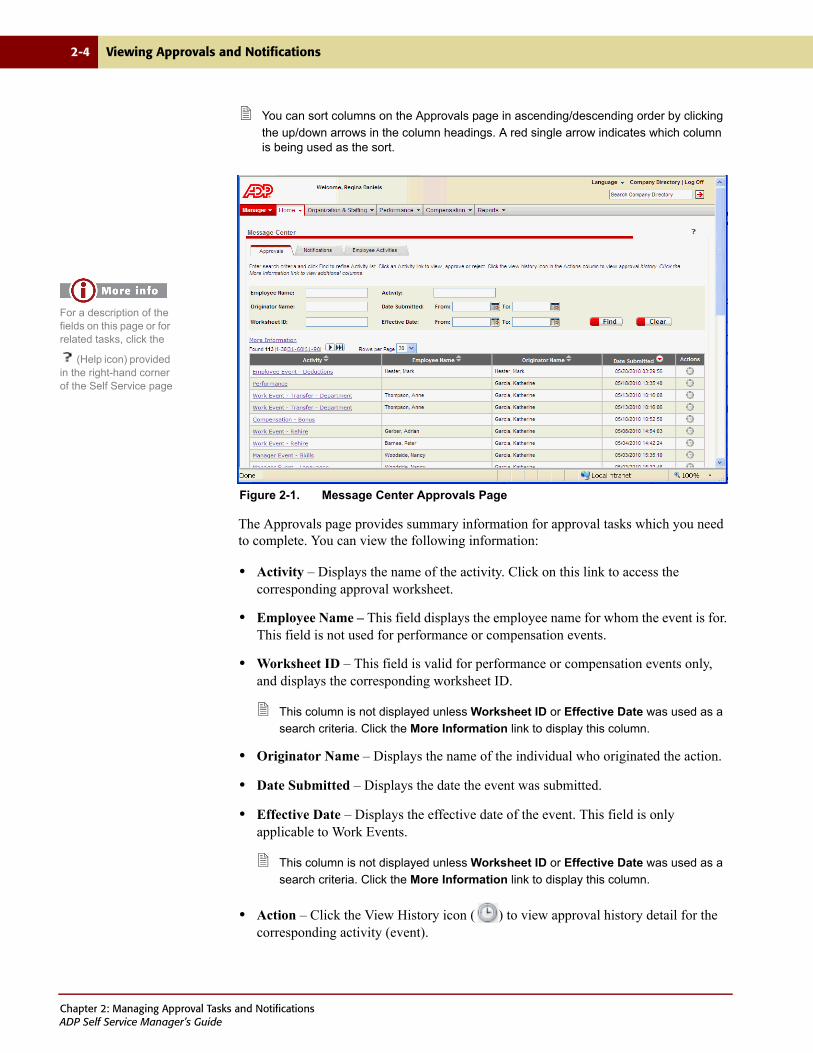
Figure 2-1. Message Center Approvals Page
The Approvals page provides summary information for approval tasks which you need to complete. You can view the following information:
• Activity – Displays the name of the activity. Click on this link to access the corresponding approval worksheet.
• Employee Name – This field displays the employee name for whom the event is for. This field is not used for performance or compensation events.
• Worksheet ID – This field is valid for performance or compensation events only, and displays the corresponding worksheet ID.
This column is not displayed unless Worksheet ID or Effective Date was used as a
search criteria. Click the More Information link to display this column.
• Originator Name – Displays the name of the individual who originated the action.
• Date Submitted – Displays the date the event was submitted.
• Effective Date – Displays the effective date of the event. This field is only applicable to Work Events.
This column is not displayed unless Worksheet ID or Effective Date was used as a
search criteria. Click the More Information link to display this column.
• Action – Click the View History icon ( ) to view approval history detail for the corresponding activity (event).
For a description of the fields on this page or for related tasks, click the
(Help icon) provided in the right-hand corner of the Self Service page
Chapter 2: Managing Approval Tasks and NotificationsADP Self Service Manager’s Guide
Viewing Approvals and Notifications 2-5
3. Click on the appropriate underlined activity. Depending on the type of task you have selected, the corresponding approval worksheet displays. Click Cancel to return to the Approvals page.
You will only have access to the Approval Worksheets if you are an approver.
4. To view approval history detail for a particular task, click the View History icon ( ) in the Actions column. The View Approval History Detail page displays. Click Back to return to the Approvals page.
You have finished viewing approvals. Next you will view notifications.
Chapter 2: Managing Approval Tasks and NotificationsADP Self Service Manager’s Guide
2-6 Viewing Approvals and Notifications
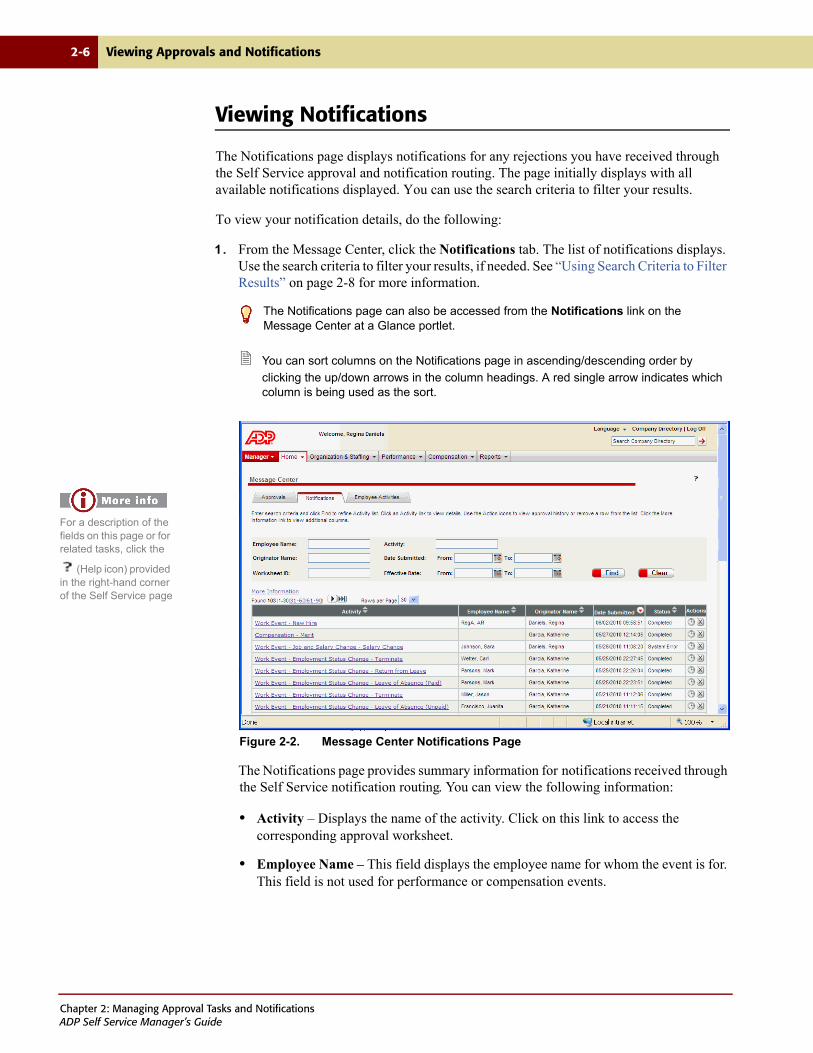
Viewing Notifications
The Notifications page displays notifications for any rejections you have received through the Self Service approval and notification routing. The page initially displays with all available notifications displayed. You can use the search criteria to filter your results.
To view your notification details, do the following:
1. From the Message Center, click the Notifications tab. The list of notifications displays. Use the search criteria to filter your results, if needed. See “Using Search Criteria to Filter Results” on page 2-8 for more information.
You can sort columns on the Notifications page in ascending/descending order by
clicking the up/down arrows in the column headings. A red single arrow indicates which column is being used as the sort.
Figure 2-2. Message Center Notifications Page
The Notifications page provides summary information for notifications received through the Self Service notification routing. You can view the following information:
• Activity – Displays the name of the activity. Click on this link to access the corresponding approval worksheet.
• Employee Name – This field displays the employee name for whom the event is for. This field is not used for performance or compensation events.
The Notifications page can also be accessed from the Notifications link on the Message Center at a Glance portlet.
For a description of the fields on this page or for related tasks, click the
(Help icon) provided in the right-hand corner of the Self Service page
Chapter 2: Managing Approval Tasks and NotificationsADP Self Service Manager’s Guide
Viewing Approvals and Notifications 2-7
• Worksheet ID – This field is valid for performance or compensation events only, and displays the corresponding worksheet ID.
This column is not displayed unless Worksheet ID or Effective Date was used as a
search criteria. Click the More Information link to display this column.
• Originator Name – Displays the name of the individual who originated the action.
• Date Submitted – Displays the date the event was submitted.
• Effective Date – Displays the effective date of the event. This field is only applicable to Work Events.
This column is not displayed unless Worksheet ID or Effective Date was used as a
search criteria. Click the More Information link to display this column.
• Status – Displays the status of the activity.
• Action – Click the View History icon ( ) to view approval history detail for the
corresponding activity (event). Click the Delete icon ( ) to delete the selected notification.
2. To view details for a notification, click on the appropriate underlined activity. Depending on the type of event you have selected, the corresponding event detail page displays. Click Cancel to return to the Notifications page.
(For Managers and Practitioners only) For compensation, performance, and work events
tasks that have been rejected, if you are the originating manager or practitioner, you can access the specific pages through the Notifications page and make corrections to the information. This allows the originating manager or practitioner to make corrections through the Notifications page and resubmit the action rather than re-enter all new information through the compensation, performance, or work events pages.
3. To delete a notification, click the corresponding Delete icon ( ) in the Actions column.
4. To view approval history detail for a particular task, click the View History icon ( ) in the Actions column. The View Approval History Detail page displays. Click Back to return to the Notifications page.
You have finished viewing notifications. Next you will review how to use the search fields to filter your results.
When you delete a notification, it is deleted from your Notifications only. The notification will remain in the Notifications list of other participants in the event.
Chapter 2: Managing Approval Tasks and NotificationsADP Self Service Manager’s Guide
2-8 Viewing Approvals and Notifications
Using Search Criteria to Filter Results
Use the search criteria fields on the Approvals and Notifications pages to filter your Approvals or Notifications results. The default view for both the Approvals and Notifications pages is to show all existing approvals and/or notifications.
The Approvals page does not apply to employees. For employees, Approvals are viewed
through Approval History.
To use the search fields to enter/select criteria, do the following:
1. In the Employee Name field, enter the beginning part of the employee's last name. (If you want to enter their entire name, use the format: Last Name, First Name) All alphanumeric and special characters are valid. The search is a "last name begins with" query and is not case sensitive.
2. In the Originator Name field, enter the beginning part of the originator's last name. (If you want to enter their entire name, use the format: Last Name, First Name) All alphanumeric and special characters are valid. The search is a "last name begins with" query and is not case sensitive.
3. In the Worksheet ID field, enter the worksheet ID. All alphanumeric and special characters are valid. The search is a "contains" query and is not case sensitive. When you include this field in the search criteria, the Worksheet ID and Effective Date columns display in your results. Otherwise, to view the Worksheet ID and/or Effective Date fields, you need to click the More Information link on the Approvals or Notifications pages.
The Worksheet ID field is only applicable to Performance and Compensation events.
4. In the Activity field, enter the name of the activity you want to filter on. The search is a "contains" query and is not case sensitive.
5. In the Date Submitted field, select the date submitted From and To dates. You can either enter the date manually (format mm/dd/yyyy), or select the date from the calendar. If no date is selected, the results will include all records.
6. In the Effective Date field, select the effective date From and To dates. You can either enter the date manually (format mm/dd/yyyy), or select the date from the calendar. If no date is selected, the results will include all records. When you include this field in the search criteria, the Worksheet ID and Effective Date columns display in your results. Otherwise, to view the Worksheet ID and/or Effective Date fields, you need to click the More Information link on the Approvals or Notifications pages.
7. Click Find. The results matching your search criteria display. You can sort columns in ascending/descending order by clicking the up/down arrows in the column headings. A red single arrow indicates which column is being used as the sort. Use the Rows per Page field to specify how many rows of data you want displayed per page. Default is 10. Step through the pages either by clicking the arrows keys, or selecting a page number range.
If you change any of your search criteria, you must click Find again.
Chapter 2: Managing Approval Tasks and NotificationsADP Self Service Manager’s Guide
Viewing Approvals and Notifications 2-9
You have finished viewing approvals and notifications.
For information on processing merit compensation tasks that have been sent to you for approval, see “Managing Merit Compensation Approval Tasks” on page 2-10.
For information on processing bonus compensation tasks that have been sent to you for approval, see “Managing Bonus Compensation Approval Tasks” on page 2-14.
For information on processing performance review tasks that have been sent to you for approval, see “Managing Performance Review Approval Tasks” on page 2-18.
For information on processing job actions, such as employee events, hiring, rehiring, changing job status, transfers, changing job and salary information, and changing employment status, that have been sent to you for approval, see “Processing Job Action Approval Tasks” on page 2-22.
For information on setting up a proxy to complete approval tasks for you in the event you are unavailable to process them in a timely manner, see “Managing Proxy Assignments” on page 2-28.
Chapter 2: Managing Approval Tasks and NotificationsADP Self Service Manager’s Guide

2-10 Managing Merit Compensation Approval Tasks
Managing Merit Compensation Approval Tasks
The Merit Compensation Approval Worksheet lists the merit compensation details for a compensation manager's direct reports, and allows you to approve or reject the compensation proposal. You will only have access to the Merit Compensation Approval Worksheet if you are an approver. Click the underlined employee's name to see the Employee Compensation History for that employee.
Only outstanding approval tasks are displayed. Once an approval task has been processed, it is removed from the Approvals page.
For detailed information on initiating compensation proposals, see Chapter 4, “Managing
Compensation.”
Managing merit compensation approvals includes the following tasks:
• Viewing and Printing Merit Compensation Approval Worksheets
• Processing Merit Compensation Approval Tasks
Viewing and Printing Merit Compensation Approval Worksheets
Once an approval task has been processed, it is removed from the Approvals page. You may want to print the approval worksheets before you complete the approval.
To view and print your merit compensation approval worksheets, do the following:
1. From the Message Center, select the Approvals tab (if not already selected). The list of approval tasks displays, as shown in Figure 2-1.
The Approvals page can also be accessed from the Approvals link on the Message Center at a Glance portlet.
Managing Merit Compensation Approval Tasks
Viewing and Printing Merit Compensation Approval Worksheets
Processing Merit Compensation Approval Tasks
Chapter 2: Managing Approval Tasks and NotificationsADP Self Service Manager’s Guide
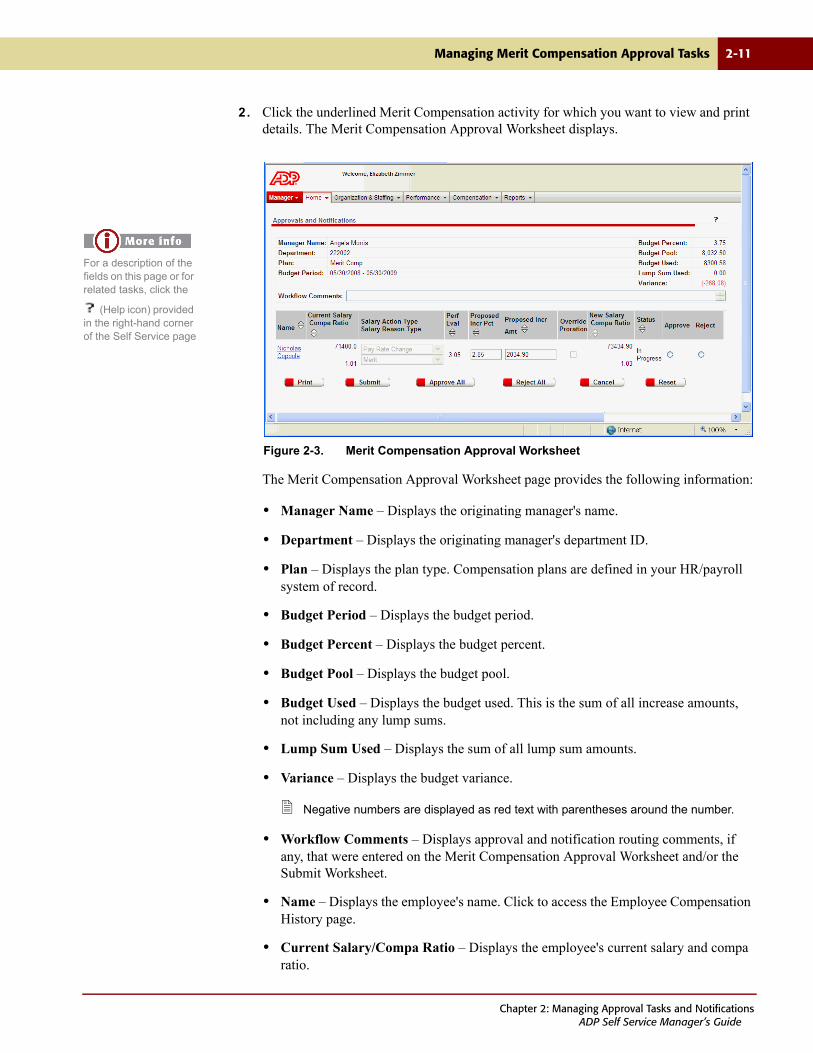
Managing Merit Compensation Approval Tasks 2-11
2. Click the underlined Merit Compensation activity for which you want to view and print details. The Merit Compensation Approval Worksheet displays.
Figure 2-3. Merit Compensation Approval Worksheet
The Merit Compensation Approval Worksheet page provides the following information:
• Manager Name – Displays the originating manager's name.
• Department – Displays the originating manager's department ID.
• Plan – Displays the plan type. Compensation plans are defined in your HR/payroll system of record.
• Budget Period – Displays the budget period.
• Budget Percent – Displays the budget percent.
• Budget Pool – Displays the budget pool.
• Budget Used – Displays the budget used. This is the sum of all increase amounts, not including any lump sums.
• Lump Sum Used – Displays the sum of all lump sum amounts.
• Variance – Displays the budget variance.
Negative numbers are displayed as red text with parentheses around the number.
• Workflow Comments – Displays approval and notification routing comments, if any, that were entered on the Merit Compensation Approval Worksheet and/or the Submit Worksheet.
• Name – Displays the employee's name. Click to access the Employee Compensation History page.
• Current Salary/Compa Ratio – Displays the employee's current salary and compa ratio.
For a description of the fields on this page or for related tasks, click the
(Help icon) provided in the right-hand corner of the Self Service page
Chapter 2: Managing Approval Tasks and NotificationsADP Self Service Manager’s Guide
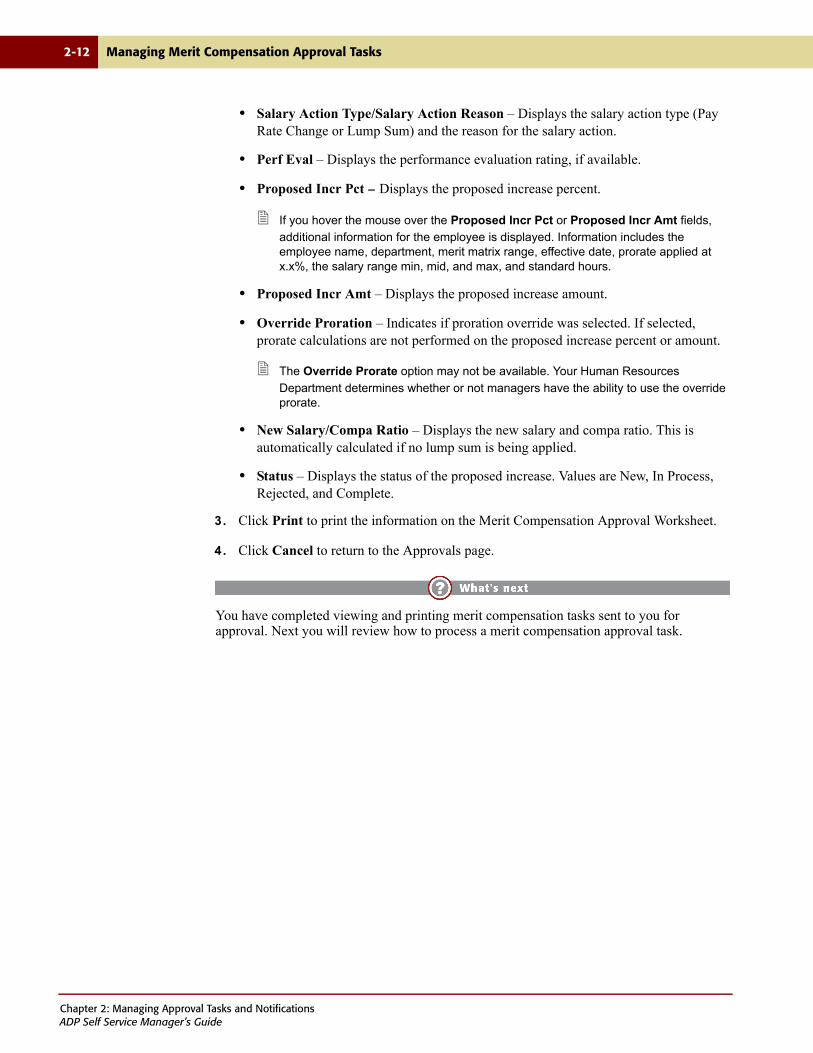
2-12 Managing Merit Compensation Approval Tasks
• Salary Action Type/Salary Action Reason – Displays the salary action type (Pay Rate Change or Lump Sum) and the reason for the salary action.
• Perf Eval – Displays the performance evaluation rating, if available.
• Proposed Incr Pct – Displays the proposed increase percent.
If you hover the mouse over the Proposed Incr Pct or Proposed Incr Amt fields,
additional information for the employee is displayed. Information includes the employee name, department, merit matrix range, effective date, prorate applied at x.x%, the salary range min, mid, and max, and standard hours.
• Proposed Incr Amt – Displays the proposed increase amount.
• Override Proration – Indicates if proration override was selected. If selected, prorate calculations are not performed on the proposed increase percent or amount.
The Override Prorate option may not be available. Your Human Resources
Department determines whether or not managers have the ability to use the override prorate.
• New Salary/Compa Ratio – Displays the new salary and compa ratio. This is automatically calculated if no lump sum is being applied.
• Status – Displays the status of the proposed increase. Values are New, In Process, Rejected, and Complete.
3. Click Print to print the information on the Merit Compensation Approval Worksheet.
4. Click Cancel to return to the Approvals page.
You have completed viewing and printing merit compensation tasks sent to you for approval. Next you will review how to process a merit compensation approval task.
Chapter 2: Managing Approval Tasks and NotificationsADP Self Service Manager’s Guide
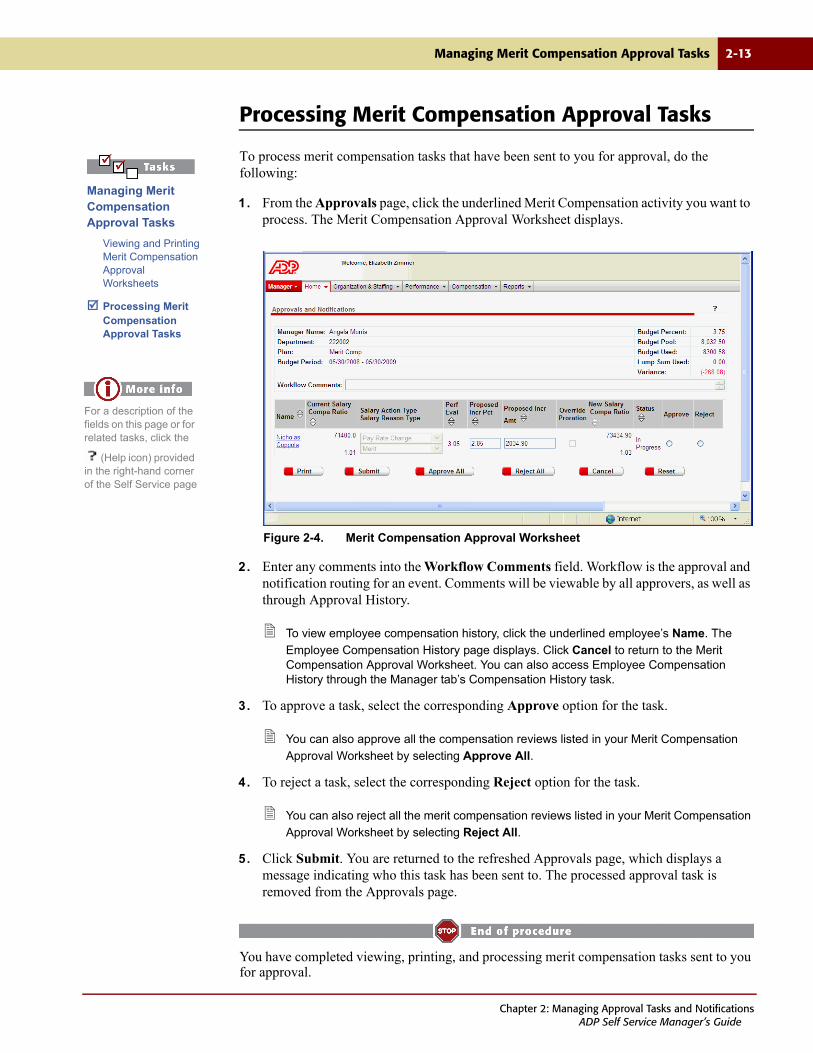
Managing Merit Compensation Approval Tasks 2-13
Processing Merit Compensation Approval Tasks
To process merit compensation tasks that have been sent to you for approval, do the following:
1. From the Approvals page, click the underlined Merit Compensation activity you want to process. The Merit Compensation Approval Worksheet displays.
Figure 2-4. Merit Compensation Approval Worksheet
2. Enter any comments into the Workflow Comments field. Workflow is the approval and notification routing for an event. Comments will be viewable by all approvers, as well as through Approval History.
To view employee compensation history, click the underlined employee’s Name. The
Employee Compensation History page displays. Click Cancel to return to the Merit Compensation Approval Worksheet. You can also access Employee Compensation History through the Manager tab’s Compensation History task.
3. To approve a task, select the corresponding Approve option for the task.
You can also approve all the compensation reviews listed in your Merit Compensation
Approval Worksheet by selecting Approve All.
4. To reject a task, select the corresponding Reject option for the task.
You can also reject all the merit compensation reviews listed in your Merit Compensation
Approval Worksheet by selecting Reject All.
5. Click Submit. You are returned to the refreshed Approvals page, which displays a message indicating who this task has been sent to. The processed approval task is removed from the Approvals page.
You have completed viewing, printing, and processing merit compensation tasks sent to you for approval.
Managing Merit Compensation Approval Tasks
Viewing and Printing Merit Compensation Approval Worksheets
Processing Merit Compensation Approval Tasks
For a description of the fields on this page or for related tasks, click the
(Help icon) provided in the right-hand corner of the Self Service page
Chapter 2: Managing Approval Tasks and NotificationsADP Self Service Manager’s Guide

2-14 Managing Bonus Compensation Approval Tasks
Managing Bonus Compensation Approval Tasks
The Bonus Compensation Approval Worksheet lists the bonus compensation details for a compensation manager's direct reports, and allows you to approve or reject the compensation proposal. You will only have access to the Bonus Compensation Approval Worksheet if you are an approver. Click the underlined employee's name to see the Employee Compensation History for that employee.
Only outstanding approval tasks are displayed. Once an approval task has been processed, it is removed from the Approvals page.
For detailed information on initiating compensation proposals, see Chapter 4, “Managing
Compensation.”
Managing bonus compensation approvals includes the following tasks:
• Viewing and Printing Bonus Compensation Approval Worksheets
• Processing Bonus Compensation Approval Tasks
Chapter 2: Managing Approval Tasks and NotificationsADP Self Service Manager’s Guide
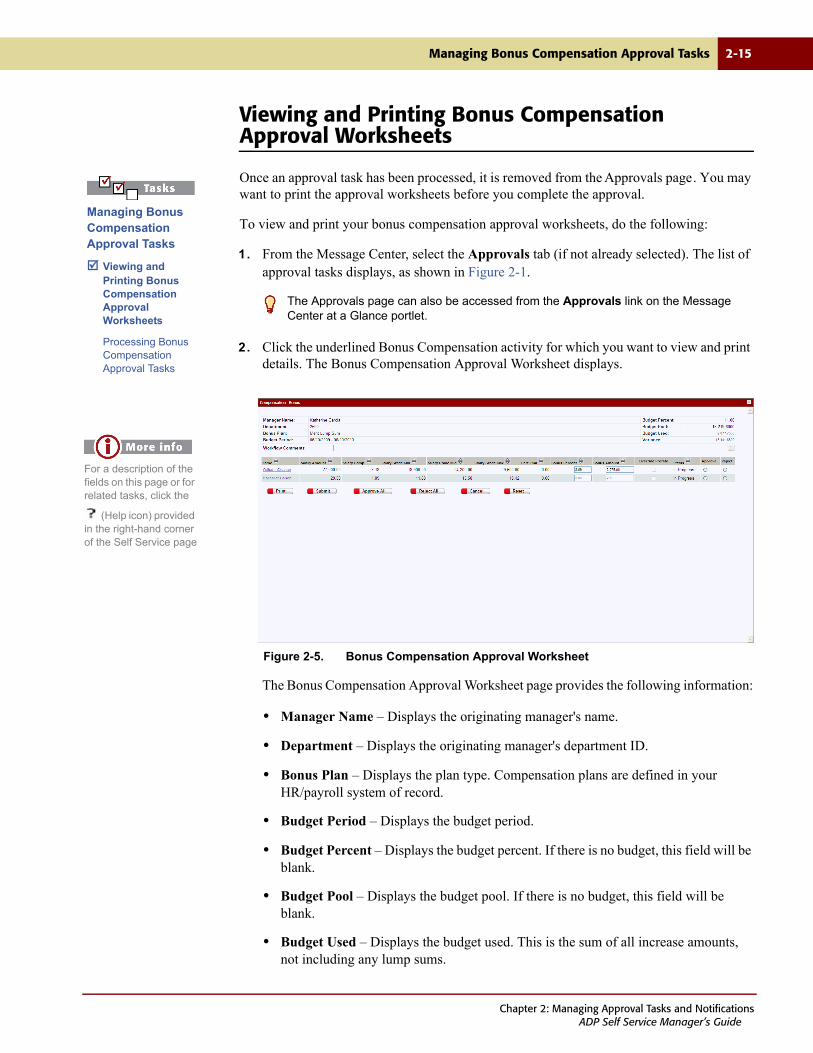
Managing Bonus Compensation Approval Tasks 2-15
Viewing and Printing Bonus Compensation Approval Worksheets
Once an approval task has been processed, it is removed from the Approvals page. You may want to print the approval worksheets before you complete the approval.
To view and print your bonus compensation approval worksheets, do the following:
1. From the Message Center, select the Approvals tab (if not already selected). The list of approval tasks displays, as shown in Figure 2-1.
2. Click the underlined Bonus Compensation activity for which you want to view and print details. The Bonus Compensation Approval Worksheet displays.
Figure 2-5. Bonus Compensation Approval Worksheet
The Bonus Compensation Approval Worksheet page provides the following information:
• Manager Name – Displays the originating manager's name.
• Department – Displays the originating manager's department ID.
• Bonus Plan – Displays the plan type. Compensation plans are defined in your HR/payroll system of record.
• Budget Period – Displays the budget period.
• Budget Percent – Displays the budget percent. If there is no budget, this field will be blank.
• Budget Pool – Displays the budget pool. If there is no budget, this field will be blank.
• Budget Used – Displays the budget used. This is the sum of all increase amounts, not including any lump sums.
The Approvals page can also be accessed from the Approvals link on the Message Center at a Glance portlet.
Managing Bonus Compensation Approval Tasks
Viewing and Printing Bonus Compensation Approval Worksheets
Processing Bonus Compensation Approval Tasks
For a description of the fields on this page or for related tasks, click the
(Help icon) provided in the right-hand corner of the Self Service page
Chapter 2: Managing Approval Tasks and NotificationsADP Self Service Manager’s Guide
2-16 Managing Bonus Compensation Approval Tasks
• Comments – Displays approval and notification routing comments, if any, that were entered on the Bonus Compensation Approval Worksheet and/or the Submit Worksheet.
• Name – Displays the employee's name. Click to access the Employee Compensation History page.
• Salary Amount – Displays the employee's current salary.
• Salary Comp – Displays the employee's current salary compa ratio.
• Salary Grade Min/Mid/Max – Displays the employee's salary grade minimum/mid-point/maximum.
• Perf Eval – Displays the performance evaluation rating, if available.
• Bonus Percent – Displays the proposed increase percent.
If you hover the mouse over the Bonus Percent and Bonus Amount fields,
additional information for the employee is displayed. Information includes the employee name, department, effective date, prorate applied at x.x%, and the performance evaluation rating.
• Bonus Amount – Displays the proposed increase amount.
• Override Proration – Indicates if proration override was selected. If selected, prorate calculations are not performed on the proposed increase percent or amount.
The Override Prorate option may not be available. Your Human Resources
Department determines whether or not managers have the ability to use the override prorate.
• Status – Displays the status of the proposed increase. Values are New, In Process, Rejected, and Complete.
3. Click Print to print the information on the Bonus Compensation Approval Worksheet.
4. Click Cancel to return to the Approvals page.
You have completed viewing and printing bonus compensation tasks sent to you for approval. Next you will review how to process a bonus compensation approval task.
Chapter 2: Managing Approval Tasks and NotificationsADP Self Service Manager’s Guide
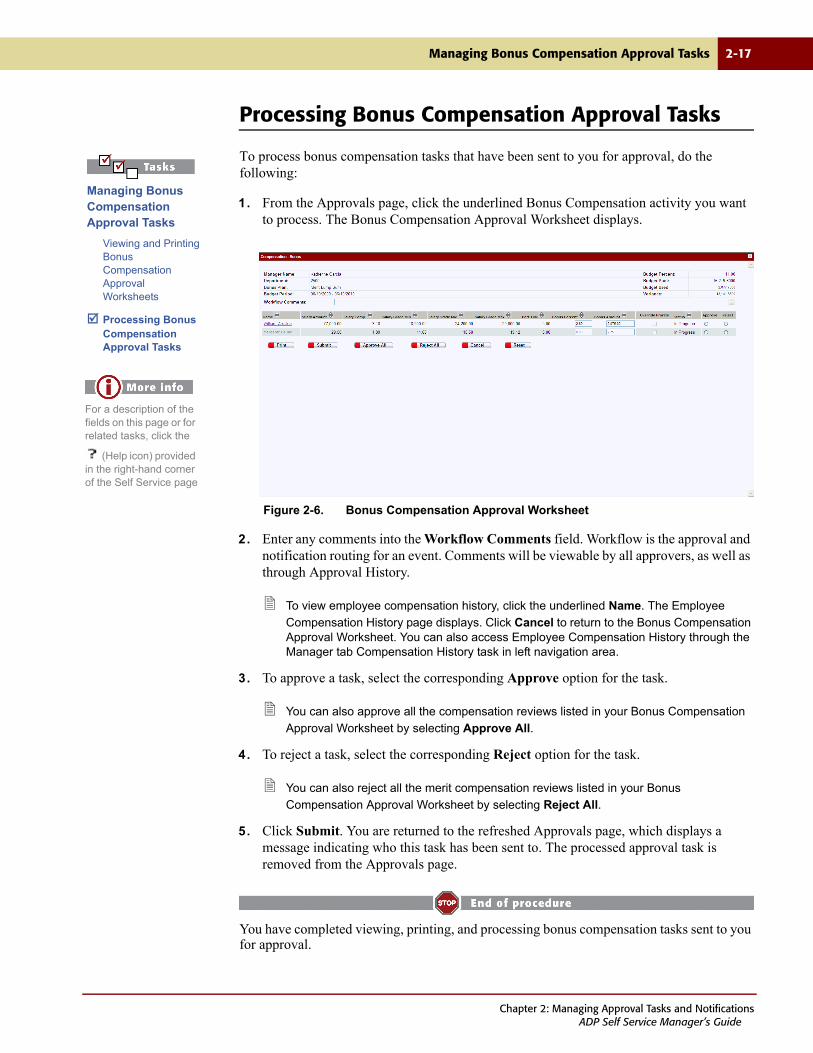
Managing Bonus Compensation Approval Tasks 2-17
Processing Bonus Compensation Approval Tasks
To process bonus compensation tasks that have been sent to you for approval, do the following:
1. From the Approvals page, click the underlined Bonus Compensation activity you want to process. The Bonus Compensation Approval Worksheet displays.
Figure 2-6. Bonus Compensation Approval Worksheet
2. Enter any comments into the Workflow Comments field. Workflow is the approval and notification routing for an event. Comments will be viewable by all approvers, as well as through Approval History.
To view employee compensation history, click the underlined Name. The Employee
Compensation History page displays. Click Cancel to return to the Bonus Compensation Approval Worksheet. You can also access Employee Compensation History through the Manager tab Compensation History task in left navigation area.
3. To approve a task, select the corresponding Approve option for the task.
You can also approve all the compensation reviews listed in your Bonus Compensation
Approval Worksheet by selecting Approve All.
4. To reject a task, select the corresponding Reject option for the task.
You can also reject all the merit compensation reviews listed in your Bonus
Compensation Approval Worksheet by selecting Reject All.
5. Click Submit. You are returned to the refreshed Approvals page, which displays a message indicating who this task has been sent to. The processed approval task is removed from the Approvals page.
You have completed viewing, printing, and processing bonus compensation tasks sent to you for approval.
Managing Bonus Compensation Approval Tasks
Viewing and Printing Bonus Compensation Approval Worksheets
Processing Bonus Compensation Approval Tasks
For a description of the fields on this page or for related tasks, click the
(Help icon) provided in the right-hand corner of the Self Service page
Chapter 2: Managing Approval Tasks and NotificationsADP Self Service Manager’s Guide
2-18 Managing Performance Review Approval Tasks
Managing Performance Review Approval Tasks
The Performance Approval Worksheet lists the performance review details and allows you to approve or reject the performance review. You will only have access to the Performance Approval Worksheet if you are an approver.
Only outstanding approval tasks are displayed. Once an approval task has been processed, it is removed from the Approvals page.
For detailed information on initiating performance reviews, see Chapter 5, “Managing
Performance Reviews.”
Managing performance review approvals includes the following tasks:
• Viewing and Printing Performance Approval Worksheets
• Processing Performance Review Approval Tasks
Chapter 2: Managing Approval Tasks and NotificationsADP Self Service Manager’s Guide
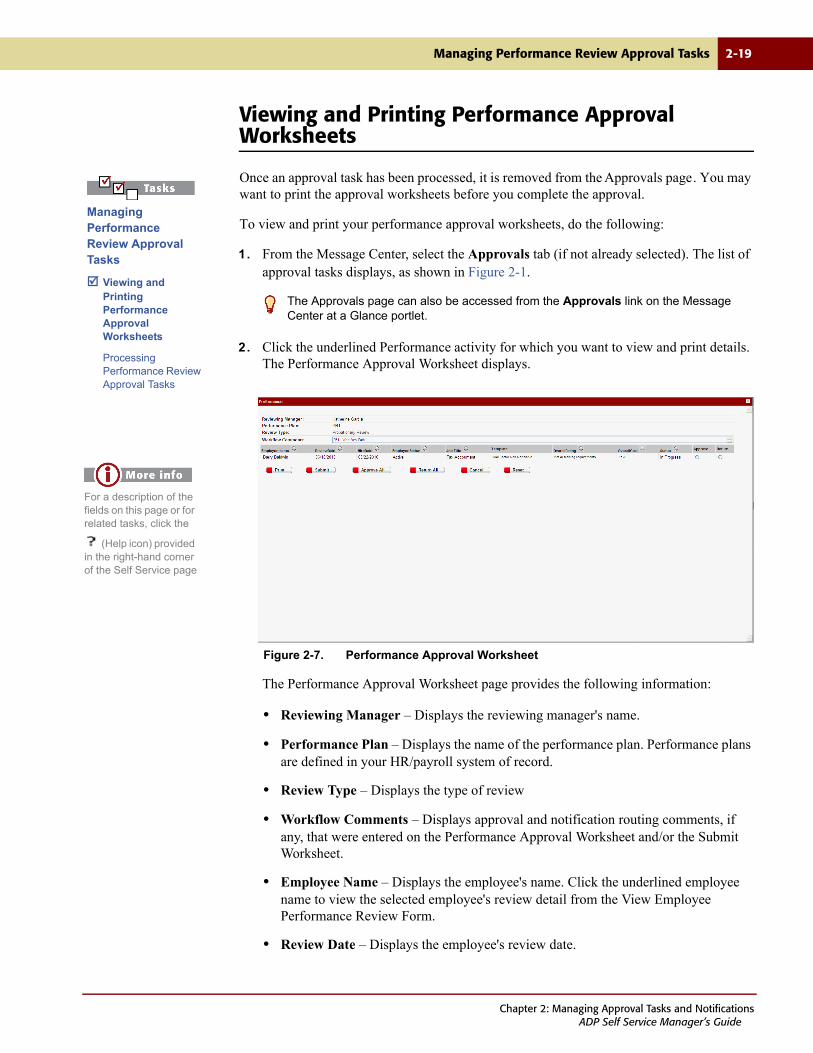
Managing Performance Review Approval Tasks 2-19
Viewing and Printing Performance Approval Worksheets
Once an approval task has been processed, it is removed from the Approvals page. You may want to print the approval worksheets before you complete the approval.
To view and print your performance approval worksheets, do the following:
1. From the Message Center, select the Approvals tab (if not already selected). The list of approval tasks displays, as shown in Figure 2-1.
2. Click the underlined Performance activity for which you want to view and print details. The Performance Approval Worksheet displays.
Figure 2-7. Performance Approval Worksheet
The Performance Approval Worksheet page provides the following information:
• Reviewing Manager – Displays the reviewing manager's name.
• Performance Plan – Displays the name of the performance plan. Performance plans are defined in your HR/payroll system of record.
• Review Type – Displays the type of review
• Workflow Comments – Displays approval and notification routing comments, if any, that were entered on the Performance Approval Worksheet and/or the Submit Worksheet.
• Employee Name – Displays the employee's name. Click the underlined employee name to view the selected employee's review detail from the View Employee Performance Review Form.
• Review Date – Displays the employee's review date.
The Approvals page can also be accessed from the Approvals link on the Message Center at a Glance portlet.
Managing Performance Review Approval Tasks
Viewing and Printing Performance Approval Worksheets
Processing Performance Review Approval Tasks
For a description of the fields on this page or for related tasks, click the
(Help icon) provided in the right-hand corner of the Self Service page
Chapter 2: Managing Approval Tasks and NotificationsADP Self Service Manager’s Guide
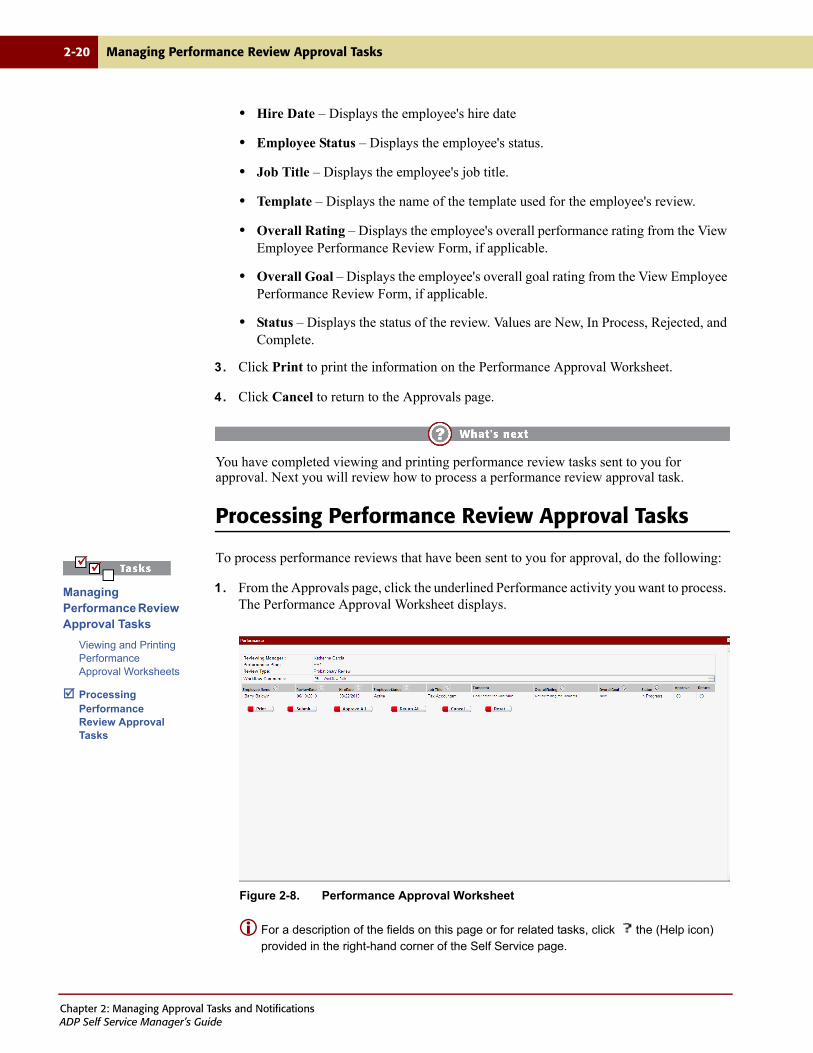
2-20 Managing Performance Review Approval Tasks
• Hire Date – Displays the employee's hire date
• Employee Status – Displays the employee's status.
• Job Title – Displays the employee's job title.
• Template – Displays the name of the template used for the employee's review.
• Overall Rating – Displays the employee's overall performance rating from the View Employee Performance Review Form, if applicable.
• Overall Goal – Displays the employee's overall goal rating from the View Employee Performance Review Form, if applicable.
• Status – Displays the status of the review. Values are New, In Process, Rejected, and Complete.
3. Click Print to print the information on the Performance Approval Worksheet.
4. Click Cancel to return to the Approvals page.
You have completed viewing and printing performance review tasks sent to you for approval. Next you will review how to process a performance review approval task.
Processing Performance Review Approval Tasks
To process performance reviews that have been sent to you for approval, do the following:
1. From the Approvals page, click the underlined Performance activity you want to process. The Performance Approval Worksheet displays.
Figure 2-8. Performance Approval Worksheet
For a description of the fields on this page or for related tasks, click the (Help icon) provided in the right-hand corner of the Self Service page.
Managing Performance Review Approval Tasks
Viewing and Printing Performance Approval Worksheets
Processing Performance Review Approval Tasks
Chapter 2: Managing Approval Tasks and NotificationsADP Self Service Manager’s Guide
Managing Performance Review Approval Tasks 2-21
2. Enter any comments into the Workflow Comments field. Workflow is the approval and notification routing for an event. Comments will be viewable by all approvers, as well as through Approval History.
To view employee performance review detail, click the underlined Employee Name. The
View Employee Performance Review Form displays (see Chapter 5, “Managing Performance Reviews” for additional details). Click the View Performance History link to access the Employee Performance History. Click Cancel to navigate back to the Performance Approval Worksheet. You can also access Employee Performance History through the Manager tab’s Performance History task.
3. To approve a task, select the corresponding Approve option for the task.
You can also approve all the performance reviews listed in your Performance Approval
Worksheet by selecting Approve All.
4. To reject a task, select the corresponding Reject option for the task.
You can also reject all the performance reviews listed in your Performance Approval
Worksheet by selecting Reject All.
5. Click Submit. You are returned to the refreshed Approvals page, which displays a message indicating who this task has been sent to. The processed approval task is removed from the Approvals page.
You have completed viewing, printing, and processing performance review tasks sent to you for approval.
Chapter 2: Managing Approval Tasks and NotificationsADP Self Service Manager’s Guide
2-22 Processing Job Action Approval Tasks
Processing Job Action Approval Tasks
You will only have access to the work event approval tasks if you are an approver. Work events include:
• New Hires
• Rehires
• Changing an employee’s job status
• Transferring employees
• Changing an employee’s job and salary information
• Changing an employee’s employment status
• Performing a Comprehensive Employment Change
For complete details on initiating work events, see Chapter 6, “Managing Work Events.”
Only outstanding approval tasks are displayed. Once an approval task has been processed, it is removed from the Approvals page.
To process job actions that have been sent to you for approval, do the following:
1. From the Message Center select the Approvals tab (if not already selected). The list of approval tasks displays.
2. Click on the appropriate underlined job action. The corresponding job action detail page displays.
3. To approve the employee event, select Approve.
4. To reject the employee event, select Reject.
You are returned to the refreshed Approvals page, which displays a message indicating either to whom this task has been sent, or that the task is completed. The processed approval task is removed from the Approvals page.
Chapter 2: Managing Approval Tasks and NotificationsADP Self Service Manager’s Guide
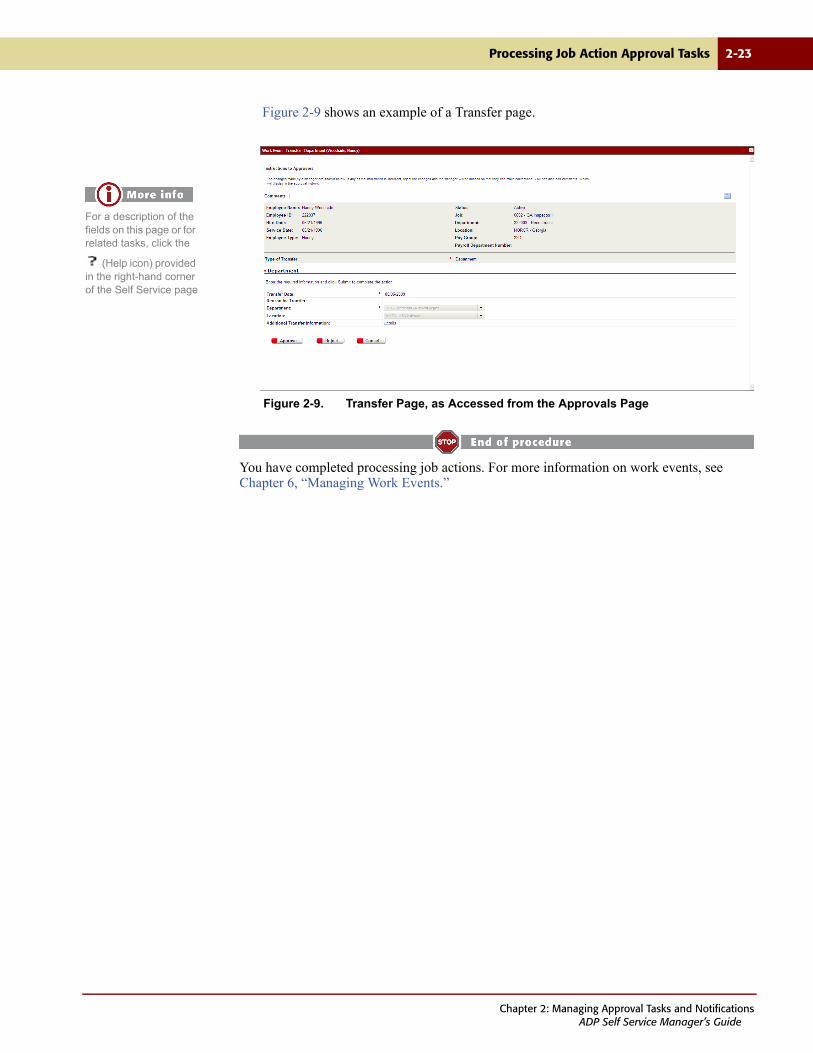
Processing Job Action Approval Tasks 2-23
Figure 2-9 shows an example of a Transfer page.
Figure 2-9. Transfer Page, as Accessed from the Approvals Page
You have completed processing job actions. For more information on work events, see Chapter 6, “Managing Work Events.”
For a description of the fields on this page or for related tasks, click the
(Help icon) provided in the right-hand corner of the Self Service page
Chapter 2: Managing Approval Tasks and NotificationsADP Self Service Manager’s Guide
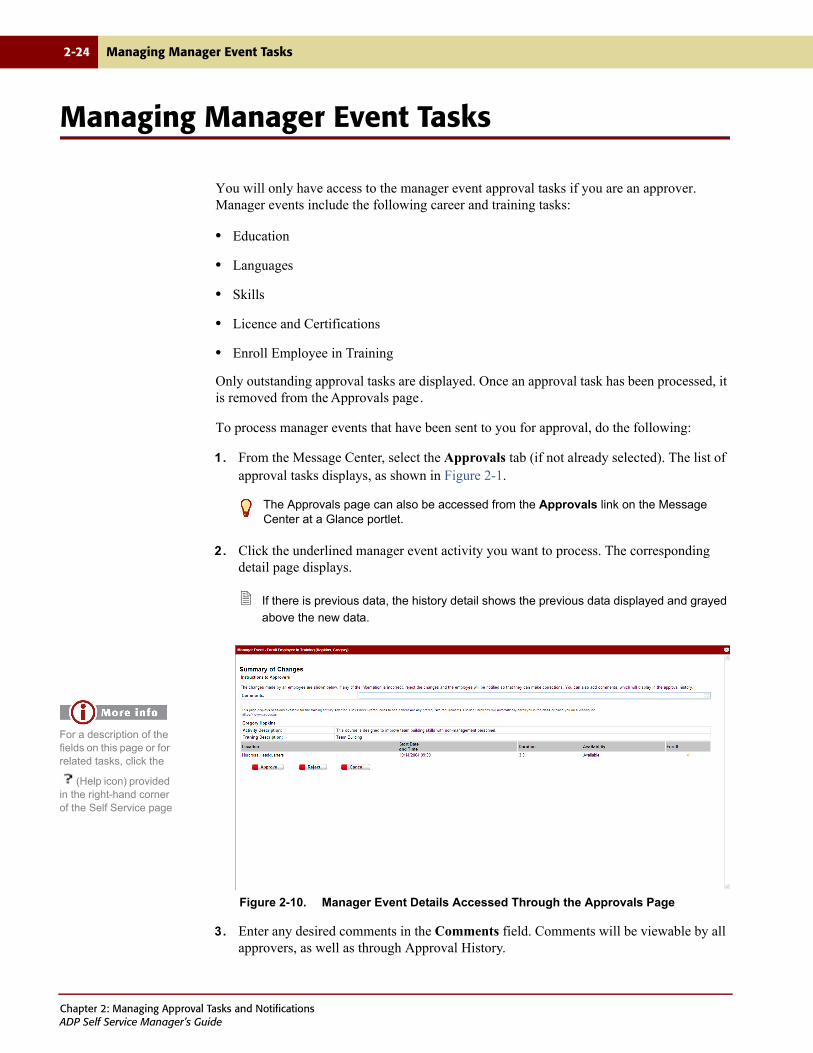
2-24 Managing Manager Event Tasks
Managing Manager Event Tasks
You will only have access to the manager event approval tasks if you are an approver. Manager events include the following career and training tasks:
• Education
• Languages
• Skills
• Licence and Certifications
• Enroll Employee in Training
Only outstanding approval tasks are displayed. Once an approval task has been processed, it is removed from the Approvals page.
To process manager events that have been sent to you for approval, do the following:
1. From the Message Center, select the Approvals tab (if not already selected). The list of approval tasks displays, as shown in Figure 2-1.
2. Click the underlined manager event activity you want to process. The corresponding detail page displays.
If there is previous data, the history detail shows the previous data displayed and grayed
above the new data.
Figure 2-10. Manager Event Details Accessed Through the Approvals Page
3. Enter any desired comments in the Comments field. Comments will be viewable by all approvers, as well as through Approval History.
The Approvals page can also be accessed from the Approvals link on the Message Center at a Glance portlet.
For a description of the fields on this page or for related tasks, click the
(Help icon) provided in the right-hand corner of the Self Service page
Chapter 2: Managing Approval Tasks and NotificationsADP Self Service Manager’s Guide
Managing Manager Event Tasks 2-25
4. To approve the event, select Approve.
5. To reject the event, select Reject. You are returned to the refreshed Approvals page, which displays a message indicating either who this task has been sent to, or that the task is completed. The processed approval task is removed from the Approvals page.
You have finished processing any manager events that have been sent to you for approval.
Chapter 2: Managing Approval Tasks and NotificationsADP Self Service Manager’s Guide
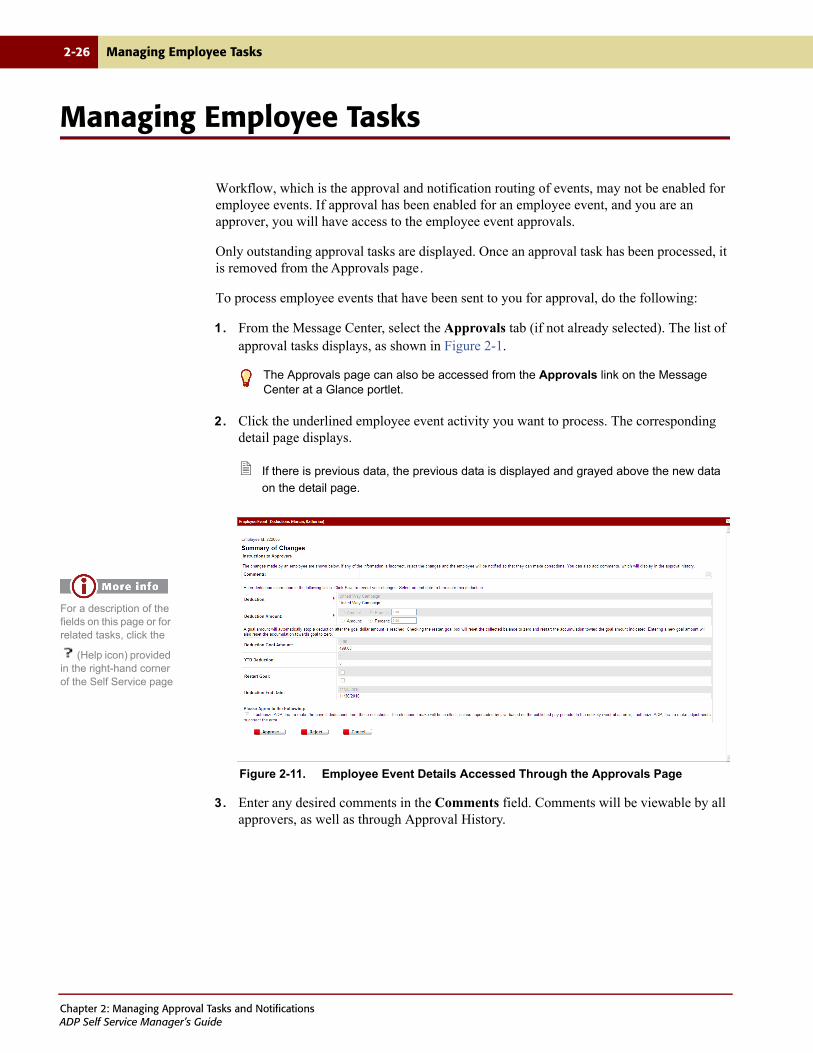
2-26 Managing Employee Tasks
Managing Employee Tasks
Workflow, which is the approval and notification routing of events, may not be enabled for employee events. If approval has been enabled for an employee event, and you are an approver, you will have access to the employee event approvals.
Only outstanding approval tasks are displayed. Once an approval task has been processed, it is removed from the Approvals page.
To process employee events that have been sent to you for approval, do the following:
1. From the Message Center, select the Approvals tab (if not already selected). The list of approval tasks displays, as shown in Figure 2-1.
2. Click the underlined employee event activity you want to process. The corresponding detail page displays.
If there is previous data, the previous data is displayed and grayed above the new data
on the detail page.
Figure 2-11. Employee Event Details Accessed Through the Approvals Page
3. Enter any desired comments in the Comments field. Comments will be viewable by all approvers, as well as through Approval History.
The Approvals page can also be accessed from the Approvals link on the Message Center at a Glance portlet.
For a description of the fields on this page or for related tasks, click the
(Help icon) provided in the right-hand corner of the Self Service page
Chapter 2: Managing Approval Tasks and NotificationsADP Self Service Manager’s Guide

Managing Employee Tasks 2-27
4. To approve the employee event, select Approve.
5. To reject the employee event, select Reject. You are returned to the refreshed Approvals page, which displays a message indicating either who this task has been sent to, or that the task is completed. The processed approval task is removed from the Approvals page.
You have finished processing any employee events that have been sent to you for approval.
Chapter 2: Managing Approval Tasks and NotificationsADP Self Service Manager’s Guide
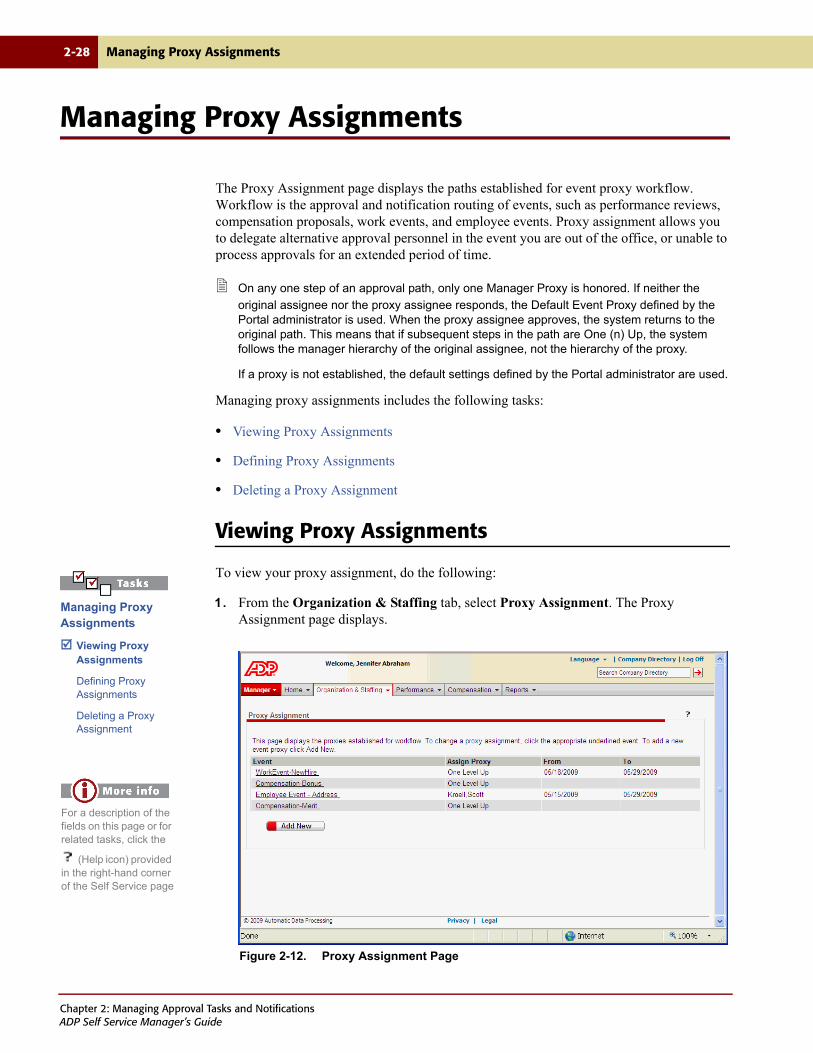
2-28 Managing Proxy Assignments
Managing Proxy Assignments
The Proxy Assignment page displays the paths established for event proxy workflow. Workflow is the approval and notification routing of events, such as performance reviews, compensation proposals, work events, and employee events. Proxy assignment allows you to delegate alternative approval personnel in the event you are out of the office, or unable to process approvals for an extended period of time.
On any one step of an approval path, only one Manager Proxy is honored. If neither the
original assignee nor the proxy assignee responds, the Default Event Proxy defined by the Portal administrator is used. When the proxy assignee approves, the system returns to the original path. This means that if subsequent steps in the path are One (n) Up, the system follows the manager hierarchy of the original assignee, not the hierarchy of the proxy.
If a proxy is not established, the default settings defined by the Portal administrator are used.
Managing proxy assignments includes the following tasks:
• Viewing Proxy Assignments
• Defining Proxy Assignments
• Deleting a Proxy Assignment
Viewing Proxy Assignments
To view your proxy assignment, do the following:
1. From the Organization & Staffing tab, select Proxy Assignment. The Proxy Assignment page displays.
Figure 2-12. Proxy Assignment Page
Managing Proxy Assignments
Viewing Proxy Assignments
Defining Proxy Assignments
Deleting a Proxy Assignment
For a description of the fields on this page or for related tasks, click the
(Help icon) provided in the right-hand corner of the Self Service page
Chapter 2: Managing Approval Tasks and NotificationsADP Self Service Manager’s Guide
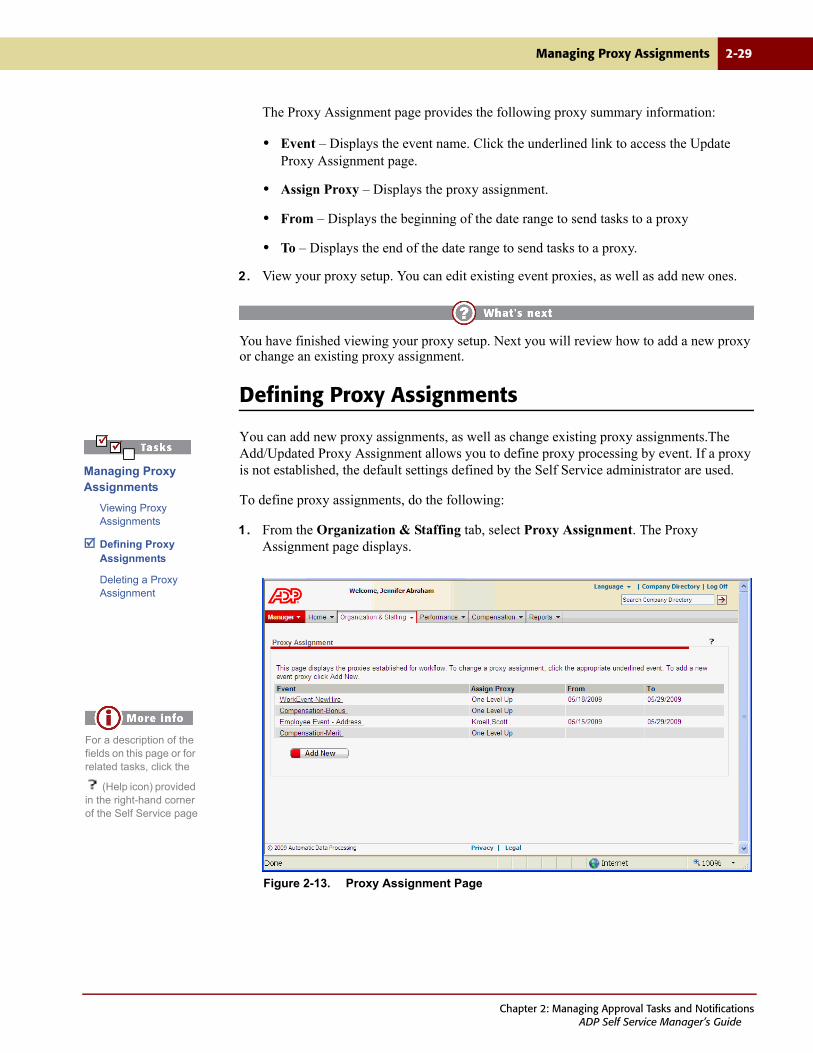
Managing Proxy Assignments 2-29
The Proxy Assignment page provides the following proxy summary information:
• Event – Displays the event name. Click the underlined link to access the Update Proxy Assignment page.
• Assign Proxy – Displays the proxy assignment.
• From – Displays the beginning of the date range to send tasks to a proxy
• To – Displays the end of the date range to send tasks to a proxy.
2. View your proxy setup. You can edit existing event proxies, as well as add new ones.
You have finished viewing your proxy setup. Next you will review how to add a new proxy or change an existing proxy assignment.
Defining Proxy Assignments
You can add new proxy assignments, as well as change existing proxy assignments.The Add/Updated Proxy Assignment allows you to define proxy processing by event. If a proxy is not established, the default settings defined by the Self Service administrator are used.
To define proxy assignments, do the following:
1. From the Organization & Staffing tab, select Proxy Assignment. The Proxy Assignment page displays.
Figure 2-13. Proxy Assignment Page
Managing Proxy Assignments
Viewing Proxy Assignments
Defining Proxy Assignments
Deleting a Proxy Assignment
For a description of the fields on this page or for related tasks, click the
(Help icon) provided in the right-hand corner of the Self Service page
Chapter 2: Managing Approval Tasks and NotificationsADP Self Service Manager’s Guide
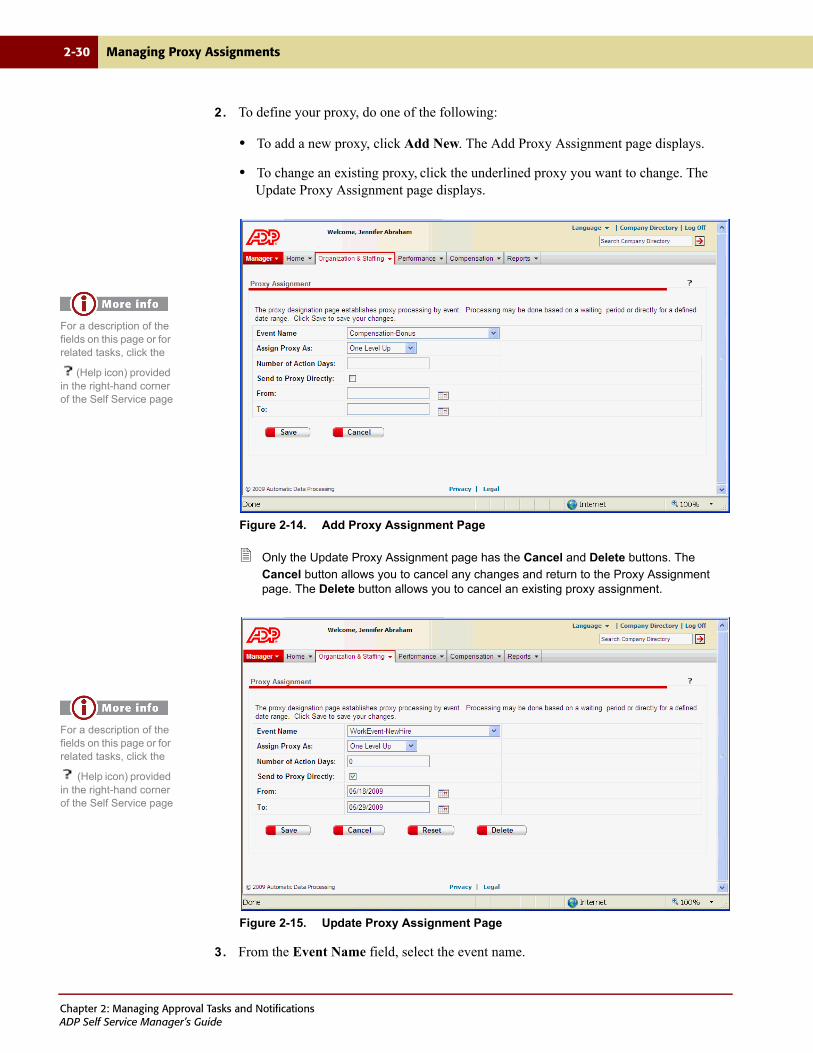
2-30 Managing Proxy Assignments
2. To define your proxy, do one of the following:
• To add a new proxy, click Add New. The Add Proxy Assignment page displays.
• To change an existing proxy, click the underlined proxy you want to change. The Update Proxy Assignment page displays.
Figure 2-14. Add Proxy Assignment Page
Only the Update Proxy Assignment page has the Cancel and Delete buttons. The
Cancel button allows you to cancel any changes and return to the Proxy Assignment page. The Delete button allows you to cancel an existing proxy assignment.
Figure 2-15. Update Proxy Assignment Page
3. From the Event Name field, select the event name.
For a description of the fields on this page or for related tasks, click the
(Help icon) provided in the right-hand corner of the Self Service page
For a description of the fields on this page or for related tasks, click the
(Help icon) provided in the right-hand corner of the Self Service page
Chapter 2: Managing Approval Tasks and NotificationsADP Self Service Manager’s Guide
Managing Proxy Assignments 2-31
4. From the Assign Proxy As field, select the proxy. If nothing is selected here, the default settings defined by the Portal administrator are used. Available options are:
• One Level Up
• Workgroup – If Workgroup is selected as the assigned proxy, a work group selection field displays. When this field initially displays, it will show Select Workgroup. This field is populated with a list of the defined work groups. Select the work group from the drop-down list.
• Specific Manager – If Specific Manager is selected as the assigned proxy, a manager selection field and a search button display. Click Find for a list of all managers, or refine your search by entering the last name of a manager and then clicking Find. The search results display any proxy managers that met the search criteria. Click the underlined Manager Name to select that manager as the proxy. You are returned to the Add Proxy Assignment page.
5. In the Number of Action Days field, enter the number of days to wait before a task will be routed to the proxy.
If the Send to Proxy Directly option is selected, this wait period is ignored.
6. Select Send to Proxy Directly if you want the task to be sent directly to the proxy for the stated time period.
If the Send to Proxy Directly option is selected, the wait period displayed in the
Number of Action Days field is ignored. A date range must be entered when the Send-to-Proxy Directly option is selected.
7. In the From field, enter the beginning of the date range you want to send tasks to a proxy. You can either enter the date manually (format mm/dd/yyyy), or select the date from the calendar.
8. In the To field, enter the end of the date range you want to send tasks to a proxy. You can either enter the date manually (format mm/dd/yyyy), or select the date from the calendar.
9. Click Save to save your changes. The new event proxy will be displayed on the Proxy Assignment page.
Click Cancel to cancel any changes and return to the Proxy Assignment page.
You have finished defining a new proxy assignment. Next you will review how to delete an existing proxy.
The maximum number of days in the proxy assignment is not absolute because the activity monitor, which triggers the proxy assignment, runs once a day at 1:00 a.m. system time. For example, if a user submits an event on Tuesday at 1:00 p.m. and the number of days before an event gets rerouted to the proxy is defined as 2, the event will not be rerouted until 1:00 a.m. on Friday morning.
Chapter 2: Managing Approval Tasks and NotificationsADP Self Service Manager’s Guide
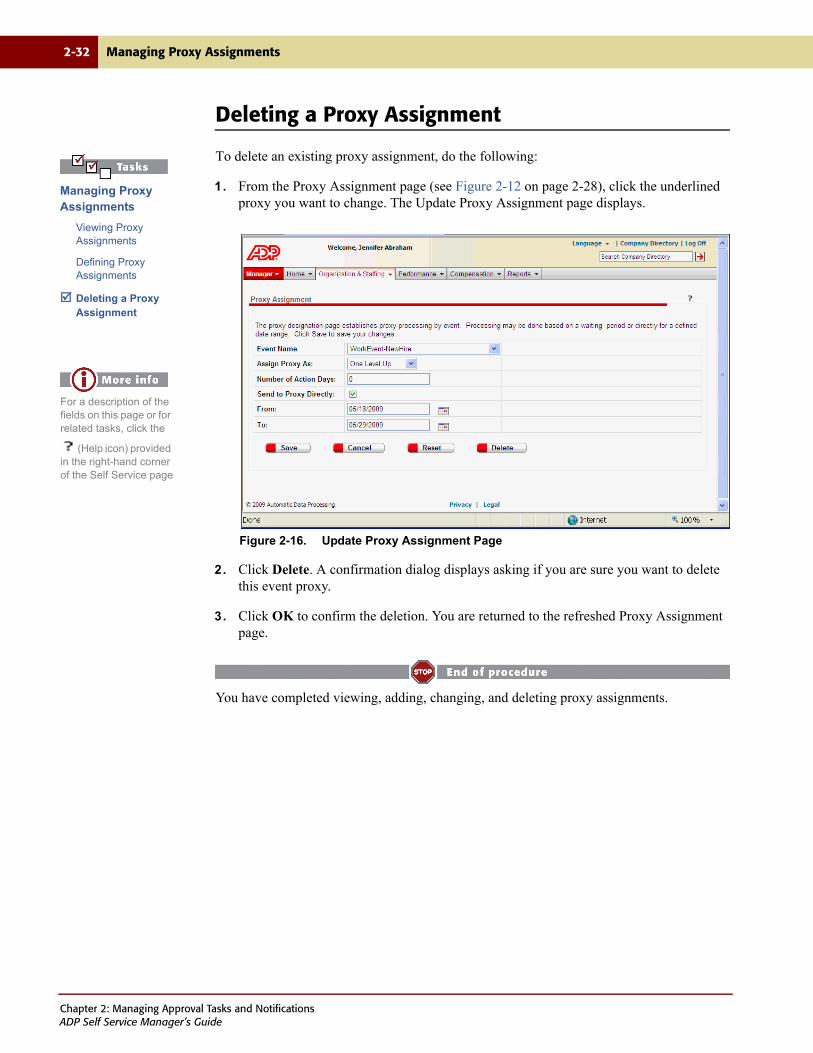
2-32 Managing Proxy Assignments
Deleting a Proxy Assignment
To delete an existing proxy assignment, do the following:
1. From the Proxy Assignment page (see Figure 2-12 on page 2-28), click the underlined proxy you want to change. The Update Proxy Assignment page displays.
Figure 2-16. Update Proxy Assignment Page
2. Click Delete. A confirmation dialog displays asking if you are sure you want to delete this event proxy.
3. Click OK to confirm the deletion. You are returned to the refreshed Proxy Assignment page.
You have completed viewing, adding, changing, and deleting proxy assignments.
Managing Proxy Assignments
Viewing Proxy Assignments
Defining Proxy Assignments
Deleting a Proxy Assignment
For a description of the fields on this page or for related tasks, click the
(Help icon) provided in the right-hand corner of the Self Service page
Chapter 2: Managing Approval Tasks and NotificationsADP Self Service Manager’s Guide
Chapter 3
Managing Approval History
PAGE TOPIC
3-2 Introduction
3-3 Managing Approval History
3-11 Viewing Employee Events Detail
3-14 Viewing and Printing Merit Compensation Event Detail
3-17 Viewing and Printing Bonus Compensation Event Detail
3-20 Viewing and Printing Performance Event Detail
3-22 Viewing Job Action Detail
3-24 Viewing Manager Event Detail
Chapter 3: Managing Approval HistoryADP Self Service Manager’s Guide
3-2 Introduction
Introduction
The Approval History page lists all events in which you have participated. You can view the history of an active workflow path, recall an activity, or remove a completed activity from the list. You can also use the search capability to filter the list based on search criteria. Click More Information to display additional columns for Effective Date and Worksheet ID.
Activity types are:
• Employee Events
• iPay Events
• Merit Compensation
• Bonus Compensation
• Performance
• Work Events (Rehire, Hire, Transfer, Change Job Status, Change Job & Salary Info, Change Employment Status, Comprehensive Employment Change)
• Manager Events (Career and Training tasks)
For Employee Event changes, if there is previous data, the event detail shows the previous
data displayed and grayed above the new data.
You can sort the information displayed in ascending/descending order by clicking the up/down arrows in the column headings. A red single arrow indicates which column is being used as the sort.
Click the underlined Activity to view the corresponding event detail. Which activity types are displayed depends on your approval history.
From the Actions column, you can do the following:
• Click the View History icon ( ) to view the history of the workflow path steps for the corresponding event.
• Click the Delete icon ( ) for the activity history you want to delete. This removes the activity from the Approval History list.
• Click the Recall icon ( ) to recall an event with an In Progress status. The refreshed Approval History page shows a new status of Recalled. You can only recall an event if you are the originator and the status of the event is In Progress.
Chapter 3: Managing Approval HistoryADP Self Service Manager’s Guide
Managing Approval History 3-3
Managing Approval History
Managing Approval History includes the following tasks:
• Using Search Criteria to Filter Results
• Viewing Approval History
• Viewing Approval History Detail
• Deleting an Activity from Approval History
• Recalling an Event
Using Search Criteria to Filter Results
Use the search criteria fields on the Approval History page to filter your results. The default view is to show all existing approval history.
To use the search fields to enter/select criteria, do the following:
1. In the Status field, select a status from the list. The default status is All.
2. In the Employee Name field, enter the beginning part of the employee's last name. (If you want to enter their entire name, use the format: Last Name, First Name) All alphanumeric and special characters are valid. The search is a "last name begins with" query and is not case sensitive.
3. In the Originator Name field, enter the beginning part of the originator's last name. (If you want to enter their entire name, use the format: Last Name, First Name) All alphanumeric and special characters are valid. The search is a "last name begins with" query and is not case sensitive.
4. In the Worksheet ID field, enter the worksheet ID. All alphanumeric and special characters are valid. The search is a "contains" query and is not case sensitive. When you include this field in the search criteria, the Worksheet ID and Effective Date columns display in your results. Otherwise, to view the Worksheet ID and/or Effective Date fields, you need to click the More Information link.
The Worksheet ID field is only applicable to Performance and Compensation events.
5. In the Activity field, enter the name of the activity you want to filter on. The search is a "contains" query and is not case sensitive.
6. In the Date Submitted field, select the date submitted From and To dates. You can either enter the date manually (format mm/dd/yyyy), or select the date from the calendar. If no date is selected, the results will include all records.
Chapter 3: Managing Approval HistoryADP Self Service Manager’s Guide

3-4 Managing Approval History
7. In the Effective Date field, select the effective date From and To dates. You can either enter the date manually (format mm/dd/yyyy), or select the date from the calendar. If no date is selected, the results will include all records. When you include this field in the search criteria, the Worksheet ID and Effective Date columns display in your results. Otherwise, to view the Worksheet ID and/or Effective Date fields, you need to click the More Information link.
8. Click Find. The results matching your search criteria display. You can sort columns in ascending/descending order by clicking the up/down arrows in the column headings. A red single arrow indicates which column is being used as the sort. Use the Rows per Page field to specify how many rows of data you want displayed per page. Default is 10. Step through the pages either by clicking the arrows keys, or selecting a page number range.
If you change any of your search criteria, you must click Find again.
You have finished reviewing how to filter your approval history results. Next you will review how to view approval history.
Chapter 3: Managing Approval HistoryADP Self Service Manager’s Guide
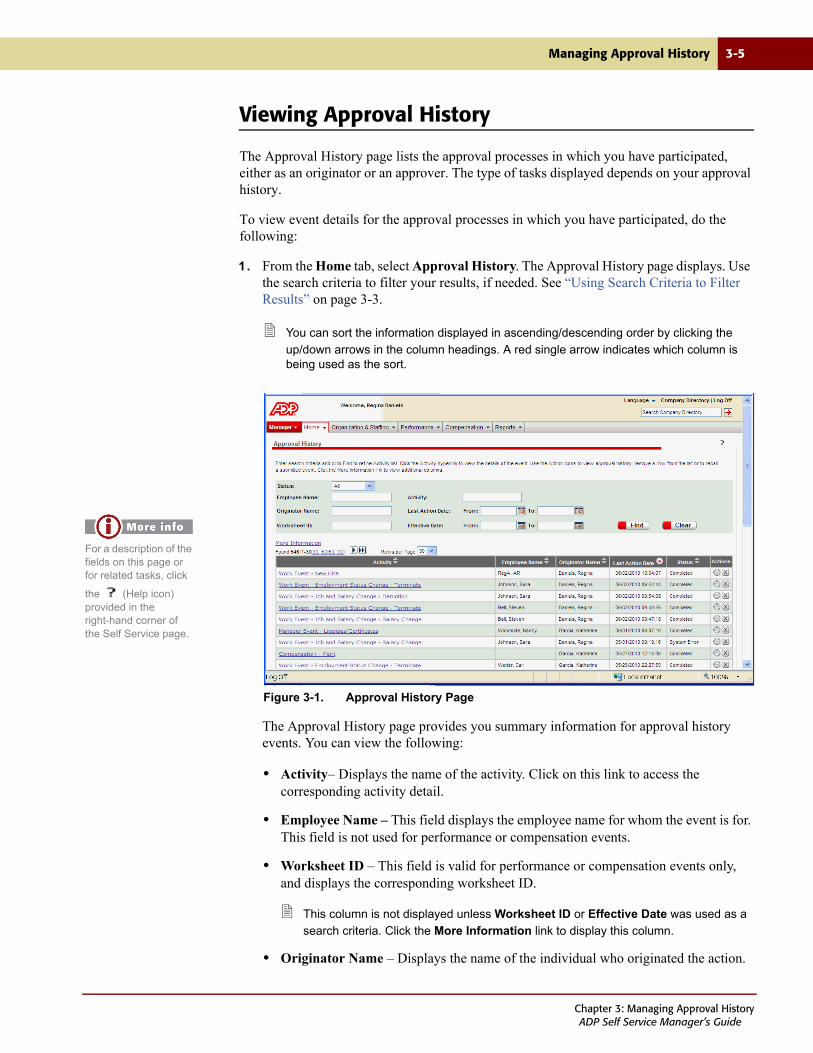
Managing Approval History 3-5
Viewing Approval History
The Approval History page lists the approval processes in which you have participated, either as an originator or an approver. The type of tasks displayed depends on your approval history.
To view event details for the approval processes in which you have participated, do the following:
1. From the Home tab, select Approval History. The Approval History page displays. Use the search criteria to filter your results, if needed. See “Using Search Criteria to Filter Results” on page 3-3.
You can sort the information displayed in ascending/descending order by clicking the
up/down arrows in the column headings. A red single arrow indicates which column is being used as the sort.
Figure 3-1. Approval History Page
The Approval History page provides you summary information for approval history events. You can view the following:
• Activity– Displays the name of the activity. Click on this link to access the corresponding activity detail.
• Employee Name – This field displays the employee name for whom the event is for. This field is not used for performance or compensation events.
• Worksheet ID – This field is valid for performance or compensation events only, and displays the corresponding worksheet ID.
This column is not displayed unless Worksheet ID or Effective Date was used as a
search criteria. Click the More Information link to display this column.
• Originator Name – Displays the name of the individual who originated the action.
For a description of the fields on this page or for related tasks, click
the (Help icon) provided in the right-hand corner of the Self Service page.
Chapter 3: Managing Approval HistoryADP Self Service Manager’s Guide
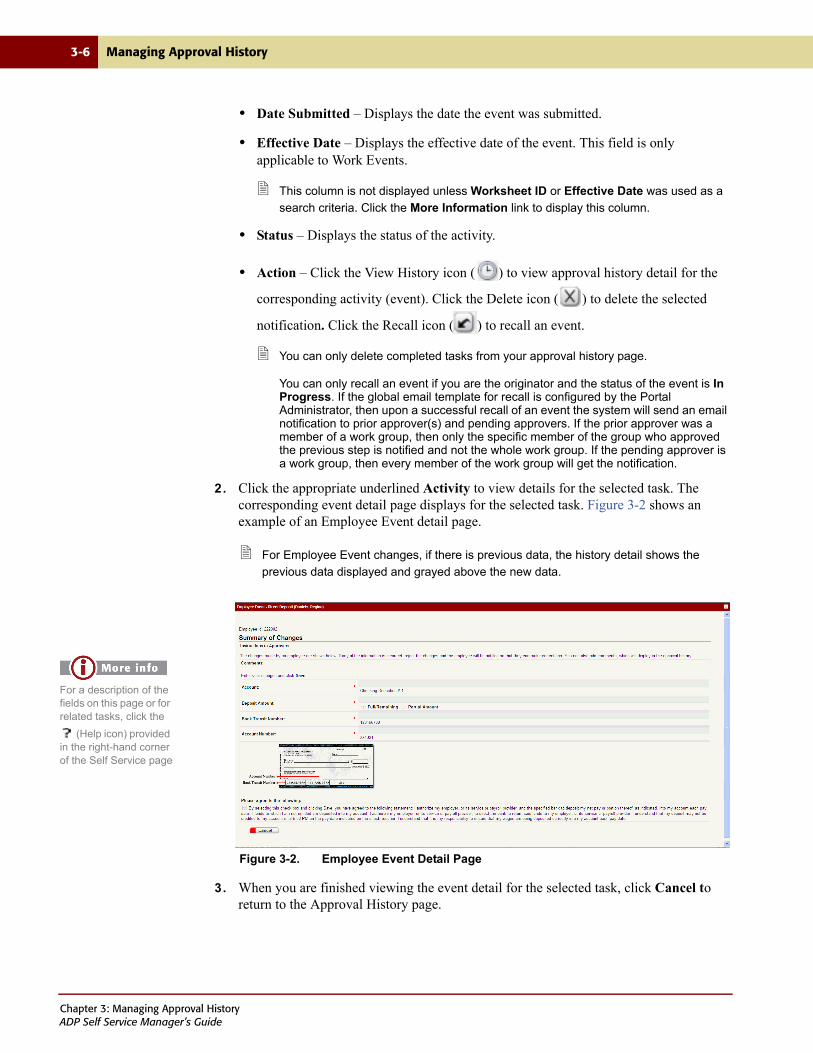
3-6 Managing Approval History
• Date Submitted – Displays the date the event was submitted.
• Effective Date – Displays the effective date of the event. This field is only applicable to Work Events.
This column is not displayed unless Worksheet ID or Effective Date was used as a
search criteria. Click the More Information link to display this column.
• Status – Displays the status of the activity.
• Action – Click the View History icon ( ) to view approval history detail for the
corresponding activity (event). Click the Delete icon ( ) to delete the selected
notification. Click the Recall icon ( ) to recall an event.
You can only delete completed tasks from your approval history page.
You can only recall an event if you are the originator and the status of the event is In Progress. If the global email template for recall is configured by the Portal Administrator, then upon a successful recall of an event the system will send an email notification to prior approver(s) and pending approvers. If the prior approver was a member of a work group, then only the specific member of the group who approved the previous step is notified and not the whole work group. If the pending approver is a work group, then every member of the work group will get the notification.
2. Click the appropriate underlined Activity to view details for the selected task. The corresponding event detail page displays for the selected task. Figure 3-2 shows an example of an Employee Event detail page.
For Employee Event changes, if there is previous data, the history detail shows the
previous data displayed and grayed above the new data.
Figure 3-2. Employee Event Detail Page
3. When you are finished viewing the event detail for the selected task, click Cancel to return to the Approval History page.
For a description of the fields on this page or for related tasks, click the
(Help icon) provided in the right-hand corner of the Self Service page
Chapter 3: Managing Approval HistoryADP Self Service Manager’s Guide

Managing Approval History 3-7
You have finished reviewing Approval History. Next you will view the Approval History detail.
Viewing Approval History Detail
The View Approval History Detail page displays the detailed steps of any workflow path and other important information about the event. Summary data appears at the top, followed by the step detail information. This page can be accessed through the Approval History, the Message Center Approvals, the Message Center Notifications, or Manage Approval History pages.
To view approval history detail, do the following:
1. Click the View History icon ( ) in the Actions column for the particular event for which you wish to view approval history detail. The View Approval History Detail page displays.
Details of what is displayed in the Assigned To column include the following:
• Names are displayed in Last Name, First Name format.
• System displays if the step was automatically skipped or automatically approved.
• If the assignee is a work group, after approval or rejection, the name of the work group member displays in the Assigned To column.
• If the action was Notified and the assignee is a work group, the work group name displays in the Assigned To column.
• If the assignee is an individual (Up level, Specific User, Transfer to Manager), the individual's name is displayed in the Assigned To column.
• If the action taken is Waiting for Approval and the assignee is a work group, the work group name displays in the Assigned To column.
Chapter 3: Managing Approval HistoryADP Self Service Manager’s Guide
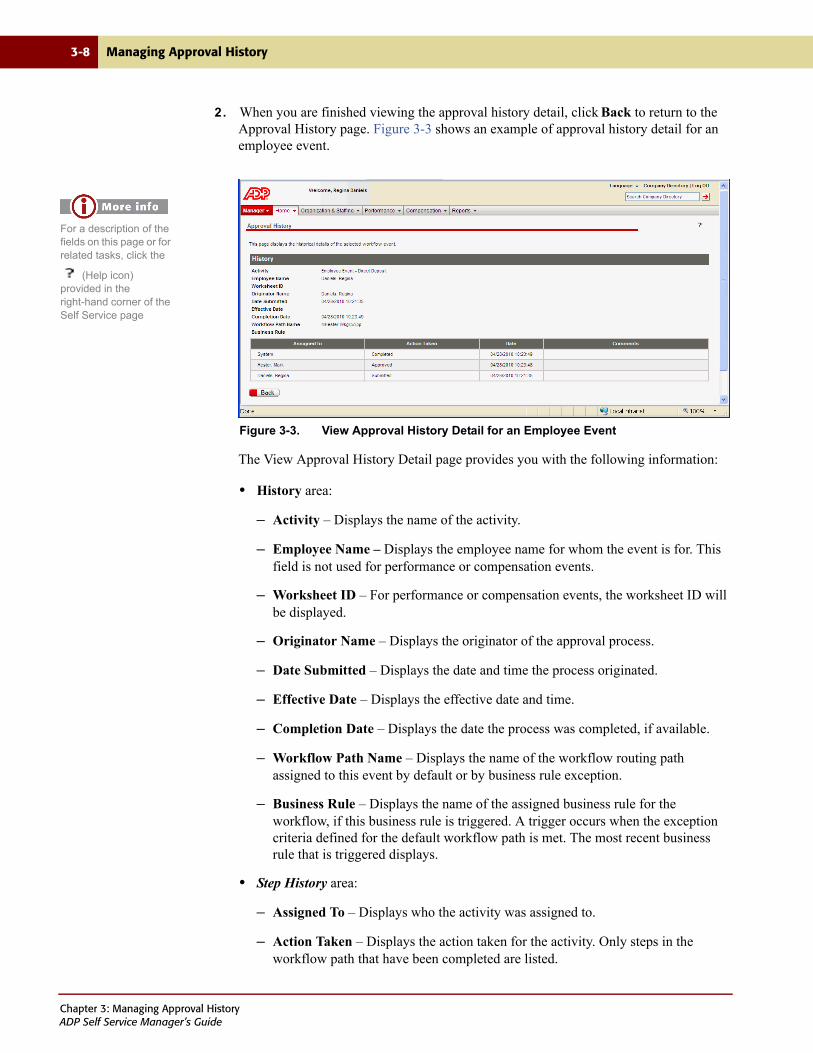
3-8 Managing Approval History
2. When you are finished viewing the approval history detail, click Back to return to the Approval History page. Figure 3-3 shows an example of approval history detail for an employee event.
Figure 3-3. View Approval History Detail for an Employee Event
The View Approval History Detail page provides you with the following information:
• History area:
– Activity – Displays the name of the activity.
– Employee Name – Displays the employee name for whom the event is for. This field is not used for performance or compensation events.
– Worksheet ID – For performance or compensation events, the worksheet ID will be displayed.
– Originator Name – Displays the originator of the approval process.
– Date Submitted – Displays the date and time the process originated.
– Effective Date – Displays the effective date and time.
– Completion Date – Displays the date the process was completed, if available.
– Workflow Path Name – Displays the name of the workflow routing path assigned to this event by default or by business rule exception.
– Business Rule – Displays the name of the assigned business rule for the workflow, if this business rule is triggered. A trigger occurs when the exception criteria defined for the default workflow path is met. The most recent business rule that is triggered displays.
• Step History area:
– Assigned To – Displays who the activity was assigned to.
– Action Taken – Displays the action taken for the activity. Only steps in the workflow path that have been completed are listed.
For a description of the fields on this page or for related tasks, click the
(Help icon) provided in the right-hand corner of the Self Service page
Chapter 3: Managing Approval HistoryADP Self Service Manager’s Guide
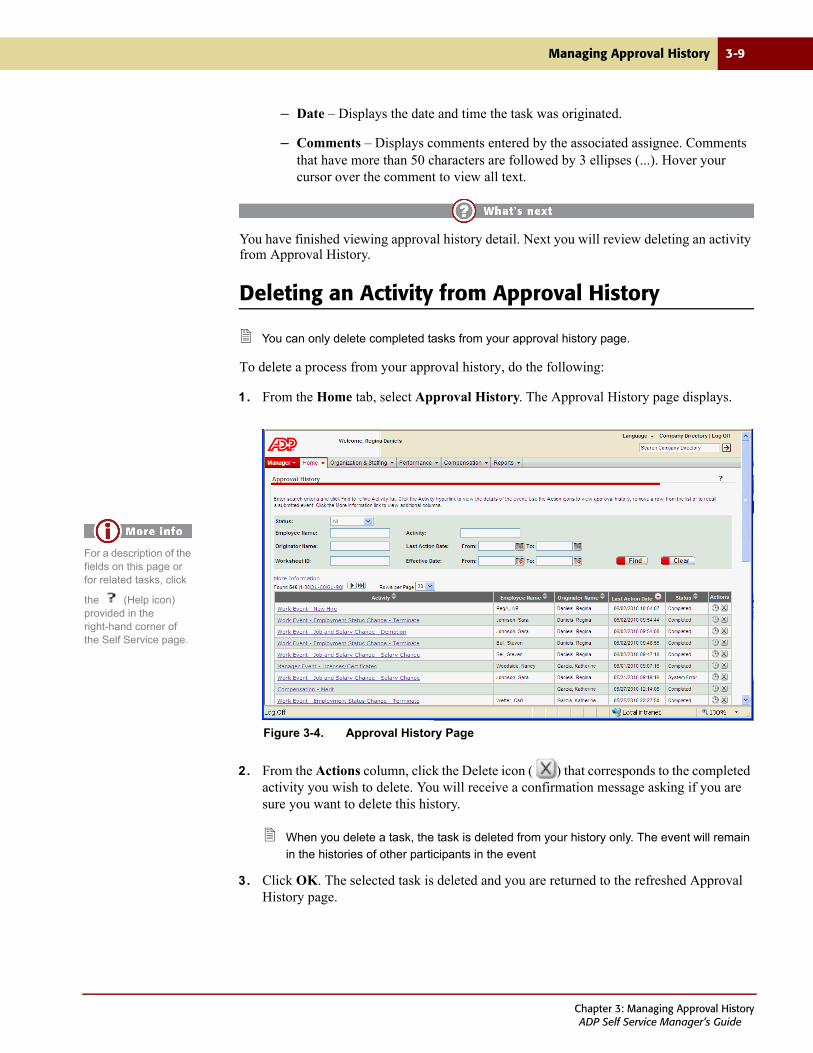
Managing Approval History 3-9
– Date – Displays the date and time the task was originated.
– Comments – Displays comments entered by the associated assignee. Comments that have more than 50 characters are followed by 3 ellipses (...). Hover your cursor over the comment to view all text.
You have finished viewing approval history detail. Next you will review deleting an activity from Approval History.
Deleting an Activity from Approval History
You can only delete completed tasks from your approval history page.
To delete a process from your approval history, do the following:
1. From the Home tab, select Approval History. The Approval History page displays.
Figure 3-4. Approval History Page
2. From the Actions column, click the Delete icon ( ) that corresponds to the completed activity you wish to delete. You will receive a confirmation message asking if you are sure you want to delete this history.
When you delete a task, the task is deleted from your history only. The event will remain
in the histories of other participants in the event
3. Click OK. The selected task is deleted and you are returned to the refreshed Approval History page.
For a description of the fields on this page or for related tasks, click
the (Help icon) provided in the right-hand corner of the Self Service page.
Chapter 3: Managing Approval HistoryADP Self Service Manager’s Guide
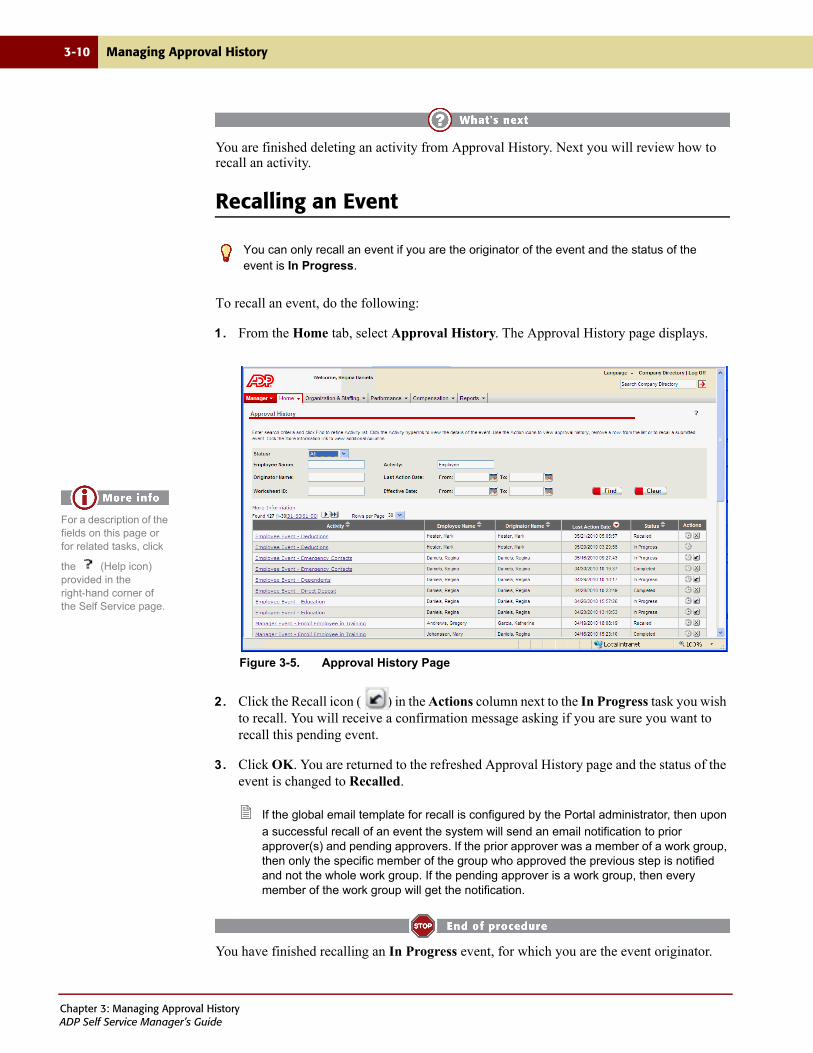
3-10 Managing Approval History
You are finished deleting an activity from Approval History. Next you will review how to recall an activity.
Recalling an Event
To recall an event, do the following:
1. From the Home tab, select Approval History. The Approval History page displays.
Figure 3-5. Approval History Page
2. Click the Recall icon ( ) in the Actions column next to the In Progress task you wish to recall. You will receive a confirmation message asking if you are sure you want to recall this pending event.
3. Click OK. You are returned to the refreshed Approval History page and the status of the event is changed to Recalled.
If the global email template for recall is configured by the Portal administrator, then upon
a successful recall of an event the system will send an email notification to prior approver(s) and pending approvers. If the prior approver was a member of a work group, then only the specific member of the group who approved the previous step is notified and not the whole work group. If the pending approver is a work group, then every member of the work group will get the notification.
You have finished recalling an In Progress event, for which you are the event originator.
You can only recall an event if you are the originator of the event and the status of the event is In Progress.
For a description of the fields on this page or for related tasks, click
the (Help icon) provided in the right-hand corner of the Self Service page.
Chapter 3: Managing Approval HistoryADP Self Service Manager’s Guide
Viewing Employee Events Detail 3-11
Viewing Employee Events Detail
Workflow for employee events is delivered turned off, with no paths defined for the event. The
Portal administrator must set up the employee events for workflow, if so desired. Workflow can be set up to either require approval, or just provide notification of the event.
The following employee events can be set up so that employees receive rejection notifications in their task list. Note that approvals are tracked through Approval History.
• Addresses
• Dependents
• Emergency Contacts
• Phone Numbers
• Direct Deposit
• Deductions
• Tax Withholding
• Pay Statement Delivery
• Annual Statement Delivery
• Pay Statement E-mail Address
• Annual Statement E-mail Address
• Flexible Spending Direct Deposit
• Flexible Spending E-mail Address
• Languages
• Education
• Skills
• Licenses and Certificates
• Enrolling in Training
• Internal Job Posting
Employees receive notification after the approval process is completed, whether approved or rejected. Notification is received through approval history or through e-mail.
Chapter 3: Managing Approval HistoryADP Self Service Manager’s Guide
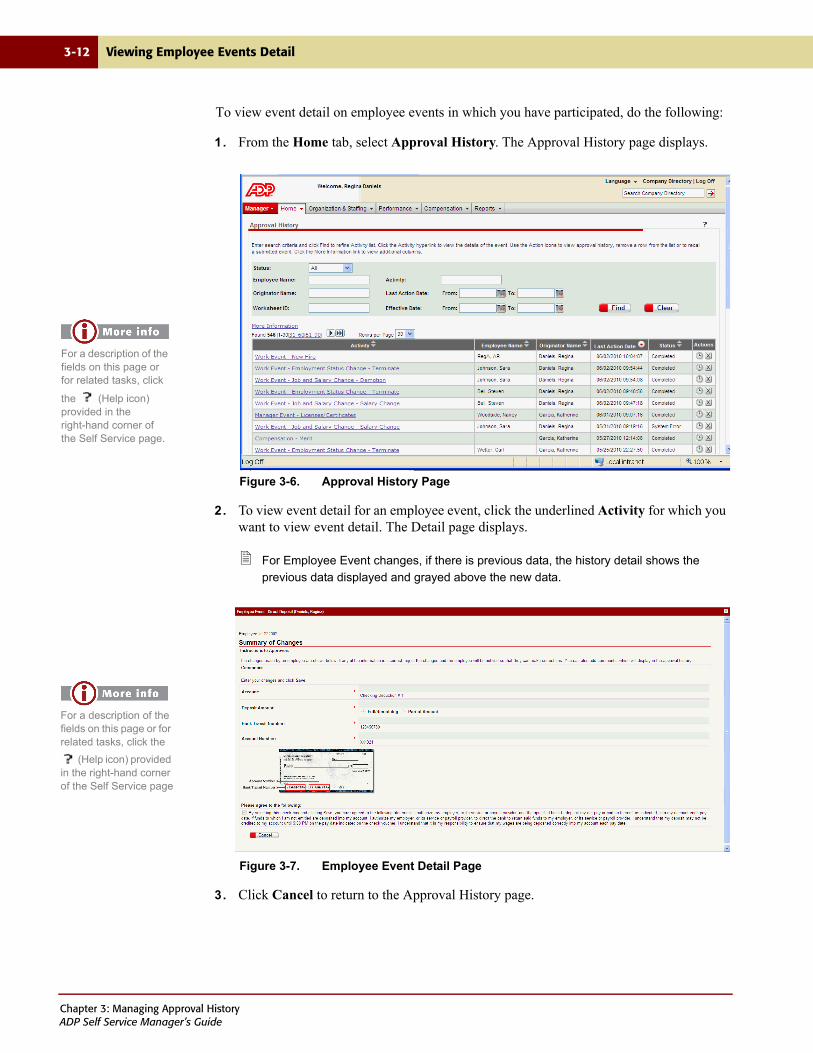
3-12 Viewing Employee Events Detail
To view event detail on employee events in which you have participated, do the following:
1. From the Home tab, select Approval History. The Approval History page displays.
Figure 3-6. Approval History Page
2. To view event detail for an employee event, click the underlined Activity for which you want to view event detail. The Detail page displays.
For Employee Event changes, if there is previous data, the history detail shows the
previous data displayed and grayed above the new data.
Figure 3-7. Employee Event Detail Page
3. Click Cancel to return to the Approval History page.
For a description of the fields on this page or for related tasks, click
the (Help icon) provided in the right-hand corner of the Self Service page.
For a description of the fields on this page or for related tasks, click the
(Help icon) provided in the right-hand corner of the Self Service page
Chapter 3: Managing Approval HistoryADP Self Service Manager’s Guide
Viewing Employee Events Detail 3-13
4. To view approval history detail, which includes information on who the approval task was assigned to and the action taken for a particular task, click the View History icon
( ) in the Actions column. The View Approval History Detail page displays, as shown in Figure 3-3 on page 3-8.
5. Click Cancel to return to the Approval History page.
You have finished viewing employee event and approval history details.
Chapter 3: Managing Approval HistoryADP Self Service Manager’s Guide
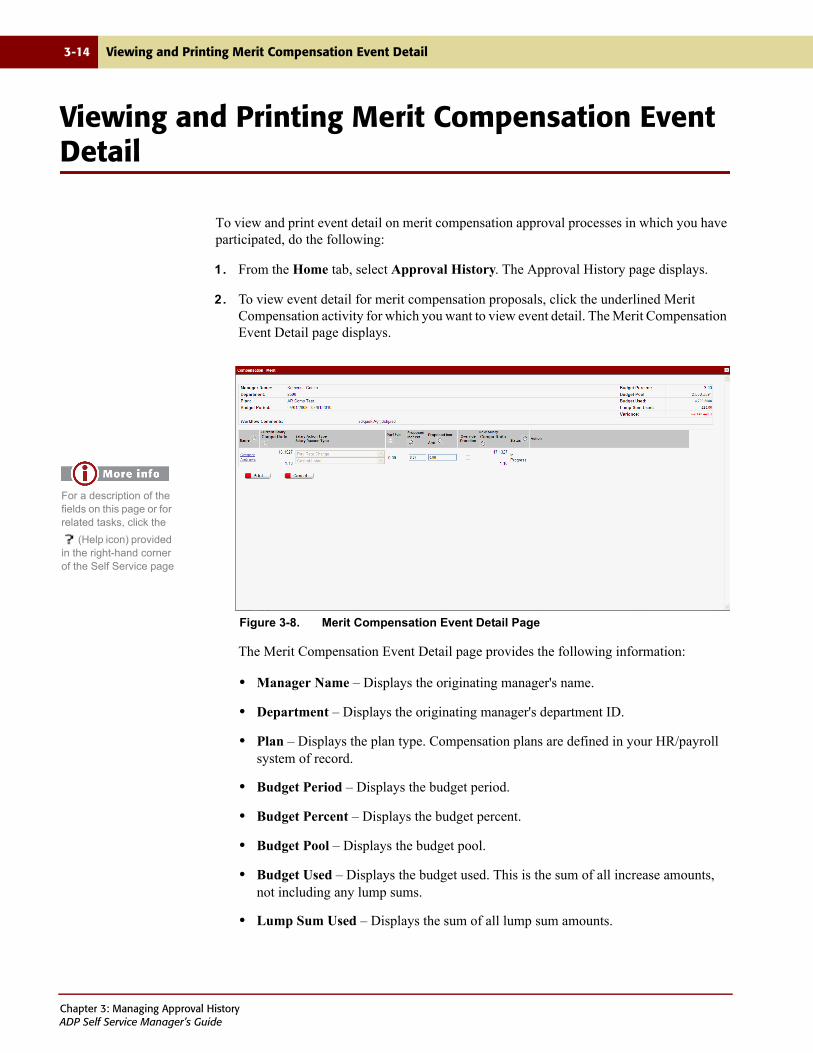
3-14 Viewing and Printing Merit Compensation Event Detail
Viewing and Printing Merit Compensation Event Detail
To view and print event detail on merit compensation approval processes in which you have participated, do the following:
1. From the Home tab, select Approval History. The Approval History page displays.
2. To view event detail for merit compensation proposals, click the underlined Merit Compensation activity for which you want to view event detail. The Merit Compensation Event Detail page displays.
Figure 3-8. Merit Compensation Event Detail Page
The Merit Compensation Event Detail page provides the following information:
• Manager Name – Displays the originating manager's name.
• Department – Displays the originating manager's department ID.
• Plan – Displays the plan type. Compensation plans are defined in your HR/payroll system of record.
• Budget Period – Displays the budget period.
• Budget Percent – Displays the budget percent.
• Budget Pool – Displays the budget pool.
• Budget Used – Displays the budget used. This is the sum of all increase amounts, not including any lump sums.
• Lump Sum Used – Displays the sum of all lump sum amounts.
For a description of the fields on this page or for related tasks, click the
(Help icon) provided in the right-hand corner of the Self Service page
Chapter 3: Managing Approval HistoryADP Self Service Manager’s Guide
Viewing and Printing Merit Compensation Event Detail 3-15
• Variance – Displays the budget variance.
Negative numbers are displayed as red text with parentheses around the number.
• Workflow Comments – Displays approval and notification routing comments, if any, that were entered on the Merit Compensation Approval Worksheet and/or the Submit Worksheet.
• Name – Displays the employee's name. Click to access the Employee Compensation History page.
• Current Salary/Compa Ratio – Displays the employee's current salary and compa ratio.
• Salary Action Type/Salary Action Reason – Displays the salary action type (Pay Rate Change or Lump Sum) and the reason for the salary action.
• Perf Eval – Displays the performance evaluation rating, if available.
• Proposed Incr Pct – Displays the proposed increase percent.
If you hover the mouse over the Proposed Incr Pct or Proposed Incr Amt fields,
additional information for the employee is displayed. Information includes the employee name, department, merit matrix range, effective date, prorate applied at x.x%, the salary range min, mid, and max, and standard hours.
• Proposed Incr Amt – Displays the proposed increase amount.
• Override Proration – Indicates if proration override was selected. If selected, prorate calculations are not performed on the proposed increase percent or amount.
The Override Prorate option may not be available. Your Human Resources
Department determines whether or not managers have the ability to use the override prorate.
• New Salary/Compa Ratio – Displays the new salary and compa ratio. This is automatically calculated if no lump sum is being applied.
• Status – Displays the status of the proposed increase. Values are New, In Process, Rejected, and Complete.
• Action – Displays the action taken on this proposed compensation. Values are Approved, Rejected, and Blank if no approval action has been taken.
3. Click Print to print the information on this page.
To view compensation history detail for an employee, click the underlined employee
name. The Employee Compensation History displays. Click Cancel to return to the Merit Compensation Approval History Detail page.
4. Click Cancel to return to the Approval History page.
Chapter 3: Managing Approval HistoryADP Self Service Manager’s Guide
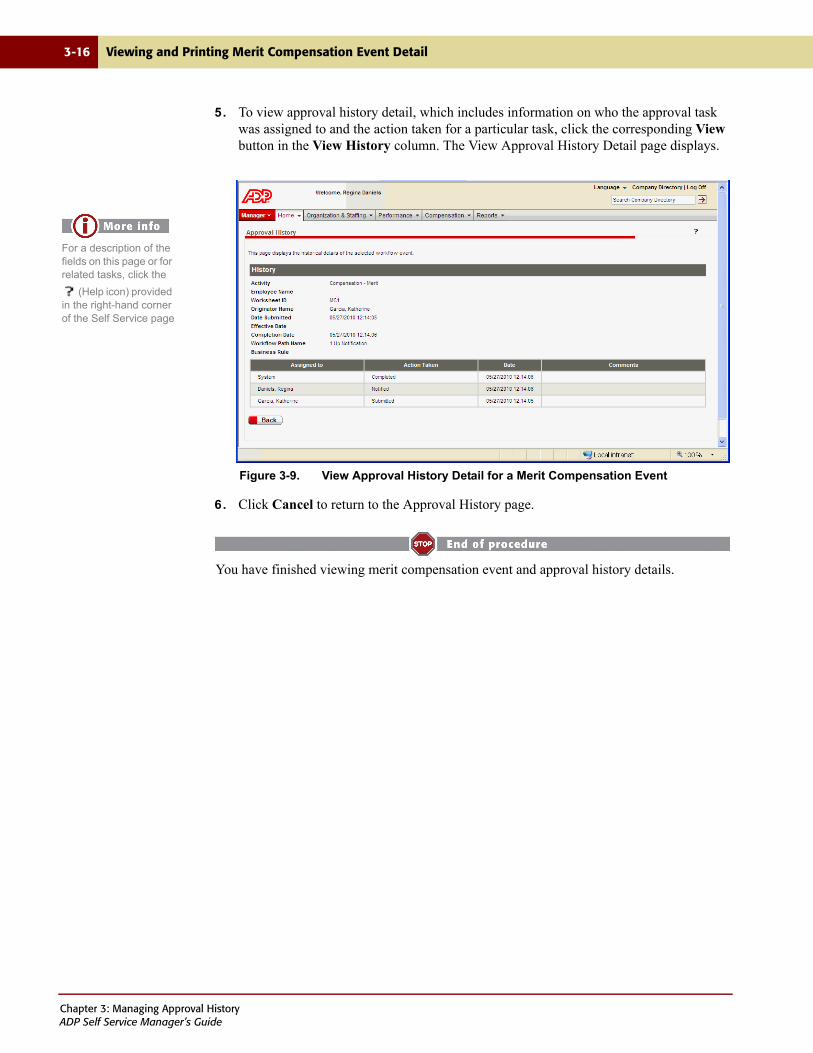
3-16 Viewing and Printing Merit Compensation Event Detail
5. To view approval history detail, which includes information on who the approval task was assigned to and the action taken for a particular task, click the corresponding View button in the View History column. The View Approval History Detail page displays.
Figure 3-9. View Approval History Detail for a Merit Compensation Event
6. Click Cancel to return to the Approval History page.
You have finished viewing merit compensation event and approval history details.
For a description of the fields on this page or for related tasks, click the
(Help icon) provided in the right-hand corner of the Self Service page
Chapter 3: Managing Approval HistoryADP Self Service Manager’s Guide
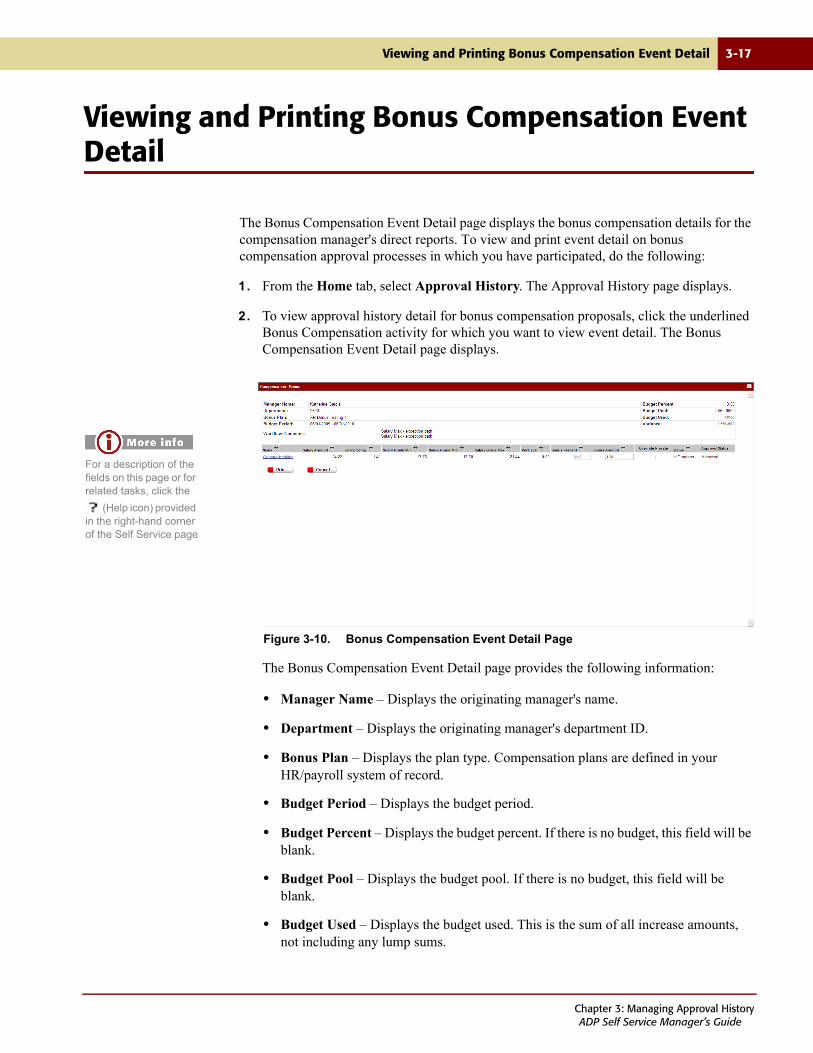
Viewing and Printing Bonus Compensation Event Detail 3-17
Viewing and Printing Bonus Compensation Event Detail
The Bonus Compensation Event Detail page displays the bonus compensation details for the compensation manager's direct reports. To view and print event detail on bonus compensation approval processes in which you have participated, do the following:
1. From the Home tab, select Approval History. The Approval History page displays.
2. To view approval history detail for bonus compensation proposals, click the underlined Bonus Compensation activity for which you want to view event detail. The Bonus Compensation Event Detail page displays.
Figure 3-10. Bonus Compensation Event Detail Page
The Bonus Compensation Event Detail page provides the following information:
• Manager Name – Displays the originating manager's name.
• Department – Displays the originating manager's department ID.
• Bonus Plan – Displays the plan type. Compensation plans are defined in your HR/payroll system of record.
• Budget Period – Displays the budget period.
• Budget Percent – Displays the budget percent. If there is no budget, this field will be blank.
• Budget Pool – Displays the budget pool. If there is no budget, this field will be blank.
• Budget Used – Displays the budget used. This is the sum of all increase amounts, not including any lump sums.
For a description of the fields on this page or for related tasks, click the
(Help icon) provided in the right-hand corner of the Self Service page
Chapter 3: Managing Approval HistoryADP Self Service Manager’s Guide
3-18 Viewing and Printing Bonus Compensation Event Detail
• Comments – Displays approval and notification routing comments, if any, that were entered on the Bonus Compensation Approval Worksheet and/or the Submit Worksheet.
• Name – Displays the employee's name. Click to access the Employee Compensation History page.
• Salary Amount – Displays the employee's current salary.
• Salary Comp – Displays the employee's current salary compa ratio.
• Salary Grade Min/Mid/Max – Displays the employee's salary grade minimum/mid-point/maximum.
• Perf Eval – Displays the performance evaluation rating, if available.
• Bonus Percent – Displays the proposed increase percent.
If you hover the mouse over the Bonus Percent and Bonus Amount fields,
additional information for the employee is displayed. Information includes the employee name, department, effective date, prorate applied at x.x%, and the performance evaluation rating.
• Bonus Amount – Displays the proposed increase amount.
• Override Proration – Indicates if proration override was selected. If selected, prorate calculations are not performed on the proposed increase percent or amount.
The Override Prorate option may not be available. Your Human Resources
Department determines whether or not managers have the ability to use the override prorate.
• Status – Displays the status of the proposed increase. Values are New, In Process, Rejected, and Complete.
• Action – Displays the action taken on this proposed compensation. Values are Approved, Rejected, and Blank if no approval action has been taken.
3. Click Print to print the information on this page.
To view compensation history detail for an employee, click the underlined employee
name. The Employee Compensation History page displays. Click Cancel to return to the Bonus Compensation Approval History Detail page.
4. Click Cancel to return to the Approval History page.
Chapter 3: Managing Approval HistoryADP Self Service Manager’s Guide
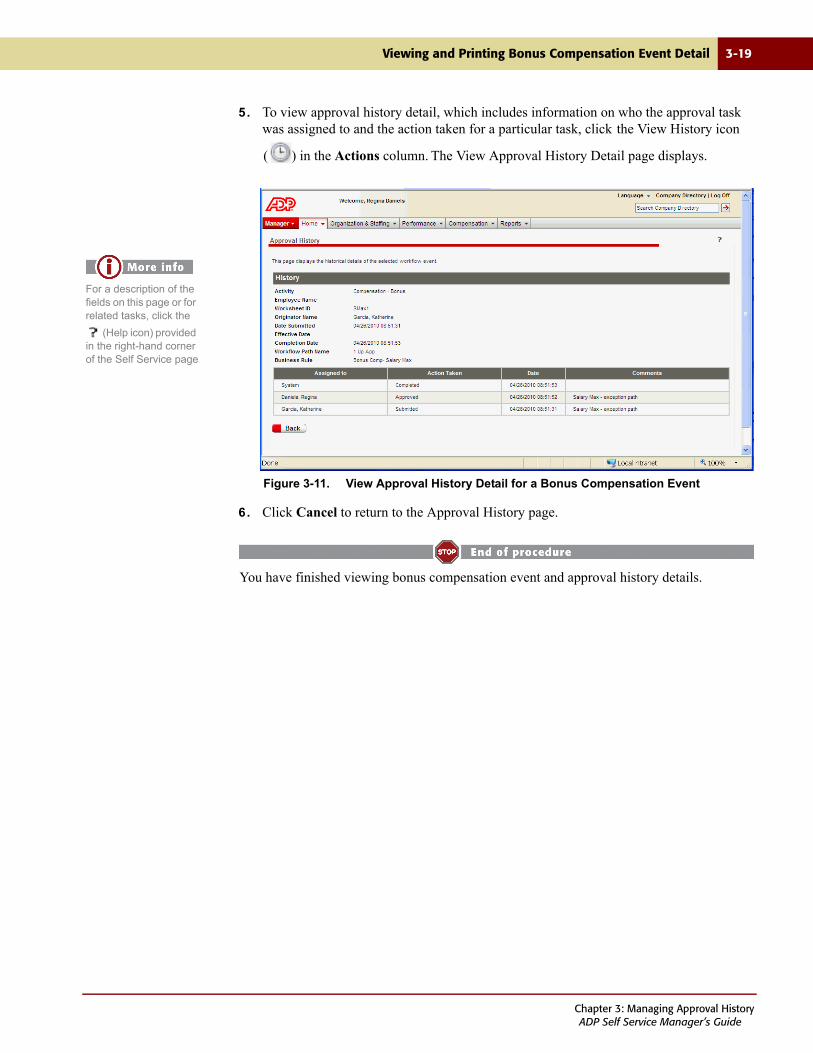
Viewing and Printing Bonus Compensation Event Detail 3-19
5. To view approval history detail, which includes information on who the approval task was assigned to and the action taken for a particular task, click the View History icon
( ) in the Actions column. The View Approval History Detail page displays.
Figure 3-11. View Approval History Detail for a Bonus Compensation Event
6. Click Cancel to return to the Approval History page.
You have finished viewing bonus compensation event and approval history details.
For a description of the fields on this page or for related tasks, click the
(Help icon) provided in the right-hand corner of the Self Service page
Chapter 3: Managing Approval HistoryADP Self Service Manager’s Guide
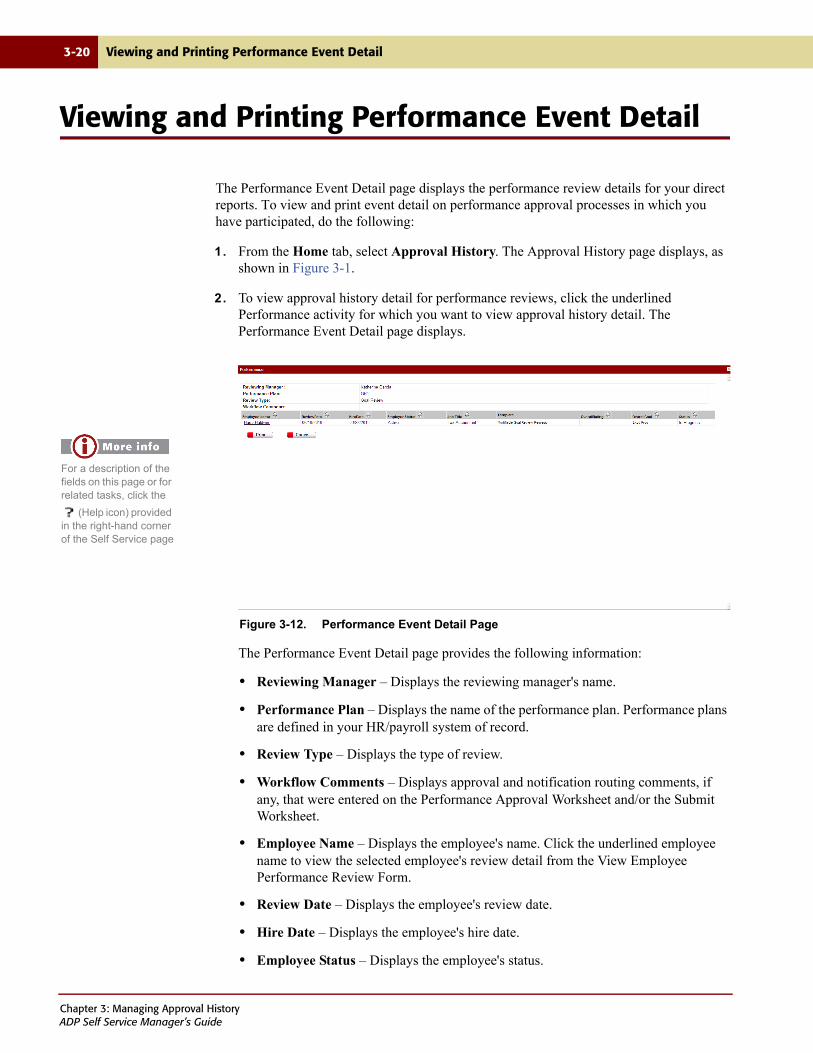
3-20 Viewing and Printing Performance Event Detail
Viewing and Printing Performance Event Detail
The Performance Event Detail page displays the performance review details for your direct reports. To view and print event detail on performance approval processes in which you have participated, do the following:
1. From the Home tab, select Approval History. The Approval History page displays, as shown in Figure 3-1.
2. To view approval history detail for performance reviews, click the underlined Performance activity for which you want to view approval history detail. The Performance Event Detail page displays.
Figure 3-12. Performance Event Detail Page
The Performance Event Detail page provides the following information:
• Reviewing Manager – Displays the reviewing manager's name.
• Performance Plan – Displays the name of the performance plan. Performance plans are defined in your HR/payroll system of record.
• Review Type – Displays the type of review.
• Workflow Comments – Displays approval and notification routing comments, if any, that were entered on the Performance Approval Worksheet and/or the Submit Worksheet.
• Employee Name – Displays the employee's name. Click the underlined employee name to view the selected employee's review detail from the View Employee Performance Review Form.
• Review Date – Displays the employee's review date.
• Hire Date – Displays the employee's hire date.
• Employee Status – Displays the employee's status.
For a description of the fields on this page or for related tasks, click the
(Help icon) provided in the right-hand corner of the Self Service page
Chapter 3: Managing Approval HistoryADP Self Service Manager’s Guide
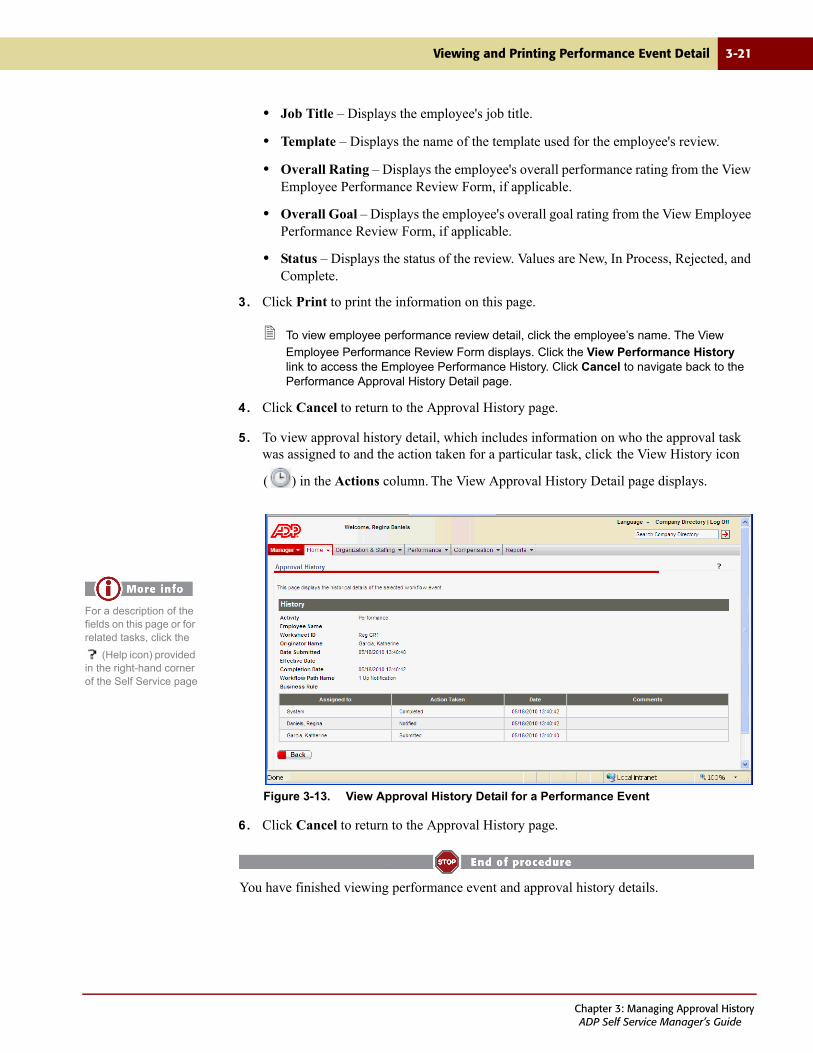
Viewing and Printing Performance Event Detail 3-21
• Job Title – Displays the employee's job title.
• Template – Displays the name of the template used for the employee's review.
• Overall Rating – Displays the employee's overall performance rating from the View Employee Performance Review Form, if applicable.
• Overall Goal – Displays the employee's overall goal rating from the View Employee Performance Review Form, if applicable.
• Status – Displays the status of the review. Values are New, In Process, Rejected, and Complete.
3. Click Print to print the information on this page.
To view employee performance review detail, click the employee’s name. The View
Employee Performance Review Form displays. Click the View Performance History link to access the Employee Performance History. Click Cancel to navigate back to the Performance Approval History Detail page.
4. Click Cancel to return to the Approval History page.
5. To view approval history detail, which includes information on who the approval task was assigned to and the action taken for a particular task, click the View History icon
( ) in the Actions column. The View Approval History Detail page displays.
Figure 3-13. View Approval History Detail for a Performance Event
6. Click Cancel to return to the Approval History page.
You have finished viewing performance event and approval history details.
For a description of the fields on this page or for related tasks, click the
(Help icon) provided in the right-hand corner of the Self Service page
Chapter 3: Managing Approval HistoryADP Self Service Manager’s Guide
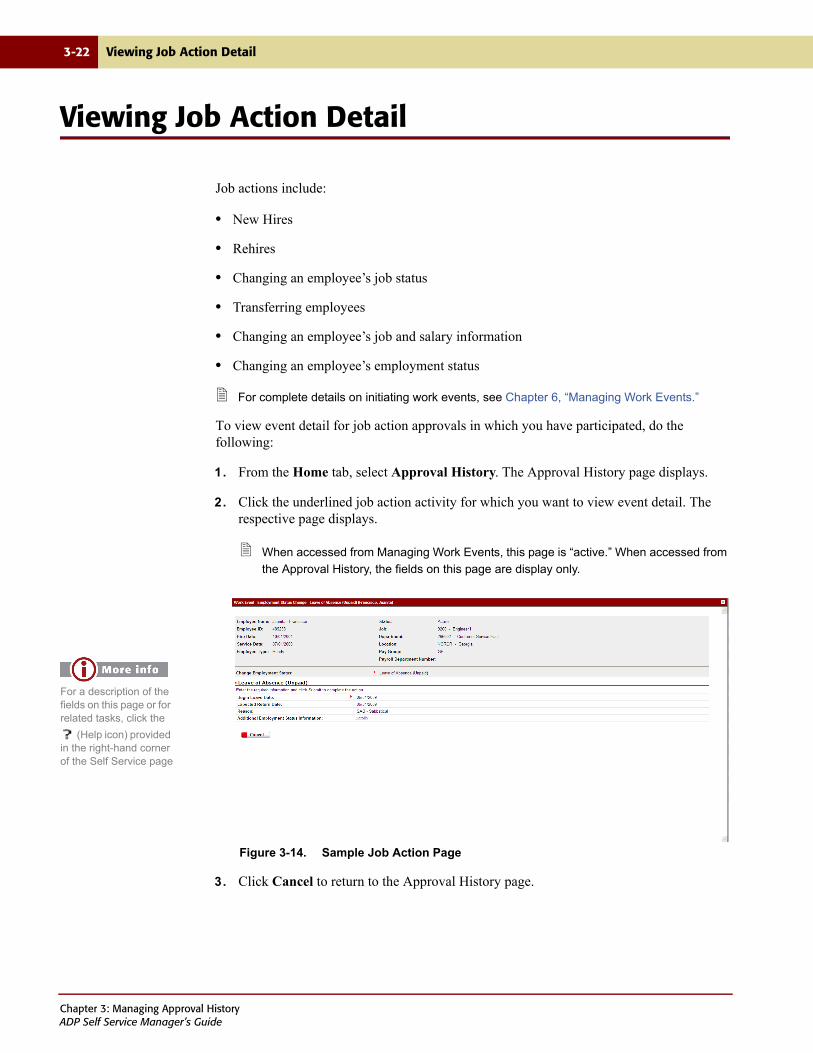
3-22 Viewing Job Action Detail
Viewing Job Action Detail
Job actions include:
• New Hires
• Rehires
• Changing an employee’s job status
• Transferring employees
• Changing an employee’s job and salary information
• Changing an employee’s employment status
For complete details on initiating work events, see Chapter 6, “Managing Work Events.”
To view event detail for job action approvals in which you have participated, do the following:
1. From the Home tab, select Approval History. The Approval History page displays.
2. Click the underlined job action activity for which you want to view event detail. The respective page displays.
When accessed from Managing Work Events, this page is “active.” When accessed from
the Approval History, the fields on this page are display only.
Figure 3-14. Sample Job Action Page
3. Click Cancel to return to the Approval History page.
For a description of the fields on this page or for related tasks, click the
(Help icon) provided in the right-hand corner of the Self Service page
Chapter 3: Managing Approval HistoryADP Self Service Manager’s Guide
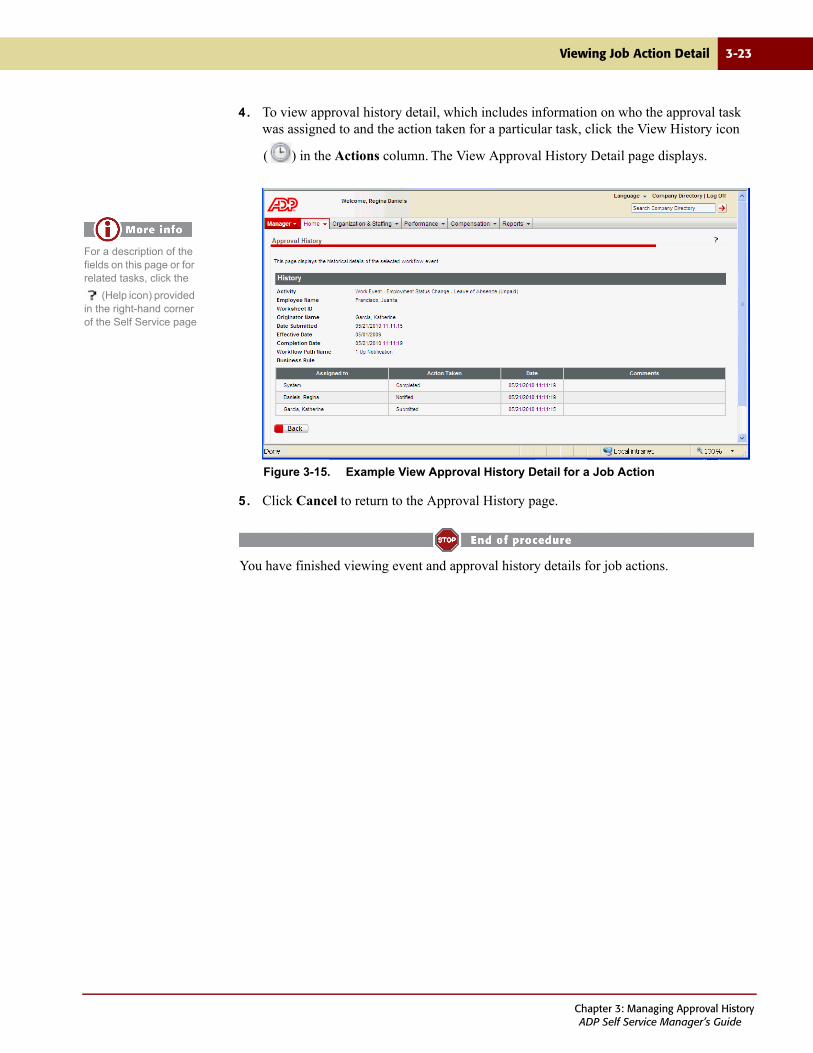
Viewing Job Action Detail 3-23
4. To view approval history detail, which includes information on who the approval task was assigned to and the action taken for a particular task, click the View History icon
( ) in the Actions column. The View Approval History Detail page displays.
Figure 3-15. Example View Approval History Detail for a Job Action
5. Click Cancel to return to the Approval History page.
You have finished viewing event and approval history details for job actions.
For a description of the fields on this page or for related tasks, click the
(Help icon) provided in the right-hand corner of the Self Service page
Chapter 3: Managing Approval HistoryADP Self Service Manager’s Guide
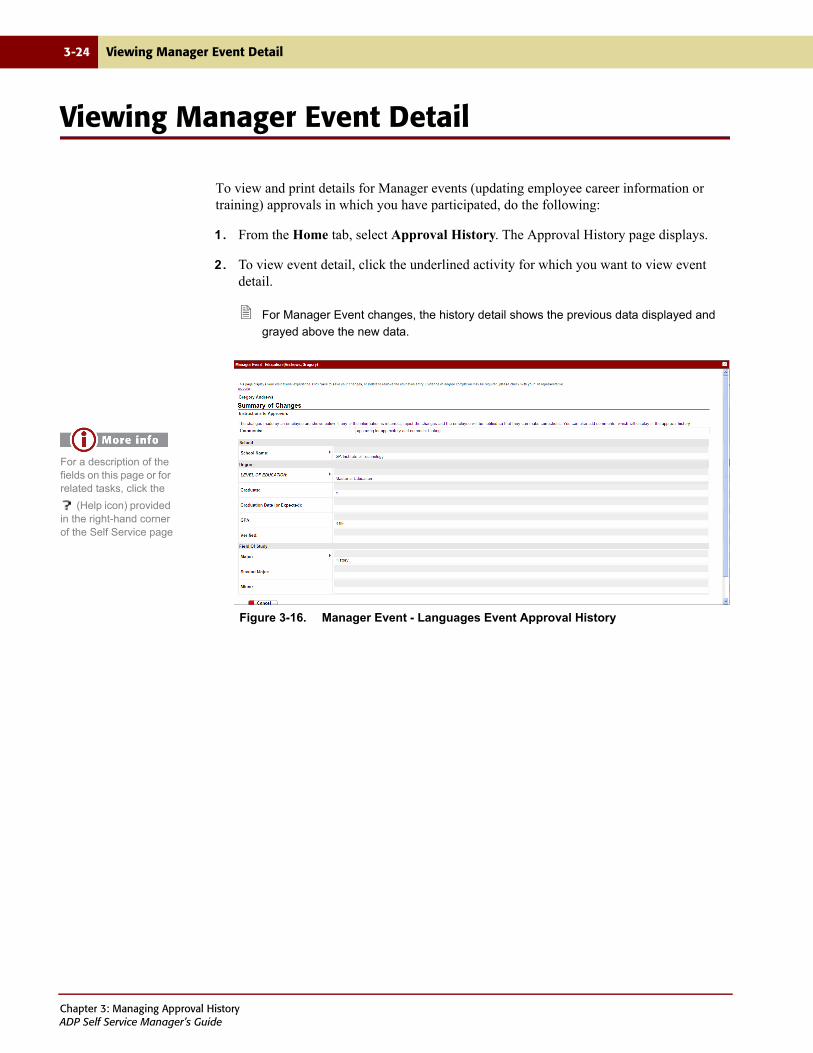
3-24 Viewing Manager Event Detail
Viewing Manager Event Detail
To view and print details for Manager events (updating employee career information or training) approvals in which you have participated, do the following:
1. From the Home tab, select Approval History. The Approval History page displays.
2. To view event detail, click the underlined activity for which you want to view event detail.
For Manager Event changes, the history detail shows the previous data displayed and
grayed above the new data.
Figure 3-16. Manager Event - Languages Event Approval History
For a description of the fields on this page or for related tasks, click the
(Help icon) provided in the right-hand corner of the Self Service page
Chapter 3: Managing Approval HistoryADP Self Service Manager’s Guide

Viewing Manager Event Detail 3-25
3. To view approval history detail, which includes information on who the approval task was assigned to and the action taken for a particular task, click the View History icon
( ) in the Actions column. The View Approval History Detail page displays.
Figure 3-17. View Approval History Detail for a Manager Event
4. Click Cancel to return to the Approval History page.
You have finished viewing event and approval history details for manager events, such as updating employee career information (education, language, skills, and license/certifications), enrolling an employee in training, or cancelling an employee’s training session. For additional information on the managing employee career and training information, see Chapter 7, “Managing Employee Career and Training Information.”
For a description of the fields on this page or for related tasks, click the
(Help icon) provided in the right-hand corner of the Self Service page
Chapter 3: Managing Approval HistoryADP Self Service Manager’s Guide

3-26 Viewing Manager Event Detail
Chapter 3: Managing Approval HistoryADP Self Service Manager’s Guide
Chapter 4
Managing Compensation
PAGE TOPIC
4-2 Introduction
4-3 Completing Compensation Reviews
4-22 Viewing and Printing Employee Compensation History
Chapter 4: Managing CompensationADP Self Service Manager’s Guide

4-2 Introduction
Introduction
Performance-based pay plans for merit increases and lump sum payments (merit or bonus), are defined in your HR/payroll system of record, as well as budget pool allocation, prorate schedules and merit matrixes. Plans are then assigned to employees and worksheets are created for use in ADP Self Service. Once the compensation worksheets have been created, managers can then process the proposed increased within Self Service to recommend merit or bonus actions.
Managers receive worksheets only for employees for whom they have been designated as compensation managers, through the Reports-To functionality. For more information on Reports-To, see the Hiring, Staffing, and Job Maintenance Guide. For more information on creating performance-based pay plans, see the Planning, Compensation, and Compliance Guide.
Through Self Service, compensation managers can do the following:
• Use the Compensation Worksheets to process the compensation review, including submitting the completed review to the next approving manager
• View and print compensation planning information for direct reports, as well as the direct reports of managers who report into them
• View and print consolidated budget information
• View and print employee compensation history
Once the proposed compensation increase has completed the approval process in Self Service, the employee’s compensation information is updated in the HR/payroll system of record.
Chapter 4: Managing CompensationADP Self Service Manager’s Guide
Completing Compensation Reviews 4-3
Completing Compensation Reviews
The Compensation Planning page is a navigational entry point for compensation planning, allowing managers to process compensation worksheets for employees who report to them. You can process compensation worksheets for your direct reports, as well as your indirect reports if your administrator has enabled the indirect report update option.
Managers can process compensation plans through either the Direct Reports page or through the Compensation Planning page.
The Compensation Worksheets are used to complete and submit bonus and/or merit increases for the compensation manager's direct reports. If you are the originating manager and the proposed increase has not already been submitted, you can enter and modify proposed increases and route for approvals. Submitted rows will be display only. If you are not the originating manager, Compensation Worksheets are display only.
Completing Compensation Reviews includes the following tasks:
• Completing Merit Compensation Worksheets
• Completing Bonus Compensation Worksheets
• Submitting Compensation Worksheets for Approval
• Viewing and Printing Compensation Planning Summary Information
Chapter 4: Managing CompensationADP Self Service Manager’s Guide
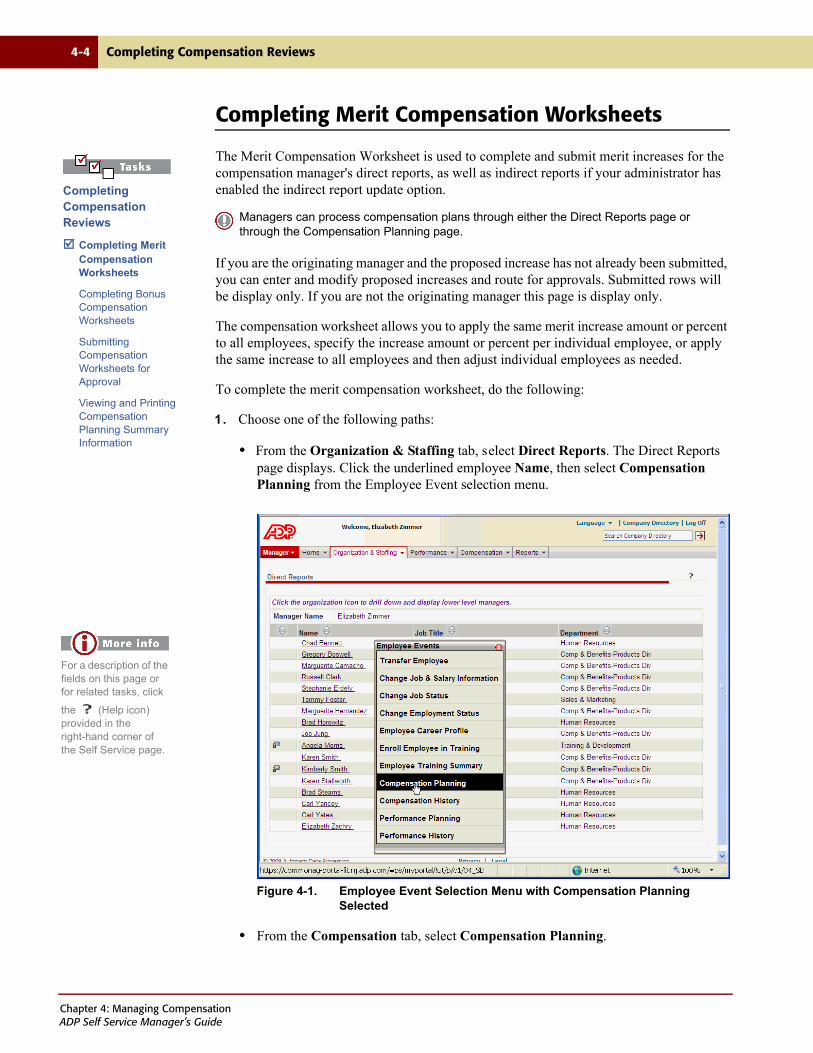
4-4 Completing Compensation Reviews
Completing Merit Compensation Worksheets
The Merit Compensation Worksheet is used to complete and submit merit increases for the compensation manager's direct reports, as well as indirect reports if your administrator has enabled the indirect report update option.
If you are the originating manager and the proposed increase has not already been submitted, you can enter and modify proposed increases and route for approvals. Submitted rows will be display only. If you are not the originating manager this page is display only.
The compensation worksheet allows you to apply the same merit increase amount or percent to all employees, specify the increase amount or percent per individual employee, or apply the same increase to all employees and then adjust individual employees as needed.
To complete the merit compensation worksheet, do the following:
1. Choose one of the following paths:
• From the Organization & Staffing tab, select Direct Reports. The Direct Reports page displays. Click the underlined employee Name, then select Compensation Planning from the Employee Event selection menu.
Figure 4-1. Employee Event Selection Menu with Compensation Planning Selected
• From the Compensation tab, select Compensation Planning.
Managers can process compensation plans through either the Direct Reports page or through the Compensation Planning page.
Completing Compensation Reviews
Completing Merit Compensation Worksheets
Completing Bonus Compensation Worksheets
Submitting Compensation Worksheets for Approval
Viewing and Printing Compensation Planning Summary Information
For a description of the fields on this page or for related tasks, click
the (Help icon) provided in the right-hand corner of the Self Service page.
Chapter 4: Managing CompensationADP Self Service Manager’s Guide
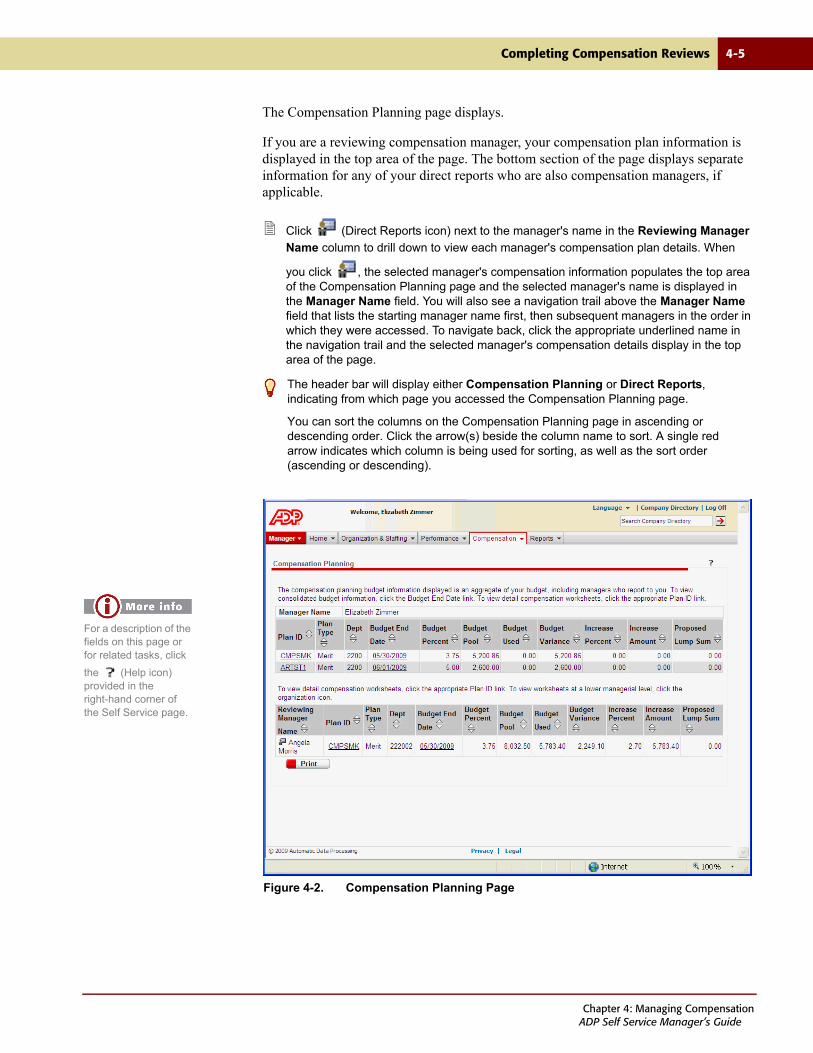
Completing Compensation Reviews 4-5
The Compensation Planning page displays.
If you are a reviewing compensation manager, your compensation plan information is displayed in the top area of the page. The bottom section of the page displays separate information for any of your direct reports who are also compensation managers, if applicable.
Click (Direct Reports icon) next to the manager's name in the Reviewing Manager
Name column to drill down to view each manager's compensation plan details. When
you click , the selected manager's compensation information populates the top area of the Compensation Planning page and the selected manager's name is displayed in the Manager Name field. You will also see a navigation trail above the Manager Name field that lists the starting manager name first, then subsequent managers in the order in which they were accessed. To navigate back, click the appropriate underlined name in the navigation trail and the selected manager's compensation details display in the top area of the page.
Figure 4-2. Compensation Planning Page
The header bar will display either Compensation Planning or Direct Reports, indicating from which page you accessed the Compensation Planning page.
You can sort the columns on the Compensation Planning page in ascending or descending order. Click the arrow(s) beside the column name to sort. A single red arrow indicates which column is being used for sorting, as well as the sort order (ascending or descending).
For a description of the fields on this page or for related tasks, click
the (Help icon) provided in the right-hand corner of the Self Service page.
Chapter 4: Managing CompensationADP Self Service Manager’s Guide
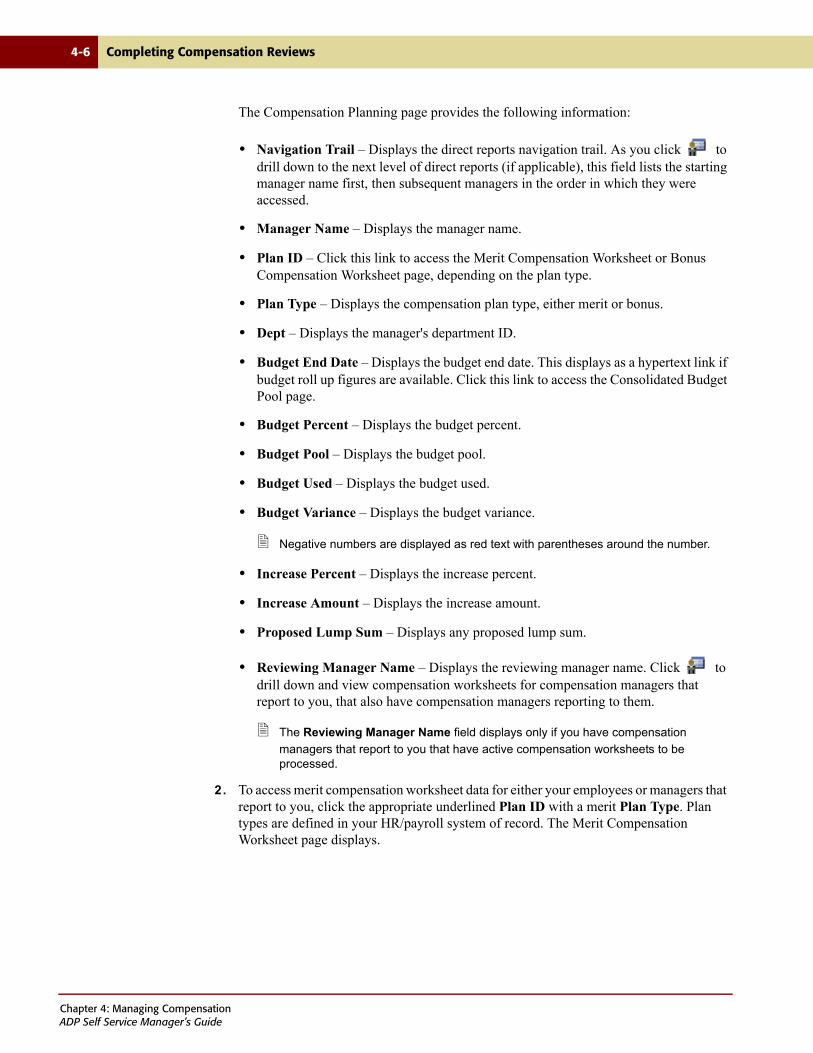
4-6 Completing Compensation Reviews
The Compensation Planning page provides the following information:
• Navigation Trail – Displays the direct reports navigation trail. As you click to drill down to the next level of direct reports (if applicable), this field lists the starting manager name first, then subsequent managers in the order in which they were accessed.
• Manager Name – Displays the manager name.
• Plan ID – Click this link to access the Merit Compensation Worksheet or Bonus Compensation Worksheet page, depending on the plan type.
• Plan Type – Displays the compensation plan type, either merit or bonus.
• Dept – Displays the manager's department ID.
• Budget End Date – Displays the budget end date. This displays as a hypertext link if budget roll up figures are available. Click this link to access the Consolidated Budget Pool page.
• Budget Percent – Displays the budget percent.
• Budget Pool – Displays the budget pool.
• Budget Used – Displays the budget used.
• Budget Variance – Displays the budget variance.
Negative numbers are displayed as red text with parentheses around the number.
• Increase Percent – Displays the increase percent.
• Increase Amount – Displays the increase amount.
• Proposed Lump Sum – Displays any proposed lump sum.
• Reviewing Manager Name – Displays the reviewing manager name. Click to drill down and view compensation worksheets for compensation managers that report to you, that also have compensation managers reporting to them.
The Reviewing Manager Name field displays only if you have compensation
managers that report to you that have active compensation worksheets to be processed.
2. To access merit compensation worksheet data for either your employees or managers that report to you, click the appropriate underlined Plan ID with a merit Plan Type. Plan types are defined in your HR/payroll system of record. The Merit Compensation Worksheet page displays.
Chapter 4: Managing CompensationADP Self Service Manager’s Guide
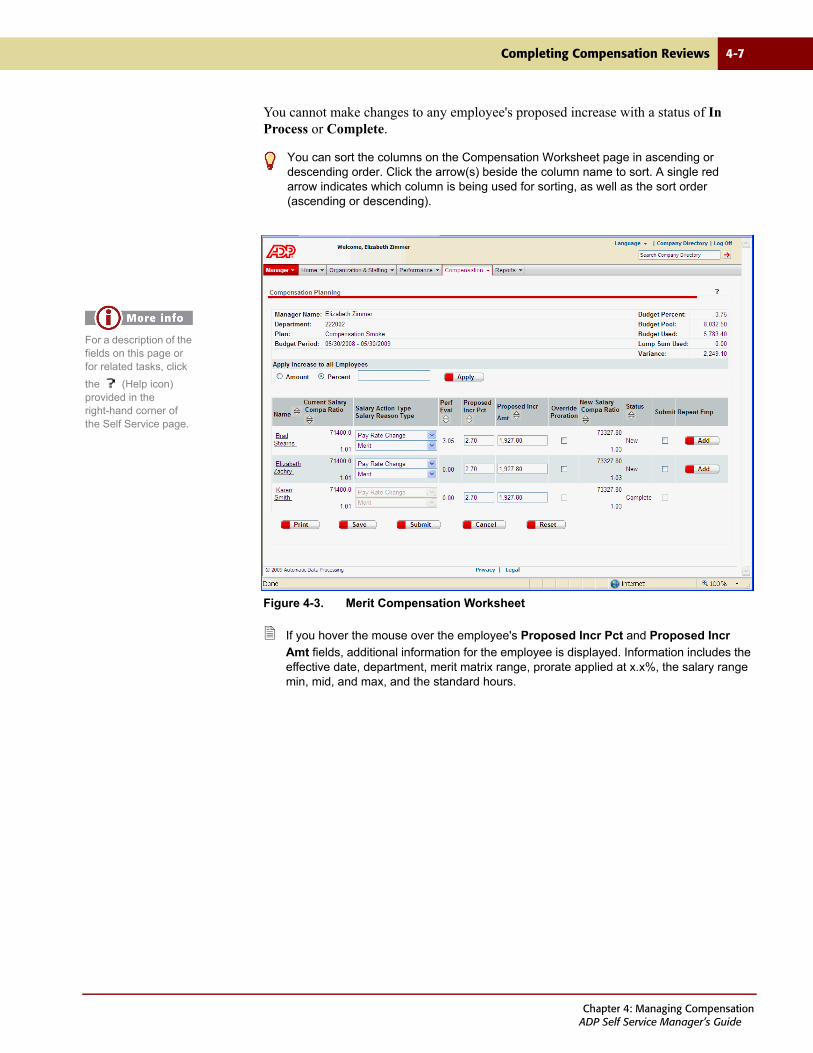
Completing Compensation Reviews 4-7
You cannot make changes to any employee's proposed increase with a status of In Process or Complete.
Figure 4-3. Merit Compensation Worksheet
If you hover the mouse over the employee's Proposed Incr Pct and Proposed Incr
Amt fields, additional information for the employee is displayed. Information includes the effective date, department, merit matrix range, prorate applied at x.x%, the salary range min, mid, and max, and the standard hours.
You can sort the columns on the Compensation Worksheet page in ascending or descending order. Click the arrow(s) beside the column name to sort. A single red arrow indicates which column is being used for sorting, as well as the sort order (ascending or descending).
For a description of the fields on this page or for related tasks, click
the (Help icon) provided in the right-hand corner of the Self Service page.
Chapter 4: Managing CompensationADP Self Service Manager’s Guide

4-8 Completing Compensation Reviews
3. If you want to apply the same merit increase amount or percent to all employees listed (will not apply to those with a status of In Progress or Complete), from the Apply Increase to All Employees area, select either the Amount or Percent option, enter the desired value, and click Apply.
The employee Proposed Incr Pct, Proposed Incr Amt, New Salary/Compa Ratio are automatically calculated, and the Budget Percent, Budget Pool, Budget Used, and Variance fields at the top of the worksheet are also automatically updated, as appropriate.
If a prorate percent exists and the Override Prorate option is not selected, the proposed
increase amount/percent is equal to the proposed increase amount/percent multiplied by the prorate percentage. A warning message is issued informing you that a prorate applies at x%. If a merit matrix exists and the proposed increase is greater than the Salary Grade Maximum, a warning message is issued informing you that the salary exceeds the merit guidelines and has been adjusted. The Proposed Incr Pct and Proposed Incr Amt fields are adjusted accordingly.
The Apply Merit Matrix to All Employees button is enabled if a merit matrix exists. The merit matrix is tied to the employee's performance evaluation and their placement within a salary range. The merit matrix is set up in your HR/payroll system of record. Click this button to set proposed increase to the average merit matrix percent for all employees listed on this page.
4. If you want to specify an increase amount or percent per employee, do the following:
a. From the Salary Action Type drop down list, select the appropriate action, Pay Rate Change or Lump Sum. If Pay Rate Change is selected, chose the reason from the Salary Action Reason drop down list. If Lump Sum is selected, the salary reason defaults to Merit Lump Sum and is disabled.
b. In the employee's Proposed Incr Pct or Proposed Incr Amt field, enter the percent or amount. If you enter the proposed percent, the proposed amount will automatically be calculated and vice versa. The employee's New Salary/Compa Ratio fields, and the Budget Percent, Budget Pool, Budget Used, Lump Sum Used, and Variance fields at the top of the worksheet are also automatically updated, as appropriate.
If a prorate percent exists and the Override Prorate option is not selected, the
proposed increase amount/percent is equal to the proposed increase amount/percent multiplied by the prorate percentage. A warning message is issued informing you that a prorate applies at x%. If a merit matrix exists and the proposed increase is greater than the Salary Grade Maximum, a warning message is issued informing you that the salary exceeds the merit guidelines and has been adjusted. The Proposed Incr Pct and Proposed Incr Amt fields are adjusted accordingly.
5. Select Override Prorate if you do not want to perform prorate calculations on the proposed merit increase.
The Override Prorate option may not be available. Your Human Resources Department
determines whether or not managers have the ability to use the override prorate.
Chapter 4: Managing CompensationADP Self Service Manager’s Guide

Completing Compensation Reviews 4-9
6. To add an additional row for an employee, click Add. Another row is added for the employee. Enter information in the fields as needed.
A Delete button is available once you have added an additional row to an employee. If
you want to delete the added row, click Delete.
7. Click Save to save your changes.
Click Print to print the information on this page. Click Reset to reset the fields to their
original values. Click Cancel to return to the Compensation Planning page.
To submit the completed review for approval, see “Submitting Compensation Worksheets for Approval” on page 4-14.
You have completed the merit compensation worksheet.
For information on submitting the completed worksheet for approval, see “Submitting Compensation Worksheets for Approval” on page 4-14.
For information on viewing and printing compensation planning information, consolidated budget information, and compensation worksheets, see “Viewing and Printing Compensation Planning Summary Information” on page 4-15.
Chapter 4: Managing CompensationADP Self Service Manager’s Guide
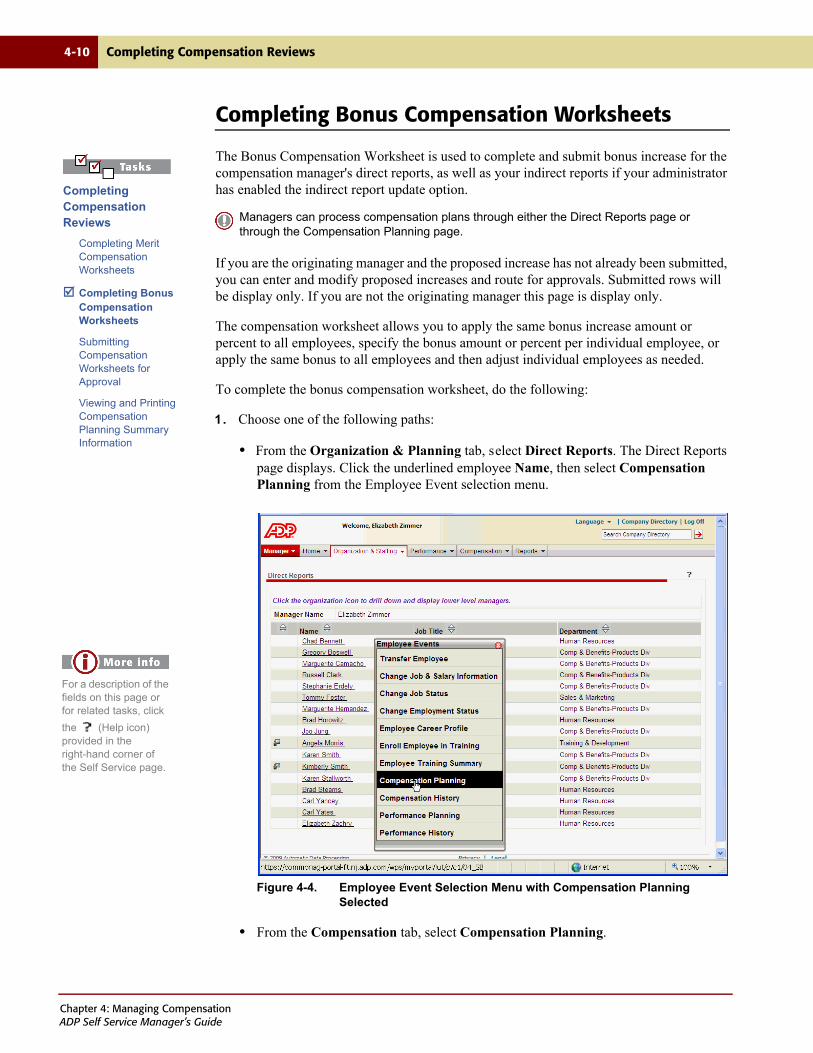
4-10 Completing Compensation Reviews
Completing Bonus Compensation Worksheets
The Bonus Compensation Worksheet is used to complete and submit bonus increase for the compensation manager's direct reports, as well as your indirect reports if your administrator has enabled the indirect report update option.
If you are the originating manager and the proposed increase has not already been submitted, you can enter and modify proposed increases and route for approvals. Submitted rows will be display only. If you are not the originating manager this page is display only.
The compensation worksheet allows you to apply the same bonus increase amount or percent to all employees, specify the bonus amount or percent per individual employee, or apply the same bonus to all employees and then adjust individual employees as needed.
To complete the bonus compensation worksheet, do the following:
1. Choose one of the following paths:
• From the Organization & Planning tab, select Direct Reports. The Direct Reports page displays. Click the underlined employee Name, then select Compensation Planning from the Employee Event selection menu.
Figure 4-4. Employee Event Selection Menu with Compensation Planning Selected
• From the Compensation tab, select Compensation Planning.
Managers can process compensation plans through either the Direct Reports page or through the Compensation Planning page.
Completing Compensation Reviews
Completing Merit Compensation Worksheets
Completing Bonus Compensation Worksheets
Submitting Compensation Worksheets for Approval
Viewing and Printing Compensation Planning Summary Information
For a description of the fields on this page or for related tasks, click
the (Help icon) provided in the right-hand corner of the Self Service page.
Chapter 4: Managing CompensationADP Self Service Manager’s Guide
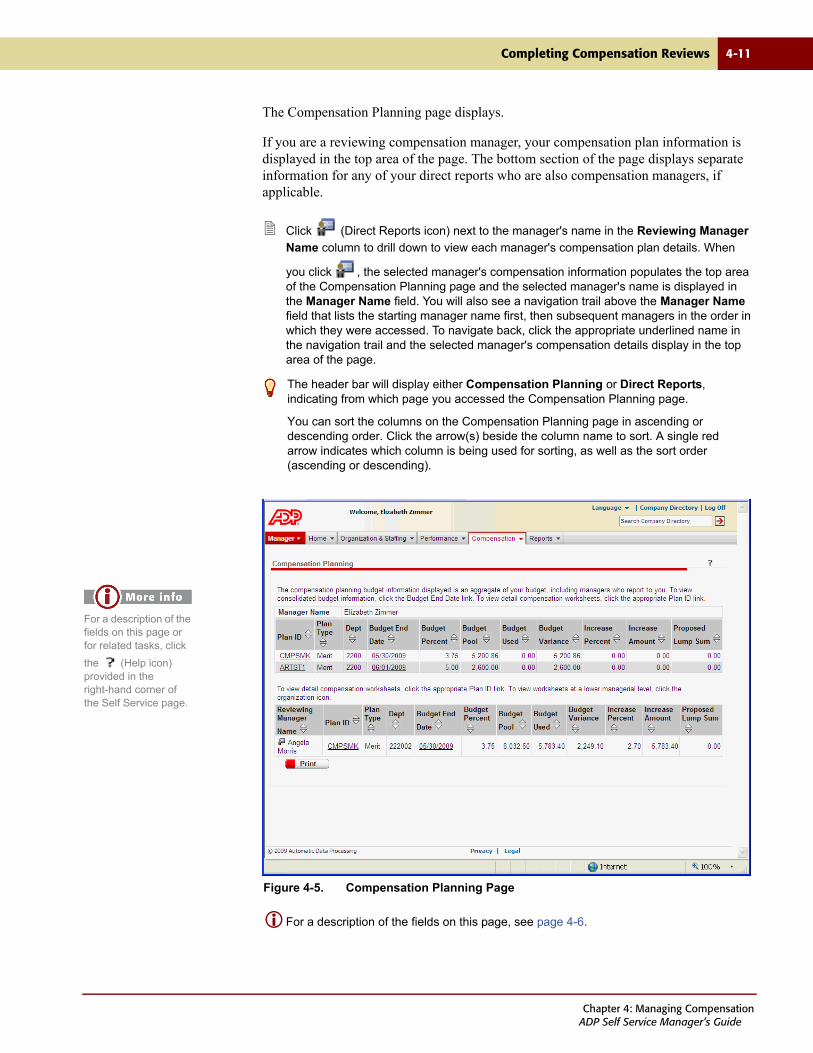
Completing Compensation Reviews 4-11
The Compensation Planning page displays.
If you are a reviewing compensation manager, your compensation plan information is displayed in the top area of the page. The bottom section of the page displays separate information for any of your direct reports who are also compensation managers, if applicable.
Click (Direct Reports icon) next to the manager's name in the Reviewing Manager
Name column to drill down to view each manager's compensation plan details. When
you click , the selected manager's compensation information populates the top area of the Compensation Planning page and the selected manager's name is displayed in the Manager Name field. You will also see a navigation trail above the Manager Name field that lists the starting manager name first, then subsequent managers in the order in which they were accessed. To navigate back, click the appropriate underlined name in the navigation trail and the selected manager's compensation details display in the top area of the page.
Figure 4-5. Compensation Planning Page
For a description of the fields on this page, see page 4-6.
The header bar will display either Compensation Planning or Direct Reports, indicating from which page you accessed the Compensation Planning page.
You can sort the columns on the Compensation Planning page in ascending or descending order. Click the arrow(s) beside the column name to sort. A single red arrow indicates which column is being used for sorting, as well as the sort order (ascending or descending).
For a description of the fields on this page or for related tasks, click
the (Help icon) provided in the right-hand corner of the Self Service page.
Chapter 4: Managing CompensationADP Self Service Manager’s Guide
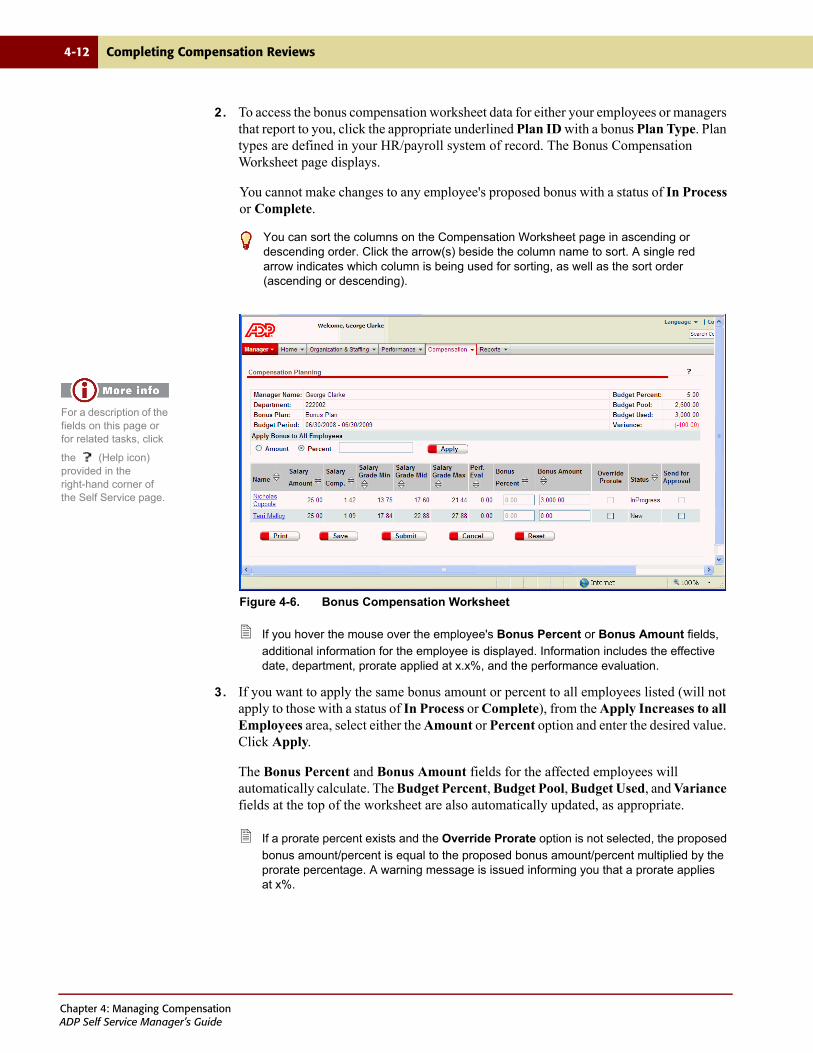
4-12 Completing Compensation Reviews
2. To access the bonus compensation worksheet data for either your employees or managers that report to you, click the appropriate underlined Plan ID with a bonus Plan Type. Plan types are defined in your HR/payroll system of record. The Bonus Compensation Worksheet page displays.
You cannot make changes to any employee's proposed bonus with a status of In Process or Complete.
Figure 4-6. Bonus Compensation Worksheet
If you hover the mouse over the employee's Bonus Percent or Bonus Amount fields,
additional information for the employee is displayed. Information includes the effective date, department, prorate applied at x.x%, and the performance evaluation.
3. If you want to apply the same bonus amount or percent to all employees listed (will not apply to those with a status of In Process or Complete), from the Apply Increases to all Employees area, select either the Amount or Percent option and enter the desired value. Click Apply.
The Bonus Percent and Bonus Amount fields for the affected employees will automatically calculate. The Budget Percent, Budget Pool, Budget Used, and Variance fields at the top of the worksheet are also automatically updated, as appropriate.
If a prorate percent exists and the Override Prorate option is not selected, the proposed
bonus amount/percent is equal to the proposed bonus amount/percent multiplied by the prorate percentage. A warning message is issued informing you that a prorate applies at x%.
You can sort the columns on the Compensation Worksheet page in ascending or descending order. Click the arrow(s) beside the column name to sort. A single red arrow indicates which column is being used for sorting, as well as the sort order (ascending or descending).
For a description of the fields on this page or for related tasks, click
the (Help icon) provided in the right-hand corner of the Self Service page.
Chapter 4: Managing CompensationADP Self Service Manager’s Guide
Completing Compensation Reviews 4-13
4. If you want to specify a bonus amount or percent per employee, enter the percent or amount in the employee's Bonus Percent or Bonus Amount field. If you enter the proposed bonus percent, the proposed bonus amount will automatically be calculated and vice versa. The Budget Percent, Budget Pool, Budget Used, and Variance fields at the top of the worksheet are also automatically updated, as appropriate.
If a prorate percent exists and the Override Prorate option is not selected, the proposed
bonus amount/percent is equal to the proposed bonus amount/percent multiplied by the prorate percentage. A warning message is issued informing you that a prorate applies at x%.
5. Select Override Prorate if you do not want to perform prorate calculations on the proposed bonus percent or amount.
The Override Prorate option may not be available. Your Human Resources Department
determines whether or not managers have the ability to use the override prorate.
6. Click Save to save your changes.
Click Print to print the information on this page. Click Reset to reset the fields to their
original values. Click Cancel to return to the Compensation Planning page.
To submit the completed review for approval, see “Submitting Compensation Worksheets for Approval” on page 4-14.
You have completed the bonus compensation worksheet.
For information on submitting the completed worksheet for approval, see “Submitting Compensation Worksheets for Approval” on page 4-14.
For information on viewing and printing compensation planning information. consolidated budget information, and compensation worksheets, see “Viewing and Printing Compensation Planning Summary Information” on page 4-15.
Chapter 4: Managing CompensationADP Self Service Manager’s Guide
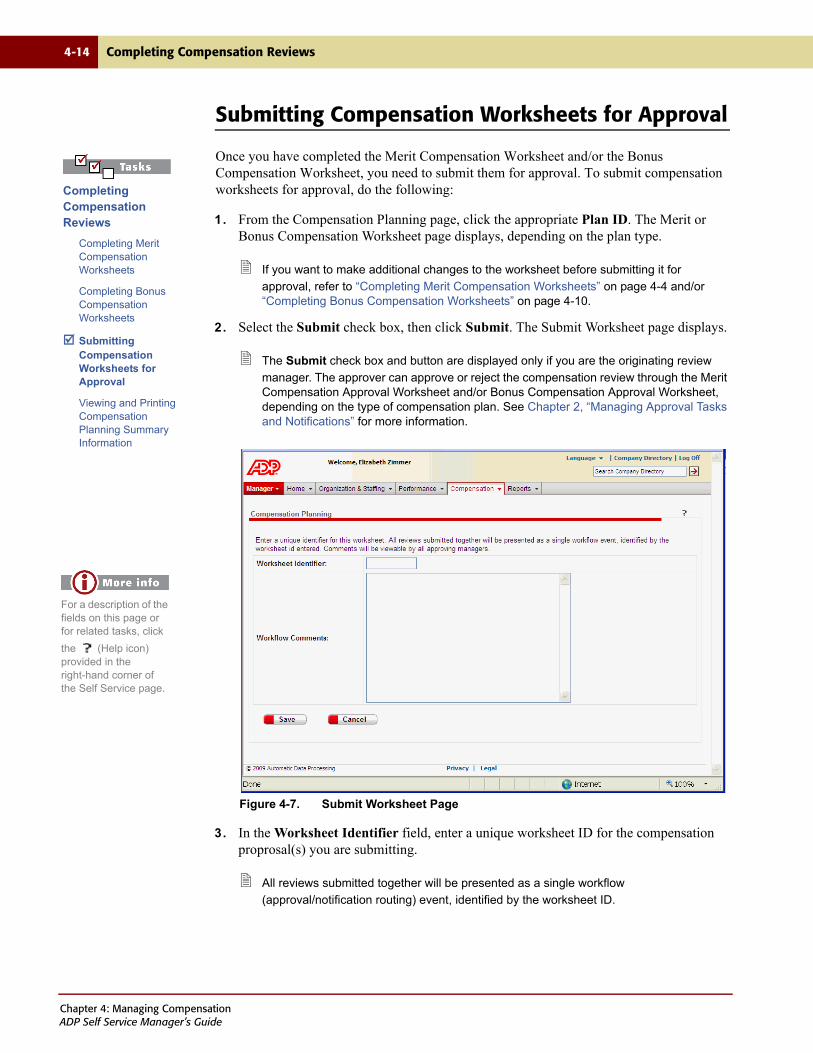
4-14 Completing Compensation Reviews
Submitting Compensation Worksheets for Approval
Once you have completed the Merit Compensation Worksheet and/or the Bonus Compensation Worksheet, you need to submit them for approval. To submit compensation worksheets for approval, do the following:
1. From the Compensation Planning page, click the appropriate Plan ID. The Merit or Bonus Compensation Worksheet page displays, depending on the plan type.
If you want to make additional changes to the worksheet before submitting it for
approval, refer to “Completing Merit Compensation Worksheets” on page 4-4 and/or “Completing Bonus Compensation Worksheets” on page 4-10.
2. Select the Submit check box, then click Submit. The Submit Worksheet page displays.
The Submit check box and button are displayed only if you are the originating review
manager. The approver can approve or reject the compensation review through the Merit Compensation Approval Worksheet and/or Bonus Compensation Approval Worksheet, depending on the type of compensation plan. See Chapter 2, “Managing Approval Tasks and Notifications” for more information.
Figure 4-7. Submit Worksheet Page
3. In the Worksheet Identifier field, enter a unique worksheet ID for the compensation proprosal(s) you are submitting.
All reviews submitted together will be presented as a single workflow
(approval/notification routing) event, identified by the worksheet ID.
Completing Compensation Reviews
Completing Merit Compensation Worksheets
Completing Bonus Compensation Worksheets
Submitting Compensation Worksheets for Approval
Viewing and Printing Compensation Planning Summary Information
For a description of the fields on this page or for related tasks, click
the (Help icon) provided in the right-hand corner of the Self Service page.
Chapter 4: Managing CompensationADP Self Service Manager’s Guide
Completing Compensation Reviews 4-15
4. In the Workflow Comments field, enter any comments concerning the workflow (approval and notification routing) of the compensation proprosal(s).
Comments will be viewable by all approvers.
5. Click Save. You are returned to the Compensation Planning page and a message is displayed informing you who your request has been submitted to.
Once you click Save, you cannot make any more changes to the compensation
worksheet you are submitting. Click Cancel to cancel any changes and return to the Compensation Planning page.
The Submit Worksheet page can be accessed from the following pages: Merit Compensation Approval Worksheet; Bonus Compensation Approval Worksheet; Performance Approval Worksheet; Merit Compensation Worksheet; Bonus Compensation Worksheet; Performance Worksheet.
You have finished submitting the compensation worksheet for approval.
Next you will review information on viewing and printing compensation planning information, consolidated budget information, and compensation worksheets.
Viewing and Printing Compensation Planning Summary Information
Through the Compensation Planning page, you can view and print compensation planning summary information, as well as compensation worksheets, for your direct reports and the direct reports of the managers that report into you. You can also view and print consolidated budget information.
Managers can view and print compensation worksheets through either the Direct Reports page or through the Compensation Planning page.
Viewing compensation information includes the following tasks:
• Viewing and Printing Compensation Planning Information
• Viewing and Printing Consolidated Budget Information
• Viewing and Printing Compensation Worksheets
For information on viewing compensation history for specific employees, see “Viewing and
Printing Employee Compensation History” on page 4-22.
Completing Compensation Reviews
Completing Merit Compensation Worksheets
Completing Bonus Compensation Worksheets
Submitting Compensation Worksheets for Approval
Viewing and Printing Compensation Planning Summary Information
Chapter 4: Managing CompensationADP Self Service Manager’s Guide
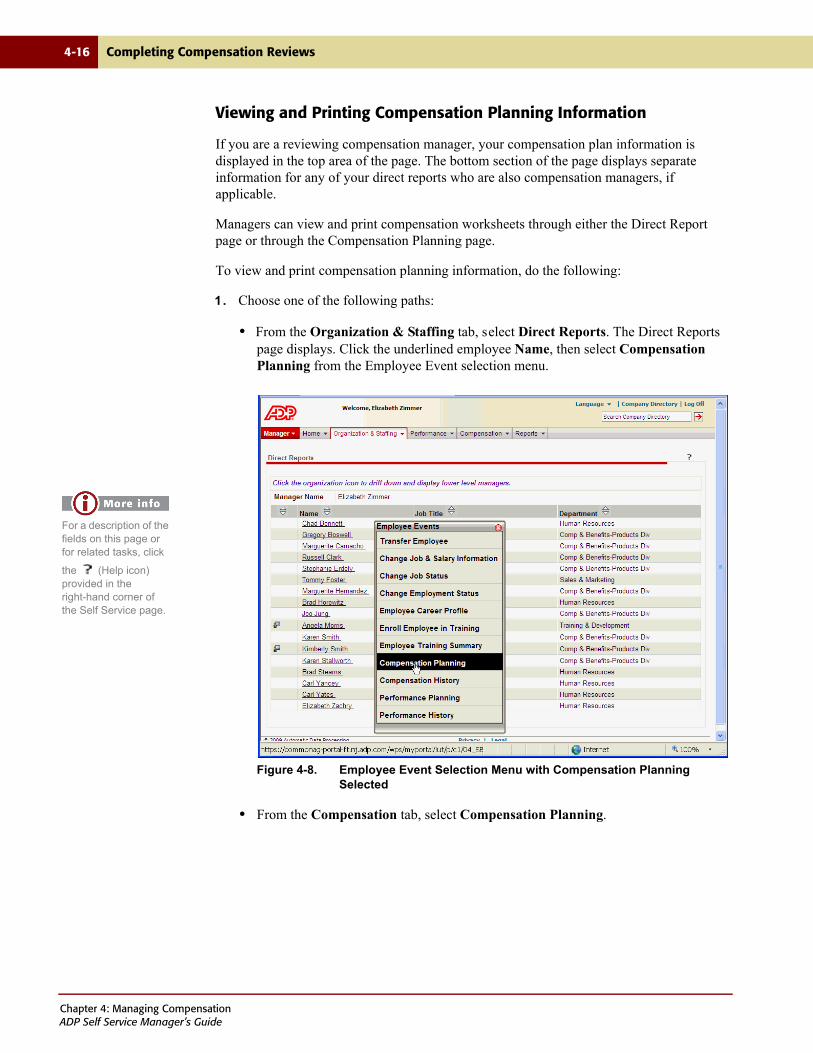
4-16 Completing Compensation Reviews
Viewing and Printing Compensation Planning Information
If you are a reviewing compensation manager, your compensation plan information is displayed in the top area of the page. The bottom section of the page displays separate information for any of your direct reports who are also compensation managers, if applicable.
Managers can view and print compensation worksheets through either the Direct Report page or through the Compensation Planning page.
To view and print compensation planning information, do the following:
1. Choose one of the following paths:
• From the Organization & Staffing tab, select Direct Reports. The Direct Reports page displays. Click the underlined employee Name, then select Compensation Planning from the Employee Event selection menu.
Figure 4-8. Employee Event Selection Menu with Compensation Planning Selected
• From the Compensation tab, select Compensation Planning.
For a description of the fields on this page or for related tasks, click
the (Help icon) provided in the right-hand corner of the Self Service page.
Chapter 4: Managing CompensationADP Self Service Manager’s Guide
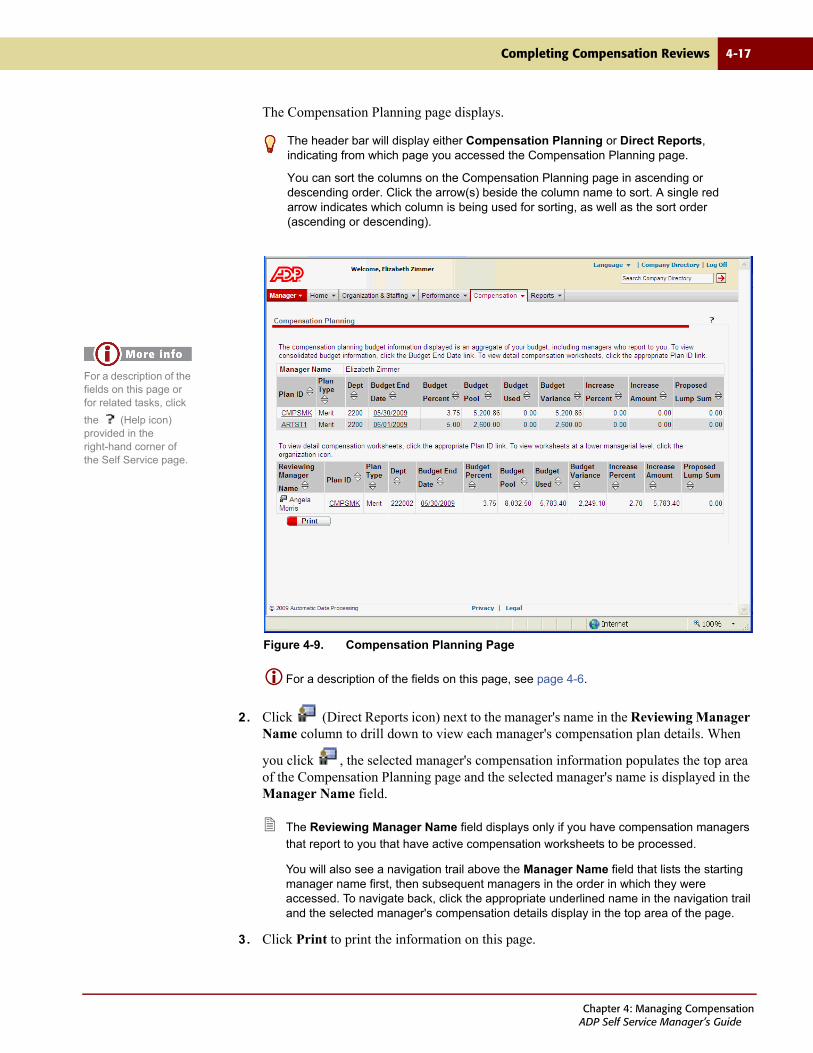
Completing Compensation Reviews 4-17
The Compensation Planning page displays.
Figure 4-9. Compensation Planning Page
For a description of the fields on this page, see page 4-6.
2. Click (Direct Reports icon) next to the manager's name in the Reviewing Manager Name column to drill down to view each manager's compensation plan details. When
you click , the selected manager's compensation information populates the top area of the Compensation Planning page and the selected manager's name is displayed in the Manager Name field.
The Reviewing Manager Name field displays only if you have compensation managers
that report to you that have active compensation worksheets to be processed.
You will also see a navigation trail above the Manager Name field that lists the starting manager name first, then subsequent managers in the order in which they were accessed. To navigate back, click the appropriate underlined name in the navigation trail and the selected manager's compensation details display in the top area of the page.
3. Click Print to print the information on this page.
The header bar will display either Compensation Planning or Direct Reports, indicating from which page you accessed the Compensation Planning page.
You can sort the columns on the Compensation Planning page in ascending or descending order. Click the arrow(s) beside the column name to sort. A single red arrow indicates which column is being used for sorting, as well as the sort order (ascending or descending).
For a description of the fields on this page or for related tasks, click
the (Help icon) provided in the right-hand corner of the Self Service page.
Chapter 4: Managing CompensationADP Self Service Manager’s Guide

4-18 Completing Compensation Reviews
You have finished viewing compensation planning summary information.
To view and print consolidated budget pool information, see “Viewing and Printing Consolidated Budget Information” on page 4-19.
To view and print compensation worksheets, see “Viewing and Printing Compensation Worksheets” on page 4-20.
Chapter 4: Managing CompensationADP Self Service Manager’s Guide
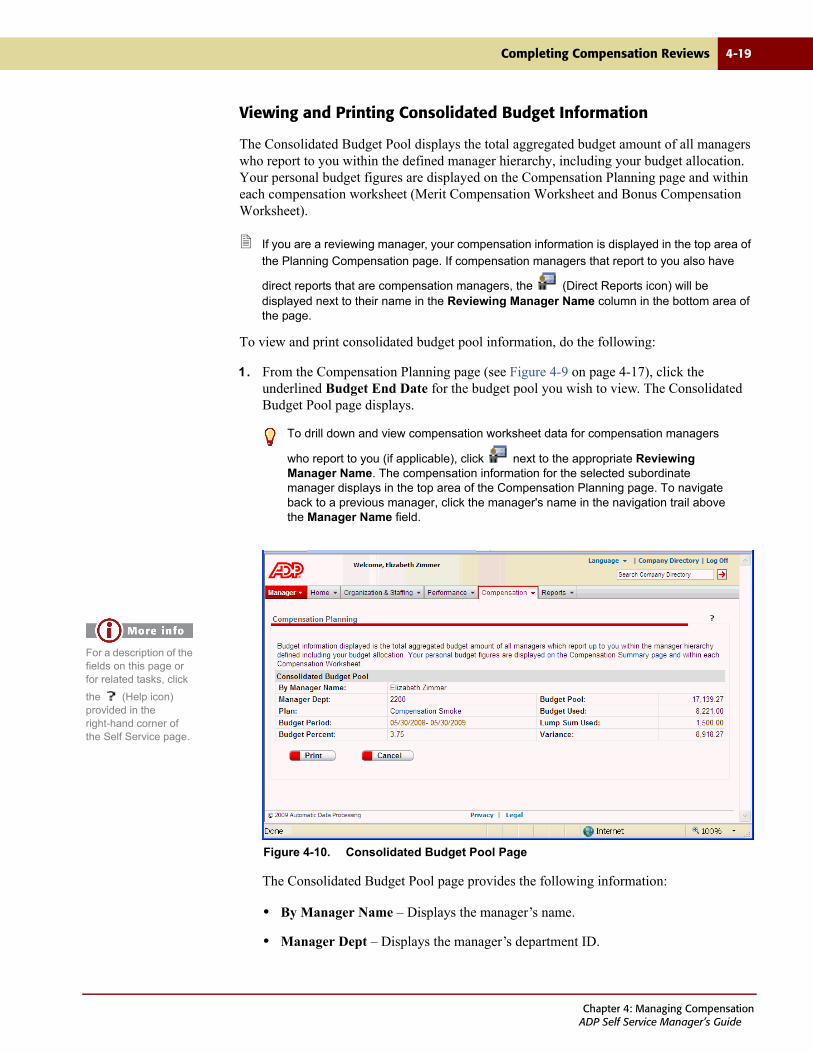
Completing Compensation Reviews 4-19
Viewing and Printing Consolidated Budget Information
The Consolidated Budget Pool displays the total aggregated budget amount of all managers who report to you within the defined manager hierarchy, including your budget allocation. Your personal budget figures are displayed on the Compensation Planning page and within each compensation worksheet (Merit Compensation Worksheet and Bonus Compensation Worksheet).
If you are a reviewing manager, your compensation information is displayed in the top area of
the Planning Compensation page. If compensation managers that report to you also have
direct reports that are compensation managers, the (Direct Reports icon) will be displayed next to their name in the Reviewing Manager Name column in the bottom area of the page.
To view and print consolidated budget pool information, do the following:
1. From the Compensation Planning page (see Figure 4-9 on page 4-17), click the underlined Budget End Date for the budget pool you wish to view. The Consolidated Budget Pool page displays.
Figure 4-10. Consolidated Budget Pool Page
The Consolidated Budget Pool page provides the following information:
• By Manager Name – Displays the manager’s name.
• Manager Dept – Displays the manager’s department ID.
To drill down and view compensation worksheet data for compensation managers
who report to you (if applicable), click next to the appropriate Reviewing Manager Name. The compensation information for the selected subordinate manager displays in the top area of the Compensation Planning page. To navigate back to a previous manager, click the manager's name in the navigation trail above the Manager Name field.
For a description of the fields on this page or for related tasks, click
the (Help icon) provided in the right-hand corner of the Self Service page.
Chapter 4: Managing CompensationADP Self Service Manager’s Guide
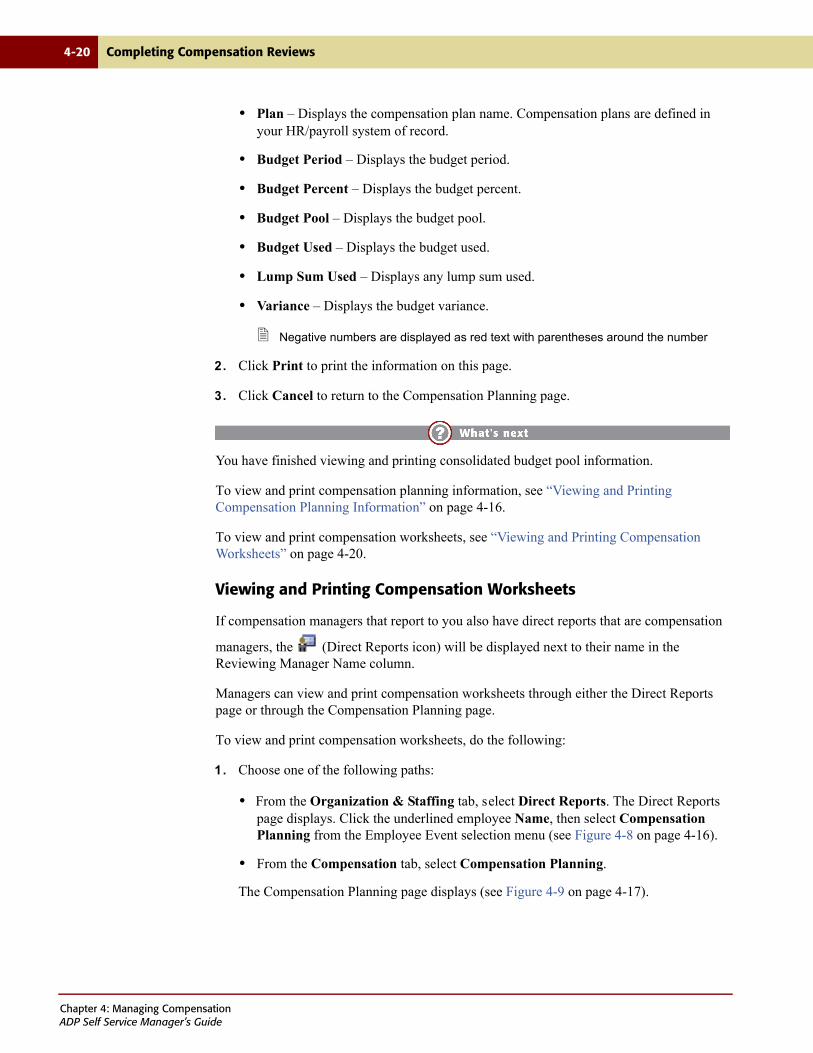
4-20 Completing Compensation Reviews
• Plan – Displays the compensation plan name. Compensation plans are defined in your HR/payroll system of record.
• Budget Period – Displays the budget period.
• Budget Percent – Displays the budget percent.
• Budget Pool – Displays the budget pool.
• Budget Used – Displays the budget used.
• Lump Sum Used – Displays any lump sum used.
• Variance – Displays the budget variance.
Negative numbers are displayed as red text with parentheses around the number
2. Click Print to print the information on this page.
3. Click Cancel to return to the Compensation Planning page.
You have finished viewing and printing consolidated budget pool information.
To view and print compensation planning information, see “Viewing and Printing Compensation Planning Information” on page 4-16.
To view and print compensation worksheets, see “Viewing and Printing Compensation Worksheets” on page 4-20.
Viewing and Printing Compensation Worksheets
If compensation managers that report to you also have direct reports that are compensation
managers, the (Direct Reports icon) will be displayed next to their name in the Reviewing Manager Name column.
Managers can view and print compensation worksheets through either the Direct Reports page or through the Compensation Planning page.
To view and print compensation worksheets, do the following:
1. Choose one of the following paths:
• From the Organization & Staffing tab, select Direct Reports. The Direct Reports page displays. Click the underlined employee Name, then select Compensation Planning from the Employee Event selection menu (see Figure 4-8 on page 4-16).
• From the Compensation tab, select Compensation Planning.
The Compensation Planning page displays (see Figure 4-9 on page 4-17).
Chapter 4: Managing CompensationADP Self Service Manager’s Guide
Completing Compensation Reviews 4-21
2. To drill down and view compensation worksheet data for compensation managers who
report to your direct report compensation managers, click next to the appropriate Reviewing Manager Name. The compensation information for the selected subordinate manager displays in the top area of the Compensation Planning page.
To navigate back to a previous manager, click the manager's name in the navigation trail above the Manager Name field.
The Reviewing Manager Name field displays only if you have compensation managers
that report to you that have active compensation worksheets to be processed
3. View compensation worksheet data for either employees or managers that report to you as follows:
a. To view merit compensation worksheet data, click the appropriate Plan ID with a merit Plan Type. Plan types are defined in your HR/payroll system of record. The Merit Compensation Worksheet displays, as shown in Figure 4-3.
For information on entering information on the Merit Compensation Worksheet, see
“Completing Merit Compensation Worksheets” on page 4-4.
b. To view bonus compensation worksheet data, click the appropriate Plan ID with a bonus Plan Type. Plan types are defined in your HR/payroll system of record. The Bonus Compensation Worksheet page displays.
For information on entering information on the Bonus Compensation Worksheet,
see “Completing Bonus Compensation Worksheets” on page 4-10.
4. Click Print to print the information on this page.
5. Click Cancel to return to the Compensation Planning page.
You have finished viewing the compensation planning summary information and compensation worksheet for your direct reports and the direct reports of the managers that report to you, as well as consolidated budget information.
To view compensation history detail for an employee, click the underlined employee name. The Employee Compensation History displays (see “Viewing and Printing Employee Compensation History” on page 4-22 for more information). Click Cancel to return to the Merit Compensation Worksheet.
Chapter 4: Managing CompensationADP Self Service Manager’s Guide
4-22 Viewing and Printing Employee Compensation History
Viewing and Printing Employee Compensation History
The Compensation History page allows you to view the compensation history of your direct
reports, as well as the direct reports of each of the managers reporting to you. The (Direct Reports icon) is displayed next to the name of any of your managers who also have direct reports.
Managers can view and print employee compensation history information through either the Direct Report page or through the Compensation History page.
To view and print employee compensation history, do the following:
1. Choose one of the following paths:
• From the Organization & Staffing tab, select Direct Reports. The Direct Reports page displays. Click the underlined employee Name, then select Compensation History from the Employee Event selection menu.
Figure 4-11. Employee Event Selection Menu with Compensation History Selected
For a description of the fields on this page or for related tasks, click
the (Help icon) provided in the right-hand corner of the Self Service page.
Chapter 4: Managing CompensationADP Self Service Manager’s Guide
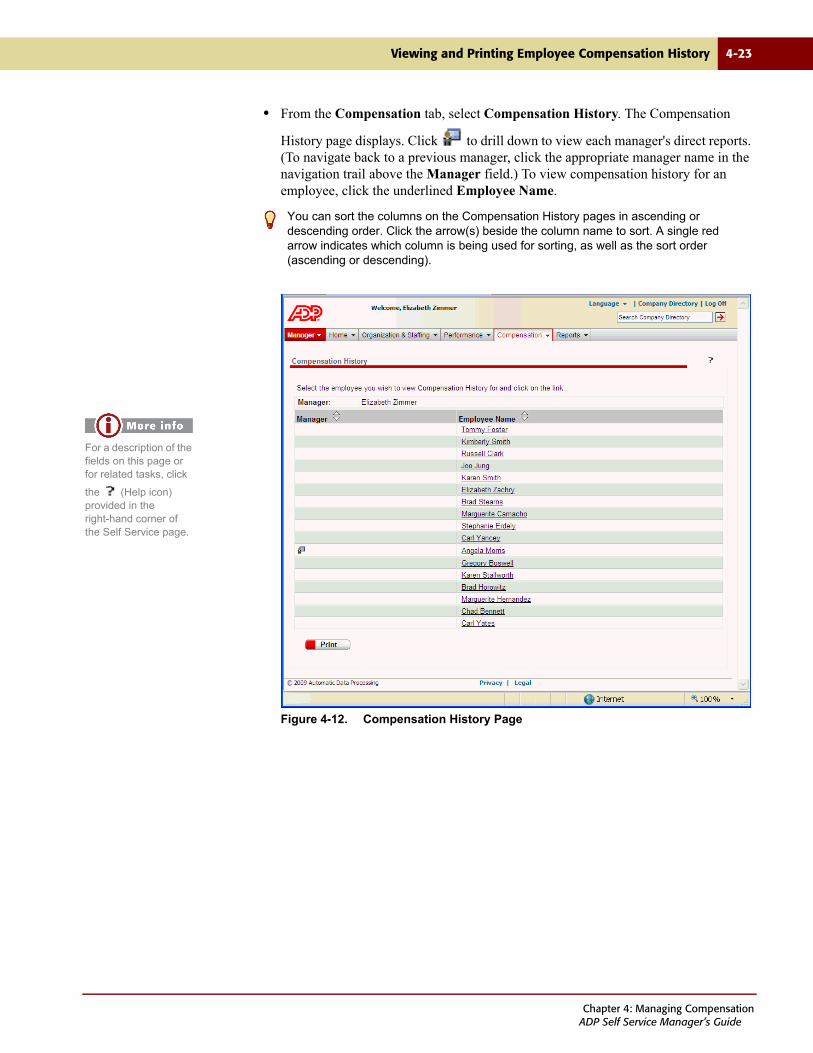
Viewing and Printing Employee Compensation History 4-23
• From the Compensation tab, select Compensation History. The Compensation
History page displays. Click to drill down to view each manager's direct reports. (To navigate back to a previous manager, click the appropriate manager name in the navigation trail above the Manager field.) To view compensation history for an employee, click the underlined Employee Name.
Figure 4-12. Compensation History Page
You can sort the columns on the Compensation History pages in ascending or descending order. Click the arrow(s) beside the column name to sort. A single red arrow indicates which column is being used for sorting, as well as the sort order (ascending or descending).
For a description of the fields on this page or for related tasks, click
the (Help icon) provided in the right-hand corner of the Self Service page.
Chapter 4: Managing CompensationADP Self Service Manager’s Guide

4-24 Viewing and Printing Employee Compensation History
The selected employee's compensation history information displays.
Figure 4-13. Employee Compensation History Page
The Employee Compensation History page provides the following information:
• Employee Name – Displays the employee's name.
• Effective Date – Displays the effective date of the compensation action.
• Manager Name – Displays the employee's manager's name.
• Dept – Displays the employee's department ID.
• Salary Grade – Displays the employee's salary grade.
• Rating Nbr – Displays the employee's overall performance rating code.
• Compensation Frequency – Displays the compensation frequency.
• Salary Action – Displays the salary action type, either Pay Rate Change or Lump Sum.
• Reason – Displays the reason for the salary action.
• New Salary – Displays the employee's new salary.
The header bar will display either Compensation History or Direct Reports, indicating from which page you accessed the Employee Compensation History page.
You can sort the columns on the Compensation History page in ascending or descending order. Click the arrow(s) beside the column name to sort. A single red arrow indicates which column is being used for sorting, as well as the sort order (ascending or descending).
You can also access the Employee Compensation History from the employee name link on the following pages: Merit Compensation Approval History Detail; Bonus Compensation Approval History Detail; Merit Compensation Approval Worksheet; Bonus Compensation Approval Worksheet; Merit Compensation Worksheet; and the Bonus Compensation Worksheet.
For a description of the fields on this page or for related tasks, click
the (Help icon) provided in the right-hand corner of the Self Service page.
Chapter 4: Managing CompensationADP Self Service Manager’s Guide
Viewing and Printing Employee Compensation History 4-25
• Increase Percent – Displays the increase percent of the employee's salary.
• Increase Amount – Displays the increase amount of the employee's salary.
2. Click Print to print the selected employee's compensation history.
3. Click Cancel to return to the page (Compensation History or Manager Home/Direct Reports) from which you accessed this page.
You have finished viewing employee compensation history.
Chapter 4: Managing CompensationADP Self Service Manager’s Guide

4-26 Viewing and Printing Employee Compensation History
Chapter 4: Managing CompensationADP Self Service Manager’s Guide

Chapter 5
Managing Performance Reviews
PAGE TOPIC
5-2 Introduction
5-3 Completing Performance Reviews
5-16 Viewing and Printing Employee Performance History
5-19 Viewing and Printing Employee Performance Review Forms
5-23 Creating Performance Review Templates
Chapter 5: Managing Performance ReviewsADP Self Service Manager’s Guide
5-2 Introduction
Introduction
Performance plans, including performance factors and goals, rating schemes, and performance review templates are defined in your HR/payroll system of record. Plans are then assigned to employees and worksheets are created for use in ADP Self Service. Once the performance review worksheets have been created, managers can then process the reviews within Self Service.
Managers may be required to use the standard template, which contains the performance factors, goals, and the rules imposed by the template, or they may be allowed to create their own template via the Create Performance Template menu task in Self Service. Managers receive worksheets only for employees for whom they have been designated as performance managers, through the Reports-To functionality. For more information on Reports-To, see the Hiring, Staffing, and Job Maintenance Guide. For more information on creating performance review plans, see the Performance and Development Guide.
Through Self Service, performance managers can do the following:
• Build customized performance review templates
• Conduct the performance review, including submitting the completed review to the next approving manager
• View and print performance summary information for direct reports, as well as the direct reports of managers who report into them
• View and print performance review forms for direct reports, as well as the direct reports of managers who report into them
• View and print employee performance history
Once the performance review has completed the approval process in Self Service, the employee’s performance review information is updated in your HR/payroll system of record.
Chapter 5: Managing Performance ReviewsADP Self Service Manager’s Guide
Completing Performance Reviews 5-3
Completing Performance Reviews
The Performance Planning page is a navigational entry point for performance planning, allowing managers to process performance worksheets for employees who report to them. You can process performance worksheets for your direct reports, as well as your indirect reports if your administrator has enabled the indirect report update option.
Managers can process compensation plans through either the Direct Reports page or through the Performance Planning page.
Performance plans, including performance factors and goals, rating schemes, and
performance review templates are defined in your HR/payroll system of record. Plans are then assigned to employees and worksheets are created for use in ADP Self Service. Once the performance review worksheets have been created, managers can then process the reviews within Self Service.
The Performance Planning page provides a departmental summary view of performance activity. Only performance managers have access to this page. If you are a performance manager, your name will be displayed in the Reviewing Manager column. If performance
managers that report to you also have direct reports that are performance managers, the (Direct Reports icon) will be displayed next to their name.
The Performance Worksheet provides current employee performance information for the selected reviewing manager. If you are the originating manager and the review has not already been submitted, you can modify proposed performance reviews and route for approvals. Submitted rows will be display only. If you are not the originating manager this page is display only.
Completing Performance Reviews includes the following tasks:’
• Completing Performance Review Forms
• Submitting Performance Worksheets for Approval
• Viewing and Printing Performance Information
Chapter 5: Managing Performance ReviewsADP Self Service Manager’s Guide
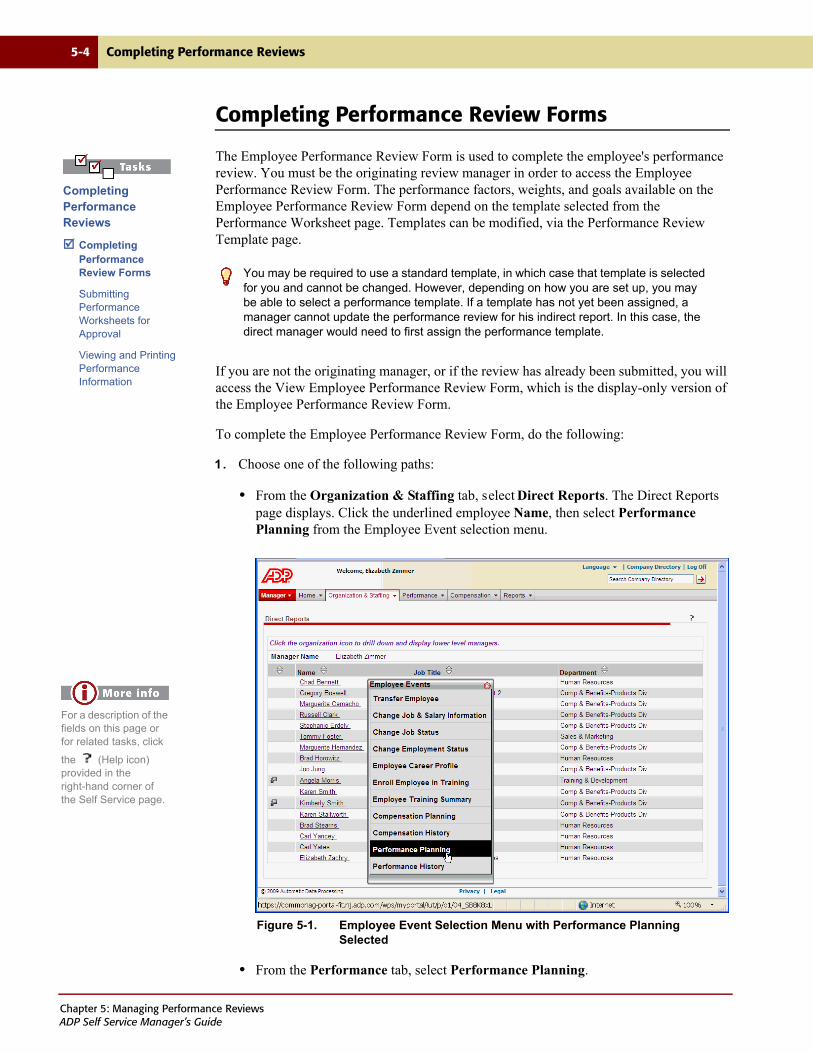
5-4 Completing Performance Reviews
Completing Performance Review Forms
The Employee Performance Review Form is used to complete the employee's performance review. You must be the originating review manager in order to access the Employee Performance Review Form. The performance factors, weights, and goals available on the Employee Performance Review Form depend on the template selected from the Performance Worksheet page. Templates can be modified, via the Performance Review Template page.
If you are not the originating manager, or if the review has already been submitted, you will access the View Employee Performance Review Form, which is the display-only version of the Employee Performance Review Form.
To complete the Employee Performance Review Form, do the following:
1. Choose one of the following paths:
• From the Organization & Staffing tab, select Direct Reports. The Direct Reports page displays. Click the underlined employee Name, then select Performance Planning from the Employee Event selection menu.
Figure 5-1. Employee Event Selection Menu with Performance Planning Selected
• From the Performance tab, select Performance Planning.
You may be required to use a standard template, in which case that template is selected for you and cannot be changed. However, depending on how you are set up, you may be able to select a performance template. If a template has not yet been assigned, a manager cannot update the performance review for his indirect report. In this case, the direct manager would need to first assign the performance template.
Completing Performance Reviews
Completing Performance Review Forms
Submitting Performance Worksheets for Approval
Viewing and Printing Performance Information
For a description of the fields on this page or for related tasks, click
the (Help icon) provided in the right-hand corner of the Self Service page.
Chapter 5: Managing Performance ReviewsADP Self Service Manager’s Guide

Completing Performance Reviews 5-5
The Performance Planning page displays.
To drill down and view performance worksheet data for performance managers who
report to your direct report performance managers, click next to the Subordinate Manager name to access the corresponding Performance Planning page. To navigate back to a previous manager, click the manager's name in the Navigation field.
Figure 5-2. Performance Planning Page
The header bar will display either Performance Planning or Direct Reports, indicating from which page you accessed the Performance Planning page.
You can sort the columns on the Performance Planning page in ascending or descending order. Click the arrow(s) beside the column name to sort. A single red arrow indicates which column is being used for sorting, as well as the sort order (ascending or descending).
For a description of the fields on this page or for related tasks, click the
(Help icon) provided in the right-hand corner of the Self Service page
Chapter 5: Managing Performance ReviewsADP Self Service Manager’s Guide

5-6 Completing Performance Reviews
2. Click your name under the Reviewing Manager column. The Performance Worksheet displays.
Figure 5-3. Performance Worksheet
To view employee performance review detail, click the employee's name. The View
Employee Performance Review Form displays. Click the View Performance History link to access the Employee Performance History. Click Cancel to navigate back to the Performance Worksheet. See “Viewing and Printing Employee Performance History” on page 5-16.
The Performance Worksheet provides the following performance information:
• Reviewing Manager – Displays the name of the reviewing manager.
• Performance Plan – Displays the type of performance plan.
• Review Type – Displays the review type.
• Employee Name – Displays the employee's name. Click to view the Employee Performance Review Form.
• Review Date – Displays employee’s review date.
• Hire Date – Displays employee’s hire date.
• Employee Status – Displays the employee's status.
• Job Title – Display’s the employee’s job title.
You can sort the columns on the Performance Worksheet page in ascending or descending order. Click the arrow(s) beside the column name to sort. A single red arrow indicates which column is being used for sorting, as well as the sort order (ascending or descending).
For a description of the fields on this page or for related tasks, click the
(Help icon) provided in the right-hand corner of the Self Service page
Chapter 5: Managing Performance ReviewsADP Self Service Manager’s Guide
Completing Performance Reviews 5-7
• Template – Select the template you want to use for the performance review, if available. (If you are not the originating review manager, or if this review has already been submitted, this field is display only.) If you are required to use a standard template, the template name will be displayed in the Template field and cannot be changed. See Step 3.
• Overall Rating – Displays the overall performance rating from the Employee Performance Review Form, if applicable. This description is based on the Overall Rating Code.
The rating scheme may or may not be in whole numbers. However, the rating
description is still based on the lowest matching rating scheme number for that description.
• Overall Goal – Displays the overall goal status from the Employee Performance Review Form, if applicable.
• Status – Displays the status of the review. Values are New, In Process, Rejected, and Complete.
3. From the Template drop down list, select the template you want to use for this performance review. If you are required to use a standard template, the template name will be displayed in the Template field and cannot be changed. Also, if you are not the originating review manager, or if this review has already been submitted, this field is display only.
If there is already existing review information in the Employee Performance Review
Form, changing the template will clear employee performance review information.
4. Click the underlined Employee Name whose performance review you want to complete. The Employee Performance Review Form page displays.
You must be the originating review manager in order to update the Employee
Performance Review Form. If you are not the originating manager, or if the review has already been submitted, you will access the View Employee Performance Review Form, which is the display-only version of the Employee Performance Review Form.
A Save in Progress button is provided on the active version of the Employee Performance Review Form. ADP Self Service will timeout after 20 minutes with what is perceived as no activity. Since completing a performance review can take longer than 20 minutes, it is recommended that you periodically save your changes using the Save in Progress button. This will let ADP Self Service know you are still active, save your changes to that point, and allow you to will remain in the Employee Performance Review Form. Once you have completed all changes, you can select the Save button, which returns you to the Performance Worksheet. You must click Save before you can submit the review for processing.
If a template has not yet been assigned, a manager cannot update the performance review for his indirect report. In this case, the direct manager would need to first assign the performance template.
Chapter 5: Managing Performance ReviewsADP Self Service Manager’s Guide
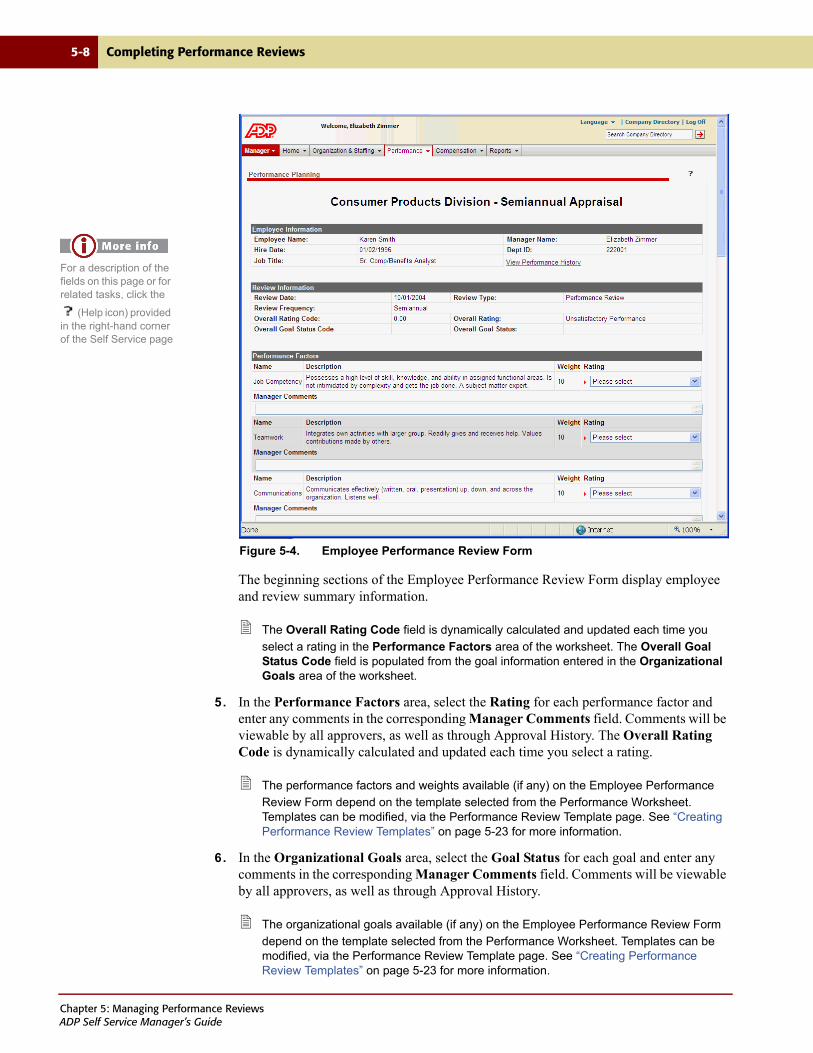
5-8 Completing Performance Reviews
Figure 5-4. Employee Performance Review Form
The beginning sections of the Employee Performance Review Form display employee and review summary information.
The Overall Rating Code field is dynamically calculated and updated each time you
select a rating in the Performance Factors area of the worksheet. The Overall Goal Status Code field is populated from the goal information entered in the Organizational Goals area of the worksheet.
5. In the Performance Factors area, select the Rating for each performance factor and enter any comments in the corresponding Manager Comments field. Comments will be viewable by all approvers, as well as through Approval History. The Overall Rating Code is dynamically calculated and updated each time you select a rating.
The performance factors and weights available (if any) on the Employee Performance
Review Form depend on the template selected from the Performance Worksheet. Templates can be modified, via the Performance Review Template page. See “Creating Performance Review Templates” on page 5-23 for more information.
6. In the Organizational Goals area, select the Goal Status for each goal and enter any comments in the corresponding Manager Comments field. Comments will be viewable by all approvers, as well as through Approval History.
The organizational goals available (if any) on the Employee Performance Review Form
depend on the template selected from the Performance Worksheet. Templates can be modified, via the Performance Review Template page. See “Creating Performance Review Templates” on page 5-23 for more information.
For a description of the fields on this page or for related tasks, click the
(Help icon) provided in the right-hand corner of the Self Service page
Chapter 5: Managing Performance ReviewsADP Self Service Manager’s Guide
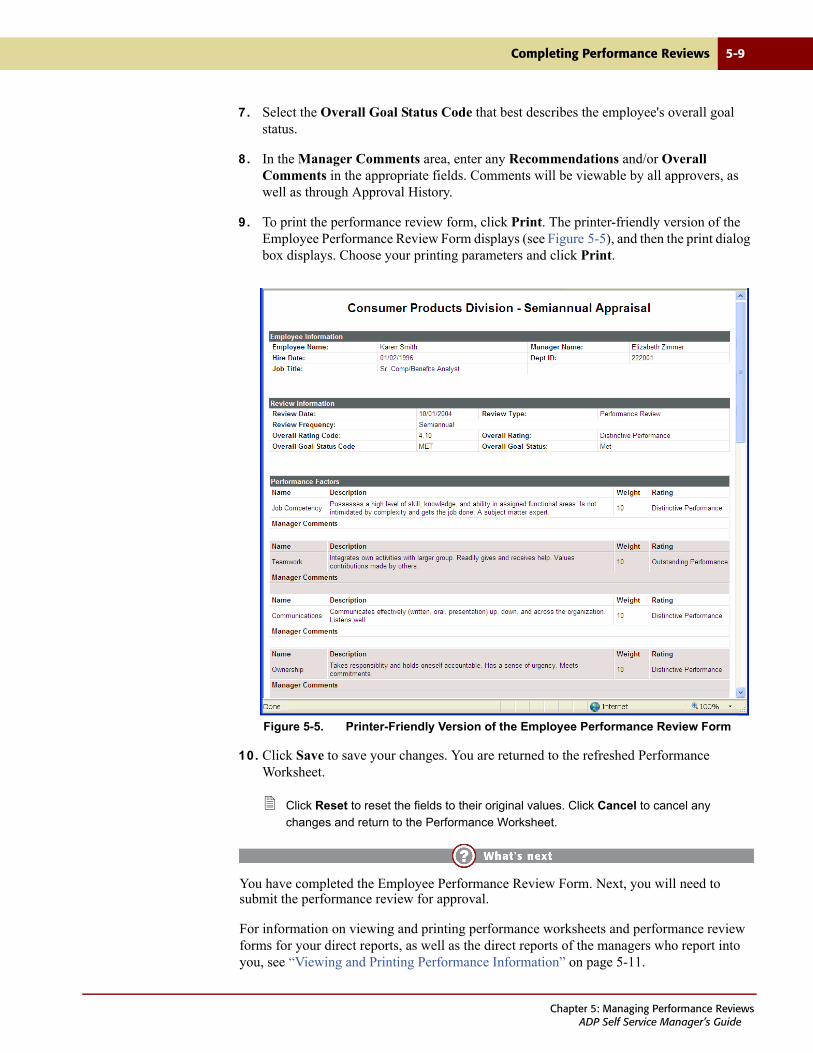
Completing Performance Reviews 5-9
7. Select the Overall Goal Status Code that best describes the employee's overall goal status.
8. In the Manager Comments area, enter any Recommendations and/or Overall Comments in the appropriate fields. Comments will be viewable by all approvers, as well as through Approval History.
9. To print the performance review form, click Print. The printer-friendly version of the Employee Performance Review Form displays (see Figure 5-5), and then the print dialog box displays. Choose your printing parameters and click Print.
Figure 5-5. Printer-Friendly Version of the Employee Performance Review Form
10. Click Save to save your changes. You are returned to the refreshed Performance Worksheet.
Click Reset to reset the fields to their original values. Click Cancel to cancel any
changes and return to the Performance Worksheet.
You have completed the Employee Performance Review Form. Next, you will need to submit the performance review for approval.
For information on viewing and printing performance worksheets and performance review forms for your direct reports, as well as the direct reports of the managers who report into you, see “Viewing and Printing Performance Information” on page 5-11.
Chapter 5: Managing Performance ReviewsADP Self Service Manager’s Guide
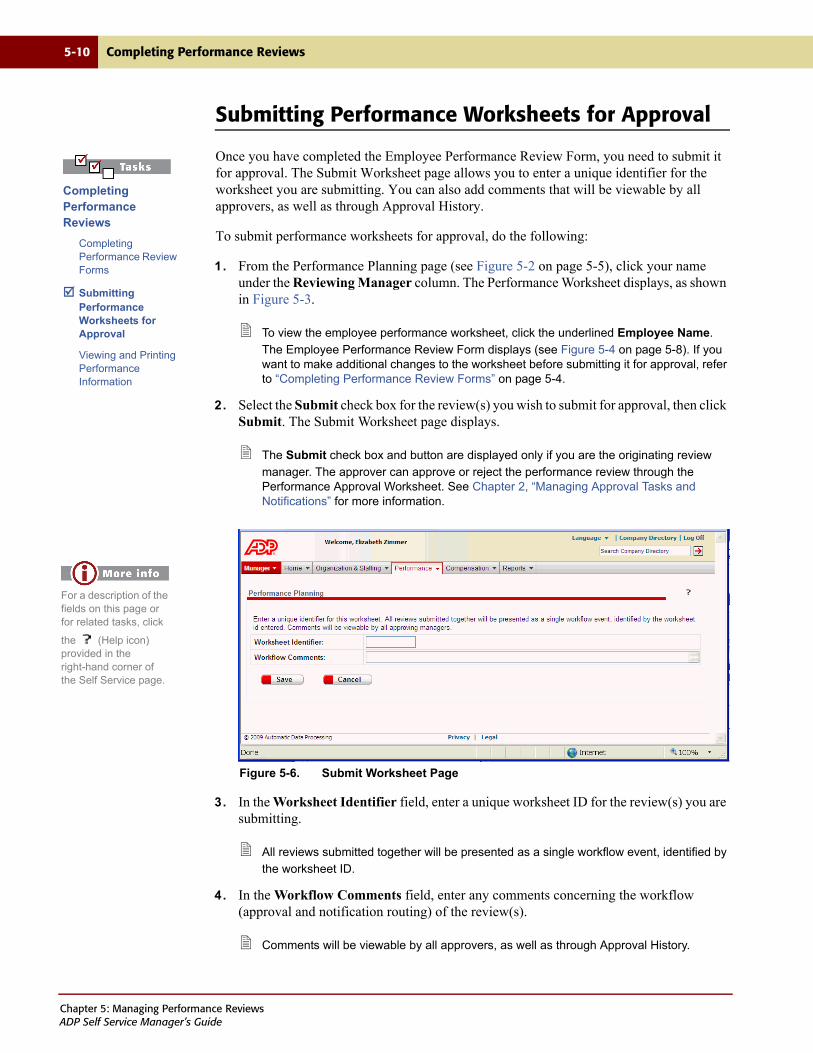
5-10 Completing Performance Reviews
Submitting Performance Worksheets for Approval
Once you have completed the Employee Performance Review Form, you need to submit it for approval. The Submit Worksheet page allows you to enter a unique identifier for the worksheet you are submitting. You can also add comments that will be viewable by all approvers, as well as through Approval History.
To submit performance worksheets for approval, do the following:
1. From the Performance Planning page (see Figure 5-2 on page 5-5), click your name under the Reviewing Manager column. The Performance Worksheet displays, as shown in Figure 5-3.
To view the employee performance worksheet, click the underlined Employee Name.
The Employee Performance Review Form displays (see Figure 5-4 on page 5-8). If you want to make additional changes to the worksheet before submitting it for approval, refer to “Completing Performance Review Forms” on page 5-4.
2. Select the Submit check box for the review(s) you wish to submit for approval, then click Submit. The Submit Worksheet page displays.
The Submit check box and button are displayed only if you are the originating review
manager. The approver can approve or reject the performance review through the Performance Approval Worksheet. See Chapter 2, “Managing Approval Tasks and Notifications” for more information.
Figure 5-6. Submit Worksheet Page
3. In the Worksheet Identifier field, enter a unique worksheet ID for the review(s) you are submitting.
All reviews submitted together will be presented as a single workflow event, identified by
the worksheet ID.
4. In the Workflow Comments field, enter any comments concerning the workflow (approval and notification routing) of the review(s).
Comments will be viewable by all approvers, as well as through Approval History.
Completing Performance Reviews
Completing Performance Review Forms
Submitting Performance Worksheets for Approval
Viewing and Printing Performance Information
For a description of the fields on this page or for related tasks, click
the (Help icon) provided in the right-hand corner of the Self Service page.
Chapter 5: Managing Performance ReviewsADP Self Service Manager’s Guide

Completing Performance Reviews 5-11
5. Click Save. You are returned to the Performance Planning page and a message is displayed informing you who your request has been submitted to.
Once you click Save, you cannot make any more changes to the performance worksheet
you are submitting. Click Cancel to cancel any changes and return to the Performance Worksheet page.
The Submit Worksheet page can be accessed from the following pages: Merit Compensation Approval Worksheet, Bonus Compensation Approval Worksheet, Performance Approval Worksheet, Merit Compensation Worksheet, Bonus Compensation Worksheet, and Performance Worksheet.
You have finished submitting the performance worksheet for approval.
Next you will review information on viewing and printing performance worksheets and performance review forms for your direct reports, as well as the direct reports of the managers who report into you.
Viewing and Printing Performance Information
Through the Performance Planning page, you can view and print Performance Worksheets, as well as Performance Review Forms, for your direct reports and the direct reports of the managers that report into you.
Viewing performance information includes the following tasks:
• Viewing and Printing Performance Worksheets
• Viewing and Printing Employee Performance Review Forms from Performance Planning
For information on viewing compensation history for specific employees, see “Viewing and
Printing Employee Performance History” on page 5-16.
You can also view completed performance review forms through the Performance History page. For more information, see “Viewing and Printing Employee Performance Review Forms” on page 5-19.
Completing Performance Reviews
Completing Performance Review Forms
Submitting Performance Worksheets for Approval
Viewing and Printing Performance Information
Chapter 5: Managing Performance ReviewsADP Self Service Manager’s Guide
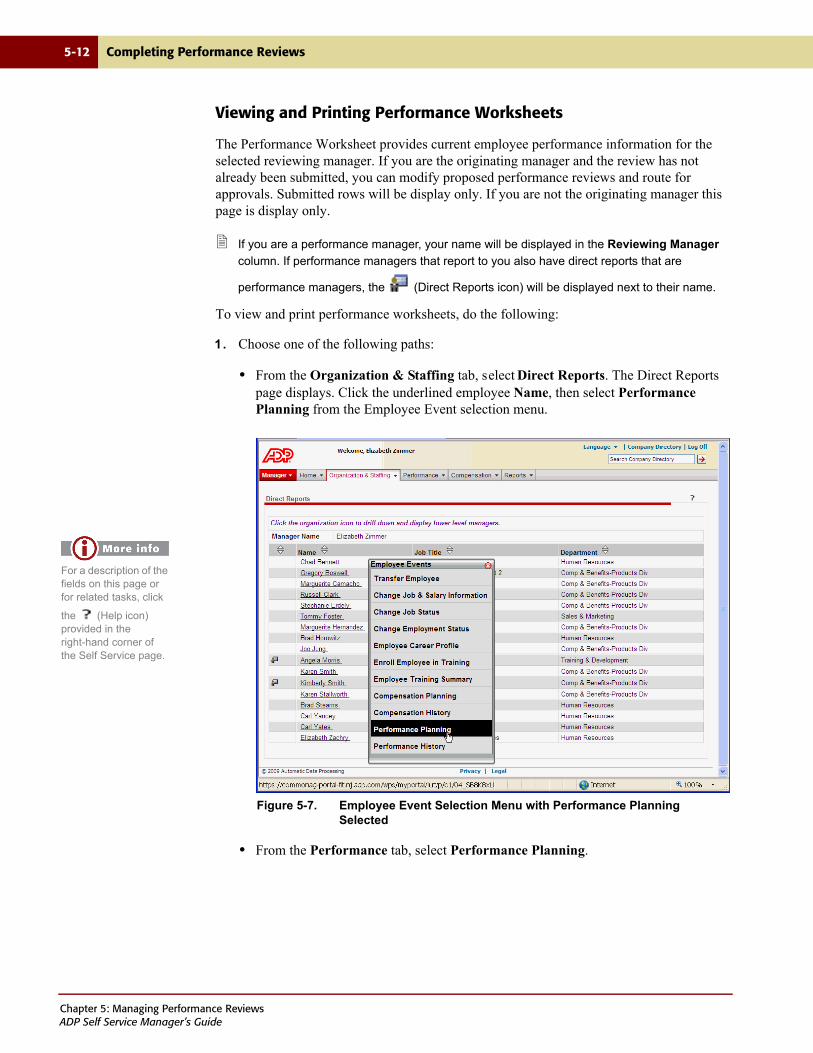
5-12 Completing Performance Reviews
Viewing and Printing Performance Worksheets
The Performance Worksheet provides current employee performance information for the selected reviewing manager. If you are the originating manager and the review has not already been submitted, you can modify proposed performance reviews and route for approvals. Submitted rows will be display only. If you are not the originating manager this page is display only.
If you are a performance manager, your name will be displayed in the Reviewing Manager
column. If performance managers that report to you also have direct reports that are
performance managers, the (Direct Reports icon) will be displayed next to their name.
To view and print performance worksheets, do the following:
1. Choose one of the following paths:
• From the Organization & Staffing tab, select Direct Reports. The Direct Reports page displays. Click the underlined employee Name, then select Performance Planning from the Employee Event selection menu.
Figure 5-7. Employee Event Selection Menu with Performance Planning Selected
• From the Performance tab, select Performance Planning.
For a description of the fields on this page or for related tasks, click
the (Help icon) provided in the right-hand corner of the Self Service page.
Chapter 5: Managing Performance ReviewsADP Self Service Manager’s Guide

Completing Performance Reviews 5-13
The Performance Planning page displays.
To drill down and view performance worksheet data for performance managers who
report to your direct report performance managers, click next to the Subordinate Manager name to access the corresponding Performance Planning page. To navigate back to a previous manager, click the manager's name in the Navigation field.
Figure 5-8. Performance Planning Page
2. To view performance worksheet data for either your employees or managers that report to you, click the underlined Reviewing Manager name. The Performance Worksheet displays, as shown in Figure 5-3.
To view employee performance review detail, click the employee's name. The View
Employee Performance Review Form displays. Click the View Performance History link to access the Employee Performance History. Click Cancel to navigate back to the Performance Worksheet.
3. Click Print to print the information on this page.
4. Click Cancel to return to the Performance Planning page.
You have finished viewing performance worksheets for your direct reports, as well as the direct reports of each of the managers reporting to you. Next you will review how to view and print employee performance review forms.
The header bar will display either Performance Planning or Direct Reports, indicating from which page you accessed the Performance Planning page.
You can sort the columns on the Performance Planning page in ascending or descending order. Click the arrow(s) beside the column name to sort. A single red arrow indicates which column is being used for sorting, as well as the sort order (ascending or descending).
For a description of the fields on this page or for related tasks, click the
(Help icon) provided in the right-hand corner of the Self Service page
Chapter 5: Managing Performance ReviewsADP Self Service Manager’s Guide
5-14 Completing Performance Reviews
Viewing and Printing Employee Performance Review Forms from Performance Planning
For performance reviews that the reviewer is doing through Self Service, there are two different views of the Employee Performance Review Forms. One is the "active" view, which is accessible only if you are the originating performance manager. The other is a "display-only" view that is accessed through several different pages. The active view is the Employee Performance Review Form The display-only view is the View Employee Performance Review Form.
For performance reviews imported from a third party application or entered into your HR/payroll system of record, a "display-only" view of summary information displays. Since the review was not completed in Self Service, detailed information is not available.
If you are the originating manager but the review has already been submitted, you will access
the display-only View Employee Performance Review Form.
This procedure details how to view and print Employee Performance Review Forms from Performance Planning. For information on all the paths available to access the Employee Performance Review Forms, see “Viewing and Printing Employee Performance Review Forms” on page 5-19.
To view and print the Employee Performance Review Forms from Performance Planning, do the following:
1. Select one of these paths:
• From the Organization & Staffing tab, select Direct Reports, click the underlined employee Name, then select Performance Planning from the Employee Event selection menu. The Performance Planning page displays. Click on a reviewing manager, then click on an underlined employee name from the Performance Worksheet.
• From the Performance tab, select Performance Planning, click on a reviewing manager, then click on an underlined employee name from the Performance Worksheet.
Chapter 5: Managing Performance ReviewsADP Self Service Manager’s Guide
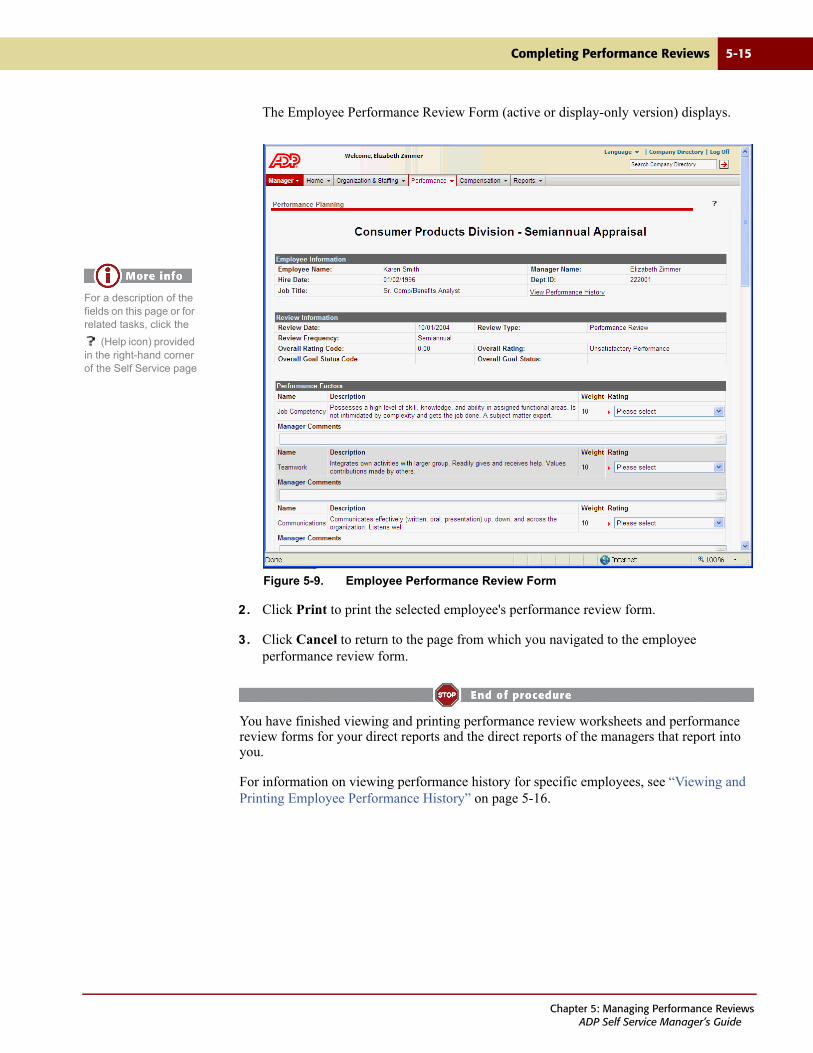
Completing Performance Reviews 5-15
The Employee Performance Review Form (active or display-only version) displays.
Figure 5-9. Employee Performance Review Form
2. Click Print to print the selected employee's performance review form.
3. Click Cancel to return to the page from which you navigated to the employee performance review form.
You have finished viewing and printing performance review worksheets and performance review forms for your direct reports and the direct reports of the managers that report into you.
For information on viewing performance history for specific employees, see “Viewing and Printing Employee Performance History” on page 5-16.
For a description of the fields on this page or for related tasks, click the
(Help icon) provided in the right-hand corner of the Self Service page
Chapter 5: Managing Performance ReviewsADP Self Service Manager’s Guide

5-16 Viewing and Printing Employee Performance History
Viewing and Printing Employee Performance History
The Performance History page allows you to view the performance history and employee performance review forms of your direct reports, as well as the direct reports of each of the managers reporting to you.
Managers can view and print employee performance history information through either the Direct Reports page or through the Performance History page.
To view and print employee performance history, do the following:
1. Choose one of the following paths:
• From the Organization & Staffing tab, select Direct Reports. The Direct Reports page displays, Click the underlined employee Name, then select Performance History from the Employee Event selection menu.
Figure 5-10. Employee Event Selection Menu with Performance History Selected
For a description of the fields on this page or for related tasks, click
the (Help icon) provided in the right-hand corner of the Self Service page.
Chapter 5: Managing Performance ReviewsADP Self Service Manager’s Guide
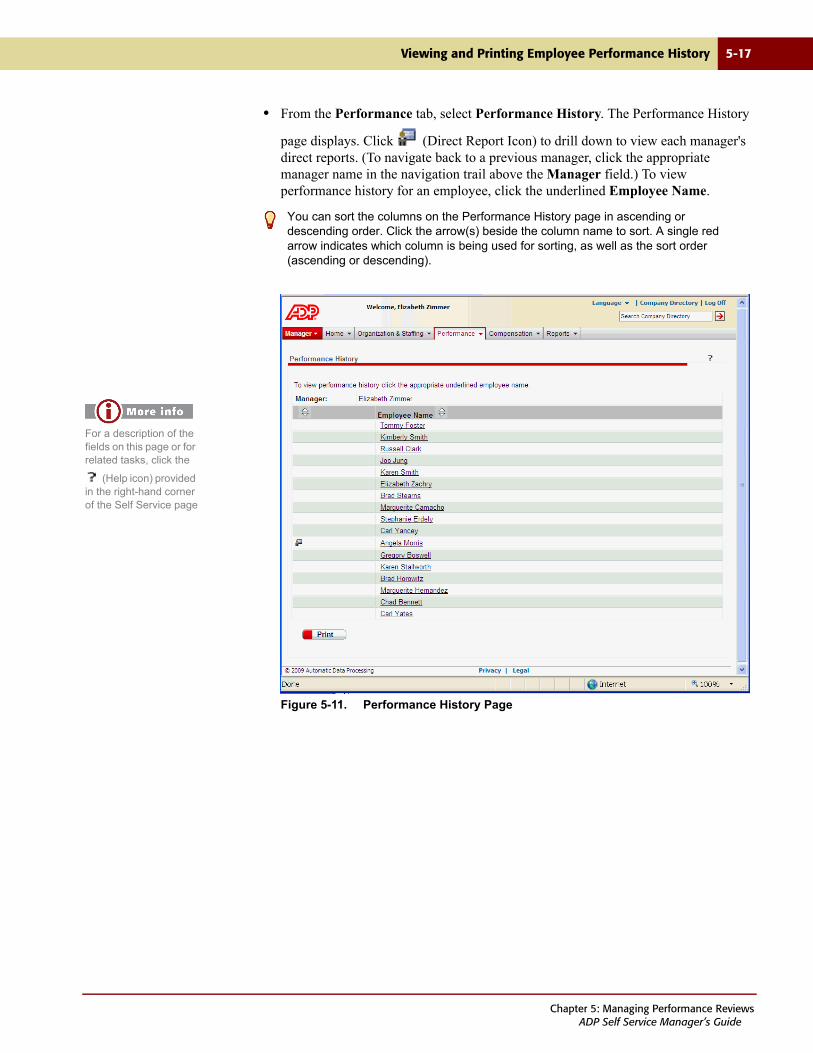
Viewing and Printing Employee Performance History 5-17
• From the Performance tab, select Performance History. The Performance History
page displays. Click (Direct Report Icon) to drill down to view each manager's direct reports. (To navigate back to a previous manager, click the appropriate manager name in the navigation trail above the Manager field.) To view performance history for an employee, click the underlined Employee Name.
Figure 5-11. Performance History Page
You can sort the columns on the Performance History page in ascending or descending order. Click the arrow(s) beside the column name to sort. A single red arrow indicates which column is being used for sorting, as well as the sort order (ascending or descending).
For a description of the fields on this page or for related tasks, click the
(Help icon) provided in the right-hand corner of the Self Service page
Chapter 5: Managing Performance ReviewsADP Self Service Manager’s Guide
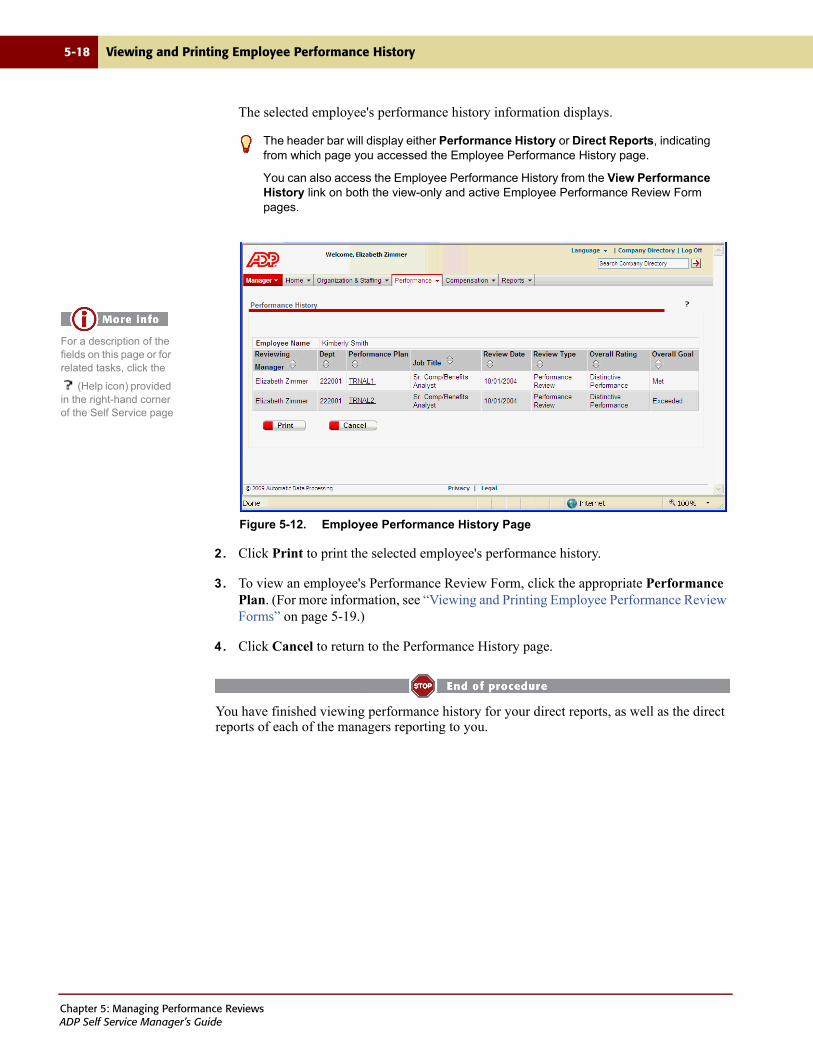
5-18 Viewing and Printing Employee Performance History
The selected employee's performance history information displays.
Figure 5-12. Employee Performance History Page
2. Click Print to print the selected employee's performance history.
3. To view an employee's Performance Review Form, click the appropriate Performance Plan. (For more information, see “Viewing and Printing Employee Performance Review Forms” on page 5-19.)
4. Click Cancel to return to the Performance History page.
You have finished viewing performance history for your direct reports, as well as the direct reports of each of the managers reporting to you.
The header bar will display either Performance History or Direct Reports, indicating from which page you accessed the Employee Performance History page.
You can also access the Employee Performance History from the View Performance History link on both the view-only and active Employee Performance Review Form pages.
For a description of the fields on this page or for related tasks, click the
(Help icon) provided in the right-hand corner of the Self Service page
Chapter 5: Managing Performance ReviewsADP Self Service Manager’s Guide
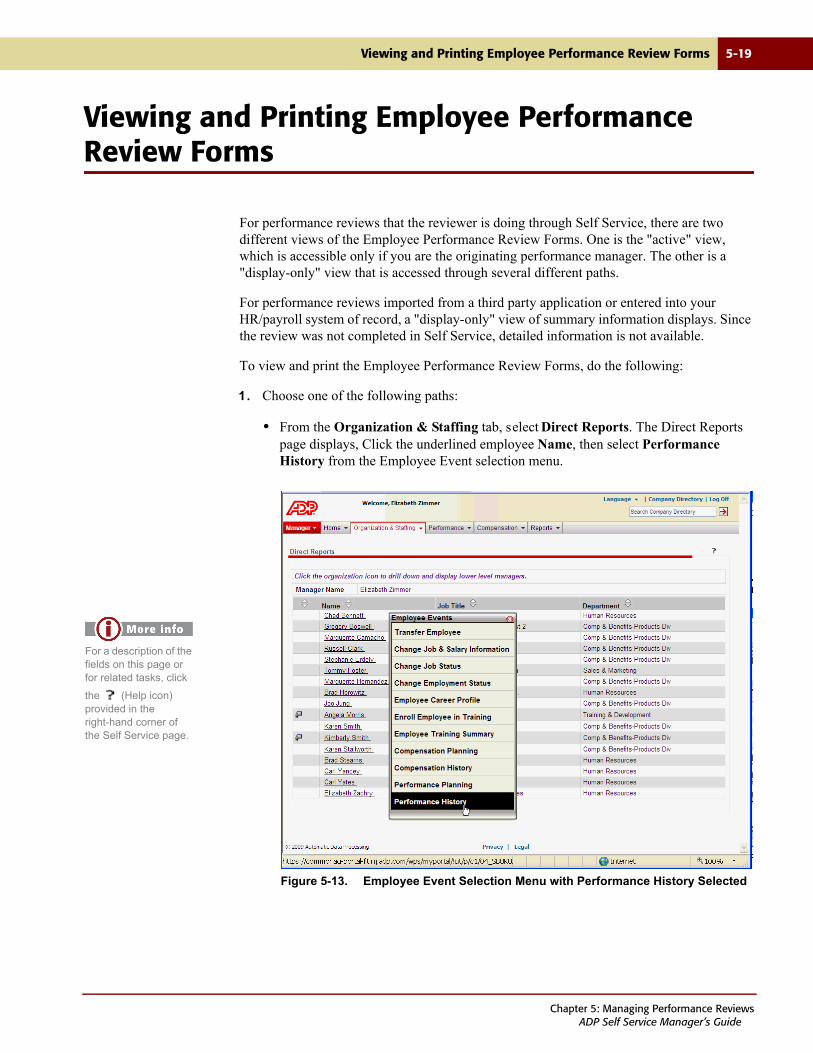
Viewing and Printing Employee Performance Review Forms 5-19
Viewing and Printing Employee Performance Review Forms
For performance reviews that the reviewer is doing through Self Service, there are two different views of the Employee Performance Review Forms. One is the "active" view, which is accessible only if you are the originating performance manager. The other is a "display-only" view that is accessed through several different paths.
For performance reviews imported from a third party application or entered into your HR/payroll system of record, a "display-only" view of summary information displays. Since the review was not completed in Self Service, detailed information is not available.
To view and print the Employee Performance Review Forms, do the following:
1. Choose one of the following paths:
• From the Organization & Staffing tab, select Direct Reports. The Direct Reports page displays, Click the underlined employee Name, then select Performance History from the Employee Event selection menu.
Figure 5-13. Employee Event Selection Menu with Performance History Selected
For a description of the fields on this page or for related tasks, click
the (Help icon) provided in the right-hand corner of the Self Service page.
Chapter 5: Managing Performance ReviewsADP Self Service Manager’s Guide

5-20 Viewing and Printing Employee Performance Review Forms
• From the Performance tab, select Performance History. The Performance History
page displays. Click (Direct Report Icon) to drill down to view each manager's direct reports. (To navigate back to a previous manager, click the appropriate manager name in the navigation trail above the Manager field.) To view performance history for an employee, click the underlined Employee Name.
Figure 5-14. Performance History Page
You can sort the columns on the Performance History page in ascending or descending order. Click the arrow(s) beside the column name to sort. A single red arrow indicates which column is being used for sorting, as well as the sort order (ascending or descending).
For a description of the fields on this page or for related tasks, click the
(Help icon) provided in the right-hand corner of the Self Service page
Chapter 5: Managing Performance ReviewsADP Self Service Manager’s Guide
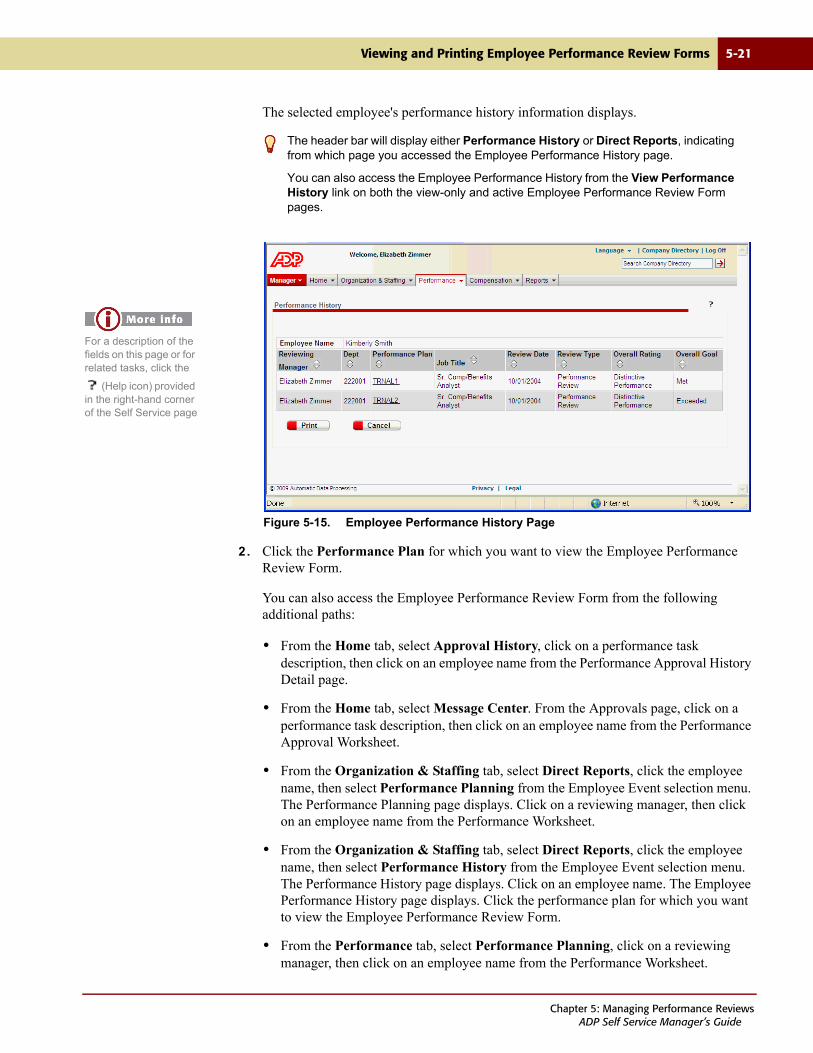
Viewing and Printing Employee Performance Review Forms 5-21
The selected employee's performance history information displays.
Figure 5-15. Employee Performance History Page
2. Click the Performance Plan for which you want to view the Employee Performance Review Form.
You can also access the Employee Performance Review Form from the following additional paths:
• From the Home tab, select Approval History, click on a performance task description, then click on an employee name from the Performance Approval History Detail page.
• From the Home tab, select Message Center. From the Approvals page, click on a performance task description, then click on an employee name from the Performance Approval Worksheet.
• From the Organization & Staffing tab, select Direct Reports, click the employee name, then select Performance Planning from the Employee Event selection menu. The Performance Planning page displays. Click on a reviewing manager, then click on an employee name from the Performance Worksheet.
• From the Organization & Staffing tab, select Direct Reports, click the employee name, then select Performance History from the Employee Event selection menu. The Performance History page displays. Click on an employee name. The Employee Performance History page displays. Click the performance plan for which you want to view the Employee Performance Review Form.
• From the Performance tab, select Performance Planning, click on a reviewing manager, then click on an employee name from the Performance Worksheet.
The header bar will display either Performance History or Direct Reports, indicating from which page you accessed the Employee Performance History page.
You can also access the Employee Performance History from the View Performance History link on both the view-only and active Employee Performance Review Form pages.
For a description of the fields on this page or for related tasks, click the
(Help icon) provided in the right-hand corner of the Self Service page
Chapter 5: Managing Performance ReviewsADP Self Service Manager’s Guide
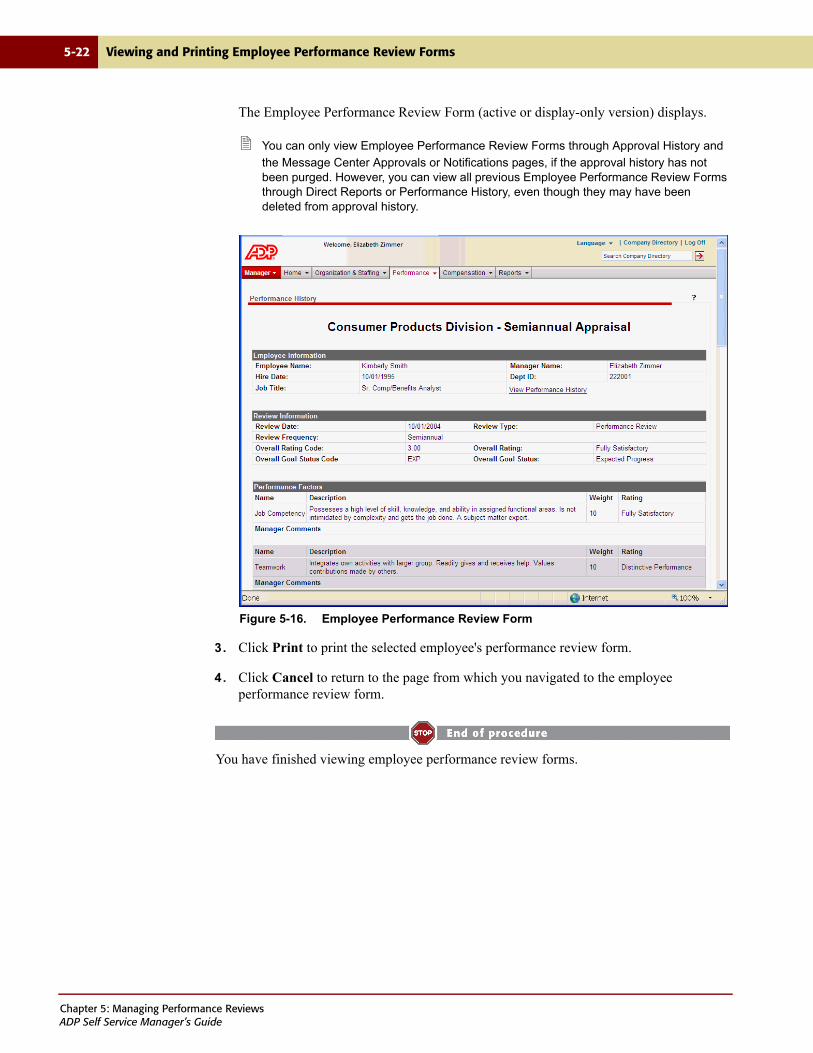
5-22 Viewing and Printing Employee Performance Review Forms
The Employee Performance Review Form (active or display-only version) displays.
You can only view Employee Performance Review Forms through Approval History and
the Message Center Approvals or Notifications pages, if the approval history has not been purged. However, you can view all previous Employee Performance Review Forms through Direct Reports or Performance History, even though they may have been deleted from approval history.
Figure 5-16. Employee Performance Review Form
3. Click Print to print the selected employee's performance review form.
4. Click Cancel to return to the page from which you navigated to the employee performance review form.
You have finished viewing employee performance review forms.
Chapter 5: Managing Performance ReviewsADP Self Service Manager’s Guide
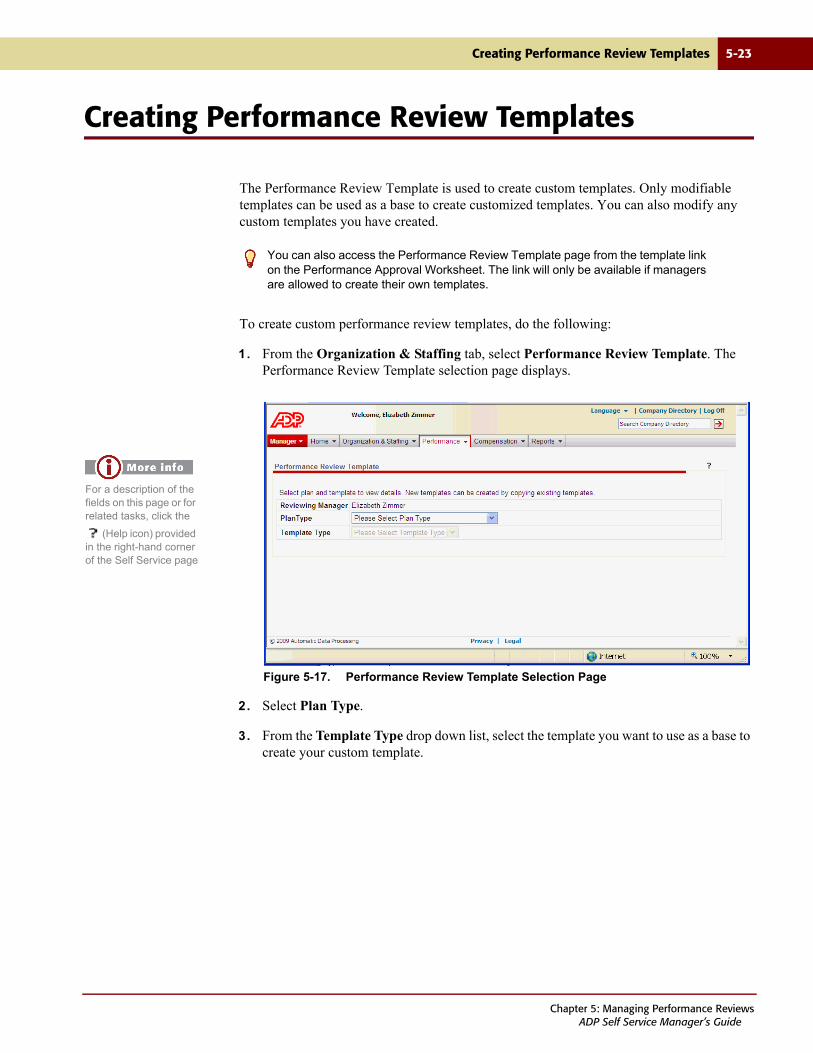
Creating Performance Review Templates 5-23
Creating Performance Review Templates
The Performance Review Template is used to create custom templates. Only modifiable templates can be used as a base to create customized templates. You can also modify any custom templates you have created.
To create custom performance review templates, do the following:
1. From the Organization & Staffing tab, select Performance Review Template. The Performance Review Template selection page displays.
Figure 5-17. Performance Review Template Selection Page
2. Select Plan Type.
3. From the Template Type drop down list, select the template you want to use as a base to create your custom template.
You can also access the Performance Review Template page from the template link on the Performance Approval Worksheet. The link will only be available if managers are allowed to create their own templates.
For a description of the fields on this page or for related tasks, click the
(Help icon) provided in the right-hand corner of the Self Service page
Chapter 5: Managing Performance ReviewsADP Self Service Manager’s Guide

5-24 Creating Performance Review Templates
Once you have selected both the Plan Type and Template Type, the performance review template displays. The performance factors, weights, and organizational goals available are dependent on the template selected from the Template Type field. Standard templates are defined in your HR/payroll system of record.
Figure 5-18. Performance Review Template Page
4. In the Performance Factors area, enter the Weight of the performance factor and select the Include check box if you want to include this performance factor in your custom template.
If this field's weight has been locked in the template you selected from the Template
Type, then the Weight field is display only. If this is a required performance factor in the template you selected from the Template Type field, the Include check box is automatically selected and grayed.
The Total field displays the total weight of all the performance factors. The sum of all performance factor weights must equal 100 prior to saving your custom template.
For a description of the fields on this page or for related tasks, click the
(Help icon) provided in the right-hand corner of the Self Service page
Chapter 5: Managing Performance ReviewsADP Self Service Manager’s Guide

Creating Performance Review Templates 5-25
5. In the Organizational Goals area, select the Include check box if you want to include the goal in your custom template.
If this is a required organizational goal in the template you selected from the Template
Type field, the Include check box is automatically selected and grayed.
6. Click Save As and enter a unique identifier and description of your template to save your custom template.
Click Reset to reset the fields to their original values.
You have finished creating a custom performance review template.
Chapter 5: Managing Performance ReviewsADP Self Service Manager’s Guide

5-26 Creating Performance Review Templates
Chapter 5: Managing Performance ReviewsADP Self Service Manager’s Guide

Chapter 6
Managing Work Events
PAGE TOPIC
6-2 Introduction
6-15 Viewing Employee Profiles
6-21 Initiating the Hiring Process
6-44 Transferring Employees
6-64 Changing an Employee’s Job Status
6-71 Changing an Employee’s Job and Salary Information
6-104 Changing an Employee’s Employment Status
6-141 Using the Comprehensive Employment Change
Chapter 6: Managing Work EventsADP Self Service Manager’s Guide

6-2 Introduction
Introduction
The Managing Work Events page displays all job actions available to you. You can perform job actions on your direct reports, as well as your indirect reports if your administrator has enabled the indirect report update option.
Managers can make job action changes through either the Direct Reports or Managing Work Events task. Indirect and direct reports can be accessed through Direct Reports. Only direct reports can be accessed through the Managing Work Events. In addition, the Hire and Rehire functionality is available only through the Managing Work Events task.
Job actions include the following:
• Hire New Employee – allows the manager to initiate the hiring of new employees
Once the hire/rehire has been approved within Self Service, the final processing of the
hire/rehire is completed in your HR/payroll system of record. For additional information, see the Hiring, Staffing, and Job Maintenance Guide.
• Rehire Employee – allows the manager to initiate the rehiring of former employees
Once the hire/rehire has been approved within Self Service, the final processing of the
hire/rehire is completed in your HR/payroll system of record. For additional information, see the Hiring, Staffing, and Job Maintenance Guide.
• Transfer Employee(s) – allows the manager to transfer employees to a new manager, department, or location
A manager can transfer an employee within the departments to which that manager has
security access. If the manager does not have security access to the department where the employee is to be transferred, the transfer must be handled by a practitioner through your HR/payroll system of record.
• Change Job Status – allows the manager to change an employee’s job status, such as full/part time, standard hours, security clearance, and so forth
• Change Job & Salary Information – allows the manager to change job and/or salary information when promoting, demoting, initiating a lateral job change, or changing an employee’s salary
The work events (hire, rehire, transfer, job status changes, job and salary changes, employment status changes) feature is available for all supported versions of ADP Enterprise HR with Autolink and ADP HR Anytime. The Comprehensive Employment Change is available only for ADP Enterprise with Autolink and ADP HR Anytime Version 5.03.
However, the work events feature is not available for ADP Enterprise HR with EPayroll Version 4.2005.2(D) or 5.0. EPayroll Versions 4.04 and higher and 5.01 and higher support the work events feature.
Chapter 6: Managing Work EventsADP Self Service Manager’s Guide
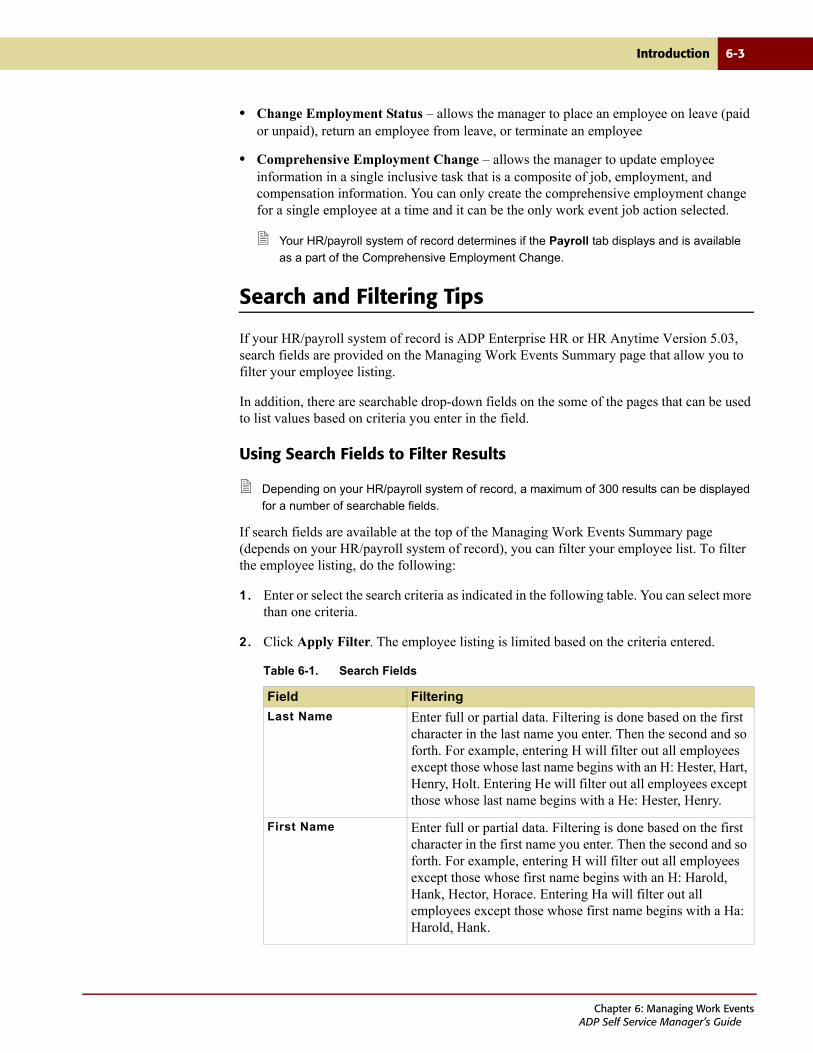
Introduction 6-3
• Change Employment Status – allows the manager to place an employee on leave (paid or unpaid), return an employee from leave, or terminate an employee
• Comprehensive Employment Change – allows the manager to update employee information in a single inclusive task that is a composite of job, employment, and compensation information. You can only create the comprehensive employment change for a single employee at a time and it can be the only work event job action selected.
Your HR/payroll system of record determines if the Payroll tab displays and is available
as a part of the Comprehensive Employment Change.
Search and Filtering Tips
If your HR/payroll system of record is ADP Enterprise HR or HR Anytime Version 5.03, search fields are provided on the Managing Work Events Summary page that allow you to filter your employee listing.
In addition, there are searchable drop-down fields on the some of the pages that can be used to list values based on criteria you enter in the field.
Using Search Fields to Filter Results
Depending on your HR/payroll system of record, a maximum of 300 results can be displayed
for a number of searchable fields.
If search fields are available at the top of the Managing Work Events Summary page (depends on your HR/payroll system of record), you can filter your employee list. To filter the employee listing, do the following:
1. Enter or select the search criteria as indicated in the following table. You can select more than one criteria.
2. Click Apply Filter. The employee listing is limited based on the criteria entered.
Table 6-1. Search Fields
Field Filtering
Last Name Enter full or partial data. Filtering is done based on the first character in the last name you enter. Then the second and so forth. For example, entering H will filter out all employees except those whose last name begins with an H: Hester, Hart, Henry, Holt. Entering He will filter out all employees except those whose last name begins with a He: Hester, Henry.
First Name Enter full or partial data. Filtering is done based on the first character in the first name you enter. Then the second and so forth. For example, entering H will filter out all employees except those whose first name begins with an H: Harold, Hank, Hector, Horace. Entering Ha will filter out all employees except those whose first name begins with a Ha: Harold, Hank.
Chapter 6: Managing Work EventsADP Self Service Manager’s Guide
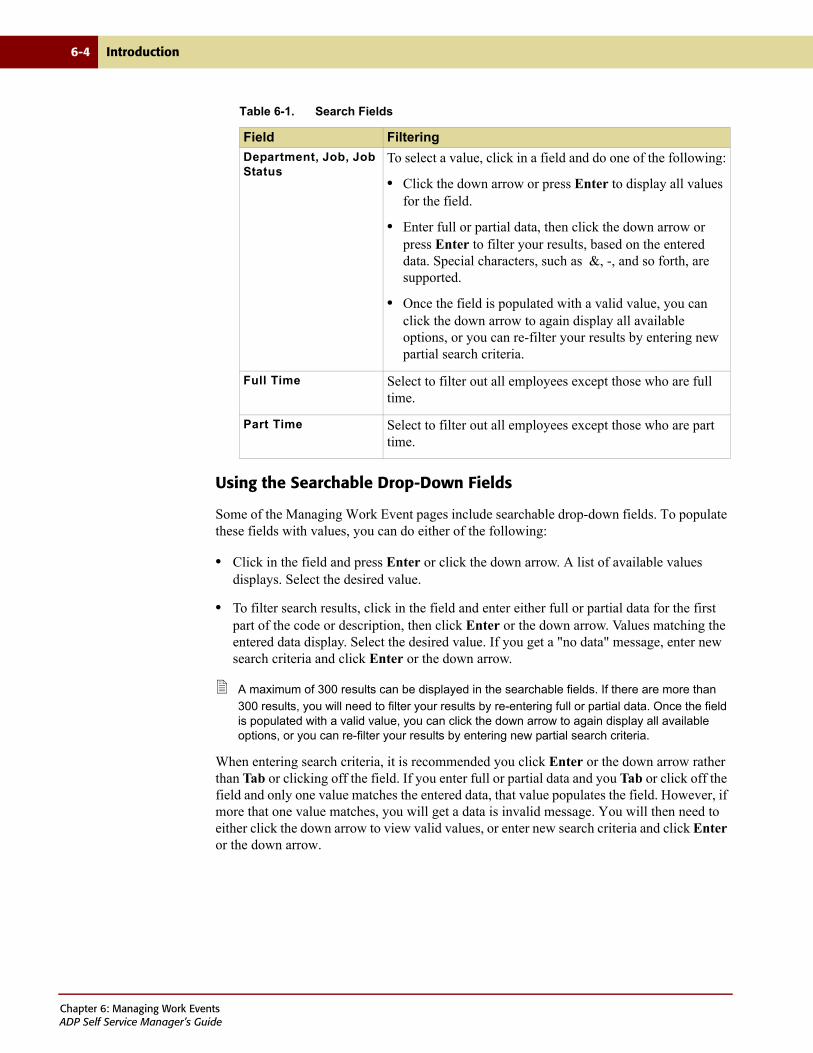
6-4 Introduction
Using the Searchable Drop-Down Fields
Some of the Managing Work Event pages include searchable drop-down fields. To populate these fields with values, you can do either of the following:
• Click in the field and press Enter or click the down arrow. A list of available values displays. Select the desired value.
• To filter search results, click in the field and enter either full or partial data for the first part of the code or description, then click Enter or the down arrow. Values matching the entered data display. Select the desired value. If you get a "no data" message, enter new search criteria and click Enter or the down arrow.
A maximum of 300 results can be displayed in the searchable fields. If there are more than
300 results, you will need to filter your results by re-entering full or partial data. Once the field is populated with a valid value, you can click the down arrow to again display all available options, or you can re-filter your results by entering new partial search criteria.
When entering search criteria, it is recommended you click Enter or the down arrow rather than Tab or clicking off the field. If you enter full or partial data and you Tab or click off the field and only one value matches the entered data, that value populates the field. However, if more that one value matches, you will get a data is invalid message. You will then need to either click the down arrow to view valid values, or enter new search criteria and click Enter or the down arrow.
Department, Job, Job Status
To select a value, click in a field and do one of the following:
• Click the down arrow or press Enter to display all values for the field.
• Enter full or partial data, then click the down arrow or press Enter to filter your results, based on the entered data. Special characters, such as &, -, and so forth, are supported.
• Once the field is populated with a valid value, you can click the down arrow to again display all available options, or you can re-filter your results by entering new partial search criteria.
Full Time Select to filter out all employees except those who are full time.
Part Time Select to filter out all employees except those who are part time.
Table 6-1. Search Fields
Field Filtering
Chapter 6: Managing Work EventsADP Self Service Manager’s Guide
Introduction 6-5
Managing Work Events
If your HR/payroll system of record is ADP Enterprise HR or HR Anytime Version 5.03,
search fields are available at the top of the Work Events Summary page. You can use these search fields to filter the employee listing. For more information, see “Using Search Fields to Filter Results” on page 6-3. The fields available for filtering depend on your HR/payroll system of record.
Job actions, such as Transfer, Change Job Status, Change Job & Salary, and Change Employment Status, can be sent as:
• An individual job action for a single employee. For specifics on a job action, see the section pertaining to that job action:
– Transferring Employees.
– Changing an Employee’s Job Status.
– Changing an Employee’s Job and Salary Information.
– Changing an Employee’s Employment Status.
• Multiple job actions for a single employee. For specifics, see “Updating Multiple Job Actions for a Single Employee.”
• Single job action for multiple employees. For specifics, see “Updating Multiple Employees with a Single Job Action.”
Hiring and Rehiring can not be included as the job action when creating work events with
multiple job actions or multiple employees.
Each work event is submitted independently, processed independently, and listed individually in approval history.
As long as an employee has an approval pending for a change, you cannot make additional changes. If you submit a work event for an employee and the employee has pending approval for a separate event, a message displays, “Employee has previous changes pending approval. Approval is required before you can submit additional changes. Check Approval History for more information.” This is true whether you have submitted a single change for a single employee, a single change for multiple employees, or multiple changes for a single employee.
If you are making changes to multiple employees, you can complete and submit the changes for those employees that do not have pending approvals.
If you are submitting multiple employees for a single action and any of the selected employees have a pending action, the submission for that employee is canceled. The other submissions continue.
Chapter 6: Managing Work EventsADP Self Service Manager’s Guide
6-6 Introduction
Click Submit to display the Start Work Event page, select the Effective Date, and if available, enter any comments you need to. Once you click OK on the Start Work Events page, you can begin to update the work event with the first job action you have selected.
How a few of the fields are populated, as well as the availability of fields on some of the Work
Events pages is determined by position management settings in your HR/payroll system of record. The position management indicator sent to Self Service from your HR/payroll system of record is a combination of the Position Management setting (Full, Partial, or None) on the Basic Options panel, and the Update Incumbents setting on the Position Information panel. For more information on using position management in your HR/payroll system of record, see the Planning, Compensation, and Compliance Guide.
Updating Multiple Job Actions for a Single Employee
This method allows you to do multiple job actions for a single employee without having to start over each time. Job actions, such as Transfer, Change Job Status, Change Job & Salary, and Change Employment Status, can be selected to for a single employee through a single task. However, each job action is submitted independently, processed independently, and listed individually in approval history.
To perform multiple job actions for a single employee then submit for approval, do the following:
1. From the Managing Work Events page, select the job actions you want to perform.
The Managing Work Events page displays all job actions available to you, as well as
your direct reports.
You can sort the columns in the employee list area in ascending or descending order. Click the arrow(s) beside the column name to sort. A single red arrow indicates which column is being used for sorting, as well as the sort order (ascending or descending).
Depending on your HR/payroll system of record, you may have to first select the Select one of more of the Employment Changes below option to enable the individual job action check boxes.
Chapter 6: Managing Work EventsADP Self Service Manager’s Guide
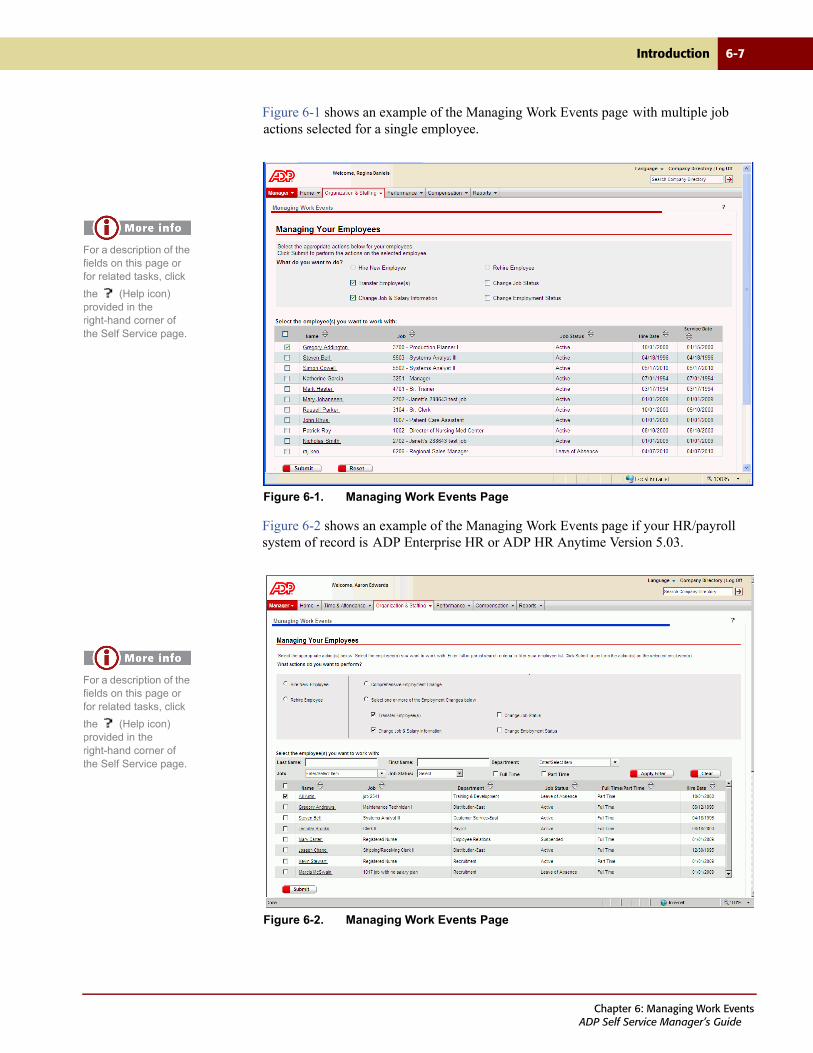
Introduction 6-7
Figure 6-1 shows an example of the Managing Work Events page with multiple job actions selected for a single employee.
Figure 6-1. Managing Work Events Page
Figure 6-2 shows an example of the Managing Work Events page if your HR/payroll system of record is ADP Enterprise HR or ADP HR Anytime Version 5.03.
Figure 6-2. Managing Work Events Page
For a description of the fields on this page or for related tasks, click
the (Help icon) provided in the right-hand corner of the Self Service page.
For a description of the fields on this page or for related tasks, click
the (Help icon) provided in the right-hand corner of the Self Service page.
Chapter 6: Managing Work EventsADP Self Service Manager’s Guide
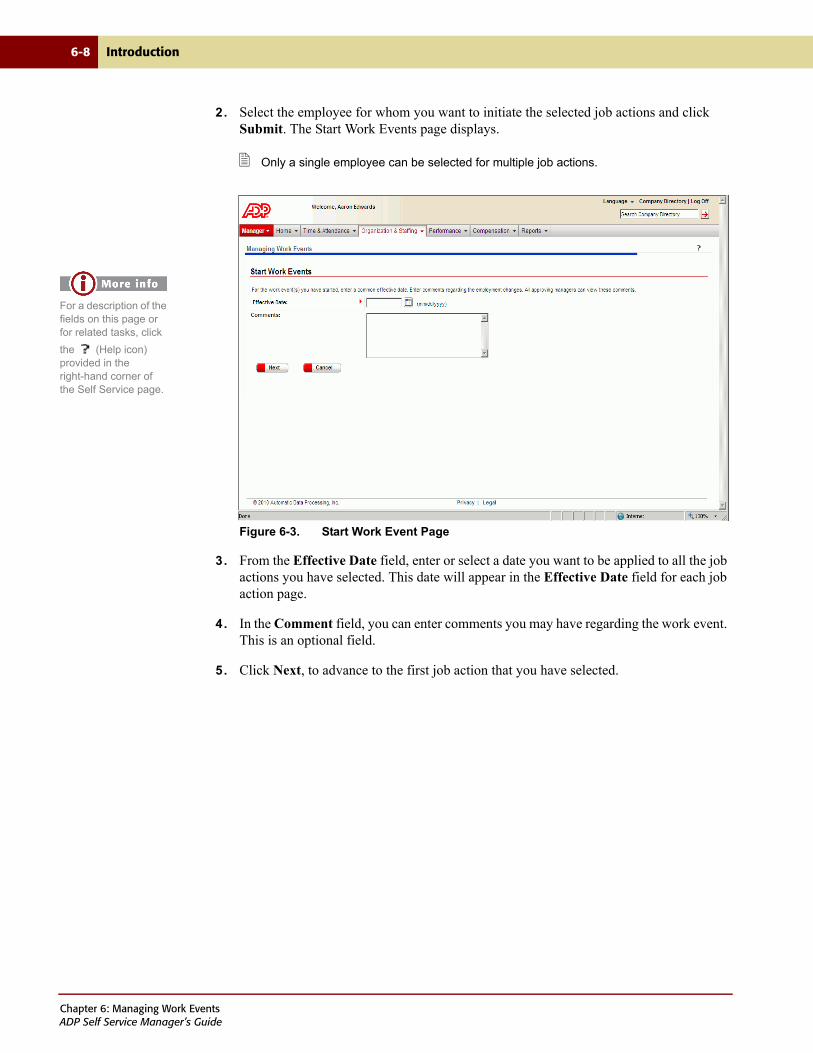
6-8 Introduction
2. Select the employee for whom you want to initiate the selected job actions and click Submit. The Start Work Events page displays.
Only a single employee can be selected for multiple job actions.
Figure 6-3. Start Work Event Page
3. From the Effective Date field, enter or select a date you want to be applied to all the job actions you have selected. This date will appear in the Effective Date field for each job action page.
4. In the Comment field, you can enter comments you may have regarding the work event. This is an optional field.
5. Click Next, to advance to the first job action that you have selected.
For a description of the fields on this page or for related tasks, click
the (Help icon) provided in the right-hand corner of the Self Service page.
Chapter 6: Managing Work EventsADP Self Service Manager’s Guide
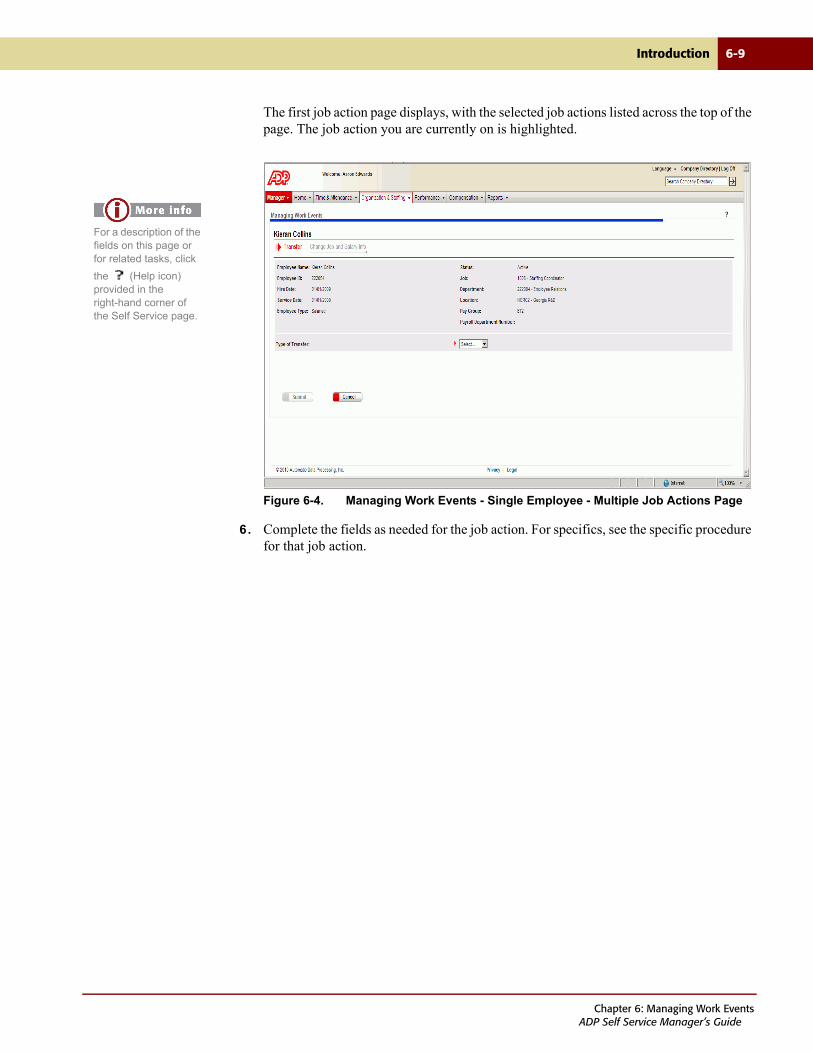
Introduction 6-9
The first job action page displays, with the selected job actions listed across the top of the page. The job action you are currently on is highlighted.
Figure 6-4. Managing Work Events - Single Employee - Multiple Job Actions Page
6. Complete the fields as needed for the job action. For specifics, see the specific procedure for that job action.
For a description of the fields on this page or for related tasks, click
the (Help icon) provided in the right-hand corner of the Self Service page.
Chapter 6: Managing Work EventsADP Self Service Manager’s Guide
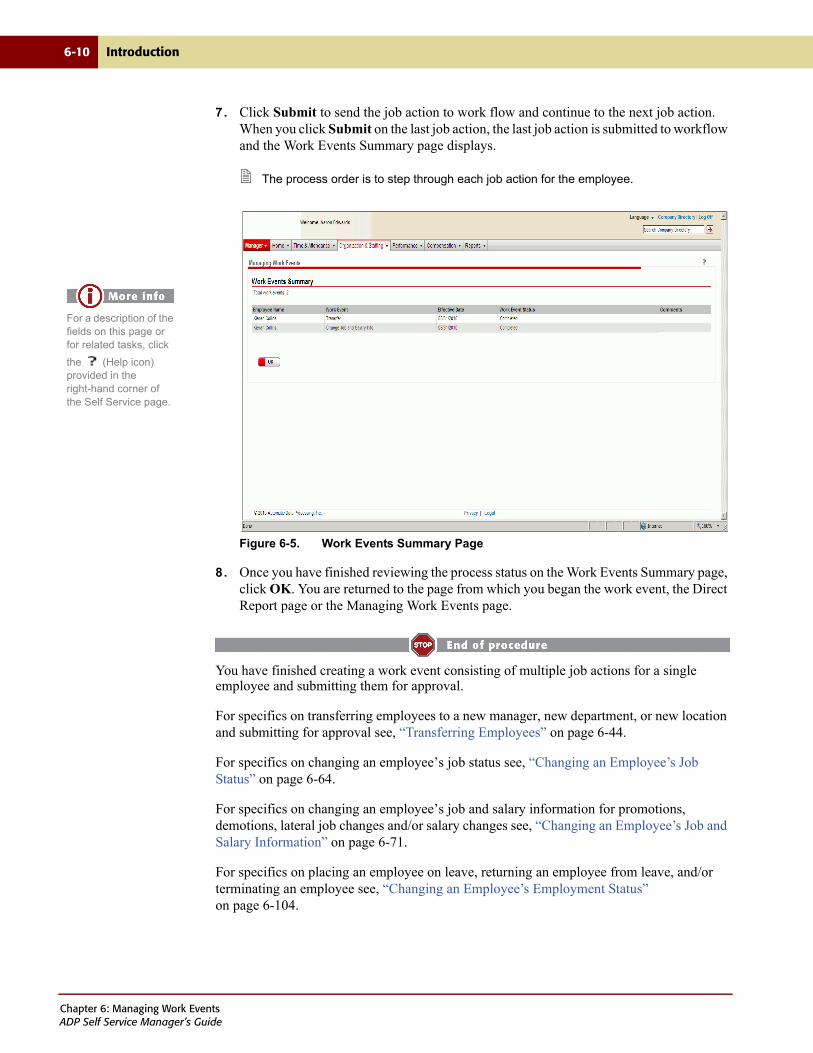
6-10 Introduction
7. Click Submit to send the job action to work flow and continue to the next job action. When you click Submit on the last job action, the last job action is submitted to workflow and the Work Events Summary page displays.
The process order is to step through each job action for the employee.
Figure 6-5. Work Events Summary Page
8. Once you have finished reviewing the process status on the Work Events Summary page, click OK. You are returned to the page from which you began the work event, the Direct Report page or the Managing Work Events page.
You have finished creating a work event consisting of multiple job actions for a single employee and submitting them for approval.
For specifics on transferring employees to a new manager, new department, or new location and submitting for approval see, “Transferring Employees” on page 6-44.
For specifics on changing an employee’s job status see, “Changing an Employee’s Job Status” on page 6-64.
For specifics on changing an employee’s job and salary information for promotions, demotions, lateral job changes and/or salary changes see, “Changing an Employee’s Job and Salary Information” on page 6-71.
For specifics on placing an employee on leave, returning an employee from leave, and/or terminating an employee see, “Changing an Employee’s Employment Status” on page 6-104.
For a description of the fields on this page or for related tasks, click
the (Help icon) provided in the right-hand corner of the Self Service page.
Chapter 6: Managing Work EventsADP Self Service Manager’s Guide
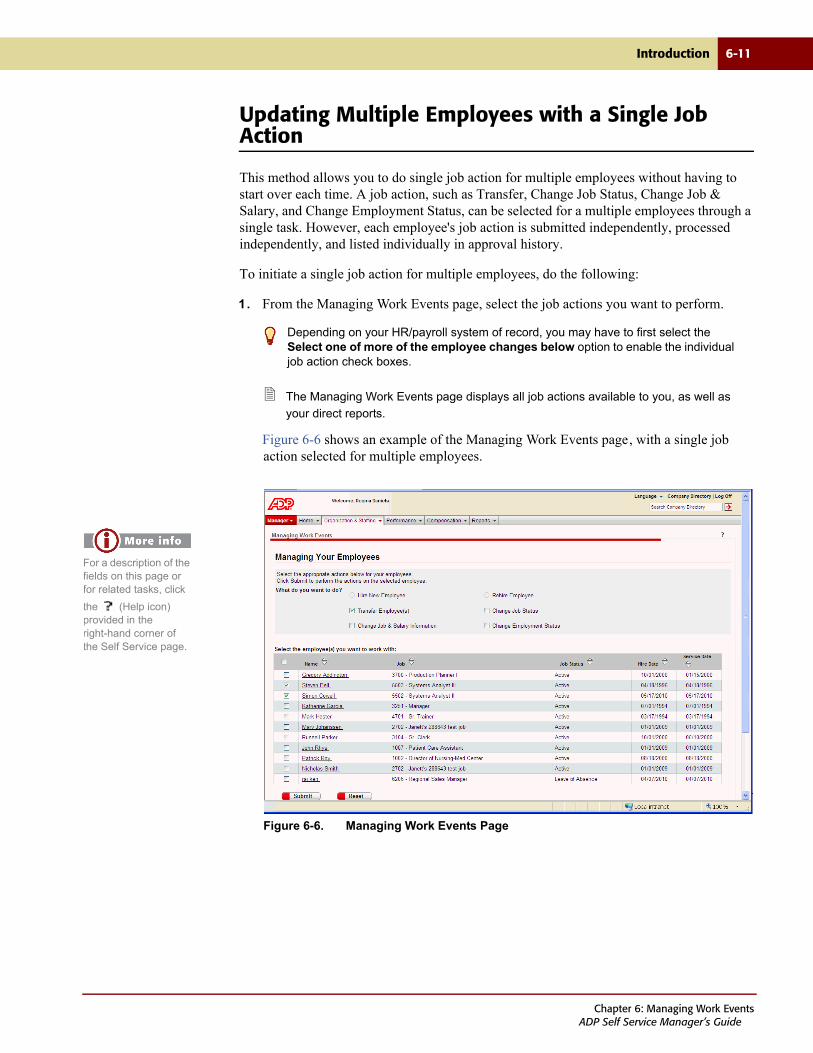
Introduction 6-11
Updating Multiple Employees with a Single Job Action
This method allows you to do single job action for multiple employees without having to start over each time. A job action, such as Transfer, Change Job Status, Change Job & Salary, and Change Employment Status, can be selected for a multiple employees through a single task. However, each employee's job action is submitted independently, processed independently, and listed individually in approval history.
To initiate a single job action for multiple employees, do the following:
1. From the Managing Work Events page, select the job actions you want to perform.
The Managing Work Events page displays all job actions available to you, as well as
your direct reports.
Figure 6-6 shows an example of the Managing Work Events page, with a single job action selected for multiple employees.
Figure 6-6. Managing Work Events Page
Depending on your HR/payroll system of record, you may have to first select the Select one of more of the employee changes below option to enable the individual job action check boxes.
For a description of the fields on this page or for related tasks, click
the (Help icon) provided in the right-hand corner of the Self Service page.
Chapter 6: Managing Work EventsADP Self Service Manager’s Guide
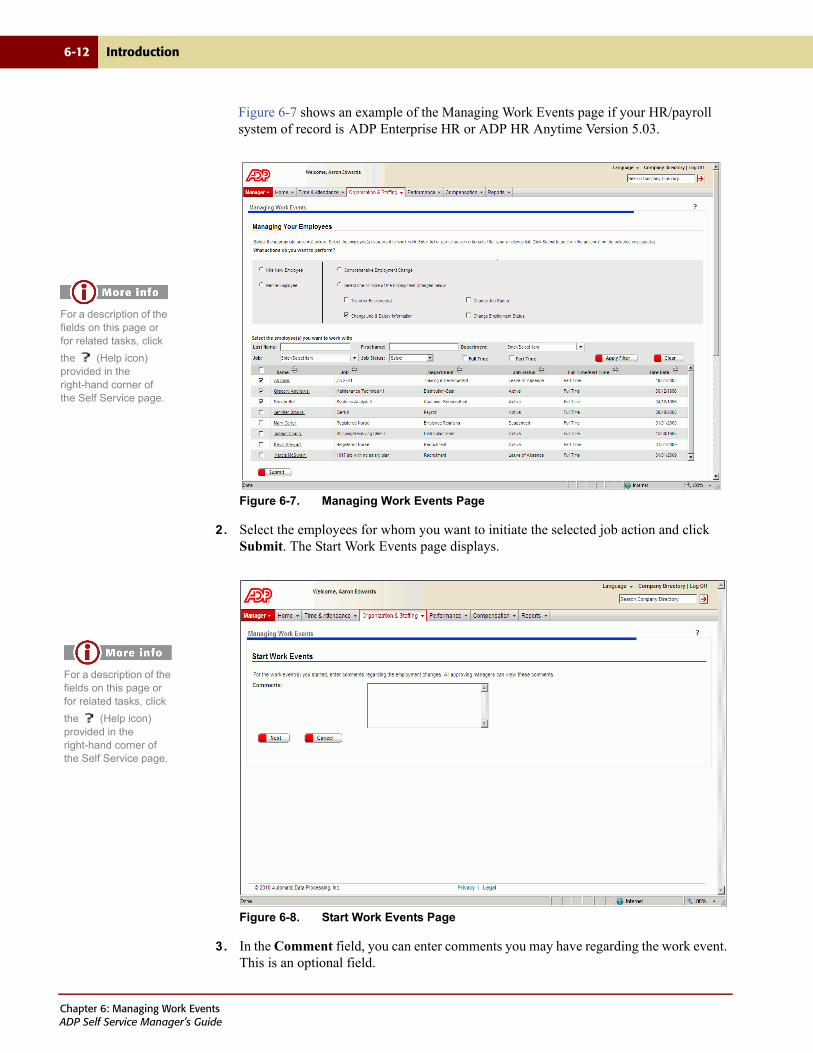
6-12 Introduction
Figure 6-7 shows an example of the Managing Work Events page if your HR/payroll system of record is ADP Enterprise HR or ADP HR Anytime Version 5.03.
Figure 6-7. Managing Work Events Page
2. Select the employees for whom you want to initiate the selected job action and click Submit. The Start Work Events page displays.
Figure 6-8. Start Work Events Page
3. In the Comment field, you can enter comments you may have regarding the work event. This is an optional field.
For a description of the fields on this page or for related tasks, click
the (Help icon) provided in the right-hand corner of the Self Service page.
For a description of the fields on this page or for related tasks, click
the (Help icon) provided in the right-hand corner of the Self Service page.
Chapter 6: Managing Work EventsADP Self Service Manager’s Guide
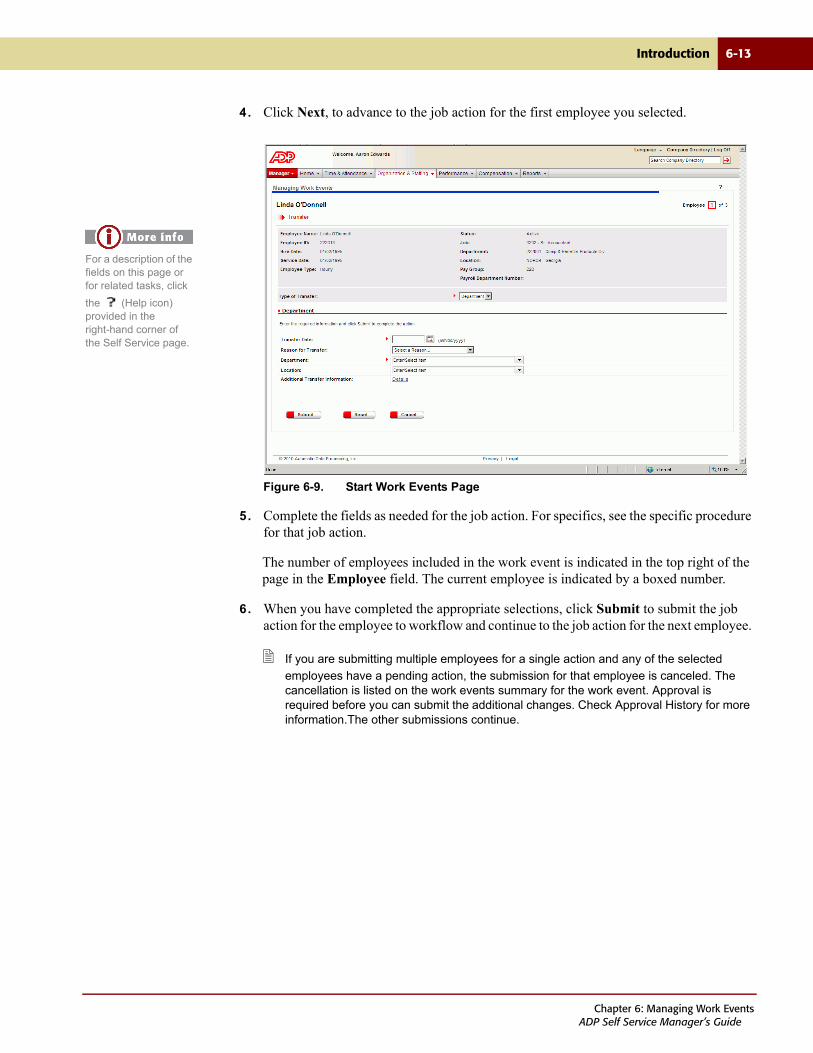
Introduction 6-13
4. Click Next, to advance to the job action for the first employee you selected.
Figure 6-9. Start Work Events Page
5. Complete the fields as needed for the job action. For specifics, see the specific procedure for that job action.
The number of employees included in the work event is indicated in the top right of the page in the Employee field. The current employee is indicated by a boxed number.
6. When you have completed the appropriate selections, click Submit to submit the job action for the employee to workflow and continue to the job action for the next employee.
If you are submitting multiple employees for a single action and any of the selected
employees have a pending action, the submission for that employee is canceled. The cancellation is listed on the work events summary for the work event. Approval is required before you can submit the additional changes. Check Approval History for more information.The other submissions continue.
For a description of the fields on this page or for related tasks, click
the (Help icon) provided in the right-hand corner of the Self Service page.
Chapter 6: Managing Work EventsADP Self Service Manager’s Guide
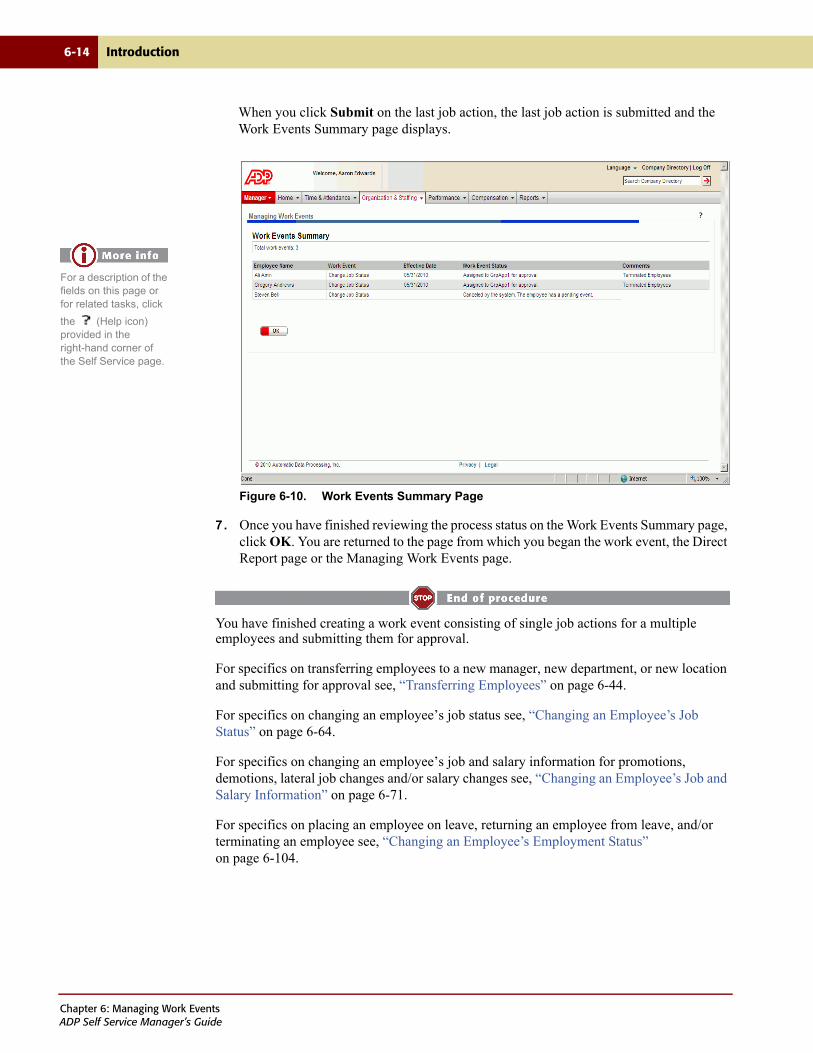
6-14 Introduction
When you click Submit on the last job action, the last job action is submitted and the Work Events Summary page displays.
Figure 6-10. Work Events Summary Page
7. Once you have finished reviewing the process status on the Work Events Summary page, click OK. You are returned to the page from which you began the work event, the Direct Report page or the Managing Work Events page.
You have finished creating a work event consisting of single job actions for a multiple employees and submitting them for approval.
For specifics on transferring employees to a new manager, new department, or new location and submitting for approval see, “Transferring Employees” on page 6-44.
For specifics on changing an employee’s job status see, “Changing an Employee’s Job Status” on page 6-64.
For specifics on changing an employee’s job and salary information for promotions, demotions, lateral job changes and/or salary changes see, “Changing an Employee’s Job and Salary Information” on page 6-71.
For specifics on placing an employee on leave, returning an employee from leave, and/or terminating an employee see, “Changing an Employee’s Employment Status” on page 6-104.
For a description of the fields on this page or for related tasks, click
the (Help icon) provided in the right-hand corner of the Self Service page.
Chapter 6: Managing Work EventsADP Self Service Manager’s Guide
Viewing Employee Profiles 6-15
Viewing Employee Profiles
The Employee Profile page displays job, pay, personal, compensation, performance, contact, and career data for the selected employee. Employee profiles can be accessed from the Managing Work Events page, the Direct Reports page, and the Employee Selection page.
The Employee Selection page is accessed when you select the Employee Career Profile,
Enroll Employee in Training, or Employee Training Summary tasks from the Organization & Staffing tab. For more information on these tasks, see Chapter 7, “Managing Employee Career and Training Information.”
Information displayed in the employee profile depends on the data available as well as which areas of the employee profile your administrator has enabled.
Viewing employee profiles includes the following tasks:
• Viewing Employee Profiles from the Managing Work Events Page
• Viewing Employee Profiles from the Direct Reports Page
• Viewing Employee Profiles from the Employee Selection Page
Chapter 6: Managing Work EventsADP Self Service Manager’s Guide
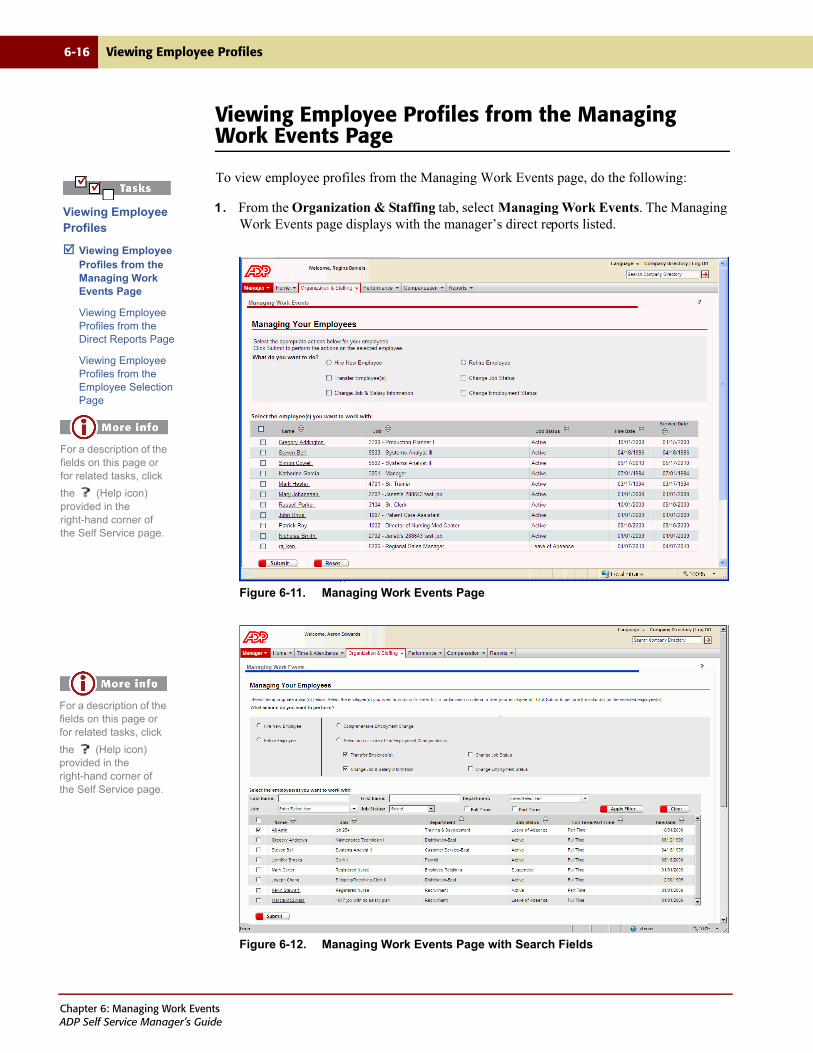
6-16 Viewing Employee Profiles
Viewing Employee Profiles from the Managing Work Events Page
To view employee profiles from the Managing Work Events page, do the following:
1. From the Organization & Staffing tab, select Managing Work Events. The Managing Work Events page displays with the manager’s direct reports listed.
Figure 6-11. Managing Work Events Page
Figure 6-12. Managing Work Events Page with Search Fields
Viewing Employee Profiles
Viewing Employee Profiles from the Managing Work Events Page
Viewing Employee Profiles from the Direct Reports Page
Viewing Employee Profiles from the Employee Selection Page
For a description of the fields on this page or for related tasks, click
the (Help icon) provided in the right-hand corner of the Self Service page.
For a description of the fields on this page or for related tasks, click
the (Help icon) provided in the right-hand corner of the Self Service page.
Chapter 6: Managing Work EventsADP Self Service Manager’s Guide

Viewing Employee Profiles 6-17
Depending on your HR/payroll system of record, a maximum of 300 results can be
displayed for a number of searchable fields. If your HR/payroll system of record is ADP Enterprise HR or ADP HR Anytime Version 5.03, search fields are available at the top of the page that allow you to filter the employee list. For more information, see “Search and Filtering Tips” on page 6-3.
2. Click the underlined Employee Name for the employee whose employment data you want to view. The Employee Profile page displays.
Figure 6-13. Employee Profile Page
Information shown in the Employee Profile is divided into the following categories:
Information displayed in the employee profile depends on the data available as well as
which areas of the employee profile your administrator has enabled.
3. Click Print to print the employee profile.
4. Click Cancel to return to the Manager Work Events page.
• Job Information • Emergency Contacts
• Pay Information • Job History
• Personal Information • Education
• Personal Accrued Time • Languages
• Compensation History • Skills
• Performance History • Licenses/Certifications
• Telephone Number
For a description of the fields on this page or for related tasks, click
the (Help icon) provided in the right-hand corner of the Self Service page.
Chapter 6: Managing Work EventsADP Self Service Manager’s Guide
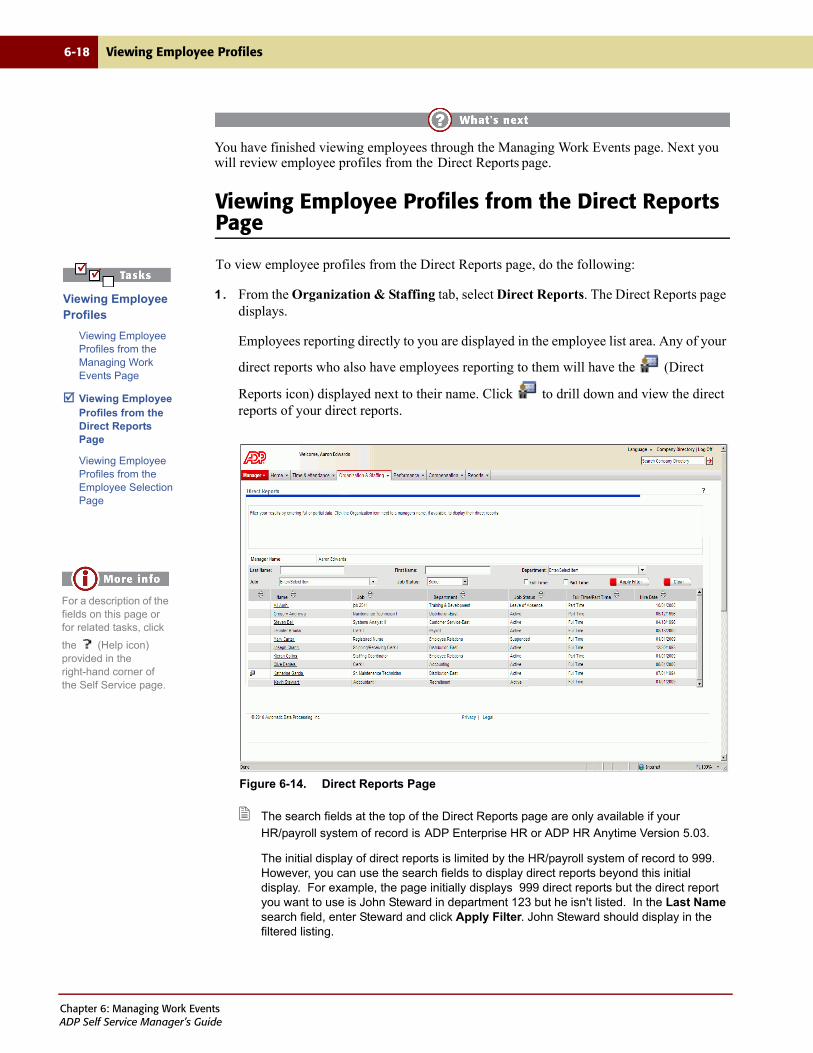
6-18 Viewing Employee Profiles
You have finished viewing employees through the Managing Work Events page. Next you will review employee profiles from the Direct Reports page.
Viewing Employee Profiles from the Direct Reports Page
To view employee profiles from the Direct Reports page, do the following:
1. From the Organization & Staffing tab, select Direct Reports. The Direct Reports page displays.
Employees reporting directly to you are displayed in the employee list area. Any of your
direct reports who also have employees reporting to them will have the (Direct
Reports icon) displayed next to their name. Click to drill down and view the direct reports of your direct reports.
Figure 6-14. Direct Reports Page
The search fields at the top of the Direct Reports page are only available if your
HR/payroll system of record is ADP Enterprise HR or ADP HR Anytime Version 5.03.
The initial display of direct reports is limited by the HR/payroll system of record to 999. However, you can use the search fields to display direct reports beyond this initial display. For example, the page initially displays 999 direct reports but the direct report you want to use is John Steward in department 123 but he isn't listed. In the Last Name search field, enter Steward and click Apply Filter. John Steward should display in the filtered listing.
Viewing Employee Profiles
Viewing Employee Profiles from the Managing Work Events Page
Viewing Employee Profiles from the Direct Reports Page
Viewing Employee Profiles from the Employee Selection Page
For a description of the fields on this page or for related tasks, click
the (Help icon) provided in the right-hand corner of the Self Service page.
Chapter 6: Managing Work EventsADP Self Service Manager’s Guide
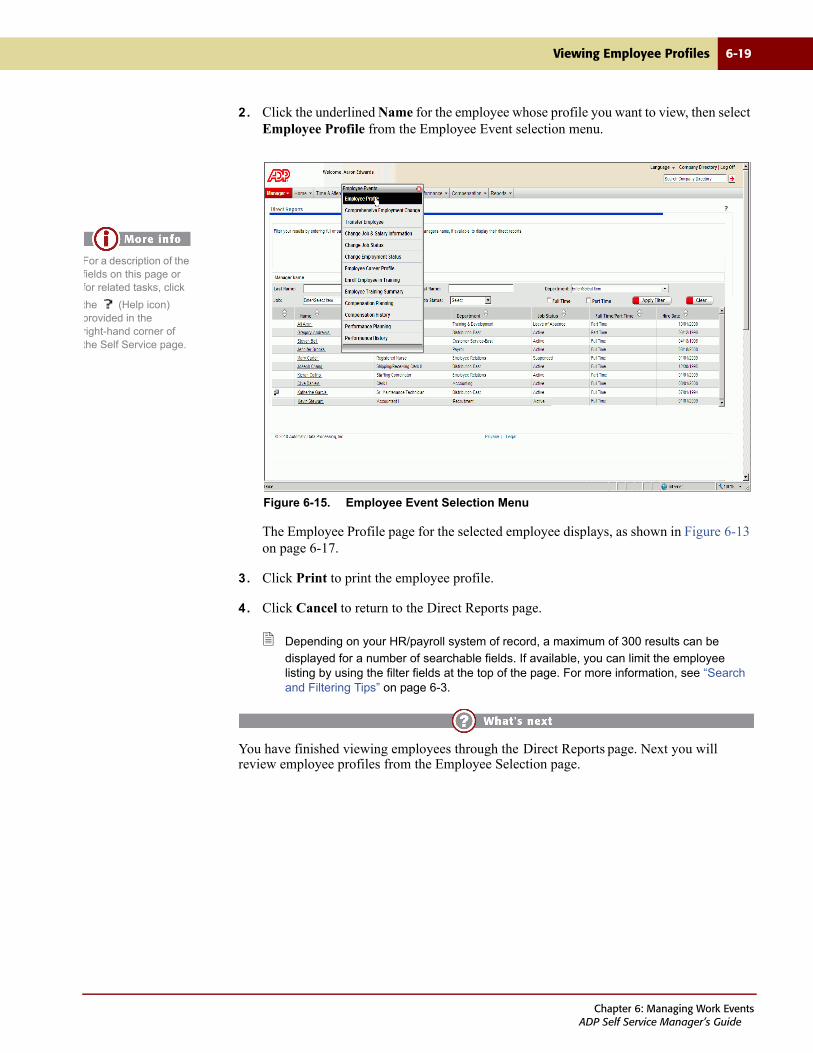
Viewing Employee Profiles 6-19
2. Click the underlined Name for the employee whose profile you want to view, then select Employee Profile from the Employee Event selection menu.
Figure 6-15. Employee Event Selection Menu
The Employee Profile page for the selected employee displays, as shown in Figure 6-13 on page 6-17.
3. Click Print to print the employee profile.
4. Click Cancel to return to the Direct Reports page.
Depending on your HR/payroll system of record, a maximum of 300 results can be
displayed for a number of searchable fields. If available, you can limit the employee listing by using the filter fields at the top of the page. For more information, see “Search and Filtering Tips” on page 6-3.
You have finished viewing employees through the Direct Reports page. Next you will review employee profiles from the Employee Selection page.
For a description of the fields on this page or for related tasks, click
the (Help icon) provided in the right-hand corner of the Self Service page.
Chapter 6: Managing Work EventsADP Self Service Manager’s Guide

6-20 Viewing Employee Profiles
Viewing Employee Profiles from the Employee Selection Page
To view and print employee profiles from the Employee Selection page, do the following:
1. From the Organization & Staffing tab, select either the Employee Career Profile, Enroll Employee in Training, or Employee Training Summary task. The Employee Selection page displays.
Figure 6-16. Employee Selection Page
For a description of the fields on this page or for related tasks, click the (Help icon) provided in the right-hand corner of the Self Service page.
The search fields are only available if your HR/payroll system of record is ADP
Enterprise HR or ADP HR Anytime Version 5.03.
2. From the employee list area, click the underlined Name for the employee whose profile you want to view. The Employee Profile page for the selected employee displays, as shown in Figure 6-13 on page 6-17.
3. Click Print to print the employee profile.
4. Click Cancel to return to the Employee Selection page.
Depending on your HR/payroll system of record, a maximum of 300 results can be
displayed for a number of searchable fields. If available, you can limit the employee listing by using the filter fields at the top of the page. For more information, see “Search and Filtering Tips” on page 6-3.
You have finished looking at employee profiles.
Viewing Employee Profiles
Viewing Employee Profiles from the Managing Work Events Page
Viewing Employee Profiles from the Direct Reports Page
Viewing Employee Profiles from the Employee Selection Page
Chapter 6: Managing Work EventsADP Self Service Manager’s Guide

Initiating the Hiring Process 6-21
Initiating the Hiring Process
Managers can initiate hiring new employees, as well as rehiring former employees, and then submit the hire/rehire for approval. Once the hire/rehire has been approved within Self Service, the final processing of the hire/rehire is completed by a practitioner in your HR/payroll system of record. The new employee will not be listed in the manager's direct reports until the practitioner has completed the hire process in your HR/payroll system of record. For additional information, see the Hiring, Staffing, and Job Maintenance Guide.
What information a manager can enter in Self Service depends on how the Portal administrator has configured the hire process. At a minimum, the following pages need to be completed:
• For New Hires – New Hire Start and the Submit page
• For Rehires – Rehire Prompt, Rehire Start, and the Submit page
The "active" version of the hire/rehire pages display when the page is accessed from the Managing Work Events page, which means the manager is able to enter information in the fields provided. When the page is accessed either through the Approval or Notification page, the fields are display-only. However, for hires/rehires that have been rejected, these pages are active through the Message Center Notifications page for the originating manager, allowing the manager to make corrections to the hire/rehire information. This allows the originating manager to make corrections through the Notifications page rather than re-enter all new information through the Managing Work Events pages.
The New Hire and Rehire processes are very similar, so both are covered in this section.
Differences between the two procedures differ only in their starting pages.
Some of the pages include searchable drop-down fields and/or search fields. For more information, see “Search and Filtering Tips” on page 6-3.
Chapter 6: Managing Work EventsADP Self Service Manager’s Guide
6-22 Initiating the Hiring Process
Initiating the new hire/rehire process includes the following tasks:
• Completing the Rehire Prompt Page (rehires only)
• Completing the Rehire Start Page (rehires only)
• Completing the New Hire Start Page (new hires only)
• Completing the Personal Data - Part A Page
• Completing the Personal Data - Part B Page
• Completing the Job Data - Part A Page
• Completing the Job Data - Part B Page
• Completing the Pay Information Page
• Completing the Citizenship Page
• Completing the Additional Hire Information Page
• Completing the Submit Page
Chapter 6: Managing Work EventsADP Self Service Manager’s Guide
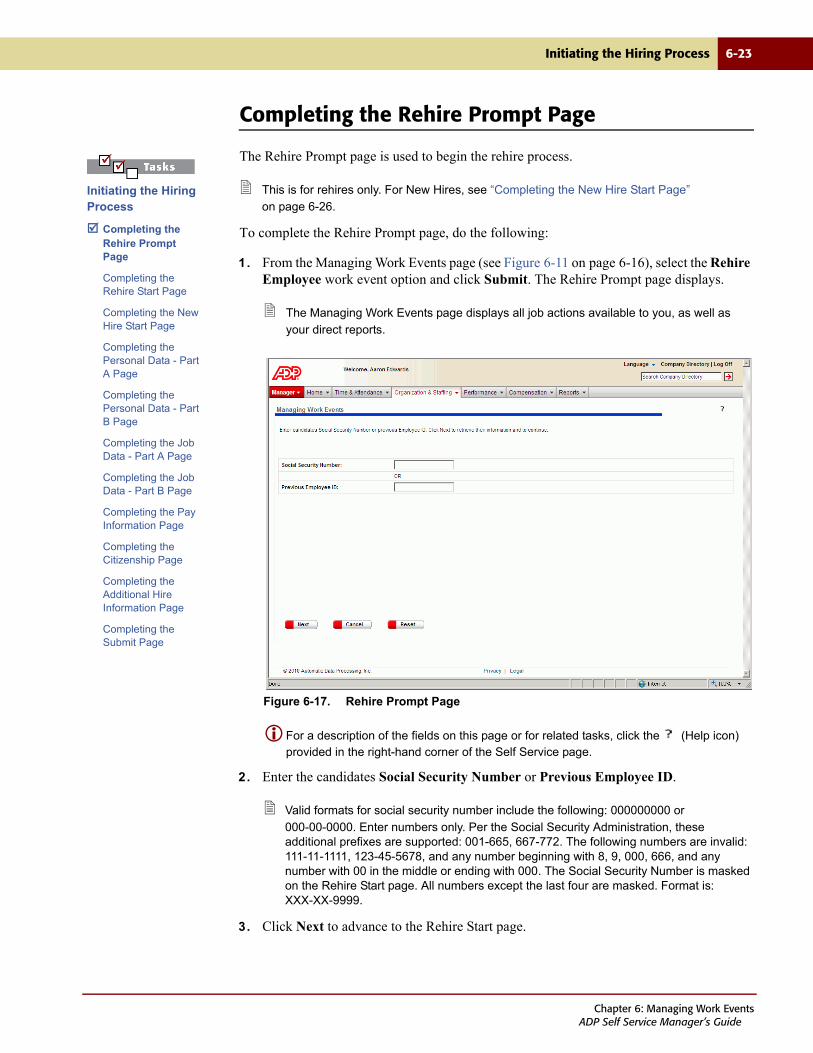
Initiating the Hiring Process 6-23
Completing the Rehire Prompt Page
The Rehire Prompt page is used to begin the rehire process.
This is for rehires only. For New Hires, see “Completing the New Hire Start Page”
on page 6-26.
To complete the Rehire Prompt page, do the following:
1. From the Managing Work Events page (see Figure 6-11 on page 6-16), select the Rehire Employee work event option and click Submit. The Rehire Prompt page displays.
The Managing Work Events page displays all job actions available to you, as well as
your direct reports.
Figure 6-17. Rehire Prompt Page
For a description of the fields on this page or for related tasks, click the (Help icon) provided in the right-hand corner of the Self Service page.
2. Enter the candidates Social Security Number or Previous Employee ID.
Valid formats for social security number include the following: 000000000 or
000-00-0000. Enter numbers only. Per the Social Security Administration, these additional prefixes are supported: 001-665, 667-772. The following numbers are invalid: 111-11-1111, 123-45-5678, and any number beginning with 8, 9, 000, 666, and any number with 00 in the middle or ending with 000. The Social Security Number is masked on the Rehire Start page. All numbers except the last four are masked. Format is: XXX-XX-9999.
3. Click Next to advance to the Rehire Start page.
Initiating the Hiring Process
Completing the Rehire Prompt Page
Completing the Rehire Start Page
Completing the New Hire Start Page
Completing the Personal Data - Part A Page
Completing the Personal Data - Part B Page
Completing the Job Data - Part A Page
Completing the Job Data - Part B Page
Completing the Pay Information Page
Completing the Citizenship Page
Completing the Additional Hire Information Page
Completing the Submit Page
Chapter 6: Managing Work EventsADP Self Service Manager’s Guide
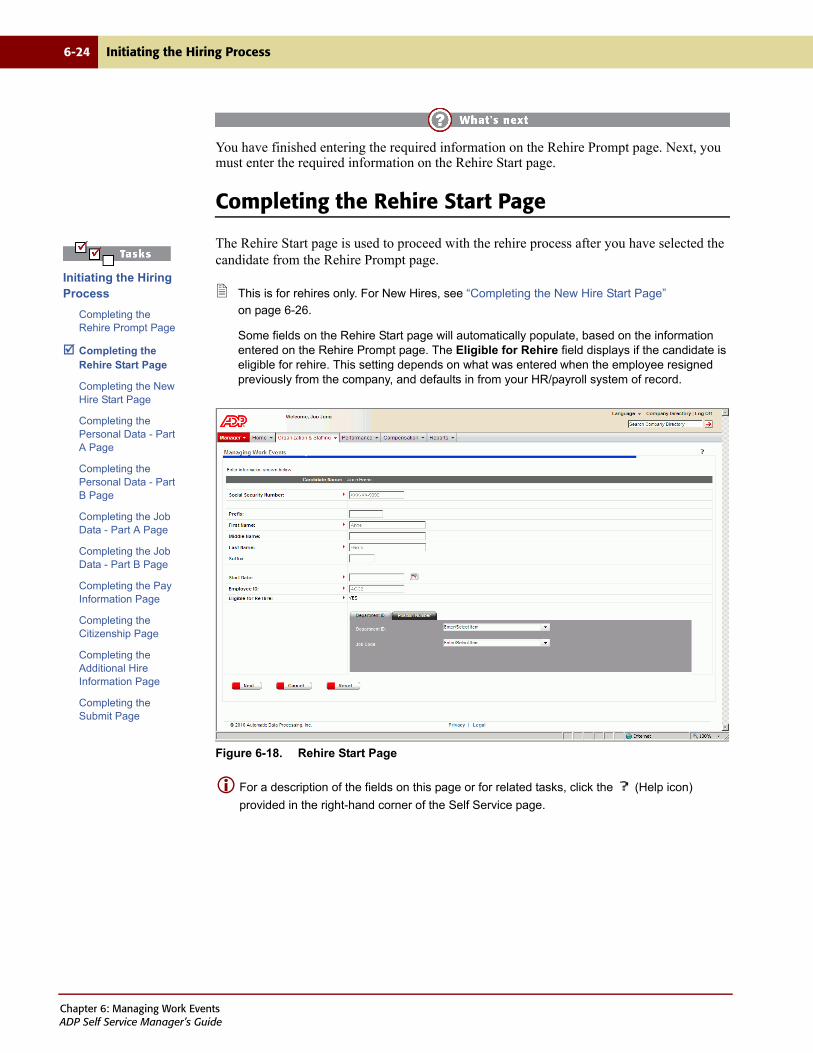
6-24 Initiating the Hiring Process
You have finished entering the required information on the Rehire Prompt page. Next, you must enter the required information on the Rehire Start page.
Completing the Rehire Start Page
The Rehire Start page is used to proceed with the rehire process after you have selected the candidate from the Rehire Prompt page.
This is for rehires only. For New Hires, see “Completing the New Hire Start Page”
on page 6-26.
Some fields on the Rehire Start page will automatically populate, based on the information entered on the Rehire Prompt page. The Eligible for Rehire field displays if the candidate is eligible for rehire. This setting depends on what was entered when the employee resigned previously from the company, and defaults in from your HR/payroll system of record.
Figure 6-18. Rehire Start Page
For a description of the fields on this page or for related tasks, click the (Help icon)
provided in the right-hand corner of the Self Service page.
Initiating the Hiring Process
Completing the Rehire Prompt Page
Completing the Rehire Start Page
Completing the New Hire Start Page
Completing the Personal Data - Part A Page
Completing the Personal Data - Part B Page
Completing the Job Data - Part A Page
Completing the Job Data - Part B Page
Completing the Pay Information Page
Completing the Citizenship Page
Completing the Additional Hire Information Page
Completing the Submit Page
Chapter 6: Managing Work EventsADP Self Service Manager’s Guide
Initiating the Hiring Process 6-25
To complete the Rehire Start page, do the following:
1. Enter the candidate's name information. Fields include the Prefix, First Name, Middle Name, Last Name, and Suffix. The First Name and Last Name fields are automatically populated, but can be changed.
Required fields are indicated with a red arrow.
2. Enter the candidate's proposed Start Date. You can either enter the date manually (format mm/dd/yyyy), or select the date from the calendar.
3. Select either the Position Number tab or the Department ID tab, but not both. (See “Using the Searchable Drop-Down Fields” on page 6-4.)
Fields on the Job Data - Part A page and the Pay Information page are automatically
populated based on the Position Number or Department ID/Job Code combination selected.
4. Click Next to advance to the next page of the rehire process.
The hire pages available depend on which pages your Portal administrator has
configured for the hire process. If all hire pages have been enabled, the next page in the process is the Personal Data - Part A page.
You have completed entering the required information on the Rehire Start page. Next complete the Personal Data - Part A page.
Chapter 6: Managing Work EventsADP Self Service Manager’s Guide
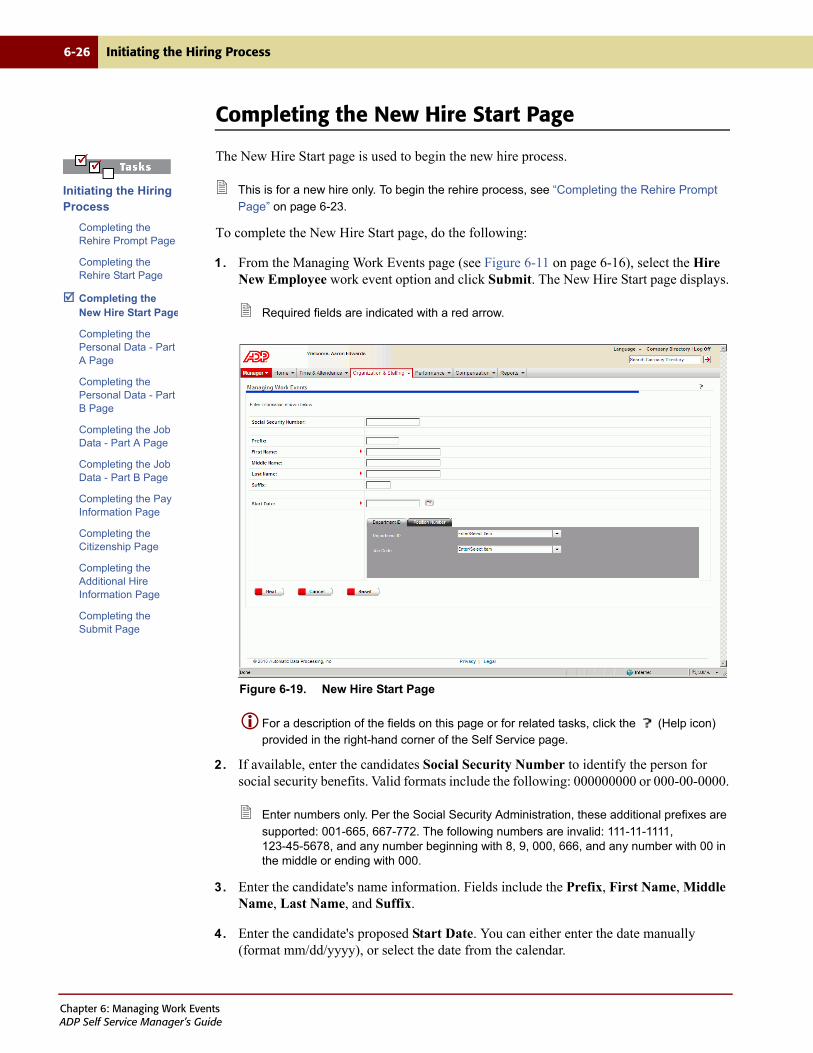
6-26 Initiating the Hiring Process
Completing the New Hire Start Page
The New Hire Start page is used to begin the new hire process.
This is for a new hire only. To begin the rehire process, see “Completing the Rehire Prompt
Page” on page 6-23.
To complete the New Hire Start page, do the following:
1. From the Managing Work Events page (see Figure 6-11 on page 6-16), select the Hire New Employee work event option and click Submit. The New Hire Start page displays.
Required fields are indicated with a red arrow.
Figure 6-19. New Hire Start Page
For a description of the fields on this page or for related tasks, click the (Help icon) provided in the right-hand corner of the Self Service page.
2. If available, enter the candidates Social Security Number to identify the person for social security benefits. Valid formats include the following: 000000000 or 000-00-0000.
Enter numbers only. Per the Social Security Administration, these additional prefixes are
supported: 001-665, 667-772. The following numbers are invalid: 111-11-1111, 123-45-5678, and any number beginning with 8, 9, 000, 666, and any number with 00 in the middle or ending with 000.
3. Enter the candidate's name information. Fields include the Prefix, First Name, Middle Name, Last Name, and Suffix.
4. Enter the candidate's proposed Start Date. You can either enter the date manually (format mm/dd/yyyy), or select the date from the calendar.
Initiating the Hiring Process
Completing the Rehire Prompt Page
Completing the Rehire Start Page
Completing the New Hire Start Page
Completing the Personal Data - Part A Page
Completing the Personal Data - Part B Page
Completing the Job Data - Part A Page
Completing the Job Data - Part B Page
Completing the Pay Information Page
Completing the Citizenship Page
Completing the Additional Hire Information Page
Completing the Submit Page
Chapter 6: Managing Work EventsADP Self Service Manager’s Guide
Initiating the Hiring Process 6-27
5. Select either the Position Number tab or the Department ID tab, but not both. (See “Using the Searchable Drop-Down Fields” on page 6-4.)
Fields on the New Hire/Rehire Job Data - Part A page and the New Hire/Rehire Pay
Information page are automatically populated based on the Position Number or Department ID/Job Code combination selected.
6. Click Next to advance to the next page of the hire process.
The hire pages available depend on which pages your Portal administrator has
configured for the hire process. If all hire pages have been enabled, the next page in the process is the Personal Data - Part A page.
You have completed the New Hire Start page. Next complete the Personal Data - Part A page.
Chapter 6: Managing Work EventsADP Self Service Manager’s Guide
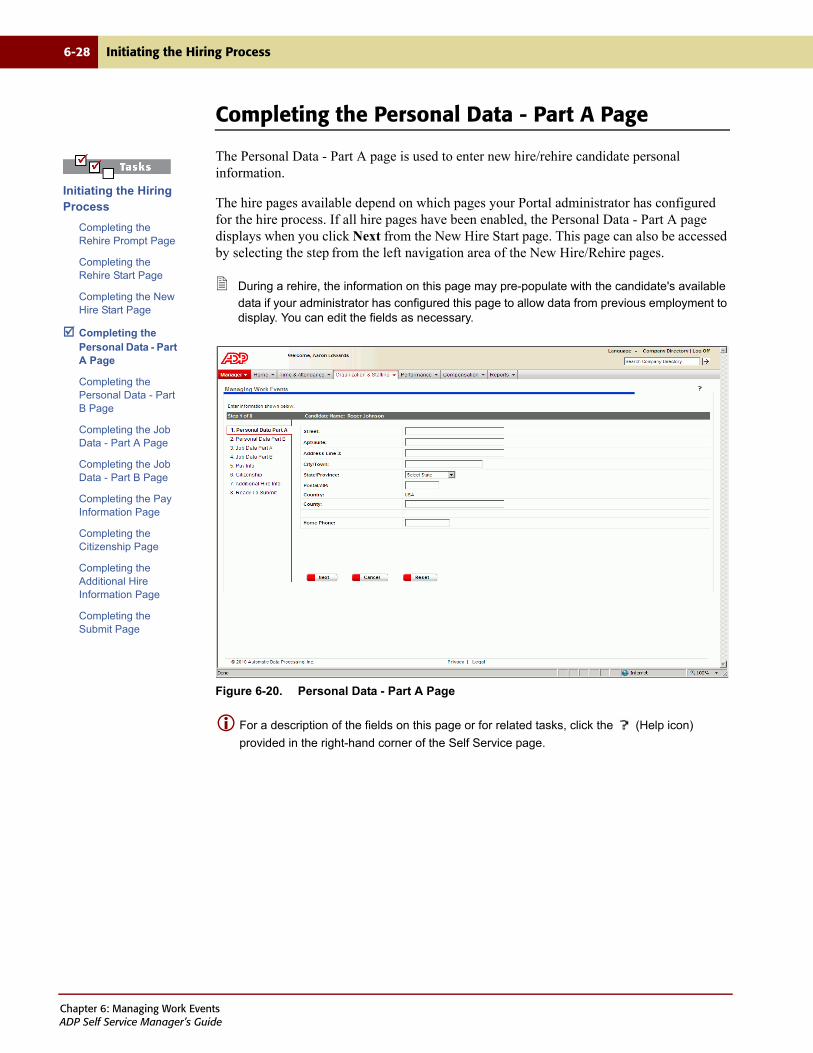
6-28 Initiating the Hiring Process
Completing the Personal Data - Part A Page
The Personal Data - Part A page is used to enter new hire/rehire candidate personal information.
The hire pages available depend on which pages your Portal administrator has configured for the hire process. If all hire pages have been enabled, the Personal Data - Part A page displays when you click Next from the New Hire Start page. This page can also be accessed by selecting the step from the left navigation area of the New Hire/Rehire pages.
During a rehire, the information on this page may pre-populate with the candidate's available
data if your administrator has configured this page to allow data from previous employment to display. You can edit the fields as necessary.
Figure 6-20. Personal Data - Part A Page
For a description of the fields on this page or for related tasks, click the (Help icon)
provided in the right-hand corner of the Self Service page.
Initiating the Hiring Process
Completing the Rehire Prompt Page
Completing the Rehire Start Page
Completing the New Hire Start Page
Completing the Personal Data - Part A Page
Completing the Personal Data - Part B Page
Completing the Job Data - Part A Page
Completing the Job Data - Part B Page
Completing the Pay Information Page
Completing the Citizenship Page
Completing the Additional Hire Information Page
Completing the Submit Page
Chapter 6: Managing Work EventsADP Self Service Manager’s Guide
Initiating the Hiring Process 6-29
To complete the Personal Data - Part A page, do the following:
1. Enter the candidate's Street information.
Enter any additional address information in the Address Line 3 field. This field is for
informational purposes only, and not used in the mailing address.
2. Enter the City/Town where the candidate lives.
3. Select the state from the State/Province field.
4. Enter the candidate's postal or zip code in the Postal/ZIP field. Use one of the following formats: 12345 or 12345-6789.
5. Enter the County where the candidate lives.
6. Enter the candidate's Home Phone number. If either 7 or 10 digits are entered with no special characters or spaces, the North American format will automatically be applied.
7. Click Next to advance to the next page of the hire process, or select the next step from the left navigation area of the New Hire/Rehire pages.
The hire pages available depend on which pages your Portal administrator has
configured for the hire process. If all hire pages have been enabled, the next page in the process is the Personal Data - Part B page.
You have completed entering information on the Personal Data - Part A page. Next complete the Personal Data - Part B page.
Chapter 6: Managing Work EventsADP Self Service Manager’s Guide
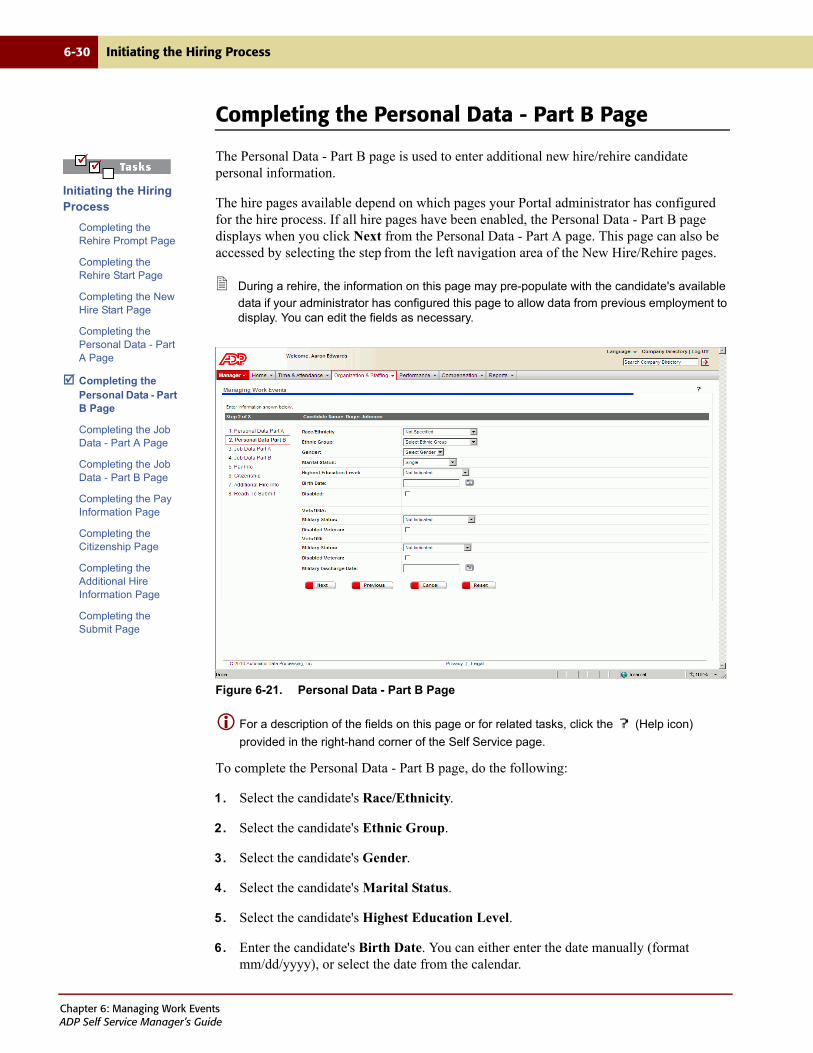
6-30 Initiating the Hiring Process
Completing the Personal Data - Part B Page
The Personal Data - Part B page is used to enter additional new hire/rehire candidate personal information.
The hire pages available depend on which pages your Portal administrator has configured for the hire process. If all hire pages have been enabled, the Personal Data - Part B page displays when you click Next from the Personal Data - Part A page. This page can also be accessed by selecting the step from the left navigation area of the New Hire/Rehire pages.
During a rehire, the information on this page may pre-populate with the candidate's available
data if your administrator has configured this page to allow data from previous employment to display. You can edit the fields as necessary.
Figure 6-21. Personal Data - Part B Page
For a description of the fields on this page or for related tasks, click the (Help icon)
provided in the right-hand corner of the Self Service page.
To complete the Personal Data - Part B page, do the following:
1. Select the candidate's Race/Ethnicity.
2. Select the candidate's Ethnic Group.
3. Select the candidate's Gender.
4. Select the candidate's Marital Status.
5. Select the candidate's Highest Education Level.
6. Enter the candidate's Birth Date. You can either enter the date manually (format mm/dd/yyyy), or select the date from the calendar.
Initiating the Hiring Process
Completing the Rehire Prompt Page
Completing the Rehire Start Page
Completing the New Hire Start Page
Completing the Personal Data - Part A Page
Completing the Personal Data - Part B Page
Completing the Job Data - Part A Page
Completing the Job Data - Part B Page
Completing the Pay Information Page
Completing the Citizenship Page
Completing the Additional Hire Information Page
Completing the Submit Page
Chapter 6: Managing Work EventsADP Self Service Manager’s Guide
Initiating the Hiring Process 6-31
7. Select the Disabled check box if the candidate is disabled.
8. Select the candidate's VETS-100A military status information, if applicable, as follows:
a. From the Military Status field, select candidate's VETS-100A status. Default value is Not Indicated.
The corresponding status displays in the VETS-100 Military Status field. You can
change the value if needed.
b. Select the Disabled Veteran check box if the candidate is considered disabled under the VETS-100A guidelines.
9. Select the candidate's VETS-100 military status information, if applicable, as follows:
a. If you have selected a value in the VETS-100A Military Status field, a corresponding value populates the VETS-100 Military Status field. You can change the status as needed.
b. Select the Disabled Veteran check box if the candidate is considered disabled under the VETS-100 guidelines.
10. Enter the candidate's Military Discharge Date. You can either enter the date manually (format mm/dd/yyyy), or select the date from the calendar.
The date entered in this field is used in determining newly separated veteran status for
VETS reporting. For VETS-100A reporting, an employee is considered a recently separated veteran if the employee's discharge date is within three years of the VETS-100A report period. For VETS-100 reporting, an employee is considered a recently separated veteran if the employee's discharge date is within one year of the VETS-100 reporting period.
11. Click Next to advance to the next page of the hire process, or select the next step from the left navigation area of the New Hire/Rehire pages.
The hire pages available depend on which pages your Portal administrator has
configured for the hire process. If all hire pages have been enabled, the next page in the process is the Job Data - Part A page.
You have completed entering information on the Personal Data - Part B page. Next complete the Job Data - Part A page.
Chapter 6: Managing Work EventsADP Self Service Manager’s Guide

6-32 Initiating the Hiring Process
Completing the Job Data - Part A Page
The Job Data - Part A page is used to enter new hire/rehire candidate job information.
The hire pages available depend on which pages your Portal administrator has configured for the hire process. If all hire pages have been enabled, the Job Data - Part A page displays when you click Next from the Personal Data - Part B page. This page can also be accessed by selecting the step from the left navigation area of the New Hire/Rehire pages.
Fields on the Job Data - Part A page are automatically populated, based on what the
manager selected for a Position Number or Job Code on the New Hire/Rehire Start page. If Position Number was selected and Position Management in your HR/Payroll system of record is set to Partial or Full, these fields are display-only and cannot be overridden. If Job Code was selected, you can change the values of these fields.
During a rehire, the information on this page may pre-populate with the candidate's available data if your administrator has configured this page to allow data from previous employment to display. You can edit the fields as necessary.
Figure 6-22. Job Data - Part A Page
For a description of the fields on this page or for related tasks, click the (Help icon)
provided in the right-hand corner of the Self Service page.
Initiating the Hiring Process
Completing the Rehire Prompt Page
Completing the Rehire Start Page
Completing the New Hire Start Page
Completing the Personal Data - Part A Page
Completing the Personal Data - Part B Page
Completing the Job Data - Part A Page
Completing the Job Data - Part B Page
Completing the Pay Information Page
Completing the Citizenship Page
Completing the Additional Hire Information Page
Completing the Submit Page
Chapter 6: Managing Work EventsADP Self Service Manager’s Guide
Initiating the Hiring Process 6-33
To complete the Job Data - Part A page, do the following:
1. If Position Number was selected on the New Hire Start page and Position Management in your HR/Payroll system of record is set to Partial or Full, the field values on this page cannot be changed. If Job Code was selected, you can select the new value, if needed, from the following fields:
• Regular/Temporary – Select if the employee is a regular or temporary employee.
• Full/Part Time – Select if the employee is full or part time.
• Rate Code – Select the shift rate code. This field is only available if your HR/payroll system of record is Enterprise HR with Enterprise Payroll (EPayroll).
• Shift – Select the employee’s shift, if applicable.
• Work Location and Reporting Location – Select the employee's appropriate work and reporting locations, as needed. (See “Using the Searchable Drop-Down Fields” on page 6-4.)
• Holiday Schedule – Select the holiday schedule associated with the job.
• Clock Number – Enter the clock number code as needed. This code is used for special coding or as a form of employee identification on AutoPay.
The Clock Number and Data Control fields are not applicable and are hidden if your
HR/payroll system of record is ADP Enterprise HR with Enterprise Payroll (EPayroll).
• Data Control – Enter a code as needed for special coding on AutoPay.
2. Click Next to advance to the next page of the hire process, or select the next step from the left navigation area of the New Hire/Rehire pages.
The hire pages available depend on which pages your Portal administrator has
configured for the hire process. If all hire pages have been enabled, the next page in the process is the Job Data - Part B page.
You have completed entering information on the Job Data - Part A page. Next complete the Job Data - Part B page.
Chapter 6: Managing Work EventsADP Self Service Manager’s Guide

6-34 Initiating the Hiring Process
Completing the Job Data - Part B Page
The Job Data - Part B page is used to enter additional new hire/rehire candidate job information.
The hire pages available depend on which pages your Portal administrator has configured for the hire process. If all hire pages have been enabled, the Job Data - Part B page displays when you click Next from the Job Data - Part A page. This page can also be accessed by selecting the step from the left navigation area of the New Hire/Rehire pages.
During a rehire, the information on this page may pre-populate with the candidate's available
data if your administrator has configured this page to allow data from previous employment to display. You can edit the fields as necessary.
Figure 6-23. Job Data - Part B Page
For a description of the fields on this page or for related tasks, click the (Help icon)
provided in the right-hand corner of the Self Service page.
Initiating the Hiring Process
Completing the Rehire Prompt Page
Completing the Rehire Start Page
Completing the New Hire Start Page
Completing the Personal Data - Part A Page
Completing the Personal Data - Part B Page
Completing the Job Data - Part A Page
Completing the Job Data - Part B Page
Completing the Pay Information Page
Completing the Citizenship Page
Completing the Additional Hire Information Page
Completing the Submit Page
Chapter 6: Managing Work EventsADP Self Service Manager’s Guide
Initiating the Hiring Process 6-35
To complete the Job Data - Part B page, do the following:
1. Select the Full Time Student option if the candidate is a full-time student.
2. From the Reason for Action field, select the reason for hiring this candidate.
3. From the Employee Classification field, select the candidate's employee classification.
4. From the Referral Source field, select the source (such as job posting or employee) that referred the candidate to the company.
5. In the Business Title field, enter the candidate's official business title, which may or may not be the same as the candidate's job title.
6. Select the Security Clearance the candidate's security level.
7. In the Bargaining Unit field, select the unit of the local union to which the candidate belongs for contract bargaining purposes, if applicable.
8. In the Union Code field, enter the union identifier for the union to which the candidate belongs, if applicable.
9. In the Union Seniority Date field, enter the date on which the candidate's union seniority ranking is based, if applicable. You can either enter the date manually (format mm/dd/yyyy), or select the date from the calendar.
10. Click Next to advance to the next page of the hire process, or select the next step from the left navigation area of the New Hire/Rehire pages.
The hire pages available depend on which pages your Portal administrator has configured for
the hire process. If all hire pages have been enabled, the next page in the process is the Pay Information page.
You have completed entering information on the Job Data - Part B page. Next complete the Pay Information page.
Chapter 6: Managing Work EventsADP Self Service Manager’s Guide
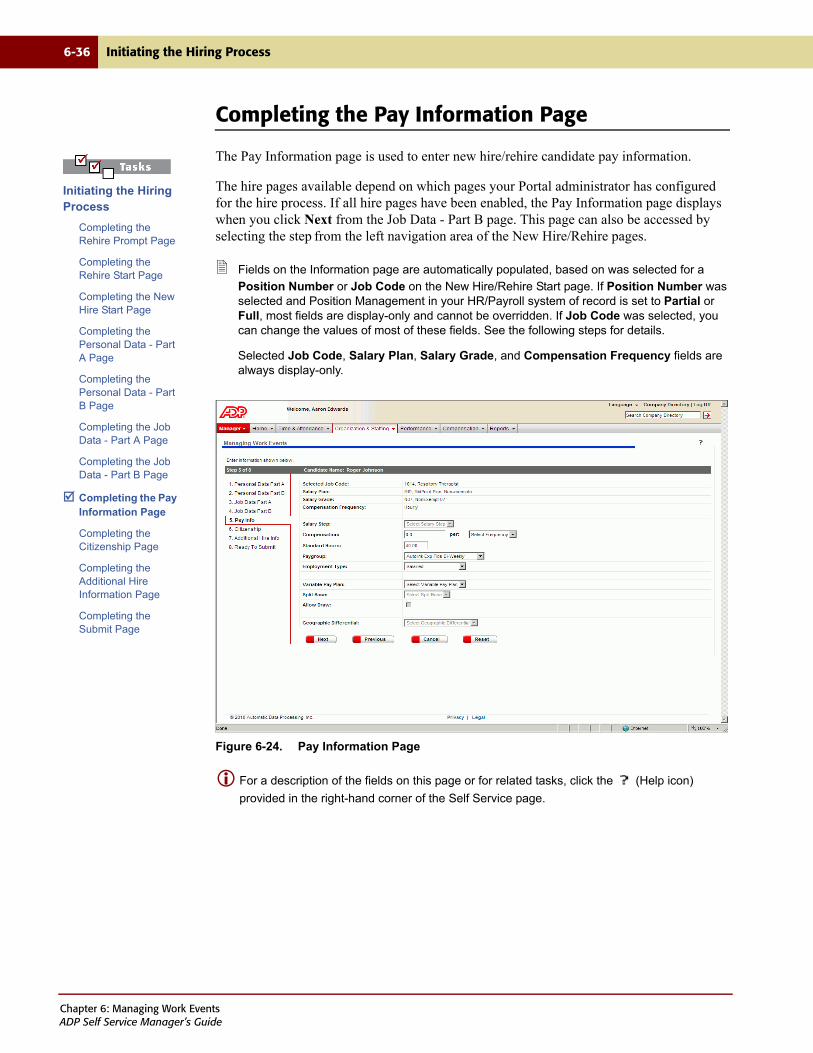
6-36 Initiating the Hiring Process
Completing the Pay Information Page
The Pay Information page is used to enter new hire/rehire candidate pay information.
The hire pages available depend on which pages your Portal administrator has configured for the hire process. If all hire pages have been enabled, the Pay Information page displays when you click Next from the Job Data - Part B page. This page can also be accessed by selecting the step from the left navigation area of the New Hire/Rehire pages.
Fields on the Information page are automatically populated, based on was selected for a
Position Number or Job Code on the New Hire/Rehire Start page. If Position Number was selected and Position Management in your HR/Payroll system of record is set to Partial or Full, most fields are display-only and cannot be overridden. If Job Code was selected, you can change the values of most of these fields. See the following steps for details.
Selected Job Code, Salary Plan, Salary Grade, and Compensation Frequency fields are always display-only.
Figure 6-24. Pay Information Page
For a description of the fields on this page or for related tasks, click the (Help icon)
provided in the right-hand corner of the Self Service page.
Initiating the Hiring Process
Completing the Rehire Prompt Page
Completing the Rehire Start Page
Completing the New Hire Start Page
Completing the Personal Data - Part A Page
Completing the Personal Data - Part B Page
Completing the Job Data - Part A Page
Completing the Job Data - Part B Page
Completing the Pay Information Page
Completing the Citizenship Page
Completing the Additional Hire Information Page
Completing the Submit Page
Chapter 6: Managing Work EventsADP Self Service Manager’s Guide

Initiating the Hiring Process 6-37
To complete the Pay Information page, do the following:
1. From the Salary Step field, select the salary step code.
This field may be enabled, disabled, or automatically populated with a value that cannot
be changed. The availability of this field depends on how salary steps and/or multi-steps are defined in your HR/payroll system of record. If this field is enabled, you can select a value from the drop-down list.
2. From the Compensation and per fields, enter the candidate's compensation and select the frequency.
These fields may be enabled, disabled, or automatically populated with a value that
cannot be changed. The availability of these fields depends on how salary steps and/or multi-steps are defined in your HR/payroll system of record.
3. The Standard Hours field displays the standard hours for the job. You can enter a new value in this field as needed.
4. If Position Number was selected on the New Hire/Rehire Start page, and Position Management in your HR/Payroll system of record is set to Partial or Full, the following field values cannot be changed. If Job Code was selected, you can enter or select new values, if needed, in the following fields:
• Paygroup – Select the employee’s paygroup.
If you change the pay group, you must also change the employment type, if needed.
Employment type will not automatically default from the new pay group selected.
• Employment Type – Select the employment type. Options are Hourly, Salaried, or Exception Hourly.
• Variable Pay Plan – Select the variable pay plan.
• Split Base – Select the split base. This field is not active unless a Variable Pay Plan has been selected.
• Geographical Differential – Select the geographical differential for the location, if available.
5. You can select or clear the Allow Draw check box. This field is not active unless a variable pay plan has been selected.
This field is automatically populated when Position Number or Job Code was selected
on the New Hire/Rehire Start page.
6. Click Next to advance to the next page of the hire process, or select the next step from the left navigation area of the New Hire/Rehire pages.
The hire pages available depend on which pages your Portal administrator has
configured for the hire process. If all hire pages have been enabled, the next page in the process is the Citizenship page.
You have completed entering information on the Pay Information page. Next complete the Citizenship page.
Chapter 6: Managing Work EventsADP Self Service Manager’s Guide
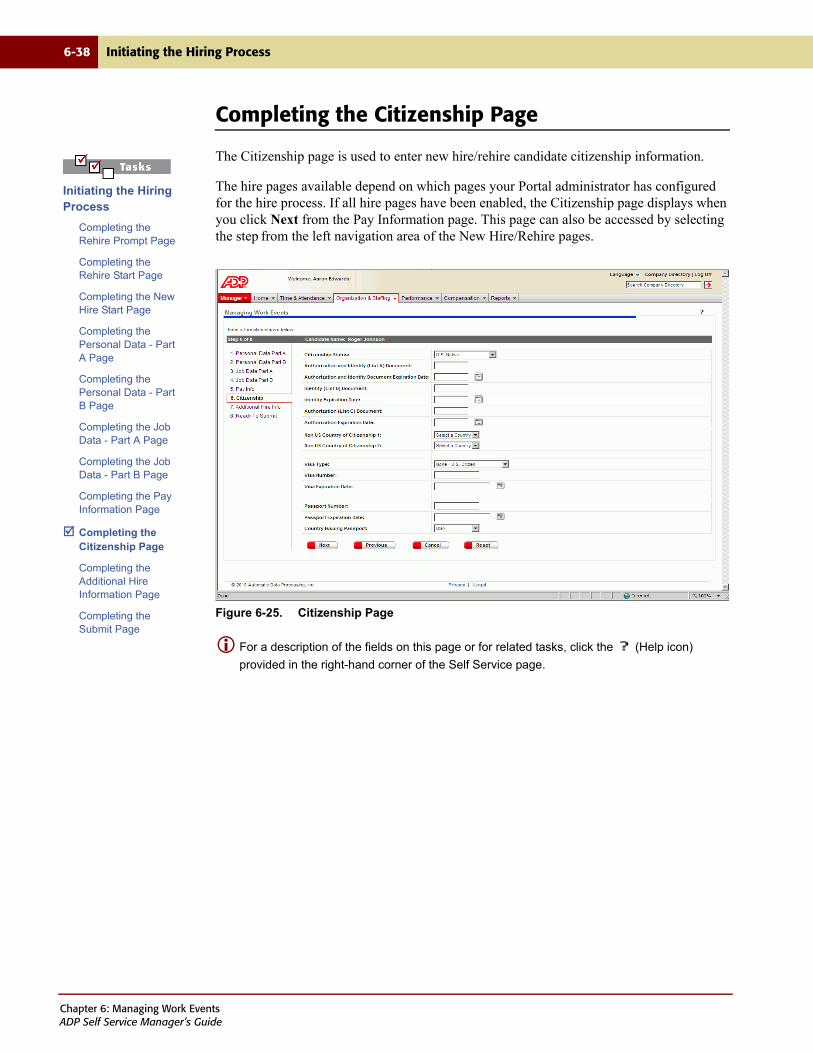
6-38 Initiating the Hiring Process
Completing the Citizenship Page
The Citizenship page is used to enter new hire/rehire candidate citizenship information.
The hire pages available depend on which pages your Portal administrator has configured for the hire process. If all hire pages have been enabled, the Citizenship page displays when you click Next from the Pay Information page. This page can also be accessed by selecting the step from the left navigation area of the New Hire/Rehire pages.
Figure 6-25. Citizenship Page
For a description of the fields on this page or for related tasks, click the (Help icon)
provided in the right-hand corner of the Self Service page.
Initiating the Hiring Process
Completing the Rehire Prompt Page
Completing the Rehire Start Page
Completing the New Hire Start Page
Completing the Personal Data - Part A Page
Completing the Personal Data - Part B Page
Completing the Job Data - Part A Page
Completing the Job Data - Part B Page
Completing the Pay Information Page
Completing the Citizenship Page
Completing the Additional Hire Information Page
Completing the Submit Page
Chapter 6: Managing Work EventsADP Self Service Manager’s Guide
Initiating the Hiring Process 6-39
To complete the Citizenship page, do the following:
1. Select the candidate's Citizenship Status.
2. In the Authorization and Identity (List A) Document field, enter the form of proof the candidate provided from List A. If you have entered a form in this field, in the Authorization and Identity Document Expiration Date field, enter the candidate's authorization and identity (List A) document expiration date. You can either enter the date manually (format mm/dd/yyyy), or select the date from the calendar
Candidates must provide one document from List A, or one document from List B and a
document from List C. For more information, refer to the INS form I-9, Employment Eligibility Verification.
3. In the Identity (List B) Document field, enter the form of proof the candidate provided from List B, if applicable. If you have entered a form in this field, in the Identity Expiration Date field, enter the candidate's identity (List B) document expiration date. You can either enter the date manually (format mm/dd/yyyy), or select the date from the calendar.
4. In the Authorization (List C) Document field, enter the form of proof the candidate provided from List C, if applicable. If you have entered a form in this field, in the Authorization Expiration Date field, enter the candidate's authorization (List C) document expiration date. You can either enter the date manually (format mm/dd/yyyy), or select the date from the calendar.
5. In the Non US Country of Citizenship 1 and Non US Country of Citizenship 2 fields, select the country code of any other country where the candidate holds citizenship, if applicable.
6. Enter the candidate's Visa information by selecting the candidate's Visa Type, entering the Visa Number, and entering the Visa Expiration Date. You can either enter the date manually (format mm/dd/yyyy), or select the date from the calendar.
7. Enter the candidate's passport information by entering the Passport Number and the Passport Expiration Date. You can either enter the date manually (format mm/dd/yyyy), or select the date from the calendar. Select the country that issued the candidate's passport from the Country Issuing Passport field.
8. Click Next to advance to the next page of the hire process, or select the next step from the left navigation area of the New Hire/Rehire pages.
The hire pages available depend on which pages your Portal administrator has
configured for the hire process. If all hire pages have been enabled, the next page in the process is the Additional Hire Information page.
You have completed the Citizenship page. Next complete the Additional Hire Information page.
If your HR/payroll system of record is a version prior to V4.05/5.01, Citizen Proof 1 and Citizen Proof 2 fields are used instead to enter the form of proof the candidate presented for employment eligibility.
Chapter 6: Managing Work EventsADP Self Service Manager’s Guide
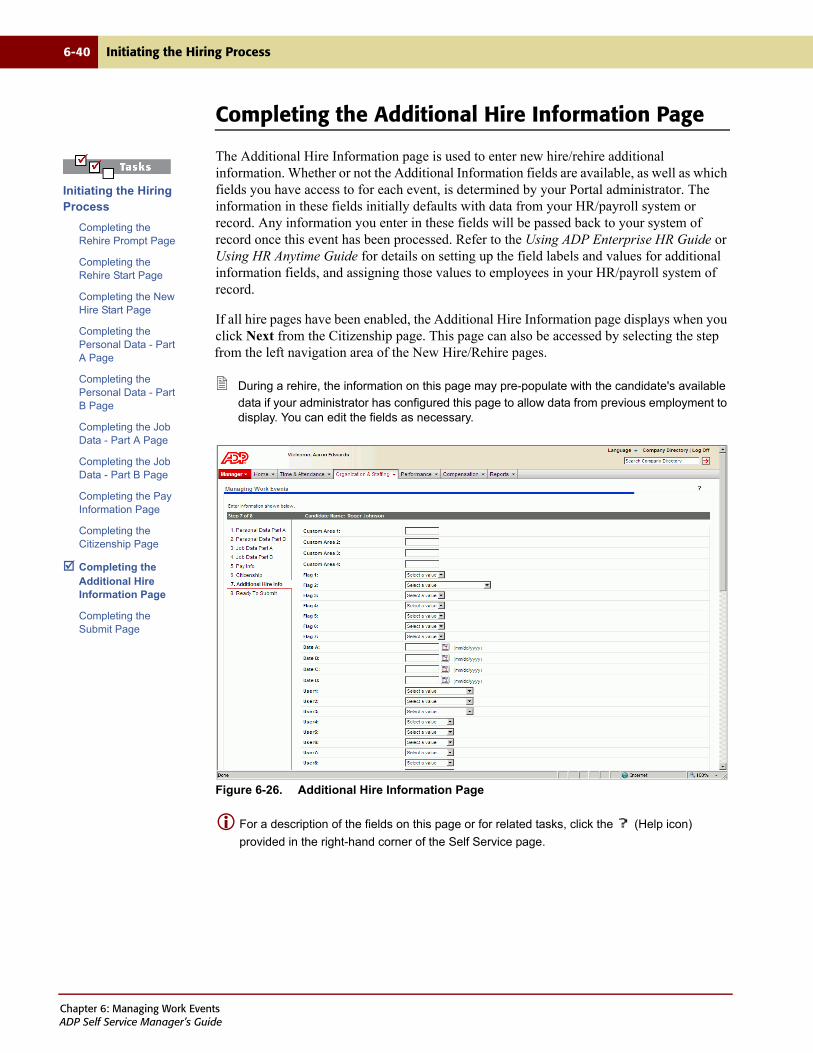
6-40 Initiating the Hiring Process
Completing the Additional Hire Information Page
The Additional Hire Information page is used to enter new hire/rehire additional information. Whether or not the Additional Information fields are available, as well as which fields you have access to for each event, is determined by your Portal administrator. The information in these fields initially defaults with data from your HR/payroll system or record. Any information you enter in these fields will be passed back to your system of record once this event has been processed. Refer to the Using ADP Enterprise HR Guide or Using HR Anytime Guide for details on setting up the field labels and values for additional information fields, and assigning those values to employees in your HR/payroll system of record.
If all hire pages have been enabled, the Additional Hire Information page displays when you click Next from the Citizenship page. This page can also be accessed by selecting the step from the left navigation area of the New Hire/Rehire pages.
During a rehire, the information on this page may pre-populate with the candidate's available
data if your administrator has configured this page to allow data from previous employment to display. You can edit the fields as necessary.
Figure 6-26. Additional Hire Information Page
For a description of the fields on this page or for related tasks, click the (Help icon)
provided in the right-hand corner of the Self Service page.
Initiating the Hiring Process
Completing the Rehire Prompt Page
Completing the Rehire Start Page
Completing the New Hire Start Page
Completing the Personal Data - Part A Page
Completing the Personal Data - Part B Page
Completing the Job Data - Part A Page
Completing the Job Data - Part B Page
Completing the Pay Information Page
Completing the Citizenship Page
Completing the Additional Hire Information Page
Completing the Submit Page
Chapter 6: Managing Work EventsADP Self Service Manager’s Guide
Initiating the Hiring Process 6-41
To complete the Additional Hire Information page, do the following:
1. Enter, change or delete data from the available Additional Hire Information fields, as needed.
2. Click Next to advance to the next page of the hire process, or select the next step from the left navigation area of the New Hire/Rehire pages.
The hire pages available depend on which pages your Portal administrator has
configured for the hire process. If all hire pages have been enabled, the next page in the process is the Submit page.
You have completed the Additional Hire Information page. Next complete the Submit page.
Chapter 6: Managing Work EventsADP Self Service Manager’s Guide
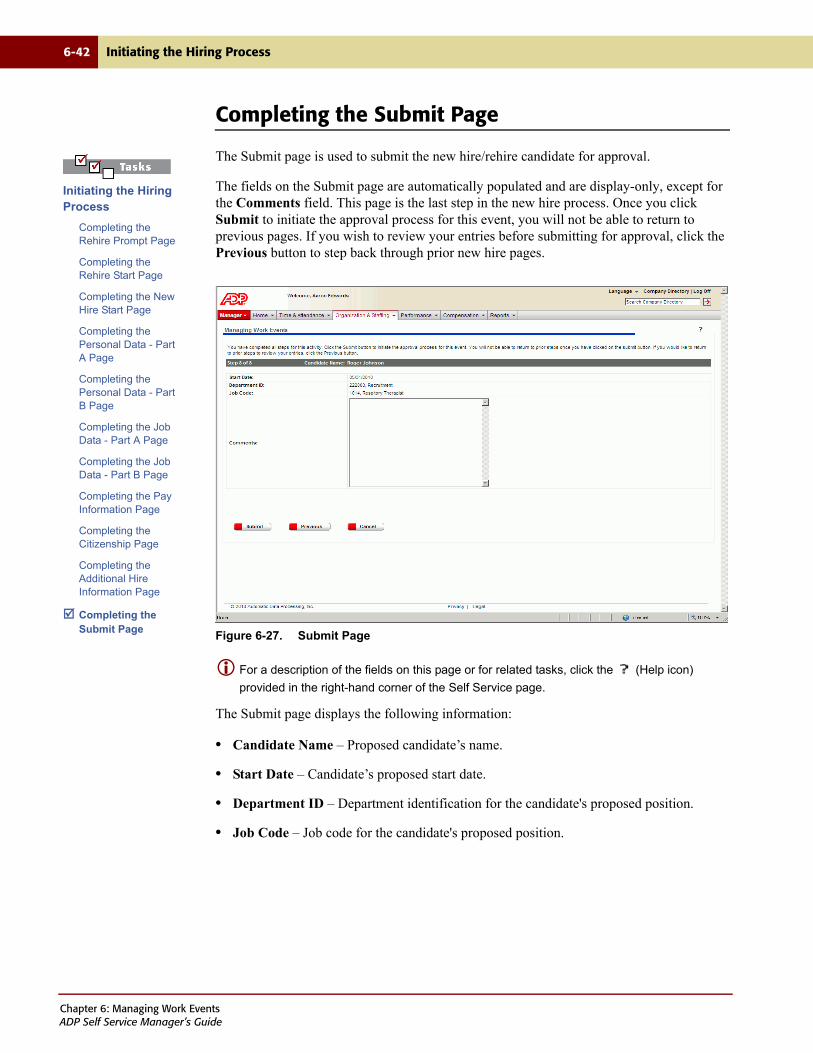
6-42 Initiating the Hiring Process
Completing the Submit Page
The Submit page is used to submit the new hire/rehire candidate for approval.
The fields on the Submit page are automatically populated and are display-only, except for the Comments field. This page is the last step in the new hire process. Once you click Submit to initiate the approval process for this event, you will not be able to return to previous pages. If you wish to review your entries before submitting for approval, click the Previous button to step back through prior new hire pages.
Figure 6-27. Submit Page
For a description of the fields on this page or for related tasks, click the (Help icon)
provided in the right-hand corner of the Self Service page.
The Submit page displays the following information:
• Candidate Name – Proposed candidate’s name.
• Start Date – Candidate’s proposed start date.
• Department ID – Department identification for the candidate's proposed position.
• Job Code – Job code for the candidate's proposed position.
Initiating the Hiring Process
Completing the Rehire Prompt Page
Completing the Rehire Start Page
Completing the New Hire Start Page
Completing the Personal Data - Part A Page
Completing the Personal Data - Part B Page
Completing the Job Data - Part A Page
Completing the Job Data - Part B Page
Completing the Pay Information Page
Completing the Citizenship Page
Completing the Additional Hire Information Page
Completing the Submit Page
Chapter 6: Managing Work EventsADP Self Service Manager’s Guide

Initiating the Hiring Process 6-43
To complete the Submit page, do the following:
1. Enter any comments you would like the approver to see into the Comments field. Comments will be viewable for all approvers, as well as through Approval History.
2. Click Submit to initiate the approval process for this event. You are returned to the Managing Work Events page, which displays a message indicating to whom this task has been sent.
If an approval workflow has not been set up for the hire process, the hire proposal is
immediately accepted. The final processing of the hire/rehire is completed in your HR/payroll system of record. For additional information, see the Hiring, Staffing, and Job Maintenance Guide.
You have completed submitting your new hire/rehire request. This is the last step in the hiring process.
Chapter 6: Managing Work EventsADP Self Service Manager’s Guide
6-44 Transferring Employees
Transferring Employees
The Transfer page allows managers to transfer employees that report to them to another manager, department, or location. If your administrator has enabled the indirect report update option, you can change information for both your direct and indirect reports.
Managers can transfer employees through either the Direct Reports or Managing Work Events task. Indirect and direct reports can be accessed through Direct Reports. Only direct reports can be accessed through the Managing Work Events task.
Select the Type of Transfer to display the corresponding detail fields. The "active" version of the Transfer page displays when the page is accessed from the Direct Reports page or Managing Work Events page, which means the manager is able to enter information in the fields provided. Note that required fields are indicated on the page by red arrows. When the page is accessed from the Approvals, Notifications, or Approval History pages, the fields are display-only.
A manager can transfer an employee within the departments to which that manager has
security access. If the manager does not have security access to the department where the employee is to be transferred, the transfer must be handled by a practitioner through your HR/payroll system of record.
Transferring employees can include the following tasks:
• Transferring an Employee to a New Manager
• Transferring an Employee to a New Department
• Transferring an Employee to a New Location
Some of the transfer pages include searchable drop-down fields. For more information, see “Using the Searchable Drop-Down Fields” on page 6-4. In addition, if your HR/payroll system of record is ADP Enterprise HR or HR Anytime Version 5.03, the Direct Reports and the Work Events Summary pages include search fields at the top of the page that allow you to filter your employee list. For more information, see “Using Search Fields to Filter Results” on page 6-3.
Chapter 6: Managing Work EventsADP Self Service Manager’s Guide

Transferring Employees 6-45
Transferring an Employee to a New Manager
If you are transferring an employee to a new position, use the Change Job & Salary Information page (see “Changing an Employee’s Job and Salary Information” on page 6-71 for more information).
Managers can transfer employees through either the Direct Reports or Managing Work Events task. Indirect and direct reports can be accessed through Direct Reports. Only direct reports can be accessed through the Managing Work Events task.
If multiple job actions need to be performed on an employee, see “Updating Multiple Job
Actions for a Single Employee” on page 6-6. If multiple employees need a job action performed, see “Updating Multiple Employees with a Single Job Action” on page 6-11. The two procedures can only be done through the Managing Work Events task.
To transfer an employee to another manager and submit for approval, do the following:
1. From the Organization & Staffing tab, choose one of the following paths:
• Select Direct Reports. The Direct Reports page displays. Click the underlined employee Name, then select Transfer Employee from the Employee Event selection menu.
Figure 6-28. Employee Event Selection Menu with Transfer Employee Selected
Transferring Employees
Transferring an Employee to a New Manager
Transferring an Employee to a New Department
Transferring an Employee to a New Location
For a description of the fields on this page or for related tasks, click
the (Help icon) provided in the right-hand corner of the Self Service page.
Chapter 6: Managing Work EventsADP Self Service Manager’s Guide

6-46 Transferring Employees
• Select Managing Work Events. The Managing Work Events page displays. Select the Transfer Employee(s) action option. Select the employee(s) you want to transfer by clicking the check box next to the employee's name, then click Submit.
Figure 6-29. Managing Work Events with Transfer Employee(s) Action Selected
The Start Work Events page displays.
Figure 6-30. Start Work Events Page
Depending on your HR/payroll system of record, you may have to first select the Select one of more of the Employment Changes below option to enable the individual job action check boxes.
For a description of the fields on this page or for related tasks, click
the (Help icon) provided in the right-hand corner of the Self Service page.
For a description of the fields on this page or for related tasks, click the
(Help icon) provided in the right-hand corner of the Self Service page
Chapter 6: Managing Work EventsADP Self Service Manager’s Guide

Transferring Employees 6-47
2. In the Comments field, enter a comment if appropriate. The comment is viewable by all approvers, as well as through Approval History.
3. Click Next. The Transfer selection page displays. with summary job information for the selected employee shown at the top of the page.
Figure 6-31. Transfer Page
4. Select Manager from the Type of Transfer field. The manager transfer fields display. Required fields are indicated by a red arrow.
The header bar will display either Managing Work Events or Direct Reports, indicating from which page you accessed the Transfer page. If more than one employee has been selected for the job action, it is indicated by a number in the top right corner of the page.
For a description of the fields on this page or for related tasks, click the
(Help icon) provided in the right-hand corner of the Self Service page
Chapter 6: Managing Work EventsADP Self Service Manager’s Guide
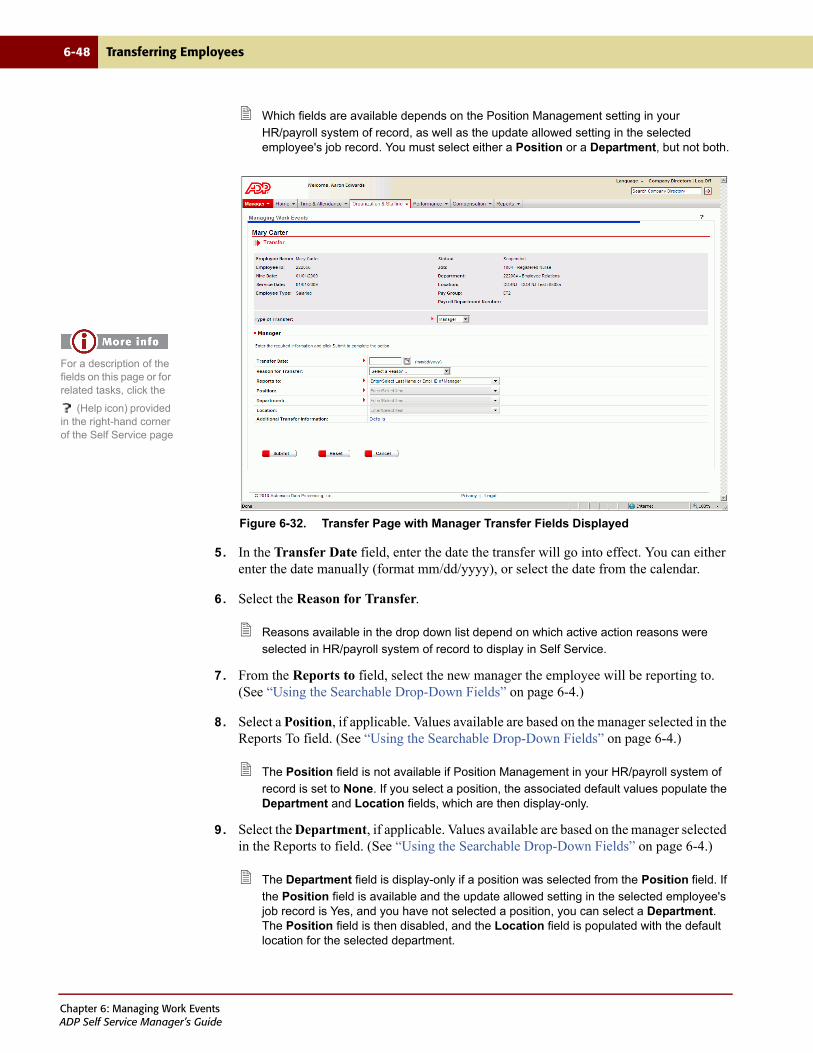
6-48 Transferring Employees
Which fields are available depends on the Position Management setting in your
HR/payroll system of record, as well as the update allowed setting in the selected employee's job record. You must select either a Position or a Department, but not both.
Figure 6-32. Transfer Page with Manager Transfer Fields Displayed
5. In the Transfer Date field, enter the date the transfer will go into effect. You can either enter the date manually (format mm/dd/yyyy), or select the date from the calendar.
6. Select the Reason for Transfer.
Reasons available in the drop down list depend on which active action reasons were
selected in HR/payroll system of record to display in Self Service.
7. From the Reports to field, select the new manager the employee will be reporting to. (See “Using the Searchable Drop-Down Fields” on page 6-4.)
8. Select a Position, if applicable. Values available are based on the manager selected in the Reports To field. (See “Using the Searchable Drop-Down Fields” on page 6-4.)
The Position field is not available if Position Management in your HR/payroll system of
record is set to None. If you select a position, the associated default values populate the Department and Location fields, which are then display-only.
9. Select the Department, if applicable. Values available are based on the manager selected in the Reports to field. (See “Using the Searchable Drop-Down Fields” on page 6-4.)
The Department field is display-only if a position was selected from the Position field. If
the Position field is available and the update allowed setting in the selected employee's job record is Yes, and you have not selected a position, you can select a Department. The Position field is then disabled, and the Location field is populated with the default location for the selected department.
For a description of the fields on this page or for related tasks, click the
(Help icon) provided in the right-hand corner of the Self Service page
Chapter 6: Managing Work EventsADP Self Service Manager’s Guide
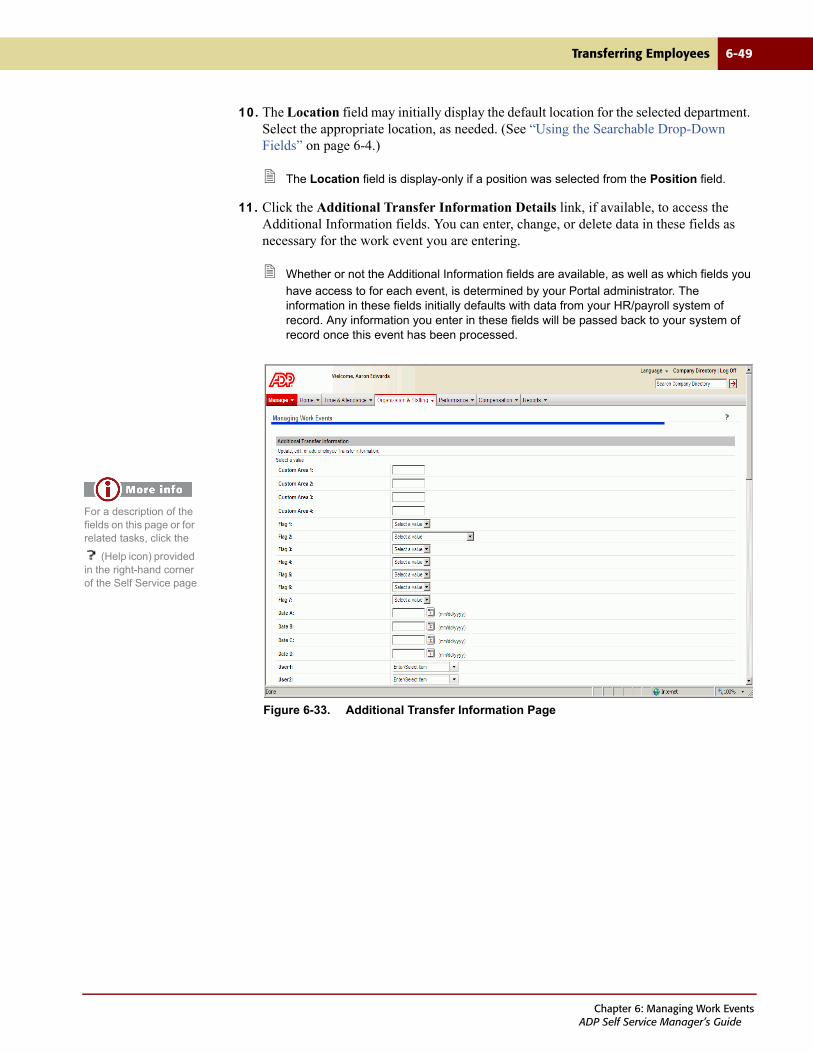
Transferring Employees 6-49
10. The Location field may initially display the default location for the selected department. Select the appropriate location, as needed. (See “Using the Searchable Drop-Down Fields” on page 6-4.)
The Location field is display-only if a position was selected from the Position field.
11. Click the Additional Transfer Information Details link, if available, to access the Additional Information fields. You can enter, change, or delete data in these fields as necessary for the work event you are entering.
Whether or not the Additional Information fields are available, as well as which fields you
have access to for each event, is determined by your Portal administrator. The information in these fields initially defaults with data from your HR/payroll system of record. Any information you enter in these fields will be passed back to your system of record once this event has been processed.
Figure 6-33. Additional Transfer Information Page
For a description of the fields on this page or for related tasks, click the
(Help icon) provided in the right-hand corner of the Self Service page
Chapter 6: Managing Work EventsADP Self Service Manager’s Guide
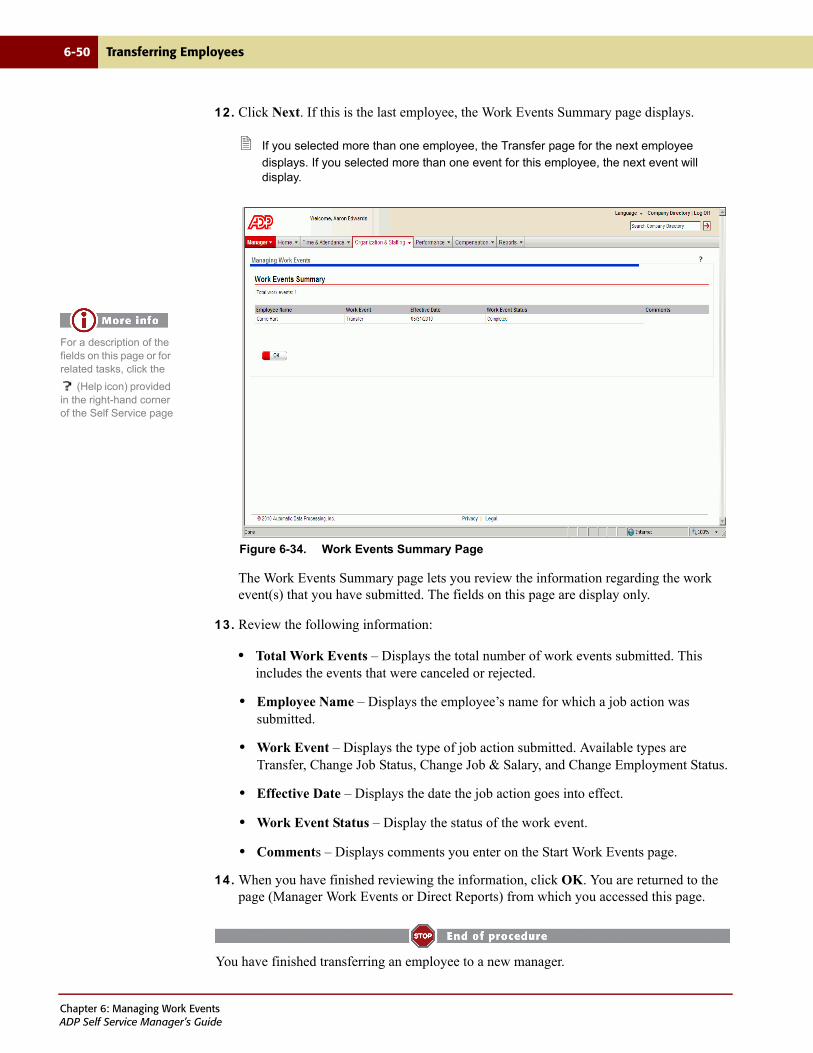
6-50 Transferring Employees
12. Click Next. If this is the last employee, the Work Events Summary page displays.
If you selected more than one employee, the Transfer page for the next employee
displays. If you selected more than one event for this employee, the next event will display.
Figure 6-34. Work Events Summary Page
The Work Events Summary page lets you review the information regarding the work event(s) that you have submitted. The fields on this page are display only.
13. Review the following information:
• Total Work Events – Displays the total number of work events submitted. This includes the events that were canceled or rejected.
• Employee Name – Displays the employee’s name for which a job action was submitted.
• Work Event – Displays the type of job action submitted. Available types are Transfer, Change Job Status, Change Job & Salary, and Change Employment Status.
• Effective Date – Displays the date the job action goes into effect.
• Work Event Status – Display the status of the work event.
• Comments – Displays comments you enter on the Start Work Events page.
14. When you have finished reviewing the information, click OK. You are returned to the page (Manager Work Events or Direct Reports) from which you accessed this page.
You have finished transferring an employee to a new manager.
For a description of the fields on this page or for related tasks, click the
(Help icon) provided in the right-hand corner of the Self Service page
Chapter 6: Managing Work EventsADP Self Service Manager’s Guide

Transferring Employees 6-51
For information on transferring an employee to a new department, see “Transferring an Employee to a New Department” on page 6-51.
For information on transferring and employee to a new location, see “Transferring an Employee to a New Location” on page 6-58.
Transferring an Employee to a New Department
If you are transferring an employee to a new position, use the Change Job & Salary Information page (see “Changing an Employee’s Job and Salary Information” on page 6-71 for more information).
Managers can transfer employees through either the Direct Reports or Managing Work Events task. Indirect and direct reports can be accessed through Direct Reports. Only direct reports can be accessed through the Managing Work Events task.
If multiple job actions need to be performed on an employee, see “Updating Multiple Job
Actions for a Single Employee” on page 6-6. If multiple employees need a job action performed, see “Updating Multiple Employees with a Single Job Action” on page 6-11. The two procedures can only be done through the Managing Work Events task.
To transfer an employee to another department and submit for approval, do the following:
1. From the Organization & Staffing tab, choose one of the following paths:
• Select Direct Reports. The Direct Reports page displays. Click the underlined employee Name, then select Transfer Employee from the Employee Event selection menu.
Figure 6-35. Employee Event Selection Menu with Transfer Employee Selected
Transferring Employees
Transferring an Employee to a New Manager
Transferring an Employee to a New Department
Transferring an Employee to a New Location
For a description of the fields on this page or for related tasks, click
the (Help icon) provided in the right-hand corner of the Self Service page.
Chapter 6: Managing Work EventsADP Self Service Manager’s Guide

6-52 Transferring Employees
• Select Managing Work Events. The Managing Work Events page displays. Select the Transfer Employee(s) action option. Select the employee(s) you want to transfer by clicking the check box next to the employee's name, then click Submit.
Figure 6-36. Managing Work Events with Transfer Employee(s) Action Selected
In addition to a single action for a single employee, you can select multiple job actions
for a single employee or multiple employees for a single job action. For more information see, “Updating Multiple Job Actions for a Single Employee” on page 6-6 or “Updating Multiple Employees with a Single Job Action” on page 6-11.
Depending on your HR/payroll system of record, you may have to first select the Select one of more of the Employment Changes below option to enable the individual job action check boxes.
For a description of the fields on this page or for related tasks, click
the (Help icon) provided in the right-hand corner of the Self Service page.
Chapter 6: Managing Work EventsADP Self Service Manager’s Guide
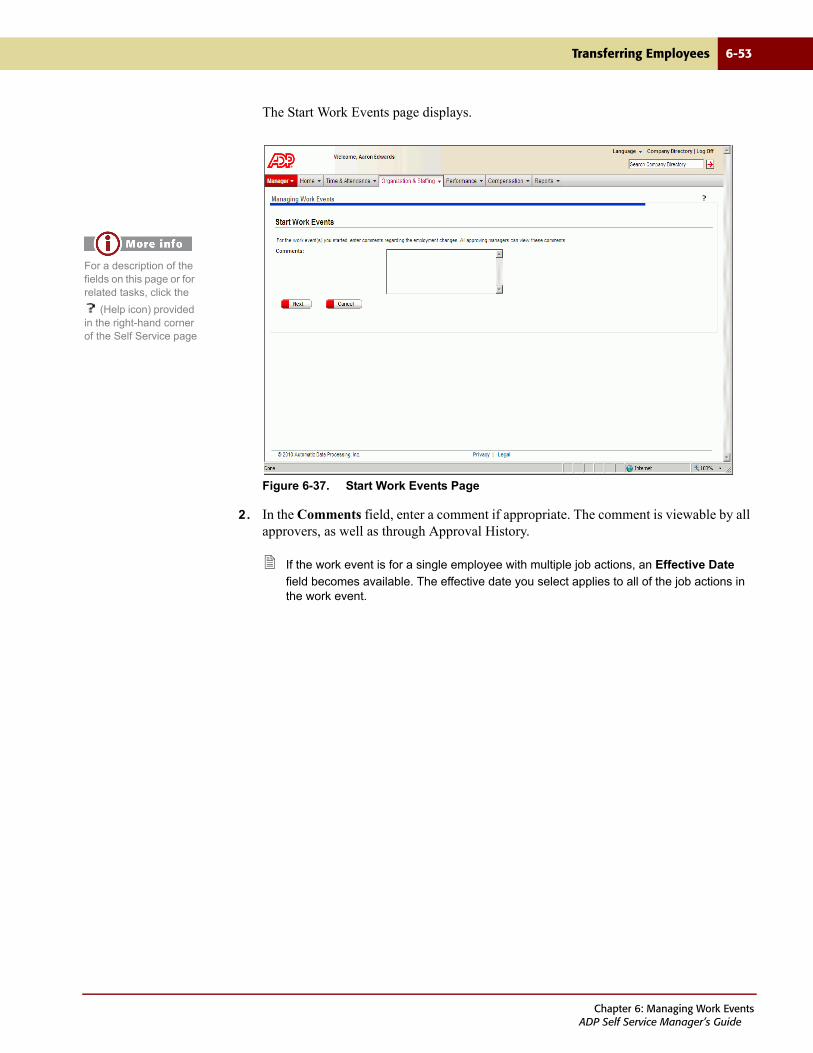
Transferring Employees 6-53
The Start Work Events page displays.
Figure 6-37. Start Work Events Page
2. In the Comments field, enter a comment if appropriate. The comment is viewable by all approvers, as well as through Approval History.
If the work event is for a single employee with multiple job actions, an Effective Date
field becomes available. The effective date you select applies to all of the job actions in the work event.
For a description of the fields on this page or for related tasks, click the
(Help icon) provided in the right-hand corner of the Self Service page
Chapter 6: Managing Work EventsADP Self Service Manager’s Guide
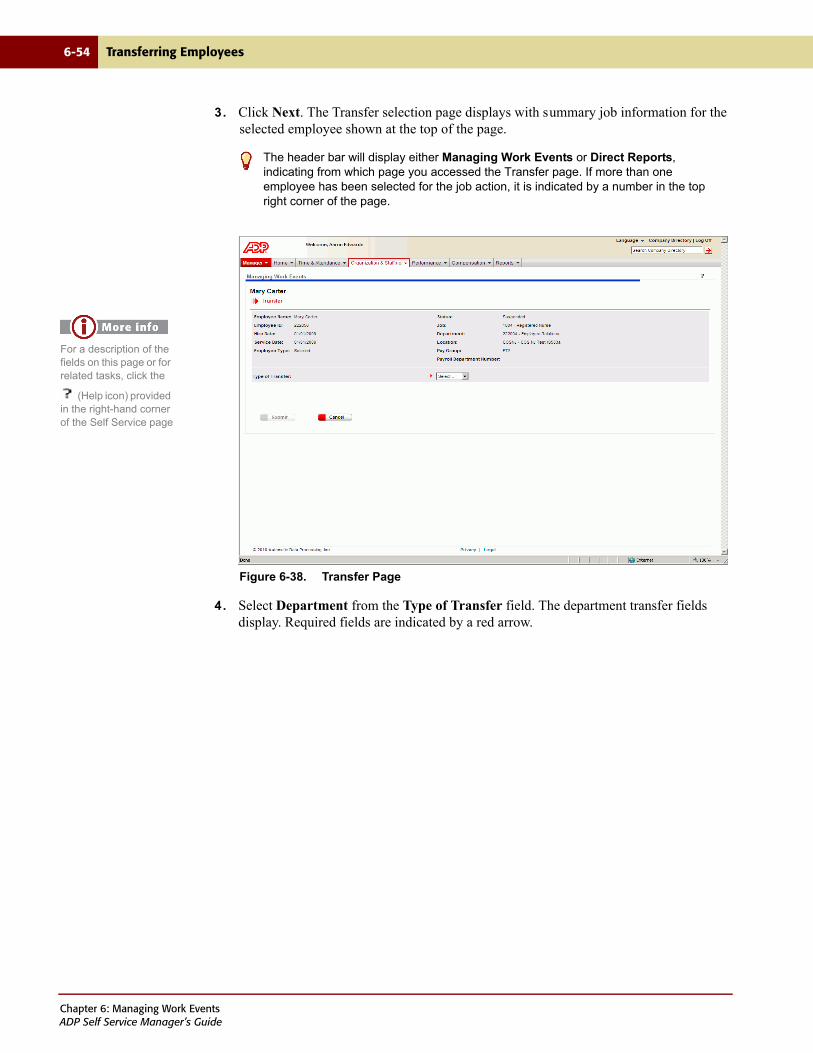
6-54 Transferring Employees
3. Click Next. The Transfer selection page displays with summary job information for the selected employee shown at the top of the page.
Figure 6-38. Transfer Page
4. Select Department from the Type of Transfer field. The department transfer fields display. Required fields are indicated by a red arrow.
The header bar will display either Managing Work Events or Direct Reports, indicating from which page you accessed the Transfer page. If more than one employee has been selected for the job action, it is indicated by a number in the top right corner of the page.
For a description of the fields on this page or for related tasks, click the
(Help icon) provided in the right-hand corner of the Self Service page
Chapter 6: Managing Work EventsADP Self Service Manager’s Guide
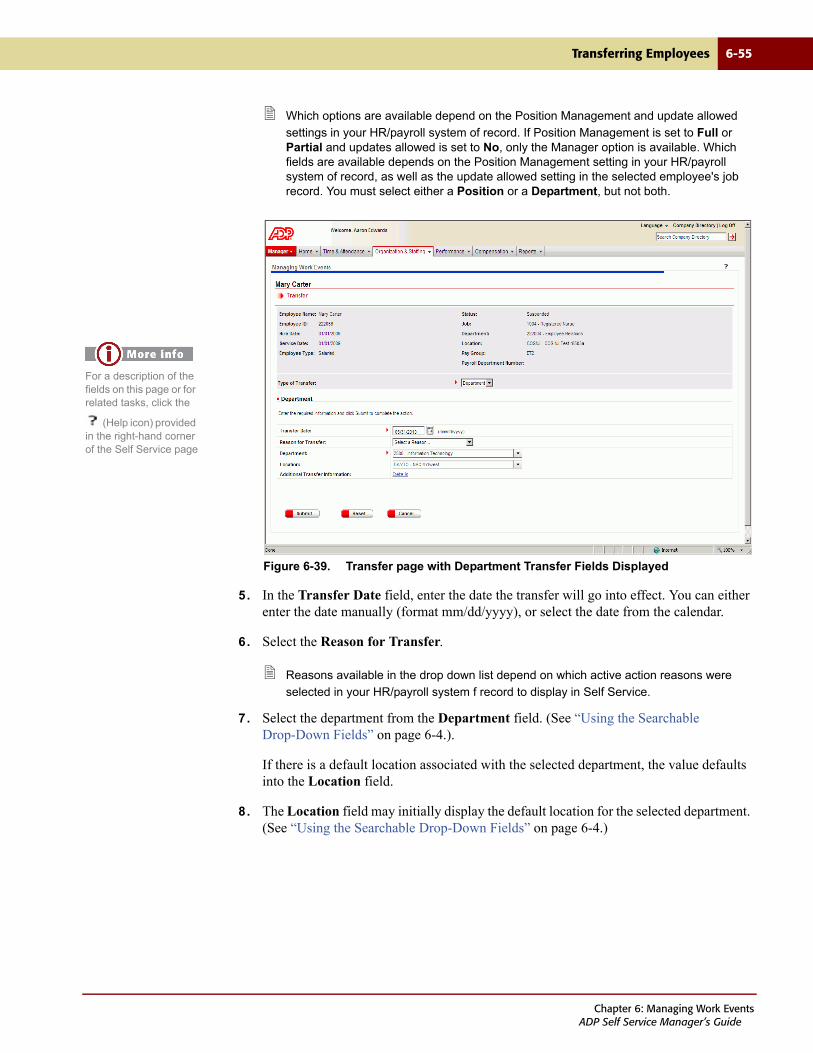
Transferring Employees 6-55
Which options are available depend on the Position Management and update allowed
settings in your HR/payroll system of record. If Position Management is set to Full or Partial and updates allowed is set to No, only the Manager option is available. Which fields are available depends on the Position Management setting in your HR/payroll system of record, as well as the update allowed setting in the selected employee's job record. You must select either a Position or a Department, but not both.
Figure 6-39. Transfer page with Department Transfer Fields Displayed
5. In the Transfer Date field, enter the date the transfer will go into effect. You can either enter the date manually (format mm/dd/yyyy), or select the date from the calendar.
6. Select the Reason for Transfer.
Reasons available in the drop down list depend on which active action reasons were
selected in your HR/payroll system f record to display in Self Service.
7. Select the department from the Department field. (See “Using the Searchable Drop-Down Fields” on page 6-4.).
If there is a default location associated with the selected department, the value defaults into the Location field.
8. The Location field may initially display the default location for the selected department. (See “Using the Searchable Drop-Down Fields” on page 6-4.)
For a description of the fields on this page or for related tasks, click the
(Help icon) provided in the right-hand corner of the Self Service page
Chapter 6: Managing Work EventsADP Self Service Manager’s Guide
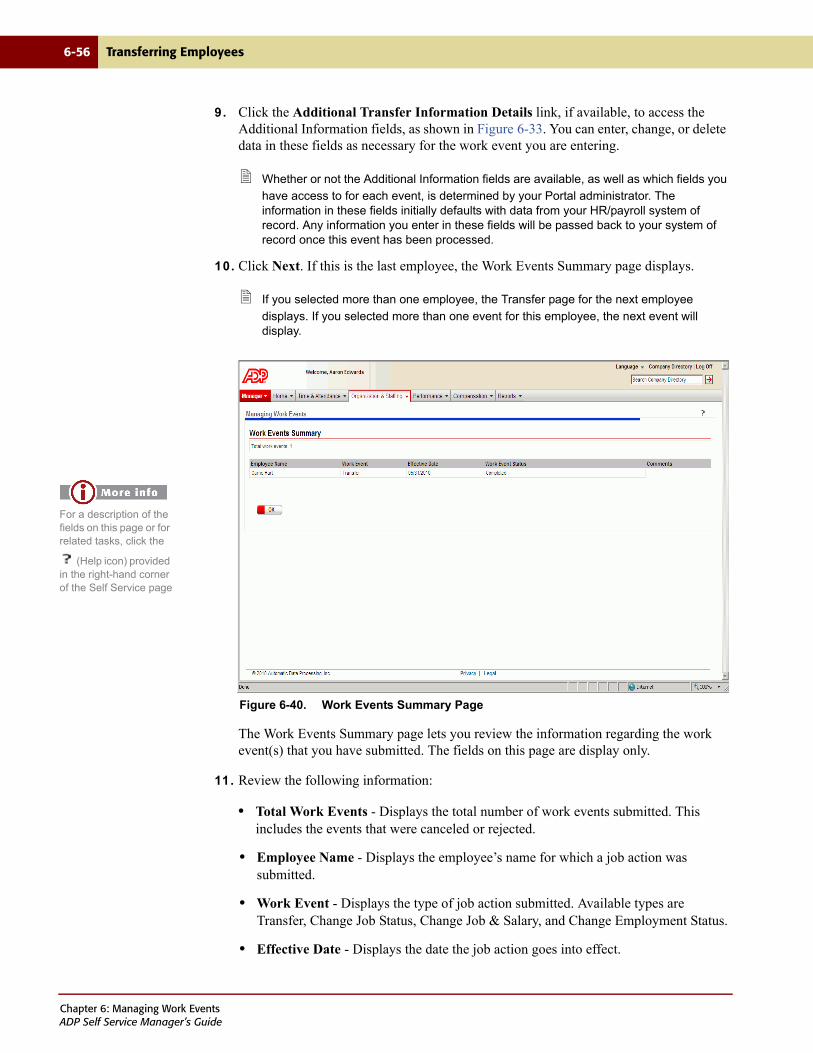
6-56 Transferring Employees
9. Click the Additional Transfer Information Details link, if available, to access the Additional Information fields, as shown in Figure 6-33. You can enter, change, or delete data in these fields as necessary for the work event you are entering.
Whether or not the Additional Information fields are available, as well as which fields you
have access to for each event, is determined by your Portal administrator. The information in these fields initially defaults with data from your HR/payroll system of record. Any information you enter in these fields will be passed back to your system of record once this event has been processed.
10. Click Next. If this is the last employee, the Work Events Summary page displays.
If you selected more than one employee, the Transfer page for the next employee
displays. If you selected more than one event for this employee, the next event will display.
Figure 6-40. Work Events Summary Page
The Work Events Summary page lets you review the information regarding the work event(s) that you have submitted. The fields on this page are display only.
11. Review the following information:
• Total Work Events - Displays the total number of work events submitted. This includes the events that were canceled or rejected.
• Employee Name - Displays the employee’s name for which a job action was submitted.
• Work Event - Displays the type of job action submitted. Available types are Transfer, Change Job Status, Change Job & Salary, and Change Employment Status.
• Effective Date - Displays the date the job action goes into effect.
For a description of the fields on this page or for related tasks, click the
(Help icon) provided in the right-hand corner of the Self Service page
Chapter 6: Managing Work EventsADP Self Service Manager’s Guide
Transferring Employees 6-57
• Work Event Status - Display the status of the work event.
• Comments - Displays comments you enter on the Start Work Events page.
12. When you have finished reviewing the information, click OK. You are returned to the page (Manager Work Events or Direct Reports) from which you accessed this page.
You have finished transferring an employee to a new department.
For information on transferring an employee to a new manager, see “Transferring an Employee to a New Manager” on page 6-45.
For information on transferring and employee to a new location, see “Transferring an Employee to a New Location” on page 6-58.
Chapter 6: Managing Work EventsADP Self Service Manager’s Guide

6-58 Transferring Employees
Transferring an Employee to a New Location
If you are transferring an employee to a new position, use the Change Job & Salary Information page (see “Changing an Employee’s Job and Salary Information” on page 6-71 for more information).
Managers can transfer employees through either the Direct Reports or Managing Work Events task. Indirect and direct reports can be accessed through Direct Reports. Only direct reports can be accessed through the Managing Work Events task.
If multiple job actions need to be performed on an employee, see “Updating Multiple Job
Actions for a Single Employee” on page 6-6. If multiple employees need a job action performed, see “Updating Multiple Employees with a Single Job Action” on page 6-11. The two procedures can only be done through the Managing Work Events task.
To transfer an employee to another location and submit for approval, do the following:
1. From the Organization & Staffing tab, choose one of the following paths:
• Select Direct Reports. The Direct Reports page displays. Click the underlined employee Name, then select Transfer Employee from the Employee Event selection menu.
Figure 6-41. Employee Event Selection Menu with Transfer Employee Selected
Transferring Employees
Transferring an Employee to a New Manager
Transferring an Employee to a New Department
Transferring an Employee to a New Location
For a description of the fields on this page or for related tasks, click
the (Help icon) provided in the right-hand corner of the Self Service page.
Chapter 6: Managing Work EventsADP Self Service Manager’s Guide
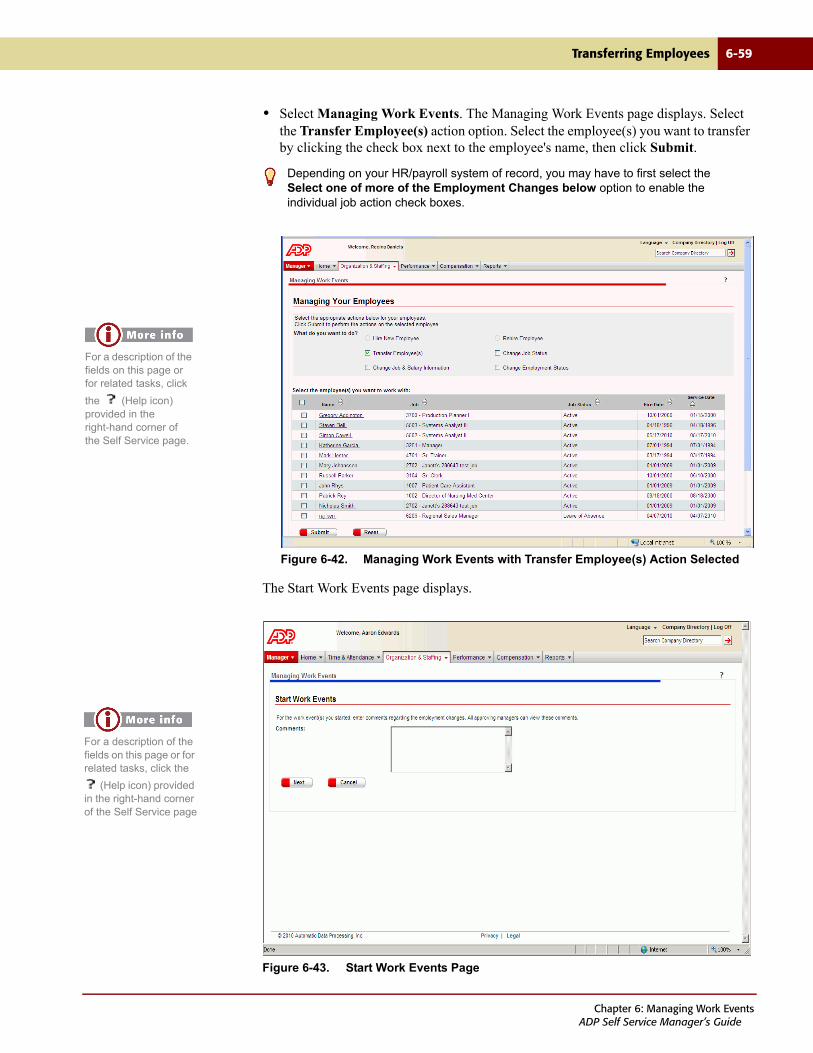
Transferring Employees 6-59
• Select Managing Work Events. The Managing Work Events page displays. Select the Transfer Employee(s) action option. Select the employee(s) you want to transfer by clicking the check box next to the employee's name, then click Submit.
Figure 6-42. Managing Work Events with Transfer Employee(s) Action Selected
The Start Work Events page displays.
Figure 6-43. Start Work Events Page
Depending on your HR/payroll system of record, you may have to first select the Select one of more of the Employment Changes below option to enable the individual job action check boxes.
For a description of the fields on this page or for related tasks, click
the (Help icon) provided in the right-hand corner of the Self Service page.
For a description of the fields on this page or for related tasks, click the
(Help icon) provided in the right-hand corner of the Self Service page
Chapter 6: Managing Work EventsADP Self Service Manager’s Guide
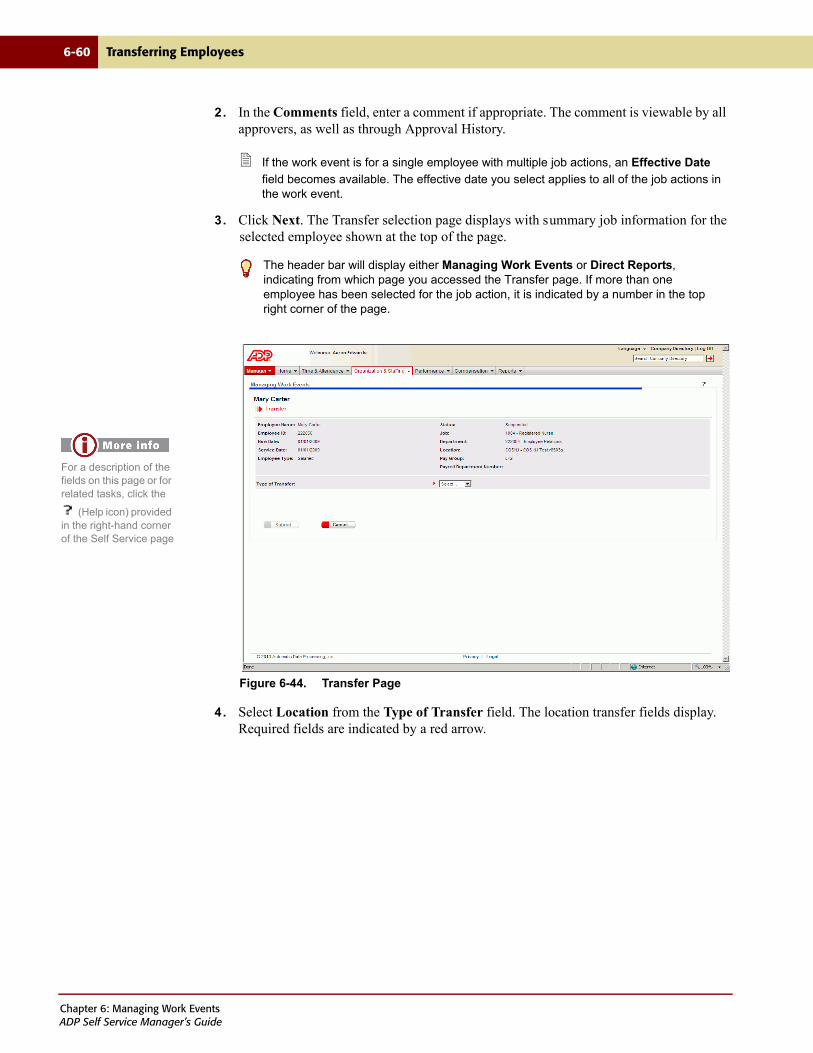
6-60 Transferring Employees
2. In the Comments field, enter a comment if appropriate. The comment is viewable by all approvers, as well as through Approval History.
If the work event is for a single employee with multiple job actions, an Effective Date
field becomes available. The effective date you select applies to all of the job actions in the work event.
3. Click Next. The Transfer selection page displays with summary job information for the selected employee shown at the top of the page.
Figure 6-44. Transfer Page
4. Select Location from the Type of Transfer field. The location transfer fields display. Required fields are indicated by a red arrow.
The header bar will display either Managing Work Events or Direct Reports, indicating from which page you accessed the Transfer page. If more than one employee has been selected for the job action, it is indicated by a number in the top right corner of the page.
For a description of the fields on this page or for related tasks, click the
(Help icon) provided in the right-hand corner of the Self Service page
Chapter 6: Managing Work EventsADP Self Service Manager’s Guide
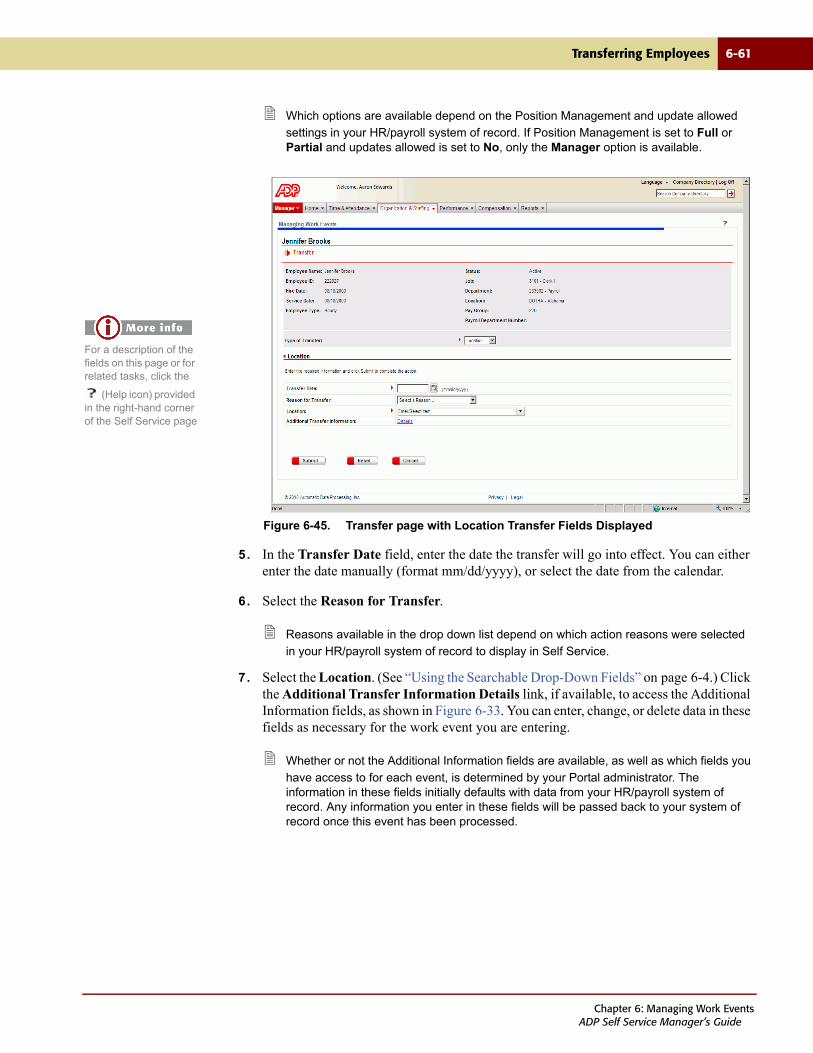
Transferring Employees 6-61
Which options are available depend on the Position Management and update allowed
settings in your HR/payroll system of record. If Position Management is set to Full or Partial and updates allowed is set to No, only the Manager option is available.
Figure 6-45. Transfer page with Location Transfer Fields Displayed
5. In the Transfer Date field, enter the date the transfer will go into effect. You can either enter the date manually (format mm/dd/yyyy), or select the date from the calendar.
6. Select the Reason for Transfer.
Reasons available in the drop down list depend on which action reasons were selected
in your HR/payroll system of record to display in Self Service.
7. Select the Location. (See “Using the Searchable Drop-Down Fields” on page 6-4.) Click the Additional Transfer Information Details link, if available, to access the Additional Information fields, as shown in Figure 6-33. You can enter, change, or delete data in these fields as necessary for the work event you are entering.
Whether or not the Additional Information fields are available, as well as which fields you
have access to for each event, is determined by your Portal administrator. The information in these fields initially defaults with data from your HR/payroll system of record. Any information you enter in these fields will be passed back to your system of record once this event has been processed.
For a description of the fields on this page or for related tasks, click the
(Help icon) provided in the right-hand corner of the Self Service page
Chapter 6: Managing Work EventsADP Self Service Manager’s Guide

6-62 Transferring Employees
8. Click Next. If this is the last employee, the Work Events Summary page displays.
If you selected more than one employee, the Transfer page for the next employee
displays. If you selected more than one event for this employee, the next event will display.
Figure 6-46. Work Events Summary Page
The Work Events Summary page lets you review the information regarding the work event(s) that you have submitted. The fields on this page are display only.
9. Review the following information:
• Total Work Events - Displays the total number of work events submitted. This includes the events that were canceled or rejected.
• Employee Name - Displays the employee’s name for which a job action was submitted.
• Work Event - Displays the type of job action submitted. Available types are Transfer, Change Job Status, Change Job & Salary, and Change Employment Status.
• Effective Date - Displays the date the job action goes into effect.
• Work Event Status - Display the status of the work event.
• Comments - Displays comments you enter on the Start Work Events page.
10. When you have finished reviewing the information, click OK. You are returned to the page (Manager Work Events or Direct Reports) from which you accessed this page.
For a description of the fields on this page or for related tasks, click the
(Help icon) provided in the right-hand corner of the Self Service page
Chapter 6: Managing Work EventsADP Self Service Manager’s Guide
Transferring Employees 6-63
You have finished transferring an employee to a new department.
For information on transferring an employee to a new manager, see “Transferring an Employee to a New Manager” on page 6-45.
For information on transferring and employee to a new department, see “Transferring an Employee to a New Department” on page 6-51.
Chapter 6: Managing Work EventsADP Self Service Manager’s Guide
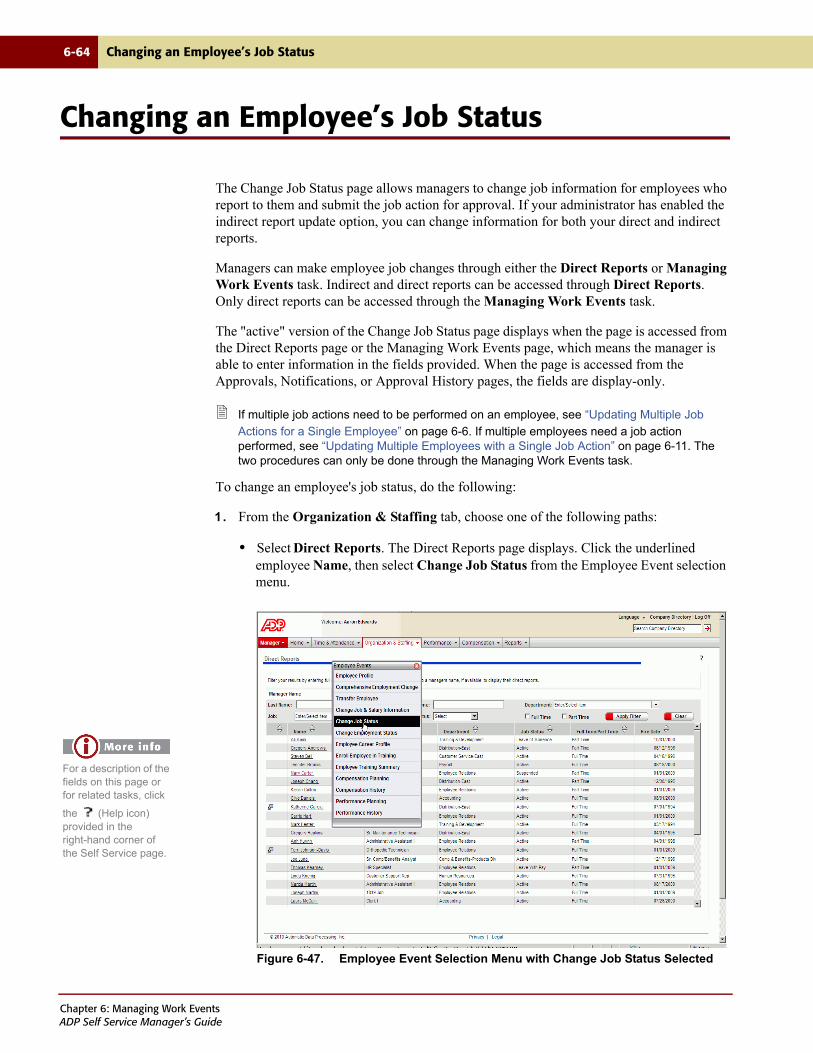
6-64 Changing an Employee’s Job Status
Changing an Employee’s Job Status
The Change Job Status page allows managers to change job information for employees who report to them and submit the job action for approval. If your administrator has enabled the indirect report update option, you can change information for both your direct and indirect reports.
Managers can make employee job changes through either the Direct Reports or Managing Work Events task. Indirect and direct reports can be accessed through Direct Reports. Only direct reports can be accessed through the Managing Work Events task.
The "active" version of the Change Job Status page displays when the page is accessed from the Direct Reports page or the Managing Work Events page, which means the manager is able to enter information in the fields provided. When the page is accessed from the Approvals, Notifications, or Approval History pages, the fields are display-only.
If multiple job actions need to be performed on an employee, see “Updating Multiple Job
Actions for a Single Employee” on page 6-6. If multiple employees need a job action performed, see “Updating Multiple Employees with a Single Job Action” on page 6-11. The two procedures can only be done through the Managing Work Events task.
To change an employee's job status, do the following:
1. From the Organization & Staffing tab, choose one of the following paths:
• Select Direct Reports. The Direct Reports page displays. Click the underlined employee Name, then select Change Job Status from the Employee Event selection menu.
Figure 6-47. Employee Event Selection Menu with Change Job Status Selected
For a description of the fields on this page or for related tasks, click
the (Help icon) provided in the right-hand corner of the Self Service page.
Chapter 6: Managing Work EventsADP Self Service Manager’s Guide
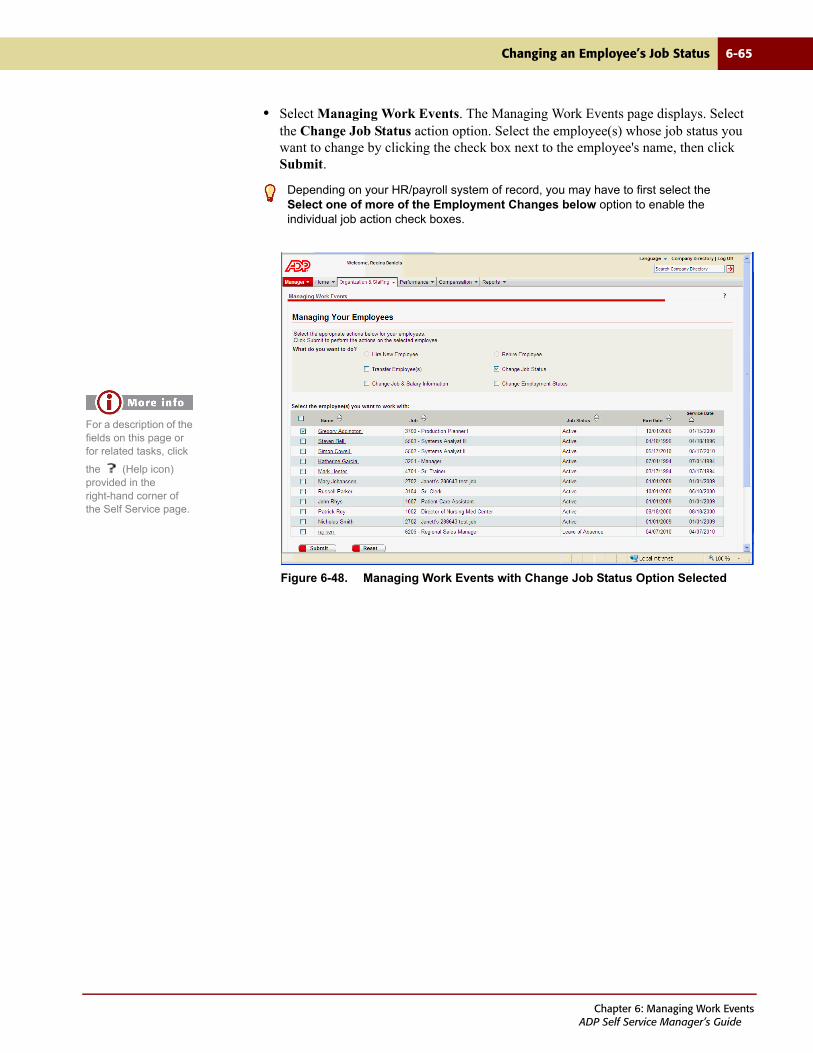
Changing an Employee’s Job Status 6-65
• Select Managing Work Events. The Managing Work Events page displays. Select the Change Job Status action option. Select the employee(s) whose job status you want to change by clicking the check box next to the employee's name, then click Submit.
Figure 6-48. Managing Work Events with Change Job Status Option Selected
Depending on your HR/payroll system of record, you may have to first select the Select one of more of the Employment Changes below option to enable the individual job action check boxes.
For a description of the fields on this page or for related tasks, click
the (Help icon) provided in the right-hand corner of the Self Service page.
Chapter 6: Managing Work EventsADP Self Service Manager’s Guide

6-66 Changing an Employee’s Job Status
The Start Work Events page displays.
Figure 6-49. Start Work Events Page
2. In the Comments field, enter a comment if appropriate. The comment is viewable by all approvers, as well as through Approval History.
If the work event is for a single employee with multiple job actions, an Effective Date
field becomes available. The effective date you select applies to all of the job actions in the work event.
For a description of the fields on this page or for related tasks, click the
(Help icon) provided in the right-hand corner of the Self Service page
Chapter 6: Managing Work EventsADP Self Service Manager’s Guide

Changing an Employee’s Job Status 6-67
3. Click Next. The Change Job Status page displays with summary job information for the selected employee shown at the top of the page.
Figure 6-50. Change Job Status Page
4. In the Effective Date field, enter the date the job status change will go into effect. You can either enter the date manually (format mm/dd/yyyy), or select the date from the calendar.
5. Select the Reason for the job status change.
Reasons available in the drop down list depend on which active action reasons were
selected in your HR/payroll system of record to display in Self Service.
6. The Regular/Temporary field initially displays the selected employee's current information. To change the employee's regular/temporary job status, select the appropriate option.
If the employee's job record in your HR/payroll system of record indicates that no
updates are allowed, these options are display only, and cannot be changed.
7. The Full/Part Time field initially displays the selected employee's current information. To change the employee's full/part time job status, select the appropriate option.
If the employee's job record in your HR/payroll system of record indicates that no
updates are allowed, these options are display only, and cannot be changed.
The header bar will display either Managing Work Events or Direct Reports, indicating from which page you accessed the Change Job Status page. If more than one employee has been selected for the job action, it is indicated by a number in the top right corner of the page.
For a description of the fields on this page or for related tasks, click the
(Help icon) provided in the right-hand corner of the Self Service page
Chapter 6: Managing Work EventsADP Self Service Manager’s Guide
6-68 Changing an Employee’s Job Status
8. The Shift field initially displays the selected employee's current shift information, if any. To change the employee's shift information, select the shift code and description from the drop down list.
If the employee's job record in your HR/payroll system of record indicates that no
updates are allowed, the shift field is display only, and cannot be changed.
9. The Standard Hours field initially displays the selected employee's standard hours. To change the employee's standard hours, enter the appropriate numeric value.
If the employee's job record in your HR/payroll system of record indicates that no
updates are allowed, the standard hours is display only, and cannot be changed.
10. The Employee Classification field initially displays the selected employee's current classification. To change the employee's classification, select the classification code and description from the drop down list.
11. The Security Clearance field initially displays the selected employee's current security clearance level. To change the employee's security clearance, select the security code and description from the drop down list.
12. The Full Time Student field initially displays the selected employee's current status. To change the employee's full time student status, select the appropriate option.
13. Click the Additional Job Status Information Details link, if available, to access the Additional Information fields. You can enter, change, or delete data in these fields as necessary for the work event you are entering.
Chapter 6: Managing Work EventsADP Self Service Manager’s Guide
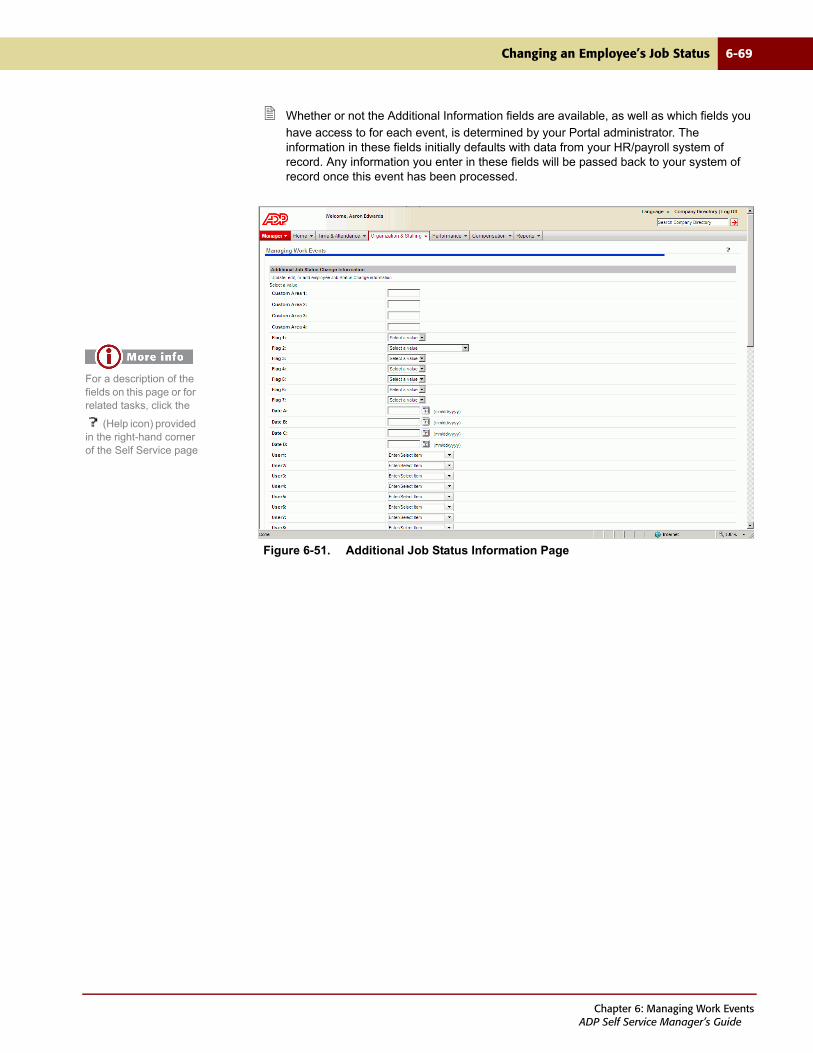
Changing an Employee’s Job Status 6-69
Whether or not the Additional Information fields are available, as well as which fields you
have access to for each event, is determined by your Portal administrator. The information in these fields initially defaults with data from your HR/payroll system of record. Any information you enter in these fields will be passed back to your system of record once this event has been processed.
Figure 6-51. Additional Job Status Information Page
For a description of the fields on this page or for related tasks, click the
(Help icon) provided in the right-hand corner of the Self Service page
Chapter 6: Managing Work EventsADP Self Service Manager’s Guide
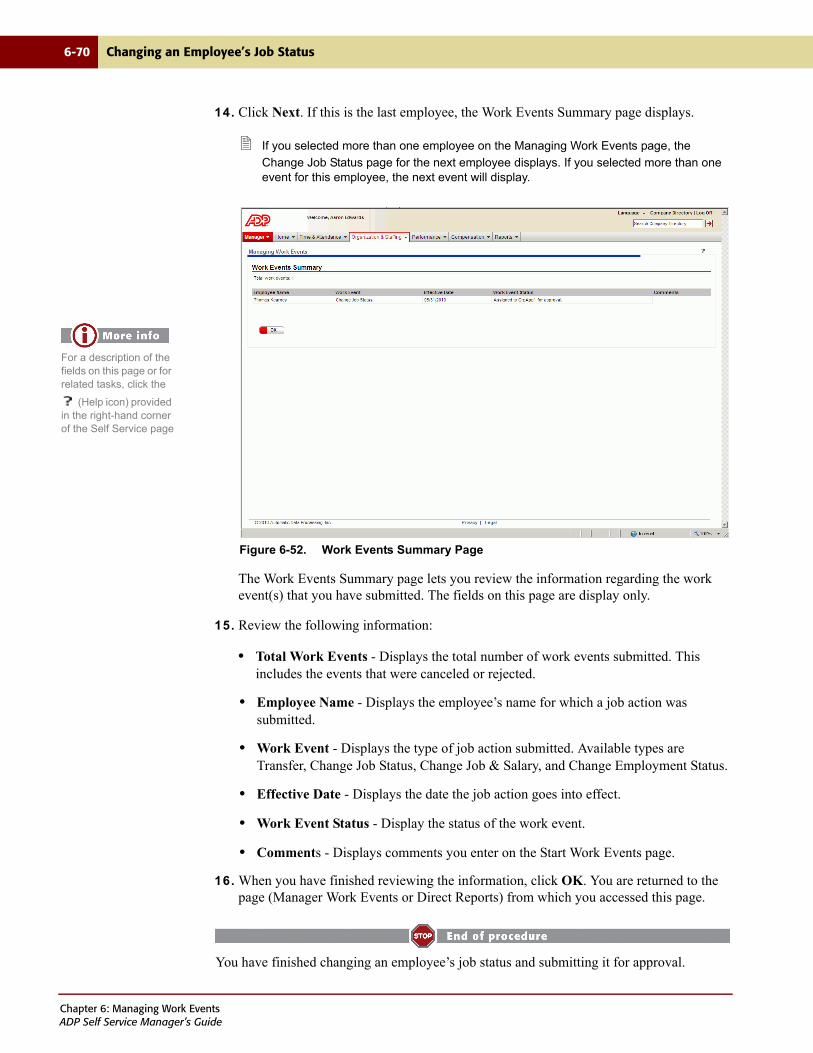
6-70 Changing an Employee’s Job Status
14. Click Next. If this is the last employee, the Work Events Summary page displays.
If you selected more than one employee on the Managing Work Events page, the
Change Job Status page for the next employee displays. If you selected more than one event for this employee, the next event will display.
Figure 6-52. Work Events Summary Page
The Work Events Summary page lets you review the information regarding the work event(s) that you have submitted. The fields on this page are display only.
15. Review the following information:
• Total Work Events - Displays the total number of work events submitted. This includes the events that were canceled or rejected.
• Employee Name - Displays the employee’s name for which a job action was submitted.
• Work Event - Displays the type of job action submitted. Available types are Transfer, Change Job Status, Change Job & Salary, and Change Employment Status.
• Effective Date - Displays the date the job action goes into effect.
• Work Event Status - Display the status of the work event.
• Comments - Displays comments you enter on the Start Work Events page.
16. When you have finished reviewing the information, click OK. You are returned to the page (Manager Work Events or Direct Reports) from which you accessed this page.
You have finished changing an employee’s job status and submitting it for approval.
For a description of the fields on this page or for related tasks, click the
(Help icon) provided in the right-hand corner of the Self Service page
Chapter 6: Managing Work EventsADP Self Service Manager’s Guide
Changing an Employee’s Job and Salary Information 6-71
Changing an Employee’s Job and Salary Information
The Change Job & Salary Information page allows managers to change job and/or salary information for employees who report to them. If your administrator has enabled the indirect report update option, you can change information for both your direct and indirect reports.
Actions available are promotion, demotion, lateral change, and salary change. Managers can perform additional salary changes for all of these options, with the exception of the lateral change. Select the Change Job & Salary Info type to display the corresponding detail fields.
Managers can make job and/or salary changes through either the Direct Reports or Managing Work Events task. Indirect and direct reports can be accessed through Direct Reports. Only direct reports can be accessed through the Managing Work Events task.
The "active" version of the Change Job & Salary page displays when the page is accessed from the Direct Reports page or the Managing Work Events page, which means the manager is able to enter information in the fields provided. Note that required fields are indicated on the page by red arrows. When the page is accessed from the Approvals, Notifications, or Approval History pages, the fields are display-only.
If multiple job actions need to be performed on an employee, see “Updating Multiple Job
Actions for a Single Employee” on page 6-6. If multiple employees need a job action performed, see “Updating Multiple Employees with a Single Job Action” on page 6-11. The two procedures can only be done through the Managing Work Events task.
Changing an employee’s job and salary information can consists of the following tasks:
• Promoting an Employee
• Demoting an Employee
• Performing a Lateral Job Change
• Changing an Employee’s Salary
Some of the transfer pages include searchable drop-down fields. For more information, see “Using the Searchable Drop-Down Fields” on page 6-4. In addition, if your HR/payroll system of record is ADP Enterprise HR or HR Anytime Version 5.03, the Direct Reports and the Work Events Summary pages include search fields at the top of the page that allow you to filter your employee list. For more information, see “Using Search Fields to Filter Results” on page 6-3.
Chapter 6: Managing Work EventsADP Self Service Manager’s Guide
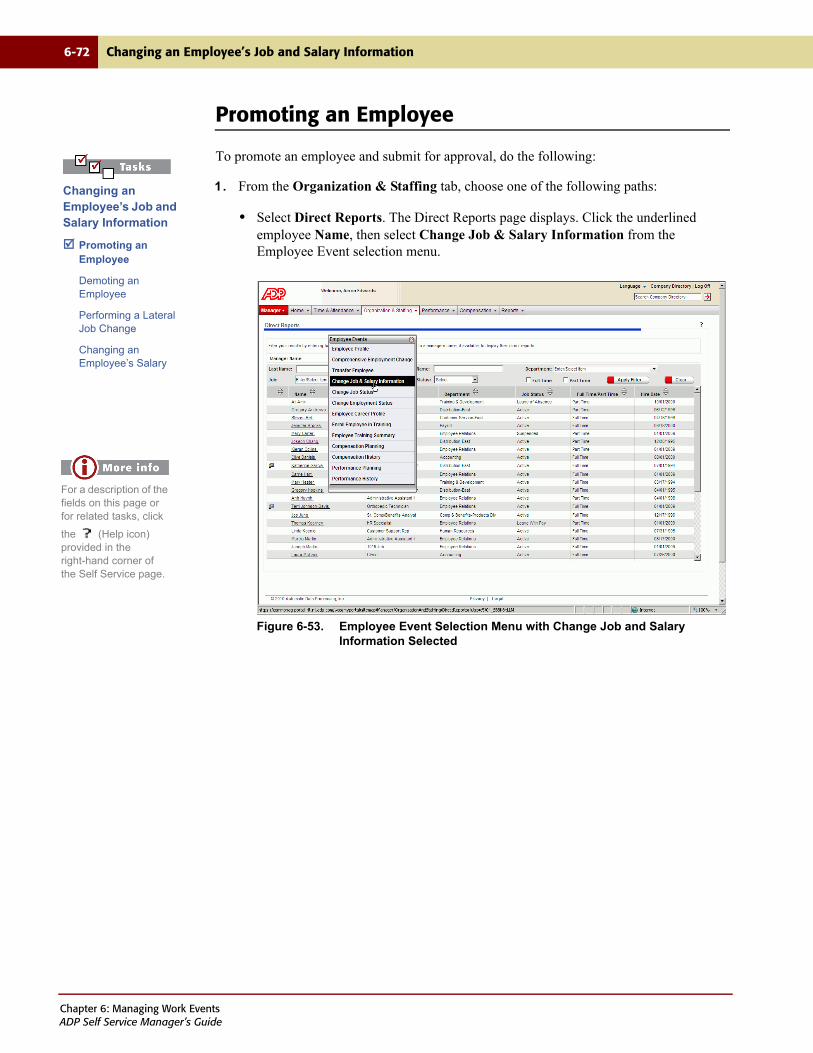
6-72 Changing an Employee’s Job and Salary Information
Promoting an Employee
To promote an employee and submit for approval, do the following:
1. From the Organization & Staffing tab, choose one of the following paths:
• Select Direct Reports. The Direct Reports page displays. Click the underlined employee Name, then select Change Job & Salary Information from the Employee Event selection menu.
Figure 6-53. Employee Event Selection Menu with Change Job and Salary Information Selected
Changing an Employee’s Job and Salary Information
Promoting an Employee
Demoting an Employee
Performing a Lateral Job Change
Changing an Employee’s Salary
For a description of the fields on this page or for related tasks, click
the (Help icon) provided in the right-hand corner of the Self Service page.
Chapter 6: Managing Work EventsADP Self Service Manager’s Guide
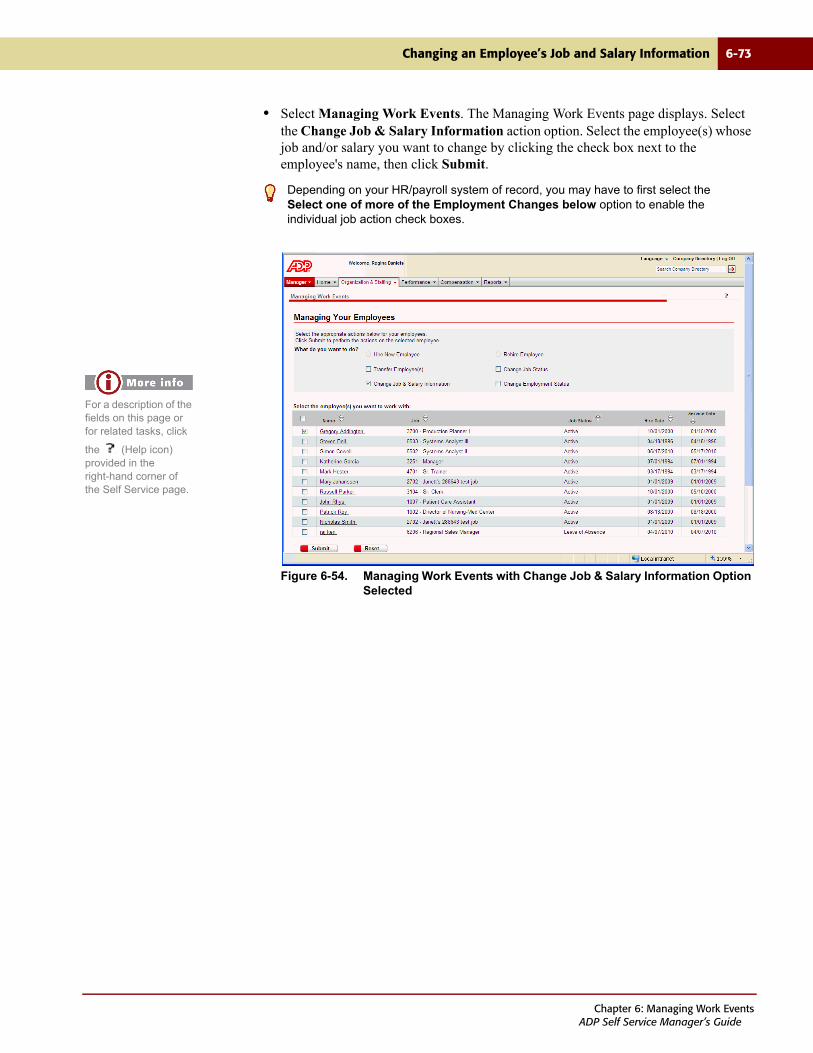
Changing an Employee’s Job and Salary Information 6-73
• Select Managing Work Events. The Managing Work Events page displays. Select the Change Job & Salary Information action option. Select the employee(s) whose job and/or salary you want to change by clicking the check box next to the employee's name, then click Submit.
Figure 6-54. Managing Work Events with Change Job & Salary Information Option Selected
Depending on your HR/payroll system of record, you may have to first select the Select one of more of the Employment Changes below option to enable the individual job action check boxes.
For a description of the fields on this page or for related tasks, click
the (Help icon) provided in the right-hand corner of the Self Service page.
Chapter 6: Managing Work EventsADP Self Service Manager’s Guide

6-74 Changing an Employee’s Job and Salary Information
The Start Work Events page displays.
Figure 6-55. Start Work Events Page
2. In the Comments field, enter a comment if appropriate. The comment is viewable by all approvers, as well as through Approval History.
If the work event is for a single employee with multiple job actions, an Effective Date
field becomes available. The effective date you select applies to all of the job actions in the work event.
For a description of the fields on this page or for related tasks, click the
(Help icon) provided in the right-hand corner of the Self Service page
Chapter 6: Managing Work EventsADP Self Service Manager’s Guide

Changing an Employee’s Job and Salary Information 6-75
3. Click Next. The Change Job & Salary Information selection page displays with summary job and salary information for the selected employee.
Figure 6-56. Change Job & Salary Information Page
The header bar will display either Managing Work Events or Direct Reports, indicating from which page you accessed the Change Job & Salary Information page. If more than one employee has been selected for the job action, it is indicated by a number in the top right corner of the page.
For a description of the fields on this page or for related tasks, click the
(Help icon) provided in the right-hand corner of the Self Service page
Chapter 6: Managing Work EventsADP Self Service Manager’s Guide
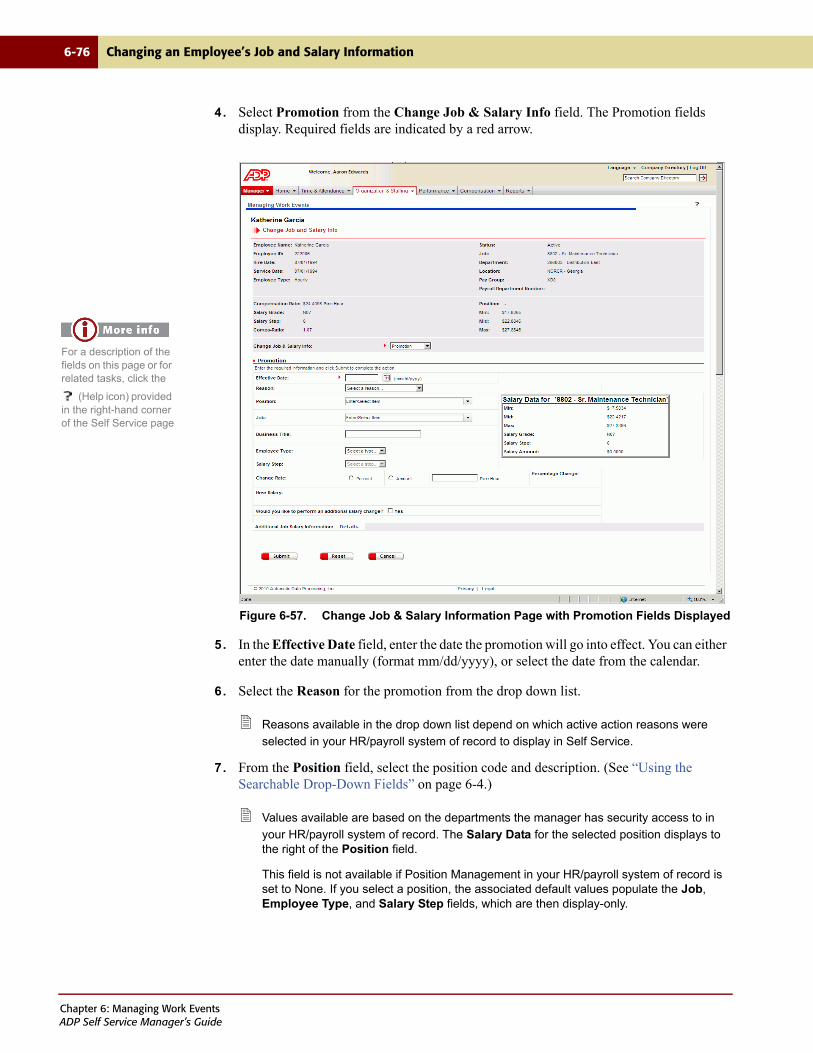
6-76 Changing an Employee’s Job and Salary Information
4. Select Promotion from the Change Job & Salary Info field. The Promotion fields display. Required fields are indicated by a red arrow.
Figure 6-57. Change Job & Salary Information Page with Promotion Fields Displayed
5. In the Effective Date field, enter the date the promotion will go into effect. You can either enter the date manually (format mm/dd/yyyy), or select the date from the calendar.
6. Select the Reason for the promotion from the drop down list.
Reasons available in the drop down list depend on which active action reasons were
selected in your HR/payroll system of record to display in Self Service.
7. From the Position field, select the position code and description. (See “Using the Searchable Drop-Down Fields” on page 6-4.)
Values available are based on the departments the manager has security access to in
your HR/payroll system of record. The Salary Data for the selected position displays to the right of the Position field.
This field is not available if Position Management in your HR/payroll system of record is set to None. If you select a position, the associated default values populate the Job, Employee Type, and Salary Step fields, which are then display-only.
For a description of the fields on this page or for related tasks, click the
(Help icon) provided in the right-hand corner of the Self Service page
Chapter 6: Managing Work EventsADP Self Service Manager’s Guide

Changing an Employee’s Job and Salary Information 6-77
8. From the Job field, select the job code and description. (See “Using the Searchable Drop-Down Fields” on page 6-4.)
The Salary Data for the selected job displays to the right of the Job field.
The Job field is display-only if a position was selected from the Position field. If you have not selected a position, you can select a job from the Job field. The Position field is then disabled, and the Salary Step field is populated with the default value, if any, and is display-only.
9. The Business Title field initially displays the employee's current business title, if available. Enter the employee's business title as needed. Maximum field length is 50 characters.
10. From the Employee Type field, select the employee type and description from the drop down list. The drop down list is populated with the employee types and descriptions defined in your HR/payroll system of record for the employee's pay group.
This field is display-only if the update allowed setting in the selected employee's job
record is set to No.
11. Select the Salary Step, if available, from the drop down list.
This field's availability depends on the compensation type and multi-step settings in your
HR/payroll system of record. Values may be defaulted into the field, and the field disabled.
12. Select the Change Rate option, either Percent or Amount, and enter the percent or amount of the pay change, positive or negative. The Per field displays Year or Hour, depending on the position or job selected. The new salary is displayed in the New Salary field.
Your administrator may have configured the Change Rate field to only have one option,
Percent or Amount available.
The Percentage Change/Amount Change field label changes depending on which Change Rate option is selected. Negative values are displayed in red.
Chapter 6: Managing Work EventsADP Self Service Manager’s Guide

6-78 Changing an Employee’s Job and Salary Information
13. Click the Additional Job & Salary Information Details link, if available, to access the Additional Information fields. You can enter, change, or delete data in these fields as necessary for the work event you are entering.
Whether or not the Additional Information fields are available, as well as which fields you
have access to for each event, is determined by your Portal administrator. The information in these fields initially defaults with data from your HR/payroll system of record. Any information you enter in these fields will be passed back to system of record once this event has been processed.
Figure 6-58. Additional Job & Salary Information Page
14. To perform an additional salary change, select Yes in the Would you like to perform an additional salary change? field. The Salary Change fields display.
Figure 6-59. Salary Change fields
For a description of the fields on this page or for related tasks, click the
(Help icon) provided in the right-hand corner of the Self Service page
Chapter 6: Managing Work EventsADP Self Service Manager’s Guide
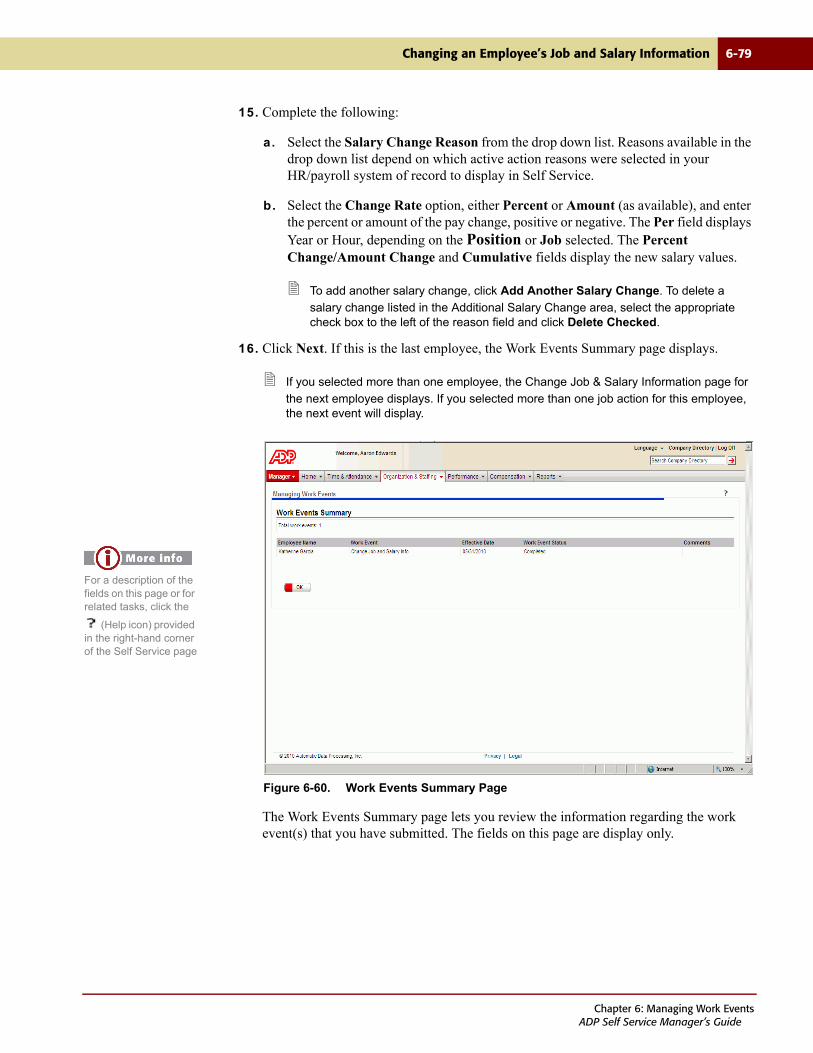
Changing an Employee’s Job and Salary Information 6-79
15. Complete the following:
a. Select the Salary Change Reason from the drop down list. Reasons available in the drop down list depend on which active action reasons were selected in your HR/payroll system of record to display in Self Service.
b. Select the Change Rate option, either Percent or Amount (as available), and enter the percent or amount of the pay change, positive or negative. The Per field displays Year or Hour, depending on the Position or Job selected. The Percent Change/Amount Change and Cumulative fields display the new salary values.
To add another salary change, click Add Another Salary Change. To delete a
salary change listed in the Additional Salary Change area, select the appropriate check box to the left of the reason field and click Delete Checked.
16. Click Next. If this is the last employee, the Work Events Summary page displays.
If you selected more than one employee, the Change Job & Salary Information page for
the next employee displays. If you selected more than one job action for this employee, the next event will display.
Figure 6-60. Work Events Summary Page
The Work Events Summary page lets you review the information regarding the work event(s) that you have submitted. The fields on this page are display only.
For a description of the fields on this page or for related tasks, click the
(Help icon) provided in the right-hand corner of the Self Service page
Chapter 6: Managing Work EventsADP Self Service Manager’s Guide

6-80 Changing an Employee’s Job and Salary Information
17. Review the following information:
• Total Work Events - Displays the total number of work events submitted. This includes the events that were canceled or rejected.
• Employee Name - Displays the employee’s name for which a job action was submitted.
• Work Event - Displays the type of job action submitted. Available types are Transfer, Change Job Status, Change Job & Salary, and Change Employment Status.
• Effective Date - Displays the date the job action goes into effect.
• Work Event Status - Display the status of the work event.
• Comments - Displays comments you enter on the Start Work Events page.
18. When you have finished reviewing the information, click OK. You are returned to the page (Manager Work Events or Direct Reports) from which you accessed this page.
You have completed initiating a promotion for an employee and submitting it for approval.
For information on demoting an employee, see “Demoting an Employee” on page 6-81.
For information on initiating a lateral job change for an employee, see “Performing a Lateral Job Change” on page 6-89.
For information on changing an employee’s salary, see “Changing an Employee’s Salary” on page 6-96.
Chapter 6: Managing Work EventsADP Self Service Manager’s Guide
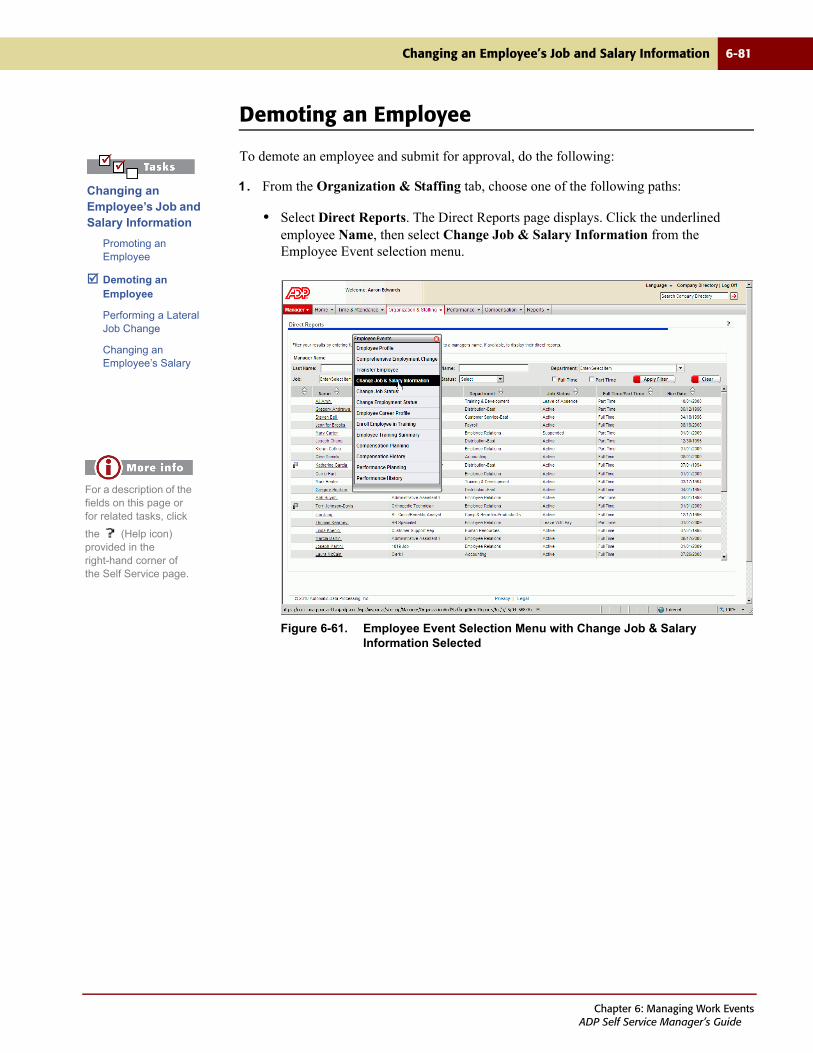
Changing an Employee’s Job and Salary Information 6-81
Demoting an Employee
To demote an employee and submit for approval, do the following:
1. From the Organization & Staffing tab, choose one of the following paths:
• Select Direct Reports. The Direct Reports page displays. Click the underlined employee Name, then select Change Job & Salary Information from the Employee Event selection menu.
Figure 6-61. Employee Event Selection Menu with Change Job & Salary Information Selected
Changing an Employee’s Job and Salary Information
Promoting an Employee
Demoting an Employee
Performing a Lateral Job Change
Changing an Employee’s Salary
For a description of the fields on this page or for related tasks, click
the (Help icon) provided in the right-hand corner of the Self Service page.
Chapter 6: Managing Work EventsADP Self Service Manager’s Guide
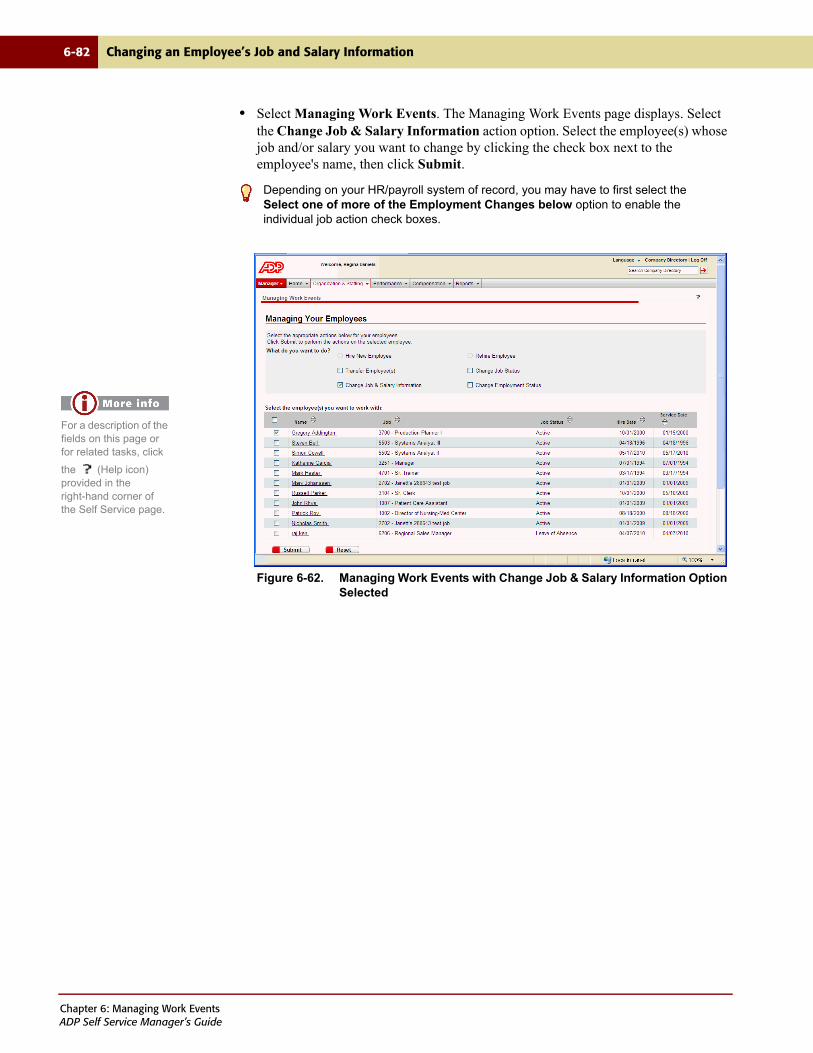
6-82 Changing an Employee’s Job and Salary Information
• Select Managing Work Events. The Managing Work Events page displays. Select the Change Job & Salary Information action option. Select the employee(s) whose job and/or salary you want to change by clicking the check box next to the employee's name, then click Submit.
Figure 6-62. Managing Work Events with Change Job & Salary Information Option Selected
Depending on your HR/payroll system of record, you may have to first select the Select one of more of the Employment Changes below option to enable the individual job action check boxes.
For a description of the fields on this page or for related tasks, click
the (Help icon) provided in the right-hand corner of the Self Service page.
Chapter 6: Managing Work EventsADP Self Service Manager’s Guide

Changing an Employee’s Job and Salary Information 6-83
The Start Work Events page displays.
Figure 6-63. Start Work Events Page
2. In the Comments field, enter a comment if appropriate. The comment is viewable by all approvers, as well as through Approval History.
If the work event is for a single employee with multiple job actions, an Effective Date
field becomes available. The effective date you select applies to all of the job actions in the work event.
For a description of the fields on this page or for related tasks, click the
(Help icon) provided in the right-hand corner of the Self Service page
Chapter 6: Managing Work EventsADP Self Service Manager’s Guide
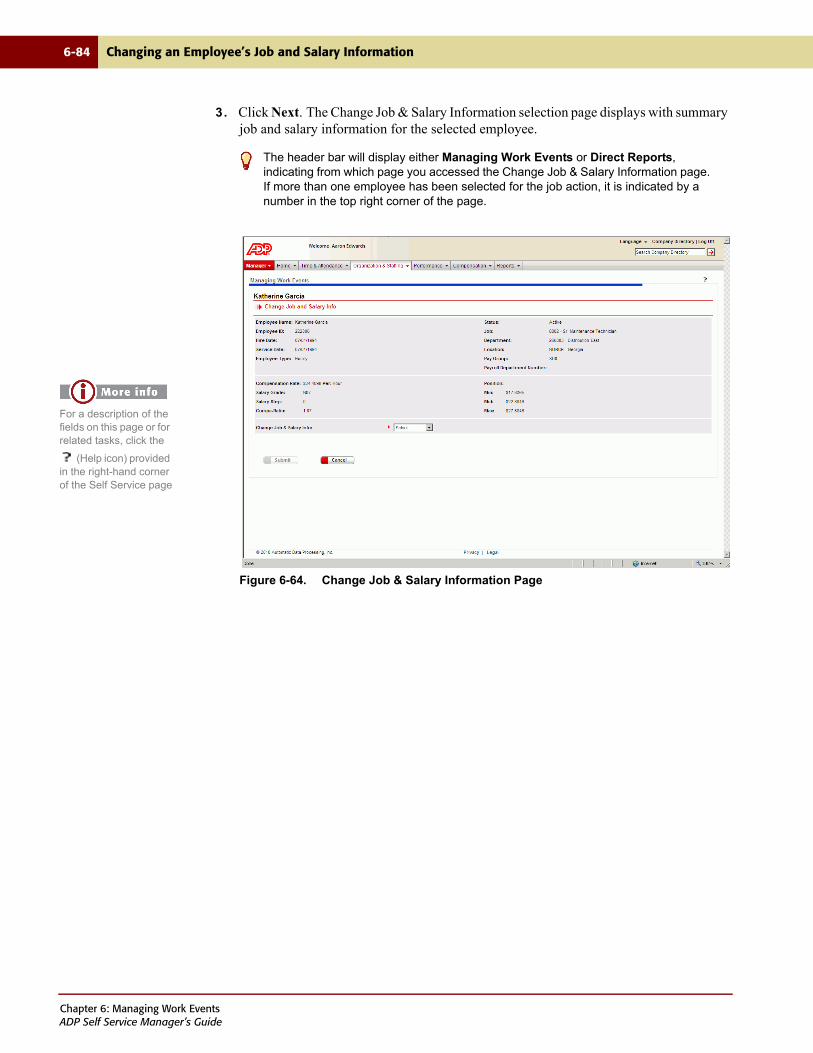
6-84 Changing an Employee’s Job and Salary Information
3. Click Next. The Change Job & Salary Information selection page displays with summary job and salary information for the selected employee.
Figure 6-64. Change Job & Salary Information Page
The header bar will display either Managing Work Events or Direct Reports, indicating from which page you accessed the Change Job & Salary Information page. If more than one employee has been selected for the job action, it is indicated by a number in the top right corner of the page.
For a description of the fields on this page or for related tasks, click the
(Help icon) provided in the right-hand corner of the Self Service page
Chapter 6: Managing Work EventsADP Self Service Manager’s Guide
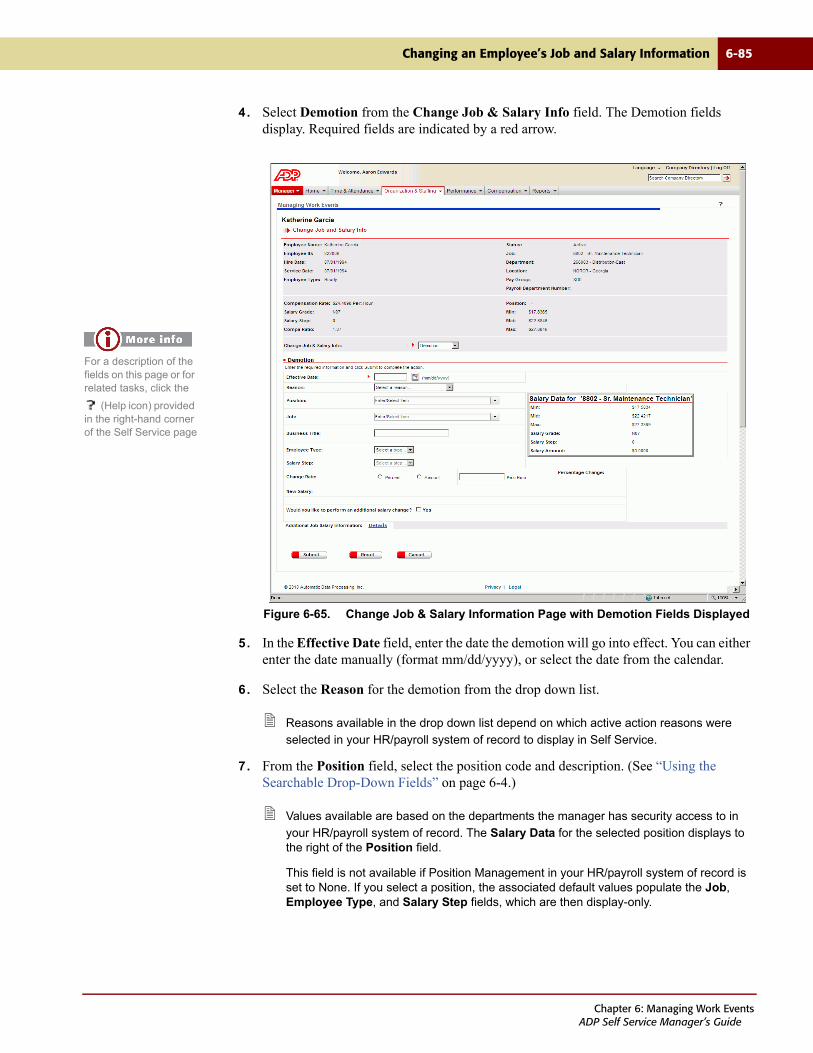
Changing an Employee’s Job and Salary Information 6-85
4. Select Demotion from the Change Job & Salary Info field. The Demotion fields display. Required fields are indicated by a red arrow.
Figure 6-65. Change Job & Salary Information Page with Demotion Fields Displayed
5. In the Effective Date field, enter the date the demotion will go into effect. You can either enter the date manually (format mm/dd/yyyy), or select the date from the calendar.
6. Select the Reason for the demotion from the drop down list.
Reasons available in the drop down list depend on which active action reasons were
selected in your HR/payroll system of record to display in Self Service.
7. From the Position field, select the position code and description. (See “Using the Searchable Drop-Down Fields” on page 6-4.)
Values available are based on the departments the manager has security access to in
your HR/payroll system of record. The Salary Data for the selected position displays to the right of the Position field.
This field is not available if Position Management in your HR/payroll system of record is set to None. If you select a position, the associated default values populate the Job, Employee Type, and Salary Step fields, which are then display-only.
For a description of the fields on this page or for related tasks, click the
(Help icon) provided in the right-hand corner of the Self Service page
Chapter 6: Managing Work EventsADP Self Service Manager’s Guide
6-86 Changing an Employee’s Job and Salary Information
8. From the Job field, select the job code and description. (See “Using the Searchable Drop-Down Fields” on page 6-4.)
The Salary Data for the selected job displays to the right of the Job field.
The Job field is display-only if a position was selected from the Position field. If you have not selected a position, you can select a job from the Job field. The Position field is then disabled, and the Salary Step field is populated with the default value, if any, and is display-only.
9. The Business Title field initially displays the employee's current business title, if available. Enter the employee's business title as needed. Maximum field length is 50 characters.
10. From the Employee Type field, select the employee type and description from the drop down list. The drop down list is populated with the employee types and descriptions defined in HR/payroll system of record for the employee's pay group.
This field is display-only if the update allowed setting in the selected employee's job
record is set to No.
11. Select the Salary Step, if available, from the drop down list.
This field's availability depends on the compensation type and multi-step settings in
HR/payroll system of record. Values may be defaulted into the field, and the field disabled.
12. Select the Change Rate option, either Percent or Amount and enter the percent or amount of the pay change, positive or negative. The Per field displays Year or Hour, depending on the position or job selected. The new salary is displayed in the New Salary field.
Your administrator may have configured the Change Rate field to only have one option,
Percent or Amount available.
The Percentage Change/Amount Change field label changes depending on which Change Rate option is selected. Negative values are displayed in red.
13. Click the Additional Job & Salary Information Details link, if available, to access the Additional Information fields, as shown in Figure 6-58. You can enter, change, or delete data in these fields as necessary for the work event you are entering.
Whether or not the Additional Information fields are available, as well as which fields you
have access to for each event, is determined by your Portal administrator. The information in these fields initially defaults with data from your HR/payroll system of record. Any information you enter in these fields will be passed back to your system of record once this event has been processed.
14. To perform an additional salary change, select Yes in the Would you like to perform an additional salary change? field. The Salary Change fields display, as shown in Figure 6-59.
Chapter 6: Managing Work EventsADP Self Service Manager’s Guide
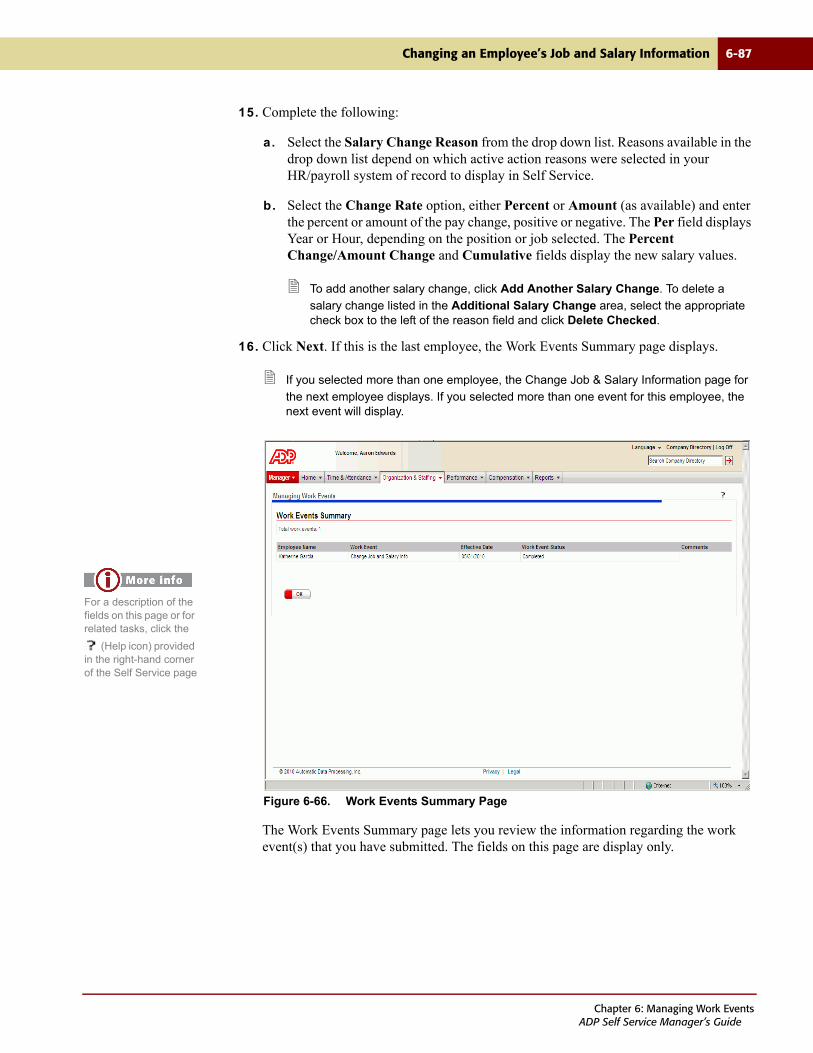
Changing an Employee’s Job and Salary Information 6-87
15. Complete the following:
a. Select the Salary Change Reason from the drop down list. Reasons available in the drop down list depend on which active action reasons were selected in your HR/payroll system of record to display in Self Service.
b. Select the Change Rate option, either Percent or Amount (as available) and enter the percent or amount of the pay change, positive or negative. The Per field displays Year or Hour, depending on the position or job selected. The Percent Change/Amount Change and Cumulative fields display the new salary values.
To add another salary change, click Add Another Salary Change. To delete a
salary change listed in the Additional Salary Change area, select the appropriate check box to the left of the reason field and click Delete Checked.
16. Click Next. If this is the last employee, the Work Events Summary page displays.
If you selected more than one employee, the Change Job & Salary Information page for
the next employee displays. If you selected more than one event for this employee, the next event will display.
Figure 6-66. Work Events Summary Page
The Work Events Summary page lets you review the information regarding the work event(s) that you have submitted. The fields on this page are display only.
For a description of the fields on this page or for related tasks, click the
(Help icon) provided in the right-hand corner of the Self Service page
Chapter 6: Managing Work EventsADP Self Service Manager’s Guide
6-88 Changing an Employee’s Job and Salary Information
17. Review the following information:
• Total Work Events - Displays the total number of work events submitted. This includes the events that were canceled or rejected.
• Employee Name - Displays the employee’s name for which a job action was submitted.
• Work Event - Displays the type of job action submitted. Available types are Transfer, Change Job Status, Change Job & Salary, and Change Employment Status.
• Effective Date - Displays the date the job action goes into effect.
• Work Event Status - Display the status of the work event.
• Comments - Displays comments you enter on the Start Work Events page.
18. When you have finished reviewing the information, click OK. You are returned to the page (Manager Work Events or Direct Reports) from which you accessed this page.
You have completed initiating a demotion for an employee and submitting it for approval.
For information on promoting an employee, see “Promoting an Employee” on page 6-72.
For information on initiating a lateral job change for an employee, see “Performing a Lateral Job Change” on page 6-89.
For information on changing an employee’s salary, see “Changing an Employee’s Salary” on page 6-96.
Chapter 6: Managing Work EventsADP Self Service Manager’s Guide
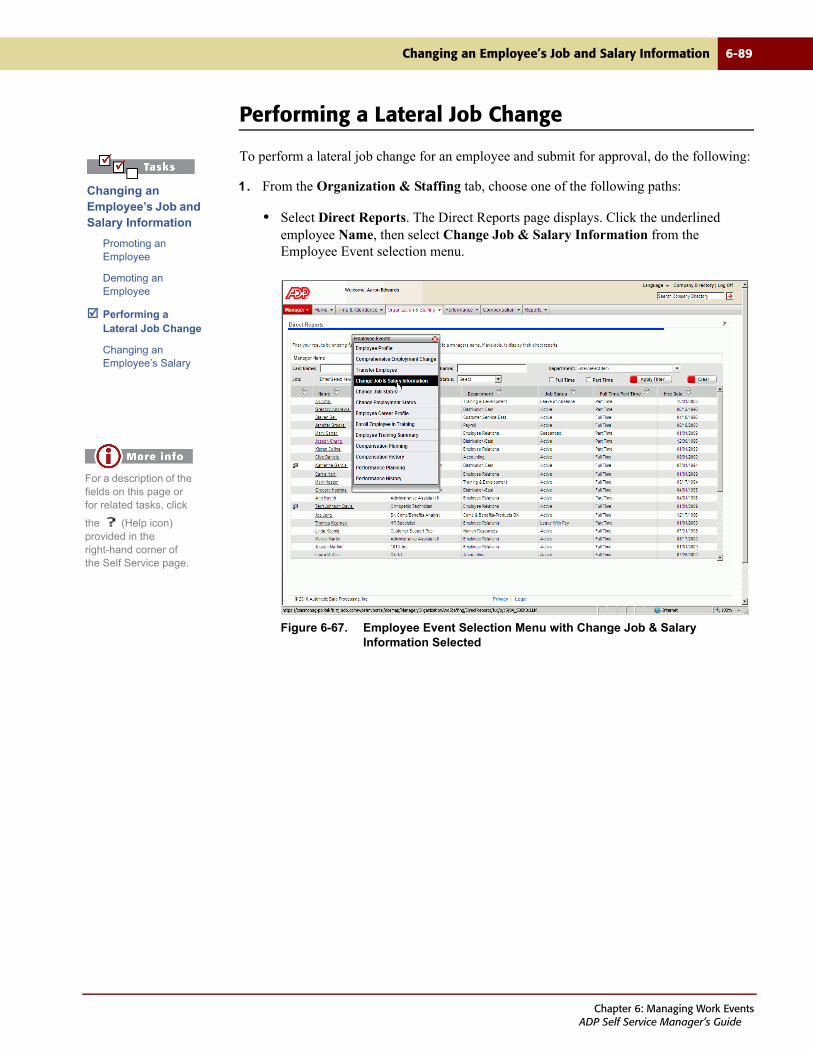
Changing an Employee’s Job and Salary Information 6-89
Performing a Lateral Job Change
To perform a lateral job change for an employee and submit for approval, do the following:
1. From the Organization & Staffing tab, choose one of the following paths:
• Select Direct Reports. The Direct Reports page displays. Click the underlined employee Name, then select Change Job & Salary Information from the Employee Event selection menu.
Figure 6-67. Employee Event Selection Menu with Change Job & Salary Information Selected
Changing an Employee’s Job and Salary Information
Promoting an Employee
Demoting an Employee
Performing a Lateral Job Change
Changing an Employee’s Salary
For a description of the fields on this page or for related tasks, click
the (Help icon) provided in the right-hand corner of the Self Service page.
Chapter 6: Managing Work EventsADP Self Service Manager’s Guide
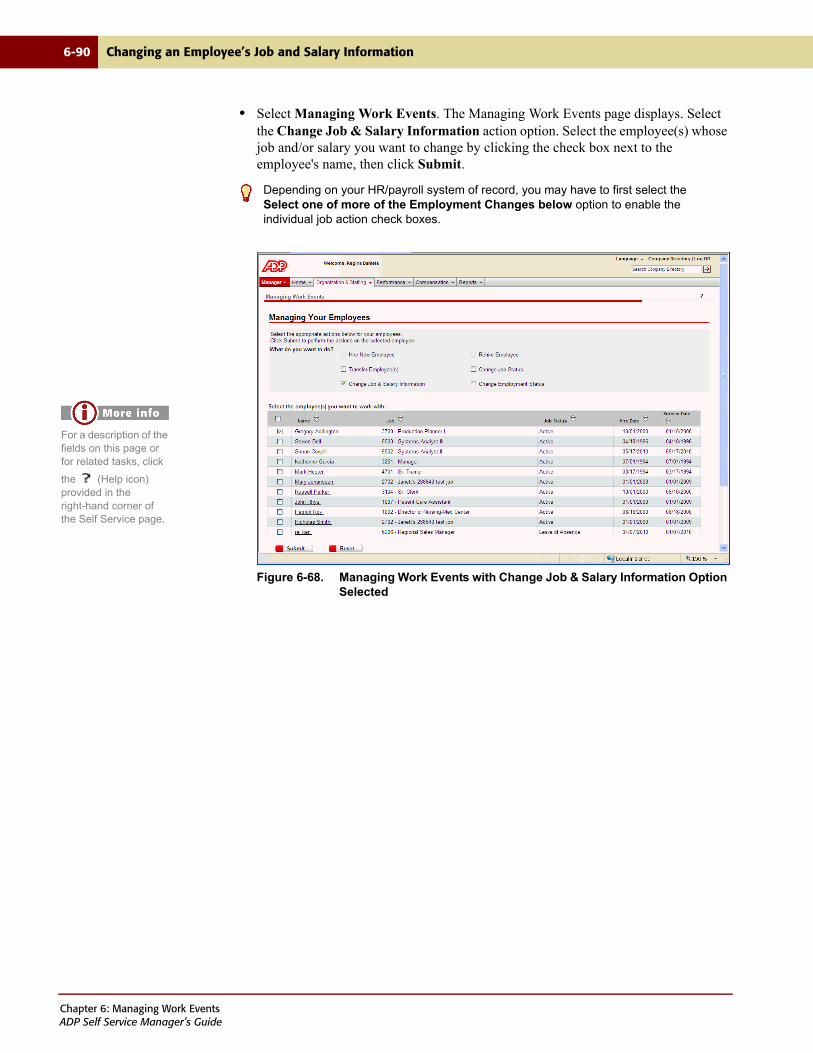
6-90 Changing an Employee’s Job and Salary Information
• Select Managing Work Events. The Managing Work Events page displays. Select the Change Job & Salary Information action option. Select the employee(s) whose job and/or salary you want to change by clicking the check box next to the employee's name, then click Submit.
Figure 6-68. Managing Work Events with Change Job & Salary Information Option Selected
Depending on your HR/payroll system of record, you may have to first select the Select one of more of the Employment Changes below option to enable the individual job action check boxes.
For a description of the fields on this page or for related tasks, click
the (Help icon) provided in the right-hand corner of the Self Service page.
Chapter 6: Managing Work EventsADP Self Service Manager’s Guide
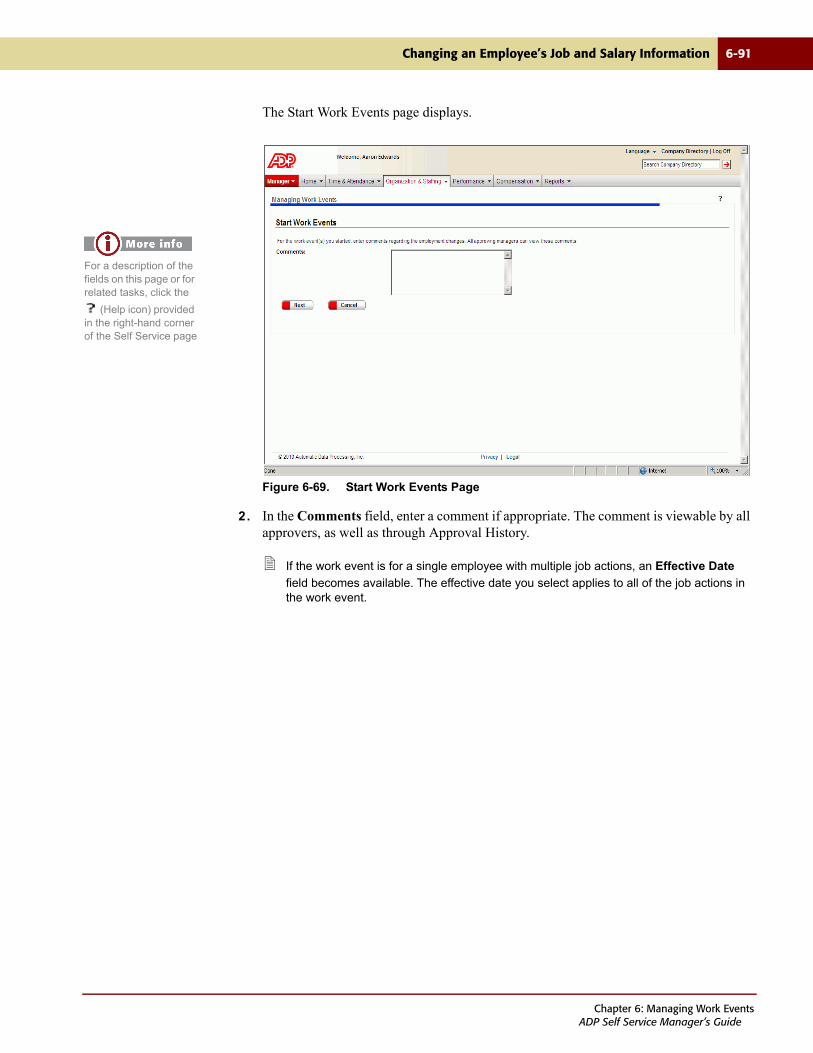
Changing an Employee’s Job and Salary Information 6-91
The Start Work Events page displays.
Figure 6-69. Start Work Events Page
2. In the Comments field, enter a comment if appropriate. The comment is viewable by all approvers, as well as through Approval History.
If the work event is for a single employee with multiple job actions, an Effective Date
field becomes available. The effective date you select applies to all of the job actions in the work event.
For a description of the fields on this page or for related tasks, click the
(Help icon) provided in the right-hand corner of the Self Service page
Chapter 6: Managing Work EventsADP Self Service Manager’s Guide
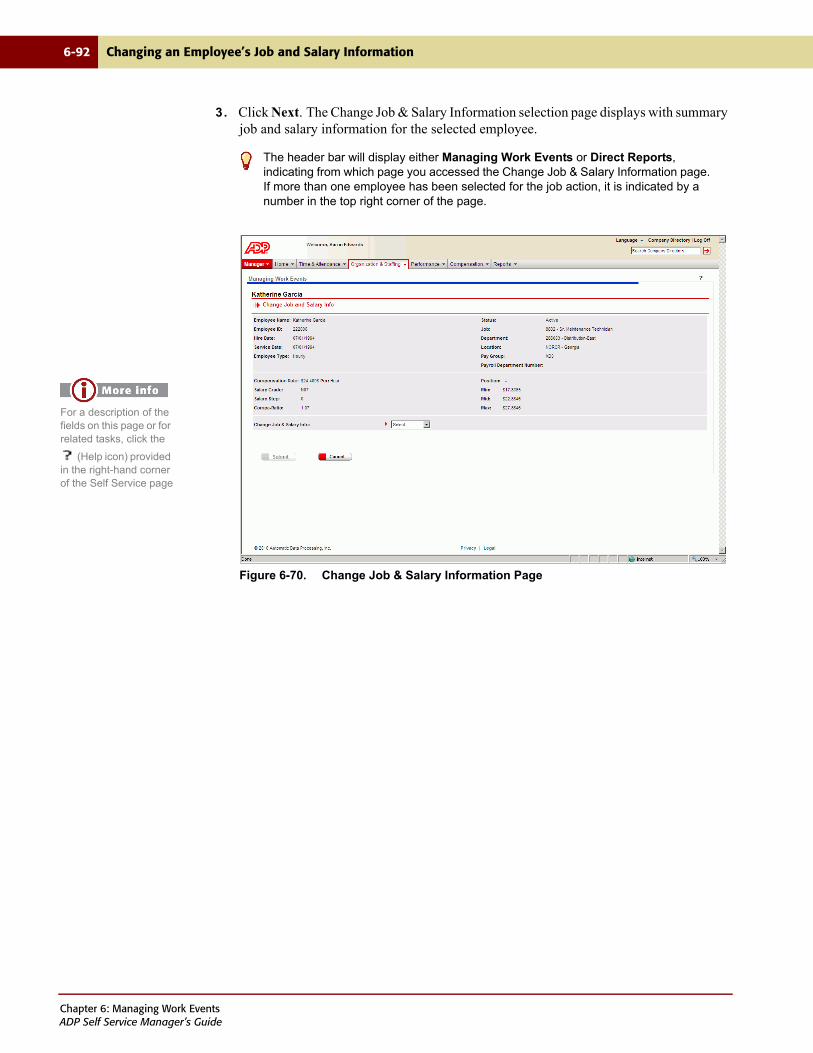
6-92 Changing an Employee’s Job and Salary Information
3. Click Next. The Change Job & Salary Information selection page displays with summary job and salary information for the selected employee.
Figure 6-70. Change Job & Salary Information Page
The header bar will display either Managing Work Events or Direct Reports, indicating from which page you accessed the Change Job & Salary Information page. If more than one employee has been selected for the job action, it is indicated by a number in the top right corner of the page.
For a description of the fields on this page or for related tasks, click the
(Help icon) provided in the right-hand corner of the Self Service page
Chapter 6: Managing Work EventsADP Self Service Manager’s Guide
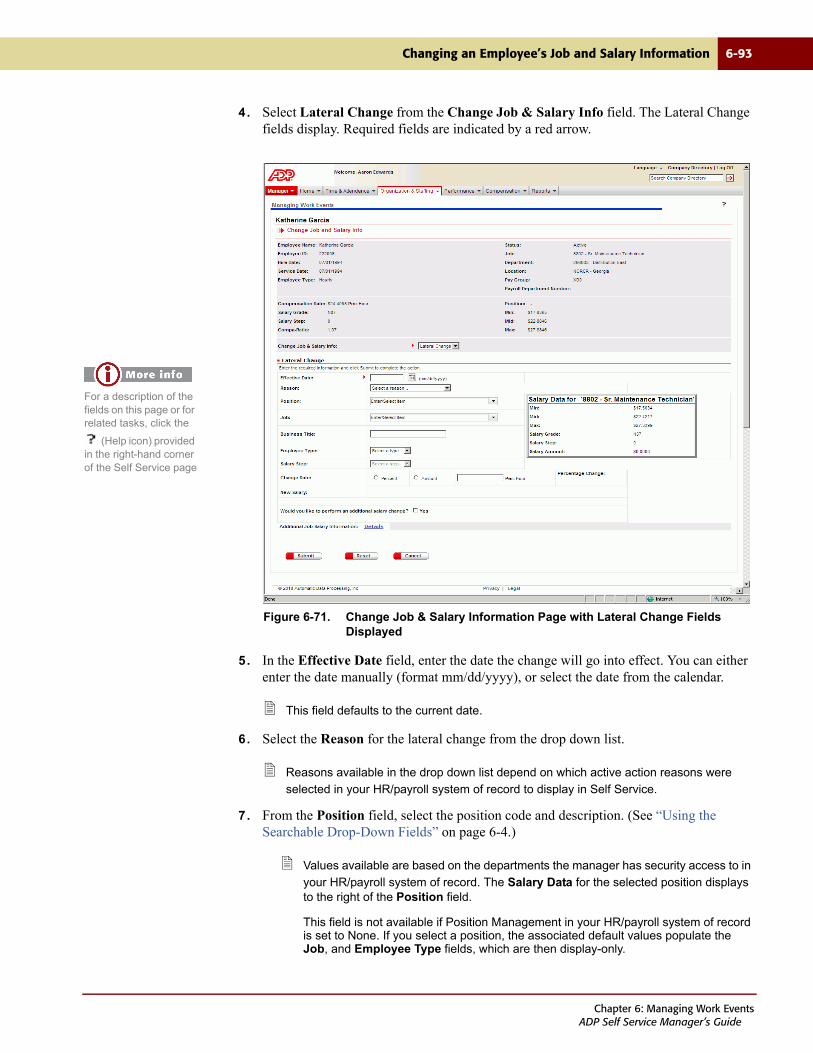
Changing an Employee’s Job and Salary Information 6-93
4. Select Lateral Change from the Change Job & Salary Info field. The Lateral Change fields display. Required fields are indicated by a red arrow.
Figure 6-71. Change Job & Salary Information Page with Lateral Change Fields Displayed
5. In the Effective Date field, enter the date the change will go into effect. You can either enter the date manually (format mm/dd/yyyy), or select the date from the calendar.
This field defaults to the current date.
6. Select the Reason for the lateral change from the drop down list.
Reasons available in the drop down list depend on which active action reasons were
selected in your HR/payroll system of record to display in Self Service.
7. From the Position field, select the position code and description. (See “Using the Searchable Drop-Down Fields” on page 6-4.)
Values available are based on the departments the manager has security access to in
your HR/payroll system of record. The Salary Data for the selected position displays to the right of the Position field.
This field is not available if Position Management in your HR/payroll system of record is set to None. If you select a position, the associated default values populate the Job, and Employee Type fields, which are then display-only.
For a description of the fields on this page or for related tasks, click the
(Help icon) provided in the right-hand corner of the Self Service page
Chapter 6: Managing Work EventsADP Self Service Manager’s Guide
6-94 Changing an Employee’s Job and Salary Information
8. From the Job field, select the job code and description. (See “Using the Searchable Drop-Down Fields” on page 6-4.)
The Salary Data for the selected job displays to the right of the Job field.
The Job field is display-only if a position was selected from the Position field. If you have not selected a position, you can select a job from the Job field. The Position field is then disabled, and the Salary Step field is populated with the default value, if any, and is display-only.
9. The Business Title field initially displays the employee's current business title, if available. Enter the employee's business title as needed. Maximum field length is 50 characters.
10. From the Employee Type field, select the employee type and description from the drop down list. The drop down list is populated with the employee types and descriptions defined in your HR/payroll system of record for the employee's pay group.
This field is display-only if the update allowed setting in the selected employee's job
record is set to No.
11. Click the Additional Job & Salary Information Details link, if available, to access the Additional Information fields, as shown in Figure 6-58. You can enter, change, or delete data in these fields as necessary for the work event you are entering.
Whether or not the Additional Information fields are available, as well as which fields you
have access to for each event, is determined by your Portal administrator. The information in these fields initially defaults with data from your HR/payroll system of record. Any information you enter in these fields will be passed back to system of record once this event has been processed.
Chapter 6: Managing Work EventsADP Self Service Manager’s Guide
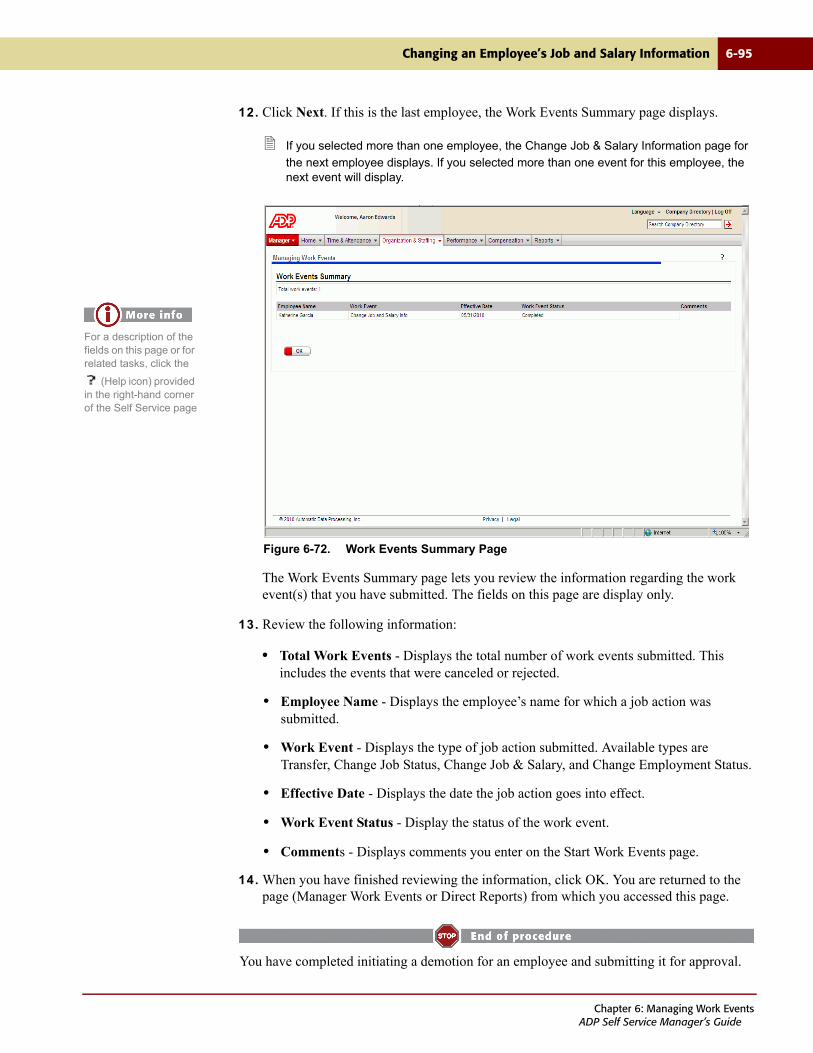
Changing an Employee’s Job and Salary Information 6-95
12. Click Next. If this is the last employee, the Work Events Summary page displays.
If you selected more than one employee, the Change Job & Salary Information page for
the next employee displays. If you selected more than one event for this employee, the next event will display.
Figure 6-72. Work Events Summary Page
The Work Events Summary page lets you review the information regarding the work event(s) that you have submitted. The fields on this page are display only.
13. Review the following information:
• Total Work Events - Displays the total number of work events submitted. This includes the events that were canceled or rejected.
• Employee Name - Displays the employee’s name for which a job action was submitted.
• Work Event - Displays the type of job action submitted. Available types are Transfer, Change Job Status, Change Job & Salary, and Change Employment Status.
• Effective Date - Displays the date the job action goes into effect.
• Work Event Status - Display the status of the work event.
• Comments - Displays comments you enter on the Start Work Events page.
14. When you have finished reviewing the information, click OK. You are returned to the page (Manager Work Events or Direct Reports) from which you accessed this page.
You have completed initiating a demotion for an employee and submitting it for approval.
For a description of the fields on this page or for related tasks, click the
(Help icon) provided in the right-hand corner of the Self Service page
Chapter 6: Managing Work EventsADP Self Service Manager’s Guide
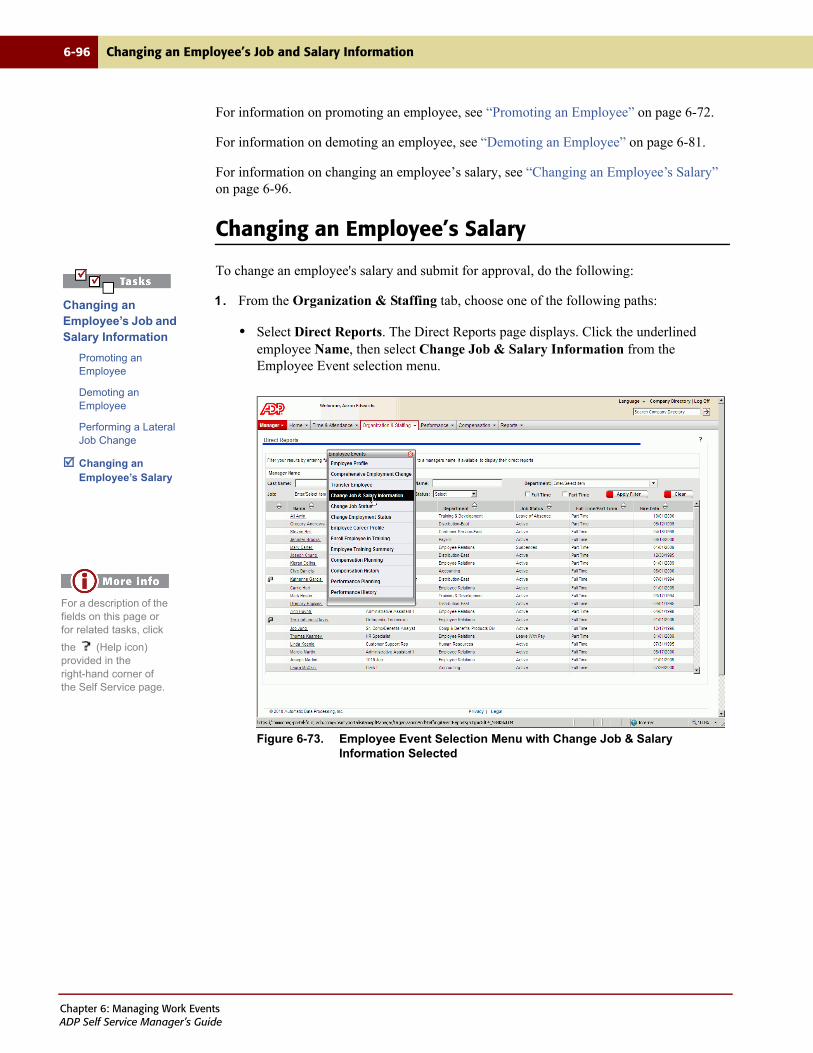
6-96 Changing an Employee’s Job and Salary Information
For information on promoting an employee, see “Promoting an Employee” on page 6-72.
For information on demoting an employee, see “Demoting an Employee” on page 6-81.
For information on changing an employee’s salary, see “Changing an Employee’s Salary” on page 6-96.
Changing an Employee’s Salary
To change an employee's salary and submit for approval, do the following:
1. From the Organization & Staffing tab, choose one of the following paths:
• Select Direct Reports. The Direct Reports page displays. Click the underlined employee Name, then select Change Job & Salary Information from the Employee Event selection menu.
Figure 6-73. Employee Event Selection Menu with Change Job & Salary Information Selected
Changing an Employee’s Job and Salary Information
Promoting an Employee
Demoting an Employee
Performing a Lateral Job Change
Changing an Employee’s Salary
For a description of the fields on this page or for related tasks, click
the (Help icon) provided in the right-hand corner of the Self Service page.
Chapter 6: Managing Work EventsADP Self Service Manager’s Guide
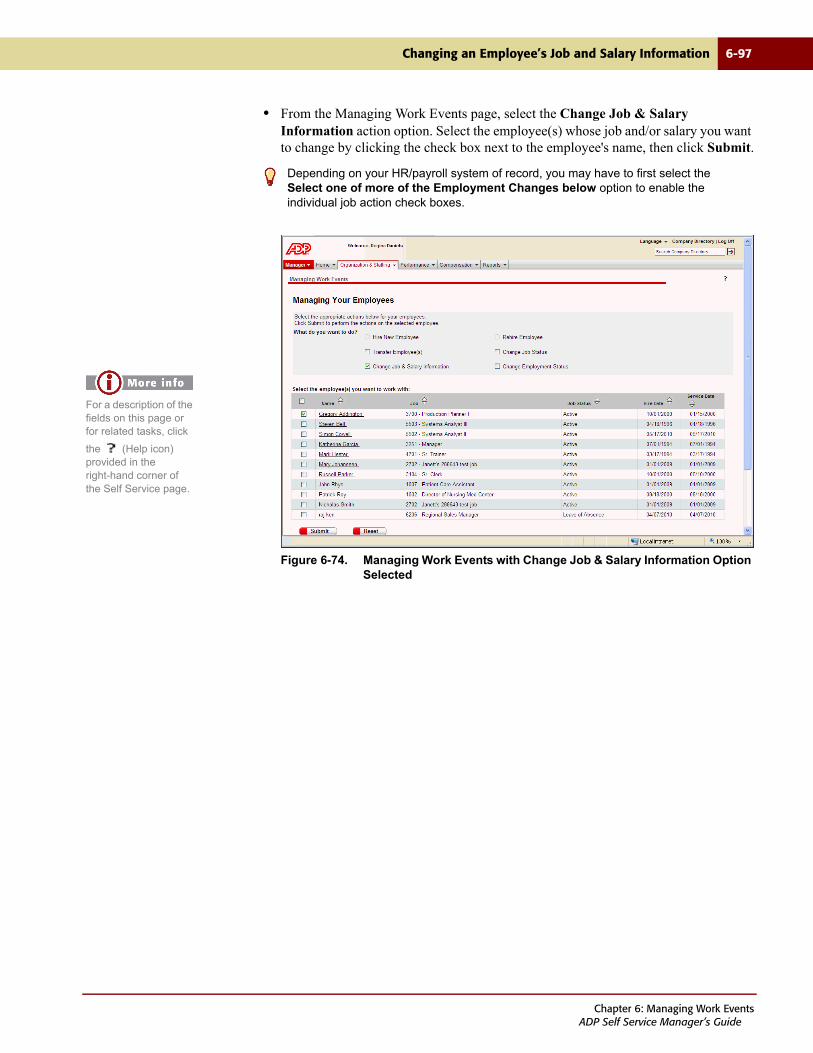
Changing an Employee’s Job and Salary Information 6-97
• From the Managing Work Events page, select the Change Job & Salary Information action option. Select the employee(s) whose job and/or salary you want to change by clicking the check box next to the employee's name, then click Submit.
Figure 6-74. Managing Work Events with Change Job & Salary Information Option Selected
Depending on your HR/payroll system of record, you may have to first select the Select one of more of the Employment Changes below option to enable the individual job action check boxes.
For a description of the fields on this page or for related tasks, click
the (Help icon) provided in the right-hand corner of the Self Service page.
Chapter 6: Managing Work EventsADP Self Service Manager’s Guide
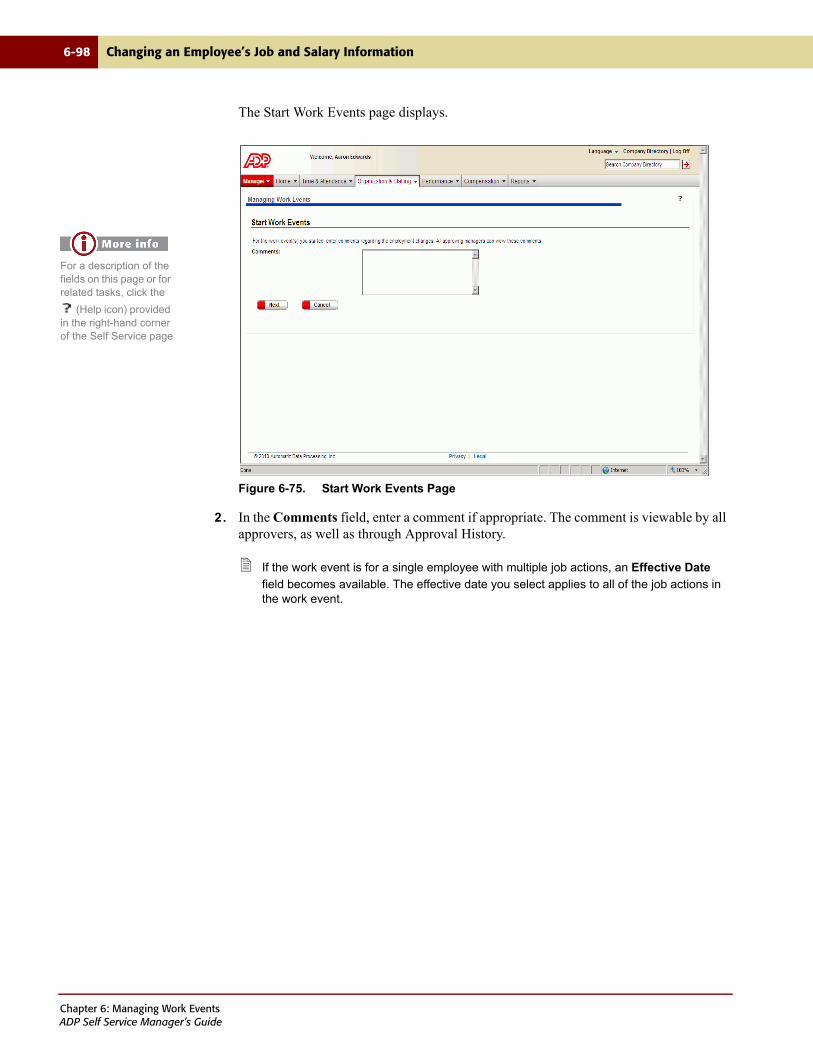
6-98 Changing an Employee’s Job and Salary Information
The Start Work Events page displays.
Figure 6-75. Start Work Events Page
2. In the Comments field, enter a comment if appropriate. The comment is viewable by all approvers, as well as through Approval History.
If the work event is for a single employee with multiple job actions, an Effective Date
field becomes available. The effective date you select applies to all of the job actions in the work event.
For a description of the fields on this page or for related tasks, click the
(Help icon) provided in the right-hand corner of the Self Service page
Chapter 6: Managing Work EventsADP Self Service Manager’s Guide
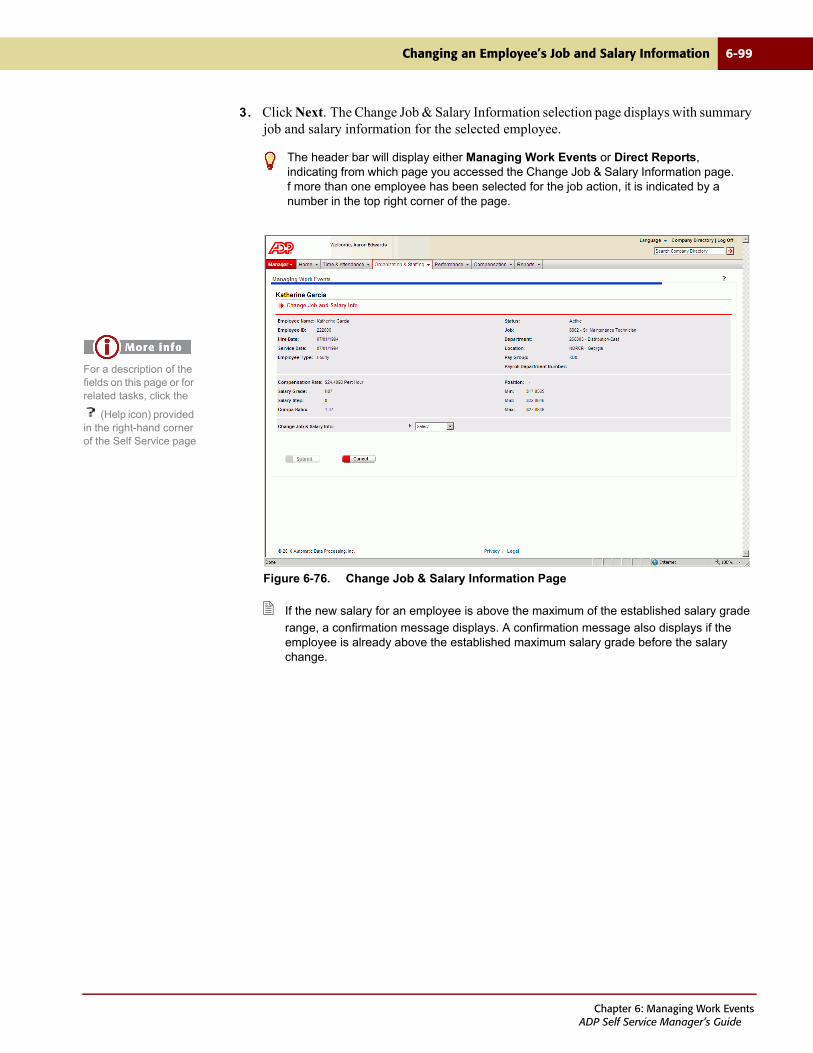
Changing an Employee’s Job and Salary Information 6-99
3. Click Next. The Change Job & Salary Information selection page displays with summary job and salary information for the selected employee.
Figure 6-76. Change Job & Salary Information Page
If the new salary for an employee is above the maximum of the established salary grade
range, a confirmation message displays. A confirmation message also displays if the employee is already above the established maximum salary grade before the salary change.
The header bar will display either Managing Work Events or Direct Reports, indicating from which page you accessed the Change Job & Salary Information page. f more than one employee has been selected for the job action, it is indicated by a number in the top right corner of the page.
For a description of the fields on this page or for related tasks, click the
(Help icon) provided in the right-hand corner of the Self Service page
Chapter 6: Managing Work EventsADP Self Service Manager’s Guide
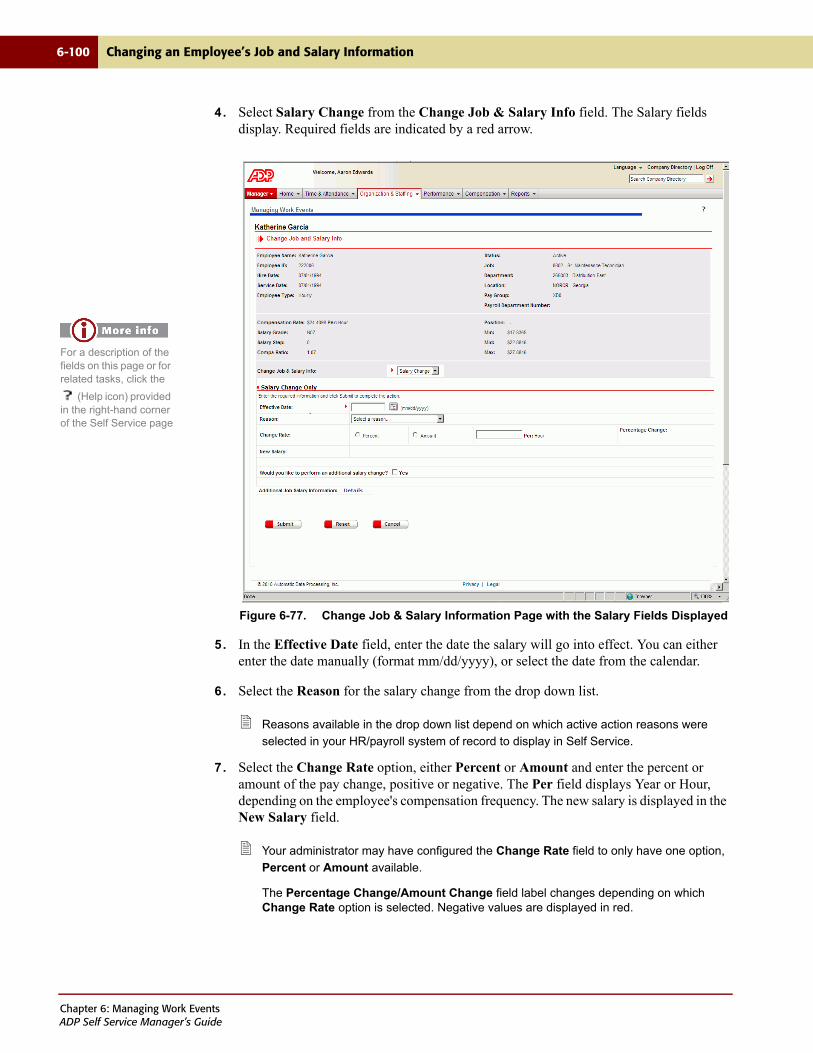
6-100 Changing an Employee’s Job and Salary Information
4. Select Salary Change from the Change Job & Salary Info field. The Salary fields display. Required fields are indicated by a red arrow.
Figure 6-77. Change Job & Salary Information Page with the Salary Fields Displayed
5. In the Effective Date field, enter the date the salary will go into effect. You can either enter the date manually (format mm/dd/yyyy), or select the date from the calendar.
6. Select the Reason for the salary change from the drop down list.
Reasons available in the drop down list depend on which active action reasons were
selected in your HR/payroll system of record to display in Self Service.
7. Select the Change Rate option, either Percent or Amount and enter the percent or amount of the pay change, positive or negative. The Per field displays Year or Hour, depending on the employee's compensation frequency. The new salary is displayed in the New Salary field.
Your administrator may have configured the Change Rate field to only have one option,
Percent or Amount available.
The Percentage Change/Amount Change field label changes depending on which Change Rate option is selected. Negative values are displayed in red.
For a description of the fields on this page or for related tasks, click the
(Help icon) provided in the right-hand corner of the Self Service page
Chapter 6: Managing Work EventsADP Self Service Manager’s Guide
Changing an Employee’s Job and Salary Information 6-101
8. Click the Additional Job & Salary Information Details link, if available, to access the Additional Information fields, as shown in Figure 6-58. You can enter, change, or delete data in these fields as necessary for the work event you are entering.
Whether or not the Additional Information fields are available, as well as which fields you
have access to for each event, is determined by your Portal administrator. The information in these fields initially defaults with data from your HR/payroll system of record. Any information you enter in these fields will be passed back to your system of record once this event has been processed.
9. To perform an additional salary change, select Yes in the Would you like to perform an additional salary change? field. The Salary Change fields display, as shown in Figure 6-59.
10. Complete the following:
a. Select the Salary Change Reason from the drop down list. Reasons available in the drop down list depend on which active action reasons were selected in your HR/payroll system of record to display in Self Service.
b. Select the Change Rate option, either Percent or Amount (as available) and enter the percent or amount of the pay change, positive or negative. The Per field displays Year or Hour, depending on the employee's compensation frequency The Percent Change/Amount Change and Cumulative fields display the new salary values.
To add another salary change, click Add Another Salary Change. To delete a
salary change listed in the Additional Salary Change area, select the appropriate check box to the left of the reason field and click Delete Checked.
Chapter 6: Managing Work EventsADP Self Service Manager’s Guide
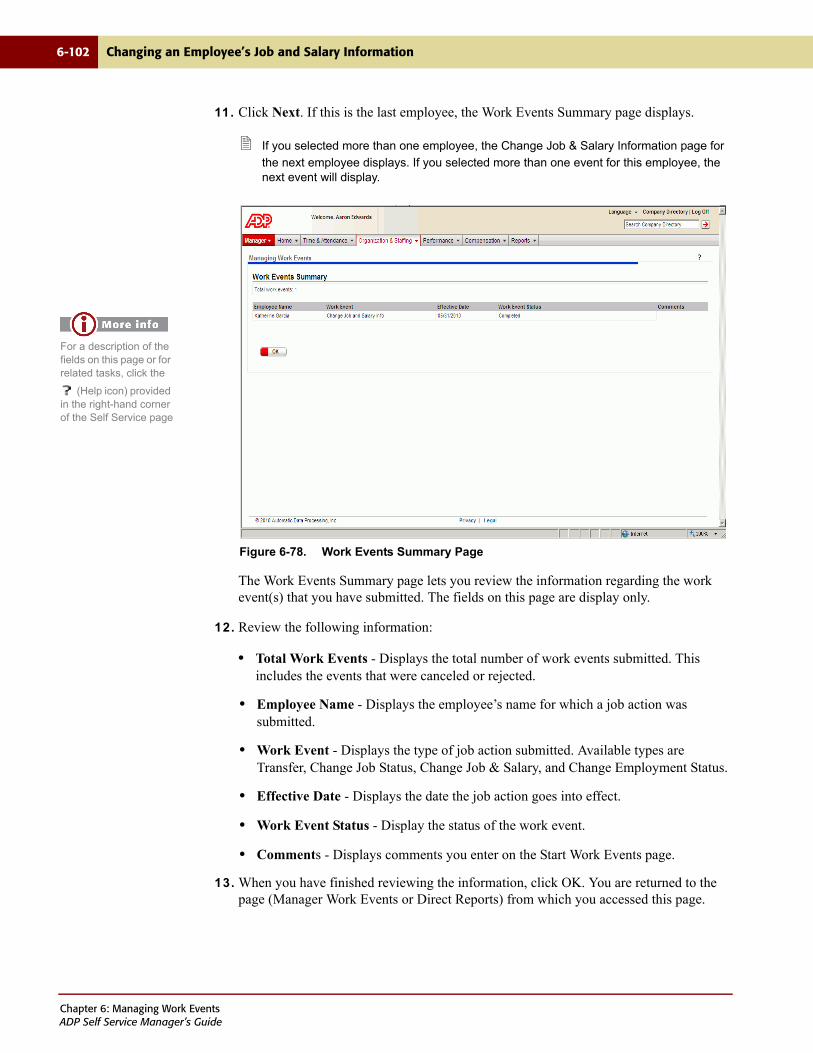
6-102 Changing an Employee’s Job and Salary Information
11. Click Next. If this is the last employee, the Work Events Summary page displays.
If you selected more than one employee, the Change Job & Salary Information page for
the next employee displays. If you selected more than one event for this employee, the next event will display.
Figure 6-78. Work Events Summary Page
The Work Events Summary page lets you review the information regarding the work event(s) that you have submitted. The fields on this page are display only.
12. Review the following information:
• Total Work Events - Displays the total number of work events submitted. This includes the events that were canceled or rejected.
• Employee Name - Displays the employee’s name for which a job action was submitted.
• Work Event - Displays the type of job action submitted. Available types are Transfer, Change Job Status, Change Job & Salary, and Change Employment Status.
• Effective Date - Displays the date the job action goes into effect.
• Work Event Status - Display the status of the work event.
• Comments - Displays comments you enter on the Start Work Events page.
13. When you have finished reviewing the information, click OK. You are returned to the page (Manager Work Events or Direct Reports) from which you accessed this page.
For a description of the fields on this page or for related tasks, click the
(Help icon) provided in the right-hand corner of the Self Service page
Chapter 6: Managing Work EventsADP Self Service Manager’s Guide
Changing an Employee’s Job and Salary Information 6-103
You have completed initiating a demotion for an employee and submitting it for approval.
For information on promoting an employee, see “Promoting an Employee” on page 6-72.
For information on demoting an employee, see “Demoting an Employee” on page 6-81.
For information on initiating a lateral job change for an employee, see “Performing a Lateral Job Change” on page 6-89.
Chapter 6: Managing Work EventsADP Self Service Manager’s Guide

6-104 Changing an Employee’s Employment Status
Changing an Employee’s Employment Status
The Change Employment Status page allows managers to change the employment status of employees who report to them and submit the job action for approval. If your administrator has enabled the indirect report update option, you can change information for both your direct and indirect reports.
Managers can make employee job changes through either the Direct Reports or Managing Work Events task. Indirect and direct reports can be accessed through Direct Reports. Only direct reports can be accessed through the Managing Work Events task.
Actions available are placing an employee on leave, returning an employee from leave, placing an employee on suspension, returning an employee from suspension, and terminating an employee.
The "active" version of the Change Employment Status page displays when the page is accessed from the Direct Reports page or the Managing Work Events page, which means the manager is able to enter information in the fields provided. Note that required fields are indicated on the page by red arrows. When the page is accessed from the Approvals, Notifications, or Approval History pages, the fields are display-only.
If multiple job actions need to be performed on an employee, see “Updating Multiple Job
Actions for a Single Employee” on page 6-6. If multiple employees need a job action performed, see “Updating Multiple Employees with a Single Job Action” on page 6-11. The two procedures can only be done through the Managing Work Events task.
Changing an employee’s employment status can include the following tasks:
• Placing an Employee on Leave
• Returning an Employee from Leave
• Placing an Employee on Suspension
• Returning an Employee from Suspension
• Terminating an Employee
Chapter 6: Managing Work EventsADP Self Service Manager’s Guide
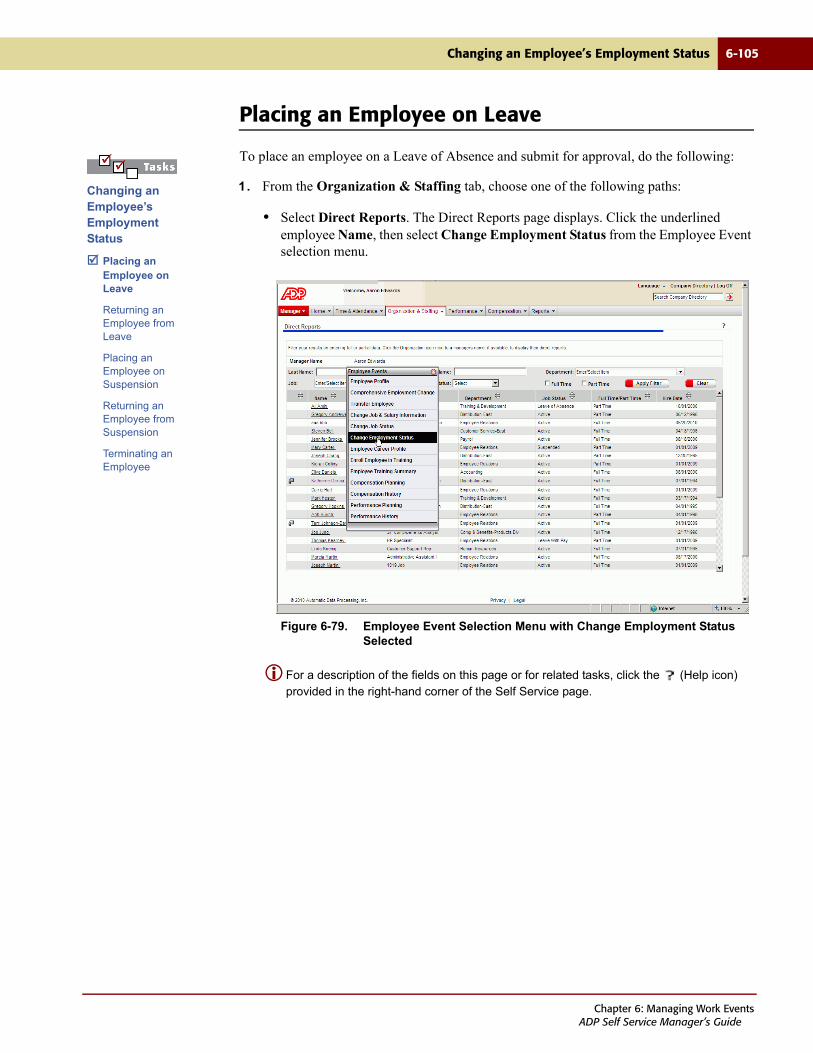
Changing an Employee’s Employment Status 6-105
Placing an Employee on Leave
To place an employee on a Leave of Absence and submit for approval, do the following:
1. From the Organization & Staffing tab, choose one of the following paths:
• Select Direct Reports. The Direct Reports page displays. Click the underlined employee Name, then select Change Employment Status from the Employee Event selection menu.
Figure 6-79. Employee Event Selection Menu with Change Employment Status Selected
For a description of the fields on this page or for related tasks, click the (Help icon) provided in the right-hand corner of the Self Service page.
Changing an Employee’s Employment Status
Placing an Employee on Leave
Returning an Employee from Leave
Placing an Employee on Suspension
Returning an Employee from Suspension
Terminating an Employee
Chapter 6: Managing Work EventsADP Self Service Manager’s Guide
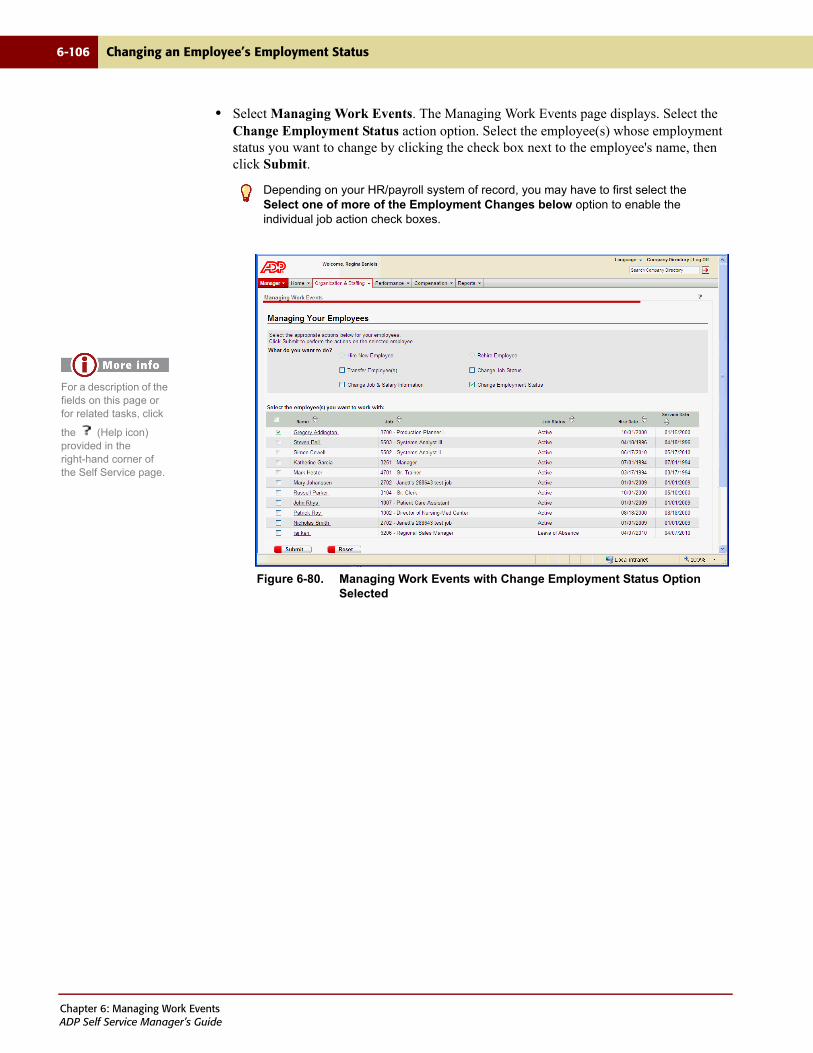
6-106 Changing an Employee’s Employment Status
• Select Managing Work Events. The Managing Work Events page displays. Select the Change Employment Status action option. Select the employee(s) whose employment status you want to change by clicking the check box next to the employee's name, then click Submit.
Figure 6-80. Managing Work Events with Change Employment Status Option Selected
Depending on your HR/payroll system of record, you may have to first select the Select one of more of the Employment Changes below option to enable the individual job action check boxes.
For a description of the fields on this page or for related tasks, click
the (Help icon) provided in the right-hand corner of the Self Service page.
Chapter 6: Managing Work EventsADP Self Service Manager’s Guide

Changing an Employee’s Employment Status 6-107
The Start Work Events page displays.
Figure 6-81. Start Work Events Page
2. In the Comments field, enter a comment if appropriate. The comment is viewable by all approvers, as well as through Approval History.
If the work event is for a single employee with multiple job actions, an Effective Date
field becomes available. The effective date you select applies to all of the job actions in the work event.
For a description of the fields on this page or for related tasks, click the
(Help icon) provided in the right-hand corner of the Self Service page
Chapter 6: Managing Work EventsADP Self Service Manager’s Guide
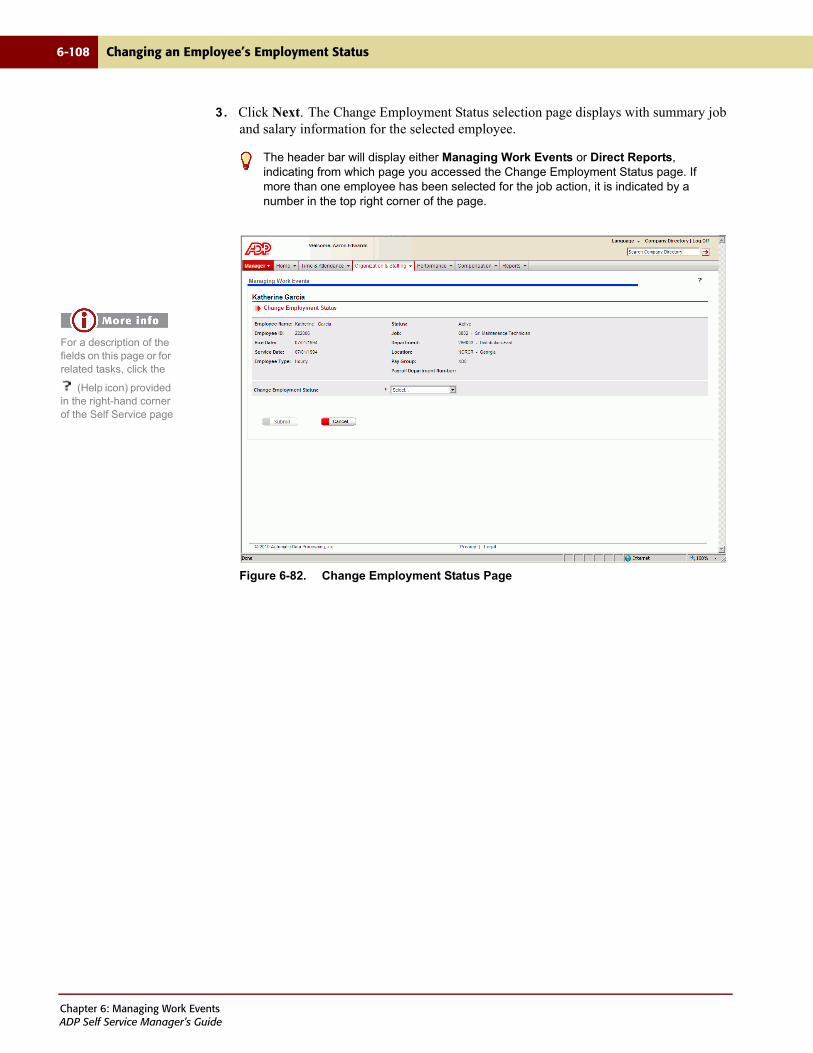
6-108 Changing an Employee’s Employment Status
3. Click Next. The Change Employment Status selection page displays with summary job and salary information for the selected employee.
Figure 6-82. Change Employment Status Page
The header bar will display either Managing Work Events or Direct Reports, indicating from which page you accessed the Change Employment Status page. If more than one employee has been selected for the job action, it is indicated by a number in the top right corner of the page.
For a description of the fields on this page or for related tasks, click the
(Help icon) provided in the right-hand corner of the Self Service page
Chapter 6: Managing Work EventsADP Self Service Manager’s Guide

Changing an Employee’s Employment Status 6-109
4. Select the Leave of Absence (Paid or Unpaid) option from the Change Employment Status field. The Leave of Absence fields display. Required fields are indicated by a red arrow.
Figure 6-83. Change Employment Status Page with Leave of Absence Fields Displayed
5. In the Begin Leave Date field, enter the date the leave will go into effect. You can either enter the date manually (format mm/dd/yyyy), or select the date from the calendar.
6. In the Expected Return Date field, enter the estimated date employee is to return from leave. You can either enter the date manually (format mm/dd/yyyy), or select the date from the calendar.
7. Select the Reason for the leave.
Reasons available in the drop down list depend on which active action reasons were
selected in your HR/payroll system of record to display in Self Service.
For a description of the fields on this page or for related tasks, click the
(Help icon) provided in the right-hand corner of the Self Service page
Chapter 6: Managing Work EventsADP Self Service Manager’s Guide
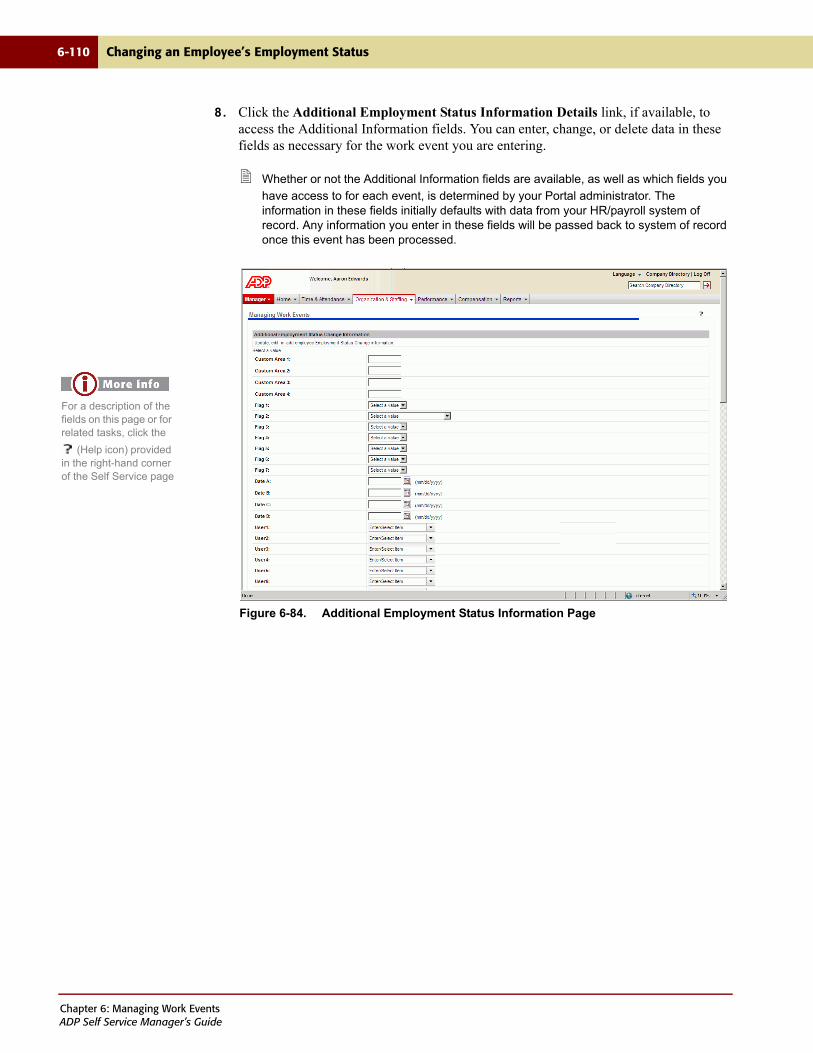
6-110 Changing an Employee’s Employment Status
8. Click the Additional Employment Status Information Details link, if available, to access the Additional Information fields. You can enter, change, or delete data in these fields as necessary for the work event you are entering.
Whether or not the Additional Information fields are available, as well as which fields you
have access to for each event, is determined by your Portal administrator. The information in these fields initially defaults with data from your HR/payroll system of record. Any information you enter in these fields will be passed back to system of record once this event has been processed.
Figure 6-84. Additional Employment Status Information Page
For a description of the fields on this page or for related tasks, click the
(Help icon) provided in the right-hand corner of the Self Service page
Chapter 6: Managing Work EventsADP Self Service Manager’s Guide
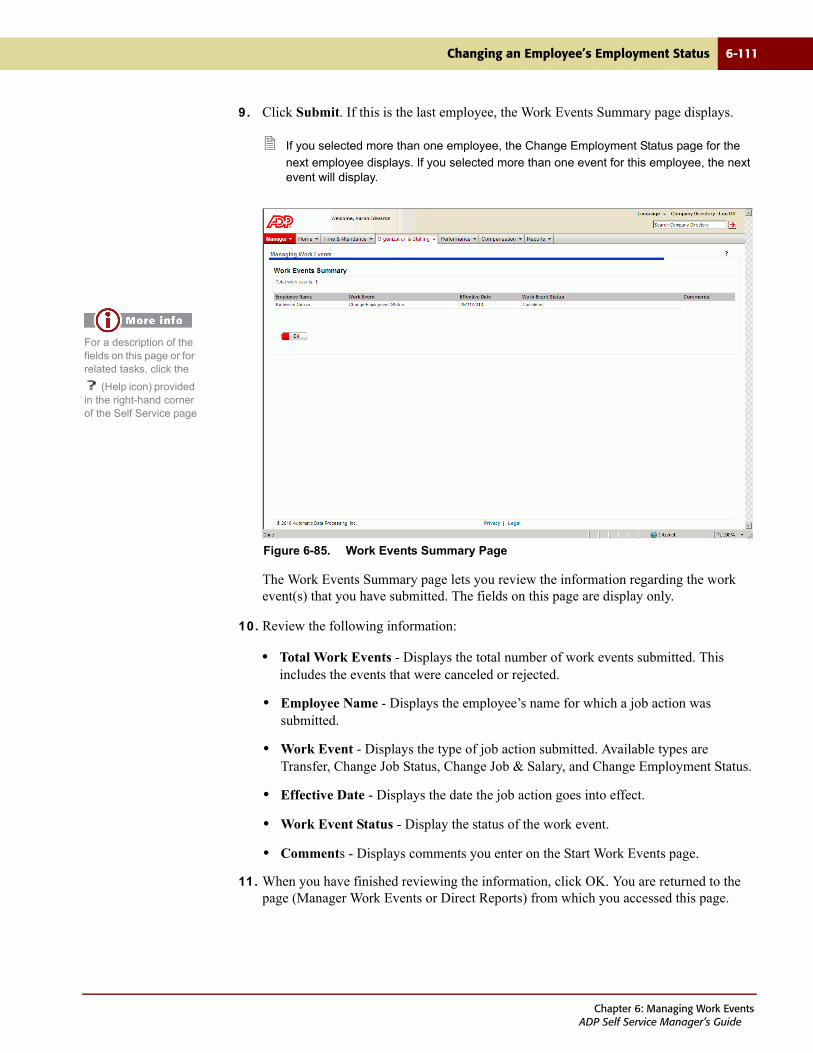
Changing an Employee’s Employment Status 6-111
9. Click Submit. If this is the last employee, the Work Events Summary page displays.
If you selected more than one employee, the Change Employment Status page for the
next employee displays. If you selected more than one event for this employee, the next event will display.
Figure 6-85. Work Events Summary Page
The Work Events Summary page lets you review the information regarding the work event(s) that you have submitted. The fields on this page are display only.
10. Review the following information:
• Total Work Events - Displays the total number of work events submitted. This includes the events that were canceled or rejected.
• Employee Name - Displays the employee’s name for which a job action was submitted.
• Work Event - Displays the type of job action submitted. Available types are Transfer, Change Job Status, Change Job & Salary, and Change Employment Status.
• Effective Date - Displays the date the job action goes into effect.
• Work Event Status - Display the status of the work event.
• Comments - Displays comments you enter on the Start Work Events page.
11. When you have finished reviewing the information, click OK. You are returned to the page (Manager Work Events or Direct Reports) from which you accessed this page.
For a description of the fields on this page or for related tasks, click the
(Help icon) provided in the right-hand corner of the Self Service page
Chapter 6: Managing Work EventsADP Self Service Manager’s Guide

6-112 Changing an Employee’s Employment Status
You have completed placing an employee on leave, either paid or unpaid, and submitting it for approval.
For information on returning an employee from leave, see “Returning an Employee from Leave” on page 6-113.
For information on placing an employee on suspension, see “Placing an Employee on Suspension” on page 6-120.
For information on returning an employee from suspension, see “Returning an Employee from Suspension” on page 6-128.
For information on terminating an employee, see “Terminating an Employee” on page 6-134.
Chapter 6: Managing Work EventsADP Self Service Manager’s Guide
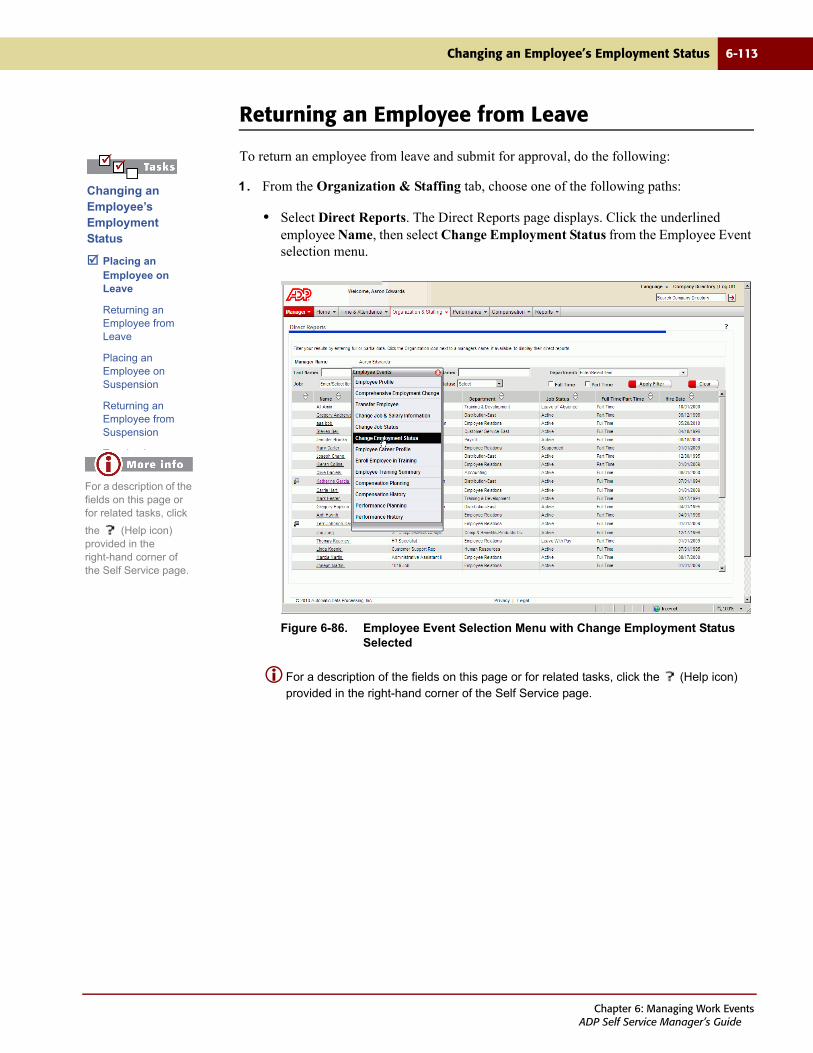
Changing an Employee’s Employment Status 6-113
Returning an Employee from Leave
To return an employee from leave and submit for approval, do the following:
1. From the Organization & Staffing tab, choose one of the following paths:
• Select Direct Reports. The Direct Reports page displays. Click the underlined employee Name, then select Change Employment Status from the Employee Event selection menu.
Figure 6-86. Employee Event Selection Menu with Change Employment Status Selected
For a description of the fields on this page or for related tasks, click the (Help icon) provided in the right-hand corner of the Self Service page.
Changing an Employee’s Employment Status
Placing an Employee on Leave
Returning an Employee from Leave
Placing an Employee on Suspension
Returning an Employee from Suspension
Terminating an Employee
For a description of the fields on this page or for related tasks, click
the (Help icon) provided in the right-hand corner of the Self Service page.
Chapter 6: Managing Work EventsADP Self Service Manager’s Guide
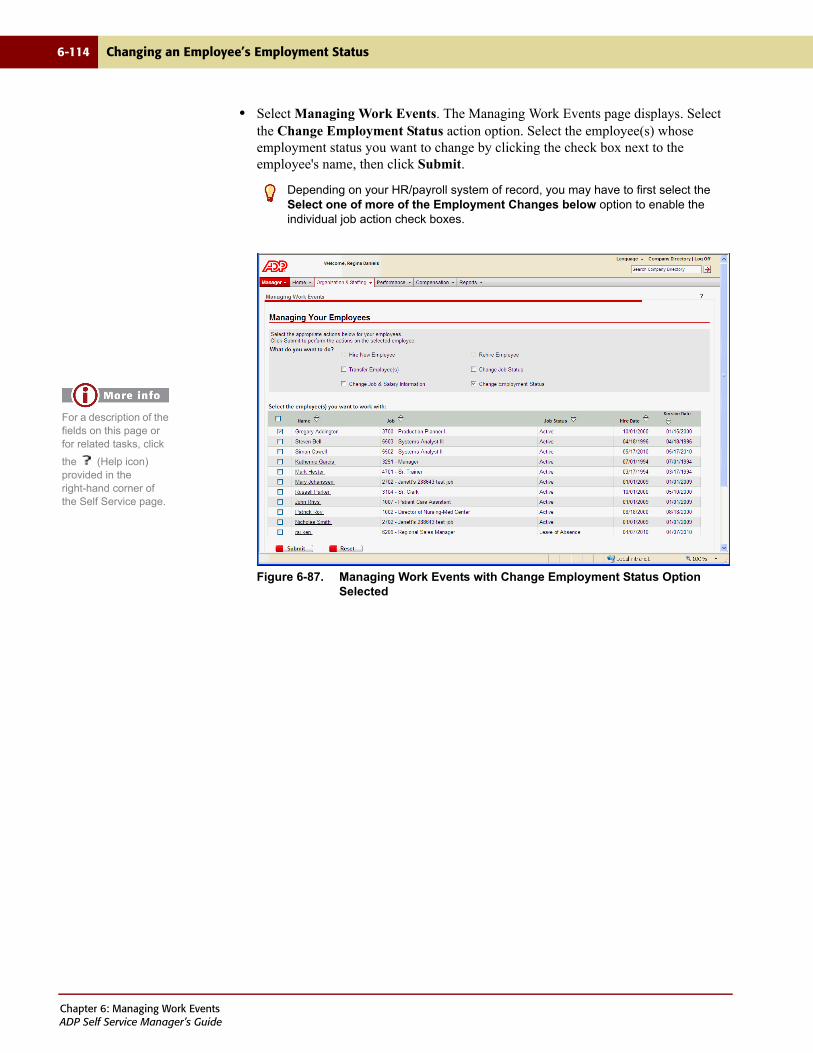
6-114 Changing an Employee’s Employment Status
• Select Managing Work Events. The Managing Work Events page displays. Select the Change Employment Status action option. Select the employee(s) whose employment status you want to change by clicking the check box next to the employee's name, then click Submit.
Figure 6-87. Managing Work Events with Change Employment Status Option Selected
Depending on your HR/payroll system of record, you may have to first select the Select one of more of the Employment Changes below option to enable the individual job action check boxes.
For a description of the fields on this page or for related tasks, click
the (Help icon) provided in the right-hand corner of the Self Service page.
Chapter 6: Managing Work EventsADP Self Service Manager’s Guide

Changing an Employee’s Employment Status 6-115
The Start Work Events page displays.
Figure 6-88. Start Work Events Page
2. In the Comments field, enter a comment if appropriate. The comment is viewable by all approvers, as well as through Approval History.
If the work event is for a single employee with multiple job actions, an Effective Date
field becomes available. The effective date you select applies to all of the job actions in the work event.
For a description of the fields on this page or for related tasks, click the
(Help icon) provided in the right-hand corner of the Self Service page
Chapter 6: Managing Work EventsADP Self Service Manager’s Guide
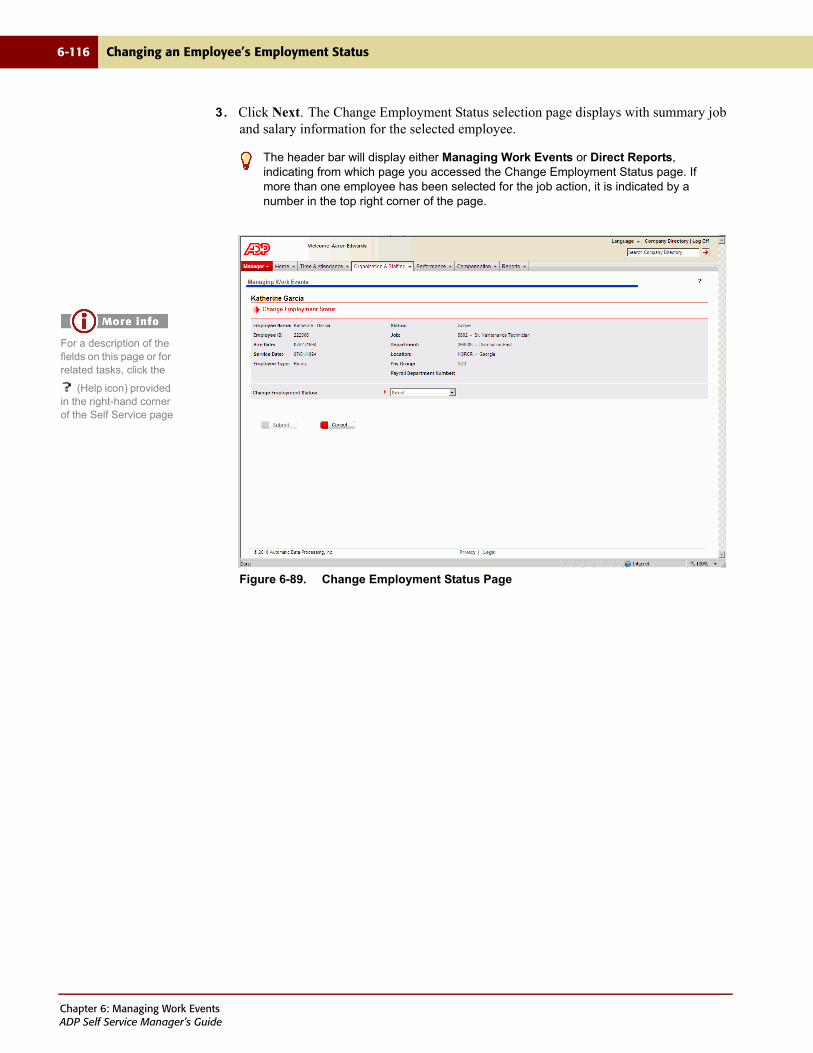
6-116 Changing an Employee’s Employment Status
3. Click Next. The Change Employment Status selection page displays with summary job and salary information for the selected employee.
Figure 6-89. Change Employment Status Page
The header bar will display either Managing Work Events or Direct Reports, indicating from which page you accessed the Change Employment Status page. If more than one employee has been selected for the job action, it is indicated by a number in the top right corner of the page.
For a description of the fields on this page or for related tasks, click the
(Help icon) provided in the right-hand corner of the Self Service page
Chapter 6: Managing Work EventsADP Self Service Manager’s Guide
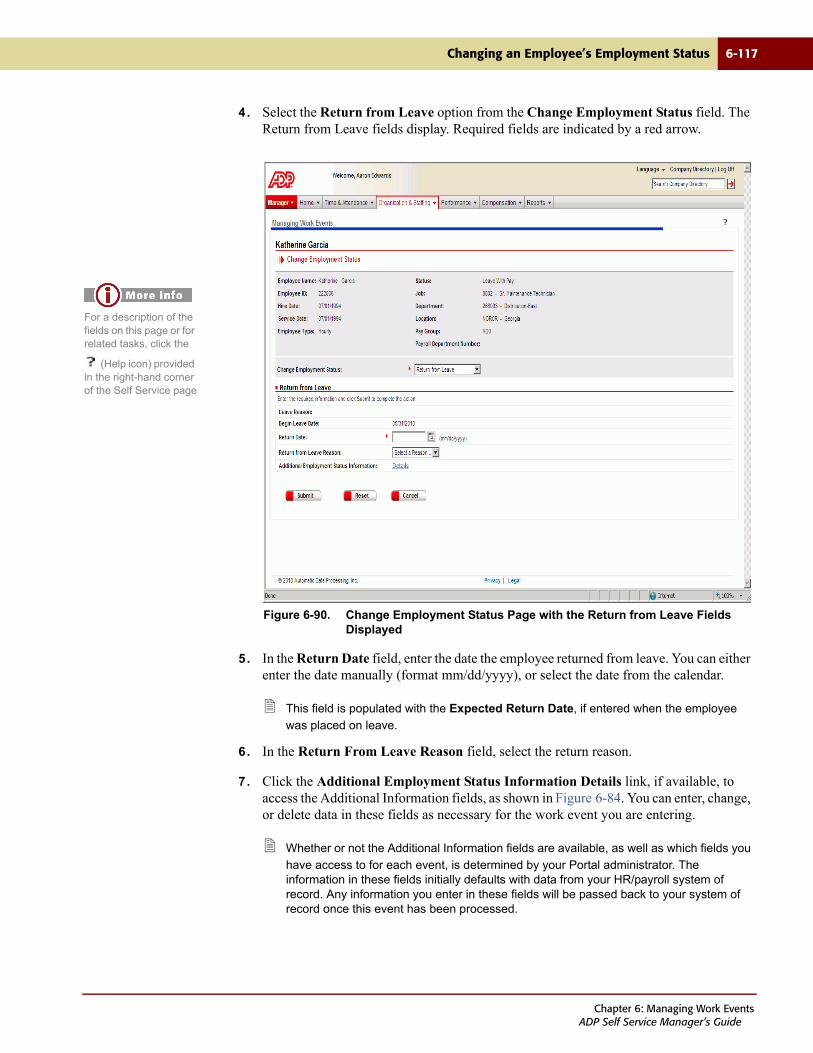
Changing an Employee’s Employment Status 6-117
4. Select the Return from Leave option from the Change Employment Status field. The Return from Leave fields display. Required fields are indicated by a red arrow.
Figure 6-90. Change Employment Status Page with the Return from Leave Fields Displayed
5. In the Return Date field, enter the date the employee returned from leave. You can either enter the date manually (format mm/dd/yyyy), or select the date from the calendar.
This field is populated with the Expected Return Date, if entered when the employee
was placed on leave.
6. In the Return From Leave Reason field, select the return reason.
7. Click the Additional Employment Status Information Details link, if available, to access the Additional Information fields, as shown in Figure 6-84. You can enter, change, or delete data in these fields as necessary for the work event you are entering.
Whether or not the Additional Information fields are available, as well as which fields you
have access to for each event, is determined by your Portal administrator. The information in these fields initially defaults with data from your HR/payroll system of record. Any information you enter in these fields will be passed back to your system of record once this event has been processed.
For a description of the fields on this page or for related tasks, click the
(Help icon) provided in the right-hand corner of the Self Service page
Chapter 6: Managing Work EventsADP Self Service Manager’s Guide
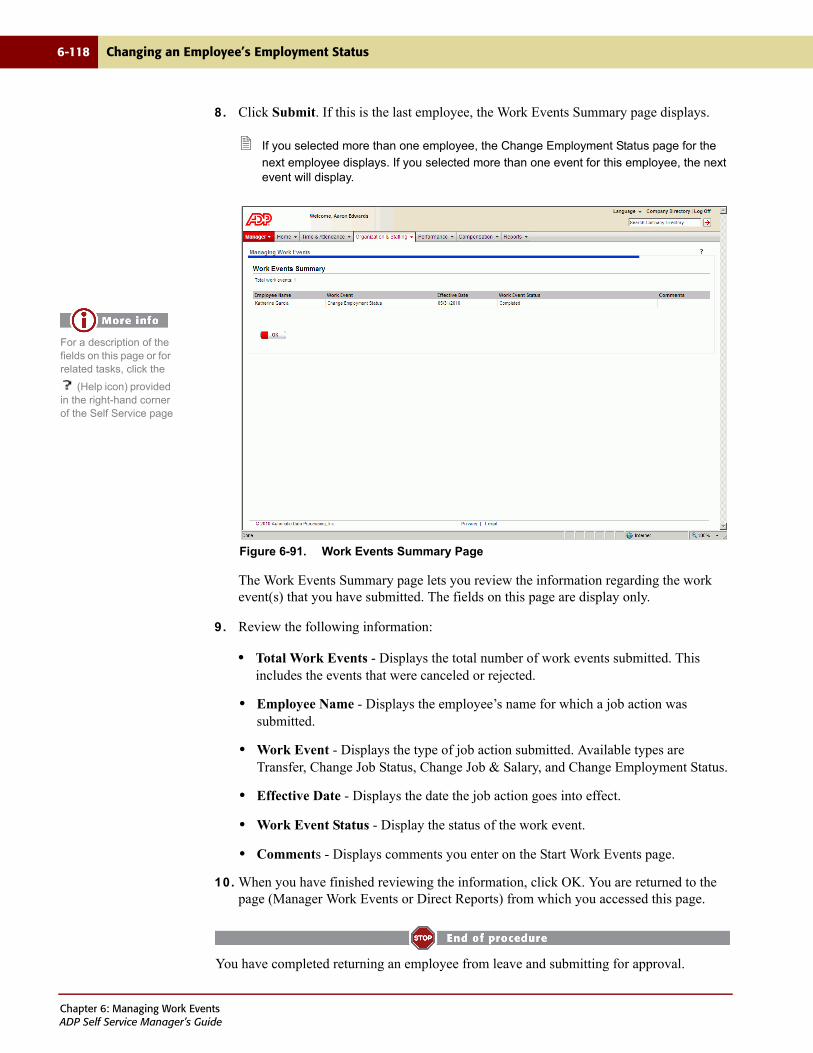
6-118 Changing an Employee’s Employment Status
8. Click Submit. If this is the last employee, the Work Events Summary page displays.
If you selected more than one employee, the Change Employment Status page for the
next employee displays. If you selected more than one event for this employee, the next event will display.
Figure 6-91. Work Events Summary Page
The Work Events Summary page lets you review the information regarding the work event(s) that you have submitted. The fields on this page are display only.
9. Review the following information:
• Total Work Events - Displays the total number of work events submitted. This includes the events that were canceled or rejected.
• Employee Name - Displays the employee’s name for which a job action was submitted.
• Work Event - Displays the type of job action submitted. Available types are Transfer, Change Job Status, Change Job & Salary, and Change Employment Status.
• Effective Date - Displays the date the job action goes into effect.
• Work Event Status - Display the status of the work event.
• Comments - Displays comments you enter on the Start Work Events page.
10. When you have finished reviewing the information, click OK. You are returned to the page (Manager Work Events or Direct Reports) from which you accessed this page.
You have completed returning an employee from leave and submitting for approval.
For a description of the fields on this page or for related tasks, click the
(Help icon) provided in the right-hand corner of the Self Service page
Chapter 6: Managing Work EventsADP Self Service Manager’s Guide

Changing an Employee’s Employment Status 6-119
For information on placing an employee on leave, either paid or unpaid, see “Placing an Employee on Leave” on page 6-105.
For information on placing an employee on suspension, see “Placing an Employee on Suspension” on page 6-120.
For information on returning an employee from suspension, see “Returning an Employee from Suspension” on page 6-128.
For information on terminating an employee, see “Terminating an Employee” on page 6-134.
Chapter 6: Managing Work EventsADP Self Service Manager’s Guide
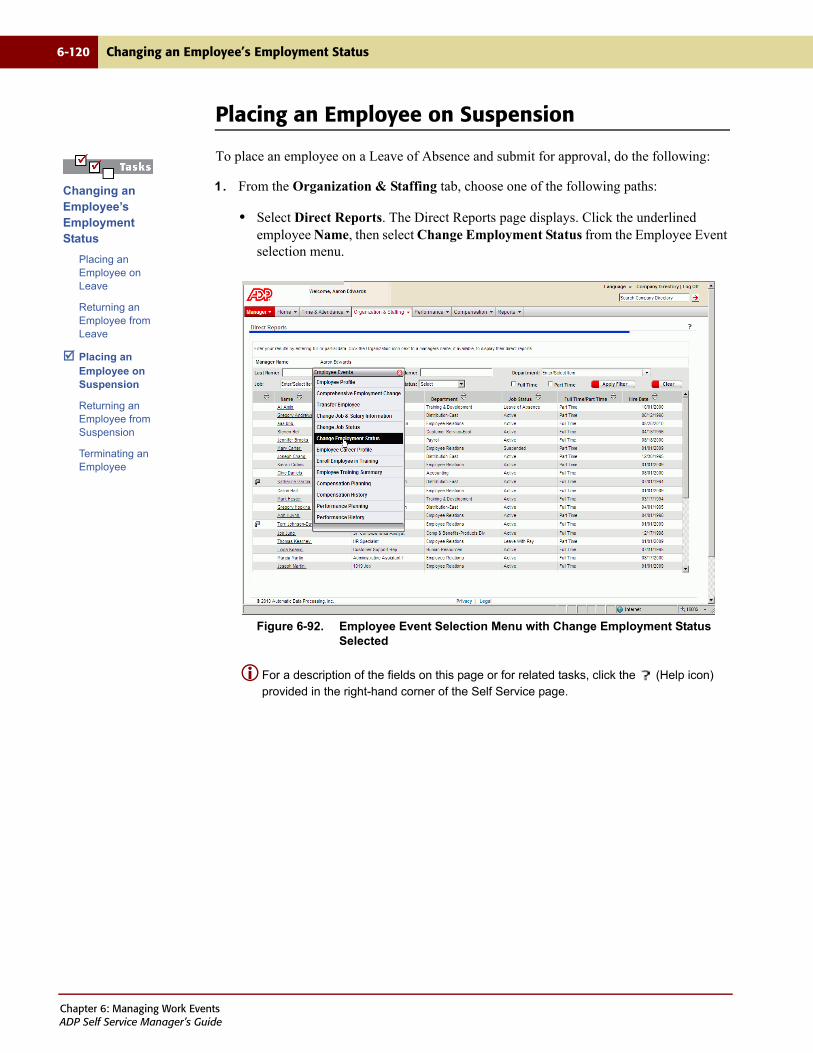
6-120 Changing an Employee’s Employment Status
Placing an Employee on Suspension
To place an employee on a Leave of Absence and submit for approval, do the following:
1. From the Organization & Staffing tab, choose one of the following paths:
• Select Direct Reports. The Direct Reports page displays. Click the underlined employee Name, then select Change Employment Status from the Employee Event selection menu.
Figure 6-92. Employee Event Selection Menu with Change Employment Status Selected
For a description of the fields on this page or for related tasks, click the (Help icon) provided in the right-hand corner of the Self Service page.
Changing an Employee’s Employment Status
Placing an Employee on Leave
Returning an Employee from Leave
Placing an Employee on Suspension
Returning an Employee from Suspension
Terminating an Employee
Chapter 6: Managing Work EventsADP Self Service Manager’s Guide
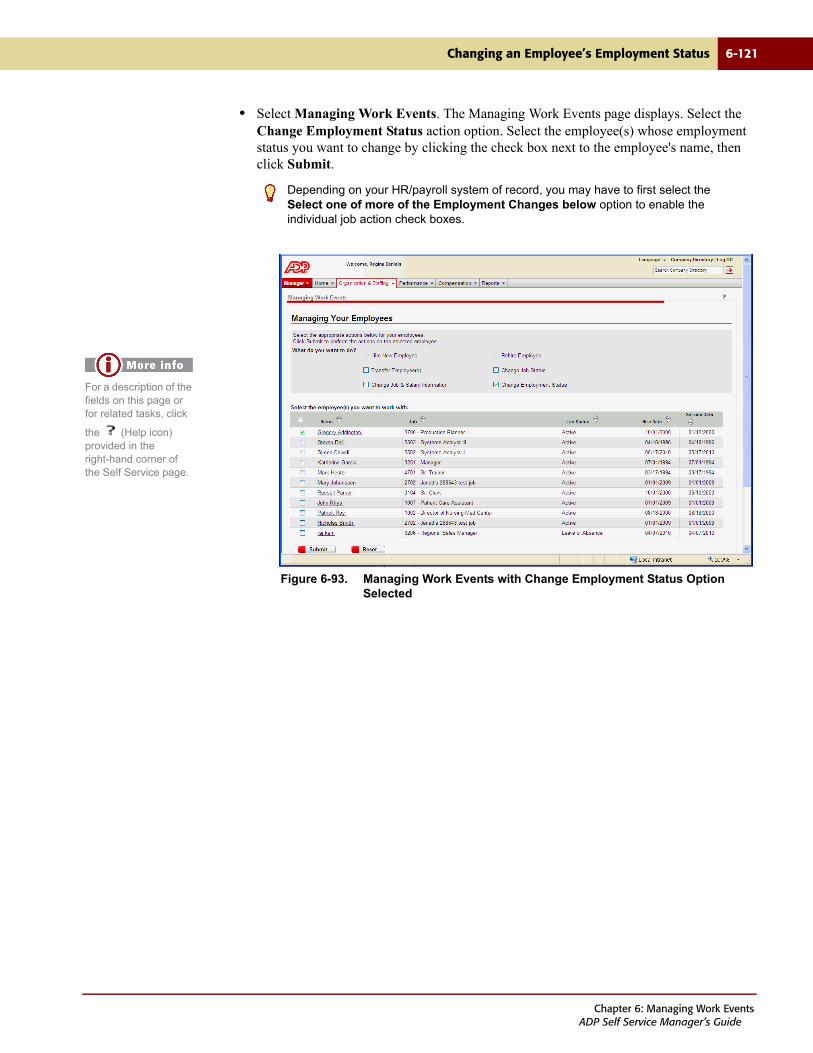
Changing an Employee’s Employment Status 6-121
• Select Managing Work Events. The Managing Work Events page displays. Select the Change Employment Status action option. Select the employee(s) whose employment status you want to change by clicking the check box next to the employee's name, then click Submit.
Figure 6-93. Managing Work Events with Change Employment Status Option Selected
Depending on your HR/payroll system of record, you may have to first select the Select one of more of the Employment Changes below option to enable the individual job action check boxes.
For a description of the fields on this page or for related tasks, click
the (Help icon) provided in the right-hand corner of the Self Service page.
Chapter 6: Managing Work EventsADP Self Service Manager’s Guide
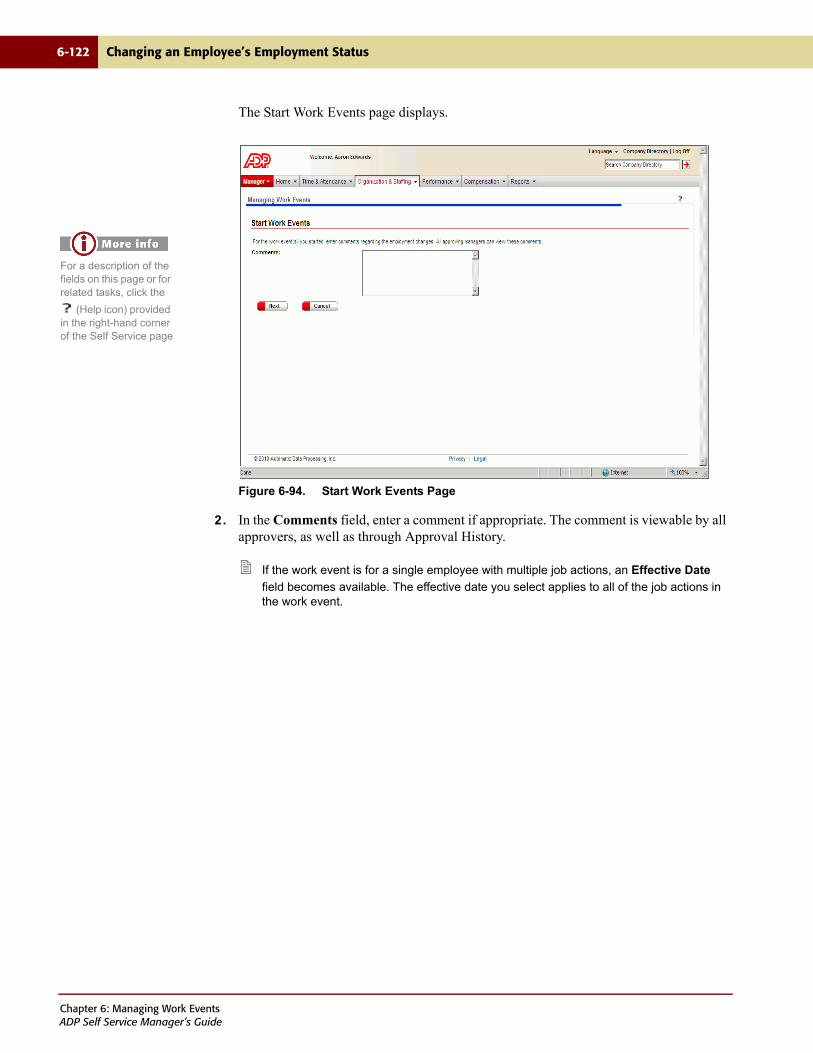
6-122 Changing an Employee’s Employment Status
The Start Work Events page displays.
Figure 6-94. Start Work Events Page
2. In the Comments field, enter a comment if appropriate. The comment is viewable by all approvers, as well as through Approval History.
If the work event is for a single employee with multiple job actions, an Effective Date
field becomes available. The effective date you select applies to all of the job actions in the work event.
For a description of the fields on this page or for related tasks, click the
(Help icon) provided in the right-hand corner of the Self Service page
Chapter 6: Managing Work EventsADP Self Service Manager’s Guide

Changing an Employee’s Employment Status 6-123
3. Click Next. The Change Employment Status selection page displays with summary job and salary information for the selected employee.
Figure 6-95. Change Employment Status Page
The header bar will display either Managing Work Events or Direct Reports, indicating from which page you accessed the Change Employment Status page. If more than one employee has been selected for the job action, it is indicated by a number in the top right corner of the page.
For a description of the fields on this page or for related tasks, click the
(Help icon) provided in the right-hand corner of the Self Service page
Chapter 6: Managing Work EventsADP Self Service Manager’s Guide
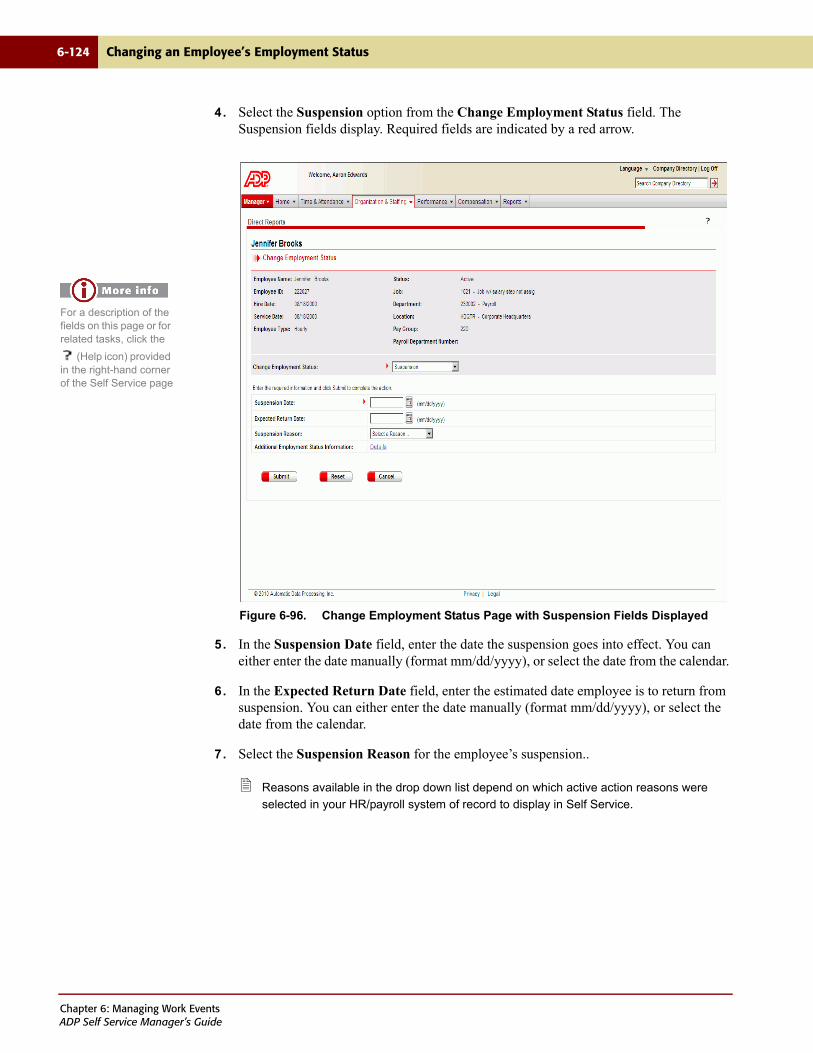
6-124 Changing an Employee’s Employment Status
4. Select the Suspension option from the Change Employment Status field. The Suspension fields display. Required fields are indicated by a red arrow.
Figure 6-96. Change Employment Status Page with Suspension Fields Displayed
5. In the Suspension Date field, enter the date the suspension goes into effect. You can either enter the date manually (format mm/dd/yyyy), or select the date from the calendar.
6. In the Expected Return Date field, enter the estimated date employee is to return from suspension. You can either enter the date manually (format mm/dd/yyyy), or select the date from the calendar.
7. Select the Suspension Reason for the employee’s suspension..
Reasons available in the drop down list depend on which active action reasons were
selected in your HR/payroll system of record to display in Self Service.
For a description of the fields on this page or for related tasks, click the
(Help icon) provided in the right-hand corner of the Self Service page
Chapter 6: Managing Work EventsADP Self Service Manager’s Guide
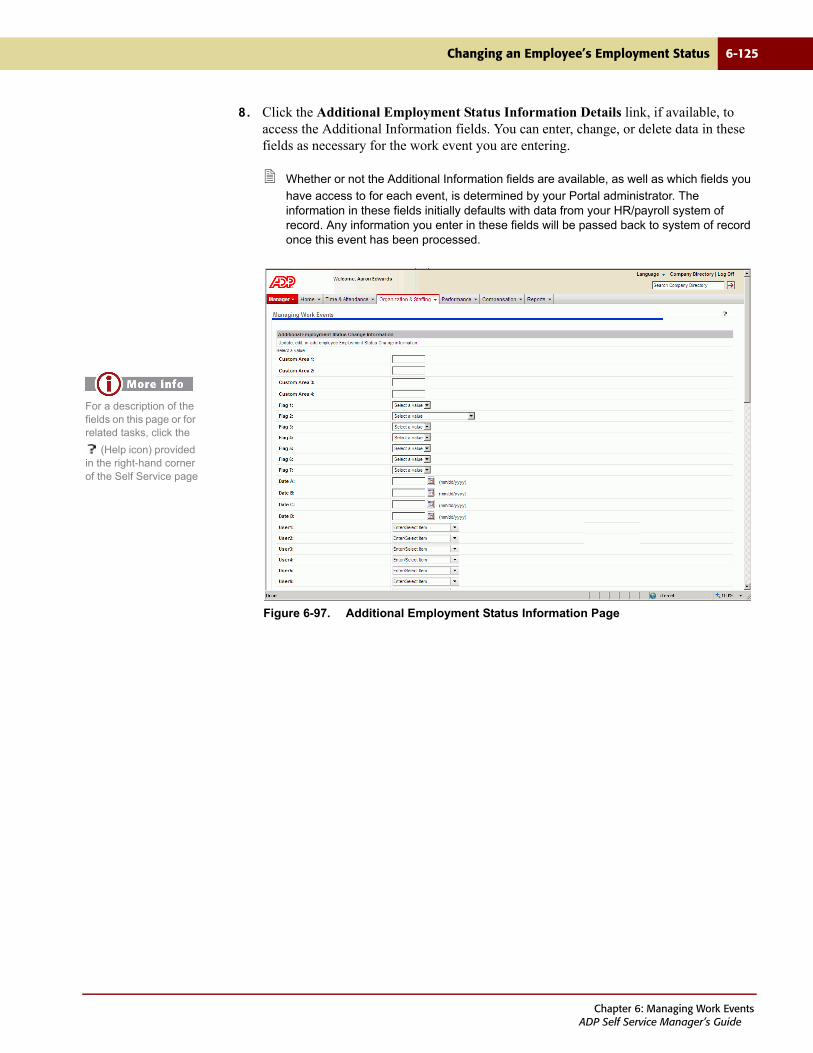
Changing an Employee’s Employment Status 6-125
8. Click the Additional Employment Status Information Details link, if available, to access the Additional Information fields. You can enter, change, or delete data in these fields as necessary for the work event you are entering.
Whether or not the Additional Information fields are available, as well as which fields you
have access to for each event, is determined by your Portal administrator. The information in these fields initially defaults with data from your HR/payroll system of record. Any information you enter in these fields will be passed back to system of record once this event has been processed.
Figure 6-97. Additional Employment Status Information Page
For a description of the fields on this page or for related tasks, click the
(Help icon) provided in the right-hand corner of the Self Service page
Chapter 6: Managing Work EventsADP Self Service Manager’s Guide
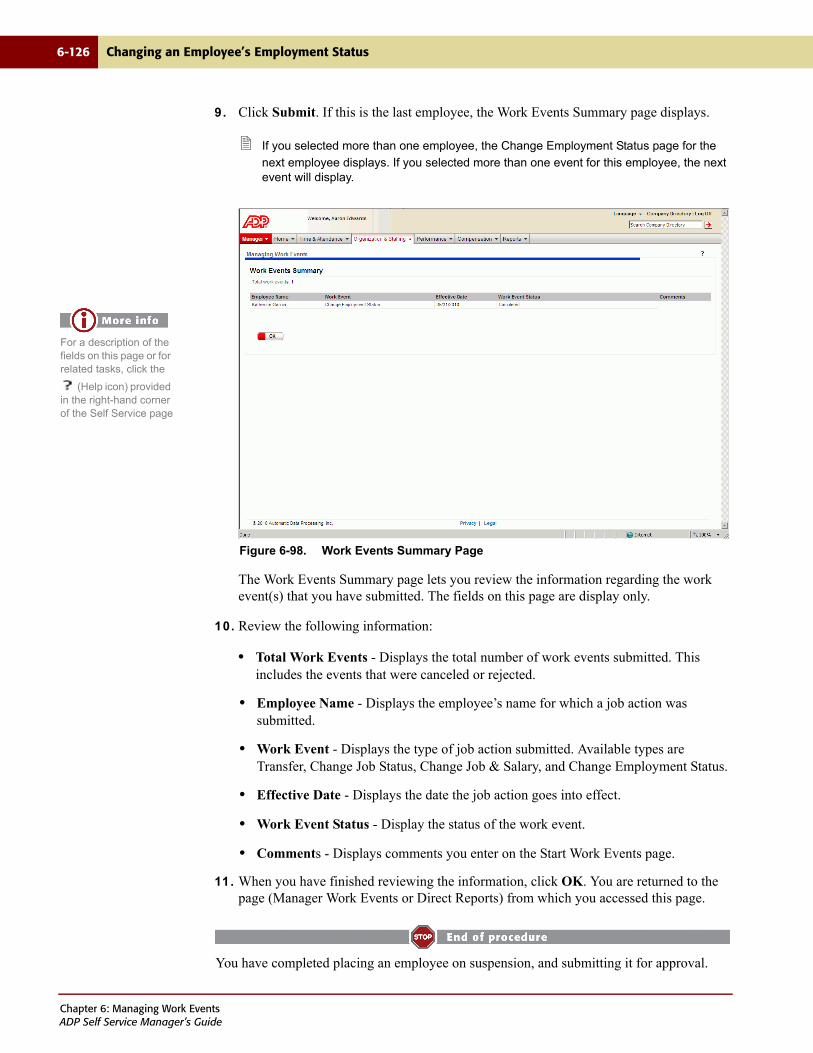
6-126 Changing an Employee’s Employment Status
9. Click Submit. If this is the last employee, the Work Events Summary page displays.
If you selected more than one employee, the Change Employment Status page for the
next employee displays. If you selected more than one event for this employee, the next event will display.
Figure 6-98. Work Events Summary Page
The Work Events Summary page lets you review the information regarding the work event(s) that you have submitted. The fields on this page are display only.
10. Review the following information:
• Total Work Events - Displays the total number of work events submitted. This includes the events that were canceled or rejected.
• Employee Name - Displays the employee’s name for which a job action was submitted.
• Work Event - Displays the type of job action submitted. Available types are Transfer, Change Job Status, Change Job & Salary, and Change Employment Status.
• Effective Date - Displays the date the job action goes into effect.
• Work Event Status - Display the status of the work event.
• Comments - Displays comments you enter on the Start Work Events page.
11. When you have finished reviewing the information, click OK. You are returned to the page (Manager Work Events or Direct Reports) from which you accessed this page.
You have completed placing an employee on suspension, and submitting it for approval.
For a description of the fields on this page or for related tasks, click the
(Help icon) provided in the right-hand corner of the Self Service page
Chapter 6: Managing Work EventsADP Self Service Manager’s Guide

Changing an Employee’s Employment Status 6-127
For information on placing an employee on leave, either paid or unpaid, see “Placing an Employee on Leave” on page 6-105.
For information on placing an employee on suspension, see “Returning an Employee from Leave” on page 6-113.
For information on returning an employee from suspension, see “Returning an Employee from Suspension” on page 6-128.
For information on terminating an employee, see “Terminating an Employee” on page 6-134.
Chapter 6: Managing Work EventsADP Self Service Manager’s Guide
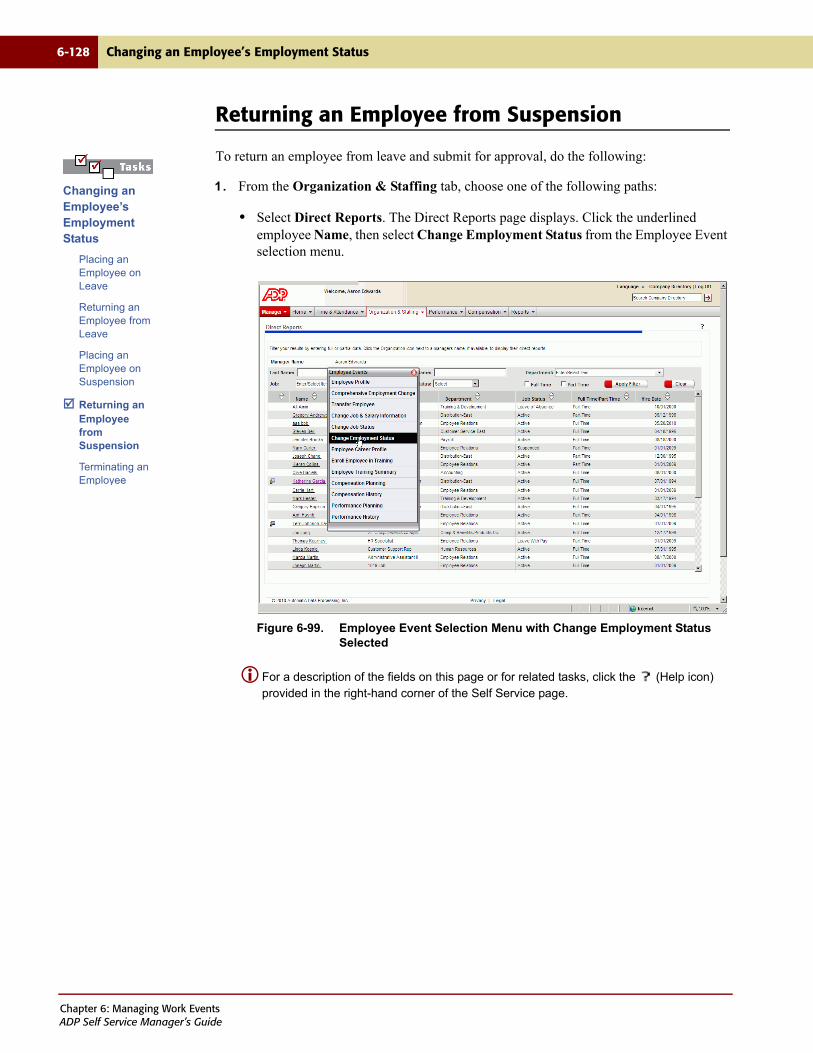
6-128 Changing an Employee’s Employment Status
Returning an Employee from Suspension
To return an employee from leave and submit for approval, do the following:
1. From the Organization & Staffing tab, choose one of the following paths:
• Select Direct Reports. The Direct Reports page displays. Click the underlined employee Name, then select Change Employment Status from the Employee Event selection menu.
Figure 6-99. Employee Event Selection Menu with Change Employment Status Selected
For a description of the fields on this page or for related tasks, click the (Help icon) provided in the right-hand corner of the Self Service page.
Changing an Employee’s Employment Status
Placing an Employee on Leave
Returning an Employee from Leave
Placing an Employee on Suspension
Returning an Employee from Suspension
Terminating an Employee
Chapter 6: Managing Work EventsADP Self Service Manager’s Guide
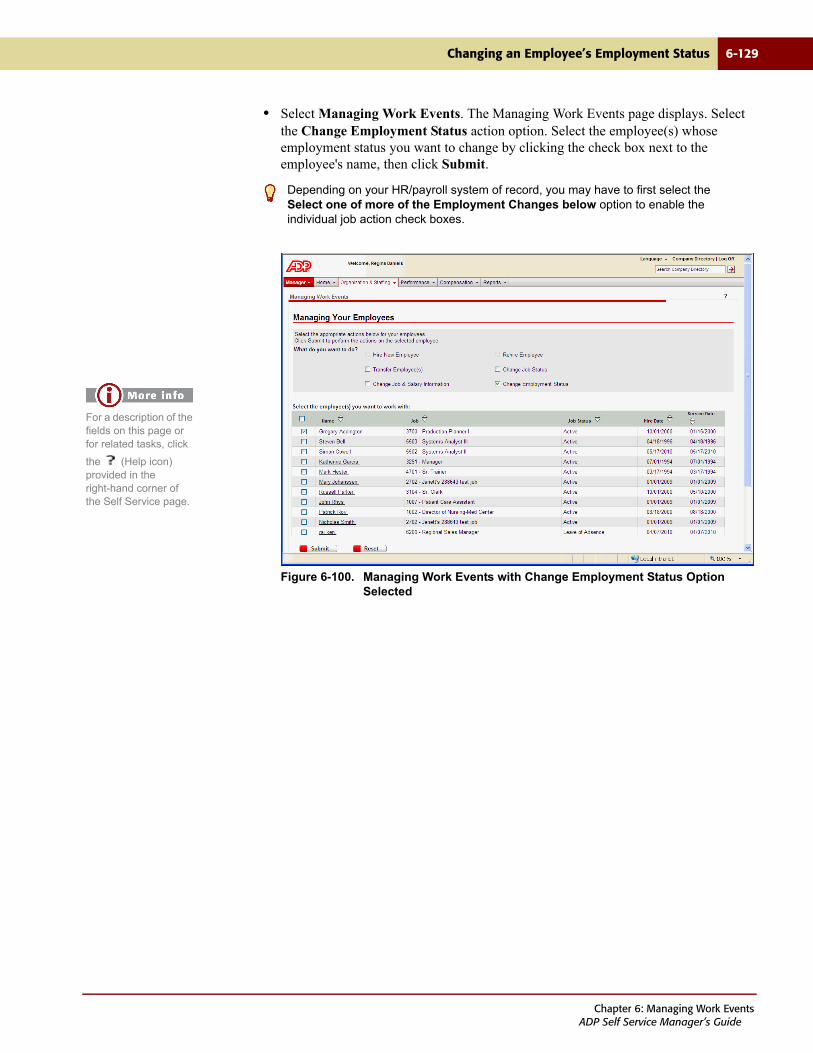
Changing an Employee’s Employment Status 6-129
• Select Managing Work Events. The Managing Work Events page displays. Select the Change Employment Status action option. Select the employee(s) whose employment status you want to change by clicking the check box next to the employee's name, then click Submit.
Figure 6-100. Managing Work Events with Change Employment Status Option Selected
Depending on your HR/payroll system of record, you may have to first select the Select one of more of the Employment Changes below option to enable the individual job action check boxes.
For a description of the fields on this page or for related tasks, click
the (Help icon) provided in the right-hand corner of the Self Service page.
Chapter 6: Managing Work EventsADP Self Service Manager’s Guide

6-130 Changing an Employee’s Employment Status
The Start Work Events page displays.
Figure 6-101. Start Work Events Page
2. In the Comments field, enter a comment if appropriate. The comment is viewable by all approvers, as well as through Approval History.
If the work event is for a single employee with multiple job actions, an Effective Date
field becomes available. The effective date you select applies to all of the job actions in the work event.
For a description of the fields on this page or for related tasks, click the
(Help icon) provided in the right-hand corner of the Self Service page
Chapter 6: Managing Work EventsADP Self Service Manager’s Guide
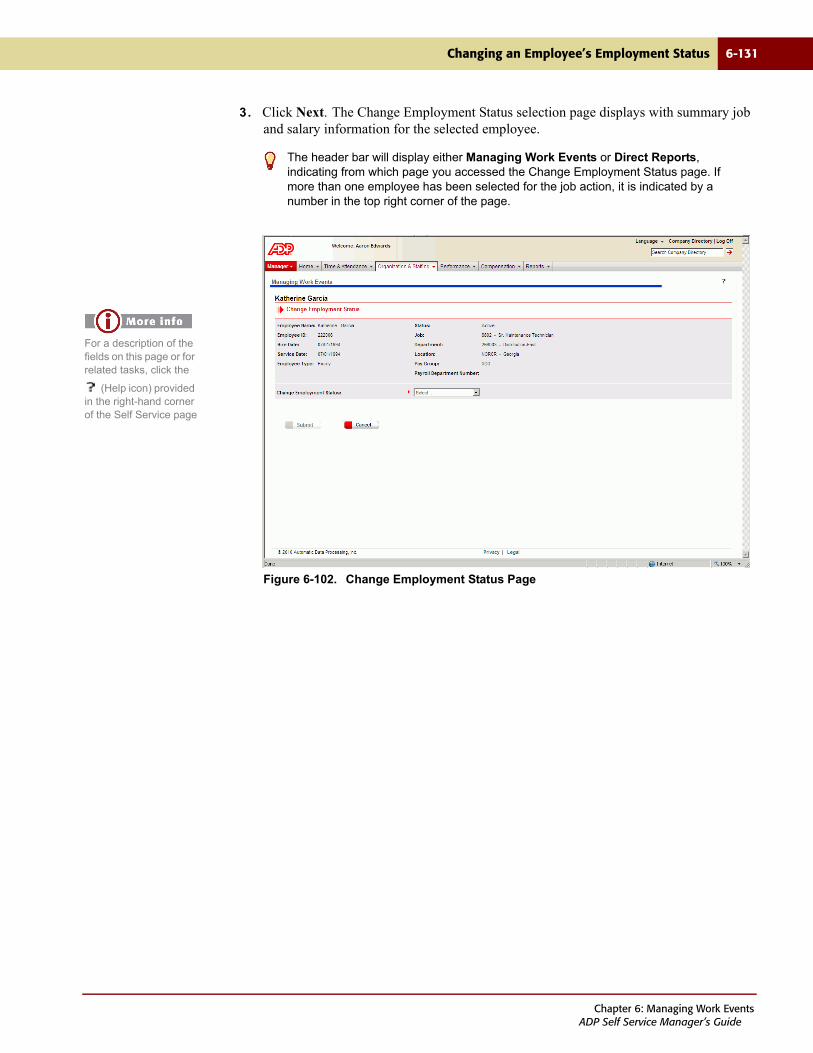
Changing an Employee’s Employment Status 6-131
3. Click Next. The Change Employment Status selection page displays with summary job and salary information for the selected employee.
Figure 6-102. Change Employment Status Page
The header bar will display either Managing Work Events or Direct Reports, indicating from which page you accessed the Change Employment Status page. If more than one employee has been selected for the job action, it is indicated by a number in the top right corner of the page.
For a description of the fields on this page or for related tasks, click the
(Help icon) provided in the right-hand corner of the Self Service page
Chapter 6: Managing Work EventsADP Self Service Manager’s Guide
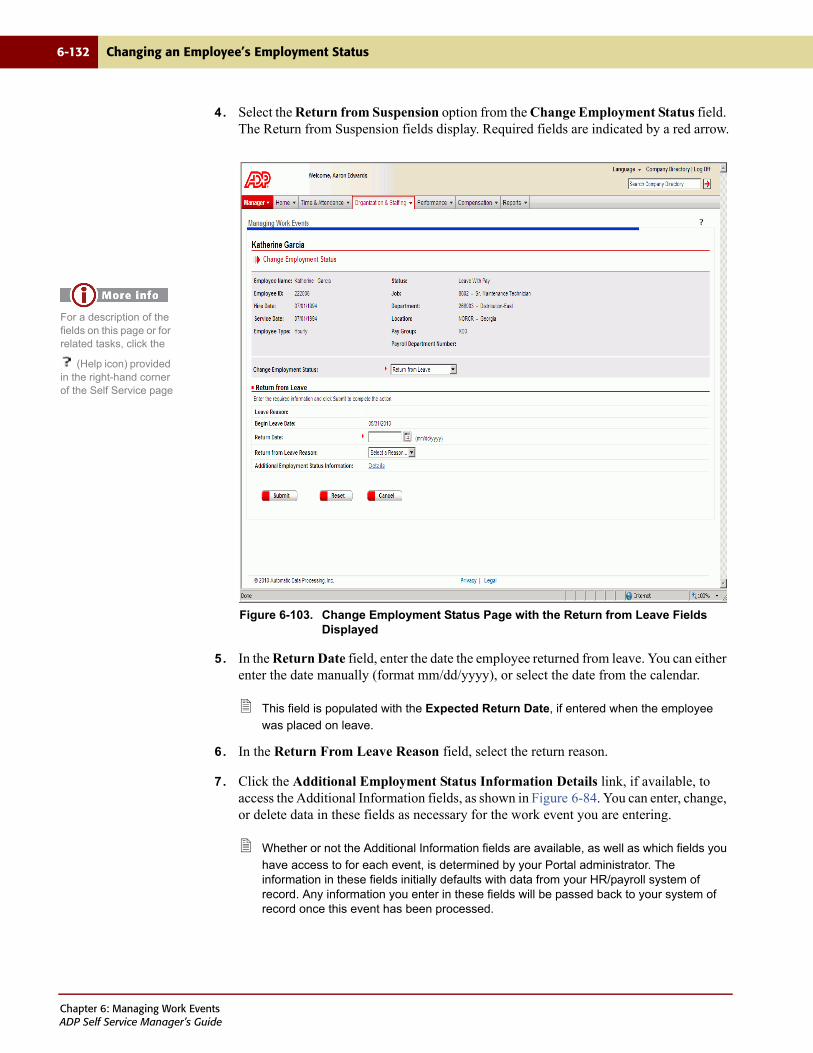
6-132 Changing an Employee’s Employment Status
4. Select the Return from Suspension option from the Change Employment Status field. The Return from Suspension fields display. Required fields are indicated by a red arrow.
Figure 6-103. Change Employment Status Page with the Return from Leave Fields Displayed
5. In the Return Date field, enter the date the employee returned from leave. You can either enter the date manually (format mm/dd/yyyy), or select the date from the calendar.
This field is populated with the Expected Return Date, if entered when the employee
was placed on leave.
6. In the Return From Leave Reason field, select the return reason.
7. Click the Additional Employment Status Information Details link, if available, to access the Additional Information fields, as shown in Figure 6-84. You can enter, change, or delete data in these fields as necessary for the work event you are entering.
Whether or not the Additional Information fields are available, as well as which fields you
have access to for each event, is determined by your Portal administrator. The information in these fields initially defaults with data from your HR/payroll system of record. Any information you enter in these fields will be passed back to your system of record once this event has been processed.
For a description of the fields on this page or for related tasks, click the
(Help icon) provided in the right-hand corner of the Self Service page
Chapter 6: Managing Work EventsADP Self Service Manager’s Guide
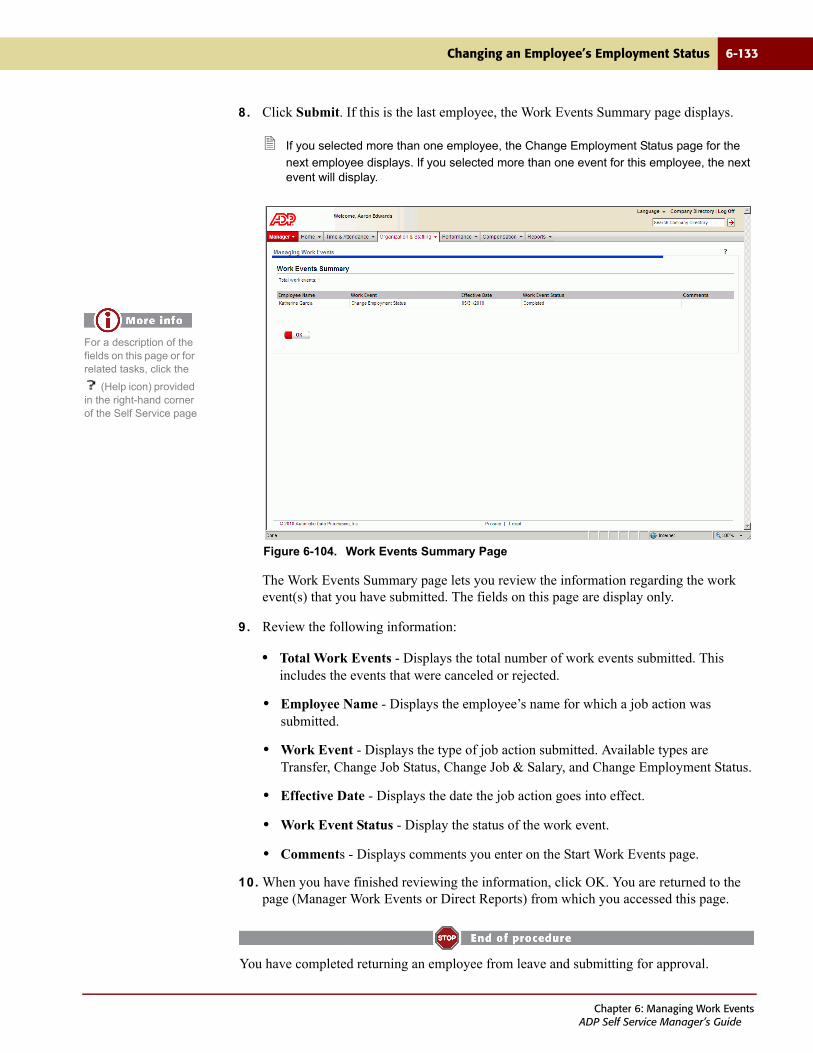
Changing an Employee’s Employment Status 6-133
8. Click Submit. If this is the last employee, the Work Events Summary page displays.
If you selected more than one employee, the Change Employment Status page for the
next employee displays. If you selected more than one event for this employee, the next event will display.
Figure 6-104. Work Events Summary Page
The Work Events Summary page lets you review the information regarding the work event(s) that you have submitted. The fields on this page are display only.
9. Review the following information:
• Total Work Events - Displays the total number of work events submitted. This includes the events that were canceled or rejected.
• Employee Name - Displays the employee’s name for which a job action was submitted.
• Work Event - Displays the type of job action submitted. Available types are Transfer, Change Job Status, Change Job & Salary, and Change Employment Status.
• Effective Date - Displays the date the job action goes into effect.
• Work Event Status - Display the status of the work event.
• Comments - Displays comments you enter on the Start Work Events page.
10. When you have finished reviewing the information, click OK. You are returned to the page (Manager Work Events or Direct Reports) from which you accessed this page.
You have completed returning an employee from leave and submitting for approval.
For a description of the fields on this page or for related tasks, click the
(Help icon) provided in the right-hand corner of the Self Service page
Chapter 6: Managing Work EventsADP Self Service Manager’s Guide
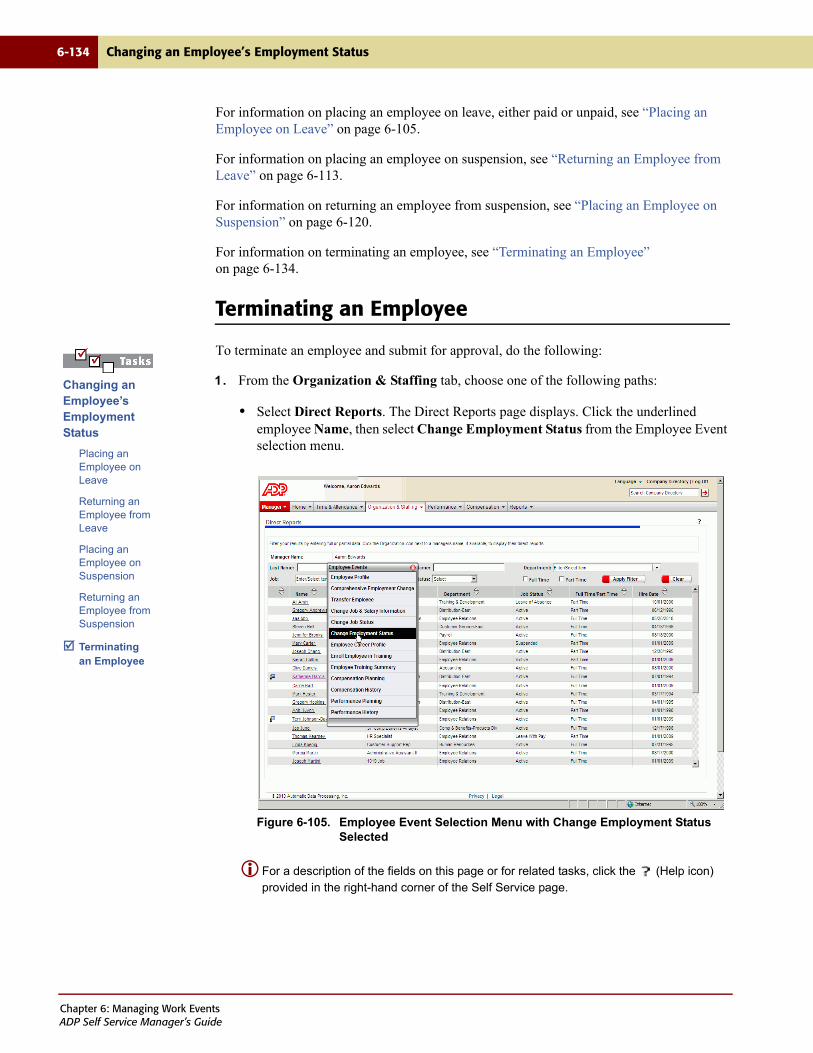
6-134 Changing an Employee’s Employment Status
For information on placing an employee on leave, either paid or unpaid, see “Placing an Employee on Leave” on page 6-105.
For information on placing an employee on suspension, see “Returning an Employee from Leave” on page 6-113.
For information on returning an employee from suspension, see “Placing an Employee on Suspension” on page 6-120.
For information on terminating an employee, see “Terminating an Employee” on page 6-134.
Terminating an Employee
To terminate an employee and submit for approval, do the following:
1. From the Organization & Staffing tab, choose one of the following paths:
• Select Direct Reports. The Direct Reports page displays. Click the underlined employee Name, then select Change Employment Status from the Employee Event selection menu.
Figure 6-105. Employee Event Selection Menu with Change Employment Status Selected
For a description of the fields on this page or for related tasks, click the (Help icon) provided in the right-hand corner of the Self Service page.
Changing an Employee’s Employment Status
Placing an Employee on Leave
Returning an Employee from Leave
Placing an Employee on Suspension
Returning an Employee from Suspension
Terminating an Employee
Chapter 6: Managing Work EventsADP Self Service Manager’s Guide
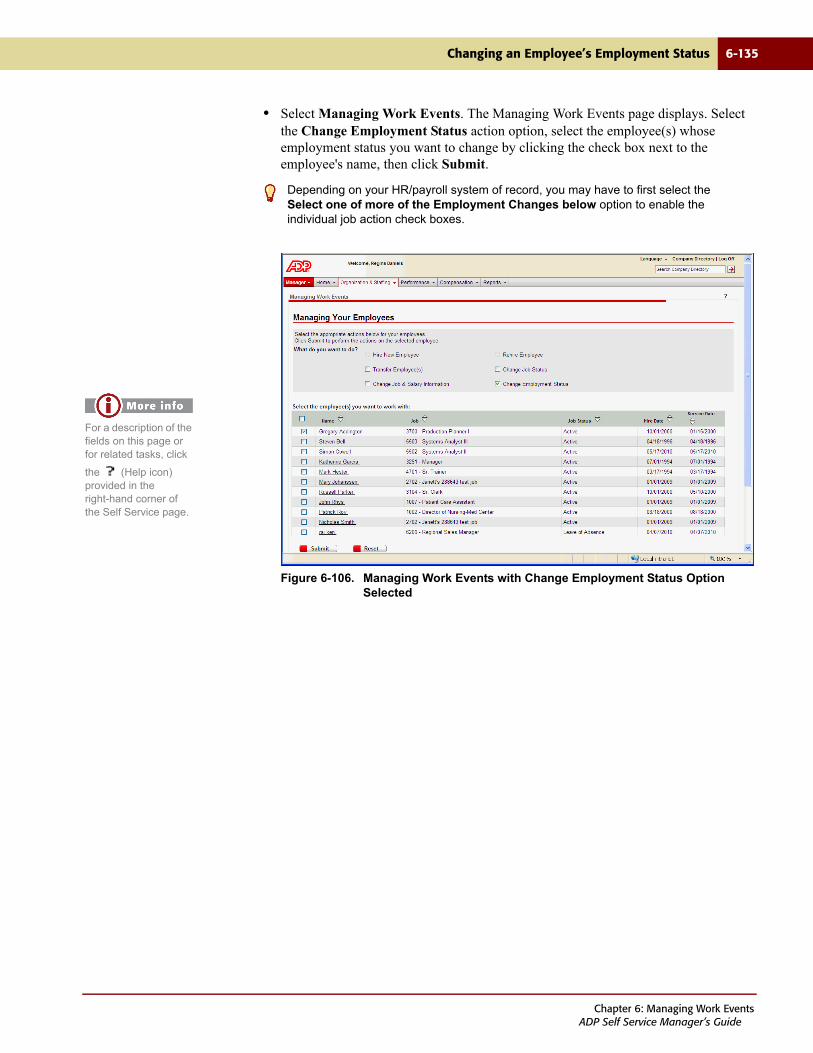
Changing an Employee’s Employment Status 6-135
• Select Managing Work Events. The Managing Work Events page displays. Select the Change Employment Status action option, select the employee(s) whose employment status you want to change by clicking the check box next to the employee's name, then click Submit.
Figure 6-106. Managing Work Events with Change Employment Status Option Selected
Depending on your HR/payroll system of record, you may have to first select the Select one of more of the Employment Changes below option to enable the individual job action check boxes.
For a description of the fields on this page or for related tasks, click
the (Help icon) provided in the right-hand corner of the Self Service page.
Chapter 6: Managing Work EventsADP Self Service Manager’s Guide

6-136 Changing an Employee’s Employment Status
The Start Work Events page displays.
Figure 6-107. Start Work Events Page
2. In the Comments field, enter a comment if appropriate. The comment is viewable by all approvers, as well as through Approval History.
If the work event is for a single employee with multiple job actions, an Effective Date
field becomes available. The effective date you select applies to all of the job actions in the work event.
For a description of the fields on this page or for related tasks, click the
(Help icon) provided in the right-hand corner of the Self Service page
Chapter 6: Managing Work EventsADP Self Service Manager’s Guide
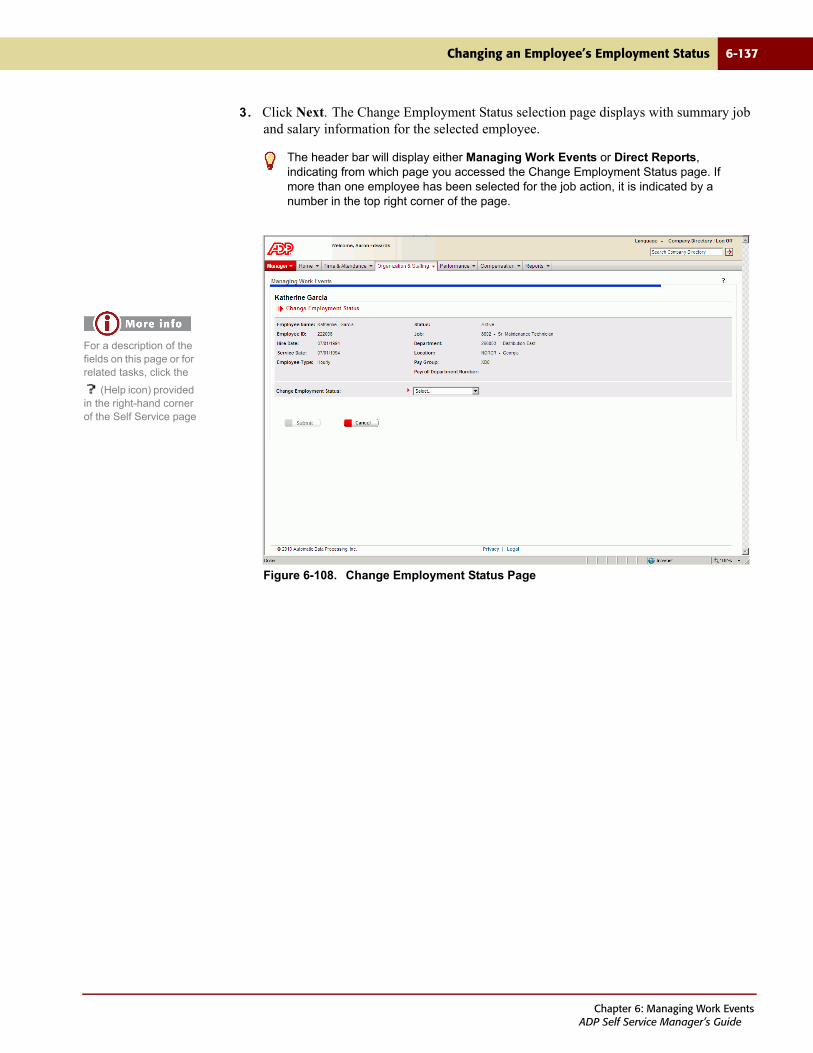
Changing an Employee’s Employment Status 6-137
3. Click Next. The Change Employment Status selection page displays with summary job and salary information for the selected employee.
Figure 6-108. Change Employment Status Page
The header bar will display either Managing Work Events or Direct Reports, indicating from which page you accessed the Change Employment Status page. If more than one employee has been selected for the job action, it is indicated by a number in the top right corner of the page.
For a description of the fields on this page or for related tasks, click the
(Help icon) provided in the right-hand corner of the Self Service page
Chapter 6: Managing Work EventsADP Self Service Manager’s Guide
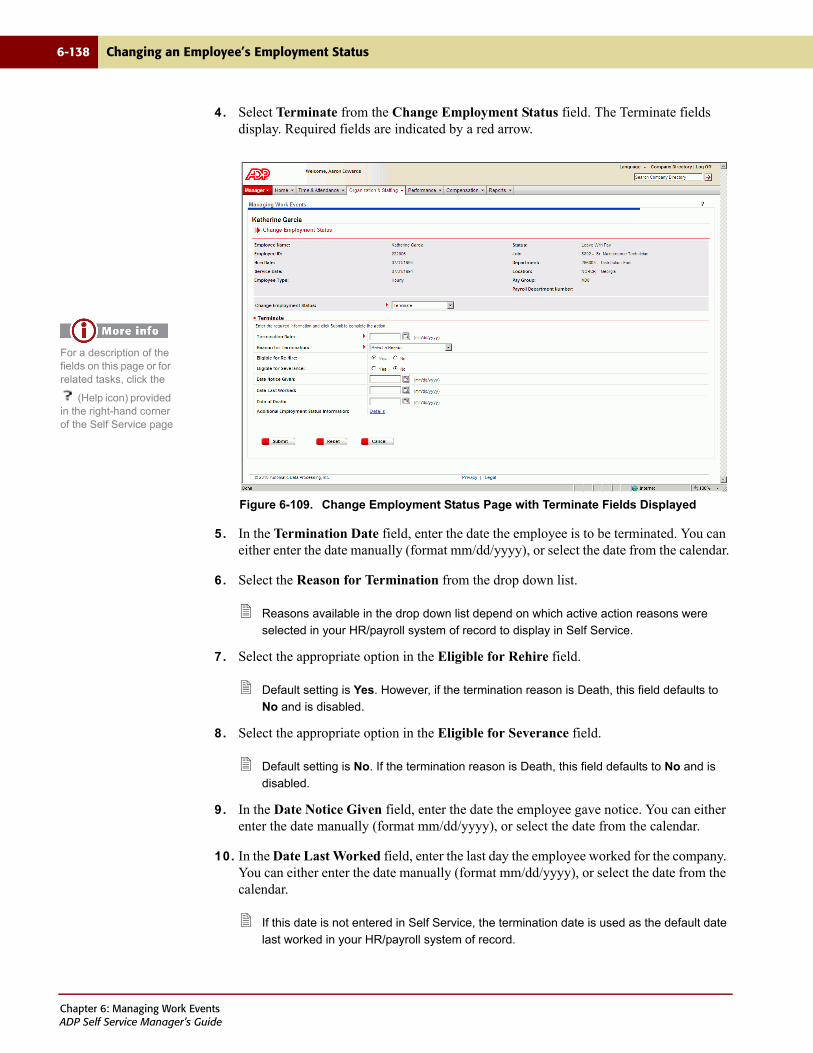
6-138 Changing an Employee’s Employment Status
4. Select Terminate from the Change Employment Status field. The Terminate fields display. Required fields are indicated by a red arrow.
Figure 6-109. Change Employment Status Page with Terminate Fields Displayed
5. In the Termination Date field, enter the date the employee is to be terminated. You can either enter the date manually (format mm/dd/yyyy), or select the date from the calendar.
6. Select the Reason for Termination from the drop down list.
Reasons available in the drop down list depend on which active action reasons were
selected in your HR/payroll system of record to display in Self Service.
7. Select the appropriate option in the Eligible for Rehire field.
Default setting is Yes. However, if the termination reason is Death, this field defaults to
No and is disabled.
8. Select the appropriate option in the Eligible for Severance field.
Default setting is No. If the termination reason is Death, this field defaults to No and is
disabled.
9. In the Date Notice Given field, enter the date the employee gave notice. You can either enter the date manually (format mm/dd/yyyy), or select the date from the calendar.
10. In the Date Last Worked field, enter the last day the employee worked for the company. You can either enter the date manually (format mm/dd/yyyy), or select the date from the calendar.
If this date is not entered in Self Service, the termination date is used as the default date
last worked in your HR/payroll system of record.
For a description of the fields on this page or for related tasks, click the
(Help icon) provided in the right-hand corner of the Self Service page
Chapter 6: Managing Work EventsADP Self Service Manager’s Guide
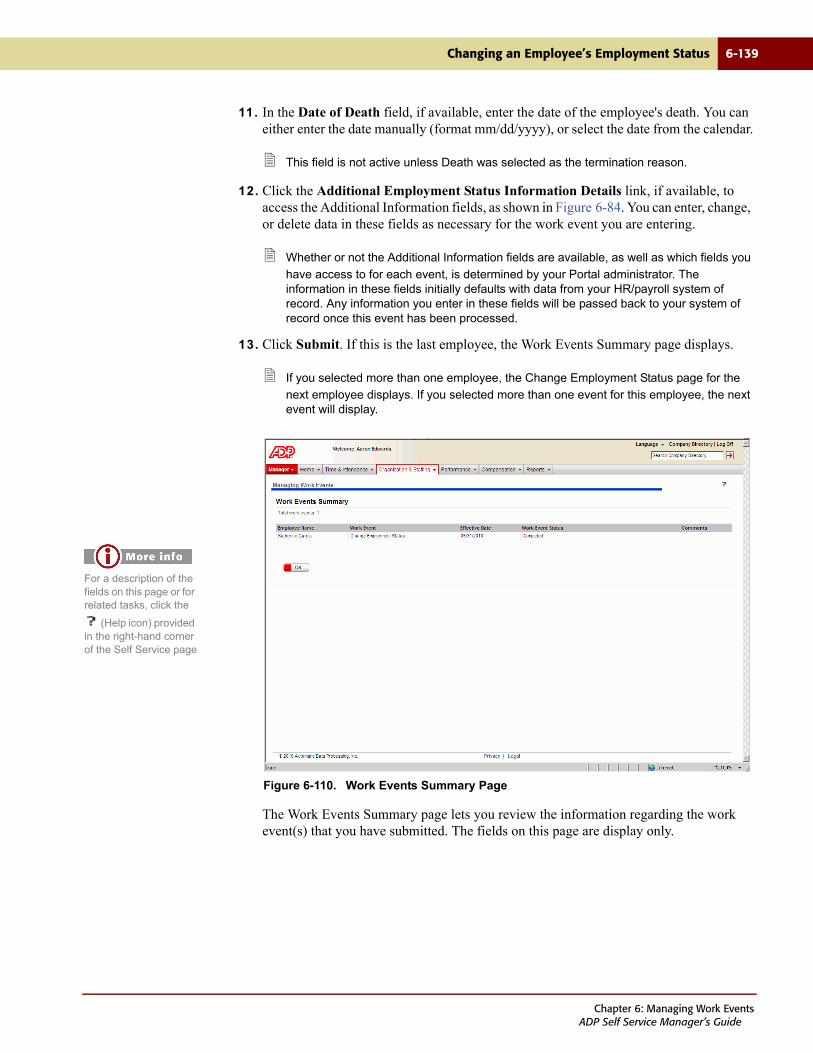
Changing an Employee’s Employment Status 6-139
11. In the Date of Death field, if available, enter the date of the employee's death. You can either enter the date manually (format mm/dd/yyyy), or select the date from the calendar.
This field is not active unless Death was selected as the termination reason.
12. Click the Additional Employment Status Information Details link, if available, to access the Additional Information fields, as shown in Figure 6-84. You can enter, change, or delete data in these fields as necessary for the work event you are entering.
Whether or not the Additional Information fields are available, as well as which fields you
have access to for each event, is determined by your Portal administrator. The information in these fields initially defaults with data from your HR/payroll system of record. Any information you enter in these fields will be passed back to your system of record once this event has been processed.
13. Click Submit. If this is the last employee, the Work Events Summary page displays.
If you selected more than one employee, the Change Employment Status page for the
next employee displays. If you selected more than one event for this employee, the next event will display.
Figure 6-110. Work Events Summary Page
The Work Events Summary page lets you review the information regarding the work event(s) that you have submitted. The fields on this page are display only.
For a description of the fields on this page or for related tasks, click the
(Help icon) provided in the right-hand corner of the Self Service page
Chapter 6: Managing Work EventsADP Self Service Manager’s Guide
6-140 Changing an Employee’s Employment Status
14. Review the following information:
• Total Work Events - Displays the total number of work events submitted. This includes the events that were canceled or rejected.
• Employee Name - Displays the employee’s name for which a job action was submitted.
• Work Event - Displays the type of job action submitted. Available types are Transfer, Change Job Status, Change Job & Salary, and Change Employment Status.
• Effective Date - Displays the date the job action goes into effect.
• Work Event Status - Display the status of the work event.
• Comments - Displays comments you enter on the Start Work Events page.
15. When you have finished reviewing the information, click OK. You are returned to the page (Manager Work Events or Direct Reports) from which you accessed this page.
You have completed terminating an employee and submitting for approval.
For information on placing an employee on leave, either paid or unpaid, see “Placing an Employee on Leave” on page 6-105.
For information on returning an employee from leave, see “Returning an Employee from Leave” on page 6-113.
For information on placing an employee on suspension, see “Placing an Employee on Suspension” on page 6-120.
For information on returning an employee from suspension, see “Returning an Employee from Suspension” on page 6-128.
Chapter 6: Managing Work EventsADP Self Service Manager’s Guide
Using the Comprehensive Employment Change 6-141
Using the Comprehensive Employment Change
The availability of the comprehensive employment change depends on your HR/payroll
system of record. Whether this event is available to you depends on how your administrator has configured your security access in Self Service.
Managers can change job information for employees who report to them and submit the job action for approval. If your administrator has enabled the indirect report update option, you can change information for both your direct and indirect reports. The Comprehensive Employment Change page allows you to update employment information for an employee in a single, inclusive task that encompasses job, employment, compensation, and payroll (if appropriate) information. The page displays all the job actions available to you in a tabbed format that allows you click through the job actions you can perform.
You can create and update a comprehensive employment change through either Direct Reports or through Managing Work Events. Indirect and direct reports can be accessed through Direct Reports. Only direct reports can be accessed through the Managing Work Events task. Creating and updating a comprehensive employment change includes the following tasks:
• Initiating a Comprehensive Employment Change for an Employee
• Changing an Employee's Job Information
• Changing an Employee's Employment Information
• Changing an Employee's Compensation Information
• Changing an Employee's Payroll Information
If there is a pending work event for the selected employee, the Comprehensive Employment Change page does not display when you click Submit. You receive the message, “Employee has previous changes pending approval. Approval is required before you can submit additional changes. Check Approval History for more information.” displays. The pending event must be completed before you can make further changes for the employee. New hires and rehires events cannot be part of a comprehensive work event.
Some of the pages include searchable drop-down fields and/or search fields. For more information, see “Search and Filtering Tips” on page 6-3.
Chapter 6: Managing Work EventsADP Self Service Manager’s Guide
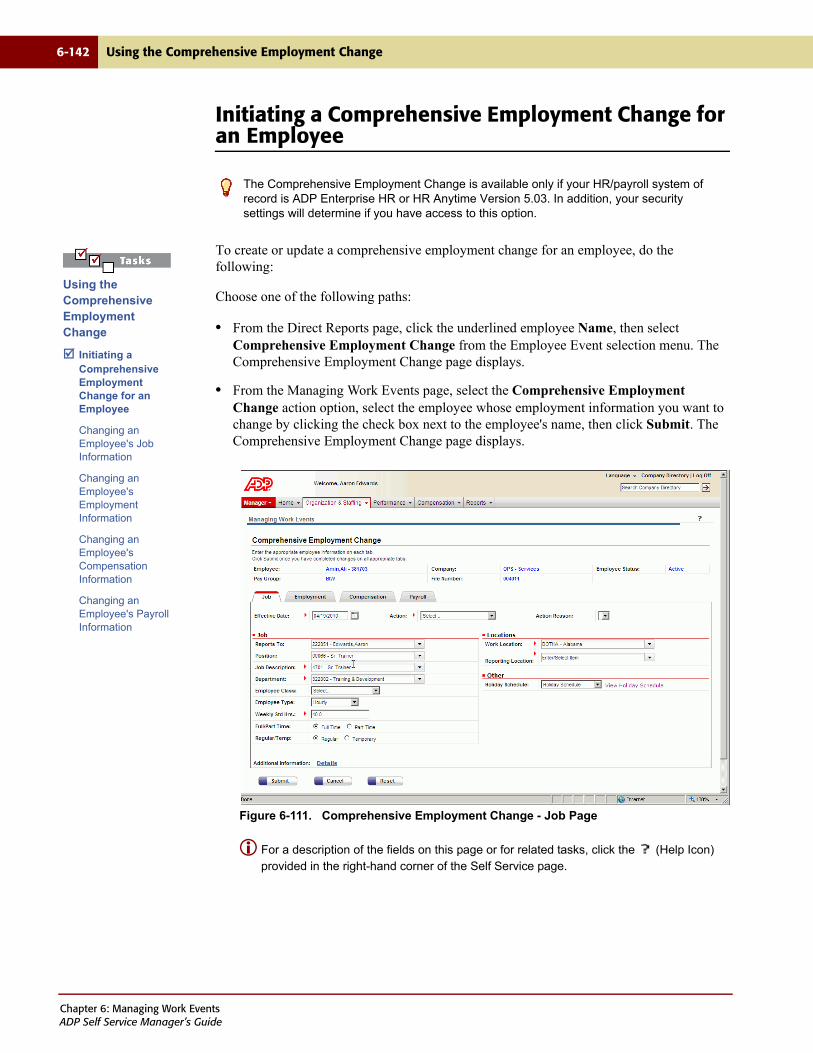
6-142 Using the Comprehensive Employment Change
Initiating a Comprehensive Employment Change for an Employee
To create or update a comprehensive employment change for an employee, do the following:
Choose one of the following paths:
• From the Direct Reports page, click the underlined employee Name, then select Comprehensive Employment Change from the Employee Event selection menu. The Comprehensive Employment Change page displays.
• From the Managing Work Events page, select the Comprehensive Employment Change action option, select the employee whose employment information you want to change by clicking the check box next to the employee's name, then click Submit. The Comprehensive Employment Change page displays.
Figure 6-111. Comprehensive Employment Change - Job Page
For a description of the fields on this page or for related tasks, click the (Help Icon) provided in the right-hand corner of the Self Service page.
The Comprehensive Employment Change is available only if your HR/payroll system of record is ADP Enterprise HR or HR Anytime Version 5.03. In addition, your security settings will determine if you have access to this option.
Using the Comprehensive Employment Change
Initiating a Comprehensive Employment Change for an Employee
Changing an Employee's Job Information
Changing an Employee's Employment Information
Changing an Employee's Compensation Information
Changing an Employee's Payroll Information
Chapter 6: Managing Work EventsADP Self Service Manager’s Guide

Using the Comprehensive Employment Change 6-143
1. Click on the appropriate tab make the appropriate selections to complete or update your comprehensive work event.
2. Creating or updating a comprehensive employment change can include the following tasks:
• Changing an Employee's Job Information
• Changing an Employee's Employment Information
• Changing an Employee's Compensation Information
• Changing an Employee's Payroll Information
Your HR/payroll system of record determines if the Payroll tab displays and is available.
3. Once you have completed all of your updates, click Submit to submit to work flow and initiate the approval process for the comprehensive work event. A Comments window displays for you to enter any appropriate comments.
4. Enter any comments for the changes you have made and click OK. The comments are optional. You are returned to the page (Managing Work Events or Direct Reports) from which you accessed this page.
You have finished initiating a comprehensive employment change. Next, you can change an employee’s job information for that comprehensive employment change.
Chapter 6: Managing Work EventsADP Self Service Manager’s Guide
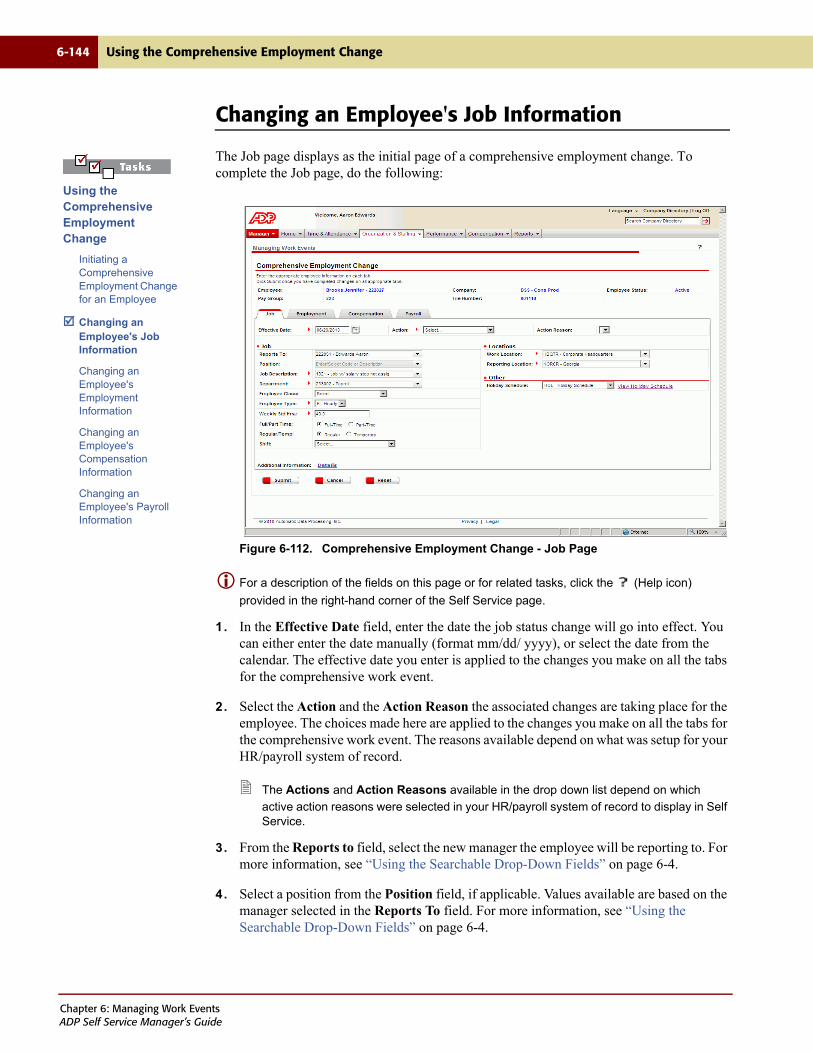
6-144 Using the Comprehensive Employment Change
Changing an Employee's Job Information
The Job page displays as the initial page of a comprehensive employment change. To complete the Job page, do the following:
Figure 6-112. Comprehensive Employment Change - Job Page
For a description of the fields on this page or for related tasks, click the (Help icon)
provided in the right-hand corner of the Self Service page.
1. In the Effective Date field, enter the date the job status change will go into effect. You can either enter the date manually (format mm/dd/ yyyy), or select the date from the calendar. The effective date you enter is applied to the changes you make on all the tabs for the comprehensive work event.
2. Select the Action and the Action Reason the associated changes are taking place for the employee. The choices made here are applied to the changes you make on all the tabs for the comprehensive work event. The reasons available depend on what was setup for your HR/payroll system of record.
The Actions and Action Reasons available in the drop down list depend on which
active action reasons were selected in your HR/payroll system of record to display in Self Service.
3. From the Reports to field, select the new manager the employee will be reporting to. For more information, see “Using the Searchable Drop-Down Fields” on page 6-4.
4. Select a position from the Position field, if applicable. Values available are based on the manager selected in the Reports To field. For more information, see “Using the Searchable Drop-Down Fields” on page 6-4.
Using the Comprehensive Employment Change
Initiating a Comprehensive Employment Change for an Employee
Changing an Employee's Job Information
Changing an Employee's Employment Information
Changing an Employee's Compensation Information
Changing an Employee's Payroll Information
Chapter 6: Managing Work EventsADP Self Service Manager’s Guide

Using the Comprehensive Employment Change 6-145
The Position field is not available if Position Management in your HR/payroll system of record is set to None. If you select a position, the associated default values populate the Department and Location fields, which are then display-only.
5. Select a job code and description from the Job Description field, if applicable, to change the employee's current job code and description.
The Job Description field is display-only if a position was selected from the Position field. If you have not selected a position, you can select a job from the Job field. The Position field is then disabled, and the Salary Step field is populated with the default value, if any, and is display-only.
6. Select the department from the Department field, if applicable. Values available are based on the manager selected in the Reports to field. For more information, see “Using the Searchable Drop-Down Fields” on page 6-4.
If there is a default location associated with the selected department, the value defaults into the Location field.
The Department field is display-only if a position was selected from the Position field. If the Position field is available and the update allowed setting in the selected employee's job record is Yes, and you have not selected a position, you can select a Department. For more information, see “Using the Searchable Drop-Down Fields” on page 6-4.The Position field is then disabled, and the Location field is populated with the default location for the selected department.
7. The Employee Class field initially displays the selected employee's current classification. To change the employee's classification, select the appropriate classification code and description from the drop down list.
8. From the Employee Type field, select the employee type and description from the drop down list. The drop down list is populated with the employee types and descriptions defined in your HR/payroll system of record for the employee's pay group.
9. The Standard Hours field displays the standard hours for the job. You can enter a new value in this field as needed. The minimum and maximum amounts allowed the field are dependent on the HR/payroll system of record.
10. Select Full or Part Time from the Full/Part Time field if applicable. The options are display-only if a position was selected from the Position field. If you have not selected a position, you can change the selection.
11. The Shift field initially displays the selected employee's current shift information, if any. To change the employee's shift information, select the shift code and description from the drop down list. The availability and value of this field depends on your HR/payroll system of record. This field is display only if a position was selected from the Position field.
Note: If the employee's job record in your HR/payroll system of record indicates that no
updates are allowed, the shift field is display only, and cannot be changed.
12. Select Regular or Temporary from the Regular/Temp field if applicable. The options are display-only if a position was selected from the Position field. If you have not selected a position, you can change the selection. For more information, see “Using the Searchable Drop-Down Fields” on page 6-4.
Chapter 6: Managing Work EventsADP Self Service Manager’s Guide

6-146 Using the Comprehensive Employment Change
13. From the Location area, select the employee's appropriate Work Location and Reporting Location. The values of these fields may initially display the default locations for the selected department. They are display-only if a position was selected from the Position field. For more information, see “Using the Searchable Drop-Down Fields” on page 6-4.
14. Select the Holiday Schedule associated with the job if needed. This field is display only if a position is selected for the Position field.
15. Click View Holiday Schedule to display the details for the holiday schedule for the current year. If no schedule is available for the current year, a message displays.
16. Click the Additional Information Details link, if available, to access the Additional Information fields. You can enter, change, or delete data in these fields as necessary for the work event you are entering.
Whether or not the Additional Information fields are available, as well as which fields you
have access to for each event, is determined by your Self Service Administrator. The information in these fields initially defaults with data from your HR/payroll system of record. Any information you enter in these fields will be passed back to your system of record once this event has been processed.
You have finished changing an employee’s information. Next you can change the employee’s employment information.
Chapter 6: Managing Work EventsADP Self Service Manager’s Guide
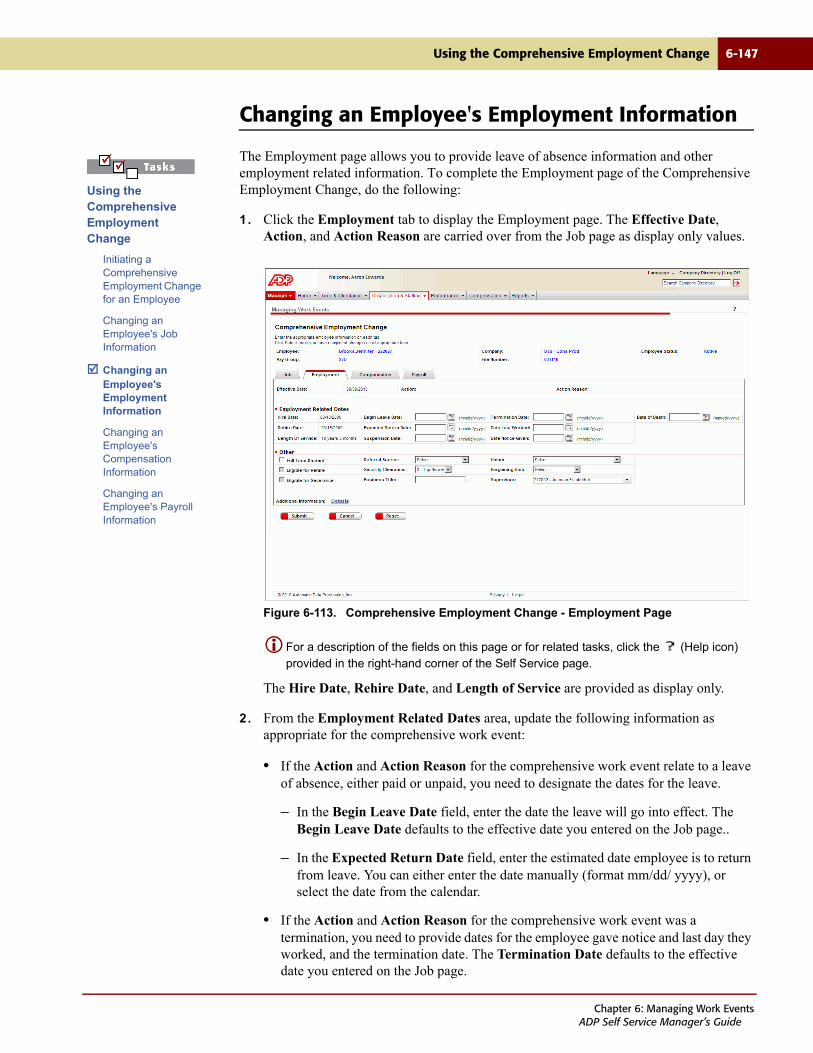
Using the Comprehensive Employment Change 6-147
Changing an Employee's Employment Information
The Employment page allows you to provide leave of absence information and other employment related information. To complete the Employment page of the Comprehensive Employment Change, do the following:
1. Click the Employment tab to display the Employment page. The Effective Date, Action, and Action Reason are carried over from the Job page as display only values.
Figure 6-113. Comprehensive Employment Change - Employment Page
For a description of the fields on this page or for related tasks, click the (Help icon) provided in the right-hand corner of the Self Service page.
The Hire Date, Rehire Date, and Length of Service are provided as display only.
2. From the Employment Related Dates area, update the following information as appropriate for the comprehensive work event:
• If the Action and Action Reason for the comprehensive work event relate to a leave of absence, either paid or unpaid, you need to designate the dates for the leave.
– In the Begin Leave Date field, enter the date the leave will go into effect. The Begin Leave Date defaults to the effective date you entered on the Job page..
– In the Expected Return Date field, enter the estimated date employee is to return from leave. You can either enter the date manually (format mm/dd/ yyyy), or select the date from the calendar.
• If the Action and Action Reason for the comprehensive work event was a termination, you need to provide dates for the employee gave notice and last day they worked, and the termination date. The Termination Date defaults to the effective date you entered on the Job page.
Using the Comprehensive Employment Change
Initiating a Comprehensive Employment Change for an Employee
Changing an Employee's Job Information
Changing an Employee's Employment Information
Changing an Employee's Compensation Information
Changing an Employee's Payroll Information
Chapter 6: Managing Work EventsADP Self Service Manager’s Guide
6-148 Using the Comprehensive Employment Change
– In the Date Notice Given field, enter the date the employee gave notice. You can either enter the date manually (format mm/dd/yyyy), or select the date from the calendar. The date defaults to the effective date you entered on the Job page.
– In the Date Last Worked field, enter the last day the employee worked for the company. You can either enter the date manually (format mm/dd/yyyy), or select the date from the calendar.
If this date is not entered in Self Service, the termination date is used as the
default date last worked in your HR/payroll system of record.
– If the Action for the comprehensive work event was a termination and the Action Reason was death, enter the date of death for the employee in the Date of Death field. You can either enter the date manually (format mm/dd/yyyy), or select the date from the calendar.
This field is not active unless Death was selected as the termination reason.
• If the Action and Action Reason for the comprehensive work event relates to a suspension, select or enter the Expected Return Date. The Suspension Date defaults to the effective date you entered on the Job page.
3. From the Other area, update the following information as appropriate.
• Select the Full Time Student option if the employee is a full-time student. The option defaults to the employee's current status.
• Select the Eligible for Rehire option if the action selected was termination and the reason was not death.
• Select the Eligible for Severance option if the action selected was termination and the reason was not death.
• Select the employee's Referral Source if available. This is the source (such as job posting or employee) that referred the employee to the company. The availability and value of this field depends on your HR/payroll system of record.
• Select the employee's Security Clearance if available. The availability and value of this field depends on your HR/payroll system of record.
• In the Business Title field, enter the employee's official business title, which may or may not be the same as the employee's job title.
• From the Union Code field, select the union identifier for the union to which the employee belongs, if applicable. The availability and value of this field depends on your HR/payroll system of record. This field is display only if a position was selected from the Position field.
Chapter 6: Managing Work EventsADP Self Service Manager’s Guide
Using the Comprehensive Employment Change 6-149
• From the Bargaining Unit field, select the unit of the local union to which the candidate belongs for contract bargaining purposes, if applicable. The values available for selection are based on the Union Code selected. If none is selected, all Bargaining Units are available for selection. This field is display only if a position was selected from the Position field.
• Select the employee's Supervisor is applicable. The value displayed, if any, depends on your HR/payroll system of record.
• Click the Additional Information Details link, if available, to access the Additional Information fields. You can enter, change, or delete data in these fields as necessary for the work event you are entering.
Whether or not the Additional Information fields are available, as well as which
fields you have access to for each event, is determined by your Self Service Administrator. The information in these fields initially defaults with data from your HR/payroll system of record. Any information you enter in these fields will be passed back to your system of record once this event has been processed.
You have finished changing an employee’s employment information. Next you can change the employee’s compensation information.
Chapter 6: Managing Work EventsADP Self Service Manager’s Guide
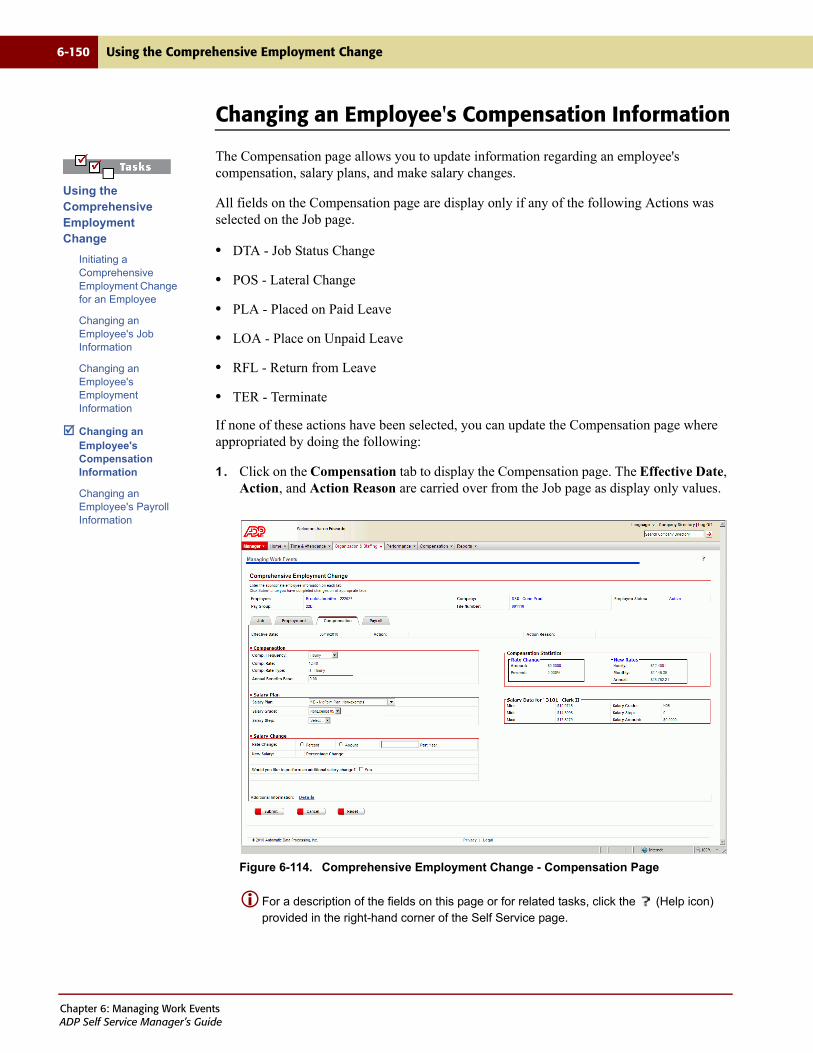
6-150 Using the Comprehensive Employment Change
Changing an Employee's Compensation Information
The Compensation page allows you to update information regarding an employee's compensation, salary plans, and make salary changes.
All fields on the Compensation page are display only if any of the following Actions was selected on the Job page.
• DTA - Job Status Change
• POS - Lateral Change
• PLA - Placed on Paid Leave
• LOA - Place on Unpaid Leave
• RFL - Return from Leave
• TER - Terminate
If none of these actions have been selected, you can update the Compensation page where appropriated by doing the following:
1. Click on the Compensation tab to display the Compensation page. The Effective Date, Action, and Action Reason are carried over from the Job page as display only values.
Figure 6-114. Comprehensive Employment Change - Compensation Page
For a description of the fields on this page or for related tasks, click the (Help icon) provided in the right-hand corner of the Self Service page.
Using the Comprehensive Employment Change
Initiating a Comprehensive Employment Change for an Employee
Changing an Employee's Job Information
Changing an Employee's Employment Information
Changing an Employee's Compensation Information
Changing an Employee's Payroll Information
Chapter 6: Managing Work EventsADP Self Service Manager’s Guide
Using the Comprehensive Employment Change 6-151
2. From the Compensation area, update the following information as appropriate for the comprehensive work event:
• Select the employee's new compensation frequency from the Comp Frequency field. The value is defaulted from the HR/payroll system of record. if you change the value, the compensation rate is recalculated and displayed in the Comp Rate field to replace the calculated rate from the HR/payroll system of record. The Comp Rate Type displayed is from the HR/payroll system of record.
• In the Annual Benefits Base field, enter the annual benefits base which is the fixed rate for calculating benefits coverage or the employee, such as a life insurance. If you enter an amount, the HR/payroll system of record uses this to calculate benefits coverage.
3. From the Salary Plan area, update the following information as appropriate for the comprehensive work event:
• From the Salary Plan field, select a salary plan for the employee if applicable. A salary plan is a unique identifier assigned to a specific compensation program. For example, a company might organize its employees into separate salary plans for exempt and nonexempt employee. When a job code is selected, the associated salary plan is displayed. The salary plans available are dictated by your HR/payroll system of record. See page 6-4 for tips on searching for a field value.
• The Salary Grade and Salary Step fields are also populated when a job code is selected. For complete information on salary step logic and how your HR/payroll system of record has it setup, refer to the documentation for that HR/payroll system of record.
4. From the Salary Change area, update the following information as appropriate for the comprehensive work event:
• From the Rate Change field, select whether the rate change is a Percent or an Amount. Enter an amount or percentage amount, depending on your selection, in the Amount field. Once you enter the amount or the percentage, the values for the New Salary field and Amount/Percent Change are recalculated and displayed.
If the new salary for an employee is above the maximum of the established salary
grade range, a confirmation message displays. A confirmation message also displays if the employee is already above the established maximum salary grade before the salary change.
• To perform an additional salary change, select Yes in the Would you like to perform an additional salary change? field. The Salary Change fields display. Complete the following:
a. Select the Salary Change Reason from the drop down list. Reasons available in the drop down list depend on which active action reasons were selected in your HR/payroll system of record to display in Self Service.
b. Select the Rate Change option, either Percent or Amount (as available) and enter the percent or amount of the pay change, positive or negative. The Per field displays Year or Hour, depending on the employee's compensation frequency The Percent Change/Amount Change and Cumulative fields display the new salary values with negative values displaying in red.
Chapter 6: Managing Work EventsADP Self Service Manager’s Guide

6-152 Using the Comprehensive Employment Change
To add another salary change, click Add Another Salary Change. To delete a salary
changed listed in the Additional Salary Change area, select the appropriate check box to the left of the reason field and click Delete.
5. Click the Additional Information Details link, if available, to access the Additional Information fields. You can enter, change, or delete data in these fields as necessary for the work event you are entering.
Whether or not the Additional Information fields are available, as well as which fields
you have access to for each event, is determined by your Self Service Administrator. The information in these fields initially defaults with data from your HR/payroll system of record. Any information you enter in these fields will be passed back to your system of record once this event has been processed.
You have finished changing an employee’s compensation information. Next you can change the employee’s payroll information.
Chapter 6: Managing Work EventsADP Self Service Manager’s Guide
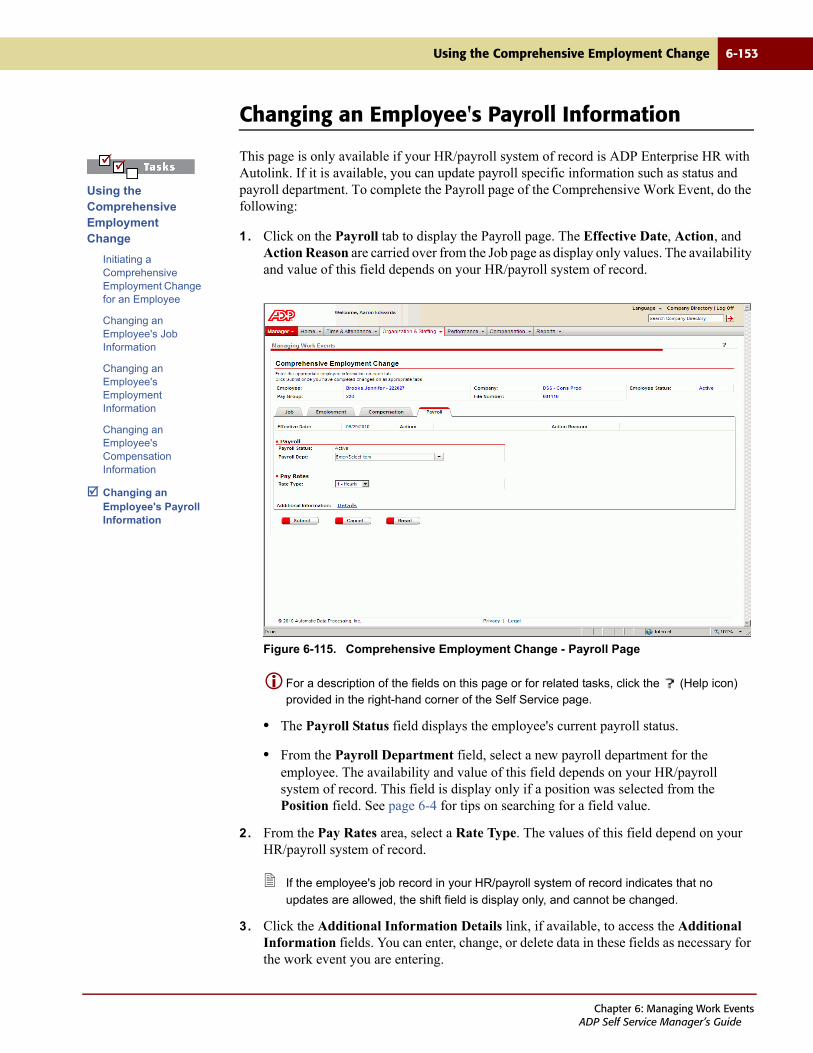
Using the Comprehensive Employment Change 6-153
Changing an Employee's Payroll Information
This page is only available if your HR/payroll system of record is ADP Enterprise HR with Autolink. If it is available, you can update payroll specific information such as status and payroll department. To complete the Payroll page of the Comprehensive Work Event, do the following:
1. Click on the Payroll tab to display the Payroll page. The Effective Date, Action, and Action Reason are carried over from the Job page as display only values. The availability and value of this field depends on your HR/payroll system of record.
Figure 6-115. Comprehensive Employment Change - Payroll Page
For a description of the fields on this page or for related tasks, click the (Help icon) provided in the right-hand corner of the Self Service page.
• The Payroll Status field displays the employee's current payroll status.
• From the Payroll Department field, select a new payroll department for the employee. The availability and value of this field depends on your HR/payroll system of record. This field is display only if a position was selected from the Position field. See page 6-4 for tips on searching for a field value.
2. From the Pay Rates area, select a Rate Type. The values of this field depend on your HR/payroll system of record.
If the employee's job record in your HR/payroll system of record indicates that no
updates are allowed, the shift field is display only, and cannot be changed.
3. Click the Additional Information Details link, if available, to access the Additional Information fields. You can enter, change, or delete data in these fields as necessary for the work event you are entering.
Using the Comprehensive Employment Change
Initiating a Comprehensive Employment Change for an Employee
Changing an Employee's Job Information
Changing an Employee's Employment Information
Changing an Employee's Compensation Information
Changing an Employee's Payroll Information
Chapter 6: Managing Work EventsADP Self Service Manager’s Guide
6-154 Using the Comprehensive Employment Change
Whether or not the Additional Information fields are available, as well as which fields you
have access to for each event, is determined by your Self Service Administrator. The information in these fields initially defaults with data from your HR/payroll system of record. Any information you enter in these fields will be passed back to your system of record once this event has been processed.
You have finished changing an employee’s payroll information. That is the final task in available in creating a comprehensive work event.
Chapter 6: Managing Work EventsADP Self Service Manager’s Guide

Chapter 7
Managing Employee Career andTraining Information
PAGE TOPIC
7-2 Introduction
7-3 Managing Employee Career Profiles
7-17 Enrolling Employees in Training
7-24 Accessing Employee Training Summary Information
Chapter 7: Managing Employee Career and Training InformationADP Self Service Manager’s Guide
7-2 Introduction
Introduction
The Career tab allows employees to view and change their “resume,” which includes education (degree), languages, skills, and license/certification information. Employees can also search for internal job postings, view their training summary, and enroll in training through the Career tab.
Managers can also manage employee career and training, using the following tasks:
• Employee Career Profile - Managers can add and update employee career information.
• Enroll Employee in Training - Managers can enroll employees in available training.
• Employee Training Summary - Manager’s can view training employee information, as well as cancel an employee’s enrollment in a training activity.
Which employee career and/or training tasks are available to you depends on how your administrator has configured your security access in Self Service. You can perform these employee events on your direct reports, as well as your indirect reports if your administrator has enabled the indirect report update option. If this option has not been enabled, you can initiate these employee events only for your direct reports.
Managing employee career and training information consists of the following tasks:
• Managing Employee Career Profiles
• Enrolling Employees in Training
• Accessing Employee Training Summary Information
Chapter 7: Managing Employee Career and Training InformationADP Self Service Manager’s Guide
Managing Employee Career Profiles 7-3
Managing Employee Career Profiles
Managing employee career profile information includes the following tasks:
• Adding or Changing Education Information
• Adding or Changing Language Information
• Adding or Changing Skill Information
• Adding or Changing License/Certificate Information
Depending on your HR/payroll system of record, a maximum of 300 results can be displayed
for a number of searchable fields. If available, you can limit the employee listing by using the search fields at the top of the page to filter your results. For more information on using these fields, see Chapter 6, “Using Search Fields to Filter Results.”
Chapter 7: Managing Employee Career and Training InformationADP Self Service Manager’s Guide
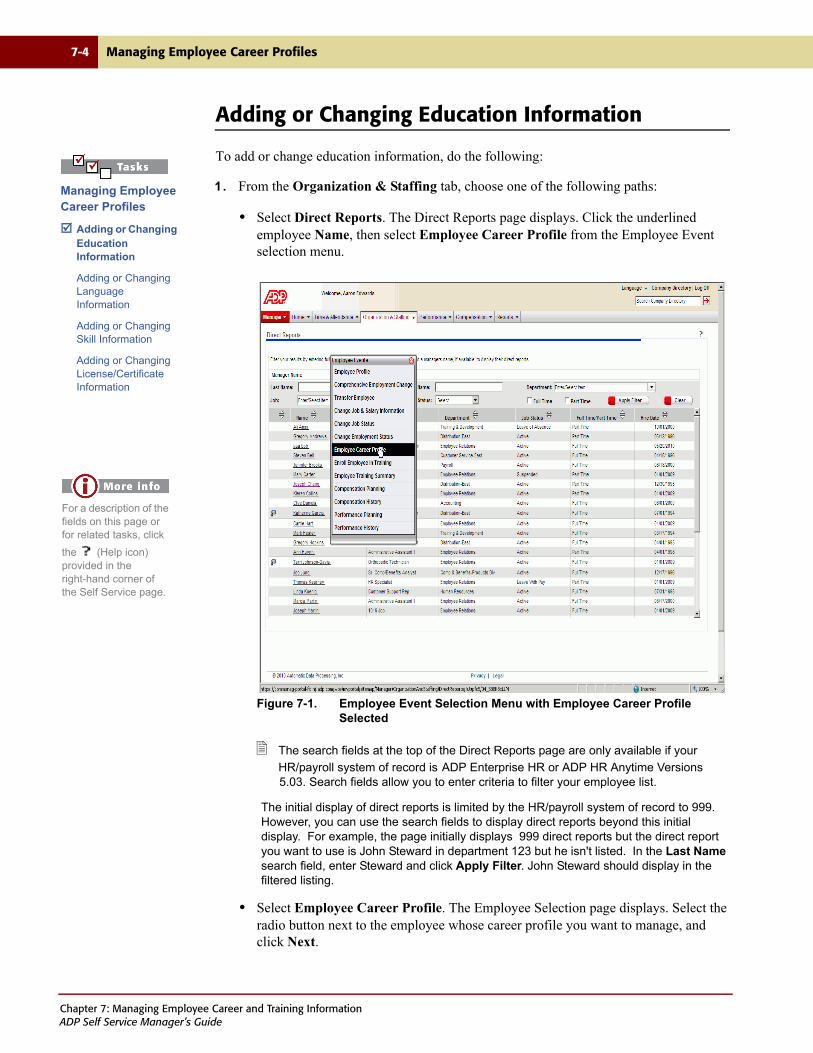
7-4 Managing Employee Career Profiles
Adding or Changing Education Information
To add or change education information, do the following:
1. From the Organization & Staffing tab, choose one of the following paths:
• Select Direct Reports. The Direct Reports page displays. Click the underlined employee Name, then select Employee Career Profile from the Employee Event selection menu.
Figure 7-1. Employee Event Selection Menu with Employee Career Profile Selected
The search fields at the top of the Direct Reports page are only available if your
HR/payroll system of record is ADP Enterprise HR or ADP HR Anytime Versions 5.03. Search fields allow you to enter criteria to filter your employee list.
The initial display of direct reports is limited by the HR/payroll system of record to 999. However, you can use the search fields to display direct reports beyond this initial display. For example, the page initially displays 999 direct reports but the direct report you want to use is John Steward in department 123 but he isn't listed. In the Last Name search field, enter Steward and click Apply Filter. John Steward should display in the filtered listing.
• Select Employee Career Profile. The Employee Selection page displays. Select the radio button next to the employee whose career profile you want to manage, and click Next.
Managing Employee Career Profiles
Adding or Changing Education Information
Adding or Changing Language Information
Adding or Changing Skill Information
Adding or Changing License/Certificate Information
For a description of the fields on this page or for related tasks, click
the (Help icon) provided in the right-hand corner of the Self Service page.
Chapter 7: Managing Employee Career and Training InformationADP Self Service Manager’s Guide

Managing Employee Career Profiles 7-5
Clicking the underlined employee Name on the Employee Selection page accesses
the Employee Profile.
Figure 7-2. Employee Selection Page, Accessed from Employee Career Profile Task
The search fields at the top of the Employee Selection page are only available if your
HR/payroll system of record is ADP Enterprise HR or ADP HR Anytime Versions 5.03. Search fields allow you to enter criteria to filter your employee list.
For a description of the fields on this page or for related tasks, click
the (Help icon) provided in the right-hand corner of the Self Service page.
Chapter 7: Managing Employee Career and Training InformationADP Self Service Manager’s Guide
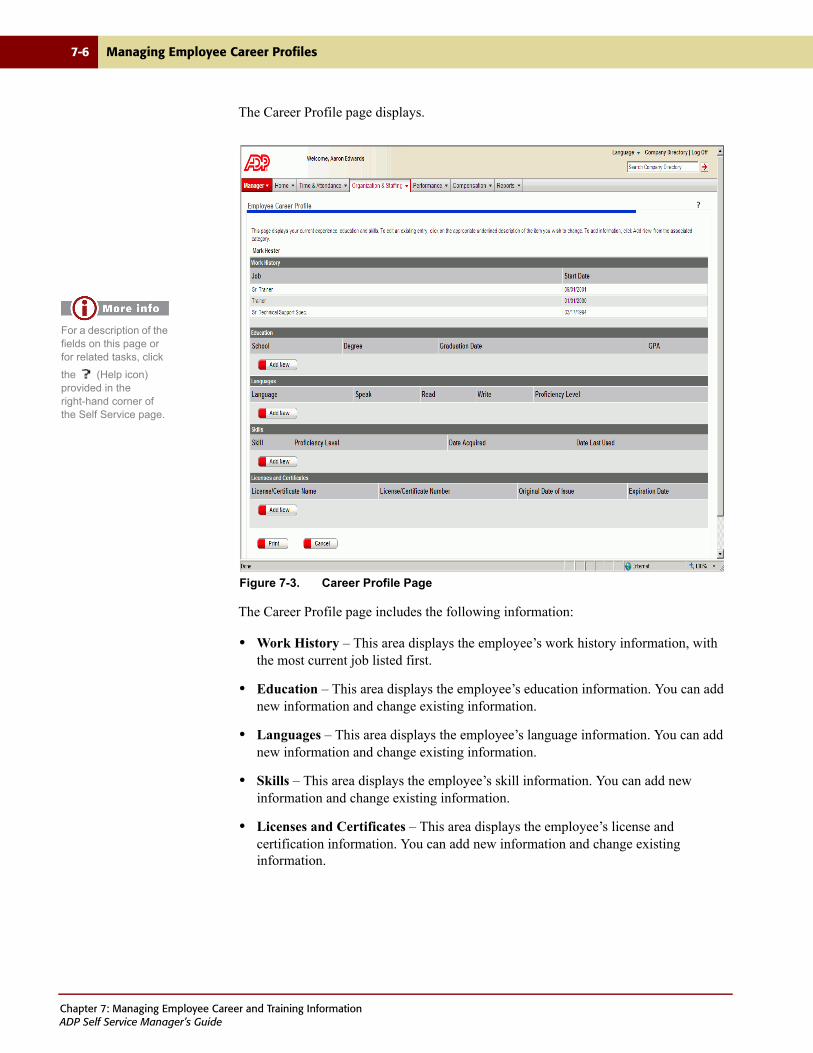
7-6 Managing Employee Career Profiles
The Career Profile page displays.
Figure 7-3. Career Profile Page
The Career Profile page includes the following information:
• Work History – This area displays the employee’s work history information, with the most current job listed first.
• Education – This area displays the employee’s education information. You can add new information and change existing information.
• Languages – This area displays the employee’s language information. You can add new information and change existing information.
• Skills – This area displays the employee’s skill information. You can add new information and change existing information.
• Licenses and Certificates – This area displays the employee’s license and certification information. You can add new information and change existing information.
For a description of the fields on this page or for related tasks, click
the (Help icon) provided in the right-hand corner of the Self Service page.
Chapter 7: Managing Employee Career and Training InformationADP Self Service Manager’s Guide

Managing Employee Career Profiles 7-7
2. From Education area, do one of the following:
• To add new education information, click Add New. The Add Education page displays.
Figure 7-4. Add Education Page
For a description of the fields on this page or for related tasks, click
the (Help icon) provided in the right-hand corner of the Self Service page.
Chapter 7: Managing Employee Career and Training InformationADP Self Service Manager’s Guide
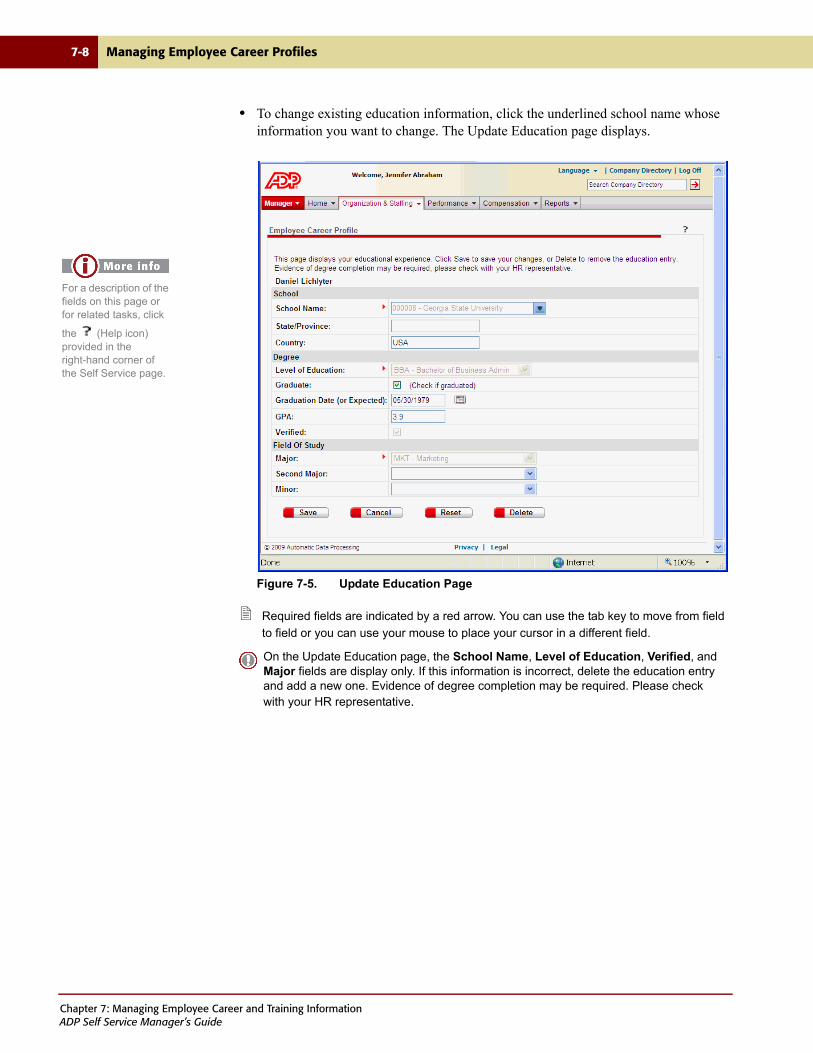
7-8 Managing Employee Career Profiles
• To change existing education information, click the underlined school name whose information you want to change. The Update Education page displays.
Figure 7-5. Update Education Page
Required fields are indicated by a red arrow. You can use the tab key to move from field
to field or you can use your mouse to place your cursor in a different field.
On the Update Education page, the School Name, Level of Education, Verified, and Major fields are display only. If this information is incorrect, delete the education entry and add a new one. Evidence of degree completion may be required. Please check with your HR representative.
For a description of the fields on this page or for related tasks, click
the (Help icon) provided in the right-hand corner of the Self Service page.
Chapter 7: Managing Employee Career and Training InformationADP Self Service Manager’s Guide
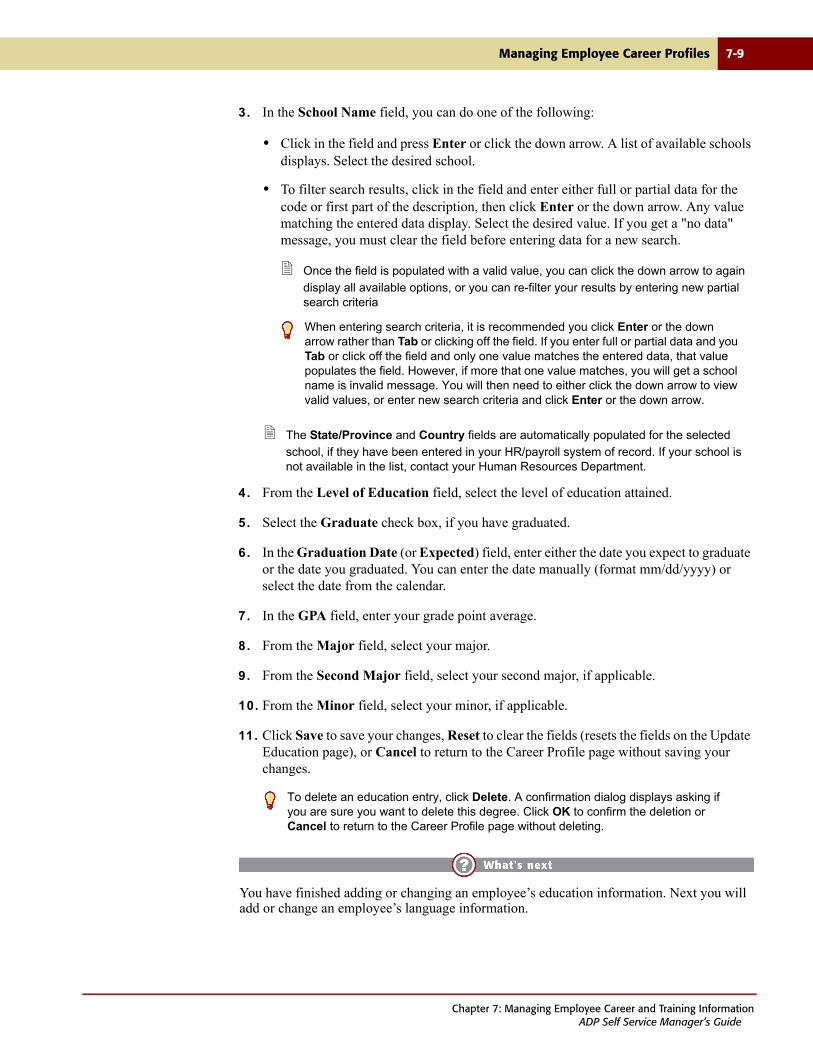
Managing Employee Career Profiles 7-9
3. In the School Name field, you can do one of the following:
• Click in the field and press Enter or click the down arrow. A list of available schools displays. Select the desired school.
• To filter search results, click in the field and enter either full or partial data for the code or first part of the description, then click Enter or the down arrow. Any value matching the entered data display. Select the desired value. If you get a "no data" message, you must clear the field before entering data for a new search.
Once the field is populated with a valid value, you can click the down arrow to again
display all available options, or you can re-filter your results by entering new partial search criteria
The State/Province and Country fields are automatically populated for the selected
school, if they have been entered in your HR/payroll system of record. If your school is not available in the list, contact your Human Resources Department.
4. From the Level of Education field, select the level of education attained.
5. Select the Graduate check box, if you have graduated.
6. In the Graduation Date (or Expected) field, enter either the date you expect to graduate or the date you graduated. You can enter the date manually (format mm/dd/yyyy) or select the date from the calendar.
7. In the GPA field, enter your grade point average.
8. From the Major field, select your major.
9. From the Second Major field, select your second major, if applicable.
10. From the Minor field, select your minor, if applicable.
11. Click Save to save your changes, Reset to clear the fields (resets the fields on the Update Education page), or Cancel to return to the Career Profile page without saving your changes.
You have finished adding or changing an employee’s education information. Next you will add or change an employee’s language information.
When entering search criteria, it is recommended you click Enter or the down arrow rather than Tab or clicking off the field. If you enter full or partial data and you Tab or click off the field and only one value matches the entered data, that value populates the field. However, if more that one value matches, you will get a school name is invalid message. You will then need to either click the down arrow to view valid values, or enter new search criteria and click Enter or the down arrow.
To delete an education entry, click Delete. A confirmation dialog displays asking if you are sure you want to delete this degree. Click OK to confirm the deletion or Cancel to return to the Career Profile page without deleting.
Chapter 7: Managing Employee Career and Training InformationADP Self Service Manager’s Guide

7-10 Managing Employee Career Profiles
Adding or Changing Language Information
To add or change education information, do the following:
1. From the Organization & Staffing tab, choose one of the following paths:
• Select Direct Reports. The Direct Reports page displays. Click the underlined employee Name, then select Employee Career Profile from the Employee Event selection menu (see Figure 7-1 on page 7-4).
• Select Employee Career Profile. The Employee Selection page displays. Select the radio button next to the employee whose career profile you want to manage, and click Next (see Figure 7-2 on page 7-5).
Clicking the underlined employee Name on the Employee Selection page accesses
the Employee Profile.
The Career Profile page displays (see Figure 7-3 on page 7-6).
2. From the Languages area, do one of the following:
• To add new language information, click Add New. The Add Languages page displays.
Figure 7-6. Add Languages Page
Managing Employee Career Profiles
Adding or Changing Education Information
Adding or Changing Language Information
Adding or Changing Skill Information
Adding or Changing License/Certificate Information
For a description of the fields on this page or for related tasks, click
the (Help icon) provided in the right-hand corner of the Self Service page.
Chapter 7: Managing Employee Career and Training InformationADP Self Service Manager’s Guide

Managing Employee Career Profiles 7-11
• To change existing language information, click the underlined language name whose information you want to change. The Update Languages page displays.
Figure 7-7. Update Languages Page
Required fields are indicated by a red arrow. You can use the tab key to move from field
to field or you can use your mouse to place your cursor in a different field.
3. From the Language field, select the language. If the language you need to add is not available in the list, contact your Human Resources Department.
On the Update Language page, the Language field is display-only.
4. Click on any combination of the Speak, Read, and Write options to denote your proficiency in the language.
5. From the Proficiency field select the competence level that best describes your command of the language.
6. Click Save to save your changes, Reset to clear the fields (resets the fields on the Update Languages page), or Cancel to return to the Career Profile page without saving your changes.
You have finished adding or changing an employee’s language information. Next you will add or change an employee’s skill information.
To delete a language entry, click Delete. A confirmation dialog displays asking if you are sure you want to delete this language. Click OK to confirm the deletion or Cancel to return to the Career Profile page without deleting.
For a description of the fields on this page or for related tasks, click
the (Help icon) provided in the right-hand corner of the Self Service page.
Chapter 7: Managing Employee Career and Training InformationADP Self Service Manager’s Guide
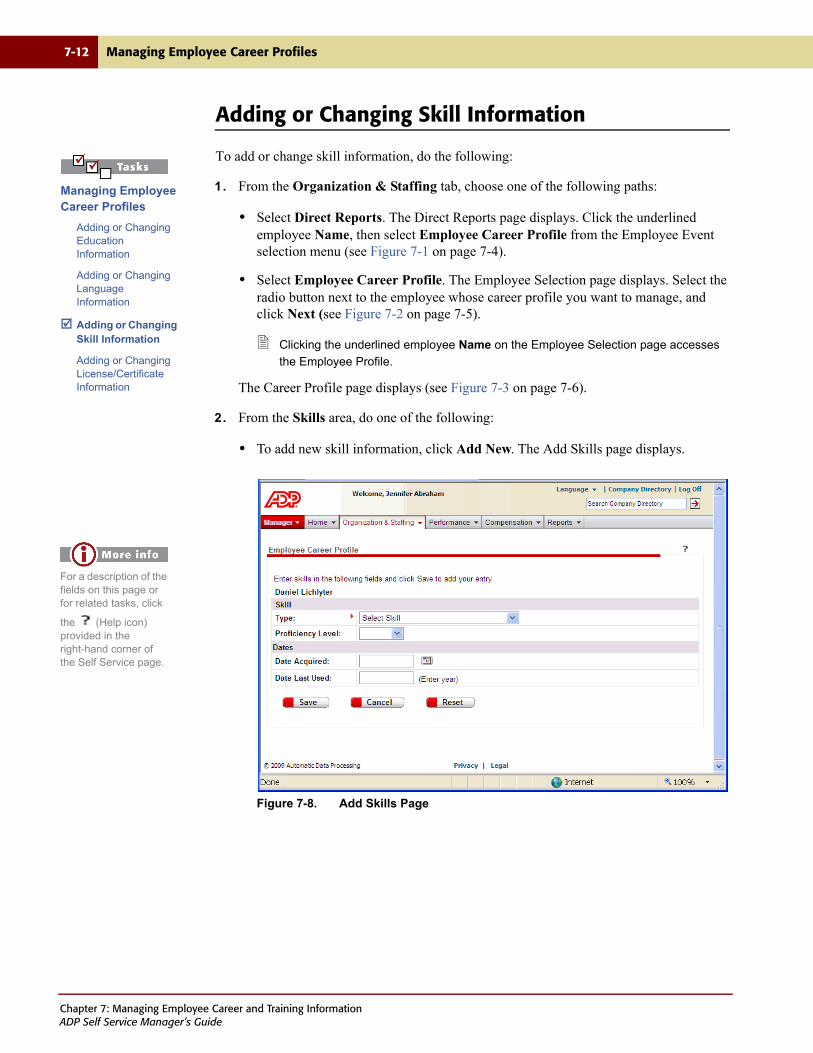
7-12 Managing Employee Career Profiles
Adding or Changing Skill Information
To add or change skill information, do the following:
1. From the Organization & Staffing tab, choose one of the following paths:
• Select Direct Reports. The Direct Reports page displays. Click the underlined employee Name, then select Employee Career Profile from the Employee Event selection menu (see Figure 7-1 on page 7-4).
• Select Employee Career Profile. The Employee Selection page displays. Select the radio button next to the employee whose career profile you want to manage, and click Next (see Figure 7-2 on page 7-5).
Clicking the underlined employee Name on the Employee Selection page accesses
the Employee Profile.
The Career Profile page displays (see Figure 7-3 on page 7-6).
2. From the Skills area, do one of the following:
• To add new skill information, click Add New. The Add Skills page displays.
Figure 7-8. Add Skills Page
Managing Employee Career Profiles
Adding or Changing Education Information
Adding or Changing Language Information
Adding or Changing Skill Information
Adding or Changing License/Certificate Information
For a description of the fields on this page or for related tasks, click
the (Help icon) provided in the right-hand corner of the Self Service page.
Chapter 7: Managing Employee Career and Training InformationADP Self Service Manager’s Guide
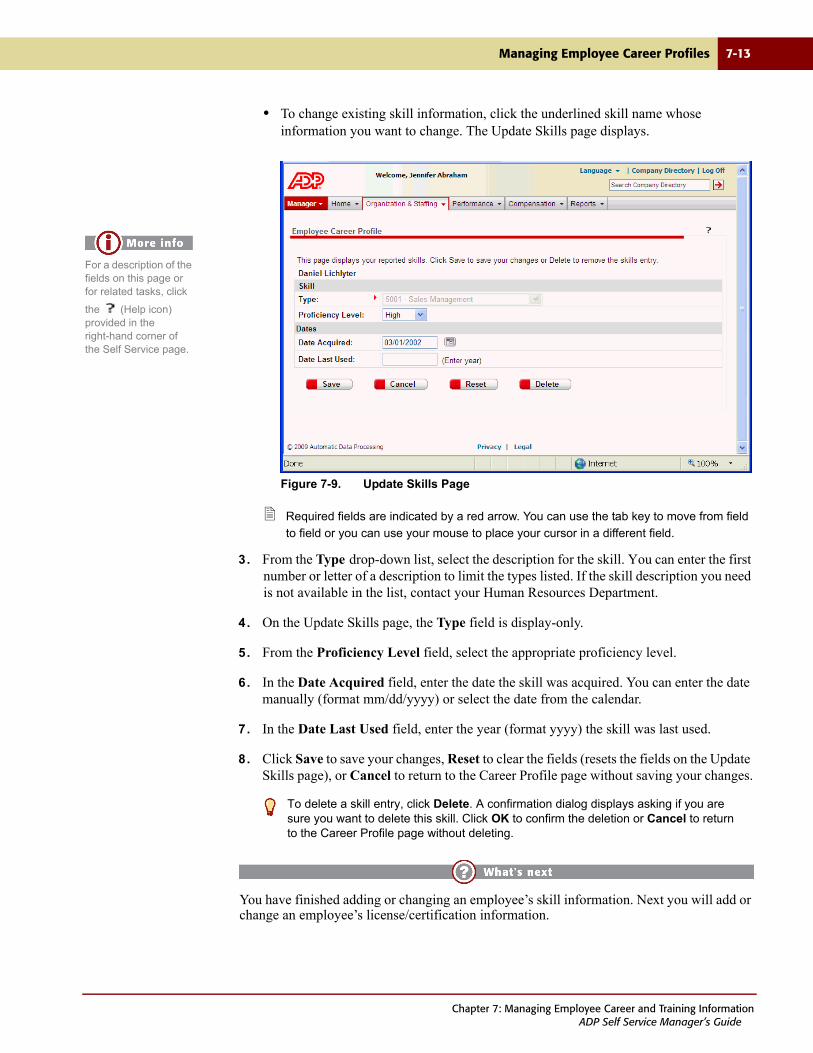
Managing Employee Career Profiles 7-13
• To change existing skill information, click the underlined skill name whose information you want to change. The Update Skills page displays.
Figure 7-9. Update Skills Page
Required fields are indicated by a red arrow. You can use the tab key to move from field
to field or you can use your mouse to place your cursor in a different field.
3. From the Type drop-down list, select the description for the skill. You can enter the first number or letter of a description to limit the types listed. If the skill description you need is not available in the list, contact your Human Resources Department.
4. On the Update Skills page, the Type field is display-only.
5. From the Proficiency Level field, select the appropriate proficiency level.
6. In the Date Acquired field, enter the date the skill was acquired. You can enter the date manually (format mm/dd/yyyy) or select the date from the calendar.
7. In the Date Last Used field, enter the year (format yyyy) the skill was last used.
8. Click Save to save your changes, Reset to clear the fields (resets the fields on the Update Skills page), or Cancel to return to the Career Profile page without saving your changes.
You have finished adding or changing an employee’s skill information. Next you will add or change an employee’s license/certification information.
To delete a skill entry, click Delete. A confirmation dialog displays asking if you are sure you want to delete this skill. Click OK to confirm the deletion or Cancel to return to the Career Profile page without deleting.
For a description of the fields on this page or for related tasks, click
the (Help icon) provided in the right-hand corner of the Self Service page.
Chapter 7: Managing Employee Career and Training InformationADP Self Service Manager’s Guide
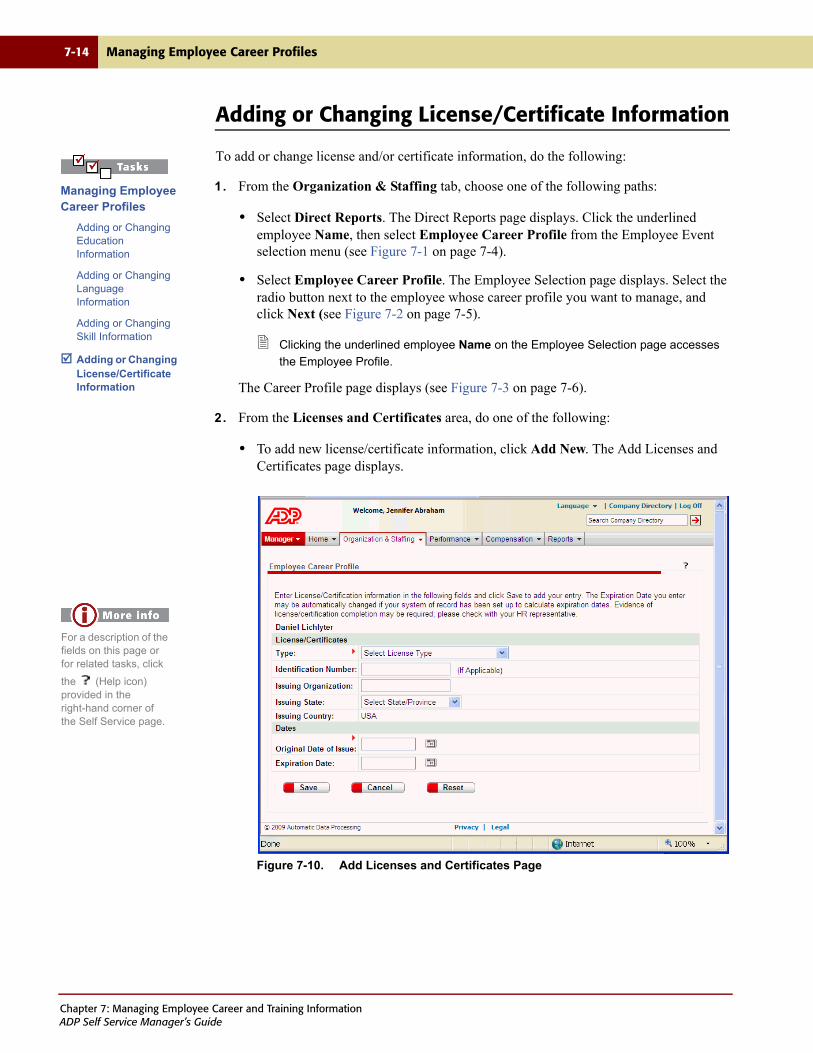
7-14 Managing Employee Career Profiles
Adding or Changing License/Certificate Information
To add or change license and/or certificate information, do the following:
1. From the Organization & Staffing tab, choose one of the following paths:
• Select Direct Reports. The Direct Reports page displays. Click the underlined employee Name, then select Employee Career Profile from the Employee Event selection menu (see Figure 7-1 on page 7-4).
• Select Employee Career Profile. The Employee Selection page displays. Select the radio button next to the employee whose career profile you want to manage, and click Next (see Figure 7-2 on page 7-5).
Clicking the underlined employee Name on the Employee Selection page accesses
the Employee Profile.
The Career Profile page displays (see Figure 7-3 on page 7-6).
2. From the Licenses and Certificates area, do one of the following:
• To add new license/certificate information, click Add New. The Add Licenses and Certificates page displays.
Figure 7-10. Add Licenses and Certificates Page
Managing Employee Career Profiles
Adding or Changing Education Information
Adding or Changing Language Information
Adding or Changing Skill Information
Adding or Changing License/Certificate Information
For a description of the fields on this page or for related tasks, click
the (Help icon) provided in the right-hand corner of the Self Service page.
Chapter 7: Managing Employee Career and Training InformationADP Self Service Manager’s Guide
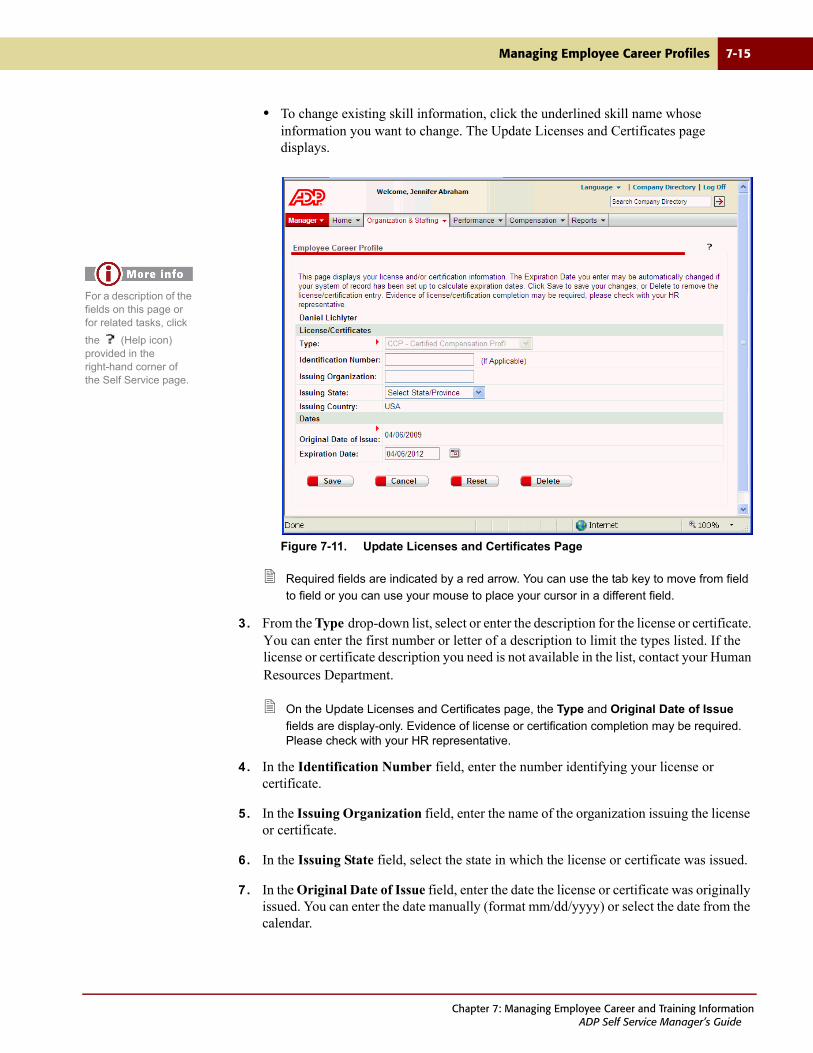
Managing Employee Career Profiles 7-15
• To change existing skill information, click the underlined skill name whose information you want to change. The Update Licenses and Certificates page displays.
Figure 7-11. Update Licenses and Certificates Page
Required fields are indicated by a red arrow. You can use the tab key to move from field
to field or you can use your mouse to place your cursor in a different field.
3. From the Type drop-down list, select or enter the description for the license or certificate. You can enter the first number or letter of a description to limit the types listed. If the license or certificate description you need is not available in the list, contact your Human Resources Department.
On the Update Licenses and Certificates page, the Type and Original Date of Issue
fields are display-only. Evidence of license or certification completion may be required. Please check with your HR representative.
4. In the Identification Number field, enter the number identifying your license or certificate.
5. In the Issuing Organization field, enter the name of the organization issuing the license or certificate.
6. In the Issuing State field, select the state in which the license or certificate was issued.
7. In the Original Date of Issue field, enter the date the license or certificate was originally issued. You can enter the date manually (format mm/dd/yyyy) or select the date from the calendar.
For a description of the fields on this page or for related tasks, click
the (Help icon) provided in the right-hand corner of the Self Service page.
Chapter 7: Managing Employee Career and Training InformationADP Self Service Manager’s Guide
7-16 Managing Employee Career Profiles
8. In the Expiration Date field, enter the date that the license or certificate will expire. You can enter the date manually (format mm/dd/yyyy) or select the date from the calendar.
The date you enter in the Expiration Date field may be automatically changed if your
system of record has been set up to calculate expiration dates.
9. Click Save to save your changes, Reset to clear the fields (resets the fields on the Update Licenses and Certificates page), or Cancel to return to the Career Profile page without saving your changes.
You have finished adding or changing an employee’s licence/certificate information, which is the last step in managing employee career information.
To delete a skill entry, click Delete. A confirmation dialog displays asking if you are sure you want to delete this skill. Click OK to confirm the deletion or Cancel to return to the Career Profile page without deleting.
Chapter 7: Managing Employee Career and Training InformationADP Self Service Manager’s Guide
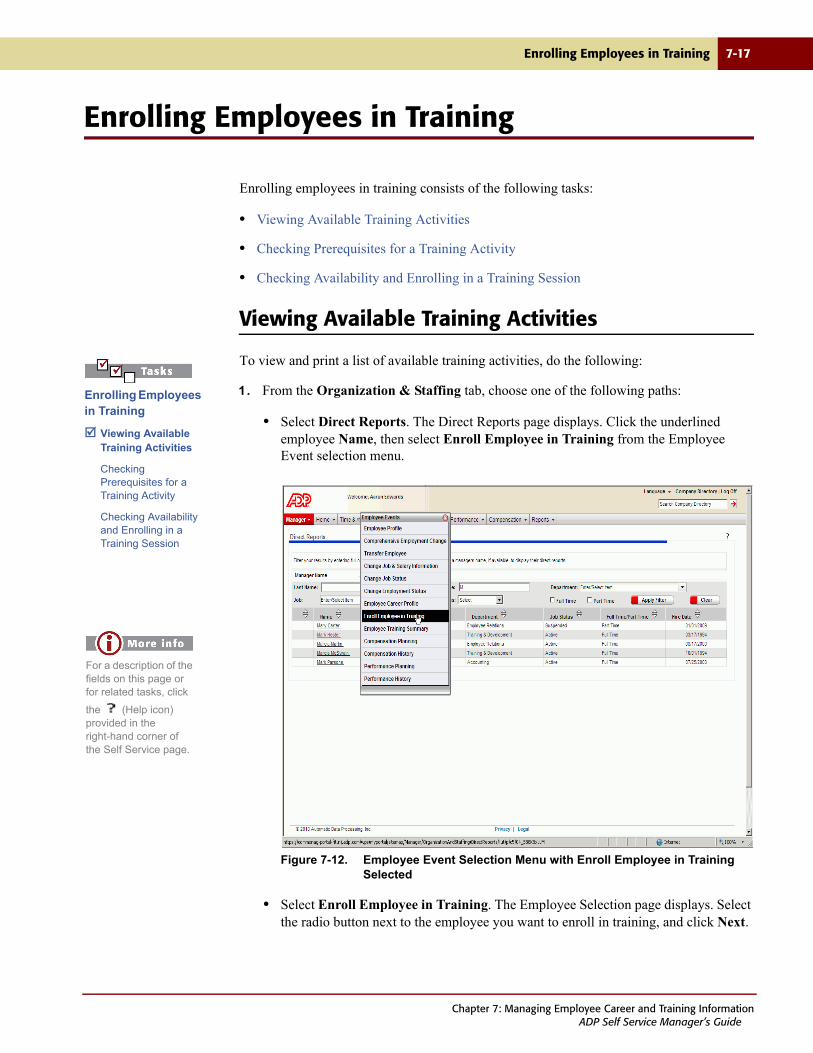
Enrolling Employees in Training 7-17
Enrolling Employees in Training
Enrolling employees in training consists of the following tasks:
• Viewing Available Training Activities
• Checking Prerequisites for a Training Activity
• Checking Availability and Enrolling in a Training Session
Viewing Available Training Activities
To view and print a list of available training activities, do the following:
1. From the Organization & Staffing tab, choose one of the following paths:
• Select Direct Reports. The Direct Reports page displays. Click the underlined employee Name, then select Enroll Employee in Training from the Employee Event selection menu.
Figure 7-12. Employee Event Selection Menu with Enroll Employee in Training Selected
• Select Enroll Employee in Training. The Employee Selection page displays. Select the radio button next to the employee you want to enroll in training, and click Next.
Enrolling Employees in Training
Viewing Available Training Activities
Checking Prerequisites for a Training Activity
Checking Availability and Enrolling in a Training Session
For a description of the fields on this page or for related tasks, click
the (Help icon) provided in the right-hand corner of the Self Service page.
Chapter 7: Managing Employee Career and Training InformationADP Self Service Manager’s Guide
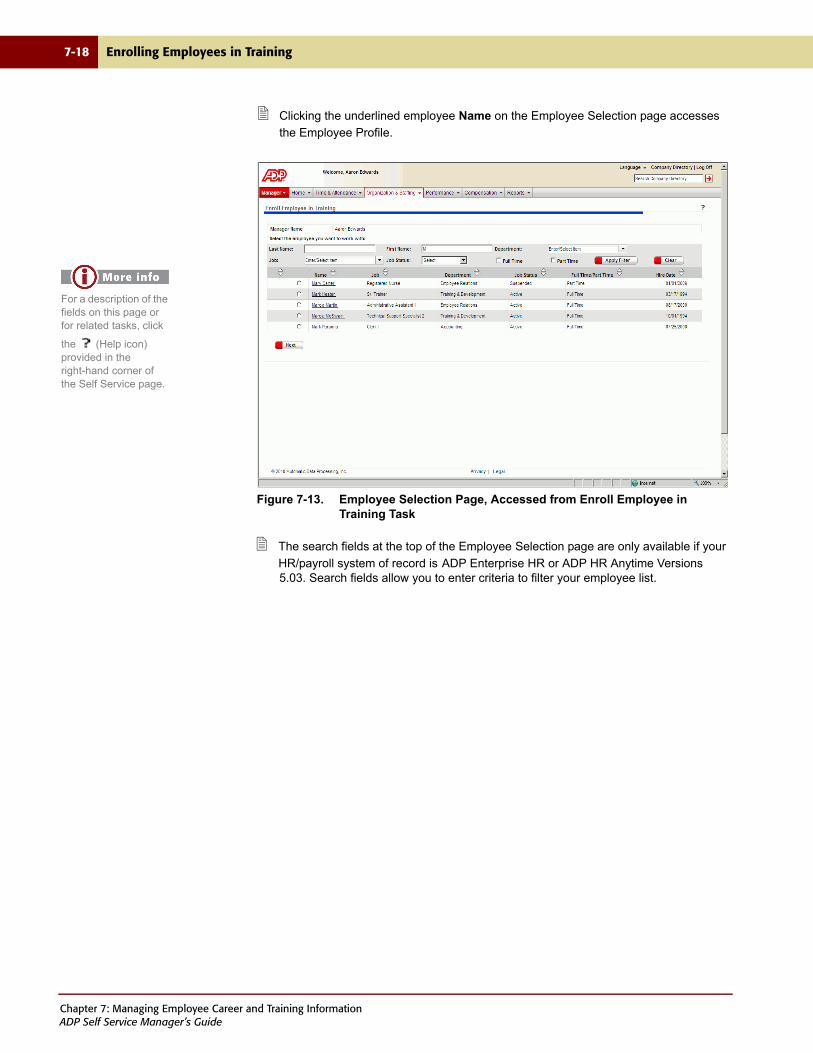
7-18 Enrolling Employees in Training
Clicking the underlined employee Name on the Employee Selection page accesses
the Employee Profile.
Figure 7-13. Employee Selection Page, Accessed from Enroll Employee in Training Task
The search fields at the top of the Employee Selection page are only available if your
HR/payroll system of record is ADP Enterprise HR or ADP HR Anytime Versions 5.03. Search fields allow you to enter criteria to filter your employee list.
For a description of the fields on this page or for related tasks, click
the (Help icon) provided in the right-hand corner of the Self Service page.
Chapter 7: Managing Employee Career and Training InformationADP Self Service Manager’s Guide
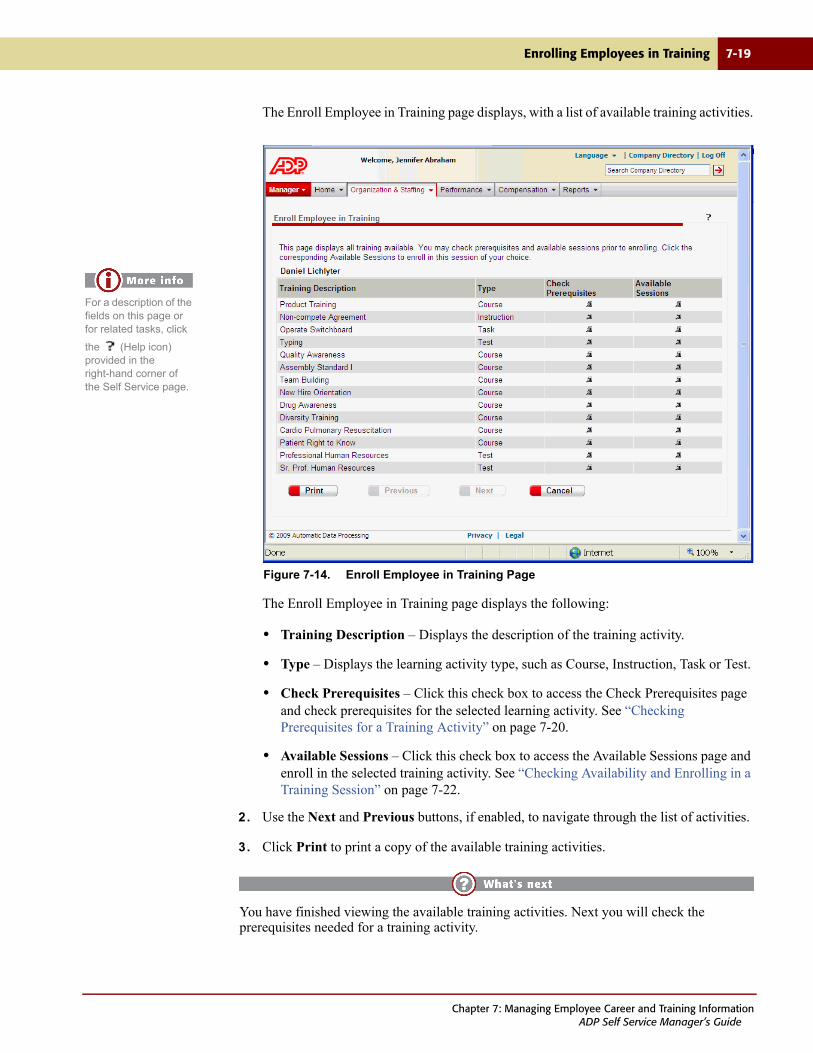
Enrolling Employees in Training 7-19
The Enroll Employee in Training page displays, with a list of available training activities.
Figure 7-14. Enroll Employee in Training Page
The Enroll Employee in Training page displays the following:
• Training Description – Displays the description of the training activity.
• Type – Displays the learning activity type, such as Course, Instruction, Task or Test.
• Check Prerequisites – Click this check box to access the Check Prerequisites page and check prerequisites for the selected learning activity. See “Checking Prerequisites for a Training Activity” on page 7-20.
• Available Sessions – Click this check box to access the Available Sessions page and enroll in the selected training activity. See “Checking Availability and Enrolling in a Training Session” on page 7-22.
2. Use the Next and Previous buttons, if enabled, to navigate through the list of activities.
3. Click Print to print a copy of the available training activities.
You have finished viewing the available training activities. Next you will check the prerequisites needed for a training activity.
For a description of the fields on this page or for related tasks, click
the (Help icon) provided in the right-hand corner of the Self Service page.
Chapter 7: Managing Employee Career and Training InformationADP Self Service Manager’s Guide

7-20 Enrolling Employees in Training
Checking Prerequisites for a Training Activity
To check and print a list of prerequisites for a selected training activity, do the following:
1. From the Enroll in Training page, use the Previous and Next buttons, if enabled, to navigate to the desired training activity.
2. Click the associated Check Prerequisites check box for the training activity for which you wish to see prerequisites. The Check Prerequisites page displays, listing the prerequisites for the selected training activity. All mandatory prerequisites are listed in bold.
Figure 7-15. Check Prerequisites Page
You can also access the Check Prerequisites page by clicking Check Prerequisites from the Available Sessions page. See “Checking Availability and Enrolling in a Training Session” on page 7-22 for more information.
Enrolling Employees in Training
Viewing Available Training Activities
Checking Prerequisites for a Training Activity
Checking Availability and Enrolling in a Training Session
For a description of the fields on this page or for related tasks, click
the (Help icon) provided in the right-hand corner of the Self Service page.
Chapter 7: Managing Employee Career and Training InformationADP Self Service Manager’s Guide
Enrolling Employees in Training 7-21
The Check Prerequisites page displays the following:
• Training Activity – Displays the target training activity you selected Check Prerequisites for from the Enroll in Training page.
• Group – Displays a description of the prerequisite group.
• Type – Displays the learning activity type, such as Course, Instruction, Task, or Test.
• Description – Displays the prerequisite learning activity's name. All mandatory prerequisites are listed in bold.
• Valid Period – Displays the amount of time for which the learning activity is valid.
• Grace Period – Displays the grace period for the learning activity, which is a brief period after the expiration date during which the student is still considered certified in the learning activity.
3. Use the Previous and Next buttons, if enabled, to navigate through the list of prerequisites.
4. Click Print to print a copy of the prerequisites for the selected training activity.
5. Click Cancel to return to the Enroll in Training page.
You have finished checking the prerequisites for a training activity. Next you will check availability for a training activity and enroll in the training session.
Chapter 7: Managing Employee Career and Training InformationADP Self Service Manager’s Guide
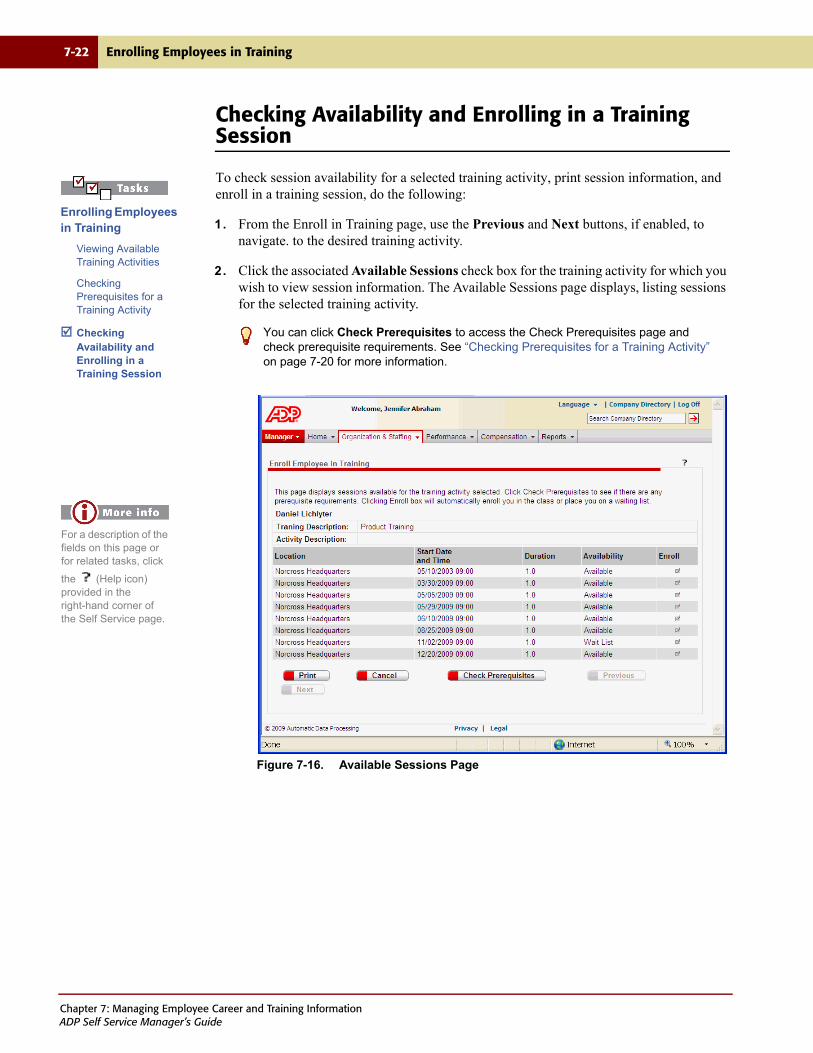
7-22 Enrolling Employees in Training
Checking Availability and Enrolling in a Training Session
To check session availability for a selected training activity, print session information, and enroll in a training session, do the following:
1. From the Enroll in Training page, use the Previous and Next buttons, if enabled, to navigate. to the desired training activity.
2. Click the associated Available Sessions check box for the training activity for which you wish to view session information. The Available Sessions page displays, listing sessions for the selected training activity.
Figure 7-16. Available Sessions Page
You can click Check Prerequisites to access the Check Prerequisites page and check prerequisite requirements. See “Checking Prerequisites for a Training Activity” on page 7-20 for more information.
Enrolling Employees in Training
Viewing Available Training Activities
Checking Prerequisites for a Training Activity
Checking Availability and Enrolling in a Training Session
For a description of the fields on this page or for related tasks, click
the (Help icon) provided in the right-hand corner of the Self Service page.
Chapter 7: Managing Employee Career and Training InformationADP Self Service Manager’s Guide
Enrolling Employees in Training 7-23
The Available Sessions page displays the following:
• Training Description – Displays the name of the target training activity for which you selected Available Sessions from the Enroll in Training page.
• Activity Description – Displays a description of the activities you will complete in this training session.
• Location – Displays the location of the training activity.
• Start Date and Time – Displays the start date and time of the training activity.
• Duration – Displays the length of time to complete the training activity.
• Availability – Displays the availability of the session, such as Available, Wait List, or Not Available.
3. Click the associated Enroll check box to enroll in the selected training session. You can only enroll in sessions that are Available or Wait Listed.
If you enroll in a session you have already enrolled in, you will get a message informing
you that you have already enrolled in this course and session. If you try to enroll in a training session for which you have not met the mandatory prerequisites, you will receive a warning that you have not met the mandatory requirements and to check the prerequisites to determine which learning activity you have not completed. You will need to enroll in any mandatory prerequisite activity before you can complete the enrollment in the activity for which you received the warning message.
Upon successful enrollment, you are returned to the refreshed Enroll in Training page.
You have finished checking for an available session and enrolling an employee in that session, which is the last step in enrolling employees in training.
For information on cancelling an employee’s enrollment in a training session, see “Accessing
Employee Training Summary Information” on page 7-24.
Chapter 7: Managing Employee Career and Training InformationADP Self Service Manager’s Guide

7-24 Accessing Employee Training Summary Information
Accessing Employee Training Summary Information
Managers can view and print an employee’s training summary information, as well as cancel an employee’s enrollment in a training session.
To access an employee’s training information, do the following:
1. From the Organization & Staffing tab, choose one of the following paths:
• Select Direct Reports. The Direct Reports page displays. Click the underlined employee Name, then select Employee Training Summary from the Employee Event selection menu.
Figure 7-17. Employee Event Selection Menu with Employee Training Summary Selected
• Select Employee Training Summary. The Employee Selection page displays. Select the radio button next to the employee you want to enroll in training, and click Next.
For a description of the fields on this page or for related tasks, click
the (Help icon) provided in the right-hand corner of the Self Service page.
Chapter 7: Managing Employee Career and Training InformationADP Self Service Manager’s Guide
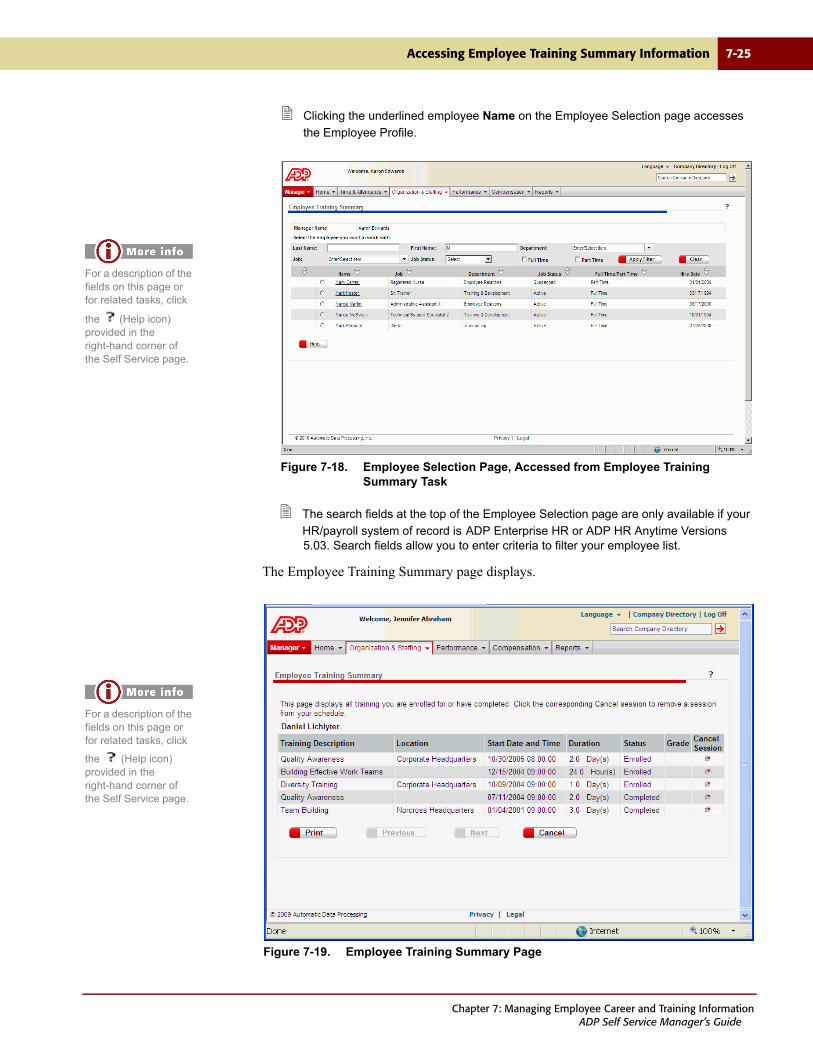
Accessing Employee Training Summary Information 7-25
Clicking the underlined employee Name on the Employee Selection page accesses
the Employee Profile.
Figure 7-18. Employee Selection Page, Accessed from Employee Training Summary Task
The search fields at the top of the Employee Selection page are only available if your
HR/payroll system of record is ADP Enterprise HR or ADP HR Anytime Versions 5.03. Search fields allow you to enter criteria to filter your employee list.
The Employee Training Summary page displays.
Figure 7-19. Employee Training Summary Page
For a description of the fields on this page or for related tasks, click
the (Help icon) provided in the right-hand corner of the Self Service page.
For a description of the fields on this page or for related tasks, click
the (Help icon) provided in the right-hand corner of the Self Service page.
Chapter 7: Managing Employee Career and Training InformationADP Self Service Manager’s Guide
7-26 Accessing Employee Training Summary Information
The Employee Training Summary page displays the following:
• Training Description – Displays a description of the training activity.
• Location – Displays the location of the training activity.
• Start Date and Time – Displays the start date and time of the training activity.
• Duration – Displays the length of time to complete the training activity.
• Status – Displays whether you are enrolled, wait listed, or have completed the training activity.
• Grade – Displays your grade for the training activity.
2. Use the Previous and Next buttons, if enabled, to navigate through the list the employee’s training summary information.
3. Click Print to print a copy of the selected employee’s training information.
4. If you need to cancel an employee’s enrollment in a training session, do the following:
a. Click the associated Cancel Session check box. A confirmation dialog box displays asking if you are sure you want to delete this session.
b. Click OK to confirm the deletion. You are returned to the refreshed Training Summary page. The training activity you selected to delete is no longer listed.
You have finished accessing an employee’s training summary information.
Chapter 7: Managing Employee Career and Training InformationADP Self Service Manager’s Guide

Chapter 8
Running Manager Reports
PAGE TOPIC
8-2 Introduction
8-3 Running Team Reports
8-6 Running Employee History Reports
Chapter 8: Running Manager ReportsADP Self Service Manager’s Guide
8-2 Introduction
Introduction
The Report feature allows manager’s to access a variety of reports that contain their team's employment and compensation information. Managers only have access to information for their direct reports. The following pre-defined reports are available:
• Team Reports
– Work Profiles
– Job and Pay Profiles
– Performance Profiles
– Anniversary List
– Birthday List
– Address & Phone List
– Team Emergency Contacts
– International Employee Information
• Employee History Reports
– Compensation History
– Performance History
The number of reports available may vary. Your company administrator can configure reports
to not display, as well as change the report label text.
The information available in each report is pre-defined. These reports include the effective-dated information for employees with the statuses of Active, Leave, Paid Leave, and Suspended. The team reports include all the direct reports for a manager. The employee history reports contain information about a single direct report. These history reports include all data of an employee based on tenure.
Only one report can be selected for processing at a time. An activity bar displays while the report is created. You must remain on the Reports page while the report is processing, or the report is cancelled.
The report produces a Microsoft Excel file that can be viewed and manipulated in an Excel spreadsheet. If Excel is not available, the Internet Explorer Download File dialog box displays, allowing you to either Open or Save the report in the application you select.
Chapter 8: Running Manager ReportsADP Self Service Manager’s Guide
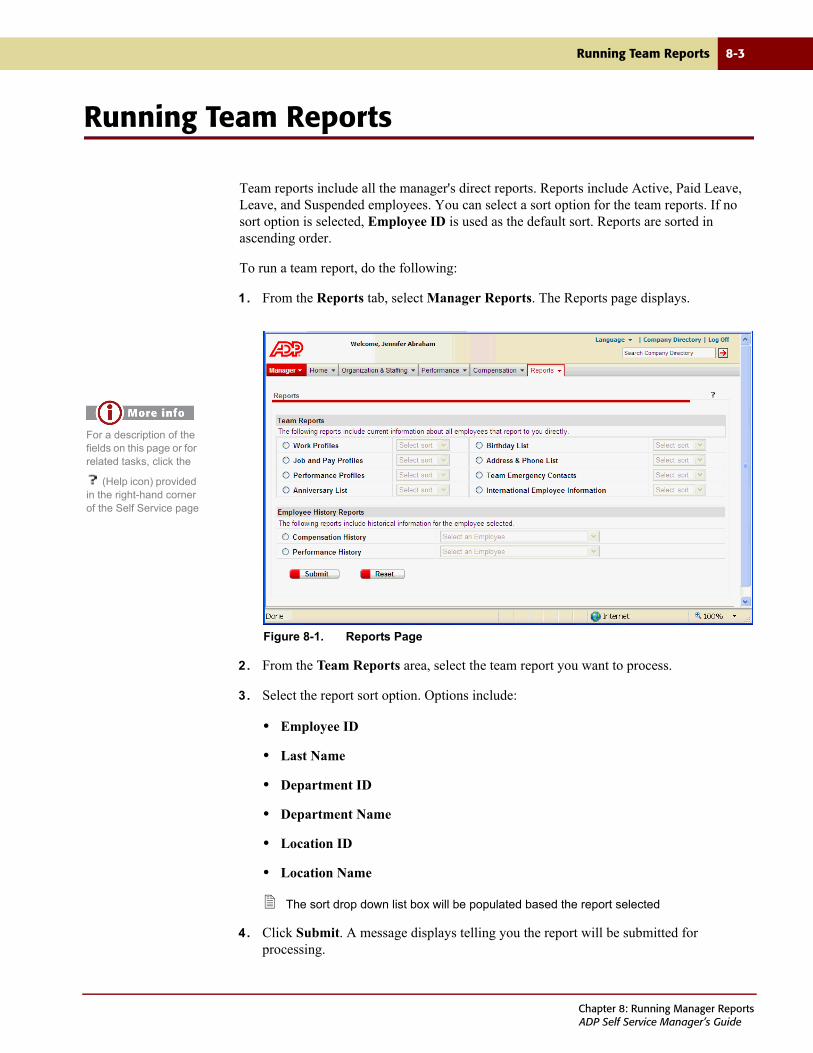
Running Team Reports 8-3
Running Team Reports
Team reports include all the manager's direct reports. Reports include Active, Paid Leave, Leave, and Suspended employees. You can select a sort option for the team reports. If no sort option is selected, Employee ID is used as the default sort. Reports are sorted in ascending order.
To run a team report, do the following:
1. From the Reports tab, select Manager Reports. The Reports page displays.
Figure 8-1. Reports Page
2. From the Team Reports area, select the team report you want to process.
3. Select the report sort option. Options include:
• Employee ID
• Last Name
• Department ID
• Department Name
• Location ID
• Location Name
The sort drop down list box will be populated based the report selected
4. Click Submit. A message displays telling you the report will be submitted for processing.
For a description of the fields on this page or for related tasks, click the
(Help icon) provided in the right-hand corner of the Self Service page
Chapter 8: Running Manager ReportsADP Self Service Manager’s Guide
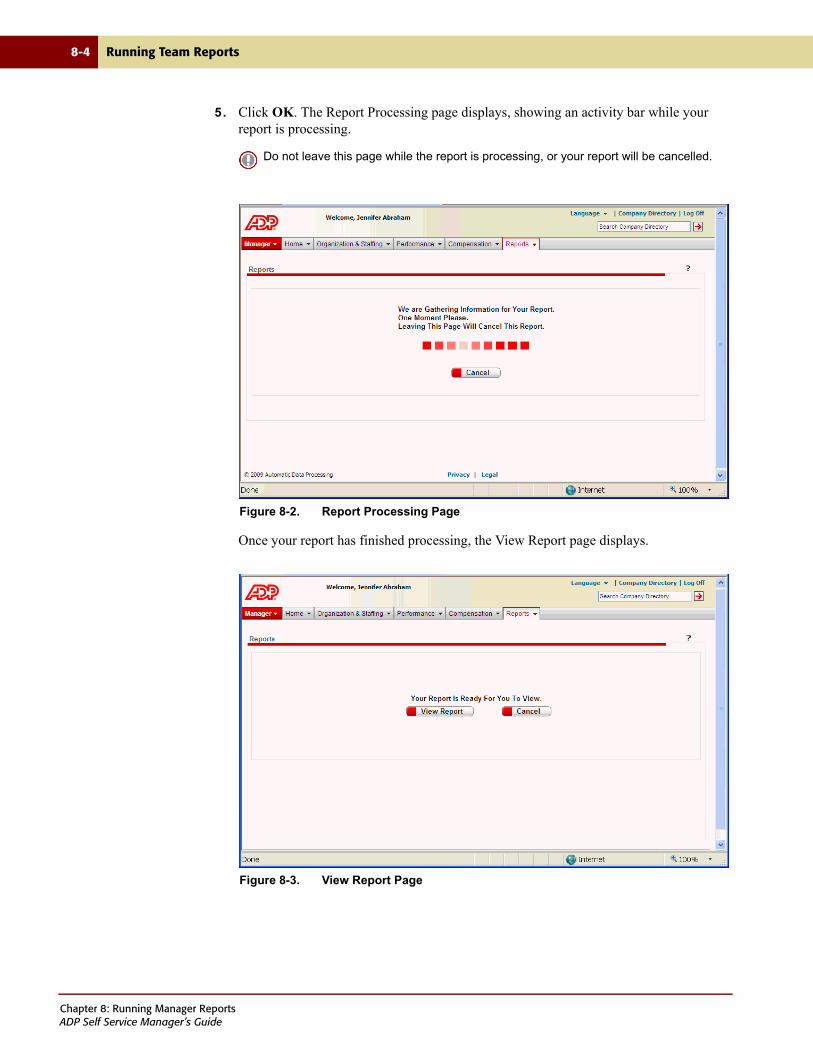
8-4 Running Team Reports
5. Click OK. The Report Processing page displays, showing an activity bar while your report is processing.
Figure 8-2. Report Processing Page
Once your report has finished processing, the View Report page displays.
Figure 8-3. View Report Page
Do not leave this page while the report is processing, or your report will be cancelled.
Chapter 8: Running Manager ReportsADP Self Service Manager’s Guide
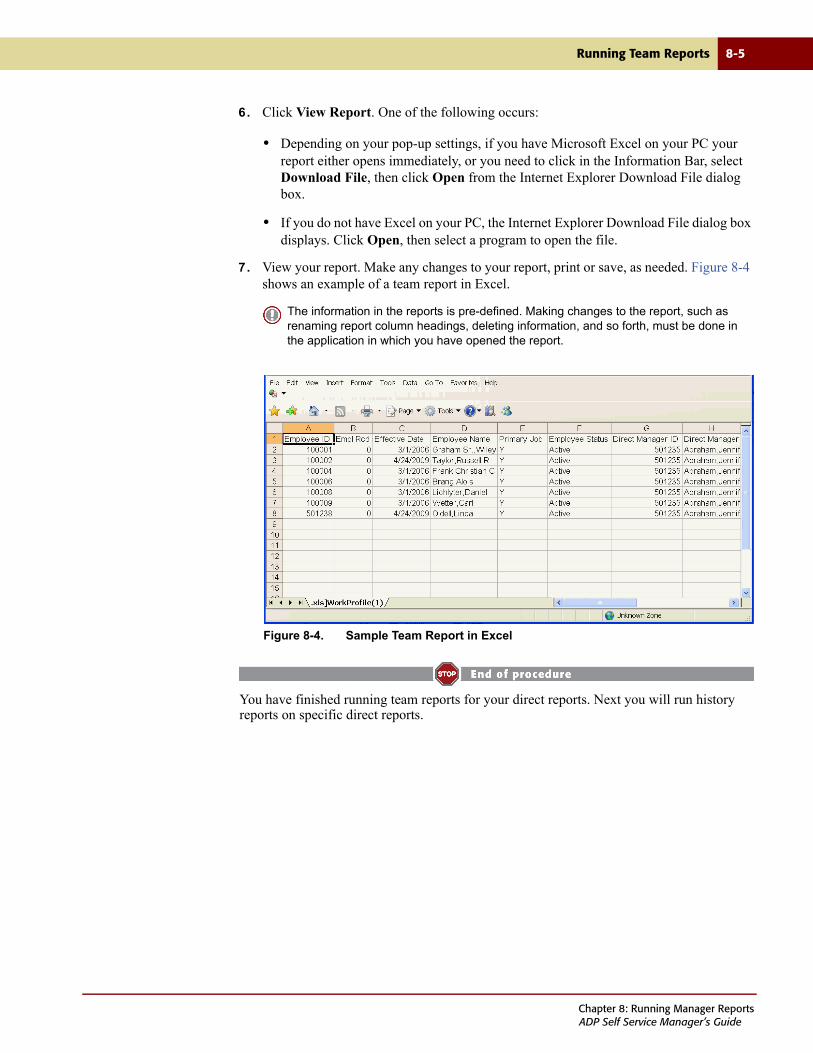
Running Team Reports 8-5
6. Click View Report. One of the following occurs:
• Depending on your pop-up settings, if you have Microsoft Excel on your PC your report either opens immediately, or you need to click in the Information Bar, select Download File, then click Open from the Internet Explorer Download File dialog box.
• If you do not have Excel on your PC, the Internet Explorer Download File dialog box displays. Click Open, then select a program to open the file.
7. View your report. Make any changes to your report, print or save, as needed. Figure 8-4 shows an example of a team report in Excel.
Figure 8-4. Sample Team Report in Excel
You have finished running team reports for your direct reports. Next you will run history reports on specific direct reports.
The information in the reports is pre-defined. Making changes to the report, such as renaming report column headings, deleting information, and so forth, must be done in the application in which you have opened the report.
Chapter 8: Running Manager ReportsADP Self Service Manager’s Guide
8-6 Running Employee History Reports
Running Employee History Reports
Employee History reports can be run on any of your direct reports with a employment status of Active, Paid Leave, Leave, and Suspended. The Employee History reports include all appropriate data, even if employee previously worked for a different department or manager.
To run an Employee History Report, do the following:
1. From the Reports page Employee History Reports area (see Figure 8-1 on page 8-3), select the type of history report you want to process. Available options are:
• Compensation History
• Performance History
The corresponding employee field is enabled once you select the history report type.
2. Select the employee for whom you want to run the history report.
3. Click Submit. A message displays telling you the report will be submitted for processing.
4. Click OK. The Report Processing page displays, as shown in Figure 8-2, showing an activity bar while your report is processing.
Once your report has finished processing, the View Report pages displays, as shown in Figure 8-3.
5. Click View Report. One of the following occurs:
• Depending on your pop-up settings, if you have Microsoft Excel on your PC your report either opens immediately, or you need to click in the Information Bar, select Download File, then click Open from the Internet Explorer Download File dialog box.
• If you do not have Excel on your PC, the Internet Explorer Download File dialog box displays. Click Open, then select a program to open the file.
Do not leave this page while the report is processing, or your report will be cancelled.
Chapter 8: Running Manager ReportsADP Self Service Manager’s Guide
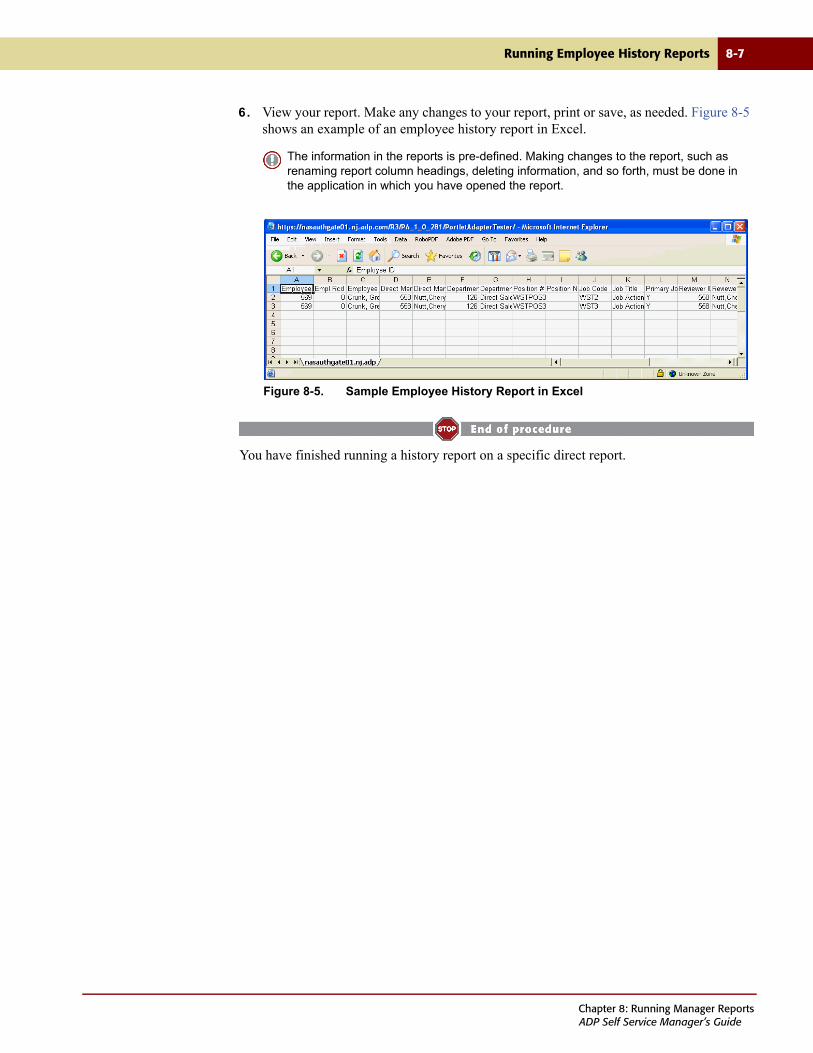
Running Employee History Reports 8-7
6. View your report. Make any changes to your report, print or save, as needed. Figure 8-5 shows an example of an employee history report in Excel.
Figure 8-5. Sample Employee History Report in Excel
You have finished running a history report on a specific direct report.
The information in the reports is pre-defined. Making changes to the report, such as renaming report column headings, deleting information, and so forth, must be done in the application in which you have opened the report.
Chapter 8: Running Manager ReportsADP Self Service Manager’s Guide

8-8 Running Employee History Reports
Chapter 8: Running Manager ReportsADP Self Service Manager’s Guide
Index
AAction field 3-15, 3-18, 6-144Action Reason field 6-144Action Taken field 3-8Actions column 2-7, 3-7Activity Description field 7-23Activity field 2-4, 2-6, 2-8, 3-3, 3-5, 3-8Add a Service tab 1-23Add Another Salary Change button 6-79, 6-87,
6-101Add Another Service button 1-20Add button 4-9Add Education page
accessing 7-7illustration of 7-7
Add Languages pageaccessing 7-10illustration of 7-10
Add Proxy Assignment pageaccessing 2-30illustration of 2-30
Add proxy assignments 2-29Add Skills page
accessing 7-12, 7-14illustration of 7-12, 7-14
Additional Employment Status Information Details link 6-110, 6-117, 6-125, 6-132, 6-139
Additional Employment Status Information pageaccessing 6-110, 6-125illustration of 6-110, 6-125
Additional Hire Information pageaccessing 6-40completing for new hires and rehires 6-40illustration of 6-40
Additional Information Details link 6-146Additional Information fields
change salary 6-101demotion 6-86hire 6-40job and salary 6-78leave of absence 6-110, 6-125promotion 6-78
Additional Information fields (cont.)rehire 6-40return from leave 6-117, 6-132terminate 6-139
Additional Job & Salary Information Details link 6-78, 6-86, 6-94, 6-101
Additional Job & Salary Information pageaccessing 6-78illustration of 6-78
Additional Job Status Information Details link 6-68Additional Job Status Information page
accessing 6-68illustration of 6-69
Additional Salary Change area 6-87, 6-101Additional Transfer Information Details link 6-49,
6-56, 6-61Additional Transfer Information page
accessing 6-49illustration of 6-49
Address Line 3 field 6-29ADP Enterprise HR
versions supported 1-2ADP Self Service Manager’s Guide link 1-13Allow Draw check box 6-37Amount Change field 6-77, 6-79, 6-86, 6-87, 6-100,
6-101, 6-151Amount option 4-8, 4-12, 6-77, 6-79, 6-86, 6-87,
6-100, 6-101Annual Benefits Base field 6-151Apply button 4-8, 4-12Apply Filter button 6-3Apply Increase to All Employees area 4-8Apply Increases to all Employees area 4-12Apply Merit Matrix to All Employees button 4-8Approval
bonus compensationprocessing 2-17
employee eventsprocessing 2-26
manager eventsprocessing 2-24
merit compensationprocessing 2-13
ADP Self Service Manager’s Guide
i-2 Index
Approval (cont.)performance
processing 2-20setting up proxy assignments 2-28
Approval Historydeleting 3-9employee event detail 3-6, 3-12managing 3-1recalling an event 3-10viewing 3-5viewing bonus compensation event details 3-17viewing employee event details 3-11viewing manager event details 3-24viewing merit compensation event details 3-14viewing new hire event details 3-22viewing performance event details 3-20
Approval History pageaccessing 3-5, 3-9, 3-10, 3-12illustration of 3-5, 3-9, 3-10, 3-12
Approval History task 1-5, 3-5, 3-9, 3-10, 3-12, 3-14, 3-17, 3-20, 3-22, 3-24
Approval notificationsmanaging 2-1
Approval tasksmanaging 2-1
Approval worksheetbonus compensation
processing 2-17viewing and printing 2-15
merit compensationprocessing 2-13viewing and printing 2-10
performanceprocessing 2-20viewing and printing 2-19
Approvalsviewing 2-3
Approvals and Notifications taskfor managers 1-4
Approvals link 2-2, 2-3, 2-10, 2-15, 2-19, 2-24, 2-26Approvals page
accessing 2-4illustration of 2-4
Approvals tab 2-2, 2-3Approve All button 2-13, 2-17, 2-21Approve button 2-25, 2-27Approve option 2-13, 2-17, 2-21Assign Proxy As field 2-31Assign Proxy field 2-29Assigned To column 3-7Assigned To field 3-8
Audiencefor this guide viii
Authorization (List C) Document field 6-39Authorization and Identity (List A) Document
field 6-39Authorization and Identity Document Expiration
Date field 6-39Authorization Expiration Date field 6-39Availability field 7-23Available Sessions check box 7-19, 7-22Available Sessions page
accessing 7-22illustration of 7-22
BBargaining Unit field 6-35, 6-149Begin Leave Date field 6-109, 6-147Birth Date field 6-30Bonus Amount field 2-16, 3-18, 4-12, 4-13Bonus compensation
completing worksheets 4-10managing approval tasks 2-14submitting worksheets for approval 4-14viewing event details 3-17
Bonus Compensation Approval Worksheetaccessing 2-15, 2-17illustration of 2-15, 2-17processing 2-17viewing and printing 2-15
Bonus Compensation Event Detail pageaccessing 3-17illustration of 3-17
Bonus Compensation Worksheetaccessing 4-12completing 4-10illustration of 4-12printing 4-13submitting for approval 4-14
Bonus Percent field 2-16, 3-18, 4-12, 4-13Bonus Plan field 2-15, 3-17Budget End Date field 4-6, 4-19Budget Percent field 2-11, 2-15, 3-14, 3-17, 4-6, 4-8,
4-12, 4-20Budget Period field 2-11, 2-15, 3-14, 3-17, 4-20Budget pool
compensationviewing and printing 4-19
Budget Pool field 2-11, 2-15, 3-14, 3-17, 4-6, 4-8, 4-12, 4-20
ADP Self Service Manager’s Guide
Index i-3
Budget Used field 2-11, 2-15, 3-14, 3-17, 4-6, 4-8, 4-12, 4-20
Budget Variance field 4-6Business Rule field 3-8Business Title field 6-35, 6-77, 6-86, 6-94, 6-148By Manager Name field 4-19
CCancel Session check box 7-26Candidate Name field 6-42Career Profile page
accessing 7-6, 7-10, 7-12, 7-14illustration of 7-6, 7-10, 7-12, 7-14
Career tab 7-2Change Employment Status
Leave of Absence fieldsaccessing 6-109, 6-124illustration of 6-109, 6-124
Return from Leave fieldsaccessing 6-117, 6-132illustration of 6-117, 6-132
Terminate fieldsaccessing 6-138illustration of 6-138
Change Employment Status event option 1-10Change Employment Status field 6-109, 6-117,
6-124, 6-132, 6-138Change Employment Status option 6-106, 6-114,
6-121, 6-129, 6-135Change Employment Status page
accessing 6-108, 6-116, 6-123, 6-131, 6-137illustration of 6-108, 6-116, 6-123, 6-131, 6-137
Change Job & SalaryAdditional Salary Change fields
accessing 6-78, 6-86, 6-101illustration of 6-78
Demotion fieldsaccessing 6-85illustration of 6-85
Lateral Change fieldsaccessing 6-93illustration of 6-93
Promotion fieldsaccessing 6-76illustration of 6-76
Salary fieldsaccessing 6-100illustration of 6-100
Change Job & Salary Info field 6-76, 6-85, 6-93, 6-100
Change Job & Salary Information event option 1-10Change Job & Salary Information option 6-72, 6-73,
6-81, 6-82, 6-89, 6-90, 6-96, 6-97, 6-105, 6-113, 6-120, 6-128, 6-134
Change Job & Salary Information pageaccessing 6-75, 6-84, 6-92, 6-99illustration of 6-75, 6-84, 6-92, 6-99
Change Job Status event option 1-10Change Job Status option 6-65Change Job Status page
accessing 6-67illustration of 6-67
Change My Password tab 1-23Change proxy assignments 2-29Change Rate field 6-77, 6-79, 6-86, 6-87, 6-100,
6-101Check Prerequisites button 7-20, 7-22Check Prerequisites check box 7-19, 7-20Check Prerequisites page
accessing 7-20illustration of 7-20
Citizen Proof 1 field 6-39Citizen Proof 2 field 6-39Citizenship page
accessing 6-38completing for new hires and rehires 6-38illustration of 6-38
Citizenship Status field 6-39City/Town field 6-29Clock Number field 6-33Comment field 6-8Comments field 2-16, 2-24, 2-26, 3-9, 3-18, 6-43,
6-50Comp Frequency field 6-151Company Directory task 1-4Compensation
completing bonus worksheets 4-10completing merit worksheets 4-4completing reviews 4-3employee history 4-22managing bonus tasks 2-14managing merit tasks 2-10overview 4-2submitting worksheets for approval 4-14viewing and printing consolidated budget pool 4-19viewing and printing summary information 4-16viewing and printing worksheets 4-15, 4-20viewing event details 3-14, 3-17
Compensation area 6-151Compensation field 6-37Compensation Frequency field 4-24Compensation History event option 1-11
ADP Self Service Manager’s Guide
i-4 Index
Compensation History option 8-6Compensation History page
accessing 4-23illustration of 4-23
Compensation History task 1-6, 4-22, 4-23Compensation information
changing 6-150Compensation Planning event option 1-11Compensation Planning page
accessing 4-4, 4-10, 4-16, 4-20illustration of 4-5, 4-11, 4-17
Compensation Planning task 1-6, 4-4, 4-10, 4-16, 4-20
Compensation tab 1-6, 4-4, 4-10, 4-16, 4-20, 4-23, 6-150
Completion Date field 3-8Comprehensive Employment Change
changing an employee’s compensation information 6-150
changing an employee’s employment information 6-147
changing an employee’s job information 6-144changing an employee’s payroll information 6-153initiating 6-142overview 6-141
Comprehensive Employment Change option 1-10Comprehensive Employment Change page
accessing 6-142illustration of 6-142
Comprehensive Employment Change, Compensation pageaccessing 6-150illustration of 6-150
Comprehensive Employment Change, Employment pageaccessing 6-147illustration of 6-147
Comprehensive Employment Change, Job pageaccessing 6-142illustration of 6-142
Comprehensive Employment Change, Payroll pageaccessing 6-153illustration of 6-153
Confirm Password field 1-20Confirm SSN field 1-18Consolidated Budget Pool page
accessing 4-6, 4-19illustration of 4-19
Country field 7-9Country Issuing Passport field 6-39County field 6-29Create Password field 1-20
Create performance review templates 5-23Cumulative field 6-79, 6-87, 6-101, 6-151Current Salary/Compa Ratio field 2-11, 3-15
DData Control field 6-33Date Acquired field 7-13Date field 3-9Date Last Used field 7-13Date Last Worked field 6-138, 6-148Date Notice Given field 6-138, 6-148Date of Birth area 1-18Date of Death field 6-139Date Submitted field 2-4, 2-7, 2-8, 3-3, 3-6, 3-8Delete
approval history 3-9Delete Checked button 6-79, 6-87, 6-101Delete proxy assignment 2-32Demotion
changing job and salary information 6-81Department
transferring to 6-51Department field 2-11, 2-15, 3-14, 3-17, 6-48, 6-55,
6-145Department ID field 6-42Department ID sort option 8-3Department ID tab 6-25, 6-27Department Name sort option 8-3Department option 6-54Dept field 4-6, 4-24Description field 7-21Detail 3-20Direct Reports area 1-7, 6-45Direct Reports page 1-7
accessing 1-8, 4-4, 4-10, 4-16, 4-20, 4-22, 5-4, 5-12, 5-16, 5-19, 6-18, 6-45, 6-51, 6-58, 6-64, 6-72, 6-81, 6-89, 6-96, 6-105, 6-113, 6-120, 6-128, 6-134, 7-4, 7-10, 7-12, 7-14, 7-17, 7-24
illustration of 1-8, 4-4, 4-10, 4-16, 4-22, 5-4, 5-12, 5-16, 5-19, 6-18, 6-45, 6-51, 6-58, 6-64, 6-72, 6-81, 6-89, 6-96, 6-105, 6-113, 6-120, 6-128, 6-134, 7-4, 7-17, 7-24
Direct Reports task 1-5, 4-4, 4-10, 4-16, 4-20, 4-22, 5-4, 5-12, 5-14, 5-16, 5-19, 6-2, 6-18, 6-44, 6-45, 6-51, 6-58, 6-64, 6-71, 6-72, 6-81, 6-89, 6-96, 6-104, 6-105, 6-113, 6-120, 6-128, 6-134, 7-4, 7-10, 7-12, 7-14, 7-17, 7-24
Disabled check box 6-31
ADP Self Service Manager’s Guide
Index i-5
Documentationcontents of this guide ixproviding comments xivrelated guides xi
Duration field 7-23
EEducation area 7-6, 7-7Effective Date column 2-8, 3-3Effective Date field 2-4, 2-7, 2-8, 3-4, 3-6, 3-8, 4-24,
6-8, 6-50, 6-67, 6-76, 6-85, 6-93, 6-100, 6-144Eligible for Rehire field 6-24, 6-138Eligible for Rehire option 6-148Eligible for Severance field 6-138Eligible for Severance option 6-148Employee
changing employment status 6-104changing job and salary 6-71changing job status 6-64changing salary 6-96complete performance review forms 5-4demoting 6-81hiring 6-21lateral job change 6-89placing on leave 6-105, 6-120print performance review forms 5-14promoting 6-72rehiring 6-21returning from leave 6-113, 6-128running history reports for 8-6submit compensation worksheets 4-14submit performance worksheets 5-10terminating 6-134transferring 6-44viewing and printing compensation history 4-22viewing and printing performance history 5-16
Employee Activities link 2-2Employee Activities tab 2-2Employee Career Profile event option 1-11, 7-4,
7-10, 7-12, 7-14Employee Career Profile task 1-5, 6-15, 6-20, 7-2,
7-4, 7-10, 7-12, 7-14Employee Class field 6-145Employee Classification field 6-35, 6-68Employee Compensation History page
accessing 4-22, 4-23illustration of 4-24
Employee Event detailillustration of 3-6, 3-12
Employee Event detail pageaccessing 3-6, 3-12
Employee Event Selection Menuaccessing 6-19illustration of 6-19
Employee Event selection menuaccessing 1-10illustration of 1-10
Employee Event Selection Menu with Change Employment Status selected 6-105, 6-113, 6-120, 6-128, 6-134
Employee Event Selection Menu with Change Job & Salary Information selected 6-72, 6-81, 6-89, 6-96
Employee Event Selection Menu with Change Job Status selected 6-64
Employee Event Selection menu with Compensation History selected 4-22
Employee Event Selection menu with Compensation Planning selected 4-4, 4-10, 4-16
Employee Event Selection Menu with Employee Career Profile selected 7-4
Employee Event Selection Menu with Employee Training Summary selected 7-24
Employee Event Selection Menu with Enroll Employee in Training selected 7-17
Employee Event Selection menu with Performance History selected 5-16, 5-19
Employee Event Selection menu with Performance Planning selected 5-4, 5-12
Employee Event Selection Menu with Transfer Employee selected 6-45, 6-51, 6-58
Employee Eventsmanaging 2-26viewing event detail 3-11
Employee field 6-13Employee history reports
running 8-6Employee History Reports area 8-6Employee ID field 6-17Employee ID sort option 8-3Employee Name field 2-4, 2-6, 2-8, 2-19, 3-3, 3-8,
3-20, 4-23, 4-24, 5-6, 5-7, 6-17, 6-50Employee Name link 5-10Employee Name/Worksheet ID field 3-5Employee Performance History page
accessing 5-16, 5-17, 5-19, 5-20illustration of 5-18, 5-21
Employee Performance Review Formaccessing 5-7, 5-15illustration of 5-8, 5-15printer-friendly version
ADP Self Service Manager’s Guide

i-6 Index
Employee Performance Review Form (cont.)accessing 5-9illustration of 5-9
Employee Profile event option 1-10Employee Profile option 6-19Employee Profile page
accessing 6-17, 6-19illustration of 6-17
Employee profilesviewing 6-15
Employee role 1-3Employee Selection page
accessing 6-20, 7-4, 7-10, 7-12, 7-14, 7-17, 7-24illustration of 6-20, 7-4, 7-17, 7-24
Employee Status field 2-20, 3-20, 5-6Employee Training Summary event option 1-11,
7-24Employee Training Summary page
accessing 7-25illustration of 7-25
Employee Training Summary task 1-6, 6-15, 6-20, 7-2, 7-24
Employee Type field 6-77, 6-86, 6-94, 6-145Employment information
changing 6-147Employment Related Dates area 6-147Employment status
changing 6-104placing on leave 6-105, 6-120returning an employee from leave 6-113, 6-128terminating employee 6-134
Employment tab 6-147Employment Type field 6-37Enroll check box 7-23Enroll Employee in Training event option 1-11, 7-17Enroll Employee in Training page
accessing 7-19illustration of 7-19
Enroll Employee in Training task 1-5, 6-15, 6-20, 7-2, 7-17
Enter Network Password dialog boxaccessing 1-21, 1-22illustration of 1-21, 1-22
Enter Your Contact Information pageillustration of 1-18
Enter Your Security Information pageaccessing 1-19illustration of 1-19
Ethnic Group field 6-30Event field 2-29Event Name field 2-30, 3-8Expected field 7-9
Expected Return Date field 6-109, 6-117, 6-124, 6-132, 6-147
Expiration Date field 7-16
FFAQs 1-5First Name field 6-25, 6-26First Time Users Register Here link 1-15Forms Library 1-5From field 2-29, 2-31Full Time Student field 6-68Full Time Student option 6-35, 6-148Full/Part Time field 6-33, 6-67, 6-145
GGender field 6-30Geographical Differential field 6-37Goal Status field 5-8GPA field 7-9Grace Period field 7-21Grade field 7-26Graduate check box 7-9Graduation Date field 7-9Group field 7-21Guides
see Documentation
HHelp
accessing guides 1-13Help, illustration of 1-12Highest Education Level field 6-30Hire Date field 2-20, 3-20, 5-6Hire New Employee option 6-26Hiring
completing the Additional Hire Information page 6-40
completing the Citizenship page 6-38completing the Job Data - Part A page 6-32completing the Job Data - Part B page 6-34completing the New Hire Start page 6-26completing the Pay Information page 6-36completing the Personal Data - Part A page 6-28completing the Personal Data - Part B page 6-30completing the Rehire Prompt page 6-23completing the Rehire Start page 6-24completing the Submit page 6-42using the new hire/rehire process 6-21
ADP Self Service Manager’s Guide
Index i-7
Historydeleting approval history 3-9employee compensation 4-22employee performance 5-16viewing approvals 3-5viewing new hire event details 3-22
History area 3-8Holiday Schedule field 6-33, 6-146Home Phone field 6-29Home tab 1-4, 2-3, 3-5, 3-9, 3-10, 3-12, 3-14, 3-17,
3-20, 3-22, 3-24, 5-21
II want to verify my identity using area 1-18Identification Number field 7-15Identity (List B) Document field 6-39Identity Expiration Date field 6-39Include check box 5-24Increase Amount field 4-6, 4-25Increase Percent field 4-6, 4-25Issuing Organization field 7-15Issuing State field 7-15
JJob
changing 6-71Job Code field 6-42Job Data - Part A page
accessing 6-32completing for new hires and rehires 6-32illustration of 6-32
Job Data - Part B pageaccessing 6-34completing for new hires and rehires 6-34illustration of 6-34
Job Description field 6-145Job field 6-77, 6-86, 6-94Job information
changing 6-144Job status
changing 6-64Job Title field 2-20, 3-21, 5-6
LLanguage field 7-11Language Option 1-4Languages area 7-6, 7-10Last Name field 6-25, 6-26
Last Name sort option 8-3Lateral Change option 6-93Lateral job change
changing job and salary information 6-89Leave of Absence
placing employee on leave 6-105, 6-120returning from 6-113, 6-128
Leave of Absence option 6-109Level of Education field 7-9Licenses and Certificates area 7-6, 7-14Location
transferring to 6-58Location field 6-49, 6-55, 6-61, 6-145, 7-23, 7-26Location ID sort option 8-3Location Name sort option 8-3Location option 6-60Login
Self Service 1-21Lump Sum Used field 2-11, 3-14, 4-20
MMajor field 7-9Manage My Profile page
illustration of 1-23Manage My Profile tab 1-23Manage My Services tab 1-23Manager
completing bonus compensation worksheets 4-10completing merit compensation worksheets 4-4completing performance review forms 5-4home page 1-7processing bonus compensation approvals 2-14processing merit compensation approvals 2-10processing performance review approvals 2-18running employee history reports 8-6running reports 8-2running team reports 8-3Self Service overview 1-1Self Service tasks 1-3submitting compensation worksheets for
approval 4-14submitting performance worksheets for
approval 5-10transferring to 6-45using Self Service 1-3viewing approval tasks 2-3
Manager Comments area 5-9Manager Comments field 5-8Manager Dept field 4-19
ADP Self Service Manager’s Guide
i-8 Index
Manager Event approvalprocessing 2-24
Manager Eventsviewing event detail 3-24
Manager field 4-23Manager Home page
using 1-7Manager Home Welcome portlets
accessing 1-3components of 1-4illustration of 1-3
Manager Name field 2-11, 2-15, 3-14, 3-17, 4-5, 4-6, 4-11, 4-24
Manager option 6-47Manager Reports task 1-6, 8-3Manager role 1-3Manager Self Service
overview 1-2overview of available tasks 1-3
Manager tasksinitiating employee events 1-9viewing you direct and indirect reports 1-8
ManagingSelf Service account 1-22
Managing work eventsviewing in Self Service 1-5
Managing Work Events pageaccessing 6-16illustration of 6-16, 6-46, 6-52, 6-59, 6-65, 6-73,
6-82, 6-90, 6-106, 6-114, 6-121, 6-129, 6-135Managing Work Events page with Transfer
Employee(s) action selected 6-46Managing Work Events task 1-5, 6-2, 6-16, 6-44,
6-45, 6-51, 6-58, 6-64, 6-71, 6-104Managing Work Events page
accessing 6-46, 6-52, 6-59, 6-65, 6-73, 6-82, 6-90, 6-106, 6-114, 6-121, 6-129, 6-135
Managing Work Events with Change Employment Status option selected 6-106, 6-114, 6-121, 6-129, 6-135
Managing Work Events with Change Job & Salary Information option selected 6-73, 6-82, 6-90, 6-97
Managing Work Events with Change Job Status option selected 6-65
Managing Work Events with Transfer Employee(s) action selected 6-52, 6-59
Marital Status field 6-30Merit compensation
completing worksheets 4-4managing approval tasks 2-10submitting worksheets for approval 4-14
Merit compensation (cont.)viewing event details 3-14
Merit Compensation Approval Worksheetaccessing 2-11, 2-13illustration of 2-11, 2-13processing 2-13viewing and printing 2-10
Merit Compensation Event Detail pageaccessing 3-14illustration of 3-14
Merit Compensation Worksheetaccessing 4-7completing 4-4illustration of 4-7printing 4-9submitting for approval 4-14
Message Centeroverview 2-2
Message Center at a Glance portlet 2-2Message Center task 2-2, 2-3Middle Name field 6-25, 6-26Military Discharge Date field 6-31Minor field 7-9More Information link 2-8, 3-2, 3-3
NName field 2-11, 2-16, 3-15, 3-18Name link 1-7Navigation field 5-5, 5-13Navigation Trail 4-6Navigation Trail field 1-9Netsecure security dialog box
accessing 1-23Netsecure Welcome page
illustration of 1-22New Hire
completing the Additional Hire Information page 6-40
completing the Citizenship page 6-38completing the Job Data - Part A page 6-32completing the Job Data - Part B page 6-34completing the New Hire Start page 6-26completing the Pay Information page 6-36completing the Personal Data - Part A page 6-28completing the Personal Data - Part B page 6-30completing the Submit page 6-42initiating 6-21
New Hire Start pageaccessing 3-22, 6-26illustration of 3-22, 6-26
ADP Self Service Manager’s Guide
Index i-9
New Salary field 4-24, 6-77, 6-100New Salary/Compa Ratio field 2-12, 3-15, 4-8Non US Country of Citizenship 1 field 6-39Non US Country of Citizenship 2 field 6-39Notifications
managing 2-1Notifications link 2-2, 2-6Notifications page
accessing 2-6illustration of 2-6
Notifications tab 2-2, 2-6Number of Action Days field 2-31
OOrganization & Planning tab 4-10Organization & Staffing ta 4-22Organization & Staffing tab 1-5, 1-7, 1-8, 2-28,
2-29, 4-4, 4-16, 4-20, 5-4, 5-12, 5-14, 5-16, 5-19, 5-21, 5-23, 6-15, 6-16, 6-18, 6-20, 6-45, 6-51, 6-58, 6-64, 6-72, 6-81, 6-89, 6-96, 6-105, 6-120, 6-134, 7-12, 7-14, 7-17, 7-24
Organizational Goals area 5-8, 5-25Original Date of Issue field 7-15Originator Name field 2-4, 2-7, 2-8, 3-3, 3-5, 3-8Other area 6-148Overall Comments field 5-9Overall Goal field 2-20, 3-21, 5-7Overall Goal Status Code field 5-8, 5-9Overall Rating Code field 5-8Overall Rating field 2-20, 3-21, 5-7Override Prorate check box 4-8, 4-13Override Prorate option 4-8, 4-12Override Proration field 2-12, 2-16, 3-15, 3-18
PPaid Leave
placing employee on leave 6-105, 6-120returning from 6-113, 6-128
Passport Expiration Date field 6-39Passport Number field 6-39Pay Information page
accessing 6-36completing for new hires and rehires 6-36illustration of 6-36
Pay Rates area 6-153Paygroup field 6-37Payroll Department field 6-153Payroll information
changing 6-153
Payroll Status field 6-153Payroll tab 6-143, 6-153Per field 6-77, 6-86, 6-87, 6-100, 6-101, 6-151per field 6-37Percent Change field 6-79, 6-87, 6-101, 6-151Percent option 4-8, 4-12, 6-77, 6-79, 6-86, 6-87,
6-100, 6-101Percentage Change field 6-77, 6-86, 6-100Perf Eval field 2-12, 2-16, 3-15, 3-18Performance
completing review forms 5-4completing reviews 5-3creating review templates 5-23employee history 5-16managing tasks 2-18submitting worksheets for approval 5-10viewing and printing review forms 5-14viewing and printing worksheets 5-11, 5-12viewing event details 3-20
Performance Approval Worksheetaccessing 2-19, 2-20illustration of 2-19, 2-20processing 2-20viewing and printing 2-19
Performance Event Detail pageaccessing 3-20illustration of 3-20
Performance Factors area 5-8, 5-24Performance History event option 1-11Performance History option 8-6Performance History page
accessing 5-17, 5-20illustration of 5-17, 5-20
Performance History task 1-6, 5-16, 5-19Performance Plan field 2-19, 3-20, 5-6, 5-18Performance Planning event option 1-11Performance Planning page
accessing 5-4, 5-12illustration of 5-5, 5-13
Performance Planning task 1-6, 5-4, 5-12, 5-14Performance review
managing approval tasks 2-18overview 5-2
Performance Review Formscompleting 5-4
Performance Review Template pageaccessing 5-24illustration of 5-24
Performance Review Template selection pageaccessing 5-23illustration of 5-23
Performance Review Template task 1-6, 5-23
ADP Self Service Manager’s Guide
i-10 Index
Performance review templatescreating in Self Service 1-6
Performance tab 1-6, 5-4, 5-12, 5-14, 5-17, 5-20, 5-21
Performance Worksheetaccessing 5-6illustration of 5-6submitting for approval 5-10
Personal Data - Part A pageaccessing 6-28completing for new hires and rehires 6-28illustration of 6-28
Personal Data - Part B pageaccessing 6-30completing for new hires and rehires 6-30illustration of 6-30
Plan field 2-11, 3-14, 4-20Plan ID field 4-6, 4-12, 4-14, 4-21Plan Type field 4-6, 4-12, 5-23Policies and Guidelines 1-5Position field 6-48, 6-76, 6-85, 6-93, 6-144, 6-153Position Management setting 6-6Position Number tab 6-25, 6-27Postal/ZIP field 6-29Practitioner role 1-3Prefix field 6-25, 6-26Previous Employee ID field 6-23Print bonus compensation approval worksheets 2-15Print bonus compensation event detail 3-17Print bonus compensation worksheets 4-13Print button 5-9Print compensation information 4-15Print compensation summary information 4-16Print compensation worksheets 4-20Print consolidated budget information 4-19Print employee compensation history 4-22Print employee performance history 5-16Print merit compensation approval worksheets 2-10Print merit compensation event detail 3-14Print merit compensation worksheets 4-9Print performance approval worksheets 2-19Print performance event detail 3-20Print performance information 5-11Print performance review forms 5-14Print performance worksheets 5-12Process bonus compensation approval
worksheets 2-17Process employee approval tasks 2-26Process merit compensation approval
worksheets 2-13Process performance review worksheets 2-20Proficiency field 7-11
Proficiency Level field 7-13Profiles
viewing employees 6-15Promotion
changing job and salary information 6-72Promotion option 6-76Proposed Incr Amt field 2-12, 3-15, 4-7, 4-8Proposed Incr Pct field 2-12, 3-15, 4-7, 4-8Proposed Lump Sum field 4-6Proxy
adding 2-29assigning 2-28changing 2-29deleting 2-32viewing assignments 2-28
Proxy Assignment pageaccessing 2-28, 2-29illustration of 2-28, 2-29
Proxy Assignment task 1-6, 2-28, 2-29
RRace/Ethnicity field 6-30Rate Change field 6-151Rate Change option 6-151Rate Code field 6-33Rate Type field 6-153Rating field 5-8Rating Nbr field 4-24Read option 7-11Reason field 4-24, 6-67, 6-76, 6-85, 6-93, 6-100,
6-109, 6-124Reason for Action field 6-35Reason for Termination field 6-138Reason for Transfer field 6-48, 6-55, 6-61Recall an event 3-10Recommendations field 5-9Referral Source field 6-35, 6-148Register for ADP Services page
accessing 1-16illustration of 1-16
Register Now button 1-16Registration
for Self Service 1-15Registration Pass Code field 1-17Registration Welcome page
accessing 1-15illustration of 1-15
Regular/Temp field 6-145Regular/Temporary field 6-33, 6-67
ADP Self Service Manager’s Guide
Index i-11
Rehirecompleting the Additional Hire Information
page 6-40completing the Citizenship page 6-38completing the Job Data - Part A page 6-32completing the Job Data - Part B page 6-34completing the Pay Information page 6-36completing the Personal Data - Part A page 6-28completing the Personal Data - Part B page 6-30completing the Rehire Prompt page 6-23completing the Rehire Start page 6-24completing the Submit page 6-42initiating 6-21
Rehire Employee option 6-23Rehire Prompt page
accessing 6-23illustration of 6-23
Rehire Start pageaccessing 6-24illustration of 6-24
Reject All button 2-13, 2-17, 2-21Reject button 2-25, 2-27Reject option 2-13, 2-17, 2-21Remove a Service tab 1-23Report feature
employee history reports 8-2manager team reports 8-2
Report Processing pageaccessing 8-4illustration of 8-4
Reporting Location field 6-33, 6-146Reports
running employee history reports 8-6running team reports 8-3
Reports pageaccessing 8-3illustration of 8-3
Reports tab 1-6, 8-3Reports to field 6-48, 6-144Reports-To feature 1-3Return Date field 6-117, 6-132Return from Leave option 6-117, 6-132Return From Leave Reason field 6-117, 6-132Review
performance 5-3proposed compensation 4-3
Review Date field 2-19, 3-20, 5-6Review forms
performanceviewing and printing 5-14
Review Type field 2-19, 3-20, 5-6Reviewing Manager column 5-3, 5-10, 5-12
Reviewing Manager field 2-19, 3-20, 5-6Reviewing Manager Name column 4-5, 4-11, 4-19Reviewing Manager Name field 4-6, 4-21Roles
in Self Service 1-2Rows per Page field 2-8, 3-4
SSalary
changing 6-71, 6-96Salary Action field 4-24Salary Action Reason field 4-8Salary Action Type field 4-8Salary Action Type/Salary Action Reason
field 2-12, 3-15Salary Amount field 2-16, 3-18Salary Change area 6-151Salary Change field 6-101Salary Change fields 6-78Salary Change option 6-100Salary Change Reason field 6-79, 6-87, 6-101Salary Comp field 2-16, 3-18Salary fields 6-100Salary Grade field 4-24, 6-151Salary Grade Max field 2-16, 3-18Salary Grade Mid field 2-16, 3-18Salary Grade Min field 2-16, 3-18Salary Plan area 6-151Salary Plan field 6-151Salary Step field 6-37, 6-77, 6-86, 6-145, 6-151Save in Progress button 5-7School Name field 7-9Second Major field 7-9Security Clearance field 6-35, 6-68, 6-148Security Information page
accessing 1-19Select one of more of the employee changes below
option 6-11Select one of more of the Employment Changes
below option 6-6, 6-46, 6-52, 6-59, 6-65, 6-73, 6-82, 6-90, 6-97, 6-106, 6-114, 6-121, 6-129, 6-135
Self Serviceadministrators 1-2ADP Enterprise HR versions supported 1-2approval history 3-1approval history overview 3-2approval tasks overview 2-2compensation overview 4-2employees 1-2
ADP Self Service Manager’s Guide
i-12 Index
Self Service (cont.)features 1-2Help, accessing manuals 1-13logging in 1-21Manager Home page 1-7manager tasks 1-3managers 1-2managing compensation reviews 4-1managing performance reviews 5-1managing your account 1-22online Help 1-12performance overview 5-2practitioners 1-2registration 1-15Registration Pass Code 1-17taking the tour 1-14users 1-2
Self Service Portal Login pageaccessing 1-15illustration of 1-15, 1-21
Self Service Registration Confirmation pageillustration of 1-20
Self Service touraccessing 1-14illustration of opening page 1-14
Send to Proxy Directly check box 2-31Shift field 6-33, 6-68Skills area 7-6, 7-12Social Security Number field 6-23, 6-26Speak option 7-11Split Base field 6-37SSN field 1-18Standard Hours field 6-37, 6-68, 6-145Start Date and Time field 7-23, 7-26Start Date field 6-25, 6-26, 6-42Start Work Events page
accessing 6-8, 6-12, 6-46, 6-66, 6-74, 6-83, 6-91, 6-98, 6-107, 6-115, 6-122, 6-130, 6-136
illustration of 6-8, 6-12, 6-46, 6-66, 6-74, 6-83, 6-91, 6-98, 6-107, 6-115, 6-122, 6-130, 6-136
State/Province field 6-29, 7-9Status field 2-5, 2-7, 2-12, 2-16, 2-20, 3-3, 3-6, 3-15,
3-18, 3-21, 5-7, 7-26Step History area 3-8Street field 6-29Submit
new hires and rehires for approval 6-42Submit button 1-20, 8-3Submit check box 4-14, 5-10Submit page
illustration of 6-42
Submit Worksheet pageaccessing 4-14, 5-10illustration of 4-14, 5-10
Subordinate Manager field 4-6, 5-5Subordinate Manager name 5-13Suffix field 6-25, 6-26Supervisor field 6-149Suspension Date field 6-124
TTasks
bonus compensation 2-14employee events 2-26merit compensation 2-10performance reviews 2-18proxy assignments 2-28work events 2-22
Team reportsrunning 8-3
Team Reports area 8-3Template
performance review 5-23Template field 2-20, 3-21, 5-7Template Type field 5-23, 5-24Terminate option 6-138Terminating
employee 6-134Termination Date field 6-138To field 2-29, 2-31Total Work Events field 6-50Tour
Self Service 1-12Self Service application overview 1-14
Trainingcancelling enrollment in a session 7-24viewing training summary 7-24
Training Activity field 7-21Training Description field 7-19, 7-23, 7-26Transfer
Department transfer fieldsaccessing 6-55illustration of 6-55
employees 6-44Location transfer fields
accessing 6-61illustration of 6-61
Manager transfer fieldsaccessing 6-48illustration of 6-48
to a new department 6-51
ADP Self Service Manager’s Guide
Index i-13
Transferto a new location 6-58to a new manager 6-45
Transfer Date field 6-48, 6-55, 6-61Transfer Employee event option 1-10Transfer Employee option 6-45, 6-51Transfer page
accessing 6-45, 6-54, 6-60illustration of 6-46, 6-47, 6-53, 6-54, 6-59, 6-60,
6-66, 6-74, 6-83, 6-91, 6-98, 6-107, 6-115, 6-122, 6-130, 6-136
Transfer Page with Manager Transfer fields displayed 6-48
Type field 7-13, 7-15, 7-19, 7-21Type of Transfer field 6-44, 6-47, 6-54, 6-60
UUnion Code field 6-35, 6-148Union Seniority Date field 6-35Unpaid leave
placing employee on leave 6-105, 6-120returning from 6-113, 6-128
Update Education pageaccessing 7-8illustration of 7-8
Update Incumbents setting 6-6Update Languages page
accessing 7-11illustration of 7-11
Update Proxy Assignment pageaccessing 2-30, 2-32illustration of 2-30, 2-32
Update Skills pageaccessing 7-13, 7-15illustration of 7-13, 7-15
Updating multiple employees for a single job action 6-11
Updating multiple job actions for a single employee 6-6
Use search criteria to filter results 2-8, 3-3User Login button 1-21Users
Self Service 1-2
VValid Period field 7-21Variable Pay Plan field 6-37Variance field 2-11, 3-15, 4-8, 4-12, 4-20Verify Your Identity page
Verify Your Identity page (cont.)accessing 1-17illustration of 1-17
VETS-100 area 6-31VETS-100 Disabled Veteran check box 6-31VETS-100 Military Status field 6-31VETS-100A area 6-31VETS-100A Disabled Veteran check box 6-31VETS-100A Military Status field 6-31View approval history 3-5View Approval History Detail page
accessing 3-8illustration of 3-8
View bonus compensation approval worksheets 2-15
View bonus compensation event detail 3-17View compensation information 4-15View compensation summary information 4-16View compensation worksheets 4-20View consolidated budget information 4-19View employee compensation history 4-22View employee events detail 3-11View employee performance history 5-16View employee performance review forms 5-14View employee profiles 6-15View History column 3-16View History field 2-4, 2-7, 3-6View Holiday Schedule button 6-146View manager events detail 3-24View merit compensation approval worksheets 2-10View merit compensation event detail 3-14View new hire event detail 3-22View performance approval worksheets 2-19View performance event detail 3-20View Performance History link 2-21, 5-6, 5-13,
5-18, 5-21View performance information 5-11View performance worksheets 5-12View proxy assignments 2-28View Report button 8-5View Report page
accessing 8-4illustration of 8-4
View Your User ID & Create Your Password pageaccessing 1-19illustration of 1-19
Viewing Approval History Detail 3-7Visa Expiration Date field 6-39Visa Number field 6-39Visa Type field 6-39
ADP Self Service Manager’s Guide
i-14 Index
WWeight field 5-24Welcome portlets 1-4Work Event
Change Employment Status 6-3Change Job & Salary Information 6-2Change Job Status 6-2Comprehensive Employment Change 6-3Hire New Employee 6-2Rehire Employee 6-2Transfer Employee(s) 6-2updating multiple employees for a single job
action 6-11updating multiple job actions for a single
employee 6-6Work Event field 6-50Work Event Status field 6-50Work Events
changing an employee’s employment status 6-104changing an employee’s job and salary 6-71changing an employee’s job status 6-64changing an employee’s salary 6-96Comprehensive Employment Change 6-141demoting an employee 6-81Employee Profile 6-17lateral job change 6-89managing 6-1, 6-5managing tasks 2-22new hire 6-21promoting an employee 6-72rehire 6-21search field and filtering tips 6-3transferring employee to new department 6-51transferring employee to new location 6-58transferring employee to new manager 6-45transferring employees 6-44viewing employee profiles 6-15
Work Events Summary pageaccessing 6-7, 6-10, 6-11, 6-12, 6-13, 6-14, 6-50,
6-56, 6-62, 6-70, 6-79, 6-87, 6-95, 6-102, 6-111, 6-118, 6-126, 6-133, 6-139
illustration of 6-7, 6-10, 6-11, 6-12, 6-13, 6-14, 6-50, 6-56, 6-62, 6-70, 6-79, 6-87, 6-95, 6-102, 6-111, 6-118, 6-126, 6-133, 6-139
Work History area 7-6Work Location field 6-33, 6-146Workflow Comments field 2-11, 2-13, 2-17, 2-19,
2-21, 3-15, 3-20, 4-15, 5-10Workflow Path Name field 3-8
Worksheetcompensation
view and print 4-15viewing and printing 4-20
performanceview and print 5-11viewing and printing 5-12
Worksheet ID column 2-8, 3-3Worksheet ID field 2-4, 2-7, 2-8, 3-3, 3-5, 3-8Worksheet Identifier field 4-14, 5-10Would you like to perform an additional salary
change? field 6-78, 6-86, 6-101, 6-151Write option 7-11
YYes option 6-78, 6-86, 6-101
ADP Self Service Manager’s Guide

i-15 Index
ADP Self Service Manager’s Guide

i-16
IndexADP Self Service Manager’s Guide