Embed Size (px)
Citation preview

.
Sage Accpac International, Inc. Confidential
SAGE ACCPAC
Sage Accpac ERP™
Accounts Payable 5.5A Getting Started
AP GS ttl.doc, printed on 1/31/2008, at 2:34:41 PM. Last saved on 1/31/2008 2:34:00 PM.
Sage Accpac International, Inc. Confidential
©2008 Sage Software, Inc. All rights reserved. Sage Software, Sage Software logos, and all Sage Accpac product and service names are registered trademarks or trademarks of Sage Software, Inc., or its affiliated entities. All other trademarks are the property of their respective owners. Sage Software, Inc. Publisher No part of this documentation may be copied, photocopied, reproduced, translated, microfilmed, or otherwise duplicated on any medium without written consent of Sage Software, Inc. Use of the software programs described herein and this documentation is subject to the Sage Software License Agreement enclosed in the software package.
Getting Started iii
Apgs‐TOC‐55.doc, printed on 11/16/2007, at 12:01:18 PM. Last saved on 11/16/2007 12:01:00 PM.
Sage Software Confidential
Contents
Chapter 1: Introducing Accounts Payable
Accounts Payable Features ......................................................1–1 Integrating with Other Programs ...............................................1–10 Accounts Payable Documentation...............................................1–11
How to Use This Manual ...................................................1–11 The User Guide ...........................................................1–12 Online Documentation .....................................................1–12
Where To Now?...............................................................1–13
Chapter 2: What You Need to Know Before Setting Up Accounts Payable
Choosing Accounts Payable Options .............................................2–2 Company Information ......................................................2–2 Processing Options .........................................................2–3 Transactions Options ......................................................2–11 Numbering Options .......................................................2–18 Retainage Options .........................................................2–20
Choosing G/L Integration Options ..............................................2–23 Specifying When, Where, and How to Create G/L Transactions ................2–24 Selecting References and Descriptions for General Ledger Transactions .........2–29 Changing Your General Ledger Integration Options ..........................2–30
Designing Accounts Payable Coding Schemes....................................2–30 Sorting Order of Codes.....................................................2–32
Entering Accounts Payable Setup Information....................................2–33 Setting Up Account Sets....................................................2–33

iv Sage Accpac Accounts Payable
Apgs‐TOC‐55.doc, printed on 11/16/2007, at 12:01:18 PM. Last saved on 11/16/2007 12:01:00 PM.
Sage Software Confidential
Setting Up 1099/CPRS Codes............................................... 2–37 Setting Up Distribution Codes.............................................. 2–38 Setting Up Distribution Sets................................................ 2–39 Setting Up Terms ......................................................... 2–41 Setting Up Payment Codes................................................. 2–43 Setting Up E‐mail Messages................................................ 2–43 Setting Up Payment Selection Codes ........................................ 2–44 Setting Up Optional Fields ................................................. 2–45
Setting Up Vendor Records .................................................... 2–49 Defining Vendor Groups .................................................. 2–50 Adding Vendors .......................................................... 2–54 Adding Remit‐To Locations................................................ 2–63 Adding Recurring Payables ................................................ 2–65
Importing and Exporting Accounts Payable Records ............................. 2–68 Entering Current and Historical Transactions.................................... 2–70
Entering Current‐Year Data ................................................ 2–71 Previous‐Year Statistics .................................................... 2–72
Customizing Checks, Payment Advices, Letters, and Label Formats................ 2–73 Setting Up Multicurrency Accounting in Accounts Payable ....................... 2–73 Where To Now? .............................................................. 2–75
Chapter 3: Setting Up Your Accounts Payable System
Before You Begin .............................................................. 3–1 Using Accounts Payable with an Internet Browser ................................ 3–2 Overview of Accounts Payable Setup ............................................ 3–2 While You Work............................................................... 3–4
Guideposts to Accounts Payable Information ................................. 3–4 Setting Up an Accounts Payable System.......................................... 3–6
Step 1: Gather Data from Your Present Payables System ....................... 3–6 Step 2: Add Payable Accounts to Your Chart of Accounts...................... 3–8 Step 3: Add Tax, Bank, Currency, and Security Information.................... 3–9

Getting Started v
Apgs‐TOC‐55.doc, printed on 11/16/2007, at 12:01:18 PM. Last saved on 11/16/2007 12:01:00 PM.
Sage Software Confidential
Step 4: Select Accounts Payable Options......................................3–9 Step 5: Add Accounts Payable Records ......................................3–28 Step 6: Add Vendor Records ...............................................3–49 Step 7: Add Remit‐To Locations (Optional) ..................................3–65 Step 8: Add Recurring Payable Records .....................................3–69 Step 9: Add Opening Balances and Current‐Year Transactions.................3–83 Step 10: Add Vendor and Vendor Group Statistics (Optional) .................3–89 Step 11: Create Payment Selection Codes to Process Payments Automatically ...3–93 Step 12: Design Checks, Payment Advices, Letters, and Labels.................3–97
Where To Now?...............................................................3–99
Appendix A: Setup Checklist Sample Setup Checklist ........................................................ A–2
Index

Getting Started 1–1
Apgs‐1.doc, printed on 1/7/2008, at 8:57:54 PM. Last saved on 1/7/2008 8:54:00 PM.
Sage Software Confidential
Introducing A
/P
Chapter 1 Introducing Accounts Payable
This chapter introduces you to Accounts Payable. It describes important features of the program, discusses how Accounts Payable integrates with other applications, and suggests how to use the Accounts Payable manuals to learn about the system.
Accounts Payable Features Accounts Payable handles all your payables record‐keeping and reporting needs, regardless of the size and complexity of your business.
You can use the Accounts Payable program to set up and maintain your vendor accounts, enter or import transactions from various sources, and print checks. You can track account and transaction details on screen displays and printed reports. Accounts Payable produces the reports you need to avoid late payment charges, secure vendor discounts, and match cash requirements to cash resources.
You can use Accounts Payable by itself or as part of an integrated system with Sage Accpac General Ledger and Financial Reporter. You can also transfer Accounts Payable account data to and from spreadsheet and database programs.
Use Accounts Payable through a browser or from the Sage Accpac desktop
You can access your Accounts Payable data using the Sage Accpac desktop or through your Internet browser. All Accounts Payable data entry forms are designed to enable users at remote locations to enter and view transaction data using a browser.
The rest of this section describes some of the tasks you can accomplish using Accounts Payable.
Accounts Payable Features
1–2 Sage Accpac Accounts Payable
Apgs‐1.doc, printed on 1/7/2008, at 8:57:54 PM. Last saved on 1/7/2008 8:54:00 PM.
Sage Software Confidential
Tailor Accounts Payable to Your Business
• Set up any number of general ledger control account sets to assign to vendors.
• Define distribution codes to represent General Ledger accounts and speed data entry.
• Define distribution sets consisting of groups of General Ledger accounts to which you frequently distribute vendor transactions. Optionally assign a distribution set to each vendor.
• Define as many payment terms as you need.
− Specify whether to include or exclude tax amounts in discount bases.
− Calculate due dates and discount dates from the invoice date, end of next month, day of next month, and days from day of next month.
− Define multiple payment schedules. Each payment can have a unique due date and discount date.
• Define and use unlimited optional fields to store additional information you want to keep with transactions, vendor records, and remit‐to locations (payment addresses).
• Choose the year and period by which to accumulate vendor and group statistics. Retain the statistics for as long as you want, or choose not to keep statistics.
• Determine the default tax calculation method for invoices and recurring payables. You can choose manual entry, or you can have the program calculate all taxes for you or distribute a manually entered total tax amount to invoice details. (You can change the type of tax calculation for individual invoices.)
• Print checks, payment advices, letters, and labels using the supplied formats — or change them to suit your needs.
• Delete groups of inactive vendor accounts quickly and easily.
Accounts Payable Features
Getting Started 1–3
Apgs‐1.doc, printed on 1/7/2008, at 8:57:54 PM. Last saved on 1/7/2008 8:54:00 PM.
Sage Software Confidential
Introducing A
/P
• Keep 1099 and Contract Payment Reporting System (CPRS) information for vendors that are subject to 1099/CPRS reporting.
Produce Comprehensive Management Reports
Accounts Payable provides numerous sorting and selection options on a full range of reports, journals, and lists, including:
• Aged Payables and Overdue Payables. Reports outstanding or overdue payables, aged by due date or by document date — selected and sorted as you choose. Report options include detail by date, detail by document, or summary report, and whether to include the vendor’s contact person, phone number, credit limit, transactions on hold, and applied details.
Reports use the default aging periods specified for the ledger, unless you specify different aging periods at print time.
• Aged Cash Requirements. Reports outstanding transactions, aged by due date or by document date, for analyzing payables. Report options include detail by date, detail by document, summary report, whether to take discounts, and whether to include the vendor’s contact person, phone number, credit limit, transactions on hold, and applied details.
• Aged Retainage, Overdue Retainage, and Future Retainage. Reports outstanding, overdue, and future retainage by due date. Report options include detail by document date, detail by document number, detail by retainage due date, or summary report, and whether to print amounts in the vendor currency or the functional currency.
Reports use the default aging periods specified for the ledger, unless you specify different aging periods at print time.
• Vendor Transactions. Provides a complete listing of transactions, including applied details, if you wish. You can report transactions by document date, document number, or fiscal year and period. You can select types of transactions, additional vendor information, and the report order.
Accounts Payable Features
1–4 Sage Accpac Accounts Payable
Apgs‐1.doc, printed on 1/7/2008, at 8:57:54 PM. Last saved on 1/7/2008 8:54:00 PM.
Sage Software Confidential
• Vendor List And Statistics. Provides a summary of information in vendor records, including addresses, vendor options, statistics, and comments.
• Batch Status. Provides a record of the types and statuses of all batches currently in your system, and of posted and deleted batches that have not been cleared.
• G/L Transactions. Lists all transactions generated by Accounts Payable for posting to Sage Accpac General Ledger or another general ledger. You can create and list a separate G/L transaction batch each time you post invoices, payments, adjustments, or revaluations.
Manage Your Vendor Records
• Define an unlimited number of vendor groups for gathering statistics and reporting purposes. Each vendor is assigned to a group.
• Define an unlimited number of remit‐to locations (payment addresses) for each vendor.
• Accumulate vendor statistics by periods you specify. Retain the statistics for as long as you want.
• Enter an unlimited number of vendor comments, each up to 2,500 characters in length, with expiration and follow‐up dates.
• Set records such as vendors or payment terms to an inactive status if you want to stop using them on a daily basis, but wish to retain them in the system for historical and reporting purposes.
Adapt Transaction Processing to Your Needs
• Maintain as many open batches of invoice, payment, and adjustment transactions as you need. This lets you group transactions by operator, time period, type of entry, or any other method you find useful.

Accounts Payable Features
Getting Started 1–5
Apgs‐1.doc, printed on 1/7/2008, at 8:57:54 PM. Last saved on 1/7/2008 8:54:00 PM.
Sage Software Confidential
Introducing A
/P
• Use retainage accounting for processing vendor invoices, debit notes, and credit notes.
• Distribute invoices to as many general ledger expense or asset accounts as you require.
• Adjust open invoices during payment entry.
• View pending payments to avoid entering duplicate checks.
• Enter prepayments for specific invoices, purchase orders, or sales orders at the same time that you enter the invoice.
• Calculate tax for vendor invoices automatically or enter taxes manually. Tax can be included in the invoice amount.
• Enter transactions directly or import them from other accounting systems or applications.
• Generate invoices automatically for standard payables such as rent, equipment leases, or standing orders, and use reminders to alert you to process the payables when they come due. (You can process the transactions directly from the Reminder List, or use the Create Recurring Payable Batch form.)
• Allow or restrict editing of system‐generated check batches, statistics, and batches retrieved and imported from other programs.
• Create batches of currency revaluation transactions that reflect gains and losses from changes in exchange rates.
• Define the prefixes Accounts Payable assigns to payments, prepayments, adjustments, and invoices created for recurring payables.
Set Payment Controls at Both the Vendor and Invoice Level
• Place holds on individual vendor accounts.
• Set maximum payment amounts for invoices.

Accounts Payable Features
1–6 Sage Accpac Accounts Payable
Apgs‐1.doc, printed on 1/7/2008, at 8:57:54 PM. Last saved on 1/7/2008 8:54:00 PM.
Sage Software Confidential
• Force or withhold payment of individual transactions. Control the maximum payment amount and change the discount amount as required.
• Establish standard payment selection criteria for creating check batches.
• Create vendor exclusion lists for payment batch creation.
Control Check Processing at All Phases
• Generate and print system checks, with or without payment advices, for current payables and forced transactions that you select for payment.
• Process checks to prepay invoices that you have not yet received. Identify invoices by invoice number, purchase order number, or sales order number.
• Automatically apply prepayments when posting payments and invoices.
• Print checks individually as you enter them, or in batches.
• Generate separate checks for each invoice, or create summary checks by vendor.
• Enter a “cash invoice” that lets you pay the vendor and enter the invoice at the same time.
• Process miscellaneous checks for vendors that are not defined in your Accounts Payable ledger.
• Reinstate invoices by reversing posted checks.
• Choose the language for printing written amounts on checks. Accounts Payable can print the check amount in English, French, and Spanish, and can use other language files written by third‐party developers.
• Specify the next check number to assign to each bank account (through Bank Services).

Accounts Payable Features
Getting Started 1–7
Apgs-1.doc, printed on 2/7/2008, at 10:10:11 AM. Last saved on 2/7/2008 10:09:00 AM.
Sage Software Confidential
Introducing A
/P
Produce Complete Audit Trails
• Keep details of fully paid transactions for as long as you choose, and print a history report.
• Print a journal of the entries posted in each posting run, listing key pieces of information you can use to track each detail.
• Print the Aged Overdue Payables, Aged Payables, and Vendor Transactions reports for a complete listing of transactions that have not yet been deleted.
• Optionally require printing of batch listings before posting.
• Specify the information you want as the references and descriptions for transactions sent to the general ledger.
• Print reports of all checks issued by Sage Accpac (using Bank Services).
• Track all tax amounts included in invoice amounts or separately expensed (using Tax Services).
• Delete history of fully paid transactions for selected vendors or vendor groups, and delete posted and printed journals for selected posting sequences.
Protect the Integrity of Your Accounts Payable Data
• You cannot delete vendor accounts with outstanding transactions, and you cannot delete accounts that have non-zero balances.
• You cannot post transactions with duplicate document numbers to the same vendor.
• You cannot post an apply document transaction to a date earlier than the documents to which they apply, nor can you post a receipt or a refund to a date earlier than the document being paid or refunded.
Accounts Payable Features
1–8 Sage Accpac Accounts Payable
Apgs‐1.doc, printed on 1/7/2008, at 8:57:54 PM. Last saved on 1/7/2008 8:54:00 PM.
Sage Software Confidential
• You cannot post adjustments and reversals (of receipts and refunds) to a date earlier than the document you are adjusting or reversing.
• You cannot post a retainage document to a date earlier than the posting date of the original document.
• You cannot post an overpayment for a given invoice.
• When adding entries, you must use valid codes for vendors, vendor groups, account sets, terms, distribution codes, distribution sets, tax groups, and bank accounts.
• You must complete specific tasks before proceeding with year‐end processing.
Ensure Date Sensitivity at All Times
• Enter run dates and cutoff dates for aging reports to ensure that more recent transactions are not reported. Specify aging periods at the time of printing.
• Control the activation date of prepayments (so they do not affect vendor balances).
• Keep all fiscal periods in balance (Accounts Payable posts all details of transactions to the same fiscal period used during transaction entry).
Quickly Review Your Data, Using Screen Displays
• Review current and historical transactions, as well as detailed statistics, for each vendor account.
• Review the payment history for individual invoices during payment entry.
• Review all invoices paid by a particular check.
• Perform on‐screen aging.
• Display a summary of each batch in the system.

Accounts Payable Features
Getting Started 1–9
Apgs-1.doc, printed on 2/21/2008, at 4:34:48 PM. Last saved on 2/21/2008 4:34:00 PM.
Sage Software Confidential
Introducing A
/P
• Drill down from General Ledger to view original transactions posted in Accounts Payable, and from Accounts Payable to originating entries in Purchase Orders.
Perform Multicurrency Accounting
Sage Accpac multicurrency accounting allows you to enter, post, and report transactions in all the currencies you use in your business, including the euro.
You can also transfer multicurrency transactions from other Sage Accpac applications to Accounts Payable, and import them from non-Sage Accpac applications.
Accounts Payable lets you:
• Accept the exchange rate associated with a rate type and date, or override the rate for individual invoices or payments.
• Apply cash to invoices in any currency.
• View account balances and print key analysis reports in both the functional currency (the home currency of a given set of data) and source currencies (the currency in which a transaction was entered).
• Revalue transactions that you entered in other currencies, as exchange rates change. You can select the currencies, rate types, vendor records, and account sets for which to revalue transactions.
• Recognize exchange gains and losses during revaluation or when you settle documents, depending on the gain/loss accounting method you use for your system.
• Print Aged Payables and Vendor Transactions reports that reflect the results of currency revaluation.

Integrating with Other Programs
1–10 Sage Accpac Accounts Payable
Apgs-1.doc, printed on 2/21/2008, at 4:36:23 PM. Last saved on 2/21/2008 4:36:00 PM.
Sage Software Confidential
Integrating with Other Programs Accounts Payable can be used by itself (with System Manager installed) or as part of an integrated system with other Sage Accpac accounting applications. You can also transfer Accounts Payable data to and from spreadsheet and database programs using the import and export facilities.
You can integrate Accounts Payable with the following Sage Accpac applications:
• General Ledger and Financial Reporter. Accounts Payable can create general ledger batches directly in General Ledger or create batches that are ready to import to General Ledger at a remote location.
You can choose to create general ledger batches automatically during posting or create the batches yourself when you are ready, and you can post transactions to the General Ledger in consolidated form or with full details. You can specify what you want to include as the reference and description for each transaction sent to the general ledger. You can select General Ledger account numbers from the Finder in Accounts Payable.
• Inventory Control. Accounts Payable maintains all vendor information for Inventory Control. If you want to generate invoices from inventory receipts, you must also use the Purchase Orders application.
• Purchase Orders. Accounts Payable maintains vendor information, terms codes, tax groups, remit-to locations and 1099/CPRS information for Purchase Orders. The Purchase Orders system creates invoices, credit notes, and debit notes in Accounts Payable.
• Project and Job Costing. Accounts Payable lets you enter job-related invoices, debit notes, credit notes, and payments that will update contracts that you manage using Sage Accpac Project and Job Costing.

Accounts Payable Documentation
Getting Started 1–11
Apgs-1.doc, printed on 2/21/2008, at 4:37:07 PM. Last saved on 2/21/2008 4:36:00 PM.
Sage Software Confidential
Introducing A
/P
Accounts Payable also integrates with Sage FAS, letting you record details of asset purchases that you can use to create asset records in the Sage FAS program.
Accounts Payable Documentation The Sage Accpac ERP 5.5 DVD includes the Getting Started guide and the User Guide in Adobe PDF format, as well the Update Notice and readme file for this version of Accounts Payable.
You can install the Getting Started guide, the User Guide, and the Update Notice on Sage Accpac ERP servers and workstations when you install the Accounts Payable program, and you can open them from the Help menu on the Sage Accpac ERP desktop.
How to Use This Manual
This Getting Started manual explains how to set up your data.
To install Sage Accpac and set up your printer, follow the instructions in the System Manager Administrator Guide.
In addition to Chapter 1, the Getting Started manual contains the following chapters:
Chapter 2, What You Need to Know Before Setting Up Accounts Payable, tells you how to create an accounts payable system that takes full advantage of the program’s features and meets your company’s current and future needs.
Chapter 3, Setting Up Your Accounts Payable System, guides you through setting up Accounts Payable to meet the unique needs of your company, and transferring your current accounts payable data to your new system.
Appendix A, Setup Checklist, describes and shows the setup checklist, and explains how to print it.
Accounts Payable Documentation
1–12 Sage Accpac Accounts Payable
Apgs‐1.doc, printed on 1/7/2008, at 8:57:54 PM. Last saved on 1/7/2008 8:54:00 PM.
Sage Software Confidential
The Index contains an alphabetical listing of topics in this manual, with corresponding page‐number references.
The User Guide
The Accounts Payable documentation includes this Getting Started manual and the User Guide.
The Accounts Payable User Guide contains an overview of Accounts Payable processing and details daily and periodic processing and maintenance procedures. It also shows reports printed from the sample data.
The appendixes in the Accounts Payable User Guide describe the import and export features and provide other technical information for interested users.
Turn to the User Guide once you have finished setting up your Accounts Payable system according to the instructions in this manual.
Online Documentation
When you install Accounts Payable, you also install the following Accounts Payable online documents:
• README.wri, APTECHINFO.wri, FORMS.wri, and AP‐SETUP.pdf files in the \Sage Accpac\DOCS\AP55AENG directory.
README contains specialized information about the program, and describes any program changes that occurred after the manual was finished.
APTECHINFO contains technical information, such as a list of all the database tables in the Accounts Payable program, the Accounts Payable fields you can import and export, and database or report changes.
Where To Now?
Getting Started 1–13
Apgs-1.doc, printed on 2/21/2008, at 4:37:56 PM. Last saved on 2/21/2008 4:37:00 PM.
Sage Software Confidential
Introducing A
/P
FORMS lists the fields, field lengths, and descriptions you can include when customizing printed Accounts Payable forms, such as checks and vendor letters.
AP-SETUP is a checklist that lists the steps for setting up the Accounts Payable program.
• The Accounts Payable Update Notice, Getting Started Guide and User Guide, if you choose to install Documents during Accounts Payable installation.
You can choose the Accounts Payable readme file and manuals from the Help menu on the Sage Accpac Desktop.
Where To Now? If you have just purchased System Manager and Accounts Payable, install the applications on your computer, following the instructions in the System Manager Administrator Guide. If you have already installed System Manager, install Accounts Payable, following the instructions in the System Manager Administrator Guide.
If Accounts Payable is already installed on your system, we suggest you read Chapter 2, “What You Need to Know Before Setting Up Accounts Payable,” in this manual.
The Sage Accpac Workbook that comes with the System Manager provides lessons that teach you how to enter invoices and payment transactions and print checks using Accounts Payable. Try the exercises in the Sage Accpac Workbook before you begin using Accounts Payable with your own data.
You can find the Sage Accpac Workbook in the Docs directory on the Sage Accpac ERP 5.5 DVD. You can also choose it from the Help menu on the Sage Accpac ERP Desktop by clicking:
Help / Online Documentation / System Manager / Workbook
Where To Now?
1–14 Sage Accpac Accounts Payable
Apgs‐1.doc, printed on 1/7/2008, at 8:57:54 PM. Last saved on 1/7/2008 8:54:00 PM.
Sage Software Confidential
When you are ready to create your own Accounts Payable system, follow the instructions in Chapter 3, “Setting Up Your Accounts Payable System,” in this manual.


Getting Started 2–i
Apgs‐2.doc, printed on 11/16/2007, at 11:58:25 AM. Last saved on 10/26/2007 8:44:00 PM.
Sage Software Confidential
Before
Setting Up
Chapter 2 What You Need to Know Before
Setting Up Accounts Payable
Choosing Accounts Payable Options .............................................2–2 Company Information ......................................................2–2 Processing Options .........................................................2–3
Using Multicurrency Accounting.........................................2–3 Force Listing of Batches .................................................2–4 Editing Imported and External Batches ...................................2–5 Using Retainage Accounting .............................................2–5 Keeping Vendor and Group Statistics .....................................2–6 Defining Aging Periods ................................................2–10 Aging Unapplied Credit Notes, Debit Notes, and Prepayments.............2–10 Default Number of Days to Keep Comments .............................2–10
Transactions Options ......................................................2–11 Specifying a Default Posting Date for Invoices ............................2–12 Setting Defaults for Tax Calculation .....................................2–13 Use 1099/CPRS Reporting ..............................................2–13 Allow Edit of 1099/CPRS Amounts ......................................2–14 Specifying a Default Tax Class for Invoice Details .........................2–14 Specifying a Default 1099/CRPS Amount.................................2–14 Setting a Default Transaction Type ......................................2–14 Setting a Default Order of Open Documents..............................2–15 Setting a Default Bank Code ............................................2–16 Setting a Default Payment Code.........................................2–16 Checking for Duplicate Checks..........................................2–17 Specifying a Default Posting Date for Payments...........................2–17 Including Pending Transactions.........................................2–17 Allowing Adjustments in Payment Batches...............................2–18
2–ii Sage Accpac Accounts Payable
Apgs‐2.doc, printed on 11/16/2007, at 11:58:25 AM. Last saved on 10/26/2007 8:44:00 PM.
Sage Software Confidential
Allowing Edit of System Generated Batches.............................. 2–18 Allowing Remit‐To Information To Be Changed.......................... 2–18
Numbering Options....................................................... 2–18 Retainage Options ........................................................ 2–20
Specifying Retainage Defaults for Vendor Records (Optional) ............. 2–20 Specifying Retainage Defaults for Invoice Entry and Retainage Processing .. 2–21
Choosing G/L Integration Options.............................................. 2–23 Specifying When, Where, and How to Create G/L Transactions................ 2–24
Creating G/L Transactions During Posting or On Request ................. 2–26 Creating G/L Transactions By Adding to an Existing Batch or
Creating a New Batch .............................................. 2–26 Choosing Consolidation Options for General Ledger Transactions ......... 2–27 Defining G/L Source Codes............................................. 2–28
Selecting References and Descriptions for General Ledger Transactions ........ 2–29 Changing Your General Ledger Integration Options.......................... 2–30
Designing Accounts Payable Coding Schemes ................................... 2–30 Sorting Order of Codes .................................................... 2–32
Entering Accounts Payable Setup Information ................................... 2–33 Setting Up Account Sets ................................................... 2–33 Setting Up 1099/CPRS Codes ............................................... 2–37 Setting Up Distribution Codes.............................................. 2–38
Entering and Posting Transactions with Distribution Codes ............... 2–39 Creating Distribution Codes............................................ 2–39
Setting Up Distribution Sets................................................ 2–39 Creating Distribution Sets.............................................. 2–40
Setting Up Terms ......................................................... 2–41 Setting Up Payment Codes................................................. 2–43 Setting Up E‐mail Messages................................................ 2–43
Variables for E‐mail Messages .......................................... 2–43 Setting Up Payment Selection Codes ........................................ 2–44
Using Payment Selection Codes ........................................ 2–45 Setting Up Optional Fields ................................................. 2–45
Optional Field Settings................................................. 2–48

Getting Started 2–iii
Apgs‐2.doc, printed on 11/16/2007, at 11:58:25 AM. Last saved on 10/26/2007 8:44:00 PM.
Sage Software Confidential
Before
Setting Up
Setting Up Vendor Records.....................................................2–49 Defining Vendor Groups ...................................................2–50
Assigning Optional Fields to Vendor Groups .............................2–53 Adding Vendors...........................................................2–54
Assigning Vendor Numbers ............................................2–57 Assigning a Group Code ...............................................2–58 Placing a Vendor Account on Hold or Setting to Inactive ..................2–58 Entering Short Names ..................................................2–58 Selecting Processing and Invoicing Options ..............................2–59 Entering Tax Information...............................................2–60 Subject to 1099/CPRS Reporting .........................................2–60 Using Vendor Statistics.................................................2–60 Entering Retainage Information for Vendors..............................2–61 Assigning Optional Fields to Vendor Records ............................2–62 Processing Vendor Comments ..........................................2–62
Adding Remit‐To Locations ................................................2–63 Assigning Optional Fields to Remit‐to Locations ..........................2–64
Adding Recurring Payables ................................................2–65 Importing and Exporting Accounts Payable Records..............................2–68 Entering Current and Historical Transactions ....................................2–70
Entering Current‐Year Data ................................................2–71 Entering Outstanding Invoice Balances in Vendor Accounts ...............2–71 Entering Current‐Year Transactions .....................................2–71
Previous‐Year Statistics ....................................................2–72 Customizing Checks, Payment Advices, Letters, and Label Formats ................2–73 Setting Up Multicurrency Accounting in Accounts Payable........................2–73 Where To Now?...............................................................2–75

Getting Started 2–1
Apgs‐2.doc, printed on 11/16/2007, at 11:58:25 AM. Last saved on 10/26/2007 8:44:00 PM.
Sage Software Confidential
Before
Setting Up
Chapter 2 What You Need to Know Before
Setting Up Accounts Payable
This chapter explains the options you can select and the data you need to add during setup.
Read this chapter before setting up Accounts Payable
Read this chapter before setting up Accounts Payable. It will help you create a system that meets your company’s current and future needs.
After reading this chapter, follow the instructions in Chapter 3, “Setting Up Your Accounts Payable System.” For information about running your Accounts Payable system to process daily transactions, see the User Guide.
Before you can begin Accounts Payable setup, you must:
1. Install the Sage Accpac System Manager, including Bank Services and Tax Services.
2. Install General Ledger, if you use it, and then install Accounts Payable.
3. Create a system database and a company database.
4. Choose company‐wide options in Common Services.
5. Activate Bank and Tax Services.
6. Add information about the bank accounts, taxes, currencies, and credit cards you use in your accounts payable system. If you are using General Ledger, set it up before Accounts Payable.
7. Activate Accounts Payable.
Choosing Accounts Payable Options
2–2 Sage Accpac Accounts Payable
Apgs‐2.doc, printed on 11/16/2007, at 11:58:25 AM. Last saved on 10/26/2007 8:44:00 PM.
Sage Software Confidential
For information on using the Sage Accpac Setup Wizard to perform these steps, see the System Manager Quick Start Guide.
Choosing Accounts Payable Options Once you activate Accounts Payable, your first task is to use Accounts Payable’s Options form and G/L Integration form to choose the options you want to use with your Accounts Payable system.
The options you choose determine how your Accounts Payable system operates and the types of data that are stored and displayed. You can also use the forms after setup to review your entries and change most of them, if necessary.
This section explains the purposes and effects of the Accounts Payable options, presenting topics in their order of appearance on each form. The options are briefly mentioned again in sections that discuss records and operations that are affected by the options you choose.
When you are ready to create your system, follow the instructions in Chapter 3, “Setting Up Your Accounts Payable System.”
Company Information
You keep and update most company address and contact information using the Company Profile form in Common Services. However, you can store the name of a contact person or position for your accounts payable department, and enter the telephone and fax numbers you use in your Accounts Payable system on the Company tab on the A/P Options form.
This tab also displays the name and address entered for the company in Common Services. To change the company name and address, use the Company Profile form in Common Services.

Choosing Accounts Payable Options
Getting Started 2–3
Apgs‐2.doc, printed on 11/16/2007, at 11:58:25 AM. Last saved on 10/26/2007 8:44:00 PM.
Sage Software Confidential
Before
Setting Up
Processing Options
Use the Processing tab on the A/P Options form to choose whether your Accounts Payable system:
• Uses multicurrency accounting.
• Keeps statistics, and whether Accounts Payable accumulates statistics by fiscal or calendar year.
• Allows you to edit statistics.
• Includes tax in statistics.
• Allows you to edit imported and external batches.
• Requires you to print batch listings before posting.
• Keeps a history of all posted transactions.
• Uses retainage accounting.
You also use the Processing tab to:
• Define the aging periods that Accounts Payable uses to group overdue transactions or balances on vendor analytical reports.
• Choose how to age credit notes, debit notes, and prepayments that do not apply to specific invoice numbers or other documents.
You can also set the default length of time to keep comments in vendor records.
Using Multicurrency Accounting
Multicurrency ledgers
Accounts Payable can process and report transactions in all the currencies used by your company and its vendors if you select the Multicurrency option on the Processing tab on the A/P Options form.

Choosing Accounts Payable Options
2–4 Sage Accpac Accounts Payable
Apgs‐2.doc, printed on 11/16/2007, at 11:58:25 AM. Last saved on 10/26/2007 8:44:00 PM.
Sage Software Confidential
Select multicurrency accounting in Common Services
Before you can select the Multicurrency option in Accounts Payable, you must select the Multicurrency option for the company in Common Services.
You can select the Multicurrency option at any time, but once you select and save the option, you cannot change Accounts Payable back to a single‐currency ledger.
Mixing multicurrency and single-currency applications
You can use Accounts Payable with all Sage Accpac applications, even if some applications use multicurrency accounting and others do not. For example, you can post transactions from a multicurrency Accounts Payable system to a single‐currency Sage Accpac General Ledger.
See “Setting Up Multicurrency Accounting in Accounts Payable,” near the end of this chapter for a summary of the steps to set up a multicurrency ledger. This manual discusses the multicurrency implications of creating records or processing transactions in the same sections as it discusses a single‐currency system.
Force Listing of Batches
To strengthen your audit trail, select the Force Listing Of Batches option. This option requires that you print listings of all invoice, payment, and adjustment batches before you post them, and provides an important set of reports for your audit trail.
If you use the option, you cannot post batches until you print listings for them, and you must also print new listings of batches you edit.
If you do not use the option
You can print batch listings whether or not you use the Force Listing Of Batches option. You can also print posting journals that provide complete information about the contents of all posted Accounts Payable batches.
You can change your choice for this option at any time.

Choosing Accounts Payable Options
Getting Started 2–5
Apgs‐2.doc, printed on 11/16/2007, at 11:58:25 AM. Last saved on 10/26/2007 8:44:00 PM.
Sage Software Confidential
Before
Setting Up
Editing Imported and External Batches
You can prevent users from deleting or making changes in transaction batches you created for Accounts Payable in other Sage Accpac applications (such as Purchase Orders) or in non‐Sage Accpac programs, such as spreadsheets.
Allow Edit Of External Batches option
If you do not want to restrict editing of external batches, use the Allow Edit Of External Batches option. External batches are batches that you create in other Sage Accpac programs and send to Accounts Payable (for example, invoice batches that you generate in Purchase Orders).
Allow Edit Of Imported Batches option
To permit editing of batches you import from non‐Sage Accpac programs, use the Allow Edit Of Imported Batches option. Selecting these options lets you edit external or imported invoice, receipt, and adjustment batches in Accounts Payable before posting the batches. Not selecting the options increases your auditing and supervisory control by reducing the possibility of errors.
Using Retainage Accounting
Accounts Payable lets you account for retainage, or a holdback. Retainage (or a “holdback”) occurs when you delay payment of a percentage of a document total in one of the following circumstances:
• Your contract with the vendor stipulates that certain conditions are to be fulfilled before a final payment is due.
• Retainage is a statutory requirement (for example, under a Builders Lien Act).
To use retainage accounting in Accounts Payable, you must select the Retainage Accounting option on the Processing tab of the A/P Options form.
Turning off the Retainage Accounting option
You can turn off the Retainage Accounting option, later, only if there are no unposted batches that include retainage and no outstanding retainage amounts.

Choosing Accounts Payable Options
2–6 Sage Accpac Accounts Payable
Apgs‐2.doc, printed on 11/16/2007, at 11:58:25 AM. Last saved on 10/26/2007 8:44:00 PM.
Sage Software Confidential
Preparing your system for retainage accounting
If you select the Retainage Accounting option, you must also specify a retainage control account for each account set in your Accounts Payable system.
For an overview on setting up account sets, see “Setting Up Account Sets,” elsewhere in this chapter. For step‐by‐step information on adding account sets, see the section “Add Account Sets,” in Chapter 3 of this guide.
When you select the Retainage Accounting option, the Retainage tab appears, letting you specify default retainage settings that determine how Accounts Payable processes retainage.
Specify default retainage settings
You use the Retainage tab to set options for processing original and retainage documents in Accounts Payable, and to specify default settings for each vendor, including the retainage percentage, retention period, and retainage terms.
(For more detailed information on choosing default retainage settings, see “Retainage Options,” later in this chapter.)
When you add a new vendor, Accounts Payable displays in the new vendor record the default settings you specified in the A/P Options form, but you can change them for individual vendors. When you enter an invoice, credit note, or debit note for a vendor, Accounts Payable uses the settings from the vendor record as defaults.
For an overview on setting up vendors, see the section “Setting Up Vendor Records,” elsewhere in this chapter. For step‐by‐step information on adding vendor records, see “Step 6: Add Vendor Records,” in Chapter 3 of this guide.
Keeping Vendor and Group Statistics
Accounts Payable can keep statistics from transactions posted for your vendors and vendor groups. You can retain and review Accounts Payable statistics by period and year, as far back as the oldest year for which you keep transaction details. Accounts Payable lets you choose the type of year and period by which to accumulate statistics.
Choosing Accounts Payable Options
Getting Started 2–7
Apgs‐2.doc, printed on 11/16/2007, at 11:58:25 AM. Last saved on 10/26/2007 8:44:00 PM.
Sage Software Confidential
Before
Setting Up
Vendor statistics For each vendor, Accounts Payable stores the total amount and number of invoices, payments, discounts taken, discounts lost, credit notes, debit notes, adjustments, and total paid invoices. The data is reported by the period you specify, for as long as you keep transaction details.
Period based on document date
Statistics are accumulated into the year and period derived from the document date. Even if you change the year and period to which you post the transaction, the statistics still go to the period specified by the full document date.
Vendor activity Activity statistics kept for each vendor include the amount and date of the vendor’s highest balance and largest invoice in the current and previous years, as well as the amount and date of the last invoice, payment, credit note, debit note, adjustment, and discount posted to the account.
Each vendor record also shows the total amount of the invoices paid in the current year, the number of checks, the average payment, and the total and average number of days it took to pay the invoices. Activity statistics for the previous year are cleared at year end.
Vendor groups The same types of statistics are kept for vendor groups. Use the Vendor Groups form to review the statistics.
Options for maintaining statistics
For vendor and vendor group statistics, you can choose:
• Whether to allow editing of statistics.
• Whether to include tax amounts in totals.
• The periods for which to display and report statistics.
Allow Edit Of Statistics
You can choose whether to allow editing of the statistics you elect to keep, using the Allow Edit Of Statistics option on the Processing tab on the A/P Options form.
Updating statistics Normally, you do not need to change statistics because they are updated automatically and accurately by Accounts Payable each time you post batches. However, if you set up your Accounts Payable system partway through a fiscal year, you may want to use
Choosing Accounts Payable Options
2–8 Sage Accpac Accounts Payable
Apgs‐2.doc, printed on 11/16/2007, at 11:58:25 AM. Last saved on 10/26/2007 8:44:00 PM.
Sage Software Confidential
the option to edit statistics so that you can enter figures for previous periods of the current year or for previous years.
From time to time, you may also want to edit a particular statistic because unusual circumstances have exaggerated the amount. For example, if a single invoice remained unpaid for a long period on an otherwise satisfactory account, you could adjust the total number of days to pay or the total number of paid invoices to correct the average so that it more accurately reflects your company’s paying habits for the vendor.
Keeping statistics in balance in vendor groups
If you edit a vendor’s statistics, you should make the same changes to the statistics for the vendor group to which the vendor belongs. Print the Vendor Group Statistics and Vendor Statistics reports for the records you change to verify that the totals still balance.
Changing your choices
You can change your choices for these options at any time. You may want to turn on an option when you are setting up your system, then turn it off to prevent errors caused by accidental editing.
Include Tax In Statistics
If your company pays taxes on its purchases, you can include tax amounts in the statistical totals by using the Include Tax In Statistics option.
Change the Include Tax In Statistics option
You can change your choice for the Include Tax In Statistics option any time, but you should make changes only at the end of a reporting period. If you change before the end of a period, statistics for the period may include taxes in some amounts, but not in others, so that you cannot make meaningful comparisons within a period or with other periods.
Accumulate By and Period Type
You can choose the periods by which statistics are totaled and reported: by seven‐day periods, weekly, biweekly, four‐week periods, monthly, bimonthly (two months at a time), quarterly, semiannually, or the periods in your company’s fiscal calendar.
You can also specify the dates to include in each period by choosing whether to use calendar dates or fiscal dates. If you keep statistics by calendar year, the first period begins with January 1. If you keep
Choosing Accounts Payable Options
Getting Started 2–9
Apgs‐2.doc, printed on 11/16/2007, at 11:58:25 AM. Last saved on 10/26/2007 8:44:00 PM.
Sage Software Confidential
Before
Setting Up
dates by fiscal year, the first period begins on the first date in your company’s fiscal year.
Use the Accumulate By and Period Type options on the Processing tab on the A/P Options form to indicate how you want to group statistics.
Change the method of reporting statistics
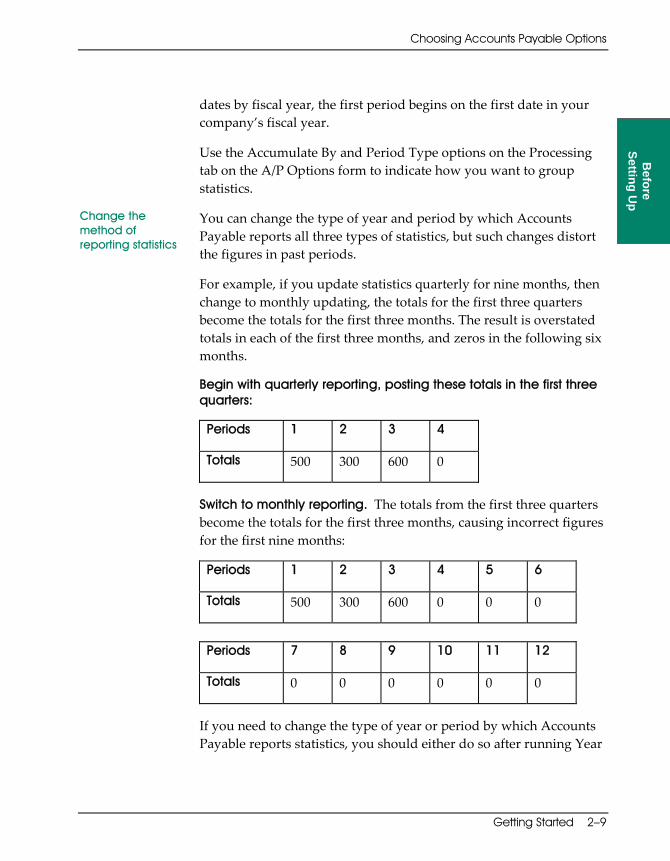
You can change the type of year and period by which Accounts Payable reports all three types of statistics, but such changes distort the figures in past periods.
For example, if you update statistics quarterly for nine months, then change to monthly updating, the totals for the first three quarters become the totals for the first three months. The result is overstated totals in each of the first three months, and zeros in the following six months.
Begin with quarterly reporting, posting these totals in the first three quarters:
Periods 1 2 3 4
Totals 500 300 600 0
Switch to monthly reporting. The totals from the first three quarters become the totals for the first three months, causing incorrect figures for the first nine months:
Periods 1 2 3 4 5 6
Totals 500 300 600 0 0 0
Periods 7 8 9 10 11 12
Totals 0 0 0 0 0 0
If you need to change the type of year or period by which Accounts Payable reports statistics, you should either do so after running Year

Choosing Accounts Payable Options
2–10 Sage Accpac Accounts Payable
Apgs‐2.doc, printed on 11/16/2007, at 11:58:25 AM. Last saved on 10/26/2007 8:44:00 PM.
Sage Software Confidential
End, or edit the statistics for the earlier periods in the year to correct distortions.
Defining Aging Periods
Accounts Payable sorts outstanding transactions and balances for the Aged Cash Requirements, Aged Retainage, and Overdue Payables reports into five periods: a current (not due) period and four overdue (or future, for the future retainage report) periods. You specify the length of each aging period for the Accounts Payable system on the A/P Options form.
You can also specify different aging periods for reports at printing time. At that time, you can also choose whether to age transactions by their due dates or their document dates for each type of report.
For more information, see “Analytical Reports” in Chapter 2 of the User Guide.
Aging Unapplied Credit Notes, Debit Notes, and Prepayments
When you have credit notes, debit notes, and prepayments that do not apply to specific invoice numbers or other documents, you can specify whether to report the amounts in the aging periods that contain their document dates, or you can group them all in the current (not due) period.
You choose these options on the Processing on the A/P Options form. You can change your choices for the options at any time.
The options have no effect on credit notes, debit notes, and prepayments that are applied to specific document numbers. Applied amounts are always included in the same aging periods as the documents to which they apply.
Default Number of Days to Keep Comments
The Vendor Groups and Vendors forms allow you to enter comments of up to 2,500 characters with vendor records. For
Choosing Accounts Payable Options
Getting Started 2–11
Apgs‐2.doc, printed on 11/16/2007, at 11:58:25 AM. Last saved on 10/26/2007 8:44:00 PM.
Sage Software Confidential
Before
Setting Up
example, you might enter a comment stating why you have placed a vendor payment on hold.
To make sure that comments are kept current, you can assign the number of days you want to retain each one. When you select the Vendor Comments option on the Clear History form, comments that have been kept for the specified number of days are deleted, saving you from having to delete each comment individually from the vendor records.
To specify the number of days to keep the comments, use the Default Number Of Days To Keep Comments option on the Processing tab on the A/P Options form. Note that you can change the number of days to keep comments on individual vendor records.
Transactions Options
Use the Transactions tab of the Options form to specify how the Invoice Entry and Payment Entry forms operate. You can specify:
• The type of date that appears as the default posting date in transaction entry forms.
• Whether invoice details use tax class 1 as the default, rather than the vendor tax class specified on the Invoice Entry Taxes tab.
• Whether to keep information for 1099 (US) or CPRS (CDN) reporting.
• Whether you can edit 1099 or CPRS payment amounts.
• Whether you can edit imported batches.
• A default method for entering tax amounts, tax bases, and tax reporting amounts on invoices and in recurring payable records.
• The order for the list of open (unpaid or unapplied) documents that appears when you are applying payments.
• Specify a method of payment (cash, check, or credit card) to use as the default for payment batches.
Choosing Accounts Payable Options
2–12 Sage Accpac Accounts Payable
Apgs‐2.doc, printed on 11/16/2007, at 11:58:25 AM. Last saved on 10/26/2007 8:44:00 PM.
Sage Software Confidential
• Specify a default transaction type and bank code for payment batches.
• Choose whether to display an error or a warning message, or no message, if you enter a duplicate check number.
• Specify the level of control you want to maintain over payment (check) batches, including whether to:
− Allow adjustment entries in payment batches.
− Allow editing and deleting of check batches generated by Accounts Payable.
− Allow remit‐to information to be changed.
Each of these options is described in more detail in the following sections.
Specifying a Default Posting Date for Invoices
Your selection for the Default Posting Date invoice option determines the date that appears as the default posting date on the A/P Invoice Entry form.
The posting date is the date that a document is posted to General Ledger, and it may be different from the document date. This distinction is particularly useful if you post a document to a different year or period from the document date. For example, Accounts Payable uses posting dates, rather than document dates, to select open documents for revaluation, so that exchange adjustments are posted to the correct fiscal year and period.
You can select Document Date, Batch Date, or Session Date as the default posting date.
You can change the posting date for particular transactions when you enter or edit them.
Choosing Accounts Payable Options
Getting Started 2–13
Apgs‐2.doc, printed on 11/16/2007, at 11:58:25 AM. Last saved on 10/26/2007 8:44:00 PM.
Sage Software Confidential
Before
Setting Up
Setting Defaults for Tax Calculation
Default entry methods for the tax amount and tax base
When you create an invoice in Accounts Payable, you can enter taxes manually or you can let the program calculate taxes for you. The Default Tax Amount, Default Tax Base, and Default Tax Reporting fields let you select the method to be used as the default for invoice entry and recurring payables.
The Tax Reporting field appears when you assign to a document a tax group that uses a different currency than the vendor. It is used to show the amount of tax in the tax reporting currency that appears on invoices.
You choose separate entry methods for each type of default amount from the following alternatives:
Enter. Selecting Enter lets you enter amounts manually on invoices, and lets you change most tax fields. However, the program does not calculate any tax amounts unless you use the Calculate Tax button.
You must ensure that the sum of the detail taxes equals the total tax for each tax authority, or you cannot add the invoice or the record.
Calculate. When you select Calculate, the program automatically calculates detail and total taxes (amounts and bases) according to information entered in Tax Services. You cannot change any tax fields, except Tax Class, Tax Included, and the tax group.
Distribute. Selecting Distribute lets you enter total amounts on the Taxes tab. However, you cannot change detail tax amounts; you must use the Distribute Taxes button to allocate amounts to details.
You can always change the Tax Class, Tax Included, and the tax group fields, regardless of your selection in the Tax Amount, Tax Base, and Tax Reporting fields.
Use 1099/CPRS Reporting
This option determines whether Accounts Payable tracks 1099/CPRS payment amounts. Choose this option if your company reports any payments to vendors that are subject to 1099/CPRS reporting. To
Choosing Accounts Payable Options
2–14 Sage Accpac Accounts Payable
Apgs‐2.doc, printed on 11/16/2007, at 11:58:25 AM. Last saved on 10/26/2007 8:44:00 PM.
Sage Software Confidential
activate this feature for vendors subject to 1099/CPRS reporting, select this option on the Taxes tab on the Vendors form.
If you choose this option and select the Subject To 1099/CPRS Reporting option on the Vendors form, the program maintains calendar year‐to‐date information for the vendor record. Even if your company does not print 1099 or CPRS forms, you can still select this option to accumulate 1099/CPRS amounts paid to vendors on any period basis you wish.
Allow Edit of 1099/CPRS Amounts
If you select the option Use 1099/CPRS Reporting, you can also choose Allow Edit Of 1099/CPRS Amounts. This allows you to edit an amount if it was entered incorrectly, or enter a zero amount for a service provided by a 1099/CPRS‐designated vendor that is not subject to 1099/CPRS reporting.
Specifying a Default Tax Class for Invoice Details
Select the Default Detail Tax Class To 1 option if you want to use 1 as the default tax class for details on new invoices.
If you do not select this option, Accounts Payable uses the vendor tax class (from the Invoice Entry Taxes tab) as the default for new invoice details.
Specifying a Default 1099/CRPS Amount
Select this option if you want to you use document totals as default amounts subject to 1099/CPRS reporting on invoices, debit notes, and credit notes.
Setting a Default Transaction Type
Select a default transaction type for Payment Entry. You can choose Payment, Prepayment, Apply Document, or Miscellaneous Payment.
Choosing Accounts Payable Options
Getting Started 2–15
Apgs‐2.doc, printed on 11/16/2007, at 11:58:25 AM. Last saved on 10/26/2007 8:44:00 PM.
Sage Software Confidential
Before
Setting Up
Setting a Default Order of Open Documents
You can control the order in which open documents (such as invoices that are not yet paid, or credit notes that have not been applied) appear in selection lists when you are applying payments in the Payment Entry form. This option lets you display the documents in the order that is easiest for you to use.
Accounts Payable displays open documents by document number unless you choose another order. To change the order at any time, use the Default Order Of Open Documents option on the Transactions tab of the A/P Options form.
You can choose to display open documents for each vendor account by:
• Document Number. This choice lists open documents, such as invoices, credit notes, and debit notes, by their document numbers, beginning with the lowest document number for each transaction type.
If you use this option, you should consider prefixing vendor invoices, credit notes and debit notes so Accounts Payable lists documents in the order you prefer.
The following prefixes would list invoices first, followed by interest invoices, credit notes, debit notes, and payments:
IN (invoice) IT (interest invoice) NCR (credit note) NDR (debit note) PY (payment)
• Purchase Order Number. This choice groups open (unpaid or unapplied) documents (invoices, credit notes, and debit notes) by their purchase order numbers. Documents issued from the lowest purchase order number are displayed first.
Choosing Accounts Payable Options
2–16 Sage Accpac Accounts Payable
Apgs‐2.doc, printed on 11/16/2007, at 11:58:25 AM. Last saved on 10/26/2007 8:44:00 PM.
Sage Software Confidential
• Due Date. This choice lists open invoices, credit notes, and debit notes by their due dates, beginning with the document with the oldest (earliest) due date.
• Order Number. This choice groups open documents by their sales order numbers. Documents entered with the lowest order numbers are listed first.
• Document Date. This choice lists open documents by the document dates entered with them, beginning with the oldest date.
• Balance Due. This choice lists open documents by their outstanding balances, beginning with the smallest amount.
Setting a Default Bank Code
Each batch of checks is assigned to one bank code, which determines the bank accounts on which checks are drawn, the currency of the checks, and the check forms on which check information is printed.
The bank code you selected on the Transactions tab appears as the default bank code when you create a new payment batch or automatically generate a check batch. You should choose the bank on which you most often write checks.
Setting a Default Payment Code
Payment codes are used to identify the types of payments you process, such as cash, checks, credit cards.
You define payment codes using the Payment Codes form in the Setup folder. If you assign the payment codes to your vendors according to the method you most commonly use to pay them, they appear when you use the vendor number on the Payment Entry form.
This option lets you specify a payment code to be used as the default for vendors for which no default payment code is specified in the vendor record.

Choosing Accounts Payable Options
Getting Started 2–17
Apgs‐2.doc, printed on 11/16/2007, at 11:58:25 AM. Last saved on 10/26/2007 8:44:00 PM.
Sage Software Confidential
Before
Setting Up
Checking for Duplicate Checks
Use this option on the Transactions tab to specify whether Accounts Payable displays a warning or an error message, or no message when you attempt to process a check that uses the same number as an existing check for the same bank.
Specifying a Default Posting Date for Payments
Your selection for the Default Posting Date payment option determines the date that appears as the default posting date on the Payment Entry form.
The posting date is the date that a document is posted to General Ledger, and it may be different from the document date. This distinction is particularly useful if you post a document to a different year or period from the document date. For example, Accounts Payable uses posting dates, rather than document dates, to select open documents for revaluation, so that exchange adjustments are posted to the correct fiscal year and period.
You can select Document Date, Batch Date, or Session Date as the default posting date.
You can change the posting date for particular transactions when you enter or edit them.
Including Pending Transactions
The Include Pending Transactions option lets you choose whether to include transactions from open (unposted) batches when Accounts Payable calculates pending amounts for Payment Entry.
You can include unposted payments, unposted payments and adjustments, or all transactions, or you can choose to include none of them. Accounts Payable uses Payments and Adjustments as the default setting.

Choosing Accounts Payable Options
2–18 Sage Accpac Accounts Payable
Apgs‐2.doc, printed on 11/16/2007, at 11:58:25 AM. Last saved on 10/26/2007 8:44:00 PM.
Sage Software Confidential
Allowing Adjustments in Payment Batches
This option lets you enter adjustments in Accounts Payable payment batches during payment entry, rather than having to enter them separately using the Adjustment Entry form.
You might use this option, for example, when the amount of a check you are entering to pay an invoice differs slightly from the invoice total. You can quickly write off the difference when you enter the payment.
You can choose the batch to which you want to add the adjustment or create a new adjustment batch from Payment Entry, and you can edit it later, if necessary, using the Adjustment Entry form.
Allowing Edit of System Generated Batches
Accounts Payable lets you edit system‐generated check entries if you select the Allow Edit Of System Generated Batches option. You should use this editing feature on an exception basis.
If you do not choose the option, you ensure that the amount of each posted check matches the pre‐check register you printed. When the option is not selected, you cannot edit or delete checks, or delete the check batch.
This option applies to system‐generated batches only.
Allowing Remit-To Information To Be Changed
Select this option if you want to allow changes to remit‐to location information on the Payment Entry form.
Numbering Options
Use the Numbering tab of the Options form to specify how Accounts Payable identifies transactions and batches that you create. You can:
• Enter the document prefixes to be used with payments, prepayments, adjustments, and recurring payables. Accounts
Choosing Accounts Payable Options
Getting Started 2–19
Apgs‐2.doc, printed on 11/16/2007, at 11:58:25 AM. Last saved on 10/26/2007 8:44:00 PM.
Sage Software Confidential
Before
Setting Up
Payable uses the prefixes and a sequence number to identify payments, prepayments, adjustments, and recurring payables.
• Enter the next number to assign to each type of transaction.
• Specify the length of each document number.
• View the next batch numbers and the next posting sequence numbers that Accounts Payable will assign.
Accounts Payable assigns a unique number to each document added to a batch. The number is a combination of a prefix you enter on the A/P Options form to identify the transaction type, and a number that is assigned sequentially by Accounts Payable, starting with the number you specify.
You can use up to six characters for each prefix. The prefixes let you easily identify transactions in Accounts Payable forms and on reports.
You can also specify the length of each document number, using a maximum length of 22 characters, including prefixes.
Changing the next document number
If you want to change the next number to assign to a lower number, change the prefix for the document type as well. You cannot use the same document number and prefix more than once in Accounts Payable.
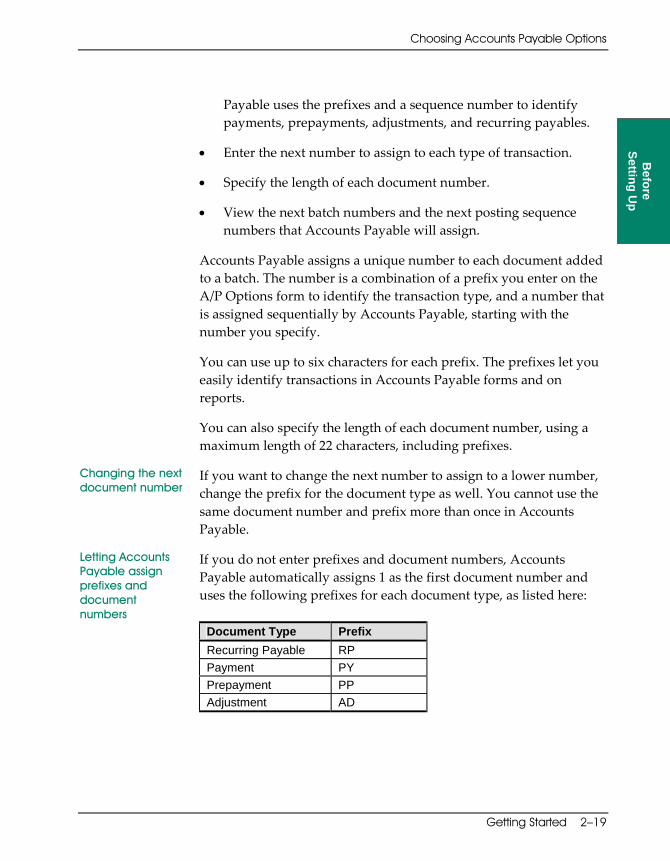
Letting Accounts Payable assign prefixes and document numbers
If you do not enter prefixes and document numbers, Accounts Payable automatically assigns 1 as the first document number and uses the following prefixes for each document type, as listed here:
Document Type Prefix Recurring Payable RP Payment PY Prepayment PP Adjustment AD
Choosing Accounts Payable Options
2–20 Sage Accpac Accounts Payable
Apgs‐2.doc, printed on 11/16/2007, at 11:58:25 AM. Last saved on 10/26/2007 8:44:00 PM.
Sage Software Confidential
Note: Check number sequences and the next check number are set in Bank Services. You enter the vendor’s invoice number on invoices, credit notes, and debit notes when you enter these documents.
Retainage Options
You must select the Retainage Accounting option before you can set other retainage options
When you select the Retainage Accounting option on the Processing tab of the A/P Options form, the Retainage tab appears. Selecting the Retainage Accounting option is described in the section “Using Retainage Accounting,” earlier in this chapter. (Chapter 2 in the User Guide contains overview information on processing original and retainage documents.)
The Retainage tab contains a number of default retainage options that can save you time when you add vendors to your Accounts Payable system or process retainage in Accounts Payable.
Specifying Retainage Defaults for Vendor Records (Optional)
The retainage tab lets you specify the following default retainage settings for new vendor records:
The default retainage percentage
• Default Retainage Percentage. The default retainage percentage you enter on the Retainage tab appears on all new vendor records. The retainage percentage from the vendor record appears on original documents you enter for the vendor. The retainage percentage determines the portion of a document total that you can withhold until the retainage due date.
The default retention period
• Default Retention Period. You also specify the number of days from an original document date that you can withhold a retained amount. The program determines the default retainage due date by adding the days in the default retention period to the original document date.
Choosing Accounts Payable Options
Getting Started 2–21
Apgs‐2.doc, printed on 11/16/2007, at 11:58:25 AM. Last saved on 10/26/2007 8:44:00 PM.
Sage Software Confidential
Before
Setting Up
You can always change the retainage settings for particular vendors in the vendor record and, if necessary, on documents you enter or edit in Invoice Entry.
Specifying Retainage Defaults for Invoice Entry and Retainage Processing
Accounts Payable uses the following settings as defaults when processing original and retainage documents:
Multicurrency • Default Retainage Exchange Rate. If you use multicurrency,
you also choose the type of exchange rate to use when you process outstanding retainage. The Default Retainage Exchange Rate field lets you select whether to use the current exchange rate or the exchange rate used on the original document as the default.
• Report Tax. Generally, when you post invoices, Accounts Payable posts tax amounts to a tax account (either tax recoverable or tax expense) or to another general ledger account, and it updates the tax tracking reports.
For retainage, when the tax is reported can differ. Some tax authorities expect you to report tax when you post a retainage document; others let you report tax when you post an original document to which retainage applies.
The Report Tax option lets you specify when to report tax on retainage. You can make one of the following selections for this option:
− At Time Of Original Document. If you select this option, the program calculates and reports tax on retainage when you post an original document that includes retainage.
You can then use the Base Retainage Amount On field to specify whether to base retainage on amounts before tax or after tax.
Choosing Accounts Payable Options
2–22 Sage Accpac Accounts Payable
Apgs‐2.doc, printed on 11/16/2007, at 11:58:25 AM. Last saved on 10/26/2007 8:44:00 PM.
Sage Software Confidential
− As Per Tax Authority. If you select this option, the program calculates tax when you post an original document, but reports the tax as required by each tax authority.
Reporting requirements for tax authorities are specified by the Report Tax On Retainage Document option, in Tax Services. The tax authority can specify No Reporting, At Time Of Retainage Document, or At Time Of Original Document.
If the tax authority reports tax At Time Of Original Document, the tax on retainage is calculated immediately and the tax tracking reports are updated when you post original documents.
If the tax authority reports tax At Time Of Retainage Document, the tax on retainage is calculated when you post the original document, but it is not reported until you post the retainage document.
When you specify As Per Tax Authority, retainage amounts are based on amounts before tax for all tax authorities and vendors.
Specify whether the retainage amount is based on tax
− Base Retainage Amount On. Use this field to specify whether retainage is calculated on the document total before or after tax is calculated.
Numbering retainage documents
− Document Type/Length/Prefix/Next Number. Use the numbering grid to specify the numbering for retainage documents that you generate using the Create Retainage Batch form. Specify the next number, length, and prefix to assign to retainage invoices, retainage credit notes, and retainage debit notes that you process to clear outstanding retainage amounts.
Specifying when to create retainage documents
The Retainage tab also contains two options that let you control the timing of retainage processing:
Number Of Days In Advance To Create Retainage Documents. This option lets you specify the number of days before retainage

Choosing G/L Integration Options
Getting Started 2–23
Apgs‐2.doc, printed on 11/16/2007, at 11:58:25 AM. Last saved on 10/26/2007 8:44:00 PM.
Sage Software Confidential
Before
Setting Up
is due to generate retainage documents using the Create Retainage Batch form.
For example, if you enter 5, you can create the retainage invoice five days before the retainage is due.
Scheduling automatic retainage processing
• Schedule To Use For Automatic Creation Of Retainage Documents. If you plan to use the Reminder List to process retainage, you need to enter the schedule code for the frequency with which you want to process outstanding retainage.
“Zoom” button
If the schedule does not yet exist in Common Services, you can click the Zoom button beside the field, then create the schedule using the Schedules form that appears. You can also click the Zoom button to view the information for an existing schedule.
For information on using schedules and the Reminder List, see the System Manager User Guide.
Last invoiced date In the Last Invoiced field, the program displays the date that you last ran Create Retainage Batch from the Reminder List.
Changing retainage options
You can edit the options on the Retainage tab at any time, but your changes affect only vendor records and transactions that you add after making the changes.
Choosing G/L Integration Options Types of General Ledger batches
Accounts Payable creates separate batches of general ledger transactions from posted invoice batches, payment batches, and adjustment batches. If you use multicurrency accounting, Accounts Payable also creates a separate general ledger batch each time you revalue Accounts Payable transactions.
If you use Sage Accpac General Ledger, Accounts Payable creates batches of payables transactions right in General Ledger, where you can edit and post them.
Choosing G/L Integration Options
2–24 Sage Accpac Accounts Payable
Apgs‐2.doc, printed on 11/16/2007, at 11:58:25 AM. Last saved on 10/26/2007 8:44:00 PM.
Sage Software Confidential
If you use another general ledger system, or if your Sage Accpac General Ledger system is at another location, Accounts Payable creates a single batch which you can import into the other general ledger, or print, then enter manually.
Use G/L Integration to select options for G/L transactions
The G/L Integration form, available in the A/P Setup folder, provides several options for producing general ledger transactions in the form and at the time that best suits your requirements.
Assign data to General Ledger fields
The G/L Integration form also lets you assign a wide range of Accounts Payable information to the entry description, detail reference, detail description, and detail comment used in general ledger transactions.
Specifying When, Where, and How to Create G/L Transactions
Accounts Payable produces general ledger transactions from all batches you post. Each general ledger transaction includes all the information you need to update payables data accurately in your general ledger.
You use the Integration tab on the G/L Integration form to specify:
• When to create general ledger transactions.
• Whether to create new batches for G/L transactions (and optionally post them) or to add them to existing G/L batches.
• Whether, and how, to consolidate transactions.
• Source codes to identify the types of Accounts Payable transactions you send to General Ledger.
The Integration tab also displays the last posting sequence for which you created general ledger transactions. (If you create general ledger transactions during posting, this number is the same as the last posting sequence.) The next posting sequence numbers are displayed on the Invoicing and Transactions tabs of the Options form.
Choosing G/L Integration Options
Getting Started 2–25
Apgs‐2.doc, printed on 11/16/2007, at 11:58:25 AM. Last saved on 10/26/2007 8:44:00 PM.
Sage Software Confidential
Before
Setting Up
You use the Integration tab of the G/L Integration form to specify:
• When to create general ledger transaction batches.
See “Create G/L Transactions During Posting or On Request” later in this section, for more information.
• Whether to create a new batch for general ledger transactions (and optionally post them), or add transactions to existing G/L batches.
For more information, see “Creating G/L Transactions By Adding to an Existing Batch or Creating a New Batch” later in this section.
• Whether – and how ‐‐ to consolidate general ledger transactions.
See “Choosing Consolidation Options for General Ledger Transactions” later in this section, for more information.
• Source codes to identify the types of Accounts Payable transactions you send to General Ledger.
For more information, see “Defining G/L Source Codes” later in this section.
The Integration tab also displays the last Accounts Payable posting sequence numbers for which general ledger transactions have been generated. The next Accounts Payable posting sequence numbers are displayed on the Numbering tab on the A/P Options form.
Assign data to General Ledger fields
The G/L Integration form also lets you assign a wide range of Accounts Payable information to the entry description, detail reference, detail description, and detail comment used in general transactions. You use the Transactions tab of the G/L Integration form to assign information to general ledger transactions.
Reporting general ledger data
You can print the G/L Transactions report whether you post batches in General Ledger or not.
When you clear posting journals with the Clear History form, the general ledger transactions that were created with the cleared

Choosing G/L Integration Options
2–26 Sage Accpac Accounts Payable
Apgs‐2.doc, printed on 11/16/2007, at 11:58:25 AM. Last saved on 10/26/2007 8:44:00 PM.
Sage Software Confidential
journals no longer appear on the G/L Transactions report. For more information about the G/L Transactions report, see Chapter 7, “Reports,” in the User Guide.
Creating G/L Transactions During Posting or On Request
You can create transactions automatically for general ledger when you post Accounts Payable batches, or you can use the Create G/L Batch form to create general ledger batches at any time you choose.
If you want to automatically create general ledger transactions each time you post Accounts Payable transactions, choose During Posting for the Create G/L Transactions option.
To create general ledger batches only when you want to, select On Request Using Create G/L Batch Icon for the Create G/L Transactions option. If you use this option, you can also print the G/L Transactions report, provided that you print it before you run Create G/L Batch. When you create the general ledger batch, the transactions are deleted from Accounts Payable.
If you use the Create G/L Batch form, you must create the transactions before using the Year End form to do year‐end processing.
Creating G/L Transactions By Adding to an Existing Batch or Creating a New Batch
If you use Sage Accpac General Ledger with Accounts Payable, you specify whether to add general ledger transactions to existing general ledger batches when you create general ledger transactions, or to create a new general ledger batch each time you create them.
You can also choose to post new batches automatically when you create general ledger transactions.
Accounts Payable creates four different types of general ledger batches, one each for:
• Posted invoice transactions.

Choosing G/L Integration Options
Getting Started 2–27
Apgs‐2.doc, printed on 11/16/2007, at 11:58:25 AM. Last saved on 10/26/2007 8:44:00 PM.
Sage Software Confidential
Before
Setting Up
• Posted payment transactions.
• Posted adjustment transactions.
• Posted revaluation transactions, if you use multicurrency accounting.
Using the Adding To An Existing Batch option
To produce only one general ledger batch of each type, select the Adding To An Existing Batch option.
Alternatively, you can let Accounts Payable create a new general ledger batch each time you post or revalue transactions by selecting one of the following options:
Creating a new batch each time
• Creating A New Batch. If you choose this option, Accounts Payable creates a new batch when you post or revalue transactions. You must then post the batch in General Ledger.
Creating and automatically posting
• Creating And Posting A New Batch. If you select this option, Accounts Payable automatically creates the general ledger batch and posts it for you in General Ledger.
Choosing Consolidation Options for General Ledger Transactions
You can create consolidated batches of General Ledger transactions that combine several details into a single detail, or you can create unconsolidated batches that include all the details posted to each general ledger account.
Drilldown Note: If you consolidate transactions, you cannot drill down from General Ledger to source documents (invoices, for example) in Accounts Payable. Do not consolidate transactions if you want to use drilldown.
Consolidating general ledger transactions during posting
To consolidate transactions, use the Consolidate G/L Batches option. This option lets you combine details posted with the same account number and fiscal period into single details for each general ledger account. You can also choose to combine (consolidate) the details by account number, fiscal period, and source code.
Choosing G/L Integration Options
2–28 Sage Accpac Accounts Payable
Apgs‐2.doc, printed on 11/16/2007, at 11:58:25 AM. Last saved on 10/26/2007 8:44:00 PM.
Sage Software Confidential
Consolidation reduces the amount of information in the general ledger batch and results in a shorter G/L Transactions report. The option also “consolidates” the information in the Reference and Description fields for each transaction, as described under “Selecting References and Descriptions for General Ledger Transactions,” later in this section.
Use the Consolidate G/L Batches option if you do not need a record of all details posted to every General Ledger account from Accounts Payable transactions.
Creating detailed general ledger transactions
If you require detailed general ledger transaction information for your Accounts Payable records or want to drill down to transactions from General Ledger, do not choose to consolidate general ledger transactions. This choice creates a single detail in a general ledger batch for all amounts you post to a general ledger account.
The choice provides complete information in your general ledger transaction batch, but can result in a long G/L Transactions report and a large General Ledger batch. However, you can consolidate the batch when you post it in Sage Accpac General Ledger.
Defining G/L Source Codes
Use the Source Type fields on the Integration tab to define the source code for each type of Accounts Payable transaction, if you prefer not to use the default source codes.
The source code is a combination of the source ledger code (AP, which you cannot change) and the source type code, which you can specify for all the different types of transactions you can process in Accounts Payable, including revaluation.
The source codes are used to identify transactions in General Ledger.
Note that the default source code for payments is the same as for payment reversals.

Choosing G/L Integration Options
Getting Started 2–29
Apgs‐2.doc, printed on 11/16/2007, at 11:58:25 AM. Last saved on 10/26/2007 8:44:00 PM.
Sage Software Confidential
Before
Setting Up
Selecting References and Descriptions for General Ledger Transactions
Transactions tab The Transactions tab on the G/L Integration form lets you specify the type of information to use in the transaction description, detail reference, detail description, and detail comment fields for general ledger transactions. This information also appears on Accounts Payable’s posting journals and on General Ledger’s Journal Entry form and reports.
You can assign one or more pieces of information (segments) to each field, provided that the combined length of the segments and separators does not exceed 60 characters. Fields exceeding this limit are truncated when you post general ledger transactions.
The segments you can select depend on the type of transaction to which you are assigning information and whether the information is for the transaction header or the details. This ensures that the information passed to General Ledger is relevant for each type of transaction. For example, you can assign the check description or remit‐to information from miscellaneous checks to any of the General Ledger fields.
When you create general ledger transactions, if no data exists in the source transaction field, the field is blank in the general ledger transaction. For example, if you assigned the original transaction description to the G/L Entry Description field, but there is no description for a particular entry, the field is blank in the G/L transaction.
Unconsolidated transactions
If you do not consolidate general ledger transactions, information for all the G/L fields is passed to General Ledger, as specified on the G/L Integration setup form.
Consolidated transactions
If you consolidate general ledger transactions, only the information for the G/L Entry Description field is passed to General Ledger. The detail reference, description, and comment are lost in consolidation.

Designing Accounts Payable Coding Schemes
2–30 Sage Accpac Accounts Payable
Apgs‐2.doc, printed on 11/16/2007, at 11:58:25 AM. Last saved on 10/26/2007 8:44:00 PM.
Sage Software Confidential
For transactions consolidated in Accounts Payable, the consolidation information is used in all the G/L fields (for example, CONSOL. BY AP ON 5/31/2010).
Changing Your General Ledger Integration Options
You can change any of your choices on the Integration tab at any time. Note that your new choices apply only to general ledger transactions posted after the change, and do not affect existing general ledger batches.
Warning! If you create general ledger batches using the Create G/L Batch form, but you want to change to create them during posting, be sure to create any outstanding transactions before changing methods. If you do not create outstanding transactions first, they are omitted from your general ledger batches, and are not posted to your general ledger.
Designing Accounts Payable Coding Schemes This section describes the various codes you need to define in your Accounts Payable system, and offers some guidelines for designing your coding schemes.
Before you can use Accounts Payable, you must add codes to identify the account sets, distribution codes, vendors, and other records you plan to add to your system. You should take the time to design sensible coding schemes for each type of code you require, before you start assigning codes to records.

Designing Accounts Payable Coding Schemes
Getting Started 2–31
Apgs‐2.doc, printed on 11/16/2007, at 11:58:25 AM. Last saved on 10/26/2007 8:44:00 PM.
Sage Software Confidential
Before
Setting Up
If you already have a system for most of these codes, you may be able to continue with the same system. Check the following list to see whether each code type allows for the number and types of characters you use in your current system:
Record Type Code Name Maximum # of Characters
Account set Account set code 6 digits or letters 1099/CPRS code 1099/CPRS code 6 digits or letters Distribution code Distribution code 6 digits or letters Distribution set Distribution set 6 digits or letters Terms Terms code 6 digits or letters Vendor group Vendor group code 3 digits or letters Vendor Vendor number 12 digits or letters Payment selection Payment selection code 6 digits or letters Remit-to location Remit-to location code 6 digits or letters
If you are designing new codes, you should assign codes that make it easy to identify each record type and that list records in the order you want them to appear on reports and in Finder forms.
Each code is a unique set of letters, symbols, and digits. For example, each of the following could be a valid vendor number:
123 123A AB1234 A1 A01
To simplify codes, we recommend that you:
• Use the same number of characters in all codes of the same record type.
• Where permitted, define codes of at least three characters to allow for future expansion.
• Use a numbering system that is significant for your business, such as representing a geographical region or division or vertical market.
Designing Accounts Payable Coding Schemes
2–32 Sage Accpac Accounts Payable
Apgs‐2.doc, printed on 11/16/2007, at 11:58:25 AM. Last saved on 10/26/2007 8:44:00 PM.
Sage Software Confidential
• If possible, use only numbers (not letters or symbols), for consistency of sorting.
Sorting Order of Codes
Accounts Payable sorts codes on screens and reports in a specific order, which you should take into consideration when designing codes.
Accounts Payable reads codes from left to right, and generally uses the database sequence to put them in order.
For Pervasive SQL, the database order is usually a binary sequence, like this:
[Blank] ! ʺ # $ % & ʹ ( ) * + , ‐ . / 0 1 2 3 4 5 6 7 8 9 : ; < = > ? @ A B C D E F G H I J K L M N O P Q R S T U V W X Y Z [ \ ] ^ _ ` a b c d e f g h i j k l m n o p q r s t u v w x y z { | } ~
Accounts Payable would sort the codes listed in the introduction to this discussion into the following order:
123 123A A‐01 A01 A1 AB 1234 AB1234
For SQL Server, you can set up the database as a binary sequence or in a dictionary sequence (where upper and lowercase letters are intermixed). Codes containing fewer than the maximum number of permitted characters are left justified in Accounts Payable Finders and forms, and on reports.

Entering Accounts Payable Setup Information
Getting Started 2–33
Apgs‐2.doc, printed on 11/16/2007, at 11:58:25 AM. Last saved on 10/26/2007 8:44:00 PM.
Sage Software Confidential
Before
Setting Up
Entering Accounts Payable Setup Information Before you can add your vendor records to Accounts Payable, you must set up other records to assign to your vendors. This section describes the records you need, and explains the options you can select when setting up each type of record.
You select icons from the Setup form to set up the following records:
• Account sets • 1099/CPRS codes • Distribution codes • Distribution sets • Terms • Payment Codes • Payment Selection codes • Optional fields (optional)
Setting Up Account Sets
Account sets are groups of general ledger accounts to which you post Accounts Payable transactions. You assign an account set to each vendor record to identify the general ledger control accounts to which you post the vendor’s transactions.
You can use one account set for all your vendors, or you can have as many as you need to categorize vendor transactions by the accounts to which they are posted in your general ledger. For example, you may want to use separate account sets to designate different types of payables or vendors in different geographical areas.
You use the Account Sets form in the Setup folder to add account sets. You must define at least one account set before you can add vendors to Accounts Payable.
Multicurrency ledgers
If you use multicurrency accounting, you must add at least one account set for each currency used by your vendors. The account set you assign to a vendor must use the currency of the vendor.

Entering Accounts Payable Setup Information
2–34 Sage Accpac Accounts Payable
Apgs‐2.doc, printed on 11/16/2007, at 11:58:25 AM. Last saved on 10/26/2007 8:44:00 PM.
Sage Software Confidential
Contents of account sets
To add an account set, you enter a unique code of up to six characters for the set, and a description.
You then enter account numbers for the general ledger payables control, purchases discounts, and prepayments accounts. In multicurrency ledgers, you also assign exchange gain and loss accounts, and an exchange rounding account, to account sets that do not use the functional currency.
You can use an account number more than once in an account set.
You enter account numbers for the following general ledger accounts:
• Payables Control account. A liability account that contains the total amount payable to all vendors assigned to the control account set. The account is credited when invoices or debit notes are posted, and debited when payments or credit notes are posted.
The word “control” in the account name means that the account contains subledger totals, whereas the information stored by the Accounts Payable program contains details at the transaction‐distribution level.
If all transactions are processed correctly, the total of all payable balances in the Accounts Payable system balances with the totals in the payable control accounts in your general ledger.
• Purchase Discounts account. An income statement account that is credited with discounts taken for early invoice payment.
• Prepayment Liability account. An asset account to which prepayments are debited. The account is credited when prepayments are applied to invoices or refunded.
• Retainage account. If you use retainage accounting, a liability account that accumulates outstanding retainage amounts until you clear the amounts by processing retainage invoices, retainage debit notes, and retainage credit notes.
Entering Accounts Payable Setup Information
Getting Started 2–35
Apgs‐2.doc, printed on 11/16/2007, at 11:58:25 AM. Last saved on 10/26/2007 8:44:00 PM.
Sage Software Confidential
Before
Setting Up
If you have a single‐currency ledger, the currency code of the account set matches your functional currency, and you cannot change it.
Identifying the account set’s currency
If you use multicurrency accounting, you must assign a currency code to each account set to identify the currency used by the vendors you plan to assign to the set. Once you add an account set, you cannot change its currency.
Multicurrency general ledger accounts
Multicurrency account sets include the same accounts as single‐currency account sets, and include additional accounts to which you post gains and losses that result when you revalue Accounts Payable transactions at new exchange rates, and rounding differences that arise during currency conversion.
The general ledger accounts you assign to multicurrency account sets depend on the type of currency information you require in your general ledger.
For example, you might use a separate Payables Control account for each currency, but use the same discount account for all the account sets.
If you use the same account number for all exchange gains and losses, the balance in that general ledger account represents the net exchange gain or loss on all payables transactions.
Assigning account numbers from Sage Accpac General Ledger
If you use Sage Accpac General Ledger with Accounts Payable, you should assign General Ledger accounts that can accept the currencies used with the account sets in Accounts Payable.
See the General Ledger Getting Started manual for more information.
Entering Accounts Payable Setup Information
2–36 Sage Accpac Accounts Payable
Apgs‐2.doc, printed on 11/16/2007, at 11:58:25 AM. Last saved on 10/26/2007 8:44:00 PM.
Sage Software Confidential
You assign the following general ledger accounts to multicurrency account sets to record exchange gains and losses:
• Unrealized Exchange Gain and Unrealized Exchange Loss accounts.
Realized and Unrealized Gain/Loss accounting method
These accounts are available only if you use the Realized and Unrealized Gain/Loss accounting method for your Sage Accpac system. (You specify the accounting method for your company in the Company Profile, in Common Services.)
These accounts are income statement accounts to which you post the amount by which a multicurrency transaction increases or decreases, respectively, in its functional‐equivalent value when you revalue it at a new exchange rate.
A gain occurs when a change in the value of a transaction benefits you. A loss occurs when the change in value of a transaction favors your vendor.
The gain or loss is “unrealized” because the transaction is not completed (that is, you have not paid it) and the exchange rate for the transaction can continue to change until it is fully paid.
If you change the accounting method to Recognized Gain/Loss, these accounts are visible, but they are no longer used for revaluation.
• Exchange Gain and Exchange Loss accounts. The income statement accounts to which you post the amount by which a multicurrency transaction increased or decreased in value in the functional currency due to fluctuations in the exchange rate.
Exchange gains and losses arise during settlement (for example, when you pay an invoice) if you pay more or less money in the functional currency than you expected.
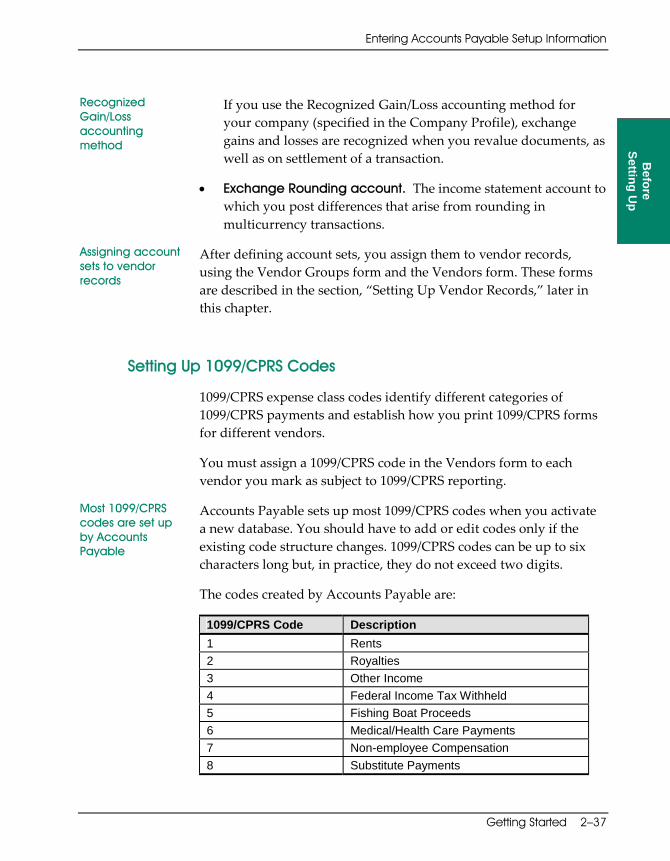
Entering Accounts Payable Setup Information
Getting Started 2–37
Apgs‐2.doc, printed on 11/16/2007, at 11:58:25 AM. Last saved on 10/26/2007 8:44:00 PM.
Sage Software Confidential
Before
Setting Up
Recognized Gain/Loss accounting method
If you use the Recognized Gain/Loss accounting method for your company (specified in the Company Profile), exchange gains and losses are recognized when you revalue documents, as well as on settlement of a transaction.
• Exchange Rounding account. The income statement account to which you post differences that arise from rounding in multicurrency transactions.
Assigning account sets to vendor records
After defining account sets, you assign them to vendor records, using the Vendor Groups form and the Vendors form. These forms are described in the section, “Setting Up Vendor Records,” later in this chapter.
Setting Up 1099/CPRS Codes
1099/CPRS expense class codes identify different categories of 1099/CPRS payments and establish how you print 1099/CPRS forms for different vendors.
You must assign a 1099/CPRS code in the Vendors form to each vendor you mark as subject to 1099/CPRS reporting.
Most 1099/CPRS codes are set up by Accounts Payable
Accounts Payable sets up most 1099/CPRS codes when you activate a new database. You should have to add or edit codes only if the existing code structure changes. 1099/CPRS codes can be up to six characters long but, in practice, they do not exceed two digits.
The codes created by Accounts Payable are:
1099/CPRS Code Description 1 Rents 2 Royalties 3 Other Income 4 Federal Income Tax Withheld 5 Fishing Boat Proceeds 6 Medical/Health Care Payments 7 Non-employee Compensation 8 Substitute Payments

Entering Accounts Payable Setup Information
2–38 Sage Accpac Accounts Payable
Apgs‐2.doc, printed on 11/16/2007, at 11:58:25 AM. Last saved on 10/26/2007 8:44:00 PM.
Sage Software Confidential
1099/CPRS Code Description 10 Crop Insurance Proceeds 16 State Income Tax Withheld
If you want to stop assigning a code to vendors, you can set it to Inactive.
1099/CPRS vendor amounts are not accumulated by code. Accounts Payable accumulates a total invoice amount for each vendor and uses the 1099/CPRS code only to indicate where that amount is printed. (In other words, you can only assign one code to a vendor record. If you need two codes for a vendor you would have to create two vendor records.)
Setting Up Distribution Codes
Distribution codes provide a quick and easy way to specify a single general ledger account when you distribute purchases, because you can make them shorter — and easier to remember — than the general ledger account numbers.
For example, the following distribution codes are easier to use than the general ledger account numbers they represent:
Distribution Code Description G/L Account OFFEXP Office supplies 6500-100-20 SHPEXP Shop supplies 6620-200-20 RENT Office rent 6560-100 INV Inventory 1300-100 GST GST input tax CR 2435
The codes are easier to remember than account codes and, if you forget them, present a shorter Finder list during data entry.
Once you define distribution codes, you can group them in distribution sets, to provide sets of default distributions for assignment to vendors.
Entering Accounts Payable Setup Information
Getting Started 2–39
Apgs‐2.doc, printed on 11/16/2007, at 11:58:25 AM. Last saved on 10/26/2007 8:44:00 PM.
Sage Software Confidential
Before
Setting Up
You can also create sets of distribution codes
Accounts Payable lets you distribute transactions by distribution set (a group of distribution codes), by distribution code, or by general ledger account number. You select a default distribution method for each vendor in the vendor records.
Entering and Posting Transactions with Distribution Codes
When you use distribution codes in invoice and adjustment entry, Accounts Payable displays the corresponding account number (and description) in the transaction entry form. When you post invoice and adjustment batches, Accounts Payable creates general ledger transactions for the accounts represented by the distribution codes, and lists the codes and account numbers on the posting journals.
Creating Distribution Codes
You use the Distribution Codes form to add distribution codes. For each record you enter a unique code, up to six characters, a description (name) for the code, and the general ledger account number that the code represents.
You also specify a Discountable status for the distribution code, so that when you use the code in an invoice, credit note, or debit note detail, the status appears as the default for the detail.
Distribution codes are optional
You can define as many distribution codes as you need to represent the various general ledger accounts to which you distribute purchases. You do not have to define distribution codes if you plan to distribute transactions by general ledger account number.
Setting Up Distribution Sets
A distribution set is a group of distribution codes and general ledger accounts that represents a standard group of distributions you would make when entering vendor transactions. Distribution sets are used to speed data entry.
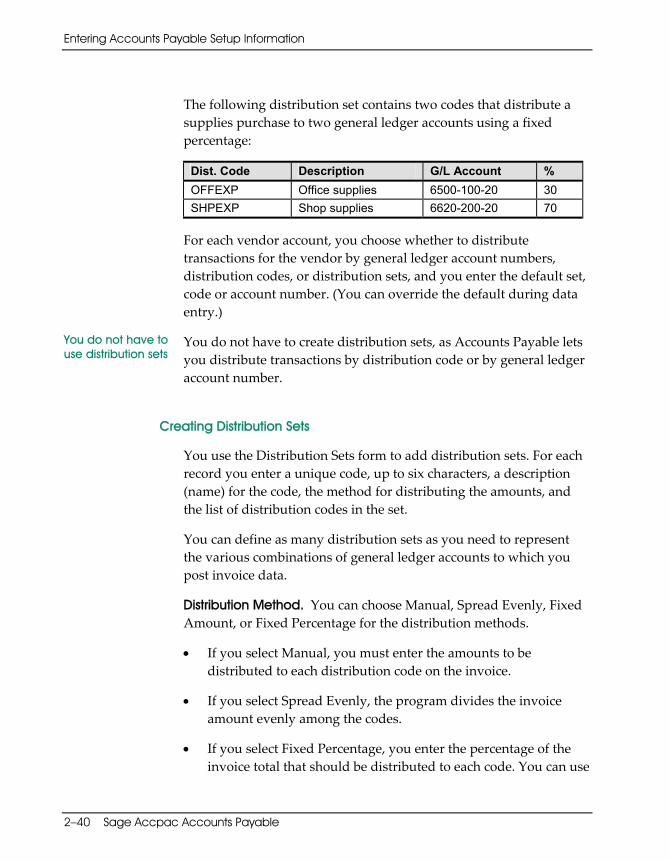
Entering Accounts Payable Setup Information
2–40 Sage Accpac Accounts Payable
Apgs-2.doc, printed on 1/31/2008, at 2:01:35 PM. Last saved on 1/30/2008 6:39:00 PM.
Sage Software Confidential
The following distribution set contains two codes that distribute a supplies purchase to two general ledger accounts using a fixed percentage:
Dist. Code Description G/L Account % OFFEXP Office supplies 6500-100-20 30 SHPEXP Shop supplies 6620-200-20 70
For each vendor account, you choose whether to distribute transactions for the vendor by general ledger account numbers, distribution codes, or distribution sets, and you enter the default set, code or account number. (You can override the default during data entry.)
You do not have to use distribution sets
You do not have to create distribution sets, as Accounts Payable lets you distribute transactions by distribution code or by general ledger account number.
Creating Distribution Sets
You use the Distribution Sets form to add distribution sets. For each record you enter a unique code, up to six characters, a description (name) for the code, the method for distributing the amounts, and the list of distribution codes in the set.
You can define as many distribution sets as you need to represent the various combinations of general ledger accounts to which you post invoice data.
Distribution Method. You can choose Manual, Spread Evenly, Fixed Amount, or Fixed Percentage for the distribution methods.
• If you select Manual, you must enter the amounts to be distributed to each distribution code on the invoice.
• If you select Spread Evenly, the program divides the invoice amount evenly among the codes.
• If you select Fixed Percentage, you enter the percentage of the invoice total that should be distributed to each code. You can use
Entering Accounts Payable Setup Information
Getting Started 2–41
Apgs‐2.doc, printed on 11/16/2007, at 11:58:25 AM. Last saved on 10/26/2007 8:44:00 PM.
Sage Software Confidential
Before
Setting Up
negative percentages and percentages greater than 100 percent, providing the total is 100 percent.
• If you select Fixed Amount, the program creates distribution lines on the invoice using the amounts specified for each distribution code.
No matter which method you choose, you can change the distribution amounts when you enter or edit invoices and adjustments.
Distribution Code. Select the distribution codes that form the set. Accounts Payable inserts the description and general ledger account of each code. If you chose to distribute by percent, you also have to enter the percentage of the distribution that should be allocated to each code.
Distribution Percent. If you chose the Fixed Percentage distribution method, enter the percentage of the total invoice that should be allocated to each distribution code. You can override the percentage during invoice entry.
Setting Up Terms
Accounts Payable automatically keeps all the payment terms by which your company determines invoice due dates. The terms are assigned to each of your vendors, but can be changed on individual invoices.
Accounts Payable uses the terms on each invoice to calculate due dates and discount dates.
Installment payments
Terms can be as simple as a due date and discount date and rate, or they can include payment schedules to allow for several installment payments.
Setting up installment terms
You can use the Multiple Payment Schedule option to set up a terms code that allows installment payments. You can define installment

Entering Accounts Payable Setup Information
2–42 Sage Accpac Accounts Payable
Apgs‐2.doc, printed on 11/16/2007, at 11:58:25 AM. Last saved on 10/26/2007 8:44:00 PM.
Sage Software Confidential
periods that vary in length and use different methods to calculate due dates and discounts. You can also set up as many installment periods for a terms code as you need.
Calculating discounts before or after tax
If you pay tax on purchases, you can specify whether to include tax in the document total that Accounts Payable uses to calculate discount amounts.
Defining terms You must define at least one set of terms before you can add vendor records. For each set of terms, use the Terms form in the Setup folder to enter a unique code of up to six characters, and a description.
The due date type and the discount type can be a time interval (a specific number of days, or a number of days from a specific day of the month) or a fixed date (the end of the next month, or a specific day of the next month).
Using standard due dates
If your vendor uses standard due dates (such as the 1st or 15th of the month), you can create a terms code table to calculate a due date for each of up to four ranges of days on which invoices were issued.
For example, your table could specify that invoices entered between the 1st and 15th of each month are due on the 30th of the month, and that invoices entered between the 15th and the end of the month are due on the 15th of the next month.
When you use due date tables, you can either define discount periods in the same way as for other terms options, or you can enter a table of standard discount periods.
For more information about using terms codes to calculate discounts, see “Calculating Discounts” in Chapter 2 of the User Guide.
Assigning terms codes to vendor records
You assign a terms code to each vendor record to set the default terms that appear when you enter new vendor invoices. You can choose different terms for the vendor during transaction entry without changing the standard terms assigned in the vendor record.
Entering Accounts Payable Setup Information
Getting Started 2–43
Apgs-2.doc, printed on 2/21/2008, at 4:55:39 PM. Last saved on 2/21/2008 4:55:00 PM.
Sage Software Confidential
Before
Setting Up
Setting Up Payment Codes
You can enter all types of payments in Accounts Payable, including cash, checks, credit cards, and the other ways you pay your vendors.
You create a record to identify each type of payment you make. During payment entry, you simply enter the relevant code, and Accounts Payable automatically adds the information about the type of payment. You may also want to batch payments by payment code.
Adding payment codes
Use the Payment Codes form to define payment codes. For each type of payment your company makes, enter a unique code, up to six characters, a description (such as the name of a credit card), and the type of payment: cash, check, credit card, or other.
Setting Up E-mail Messages
You use the E-mail Messages form to create standard messages to send with e-mailed letters.
Tailor messages for individual vendors
You can use variables (field names) from your company database to include vendor- or company-specific information on the messages. (See the next section, "Variables for E-mail Messages," for a list of the variables you can use with letters.)
You identify each e-mail message with a unique 16-character Message ID code. When you select Vendor as the Delivery Method on the Letters/Labels form, you can select message codes for the message you want to send with e-mailed letters.
Variables for E-mail Messages
If you use variable names from your company database in the subject line or in the body of e-mail messages that you set up for use with letters, the program substitutes (or “merges”) vendor- or company-specific information in the e-mailed messages.
You can use the following variables for messages that you send with e-mailed letters:
Entering Accounts Payable Setup Information
2–44 Sage Accpac Accounts Payable
Apgs‐2.doc, printed on 11/16/2007, at 11:58:25 AM. Last saved on 10/26/2007 8:44:00 PM.
Sage Software Confidential
• $VENDOR_ID • $VENDOR_NAME • $VENDOR_CONTACT • $COMPANY_PHONE • $COMPANY_FAX • $COMPANY_CONTACT • $COMPANY_NAME
Setting Up Payment Selection Codes
When you create an automatic payment batch with Accounts Payable, you must tell the program how you want it to select vendors and invoices for payment. The way you do this is with a payment selection code.
Payment selection codes are identified by codes of up to six characters (letters and digits). The rest of the selection record defines the criteria for selecting — or excluding — vendor invoices for payment.
Payment selection codes define the following elements:
• The bank on which the checks are drawn.
• How you select invoices (by due date, discount date, or due date and discount date).
• Whether you pay all documents or forced documents only.
• The range of vendor groups.
• The range of vendors.
• The range of account sets.
• The range of payment codes (for vendors that use a check‐type payment code).
• The range of check amounts (for example, so you could pay all the small outstanding amounts first).

Entering Accounts Payable Setup Information
Getting Started 2–45
Apgs‐2.doc, printed on 11/16/2007, at 11:58:25 AM. Last saved on 10/26/2007 8:44:00 PM.
Sage Software Confidential
Before
Setting Up
• A method to apply partial payments to job‐related invoices.
• Whether to select vendors by a specified optional field (if you use optional fields).
• Vendors you want to exclude from the payment selection.
• Optional information that you want to include with payment batches (if you use optional fields).
Multicurrency ledgers
• The bank currency (multicurrency ledgers only).
• The vendor currency (multicurrency ledgers only).
Using Payment Selection Codes
You create payment selection codes using the Payment Selection Codes form.
You cannot use the Create Payment Batch form to generate checks unless you have defined at least one payment selection code.
You can change the payment selection criteria after you enter the payment selection code in the Create Payment Batch form. If your payment selection needs are fairly simple (for example, if you use only one bank and have a small number of vendors), you may define only one code and modify it if you are generating a special check run.
Setting Up Optional Fields
This form appears in the A/P Setup folder if you use Transaction Analysis and Optional Fields Creator, a separately licensed package that you can purchase and use with any edition of Accounts Payable.
Use optional fields to customize Accounts Payable
Optional fields let you customize your Accounts Payable system by letting you store an unlimited amount of additional information with transactions, and with vendor and remit‐to location records.
Entering Accounts Payable Setup Information
2–46 Sage Accpac Accounts Payable
Apgs‐2.doc, printed on 11/16/2007, at 11:58:25 AM. Last saved on 10/26/2007 8:44:00 PM.
Sage Software Confidential
Because you can select records by optional field on a number of reports, optional fields also provide an additional means of analyzing vendors and transactions in Accounts Payable.
G/L can keep optional data sent from Accounts Payable
If you use exactly the same optional fields in Accounts Payable and General Ledger, General Ledger retains the optional field information used in transactions that you send from Accounts Payable.
First, you must set up optional fields for your Sage Accpac system
You can use an unlimited number of optional fields in Accounts Payable. However, you must first define optional fields for your Sage Accpac system using the Optional Fields form in Common Services. (For more information about setting up optional fields in Common Services, see the System Manager Administrator Guide.)
Define the optional fields you want to use in Accounts Payable
Once you have set up optional fields for your Sage Accpac system, you use the A/P Optional Fields form in the A/P Setup folder to define optional fields for use with the following Accounts Payable records and transactions:
• Vendors and vendor groups. • Remit‐to locations. • Invoices. • Invoice details. • Payments. • Adjustments. • Revaluation transactions.
For each optional field you plan to use in Accounts Payable, you specify:
• The type of optional field you are entering, indicating whether the optional field is to be used with specific Accounts Payable setup records (vendors or remit‐to locations) or transactions (invoice headers or details, adjustments, payments, or revaluations).
You can set up an unlimited number of optional fields for each type, providing the optional fields are set up in Common Services for use in your system.
Entering Accounts Payable Setup Information
Getting Started 2–47
Apgs‐2.doc, printed on 11/16/2007, at 11:58:25 AM. Last saved on 10/26/2007 8:44:00 PM.
Sage Software Confidential
Before
Setting Up
• The optional field code for each optional field you are defining. Note that if you want to retain optional field information from Accounts Payable transactions when you create batches for General Ledger, you must use the same optional fields for transactions in Accounts Payable as you use in General Ledger.
• Whether or not the optional field has a default value. If you want to set a default value for the optional field, you must set the Value Set field to Yes.
The Value Set field alerts the data entry clerk that a seemingly blank optional field actually has an entry. (By looking at the Value field, you cannot tell whether it has a “blank” default value or no value at all.)
• The default entry to use for the optional field. If the optional field you select requires validation, you must select a value that is defined for the optional field in Common Services. However, if the optional field allows blanks, you can leave the default entry blank.
If the optional field does not use validation, you can:
− Select a value that is defined for the optional field in Common Services.
− Leave the field blank.
− Enter a combination of alphanumeric or special characters and spaces. The entry must be consistent with the type of field (text, number, date, amount, and so on) and must not exceed the number of characters specified for the optional field. In a Yes/No field, you can enter only Yes or No. In an Integer field you can enter any integer with an absolute value less than 2,147,483,647.
• Whether you must fill in the optional field during data entry before you can save the record or transaction. If an optional field is required and has a default value, you can accept the value that appears or assign a different one, and then save the record.

Entering Accounts Payable Setup Information
2–48 Sage Accpac Accounts Payable
Apgs‐2.doc, printed on 11/16/2007, at 11:58:25 AM. Last saved on 10/26/2007 8:44:00 PM.
Sage Software Confidential
If the optional field is required, but does not have a default value, you must fill in the field before you can proceed.
If you make an optional field a required field, the Auto Insert field changes to Yes. Normally, you want required fields to appear automatically in the records or transactions for which they are defined.
• Whether the program displays the optional field and its default entry on the form for the type of optional field when you set up new records or enter transactions.
For example, if you define Transit Number as an optional field for invoices and you select Yes in the Auto Insert field, the Transit Number field appears automatically in Invoice Entry.
• Settings that determine whether General Ledger accounts and Project and Job Costing can be updated with optional field information from posted transactions, as described in the next section, “Optional Field Settings.”
Assigning optional fields to particular A/P records
After defining optional fields, you can assign them to particular vendor, vendor group, and remit‐to location records, as described in the section, “Setting Up Vendor Records,” later in this chapter.
A/P assigns optional fields when you create transactions automatically
Accounts Payable assigns the optional fields you define for payables transactions when you generate transactions using the following forms:
• Create Recurring Payable Batch (invoice optional fields).
• Create Payment Batch (payment optional fields).
• Create Retainage Batch (invoice optional fields).
Optional Field Settings
You can — and should — restrict the flow of information that is passed to General Ledger when you post transactions that use optional fields. The Optional Fields setup form lets you specify groups of accounts for which values for an optional field can be

Setting Up Vendor Records
Getting Started 2–49
Apgs‐2.doc, printed on 11/16/2007, at 11:58:25 AM. Last saved on 10/26/2007 8:44:00 PM.
Sage Software Confidential
Before
Setting Up
passed to General Ledger. (The optional fields used in a transaction must also match the transaction details optional fields used for an account in order to be passed to General Ledger.)
If you use Sage Accpac Project and Job Costing, you can also specify whether optional field information for job‐related transactions is passed to Project and Job Costing, if the optional fields match those used for external cost transactions in that program.
Important Note that while all account groups are initially selected for new optional fields, you need to consider carefully the purpose of the optional field you are defining. You should send values to General Ledger only for optional fields that require financial analysis, and only to accounts where they are required. For example, you might want to send optional fields that contain vendor numbers or sales territories only to revenue accounts.
You do not need to send optional field information for analysis that is performed only in Accounts Payable. If you routinely send all the optional fields you use in Accounts Payable transactions, your General Ledger may become unwieldy, and you may also slow down processing considerably.
Setting Up Vendor Records Accounts Payable allows you to keep very detailed records about your vendors, and provides several options you can use to customize the records to match your business requirements.
Use this section to find out how vendor records are set up and used in Accounts Payable, and to determine which options let you process vendor information and transactions to suit your company’s procedures.
Preparing to add vendor records
Before you can add vendor records to Accounts Payable, you must set up account sets, 1099/CPRS codes, distribution codes, distribution sets, payment codes, and payment terms.
Setting Up Vendor Records
2–50 Sage Accpac Accounts Payable
Apgs‐2.doc, printed on 11/16/2007, at 11:58:25 AM. Last saved on 10/26/2007 8:44:00 PM.
Sage Software Confidential
In addition, if you use Sage Accpac Transaction Analysis and Optional Field Creator (a separately licensed package), you must also set up in Common Services the optional fields that you want to assign to Accounts Payable records.
If you need more information about any of these tasks, see the section on setting up for each type of record, earlier in this chapter.
You take the following steps to set up vendor records in Accounts Payable:
1. Define the groups by which you want to group vendors for reporting purposes.
Vendor groups also determine a number of default settings that appear when you add new vendor records (but which can be overridden for individual vendors).
2. Add vendor records.
These steps are described in more detail in the following sections.
Defining Vendor Groups
You use vendor groups to classify your vendor records into groups that share similar characteristics. You must define your vendor groups before you can add vendor records.
Vendor groups provide the following features. They let you:
• Set default entries to speed up the task of adding vendor records.
• Select accounts for payment. (The vendor group is one of the selection criteria.)
• Select vendors on reports. (Vendor transactions, aged payables, aged cash requirements, letters, and labels can all be printed for a range of vendor groups.)
Setting Up Vendor Records
Getting Started 2–51
Apgs‐2.doc, printed on 11/16/2007, at 11:58:25 AM. Last saved on 10/26/2007 8:44:00 PM.
Sage Software Confidential
Before
Setting Up
You can add as many vendor groups as you want, but you must add at least one group.
Adding vendor groups
You use the Vendor Groups form to define the vendor groups you need.
To define a vendor group, you must:
• Assign a unique code, up to six characters, to identify each group.
For information about selecting vendor group codes, see the section, “Designing Accounts Payable Coding Schemes,” earlier in this chapter.
• Select the account set, terms code, bank code, and payment code you want to use as the default selections for the vendor records you plan to add to the group.
• Specify the default method for distributing transactions to general ledger accounts. You can distribute invoices by distribution set, distribution code, or general ledger account. You can also suppress the default distribution line on documents by selecting None as the Distribute By method for vendors.
If you select Distribution Set, Distribution Code, or G/L Account as the method, you must also specify a default code for the method. For example, if you select G/L Account, you must specify the default general ledger account to which you want distributions made.
Select None as the Distribute By method for job-related vendors
If you use Sage Accpac Project and Job Costing, we recommend that you select None as the Distribute By method for vendors from whom you frequently purchase goods or services. (Because you cannot mix job‐related details with other details on an invoice, the program does not let you choose the Job Related option when a detail that is not job‐related appears on an invoice. If you choose None, you do not have to delete the default detail each time you want to enter a job‐related invoice.)
Setting Up Vendor Records
2–52 Sage Accpac Accounts Payable
Apgs‐2.doc, printed on 11/16/2007, at 11:58:25 AM. Last saved on 10/26/2007 8:44:00 PM.
Sage Software Confidential
Multicurrency • Specify the default rate type for vendors in this group (if you
have a multicurrency ledger and chose a non‐functional currency account set).
• Choose whether to check for duplicate invoices with the same vendor and amount and/or same vendor and date.
• Choose whether to generate separate payments for each invoice, or pay several invoices with a single check.
• Set default entries for vendor optional fields.
• Select the default tax group for vendors in this vendor group. You must also enter a tax class for each tax authority in the group, and indicate whether tax is usually included in the invoice details.
• Specify whether the vendors in this group are subject to 1099/CPRS reporting and, if so, specify the appropriate 1099/CPRS code. (You can override this choice for individual vendors.)
Vendor group statistics
Accounts Payable keeps statistics for vendor groups, and displays them on the Statistics tab on the Vendor Groups form. You can display the statistics by the type of year and period you specified in the A/P Options form for vendor statistics.
For each group, Accounts Payable lists the amount and number of invoices, payments, discounts taken, discounts lost, credit notes, debit notes, adjustments, and total paid invoices. Accounts Payable also calculates and displays the total days to pay, and the average days to pay for the group.
You can edit the statistics in a vendor group if you select the Allow Edit Of (vendor) Statistics option in the A/P Options form.
For more information about vendor group statistics, see “Keeping Vendor and Group Statistics,” earlier in this chapter.

Setting Up Vendor Records
Getting Started 2–53
Apgs‐2.doc, printed on 11/16/2007, at 11:58:25 AM. Last saved on 10/26/2007 8:44:00 PM.
Sage Software Confidential
Before
Setting Up
Accumulating tax amounts
The totals kept for invoices, credit notes, and debit notes can include or exclude any tax amounts that were posted with the documents, depending on the choice you enter for the Include Tax In Statistics option in the A/P Options form.
Assigning Optional Fields to Vendor Groups
If you use optional fields, you can assign to each vendor group the optional fields and values you want to use as defaults for new vendors that use the group code.
Any optional vendor fields that you set up for automatic insertion appear automatically, along with their default entries, on the Optional Fields tab of the Vendor Groups form.
You can accept the optional fields that are displayed as defaults, or you can delete them. You can also assign any additional optional fields that are defined in Accounts Payable for vendors and vendor groups.
You can also accept or change any entries that appear as defaults. If the optional field is validated, you must select a value that is defined for the optional field in Common Services.
If an optional field is a required field, it must have a value before you can save the record. (Check the Value Set column to see whether a “blank” value has been set for an optional field for which the Value field appears blank. If the Value Set field displays Yes, the Value field contains a value, and you can save the record.)
You can add an unlimited number of optional fields to vendor group records, providing that you first set them up:
• For your Sage Accpac system, in Common Services.
• For Accounts Payable vendors and vendor groups using the A/P Optional Fields form.
Setting Up Vendor Records
2–54 Sage Accpac Accounts Payable
Apgs‐2.doc, printed on 11/16/2007, at 11:58:25 AM. Last saved on 10/26/2007 8:44:00 PM.
Sage Software Confidential
Adding Vendors
Adding vendor records to Accounts Payable involves transferring your existing vendor information to Sage Accpac and selecting options that let you process payables more effectively.
General information about your vendors
You use the Vendors form to enter most of your vendor information to Accounts Payable. This form lets you enter information such as:
• The vendor number (the code you use to identify the account), as described under “Assigning Vendor Numbers,” later in this section.
• Whether the account is on hold or inactive. (See “Placing a Vendor Account on Hold or Setting to Inactive,” later in this section.)
• The vendor group, which categorizes the record and assigns default processing, tax, and optional field entries.
• An optional “short name,” (an abbreviation or acronym that represents the vendor). For more information, see “Entering Short Names,” later in this section.
• The vendor’s name, address, and phone numbers.
• The date on which you started to do business with the vendor.
• The vendor’s email addresses and Web site URL.
• Additional information your company wants to include in the optional fields you created for your vendor records.
For more information about optional fields, see “Setting Up Optional Fields,” earlier in this chapter.
• Comments you want to store with the vendor record or want to print on correspondence with the vendor, display during transaction entry, or keep for other purposes. For more information, see “Processing Vendor Comments,” later in this section.
Setting Up Vendor Records
Getting Started 2–55
Apgs‐2.doc, printed on 11/16/2007, at 11:58:25 AM. Last saved on 10/26/2007 8:44:00 PM.
Sage Software Confidential
Before
Setting Up
Processing options in the Vendors form
You also use the Vendors form to identify how to process transactions for each vendor, specifying the following information.
• The account set, which determines the general ledger accounts to which the vendor’s transactions are distributed. Each set includes accounts for payables control, purchase discounts, and prepayments.
Multicurrency ledgers
If you use multicurrency accounting, the account set determines the vendor currency. A multicurrency account set also includes unrealized and realized exchange gain and loss accounts, and an exchange rounding account.
See “Setting Up Account Sets,” earlier in this chapter.
• The default payment code that Accounts Payable displays in the Payment Entry form. You specify the most frequent payment method you use for this vendor.
If you do not assign a payment code, Payment Entry displays the default payment code specified for your Accounts Payable system on the A/P Options form when you create payments for the vendor.
• The default payment terms that Accounts Payable uses to calculate the due date, discount period, and discount amount for vendor invoices.
See “Setting Up Terms,” earlier in this chapter.
• The bank code and credit limit associated with the vendor.
The vendor bank code is the bank account on which you usually write checks to pay the vendor. (See the Tax and Bank Services User Guide.)
• The method for distributing invoice amounts to General Ledger accounts.
You may distribute amounts by distribution code, distribution sets, or by general ledger account code.
Setting Up Vendor Records
2–56 Sage Accpac Accounts Payable
Apgs‐2.doc, printed on 11/16/2007, at 11:58:25 AM. Last saved on 10/26/2007 8:44:00 PM.
Sage Software Confidential
See “Setting Up Distribution Codes” and “Setting Up Distribution Sets,” earlier in this chapter.
Multicurrency ledgers
• The rate type that Accounts Payable uses to calculate the exchange rate between the functional currency and the vendor currency.
• Retainage percentage, retention period, and retainage terms, if you use retainage accounting in your Accounts Payable system. Accounts Payable uses these settings as defaults when you enter an invoice, credit note, or debit note for the vendor.
When you add a new vendor record, Accounts Payable displays the settings you specified in the A/P Options form as defaults, but you can change them.
• How you check for duplicate vendor invoices.
• A delivery method for sending letters to the vendor.
• Whether you pay each invoice with a separate check or cover several invoices with a single payment.
• Tax information for vendor invoices, and whether the vendor is subject to 1099/CPRS reporting.
The tax group for the vendor determines the taxing authorities and tax class for each authority to which you would pay tax on an invoice. This information tells Accounts Payable how to calculate tax amounts on the vendor’s invoices. For more information, see “Entering Tax Information,” later in this section.
For information on tax groups, tax authorities, and tax classes, see the Tax and Bank Services User Guide.
Entering vendor statistics
In addition to the information you can enter for each vendor on the Vendors form, Accounts Payable automatically adds the statistics it collects from all vendor transactions to each vendor record.
If you select the Allow Edit Of (vendor) Statistics option on the A/P Options form, you can enter statistical figures when you are
Setting Up Vendor Records
Getting Started 2–57
Apgs‐2.doc, printed on 11/16/2007, at 11:58:25 AM. Last saved on 10/26/2007 8:44:00 PM.
Sage Software Confidential
Before
Setting Up
setting up a new Accounts Payable system, and revise them as needed. For more information, see “Using Vendor Statistics,” later in this section.
Keeping additional remit-to addresses for a vendor
If you need to keep more than one remit‐to address for a vendor, you can also define as many additional addresses as you need, using the Remit‐To Locations form, as described in the section, “Adding Remit‐To Locations,” later in this chapter.
Importing vendor records
You can also import vendor records into Accounts Payable from non‐Sage Accpac programs, instead of adding them with the Vendors form. For information about importing records, see Appendix B, “Importing and Exporting,” in the User Guide.
Assigning Vendor Numbers
You use the Vendors form to add vendor records. For each new record, you must assign a unique vendor number, up to 12 characters, including letters, numbers, and symbols.
If your current system for assigning vendor numbers makes sense in Sage Accpac, you may want to transfer your present system. However, you should probably take the time now to evaluate your current system, because the best time to switch systems is when you already have to recreate all your vendor records.
If you do not have a logical method of assigning vendor numbers, you should develop a system before you add any vendor records to Accounts Payable.
Your numbering system should let you organize the records as you require, such as alphabetically, by region, and for reporting purposes. The system should also allow for expansion as your business grows.
For information about developing Accounts Payable coding systems, such as vendor numbers, see the section, “Designing Accounts Payable Coding Schemes,” earlier in this chapter.

Setting Up Vendor Records
2–58 Sage Accpac Accounts Payable
Apgs‐2.doc, printed on 11/16/2007, at 11:58:25 AM. Last saved on 10/26/2007 8:44:00 PM.
Sage Software Confidential
Assigning a Group Code
Vendor groups let you categorize vendors on reports and provide default entries for processing, taxes, and optional fields. The vendor group includes the Account Set, which determines the vendor currency.
Placing a Vendor Account on Hold or Setting to Inactive
You can place a vendor account on hold. When an account is on hold, Accounts Payable warns you when you start to enter an invoice for the vendor, so that you can choose whether to continue entering the invoice.
If a vendor is on hold, you cannot make payments or prepayments, or otherwise decrease the balance in the vendor account, using the Create Payment Batch form. However, you can use the Payment Entry form to make payments. The system warns you that the vendor is on hold.
You can set a vendor account to inactive only if:
• You have no balance owing to the vendor.
• You have no unposted documents for the vendor.
Once you set an account to inactive, you can no longer enter transactions, but you can view the vendor’s account history.
Entering Short Names
You can enter a code or “short name” of up to ten characters for each of your vendors. Short names are a means by which you can list vendors in alphabetical order (or any other order) on reports, and still include the full vendor name in the vendor record, because Accounts Payable can sort records by short name first.
To illustrate, assume you have the following four vendors. When listed alphabetically, the names appear in this order:
A. Craig & Son
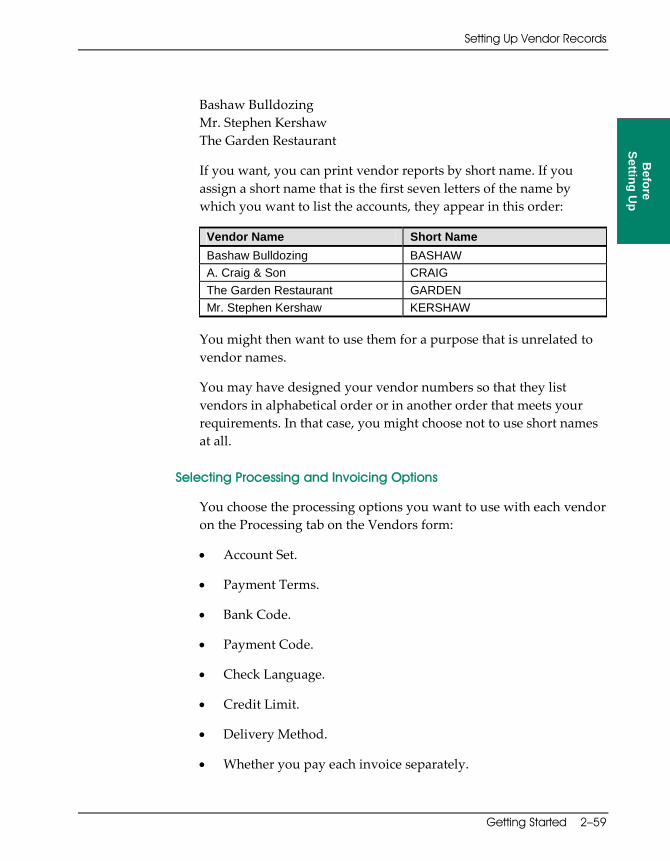
Setting Up Vendor Records
Getting Started 2–59
Apgs‐2.doc, printed on 11/16/2007, at 11:58:25 AM. Last saved on 10/26/2007 8:44:00 PM.
Sage Software Confidential
Before
Setting Up
Bashaw Bulldozing Mr. Stephen Kershaw The Garden Restaurant
If you want, you can print vendor reports by short name. If you assign a short name that is the first seven letters of the name by which you want to list the accounts, they appear in this order:
Vendor Name Short Name Bashaw Bulldozing BASHAW A. Craig & Son CRAIG The Garden Restaurant GARDEN Mr. Stephen Kershaw KERSHAW
You might then want to use them for a purpose that is unrelated to vendor names.
You may have designed your vendor numbers so that they list vendors in alphabetical order or in another order that meets your requirements. In that case, you might choose not to use short names at all.
Selecting Processing and Invoicing Options
You choose the processing options you want to use with each vendor on the Processing tab on the Vendors form:
• Account Set.
• Payment Terms.
• Bank Code.
• Payment Code.
• Check Language.
• Credit Limit.
• Delivery Method.
• Whether you pay each invoice separately.
Setting Up Vendor Records
2–60 Sage Accpac Accounts Payable
Apgs‐2.doc, printed on 11/16/2007, at 11:58:25 AM. Last saved on 10/26/2007 8:44:00 PM.
Sage Software Confidential
• Rate Type for converting source currencies to their functional‐currency equivalents (multicurrency ledgers).
Entering Tax Information
Whether you are charged taxes on purchases or are tax exempt, you enter all the necessary tax information in the vendor record. Accounts Payable can then automatically calculate all the applicable taxes so you can verify the invoices you receive from vendors.
To specify tax information in the Vendors form, you first select the tax group that includes the taxing authorities and tables that apply to your purchases in the vendor’s geographical area. (You set up tax groups in the Tax Services forms in Common Services.)
You then select the taxing authorities that tax your purchases (collected by the vendor) and the tax class that indicates the type of purchase that is taxed by each authority.
If you have a tax‐exemption number or a registration number, such as for the Canadian Goods and Services Tax (GST), you also enter it here.
Subject to 1099/CPRS Reporting
Specify whether the vendor is subject to 1099/CPRS reporting and, if so, specify the appropriate 1099/CPRS code.
Using Vendor Statistics
Accounts Payable keeps statistics for vendors, and displays them in the Vendors form. You can view the statistics by the type of year (fiscal or calendar) and length of period you specified on the A/P Options form for vendor statistics.
For each vendor, the application displays the amount and number of invoices, payments, discounts taken and lost, credit notes, debit notes, adjustments, and total paid invoices. The application also calculates and displays the total days to pay and average days to pay for the vendor.

Setting Up Vendor Records
Getting Started 2–61
Apgs-2.doc, printed on 1/30/2008, at 6:33:50 PM. Last saved on 1/30/2008 6:33:00 PM.
Sage Software Confidential
Before
Setting Up
Activity statistics Accounts Payable keeps track of any outstanding balances on the vendor’s account, the year-to-date amounts and the dates of the highest balance and largest invoice in the current and previous years, and the last invoice, payment, credit note, debit note, adjustment, and discount posted to the vendor’s account.
Finally, Accounts Payable calculates and displays the total invoices paid, number of checks, total days to pay, and average days to pay for the account.
Editing statistics You can edit the statistics in a vendor record if you select the Allow Edit Of Statistics option in the A/P Options form. For more information about accumulating vendor statistics, see “Keeping Vendor and Group Statistics,” earlier in this chapter.
Reporting tax amounts in statistics
The totals kept for invoices, credit notes, and debit notes can include or exclude tax amounts posted with the document, depending on your choice for the Include Tax In Statistics option in the A/P Options form.
You can also see, but not change, the outstanding balance, open document count, current prepayment amount, and number of prepayments for the account.
Entering Retainage Information for Vendors
Default retainage settings for vendors
If you use retainage accounting in your Accounts Payable system, you should also specify default settings for each vendor, including the retainage percentage, retention period, and retainage terms.
When you add a new vendor, Accounts Payable displays on the Invoicing tab of the new vendor record the default retainage percentage, retention period, and retainage terms you specified on the A/P Options form, but you can change these settings for individual vendors.
When you enter an invoice, credit note, or debit note for a vendor, Accounts Payable uses the settings from the vendor record as defaults.

Setting Up Vendor Records
2–62 Sage Accpac Accounts Payable
Apgs‐2.doc, printed on 11/16/2007, at 11:58:25 AM. Last saved on 10/26/2007 8:44:00 PM.
Sage Software Confidential
Assigning Optional Fields to Vendor Records
If you use Transaction Analysis and Optional Fields Creator, you can assign optional fields to store additional information you want to keep with vendor records.
You use the Optional Fields tab on the Vendors form to assign optional fields to particular vendors.
Optional fields that are marked for automatic insertion in vendor records appear on the tab, along with their default values. You can accept the optional fields that are displayed as defaults, or you can delete them.
You can also assign any additional optional fields that are defined in Accounts Payable for vendors and vendor groups.
The program assigns default values to the optional fields, as follows:
• For optional fields that match those used by the vendor group, values from the vendor group record appear as defaults.
• If no default entry is specified for an optional field in the vendor group record, the program uses the value specified in the optional fields record.
You can accept or change the default entries. However, if the optional field is validated, you must use a value that is defined for the optional field in Common Services.
Processing Vendor Comments
Accounts Payable lets you enter any number of comments in vendor records, using up to 2,500 characters for each comment. The Comments tab displays a list of the comments entered for the vendor in order of the date they were entered.
When you enter a comment, you can also enter a follow‐up date when you want to check on the comment, as well as an expiration date when you want to delete the comment. Once the expiration date is reached, Accounts Payable automatically deletes the comment

Setting Up Vendor Records
Getting Started 2–63
Apgs‐2.doc, printed on 11/16/2007, at 11:58:25 AM. Last saved on 10/26/2007 8:44:00 PM.
Sage Software Confidential
Before
Setting Up
when you use the Clear History form to clear comments for the vendor number.
Adding Remit-To Locations
Remit‐to locations are the addresses to which vendors want you to send payments. (For example, the remit‐to address may be different from the mailing address if the address in the vendor record is just for ordering.) You use the Remit‐To Locations form to add remit‐to addresses for your vendors.
Primary remit-to location
If you mark a remit‐to location as the primary remit‐to location (an option in the Remit‐To Locations form), Accounts Payable uses this location as the default address on invoices and on vendor checks.
Accounts Payable can keep an almost unlimited number of remit‐to addresses for your vendors, and you can choose the location to use when you are entering invoices and payments.
For each remit‐to location, you can:
• Specify whether it is the primary location.
• Set the location to active or inactive.
• Specify the check language.
• Enter a remit‐to address.
• Provide default entries for the vendor optional fields. If you use the remit‐to location, these entries override the optional field entries provided by the vendor record.
Specifying remit-to locations
If you selected the option Allow Remit‐To Information To Be Changed (on the Options form), you can change the remit‐to address when you enter an invoice for the vendor. (To edit the information, you click the Zoom button beside the Remit‐To Location field on the Invoice Entry form. You can then choose a remit‐to location using the Finder, or enter an alternative address for the current invoice.)

Setting Up Vendor Records
2–64 Sage Accpac Accounts Payable
Apgs‐2.doc, printed on 11/16/2007, at 11:58:25 AM. Last saved on 10/26/2007 8:44:00 PM.
Sage Software Confidential
When you add a remit‐to location in the Remit‐To Locations form, you assign a code that identifies the location. You then use the code to select the location during invoice or payment entry.
Customizing remit-to address information
Remit‐to locations have the same optional fields as vendor records. See “Adding Optional Fields to Vendor and Vendor Group Records,” earlier in this chapter, for details.
You use the Vendor tab on the A/P Options form to add extra fields to the Optional Fields tab on the Remit‐To Locations form.
Deleting or setting inactive
Note that you cannot delete a remit‐to location record, or set it inactive, if the remit‐to location is used in any unposted documents.
Assigning Optional Fields to Remit-to Locations
If you use Transaction Analysis and Optional Fields Creator, you can assign an unlimited number of optional fields to store additional information you want to keep with remit‐to locations.
You must first set up optional fields for remit‐to locations using the Optional Fields setup form before you can assign them to particular remit‐to location records.
If you define and use the same optional fields for vendors and remit‐to locations as you use for invoices, the program can assign optional field entries from the remit‐to location record on invoices, debit notes, and credit notes when you specify a particular remit‐to location in Invoice Entry.
Automatically inserted optional fields and values
Any remit‐to location optional fields that you marked for automatic insertion on the Optional Fields setup form appear, along with their default entries, on the Optional Fields tab when you add a new remit‐to location.
You can accept the default optional fields, or you can delete them. You can also assign any other optional fields that are defined for remit‐to locations in Accounts Payable.
Setting Up Vendor Records
Getting Started 2–65
Apgs‐2.doc, printed on 11/16/2007, at 11:58:25 AM. Last saved on 10/26/2007 8:44:00 PM.
Sage Software Confidential
Before
Setting Up
The default entry comes from the optional field record
The program displays the default entry from the optional field record. You can accept or change the default value. However, if the optional field is validated, you must select a value that is defined for the optional field in Common Services
Adding Recurring Payables
If you have vendors to whom you make standard payments at regular intervals, such as for rent, equipment leases, or standing orders, you can define records for the payments and vendors using the Recurring Payables setup form.
Note that when you delete a vendor record, all recurring payables for the vendor are also deleted.
When you are ready to produce invoices for the payables, you use the Create Recurring Payable Batch form to create the invoice batch automatically.
Specifying invoice frequency
You specify when to invoice recurring payables and how to assign the invoice date by assigning to the recurring payable a schedule that you have set up in Common Services.
Reminders to produce recurring payable invoices
If the schedule is set up with a reminder, the payable appears automatically on your Reminder List when it is due for processing.
You can set up payables to recur indefinitely, or you can limit the number of times a payable can be invoiced.
Specifying limits for the payable
You use the Expiration Type field to specify whether to restrict invoices beyond a specific date, a maximum amount, or a specified number of invoices. Depending on your choice for the expiration type, you also:
• Enter an expiration date for the payable. No invoices would be created for the payable after its expiration date.

Setting Up Vendor Records
2–66 Sage Accpac Accounts Payable
Apgs‐2.doc, printed on 11/16/2007, at 11:58:25 AM. Last saved on 10/26/2007 8:44:00 PM.
Sage Software Confidential
• Specify a maximum amount for a payable. Once the maximum amount has been invoiced, Accounts Payable creates no further invoices for the payable.
• Specify the number of invoices to process for the recurring payable. Once the specified number of invoices has been created, Accounts Payable creates no additional invoices.
Assigning payment terms to recurring payable
You enter a terms code for each recurring payable, according to the terms your vendor offers. The code determines the due date for recurring payable invoices, as well as the discount percentage and period. You can change any of this information on the invoice.
Adding general ledger information
You can distribute each detail of a recurring payable to a different distribution code or general ledger payable account.
Using optional invoice fields
If you defined optional fields for invoices, the fields appear in the recurring payable record as well as on the Invoice Entry form. If the optional invoice fields use optional tables, you must enter valid codes in recurring payable records.
Entering remit-to information
You can assign a remit‐to location for invoices.
You can also enter an order number and a purchase order number with each recurring payable.
Accounts Payable also lets you enter a comment (using up to 250 characters) with each recurring payable detail.
Last generated date
The record for each recurring payable shows the last date on which an invoice was created for it. Accounts Payable updates this field each time you create an invoice for the payable using the Create Recurring Payable Batch form.
Next invoice date The program uses the Last Generated date together with the schedule to determine when the next invoice should be generated.
Accounts Payable updates this field when you generate an invoice using the Create Recurring Payable Batch form, or when you change the schedule for the recurring payable. You cannot change the date.
Setting Up Vendor Records
Getting Started 2–67
Apgs‐2.doc, printed on 11/16/2007, at 11:58:25 AM. Last saved on 10/26/2007 8:44:00 PM.
Sage Software Confidential
Before
Setting Up
Entering taxes Accounts Payable lets you enter detail and total taxes manually in recurring payable records, if you want, or you can let the program calculate taxes for you when you create a recurring payable batch.
If you want to have the program calculate taxes for you, you can choose to have Accounts Payable either:
• Calculate all tax amounts.
• Distribute manually entered total taxes to individual detail lines.
Accounts Payable displays the estimated taxes on the Tax/Totals tab of the Recurring Payables form. (If tax rates change, however, the calculated tax amounts will be different when you create the invoices.)
For information about creating and processing invoices for recurring payables, see the “Invoicing Recurring Payables” section in Chapter 2 of the User Guide.
Using optional fields
If you use optional fields, an Optional Fields tab appears.
When you first add a recurring payable record, the tab displays any optional fields that you set up for automatic insertion on invoices, and assigns default entries, as follows:
• If you assigned to the vendor the same optional fields you defined for invoices, the program displays the optional field entries from the vendor record.
• If you assigned to the remit‐to location the same optional fields you defined for invoices, the program displays the entries from the remit‐to location record.
• If you assigned the same optional fields to the vendor record and the remit‐to location record, the program displays the values from the remit‐to location record.
• If an optional field that is defined for invoices is not assigned either to the vendor or the remit‐to location, the program displays the default value specified for the invoice optional field.
Importing and Exporting Accounts Payable Records
2–68 Sage Accpac Accounts Payable
Apgs‐2.doc, printed on 11/16/2007, at 11:58:25 AM. Last saved on 10/26/2007 8:44:00 PM.
Sage Software Confidential
You can delete or change the optional invoice fields used with a recurring payable, or add any that you have set up for use with invoices.
Optional detail fields
Any invoice details optional fields that you set up for automatic insertion are assigned to recurring payable detail.
Optional fields indicator
An Optional Fields indicator (a field or a checkbox, depending on whether you are using the detail‐entry grid or the Detail Accounts/
Taxes form) shows whether a selected detail uses optional fields. Note that the program sets this indicator — you cannot select or clear it. If you delete all the optional fields associated with the detail, the program resets the Optional Fields indicator.
Zoom To check or to change the optional fields that are used for the detail, select the detail, then click the Zoom button beside the field, or press Shift+F9. The Optional Fields form appears, where you can add or delete optional fields for the detail. You can add any optional fields that are defined for invoice details.
You can change the value for an optional field, as follows:
• If the optional field is validated, you must specify a value that you have defined for the optional field in Common Services. You can leave the value blank only if the optional field allows blanks.
• If the optional field is not validated, you can either select a value that you defined for the optional field in Common Services, or you can enter any value that is consistent with the type of optional field and does not exceed the length specified for the field.
Importing and Exporting Accounts Payable Records If you are using another computerized accounts payable system, you may be able to transfer vendor records directly into Sage Accpac Accounts Payable by importing them.
Importing and Exporting Accounts Payable Records
Getting Started 2–69
Apgs‐2.doc, printed on 11/16/2007, at 11:58:25 AM. Last saved on 10/26/2007 8:44:00 PM.
Sage Software Confidential
Before
Setting Up
You can also export records from another Sage Accpac Accounts Payable database, edit them in a spreadsheet or other program to change codes, amounts, and other information, then import them into the new Accounts Payable system you are setting up.
Accounts Payable records you can import and export include:
• Account Sets.
• 1099/CPRS Codes (although these are set up by Accounts Payable).
• Distribution Codes.
• Distribution Sets.
• Remit‐to Locations.
• Recurring Payables.
• Terms Codes.
• Vendor Groups.
• Vendors.
• Payment Selection Codes.
You could, for example, export vendor records to a spreadsheet to analyze their statistics. You could also export all vendor records with the same account set to a spreadsheet, change their tax group, then import them back into Accounts Payable.
You can also import and export transaction batches, as described in the section, “Importing and Exporting Batches,“ in Chapter 2 of the User Guide.
Accounts Payable can create export files in several formats, including Microsoft Excel 2000 and Excel 5.0, Microsoft Access, Comma Separated Values, dBase 5.0, and ODBC formats. You select the format to use when you export the data.
Entering Current and Historical Transactions
2–70 Sage Accpac Accounts Payable
Apgs‐2.doc, printed on 11/16/2007, at 11:58:25 AM. Last saved on 10/26/2007 8:44:00 PM.
Sage Software Confidential
You can also create files to be imported by Accounts Payable in any of the above programs or formats.
For information about importing and exporting Accounts Payable records, see Appendix B in the User Guide and the chapter on importing and exporting in the System Manager User Guide.
Entering Current and Historical Transactions Accounts Payable can display statistical information for vendor accounts and vendor groups for the current year and for all the previous years for which you retain the data. You add the historical information you need during setup. Accounts Payable then automatically updates the statistical information every time you post transactions.
Adding prior and current-year data
To set up your Accounts Payable system properly, you must follow these steps:
1. Enter and post the outstanding invoice balances in your vendor accounts at the beginning of the fiscal or calendar year — depending on your method for collecting vendor statistics.
For example, if you have two partially paid invoices from vendor 1000, enter the unpaid portion of each invoice.
The dates for these transactions should be the dates of the original invoices.
2. If you want to have prior‐year statistics in the vendor records, edit the statistics after posting the opening invoice amounts.
3. Enter and post all invoices you received since the beginning of the year up to your last Accounts Payable posting to the General Ledger.
4. Enter and post all payments you made since the beginning of the year up to your last Accounts Payable posting to the General Ledger.
Entering Current and Historical Transactions
Getting Started 2–71
Apgs‐2.doc, printed on 11/16/2007, at 11:58:25 AM. Last saved on 10/26/2007 8:44:00 PM.
Sage Software Confidential
Before
Setting Up
5. Delete all general ledger batches created from posting historical transactions. If you post these to your general ledger, you will duplicate posted transactions.
Once you have completed these steps you can proceed to enter new invoice and payment transactions.
Entering Current-Year Data
When you first set up your Accounts Payable system, you must establish the opening balances in your vendor accounts and enter any transactions that are outstanding at the time.
The information in this section outlines the steps you take to enter figures for the current year‐to‐date. For step‐by‐step instructions, see “Step 9: Add Opening Balances and Current‐Year Transactions,” in Chapter 3, “Setting Up Your Accounts Payable System.”
Entering Outstanding Invoice Balances in Vendor Accounts
You create the opening balances in your vendor accounts by entering them as invoices using the Invoice Entry form, then posting them.
The opening balance invoice should use the first date of the current fiscal year as the transaction (document) date. You can also import the figures from a spreadsheet or other non‐Sage Accpac program.
Entering Current-Year Transactions
When you set up an Accounts Payable system partway through a fiscal year, you must enter the transaction data for the current year‐to‐date. To add the data, enter it directly into Accounts Payable batches, or import it, then post it using one of the following methods.
• Post all the current‐year transactions, one at a time, period by period.
This provides full detail for current‐year transactions.
Entering Current and Historical Transactions
2–72 Sage Accpac Accounts Payable
Apgs‐2.doc, printed on 11/16/2007, at 11:58:25 AM. Last saved on 10/26/2007 8:44:00 PM.
Sage Software Confidential
• Post all the transactions for the current period, and the net changes in each vendor’s invoice and payment totals for each of the earlier periods in the current year.
This provides full detail for current‐period transactions, and creates accurate balances for previous periods in the current year.
• Post the net changes in each vendor’s invoice and payment totals for each of the periods in the current year.
This produces accurate balances for each account in each period of the current year, but does not provide transaction detail for the audit trail reports.
• Post the net change between the opening and current balances for each vendor account.
This is the quickest method of entering the data, but it does not provide transaction detail for audit trail reports.
Previous-Year Statistics
If you need to add purchases history for previous years to a new Accounts Payable system, you can add it quickly or import it, using the Vendors and Vendor Groups forms.
You enter statistics by the periods and years you specified for the options to keep the data.
Entering vendor statistics for previous years
For each vendor and vendor group, you can enter the amount and number of invoices, payments, discounts taken, discounts lost, credit notes, debit notes, adjustments, and paid invoices.
You can also enter the:
• Amount and date of the high and low balance this year and last year, and the largest invoice for each year.
• Amount and date of the last invoice, payment, credit note, debit note, adjustment, and discount.

Customizing Checks, Payment Advices, Letters, and Label Formats
Getting Started 2–73
Apgs‐2.doc, printed on 11/16/2007, at 11:58:25 AM. Last saved on 10/26/2007 8:44:00 PM.
Sage Software Confidential
Before
Setting Up
• Total number of invoices paid, number of checks, and total days to pay.
You can review the figures in the Vendors and Vendor Groups forms, and you can print them using the Statistics option in the Setup reports for each type of data.
If you do not need historical data right away, you do not have to add it when you set up an Accounts Payable system. The application updates the figures automatically each time you post transactions.
Customizing Checks, Payment Advices, Letters, and Label Formats
The Sage Accpac Accounts Payable package includes sample checks and payment advices, letters, labels, and forms that you may be able to use “as is,” or adapt for the forms you currently use.
You select the checks you want to use when you set up bank accounts in Bank Services.
The readme file, FORMS.WRI (in the ACCPAC\DOCS\APxxAENG folder, on the computer on which you installed Sage Accpac), provides a description of the fields and parameters you can use when customizing your reports.
You should set up and test the forms you want to use before you begin entering transactions.
Setting Up Multicurrency Accounting in Accounts Payable
Accounts Payable lets you process invoices and payments in any currencies your vendors use. This section summarizes the steps you take to set up a multicurrency Accounts Payable system.
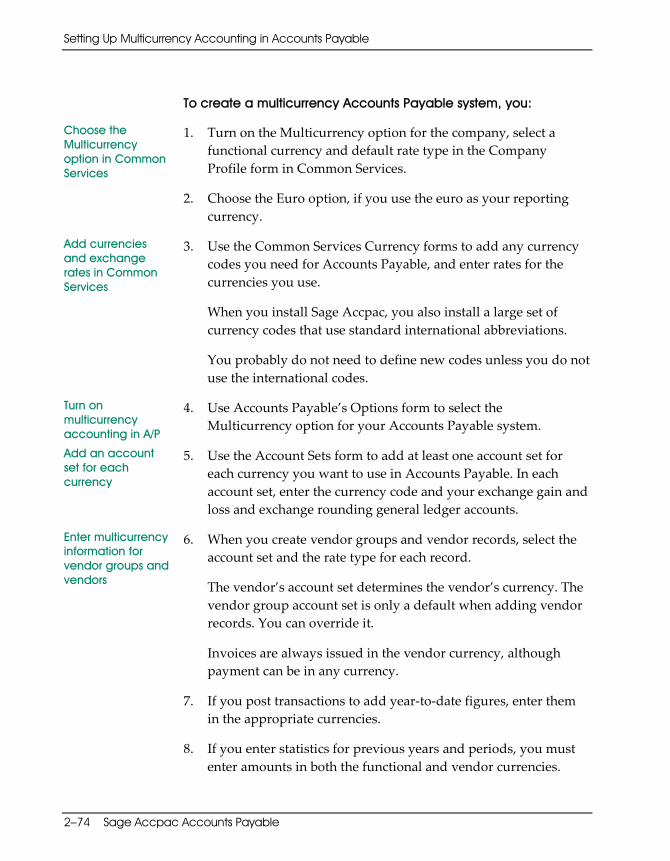
Setting Up Multicurrency Accounting in Accounts Payable
2–74 Sage Accpac Accounts Payable
Apgs‐2.doc, printed on 11/16/2007, at 11:58:25 AM. Last saved on 10/26/2007 8:44:00 PM.
Sage Software Confidential
To create a multicurrency Accounts Payable system, you:
Choose the Multicurrency option in Common Services
1. Turn on the Multicurrency option for the company, select a functional currency and default rate type in the Company Profile form in Common Services.
2. Choose the Euro option, if you use the euro as your reporting currency.
Add currencies and exchange rates in Common Services
3. Use the Common Services Currency forms to add any currency codes you need for Accounts Payable, and enter rates for the currencies you use.
When you install Sage Accpac, you also install a large set of currency codes that use standard international abbreviations.
You probably do not need to define new codes unless you do not use the international codes.
Turn on multicurrency accounting in A/P
4. Use Accounts Payable’s Options form to select the Multicurrency option for your Accounts Payable system.
Add an account set for each currency
5. Use the Account Sets form to add at least one account set for each currency you want to use in Accounts Payable. In each account set, enter the currency code and your exchange gain and loss and exchange rounding general ledger accounts.
Enter multicurrency information for vendor groups and vendors
6. When you create vendor groups and vendor records, select the account set and the rate type for each record.
The vendor’s account set determines the vendor’s currency. The vendor group account set is only a default when adding vendor records. You can override it.
Invoices are always issued in the vendor currency, although payment can be in any currency.
7. If you post transactions to add year‐to‐date figures, enter them in the appropriate currencies.
8. If you enter statistics for previous years and periods, you must enter amounts in both the functional and vendor currencies.

Where To Now?
Getting Started 2–75
Apgs‐2.doc, printed on 11/16/2007, at 11:58:25 AM. Last saved on 10/26/2007 8:44:00 PM.
Sage Software Confidential
Before
Setting Up
Accounts Payable cannot calculate equivalent amounts from statistics you enter yourself.
When you post transactions during and after setup, Accounts Payable calculates statistical totals in both the functional currency and the vendorʹs currency, using the exchange rate posted with each transaction.
For information on processing multicurrency transactions, see “Processing Multicurrency Transactions” in Chapter 2 of the User Guide.
For information on using the euro in Sage Accpac, see the chapter on entering currency information in the System Manager User Guide.
Where To Now? You are now ready to set up your own Sage Accpac Accounts Payable system, following the steps in Chapter 3, “Setting Up Your Accounts Payable System.”
You may also want to practice processing Accounts Payable transactions using the lessons in the Sage Accpac Workbook that comes with the System Manager.
If you are unfamiliar with the operation of the System Manager, you should read the System Manager User Guide.

Getting Started 3–i
Apgs‐3.doc, printed on 11/16/2007, at 11:53:29 AM. Last saved on 11/16/2007 11:48:00 AM.
Sage Software Confidential
Setting Up
Accounts Payable
Chapter 3 Setting Up Your
Accounts Payable System
Before You Begin...............................................................3–1 Using Accounts Payable with an Internet Browser.................................3–2 Overview of Accounts Payable Setup.............................................3–2 While You Work ...............................................................3–4
Guideposts to Accounts Payable Information..................................3–4 Using Finders ..........................................................3–5 Using Help.............................................................3–5 Finding Additional Information ..........................................3–5 Finding Multicurrency Information.......................................3–5 Protecting Your Work ...................................................3–6
Setting Up an Accounts Payable System ..........................................3–6 Step 1: Gather Data From Your Present Payables System.......................3–6 Step 2: Add Payable Accounts to Your Chart of Accounts ......................3–8 Step 3: Add Tax, Bank, Currency, and Security Information ....................3–9 Step 4: Select Accounts Payable Options......................................3–9
Select G/L Integration Options ..........................................3–22 Step 5: Add Accounts Payable Records......................................3–28
Add Account Sets......................................................3–30 Add 1099/CPRS Codes .................................................3–32 Add Distribution Codes ................................................3–34 Add Distribution Sets ..................................................3–35 Add Payment Terms ...................................................3–38 Add Payment Codes ...................................................3–42 Add E‐mail Messages (Optional) ........................................3–43 Add Optional Fields (Optional) .........................................3–45 Modify Accounts Payable Records.......................................3–48

3–ii Sage Accpac Accounts Payable
Apgs‐3.doc, printed on 11/16/2007, at 11:53:29 AM. Last saved on 11/16/2007 11:48:00 AM.
Sage Software Confidential
Step 6: Add Vendor Records............................................... 3–49 Add Vendor Groups................................................... 3–49 Modify Vendor Groups ................................................ 3–56 Add Vendors ......................................................... 3–56 Modify Vendor Records................................................ 3–65
Step 7: Add Remit‐To Locations (Optional).................................. 3–65 Modify Remit‐To Locations ............................................ 3–68
Step 8: Add Recurring Payable Records..................................... 3–69 Step 9: Add Opening Balances and Current‐Year Transactions ................ 3–83 Step 10: Add Vendor and Vendor Group Statistics (Optional) ................. 3–89 Step 11: Create Payment Selection Codes to Process Payments Automatically .. 3–93 Step 12: Design Checks, Payment Advices, Labels, and Letters ................ 3–97
Where To Now? .............................................................. 3–99
Getting Started 3–1
Apgs‐3.doc, printed on 11/16/2007, at 11:53:29 AM. Last saved on 11/16/2007 11:48:00 AM.
Sage Software Confidential
Setting Up
Accounts Payable
Chapter 3 Setting Up Your
Accounts Payable System
This chapter contains instructions for creating an Accounts Payable system suited to your business. It also describes how to transfer your existing payables records to Sage Accpac Accounts Payable after you have set up the system.
The purpose of this chapter is to get you “up and running” quickly. The instructions assume you have read Chapter 2, “What You Need to Know Before Setting Up Accounts Payable,” and know which options you want to use in your Accounts Payable system.
Using the Setup wizard
If you are using the Setup wizard to create a new Sage Accpac database, refer to the instructions in the System Manager Quick Start Guide, then return to this chapter to complete Accounts Payable setup. The Setup wizard activates Accounts Payable and allows you to choose Accounts Payable options.
Converting from ACCPAC Plus
If you plan to convert from the DOS version of Accounts Payable, first read the instructions in the Converting from Sage Accpac Plus Accounting manual before following the steps in this chapter.
Before You Begin Install and set up the Sage Accpac System Manager first
Before taking the steps in this chapter, you must install the Sage Accpac System Manager, create system and company databases, choose some company‐wide options in Common Services, and install and activate Bank and Tax Services.

Using Accounts Payable with an Internet Browser
3–2 Sage Accpac Accounts Payable
Apgs‐3.doc, printed on 11/16/2007, at 11:53:29 AM. Last saved on 11/16/2007 11:48:00 AM.
Sage Software Confidential
If you use Sage Accpac General Ledger, you must also add the general ledger accounts you need for the account sets you want to use in Accounts Payable.
Install and activate Accounts Payable according to the instructions in the System Manager User Guide.
Using Accounts Payable with an Internet Browser All Accounts Payable forms are designed to enable users at remote locations to enter and view data using an Internet browser.
If you are using Accounts Payable through a browser, you navigate the program in much the same way as you would from the Sage Accpac desktop.
To find out how to set up your system for use on the Web and how to sign on to Sage Accpac through your browser, see the System Manager Administrator Guide.
Overview of Accounts Payable Setup Once you have activated the Accounts Payable program for your company database, you are ready to set up the Accounts Payable ledger.
The following flowchart lists the steps for setting up a Sage Accpac Accounts Payable system. The step numbers identify the sets of instructions in this chapter that explain the tasks more fully.
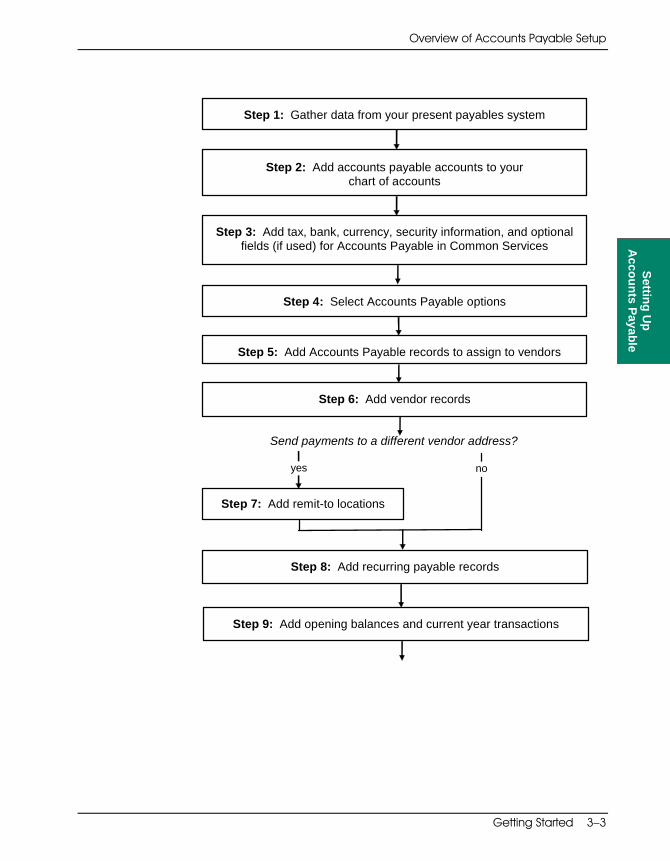
Overview of Accounts Payable Setup
Getting Started 3–3
Apgs‐3.doc, printed on 11/16/2007, at 11:53:29 AM. Last saved on 11/16/2007 11:48:00 AM.
Sage Software Confidential
Setting Up
Accounts Payable
Step 2: Add accounts payable accounts to your chart of accounts
Step 3: Add tax, bank, currency, security information, and optional fields (if used) for Accounts Payable in Common Services
Step 1: Gather data from your present payables system
Step 4: Select Accounts Payable options
Step 5: Add Accounts Payable records to assign to vendors
Step 6: Add vendor records
no
Send payments to a different vendor address?
Step 7: Add remit-to locations
yes
Step 9: Add opening balances and current year transactions
Step 8: Add recurring payable records
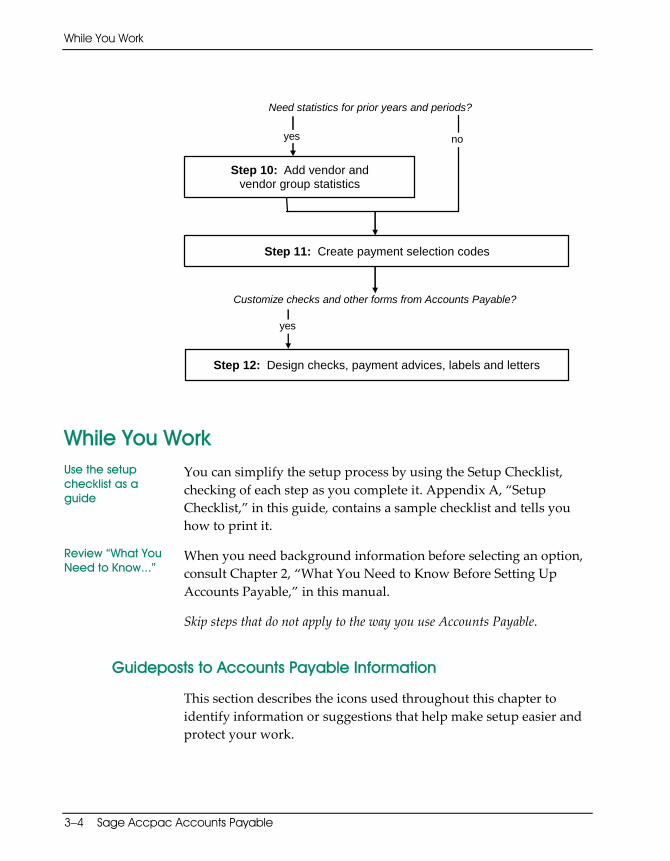
While You Work
3–4 Sage Accpac Accounts Payable
Apgs‐3.doc, printed on 11/16/2007, at 11:53:29 AM. Last saved on 11/16/2007 11:48:00 AM.
Sage Software Confidential
Customize checks and other forms from Accounts Payable?
Step 10: Add vendor and vendor group statistics
Step 11: Create payment selection codes
Step 12: Design checks, payment advices, labels and letters
noyes
yes
Need statistics for prior years and periods?
While You Work Use the setup checklist as a guide
You can simplify the setup process by using the Setup Checklist, checking of each step as you complete it. Appendix A, “Setup Checklist,” in this guide, contains a sample checklist and tells you how to print it.
Review “What You Need to Know...”
When you need background information before selecting an option, consult Chapter 2, “What You Need to Know Before Setting Up Accounts Payable,” in this manual.
Skip steps that do not apply to the way you use Accounts Payable.
Guideposts to Accounts Payable Information
This section describes the icons used throughout this chapter to identify information or suggestions that help make setup easier and protect your work.
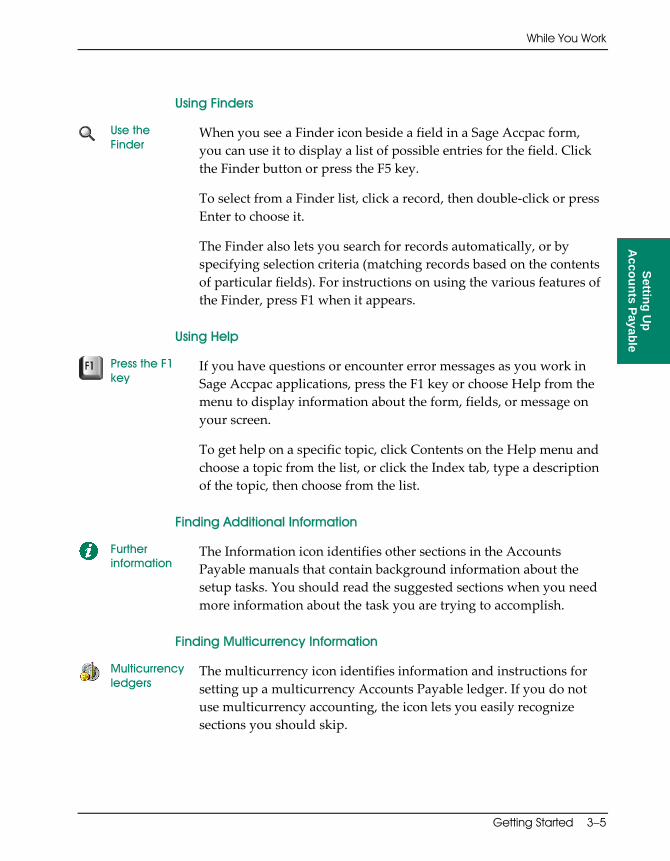
While You Work
Getting Started 3–5
Apgs‐3.doc, printed on 11/16/2007, at 11:53:29 AM. Last saved on 11/16/2007 11:48:00 AM.
Sage Software Confidential
Setting Up
Accounts Payable
Using Finders
Use the Finder
When you see a Finder icon beside a field in a Sage Accpac form, you can use it to display a list of possible entries for the field. Click the Finder button or press the F5 key.
To select from a Finder list, click a record, then double‐click or press Enter to choose it.
The Finder also lets you search for records automatically, or by specifying selection criteria (matching records based on the contents of particular fields). For instructions on using the various features of the Finder, press F1 when it appears.
Using Help
Press the F1 key
If you have questions or encounter error messages as you work in Sage Accpac applications, press the F1 key or choose Help from the menu to display information about the form, fields, or message on your screen.
To get help on a specific topic, click Contents on the Help menu and choose a topic from the list, or click the Index tab, type a description of the topic, then choose from the list.
Finding Additional Information
Further information
The Information icon identifies other sections in the Accounts Payable manuals that contain background information about the setup tasks. You should read the suggested sections when you need more information about the task you are trying to accomplish.
Finding Multicurrency Information
Multicurrency ledgers
The multicurrency icon identifies information and instructions for setting up a multicurrency Accounts Payable ledger. If you do not use multicurrency accounting, the icon lets you easily recognize sections you should skip.
Setting Up an Accounts Payable System
3–6 Sage Accpac Accounts Payable
Apgs‐3.doc, printed on 11/16/2007, at 11:53:29 AM. Last saved on 11/16/2007 11:48:00 AM.
Sage Software Confidential
Protecting Your Work
Check data and make backups
Throughout this chapter, the microscope in the margin reminds you to check data integrity and make backups of your Sage Accpac data.
Do not ignore this suggestion!
You should check integrity and back up your data:
• When you have added records that would be time‐consuming to enter a second time.
• Before you post batches or do other major tasks that change your Accounts Payable data.
For most offices, this means a routine, daily integrity check and backup of their accounting records.
For information about checking data integrity and making backups, see the System Manager User Guide.
Setting Up an Accounts Payable System This section guides you through the process of setting up Sage Accpac Accounts Payable. The instructions in each step list the required and optional information that you enter for your particular system.
For information on using a mouse or keyboard, see the appendix in the System Manager User Guide.
Step 1: Gather Data from Your Present Payables System
Once you have activated Accounts Payable for your company database, you can begin to add the data from your company’s present payables system to Sage Accpac.
Refer to existing records
First, gather all your current accounts payable records. These can be manual records or printed listings and reports from other accounting software, such as:
Step 1: Gather Data from Your Present Payable

Step 1: Gather Data from Your Present Payables System
Getting Started 3–7
Apgs‐3.doc, printed on 11/16/2007, at 11:53:29 AM. Last saved on 11/16/2007 11:48:00 AM.
Sage Software Confidential
Setting Up
Accounts Payable
• A list of the general ledger accounts used in your accounts payable system, including the payables control, purchases discount, prepayment, and retainage control accounts.
Multicurrency ledgers
If you use multicurrency accounting, also list the numbers of the accounts you use for unrealized and realized exchange gains and losses, and for rounding differences that arise during currency conversion.
See page 2-33
These accounts are described in “Setting Up Account Sets,” in Chapter 2 of this manual.
• A list of your vendors and the data you keep for each vendor account, including year‐to‐date and previous‐year statistics.
• Aged accounts payable listing as of the date you are transferring the information, including full account details for invoices, credit notes, and debit notes, if possible.
• Lists of the other information you need to set up vendor records:
− Account sets.
− Distribution codes.
− Distribution sets.
− Payment terms.
− Payment codes.
− Vendor groups.
− Remit‐to locations.
− 1099/CPRS Codes.
− Additional information you may want to track in optional fields, if you use Transaction Analysis and Optional Field Creator.
Step 2: Add Payable Accounts to Your Chart of Accounts
3–8 Sage Accpac Accounts Payable
Apgs‐3.doc, printed on 11/16/2007, at 11:53:29 AM. Last saved on 11/16/2007 11:48:00 AM.
Sage Software Confidential
The above information is stored in separate records, each of which is identified by a unique code. Decide on your coding schemes before you start to set up your ledger.
• Information on recurring payables (if any).
• Samples of the preprinted or laser‐printed forms for the checks, payment advices, letters, and labels you send to your vendors.
Multicurrency ledgers
• If you use a multicurrency accounts payable ledger, a list of the source currencies in which you deal, and a list of current exchange rates.
Use the Setup checklist
• The checklist you printed and filled out while reading Chapter 2, “What You Need to Know Before Setting Up Accounts Payable.”
Consider importing the data
• You may be able to enter much of the accounts payable data by reading it directly from files created by another program. In Sage Accpac, this is called importing.
You can import data into Sage Accpac Accounts Payable for vendors, vendor groups, account sets, distribution codes, distribution sets, and terms codes. To see whether you can import data, read Appendix B, “Importing and Exporting,” in the User Guide.
Step 2: Add Payable Accounts to Your Chart of Accounts
Add the accounts to your general ledger that you need for your accounts payable data, including:
• Payables control
• Purchase discounts
• Prepayment
• Retainage control (if you use retainage accounting)
Step 2: Add P
Step 3: Add Tax, Bank, Currency, and Security Information
Getting Started 3–9
Apgs‐3.doc, printed on 11/16/2007, at 11:53:29 AM. Last saved on 11/16/2007 11:48:00 AM.
Sage Software Confidential
Setting Up
Accounts Payable
Multicurrency ledgers
If you are creating a multicurrency accounts payable ledger, also add accounts for:
• Unrealized exchange gain (if you use the Realized and Unrealized Gain/Loss accounting method).
• Unrealized exchange loss (if you use the Realized and Unrealized Gain/Loss accounting method).
• Exchange gain.
• Exchange loss.
• Exchange rounding.
Step 3: Add Tax, Bank, Currency, and Security Information
Tax and Bank Services
Use the Bank Services and Tax Services folders in Common Services to enter the bank and tax information used in Accounts Payable. For information about these services, see the Tax and Bank Services User Guide.
Multicurrency ledgers
If you use currency codes or currencies not currently included in the Common Services Currency forms, add the currencies you require, and enter rates for each currency, following the instructions in the System Manager User Guide.
Security Use Administrative Services to assign passwords, create security groups and assign user authorizations for Accounts Payable. See Chapter 7 in the System Manager Administrator Guide for more information.
Step 4: Select Accounts Payable Options
After you install the Accounts Payable program and activate Accounts Payable for your company database, your first task is to select Accounts Payable processing options and enter general information about your payables ledger.
Step 3: Add Tax, Bank, Currency, and Security Information
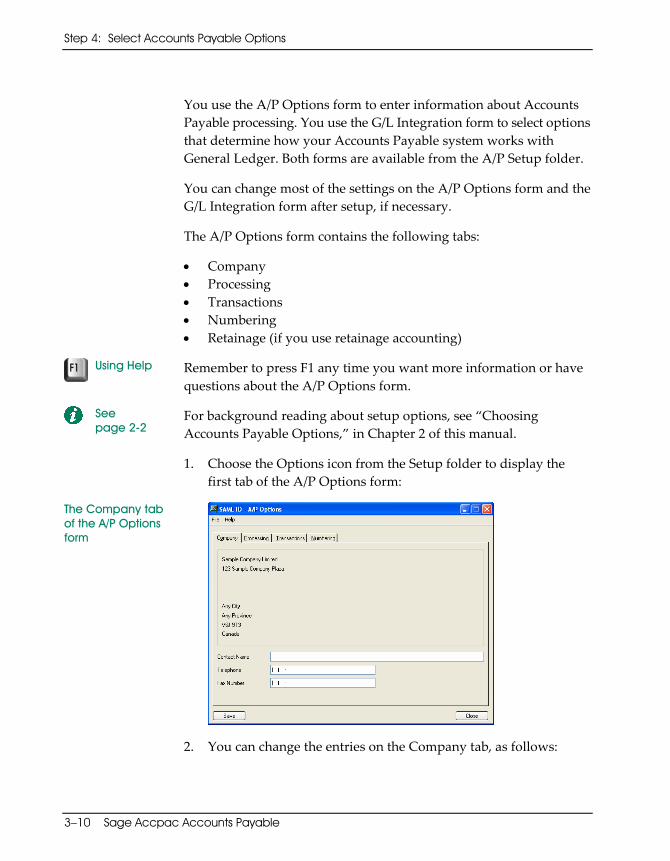
Step 4: Select Accounts Payable Options
3–10 Sage Accpac Accounts Payable
Apgs‐3.doc, printed on 11/16/2007, at 11:53:29 AM. Last saved on 11/16/2007 11:48:00 AM.
Sage Software Confidential
You use the A/P Options form to enter information about Accounts Payable processing. You use the G/L Integration form to select options that determine how your Accounts Payable system works with General Ledger. Both forms are available from the A/P Setup folder.
You can change most of the settings on the A/P Options form and the G/L Integration form after setup, if necessary.
The A/P Options form contains the following tabs:
• Company • Processing • Transactions • Numbering • Retainage (if you use retainage accounting)
Using Help Remember to press F1 any time you want more information or have
questions about the A/P Options form.
See page 2-2
For background reading about setup options, see “Choosing Accounts Payable Options,” in Chapter 2 of this manual.
1. Choose the Options icon from the Setup folder to display the first tab of the A/P Options form:
The Company tab of the A/P Options form
2. You can change the entries on the Company tab, as follows:
Step 4: Select Accounts Payable Options
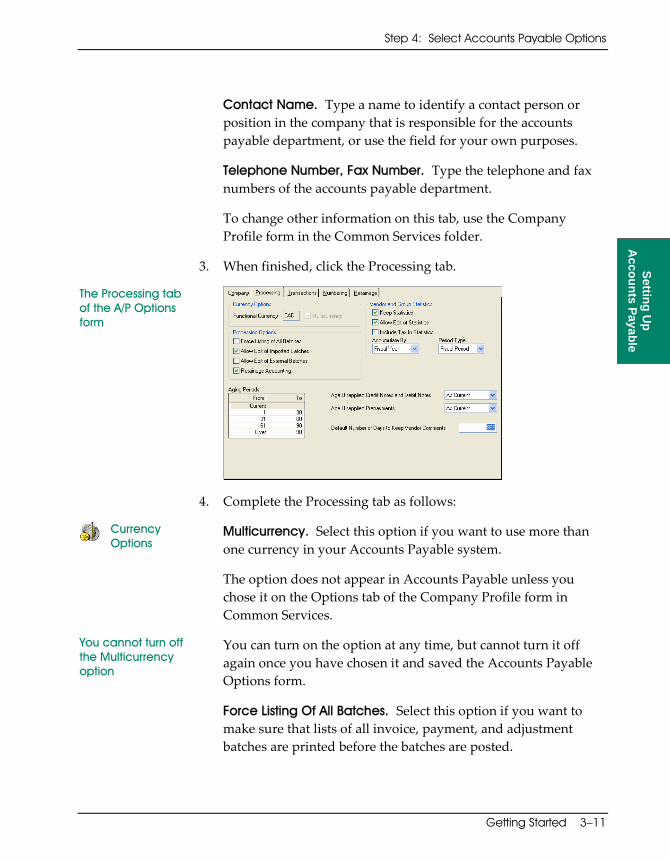
Step 4: Select Accounts Payable Options
Getting Started 3–11
Apgs‐3.doc, printed on 11/16/2007, at 11:53:29 AM. Last saved on 11/16/2007 11:48:00 AM.
Sage Software Confidential
Setting Up
Accounts Payable
Contact Name. Type a name to identify a contact person or position in the company that is responsible for the accounts payable department, or use the field for your own purposes.
Telephone Number, Fax Number. Type the telephone and fax numbers of the accounts payable department.
To change other information on this tab, use the Company Profile form in the Common Services folder.
3. When finished, click the Processing tab.
The Processing tab of the A/P Options form
4. Complete the Processing tab as follows:
Currency Options
Multicurrency. Select this option if you want to use more than one currency in your Accounts Payable system.
The option does not appear in Accounts Payable unless you chose it on the Options tab of the Company Profile form in Common Services.
You cannot turn off the Multicurrency option
You can turn on the option at any time, but cannot turn it off again once you have chosen it and saved the Accounts Payable Options form.
Force Listing Of All Batches. Select this option if you want to make sure that lists of all invoice, payment, and adjustment batches are printed before the batches are posted.
Step 4: Select Accounts Payable Options
3–12 Sage Accpac Accounts Payable
Apgs‐3.doc, printed on 11/16/2007, at 11:53:29 AM. Last saved on 11/16/2007 11:48:00 AM.
Sage Software Confidential
When you use the option, you cannot post batches until you print listings for them, and you must reprint the listings for any batches you edit.
You can change your choice for this option at any time.
Allow Edit Of Imported Batches. This option lets you revise transactions that you imported from non‐Sage Accpac programs.
Allow Edit Of External Batches. If you want to be able to edit batches that you create in Sage Accpac Purchase Orders (if you use it) and send to Accounts Payable, select this option.
Do not use the option if you want to make sure that exported batches are posted without changes.
Change entries in the originating program
Do not use these options if you want to make sure that imported and external batches are posted without changes. If you do not use these options, you must correct batches containing errors in their source applications and then re‐import them into Accounts Payable.
Use retainage accounting
Retainage Accounting. Select this option if you withhold retainage, or holdbacks, from your vendor invoices.
When you select this option, Accounts Payable displays a Retainage tab on the Options form, allowing you to select retainage defaults.
See also page 2-5
For more information about retainage accounting, see the section “Using Retainage Accounting,” in Chapter 2 of this guide.
Keep Statistics. Choose whether to keep vendor and vendor group statistics. Keep Statistics is selected by default.
Vendor and Group Statistics
Accounts Payable automatically accumulates statistics from the transactions you post to vendor accounts, and displays them in the Vendors and Vendor Groups forms.
See page 2-6
For information about keeping statistics, see “Keeping Vendor and Group Statistics,” in Chapter 2 of this manual.

Step 4: Select Accounts Payable Options
Getting Started 3–13
Apgs‐3.doc, printed on 11/16/2007, at 11:53:29 AM. Last saved on 11/16/2007 11:48:00 AM.
Sage Software Confidential
Setting Up
Accounts Payable
Using the other options in this section, you can specify whether to allow users to change statistics, whether to include taxes in the totals kept, and the periods for keeping statistics.
Allow Edit Of Statistics. Select this option if you want to be able to enter or revise year‐to‐date or previous‐year totals for vendors and vendor groups.
Use this option when setting up partway through an accounting year
You may want to turn on the option while you are setting up your Accounts Payable system, particularly if you are creating the system partway through an accounting year. You can then enter more complete payables records by adding the statistics from your previous system.
Once your system is operating, you should turn off the option because the program automatically updates the statistics when you post invoice, adjustment, and payment batches.
Include Tax In Statistics. Use this option if you want to include tax amounts in the invoice totals kept for each vendor and vendor group. If you do not select this option, Accounts Payable adds only before‐tax totals to the statistics.
Accumulate By and Period Type. Use these options to indicate whether to report statistics by fiscal year or calendar year, and to specify the period type to use.
If you choose to accumulate by calendar year, the starting date for statistics is January 1. If you choose to accumulate by fiscal year, the starting date is the first day of your fiscal year, as specified in the fiscal calendar in Common Services.
Use the Vendors and Vendor Groups forms to enter the statistics when adding vendor records in Step 6.
Specifying default aging periods
Aging Periods. Use these fields to set the default time periods into which Accounts Payable groups outstanding transactions or balances for the Aged Payables, Aged Retainage, and Aged Cash Requirements reports.
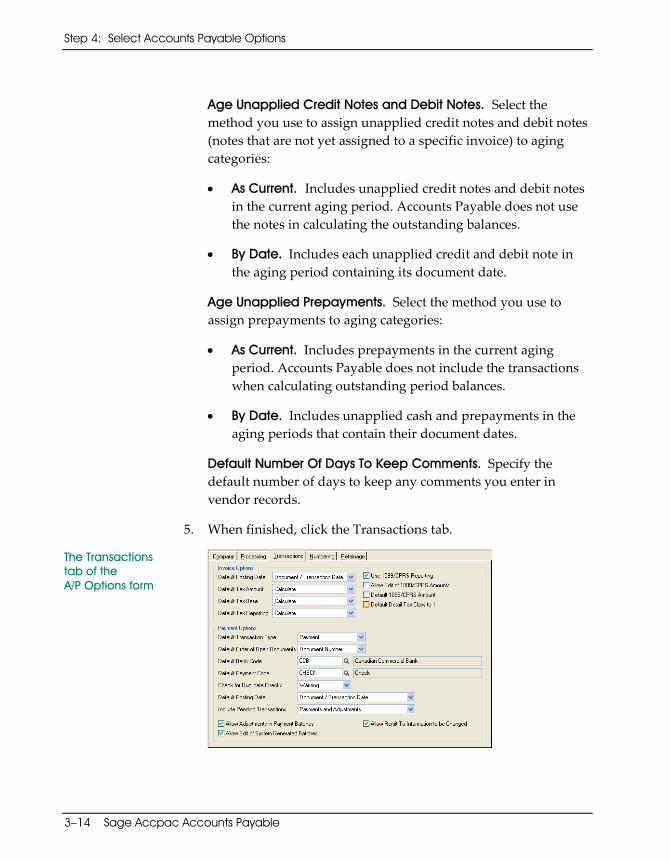
Step 4: Select Accounts Payable Options
3–14 Sage Accpac Accounts Payable
Apgs‐3.doc, printed on 11/16/2007, at 11:53:29 AM. Last saved on 11/16/2007 11:48:00 AM.
Sage Software Confidential
Age Unapplied Credit Notes and Debit Notes. Select the method you use to assign unapplied credit notes and debit notes (notes that are not yet assigned to a specific invoice) to aging categories:
• As Current. Includes unapplied credit notes and debit notes in the current aging period. Accounts Payable does not use the notes in calculating the outstanding balances.
• By Date. Includes each unapplied credit and debit note in the aging period containing its document date.
Age Unapplied Prepayments. Select the method you use to assign prepayments to aging categories:
• As Current. Includes prepayments in the current aging period. Accounts Payable does not include the transactions when calculating outstanding period balances.
• By Date. Includes unapplied cash and prepayments in the aging periods that contain their document dates.
Default Number Of Days To Keep Comments. Specify the default number of days to keep any comments you enter in vendor records.
5. When finished, click the Transactions tab.
The Transactions tab of the A/P Options form

Step 4: Select Accounts Payable Options
Getting Started 3–15
Apgs‐3.doc, printed on 11/16/2007, at 11:53:29 AM. Last saved on 11/16/2007 11:48:00 AM.
Sage Software Confidential
Setting Up
Accounts Payable
6. Complete the Transactions tab as follows:
Select a default invoice posting date
Default Posting Date. Select Document Date, Batch Date, or Session Date as the default posting date that appears on the A/P Invoice Entry form.
The posting date is the date that a document is posted to General Ledger, and it may be different from the document date.
You can change the posting date for particular transactions when you enter or edit them.
Select a default tax entry method
Default Tax Amount / Default Tax Base / Default Tax Reporting. Select the tax entry methods for the tax amount, tax base, and tax reporting amount, to be used as defaults during invoice entry.
Accounts Payable uses the defaults for the tax amount and tax base when you enter a new recurring payable record. You do not specify a tax reporting amount for recurring payables. Accounts Payable calculates the tax reporting amount on all invoices created for recurring payables. However, you can change the tax reporting amounts on the invoices.
You can select from the following options:
• Enter. With this method, you must enter all tax amounts yourself. The program does not make any calculations automatically for you. However, you can always use the Calculate button to calculate amounts for invoices using information from Tax Services.
• Calculate. With this method, the program makes all the tax calculations for you, and you cannot enter tax amounts or tax bases manually. However, you can still change tax classes and, if the tax authority permits it, whether tax is included in the price.
• Distribute. With this method, you enter the total tax amount, tax base, and tax reporting amount, but you cannot change
Step 4: Select Accounts Payable Options
3–16 Sage Accpac Accounts Payable
Apgs‐3.doc, printed on 11/16/2007, at 11:53:29 AM. Last saved on 11/16/2007 11:48:00 AM.
Sage Software Confidential
these amounts for details. You use the Distribute button to allocate amounts to the invoice or recurring payable details.
Use 1099/CPRS Reporting. Select this option if you need to print 1099 forms or generate CPRS reports for vendors subject to 1099/CPRS reporting.
Allow Edit Of 1099/CPRS Amounts. Select this option if you have vendors that supply additional goods or services that are not subject to 1099/CPRS reporting.
Default 1099/CPRS Amount. Select this option to use document totals as default 1099/CRPS amounts on invoices, credit notes, and debit notes.
Default Detail Tax Class To 1. Select this option if you want to use 1 as the default tax class for new invoice details. If you do not select this option, Accounts Payable uses the vendor tax class (from the Invoice Entry Taxes tab) as the default for new invoice details.
Payment processing options
Default Transaction Type. Accounts Payable lets you choose the transaction type you use most frequently as the default for Payment Entry. You can select: Payment, Prepayment, Apply Document, or Miscellaneous Payment.
Default Order of Open Documents. Choose the order in which to list documents (such as invoices, debit notes, and credit notes) when you apply cash, checks, and other payments to vendor accounts in the Payment Entry form.
You can choose to list open documents by:
• Document Number. Begins with the lowest document number for each transaction type.
• PO Number. Lists documents by their purchase order numbers, beginning with the lowest purchase order number and earliest document.
Step 4: Select Accounts Payable Options
Getting Started 3–17
Apgs‐3.doc, printed on 11/16/2007, at 11:53:29 AM. Last saved on 11/16/2007 11:48:00 AM.
Sage Software Confidential
Setting Up
Accounts Payable
• Due Date. Lists by due date, beginning with the document with the oldest (earliest) due date.
• Order Number. Lists documents by their sales order numbers, beginning with the lowest order number.
• Document Date. Lists by the date entered with the document, beginning with the oldest date.
• Current Balance. Lists by outstanding balances, beginning with the smallest balance.
Default Bank Code. Select the code for the bank account on which you most often write checks.
You must use one of the bank codes defined in Bank Services. For information about setting up bank accounts, see the Tax and Bank Services User Guide.
Default Payment Code. Select the type of payment you process most often.
When you enter payments, you have to enter the payment code only when it is different from the type you specify here.
See also page 3-42
Initially, Accounts Payment has payment codes defined for cash, check, and credit card. If you want to use another type, you must first add it using the Payment Codes form, as described under the “Add Payment Codes” heading in “Step 5: Add Accounts Payable Records,” later in this chapter.
Check For Duplicate Checks. Specify whether to display a warning or an error message, or no message, when you attempt to process a check that uses the same number as an existing check for the same bank.
Select a default payment posting date
Default Posting Date. Select Document Date, Batch Date, or Session Date as the default posting date that appears on the A/P Payment Entry form.
Step 4: Select Accounts Payable Options
3–18 Sage Accpac Accounts Payable
Apgs‐3.doc, printed on 11/16/2007, at 11:53:29 AM. Last saved on 11/16/2007 11:48:00 AM.
Sage Software Confidential
The posting date is the date that a document is posted to General Ledger, and it may be different from the document date.
You can change the posting date for particular payments when you enter or edit them.
Include Pending Transactions. Select whether transactions from open (unposted) batches are included when Accounts Payable calculates pending amounts for Payment Entry. You can include unposted payments, unposted payments and adjustments, or all transactions, or you can choose to include none of them.
Allow Adjustments in Payment Batch. Select this option if you want to be able to enter adjustments or quickly write off small amounts while entering payments, rather than having to enter the transactions separately in the Adjustment Entry form.
Allow Edit Of System Generated Batches. Select this option if you want to be able to edit or delete payment batches after you have generated them. If the option is not selected, you cannot edit or delete checks, or delete the check batch.
Note that if you edit check amounts, they will not match the pre‐check register you printed. Use this editing feature on an exception basis only.
Allow Remit-To Information To Be Changed. Select this option if you want to allow changes to remit‐to location information on the Payment Entry form.
7. Click the Numbering tab.
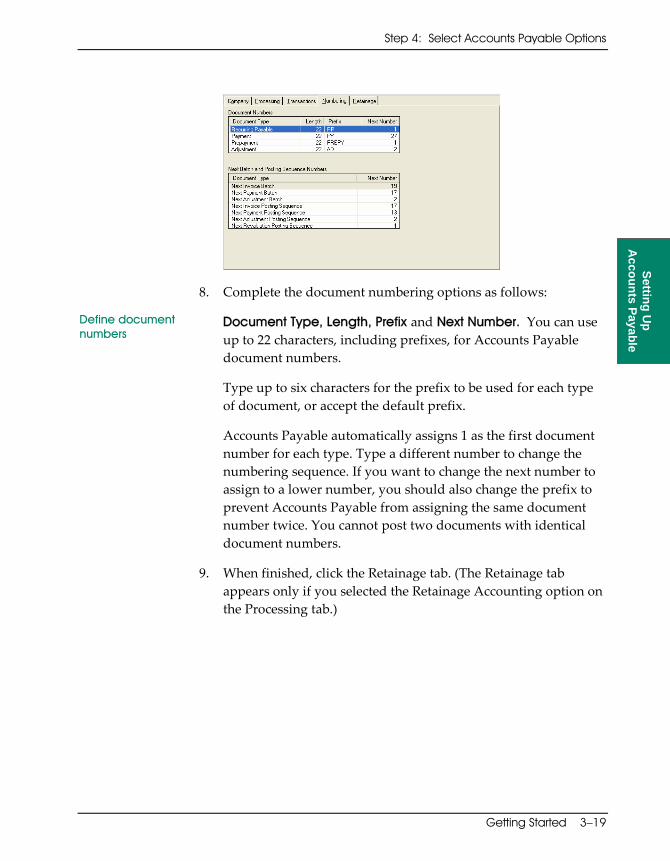
Step 4: Select Accounts Payable Options
Getting Started 3–19
Apgs‐3.doc, printed on 11/16/2007, at 11:53:29 AM. Last saved on 11/16/2007 11:48:00 AM.
Sage Software Confidential
Setting Up
Accounts Payable
8. Complete the document numbering options as follows:
Define document numbers
Document Type, Length, Prefix and Next Number. You can use up to 22 characters, including prefixes, for Accounts Payable document numbers.
Type up to six characters for the prefix to be used for each type of document, or accept the default prefix.
Accounts Payable automatically assigns 1 as the first document number for each type. Type a different number to change the numbering sequence. If you want to change the next number to assign to a lower number, you should also change the prefix to prevent Accounts Payable from assigning the same document number twice. You cannot post two documents with identical document numbers.
9. When finished, click the Retainage tab. (The Retainage tab appears only if you selected the Retainage Accounting option on the Processing tab.)
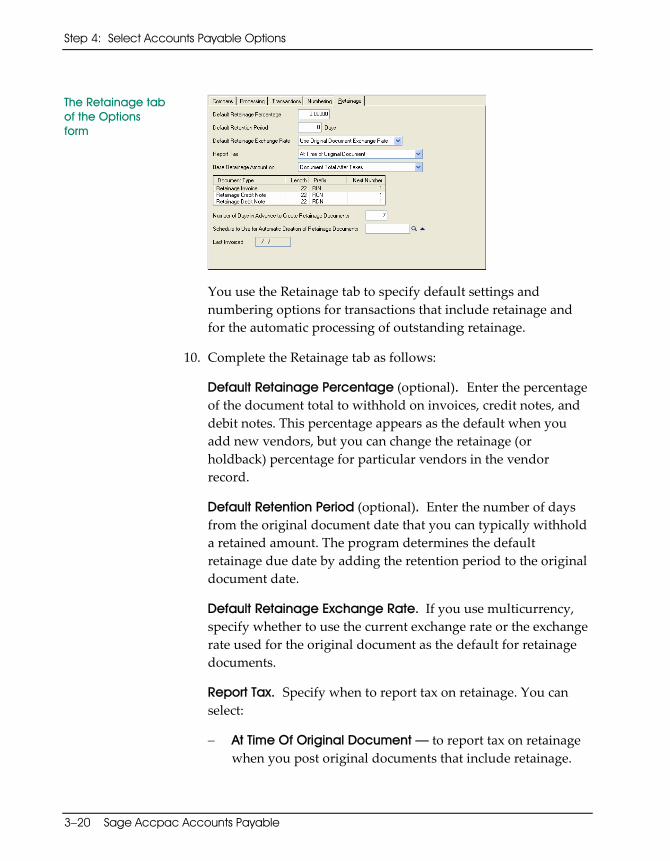
Step 4: Select Accounts Payable Options
3–20 Sage Accpac Accounts Payable
Apgs‐3.doc, printed on 11/16/2007, at 11:53:29 AM. Last saved on 11/16/2007 11:48:00 AM.
Sage Software Confidential
The Retainage tab of the Options form
You use the Retainage tab to specify default settings and numbering options for transactions that include retainage and for the automatic processing of outstanding retainage.
10. Complete the Retainage tab as follows:
Default Retainage Percentage (optional). Enter the percentage of the document total to withhold on invoices, credit notes, and debit notes. This percentage appears as the default when you add new vendors, but you can change the retainage (or holdback) percentage for particular vendors in the vendor record.
Default Retention Period (optional). Enter the number of days from the original document date that you can typically withhold a retained amount. The program determines the default retainage due date by adding the retention period to the original document date.
Default Retainage Exchange Rate. If you use multicurrency, specify whether to use the current exchange rate or the exchange rate used for the original document as the default for retainage documents.
Report Tax. Specify when to report tax on retainage. You can select:
− At Time Of Original Document — to report tax on retainage when you post original documents that include retainage.

Step 4: Select Accounts Payable Options
Getting Started 3–21
Apgs‐3.doc, printed on 11/16/2007, at 11:53:29 AM. Last saved on 11/16/2007 11:48:00 AM.
Sage Software Confidential
Setting Up
Accounts Payable
(Use the Base Retainage Amount On field to specify whether to base retainage on amounts before tax or after tax.)
− As Per Tax Authority — to report tax on retainage as specified for each tax authority in Tax Services.
If the tax authority specifies that tax is reported when you post original documents, Accounts Payable calculates the tax amount and updates the tax tracking reports immediately when you post original documents.
If the tax authority specifies that tax is reported when you post retainage documents, Accounts Payable calculates the tax amount when you post the original document, but it does not update the tax tracking reports until you post the retainage document.
If you select this option for Accounts Payable, retainage amounts are based on amounts before tax for all tax authorities and vendors.
Base Retainage Amount On. Select whether retainage is calculated on the document total before tax or after tax is calculated.
Document Type, Length, Prefix, and Next Number. Specify the next number, length, and prefix to assign to retainage invoices, credit notes, and debit notes that you process to clear outstanding retainage amounts.
Number Of Days In Advance To Create Retainage Documents. Enter the number of days before the retainage due date that you can generate retainage documents using the Create Retainage Batch form.
When you create a retainage batch, the program generates documents only for retainage that is due or will become due during the period encompassed by the specified number of days in advance.
Step 4: Select Accounts Payable Options
3–22 Sage Accpac Accounts Payable
Apgs‐3.doc, printed on 11/16/2007, at 11:53:29 AM. Last saved on 11/16/2007 11:48:00 AM.
Sage Software Confidential
Schedule To Use For Automatic Creation Of Retainage Documents (optional). Enter or use the Finder to select the code for the schedule you want to use to process retainage from the Reminder List.
“Zoom” button
If the schedule does not yet exist in Common Services, you can click the Zoom button, and then create the schedule using the Schedules form that opens. You can also click the Zoom button after entering a schedule code to view information about the schedule.
For information on using schedules and the Reminder List, see the System Manager User Guide.
Last Invoiced (display only). The Retainage tab displays the date that you last ran Create Retainage Batch from the Reminder List.
11. When you are finished with the last tab of the A/P Options form, check your entries, then click Save.
12. To print a report of the options you selected for your Accounts Payable system, click Print on the A/P Options File menu or choose the Options icon from the Setup Reports folder.
13. Finally, click Close to close the A/P Options form.
For more information
For information about setting up your printer and printing Sage Accpac reports, see the chapter on printing in the System Manager User Guide.
Select G/L Integration Options
The G/L Integration form provides options that let you control how your Accounts Payable system interacts with General Ledger, and lets you specify the types of information to send with the transactions you send to General Ledger from Accounts Payable.
1. From the A/P Options folder, choose the G/L Integration icon.
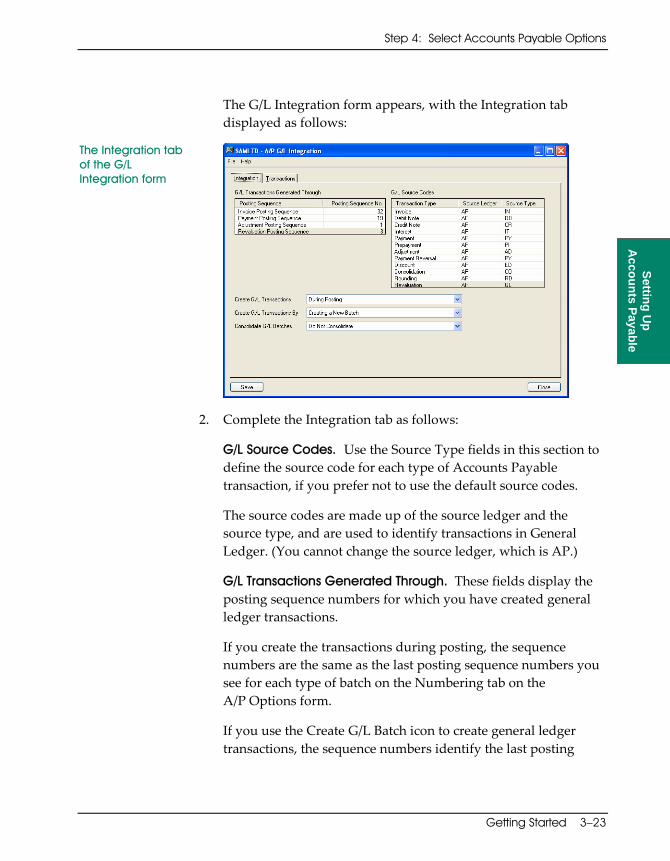
Step 4: Select Accounts Payable Options
Getting Started 3–23
Apgs‐3.doc, printed on 11/16/2007, at 11:53:29 AM. Last saved on 11/16/2007 11:48:00 AM.
Sage Software Confidential
Setting Up
Accounts Payable
The G/L Integration form appears, with the Integration tab displayed as follows:
The Integration tab of the G/L Integration form
2. Complete the Integration tab as follows:
G/L Source Codes. Use the Source Type fields in this section to define the source code for each type of Accounts Payable transaction, if you prefer not to use the default source codes.
The source codes are made up of the source ledger and the source type, and are used to identify transactions in General Ledger. (You cannot change the source ledger, which is AP.)
G/L Transactions Generated Through. These fields display the posting sequence numbers for which you have created general ledger transactions.
If you create the transactions during posting, the sequence numbers are the same as the last posting sequence numbers you see for each type of batch on the Numbering tab on the A/P Options form.
If you use the Create G/L Batch icon to create general ledger transactions, the sequence numbers identify the last posting
Step 4: Select Accounts Payable Options
3–24 Sage Accpac Accounts Payable
Apgs‐3.doc, printed on 11/16/2007, at 11:53:29 AM. Last saved on 11/16/2007 11:48:00 AM.
Sage Software Confidential
sequence of each batch type for which you have created the transactions.
Multicurrency If you use multicurrency accounting, revaluation transactions are created for the exchange gain and loss general ledger accounts when you revalue your Accounts Payable ledger.
Create G/L Transactions
Create G/L Tranactions. Use these settings to specify when to create general ledger transactions:
• During Posting. Select this option to create general ledger transactions automatically when you post batches of Accounts Payable transactions.
• On Request Using Create G/L Batch Icon. Select this option to create general ledger transactions using the Create G/L Batch form. (The option lets you print Accounts Payable’s G/L Transactions report. You must print the report before creating general ledger batches.)
Create G/L Transactions By. Select one of the following options to specify how to create general ledger transactions:
− Adding to an Existing Batch. Choose this option to add new general ledger transactions to existing batches.
Use this option during setup
You may want to select this option if your general ledger already contains the transactions you plan to post during setup to enter opening vendor account balances and current transactions. This choice reduces the number of general ledger batches you need to delete after setup, making it easier to ensure that you do not accidentally post general ledger transactions twice.
Do not select this option if you want to create a new general ledger batch each time you produce general ledger transactions.
− Creating a New Batch. Choose this option to produce a new general ledger batch each time you create general ledger transactions.
Step 4: Select Accounts Payable Options
Getting Started 3–25
Apgs‐3.doc, printed on 11/16/2007, at 11:53:29 AM. Last saved on 11/16/2007 11:48:00 AM.
Sage Software Confidential
Setting Up
Accounts Payable
− Creating and Posting a New Batch. Choose this option to create and automatically post a new general ledger batch when you create general ledger transactions.
Note: If you do not use Sage Accpac General Ledger, all general ledger transactions are added to the same general ledger batch, regardless of the type of transaction and your choice for this option. When you are asked to whether to add the transactions to the existing batch or overwrite the batch, always choose to add to an existing batch.
Accounts Payable automatically creates separate general ledger batches for invoices, payments, and adjustments, and for revaluation transactions (if you use multicurrency accounting).
Consolidate G/L Batch. Use this option to specify whether to combine transaction details for the same general ledger account into single details, or to send unconsolidated Accounts Payable transaction details to General Ledger. You can choose:
• Do Not Consolidate. The General Ledger transaction batch includes separate details for each invoice, credit note, debit note, payment, or adjustment posted in Accounts Payable.
Use this option during setup
We recommend you select this option during setup, so that the G/L Transactions report provides complete details of all the transactions you enter to create opening vendor account balances. You can then check the report against source documents and your general ledger account balances, to be sure you entered all transactions correctly.
You must select this option if you want to be able to drill down from General Ledger to source documents in Accounts Payable.
Consolidation prevents drilldown
If you consolidate transactions, you cannot drill down from General Ledger transactions to source documents.
• Consolidate By Posting Sequence, Account And Fiscal Period. Accounts Payable combines all details with the
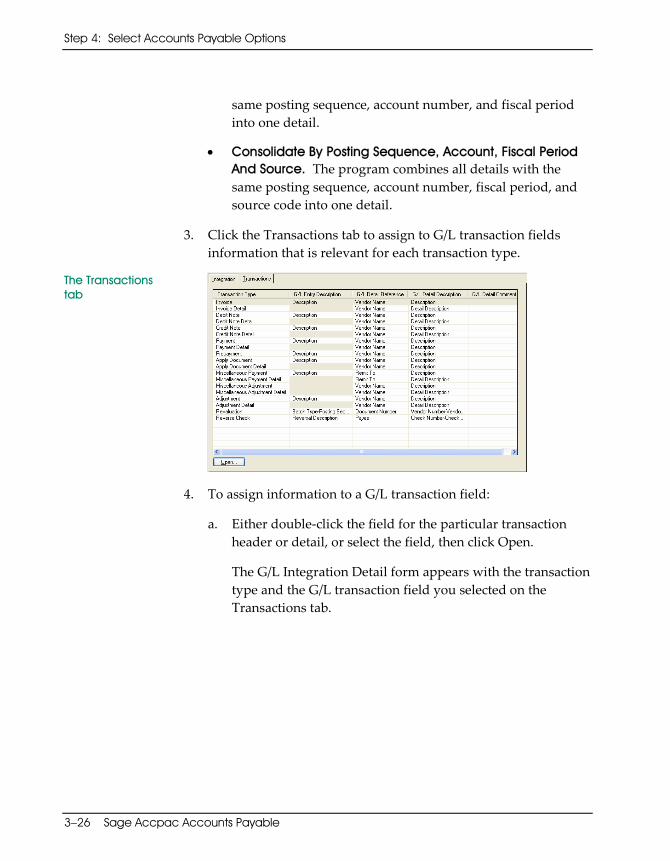
Step 4: Select Accounts Payable Options
3–26 Sage Accpac Accounts Payable
Apgs‐3.doc, printed on 11/16/2007, at 11:53:29 AM. Last saved on 11/16/2007 11:48:00 AM.
Sage Software Confidential
same posting sequence, account number, and fiscal period into one detail.
• Consolidate By Posting Sequence, Account, Fiscal Period And Source. The program combines all details with the same posting sequence, account number, fiscal period, and source code into one detail.
3. Click the Transactions tab to assign to G/L transaction fields information that is relevant for each transaction type.
The Transactions tab
4. To assign information to a G/L transaction field:
a. Either double‐click the field for the particular transaction header or detail, or select the field, then click Open.
The G/L Integration Detail form appears with the transaction type and the G/L transaction field you selected on the Transactions tab.
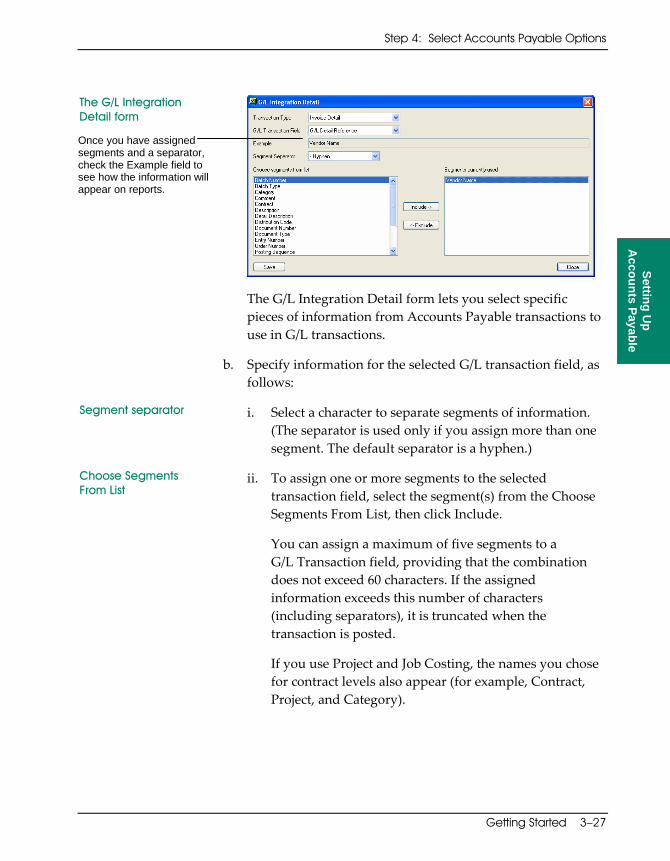
Step 4: Select Accounts Payable Options
Getting Started 3–27
Apgs‐3.doc, printed on 11/16/2007, at 11:53:29 AM. Last saved on 11/16/2007 11:48:00 AM.
Sage Software Confidential
Setting Up
Accounts Payable
The G/L Integration Detail form
The G/L Integration Detail form lets you select specific pieces of information from Accounts Payable transactions to use in G/L transactions.
b. Specify information for the selected G/L transaction field, as follows:
Segment separator i. Select a character to separate segments of information. (The separator is used only if you assign more than one segment. The default separator is a hyphen.)
Choose Segments From List
ii. To assign one or more segments to the selected transaction field, select the segment(s) from the Choose Segments From List, then click Include.
You can assign a maximum of five segments to a G/L Transaction field, providing that the combination does not exceed 60 characters. If the assigned information exceeds this number of characters (including separators), it is truncated when the transaction is posted.
If you use Project and Job Costing, the names you chose for contract levels also appear (for example, Contract, Project, and Category).
Once you have assigned segments and a separator, check the Example field to see how the information will appear on reports.
Step 5: Add Accounts Payable Records
3–28 Sage Accpac Accounts Payable
Apgs‐3.doc, printed on 11/16/2007, at 11:53:29 AM. Last saved on 11/16/2007 11:48:00 AM.
Sage Software Confidential
c. Once the G/L Integration Detail form is open, you can assign information to other Accounts Payable transaction types, as follows:
i. Select the transaction type or transaction detail type from the Transaction Type field.
The information displayed in the G/L Transaction Field and the Choose Segments From List fields changes, consistent with the selected transaction type.
G/L Transaction Field
ii. Select the G/L transaction field to which you are assigning information.
iii. In the Segment Separator field, select the symbol to use between information segments.
iv. Assign segments to include from Accounts Payable transactions, as described in the preceding instructions.
5. When you have finished defining reference and description fields, click Save, and then click Close to return to the Transactions tab.
6. When you are satisfied with your choices for G/L integration, click Save, and then click Close.
Step 5: Add Accounts Payable Records
This step shows you how to enter all the records you need to assign to your vendor accounts when you add them, such as account sets, 1099/CPRS codes, distribution codes and sets, and payment terms.
In most cases, you must add these records before you can add vendor records.
Everything you need to know or do before adding each type of record is listed at the beginning of each section.
Step 5: Add Accounts Payable Records
Step 5: Add Accounts Payable Records
Getting Started 3–29
Apgs‐3.doc, printed on 11/16/2007, at 11:53:29 AM. Last saved on 11/16/2007 11:48:00 AM.
Sage Software Confidential
Setting Up
Accounts Payable
The icons you use to add setup records are all in the Accounts Payable Setup folder:
• Account Sets • 1099/CPRS Codes • Distribution Codes • Distribution Sets • Terms • Optional fields (optional)
While adding these records, you notice that two fields are common to all the Setup forms included in this step:
• Last Maintained. This is an information field in which Accounts Payable automatically inserts the date of the last change made to the record. You do not fill in this field.
• Inactive. Select this option if you do not want to assign the records to any vendors.
You would not likely use this option when adding records. Normally, you select it when you have decided to delete a record, and want to ensure no further vendor accounts are assigned to it. You can change your selection for the option at any time.
Remember to check data integrity (in the Administrative Services folder) and back up your data regularly while setting up your ledger.
To change a record, see page 3-48
You can change most of the data in your records if you need to. Refer to the section, “Modify Accounts Payable Records,“ at the end of this step for information about how to change or delete records and about any restrictions that may apply.
Using Help If you need information about the Accounts Payable folder you are
working with, or about any of the fields on the screen, press the F1 key for help or the Help button. (The Help button appears on error messages and warnings when the F1 button is inactive.)

Step 5: Add Accounts Payable Records
3–30 Sage Accpac Accounts Payable
Apgs‐3.doc, printed on 11/16/2007, at 11:53:29 AM. Last saved on 11/16/2007 11:48:00 AM.
Sage Software Confidential
Add Account Sets
Account sets identify the general ledger accounts to which you post transactions entered for your vendors.
You must add at least one account set to Accounts Payable before you can add vendor records.
Before adding an account set, you must:
Use valid G/L account numbers
• Be sure your general ledger contains the accounts you want to assign to account sets in Accounts Payable.
• Decide on the account set codes you want to use. (Account set codes identify the account sets.)
• Find out the numbers to assign to each account set for these general ledger accounts:
− Payables control − Purchase discounts − Prepayment − Retainage
Multicurrency account sets
If you are creating a multicurrency ledger, you also need to know the currency code for each account set that does not use the functional currency, as well as account numbers for the following accounts in each set:
− Unrealized exchange gain (if you use the Realized and Unrealized Gain/Loss accounting method)
− Unrealized exchange loss (if you use the Realized and Unrealized Gain/Loss accounting method)
− Exchange gain
− Exchange loss
− Exchange rounding
See page 2-33
For more information, see “Setting Up Account Sets,” in Chapter 2.

Step 5: Add Accounts Payable Records
Getting Started 3–31
Apgs‐3.doc, printed on 11/16/2007, at 11:53:29 AM. Last saved on 11/16/2007 11:48:00 AM.
Sage Software Confidential
Setting Up
Accounts Payable
To add an account set:
1. Choose the Account Sets icon from the Setup folder.
2. Add the account sets you need, entering for each:
Account Set Code. Type a unique code, up to six characters, to identify the account set.
Starting a new account set
To begin adding a new account set, you can type the code for the set, or you can click the New icon next to the Account Set Code field.
Description. Type a description of the account set.
General Ledger Account. Type the general ledger account numbers for the payables control, purchase discounts, and prepayment accounts that make up the set. If you use retainage accounting in Accounts Payable, you must also specify a retainage control account.
Currency code determines vendor currency
Currency Code. If you plan to assign this account set to vendors who do not use your functional currency, enter the code for the currency that the vendors use.
The Currency Code field appears only in multicurrency ledgers. Additional account fields appear if the account set does not use the functional currency.
Unrealized exchange gain and loss accounts appear if you use the Realized and Unrealized Gain/Loss accounting method or if you change from this accounting method.
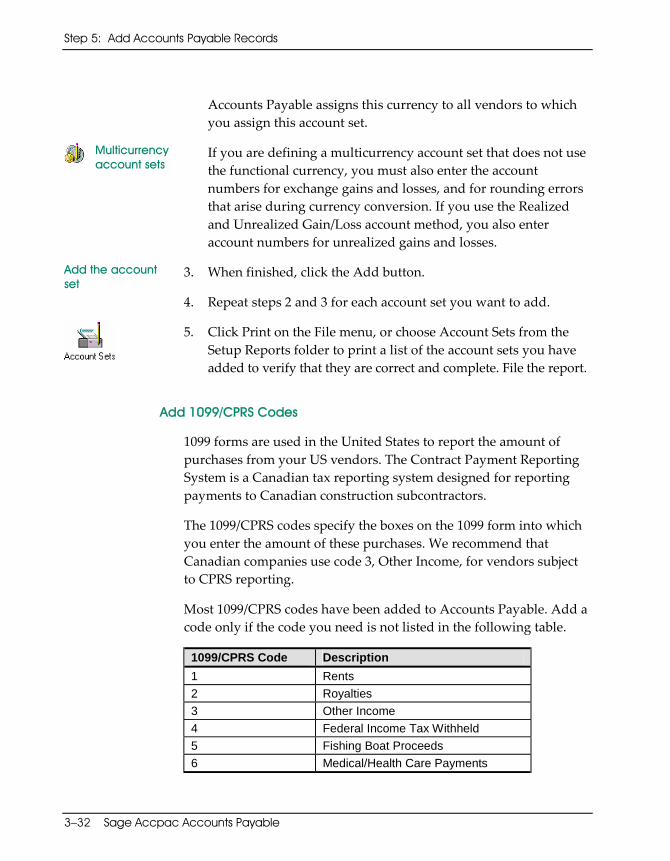
Step 5: Add Accounts Payable Records
3–32 Sage Accpac Accounts Payable
Apgs‐3.doc, printed on 11/16/2007, at 11:53:29 AM. Last saved on 11/16/2007 11:48:00 AM.
Sage Software Confidential
Accounts Payable assigns this currency to all vendors to which you assign this account set.
Multicurrency account sets
If you are defining a multicurrency account set that does not use the functional currency, you must also enter the account numbers for exchange gains and losses, and for rounding errors that arise during currency conversion. If you use the Realized and Unrealized Gain/Loss account method, you also enter account numbers for unrealized gains and losses.
Add the account set
3. When finished, click the Add button.
4. Repeat steps 2 and 3 for each account set you want to add.
5. Click Print on the File menu, or choose Account Sets from the Setup Reports folder to print a list of the account sets you have added to verify that they are correct and complete. File the report.
Add 1099/CPRS Codes
1099 forms are used in the United States to report the amount of purchases from your US vendors. The Contract Payment Reporting System is a Canadian tax reporting system designed for reporting payments to Canadian construction subcontractors.
The 1099/CPRS codes specify the boxes on the 1099 form into which you enter the amount of these purchases. We recommend that Canadian companies use code 3, Other Income, for vendors subject to CPRS reporting.
Most 1099/CPRS codes have been added to Accounts Payable. Add a code only if the code you need is not listed in the following table.
1099/CPRS Code Description 1 Rents 2 Royalties 3 Other Income 4 Federal Income Tax Withheld 5 Fishing Boat Proceeds 6 Medical/Health Care Payments
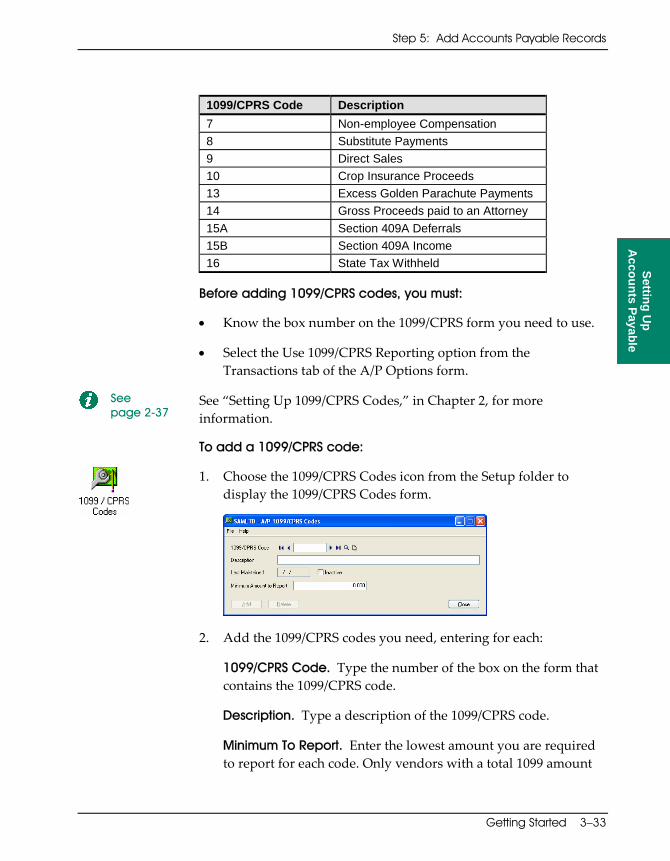
Step 5: Add Accounts Payable Records
Getting Started 3–33
Apgs‐3.doc, printed on 11/16/2007, at 11:53:29 AM. Last saved on 11/16/2007 11:48:00 AM.
Sage Software Confidential
Setting Up
Accounts Payable
1099/CPRS Code Description 7 Non-employee Compensation 8 Substitute Payments 9 Direct Sales 10 Crop Insurance Proceeds 13 Excess Golden Parachute Payments 14 Gross Proceeds paid to an Attorney 15A Section 409A Deferrals 15B Section 409A Income 16 State Tax Withheld
Before adding 1099/CPRS codes, you must:
• Know the box number on the 1099/CPRS form you need to use.
• Select the Use 1099/CPRS Reporting option from the Transactions tab of the A/P Options form.
See page 2-37
See “Setting Up 1099/CPRS Codes,” in Chapter 2, for more information.
To add a 1099/CPRS code:
1. Choose the 1099/CPRS Codes icon from the Setup folder to display the 1099/CPRS Codes form.
2. Add the 1099/CPRS codes you need, entering for each:
1099/CPRS Code. Type the number of the box on the form that contains the 1099/CPRS code.
Description. Type a description of the 1099/CPRS code.
Minimum To Report. Enter the lowest amount you are required to report for each code. Only vendors with a total 1099 amount
Step 5: Add Accounts Payable Records
3–34 Sage Accpac Accounts Payable
Apgs‐3.doc, printed on 11/16/2007, at 11:53:29 AM. Last saved on 11/16/2007 11:48:00 AM.
Sage Software Confidential
equal to or greater than this amount are included in the electronic 1099 file or on printed 1099‐MISC forms.
Add the 1099/CPRS code
3. When finished, click the Add button. Repeat steps 2 to 3 for each code you want to add.
4. Click Print on the File menu or choose the 1099/CPRS Codes icon in the Setup Reports folder to print a list of the codes you have added to verify that they are correct and complete. File the report.
Add Distribution Codes
Distribution codes identify general ledger accounts to which you post data from purchases transactions.
A distribution code is simply an easy‐to‐remember name for an account number. For example, you might use code “OFFSUP” for purchases of office supplies — easier to remember than 6945‐100‐20.
You can group distribution codes into sets
If you have three distribution codes that you always use for the same vendors, you can group these codes into sets, and identify them with a distribution set code. Distribution sets are covered in the next section.
Before adding a distribution code, you must:
• List the purchase distributions that you use.
• Be sure your general ledger contains the accounts you need for the distribution codes.
• Decide on the coding scheme you want to use.
See page 2-38
For more information, see “Setting Up Distribution Codes,” in Chapter 2.
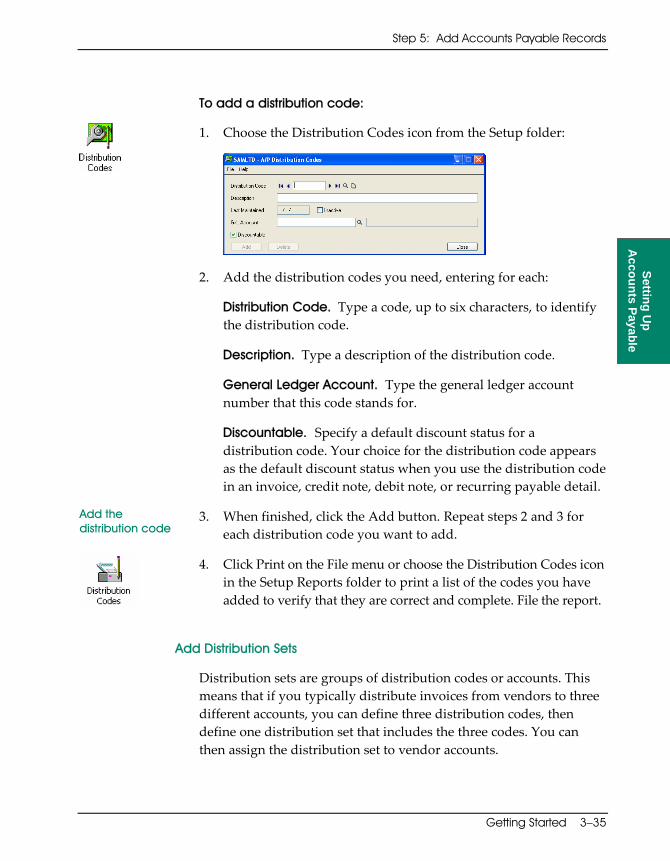
Step 5: Add Accounts Payable Records
Getting Started 3–35
Apgs‐3.doc, printed on 11/16/2007, at 11:53:29 AM. Last saved on 11/16/2007 11:48:00 AM.
Sage Software Confidential
Setting Up
Accounts Payable
To add a distribution code:
1. Choose the Distribution Codes icon from the Setup folder:
2. Add the distribution codes you need, entering for each:
Distribution Code. Type a code, up to six characters, to identify the distribution code.
Description. Type a description of the distribution code.
General Ledger Account. Type the general ledger account number that this code stands for.
Discountable. Specify a default discount status for a distribution code. Your choice for the distribution code appears as the default discount status when you use the distribution code in an invoice, credit note, debit note, or recurring payable detail.
Add the distribution code
3. When finished, click the Add button. Repeat steps 2 and 3 for each distribution code you want to add.
4. Click Print on the File menu or choose the Distribution Codes icon in the Setup Reports folder to print a list of the codes you have added to verify that they are correct and complete. File the report.
Add Distribution Sets
Distribution sets are groups of distribution codes or accounts. This means that if you typically distribute invoices from vendors to three different accounts, you can define three distribution codes, then define one distribution set that includes the three codes. You can then assign the distribution set to vendor accounts.

Step 5: Add Accounts Payable Records
3–36 Sage Accpac Accounts Payable
Apgs‐3.doc, printed on 11/16/2007, at 11:53:29 AM. Last saved on 11/16/2007 11:48:00 AM.
Sage Software Confidential
Accounts Payable also lets you enter particular General Ledger accounts, as well as distribution codes, in distribution sets.
You do not have to add distribution sets, but it is more efficient to enter a single distribution set rather than several distribution codes or accounts when you add a transaction.
Before adding a distribution set, you must:
• Add the distribution codes and accounts that comprise the set.
• Decide on the codes to use for identifying distribution sets.
See page 2-39
For more information, see “Setting Up Distribution Sets,” in Chapter 2.
To add a distribution set:
1. Choose the Distribution Sets icon from the Setup folder.
2. Add the distribution sets you need, entering for each:
Distribution Set. Type a code, up to six characters, to identify the distribution set.
Description. Type a description of the distribution set.
Distribution Method. Select the method by which you are going to apportion the invoice amount among the accounts in the distribution set. The setting you select determines the default invoice distribution, which you can override at invoice entry.
Step 5: Add Accounts Payable Records
Getting Started 3–37
Apgs‐3.doc, printed on 11/16/2007, at 11:53:29 AM. Last saved on 11/16/2007 11:48:00 AM.
Sage Software Confidential
Setting Up
Accounts Payable
You have the following choices:
• Spread Evenly. This method divides the invoice amount evenly among all the distribution codes in the distribution set. You can then edit the result.
• Fixed Percentage. This method lets you specify the percentage of the total invoice amount to allocate to each distribution code.
• Fixed Amount. This method distributes a specific amount to each distribution code in the distribution set. You must specify a currency code to use this method, and you can select the distribution code only for vendors that use this currency. You can edit the result.
• Manual. This method provides no amount allocation; it just enters the distribution codes and lets you enter the amounts of the distribution.
Distribution Code. Type or select the code that you want to add to the distribution set. Once you enter the code, Accounts Payable displays the code description and General Ledger account number so you can verify it.
If you are adding to an existing list of codes, press the Insert key to start a new line.
Distribution Percent. If you selected Fixed Percentage, enter the percentage of the invoice total that should be distributed to this code.
You can use negative percents and percents greater than 100%, provided the total of all distributions adds up to 100%.
Add the distribution set code
3. When finished, click the Add button. Repeat steps 2 to 3 for each distribution set you want to add.

Step 5: Add Accounts Payable Records
3–38 Sage Accpac Accounts Payable
Apgs‐3.doc, printed on 11/16/2007, at 11:53:29 AM. Last saved on 11/16/2007 11:48:00 AM.
Sage Software Confidential
4. Click Print from the File menu or choose the Distribution Sets icon in the Setup Reports folder to print a list of the sets you have added to verify that they are correct and complete. File the report.
Add Payment Terms
Accounts Payable uses terms codes during invoice entry to calculate the due dates of invoices. If you can claim discounts for early payment of invoices, Accounts Payable also uses terms codes to calculate discount periods and amounts on invoices.
You must add at least one terms record before you can enter Accounts Payable invoices.
Before adding a terms record, you must know:
• The terms code.
• The method of calculating the invoice due dates for each term.
• Discount periods and percents (if used).
See also page 2-41
For background information about payment terms, see “Setting Up Terms,” in Chapter 2.
To add a terms record:
1. Choose the Terms icon from the Setup folder to display the Terms form:

Step 5: Add Accounts Payable Records
Getting Started 3–39
Apgs‐3.doc, printed on 11/16/2007, at 11:53:29 AM. Last saved on 11/16/2007 11:48:00 AM.
Sage Software Confidential
Setting Up
Accounts Payable
2. Add the terms records you need, entering for each:
Terms Code. Type a code to identify the terms, using up to six characters, then type a description (name) for the terms code in the adjacent field.
Calculate Base For Discount With Tax. Use this option to specify whether to include tax amounts in the invoice totals on which discount amounts are calculated.
Select:
• Included — if you receive a discount on taxes.
• Excluded — if you do not receive a discount on taxes or are not charged taxes by your vendors.
Multiple Payment Schedule. You can select this option to create a schedule of installments. Then choose the due date type (described next) and enter the information for each payment as shown in Example 5, in the section “Examples of Payment Terms.”
Due Date Type. Select the method by which your vendor calculates invoice due dates. You can select:
• Days From Invoice Date — if invoices are due by a specific number of days from the invoice date.
Then type the number of days in the Number Of Days column that appears. (See Examples 1 and 2, following step 4.)
• End Of Next Month — if invoices are due on the last day of the next month.
• Day Of Next Month — if invoices are due on a specific day in the next month.
Then type the number (representing the due date) in the Day of Month column, as shown in Example 3.

Step 5: Add Accounts Payable Records
3–40 Sage Accpac Accounts Payable
Apgs‐3.doc, printed on 11/16/2007, at 11:53:29 AM. Last saved on 11/16/2007 11:48:00 AM.
Sage Software Confidential
• Days From Day Of Next Month — if invoices are due a standard number of days after a specific day in the next month.
Then type the number of days and the number that represents the day of the month, as in Example 4.
• Due Date Table — if your vendor uses standard due dates for invoices with specific ranges of days.
Then complete the table that appears, as shown in Example 6.
Using Help If you need help adding the information, press the F1 key to
display Help windows (or click Help on the menu) to find out how to fill in a particular field or column.
Discount Type. Select the method your vendor uses to calculate the last day on which you may take a discount for prompt payment. You select from the options described above for Due Date Type, and type discount percentages. (See example 2 at the end of this step.)
If you do not receive discounts from your vendors, ignore the discount fields and columns.
Add the terms code
3. When finished adding a set of terms, click the Add button. Repeat steps 2 to 3 for each set of terms you want to add.
4. Click Print on the File menu or choose the Terms icon in the Setup Reports folder to print a list of the payment terms you added, to verify that they are correct and complete. File the report.
Examples of Payment Terms
Use the following examples as guides when entering your own terms information.
Step 5: Add Accounts Payable Records
Getting Started 3–41
Apgs‐3.doc, printed on 11/16/2007, at 11:53:29 AM. Last saved on 11/16/2007 11:48:00 AM.
Sage Software Confidential
Setting Up
Accounts Payable
Example 1 (Net 30)
Terms are Net 30 (invoices are due in 30 days, no discount).
1. In the Due Date Type field select Days From Invoice Date.
2. Type 30 in the Number Of Days column.
Example 2 (2/10 Net 30)
Terms are 2%/10 net 30 (invoices are due in 30 days, 2% discount if paid in the first ten days).
1. In the Due Date Type and Discount Type fields select Days From Invoice Date.
2. Type 30 in the first Number Of Days column.
3. Type 2 in the Discount Percent column.
4. Type 10 in the second Number Of Days column.
Example 3 (Due on the 15th)
Invoices are due on the 15th day of the month that follows the invoice date. (Invoices issued in June are due on July 15.)
1. In the Due Date Type field select Day Of Next Month.
2. Type 15 in the Day Of Month column.
Example 4 (Due in the month after the invoice date
Invoices are due 30 days after the 15th day of the month that follows the invoice date. (Invoices issued in June are due on August 14.)
1. In the Due Date Type field select Days from Day Of Next Month.
2. Type 30 in the first Number Of Days column.
3. Type 15 in the Day of Month column.
Example 5 (Multiple Payment Schedule)
Invoices are to be paid in four equal monthly installments, starting at the end of the next month after the invoice date. (If the invoice is issued in June, payments are due on July 31, August 31, September 30, and October 31.)
1. Select Multiple Payment Schedule.
2. In the Due Date Type field, select End Of Next Month.
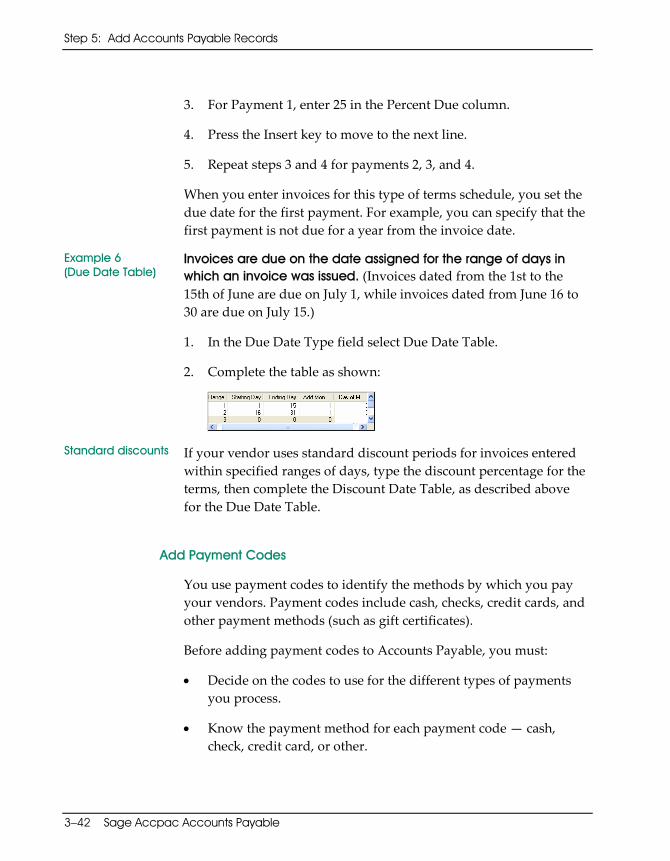
Step 5: Add Accounts Payable Records
3–42 Sage Accpac Accounts Payable
Apgs‐3.doc, printed on 11/16/2007, at 11:53:29 AM. Last saved on 11/16/2007 11:48:00 AM.
Sage Software Confidential
3. For Payment 1, enter 25 in the Percent Due column.
4. Press the Insert key to move to the next line.
5. Repeat steps 3 and 4 for payments 2, 3, and 4.
When you enter invoices for this type of terms schedule, you set the due date for the first payment. For example, you can specify that the first payment is not due for a year from the invoice date.
Example 6 (Due Date Table)
Invoices are due on the date assigned for the range of days in which an invoice was issued. (Invoices dated from the 1st to the 15th of June are due on July 1, while invoices dated from June 16 to 30 are due on July 15.)
1. In the Due Date Type field select Due Date Table.
2. Complete the table as shown:
Standard discounts If your vendor uses standard discount periods for invoices entered within specified ranges of days, type the discount percentage for the terms, then complete the Discount Date Table, as described above for the Due Date Table.
Add Payment Codes
You use payment codes to identify the methods by which you pay your vendors. Payment codes include cash, checks, credit cards, and other payment methods (such as gift certificates).
Before adding payment codes to Accounts Payable, you must:
• Decide on the codes to use for the different types of payments you process.
• Know the payment method for each payment code — cash, check, credit card, or other.
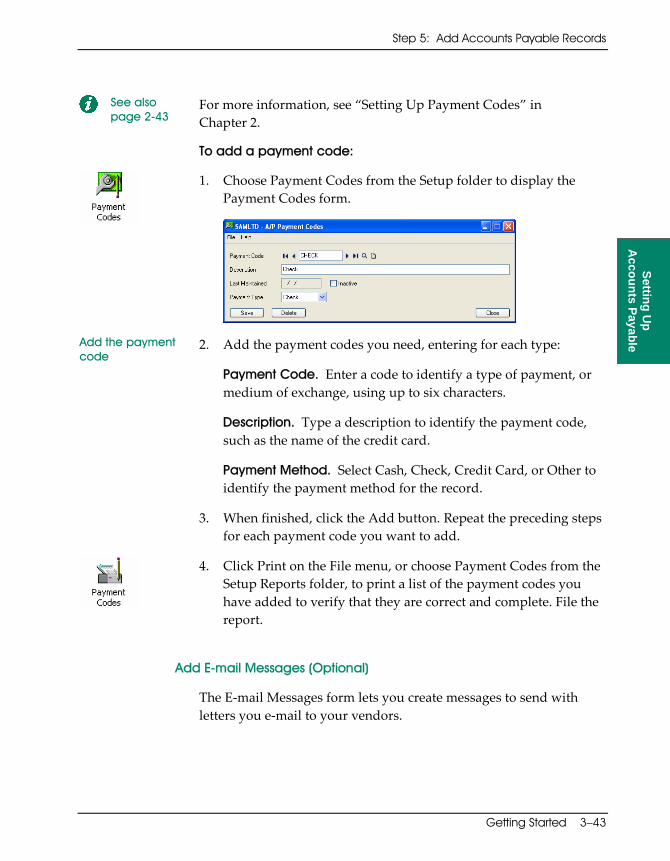
Step 5: Add Accounts Payable Records
Getting Started 3–43
Apgs‐3.doc, printed on 11/16/2007, at 11:53:29 AM. Last saved on 11/16/2007 11:48:00 AM.
Sage Software Confidential
Setting Up
Accounts Payable
See also page 2-43
For more information, see “Setting Up Payment Codes” in Chapter 2.
To add a payment code:
1. Choose Payment Codes from the Setup folder to display the Payment Codes form.
Add the payment code
2. Add the payment codes you need, entering for each type:
Payment Code. Enter a code to identify a type of payment, or medium of exchange, using up to six characters.
Description. Type a description to identify the payment code, such as the name of the credit card.
Payment Method. Select Cash, Check, Credit Card, or Other to identify the payment method for the record.
3. When finished, click the Add button. Repeat the preceding steps for each payment code you want to add.
4. Click Print on the File menu, or choose Payment Codes from the Setup Reports folder, to print a list of the payment codes you have added to verify that they are correct and complete. File the report.
Add E-mail Messages (Optional)
The E‐mail Messages form lets you create messages to send with letters you e‐mail to your vendors.
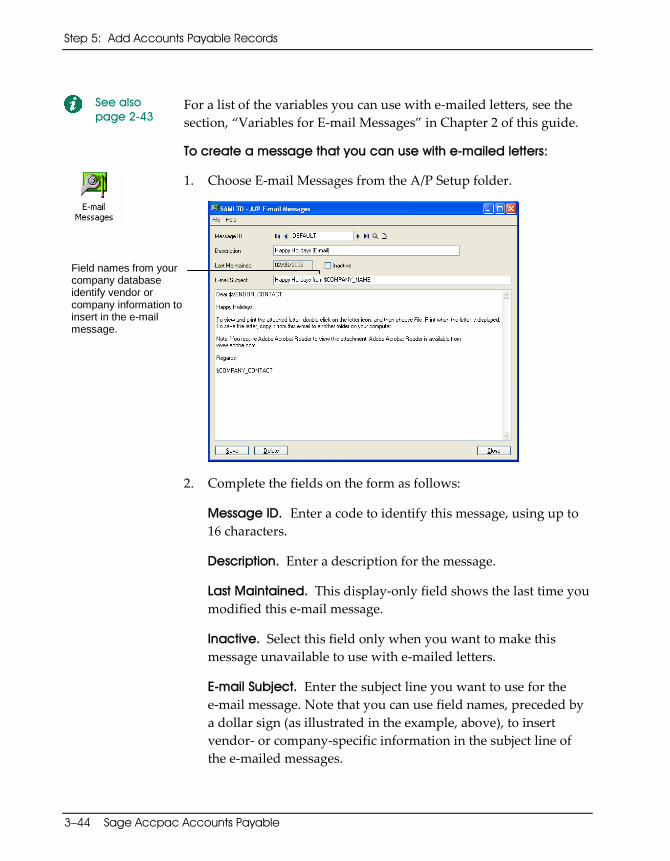
Step 5: Add Accounts Payable Records
3–44 Sage Accpac Accounts Payable
Apgs‐3.doc, printed on 11/16/2007, at 11:53:29 AM. Last saved on 11/16/2007 11:48:00 AM.
Sage Software Confidential
See also page 2-43
For a list of the variables you can use with e‐mailed letters, see the section, “Variables for E‐mail Messages” in Chapter 2 of this guide.
To create a message that you can use with e-mailed letters:
1. Choose E‐mail Messages from the A/P Setup folder.
2. Complete the fields on the form as follows:
Message ID. Enter a code to identify this message, using up to 16 characters.
Description. Enter a description for the message.
Last Maintained. This display‐only field shows the last time you modified this e‐mail message.
Inactive. Select this field only when you want to make this message unavailable to use with e‐mailed letters.
E-mail Subject. Enter the subject line you want to use for the e‐mail message. Note that you can use field names, preceded by a dollar sign (as illustrated in the example, above), to insert vendor‐ or company‐specific information in the subject line of the e‐mailed messages.
Field names from your company database identify vendor or company information to insert in the e-mail message.

Step 5: Add Setup Records — Optional Fields
Getting Started 3–45
Apgs‐3.doc, printed on 11/16/2007, at 11:53:29 AM. Last saved on 11/16/2007 11:48:00 AM.
Sage Software Confidential
Setting Up
Accounts Payable
3. Enter the body of the e‐mail message. Use field names preceded by a dollar sign to identify variable information that you want to include with the message.
4. Click Add or Save when you are satisfied with your message.
Add Optional Fields (Optional)
The Optional Fields form is available in the A/P Setup folder only if you use Sage Accpac Transaction Analysis and Optional Field Creator.
Before adding A/P optional fields
Before you can define optional fields for use in Accounts Payable, you must first set them up for system‐wide use in Common Services. For information on setting up system‐wide optional fields, see the System Manager User Guide.
To define optional fields for your Accounts Payable system:
1. Choose Optional Fields from the A/P Setup folder.
2. Complete the following fields for each optional field you plan to use in Accounts Payable:
Step 5: Add Setup Records — Optional Fields
Step 5: Add Setup Records — Optional Fields
3–46 Sage Accpac Accounts Payable
Apgs‐3.doc, printed on 11/16/2007, at 11:53:29 AM. Last saved on 11/16/2007 11:48:00 AM.
Sage Software Confidential
Optional Fields For. Select the type of record or transaction for which you are defining the optional field. You can choose:
• Vendors and Vendor Groups.
• Remit‐To Locations.
• Invoices. (These optional fields are associated with document headers. Optional fields for document details are defined separately.)
• Invoice Details.
• Payments.
• Adjustments.
• Revaluation.
Optional Field and Description. Use the Finder to select the optional field codes you want to use for each type.
You can define an unlimited number of optional fields for each type, providing the optional fields are set up in Common Services for use in your system.
Note: If you want to retain Accounts Payable optional field information when you create batches for General Ledger, you must use the same optional fields for transactions in Accounts Payable as you use in General Ledger.
When you select an optional field code, the program displays the description for the optional field.
Value Set. Double‐click the Value Set column to indicate whether the optional field has a default value.
You must set the Value Set field to “Yes” to specify a default value for the optional field.
Default Value and Description. Enter or select the value that the program displays as the default for the optional field.
Step 5: Add Setup Records — Optional Fields
Getting Started 3–47
Apgs‐3.doc, printed on 11/16/2007, at 11:53:29 AM. Last saved on 11/16/2007 11:48:00 AM.
Sage Software Confidential
Setting Up
Accounts Payable
If the optional field you selected requires validation, you must select a value that is defined for the optional field in Common Services. However, if the optional field allows blanks, you can leave the default value field blank.
If the optional field does not use validation, you can do one of the following:
• Select a value that is defined for the optional field in Common Services.
• Leave the field blank.
• Enter a combination of alphanumeric or special characters and spaces. The entry must be consistent with the type of field (text, number, date, amount, and so on) and must not exceed the number of characters specified for the optional field. In a Yes/No field, you can enter only Yes or No. In an Integer field you can enter any integer with an absolute value less than 2,147,483,647.
When you specify a value from Common Services, the program displays the description for the value.
Required. Double‐click this field to indicate whether the optional field must be used in the records and transactions for which it is created. During data entry, if the optional field is required and does not have a default value, you must fill in the field before you can proceed.
Auto Insert. Select Yes in this field if you want the program to display the optional field and its default value on the form for the type of optional field when you set up new records or enter transactions.
Select No if you do not want the optional field to appear automatically.
For example, if you define Transit Number as an optional field for invoices and you select Yes in the Auto Insert field, the Transit Number field appears automatically in Invoice Entry.
Step 5: Add Setup Records — Optional Fields
3–48 Sage Accpac Accounts Payable
Apgs‐3.doc, printed on 11/16/2007, at 11:53:29 AM. Last saved on 11/16/2007 11:48:00 AM.
Sage Software Confidential
Specify additional settings for the optional field
3. Click the Settings button.
A separate form appears that lists all the groups of accounts that are affected when you post transactions of the type for which you are defining the optional field. Use the form to select:
• The account groups for which you want to pass values to General Ledger when you post transactions that include the optional field.
• Whether optional field information for job‐related transactions is passed to Project and Job Costing, if the optional fields match those used for external costs in that program. (Note that this option appears only if you use Sage Accpac Project and Job Costing.)
4. Click Add (or Save) to add the optional field.
You can now assign the optional fields to vendor, vendor group, and remit‐to location records, or use them in the types of transactions for which they are defined.
Modify Accounts Payable Records
You can modify and delete the records you added in this step as needed.
To modify a record, you select the code that identifies it (such as the account set code or the distribution code), then make your changes and save them.
You can change everything in most records except the identifying code. If you want to delete a code that is assigned to a record or transaction, you must first assign a different code to the vendor record, and then delete the code.
Multicurrency account sets
If you use multicurrency accounting, you cannot change the currency code assigned to an account set.
Step 6: Add Vendor Records
Getting Started 3–49
Apgs‐3.doc, printed on 11/16/2007, at 11:53:29 AM. Last saved on 11/16/2007 11:48:00 AM.
Sage Software Confidential
Setting Up
Accounts Payable
You cannot delete codes assigned to a vendor
You can delete account sets, distribution codes, distribution sets, terms codes, and optional fields only if they are not assigned to vendor, vendor group, remit‐to location records, or transactions.
Step 6: Add Vendor Records
This step guides you through the process of adding your vendor records to Accounts Payable.
Use the Vendors folder icons to add two types of vendor records:
• Vendor Groups • Vendors
Check integrity
Remember to check data integrity (using Administrative Services) and back up your database regularly.
Use Help Remember to use Help when you want quick information about Accounts Payable fields and forms.
Importing vendor records
You can import vendor records into Accounts Payable from another Sage Accpac Accounts Payable database or from a non‐Sage Accpac program. You can import everything in the records except vendor activity statistics.
See Appendix B in the User Guide for information about importing data.
Add Vendor Groups
Use vendor groups to classify your vendor records into groups that share similar characteristics, such as currency, country, or type of purchase.
You can use as many vendor groups as you want. However, you must add at least one vendor group before you can add vendor records.
Step 6: Add Vendor Records

Step 6: Add Vendor Records
3–50 Sage Accpac Accounts Payable
Apgs‐3.doc, printed on 11/16/2007, at 11:53:29 AM. Last saved on 11/16/2007 11:48:00 AM.
Sage Software Confidential
Before adding a vendor group, you must:
• Add records for the account sets, distribution codes, distribution sets, bank codes, tax groups, terms codes, and optional fields that you want to assign to vendor groups.
• Decide on the vendor group codes and descriptions.
Multicurrency ledgers
If you use multicurrency accounting, you must also know the rate type to use for the group, and you must assign an account set that uses the same currency as vendors you plan to assign to the group.
Adding statistics If you want to enter statistics for vendor groups, first turn on the Allow Edit Of Statistics option on the Processing tab of the A/P Options form.
See page 2-50
For more information, see “Defining Vendor Groups” in Chapter 2.
If editing, see page 3-56
You can change most of the entries you make in a vendor group record if you need to. Refer to the section, “Modify Vendor Groups,” at the end of these instructions for information about editing or deleting vendor groups and about any restrictions that may apply.
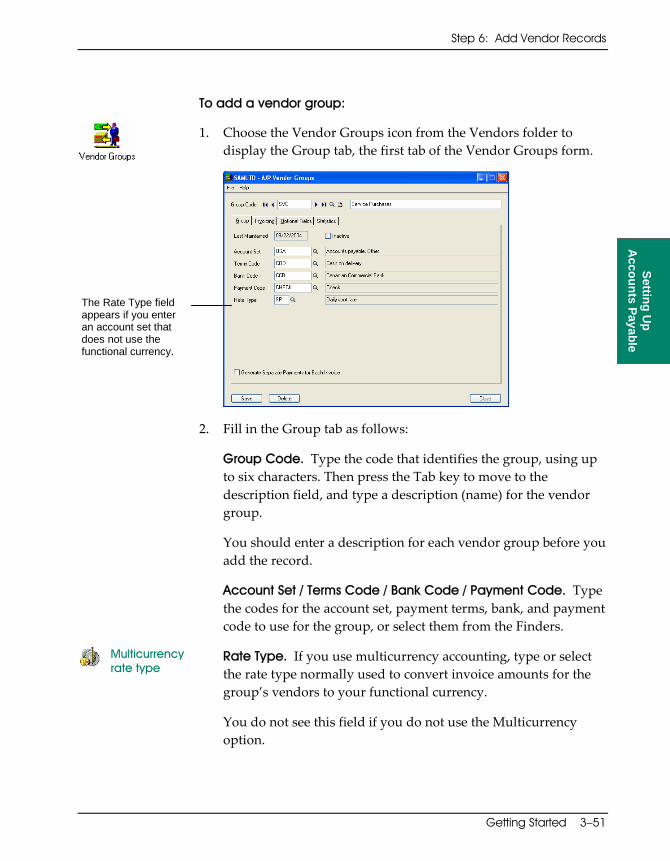
Step 6: Add Vendor Records
Getting Started 3–51
Apgs‐3.doc, printed on 11/16/2007, at 11:53:29 AM. Last saved on 11/16/2007 11:48:00 AM.
Sage Software Confidential
Setting Up
Accounts Payable
To add a vendor group:
1. Choose the Vendor Groups icon from the Vendors folder to display the Group tab, the first tab of the Vendor Groups form.
2. Fill in the Group tab as follows:
Group Code. Type the code that identifies the group, using up to six characters. Then press the Tab key to move to the description field, and type a description (name) for the vendor group.
You should enter a description for each vendor group before you add the record.
Account Set / Terms Code / Bank Code / Payment Code. Type the codes for the account set, payment terms, bank, and payment code to use for the group, or select them from the Finders.
Multicurrency rate type
Rate Type. If you use multicurrency accounting, type or select the rate type normally used to convert invoice amounts for the group’s vendors to your functional currency.
You do not see this field if you do not use the Multicurrency option.
The Rate Type field appears if you enter an account set that does not use the functional currency.
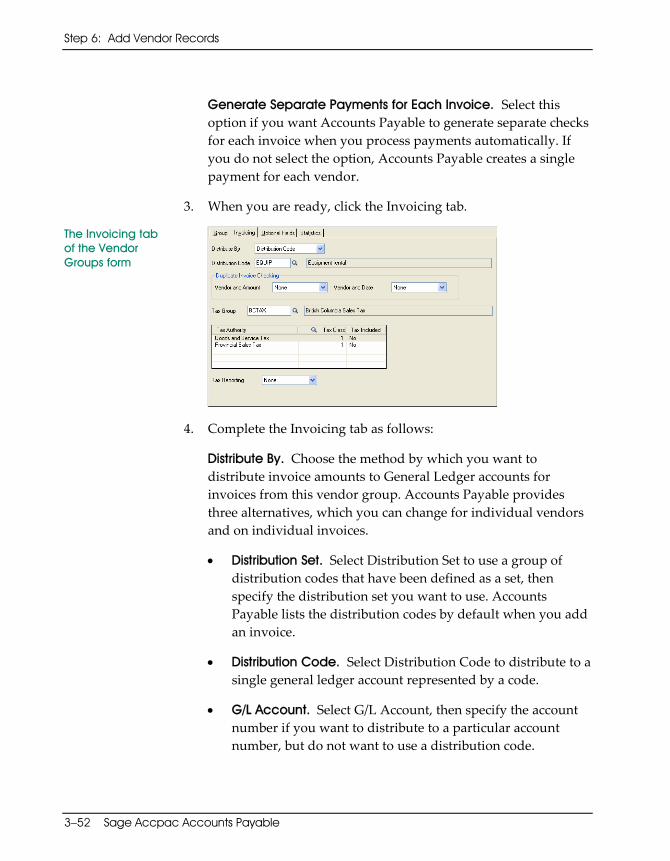
Step 6: Add Vendor Records
3–52 Sage Accpac Accounts Payable
Apgs‐3.doc, printed on 11/16/2007, at 11:53:29 AM. Last saved on 11/16/2007 11:48:00 AM.
Sage Software Confidential
Generate Separate Payments for Each Invoice. Select this option if you want Accounts Payable to generate separate checks for each invoice when you process payments automatically. If you do not select the option, Accounts Payable creates a single payment for each vendor.
3. When you are ready, click the Invoicing tab.
The Invoicing tab of the Vendor Groups form
4. Complete the Invoicing tab as follows:
Distribute By. Choose the method by which you want to distribute invoice amounts to General Ledger accounts for invoices from this vendor group. Accounts Payable provides three alternatives, which you can change for individual vendors and on individual invoices.
• Distribution Set. Select Distribution Set to use a group of distribution codes that have been defined as a set, then specify the distribution set you want to use. Accounts Payable lists the distribution codes by default when you add an invoice.
• Distribution Code. Select Distribution Code to distribute to a single general ledger account represented by a code.
• G/L Account. Select G/L Account, then specify the account number if you want to distribute to a particular account number, but do not want to use a distribution code.

Step 6: Add Vendor Records
Getting Started 3–53
Apgs‐3.doc, printed on 11/16/2007, at 11:53:29 AM. Last saved on 11/16/2007 11:48:00 AM.
Sage Software Confidential
Setting Up
Accounts Payable
• None. Select this option if you want to suppress the default distribution line on the Invoice Entry and Recurring Payables forms for most vendors in this vendor group. (This setting is recommended if you use Sage Accpac Project and Job Costing.)
Enter the code for the distribution set, distribution code, or G/L account number (depending on what you chose for the Distribute By option).
Duplicate Invoice Checking. Select how you want Accounts Payable to check for duplicate vendor invoices. You can have the program ignore, warn, or stop you from posting invoices that might be duplicates according to two separate criteria:
• The invoices are for the same vendor and amount.
• The invoices are for the same vendor and date.
Tax Group. Select the tax group with the taxes that are applied to the purchases you make with vendors in this group. The taxing authorities in the group appear on the screen so you can enter tax classes for each authority.
Tax groups are defined in Tax Services (in Common Services), and include the taxing authorities and tax classes for each authority.
Tax Class. Select your tax class with each tax authority. You can change the classes for individual vendors and on invoices.
Tax Included. Specify whether this tax is typically included in the total invoice amount or listed separately.
If you have a tax‐exemption number or a registration number, such as for the Canadian Goods and Services Tax (GST), you can enter it in the vendor records.
Tax Reporting. If the vendors in this group are subject to tax reporting, select 1099 or CPRS, depending on the jurisdiction that applies.
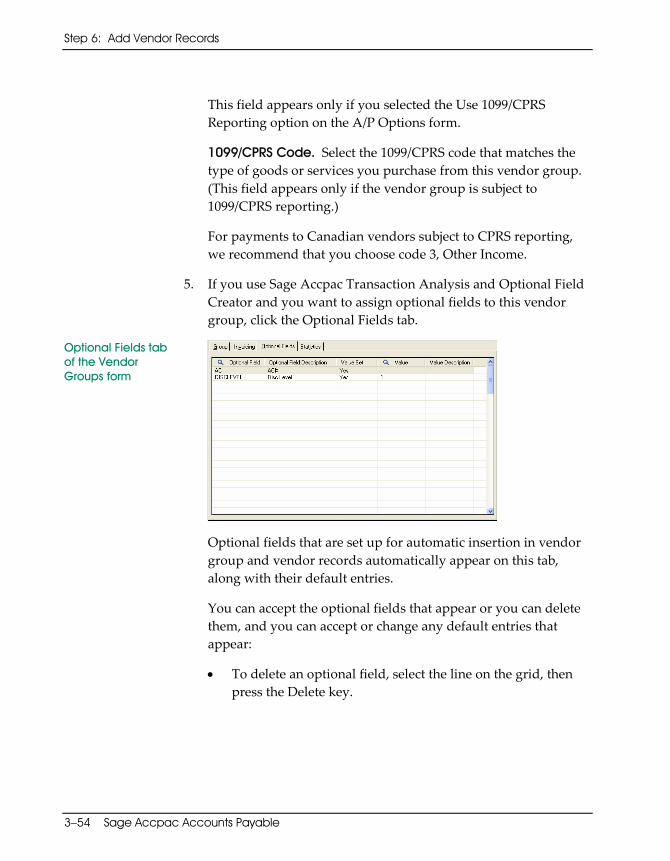
Step 6: Add Vendor Records
3–54 Sage Accpac Accounts Payable
Apgs‐3.doc, printed on 11/16/2007, at 11:53:29 AM. Last saved on 11/16/2007 11:48:00 AM.
Sage Software Confidential
This field appears only if you selected the Use 1099/CPRS Reporting option on the A/P Options form.
1099/CPRS Code. Select the 1099/CPRS code that matches the type of goods or services you purchase from this vendor group. (This field appears only if the vendor group is subject to 1099/CPRS reporting.)
For payments to Canadian vendors subject to CPRS reporting, we recommend that you choose code 3, Other Income.
5. If you use Sage Accpac Transaction Analysis and Optional Field Creator and you want to assign optional fields to this vendor group, click the Optional Fields tab.
Optional Fields tab of the Vendor Groups form
Optional fields that are set up for automatic insertion in vendor group and vendor records automatically appear on this tab, along with their default entries.
You can accept the optional fields that appear or you can delete them, and you can accept or change any default entries that appear:
• To delete an optional field, select the line on the grid, then press the Delete key.
Step 6: Add Vendor Records
Getting Started 3–55
Apgs‐3.doc, printed on 11/16/2007, at 11:53:29 AM. Last saved on 11/16/2007 11:48:00 AM.
Sage Software Confidential
Setting Up
Accounts Payable
• To assign additional optional fields, select an existing line on the grid, press the Insert key, and then complete the fields on the new line, as follows:
Use the Finder
Optional Field. Use the Finder to select the optional field codes you want to use with this vendor group.
When you select an optional field code, the program displays the description for the optional field.
Value. Enter or select the value to display as the default in new vendor records.
Note that the Value Set field alerts you whether an optional field has an automatically inserted default value. If the field looks empty, but has a blank value, the Value Set field displays Yes. (You cannot tell whether an optional field has a “blank” default value or no value just by looking at the Value field.)
Add the record 6. When you finish entering information for the vendor group, click Add to add the record. You should enter group statistics after you have added vendors and posted current invoices to vendor accounts.
7. Click Print on the File menu or choose the Vendor Groups icon in the Setup Reports folder to print a list of the Vendor Group records you added.
If you want to enter statistics for the vendor group, see “Step 10: Add Vendor and Vendor Group Statistics,” in this chapter.
If you also added statistics, use the same menu choice or icon to print the Vendor Group Statistics report. Check the reports to verify that your vendor group records are correct and complete, and then file them.
Step 6: Add Vendor Records
3–56 Sage Accpac Accounts Payable
Apgs‐3.doc, printed on 11/16/2007, at 11:53:29 AM. Last saved on 11/16/2007 11:48:00 AM.
Sage Software Confidential
Modify Vendor Groups
You can change and delete vendor groups as needed, with these restrictions:
• To change the vendor group code, you must first set up a new vendor group with the code you want to use, and then delete the group using the code you no longer want.
• You cannot delete a vendor group that is assigned to a vendor record, unless you first assign a different vendor group to the vendor.
• You can edit group statistics only if you use the Allow Edit Of Statistics option.
Add Vendors
Use the Vendors form to add records for your vendors to Accounts Payable.
You must add vendor records before you can enter and process transactions in Accounts Payable.
Before adding a vendor, you must:
• Add the vendor group, account set, distribution codes, distribution set, bank code, terms code, optional fields, and tax group you want to assign to the vendor.
• Decide on the vendor number and name.
• Find out which codes identify the vendor’s:
− Vendor Group − Tax Group
Multicurrency ledgers
If you are creating a multicurrency Accounts Payable ledger, you must assign an account set that uses the vendor’s currency. You must also know the rate type to use for vendors with different source currencies.
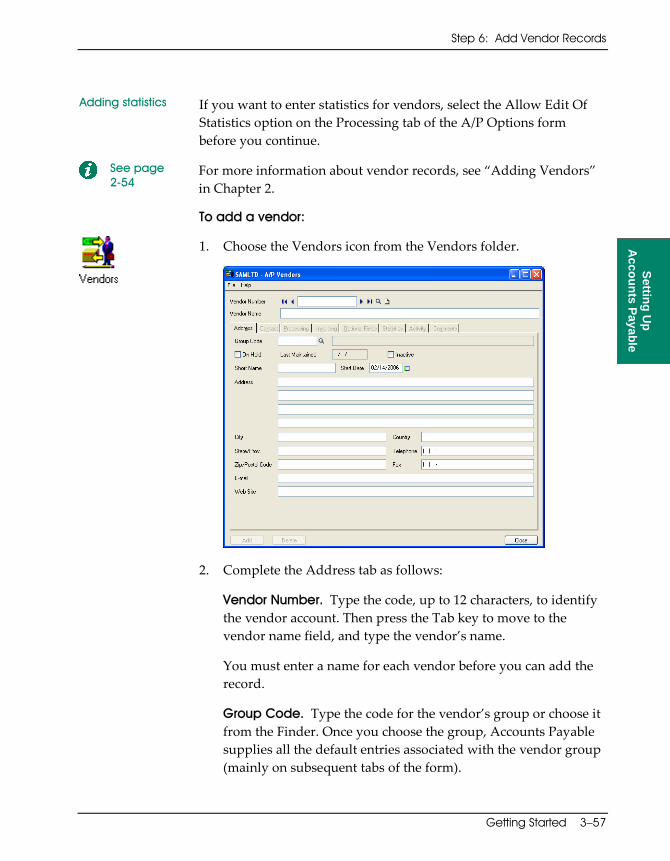
Step 6: Add Vendor Records
Getting Started 3–57
Apgs‐3.doc, printed on 11/16/2007, at 11:53:29 AM. Last saved on 11/16/2007 11:48:00 AM.
Sage Software Confidential
Setting Up
Accounts Payable
Adding statistics If you want to enter statistics for vendors, select the Allow Edit Of Statistics option on the Processing tab of the A/P Options form before you continue.
See page 2-54
For more information about vendor records, see “Adding Vendors” in Chapter 2.
To add a vendor:
1. Choose the Vendors icon from the Vendors folder.
2. Complete the Address tab as follows:
Vendor Number. Type the code, up to 12 characters, to identify the vendor account. Then press the Tab key to move to the vendor name field, and type the vendor’s name.
You must enter a name for each vendor before you can add the record.
Group Code. Type the code for the vendor’s group or choose it from the Finder. Once you choose the group, Accounts Payable supplies all the default entries associated with the vendor group (mainly on subsequent tabs of the form).

Step 6: Add Vendor Records
3–58 Sage Accpac Accounts Payable
Apgs-3.doc, printed on 1/31/2008, at 4:51:30 PM. Last saved on 1/31/2008 4:51:00 PM.
Sage Software Confidential
On Hold. Select this option if the account is on hold.
Short Name. Type a code of up to ten characters, such as the first ten characters of the vendor’s last name — or company name without the “The” — to use when selecting vendors for reports. You can also leave the field blank.
See page 2-58
For information about using short names, see the section, “Entering Short Names,” in Chapter 2.
Address. Type the vendor’s address, telephone and fax numbers, and the name of a contact person or position for the vendor.
The address entered on this tab is automatically entered on invoices and payments for the vendor.
Remit-to addresses You can add a separate remit-to location for any vendor, which Accounts Payable uses automatically as the payment address. See Step 7, “Add Remit-to Locations,” later in this chapter.
Start Date. Type the date when you first started using this vendor.
E-mail. Enter the vendor’s e-mail address (such as an e-mail address for sending orders).
Web Site. Enter the company’s Web site address.
3. When finished, click the Contact tab, then enter the contact’s name, telephone number, fax number, and e-mail address. (This information is optional.)
4. When finished, click the Processing tab.
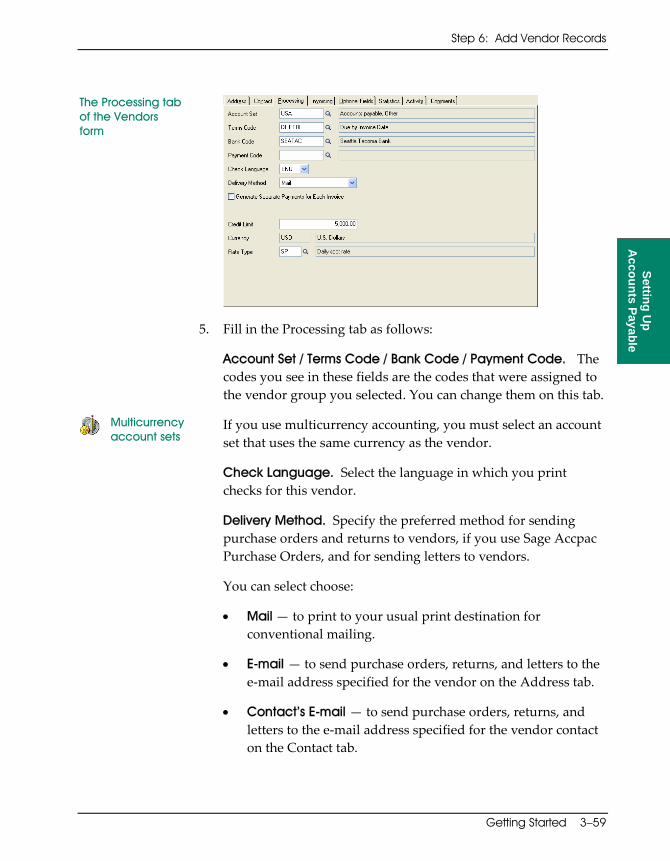
Step 6: Add Vendor Records
Getting Started 3–59
Apgs‐3.doc, printed on 11/16/2007, at 11:53:29 AM. Last saved on 11/16/2007 11:48:00 AM.
Sage Software Confidential
Setting Up
Accounts Payable
The Processing tab of the Vendors form
5. Fill in the Processing tab as follows:
Account Set / Terms Code / Bank Code / Payment Code. The codes you see in these fields are the codes that were assigned to the vendor group you selected. You can change them on this tab.
Multicurrency account sets
If you use multicurrency accounting, you must select an account set that uses the same currency as the vendor.
Check Language. Select the language in which you print checks for this vendor.
Delivery Method. Specify the preferred method for sending purchase orders and returns to vendors, if you use Sage Accpac Purchase Orders, and for sending letters to vendors.
You can select choose:
• Mail — to print to your usual print destination for conventional mailing.
• E-mail — to send purchase orders, returns, and letters to the e‐mail address specified for the vendor on the Address tab.
• Contact’s E-mail — to send purchase orders, returns, and letters to the e‐mail address specified for the vendor contact on the Contact tab.

Step 6: Add Vendor Records
3–60 Sage Accpac Accounts Payable
Apgs‐3.doc, printed on 11/16/2007, at 11:53:29 AM. Last saved on 11/16/2007 11:48:00 AM.
Sage Software Confidential
Generate Separate Payments For Each Invoice. Select this option if you want Accounts Payable to generate separate checks for each invoice when you automatically process payments. If you do not select the option, Accounts Payable creates a single check to cover this vendor’s outstanding amount.
Credit Limit. Type the credit limit permitted by the vendor.
Multicurrency rate type
Rate Type. If you use multicurrency accounting, type or select the rate type normally used to convert the vendor’s invoice amounts to your functional currency.
6. Next, click the Invoicing tab.
The Invoicing tab of the Vendors form
7. Complete the fields on the Invoicing tab, as follows:
Distribute By. Choose the method by which you want to distribute invoice amounts to general ledger accounts for invoices from this vendor. You can change the method for individual invoices.
• Distribution Set. Select Distribution Set to use a group of distribution codes that have been defined as a set, then specify the distribution set you want to use.
• Distribution Code. Select Distribution Code to distribute to a single general ledger account represented by a code, and then specify the distribution code you want to use.

Step 6: Add Vendor Records
Getting Started 3–61
Apgs‐3.doc, printed on 11/16/2007, at 11:53:29 AM. Last saved on 11/16/2007 11:48:00 AM.
Sage Software Confidential
Setting Up
Accounts Payable
• G/L Account. Select G/L Account, then specify the account number if you want to distribute to a particular account number, but do not want to use a distribution code.
Duplicate Invoice Checking. Select how you want Accounts Payable to check for duplicate vendor invoices from this vendor. You can have the program ignore, warn, or stop you from posting invoices that might be duplicates according to two separate criteria:
• The invoices are for the same vendor and amount.
• The invoices are for the same vendor and date.
Tax Group. Select the code for the tax group to which you belong when invoiced by this vendor. The taxing authorities in the group appear on the screen so you can enter tax classes for each authority.
Multicurrency tax groups
If you use multicurrency accounting, you can only select a tax group that uses the same currency as the vendor. The Finder displays the tax groups that use the vendor’s currency.
Tax Class. Select your tax class for each of the tax authorities in the tax group.
Registration Number. Type your tax registration or exemption numbers, if any.
Tax Included. Specify whether this tax is typically included in the total invoice amount or listed separately.
Tax Reporting. If you have to print 1099 forms or CPRS reports for this vendor, select 1099 or CPRS, accordingly. If the vendor is not subject to tax reporting, select None.
This field appears only if you selected the Use 1099/CPRS Reporting option on the A/P Options form.
Tax Number. Type the vendor’s 1099/CPRS tax number (you can match this to the type of number in the Type field).
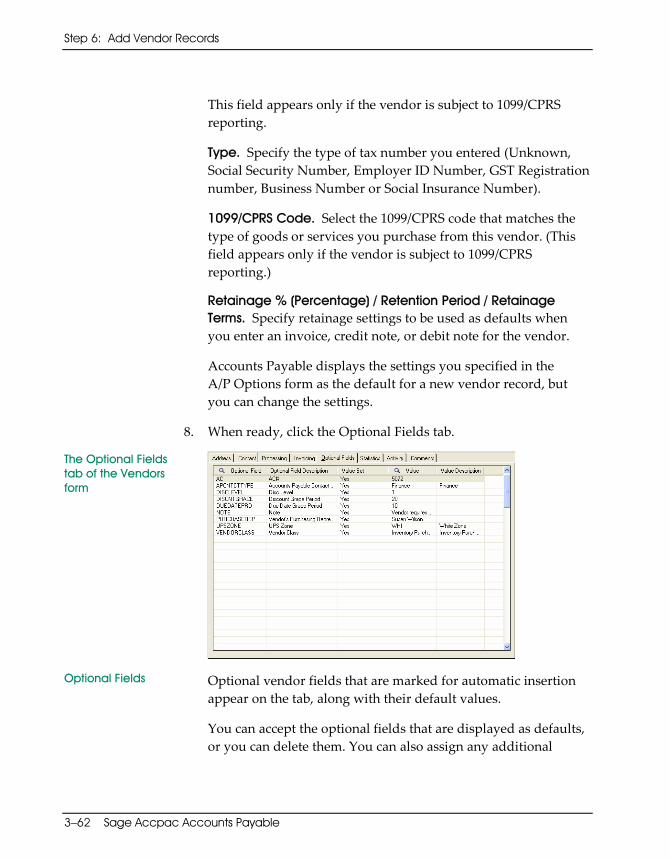
Step 6: Add Vendor Records
3–62 Sage Accpac Accounts Payable
Apgs‐3.doc, printed on 11/16/2007, at 11:53:29 AM. Last saved on 11/16/2007 11:48:00 AM.
Sage Software Confidential
This field appears only if the vendor is subject to 1099/CPRS reporting.
Type. Specify the type of tax number you entered (Unknown, Social Security Number, Employer ID Number, GST Registration number, Business Number or Social Insurance Number).
1099/CPRS Code. Select the 1099/CPRS code that matches the type of goods or services you purchase from this vendor. (This field appears only if the vendor is subject to 1099/CPRS reporting.)
Retainage % (Percentage) / Retention Period / Retainage Terms. Specify retainage settings to be used as defaults when you enter an invoice, credit note, or debit note for the vendor.
Accounts Payable displays the settings you specified in the A/P Options form as the default for a new vendor record, but you can change the settings.
8. When ready, click the Optional Fields tab.
The Optional Fields tab of the Vendors form
Optional Fields Optional vendor fields that are marked for automatic insertion appear on the tab, along with their default values.
You can accept the optional fields that are displayed as defaults, or you can delete them. You can also assign any additional

Step 6: Add Vendor Records
Getting Started 3–63
Apgs‐3.doc, printed on 11/16/2007, at 11:53:29 AM. Last saved on 11/16/2007 11:48:00 AM.
Sage Software Confidential
Setting Up
Accounts Payable
optional fields that are defined in Accounts Payable for vendors and vendor groups.
If the assigned group uses the same optional fields, the program displays the entries from the vendor group record as defaults for the vendor.
If no default entry is specified for an optional field in the vendor group record, the program displays the entry used in the optional field setup record.
You can accept or change the default entries. However, if the optional field is validated, you can use only a value that is defined for the optional field in Common Services.
Enter vendor comments
9. If you do not want to add any vendor comments, click the Add button to add the vendor record now.
10. If you want to add miscellaneous information to the vendor record, click the Comments tab.
The Comments tab of the Vendors form
11. Fill in the Comments tab as follows:
Date Entered. Type or select the date you want to use, or use the displayed (system) date.
Accounts Payable stores comments by entry date.
Step 6: Add Vendor Records
3–64 Sage Accpac Accounts Payable
Apgs‐3.doc, printed on 11/16/2007, at 11:53:29 AM. Last saved on 11/16/2007 11:48:00 AM.
Sage Software Confidential
Add new comments
To enter more than one comment for the same date, use the New button for each comment (otherwise, you will edit an existing comment, rather than add new comments).
Select an existing comment
Use the Finder or the Browse buttons to select from existing comments.
Follow-up Date. Type or select the date on which you want to check on the comment.
You can print comments on the Vendors report, and you can select vendors by a range of follow‐up dates.
Expiration Date. Type or select the date used for marking the comment for deletion.
You use the Clear History form to remove comments that have reached their expiration dates. You can also delete comments individually in the Vendors form using the Delete Comment button.
Comment. Type the comment, using up to 2,500 characters.
Entering a long comment
If you are entering a long comment, double‐click the comment line, or select the line, then click the Comment Zoom button, to open a separate Comment form that lets you view the entire comment as you enter it.
Add the vendor record
12. When finished, click Add to add the vendor to your records. Repeat the preceding steps for each vendor you want to add.
Add vendor statistics and activity later
If you want to enter statistics for the vendor, see “Step 10: Add Vendor and Vendor Group Statistics,” later in this chapter. You should enter all your vendor records and the current‐year transactions before entering vendor statistics.
13. Click Print on the File menu or choose the Vendors icon in the Setup Reports folder to print a list of the records you added.
Step 7: Add Remit-To Locations
Getting Started 3–65
Apgs‐3.doc, printed on 11/16/2007, at 11:53:29 AM. Last saved on 11/16/2007 11:48:00 AM.
Sage Software Confidential
Setting Up
Accounts Payable
If you added vendor statistics, use the same menu choice or icon to print the Vendor Statistics report. Check the reports to verify that your vendor records are correct and complete, and then file them.
Check data integrity
When you finish adding your vendor records, you should check data integrity and make a backup copy of the data, to ensure that you do not have to add the records a second time.
Modify Vendor Records
You can modify and delete vendor records, as needed, with these restrictions:
• To change the vendor number, you must first set up a new vendor account with the number you want to use, then delete the record you no longer want.
• You can edit vendor statistics only if you use the Allow Edit Of Statistics option.
• You cannot set a vendor record inactive if it is used in any unposted transactions.
• You cannot delete a vendor record that is used in unposted or outstanding transactions.
Multicurrency ledgers
• You can change the vendor group, account set, and tax group assigned to a vendor, but only to another vendor group, account set, or tax group that uses the same currency.
Step 7: Add Remit-To Locations (Optional)
The Remit‐To Location form lets you add addresses to which you send your payment checks (if the address is different from the address in the vendor record). You can add unlimited remit‐to locations for a vendor.
This step guides you through the process of adding a remit‐to location record.
Step 7: Add Remit‐To Locations
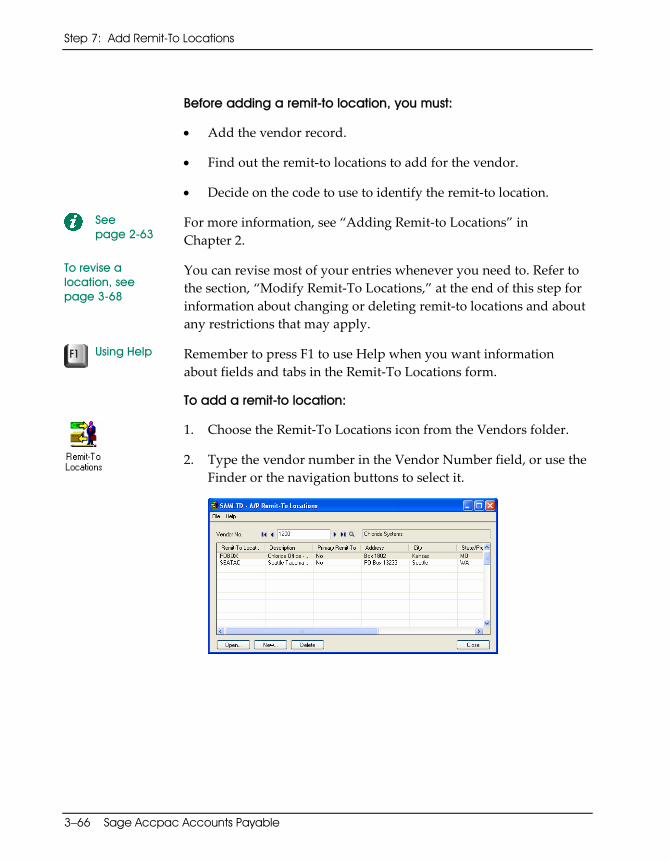
Step 7: Add Remit-To Locations
3–66 Sage Accpac Accounts Payable
Apgs‐3.doc, printed on 11/16/2007, at 11:53:29 AM. Last saved on 11/16/2007 11:48:00 AM.
Sage Software Confidential
Before adding a remit-to location, you must:
• Add the vendor record.
• Find out the remit‐to locations to add for the vendor.
• Decide on the code to use to identify the remit‐to location.
See page 2-63
For more information, see “Adding Remit‐to Locations” in Chapter 2.
To revise a location, see page 3-68
You can revise most of your entries whenever you need to. Refer to the section, “Modify Remit‐To Locations,” at the end of this step for information about changing or deleting remit‐to locations and about any restrictions that may apply.
Using Help Remember to press F1 to use Help when you want information
about fields and tabs in the Remit‐To Locations form.
To add a remit-to location:
1. Choose the Remit‐To Locations icon from the Vendors folder.
2. Type the vendor number in the Vendor Number field, or use the Finder or the navigation buttons to select it.

Step 7: Add Remit-To Locations
Getting Started 3–67
Apgs‐3.doc, printed on 11/16/2007, at 11:53:29 AM. Last saved on 11/16/2007 11:48:00 AM.
Sage Software Confidential
Setting Up
Accounts Payable
3. Click the New button to open a new record for the vendor. The Address tab, the first tab of the Remit‐To Locations record, appears as follows:
4. In the Remit‐To Location field, type a unique code, up to six characters, to identify the payment address. Press the Tab key to move to the description field, and then type a description of the location.
5. Fill out the Address tab as follows:
Primary Remit-To. Select Primary Remit‐To if you want Accounts Payable to use this location as the default address on invoices you enter from this vendor and on the checks you print for the vendor.
Address. Type the address, telephone and fax numbers, e‐mail address, and the name of a contact person or position at the remit‐to location.
Check Language. Choose the language in which you print checks for this remit‐to location.
6. When finished, click the Contact tab, and enter the name, telephone and fax numbers, and an e‐mail address for a contact person at the remit‐to location.
The vendor number you entered earlier appears here. Accept the entry, type a different one, or use the Finder to select the vendor number for which you are adding a remit-to location.

Step 7: Add Remit-To Locations
3–68 Sage Accpac Accounts Payable
Apgs‐3.doc, printed on 11/16/2007, at 11:53:29 AM. Last saved on 11/16/2007 11:48:00 AM.
Sage Software Confidential
7. Click the Optional Fields tab, if available.
If you do not use Sage Accpac Transaction Analysis and Optional Field Creator, you do not see the Optional Fields tab. Skip to step 8, below.
The Optional Fields tab of the Remit-to Locations form
Optional fields that are marked for automatic insertion on new remit‐to location records appear on the tab, along with their default values. (The Value Set field indicates whether a default value is set for an optional field.)
If the optional fields for the remit‐to location match those defined for vendors and vendor groups, the entries from the vendor record appear as default values. You can accept or change the values.
See page 2-64
For information about optional fields, see “Assigning Optional Fields to Remit‐to Locations” in Chapter 2.
Add the remit-to location
8. When ready, click the Add button. Repeat steps 2 through 7 for each remit‐to location you want to add.
9. Click Print on the File menu or choose the Remit‐To Locations icon in the Vendor Reports folder to print a list of the locations you added, to verify that they are correct and complete. File the report.
Modify Remit-To Locations
You can change or delete a remit‐to location at any time.
Step 8: Add Recurring Payable Records
Getting Started 3–69
Apgs‐3.doc, printed on 11/16/2007, at 11:53:29 AM. Last saved on 11/16/2007 11:48:00 AM.
Sage Software Confidential
Setting Up
Accounts Payable
To change a record, select the vendor number and remit‐to location code for the record you want to modify, then select or type new information in the fields you want to change.
You can change all the information in a record except the remit‐to code. To change this code, you must add another record using the new code, and then delete the record you no longer need.
When finished modifying a record, click Save to confirm your changes.
To delete a remit‐to location, select the vendor number and remit‐to code for the record, and then click Delete.
You cannot delete or set inactive a remit‐to location that is used in unposted documents.
Step 8: Add Recurring Payable Records
Before you can process a recurring payables batch, you must create recurring payable records in the Recurring Payables setup form. This step guides you through the process of adding a recurring payable record.
Note that you must have Invoice Batch Entry security access to be able to add, modify, or delete recurring payables records.
Before adding a recurring payable, you must:
• Add the vendor record for which you are adding the recurring payable.
• Decide on the code to identify the recurring payable. You can use the same code for different vendors.
• Determine the start date and the day of the month on which the recurring payable is due to be invoiced.
• Determine whether the recurring payable will expire on a certain date, or after you have processed a certain number of invoices,
Step 8: Add Recurring Payable Records
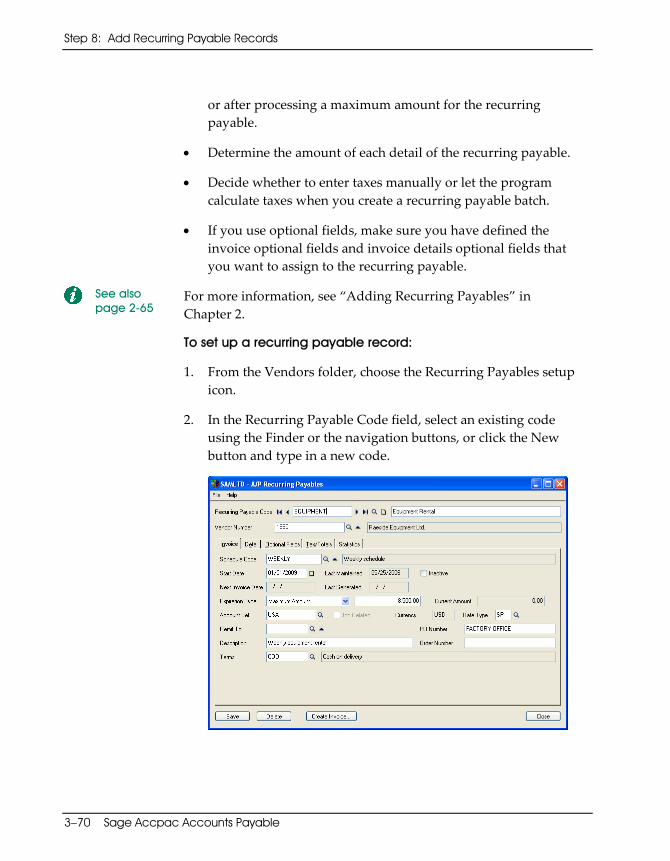
Step 8: Add Recurring Payable Records
3–70 Sage Accpac Accounts Payable
Apgs‐3.doc, printed on 11/16/2007, at 11:53:29 AM. Last saved on 11/16/2007 11:48:00 AM.
Sage Software Confidential
or after processing a maximum amount for the recurring payable.
• Determine the amount of each detail of the recurring payable.
• Decide whether to enter taxes manually or let the program calculate taxes when you create a recurring payable batch.
• If you use optional fields, make sure you have defined the invoice optional fields and invoice details optional fields that you want to assign to the recurring payable.
See also page 2-65
For more information, see “Adding Recurring Payables” in Chapter 2.
To set up a recurring payable record:
1. From the Vendors folder, choose the Recurring Payables setup icon.
2. In the Recurring Payable Code field, select an existing code using the Finder or the navigation buttons, or click the New button and type in a new code.

Step 8: Add Recurring Payable Records
Getting Started 3–71
Apgs‐3.doc, printed on 11/16/2007, at 11:53:29 AM. Last saved on 11/16/2007 11:48:00 AM.
Sage Software Confidential
Setting Up
Accounts Payable
Note that the code and the vendor number together identify the recurring payable record. Therefore, you can use the same recurring payable code for different vendors.
3. In the Vendor Number field, type the vendor number or use the Finder to select the vendor for whom you are creating the record.
4. Enter a description to identify the recurring payable record.
5. On the Invoice tab, enter the following details:
Schedule Code. Enter the schedule code that you want to attach to this record, or select it using the Finder.
Zoom If you want to set up a new schedule or modify an existing one, click the Zoom button. You can use up to 15 characters to create the new code. (Note that you must have a security authorization to maintain schedules in Common Services to be able to add or modify an existing schedule.)
Note: Any changes you make to a schedule affect all other programs using the schedule throughout Sage Accpac.
For more information about setting up schedules for recurring transactions, refer to the System Manager User Guide.
Start Date. Enter the date that the recurring payable for this vendor begins.
When you create a batch using the Create Recurring Payable Batch form, Accounts Payable includes the invoice in the batch only if the run date for the batch is the same or later than the specified start date.
Next Invoice Date. Accounts Payable updates this field when you generate an invoice using the Create Recurring Payable Batch form, or when you change the schedule for the recurring payable. You cannot change the date.
Step 8: Add Recurring Payable Records
3–72 Sage Accpac Accounts Payable
Apgs‐3.doc, printed on 11/16/2007, at 11:53:29 AM. Last saved on 11/16/2007 11:48:00 AM.
Sage Software Confidential
The program uses the Last Generated date together with the schedule to determine when the next invoice should be generated.
Last Generated. Accounts Payable updates this date field when you create an invoice for this recurring payable. You cannot change the date.
Expiration Type. Use this field to specify whether to limit the invoices for the recurring payable, as follows:
• Select Specific Date if you do not want to create any invoices for the payable after a certain date. Type the expiration date for the recurring payable in the adjacent date field.
• Select Maximum Amount, and then specify the maximum amount that can be invoiced for the recurring payable, if you want to stop processing invoices after reaching a maximum amount.
When you create a recurring payables invoice batch, if the amount invoiced to date plus the new invoice amount will exceed the maximum, Accounts Payable does not create the invoice. A message appears at the end of processing stating that the recurring payable for the vendor will exceed the maximum amount.
• Select Number of Invoices, and then specify the number of invoices to process for the recurring payable, if you want to limit the number of invoices to process for the payable.
• Select No Expiration, if you want to process invoices indefinitely for the recurring payable.
Current Amount. If the recurring payable uses the Maximum Amount expiration type, the program displays the total invoiced for the recurring payable from the Statistics tab.
Current Count. If the recurring payable uses the Number Of Invoices expiration type, the program displays the total number
Step 8: Add Recurring Payable Records
Getting Started 3–73
Apgs‐3.doc, printed on 11/16/2007, at 11:53:29 AM. Last saved on 11/16/2007 11:48:00 AM.
Sage Software Confidential
Setting Up
Accounts Payable
of invoices created for the recurring payable from the Statistics tab.
Account Set. Accounts Payable displays the vendor’s account set in this field, but you can change it to another account set. In a multicurrency ledger, the new account set must use the vendor’s currency.
Currency. This field appears only in multicurrency Accounts Payable ledgers. The Currency field displays your vendor currency.
Rate Type. This field appears only in multicurrency ledgers. It shows the rate type to be used to determine the exchange rate when you create a recurring invoice.
The rate type from the vendor record appears as the default, but you can enter a different rate type if you want.
Remit-To. If you have a primary remit‐to location or specify a remit‐to location, it appears on an invoice created for the recurring payable. The Remit‐To field displays the code for the primary remit‐to location, if you have set one up for the vendor.
Zoom To display the remit‐to location information, click the Zoom button next to the field. If the field is blank, Accounts Payable displays the address from the vendor record.
If a code is displayed, you can accept it or change it to another remit‐to location, or you can leave the field blank.
PO Number. If the recurring payable is for a blanket order or a standing order, enter the purchase order number. You can use up to 22 alphanumeric characters.
Description. Enter a description for the recurring payable. You can use up to 30 alphanumeric characters. The description is used in the invoice when you create a recurring payables batch.

Step 8: Add Recurring Payable Records
3–74 Sage Accpac Accounts Payable
Apgs‐3.doc, printed on 11/16/2007, at 11:53:29 AM. Last saved on 11/16/2007 11:48:00 AM.
Sage Software Confidential
Order Number. If you want, enter the sales order number, using up to 22 alphanumeric characters. The order number is used on the invoice when you create a recurring payables batch.
Terms. The payment terms from the vendor record appear by default in this field. You can either tab out of the field to accept the terms, or enter different terms by typing a valid code or using the Finder to choose it.
The due date, discount date, and discount amount for the invoice is determined by the terms code.
If you use a terms code for a multiple payment schedule, Accounts Payable creates payment schedules when you create invoices for the recurring payable.
1099/CPRS Code and 1099/CPRS Amount. These fields appear only if you have selected both of the following options:
• Use 1099/CPRS Reporting (on the Transactions tab on the Options form).
• Subject To 1099/CPRS Reporting (on the Invoicing tab in the vendor record).
Accounts Payable displays the 1099/CPRS code from the vendor record as the default. You can accept the default, or you can enter another 1099/CPRS code either by typing it or by using the Finder to select it. You can also leave the field blank.
Enter a positive amount, or zero, in the 1099/CPRS Amount field. The amount must not exceed the document total when the invoice is created.
6. Click the Detail tab to enter distribution information.
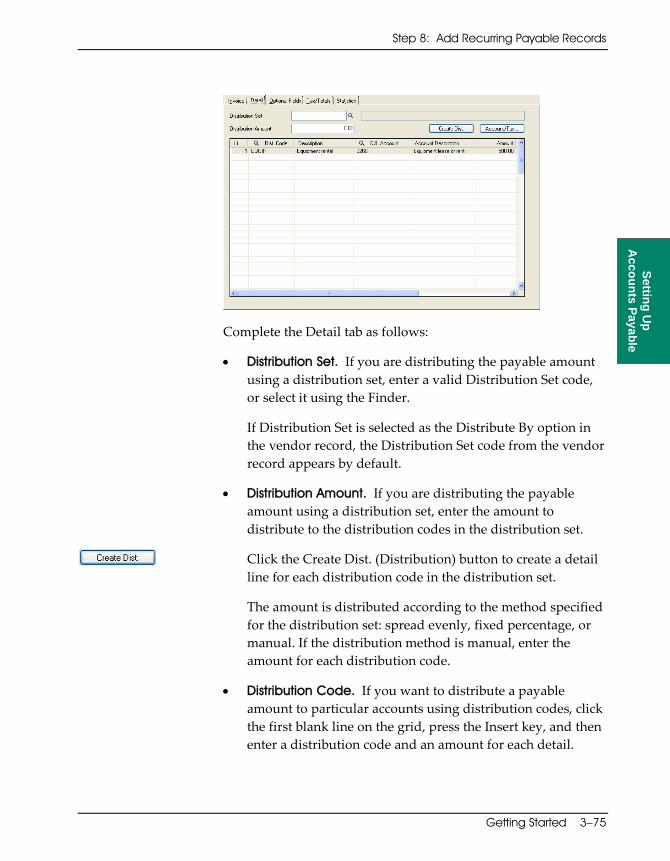
Step 8: Add Recurring Payable Records
Getting Started 3–75
Apgs‐3.doc, printed on 11/16/2007, at 11:53:29 AM. Last saved on 11/16/2007 11:48:00 AM.
Sage Software Confidential
Setting Up
Accounts Payable
Complete the Detail tab as follows:
• Distribution Set. If you are distributing the payable amount using a distribution set, enter a valid Distribution Set code, or select it using the Finder.
If Distribution Set is selected as the Distribute By option in the vendor record, the Distribution Set code from the vendor record appears by default.
• Distribution Amount. If you are distributing the payable amount using a distribution set, enter the amount to distribute to the distribution codes in the distribution set.
Click the Create Dist. (Distribution) button to create a detail line for each distribution code in the distribution set.
The amount is distributed according to the method specified for the distribution set: spread evenly, fixed percentage, or manual. If the distribution method is manual, enter the amount for each distribution code.
• Distribution Code. If you want to distribute a payable amount to particular accounts using distribution codes, click the first blank line on the grid, press the Insert key, and then enter a distribution code and an amount for each detail.
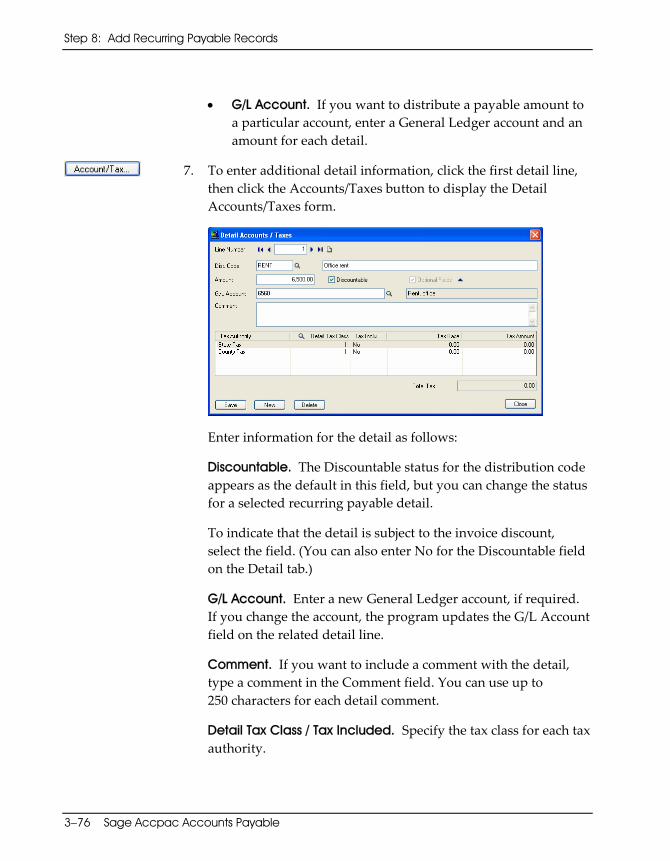
Step 8: Add Recurring Payable Records
3–76 Sage Accpac Accounts Payable
Apgs‐3.doc, printed on 11/16/2007, at 11:53:29 AM. Last saved on 11/16/2007 11:48:00 AM.
Sage Software Confidential
• G/L Account. If you want to distribute a payable amount to a particular account, enter a General Ledger account and an amount for each detail.
7. To enter additional detail information, click the first detail line, then click the Accounts/Taxes button to display the Detail Accounts/Taxes form.
Enter information for the detail as follows:
Discountable. The Discountable status for the distribution code appears as the default in this field, but you can change the status for a selected recurring payable detail.
To indicate that the detail is subject to the invoice discount, select the field. (You can also enter No for the Discountable field on the Detail tab.)
G/L Account. Enter a new General Ledger account, if required. If you change the account, the program updates the G/L Account field on the related detail line.
Comment. If you want to include a comment with the detail, type a comment in the Comment field. You can use up to 250 characters for each detail comment.
Detail Tax Class / Tax Included. Specify the tax class for each tax authority.
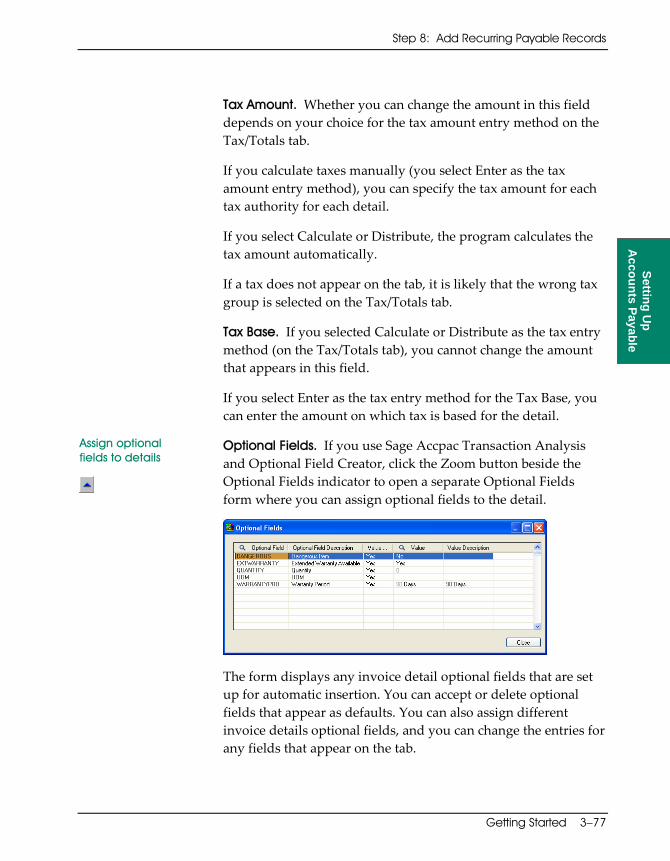
Step 8: Add Recurring Payable Records
Getting Started 3–77
Apgs‐3.doc, printed on 11/16/2007, at 11:53:29 AM. Last saved on 11/16/2007 11:48:00 AM.
Sage Software Confidential
Setting Up
Accounts Payable
Tax Amount. Whether you can change the amount in this field depends on your choice for the tax amount entry method on the Tax/Totals tab.
If you calculate taxes manually (you select Enter as the tax amount entry method), you can specify the tax amount for each tax authority for each detail.
If you select Calculate or Distribute, the program calculates the tax amount automatically.
If a tax does not appear on the tab, it is likely that the wrong tax group is selected on the Tax/Totals tab.
Tax Base. If you selected Calculate or Distribute as the tax entry method (on the Tax/Totals tab), you cannot change the amount that appears in this field.
If you select Enter as the tax entry method for the Tax Base, you can enter the amount on which tax is based for the detail.
Assign optional fields to details
Optional Fields. If you use Sage Accpac Transaction Analysis and Optional Field Creator, click the Zoom button beside the Optional Fields indicator to open a separate Optional Fields form where you can assign optional fields to the detail.
The form displays any invoice detail optional fields that are set up for automatic insertion. You can accept or delete optional fields that appear as defaults. You can also assign different invoice details optional fields, and you can change the entries for any fields that appear on the tab.
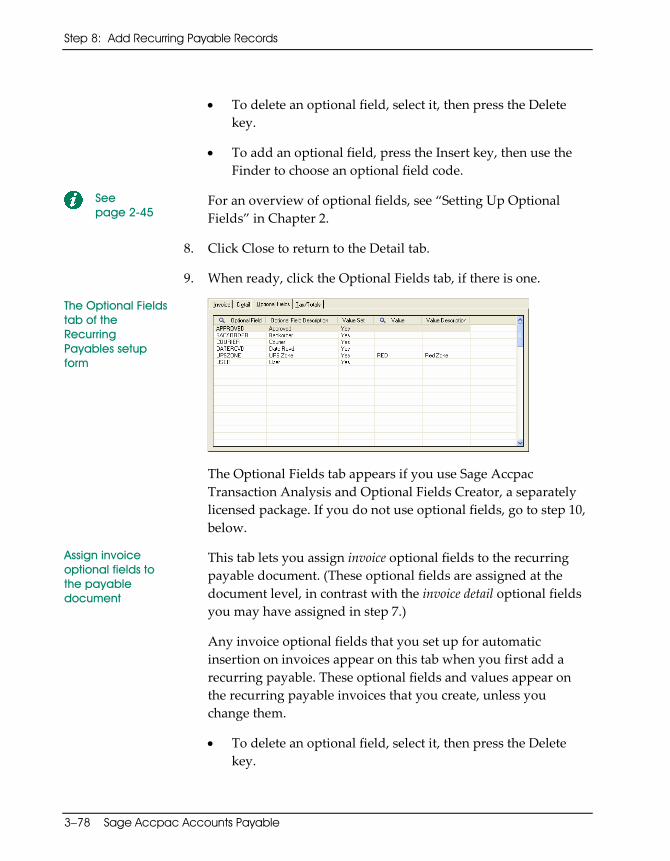
Step 8: Add Recurring Payable Records
3–78 Sage Accpac Accounts Payable
Apgs‐3.doc, printed on 11/16/2007, at 11:53:29 AM. Last saved on 11/16/2007 11:48:00 AM.
Sage Software Confidential
• To delete an optional field, select it, then press the Delete key.
• To add an optional field, press the Insert key, then use the Finder to choose an optional field code.
See page 2-45
For an overview of optional fields, see “Setting Up Optional Fields” in Chapter 2.
8. Click Close to return to the Detail tab.
9. When ready, click the Optional Fields tab, if there is one.
The Optional Fields tab of the Recurring Payables setup form
The Optional Fields tab appears if you use Sage Accpac Transaction Analysis and Optional Fields Creator, a separately licensed package. If you do not use optional fields, go to step 10, below.
Assign invoice optional fields to the payable document
This tab lets you assign invoice optional fields to the recurring payable document. (These optional fields are assigned at the document level, in contrast with the invoice detail optional fields you may have assigned in step 7.)
Any invoice optional fields that you set up for automatic insertion on invoices appear on this tab when you first add a recurring payable. These optional fields and values appear on the recurring payable invoices that you create, unless you change them.
• To delete an optional field, select it, then press the Delete key.
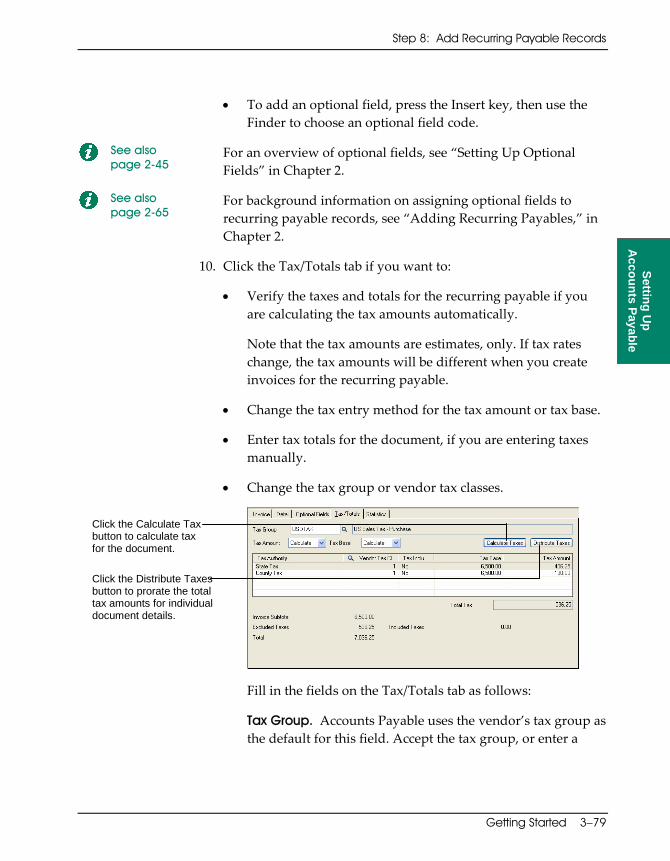
Step 8: Add Recurring Payable Records
Getting Started 3–79
Apgs‐3.doc, printed on 11/16/2007, at 11:53:29 AM. Last saved on 11/16/2007 11:48:00 AM.
Sage Software Confidential
Setting Up
Accounts Payable
• To add an optional field, press the Insert key, then use the Finder to choose an optional field code.
See also page 2-45
For an overview of optional fields, see “Setting Up Optional Fields” in Chapter 2.
See also page 2-65
For background information on assigning optional fields to recurring payable records, see “Adding Recurring Payables,” in Chapter 2.
10. Click the Tax/Totals tab if you want to:
• Verify the taxes and totals for the recurring payable if you are calculating the tax amounts automatically.
Note that the tax amounts are estimates, only. If tax rates change, the tax amounts will be different when you create invoices for the recurring payable.
• Change the tax entry method for the tax amount or tax base.
• Enter tax totals for the document, if you are entering taxes manually.
• Change the tax group or vendor tax classes.
Fill in the fields on the Tax/Totals tab as follows:
Tax Group. Accounts Payable uses the vendor’s tax group as the default for this field. Accept the tax group, or enter a
Click the Calculate Tax button to calculate tax for the document.
Click the Distribute Taxes button to prorate the total tax amounts for individual document details.
Step 8: Add Recurring Payable Records
3–80 Sage Accpac Accounts Payable
Apgs‐3.doc, printed on 11/16/2007, at 11:53:29 AM. Last saved on 11/16/2007 11:48:00 AM.
Sage Software Confidential
different one either by typing it in the field or by using the Finder to select it.
If you are using a multicurrency ledger and the currency for the tax group is not the same as the vendor’s currency, tax reporting amounts will appear on the invoices created for the recurring payable.
Tax Amount/Tax Base (entry method). The default tax entry methods you selected on the A/P Options form appear, but you can change them. For the tax amount and the tax base, you can select:
• Calculate — to have Accounts Payable calculate all tax amounts for you when you create the recurring payables batch. This method prevents you from changing tax amounts manually.
• Distribute —to enter total tax amounts manually but distribute tax automatically to individual distribution lines using the Distribute Taxes button. This choice prevents you from changing taxes for distribution lines.
• Enter —to enter all tax amounts manually, including detail taxes.
Click the Calculate Taxes button or the Distribute Taxes button to override manually entered amounts. You can change the total tax amounts and the taxes for distribution lines.
Note that with this entry method, you must ensure that the sum of the amounts you enter for the details equals the totals you enter on the Tax/Totals tab. If the amounts are different, Accounts Payable displays an error message and does not let you add or save the recurring payable record.

Step 8: Add Recurring Payable Records
Getting Started 3–81
Apgs‐3.doc, printed on 11/16/2007, at 11:53:29 AM. Last saved on 11/16/2007 11:48:00 AM.
Sage Software Confidential
Setting Up
Accounts Payable
11. For each tax authority, accept or change the fields on the tax grid, as follows:
Vendor Tax Class. Accept or change the Vendor Tax Class, if necessary (use the Finder).
Tax Included. You can change the Tax Included option only if the Allow Tax in Price option is selected for the tax authority in Tax Services.
Tax Base. If you selected Enter or Distribute as the tax base entry method, enter the tax base in this field for each tax authority.
Tax Amount. If you selected Enter or Distribute as the tax amount entry method, specify the total amount of tax for each tax authority in this field.
If you selected Calculate (or Distribute) as the entry methods for both the tax amount and tax base, you can add or save the recurring payable record now. (You cannot change the detail tax amounts or bases.)
Distribute taxes manually
If you selected Enter as the method for the tax amount, ensure that the sum of the amounts and bases you entered for the document details equals the total on the Tax/Totals tab. (If you selected Distribute for the tax base, you cannot change the detail tax bases.)
If you selected Enter as the method for the tax base and Distribute for the tax amount, ensure that the sum of the bases you entered for the document details equals the total on the Tax/Totals tab.
If you selected Calculate for the tax amount and Distribute or Enter for the tax base, the program uses the tax bases to calculate tax amounts automatically.
12. If you need to update totals for the recurring payable, click the Statistics tab. Otherwise, skip this step.
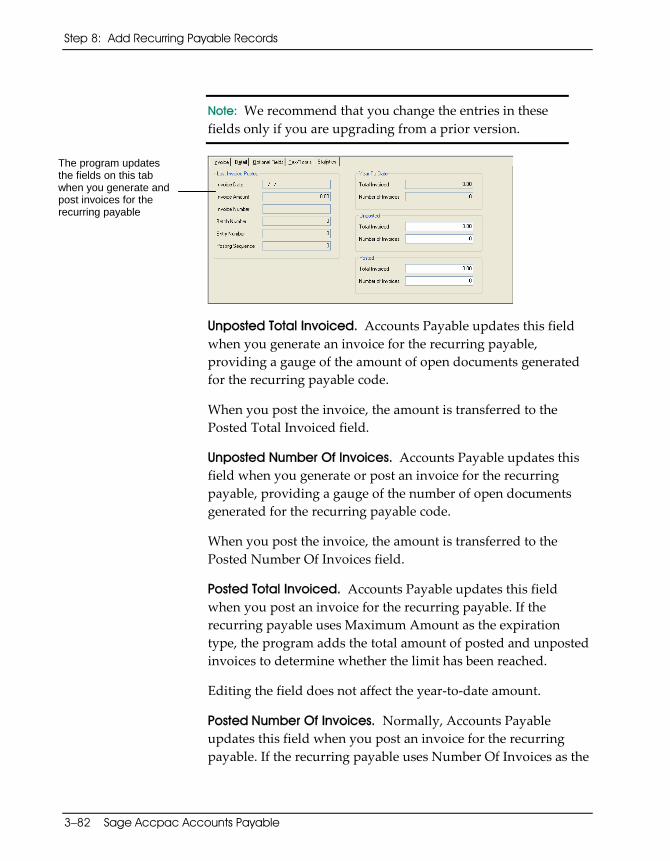
Step 8: Add Recurring Payable Records
3–82 Sage Accpac Accounts Payable
Apgs‐3.doc, printed on 11/16/2007, at 11:53:29 AM. Last saved on 11/16/2007 11:48:00 AM.
Sage Software Confidential
Note: We recommend that you change the entries in these fields only if you are upgrading from a prior version.
Unposted Total Invoiced. Accounts Payable updates this field when you generate an invoice for the recurring payable, providing a gauge of the amount of open documents generated for the recurring payable code.
When you post the invoice, the amount is transferred to the Posted Total Invoiced field.
Unposted Number Of Invoices. Accounts Payable updates this field when you generate or post an invoice for the recurring payable, providing a gauge of the number of open documents generated for the recurring payable code.
When you post the invoice, the amount is transferred to the Posted Number Of Invoices field.
Posted Total Invoiced. Accounts Payable updates this field when you post an invoice for the recurring payable. If the recurring payable uses Maximum Amount as the expiration type, the program adds the total amount of posted and unposted invoices to determine whether the limit has been reached.
Editing the field does not affect the year‐to‐date amount.
Posted Number Of Invoices. Normally, Accounts Payable updates this field when you post an invoice for the recurring payable. If the recurring payable uses Number Of Invoices as the
The program updates the fields on this tab when you generate and post invoices for the recurring payable
Step 9: Add Opening Balances and Current-Year Transactions
Getting Started 3–83
Apgs‐3.doc, printed on 11/16/2007, at 11:53:29 AM. Last saved on 11/16/2007 11:48:00 AM.
Sage Software Confidential
Setting Up
Accounts Payable
expiration type, the program adds the number of posted and unposted invoices to determine whether the limit has been reached.
Editing the field does not affect the year‐to‐date total.
13. Click Add to add the recurring payable record.
Accounts Payable warns you if the amount before tax exceeds the maximum. However, if the 1099/CPRS Amount exceeds the document total when you try to create an invoice for the recurring payable, Accounts Payable does not create the invoice.
Step 9: Add Opening Balances and Current-Year Transactions
In this step, you prepare and post invoices and (where necessary) payment and adjustment transactions to set up the current balances in each of your vendor accounts.
The method you use to create current vendor account balances depends on how much information you want to transfer to Sage Accpac Accounts Payable from your previous system.
The instructions in this step assume that:
• Your general ledger is up to date.
In other words, you have already posted all transactions from purchases to your general ledger. The only transactions you want to post to your general ledger are for invoices or payments that you record after you set up the Accounts Payable ledger.
• You have already added the tax groups, tax authorities, tax classes, and tax rates you use with Accounts Payable.
Further, we assume that your tax information is up to date, and that you do not want to send any tax information to Tax Services when you add your current Accounts Payable balances in this step.
Step 9: Add Opening Balances and Current‐Year Transactions

Step 9: Add Opening Balances and Current-Year Transactions
3–84 Sage Accpac Accounts Payable
Apgs‐3.doc, printed on 11/16/2007, at 11:53:29 AM. Last saved on 11/16/2007 11:48:00 AM.
Sage Software Confidential
• You have defined the banks you need for Accounts Payable in Bank Services, and have already added all payments and prepayment information.
In other words, we assume that you do not want to send information to your banks when you add your current Accounts Payable balances.
• You want to enter only the outstanding balance of each vendor invoice.
If necessary, on an individual basis, you can enter original invoice amounts and all documents applied to the invoice. You can also enter the original invoice amount in the invoice description field of the invoice, or you can enter the invoice history as a comment in the vendor record.
• You have selected the options you want to use to enter and edit vendor and vendor group statistics in the steps that follow. Some of these statistics are created as you post the setup transactions.
You must decide on the amount of detail you need for each vendor and invoice. In many cases, you only want the outstanding balance in your new ledger; for some invoices, you may want the original amount, plus every payment, credit note, or adjustment applied to it. The more detail you want, however, the more time it takes to set up your records.
There are also other methods you may want to use to set up your system. For example, you can start your Accounts Payable system as an all‐new system, entering only new invoices and other transactions that occur after set up. You then run two payables systems, processing existing invoices in your previous system until they are all completed, before switching entirely to Sage Accpac Accounts Payable.
This method also does not let you initially use Accounts Payable to print complete payables reports, and it may cause confusion about which system to check when tracking transactions — but if all your

Step 9: Add Opening Balances and Current-Year Transactions
Getting Started 3–85
Apgs‐3.doc, printed on 11/16/2007, at 11:53:29 AM. Last saved on 11/16/2007 11:48:00 AM.
Sage Software Confidential
Setting Up
Accounts Payable
payables are short‐term, this method may provide an easier transition.
To add outstanding transactions to create opening balances:
Turn off tax tracking
1. Select No Reporting for the Tax Tracking option in all the tax authorities you use with Accounts Payable.
See the Tax and Bank Services User Guide for information about selecting options for tax authorities.
Use a dummy bank
2. Create a bank called SETUP in Bank Services.
Multicurrency ledger
If you use multicurrency accounting, select the Multicurrency option for the bank account, then select the functional currency as the statement currency.
See the Tax and Bank Services User Guide for information about defining banks.
Create general ledger batches “On Request”
3. If you have not already done so, select On Request Using Create G/L Batch Icon for the Create G/L Transactions option on the Integration tab of the G/L Integration form.
Prepare and enter invoices
4. Create one invoice for the amount of each invoice that is currently outstanding. Make sure you enter the correct document dates and terms, so that the transactions are aged correctly.
Use the Invoice Entry form to add the transactions, as described in the User Guide.
Note that if you choose to enter the original amount of each invoice, you also have to enter transactions for each payment, credit or debit note, and adjustment that has been applied to the invoice.
5. Create a payment entry for each prepayment you have made to a vendor.
Use the SETUP bank Use the SETUP bank code with each batch of payments you create.
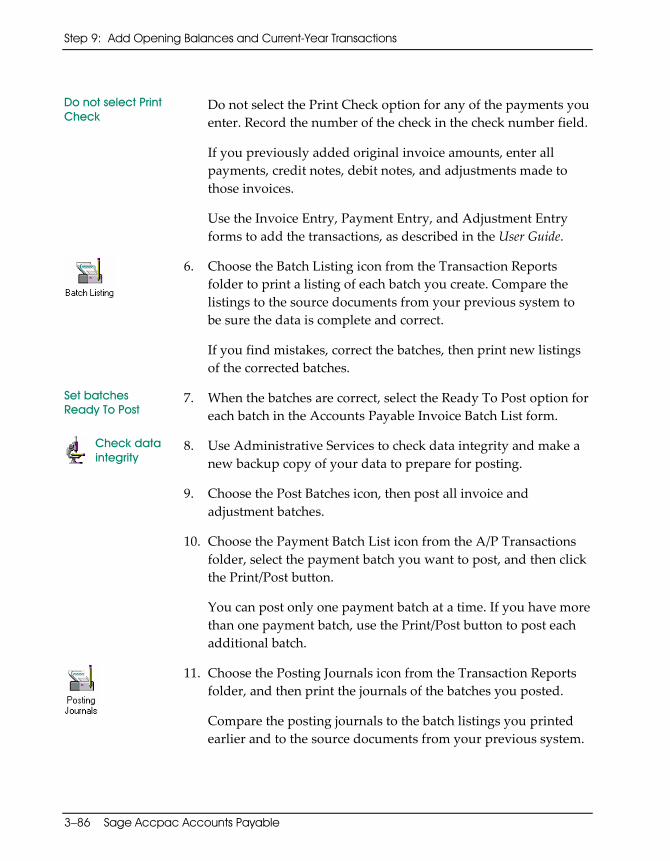
Step 9: Add Opening Balances and Current-Year Transactions
3–86 Sage Accpac Accounts Payable
Apgs‐3.doc, printed on 11/16/2007, at 11:53:29 AM. Last saved on 11/16/2007 11:48:00 AM.
Sage Software Confidential
Do not select Print Check
Do not select the Print Check option for any of the payments you enter. Record the number of the check in the check number field.
If you previously added original invoice amounts, enter all payments, credit notes, debit notes, and adjustments made to those invoices.
Use the Invoice Entry, Payment Entry, and Adjustment Entry forms to add the transactions, as described in the User Guide.
6. Choose the Batch Listing icon from the Transaction Reports folder to print a listing of each batch you create. Compare the listings to the source documents from your previous system to be sure the data is complete and correct.
If you find mistakes, correct the batches, then print new listings of the corrected batches.
Set batches Ready To Post
7. When the batches are correct, select the Ready To Post option for each batch in the Accounts Payable Invoice Batch List form.
Check data integrity
8. Use Administrative Services to check data integrity and make a new backup copy of your data to prepare for posting.
9. Choose the Post Batches icon, then post all invoice and adjustment batches.
10. Choose the Payment Batch List icon from the A/P Transactions folder, select the payment batch you want to post, and then click the Print/Post button.
You can post only one payment batch at a time. If you have more than one payment batch, use the Print/Post button to post each additional batch.
11. Choose the Posting Journals icon from the Transaction Reports folder, and then print the journals of the batches you posted.
Compare the posting journals to the batch listings you printed earlier and to the source documents from your previous system.

Step 9: Add Opening Balances and Current-Year Transactions
Getting Started 3–87
Apgs‐3.doc, printed on 11/16/2007, at 11:53:29 AM. Last saved on 11/16/2007 11:48:00 AM.
Sage Software Confidential
Setting Up
Accounts Payable
12. Choose the Vendor Transactions icon from the Transaction Reports folder to print the Vendor Transactions report for all your vendors.
Select all transactions types, and print the report by fiscal year and period. Select Account Set as the first Sort By option.
13. Check the Vendor Transactions report against your vendor accounts, to be sure you posted all transactions correctly.
14. Check the account set balances on the Vendor Transactions report against the balances in the Payables Control accounts in your general ledger to be sure the total of outstanding payables in your general ledger equals the total of the Accounts Payable ledger.
If the totals do not match, post missing transactions and adjustments to correct errors, then print the report and check it against the general ledger total again.
15. Choose the Create G/L Batch icon from the Periodic Processing folder, then create the general ledger transactions for the batches you posted.
16. Choose the G/L Transactions icon from the Transaction Reports folder, then print the report for each of the batch types you posted in Accounts Payable.
Compare the report to the General Ledger summaries on the posting journals and to the general ledger listing from your previous system to be sure the totals balance.
17. File the batch listings, posting journals, and other reports you printed in these steps as part of your setup records.
18. Check the Integration tab of the G/L Integration form to see whether you want to change your selections for any of the options, such as the Create G/L Transactions By option and the Consolidate G/L Batches option.
Step 9: Add Opening Balances and Current-Year Transactions
3–88 Sage Accpac Accounts Payable
Apgs‐3.doc, printed on 11/16/2007, at 11:53:29 AM. Last saved on 11/16/2007 11:48:00 AM.
Sage Software Confidential
19. If necessary, change your selection for the Tax Tracking option to At Invoice Level for the tax authorities you use with Accounts Payable. (You selected No Reporting for the option in step 1 of these instructions.)
20. Reconcile, then delete the SETUP bank as follows:
a. Make a bank entry for the total check amount sent to the bank by your Accounts Payable setup transactions (if you entered payments).
b. Clear the individual checks.
c. Post the reconciliation to reduce the bank balance to zero.
d. Delete the bank.
See the Tax and Bank Services User Guide for instructions about reconciling and deleting banks.
21. Process the general ledger batches.
If your general ledger already contains the correct Accounts Payable and Bank balances, you need to delete the general ledger batches that you created by posting the Accounts Payable transactions.
If you do not delete the batches, you risk posting transaction amounts twice in your general ledger.
To delete the batches:
• If you use Sage Accpac General Ledger, follow the instructions in the General Ledger User Guide. The batches appear as open General Ledger batches, and you must set General Ledger to Allow Edit Of Imported Entries, on the Posting tab of the G/L Options form.
• If you use another general ledger, delete them from the directory in which you keep your company’s data. (Delete the files that begin with the letters GLAP and GLBK, and have the filename extension .CSV.)
Step 10: Add Vendor and Vendor Group Statistics
Getting Started 3–89
Apgs-3.doc, printed on 1/31/2008, at 4:52:04 PM. Last saved on 1/31/2008 4:51:00 PM.
Sage Software Confidential
Setting Up
Accounts Payable
If your general ledger does not contain the Accounts Payable transactions (that is, you have not previously posted payables transactions to the General Ledger), you should print the payables batch listing in General Ledger, check it for errors, then post the batch, following the instructions in the Sage Accpac General Ledger User Guide.
If you do not have Sage Accpac General Ledger, you can import the General Ledger batches into another computerized general ledger, or use your copy of the G/L Transactions report to manually enter the transactions in your general ledger.
If you do not have Sage Accpac General Ledger, Accounts Payable creates general ledger batch files in CSV format (Comma Separated Values). These files begin with the letters GLAP and GLBK, and have the filename extension CSV.
Step 10: Add Vendor and Vendor Group Statistics (Optional)
After you post transactions to set up the current balances in your vendor accounts, you may want to add account totals from earlier periods and years as statistics in the vendor records.
Before adding vendor statistics, you must:
• Add records for vendors and vendor groups.
• Select the Allow Edit Of Statistics option on the Processing tab of the A/P Options form.
See page 2-60
For more information, see “Using Vendor Statistics” in Chapter 2.
To add statistics:
1. Choose the Vendors icon from the Vendors folder.
2. Enter the number of the vendor for whom you are adding statistics, or choose the number from the Finder.
3. Click the Statistics tab.
Step10:
Add Vendor
nd Vendor Group Statitics
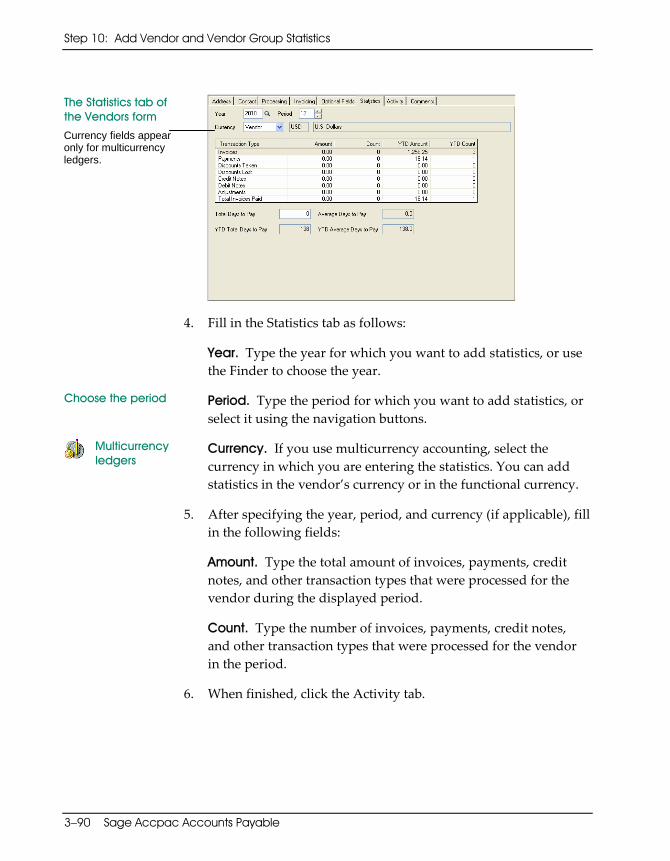
Step 10: Add Vendor and Vendor Group Statistics
3–90 Sage Accpac Accounts Payable
Apgs‐3.doc, printed on 11/16/2007, at 11:53:29 AM. Last saved on 11/16/2007 11:48:00 AM.
Sage Software Confidential
The Statistics tab of the Vendors form
4. Fill in the Statistics tab as follows:
Year. Type the year for which you want to add statistics, or use the Finder to choose the year.
Choose the period Period. Type the period for which you want to add statistics, or select it using the navigation buttons.
Multicurrency ledgers
Currency. If you use multicurrency accounting, select the currency in which you are entering the statistics. You can add statistics in the vendor’s currency or in the functional currency.
5. After specifying the year, period, and currency (if applicable), fill in the following fields:
Amount. Type the total amount of invoices, payments, credit notes, and other transaction types that were processed for the vendor during the displayed period.
Count. Type the number of invoices, payments, credit notes, and other transaction types that were processed for the vendor in the period.
6. When finished, click the Activity tab.
Currency fields appear only for multicurrency ledgers.

Step 10: Add Vendor and Vendor Group Statistics
Getting Started 3–91
Apgs‐3.doc, printed on 11/16/2007, at 11:53:29 AM. Last saved on 11/16/2007 11:48:00 AM.
Sage Software Confidential
Setting Up
Accounts Payable
The Activity tab of the Vendors form
7. Fill in the Activity tab as follows:
Multicurrency ledgers
Currency. If you use multicurrency accounting, select the currency in which to enter amounts. You can enter statistics in the functional currency or the vendor’s currency.
Amount. Type the amount of the highest balance this year, highest balance last year, and so on, for the vendor.
Date. Type the date on which each balance or amount was added to the vendor account.
Total Invoices Paid. Type the number of invoices paid to the vendor in the current year to date.
Number Of Payments. Type the number of checks sent to the vendor in the current year to date.
Total Days To Pay. Type the number of days it has taken your company to pay all the invoices that have been paid for this vendor in the current year to date.
8. When finished, click Save.
9. Repeat steps 4 through 8 for each set of vendor statistics you want to add.
These fields refer to the last posted documents.
Step 10: Add Vendor and Vendor Group Statistics
3–92 Sage Accpac Accounts Payable
Apgs‐3.doc, printed on 11/16/2007, at 11:53:29 AM. Last saved on 11/16/2007 11:48:00 AM.
Sage Software Confidential
10. Click Print on the File menu or choose the Vendors icon in the Vendor Reports folder.
a. When the Vendor Report form appears, select Vendor Period Statistics as the report type.
b. Make other selections to include the periods and vendors for which you have entered statistics.
c. Choose Vendor Group as the first Select By option. This choice arranges vendors on the report by group, so you can compare your vendor statistics report with the statistical report you print for vendor groups.
d. Click Print to print the report.
11. Compare the figures on the report to the statistical information in your previous payables system to be sure you correctly entered all the statistics you require.
If you find mistakes, edit the statistics for those vendors.
12. Repeat step 10, selecting Vendor Activity Statistics as the report type, to print a report of the activity statistics you entered.
Add vendor group statistics
13. Use the Vendor Groups form to enter statistical totals for all vendors in each of your vendor groups. You enter only period statistics for vendor groups. No activity statistics are kept for groups.
14. Click Print on the File menu or choose the Vendor Groups icon in the Vendor Reports folder.
When the Vendor Group Report form appears, select Vendor Group Statistics as the report type. Select the Include Counts option, and make other selections to include the periods and groups for which you have entered statistics, then print the report.
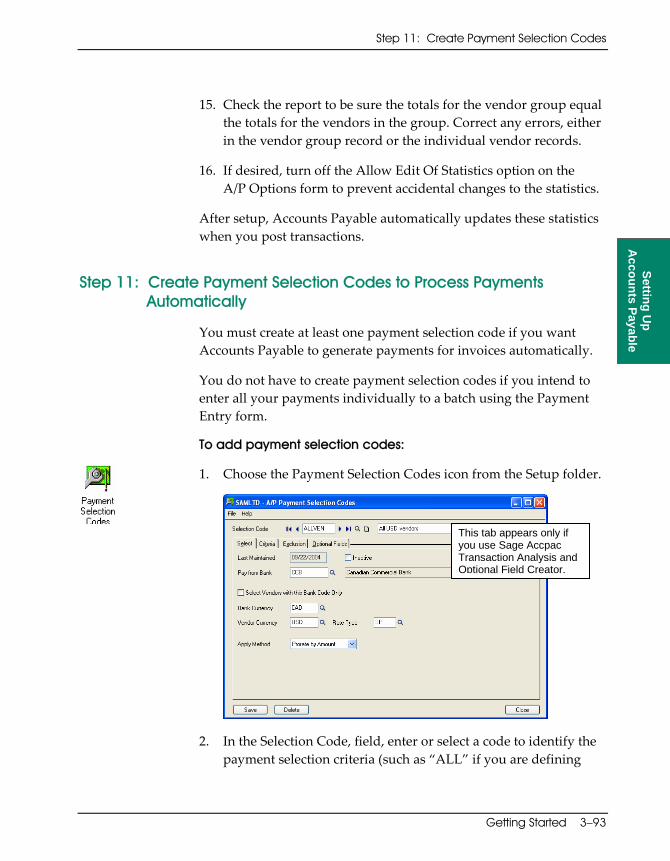
Step 11: Create Payment Selection Codes
Getting Started 3–93
Apgs‐3.doc, printed on 11/16/2007, at 11:53:29 AM. Last saved on 11/16/2007 11:48:00 AM.
Sage Software Confidential
Setting Up
Accounts Payable
15. Check the report to be sure the totals for the vendor group equal the totals for the vendors in the group. Correct any errors, either in the vendor group record or the individual vendor records.
16. If desired, turn off the Allow Edit Of Statistics option on the A/P Options form to prevent accidental changes to the statistics.
After setup, Accounts Payable automatically updates these statistics when you post transactions.
Step 11: Create Payment Selection Codes to Process Payments Automatically
You must create at least one payment selection code if you want Accounts Payable to generate payments for invoices automatically.
You do not have to create payment selection codes if you intend to enter all your payments individually to a batch using the Payment Entry form.
To add payment selection codes:
1. Choose the Payment Selection Codes icon from the Setup folder.
2. In the Selection Code, field, enter or select a code to identify the payment selection criteria (such as “ALL” if you are defining
Step 11: Create Payment Selection Codes
This tab appears only if you use Sage Accpac Transaction Analysis and Optional Field Creator.

Step 11: Create Payment Selection Codes
3–94 Sage Accpac Accounts Payable
Apgs‐3.doc, printed on 11/16/2007, at 11:53:29 AM. Last saved on 11/16/2007 11:48:00 AM.
Sage Software Confidential
only one). Tab once to move to the next field, then type a description for the code.
3. Complete the Select tab as follows:
Pay From Bank. Select the bank on which you are writing the checks.
Select Vendors With This Bank Code Only. This option restricts the payment selection to vendors that specify this bank in their vendor records.
Multicurrency ledgers
If you have a multicurrency ledger, you also select the bank currency and the vendor currency.
All checks in a batch must be:
• Drawn on the same bank. • In the same check currency. • For vendors with the same source currency.
Bank Currency. This is the check currency. You can only use one in a batch.
Rate Type (Bank). If the bank currency is different from your functional currency, you can enter or select the exchange rate type you want to use. (You can override this rate when you create a payment batch.)
Vendor Currency. All the vendors must use the same source currency. However, you do not have to specify the currency in the selection criteria record; you can select it when you generate payments.
Rate Type (Vendor). If the vendor currency is different form your functional currency, you can enter or select the exchange rate type for converting vendor currency to functional currency.
Apply Method. Specify how to apply partial payments to invoices that use different contracts, projects, and categories. Choose:
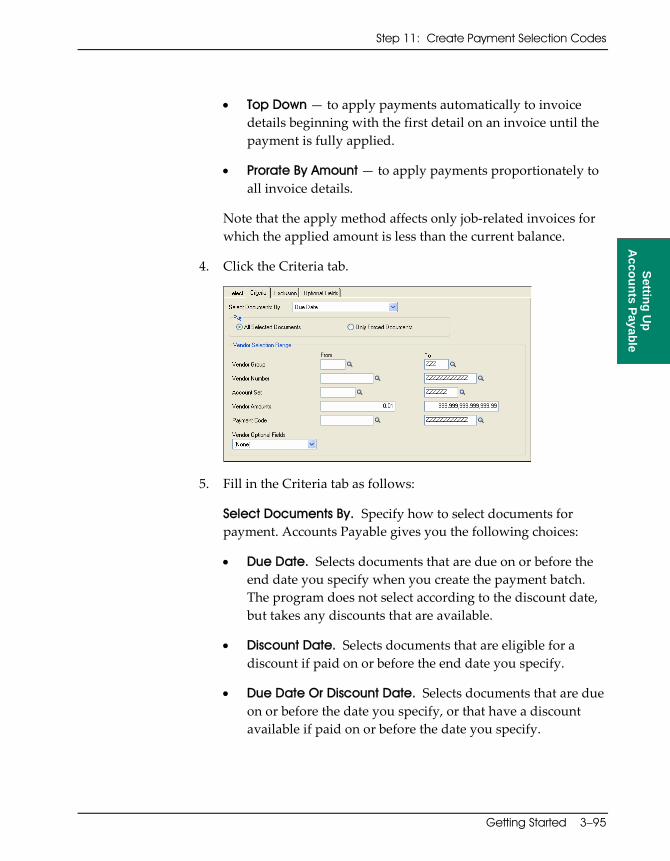
Step 11: Create Payment Selection Codes
Getting Started 3–95
Apgs‐3.doc, printed on 11/16/2007, at 11:53:29 AM. Last saved on 11/16/2007 11:48:00 AM.
Sage Software Confidential
Setting Up
Accounts Payable
• Top Down — to apply payments automatically to invoice details beginning with the first detail on an invoice until the payment is fully applied.
• Prorate By Amount — to apply payments proportionately to all invoice details.
Note that the apply method affects only job‐related invoices for which the applied amount is less than the current balance.
4. Click the Criteria tab.
5. Fill in the Criteria tab as follows:
Select Documents By. Specify how to select documents for payment. Accounts Payable gives you the following choices:
• Due Date. Selects documents that are due on or before the end date you specify when you create the payment batch. The program does not select according to the discount date, but takes any discounts that are available.
• Discount Date. Selects documents that are eligible for a discount if paid on or before the end date you specify.
• Due Date Or Discount Date. Selects documents that are due on or before the date you specify, or that have a discount available if paid on or before the date you specify.

Step 11: Create Payment Selection Codes
3–96 Sage Accpac Accounts Payable
Apgs‐3.doc, printed on 11/16/2007, at 11:53:29 AM. Last saved on 11/16/2007 11:48:00 AM.
Sage Software Confidential
The due date you enter when you create a check batch in each case is the latest date up to which you want transactions to be included. At batch creation, you must also enter a date indicating how far back you want to take discounts. The program ignores discounts that ceased to be available before the date you enter.
Pay All Selected Documents / Only Forced Documents. Choose to pay all documents in the selection, or only transactions that have a Forced status. (You use the Control Payments form to place invoices on hold or force their payment.)
Vendor Selection Range. Specify the range of vendor groups, vendor numbers, account sets, vendor (check) amounts, payment codes, and (if you use optional fields) a vendor optional field from which you want to choose documents for payment.
Specifying a range of vendor amounts lets you maintain different procedures for smaller checks.
Note that you can select a vendor optional field only if you use Sage Accpac Transaction Analysis and Optional Field Creator and you have defined optional fields for vendors. If you specify an optional field, additional fields appear, letting you specify a range of values for the field. If you do not want to use an optional field as a criterion, accept None, the default setting for this field.
6. Click the Exclusion tab. The Exclusion tab lets you list vendors that you want to exclude from the check run.
7. Click the Optional Fields tab, if you use Sage Accpac Transaction Analysis and Optional Field Creator and you want to assign optional fields to this payment selection code.
Any optional fields that you set up for automatic insertion on payments appear on the grid, along with their default values. You can accept, change, or delete these entries. You can also add any other optional fields that are defined for payments.
Step 12: Design Checks, Payment Advices, Letters, and Labels
Getting Started 3–97
Apgs‐3.doc, printed on 11/16/2007, at 11:53:29 AM. Last saved on 11/16/2007 11:48:00 AM.
Sage Software Confidential
Setting Up
Accounts Payable
Note that if you delete an automatically inserted optional field, the program reinserts the optional field with its default value when you create a batch using the payment selection code.
Add the payment selection code
8. When ready, click the Add button. Repeat the preceding steps for each payment selection code you want to add.
9. Click Print on the File menu, or choose the Payment Selection Codes icon from the Setup Reports folder to print a list of the selection criteria you added. File the report.
Step 12: Design Checks, Payment Advices, Letters, and Labels
Sage Accpac Accounts Payable includes sample report formats for checks and payment advices, letters, and mailing labels. You can adapt these formats to print on the check forms you send to your vendors, or you may want to create your own formats.
Accounts Payable provides six check and advice formats that you can use or modify:
APCHECK.RPT — Check‐Advice format for dot matrix printers (8.5ʺx7ʺ).
APCHK01.RPT — Advice‐Check‐Advice format for laser printers (8.5ʺx11ʺ).
APCHK01A.RPT — similar to ARCHK01. The check portion is ANSI‐compliant.
APCHK02.RPT — Advice‐Check format for dot matrix printers (8.5ʺx7ʺ).
APCHK03.RPT — Check‐Advice‐Advice format for laser printers (8.5ʺx11ʺ).
APCHK11.RPT — Check‐Advice‐Advice format for laser printers (8.5ʺx11ʺ) (contains minor alignment differences from APCHK03).
APCHK11A.RPT — similar to ARCHK11A, in ANSI‐compliant format.
Step 12: Design Checks, Payment Advices, Letters, and Labels
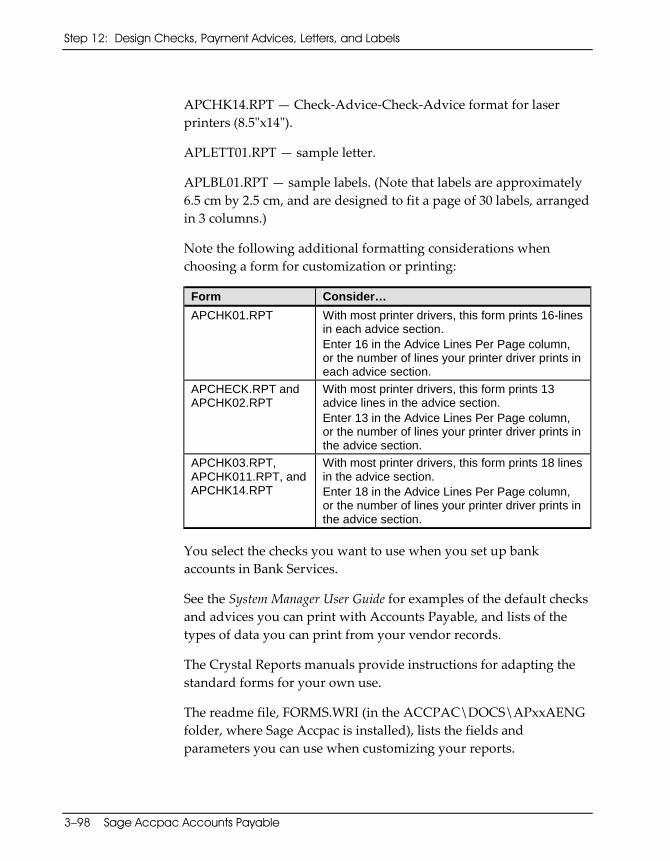
Step 12: Design Checks, Payment Advices, Letters, and Labels
3–98 Sage Accpac Accounts Payable
Apgs‐3.doc, printed on 11/16/2007, at 11:53:29 AM. Last saved on 11/16/2007 11:48:00 AM.
Sage Software Confidential
APCHK14.RPT — Check‐Advice‐Check‐Advice format for laser printers (8.5ʺx14ʺ).
APLETT01.RPT — sample letter.
APLBL01.RPT — sample labels. (Note that labels are approximately 6.5 cm by 2.5 cm, and are designed to fit a page of 30 labels, arranged in 3 columns.)
Note the following additional formatting considerations when choosing a form for customization or printing:
Form Consider… APCHK01.RPT With most printer drivers, this form prints 16-lines
in each advice section. Enter 16 in the Advice Lines Per Page column, or the number of lines your printer driver prints in each advice section.
APCHECK.RPT and APCHK02.RPT
With most printer drivers, this form prints 13 advice lines in the advice section. Enter 13 in the Advice Lines Per Page column, or the number of lines your printer driver prints in the advice section.
APCHK03.RPT, APCHK011.RPT, and APCHK14.RPT
With most printer drivers, this form prints 18 lines in the advice section. Enter 18 in the Advice Lines Per Page column, or the number of lines your printer driver prints in the advice section.
You select the checks you want to use when you set up bank accounts in Bank Services.
See the System Manager User Guide for examples of the default checks and advices you can print with Accounts Payable, and lists of the types of data you can print from your vendor records.
The Crystal Reports manuals provide instructions for adapting the standard forms for your own use.
The readme file, FORMS.WRI (in the ACCPAC\DOCS\APxxAENG folder, where Sage Accpac is installed), lists the fields and parameters you can use when customizing your reports.
Where To Now?
Getting Started 3–99
Apgs‐3.doc, printed on 11/16/2007, at 11:53:29 AM. Last saved on 11/16/2007 11:48:00 AM.
Sage Software Confidential
Setting Up
Accounts Payable
Test reports with sample data
Before you begin processing transactions, you should test your check formats by printing on the forms you use. The easiest way to test printing is to use the sample data that comes with Accounts Payable.
To print test copies of checks, advices, 1099 forms, CPRS reports, and labels:
Use Payment Entry to test checks
• Use the Payment Entry icon from the A/P Transactions folder to print checks. See Chapter 5 of the User Guide for instructions.
Use the 1099/CPRS Amounts report to test 1099/CPRS reporting
• Use the 1099/CPRS Amounts icon from the Vendor Reports folder to print 1099 forms, or to print reports on CPRS vendor payments.
You must first:
− Select the Use 1099/CPRS Reporting option from the A/P Options form.
− Select a tax reporting option in at least one vendor record.
− Enter and post invoices from the vendors who are subject to 1099/CPRS reporting.
Use the Letters/ Labels report icon to test labels
• Use the Letters/Labels report icon in the Vendor Reports folder to test labels. See the System Manager User Guide for instructions on creating label formats to match the printer you use.
Where To Now? Your Accounts Payable system is now ready to use. Refer to the User Guide for information about entering transactions and operating your Accounts Payable system on a daily basis.
Where To Now?


Getting Started A–1
Apgs‐A.doc, printed on 11/16/2007, at 11:57:21 AM. Last saved on 10/19/2007 3:35:00 PM.
Sage Software Confidential
Setup C
hecklist
Appendix A Setup Checklist
This appendix describes the Accounts Payable Setup Checklist, and tells you how to print it.
You can print the Setup Checklist (form AP‐SETUP.PDF) for use while setting up Accounts Payable. As you complete the step‐by‐step instructions in Chapter 3 of the Getting Started manual, check off each step on the checklist, including:
• Gathering data from your present payables system.
• Adding payables accounts to your general ledger chart of accounts.
• Adding tax, bank, currency, and security information.
• Selecting options in the Accounts Payable Options form.
• Adding Accounts Payable records.
• Adding vendor accounts and related records.
• Adding remit‐to locations.
• Adding recurring payables records.
• Adding the opening balances and outstanding transactions for your vendor accounts.
• Adding vendor statistics.
• Adding optional fields (if you use them).
• Preparing and testing formats for printed checks and payment advices.

Sample Setup Checklist
A–2 Accounts Payable
Apgs‐A.doc, printed on 11/16/2007, at 11:57:21 AM. Last saved on 10/19/2007 3:35:00 PM.
Sage Software Confidential
Sample Setup Checklist The Setup Checklist (shown on the following pages) can guide you through the steps of setting up your Accounts Payable system.
To print the checklist:
1. From the Windows Start menu, click Programs, then Sage Accpac.
2. Click the subfolder Online Documentation, then Accounts Payable 5.5A.
3. Click Setup Checklist.
You can also open the checklist from the folder
X:\Sage Accpac\DOCS\AP55AENG
where X:\ Sage Accpac describes the drive and folder where your Sage Accpac programs are located.
Acrobat Reader will start.
4. On the File menu, click Print. Adjust the settings, and then click OK.
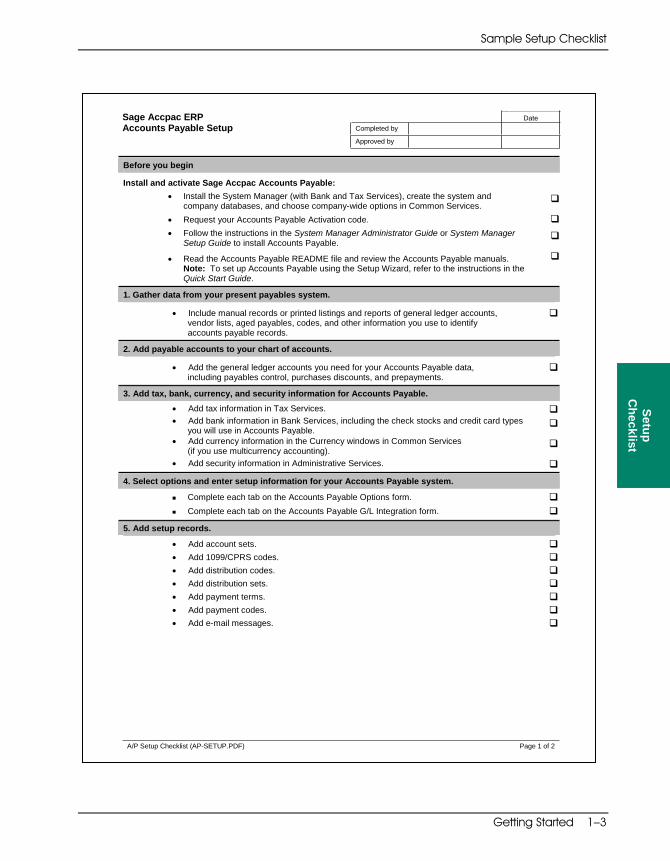
Sample Setup Checklist
Getting Started 1–3
Apgs‐A.doc, printed on 11/16/2007, at 11:57:21 AM. Last saved on 10/19/2007 3:35:00 PM.
Sage Software Confidential
Setup C
hecklist
DateCompleted by
Sage Accpac ERPAccounts Payable Setup
Approved by
A/P Setup Checklist (AP-SETUP.PDF) Page 1 of 2
Before you begin
Install and activate Sage Accpac Accounts Payable:Install the System Manager (with Bank and Tax Services), create the system and company databases, and choose company-wide options in Common Services.Request your Accounts Payable Activation code.Follow the instructions in the System Manager Administrator Guide or System ManagerSetup Guide to install Accounts Payable.
Read the Accounts Payable README file and review the Accounts Payable manuals.Note: To set up Accounts Payable using the Setup Wizard, refer to the instructions in theQuick Start Guide.
1. Gather data from your present payables system.
Include manual records or printed listings and reports of general ledger accounts,vendor lists, aged payables, codes, and other information you use to identifyaccounts payable records.
2. Add payable accounts to your chart of accounts.
Add the general ledger accounts you need for your Accounts Payable data,including payables control, purchases discounts, and prepayments.
3. Add tax, bank, currency, and security information for Accounts Payable.
Add tax information in Tax Services.Add bank information in Bank Services, including the check stocks and credit card typesyou will use in Accounts Payable.Add currency information in the Currency windows in Common Services(if you use multicurrency accounting).Add security information in Administrative Services.
4. Select options and enter setup information for your Accounts Payable system.
Complete each tab on the Accounts Payable Options form.Complete each tab on the Accounts Payable G/L Integration form.
5. Add setup records.
Add account sets. Add 1099/CPRS codes. Add distribution codes. Add distribution sets. Add payment terms. Add payment codes. Add e-mail messages.

Sample Setup Checklist
A–4 Accounts Payable
Apgs‐A.doc, printed on 11/16/2007, at 11:57:21 AM. Last saved on 10/19/2007 3:35:00 PM.
Sage Software Confidential
DateCompleted by
Sage Accpac ERPAccounts Payable Setup
Approved by
A/P Setup Checklist (AP-SETUP.PDF) Page 2 of 2
Add setup records (continued...)If you use Sage Accpac Transaction Analysis and Optional Field Creator, add optionalfields for:
Vendors and Vendor Groups Remit-To Locations
Invoices (invoice, credit note, and debit note documents) Invoice Details Payments Adjustments Revaluation
6. Add vendor groups and vendor records.Add vendor group records.
Add vendor records.
7. Add remit-to locations (optional).Add a remit-to location record for each vendor.
8. Add the opening balances and current-year transactions for your vendor accounts.Prepare and post invoices, payments, and adjustments to set up the current balancein each of your vendor accounts.
9. Add vendor and vendor group statistics (optional).Complete the Vendor Period Statistics and Vendor Period Activity pages of the Vendorsform.Complete the Group Statistics page of the Vendor Groups form.
10. Create payment selection criteria for processing payments automatically.Create at least one payment selection criteria if you want Accounts Payable to generatepayments for invoices automatically.
11. Add recurring payable records (optional).Create Recurring Payable records for standard invoices that you regularly receive fromvendors. Refer to the Accounts Payable Getting Started manual and User Guide for moreinformation about recurring payables.
12. Prepare and test the formats for printing reportsTo find out how to adapt sample forms or create new ones, see the online documentationfor System Manager. For a list of the fields you can use in your custom forms, see thedocument, FORMS.WRI, in the Sage Software/Sage Accpac/DOCS/AP55AENG folder.Print test copies from your own data.
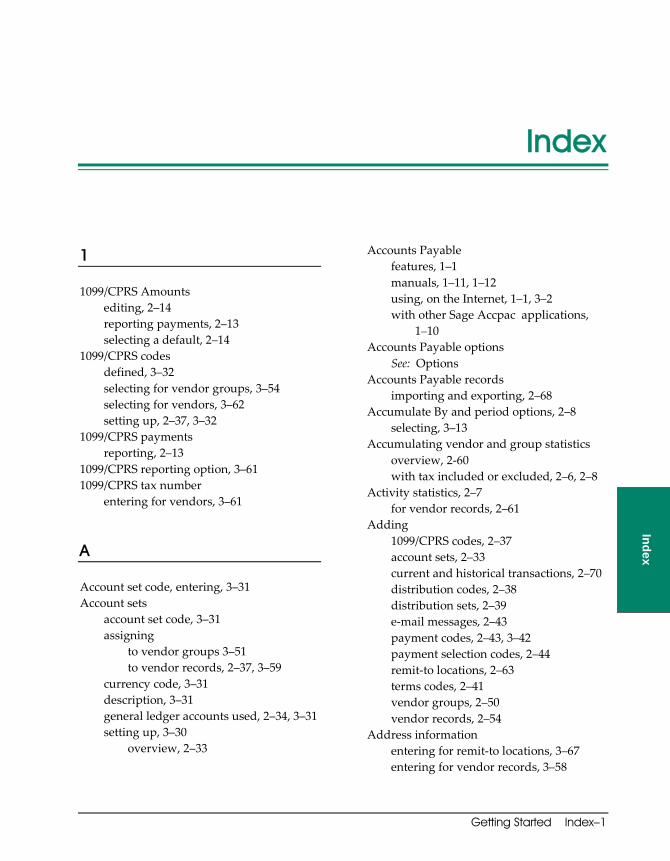
Getting Started Index–1
Apgs‐Inx‐55.doc, printed on 1/30/2008, at 8:32:35 PM. Last saved on 1/30/2008 8:32:00 PM.
Sage Software Confidential
Index Index
Index
1
1099/CPRS Amounts editing, 2–14 reporting payments, 2–13 selecting a default, 2–14
1099/CPRS codes defined, 3–32 selecting for vendor groups, 3–54 selecting for vendors, 3–62 setting up, 2–37, 3–32
1099/CPRS payments reporting, 2–13
1099/CPRS reporting option, 3–61 1099/CPRS tax number
entering for vendors, 3–61
A
Account set code, entering, 3–31 Account sets
account set code, 3–31 assigning
to vendor groups 3–51 to vendor records, 2–37, 3–59
currency code, 3–31 description, 3–31 general ledger accounts used, 2–34, 3–31 setting up, 3–30
overview, 2–33
Accounts Payable
features, 1–1 manuals, 1–11, 1–12 using, on the Internet, 1–1, 3–2 with other Sage Accpac applications,
1–10 Accounts Payable options
See: Options Accounts Payable records
importing and exporting, 2–68 Accumulate By and period options, 2–8
selecting, 3–13 Accumulating vendor and group statistics
overview, 2‐60 with tax included or excluded, 2–6, 2–8
Activity statistics, 2–7 for vendor records, 2–61
Adding 1099/CPRS codes, 2–37 account sets, 2–33 current and historical transactions, 2–70 distribution codes, 2–38 distribution sets, 2–39 e‐mail messages, 2–43 payment codes, 2–43, 3–42 payment selection codes, 2–44 remit‐to locations, 2–63 terms codes, 2–41 vendor groups, 2–50 vendor records, 2–54
Address information entering for remit‐to locations, 3–67 entering for vendor records, 3–58
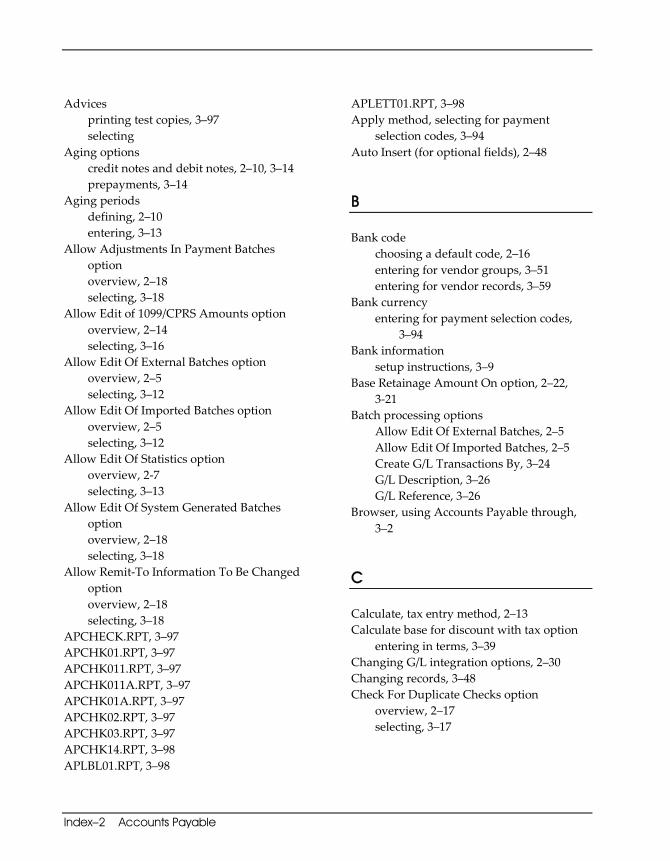
Index–2 Accounts Payable
Apgs‐Inx‐55.doc, printed on 1/30/2008, at 8:32:35 PM. Last saved on 1/30/2008 8:32:00 PM.
Sage Software Confidential
Advices printing test copies, 3–97 selecting
Aging options credit notes and debit notes, 2–10, 3–14 prepayments, 3–14
Aging periods defining, 2–10 entering, 3–13
Allow Adjustments In Payment Batches option overview, 2–18 selecting, 3–18
Allow Edit of 1099/CPRS Amounts option overview, 2–14 selecting, 3–16
Allow Edit Of External Batches option overview, 2–5 selecting, 3–12
Allow Edit Of Imported Batches option overview, 2–5 selecting, 3–12
Allow Edit Of Statistics option overview, 2‐7 selecting, 3–13
Allow Edit Of System Generated Batches option overview, 2–18 selecting, 3–18
Allow Remit‐To Information To Be Changed option overview, 2–18 selecting, 3–18
APCHECK.RPT, 3–97 APCHK01.RPT, 3–97 APCHK011.RPT, 3–97 APCHK011A.RPT, 3–97 APCHK01A.RPT, 3–97 APCHK02.RPT, 3–97 APCHK03.RPT, 3–97 APCHK14.RPT, 3–98 APLBL01.RPT, 3–98
APLETT01.RPT, 3–98 Apply method, selecting for payment
selection codes, 3–94 Auto Insert (for optional fields), 2–48
B
Bank code choosing a default code, 2–16 entering for vendor groups, 3–51 entering for vendor records, 3–59
Bank currency entering for payment selection codes,
3–94 Bank information
setup instructions, 3–9 Base Retainage Amount On option, 2–22,
3‐21 Batch processing options
Allow Edit Of External Batches, 2–5 Allow Edit Of Imported Batches, 2–5 Create G/L Transactions By, 3–24 G/L Description, 3–26 G/L Reference, 3–26
Browser, using Accounts Payable through, 3–2
C
Calculate, tax entry method, 2–13 Calculate base for discount with tax option
entering in terms, 3–39 Changing G/L integration options, 2–30 Changing records, 3–48 Check For Duplicate Checks option
overview, 2–17 selecting, 3–17
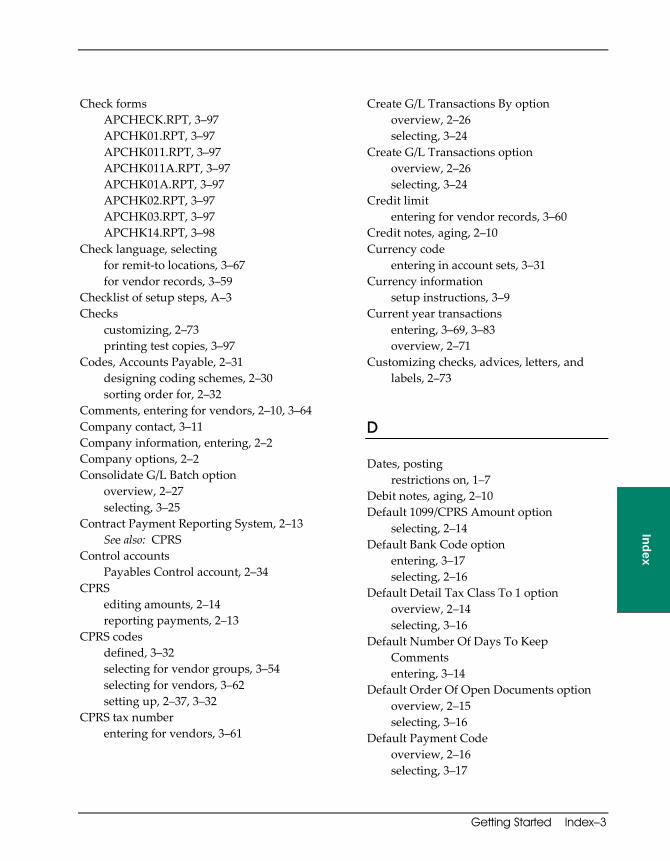
Getting Started Index–3
Apgs‐Inx‐55.doc, printed on 1/30/2008, at 8:32:35 PM. Last saved on 1/30/2008 8:32:00 PM.
Sage Software Confidential
Index
Check forms APCHECK.RPT, 3–97 APCHK01.RPT, 3–97 APCHK011.RPT, 3–97 APCHK011A.RPT, 3–97 APCHK01A.RPT, 3–97 APCHK02.RPT, 3–97 APCHK03.RPT, 3–97 APCHK14.RPT, 3–98
Check language, selecting for remit‐to locations, 3–67 for vendor records, 3–59
Checklist of setup steps, A–3 Checks
customizing, 2–73 printing test copies, 3–97
Codes, Accounts Payable, 2–31 designing coding schemes, 2–30 sorting order for, 2–32
Comments, entering for vendors, 2–10, 3–64 Company contact, 3–11 Company information, entering, 2–2 Company options, 2–2 Consolidate G/L Batch option
overview, 2–27 selecting, 3–25
Contract Payment Reporting System, 2–13 See also: CPRS
Control accounts Payables Control account, 2–34
CPRS editing amounts, 2–14 reporting payments, 2–13
CPRS codes defined, 3–32 selecting for vendor groups, 3–54 selecting for vendors, 3–62 setting up, 2–37, 3–32
CPRS tax number entering for vendors, 3–61
Create G/L Transactions By option overview, 2–26 selecting, 3–24
Create G/L Transactions option overview, 2–26 selecting, 3–24
Credit limit entering for vendor records, 3–60
Credit notes, aging, 2–10 Currency code
entering in account sets, 3–31 Currency information
setup instructions, 3–9 Current year transactions
entering, 3–69, 3–83 overview, 2–71
Customizing checks, advices, letters, and labels, 2–73
D
Dates, posting restrictions on, 1–7
Debit notes, aging, 2–10 Default 1099/CPRS Amount option
selecting, 2–14 Default Bank Code option
entering, 3–17 selecting, 2–16
Default Detail Tax Class To 1 option overview, 2–14 selecting, 3–16
Default Number Of Days To Keep Comments entering, 3–14
Default Order Of Open Documents option overview, 2–15 selecting, 3–16
Default Payment Code overview, 2–16 selecting, 3–17
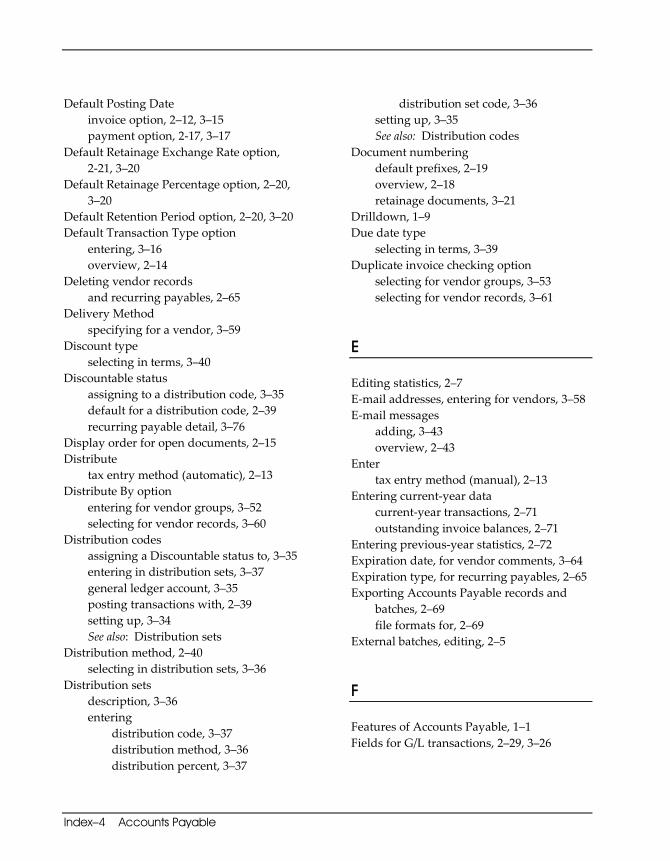
Index–4 Accounts Payable
Apgs‐Inx‐55.doc, printed on 1/30/2008, at 8:32:35 PM. Last saved on 1/30/2008 8:32:00 PM.
Sage Software Confidential
Default Posting Date invoice option, 2–12, 3–15 payment option, 2‐17, 3–17
Default Retainage Exchange Rate option, 2‐21, 3–20
Default Retainage Percentage option, 2–20, 3–20
Default Retention Period option, 2–20, 3–20 Default Transaction Type option
entering, 3–16 overview, 2–14
Deleting vendor records and recurring payables, 2–65
Delivery Method specifying for a vendor, 3–59
Discount type selecting in terms, 3–40
Discountable status assigning to a distribution code, 3–35 default for a distribution code, 2–39 recurring payable detail, 3–76
Display order for open documents, 2–15 Distribute
tax entry method (automatic), 2–13 Distribute By option
entering for vendor groups, 3–52 selecting for vendor records, 3–60
Distribution codes assigning a Discountable status to, 3–35 entering in distribution sets, 3–37 general ledger account, 3–35 posting transactions with, 2–39 setting up, 3–34 See also: Distribution sets
Distribution method, 2–40 selecting in distribution sets, 3–36
Distribution sets description, 3–36 entering
distribution code, 3–37 distribution method, 3–36 distribution percent, 3–37
distribution set code, 3–36 setting up, 3–35 See also: Distribution codes
Document numbering default prefixes, 2–19 overview, 2–18 retainage documents, 3–21
Drilldown, 1–9 Due date type
selecting in terms, 3–39 Duplicate invoice checking option
selecting for vendor groups, 3–53 selecting for vendor records, 3–61
E
Editing statistics, 2–7 E‐mail addresses, entering for vendors, 3–58 E‐mail messages
adding, 3–43 overview, 2–43
Enter tax entry method (manual), 2–13
Entering current‐year data current‐year transactions, 2–71 outstanding invoice balances, 2–71
Entering previous‐year statistics, 2–72 Expiration date, for vendor comments, 3–64 Expiration type, for recurring payables, 2–65 Exporting Accounts Payable records and
batches, 2–69 file formats for, 2–69
External batches, editing, 2–5
F
Features of Accounts Payable, 1–1 Fields for G/L transactions, 2–29, 3–26

Getting Started Index–5
Apgs‐Inx‐55.doc, printed on 1/30/2008, at 8:32:35 PM. Last saved on 1/30/2008 8:32:00 PM.
Sage Software Confidential
Index
File formats, for importing and exporting Accounts Payable data, 2–69
Follow‐up date entering for vendor comment, 3–64
Force Listing Of Batches option overview, 2–4 selecting, 3–11
G
G/L accounts See: General ledger accounts
G/L Description Feld option selecting, 3–26
G/L Integration options assigning information to G/L fields,
2‐29, 3–26 changing options, 2–30 choosing options for G/L batches, 3–23 consolidate G/L batches option, 3–25
effect on G/L fields, 2–29 Create G/L Transactions, 3–24 Create G/L Transactions By option, 2‐26,
3–24 G/L Description, selecting, 3–26 G/L Reference, selecting, 3–26 overview, 2–24 posting sequence number, 2–24 selecting options, 3–22 source Codes, defining, 2–28
G/L Source Codes overview, 2–28 specifying, 3–23
G/L transaction fields assigning information to, 2–29, 3–26
G/L transactions consolidation options, 2–27 creating, 2–26
G/L Transactions Created Through, 2–24 G/L Transactions report, 2–25
General Ledger integration with Accounts Payable See: G/L Integration
General ledger accounts assigning to vendor records, 2–37 entering in account sets, 2–34, 3–31 entering in distribution codes, 3–35 Exchange Gain, 2–36 Exchange Loss, 2–36 Payables Control, 2–34 Prepayment, 2–34 Purchases Discount, 2–34 Retainage, 2–34 setup instructions, 3–8 Unrealized Exchange Gain, 2–36 Unrealized Exchange Loss, 2–36 used in account sets, 2–34, 3–31
Generate separate payments for each invoice option selecting for vendor groups, 3–52 selecting for vendor records, 3–60
Group code entering for vendor groups, 3–51 entering for vendor records, 3–57
Group statistics, accumulating, 2–6
I
Imported batches, editing, 2–5 Importing
Accounts Payable records, 2–68 file formats, 2–69 transaction batches, 2–69 vendor records, 2–57
Include Pending Transactions option overview, 2–17 selecting, 3–18
Include Tax In Statistics option overview, 2–8 selecting, 3–13
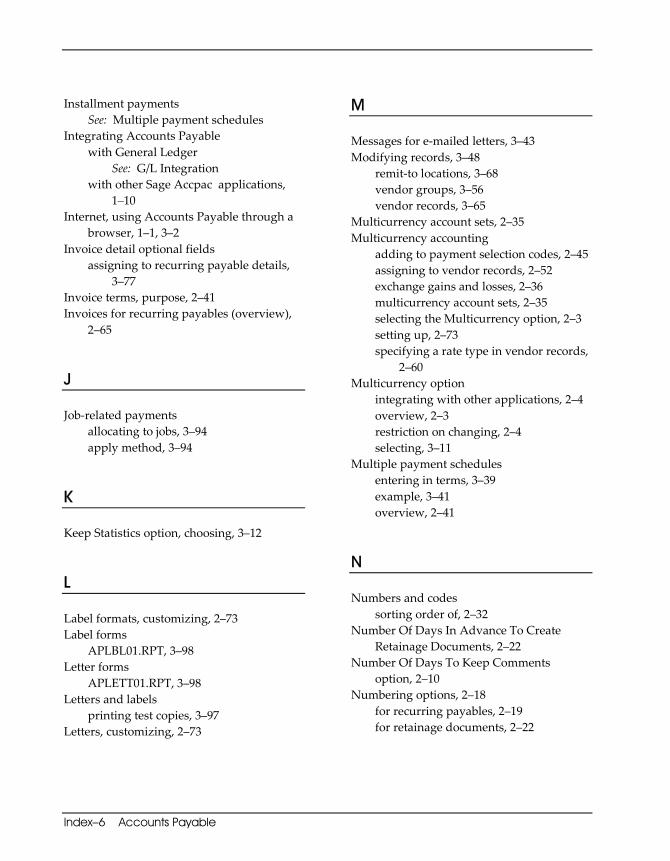
Index–6 Accounts Payable
Apgs‐Inx‐55.doc, printed on 1/30/2008, at 8:32:35 PM. Last saved on 1/30/2008 8:32:00 PM.
Sage Software Confidential
Installment payments See: Multiple payment schedules
Integrating Accounts Payable with General Ledger
See: G/L Integration with other Sage Accpac applications,
1–10 Internet, using Accounts Payable through a
browser, 1–1, 3–2 Invoice detail optional fields
assigning to recurring payable details, 3–77
Invoice terms, purpose, 2–41 Invoices for recurring payables (overview),
2–65
J
Job‐related payments allocating to jobs, 3–94 apply method, 3–94
K
Keep Statistics option, choosing, 3–12
L
Label formats, customizing, 2–73 Label forms
APLBL01.RPT, 3–98 Letter forms
APLETT01.RPT, 3–98 Letters and labels
printing test copies, 3–97 Letters, customizing, 2–73
M
Messages for e‐mailed letters, 3–43 Modifying records, 3–48
remit‐to locations, 3–68 vendor groups, 3–56 vendor records, 3–65
Multicurrency account sets, 2–35 Multicurrency accounting
adding to payment selection codes, 2–45 assigning to vendor records, 2–52 exchange gains and losses, 2–36 multicurrency account sets, 2–35 selecting the Multicurrency option, 2–3 setting up, 2–73 specifying a rate type in vendor records,
2–60 Multicurrency option
integrating with other applications, 2–4 overview, 2–3 restriction on changing, 2–4 selecting, 3–11
Multiple payment schedules entering in terms, 3–39 example, 3–41 overview, 2–41
N
Numbers and codes sorting order of, 2–32
Number Of Days In Advance To Create Retainage Documents, 2–22
Number Of Days To Keep Comments option, 2–10
Numbering options, 2–18 for recurring payables, 2–19 for retainage documents, 2–22

Getting Started Index–7
Apgs‐Inx‐55.doc, printed on 1/30/2008, at 8:32:35 PM. Last saved on 1/30/2008 8:32:00 PM.
Sage Software Confidential
Index
O
On hold option selecting for vendor records, 3–58
Open documents choosing the display order, 2–15
Opening balances setup instructions, 3–69, 3–83
Optional fields adding, 3–45 assigning
to remit‐to locations, 2–64 to vendor groups, 2–53 to vendors, 2–62
Auto Insert option, 2–48 customizing Accounts Payable using,
2–45 entering optional data in vendor
records, 3–62 required fields
overview, 2–48 specifying, 3–47
settings, specifying, 3–48 Value Set option, 2–47
Options Aging options, 2–10
Accumulate By, 3–13 Age Unapplied Credit Notes And
Debit Notes, 3‐14 Age Unapplied Prepayments, 3–14 Aging Periods, 3–13 Default Number Of Days To Keep
Comments, 3–14 Company options, 2–2
company contact, 3–11 telephone and fax numbers, 3–11
Invoice options Allow Edit Of 1099/CPRS Amounts,
3–16 Default 1099/CPRS Amount, 3–16 Default Detail Tax Class To 1, 3–16 Default Posting Date, 3–15
default tax entry methods, 3–15 Use 1099/CPRS Reporting, 3‐16
Numbering options (overview), 2–18 Payment options
Allow Adjustments In Payment Batches, 3–18
Allow Edit Of System Generated Batches, 3–18
Allow Remit‐To Information To Be Changed, 3–18
Check For Duplicate Checks, 3–17 Default Bank Code, 3–17 Default Order Of Open Documents,
3–16 Default Payment Code, 3–17 Default Posting Date, 3–17 Default Transaction Type, 3–16 Include Pending Transactions, 3–18
Processing options, 2–3 Allow Edit Of External Batches,
3–12 Allow Edit Of Imported Batches,
3–12 Force Listing Of All Batches, 3–11 Keep Statistics, 2–59, 3–12 Multicurrency, 3–11 overview, 2–3, 2–5 Retainage Accounting, 2–5, 3–12
Retainage options, 2–20 Base Retainage Amount On, 2–22,
3–21 Default Retainage Exchange Rate,
2–21, 3–20 Default Retainage Percentage, 2–20,
3–20 Default Retention Period, 2‐20, 3–20 Number Of Days In Advance To
Create Retainage Documents, 2–22
numbering retainage documents, 2–22
Report Tax, 2–21, 3–20

Index–8 Accounts Payable
Apgs‐Inx‐55.doc, printed on 1/30/2008, at 8:32:35 PM. Last saved on 1/30/2008 8:32:00 PM.
Sage Software Confidential
Options (Continued) Schedule To Use For Automatic
Creation Of Retainage Documents, 2–23
setup instructions, 3–9 Transaction options, 2–11 vendor and group statistics, 3–12
allow edit of statistics, 3–13 include tax in statistics, 3–13 overview, 2–59
See also: G/L Integration options Outstanding invoice balances, entering, 2–71
P
Partial payments allocating to jobs, 3–94
Pay option payment selection codes, 3–96
Payment advices customizing, 2–73 printing test copies, 3–97
Payment codes adding, 2–43, 3–42 choosing a default code, 2–16 entering for vendor groups, 3–51 entering for vendor records, 3–59 overview, 2–43
Payment Codes form using, 3–42
Payment options See: Options
Payment selection codes apply method, 3–94 bank and currency selection criteria tab
bank currency, 3–94 select vendors with this bank only,
3–94 selection code, 3–93 vendor currency, 3–94
setting up, 2–44
setup instructions, 3–93 specifying selection criteria, 2‐45 using, 2–45 vendor and date selection
pay option, 3–96 Select Documents By option, 3–95 vendor selection range, 3–96
Payment selection criteria, changing, 2–45 Payment terms, 2–41
examples of, 3–40 setup instructions, 3–38
Period Type option, 2–8 Posting dates, restrictions on, 1–7 Previous‐year statistics, entering, 2–72 Primary remit‐to location, 2–63
entering for remit‐to locations, 3–67 Processing options
See: Options Program features, 1–1
R
Rate type entering for vendor groups, 3–51 entering for vendor records, 3–60
Realized gains and losses (overview), 2–36 Records
changing, 3–48 remit‐to locations, 3–68 vendor groups, 3–56 vendor records, 3–65
setup instructions, 3–28 Recurring payables
and deleting vendor records, 2–65 and invoice frequency, 2–65 assigning a document prefix, 2–19 assigning amounts and limits, 2–65 assigning document numbers to, 2–19 assigning invoice detail optional fields,
3–77 assigning payment terms, 2–66
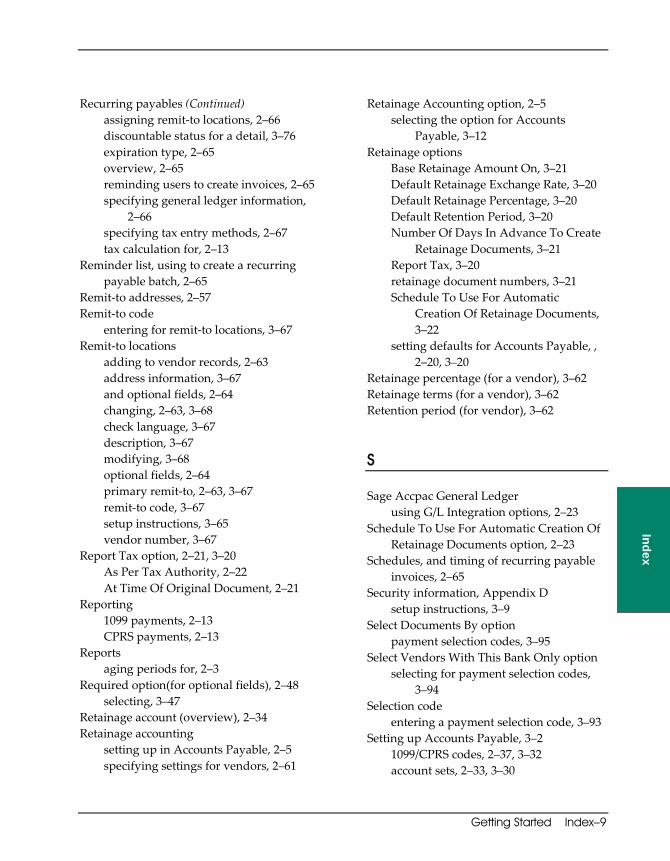
Getting Started Index–9
Apgs‐Inx‐55.doc, printed on 1/30/2008, at 8:32:35 PM. Last saved on 1/30/2008 8:32:00 PM.
Sage Software Confidential
Index
Recurring payables (Continued) assigning remit‐to locations, 2–66 discountable status for a detail, 3–76 expiration type, 2–65 overview, 2–65 reminding users to create invoices, 2–65 specifying general ledger information,
2–66 specifying tax entry methods, 2–67 tax calculation for, 2–13
Reminder list, using to create a recurring payable batch, 2–65
Remit‐to addresses, 2–57 Remit‐to code
entering for remit‐to locations, 3–67 Remit‐to locations
adding to vendor records, 2–63 address information, 3–67 and optional fields, 2–64 changing, 2–63, 3–68 check language, 3–67 description, 3–67 modifying, 3–68 optional fields, 2–64 primary remit‐to, 2–63, 3–67 remit‐to code, 3–67 setup instructions, 3–65 vendor number, 3–67
Report Tax option, 2–21, 3–20 As Per Tax Authority, 2–22 At Time Of Original Document, 2–21
Reporting 1099 payments, 2–13 CPRS payments, 2–13
Reports aging periods for, 2–3
Required option(for optional fields), 2–48 selecting, 3–47
Retainage account (overview), 2–34 Retainage accounting
setting up in Accounts Payable, 2–5 specifying settings for vendors, 2–61
Retainage Accounting option, 2–5 selecting the option for Accounts
Payable, 3–12 Retainage options
Base Retainage Amount On, 3–21 Default Retainage Exchange Rate, 3–20 Default Retainage Percentage, 3–20 Default Retention Period, 3–20 Number Of Days In Advance To Create
Retainage Documents, 3–21 Report Tax, 3–20 retainage document numbers, 3–21 Schedule To Use For Automatic
Creation Of Retainage Documents, 3–22
setting defaults for Accounts Payable, , 2–20, 3–20
Retainage percentage (for a vendor), 3–62 Retainage terms (for a vendor), 3–62 Retention period (for vendor), 3–62
S
Sage Accpac General Ledger using G/L Integration options, 2–23
Schedule To Use For Automatic Creation Of Retainage Documents option, 2–23
Schedules, and timing of recurring payable invoices, 2–65
Security information, Appendix D setup instructions, 3–9
Select Documents By option payment selection codes, 3–95
Select Vendors With This Bank Only option selecting for payment selection codes,
3–94 Selection code
entering a payment selection code, 3–93 Setting up Accounts Payable, 3–2
1099/CPRS codes, 2–37, 3–32 account sets, 2–33, 3–30
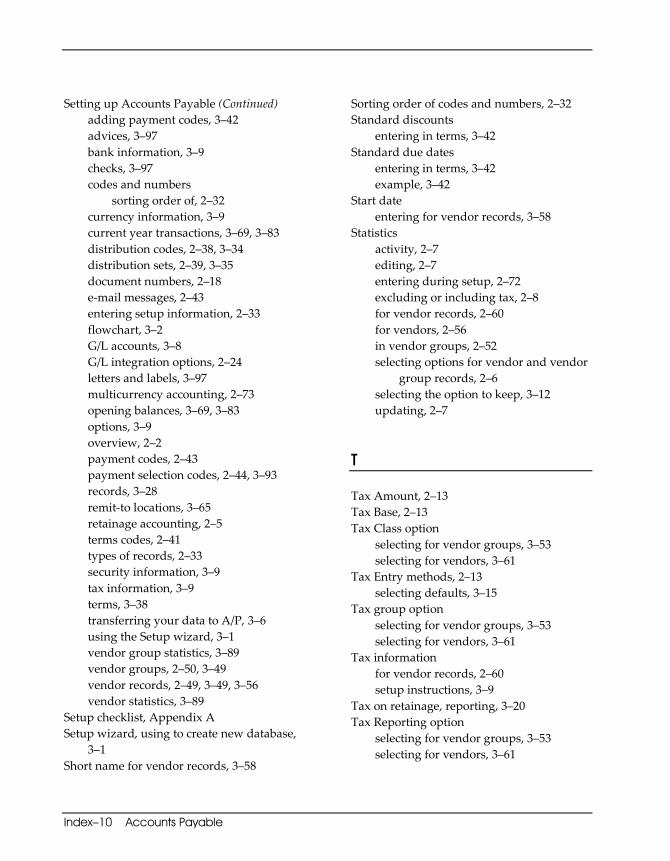
Index–10 Accounts Payable
Apgs‐Inx‐55.doc, printed on 1/30/2008, at 8:32:35 PM. Last saved on 1/30/2008 8:32:00 PM.
Sage Software Confidential
Setting up Accounts Payable (Continued) adding payment codes, 3–42 advices, 3–97 bank information, 3–9 checks, 3–97 codes and numbers
sorting order of, 2–32 currency information, 3–9 current year transactions, 3–69, 3–83 distribution codes, 2–38, 3–34 distribution sets, 2–39, 3–35 document numbers, 2–18 e‐mail messages, 2–43 entering setup information, 2–33 flowchart, 3–2 G/L accounts, 3–8 G/L integration options, 2–24 letters and labels, 3–97 multicurrency accounting, 2–73 opening balances, 3–69, 3–83 options, 3–9 overview, 2–2 payment codes, 2–43 payment selection codes, 2–44, 3–93 records, 3–28 remit‐to locations, 3–65 retainage accounting, 2–5 terms codes, 2–41 types of records, 2–33 security information, 3–9 tax information, 3–9 terms, 3–38 transferring your data to A/P, 3–6 using the Setup wizard, 3–1 vendor group statistics, 3–89 vendor groups, 2–50, 3–49 vendor records, 2–49, 3–49, 3–56 vendor statistics, 3–89
Setup checklist, Appendix A Setup wizard, using to create new database,
3–1 Short name for vendor records, 3–58
Sorting order of codes and numbers, 2–32 Standard discounts
entering in terms, 3–42 Standard due dates
entering in terms, 3–42 example, 3–42
Start date entering for vendor records, 3–58
Statistics activity, 2–7 editing, 2–7 entering during setup, 2–72 excluding or including tax, 2–8 for vendor records, 2–60 for vendors, 2–56 in vendor groups, 2–52 selecting options for vendor and vendor
group records, 2–6 selecting the option to keep, 3–12 updating, 2–7
T
Tax Amount, 2–13 Tax Base, 2–13 Tax Class option
selecting for vendor groups, 3–53 selecting for vendors, 3–61
Tax Entry methods, 2–13 selecting defaults, 3–15
Tax group option selecting for vendor groups, 3–53 selecting for vendors, 3–61
Tax information for vendor records, 2–60 setup instructions, 3–9
Tax on retainage, reporting, 3–20 Tax Reporting option
selecting for vendor groups, 3–53 selecting for vendors, 3–61

Getting Started Index–11
Apgs‐Inx‐55.doc, printed on 1/30/2008, at 8:32:35 PM. Last saved on 1/30/2008 8:32:00 PM.
Sage Software Confidential
Index
Taxes entering, 2–13 in recurring payable records, 2–13 including in vendor statistics, 2–8
Telephone and fax numbers (company) entering, 3–11
Terms codes assigning, 3–39
to vendor groups, 3–51 to vendor records, 2–42, 3–59
calculate base for discount with tax option, 3–39
discount type, 2–42, 3–40 due date type, 2–42, 3–39 examples of, 3–40 multiple payment schedule, 3–39 purpose, 2–41 setting up, 2–41, 3–38 standard discounts, 3–42 standard due dates, 3–42 terms code, 3–39
Transaction batches importing and exporting, 2–69
Transaction type selecting a default for Payment Entry,
2–14 Transactions
adding current and historical, 2–70 assigning data to G/L transaction fields,
2–29, 3–26 entering current, 2–71
Transactions options, 2–11 Transferring your data to A/P
setup instructions, 3–6
U
Unrealized Exchange Gain / Unrealized Exchange Loss general ledger accounts overview, 2–36
Use 1099/CPRS Reporting option overview, 2–13 selecting, 3–16
V
Value Set option (optional field), 2–47 Vendor and Group Statistics
entering, 2–52, 3–12 setup instructions, 3–89
Vendor currency for payment selection codes, 3–94
Vendor group code sorting order, 2–32
Vendor groups 1099/CPRS code, 3–54 account set code, 3–51 assigning optional fields to, 2–53 bank code, 3–51 changing, 3–56 description, 3–51 Distribute By option, 3–52 duplicate invoice checking option, 3–53 editing statistics, 2–52 generate separate payments for each
invoice option, 3–52 group code, 3–51 modifying, 3–56 payment code, 3–51 rate type, 3–51 setting up, 2–50, 3–49 statistics, 2–52 tax class option, 3–53 tax group option, 3–53 tax information tab tax reporting option, 3–53 terms code, 3–51
Vendor numbers assigning to vendor records, 2–57, 3–57 entering for remit‐to locations, 3–67 sorting order, 2–32

Index–12 Accounts Payable
Apgs‐Inx‐55.doc, printed on 1/30/2008, at 8:32:35 PM. Last saved on 1/30/2008 8:32:00 PM.
Sage Software Confidential
Vendor selection range payment selection codes, 3–96
Vendor statistics excluding or including tax, 2–8 setup instructions, 3–89 See also: Statistics
Vendors 1099/CPRS code, 3–62 1099/CPRS tax number, 3–61 account set code, 3–59 activity statistics, 2–61 adding, 2–54 address information, 3–58 bank code, 3–59 changing, 3–65 check language, 3–59 comment, 3–64
date entered, 3–63 credit limit, 3–60 deleting
and recurring payables, 2–65 delivery method for, 3–59 Distribute By option, 3–60 duplicate invoice checking, 3–61 e‐mail, 3–58 entering tax information, 2–60 expiration date, 3–64 follow‐update, 3–64 Generate Separate Payments For Each
Invoice option, 3–60 group code, 3–57 importing records, 2–57 Inactive setting, 2–58 modifying records, 3–65 multicurrency information, 2–52 On Hold option, 2–58, 3–58 optional fields, 2–62
entering data for, 3–62 payment code, 3–59 rate type, 3–60 retainage information, 3‐62 short names, 2–58
statistics, 2–56, 3-89 terms codes, 2–42 vendor numbers, 2–57 remit‐to locations, 2–57, 2–63 retainage defaults for, 2–20 retainage percentage, 3–62 retainage settings, 2–56, 2–61 retainage terms, 3–62 retention period, 3–62 selecting processing options for, 2–59 setting up records for, 2–49, 3–49, 3–56 short name, 3–58 start date, 3–58 statistics, 2–60
editing, 2–61 tax amounts in, 2–61
tax class option, 3–61 tax group option, 3–61 tax reporting option, 3–61 terms code, 3–59 type, 3–62 vendor number, 3–57
W
Web, using Accounts Payable through a browser, 1–1, 3–2