Embed Size (px)
Citation preview

Purpose• To help students ask questions and make observations about soil.• To introduce students to the properties of soil and that soil is made of many
different organic and inorganic components.
OverviewStudents make predictions about the properties of various soil samples and examine several types of soils, recording their observations. In Part 2 of the activity, they will examine a soil sample in a jar.
Student OutcomesAfter reading and/or listening to the Elementary GLOBE book The Scoop On Soils and completing this activity, students will know about soil’s different properties. Students will know that soils have different properties including texture, color, and size.
Next Generation Science Standards• DCI ESS-2A: Earth Materials and Systems• Science Practice 1 Asking Questions• Science Practice 4 Analyzing and Interpreting Data• Science Practice 8 Obtaining, Communicating, and Evaluating Information• Crosscutting Concept 1 Patterns
CCSS.ELA Anchor Standards• W.2 Write informative/explanatory texts...• W.4 Produce clear and coherant writing...• W.7 Conduct short as well as more sustained research projects...
CCSS.MATH Content Standards• MD A.1-A.4 Measurement and Data
Time• Part 1: One 30-minute class period• Part 2: One 30-minute class period
LevelElementary (Part 1 is appropriate for grades K-4; Part 2 is most appropriate for grades 2-4)
Materials
Part 1:•Elementary GLOBE
storybook: The Scoop on Soils
For each student group:
• Soil samples (sand, silt, and clay) in resealable plastic bags
• Tweezers
• Toothpicks
• Magnifying lenses
• Markers, colored pencils, or crayons
• Getting to Know Soils Student Activity Sheet 1 (one per student)
Part 2: • A soil sample from a
site near your school
• 16 oz or larger clear jars with lids (one per group)
• Stapler, scissors, and pencils
• Markers, colored pencils, or crayons
• Getting to Know Soils Student Activity Sheets 2 and 3 (one per student)
The GLOBE Program Getting To Know Soil - Page 1 The Scoop on Soils
Getting To Know Soil
A Learning Activity forThe Scoop on Soils
© 2018 University Corporation for Atmospheric Research All Rights Reserved

Preparation
• Read the Elementary GLOBE storybook The Scoop on Soils – either read it to the class or have students read it to themselves. The book can be downloaded from www.globe.gov/elementaryglobe.
• Collect soil samples of sand, silt and clay or purchase them from science education suppliers. You can reuse the samples but they tend to get hard after they dry out. Moisten them for reuse, or grind them (with a hammer or rolling pin or mortar and pestle) to get them back into a usable state.
• Put the different types of soil in clear, resealable plastic bags so the students can see the soil before touching it; this way they can make some predictions about the soil. In addition, print and laminate labels that say: “sand,” “silt,” and “clay.” Put the labels by the different samples so students know what type of soil they are observing.
• Cover the classroom workspaces with newspaper.
• Make copies of Getting to Know Soil Student Activity Sheets 1, 2, and 3.
• Note: Alternatively, you can collect soil samples from local areas and have the students discover how much sand, silt, and clay is in the soil you collected.
Teacher’s Notes
Soil is different from dirt. Soil is the Earth material composed of mineral and organic material, air, and water that serves as a medium for plant growth and other uses. Dirt is simply soil that is out of place. For example, when you track soil into your house on your shoes, soil becomes unwanted and is called dirt. Otherwise, it is called soil because it is an important resource we need and it has an important job to do. In order to show respect for our natural environment, we call it soil and not dirt!
Soil CompositionSoils are composed of four main components:• Minerals of different sizes• Organic materials from the remains of dead plants
and animals• Water that fills open pore spaces• Air that fills open pore space
The use and function of a soil depends on the amount of each component. For example, a good soil for growing agricultural plants has about 45% minerals, 5% organic matter, 25% air, and 25% water. Plants that live in wetlands require more water and less air. Soils used as raw material for bricks need to be completely free of organic matter.
Five Soil Forming FactorsThey are:1. Parent Material: The material from which the soil
is formed. Soil parent material can be bedrock, organic material, or loose soil material deposited by wind, water, glaciers, volcanoes, or material moving down a slope.
2. Climate: Heat, rain, ice, snow, wind, sunshine, and other environmental forces break down the parent material and affect how fast or slow soil processes go.
3. Organisms: All plants or animals living in or on the soil (including micro-organisms and humans!). The amount of water and nutrients plants need affects the way soil forms. Animals living in the soil affect decomposition of waste materials and how soil materials will be moved around in the soil profile. The dead remains of plants and animals become organic matter that enriches the soil. The way humans use soils affect soil formation.
4. Topography: The location of a soil on a landscape can affect how climate processes impact it. Soils at the bottom of a hill will get more water than soils on the slopes, and soils on the slopes that directly face the sun will be drier than soils on slopes that do not.
5. Time: All of the above factors assert themselves over time, often hundreds or thousands of years.
The GLOBE Program Getting To Know Soil - Page 2 The Scoop on Soils© 2018 University Corporation for Atmospheric Research All Rights Reserved

The GLOBE Program Getting To Know Soil - Page 3 The Scoop on Soils
The way the five soil-forming factors interact is always different from one place to another, so soils differ greatly from each other. Each section of soil on a landscape has its own unique characteristics. The face of a soil, or the way it looks if you cut a section of it out of the ground, is called a soil profile. Every soil profile is made up of layers called soil horizons. Soil horizons can be as thin as a few millimeters or thicker than a meter.
Soil profiles and their horizons change as you move across a landscape, and also change as you move downward deeper into the soil at one location. In fact, soil samples taken at the surface may have entirely different characteristics and appearances from soil dug deeper in the soil profile. One common reason soil horizons are different as you dig deeper is because of mixing of organic material in the upper horizons and weathering and leaching in the lower horizons. Erosion, deposition, and other processes might also affect the way a soil profile looks at a particular location.
Soil texture is the way soil feels when it is squeezed between the fingers or in the hand. The texture depends on the amount of sand, silt, or clay in the sample (particle size distribution), as well as other factors (how wet it is, how much organic matter is in the sample, the kind of clay, etc.). Clay is a mineral particle less than 0.002 mm in size that has a sticky and dense feel when moistened and rubbed between the fingers. Silt is a mineral particle between 0.002 and 0.05 mm in size that has a floury and smooth feel when moistened and rubbed between the fingers. Sand is a mineral particle between 0.05 and 2.0 mm in size that has a gritty feel when moistened and rubbed between the fingers. In Part 1 of this activity, students should be able to feel the difference between clay, sily, and sand.
See the soil section of the GLOBE Teacher’s Guide for more information on soil (www.globe.gov).
What To Do and How To Do It
Part 1:
1. Hold up the three bags of soil (sand, silt, clay) and ask the students what they think they might find out about the soil samples if they were to study each kind carefully. Note: make sure the students know that these samples only represent one kind of sand, silt, or clay soil. Samples collected in other locations might be different colors, but the grain size will be similar to the samples you have.
2. After developing a list of predictions about the soil on the board, distribute soil and various tools (strainer, magnifying lenses, etc.) and supplies (water, markers/crayons, etc.) to small groups of students. Make sure the students keep the different soil samples separate. One way to keep them separate is to have each soil type at a different station and have the students take turns visiting each soil station.
3. Have the groups of students spend time experimenting with the different soil samples. With each sample they should use their various senses - feeling the soil with their fingers, smelling the soil, making visual observations, etc.
4. After experimenting with the different soil types, have the students record their observations of each soil type on their Getting to Know Soil Student Activity Sheet 1. They can also include a smudge of each soil sample as a way to record the soil color.
5. Have the students share their observations with the class. Use chart paper to record those observa-tions. Encourage the students to discuss the soil’s texture and color. Explain those terms if necessary. Refer back to the student’s initial questions about soil during this discussion. See if their questions have been answered yet. If not, you may want to do further investigations.
© 2018 University Corporation for Atmospheric Research All Rights Reserved

The GLOBE Program Getting To Know Soil - Page 4 The Scoop on Soils
Part 2:
1. Explain that soils are usually a combination of clay, silt, and sand and that soils usually include organic matter - living and dead plants and animals. Tell students that in this part of the activity, they will look at soil from near their school.
2. Have each group of students put a sample of soil from near your school into a jar that is partially filled with water. Tell them to put a top on the jar, shake the jar, and then observe what happens after two minutes, ten minutes, and 24 hours. Have them record their observations on the Getting to Know Soil Student Activity Sheet 2. Note: usually organic materials float to the surface and the inorganic materials settle into layers of different sizes and colors (the organic layer will be at the top, then clay, silt, and sand). Also, mark the water level on the jar at the start and observe how it changes.
3. Give each student a copy of the Getting to Know Soil Student Activity Sheet 3 and invite them to discuss the various layers in the soil. Note: Not all soil will settle in layers in this order. This is just one example. You can modify the Getting to Know Soil Student Activity Sheet 3 to match the way your local soil sample settles in the jar of water.
4. Add to the discussion as needed to discuss the different features in the soil layers. Focus on the visible features you can see in the profile, including different layers, grain size, roots, rocks, etc.
5. Have the students color in the different layers on the Getting to Know Soil Student Activity Sheet 3. Matching colors with layers in the jar of soil. See the “Soil Crayons” activity in the Further Investigations section of this activity for an idea of how to make crayons out of soil; the students could use those crayons to color the horizons in this activity.
6. Have the students complete the words on Student Activity Sheet 3. Have them cut out both the profile and cover sheet and staple the cover sheet
to the top. To review the layers, have the students read a word and lift the corresponding flap to check that they correctly identified the word.
7. If you would like to take this activity to a more advanced level, have the students write in more information and observations about each layer on the back of its flap. Older students can also write the whole word rather than filling in the blanks.
Adaptations for Youngerand Older Students Younger students can sing songs about soils. The following Web site has several songs about soils: soils.usda.gov/education/resources/k_12/songs/.
Older students can practice making measurements of soil grains. If a grain is larger than 2.0 mm then it is considered gravel. Place a handful of sandy soil and some rulers on a table and have students measure the larger grains to see if they are classified as soil or rocks. Also, do the Soil and My Backyard Learning Activity with older students. This can be found in the soil chapter of the GLOBE Teacher’s Guide (www.globe.gov). You can also introduce the concept of turbidity to older students. Shake a jar of soil and water and hold a small light behind the back of the jar. Use a timer and record how much time passes before the light can be observed.
Older students can also explore the mechanism that causes different soil components to sort when settling in water (density) and identify which soil components are havve higher and lower density.
Further Investigations
• Soil Word Wall: Generate a list of words students might use to describe soil. This list should include ways to describe soil’s color, texture, and structure. Also include words that apply to the different senses. Your students can help you generate the list. Keep the list up on the wall while you are doing the Elementary GLOBE
© 2018 University Corporation for Atmospheric Research All Rights Reserved

The GLOBE Program Getting To Know Soil - Page 5 The Scoop on Soils
soil activities so students can refer to it; it will help them think of words to use on their student activity sheets.
• Soil Art: Have your students explore the various colors of soil for a classroom art project. Take different dried soil samples and grind them into a fine powder. Notice the colors and textures of the different soils. Pour acrylic paint into small paper cups and mix different soils into the cups. Experiment with different amounts of soil to see how it affects the color of the paint mix. Use a paintbrush to apply the soil paint to a piece of paper and have fun creating some artwork! Another art project using soils is to make soil crayons. Go to the following Web site for more information on this activity: nrcs.usda.gov/wps/portal/nrcs/detail/soils/edu/?cid=nrcs142p2_054292. Compare the soil colors to the colors on the Munsel Color Chart.
• Soil Colors: Further explore soil color and texture. Use paint chips or crayons in earth tones to look at the colors of various soil samples. Older students can follow a “Texture By Feel” flowchart to explore the different textures found in soils. Wow! The Wonders of Wetlands by Environmental Concern, Inc. and The Watercourse has an activity called Do You Dig Wetland Soil? that provides more details for this activity.
• “Making” Soil: To do this, collect the various ingredients that make up soil: small rocks, leaves, roots, bark, twigs, dead insects, etc. Put these items in a sturdy plastic bag or a pillowcase. Add a little water to the mixture. Help the students safely use a hammer or mallet to try and crush the soil building materials. Discuss the forces in nature that act like these hammers (freeze/thaw, water erosion, wind etc). Once they have done this, pour the mixture onto a surface and compare it to a soil sample you collected outside. Discuss with the students that one ingredient you didn’t use was time – if this had been a natural soil forming process it would have taken many years in nature for soil to form out of those ingredients!
• Experimenting with soil and water: Have your students make comparisons between their
© 2018 University Corporation for Atmospheric Research All Rights Reserved
observations of dry and wet soil. They can observe differences in texture, color, weight, etc.
• Observe Soil: Find a special place to dig up the soil and make observations. Use tools like magnifying lenses, rulers, and color charts. Have your students write and draw what they discover in their journals.
• Soil Investigations: Use the GLOBE Teacher’s Guide for more information (www.globe.gov). As an extension to Part 2 of this activity, take your students outside at your school and expose a soil profile to make observations based on what they have learned in the classroom.

What I see
What I feel
What I smell
My observations about types of soil
Getting To Know Soil Student Activity Sheet 1
The Scoop on Soils
© 2018 University Corporation for Atmospheric Research All Rights Reserved
Name
Date

Getting To Know Soil Student Activity Sheet 2
The Scoop on Soils
© 2018 University Corporation for Atmospheric Research All Rights Reserved
The soil in the jar looked like this after:
Name Date
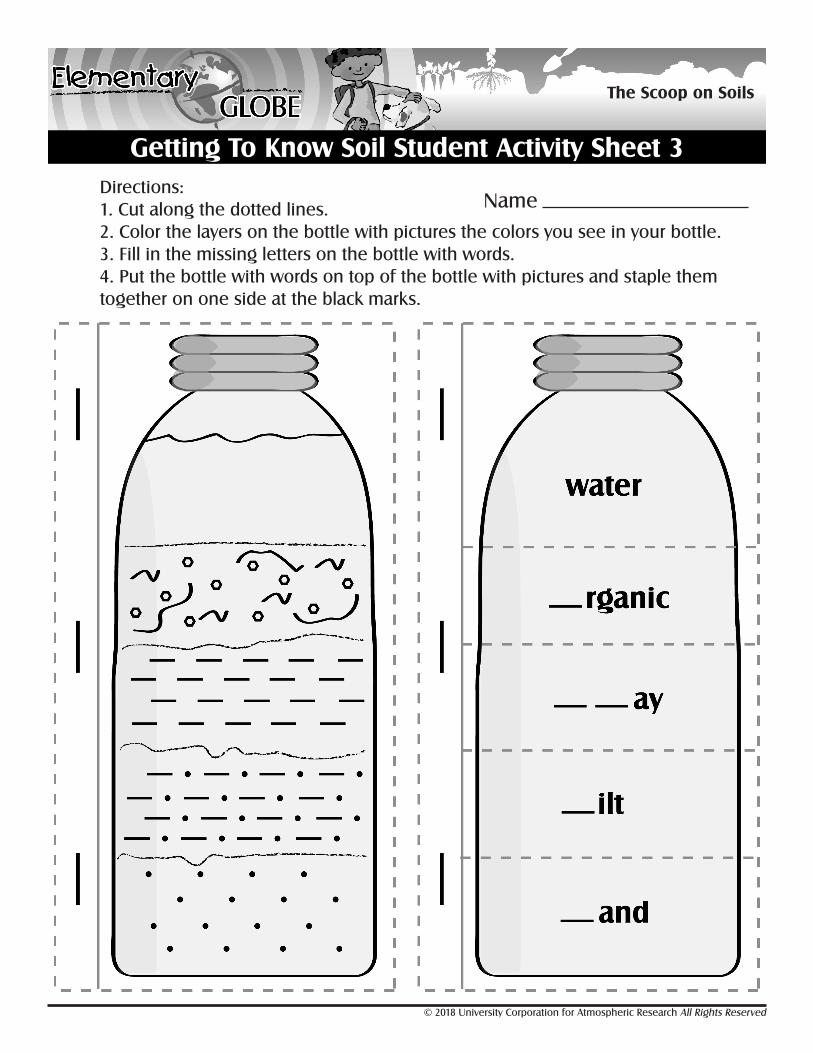
Getting To Know Soil Student Activity Sheet 3
The Scoop on Soils
Directions:1. Cut along the dotted lines.2. Color the layers on the bottle with pictures the colors you see in your bottle.3. Fill in the missing letters on the bottle with words.4. Put the bottle with words on top of the bottle with pictures and staple them together on one side at the black marks.
© 2018 University Corporation for Atmospheric Research All Rights Reserved
Name