Embed Size (px)
Citation preview

4
Chapter 1 – Introduction ........................................................................... 7
Chapter 2 – Three points of handstand foundation ..................................... 9
Chapter 3 – The most common mistakes. Reasons. Solutions .................... 10
Chapter 4 – Upper body flexibility ............................................................ 12
Chapter 5 – Upper body strength .............................................................. 17
Chapter 6 – Core strength ......................................................................... 22
Chapter 7 – Wall assisted handstand. Way to free standing handstand ....... 26
Chapter 8 – How to kick up into handstand and go down safely ............... 32
Chapter 9 – The perfect handstand ............................................................ 36
Chapter 10 – Technique exercises .............................................................. 38
Chapter 11 – How to organize your handstand training routine ................ 41
Bonus – How to combine handstand with other calisthenics and gymnastics
moves ......................................................................................................... 44
The conclusion .......................................................................................... 45
26
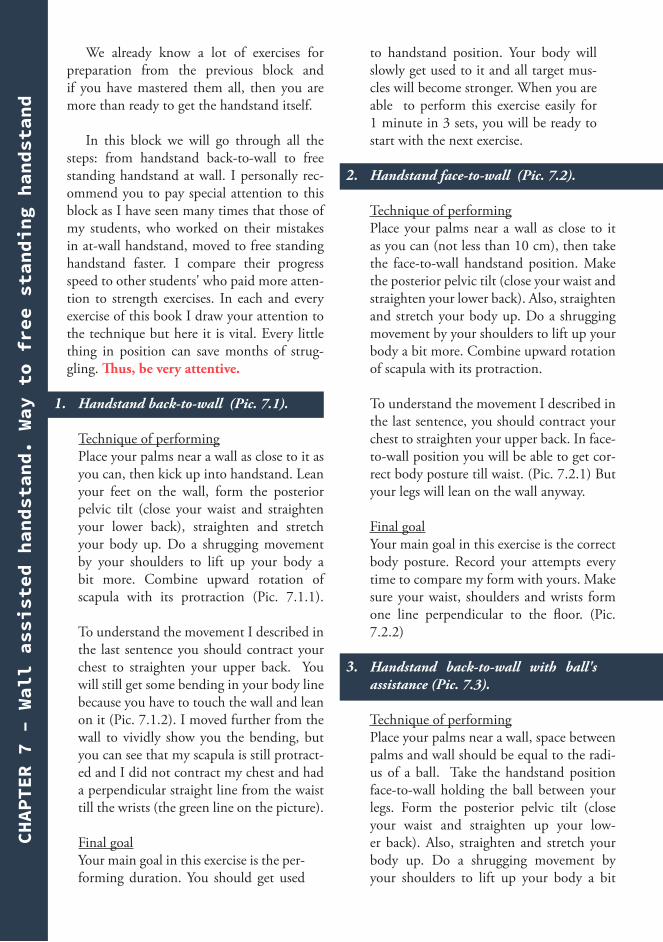
CHAP
TER 7 – Wall assis
ted handstand. Way to free stand
ing
handst
and
We already know a lot of exercises for preparation from the previous block and if you have mastered them all, then you are more than ready to get the handstand itself.
In this block we will go through all the steps: from handstand back-to-wall to free standing handstand at wall. I personally rec-ommend you to pay special attention to this block as I have seen many times that those of my students, who worked on their mistakes in at-wall handstand, moved to free standing handstand faster. I compare their progress speed to other students' who paid more atten-tion to strength exercises. In each and every exercise of this book I draw your attention to the technique but here it is vital. Every little thing in position can save months of strug-gling. Thus, be very attentive.
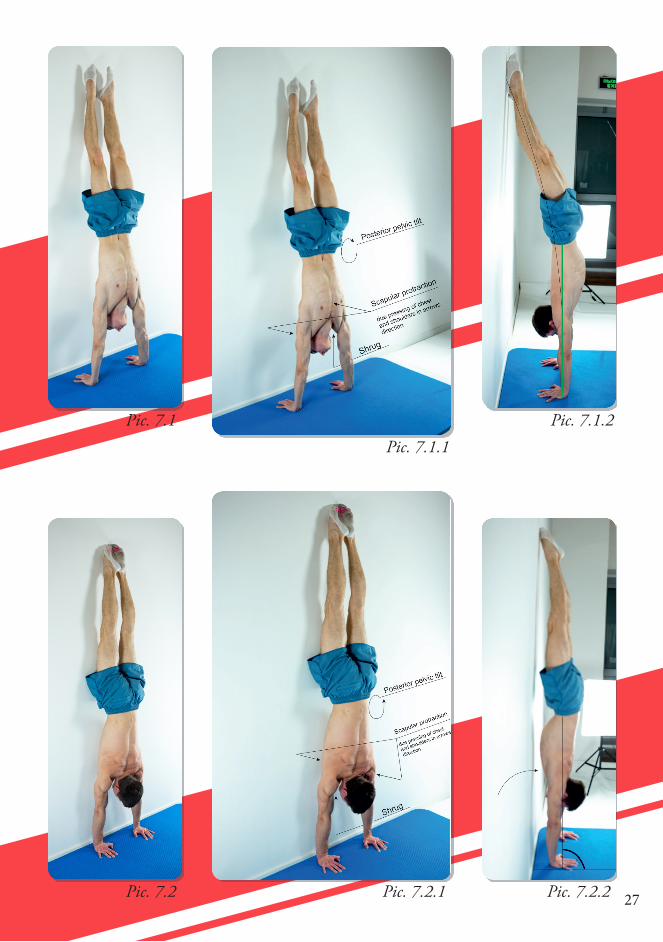
1. Handstand back-to-wall (Pic. 7.1).
Technique of performingPlace your palms near a wall as close to it as you can, then kick up into handstand. Lean your feet on the wall, form the posterior pelvic tilt (close your waist and straighten your lower back), straighten and stretch your body up. Do a shrugging movement by your shoulders to lift up your body a bit more. Combine upward rotation of scapula with its protraction (Pic. 7.1.1). To understand the movement I described in the last sentence you should contract your chest to straighten your upper back. You will still get some bending in your body line because you have to touch the wall and lean on it (Pic. 7.1.2). I moved further from the wall to vividly show you the bending, but you can see that my scapula is still protract-ed and I did not contract my chest and had a perpendicular straight line from the waist till the wrists (the green line on the picture).
Final goalYour main goal in this exercise is the per-forming duration. You should get used
to handstand position. Your body will slowly get used to it and all target mus-cles will become stronger. When you are able to perform this exercise easily for 1 minute in 3 sets, you will be ready to start with the next exercise.
2. Handstand face-to-wall (Pic. 7.2).
Technique of performingPlace your palms near a wall as close to it as you can (not less than 10 cm), then take the face-to-wall handstand position. Make the posterior pelvic tilt (close your waist and straighten your lower back). Also, straighten and stretch your body up. Do a shrugging movement by your shoulders to lift up your body a bit more. Combine upward rotation of scapula with its protraction.
To understand the movement I described in the last sentence, you should contract your chest to straighten your upper back. In face-to-wall position you will be able to get cor-rect body posture till waist. (Pic. 7.2.1) But your legs will lean on the wall anyway.
Final goalYour main goal in this exercise is the correct body posture. Record your attempts every time to compare my form with yours. Make sure your waist, shoulders and wrists form one line perpendicular to the floor. (Pic. 7.2.2)
3. Handstand back-to-wall with ball's assistance (Pic. 7.3).
Technique of performingPlace your palms near a wall, space between palms and wall should be equal to the radi-us of a ball. Take the handstand position face-to-wall holding the ball between your legs. Form the posterior pelvic tilt (close your waist and straighten up your low-er back). Also, straighten and stretch your body up. Do a shrugging movement by your shoulders to lift up your body a bit
27
Pic. 7.1
Pic. 7.2
Pic. 7.1.1
Pic. 7.2.1
Pic. 7.1.2
Pic. 7.2.2
32
CHAPTER 8 – How to kick up into handstand and go d
own
safe
lyWhen you have already succeed in the
previous blocks it is high time to try out free standing handstand, but here comes the ques-tion, 'How to get into handstand position?'
There are a few different ways to do that. We will consider in details how to perform it efficiently. Before you start with this block, make sure that you are confident with your handstand and already know how to go down safely. Use some mat to make training safer. That is why I will put couple of ways how to do that in the beginning of chapter.
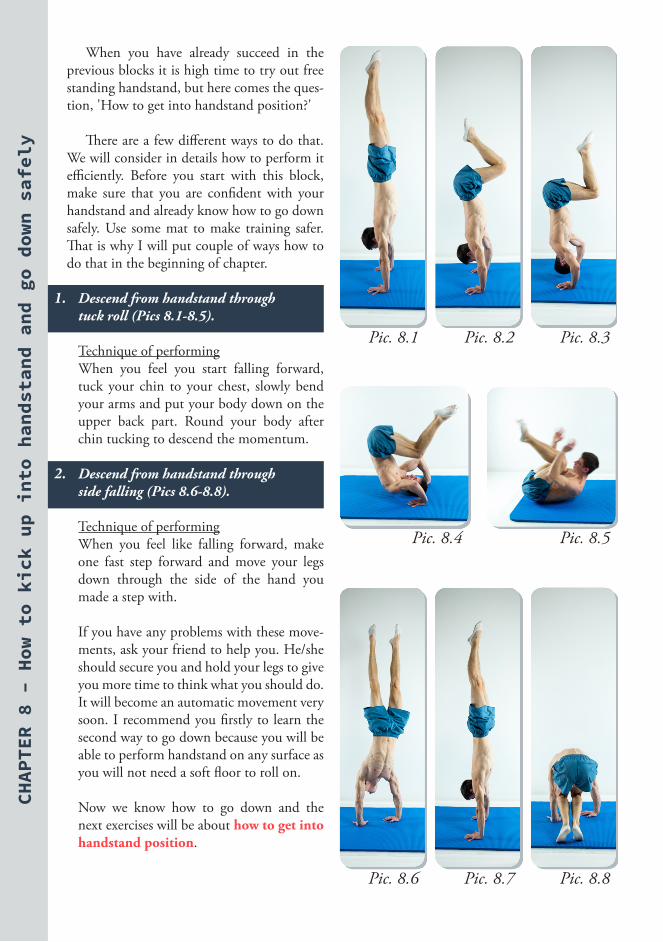
1. Descend from handstand through tuck roll (Pics 8.1-8.5).
Technique of performingWhen you feel you start falling forward, tuck your chin to your chest, slowly bend your arms and put your body down on the upper back part. Round your body after chin tucking to descend the momentum.
2. Descend from handstand through side falling (Pics 8.6-8.8).
Technique of performingWhen you feel like falling forward, make one fast step forward and move your legs down through the side of the hand you made a step with. If you have any problems with these move-ments, ask your friend to help you. He/she should secure you and hold your legs to give you more time to think what you should do. It will become an automatic movement very soon. I recommend you firstly to learn the second way to go down because you will be able to perform handstand on any surface as you will not need a soft floor to roll on.
Now we know how to go down and the next exercises will be about how to get into handstand position.
Pic. 8.1
Pic. 8.4
Pic. 8.6 Pic. 8.7 Pic. 8.8
Pic. 8.5
Pic. 8.2 Pic. 8.3
33
Pic. 8.10
Pic. 8.12
Pic. 8.13 Pic. 8.14
Pic. 8.15 Pic. 8.16
Pic. 8.11
Pic. 8.9
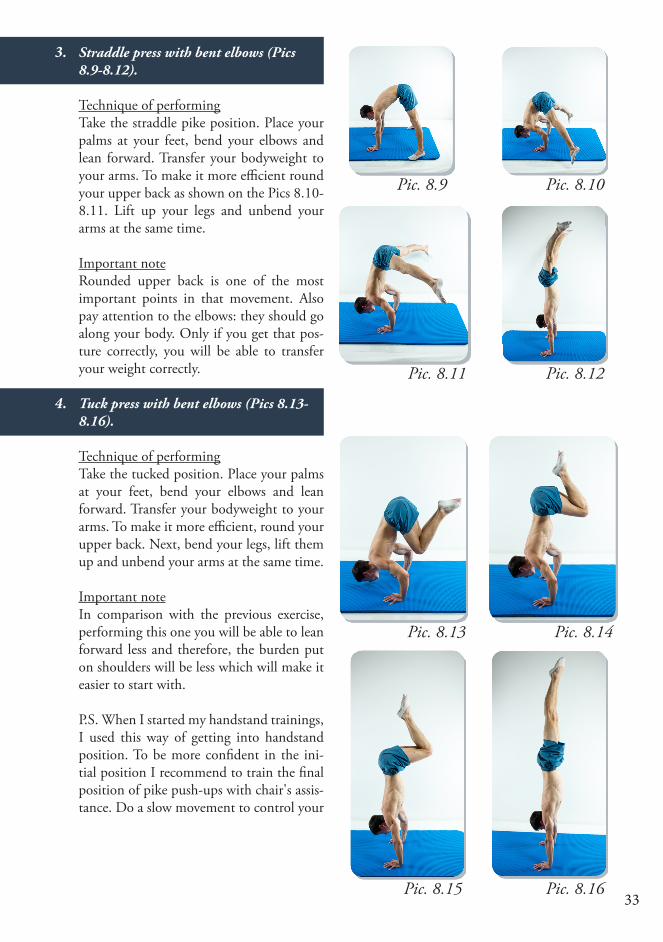
3. Straddle press with bent elbows (Pics 8.9-8.12).
Technique of performingTake the straddle pike position. Place your palms at your feet, bend your elbows and lean forward. Transfer your bodyweight to your arms. To make it more efficient round your upper back as shown on the Pics 8.10-8.11. Lift up your legs and unbend your arms at the same time.
Important noteRounded upper back is one of the most important points in that movement. Also pay attention to the elbows: they should go along your body. Only if you get that pos-ture correctly, you will be able to transfer your weight correctly.
4. Tuck press with bent elbows (Pics 8.13-8.16).
Technique of performingTake the tucked position. Place your palms at your feet, bend your elbows and lean forward. Transfer your bodyweight to your arms. To make it more efficient, round your upper back. Next, bend your legs, lift them up and unbend your arms at the same time.
Important noteIn comparison with the previous exercise, performing this one you will be able to lean forward less and therefore, the burden put on shoulders will be less which will make it easier to start with.
P.S. When I started my handstand trainings, I used this way of getting into handstand position. To be more confident in the ini-tial position I recommend to train the final position of pike push-ups with chair's assis-tance. Do a slow movement to control your

THE FULL VERSIONIS HERE
https://link