Embed Size (px)
DESCRIPTION
The second edition of Local Flap Reconstruction consists of 78 photographic case studies, from all anatomical regions, illustrating the techniques of local flap repair for the reconstruction of skin defects. From basic explanation of the principles of reconstructive surgery to some of the more advanced and recent procedural skills, like island flaps, the book covers all aspects of flap surgery in a concise and visual manner.
Citation preview

Part aPrinciPles
Penington_2e_CH01.indd 1 5/6/10 6:31:12 PM

chaPter 1Design anD techniques
Penington_2e_CH01.indd 2 5/6/10 6:31:12 PM
3
1.0 introDuction
Local flap surgery is at the core of the plastic surgical craft. The surgeon managing skin cancer must deal with an infinite array of skin defects that will draw on his or her full technical and creative ability.
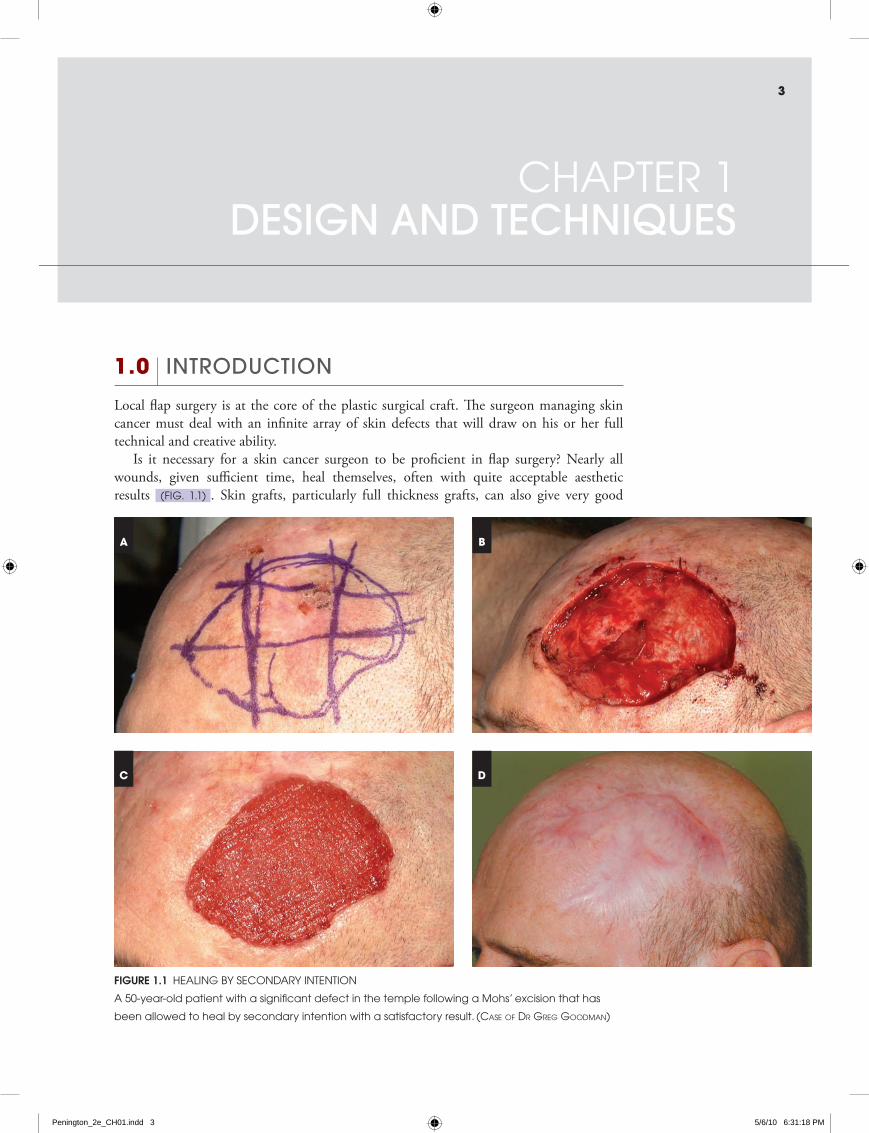
Is it necessary for a skin cancer surgeon to be proficient in flap surgery? Nearly all wounds, given sufficient time, heal themselves, often with quite acceptable aesthetic results (Fig. 1.1) . Skin grafts, particularly full thickness grafts, can also give very good
chaPter 1Design anD techniques
Figure 1.1 healing by secondary intention
a 50-year-old patient with a significant defect in the temple following a Mohs’ excision that has
been allowed to heal by secondary intention with a satisfactory result. (Case of Dr GreG GooDman)
A
C D
B
Penington_2e_CH01.indd 3 5/6/10 6:31:18 PM
4 part a PrinciPles
outcomes. The answer is that only skin flap surgery can consistently produce the excellent results that should be the aim of every reconstructive surgeon.
All skin defects are different and even a small difference in the location of a defect can make a large difference to the choice of flap. It is therefore not possible to write a ‘cookbook’ that will show what flap is ‘right’ for each defect and this book does not attempt to do so. Instead, it aims to give the surgeon the knowledge needed to design the flap that is best suited to each reconstructive problem.
This book is based around a series of case studies. These have been chosen to highlight points of technique and to demonstrate principles of reconstruction in many parts of the body. These examples will show what type of flap works in what location but this does not mean that other types of flap cannot be used at a given site.
While the technical aspects of flap surgery are important, the key to successful reconstruction lies beyond the mechanics of flap surgery. When beginning the study of flap reconstruction, most trainees understandably focus on learning the technical considerations of flap design and execution. However, in the longer term it is the ability to select the right flap and match its design to the clinical situation that marks a good flap surgeon.
The ability to choose the correct flap depends on a clear understanding of what the reconstruction is trying to achieve. It is the surgeon who is able to maintain a clear vision of the purpose of reconstruction who will create flaps that consistently satisfy the patient’s needs.
1.1 aims of reconstruction
The starting point of any reconstruction is to define the aims of surgery. This allows the surgeon to focus on the problem in hand and avoid inadequate or over-complicated reconstructions.
Ideally, the aim of any reconstruction would be to restore the part to the exact state it was in prior to injury. However, such an aim could never be achieved because scar tissue is an inevitable consequence of any surgical procedure.
A more realistic approach is to say that surgeons seek to restore a part so that it looks normal and functions normally. We define these as the aesthetic and functional aims of reconstructive surgery. Either of these aims may need to be compromised or emphasised in the reconstructive process.
Achieving wound closure should not in itself be considered an aim of flap surgery. There are some situations where a flap is the only option to obtain wound closure. As previously mentioned however, most wounds can heal by secondary intention and the final appearance is often satisfactory. Too many poor reconstructions are performed by surgeons who believe that raising and transferring a flap to achieve wound closure constitutes success if the flap survives and the wound does not break down. If the patient is to pay the price of a flap donor site, the surgeon should be aiming to achieve more than just skin closure.
aesthetic aimsThe appearance of each part of the body can be analysed in terms of its contour and the colour and texture of the skin. Various parts of the body also have special features, such as hair and nails.
Skin colour and texture vary considerably from one part of the body to another but generally most closely resemble that of the adjacent skin. One of the greatest advantages
Penington_2e_CH01.indd 4 5/6/10 6:31:19 PM
5chapter 1 design and techniques
of local flaps over skin grafts and flaps from distant sites is that the reconstruction uses the adjacent, well matched skin. Local flaps tend to maintain their colour, unlike skin grafts, which have a prolonged period of colour change postoperatively, while the new blood supply adjusts, and a less predictable final appearance.
Colour and texture, while important, can be covered if necessary with make-up. Changes in contour, however, are more obvious and more difficult to disguise. Differences in skin colour improve over time as sun exposure and other environmental factors take effect and scars settle. For these reasons, correction of contour takes precedence over other aesthetic considerations.
In every part of the body there are elements of contour that draw the eye and define the shape of features, such as the grooves between the nose and the lip or the helical rims of the ear. Other contours can be varied without causing appreciable change to appearance. The understanding of these differences is subjective and will come with experience. Some examples will be given in the case studies.
Symmetry is an important consideration in contour correction, particularly in central features such as the nose and lips. The importance of symmetry varies in subtle ways but should never be underestimated.
functional aimsRestoration of function with local flap surgery—such as eyelid closure, oral competence and nasal patency—is in general more difficult to achieve than satisfactory appearance. Return of function usually depends not only on the correction of the normal contour but also on such factors as the return of sensation and active movement.
Scar tissue inevitably works against the return of function by inhibiting free movement. Scarring varies between patients in ways that are sometimes unpredictable and are independent of surgical technique. If function is a consideration, the scar must be positioned in the location that least inhibits free motion. Fortunately there is usually considerable redundancy in the function of structures like the lip and eyelid so that it is enough that the flap is positioned in a manner that does not interfere with motion, even if does not actively contribute.
1.2 Defining the aims of surgery
In preoperative consultation it is important to discuss the aims of the reconstruction with the patient. The relative emphasis on aesthetic and functional aims will vary from patient to patient. It is a mistake, for instance, to undertake a more complex reconstruction to satisfy the surgeon’s aesthetic goals when the patient’s concerns are purely functional.
When considering the aesthetic aims, it is important to be clear for each patient what level of aesthetic result is being aimed for. It is neither possible nor desirable to aim for an appearance that is indistinguishable from normal anatomy in every case. A surgeon may aim only, for instance, to achieve a normal appearance when covered with make-up or in normal light at a conversational distance. Occasionally it may be appropriate to aim only for the patient to be able to be seen in public without attracting undue attention. It is not right for the surgeon to take the attitude ‘I always aim for the best possible appearance’. Achieving that appearance may involve a more complicated operation than is strictly necessary. If that operation leads to a complication, the patient may justifiably feel aggrieved that he or she has suffered from an operation that was not requested or desired.
Penington_2e_CH01.indd 5 5/6/10 6:31:19 PM
6 part a PrinciPles
On the other hand, the surgeon must be wary of the patient who claims ‘I don’t care what it looks like, just fix it’. When the stress of the original diagnosis of skin cancer is passed, many patients come to a changed view and sometimes it is difficult to go back and do a more complicated reconstruction. Judgment, experience and listening to the patient are the solutions to such problems.
1.3 excision anD Direct closure
Any skin flap reconstruction begins with an excision, often the excision of a skin cancer such as a squamous cell carcinoma (SCC) or basal cell carcinoma (BCC). If the excision is not performed correctly and a cancer is incompletely excised, a flap reconstruction, however elegant, must be counted a failure when it is subsequently invaded by recurrent cancer.
excisionThe first step in excising a skin tumour is to identify and mark the margins of the tumour. In some cases there may be induration of the skin beyond the visible abnormality and therefore tumour margins should be marked before local anaesthetic is infiltrated. Once the margins of the tumour are marked, the line of excision is drawn (in this book with a single solid line). Once it has been decided upon, the line of excision should not be changed except to increase the margin. In contrast, incisions for the flap reconstruction can vary from the marked lines. The surgeon should be disciplined in making the incisions for the tumour excision exactly as they have been marked.
The most important principle of tumour excision is that the surgeon must clearly separate in his or her mind the process of excision from the process of reconstruction. Tumour excision must never be compromised to facilitate the reconstruction. Further comments on excision may be found in Section 8.1.
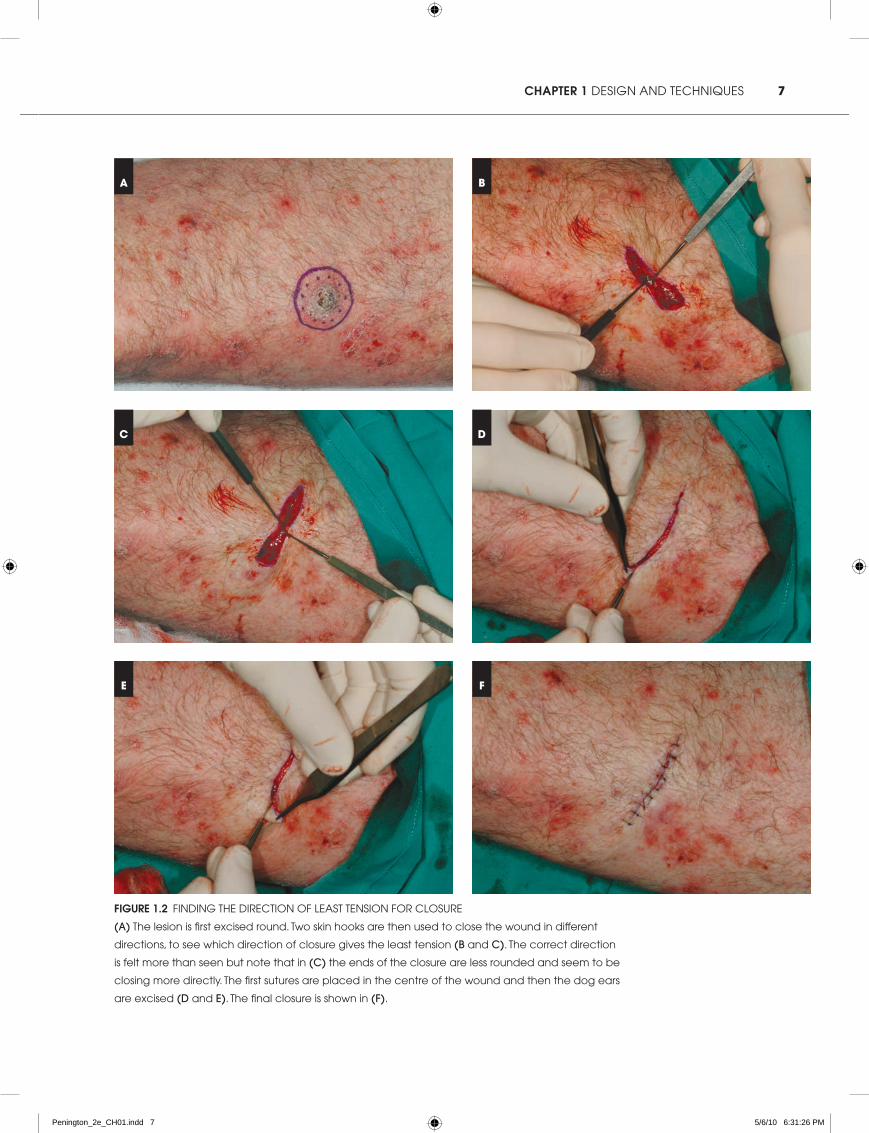
Direct closureIf there is sufficient skin to close a skin defect directly, direct closure is usually—but not always—the best reconstruction. Judgment is required in choosing the best direction for closing the wound and this comes with experience. It is often a good idea to excise tumours ‘round’ with the appropriate margin in all directions and then decide, by pulling on the wound edges with two skin hooks, on the optimum closure (Fig. 1.2) . It is possible in this way to learn a good deal about the direction of skin tension.
There are two main considerations in choosing the direction of a direct closure: the ultimate appearance of the scar itself and the effect of tension on surrounding structures. The appearance of the scar will be determined to some degree by its orientation to the internal structure of the skin, as reflected in Langer’s lines and relaxed skin tension lines (box 1.1) . Generally, scars parallel to Langer’s lines and to relaxed skin tension lines can be expected to have a better long term appearance. Scars that cross joint creases are always to be avoided.
The effect of the tension of closure on surrounding structures is not always easy to predict. It is usually a problem in the face, where facial features such as the eyebrow or eyelid can become unacceptably distorted. Generally speaking, the position of anatomical features is determined more by the function of the underlying muscle than by tension on the skin, so as skin relaxes over time, distortion will tend to diminish. In young patients, anatomical structures can return to their normal position despite significant displacement.
Penington_2e_CH01.indd 6 5/6/10 6:31:19 PM
7chapter 1 design and techniques
Figure 1.2 Finding the direction oF least tension For closure
(a) the lesion is first excised round. two skin hooks are then used to close the wound in different
directions, to see which direction of closure gives the least tension (b and c). the correct direction
is felt more than seen but note that in (c) the ends of the closure are less rounded and seem to be
closing more directly. the first sutures are placed in the centre of the wound and then the dog ears
are excised (D and e). the final closure is shown in (f).
A B
C D
E F
Penington_2e_CH01.indd 7 5/6/10 6:31:26 PM
8 part a PrinciPles
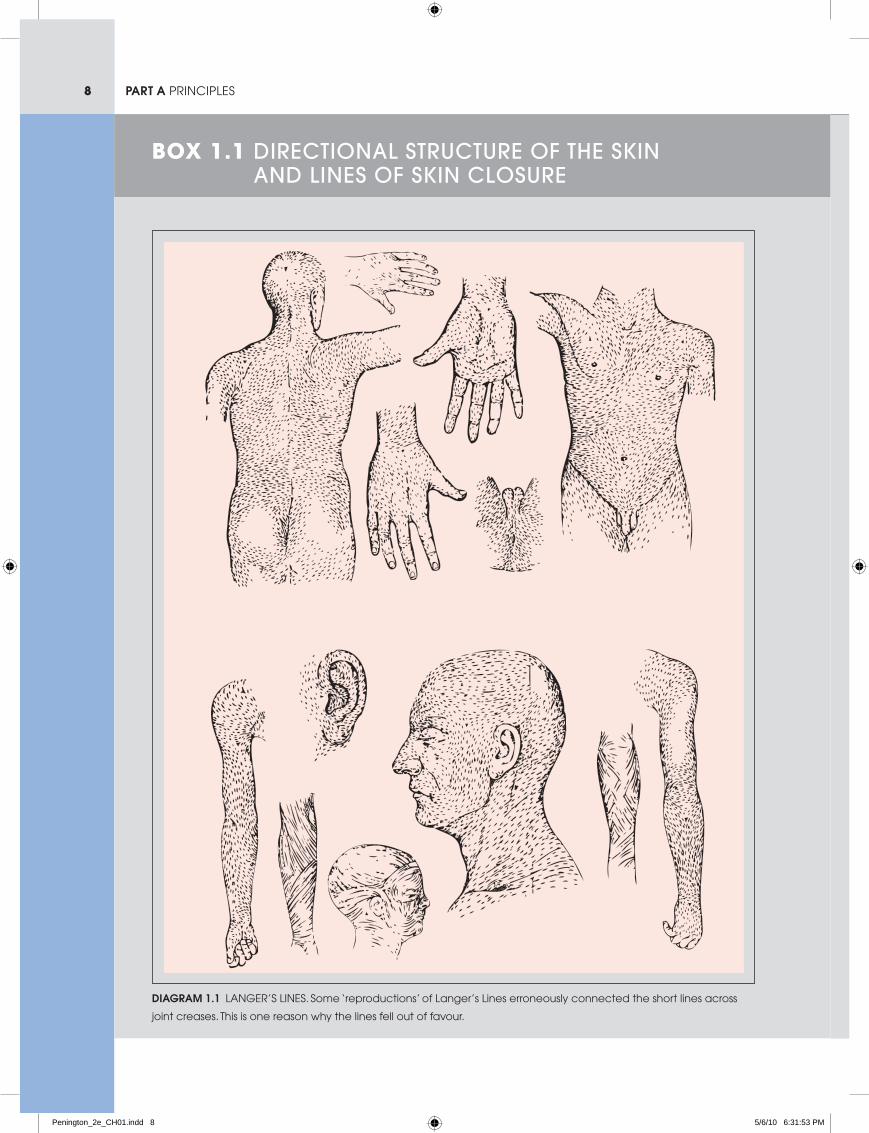
Box 1.1 Directional structure of the skin anD lines of skin closure
Diagram 1.1 langer’s lines. some ‘reproductions’ of langer’s lines erroneously connected the short lines across
joint creases. this is one reason why the lines fell out of favour.
Penington_2e_CH01.indd 8 5/6/10 6:31:53 PM

9chapter 1 design and techniques
some directions of skin closure lead to better scars
than others but it has proved surprisingly difficult
to say definitively which direction is always better.
the most famous attempt was the work of Karl
langer, a nineteenth century austrian anatomist.
baron dupuytren, the famous French surgeon,
was asked to give an opinion at the post-mortem
of a young man who had apparently been
stabbed with a round awl but whose body had
a linear wound. dupuytren experimented with
a similar implement and confirmed that a round
blade does create a linear wound. he suggested
langer study the directional properties of the
skin. langer presented his findings in a series of
four papers which were rediscovered in 1978 and
translated and published by tom gibson in the
British Journal of Plastic Surgery. they are well
worth reading.
diagrams from the first and most famous of these
papers are shown below (diagram 1.1). although
he never described continuous lines, langer’s lines
became widely used for elective incisions but later
fell out of favour for a variety of reasons, some
correct and some erroneous.
a number of alternative schemes have since
been proposed, the most popular being the relaxed
skin tension lines of borges. these lines indicate the
direction in which skin can be picked up with the
least tension. additionally, Kraissl proposed a system
of lines on the face associated with wrinkles and
running at right angles to underlying muscle. in some
areas one or both systems coincide with langer’s
lines and in some they differ. no one system of lines
is perfect: for one thing, the best direction of closure
can change with age and body shape. in areas
where all the systems agree they tend to be a reliable
guide. in other areas, such as the
lower medial cheek, there is no
agreement and it remains difficult
to choose a satisfactory direction.
diagram 1.2 shows the author’s
general preference for skin closure
direction. it is a minor modification of
the system of relaxed skin tension lines.
the areas of major disagreement are
shown in red. in the glabellar region,
vertical scars do well. indeed, across
the whole forehead vertical scars
can be preferable, particularly as
wide horizontal excisions can tend
to raise an eyebrow and give an
unusual appearance. interestingly,
langer described lines running
in both directions in the central
forehead. on the temple, scars can
be well hidden in the crow’s feet,
especially in older patients (these
lines run in the direction described
by Kraissl). the nasolabial groove
provides an excellent opportunity
to hide scars, particularly inferiorly.
on the chin, scars that respect the
curved mentolabial crease seem to
do well.Diagram 1.2 lines oF elective sKin lesions
Penington_2e_CH01.indd 9 5/6/10 6:32:03 PM
10 part a PrinciPles
This effect can be relied on less in older patients. Closures that pull down the lower eyelid lead to ectropion and must always be avoided.
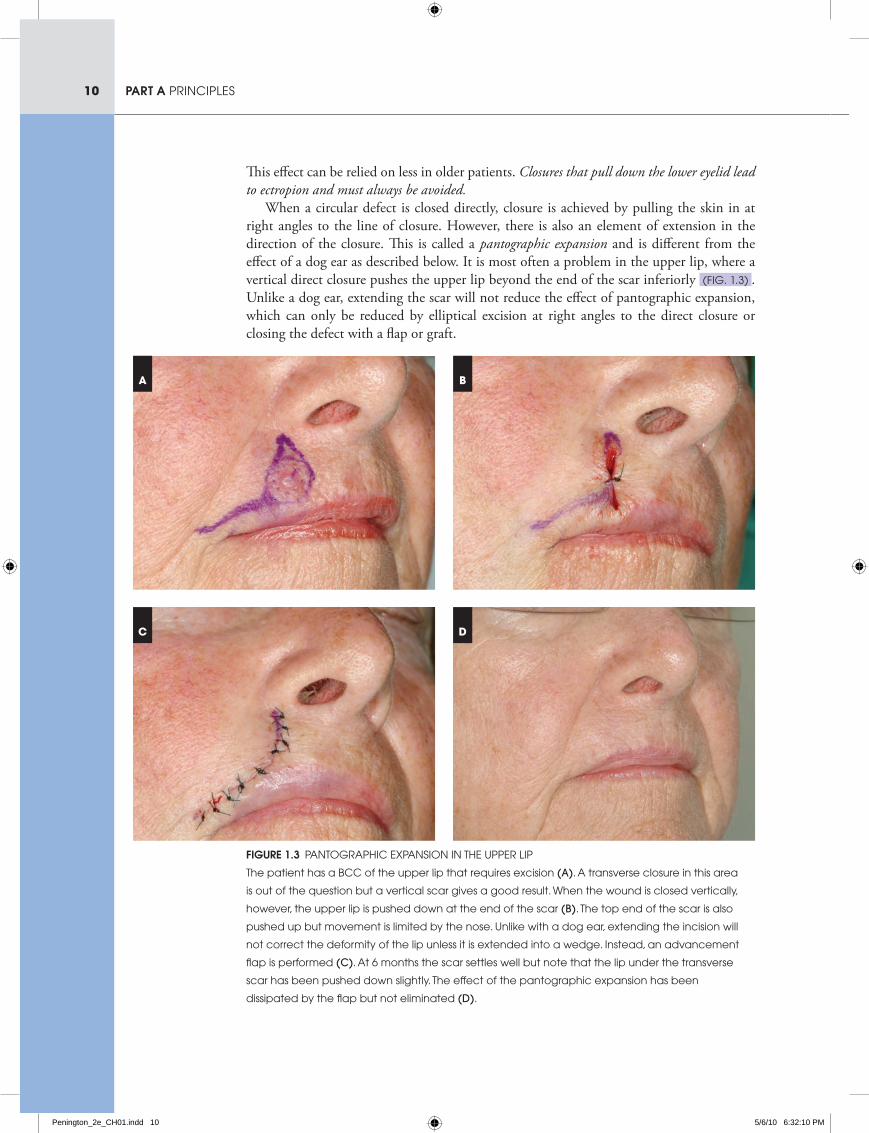
When a circular defect is closed directly, closure is achieved by pulling the skin in at right angles to the line of closure. However, there is also an element of extension in the direction of the closure. This is called a pantographic expansion and is different from the effect of a dog ear as described below. It is most often a problem in the upper lip, where a vertical direct closure pushes the upper lip beyond the end of the scar inferiorly (Fig. 1.3) . Unlike a dog ear, extending the scar will not reduce the effect of pantographic expansion, which can only be reduced by elliptical excision at right angles to the direct closure or closing the defect with a flap or graft.
Figure 1.3 PantograPhic exPansion in the uPPer liP
the patient has a bcc of the upper lip that requires excision (a). a transverse closure in this area
is out of the question but a vertical scar gives a good result. When the wound is closed vertically,
however, the upper lip is pushed down at the end of the scar (b). the top end of the scar is also
pushed up but movement is limited by the nose. unlike with a dog ear, extending the incision will
not correct the deformity of the lip unless it is extended into a wedge. instead, an advancement
flap is performed (c). at 6 months the scar settles well but note that the lip under the transverse
scar has been pushed down slightly. the effect of the pantographic expansion has been
dissipated by the flap but not eliminated (D).
A B
C D
Penington_2e_CH01.indd 10 5/6/10 6:32:10 PM
11chapter 1 design and techniques
Dog earsDog ears are an inevitable consequence of closing a round defect into a straight line. As the skin is stretched to close the centre of the wound, redundant skin accumulates at either end of the closure and produces a bulge at either end of the scar. There is in fact no true excess of skin in a dog ear but a relative looseness because the skin is pulled in by its attachment to the tight skin at the centre of the closure. The bulge of a dog ear is at right angles to the plane of the skin and this distinguishes it from a pantographic expansion. box 1.2 explains the technique of dog ear excision.
A dog ear can be reduced by extending the excision in the direction of closure. The cost of this reduction is a longer scar.
With remodelling over time and as the tight skin undergoes stress relaxation at the centre of the scar, the dog ears at the ends will tend to subside and if small enough will disappear altogether. The surgeon at the time of excision must therefore compromise between extending a scar unnecessarily and leaving behind a dog ear that may not resolve completely. The balance will differ with anatomical site and particularly with age. In children there is better remodelling and greater concern over hypertrophic scarring, so a short scar with a dog ear is usually preferable. In the elderly the situation is reversed.
On a convex surface such as a limb, the loss of bulk in the centre of the closure due to removal of subcutaneous fat with the tumour accentuates the bulge at either end of the wound and can contribute significantly to the appearance of dog ears. In this circumstance particularly, the appearance of a dog ear can be lessened by the removal of extra subcutaneous fat from beyond the end of the scar in the area where the dog ear is likely to appear.
Sometimes a dog ear is best excised by directly extending the wound in the line of the closure and sometimes it is better to change the angle to accommodate local tension or anatomical features. Occasionally there will be an opportunity to hide the dog ear excision in an adjacent anatomical feature. An example is given in Case 2.19. There an incision tangential to the defect is used so that the dog ear is effectively moved from the defect and conveniently hidden in an anatomical feature. Sometimes flap reconstruction is indicated only for managing a dog ear of this type.
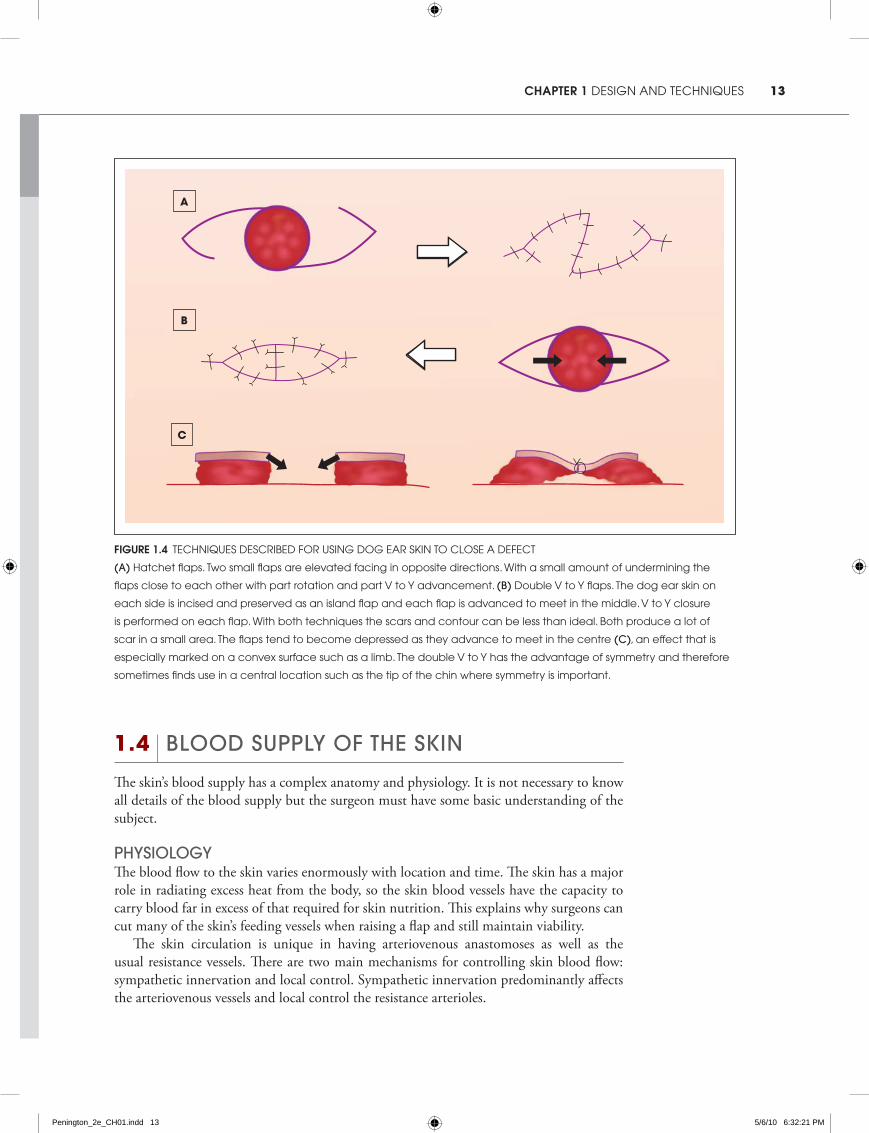
using Dog ear skin for closureWhen closing a round defect directly there is a skin deficiency centrally and an excess in the dog ear. This makes it tempting to bring skin from the dog ear into the centre of the defect to help closure. Some techniques for doing this are shown in Figure 1.4 .
No clinical examples of these techniques are shown in the book, mainly because the author rarely uses them. Attractive as the concepts are, the problem with these techniques is that they tend to produce messy scars. When two flaps are advanced to meet each other under tension the central scar tends to be depressed (Fig. 1.4c) . If the wound does not close directly it is generally better to plan and execute a formal flap reconstruction that will give a better aesthetic result.
Penington_2e_CH01.indd 11 5/6/10 6:32:11 PM
12 part a PrinciPles
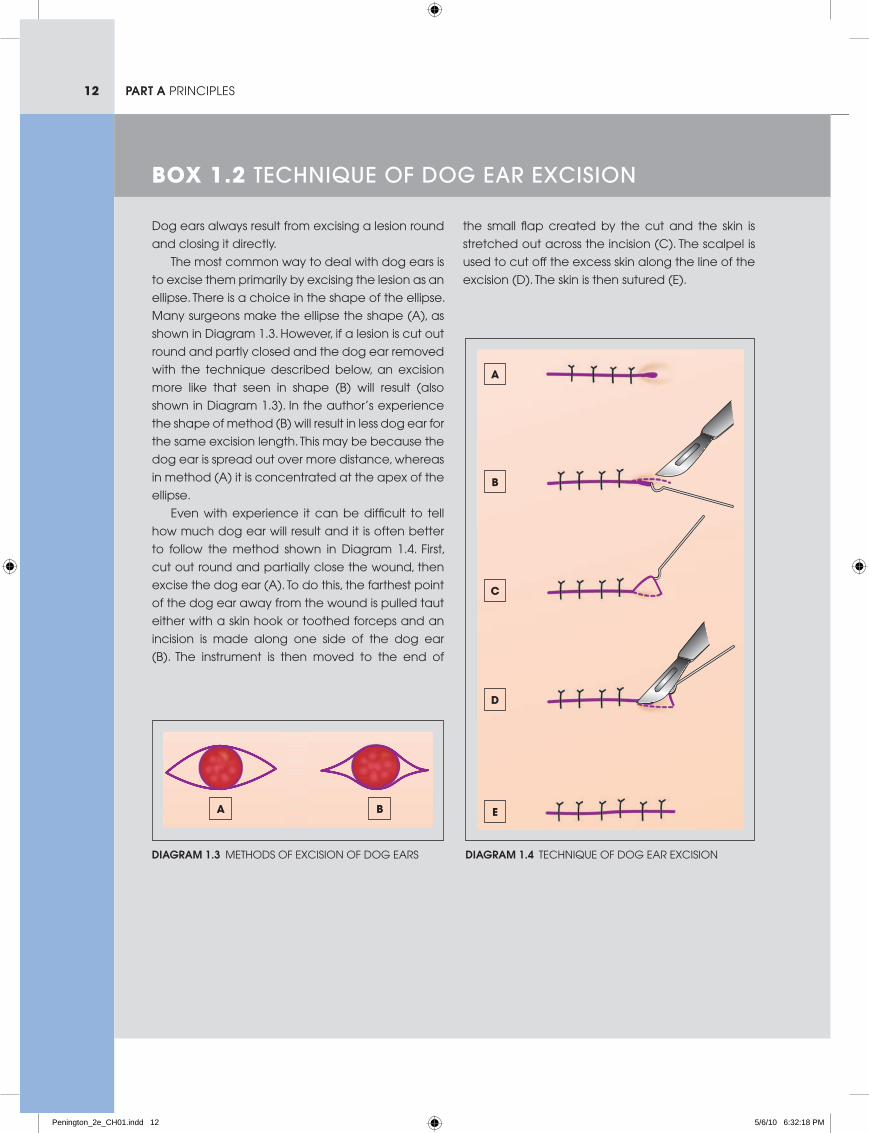
dog ears always result from excising a lesion round
and closing it directly.
the most common way to deal with dog ears is
to excise them primarily by excising the lesion as an
ellipse. there is a choice in the shape of the ellipse.
Many surgeons make the ellipse the shape (a), as
shown in diagram 1.3. however, if a lesion is cut out
round and partly closed and the dog ear removed
with the technique described below, an excision
more like that seen in shape (b) will result (also
shown in diagram 1.3). in the author’s experience
the shape of method (b) will result in less dog ear for
the same excision length. this may be because the
dog ear is spread out over more distance, whereas
in method (a) it is concentrated at the apex of the
ellipse.
even with experience it can be difficult to tell
how much dog ear will result and it is often better
to follow the method shown in diagram 1.4. First,
cut out round and partially close the wound, then
excise the dog ear (a). to do this, the farthest point
of the dog ear away from the wound is pulled taut
either with a skin hook or toothed forceps and an
incision is made along one side of the dog ear
(b). the instrument is then moved to the end of
the small flap created by the cut and the skin is
stretched out across the incision (c). the scalpel is
used to cut off the excess skin along the line of the
excision (d). the skin is then sutured (e).
Box 1.2 technique of Dog ear excision
Diagram 1.3 Methods oF excision oF dog ears
A B
Diagram 1.4 technique oF dog ear excision
A
B
C
D
E
Penington_2e_CH01.indd 12 5/6/10 6:32:18 PM
13chapter 1 design and techniques
1.4 blooD supply of the skin
The skin’s blood supply has a complex anatomy and physiology. It is not necessary to know all details of the blood supply but the surgeon must have some basic understanding of the subject.
physiologyThe blood flow to the skin varies enormously with location and time. The skin has a major role in radiating excess heat from the body, so the skin blood vessels have the capacity to carry blood far in excess of that required for skin nutrition. This explains why surgeons can cut many of the skin’s feeding vessels when raising a flap and still maintain viability.
The skin circulation is unique in having arteriovenous anastomoses as well as the usual resistance vessels. There are two main mechanisms for controlling skin blood flow: sympathetic innervation and local control. Sympathetic innervation predominantly affects the arteriovenous vessels and local control the resistance arterioles.
Figure 1.4 techniques described For using dog ear sKin to close a deFect
(a) hatchet flaps. two small flaps are elevated facing in opposite directions. With a small amount of undermining the
flaps close to each other with part rotation and part v to y advancement. (b) double v to y flaps. the dog ear skin on
each side is incised and preserved as an island flap and each flap is advanced to meet in the middle. v to y closure
is performed on each flap. With both techniques the scars and contour can be less than ideal. both produce a lot of
scar in a small area. the flaps tend to become depressed as they advance to meet in the centre (c), an effect that is
especially marked on a convex surface such as a limb. the double v to y has the advantage of symmetry and therefore
sometimes finds use in a central location such as the tip of the chin where symmetry is important.
A
B
C
Penington_2e_CH01.indd 13 5/6/10 6:32:21 PM

14 part a PrinciPles
A lot of experimental work has been done into the events that occur in a skin flap in which the blood supply is compromised. Many pharmacological agents have been trialled that in theory should increase blood flow through vasodilation or by closing arteriovenous vessels. To date none has proved effective in clinical practice for flap surgery. In a failing flap it is likely that local control mechanisms are maximally directed towards vasodilation and there is no capacity to further increase blood flow. Preventing ischaemia by preserving the blood supply is the only way to avoid flap necrosis.
Surgeons should be familiar with two important findings from animal experimental skin flaps. First, haematoma under a flap will compromise its viability. Mulliken and colleagues have shown that the effect goes beyond the physical pressure caused by the volume of haematoma and seems to be due to an as yet unidentified agent released by the haematoma, possibly a free radical. Haematoma, if not the root of all evil in local flap surgery, is certainly to be avoided at all costs.
Second, it has been shown that the poorly perfused end of a skin flap survives less well than if the same skin is excised and replaced in the same location as a skin graft. In other words a skin graft survives better than a poorly perfused flap. Again the reasons for this are not known but it emphasises the importance of blood supply in flap design.
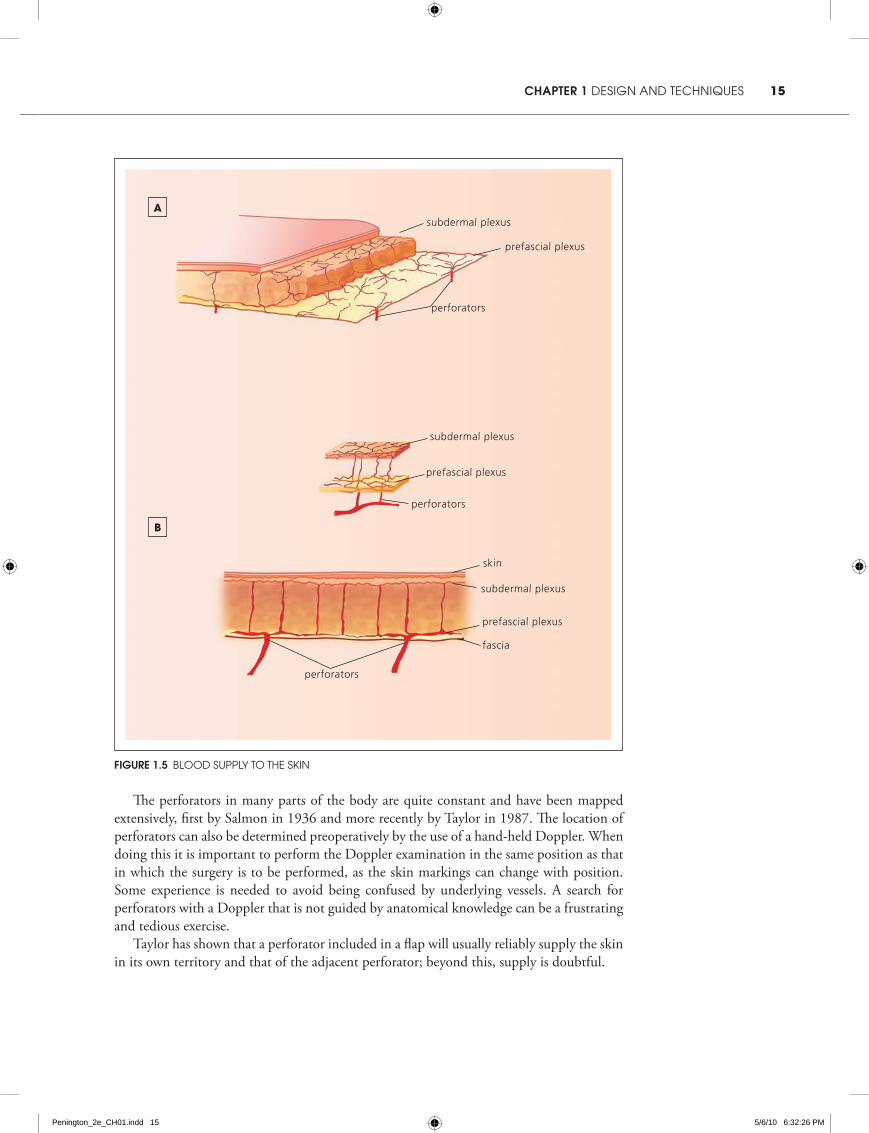
anatomyThe anatomy of the skin circulation is not only complex but varies with different locations on the body. It is helpful to have a simple scheme to categorise the skin blood vessels for flap design. One such a scheme separates the vessels into horizontal and vertical components.
The horizontal components consist of several vascular plexuses that lie in a plane parallel to the skin surface (Fig. 1.5a) . The two most important of these are the subdermal plexus and the deeper prefascial plexus. The subdermal plexus lies at the junction of the dermis and the subcutaneous fat. The prefascial plexus lies on the deep fascia or, in parts of the body with no deep fascia, on similarly positioned structures such as the platysma muscle in the lower face.1 These plexuses distribute blood within the skin and therefore within a skin flap.
The vertical components are perforating vessels (perforators) that arise from deeper arteries and veins (Fig. 1.5b) . They anastomose with the prefascial plexus and connect it to the subdermal plexus. They can pass directly from the deeper tissues to the fascia and skin or they can come through the underlying muscle. In the limbs especially, large perforators tend to track to the skin from the deeper vessels along the intermuscular septa. Perforators through muscle tend to be smaller but more numerous. Sometimes perforating vessels enter the skin and run parallel to the surface for a distance before ramifying.
Perforators typically consist of an artery and two smaller venae comitantes. The density of perforators varies around the body depending on the richness of the blood supply and the underlying anatomy. Where the perforators are less numerous they tend to be larger and supply a larger area of skin. For obvious reasons they tend to enter the skin in areas where the skin is relatively fixed to underlying structures.
1 The term ‘prefascial’ will be used regardless of whether or not there is a deep fascia in the part of the body referred to (where there is no deep fascia, the deeper plexus is related to another anatomical structure). This is not strictly speaking correct but the meaning is clear.
Penington_2e_CH01.indd 14 5/6/10 6:32:21 PM
15chapter 1 design and techniques
The perforators in many parts of the body are quite constant and have been mapped extensively, first by Salmon in 1936 and more recently by Taylor in 1987. The location of perforators can also be determined preoperatively by the use of a hand-held Doppler. When doing this it is important to perform the Doppler examination in the same position as that in which the surgery is to be performed, as the skin markings can change with position. Some experience is needed to avoid being confused by underlying vessels. A search for perforators with a Doppler that is not guided by anatomical knowledge can be a frustrating and tedious exercise.
Taylor has shown that a perforator included in a flap will usually reliably supply the skin in its own territory and that of the adjacent perforator; beyond this, supply is doubtful.
Figure 1.5 blood suPPly to the sKin
subdermal plexus
subdermal plexus
subdermal plexus
skin
fascia
prefascial plexus
prefascial plexus
prefascial plexus
perforators
perforators
perforators
A
B
Penington_2e_CH01.indd 15 5/6/10 6:32:26 PM
16 part a PrinciPles
blooD supply anD flap DesignThe simplest skin flaps receive their blood through the horizontal component. In raising a skin flap that includes the dermis and some subcutaneous tissue the subdermal plexus is included by default. The subdermal plexus forms a rich anastomotic network that is adequate to supply the skin for some distance.
A flap that is designed to include the deep fascia will also capture the prefascial plexus and therefore have a significantly augmented horizontal blood supply. Such a flap is termed a fasciocutaneous flap. Fasciocutaneous flaps can generally be made larger and longer with more safety. In areas without a deep fascia, a similar principle can be applied in raising a flap with an augmented horizontal blood supply by including an appropriate deeper anatomical layer, such as the platysma in the face.
Island flaps are ones in which the skin is incised circumferentially around the flap. Because the subdermal plexus is completely divided, the flap relies on a vertical component for its blood supply. If the deep fascia is not divided, the flap can rely on the prefascial plexus and its many connections to the subdermal plexus and the skin. If, however, the deep fascia is also divided, then the flap must include at least one major perforator to be viable.
the length–breaDth ratioIt used to be widely accepted that the most important consideration in planning a viable non-island skin flap was the ratio of length to breadth. It was held that if the distance from the base to the tip of the flap was less than the width of the base, the flap would always be viable but that a longer flap would not be viable, except in the face where the excellent blood supply permitted higher length–breadth ratios. Subsequently it was shown that skin flaps outside the face can reliably be raised with high length–breadth ratios if a known large vessel is included in the flap or even if a moderately large perforator is positioned at the base of the flap. Such a flap is termed an axial flap.
Even though the concept of length–breadth ratios has now fallen out of favour, it still remains a useful one. A flap in continuity with a length–breadth ratio of one or less, such as a rhomboid flap, is always viable wherever in the body it is raised and regardless of the presence or absence of perforators. This means that it is only for island flaps and flaps with a length–breadth ratio greater than one that the specific anatomy of the blood supply must be considered.
the Delay phenomenonIt has been known at least since the sixteenth century that if the skin at the margins of a flap is incised at one operation and then a week or more later the flap is raised, flap viability will be better than if the earlier incisions had not been made.2 This is known as the delay phenomenon. It appears that dividing the vessels that will not contribute to the flap encourages the ones in the intact pedicle to enlarge. The delay phenomenon is not often used in practice because of the inconvenience of having two operations. Attempts to pharmacologically mimic the delay phenomenon have been unsuccessful but this remains a significant area of flap research.
2 The delay phenomenon was described by Gaspare Tagliocozzi (1545–1599) of Bologna in his book De Curtorum Chirurgia per Insitionem.
Penington_2e_CH01.indd 16 5/6/10 6:32:27 PM
17chapter 1 design and techniques
1.5 flaps in continuity
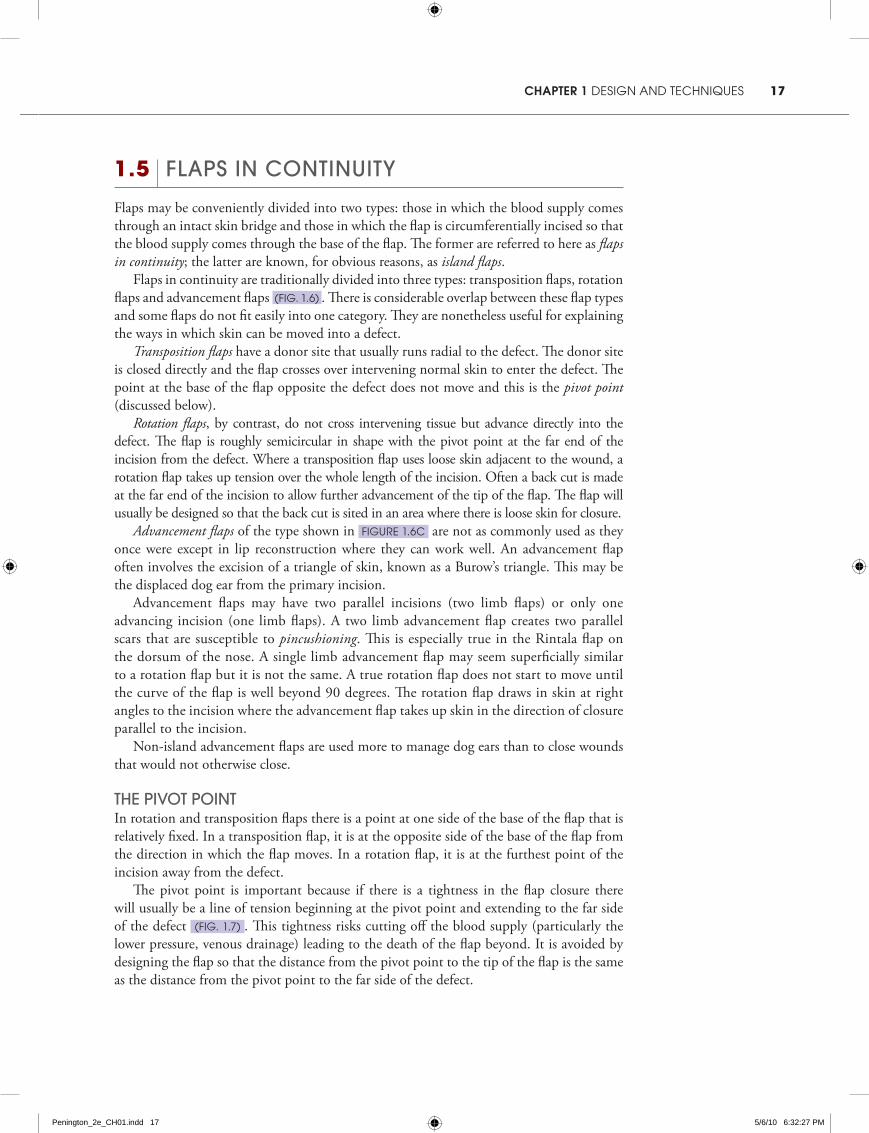
Flaps may be conveniently divided into two types: those in which the blood supply comes through an intact skin bridge and those in which the flap is circumferentially incised so that the blood supply comes through the base of the flap. The former are referred to here as flaps in continuity; the latter are known, for obvious reasons, as island flaps.
Flaps in continuity are traditionally divided into three types: transposition flaps, rotation flaps and advancement flaps (Fig. 1.6) . There is considerable overlap between these flap types and some flaps do not fit easily into one category. They are nonetheless useful for explaining the ways in which skin can be moved into a defect.
Transposition flaps have a donor site that usually runs radial to the defect. The donor site is closed directly and the flap crosses over intervening normal skin to enter the defect. The point at the base of the flap opposite the defect does not move and this is the pivot point (discussed below).
Rotation flaps, by contrast, do not cross intervening tissue but advance directly into the defect. The flap is roughly semicircular in shape with the pivot point at the far end of the incision from the defect. Where a transposition flap uses loose skin adjacent to the wound, a rotation flap takes up tension over the whole length of the incision. Often a back cut is made at the far end of the incision to allow further advancement of the tip of the flap. The flap will usually be designed so that the back cut is sited in an area where there is loose skin for closure.
Advancement flaps of the type shown in Figure 1.6c are not as commonly used as they once were except in lip reconstruction where they can work well. An advancement flap often involves the excision of a triangle of skin, known as a Burow’s triangle. This may be the displaced dog ear from the primary incision.
Advancement flaps may have two parallel incisions (two limb flaps) or only one advancing incision (one limb flaps). A two limb advancement flap creates two parallel scars that are susceptible to pincushioning. This is especially true in the Rintala flap on the dorsum of the nose. A single limb advancement flap may seem superficially similar to a rotation flap but it is not the same. A true rotation flap does not start to move until the curve of the flap is well beyond 90 degrees. The rotation flap draws in skin at right angles to the incision where the advancement flap takes up skin in the direction of closure parallel to the incision.
Non-island advancement flaps are used more to manage dog ears than to close wounds that would not otherwise close.
the pivot pointIn rotation and transposition flaps there is a point at one side of the base of the flap that is relatively fixed. In a transposition flap, it is at the opposite side of the base of the flap from the direction in which the flap moves. In a rotation flap, it is at the furthest point of the incision away from the defect.
The pivot point is important because if there is a tightness in the flap closure there will usually be a line of tension beginning at the pivot point and extending to the far side of the defect (Fig. 1.7) . This tightness risks cutting off the blood supply (particularly the lower pressure, venous drainage) leading to the death of the flap beyond. It is avoided by designing the flap so that the distance from the pivot point to the tip of the flap is the same as the distance from the pivot point to the far side of the defect.
Penington_2e_CH01.indd 17 5/6/10 6:32:27 PM
18 part a PrinciPles
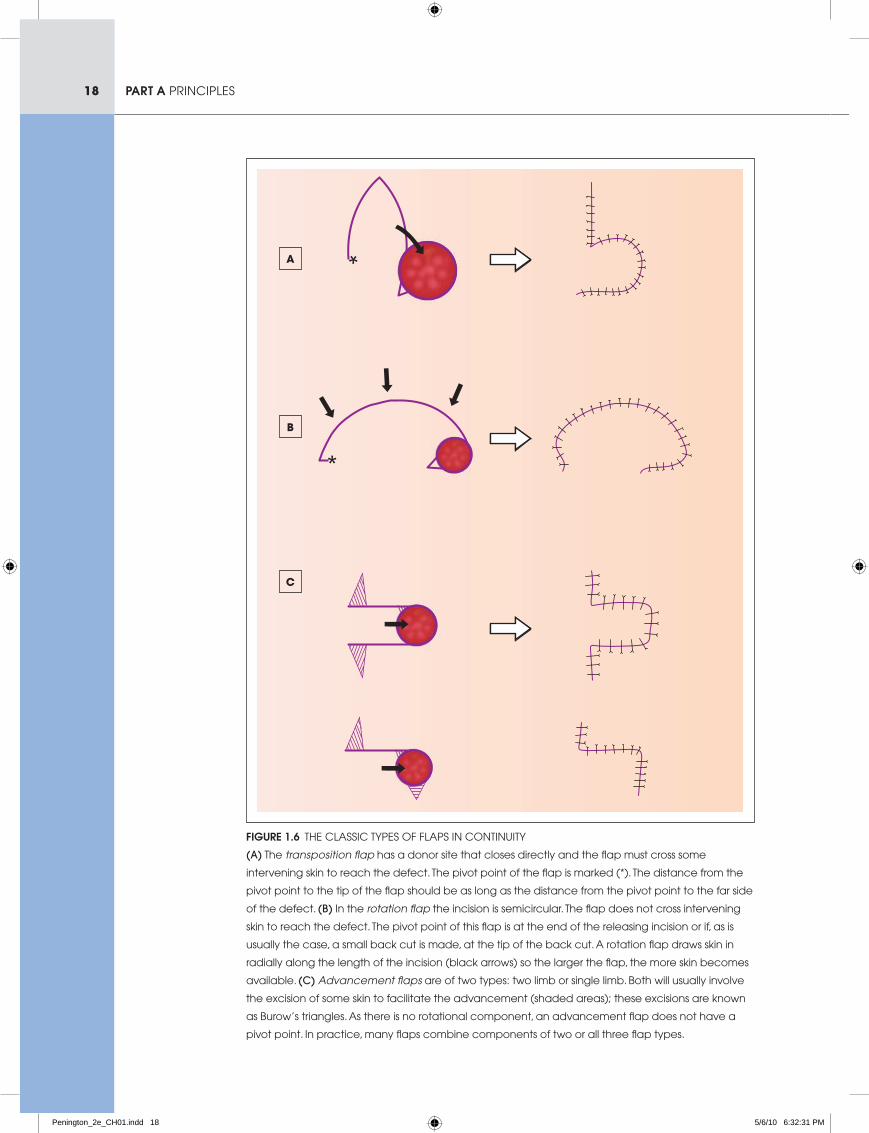
Figure 1.6 the classic tyPes oF FlaPs in continuity
(a) the transposition flap has a donor site that closes directly and the flap must cross some
intervening skin to reach the defect. the pivot point of the flap is marked (*). the distance from the
pivot point to the tip of the flap should be as long as the distance from the pivot point to the far side
of the defect. (b) in the rotation flap the incision is semicircular. the flap does not cross intervening
skin to reach the defect. the pivot point of this flap is at the end of the releasing incision or if, as is
usually the case, a small back cut is made, at the tip of the back cut. a rotation flap draws skin in
radially along the length of the incision (black arrows) so the larger the flap, the more skin becomes
available. (c) Advancement flaps are of two types: two limb or single limb. both will usually involve
the excision of some skin to facilitate the advancement (shaded areas); these excisions are known
as burow’s triangles. as there is no rotational component, an advancement flap does not have a
pivot point. in practice, many flaps combine components of two or all three flap types.
A
B
C
Penington_2e_CH01.indd 18 5/6/10 6:32:31 PM
19chapter 1 design and techniques
A
B
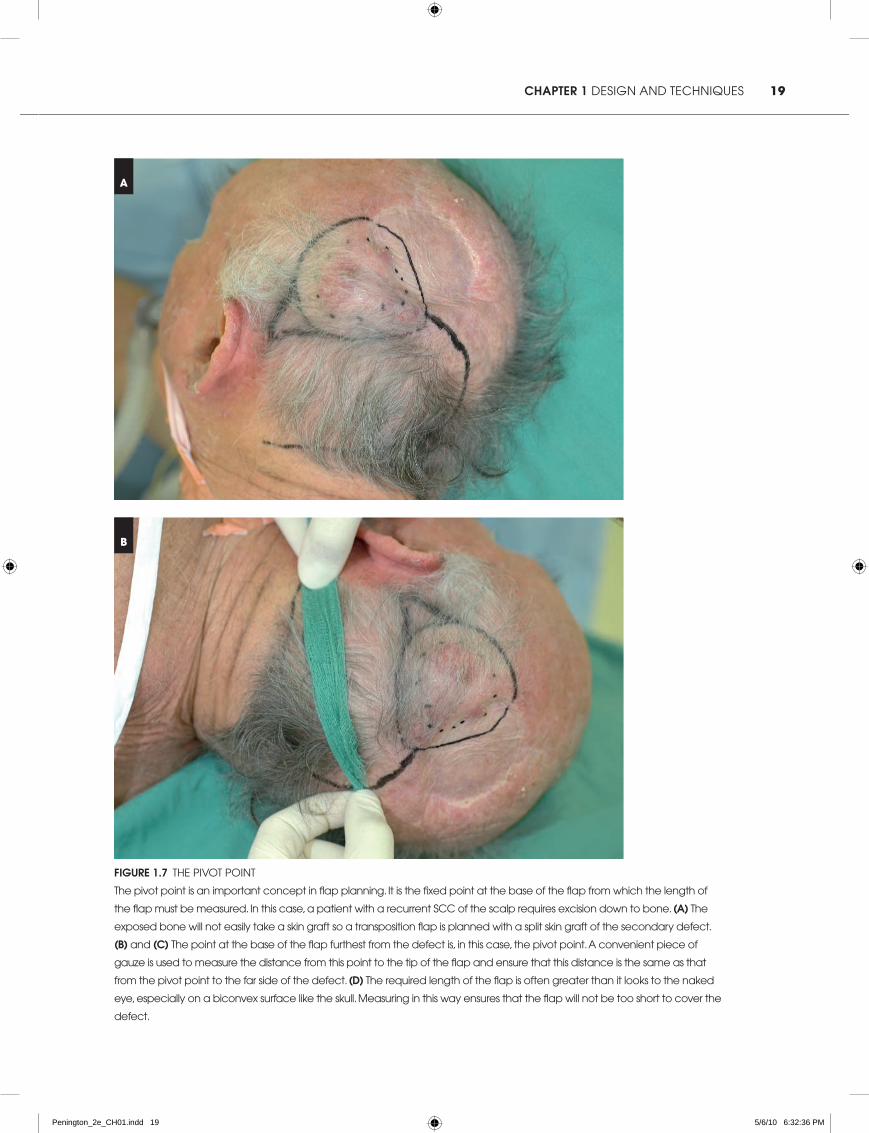
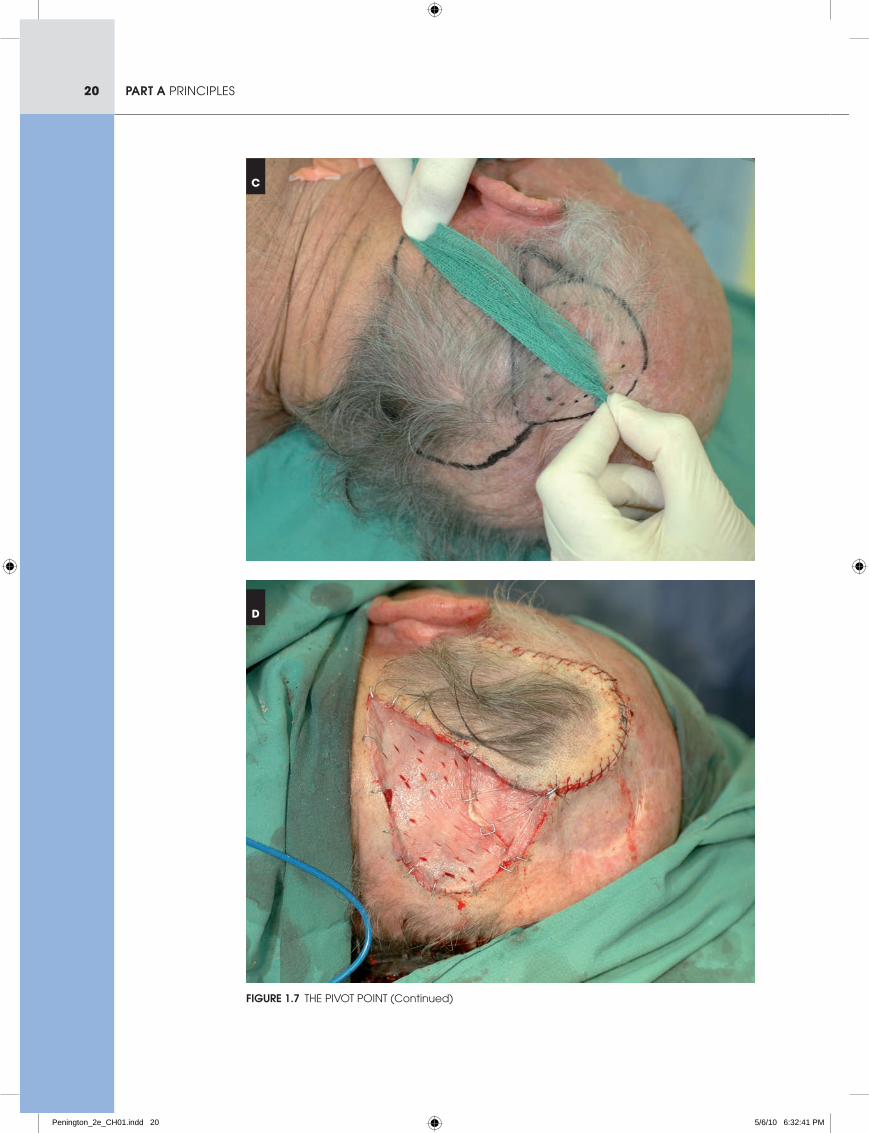
Figure 1.7 the Pivot Point
the pivot point is an important concept in flap planning. it is the fixed point at the base of the flap from which the length of
the flap must be measured. in this case, a patient with a recurrent scc of the scalp requires excision down to bone. (a) the
exposed bone will not easily take a skin graft so a transposition flap is planned with a split skin graft of the secondary defect.
(B) and (c) the point at the base of the flap furthest from the defect is, in this case, the pivot point. a convenient piece of
gauze is used to measure the distance from this point to the tip of the flap and ensure that this distance is the same as that
from the pivot point to the far side of the defect. (D) the required length of the flap is often greater than it looks to the naked
eye, especially on a biconvex surface like the skull. Measuring in this way ensures that the flap will not be too short to cover the
defect.
Penington_2e_CH01.indd 19 5/6/10 6:32:36 PM
20 part a PrinciPles
C
D
Figure 1.7 the Pivot Point (continued)
Penington_2e_CH01.indd 20 5/6/10 6:32:41 PM
21chapter 1 design and techniques
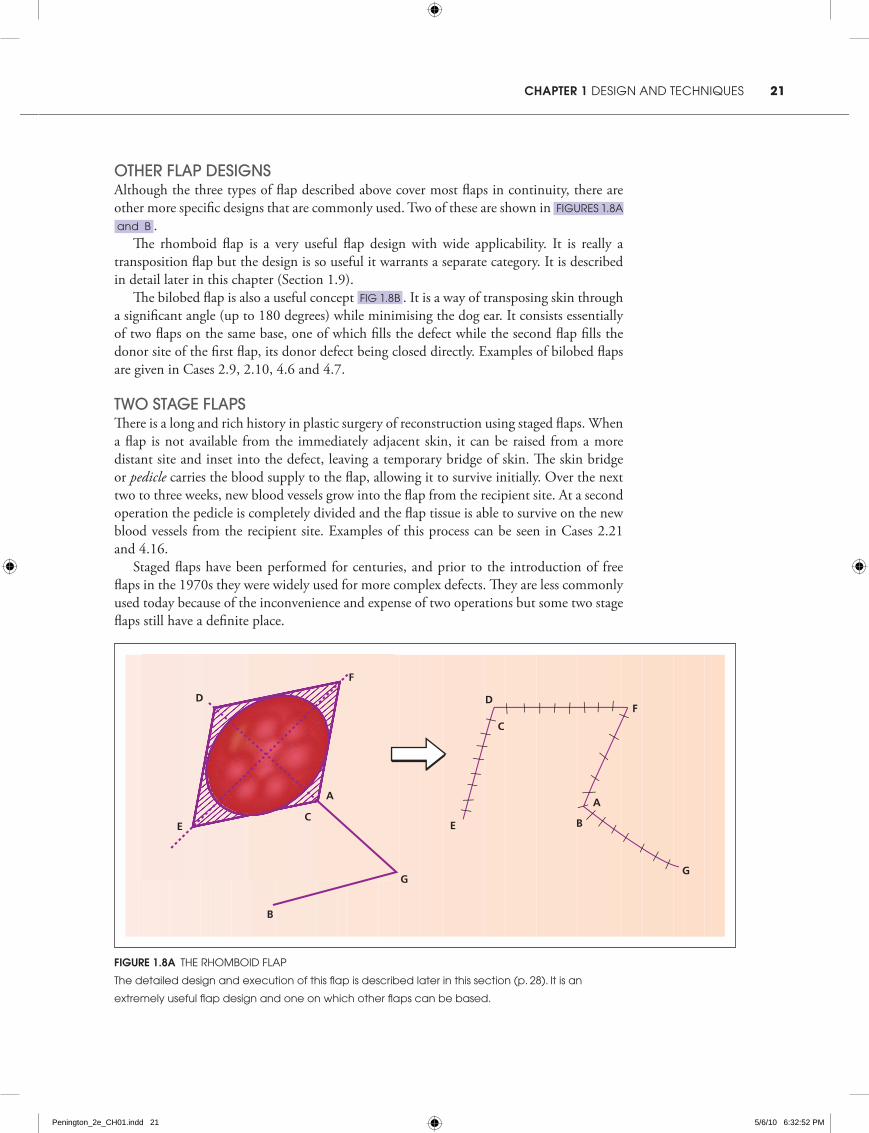
other flap DesignsAlthough the three types of flap described above cover most flaps in continuity, there are other more specific designs that are commonly used. Two of these are shown in Figures 1.8a
and b .The rhomboid flap is a very useful flap design with wide applicability. It is really a
transposition flap but the design is so useful it warrants a separate category. It is described in detail later in this chapter (Section 1.9).
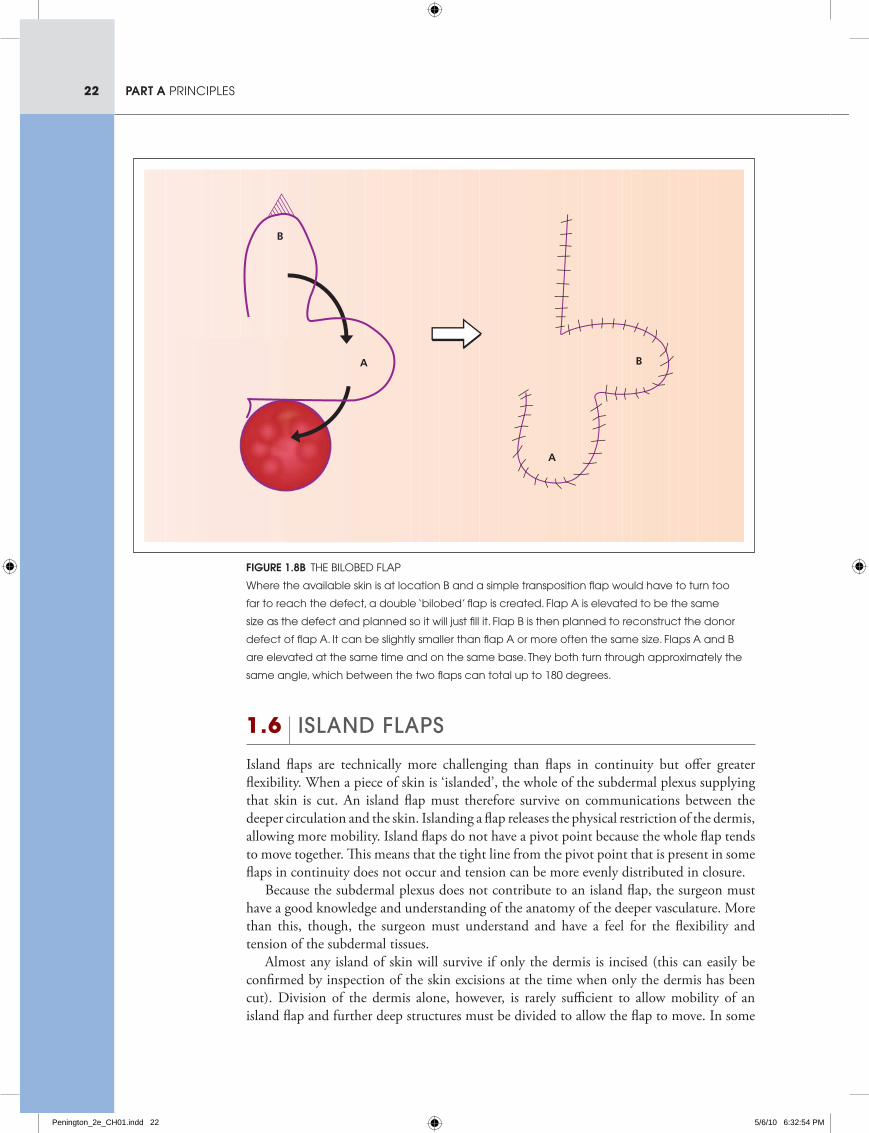
The bilobed flap is also a useful concept Fig 1.8b . It is a way of transposing skin through a significant angle (up to 180 degrees) while minimising the dog ear. It consists essentially of two flaps on the same base, one of which fills the defect while the second flap fills the donor site of the first flap, its donor defect being closed directly. Examples of bilobed flaps are given in Cases 2.9, 2.10, 4.6 and 4.7.
two stage flapsThere is a long and rich history in plastic surgery of reconstruction using staged flaps. When a flap is not available from the immediately adjacent skin, it can be raised from a more distant site and inset into the defect, leaving a temporary bridge of skin. The skin bridge or pedicle carries the blood supply to the flap, allowing it to survive initially. Over the next two to three weeks, new blood vessels grow into the flap from the recipient site. At a second operation the pedicle is completely divided and the flap tissue is able to survive on the new blood vessels from the recipient site. Examples of this process can be seen in Cases 2.21 and 4.16.
Staged flaps have been performed for centuries, and prior to the introduction of free flaps in the 1970s they were widely used for more complex defects. They are less commonly used today because of the inconvenience and expense of two operations but some two stage flaps still have a definite place.
Figure 1.8a the rhoMboid FlaP
the detailed design and execution of this flap is described later in this section (p. 28). it is an
extremely useful flap design and one on which other flaps can be based.
A
C
D
E
F
G
B
C
D
E
F
G
B
A
Penington_2e_CH01.indd 21 5/6/10 6:32:52 PM
22 part a PrinciPles
B
A
B
A
Figure 1.8B the bilobed FlaP
Where the available skin is at location b and a simple transposition flap would have to turn too
far to reach the defect, a double ‘bilobed’ flap is created. Flap a is elevated to be the same
size as the defect and planned so it will just fill it. Flap b is then planned to reconstruct the donor
defect of flap a. it can be slightly smaller than flap a or more often the same size. Flaps a and b
are elevated at the same time and on the same base. they both turn through approximately the
same angle, which between the two flaps can total up to 180 degrees.
1.6 islanD flaps
Island flaps are technically more challenging than flaps in continuity but offer greater flexibility. When a piece of skin is ‘islanded’, the whole of the subdermal plexus supplying that skin is cut. An island flap must therefore survive on communications between the deeper circulation and the skin. Islanding a flap releases the physical restriction of the dermis, allowing more mobility. Island flaps do not have a pivot point because the whole flap tends to move together. This means that the tight line from the pivot point that is present in some flaps in continuity does not occur and tension can be more evenly distributed in closure.
Because the subdermal plexus does not contribute to an island flap, the surgeon must have a good knowledge and understanding of the anatomy of the deeper vasculature. More than this, though, the surgeon must understand and have a feel for the flexibility and tension of the subdermal tissues.
Almost any island of skin will survive if only the dermis is incised (this can easily be confirmed by inspection of the skin excisions at the time when only the dermis has been cut). Division of the dermis alone, however, is rarely sufficient to allow mobility of an island flap and further deep structures must be divided to allow the flap to move. In some
Penington_2e_CH01.indd 22 5/6/10 6:32:54 PM
23chapter 1 design and techniques
parts of the body, such as the medial cheek, the subcutaneous tissues are loose and with minimal further dissection an island flap can become quite mobile. In other parts of the body, particularly those with a deep fascia, division of the dermis confers almost no mobility on the flap and considerable further dissection is required.
Island flaps are usually moved by advancement but occasionally they can also be rotated or transposed.
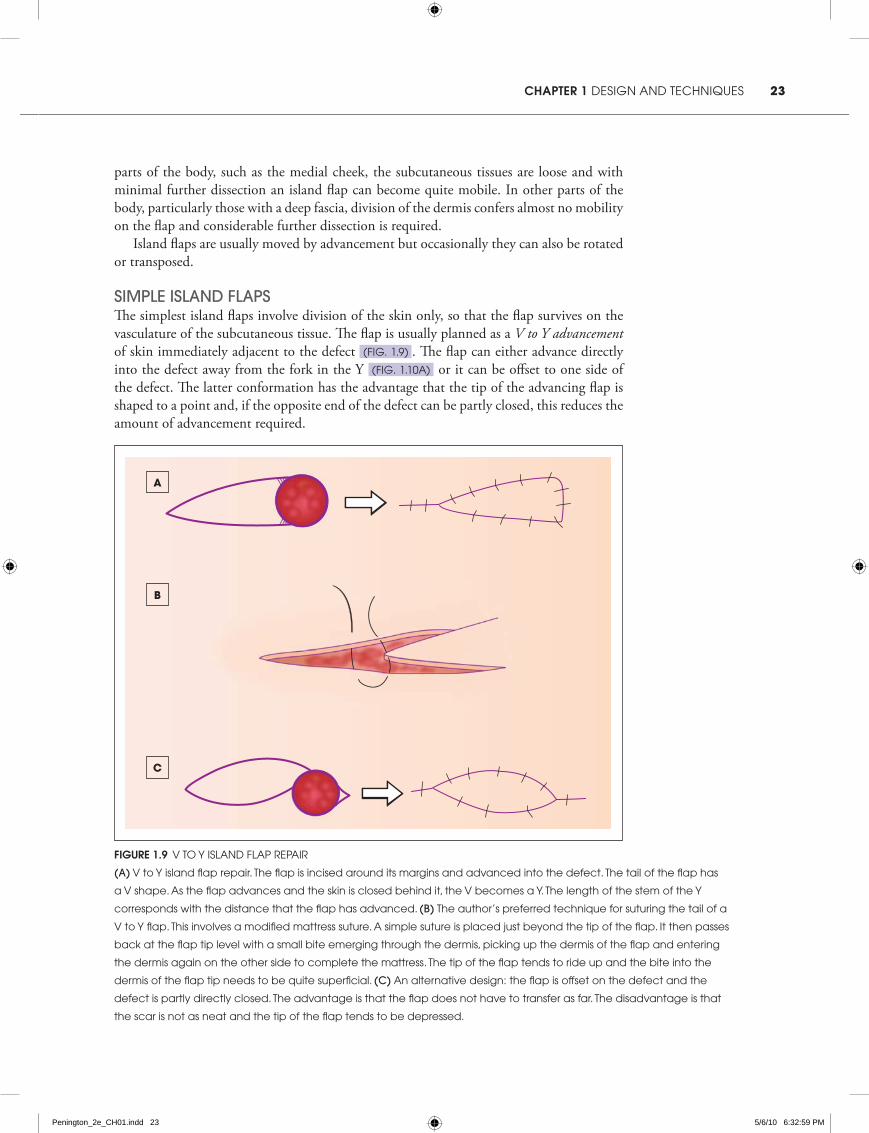
simple islanD flapsThe simplest island flaps involve division of the skin only, so that the flap survives on the vasculature of the subcutaneous tissue. The flap is usually planned as a V to Y advancement of skin immediately adjacent to the defect (Fig. 1.9) . The flap can either advance directly into the defect away from the fork in the Y (Fig. 1.10a) or it can be offset to one side of the defect. The latter conformation has the advantage that the tip of the advancing flap is shaped to a point and, if the opposite end of the defect can be partly closed, this reduces the amount of advancement required.
Figure 1.9 v to y island FlaP rePair
(a) v to y island flap repair. the flap is incised around its margins and advanced into the defect. the tail of the flap has
a v shape. as the flap advances and the skin is closed behind it, the v becomes a y. the length of the stem of the y
corresponds with the distance that the flap has advanced. (b) the author’s preferred technique for suturing the tail of a
v to y flap. this involves a modified mattress suture. a simple suture is placed just beyond the tip of the flap. it then passes
back at the flap tip level with a small bite emerging through the dermis, picking up the dermis of the flap and entering
the dermis again on the other side to complete the mattress. the tip of the flap tends to ride up and the bite into the
dermis of the flap tip needs to be quite superficial. (c) an alternative design: the flap is offset on the defect and the
defect is partly directly closed. the advantage is that the flap does not have to transfer as far. the disadvantage is that
the scar is not as neat and the tip of the flap tends to be depressed.
A
B
C
Penington_2e_CH01.indd 23 5/6/10 6:32:59 PM
24 part a PrinciPles
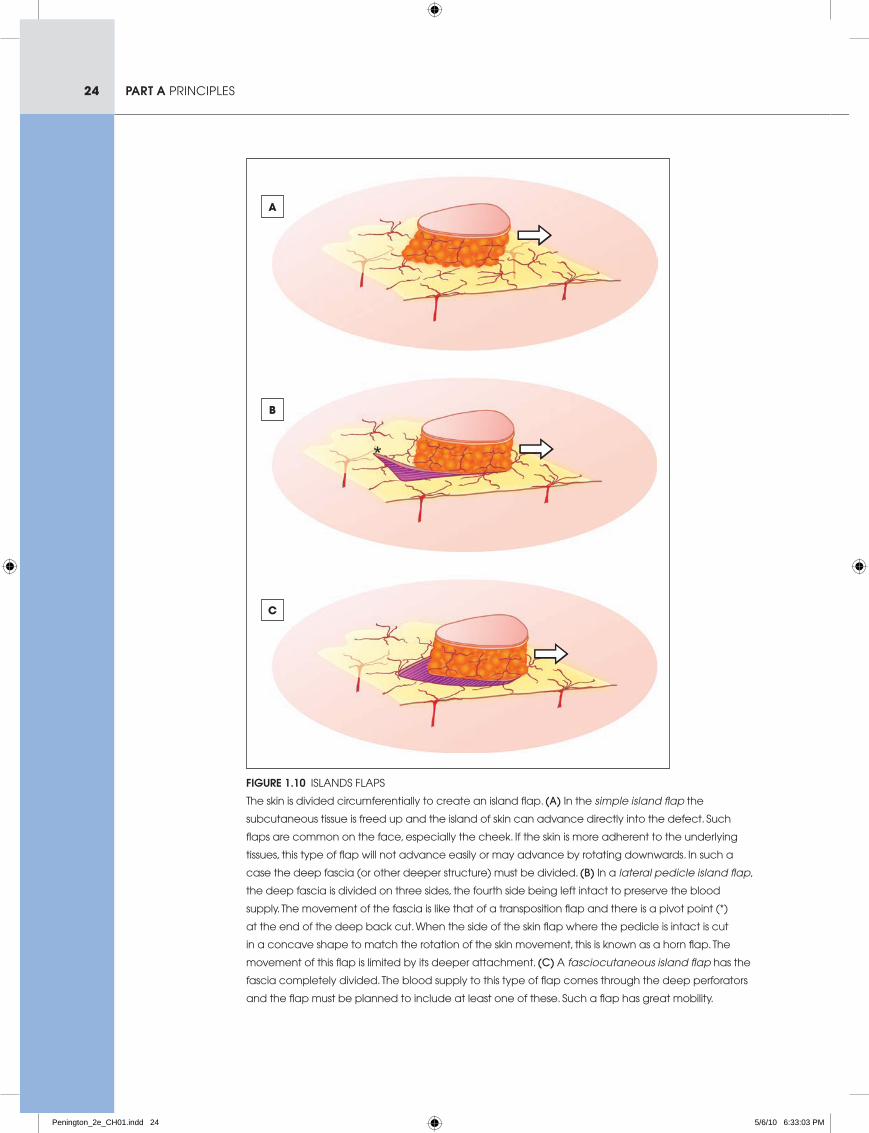
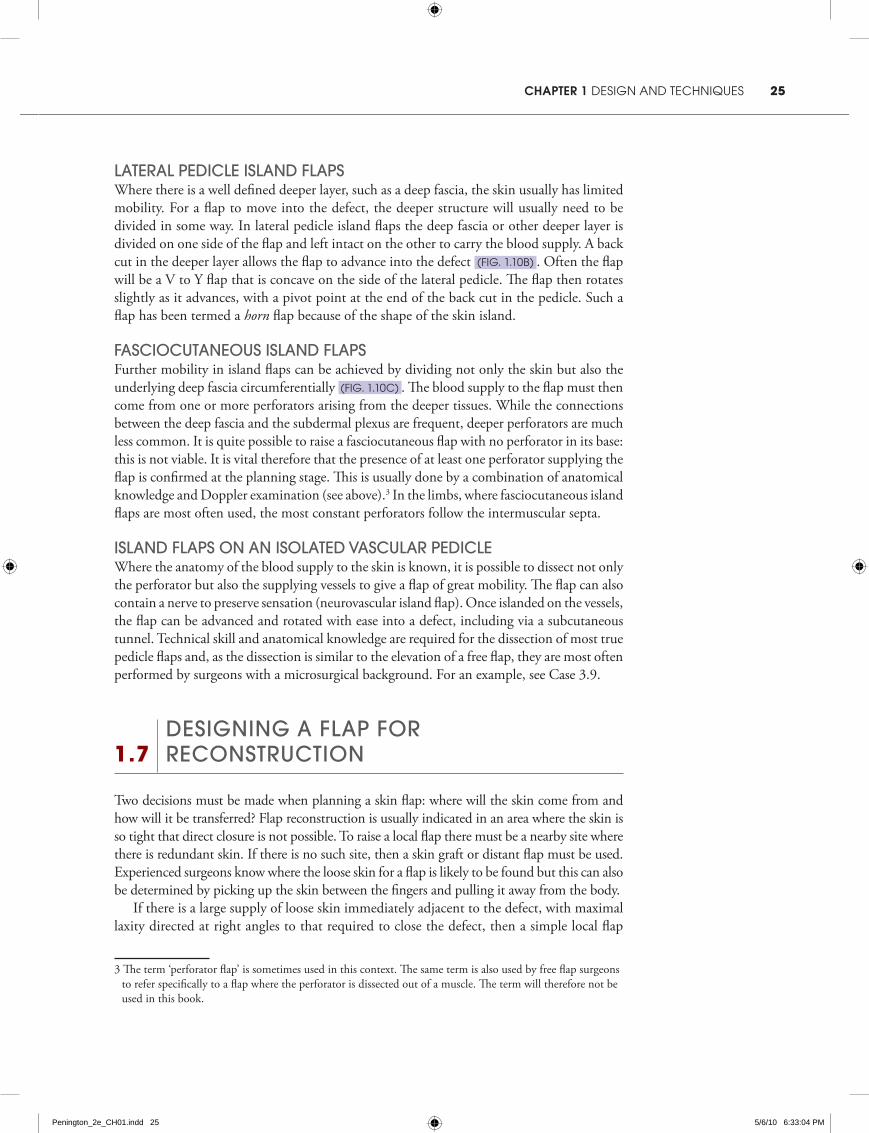
Figure 1.10 islands FlaPs
the skin is divided circumferentially to create an island flap. (a) in the simple island flap the
subcutaneous tissue is freed up and the island of skin can advance directly into the defect. such
flaps are common on the face, especially the cheek. if the skin is more adherent to the underlying
tissues, this type of flap will not advance easily or may advance by rotating downwards. in such a
case the deep fascia (or other deeper structure) must be divided. (b) in a lateral pedicle island flap,
the deep fascia is divided on three sides, the fourth side being left intact to preserve the blood
supply. the movement of the fascia is like that of a transposition flap and there is a pivot point (*)
at the end of the deep back cut. When the side of the skin flap where the pedicle is intact is cut
in a concave shape to match the rotation of the skin movement, this is known as a horn flap. the
movement of this flap is limited by its deeper attachment. (c) a fasciocutaneous island flap has the
fascia completely divided. the blood supply to this type of flap comes through the deep perforators
and the flap must be planned to include at least one of these. such a flap has great mobility.
A
B
C
Penington_2e_CH01.indd 24 5/6/10 6:33:03 PM
25chapter 1 design and techniques
lateral peDicle islanD flapsWhere there is a well defined deeper layer, such as a deep fascia, the skin usually has limited mobility. For a flap to move into the defect, the deeper structure will usually need to be divided in some way. In lateral pedicle island flaps the deep fascia or other deeper layer is divided on one side of the flap and left intact on the other to carry the blood supply. A back cut in the deeper layer allows the flap to advance into the defect (Fig. 1.10b) . Often the flap will be a V to Y flap that is concave on the side of the lateral pedicle. The flap then rotates slightly as it advances, with a pivot point at the end of the back cut in the pedicle. Such a flap has been termed a horn flap because of the shape of the skin island.
fasciocutaneous islanD flapsFurther mobility in island flaps can be achieved by dividing not only the skin but also the underlying deep fascia circumferentially (Fig. 1.10c) . The blood supply to the flap must then come from one or more perforators arising from the deeper tissues. While the connections between the deep fascia and the subdermal plexus are frequent, deeper perforators are much less common. It is quite possible to raise a fasciocutaneous flap with no perforator in its base: this is not viable. It is vital therefore that the presence of at least one perforator supplying the flap is confirmed at the planning stage. This is usually done by a combination of anatomical knowledge and Doppler examination (see above).3 In the limbs, where fasciocutaneous island flaps are most often used, the most constant perforators follow the intermuscular septa.
islanD flaps on an isolateD vascular peDicleWhere the anatomy of the blood supply to the skin is known, it is possible to dissect not only the perforator but also the supplying vessels to give a flap of great mobility. The flap can also contain a nerve to preserve sensation (neurovascular island flap). Once islanded on the vessels, the flap can be advanced and rotated with ease into a defect, including via a subcutaneous tunnel. Technical skill and anatomical knowledge are required for the dissection of most true pedicle flaps and, as the dissection is similar to the elevation of a free flap, they are most often performed by surgeons with a microsurgical background. For an example, see Case 3.9.
1.7 Designing a flap for
reconstruction
Two decisions must be made when planning a skin flap: where will the skin come from and how will it be transferred? Flap reconstruction is usually indicated in an area where the skin is so tight that direct closure is not possible. To raise a local flap there must be a nearby site where there is redundant skin. If there is no such site, then a skin graft or distant flap must be used. Experienced surgeons know where the loose skin for a flap is likely to be found but this can also be determined by picking up the skin between the fingers and pulling it away from the body.
If there is a large supply of loose skin immediately adjacent to the defect, with maximal laxity directed at right angles to that required to close the defect, then a simple local flap
3 The term ‘perforator flap’ is sometimes used in this context. The same term is also used by free flap surgeons to refer specifically to a flap where the perforator is dissected out of a muscle. The term will therefore not be used in this book.
Penington_2e_CH01.indd 25 5/6/10 6:33:04 PM
26 part a PrinciPles
is likely to be satisfactory. If the laxity is not great or is distant from the defect, a more complicated flap design will be required.
The best reconstruction is that which comes closest to achieving the functional and aesthetic aims defined at the start of the case.
simplicityIn general the surgeon should aim to use the simplest reconstruction that will achieve the desired aims. Gilles defined the reconstructive ladder, starting with the simplest technique, direct closure, and working up through secondary intention, skin graft, local flap, distant flap and, more recently, free flap.4 While the concept has validity, it does not mean that if a procedure lower on the ladder can be done, it must be done. If a procedure higher on the ladder better meets the aims of reconstruction with a risk acceptable to both surgeon and patient, it should be performed. In particular, if a local flap will achieve a better result than direct closure or graft then it should be offered to the patient.
Donor siteThe choice of flap to use in each circumstance will depend on many factors. The availability of loose skin (discussed above) is the most important. Raising a flap creates new scars and the impact of these scars must be minimised if the benefits of the reconstruction are to outweigh the cost. The same consideration given to direct closure of defects must be given to the placement of donor site scars. On the face, wherever possible, donor site scars should sit in crease lines. A useful concept is that of cosmetic units. The face can be broken into several units and then into subunits. Flap donor sites that follow the edges of the units are less obvious than those that cross them. Planning such a flap may mean enlarging the defect so that it extends to the edge of a cosmetic subunit. A common mistake of inexperienced surgeons is to think that a smaller flap will be less obvious whereas in fact a large flap that reconstructs a whole cosmetic unit can be much less conspicuous in the long run.
flap sizeSurgeons new to flap surgery often struggle with judging the size of flap required for a given defect. If a wound can be almost closed directly, the surgeon is tempted to believe that only a small flap will be required to complete the closure. This is incorrect because the tension that can be applied to a flap is much less than the tension that can be applied to wound edges in direct closure. It is therefore usually necessary to remove the tight sutures that almost closed the wound and plan a flap that can fill the larger, tension-free defect.
When planning the size of a transposition or rotation flap, an important consideration is the distance from the pivot point to the tip of the flap. Unless it is anticipated that the pivot point will move, the distance from the pivot point to the tip of the flap should be the same as or greater than the distance from the pivot point to the far side of the defect to be reconstructed (Fig. 1.7) . If the distance is less, the flap will not be long enough.
Island flaps are less susceptible to such tension but the safe tension is still less than that of a direct closure. As the tension must be distributed evenly around the flap, large island flaps are safer than small ones because they have a larger perimeter over which to distribute the tension. Another advantage of a large island flap is that, in an area of the body where
4 Sir Harold Gilles (1882–1960) was a New Zealand-born surgeon who pioneered many of the techniques of modern plastic surgery, establishing many principles of flap repair.
Penington_2e_CH01.indd 26 5/6/10 6:33:04 PM
27chapter 1 design and techniques
perforators are sparse, a small flap is more likely to be situated between perforators and so have no blood supply. A larger island flap has a greater chance of including a perforator.
Gilles advocated raising large flaps for all defects (‘think of a flap and double it’) and without question this advice leads to safe flaps. Unfortunately it can also lead to contour problems and pincushioning of flaps and some caution is required. The best advice for a surgeon learning flaps is to make flaps bigger rather than smaller because it is much easier to trim a large flap down than to deal with a flap that is too small for the defect.
1.8 surgical technique
Surgical technique in flap surgery is similar to good technique in any other branch of plastic surgery. Gentle handling of tissues is always important but, more than in any other area, careful planning is essential. Most mistakes in local flap surgery are made with the pen rather than the scalpel.
preoperative preparationThere is usually little specific preoperative preparation required for local flap surgery beyond the planning discussed above. Wherever possible, adrenaline (epinephrine) should be used with the local anaesthetic or surgery should be performed under tourniquet to allow maximum vision for dissection. While local anaesthetic generally works quickly, a 10-minute delay to allow the adrenaline to work is usually well rewarded.
raising the flapGood planning means that flap elevation proceeds without hesitation. The surgeon should have considered in the planning phase what structures are at risk of damage in raising the flap and require dissection. If the surgeon has satisfied himself or herself that no structure is at risk, flap elevation is usually brisk.
It is more common for a novice flap surgeon to do too little rather than too much dissection in elevating a flap. Flaps are more likely to die from excessive tension due to inadequate dissection than from interference with blood supply by over-dissection of the pedicle. The flap should advance into the defect with ease and tension in closure should mainly be in the donor site. Having said this, at all stages in the dissection the surgeon should be aware of where the blood supply is.
Judging the thickness of a flap to raise can be difficult. Generally speaking, the thickness of the flap should match that of the defect. Matching this carefully is one of the points that helps to refine the final appearance of the flap. It is much better to start with the correct thickness than to have to thin the flap later and, of course, if the flap is too thin to fill the defect, the situation may be irretrievable.
wounD closureHaemostasis prior to closure is important because of the proven effect of haematoma in killing marginally viable flaps. Interrupted sutures are the easiest technique for suturing flaps as they give the greatest flexibility in sensing and distributing tension. They can also be more easily removed if tension proves too great or there is a haematoma. With greater experience, continuous or subcuticular sutures can be used in selected cases.
Usually the donor site is closed first or at least approximated with a key suture. The next suture is then placed where the tension is the greatest, often the leading edge of the flap.
Penington_2e_CH01.indd 27 5/6/10 6:33:05 PM
28 part a PrinciPles
The surgeon then moves around the flap placing key sutures and observing where tension occurs. If as a suture is placed the flap blanches, the suture may need to be removed and resited or even left out. If the skin cannot be closed without compromising flap viability, it is better to leave the wound edges apart to heal by secondary intention than to risk the whole flap through too much tension (see Section 8.4). If adrenaline has been used with the local anaesthetic, it may be hard to judge the viability of the flap as it is sutured. In this case it may be best to leave the suture in and review the patient an hour or two later, when the adrenaline has worn off.
postoperative careA dressing is not essential for a local flap but most patients prefer it. In the first 24 hours some skin edge bleeding is common and patients generally appreciate a gauze dressing to absorb the blood. Adhesive tapes can help support the wound. The dressing should be applied in such a way that the flap can still be seen so its colour can be assessed for signs of ischaemia.
A flap that looks pink and healthy at the end of the procedure is unlikely to develop vascular compromise unless a haematoma collects under it. As the patient will generally present with pain if there is a haematoma, such a flap does not require regular review until the follow-up appointment.
A flap that has some signs of ischaemia at the end of the operation must be reviewed within a few hours to see whether the situation has improved or worsened. Blue discolouration is much more concerning than pallor and the maxim that ‘white flaps go pink and blue flaps go black’ is largely (but not universally) true. If there is doubt about viability, the whole flap must be exposed to look for any line of tension. If such a line is present or if the whole flap looks ischaemic, sutures must be removed.
If sutures do have to be removed, the open part of the wound is left to heal secondarily. It is greatly preferable to have an area heal this way than to lose the whole flap. The final appearance in this situation is often surprisingly good. If there is a choice about which part of the wound to leave open, priority is given to covering vital structures or any part of the wound that will not take a skin graft, such as exposed bone or tendon.
If the flap still looks ischaemic after removing sutures, it should be returned to its original location where circulation may improve. The reconstruction may have failed but at least if the flap survives the defect has not been made larger.
Significant pain is unusual after local flap surgery and may be an indication of haematoma or other problem. Paracetamol (acetaminophen) or a similar mild analgesic is usually sufficient for the normal pain of local flap surgery.
1.9 a simple skin flap reconstruction:
the rhomboiD flap
The rhomboid flap is the simplest of all local flaps to design and perform. Because the length–breadth ratio is less than one, it can be designed as a simple cutaneous flap without regard to the blood supply, with the only considerations being the availability of skin and the location of scars.
Penington_2e_CH01.indd 28 5/6/10 6:33:05 PM
29chapter 1 design and techniques
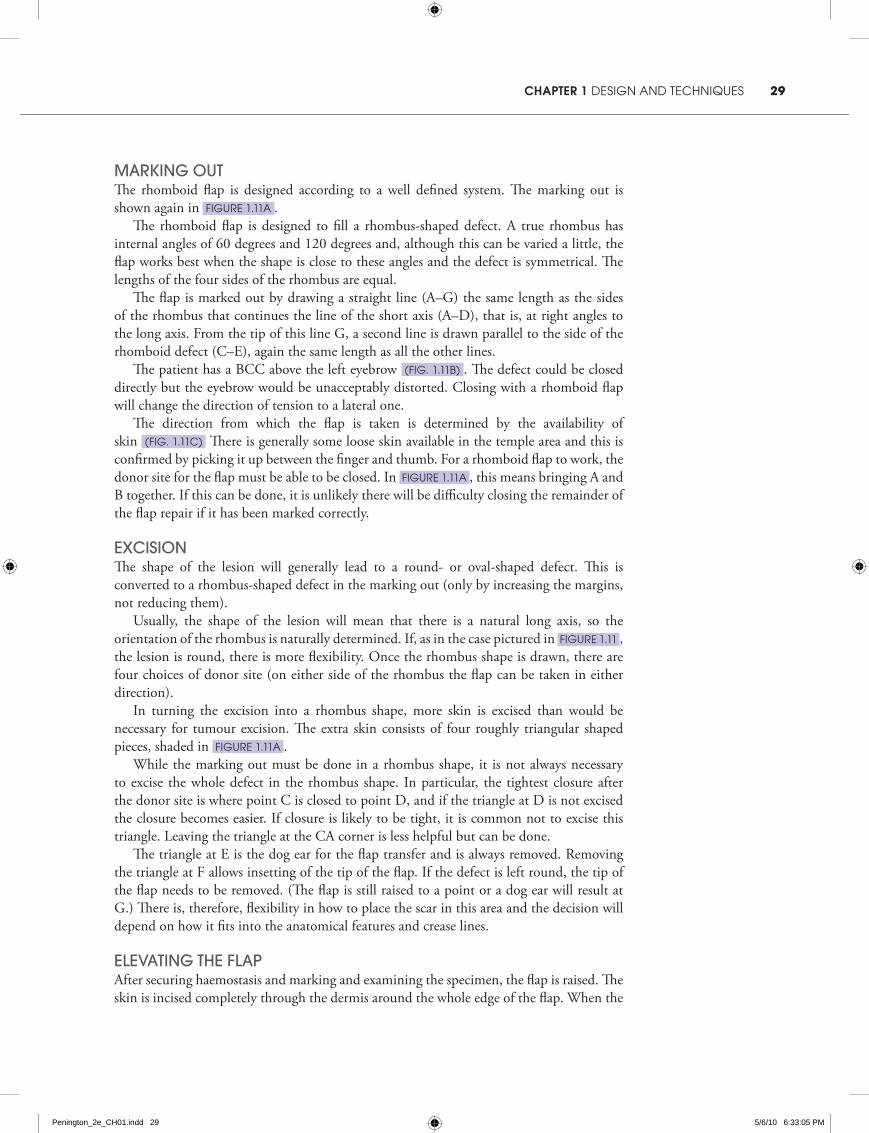
marking outThe rhomboid flap is designed according to a well defined system. The marking out is shown again in Figure 1.11a .
The rhomboid flap is designed to fill a rhombus-shaped defect. A true rhombus has internal angles of 60 degrees and 120 degrees and, although this can be varied a little, the flap works best when the shape is close to these angles and the defect is symmetrical. The lengths of the four sides of the rhombus are equal.
The flap is marked out by drawing a straight line (A–G) the same length as the sides of the rhombus that continues the line of the short axis (A–D), that is, at right angles to the long axis. From the tip of this line G, a second line is drawn parallel to the side of the rhomboid defect (C–E), again the same length as all the other lines.
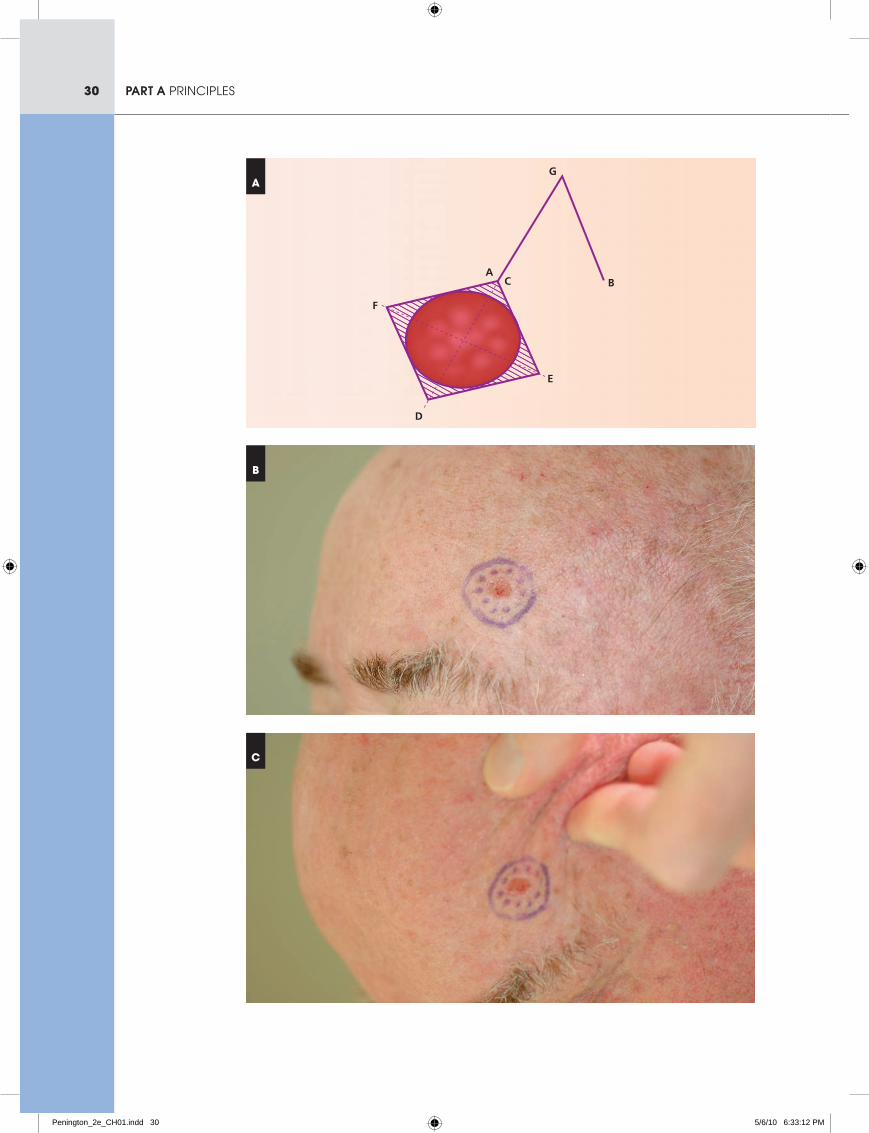
The patient has a BCC above the left eyebrow (Fig. 1.11b) . The defect could be closed directly but the eyebrow would be unacceptably distorted. Closing with a rhomboid flap will change the direction of tension to a lateral one.
The direction from which the flap is taken is determined by the availability of skin (Fig. 1.11c) There is generally some loose skin available in the temple area and this is confirmed by picking it up between the finger and thumb. For a rhomboid flap to work, the donor site for the flap must be able to be closed. In Figure 1.11a , this means bringing A and B together. If this can be done, it is unlikely there will be difficulty closing the remainder of the flap repair if it has been marked correctly.
excisionThe shape of the lesion will generally lead to a round- or oval-shaped defect. This is converted to a rhombus-shaped defect in the marking out (only by increasing the margins, not reducing them).
Usually, the shape of the lesion will mean that there is a natural long axis, so the orientation of the rhombus is naturally determined. If, as in the case pictured in Figure 1.11 , the lesion is round, there is more flexibility. Once the rhombus shape is drawn, there are four choices of donor site (on either side of the rhombus the flap can be taken in either direction).
In turning the excision into a rhombus shape, more skin is excised than would be necessary for tumour excision. The extra skin consists of four roughly triangular shaped pieces, shaded in Figure 1.11a .
While the marking out must be done in a rhombus shape, it is not always necessary to excise the whole defect in the rhombus shape. In particular, the tightest closure after the donor site is where point C is closed to point D, and if the triangle at D is not excised the closure becomes easier. If closure is likely to be tight, it is common not to excise this triangle. Leaving the triangle at the CA corner is less helpful but can be done.
The triangle at E is the dog ear for the flap transfer and is always removed. Removing the triangle at F allows insetting of the tip of the flap. If the defect is left round, the tip of the flap needs to be removed. (The flap is still raised to a point or a dog ear will result at G.) There is, therefore, flexibility in how to place the scar in this area and the decision will depend on how it fits into the anatomical features and crease lines.
elevating the flapAfter securing haemostasis and marking and examining the specimen, the flap is raised. The skin is incised completely through the dermis around the whole edge of the flap. When the
Penington_2e_CH01.indd 29 5/6/10 6:33:05 PM
30 part a PrinciPles
AC
D
E
F
G
B
C
B
A
Penington_2e_CH01.indd 30 5/6/10 6:33:12 PM
31chapter 1 design and techniques
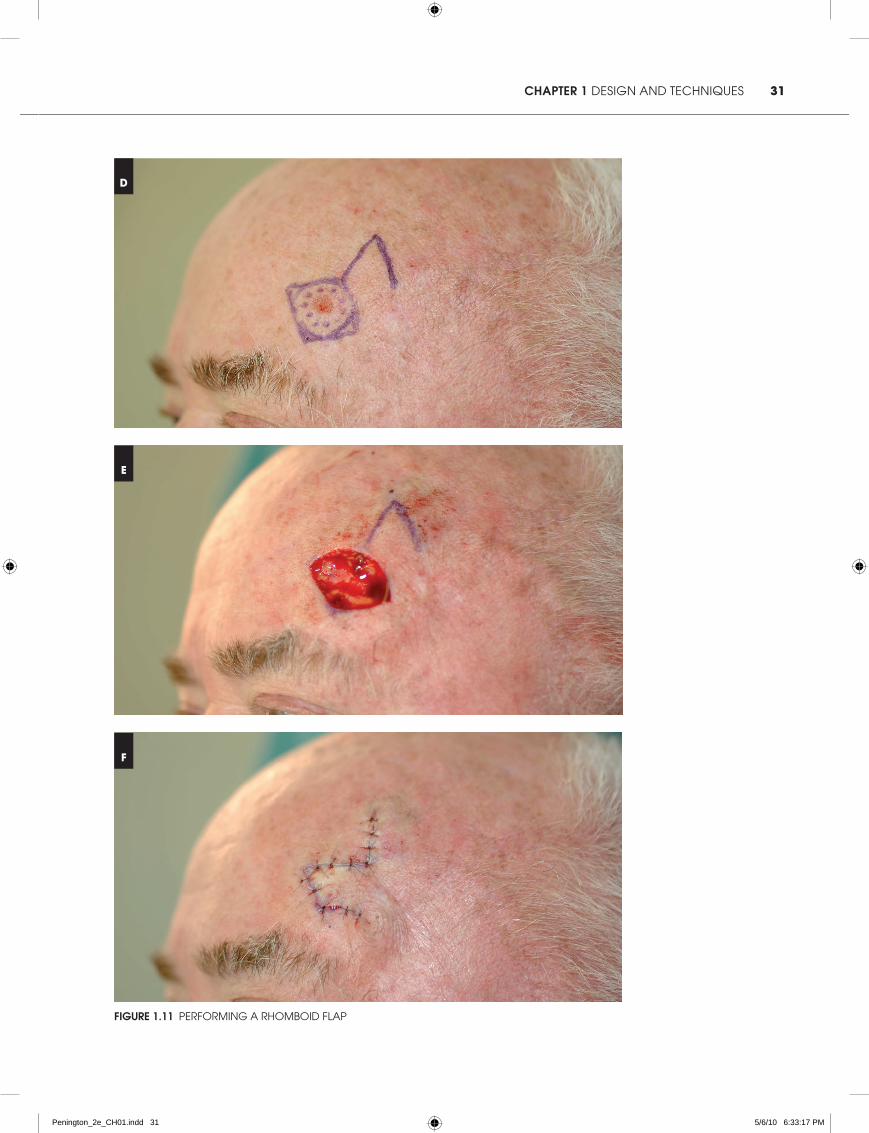
Figure 1.11 PerForMing a rhoMboid FlaP
E
F
D
Penington_2e_CH01.indd 31 5/6/10 6:33:17 PM
32 part a PrinciPles
skin is completely free, it is lifted by the corner (using either toothed forceps or a skin hook) and the flap separated from the underlying tissue using a scalpel.
The thickness of the flap will depend in part on the depth of the defect and for a good final contour the flap thickness and defect depth should be as close as possible. Some fat must be left on the underside of the flap to protect the subdermal plexus. The flap should be of uniform thickness throughout and in particular should not become thinner near the base, where the blood supply may be compromised. Undermining must go right to the base of the flap (to the line E–B) or it will not be mobile enough to move into the defect. It is sometimes helpful also to undermine the corner A.
Haemostasis of the donor site, the underside of the flap and the defect is checked prior to suturing.
suturingIt is usual to start by closing the donor site with a suture at the point AB. If the flap has been properly designed, it should fall naturally into the defect at this point.
The next point to close is usually CD, the tightest point in the flap. If this will not close, this may be because the flap has not been sufficiently undermined and further sharp dissection under the flap may help. It may be necessary to remove the donor site stitch to do this.
Once the point CD has been sutured, the remainder of the closure should be straightforward. After a few more sutures the tip of the flap can be trimmed if that is required. Rarely, an excessive dog ear at G or E requires further excision. This is a simple matter at point G but if excising a dog ear at point E, care must be taken to avoid encroaching on the base of the flap and risking the blood supply. Usually it is better to leave a dog ear here unless it can be taken out in a direction away from the flap base.
When the closure is complete the eyebrow remains in its original position (Fig. 1.11F) . The rhomboid flap is a robust, reliable and especially useful flap.
Penington_2e_CH01.indd 32 5/6/10 6:33:17 PM


![Deep Circumflex Iliac Artery Flap for Reconstruction of ... · mandibular reconstruction, the fibula flap [6] has been equally successful. Although fibula and scapula free flaps remains](https://img.pdfslide.us/doc/110x75/5ed54f1f1dbb8245b96a7213/deep-circumflex-iliac-artery-flap-for-reconstruction-of-mandibular-reconstruction.jpg)


![Free flap reconstruction following lower leg trauma in the ... · management of open fractures in lower limb trauma[1]. The flap was raised in standard fashion ... reconstruction](https://img.pdfslide.us/doc/110x75/5e8adad96fe3840f42432e73/free-flap-reconstruction-following-lower-leg-trauma-in-the-management-of-open.jpg)


![Fascial Flap Reconstruction of the Hand a Single.25[1]](https://img.pdfslide.us/doc/110x75/55147566497959ee1d8b4746/fascial-flap-reconstruction-of-the-hand-a-single251.jpg)
