Embed Size (px)
Citation preview

Lectures on Basics of practical nursing for beginners BY Dr.Rastrapati Choudhury
1
LECTURES ON BASICS OF PRACTICAL NURSING………………………FOR BEGINNERS.
NURSING DEFINATION, BASIC ROLE OF NURSINGBASIC ROLE OF NURSING: Definition:“It is the diagnosis and treatment of human responses to actual or potential health problems”(ANA 1980). It is assisting the individual, sick or well in the performance of thoseactivities contributing to health or its recovery (to peaceful death) that he will performunaided, if he had the necessary strength, will or knowledge and to do this in such a wayas to help him gain independence as rapidly as possible (Virginia Henderson 1960).ROLE OF SISTER and DOCTOR’S PROFESIONAL RELATION SHIP.Great doctor-nurse relationships are critical for quality patient care. Collaboration, clearcommunication, cooperation, respect, and positive attitudes are the essentialingredients for any relationship. Shared positive attitude and behavior is what willdrive a team to be successful. Doctors and nurses need to function at an emotionallyintelligent level.Doctor and nurse relationship is very important during work they should work together as ateam, the professional nurse should share with the doctor about the treatment for thepatient , some doctors still think that nurses only taken order, this vision should bechanged.Importance of Nurse in clinical observation.
Professional nurse can play a great role in clinical observations and they can guide theconsultant for the plan of treatment, to be a good professional than you have to improveyour depth in subject and clinical skills.
BASIC NURSING PROCEDURES AND SKILLSVITAL SIGNS (Cardinal Signs)Vital signs reflect the body’s physiologic status and provide information critical to evaluatinghomeostatic balance. The term “vital” is used because the information gathered is the clearestIndicator of overall health status.Vital signs Includes: T(temperature),P (Pulse Rate),R(Respiratory rate)and BP (Blood Pressure)Vital Signs = Temperature, Pulse, Respirations, & Blood PressureTemperature = Warmth of the body, a balance between heat produced & lost.The Hypothalamus = the thermostat that regulates body temperature. Blood Pressure(BP) mm/Hg(mercury) Temperature(temp) degree Fernaheite( ) or ( ) Pulse beats/mt,BPM Respiration Rate: RPM Saturation: SpO2 % Blood Sugar : mg/dl
Purposes: To obtain base line data about the patient condition To aid in diagnosing patient condition (diagnostic purpose) For therapeutic purpose so that to intervene accordingly
Equipment Vital sign tray Stethoscope Sphygmomanometer Thermometer (glasses, electronic ortympanic) Second hand watch.
Red and blue pen Pencil Vital sign sheet Cotton swab in bowel Disposable gloves if available Dirty receiver kidney dish
Nursing note of vitalsTemp= 99Pulse= 98 BPMR = 22 RPMBP= 110/70 mm Hg.SpO2= 99%RBS= 110 mg/dL

Lectures on Basics of practical nursing for beginners BY Dr.Rastrapati Choudhury
2
Times to Assess Vital SignsOn admission – to obtain baseline data.When a client has a change in health status or reports symptoms such as chest pain orfaintingAccording to a nursing or medical protocol.Before and after the administration of certain medications that could affect RR or BP(Respiratory and CVS (Cardio Vascular System)).Before and after surgery or an invasive diagnostic procedures.Before and after any nursing intervention that could affect the vital signs. E.g.AmbulationAccording to hospital or health institution policy.TemperatureBody temperature is the measurement of heat inside a person’s body (core temperature); it isthe balance between heat produced and heat lost.
Normal body temperature using oral (O; or per os, PO)measurement remains as appropriately 37 (Celsius )or 98.6 .There are Two Kinds of Body Temperature1. Core Temperature Is the Temperature of the deep tissues of the body, such as the cranium, thorax,abdominal cavity, and pelvic cavity ,Remains relatively constant, this Is the Temperaturethat we measure with thermometer2. Surface Temperature: The temperature of the skin, the subcutaneous tissue and fat.
Alterations in Body TemperatureNormal body temperature is:37 or 98.6 (Average) the range is 36-38 or 96.8 – 100 Pyrexia: a body temperature above the normal ranges 38 – 41 100.4 –105.8 Hyper pyrexia: a very high fever, such as 410 C > 42 0c leads to death. A client who hasfever is referred as febrile; the one who has not is afebrile. Hypothermia: – body temperature between 34 0c – 35 0c, < 34 0c is death
Temperature Conversations°F = 9/5 °C + 32°C = 5/9 (°F - 32)
Common Types of Fevers Intermittent fever: the body temperature alternates at regular intervals betweenperiods of fever and periods of normal or subnormal temperature. Remittent fever: a wide range of temperature fluctuation (more than 2 0c) occurs overthe 24 hr period, all of which are above normal
Heat productionmusclesglandsoxidation of food
Heat lossrespirationperspirationexcretion

Lectures on Basics of practical nursing for beginners BY Dr.Rastrapati Choudhury
3
Relapsing fever: short febrile periods of a few days are interspersed with periods of 1or 2 days of normal temperature. Constant fever: the body temperature fluctuates minimally but always remains abovenormal
Factors Affecting Body Temperature1. Age Children’s temperature continue to be more labile than those of adults until puberty Elderly people, particularly those > 75 are at risk of hypothermia Normal body temperature of the newborn if taken orally is 37 0C.
2. Diurnal variations (circadian rhythms) Body temperature varies throughout the day The point of highest body temperature is usually reached between 8:00 p.m. andmidnight and lowest point is reached during sleep between 4:00 and 6:00 a.m.
3. Exercise Hard or strenuous exercise can increase body temperature to as high as 38.3 –40 – measured rectally
4. Hormones • In women progesterone secretion at the time of ovulation raises body temperature byabout 0.3 – 0.6 above basal temperature.
5. Stress Stimulation of skin can increases the production of epinephrine and nor-epinephrine – which increases metabolic activity and heat production.
6. Environment• Extremes in temperature can affect a person’s Temperature regulatory systems.
Measuring Body Temperature/ Sites to Measure TemperatureMost common are: Oral Rectal Axillary Tympanic
Thermometer: it is an instrument used to measure body temperatureTypes of Thermometers
1. Oral thermometerHave long slender tips

Lectures on Basics of practical nursing for beginners BY Dr.Rastrapati Choudhury
4
2. Rectal thermometerShort, rounded tips3. AxillaryLong and slender tip4. TympanicIn other way it is also divided as mercury, digital and electronic types. In developed countries,mercury type thermometers are no more use in hospital setup but in our context still veryimportant.
1. Rectal Temperature recording procedure: Readings are considered to be more accurate, most reliable, is > 0.650 c (1 0F) higherthan the oral temperature.
Procedure Explain the procedure to the patient Wash hands and assemble necessary equipment and bring to the patient bedside. Position the person laterally; Apply lubricant 2.5 cm above the bulb; Insert the thermometer 1.5 – 4 cm into the anus. For an infant 2.5cm, for a child 3.7 cm– for an adults 4 cm Measured for 2-3 minutes
ORAL THERMAMETER
Lectures on Basics of practical nursing for beginners BY Dr.Rastrapati Choudhury
5
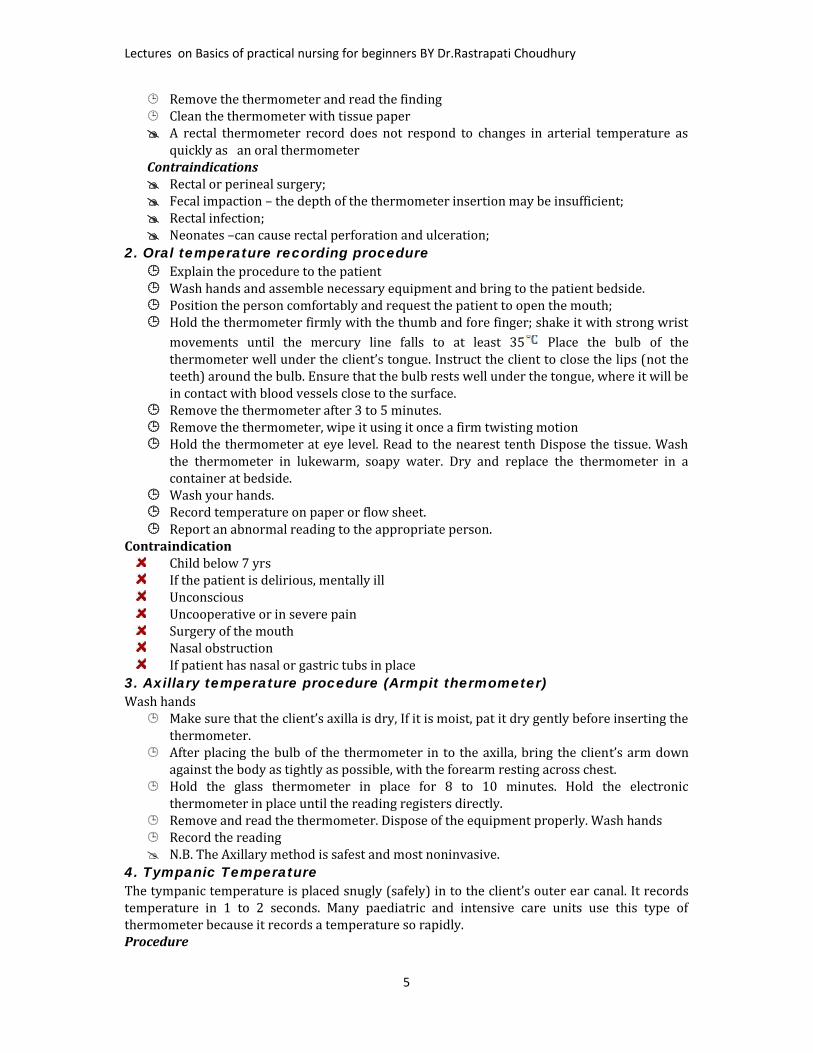
Remove the thermometer and read the finding Clean the thermometer with tissue paper A rectal thermometer record does not respond to changes in arterial temperature asquickly as an oral thermometerContraindications Rectal or perineal surgery; Fecal impaction – the depth of the thermometer insertion may be insufficient; Rectal infection; Neonates –can cause rectal perforation and ulceration;
2. Oral temperature recording procedure Explain the procedure to the patient Wash hands and assemble necessary equipment and bring to the patient bedside. Position the person comfortably and request the patient to open the mouth; Hold the thermometer firmly with the thumb and fore finger; shake it with strong wristmovements until the mercury line falls to at least 35 Place the bulb of thethermometer well under the client’s tongue. Instruct the client to close the lips (not theteeth) around the bulb. Ensure that the bulb rests well under the tongue, where it will bein contact with blood vessels close to the surface. Remove the thermometer after 3 to 5 minutes. Remove the thermometer, wipe it using it once a firm twisting motion Hold the thermometer at eye level. Read to the nearest tenth Dispose the tissue. Washthe thermometer in lukewarm, soapy water. Dry and replace the thermometer in acontainer at bedside. Wash your hands. Record temperature on paper or flow sheet. Report an abnormal reading to the appropriate person.
ContraindicationChild below 7 yrsIf the patient is delirious, mentally illUnconsciousUncooperative or in severe painSurgery of the mouthNasal obstructionIf patient has nasal or gastric tubs in place3. Axillary temperature procedure (Armpit thermometer)Wash hands Make sure that the client’s axilla is dry, If it is moist, pat it dry gently before inserting thethermometer. After placing the bulb of the thermometer in to the axilla, bring the client’s arm downagainst the body as tightly as possible, with the forearm resting across chest. Hold the glass thermometer in place for 8 to 10 minutes. Hold the electronicthermometer in place until the reading registers directly. Remove and read the thermometer. Dispose of the equipment properly. Wash hands Record the reading N.B. The Axillary method is safest and most noninvasive.
4. Tympanic TemperatureThe tympanic temperature is placed snugly (safely) in to the client’s outer ear canal. It recordstemperature in 1 to 2 seconds. Many paediatric and intensive care units use this type ofthermometer because it records a temperature so rapidly.Procedure

Lectures on Basics of practical nursing for beginners BY Dr.Rastrapati Choudhury
6
Wash the hands Explain the procedure to the client to ensure cooperation and understanding. Hold the probe in the dominant hand. Use the client’s same ear as your hand (e.g. use theclient’s right ear when you use your right hand). Select the desired mode of temperature. Use the rectal equivalent for children under 3years of age Wait for “ready” message to display. With your nondominant hand, grasp the adult’s external ear at the midpoint. Pull theexternal ear up and back. For a child of 6 years or younger, use your nondominant handto pull the ear down and back. Slowly advance the probe in to the client’s ear with a back and forth motion until it sealsthe ear canal. Point the probe’s tip in an imaginary line from the client’s sideburns to his or heropposite eyebrow. As soon as the instrument is in correct position, press the button to activate thethermometer. Keep the probe in place until the thermometer makes a sound or flashes a light. Read the temperature and discard the probe cover. Replace the thermometer and wash your hands. Record the temperature on the client’s record.
PulseIt is a wave of blood created by contraction of the left ventricle of the heart. i.e. the pulse reflectsthe heart beat or is the same as the rate of ventricular contractions of the heart in a healthyperson.In some types of cardiovascular diseases heartbeat and pulse rate differs. Eg. Client's heartproduces very weak or small pulses that are not detectable in a peripheral pulse far from theheart.Peripheral Pulse: is a pulse located in the periphery of the body(away from heart) e.g. in thefoot, an, or neck, armApical Pulse (central pulse): it is located at the apex of the heart The PR is expressed in beats/minute (BPM)Pulse Deficit- It is a difference that exists between the apical and radial pulseFactors Affecting Pulse Rates Age: as age increase the PR gradually decreases. New born to 1 month – 130 BPM 80-180 (range) Adult 80 BPM (beat per minute) – 60 – 100 BPM (beat per minute range) Sex: after puberty the average males PR is slightly lower than female Exercise: PR increase with exercise Fever: increases PR in response to the lowered B/P that results from peripheralvasodilatation – increased metabolic rate Medications: digitalis preparation decreases PR, Epinephrine– increases PR Heat: increase PR as a compensatory mechanism Stress: increases the sympathetic nerve stimulation – increases the rate and force ofheart beat Position changes: when a patient assumes a sitting or standing position bloodusually pools in dependent vessels of the venous system. Pooling results in a transientdecrease in the venous blood return to heart and subsequent decrease in BP increasesheart rate.
Pulse SitesTemporal: is superior (above) and lateral to (away from the midline of) the eye
Lectures on Basics of practical nursing for beginners BY Dr.Rastrapati Choudhury
7
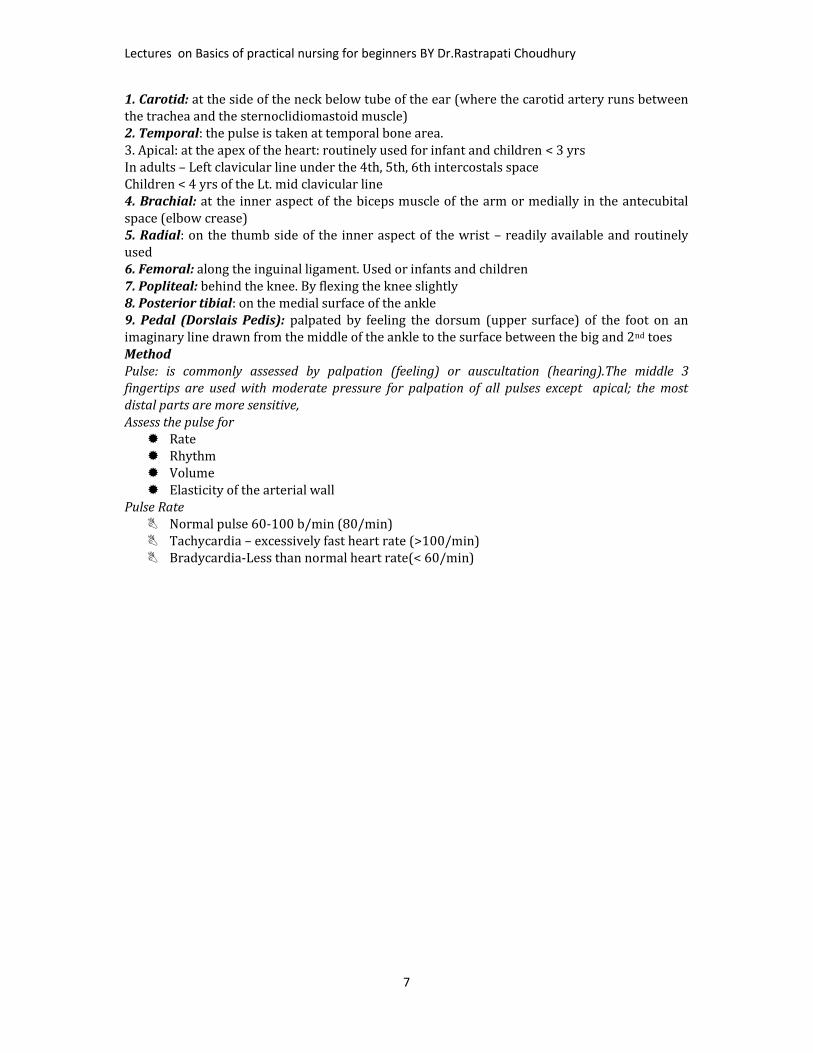
1. Carotid: at the side of the neck below tube of the ear (where the carotid artery runs betweenthe trachea and the sternoclidiomastoid muscle)2. Temporal: the pulse is taken at temporal bone area.3. Apical: at the apex of the heart: routinely used for infant and children < 3 yrsIn adults – Left clavicular line under the 4th, 5th, 6th intercostals spaceChildren < 4 yrs of the Lt. mid clavicular line4. Brachial: at the inner aspect of the biceps muscle of the arm or medially in the antecubitalspace (elbow crease)5. Radial: on the thumb side of the inner aspect of the wrist – readily available and routinelyused6. Femoral: along the inguinal ligament. Used or infants and children7. Popliteal: behind the knee. By flexing the knee slightly8. Posterior tibial: on the medial surface of the ankle9. Pedal (Dorslais Pedis): palpated by feeling the dorsum (upper surface) of the foot on animaginary line drawn from the middle of the ankle to the surface between the big and 2nd toesMethodPulse: is commonly assessed by palpation (feeling) or auscultation (hearing).The middle 3fingertips are used with moderate pressure for palpation of all pulses except apical; the mostdistal parts are more sensitive,Assess the pulse for Rate Rhythm Volume Elasticity of the arterial wall
Pulse Rate Normal pulse 60-100 b/min (80/min) Tachycardia – excessively fast heart rate (>100/min) Bradycardia-Less than normal heart rate(< 60/min)

Lectures on Basics of practical nursing for beginners BY Dr.Rastrapati Choudhury
8
Normal ResultsFor resting heart rate:Newborns (0-30 days old): 70 - 190 beats per minuteInfants (1 - 11 months old): 80-120 beats per minuteChildren 1 to 10 years: 70 - 130 beats per minuteChildren over 10 and adults (including seniors): 60 - 100 beats per minuteWell-trained athletes: 40 - 60 beats per minutePulse RhythmThe pattern and interval between the beats, random, irregular beats – dysrythymiaPulse Volume: the force of blood with each beat A normal pulse can be felt with moderate pressure of the fingers and can be obliteratedwith greater pressure. Full or bounding pulse forceful or full blood volume obliterated with difficulty Weak, feeble or thready readily obliterated with pressure from the finger tips Elasticityof arterial wall A healthy, normal artery feels, straight, smooth, soft and pliable, easily bent afterbreaking Reflects the status of the clients vascular system If the pulse is regular, measure (count)for 30 seconds and multiply by 2, If it is irregular count for 1 full minute
Procedure for measuring radial pulse (the most common) Wash hands Explain the procedure to the client

Lectures on Basics of practical nursing for beginners BY Dr.Rastrapati Choudhury
9
Position the client’s forearm comfortably with the wrist extended and the palm down Place the tips of your first, second, and third fingers over the client’s radial artery on theinside of the wrist on the thumb side. Press gently against the client’s radial artery to the point where pulsation can be feltdistinctly Using a watch, count the pulse beats for 30 seconds and multiply by two to get the rateper minute Count the pulse for full minute if it is abnormal in any way or take an apical pulse Record the rate (BPM) on paper or the flow sheet. Report any irregular findings toappropriate erson Wash your hands
RespirationRespiration is the act of breathing (includes intake of o2 removal of co2) Ventilation is anotherword, which refer to the movement of air in and out of the lungs. Hyperventilation: very deep,rapid respiration Hypoventilation: very shallow respirationTwo Types of Breathing1. Costal (thoracic)Involves the external muscles and other accessory muscles (sternoclodio mastoid)Observed by the movement of the chest up ward and down ward. Commonly used foradults2. Diaphragmatic (abdominal)Involves the contraction and relaxation of the diaphragm, observed by the movement ofabdomen. Commonly used for children.AssessmentThe client should be at restAssessed by watching the movement of the chest or abdomen.Rate, rhythm, depth and special characteristics of respiration are assessedA. Rate: is described in rate per minute (RPM) Healthy adult RR = 15- 20/ min. is measured forfull minute, if regular for 30 seconds. As the age decreases the respiratory rate increases. Eupnea- normal breathing rate and depth Bradypnea- slow respiration Tachypnea - fast breathing Apnea - temporary cessation of breathing
B. Rhythm: is the regularity of expiration and inspiration Normal breathing is automatic &effortless.C. Depth: described as normal, deep or shallow. Deep: a large volume of air inhaled & exhaled,inflates most of the lungs. Shallow: exchange of a small volume of air minimal use of lung tissue.
Blood Pressure
Blood pressure is the pressure exerted by blood against the wall of blood vessels. It includesarterial, venous and capillary pressures. Arterial BP: it is a measure of a pressure exerted by theblood as it flows through the arteries.Arterial blood pressure (BP) =cardiac output (CO) x total peripheral resistance (TPR).There are two types of blood pressure.1. Systolic pressure: is the pressure of the blood as a result of contraction of the ventricle (is thepressure of the blood at the height of the blood wave);2. Diastolic blood pressure: is the pressure when the ventricles are at rest.

Lectures on Basics of practical nursing for beginners BY Dr.Rastrapati Choudhury
10
3. Pulse pressure: is the difference between the systolic and diastolic pressure Blood pressureis measured in mm Hg and recorded as fraction. A number of conditions are reflected bychanges in blood pressure. Increase in blood pressure is called hypertension; Decrease is called hypotensionConditions Affecting Blood Pressure Fever Increase Stress” Arteriosclerosis " Obesity "
Hemorrhage Decrease Low hematocrit " External heat " Exposure to cold Increase
Sites for Measuring Blood Pressure1. Upper arm using brachial artery (commonest)2. Thigh around popliteal artery3. Fore -arm using radial artery4. Leg using posterior tibial or dorsal pedisMethods of Measuring Blood PressureBlood pressure can be assessed directly or indirectly1. Direct (invasive monitoring) measurement involves the insertion of catheter in to thebrachial, radial, or femoral artery. The physician inserts the catheter and the nurse monitors thepressure reading. With use of correct placement, it is highly accurate.2. Indirect (non invasive methods)
The auscultatoryThe palpatoryThe auscultatory method is the commonest method used in health activities.When taking blood pressure using stethoscope, the nurse identifies five phases in series ofsounds called Korotkoff's sound.
Phase 1: The pressure level at which the 1st joint clear tapping sound is heard, these soundsgradually become more intense. To ensure that they are not extraneous sounds, the nurse shouldidentify at least two consecutive tapping sounds.Phase 2: The period during deflation when the sound has a swishing qualityPhase 3: The period during which the sounds are crisper and more intensePhase 4: The time when the sounds become muffled and have a soft blowing qualityPhase 5: The pressure level when the sounds disappearProcedureAssessing Blood pressurePurpose To obtain base line measure of arterial blood pressure for subsequent evaluation To determine the clients homodynamic status To identify and monitor changes in blood pressure resulting from a disease process andmedical therapy.
EQUEPMENT
Lectures on Basics of practical nursing for beginners BY Dr.Rastrapati Choudhury
11
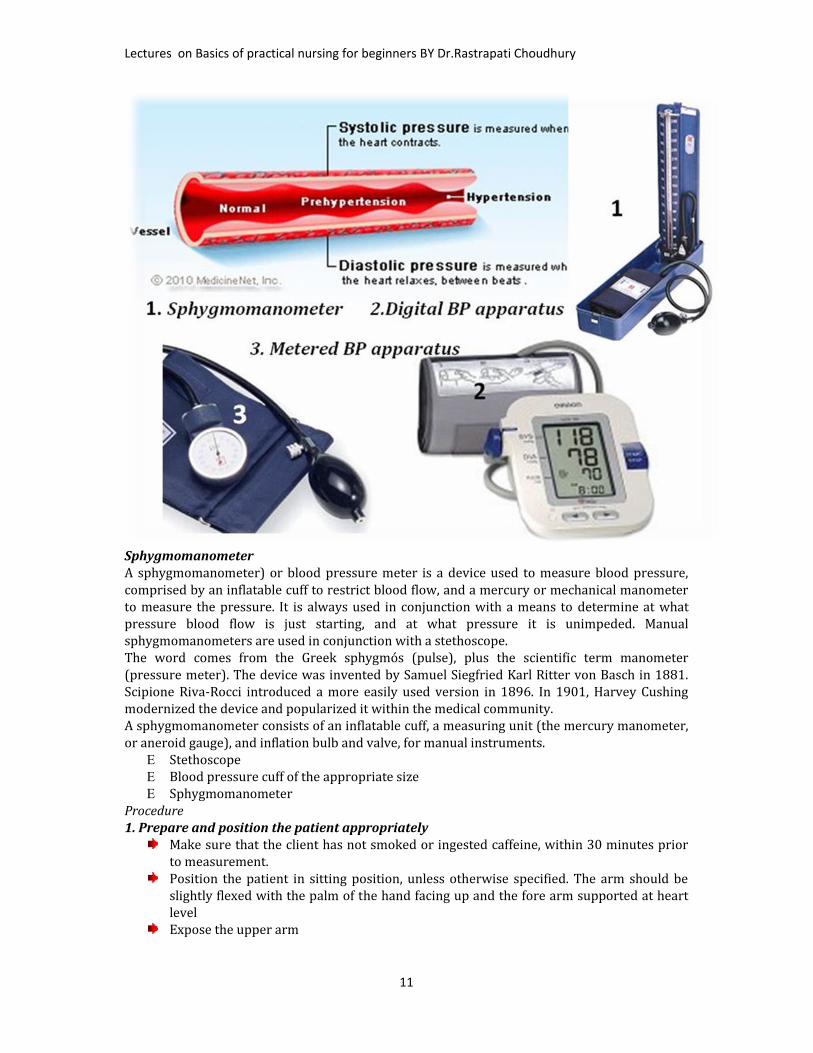
SphygmomanometerA sphygmomanometer) or blood pressure meter is a device used to measure blood pressure,comprised by an inflatable cuff to restrict blood flow, and a mercury or mechanical manometerto measure the pressure. It is always used in conjunction with a means to determine at whatpressure blood flow is just starting, and at what pressure it is unimpeded. Manualsphygmomanometers are used in conjunction with a stethoscope.The word comes from the Greek sphygmós (pulse), plus the scientific term manometer(pressure meter). The device was invented by Samuel Siegfried Karl Ritter von Basch in 1881.Scipione Riva-Rocci introduced a more easily used version in 1896. In 1901, Harvey Cushingmodernized the device and popularized it within the medical community.A sphygmomanometer consists of an inflatable cuff, a measuring unit (the mercury manometer,or aneroid gauge), and inflation bulb and valve, for manual instruments. Stethoscope Blood pressure cuff of the appropriate size Sphygmomanometer
Procedure1. Prepare and position the patient appropriatelyMake sure that the client has not smoked or ingested caffeine, within 30 minutes priorto measurement.Position the patient in sitting position, unless otherwise specified. The arm should beslightly flexed with the palm of the hand facing up and the fore arm supported at heartlevelExpose the upper arm

Lectures on Basics of practical nursing for beginners BY Dr.Rastrapati Choudhury
12
2. Wrap the deflated cuff evenly around the upper arm. Apply the center of the bladder directly over the medial aspect of the arm. The bladderinside the cuff must be directly over the artery to be compressed if the reading to beaccurate. For adult, place the lower border of the cuff approximately 2 cm above antecubitalspace.
3. For initial examination, perform preliminary palipatory determination of systolicpressure Palpate the brachial artery with the finger tips Close the valve on the pump by turning the knob clockwise. Pump up the cuff until you no longer feel the brachial pulse Note the pressure on sphygmomanometer at which the pulse is no longer felt Release the pressure completely in the cuff, and wait 1 to 2 minutes before makingfurther measurement
4. Position the stethoscope appropriately Insert the ear attachments of the stethoscope in your ears so that they tilt slightlyforeword. Place the diaphragm of the stethoscope over the brachial pulse; hold the diaphragm withthe thumb and index finger.
5. Auscultate the client's blood pressurePump up the cuff until the sphygmomanometer registers about 30 mm Hg above thepoint where the brachial pulse disappeared.Release the valve on the cuff carefully so that the pressure decreases at the rate 2-3mmHg per second.As the pressure falls, identify the manometer reading at each of the five phasesDeflate the cuff rapidly and completelyRepeat the above step once or twice as necessary to confirm the accuracy of the reading.6. Remove the cuff from the client’s arm7. For initial determination, repeat the procedure on the client's other arm, there should be adifference of no more than 5 to 10 mmHg between the arms. The arm found to have the higherpressure, should be used for subsequent examinations8. Document and report pertinent assessment data, report any significant change in client'sblood pressure to the nurse in charge also report these finding: Systolic blood pressure (of adult) above 140 mmHg. Diastolic blood pressure (of an adult) above 90 mmHg. Systolic blood pressure of (an adult) below 100mmHg.
Normal blood pressure less than 120/80mmHgPre-hypertension 120-139/ 80-89 mmHgHigh blood pressure (stage 1) 140-159/90-99 mmHgHigh blood pressure (stage 2) higher than 160/100 mmHg
Pulse oximeterA finger mounted pulseoximeter taking measurement through the fingernail.A wrist mounted remote sensor pulseoximeter withPlethysmogram.

Lectures on Basics of practical nursing for beginners BY Dr.Rastrapati Choudhury
13
A pulseoximeter (saturometer) is a medical device that indirectly monitors the oxygensaturation of a patient's blood (as opposed to measuring oxygen saturation directly through ablood sample) and changes in blood volume in the skin, producing a photoplethysmograph. It isoften attached to a medical monitor so staff can see a patient's oxygenation at all times. Mostmonitors alsodisplay the heart rate. Portable, battery-operated pulseoximeter are also availablefor home blood-oxygen monitoring. Theoriginal oximeter was made by Millikan inthe 1940s.[1] The precursor to today'smodern pulse oximeter was developed in1972, by Aoyagi at Nihon Kohden using theratio of red to infrared light absorption ofpulsating components at the measuring site.It was commercialized by Biox in 1981. Thedevice did not see wide adoption in theUnited States until the late 1980s.
ROUTE OF ADMINSTRATION OF DRUGSDefination: The route of administration (ROA) that is chosen may have a profound effect uponthe speed and efficiency with which the drug actsCLASSIFICATION SYSTEMIC ROUTES ENTERAL ORAL SUBLINGUAL RECTAL PARENTERAL LOCAL
ORAL ROUTE

Lectures on Basics of practical nursing for beginners BY Dr.Rastrapati Choudhury
14
SYSTEMIC-PARENTERAL INJECTABLES01. INTRAVENOUS02. INTRAMUSCULAR03. SUBCUTANEOUS04. INTRA-ARTERIAL05. INTRA-ARTICULAR06. INTRATHECAL07. INTRADERMAL08. INHALATIONALFACTORS GOVERNING CHOICE OF ROUTEPHYSICAL & CHEMICAL PROPERTIES OF DRUGSITE OF DESIRED ACTIONRATE & EXTENT OF ABSORPTION FROM VARIOUS ROUTESEFFECT OF DIGESTIVE JUICES & FIRST PASS EFFECTRAPIDITY OF THE DESIRED RESPONSEACCURACY OF DOSAGECONDITION OF THE PATIENT

Lectures on Basics of practical nursing for beginners BY Dr.Rastrapati Choudhury
15
Type of Oral Medication Lozenges (troches) - sweet medicinal tablet containing sugar that dissolve in the mouth so
that the medication is applied to the mouth and throat Tablets - a small disc or flat round piece of dry drug containing one or more drugs made by
compressing a powdered form of drug(s) Capsules - small hollow digestible case usually made of gelatin, filled with a drug to be
swallowed by the patient. Syrups - sugar containing medicine dissolved in water Tinctures - medicinal substances dissolved in water Suspensions - liquid medication with undissolved solid particles in it. Pills and gargle - a small ball of variable size, shape and color some times coated with sugar
that contains one or more medicinal substances in solid form taken in mouth. Effervescence - drugs given of small bubbles of gas. Gargle - mildly antiseptic solution used to clean the mouth or throat. Powder - a medicinal preparation consisting of a mixture of two or more drugs in the form
of fine particles.

Lectures on Basics of practical nursing for beginners BY Dr.Rastrapati Choudhury
16
INTRAMUSULAR ROUTE1.Very rapid absorption of drugs in aqueous solution2.Suppository and slow release reparations3. pain at injection sites for certain drugsIM Injection—Deltoid Upper arm Triangular area Use for vaccinations with small volumes Muscle is small Avoid hitting radial nerve Patient should sit upright or lie flat and relax arm muscles
Dorsogluteal Method 1Divide buttock into imaginary quadrantsAdminister drug into upper outer quadrant
ADVANTAGES

Lectures on Basics of practical nursing for beginners BY Dr.Rastrapati Choudhury
17
Dorsogluteal Method 2Locate posterior superior iliac spine and greater trochanter of femur.Draw imaginary line between the two landmarks.Injection given up and out from this line.IM Injection—Dorsogluteal Large muscles Can inject up to 5 mL Anything >3 mL uncomfortable Patient lies prone Toes pointing inward to relax muscles
IM Injection—Vastus Lateralis and Rectus FemorisSide by side in thighVastus lateralis is preferred injection site for childrenRectus Femoris used for self-injection due to its accessibilityMay inject up to 5 mL in adultVolumes for injection vary with patient age and muscle size
IM Injection—Ventrogluteal
Lectures on Basics of practical nursing for beginners BY Dr.Rastrapati Choudhury
18
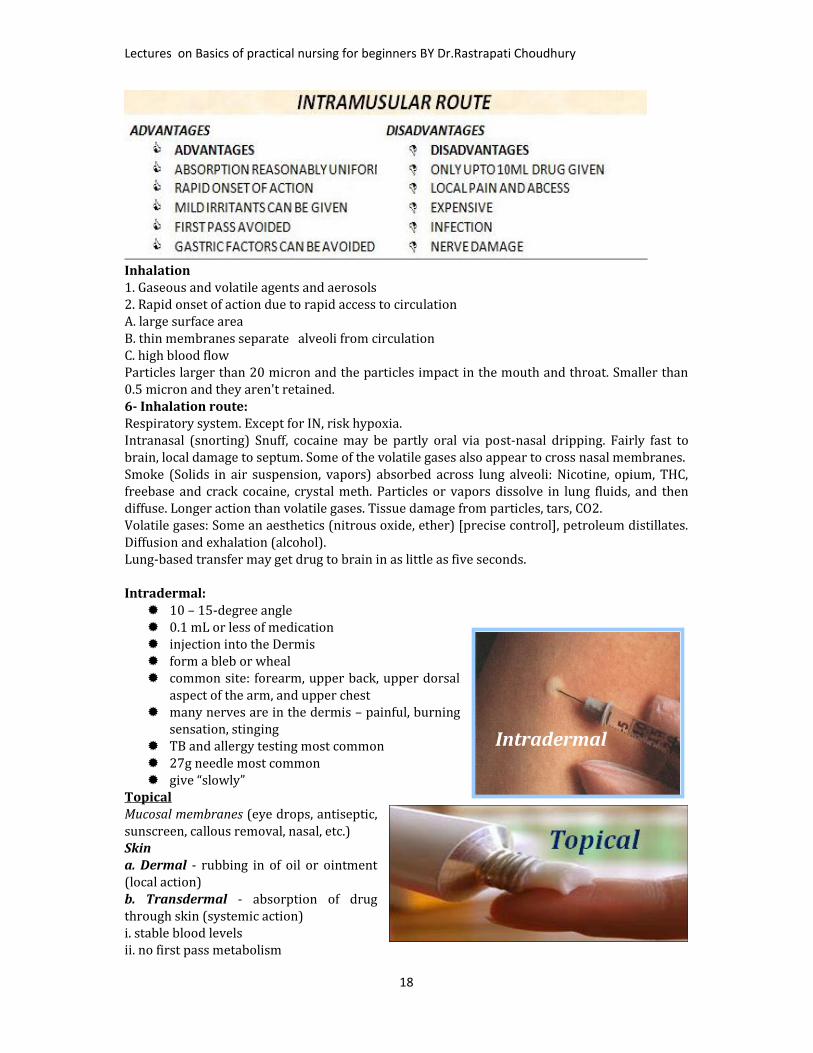
Inhalation1. Gaseous and volatile agents and aerosols2. Rapid onset of action due to rapid access to circulationA. large surface areaB. thin membranes separate alveoli from circulationC. high blood flowParticles larger than 20 micron and the particles impact in the mouth and throat. Smaller than0.5 micron and they aren't retained.6- Inhalation route:Respiratory system. Except for IN, risk hypoxia.Intranasal (snorting) Snuff, cocaine may be partly oral via post-nasal dripping. Fairly fast tobrain, local damage to septum. Some of the volatile gases also appear to cross nasal membranes.Smoke (Solids in air suspension, vapors) absorbed across lung alveoli: Nicotine, opium, THC,freebase and crack cocaine, crystal meth. Particles or vapors dissolve in lung fluids, and thendiffuse. Longer action than volatile gases. Tissue damage from particles, tars, CO2.Volatile gases: Some an aesthetics (nitrous oxide, ether) [precise control], petroleum distillates.Diffusion and exhalation (alcohol).Lung-based transfer may get drug to brain in as little as five seconds.Intradermal: 10 – 15-degree angle 0.1 mL or less of medication injection into the Dermis form a bleb or wheal common site: forearm, upper back, upper dorsalaspect of the arm, and upper chest many nerves are in the dermis – painful, burningsensation, stinging TB and allergy testing most common 27g needle most common give “slowly”
TopicalMucosal membranes (eye drops, antiseptic,sunscreen, callous removal, nasal, etc.)Skina. Dermal - rubbing in of oil or ointment(local action)b. Transdermal - absorption of drugthrough skin (systemic action)i. stable blood levelsii. no first pass metabolism
Intradermal

Lectures on Basics of practical nursing for beginners BY Dr.Rastrapati Choudhury
19
iii. Drug must be potent or patch becomes to largeRoute for administration -Time of medicine effect starts intravenous 30-60 seconds intraosseous 30-60 seconds endotracheal 2-3 minutes inhalation 2-3 minutes sublingual 3-5 minutes intramuscular 10-20 minutes subcutaneous 15-30 minutes rectal 5-30 minutes ingestion(oral) 30-90 minutes Transdermal (topical) variable (minutes to hours)
Very Important Info!No single method of drug administration is ideal for all drugs in all circumstancesParenteral Routes of Medication AdministrationRoutes of Administration and Rates of Absorption Parenteral Routes Enteral Routes – drug placed directly in the GI tract: Sublingual Routes - placed under the tongue Oral Routes - swallowing (p.o., per os) Rectal Routes - Absorption through the rectum

Lectures on Basics of practical nursing for beginners BY Dr.Rastrapati Choudhury
20
SYRANGES AND NEEDLESTypes of Syringes & NeedlesGiving medications by injection requires the use of the right syringe, the right needle and theright part of the body. Syringes are also used to remove blood from the body during blooddonation, for blood samples and to transfuse blood into a patient.About SyringesSyringes are made up of a round cylindrical barrel, a close-fitting plunger and a tip where thehub of a needle is attached. They come in a number of sizes, ranging from .5 ml to 60 ml. A 1- to3-ml syringe is normally adequate for injections given into tissues under the skin, also calledsubcutaneous injections, or injections into muscle, also known as intramuscular injections.Larger syringes are used to add medication to intravenous lines and irrigate wounds.

Lectures on Basics of practical nursing for beginners BY Dr.Rastrapati Choudhury
21
ClassificationSyringes are generally classified as Luer-Lok or non-Luer-Lok syringes. This classification isbased on the type of syringe tip. Luer-Lok syringes have tips that require needles that can betwisted and locked into place. This design prevents the needle from accidentally slipping off thesyringe. Non-Luer-Lok syringes have tips that require needles that can be pressed on to the tipof the syringe without being twisted into place.Insulin SyringeInsulin syringes are small in size, they hold between 0.3 and 1 ml of medication. These needlesare not calibrated in milliliters, they are calibrated in units. Most insulin syringes are calibratedup to 100 units. Insulin syringes are designed for self-injection and are used to givesubcutaneous injections.Tuberculin SyringeTuberculin syringes are used for tuberculosis testing. The fluid they contain is injected right intothe skin. This syringe is small and is calibrated in milliliters. It has a long, thin barrel with apreattached needle. The tuberculin syringe can hold up to 1 ml of fluid. Even though this syringeis small, it cannot be used to give insulin.About Needles

Lectures on Basics of practical nursing for beginners BY Dr.Rastrapati Choudhury
22
Most needles are made of stainless steel. The needle is hollow with a hole in the middle and hasthree parts: the hub, which fits on to the tip of the syringe; the shaft, which is the long length ofthe needle; and the bevel, which is the slanted tip of the needle. The bevel creates a narrow slitor hole in a person’s skin through which the fluid in the syringe is injected into a person. Thisslit closes once the needle is removed from the person's skin so there is no leakage ofmedication or blood. Long-beveled tips are sharper and narrower, which reduces discomfortwhen it pierces the skin.Injection Needle Description:Structure: Plastic protector, hub, stainless steel needle cannulaSize: 16G--30G in general also available in different sizes.Different color hub for easy recognition of size. This colour code has slight different fromcompany to company it is advisable that look at the number.Types of NeedlesNeedles are differentiated based on their length and diameter. The length of needles range frombetween 1/2-inch to 3 inches. The diameter of a needle is measured in gauges. A 25-gaugeneedle has a smaller diameter than a 19-gauge needle. As the needle gauge gets bigger, theneedle's diameter gets smaller. Two different needles may have the same length and havedifferent gauge sizes. Needle gauges range from between 7 gauges being the largest to 33 gaugethe smallest. Gauge selection is made based on the thickness of a medication to be given. If themedication is thick, a needle with a small gauge and big diameter would be the needle of choice.Intramuscular medications are given with long needles, while subcutaneous medications aregiven with shorter needles._____________________________________________________________________________________________________
BEDMAKING AND POSITIONS OF BEDHospital BedA hospital bed is a special bed that may be needed to care for a person who is ill. You can buy orrent a hospital bed for use at home at medical supply stores. Most hospital beds look like a twinbed made of heavy metal parts. The bed has moveable side rails. Hand cranks or electricity maybe used to change positions of the bed. Talk to your caregiver about what kind of bed is the bestfor you.

Lectures on Basics of practical nursing for beginners BY Dr.Rastrapati Choudhury
23
A hospital bed may be needed if you or a family member is ill or recovering from an illness athome. Hospital beds can be manual or electric. Electric beds may be easier for most people touse. Bed positions may be changed on hospital beds. You may raise or
lower the head, knees, or foot of the bed. This may help a person in bed breathe easier and bemore comfortable. You may also change the entire height of the bed, making it morecomfortable for caregivers working with someone in bed. You may be able to change theposition of an electric bed by pushing a button, without having to call for help.When choosing a bed, think of your needs, as well as the needs of those caring for you. There areseveral kinds of hospital beds to choose from. Your caregivers will help you choose the bed thatis right for you.Manual hospital bed: With this bed you need to change bed positions by hand using cranks. Ifyou are unable to do this, you will need to ask someone to help you. The cranks are located atthe foot or head of the bed. Manual beds may not move to as many positions as an electric bed.Most manual beds can be raised to make it easier for caregivers to help you. The bed may also

Lectures on Basics of practical nursing for beginners BY Dr.Rastrapati Choudhury
24
be lowered to make it easier for you to get in and out of bed. A manual bed may be very difficultfor a person who has limited hand or arm strength to use. You may need good hand strength toturn the cranks. A person with a back condition or knee problems may also have trouble. Aperson may need to bend or kneel to use the bed cranks.Electric hospital bed: An electric bed has a motor and a cord to plug into an electrical outlet.There is a control pad hooked to the bed that may look like a television remote control. Eachbutton on the control may have a picture showing how the bed will move when you push thebutton. Many people like an electric bed because the positions of the bed can be changed easily.These beds may also have a built in scale for weighing a person.There are many kinds of mattresses available for a hospital bed, including mattresses filled withair, gel, or foam. Some special mattresses can reduce pressure on certain body areas, and helpprevent pressure sores. You can buy or rent the mattress at the same supply store where youbuy or rent the bed. The mattress usually comes with a waterproof cover. You may need otherpads or bed attachments. Ask your caregiver for information about renting extra bed equipmentif needed.Where the bed should be placed in the home?Place a hospital bed where there is enough room for it when it is in any position. Put the bed in aplace where there is room on the sides of the bed to walk around. Be sure others can hear you ifyou are in bed and call for help. You may want to place the bed near the bathroom. You maywant to place it on the main level to avoid having to climb stairs. Place the bed away fromwindows or doors where they may be cold drafts of air. The best place for a bed may not be abedroom. Put the bed in a room close to where the family activities are, but still providingprivacy.What should I know about safety while using a hospital bed?Keep the wheels of the bed locked at all times. Unlock the wheels only if the bed needs to bemoved.Put a bell and a telephone within reach of the bed. These should be available so the person maycall for help when needed.Keep the side rails up. If there is danger of the person falling off the bed, keep the rails up at alltimes.Never light matches, candles or smoke while in or around the bed. Do not let others smoke orlight matches or candles near your bed.Follow the specific manufacturer's instructions for using the bed.Put night lights where needed.Night-lights may help prevent falls.If a footstool is needed for the person they get out of bed, make sure it is strong and stable.Put the bed control pad within easy reach of the bed for the person to adjust positions. Learn touse the control panel, and practice the different positions. Test the bed's hand and panelcontrols to be sure the bed is working correctly. Some hospital bed controls may be locked sothat a person in bed cannot change bed positions themselves. If the bed has this "locking"feature, test it to be sure it is working correctly.Check for cracks and damage to the covering of the all bed controls. If covers are damaged,liquids may get into the controls. This may cause them to stop working, and may cause a fire.Have a professional look at all parts of the bed, as well as the floor beneath and around the bedfor dust and lint build-up. These areas should be kept clean.Call the bed manufacturer or another professional if there are burning smells or unusual soundscoming from the bed. Do not use the bed if there is a burning smell coming from it. Call if the bedcontrols are not working correctly to change positions of the bed.What should I know about using electrical outlets and extension cords for the hospital bed?Check the bed's power cord for damage. It may be crushed, pinched, sheared, cut or wornthrough. Do not place furniture (such as rocking chairs) away from the cord. Avoid placing orrolling the bed over the power cord.

Lectures on Basics of practical nursing for beginners BY Dr.Rastrapati Choudhury
25
Do not allow clothing, sheets, blankets, books, or anything else to be in contact with a walloutlet. Do not let these items get stuck between the cord and outlet when the bed is plugged in.This may cause a fire, or damage the cord or the plug.Do not place a rug or carpet over the power cord for the bed, or anything else. Carpets and rugsmay cause the cord to heat up too much, and lead to a fire. Do not place the cord in a locationwhere people walk, as this may cause falls and damage the power cord.Do not use an extension cord, or a power strip having more than one plug-in outlet. Any damageto these can cause a fire. If you must use an extension cord or power strip, have a professionalcheck it before using it. It will also need to be checked regularly for as long as you use it. Avoidusing outlet boxes that more than one cord may be plugged into. If you must use an outlet box,place it where there is no risk of damage or spilling liquids.Plug the power cord from the bed directly into an outlet on the wall. Have a professional checkthe outlet to see if it is working correctly. The outlet should also be checked to be sure it is theright type for the cord. The prongs (blades) on the plug should be tight. The cord should fittightly into the outlet. The plug, outlet and wall plate should not be chipped or cracked.When adjusting the head, foot, or any part of the bed, be sure the bed is able to move freely. Itshould extend to its full length, and adjust to any position. Be sure bed movement does notaffect the bed's power cord, plug, or outlet. Hand control and power cords should not bethreaded through moving parts of the bed, or through bed rails. Watch the hand control cablesand the power cord as you are adjusting the bed. Normal bed movement should not pinch ordamage these cords.What other things may be done so that I am more comfortable?If there is a television near the bed, place it so that it is seen clearly from the bed.Keep a glass and pitcher of water, tissues, hand lotion, and other personal items within easyreach.Place a wastebasket next to the bed.Put a bedside commode (portable toilet) beside the bed if needed.What are the advantages of having side rails on the bed?Providing a place to fasten bed controls that is within easy reach of the person in bed.Provides aplace to hold on to when getting into or out of bed.Side rails may allow a person in bed to help with repositioning (turning) themselves.What are the dangers of having side rails on the bed?Injury from a fall if a person climbs over the bed rail and falls. You may have a higher risk ofinjury than falling from the bed itself. The fall may be more awkward, causing more seriousinjury.Injury if a part of the body gets caught between the bed rails, or the bed rails and theBeds and Bed Preparation TechniquesDefinitionA hospital bed is the piece of equipment most frequently used by the hospitalized patient.Hospital beds are also found in long-term-care facilities, as well as patients' homes. The idealhospital bed should be selected for its impact on patients' comfort, safety, medical condition,and ability to change positions.PurposeThe purpose of a well-made hospital bed, as well as an appropriately chosen mattress, is toprovide a safe, comfortable place for the patient, where repositioning is more easily achieved,and pressure ulcers are prevented.PrecautionsWhen selecting a bed, the nurse should consider the patient's mobility, overall medicalcondition, and risk for pressure ulcer development. Safety factors should also be considered.Unless a patient is accompanied by a health care professional or other caregiver, the bed shouldalways be placed in its lowest position to reduce the risk of injury from a possible fall.
Lectures on Basics of practical nursing for beginners BY Dr.Rastrapati Choudhury
26
Another precaution to take, especially for weak or bed-bound patients, or for those with alteredmental status, is to elevate the side rails. However, health care professionals should be aware ofa safety alert issued by the Food and Drug Administration (FDA) in 1995 concerning the use ofhospital beds' side rails. Because of a number of injuries and deaths related to side railentrapment, the FDA recommends the following actions to prevent potential deaths and injuriesrelated to side rail entrapment:All hospital bed frames, side rails, and mattresses should be inspected regularly to identifypotential areas of entrapment. The alignment of the bed frame, side rail, and mattress should leave no gap that is wideenough to entrap a patient's head or any other part of the body. Be alert for side rails or mattresses that have been replaced. Not all of these areinterchangeable, and may increase the potential for entrapment. Check side rails for proper installation. Consider additional safety measures for those patients at high risk for entrapment. Siderail protective barriers may be used to close off open spaces. Do not use side rails as a substitute for patient protective restraints.
DescriptionThe usual hospital bed consists of a mattress on a metal frame that can be raised or loweredhorizontally. The frame is separated into three sections so the head and foot of the bed can beraised and lowered, in addition to inclining the entire bed with the headboard up or down. Themajority of hospital beds are powered by electrical motors, but some are run manually (using acrank) or by hydraulic methods.The bed's position is typically changed by using electrical controls that may be located on theside or foot of the bed, in a bedside table, or on a pendant. The electrical controls enable patientsto reposition the bed with very little effort. Patients should be instructed how to use the bedcontrols. They should also be cautioned against raising the bed to a position that may contributeto injuries or falls. At its lowest level, a hospital bed is usually about 26–28 inches (65–70 cm)above the floor.with the patient in the bed Various safety features are present on hospital beds. These featuresinclude:Wheel locks: These should be used whenever the bed is stationary.Side rails: They help to protect patients from accidentally falling out of bed, as well as providesupport to the upper extremities as the patient gets out of bed.Removable headboard: This feature is important during emergency situations, especially duringcardiopulmonary resuscitation.Most hospital beds have water-repellent mattresses. However, a number of specially designedbeds, frames, and mattresses have been created to aid in caring for bed-bound patients. Some ofthese beds help to turn the immobile patient, and may make it easier for nurses to lift orreposition the patient. The major categories of specialized beds are:Air-fluidized beds: These are also known as bead beds, sand beds, and high-air-loss beds. Air iscirculated via silicone microspheres, creating a fluid-like state.Low-air-loss beds. These beds have interconnected air cells with a minimum depth of fiveinches (12–13 cm). They allow air to escape from the surface of the bed.There are also a variety of support surfaces that can be placed on top of the existing mattress, orspecialized mattresses that can reduce the risk of pressure ulcer formation. These surfaces andmattresses include:Static air-filled overlaysAlternating air-filled mattress overlaysGelor water-filled mattress overlaysFoam mattressesLow-air-loss replacement mattresses
Lectures on Basics of practical nursing for beginners BY Dr.Rastrapati Choudhury
27
The rot kinetic bed is used primarily for severely immobilized patients or patients with spinalcord injuries. The bed can rotate a patient up to 270°. Bariatric beds are available for especiallyobese patients.PreparationThe nurse normally makes the bed in the morning after a patient's bath, or when the patient isout of the room for tests. The nurse should straighten the linens throughout the day, makingcertain they are neither loose nor wrinkled. Any sheets that become wet or soiled should bechanged promptly.When changing bed linen, the nurse should keep the soiled linen away from the uniform, andplace it in the appropriate linen bag or other designated container. Never fan or shake linens,which can spread microorganisms and, if any of the sheets touch the floor, they should bereplaced.The bed can be made in a variety of ways, depending on the particular patient situation. Thecategories of unoccupied bed making include:Open unoccupied: In an open bed, the top covers are folded back so the patient can easily getback into the bed.Closed unoccupied: In a closed bed, the top sheet, blanket, and bedspread are pulled up to thehead of the mattress and beneath the pillows. A closed bed is done in a hospital bed prior to theadmission of a new patient.Surgical, recovery, or postoperative: These techniques are similar to the open unoccupied bed.The top bed linens are placed so that the surgical patient can transfer easily from the stretcherto the bed. The top sheets and bedspread are folded lengthwise or crosswise at the foot of thebed.The other method of making a hospital bed is an occupied bed, where the patient is in the bedwhile the linens are being changed. The nurse should perform the following when making theoccupied bed:Raise the bed to a comfortable working height. Loosen the top linens, and help the patientassume a side-lying position.Roll the bottom linens toward the patient.Place the bottom sheet on the mattress, seam side down, and cover the mattress. Miter thecorners of any non-fitted sheets.Place waterproof pads and/or a draw sheet on the bed.Tuck in the remaining half of the clean sheets as close to the patient as possible.Assist the patient to roll over the linen. Raise the side rail, and go to the other side of the bed.Remove the dirty linen and dispose of appropriately.Slide the clean sheets over and secure. Pull all sheets straight and taut.Place the clean top sheets over the patient and remove the used top sheet and blanket. Miter thecorners of the top linens at the foot of the bed. Loosen the linens at the foot of the bed for thepatient's comfort.Change the pillowcase.Return the patient's bed to the appropriate position, at its lowest level.The nurse also needs to place the bed into one of the following positions, considering theparticular needs of each patient:Fowler's: The head of the bed is raised to an angle of 45° or more; a semi sitting position. Thisposition is appropriate when the patient is eating. It is also used during nasotracheal suctioningor during nasagrastic tube placement.Semi-Fowler: In this position, the head of the bed is raised about 30°. This position helps topromote adequate lung expansion.Trendelenburg: The entire bed frame is tilted with the head of the bed down. This helps topromote postural drainage or to promote venous return in patients with poor peripheralcirculation.
Lectures on Basics of practical nursing for beginners BY Dr.Rastrapati Choudhury
28
Reverse Trendelenburg: The entire bed frame is tilted with the foot of the bed down. Thisposition is not frequently used, though it may help to prevent esophageal reflux.Flat: Keeping the bed flat is appropriate for some patients with spinal injuries, and for those incervical traction. It may also be used for patients with hypotension. It is a position preferred bymany for sleeping.AftercareAfter preparing the hospital bed, the patient should be assessed for comfort and safety.Health care team rolesSelecting and preparing a bed for the patient are important responsibilities for the nurse. Thenurse or nursing assistant normally makes up the bed, but it is important that all health careprofessionals be aware of the positive impact an appropriate, well-made bed has on a patient'scare, safety, and sense of comfort.KEY TERMS Draw sheet—A sheet placed over the bottom sheet to help lift or move a patient and
to protect the bottom sheet from soiling. Fowler's position—A bed position where the head of the bed is raised to an angle of
45° or more; a semi sitting position. Trendelenburg—a bed position where the entire frame of the bed is tilted with the
head of the bed down.POSITIONING A PATIENT FOR MEDICAL EXAMINATION OR TREATMENT OR RESTPatients are put in special positions for examination, for treatment or test, and to obtainspecimens. You should know the positions used, how to assist the patient, and how to adjust thedrapes.1.1. Horizontal Recumbent or Decubitus Position. Used for most physical examinations.Patient is on his back with legs extended. Arms may be above the head, alongside the body orfolded on the chest.1.2. Dorsal Recumbent Position. Patient is on his back with knees flexed and soles of feetflat on the bed. Fold sheet once across the chest. Fold a second sheet crosswise over the thighsand legs so that genital area is easily exposed.1.3. Fowler's Position. Used to promote drainage or ease breathing. Head rest is adjusted todesired height and bed is raised slightly under patient's knees1.4. Dorsal Lithotomy Position. Used for examination of pelvic organs. Similar to dorsalrecumbent position, except that the patient's legs are well separated and thighs are acutelyflexed. Feet are usually placed in stirrups. Fold sheet or bath blanket crosswise over thighs andlegs so that genital area is easily exposed. Keep patient covered as much as possible.1.5. Prone Position. Used to examine spine and back. Patient lies on abdomen with head turnedto one side for comfort. Arms may be above head or alongside body. Cover with sheet or bathblanket. NOTE: An unconscious patient or one with an abdominal incision or breathing difficultyusually cannot lie in this position.
1.6. Sim's Position. Used for rectal examination. Patient is on left side with right knee flexedagainst abdomen and left knee slightly flexed. Left arm is behind body; right arm is placedcomfortably.NOTE: Patient with leg injuries or arthritis usually cannot assume this position.

Lectures on Basics of practical nursing for beginners BY Dr.Rastrapati Choudhury
29
1.7. Knee-Chest Position. Used for rectal and vaginal examinations and as treatment to bringuterus into normal position. Patient is on knees with chest resting on bed and elbows resting onbed or arms above head. Head is turned to one side. Thighs are straight and lower legs are flaton bed.
NOTE: Do not leave patient alone; he/she may become dizzy, faint, and fall.Anatomical position that of the human body standing erect with palms turned forward, used as theposition of reference in designating the site or direction of structures of the body.Bozeman's position the knee-elbow position with straps used for support.
Decubitus positionDorsal decubitus: lying on the back.

Lectures on Basics of practical nursing for beginners BY Dr.Rastrapati Choudhury
30
Lateral decubitus: lying on one side, designated right lateral decubitus when the subject lies on theright side and left lateral decubitus when it lies on the left side.Decubitus ulcer: an ulcer due to local interference with the circulation; called also pressure sore. The
ulcer usually occurs over a bony prominence such as that of the sacrum, hip, heel, shoulder orelbow. Excessive or prolonged pressure produced by the weight of the body or limb is the primarycause.Ventral decubitus: lying on the stomach.Fowler's position: that in which the head of the patient's bed is raised 18–20 inches above the level,with the knees also elevated.Knee-chest position: the patient resting on knees and upper chest.Knee-elbow position: the patient resting on knees and elbows with the chest elevated.Lithotomy position: the patient supine with hips and knees flexed and thighs abducted andexternally rotated.Mayer position: a radiographic position that gives a unilateral superoinferior view of thetemporomandibular joint, external auditory canal, and mastoid and petrous processes.Rose's position: a supine position with the head over the table edge in full extension, to preventaspiration or swallowing of blood.

Lectures on Basics of practical nursing for beginners BY Dr.Rastrapati Choudhury
31
Semi-Fowler position: one similar to Fowler's position but with the head less elevated.Sims position: the patient on the left side and chest, the right knee and thigh drawn up, the left armalong the back.Trendelenburg position: the patient is supine on a surface inclined 45 degrees, head at the lowerend and legs flexed over the upper end.Verticosubmental position: a radiographic position that gives an axial projection of the mandible,including the coronoid and condyloid processes of the rami, the base of the skull and its foramina,the petrous pyramids, the sphenoidal, posterior ethmoid, and maxillary sinuses, and the nasalseptum.Waters' position: a radiographic position that gives a posteroanterior view of the maxillary sinus,maxilla, orbits, and zygomatic arches.The squatting posture: is used for squat toilets. It is also commonly used for defecation in theabsence of toilets or other devices
TYPES OF INTRA VENOUS FLUIDS AND THEIR ACTIONand Intravenous Fluid SelectionLEARNING OBJECTIVES Describe and differentiate colloid and crystalloid IV fluids Understand osmosis as it pertains to water movement with IV therapy Define tonicity and the actions of isotonic, hypotonic, andhypertonic crystalloids in thebody Identify the three most common IV solutions used in theprehospital setting, and classifythem as isotonic, hypotonic,or hypertonic

Lectures on Basics of practical nursing for beginners BY Dr.Rastrapati Choudhury
32
Describe how an IV fluid is packaged and important information located on the label of the IV fluid
KEY TERMS5% Dextrose in water—A carbohydrate solution that uses glucose (sugar) as the solutedissolved in sterile water. Five percent dextrose in water is packed as an isotonicsolution but becomes hypotonic once in the body because the glucose (solute) dissolvedin sterile water is metabolized rapidly by the body’s cells.Colloid solutions—IV fluids containing large proteins and molecules that tend to stay withinthe vascular space (blood vessels).Crystalloid solutions—IV fluids containing varying concentrations of electrolytes.D5W—See 5% dextrose in water.Extracellular space—Space outside the cells consisting of the intravascular and interstitialspaces.Hypertonic crystalloid—A crystalloid solution that has a higher concentration of electrolytesthan the body plasma.Hypotonic crystalloid—A crystalloid solution that has a lower concentration of electrolytesthan the body plasma.Intracellular space—Space within the cells. Intravascular volume—Volume of bloodcontained within the blood vessels.Intravenous fluids—chemically prepared solutions that are administered to a patient throughthe IV site.Isotonic crystalloid—A crystalloid solution that has the same concentration of electrolytes asthe body plasma.Lactated Ringer’s (LR), Ringer’s lactate —an isotonic crystalloid solution containing thesolutes sodium chloride, potassium chloride, calcium chloride, and sodium lactate,dissolved in sterile water (solvent).Normal saline solution—an isotonic crystalloid solution that contains sodium chloride (salt)as the solute, dissolved in sterile water (solvent). The specific concentration for normalsaline solution is 0.9%.Osmosis—The movement of water across a semi-permeable membrane from an area of lowersolute concentration to an area of higher solute concentration. This movement of waterallows the equalization of the solute-to-solution ratio across the membrane.Osmotic pressureFluid therapy also affects osmotic pressure. Osmosis is often defined as "the diffusion of wateracross a semi permeable membrane from an area of high concentration to an area of lowconcentration. But it may be easier to understand when put this way: Water moves into thecompartment with the higher concentration of particles, or solute. Water is actuallypulled into the compartment in the same way that a sponge soaks up a spill. This pull iscalled osmotic pressure.While the size of particles distinguishes the two major types of fluid—crystalloid (small) orcolloid (large)—it's the number of particles in each compartment that keeps water where it'ssupposed to be.6 Nurses give fluids with more (or fewer) particles than blood plasma to pullfluid into the compartment that needs it most.So how do you know where the water is needed? To assess water balance, you'll measure theosmolality of blood plasma. Osmolality is the number of particles (osmoles) in a kilogram offluid; osmolality is the number of particles in a liter of fluid. These terms are often usedinterchangeably because the density of water is 1 kg/L. Normal serum osmolality is around 300mOsm/L.Oncotic pressureOncotic pressure is a form of pressure in the circulatory system which encourages water tocross the barrier of the capillaries and enter the circulatory system. In patients with low Oncotic

Lectures on Basics of practical nursing for beginners BY Dr.Rastrapati Choudhury
33
pressure, fluid will tend to accumulate in the tissues, resulting in edema. This phenomenon ispart of a complex interconnected system which is designed to keep the body in a state ofhomeostasis, working together with hydrostatic pressure to keep the level of fluids in the bloodstable.The walls of the circulatory system are semi-permeable. Fluids can pass across thesemembranes, but larger materials such as proteins, also known as colloids, cannot. Hydrostaticpressure is the force which pushes fluids over this membrane and out of the circulatory system,while oncotic pressure is the force which brings fluids back into the circulatory system. Whenthese two forces are in balance, there is no net loss or gain of fluid from the circulatory system.When they are not, a patient can develop medical problems.Oncotic pressure occurs as a result of osmosis. When fluids move across the membrane of thecapillaries due to hydrostatic pressure, they leave behind a concentration of solutes which weretoo big to cross the membrane. Fluids tend to flow from areas of low concentration to areas ofhigh concentration, which means that when the solute level rises as fluid leaves the capillaries,fluids are pulled across the membrane and into the capillaries to balance the concentration ofthe solution on both sides of the barrier.Oxygen-carrying solutions—chemically prepared solutions that can carry oxygen to the cells.Plasma—Fluid surrounding the cells of the body.Solute—Particles that are dissolved in the sterile water (solvent) of an IV fluid.Solvent—the liquid portion of an IV solution that the solute(s) dissolves into. The mostcommon solvent is sterile water.Total body water—Water contained within the cells, around the cells, and in the bloodstream.Water comprises about 60% of the body’s weight.TYPES OF IV FLUIDS Dextrose (5%, 10%, 25%) Normal Saline(NS) (0.9%Nacl) DNS (5% Dex with 0.9% NaCl) ½ NS(0.45%Nacl) ½ DNS(5% Dex with 0.45% NaCl) RL (Ringer’s Lactate)
Isolyte- G Isolyte - M Isolyte – E Isolyte-P Albumin (20%,25%) Gelatin Polymers (Haemaccel)
INTRODUCTIONIntravenous fluids are chemically prepared solutions that are administered to the patient.They are tailored to the body’s needs and used to replace lost fluid and/or aid in the delivery ofIV medications. For patients that do not require immediate fluid or drug therapy, the continuousdelivery of a small amount of IV fluid can be used to keep a vein patent (open) for future use.IV fluids come in different forms and have different impacts on the body. Therefore, it isimportant to have an understanding of the different types of IV fluids, along with theirindications for use.How Intravenous Fluids are CreatedThere are several types of IV fluids that have different effects on the body. Some IV fluids aredesigned to stay in the intravascular space (intra= within, vascular= blood vessels) to increasethe intravascular volume, or volume of circulating blood. Other IV fluids are specificallydesigned so the fluid leaves the intravascular pace and enters the interstitial and intracellularspaces. Still others are created to distribute evenly between the intravascular, interstitial, andcellular spaces. The property that an IV solution has within the body depends on how it is

Lectures on Basics of practical nursing for beginners BY Dr.Rastrapati Choudhury
34
created and the specific materials it contains. It also determines the best type of IV solution touse in relation to the patient’s needs. The majority of an IV solution is sterile water. Chemically,water is referred to as a “solvent.” A solvent is a substance that dissolves other materialscalled “solutes.” Within IV solutions, the solutes can be molecules called electrolytes (chargedparticles such as sodium (Na+) potassium( +), and chloride(Cl-) )and/or other largercompounds such as proteins or molecules. Together, the solvent (water) and solutes(electrolytes, proteins, or other molecules dissolved in the water) create the IV solution.Consider a cup of coffee to which sugar is added for sweetness. The coffee is the solvent, whichdissolves the solute sugar.Intravenous FluidsIV fluids come in four different forms:
ColloidsCrystalloidsBlood and blood productsOxygen-carrying solutionsUnderstanding these IV fluids is important because each has a different impact on the body andparticular indications for use:
Colloid Solutions:Colloid solutions are IV fluids that contain solutes in the form of large proteins or othersimilarly sized molecules. The proteins and molecules are so large that they cannot passthrough the walls of the capillaries and into the cells. Accordingly, colloids remain in the bloodvessels for long periods of time and can significantly increase the intravascular volume (Bloodvolume). The proteins also have the ability to attract water from the cells into the blood vessels.However, although the movement of water from the cells into the bloodstream may bebeneficial in the short term, continual movement in this direction can cause the cells to lose toomuch water and become dehydrated. Colloids are useful in maintaining blood volume, but theiruse in the field is limited. Colloids are expensive, have specific storage requirements, and have ashort shelf life. This makes their use more suitable in the hospital setting. However, familiarity isimportant because in a mass casualty incident the EMT may be required to assist with theadministration of colloids either in a field hospital or during the transport of critically injuredpatients. Commonly used colloid solutions include plasma protein fraction, salt poor albumin,dextran, and heptastich.
Colloids: Types Albumin: e.g. 4.5-5%, 20-25% human albumin solution Dextran: e.g. 6% Dextran 70

Lectures on Basics of practical nursing for beginners BY Dr.Rastrapati Choudhury
35
Gelatin: e.g. 3.5% polygeline (Haemaccel), 4% succinylated gelatin (Gelofusion) Hydroxyethyl starch: e.g. 6% hetastarch (Elo-HAES, Hespan), 6 & 10 pentastarch(Pentaspain, HAES-steril)
Uses Used for maintenance of plasma volume and acute replacement of plasma volumedeficit. Short term volume expansion (gelatin, dextran) Medium term volume expansion (albumin, pentastarch) Long term volume expansion (hetastarch)
Routes: IV (Intra Venous)Side effects Dilution coagulopathy Anaphylaxis Interference with blood cross matching (Dextran 70)Notes Smaller volumes of colloid are required for resuscitation with less contribution tooedema. Maintenance of plasma colloid osmotic pressure (COP) is a useful effect notseen with crystalloids but they contain no clotting factors or other plasma enzymesystems. Albumin is the main provider of COP in the Plasma and has a number of other functions.However, there is no evidence that maintenance of plasma albumin levels, as opposed tomaintenance of plasma COP with artificial plasma substitutes, is advantageous.
Crystalloid Solutions:Crystalloid solutions are the primary fluid used for pre-hospital IV therapy. Crystalloidscontain electrolytes (e.g., sodium, potassium, calcium, chloride) but lack the large proteins andmolecules found in colloids. Crystalloids come in many preparations and are classifiedaccording to their “tonicity.” A crystalloid’s tonicity describes the concentration of electrolytes(solutes) dissolved in the water, as compared with that of body plasma(fluid surrounding the cells). When the crystalloid contains the same amount of electrolytes asthe plasma, it has the same concentration and is referred to as “isotonic”(iso= same, tonic= concentration).If a crystalloid contains more electrolytes than the body plasma, it is more concentrated andreferred to as “hypertonic” (hyper, high; tonic, concentration).Crystalloids: TypesSaline e.g. 0.9% saline, Hartmann’s solution 0.18% saline in 4% glucose.Glucose: e.g. 5% glucose, 10% glucose, 20% glucose.Potassium chlorideSodium bicarbonate: e.g. 1.26%, 8.4%.Crystalloids: Uses Crystalloids fluids are used to provide the daily requirements of water and electrolytes.They should be given to critically ill patients as a continuous background infusion tosupplement fluids given during feeding or to carry drugs Higher concentration glucose infusions are used to prevent hypoglycemia. Potassium chloride is used to supplement crystalloid fluids. Correction of metabolic acidosis (sodium bicarbonate) Extracellular expander Limited volume expansion Maintain urine output Reduce plasma oncotic pressure Variable electrolyte content Cheap!
Lectures on Basics of practical nursing for beginners BY Dr.Rastrapati Choudhury
36
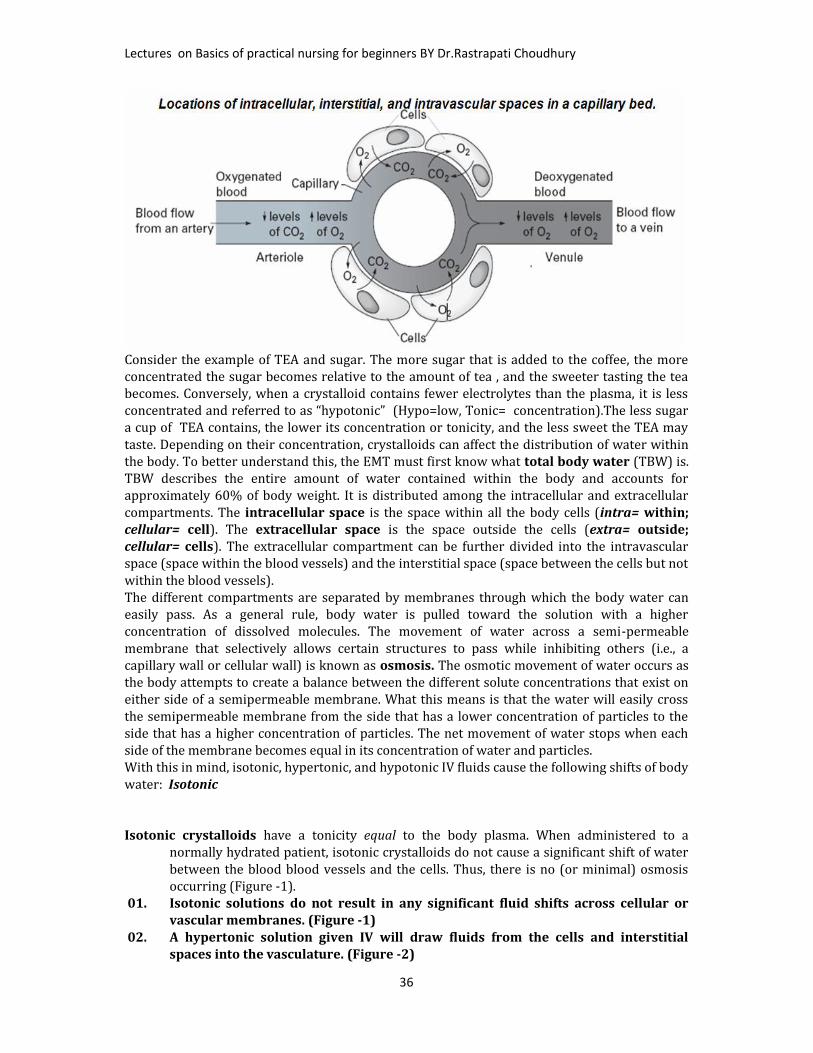
Consider the example of TEA and sugar. The more sugar that is added to the coffee, the moreconcentrated the sugar becomes relative to the amount of tea , and the sweeter tasting the teabecomes. Conversely, when a crystalloid contains fewer electrolytes than the plasma, it is lessconcentrated and referred to as “hypotonic” (Hypo=low, Tonic= concentration).The less sugara cup of TEA contains, the lower its concentration or tonicity, and the less sweet the TEA maytaste. Depending on their concentration, crystalloids can affect the distribution of water withinthe body. To better understand this, the EMT must first know what total body water (TBW) is.TBW describes the entire amount of water contained within the body and accounts forapproximately 60% of body weight. It is distributed among the intracellular and extracellularcompartments. The intracellular space is the space within all the body cells (intra= within;cellular= cell). The extracellular space is the space outside the cells (extra= outside;cellular= cells). The extracellular compartment can be further divided into the intravascularspace (space within the blood vessels) and the interstitial space (space between the cells but notwithin the blood vessels).The different compartments are separated by membranes through which the body water caneasily pass. As a general rule, body water is pulled toward the solution with a higherconcentration of dissolved molecules. The movement of water across a semi-permeablemembrane that selectively allows certain structures to pass while inhibiting others (i.e., acapillary wall or cellular wall) is known as osmosis. The osmotic movement of water occurs asthe body attempts to create a balance between the different solute concentrations that exist oneither side of a semipermeable membrane. What this means is that the water will easily crossthe semipermeable membrane from the side that has a lower concentration of particles to theside that has a higher concentration of particles. The net movement of water stops when eachside of the membrane becomes equal in its concentration of water and particles.With this in mind, isotonic, hypertonic, and hypotonic IV fluids cause the following shifts of bodywater: Isotonic
Isotonic crystalloids have a tonicity equal to the body plasma. When administered to anormally hydrated patient, isotonic crystalloids do not cause a significant shift of waterbetween the blood blood vessels and the cells. Thus, there is no (or minimal) osmosisoccurring (Figure -1).01. Isotonic solutions do not result in any significant fluid shifts across cellular or
vascular membranes. (Figure -1)02. A hypertonic solution given IV will draw fluids from the cells and interstitial
spaces into the vasculature. (Figure -2)

Lectures on Basics of practical nursing for beginners BY Dr.Rastrapati Choudhury
37
03. A hypotonic solution given IV will cause fluids to leave the vasculature for theinterstitial and intracellular spaces. (Figure -3)
Hypertonic crystalloids have a tonicity higher than the body plasma. The administration of ahypertonic crystalloid causes water to shift from the extravascular spaces into thebloodstream, increasing the intravascular volume. This osmotic shift occurs as the bodyattempts to dilute the higher concentration of electrolytes contained within the IV fluidby moving water into the intravascular space (Figure -2).Hypotonic crystalloids have a tonicity lower than the body plasma. The administration of ahypotonic crystalloid causes water to shift from the intravascular space to theextravascular space, and eventually into the tissue cells. Because the IV solution beingadministered is hypotonic, it creates an environment where the extravascular spaceshave higher concentrations of electrolytes.The osmotic change results in the body moving water from the intravascular space to the cellsin an attempt to dilute the electrolytes.Of the different types of IV solutions, crystalloids are the mainstay of IV therapy in theprehospital setting. The particular type of IV solution selected beyond this depends on thepatient’s needs. For instance, based on the osmotic movement of water as described previously,a person with a low volume of blood may benefit from a hypertonic or isotonic crystalloidsolution that will increase blood volume, whereas a hypotonic crystalloid would be moreappropriate for a person suffering from cellular dehydration. The EMS system’s medical directorwill determine which crystalloids will be used for prehospital IV therapy.The most common isotonic solutions used in prehospital care areLactated Ringer’s. Lactated Ringer’s (LR) is an isotonic crystalloid that contains sodiumchloride, potassium chloride, calcium chloride, and sodium lactate in sterile water.Normal saline solution or Normal saline solution (NSS): is an isotonic crystalloid thatcontains 0.9% sodium chloride (salt) in sterile water.5% Dextrose in water, 5% Dextrose in water (D5W): is packaged as an isotoniccarbohydrate (sugar solution) that contains glucose (sugar) as the solute. D5W is useful inkeeping a vein open by delivering a small amount of the fluid over a long period of time and/orsupplying sugar, which is used by the cells to create energy.However, once D5W enters the body, the cells rapidly consume the glucose. This leavesprimarily water and causes IV fluid to become hypotonic in relation to the plasma surroundingthe cells. Accordingly, the now hypotonic solution causes an osmotic shift of water to and fromthe bloodstream and into the cells.In the prehospital setting, LR and NSS are commonly used for fluid replacement because of theirimmediate ability to expand the volume of circulating blood. However, over the course of about

Lectures on Basics of practical nursing for beginners BY Dr.Rastrapati Choudhury
38
1 hour, approximately two-thirds of these IV fluids eventually leave the blood vessels and moveinto the cells. Some authorities recommend that for every 1 liter of blood lost, 3 liters of anisotonic crystalloid be administered for replacement. This is only a guide, and the volume of IVfluid administered should be based on medical direction or local protocol, as well as thepatient’s clinical response to fluid administration.Blood and Blood Products. Blood and blood products (e.g., platelets, packed red blood cellsand plasma) are the most desirable fluids for replacement. Unlike colloids and crystalloids, thehemoglobin (in the red blood cells) carries oxygen to the cells. Not only is the intravascularvolume increased, but the fluid administered can also transport oxygen to the cells. Blood,however, is a precious commodity and must be conserved to benefit the people most in need. Itsuse in the field is generally limited to aero medical services or mass casualty incidents. Theuniversal compatibility of O-negative blood makes it the ideal choice for administration inemergent situations.To learn more about blood and blood products, consult a critical care or paramedic textbook.• Oxygen-Carrying Solutions. Oxygen-carrying solutions are synthetic fluids that carry anddeliver oxygen to the cells. These fluids, which remain experimental, show promise for theprehospital care of patients who have experienced severe blood loss or are otherwise sufferingfrom hypovolemia. It is hoped that oxygen-carrying solutions will be similar to crystalloidsolutions in cost, storage capability, and ease of administration, and be capable of carryingoxygen, which presently can only be accomplished by blood or blood products.

Lectures on Basics of practical nursing for beginners BY Dr.Rastrapati Choudhury
39

Lectures on Basics of practical nursing for beginners BY Dr.Rastrapati Choudhury
40
Intravenous Fluid PackagingMost IV fluids are packaged in soft plastic or a vinyl bag of various sizes (10, 50, 100, 250, 500,1,000, 2,000, and 3,000 milliliters) The EMT will most likely be using 250-, 500-, and 1,000-milliliter bags.Some IV solutions are premixed with medications that are not compatible with plastic or vinyland must be packaged in glass bottles. Glass bottles are not common to prehospital IV therapybut may be encountered during interfacility or critical care transports. Every IV fluid containermust contain a label. The label provides important information that you must examine beforeadministering the fluid to a patient. This information includes Type of IV fluid (by name and by type of solutes contained within). Amount of IV fluid (expressed in milliliters or “mL”). Expiration date.Always carefully read the label to ensure you are administering the correct IV solution. Manydifferent IV fluids are packaged in similar containers, including those containing premixedmedications. Administering an inappropriate IV fluid may be detrimental or even fatal to thepatient, resulting in disciplinary and/or legal action. Like any other medication, IV solutionshave a shelf life and must not be used after their expiration date .The IV fluid container containsa medication injection site and administration set port. Both ports are located on the bottom ofthe IV bag when holding it upright. The medication injection port permits the injection of medication into
the fluid for use by Advanced Life Support (ALS) or hospital personnel after the EMT has initiated the IV.
Things to remember IV fluids are comprised of solutes dissolved in a solvent. Although colloids are an effective IV solution for increasing a patient’s blood volume, their
expense and specific storage requirements limit their use in the prehospital setting. Through osmosis, water is pulled from an area of lower solute concentration to an area of
higher solute concentration. Isotonic crystalloids have a tonicity that is equal to the plasma in the body. When
administering an isotonic crystalloid, the fluid will distribute evenly between the intravascular space and cells. Hypertonic crystalloids have a tonicity that is greater than the plasma in the body. When
administering a hypertonic crystalloid, the fluid will pull water from the cells into theintravascular space (blood vessels).
Hypotonic crystalloids have a tonicity that is less than the plasma in the body. Whenadministering a hypotonic
Crystalloid, the fluid will quickly move from the intravascular space (blood vessels) intothe cells.
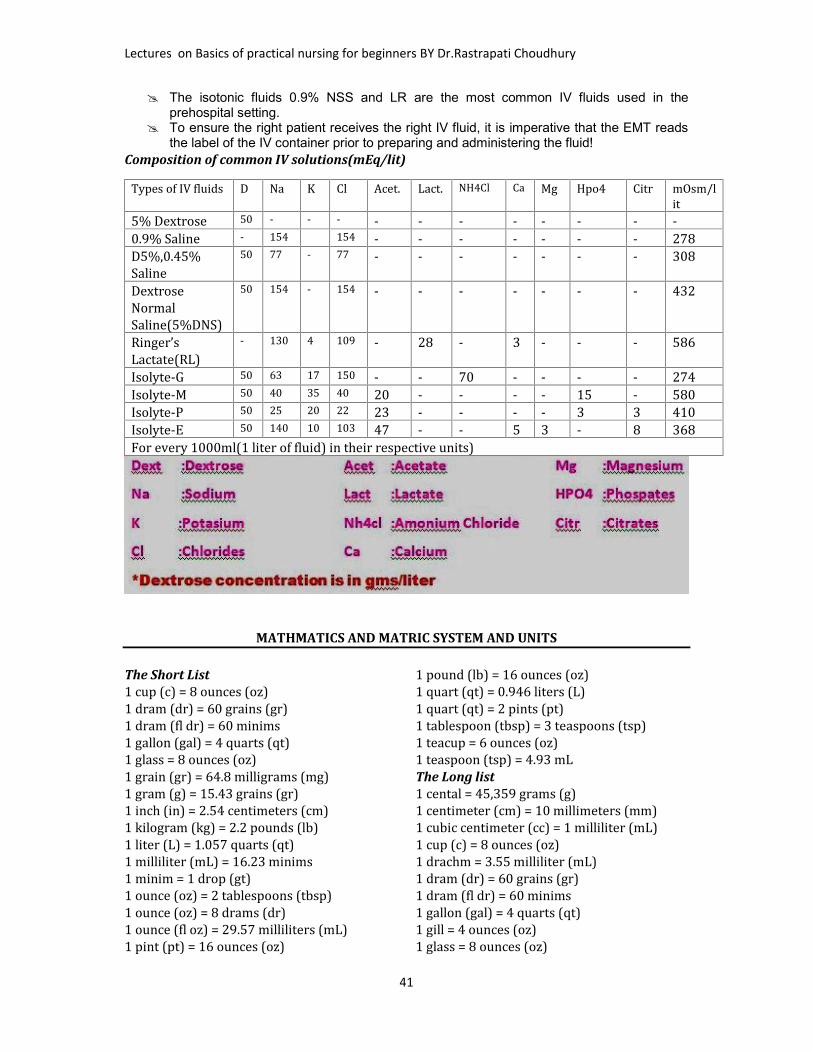
Lectures on Basics of practical nursing for beginners BY Dr.Rastrapati Choudhury
41
The isotonic fluids 0.9% NSS and LR are the most common IV fluids used in theprehospital setting.
To ensure the right patient receives the right IV fluid, it is imperative that the EMT readsthe label of the IV container prior to preparing and administering the fluid!
Composition of common IV solutions(mEq/lit)Types of IV fluids D Na K Cl Acet. Lact. NH4Cl Ca Mg Hpo4 Citr mOsm/lit5% Dextrose 50 - - - - - - - - - - -0.9% Saline - 154 154 - - - - - - - 278D5%,0.45%Saline 50 77 - 77 - - - - - - - 308DextroseNormalSaline(5%DNS) 50 154 - 154 - - - - - - - 432Ringer’sLactate(RL) - 130 4 109 - 28 - 3 - - - 586Isolyte-G 50 63 17 150 - - 70 - - - - 274Isolyte-M 50 40 35 40 20 - - - - 15 - 580Isolyte-P 50 25 20 22 23 - - - - 3 3 410Isolyte-E 50 140 10 103 47 - - 5 3 - 8 368For every 1000ml(1 liter of fluid) in their respective units)
MATHMATICS AND MATRIC SYSTEM AND UNITS
The Short List1 cup (c) = 8 ounces (oz)1 dram (dr) = 60 grains (gr)1 dram (fl dr) = 60 minims1 gallon (gal) = 4 quarts (qt)1 glass = 8 ounces (oz)1 grain (gr) = 64.8 milligrams (mg)1 gram (g) = 15.43 grains (gr)1 inch (in) = 2.54 centimeters (cm)1 kilogram (kg) = 2.2 pounds (lb)1 liter (L) = 1.057 quarts (qt)1 milliliter (mL) = 16.23 minims1 minim = 1 drop (gt)1 ounce (oz) = 2 tablespoons (tbsp)1 ounce (oz) = 8 drams (dr)1 ounce (fl oz) = 29.57 milliliters (mL)1 pint (pt) = 16 ounces (oz)
1 pound (lb) = 16 ounces (oz)1 quart (qt) = 0.946 liters (L)1 quart (qt) = 2 pints (pt)1 tablespoon (tbsp) = 3 teaspoons (tsp)1 teacup = 6 ounces (oz)1 teaspoon (tsp) = 4.93 mLThe Long list1 cental = 45,359 grams (g)1 centimeter (cm) = 10 millimeters (mm)1 cubic centimeter (cc) = 1 milliliter (mL)1 cup (c) = 8 ounces (oz)1 drachm = 3.55 milliliter (mL)1 dram (dr) = 60 grains (gr)1 dram (fl dr) = 60 minims1 gallon (gal) = 4 quarts (qt)1 gill = 4 ounces (oz)1 glass = 8 ounces (oz)
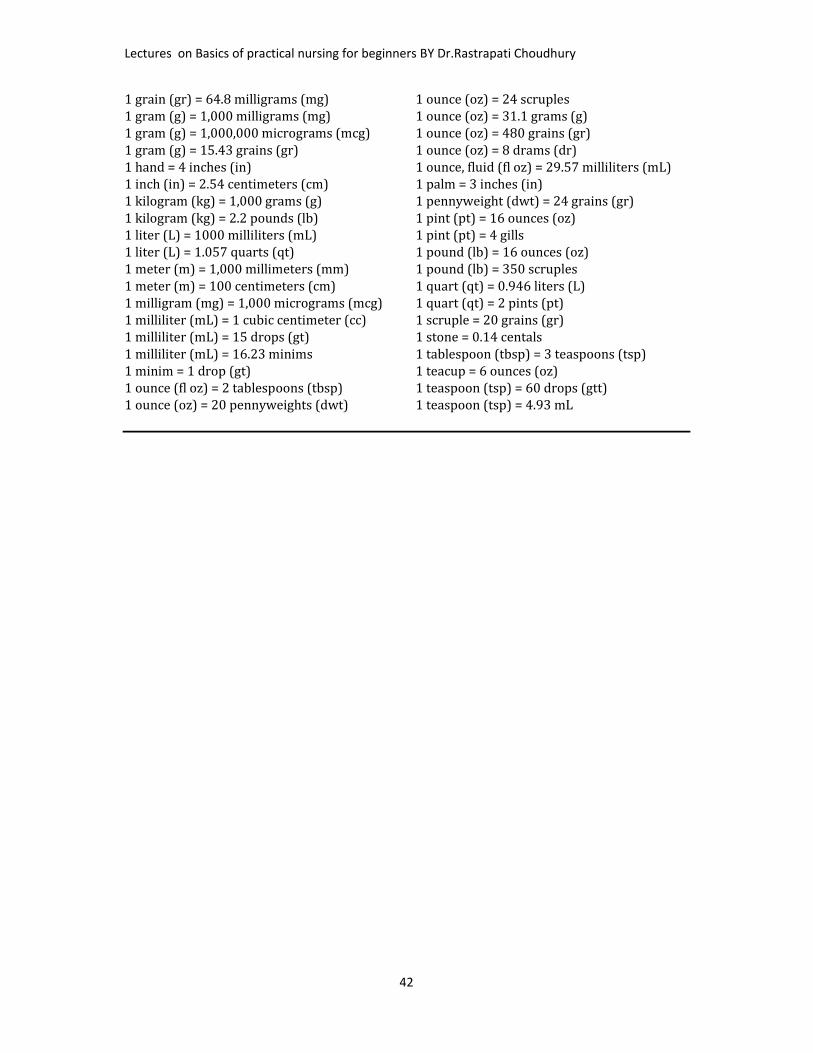
Lectures on Basics of practical nursing for beginners BY Dr.Rastrapati Choudhury
42
1 grain (gr) = 64.8 milligrams (mg)1 gram (g) = 1,000 milligrams (mg)1 gram (g) = 1,000,000 micrograms (mcg)1 gram (g) = 15.43 grains (gr)1 hand = 4 inches (in)1 inch (in) = 2.54 centimeters (cm)1 kilogram (kg) = 1,000 grams (g)1 kilogram (kg) = 2.2 pounds (lb)1 liter (L) = 1000 milliliters (mL)1 liter (L) = 1.057 quarts (qt)1 meter (m) = 1,000 millimeters (mm)1 meter (m) = 100 centimeters (cm)1 milligram (mg) = 1,000 micrograms (mcg)1 milliliter (mL) = 1 cubic centimeter (cc)1 milliliter (mL) = 15 drops (gt)1 milliliter (mL) = 16.23 minims1 minim = 1 drop (gt)1 ounce (fl oz) = 2 tablespoons (tbsp)1 ounce (oz) = 20 pennyweights (dwt)
1 ounce (oz) = 24 scruples1 ounce (oz) = 31.1 grams (g)1 ounce (oz) = 480 grains (gr)1 ounce (oz) = 8 drams (dr)1 ounce, fluid (fl oz) = 29.57 milliliters (mL)1 palm = 3 inches (in)1 pennyweight (dwt) = 24 grains (gr)1 pint (pt) = 16 ounces (oz)1 pint (pt) = 4 gills1 pound (lb) = 16 ounces (oz)1 pound (lb) = 350 scruples1 quart (qt) = 0.946 liters (L)1 quart (qt) = 2 pints (pt)1 scruple = 20 grains (gr)1 stone = 0.14 centals1 tablespoon (tbsp) = 3 teaspoons (tsp)1 teacup = 6 ounces (oz)1 teaspoon (tsp) = 60 drops (gtt)1 teaspoon (tsp) = 4.93 mL

Lectures on Basics of practical nursing for beginners BY Dr.Rastrapati Choudhury
43
MEDICAL ABBREVIATIONS AND ACRONYMS
Apothecary/Household/Metric EquivalentsABBREVATIONS & SYMBOLS
Liquid List of Common Drug infusions and How TheyAre Given
oz = mL minim = mL Read First!Medication
Dosage1 = 30 45 = 3 Aminophylline 0.5 - 0.7 mg/kg/hr1/2 = 15 30 = 2 Amrinone 5 - 15 mcg/kg/min
15 = 1 Amiodarone 0.5 mg/min x 24hrsdram = mL 12 = 0.75 Bretylium 1 - 2 mg/min2 1/2 = 10 10 = 0.6 Diltiazem 5 - 15 mg/hr2 = 8 8 = 0.5 Dobutamine 2 - 20 mcg/kg/min1 1/4 = 5 5 = 0.3 Dopamine 1 - 20 mcg/kg/min1 = 4 4 = 0.25 Epinephrine 2 - 10 mcg/min
3 = 0.2 Esmolol 0.05 mg/kg/minOthers 1 1/2 = 0.1 Isoproterenol 2 - 10 mcg/min1 mi (minum) = 1 gtt(drop)
1 = 0.06 Labetalol 2 - 8 mcg/min
1T (tablespoon) = 15mL 3/4 = 0.05 Lidocaine 30 - 50 mcg/kg/min or2-4 mg/min
1t (teaspoon) = 5mL 1/2= 0.03 Magnesium Sulfate 0.5 - 1 g/hr x 24 hrs
1 ml = 1 cc Nitroglycerin 10 - 20 mcg/minWeight Nitroprusside 0.1 - 5 mcg/kg/mingrain = mg grain=mg Norepinephrine 0.5 - 30 mcg/min15 = 1000 1/4 = 15 Procainamide 1-4 mg/min10 = 600 1/6 = 107 1/2 = 500 1/8 = 85 = 300 1/10 = 64 = 250 1/15 = 4Weight
grain = mg grain=mg
2 1/2 = 150 1/30 = 22 = 120 1/40 = 1.51 1/2 = 100 1/60 = 11 = 60 1/100 = 0.63/4 = 45 1/120= 0.51/2 = 30 1/150 = 0.41/3 = 20 1/200 = 0.3
1/250= 0.25

Lectures on Basics of practical nursing for beginners BY Dr.Rastrapati Choudhury
44
ABG Arterial Blood GasAb AntibodyABCDE Airway, breathing,circulation, disability, exposeand examineA.C. Before meal (ante cibum)ACTH Adreno cortico trophichormoneAD. As desiredADL Activities of daily livingAIDS Acquire immenodeficiency yndromeAI Adequate intakeAM. MorningAMALG Amalgam fillingAMA Against medical adviceA and P Auscultation andpercussionAPC Aspirin, Phenacetine &caffeineAP Apical pulse or antero-posteriorAQ AqueousA-R Apical radial pulseAROM Active range of motion;artificial rapture ofmembraneAx AxillaryBID Twice a day (bis in die)B.M Bowel movementB.M.R. Basal metabolic rateB.P Blood pressureBPM Beat per minuteB.R.P. Bathroom privilegeBUN Blood urea nitrogen
CentigradeC.B. C Complete blood countCC Cubic centimeterC.N. S. Central nervous systemCo2 Carbon dioxideC.S. F. Cerebro- spinal fluidCXR Chest X-rayD and C Dilatation andCurettageD/NS Dextrose in normal salineDPT Diphtheria, pertusis,tetanusD/W Dextrose in waterDx DiagnosisEEG Electro encephalogramE.E.N.T. Eye, ear, nose, throatECG ElectrocardiogramoF FahrenheitF.B.S. Fasting blood sugarF.H.B. Fetal heartbeatG.I. Gastro intestinalG or Gm Gramgr. Graingt. Drop (gutte)Gtt. DropsG.U. Genito urinaryGYN. GynecologyHCL Hydrochloric acidHb HemoglobinHS At bed- time (hours ofsleep)H2o WaterI.V. IntravenousI.V.P Intravenous pyelogramKI. Potassium iodide
L. P Lumbar punctureNaCl Sodium ChlorideNOCTE At nightN.P.O. Nothing by mouth(nothing by os)O.P.D. Out Patient DepartmentO.R. Operating roomPM After noonPRN As needed, whennecessaryPt. PatientQ. EveryQ.D. Every DayQ.H. Every HourQ.I.D. Four times a dayQ.N. Every nightQ.O.D. Every other dayR.B.C. Red blood count or redblood cellRh. Rhesus factorRx Prescription, takeSol. SolutionSOS If necessarySTAT Immediately -at onceS.C SubcutaneousT. I.D Three times a dayT.P.R. Temperature, pulse,respirationTsp Teaspoon, tablespoonU.R. Upper rightWBC White blood cellsWt. WeightU.R.Q. Upper right quadrantU.L.Q. Upper lower quadrantUTI Urinary tract Infection
NURSING PROCEDURES AND TECHNIQUES INTRAVENOUS CANULISATIONPeripheral IV’s for BeginnersWhat is an intravenous?The bagIt contains sterile fluid it may beNS,DNS,RL,MANNITOL,albumin,Blood etc.The tubingThe whole fluid path from thespike to the needle is sterile.The spike

Lectures on Basics of practical nursing for beginners BY Dr.Rastrapati Choudhury
45
This one’s vented – you use this kind with bottle mixes; it lets air get into the bottle, so the fluid
can come out, while with bag mixes, the bag just collapses closed.The drip chamberA little hard to see, but the one on the left is “maxi” drip, or ten drops per cc, and the one on theright is “mini” - 60 drops per cc. We never regulate constant infusions by eye anymore – mosteverything goes on an infusion pump nowadays.But for a rapid IV volume bolus of something (not meds) – normal saline, Ringer’s lactate,whatever, we still use gravity. Which one of these are you going to reach for? In other words,which one is going to run more rapidly?Roller clampsWe only use gravity tubing in two situations nowadays: for rapid IV bolus infusions, and forblood. For boluses, the roller clamp has two positions: “all the way open”, and “closed”. For blood– mm… depends. For acute bleeds? – all the way open. Otherwise we titrate by eye to infuse theblood over an hour or two.Pump tubingThey’re all different. The only thing to do is to learn the system where you’re at. One importantthing that’s developed recently: ALL the sets have to self-clamp if they come out of the pump.Why?Buretrols and SolusetsInterchangeable names for the same thing, so far as I know. I still use these once in a while forpremixed meds – Flagyl comes to mind. The problem is that single doses of intravenous medsreally need to be given over predictable periods of time – an hour is usually good for most dosesof antibiotics. Vancomycin I usually give over two. The problem is that anything with a rollerclamp is never going to be as precise in timed delivery as a pump, so these are rapidly vanishing.The ports:This is where things get plugged into the line. Are you running, say, normal saline at53.7 cc’s per hour? And you want to plug in the patient’s dose of IV colace? This is where you go…Wait a second… IV what?What are needle-less connectors all about?

Lectures on Basics of practical nursing for beginners BY Dr.Rastrapati Choudhury
46
It’s been a LONG time since we used needled connectors, but it’s worth mentioning, I guess.Needles, or “sharps”, as we call them, are generally considered a Bad Thing. This doesn’t meanwe don’t use them all the time for various things – we draw up meds with them, we givesubcutaneous and intramuscular injections with them… but poking yourself with one – whetherit’s been in contact with a patient or not – is pretty much a Bad Thing. People were gettinghepatitis from patients, I think there were a few cases of HIV… so the word went out: the fewerneedles, the better.And lo - non-needle connection systems were created. And they were pretty good…The connection to the catheter – what are Luer connectors?Not a bad picture of the end of the catheter. The tubing actually screws onto the yellow end there– except sometimes it’s blue, or green, or pink, or whatever, usually depending on the cathetersize. But the screw technology is pretty uniform, all under the name of Luer connectors. That guyLuer – what a genius!So – what the heck part of the patient is that, anyhow?These syringes have female luer connections at the ends.

Lectures on Basics of practical nursing for beginners BY Dr.Rastrapati Choudhury
47
The catheter hub of the IV, the hubs of injection needles, the connector hubs at the ends of IVtubing – they all use the same size and type of connector, which was probably what developing
the Luer standard was all about.The dressingWe like to be able to see the site (why?), so we put a clear tegaderm over it…Change the dressing if it gets loose, or dirty.a. FiltersSome infusions need filtering – this is an inline blood filter that a company makes, I guess forpeople who don’t use the filtered IV tube sets that we do. (You mean there are OTHER hospitalsin the world? OMG!)Patient’s with PFO’s need air filters attached to ALL their IV lines.Why?Mannitol needs to be filtered. Crystals! There’s a special little filter thingy that goes on the end ofthe infusion line.Well – they SAID it was mannitol…TPN(Total parenteral nutrition) is always filtered – check with the pharmacy to make surewhich filters to use for which.I.V.Canulas
Definition: It is the introduction of a drug in solution form into a vein. Often the amount is notmore than 10.ml. at a time

Lectures on Basics of practical nursing for beginners BY Dr.Rastrapati Choudhury
48
Sites for IV injection1. Dorsal Venous network2. Dorsal metacarpal Veins3. Cephalic Veins4. Radial vein5. Ulnar vein6. Baslic vein7. Median Cubital vein8. Greater saphenous vein
I.V.Canula(venous section)
1. Firstly, Introduce yourself to the patient, explain what you are going to do and ask for consent. It isalso worth explaining that cannulation may cause some discomfort but that this will be short lived.

Lectures on Basics of practical nursing for beginners BY Dr.Rastrapati Choudhury
49
2. As ever, ensure that you have all of your equipment ready. This is alcohol gel, gloves, an alcoholwipe, a tourniquet, an IV cannula, a suitable plaster, a syringe, saline and a sharps box.3. Wash your hands with alcohol gel.4. Position the arm so that it is comfortable forthe patient and identify a vein.5. Apply the tourniquet and re-check the vein.6. Put on your gloves, clean the skin with thealcohol wipe and let it dry.7. Remove the cannula from its packaging andremove the needle cover ensuring not to touchthe needle.8. Stretch the skin distally and tell the patientto expect a sharp scratch.
9. Insert the needle, bevel upwards at about 30 degrees. Advance the needle until a flashback ofblood is seen in the hub at the back of the cannula.10. Once this is seen, progress the entire cannula a further 2mm then fix the needle advancing therest of the cannula into the vein.11. Release the tourniquet, apply pressure to the vein at the tip of the cannula and remove theneedle fully. Remove the cap from the needle and put this on the end of the cannula.12. CAREFULLY dispose of the needle into the sharps box.

Lectures on Basics of practical nursing for beginners BY Dr.Rastrapati Choudhury
50

Lectures on Basics of practical nursing for beginners BY Dr.Rastrapati Choudhury
51
13. Apply the plaster to the cannula to fix it in place.14. Having checked the Use By date, fill the syringe with saline and flush it through the cannula tocheck for patency. If there is any resistance, if it causes any pain or you notice any localised tissueswelling immediately stop flushing, remove the cannula and start again.15. Ensure that the patient is comfortable and thank them.NB. As an extension to this you may be asked to set up an IV drip.
Infusion IV Administration Set
Basic IV Setup
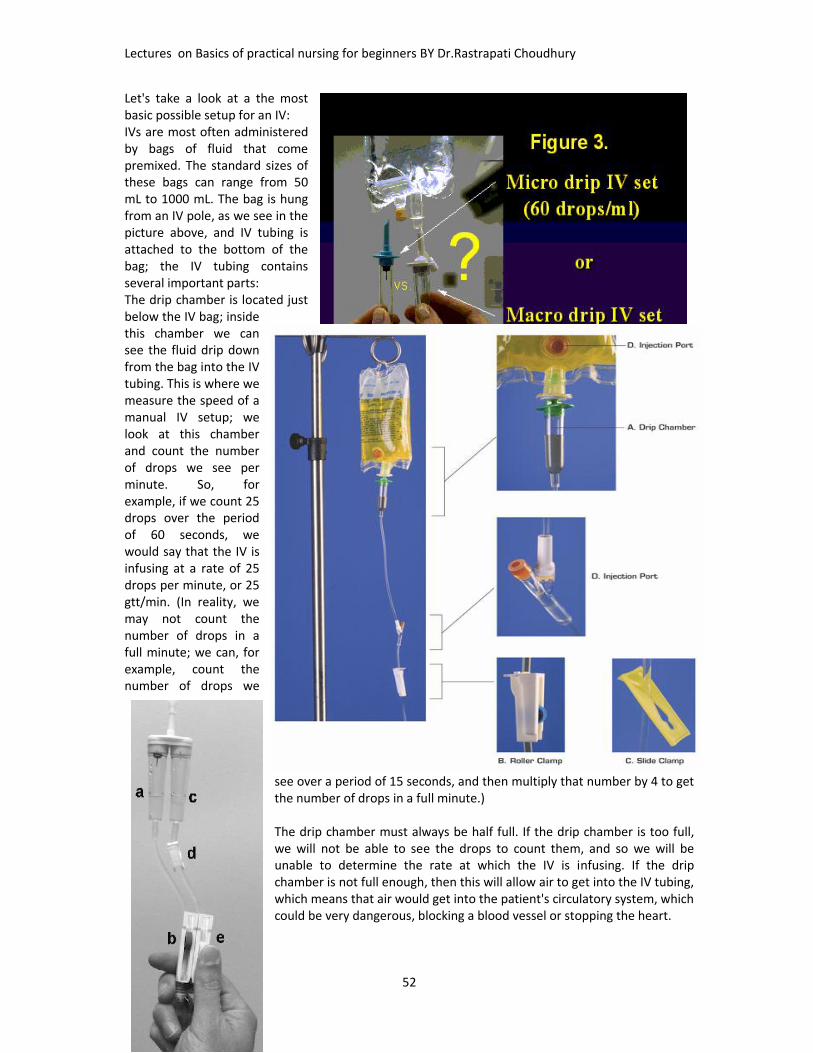
Lectures on Basics of practical nursing for beginners BY Dr.Rastrapati Choudhury
52
Let's take a look at a the mostbasic possible setup for an IV:IVs are most often administeredby bags of fluid that comepremixed. The standard sizes ofthese bags can range from 50mL to 1000 mL. The bag is hungfrom an IV pole, as we see in thepicture above, and IV tubing isattached to the bottom of thebag; the IV tubing containsseveral important parts:The drip chamber is located justbelow the IV bag; insidethis chamber we cansee the fluid drip downfrom the bag into the IVtubing. This is where wemeasure the speed of amanual IV setup; welook at this chamberand count the numberof drops we see perminute. So, forexample, if we count 25drops over the periodof 60 seconds, wewould say that the IV isinfusing at a rate of 25drops per minute, or 25gtt/min. (In reality, wemay not count thenumber of drops in afull minute; we can, forexample, count thenumber of drops we
see over a period of 15 seconds, and then multiply that number by 4 to getthe number of drops in a full minute.)
The drip chamber must always be half full. If the drip chamber is too full,we will not be able to see the drops to count them, and so we will beunable to determine the rate at which the IV is infusing. If the dripchamber is not full enough, then this will allow air to get into the IV tubing,which means that air would get into the patient's circulatory system, whichcould be very dangerous, blocking a blood vessel or stopping the heart.

Lectures on Basics of practical nursing for beginners BY Dr.Rastrapati Choudhury
53
The roller clamp is what we use to control the rate at which the IV fluid infuses. If we roll it one way,it squeezes the IV tubing more tightly, making it narrower and therefore making the fluid flowthrough the tubing more slowly; if we roll it the other way, it loosens its pinching of the IV tubing,making the tubing less narrow, and allowing the IV fluid to flow through at a faster rate. So, if forexample, we observe (by looking at the drip chamber and counting drops) that an IV is infusing at arate of 50 gtt/min, but it was ordered to infuse at a rate of 30 gtt/min, we would tighten the rollerclamp to slow the drip rate down until we could count only 30 drops going through the drip chambereach minute.
All roller clamps on a set of IV tubing should be closed before we attach a bag of IV fluid to the top ofthe tubing; this ensures that no air gets into the tubing.
Every IV medication will be ordered to infuse at a specific rate, and one of the major tasks of hospitalnurses is to set up the IV so that it infuses at this rate and to adjust the IV periodically if the rate haschanged so that it remains at the ordered rate. The rate at which an IV fluid infuses is referred to asthe IV infusion rate or flow rate.
The slide clamp is used when we want to completely stop the IV from flowing, without having toadjust the roller clamp. This is handy if we want to stop the IV for a moment, but we don't want tohave to reset the flow rate by readjusting the roller clamp all over again once we start the IV up again.This works by pinching the tubing completely shut when we slide the tubing into the narrowest partof the clamp.
The injection port is a place where medicine or fluids other than those in the current IV bag can beinjected so that they will infuse into the patient's vein through the IV tubing. On the photo above wecan see two ports: one on the IV bag itself and one below the drip chamber. There is also usually aninjection port close to where the needle goes into the patient's vein; we'll see this below. Theinjection port on the actual IV bag is used if we want to mix some kind of medication with the fluidthat is in the IV bag; if we inject the medication into this port and then roll the bag a little to mix themedication into the fluid in the bag, then the patient will receive both the medication and the IV fluidat the same time. However, this can only be done when the IV fluid and the medication are allowedto be mixed. If we want to inject medication or a second kind of IV fluid directly so that it does notmix with the IV fluid that we've already attached, then we will use one of the ports that are locatedbelow the drip chamber.How the Height of the IV Bag Affects the Infusion Rate
IV infusion works because gravity pushes the fluid down through the IV tubing into the patient's vein.The higher the bag is hung, the greater the gravitational pressure on the IV fluid to go downwardthrough the tubing; if the IV bag is not hung high enough, there will not be enough pressure causedby gravity to force the fluid into the vein. So, all IV bags must be hung above the patient's heart inorder for there to be enough pressure for the IV fluid to infuse, and it is standard procedure to hangthe IV bag at least 3 feet above an adult patient's heart to ensure there is enough pressure to keepthe IV running at a constant rate.
Also, since changing the height of the IV bag changes the gravitational pressure on the fluid, a changein the bag's height over a patient's heart will change the infusion rate of the IV. If the IV bag getshigher above the patient's heart, the IV infusion rate will speed up, and if the IV bag gets lower to thepatient's heart, the IV infusion rate will slow down. Because of this property, if a patient who hasbeen lying down when the IV was set up then sits up, the IV infusion rate will slow down because theIV is now closer the to patient's heart. In fact, technically any small movement by the patient or shiftin position can change the rate at which the IV is infusing. Because of this, IVs are frequently checked

Lectures on Basics of practical nursing for beginners BY Dr.Rastrapati Choudhury
54
to make sure that they are still infusing at the correct rate; usually once an hour and after any majorposition change of the patient.In addition, there are other complications of IV therapy that a nurse should watch out for. Sometimesthe needle can become dislodged from the vein so that the IV fluid is no longer infusing into the vein,but rather infusing into the surrounding tissue; this is called infiltration. Some of the fluid will infuseinto the tissue instead of the vein, but eventually the IV will stop because the pressure from gravitywill not be enough to overcome the pressure from surrounding tissue to keep additional fluid out.Once an IV has infiltrated, a new IV must be started in a new spot on the patient's body, and the IVmust be restarted at the correct rate for the given dosage. Signs that an IV has infiltrated include:pain or discomfort in the area around the IV needle, swelling in the area, the area around the needleis cool to the touch,

Lectures on Basics of practical nursing for beginners BY Dr.Rastrapati Choudhury
55
BLOOD TRANSFUSION
DefinitionIt Is the introduction of whole blood or component of theblood, e.g. plasma or erythrocytes into venous circulation.Blood GroupHuman blood is classified in to four main groups (A, B, ABand O) .A blood contain type A agglutinogen, group B bloodcontain type B agglutinogen, group AB contain both A & Bagglutinogen, and group O blood has contain noagglutinogen. In addition to agglutinogen on theerythrocytes agglutinin (antibody) are present in the bloodplasma. No individual can have agglutinin and agglutinogenof the same type, that person's system would attack its owncells. Then group A blood does not contain agglutinin A butdoes contain agglutinin B. Group B blood does not containagglutinin B but does contain agglutinin A. Group AB bloodcontain neither agglutinin and group O contain both anti Aand anti B agglutinin. Blood transfusion must be match tothe patient blood type in term of compatible agglutinogenmismatch blood will cause hemolytic reaction. Rhesus (Rh)and other factorsRh antigen also on the surface of erythrocytes are present inabout 85% of the population are can be a major cause of hemolytic reaction. Persons who possessthe Rh factor are referred to as Rh positive those who do not are referred to as Rh negative.Unlike the A and B agglutinogen, the Rh factor cannot cause a hemolytic reaction on the firstexposure to mismatched blood, because the Rh antibody is not normally present in the plasma of Rhnegative person.According to above blood grouping systems, you can belong to either of following 8 blood groups:Note: + (positive), - (negative)
A Rh+ B Rh+ AB Rh+ 0 Rh+
A Rh- B Rh- AB Rh- 0 Rh-
3. Transfusion reactionTransfusion reaction can be categorized as hemolytic, febrile, circulatory over load and allergic. Thenurse must asses a client closely for reactions. Sign of an acute reaction include sudden chills or fever,low back pain, drop in blood pressure, nausea, flushing agitation or respiratory disorders. Sign of lesssevere allergic reaction include hives and itching but no fever.
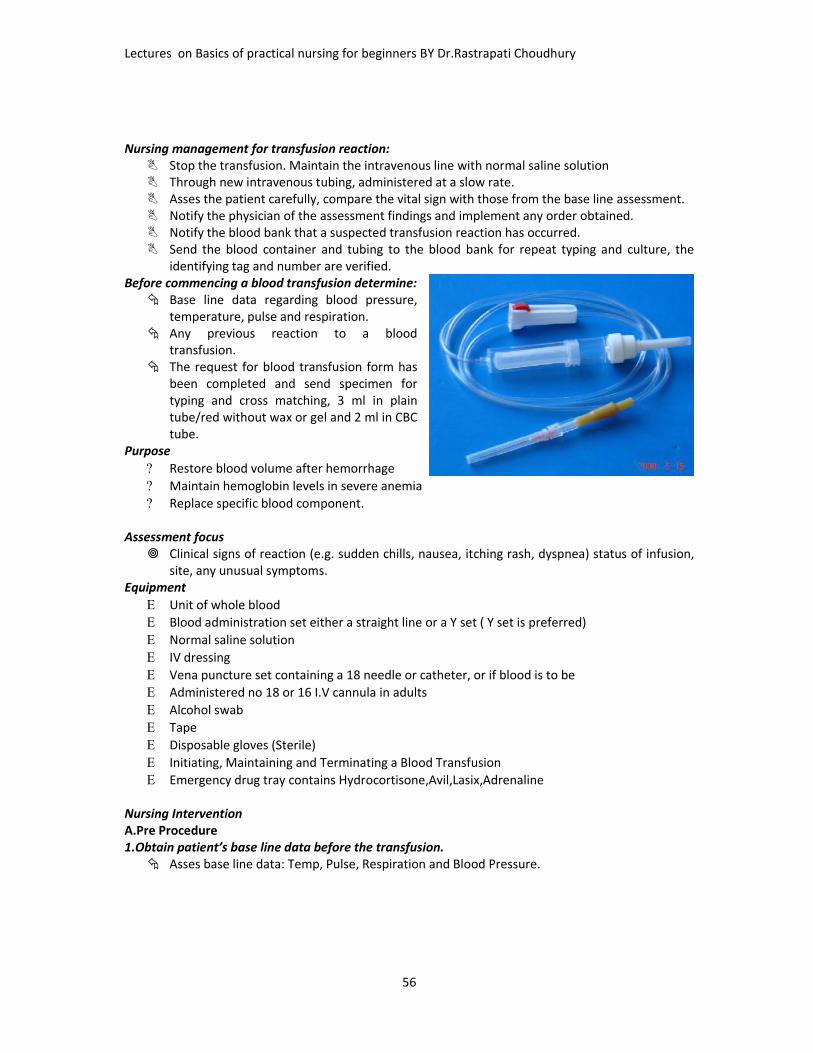
Lectures on Basics of practical nursing for beginners BY Dr.Rastrapati Choudhury
56
Nursing management for transfusion reaction: Stop the transfusion. Maintain the intravenous line with normal saline solution Through new intravenous tubing, administered at a slow rate. Asses the patient carefully, compare the vital sign with those from the base line assessment. Notify the physician of the assessment findings and implement any order obtained. Notify the blood bank that a suspected transfusion reaction has occurred. Send the blood container and tubing to the blood bank for repeat typing and culture, the
identifying tag and number are verified.Before commencing a blood transfusion determine: Base line data regarding blood pressure,
temperature, pulse and respiration. Any previous reaction to a blood
transfusion. The request for blood transfusion form has
been completed and send specimen fortyping and cross matching, 3 ml in plaintube/red without wax or gel and 2 ml in CBCtube.
Purpose Restore blood volume after hemorrhage Maintain hemoglobin levels in severe anemia Replace specific blood component.
Assessment focus Clinical signs of reaction (e.g. sudden chills, nausea, itching rash, dyspnea) status of infusion,
site, any unusual symptoms.Equipment Unit of whole blood Blood administration set either a straight line or a Y set ( Y set is preferred) Normal saline solution IV dressing Vena puncture set containing a 18 needle or catheter, or if blood is to be Administered no 18 or 16 I.V cannula in adults Alcohol swab Tape Disposable gloves (Sterile) Initiating, Maintaining and Terminating a Blood Transfusion Emergency drug tray contains Hydrocortisone,Avil,Lasix,Adrenaline
Nursing InterventionA.Pre Procedure1.Obtain patient’s base line data before the transfusion. Asses base line data: Temp, Pulse, Respiration and Blood Pressure.
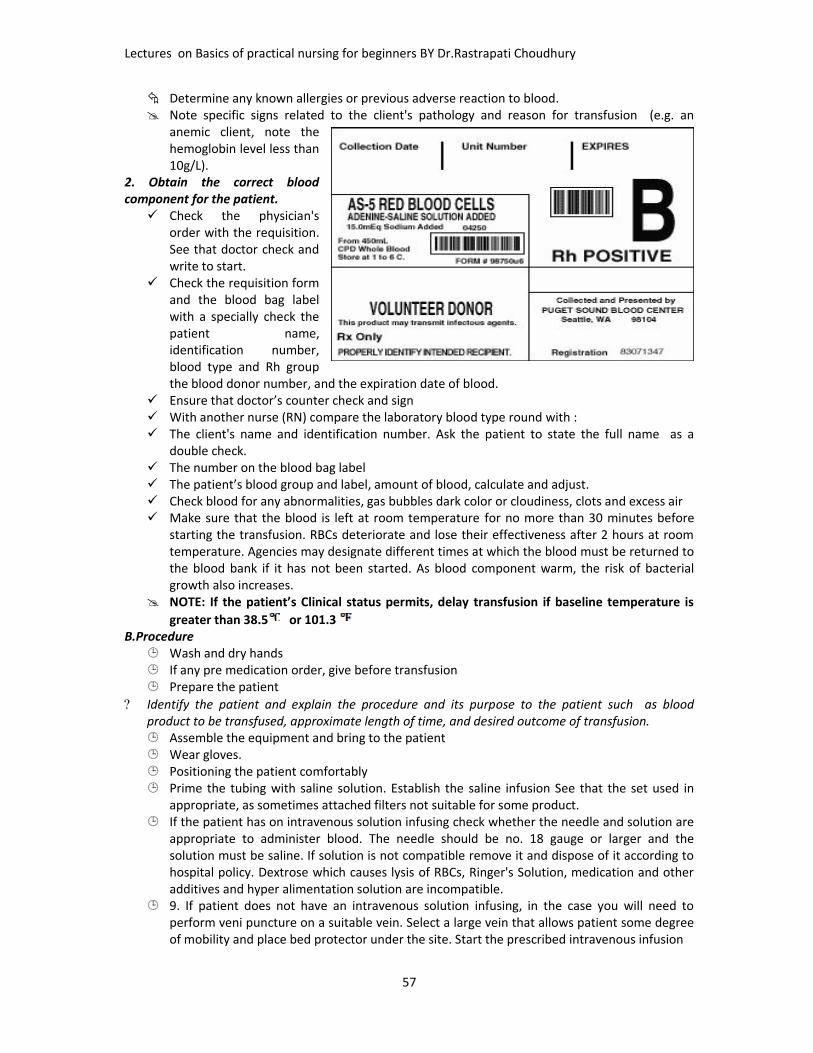
Lectures on Basics of practical nursing for beginners BY Dr.Rastrapati Choudhury
57
Determine any known allergies or previous adverse reaction to blood. Note specific signs related to the client's pathology and reason for transfusion (e.g. an
anemic client, note thehemoglobin level less than10g/L).
2. Obtain the correct bloodcomponent for the patient. Check the physician's
order with the requisition.See that doctor check andwrite to start.
Check the requisition formand the blood bag labelwith a specially check thepatient name,identification number,blood type and Rh groupthe blood donor number, and the expiration date of blood.
Ensure that doctor’s counter check and sign With another nurse (RN) compare the laboratory blood type round with : The client's name and identification number. Ask the patient to state the full name as a
double check. The number on the blood bag label The patient’s blood group and label, amount of blood, calculate and adjust. Check blood for any abnormalities, gas bubbles dark color or cloudiness, clots and excess air Make sure that the blood is left at room temperature for no more than 30 minutes before
starting the transfusion. RBCs deteriorate and lose their effectiveness after 2 hours at roomtemperature. Agencies may designate different times at which the blood must be returned tothe blood bank if it has not been started. As blood component warm, the risk of bacterialgrowth also increases.
NOTE: If the patient’s Clinical status permits, delay transfusion if baseline temperature isgreater than 38.5 or 101.3
B.Procedure Wash and dry hands If any pre medication order, give before transfusion Prepare the patient
Identify the patient and explain the procedure and its purpose to the patient such as bloodproduct to be transfused, approximate length of time, and desired outcome of transfusion. Assemble the equipment and bring to the patient Wear gloves. Positioning the patient comfortably Prime the tubing with saline solution. Establish the saline infusion See that the set used in
appropriate, as sometimes attached filters not suitable for some product. If the patient has on intravenous solution infusing check whether the needle and solution are
appropriate to administer blood. The needle should be no. 18 gauge or larger and thesolution must be saline. If solution is not compatible remove it and dispose of it according tohospital policy. Dextrose which causes lysis of RBCs, Ringer's Solution, medication and otheradditives and hyper alimentation solution are incompatible.
9. If patient does not have an intravenous solution infusing, in the case you will need toperform veni puncture on a suitable vein. Select a large vein that allows patient some degreeof mobility and place bed protector under the site. Start the prescribed intravenous infusion
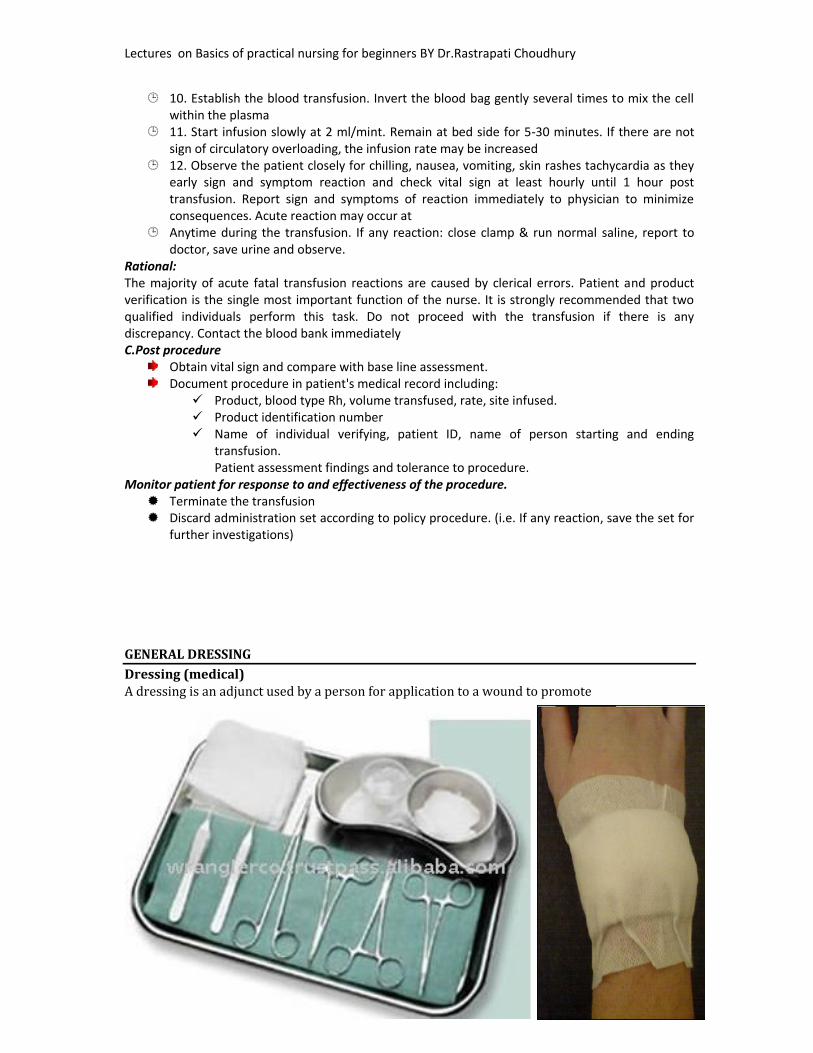
Lectures on Basics of practical nursing for beginners BY Dr.Rastrapati Choudhury
58
10. Establish the blood transfusion. Invert the blood bag gently several times to mix the cellwithin the plasma
11. Start infusion slowly at 2 ml/mint. Remain at bed side for 5-30 minutes. If there are notsign of circulatory overloading, the infusion rate may be increased
12. Observe the patient closely for chilling, nausea, vomiting, skin rashes tachycardia as theyearly sign and symptom reaction and check vital sign at least hourly until 1 hour posttransfusion. Report sign and symptoms of reaction immediately to physician to minimizeconsequences. Acute reaction may occur at
Anytime during the transfusion. If any reaction: close clamp & run normal saline, report todoctor, save urine and observe.
Rational:The majority of acute fatal transfusion reactions are caused by clerical errors. Patient and productverification is the single most important function of the nurse. It is strongly recommended that twoqualified individuals perform this task. Do not proceed with the transfusion if there is anydiscrepancy. Contact the blood bank immediatelyC.Post procedure
Obtain vital sign and compare with base line assessment.Document procedure in patient's medical record including: Product, blood type Rh, volume transfused, rate, site infused. Product identification number Name of individual verifying, patient ID, name of person starting and ending
transfusion.Patient assessment findings and tolerance to procedure.
Monitor patient for response to and effectiveness of the procedure. Terminate the transfusion Discard administration set according to policy procedure. (i.e. If any reaction, save the set for
further investigations)
GENERAL DRESSINGDressing (medical)A dressing is an adjunct used by a person for application to a wound to promote

Lectures on Basics of practical nursing for beginners BY Dr.Rastrapati Choudhury
59
healing and/or prevent further harm. A dressing is designed to be in direct contact with thewound, which makes it different from a bandage, which is primarily used to hold a dressing inplace. Some organisations classify them as the same thing (for example, the BritishPharmacopoeia) and the terms are used interchangeably by some people. Dressings arefrequently used in first aid and nursing.Core purposes of a dressingA dressing can have a number of purposes, depending on the type, severity and position of thewound, although all purposes are focused towards promoting recovery and preventing furtherharm from the wound. Key purposes of a dressing are:Stem bleeding – Helps to seal the wound to expedite the clotting processAbsorb exudates – Soak up blood, plasma and other fluids exuded from the wound, containing itin one placeEase pain – Some dressings may have a pain relieving effect, and others may have a placeboeffectDebride the wound – The removal of slough and foreign objects from the woundProtection from infection and mechanical damage, and Promote healing – through granulationand epithelialization.
BLADDER CATHETETISATION(Male and Female Catheterization)Urinary CatheterizationDefinition of catheterization: Is the introduction of a tube (catheter) through the urethra into theurinary bladder
Is performed only when absolutely necessary for fear of infection and trauma

Lectures on Basics of practical nursing for beginners BY Dr.Rastrapati Choudhury
60
Note. Strictly a sterile procedure, i.e. the nurse should always follow aseptic technique Catheter: is a tube with a hole at the tip
Types of Catheter Straight (plain or Robinson) Retention (Foleys, indwelling)
Selecting an appropriate catheter:May be made of
Plastic – for 1 weekLatex – 2-3 (rubber)Silicon – for 2-3 monthPelyvinylchloride (PVC) – 4-6
1. Select the type of material in accordance with the estimated length of the catheterization period:2. Determine appropriate catheter size- are determined by diameter of lumen- graded on French scale or number.
Catheter size depends on the size of the urethral canal 8-10 Fr – children 14-16 Fr – female adults 18 Fr – adult male
NB. Fr= French Scale3. Determine appropriate catheter length by the client’s gender For adult male – 40 cm catheter For adult females – 22 cm catheter
4. Select appropriate balloon size 5 ml – for adults 3 ml – for children
Catheterization using a straight catheter
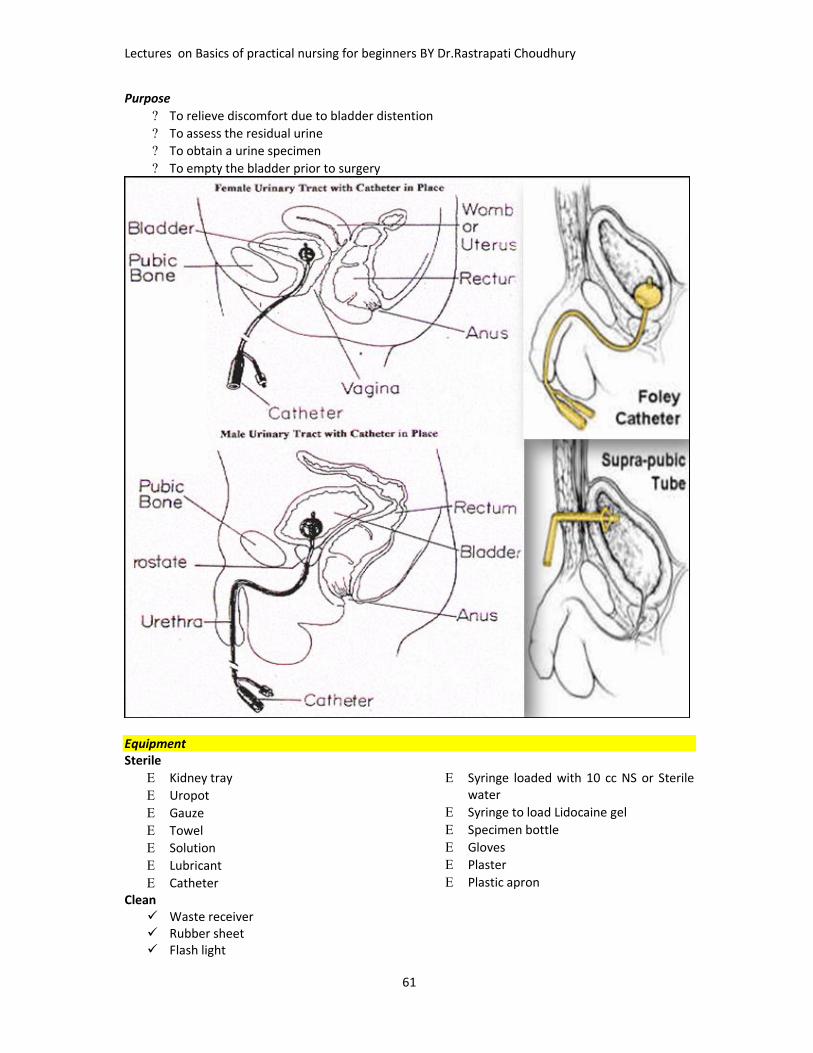
Lectures on Basics of practical nursing for beginners BY Dr.Rastrapati Choudhury
61
Purpose To relieve discomfort due to bladder distention To assess the residual urine To obtain a urine specimen To empty the bladder prior to surgery
EquipmentSterile Kidney tray Uropot Gauze Towel Solution Lubricant Catheter
Syringe loaded with 10 cc NS or Sterilewater
Syringe to load Lidocaine gel Specimen bottle Gloves Plaster Plastic apron
Clean Waste receiver Rubber sheet Flash light

Lectures on Basics of practical nursing for beginners BY Dr.Rastrapati Choudhury
62
Measuring jug Screen
Procedure Prepare the client and equipment for perennial wash Position the patient – dorsal recumbent (pillows can be used to elevate the buttocks in females).
Drape the patient. Wash the perennial area with warm water and soap Rinse and dry the area Prepare the equipment Create a sterile field Drop the client with a sterile drape Clean the area with antiseptic solution. Lubricate the insertion tip of the catheter (5-7 cm in) Expose the urinary meatus adequately by retracting the
tissue or the labia minora in an upward direction – female Retract the fore skin of uncircumcised mal. Grasp the penis firmly behind the glans and hold
straighten the down ward curvature of vertical it go to thebody – male hole the catheter 5 cm from the insertion tip

Lectures on Basics of practical nursing for beginners BY Dr.Rastrapati Choudhury
63
Insert the catheter into the urethral orifice Insert 5 cm in females and 20 cm in males or until urine comes Collect the urine – for specimen (about 30 ml) Pinch previous leakage Empty or drain the bladder and remove the catheter For adults experiencing urinary retention an order is needed on the amount to urine to be
expelledNote. If resistance is encountered during insertion, do not force it – forceful pressure can cause trauma.
Ask the client to take deep breaths - relaxes the external sphincter (slight resistance is normal) Position -Dorsal Recumbent position Female - for a better view of the urinary meatus and reduce the risk of catheter contaminate. Male- allows greater relaxation of the abdominal and perennial muscles and permits easier
insertion of the tube. Straight Catheter: is a single lumen tube with a small eye or opening about (1.25 cm) from the
insertion tip:Inserting a Retention (Indwelling) CatheterRetention (Foley) Catheter Contains a second, smaller tube throughout its length on the inside– This tube is connected to a balloon near the insertion tip.Purpose To manage incontinence To provide for intermittent or continuous bladder drainage and irrigation To prevent urine from contacting an incision after perineal surgery (prevent infection) To measure urine output needs to be monitored hourly
Procedure Explain the procedure to the patient Prepare the equipment like:
Retention catheter Syringe Sterile water Tape Urine collection bag and tubing
After catheter insertion, the balloon is inflated to hold the catheter in place with in the bladder.The out side end of the catheter is bifurcated i.e., it has two openings, one to drain theurine, the other to inflate the balloon.The balloons are sized by the volume of fluid or air used to inflate them 5 ml – 30 ml (15commonly) indicated with the catheter size 18 Fr – 5 ml.
Test the catheter balloon Follow steps as insertion straight catheter Insert the catheter an additional 2.5 – 5 cm (1-2 in) beyond the point at which urine began to flow
(the balloon of the catheter is located behind the opening at the insertion tip) – this ensures thatthe balloon is inflated inside the bladder and not in the urethra (cause trauma)
Inflate the balloon with the pre filled syringe Apply slight tension on the catheter until you feel resistance: resistance indicates that the catheter
balloon is inflated appropriately and that the catheter is well anchored in the bladder Release the resistance Tape the catheter with tape to the inside of a females thigh or to the thigh or a body of a male
client Restricts the movement of the catheter and irritation in the urethra when the client
moves. When there is increased risk of penile scrotal excoriation.

Lectures on Basics of practical nursing for beginners BY Dr.Rastrapati Choudhury
64
Establish effective drainage The bag should be off the floor – the emptying spout does not become grossly contaminated Document pertinent data
Removal Withdraw the solution or air from the balloon using a syringe. Then remove gently
NASOGASTRIC INTUBATIONRyle’s tubeRyle’s Tube - Stomach TubeRyle’s tube is used for nutritional feeding purposes or aspiration of intestinal secretions.Manufactured from non toxic, medical grade PVCcompound.Distal end is coned with steel balls sealed into the tubeto facilitates easy insertion.Four lateral eyes for efficient drainage.The tube is marked at 50, 60 and 70cm from the distalend for accurate placement into the abdomen.Radio opaque line provided throughout the tube for X-ray visualization.Proximal end is provided with Universal FunnelConnecter for easy extension.
InfantFeeding TubeInfant Feeding tube is used for neonates and paediatricfeeding.Manufactured from non toxic, medical grade PVC compound.Distal end is smooth coned shape for non traumaticintubation.Two lateral eyes for efficient drainage.The tube is marked at 20 cm from the distal end for accurateplacement into the abdomen.Radio opaque line provided throughout the tube for X-rayvisualization.Proximal end is provided with luer mount for connectionwith feeding device.

Lectures on Basics of practical nursing for beginners BY Dr.Rastrapati Choudhury
65
OverviewGastric intubation via the nasal passage (i.e., nasogastric route) is a common procedure that providesaccess to the stomach for diagnostic and therapeutic purposes. A nasogastric (NG) tube is used for theprocedure. The placement of an NG tube can be uncomfortable for the patient if the patient is notadequately prepared with anesthesia to the nasal passages and specific instructions on how tocooperate with the operator during the procedure.IndicationsDiagnosticEvaluation of upper gastrointestinal (GI) bleed (i.e., presence, volume)Aspiration of gastric fluid contentIdentification of the esophagus and stomach on a chest radiographAdministration of radiographic contrast to the GI tractTherapeuticGastric decompression, including maintenance of a decompressed state after endotracheal intubation,often via the oropharynxRelief of symptoms and bowel rest in the setting of small-bowel obstructionAspiration of gastric content from recent ingestion of toxic materialAdministration of medicationFeedingBowel irrigationContraindications & Absolute contraindicationsSevere midface trauma Recent nasal surgery
Feeding tubes
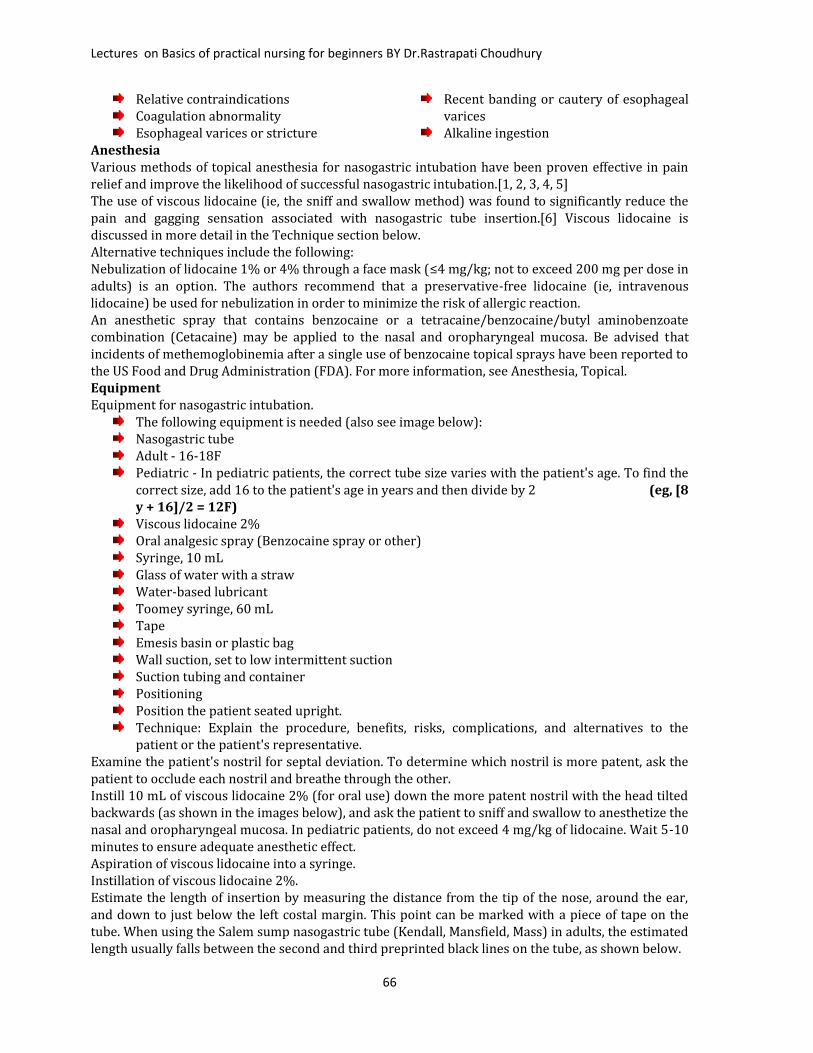
Lectures on Basics of practical nursing for beginners BY Dr.Rastrapati Choudhury
66
Relative contraindicationsCoagulation abnormalityEsophageal varices or stricture Recent banding or cautery of esophagealvaricesAlkaline ingestionAnesthesiaVarious methods of topical anesthesia for nasogastric intubation have been proven effective in painrelief and improve the likelihood of successful nasogastric intubation.[1, 2, 3, 4, 5]The use of viscous lidocaine (ie, the sniff and swallow method) was found to significantly reduce thepain and gagging sensation associated with nasogastric tube insertion.[6] Viscous lidocaine isdiscussed in more detail in the Technique section below.Alternative techniques include the following:Nebulization of lidocaine 1% or 4% through a face mask (≤4 mg/kg; not to exceed 200 mg per dose inadults) is an option. The authors recommend that a preservative-free lidocaine (ie, intravenouslidocaine) be used for nebulization in order to minimize the risk of allergic reaction.An anesthetic spray that contains benzocaine or a tetracaine/benzocaine/butyl aminobenzoatecombination (Cetacaine) may be applied to the nasal and oropharyngeal mucosa. Be advised thatincidents of methemoglobinemia after a single use of benzocaine topical sprays have been reported tothe US Food and Drug Administration (FDA). For more information, see Anesthesia, Topical.EquipmentEquipment for nasogastric intubation.The following equipment is needed (also see image below):Nasogastric tubeAdult - 16-18FPediatric - In pediatric patients, the correct tube size varies with the patient's age. To find thecorrect size, add 16 to the patient's age in years and then divide by 2 (eg, [8
y + 16]/2 = 12F)Viscous lidocaine 2%Oral analgesic spray (Benzocaine spray or other)Syringe, 10 mLGlass of water with a strawWater-based lubricantToomey syringe, 60 mLTapeEmesis basin or plastic bagWall suction, set to low intermittent suctionSuction tubing and containerPositioningPosition the patient seated upright.Technique: Explain the procedure, benefits, risks, complications, and alternatives to thepatient or the patient's representative.Examine the patient's nostril for septal deviation. To determine which nostril is more patent, ask thepatient to occlude each nostril and breathe through the other.Instill 10 mL of viscous lidocaine 2% (for oral use) down the more patent nostril with the head tiltedbackwards (as shown in the images below), and ask the patient to sniff and swallow to anesthetize thenasal and oropharyngeal mucosa. In pediatric patients, do not exceed 4 mg/kg of lidocaine. Wait 5-10minutes to ensure adequate anesthetic effect.Aspiration of viscous lidocaine into a syringe.Instillation of viscous lidocaine 2%.Estimate the length of insertion by measuring the distance from the tip of the nose, around the ear,and down to just below the left costal margin. This point can be marked with a piece of tape on thetube. When using the Salem sump nasogastric tube (Kendall, Mansfield, Mass) in adults, the estimatedlength usually falls between the second and third preprinted black lines on the tube, as shown below.
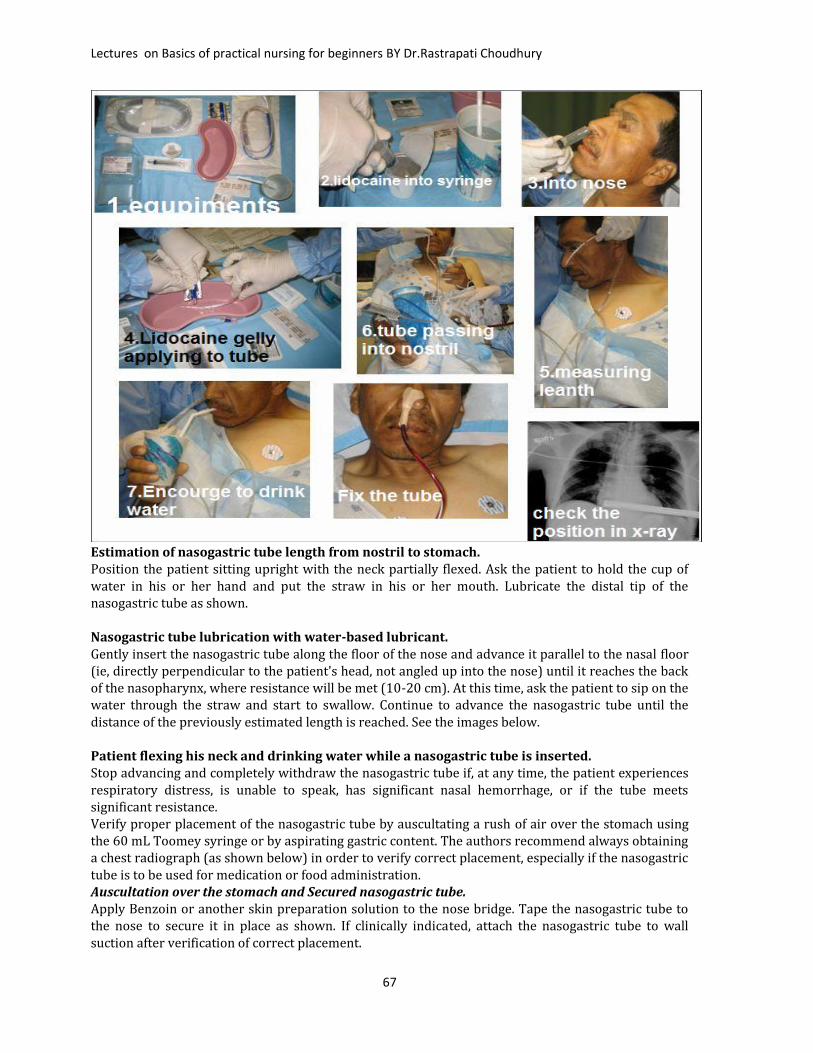
Lectures on Basics of practical nursing for beginners BY Dr.Rastrapati Choudhury
67
Estimation of nasogastric tube length from nostril to stomach.Position the patient sitting upright with the neck partially flexed. Ask the patient to hold the cup ofwater in his or her hand and put the straw in his or her mouth. Lubricate the distal tip of thenasogastric tube as shown.Nasogastric tube lubrication with water-based lubricant.Gently insert the nasogastric tube along the floor of the nose and advance it parallel to the nasal floor(ie, directly perpendicular to the patient's head, not angled up into the nose) until it reaches the backof the nasopharynx, where resistance will be met (10-20 cm). At this time, ask the patient to sip on thewater through the straw and start to swallow. Continue to advance the nasogastric tube until thedistance of the previously estimated length is reached. See the images below.Patient flexing his neck and drinking water while a nasogastric tube is inserted.Stop advancing and completely withdraw the nasogastric tube if, at any time, the patient experiencesrespiratory distress, is unable to speak, has significant nasal hemorrhage, or if the tube meetssignificant resistance.Verify proper placement of the nasogastric tube by auscultating a rush of air over the stomach usingthe 60 mL Toomey syringe or by aspirating gastric content. The authors recommend always obtaininga chest radiograph (as shown below) in order to verify correct placement, especially if the nasogastrictube is to be used for medication or food administration.Auscultation over the stomach and Secured nasogastric tube.Apply Benzoin or another skin preparation solution to the nose bridge. Tape the nasogastric tube tothe nose to secure it in place as shown. If clinically indicated, attach the nasogastric tube to wallsuction after verification of correct placement.

Lectures on Basics of practical nursing for beginners BY Dr.Rastrapati Choudhury
68
Secured nasogastric tube.Nasogastric tube in lung. : if any doubt ask for chest x-ray PA viewPearlsDuring insertion, if concern exists that the tube is in the incorrect place, ask the patient to speak. If thepatient is able to speak, then the nasogastric tube has not passed through the vocal cords and/orlungs.The nasogastric tube may coil in the nasopharynx or oropharynx. If this occurs, or if the tube isdifficult to pass in general, try curling the distal end and partially freezing it in a cup of ice so ittemporarily holds its curled shape better. Insert the lubricated tube tip through the nose with thecurled end pointing downward. Once the distal tip passes into the hypopharynx, the curved tip facesanteriorly. Rotate the tube 180 degrees so that the curved end is pointing posteriorly toward theesophagus. Continue to insert in the usual manner by having the patient swallow water.Another option (only in patients who are sedated and paralyzed) is to place 2-3 fingers through thepatient’s mouth into the oropharynx. The fingers are used to guide the nasogastric tube into thehypopharynx.Lifting the thyroid cartilage anterior and upward might open the esophagus and allow passage intothe proximal esophagus.A method of freezing a nasogastric tube with distilled water was shown to increase the success rate ofinsertion for intubated patientsDirect laryngoscopy or video laryngoscopy can aid in placing a nasogastric tube in sedated patients byvisualization of the tip entering the esophagusAlthough pH, enzyme, bilirubin, and carbon dioxide testing have been used to distinguish respiratoryfrom gastrointestinal placement of nasogastric tubes, none of these methods has enabled detection oftube placement in the esophagus or gastroesophageal junction. Therefore, the authors recommendthe routine use of x-ray verification.In patients who are anesthetized, Appukutty and Shroff found that 3 techniques can increase thesuccess rate of nasogastric tube placement. In randomized controlled study in 200 patients, the use ofa ureteral guidewire as stylet or a slit endotracheal tube as an introducer increased the success ratecompared with controls, although the latter technique significantly lengthened the time for insertion.However, head flexion with lateral neck pressure proved to be the easiest technique, with a highsuccess rate and fewest complicationsComplicationsPatient discomfortGenerous lubrication, the use of topical anesthetic, and a gentle technique may reduce the patient’slevel of discomfort.Throat irritation may be reduced with administration of anesthetic lozenges (eg, benzocaine lozenges[Cepacol]) prior to the procedure.Epistaxis may be prevented by generously lubricating the tube tip and using a gentle technique.Respiratory tree intubationEsophageal perforation
SUTURING
SuturingDefinition: The application of stitch on body tissues with the surgical needle & thread.Purpose• To approximate wound edges until healing occurs• To speed up healing of wound• To minimize the chance of infection• For esthetic purposeEquipment

Lectures on Basics of practical nursing for beginners BY Dr.Rastrapati Choudhury
69
Tray or trolley covered with a steriletowelSterile needle holderSterile round needle (2)Sterile cutting needle (2)Sterile silkSterile cat- gutSterile tissue forcepsSterile suture scissorsSterile cotton swabs in a galipotsSterile solution for cleaning
Sterile dressing forcepsSterile receiverSterile gauzeSterile plasterDressing scissorsLocal anesthesiaSterile needle & syringesSterile glovesSterile hole- towel (Fenestratedtowel)
Procedure Explain procedure to patient Adjust light Wash your hands Clean the wound thoroughly Wash your hands again Put on sterile gloves Drape the Wound with the hold-
sheet Infiltrate the edges of the wound to
be sutured with local anesthesia. Approximate the edges of the fascia
with the help of the tissue forceps
and using the round needle and cat-gut. Suture the fascia layer first.
Using the cutting needle and silk,suture the outer layer of skinapproximating the edges with thehelp of the tissue forceps.
Clean with iodine and cover withsterile gauze.
Remove the hole- Sheet Make patient comfortable Remove all equipment, wash & return
to its proper place or send forsterilization.
Note:Do not suture wounds that are over 12 hrs old. How ever, such wounds have to be seen by adoctor since excision of all dead & devitalized tissue and eventual suturing may be required.Check that the patient gets his order for T.A.T before he leaves the hospital.Do not suture deep wound.Don’t suture any wound without sterilization, make sure it is free of any foreign bodies.

Lectures on Basics of practical nursing for beginners BY Dr.Rastrapati Choudhury
70
SUTURE REMOVAL

Lectures on Basics of practical nursing for beginners BY Dr.Rastrapati Choudhury
71
Removal of the StitchTechnique: Use aseptic techniquePrinciples Sutures may be removed all at a time or may be removed alternatively. Do not cut stitches in more than one place as a part of it may be left behind and may cause
infection. Suture is lifted slightly by the knot to allow scissors to go under and one part of the suturing
from the cleanest part of the wound to the most contaminated part. Cleanse the skin around with antiseptic. Remove – gum with benzene or ether and discard
the forceps Place sterile gauze to receive stitches. Take a pair of scissors in the right hand. Take a dissecting forceps in the left hand. Pull-up gently the knot resting against the skin with the forceps, pass the point of the
scissors under the knot then cut the stitch on one side and remove. Receive pieces of stitches on sterile gauze Inspect the scar for wound healing and apply iodine on the skin punctures if patient is not
sensitive to iodine. Apply dressing Keep patient comfortable and tide Record the state of the wound Clean and return equipment to their proper places.
ClipsDefinition: Metal suture used to stitch the skinPurposeSome as suturing with stitchEquipment Michel clip applier Clip Tissue forceps (toothed dissecting forceps) Cleaning material- same as stuttering with stitch.
ProcedureThe first part of procedure is the same as for suturing with stitch Except that instead of suturing theskin with thread and needle you would apply clips with the applier.Removal of ClipsTechniqueUse aseptic techniqueEquipment Sterile gauze Sterile cotton balls Sterile kidney dish Sterile forceps 3 Sterile clip removal forceps Antiseptic solution (Savalon 1% and iodine) Receiver Benzene or ether Adhesive tape or bandage
ProcedureExplain procedure to the patient and organize the needed equipment Drape and position patient

Lectures on Basics of practical nursing for beginners BY Dr.Rastrapati Choudhury
72
Protect bedding with rubber sheet and its cover Remove old dressing and discard. Cleans wound with antiseptic solution starting from the cleanest part of the wound to the
most contaminated part and discard the cotton ball. Place sterile gauze to receive removed clips. Take clip remove with the right hand and dissecting forceps with the left hand. Insert the lower blade of the clip remove below the middle of the clip using the dissecting
forceps as a support of old the clips in place, and close the blade firmly as this will causedisagreement of the clips from the skin.
Receive clips on sterile gauze Apply iodine on the skin punctures if required Dress the area if required Secure dressing in place with adhesive tape Leave patient comfortable and tidy Record the state of scare Clean and return used equipment to its proper place.
WOUND CARE

Lectures on Basics of practical nursing for beginners BY Dr.Rastrapati Choudhury
73
Learning Objectives Differentiate types of wounds. Explain the purpose of wound care. List important equipment needed to provide wound care. Perform dressing of clean and septic wounds. Provide care for the patient with draining wound. Demonstrate skill of wound suturing and irrigation. Apply clip and remove it when indicated.
Key Terminologyabrasion laceration wounddebridement pressure ulcerdecubitus ulcer punctureexudates surgical incision
The skin acts as a barrier to protect the body from the potentially harmful external environment.When the skin’s integrity (intactness) is broken, the body’s internal environment is open tomicroorganisms that cause infection. Any abnormal opening in the skin is a wound.A wound is any disruption in the skins intactness. It may be accidental or intentional such as abrasion(rubbing off the skin’s surface); a puncture wound (stab wound); or laceration (a wound with torn,ragged edges). A wound may be intentional, such as surgical incision (a wound with clean edges). Awound that occurs accidentally is contaminated; intentional wounds are made under sterileconditions.Wound healing

Lectures on Basics of practical nursing for beginners BY Dr.Rastrapati Choudhury
74
Wound healing differs according to how much tissue has been damaged. It occurs by first, second,and third intention.First intention healing occurs in wounds with minimal tissue loss, such as surgical incisions orsutured wounds. Edges are approximated (close to each other); thus they seal together rapidly.Scaring and infection rate with first intention healing are low.Second intention healing occurs with tissue loss, such as in deep laceration, burns, and pressureulcers. Because edges don’t approximate, openings fill with granulation tissue that is soft andpinkish. Later, epithelial cells grow over the granulation greater than that for first intention healing.Third intention healing occurs when there is a delay in the time between the injury and closure ofthe wound. For example, a wound may be left open temporarily to allow for drainage or removal ofinfectious materials. This type of healing some times occurs after surgery, when the wound closeslater. In the mean time, wound surfaces start to granulate. Scaring is common.1. Dressing of a Clean WoundPurpose
To keep wound clean To prevent the wound from injury and contamination To keep in position drugs applied locally To keep edges of the wound together by immobilization To apply pressure
Equipment Pick up forceps in a container Sterile gloves according to siz Sterile bowl or kidney dish Sterile cotton balls Sterile galipot Sterile gauze Three sterile forceps Rubber sheet with its cover Antiseptic solution as ordered
Adhesive tape or bandages Scissors Ointment or other types of drugs as
needed Receiver Spatula if needed Benzene or ether.
TechniqueAseptic technique to prevent infectionProcedure: Explain procedure to the patient Clean trolley or tray; assemble sterile equipment on one side and clean items on the other
side. Make sure it is covered. Drape and put patient in comfortable position. Place rubber sheet and its cover under the affected side. Remove the outer layer of the dressing e.g. adhesive tape bandage. Remove the inner layer of the dressing using the first sterile forceps and discard both the
soiled dressing and the forceps. Take the second sterile forceps. Clean wound with cotton balls soaked in antiseptic solution,
starting from inside to the outside. Again use the second forceps to clean the skin around and remove adhesive with betadine Apply medication if any and dress the wound with sterile gauze.
Method of ApplicationOintment and paste must be smeared with spatula on gauze and then applied on thewound.Solutions or powder can be applied direct on the wound.Make sure that the wound is properly covered.Fix dressing in place using adhesive tape or bandage.Leave patient comfortable and tidyRecord state of wound

Lectures on Basics of practical nursing for beginners BY Dr.Rastrapati Choudhury
75
Clean and return equipment to proper placeN.B.:The above-mentioned equipment can be prepared in a separate pack if central sterilizationdepartment is available.2. Dressing of Septic Wound the purpose is to
Absorb materials being discharge from the wound Apply pressure to the area Apply local medication Prevent pain, swelling and injury
Equipment Sterile galipot Sterile kidney dish Sterile gauze Sterile forceps 3 Sterile test tube or slide Sterile cotton- tipped application Sterile pair of gloves, if needed, in
case of gas gangrene rabies etc. Rubber sheet and its cover
Local medication if ordered Spatula Receiver with strong disinfectant to
immerse used instrument Probe and director if required Scissors Benzene or ether Bandages or adhesive tape Bucket to put in soiled dressing
ProcedureExplain procedure to the patient Clean trolley o tray and assemble sterile equipment on one side and surgically clean items
on the other side. Make sure the tray or trolley is covered. Drape patient and position comfortably. Place rubber sheet and its cover under the affected part First remove the outer layer of the dressing Wear gloves if necessary. Use, forceps to remove the inner layer of the dressing smoothly
and discard there for caps. Observe wound and check if there is drainage rubber or tube. Take specimen for culture or slide if ordered (Do not cleanse wound with antiseptic before
you obtain the specimen.) Start cleaning wound from the cleanest part of the wound to the most contaminated part
using antiseptic solution. •Hydrogen peroxide ( H2O2 3% is commonly used for septic wound). Discard cotton ball
used for cleaning after each stroke over the wound. Cleanse the skin around the wound to remove the plaster gum with benzene or ether Use cotton balls for drying the skin around the wound properly Dress the wound and make sure that the wound is covered completely Fix dressing in place with adhesive tape or bandages Leave patient comfortable and tidy Cleanse and return equipment to its proper places Discard soiled dressings properly to prevent cross infection in the ward.
N.B.:• If sterile forceps are not available, use sterile gloves Immerse used forceps, scissors and other instrument in strong antiseptic solution before
cleansing and discard soiled dressing properly. In a big ward it is best to give priorities to clean wounds and then to septic wounds, when
changing dressings, as this night lessen the risk of cross infection. Consideration should be given to provide privacy for the patient while dressing the wound. Wounds should not be too tightly packed in effort to absorb discharge as this may delay
healing.4. Dressing with Drainage TubePurpose
Lectures on Basics of practical nursing for beginners BY Dr.Rastrapati Choudhury
76
Aids to prevent haematoma or collection of fluid in the affected area.Equipment Sterile kidney dish Sterile gallipot Sterile Scissors 3 Sterile forceps Sterile cotton balls Sterile gauze Anti septic solution as ordered Sterile safety pins if needed
Cotton wool or absorbent Receiver Rubber sheet and its cover Adhesive tape or bandage Dressing scissors Ointment paste or paraffin gauze Spatulas if needed One pair sterile gloves if available.
ProcedureExplain procedure to the patient Cleanse tray or trolley and organize the needed equipment and make sure it is covered. Drape and position the patient according to the need and put rubber sheet and its cover
under the part to be dressed Remove the outer layer of the dressing Use sterile forceps and remove the inner layer of the dressing (pay attention so that the
drainage tube is not pulled out with the old dressing) Observe the wound for the type and amount of discharge Clean the wound with cotton balls soaked in antiseptic solution. Grasp the top of the drainage tube with sterile forceps. Pull it up a short distance while using
gentle rotation and cut off the tip of the drain with sterile scissors (the length to be cutdepends on the instruction or order).
Place sterile safety pin through the drainage tube close to the wound using sterile gloves orsterile gauze, if it is in the abdomen to stop the drainage tube slipping down out of sight.
Make sure the wound and the skin around are properly cleaned. Apply ointment or paste to the skin with spatula directly around to prevent irritation and
excoriation (if the excoriation exists use paraffin gauze to prevent further complications). Cut the gauze towards its center to fit around rubber drainage tube, so that it fits properly
around the tube thus preventing discomfort. Use adhesive tape or bandages to secure the dressing in place. Record state of wound and the drainage.
Note. Safe method should be used for disposing old dressing. Gauze and cotton used for cleaning
wound. Take preventive measures to avoid skin irritation and excoriation. If drainage tube is attached to the bottle precaution must be taken to secure the tube in
place and avoid the risk of cross infection.Wound IrrigationPurposeTo cleans and maintain. Free drainage of infected wounds.Equipment Sterile galipot or kidney dish Sterile cotton balls Sterile gauze 3 Sterile forceps Sterile catheter Sterile syringe 20 cc 2 receiver Rubber sheet and its cover
Rubber sheet and its cover Solutions (H2O2 or normal saline are
commonly used) Adhesive tape or bandage Bandage scissors Receiver for soiled dressings
Procedure

Lectures on Basics of practical nursing for beginners BY Dr.Rastrapati Choudhury
77
Explain the procedure to the patient and organize the needed items. Drape and position patient Put rubber sheet and its cover under the part to be irrigated Remove the outer layer of the dressing Remove the inner layer of the dressing using the first sterile forceps. Put the receiver under patient to receive the out flow Use syringe with desired amount of solution fitted with the catheter. Use forceps to direct the catheter into the wound. First inject the solution such as H2O2 at body temperature gently and wait for the flow. This
must be followed by normal saline for rinsing. Make sure the wound is cleaned and dried properly. Dress the wound and check if it is covered completely Secure dressing in place with adhesive tape or bandage Leave patient comfortable and tidy Record the state of the wound Clean and return equipment to its proper place.
Note:Keep patient in a convinent position. According to the need so that solution will flow fromwound down to the receiver. Use sterile technique and warn solution for irrigating the wound.
BANDAGE TECHENIQUESA bandage is a material used to provide support either to a medical dressing or an injured partof the body. Bandages, ranging from cloth strips to specialized bandages used for a particularbody part, are importantcomponents of your first aidkit. Very often the wordbandage is used to refer to adressing used on a wound.There are various bandagingtechniques, each specificallytargeting a particular area ora particular type of ailment.Bandage WrappingBandage wrapping is theprocess wherein a circularrole of bandage is firmlyrolled around the limb, mostoften to support dressing, orstop bleeding. To wrap thebandage on the limb, hold ittransversely in the hand, andstart rolling it around thelimb with the outer side ofthe bandage roll applied tothe inner side of the limb.The bandage has to be rolledfrom the inner side to theouter side. Though rare, insome cases, it is rolledupwards from below. The

Lectures on Basics of practical nursing for beginners BY Dr.Rastrapati Choudhury
78
pressure on the part of the body being bandaged should be uniform. Once the rolling is done, theend of the bandage can be secured either by applying asafety pin or by giving it a slit and tying it around the limb.The various reasons for applying bandages are:Bandaging helps the dressing to stay firmly on the wound.Bandaging is an effective technique to support a hurt joint.Bandage wrapping helps to reduce swelling.In case of a wound, bandaging helps to stop bleeding.Bandaging helps to restrict the movement of an injuredbody part.Bandaging TechniquesThe use of various bandaging techniques are determined based on the reason for whichbandaging is required. The three most commonly used techniques of bandaging are spiraltechnique, ascending spica technique and diverging spica technique.BANDAGING TECHNIQUESCircularEach turn encircles the previous one, covering it completely. Use this technique to anchor abandage.SpiralEach turn partially overlaps the previous one. Use this technique to wrap a long, straight bodypart or one of increasing circumference.Spiral-reverseAnchor the bandage and then reverse direction halfway through each spiral turn. Use thistechnique to accommodate the increasing circumference of a body part.Figure eightAnchor below the joint, and then use alternating ascending and descending turns to form afigure eight. Use this technique around joints.RecurrentThis technique includes a combination of recurrent and circular turns. Hold the bandage as youmake each recurrent turn and then use the circular turns as a final anchor. Use this techniquefor a stump, a hand, or the scalp.
AMBU BAG and its USE

Lectures on Basics of practical nursing for beginners BY Dr.Rastrapati Choudhury
79
AMBU : Artificial maneuver(A plan for attaining a particular goal) breathing unit.Ambu bag(also known as a Bag valve mask)is a hand-held device used toprovide positive pressureventilation to a patient who is notbreathing or who is breathinginadequately.UsesThe device is a normal part of aresuscitation tray/kit and isessential part of a crash cart. Thedevice is used extensively in theoperating room to ventilate ananaesthetised patient in theminutes before a mechanicalventilation is attached.
Parts of Ambu bagSizes: BagAdult------1600 ml.Child-------500 ml.Infant-------500 ml.MaskAdult------Size 4Child------Size 2
Infant------Size 1ReservoirAdult------suitable for 1600 ml. bagChild / Infant---Suitable for 500 ml. bagtubingHaving suitable connectors at both endsfor easy and safe connections.
AIRWAY APPLICATION AND USENasopharyngeal airway, also known asan NPA or a nasal trumpet because of its

Lectures on Basics of practical nursing for beginners BY Dr.Rastrapati Choudhury
80
flared end, a type of airway adjunct, is a tube that is designed to be inserted into the nasalpassageway to secure an open airway. When a patient becomes unconscious, the muscles in thejaw commonly relax and can allow the tongue to slide back and obstruct the airway. Thepurpose of the flared end is to prevent the device from becoming lost inside the patient's head.Easy to identify50 mm (blue), 60 mm (black), 70 mm (white), 80 mm (green), 90 mm (yellow),and 100 mm (red).Indications and contraindicationsNasopharyngeal airways are sometimes used by people who have sleep apnea.These devices are also used by emergency care professionals such as EMTs and paramedics insituations where an artificial form of airway maintenance is necessary but it is impossible orinadvisable to use an oropharyngeal airway, the preferred type of airway adjunct, or intubate,considered the most certain way to secure a patent airway, but also the most medically invasive.In an unconscious patient, suction of the upper airways may also be applied via an NPA.Insertion of an NPA is contraindicated in patients with severe head or facial injuries, or haveevidence of a basilar skull fracture (Battle's sign, raccoon eyes, cerebrospinal fluid/blood fromears, etc.) due to the possibility of direct intrusion upon brain tissue. An oropharyngeal airwaymay be used instead, but these devices frequently trigger a patient's gag reflex, whilenasopharyngeal airways usually do not.[1]InsertionThe correct size airway is chosen by measuring the device on the patient: the device shouldreach from the patient's nostril to the earlobe or the angle of the jaw.[1] The outside of the tubeis lubricated with a water-based lubricant so that it enters the nose more easily. The device isinserted until the flared end rests against the nostril.
INTUBATIONUNDERSTANDING EQUIPMENTFace Mask: Delivery of positive pressure ventilation by means of a face mask (or bag-valve-maskdevice) is an essential skill to develop. The rim of the mask is soft and form-fittingand by pressing it firmly against the face an airtight seal is made. The mask is attached to abreathing circuit including an oxygen bag. When pressure in the mask increases by squeezing theinflated oxygen bag, air flows through the upper airway into the lungs. When the bag is empty oryou stop squeezing it, air will flow out the lungs through the nose and mouth into the mask.Successful ventilation requires both an air-tight mask fit and a patent airway. Withoutan airtight seal between the skin of thepatient’s face and the mask, sufficientpressure to inflate the lungs (or for thatmatter the ventilation bag) will not develop.Leak is the most common problem indelivering face mask ventilation and can beavoided or resolved by proper technique.If you have an assistant who can squeeze theventilation bag for you, use two hands tosecure an air-tight seal. The thumbs hold the
Face Mask

Lectures on Basics of practical nursing for beginners BY Dr.Rastrapati Choudhury
81
mask down while the fingertips or knuckles displace the jaw forward and upward (lift and protrudethe jaw to prevent or alleviate airway obstruction by the tongue). The one handed technique isachieved by using the right hand to generate positive pressure by squeezing the bag using the leftthumb and index finger tosecure the mask (by pushing downward). The middle and ring finger grasp the mandible (and notthe soft tissue of the chin) to extend the atlanto-occipital joint (the neck). The little finger ispositioned under the angle of the jaw andthrusts it anteriorly.Signs of successful seal and ventilation include: a foggy mask the rising of the chest with delivery of positive
pressure breath sounds on auscultation a firm/taught/full bag return carbon dioxide on
exhalation capnography.Oropharyngeal airway (OPA) – A curved piece of plasticinserted over the tongue that creates an air passage waybetween the mouth and the posterior pharyngeal wall.Useful when the tongue and/or epiglottis fall backagainst the posterior pharynx in anesthetized orunconscious patients obstructing the flow of air. Thepreferred technique is to use a tongue blade to depress the tongue and then insert the airwayposteriorly. An alternate technique is to insert the oral airway upside down until the soft palate isreached. Rotate the device 180 degrees and slip it over the tongue. Be sure not to use the airway topush the tongue backward and block, rather than clear, the airway. This device is poorly tolerated inconscious patients and may induce gagging, vomiting and aspiration.Nasopharyngeal airway – Also known as trumpets, nasopharyngeal airways are insertedthrough one nostril to create an air passagebetween the nose and the nasopharynx. TheNPA is preferred to the OPA in consciouspatients because it is better tolerated and lesslikely to induce a gag reflex.The length of the nasal airway can beestimated as the distance from the nares tothe meatus of the ears and is usually 2-4 cmlonger than the oral airway. Any tube insertedthrough the nose should bewell lubricated andadvanced at an angleperpendicular to the face(remember: the floor of thenose is the roof of themouth!). Use a nostril thatis unobstructed.While nasopharyngealairways are better toleratedthan oropharyngeal airwaysin awake or lightlyanesthetized patients, theyare contraindicated inpatients who are anticoagulated, patients with basilar skull fractures,

Lectures on Basics of practical nursing for beginners BY Dr.Rastrapati Choudhury
82
patients with nasal infectios and deformities as well as in children (because of risk of epistaxis).If the nasopharyngeal tube is visible in the posterior oropharynx, it may provide safe passage of annasogastric tube (NG tube) in a patient with maxillofacial fractures.Laryngeal Mask Airway (LMA) – The LMA is a cuff device that provides sufficient seal to allow forpositive pressure ventilation to be delivered. It is particularly useful in maintaining an airway inanesthetized patients when endotracheal intubation is not
desired or during emergency situations in which mask ventilation is not possible orintubation and/or ventilation fails.An LMA is a wide bore tube, with a connector at its proximal end (that can be connected to abreathing circuit)and with an elliptical cuff at its distal end. When inflated, the elliptical cuff forms alow pressure seal around the entrance into the larynx. The LMA comes in a variety of pediatric andadult sizes and successful insertion requires appropriate sizeselection.LaryngoscopeA lryngoscope is a rigid instrument used to examine the larynxand to facilitate intubation ofthe trachea. It is composed of two separate parts: the handle(which also contains the battery) and the blade, which is usedto move the tongue and soft tissues aside to reveal a view ofthe larynx. To this end, an incandescent bulb can be found onthe blade tip - it turns on when the blade is attached to thehandle and locked into the 90 degree position to illuminate thelarynx.The two most commonly used blades in the United States arethe Macintosh, which is curved, and the Miller, which isstraight. Both blades come in a variety of sizes. The choice ofblade depends on personal preference and patient anatomy.
The laryngoscope is held in your NON-DOMINANT HAND (if youare right handed, resist the temptation to hold thelaryngoscope in your right hand!). Carefully introduce theblade into the right side of the mouth. Regardless of whichblade is used, IT MUST NEVER PRESS AGAINST THE TEETH ordental trauma will result. The tongue is then swept to the leftand up into the floor of the pharynx by the blade’s flange.The curved Macintosh blade is inserted past the tongue intothe vallecula (at the base of the tongue). Providing sufficientlifting force in parallel with the handle, yet avoiding posteriorrotation that causes the blade to press against the teeth,pressure is applied deep in the vallecular space by the tip of theblade immediately anterior to the epiglottis, which flips out ofthe visual field to expose the laryngeal opening.The straight Miller blade is inserted deep into the oropharynx,PAST the epiglottis. Providing sufficient lifting force in parallelwith the handle, yet avoiding posterior rotation that causes theblade to press against the teeth, under direct vision, the bladeis slowly withdrawn. It will slip over the anterior larynx andcome to a position at which it holds the epiglottis flat againstthe tongue and anterior pharynx, exposing a view of the larynx.

Lectures on Basics of practical nursing for beginners BY Dr.Rastrapati Choudhury
83
With either blade, the handle is raised up and away from the patient ina plane perpendicular to the patient’s mandible. Avoid trapping a lipbetween the teeth and the blade and AVOID using the teeth asleverage.
Endotracheal TubeEndotracheal tubes are most commonly made from polyvinyl chloride,with a radiopaque line from top to bottom, standard size connectors(for anesthesia machines, ventilators, or bag-mask devices, a highpressure/low volume inflatable balloon, and a hole at the beveled,distal end (known as Murphy’s eye). Tubes come in a number of sizes,usually designated in millimeters of internal diameter. The choice ofETT size is always a compromise between choosing the largest size tomaximize flow and minimize airway resistance and the smallest size tominimize airway trauma.Once a view of the larynx is obtained via laryngoscopy, the ETT is introduced with the dominanthand through the right side of the mouth. Directly observe the tip of the tube passing into thelarynx, between the abducted cords. Pass the tube 1 cm through the cords.Double lumen endotracheal tubes are designed so that one lung may be isolated from the other tofacilitate selective ventilation of one lung or surgery within a hemithorax.Stylet – A stylet is a long, bendable rod that can beinserted into an endotracheal tube to facilitateintubation. It is placed into the tube prior tolaryngoscopy and then the tube (with the stylet in it) isbent to resemble a hockey stick. After insertion of thetube into the trachea, the stylet is removed.Bougie(Boogie) – The Bougie is a straight, semi-rigid
stylette-like devicewith a bent tip thatcan be used whenintubation is (or ispredicted to be)difficult. Duringlaryngoscopy, thebougie is carefullyadvanced into thelarynx and throughthecords until the tipenters a mainstem
broncus. While maintaining the laryngoscope and Bougie in position, an assistant threads an ETTover the end of the bougie, into the larynx. Once the ETT is in place, the bougie is removed.HOW TO INTUBATEPrior to intubation, always check equipment and make sure everything you might need is not onlywithin your reach, but also properly working. If in the operating room, a complete check of theanesthesia equipment at the start of each day as well as a modified check before each new case isimperative. If in the emergency room or the hospital wards, make sure you know where all of yourequipment is and, also, that you have the necessary resources to support the patient onceintubated. Prior to positioning the patient:

Lectures on Basics of practical nursing for beginners BY Dr.Rastrapati Choudhury
84
Make sure that your laryngoscope is locked into position and that the incandescent light on theblade tip functions. Also make sure that you have several alternate blades available in case the oneyou have chosen does not allowfor visualization of the cords.Examine the endotracheal tube.Make sure that the cuff inflatesby using a 10-mL syringe to inflatethe cuff and then detach thesyringe to ensure that the cuffpressure is maintained. Be sureto deflate deflate the cuff aftertesting it.Attach the connector to theproximal end of the tube. Push itin as far as possible to lessen thelikelihood of disconnection.If you are going to use a stylet, itshould be inserted into the ETtube and bent to resemble ahockey stick to facilitateintubation of an anteriorlypositioned larynx. Even if you donot plan on using a stylet, one should be within easy access in case the intubation proves to be moredifficult than anticipated.Ensure a functioning suction unit to clear the airway in case of unexpected blood, emesis orsecretions.Ensure that you have tape within your reach to secure the tube once it is in place.Proper patient positioning can be the difference between a successful and failed intubation.The patient’s head should be level with the physician’s xiphoid process.To achieve the sniff position (which allows for optimal visualization of the glottic opening), elevatethe patient’s head and extend the atlanto-occipital joint. This can be achieved by sliding your freehand (right hand if you are right handed, left hand if you are left handed) beneath the patient’s headand gently lifting it up and towards you. Or, you can gently position the chin up and mouth openbefore attemting laryngoscopy.The "scissor technique" can also be used to further open the patients mouth. Cross your rightforefinger and thumb and insert into the right side of the patient's mouth. Apply pressure to theupper teeth with your forefinger and the lower teeth with your thumb to open the mouth. Be sureto position your hands so as NOT to obstruct your view.Mask Ventilation is often used in the operating room after induction, prior to intubation. If you areable to achieve signs of ventilation using this technique, you are afforded the knowledge that, ifintubation fails, you are able to achieve ventilation using the bag-mask-valve device. Further, itallows for pre-oxygenation. Preparation for induction and intubation in the operating room alsoinvolves pre-oxygenation with several (eight) deep breaths of 100% oxygen. Preoxygenationprovides an extra margin of safety in case the patient is not easily ventilated after induction.

Lectures on Basics of practical nursing for beginners BY Dr.Rastrapati Choudhury
85
After preoxygenating thepatient and positioning thepatient in the Sniffposition, with the patient’smouth widely open,carefully introduce theblade, held in your LEFTHAND, into the right side ofthe mouth. Regardless ofwhich blade is used, ITMUST NEVER PRESSAGAINST THE TEETH ordental trauma will result.The tongue is then sweptto the left and up into thefloor of the pharynx by theblade’s flange.The curved Macintosh blade is inserted past the tongue into the vallecula (at the base of thetongue) Providing sufficient lifting force in parallel with the handle, yet avoiding posterior rotationthat causes the blade to press against the teeth, pressure is applied deep in the vallecular space bythe tip of the blade immediately anterior to the epiglottis, which flips out of the visual field toexpose the laryngeal opening.The straight Miller blade is nserteddeep into the oropharynx, PASTthe epiglottis. Providing sufficientlifting force in parallel with thehandle, yet avoiding posteriorrotation that causes the blade topress against the teeth, underdirect vision, the blade is slowlywithdrawn. It will slip over theanterior larynx and come to aposition at which it holds theepiglottis flat against the tongueand anterior pharynx, exposing a view of the larynx.With either blade, the handle is raised up and away from the patient in a plane perpendicular to thepatient’s mandible. Avoid trapping a lip between the teeth and the blade and AVOID using the teethas leverage and avoid posterior rotation of the blade.Once a view of the larynx is obtained vialaryngoscopy, the ETT is introduced with the RIGHT HAND through the right side often mouth.Directly observe the tip of the tube passing into the larynx, between the abducted cords. Pass thetube 1 cm through the cords. The ETT should lie in the upper trachea but beyond the larynx (3 to 4cm proximal to the carina). If the patient is going to be repositioned, the cuff should be closer to 2cm beyond the cords.Remove the laryngoscope, careful not to displace the ET tube and not to cause trauma to the teeth,lips or mucosa.Inflate the cuff with the least amount of air necessary to create a seal during positive pressureventilation (usually 4-8 mL of air).Remove the mask from the bag-valve device and attach the 15 mm connector on the proximal endof the ET tube to the bag-valve device (into which oxygen is flowing and to which the carbon dioxidedetector is attached). Provide positive pressure and immediately (and quickly):ausculatate the chest for breath sounds
curvedMacintosh blade
straight Miller blade
Lectures on Basics of practical nursing for beginners BY Dr.Rastrapati Choudhury
86
check the capnoraphic tracing on the monitor to ensure end tidal CO2check the connector for foglook at the chest for expansion with each breathIf there is any question as to whether the tube is in the esophagus or trachea, remove the tube,ventilate with a mask and try again, this time attempting to adjust anything that may have interferedwith your first attempt. You might reposition the patient, use a different blade, decrease tube size,or add a stylet.If you are sure that your intubation is successful, turn on the mechanical ventilator. Continuouslyprovide positive-pressure ventilation at a volume of 350-700 ML per 70 kg (5-10 mL/Kg) and at asufficient rate to maintain normal end tidal CO2 (8-12 respirations per minute).Proceed to tape or tie the tube to secure its position. Do not tape or tie the cuff. To prevent thepatient from biting and occluding the ETT during emergence fromanesthesia, a roll of gauze can be placed between the teeth or anOPA can be inserted.Document the view of the larynx obtained during laryngoscopyusing the following criteria:Grade I: full view of the cordsGrade II: partial view of the cordsGrade III: view of the epiglottisGrade IV: No view of the cords or epiglottisOTHER WAYS TO INTUBATENasotracheal Intubation: Nasal intubation is similar to oralintubation except that the ETT is advanced through the nose intothe oropharynx before laryngoscopy. If the patient is awake, localanesthetic drops and nerve blocks can be used. A lubricated ETT isintroduced along the floor of the nose, below the inferior nasalturbinate, perpendicular to the face. Often, a nasopharyngealairway can be used. The tube is advanced until it can be visualizedin the oropharynx. Via laryngoscopy, the tube is then advanced inbetween the abducted vocal cords.Nasal instrumentation (with ETTs, NPOs, or nasal catheters) is contraindicated in all patients withsevere midfacial trauma.Bougie: The Bougie is a straight, semi-rigid stylette-like device with a bent tip that can be used whenintubation is (or is predicted to be) difficult – often helpful when the tracheal opening is anterior tothe visual field. During laryngoscopy, the bougie is carefully advanced into the larynx and throughthe cords until the tip enters a mainstem broncus. While maintaining the laryngoscope and Bougiein position, an assistant threads an ETT over the end of the bougie, into the larynx. Once the ETT isin place, the bougie is removed.Light Wand: Lightwands, when inserted into an endotracheal tube, may be useful for blindintubations of the trachea (when the laryngeal opening cannot be visualized). The end of the ETtube is at the entrance of the trachea when light is well transilluminated through the neck (the jacko’lantern effect). The tube can then be threaded off the light wand and into the trachea in a blindfashion.Flexible Fiber optic Bronchoscopy: Laryngoscopy may be contraindicated in a patient who requiresintubation and mechanical ventilation. This is often the case in trauma patients who may have anunstable cervical spine or in patients with poor range of motion of the temporomandibular joint. Insuch patients, flexible fiber optic bronchoscopy allows for indirect visualization of the larynx. Theendoscope is introduced through the mouth or nose. Once anatomic structures are recognized, andthe larynx or tracheas are entered under direct visualization.

Lectures on Basics of practical nursing for beginners BY Dr.Rastrapati Choudhury
87
COMPLICATIONS OF INTUBATIONComplications of laryngoscopy and intubation aremost frequently secondary to airway trauma, tubemalpositioning, tube malfunction or physiologicresponses to airway instrumentation. Trauma such astooth damage, lip/tongue/mucosal laceration, sorethroat, dislocated mandible, retropharyngealdissection can occur during laryngoscopy andintubation. Mucosal inflammation and ulceration andexcoriation of nose can occur while the tube is inplace. Laryngeal malfunction and aspiration, glottic,subglottic or tracheal edema and stenosis, vocal cordgranuloma or paralysis during extubation.Malpositioning of the endotracheal tube can result inesophageal intubation and unintentional extubation.Physiologic responses to intubation includehypertension, tachycardia, intracranial hypertension,and laryngospasm. Laryngospasm, which occursduring induction and recovery from anesthesia or,rarely, in an awake patient, is a forceful involuntaryspasm of the laryngeal musculature caused by sensorystimulation of the superior laryngeal nerve.Treatment includes positive pressure ventilation via abag-mask device using 100% oxygen or administrationof IV lidocaine.HOW TO EXTUBATEKnowing when to extubate is also an important knowledge set. In general, it is best to extubatewhen a patient is still deeply anesthetized (but with adequate spontaneous respirations) or whenthe patient is awake and responsive with stable vital signs, good grip and sustained head lift.Adequate reversal of neuromuscular blockade must be established. A patient must alsodemonstrate adequate spontaneous respiratory function with a vital capacity of greater than 15mL/kg and a negative inspiratory force of greater than 20 mm Hg. Extubation while the patient is ina light plane of anesthesia or still emerging from anesthesia is avoided because of an increased riskof laryngospasm, the most dreaded complication of extubation.Regardless of whether a patient is extubated while deeply anesthetized or awake, begin bythoroughly suctioning the patient’s pharynx and mouth in order to decrease the risk of aspiration orlaryngospasm. Also, “preoxygenate” the patient with 100% oxygen in case it becomes difficult toestablish an airway after the ETT is removed. Untape the ETT and deflate its cuff. Apply a smalldegree of positive pressure on the air bag to help blow out any secretions you may have missed onfirst suctioning and suction again. Withdraw the tube on end-inspiration or end-expiration in asingle, smooth motion. Apply a face mask to deliver 100% oxygen.DIFFICULT INTUBATIONSThe American Society of Anesthesiologists has developed an algorithm for handling difficult airways.Although each patient must be evaluated on an individual basis, conditions generally associated withdifficult intubations include:Oral/pharyngeal tumors, hemangiomas or hematomasInfections such as submandibular or peritonsillar abscesses or epiglottitisCongenital Anomalies such as Pierre Ronin Syndrome, Laryngeal atresia or craniofacial dysostosisForeign bodyFacial trauma such as laryngeal, maxillary or mandibular fracture, cervical spine injuryInhalational burn
Flexible Fiberoptic
Bronchoscopy

Lectures on Basics of practical nursing for beginners BY Dr.Rastrapati Choudhury
88
ObesityInadequate neck extension due to rheumatoid arthritis, cervical stenosis or ankylosing spondylitisAnatomic Variations such as micrognathia, prognathism, macroglossia, arched palate, short neck,prominent incisors or buck teeth.APPROACH TO THE AIRWAY IN TRAUMA PATIENTS:The A of ABCThe most immediately life threatening complication of any trauma is loss of airway patency.Maintaining oxygenation and preventing hypercarbia are critical in managing the trauma patient,especially if the patient has sustained a head injury. Thus, the first step in evaluating and treatingany trauma patient is to assess airway patency and, if compromised, restore it: the A of A (airway), B(breathing), C (circulation). Any patient who is awake, alert and able to talk has a patent airway.Whether they need supplemental oxygen can be determined by vitals and physical exam. Patientswho are unconscious or have signs suggestive of respiratory compromise, however, requireimmediate attention.All patients should be immobilized due to increased risk of spinal injury. Assessment of the patientshould be done while maintaining the cervical spine in a stable, neutral position. Begin the primarysurvey by rapidly assessing airway patency: rapidly assess for obstruction. Maintain an airway withjaw thrust or the chin lift maneuver. Clear the airway of foreign bodies. If the patient is likely tovomit, position them in a lateral and head down position to prevent aspiration. All trauma patientsshould be administered supplemental oxygen!Determine the patient’s needs. Signs and symptoms suggestive or airway or ventilator compromiseinclude: maxillofacial trauma, neck traumalaryngeal trauma (with hoarseness or subcutaneous emphysema)LOOK for: obturation agitation (which may suggest hypercarbia) cyanosis retractions/accessory muscle use symmetrical rise and fall of the chest wall
LISTEN for: abnormal breath sounds snoring Stridor (A whistling sound when breathing (usually heard on inspiration); indicates
obstruction of the trachea or larynx. crackles dysphonia symmetrical breath sounds over both hemi thoraces tachypnea
FEEL for: a deviated trachea subcutaneous emphysema The ladder of tools available for respiratory support in order of increasing invasiveness are: Nasal cannula Face mask, non-rebreather face mask Nebulizer Oral-pharyngeal airway/Nasopharyngeal airway Bag-mask ventilation Intubation – Any patient exhibiting airway symptoms (stridor, hoarseness, severe cough,
voice change) and all unconscious patients should be intubated. Endotracheal intubation isfar superior to bag-mask ventilation because it provides larger tidal volumes and preventsaspiration. Particularly in the trauma patient population – often time obtunded or

Lectures on Basics of practical nursing for beginners BY Dr.Rastrapati Choudhury
89
unconscious, with loss of or diminished gag reflexes – the prevention of aspiration is of keyimportance.
Emergency cricothyroidotomy – Two large bore needles (14 guage) needles are inserted intothe cricothyroid membrane
THE DEFINITIVE AIRWAY:A definitive airway can be:
An endotracheal tube, a nasotracheal tube, or a surgical airway (cricothyroidotomy).The need for a definitive airway is based upon a number of clinical findings:The presence of apneaInability to maintain a patent airway by less invasive meansNeed to protect the lower airway from aspiration of blood or vomitusImpending or potential airway compromise (following inhalational injury, facial fractures,retropharyngeal hematoma or sustained seizure activity)Presence of a closed head injury requiring assisted ventilationInability to maintain adequate oxygenation by face mask oxygen supplementationAny patient with a Glasgow coma score of 8 or less.In the trauma situation, the decision whether to proceed with oro-tracheal or naso-trachealintubation is based upon the experience and discretion of the supervising attending or chiefresident. Both techniques are safe and effective when performed properly. (All apneicpatients should be intubated orally).If the decision is made to proceed with orotracheal intubation, the two person techniquewith in-line cervical spine immobilization should be used.
Nasotracheal Intubation: Nasal intubation is similar to oral intubation except that the ETT isadvanced through the nose into the oropharynx before laryngoscopy. If the patient isawake, local anesthetic drops and nerve blocks can be used. A lubricated ETT is introducedalong the floor of the nose, below the inferior nasal turbinate, perpendicular to the face.The tube is advanced until it can be visualized in the oropharynx. Via laryngoscopy, the tubeis then advanced in between the abducted vocal cords.
**Nasal instrumentation (with ETTs, NPOs, or nasal catheters) is contraindicated in all patients withsevere midfacial trauma.Surgical Cricothyroidotomy: Surgical cricothyroidotomy is performed by making a skin incision thatextends through the cricothyroid membrane. The incision is dilated using a curved hemostat andsmall endotracheal tube or trachesotomy tube can be inserted. because of potential damage to thecricoid cartilage (the only circumferential support to the upper trachea, this procedure is notrecommended in children under the age of 12.
ENEMAEnema: is the introduction of fluid into rectum and sigmoid colon for cleansing, therapeutic ordiagnostic purposes.Purpose:• For emptying – soap solution enema• For diagnostic purpose (Barium enema)• For introducing drug/substance (retention enema)Solution used:1. Normal saline

Lectures on Basics of practical nursing for beginners BY Dr.Rastrapati Choudhury
90
2. Soap solution – sol. Soap 1gm in 20 ml of H2O(WATER)3. Epsom salt 15 gm – 120 gm in 1,000 ml of H2O
Mechanisms of some solutions used in enema1. Tap water: increase peristalsis by causing mechanical distension of the colon.2. Normal saline solution3. Soap solution: increases peristalsis due to irritating effect of soap to the lumenal mucosa of thecolon.4. Epsom salt: The concentrated solution causes flow of ECF (extra cellular fluid) to the lumencausing mechanical distension resulting in increased peristalsis.Enema Classified into:• Cleansing (evacuation)• Retention• Carminative• Return flow enemaCleansing enema Kinds:1. High enema Is given to clean as much of the colon as possible The solution container should be 30-45 cm about the rectum
2. Low enema Is administered to clean the rectum and sigmoid colon only
Guidelines:Enema for adults are usually given at 40-43oc and for children at 37.7 ocHot – cause injury to the bowel mucousCold – uncomfortable and may trigger a spasm of the sphincter muscles
The amount of solution to be administered depends on: Kind of enema The age of the person and The person’s ability to retain the solution
Age Amount 18 month 50-200 ml 18 mon-5 yrs 200-300 ml 5-12 yrs 300-500 ml 12 yrs and older 500-1,000 ml
The rectal tube should be appropriate: is measured in French scaleAge SizeInfants/small child 10-12 FrToddler 14-16 Fr

Lectures on Basics of practical nursing for beginners BY Dr.Rastrapati Choudhury
91
School age child 16-18 FrAdults 22-30 Fr
Purpose To stimulate peristalsis and remove feces or flatus (for constipation) To soften feces and lubricate the rectum and colon To clean the rectum and colon in preparation for an examination. E.g. Colonoscopy To remove feces prior to a surgical procedure or a delivery For incontinent patients to keep the colon empty For diagnostic test E.g. before certain x-ray exam – barium enema Before giving stool
specimen for certain parasitesProcedure Inform the patient about the procedure Put bed side screen for privacy Attach rubber tube with enema can with nozzle and stop cock or clamp Place the patient in the lateral position with the Rt. leg flexed, for adequate exposure of the
anus (facilitates the flow of solution by gravity into the sigmoid and descending color, whichare on the side
Fill the enema can which 1000 cc of solution for adults Lubricate about 5 cm of the rectal tube – facilities insertion through the sphincter and
minimizes trauma Hung the can = 45 cm from bed or 30 cm from patient on the stand Place a piece of mackintosh under the bed � Make the tube air free by releasing the clamp and allowing the fluid to run down little to
the bed pan and clamp open – prevents unnecessary distention Lift the upper buttock to visualize the answer Insert the tube 7-10 cm in an adult smoothly and slowly 5-7.5 cm in the child 2.5-3.75 cm in an infant Raise the solution container and open the clamp to allow fluid to flow Administer the fluid slowly if client complains of fullness or pain stop the flow for 30” and
restart the flow at a slower rate – decreases intestinal spasm and premature ejection of thesolution
Do not allow all the fluid to go as there is a possibility of air entering the rectum or when theclient can not hold anymore and wants to defecate, close the clamp and remove the rectaltube from the anus and offer the bed pan.
Remove bed pan and clean the rectal tubeNote: if resistance is encountered at the internal sphincter, ask the clients to take a deep breath,
then run a small amount of solution (relaxes the internal anus sphincter)Retention EnemaAdministration of solution to be retained in rectum for short or long periodAre enemas meant for various purpose in which the fluid usually medicine is retained in rectum forshort or long period– for local or general effectsE.g. oil retention enemaAntispasmodic enema1. Principles:
Is given slowly by means of a rectal tubeThe amount of fluid is usually 150-200 ccCleansing enema is given after the retention time is over

Lectures on Basics of practical nursing for beginners BY Dr.Rastrapati Choudhury
92
Temperature of enema fluid is 37.4 c or body (Return flow Enema) Harris fluidPurpose To supply the body with fluid. To give medication E.g. stimulants – paraldehyde or antispasmodic. To soften impacted fecal matter. Other equipment is similar except that the tube for retention enema is smaller in width.
Procedure Similar with the cleansing enema but the enema should be administered very slowly and
always be preceded by passing a flatus tubeNote Most medicated retention enema must be preceded by a cleansing enema. A patient must
rest for ½ hrs before giving retention enema Elevate foot of bed to help patient retain enema The amount of fluid is usually 150-200 cc Temperature of enema fluid is 37.4 oc or at body Kinds of solution used to supply body with fluid are plain H2O, normal saline, glucose 5%
soda bicarbonate 2-5% Olive oil 100-200 cc to be retained for 6-8 hrs is given for server constipation
Rectal Washout (Siphoning Enema)(Colon irrigation or colonic flush)- Also called enterolysis- Is the process of introducing large amount of fluid into large bowel for flushing purpose and allowreturn or wash out fluidPurpose To prepare the patient for x-ray exam and sigmoidoscopy To prepare the patient for rectum and color operation

Lectures on Basics of practical nursing for beginners BY Dr.Rastrapati Choudhury
93
Solution Used Normal saline Soda-bi-carbonate solution (to remove excess mucus) Tap water KMNO4 sol. 1:6000 for dysentery or weak tannic acid Tr. Asafetida in 1:1000 to relieve distention
Procedure Insert the tube like the cleansing enema The client lies on the bed with hips close to the side of the bed (client assumes a right side
lying position for siphoning) Open the clamp and allow running about 1,000 cc of fluid in the bowel, then siphoning back
into the bucket Carry on the procedure until the fluid return is clear
Note: The procedure should not take > 2 hrs Should be finished 1 hr before exam or x-ray – to give time for the large intestine to absorb
the rest of the fluid

Lectures on Basics of practical nursing for beginners BY Dr.Rastrapati Choudhury
94
Give cleansing enema ½ hr before the rectal wash out Allow the fluid to pass slowly Amount of solution 5-6 liters or until the wash out rectum fluid becomes clear
Return flow enemaThe recommended position for the patient during enema administration is lying in the left lateralposition with their right leg flexed as much as possible.Use a solution at a temperature of 105o to 110oF in adults and 100oF in children. Cool solutions willincrease the incidence of cramping.Alternately rise the enema container 12-18 inches above the rectum for an adult and administerapproximately 200 ml of fluid, then lower the container 12-18 inches below the patient's rectumuntil no further flatus is seen.Passing a Flatus TubePurpose To decrease flatulence (severe abdominal distention) Before giving a retention enema
Procedure Place the patient in left. Lateral position Lubricate the tube about 15 cm Separate the rectum and insert 12-15 cm in to the rectum and tape it Connect the free end to extra tubing by the glass connector The end of the tube should reach the (tape H2O) solution in the bowel The amount of air passed can be seen bubbling through the solution (a funnel may be connected to free end of tube and placed in an antiseptic solution in
bowel) Teach client to avoid substances that cause flatulent Leave the rectal tube in place for a period or no longer than 20 minute – can affect the
ability to voluntarily control the sphincter if placement is prolonged Reinsert the rectal tube every 2-3 hrs if the distention has been unrelieved or re-
accumulates, allows gas to move in the direction of the rectum.
PREPARE PATIENT FOR SURGERY AND POST OPERATIVE MANAGEMENT
PERI OPERATIVE NURSING CARE (PRE & POSTOPERATIVE NURSINGCARE)Learning objectives: List steps in pre operative preparation. Identify the high-risk surgical patients. Describe the major assessment skills, needed in the pre operative, intra operative, and
postoperative stages. Explain the purpose of informed consent. Perform general postoperative measures such as: obtaining vital sings, assessing level of
consciousness, assessing surgical pain. Report and document post operative complication. Assess for patient air way.
Key terminologyAnesthesia hypothermia postoperativeAtlectasis hypoxia preoperativeElective intraoperative sutureEmbolus preoperativeevisceration pneumonia
Lectures on Basics of practical nursing for beginners BY Dr.Rastrapati Choudhury
95
Preoperative Care – Nursing ProcessAssessmentAssessment Priorities Nursing history Client’s understanding of the proposed surgical procedure Past experiences with surgery Fear (fear of unknown, fear of pain or death, fear of change of body image or self concept) Factors that increase surgical risk or the potential for post operative complications. Adequacy of coping patterns and support systems. Pertinent socio cultural factors. Vital signs the morning of surgery, (any deviation should be reported) Accurate height and weight, especially for children General systems review Results of all preoperative diagnostic tests recorded
Possible Nursing Diagnosis Anxiety Ineffective coping Decisional conflict Fear Anticipated grieving Difficult knowledge Powerlessness
Planning/ObjectivesPrior to surgery, the client: Demonstrates physical preparedness for surgery (absence of significance deviations from
normal in vital signs, no signs of infection). Verbalize any concerns or fears related to the surgery. Provides informed consent for the surgery. Correctly demonstrates how to turn, deep breath, use equipment. Verbalizes understanding of post operative pain management program. Verbalizes understanding of post operative activity plan. Demonstrate the present of
adequate caregivers at home after discharge.Implementation
Establish a supportive and trusting nurse-client relationship.Develop and implement a teaching plan that:
familiarizes the client and family with what to expect on the day of surgery. prepares the client to participate in the pain management program. Counsel the client and family about helpful coping strategies and available
resources. Maintain nutrition and hydration, if the client is NPO, for 8 to 12 hours prior to
surgery, ensure that the client understands the reason for this restriction, andremove all food and fluid from bed side.
Evaluate the client’s bowel status and determine the need for an order of bowelelimination.
Cary out preoperative skin and hygiene orders. Facilitate sleep and rest in the immediate preoperative period.
EvaluationDetermine the adequacy of the plan of care by evaluating the client’s achievement of the precedinggoals.

Lectures on Basics of practical nursing for beginners BY Dr.Rastrapati Choudhury
96
Key evaluative criteria:Client’s physical preparedness for surgery.Client’s mental preparedness for surgery.Client’s understanding of and ability to participate in care post operatively. Aneventful course of recovery.
Pre-operativePurpose To prepare the patient emotionally, mentally and physically for surgery. To prevent any complication before, during and after surgery.
Equipment: -->>as necessary. It is important that the patient be in a good state of physical health before he has surgery.Unless it is an emergency operation. He should have balanced diet, fluid, sleep and rest before his surgery. The patient’s mental state is important to his recovery. Try to relieve his fears about theoperation and any fear of death: explain to him what will be done and that every measure will betaken for his safety.
ProcedureThe day before surgery:
Physical preparationGive the patient a complete bed bath to keep the body clean before surgery. Give specialattention to the umbilicus and other areas of the body. Keep the fingernails and the nails ofthe toe short and clean.Be sure the patient’s hair is clean. If the surgery is on the face, neck, shoulders or upperchest, the hair should be the thoroughly washed, combed and tied up to keep it fromtouching the operative area. If the surgery is on the head the area must be shaved and thehair washed. • If an enema has been ordered, give the night before surgery. Be sure this isgiven and is effective. Chart the results.
Psychological preparationIf the patient does not yet understand what will be done. Explain briefly what the operationis and how it will help him. Avoid telling him anything that would make him worry.It is important that the patient has a good sleep the night before his operation. Make himcomfortable and turn out the light in his room early. If he is unable to sleep report to thedoctor.Have patient or relative sign consent for the operationInstructs patient about deep breathing and cough exercise
Day of Surgery: If the surgery is in the morning be sure the patient is prepared early. Anything abnormal
such as pain, fever cough rapid pulse or elevated blood pressure must be reportedimmediately. The surgery may have to be canceled or delayed until the patient is well.
If the surgery is in the morning, nothing should be taken by mouth after midnight (N.P.O.) ifthe surgery is in the afternoon. fluids and food should not be taken in the morningdepending on the orders
Check the cleanliness of body areas, umbilicus, nails and hair. Shave the hair from the skin of the operative area thoroughly. Someone should check to see
if all the hair has been removed. Wash the skin well with soap and water before and aftershaving.
Cheek the orders for preoperative treatment, such as enema, catheterization of follycatheter.

Lectures on Basics of practical nursing for beginners BY Dr.Rastrapati Choudhury
97
The patient’s temperature, pulse, respirations and blood pressure should be taken andrecorded on the chart just before surgery.
Give the premeditation as ordered, being careful to give the tight amount at the right timeto the right patient and record.
Just before surgery Have the patient void, if he is unable to void inform the doctor. Assist patient to move to the stretcher. The patient may be very sleepy or dizzy from the
preoperative medications and may hurt himself. Support the stretcher to keep it from rollingas the patient moves onto it.
Make sure his elbows are close to his sides or over his chest prevent them from beingpumped as the stretcher passes through doorways.
Reassure him as you take him to the operating room Make sure the chart is complete and take to the theater with the patient.
ShavingPurpose To minimize the danger of infection by decreasing the number of bacteria on the skin.
Equipment Basin of warm water Washcloth Towel Soap Blade and razor holder, if available Scissors Rubber sheet and towel
Procedure Prepare the equipment and bring it to the bedside. Fold the top linen and cover the patient with the bath blanket (if available) Screen bed Make the patient comfortable in the best position for the procedure. Place the rubber sheet and towel under the part to protect the bed linen. Wash the area well with soap and water. Leave the soap on the area while you have. When all the hair has been shaved off, rinse the skin with clear water. (If hair is long it could
be shortened before shaving) Wash it again with soap, and water. Use enough soap to make lather. Be sure to wash all creases and folds very well. Rinse with clean water Repeat washing until the area is clean. Dry the skin well and examine it to see if bed linen. Make the patient comfortable and replace the bed linen.
Specific Area to be shaved:Head Operations
Explain the reason for having the head to the patientIf the hair is long, it must be cut shortWash the head and hair wellShave the area of the operation as directed. If it is a major operation, the whole head shouldbe shaved.
Eye Operation

Lectures on Basics of practical nursing for beginners BY Dr.Rastrapati Choudhury
98
Cut the eyelashes as close as possible on both sides.Use some Vaseline on the blades of the scissors before you begin to prevent the eyelashesfrom falling into the eye.Shave the eyebrows on both sides if ordered only.Be very careful not to injure the eye or let any hair fall into the eye.
Face OperationShave the site of the operation will beIf the patient is a man, make sure that the face is completely free from beard.Wash faceBe careful not to get soap into the patient’s eyes.
Anterior Neck Operations:Wash the patient’s head and neckIf the patient is a woman, tie her hair, and keep it away from her neck, or cut it short.Shave the front and sides of the neck from the chin to the end of the sternum, and out tothe shoulders.The area must be clean.
Posterior Neck Operations:The head and neck should be washed. Cut the hair short or tie out of the way.Shave at least 15cm. and around the place of incision.
Spinal-OperationsAsk the doctor where the site of operation will beShave at least 15-25cm. all around the area of incision.
Breast OperationsShave the anterior and posterior chest from neck to the waist line on the side where thesurgery will beShave the axilla on that side and the arm as far down as the elbow.
Kidney OperationsTurn the patient on his side with the operative side upward.Shave from the sternum to the groin and across the side the same width up to the spinalcolumn.Shave the axilla on that operation is a long one, so a large area must be prepared.
Abdominal operationsShave the whole abdomen from the end of the sternum down to the pubes.The umbilicus must be clean
Perennial and Rectal OperationsThe pubic and perinea hair must be shaved from the pubes to the anal area.Shave at least 15 cm. down the inside of the thighs both sides
Limb OperationsThe whole limb should be washed wellShaved at least 15 cm all around the operative area.If the operation is on the upper arm or the upper leg. Theaxilla or perineum should be shaved as well.If the operation is near the hand or foot cut the nails very short and clean them well.
Intra-operative Nursing CareObserving a client undergoing surgery may be a component of a nursing student’s experience. Doingso will not only give the student a better idea of surgical procedures, but it will also help inunderstanding the client’s feelings and apprehensions. Special training mostly given in techniqueand anesthesia. Nurses assist surgeons in the operating room.

Lectures on Basics of practical nursing for beginners BY Dr.Rastrapati Choudhury
99
The two basic categories of assistant are the sterile assistant and the circulating assistant.The sterile assistant (scrub nurse)
o is scrubbed, gowned and gloved. He/she functions within the sterile field. Dutiesinclude handling instruments to the surgeon, threading needles, cutting sutures,assisting with retraction and suction, and handling specimen.
The circulating nurseo Works outside the sterile field. Duties include opening sterile packs, delivering
supplies and instruments to the sterile team, delivering medications to sterile nurse,labeling specimens, and keeping records during the surgical procedure.
o This person acts as a client advocate by monitoring the situation and maintainingsafety in the operating room. In most cases, the circulating nurse must be registerednurse.
Post- operative CarePurpose To prevent any complication from anesthesia To detect any sign of post- operative complications To rehabilitate the patient.
Equipment Anesthetic bed Oxygen Sphygmomanometer Stethoscope Suction machine (as needed) Extra rubber sheet (as needed) I.V stand Emergency drugs (to be ready in wards) Bed blocks (as needed) for shock
Procedure Prepare anesthetic bed (see section on bed making) Assist operating room nurse in placing patient in bed. An unconscious patient may be placed
on either his right or left side unless specified Check post- operative orders and adjust flow of drip of IV fluid. Take blood pressure, pulse and respiration as ordered (usually every 15 minutes until stable) Encourage patient cough and breathe deeply every 15 minutes for two hours, and then
every two hours until able to be up, unless other orders are written. Check dressing for any excessive bleeding or drainage. Check for tubes to be connected to drainage bottle- no kinks in tubing. Secure tubing with
bedding. If patient vomits, turn his head to the side to prevent aspiration and chocking. Observe patient closely for any signs of shock and hemorrhage. Report any untoward symptom immediately.
Charting and Time of returnGeneral condition and appearance State of consciousness Color of skin Temperature of skin to touch Skin- moist or dry Blood pressure, plus and respiration Any unusual condition such as bleeding drainage,Vomiting etc.
Generals Instructions

Lectures on Basics of practical nursing for beginners BY Dr.Rastrapati Choudhury
100
If patient shows any signs of shock immediate action should be taken and then be reportedto the doctor. The head of the bed should be lowered (If no gatches on bed, bed blocks maybe used)
Do not leave unconscious patient alone. Keep patient flat in bed with the head to the side (no pillows) and avoid chilling. Watch color of skin, lips, and fingernails carefully, If there is any bleeding carry out the necessary measures and report immediately. The patient is having pain after he is awake. Analgesics may be given according to orders. Limit visitors in the patient’s room Carry out post-operative orders carefully Place patient in a comfortable position
Post-operative Care of Specific SurgeriesBrain Surgery Patient must lie on his back without pillows unless ordered otherwise. Room should be dark and quit to prevent irritation to the brain.
Breast Surgery Encourage deep breathing often, because of danger of pneumonia Special arm exercises should be given
Abdominal Surgery Encourage deep breathing Turn from side to side often Sit patient on edge of bed 1st day postoperatively and Start walking second day post operatively (unless contraindicated) Intake and output should be recorded If gastric suction is present make sure it is working properly Frequent mouth care for patients who are not allowed to drink.
Eye Surgery Must lie very still because the incision and sutures can be damaged by pulling on the eye
muscles. Both eyes may be covered. Room may be quiet and dark Patient must be fed.
Spinal Surgery Must lie on abdomen of back with bed flat, and supported by fracture board mattress. Patient may be in a body cast. Care must be given to prevent bed scares where the cast rubs.
Thyroidectomy Place in high lowers position. This will make it easier to breathe since the pressure of
dressing and swelling may give choking feeling. An emergency tracheotomy set should always be at the bedside or nurses office for first
three days, in case of hemorrhage or swelling trachea. The complication “Thyroid crisis” must be reported immediately as death can occur if
condition is not treated quickly.
TonsillectomyChild
Lie on abdomen or side to prevent blood drainage into throat, lunge or stomach. Watch carefully for excessive bleeding.
Adult If conscious, he may sit in semi- fowler’s positron in order to spit the blood more
easily. Watch carefully for excessive bleeding.

Lectures on Basics of practical nursing for beginners BY Dr.Rastrapati Choudhury
101
INHALATION OXYGEN DELIVERYInhalationDefinition: Inhalation is the act of drawing in of gas vapor or steam into the lungs for therapeuticpurposes it could be in dry, moist or vapour form.Oxygen Administration:PurposeTo provide and maintain a normal supply of o2 for blood, and tissues.o2 may be administered in three ways.1. By mask2. Nasal Catheter3. Tent.

Lectures on Basics of practical nursing for beginners BY Dr.Rastrapati Choudhury
102
1. Giving O2 by maskThere are many kinds of masks used for O2 administration theCommon ones are:1. The venture mask2. The B.L.B. masks (Boothby. Lovelace & Bulbulain)The venture mask gives a controlled amount of O2 i.e. it is not high to cause respiratory depression& it is sufficient to relieve anoxia. It gives 24-35% of O2. The B.L.B mask provides an oxygenconcentration of 90% with the flow meter set at 7 liters/minute. This kind of mask allows the patientto eat, drink and to expectorate. If the patient cannot breath through his nose, the B.L.B maskshould not be used.
Oxygen Face mask

Lectures on Basics of practical nursing for beginners BY Dr.Rastrapati Choudhury
103
Equipment A cylinder of O2 with a reducing value and pressure tubing to be connected with the O2
cylinder. Mask Safety pin to secure the tubing to the bed linen Tissue paper to clean the nostrils with. If the patient is unconscious, a tray containing a
galipot of saline or water, wooden applicator and receiver for soiled applicator is necessaryin order to clean the nostrils
Procedure The adjustment is turned on before bringing the cylinder to the bedside. Explain treatment to pt. Bring equipment to the bedside Ask him to clean his nostril to avoid obstruction (if well enough) Connect the mask to tubing and open the fine adjustment to the required rate of flow. Then
apply the mask to the patient's face making sure that it rests comfortably on the pt's face.See that the tubing is secured to the bed linen by means of safety pin. Stay with the patienttill he is reassured if it is his first time to be on oxygen therapy.
2. Giving oxygen by nasal catheter.There are different kinds of catheters, A fine catheter A spectacle frame, which carries two, places of rubber tubing and is worn by the pt.
Lectures on Basics of practical nursing for beginners BY Dr.Rastrapati Choudhury
104
Two soft rubber catheters connected by y- shaped connection to the tube on O2 apparatus.Equipment Oxygen cylinder with regulating valve and pressure tubing Wolf’s bottle Glass connection Fine catheters, lubricant, plaster Safety pin Tray containing a galipot of saline or water. Receiver for soiled applicators.
Procedure Procedure is the same as giving oxygen by mask: (Procedure 1-4) Connect the fine catheter with the pressure tubing. Turn on the fine adjustment to the
required rate of flow the maximum liter flow being 6-7 litter /minute. Catheter is lubricated preferably with water and passed backward into pharynx till the tip of
the catheter is opposite the uvula. The catheter can also be inserted by measuring thedistance from the patient's nose to his ear lobe. It is then taped in place. Never forcecatheter against an obstruction.
Note:Oxygen catheter are removed every 8 hrs. and a clean catheter is inserted into the other nostril. Apatient receiving oxygen by catheter requires special mouth and nose care since the catheter tendsto irritate the mucous membrane. Oxygen dries and irritates mucous membrane, therefore, shouldbe passed through water (Humidified) before it is administered by catheter. The advantage ofadministration of oxygen by catheter is the freedom of movement that it gives to patients receivingoxygen. By this method patient can obtain about 50% concentration of oxygen.3. Oxygen tentPurpose: To keep patient in high oxygenation environment. Whenever the other means are not possible.
Equipment Transparent oxygen tent and its apparatus fitted with oxygen Ice if the apparatus is without refrigerator device. Hanger for the tent Room thermometer if needed No smoking sign for the unit
Procedure Remove all electrical appliances from the room as this may produce sparks. Post sign of no smoking on many places in the unit Prepare and check if the applicator is working properly. Bring the oxygen unit to the bedside and fix the tent on the hanger. Close all appliances of the tent: place ice if the apparatus is without refrigeration device. Tuck the side of the hold of tent under the mattress as far as they will go. Fill the tent with 12-15 liters of oxygen 40-60% concentration for the first half hour. After the first half hour regulate the flow of oxygen to 6-10 liters or as ordered by the doctor
until the treatment is completed. Check temperature indicator frequently and adjust to 180C- 220C. Record state of patient and time started and the flow of the oxygen.
Precautions to be taken when Oxygen is used Oxygen supports combustion. Therefore it is essential for the patient's safety there is no
smoking within 3 meters of oxygen equipment. Lighted matches, cigarettes, electric lights,nylon clothing, electric pads, bells mechanical toys should be forbidden.
Alcohol must not be applied to the pt's skin

Lectures on Basics of practical nursing for beginners BY Dr.Rastrapati Choudhury
105
3 The catheter tip and the cylinder itself must not be lubricated with Vaseline or oil or anykind
6. Cylinders must be handled carefully as the oxygen is under pressure. 7. The fine adjustment should always be closed when the main tap is turned on. 8. Check that there is no obstacle in the pt's airway before firing oxygen in order to prevent
pt. From suffocation. 9. A rate of 2-liters/ minute is commonly used when oxygen used in case of emergency
instead of free air. In the case of asphyxia liter/min may be needed. Protect patient fromasphyxia, inspecting regularly pressure gauge and flow meter and noting pulse, respiration,color, mental state and necrosis from carbon dioxide.
Steam InhalationDefinition: It is the intake of steam alone or with medication through the nose or mouthPurpose In order to produce a local effect on the upper respiratory passage during cold, sinusitis,
laryngitis, bronchitis etc. common drugs used are frier balsam (tincture of benzoincompound, eucalyptus. Menthol, camphor)
To allay spasm e.g. Asthma, angina pectoris To increase circulation in the lungs by increasing or decreasing the secretion of the bronchi.
E.g. ammonia inhaled in cases of fainting and syncope stimulated the respiratory center andheart action.
To moisten secretions e.g. Tracheotomy
There are two Types of Inhalation1) Intermittent (interrupted) e.g. Nelson's inhaler.2) Continues method e.g. steam tent.
1. Nelson's InhalerEquipment Nelson's inhaler with the mouth piece Cover for the inhaler (blanket or towel) A bowl or saucepan to carry the inhaler Face towel to wipe the face as patient required Gauze can be use around the mouthpiece to prevent burning of the lips. A tray. Large enough, to carry the inhaler to take it to the bedsides. A measuring jug with water which is 820C The drug ordered might be eucalyptus, tincture of benzene (about 4 cc).
Procedure Inhaler should be warmed and glass mouthpiece boiled Measure the drug as ordered. Both point in the graduate measure 90 cc of cold water and
500 cc of boiled water to bring the temperate 820c or half by half or pour half point (300cc) of boiling
water into the inhaler than 5 cc of tincture of benzene or any other drug ordered. Then add 300 cc water making sure that the temperature of water in the inhaler comes to
820C. This Is done in order to have a good mixture of the drug. The level of the fluid should not be
above the spout. Fix the mouthpiece firmly in the inhaler in direction opposite to the air inlet and cover the
inhaler with blanket or towel Close windows. Prepare the patient usually in a sitting - up position making sure that he/she is well
supported.

Lectures on Basics of practical nursing for beginners BY Dr.Rastrapati Choudhury
106
Then put inhaler on a saucepan on the tray. Place the tray on the over- bed table or on his knees in such a way that he can bend over the
inhaler easily. Put the spout for the escape of steam away from him. Cover his head with blanket. Tell the patient to breath in by putting his lip to the mouth piece which may be protected by
a piece of gauze, and breath out by removing his lips for a moment from the mouth piece The treatment can take from 5-10 minutes after which the patient should be kept warm and
comfortable for some time.N.B: If a Nelson's inhaler is not available a wide- mouthed jug may used. The patient should be
covered up to the waist with a balance from a canopy, or the mouth of the jug may becovered with a towel to make the opening small enough for the patient to put his nose andmouth (not eyes) on it.
for irrational, helpless patients, stay with them throughout the procedure. Report the amount and nature of any sputum or discharge.
Care of Equipment after use Pour out the water from the inhaler (not onto a sink) Wash the inhaler with hot water Boil the mouth piece
SAMPLE COLLECTIONSPECIMEN COLLECTIONSpecimen CollectionSpecimen collection refers to collecting various specimens (samples), such as, stool, urine, blood and
other body fluids or tissues, from the patient for diagnostic or therapeutic purposes. Varioustypes of specimen collected from the patient in the clinical settings, either in outpatientdepartments (OPD) or in-patient units, for diagnostic and therapeutic purposes. Theseincludes, stool, urine, blood and other body fluid or tissue specimens.
General Considerations for Specimen CollectionWhen collecting specimen, wear gloves to protect self from contact with body fluids.
Get request for specimen collection and identify the types of specimen being collected andthe patient from which the specimen collected.Give adequate explanation to the patient about the purpose, type of specimen beingcollected and the method used.Assemble and organize all the necessary materials for the specimen collection.Get the appropriate specimen container and it should be clearly labeled have tight cover toseal the content and placed in the plastic bag or racks, so that it protects the laboratorytechnician from contamination while handling it. The patient's identification such as, name, age, card number, the ward and bed
number (if in-patient). The types of specimen and method used (if needed). The time and date of the specimen collected.
6Put the collected specimen into its container without contaminating outer parts of thecontainer and its cover.
All the specimens should be sent promptly to the laboratory, so that the temperature and timechanges do not alter the content.A. Collecting Stool SpecimenPurpose

Lectures on Basics of practical nursing for beginners BY Dr.Rastrapati Choudhury
107
For laboratory diagnosis, such as microscopic examination, culture and sensitivity tests.
Equipments required Clean bedpan or commode Wooden spatula or applicator Specimen container Tissue paper Laboratory requests Disposable glove, for patients confined in bed Bed protecting materials Screen
Procedurei) For ambulatory patientGive adequate instruction to the patient to
Defecate in clean bedpan or commode (toilet)Avoid contaminating the specimen by urine, menstrual period or used tissue papers,because these may affect the laboratory analysis.Void before collecting the specimenTransfer the sample (specimen) to the container using spatula or applicator
ii) For patients confined in bed1. Prepare the patient's unit
Provide privacy by drawing screen, closing windows and doors (To provide privacy)2. Prepare the patientPut on glovesPosition the patientPlace bed protecting materials under the patient's hipsAssist the patient and place the bed pan under the patient's buttocks (follow the steps under "Givingand removing bedpan")Give patient privacy by leaving alone, but not farInstruct the patient about how to notify you when finished defecation.Remove the bedpan and keep on safe place by covering itRecomfort the patient3. Obtain stool sample
Take the used bedpan to utility room/toilet container using spatula or applicator withoutContaminating the outside of the container.The amount of stool specimen to be taken depends on the purpose, but usually takes.3.5 gm sample from formed stool15.30 ml sample from liquid stoolVisible mucus, pus or blood should be included into sample stool specimen taken.
4. Care of equipments and the specimen collected.• Handle and label the specimen correctly• Send the specimen to the laboratory immediately, unless there is an order for its handling.Becausefresh specimen provides the most accurate results.• Dispose the bedpan's content and give proper care of all equipments used.5. Documentation and reportB. Collecting Urine SpecimenTypes of urine specimen collection1. Clean voided urine specimen (Also called clean catch or midstream urine specimen)2. Sterile urine specimen3. Timed urine specimen

Lectures on Basics of practical nursing for beginners BY Dr.Rastrapati Choudhury
108
It is two typesShort period → 1-2 hoursLong period → 24 hours
PurposeFor diagnostic purposes
Routine laboratory analysis and culture and sensitivity testsEquipments Required Disposable gloves Specimen container Laboratory requisition form (Completely filled) Water and soap or cotton balls and antiseptic solutions (swabs). For patients confined Urine receptacles (i.e. bedpan or urinals) Bed protecting materials Screen (if required)
Procedurei) For ambulatory patients give adequate instruction to the patient about The purpose and method of taking specimen Assist the patient to move to the toilet
ii) For patient confined in bed1. Prepare the patient unit providing privacy2. Prepare the patient Put on gloves Place bed protecting materials under patient's hips Assist the patient to position in bed and in positioning the receptacles Assist the patient or clean the vulva or penis thoroughly using soap and water or antiseptic
swabs (Follow the steps of giving and receiving bed pan/urinal and cleaning the genitalia)3. Obtain urine specimen Ask patient to void Let the initial part of the voiding passed into the receptacle (bed pan or urinal) then pass the
next part (the midstream) into the specimen container. Hold the vulva or penis apart from the specimen container while the patient voids to
decrease urine contamination. Don't allow the container to touch body parts Collect about 30-60 ml midstream urine Handle the outside parts of the container and put on the cover tightly on specimen
container Clean the outside parts of the container with cotton if spillage occurs Remove the glove
4. Recomfort the patient5. Care of the specimen and the equipment Handle and label the container correctly Send the urine specimen to the laboratory immediately together with the completed
laboratory requested forms Empty the receptacles content properly Give appropriate care for the used equipments
6. Document pertinent data and report, such as Specimen collected, amount, time and date. Consistency of the urine Patients experience during voiding
Lectures on Basics of practical nursing for beginners BY Dr.Rastrapati Choudhury
109
Collecting a Sterile Urine SpecimenSterile urine specimen collected using a catheter in aseptic techniques (The whole discussion for thisprocedure presented on the catheterization part)Collecting a Timed Urine SpecimenPurpose• For some tests of renal functions and urine compositions, such as: - measuring the level of orhormones, such as adrenocortico steroid hormone creatinine clearance or protein quantitative tests.Equipments Required• Urine specimen collecting materials (usually obtained from the laboratory and kept in the patient'sbathroom.)• Format for recording the time, date started and end, and the amount of urine collected on eachpatient's voiding during the specified period for collection.Procedure1. Patient preparation• Adequate explanation to the patient about the purpose of the test, when it begins and what to dowith the urine• Place alert signs about the specimen collection at the patient's bedside or bathroom.• Label the specimen container to include date and time of each voiding as well as patient'sidentification data• Containers may be numbered sequentially (e.g. 1st, 2nd, 3rd etc) in case of 24-hours urinecollection.2. Collecting the urine• Usually it begin in the morning• Before you begin the timing, the patient should void and do not use this urine (It is the urine thathas been in the bladder some time)• Then all urine voided during the specified time (e.g. the next 24 hours) is collected in the container• At the end of the time (e.g. 24 hours period) the patient should void the last specimen, which isadded to the rest.• Ensure that urine is free of fecesC. Collecting sputum specimenSputum is the mucus secretion from the lungs, bronchi and trachea, but it is different from saliva.The best time for sputum specimen collection is in the mornings up on the patient’s awaking (thathavebeen accumulated during the night). If the patient fails to cough out, the nurse can obtain sputumspecimen by aspirating pharyngeal secretion using suction.PurposeSputum specimen usually collected for:• Culture and sensitivity test (i.e. to identify the microorganisms and sensitive drugs for it)• Cytological examination• Acid fast bacillus (AFB) tests• Assess the effectiveness of the therapyEquipments Required• Disposable gloves• Specimen container• Laboratory requisition form• Mouth care (wash) trayProcedure1. Patient preparation• Before collecting sputum specimen, teach pt about the difference between sputum and saliva,how to cough deeply to raise sputum.

Lectures on Basics of practical nursing for beginners BY Dr.Rastrapati Choudhury
110
• Position the patient, usually sitting up position and splinting may help. Also postural drainage canbe used.• Give oral care, to avoid sputum contamination with microorganisms of the mouth. Avoid usingtoothpaste because it alters the result.2. Obtain sputum specimen• Put on gloves, to avoid contact with sputum particularly if hemoptysis (blood in sputum) present.• Ask pt to cough deeply to raise up sputum• Take usually about 15-30 ml sputum• Ask pt to spit out the sputum into the specimen container• Make sure it doesn't contaminate the outer part of the container. If contaminated clean (wash)with disinfectant• Cover the cape tightly on the container3. Recomfort the patient• Give oral care following sputum collection (To remove any unpleasant taste)4. Care of the specimen and the equipments used• Label the specimen container• Arrange or send the specimen promptly and immediately to laboratory.• Give proper care of equipments used5. Document the amount, color, consistency of sputum, (thick, watery, tenacious) and presence ofblood in the sputum.
D. Collecting Blood SpecimenThe hospital laboratory technicians obtain most routine blood specimens. Venous blood is drawn formost tests, but arterial blood is drawn for blood gas measurements. However, in some settingnurses draw venous blood.PurposeSpecimen of venous blood are taken for complete blood count, which includes• Hemoglobin and hematocrit measurements• Erythrocytes (RBC) count• Leukocytes (WBC) count• Differential counts and so many biochemical tests.Equipment• Sterile gloves• Tourniquet• Antiseptic swabs• Dry cotton (gauze)• Needle and syringe• Specimen container with the required diluting or preservative agents, for example: anticoagulant.• Identification/ labeling: name, age address, etc.• Laboratory requisition formsProcedure1. Patient preparation• Instruct the pt what to expect and for fasting (if required)• Position the pt comfortably2. Select and prepare the vein sites to be punctured• Put on gloves• Select the vein to be punctured. Usually the large superficial veins used such as, brachial andmedian Cubital veins.• Place the veins in dependent positions• Apply tourniquet firmly 15-20 cm about the selected sites. It must be tight enough to obstruct veinblood flow, but not to occlude arterial blood flow.

Lectures on Basics of practical nursing for beginners BY Dr.Rastrapati Choudhury
111
• If the vein is not sufficiently to dilate massage (stroke) the vein from the distal towards the site orencourage the pt to clench and unclench repeatedly.• Clean the punctured site using antiseptic swabs3. Obtain specimen of the venous to blood• Adjust the syringe and needles• Clean/disinfect the area with alcohol swab, dry with sterile cotton swab• Puncture the vein sites• Release the tourniquet when you are sure in the vein• Withdraw the required amount of venous blood specimen• Withdraw the needle and hold the sites with dry cotton (to apply pressure)• Put the blood into the specimen container• Made sure not to contaminate outer part of the container and not to distract the blood cells whileputting it into the container4. Recomfort the patient5. Care of the specimen and the equipment• Label the container• Shake gently (if indicated to mix)• Send immediately to laboratory, accompanying the request• Give care of used equipments6. Documentation and reportingObservations and Recording of Signs and Symptoms of the Patient1. Objective Symptoms (signs): Are symptoms, which could be seen by the health ersonnel?E.g. swelling, redness, rash, body discharges (defecation, diaphoresis, emesis,)2. Subjective Symptoms: Are symptoms, which are felt by the patient and explained by the patient.E.g. decrease of appetite, dizziness, deafness, burning sensation, nausea, etc3. ChartDefinition: it is a written record of history, examination, tests, diagnosis, and prognosis response totherapyPurpose of Patients Charta. For diagnosis or treatment of a patient while in the hospital (find after discharge) if patient returnsfor treatment in the future timeb. For maintaining accurate data on matters demanded by courtsc. For providing material for researchd. For serving information in the education of health personnel (medical students, interns, nurses,dietitians, etc)e. For securing needed vital statisticsf. For promoting public healthGeneral Rules for Charting• Spelling: Make certain you spell correctly• Accuracy: Records must be correct in all ways, be honest• Completeness: No omission, avoid unnecessary words or statement• Exactness: Do not use a word you are not sure of• Objective information: Record what you see avoid saying (condition better)• Legibility: Print/write plainly and distinctively as possible• Neatness: No wrinkles, proper speaking of items Place all abbreviation, and at end of statement• Composition / arrangement: Chart carefully consult if in doubt avoid using of chemical formulas• Sentences need to be complete and clear, avoid repetition• Don’t overwrite• Don’t leave empty spaces in between• Time of chartingSpecific time and date
Lectures on Basics of practical nursing for beginners BY Dr.Rastrapati Choudhury
112
• Color of inkBlack or blue (red for transfusion, days of surgery)It should be recorded on the graphic sheet all orders should be written and signed. Verbal ortelephone orders should be taken only in emergency verbal orders should be written in the ordersheet and signed on the next visit.Orders of Assembling Patients Charta. History sheetb. Personal and social datac. Order sheetd. Doctor’s progress notese. Nurses notesf. Vital sign sheet (graphics)g. Intake and output recording sheeth. Laboratory and other diagnostic reports• Patients or relatives and friends of patients are not allowed to read the chart when necessary butcan have access if allowed by patient.4. Intake and out puta. Intake: all fluids that is taken in to the body through the mouth, NG tube or parentallyb. Output: all fluid that is excreted or put out of the body through the mouth. N/G tube, urethra,drainage tube or other route (GI-diarrhea, vomiting).Purpose:• To replace fluid losses• To provide maintenance requirements• To check for retention of body fluidFluid balance sheet♦ 24 hrs the intake output should be compared and the balance is recorded Positive balance if intake >output Negative balance if output >intake
____________________________________________________________
FLUID & ELECTROLYTE BALANCE & ARTERIAL BLOOD GASSESA. Fluid, electrolyte and Acid base balanceI. Fluid & Electrolyte Balance

Lectures on Basics of practical nursing for beginners BY Dr.Rastrapati Choudhury
113
Normal body function depends on a relatively constant volume of water and definite concentrationof chemical compounds (electrolyte).Water – is the most essential nutrient of life. 60-65% of the body weight is water and no physiologycan function without it.Electrolyte – is a compound that dissociate in a solution to break up in to separate electricallycharged particles (ions) – cation, anionsDistribution of Body Water in AdultBody water is contained within two major physiological reservoirs (compartments).1. Intracellular fluid � about 40% of body weight (25 liter)2. Extra cellular fluid � about 20% of body weight (20 liters) in which:a) 5 liter in intra vassalb) 15 liter interistissual – tissue space the space between blood and the cells. A part from this theextra cellular fluid contains other fluids, which are usually negligible, considering their concentrationinthe body. These are CSF, ocular fluid, synovial fluid, pleural fluid, and pericardial fluid, peritonealfluid.Water BalanceNormal body water is in a dynamic state. There is constant loss and constant replacement. i.e.,intake is equal to output.Electrolyte Composition of the FluidElectrically charged particles act as a conductor of electrical current in the solution. E.g. NaClNa+ + Cl-Intracellular fluid and extra cellular fluid are separated by cell membrane, which is semi permeable.Body fluid composed of water, electrolyte, and non-electrolyte. The difference is maintained by thecells, which actively reject certain electrolytes, and retain others. E.g. Na+ is reach higher inconcentration in extra cellular fluid. The difference is maintained by cellular action referred assodium pump, which reject sodium from the cells. The major ions of cellular fluid in order of theirquantity are:ICF ECFK+ 141 M Eq/L 4 M. Eq/LMg++ 58 M Eq/L 2 M. Eq/LPo4++ 75 M Eq/L 10 M. Eq/LNa+ 10 M Eq/L 142 M. Eq/LCl+ 4 M Eq/L 103 M. Eq/LTransport Mechanism of Electrolyte1. Osmosis2. Diffusion3. Active transport (Na and K pump)4. Filtration5. Phagocytosis6. PincytosisSubstances are transported between cellular and extracellular fluids between biological membranes.These transport mechanisms are mentioned above.Osmolality – refers to the concentration of active particles per unit of solution. Two opposing forcesexist within the vascular compartment. These are:1. Hydrostatic pressure of the blood which forces fluid out through semi permeable membrane2. Osmotic pressure of the blood protein (colloid osmotic pressure) – which is pulling or holdingforce opposing the flow of fluid across the vascular membrane When blood enter the arteriole andthe capillaries hydrostatic pressure is greater than osmotic pressure and fluid filters out of thevessels. The movement of fluid out of the vessel is facilitated also by negative hydrostatic pressure –sucking fluid from plasma and the osmotic pressure in the interistissual space. The result of the force

Lectures on Basics of practical nursing for beginners BY Dr.Rastrapati Choudhury
114
that promotes the movement of fluid through the capillary is the sum of positive out ward pressurefrom within the capillaries and the negative hydrostatic pressure and the osmotic pressure in theinterstitial spaces. E.g.
Intracapillary hydrostatic pressure (ICHP),Plasma osmotic pressure (POP).Negative interstitial hydrostatic pressure (Int.-H.P)Interstitial Osmotic Pressure (Int.O.P)
At arterial end of capillaries, there is outward force =ICHP – POP + Int.H.P – Int.O.P=30 - 28 + 6 – (-5.3) = 13.3At the venous end: POP – CHP + Int.H.P – Int.O.P = 28 – 10 + 6 – (-5.3)= 6.7In extracellular fluid the principal osmotic forces are exerted by Sodium and chlorine ions.Potassium, magnesium and phosphorous are mainly responsible for osmotic pressure within thecells. Effect of osmosis as applied to different extracellular soluteConcentration will give isotonic, hyper tonic and hypotonic solution. When all contributions toosmolality are summed the total serum osmolality ranges from 275 mOsm/kg to 290 mOsm/kg.Solutions can be categorized according to how their osmolality compared with that of extracellularfluids. When the osmolality is the same as extracellular fluid, a solution is lebelled isotonic. Such asolution remains within extracellular compartment. One third is distributed to the vascular spaceand two thirds to the interstitial space.A fluid with a lower or higher osmolality is lebelled hypotonic or hypertonic respectively. Hypotonicfluids are distributed in proportion of ⅓ to the extracellular compartment and ⅔ of intracellularcompartment. They are associated with cell swelling. When hypertonic fluids are added to thevascular space, the extracellular osmolality becomes greater than that of intracellular fluid. As aresult water moves from the intracellular to extracellular compartment and cells shrink.Disturbance in Fluid Balance1. Fluid deficit – negative fluid balance – dehydration fluid loss exceeds the fluid intake.Causes: - fluid defect is caused by:Excess fluid loss:(a) From GIT – vomiting and diarrhea(b) Excessive perspiration � increase fever, exposure to high environmental temperature.(c) Hemorrhage(d) Excess of solute(e) Chronic venal diseases(f) Wounds – especially big wounds2. Decreased fluid intake due to:(a) Inability to swallow(b) Lack of available fluid(c) Lack of thirstsensation3. Deficiency ofelectrolyte(a) Deficiency ofaldostrone – duringAddison’s disease(b) Relative decrease ofelectrolyteEffects andManifestations of fluiddeficitThe effect depends onseverity:

Lectures on Basics of practical nursing for beginners BY Dr.Rastrapati Choudhury
115
Usually, the first sign is thirst, dry skin,Decreased blood pressureOliguriaRetention of wastes � acidosisIncreased hemoglobin and hematocritLoss of strength and apathyDisturbance in cellular function in the brain � Coma � death
Excess FluidCauses of excess fluid in the body
Increased venous pressure = increased hydrostatic pressure at venous endObstruction of lymphatic drainageDeficiency of blood proteinIncreased capillary permeabilityRenal insufficiency – increased intake and decreased outputExcessive hormone e.g. Mineral corticoid hormone
ACID BASE BALANCEAcids are substances, which contain hydrogen ions that can be freed or donated by the chemicalreaction to the other substances. Conversely, bases are chemical substances that combine withhydroxyl ions in a chemical reaction. The acidity or alkalinity of a solution depends upon theconcentration of hydrogen ions and hydroxyl ions. A compound that completely dissociates itshydrogen ions is referred as strong acid. E.g. H2S04, HCl, H2P04A compound that particularly freezes its hydrogen ions partially is referred as weak acid.E.g. H2Co3, citric acid, acetic acid.
What is an ABG?• The Components
• pH / PaCO2 / PaO2 / HCO3 / O2sat / BE• Desired Ranges
• pH - 7.35 - 7.45• PaCO2 - 35-45 mmHg• PaO2 - 80-100 mmHg• HCO3 - 21-27• O2sat - 95-100%• Base Excess - +/-2 mEq/L
Acid-Base RegulationBody fluid normally have a PH of 7.35 – 7.45. The chief acid regulating from Metabolism is H2CO3which is formed by a combination of CO2 + H2O. The combination is promoted by carbonicanhydrase within the cells. In addition to the carbolic acid, cellular activity produces a substantialquantity of strong acid.Acids must be rapidly neutralized or weakened by chemical reaction. There must be a constantelimination of them from the body. Carbolic acid is removed by lungs by eliminating carbon dioxide.Control Mechanism of body PH

Lectures on Basics of practical nursing for beginners BY Dr.Rastrapati Choudhury
116
The optimum PH of the body fluid is maintained by:1. acid-base buffer system2. Respiratory system regulation3. Kidney regulationBuffers are substances, which tends to stabilize or maintain the constancy of the PH of a solutionwhen an acid or a base is added to it.Example: HCl + NaCO3 = H2CO3 + NaClThey do this by rapidly converting a strong acid or base to a weaker one, which does not dissociateas rapidly. Strong base NaOH + HCO3 gives H2ONaCO3Example of Buffering System:A) Bicarbonate Buffering SystemB) Phosphate Buffering SystemRespiratory Regulation of Acid-Base BalanceCarbondioxide is constantly produced in cellular metabolism and diffuses from the cells into theblood and erythrocytes, and as a result CO2 is in greater concentration in the blood. When it enterspulmonary capillaries than in the air in alveoli of the lungs.Kidney RegulationThe kidneys play an important role in maintaining acid base balance by execration of H+ and forminghydrogen carbonate. The cell of the distal tubules is sensitive to the changes in the PH.Test for acid base balance1. Blood gas: O2 and CO2 are checked- H+ concentration in arterial blood is checked- PH also determinedACIDOSISA condition in which hydrogen ion concentration is increased in the body and the PH falls belownormal. There are two types of acidosis: Respiratory acidosis and metabolic acidosis.
Respiratory AcidosisCause:- Hypoventilation related to acuteand chronic pulmonary diseases- Circulatory failure- Depression of CNS- Drugs such as atrophine- Gulian Bari syndrome- Poliomalititis-Decreased or increased potassium inthe blood
B. Metabolic AcidosisCause:
Normal ABG Values (at sea level)
Quick Reference
pH 7.4 +/- 0.05 pH
PaO2 90 +/- 10 Oxygenation
PaCO2 40 +/- 5 Respiratory Mechanism
HCO3 24 +/- 2 Metabolic Mechanism
SaO2 97 +/- 3 Oxygenation

Lectures on Basics of practical nursing for beginners BY Dr.Rastrapati Choudhury
117
- Increased acid production- Uncontrolled diabetes mellitus- Increased alcohol intake-Excessive administration of drugs e.g ASA, Amonium Chloride- Renal Failure- Dehydration-Sever diarrhea and vomiting Common signs and symptoms for respiratory acidosis-Restlessness, apprehensive, slow mental response, weakness,headache, confusioncoma. PH is < 7.35- Decreased bicarbonate- Increased arterial CO2 anddecreased O2- Increased urine acidity- Increased ammonium inurine- Low PH in urineMetabolic AcidosisHeadache,fatigue,drowsinessSerum PH < 7.35Serum bicarbonate is lowDepression in CNSIncreased respirationNursing Intervention- Improve respiratoryventilation (e.g., administer bronchial dilators, antibiotic oxygen as ordered.- Maintain adequate hydration (2 to 3 L of fluid prerday)- Carefully regulate mechanical ventilation if used.- Monitor fluid in take and out put, vital signs, arterial blood gases (ABGs), and PH
Metabolic acidosis: Nursing interventions- Monitor Arterial Blood Gases values- Administer IVsodiumbicarbonatecarefully ifordered -Correctunderlyingproblem asorderedAlkalosis: - isacid-baseimbalance inwhich there is adecrease in H+concentrationbelow 35 nmol/L and anincrease in the

Lectures on Basics of practical nursing for beginners BY Dr.Rastrapati Choudhury
118
PH in excess of 7.45 due to carbonic acid deficit or an excess amount of bicarbonate (HCO3).
Types of Alkalosis1. Respiratory Alkalosis2. Metabolic AlkalosisRespiratory AlkalosisCauses1. Hyperventilation (excessive loss of carbolic acid) related to anxiety, hysteria, CNS disease whichcauses over stimulation of respiratory center.2. High fever3. Hypoxia4. Sever pain5. High altitudeSign and Symptoms Serum PH > 7.45 Serum bicarbonate decreases Serum hydrogenion < 35 n mol/L Serum potassium decreased Cardiac arrythemia Increased Na+ and K+ excretion in urine Decreased chloride ion and hydrogenion excretion Hyperventilation Increased rate and depth of respiration Decreased arterial blood CO2 Dizzness, tetany, muscle spasm (carpopedal spasm) Cramp, tingling in extremities Convulsion
Nursing Interventions Monitor vital signs and ABGs Assist client to breath more slowly Administer CO2 inhalations, or help client breath in a paper bag (to inhale CO2)
Metabolic Alkalosis:Causes Abnormal loss of acid associated with vomiting and aspiration Diuretics – through excess urination Excessive ingestion of alkaline e.x. sodium bicarbonate
Sign and systemScrum PH > 7.45Scrum H+ < 35 n mal/LIncrease serum bicarbonateDecreased serum potassiumCardiac arrhythmiaHypoventilationSlow, shallow respirationIncreased PaCO2 or normalDecreased PaO2 if prolonged alkalosisIncreased sodium and potassium ions excretionDecreased chloride and hydrogen ions excretionsDizziness, tremer, twitching, tetany, cramping, tingling in limbs, convulsionOthers like nausea, vomiting and diarrhea
Nursing Interventions

Lectures on Basics of practical nursing for beginners BY Dr.Rastrapati Choudhury
119
Monitor clients fluid losses closely Monitor vital signs, especially respirations Administer ordered IV fluids carefully Reverse underlying problemsEasy method for ABG (Arterial Blood Gas) AnalysisStep 1:
Look at the PH first. Draw an arrow if it is a low ( or high (↑). An arrow indicating low (
means acidosis. An arrow indicating high (↑) means alkalosis.
Next, look at the respiratory indicator (PaCO2). Draw an arrow if it is low ( or high (↑).
Step 2:If the arrows are in the opposite direction, the problem is respiratory in nature-either respiratory acidosis or respiratory alkalosis.
Next, look at the metabolic indicator (HCO3). Draw an arrow if it is low ( or high (↑).
Step 3: If the pH arrow and the metabolic arrow are in the
Same direction [(↑↑) ( , the problem is of metabolic in nature-either metabolic acidosis or
metabolic alkalosis.Step 4: there are so many interpretations like compensated, uncompensated acidosis andalkalosis, it is specialist intervention, will be looked after by consultants.PH PaCO2 HCO3Normalvalue 7.35-7.45 35 to 45mm Hg 22-26mEq/L
↑ AlkalosisAcidosis↑ Respiratory Alkalosis
↑ Respiratory Acidosis↑ ↑ Metabolic AlkalosisMetabolic Acidosis
________________________________________________________________________

Lectures on Basics of practical nursing for beginners BY Dr.Rastrapati Choudhury
120
NUTRITIONNutrition is the study of nutrients and how the body utilizes the nutrients in food. Nutrition has agreat impact on human well-being, behavior, and the environment. Nutrients are substances neededfor growth, maintenance, and repair of the body. The body can make some nutrients if adequateamount of necessary precursors (building blocks) are available.Essential nutrients are those that a person must obtain through food because the body cannot makethem in sufficient quantities to meet its needs. The six classes of nutrients are carbohydrates, fat,protein, water, minerals, and vitamins. Carbohydrate, fat and protein provide energy and are calledmacronutrients. Vitamins and minerals regulate body process and are called micronutrients. Wateris necessary for virtually everybody function.A HEALTHY DIETA healthy diet is one that provides an adequate amount of each essential nutrient needed to supportgrowth and development, perform physical activity, and maintain health. In addition to meetingphysiologic requirements, diet also used to satisfy a variety of personal, social, and cultural needs.These factors must be considered in diet planning. The diets of all individuals must consist of foodsthat are easily attainable and affordable. People can use an infinite variety and combination of foodsto form a healthy diet. The current philosophy is that no good foods or bad foods exist, and that allfoods can be enjoyed in moderation.Dietary GuidelinesThe purpose of dietary guidelines is to provide a healthy public with practical and positivesuggestions for choosing a diet that meets nutritional requirements, support activity, and reducesthe risk of malnutrition and chronic disease. These guidelines are not intended as a diet prescriptionfor specific individuals, but serve as a starting point from which people can plan healthy diets.A guideline for healthy diet :Guide Line Rationale
Eat a variety of foods - No single food supplies all 40-plus essential nutrients in amountsneeded variety also helps reduce the risk of nutrient toxicity and accidental contamination.Balance the food you eat with physical activity – maintain or improve your weightExcess weight increases the risk of numerous chronic diseases. Such as hypertension, heartdisease, and diabetesChoose a diet with plenty of gain products, vegetables, and fruitsPlant foods provide fiber, complex carbohydrates, vitamins, minerals, and other substancesimportant for good healthChoose a diet low in fat, saturated fat, and cholesterolHigh fat diets increase the risk of obesity, heart diseases, and certain types of cancerChoose a diet moderate in sugarsFoods high in added sugar are “empty calories”. Both sugar and starches promote toothdecayChoose a diet that is moderate in salt and sodiumA high salt intake is associate with higher blood pressure
Therapeutic NutritionTherapeutic nutrition is a modification of nutritional needs based on the disease condition or theexcess or deficit of a nutrition status. Combination diets, which include alterations in minerals,vitamins,Proteins, carbohydrates, fats as well as fluid and texture, are prescribed in therapeuticnutrition.Gastrostomy/Jejunostomy FeedingsA gastrostomy feeding is the installation of liquid nourishment through a tube that enters a surgicalopening (called a gastrostomy) through the abdominal wall in to the stomach. A jejunostomy feeding

Lectures on Basics of practical nursing for beginners BY Dr.Rastrapati Choudhury
121
is the installation of liquid nourishment through a tube that enters a surgical opening (ajejunostomy)through the abdominal wall in to the jejunum. These feedings are usually temporary measures.When there is an obstruction the esophagus, they may become permanent, for example, afterremoval of the esophagus.Glasgow Coma Scale(GCS)Glasgow Coma Scale or GCS is a neurological scale that aims to give a reliable, objective way ofrecording the conscious state of a person for initial as well as subsequent assessment.A patient is assessed against the criteria of the scale, and the resulting points give a patientscore between 3 (indicating deep unconsciousness) and 15E+V+M=4+5+6=15E: Eye Opening Response=4V: Verbal Response=5M: Motor Response=6Eye Opening Response
• Spontaneous--open with blinking at baseline 4 points• To verbal stimuli, command, speech 3 points• To pain only (not applied to face) 2 points• No response 1 point
Verbal Response• Oriented 5 points• Confused conversation, but able to answer questions 4 points• Inappropriate words 3 points• Incomprehensible speech 2 points• No response 1 point
Motor Response• Obeys commands for movement 6 points• Purposeful movement to painful stimulus 5 points• Withdraws in response to pain 4 points• Flexion in response to pain (decorticate posturing) 3 points• Extension response in response to pain (decerebrate posturing) 2 points• No response 1 point
Categorization: Coma: No eye opening, no ability to follow commands, no wordverbalizations (3-8)
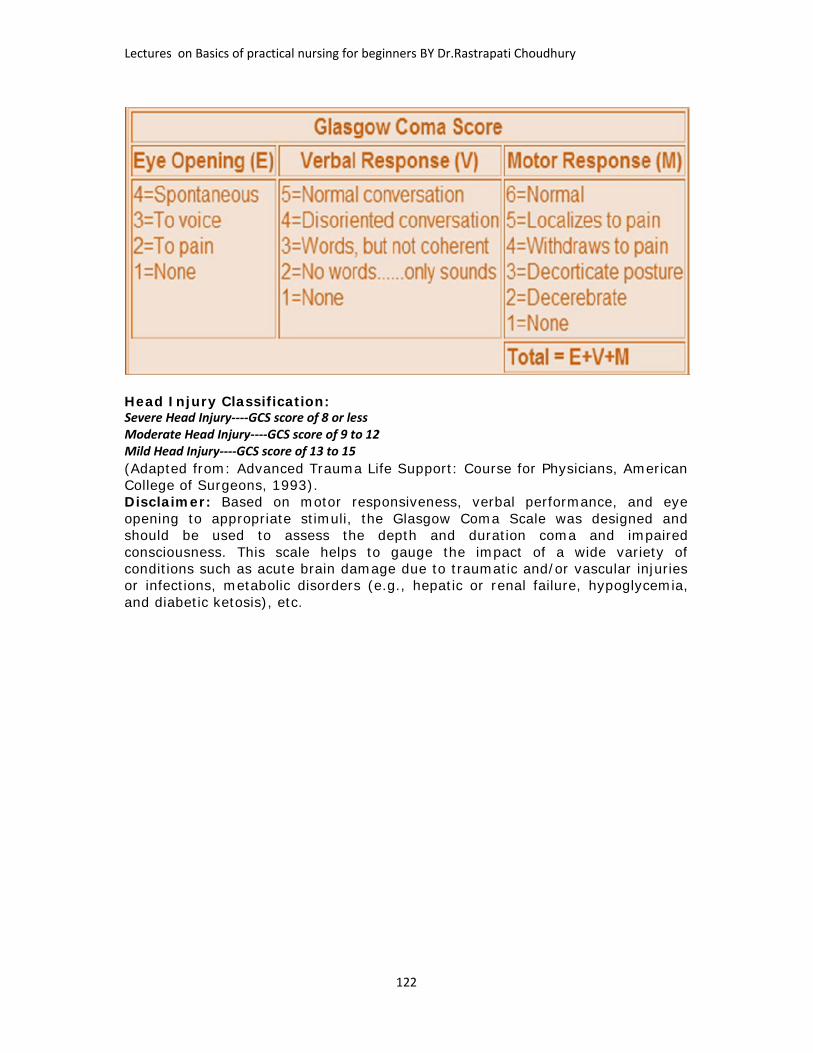
Lectures on Basics of practical nursing for beginners BY Dr.Rastrapati Choudhury
122
Head Injury Classification:Severe Head Injury----GCS score of 8 or lessModerate Head Injury----GCS score of 9 to 12Mild Head Injury----GCS score of 13 to 15(Adapted from: Advanced Trauma Life Support: Course for Physicians, AmericanCollege of Surgeons, 1993).Disclaimer: Based on motor responsiveness, verbal performance, and eyeopening to appropriate stimuli, the Glasgow Coma Scale was designed andshould be used to assess the depth and duration coma and impairedconsciousness. This scale helps to gauge the impact of a wide variety ofconditions such as acute brain damage due to traumatic and/or vascular injuriesor infections, metabolic disorders (e.g., hepatic or renal failure, hypoglycemia,and diabetic ketosis), etc.

Lectures on Basics of practical nursing for beginners BY Dr.Rastrapati Choudhury
123

Lectures on Basics of practical nursing for beginners BY Dr.Rastrapati Choudhury
124
CPR (CARDIO PULMONARY RESUSCITATION)If you've ever watched a hospital show on TV, you've probably seen cardiopulmonaryresuscitation. That's when a doctor or another rescuer breathes intosomeone's mouth and presses on the person's chest.It's called CPR for short and it saves lives. Let's find out how itworks.What Is CPR?Cardio means "of the heart" and pulmonary means "of thelungs." Resuscitation is a medical word that means "to revive"— or bring back to life. Sometimes CPR can help a person who has stopped breathing, andwhose heart may have stopped beating, to stay alive.People who handle emergencies — such as police officers, firefighters, paramedics, doctors, andnurses — are all trained to do CPR. Many other teens and adults — like lifeguards, teachers,childcare workers, andmaybe even your mom ordad — know how to do CPR,too.Here's what happens:A person giving CPR — calleda rescuer — will give somebreaths to someone who isnot breathing on his or herown. This is called artificialrespiration (say: ar-tuh-fih-shul res-puh-ray-shun),mouth-to-mouth rescuebreathing, or mouth-to-mouth resuscitation.To do this, a rescuer puts hisor her mouth over the otherperson's open mouth andblows, forcing air into the lungs. (Ideally the rescuer will use a special mask so that their mouthsdon't actually have to touch.) Rescue breathing helps to move oxygen, which everyone needs tolive, down into the lungs of the person who isn't breathing.After giving two breaths, the rescuer will probably use both hands, one placed over the other, topress on the person's chest many times in a row to move blood out of a heart that has stoppedbeating. These are called chest compressions and they help move oxygen-carrying blood to thebody's vital organs — especially the all-important brain. A person who goes too long without oxygen reaching the brain will die. After 30 chestcompressions have been given, two more rescue breaths are given and the cycle continues untilhelp arrives.In between chest compressions, the person's ribcage relaxes long enough to let blood flow backtoward the heart. In this way, the rescuer can keep the person alive by continuing to supplyblood and oxygen to the brain and the rest of the body, until emergency help — like theparamedics — arrives to take the person to a hospital.Instead of doing mouth-to-mouth rescue breathing, professional rescuers — such as paramedics— will provide artificial breathing for someone by using a mask with a special hand pumpconnected to an oxygen tank. Doctors in the emergency department will put a tube into theperson's windpipe to pump oxygen directly through the tube and into the lungs.

Lectures on Basics of practical nursing for beginners BY Dr.Rastrapati Choudhury
125
When Should Someone Use CPR?The steps in CPR should be used whenever someone is not breathing and when the heart is notbeating. After two rescue breaths are given, 30 chest compressions should be started rightaway.Someone can stop breathing and/or have cardiac arrest from:heart attacksstrokes (when the blood flow to a part of the brain suddenly stops)choking on something that blocks the entire airwaynear-drowning incidents (when someone is under water for too long and stops breathing)a very bad neck, head, or back injurysevere electrical shocks (like from touching a power line)being very sick from a serious infectiontoo much bleedingsevere allergic reactionsswallowing a drug or chemicalIf an emergency happens or someone becomes very sick while you're around, do your best tostay calm. First, try to get the person to respond by gently shaking his or her shoulder andasking, "Are you OK?" If there is no response and you are certified in CPR, you can begin CPR. Ifyou're alone, shout for help or call 911 yourself.Who Should Know CPR?Certain people need to know how to perform CPR to do their jobs. Medical professionals — fromnurses and doctors toparamedics and emergencymedicine technicians — mustknow CPR. Lifeguards,childcare workers, schoolcoaches, and trainers usuallyhave to learn CPR. Manyparents know how to performCPR on their kids in case ofemergency. Other adults whohave family memberswith medical conditions such asheart disease sometimes knowCPR, too.Many people — maybe you — might want to learn how to do CPR just in case they need to use itsomeday. You can never tell when a medical emergency will happen and it feels good to knowthat you could help.Knowing CPR can be a real lifesaver!CPR Basics1. Introduction to How CPR Works2. Cardiopulmonary Arrest3. CPR Basics CPR Step-by-Step4. The ABCs5. CPR's Role in RescueCardiopulmonary Arrest

Lectures on Basics of practical nursing for beginners BY Dr.Rastrapati Choudhury
126
Cardiopulmonary arrest simply means that your heart (cardio) and lungs (pulmonary) aren'tworking -- your heart isn't beating, and you aren't breathing. Many different things can lead tocardiopulmonary arrest,including: Stroke Drug overdose Heart attack Near drowning Choking Blood loss Electric shocks Carbon monoxidepoisoningA heart attack, for example, candamage the heart muscle andimpede its ability to vigorouslycontract, resulting incardiopulmonary arrest. Ifyou've read How Your HeartWorks, you know that the heartis a muscle that expands andcontracts under the electricalcontrol of a special group ofpacemaking cells. The pumpingaction of the heart pushesblood teeming with oxygen andother nutrients out to the restof your body. If your heart isn'tbeating properly or at all, bloodisn't supplied to your body, and oxygen and other vital nutrients don't get delivered to yourtissues and organs (including your heart). With no energy to power your body, vital organs likeyour heart and lungs stop working, and you are in a state of cardiopulmonary arrest.In a heart attack, something like a blood clot obstructs one of your coronary arteries and cuts offblood flow to your heart.Cardiopulmonary arrest is an extremely dangerous situation. Within 4 to 6 minutes withoutoxygen, your brain cells begin to die off rapidly. With each additional minute, the damage buildsup. Most people cannot survive long in such a state.
CPR BasicsCardiopulmonary resuscitation (CPR) is a first-aid technique used to keep victims ofcardiopulmonary arrest alive and to prevent brain damage while more advanced medical help ison the way.CPR has two goals:keeps blood flowing throughout the bodykeeps air flowing in and out of the lungsWhile the modern emergency room has high-tech equipment and an arsenal of drugs to helptreat victims of cardiopulmonary arrest, CPR is a simple technique that requires little or noequipment. What you do is pretty basic:Blow into the victim's mouth to push oxygenated air into the lungs. This allows oxygen todiffuse through the lining of the lungs into the bloodstream.Compress the victim's chest to artificially re-create blood circulation.Here are the steps that make up CPR:

Lectures on Basics of practical nursing for beginners BY Dr.Rastrapati Choudhury
127
It sounds pretty simple, but as you can see above, CPR must be performed in a specific, timedsequence to accurately mimic your body's natural breathing pattern and the way your heartpumps. When someone collapses right in front of you, your first reaction is often sheer terror.But while you're panicked and unable to act, valuable minutes are slipping away. To counterthis, many organizations such as the American Heart Association and the American Red Crossoffer classes that train you in CPR and basic first aid and give you hands-on practice to honeyour CPR skills. Then, if you are confronted with an emergency situation, you are prepared tojump into action.CPR Step-by-StepWhat should you do to help a seemingly unconscious victim? The first thing you'll want to do isto figure out whether or not the victim is really unconscious. Just like you were trying to getthem out of bed, you should call out to them, tap them, and gently shake them to try andprovoke a response. You also should check to see if they are breathing. If you try and performCPR on someone who is not in cardiopulmonary arrest, you can actually hurt them!If you can't rouse them, the very next thing to do is have someone call 108 so that professionalparamedics will be on their way to the scene while you are performing CPR. This is veryimportant, because, with the exception of choking, CPR doesn't address the underlying causes ofcardiopulmonary arrest. It is only meant to buy time until the victim can get intensive medicalcare.After you've called for medical assistance, you need to begin CPR. In order for CPR to work, thevictim must be lying on his or her back on a flat surface. If the victim is face-down, gently roll theperson toward you while making sure that you support their neck. Once the person is on theirback, you can then use the American Heart Association's "ABCs of CPR" to guide you through therest of process:Airway: clear obstructed airwaysBreathing: perform mouth-to-mouth breathingCirculation: start chest compressionsWe'll talk about each of these steps in detail in the following section.Checking for a PulseCardiopulmonary arrest means that both heart and lungs have stopped working properly, so itwould make sense to check and see whether a victim is breathing and whether or not their heartis beating. However, current CPR guidelines don't require a layperson to check the victim'spulse before starting CPR. Why is this?The answer is that the average person has a lot of trouble finding and determining pulseaccurately. Think about how difficult it can be to find your own pulse, and then imagine trying torepeat the process on an unresponsive person. If someone is not breathing, their heart isalready in danger of quitting (if it hasn't already) due to lack of oxygen. Since the first steps inCPR address the victim's respiratory state, you can try and get them breathing again right away.Then, you can check for a pulse. Skipping an initial pulse check simplifies CPR and savesvaluable time; every minute that you delay starting CPR reduces the odds that the victim willsurvive by 7-10 percent.The ABCsHere's a summary of how you might perform CPR on a non-responsive adult. There is actually adifferent procedure used to save infants and young children). To learn all about CPR in detail, sothat you could actually practice and perform this life-saving act, you should sign up for trainingfrom an organization like the American Red Cross.A is for Airway

Lectures on Basics of practical nursing for beginners BY Dr.Rastrapati Choudhury
128
When you pass out, your tongue relaxes, and it can roll back in your mouth and block yourwindpipe. Before you can start CPR on an unconscious person, you'll probably need move theirtongue out of the way. Here's how to clear a blocked airway:Place the palm of your hand across the victim's forehead and push down gently.With the other hand, slowly lift the chin forward and slightly up.Move the chin up until the teeth are almost together, but the mouth is still slightly open.Tilting the head back and lifting the chin move the tongue out of the airway. At this point, youshould check again for breathing. If the victim is choking on something, you may see their chestheave as they try to breathe, but you won't be able to feel or hear air being exhaled. You'll haveto take additional measures to clear out what's blocking their windpipe, including:Compressing the abdomen with forceful thrusts. This creates pressure that forces the object upand out of the windpipe.Trying to manually dislodge the object with your fingers.Once this is done, you have to check for signs of breathing again. Just clearing out the windpipemay sometimes be enough to allow the victim to start breathing on their own! If the victimstarts breathing and moving around on their own, you can stop CPR. If this doesn't happen,you'll have to help them breathe, by providing mouth-to-mouth resuscitation.B is for BreathingYour lungs have one main function: remove carbon dioxide and take up oxygen. Normally, themuscles in your chest contract and expand your chest cavity, allowing your lungs to fill up withair. Oxygen and carbon dioxide diffuse across the immense surface area of your lungs. Finally,your chest muscles relax, and you exhale. (To learn more about lungs, see How Your LungsWork).

Lectures on Basics of practical nursing for beginners BY Dr.Rastrapati Choudhury
129
Rescue breathing uses your lungs to force air into the victim's lungs at regular intervals. Thetiming of each breath (about 1.5 to 2 seconds per breath) mimics normal breathing. However,the process is much more like blowing up a balloon than real breathing. You inhale deeply, forma tight seal with your mouth over their mouth, and exhale strongly to push air out of your mouthinto theirs. Because you also pinch the victim's nostrils closed, the air has nowhere to go exceptdown into the lungs, which expand as they fill with air.Mouth-to-mouth breathing is hard work. Normally, when you inhale, the chest muscles drive theprocess. In artificial respiration, you're working against the victim's relaxed chest muscles.When the chest muscles are relaxed, the chest cavity is small, keeping the lungs in a deflatedstate. As a rescuer, you have to exhale forcefully into the victim's mouth for 1 to 2 seconds toovercome this resistance. As the lungs fill with air, the victim's chest is pushed up at the sametime; you can actually see it rise. When you remove your mouth from the victim's and break theair seal, their chest falls and once again deflates the lungs. As in normal breathing, this results inair being exhaled from the victim's mouth.Does air exhaled from someone else's mouth really provide enough oxygen to save anunconscious person? Normally, the air you inhale contains about 20 percent oxygen by volume,and your lungs remove about 5 percent of the oxygen in each breath. The air you blow into avictim's mouth thus contains about 15 to 16 percent oxygen, which is more than enough tosupply their needs.After you've given the victim two breaths, you then check to see whether or not they have apulse and whether they are able to breathe on their own. This will determine what you do next.

Lectures on Basics of practical nursing for beginners BY Dr.Rastrapati Choudhury
130
C is for CirculationIf the victim's heart is not beating, all your breathing efforts are for naught; the oxygen thatyou're getting into their circulation isn't going anywhere! Once again, you have to take over for afailing organ. This time you essentially become a surrogate heart to pump oxygenated blood outto the rest of the victim's body. How can you have any effect on blood flow from outside of thebody? All it takes is your hands and some strength. The steps are simple:Kneeling by the victim, place the heel of your hands one atop the other about .4 to .8 inches (1 to2 cm) from tip of the breastbone.Using the weight of your body, push the victim's chest down. You should compress their chest 1to 2 inches (2.54 to 5.08 cm).Hold in this position for half a second, then relax for half a secondRepeat steps two and three 29 more times.Give the victim two rescue breaths as you did before to deliver more oxygen to the blood.Repeat steps 1 through 5 three more times, and then check for a pulse. In reality, all you aredoing is squeezing the heart between the breastbone and the backbone to force blood out.Compressing the chest creates positive pressure inside the chest that pushes oxygenated bloodout of the heart through the aorta. From here, it travels to the brain and then on to other parts ofthe body, delivering oxygen for cellular respiration. When you relax, the pressure inside thevictim's chest subsides. Deoxygenated blood moves back into the heart from the veins.As the chest is compressed, positive pressure is created inside the chest, and oxygenatedblood is pushed through the arteries to the brain and other organs. When you release, thepressure drops, and blood flows back into the heart from the veins. Note: According to new guidelines ABC is changed into CBA
CPR's Role in RescueWith CPR, respirators and defibrillators, we now have ways of bringing the dead back to life.CPR extends the window of opportunity to perform more elaborate first aid procedures. Byitself, CPR cannot save the majority of victims of cardiopulmonary arrest. CPR only temporarilyrestores circulation to only 10 to 30 percent of what it would be with a healthy heart. Further, inabout two-thirds of people in cardiopulmonary arrest, the heart goes into what's known asventricular fibrillation. In this state, the heart muscle quivers rapidly and is unable to beatproperly. CPR cannot stop ventricular fibrillation, and only about 4 percent of patients whoreceive CPR alone will survive an attack.In order to restore a normal heartbeat, an electrical shock must be delivered to the heart. This iscalled defibrillation. The shock itself doesn't switch the heart back on - it's not like flipping atripped circuit breaker. Instead, defibrillation actually stops the heart briefly! This gives thepeacemaking cells a chance to re-establish a normal heartbeat.So why do CPR at all if it can't address the root causes of cardiopulmonary arrest? The bottomline is that CPR is an important part of a comprehensive response to a cardiac emergency.

Lectures on Basics of practical nursing for beginners BY Dr.Rastrapati Choudhury
131
Defibrillation requires special equipment that has to be brought to the patient, and CPR cankeep a patient alive until a defibrillator arrives. When CPR is started within 4 minutes anddefibrillation within 10 minutes of an attack, the survival rate skyrockets to 43 percent. Otherfactors that contribute to survival are:Rapid access to emergency care from paramedics and other medical professionals.Quick provision of other supportive medical care, such as epinephrine, a drug that stimulatesthe heart.
SURGICAL INSTRUMENTSSurgical instrumentsDissectingScalpels (Laser scalpel) · RF Knife · Lancets · Liston knife · Catlin · Von Graefe knifeScissors: Bandage scissors · Metzenbaum scissors · Tenotomy scissorsOther: Rongeur · Curette · Osteotome · Drill bits · Rasps · Trocars · Drills · DermatomesGrasping (forceps) Bulldogs forceps · Hemostat · Obstetric · Vulsellum · Tenaculum · DebakeyforcepsClamping Foerster clamp · Hemostat · Pennington clamp · Aortic cross-clamp · Gomco clampRetracting/viewing Retractors: Senn retractor · Rib spreaderAccessory/otherExamination/prep: Dilators · Specula · Fiber optic endoscopes · Head mirrorSuction: Yankauer suction tipIrrigation and injection needlesMeasurement devices: rulers and caliperDrain: Jackson-Pratt drain · Penrose drainOther: Surgical staplers · Periodontal probe · Surgical sutureFew surgical instrumentsAllis Clamp Army Navy Retractor Babcock

Lectures on Basics of practical nursing for beginners BY Dr.Rastrapati Choudhury
132
Bonney ForcepsCastro-Viejo Needle DriverCurved Mayo ScissorsDebakey ForcepsDeep Gelpi RetractorDouble Action RongeurHemo Clip Applier
Kerrison PunchKocher ClampMayo Body Wall RetractorMetzenbaum Scissors (Metz)Penfield #1Poole SuctionRichardson Retractor
Russian ForcepsMayo Scissors, StraightWeitlaner RetractorScalpelsBlades
Pictures of Surgical InstrumentsAllis Clamp
Surgical Instrument - Allis ClampUse - GraspingAdditional Info - Often used for grasping soft tissue such as breast tissue or bowel tissue
Army Navy Retractor
Surgical Instrument - Army Navy RetractorAlias - US Retractor. Use - Tissue or Bone RetractionAdditional Info - Common to the both major and minor orthopedic and general surgeryBabcock
Surgical Instrument - BabcockUse - GraspingAdditional Info - For grasping soft tissue or bowel.Bonney Forceps

Lectures on Basics of practical nursing for beginners BY Dr.Rastrapati Choudhury
133
Surgical Instrument - Bonney ForcepsUse - GraspingAdditional Info - Often used for grasping fascia during the closure of abdominal surgery or for closureand suturing of large orthopedic procedures such as total knee and total hip replacement surgery.Castro-Viejo Needle Driver
Surgical Instrument - Castro-Viejo Needle DriverAlias - Castro's. Use - SuturingAdditional Info - Castro Viejo needle drivers are most common to Vascular, Ophthalmic, and delicateCosmetic Surgery. The come in both locking and non-locking varieties depending on surgeonpreference and are used for very fine suture in the 5-0 and smaller range.Curved Mayo Scissors
Surgical Instrument - Curved Mayo ScissorsAlias – None. Use - CuttingAdditional Info - Common to most surgical trays, used for cutting dense tissue where metz scissorsare too delicate.DebakeyForceps
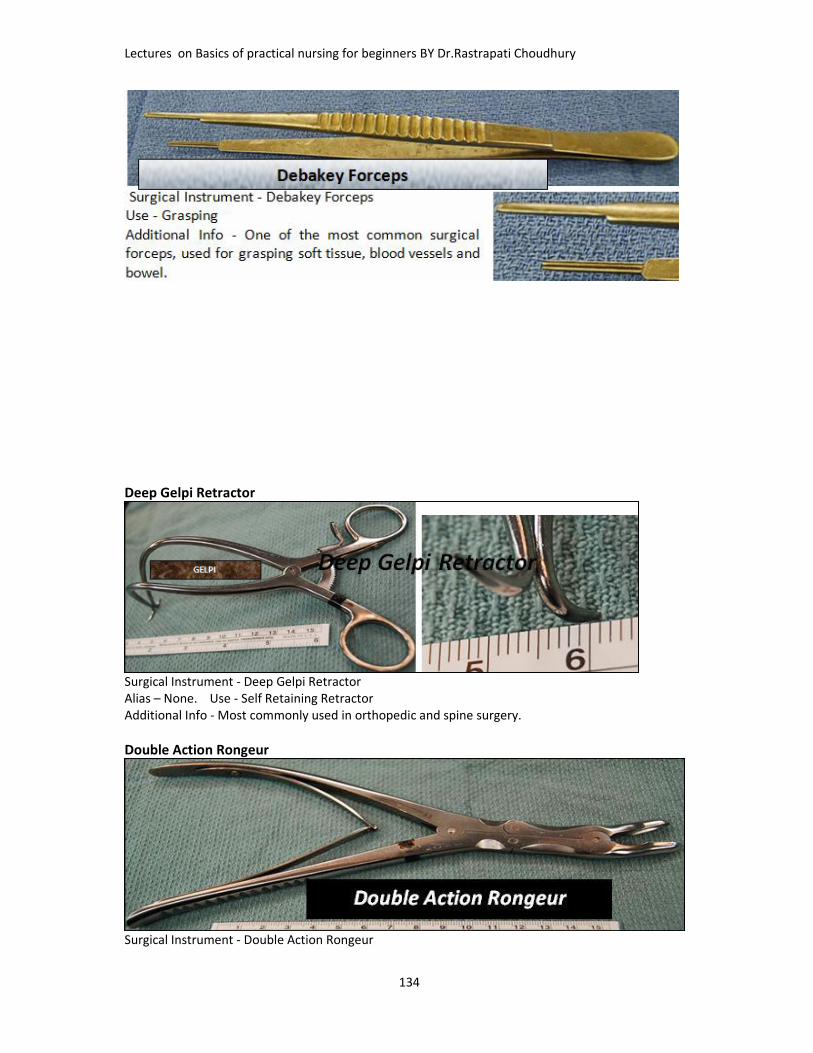
Lectures on Basics of practical nursing for beginners BY Dr.Rastrapati Choudhury
134
Deep Gelpi Retractor
Surgical Instrument - Deep Gelpi RetractorAlias – None. Use - Self Retaining RetractorAdditional Info - Most commonly used in orthopedic and spine surgery.
Double Action Rongeur
Surgical Instrument - Double Action Rongeur

Lectures on Basics of practical nursing for beginners BY Dr.Rastrapati Choudhury
135
Alias – None. Use - CuttingAdditional Info - Used for cutting bone in othopedic and spine surgery.Hemo Clip Applier
Surgical Instrument - Hemo Clip ApplierUse - ClampingAdditional Info - For both permanent and temporary ligation of vessels and marking tissue for postoperative imaging.
Kerrison Punch
Surgical Instrument - Kerrison Punch ,Use - CuttingAdditional Info - For cutting bone in spine and neuro surgery.Kocher Clamp
Surgical Instrument - KocherAlias - NoneUse - GraspingAdditional Info - Used to grasp bone or fascia.
Mayo Body Wall Retractor

Lectures on Basics of practical nursing for beginners BY Dr.Rastrapati Choudhury
136
Surgical Instrument - Mayo Bodywall RetractorAlias - NoneUse - RetractionAdditional Info - For rectration in large abdominal surgeries.
Metzenbaum Scissors (Metz)
Surgical Instrument - Metzenbaum Scissors,- MetzUse - CuttingAdditional Info - The most common scissors use for cutting tissue.Penfield #1

Lectures on Basics of practical nursing for beginners BY Dr.Rastrapati Choudhury
137
Surgical Instrument - Penfield 1Use - Blunt DissectionAdditional Info - None
Poole Suction
Richardson Retractor
Surgical Instrument - Richardson Retractor, RichUse - RetractionAdditional Info - Available in multiple sizes as well as single and double ended.This is one of the most common general surgery retractors.Russian Forceps

Lectures on Basics of practical nursing for beginners BY Dr.Rastrapati Choudhury
138
Surgical Instrument - Russian Forceps, Russians.Use – Grasping Additional Info - A multipurpose pick up in most instrument sets
Mayo Scissors, Straight
Surgical Instrument - Mayo Scissors, Suture Scissors.Use - CuttingAdditional Info - General purpose and suture cutting scissors, normally not used on tissue.
Weitlaner RetractorSurgical Instrument - Weitlaner RetractorAlias - Self Retainer, Use - RetractionAdditional Info - Available with both sharp and dull jaws.
Suture removal scissor
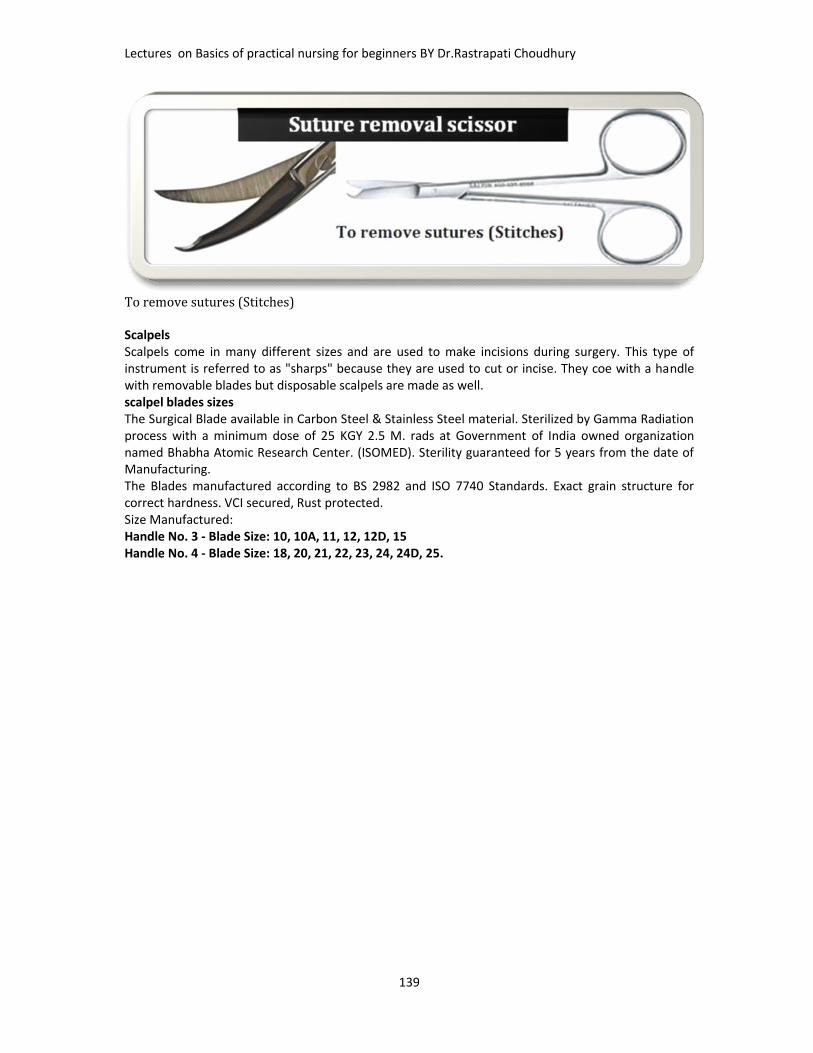
Lectures on Basics of practical nursing for beginners BY Dr.Rastrapati Choudhury
139
To remove sutures (Stitches)ScalpelsScalpels come in many different sizes and are used to make incisions during surgery. This type ofinstrument is referred to as "sharps" because they are used to cut or incise. They coe with a handlewith removable blades but disposable scalpels are made as well.scalpel blades sizesThe Surgical Blade available in Carbon Steel & Stainless Steel material. Sterilized by Gamma Radiationprocess with a minimum dose of 25 KGY 2.5 M. rads at Government of India owned organizationnamed Bhabha Atomic Research Center. (ISOMED). Sterility guaranteed for 5 years from the date ofManufacturing.The Blades manufactured according to BS 2982 and ISO 7740 Standards. Exact grain structure forcorrect hardness. VCI secured, Rust protected.Size Manufactured:Handle No. 3 - Blade Size: 10, 10A, 11, 12, 12D, 15Handle No. 4 - Blade Size: 18, 20, 21, 22, 23, 24, 24D, 25.

Lectures on Basics of practical nursing for beginners BY Dr.Rastrapati Choudhury
140
Few more regularly used surgical and accessory instruments

Lectures on Basics of practical nursing for beginners BY Dr.Rastrapati Choudhury
141

Lectures on Basics of practical nursing for beginners BY Dr.Rastrapati Choudhury
142
FEW MORE SURGICAL INSTRUMENTSINSTRUMENTS LIST#3 KNIFE HANDLE#7 KNIFE HANDLES10 BLADE11 BLADE15 BLADE90 DEGREE DURALELEVATORADENOID CURRETTEADSON BIPOLAR FORCEPSADSON BROWN FORCEPSADSON FORCEPSALEXANDERPERIOSTEOTOMEALLIS CLAMPALM RETRACTORANGLED DEBAKEY
AORTIC CLAMPAP SUCTION TIPARMY NAVY RETRACTORBABCOCKBABY BENNETTERETRACTORBACK BITING FORCEPSBALFOUR RETRACTORBAYONETTE BIPOLARFORCEPSBAYONETTE FORCEPSBEAVER BLADE HANDLEBETHUNE RIB SHEARSBISHOP HARMOND FORCEPSBONETAMPBONNEY FORCEPS
BOVIEBREAST TEMPLATEBRUN CURRETTEBURFORD FINOCHETTIBUTTER KNIFECALIPERCARMAULTCARTILAGE BLOCKCARTILAGE CRUSHERCASTRO VIEJO NEEDLEHOLDERCEREBELLAR RETRACTORCHERRY SCISSORSCOBB ELEVATORCORNEAL SHIELDCOTTLE ANGULAR SCISSORS

Lectures on Basics of practical nursing for beginners BY Dr.Rastrapati Choudhury
143
COTTLE ELEVATORCURVED ALLISCURVED DISSECTORCUSHING FORCEPSDAVIS MOUTH GAGDEAVER RETRACTORDEBAKEY CLAMPDEBAKEY FORCEPSDEMARR RETRACTORDETRICH FORCEPSDOYAN RIB RASPDURAL RETRACTORDUVAL LUNG CLAMPELECTRO CAUTERY PENCILFACELIFT SCISSORSFIBER OPTIC BREASTRETRACTORFIBER OPTIC CORDFINOCHETTI BLADEFOGARTY CLAMPFOUR PRONGE SKIN HOOKSFRAZIER SUCTION TIPFREEMAN RETRACTORFREER ELEVATORGAURDED OSTEOTOMEGELPI, DEEPGELPI, SHALLOWGERALD FORCEPSGLOVER CLAMP, ANGLEDGLOVER CLAMP, CURVEDGLOVER CLAMP, STRAIGHTGOELET RETRACTORGORGENSON SCISSORSHAGAR SCISSORS/NEEDLEHOLDERHEANEY BALLANTYNECLAMP, CURVEDHEANEY BALLANTYNECLAMP, STRAIGHTHEANEY NEEDLE HOLDERHEANEY-SIMON RETRACTORHEMO CLIP APPLIERHENLEY RETRACTORHOEN ELEVATORHOKE OSTEOTOMEHURD DISSECTORIRIS SCISSORSISREAL RETRACTORJACOB TENACULMJAKE CLAMPJAVID CAROTID CLAMP
KARCHNER INTERNALCAROTID CLAMPKELLY CLAMPKERRISON RONGEURKEY ELEVATORKLIEN NEEDLEKNIGHT SCISSORSKOCHER CLAMPK-WIRE CUTTERLAHEY CLAMPLAMBOTTE OSTEOTOMELAPAROSCOPIC GRASPERLAPAROSCOPIC PORTLAPAROSCOPIC TROCARLIPOSUCTION CANNULALITTLER SCISSORSMARYLAND GRASPERMAYO BODYWALLRETRACTORMAYO SCISSORS, CURVEDMAYO SCISSORS, STRAIGHTMAYO-HEGAR NEEDLEHOLDERMETZMETZENBAUM, SCISSORSMOSQUITO CLAMPMOUTH GAG EXTENSIONMOUTH GAG TONGUE BLADENASAL RASPNASAL SPECULUMNERVE HOOKNEW YORK SPECULUMNON PERFORATING TOWELCLAMPOLIVE TIP SUCTIONPENFIELD 1PENFIELD 2PENFIELD 3PENFIELD 4PERFORATING TOWELCLAMPPITUITARY FORCEPSPOOLE SUCTIONPOTTS SCISSORSPUTTI RASPRAG NAIL RETRACTORRAINEY FORCEPSRAT TOOTH FORCEPSRIB APPROXIMATORRICHARDSON RETRACTORRIGHT ANGLE CLAMP
RONGEUR, SINGLE ACTIONRONGEUR, DOUBLE ACTIONRUMMEL STYLETRUSSIAN FORCEPSSAUER BURSH RETRACTORSAUERBRUCH RONGEURSCAPULA RETRACTORSENN RETRACTORSICKLE KNIFESIMS RETRACTORSINUS BITING FORCEPSSINUS CURRETTESINUS FORCEPSSINUS PROBESINUS SCISSORSSPHENOID PUNCHSPONGE FORCEPSSPRING RETRACTORSTATINSKY CLAMPSTATINSKY SCISSORSSTEVENS TENOTOMYSCISSORSSTRABISMUS SCISSORST CLAMPTAKAHASHI FORCEPSTENACULUM, DOUBLETOOTHTENDON PASSERTENOTOMY SCISSORSTONSIL CLAMPTONSIL SNARETWO PRONGE SKIN HOOKSUP BITING FORCEPSUTERINE SOUNDVEIN RETRACTORVESSEL IRRIGATORVESSEL PROBEWEBSTER NEEDLE HOLDERWEEDER TONGUE BLADEWEIGHTED VAGINALSPECULUMWEITLANER RETRACTOR,DULLWEITLANER RETRACTOR,SHARPWESTCOTT SCISSORSWOODSON ELEVATORWYLIE EXTERNAL CAROTIDCLAMPYANKAUER SUCTION

Lectures on Basics of practical nursing for beginners BY Dr.Rastrapati Choudhury
144
Surgical NeedlesTypes of Surgical NeedlesOperating physicians select surgical needles according to several factors, including suture location,tissue type, suture material andprocedural requirements. Surgicalneedles are sold in various shapes,types, thicknesses and lengths.Cutting NeedlesCutting needles are designed to cutthrough thick or dense tissues. Thistype of surgical needle is commonlyused for sutures.Taper-Point NeedlesTaper-point needles, often calledround needles, are designed topenetrate and pass through tissuesby stretching the tissue withoutcutting it.Beveled, Conventional Cutting-EdgeNeedlesBeveled, conventional cutting-edgeneedles are bend-resistant needlesmade from stainless steel that washeat-treated after being curved.These surgical needles are typicallyused to close lacerations.Blunt-Point NeedlesBlunt-point needles tissue ratherthan cut it. These surgical needleshave rounded points to reduce therisk of needlestick injuries.Intestinal NeedlesIntestinal needles are specificallydesigned to use in areas with a risk ofleakage, such as the gastrointestinal(GI) tract, the urogenital tract and thebiliary tract (for the conveyance ofbile).The needle makes a hole that isimmediately filled with the suturematerial.
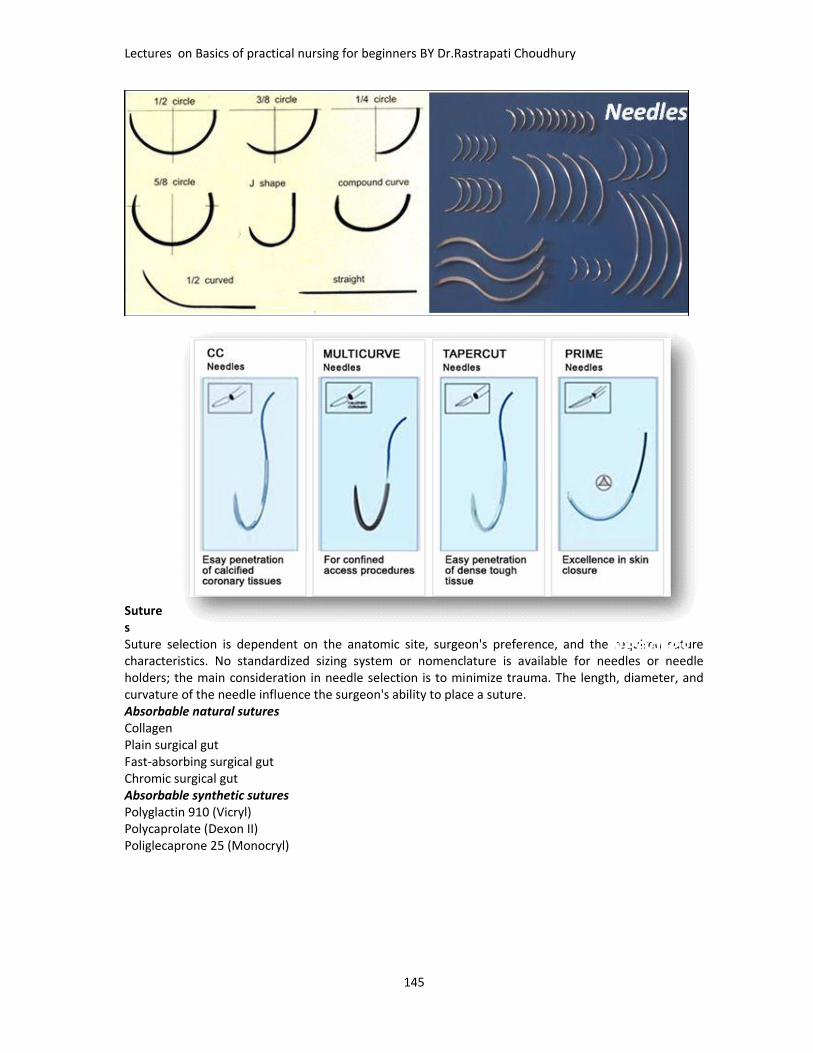
Lectures on Basics of practical nursing for beginners BY Dr.Rastrapati Choudhury
145
SuturesSuture selection is dependent on the anatomic site, surgeon's preference, and the required suturecharacteristics. No standardized sizing system or nomenclature is available for needles or needleholders; the main consideration in needle selection is to minimize trauma. The length, diameter, andcurvature of the needle influence the surgeon's ability to place a suture.Absorbable natural suturesCollagenPlain surgical gutFast-absorbing surgical gutChromic surgical gutAbsorbable synthetic suturesPolyglactin 910 (Vicryl)Polycaprolate (Dexon II)Poliglecaprone 25 (Monocryl)
Needles

Lectures on Basics of practical nursing for beginners BY Dr.Rastrapati Choudhury
146
Polysorb
Polydioxanone (PDS II)MaxonV-LocAbsorbable monofilament suturesCaprosynAbsorbable multifilament suturesNonabsorbable natural suturesSurgical silkSurgical cottonSurgical steelNonabsorbable synthetic suturesNylonPolyester fiber (Mersilene/Surgidac [uncoated] and Ethibond/Ti-cron [coated])Polybutester Suture (Novafil)Coated Polybutester Suture (Vascufil)Polypropylene (Prolene)Surgipro II

Lectures on Basics of practical nursing for beginners BY Dr.Rastrapati Choudhury
147
Stitches and Staples

Lectures on Basics of practical nursing for beginners BY Dr.Rastrapati Choudhury
148
Stitches and staples are used to hold tissues together so that they will heal. Different tissuesrequire different materials and thicknesses of material to hold them.Absorbable SuturesAbsorbable sutures are made of a material that will dissolve over 3 – 5 months. They are put inwith a needle. Examples that I use are Vicryl and Chromic Gut. I use these stitches for most of thewound closure underneath the skin. Most absorbable sutures will cause a reaction if they gothrough the skin. Occasionally an absorbable suture just under the skin will cause a tiny area ofinfection, a stitch abscess. These can be relieved by removing the stitch.Non-Absorbable SuturesNon-Absorbable sutures, on the other hand, are made of material that will not break down in yourbody. These are also sewn in with a needle. These are used to close the most superficial level of thewound, the skin. These must be taken out of the skin, usually after 7 – 14 days. They are also usedto repair tendon injuries, or ankle ligaments that are sewn back into bone. I use Nylon, Prolene andFiber Wire non-absorbable sutures.Skin Staples are little metal clips that can be used to close the skin instead of non-absorbablesutures. There is a device that puts them in, bending the little pieces of metal to hold the edges ofthe skin together. Another device is used to remove them – it unbends the staple and pulls theends out with one smooth motion.Steri-StripsSteri-Strips are little pieces of tape that are used like a “butterfly”. They have tiny fibers runningthrough them, so they are strong. The adhesive backing will usually keep the steri-strip in place formany days. They will usually come off on their own. It is okay to bathe your foot with steri-stripson, they will not come off unless you rub firmly about them.Stitch or Staple RemovalThe skin stitches or staples are unusually taken out at the first post-operative visit, 7 – 10 daysafter surgery. I will first wash your foot or ankle to clean it. Most people get very concerned aboutremoving them, but they usually come out quickly and without much discomfort. If you areconcerned, you may wish to take a pain pill before coming in to that visit.After the stitches or staples are removed, I will put Steri-Strips over the wound to ensure that theedges stay together.
ASSISTING DOCTORS IN PROCEDURES GENERAL DRESSINGPurposeTo keep wound cleanTo prevent the wound from injury and contaminationTo keep in position drugs applied locallyTo keep edges of the wound together by immobilizationTo apply pressureEquipment
Adhesive tape and bandages Antiseptic solution as ordered
Stitch removalRemoval
staple

Lectures on Basics of practical nursing for beginners BY Dr.Rastrapati Choudhury
149
Bandage roll Betadine Hydrogen peroxide Normal saline Ointment or other types of drugs as
needed Pick up forceps in a container Receiver to collect waste Rubber sheet with its cover Scissors
Sponge holder Sterile bowl or kidney dish Sterile cotton balls Sterile galipot Sterile gauze Sterile gloves as required Surgical blade Three sterile forceps
TechniqueAseptic technique to prevent infection
SUTURE REMOVAL
PurposeTo Remove post surgical suturesEquipment
Adhesive tape and bandagesAntiseptic solution as orderedBandage rollBetadineHydrogenperoxide
Normal salineOintment or other types of drugs asneededPick up forceps in a containerReceiver to collect waste

Lectures on Basics of practical nursing for beginners BY Dr.Rastrapati Choudhury
150
Rubber sheet with its coverSuture removal ScissorsSponge holderSterile bowl or kidney dishSterile cotton balls
Sterile galipotSterile gauzeSterile gloves as requiredSurgical bladeThree sterile forceps
TechniqueAseptic technique to prevent infection
LUMBAR PUNTURE
PurposeTo give spinal anesthesia and medicationTo check pressureTo collect CSF(Cerbro Spinal Fluid) for diagnostic andtherapeutic purposeIntroductionA lumbar puncture (also known as a spinal tap) is a diagnosticprocedure where samples of cerebrospinal fluid (CSF) arecollected and analyzed to help with the diagnosis of certainconditions such as infections (e.g. meningitis), demyelinating
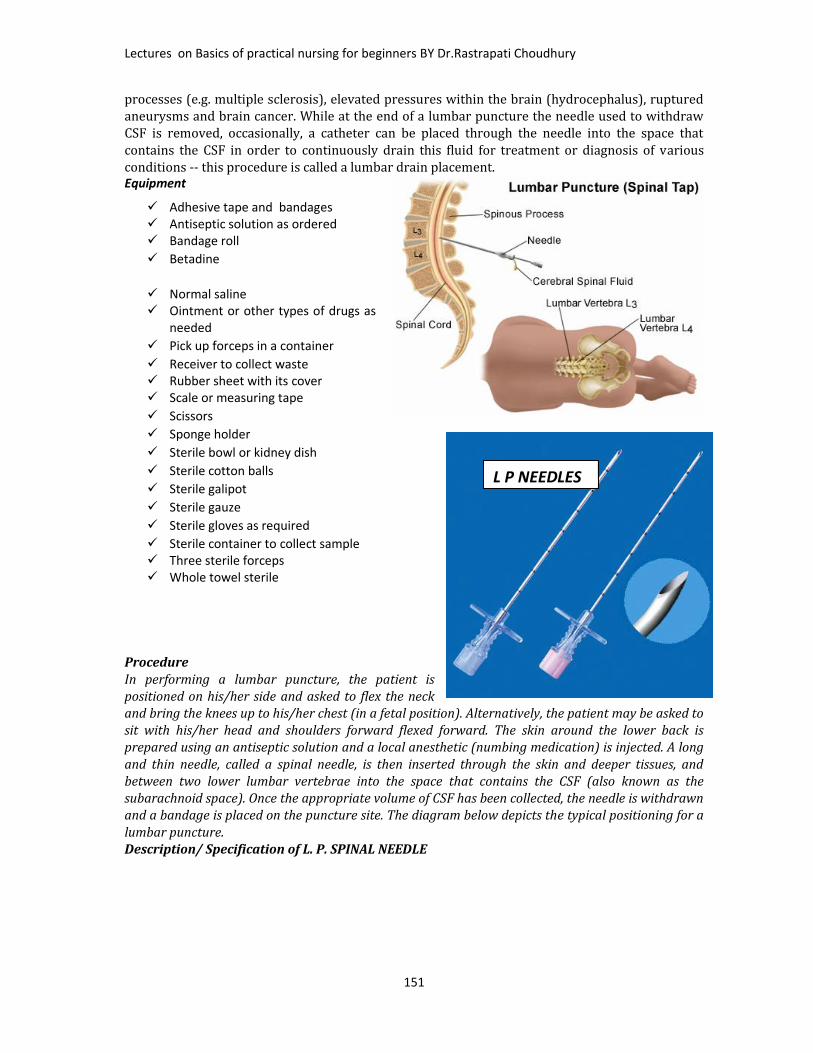
Lectures on Basics of practical nursing for beginners BY Dr.Rastrapati Choudhury
151
processes (e.g. multiple sclerosis), elevated pressures within the brain (hydrocephalus), rupturedaneurysms and brain cancer. While at the end of a lumbar puncture the needle used to withdrawCSF is removed, occasionally, a catheter can be placed through the needle into the space thatcontains the CSF in order to continuously drain this fluid for treatment or diagnosis of variousconditions -- this procedure is called a lumbar drain placement.Equipment
ProcedureIn performing a lumbar puncture, the patient ispositioned on his/her side and asked to flex the neckand bring the knees up to his/her chest (in a fetal position). Alternatively, the patient may be asked tosit with his/her head and shoulders forward flexed forward. The skin around the lower back isprepared using an antiseptic solution and a local anesthetic (numbing medication) is injected. A longand thin needle, called a spinal needle, is then inserted through the skin and deeper tissues, andbetween two lower lumbar vertebrae into the space that contains the CSF (also known as thesubarachnoid space). Once the appropriate volume of CSF has been collected, the needle is withdrawnand a bandage is placed on the puncture site. The diagram below depicts the typical positioning for alumbar puncture.Description/ Specification of L. P. SPINAL NEEDLE
Adhesive tape and bandages Antiseptic solution as ordered Bandage roll Betadine
Normal saline Ointment or other types of drugs as
needed Pick up forceps in a container Receiver to collect waste Rubber sheet with its cover Scale or measuring tape Scissors Sponge holder Sterile bowl or kidney dish Sterile cotton balls Sterile galipot Sterile gauze Sterile gloves as required Sterile container to collect sample Three sterile forceps Whole towel sterile
L P NEEDLES
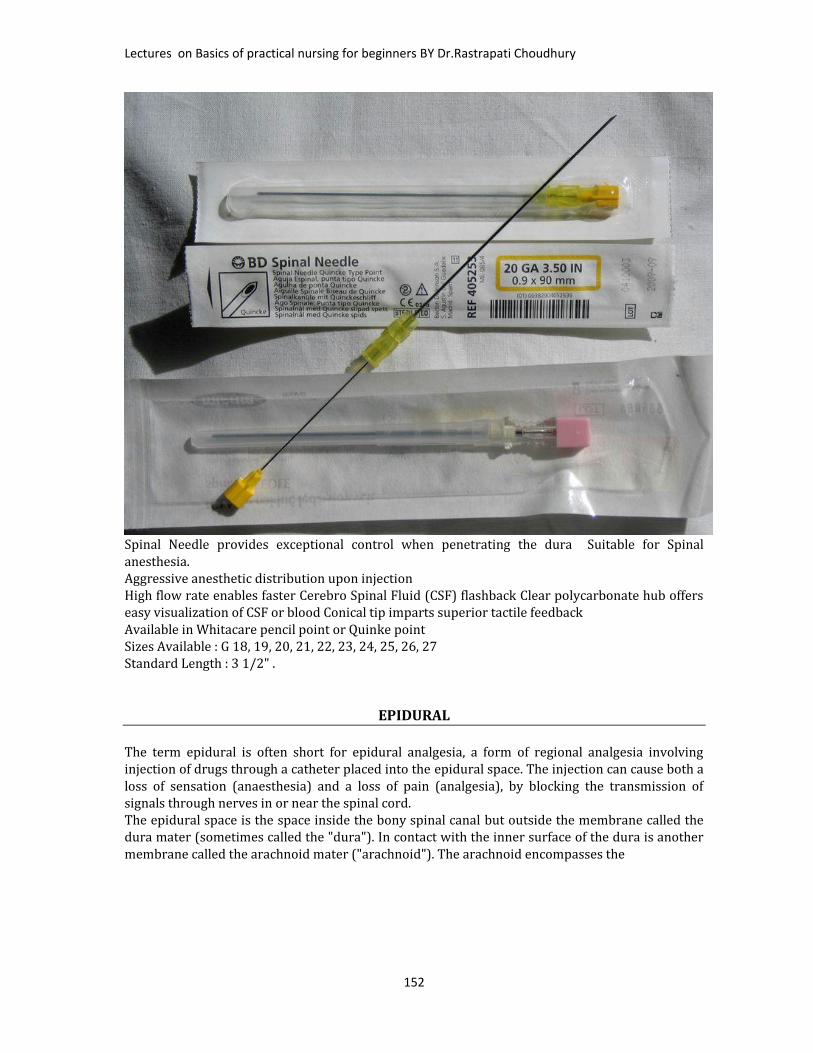
Lectures on Basics of practical nursing for beginners BY Dr.Rastrapati Choudhury
152
Spinal Needle provides exceptional control when penetrating the dura Suitable for Spinalanesthesia.Aggressive anesthetic distribution upon injectionHigh flow rate enables faster Cerebro Spinal Fluid (CSF) flashback Clear polycarbonate hub offerseasy visualization of CSF or blood Conical tip imparts superior tactile feedbackAvailable in Whitacare pencil point or Quinke pointSizes Available : G 18, 19, 20, 21, 22, 23, 24, 25, 26, 27Standard Length : 3 1/2" .EPIDURALThe term epidural is often short for epidural analgesia, a form of regional analgesia involvinginjection of drugs through a catheter placed into the epidural space. The injection can cause both aloss of sensation (anaesthesia) and a loss of pain (analgesia), by blocking the transmission ofsignals through nerves in or near the spinal cord.The epidural space is the space inside the bony spinal canal but outside the membrane called thedura mater (sometimes called the "dura"). In contact with the inner surface of the dura is anothermembrane called the arachnoid mater ("arachnoid"). The arachnoid encompasses the

Lectures on Basics of practical nursing for beginners BY Dr.Rastrapati Choudhury
153
EpiduralThis anesthesia /procedurerequires a high level oftechnical proficiency toavoid serious complications,and should always beperformed by a trainedanesthetist or interventionalradiologist under imageguidance, using a strictaseptic technique to reducethe risk of infection.This procedure is andequipments required sameas LP procedure withaddition to syringes asrequired size, epiduralcatheter, and as ordered bydoctor.This topic will be discussed in detail in advanced nursing course in next series of book._______________________________________________________________________________________
CHESTTUBE(THORACOCENT
OSIS)Thoracentesis, alsoknown asthoracocentesis orpleural tap, is aninvasive procedureto removefluid or air from thepleural space fordiagnostic ortherapeutic

Lectures on Basics of practical nursing for beginners BY Dr.Rastrapati Choudhury
154
purposes. A cannula, or hollow needle, is carefully introduced into the thorax, generally afteradministration of local anesthesia. The procedure was first described in 1852.The recommended location varies depending upon the source. It is critical that the patient hold hisor her breath to avoid piercing of the lung. Some sources recommend the midaxillary line, in theninth intercostal space.THORACENTESISa. General. Thoracentesis is the procedure in which a puncture is made into the chest wall towithdraw fluid or air from thepleural cavity for diagnostic ortherapeutic purposes. Athoracotomy needle is insertedthrough the intercostal areainto the pleural cavity. Suctionis then applied by syringe toaspirate the accumulated fluidor air. The procedure is usuallydone at the patient's bedside.
b. Assembling the Necessary Equipment. Assemble the following: 4x4 gauze compresses. Alcohol prep sponges. Adhesive tape. Mobile table or stand.
Equipments Adhesive tape and bandages Bandage roll Betadine Calibrated drainage bottle. Prescribed local anesthetic. 3 way cannula 50 cc syringe IV set Needled size as required Normal saline Pick up forceps in a container
Receiver to collect waste Rubber sheet with its cover Scissors Sponge holder Sterile bowl or kidney dish
Sterile cotton balls Sterile galipot
Sterile gloves as required Sterile containers to collect sample Three sterile forceps Whole towel sterile

Lectures on Basics of practical nursing for beginners BY Dr.Rastrapati Choudhury
155
Waste receptacle. gc. Preparation for the Procedure. Check clinical record for signed, Authorization for Administration of Anesthesia and forPerformance of Operations and Other Procedures.(High risk informed concent) Obtain chest X-rays, if requested. Explain the procedure to the patient, stressing the importance of remaining immobileduring the procedure. Take and record TPR and blood pressure (BP). Screen the patient. Remove pajama jacket to expose chest. The site of the puncture willdepend upon the location of the fluid or air that is to be aspirated. Position the patient as directed by the physician. The position may be either one of thefollowing or a similar position, as directed by the physician.(a) Seat the patient on the side of the bed, facing away from the physician, with feet supported on achair and the head and arms resting on an overbed table padded with pillows. The arms areelevated slightly to widen the intercostal spaces.(b) Place the patient in a semi recumbent position, facing away from the physician, resting on thenon-affected side, with the head of the bed elevated about 45 degrees. A pillow is placed under thechest to widen the intercostal spaces.(c)The arm of the affected side is placed above the head to elevate the ribs, thereby making theinsertion of the needle easier.
d. Assisting with Thoracentesis. Place the thoracentesis tray on instrument table. Open sterile wrapper cover to provide asterile field. Place other supplies on adjacent bedside stand or over bed table. Open glove wrapper. Assist with handling of local anesthetic vial. Hold vial with label uppermost so that thephysician can personally check the label before withdrawing any of the solution. Cleansestopper with alcohol sponge. Invert vial and hold firmly while the doctor, with glovedhands, withdraws the required solution. Support and help patient to avoid moving and coughing while the thoracentesis needle isintroduced. Assist as directed with collection of specimens as the physician manipulates the syringe,the stopcock, and drainage tubing. Use care not to contaminate the end of the tubing, thecap, or the open end of the specimen tubes. Cap the tubes and place them upright in a cleanglass provided for this purpose. Label each tube as directed by the physician. If drainage of a large amount of accumulated fluid is necessary, assist the doctor by placingthe free end of the tubing in the drainage bottle. Watch the patient's color; check pulse and respiration. Immediately report any suddenchange, as this may indicate damage to the visceral pleura from a nick or puncture by theneedle. After the needle is withdrawn, apply a sterile dressing over the puncture site. Position patient comfortably (usually Fowler's position).
e. Follow-up Procedures. Remove equipment from bedside to utility room. Complete entries on appropriate laboratory request forms as directed. Send properly labeled specimens with completed request forms to laboratory immediately. Measure and record amount of fluid withdrawn and discard this fluid unless directedotherwise. Discard disposables, place all linen in hamper, and return appropriate items to CMS. Continue to observe patient for respiratory difficulty: persistent cough, dyspnea, or thepresence of blood in the sputum. Take and record vital signs q4h (every 4 hours), or asordered.

Lectures on Basics of practical nursing for beginners BY Dr.Rastrapati Choudhury
156
Obtain post-procedural chest X-rays, if ordered. Enter the following information on Nursing Notes: date and time, procedure, by whomperformed, amount and type of fluid withdrawn, patient's reactions, and specimens sent tolaboratory.
There are few more pulmonary procedures. Equipments and preparation is almost sameand few more according to specified procedure like chest tube, suturing set, surgicalblade,waterseal and as required by doctor.CHEST TUBE INSERTION, WATER-SEAL CHEST DRAINAGE, CARING FOR THE PATIENT WITHWATER-SEAL CHEST DRAINAGEASCITIC FLUID TAPING (PARACENTESIS)Paracentesis and Ascites Fluid AnalysisTHE PROCEDURE:A relatively simple bedside procedure in which one inserts a needle into the abdomen, therebyevacuating either a small amount of ascites fluid for diagnostic purposes, or large amounts of fluid fortherapeutic purposes.It is the most cost-effective means of determining the cause of ascites.INDICATIONS:
1. Above all, anyone (in- or outpatient) with new-onset ascites should have at least a diagnosticparacentesis.
2. Many authors advocate tapping anyone admitted to the hospital with ascites.3. Anyone with ascites who is showing signs/symptoms of infection, especially fever,
hypotension, peripheral leukocytosis, encephalopathy, acidosis.
CONTRAINDICATIONS:Really, very few contraindications at all.
1. Coagulopathy stands as one relative contraindication, but keep in mind that most cirrhotic withascites have a concomitant coagulopathy (reflected by an elevated INR). Very few of them willbleed unless the needle actually enters a blood vessel (which is a rare event). Incidentally,there are NO studies to support giving FFP or other blood products prior to paracentesis toreduce bleeding complications.
2. DIC or evidence of fibrinolysis is considered by some authors to be an absolutecontraindication to paracentesis.
RISKS:When you talk with the patient or proxy to get consent for the procedure, remember to discuss withthem the following risks of the procedure:
1. Abdominal wall hematoma (rare, only about 2% of cases in some studies)2. Infection (also extremely rare to get it from paracentesis; some studies report ZERO infections
related to the procedure)
Lectures on Basics of practical nursing for beginners BY Dr.Rastrapati Choudhury
157
3. BleedingThere have been studies of paracentesis complications, and none of them report any deaths associatedwith the procedure itself.TOOLS: You’ll need the following…
1. A large bore Angiocath needle (around 16-18 gauge usually suffices for large volume taps; 20-22 is fine for a diagnostic). Avoid the short Angiocath (less than 3.5 inches), as these oftenwon’t be long enough to get good access into the peritoneal space
2. A thoracentesis kit. Out of this, you will use the long tubing provided to drain fluid intocollection bottles in large volume paracentesis. And, in the occasional situations where anAngiocath is not effective, you may need to use the ‘harpoon’ long needle used inthoracentesis for access instead.
Always make sure you familiarize yourself with the instruments in the kit and how the stopcockswork before you start your procedure!3. Betadine and sterile gauze4. 1 or 2% Lidocaine and a 25 gauge needle and 5cc syringe for infiltration5. Rubber sheet to keep the bed clean6. A gown and mask for yourself (the fluid is often under pressure, and it can spurt out the needle
a good distance!). Always remember that with any procedure, you should be wearingeye/splash protection.
7. Sterile gloves, sterile IV set,16 and 18 gauze needle, general dressing set, spongeholder,betadine and etc.
8. Collection bottles – if doing a large volume paracentesis, you may need up to 6-7 bottles (1liter each)
TECHNIQUE Get consent from either the patient or the patient’s health care proxy. Position the patient, either supine or, more commonly, in the lateral decubitus position
favoring the side where you intend to insert the needle. The usual sites to tap are RLQ orcaudal to the umbilicus (if the patient is thin).
Elevate the head of the bed slightly Percuss the abdomen to determine where the fluid level exists Clean the skin thoroughly with Betadine solution Infiltrate the skin and subcutaneous tissues with lidocaine via the 25 gauge needle and wait
about 3-5 minutes for the lido to take effect. Insert the Angiocath or thoracentesis needle with a syringe attached at your chosen site
perpendicular to the skin. As you advance your needle slowly, aspirate intermittently until youget fluid return. Continuous aspiration has the theoretical risk of vacuum suctioning bowel andomentum towards the needle.
Once flow is obtained, remove the needle leaving the catheter in place. Collect at least 20-30ccfor your lab tests and cultures (into blood culture bottles – 5-10cc’s each bottle).
If performing a therapeutic paracentesis, then disconnect your syringe and attach the tubing tothe catheter, with another needle at the other end of the tubing. This needle is used to insertinto the collection bottles (1 liter each).
The doctor may ask for following medical investigation.Remember to send at least the following routine ascites labs:
1. Cell count and differential2. LDH3. Albumin

Lectures on Basics of practical nursing for beginners BY Dr.Rastrapati Choudhury
158
4. Culture in blood culture bottles inoculated at the bedsideALSO remember to send a serum LDH and albumin at the same time (or at least from the same day) asadvised by the consultant.Exudates, Transudates and Ratios: We are always taught in medical school that the serum:ascites LDH and protein ratios help
differentiate exudates and transudates The literature shows that these calculations are actually not all that helpful, surprisingly. The SAAG has become more favored in helping to characterize ascites fluid.
Amylase: “Normally” in ascites, you see an ascites amylase that’s about half the serum amylase If the ascites is secondary to pancreatitis or perforated viscus, the amylase levels can be as
great as five-fold higher than the serum levelsGlucose: In uncomplicated ascites, usually similar to serum levels. In later SBP (but often not in early), ascites glucose levels can drop to as low as zero mg/dl
secondary to bacterial consumptionCultures and Gram Stains: Cultures should be obtained by inoculating blood culture bottles at the bedside. This has been
shown to improve sensitivity to at least 80%, compared with 50% for ‘conventional’ culturemethods.
Gram stains are relatively useless on ascites fluid – about as useful as asking for a Gram stainon blood cultures to look for bacteremia. The concentration of organisms just won’t be highenough to see something on Gram stain.
Cytology Truly only helpful in diagnosing peritoneal carcinomatosis. Reported sensitivities up to 100%. Does not detect most other intra-abdominal cancers, mainly because most of the other cancers
do not frequently metastasize to the peritoneum. Think of cytology as helping you only if you’re suspicious of a cancer that has spread to the
peritoneum. And remember that a negative cytology does not rule out cancers such ashepatocellular carcinoma or liver metastases, which commonly cause ‘malignant ascites.’
______________________________________________________________________________________________
PERICARDIOCENTESIS (PERICARDIAL TAP, CARDIAC NEEDLE ASPIRATION)
PERICARDIALFLUID TAPPINGPericardial EffusionIntroductionBackgroundPericardial effusion defines the presence of anabnormal amount and/or character of fluid in thepericardial space. It can be caused by a variety oflocal and systemic disorders, or it may beidiopathic. Pericardial effusions can be acute orchronic, and the time course of development has agreat impact on the patient’s symptoms. Treatmentvaries, and is directed at both removal of thepericardial fluid and alleviation of the underlying

Lectures on Basics of practical nursing for beginners BY Dr.Rastrapati Choudhury
159
cause, which usually is determined by a combination of fluid analysis and correlation with comorbid illnesses.
PERICARDIOCENTESISINDICATIONS Relieve pericardial tamponade Medical causes Traumatic causes Diagnostic pericardiocentesis Need for tapping pericardial effusions questioned Should be done under ultrasound or flouro guidance Subxiphoid pericardiotomy in the OR will obtain fluid and pericardial biopsy Limited role for diagnosing tamponade in trauma: sensitivity is only 60-80% because blood is clotted and not easily aspirated
EquipmentGeneral sterile dressing set in addition to 18 guage spinal needle (7.5-12.5 cm long) Leave the obturator in the needle during initial passage through skin then remove the obturator
and attach the syringe Three way stop cock attached to needle to allow repeated aspiration central line 8 French Pigtail catheters multilumen catheters, fenestrated central lines have all been used
PreparationPretreatment with atropine may prevent vagal reactionsPatient sitting at 45 degree angle if possible to bring the heart closer to the anterior abdominal wallInsert NG if abdomen distended or patient on positive pressure ventilationIodine prep and sterile drapes if time permits
INCISION AND DRAINAGEABSCESS INCISION AND DRAINAGE

Lectures on Basics of practical nursing for beginners BY Dr.Rastrapati Choudhury
160
Abscesses are localized infections of tissue marked by a collection of pus surrounded by inflamedtissue. Abscesses may be found in any area of thebody, but most abscesses presenting for urgentattention are found on the extremities, buttocks,breast, perianal area, or from a hair follicle.Abscesses begin when the normal skin barrier isbreached, and microorganisms invade theunderlying tissues. Causative organisms commonlyinclude Streptococcus, Staphylococcus, entericbacteria (perianal abscesses), or a combination ofanaerobic and gram-negative organisms.Abscess resolve by drainage. Smaller (<5mm indiameter) abscesses may resolve to conservativemeasures (warm soaks) to promote drainage. Largerabscesses will require incision to drain them, as theincreased inflammation, pus collection, and walling off of the abscess cavity diminishes theeffectiveness of conservative measures.Indications1. Abscess on the skin which is palpableContraindications1. Extremely large abscesses which require extensive incision, debridement, or irrigation (best done inOR)2. Deep abscesses in very sensitive areas (supralevator, ischiorectal, perirectal) which require a generalanesthetic to obtain proper exposure3. Palmar space abscesses, or abscesses in the deep plantar spaces4. Abscesses in the nasolabial folds (may drain to sphenoid sinus, causing a septic phlebitis)Materials01. Universal
precautions materials02. 1% or 2% lidocaine
WITH epinephrine for localanesthesia, 10 cc syringeand 25 gauge needle forinfiltration
03. Skin prep solution04. #11 scalpel blade
with handle05. Draping06. Gauze07. Hemostat,
scissors, packing (plain oriodoform, 1/2”)
08. Tape09. Culture swab10. Preprocedure education
I. Obtain informed consentII. Inform the patient of potential severe complications and their treatment
III. Explain the steps of the procedure, including the not insignificant pain associated withanesthetic infiltration
IV. Explain necessity for follow-up, including packing change or removal
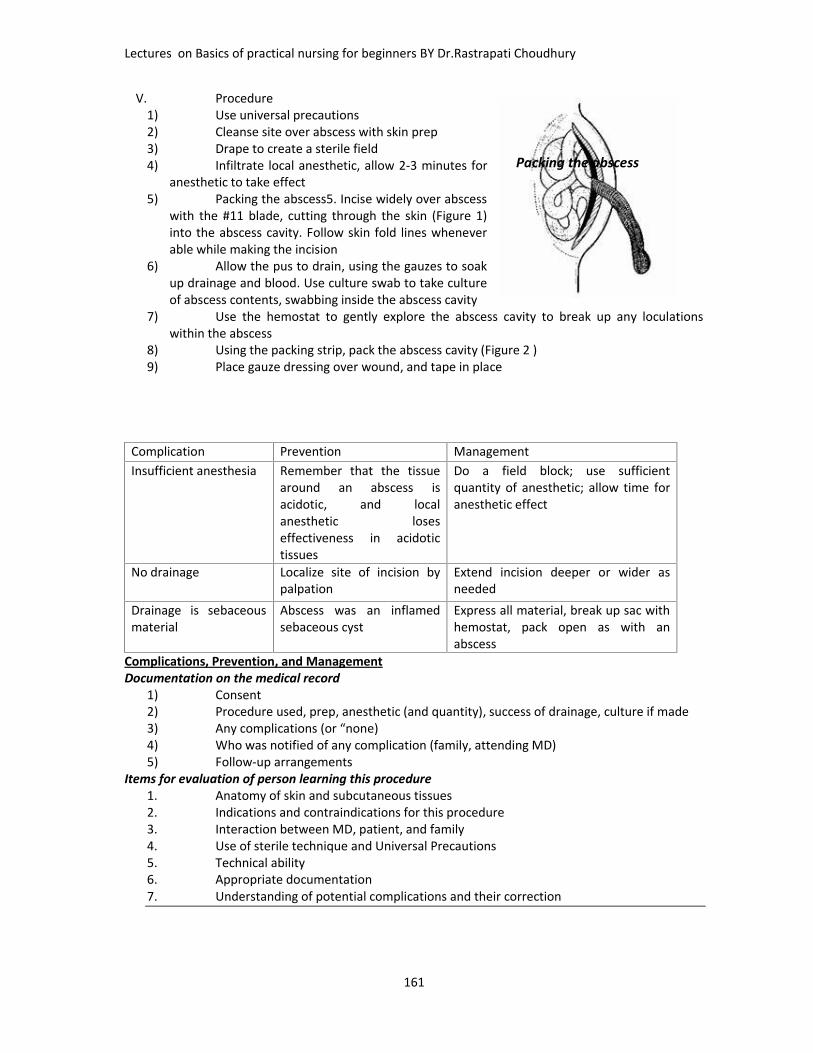
Lectures on Basics of practical nursing for beginners BY Dr.Rastrapati Choudhury
161
V. Procedure1) Use universal precautions2) Cleanse site over abscess with skin prep3) Drape to create a sterile field4) Infiltrate local anesthetic, allow 2-3 minutes for
anesthetic to take effect5) Packing the abscess5. Incise widely over abscess
with the #11 blade, cutting through the skin (Figure 1)into the abscess cavity. Follow skin fold lines wheneverable while making the incision
6) Allow the pus to drain, using the gauzes to soakup drainage and blood. Use culture swab to take cultureof abscess contents, swabbing inside the abscess cavity
7) Use the hemostat to gently explore the abscess cavity to break up any loculationswithin the abscess
8) Using the packing strip, pack the abscess cavity (Figure 2 )9) Place gauze dressing over wound, and tape in place
Complication Prevention ManagementInsufficient anesthesia Remember that the tissue
around an abscess isacidotic, and localanesthetic loseseffectiveness in acidotictissues
Do a field block; use sufficientquantity of anesthetic; allow time foranesthetic effect
No drainage Localize site of incision bypalpation
Extend incision deeper or wider asneeded
Drainage is sebaceousmaterial
Abscess was an inflamedsebaceous cyst
Express all material, break up sac withhemostat, pack open as with anabscess
Complications, Prevention, and ManagementDocumentation on the medical record
1) Consent2) Procedure used, prep, anesthetic (and quantity), success of drainage, culture if made3) Any complications (or “none)4) Who was notified of any complication (family, attending MD)5) Follow-up arrangements
Items for evaluation of person learning this procedure1. Anatomy of skin and subcutaneous tissues2. Indications and contraindications for this procedure3. Interaction between MD, patient, and family4. Use of sterile technique and Universal Precautions5. Technical ability6. Appropriate documentation7. Understanding of potential complications and their correction
Packing the abscess
Lectures on Basics of practical nursing for beginners BY Dr.Rastrapati Choudhury
162
TRACHEOSTOMY PATIENT CARE
A Tracheostomy is the surgical opening into the trachea for the purpose of establishing anairway. When laryngectomy accompanies a trachesotomy:
A laryngectomy tube (a shorter version of a trachesotomy tube) may be inserted by thedoctor;The patient’s trachea is sutured to the skin surface;Consequently, with a laryngectomy, accidental tube expulsion doesn’t precipitateimmediate closure of the tracheal opening. Once healing occurs, the patient has apermanent neck stoma through which respiration takes place. Whether a trachesotomyis performed in an emergency situation or after careful preparation, as a permanentmeasure or as a temporary therapy, post-procedure patient care has the samepurposes: To promote and assure free passage of air within the trachea-bronchial tree by
preventing encrustation and clogging of the inner cannula. To facilitate the removal of secretions. To care for trachesotomy or laryngectomy tubes and surrounding skin,
preventing infection and promoting healing.DESCRIPTION: Many trachesotomy tubes have a cuff that is inflated after tube placement.The cuff creates a tracheal seal that blocks aspiration and prevents air leakage, an importantconsideration immediately after trachesotomy or during positive-pressure ventilation.Tracheostomy tubes may be fenestrated (a window and/or hole is in the outer cannula),unfenestrated, cuffed and/or uncuffed.Bivona trachesotomy tubes have either foam or water in cuffs; if unsure of brand, consultRespiratory Therapist for follow up.Cannula is of two types: Disposable: Shiley disposable inner cannula are indicated by “DCT” on the plate of the
outer cannula, and by the “pinching” snap lock mode on the inner cannula; available insizes 4, 6, 8, and 10.
Reusable: Inner cannula are indicated by the “twisting” lock mode on the inner cannulaavailable in sizes 00, 0, 1, 2, 3, 4, 5 (children), and 4-10 (for adults).
KNOWLEDGE BASE:1) A duplicate sterile trachesotomy tube of the same size must be kept at the bedside
along with a hemostat, so that, should an obstruction occur or the tube be dislodged, itcan be replaced immediately by another tube. Hemostats can be ordered from CentralService. After use, they are discarded. An ambu-bag should be at the bedside alongwith a bottle of normal saline.

Lectures on Basics of practical nursing for beginners BY Dr.Rastrapati Choudhury
163
2) The obturator should be placed in a clean plastic bag and taped to the head of the bedat all times.
3) When the patient is being transported to any other department, the obturatorshould be taped to the front of his chart and accompany him.
If the obturator is not available, an extra (duplicate) Tracheostomy tube should accompany thepatient.
4) Inform all nursing unit personnel of the presence of a posttracheostomy patient in thearea.
5) To reduce the possibility of contamination, aseptic technique is essential duringsuctioning and tracheostomy care.
6) If the patient is alert, he must be equipped with a signal light or call bell, and paper andpencil, so that he can communicate with staff.
7) If necessary, obtain an order to restrain the patient so he cannot reach thetracheostomy tube.
8) Cotton balls, loose threads from gauze, or other small foreign bodies must be keptaway from the tracheostomy opening.
9) During ongoing oxygenation, humidification (which may be heated) with sterile waterhelps prevent drying of tracheal and bronchial mucosa and the formation of crusts.
10) Keep the nebulizer tubing below the level of the trachea. This permits condensation togo back into the reservoir and prevents it from running into the trachea. Remove anyexcess water from the reservoir as needed with the suction provided. Whenoxygenation is discontinued by the physician, humidification of Tracheostomy tube
11) and/or laryngectomy stoma may be achieved by use of an atomizer filled with normalsaline
12) All tracheostomy patients have some tracheo-bronchial secretions. When they cannotbe suctioned out, this may indicate inadequate humidification.
13) It is the physician’s responsibility to change the outer cannula unless he delegates thisresponsibility to a respiratory therapy team leader or specialist. If the tube isaccidentally expelled, a hemostat may be used to hold the tracheostomy incision openuntil a duplicate sterile outer cannula can be reinserted with the use of an obturator.
INDICATIONS:Tracheostomy care, including cleaning and/or changing of the inner cannula and stomasite care, should be done as often as needed, and/or at a MINIMUM of once everyeight (8) hours.Trach ties need to be changed whenever soiled to avoid compromised skin integrity.Always hold tracheostomy in place with one hand while ties are being changed (asecond nurse may be needed). Ties are tightened down to one finger space to allow forvenous outflow.
Secretions should be suctioned and/or coughed out of the trachea on a regular basis asneeded and prior to removing the inner cannula during Tracheostomy tube care. Nursing staffmust check the cannula at least every four (4) hours to document the condition of the cannula.The use of a penlight to detect crustation building up is indicated when the patient presents inrespiratory distress and secretions are not able to be suctioned out of tracheostomy. Sterilehemostats can
be used to grasp and remove such encrustations visible when only an outer cannula ispresent. Otherwise, change or clean the inner cannula depending on if it is disposableor reusable, respectively.
EQUIPMENT: Assemble the following:OPEN SUCTIONING TECHNIQUE: Suction catheter of appropriate size. Sterile normal saline

Lectures on Basics of practical nursing for beginners BY Dr.Rastrapati Choudhury
164
Sterile gloves. Suction source. Manual resuscitation bag connected to oxygen and flow-meter set at 15L/min. Goggles or glasses and mask.
CLOSED SUCTIONING TECHNIQUE: Closed-suction setup with a catheter of appropriate Sterile normal saline. Gloves. Suction source. Mechanical ventilator. Goggles or glasses and mask.
FOR REUSABLE INNER CANNULA:Sterile tracheostomy cleaning tray (contains basins, drape, 4 x 4s or gauze pads, cleaningbrush, pipe cleaners, tracheostomy dressing, tracheostomy ties).FOR DISPOSABLE INNER CANNULA: Hydrogen peroxide (H2O2). Disposable inner cannula (from Central Service) sized to
Tracheostomy tube Tracheostomy drain sponge dressings Tracheostomy ties (from Central Service). 4 x 4s, gauze sponges, and/or sterile Q-tips.

Lectures on Basics of practical nursing for beginners BY Dr.Rastrapati Choudhury
165
Normal salinePROCEDURE: 1. ENDOTRACHIAL OR TRACHEOSTOMY TUBE SUCTIONING: Perform hand hygiene. Place patient in fowler’s position. Turn on suction apparatus and set vacuum regulator to 100- 120 mmHg. Secure one end of the connecting tube to the suction machine. Monitor patient’s vital signs. Open-suction Technique: Open sterile catheter package on a clean surface, using the inside of the wrapping
as a sterile field. Set up sterile solution container in sterile field and fill with approximately 100ml of
normal saline solution. Be careful as to not touch the inside of the container. Don sterile gloves. Pick up suction catheter, being careful to avoid touching non-sterile surfaces. With
non-dominant hand, pick up connecting tubing and secure to catheter. Check equipment for proper functioning. Proceed to step 6.
Closed-suction Technique: Connect the suction tubing to the closed system suction port.
Prior to suctioning, always pre-oxygenate with 100% for thirty (30) seconds to one (1)minute or press the oxygenation button on the ventilator. Synchronize hyperinflationswith inhalations. When preparing the patient’s room, be certain that the adapter for themanual resuscitation bag to the tracheostomy is present.
There should be no suction applied to the catheter while the catheter is being inserted.This is to avoid depriving the patient of oxygen and to minimize trauma to the mucousmembranes. Rotating the catheters slightly aids its insertion and removal.
Apply intermittent suction no longer than 15 seconds at a time and preferably not morethan 5 seconds while withdrawing the catheter. The patient must be allowed to breathefor one to three minutes between periods of suctioning.
DO NOT JAB THE CATHETER UP AND DOWN WHILE SUCTIONING. NOTE: Two persons may be required to suction a patient adequately. CAUTION NOTE: If the patient has a fenestrated tracheostomy tube, always insert the
inner cannula prior to suctioning since the catheter could pass into upper oral pharynxcausing ineffective suctioning.
CLEANING OF REUSABLE INNER CANNULA:Open hydrogen peroxide and sterile normal saline bottles.Open tracheostomy cleaning tray aseptically.Fill one basin with 3% hydrogen peroxide.Don sterile gloves.Remove reusable inner cannula in an upward and outward arc (must turn to unlock),being careful not to contaminate the inner length of the cannula.Cleanse the inner cannula by submerging it in hydrogen peroxide solution.
1) A sterile brush or pipe cleaner provided on the tray can be used to remove thick, encrustedsecretions. Use sterile-gloved hand to move the brush back and forth through the inner cannulawhile holding the cannula at the lock connection end with the clean-gloved hand.2) Rinse cannula thoroughly with sterile water or saline for 10-20 seconds by pouring over andthrough inner cannula from the sterile end.
g. Suction outer cannula only if necessary with sterile technique—length of outercannula only!h. After shaking off excess water or saline, reinsert inner cannula and twist to lock inplace.
3. CHANGING OF DISPOSABLE INNER CANNULA (DIC):Open sterile disposable inner cannula tray aseptically by removing the lid.Don clean gloves.
NOTE: Sterile gloves are not necessary since sterile portions of the catheter are not touched.Clean gloves are worn to protect self.

Lectures on Basics of practical nursing for beginners BY Dr.Rastrapati Choudhury
166
c. Unlock (by unsnapping) and remove the disposable inner cannula. Discard.d. Empty disposable inner cannula tray into hand and pick up sterile DIC by the snap-lock connection end, keeping inner aspect sterile.e. Replace and snap-lock in place the new sterile DIC.
CAUTION NOTE: Make sure the inner cannula number (size) is the same as thetracheostomy.
4. CHANGING OF TRACHEOSTOMY DRESSING AND STOMA CARE: NOTE: To avoid excessive trauma, the dressing is not changed for 24 hours following
surgery of a tracheostomy unless there is excessive bleeding. Open packages of sterile 4 x 4s (at least 2) or sterile Q-tips. Open tracheostomy dressing packages(s). Remove soiled dressing and discard. Don sterile gloves if using sterile 4 x 4s to clean stoma. (Gloves are not necessary if Q-
tips are used.) Using 4 x 4s or Q-tips, dip sterile gauze in a hydrogen peroxide/normal saline mix.
Clean stoma site, faceplate of tracheostomy tube, and the adjacent skin. Repeatcleaning with just normal saline to remove residual hydrogen peroxide.
Reapply sterile tracheostomy drain sponge dressing(s). DO NOT use a cut 4 x 4 gauzesponge for a tracheostomy dressing.
5. CHANGING TRACH TIES: CAUTION NOTE: When changing ties, care must be taken to prevent the patient from
coughing out the tube. At times, two nurses may be needed to do this, or the old tapesmay be left in place until the new tapes are secured.
1. Replace ties with clean twill tape or disposable foam tracheostomy tube ties. Securetracheostomy tube tie with square knots (NEVER USE A BOW) at the side of the neck.
2. Leave tape loose enough to allow one small finger to fit between tape and neck.6. CUFF INFLATION/DEFLATION:EQUIPMENT: 6- to 12-cc syringe,StethoscopePROCEDURE: A tracheostomy tube should only be deflated and/or inflated if ordered by the physician.
Usually, the cuff will be inflated during meals to prevent aspiration of ingestedfood. Prior to deflating the cuff, suctioning of the oral pharyngeal cavity may beappropriate to minimize secretions which could descend into the trachea.
2) To gauge proper inflation point, use the minimal leak technique by bagging thepatient with a manual resuscitation bag while simultaneously listening with astethoscope on the neck above the tracheostomy tube. Stop inflating when the leakbecomes minimal or first disappears. With minimal cuff inflation, you should feel no aircoming from the patient’s mouth, nose, or tracheostomy site, and a conscious patientshould not be able to speak. Note the amount of air used to inflate the cuff in theintegrated notes (usually 2 to 5 ml).
3) To deflate, insert syringe into the cuff pilot balloon and gently withdraw all air fromthe cuff, noting the amount.
PATIENT EDUCATION: Explain the purpose and the procedure to the patient. Instruct the patient to take several deep breaths. If he is on a ventilator, initiate several
deep respirations (sighs) before suctioning him. Explain that the patient will behyperoxygenated with a manual resuscitation bag connected to the tracheostomy tubebefore and between suction attempts. Sometimes a second person may be needed toassist with the suctioning.
If the patient will be discharged with a tracheostomy, patient teaching should includeteaching at-home tracheostomy care using clean technique.
DOCUMENTATION: Nursing Reassessment: Document the size and type of trachesotomy tube (e.g. shiley
or bivona) and the date and time of care given and patient’s tolerance of the procedure.

Lectures on Basics of practical nursing for beginners BY Dr.Rastrapati Choudhury
167
Note types of secretions obtained from suctioning of from drainage at tracheostomy siteas well as condition of skin. If cuff inflation and deflation are done, note the time andvolume of air or pressure obtained. Note any family and patient teaching.
__________________________________________________________________
CENTRAL LINE CARE: Central venous lines and care
A central venous line is a device inserted into the superior vena cava or right atrium. A medicalpractitioner inserts the catheter via the internal jugular, subclavian or femoral veins using strict aseptictechnique. they are more commonlyused in the high-dependencycategory patient.A central venous line is a deviceinserted into the superior vena cavaor right atrium. A medical practitionerinserts the catheter via the internaljugular, subclavian or femoral veinsusing strict aseptic technique.There are several reasons for theinsertion of a central venouscatheter. These include:
To monitor central venouspressure in critically ill patients;For the rapid administration ofintravenous fluids;For the administration of drugs,such as antibiotic therapy andcytotoxic drugs;For the administration ofparenteral nutrition;To aid in the diagnosis of cardiacfailure;To monitor postoperativepatients.Types of catheter and theirinsertionThe patient's condition will helpthe medical practitioner to decidewhich catheter is most appropriate for the patient's needs. There are a number of central venouscatheters to choose from:Single, double, triple and quadruple lumen. Multiple lumen catheters allow more than one infusionto be given separately while facilitating continuous pressure monitoring, thereby minimising therisk of accidental bolus.Sheaths for the insertion of a pulmonary artery catheter or pacing wire;Tunnelled catheters for long-term use.Measuring central venous pressureCentral venous pressure (CVP) is a measurement of pressure in the right atrium of the heart.Normal CVP range is 3-10mmHg (5-12cmH2O).

Lectures on Basics of practical nursing for beginners BY Dr.Rastrapati Choudhury
168
Nursing careThe patient should be closely monitored and the catheter site and the system observed. The patient'svital signs should be monitored and recorded. Any handling of the line should be kept to a minimum toreduce the risk of contamination and the line should be securely fastened to the patient.
The dressing on the central venous site should be changed in accordance with hospital policy andprocedures. It should always be changed using aseptic techniques and a transparent dressing is oftenused to allow observation for evidence of redness or discharge.
The nurse usually removes the catheter after the medical practitioner has given an instruction to do so.The patient should be informed and reassured and the procedure explained. The patient should lie flatin bed with the foot of the bed elevated to prevent air emboli on removal of the catheter. Beforeremoving the catheter, ask the medical practitioner if the tip of the catheter should be kept and sentfor microbiological examination. If the tip is to be sent to the laboratory to be cultured it should be cutwith sterile scissors and placed in a sterile specimen pot to prevent further contamination.
The removal procedure is carried out using an aseptic technique. After removal of the sutures fromaround the catheter, a wad of sterile gauze should be held under pressure over the site. The catheter ispulled gently until it is removed, while the nurse continues to apply pressure to the site for up to fiveminutes until bleeding has stopped. The site is sealed with an airtight dressing, which should be left inplace for 48 hours, and the patient can be returned to a comfortable position. play in helping tosafeguard the patient against the potential risks associated with central venous ines__________________________________________________________________________
KNOWALDGE OF DRUGS
Most common drugsNote: before going to drug administration check twice date of expiary ,correct dose,right patient,Medication errors, or mistakes involving medications, are so common that in the medical professionwe have the “5 Rights” to help us avoid them. The Five Rights are: The right dose

Lectures on Basics of practical nursing for beginners BY Dr.Rastrapati Choudhury
169
The right medication The right patient The right route The right time
Analgesics: Drugs that relieve pain. There are two main types: non-narcotic analgesics for mild pain,and narcotic analgesics for severe pain.Antacids: Drugs that relieve indigestion and heartburn by neutralizing stomach acids.Antianxiety Drugs: Drugs that suppress anxiety and relax muscles (sometimes called axiolytics,sedatives, or minor tranquilizers).Antiarrhythmics: Drugs used to control irregularities of heartbeat.Antibacterial: Drugs used to treat infections.Antibiotics: Drugs made from naturally occurring and synthetic substances that combat bacterialinfection. Some antibiotics are effective only against limited types of bacteria. Others, known as broadspectrum antibiotics, are effective against a wide range of bacteria.Anticoagulants and Thrombolytic: Anticoagulants prevent blood from clotting. Thrombolytic helpdissolve and disperse blood clots and may be prescribed for patients with recent arterial or venousthrombosis.Anticonvulsants: Drugs that prevent epileptic seizures.Antidepressants: There are three main groups of mood-lifting antidepressants: those belonging to thetricyclics, SSRI (selective serotonin reuptake inhibitors) class, and monoamine oxidaseinhibitors.Tricyclic Antidepressants(Amitriptyline) . (Cyclobenzaprine), (Doxepin), (Nortriptyline), (Trazodone).Many of the tricyclic antidepressants have side effects that may be intolerable for some people. Theseinclude constipation, drowsiness, dry mouth and eyes, headache, heart rate abnormalities, increasedsensitivity to sunlight, morning "hangover," and weight gain. These side effects may improve afterpatients have been using the medication for a few weeks. If not the doctor should be consultedregarding another medication.Benzodiazepines(Antidepressant and anti-anxiety properties)(Alprazolam) (Clonazepam)The antidepressant and anti-anxiety properties of these medications can cause the following effects:Depression, drowsiness, impaired coordination, impaired memory, muscular weakness and/orconcentration problems, and they are known to be addictive.Serotoning Boosting Medications(Fluoxetine), (Paroxetine hydrochloride),(Sertraline),(Nefazodone) , (venlafaxine hydrochloride) Thefollowing are some of the side effects of serotonin boosting medications: anxiety/nervousness,headache, insomnia, mood swings, sexual difficulties, nausea and stomach distress.Antidiarrheals: Drugs used for the relief of diarrhea. Two main types of antidiarrheal preparations aresimple adsorbent substances and drugs that slow down the contractions of the bowel muscles so thatthe contents are propelled more slowly.Antiemetic: Drugs used to treat nausea and vomiting.Antifungal: Drugs used to treat fungal infections, the most common of which affect the hair, skin, nails,or mucous membranes.

Lectures on Basics of practical nursing for beginners BY Dr.Rastrapati Choudhury
170
Antihistamines: Drugs used primarily to counteract the effects of histamine, one of the chemicalsinvolved in allergic reactions.Antihypertensives: Drugs that lower blood pressure. The types of antihypertensives currently marketedinclude diuretics, beta-blockers, calcium channel blocker, ACE (angiotensin- converting enzyme)inhibitors, centrally acting antihypertensives and sympatholytics.Anti-Inflammatory: Drugs used to reduce inflammation - the redness, heat, swelling, and increasedblood flow found in infections and in many chronic noninfective diseases such as rheumatoid arthritisand gout.Antineoplastics: Drugs used to treat cancer.Antipsychotics: Drugs used to treat symptoms of severe psychiatric disorders. These drugs aresometimes called major tranquilizers.Antipyretics: Drugs that reduce fever.Antiviral: Drugs used to treat viral infections or to provide temporary protection against infections suchas influenza.Barbiturates: Also called sleeping drugs.Beta-Blockers: Beta-adrenergic blocking agents, or beta-blockers for short, reduce the oxygen needs ofthe heart by reducing heartbeat rate.Bronchodilators: Drugs that open up the bronchial tubes within the lungs when the tubes have becomenarrowed by muscle spasm. Bronchodilators ease breathing in diseases such as asthma.Cold Remedies: Although there is no drug that can cure a cold, the aches, pains, and fever thataccompany it can be relieved by aspirin or acetaminophen often accompanied by a decongestant,antihistamine, and sometimes caffeine.Corticosteroids: These hormonal preparations are used primarily as anti-inflammatory in arthritis orasthma or as immunosuppressive, but they are also useful for treating some malignancies orcompensating for a deficiency of natural hormones in disorders such as Addison's diseaseCough Suppressants: Simple cough medicines, which contain substances such as honey, glycerin, ormenthol, soothe throat irritation but do not actually suppress coughing. They are most soothing whentaken as lozenges and dissolved in the mouth.As liquids, they are probably swallowed too quickly to be effective. A few drugs are actually coughsuppressants. There are two groups of cough suppressants: those that alter the consistency orproduction of phlegm such as mucolytics and expectorants; and those that suppress the coughingreflex such as codeine (narcotic cough suppressants), antihistamines, dextromethorphan andisoproterenol (non-narcotic cough suppressants).Cytotoxics: Drugs that kill or damage cells. Cytotoxics are used as antineoplastics (drugs used to treatcancer) and as immunosuppressive.Decongestants: Drugs that reduce swelling of the mucous membranes that line the nose by constrictingblood vessels, thus relieving nasal stuffiness.Diuretics: Drugs that increase the quantity of urine produced by the kidneys and passed out of thebody, thus ridding the body of excess fluid. Diuretics reduce water logging of the tissues caused by fluidretention in disorders of the heart, kidneys, and liver. They are useful in treating mild cases of highblood pressure.Expectorants: Drugs that stimulate the flow of saliva and promotes coughing to eliminate phlegm fromthe respiratory tract.Hormones: Chemicals produced naturally by the endocrine glands (thyroid, adrenal, ovary, testis,pancreas, and parathyroid). In some disorders, for example, diabetes mellitus, in which too little of a

Lectures on Basics of practical nursing for beginners BY Dr.Rastrapati Choudhury
171
particular hormone is produced, synthetic equivalents or natural hormone extracts are prescribed torestore the deficiency. Such treatment is known as hormone replacement therapy.Hypoglycemic (Oral): Drugs that lower the level of glucose in the blood. Oral hypoglycemic drugs areused in diabetes mellitus if it cannot be controlled by diet alone, but does require treatment withinjections of insulin.Immunosuppressive: Drugs that prevent or reduce the body's normal reaction to invasion by disease orby foreign tissues. Immunosuppressive are used to treat autoimmune diseases (in which the body'sdefenses work abnormally and attack its own tissues) and to help prevent rejection of organtransplants.Laxatives: Drugs that increase the frequency and ease of bowel movements, either by stimulating thebowel wall (stimulant laxative), by increasing the bulk of bowel contents (bulk laxative), or bylubricating them (stool-softeners, or bowel movement-softeners). Laxatives may be taken by mouth ordirectly into the lower bowel as suppositories or enemas. If laxatives are taken regularly, the bowelsmay ultimately become unable to work properly without them.Muscle Relaxants: Drugs that relieve muscle spasm in disorders such as backache. Antianxiety drugs(minor tranquilizers) that also have a muscle-relaxant action are used most commonly. MuscleRelaxants(Cyclobenzaprine) ,(Orphenadreine Citrate)Patients should be cautioned that muscle relaxants can cause drowsiness and they should not operatea motor vehicle when taking this type of medication.Sedatives: Same as Antianxiety drugsSex Hormones (Female): There are two groups of these hormones (estrogens and progesterone), whichare responsible for development of female secondary sexual characteristics. Small quantities are alsoproduced in males. As drugs, female sex hormones are used to treat menstrual and menopausaldisorders and are used as oral contraceptives. Estrogens may be used to treat cancer of the breast orprostate, progestins (synthetic progesterone to treat endometriosis).Sex Hormones (Male): Androgenic hormones, of which the most powerful is testosterone, areresponsible for development of male secondary sexual characteristics. Small quantities are alsoproduced in females. As drugs, male sex hormones are given to compensate for hormonal deficiency inhypopituitarism or disorders of the testes. They may be used to treat breast cancer in women, butsynthetic derivatives called anabolic steroids, which have less marked side- effects, or specific anti-estrogens are often preferred. Anabolic steroids also have a "body building" effect that has led to their(usually no sanctioned) use in competitive sports, for both men and women.Sleeping Drugs: The two main groups of drugs that are used to induce sleep in patients with insomniaare benzodiazepines and barbiturates. All such drugs have a sedative effect in low doses and areeffective sleeping medications in higher doses. Benzodiazepines drugs are used more widely thanbarbiturates because they are safer, the side-effects are less marked, and there is less risk of eventualphysical dependence.Tranquilizers: This is a term commonly used to describe any drug that has a calming or sedative effect.However, the drugs that are sometimes called minor tranquilizers should be called antianxiety drugs,and the drugs that are sometimes called major tranquilizers should be called antipsychotics.Vitamins: Chemicals essential in small quantities for good health. Some vitamins are not manufacturedby the body, but adequate quantities are present in a normal diet. People whose diets are inadequateor who have digestive tract or liver disorders may need to take supplementary vitamins.
Lectures on Basics of practical nursing for beginners BY Dr.Rastrapati Choudhury
172
NSAIDS (anti-inflammatory):Non Steroid Anti-inflammatory drugs. Such as- diclofenac sodium,aceclofenac, to control pain and inflammation_________________________________________________________________________________________________
EMERGENCY DRUGS AND EQUIPMENTS
List of Emergency Drugs. List of Emergency Equipment
Digoxin Mouth gagdopamine Receiver for wasteCarmine (Nikethamide) Adhesive plasterAtropine Container with alcohol0 .9% Normal Saline Dressing scissors40% dextrose IV CanualsAminophylline NebulizerAvil amples Ned blacksAdrenalin( Epinephrine.) O2 mask or nasal catheter
Allercur suction machineDiazepam SwabsAramine Syringes and needles5% D/w with complete set TourniquetErgometrineHydrocortisoneKcl (potassium chloride)LargactilLasix amplesLevophedMidazolamMorphine sulfateNa HCO3 (Sodium bicarbonate)Nor adrenalineNoradrenalineO2(oxygen)PhenerganVitamin k

Lectures on Basics of practical nursing for beginners BY Dr.Rastrapati Choudhury
173
MEDICAL DEVICES, HANDLING AND USE DEFIBRILATOR ECG MECHINE GLUCOMETER NEBULIZER MULTI-PARA METER MECHANICAL VENTILATIR PULSE OXYMETER SUCTION APPRATUS SYRINGE PUMP
Note:All the medical devices are highly expencive and delicate,handle carefully.Charge the batteries regularlyClean the machine regularlyKeep away from fire and waterFor complaints contact bio-medical enginearDEFIBRILATORA defibrillator is a machine used to shock the victim's heart and restore the heart's normal rhythmicpatterns. When a defibrillator is used, it in effect kicks the heart into action again, causing it toresume sending blood throughout the body.Types
Manual external defibrillatorManual internal defibrillatorAutomated external defibrillator (AED)Implantable cardioverter-defibrillator (ICD)Wearable cardiac defibrillator
INDICATIONS:ventricular arrhythmia (ventricular tachycardia orventricular fibrillation) and associated cardiac arrest(unresponsive patient without a pulse)CONTRAINDICATIONS: awake, responsive patients any arrhythmias in a patient with a pulse
MATERIALS: defibrillator many different machines/modelsbecome familiar with equipment
where you are practicing paddles adult size (8-9cm diameter) for
patient weight > 10 kg. pediatric size ( 2.2 cm diameter)for patient weight < 10 kg. Electrode pads Self – adhesive
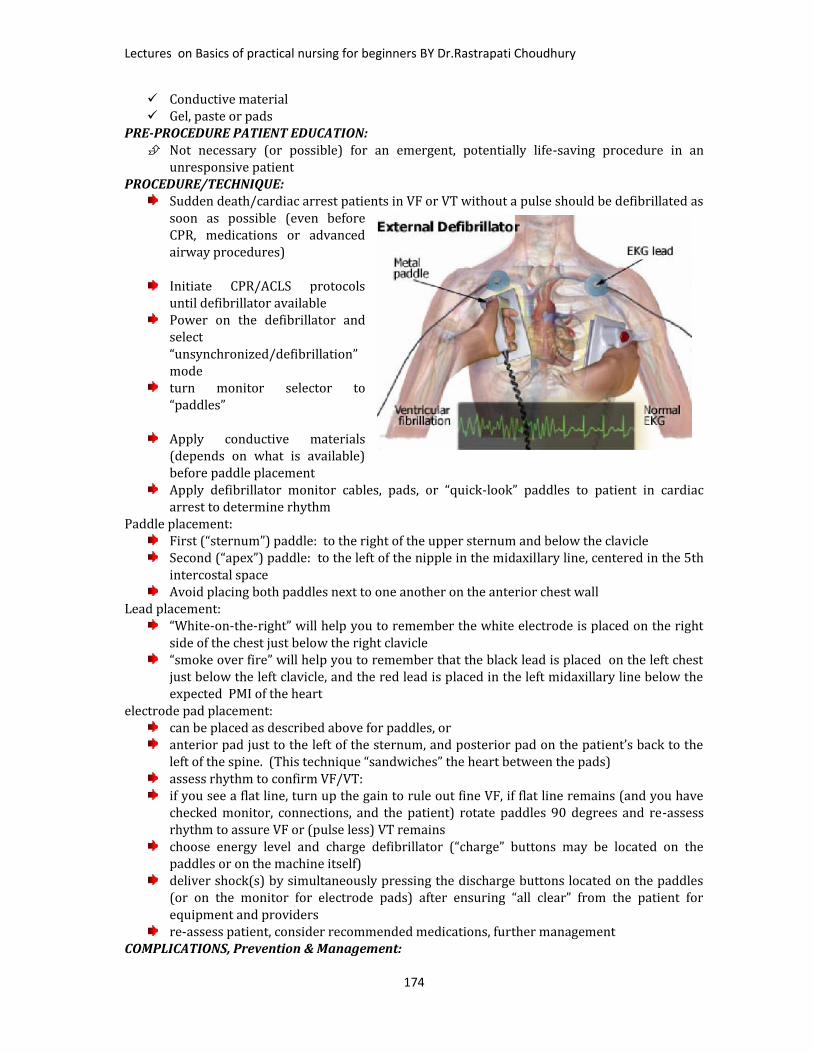
Lectures on Basics of practical nursing for beginners BY Dr.Rastrapati Choudhury
174
Conductive material Gel, paste or pads
PRE-PROCEDURE PATIENT EDUCATION: Not necessary (or possible) for an emergent, potentially life-saving procedure in anunresponsive patient
PROCEDURE/TECHNIQUE:Sudden death/cardiac arrest patients in VF or VT without a pulse should be defibrillated assoon as possible (even beforeCPR, medications or advancedairway procedures)Initiate CPR/ACLS protocolsuntil defibrillator availablePower on the defibrillator andselect“unsynchronized/defibrillation”modeturn monitor selector to“paddles”Apply conductive materials(depends on what is available)before paddle placementApply defibrillator monitor cables, pads, or “quick-look” paddles to patient in cardiacarrest to determine rhythmPaddle placement:First (“sternum”) paddle: to the right of the upper sternum and below the clavicleSecond (“apex”) paddle: to the left of the nipple in the midaxillary line, centered in the 5thintercostal spaceAvoid placing both paddles next to one another on the anterior chest wallLead placement:“White-on-the-right” will help you to remember the white electrode is placed on the rightside of the chest just below the right clavicle“smoke over fire” will help you to remember that the black lead is placed on the left chestjust below the left clavicle, and the red lead is placed in the left midaxillary line below theexpected PMI of the heartelectrode pad placement:can be placed as described above for paddles, oranterior pad just to the left of the sternum, and posterior pad on the patient’s back to theleft of the spine. (This technique “sandwiches” the heart between the pads)assess rhythm to confirm VF/VT:if you see a flat line, turn up the gain to rule out fine VF, if flat line remains (and you havechecked monitor, connections, and the patient) rotate paddles 90 degrees and re-assessrhythm to assure VF or (pulse less) VT remainschoose energy level and charge defibrillator (“charge” buttons may be located on thepaddles or on the machine itself)deliver shock(s) by simultaneously pressing the discharge buttons located on the paddles(or on the monitor for electrode pads) after ensuring “all clear” from the patient forequipment and providersre-assess patient, consider recommended medications, further managementCOMPLICATIONS, Prevention & Management:
Lectures on Basics of practical nursing for beginners BY Dr.Rastrapati Choudhury
175
Soft tissue injury can occur after repeated shocks. The presence of liquid (body fluids,medications, or IV fluids) may cause electrical arching thermal burns to the skin and softtissue and produce ineffective defibrillation by allowing the current to pass across thetrunk rather than transthoracic. To minimize this potential complication, ensure that anybody fluids or liquids are wiped away from the skin before defibrillation attempts. Myocardial and epicardial injury may result from the electrical current (not direct thermalinjury)applied in defibrillation. Use the minimal recommended energy levels to minimizeinjury Post-defibrillation cardiac dysrhythmias are more common following prolonged VF andhigher energy level countershocks. Early defibrillation at the recommended energy levelsminimizes this complication. Follow ACLS protocols to manage resulting dysrhythmias. Electrical injuries to health care providers can result if participants remain in contact withthe patient during delivery of a countershock, because they can serve as a ground for thecurrent discharged. Fires which can result from sparks in the presence of nitroglycerinpatches or ointment, flammable gasses, or an oxygen-rich environment can also be asource of injury to the patient or healthcare providers. Ensure “all clear” from the patientprior to delivery of shock to avoid these complications.DOCUMENTATION FOR THE MEDICAL RECORD: most facilities have a “code sheet” to be filled out by a member of the code team. This sheetshould be reviewed for accuracy and completeness and signed by the physician (residentand/or attending) in charge of the code. A brief progress note should be written in the chart to include the circumstances of the“code,” patient outcome, disposition, and the notification of attending physician and familymembers. You should also make reference to the code sheet for medications given andother details of the code.
ITEMS FOR EVALUATION: Performs accurate patient assessment and recognizes VF/VT Understands indications / contraindications for defibrillation Applies and operates defibrillator/monitor properly and safely Completes appropriate documentation for medical record Effectively communicates with patient, family and involved physicians

Lectures on Basics of practical nursing for beginners BY Dr.Rastrapati Choudhury
176
EXTERNAL DEFIBRILLATOR

Lectures on Basics of practical nursing for beginners BY Dr.Rastrapati Choudhury
177
ECG MECHINE
The Electrocardiogram (ECG)What is it used for?The ECG is the most commonlyperformed cardiac test. This isbecause the ECG is a usefulscreening tool for a variety ofcardiac abnormalities; ECG machinesare readily available in most medicalfacilities; and the test is simple toperform, risk-free and inexpensive.How is the ECG performed?You will lie on an examination table,and 10 electrodes (or leads) areattached to your arms, legs, andchest. The electrodes detect theelectrical impulses generated byyour heart, and transmit them to theECG machine. The ECG machineproduces a graph (the ECG tracing) of those cardiac electrical impulses. The electrodes are thenremoved. The test takes less than 5 minutes to perform.What does the ECG tracing look like?Click here for an example of an ECG, and for an explanation of what those squiggly lines mean.What information can be gained from the ECG?From the ECG tracing, the following information can be determined: the heart ratethe heart rhythmwhether there are “conduction abnormalities” (abnormalities in how the electrical impulse spreadsacross the heart)whether there has been a prior heart attackwhether there may be coronary artery diseasewhether the heart muscle has become abnormally thickenedthe heart ratethe heart rhythmwhether there are “conduction abnormalities” (abnormalities in how the electrical impulse spreadsacross the heart)whether there has been a prior heart attackwhether there may be coronary artery diseasewhether the heart muscle has become abnormally thickenedAll of these features are potentially important. If the ECG indicates a heart attack or possible coronaryartery disease, further testing is often done to completely define the nature of the problem and decideon the optimal therapy. (These tests often include a stress test and/or cardiac catheterization.) If theheart muscle is thickened, an echocardiogram is often ordered to look for possible valvular heartdisease or other structural abnormalities. Changes in the electrical pattern on the ECG may give cluesto the cause of syncopee (fainting), or may indicate underlying cardiac disease.What are the limitations of the ECG?The ECG reveals the heart rate and rhythm only during the time that the ECG is taken. If intermittentcardiac rhythm abnormalities are present, the ECG is likely to miss them. Ambulatory monitoring isneeded to record transient arrhythmias.The ECG can often be normal or nearly normal in patients with undiagnosed coronary artery disease orother forms of heart disease (false negative results.)

Lectures on Basics of practical nursing for beginners BY Dr.Rastrapati Choudhury
178
Many "abnormalities" that appear on the ECG turn out to have no medical significance after a thoroughevaluation is done (false positive results).
How to Use EKG MachinesElectrocardiography (EKG or ECC) machines are universal in the ability to read cardiac activity andprovide a printout demonstrating the electrical activity of the heart. While EKG machines vary in style,setup and operation, the standards for correct use remain similar. Every EKG machine comes with amanual for fast reference if you have questions about use, though knowing basic steps for EKGoperations will make performing EKGs on any machine easier.Things You'll NeedEKG machine, Electrodes , Leads,ECG Gelly
ECG ELECTRODE

Lectures on Basics of practical nursing for beginners BY Dr.Rastrapati Choudhury
179
1.Look for instructions or diagrams printed on the EKG machine for reference ofits use. You may find laminated cards attached to the machine, or an operationsmanual, for reference.2.Locate the power button and turn on the machine. Though most EKGmachines run on battery power, plug the machine into a proper outlet tomaintain a steady supply of power while you are performing the EKG, instead ofrelying on the battery alone.3.Enter your patient information into the EKG machine computer. You mayneed to type in your patient's name, vital statistics, diagnosis and physicianinformation on a keyboard or via a touch screen. Make sure you have saved thepatient information to the machine before moving on, if needed.4.Determine what type of EKG has been ordered for the patient: a 3-lead, 5-lead or 12-lead EKG. If appropriate, select the type of EKG on the computer.This will ensure the machine is primed to read and deliver the correct EKG.5.Prepare your patient for the EKG test and apply the electrodes and leads inproper order. Have your patient lie still once all electrodes and leads are placed,and instruct him to remain still until after the EKG is complete. Patientmovement can interfere with thecardiac reading.6.Look at the EKG computermonitor, if applicable, to be surethe machine is reading anappropriate rhythm. This includes areading that is free of spikes ordips caused by patient movementor incorrect lead placement. Onceyou are confident the rhythm looksappropriate, press the print buttonto capture, and print the EKGreading.7.Complete the EKG test byallowing the machine to save the patient information, if needed. Then unhook your patient from themachine and turn the power off.What the Leads MeasureDo not get leads confused with wires.There are 10 wires in a 12 Lead ECG.Each lead takes a snapshot of the electrical activity of the heart from a different perspective. Forexample, Lead I examines the lateral border of the heart. The twelve leads of a twelve-lead ECG areshown here, with the contiguous leads shown in the same colour.Pink – Lead aVR offers no specific view of the left ventricle.Orange – Septal Leads (V1, V2)Yellow – Inferior Leads (II, III, aVF)Green – Lateral Leads (I, aVL, V5, V6)Blue – Anterior Leads (V3, V4)
GLUCOMETER
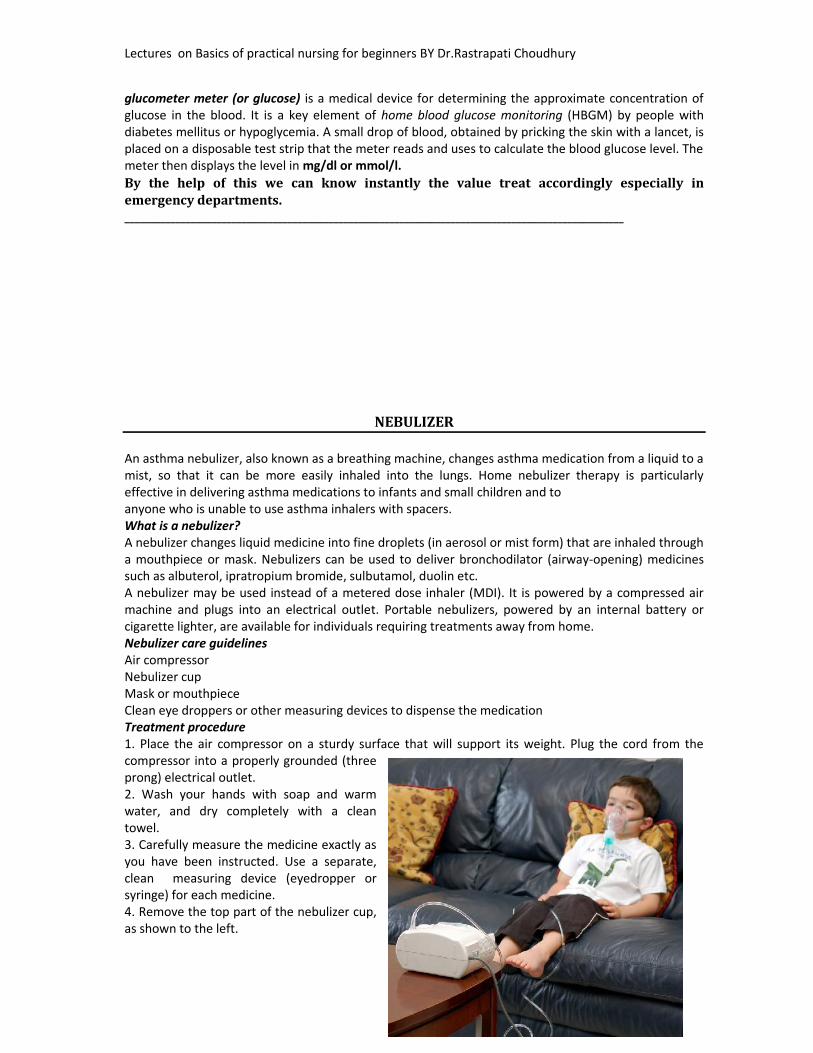
Lectures on Basics of practical nursing for beginners BY Dr.Rastrapati Choudhury
180
glucometer meter (or glucose) is a medical device for determining the approximate concentration ofglucose in the blood. It is a key element of home blood glucose monitoring (HBGM) by people withdiabetes mellitus or hypoglycemia. A small drop of blood, obtained by pricking the skin with a lancet, isplaced on a disposable test strip that the meter reads and uses to calculate the blood glucose level. Themeter then displays the level in mg/dl or mmol/l.By the help of this we can know instantly the value treat accordingly especially inemergency departments.__________________________________________________________________________________________________
NEBULIZER
An asthma nebulizer, also known as a breathing machine, changes asthma medication from a liquid to amist, so that it can be more easily inhaled into the lungs. Home nebulizer therapy is particularlyeffective in delivering asthma medications to infants and small children and toanyone who is unable to use asthma inhalers with spacers.What is a nebulizer?A nebulizer changes liquid medicine into fine droplets (in aerosol or mist form) that are inhaled througha mouthpiece or mask. Nebulizers can be used to deliver bronchodilator (airway-opening) medicinessuch as albuterol, ipratropium bromide, sulbutamol, duolin etc.A nebulizer may be used instead of a metered dose inhaler (MDI). It is powered by a compressed airmachine and plugs into an electrical outlet. Portable nebulizers, powered by an internal battery orcigarette lighter, are available for individuals requiring treatments away from home.Nebulizer care guidelinesAir compressorNebulizer cupMask or mouthpieceClean eye droppers or other measuring devices to dispense the medicationTreatment procedure1. Place the air compressor on a sturdy surface that will support its weight. Plug the cord from thecompressor into a properly grounded (threeprong) electrical outlet.2. Wash your hands with soap and warmwater, and dry completely with a cleantowel.3. Carefully measure the medicine exactly asyou have been instructed. Use a separate,clean measuring device (eyedropper orsyringe) for each medicine.4. Remove the top part of the nebulizer cup,as shown to the left.

Lectures on Basics of practical nursing for beginners BY Dr.Rastrapati Choudhury
181
5. Place your medicine in the bottom of the nebulizer cup, as shown to the right.6. Attach the top portion of the nebulizer cup and connect the mouthpiece or face mask to the cup.7. Connect the tubing to both the aerosol compressor and nebulizer cup.
8. Turn on the compressor with the on/off switch. Once you turn on the compressor, you should see alight mist coming from the back of the tube opposite the mouthpiece as shown to the left.
9. Sit up straight on a comfortable chair.10. If you are using a mask, position it comfortably and securely on your face as shown to the right.11. If you are using a mouth piece, place it between your teeth and seal your lips around it as shown tothe left..12. Take slow, deep breaths through your mouth. If possible, hold each breath for two to three secondsbefore breathing out. This allows the medication to settle into the airways.13. Continue the treatment until the medication is gone (about seven to 10 minutes).14. If you become dizzy or feel "jittery," stop the treatment and rest for about five minutes. Thencontinue the treatment, but try to breathe more slowly. If these symptoms continue with futuretreatments, inform your health care provider.15. Turn the compressor off.16. Take several deep breaths and cough. Continue coughing and try to clear any secretions you mighthave in your lungs. Cough the secretions into a tissue and dispose of it properly.17. Wash your hands with warm water and soap, and dry them with a clean towel.Care of nebulizer Cleaning and disinfecting your equipment is simple, yet very important. Cleaningshould be done in a dust- and smoke-free area away from open windows. Here is how to clean yourequipment:1. After each treatment, rinse the nebulizer cup with warm water, shake off excess water and let it airdry.2. At the end of each day, the nebulizer cup, mask, or mouthpiece should be washed in warm, soapywater using a mild detergent, rinsed thoroughly, and allowed to air dry.Note: There is no need to clean the tubing that connects the nebulizer to the air compressor.
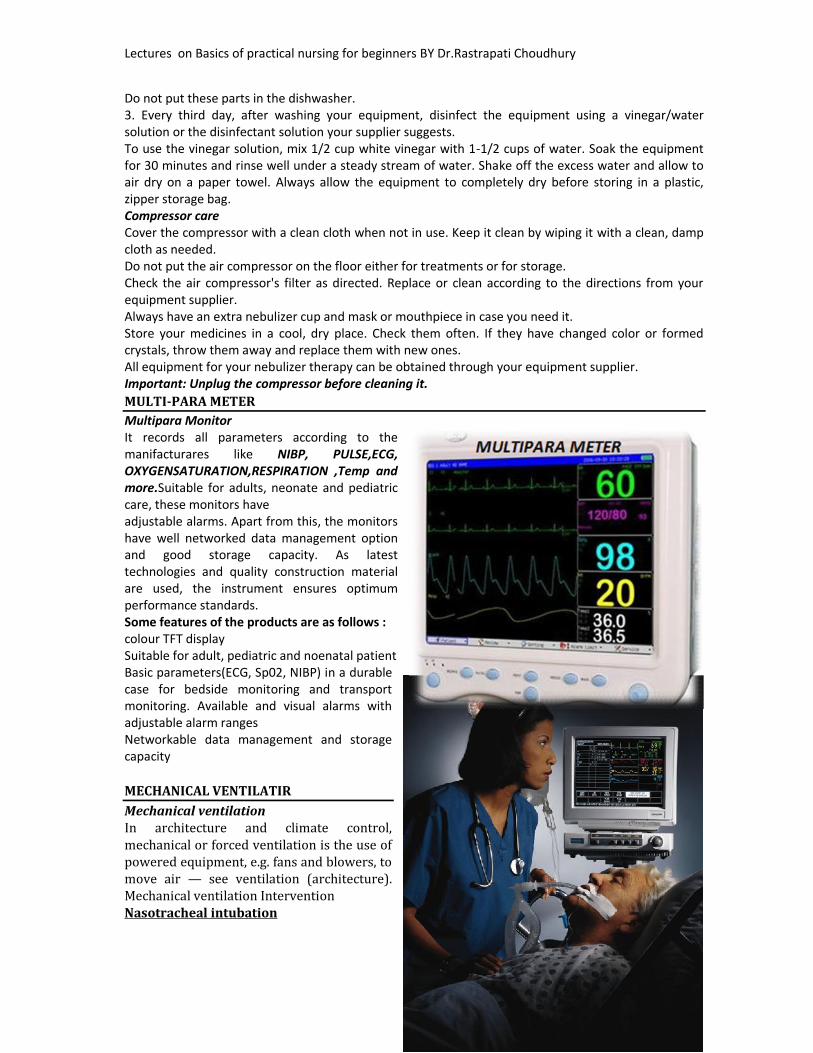
Lectures on Basics of practical nursing for beginners BY Dr.Rastrapati Choudhury
182
Do not put these parts in the dishwasher.3. Every third day, after washing your equipment, disinfect the equipment using a vinegar/watersolution or the disinfectant solution your supplier suggests.To use the vinegar solution, mix 1/2 cup white vinegar with 1-1/2 cups of water. Soak the equipmentfor 30 minutes and rinse well under a steady stream of water. Shake off the excess water and allow toair dry on a paper towel. Always allow the equipment to completely dry before storing in a plastic,zipper storage bag.Compressor careCover the compressor with a clean cloth when not in use. Keep it clean by wiping it with a clean, dampcloth as needed.Do not put the air compressor on the floor either for treatments or for storage.Check the air compressor's filter as directed. Replace or clean according to the directions from yourequipment supplier.Always have an extra nebulizer cup and mask or mouthpiece in case you need it.Store your medicines in a cool, dry place. Check them often. If they have changed color or formedcrystals, throw them away and replace them with new ones.All equipment for your nebulizer therapy can be obtained through your equipment supplier.Important: Unplug the compressor before cleaning it.MULTI-PARA METERMultipara MonitorIt records all parameters according to themanifacturares like NIBP, PULSE,ECG,OXYGENSATURATION,RESPIRATION ,Temp andmore.Suitable for adults, neonate and pediatriccare, these monitors haveadjustable alarms. Apart from this, the monitorshave well networked data management optionand good storage capacity. As latesttechnologies and quality construction materialare used, the instrument ensures optimumperformance standards.Some features of the products are as follows :colour TFT displaySuitable for adult, pediatric and noenatal patientBasic parameters(ECG, Sp02, NIBP) in a durablecase for bedside monitoring and transportmonitoring. Available and visual alarms withadjustable alarm rangesNetworkable data management and storagecapacity
MECHANICAL VENTILATIRMechanical ventilationIn architecture and climate control,mechanical or forced ventilation is the use ofpowered equipment, e.g. fans and blowers, tomove air — see ventilation (architecture).Mechanical ventilation InterventionNasotracheal intubation

Lectures on Basics of practical nursing for beginners BY Dr.Rastrapati Choudhury
183
In medicine, mechanical ventilation is a method to mechanically assist or replace spontaneousbreathing.This may involve a machine called a ventilator or the breathing may be assisted by a physician orother suitable person compressing a bag or set of bellows. Traditionally divided into negative-pressure ventilation, where air is essentially sucked into the lungs, or positive pressureventilation, where air (or another gas mix) is pushed into the trachea.It can be used as a short term measure, for example during an operation or critical illness (often inthe setting of an intensive care unit). It may be used at home or in a nursing or rehabilitationinstitution if patients have chronic illnesses that require long-term ventilatory assistance.Owing to the anatomy of the human pharynx, larynx, and esophagus and the circumstances forwhich ventilation is required then additional measures are often required to "secure" the airwayduring positive pressure ventilation to allow unimpeded passage of air into the trachea and avoidair passing into the esophagus and stomach. Commonly this is by insertion of a tube into thetrachea which provides a clear route for the air. This can be either an endotracheal tube, insertedthrough the natural openings of mouth or nose or a tracheostomy inserted through an artificialopening in the neck. In other circumstances simple airway maneuvers, an oropharyngeal airway orlaryngeal mask airway may be employed. If the patient is able to protect their own airway such asin non-invasive ventilation or negative-pressure ventilation then no airway adjunct may beneeded.Mechanical ventilation is often a life-saving intervention, but carries many potential complicationsincluding pneumothorax, airway injury, alveolar damage, and ventilator-associatedpneumonia.[citation needed].In many healthcare systems prolonged ventilation as part of intensive care is a limited resource (inthat there are only so many patients that can receive care at any given moment). It is used tosupport a single failing organ system (the lungs) and cannot reverse any underlying diseaseprocess (such as terminal cancer). For this reason there can be (occasionally difficult) decisions tobe made about whether it is suitable to commence someone on mechanical ventilation. Equallymany ethical issues surround the decision to discontinue mechanical ventilation.Neonatal mechanical ventilatorThe designs of the modern positive-pressure ventilators were mainly based on technicaldevelopments by the military during World War II to supply oxygen to fighter pilots in highaltitude. Such ventilators replaced the iron lungs as safe endotracheal tubes with high volume/lowpressure cuffs were developed. The popularity of positive-pressure ventilators rose during thepolio epidemic in the 1950s in Scandinavia and the United States and was the beginning of modernventilation therapy. Positive pressure through manual supply of 50% oxygen through atracheostomy tube led to a reduced mortality rate among patients with polio and respiratoryparalysis. However, because of the sheer amount of man-power required for such manualintervention, mechanical positive-pressure ventilators became increasingly popular.Positive-pressure ventilators work by increasing the patient's airway pressure through anendotracheal or tracheostomy tube. The positive pressure allows air to flow into the airway untilthe ventilator breath is terminated. Subsequently, the airway pressure drops to zero, and theelastic recoil of the chest wall and lungs push the tidal volume — the breath—out through passiveexhalation.Indications for useMechanical ventilation is indicated when the patient's spontaneous ventilation is inadequate tomaintain life. It is also indicated as prophylaxis for imminent collapse of other physiologicfunctions, or ineffective gas exchange in the lungs. Because mechanical ventilation only serves toprovide assistance for breathing and does not cure a disease, the patient's underlying conditionshould be correctable and should resolve over time. In addition, other factors must be taken intoconsideration because mechanical ventilation is not without its complications (see below)

Lectures on Basics of practical nursing for beginners BY Dr.Rastrapati Choudhury
184
Common medical indications for use include:Acute lung injury (including ARDS, trauma)Apnea with respiratory arrest, including cases from intoxicationChronic obstructive pulmonary disease (COPD)Acute respiratory acidosis with partial pressure of carbon dioxide (pCO2) > 50 mmHg and pH <7.25, which may be due to paralysis of the diaphragm due to Guillain-Barré syndrome, MyastheniaGravis, spinal cord injury, or the effect of anesthetics and muscle relaxant drugsIncreased work of breathing as evidenced by significant tachypnea, retractions, and other physicalsigns of respiratory distressHypoxemia with arterial partial pressure of oxygen (PaO2) < 55 mm Hg with supplementalfraction of inspired oxygen (FiO2) = 1.0Hypotension including sepsis, shock, congestive heart failureNeurological diseases such as Muscular Dystrophy and Amyotrophic Lateral SclerosisAssociated riskBarotraumas — pulmonary barotraumas is a well-known complication of positive pressuremechanical ventilation. This includes pneumothorax, subcutaneous emphysema,pneumomediastinum, and pneumoperitoneum.Ventilator-associated lung injury — Ventilator-associated lung injury (VALI) refers to acute lunginjury that occurs during mechanical ventilation. It is clinically indistinguishable from acute lunginjury or acute respiratory distress syndrome (ALI/ARDS).Diaphragm — Controlled mechanical ventilation may lead to a rapid type of disuse atrophyinvolving the diaphragmatic muscle fibers, which can develop within the first day of mechanicalventilation. This cause of atrophy in the diaphragm is also a cause of atrophy in all respiratoryrelated muscles during controlled mechanical ventilation.Motility of mucocilia in the airways — Positive pressure ventilation appears to impair mucociliarymotility in the airways. Bronchial mucus transport was frequently impaired and associated withretention of secretions and pneumonia.Types of ventilatorsSMART BAG MO Bag-Valve-Mask ResuscitatorVentilators come in many different styles and method of giving a breath to sustain life. Handcontrolled — Manual ventilators such as Bag valve masks and anesthesia bags require the user tohold the ventilator to the face or to an artificial airway and maintain breaths with their hands.Mechanical ventilatorsMechanical ventilators typically require power by a battery or a wall outlet (DC or AC) thoughsome ventilators work on a pneumatic system not requiring power.Transport ventilators — these ventilators are small, more rugged, and can be poweredpneumatically or via AC or DC power sources.Intensive-care ventilators — these ventilators are larger and usually run on AC power (thoughvirtually all contain a battery to facilitate intra-facility transport and as a back-up in the event of apower failure). This style of ventilator often provides greater control of a wide variety ofventilation parameters (such as inspiratory rise time). Many ICU ventilators also incorporategraphics to provide visual feedback of each breath.Neonatal ventilators — Designed with the preterm neonate in mind, these are a specializedsubset of ICU ventilators which are designed to deliver the smaller, more precise volumes andpressures required to ventilate these patients.

Lectures on Basics of practical nursing for beginners BY Dr.Rastrapati Choudhury
185
Positive airway pressure ventilators (PAP) — These ventilators are specifically designed fornon-invasive ventilation. this includes ventilators for use at home for treatment of chronicconditions such as sleep apnea or COPD.Ventilation process in conventional mechanical ventilationThe three traditional categories of ventilators are listed below. As microprocessor technology isincorporated into ventilator design, the distinction among these types has become less clear asventilators may use combinations of all of these modes as well as flow-sensing, which controls theventilator breath based on the flow-rate of gas versus a specific volume, pressure, or time.Breath terminationModes of ventilation are classified by the means that they determine the inspired breath iscomplete. This is sensed by either pressure or volume.Volume ventilation — A predetermined tidal volume (Vt) is set for the patient and is deliveredwith each inspiration. The amount of pressure necessary to deliver this volume will fluctuate frombreath to breath based on the resistance and compliance of the patient and ventilator circuit. If thetidal volume is set at 500ml, the ventilator will continue to inspire gas until it reaches its goal.Upon completion of the inspired volume, the ventilator will open a valve allowing the patient topassively exhale.Pressure ventilation — A predetermined peak inspiratory pressure (PIP) is determined based onthe patient's condition and pathophysiology. The ventilator will flow gas into the patient until thisset pressure is reached. Upon reaching the preset PIP, the ventilator allows for passive exhalation.Caution and close observation must be given in this mode due to potential for eitherhypoventilation or hyperventilation because the tidal volume is variable.Several manufactures have incorporated features from both of these modes in an attempt toaccommodate patient’s needs.These modes are flow-variable, volume-targeted, pressure-regulated, time-limited modes (forexample, pressure regulated volume control — PRVC). This means that instead of providing anexact tidal volume each breath, a target volume is set and the ventilator will vary the inspiratoryflow at each breath to achieve the target volume at the lowest possible peak pressure. Theinspiratory time (Ti) limits the length of the inspiratory cycle and therefore the I:E ratio. Pressureregulated modes such as PRVC, Auto-flow (Draeger) or Average Volume Assured Pressure Support(AVAPS) from Philips can most easily be thought of as turning a volume mode into a pressuremode with the added benefit of maintaining more control over tidal volume than with strictlypressure-control.Breath initiationThe other method of classifying mechanical ventilation is based on how to determine when to startgiving a breath. Similar to the termination classification noted above, microprocessor control hasresulted in a myriad of hybrid modes that combine features of the traditional classifications. Notethat most of the timing initiation classifications below can be combined with any of thetermination classifications listed above.Modes of mechanical ventilationMechanical ventilation utilizes several separate systems for ventilation referred to as the "mode".Modes come in many different delivery concepts but all modes generally fall into one of the fewmain flagship categories such as volume controlled continuous mandatory ventilation, volumecontrolled intermittent mandatory ventilation, pressure controlled continuous mandatoryventilation, pressure controlled intermittent mandatory ventilation, continuous spontaneousventilation and the high frequency ventilation systems.

Lectures on Basics of practical nursing for beginners BY Dr.Rastrapati Choudhury
186
Volume controlled continuous mandatory ventilationControlled mechanical ventilation (CMV) — in this mode the ventilator provides a mechanicalbreath on a preset timing. Patient respiratory efforts are ignored. This is generally uncomfortablefor children and adults who are conscious and is usually only used in an unconscious patient. Itmay also be used in infants who often quickly adapt their breathing pattern to the ventilatortiming. Since CMV is no longer contained in its original form the term volume controlledcontinuous mandatory ventilation has consumed it into its definition and overall has combinedany CMV mode for mechanical ventilation into the more accepted term in nomenclature formechanical ventilation.Volume controlled continuous mandatory ventilation — In this mode the ventilator provides amechanical breath with either a pre-set tidal volume or peak pressure every time the patientinitiates a breath. Traditional assist-control used only a pre-set tidal volume—when a preset peakpressure is used this is also sometimes termed intermittent positive pressure ventilation (IPPV).However, the initiation timing is the same—both provide a ventilator breath with every patienteffort. In most ventilators a back-up minimum breath rate can be set in the event that the patientbecomes apnoeic. Although a maximum rate is not usually set, an alarm can be set if the ventilatorcycles too frequently. This can alert that the patient is tachypneic or that the ventilator may beauto-cycling (a problem that results when the ventilator interprets fluctuations in the circuit dueto the last breath termination as a new breath initiation attempt).Volume controlled intermittent mandatory ventilationVolume controlled intermittent mandatory ventilation (VC-IMV). Formerly known assynchronized intermittent mandatory ventilation (SIMV). In this mode the ventilator provides apre-set mechanical breath (volume limited) every specified number of seconds (determined bydividing the respiratory rate into 60 seconds — thus a respiratory rate of 12 results in a 5 secondcycle time). Within that cycle time the ventilator waits for the patient to initiate a breath usingeither a pressure or flow sensor. When the ventilator senses the first patient breathing attemptwithin the cycle, it delivers the preset ventilator breath. If the patient fails to initiate a breath, theventilator delivers a mechanical breath at the end of the breath cycle. Additional spontaneousbreaths after the first one within the breath cycle do not trigger another SIMV breath. However,SIMV may be combined with pressure support (see below). SIMV is frequently employed as amethod of decreasing ventilatory support (weaning) by turning down the rate, which requires thepatient to take additional breaths beyond the SIMV triggered breath.Pressure controlled continuous mandatory ventilationPressure controlled continuous mandatory ventilation (PC-CMV) — mechanical ventilation withpreset inspiratory pressure (PIP) and inspiratory time (Ti). Every breath is machine initiated andmandatory.Pressure controlled intermittent mandatory ventilationPressure controlled intermittent mandatory ventilation (formerly known as SIMV) — In this modethe ventilator provides a pre-set pressure limited mechanical breath every specified number ofseconds SIMV is frequently employed as a method of decreasing ventilatory support (weaning) byturning down the rate, which requires the patient to take additional breaths beyond the SIMVtriggered breath. PC-IMV is fundamentally the same as VC-IMV with an emphasis on pressuresupport and control instead of volume. An example of PC-IMV is in the mode pressure regulatedvolume control.High frequency ventilation

Lectures on Basics of practical nursing for beginners BY Dr.Rastrapati Choudhury
187
High frequency ventilation refers to ventilation that occurs at rates significantly above that foundin natural breathing. High frequency ventilation is further defined as any ventilation with arespiratory rate (VF) greater than 150 respirations per minute. Within the category of high-frequency ventilation, the two principal types are high-frequency ventilation (passive) (i.e. high-frequency jet ventilation) and high-frequency ventilation (active) (i.e. high-frequency oscillatoryventilation).Continuous spontaneous ventilationPressure Support VentilationPressure support ventilation (PSV). When a patient attempts to breathe spontaneously through anendotracheal tube, the narrowed diameter of the airway results in higher resistance to airflow, andthus a higher work of breathing. PSV was developed as a method to decrease the work of breathingin-between ventilator mandated breaths by providing an elevated pressure triggered byspontaneous breathing that "supports" ventilation during inspiration. Thus, for example, SIMVmight be combined with PSV so that additional breaths beyond the SIMV programmed breaths aresupported. However, while the SIMV mandated breaths have a preset volume or peak pressure, thePSV breaths are designed to cut short when the inspiratory flow reaches a percentage of the peakinspiratory flow (e.g. 10–25%). New generation of ventilators provides user-adjustable inspirationcycling off threshold, and some even are equipped with automatic inspiration cycling off thresholdfunction. This helps the patient ventilator synchrony.[9] The peak pressure set for the PSV breathsis usually a lower pressure than that set for the full ventilator mandated breath. PSV can be also beused as an independent mode.Continuous positive airway pressureContinuous positive airway pressure (CPAP). A continuous level of elevated pressure is providedthrough the patient circuit to maintain adequate oxygenation, decrease the work of breathing, anddecrease the work of the heart (such as in left-sided heart failure CHF). Note that no cycling ofventilator pressures occurs and the patient must initiate all breaths. In addition, no additionalpressure above the CPAP pressure is provided during those breaths. CPAP may be used invasivelythrough an endotracheal tube or tracheostomy or non-invasively with a face mask or nasal prongs.Choosing amongst ventilator modesAssist-control mode minimizes patient effort by providing full mechanical support with everybreath. This is often the initial mode chosen for adults because it provides the greatest degree ofsupport. In patients with less severe respiratory failure, other modes such as SIMV may beappropriate. Assist-control mode should not be used in those patients with a potential forrespiratory alkalosis, in which the patient has an increased respiratory drive. Suchhyperventilation and hypocapnia (decreased systemic carbon dioxide due to hyperventilation)usually occurs in patients with end-stage liver disease, hyperventilatory sepsis, and head trauma.Respiratory alkalosis will be evident from the initial arterial blood gas obtained, and the mode ofventilation can then be changed if so desired.Positive End Expiratory Pressure may or may not be employed to prevent atelectasis in adultpatients. It is almost always used for pediatric and neonatal patients due to their increasedtendency for atelectasis.High frequency oscillation is used most frequently in neonates, but is also used as an alwaysalternative mode in adults with severe ARDS.Pressure regulated volume control is another option.Initial ventilator settings

Lectures on Basics of practical nursing for beginners BY Dr.Rastrapati Choudhury
188
The following are general guidelines that may need to be modified for the individual patient.As a general rule, whenever possible, spontaneous breathing must be maintained or supported, toavoid muscular atrophy of the diaphragm (Ventilator Induced Dysfunction of Diaphragm, VIDD) .To limit VALI and VILI, protective ventilation pattern should be applied to the patient. If thisresults in severe hypercapnia, exceeding accepted levels for permissive hypercapnia (pH below7.2), measures for extracorporeal CO2 removal (iLA Membranventilator, Novalung) should beinstalled at an early stage of mechanical ventilation, to terminate cascades of inflammatoryresponse from the lung tissue, resulting in multiorgan failure respective.Tidal volume, rate, and pressuresFor adult patients and older childrentidal volume(Vt) is calculated in milliliters per kilogram. Traditionally 10 ml/kg was used but hasbeen shown to cause barotrauma, or injury to the lung by overextension, so 6 to 8 ml/kg IBW(ideal body weight) is now common practice in ICU. Hence a patient weighing 70 kg would get a Vtof 420–560 ml. In adults a rate of 12 breaths per minute is generally used.with acute respiratory distress syndrome (ARDS) most commonly, a tidal volume of 6–8 ml/kg isused with a rate of 10–12 per minute. This reduced tidal volume allows for minimal volutraumabut may result in an elevated pCO2 (due to the relative decreased oxygen delivered) but thiselevation does not need to be corrected (termed permissive hypercapnia)For infants and younger childrenwithout existing lung disease—a tidal volume of 4–8 ml/kg to be delivered at a rate of 30–35breaths per minutewith ARDS—decrease tidal volume and increase respiratory rate sufficient to maintain pCO2between 45 and 55[vague]. Allowing higher pCO2 (sometimes called permissive hypercapnia) mayhelp prevent ventilator induced lung injuryAs the amount of tidal volume increases, the pressure required to administer that volume isincreased. This pressure is known as the peak airway pressure. If the peak airway pressure ispersistently above 45 cmH2O (4.4 kPa) for adults, the risk of barotrauma is increased (see below)and efforts should be made to try to reduce the peak airway pressure (such as acceptable alarmlimits). In infants and children it is unclear what level of peak pressure may cause damage. Ingeneral, keeping peak pressures below 30 cmH2O (2.9 kPa) is desirable.Monitoring for barotrauma can also involve measuring the plateau pressure, which is the pressureafter the delivery of the tidal volume but before the patient is allowed to exhale. Normal breathingpattern involves inspiration, then expiration. The ventilator is programmed so that after deliveryof the tidal volume (inspiration), the patient is not allowed to exhale for a half a second. Therefore,pressure must be maintained in order to prevent exhalation, and this pressure is the plateaupressure. Barotrauma is minimized when the plateau pressure is maintained < 30–35 cmH2O.SighsAn adult patient breathing spontaneously will usually sigh about 6–8 times per hour to preventmicroatelectasis, and this has led some to propose that ventilators should deliver 1½–2 times theamount of the preset tidal volume 6–8 times per hour to account for the sighs. However, such highquantity of volume delivery requires very high peak pressure that predisposes to barotrauma.Currently, accounting for sighs is not recommended if the patient is receiving 10–12 mL/kg or ison PEEP. If the tidal volume used is lower, the sigh adjustment can be used, as long as the peak andplateau pressures are acceptable.Sighs are not generally used with ventilation of infants and young children. Initial FiO2Because the mechanical ventilator is responsible for assisting in a patient's breathing, it must thenalso be able to deliver an adequate amount of oxygen in each breath. The FiO2 stands for fractionof inspired oxygen, which means the percent of oxygen in each breath that is inspired. (Note that

Lectures on Basics of practical nursing for beginners BY Dr.Rastrapati Choudhury
189
normal room air has ~21% oxygen content or an FiO2 of 0.21). In adult patients who can toleratehigher levels of oxygen for a period of time, the initial FiO2 may be set at 100% until arterial bloodgases can document adequate oxygenation. An FiO2 of 100% for an extended period of time cancause atelectasis, but it can protect against hypoxemia from unexpected intubation problems. Forinfants, and especially in premature infants, avoiding high levels of FiO2 (>60%) is very importantto avoid lung injury and apnea of prematurity. Fraction of inspired oxygen should always betitrated to meet the patients needs and to avoid unnecessary lung injury.Positive end-expiratory pressurePEEP is an adjuvant to the mode of ventilation used to help maintain functional residual capacity(FRC). At the end of expiration, the PEEP exerts pressure to oppose passive emptying of the lungand to keep the airway pressure above the atmospheric pressure. The presence of PEEP opens upcollapsed or unstable alveoli and increases the FRC and surface area for gas exchange, thusreducing the size of the shunt. For example, if a large shunt is found to exist based on theestimation from 100% FiO2 (see above), then PEEP can be considered and the FiO2 can belowered (< 60%) in order to maintain an adequate PaO2, thus reducing the risk of oxygen toxicity.In addition to treating a shunt, PEEP may also be useful to decrease the work of breathing. Inpulmonary physiology, compliance is a measure of the "stiffness" of the lung and chest wall. Themathematical formula for compliance (C) equals change in volume divided by change in pressure.The higher the compliance, the more easily the lungs will inflate in response to positive pressure.An underinflated lung will have low compliance and PEEP will improve this initially by increasingthe FRC, since the partially inflated lung takes less energy to inflate further. Excessive PEEP canhowever produce overinflation, which will again decrease compliance. Therefore it is important tomaintain an adequate, but not excessive FRC.Indications. PEEP can cause significant haemodynamic consequences through decreasing venousreturn to the right heart and decreasing right ventricular function. As such, it should be judiciouslyused and is indicated for adults in two circumstances.If a PaO2 of 60 mmHg cannot be achieved with a FiO2 of 60% If the initial shunt estimation isgreater than 25%If used, PEEP is usually set with the minimal positive pressure to maintain an adequate PaO2 witha safe FiO2. As PEEP increases intrathoracic pressure, there can be a resulting decrease in venousreturn and decrease in cardiac output. A PEEP of less than 10 cmH2O (1 kPa) is usually safe inadults if intravascular volume depletion is absent. Lower levels are used for pediatric patients.Older literature recommended routine placement of a Swan-Ganz catheter if the amount of PEEPused is greater than 10 cmH2O for hemodynamic monitoring. More recent literature has failed tofind outcome benefits with routine PA catheterisation when compared to simple central venouspressure monitoring.[10] If cardiac output measurement is required, minimally invasivetechniques, such as oesophageal doppler monitoring or arterial waveform contour monitoringmay be sufficient alternatives. When withdrawing, it is decreased through 1–2 cmH2O decrementswhile monitoring haemoglobin-oxygen saturations. Any unacceptable haemoglobin-oxygensaturation should prompt reinstitution of the last PEEP level that maintained good saturation.PositioningProne (face down) positioning has been used in patients with ARDS and severe hypoxemia. Itimproves FRC, drainage of secretions, and ventilation-perfusion matching (efficiency of gasexchange). It may improve oxygenation in > 50% of patients, but no survival benefit has beendocumented.Sedation and paralysis
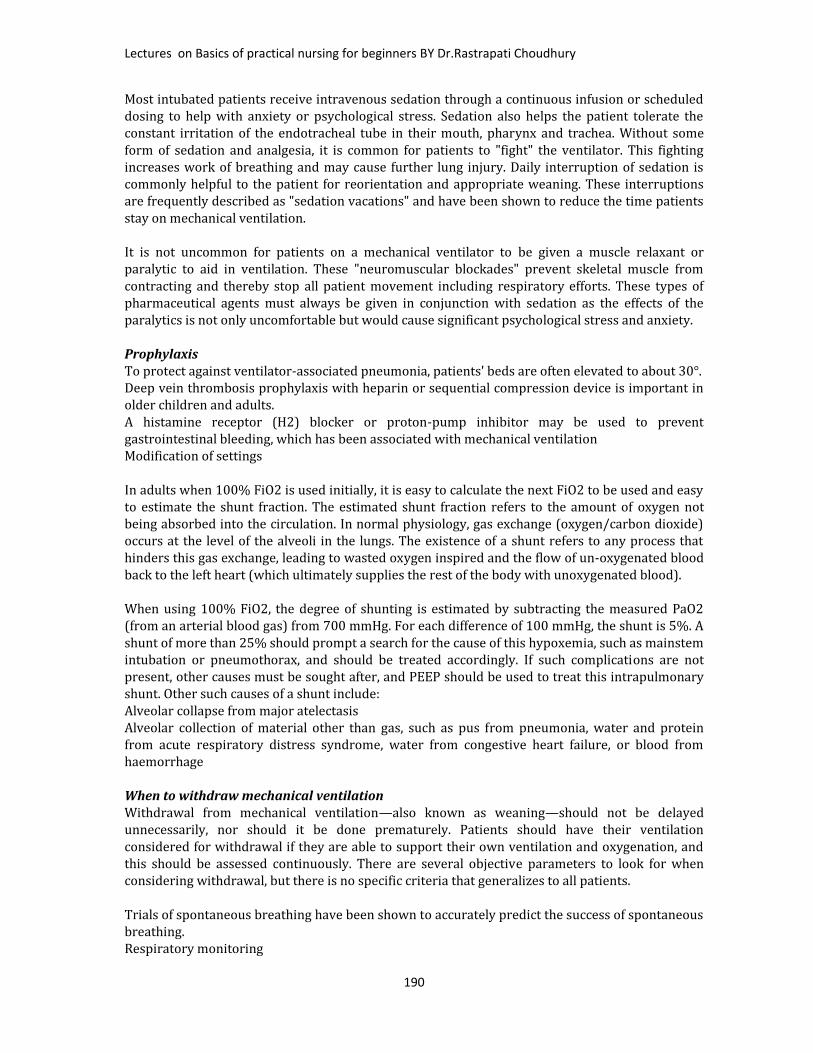
Lectures on Basics of practical nursing for beginners BY Dr.Rastrapati Choudhury
190
Most intubated patients receive intravenous sedation through a continuous infusion or scheduleddosing to help with anxiety or psychological stress. Sedation also helps the patient tolerate theconstant irritation of the endotracheal tube in their mouth, pharynx and trachea. Without someform of sedation and analgesia, it is common for patients to "fight" the ventilator. This fightingincreases work of breathing and may cause further lung injury. Daily interruption of sedation iscommonly helpful to the patient for reorientation and appropriate weaning. These interruptionsare frequently described as "sedation vacations" and have been shown to reduce the time patientsstay on mechanical ventilation.It is not uncommon for patients on a mechanical ventilator to be given a muscle relaxant orparalytic to aid in ventilation. These "neuromuscular blockades" prevent skeletal muscle fromcontracting and thereby stop all patient movement including respiratory efforts. These types ofpharmaceutical agents must always be given in conjunction with sedation as the effects of theparalytics is not only uncomfortable but would cause significant psychological stress and anxiety.ProphylaxisTo protect against ventilator-associated pneumonia, patients' beds are often elevated to about 30°.Deep vein thrombosis prophylaxis with heparin or sequential compression device is important inolder children and adults.A histamine receptor (H2) blocker or proton-pump inhibitor may be used to preventgastrointestinal bleeding, which has been associated with mechanical ventilationModification of settingsIn adults when 100% FiO2 is used initially, it is easy to calculate the next FiO2 to be used and easyto estimate the shunt fraction. The estimated shunt fraction refers to the amount of oxygen notbeing absorbed into the circulation. In normal physiology, gas exchange (oxygen/carbon dioxide)occurs at the level of the alveoli in the lungs. The existence of a shunt refers to any process thathinders this gas exchange, leading to wasted oxygen inspired and the flow of un-oxygenated bloodback to the left heart (which ultimately supplies the rest of the body with unoxygenated blood).When using 100% FiO2, the degree of shunting is estimated by subtracting the measured PaO2(from an arterial blood gas) from 700 mmHg. For each difference of 100 mmHg, the shunt is 5%. Ashunt of more than 25% should prompt a search for the cause of this hypoxemia, such as mainstemintubation or pneumothorax, and should be treated accordingly. If such complications are notpresent, other causes must be sought after, and PEEP should be used to treat this intrapulmonaryshunt. Other such causes of a shunt include:Alveolar collapse from major atelectasisAlveolar collection of material other than gas, such as pus from pneumonia, water and proteinfrom acute respiratory distress syndrome, water from congestive heart failure, or blood fromhaemorrhageWhen to withdraw mechanical ventilationWithdrawal from mechanical ventilation—also known as weaning—should not be delayedunnecessarily, nor should it be done prematurely. Patients should have their ventilationconsidered for withdrawal if they are able to support their own ventilation and oxygenation, andthis should be assessed continuously. There are several objective parameters to look for whenconsidering withdrawal, but there is no specific criteria that generalizes to all patients.Trials of spontaneous breathing have been shown to accurately predict the success of spontaneousbreathing.Respiratory monitoring

Lectures on Basics of practical nursing for beginners BY Dr.Rastrapati Choudhury
191
Respiratory mechanics monitorOne of the main reasons why a patient is admitted to an ICU is for delivery of mechanicalventilation. Monitoring a patient in mechanical ventilation has many clinical applications: Enhanceunderstanding of pathophysiology, aid with diagnosis, guide patient management, avoidcomplications and assessment of trends.Most of modern ventilators have basic monitoring tools. There are also monitors that workindependently of the ventilator, which allow to measure patients after the ventilator has beenremoved, such as a T tube test.Connection to ventilatorsThere are various procedures and mechanical devices that provide protection against airwaycollapse, air leakage, and aspiration:Face mask — In resuscitation and for minor procedures under anaesthesia, a face mask is oftensufficient to achieve a seal against air leakage. Airway patency of the unconscious patient ismaintained either by manipulation of the jaw or by the use of nasopharyngeal or oropharyngealairway. These are designed to provide a passage of air to the pharynx through the nose or mouth,respectively. Poorly fitted masks often cause nasal bridge ulcers, a problem for some patients. Facemasks are also used for non-invasive ventilation in conscious patients. A full face mask does not,however, provide protection against aspiration.Laryngeal mask airway — The laryngeal mask airway (LMA) causes less pain and coughing thana tracheal tube. However, unlike tracheal tubes it does not seal against aspiration, making carefulindividualised evaluation and patient selection mandatory.Tracheal intubation is often performed for mechanical ventilation of hours to weeks duration. Atube is inserted through the nose (nasotracheal intubation) or mouth (orotracheal intubation) andadvanced into the trachea. In most cases tubes with inflatable cuffs are used for protection againstleakage and aspiration. Intubation with a cuffed tube is thought to provide the best protectionagainst aspiration. Tracheal tubes inevitably cause pain and coughing. Therefore, unless a patientis unconscious or anaesthetized for other reasons, sedative drugs are usually given to providetolerance of the tube. Other disadvantages of tracheal intubation include damage to the mucosallining of the nasopharynx or oropharynx and subglottic stenosis.Esophageal obturator airway — sometimes used by emergency medical technicians and basic EMSproviders not trained to intubate. It is a tube which is inserted into the esophagus, past theepiglottis. Once it is inserted, a bladder at the tip of the airway is inflated, to block ("obturate") theesophagus, and oxygen is delivered through a series of holes in the side of the tube which is thenforced into the lungs.Cricothyrotomy — Patients who require emergency airway management, in whom trachealintubation has been unsuccessful, may require an airway inserted through a surgical opening inthe cricothyroid membrane. This is similar to a tracheostomy but a cricothyrotomy is reserved foremergency access.[16]Tracheostomy — When patients require mechanical ventilation for several weeks, a tracheostomymay provide the most suitable access to the trachea. A tracheostomy is a surgically createdpassage into the trachea. Tracheostomy tubes are well tolerated and often do not necessitate anyuse of sedative drugs. Tracheostomy tubes may be inserted early during treatment in patients withpre-existing severe respiratory disease, or in any patient who is expected to be difficult to weanfrom mechanical ventilation, i.e., patients who have little muscular reserve.Mouthpiece — Less common interface, does not provide protection against aspiration. There arelipseal mouthpieces with flanges to help hold them in place if patient is unable.TerminologyTerminology used in the field of mechanical ventilation and respiratory support: APRV: Airway pressure release ventilation ASB: Assisted spontaneous breathing—also ASV :assisted spontaneous ventilation

Lectures on Basics of practical nursing for beginners BY Dr.Rastrapati Choudhury
192
ASV:[[Adaptive Support Ventilation]]—a patented technology—closed-loop mechanicalrespiration, a further development of MMV. Can also stand for assisted spontaneousventilation. ATC Automatic tube compensation
Automode Automode BCV: Biphasic cuirass ventilation BPAP: Bi-level positive airway pressure CMV: Continuous mandatory ventilation CPAP: Continuous positive airway pressure CPPV: Continuous positive pressure ventilation EPAP: Expiratory positive airway pressure HFV: High frequency ventilation HFFI: High frequency flow interruption HFJV: High frequency jet ventilation HFOV: High frequency oscillatory ventilation HFPPV: High frequency positive pressure ventilation ILV: Independent lung ventilation—separate sides
positive pressure ventilation. IPAP: Inspiratory positive airway pressure IPPV: Intermittent positive pressure ventilation IRV: Inversed ratio ventilation— mechanical
ventilation with switched respiration phases/timerate.
LFPPV: Low frequency positive pressure ventilation MMV: Mandatory minute volume NAVA: Neurally adjusted ventilatory assist NIF: Negative inspiratory force—amount of force
generated by a patient against a closed valve;greater than 20 cmH2O indicates an adequatelystrong diaphragm.
NIV: Non-invasive ventilation PAP: Positive airway pressure PAV and PAV+: Proportional assist ventilation and
proportional assist ventilation plus P/F ratio Ratio of PaO2 off an ABG and FiO2 off the
ventilator. P/F < 200 indicates ARDS, P/F < 300indicates ALI
PCMV (P-CMV): Pressure controlled mandatoryventilation
PCV: Pressure controlled ventilation or PC Pressurecontrol—pressure-controlled, fully mechanicalventilation.
PEEP: Positive end-expiratory pressure PNPV: Positive negative pressure ventilation—
switching pressure mechanical ventilation PPS: Proportional pressure support PRVC: Pressure regulated volume controlled
ventilation PSV: Pressure support ventilation or PS—supported
spontaneous respiration, see also ASB. RSBI: Rapid shallow breathing index—ratio of
breath rate divided by the tidal volume. RSBI<105declares a patient can be extubated and maintainthemselves. Also indicates patient has a good chanceof staying extubated.[17]
(S) IMV: (Synchronized) intermittent mandatoryventilation
S-CPPV: Synchronized continuous positive pressureventilation
S-IPPV: Synchronized intermittent positive pressureventilation
TNI: Therapy with nasal insufflations—nasal high-flow mechanical ventilation for respiration support.
VCMV: (V-CMV): Volume controlled mandatoryventilation
VCV: Volume controlled ventilation or VC, Volumecontrol — volume-controlled, fully mechanicalventilation.
VS: Volume Support ZAP: Zero airway pressure—spontaneous
respiration under atmospheric pressure.
PULSE OXYMETER
Principles of Pulse Oximetry Technology:The principle of pulse oximetry is based on the red and infrared light absorption characteristics ofoxygenated and deoxygenated hemoglobin. Oxygenated hemoglobin absorbs more infrared light andallows more red light to pass through. Deoxygenated (or reduced) hemoglobin absorbs more red lightand allows more infrared light to pass through. Red light is in the 600-750 nm wavelength light band.Infrared light is in the 850-1000 nm wavelength lightband.Pulse oximetry uses a light emitter with red andinfrared LEDs that shines through a reasonablytranslucent site with good blood flow. Typicaladult/pediatric sites are the finger, toe, pinna (top) orlobe of the ear. Infant sites are the foot or palm ofthe hand and the big toe or thumb. Opposite the

Lectures on Basics of practical nursing for beginners BY Dr.Rastrapati Choudhury
193
emitter is a photodetector that receives the light that passes through the measuring site.There are two methods of sending light through the measuring site: transmission and reflectance. Inthe transmission method, as shown in the figure on the previous page, the emitter and photodetectorare opposite of each other with the measuring site in-between. The light can then pass through thesite. In the reflectancemethod, the emitter andphotodetector are next toeach other on top themeasuring site. The lightbounces from the emitterto the detector across thesite. The transmissionmethod is the mostcommon type used and forthis discussion thetransmission method will be implied.After the transmitted red (R) and infrared (IR) signals pass through the measuring site and are receivedat the photodetector, the R/IR ratio is calculated. The R/IR is compared to a "look-up" table (made upof empirical formulas) that convert the ratio to an SpO2 value. Most manufacturers have their ownlook-up tables based on calibration curves derived from healthy subjects at various SpO2 levels.Typically a R/IR ratio of 0.5 equates to approximately 100% SpO2, a ratio of 1.0 to approximately 82%SpO2, while a ratio of 2.0 equates to 0% SpO2.
The major change that occurred from the 8-wavelength Hewlett Packard oximeters of the '70s to theoximeters of today was the inclusion of arterial pulsation to differentiate the light absorption in themeasuring site due to skin, tissue and venous blood from that of arterial blood.
At the measuringsite there areconstant lightabsorbers that arealways present.They are skin,tissue, venousblood, and thearterial blood.However, witheach heart beatthe heart contractsand there is a surge of arterial blood, which momentarily increases arterial blood volume across themeasuring site. This results in more light absorption during the surge. If light signals received at thephoto-detector are looked at 'as a waveform', there should be peaks with each heartbeat and troughsbetween heartbeats. If the light absorption at the trough (which should include all the constantabsorbers) is subtracted from the light absorption at the peak then, in theory, the resultants are theabsorption characteristics due to added volume of blood only; which is arterial. Since peaks occur witheach heartbeat or pulse, the term "pulse oximetry" was coined. This solved many problemsinherent to oximetry measurements in the past and is the method used today in conventional pulseoximetry. Still, conventional pulse oximetry accuracy suffered greatly during motion and low perfusionand made it difficult to depend on when making medical decisions. Arterial blood gas tests have beenand continue to be commonly used to supplement or validate pulse oximeter readings. The advent of"Next Generation" pulse oximetry technology has demonstrated significant improvement in the ability

Lectures on Basics of practical nursing for beginners BY Dr.Rastrapati Choudhury
194
to read through motion and low perfusion; thus making pulse oximeter more dependable to basemedical decisions on.__________________________________________________________________________
SUCTION APPRATUSSUCTIONING,Aspirator (medical device)A medical aspirator is a small suction machine used to remove mucus and other bodily fluids from apatient. These machines are often designed to be portable for use in ambulances and nursing homes,and can run on AC/DC or battery power.. In the past manually operated aspirators were used such asPotain's aspirator.WHAT IS SUCTIONING?The patient with an artificial airway is not capable of effectively coughing; the mobilization ofsecretions from the trachea must be facilitated by aspiration. This is called as suctioning.

Lectures on Basics of practical nursing for beginners BY Dr.Rastrapati Choudhury
195
INDICATIONTherapeutic:
Coarse breath sounds Noisy breathing Visible secretions in the airway Decreased SpO2 in the pulse oximeter & Deterioration of arterial blood gas values Clinically increased work of breathing Suspected aspiration of gastric or upper airway secretions Patient’s inability to generate an effective spontaneous cough Changes in monitored flow/pressure graphics Increased PIP; decreased Vt during ventilation X-ray changes consistent with retained secretions The need to maintain the patency and integrity of the artificial airway The need to stimulate a cough in patient’s unable to cough effectively secondary to
changes in mental status or the influence of medication Presence of pulmonary atlectasis or consolidation, presumed to be associated with
secretion retention During special procedures like Bronchoscopy & Endoscopy
Diagnostic: The need to obtain a sputum specimen / ETA (Endo Tracheal Aspiration) for Bacteriological
or microbiological or cytological investigations.

Lectures on Basics of practical nursing for beginners BY Dr.Rastrapati Choudhury
196
This is the picture which shows us about the ETA sampling.HAZARDS & COMPLICATIONS Hypoxia / hypoxemia Tracheal and / or bronchial mucosal trauma Cardiac or respiratory arrest Pulmonary hemorrhage / bleeding Cardiac dysrythymia Pulmonary atlectasis Bronchoconstriction / bronchospasm Hypotension / hypertension Elevated ICP Interruption of mechanical ventilation
ASSESSMENT OF NEEDQualified personnel should assess the need for tracheal suctioning as a routine part of a patient /ventilator system check.
NECESSARY EQUIPMENT Vacuum source with adjustable regulator suction jar stethoscope Sterile gloves for open suctioning method Clean gloves for closed suctioning method Sterile catheter Clear protective goggles, apron & mask Sterile normal saline Bain’s circuit or ambu bag for preoxygenate the patient Suction tray with hot water for flushing
TYPES OF SUCTIONINGOPEN SUCTION SYSTEM:
Regularly using system in the intubated patients.CLOSED SUCTION SYSTEM: This is used to facilitate continuous mechanical ventilation and oxygenation during the
suctioning. Closed suctioning is also indicated when PEEP level above 10cmH2O.
MONITORINGThe following should be monitored prior to, during & after the procedure: Breath sounds Oxygen saturation RR & pattern Haemodynamic parameters (pulse rate, Blood pressure) Cough effort ICP (If indicated and available) Sputum characteristics (colour, volume, consistency & odor) Ventilator parameters (PIP, Vt & FiO2)
Patient Preparation Explain the procedure to the patient (If patient is concious). The patient should receive hyper oxygenation by the delivery of 100% oxygen for >30
seconds prior to the suctioning (Either with Bain’s circuit or by increasing the FiO2 bymechanical ventilator).
Position the patient in supine position. Auscultate the breath sounds.

Lectures on Basics of practical nursing for beginners BY Dr.Rastrapati Choudhury
197
PROCEDURE Perform hand hygiene, wash hands. It reduces transmission of microorganisms. Turn on suction apparatus and set vacuum regulator to appropriate negative pressure. For
adult a pressure of 100-120 mmHg, 80-100mmhg for children & 60-80mmhg for infants. Goggles, mask & apron should be worn to prevent splash from secretions Preoxygenate with 100% O2 Open the end of the suction catheter package & connect it to suction tubing (If you are
alone) Wear sterile gloves with sterile technique With a help of an assistant open suction catheter package & connect it to suction tubing With a help of an assistant disconnect the ventilator Kink the suction tube & insert the catheter in to the ETtube until resistance is felt Resistance is felt when the catheter impacts the carina or bronchial mucosa, the suction
catheter should be withdrawn 1cm out before applying suction Apply continuous suction while rotating the suction catheter during removal The duration of each suctioning should be less the 15sec. Instill 3 to 5ml of sterile normal saline in to the artificial airway, if required Assistant resumes the ventilator Give four to five manual breaths with bag or ventilator Continue making suction passes, bagging patient between passes, until clear of secretions,
but no more than four passes Return patient to ventilator Flush the catheter with hot water in the suction tray Suction nares & oropharynx above the artificial airway Discard used equipments Flush the suction tube with hot water Auscultate chest Wash hands Document including indications for suctioning & any changes in vitals & patient’s tolerance
Closed suctioning procedure Wash hands Wear clean gloves Connect tubing to closed suction port Pre-oxygenate the patient with 100% O2 Gently insert catheter tip into artificial airway without applying suction, stop if you met
resistance or when patient starts coughing and pull back 1cm out Place the dominant thumb over the control vent of the suction port, applying continuous or
intermittent suction for no more than 10 sec as you withdraw the catheter into the sterilesleeve of the closed suction device
Repeat steps above if needed Clean suction catheter with sterile saline until clear; being careful not to instill solution into
the ET tube Suction oropharynx above the artificial airway Wash hands
ASSESSMENT OF OUTCOME Improvement in breath sounds. Decreased peak inspiratory pressure; Increased tidal volume delivery during
ventilation. Improvement in arterial blood gas values or saturation as reflected by pulse oximetry.
(SpO2) Removal of pulmonary secretions.

Lectures on Basics of practical nursing for beginners BY Dr.Rastrapati Choudhury
198
CONTRAINDICATIONSMost contraindications are relative to the patient's risk of developing adverse reactions orworsening clinical condition as result of the procedure.Suctioning is contraindicated when there is fresh bleeding.When indicated, there is no absolute contraindication to endotracheal suctioning because thedecision to abstain from suctioning in order to avoid a possible adverse reaction may, in fact,be lethal.
LIMITATIONS OF METHOD Suctioning is potentially an harmful procedure if carried out improperly. Suctioning should be done when clinically necessary (not routinely). The need for suctioning should be assessed at least every 2hrs or more frequently as need
arises.
SYRINGE PUMP/INFUSION PUMPSInfusion Pumps What are they?
Usually electrically powered infusion devicesWhat do they do?
Use pumping action to infuse fluids, medication or nutrients into patientSuitable for intravenous, subcutaneous, enteral and epidural infusions
Infusion Pumps Why are they used?To provide accurate and controllable flow over a prescribed period or on demand
What are they used for?Wide range of drugs and therapies includingChemotherapyPain managementTotal parental nutritionAnaesthesia/sedationEtc. etc.
INFUSION PUMPS TWO BASIC TYPES (Syringe Pumps, Volumetric Pumps)1) Syringe Pumps2) Volumetric Pumps

Lectures on Basics of practical nursing for beginners BY Dr.Rastrapati Choudhury
199
Syringe PumpGenerally used for low volume, low flow rate infusionsGood short term accuracyLong start up time at low flow rates Prime and purge line before connecting to patient
Alarms: End/near end of infusion; drive disengaged, occlusion, battery lowSpecialised syringe pumps for ambulatory use, PCA, sedation, insulin etc
Volumetric PumpsPreferred for medium and high flow rates and large volumesGenerally not suitable for rates < 5ml/hVariable short term accuracyAlarms: Latch/door open, set out, occlusion, battery low, air-in-lineSpecialised volumetric pumps for ambulatory use, epidural infusions etc.Do not use a model you have not been trained and are deemed competent to use
____________________________________________________________________________________________________

Lectures on Basics of practical nursing for beginners BY Dr.Rastrapati Choudhury
200
GLOSSARYAbrasion: a scraping or rubbing off of the skin.Airborne precaution: precaution taken when a person has an illness that can be carried in the air orin the dust particles. Common measures include special air handling and ventilation.Ambulatory: WalkingAmpule: small, glass sealed flask, often containing medication.Anesthesia: complete or partial loss of sensation.Anuria: complete suppression of urine secretion in the kidney.Apex: lower point of the heart, formed by the tip of the left ventricleApical pulse: pulse normally heard at the heart’s apex, which usually give the most accurateassessment of pulse rateAspiration: Inhalation of foodstuff, vomitus or saliva into the lungs.Axilla: Armpit (under arm).Autoclave: Equipment that decontaminates materials by exposing them to steam under pressure.Apnea: Absence or lack of breathingAnoxia: Lack of oxygen in the tissue.Asphyxia: A condition produced by prolonged lack of oxygenAsepsis: Absolute freedom from all microorganismsAntiseptic: Harmless chemicals that can kill microorganisms or prevent them from multiplying.Aplastic anemia: Anemia resulting from destruction of bone marrow cells.Atlectasis collapse of all or part of the lung.Aseptic: technique Procedure used to prevent microorganisms from reaching the operation site.Auscultation: externally hearing sounds from within the body to differentiate abnormal conditions.Autopsy: examination of the body after death.Base of support: balance or stability provided by the feet and their position.Bed cradles: a wire or wooden frame placed over the patient's body or feet to support the weight ofthe bedclothes.Blood pressure: The force exerted by the heart to pump the blood around the bodyBradycardia: Abnormally slow heartbeat.Bradypnea: abnormally sloe breathing, below 10 per minute.Brand name: copyright name assigned by a company that makes the medication; also called thetrade name.Brain death: irreversible cessation of brain and brain stem function to the extent thatcardiopulmonary function must be mechanical maintained.Bounding pulse: Stronger than normal heartbeat.Body mechanics: use of safe and efficient methods of moving and lifting.Carotid pulse: pulse felt on either sides of the neck, over the carotid artery.Capsule: a small gelatinous case for holding a dose of medicine; a membranous structuring enclosinganother body structure, as the articular capsule in a joint.Catheter: A soft rubber tube which is used for passage of fluid.Center of gravity: the center of one’s weight; half of one’s body weight is below and half above, andhalf to the left and half to the right of the center of gravity.Chemical name: medication name that describes its chemical composition (often same as genericname).Cheyne-Stokes respiration: breathing characterized by deep breathing alternating with very slowbreathing or apnea often precedes death.Contaminated Area: that contains germs or disease producing material.Constipation: difficult or infrequent and hardened bowel movement.Contracture: abnormal shortening of muscle with resulting deformity.Cyanosis: Bluish color of lips, tip of the nose, and ear lobes due to lack of or shortage of oxygen inthe blood.Cast: A material that supported an injured part of the body and makes it immobilize.

Lectures on Basics of practical nursing for beginners BY Dr.Rastrapati Choudhury
201
Clips: Metallic materials that keep the skin together.Closed bed: bed used when preparing a unit for a new client- an unoccupied bed.Congestion Hyperemia: accumulation of blood in a part of blood or fluid in a part of the body e.g.,lung.Contact precaution: precaution taken against disease that can be transmitted through direct contactbetween a susceptible host’s body surface and an infected or colonized person.Cystitis: inflammation of urinary bladder.Dangling: positioning of a client so that he or she is sitting on the edge of the bed with legs downand feet supported by a footstool or the floor.Debridement: removal of foreign, dead, and contaminated material from a wound, so as to exposehealthy underlying tissue.Decontamination: The process of rendering an item free from infection.Defecation: Act of excreting feces from the rectum.Detergent: A substance usually dissolved in water used as an aid for cleaning purposes.Diagnosis: The decision regarding the nature of an illness, arrived at by clinical assessment of thepatient and result of investigation.Diarrhea: abnormal frequency and fluidity of discharge from the bowels.Diastole: The resting phase of the heart during which it fills with blood.Digitalis: A drug given to slow and strengthen the heartbeat.Disinfectant: A chemical used to kill microorganisms.Dorsal Lithotomy: examination position in which the client is lying on his or her back with the feet instirrups.Dosage: an amount in a prescription that contains the dose and the scheduled time.Dry heat: Air heated to high temperature by electricity and used for sterilizing purposes.Droplet precaution: precautions taken to prevent the spread of diseases transmitted bymicroorganisms propelled through the air from an infected person and deposed on the host’s eyes,nose or mouth.Dyspnea: Difficulty in breathing.Dysuria: difficult or painful urination or voiding.Edema: Swelling due to water accumulation in body cells vessel, which partially or completelyobstructs blood flow (embolism; pl. emboli).Elective (surgery): case in which the client’s condition is not life threatening and may choosewhether or not to have surgery; also called optional surgery.Embolus: a foreign substance, blood clot, fat globule, piece of tissue, or air bubble carried in a bloodEnema: An injection of fluid into the colon or rectum.Enteric: pertaining to the small intestine. Enteric coated tablets are covered with a substance thatprevents their digestion in the stomach.Eupnea: normal respirationEvisceration: the protrusion of the intestines through an abdominal wound; removal of the internalbody contents.Exhalation: Breathing out.Exudates: material that escapes from blood vessels and is deposited in tissue or on tissueSurfaces: usually contains protein substances.Fahrenheit: System of measuring heat.Femoral pulse: pulse felt in the groin over the femoral arteryFecal impaction: accumulation of hardened stool in the rectum.Fever: Body temperature elevation above 37Flatus: Gas in the intestines.Footboard: A board placed at the foot of the bed to support the feet.Foot drop: contracture deformity that prevents the client from putting the heel on the floor; resultsfrom improper positioning or anterior leg muscle paralysis. On his or her back with the headelevated.Fowler’s position: a position in which the client is lying.Gait: manner or style of walking.Gastrostomy: Making an artificial opening into the stomach through which the patient is fed bypouring nourishment through a tube directly into the stomach.

Lectures on Basics of practical nursing for beginners BY Dr.Rastrapati Choudhury
202
Generic name: name assigned by a drug’s first manufacturer (often the chemical name).Halitosis: bad breath.Hemoglobin: the oxygen carrying pigment in blood that gives blood its red color.Hypertension: High blood pressure.Hypo tension: Low blood pressure.Hypothermia: low body temperature.Hypothermia blanket: cooling blanket; also called hypothermia blanket.Hypoxia: reduction of oxygen in the tissues; also called hypoxemia.Incontinence: Loss of bladder or bowel control.Infection: Invasion of the body by germs.Inflammation: Reaction of the body to infection or injury, characterized by redness, heat, pain, andswelling at the site.Infusion: slow induction of fluids (not blood) into a vein, as an intravenous (IV) infusionInhalation: Breathing in.Intake: Fluid taken into the body.Intraoperative: occurring during a surgical operation.Irrigation: Injecting fluid into a cavity without interrupting its return.Isolation The act of setting apart. An isolation room or ward is one kept for contagious or infectiousdiseases.Korotkoff’s sound: sounds heard when measuring blood pressure with a stethoscope.Kusmal’s breathing: sever paroxysmal dyspnea, as in diabetic acidosis and comaLaceration: a wound produced by tearing or ripping (as opposed to an incision made in surgery).Leukocyte white blood cell (WBC).Line of gravity: direction of gravitation pull; an imaginary vertical line through the top of the head,center of gravity, and base of support.Microorganism: Bacteria, virus, fungi, and spores.Medication: substance other than food used to prevent disease, to aid in diagnosis and treatmentand to restore or maintain functions in the body tissues; also called drug.Melina: passage of dark colored stools containing partially or fully digested blood, also used to meanabnormal blood in the stool or vomits.Micturation: passage of urine from the urinary bladder; also called voiding urinating.Mitered corner: A triangular fold made in bedclothes to hold them in place at the corners.Necrosis: Death of tissue.Nocturia: excessive voiding (urination) during the night.Nits: The eggs of a louse.Occupied bed: bed holding a client that is unable to get up as a result of his or her condition orgeneralized weakness.Occult: hidden.Oliguria: deficient urinary secretion or infrequent urination.Ophthalmic: medications that are instilled or administration directly to the eye.Oral: of or pertaining to the mouthOrthopnea: difficult breathing relieved by seating or standing erectOutput: All fluid lost from the body. Otic of the ear.Orthopnea: A condition in which one breathes easier in a sitting position.Palpation: the act of feeling with the hand placing the finger on the skin.Paralysis: motion loss or impairment of sensation in a body part.Parenteral: administered in to the body in a way other than through the alimentary canal(subcutaneous, intravenous, intramuscular), as Parenteral medicationPedal pulse: pulse on the foot felt over the dorsal Pedis artery or posterior tibial arteryPerineal: care bathing the genital and surrounding area.Perioperative: the period surrounding surgery; includes preoperative, intraoperative, andpostoperative periods.Pharmacokinetics: actions of drugPharmacology: the study of chemicals (drugs, medications) and their effect.Potentiating: enhancement of one agent by another, so that the combined action is greater than thesum of the two.Pneumonia: lung inflammation, with consolidation and drainage.

Lectures on Basics of practical nursing for beginners BY Dr.Rastrapati Choudhury
203
Pediculosis: Human louse infestationPolyuria: voiding an excessive amount of urine.Popliteal pulse: pulse located posterior to the knee.Postural drainage: Position adapted to facilitate expectoration of material in patients with lungdisease.Postoperative: After an operation.Postoperative bed: bed prepared for a client who is returning from surgery or another procedurethat requires transfer into the bed from a stretcher or wheelchair.Prescription: written formula for preparing and administering medication.Preoperative: Before an operationProjectile vomiting: emesis expelled with great force.Prone positioning: a client so that he or she is lying on the stomach.Pressure ulcer: ulcerated sore often cause by prolonged pressure on a bony prominence or otherarea, especially if the client is allowed to lie in one position for an extended period. Also calleddecubitus ulcer. (Formerly “called bedsore”).Protective device: piece of equipment, most often a vest or a belt, used to ensure the safety of theclient (ie, helping client to remain in a chair without falling); also called a client reminder device.Protective isolation: attempts to prevent harmful microorganisms from coming into contact with theclient; also called reverse or neutropenic isolationPulse: The beat of the heart felt in the arteries.Pulse deficit: the difference between apical pulse and radial pulse.Pulse pressure: difference between systolic & diastolic pressure.Puncture: a whole made by a pointed object; penetration.Recumbent: lying downRotation: process of turning about an axis, as rotation of the hand of the fetus in preparation ofdelivery.Respiration: Breathing rate.Radial pulse: pulse measured above the radial artery on the inside of the wrist.Rectal of the rectumRetention enema An injection of fluid that is retained in the rectum for absorption into the bloodstream.Restraints Devices that limit the patient's ability to move in order to protect him/her from injury.Septic wound: Infection wound; a wound containing infective microorganisms.Sitzbath: A warm soaking of the rectum and perineal area.Splint: A device for immobilizing part of the bodySpore: The seeds of microorganisms, which are resistant to drying, heat, and disinfectantsStandard precaution: precautions designed for the care of all clients regardless of diagnosis orinfection status.Sterile Specially: treated so that all microorganisms are destroyedStethoscope: Instrument for magnifying soundSpecimen: A small amount of body excretion or body fluid that is sent to a laboratory forexamination.Sphygmomanometer: Blood pressure apparatus.Suppository: Rectally administered cones containing a medication in the base that is soluble at bodytemperature.Sutures: Materials that keep broken skin together.Systole Blood pressure: period during the beating phase of the heartbeat during which blood isexpelled from heat.Sepsis: Presence of microorganisms.Synergism: joint action of agents in which the combined effects is greater than the sum of theindividual parts.Tablet: a compressed, spherical form of medication.Temperature: Degree of heat.Tachycardia Abnormally fast heartbeat.Tachypnea: conditions in which breaths are abnormally rapid, more than 20 per minuteThermometer: An instrument used to measure temperature.Topical: medication that are applied directly to the skin or mucus membranes.

Lectures on Basics of practical nursing for beginners BY Dr.Rastrapati Choudhury
204
Traction: exertion of a pulling force ; an apparatus attached to the client to maintain stability of ajoint or aligned fracture or to exert a pulling force elsewhere, as in the lower back, to relievepressure.Transfusion: Injection of blood into a vein.Transmission-based- precaution: precaution designed for clients with specific infection or diagnosesTympanic: membrane eardrum.Unconscious: Not aware of or responding to surroundings.Unoccupied bed: bed that is empty at the time it is made up.Urinalysis: examination of urine.Urgency: desire or sensation of needing to void immediately.Urinary catheter: tube inserted into bladder through the urethra to remove urine.Urinary frequency: voiding more often than usual without an increase in total urine volume.Urinary retention: inability to empty the bladder of urine.Virulence: ability of a microorganism to cause a disease, strength,, potency.Vital signs: Signs of life (e.g., temperature, pulse rate, respiration rate, blood pressure).Void: to cast out waste, as to urinate, micturate.Vomitus: stomach contents expelled by vomitus.Wound: injury to anybody structures caused by physical means.Z-track: “zigzag” method of injecting caustic medications deep into muscle tissue.____________________________________________________________________________________________________