Embed Size (px)
Citation preview
MagicInfo VideoWall 2
Console
Troubleshooting GuideThis document describes solutions to troubleshoot error (warning) messages that can occur when installing or using MagicInfo VideoWall 2 Console.You can troubleshoot error messages using the provided hints and solutions.If you encounter an error message that is not found in this document or if you have suggestions to add to this document, please contact us at www.samsunglfd.com.
2
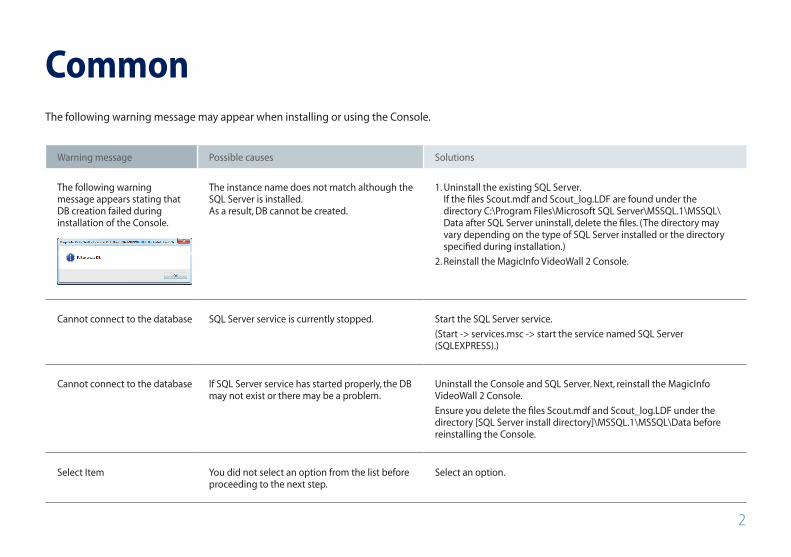
CommonThe following warning message may appear when installing or using the Console.
Warning message Possible causes Solutions
The following warning message appears stating that DB creation failed during installation of the Console.
The instance name does not match although the SQL Server is installed. As a result, DB cannot be created.
1. Uninstall the existing SQL Server. If the files Scout.mdf and Scout_log.LDF are found under the directory C:\Program Files\Microsoft SQL Server\MSSQL.1\MSSQL\Data after SQL Server uninstall, delete the files. (The directory may vary depending on the type of SQL Server installed or the directory specified during installation.)
2. Reinstall the MagicInfo VideoWall 2 Console.
Cannot connect to the database SQL Server service is currently stopped. Start the SQL Server service.
(Start -> services.msc -> start the service named SQL Server (SQLEXPRESS).)
Cannot connect to the database If SQL Server service has started properly, the DB may not exist or there may be a problem.
Uninstall the Console and SQL Server. Next, reinstall the MagicInfo VideoWall 2 Console.
Ensure you delete the files Scout.mdf and Scout_log.LDF under the directory [SQL Server install directory]\MSSQL.1\MSSQL\Data before reinstalling the Console.
Select Item You did not select an option from the list before proceeding to the next step.
Select an option.
3
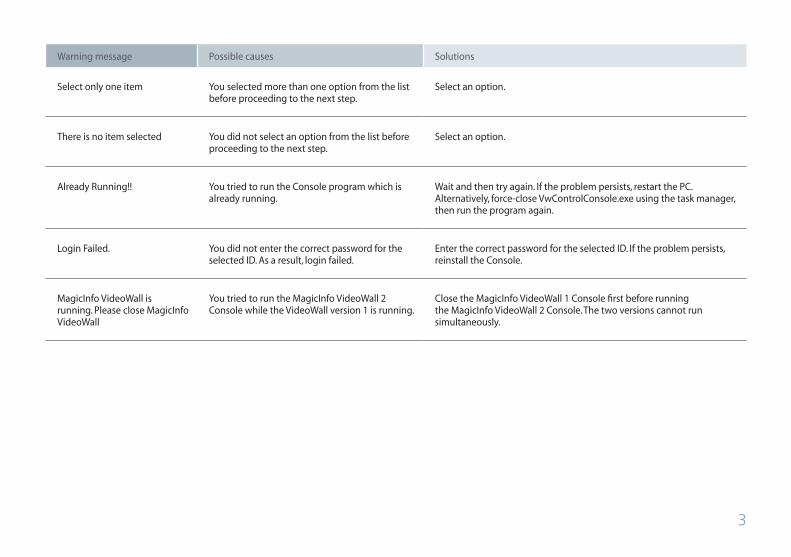
Warning message Possible causes Solutions
Select only one item You selected more than one option from the list before proceeding to the next step.
Select an option.
There is no item selected You did not select an option from the list before proceeding to the next step.
Select an option.
Already Running!! You tried to run the Console program which is already running.
Wait and then try again. If the problem persists, restart the PC. Alternatively, force-close VwControlConsole.exe using the task manager, then run the program again.
Login Failed. You did not enter the correct password for the selected ID. As a result, login failed.
Enter the correct password for the selected ID. If the problem persists, reinstall the Console.
MagicInfo VideoWall is running. Please close MagicInfo VideoWall
You tried to run the MagicInfo VideoWall 2 Console while the VideoWall version 1 is running.
Close the MagicInfo VideoWall 1 Console first before running the MagicInfo VideoWall 2 Console. The two versions cannot run simultaneously.
4
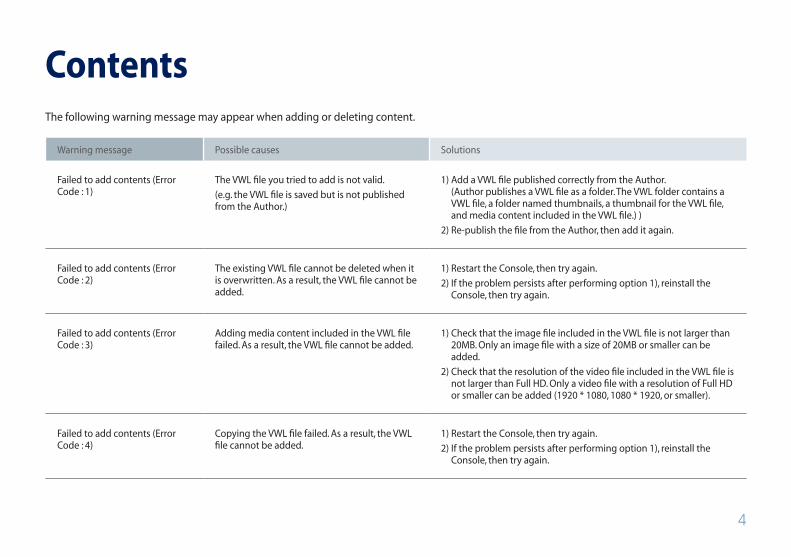
ContentsThe following warning message may appear when adding or deleting content.
Warning message Possible causes Solutions
Failed to add contents (Error Code : 1)
The VWL file you tried to add is not valid.
(e.g. the VWL file is saved but is not published from the Author.)
1) Add a VWL file published correctly from the Author. (Author publishes a VWL file as a folder. The VWL folder contains a VWL file, a folder named thumbnails, a thumbnail for the VWL file, and media content included in the VWL file.) )
2) Re-publish the file from the Author, then add it again.
Failed to add contents (Error Code : 2)
The existing VWL file cannot be deleted when it is overwritten. As a result, the VWL file cannot be added.
1) Restart the Console, then try again.
2) If the problem persists after performing option 1), reinstall the Console, then try again.
Failed to add contents (Error Code : 3)
Adding media content included in the VWL file failed. As a result, the VWL file cannot be added.
1) Check that the image file included in the VWL file is not larger than 20MB. Only an image file with a size of 20MB or smaller can be added.
2) Check that the resolution of the video file included in the VWL file is not larger than Full HD. Only a video file with a resolution of Full HD or smaller can be added (1920 * 1080, 1080 * 1920, or smaller).
Failed to add contents (Error Code : 4)
Copying the VWL file failed. As a result, the VWL file cannot be added.
1) Restart the Console, then try again.
2) If the problem persists after performing option 1), reinstall the Console, then try again.
5
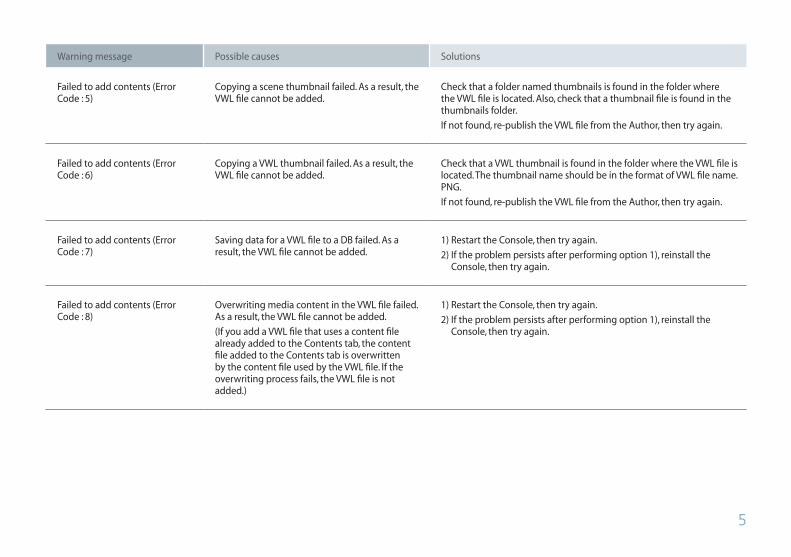
Warning message Possible causes Solutions
Failed to add contents (Error Code : 5)
Copying a scene thumbnail failed. As a result, the VWL file cannot be added.
Check that a folder named thumbnails is found in the folder where the VWL file is located. Also, check that a thumbnail file is found in the thumbnails folder.
If not found, re-publish the VWL file from the Author, then try again.
Failed to add contents (Error Code : 6)
Copying a VWL thumbnail failed. As a result, the VWL file cannot be added.
Check that a VWL thumbnail is found in the folder where the VWL file is located. The thumbnail name should be in the format of VWL file name.PNG.
If not found, re-publish the VWL file from the Author, then try again.
Failed to add contents (Error Code : 7)
Saving data for a VWL file to a DB failed. As a result, the VWL file cannot be added.
1) Restart the Console, then try again.
2) If the problem persists after performing option 1), reinstall the Console, then try again.
Failed to add contents (Error Code : 8)
Overwriting media content in the VWL file failed. As a result, the VWL file cannot be added.
(If you add a VWL file that uses a content file already added to the Contents tab, the content file added to the Contents tab is overwritten by the content file used by the VWL file. If the overwriting process fails, the VWL file is not added.)
1) Restart the Console, then try again.
2) If the problem persists after performing option 1), reinstall the Console, then try again.
6
Warning message Possible causes Solutions
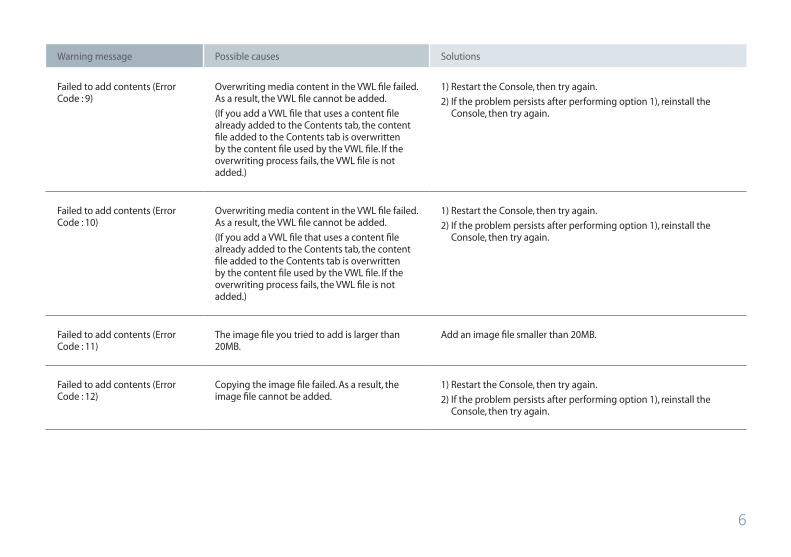
Failed to add contents (Error Code : 9)
Overwriting media content in the VWL file failed. As a result, the VWL file cannot be added.
(If you add a VWL file that uses a content file already added to the Contents tab, the content file added to the Contents tab is overwritten by the content file used by the VWL file. If the overwriting process fails, the VWL file is not added.)
1) Restart the Console, then try again.
2) If the problem persists after performing option 1), reinstall the Console, then try again.
Failed to add contents (Error Code : 10)
Overwriting media content in the VWL file failed. As a result, the VWL file cannot be added.
(If you add a VWL file that uses a content file already added to the Contents tab, the content file added to the Contents tab is overwritten by the content file used by the VWL file. If the overwriting process fails, the VWL file is not added.)
1) Restart the Console, then try again.
2) If the problem persists after performing option 1), reinstall the Console, then try again.
Failed to add contents (Error Code : 11)
The image file you tried to add is larger than 20MB.
Add an image file smaller than 20MB.
Failed to add contents (Error Code : 12)
Copying the image file failed. As a result, the image file cannot be added.
1) Restart the Console, then try again.
2) If the problem persists after performing option 1), reinstall the Console, then try again.
7
Warning message Possible causes Solutions
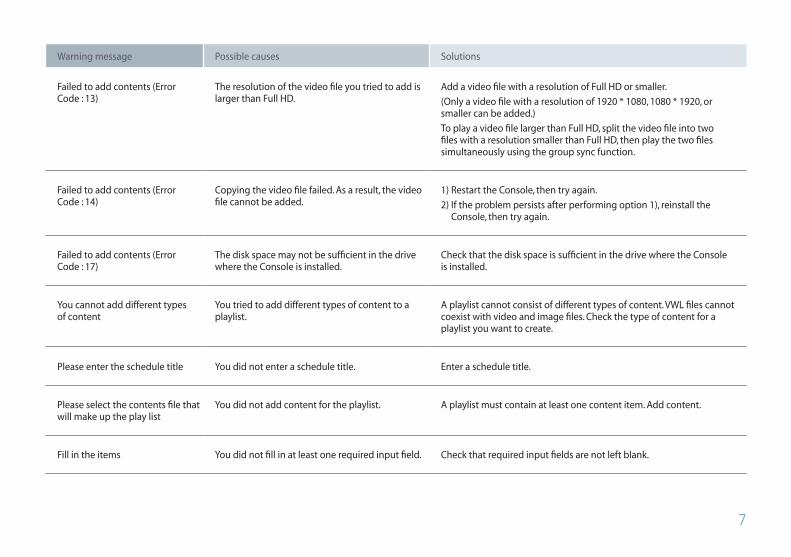
Failed to add contents (Error Code : 13)
The resolution of the video file you tried to add is larger than Full HD.
Add a video file with a resolution of Full HD or smaller.
(Only a video file with a resolution of 1920 * 1080, 1080 * 1920, or smaller can be added.)
To play a video file larger than Full HD, split the video file into two files with a resolution smaller than Full HD, then play the two files simultaneously using the group sync function.
Failed to add contents (Error Code : 14)
Copying the video file failed. As a result, the video file cannot be added.
1) Restart the Console, then try again.
2) If the problem persists after performing option 1), reinstall the Console, then try again.
Failed to add contents (Error Code : 17)
The disk space may not be sufficient in the drive where the Console is installed.
Check that the disk space is sufficient in the drive where the Console is installed.
You cannot add different types of content
You tried to add different types of content to a playlist.
A playlist cannot consist of different types of content. VWL files cannot coexist with video and image files. Check the type of content for a playlist you want to create.
Please enter the schedule title You did not enter a schedule title. Enter a schedule title.
Please select the contents file that will make up the play list
You did not add content for the playlist. A playlist must contain at least one content item. Add content.
Fill in the items You did not fill in at least one required input field. Check that required input fields are not left blank.
8
Warning message Possible causes Solutions
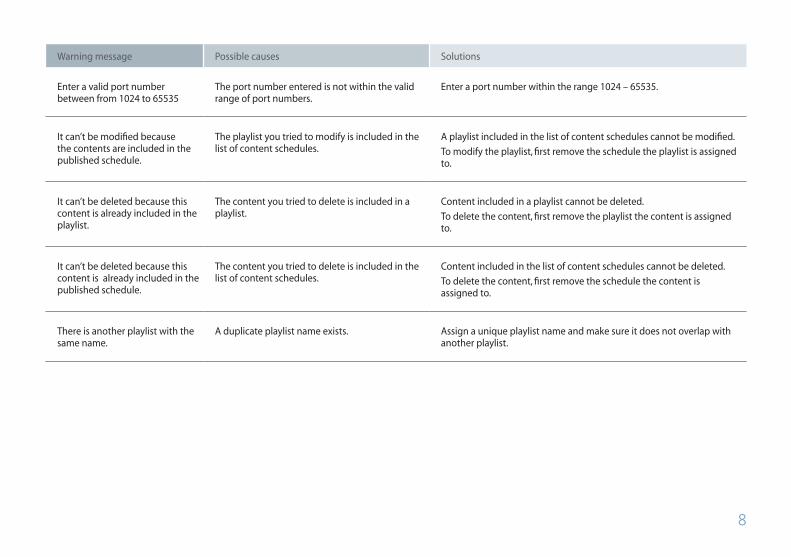
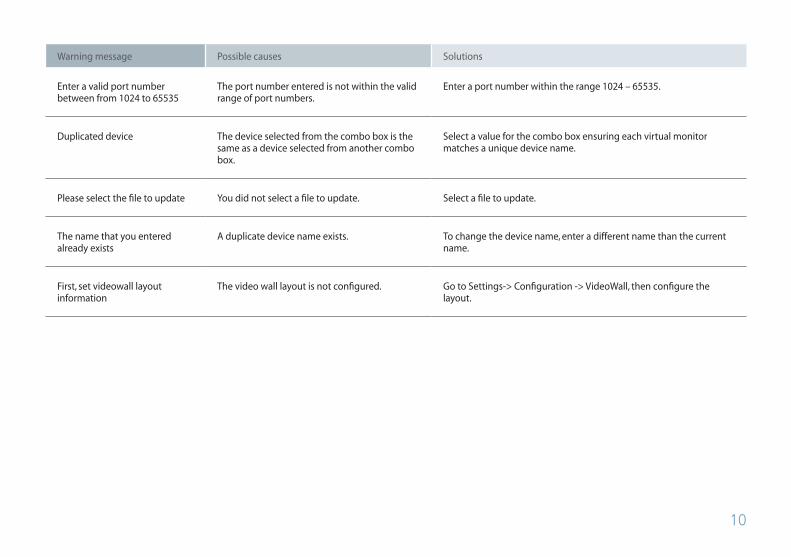
Enter a valid port number between from 1024 to 65535
The port number entered is not within the valid range of port numbers.
Enter a port number within the range 1024 – 65535.
It can’t be modified because the contents are included in the published schedule.
The playlist you tried to modify is included in the list of content schedules.
A playlist included in the list of content schedules cannot be modified.
To modify the playlist, first remove the schedule the playlist is assigned to.
It can’t be deleted because this content is already included in the playlist.
The content you tried to delete is included in a playlist.
Content included in a playlist cannot be deleted.
To delete the content, first remove the playlist the content is assigned to.
It can’t be deleted because this content is already included in the published schedule.
The content you tried to delete is included in the list of content schedules.
Content included in the list of content schedules cannot be deleted.
To delete the content, first remove the schedule the content is assigned to.
There is another playlist with the same name.
A duplicate playlist name exists. Assign a unique playlist name and make sure it does not overlap with another playlist.
9
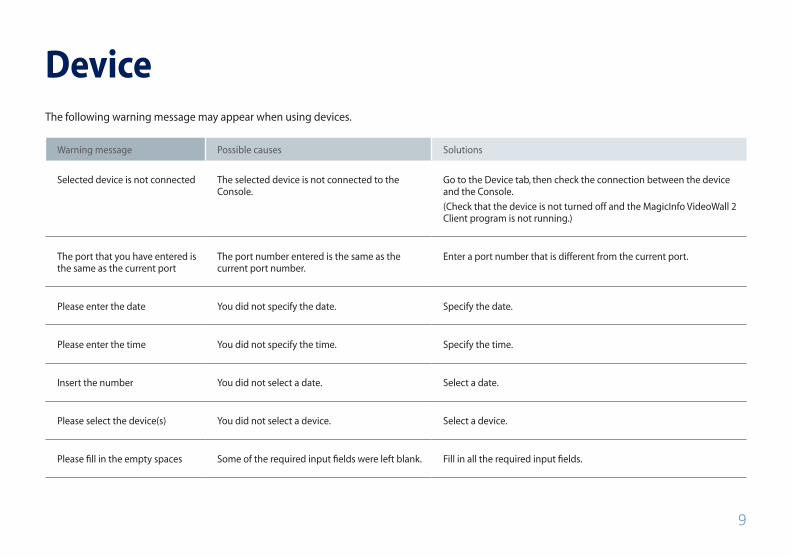
DeviceThe following warning message may appear when using devices.
Warning message Possible causes Solutions
Selected device is not connected The selected device is not connected to the Console.
Go to the Device tab, then check the connection between the device and the Console.
(Check that the device is not turned off and the MagicInfo VideoWall 2 Client program is not running.)
The port that you have entered is the same as the current port
The port number entered is the same as the current port number.
Enter a port number that is different from the current port.
Please enter the date You did not specify the date. Specify the date.
Please enter the time You did not specify the time. Specify the time.
Insert the number You did not select a date. Select a date.
Please select the device(s) You did not select a device. Select a device.
Please fill in the empty spaces Some of the required input fields were left blank. Fill in all the required input fields.
10
Warning message Possible causes Solutions
Enter a valid port number between from 1024 to 65535
The port number entered is not within the valid range of port numbers.
Enter a port number within the range 1024 – 65535.
Duplicated device The device selected from the combo box is the same as a device selected from another combo box.
Select a value for the combo box ensuring each virtual monitor matches a unique device name.
Please select the file to update You did not select a file to update. Select a file to update.
The name that you entered already exists
A duplicate device name exists. To change the device name, enter a different name than the current name.
First, set videowall layout information
The video wall layout is not configured. Go to Settings-> Configuration -> VideoWall, then configure the layout.
11
Scene EditorThe following warning message may appear when using the Scene Editor.
Warning message Possible causes Solutions
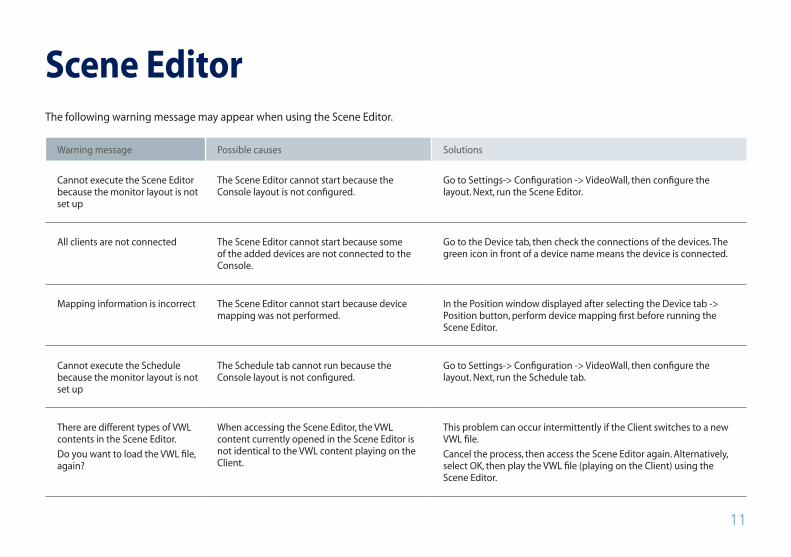
Cannot execute the Scene Editor because the monitor layout is not set up
The Scene Editor cannot start because the Console layout is not configured.
Go to Settings-> Configuration -> VideoWall, then configure the layout. Next, run the Scene Editor.
All clients are not connected The Scene Editor cannot start because some of the added devices are not connected to the Console.
Go to the Device tab, then check the connections of the devices. The green icon in front of a device name means the device is connected.
Mapping information is incorrect The Scene Editor cannot start because device mapping was not performed.
In the Position window displayed after selecting the Device tab -> Position button, perform device mapping first before running the Scene Editor.
Cannot execute the Schedule because the monitor layout is not set up
The Schedule tab cannot run because the Console layout is not configured.
Go to Settings-> Configuration -> VideoWall, then configure the layout. Next, run the Schedule tab.
There are different types of VWL contents in the Scene Editor.
Do you want to load the VWL file, again?
When accessing the Scene Editor, the VWL content currently opened in the Scene Editor is not identical to the VWL content playing on the Client.
This problem can occur intermittently if the Client switches to a new VWL file.
Cancel the process, then access the Scene Editor again. Alternatively, select OK, then play the VWL file (playing on the Client) using the Scene Editor.
12
Warning message Possible causes Solutions
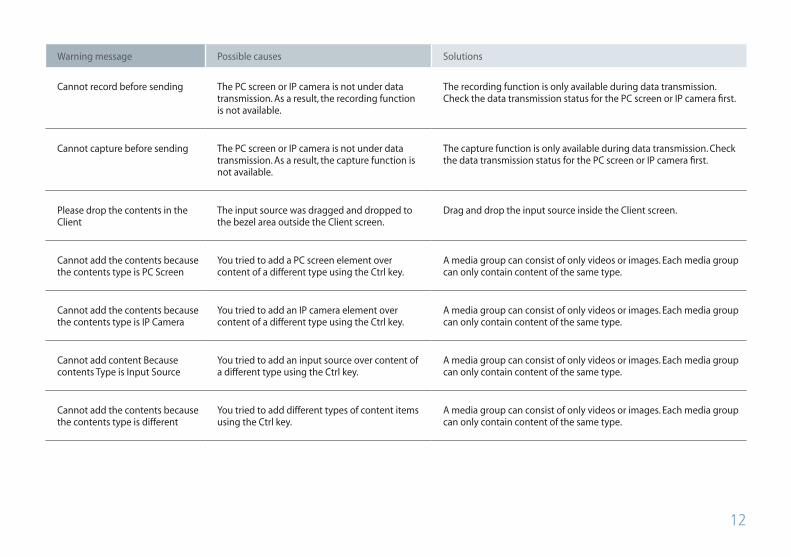
Cannot record before sending The PC screen or IP camera is not under data transmission. As a result, the recording function is not available.
The recording function is only available during data transmission. Check the data transmission status for the PC screen or IP camera first.
Cannot capture before sending The PC screen or IP camera is not under data transmission. As a result, the capture function is not available.
The capture function is only available during data transmission. Check the data transmission status for the PC screen or IP camera first.
Please drop the contents in the Client
The input source was dragged and dropped to the bezel area outside the Client screen.
Drag and drop the input source inside the Client screen.
Cannot add the contents because the contents type is PC Screen
You tried to add a PC screen element over content of a different type using the Ctrl key.
A media group can consist of only videos or images. Each media group can only contain content of the same type.
Cannot add the contents because the contents type is IP Camera
You tried to add an IP camera element over content of a different type using the Ctrl key.
A media group can consist of only videos or images. Each media group can only contain content of the same type.
Cannot add content Because contents Type is Input Source
You tried to add an input source over content of a different type using the Ctrl key.
A media group can consist of only videos or images. Each media group can only contain content of the same type.
Cannot add the contents because the contents type is different
You tried to add different types of content items using the Ctrl key.
A media group can consist of only videos or images. Each media group can only contain content of the same type.
13
Warning message Possible causes Solutions
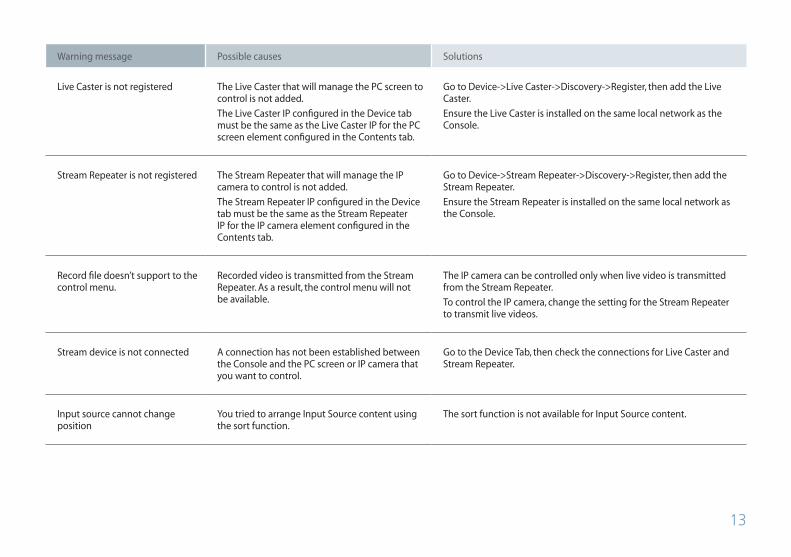
Live Caster is not registered The Live Caster that will manage the PC screen to control is not added.
The Live Caster IP configured in the Device tab must be the same as the Live Caster IP for the PC screen element configured in the Contents tab.
Go to Device->Live Caster->Discovery->Register, then add the Live Caster.
Ensure the Live Caster is installed on the same local network as the Console.
Stream Repeater is not registered The Stream Repeater that will manage the IP camera to control is not added.
The Stream Repeater IP configured in the Device tab must be the same as the Stream Repeater IP for the IP camera element configured in the Contents tab.
Go to Device->Stream Repeater->Discovery->Register, then add the Stream Repeater.
Ensure the Stream Repeater is installed on the same local network as the Console.
Record file doesn’t support to the control menu.
Recorded video is transmitted from the Stream Repeater. As a result, the control menu will not be available.
The IP camera can be controlled only when live video is transmitted from the Stream Repeater.
To control the IP camera, change the setting for the Stream Repeater to transmit live videos.
Stream device is not connected A connection has not been established between the Console and the PC screen or IP camera that you want to control.
Go to the Device Tab, then check the connections for Live Caster and Stream Repeater.
Input source cannot change position
You tried to arrange Input Source content using the sort function.
The sort function is not available for Input Source content.
14
Warning message Possible causes Solutions
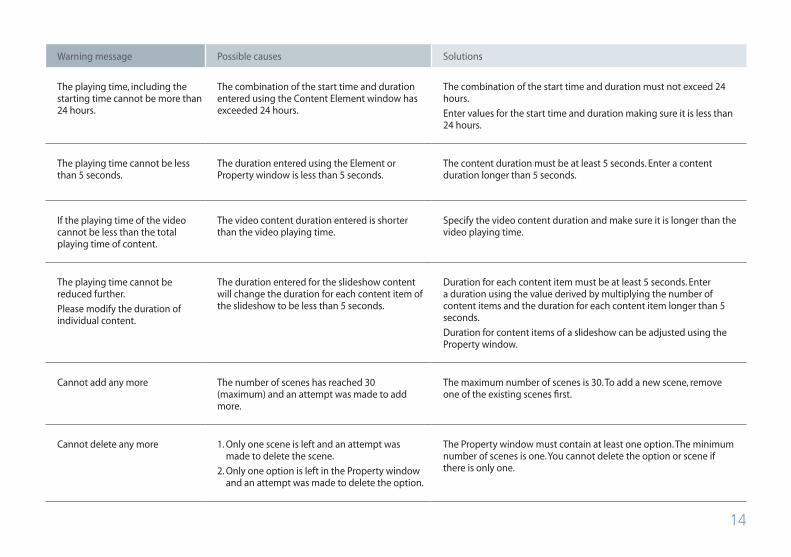
The playing time, including the starting time cannot be more than 24 hours.
The combination of the start time and duration entered using the Content Element window has exceeded 24 hours.
The combination of the start time and duration must not exceed 24 hours.
Enter values for the start time and duration making sure it is less than 24 hours.
The playing time cannot be less than 5 seconds.
The duration entered using the Element or Property window is less than 5 seconds.
The content duration must be at least 5 seconds. Enter a content duration longer than 5 seconds.
If the playing time of the video cannot be less than the total playing time of content.
The video content duration entered is shorter than the video playing time.
Specify the video content duration and make sure it is longer than the video playing time.
The playing time cannot be reduced further.
Please modify the duration of individual content.
The duration entered for the slideshow content will change the duration for each content item of the slideshow to be less than 5 seconds.
Duration for each content item must be at least 5 seconds. Enter a duration using the value derived by multiplying the number of content items and the duration for each content item longer than 5 seconds.
Duration for content items of a slideshow can be adjusted using the Property window.
Cannot add any more The number of scenes has reached 30 (maximum) and an attempt was made to add more.
The maximum number of scenes is 30. To add a new scene, remove one of the existing scenes first.
Cannot delete any more 1. Only one scene is left and an attempt was made to delete the scene.
2. Only one option is left in the Property window and an attempt was made to delete the option.
The Property window must contain at least one option. The minimum number of scenes is one. You cannot delete the option or scene if there is only one.
15
Warning message Possible causes Solutions
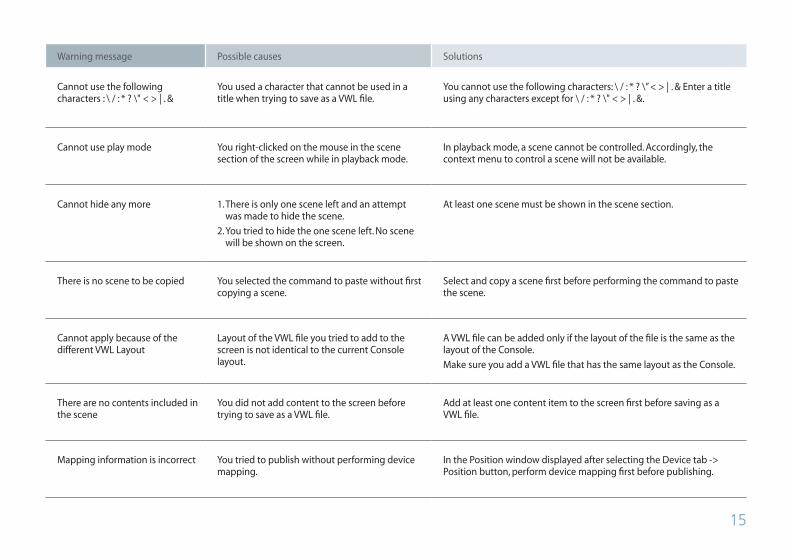
Cannot use the following characters : \ / : * ? \" < > | . &
You used a character that cannot be used in a title when trying to save as a VWL file.
You cannot use the following characters: \ / : * ? \” < > | . & Enter a title using any characters except for \ / : * ? \" < > | . &.
Cannot use play mode You right-clicked on the mouse in the scene section of the screen while in playback mode.
In playback mode, a scene cannot be controlled. Accordingly, the context menu to control a scene will not be available.
Cannot hide any more 1. There is only one scene left and an attempt was made to hide the scene.
2. You tried to hide the one scene left. No scene will be shown on the screen.
At least one scene must be shown in the scene section.
There is no scene to be copied You selected the command to paste without first copying a scene.
Select and copy a scene first before performing the command to paste the scene.
Cannot apply because of the different VWL Layout
Layout of the VWL file you tried to add to the screen is not identical to the current Console layout.
A VWL file can be added only if the layout of the file is the same as the layout of the Console.
Make sure you add a VWL file that has the same layout as the Console.
There are no contents included in the scene
You did not add content to the screen before trying to save as a VWL file.
Add at least one content item to the screen first before saving as a VWL file.
Mapping information is incorrect You tried to publish without performing device mapping.
In the Position window displayed after selecting the Device tab -> Position button, perform device mapping first before publishing.
16
Warning message Possible causes Solutions
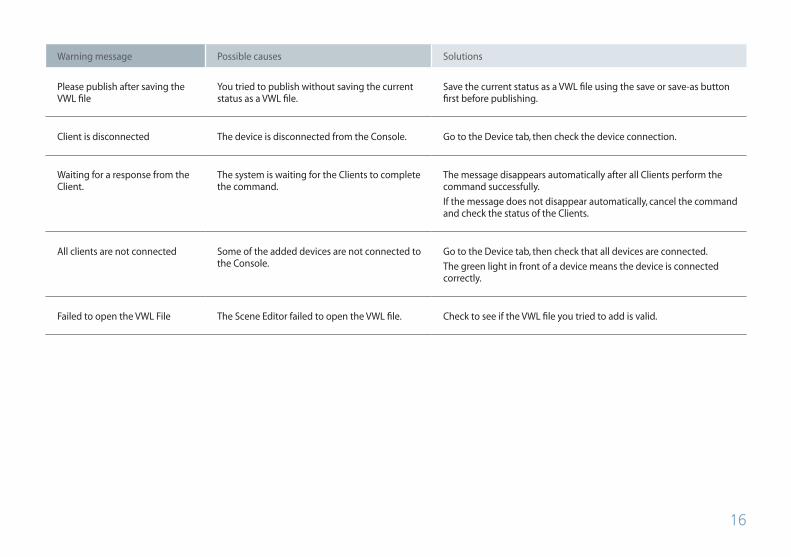
Please publish after saving the VWL file
You tried to publish without saving the current status as a VWL file.
Save the current status as a VWL file using the save or save-as button first before publishing.
Client is disconnected The device is disconnected from the Console. Go to the Device tab, then check the device connection.
Waiting for a response from the Client.
The system is waiting for the Clients to complete the command.
The message disappears automatically after all Clients perform the command successfully.
If the message does not disappear automatically, cancel the command and check the status of the Clients.
All clients are not connected Some of the added devices are not connected to the Console.
Go to the Device tab, then check that all devices are connected.
The green light in front of a device means the device is connected correctly.
Failed to open the VWL File The Scene Editor failed to open the VWL file. Check to see if the VWL file you tried to add is valid.
17
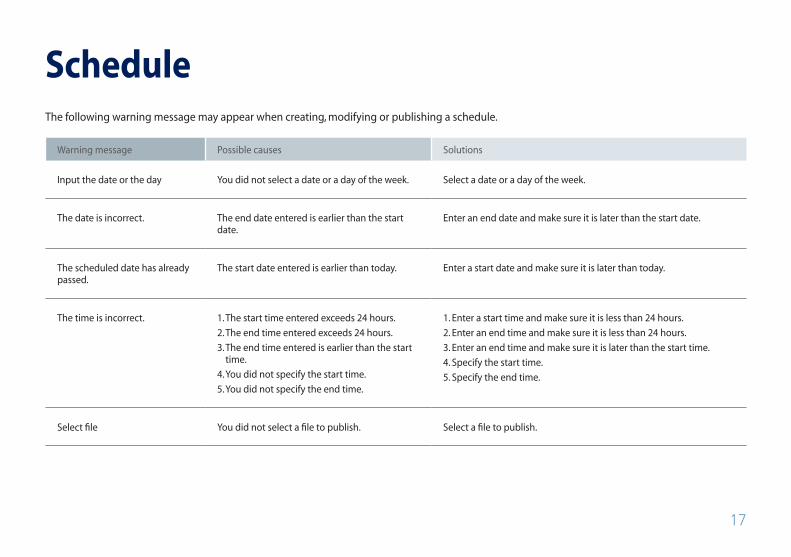
ScheduleThe following warning message may appear when creating, modifying or publishing a schedule.
Warning message Possible causes Solutions
Input the date or the day You did not select a date or a day of the week. Select a date or a day of the week.
The date is incorrect. The end date entered is earlier than the start date.
Enter an end date and make sure it is later than the start date.
The scheduled date has already passed.
The start date entered is earlier than today. Enter a start date and make sure it is later than today.
The time is incorrect. 1. The start time entered exceeds 24 hours.
2. The end time entered exceeds 24 hours.
3. The end time entered is earlier than the start time.
4. You did not specify the start time.
5. You did not specify the end time.
1. Enter a start time and make sure it is less than 24 hours.
2. Enter an end time and make sure it is less than 24 hours.
3. Enter an end time and make sure it is later than the start time.
4. Specify the start time.
5. Specify the end time.
Select file You did not select a file to publish. Select a file to publish.
18
Warning message Possible causes Solutions
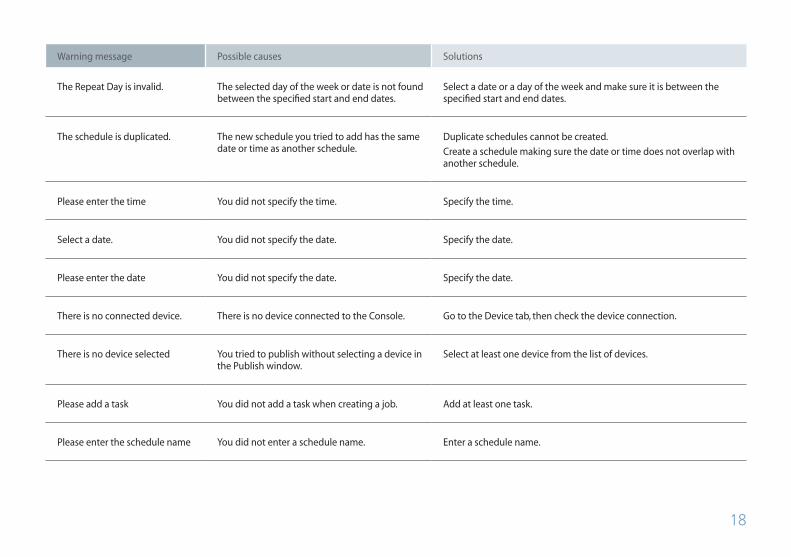
The Repeat Day is invalid. The selected day of the week or date is not found between the specified start and end dates.
Select a date or a day of the week and make sure it is between the specified start and end dates.
The schedule is duplicated. The new schedule you tried to add has the same date or time as another schedule.
Duplicate schedules cannot be created.
Create a schedule making sure the date or time does not overlap with another schedule.
Please enter the time You did not specify the time. Specify the time.
Select a date. You did not specify the date. Specify the date.
Please enter the date You did not specify the date. Specify the date.
There is no connected device. There is no device connected to the Console. Go to the Device tab, then check the device connection.
There is no device selected You tried to publish without selecting a device in the Publish window.
Select at least one device from the list of devices.
Please add a task You did not add a task when creating a job. Add at least one task.
Please enter the schedule name You did not enter a schedule name. Enter a schedule name.
19
Warning message Possible causes Solutions
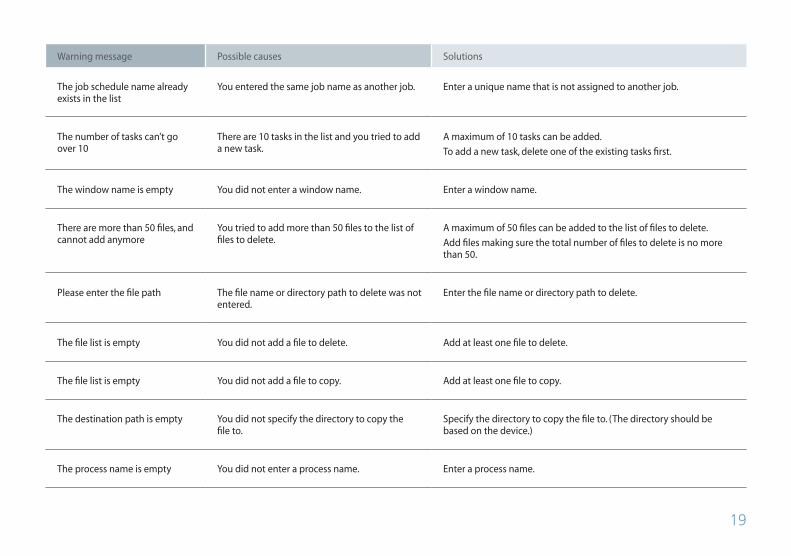
The job schedule name already exists in the list
You entered the same job name as another job. Enter a unique name that is not assigned to another job.
The number of tasks can’t go over 10
There are 10 tasks in the list and you tried to add a new task.
A maximum of 10 tasks can be added.
To add a new task, delete one of the existing tasks first.
The window name is empty You did not enter a window name. Enter a window name.
There are more than 50 files, and cannot add anymore
You tried to add more than 50 files to the list of files to delete.
A maximum of 50 files can be added to the list of files to delete.
Add files making sure the total number of files to delete is no more than 50.
Please enter the file path The file name or directory path to delete was not entered.
Enter the file name or directory path to delete.
The file list is empty You did not add a file to delete. Add at least one file to delete.
The file list is empty You did not add a file to copy. Add at least one file to copy.
The destination path is empty You did not specify the directory to copy the file to.
Specify the directory to copy the file to. (The directory should be based on the device.)
The process name is empty You did not enter a process name. Enter a process name.
20
Warning message Possible causes Solutions
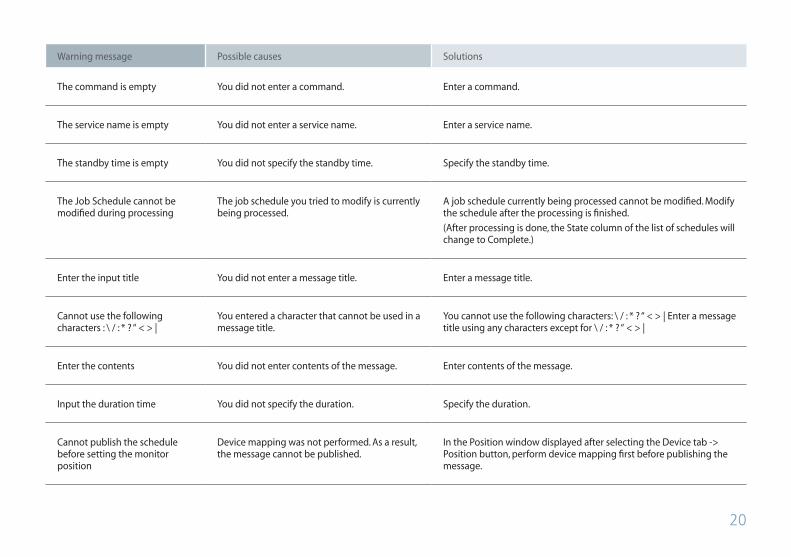
The command is empty You did not enter a command. Enter a command.
The service name is empty You did not enter a service name. Enter a service name.
The standby time is empty You did not specify the standby time. Specify the standby time.
The Job Schedule cannot be modified during processing
The job schedule you tried to modify is currently being processed.
A job schedule currently being processed cannot be modified. Modify the schedule after the processing is finished.
(After processing is done, the State column of the list of schedules will change to Complete.)
Enter the input title You did not enter a message title. Enter a message title.
Cannot use the following characters : \ / : * ? “ < > |
You entered a character that cannot be used in a message title.
You cannot use the following characters: \ / : * ? “ < > | Enter a message title using any characters except for \ / : * ? “ < > |
Enter the contents You did not enter contents of the message. Enter contents of the message.
Input the duration time You did not specify the duration. Specify the duration.
Cannot publish the schedule before setting the monitor position
Device mapping was not performed. As a result, the message cannot be published.
In the Position window displayed after selecting the Device tab -> Position button, perform device mapping first before publishing the message.
21
Warning message Possible causes Solutions
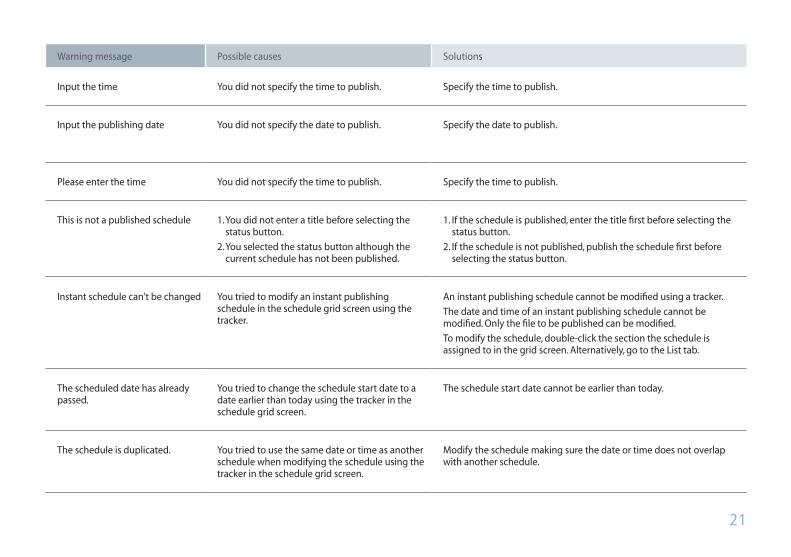
Input the time You did not specify the time to publish. Specify the time to publish.
Input the publishing date You did not specify the date to publish. Specify the date to publish.
Please enter the time You did not specify the time to publish. Specify the time to publish.
This is not a published schedule 1. You did not enter a title before selecting the status button.
2. You selected the status button although the current schedule has not been published.
1. If the schedule is published, enter the title first before selecting the status button.
2. If the schedule is not published, publish the schedule first before selecting the status button.
Instant schedule can't be changed You tried to modify an instant publishing schedule in the schedule grid screen using the tracker.
An instant publishing schedule cannot be modified using a tracker.
The date and time of an instant publishing schedule cannot be modified. Only the file to be published can be modified.
To modify the schedule, double-click the section the schedule is assigned to in the grid screen. Alternatively, go to the List tab.
The scheduled date has already passed.
You tried to change the schedule start date to a date earlier than today using the tracker in the schedule grid screen.
The schedule start date cannot be earlier than today.
The schedule is duplicated. You tried to use the same date or time as another schedule when modifying the schedule using the tracker in the schedule grid screen.
Modify the schedule making sure the date or time does not overlap with another schedule.

22
Warning message Possible causes Solutions
Input the schedule title You did not enter a schedule title. Enter a schedule title.
Select file to publish You did not select a file to publish. Select a file to publish.
The schedule is currently being published
The new schedule cannot be published since another schedule is being published.
Publish the new schedule after the current schedule is published first.
If the schedule needs to be published right away, cancel the schedule currently being published.
To cancel the current publishing process, select the corresponding schedule from the list of schedules and select the delete button.
Insert a frame schedule to be published
There is no schedule added to the schedule grid screen and an attempt was made to publish a schedule using the Schedule Publish function.
Add at least one schedule to the schedule grid screen before publishing.
Cannot create a message item because the layout is atypical.
You tried to create a message while the Console layout is informal.
A message can be created only if the Console layout is formal.
Go to Settings tab - Configuration - VideoWall, then check the layout.
This message already exists The new message you tried to add has the same title as another message.
Enter a unique title that is not identical to another message.
Cannot publish the schedule before setting the monitor position
Device mapping was not performed. As a result, the message cannot be published or modified.
In the Position window displayed after selecting the Device tab -> Position button, perform device mapping first before publishing or modifying the message.
23
Warning message Possible causes Solutions
Cannot delete the published message
You tried to delete a published message (which exists on the list of message schedules).
A published message cannot be deleted. To delete a published message, first delete the schedule the message is assigned to from the list of schedules.
Cannot be published because the layout is atypical
You tried to publish a message while the Console layout is informal.
A message can be published only if the Console layout is formal.
Go to Settings tab - Configuration - VideoWall, then check the layout.
All clients are not connected Some of the added devices are not connected to the Console.
Go to the Device tab, then check the connections of the devices. The green light means the device is connected.
Publishing state in the list of schedules is displaying Skip
Devices were disconnected at the specified time of publishing the schedule.
Check the connections with the devices, then publish the schedule again.
24
Warning message Possible causes Solutions
Publishing state in the list of schedules is displaying Error
1. The file server is not working.
2. Disk space on the device is insufficient.
1. Check to see if the service file server has started. If it stopped, restart the service. (Start -> services.msc -> start the service named VideoWall Control Center FileServer_s.)
2. Check to see if there is sufficient disk space in the drive on the device where the MagicInfo VideoWall Client is installed.
25
SettingsThe following warning message may appear when configuring settings for the Console.
Warning message Possible causes Solutions
Please enter the date You did not specify the date. Specify the date.
The Serial key is invalid. The serial key entered is invalid. Check to see if the serial key is valid before entering it in. If it is invalid, request a new serial key.
The license key is invalid. The license key entered is invalid. Check to see if the license key is valid before entering it in. If it is invalid, request a new license key.
The maximum number of license key is 250
The sum of the existing licenses and the new licenses to add exceeds 250.
The maximum number of licenses is 250. Add licenses and make sure the total number of licenses is no more than 250.
Please fill in the checked(*) items You did not fill in at least one required input field. Fill in all the required input fields.
This is only available when the user authority is set to an administrator
A user with standard user privileges tried to add a new account.
Only a user with administrator privileges is authorized to add a new account.
To add a new account, first log in with a user ID with administrator privileges.
26
Warning message Possible causes Solutions
The ID already exists The user ID entered is already assigned to another user.
Enter a unique ID that does not overlap with another user.
The ID shall be between 4~12 characters
The ID entered is shorter than 4 characters or longer than 12 characters.
Enter an ID and make sure it is 4 to 12 characters long.
Invalid ID format. Invalid characters : ! @ # $ % ^ & * ? “
The ID entered includes at least one invalid character.
You cannot use the following characters: ! @ # $ % ^ & * ? ". Enter an ID using any characters except for ! @ # $ % ^ & * ? ".
The password shall be between 4~12 characters
The password entered is shorter than 4 characters or longer than 12 characters.
Enter a password and make sure it is 4 to 12 characters long.
Invalid password format. Invalid characters : ! @ # $ % ^ & * ? “
The password entered includes at least one invalid character.
You cannot use the following characters: ! @ # $ % ^ & * ? ". Enter a password using any characters except for ! @ # $ % ^ & * ? ".
Please re-enter your password The password re-entered for confirmation is not the same as the new password.
Enter the same password as the new password.
Too many administrators The number of users with administrator privileges has reached 50 and an attempt was made to add a new account with administrator privileges.
The maximum number of users that can have administrator privileges is 50.
To add a new account, delete one of the existing accounts first.
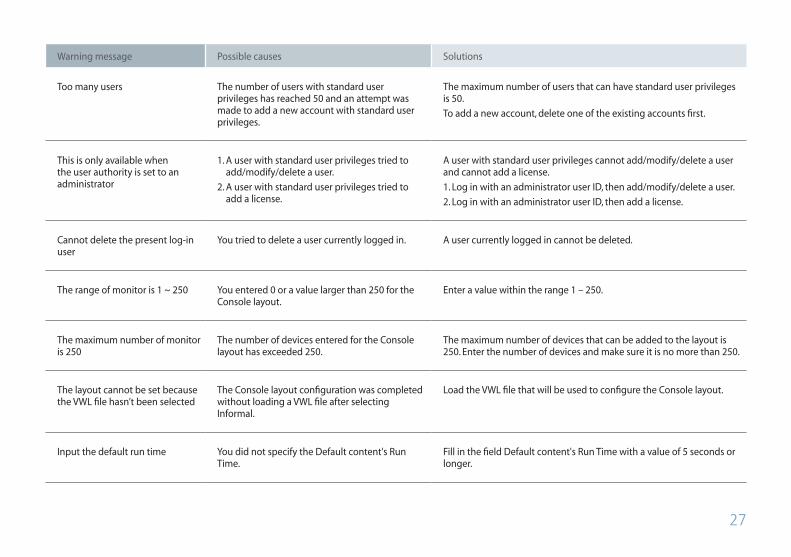
27
Warning message Possible causes Solutions
Too many users The number of users with standard user privileges has reached 50 and an attempt was made to add a new account with standard user privileges.
The maximum number of users that can have standard user privileges is 50.
To add a new account, delete one of the existing accounts first.
This is only available when the user authority is set to an administrator
1. A user with standard user privileges tried to add/modify/delete a user.
2. A user with standard user privileges tried to add a license.
A user with standard user privileges cannot add/modify/delete a user and cannot add a license.
1. Log in with an administrator user ID, then add/modify/delete a user.
2. Log in with an administrator user ID, then add a license.
Cannot delete the present log-in user
You tried to delete a user currently logged in. A user currently logged in cannot be deleted.
The range of monitor is 1 ~ 250 You entered 0 or a value larger than 250 for the Console layout.
Enter a value within the range 1 – 250.
The maximum number of monitor is 250
The number of devices entered for the Console layout has exceeded 250.
The maximum number of devices that can be added to the layout is 250. Enter the number of devices and make sure it is no more than 250.
The layout cannot be set because the VWL file hasn’t been selected
The Console layout configuration was completed without loading a VWL file after selecting Informal.
Load the VWL file that will be used to configure the Console layout.
Input the default run time You did not specify the Default content's Run Time.
Fill in the field Default content's Run Time with a value of 5 seconds or longer.
28
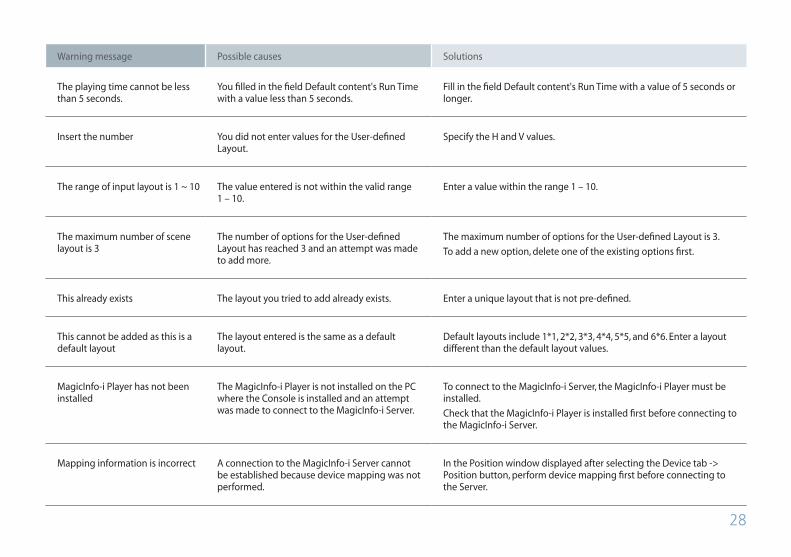
Warning message Possible causes Solutions
The playing time cannot be less than 5 seconds.
You filled in the field Default content's Run Time with a value less than 5 seconds.
Fill in the field Default content's Run Time with a value of 5 seconds or longer.
Insert the number You did not enter values for the User-defined Layout.
Specify the H and V values.
The range of input layout is 1 ~ 10 The value entered is not within the valid range 1 – 10.
Enter a value within the range 1 – 10.
The maximum number of scene layout is 3
The number of options for the User-defined Layout has reached 3 and an attempt was made to add more.
The maximum number of options for the User-defined Layout is 3.
To add a new option, delete one of the existing options first.
This already exists The layout you tried to add already exists. Enter a unique layout that is not pre-defined.
This cannot be added as this is a default layout
The layout entered is the same as a default layout.
Default layouts include 1*1, 2*2, 3*3, 4*4, 5*5, and 6*6. Enter a layout different than the default layout values.
MagicInfo-i Player has not been installed
The MagicInfo-i Player is not installed on the PC where the Console is installed and an attempt was made to connect to the MagicInfo-i Server.
To connect to the MagicInfo-i Server, the MagicInfo-i Player must be installed.
Check that the MagicInfo-i Player is installed first before connecting to the MagicInfo-i Server.
Mapping information is incorrect A connection to the MagicInfo-i Server cannot be established because device mapping was not performed.
In the Position window displayed after selecting the Device tab -> Position button, perform device mapping first before connecting to the Server.
29
Warning message Possible causes Solutions
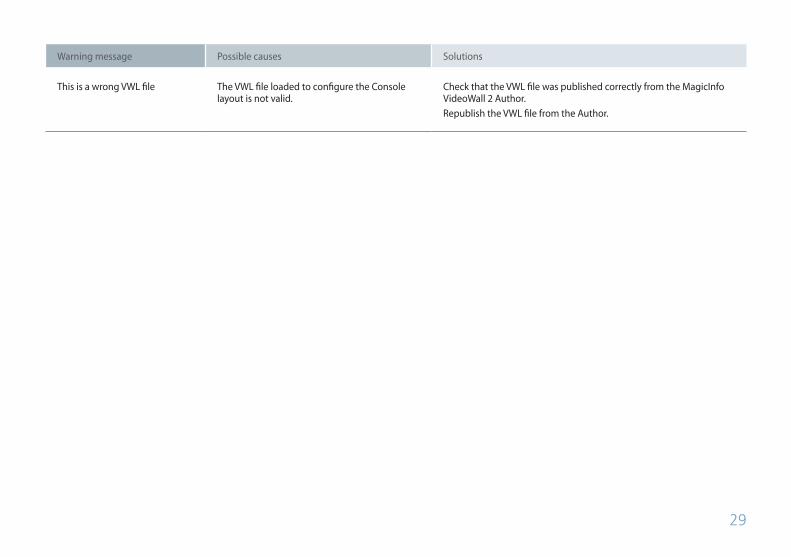
This is a wrong VWL file The VWL file loaded to configure the Console layout is not valid.
Check that the VWL file was published correctly from the MagicInfo VideoWall 2 Author.
Republish the VWL file from the Author.

30
LicenseThe following warning message may appear when registering a license.
Warning message Possible causes Solutions
The usage period was readjusted. The temporary period for usage without a license has expired.
To use the Console, register a license.
The program will be exited due to a failure to verify the license.
The temporary period for usage without a license has expired.
To use the Console, register a license.
The Serial key is invalid. The serial key entered is invalid. Check to see if the serial key is valid before entering it in. If it is invalid, request a new serial key.
The license key is invalid. The license key entered is invalid. Check to see if the license key is valid before entering it in. If it is invalid, request a new license key.