Embed Size (px)
Citation preview

Chapter 10
Developing a Presentation with Content from
Outside Sources
Microsoft
PowerPoint 2013

• Insert an object from a file
• Embed and edit a file
• Draw and format a table
• Resize, split, distribute, and arrange table columns and rows
• Insert and edit a linked Excel worksheet
• Switch chart rows and columns
Developing a Presentation with Content from Outside Sources 2
Objectives

• Change a chart type
• Apply a chart style
• Apply effects to chart elements
• Display chart elements
• Edit chart data
• Add a hyperlink to a table
Developing a Presentation with Content from Outside Sources 3
Objectives

Developing a Presentation with Content from Outside Sources 4
Project – Presentation with Embedded and
Linked Files and Formatted Table and Chart

Developing a Presentation with Content from Outside Sources 5
Project – Presentation with Embedded and
Linked Files and Formatted Table and Chart

• Insert and edit a Microsoft word file by adding text
• Draw table rows and columns and then erase lines and split columns and rows
• Format a table by adding shading, a gradient fill, and a cell bevel, and then distributing rows and resizing columns and rows
• Insert and edit a linked Excel worksheet
• Copy, format and edit an Excel chart by changing the type, colors, legend, labels, background, and data
Developing a Presentation with Content from Outside Sources 6
Roadmap

• Embedding
– Embedded object
• Linking
– Linked object
– Source file
• Copying and pasting
Developing a Presentation with Content from Outside Sources 7
Inserting Graphics or Other Objects
from a File

• Tap or click the Object button (INSERT tab | Text group) to display the Insert Object dialog box
• Tap or click ‘Create from file’ to display the File box
• Tap or click the Browse button and navigate to the location of the file to insert
• Tap or click the desired file to insert
• Tap or click the OK button to insert the file name into the File box
• Tap or click the OK button to display the file’s contents on the selected slide
Developing a Presentation with Content from Outside Sources 8
Inserting a File with Graphics and Text

Developing a Presentation with Content from Outside Sources 9
Inserting a File with Graphics and Text

• Double-tap or double-click the embedded object to start the program that created the embedded file
• Make the desired changes
• Tap or click outside the program that opened to display the edited object
Developing a Presentation with Content from Outside Sources 10
Editing an Embedded File

Developing a Presentation with Content from Outside Sources 11
Editing an Embedded File

• Display the VIEW tab and then tap or click the Ruler check box to display the horizontal and vertical rulers
• Display the INSERT tab and then tap or click the Table button to display the Insert Table gallery
• Click Draw Table and then position the pointer, which has the shape of a pencil, in the desired location to begin drawing the table
• Drag the pencil pointer to the desired location to draw the outer edges of the table
• Release the mouse button to draw the table frame
Developing a Presentation with Content from Outside Sources 12
Drawing a Table

Developing a Presentation with Content from Outside Sources 13
Drawing a Table

• With the TABLE TOOLS DESIGN tab displaying, click the Draw Table button (TABLE TOOLS DESIGN tab | Draw Borders group) to change the pointer to a pencil and then position the pencil pointer inside the table at the location for the first table row
• Drag the pencil pointer across the table to divide the table, and then release the mouse button
• Repeat the previous step to draw additional rows
Developing a Presentation with Content from Outside Sources 14
Drawing Table Rows

Developing a Presentation with Content from Outside Sources 15
Drawing Table Rows

• Position the pencil pointer inside the table at the location for the first column border
• Drag the pencil pointer down through all the horizontal lines to divide the table
• Repeat the previous step to create additional columns
Developing a Presentation with Content from Outside Sources 16
Drawing Table Columns

Developing a Presentation with Content from Outside Sources 17
Drawing Table Columns

• Click the Table Eraser button (TABLE TOOLS DESIGN tab | Draw Borders group)
• Position the pointer, which has the shape of an eraser, over the line to erase
• Click the line to erase it
• Press the ESC key to change the pointer to an I-beam
Developing a Presentation with Content from Outside Sources 18
Erasing a Table Line

Developing a Presentation with Content from Outside Sources 19
Erasing a Table Line

• With the row or column to split selected, tap or click the Split Cells button (TABLE TOOLS LAYOUT tab | Merge group) to display the Split Cells dialog box
• Type the desired number of columns or rows to split the selected cells, and then tap or click the OK button
Developing a Presentation with Content from Outside Sources 20
Splitting a Table Column and Row

Developing a Presentation with Content from Outside Sources 21
Splitting a Table Column and Row

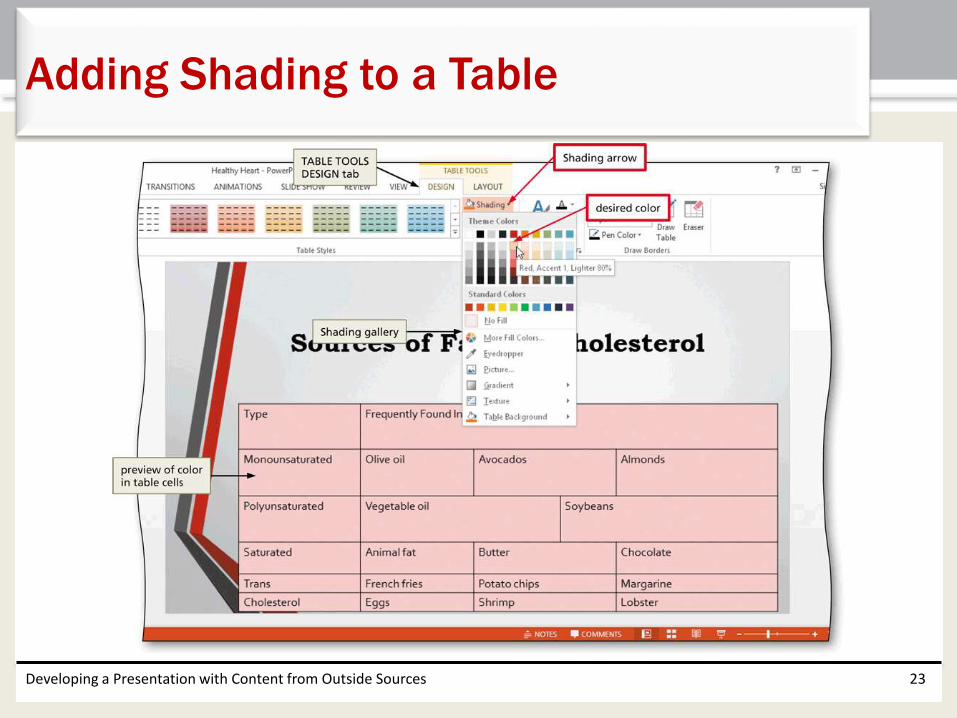
• Tap or click the Select button (TABLE TOOLS LAYOUT tab | Table group) to display the Select menu
• Tap or click Select Table in the Select menu to select the entire table
• Tap or click the TABLE TOOLS DESIGN tab and then tap or click the Shading arrow (TABLE TOOLS DESIGN tab | Table Styles group) to display the Shading gallery
• Tap or click the desired color for the shading to apply the selected color to the table
Developing a Presentation with Content from Outside Sources 22
Adding Shading to a Table
Developing a Presentation with Content from Outside Sources 23
Adding Shading to a Table

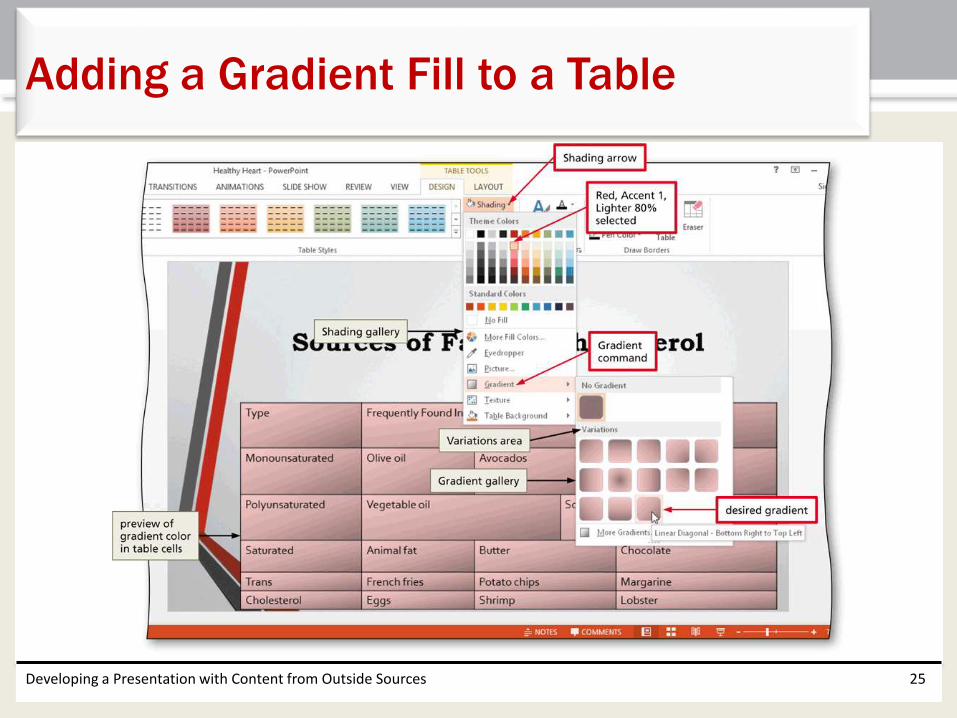
• With the table selected, tap or click the Shading arrow (TABLE TOOLS DESIGN tab | Table Styles group) again to display the Shading gallery
• Tap or click Gradient to display the Gradient gallery and then tap or click the desired gradient to apply the selected gradient to the table
Developing a Presentation with Content from Outside Sources 24
Adding a Gradient Fill to a Table
Developing a Presentation with Content from Outside Sources 25
Adding a Gradient Fill to a Table

• With the table selected, tap or click the Effects button (TABLE TOOLS DESIGN tab | Table Styles group) to display the Effects menu
• Tap or click Cell Bevel on the Effects menu to display the Cell Bevel gallery
• Tap or click the desired bevel effect in the Bevel gallery to apply the selected bevel effect to the table
Developing a Presentation with Content from Outside Sources 26
Adding a Cell Bevel

Developing a Presentation with Content from Outside Sources 27
Adding a Cell Bevel

• Select the rows to distribute
• Tap or click the Distribute Rows button (TABLE TOOLS LAYOUT tab | Cell Size group) to equally space the selected rows
Developing a Presentation with Content from Outside Sources 28
Distributing Table Rows

• Position the insertion point in a cell in a row or column to resize
• Tap or click the Width box or Height box up arrow or down arrow as needed
Developing a Presentation with Content from Outside Sources 29
Resizing Table Columns and Rows

Developing a Presentation with Content from Outside Sources 30
Resizing Table Columns and Rows

• With the insertion point in the table, tap or click the Align button (TABLE TOOLS LAYOUT tab | Arrange group) to display the Align menu
• Tap or click Align Center on the Align menu, so PowerPoint adjusts the position of the table evenly between the left and right sides of the slide
Developing a Presentation with Content from Outside Sources 31
Centering a Table

Developing a Presentation with Content from Outside Sources 32
Centering a Table

• Tap o click the object button (INSERT tab | Text group) to display the Insert Object dialog box
• Tap or click ‘Create from file’ to display the File box• Tap or click the Browse button, navigate to the
location containing the file to insert, and then select the desired file name
• Tap or click the OK button to insert the file name into the File box
• Tap or click the Link check box to select the check box• Tap or click the OK button to insert the worksheet
into the selected slide
Developing a Presentation with Content from Outside Sources 33
Inserting a Linked Excel Worksheet

Developing a Presentation with Content from Outside Sources 34
Inserting a Linked Excel Worksheet

• Tap or click the Align button (DRAWING TOOLS FORMAT tab | Arrange group) to display the Align menu
• Tap or click the desired alignment option to align the worksheet accordingly
Developing a Presentation with Content from Outside Sources 35
Aligning a Worksheet

Developing a Presentation with Content from Outside Sources 36
Aligning a Worksheet

• Double-tap or double-click the table to open Microsoft Excel and display the worksheet
• Make the necessary edits
• Tap or click the Close button in the upper-right corner of the Microsoft Excel window to quit Excel
Developing a Presentation with Content from Outside Sources 37
Editing a Linked Worksheet

Developing a Presentation with Content from Outside Sources 38
Editing a Linked Worksheet

• Select the desired chart to copy
• Tap or click the Copy button (HOME tab | Clipboard group) to copy the chart to the Office Clipboard
• Display the desired slide to contain a copy of the chart and then click the Paste arrow (HOME tab | Clipboard group) to display the Paste Options gallery
• Tap or click the ‘Use Destination Theme & Link Data’ button to paste the chart into the slide
Developing a Presentation with Content from Outside Sources 39
Copying an Excel Chart

Developing a Presentation with Content from Outside Sources 40
Copying an Excel Chart

• With the chart selected, tap or click the Align button (CHART TOOLS FORMAT tab | Arrange group) to display the Align menu
• Tap or click the desired alignment option
Developing a Presentation with Content from Outside Sources 41
Aligning a Chart

Developing a Presentation with Content from Outside Sources 42
Aligning a Chart

• Tap or click the Switch Row/Column button (CHART TOOLS DESIGN tab | Data group) to swap the data charted on the x-axis with the data on the y-axis
Developing a Presentation with Content from Outside Sources 43
Switching Rows and Columns in a Chart

Developing a Presentation with Content from Outside Sources 44
Switching Rows and Columns in a Chart

• Tap or click the ‘Change Chart Type’ button (CHART TOOLS DESIGN tab | Type group) to display the Change Chart Type dialog box
• Click the desired chart type to select it
• Tap or click the OK button to change the chart in the selection rectangle
Developing a Presentation with Content from Outside Sources 45
Changing a Chart Type

Developing a Presentation with Content from Outside Sources 46
Changing a Chart Type

• Tap or click the Chart Style button (paintbrush icon) on the right side of the chart area to display the Chart Style gallery with the STYLE tab displayed
• Tap or click the desired style to apply the chart style to the chart
Developing a Presentation with Content from Outside Sources 47
Applying a Style to a Chart

• With the Chart Style gallery displaying, tap or click the COLOR tab at the top of the pane to display the Chart Color gallery
• Tap or click the desired color to apply the colors to the char
• Tap or click the Chart Style button to the right of the chart to close the Chart Color gallery
Developing a Presentation with Content from Outside Sources 48
Changing Chart Colors

Developing a Presentation with Content from Outside Sources 49
Changing Chart Colors

• Tap or click the Chart Elements button (plus sign icon) on the right side of the chart area to display the CHART ELEMENTS pane. Tap or click the Axis Titles check box to display the two default titles for the x and y axes
• Select the desired title box to update, type the desired text, and format as desired
Developing a Presentation with Content from Outside Sources 50
Displaying and Formatting Axis Titles

Developing a Presentation with Content from Outside Sources 51
Displaying and Formatting Axis Titles

• With the CHART ELEMENTS pane displaying, position the pointer over the word, Legend, in the list to display an arrow and then tap or click this arrow to display the Legend menu
• Tap or click the desired location
Developing a Presentation with Content from Outside Sources 52
Moving a Chart Legend

Developing a Presentation with Content from Outside Sources 53
Moving a Chart Legend

• With the CHART ELEMENTS pane displaying, display the Legend menu
• Select the desired settings
Developing a Presentation with Content from Outside Sources 54
Formatting a Chart Legend

Developing a Presentation with Content from Outside Sources 55
Formatting a Chart Legend

• Press and hold or right-click an area of the chart wall to select this chart element and to display a mini toolbar and shortcut menu. If necessary, tap or click the Chart Elements arrow and then tap or click Walls in the list
• If necessary, display the shortcut menu again. Tap or click Format Walls in the shortcut menu to display the Format Walls pane. If necessary, tap or click FILL to expand the FILL section
• Select the desired settings• Tap or click the Close button
Developing a Presentation with Content from Outside Sources 56
Formatting a Chart Background

Developing a Presentation with Content from Outside Sources 57
Formatting a Chart Background

• Display the CHART TOOLS DESIGN tab and then tap or click the Edit Data button (CHART TOOLS DESIGN tab | Data group) to display the worksheet
• Make the desired changes
• Tap or click the Save button on the spreadsheet toolbar to save the data to the Excel spreadsheet
• Tap or click the Close button on the spreadsheet to close the window
• Tap or click the slide in a location outside the chart area
Developing a Presentation with Content from Outside Sources 58
Editing Data in a Chart

Developing a Presentation with Content from Outside Sources 59
Editing Data in a Chart

• Tap or click the Hyperlink button (INSERT tab | Links group) to display the Insert Hyperlink dialog box
• If necessary, tap or click the ‘Existing File or Web Page’ button in the Link to area
• Navigate to the location containing the file to which you want to link
• Tap or click the desired file
• Tap or click the OK button to insert the hyperlink
Developing a Presentation with Content from Outside Sources 60
Adding a Hyperlink to a Table

Developing a Presentation with Content from Outside Sources 61
Adding a Hyperlink to a Table

• Insert an object from a file
• Embed and edit a file
• Draw and format a table
• Resize, split, distribute, and arrange table columns and rows
• Insert and edit a linked Excel worksheet
• Switch chart rows and columns
Developing a Presentation with Content from Outside Sources 62
Chapter Summary

• Change a chart type
• Apply a chart style
• Apply effects to chart elements
• Display chart elements
• Edit chart data
• Add a hyperlink to a table
Developing a Presentation with Content from Outside Sources 63
Chapter Summary

Chapter 10 Complete
Microsoft
PowerPoint 2013