Embed Size (px)
Citation preview


Kitchen Gardening In Pakistan
A Training PresentationBy
Mr. Allah Dad Khan Agriculture Consultant KPK Province Pakistan
Kitchen Gardening
A kitchen garden is where herbs and vegetables are
grown around the house for household use. Since early
times a small plot near to the house has been used for
growing a variety of vegetables according to the season.
Local varieties such as radish, broad leaf mustard,
chilli, beans, pumpkins etc. are all grown in the kitchen
garden.
Why Kitchen Gardening ?
For people to stay healthy it's very important to have a
healthy diet. A healthy diet means a balanced mix of
rice, bread, pulses, vegetables, herbs, fruit etc.
Vegetables are a very important part of a good diet as
they contain various nutrients for many body functions.
For growing, energy and protection against disease,
vegetables play an essential role. Vegetables are
especially important for the young, and for pregnant
and nursing women.
Benefits of Kitchen Gardening
to grow healthy, fresh vegetables yourself; • to save the
cost of buying vegetables and herbs; • waste resources
such as sweepings, kitchen scraps and dirty water can
be recycled onto the garden; • wasteland around the
house can be made productive.
How to make a Kitchen
Garden
Because there's often no tradition of kitchen gardens, many people can't grow the vegetables they need for a good diet. Or they spend lots of money on vegetables, or their health suffers from lack of vegetables. It may be that you haven't been able to make a kitchen garden. There are several reasons why it may be difficult to make a kitchen garden, or if you have made one, it is not successful. For example: • pests, diseases or livestock have destroyed the crop; • no good seed or seedlings; • lack of space; • lack of water; • lack of fertility; • no spare time; • lack of the right skills. These vegetables have wilted because of lack of water In this chapter easy methods are described to solve these sorts of problems, and so help the family to be able to grow good produce from their kitchen garden
Prerequisite for Kitchen
Gardening
To make and manage a kitchen garden easily, and to
give best production, the following things are important
:- Good management of the garden needs knowledge of
all these. Then we can make our kitchen garden more
successful
1.Site Selection
2.Protection
3. Water Management
4.Fertility
5.Seed and Seedlings
6.Design of the Garden
1.Site Selection
If you already have a kitchen garden you may not need
to choose a new site, it's enough to improve the old
site. If you are making a new garden, there are many
factors to consider. For example :- • how to protect
from livestock ? • how can you bring water to the site
and distribute it ? • how is the soil ? How can the
fertility needs be managed ? • where is the sunlight
coming from ? • how can the area be accessed easily
from the house ? When these issues are considered, the
best site can be chosen and the work of making the
garden will be easier.
2.Protection
The kitchen garden area needs protection from the very
start. It should not be possible for livestock to enter the
area. A permanent fence should be made. Thorny plants
can be cut and used to make a fence, but the best
method is to plant a living fence to protect the garden.
• Then, the crops within the garden will also need
protection from damage by many types of pest and
disease. There are many ways to do this. Mixed
cropping, rotations, liquid manure, etc. are all ways of
protecting crops. There is more information about crop
protection in the chapter Integrated Pest Management.
Kitchen garden:
Kitchen gardens can be grown in the empty space
available at the
backyard of the house. OR a group of women can come
together, identify a
commonplace or land and grow desired vegetables,
fruits, cereals etc that
can benefit the women and community as a whole
Individual Kitchen Gardens:
Individual kitchen gardens can be grown in the small space available in
the backyard. The individual kitchen gardens
1. Would provide for direct access to a diversity of nutritionally rich
foods,
2. Increases purchasing power from savings on food bills and
income if the garden products are sold.
A packet containing seeds of desired varieties can be provided to the
women interested to have kitchen garden, at an affordable price.
These seeds can be procured in bulk from a nursery or horticulture
department at reasonable rates and distributed to the interested
women through VO/MMS
Here the family members directly consume the benefits.
Guidance on maintenance of the gardens by using simple household
techniques should be provided to the members
Kitchen Garden
Vegetables occupy an important place in our daily life
particularly for vegetarians. Vegetables are the only
source to increase not only the nutritive values of foods
but also its palatability. For a balanced diet, an adult
should have an intake of 85 g of fruits and 300 g of
vegetables per day as per the dietary recommendation
of nutrition specialists. But the present level of
production of vegetables in our country can permit a
per capita consumption of only 120 g of vegetables per
day.
Kitchen Garden
Considering the above facts, we should plan to produce
our own vegetable requirements in our backyards using
the available fresh water as well as the kitchen and
bathroom wastewater. This will not only facilitate
prevention of stagnation unused water which will be
hazardous to our health through environmental
pollution, but can be useful for successful production of
our own requirement of vegetables Cultivation in a
small area facilitates the methods of controlling pests
and diseases through the removal of affected parts and
non-use of chemicals. This is a safe practice, which does
not cause toxic residues of pesticides in the vegetables
produced.

Kitchen Garden Site Selection
There will be limited choice for the selection of sites for kitchen gardens. The final choice is usually the backyard of the house. This is convenient as the members of the family can give a constant care to the vegetables during leisure and the wastewater from the bathrooms and kitchen can easily be diverted to the vegetable beds. The size of a kitchen garden depends upon the availability of land and number of persons for whom vegetables are to be provided. There is no restriction in the shape of the kitchen garden but wherever possible rectangular garden is preferred to a square one. With succession cropping and intercropping, five cents of land would be adequate to supply vegetables for an average family of four to five persons.

Land preparation
Firstly a through spade digging is made to a depth of 30-
40 cm. Stones, bushes and perennial weeds are
removed. 100 kg of well decomposed farmyard manure
or vermicompost is applied and mixed with the soil.
Ridges and furrows are formed at a spacing of 45 cm or
60 cm as per the requirement. Flat beds can also be
formed instead of ridges and furrows.

Sowing and planting
Ø Direct sown crops like bhendi, cluster beans and
cowpea can be sown on one side of the ridges at a
spacing of 30 cm. Amaranthus (meant for whole plant
pull out and clipping) can be sown after mixing 1 part of
seeds with 20 parts of fine sand by broadcasting in the
plots. Small onion, mint and coriander can be
planted/sown along the bunds of plots.
Sowing and planting
Seeds of transplanted crops like tomato, brinjal and chilli can be sown in nursery beds or pots one month in advance by drawing lines. After sowing and covering with top soil and then dusting with 250 grams neem cake so as to save the seeds from ants. About 30 days after sowing for tomato and 40-45 days for brinjal and chilli and big onion the seedlings are removed from nursery and transplanted along one side of the ridges at spacing of 30-45 cm for tomato, brinjal and chilli and 10 cm on both the sides of the ridges for big onion. The plants should be irrigated immediately after planting and again on 3rd day. The seedlings can be watered once in two days in the earlier stages and then once in 4 days later.
Sowing and planting
he main objective of a kitchen garden is the maximum
output and a continuous supply of vegetables for the
table throughout the year. By following certain
procedures, this objective can easily be achieved.
Ø The perennial plants should be located on one
side of the garden, usually on the rear end of the
garden so that they may not shade other crops,
compete for nutrition with the other vegetable crops.
Ø The adjacent to the foot path all around the
garden and the central foot path may be utilised for
growing different short duration green vegetables like
Coriander, spinach, fenugreek, Alternanthera, Mint
Economic benefits of gardening
Ø Gardeners feed their families first and then sell, barter or give away surplus garden foods. In certain contexts, however, income generation may become the primary objective of the home garden. In any case, it is counterproductive to impose the nutrition objective to the exclusion of the income generation objective, since in most contexts they are linked and compatible.
Ø The potential economic benefits of home gardening, include the following:
Ø gardening gives dual benefits of food and income generation;
Ø gardens provide fodder for household animals and supplies for other household needs (handicrafts, fuel wood, furniture, baskets, etc.);
Ø marketing of garden produce and animals is often the only source of independent income for women.
Planning a Vegetable Garden
Planning is the first and most basic step in home
vegetable gardening. Planning not only saves
time when you’re ready to plant but also gives
you an idea of the types and quantities of seeds
or plants you’ll need. Most importantly,
planning helps assure that the home garden will
satisfy your needs and desires.
Choosing the Site
Vegetables grow best in an open, level area where the
soil is loose, rich, and well drained. If the quality of the
soil is poor, mix in 2-3 inches of topsoil, peat moss,
strawy manure, compost, or leaves plus fertilizer. The
more organic matter or topsoil you add, the more you’ll
improve your soil. Avoid heavy clays, sandy soils, and
shady spots
Clearance with Trees and Shrubs
Vegetables grow best in an open, level area where the soil is
loose, rich, and well drained. If the quality of the soil is poor,
mix in 2-3 inches of topsoil, peat moss, straw manure,
compost, or leaves plus fertilizer.
Sunlight: Most vegetable garden plants need full sun to thrive
and produce their best. (Full sun means at least 6 hours of
direct sun during the day.) Realistically, you may not have this
ideal spot. So if you’ll be tilling a new garden, what’s most
important? Number one is sunlight. You can improve soil and
build windbreaks, but you can’t move the sun! So choose the
sunniest spot you garden.
Soil
Choose the spot in your yard that has the best
soil. You may be able to distinguish the quality
of your soil by looking at your lawn. If it looks
lush and healthy, then the soil supporting it is
probably good for a garden. Don't pick the spot
where the lawn is the worst, and figure you can get
out of reseeding by locating your garden there. And
avoid low spots that stay wet in the spring.

Protection from wind:
Strong winds dry out plants and soil, and can topple tall
plants like corn and sunflowers. Wind is a little harder
to plan for, but if you have the choice, choose a spot
that is protected from your area’s prevailing winds. If
your worst winds come from the north, then a garden
on the south edge of a row of trees will receive some
protection. Just be sure your windbreak doesn’t shade
your garden! You can set up a snow fence or plant some
low shrubs to help break the wind without sacrificing
sunlight.
Water:
Locate your garden near a water source, or have hoses
that will reach it. (Underground soaker hoses save
water and time, so consider installing them before you
plant.)
Choosing Varieties
How do you choose among all those luscious-sounding
tomato varieties! (Especially if you are looking at photos
on a cold January day!) Though there’s nothing wrong
with choosing a variety because you like how it looks,
you may
want to consider some other characteristics that can
make your job as gardener a little easier.

Disease Resistance
There are cultivars (cultivated varieties) of many
garden plants that have shown resistance to certain
pests. If you
know a pest is common in your region, by all means
choose a resistant variety! If you don’t know what pests
you
might encounter, you might want to plant a few disease-
resistant plants
Short or Long Season
If you like to have the first ripe tomatoes on the block,
or you live in a region with relatively short summers,
choose varieties that mature the fastest. Some tomato
varieties, for example, ripen 60 days after
transplanting, while others need 85 days or more to
maturity.
Growing Habit
Bush beans, as the name implies, grow as small,
freestanding plants, while pole beans need
something to climb.
Some types of squash grow in compact form,
while others need lots of space for their vines to
run
Hybrid or Open-Pollinated
Hybrid plants often are more productive and disease-
resistant than open-pollinated (non-hybrid) varieties.
However, there’s a drawback. If you like to save seed at
the end of the season for planting the following year,
avoid hybrids. Their seed doesn’t come true -- that is,
the resulting offspring plants may not have all the
positive characteristics of the parent plant.
Seeds or Transplants?
Which seeds should you sow directly in the garden, and which do better if you plant them as seedlings (either purchasing transplants or starting the seeds indoors yourself)?
Many garden plants do just fine when you sow the seed directly in the garden. These plants usually mature relatively fast; so direct sowing works well. Plants with taproots, such as carrots, generally don’t transplant well, so it’s best to start them from seed right in the garden too.
Other plants have long growing seasons, or must be planted outdoors in early spring so they mature before the hot weather arrives. These do best when set in the garden as transplants.
Direct sow: Beans, beets, carrots, corn, lettuce, spinach, Swiss chard, peas, radish, potato
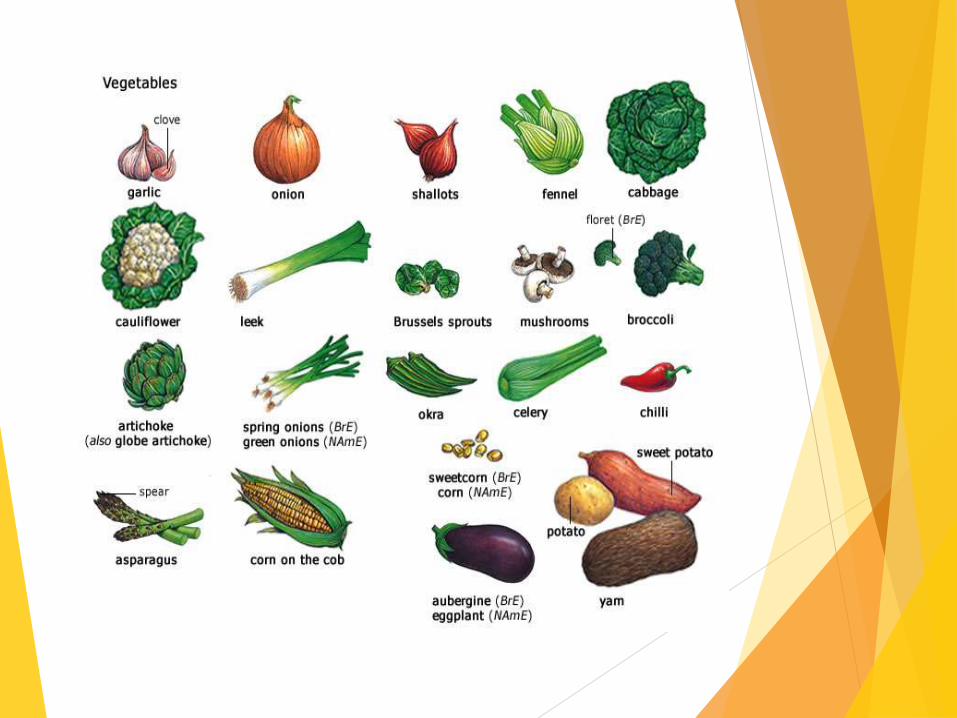
Plant transplants:
Broccoli, cabbage, cauliflower, cabbage, peppers, tomatoes, okra, asparagus, rhubarb You can go either way with these: Cucumbers, squash, muskmelon, watermelon, pumpkins, gourds

Size of Kitchen Garden
If you are new to gardening, you may wish to start with a relatively small
garden, say 10 foot x 20 foot.
Enthusiastic novices often till up a huge garden area, and then abandon it to
the weeds by July. A small, well-tended garden will produce more than more
than a large, neglected one
Single rows or wide-row beds?
If space is at a premium, creating 3- to 4-foot-wide beds will allow you to
grow more plants than if you plant in long single rows because less space
is wasted on paths. Plants in wide rows are spaced closer together, making
it easier to weed, feed, and water them.
Wide-row plantings do not have to be raised-bed plantings, but like raised
beds, the width of the row should be such that you can easily reach the
center of the bed from each side (3 to 4 feet)
Square Foot Gardening
Square-foot gardening is a form of intensive
gardening where you block off squares of space for
crops rather than planting them in rows. The name
comes from partitioning blocks of gardens space
that are 1 ft by 1 ft. Each square holds a different
vegetable, flower, or herb. These small 1-foot
squares are grouped together into blocks
Measuring 4 ft by 4 ft square.

Spacing of Plants -- Intensive
Gardening
Individual plants are more closely spaced in a raised bed or interplanted garden. An equidistant spacing pattern calls for plants to be the same distance from each other within the bed; that is, plant so that the center of one plant is the same distance from the centers of plants on all sides of it. In beds of more than two rows this means that the rows should be staggered so that the plants in every other row are between the plants in the adjacent rows.
The distance recommended for plants within the row on a seed packet is the distance from the center of one plant to the center of the next. This results in a more efficient use of space and leaves less area to weed and mulch. The close spacing tends to create a nearly solid leaf canopy, acting as living mulch, decreasing water loss, and keeping weed problems down. However, plants should not be crowded to the point at which disease problems arise or competition causes stunting.
Gardening Spacing
Plant Inches Plant Inches
Asparagus 15-18 Beans 4-6
Beets 2-4 Broccoli 12-18
Cabbage 15-18 Carrot 2-3
Cauliflower 15-18 Cucumber 12-18
Egg plant 18-24 Lettuce Head 10-12
Lettuce Leaf 4-6 Melons 18-24
Mustard 6-9 Okra 12-18
Onion 2-4 Peas 2-4
Peppers 12-15 Potato 10-12
Pumpkin 24-36 Radish 2-3
Spinach 4-6 Squash 24=36
Tomatoes 18-24 Turnip 4-6
Raised Beds
In raised-bed gardening the planting surface is elevated to predetermined height. A raised bed can be a simple mound of soil or an elaborate wood or stone structure. There are a number of benefits to creating raised beds:
Better drainage. Growing plants in raised beds is a logical choice for gardeners with heavy, poorly drained soils. Raised beds permit plant roots to develop in soil held above waterlogged or compacted zones. This provides a more optimum soil environment for root growth. As beds are built up, compost or other forms of organic matter may be incorporated, further improving soil structure, drainage and nutrient-holding capacity.
Higher yields. Better root growth from improved soils leads to higher yields for food crops and lusher growth of ornamental plantings. Also, intensive planting in raised beds means more plants can be grown in a smaller area than with conventional row-cropping techniques. No space is wasted between rows.
Raised Beds
Expanded growing season. Better drainage speeds soil warming and allow earlier spring planting. In
Wet seasons, soil dries out faster, permitting planting to proceed between rains.
Maintenance. Because plants are growing above the level of walkways, less stooping is required for
weeding, watering and other chores. Intensively planted raised beds provide dense foliage cover,
shading out much weed growth. Pathways are more defined, so you (and your visitors) are less likely to
Trample new plantings.
Using difficult sites. Raised beds make gardening possible on sites where growing plants would
Otherwise be impossible. Rooftop gardens and raised beds on top of solid rock are examples. Terraced
raised beds turn hillsides into productive growing areas while reducing soil erosion potential.
Disadvantages: Raised beds are not the answer for all gardeners lacking space. The initial labor cost to
establish the beds may be high. Once established, especially with permanent sides, it may be difficult to
use a standard size tiller for cultivation. The tendency of the soil in raised beds to dry faster may
Increase the need for irrigation later in the season.
Compost making
Choose a well-drained spot. Find a place for your compost that's convenient to your kitchen or garden and has well-drained soil. Install compost container. Although not required, a wire, wood, or plastic container keeps your compost pile looking neat and prevents animals from scattering food scraps. Choose a 3- to 4-foot-wide container that comes apart easily and allows plenty of air through to its contents.
Add layer of brown materials. Carbon-rich dried grass, peat moss, straw, shredded leaves, and other brown plant materials go into the pile first. Add a 4- to 6-inch layer.
Add layer of green materials. Make a second, 2- to 4-inch thick layer of nitrogen-rich green materials, such as fresh grass clippings, vegetable kitchen scraps, or livestock manure. Add a couple of inches of garden soil, especially if the layer contains food scraps.
Moisten and repeat. Alternate layers of brown and green materials until the pile is 3 to 5 feet high (or until the container is full). Moisten each layer with water before adding the next layer, but don't saturate the pile.
Compost making
Turn the pile. As the materials begin to decompose, the pile heats up, but not evenly.
To ensure that all materials break down, mix the pile and keep it moist. Turn the pile
after the center heats up and then cools down. This can take from one to several
weeks, depending on the time of year and size and composition of the materials in the
pile.
Use a garden fork or shovel to mix the contents, blending the inside and outside
materials. Turn it about once a month from April through November. If you start a
compost pile in fall and use the method discussed above, you should have finished
compost by the middle of the next summer.
The compost is ready to use when it's
dark and crumbly. Although some people sprinkle a handful or two of lawn or garden
fertilizer on top of each layer in the pile, you don't need to do this. The fertilizer does
help feed the pile with nutrients and speeds the composting process, but, if added,
be very careful not to add a weed n' feed, which contains herbicides.
Care of the Vegetable Garden
Care after planting is the third important step in
good vegetable gardening. Proper care is what
makes the difference between “just” vegetables
and those that have that really fresh, home
garden goodness

Weed Control
Weed control is a must. Nothing is more disheartening
than a well-prepared garden overrun by weeds. The
best time to control weeds is when they’re small. If
allowed to grow, weeds compete with the vegetable
plants for water, fertilizer, and sunlight while harboring
insects and diseases. Weed with a sharp hoe, using a
shallow shaving stroke, not a chop. Don’t cultivate too
closely to plants. Prevent stem and root injury by hand
pulling weeds.
Mulching
Mulches control weeds and offer other advantages as well. A 2-4-inch layer of organic matter will control most of the weeds. Mulching encourages growth by conserving moisture, controlling weeds, and moderating soil temperature. Black plastic mulch tends to increase soil temperature and is ideal for warm season crops such as tomatoes, eggplants, peppers, and vine crops. Black films are mainly used to suppress weeds, although they also raise the soil temperature. Early potatoes may be grown under black plastic films without hilling up. White and red films are used mainly to reflect light and warmth onto ripening fruits such as tomatoes and melons.
Some films are made with a lower side black to suppress weeds,
and the upper side white to reflect light. These films raise the soil temperature about 12oF.

Mulch
Plastic mulch is applied before planting the crop. · Dig a trench around the area to be planted, lay down the mulch, and secure its edges firmly into the soil.
Make cross-shaped slits in the plastic at the required spacing, and dig a hole in the soil large enough to take the plant’s root ball.
Remove the plant from its pot, and place it in the hole. Firm the soil around the root ball and water. Stake if necessary.
If drip irrigation is used, install hose before applying the plastic mulch.
Organic mulches tend to keep soil cooler and are ideal for moderating hot summer temperatures. Straw, bark chips, shredded bark, sawdust, and compost are all good mulching materials. Apply these materials in late early June, after you clean up weeds and the soil has warmed. Place the material around the plants and between the rows. Use 4 inches of mulch if coarse material like straw is used, or 2 inches for fine material like grass clippings.
Watering
Vegetable plants need plenty of water throughout the entire growing
season. Apply 1 to 1 ½ inches per week in a single watering, unless
rain does it for you. Light sprinklings may do more harm than good
because roots tend to form near the surface of the ground if water
doesn’t penetrate deeper. Shallowly rooted plants are more
Susceptible to drought damage. Sandy soil requires more frequent
watering than heavy clay. However, always apply water
slowly so it can soak in. Check the amount applied by catching it in
straight-sided tin cans placed throughout the garden, or by digging
down to see if the moisture has penetrated at least 6 inches.
Inexpensive plastic rain gauges are also available
Thinning
Vegetables need room to grow. Proper spacing
between plants in the row as well as between
rows promotes faster growth and a larger, better
quality crop. Vegetables started from plants
should have been spaced properly when
planted; however, those started from seed will
have to be thinned.
Diseases
The most practical way to control certain plant diseases is to use resistant or tolerant cultivars when
available. There are other steps you can take to avoid diseases in your vegetable garden.
Clean up plant refuse in and around the garden in the fall and compost only disease-free refuse
Avoid bringing in diseased plants or using your own “saved seed”
Avoid damping-off of seedlings by using a sterile growing mixture
If you choose to spray potato and tomato plants with a labeled fungicide, do so once each week after
the plants are approximately 12 inches tall to reduce losses from leaf spots and late blight. This
treatment will also control anthracnose fruit spot on tomato. You should also try to pick off and destroy
the leaves as soon as spots occur.
To reduce dependence on pesticides, use the following techniques:
Plant only disease-resistant cultivars
Plant crops in a different location from year to year
Practice good garden sanitation, such as removing plant debris from the garden and keeping the
edges and fence rows free of trash and we
Crop Rotation
Rotation is a system by which vegetable crops are grown on
different areas of the plot in succession in consecutive
years. The principle reason for rotating crops is to prevent a
buildup of soil-borne pests and diseases specific to one
group of crops. If the same type of host crop is grown every
year in the same soil, its pests and diseases increase
rapidly in number and often become a serious problem.
Rotation is a sensible practice and gardeners should try to
build it into their garden plans, taking care at least to
follow a crop of one vegetable type with a vegetable from
another group.
Sign of Harvest and Storage The nutritional content, freshness, and flavor that vegetables possess depend
on the stage of maturity and the time of day at which they are harvested. Over-
mature vegetables will be stringy and coarse. When possible, harvest
vegetables during the cool part of the morning and process them as soon as
possible. If for some reason processing must be delayed, cool the vegetables in ice
water or crushed ice and store them in the refrigerator to preserve flavor and quality Here are some brief guidelines for harvesting vegetable crops:
Asparagus -- Harvest the spears when they are at least 6 to 8 inches tall by snapping
or cutting them at ground level. A few spears may be harvested the second year after
crowns are set out. A full harvest season will last 4 to 6 weeks during the third
growing season.
Beans, Snap -- Start harvesting before seeds develop in the pod. Beans are ready to
pick if they snap easily when bent in half.
Sign of Harvest and Storage Contd
Beans, Lima -- Harvest when the pods first start to bulge with the enlarged seeds.
Pods must still be green, not yellowish.
Broccoli -- Harvest the dark green, compact cluster or head while the buds are shut
tight, before any yellow flowers appear. Small side shoots will develop later, providing
a continuous harvest.
Brussels Sprouts -- Harvest the lower sprouts (small heads) when they are about 1 to
1 /2 inches in diameter by twisting them off. Lower leaves along the stem may be
removed to hasten maturity.
Cabbage -- Harvest when the heads feel hard and solid.
Carrots -- Harvest when the roots are 3 /4 to 1 inch in diameter. The largest roots
generally have the darkest tops.
Sign of Harvest and Storage
Contd
Cauliflower -- Exclude sunlight (blanch) when the curds are 2 to 3
inches in diameter by loosely tying together the outer leaves above
the curd with a string or rubber band. Harvest the curds (heads) when
they are 6 to 8 inches in diameter but still compact, white, and
smooth. The head should be ready 10 to 15 days after tying.
Corn, Sweet -- Silks begin to turn brown and dry out as the ears
mature. Check a few ears for maturity by opening the top of the ear
and pressing a few kernels with a thumbnail. If the liquid exuded is
milky rather than clear, the ear is ready for harvest. Cooking a few ears
is a good way to test for maturity.
Sign of Harvest and Storage
Contd
Cucumbers -- Harvest when the fruits are deep green, before yellow color appears. The length should
be 2 to 3 inches for sweet pickles, 5 to 6 for dills, and 6 to 8 for slicing. Pick 4 to 5 times per week to
Encourage continuous production. Mature cucumbers left on the vine will stop production of the entire
plant.
Eggplant -- Harvest when the fruits are 4 to 5 inches in diameter and their color is a glossy purplish
black. (A white variation is also available.) The fruit is getting too old when the color starts to dull or
become bronzed. Because the stem is woody, cut -- do not pull -- the fruit from the plant. A short stem
should remain on each fruit.
Kale -- Twist off the outer, older leaves when they reach a length of 8 to 10 inches and are medium
green in color. Heavy, dark green leaves are over-mature and are likely to be tough and bitter. New
leaves will grow, providing a continuous harvest.
Kohlrabi -- Harvest when the thickened stems or bulb (the edible part) is 2 to 3 inches in diameter by
Cutting off the plant just below the bulb. Stems become woody if left too long before harvest.
Lettuce -- Harvest the older, outer leaves from leaf lettuce as soon as they are 4 to 6 inch
Sign of Harvest and Storage
Contd
Muskmelons(Cantaloupes) -- Harvest when the stem slips easily from the fruit with a gentle tug. Another
indicator of ripeness is when the netting on skin becomes rounded and the flesh between the netting turns from
a green to a tan color.
Mustard -- Harvest the leaves and leaf stems when they are 6 to 8 inches long; new leaves will provide a
continuous harvest until they become strong in flavor and tough in texture from temperature extremes.
Okra -- Harvest young, tender pods when they are 2 to 3 inches long. Pick at least every other day during the
peak-growing season. Over-mature pods become woody and are too tough to eat.
Onions -- Harvest when the tops fall over and begin to turn yellow. Dig the onions and allow them to dry out in
the open sun for a few days to toughen the skin. Then remove the dried soil by brushing and onions lightly. Cut
the stem, leaving 2 to 3 inches attached, and store in net-type bag in a cool, dry place.
Peas -- Harvest regular peas when the pods are well rounded; edible-podded varieties should be harvested when
pods are well rounded but before seeds are more than one-half of their full size if the pods are to be eaten;
harvest when seeds are fully developed but still fresh and bright green if pods are to be discarded. Pods are
getting too old when they lose their brightness and turn light or yellowish green.
Sign of Harvest and Storage
Contd
Peppers -- Harvest sweet peppers with a sharp knife when the fruits are firm, crisp, and full size. Green peppers
will turn red if left on the plant. Allow hot peppers to attain their bright red color and full flavor while attached
to the vine; then cut them and hang them to dry.
Potatoes -- Harvest the tubers when the plants begin to dry and die down. Store the tubers in a cool, high-humidity
location with good ventilation, such as the basement or crawl space to the house. Avoid exposing the tubers to light.
Greening, which denotes the presence of dangerous alkaloids, will occur even with small amounts of light.
Pumpkins -- Harvest pumpkins and winter squash before frost and after the vines dry up, the fruit color darkens, and
the skin surface resists puncture from your thumbnail. Avoid bruising or scratching the fruit while handling it. Leave a 3-
to 4-inch portion of stem attached to the fruit and store it in a cool, dry location with good ventilation.
Radishes -- Harvest when the roots are 1/2 to 1 1/2 inches in diameter. The shoulders of radish roots often appear
through the soil surface when they are mature. If left in the ground too long, they will become tough and
woody.
Spinach -- Harvest by cutting all the leaves off at the base of the plant when they are 4 to 6 inches long. New
leaves will grow, providing additional harvests.
Squash, Summer -- Harvest when the fruit is soft, tender, and 6 to 8 inches long (3 to 4 inches across for patty
pans). The skin color often changes to a dark, glossy green or yellow, depending on variety. Pick every two or
three days to encourage production.
Sign of Harvest and Storage
Contd
Tomatoes -- Harvest the fruits at the most appealing ripeness stage
-- up to dead red ripe. (There are some yellow varieties of tomatoes.)
Flavor is best at room temperature, but ripe fruit may be held at 45
O to 50oF for 7 to 10 days.
Turnips -- Harvest the roots when they are 2 to 3 inches in diameter
but before heavy frosts occur in the fall. The tops may be used as
greens when the leaves are 3 to 5 inches long.
Watermelons -- Ripe watermelons produce a dull thud rather than a
sharp, metallic sound when thumped. Other ripeness indicators are a
deep yellow rather than white color when the melon touches the
ground, brown tendrils on the stem near the fruit, and a rough, slightly
rigid feel to the skin surface
History of Kitchen Gardening
If I had an outdoor space, I’d have my hands in the dirt right about now. Instead, I’ve been distracting myself by flipping through books about other people’s gardens and I’ve become entranced with the history of the kitchen garden. The kitchen garden is a bit different from the humble vegetable garden – which is planted in the spring and harvested in the fall (with surplus canned or dried). The kitchen garden is designed to be useful and visually appealing year-round, and often incorporates flowers (edible as well as non-edible) amongst the vegetables. The visual appeal of the kitchen garden is extremely important. The kitchen garden is not solely concerned with food but also with beauty. In French it’s called a potager (love that word!) - what’s grown in the garden is served at the table.
History of Kitchen Gardening
A traditional kitchen garden has four quadrants with a
central water source. This design evolved from a
combination of sources - the gardens of Egypt, Persia,
Mesopotamia and Babylon. In the Middle Ages,
monasteries developed elaborate kitchen gardens.
Because they were secluded from the outside world, the
monks were responsible for growing the food necessary
for their survival. Not only did the monks have
elaborate kitchen gardens (and were great seed savers),
but they also would have had a cloister garden, a
medicinal garden and an orchard.
History of Kitchen Gardening
At the end of the 17th century, Louis XIV had a great kitchen garden planted at Versailles. This was someone with rather high expectations so it’s no surprise that the garden utilized the best technology of the time and provided the king with asparagus in December, strawberries in March and cucumber and peas in April – whatever the King wanted and whenever he wanted it. Like the frenchmedieval garden above, Le Potager du Roi, was (and is) organized into sixteen squares rather than rows and are all oriented around a large pond. All around this Grand Square, behind high walls, were twenty-nine walled gardens containing fruit trees, vegetables and berries. Now these gardens - 22 acres – are managed by the students École nationale supérieure du paysage. (Can you imagine going to school at Versailles?!)
WHERE SHOULD I PLANT MY GARDEN?
Your garden should be close to home or work and easily accessible. You’ll soon grow
tired of commuting to a distant location.
If you have no usable soil, you can build open-bottom containers on top of almost
anything—even driveways, patios, and roofs.
Choose a location that receives full sunlight all day long (or at least from mid-morning
through the afternoon).
Avoid trees, buildings, tall fences, hedges, and bushes that would block out the sun.
Shade retards plant growth.
For better results and less work, choose a level area. A slight southern slope (toward
the sun) is ideal.
Avoid north slopes (away from the sun). They have more shadows, less direct sunlight,
and are sometimes too cold.
If your ground is on a hillside, plant on the contour. Always level the ground under the
containers.
Locate your garden near a readily available source of good water.
Do not use low spots where drainage is poor. Plants must have oxygen and will
suffocate in standing water.
Avoid windy areas, or build windbreaks. Tender plant leaves are easily damaged by
strong winds.
Fence the area to protect against animal and human intruders. If small animals are a
problem, use wire mesh at ground level.
HOW BIG SHOULD MY GARDEN BE?
Available sunny space often dictates the size of your garden. A small, well-tended, sunlit
garden will yield more than a larger garden in poor conditions.
Container dimensions:
o For two rows of plants, containers are ideally 10’ long, 18” wide, and 8” high.
Placing two rows of plants close together reduces watering and fertilizing
by 50%.
o Include a 3’ to 3 ½’ aisle between containers, and at least one end aisle of 5’.
Wide aisles give ready access to plants for feeding, watering, inspection,
and harvesting.
Start small and provide regular care, and your success will give you the training and
incentive to increase your garden size.

VegetablesSpecific problems ( Diseases )
Vegetable Specific Problem
Amaranthus Damping off, Choanephora blight
Artichoke Artichoke Curly Dwarf, Bacterial Crown Rot,Damping off,Powdery mildew,verticillum wilt
Asparagus Fusarium rot, root rot, crown rot
Beans Bacterial Brown Spot, Bacterial Wilt, Bacterial Blight ,Fusarium, Root Knot Nematodes, Bean common Mosaic Virus
Beet root Cercospora Leaf Spot, Damping off, Bacterial bligt , Downy Mildew, Powdery mildew, Black Root Rot,Root Knot Nematodes,
Sugarbeet cyst nematodes
Bitter Gourd Powdery mildew, Fusarium wilt,Downey mildew, Bitter Gourd Mosaic,
Bottle Gourd Angular Leaf Spot, Bacterial Leaf Spot, Alternaria Leaf Blight, Anthracnose, Downy Mildew , Crown Rot, Powdery Mildew, Scab
Broccoli Alternaria Leaf Spot, Powdery mildew, Downy Mildew , Phoma Leaf Spot and stem Canker.
Brussels sprout Bacterila Leaf Spot,Bacterial soft rot, Damping off, Downey mildew, Phytophthera root rot , Powdery mildew, Ringspot,
Verticillium wilt
Bursunday
Cabbage Sclerotinia head rot, Bacterial Soft Rot, Black rot, Black leg, Club root, Fusarium yellow, Alternaria Leaf Spot, Downey mildew
Carrot Aster yellow disease , Carrot rust, Leaf beetle, Nematodes, Bacterial Soft Rot, Sclerotinia stem rot, Black rot,
Cauliflower Cauliflower mosaic, Powdery mildew, White rust,
Chinese
Cabbage
Sclerotinia head rot, Bacterial Soft Rot, Black rot, Black leg, Club root, Fusarium yellow, Alternaria Leaf Spot, Downey mildew
Coriander Damping off , Rhizoctonia , Aster Yellow,
Cucumber Angular Leaf Spot, Bacterial wilt, Anthracnose, Damping off, Fruit Rot , Downey mildew, Fusarium Wilt ,Target leaf spot,
Mosaic,
Chillies Anthraconose, Bacterial Leaf spot, Bacterial Soft Rot, Bacterial wilt, Cercospora Leaf Spot, Damping off, Grey mold,
Phytophthera blight, Powdery mildew, verticilium wilt, White mold , Pepper mottle virus, Tobacco etch virus, Tobacco mosaic
virus
Eggplant Damping off , Mosaic , Root rot , TMV, Tomato Spotted Wilt, Verticilium Wilt
VegetablesSpecific problems ( Diseases )
Vegetable Specific Problem
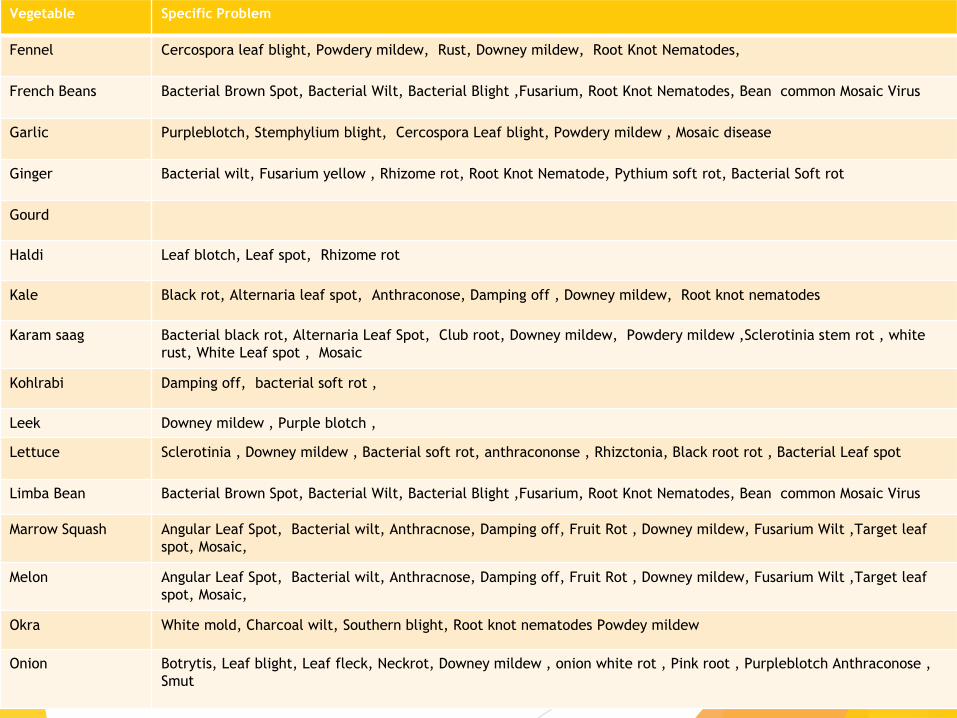
Fennel Cercospora leaf blight, Powdery mildew, Rust, Downey mildew, Root Knot Nematodes,
French Beans Bacterial Brown Spot, Bacterial Wilt, Bacterial Blight ,Fusarium, Root Knot Nematodes, Bean common Mosaic Virus
Garlic Purpleblotch, Stemphylium blight, Cercospora Leaf blight, Powdery mildew , Mosaic disease
Ginger Bacterial wilt, Fusarium yellow , Rhizome rot, Root Knot Nematode, Pythium soft rot, Bacterial Soft rot
Gourd
Haldi Leaf blotch, Leaf spot, Rhizome rot
Kale Black rot, Alternaria leaf spot, Anthraconose, Damping off , Downey mildew, Root knot nematodes
Karam saag Bacterial black rot, Alternaria Leaf Spot, Club root, Downey mildew, Powdery mildew ,Sclerotinia stem rot , white
rust, White Leaf spot , Mosaic
Kohlrabi Damping off, bacterial soft rot ,
Leek Downey mildew , Purple blotch ,
Lettuce Sclerotinia , Downey mildew , Bacterial soft rot, anthracononse , Rhizctonia, Black root rot , Bacterial Leaf spot
Limba Bean Bacterial Brown Spot, Bacterial Wilt, Bacterial Blight ,Fusarium, Root Knot Nematodes, Bean common Mosaic Virus
Marrow Squash Angular Leaf Spot, Bacterial wilt, Anthracnose, Damping off, Fruit Rot , Downey mildew, Fusarium Wilt ,Target leaf
spot, Mosaic,
Melon Angular Leaf Spot, Bacterial wilt, Anthracnose, Damping off, Fruit Rot , Downey mildew, Fusarium Wilt ,Target leaf
spot, Mosaic,
Okra White mold, Charcoal wilt, Southern blight, Root knot nematodes Powdey mildew
Onion Botrytis, Leaf blight, Leaf fleck, Neckrot, Downey mildew , onion white rot , Pink root , Purpleblotch Anthraconose ,
Smut
VegetablesSpecific problems ( Diseases )
Vegetable Specific Problem
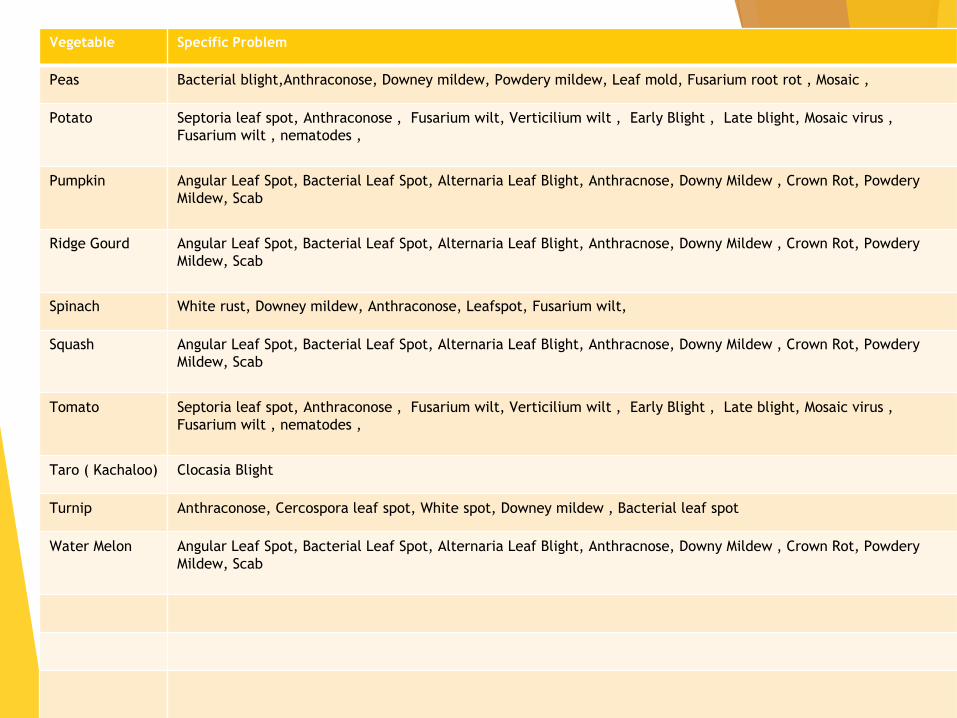
Peas Bacterial blight,Anthraconose, Downey mildew, Powdery mildew, Leaf mold, Fusarium root rot , Mosaic ,
Potato Septoria leaf spot, Anthraconose , Fusarium wilt, Verticilium wilt , Early Blight , Late blight, Mosaic virus ,
Fusarium wilt , nematodes ,
Pumpkin Angular Leaf Spot, Bacterial Leaf Spot, Alternaria Leaf Blight, Anthracnose, Downy Mildew , Crown Rot, Powdery
Mildew, Scab
Ridge Gourd Angular Leaf Spot, Bacterial Leaf Spot, Alternaria Leaf Blight, Anthracnose, Downy Mildew , Crown Rot, Powdery
Mildew, Scab
Spinach White rust, Downey mildew, Anthraconose, Leafspot, Fusarium wilt,
Squash Angular Leaf Spot, Bacterial Leaf Spot, Alternaria Leaf Blight, Anthracnose, Downy Mildew , Crown Rot, Powdery
Mildew, Scab
Tomato Septoria leaf spot, Anthraconose , Fusarium wilt, Verticilium wilt , Early Blight , Late blight, Mosaic virus ,
Fusarium wilt , nematodes ,
Taro ( Kachaloo) Clocasia Blight
Turnip Anthraconose, Cercospora leaf spot, White spot, Downey mildew , Bacterial leaf spot
Water Melon Angular Leaf Spot, Bacterial Leaf Spot, Alternaria Leaf Blight, Anthracnose, Downy Mildew , Crown Rot, Powdery
Mildew, Scab
HOW SHOULD I ARRANGE MY
PLANTING AREA?
First create a blueprint of your garden area on scaled grid paper, showing the number,
location, and size of your containers.
Orient your containers for maximum advantage of sunlight,
watering, and access.
As you place plants on your blueprint, put tallest varieties on
the north and east sides. Never shade short plants with taller
ones.
If necessary, place leafy crops, such as lettuce and spinach, in locations with less
optimal sunshine.

VegetablesSpecific problems ( Diseases )
Vegetable Specific Problem
Amaranthus Leaf miner, Leaf Aphids, Fleabeetle, Mites
Artichoke Artichoke Aphids, Armyworm,Loopers, Mollusks,
Asparagus Army worm , Asparagus beetle, Asparagus miner, Cutworm , Aphid , Thrips
Beans Bean Leaf beetle , Leaf miner , Bean Aphids , Potato Aphids ,Potato Leaf Hopper,Thrips, Corn Earworm,Melon Aphids,
Beet root Beet Webworm,Vegetable Weevil,Aphids and Jassids
Bitter Gourd Red Pumpkin Beetle, Fruit Fly
Bottle Gourd Cucumber beetle, Squash vine borer
Broccoli Aphids, Cabbage looper, , Cabbage webworm, Diamond Back Moth Caterpillars, Cabbage Maggot, White Flies
Brussels sprout Beet armyworm, Cabbage Aphids, Cabbage maggot, Cutworm , Diamond back moth, Earwigs,Flea beetle , Leafminer, Loopers, Nematodes,
Snails, White flies , wireworm
Bursunday
Cabbage Cabbage looper, Cabbage Aphids, Cabbge maggot , Diamond back moth, Cabbage Head worm , Beet army worm , Stripped Fleabeetle,
Carrot Carrot rustfly, Carrot weevil, Aster Leaf Hopper ,
Cauliflower Cucumber Beetle, Cabbageworm, Diamond Back Moth , Thrips, Cabbage Aphids , Fleabeetle, Beet armyworm, Cutworm , Root knot
nematodes
Chinese Cabbag Cabbage looper, Cabbage Aphids, Cabbge maggot , Diamond back moth, Cabbage Head worm , Beet army worm , Stripped Fleabeetle,
Coriander Grass hoppers, Leaf hoppers,
Cucumber Cucumber beetle, Cabbage Looper, Fleabeetle, Aphids, Cutworm , Thrips,
Chillies Slug and snail, Aphids , Fleabeetle, Pepper maggot, Spider mite, Thrips, Whitefly
Eggplant Aphids, Army worm , cabbage Loopers, Fleabeetle, Hornworm, Silverleafwhitefly, Thrips , Spider mite.
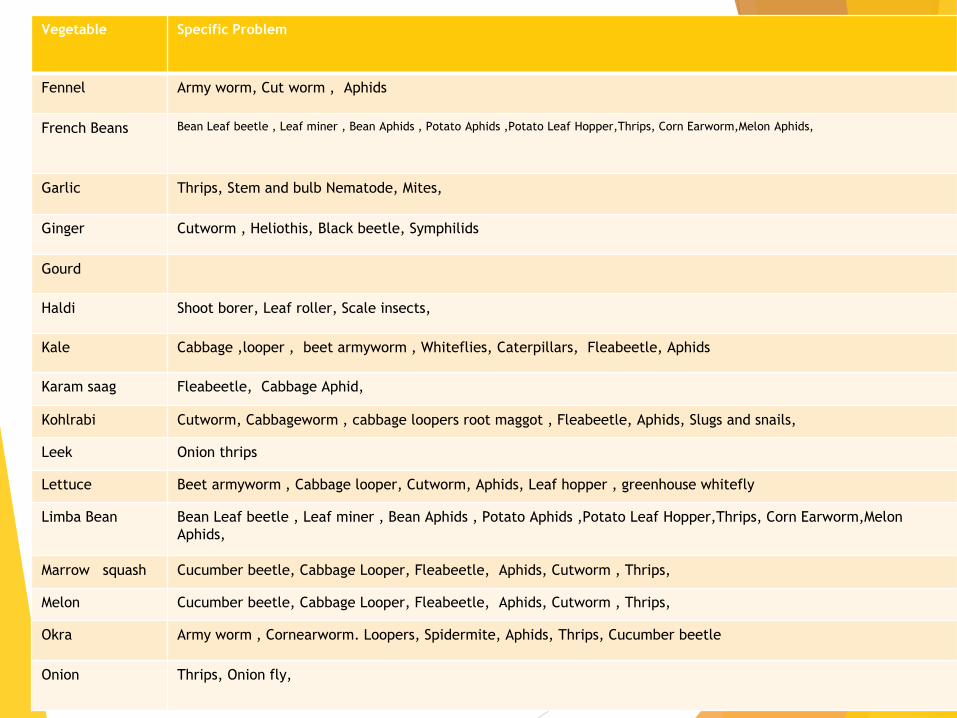
VegetablesSpecific problems ( Diseases )
Vegetable Specific Problem
Fennel Army worm, Cut worm , Aphids
French Beans Bean Leaf beetle , Leaf miner , Bean Aphids , Potato Aphids ,Potato Leaf Hopper,Thrips, Corn Earworm,Melon Aphids,
Garlic Thrips, Stem and bulb Nematode, Mites,
Ginger Cutworm , Heliothis, Black beetle, Symphilids
Gourd
Haldi Shoot borer, Leaf roller, Scale insects,
Kale Cabbage ,looper , beet armyworm , Whiteflies, Caterpillars, Fleabeetle, Aphids
Karam saag Fleabeetle, Cabbage Aphid,
Kohlrabi Cutworm, Cabbageworm , cabbage loopers root maggot , Fleabeetle, Aphids, Slugs and snails,
Leek Onion thrips
Lettuce Beet armyworm , Cabbage looper, Cutworm, Aphids, Leaf hopper , greenhouse whitefly
Limba Bean Bean Leaf beetle , Leaf miner , Bean Aphids , Potato Aphids ,Potato Leaf Hopper,Thrips, Corn Earworm,Melon
Aphids,
Marrow squash Cucumber beetle, Cabbage Looper, Fleabeetle, Aphids, Cutworm , Thrips,
Melon Cucumber beetle, Cabbage Looper, Fleabeetle, Aphids, Cutworm , Thrips,
Okra Army worm , Cornearworm. Loopers, Spidermite, Aphids, Thrips, Cucumber beetle
Onion Thrips, Onion fly,

VegetablesSpecific problems ( Diseases )
Vegetable Specific Problem
Peas Pea weevil, Native budworm , Aphids, Thrips, Lesser corn stalkborer , Spider mite ,
Potato Cutworm , Fleabeetle, Aphids , Leaf miner , Stalkborer , white flies , Spider mites, slugs
Pumpkin Red Pumpkin Beetle, Fruit Fly
Ridge Gourd Red Pumpkin Beetle, Fruit Fly
Spinach Caterpillars, Wireworm, Crown mites, Aphids, Leafminer,
Squash Red Pumpkin Beetle, Fruit Fly
Tomato Cutworm , Fleabeetle, Aphids , Leaf miner , Stalkborer , white flies , Spider mites, slugs
Taro (
Kachaloo)
Clocasia Blight
Turnip Cabbage maggot, Wireworm , Aphids, Cabbage looper, Diamondbackmoth
Water Melon Red Pumpkin Beetle, Fruit Fly

WHAT SHOULD I PLANT?
Choose varieties that do well in your climate. If you live in a cooler northern climate, do
not try to grow long-season crops like peanuts or sweet potatoes.
Plan for only those vegetables that your family will eat, and only in quantities you can
use, preserve, give away, or sell quickly, while fresh.
Single-crop varieties like lettuce, broccoli, and cauliflower mature all at once, and so
must be used quickly. Don’t grow too much of these!
Ever-bearing crops like pole beans, cucumbers, eggplant, peppers, squash, and
tomatoes mature a little at a time, feed you all season long, and have a high value for the
amount of space used, especially if grown vertically.
Single-crop varieties that are grown for storage may be important for your winter
emergency preparedness. Consider fall potatoes, cabbage, onions, winter squash, and
carrots. Cool storage (40–50 degrees Fahrenheit) will preserve these vegetables.
You can grow two crops of many single-crop varieties if you learn to grow and
transplant healthy seedlings.

WHAT TOOLS DO I NEED?
A long-handled irrigation (or round-headed) shovel is important for initial soil
preparation and to remove perennial weeds and their rhizomes.
A strong 12”- or 14”-wide garden rake is good for removing weeds and leveling the soil,
as well as for mixing and leveling the custom-made soil in the containers.
A two-way hoe, sometimes called a scuffle or hula
hoe, is best for early weeding of small weed
seedlings in the aisles. It cuts them off just below
the soil surface with very little movement of the
soil. Container gardens rarely require weeding.
If you’re watering by hand, a garden hose with a gentle watering wand will let you
water quickly without washing out the custom-made soil from your containers.
Plant-spacing markers save time and give your garden a professional look while
providing equal light, water, and nutrition to each plant. Two rows of ½” dowels,
spaced 6” and 7” apart, will help you plant most varieties properly.
A wheelbarrow or large cart is useful for larger gardens.

HOW SHOULD I PLAN MY TIME?
Schedule the time to create and grow your garden. Like a cow that has to be milked
twice daily, your garden needs daily care and attention to produce a high yield of
healthy crops.
Make a garden calendar and list the projects that need attention. That way you will not
forget important things like planting dates.
Plan on these time estimates for a garden of ten container beds that are each 10’-long:
o Six to eight hours to clear the area, construct containers, and make aisles.
o Four to six hours to prepare the custom soil, apply fertilizers, plant seeds, and
transplant seedlings.
o Twenty minutes per day, preferably in the early morning, to water, feed, prune,
and otherwise care for your plants.
o Two to ten minutes per day to harvest, depending on what and how much you
are harvesting.
HOW DO I PREPARE MY GARDEN?
Clear your garden area of everything—whether living or dead—including trees, shrubs,
bushes, flowers, grass, and trash.
Eliminate weeds, both annual and perennial.
o Annual weeds can be plowed under or removed with a shovel, rake, or hoe.
o Perennial weeds continue growing year after year. These must be removed—
roots, rhizomes (underground stems), and runners. Otherwise they will be a
constant problem.
Measure and stake the corners of your garden as planned. Make sure your dimensions
fit the number of containers you want to have.
Before seed develops
WHY FERTILIZERS?
Fertilizers are essential-mineral raw materials from which plants make food.
Custom-made soil has little natural nutrition, so adding small amounts of balanced
nutrition guarantees plants receive what they need.
Plants, like people and animals, need balanced nutrition. Plant nutrition consists of 16
nutrients, 3 of which come from the air.
The 13 mineral nutrients man can supply are abundant throughout the earth, and are
mined for use as fertilizers.
Mineral fertilizers are classified as major, secondary, or micro nutrients, depending on
how much of each the plants use:
o Major Nutrients
Nitrogen (N)—gives green color, rapid growth, high protein, and yield.
Phosphorus (P)—affects early vigor, healthy roots, and quality.
Potassium (K)—produces healthy plants, and high-quality seeds and fruit.
o Secondary Nutrients
Calcium (Ca)—promotes early root growth, high vigor, and seed
formation.
Magnesium (Mg)—associated with chlorophyll, oil, and fat formation.
Sulfur (S)—aids in root growth, green color, and seed production.
o Micro Nutrients or Trace Elements
Zinc (Z)—aids chlorophyll formation.
Boron (B)—increases yield in root crops, affects seed germination and
terminal bud formation.
Manganese (Mn)—aids seed germination and vigor.
Iron (Fe)—associated with chlorophyll formation.
WHEN SHOULD WEED
CONTROL BEGIN
?
Properly prepared containers require very little weeding.
Using clean, weed-free materials for your growing medium is essential. Do not use soil,
dirty sand, compost, or manure.
There are two main types of weeds:
1. Perennials, which grow for many years from rhizomes (underground stems)
and runners (above-ground stems).
2. Annuals, which grow from new seeds every year.
There are two main times to control weeds:
1. While preparing your garden soil before planting: remove all weeds,
including perennial rhizomes and runners.
2. Immediately after weeds sprout, usually 7–10 days after planting your
vegetable crop: weed thoroughly now!
HOW CAN I PREVENT WEEDS?
Using a non-soil growing medium is one of the best ways to prevent weeds in your
garden.
Other ways of preventing weeds from getting into your containers include:
o Irrigating with well water, the culinary water supply, or filtered water.
o Maintaining a wide weed-free perimeter around your garden. Weed seeds often
travel through the air.
o Staying out of the containers. Shoes can carry weeds and diseases.
o Removing all weeds from the aisles when they are small and before they
produce seeds.
HOW CAN I PROTECT THE
HARVEST?
Keep crops off the ground to prevent spoilage and pest
problems.
Allow crops to ripen on the vine, but pick immediately
when mature.
Harvest in the early morning, while it is cool.
Handle produce gently to prevent bruising.
Remove dirt and outer leaves if necessary, and clean
thoroughly.
Package, remove from the garden, and cool promptly.
Use while fresh for maximum flavor and quality.
Making compost is very easy
.
1. Dig a hole 1 meter wide by 1 meter deep
2. Put kitchen waste such as left over food, vegetables, egg shells, etc into the hole regularly.
4. Leaves and other organic matter can also be used but avoid putting bones and meat in the
compost to keep animals away
5. Water daily with wash water
6. Turn the compost regularly to keep allow air in
7. Once the material begins to look like soil it is ready for use in the garden

Manuring
Manure is an excellent source of nutrients for soil. Manure from livestock and chickens, much
like compost, is primarily concentrated, decayed plant matter. Nutrients from manure are
easily dissolved and absorbed by the soil for transfer to plants.
Manure should be completely dry and flaky before use. Dry manure will soak up water and
help the soil retain moisture, while wet manure will attract flies and insects that may damage
vegetables. Wet or moist manure also has a very high concentration of nutrients and may be
too strong for most crops. To apply manure, dig it into the top layer of soil.
Manure Tea
Manure can also be mixed with water to form a liquid known as manure tea. As the manure
dissolves in water, the water becomes rich in nutrients and microorganisms. This mixture
contains a high concentration of nutrients and can be used to irrigate gardens or fields. Using
manure tea instead of applying manure directly can help to control weeds, as seeds and other
plant material are filtered off in the tea brewing process.
To make manure tea:
1. Fill a large burlap, cloth, or aerated plastic sack (a maize meal bag) with manure from
cattle, goats, or sheep.
2. Tie the sack to the centre of a large stick or pole.
3. Fill a large bucket or other container (50-gallon or 200-liter drums are ideal) with water.
4. Suspend the sack of manure in the water by placing the stick or pole across the top of the
container.
The manure will filter through the sack into the water like a tea bag. When the water becomes
deep brown in color, the manure tea is ready for use in the garden.
Manure tea has a high concentration of nutrients and is very strong. Like fertilizer, overuse
can contribute to soil acidity and burn plants. Dilute manure tea with water (1:1 ratio) before
applying
Crop Rotation
Regular rotation of crops combined with cycles of leaving land fallow also help to rejuvenate
the soil. As mentioned in previous sections, different crops use nutrients in different ways. For
example, crops like beans and peas put nitrogen back into the soil, while maize is a heavy feeder of
nitrogen. Rotating the type of crops planted seasonally will help to balance the nutrients in the soil.
Allowing fields or plots to lie fallow helps the soils to “rest.” Over time, new deposits of soil and
growth of natural vegetation renew nutrients in the soil. During fallow cycles, farmers may plant
cover crops or fodder to protect the topsoil from erosion. Plowing this vegetation under later
will increase the amount of organic matter in the soil, promoting the formation of hummus and
attracting earthworms and microorganisms