ProviderConnect User Guide
Name Here

ProviderConnect User Guide
IT Operations - Reston, VA
This document is confidential and proprietary to Beacon Health Options IT Operations.

ProviderConnect User Guide
i IT Operations - Reston, VA
Revision History
Click on the link for the revision in which you are interested. Although every effort is made to keep
the links current, users should consult the Table of Contents if a particular link does not work.
Last Revised Date Revised By Revisions
04/14 L. Finta FHC & Affiliates reference corrected; Empire
Service Center changed to Empire Client (Corporate
Renaming Project)
05/14 L. Finta Tax ID reference removed from Update
Demographic Information chapter
07/14 L. Finta Updates from 6/27/14 release
09/14 L. Finta Updates from 9/26/14 release; new Secure
Provider/Member Communications chapter added
12/14 L. Finta Updates from 12/12/14 release; new Enter an ABA
Authorization Request chapter added
04/15 L. Finta Updates from 3/27/15 release; includes a new
IP/HLOC/Specialty Level of Service – ITR2 Form
section in Chapter 10
07/15 L. Finta Updates from 6/26/15 release; new NDC fields added
to the Enter a Claim section of Chapter 8
10/15 L. Finta Updates from 9/25/15 release; new Add a New
Federal Tax ID section added to Chapter 23
01/16 L. Finta Updates from 12/18/15 release; VO-branded screen
captures replaced as needed
04/16 L. Finta Updates from 4/1/16 release; includes a new ABA
Tracking Measures chapter
06/16 L. Finta Updates from 6/24/16 release; includes a new Enter
a Notification chapter
09/16 L. Finta Updates from 9/23/16 release; new Prior Auth #, Assn.
Qualifier, & Assn. # fields added to the Enter a Claim
section of Chapter 8
01/17 L. Finta Updates from 12/16/16 release; new Warn and
Restrict Access to ProviderConnect When
Attestation Is Due chapter added; new Invalidate a
Service Location section added to Chapter 23
Beacon Health Options IT Operations maintains the original electronic version of this document.
Copies or changes made by another party are the responsibility of that party.

ProviderConnect User Guide
ii IT Operations - Reston, VA
Table of Contents
Revision History ................................................................................................... i 1 Introduction ................................................................................................ 1
ProviderConnect Overview ....................................................................................... 1 Course and User Guide Overview ............................................................................. 1 Contact Information .................................................................................................. 2 Before You Begin ...................................................................................................... 2
2 Accessing ProviderConnect...................................................................... 3 Log On to ProviderConnect ...................................................................................... 3 New User Registration .............................................................................................. 4
Password Change Rules ................................................................................... 6
Account Request Form ......................................................................................... 7 Claim Operation Center ................................................................................... 7
Attestation Page ............................................................................................... 8 Electronically Sign the Attestation ............................................................. 8
Manually Sign and Fax the Attestation ....................................................... 8 Welcome to the Claims e-Signature Process ................................................... 8
Access Information without Logging On .................................................................. 9
3 Warn and Restrict Access to ProviderConnect When Attestation Is Due ............................................................................................................ 10 Display Warning Message ...................................................................................... 10
Update Provider Demographics / Continue With ProviderConnect ................... 11 Restrict User Access ................................................................................................ 11
4 ProviderConnect Navigation ................................................................... 12 Main Menu .............................................................................................................. 13
Navigation Bar ........................................................................................................ 14 Clinical Support Tools ............................................................................................ 15
News & Alerts ......................................................................................................... 15 Your Message Center .............................................................................................. 15
5 Secure Provider/Member Communications ........................................... 16 Enable/Disable Communication with All Members ............................................... 16 Enable/Disable Communication with Individual Members .................................... 16
Send Messages to Members .................................................................................... 17 Receive Messages from Members ........................................................................... 17 Reply to Messages from Members .......................................................................... 17
View Messages Exchanged with Members ............................................................. 18 Print Messages Exchanged with Members .............................................................. 18 Receive New Messages Notifications ..................................................................... 18 Send New Messages Notifications .......................................................................... 18
6 EDI Homepage .......................................................................................... 19 Submit a Batch File ................................................................................................. 19 Complete Four Pages .............................................................................................. 20 Search Files ............................................................................................................. 22 View Previous Claims File Batch Submissions ...................................................... 25 View Incoming Files ............................................................................................... 26

ProviderConnect User Guide
iii IT Operations - Reston, VA
7 Member Information ................................................................................. 28 Member Search ....................................................................................................... 28 Demographics Tab .................................................................................................. 29 Enrollment History Tab ........................................................................................... 30 COB Tab ................................................................................................................. 31
Benefits Tab ............................................................................................................ 31 Additional Information Tab .................................................................................... 31
8 View Member Authorizations & Claims Information ............................. 32 View Member Authorizations ................................................................................. 33 View an Authorization Letter .................................................................................. 33 View Member Claims ............................................................................................. 34
View Empire Claims ............................................................................................... 35
View GHI-BMP Claims .......................................................................................... 35
Enter Member Reminders ....................................................................................... 36 ABA Assessment ..................................................................................................... 36
Attach a Document ............................................................................................. 37 View Member Registrations .................................................................................... 38
Enter an Authorization Request .............................................................................. 38 Enter a Claim ........................................................................................................... 39
Send an Inquiry ....................................................................................................... 42
9 Authorization Listing ............................................................................... 43
10 Enter an Authorization Request (RFS) ................................................... 45 Search a Member ..................................................................................................... 46 Review Demographics ............................................................................................ 46
Capture Provider ..................................................................................................... 46 Enter Requested Services ........................................................................................ 47
Outpatient Level of Service ..................................................................................... 47 Outpatient ORF1 ................................................................................................ 47
Type of Services ............................................................................................ 48
Current Risks ................................................................................................. 49 Requested Services ........................................................................................ 50
Outpatient ORF2 ................................................................................................ 50 Type of Services ............................................................................................ 50 Current Risks ................................................................................................. 51
Diagnosis ....................................................................................................... 52 Behavioral Diagnoses ............................................................................... 52 Primary Medical Diagnoses ...................................................................... 52
Social Elements Impacting Diagnosis ...................................................... 53
Functional Assessment.............................................................................. 53 Treatment History .......................................................................................... 55 Treatment Plan ............................................................................................... 55 Psychotropic Medications .............................................................................. 56 Requested Services ........................................................................................ 57
Inpatient/HLOC/Specialty Level of Service – ITR Form ....................................... 57 Level of Care ................................................................................................. 58
Current Risks ................................................................................................. 59

ProviderConnect User Guide
iv IT Operations - Reston, VA
Current Impairments ...................................................................................... 60 Diagnosis ....................................................................................................... 60
Behavioral Diagnoses ............................................................................... 60 Primary Medical Diagnoses ...................................................................... 61 Social Elements Impacting Diagnosis ...................................................... 61
Functional Assessment.............................................................................. 62 Treatment History .......................................................................................... 62 Psychotropic Medications .............................................................................. 64 Substance Abuse ............................................................................................ 65 Treatment Plan ............................................................................................... 66 Treatment Request ......................................................................................... 67
Inpatient/HLOC/Specialty Level of Service – ITR2 Form ..................................... 69
Level of Care/Diagnosis ................................................................................ 70
Information Requested by Clinician for Inclusion in this Request ........... 70 Level of Care............................................................................................. 70 Diagnosis................................................................................................... 71 Medical Implications ................................................................................ 71
Metabolic Assessment Tool ...................................................................... 71 Clinical Presentation/Medication/Treatment ................................................. 72
Information Requested by Clinician for Inclusion in this Request ........... 72 Symptomatology ....................................................................................... 72 Primary Issues/Symptoms Addressed in Treatment ................................. 73
Recovery and Resiliency........................................................................... 73 Medications ............................................................................................... 74
Add a Medication ................................................................................. 74 Best Practices Endorsement ...................................................................... 74
Additional Information on Selected Conditions ....................................... 75 Discharge Information .............................................................................. 75
Additional Information .................................................................................. 76
Medication Management Level of Service ............................................................. 77 Decrease Approved Visits ....................................................................................... 78
11 Enter an ABA Authorization Request ..................................................... 79 ABA Services .......................................................................................................... 79
Attach a Document ............................................................................................. 80
Concurrent ABA Services .................................................................................. 81
12 ABA Tracking Measures .......................................................................... 82 Enter ABA Maladaptive Behavior .......................................................................... 83
Read-only Information ....................................................................................... 83
Data Entry Fields ................................................................................................ 84 Submit ABA Maladaptive Behavior Data .......................................................... 84
Enter ABA Skills ..................................................................................................... 85 Read-only Information ....................................................................................... 85 Data Entry Fields ................................................................................................ 86
Submit ABA Skills Data .................................................................................... 87 View ABA Clinical Data ......................................................................................... 88
Weekly ABA Measures Confirmation .................................................................... 88

ProviderConnect User Guide
v IT Operations - Reston, VA
13 Review an Authorization – EAP CAF ...................................................... 89 14 Save Request as a Draft .......................................................................... 95
Authorized User ...................................................................................................... 96 View Clinical Drafts ................................................................................................ 97
15 Enter a Notification .................................................................................. 98 Contact Information ................................................................................................ 98 Diagnosis Information ............................................................................................. 98 Additional Information ............................................................................................ 99
16 Recent Provider Summary Vouchers ................................................... 100 17 Claim Listing and Submission .............................................................. 101
18 Viewing OnTrack Outcomes .................................................................. 103 19 My Online Profile .................................................................................... 104
20 My Practice Information ......................................................................... 105 21 Provider Data Sheet ............................................................................... 107
Electronically Sign the Attestation ........................................................................ 119
22 Facility Data Sheet ................................................................................. 121
23 Update Demographic Information ......................................................... 132 Provider Demographics ......................................................................................... 134 Service Location Information ................................................................................ 135
Edit a Service Location .................................................................................... 135 Invalidate a Service Location ........................................................................... 137 Add a Service Address ..................................................................................... 138
Two-Step Process ........................................................................................ 138 Step 1of 2 ................................................................................................ 138
Step 2 of 2 ............................................................................................... 139 Three-Step Process ...................................................................................... 139
Step 1of 3 ................................................................................................ 139 Step 2 of 3 ............................................................................................... 139 Step 3 of 3 ............................................................................................... 140
Add a New Federal Tax ID .............................................................................. 140 Billing Location Information ................................................................................ 142
24 Performance Report ............................................................................... 143 25 Compliance ............................................................................................. 144 26 Provider Handbook ................................................................................ 147
27 Forms ...................................................................................................... 150 28 Network-Specific Information ................................................................ 151 29 Education Center .................................................................................... 154
30 ValueSelect Designation ........................................................................ 155 31 Contact Us .............................................................................................. 157 32 Role-Based Security .............................................................................. 160
Overview ............................................................................................................... 160 Managing Users ..................................................................................................... 161
Create a New Login Account ........................................................................... 161
Control Access to Certain Areas of ProviderConnect ...................................... 164 Deactivate a Managed User .............................................................................. 166
33 Glossary of Terms .................................................................................. 168

ProviderConnect User Guide
vi IT Operations - Reston, VA
Index ................................................................................................................ 171

ProviderConnect User Guide
vii IT Operations - Reston, VA
Table of Figures
Figure 1: ProviderConnect Login ....................................................................................... 3
Figure 2: New User Registration ........................................................................................ 4 Figure 3: Provider Online Services Registration ................................................................ 5 Figure 4: ProviderConnect Home Page Example ............................................................. 12 Figure 5: EDI Transactions ............................................................................................... 19 Figure 6: Step 1 of 4.......................................................................................................... 20
Figure 7: Step 2 of 4.......................................................................................................... 20 Figure 8: Step 3 of 4.......................................................................................................... 21 Figure 9: Step 4 of 4.......................................................................................................... 21 Figure 10: Search Files on EDI Transactions ................................................................... 22
Figure 11: Search File Submissions .................................................................................. 22 Figure 12: Tracking Number Link .................................................................................... 23
Figure 13: Submission Details .......................................................................................... 24 Figure 14: Previous Claims File Batch Submissions ........................................................ 25
Figure 15: Incoming Files ................................................................................................. 26 Figure 16: View Incoming Files ....................................................................................... 27 Figure 17: Download a File .............................................................................................. 27
Figure 18: Download Unsuccessful .................................................................................. 27 Figure 19: Search Member Eligibility & Benefits ............................................................ 28
Figure 20: Demographics Tab .......................................................................................... 29 Figure 21: Enrollment History Tab ................................................................................... 30 Figure 22: COB Tab.......................................................................................................... 31 Figure 23: Benefits Tab .................................................................................................... 31 Figure 24: Additional Information Tab............................................................................. 31
Figure 25: View Letter Icon .............................................................................................. 33 Figure 26: View Letter Link ............................................................................................. 33
Figure 27: ABA Assessment ............................................................................................. 37 Figure 28: Submit a Claim – Step 1 of 3 .......................................................................... 39 Figure 29: Submit a Claim – Step 2 of 3 .......................................................................... 40
Figure 30: Submit a Claim – Step 3 of 3 .......................................................................... 41 Figure 31: Customer Service Inquiry ................................................................................ 42
Figure 32: Search Authorizations ..................................................................................... 43 Figure 33: Disclaimer ....................................................................................................... 46 Figure 34: Search a Member ............................................................................................. 46
Figure 35: Requested Services Header ............................................................................. 47 Figure 36: Type of Services .............................................................................................. 48 Figure 37: Diagnosis ......................................................................................................... 48 Figure 38: Current Risks ................................................................................................... 49
Figure 39: Current Impairments........................................................................................ 49 Figure 40: Current Risks ................................................................................................... 51 Figure 41: Current Impairments........................................................................................ 51 Figure 42: Treatment History............................................................................................ 55 Figure 43: Psychotropic Medications ............................................................................... 56 Figure 44: Requested Services Header ............................................................................. 58

ProviderConnect User Guide
viii IT Operations - Reston, VA
Figure 45: Level of Care – Preliminary Information ........................................................ 58 Figure 46: Level of Care – Contact Information .............................................................. 58 Figure 47: Current Risks ................................................................................................... 59 Figure 48: Current Impairments........................................................................................ 60 Figure 49: Treatment History............................................................................................ 63
Figure 50: Psychotropic Medications ............................................................................... 64 Figure 51: Substance Abuse Types ................................................................................... 65 Figure 52: Withdrawal Symptoms and Vitals ................................................................... 65 Figure 53: ASAM/Other Placement Criteria .................................................................... 66 Figure 54: Treatment Plan ................................................................................................ 66 Figure 55: Treatment Request ........................................................................................... 67
Figure 56: Baseline Functioning ....................................................................................... 68
Figure 57: Requested Services Header ............................................................................. 69
Figure 58: Level of Care – Contact Information .............................................................. 70 Figure 59: Metabolic Assessment Tool ............................................................................ 71 Figure 60: Add a Medication ............................................................................................ 74 Figure 61: Discharge Information ..................................................................................... 75
Figure 62: Number of Visits & Expiration Date Pop-up .................................................. 78 Figure 63: ABA Service.................................................................................................... 80
Figure 64: ABA Maladaptive Behavior & ABA Skills Data Tracking Buttons ............... 82 Figure 65: Search Authorizations ..................................................................................... 89 Figure 66: Authorization Search Results .......................................................................... 90
Figure 67: Auth Summary ................................................................................................ 90 Figure 68: Auth Details ..................................................................................................... 91
Figure 69: Case Activity Form (CAF) .............................................................................. 92 Figure 70: Select a Service Address ................................................................................. 93
Figure 71: Step 1 of 2........................................................................................................ 93 Figure 72: Step 2 of 2........................................................................................................ 94 Figure 73: CAF Results .................................................................................................... 94
Figure 74: Search a Provider Summary Voucher ........................................................... 100 Figure 75: Claims ............................................................................................................ 101
Figure 76: OnTrack Outcomes Tool ............................................................................... 103 Figure 77: My Online Profile .......................................................................................... 104 Figure 78: View Provider Contact Information .............................................................. 105
Figure 79: Provider Search Results................................................................................. 106 Figure 80: Provider Information ..................................................................................... 107 Figure 81: Provider Referral Information ....................................................................... 108
Figure 82: Provider Practice Information ....................................................................... 109
Figure 83: Provider Education Information .................................................................... 110 Figure 84: License/Certification Information ................................................................. 111 Figure 85: Malpractice Insurance Information ............................................................... 112 Figure 86: Work History Information ............................................................................. 113 Figure 87: EAP Counselor Only ..................................................................................... 113
Figure 88: Disability Provider Network Only Information ............................................ 114 Figure 89: FFD Specialist Information ........................................................................... 115
Figure 90: Provider Profile Information ......................................................................... 116

ProviderConnect User Guide
ix IT Operations - Reston, VA
Figure 91: W-9 ................................................................................................................ 117 Figure 92: Supporting Documentation............................................................................ 117 Figure 93: Attestation Information ................................................................................. 118 Figure 94: Practitioner Final Submission Pop-up ........................................................... 120 Figure 95: General Information ...................................................................................... 122
Figure 96: License/Accreditation Information ................................................................ 123 Figure 97: Insurance Information ................................................................................... 124 Figure 98: Demographic Data ......................................................................................... 125 Figure 99: Service Locations and Programs ................................................................... 126 Figure 100: Verify Service Location .............................................................................. 127 Figure 101: Verify Programs .......................................................................................... 128
Figure 102: Addenda Information .................................................................................. 129
Figure 103: Supporting Documentation.......................................................................... 130
Figure 104: Roster of Providers ...................................................................................... 130 Figure 105: Participation Information ............................................................................ 131 Figure 106: Provider Demographics Summary Example ............................................... 133 Figure 107: Enter & Verify Mailing Address ................................................................. 134
Figure 108: Edit a Service Location ............................................................................... 136 Figure 109: Invalidate a Service Location ...................................................................... 137
Figure 110: Add a Service Location ............................................................................... 138 Figure 111: Add a New Federal Tax ID ......................................................................... 140 Figure 112: Download a W-9 Form ................................................................................ 141
Figure 113: Performance Report Card ............................................................................ 143 Figure 114: Compliance .................................................................................................. 145
Figure 115: Provider Handbook...................................................................................... 148 Figure 116: Network-Specific Information .................................................................... 152
Figure 117: ValueSelect Network Program Description ................................................ 156 Figure 118: Contact Us ................................................................................................... 158 Figure 119: Manage Users Link ..................................................................................... 162
Figure 120: Manage this User ......................................................................................... 162 Figure 121: Copy User .................................................................................................... 163
Figure 122: Copy User .................................................................................................... 163 Figure 123: Manage Users Link ..................................................................................... 164 Figure 124: Manage this User ......................................................................................... 164
Figure 125: Function Categories ..................................................................................... 165 Figure 126: Manage Users Link ..................................................................................... 166 Figure 127: Deactivate User ........................................................................................... 166

ProviderConnect User Guide
1 IT Operations - Reston, VA
1 Introduction
ProviderConnect Overview
ProviderConnect is an easy-to-use online application that providers can use to complete
everyday service requests. Providers have the ability to access information 24 hours a
day/7 days a week.
Providers can use ProviderConnect to:
Obtain information about member eligibility and benefit status
Enter authorization/notification requests
Search claims and authorizations
View and print correspondence
Access and update practice profiles
Submit EDI claims and inquiries to the Beacon Customer Service Department
Send messages to and receive messages from Beacon
Send messages to and receive messages from members
Attach documents
In addition, ProviderConnect contains links to other resources such as:
Compliance
Provider Handbook
Forms
Network Specific Information
Course and User Guide Overview
After successfully completing this course, users will be able to:
Understand the basic navigational system flow
Access and register a provider
Search member information
Search claims
Enter an authorization/notification request
Enter a claim
Update a provider profile
Verify eligibility and benefit status
Submit an EDI claim
Obtain applicable forms

ProviderConnect User Guide
2 IT Operations - Reston, VA
Contact Information
If you have any questions or need further clarification about the subject matter, please
contact the National IT Trainers at: [email protected]
Before You Begin
Be aware of the following before using this guide.
Screen captures are examples only.
The workflows presented in this document represent one possible scenario.
Workflows may vary in practice depending on a particular user’s circumstances.

ProviderConnect User Guide
3 IT Operations - Reston, VA
2 Accessing ProviderConnect
Log On to ProviderConnect
To log on to ProviderConnect:
1. Access the following URL: www.beaconhealthoptions.com
The Beacon Health Options home page displays.
2. Click on the ValueOptions link. (Located under HELPFUL LINKS.)
3. Click the Providers tab.
The Provider Services page displays.
4. Click the Log In link.
5. Click Log In.
6. Enter your User ID and Password.
7. Click Log In.
Figure 1: ProviderConnect Login
Note: ProviderConnect permits submitters belonging to providers with the same NPI# to
use a single login to access multiple accounts.
8. Carefully read the ProviderConnect Use Agreement and then select I Agree.
Refer to the Warn and Restrict Access to ProviderConnect When Attestation Is Due
chapter for important information!

ProviderConnect User Guide
4 IT Operations - Reston, VA
New User Registration
New users must register in order to access the ProviderConnect application.
1. Click Register.
Figure 2: New User Registration
The Provider Online Services Registration page displays. Complete the following
information.
Note: A red asterisk (*) indicates a required field.
2. Enter the provider’s first and last names in the First Name and Last Name fields.
3. Enter a contact name in the Contact Name field.
4. Enter the provider number in the Provider ID field. Contact National Networks at
800.397.1630 to obtain a provider ID number if needed.
Note: The provider ID is a six-digit number assigned by Beacon.
5. Enter the provider’s nine-digit Federal ID or Social Security Number in the Tax ID
field.
6. Enter the provider’s group, facility, or clinic name if applicable.
7. Enter the provider’s primary e-mail address in the Primary Email Address field.
Note: E-mail addresses must be formatted as [email protected].
8. Enter the same e-mail address in the Verify Primary Email Address field.
9. Enter the provider’s secondary e-mail address in the Secondary Email Address
field.
10. Enter a ten-digit phone number without dashes in the Phone Number field.
11. Enter a ten-digit number without dashes in the Fax Number field.

ProviderConnect User Guide
5 IT Operations - Reston, VA
Figure 3: Provider Online Services Registration
12. Enter a password in the Select a Password field. (See: Password Change Rules)
Passwords must contain at least:
o One number (0-9) and,
o One upper case letter (A-Z) and,
o One lower case letter (a-z) and,
o One of the following special characters:
!
#
$
~
"
%
&
'
(
)
*
+
,
-
.

ProviderConnect User Guide
6 IT Operations - Reston, VA
:
;
<
=
>
?
[
\
]
^
_
`
{
|
}
Passwords must be between 8 and 20 characters in length.
Note: Passwords cannot contain spaces and are case-sensitive.
13. Enter the same password in the Confirm New Password field.
14. Create a security question in the Create a Security Question field.
15. Enter the answer to the question in the Answer to Security Question field.
16. Select the Claims Submission checkbox if applicable. (Go to: Account Request
Form)
17. Click Next.
The Use Agreement page displays.
18. Select I Agree. (This completes the registration process.)
Password Change Rules
Users are required to change their passwords every 90 days. A Password Expired page is
available that allows a user to change an expired password. The Submit and Cancel
buttons on this page allow the user to either create a new password or cancel the
password change.
When a user attempts to update an expired password, the system prohibits “recent”
password reuse by not allowing the last 10 passwords to be reused. If a user enters a
password that is one of the last 10 passwords used (includes password case-sensitivity),
an appropriate error message displays.

ProviderConnect User Guide
7 IT Operations - Reston, VA
Account Request Form
Upon clicking Claims Submission and then Next, the Use Agreement page displays. Upon
agreeing to the terms of use, the Account Request Form displays pre-populated with the
provider name; provider ID; NPI# (if available); Tax ID (if entered); and group, facility,
or clinic name (if entered).
The following fields display on this form.
Note: A red asterisk (*) indicates a required field.
Provider Name (pre-populated)
Provider ID (pre-populated)
NPI# (pre-populated if available)
Tax ID (pre-populated if entered)
Provider Group, Facility or Clinic Name (pre-populated if entered)
Online Provider Services Options
o Electronic Batch Claims Submission (837 HIPAA format)
o Military OneSource Case Activity Form
o Direct Claims Submission
Provider has retained a 3rd party Billing Agent or Clearinghouse to submit claims
on their behalf. (Yes/No)
Claim Operation Center
The user is required to select a Claim Operation Center and one of the following options.
Yes (Medicaid)
No (Commercial Only)
Both (Medicaid and Commercial)
The user also needs to enter the e-mail address where he/she would like to receive batch
submission file feedback if applicable and the provider contact name.

ProviderConnect User Guide
8 IT Operations - Reston, VA
Attestation Page
Upon clicking Next, the Attestation page displays pre-populated with the information
from the Account Request Form. The user must attest to one of the following:
I am a provider.
-or-
I am office staff of a provider, and am authorized to sign on their behalf.
The following options are available.
Electronically sign the attestation
Manually sign and fax the attestation
Electronically Sign the Attestation
To electronically sign the attestation, click on the Click here to sign this document
electronically link. The Welcome to the Claims e-Signature Process page displays.
Manually Sign and Fax the Attestation
To manually sign and fax the attestation, select the Check here if you intend to fax the
Attestation form checkbox. (After indicating their intention to fax the form, users should
print the document prior to saving.)
Note: This action enables the Continue to ProviderConnect button.
Welcome to the Claims e-Signature Process
Once on the Welcome to the Claims e-Signature Process page, the user should review the
steps to apply an electronic signature and then:
1. Enter his or her full name.
2. Click Submit.
The US Federal Consumer Disclosure – E-SIGN Act page displays.
3. Carefully read the information on this page.
4. Click on the Yes link to signify consent to complete and sign the document
electronically. The Signer Information page displays.
5. Enter the user’s name to apply to the attestation document.
Note: Users should enter their name as they would normally write it when signing
a paper document, using upper and lower case letters as appropriate.
6. Click the Submit button to display the e-Claims Agreement Terms.
Note: The applicant’s name and application date pre-populate.
7. Click in the highlighted Click Here to Sign area to electronically sign the
document. The Thank You page displays stating that the document has been
successfully signed and the user role changed to general claims user.
8. Follow the instructions to download a copy of the document and save it to a local
or network drive.
9. Click Continue to ProviderConnect to continue to the ProviderConnect home
page.

ProviderConnect User Guide
9 IT Operations - Reston, VA
Access Information without Logging On
Providers can access information without logging on to ProviderConnect. Links available
on the Providers page include:
Enables users to return to the Providers home page.
Provides users with information on Beacon’s policies and procedures.
Provides users with administrative, clinical, and EAP forms specific to Beacon Health Options.
Provides articles, workshops, training tools, and access to external web sites (e.g., Achieve Solutions).
Provides information specific to federal and state program requirements for maintaining HIPAA- compliant claims submission.
Provides program-specific handbooks, forms, and other details that are unique to a specific network.
Provides internal and external articles and updates.
Provides information for Beacon’s customer service web sites and technical support.
Provides access to provider profiles. (Note: Must enter a User ID and Password to review secure information.)
Provides access to video tutorials that help providers navigate and perform the tasks needed to successfully do business with Beacon Health Options.
Provides access to helpful resources such as user guides, claims resources, forms, HIPAA resources, and webinars.

ProviderConnect User Guide
10 IT Operations - Reston, VA
3 Warn and Restrict Access to ProviderConnect When Attestation Is Due
As part of the user login, the system checks to see whether ProviderConnect is permitted
to make a call to a special NetworkConnect service that identifies providers who are due
for demographic attestation. If the system determines that ProviderConnect should call
the service, the call is initiated by passing information like the submitter ID and provider
ID. (This occurs during provider login and when switching accounts.)
ProviderConnect reads the response from the service to determine whether to display a
warning message to the provider.
If the response indicates the provider is not yet due for attestation, the provider is not
warned nor restricted.
If the response indicates the provider should be warned, ProviderConnect displays a
warning message on the Use Agreement page.
If the response indicates the provider’s account should be locked, ProviderConnect
displays a warning message on the Use Agreement page and restricts the provider to
all but the Update Demographic Information feature.
Note: If the service fails to respond, ProviderConnect logs the provider in without
checking his/her attestation status.
Display Warning Message
The following message displays on the Use Agreement page following the Message from
Webpage and Message Center pop-ups if the response from the service indicates the
provider needs to be warned: “Please review your demographic information and provide
attestation in the Provider Demographics page. Your demographic information attestation is due by MM-DD-YYYY for Provider ID XXXXXX. Please verify your information by this date to continue using ProviderConnect. You will have restricted access to ProviderConnect, if you do not attest
by this date.”
Notes:
MM-DD-YYYY is replaced with the actual due date.
Provider ID XXXXXX is replaced with the actual provider ID.

ProviderConnect User Guide
11 IT Operations - Reston, VA
Update Provider Demographics / Continue With ProviderConnect
The following buttons display on the warning message pop-up.
Update Provider Demographics – Redirects the user to the Provider Demographics
page.
Continue with ProviderConnect – Redirects the user to the ProviderConnect home
page.
Restrict User Access
The above warning message also displays for those providers whose accounts should be
locked according to the response received from the service. In addition, the following
message displays on the ProviderConnect home page: “Your access is restricted because
Provider ID XXXXXX is due for attestation and you will not be able to use all functionalities available in ProviderConnect. Please click on “Update Demographic Information” link to review and provide attestation. Access to ProviderConnect will be restored once you provide your
attestation.”
Note: Provider ID XXXXXX is replaced with the actual provider ID.

ProviderConnect User Guide
12 IT Operations - Reston, VA
4 ProviderConnect Navigation
Users have the ability to navigate ProviderConnect via the main menu or the navigation
bar.
Figure 4: ProviderConnect Home Page Example

ProviderConnect User Guide
13 IT Operations - Reston, VA
Main Menu
A user can access a specific section by clicking the appropriate link on the main menu.
The main menu contains the following options.
Link/Unlink Accounts – Works in conjunction with the Switch Account field. The
Switch Account field displays all the submitters linked to the logged in ID. (This
field defaults to the logged in account regardless of whether or not the submitter
has any linked accounts.) The Link/Unlink Accounts link allows the user to link or
unlink accounts as necessary.
Eligibility and Benefits
o Find a Specific Member
o Register a Member
Enter or Review Claims
o Enter EAP CAF
o Enter a Claim
o Review a Claim
o View My Recent Provider Summary Vouchers
o PaySpan – Allows providers to directly access the PaySpan web site to
retrieve Explanations of Benefits (EOBs) and receive any payments that were
submitted electronically.
Note: Provider must be assigned the appropriate role.
Enter or Review Authorization Requests
o Enter an Authorization/Notification Request
o Enter an Individual Plan
o Review an Authorization
o View Clinical Drafts
o Weekly ABA Measures
Enter or Review Referrals
o Enter a Referral
o Review Referrals
Enter Member Reminders
Enter Case Management Referral
Enter Bed Tracking Information
Search Beds/Openings
Update Demographic Information
Update Roster Information
Update ABA Paraprofessional Roster Information
View My Recent Authorization Letters
Print Spectrum Release of Information Form
ProviderConnect User Guide
14 IT Operations - Reston, VA
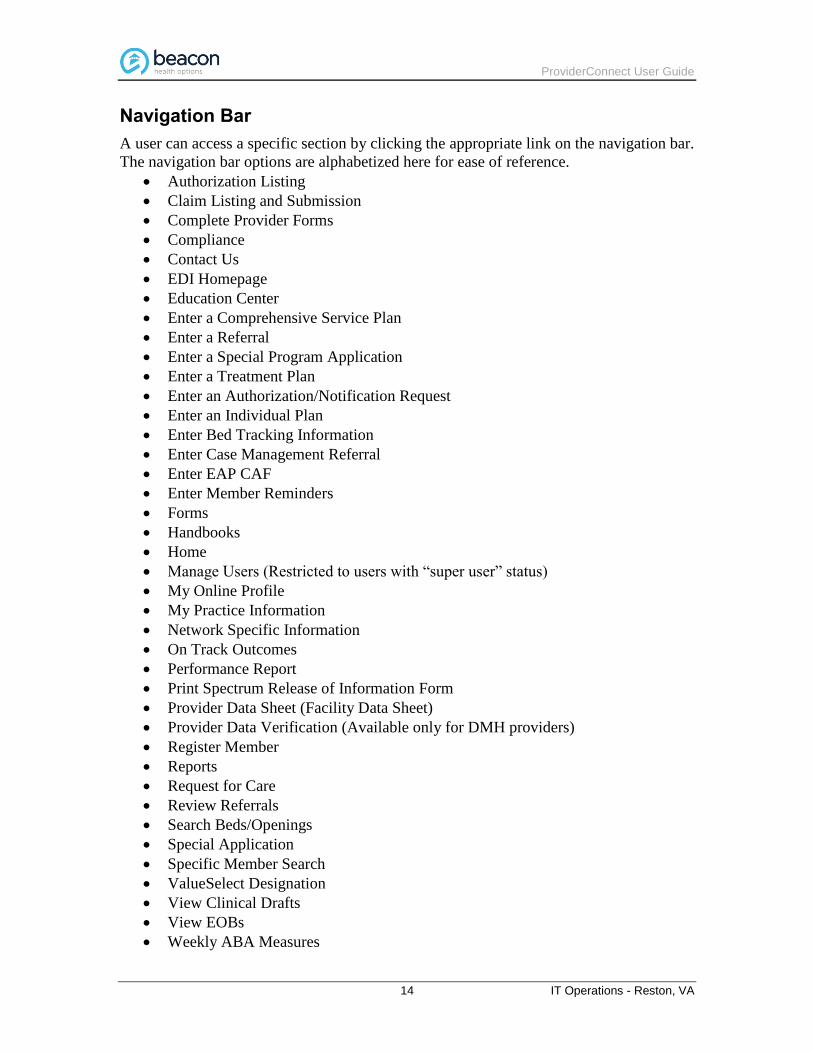
Navigation Bar
A user can access a specific section by clicking the appropriate link on the navigation bar.
The navigation bar options are alphabetized here for ease of reference.
Authorization Listing
Claim Listing and Submission
Complete Provider Forms
Compliance
Contact Us
EDI Homepage
Education Center
Enter a Comprehensive Service Plan
Enter a Referral
Enter a Special Program Application
Enter a Treatment Plan
Enter an Authorization/Notification Request
Enter an Individual Plan
Enter Bed Tracking Information
Enter Case Management Referral
Enter EAP CAF
Enter Member Reminders
Forms
Handbooks
Home
Manage Users (Restricted to users with “super user” status)
My Online Profile
My Practice Information
Network Specific Information
On Track Outcomes
Performance Report
Print Spectrum Release of Information Form
Provider Data Sheet (Facility Data Sheet)
Provider Data Verification (Available only for DMH providers)
Register Member
Reports
Request for Care
Review Referrals
Search Beds/Openings
Special Application
Specific Member Search
ValueSelect Designation
View Clinical Drafts
View EOBs
Weekly ABA Measures

ProviderConnect User Guide
15 IT Operations - Reston, VA
Clinical Support Tools
View My Outcomes with On Track
News & Alerts
A News & Alerts section is also located on the home page. This section displays
information disseminated by Beacon Health Options. Providers can view this information
by clicking on the links.
Your Message Center
A Your Message Center is available that provides a secure message center to ensure
confidentiality and to comply with HIPAA requirements. Providers can send messages to
and receive messages from Beacon. Providers can also send messages to and receive
messages from members. (Refer to the Secure Provider/Member Communications
chapter for more information.)
To view the Inbox, click the Inbox icon. The Message Center – Inbox page displays.
If there are no messages in the provider’s Inbox, the following message displays:
“Your Inbox is empty.”
If there are messages in the provider’s Inbox, the following message displays:
“Click on Inbox to view your messages.”
Note: All messages in the provider’s Inbox, including messages from Beacon, will be
available for viewing until the provider deletes them.
To view Sent items, click the Sent icon. The Message Center – Sent page displays.
Note: All messages in the provider’s Sent Messages, including inquiries and replies sent
to Beacon, will be available for viewing until the provider deletes them.

ProviderConnect User Guide
16 IT Operations - Reston, VA
5 Secure Provider/Member Communications
ProviderConnect offers providers a secure method of electronic communication between
themselves and the member. This chapter focuses on that functionality.
Enable/Disable Communication with All Members
Providers have the ability to either enable or disable communication with all members. A
Use ProviderConnect Message Center to communicate with members? (Yes/No) field is
available in the online profile for that purpose. (Refer to the My Online Profile chapter
for more information.)
Yes – Enables Message Center communication functionality between the provider
and all members that the provider has not expressly excluded.
No – Disables Message Center communication functionality between the provider
and all members.
Enable/Disable Communication with Individual Members
Providers have the ability to either enable or disable communication with individual
members.
Enable Communication – Communication with an individual member is
automatically enabled when the provider opts in to the communication
functionality if the member in question has also opted in to the communication
functionality and has not disabled communication with that provider.
Disable Communication – o If the provider has opted in to the communication functionality and
communication with a particular member is enabled, the Message Details
page displays a Disable Communication button that allows the provider to
disable communication with that one member. (To disable communication
with all members the provider would need to update his/her online profile.)
Note: If the provider has disabled communication with a member after
receiving a message from that member, the Message Details page displays an
Enable Communication button if the provider has opted in to the
communication functionality.
o If the provider has opted in to the communication functionality and
communication with a particular member is enabled, the Member
Demographics page displays a Disable Member Communication button. This
button functions in the same manner as the Disable Communication button.
Note: If the provider has disabled communication with a member, the Member
Demographics page displays an Enable Member Communication button.

ProviderConnect User Guide
17 IT Operations - Reston, VA
Send Messages to Members
Providers have the ability to send messages to members via the Member Demographics
page. A provider may initiate communication with a member upon executing a successful
search for that member. (The member in question must have opted in to the
communication functionality.)
A read-only Member Participates in Message Center Communication with Providers?
(Yes/No) field displays on the Member Demographics page.
Displays as Yes if –
o The member is an active MemberConnect user, and
o The member has opted in to the communication functionality, and
o The member has not disabled communication with that provider.
Displays as No if –
o The member is not an active MemberConnect user, or
o The member has opted out of the communication functionality, or
o The member has disabled communication with that provider.
A Send Message to Member button also displays on this page if all the following
conditions have been met.
The provider has the appropriate role assignment, and
The provider has opted in to the communication function, and
The provider has not disabled communication with that member, and
The member has not disabled communication with that provider.
Upon clicking the Send Message to Member link, the system displays the Send Message to
Member page.
Receive Messages from Members
Providers have the ability to receive messages from members. A provider can receive
messages from a member if both the following conditions have been met.
The provider has opted in to the communication functionality, and
The provider has not disabled communication with that particular member.
Reply to Messages from Members
Providers have the ability to reply to messages received from members. The Message
Details page for member messages contains a message reply section that is similar to the
message reply section for Beacon Health Options messages.

ProviderConnect User Guide
18 IT Operations - Reston, VA
View Messages Exchanged with Members
Providers have the ability to view messages sent to members. The system automatically
displays all messages and message replies sent to a member in the provider’s Message
Center Sent Messages. Upon selecting a specific message, a Sent Message Details page
displays.
Providers can also view messages received from members. The system automatically
displays all messages received from a member in the provider’s Message Center Inbox.
Upon selecting a specific message, a Message Details page displays.
Print Messages Exchanged with Members
Providers have the ability to print messages and message replies sent to members. The
Sent Message Details page contains a Print button for that purpose.
Providers can also print messages received from members. The Message Details page
contains a Print button for that purpose.
Receive New Messages Notifications
Providers have the ability to be automatically alerted when new messages arrive in their
Message Center Inbox. The system automatically sends an e-mail notification to the
provider whenever a new system-generated or member message arrives in his/her Inbox
if the provider has enabled the e-mail notification functionality.
Send New Messages Notifications
The system automatically sends an e-mail notification to the member whenever a new
system-generated or provider message is sent to his/her Inbox if the member has
answered Yes to the Receive Email Notification Of New Message Center Messages?
question in the MemberConnect online profile.

ProviderConnect User Guide
19 IT Operations - Reston, VA
6 EDI Homepage
The EDI Homepage allows users to access the EDI Transactions page. A user can submit
batch files; search files; view previous claims; and view, download, and delete files from
within this section.
Note: Beacon can also accommodate batch claims processed via a clearinghouse. If you
currently use a clearinghouse, please provide them with Beacon’s payer ID: FHC &
Affiliates.
Submit a Batch File
To submit a batch file, click the EDI Homepage link on the navigation bar. The EDI
Transactions page displays.
Figure 5: EDI Transactions
Click the Submit Batch File link on the navigation bar or click the Submit Batch File button
on the EDI Transactions page.
The Submit Batch File –Step 1 of 4 page displays.

ProviderConnect User Guide
20 IT Operations - Reston, VA
Complete Four Pages
The following four pages must be completed in order to submit a batch file.
On the Submit Batch File –Step 1 of 4 page, select the required form from the Form Type
drop-down and click Next.
Figure 6: Step 1 of 4
On the Submit Batch File – Step 2 of 4 page:
1. Enter the number of claims in the file in the How many claims are in this file field.
2. Enter the total dollar amount of all the claims submitted in the What is the total
dollar amount field and click Next.
Figure 7: Step 2 of 4
On the Submit Batch File – Step 3 of 4 page:
1. Click Browse.

ProviderConnect User Guide
21 IT Operations - Reston, VA
Figure 8: Step 3 of 4
2. Search for the batch file.
3. Select the batch file.
4. Click Open.
5. Click Upload. The batch file transfer will begin.
Note: Some restrictions apply to the files, such as files must be only text or zip files, they
must be at least 50 bytes in size, and they cannot be password-protected.
The Submit Batch File – Step 4 of 4 page displays when the upload is completed. The
following information displays on this page.
A confirmation that the file was successfully uploaded.
A statement that the submission number will be sent to the registered e-mail
address.
Figure 9: Step 4 of 4
ProviderConnect User Guide
22 IT Operations - Reston, VA
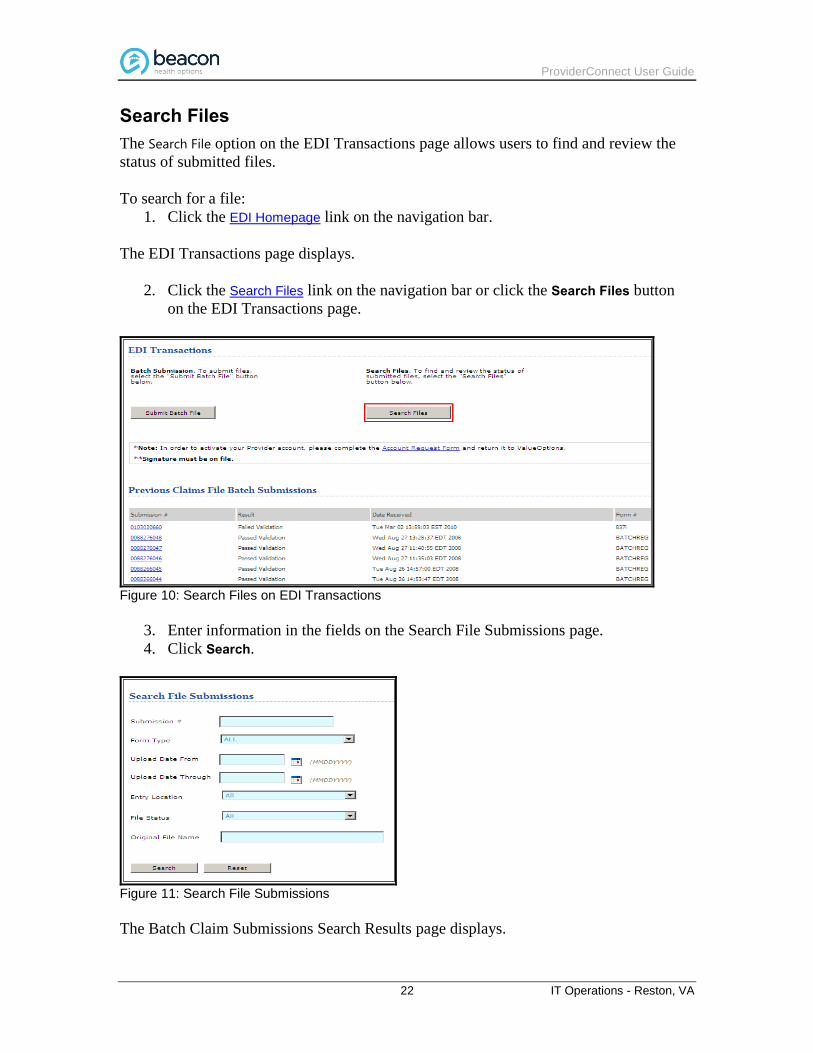
Search Files
The Search File option on the EDI Transactions page allows users to find and review the
status of submitted files.
To search for a file:
1. Click the EDI Homepage link on the navigation bar.
The EDI Transactions page displays.
2. Click the Search Files link on the navigation bar or click the Search Files button
on the EDI Transactions page.
Figure 10: Search Files on EDI Transactions
3. Enter information in the fields on the Search File Submissions page.
4. Click Search.
Figure 11: Search File Submissions
The Batch Claim Submissions Search Results page displays.

ProviderConnect User Guide
23 IT Operations - Reston, VA
5. Click on the Tracking # link for the file.
Figure 12: Tracking Number Link
The Submission Detail page displays. This page contains the following information.
Submission Number
Form Type
Upload and Process Date and Time
Entry Location
File Status
Information on the Original File

ProviderConnect User Guide
24 IT Operations - Reston, VA
Figure 13: Submission Details

ProviderConnect User Guide
25 IT Operations - Reston, VA
View Previous Claims File Batch Submissions
The EDI Transactions page also contains a Previous Claims File Batch Submissions
section. The six most recent submissions can be viewed in this section. A file search must
be conducted to view all the submissions for an account.
Figure 14: Previous Claims File Batch Submissions

ProviderConnect User Guide
26 IT Operations - Reston, VA
View Incoming Files
The EDI Transactions page also contains an Incoming Files section. All the files that
have been sent from Beacon can be viewed in this section.
Figure 15: Incoming Files
1. Click on the File Name link.
The View Incoming Files page displays.
2. Click on the File Name link to access the Download File page.
Note: A file can be deleted from this page by clicking on the Select Files column
and clicking Delete.

ProviderConnect User Guide
27 IT Operations - Reston, VA
Figure 16: View Incoming Files
The Download File page displays.
3. Click Yes if the download was completed successfully.
4. Click No if the download was not completed successfully.
Figure 17: Download a File
If the download was unsuccessful, a page containing instructions displays.
Figure 18: Download Unsuccessful

ProviderConnect User Guide
28 IT Operations - Reston, VA
7 Member Information
A user can search for and access information for a member via the Specific Member
Search section of ProviderConnect.
Member Search
To search for a member, either click Specific Member Search on the navigation bar or Find
a Specific Member on the main menu. The Eligibility & Benefits Search page displays.
To retrieve member information:
1. Enter the member ID in the Member ID field.
2. Enter a date in the Date of Birth field.
Note: Enter information in MMDDYYYY format only.
3. Enter the member’s first and last names to narrow the search. (This step is
optional.)
4. Click Search.
Figure 19: Search Member Eligibility & Benefits

ProviderConnect User Guide
29 IT Operations - Reston, VA
Once the search has been completed, the member’s information displays in a section that
contains the following tabs.
Demographics – Displays all of the member’s information
Enrollment History – Displays all of the member’s enrollments
COB – Displays information about the member’s other insurance policies
Benefits – Displays the member’s benefit information
Additional Information – Displays the claims mailing address(es), member
information, and eligibility data
Demographics Tab
The Demographics page displays member-specific information such as member ID,
name, date of birth, eligibility, and so forth. Claims and authorization/notification
requests are displayed for a member ID number that is associated with the provider
number entered in the search. If providers have multiple numbers, some of the
authorization/notification requests and claims that are linked to different numbers may
not display in the search results.
Figure 20: Demographics Tab
ProviderConnect User Guide
30 IT Operations - Reston, VA
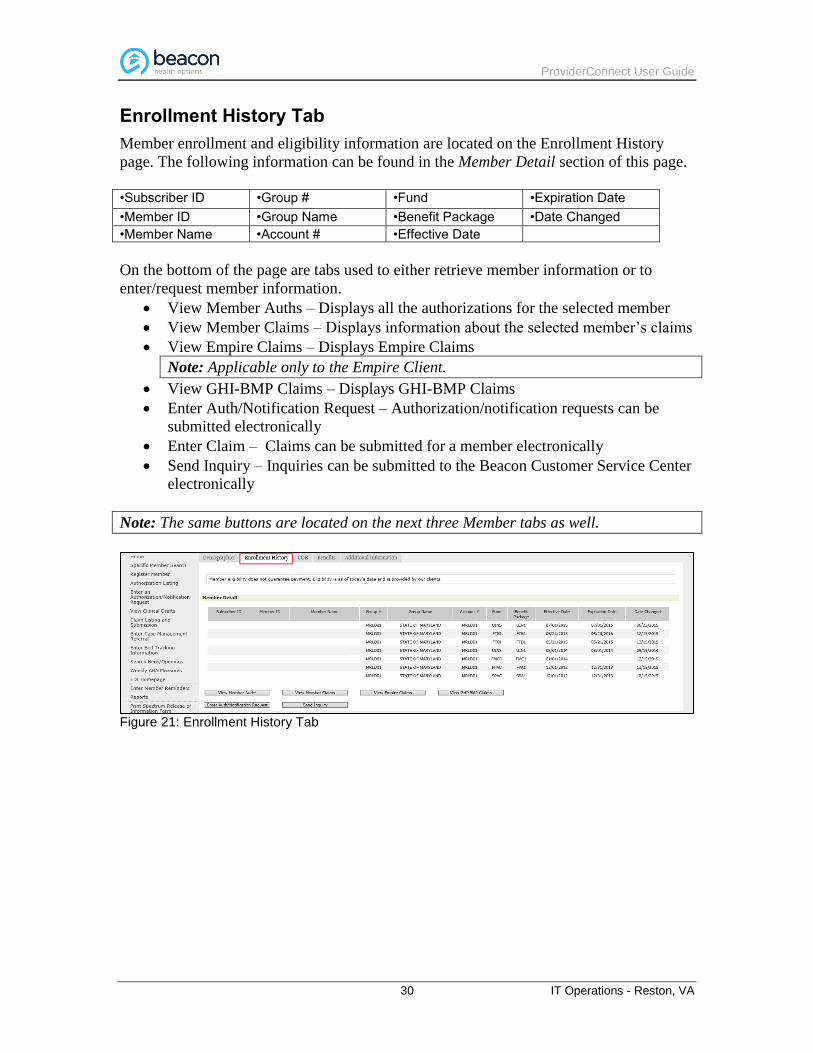
Enrollment History Tab
Member enrollment and eligibility information are located on the Enrollment History
page. The following information can be found in the Member Detail section of this page.
•Subscriber ID •Group # •Fund •Expiration Date
•Member ID •Group Name •Benefit Package •Date Changed
•Member Name •Account # •Effective Date
On the bottom of the page are tabs used to either retrieve member information or to
enter/request member information.
View Member Auths – Displays all the authorizations for the selected member
View Member Claims – Displays information about the selected member’s claims
View Empire Claims – Displays Empire Claims
Note: Applicable only to the Empire Client.
View GHI-BMP Claims – Displays GHI-BMP Claims
Enter Auth/Notification Request – Authorization/notification requests can be
submitted electronically
Enter Claim – Claims can be submitted for a member electronically
Send Inquiry – Inquiries can be submitted to the Beacon Customer Service Center
electronically
Note: The same buttons are located on the next three Member tabs as well.
Figure 21: Enrollment History Tab

ProviderConnect User Guide
31 IT Operations - Reston, VA
COB Tab
If applicable, additional insurance information for a specific member displays on the
Coordination of Benefits (COB) tab. Some of the same buttons on the bottom of the
Demographics page also display on the bottom of the COB page.
Figure 22: COB Tab
Benefits Tab
Upon clicking the Benefits link, the user is re-directed to the Self-Service Portal (SSP)
application where he/she can view detailed benefit information for the selected member.
Figure 23: Benefits Tab
Additional Information Tab
The Additional Information tab displays the claims mailing address(es), member
information, and eligibility data.
Figure 24: Additional Information Tab

ProviderConnect User Guide
32 IT Operations - Reston, VA
8 View Member Authorizations & Claims Information
As previously mentioned, there are a number of buttons on the Member tabs. These
buttons are:
View Member Auths
View Member Claims
View Empire Claims (Note: Applicable only to the Empire Client.)
View GHI-BMP Claims
Enter Auth/Notification Request
Enter Claim
Send Inquiry
View Clinical Drafts
Enter Member Reminders
View Member Registrations
View Spectrum Record
ProviderConnect User Guide
33 IT Operations - Reston, VA
View Member Authorizations
To view member authorizations:
1. Click the View Member Auths button. The following fields display with some of
the information already populated.
Provider ID
Auth #
Service From/Through
2. Click the Search button.
The Authorization Search Results page displays. This page contains information about
member-specific authorizations. Clicking the links on this page enables users to view
authorization letters and authorization detail information.
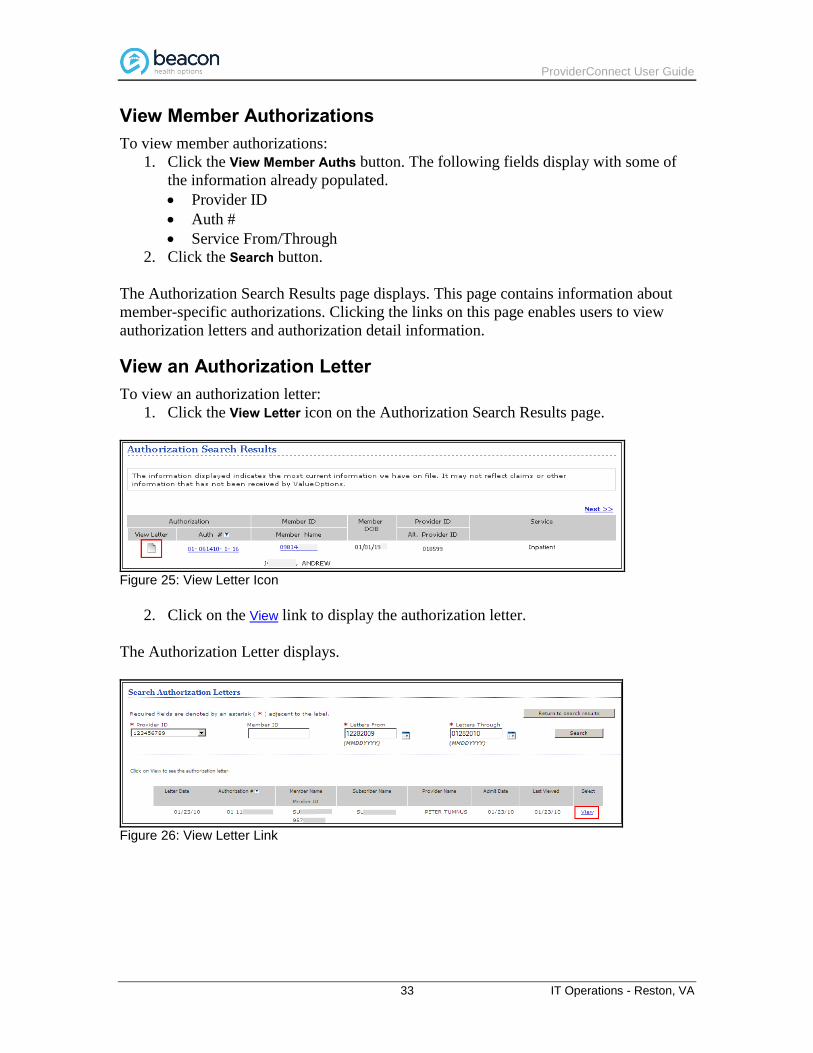
View an Authorization Letter
To view an authorization letter:
1. Click the View Letter icon on the Authorization Search Results page.
Figure 25: View Letter Icon
2. Click on the View link to display the authorization letter.
The Authorization Letter displays.
Figure 26: View Letter Link

ProviderConnect User Guide
34 IT Operations - Reston, VA
View Member Claims
A user can search for information about a specific member claim.
1. Click the View Member Claims button.
Note: This button also appears on the Enrollment History, COB, Benefits, and
Additional Information pages.
The following fields display with some of the information already populated.
Provider ID
Claim #
Service From/Through
2. Click the Search button.
The Member Claims Results displays.
3. Select a provider ID from the Provider ID drop-down if necessary.
4. Enter the claim number in the Claim ID field.
5. Enter the service start date in the Service From field.
6. Enter the service end date in the Service Through field.
7. Click Search.
The Claims Search Results page displays all the claims that meet the selected criteria.
Claim Number
Member Name and ID Number
Provider ID Number
Vendor Name and ID Number
Dates of Service
Claim Status
Charge Amount ($)
To review the information about a specific claim, click on the Claim # link.

ProviderConnect User Guide
35 IT Operations - Reston, VA
View Empire Claims
A user can search for information on an Empire claim for a member by clicking the View
Empire Claims button.
Note: This function is applicable only to the Empire Client.
To view information about Empire claims:
1. Click the View Empire Claims button on the Enrollment History tab.
Note: This button also appears on the COB, Benefits, and Additional Information
pages.
2. Follow the directions for entering claim information in the View Member Claims
section of this user guide.
The Empire Claims Search Results page displays all the claims that meet the selected
criteria.
Claim Number
Member Name and ID Number
Provider ID Number
Vendor Name and ID Number
Dates of Service
Claim Status
Charge Amount ($)
Paid Amount ($)
To review the information about a specific claim, click on the Claim # link.
View GHI-BMP Claims
A user can search for information on a GHI-BMP claim for a member by clicking the
View GHI-BMP Claims button. To view information on GHI-BMP claims:
1. Click the View GHI-BMP Claims button on the Demographics tab.
Note: This button also appears on the Enrollment History, COB, and Benefits
pages.
2. Follow the directions for entering claim information in the View Member Claims
section of this user guide.
The GHI-BMP Claims Search Results page displays all the claims that meet the selected
criteria. The following information displays on this page.
Claim Number
Member Name and ID Number
Provider ID Number
Vendor Name and ID Number
Dates of Service
Charge Amount ($)
Paid Amount ($)

ProviderConnect User Guide
36 IT Operations - Reston, VA
To review the information about a specific claim, click on the Claim # link.
Enter Member Reminders
A user can enter member reminder information, allowing appointment and medication
reminders to be displayed.
1. Click the Enter Member Reminders button on the Demographics tab.
The Enter Member Reminders page displays the member ID and member name, with
links pertaining to setting up appointment and medication reminders.
Note: Clicking on the Member ID link re-directs you to the Member Demographics page.
2. Click on each link and enter the necessary information for setting up reminders.
ABA Assessment
The Applied Behavioral Analysis (ABA) Assessment workflow is initiated upon a
provider completing the requested services header information as follows.
Level of Service – Outpatient
Type of Service – Mental Health
Level of Care – Outpatient
Type of Care – ABA Assessment
The following initial Yes/No question displays upon clicking Next: Does member have an
Autism Spectrum Disorder diagnosis?
If the answer to this question is Yes, the following fields must be completed.
Name of professional who gave the diagnosis
License type of the professional
Date of the diagnostic assessment/diagnosis

ProviderConnect User Guide
37 IT Operations - Reston, VA
Figure 27: ABA Assessment
Attach a Document
The provider is required to upload supporting documentation for both initial and
concurrent requests.
The following text displays below the Attach a Document section:
ABA Assessment/Treatment Planning by BCBA or Licensed Clinician Request in Hours:
Based on 1 hour increment
Please indicate how many hours are anticipated for completing the assessment
(required)
Provide details on clinical rationale for testing and for the number of hours
required, as well as which the assessment tools are to be used (required)
The provider then completes the standard Diagnosis page. (Refer to the Diagnosis section
of the Enter an Authorization Request (RFS) chapter for detailed information.)

ProviderConnect User Guide
38 IT Operations - Reston, VA
View Member Registrations
A user can enter/view member registration information. This will allow demographic
information to be captured and saved for a specific member.
1. Click the View Member Registrations button on the Demographics tab.
2. Enter the member information.
Enter an Authorization Request
Refer to the Enter an Authorization Request (RFS) chapter for detailed information about
how to enter authorization requests (requests for services).

ProviderConnect User Guide
39 IT Operations - Reston, VA
Enter a Claim
A user can enter and submit a claim for a member electronically.
1. Click the Enter Claim button.
Note: This button also appears on the Enrollment History, COB, Benefits, and
Additional Information pages.
The Provider page displays.
2. Select an option from the Select Service Address list and click Next.
The Submit A Claim – Step 1 of 3 page displays. (Note that the Member ID and Member
DOB fields pre-populate.)
3. Select a different NPI Number if necessary. (Defaults to the first number in the list
if there are multiple NPI numbers. Otherwise, displays just the one number.)
4. Enter a Taxonomy Code.
5. Enter the earliest date of service for the claim in the First Date of Service field.
6. Select either Yes or No in the Is this claim being billed under EAP Services? field
and click Next.
Note: The Next button will be disabled if the claim cannot be processed.
Figure 28: Submit a Claim – Step 1 of 3
The Submit A Claim (Step 2 of 3) page displays. Complete any applicable fields and
click Next.

ProviderConnect User Guide
40 IT Operations - Reston, VA
Figure 29: Submit a Claim – Step 2 of 3
The Submit A Claim (Step 3 of 3) page displays. Complete the Service Line Entry
section.
1. Enter dates in the Service From and Service Through fields.
2. Enter a code in the Service Code field.
3. Enter codes, if needed, in the Modifier Code 1, 2, 3, and 4 fields.
4. Enter a dollar amount in the Charge Amount ($) field.
5. Enter a code (from 00-99) in the Place of Service field.
6. Enter a number (up to three digits) in the Units field.
7. Enter a code (e.g., 765.04) in the Diagnosis Code 1 field.
8. Enter codes, if needed, in the Diagnosis Code 2, 3, 4, 5, 6, 7, and 8 fields.
9. Enter codes, if needed, in the Primary Payer, Secondary Payer, and Tertiary Payer
fields.
10. Complete the National Drug Code (NDC) fields if applicable. (Note that these
fields may not apply to all users!)
NDC Number (Allows 48 characters maximum. Must be all numerals.)
NDC Units (Allows 19 characters maximum; up to 17 digits, a decimal point,
and 1 decimal place. For example: 12345678901234567.0)
Type of Units
o UN – Unit
o ML – Milliliter
o ME – Milligram
o GR – Gram
o F2 – International Unit
Note: The National Drug Code is a unique product identifier used in the United
States for drugs that are intended for human use.
11. Complete the Association Qualifier field if applicable. (Note that this field may
not apply to all users, but is required if an association number is entered.)
12. Complete the Association Number field if applicable. (Note that this field may not
apply to all users, but is required if an association qualifier is entered.)

ProviderConnect User Guide
41 IT Operations - Reston, VA
13. Click the Add Service Line button. (The Claim Detail: Ready to Submit page
displays.)
Figure 30: Submit a Claim – Step 3 of 3
Click Submit to submit the entire claim.
To remove a service line:
1. Select the Click to Remove option button.
2. Click Remove.
3. Click Previous to return to the preceding provider and member entry page.
After the claim has been submitted, the Submit A Claim page displays. This page shows
the submission results and the claim information.
Clicking on the Claim # link directs the user to the Claim Summary page.

ProviderConnect User Guide
42 IT Operations - Reston, VA
Send an Inquiry
A user can submit an inquiry about a member to the Beacon Customer Service Center
electronically.
1. Click the Send Inquiry button.
Note: This button also appears on the Enrollment History, COB, Benefits, and
Additional Information pages.
The Customer Service Inquiry page displays.
2. Review the information in the Current Member section for accuracy.
3. Enter a name in the Contact Name field if necessary.
4. Enter the reason for the inquiry in the State your reason for the inquiry text box.
Note: This text box accepts up to 2,000 characters.
5. Attach a document if applicable.
6. Click Submit.
Figure 31: Customer Service Inquiry
The inquiry will be sent to the Beacon Customer Service Center. A confirmation of the
submission and an inquiry number will be displayed.

ProviderConnect User Guide
43 IT Operations - Reston, VA
9 Authorization Listing
In this section of ProviderConnect, a user can search for information on provider-specific
authorizations (e.g., authorization letters, associated claims).
Note: To research a specific member’s authorizations, select Specific Member Search on
the navigation bar instead of selecting Authorization Listing.
Upon clicking either Authorization Listing or Review an Authorization, the Search
Authorizations page displays.
1. Click View All to see all the authorizations for the provider. (The Search Results
page displays all the authorizations.)
Note: Results can be sorted by member ID, member name, or authorization
number.
- or-
1. Enter a number in the Authorization # field.
2. Enter a date range in the Effective Date and Expiration Date fields.
3. Click Search. (The Search Results page displays the specified authorization.)
Figure 32: Search Authorizations
ProviderConnect User Guide
44 IT Operations - Reston, VA
Refer to the Review an Authorization - EAP CAF chapter for detailed information about
the Search Results section (including the Auth Summary, Auth Details, and Associated
Claims tabs).

ProviderConnect User Guide
45 IT Operations - Reston, VA
10 Enter an Authorization Request (RFS)
The Enter an Authorization Request function enables users to electronically submit
requests for services (RFS) for Outpatient, Inpatient, and Medication Management
services. (This process is based on the member’s contract.)
ProviderConnect sends automatic e-mail reminders to providers who have both saved
drafts in RFS as well as saved a re-credentialing application draft. The e-mail reminder is
sent 5 days after the last time the re-credentialing application draft was saved and 25 days
after the RFS was saved.
An e-mail will be sent to each ProviderConnect user on the 6th day (after 5 days) after
the last change date on an existing Provider Data Sheet (PDS) draft. An Authorization
Request Draft Reminder e-mail will be sent to each ProviderConnect user (that is, the
user who initially saved the draft) on the 26th day (after 25 days) after the initial save
date on an existing Authorization (RFS) draft.
Draft reminder e-mails will not be sent if a user does not have an e-mail address on file in
the user’s ProviderConnect account/profile record. Also, ProviderConnect will send
reminder e-mails for only those RFS drafts that are in a “Saved” status, not an “Expired”
or “Deleted” status.
Additionally, clinicians have the ability to electronically send a message to a provider’s
inbox with a request for any missing clinical information. The message, which is in the
form of a web response, will display to the provider with a read-only history of the
authorization request that was submitted by the provider and allow the provider an
opportunity to respond back with the missing information within a defined turnaround
time. The provider’s feedback will be clinical information and will display in the
CareConnect review. Providers can attach clinical documents and enter notes. Be aware
however, that messages not responded to within the allotted time frame will be disabled.
Upon clicking the Enter an Authorization/Notification Request link, the Disclaimer page
displays.
1. Review the disclaimer.
2. Click Next.
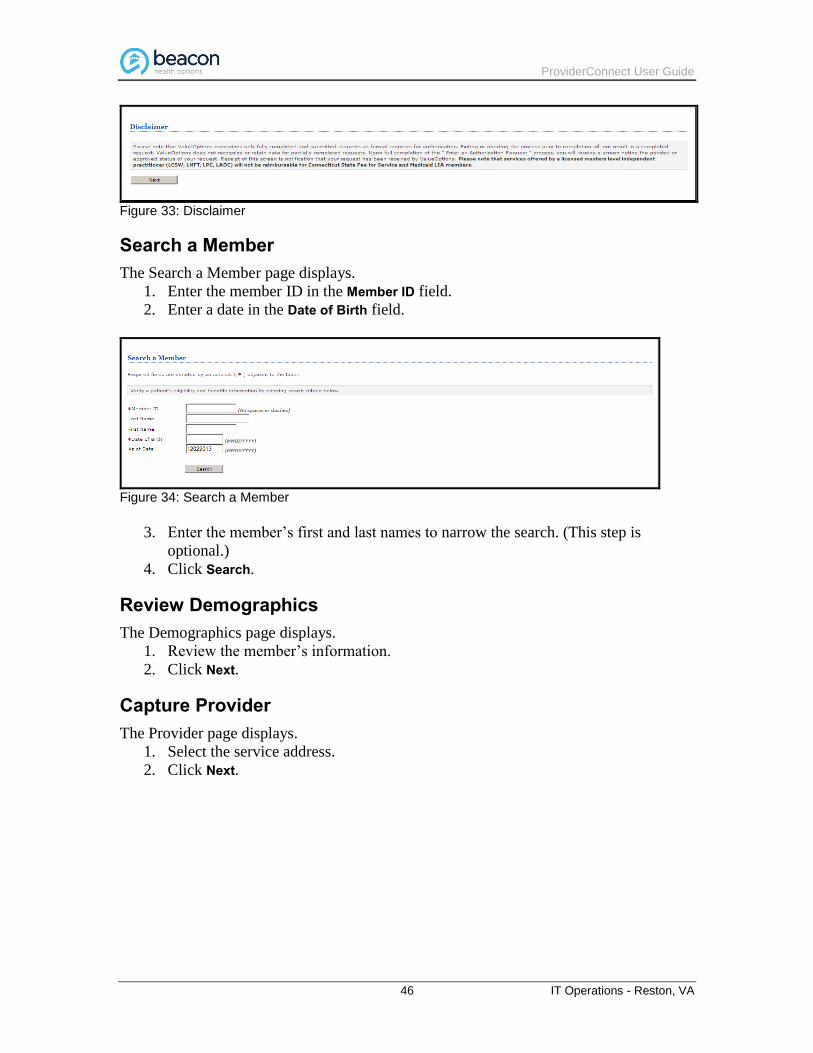
ProviderConnect User Guide
46 IT Operations - Reston, VA
Figure 33: Disclaimer
Search a Member
The Search a Member page displays.
1. Enter the member ID in the Member ID field.
2. Enter a date in the Date of Birth field.
Figure 34: Search a Member
3. Enter the member’s first and last names to narrow the search. (This step is
optional.)
4. Click Search.
Review Demographics
The Demographics page displays.
1. Review the member’s information.
2. Click Next.
Capture Provider
The Provider page displays.
1. Select the service address.
2. Click Next.

ProviderConnect User Guide
47 IT Operations - Reston, VA
Enter Requested Services
The Requested Services Header page displays next. The level of service selected on this
page determines which additional fields will display and which pages need to be
completed. The three options for the level of service are:
Outpatient
Inpatient/HLOC/Specialty
Medication Management
The steps for each level of service are covered in the following sections.
Note: Instructions are provided for all the fields on a particular page. Only the fields
with asterisks (*) are required, however.
Figure 35: Requested Services Header
Outpatient Level of Service
Pages for either an ORF1 or an ORF2 will display for the Outpatient level of service
depending on pre-established authorization parameters.
Outpatient ORF1
If the Outpatient request generates the equivalent of an ORF1 form, the following pages
display.
Type of Services
Current Risks
Requested Services
Results
These pages need to be completed sequentially.
Note: Only the fields with asterisks (*) are required.

ProviderConnect User Guide
48 IT Operations - Reston, VA
Type of Services
The Type of Services page is completed first.
1. Enter a Contact Name and Phone Number.
2. Answer the Type of Services questions.
Figure 36: Type of Services
3. Enter the member’s diagnosis information. (Refer to the Diagnosis section under
Outpatient ORF2 authorization requests.)
Figure 37: Diagnosis

ProviderConnect User Guide
49 IT Operations - Reston, VA
Current Risks
The Current Risks page displays next.
1. Enter a rating in the Member’s Risk to Self field.
2. Enter a rating in the Member’s Risk to Others field.
Figure 38: Current Risks
Note: Click on the links to display the rating information windows.
In the Current Impairments section:
1. Rate the severity of each of the listed impairments.
2. Click Next.
Figure 39: Current Impairments
3. Either Accept or Reject the number of visits.

ProviderConnect User Guide
50 IT Operations - Reston, VA
Requested Services
The Requested Services page displays next.
1. Select an option from the Place of Service drop-down.
2. Click Add/Modify Service Classes and select the appropriate service class from the
list. (Up to 20 service classes can be selected.)
The number of visits/units will auto-populate. If more than one service is requested:
1. Enter information on additional lines.
2. Enter the number of visits in the Visits/Units field.
3. Go back and modify the Visits/Units field in the previous line so that the Total
Visits/Units amount does not exceed the allowed amount.
4. Click Submit.
Clicking Next on the Requested Services page re-directs the user to the Determination
Status page. (If needed, refer to the Decrease Approved Visits section at the end of this
chapter for detailed information about how to decrease the number of approved visits.)
Outpatient ORF2
If the Outpatient request generates the equivalent of an ORF2 form, the following several
pages will display. (The Requested Services page may or may not display depending on
pre-established parameters.)
Type of Services
Current Risks
Diagnosis
Treatment History
Treatment Plan
Psychotropic Medications
Requested Services
Results
Type of Services
The Type of Services page is completed first.
1. Enter the Contact Name and Phone Number of the person to be contacted if
additional information is needed.
2. Enter a name, if applicable, in the Member’s Guardian field.
3. Select an option in the Is member currently receiving disability benefits? field and
click Next.

ProviderConnect User Guide
51 IT Operations - Reston, VA
Current Risks
The Current Risks page displays next.
1. Enter a rating in the Member’s Risk to Self field.
2. Enter a rating in the Member’s Risk to Others field.
Note: Click on the links to display the rating information windows.
Figure 40: Current Risks
In the Current Impairments section:
1. Rate the severity of each of the listed impairments.
2. Click Next.
Figure 41: Current Impairments

ProviderConnect User Guide
52 IT Operations - Reston, VA
Diagnosis
The Diagnosis page displays next and contains the following sections for capturing
diagnosis information.
Behavioral Diagnoses
Primary Medical Diagnoses
Social Elements Impacting Diagnosis
Functional Assessment
Behavioral Diagnoses
The Behavioral Diagnoses section contains five rows for capturing diagnoses. Each row
contains the following fields.
Diagnostic Category
Diagnosis Code
Description
The system uses the value entered in the Diagnostic Category field to determine the
values of the other two fields. If multiple options are available for the remaining fields,
the user can select from among a list of possible choices. If only one option is available
for the remaining fields, the system auto-populates those values.
Note: Entering either a diagnosis code or description automatically populates the other
two fields if only one description exists for that particular code or vice versa.
This section functions as follows:
Users may enter up to five diagnoses, but only the principal (primary)
diagnosis is required.
All the fields are required as all three fields are needed to obtain a complete
behavioral diagnosis.
The user must enter at least three characters of the diagnosis code in order to
initiate the automatic search. (That is, the automatic search begins when the fourth
character is entered.)
Upon a user entering a partial or complete diagnosis description and then tabbing
or clicking out of the field, the system begins an automatic search to complete the
other two fields if there is only a single match
Primary Medical Diagnoses
The Primary Medical Diagnoses section contains three rows for capturing diagnoses.
Each row contains the following fields.
Diagnostic Category
Diagnosis Code
Description
The system uses the value entered in the Diagnostic Category field to determine the
values of the other two fields. If multiple options are available for the remaining fields,
the user can select from among a list of possible choices. If only one option is available
for the remaining fields, the system auto-populates those values.

ProviderConnect User Guide
53 IT Operations - Reston, VA
Note: Entering either a diagnosis code or description automatically populates the other
two fields if only one description exists for that particular code or vice versa.
This section functions as follows:
Users may enter up to three diagnoses, but only the principal (primary)
diagnosis is required.
The diagnosis code and description are optional.
The user must enter at least two characters of the diagnosis code in order to
initiate the automatic search. (That is, the automatic search begins when the third
character is entered.)
Upon a user entering a partial or complete diagnosis description and then tabbing
or clicking out of the field, the system begins an automatic search to complete the
other two fields if there is only a single match.
Social Elements Impacting Diagnosis
The Social Elements Impacting Diagnosis section contains the following checkboxes.
(Users may select multiple checkboxes, but are required to select at least one.)
None
Educational problems
Financial problems
Housing Problems (Not Homelessness)
Homelessness
Occupational problems
Problems with Primary support group
Problems with access to health care services
Problems related to interaction w/legal system/crime
Problems related to the social environment
Other psychosocial and environmental problems*
Unknown
*Selecting Other psychosocial and environmental problems activates a 250-character text
box. (This field is required.)
Functional Assessment
The Functional Assessment section contains the following fields.
Assessment Measure
Secondary Assessment Measure
The following options are available in both drop-downs. CDC HRQOL
FAST
GAF
Other*
OMFAQ
SF12

ProviderConnect User Guide
54 IT Operations - Reston, VA
SF36
WHO DAS
*Selecting Other from either drop-down activates a 25-character text box. (This field is
required.)
The system also displays an Assessment Score field next to each assessment measure.
These fields accept a maximum of 25 alphanumeric characters and are required for each
assessment measure selected.
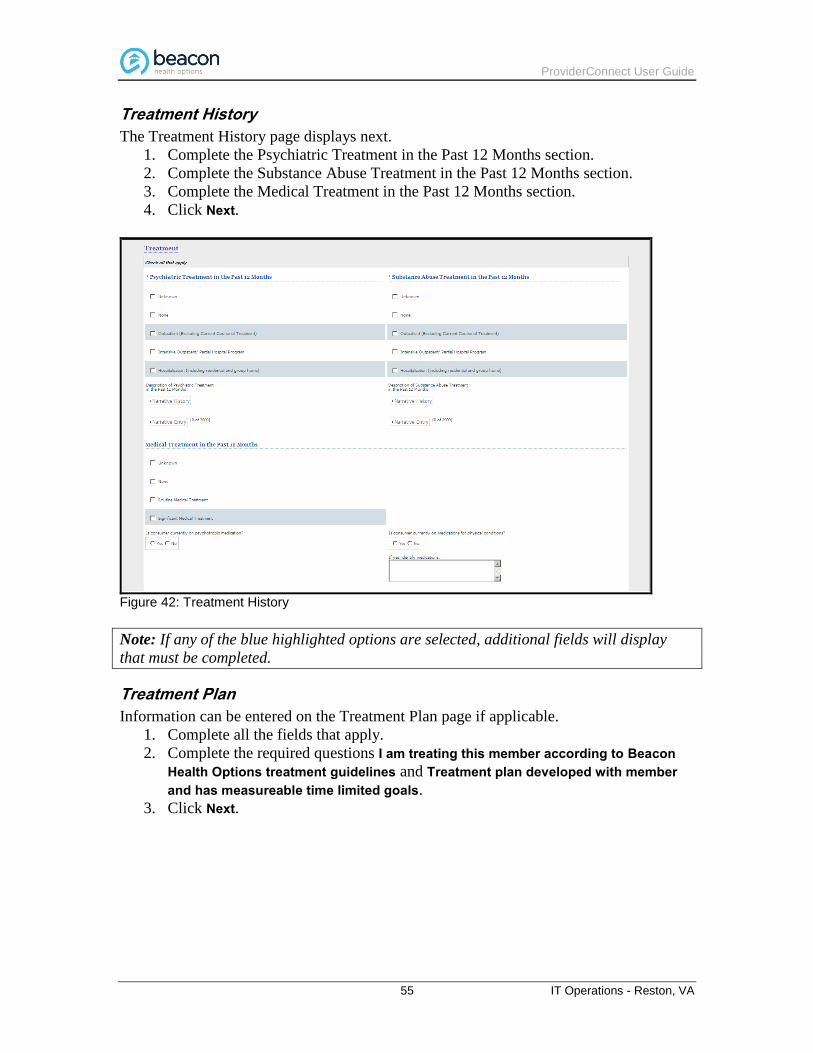
ProviderConnect User Guide
55 IT Operations - Reston, VA
Treatment History
The Treatment History page displays next.
1. Complete the Psychiatric Treatment in the Past 12 Months section.
2. Complete the Substance Abuse Treatment in the Past 12 Months section.
3. Complete the Medical Treatment in the Past 12 Months section.
4. Click Next.
Figure 42: Treatment History
Note: If any of the blue highlighted options are selected, additional fields will display
that must be completed.
Treatment Plan
Information can be entered on the Treatment Plan page if applicable.
1. Complete all the fields that apply.
2. Complete the required questions I am treating this member according to Beacon
Health Options treatment guidelines and Treatment plan developed with member
and has measureable time limited goals.
3. Click Next.

ProviderConnect User Guide
56 IT Operations - Reston, VA
Psychotropic Medications
Information must now be entered on the Psychotropic Medications page.
1. Enter the medication’s name in the Medication field or click on the link to select a
medication.
2. Enter the amount in the Dosage field.
3. Select an option from the Frequency drop-down.
4. Select either Yes or No in the Side Effects field.
5. Select either Yes or No in the Usually adherent field.
6. Select an option from the Prescriber drop-down.
7. Repeat steps 1 through 6 for each additional medication and click Next.
Figure 43: Psychotropic Medications
Note: Click on the Medication link to display the Select Medication Code window.
ProviderConnect User Guide
57 IT Operations - Reston, VA
Requested Services
The Requested Services tab may display next.
1. Select an option from the Place of Service drop-down.
2. Click Add/Modify Service Classes and select the appropriate service class from the
list.
Note: Up to 20 service classes can be selected.
3. Click Submit.
The number of visits/units will auto-populate. If more than one service is requested:
1. Enter information on additional lines.
2. Enter the number of visits in the Visits/Units field.
3. Go back and modify the Visits/Units field in the previous line so that the Total
Visits/Units amount does not exceed the allowed amount.
4. Click Submit.
Clicking Next on the Requested Services page re-directs the user to the Determination
Status page. (If needed, refer to the Decrease Approved Visits section at the end of this
chapter for detailed information about how to decrease the number of approved visits.)
Inpatient/HLOC/Specialty Level of Service – ITR Form
For an Inpatient/HLOC/Specialty Level of Service using the Inpatient Treatment Report
(ITR) form:
1. Enter a date in the Requested Start Date field.
2. Select Inpatient/HLOC/Specialty from the Level of Service drop-down.
3. Select an option from the Type of Service drop-down.
4. Select an option from the Level of Care drop-down.
5. Select an option from the Type of Care drop-down.
6. Enter a date in the Admit Date field.
7. Enter a time in the Admit Time field.
8. Select either Yes or No in the Has the member already been admitted to the
facility? field.
Notes:
This question displays only if the level of service is Inpatient/HLOC/Specialty.
This question is required if the level of service is Inpatient/HLOC/Specialty
and any combination of type of service, level of care, and type of care is
selected.
9. Attach any applicable documents and click Next.

ProviderConnect User Guide
58 IT Operations - Reston, VA
Figure 44: Requested Services Header
A page containing several tabs displays.
Note: Only the fields with asterisks (*) are required.
Level of Care
The Level of Care page is completed first.
1. Verify the Level of Care and Type of Service.
2. Enter the treatment in the Treatment Unit/Program field.
3. Enter a name in the Member’s Guardian field.
4. Select an option from the Member’s Current Location drop-down.
5. Select an option from the Primary Referral Source drop-down.
6. Enter an aftercare follow-up phone number.
-or-
Select N/A and enter a reason.
Figure 45: Level of Care – Preliminary Information
7. Enter at least one contact name and phone number and click Next.
Figure 46: Level of Care – Contact Information

ProviderConnect User Guide
59 IT Operations - Reston, VA
Current Risks
The Currents Risks page displays next.
1. Select an option from the Precipitant (Why Now?) drop-down and enter a brief
explanation.
2. Complete the Member’s Risk to Self section.
3. Complete the Member’s Risk to Others section.
4. Click Next.
Figure 47: Current Risks

ProviderConnect User Guide
60 IT Operations - Reston, VA
Current Impairments
The Current Impairments page displays next.
1. Rate the severity of each of the listed impairments.
2. Click Next.
Figure 48: Current Impairments
Diagnosis
The Diagnosis page displays next and contains the following sections for capturing
diagnosis information.
Behavioral Diagnoses
Primary Medical Diagnoses
Social Elements Impacting Diagnosis
Functional Assessment
Behavioral Diagnoses
The Behavioral Diagnoses section contains five rows for capturing diagnoses. Each row
contains the following fields.
Diagnostic Category
Diagnosis Code
Description
The system uses the value entered in the Diagnostic Category field to determine the
values of the other two fields. If multiple options are available for the remaining fields,
the user can select from among a list of possible choices. If only one option is available
for the remaining fields, the system auto-populates those values.
Note: Entering either a diagnosis code or description automatically populates the other
two fields if only one description exists for that particular code or vice versa.
This section functions as follows:
Users may enter up to five diagnoses, but only the principal (primary)
diagnosis is required.
ProviderConnect User Guide
61 IT Operations - Reston, VA
All the fields are required as all three fields are needed to obtain a complete
behavioral diagnosis.
The user must enter at least three characters of the diagnosis code in order to
initiate the automatic search. (That is, the automatic search begins when the fourth
character is entered.)
Upon a user entering a partial or complete diagnosis description and then tabbing
or clicking out of the field, the system begins an automatic search to complete the
other two fields if there is only a single match
Primary Medical Diagnoses
The Primary Medical Diagnoses section contains three rows for capturing diagnoses.
Each row contains the following fields.
Diagnostic Category
Diagnosis Code
Description
The system uses the value entered in the Diagnostic Category field to determine the
values of the other two fields. If multiple options are available for the remaining fields,
the user can select from among a list of possible choices. If only one option is available
for the remaining fields, the system auto-populates those values.
Note: Entering either a diagnosis code or description automatically populates the other
two fields if only one description exists for that particular code or vice versa.
This section functions as follows:
Users may enter up to three diagnoses, but only the principal (primary)
diagnosis is required.
The diagnosis code and description are optional.
The user must enter at least two characters of the diagnosis code in order to
initiate the automatic search. (That is, the automatic search begins when the third
character is entered.)
Upon a user entering a partial or complete diagnosis description and then tabbing
or clicking out of the field, the system begins an automatic search to complete the
other two fields if there is only a single match.
Social Elements Impacting Diagnosis
The Social Elements Impacting Diagnosis section contains the following checkboxes.
(Users may select multiple checkboxes, but are required to select at least one.)
None
Educational problems
Financial problems
Housing Problems (Not Homelessness)
Homelessness
Occupational problems
Problems with Primary support group
Problems with access to health care services
Problems related to interaction w/legal system/crime

ProviderConnect User Guide
62 IT Operations - Reston, VA
Problems related to the social environment
Other psychosocial and environmental problems*
Medical disabilities that impact diagnosis or must be accommodated for in
treatment
Unknown
*Selecting Other psychosocial and environmental problems activates a 250-character text
box. (This field is required.)
Functional Assessment
The Functional Assessment section contains the following fields.
Assessment Measure
Secondary Assessment Measure
The following options are available in both drop-downs. CDC HRQOL
FAST
GAF
Other*
OMFAQ
SF12
SF36
WHO DAS
*Selecting Other from either drop-down activates a 25-character text box. (This field is
required.)
The system also displays an Assessment Score field next to each assessment measure.
These fields accept a maximum of 25 alphanumeric characters and are required for each
assessment measure selected.
Treatment History
The Treatment History page displays next.
1. Complete the Psychiatric Treatment in the Past 12 Months section.
2. Complete the Substance Abuse Treatment in the Past 12 Months section.
3. Complete the Medical Treatment in the Past 12 Months section if needed.
4. Click Next.

ProviderConnect User Guide
63 IT Operations - Reston, VA
Figure 49: Treatment History

ProviderConnect User Guide
64 IT Operations - Reston, VA
Psychotropic Medications
The Psychotropic Medications page displays next.
1. Enter the medication’s name in the Medication field or click on the link to select a
medication.
2. Enter the amount in the Dosage field.
3. Select an option from the Frequency drop-down.
4. Select either Yes or No in the Side Effects field.
5. Select either Yes or No in the Usually Adherent field.
6. Select an option from the Prescriber drop-down.
7. Repeat steps 1 through 6 for each additional medication and click Next.
Figure 50: Psychotropic Medications

ProviderConnect User Guide
65 IT Operations - Reston, VA
Substance Abuse
The Substance Abuse page displays next.
1. Check all Substance Abuse types that apply.
Figure 51: Substance Abuse Types
For each substance you selected:
Select an option from the Total Years of Use drop-down.
Select an option from the Length of Current Use drop-down.
Enter an amount in the Amount of Use field.
Select an option from the Frequency of Use drop-down.
Enter a date in the Date Last Used field.
2. Select all Withdrawal Symptoms that the member is experiencing.
Note: This field is required if the type of service is Detoxification.
3. Complete the Vitals section (i.e., Blood Pressure, Temperature, Pulse,
Respiration, and Blood Alcohol).
Figure 52: Withdrawal Symptoms and Vitals

ProviderConnect User Guide
66 IT Operations - Reston, VA
The ASAM/Other Patient Placement Criteria section must be completed next.
1. Select Low, Medium, or High for the Dimension 1, Dimension 2, and Dimension 3
fields if the type of service is Detoxification.
2. Select Low, Medium, or High for the Dimension 1 through Dimension 6 fields if the
type of service is Substance Abuse and click Next.
Figure 53: ASAM/Other Placement Criteria
Treatment Plan
The Treatment Plan page displays next.
1. Enter the Date of Plan.
2. Select either Yes or No in the Member/Guardian Involved in Treatment Plan field.
3. Expand the PCP for Select Medicaid Accounts section if applicable.
4. Enter Long Term Goals.
5. Enter information in the Symptom/Observation text box and all applicable text
boxes in that section. (Sections repeat for multiple symptoms to be entered.)
Figure 54: Treatment Plan

ProviderConnect User Guide
67 IT Operations - Reston, VA
Treatment Request
The Treatment Request page displays next.
1. Select either Yes or No in the Certificate of Need Required field.
2. Select either Yes or No in the Is Family/Couples Therapy Indicated field.
3. Expand the Medical Implications section if applicable.
4. Check all boxes that apply for the Treatment Request Information fields.
5. Enter the length in the Specify Length field if the Fixed Length Program option is
selected.
6. Enter a number (of visits per week or days per month) if the Frequency of Program
option is selected.
7. Select an option from the Primary Reason for Continued Stay drop-down.
8. Select an option from the Primary Barrier to Discharge drop-down.
Figure 55: Treatment Request
9. Check all applicable Baseline Functioning behaviors. Describe the behavior in the
text box if Other is checked.
10. Enter a date in the Expected Discharge Date field.
11. Enter a date in the Estimated Return to Work Date field.
-or-
Select N/A if the information is not available.
12. Select an option from the Planned Discharge Level of Care drop-down.
13. Select an option from the Planned Discharge Residence drop-down.
14. Click Submit.

ProviderConnect User Guide
68 IT Operations - Reston, VA
Figure 56: Baseline Functioning
The Determination Status page displays next.

ProviderConnect User Guide
69 IT Operations - Reston, VA
Inpatient/HLOC/Specialty Level of Service – ITR2 Form
The IP/HLOC Inpatient Treatment Report (ITR2) form is designed to encourage more
provider use of ProviderConnect and also decrease the need to contact him/her to obtain
additional clinical information.
For an Inpatient/HLOC/Specialty Level of Service using the Inpatient Treatment Report
(ITR2) form: 1. Enter a date in the Requested Start Date field.
2. Select Inpatient/HLOC/Specialty from the Level of Service drop-down.
3. Select an option from the Type of Service drop-down.
4. Select an option from the Level of Care drop-down.
5. Select an option from the Type of Care drop-down.
6. Enter a date in the Admit Date field.
7. Enter a time in the Admit Time field.
8. Select either Yes or No in the Has the member already been admitted to the
facility? field.
Notes:
This question displays only if the level of service is Inpatient/HLOC/Specialty.
This question is required if the level of service is Inpatient/HLOC/Specialty
and any combination of type of service, level of care, and type of care is
selected.
9. Attach any applicable documents and click Next.
Figure 57: Requested Services Header
A page containing three tabs displays.
Note: Only the fields with asterisks (*) are required.

ProviderConnect User Guide
70 IT Operations - Reston, VA
Level of Care/Diagnosis
The Level of Care/Diagnosis page is completed first.
Information Requested by Clinician for Inclusion in this Request
This section contains information entered on the Focus of Next Clinical Review page in
Service/CareConnect. Clinicians use that screen to enter information they would like to
see from the provider on the next request. The information entered by the clinician is
displayed in ProviderConnect so that the provider can make sure to include it in the
request that he/she is submitting. (The information is read-only.) Note that:
If the most recent previous review is blank, neither the field nor the field label will
display as no information was entered for the review.
If multiple concurrent reviews occur, only the most recently added Focus of Next
Clinical Review narrative will display.
Level of Care
This section contains level of care, type of service, and contact information fields.
1. Verify the Level of Care and Type of Service.
2. Select the Treatment Includes ECT checkbox if applicable.
3. Select the Treatment Includes Psych Testing checkbox if applicable.
4. Enter aftercare follow-up contact information for the member.
Phone #
Validate E-mail
Note: Phone #, e-mail, or N/A is required. If N/A, the provider must explain why
follow-up information is not available.
5. Enter at least one contact name and phone number.
Figure 58: Level of Care – Contact Information

ProviderConnect User Guide
71 IT Operations - Reston, VA
Diagnosis
This section comprises the standard DSM-5 Diagnosis page. (Refer to Diagnosis in the
Inpatient/HLOC/Specialty Level of Service – ITR Form section of this chapter for
detailed information.)
Medical Implications
This section contains the following fields and is required if the Primary Medical
Diagnostic Category entered on the Diagnosis page is other than None or Unknown.
Are there any comorbid medical conditions that impact the treatment of the diagnosed
MHSU conditions? Is the member receiving appropriate medical care for the comorbid medical
conditions?
Metabolic Assessment Tool
This section contains the BMI functionality from the case management referral follow-up
workflow.
1. Enter BMI information.
-or-
Select the BMI not assessed checkbox.
2. Enter the results of the metabolic syndrome assessment.
3. Enter additional information about the reason for not obtaining BMI if applicable.
If the recommendation is to follow up, enter the details about the follow-up when
they become available.
Figure 59: Metabolic Assessment Tool

ProviderConnect User Guide
72 IT Operations - Reston, VA
Clinical Presentation/Medication/Treatment
The Clinical Presentation/Medication/Treatment page displays next.
Information Requested by Clinician for Inclusion in this Request
This section contains information entered on the Focus of Next Clinical Review page in
Service/CareConnect. Clinicians use that screen to enter information they would like to
see from the provider on the next request. The information entered by the clinician is
displayed in ProviderConnect so that the provider can make sure to include it in the
request that he/she is submitting. (The information is read-only.) Note that:
If the most recent previous review is blank, neither the field nor the field label will
display as no information was entered for the review.
If multiple concurrent reviews occur, only the most recently added Focus of Next
Clinical Review narrative will display.
Symptomatology
This section contains the following fields along with these instructions: “Please explain
the reason for current admission (describe symptoms) and include the precipitant (what
stressor or situation led to this decompensation). If this is a concurrent request, please
list both the progress that has been made to date and what symptoms still remain.”
Narrative Entry
Member’s Risk to Self
o Danger to Self Symptom Complex*
* Required if member’s risk to self is a 2 or 3.
Member’s Risk to Others
o Danger to Others Symptom Complex*
* Required if member’s risk to others is a 2 or 3.
Substance Use
Urine drug screen?*
*Urine drug screen is required for the RFS workflow if member’s substance use is
a 2 or 3 OR Type of Service = Substance Use OR Primary Behavioral Diagnostic
Category for the incoming request is one of the following:
Alcohol-Related Disorders
Cannabis-Related Disorders
Combined Other Substance Disorders
Hallucinogen-Related Disorders
Inhalant-Related Disorders
Opioid-Related Disorders
Sedative-, Hypnotic-, or Anxiolytic-Related Disorders
Stimulant-Related Disorders
Outcome of UDS
Date of Urine Drug Screen
Positive for*
*At least one substance or “Other” must be selected if the outcome of the urine
drug screen is positive.

ProviderConnect User Guide
73 IT Operations - Reston, VA
Blood Alcohol*
* Blood Alcohol or N/A is required for the RFS workflow if member’s substance
use is a 2 or 3 OR Type of Service = Substance Use OR Primary Behavioral
Diagnostic Category for the incoming request is one of the following:
Alcohol-Related Disorders
Cannabis-Related Disorders
Combined Other Substance Disorders
Hallucinogen-Related Disorders
Inhalant-Related Disorders
Opioid-Related Disorders
Sedative-, Hypnotic-, or Anxiolytic-Related Disorders
Stimulant-Related Disorders
Blood Alcohol N/A*
*Checkbox is required if Blood Alcohol is left blank.
Primary Issues/Symptoms Addressed in Treatment
This section comprises a number of symptom complexes. Note that:
For each symptom complex that is “triggered” as being required when completing a
request for service, the applicable sections will automatically be expanded upon
accessing the Clinical Presentation/Medication/Treatment tab.
Sections can also be manually expanded/collapsed.
If a particular symptom complex is expanded, the associated Narrative Entry textbox
will also be expanded by default. If a particular system complex is required, then the
associated Narrative Entry will also be required.
The following directive displays just below the section title: “Symptom complexes are
utilized for gathering clinical information specific to the primary behavioral diagnosis
and/or risk. At times more than one complex may be identified for completion. Providing
all the requested information in the identified complex(es) will assist in completing the
authorization process and determining medical necessity. If this is a concurrent request,
please update the identified complexes with any new information for each complex based
on the individual’s current symptomatology.”
Recovery and Resiliency
This section contains a Narrative Entry textbox along with the following instructions:
“Please outline the recovery and resiliency environment to support this individual’s long-
term recovery plan. Please include personal strengths, support systems available to
support the recovery and details around living environment, as well as outline any
identified needs or supports that need to be put in place to assist in the successful
recovery.”

ProviderConnect User Guide
74 IT Operations - Reston, VA
Medications
This section enables the provider to view and modify information regarding current and
historical medications for the member. He/she can also add new medications as needed.
Add a Medication
Upon clicking Add Medication, the system displays data entry fields for adding a new
medication. (If there are no medications on file for the member, the system displays a
blank set of data entry fields upon accessing this page.)
The system also displays a separate medication-related Narrative Entry textbox along
with the following instructions: “For this medication, please enter any details concerning
dosage, side effects, adherence, effectiveness, prescribing provider and any specific
target symptoms.”
Clicking the Add Medication button again adds a new medication record. Medications are
saved upon submitting the request for services.
Note: Up to 10 medications can be added per request for services.
Figure 60: Add a Medication
Best Practices Endorsement
This section utilizes the Primary Behavioral Diagnostic Category entered on the
Diagnosis page for the incoming request and dynamically updates the Best Practice
Guidelines Related to Primary Behavioral Diagnosis hyperlink with the PDF document
associated to that particular diagnostic category. (If there is no match, then a generic PDF
document displays.)
Respond either Yes or No to the following statement: I endorse that I follow Best Practice
Guidelines for the Primary Behavioral Diagnosis.
If the answer is No, you must give a reason why you do not endorse best practice
guidelines related to the primary behavioral diagnosis.
Note: The best practices endorsement statement is required.

ProviderConnect User Guide
75 IT Operations - Reston, VA
Additional Information on Selected Conditions
This section utilizes the Primary Behavioral and Medical Diagnostic Categories entered
on the Diagnosis page for the incoming request and automatically displays hyperlinked
descriptions for those categories. (The system can display up to five hyperlinked
descriptions per category. Upon selecting a particular link, the system opens the
applicable Achieve Solutions® web page.)
Note: If no active hyperlinks exist for a particular diagnostic category, the following
message appears: “No links to display.”
Discharge Information
This section contains the following instructions: “Discharge planning considerations
should include obtaining releases to speak to and coordinate care with the providers that
individual will be transitioning to as well as confirming that appointments are timely
scheduled. Discharge planning should be included as a component of the treatment
throughout the entire stay. (HEDIS measures require follow-up within 7 days to
discharge. Requirements may be sooner based on individual circumstances.)”
Complete the following information.
1. Planned Discharge Level of Care
2. Other Planned Discharge Level of Care (if applicable)
3. Planned Discharge Residence
4. Other Planned Discharge Residence (if applicable)
5. Expected Discharge Date
Note: Planned Discharge Level of Care and Planned Discharge Residence are required
for all requests for services. Expected Discharge Date is required for concurrent requests
for services.
Figure 61: Discharge Information

ProviderConnect User Guide
76 IT Operations - Reston, VA
Additional Information
The Additional Information page contains parent-specific custom fields from the ITR
form and displays for concurrent requests for services only. If there is no parent-specific
information for a particular parent, the following message displays: “No additional
information is required.”
ProviderConnect User Guide
77 IT Operations - Reston, VA
Medication Management Level of Service
If the Medication Management level of service is selected, the number of steps in the
process is reduced and only three tabs are displayed.
1. Select Medication Management from the Level of Service drop-down.
2. Click Next.
The Diagnosis page displays next.
3. Enter the Contact Name and Phone Number of the person to be contacted if
additional information is needed.
4. Enter the member’s diagnosis information. (Refer to the Diagnosis section under
Outpatient ORF2 authorization requests.)
The Requested Services page displays next.
5. Select an option from the Place of Service drop-down.
6. Click Add/Modify Service Classes and select the appropriate service class from the
list. (Up to 20 service classes can be selected.)
The number of visits/units will auto-populate. If more than one service is requested:
7. Enter information on additional lines.
8. Enter the number of visits in the Visits/Units field.
9. Go back and modify the Visits/Units field in the previous line so that the Total
Visits/Units amount does not exceed 20.
10. Click Submit.
The Determination Status page displays next.

ProviderConnect User Guide
78 IT Operations - Reston, VA
Decrease Approved Visits
VSP and in-network providers can choose to decrease the number of visits approved for
the request for services (RFS). When units are offered for potential auto-approval,
accepting that number of units or requesting fewer units may result in automatic
authorization. Requests for a greater number of units will need to pend for further review.
To decrease the number of approved visits:
1. Click Reject.
The following pop-up window displays.
Figure 62: Number of Visits & Expiration Date Pop-up
2. Enter the new number in the Please enter number of visits you would like to
request field.
3. Optionally enter a date in the Please enter the expiration date you would like for
the request if approved field.
Note: The expiration date must be greater than the requested start date for this
authorization and not exceed the expiration date allowed for this authorization
request. If the date exceeds the allowed expiration date, the system expiration
date will apply.
4. Click Submit.
The Requested Services page displays.
5. Complete the fields on the Requested Services page if necessary.
6. Verify the Visits/Units amount.
7. Click Submit.
The Results page displays reflecting the modified amount of visits/units.

ProviderConnect User Guide
79 IT Operations - Reston, VA
11 Enter an ABA Authorization Request
The following Applied Behavioral Analysis (ABA) outpatient workflows/pages are
available for providers to evaluate and determine the appropriate course of treatment for
members with Autism Spectrum Disorder or other Intellectual Developmental
Disabilities.
ABA Assessment
ABA Services
ABA Services
The ABA Services workflow is initiated upon a provider completing the requested
services header information as follows.
Level of Service – Outpatient
Type of Service – Mental Health
Level of Care – Outpatient
Type of Care – ABA Services
The following initial Yes/No question displays upon clicking Next: Does member have an
Autism Spectrum Disorder diagnosis?
If the answer to this question is Yes, the provider must “complete the following
information and documentation” and “if previously submitted, please indicate.” (Select
the Already submitted checkbox if documentation has already been submitted.)
Name of professional who gave the diagnosis
License type of the professional
Date of the diagnostic assessment/diagnosis

ProviderConnect User Guide
80 IT Operations - Reston, VA
Figure 63: ABA Service
Attach a Document
Supporting documentation is required if the answer to the Autism Spectrum
Disorder diagnosis question is Yes.
Supporting documentation is not required if the answer to the Autism Spectrum
Disorder diagnosis question is No.
Supporting documentation is not required if the provider has indicated that
documentation has already been submitted.
The provider must next answer the following question: Does member have a co-occurring
mental health diagnosis?
The provider then completes the standard Diagnosis page. (Refer to the Diagnosis section
of the Enter an Authorization Request (RFS) chapter for detailed information.)
The following required fields display below the Diagnosis page.
Is member receiving other professional services?
o If the answer to this question is Yes, the provider must select one or more of
the services listed or select Other.
Is member taking any medication?
o If the answer to this question is Yes, the provider must enter the applicable
information.

ProviderConnect User Guide
81 IT Operations - Reston, VA
The provider then completes the Current Impairments and Current Skills Impairments
sections.
Ratings for Current Impairments are: 0 (none), 1 (mild/mildly incapacitating), 2
(moderate/moderately incapacitating), 3 (severe/severely incapacitating), or ANC
(assessment not completed)
Ratings for Current Skills Impairments are: 0 (age appropriate), 1 (1 to 2 years
below), 2 (3 to 4 years below), 3 (5 or more years below), or ANC (assessment
not completed)
The following free text field displays next.
“Please outline areas of progress since last review, as well as areas that need to be focus
of future treatment. If there has been a lack of progress, please indicate the actions to
adjust or change treatment plan to address lack of progress. Include a summary of the
Transition/Discharge Plan and any additional resources or referrals that are needed for
the member and their family.”
Note: This field is required for concurrent requests for services only.
The following instructions display next.
“Please refer to http://www.valueoptions.com/providers/Forms/Clinical/ABA-Provider-
Progress-Report-Guidelines.pdf to download ValueOptions ABA report guidelines.”
“Providing the following components in the report will help determine medical
necessity.”
Member’s basic bio-psychosocial
Member’s skill impairments
List of data source/tools used
Intervention plan (including baseline data)
Transition & discharge plan
Member’s strengths/capabilities
Crisis Plan
Parent training
Coordination of care
Description of supervision
Note: The provider is required to upload documentation for concurrent ABA services
only.
Concurrent ABA Services
The following fields display only for concurrent ABA requests for services.
Follow-up considerations for concurrent review.
Number of member behavior goals targeted during current authorization period.
How many member behavior goals were met?
Number of new member behavior goals added for next authorization period.
Re-assessment tools used. Check all that apply.
During recent authorization period were there any gaps in treatment?

ProviderConnect User Guide
82 IT Operations - Reston, VA
12 ABA Tracking Measures
Applied Behavioral Analysis (ABA) Maladaptive Behavior and Skills Data Tracking
functionality is available in ProviderConnect for providers who have the appropriate
clinical function(s) assigned to their user security role.
To access this feature:
1. Click on the Weekly ABA Measures link. (The member search page displays.)
2. Search for the appropriate member. (The Demographics page displays.)
From the Demographics page the user can:
Enter weekly maladaptive behavior updates for the current member,
Enter weekly skills updates for the current member, or
View ABA clinical data.
Figure 64: ABA Maladaptive Behavior & ABA Skills Data Tracking Buttons

ProviderConnect User Guide
83 IT Operations - Reston, VA
Enter ABA Maladaptive Behavior
Clicking the Enter ABA Maladaptive Behavior button re-directs the user to the ABA
Maladaptive Behavior page for him/her to enter weekly maladaptive behavior updates for
the selected member.
Note: This button also displays if accessing the Demographics page via the Specific
Member Search or Find a Specific Member option.
Read-only Information
The following read-only fields display in the page header.
Record #
Member Name
Member ID
Date of Birth
Age
The user is prompted to select the week for which he/she will be entering/editing data.
Note: The No Maladaptive Behavior Data to report this week checkbox should be
selected if there is no data to report for the current week. (This checkbox is required if no
data is entered.)
The user can also search for an existing maladaptive behavior data record by selecting the
appropriate week from the calendar.

ProviderConnect User Guide
84 IT Operations - Reston, VA
Upon making a selection, the following read-only fields display.
Added By – Displays the ID of the person who submitted the maladaptive behavior
data.
Date Added – Displays the date the maladaptive behavior data was submitted.
Changed By – Displays the ID of the person who last edited the maladaptive behavior
data.
Date Changed – Displays the date the maladaptive behavior data was last edited.
Data Entry Fields
The following fields display in tabular format.
Baseline – Contains checkboxes associated with each of the behavior types. Baseline
selections (checkmarks) apply only to the week those particular behavior types are
first evaluated. They do not carry over to subsequent weeks. (That is, the checkboxes
are cleared.)
Behavior Type – Contains a read-only list of behavior types.
Behavior Name – Allows the user to select a behavior associated with a particular
behavior type. If Other, a 25-character textbox displays for the user to enter the other
behavior. (Behavior names are based on behavior type.)
Measurement Type – Allows the user to select a measurement type for the behavior.
Measurement Units – Allows the user to select a measurement unit for the
measurement type. (Default measurement units are based on measurement type.)
Interval Units – Allows the user to enter the interval units. (Only numeric values are
permitted and can include decimals.)
Data Value – Allows the user to enter a data value. (Only numeric values are
permitted and can include decimals.)
Submit ABA Maladaptive Behavior Data
Upon clicking Submit, the system validates the data and displays the determination status.
(See: Weekly ABA Measures Confirmation)

ProviderConnect User Guide
85 IT Operations - Reston, VA
Enter ABA Skills
Clicking the Enter ABA Skills button re-directs the user to the ABA Skills page for
him/her to enter weekly skills updates for the selected member.
Note: This button also displays if accessing the Demographics page via the Specific
Member Search or Find a Specific Member option.
Read-only Information
The following read-only fields display in the page header.
Record #
Member Name
Member ID
Date of Birth
Age
The user is prompted to select the week for which he/she will be entering/editing data.
Note: The No Skills Data to report this week checkbox should be selected if there is no
data to report for the current week. (This checkbox is required if no data is entered.)
The user can also search for an existing skills record by selecting the appropriate week
from the calendar.
Upon making a selection, the following read-only fields display.
Added By – Displays the ID of the person who submitted the skills data.
Date Added – Displays the date the skills data was submitted.
Changed By – Displays the ID of the person who last edited the skills data.
Date Changed – Displays the date the skills data was last edited.

ProviderConnect User Guide
86 IT Operations - Reston, VA
Data Entry Fields
The following sections display. Each section contains a number of textboxes in which the
user can enter values ranging from 1 – 20.
Readiness Skills
o Attending
o Fine Motor
o Gross Motor
o Motor Imitation
o Routine/Schedule
o Visual Performance
Language/Communication
o Intraverbals
o Label/Tact
o Receptive Language
o Request/Mands
o Social Interactions
o Syntax and Grammar
o Vocal Imitation
Daily Living/Self-Help
o Chores
o Dressing
o Eating
o Grooming
o Play and Leisure
o Toileting
o Vocational
Social Skills
o Group Instruction
o Pragmatic Language
o Social Interaction
Academics
o Math
o Reading
o Spelling
o Writing
Generalized Responding
o Academics
o Cognitive Functioning
o Daily Living/Self Help
o Language/Communications
o Readiness Skills
o Safety
o Social Skills

ProviderConnect User Guide
87 IT Operations - Reston, VA
Submit ABA Skills Data
Upon clicking Submit, the system validates the data and displays the determination status.
(See: Weekly ABA Measures Confirmation)
ProviderConnect User Guide
88 IT Operations - Reston, VA
View ABA Clinical Data
Upon clicking the View ABA Clinical Data button, the system authenticates the submitter
ID and then passes the member number parameters to IntelligenceConnect. Upon success
of the user authentication and the above parameters being passed, the user is re-directed
to the IntelligenceConnect application where he/she can view the ABA Maladaptive
Behaviors and ABA Skills Graphical Reports.
Note: This button also displays if accessing the Demographics page via the Specific
Member Search or Find a Specific Member option.
Weekly ABA Measures Confirmation
Upon clicking Submit on either the ABA Maladaptive Behavior or ABA Skills page, the
system validates the data and re-directs the user to the appropriate Determination Status
page. The following information displays on this page.
Member Name
Member ID
Member DOB
Record #
Type of Request
From – To (Dates)
Submission Date
Provider Name & Address
Provider ID
Clicking the Enter Maladaptive Behavior Data button re-directs the user to the ABA
Maladaptive Behavior page.
Clicking the Enter ABA Skills button re-directs the user to the ABA Skills page.
Users also have the ability to:
Print the maladaptive behaviors/skills results,
Print the maladaptive behaviors/skills request,
Download the maladaptive behaviors/skills request, or
Return to the ProviderConnect home page.

ProviderConnect User Guide
89 IT Operations - Reston, VA
13 Review an Authorization – EAP CAF
The Review an Authorization Request function enables users to electronically perform an
authorization search by provider ID. Network providers authorized to perform EAP
Services can submit their one-page version of the CAF-1 / Billing Form from within this
section.
Upon clicking the Review an Authorization link, the Search Authorizations page displays.
Note: The provider ID will be auto-populated along with the current date.
1. Enter the member ID, authorization #, and/or authorization dates on the Search
Authorizations page.
2. Select the Only display EAP cases where final billing and/or disposition has not
occurred checkbox if you want only EAP authorizations that are tied to open EAP
cases and that meet the stated conditions to be returned in the search results.
3. Click either Search or View All.
Figure 65: Search Authorizations

ProviderConnect User Guide
90 IT Operations - Reston, VA
The Authorization Search Results page displays.
Note: If the provider’s security role contains the EAP CAF function, Enter EAP CAF
links appear on the ProviderConnect home page. Clicking either of these links re-directs
the provider to the Authorization Search Results page. (Be aware that only the EAP
authorizations that are tied to open EAP cases will be listed.)
Figure 66: Authorization Search Results
4. Click on the Authorization # link adjacent to the appropriate service.
Note: Member IDs also display as links, but were deleted to protect members’
privacy.
The Auth Summary page displays.
Figure 67: Auth Summary

ProviderConnect User Guide
91 IT Operations - Reston, VA
5. Click the Auth Details tab to view the authorization details.
The Auth Details page displays.
Figure 68: Auth Details
6. Click the Enter EAP CAF button on either the Auth Summary tab or Auth Details
tab to start the CAF (Case Activity Form) entry process.

ProviderConnect User Guide
92 IT Operations - Reston, VA
Figure 69: Case Activity Form (CAF)
7. Enter all the EAP Case Activity and Billing Information and click Next.

ProviderConnect User Guide
93 IT Operations - Reston, VA
Providers have the ability to submit an EAP CAF without executing a claim submission
by answering Yes to the Is this a case closing with no dates of service to submit claim
for? question. The claims section will be bypassed, leaving the date of service blank.
The Select Service Address page displays next.
Figure 70: Select a Service Address
8. Enter the necessary information and click Next.
9. The Step 1 of 2 page for submitting a claim displays. Enter the applicable
information and click Next.
Figure 71: Step 1 of 2
10. The Step 2 of 2 page for submitting a claim displays. Enter the applicable
information and click Submit.

ProviderConnect User Guide
94 IT Operations - Reston, VA
Figure 72: Step 2 of 2
The Case Activity & Billing process is complete.
Note: The following Submission Printing Options display at the bottom of the results
page.
Print Submission Result
Print Submission
Download Submission
Figure 73: CAF Results

ProviderConnect User Guide
95 IT Operations - Reston, VA
14 Save Request as a Draft
This functionality allows a provider to save an authorization request as a work in progress
prior to submission. The provider has the option to save the authorization on each
tab/page. The draft is maintained on the home page for 30 days. After 30 days, the
request is removed and a new request is required. The Save Request function displays as
a Save Request as Draft button on the Requested Services Header page.
To save a draft of an authorization request:
1. Click on the Enter an Authorization/Notification Request link.
2. Click Next on the Disclaimer page.
3. Complete the Member ID and Date of Birth fields and click Search.
4. Click Next.
5. Select the service address and click Next.
6. Complete the Requested Services Header page and click Next.
The Save Request as Draft button can be selected on any of the subsequent pages.
Note: The Authorized User link allows creators of clinical drafts to authorize other users
to update and/or submit saved drafts. (Refer to the Authorized User section at the end of
this chapter for detailed information.)
Upon clicking the Save Request as Draft button, the following pop-up message displays
advising the user how long the draft will be available for viewing and modification.
Upon clicking OK, the user receives a message stating that the draft request has been
successfully saved.
To view saved drafts, click on the View Clinical Drafts link.
Users will be able to view a read-only version of the draft by clicking the View button.
To modify or continue with the Request for Authorization, the user may click the Open
button. To delete a draft, the user may place a checkmark inside the box to the left of the
draft and then click the Delete Request Drafts button. Clinical Request Drafts that have
expired within the last 30 days will display at the bottom of the page.
Note: If attachments were added, they need to be reattached when the draft is opened.
Attachments do not remain after saving a request as a draft.

ProviderConnect User Guide
96 IT Operations - Reston, VA
Authorized User
Creators of clinical drafts have the ability to allow other users to update and/or submit
saved drafts via an Authorized User link. This functionality applies to all Requests for
Services (RFS) workflows, the Individual Care Plan workflow (MRLD parent code), the
Wellness Recovery Treatment Plan workflow (BHK parent code), and the Special
Program Application and Comprehensive Service Plan workflows (ILL parent code).
If a user is not associated with other users, the Authorized User field label will be fixed
(i.e., static). If only one user was saved, the authorized user ID will display in this field. If
multiple users were saved, the word “Multiple” displays in this field.
Following are some of the attributes of this functionality.
The system will store a record for each authorized user of a saved draft.
Users who belong to a group will be able to authorize multiple users to a draft.
When a saved draft is reopened for editing by the originating user, the Authorized User
link will remain available to enable the originating user to access the pop-up to
change authorized users.
A Select Authorized User(s) pop-up window will display a list of users who can be
authorized to have access to the originating user’s saved draft request. The pop-up
can be accessed from the Authorized User link when the logged on user is in a group
with other users who have clinical access.
o The user will be able to select authorized users by clicking a checkbox next to
each user.
o The user will have the option to select all associated users.
o There will be an option to clear all the selected users.
o The pop-up will display users associated with the logged in user who have clinical
access to View/Save Draft Requests.
o If a user is associated with the logged in user but does not have the appropriate
clinical security, that user will not appear in the pop-up.
o The list will be sorted in ascending order by user ID and cannot be re-sorted.
ProviderConnect User Guide
97 IT Operations - Reston, VA
View Clinical Drafts
The View Clinical Drafts page will display the Authorized User field with the updated
saved draft information. A read-only pop-up window will display the authorized users
associated with a Saved Draft or an Expired Draft (Clinical Request Drafts and Plan
Drafts).

ProviderConnect User Guide
98 IT Operations - Reston, VA
15 Enter a Notification
The Enter a Notification function enables users to electronically submit a notification
using the Global Notification (NTFN) form. The purpose of this form is to meet the data
collection and reporting requirements of the Substance Abuse and Mental Health
Services Administration (SAMHSA) Certified Community Behavioral Health Clinic
(CCBHC) Grant and to lessen the administrative burden on the providers responsible for
creating these notifications/authorizations. That is, the NTFN form allows for an
authorization to be generated without requiring clinical information. (Note that not all
workflows may have access to this form.)
The NTFN form contains the following tabs.
Notification
Results
Contact Information
The contact information is entered first.
Admitting Physician
Admitting Physician Phone#
Attending Physician
Attending Physician Phone#
Preparer
Preparer Phone#
Utilization Review Contact
Utilization Review Contact Phone#
Utilization Review Contact Fax
Diagnosis Information
The diagnosis information is entered next.
Behavioral Diagnoses
Primary Medical Diagnosis
Social Elements Impacting Diagnosis
Functional Assessment
(Refer to the Diagnosis section of the Enter an Authorization Request (RFS) chapter for
detailed information.)

ProviderConnect User Guide
99 IT Operations - Reston, VA
Additional Information
The form also includes a 2,000-character text field for the user to provide any additional
information that would be helpful in processing the request.
Clicking Submit re-directs the user to the Determination Status page.

ProviderConnect User Guide
100 IT Operations - Reston, VA
16 Recent Provider Summary Vouchers
Users can view recent provider summary vouchers by clicking on the View My Recent
Provider Summary Vouchers link.
Provider summary vouchers can be retrieved by:
Searching Provider Summary Vouchers by Provider
Note: This is the default.
Searching Provider Summary Vouchers by Check
The search results will contain records that match the search criteria. A specific provider
summary voucher can be viewed by clicking on the View link.
Figure 74: Search a Provider Summary Voucher

ProviderConnect User Guide
101 IT Operations - Reston, VA
17 Claim Listing and Submission
In this section of ProviderConnect, a user can enter a claim, submit a claim, and search
for a claim.
Upon clicking either Claim Listing and Submission or Review a Claim, the Claims page
displays with three sections titled New Claims, Search Claims, and Search Other Claims.
Figure 75: Claims
This page contains several options.
Click the Enter Claim button to enter a claim for immediate adjudication. For
detailed information, refer to the Enter a Claim section.
Note:
o Providers will need their vendor number. This number can be obtained from
Provider Relations.
o Name fields are not required. If a name is entered, make sure the spelling is
correct or an error message will display.
o The patient’s date of birth must be filled out, not the member’s date of birth.
Click the EDI Claims File button to submit an electronic claim. For detailed
information, refer to the EDI Homepage chapter.
Complete the Search Claims section and click Search to search for a provider-
specific claim. For detailed information, refer to the View Member Claims
section.
Click the Search Empire Claims button if the claim is specific to the Empire
Client. For detailed information, refer to the View Empire Claims section.

ProviderConnect User Guide
102 IT Operations - Reston, VA
Click the Search GHI-BMP Claims button if it is a GHI-BMP claim. For detailed
information, refer to the View GHI-BMP Claims section.
Slight differences will appear between the directions in the referenced sections and the
directions for Claims Listing and Submission (because the information is member-
specific instead of provider-specific). The majority of the directions are the same,
however.
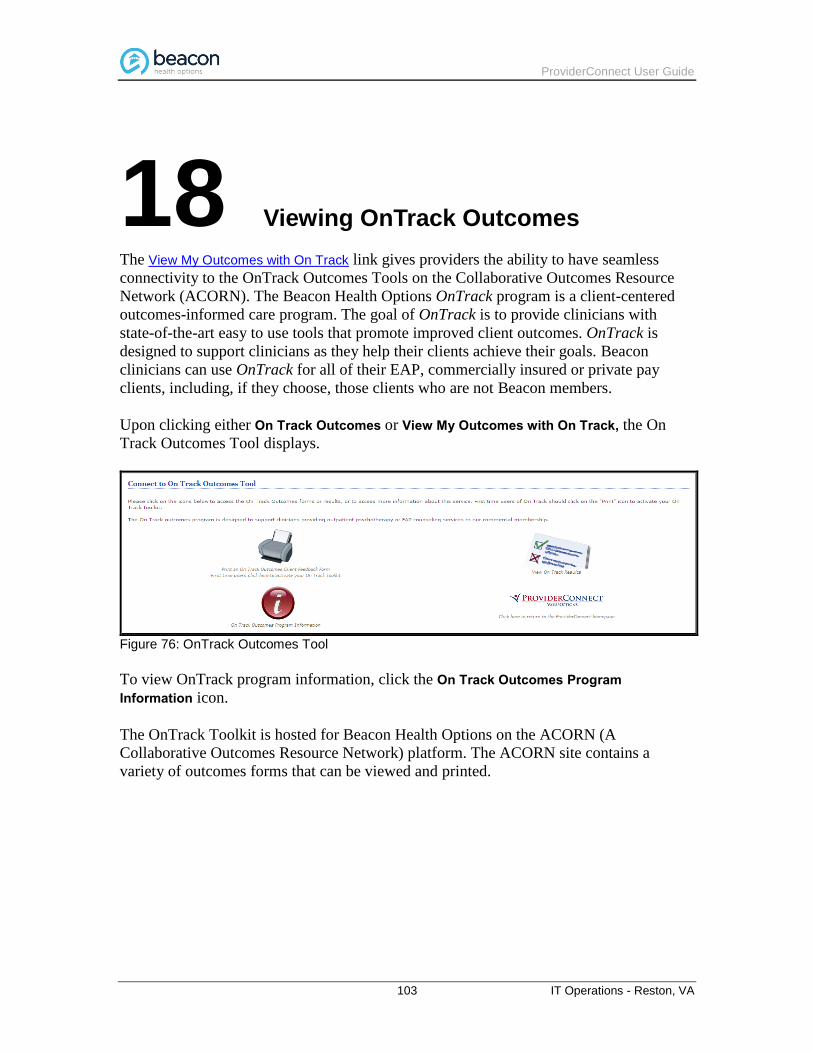
ProviderConnect User Guide
103 IT Operations - Reston, VA
18 Viewing OnTrack Outcomes
The View My Outcomes with On Track link gives providers the ability to have seamless
connectivity to the OnTrack Outcomes Tools on the Collaborative Outcomes Resource
Network (ACORN). The Beacon Health Options OnTrack program is a client-centered
outcomes-informed care program. The goal of OnTrack is to provide clinicians with
state-of-the-art easy to use tools that promote improved client outcomes. OnTrack is
designed to support clinicians as they help their clients achieve their goals. Beacon
clinicians can use OnTrack for all of their EAP, commercially insured or private pay
clients, including, if they choose, those clients who are not Beacon members.
Upon clicking either On Track Outcomes or View My Outcomes with On Track, the On
Track Outcomes Tool displays.
Figure 76: OnTrack Outcomes Tool
To view OnTrack program information, click the On Track Outcomes Program
Information icon.
The OnTrack Toolkit is hosted for Beacon Health Options on the ACORN (A
Collaborative Outcomes Resource Network) platform. The ACORN site contains a
variety of outcomes forms that can be viewed and printed.

ProviderConnect User Guide
104 IT Operations - Reston, VA
19 My Online Profile
In this section of ProviderConnect, providers can access and modify their own profile
information.
Upon clicking the My Online Profile link, a page containing two sections displays.
The Modify Profile section contains information that cannot be changed (e.g.,
Provider ID, Provider Name, and Tax ID).
In the Editable Profile Details section, however, the user can edit information (e.g.,
E-mail Address, Phone Number, and Password).
To edit provider information:
1. Update the information in the Editable Profile Details section as appropriate.
2. Click Update Profile.
Figure 77: My Online Profile

ProviderConnect User Guide
105 IT Operations - Reston, VA
20 My Practice Information
In the My Practice Information section of ProviderConnect, information on provider
practices can be accessed.
Click on My Practice Information to view provider contact information.
Figure 78: View Provider Contact Information
1. Enter the provider’s last name in the Last Name field.
2. Enter provider’s first name, if needed, in the First Name field.
3. Select a state, if needed, from the State drop-down.
4. Click Search.
The Provider Search Results page displays.
5. Click on the Last Name link for the appropriate provider.

ProviderConnect User Guide
106 IT Operations - Reston, VA
Figure 79: Provider Search Results
The Provider Details page displays. Detailed information about the provider displays on
this page (e.g., Name, Address, Specialties).

ProviderConnect User Guide
107 IT Operations - Reston, VA
21 Provider Data Sheet
The Provider Data Sheet (PDS) is Beacon’s online provider re-credentialing application
and is accessible to providers only at the time re-credentialing is needed. Providers are
notified via telephone, fax, e-mail, or mail when re-credentialing is due and the PDS is
available.
To access this section, click the Provider Data Sheet link on the navigation bar. The PDS
contains the following tabs.
Provider EAP Counselor
Referral Disability Provider
Practice FFD Specialist
Education Provider Profile
License/Certification W-9
Insurance Supporting Documentation
Work History Attestation
1. Review the Provider Information, and make any necessary corrections or additions.
Click Save & Next to continue.
Note: A red asterisk (*) indicates a required field.
Figure 80: Provider Information

ProviderConnect User Guide
108 IT Operations - Reston, VA
2. Enter the necessary Referral Information. Click Save & Next to continue.
Figure 81: Provider Referral Information

ProviderConnect User Guide
109 IT Operations - Reston, VA
3. Enter the provider’s Practice Information. Click Save & Next to continue.
Figure 82: Provider Practice Information

ProviderConnect User Guide
110 IT Operations - Reston, VA
4. Enter the provider’s Education Information. Click Save & Next to continue.
Figure 83: Provider Education Information

ProviderConnect User Guide
111 IT Operations - Reston, VA
5. Enter the provider’s License/Certification Information, and upload or fax a copy of
his/her current certificate(s). Click Save & Next to continue.
Figure 84: License/Certification Information

ProviderConnect User Guide
112 IT Operations - Reston, VA
6. Enter the provider’s Malpractice Insurance Carrier Information, and upload or fax a
copy of his/her current malpractice insurance face sheet. Click Save & Next to
continue.
Figure 85: Malpractice Insurance Information

ProviderConnect User Guide
113 IT Operations - Reston, VA
7. Enter the provider’s Work History Information. Click Save & Next to continue.
Figure 86: Work History Information
8. If applicable, enter the EAP Counselor Information. Click Save & Next to continue.
Figure 87: EAP Counselor Only

ProviderConnect User Guide
114 IT Operations - Reston, VA
9. If applicable, enter the necessary Disability Provider Network Information. Click
Save & Next to continue.
Figure 88: Disability Provider Network Only Information

ProviderConnect User Guide
115 IT Operations - Reston, VA
10. If applicable, enter the Fitness for Duty Assessment Specialist Network Information
(FFD Specialist). Click Save & Next to continue.
Figure 89: FFD Specialist Information

ProviderConnect User Guide
116 IT Operations - Reston, VA
11. Answer all the Provider Profile Information. If the Yes option button is selected,
please provide an explanation in the Comments section at the bottom of the page.
Click Save & Next to continue.
Figure 90: Provider Profile Information

ProviderConnect User Guide
117 IT Operations - Reston, VA
12. Enter the necessary information for the Substitute for Form W-9 Request for
Taxpayer Identification Number. Click Save & Next to continue.
Figure 91: W-9
13. Follow the directions on this page to complete and upload any additional
contract-specific Supporting Documentation as necessary. Click Save & Next to
continue.
Note: Customized text along with a related link can be added to this tab as necessary.
Figure 92: Supporting Documentation

ProviderConnect User Guide
118 IT Operations - Reston, VA
14. Read the Attestation/Participation Statement. If manually signing and faxing the
Attestation form, follow the instructions on this page. (After indicating their intention
to fax the form, users should print the document prior to saving.)
Figure 93: Attestation Information

ProviderConnect User Guide
119 IT Operations - Reston, VA
Electronically Sign the Attestation
To electronically sign the form, do the following:
1. Click in the highlighted Click here to sign this document electronically area on the
Attestation page. The Welcome to the Provider Esignature Process page displays.
2. Review the steps on the Welcome to the Provider Esignature Process page to
apply an electronic signature.
3. Click on the Proceed to ESIGN Disclosure link.
The US Federal Consumer Disclosure – E-SIGN Act page displays.
4. Carefully read the information on the US Federal Consumer Disclosure – E-SIGN
Act page.
5. Click on the Yes link to signify consent to complete and sign the document
electronically. The Signature Information page displays.
6. Enter the user’s name to apply to the attestation document on the Signature
Information page.
Note: Enter the name as you would normally write it when signing a paper
document, using upper and lower case letters as appropriate.
7. Click the Submit button to display the Attestation/Participation Statement that the
user is being asked to electronically sign.
8. Click in the highlighted Click Here to Sign area to electronically sign the
document. The Thank You page displays stating that the document has been
successfully signed.
9. Follow the instructions on the Thank You page to download a copy of the
document and save it to your computer.
After the user saves the signed attestation locally or closes the Esign confirmation window, a
pop-up window displays indicating that the form has been submitted to Beacon Health
Options. At that point, if any of the required tabs were left blank, a pop-up window displays
informing the user to enter information for the missing tabs. The completed PDS application
is automatically submitted once the user has applied his or her Esignature.
Following is an example of the pop-up window that displays when a practitioner has
submitted his or her PDS application.

ProviderConnect User Guide
120 IT Operations - Reston, VA
Figure 94: Practitioner Final Submission Pop-up
There are also options on the PDS to Print current page, Print all pages, or Close.

ProviderConnect User Guide
121 IT Operations - Reston, VA
22 Facility Data Sheet
The Facility Data Sheet (FDS) is Beacon’s online facilities and organizational provider
re-credentialing application and is similar to the Provider Data Sheet (PDS). Like the
PDS, it is accessible only at the time re-credentialing is needed. Facilities are notified via
telephone, fax, e-mail, or mail when re-credentialing is due and the FDS is available.
Click on the Provider Data Sheet link to access the FDS. The FDS contains the following
tabs.
General Information
License/Accreditation
Insurance
Demographic
Service Locations & Programs
Addenda
Supporting Documentation
Roster of Providers
Participation Statement

ProviderConnect User Guide
122 IT Operations - Reston, VA
1. Review the General Information, and make any necessary corrections or additions.
Click Save & Next to continue.
Note: A red asterisk (*) indicates a required field.
Figure 95: General Information
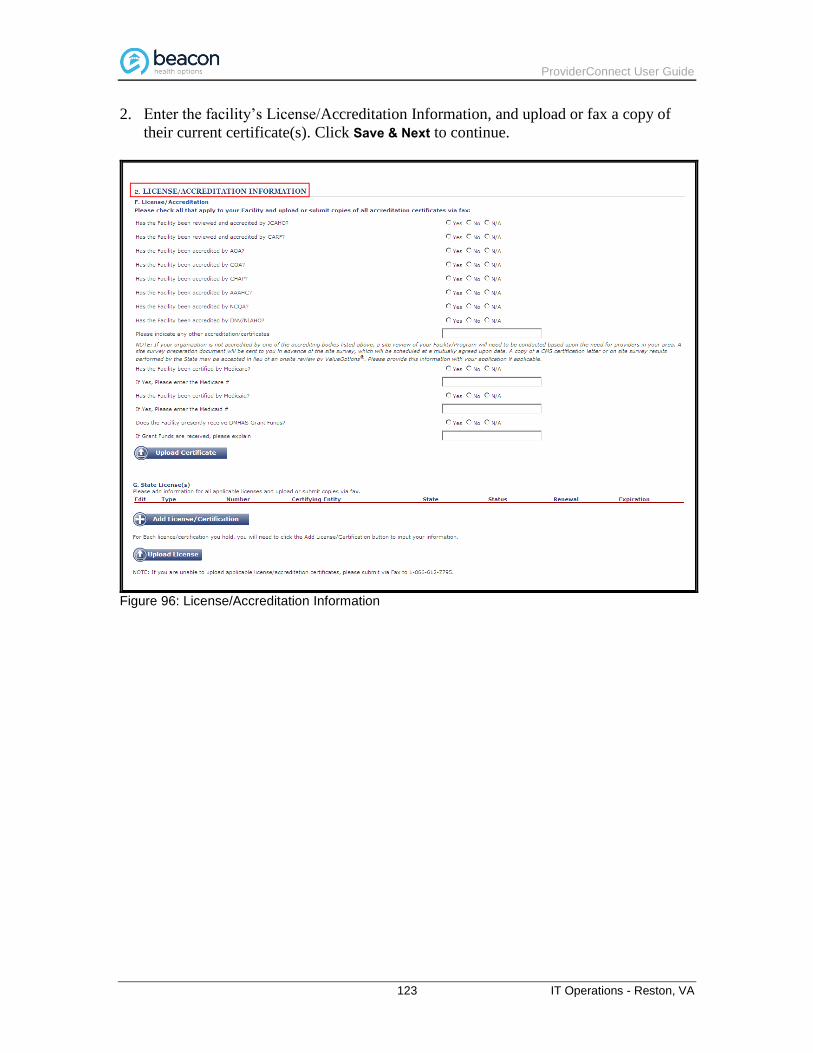
ProviderConnect User Guide
123 IT Operations - Reston, VA
2. Enter the facility’s License/Accreditation Information, and upload or fax a copy of
their current certificate(s). Click Save & Next to continue.
Figure 96: License/Accreditation Information

ProviderConnect User Guide
124 IT Operations - Reston, VA
3. Enter the facility’s Malpractice Insurance Carrier Information, and upload or fax a
copy of their current medical malpractice, comprehensive professional, general and/or
umbrella liability insurance certificates. Click Save & Next to continue.
Figure 97: Insurance Information

ProviderConnect User Guide
125 IT Operations - Reston, VA
4. Enter the facility’s Demographic Data, and upload or fax a copy of their current 8(a)
and HUBZone certificate(s) if applicable. Click Save & Next to continue.
Figure 98: Demographic Data

ProviderConnect User Guide
126 IT Operations - Reston, VA
5. The Service Locations & Programs page lists all the service locations that were active
at the time the data sheet was created. (That is, the data sheet is a “snapshot” of the
service locations that were active on the day the data sheet was created.) When the
page is first accessed the service location headings display in red, indicating that the
user needs to take action. The user must verify each service location as well as the
programs for each location in order to submit the application.
Figure 99: Service Locations and Programs
Click anywhere in the heading to collapse/expand a specific service location.
Click the icon to delete a specific service location. (If a service location is
deleted in error, click the icon to undo the deletion.)
Click the icon to verify a specific service location. The following pop-up
window displays.

ProviderConnect User Guide
127 IT Operations - Reston, VA
Figure 100: Verify Service Location
Click Verify & Next to confirm the information is correct.
-or-
Update the information as necessary. Click Verify & Next.
-or-
Click the Check here if this location should be removed from our records
checkbox to remove the location from Beacon’s records. Click Verify & Next.

ProviderConnect User Guide
128 IT Operations - Reston, VA
Once the service location information is verified, the system displays any programs
associated with the location.
Figure 101: Verify Programs
Review the program information and make any necessary updates.
Click Verify & Save when finished.
Click Save & Next to continue.

ProviderConnect User Guide
129 IT Operations - Reston, VA
6. Complete the Program Addenda Questionnaire. Click Save & Next to continue.
Figure 102: Addenda Information

ProviderConnect User Guide
130 IT Operations - Reston, VA
7. Follow the directions on this page to complete and upload any additional
contract-specific Supporting Documentation as necessary. Click Save & Next to
continue.
Figure 103: Supporting Documentation
8. Use the Roster of Providers page to:
Manually add providers to the roster
Make any necessary corrections to the existing roster
Upload a copy of a staff roster
Click Next to continue.
Figure 104: Roster of Providers

ProviderConnect User Guide
131 IT Operations - Reston, VA
9. Read the Participation Statement. If manually signing and faxing the Participation
form, follow the instructions on this page. (After indicating their intention to fax the
form, users should print the document prior to saving.) (Refer to the Electronically
Sign the Attestation section of the Provider Data Sheet chapter for detailed
information.)
Figure 105: Participation Information

ProviderConnect User Guide
132 IT Operations - Reston, VA
23 Update Demographic Information
This functionality allows a provider to see all his/her active service locations along with
the associated telephone numbers, fax numbers, and billing locations. Providers make and
submit changes as needed from within ProviderConnect.
To update demographic information, click on the Update Demographic Information link.
(This link is controlled outside the application. Providers will have access to this link
only at certain times.)
The Provider Demographics Summary page displays.
Note: A icon is available on the various demographics pages that displays additional
information upon the provider hovering his/her mouse over the icon.
This page contains the following sections.
Provider Demographics
Service Location Information

ProviderConnect User Guide
133 IT Operations - Reston, VA
Figure 106: Provider Demographics Summary Example

ProviderConnect User Guide
134 IT Operations - Reston, VA
Provider Demographics
The top portion of the Provider Demographics Summary page displays the provider’s
mailing address along with other provider-related information.
1. Click the “edit” ( ) icon to update provider demographic information.
The Enter & Verify Mailing Address page displays.
2. Edit the following information as necessary.
Address Line 1/Line 2
City/State/Zip Code
Country
Phone #
Phone extension
Fax #
Fax extension
Website address
ProviderConnect E-mail (Verify e-mail)
Correspondence E-mail (Verify e-mail)
Figure 107: Enter & Verify Mailing Address
Upon clicking Continue, the user is presented with three options.
Cancel – Cancels the changes and returns the user to the Provider Demographics
Summary page.
Back – Returns the user to the previous page.
Submit – Sends the changes to Network Operations. Once a decision is made by
Network Operations to approve or reject a specific change, the system sends a
message to the provider’s message center indicating the status of the update.
While on the Enter & Verify Mailing Address page, the user can also cancel any changes
or reset the page.

ProviderConnect User Guide
135 IT Operations - Reston, VA
Service Location Information
The bottom portion of the Provider Demographics Summary page displays the provider’s
service locations.
Clicking the SHOW ( ) icon reveals the billing location for a specific service
location.
Clicking the HIDE ( ) icon re-hides the billing information.
Clicking the Show Hours ( ) icon expands the office hours display,
allowing the provider to add and update service location office hours.
Clicking the Hide Hours ( ) icon collapses the office hours display.
Edit a Service Location
Providers have the ability to edit service locations. To edit a service location:
1. Click the “edit” ( ) icon for the appropriate record.
2. Select between the following name formats by moving the right-pointing blue
arrow up or down.
First MI Last
Facility/Group Name
3. Edit the following information as necessary.
Location name
Note: Editable only if the location does not have a tax ID.
Phone #
Phone extension
Fax #
Fax extension
Office Hours
4. Click Save.

ProviderConnect User Guide
136 IT Operations - Reston, VA
Figure 108: Edit a Service Location
Providers also have the ability to remove a specific service location. The following
message displays: “If this location is being replaced by a new location, please select Cancel and
add the new location first via the ‘Add New Service Address’ button below. You will be prompted during the process on whether the new location is replacing an existing one. Otherwise, if this
location is not being replaced, please select OK to continue.”

ProviderConnect User Guide
137 IT Operations - Reston, VA
Invalidate a Service Location
A checkbox is available on the Service Location Information page that enables providers
to invalidate a particular service location. Upon selecting this checkbox, a pop-up
window displays advising the provider to contact MMIS to have the information updated.
Note: Used only for the attestation process.
Figure 109: Invalidate a Service Location
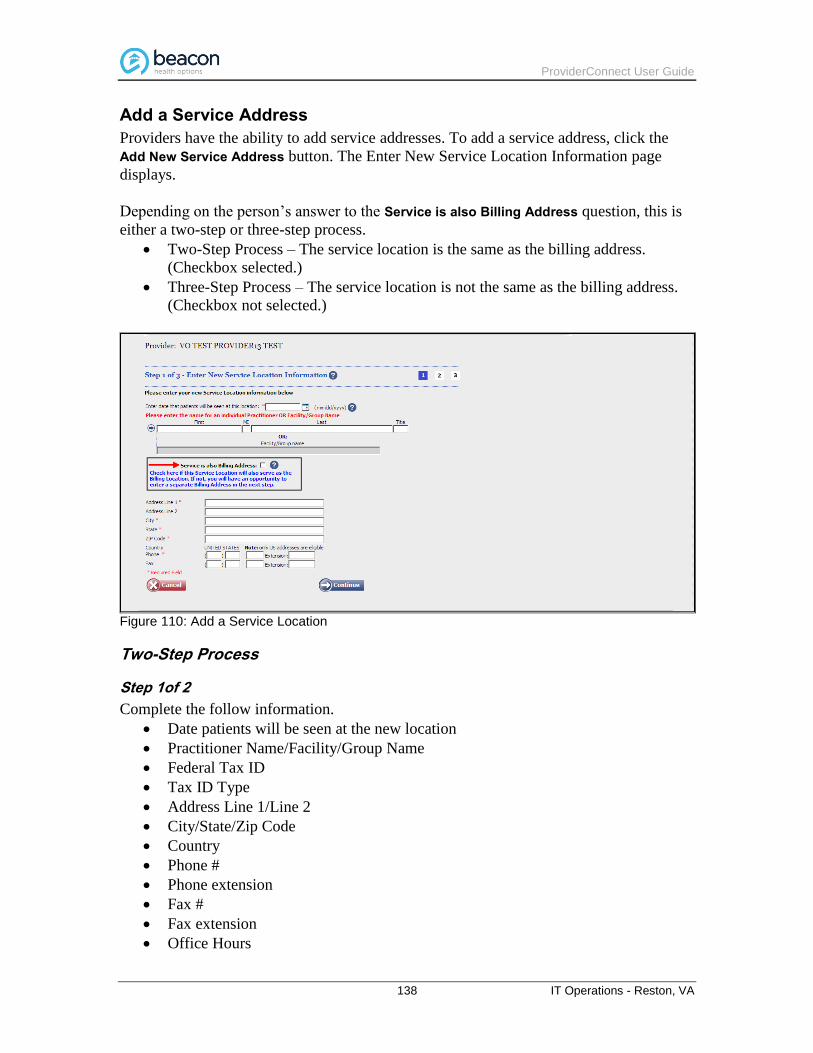
ProviderConnect User Guide
138 IT Operations - Reston, VA
Add a Service Address
Providers have the ability to add service addresses. To add a service address, click the
Add New Service Address button. The Enter New Service Location Information page
displays.
Depending on the person’s answer to the Service is also Billing Address question, this is
either a two-step or three-step process.
Two-Step Process – The service location is the same as the billing address.
(Checkbox selected.)
Three-Step Process – The service location is not the same as the billing address.
(Checkbox not selected.)
Figure 110: Add a Service Location
Two-Step Process
Step 1of 2
Complete the follow information.
Date patients will be seen at the new location
Practitioner Name/Facility/Group Name
Federal Tax ID
Tax ID Type
Address Line 1/Line 2
City/State/Zip Code
Country
Phone #
Phone extension
Fax #
Fax extension
Office Hours

ProviderConnect User Guide
139 IT Operations - Reston, VA
Upon clicking Continue, the QAS verification process verifies /standardizes the address.
Step 2 of 2
Answer the Will this New Service Location replace an existing one? (Yes/No) question.
If Yes, select the service location to replace. (This location will be terminated.)
-or-
If No, the system selects the first provider/vendor combination encountered (in the
same state) and proceeds to copy the location information into the new service
location. (If the provider does not have any existing locations in the same state,
the system displays an error message.)
Three-Step Process
Step 1of 3
Complete the follow information.
Date patients will be seen at the new location
Practitioner Name/Facility/Group Name
Address Line 1/Line 2
City/State/Zip Code
Country
Phone #
Phone extension
Fax #
Fax extension
Office Hours
Upon clicking Continue, the QAS verification process verifies /standardizes the address.
Step 2 of 3
Answer the Will this New Service Location replace an existing one? (Yes/No) question.
If Yes, select the service location to replace. (This location will be terminated.)
-or-
If No, the system selects the first provider/vendor combination encountered (in the
same state) and proceeds to copy the location information into the new service
location. (If the provider does not have any existing locations in the same state,
the system displays an error message.)
Upon clicking Continue to Billing Selection, the billing address maintenance page
displays.

ProviderConnect User Guide
140 IT Operations - Reston, VA
Step 3 of 3
1. Optionally select a replacement billing location.
2. Enter the effective date of the change request.
Practitioners and facilities can also create new billing addresses.
Add a New Federal Tax ID
Providers have the ability to request the addition of Federal Tax IDs that do not already
exist in NetworkConnect. To add a Federal Tax ID:
1. Enter the new tax ID in the Federal Tax ID field.
2. Select a tax ID type from the Tax ID Type drop-down.
3. Click the Verify button.
Figure 111: Add a New Federal Tax ID
The system verifies whether or not the tax ID entered matches a tax ID currently on file.
If a match is found, the system indicates as such.
If a match is not found, the system displays a hyperlink for the provider to download
a blank W-9 form to complete, save, and then upload or he/she can upload a
previously saved W-9. The provider must also select a reason for requesting a new
tax ID.

ProviderConnect User Guide
141 IT Operations - Reston, VA
Figure 112: Download a W-9 Form

ProviderConnect User Guide
142 IT Operations - Reston, VA
Billing Location Information
Providers have the ability to edit the billing information for a specific service location.
They can also replace a specific billing location. If a provider chooses to replace a billing
location, the billing address maintenance page displays for him/her to select the
replacement location. (The provider must also enter the effective date of the change
request.)
To edit a billing location:
1. Click the SHOW ( ) icon for the appropriate record.
2. Click the “edit” ( ) icon.
3. Edit the following information as necessary.
Phone #
Phone extension
Fax #
Fax extension
4. Click Save.
Both practitioners and facilities can create new billing locations by clicking the Add New
Billing Address button on the billing address maintenance page. The provider can also
add a new Federal Tax ID if needed. (Refer to the Add a New Federal Tax ID section of
this chapter for detailed information.)

ProviderConnect User Guide
143 IT Operations - Reston, VA
24 Performance Report
The Performance Report section of ProviderConnect allows provider information to be
entered and saved. Upon clicking the Performance Report link, a performance report card
displays.
Figure 113: Performance Report Card

ProviderConnect User Guide
144 IT Operations - Reston, VA
25 Compliance
The Compliance section of ProviderConnect contains regulatory information, HIPAA
information, resources, and technical assistance contact information. Click on Compliance
to access the Compliance page.

ProviderConnect User Guide
145 IT Operations - Reston, VA
Figure 114: Compliance

ProviderConnect User Guide
146 IT Operations - Reston, VA
Read the Beacon policies and technical assistance information.
Click on the links to access additional information.

ProviderConnect User Guide
147 IT Operations - Reston, VA
26 Provider Handbook
This section of ProviderConnect allows providers to access the Beacon Health Options
Provider Handbook. The handbook is a guide to Beacon’s policies and procedures for
individual providers, affiliates, group practices, programs, and facilities. It provides
important information regarding the managed care features incorporated in Beacon’s
provider contract. The handbook reflects the policies that are applicable to Beacon’s
“general” commercial product lines.
Click on Handbooks to access the provider handbook.
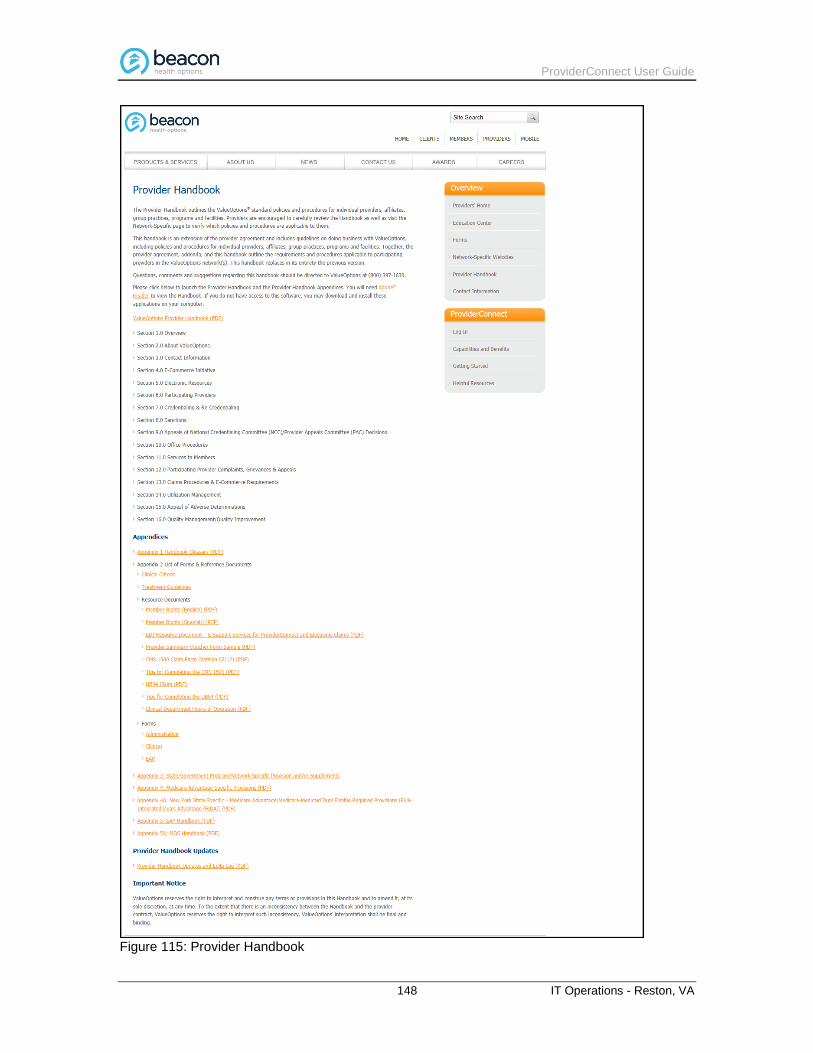
ProviderConnect User Guide
148 IT Operations - Reston, VA
Figure 115: Provider Handbook

ProviderConnect User Guide
149 IT Operations - Reston, VA
Information on the following topics can be accessed from this page.
Clinical Criteria
Treatment Guidelines
Member Rights
Tips for Completing the CMS-1500 Claim Form

ProviderConnect User Guide
150 IT Operations - Reston, VA
27 Forms
Users can select, view, and print a variety of forms in this section of ProviderConnect.
Click on Forms to access the Provider Online Services page.
1. Click on Forms to expand the section.
2. Select a Type of Form from the options that appear in the expanded section.
3. Click on the applicable Form Name link.
Some examples of the forms that can be accessed from this page are:
CMS-1500 Claim Form
UB04 Claim Form
Outpatient Treatment Report Forms
Inpatient and Higher Levels of Care Authorization Requests
Psychological Evaluation Forms

ProviderConnect User Guide
151 IT Operations - Reston, VA
28 Network-Specific Information
Users can access network-specific information in this section of ProviderConnect. Click
on Network Specific Information to access the Network-Specific page.

ProviderConnect User Guide
152 IT Operations - Reston, VA
Figure 116: Network-Specific Information

ProviderConnect User Guide
153 IT Operations - Reston, VA
Some examples of network-specific information that can be accessed from this page are:
Beacon Health Options Colorado Partnerships for Colorado Medicaid
North Carolina Medicaid
NorthSTAR
Beacon Health Options of California

ProviderConnect User Guide
154 IT Operations - Reston, VA
29 Education Center
A user can access articles, training/workshops, and provider tools in the Education
Center section of ProviderConnect. Click on Education Center to access the Provider
Online Services page.
1. Click on Education Center to expand the section.
2. Click on the applicable topic link.
ProviderConnect User Guide
155 IT Operations - Reston, VA
30 ValueSelect Designation
Users can access a description of the ValueSelect Network Program by clicking on the
ValueSelect Designation link.

ProviderConnect User Guide
156 IT Operations - Reston, VA
Figure 117: ValueSelect Network Program Description

ProviderConnect User Guide
157 IT Operations - Reston, VA
31 Contact Us
This section of ProviderConnect contains a summary of contact information. Click on
Contact Us to access the Contact Us page.

ProviderConnect User Guide
158 IT Operations - Reston, VA
Figure 118: Contact Us

ProviderConnect User Guide
159 IT Operations - Reston, VA
Some examples of contact information that can be accessed from this page are:
Claims – General Information
Provider Supporting Documentation
Regional Offices
ProviderConnect User Guide
160 IT Operations - Reston, VA
32 Role-Based Security
Overview
ProviderConnect offers the ability to control user access to sensitive areas within the
application via role-based security. Providers can:
Create New Login Accounts
Deactivate Login Accounts
Control User Access to Certain Areas within ProviderConnect
In addition to user roles, which are assigned either during ProviderConnect online
registration or via FileConnect Admin, the system contains user statuses (that is, user
types) that are also assigned via FileConnect Admin. These statuses are:
Standard User –
o Is not managed by another user
o Does not manage other users
o Has access to certain areas of ProviderConnect depending on his/her assigned
user role and/or submitter type. For example:
Standard users with the user role of “Connecticut” have access to certain
functions that other standard users may not.
Standard users with a submitter type of “General Claims Submitter” have
access to certain functions that other standard users may not.
Super User –
o Is an administrative user
o Manages other users’ login accounts
o Has the ability to:
Create new login accounts
Deactivate (disable) a managed user
Control access to specific areas within ProviderConnect
Managed User –
o Is managed by a super user
o Has access to only those functions to which he/she has been granted access
Note: Managed users are associated to a particular super user via FileConnect
Admin.

ProviderConnect User Guide
161 IT Operations - Reston, VA
For a user to become a super user:
Contact the EDI Help Desk at 1-888-247-9311 from 8:00 am – 6:00 pm EST or by e-mail
at [email protected]. (The EDI Help Desk will set up your account
and e-mail you once setup is complete. Please expect a turnaround time of 5 business
days for completion.)
If a super user leaves the facility:
Contact the EDI Help Desk at 1-888-247-9311 from 8:00 am – 6:00 pm EST or by e-mail
at [email protected]. (The managed users can be re-assigned to
another super user by the EDI Help Desk. The super user’s account will need to be de-
activated by the EDI Help Desk.)
For a managed user to become a super user:
Contact the EDI Help Desk at 1-888-247-9311 from 8:00 am – 6:00 pm EST or by e-mail
at [email protected]. (The request must include at least one user that
the super user will manage.)
Managing Users
As previously stated, super users can:
Create a new login account
Control access to certain areas of ProviderConnect
Deactivate a managed user
Create a New Login Account
If a super user has existing managed users, he/she can create new login accounts by
copying another managed user’s account.
1. Click the Manage Users link on the main menu.
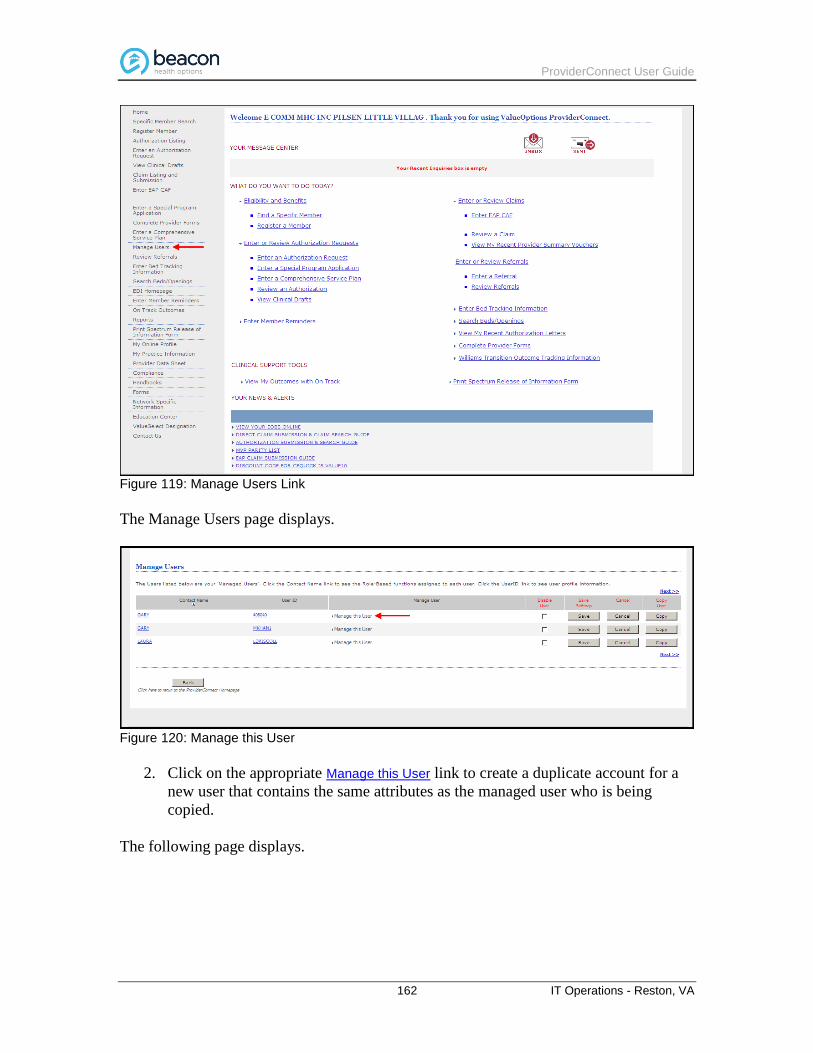
ProviderConnect User Guide
162 IT Operations - Reston, VA
Figure 119: Manage Users Link
The Manage Users page displays.
Figure 120: Manage this User
2. Click on the appropriate Manage this User link to create a duplicate account for a
new user that contains the same attributes as the managed user who is being
copied.
The following page displays.

ProviderConnect User Guide
163 IT Operations - Reston, VA
Figure 121: Copy User
3. Click the Copy button.
The Copy User page displays with some of the fields already pre-populated.
Figure 122: Copy User
4. Edit any pre-populated information as necessary.
5. Complete the remaining fields and click Submit.
Note: A red asterisk (*) indicates a required field.

ProviderConnect User Guide
164 IT Operations - Reston, VA
Control Access to Certain Areas of ProviderConnect
If a super user has existing managed users, he/she can control a specific user’s access to
ProviderConnect.
1. Click the Manage Users link on the main menu.
Figure 123: Manage Users Link
The Manage Users page displays.
Figure 124: Manage this User
2. Click on the appropriate Manage this User link to expand the section.

ProviderConnect User Guide
165 IT Operations - Reston, VA
Upon clicking Manage this User, the following page displays where the user can allow
access to a specific function category (e.g., Claims Review) by selecting the appropriate
checkbox. (More than one category can be selected.)
Note: The logged in super user may not have access to all the function categories.
Figure 125: Function Categories
3. Click Save when finished.

ProviderConnect User Guide
166 IT Operations - Reston, VA
Deactivate a Managed User
If a super user has existing managed users, he/she can deactivate (disable) any of those
users.
1. Click the Manage Users link on the main menu.
Figure 126: Manage Users Link
The Manage Users page displays.
Figure 127: Deactivate User
2. Select the Disable User checkbox for the managed user you wish to deactivate.
3. Click Save.

ProviderConnect User Guide
167 IT Operations - Reston, VA
The following message displays the next time the deactivated user attempts to log in:
“Your account has been disabled. Please contact e-Support Services by email at e-
[email protected] or by phone 888-247-9311 to activate your account.”

ProviderConnect User Guide
168 IT Operations - Reston, VA
33 Glossary of Terms
Term Definition
ABA Applied Behavioral Analysis. The process of systematically applying interventions based upon the principles of learning theory to improve socially significant behaviors to a meaningful degree, and to demonstrate that the interventions employed are responsible for the improvement of behavior.
CAF Case Activity Form. Network providers authorized to perform EAP Services can submit their one-page version of this form via ProviderConnect.
Clinical Draft An authorization request that a provider has created and saved but not submitted. Creators of clinical drafts can authorize other users to update and/or submit saved drafts.
COB Coordination of Benefits. A provision which requires that when a member is covered by two or more group health plans, payment will be divided between them so the combined coverage will pay up to 100% of eligible expenses.
Compliance This part of ProviderConnect contains regulatory and HIPAA information, resources, and technical assistance contact information.
Comprehensive Service Plan Refers to the Comprehensive Service Plan workflow for parent code ILL.
CSR Customer Service Representative. A Beacon staff member who responds to provider inquiries.
DOB Date of Birth. Refers to a member’s birth date.
EDI Electronic Data Interchange. The structured transmission of data between organizations by electronic means. Used to transfer electronic documents or business data from one computer system to another computer system.
FDS Facility Data Sheet. The FDS is Beacon’s online facility and organizational provider re-credentialing application. (Also see PDS)
HIPAA Health Insurance Portability and Accountability Act of 1996. The primary goal of this law is to help employees take their health benefits with them upon a move from one employer to another. The law also includes an Administrative Simplification provision with the goals of improving:
Efficiency of the health care system by encouraging the use of electronic information systems.
Privacy and security protections for individually identifiable health information.
Individual Care Plan Refers to the Individual Care Plan workflow for parent code MRLD.
ITR Inpatient Treatment Report. The ITR and ITR2 forms are both used to enter IP/HLOC requests for services.
Member Reminders Appointment and/or medication reminders entered for a member.

ProviderConnect User Guide
169 IT Operations - Reston, VA
Term Definition
OnTrack Outcomes The Beacon Health Options OnTrack program is a client-centered outcomes-informed care program that provides clinicians with state-of-the-art easy to use tools that promote improved client outcomes.
ORF1 Outpatient Review Form 1. A short form used for routine OP requests for services requiring limited clinical information.
ORF2 Outpatient Review Form 2. A longer form that captures more detailed clinical information via both required and optional data fields.
PDS Provider Data Sheet. The PDS is Beacon’s online provider re-credentialing application.
Performance Report This part of ProviderConnect allows information about a provider to be entered and saved. Displays in the form of a performance report card.
RFS Request for Services. Providers can electronically submit requests for services for Outpatient, Inpatient, and Medication Management services using the Enter an Authorization/Notification Request function.
Special Program Application Refers to the Special Program Application workflow for parent code ILL.
ValueSelect Designation A designation that recognizes network outpatient providers for engaging in activities that promote clinical effectiveness, member access to services, member satisfaction, and administrative efficiency.
VSP Value Service Provider. Designation that is reserved for top-of-the-line Beacon providers.
Wellness Recovery Treatment Plan
Refers to the Wellness Recovery Treatment Plan workflow for parent code BHK.

ProviderConnect User Guide
170 IT Operations - Reston, VA
Notes

ProviderConnect User Guide
171 IT Operations - Reston, VA
Index
ABA authorization requests, entering, 79
ABA tracking measures, 82
Add a new Federal Tax ID, 140
Authorization letters, viewing, 33
Authorization requests, entering, 38, 45
Claims, entering, 39
Compliance, 144
Contact information, 2, 157
Decrease number of approved visits, 78
Demographic information, updating, 132
Draft authorization request, saving, 95
EAP CAF authorizations, reviewing, 89
EDI batch claims files, submitting, 19
EDI claims file batch submissions, viewing,
25
EDI claims files, searching, 22
Education Center, 154
Enter a claim, 39
Enter a notification, 98
Enter an ABA authorization request, 79
Enter an authorization request (RFS), 38, 45
Enter member reminders, 36
Facility Data Sheet (FDS), 121
Forms, 150
Get information without logging on, 9
Handbooks, 147
Incoming EDI files, viewing, 26
Inpatient/HLOC/Specialty requests, 57, 69
Inquiries, submitting, 42
Log on to ProviderConnect, 3
Manage users, 161
Medication Management requests, 77
Member authorizations, viewing, 33
Member claims, viewing, 34
Member registrations, viewing, 38
Member reminders, entering, 36
Member search, 28, 46
Message Center, 15
Navigating ProviderConnect, 12
Network-specific information, 151
New Federal Tax ID, adding, 140
New user registration, 4
News & Alerts, 15
Notifications, entering, 98
Online profile, updating, 104
ORF 1 Outpatient requests, 47
ORF 2 Outpatient requests, 50
Performance Report, 143
Practice information, viewing, 105
Provider Data Sheet (PDS), 107
Provider handbook, 147
ProviderConnect main menu, 13
ProviderConnect navigation, 12
ProviderConnect navigation bar, 14
ProviderConnect, uses of, 1
Provider-specific authorizations, searching
for, 43
Recent provider summary vouchers,
viewing, 100
Register a new user, 4
Review EAP CAF authorizations, 89
Role-based security, 160
Save a draft authorization request, 95
Search EDI claims files, 22
Search for provider-specific authorizations,
43
Search members, 28, 46
Secure provider/member communications,
16
Submit an inquiry, 42
Submit EDI batch claims files, 19
Update demographic information, 132
Update provider online profile, 104
Uses of ProviderConnect, 1
ValueSelect Designation, 155
View authorization letters, 33
View EDI claims file batch submissions, 25
View incoming EDI files, 26
View member authorizations, 33
View member claims, 34
View member registrations, 38
View OnTrack Outcomes, 103
View practice information, 105
View recent provider summary vouchers,
100
Warn & restrict access to ProviderConnect
when attestation is due, 10
Recommended