SAMPLE ONLY
Please order from Docum
ents, Media and M
ail: 415/514-2054
Your Child’s Health
Find a Doctor: (888) 689-8273 • Patient Education Library: www.ucsfbenioffchildrens.org/education
Home Care of Your Child’s Central Venous Catheter
Unit: __________________________________ Telephone: ________________________
Type of central venous catheter: __________________ Size: _________________________
These are instructions to help you with the care of your child’s central venous catheter. You may get additional help or supplies from your home care agency.
After reading this information, you will have a better understanding of how to:
• Changethedressingofyourchild’scentralvenouscatheter
• Heparinflushlockthecatheter
• Changethecathetercap
• Drawbloodsamplesfromthecatheter
• Knowwhattodoifthecatheterbreaks
• Knowwhomtocallincaseofproblems
I. Important Information
• Callyourproviderifyouseeswelling,drainageorrednessontheskinnearthesiteofthecatheter.
• Callyourproviderifthereispain,burningoranythingunusual while flushing your catheter.
• Alwayscarryablue plastic clamp with you in case yourcatheterleaksorbreaks.Ifyouseebloodorfluidleakingfromthecatheter,clampthecatheterright awaybetweenyourchildandtheleakingarea.(SeeFigure1.)CallyourUCSFproviderandgotothenearestemergencyroomwithyourcentrallinerepairkit.Somecatheters cannot be repaired.
Figure 2: Biopatch Figure 3: Stress loop
Tape
Figure 4: Statlock for PowerLine
Figure 6: Sample syringe to injection cap
Figure 1: Emergency clamp placement
Break
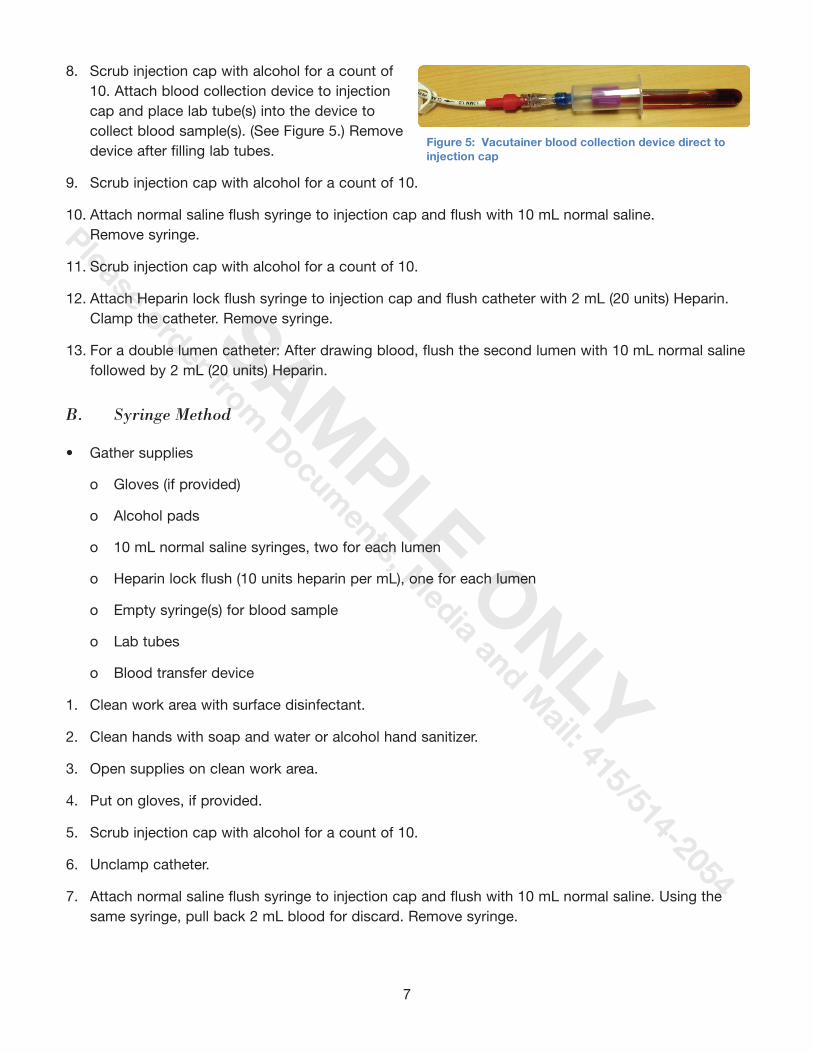
Figure 5: Vacutainer blood collection device direct to injection cap
Figure 7: Transfer device

SAMPLE ONLY
Please order from Docum
ents, Media and M
ail: 415/514-2054
2
II. General Guidelines
• Alwayscleanyourhandswithsoapandwateroralcoholhandsanitizerbeforeandafterhandlingyour catheter.
• Scrubtheinjectioncaporcatheterhubconnectionwithanalcoholpadforacountof10eachtimeyou enter the catheter to flush, draw blood, or give medications.
• Alwaysclampthecatheterwhennotinuse.
• Donotletcatheterordressinggetwet.
• Donotusescissors,safetypinsorothersharpobjectsnearthecatheter.
• PICClinedressingchangeisdoneinclinicorbyHomeHealthNurse.
III. Dressing Change
Transparent Dressing with or without Biopatch
Transparent Dressing with Gauze
Tape Dressing with Gauze
Schedule Changeevery7days. Changeevery48hours. Changeevery48hours.
Note: The dressing should always be changed if it becomes loose, dirty or wet. Chlorhexidine Allergy or Sensitivity:Pleasesee“DressingChangeUsingPovidone-Iodine”.
• Gathersuppliesorusedressingkit(ifprovided)
o Chlorhexidineskinpreparation
o Transparent dressing
o Biopatch®
o Tape
o Glovesandmask(ifprovided)
o StatLock(ifPowerLine)
1. Cleanworkareawithsurfacedisinfectant.
2. Putonmask,ifprovided.
3. Cleanhandswithsoapandwateroralcoholhandsanitizer.
4. Opensuppliesordressingchangekitoncleanworkarea.
5. Takeoffolddressing.Lookatskinforsignsofinfection, such as: swelling, drainage, or redness.
6. Cleanhandswithsoapandwateroralcoholhandsanitizer.
7. Putongloves,ifprovided.
Figure 2: Biopatch Figure 3: Stress loop
Tape
Figure 4: Statlock for PowerLine
Figure 6: Sample syringe to injection cap
Figure 1: Emergency clamp placement
Break
Figure 5: Vacutainer blood collection device direct to injection cap
Figure 7: Transfer device
Figure 2: Biopatch Figure 3: Stress loop
Tape
Figure 4: Statlock for PowerLine
Figure 6: Sample syringe to injection cap
Figure 1: Emergency clamp placement
Break
Figure 5: Vacutainer blood collection device direct to injection cap
Figure 7: Transfer device

SAMPLE ONLY
Please order from Docum
ents, Media and M
ail: 415/514-2054
SAMPLE ONLY
Please order from Docum
ents, Media and M
ail: 415/514-2054
3
8. Scrubaroundthesitewithchlorhexidineinbackandforthdirectionsforatleast30secondstocompletelycleantheskin.
9. Lettheareaairdrycompletely.Do not blow or wipe chlorhexidine away.
10.PlaceBiopatchoncatheterexitsitewiththesmoothfoamsideonskin.PutslitofBiopatchindirectionofcatheter.PuttransparentdressingovertheBiopatch.(SeeFigure2.)
11.Makeanextraloopoutsideofthetransparentdressingandsecurewithapieceoftape.(Seefigure3.)
12. For PowerLine Only.PlaceBiopatchoncatheterexitsitewiththesmoothfoamsideonskin.PutslitofBiopatchindirectionofcatheter.AttachandcloseStatLockoncatheterandpeelawaypaperbackingandattachtoskin.PuttransparentdressingovertheBiopatchandStatlock. (SeeFigures2and4.)
Dressing Change Using Povidone-Iodine (Betadine®)
Theseinstructionsshouldbeusedifyourchildisallergicorsensitivetochlorhexidine.
• Gathersupplies
o Povidone-iodine(Betadine®)swabsticks
o Two sterile normal saline pads
o Transparent dressing
o Biopatch®
o Sterile2x2gauze
o Tape, if needed
o Glovesandmask(ifprovided)
o StatLock(ifPowerLine)
1. Cleanworkareawithsurfacedisinfectant.
2. Putonmask,ifprovided.
3. Cleanhandswithsoapandwateroralcoholhandsanitizer.
4. Opensupplies,leaveinpackagingandplaceoncleanworkarea.
5. Takeoffolddressing.Lookatskinforsignsofinfectionsuchas:swelling,drainage,orredness.
6. Cleanhandswithsoapandwateroralcoholhandsanitizer.
Figure 2: Biopatch Figure 3: Stress loop
Tape
Figure 4: Statlock for PowerLine
Figure 6: Sample syringe to injection cap
Figure 1: Emergency clamp placement
Break
Figure 5: Vacutainer blood collection device direct to injection cap
Figure 7: Transfer device

SAMPLE ONLY
Please order from Docum
ents, Media and M
ail: 415/514-2054
4
7. Putongloves,ifprovided.
8. Usepovidone-iodineswabstickstocleanfrominsertionsiteoutwardinacircularmotion.Completethreetimes,usinganewswabstickeachtime.
9. Allowpovidone-iodinetoairdryfortwominutes.
10.Removepovidone-iodinewithsterilesalinewipesusingthesamecircularmotion.Blotdrywithsterile2x2gauze.Makesureskiniscompletelydrybeforeapplyingdressing.
11.PlaceBiopatchoncatheterexitsitewiththesmoothfoamsideonskin.PutslitofBiopatchindirectionofcatheter.PuttransparentdressingovertheBiopatch.(SeeFigure2.)
12.Makeastressloopoutsideofthetransparentdressingandsecureitwithapieceoftape.(SeeFigure 3.)
13. For PowerLine Only.PlaceBiopatchoncatheterexitsitewiththesmoothfoamsideonskin.PutslitofBiopatchindirectionofcatheter.AttachandcloseStatLockoncatheterandpeelawaypaperbackingandattachtoskin.PuttransparentdressingovertheBiopatchandStatLock.(SeeFigures2and4.)
IV. Flushing Your Catheter
Flush/Lock Cap Change
Flush/Hep-Lock
• Everyday/2mL(20units)
• After med/fluid infusion or lab draw
• Every7daysOR
• IfyouseedirtorbloodundertheedgeofthecapOR
• Ifbloodcannotbeflushedfromcap
Groshong Catheter ONLY
Flush/Saline Lock
• 5mlevery7days
• After med/fluid infusion or lab draw
• Every7daysOR
• IfyouseedirtorbloodundertheedgeofthecapOR
• Ifbloodcannotbeflushedfromcap
A. Flushing your Catheter through the Injection Cap
NOTE: For Groshong Catheters:Onlyusenormalsalinetoflushcatheter.Heparinnotneeded.
• Gathersupplies
o Alcohol pads
o Heparinlockflush(10unitsheparinpermL),oneforeachlumen
o 10mLnormalsalinesyringe(s),oneforeachlumen
o Gloves(ifprovided)

SAMPLE ONLY
Please order from Docum
ents, Media and M
ail: 415/514-2054
SAMPLE ONLY
Please order from Docum
ents, Media and M
ail: 415/514-2054
5
1. Cleanworkareawithsurfacedisinfectant.
2. Cleanhandswithsoapandwateroralcoholhandsanitizer.
3. Opensuppliesoncleanworkarea.
4. Putongloves,ifprovided.
5. Scrubinjectioncapwithalcoholforacountof10.
6. Attachnormalsalinesyringetocap.Unclampcatheterandflushwith10mLnormalsaline.Removesyringe. For Groshong Catheters Only:Stophere.
7. Scrubinjectioncapwithalcoholforacountof10.
8. AttachHeparinlockflushsyringetoinjectioncapandflushwith2mL(20units)Heparin.Clampcatheter.Removesyringe.
9. Repeattheaboveprocedureforsecondinjectioncapifyouhaveadoublelumencatheter.
B. Flushing Through the Injection Cap with Cap Change
NOTE: For Groshong Catheters:Onlyusenormalsalinetoprimecapandflush.Heparinnotneeded.
• Gathersupplies
o Alcohol pads
o Heparinlockflush(10unitsheparinpermL),oneforeachlumen
o 10mLnormalsalinesyringe(s),oneforeachlumen
o Sterileinjectioncap(s)
o Maskandgloves(ifprovided)
1. Cleanworkareawithsurfacedisinfectant.
2. Putonmask,ifprovided.
3. Cleanhandswithsoapandwateroralcoholhandsanitizer.
4. Opensuppliesoncleanworkarea.
5. Putongloves,ifprovided.
6. Primenewinjectioncap(s)withnormalsaline.Toprimecap:Attachnormalsalinesyringetonewinjectioncap(s)andslowlypushonendofsyringeuntilyoucanseeasmallamountoftheliquidinthe cap.
7. Holdcatheterbelowthecatheterhubandinjectioncapjunction.Wrapanalcoholpadaroundthejunctionandscrubwithalcoholforacountof10.
8. Make sure the catheter is clamped.

SAMPLE ONLY
Please order from Docum
ents, Media and M
ail: 415/514-2054
6
9. Removetheoldinjectioncap.
10.Ifyoucanseedirtorbloodonthecatheterhub,useanewalcoholpadtocleanaroundthecatheterhub. Be careful to clean only the outside of the hub; do not touch the inside of the catheter lumen. Placenewprimedinjectioncaponendofcatheter.Unclampcatheterandflushwith10mLnormalsaline.Removesyringe.For Groshong Catheters Only:Stophere.
11.Scrubinjectioncapwithalcoholforacountof10.
12.AttachHeparinlockflushsyringetoinjectioncapandflushwith2mL(20units)Heparin.Clampcatheter.Removesyringe.
13.Repeattheabovestepsforsecondinjectioncapifyouhaveadoublelumencatheter.
V. Drawing Blood from Your Catheter
A. Vacutainer Blood Collection Method
• Gathersupplies
o Gloves(ifprovided)
o Alcohol pads
o 10mLnormalsalinesyringes,twoforeachlumen
o Heparinlockflush(10unitsheparinpermL),oneforeachlumen
o Labtubes
o Vacutainer blood collection device
1. Cleanworkareawithsurfacedisinfectant.
2. Cleanhandswithsoapandwateroralcoholhandsanitizer.
3. Opensuppliesoncleanworkarea.
4. Putongloves,ifprovided.
5. Scrubinjectioncapwithalcoholforacountof10.
6. Unclampcatheter.
7. Attachnormalsalineflushsyringetoinjectioncapandflushwith10mLnormalsaline.Usingthesamesyringe,pullback2mLbloodfordiscard.Removesyringe.
SAMPLE ONLY
Please order from Docum
ents, Media and M
ail: 415/514-2054
SAMPLE ONLY
Please order from Docum
ents, Media and M
ail: 415/514-2054
7
8. Scrubinjectioncapwithalcoholforacountof10.Attachbloodcollectiondevicetoinjectioncapandplacelabtube(s)intothedevicetocollectbloodsample(s).(SeeFigure5.)Removedevice after filling lab tubes.
9. Scrubinjectioncapwithalcoholforacountof10.
10.Attachnormalsalineflushsyringetoinjectioncapandflushwith10mLnormalsaline. Removesyringe.
11.Scrubinjectioncapwithalcoholforacountof10.
12.AttachHeparinlockflushsyringetoinjectioncapandflushcatheterwith2mL(20units)Heparin.Clampthecatheter.Removesyringe.
13.Foradoublelumencatheter:Afterdrawingblood,flushthesecondlumenwith10mLnormalsalinefollowedby2mL(20units)Heparin.
B. Syringe Method
• Gathersupplies
o Gloves(ifprovided)
o Alcohol pads
o 10mLnormalsalinesyringes,twoforeachlumen
o Heparinlockflush(10unitsheparinpermL),oneforeachlumen
o Emptysyringe(s)forbloodsample
o Labtubes
o Blood transfer device
1. Cleanworkareawithsurfacedisinfectant.
2. Cleanhandswithsoapandwateroralcoholhandsanitizer.
3. Opensuppliesoncleanworkarea.
4. Putongloves,ifprovided.
5. Scrubinjectioncapwithalcoholforacountof10.
6. Unclampcatheter.
7. Attachnormalsalineflushsyringetoinjectioncapandflushwith10mLnormalsaline.Usingthesamesyringe,pullback2mLbloodfordiscard.Removesyringe.
Figure 2: Biopatch Figure 3: Stress loop
Tape
Figure 4: Statlock for PowerLine
Figure 6: Sample syringe to injection cap
Figure 1: Emergency clamp placement
Break
Figure 5: Vacutainer blood collection device direct to injection cap
Figure 7: Transfer device

Your Child’s Health
Find a Doctor: (888) 689-8273 • Patient Education Library: www.ucsfbenioffchildrens.org/education
8. Scrubinjectioncapwithalcoholforacountof10.Attachbloodsamplesyringe(s)toinjection capandpullbackvolumeofbloodneededforbloodtest(s).(SeeFigure6.)Removeblood sample syringe.
9. Scrubinjectioncapwithalcoholforacountof10.
10.Attachnormalsalineflushsyringetoinjectioncapandflushwith10mLnormalsaline. Removesyringe.
11.Scrubinjectioncapwithalcoholforacountof10.AttachHeparinlockflushsyringetoinjectioncapandflushcatheterwith2mL(20units)Heparin.Clampthecatheter.Removesyringe.
12.Transferbloodfromsamplesyringetolabtubes.(Seeprocedurebelow.)
13.Foradoublelumencatheter:Afterdrawingblood,flushthesecondlumenwith10mLnormalsalinefollowedby2mL(20units)Heparin.
Transferring Blood from Sample Syringe to Lab tubes
• Attachbloodsamplesyringetobloodtransferdeviceandplacelabtubesintodevicetofill. Bloodwillflowquicklyfromthesamplesyringeintothelabtubes.(SeeFigure7.)
Figure 2: Biopatch Figure 3: Stress loop
Tape
Figure 4: Statlock for PowerLine
Figure 6: Sample syringe to injection cap
Figure 1: Emergency clamp placement
Break
Figure 5: Vacutainer blood collection device direct to injection cap
Figure 7: Transfer device
SDPED05
40•R
evised
7/13
Figure 2: Biopatch Figure 3: Stress loop
Tape
Figure 4: Statlock for PowerLine
Figure 6: Sample syringe to injection cap
Figure 1: Emergency clamp placement
Break
Figure 5: Vacutainer blood collection device direct to injection cap
Figure 7: Transfer device
Recommended


![Index [editorial.mcpressonline.com]editorial.mcpressonline.com/web/mcpdf.nsf/wdocs/5125/$FILE/5125… · success requirements, 11 summary, 31 total customer review provision, 18–19](https://img.pdfslide.us/doc/110x75/5f06c0f37e708231d419907a/index-file5125-success-requirements-11-summary-31-total-customer-review.jpg)