Embed Size (px)
Citation preview
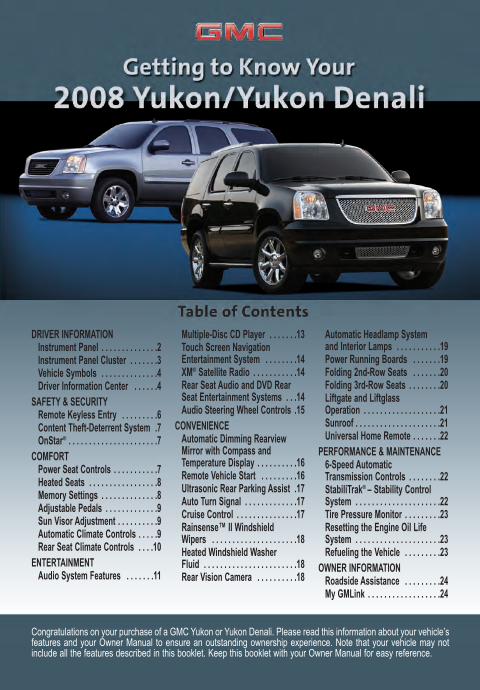
Congratulations on your purchase of a GMC Yukon or Yukon Denali. Please read this information about your vehicle’sfeatures and your Owner Manual to ensure an outstanding ownership experience. Note that your vehicle may notinclude all the features described in this booklet. Keep this booklet with your Owner Manual for easy reference.
DRIVER INFORMATIONInstrument Panel . . . . . . . . . . . . . .2Instrument Panel Cluster . . . . . . .3Vehicle Symbols . . . . . . . . . . . . . .4Driver Information Center . . . . . .4
SAFETY & SECURITYRemote Keyless Entry . . . . . . . . .6Content Theft-Deterrent System .7OnStar® . . . . . . . . . . . . . . . . . . . . . .7
COMFORT Power Seat Controls . . . . . . . . . . .7Heated Seats . . . . . . . . . . . . . . . . .8Memory Settings . . . . . . . . . . . . . .8Adjustable Pedals . . . . . . . . . . . . .9Sun Visor Adjustment . . . . . . . . . .9Automatic Climate Controls . . . . .9Rear Seat Climate Controls . . . .10
ENTERTAINMENTAudio System Features . . . . . . .11
Multiple-Disc CD Player . . . . . . .13Touch Screen NavigationEntertainment System . . . . . . . .14XM® Satellite Radio . . . . . . . . . . .14Rear Seat Audio and DVD RearSeat Entertainment Systems . . .14Audio Steering Wheel Controls .15
CONVENIENCEAutomatic Dimming RearviewMirror with Compass andTemperature Display . . . . . . . . . .16Remote Vehicle Start . . . . . . . . .16Ultrasonic Rear Parking Assist .17Auto Turn Signal . . . . . . . . . . . . .17Cruise Control . . . . . . . . . . . . . . .17Rainsense™ II Windshield Wipers . . . . . . . . . . . . . . . . . . . . .18Heated Windshield Washer Fluid . . . . . . . . . . . . . . . . . . . . . . .18Rear Vision Camera . . . . . . . . . .18
Automatic Headlamp System and Interior Lamps . . . . . . . . . . .19Power Running Boards . . . . . . .19Folding 2nd-Row Seats . . . . . . .20Folding 3rd-Row Seats . . . . . . . .20Liftgate and Liftglass Operation . . . . . . . . . . . . . . . . . . .21Sunroof . . . . . . . . . . . . . . . . . . . . .21Universal Home Remote . . . . . . .22
PERFORMANCE & MAINTENANCE 6-Speed Automatic Transmission Controls . . . . . . . .22StabiliTrak® – Stability ControlSystem . . . . . . . . . . . . . . . . . . . . .22Tire Pressure Monitor . . . . . . . . .23Resetting the Engine Oil LifeSystem . . . . . . . . . . . . . . . . . . . . .23Refueling the Vehicle . . . . . . . . .23
OWNER INFORMATIONRoadside Assistance . . . . . . . . .24My GMLink . . . . . . . . . . . . . . . . . .24
Yukon Yukon Denali 2008 A 5/1/07 12:15 PM Page 1
Getting to Know Your Yukon/Yukon Denali2
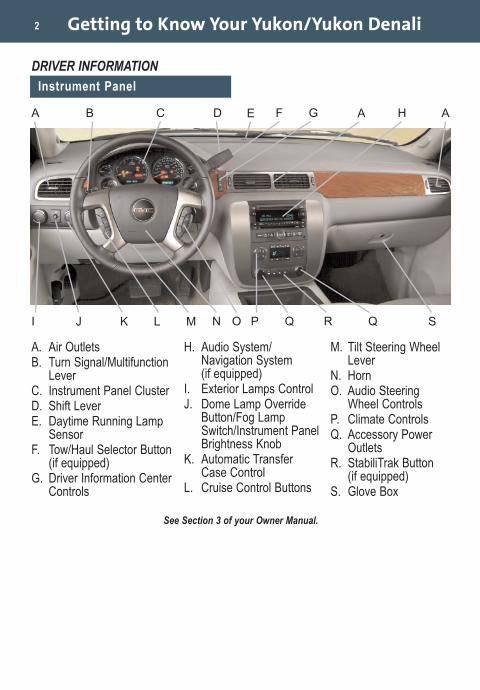
See Section 3 of your Owner Manual.
Instrument Panel
DRIVER INFORMATION
A B C D F G H AA
I J K L M N O P Q R SQ
A. Air OutletsB. Turn Signal/Multifunction
LeverC. Instrument Panel ClusterD. Shift LeverE. Daytime Running Lamp
SensorF. Tow/Haul Selector Button
(if equipped)G. Driver Information Center
Controls
H. Audio System/Navigation System (if equipped)
I. Exterior Lamps ControlJ. Dome Lamp Override
Button/Fog LampSwitch/Instrument PanelBrightness Knob
K. Automatic TransferCase Control
L. Cruise Control Buttons
M. Tilt Steering WheelLever
N. HornO. Audio Steering
Wheel ControlsP. Climate ControlsQ. Accessory Power
OutletsR. StabiliTrak Button
(if equipped)S. Glove Box
E
Yukon Yukon Denali 2008 A 5/1/07 12:15 PM Page 2
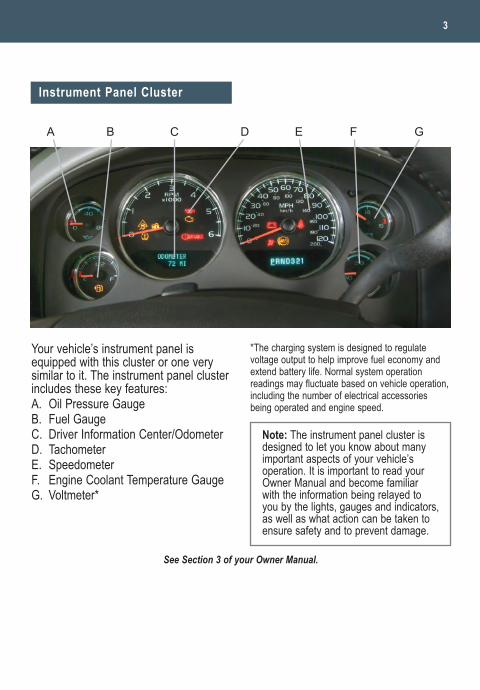
3
Your vehicle’s instrument panel isequipped with this cluster or one verysimilar to it. The instrument panel clusterincludes these key features:A. Oil Pressure GaugeB. Fuel GaugeC. Driver Information Center/OdometerD. TachometerE. SpeedometerF. Engine Coolant Temperature GaugeG. Voltmeter*
*The charging system is designed to regulatevoltage output to help improve fuel economy andextend battery life. Normal system operationreadings may fluctuate based on vehicle operation,including the number of electrical accessoriesbeing operated and engine speed.
See Section 3 of your Owner Manual.
Note: The instrument panel cluster isdesigned to let you know about manyimportant aspects of your vehicle’soperation. It is important to read yourOwner Manual and become familiarwith the information being relayed toyou by the lights, gauges and indicators,as well as what action can be taken toensure safety and to prevent damage.
Instrument Panel Cluster
A B C D E F G
Yukon Yukon Denali 2008 A 5/1/07 12:15 PM Page 3
Getting to Know Your Yukon/Yukon Denali4
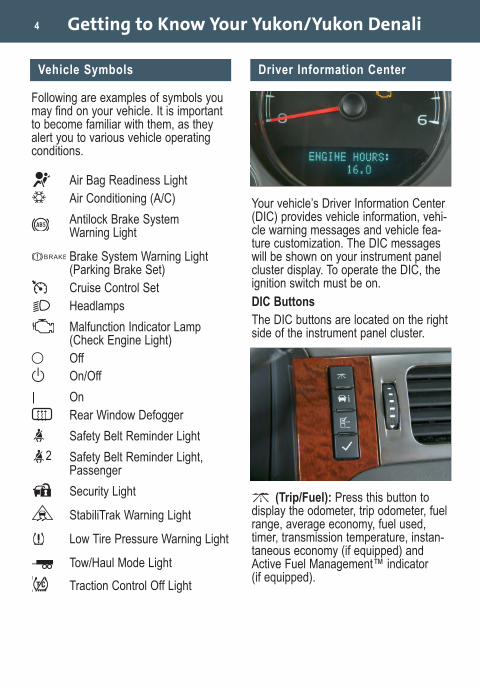
Vehicle Symbols
Following are examples of symbols youmay find on your vehicle. It is importantto become familiar with them, as theyalert you to various vehicle operatingconditions.
Air Bag Readiness LightAir Conditioning (A/C)
Antilock Brake System Warning Light
Brake System Warning Light (Parking Brake Set)Cruise Control SetHeadlamps
Malfunction Indicator Lamp (Check Engine Light)OffOn/Off
OnRear Window Defogger
Safety Belt Reminder Light
2 Safety Belt Reminder Light,Passenger
Security Light
StabiliTrak Warning Light
Low Tire Pressure Warning Light
Tow/Haul Mode Light
Traction Control Off Light
Driver Information Center
Your vehicle’s Driver Information Center(DIC) provides vehicle information, vehi-cle warning messages and vehicle fea-ture customization. The DIC messageswill be shown on your instrument panelcluster display. To operate the DIC, theignition switch must be on.DIC ButtonsThe DIC buttons are located on the rightside of the instrument panel cluster.
(Trip/Fuel): Press this button todisplay the odometer, trip odometer, fuelrange, average economy, fuel used,timer, transmission temperature, instan-taneous economy (if equipped) andActive Fuel Management™ indicator(if equipped).
Yukon Yukon Denali 2008 A 5/1/07 12:15 PM Page 4
5
(Vehicle Information): Pressthis button to display the oil life,English/Metric units, tire pressure andtire pressure system programming(if equipped), engine hours and RemoteKeyless Entry programming.
(Customization): Press this buttonto customize certain vehicle features toyour preference.
(Set/Reset): Press this button to setor reset certain vehicle functions as wellas acknowledge DIC messages.Customization FeaturesTo customize features:1. With the vehicle in Park, turn on the
ignition.2. Press the (Customization) button
to display available customizationfeatures.
3. With the desired customizationfeature displayed, press the (Set/Reset) button to access thefeature settings.
4. Press the button to scroll throughthe available settings.
5. With the desired setting displayed,press the button to select it.
6. To exit the Feature Settings menu,press the button until EXIT FEA-TURE SETTINGS is displayed andthen press , or press the button or the button.
Customization features include:• Display Language — DIC information
can be displayed in several languages
• Auto Door Lock — Automaticallylocks the vehicle doors
• Auto Door Unlock — Automaticallyunlocks the vehicle doors
• Remote Door Lock — Type of feed-back from Remote Keyless Entrylocking
• Remote Door Unlock — Type of feed-back from Remote Keyless Entryunlocking
• Delay Door Lock — Delays lockingdoors and liftgate after exiting
• Exit Lighting — Amount of time theexterior lamps remain on after exiting
• Approach Lighting — Exterior lampsturn on when using Remote KeylessEntry
• Chime Volume — Increases thevolume level
• Park Tilt Mirrors (if equipped) —Automatically tilts down the outsidemirrors when in Reverse
• Easy Exit Seat (if equipped) —Automatically moves back the driver’sseat when the key is removed fromthe ignition
• Memory Seat Recall (if equipped) —Automatically recalls the driver’s seatposition when using Remote KeylessEntry
• Remote Start (if equipped) —Enables remote vehicle start
• Factory Settings — Sets all featuresto the factory default
• Exit Feature Settings
Yukon Yukon Denali 2008 A 5/1/07 12:15 PM Page 5
Getting to Know Your Yukon/Yukon Denali6
Warnings and MessagesThe DIC provides a variety of vehiclemessages (depending on optional equip-ment) as well as warnings if a problemis sensed in a vehicle system. To acknowledge a message and clear itfrom the display, press any of the DICbuttons. Some urgent messages cannotbe cleared from the DIC display. If your vehicle is equipped with OnStarand a warning message appears, youcan press the OnStar button and speakto an OnStar Advisor. In many vehicles,OnStar Advisors can access certaindiagnostic information and can tell youhow serious the condition is and whatyou should do about it.
See Section 3 of your Owner Manual.
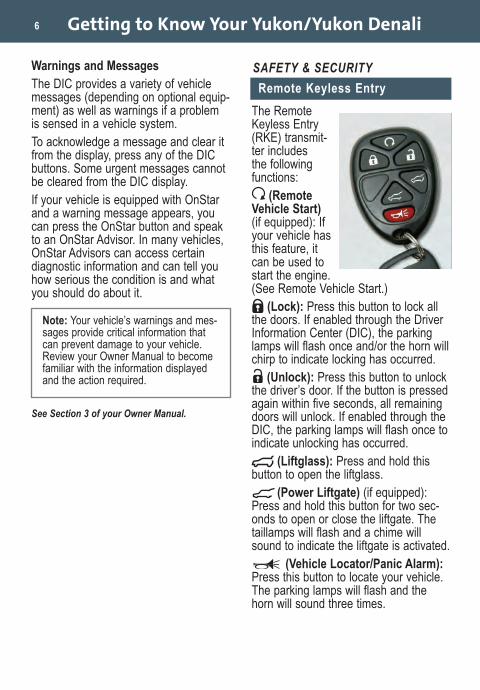
The RemoteKeyless Entry(RKE) transmit-ter includesthe followingfunctions:
(RemoteVehicle Start)(if equipped): Ifyour vehicle hasthis feature, itcan be used tostart the engine.(See Remote Vehicle Start.)
(Lock): Press this button to lock allthe doors. If enabled through the DriverInformation Center (DIC), the parkinglamps will flash once and/or the horn willchirp to indicate locking has occurred.
(Unlock): Press this button to unlockthe driver’s door. If the button is pressedagain within five seconds, all remainingdoors will unlock. If enabled through theDIC, the parking lamps will flash once toindicate unlocking has occurred.
(Liftglass): Press and hold thisbutton to open the liftglass.
(Power Liftgate) (if equipped):Press and hold this button for two sec-onds to open or close the liftgate. Thetaillamps will flash and a chime willsound to indicate the liftgate is activated.
(Vehicle Locator/Panic Alarm):Press this button to locate your vehicle.The parking lamps will flash and thehorn will sound three times.
Note: Your vehicle’s warnings and mes-sages provide critical information thatcan prevent damage to your vehicle.Review your Owner Manual to becomefamiliar with the information displayedand the action required.
Remote Keyless Entry
SAFETY & SECURITY
Yukon Yukon Denali 2008 A 5/1/07 12:15 PM Page 6
7
Press and hold the button to activate thepanic alarm. The parking lamps will flashand the horn will sound for 30 seconds.Press the button again or turn the igni-tion to Run to cancel the panic alarm.See Section 2 of your Owner Manual.
To arm the content theft-deterrent alarmsystem, lock the doors using the RKEtransmitter. The security light on theinstrument panel cluster will flash forapproximately 30 seconds to indicatethe alarm is activated. To disarm thesystem, unlock the doors using the RKEtransmitter. The alarm system will not be armed ordisarmed if the doors are locked orunlocked with a key, the manual doorlock or the power door lock switch.See Section 2 of your Owner Manual.
Your vehicle may feature the OnStarSafe & Sound Plan or the uplevelOnStar Directions & Connections Plan,with one year of OnStar service from thedate you purchased your new vehicle.OnStar offers a variety of capabilities,such as Remote Door Unlock, AutomaticAirbag Notification, and Hands-FreeCalling. In addition, most vehicles canget driving directions using a systemcalled Turn-by-Turn Navigation. OnStarAdvisors can send a planned route toyour vehicle and, as you approach aturn, instructions play over your vehiclespeakers. Press the OnStar button toask an OnStar Advisor about the serviceplan you have or to upgrade your plan.
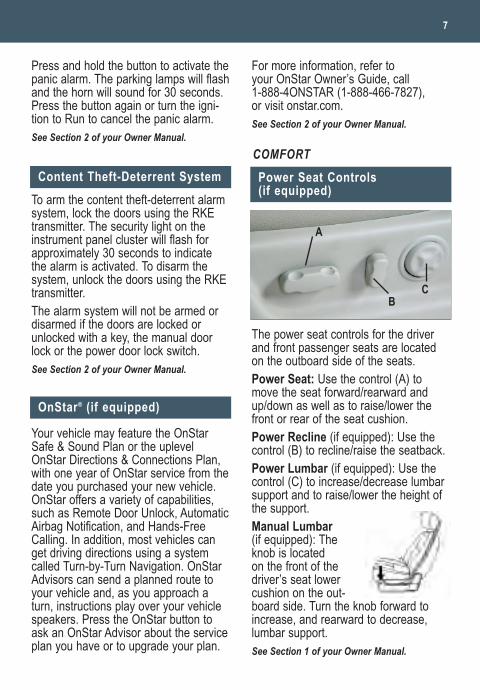
The power seat controls for the driverand front passenger seats are locatedon the outboard side of the seats. Power Seat: Use the control (A) tomove the seat forward/rearward andup/down as well as to raise/lower thefront or rear of the seat cushion.Power Recline (if equipped): Use thecontrol (B) to recline/raise the seatback.Power Lumbar (if equipped): Use thecontrol (C) to increase/decrease lumbarsupport and to raise/lower the height ofthe support.Manual Lumbar (if equipped): Theknob is locatedon the front of thedriver’s seat lowercushion on the out-board side. Turn the knob forward toincrease, and rearward to decrease,lumbar support.See Section 1 of your Owner Manual.
Power Seat Controls (if equipped)
A
BC
Content Theft-Deterrent System
OnStar® (if equipped)
COMFORT
For more information, refer toyour OnStar Owner’s Guide, call 1-888-4ONSTAR (1-888-466-7827),or visit onstar.com.See Section 2 of your Owner Manual.
Yukon Yukon Denali 2008 A 5/1/07 12:15 PM Page 7
Getting to Know Your Yukon/Yukon Denali8
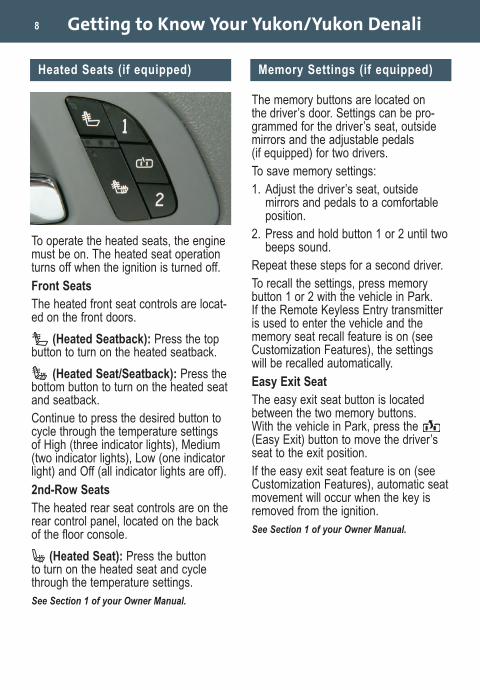
To operate the heated seats, the enginemust be on. The heated seat operationturns off when the ignition is turned off.Front SeatsThe heated front seat controls are locat-ed on the front doors.
(Heated Seatback): Press the topbutton to turn on the heated seatback.
(Heated Seat/Seatback): Press thebottom button to turn on the heated seatand seatback.Continue to press the desired button tocycle through the temperature settingsof High (three indicator lights), Medium(two indicator lights), Low (one indicatorlight) and Off (all indicator lights are off).2nd-Row SeatsThe heated rear seat controls are on therear control panel, located on the backof the floor console.
(Heated Seat): Press the buttonto turn on the heated seat and cyclethrough the temperature settings.See Section 1 of your Owner Manual.
The memory buttons are located onthe driver’s door. Settings can be pro-grammed for the driver’s seat, outsidemirrors and the adjustable pedals(if equipped) for two drivers.To save memory settings:1. Adjust the driver’s seat, outside
mirrors and pedals to a comfortableposition.
2. Press and hold button 1 or 2 until twobeeps sound.
Repeat these steps for a second driver.To recall the settings, press memorybutton 1 or 2 with the vehicle in Park.If the Remote Keyless Entry transmitteris used to enter the vehicle and thememory seat recall feature is on (seeCustomization Features), the settingswill be recalled automatically. Easy Exit SeatThe easy exit seat button is locatedbetween the two memory buttons.With the vehicle in Park, press the (Easy Exit) button to move the driver’sseat to the exit position.If the easy exit seat feature is on (seeCustomization Features), automatic seatmovement will occur when the key isremoved from the ignition.See Section 1 of your Owner Manual.
Heated Seats (if equipped) Memory Settings (if equipped)
Yukon Yukon Denali 2008 A 5/1/07 12:15 PM Page 8
9
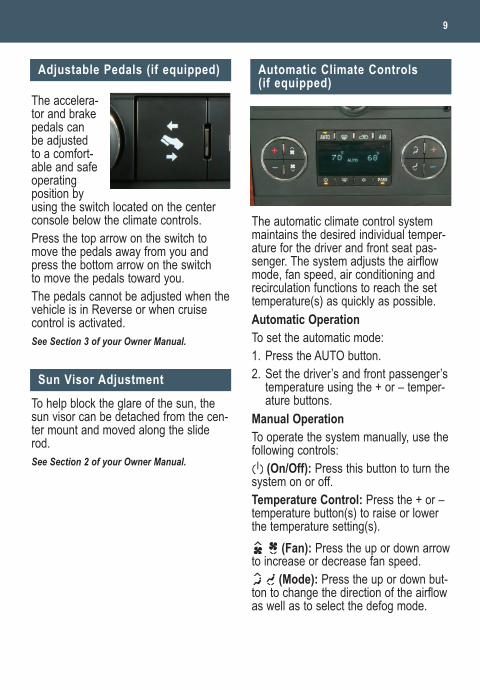
Adjustable Pedals (if equipped)
The accelera-tor and brakepedals canbe adjustedto a comfort-able and safeoperatingposition byusing the switch located on the centerconsole below the climate controls.Press the top arrow on the switch tomove the pedals away from you andpress the bottom arrow on the switchto move the pedals toward you.The pedals cannot be adjusted when thevehicle is in Reverse or when cruisecontrol is activated.See Section 3 of your Owner Manual.
To help block the glare of the sun, thesun visor can be detached from the cen-ter mount and moved along the sliderod.See Section 2 of your Owner Manual.
Sun Visor Adjustment
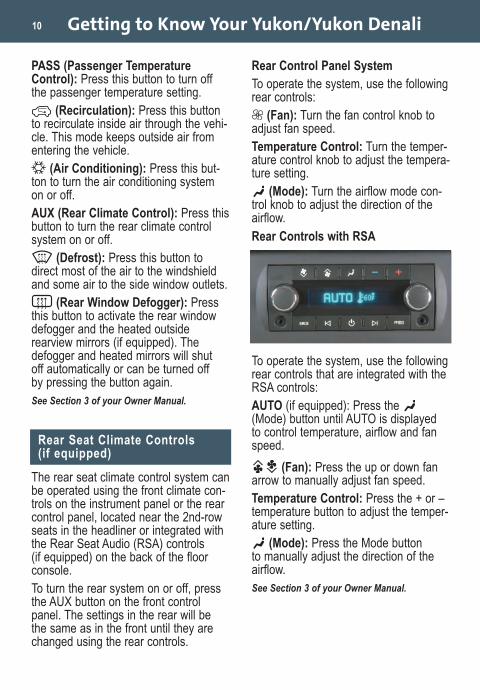
The automatic climate control systemmaintains the desired individual temper-ature for the driver and front seat pas-senger. The system adjusts the airflowmode, fan speed, air conditioning andrecirculation functions to reach the settemperature(s) as quickly as possible.Automatic OperationTo set the automatic mode:1. Press the AUTO button.2. Set the driver’s and front passenger’s
temperature using the + or – temper-ature buttons.
Manual OperationTo operate the system manually, use thefollowing controls:
(On/Off): Press this button to turn thesystem on or off.Temperature Control: Press the + or –temperature button(s) to raise or lowerthe temperature setting(s).
(Fan): Press the up or down arrowto increase or decrease fan speed.
(Mode): Press the up or down but-ton to change the direction of the airflowas well as to select the defog mode.
Automatic Climate Controls (if equipped)
Yukon Yukon Denali 2008 A 5/1/07 12:15 PM Page 9
Getting to Know Your Yukon/Yukon Denali10
PASS (Passenger TemperatureControl): Press this button to turn offthe passenger temperature setting.
(Recirculation): Press this buttonto recirculate inside air through the vehi-cle. This mode keeps outside air fromentering the vehicle.
(Air Conditioning): Press this but-ton to turn the air conditioning systemon or off.AUX (Rear Climate Control): Press thisbutton to turn the rear climate controlsystem on or off.
(Defrost): Press this button todirect most of the air to the windshieldand some air to the side window outlets.
(Rear Window Defogger): Pressthis button to activate the rear windowdefogger and the heated outsiderearview mirrors (if equipped). Thedefogger and heated mirrors will shutoff automatically or can be turned offby pressing the button again.See Section 3 of your Owner Manual.
The rear seat climate control system canbe operated using the front climate con-trols on the instrument panel or the rearcontrol panel, located near the 2nd-rowseats in the headliner or integrated withthe Rear Seat Audio (RSA) controls(if equipped) on the back of the floorconsole.To turn the rear system on or off, pressthe AUX button on the front controlpanel. The settings in the rear will bethe same as in the front until they arechanged using the rear controls.
Rear Seat Climate Controls (if equipped)
Rear Control Panel SystemTo operate the system, use the followingrear controls:
(Fan): Turn the fan control knob toadjust fan speed.Temperature Control: Turn the temper-ature control knob to adjust the tempera-ture setting.
(Mode): Turn the airflow mode con-trol knob to adjust the direction of theairflow.Rear Controls with RSA
To operate the system, use the followingrear controls that are integrated with theRSA controls:AUTO (if equipped): Press the (Mode) button until AUTO is displayedto control temperature, airflow and fanspeed.
(Fan): Press the up or down fanarrow to manually adjust fan speed.Temperature Control: Press the + or –temperature button to adjust the temper-ature setting.
(Mode): Press the Mode buttonto manually adjust the direction of theairflow.See Section 3 of your Owner Manual.
Yukon Yukon Denali 2008 A 5/1/07 12:15 PM Page 10
11
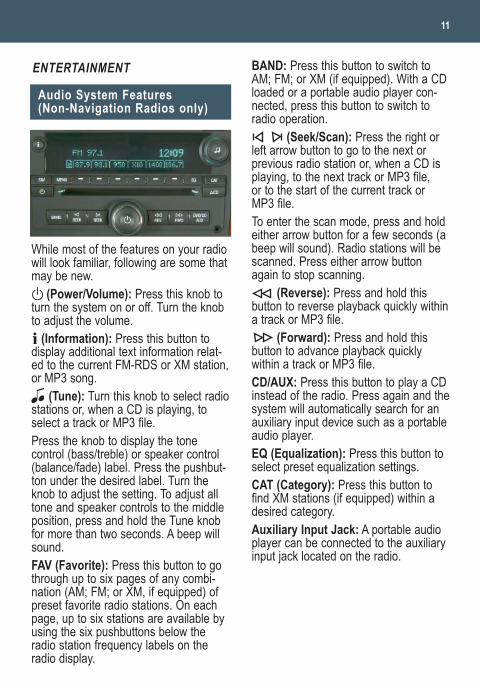
While most of the features on your radiowill look familiar, following are some thatmay be new.
(Power/Volume): Press this knob toturn the system on or off. Turn the knobto adjust the volume.
(Information): Press this button todisplay additional text information relat-ed to the current FM-RDS or XM station,or MP3 song.
(Tune): Turn this knob to select radiostations or, when a CD is playing, toselect a track or MP3 file. Press the knob to display the tonecontrol (bass/treble) or speaker control(balance/fade) label. Press the pushbut-ton under the desired label. Turn theknob to adjust the setting. To adjust alltone and speaker controls to the middleposition, press and hold the Tune knobfor more than two seconds. A beep willsound.FAV (Favorite): Press this button to gothrough up to six pages of any combi-nation (AM; FM; or XM, if equipped) ofpreset favorite radio stations. On eachpage, up to six stations are available byusing the six pushbuttons below theradio station frequency labels on theradio display.
Audio System Features (Non-Navigation Radios only)
ENTERTAINMENT BAND: Press this button to switch toAM; FM; or XM (if equipped). With a CDloaded or a portable audio player con-nected, press this button to switch toradio operation.
(Seek/Scan): Press the right orleft arrow button to go to the next orprevious radio station or, when a CD isplaying, to the next track or MP3 file,or to the start of the current track orMP3 file.To enter the scan mode, press and holdeither arrow button for a few seconds (abeep will sound). Radio stations will bescanned. Press either arrow buttonagain to stop scanning.
(Reverse): Press and hold thisbutton to reverse playback quickly withina track or MP3 file.
(Forward): Press and hold thisbutton to advance playback quicklywithin a track or MP3 file.CD/AUX: Press this button to play a CDinstead of the radio. Press again and thesystem will automatically search for anauxiliary input device such as a portableaudio player. EQ (Equalization): Press this button toselect preset equalization settings.CAT (Category): Press this button tofind XM stations (if equipped) within adesired category.Auxiliary Input Jack: A portable audioplayer can be connected to the auxiliaryinput jack located on the radio.
Yukon Yukon Denali 2008 A 5/1/07 12:15 PM Page 11
Getting to Know Your Yukon/Yukon Denali12
Setting Favorite StationsBefore setting your favorite stations,shift the vehicle into Park.
To set up the number of favorite stationpages:1. Press the MENU button to display the
radio setup menu.2. Press the pushbutton located below
the FAV 1–6 label on the radiodisplay.
3. Select the desired number of favoritestation pages.
4. Press the FAV button. You may nowbegin storing your favorite stations forthe chosen number of pages.
To store favorite stations:1. Press the BAND button to select the
band (AM; FM; or XM, if equipped).2. Tune to the desired radio station.3. Press the FAV button to display the
page where the station is to bestored.
4. Press and hold one of the six push-buttons until a beep sounds.
5. Repeat the steps for each pushbuttonon each page.
Setting the Speed CompensatedVolume (if equipped)With Speed Compensated Volume, theradio automatically adjusts the volumeto compensate for road noise as vehiclespeed changes.To set Speed Compensated Volume:1. Set the radio volume to the desired
level.2. Press the MENU button to display the
radio setup menu.3. Press the pushbutton below the auto
volume label on the radio display.4. Press the pushbutton under the
desired setting (Off, Low, Mediumor High) to select the level ofcompensation.
The compensation will be set once thedisplay times out after 10 seconds.Setting the TimeTo set the time:1. Press the (Clock) button. Or, if
equipped, press the MENU buttonuntil the clock option is displayed;and then press the pushbutton locat-ed under the clock option label. TheHR, MIN, MM, DD, YYYY labels willappear on the display.
2. Press the pushbutton under any ofthe labels to be changed.
3. Press the pushbutton again, the rightSEEK arrow or the FWD button toincrease the numbers. Press the leftSEEK arrow or the REV button todecrease the numbers. Rotating the
(Tune) knob also will increase ordecrease the selected label.
4. Press the Clock or MENU button toset the displayed time and date.
Note: Choosing to engage in extendedsearching for specific audio stations orsongs by using buttons and knobs —or to give extended attention to enter-tainment tasks — can lead you to lookaway from the road frequently or longerthan usual. Looking away from the roadfor prolonged periods may cause you tomiss seeing things on the road that youneed to see. Be sure to keep your eyeson the road and mind on the drive —and avoid engaging in extended search-ing for specific items while driving.
Yukon Yukon Denali 2008 A 5/1/07 12:15 PM Page 12
13
MP3 CapabilityYour audio system has MP3 playingcapability. A CD-R containing MP3 audiotracks will play automatically wheninserted into the CD player. An MP3label will be displayed.Portable Audio PlayerA portable audio player, such as an MP3player or cassette player, can be con-nected to the auxiliary input jack locatedon the radio. When connected, the radioautomatically begins playing audio fromthe player over the vehicle speakers.Radio Data System (if equipped)When you tune to a Radio Data System(RDS) station, the station name and callletters will appear on the display insteadof the frequency. RDS stations may alsoprovide the time of day, a program typefor current programming and the nameof the program being broadcast.RDS features are available for use onlyon FM stations that broadcast RDSinformation. RDS relies on receivingspecific information from these stationsand will work only when the informationis available.See Section 3 of your Owner Manual.
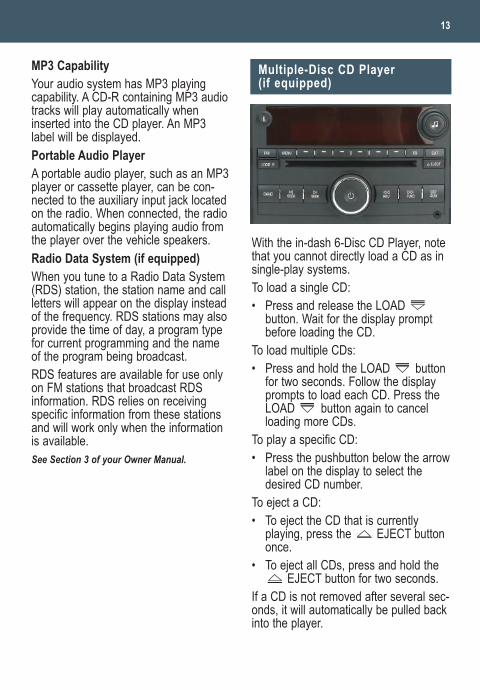
With the in-dash 6-Disc CD Player, notethat you cannot directly load a CD as insingle-play systems.To load a single CD:• Press and release the LOAD
button. Wait for the display promptbefore loading the CD.
To load multiple CDs:• Press and hold the LOAD button
for two seconds. Follow the displayprompts to load each CD. Press theLOAD button again to cancelloading more CDs.
To play a specific CD:• Press the pushbutton below the arrow
label on the display to select thedesired CD number.
To eject a CD:• To eject the CD that is currently
playing, press the EJECT buttononce.
• To eject all CDs, press and hold theEJECT button for two seconds.
If a CD is not removed after several sec-onds, it will automatically be pulled backinto the player.
Multiple-Disc CD Player (if equipped)
Yukon Yukon Denali 2008 A 5/1/07 12:15 PM Page 13
Getting to Know Your Yukon/Yukon Denali14
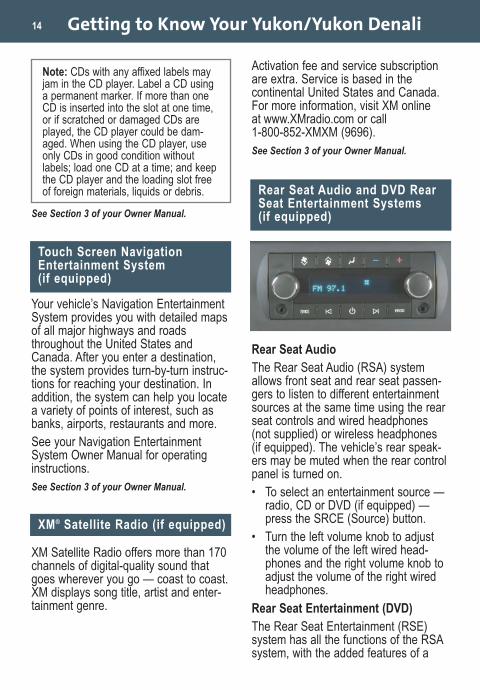
Rear Seat AudioThe Rear Seat Audio (RSA) systemallows front seat and rear seat passen-gers to listen to different entertainmentsources at the same time using the rearseat controls and wired headphones(not supplied) or wireless headphones(if equipped). The vehicle’s rear speak-ers may be muted when the rear controlpanel is turned on. • To select an entertainment source —
radio, CD or DVD (if equipped) —press the SRCE (Source) button.
• Turn the left volume knob to adjustthe volume of the left wired head-phones and the right volume knob toadjust the volume of the right wiredheadphones.
Rear Seat Entertainment (DVD)The Rear Seat Entertainment (RSE)system has all the functions of the RSAsystem, with the added features of a
See Section 3 of your Owner Manual.
Your vehicle’s Navigation EntertainmentSystem provides you with detailed mapsof all major highways and roadsthroughout the United States andCanada. After you enter a destination,the system provides turn-by-turn instruc-tions for reaching your destination. Inaddition, the system can help you locatea variety of points of interest, such asbanks, airports, restaurants and more.See your Navigation EntertainmentSystem Owner Manual for operatinginstructions.See Section 3 of your Owner Manual.
Note: CDs with any affixed labels mayjam in the CD player. Label a CD usinga permanent marker. If more than oneCD is inserted into the slot at one time,or if scratched or damaged CDs areplayed, the CD player could be dam-aged. When using the CD player, useonly CDs in good condition withoutlabels; load one CD at a time; and keepthe CD player and the loading slot freeof foreign materials, liquids or debris. Rear Seat Audio and DVD Rear
Seat Entertainment Systems (if equipped)
Touch Screen NavigationEntertainment System (if equipped)
XM® Satellite Radio (if equipped)
XM Satellite Radio offers more than 170channels of digital-quality sound thatgoes wherever you go — coast to coast.XM displays song title, artist and enter-tainment genre.
Activation fee and service subscriptionare extra. Service is based in thecontinental United States and Canada.For more information, visit XM onlineat www.XMradio.com or call 1-800-852-XMXM (9696).See Section 3 of your Owner Manual.
Yukon Yukon Denali 2008 A 5/1/07 12:15 PM Page 14
15
CD/DVD player as part of the frontradio, a flip-down video screen, wirelessheadphones and a remote control.To play a DVD:1. Turn the ignition to the Accessory or
Run position.2. Push the release button on the DVD
display console and pull down thevideo screen.
3. Insert a DVD into the DVD slot in theradio. It will turn on the video screenand begin playing automatically. Itmay be necessary to press the Playbutton on the RSE system or theremote control to start playing themovie if the DVD stops at a menuscreen.
4. To listen to the DVD through the vehi-cle speakers, press the DVD/CD AUXbutton. Adjust volume using the radiovolume control.To listen to the DVD through the wire-less headphones, select channel 1and push the power button on theheadphones. Adjust volume using theheadphone volume control.
5. To control DVD playback, use theremote control or the buttons underthe labels on the front radio display.
6. To turn off the RSE system, press thefront radio’s power button for two sec-onds, eject the DVD, or press thepower button on the remote control.
See Section 3 of your Owner Manual.
Note: Aim the remote control at thevideo screen, not the DVD player,for proper operation.
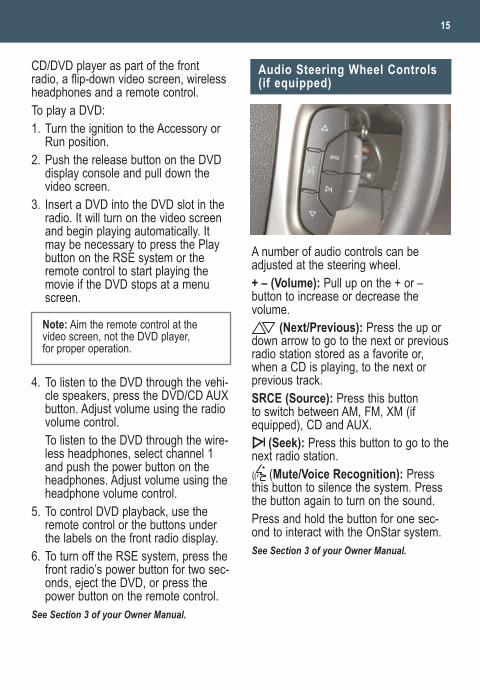
A number of audio controls can beadjusted at the steering wheel. + – (Volume): Pull up on the + or –button to increase or decrease thevolume.
(Next/Previous): Press the up ordown arrow to go to the next or previousradio station stored as a favorite or,when a CD is playing, to the next orprevious track.SRCE (Source): Press this buttonto switch between AM, FM, XM (ifequipped), CD and AUX.
(Seek): Press this button to go to thenext radio station.
(Mute/Voice Recognition): Pressthis button to silence the system. Pressthe button again to turn on the sound.Press and hold the button for one sec-ond to interact with the OnStar system.See Section 3 of your Owner Manual.
Audio Steering Wheel Controls(if equipped)
Yukon Yukon Denali 2008 A 5/1/07 12:15 PM Page 15
Getting to Know Your Yukon/Yukon Denali16
This feature allows you to start theengine from outside the vehicle by usingthe Remote Keyless Entry (RKE) trans-mitter. The remote start capability mustbe turned on using the DriverInformation Center.The vehicle’s automatic climate controlsystem (if equipped) will default to aheating or cooling mode based onoutside temperature, and the manualclimate control system will turn on atthe same setting as when the vehiclewas last turned off.Starting the VehicleTo remote start the vehicle:1. Aim the RKE transmitter at the vehicle.
(Transmitter range is within approxi-mately 200 feet of the vehicle.)
2. Press and release the (Lock)button on the transmitter.
3. Immediately press and hold the (Remote Start) button for about fourseconds. When the parking lampsflash, release the button. The enginewill start and the parking lamps willremain on. The engine will continuerunning for 10 minutes.
4. Repeat these steps for a 10-minutetime extension. Only two consecutiveremote starts are allowed.
When you enter the vehicle after aremote start, the key must be insertedin the ignition and turned to the Runposition before driving.
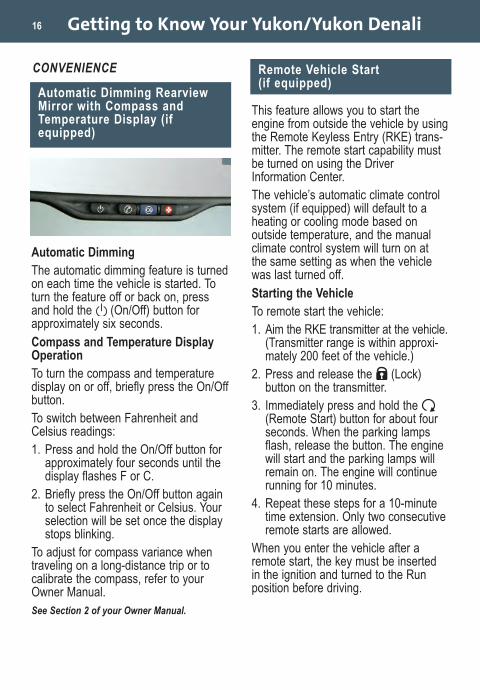
Automatic Dimming RearviewMirror with Compass andTemperature Display (ifequipped)
Automatic DimmingThe automatic dimming feature is turnedon each time the vehicle is started. Toturn the feature off or back on, pressand hold the (On/Off) button forapproximately six seconds.Compass and Temperature DisplayOperationTo turn the compass and temperaturedisplay on or off, briefly press the On/Offbutton.To switch between Fahrenheit andCelsius readings:1. Press and hold the On/Off button for
approximately four seconds until thedisplay flashes F or C.
2. Briefly press the On/Off button againto select Fahrenheit or Celsius. Yourselection will be set once the displaystops blinking.
To adjust for compass variance whentraveling on a long-distance trip or tocalibrate the compass, refer to yourOwner Manual.See Section 2 of your Owner Manual.
Remote Vehicle Start (if equipped)
CONVENIENCE
Yukon Yukon Denali 2008 A 5/1/07 12:15 PM Page 16
17
Canceling a Remote StartTo turn off the engine instead of drivingafter a remote start:• Press and hold the (Remote Start)
button until the parking lamps turn off.• Press and release the Hazard
Warning Flashers button. Press itagain to turn off the flashers.
• Turn the key in the ignition switch tothe Run position and then off.
See Section 2 of your Owner Manual.
This feature uses ultrasonic sensorsbuilt into the rear bumper cover to helpyou avoid colliding with objects whenparking the vehicle. It operates only atspeeds less than 5 mph.The rear parking assist display is locat-ed near the rear window. The lights onthe display provide distance information.Low-toned beeps play out of the rearspeakers (for objects near the rearbumper).To turn off the system, press thedisable button located below the climatecontrols on the instrument panel. Theindicator light will illuminate when thesystem is off.See Section 3 of your Owner Manual.
Note: Remote Vehicle Start will notoperate if the key is in the ignition, thehood or liftgate is open, or the CheckEngine light is illuminated on the instru-ment cluster.
Auto Turn Signal
The turn signal lever includes an auto-matic lane change signal feature.To signal a lane change, raise or lowerthe lever until the arrow on the instru-ment panel cluster starts to flash, andthen release the lever. The turn signalwill automatically flash three times. If theTow/Haul mode is selected, the turn sig-nal will automatically flash six times.To signal a turn, move the lever all theway up or down.See Section 3 of your Owner Manual.
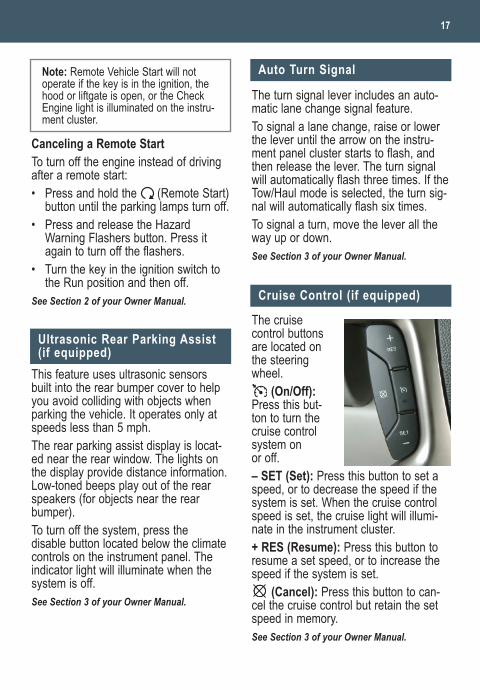
The cruisecontrol buttonsare located onthe steeringwheel.
(On/Off):Press this but-ton to turn thecruise controlsystem onor off. – SET (Set): Press this button to set aspeed, or to decrease the speed if thesystem is set. When the cruise controlspeed is set, the cruise light will illumi-nate in the instrument cluster.+ RES (Resume): Press this button toresume a set speed, or to increase thespeed if the system is set.
(Cancel): Press this button to can-cel the cruise control but retain the setspeed in memory.See Section 3 of your Owner Manual.
Cruise Control (if equipped)
Ultrasonic Rear Parking Assist(if equipped)
Yukon Yukon Denali 2008 A 5/1/07 12:15 PM Page 17
Getting to Know Your Yukon/Yukon Denali18
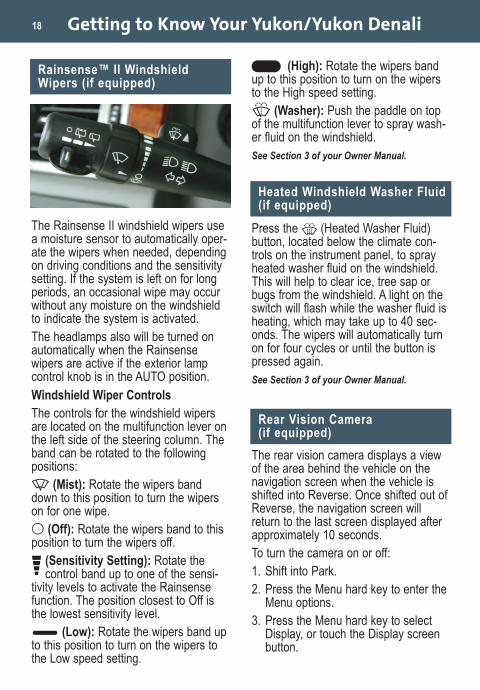
The Rainsense II windshield wipers usea moisture sensor to automatically oper-ate the wipers when needed, dependingon driving conditions and the sensitivitysetting. If the system is left on for longperiods, an occasional wipe may occurwithout any moisture on the windshieldto indicate the system is activated.The headlamps also will be turned onautomatically when the Rainsensewipers are active if the exterior lampcontrol knob is in the AUTO position.Windshield Wiper ControlsThe controls for the windshield wipersare located on the multifunction lever onthe left side of the steering column. Theband can be rotated to the followingpositions:
(Mist): Rotate the wipers banddown to this position to turn the wiperson for one wipe.
(Off): Rotate the wipers band to thisposition to turn the wipers off.
(Sensitivity Setting): Rotate the control band up to one of the sensi-
tivity levels to activate the Rainsensefunction. The position closest to Off isthe lowest sensitivity level.
(Low): Rotate the wipers band upto this position to turn on the wipers tothe Low speed setting.
(High): Rotate the wipers bandup to this position to turn on the wipersto the High speed setting.
(Washer): Push the paddle on topof the multifunction lever to spray wash-er fluid on the windshield.See Section 3 of your Owner Manual.
Press the (Heated Washer Fluid)button, located below the climate con-trols on the instrument panel, to sprayheated washer fluid on the windshield.This will help to clear ice, tree sap orbugs from the windshield. A light on theswitch will flash while the washer fluid isheating, which may take up to 40 sec-onds. The wipers will automatically turnon for four cycles or until the button ispressed again.See Section 3 of your Owner Manual.
The rear vision camera displays a viewof the area behind the vehicle on thenavigation screen when the vehicle isshifted into Reverse. Once shifted out ofReverse, the navigation screen willreturn to the last screen displayed afterapproximately 10 seconds.To turn the camera on or off:1. Shift into Park.2. Press the Menu hard key to enter the
Menu options.3. Press the Menu hard key to select
Display, or touch the Display screenbutton.
Rainsense™ II WindshieldWipers (if equipped)
Heated Windshield Washer Fluid(if equipped)
Rear Vision Camera (if equipped)
Yukon Yukon Denali 2008 A 5/1/07 12:15 PM Page 18
19
4. Touch the Rear Camera Optionsscreen button.
5. Touch the Rear Camera Image inReverse screen button.
To clean the camera lens, located abovethe license plate, rinse it with water andwipe it with a soft cloth.
See Section 2 of your Owner Manual.
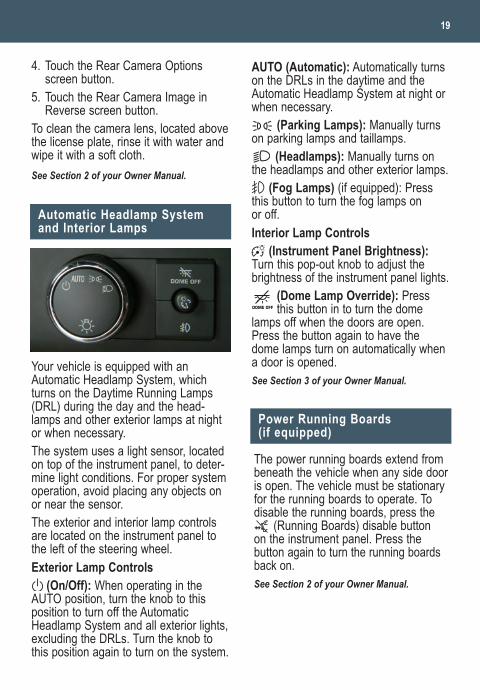
Your vehicle is equipped with anAutomatic Headlamp System, whichturns on the Daytime Running Lamps(DRL) during the day and the head-lamps and other exterior lamps at nightor when necessary.The system uses a light sensor, locatedon top of the instrument panel, to deter-mine light conditions. For proper systemoperation, avoid placing any objects onor near the sensor.The exterior and interior lamp controlsare located on the instrument panel tothe left of the steering wheel.Exterior Lamp Controls
(On/Off): When operating in theAUTO position, turn the knob to thisposition to turn off the AutomaticHeadlamp System and all exterior lights,excluding the DRLs. Turn the knob tothis position again to turn on the system.
AUTO (Automatic): Automatically turnson the DRLs in the daytime and theAutomatic Headlamp System at night orwhen necessary.
(Parking Lamps): Manually turnson parking lamps and taillamps.
(Headlamps): Manually turns onthe headlamps and other exterior lamps.
(Fog Lamps) (if equipped): Pressthis button to turn the fog lamps onor off. Interior Lamp Controls
(Instrument Panel Brightness):Turn this pop-out knob to adjust thebrightness of the instrument panel lights.
(Dome Lamp Override): Press this button in to turn the dome
lamps off when the doors are open.Press the button again to have thedome lamps turn on automatically whena door is opened.See Section 3 of your Owner Manual.
Automatic Headlamp System and Interior Lamps
Power Running Boards(if equipped)
The power running boards extend frombeneath the vehicle when any side dooris open. The vehicle must be stationaryfor the running boards to operate. Todisable the running boards, press the
(Running Boards) disable buttonon the instrument panel. Press thebutton again to turn the running boardsback on.See Section 2 of your Owner Manual.
Yukon Yukon Denali 2008 A 5/1/07 12:15 PM Page 19

Getting to Know Your Yukon/Yukon Denali20
The 2nd-row seats fold and tumble toprovide more cargo space and access tothe 3rd-row seats.To fold and tumble the seat:1. Make sure nothing is under or in front
of the seat.2. Fold the seatback forward by lifting
the release lever located at thebottom rear of the seatback on theoutboard side of the seat.
3. Tumble the seat forward by lifting therelease lever again.
To unfold the seat:1. Pull down the seat until it latches to
the floor.2. Lift up the seatback until it locks in
place. Pull on the seatback to makesure it is locked.
Power Release Seats (if equipped)To fold and tumble the power releaseseat:1. Shift the vehicle into Park.2. Make sure nothing is under or in front
of the seat.
3. Press one ofthe automaticrelease but-tons, locatedon the over-head consoleand on the panel behind the reardoors. The seat will fold and tumbleforward automatically.
The seat must be unfolded manually toreturn it to the sitting position.See Section 1 of your Owner Manual.
The split rear seats fold and tumble toprovide more cargo space.To fold and tumble the seat:1. Make sure nothing is in front of the
seat.2. Fold the seatback forward by lifting
the release lever (A) located at thebottom rear of the seatback on theoutboard side of the seat.
3. Tumble the seat forward by lifting therelease lever (B) located to the left ofthe handle on the center rear of theseat.
4. Tilt the seat fully forward and lock itin place.
To unfold the seat:1. Lower the seat by lifting the release
lever located to the left of the handleon the center rear of the seat.
Folding 3rd-Row Seats
B A
Folding 2nd-Row Seats
Yukon Yukon Denali 2008 A 5/1/07 12:15 PM Page 20
21
2. Pull down the seat until it latches tothe floor.
3. Lift up the seatback until it locks inplace. Pull on the seatback to makesure it is locked.
See Section 1 of your Owner Manual.
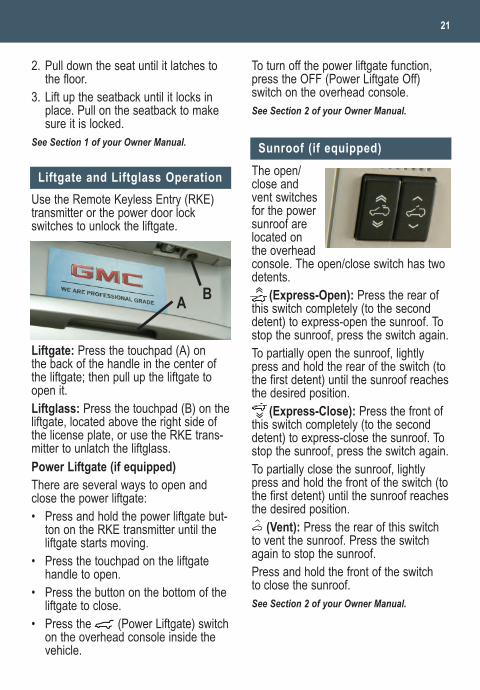
Use the Remote Keyless Entry (RKE)transmitter or the power door lockswitches to unlock the liftgate.
Liftgate: Press the touchpad (A) onthe back of the handle in the center ofthe liftgate; then pull up the liftgate toopen it. Liftglass: Press the touchpad (B) on theliftgate, located above the right side ofthe license plate, or use the RKE trans-mitter to unlatch the liftglass.Power Liftgate (if equipped)There are several ways to open andclose the power liftgate:• Press and hold the power liftgate but-
ton on the RKE transmitter until theliftgate starts moving.
• Press the touchpad on the liftgatehandle to open.
• Press the button on the bottom of theliftgate to close.
• Press the (Power Liftgate) switchon the overhead console inside thevehicle.
To turn off the power liftgate function,press the OFF (Power Liftgate Off)switch on the overhead console.See Section 2 of your Owner Manual.
The open/close andvent switchesfor the powersunroof arelocated onthe overheadconsole. The open/close switch has twodetents.
(Express-Open): Press the rear ofthis switch completely (to the seconddetent) to express-open the sunroof. Tostop the sunroof, press the switch again.To partially open the sunroof, lightlypress and hold the rear of the switch (tothe first detent) until the sunroof reachesthe desired position.
(Express-Close): Press the front ofthis switch completely (to the seconddetent) to express-close the sunroof. Tostop the sunroof, press the switch again.To partially close the sunroof, lightlypress and hold the front of the switch (tothe first detent) until the sunroof reachesthe desired position.
(Vent): Press the rear of this switchto vent the sunroof. Press the switchagain to stop the sunroof.Press and hold the front of the switchto close the sunroof.See Section 2 of your Owner Manual.
Liftgate and Liftglass Operation
A B
Sunroof (if equipped)
Yukon Yukon Denali 2008 A 5/1/07 12:15 PM Page 21
Getting to Know Your Yukon/Yukon Denali22
The Universal Home Remote is a com-bined universal transmitter and receiverthat can activate up to three devices,such as garage door openers, entrydoor locks, gates and security systems.It’s recommended that you read theinstructions in your Owner Manual com-pletely before attempting to program anyof the three channels on the UniversalHome Remote. The engine should beturned off when programming theremote.
See Section 2 of your Owner Manual.
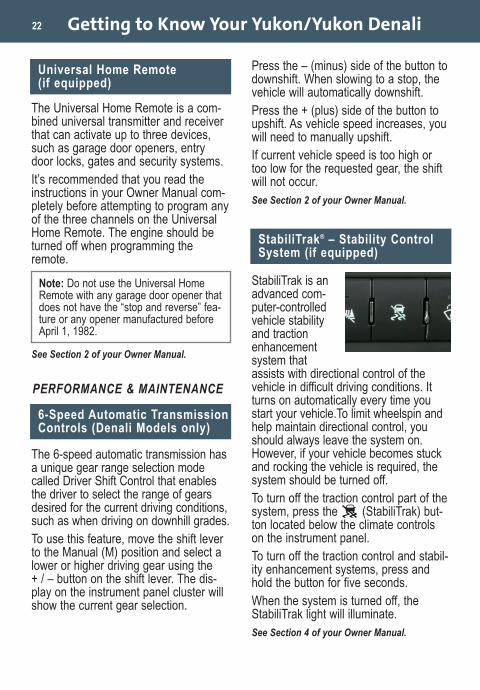
StabiliTrak is anadvanced com-puter-controlledvehicle stabilityand tractionenhancementsystem thatassists with directional control of thevehicle in difficult driving conditions. Itturns on automatically every time youstart your vehicle.To limit wheelspin andhelp maintain directional control, youshould always leave the system on.However, if your vehicle becomes stuckand rocking the vehicle is required, thesystem should be turned off.To turn off the traction control part of thesystem, press the (StabiliTrak) but-ton located below the climate controlson the instrument panel. To turn off the traction control and stabil-ity enhancement systems, press andhold the button for five seconds.When the system is turned off, theStabiliTrak light will illuminate.See Section 4 of your Owner Manual.
StabiliTrak® – Stability ControlSystem (if equipped)
PERFORMANCE & MAINTENANCE
Universal Home Remote (if equipped)
Note: Do not use the Universal HomeRemote with any garage door opener thatdoes not have the “stop and reverse” fea-ture or any opener manufactured beforeApril 1, 1982.
6-Speed Automatic TransmissionControls (Denali Models only)
The 6-speed automatic transmission hasa unique gear range selection modecalled Driver Shift Control that enablesthe driver to select the range of gearsdesired for the current driving conditions,such as when driving on downhill grades.To use this feature, move the shift leverto the Manual (M) position and select alower or higher driving gear using the + / – button on the shift lever. The dis-play on the instrument panel cluster willshow the current gear selection.
Press the – (minus) side of the button todownshift. When slowing to a stop, thevehicle will automatically downshift.Press the + (plus) side of the button toupshift. As vehicle speed increases, youwill need to manually upshift. If current vehicle speed is too high ortoo low for the requested gear, the shiftwill not occur.See Section 2 of your Owner Manual.
Yukon Yukon Denali 2008 A 5/1/07 12:15 PM Page 22
23
The Tire Pressure Monitor alerts youwhen a significant reduction in pressureoccurs in one or more of your vehicle’stires by illuminating the (Low TirePressure) warning light, which will remainon until you correct the tire pressure.Youmay also have a CHECK TIRE PRES-SURE message appear on the DIC (ifequipped). Correcting the Tire PressureWhen the low tire pressure warning lightilluminates, you must fill the tire to theproper tire inflation pressure (just as youmust refuel the vehicle when the lowfuel warning light illuminates). The Tireand Loading Information label shows thecorrect inflation pressure for the tireswhen they’re cold. “Cold” means yourvehicle has been sitting for at least threehours or driven no more than one mile.You can temporarily remove the DIC mes-sage by acknowledging it with your DICcontrols. However, at the next vehiclestart-up, the DIC message will reappear ifthe tire pressure has not been corrected.During cooler conditions, the low tirepressure warning light may appear whenthe vehicle is first started and then turnoff as you start to drive the vehicle. Thiscould be an early indicator that your tirepressures are getting low and need tobe inflated to the proper pressure.
See Section 5 of your Owner Manual.
Tire Pressure Monitor
The Oil Life System calculates engine oillife based on vehicle use and displaysCHANGE ENGINE OIL in the DriverInformation Center (DIC) when it’s nec-essary to change your engine oil and fil-ter. The Oil Life System should be resetto 100% only following an oil change.Reset the Oil Life System using the DIC:1. Turn on the ignition.2. Press the (Vehicle Information)
button until the DIC displays OIL LIFEREMAINING.
3. Press and hold the (Set/Reset)button until 100% is displayed.
4. Turn off the ignition.Reset the Oil Life System without the DIC:1. Turn on the ignition, with the engine off.2. Fully press and release the accelera-
tor pedal slowly three times withinfive seconds.
3. If the CHANGE ENGINE OIL mes-sage flashes, the system is reset;otherwise, repeat the procedure.
4. Turn off the ignition.See Section 5 of your Owner Manual.
Resetting the Engine Oil Life System
Note: The Tire Pressure Monitor can alertyou about low tire pressure, but it doesn’treplace normal monthly tire maintenance.
Refueling the Vehicle
To open the fuel door, press the center-rear edge of the door and it will popopen slightly. Pull the door to open itfully.When closing the fuel door, press therear edge of the door until it latches andis flush with the side of the vehicle.See Section 5 of your Owner Manual.
Yukon Yukon Denali 2008 A 5/1/07 12:15 PM Page 23
Getting to Know Your Yukon/Yukon Denali24
15854831 A
Roadside Assistance
My GMLink
The GMC Owner Center at My GMLinkis a complimentary service for GMCowners, a one-stop resource to enhanceyour GMC ownership experience.Exclusive member benefits includeonline service reminders, vehicle main-tenance tips, online owner manual,special privileges and more. Sign uptoday at www.mygmlink.com.
Certain restrictions, precautions and safety procedures apply to your vehicle. Please read your OwnerManual for complete instructions. All information contained herein is based on information available at thetime of printing and is subject to change without notice. Copyright 2007 by GM Corp. All rights reserved.
!15854831=A!
1-800-GMC-8782(1-800-462-8782)TTY Users: 1-888-889-2438As the proud owner of a new GMCvehicle, you are automatically enrolled inthe GMC Roadside Assistance program.This value-added service is intended toprovide you with peace of mind as youdrive in the city or travel the open road. GMC’s Roadside Assistance toll-freenumber is staffed by a team of technicallytrained advisors, who are available24 hours a day, 365 days a year. Theadvisors can provide minor repair infor-mation or make arrangements to towyour vehicle to the nearest GMC dealer.GMC will provide the following servicesfor 5 years/100,000 miles at no expenseto you:• Fuel delivery• Lockout service (identification
required)• Tow to nearest dealership for warranty
service• Flat tire assistance• Jump startsIn many instances, mechanical failuresare covered under GMC’s comprehensivewarranty. However, when other servicesare utilized, our advisors will explain anypayment obligations you might incur.
OWNER INFORMATION For prompt and efficient assistance whencalling, please provide the following infor-mation to the advisor:• Location of the vehicle• Telephone number and your location• Vehicle model, year and color• Vehicle mileage• Vehicle Identification Number (VIN)• Vehicle license plate numberGMC reserves the right to limit servicesor reimbursement to an owner or driverwhen, in GMC’s judgment, the claimsbecome excessive in frequency or typeof occurrence.Roadside Assistance and OnStar®
(if equipped)If you have a current OnStar subscrip-tion, press the OnStar button and thevehicle will send your current GPSlocation to an OnStar Advisor who willspeak to you, assess your problem,contact Roadside Assistance and relayyour exact location so you will get thehelp you need.
Yukon Yukon Denali 2008 A 5/1/07 12:15 PM Page 24