Embed Size (px)
Citation preview
XenData SX-10V2 LTO Archive Appliance
Installation and Users Guide
© 2011-2014 XenData, Inc. All rights reserved. XenData is a trademark of XenData Limited. Document last modified: 23 April 2014
Installation and Users Guide: XenData SX-10 Archive Appliance
Page 2
Contents Notices 1. Introduction
1.1. Overview 1.2. Logical Drives
1.3. Specification
1.4. SX-10 Models
2. Control Panel and Connections
2.1. Front Panel
2.2. Rear Connections
3. Installation
3.1. Rack Mounting 3.2. Desktop Mounting
3.3. Initial System Configuration
3.4. Setting Policies for Archiving to LTO
3.5. Configuring the XenData Alert Module
4. Power-On and Power-Off Procedures
4.1. System Power-On
4.2. System Power-Off
Installation and Users Guide: XenData SX-10 Archive Appliance
Page 3
Notices SAFETY To avoid the possibility of personal injury, be sure to turn off the power to the equipment and disconnect the power cable before removing the cover. FCC This equipment has been tested and found to comply with the limits for a Class B digital device, pursuant to Part 15 of the FCC Rules. These limits are designed to provide reasonable protection against harmful interference in a residential installation. This equipment generates, uses, and can radiate radio frequency energy and, if not installed and used in accordance with the instruction manual, may cause harmful interference to radio communications. Shielded cables are required for this device to comply with FCC Rules. Use shielded cables when connecting this device to others. European Directive on Waste Electrical and Electronic Equipment (WEEE) XenData encourages its customers to use current recycling practices in order to reduce the burden that waste electronic products place on the environment. If you are retiring a fully functional appliance, you are encouraged to transfer the functional unit to a new user, thereby extending the useful life of the tape library. The manufacture of all products requires the consumption of energy. By extending the life of the equipment, energy is conserved. In accordance with environmental directives that are being implemented in many countries (refer to the European Directive on Waste Electrical and Electronic Equipment - WEEE) XenData provides customers with “End of Life Instructions” that identify the process for recycling the materials and components that make up this equipment.
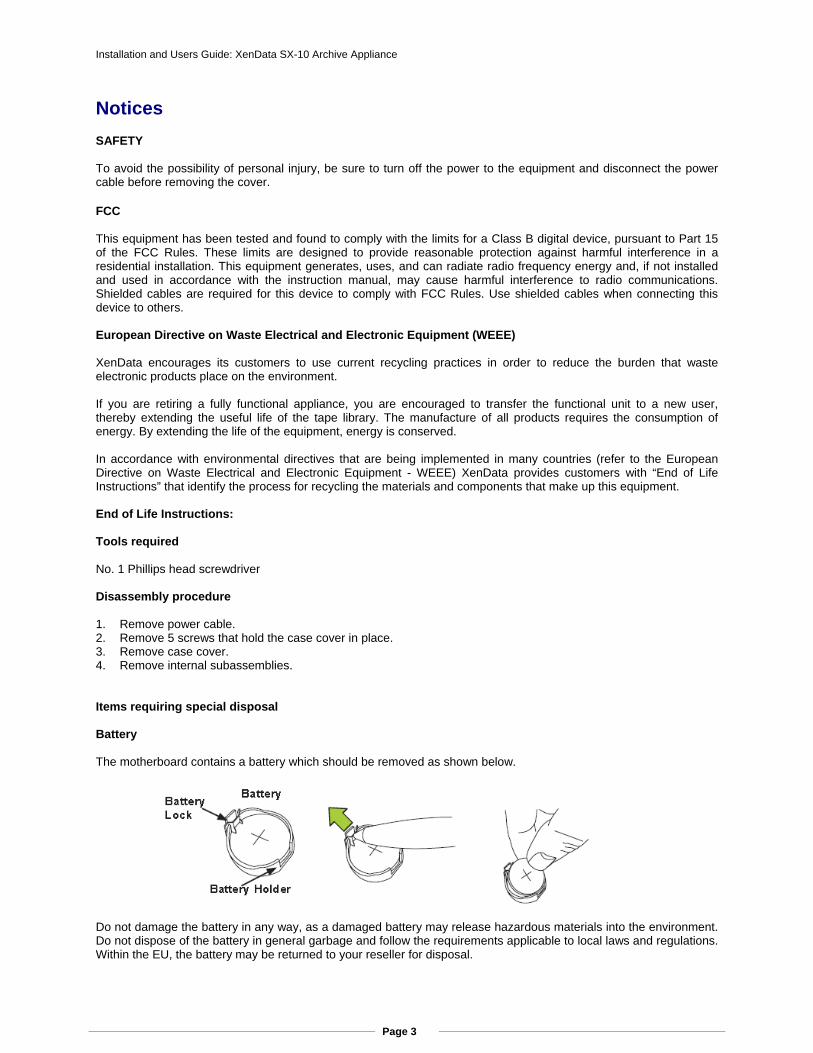
End of Life Instructions: Tools required No. 1 Phillips head screwdriver Disassembly procedure 1. Remove power cable. 2. Remove 5 screws that hold the case cover in place. 3. Remove case cover. 4. Remove internal subassemblies. Items requiring special disposal Battery The motherboard contains a battery which should be removed as shown below. Do not damage the battery in any way, as a damaged battery may release hazardous materials into the environment. Do not dispose of the battery in general garbage and follow the requirements applicable to local laws and regulations. Within the EU, the battery may be returned to your reseller for disposal.
Installation and Users Guide: XenData SX-10 Archive Appliance
Page 4
PCIe Riser Card The PCIe riser card requires special disposal, as it contains lead-based solder. Reduction of Hazardous Substances (RoHS) This equipment is compliant with the European RoHS Directive 2002/95EC as long as used as provided in the Server Exception, located in Section 7 of the Directive Annex. Use of the products outside the scope of the Server Exception will not be compliant with the Directive. New and Used Parts XenData equipment is manufactured from new parts, or new and used parts. Regardless, XenData’s warranty terms apply unless the equipment is specifically identified by XenData as “used” or “refurbished”.
Installation and Users Guide: XenData SX-10 Archive Appliance
Page 5
Chapter 1. Introduction 1.1 Overview
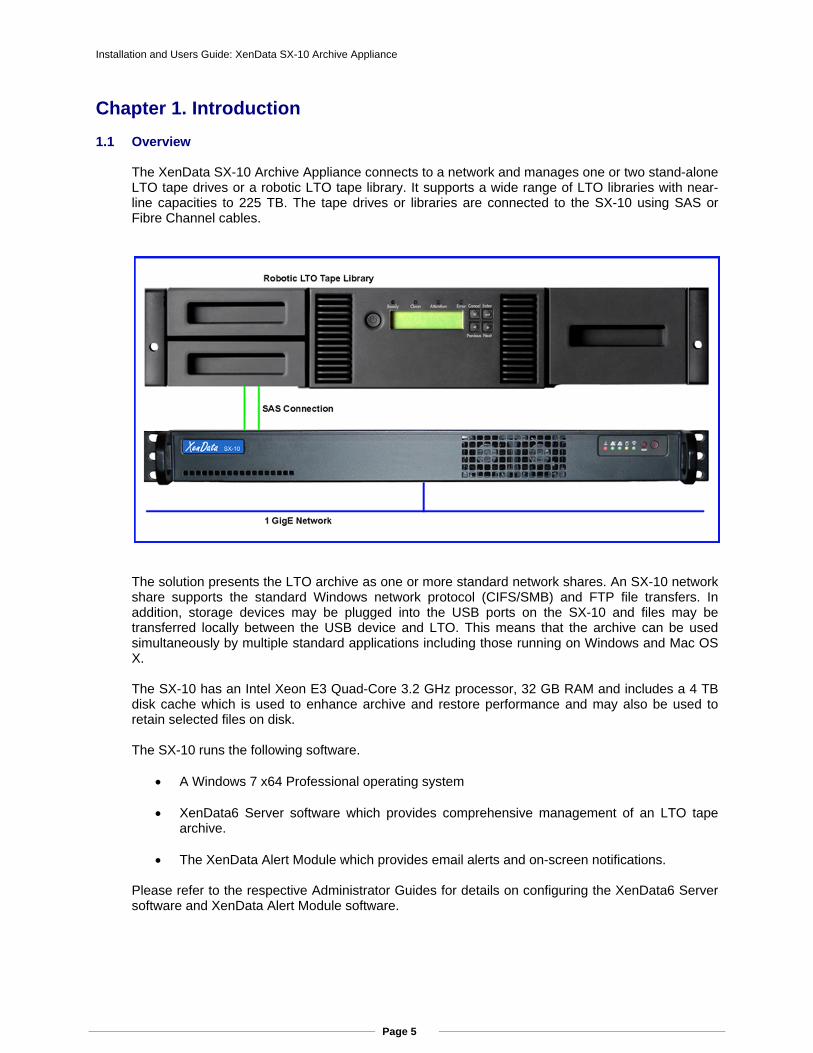
The XenData SX-10 Archive Appliance connects to a network and manages one or two stand-alone LTO tape drives or a robotic LTO tape library. It supports a wide range of LTO libraries with near-line capacities to 225 TB. The tape drives or libraries are connected to the SX-10 using SAS or Fibre Channel cables.
The solution presents the LTO archive as one or more standard network shares. An SX-10 network share supports the standard Windows network protocol (CIFS/SMB) and FTP file transfers. In addition, storage devices may be plugged into the USB ports on the SX-10 and files may be transferred locally between the USB device and LTO. This means that the archive can be used simultaneously by multiple standard applications including those running on Windows and Mac OS X. The SX-10 has an Intel Xeon E3 Quad-Core 3.2 GHz processor, 32 GB RAM and includes a 4 TB disk cache which is used to enhance archive and restore performance and may also be used to retain selected files on disk. The SX-10 runs the following software.
A Windows 7 x64 Professional operating system
XenData6 Server software which provides comprehensive management of an LTO tape archive.
The XenData Alert Module which provides email alerts and on-screen notifications.
Please refer to the respective Administrator Guides for details on configuring the XenData6 Server software and XenData Alert Module software.
Installation and Users Guide: XenData SX-10 Archive Appliance
Page 6
1.2 SX-10 Logical Drives
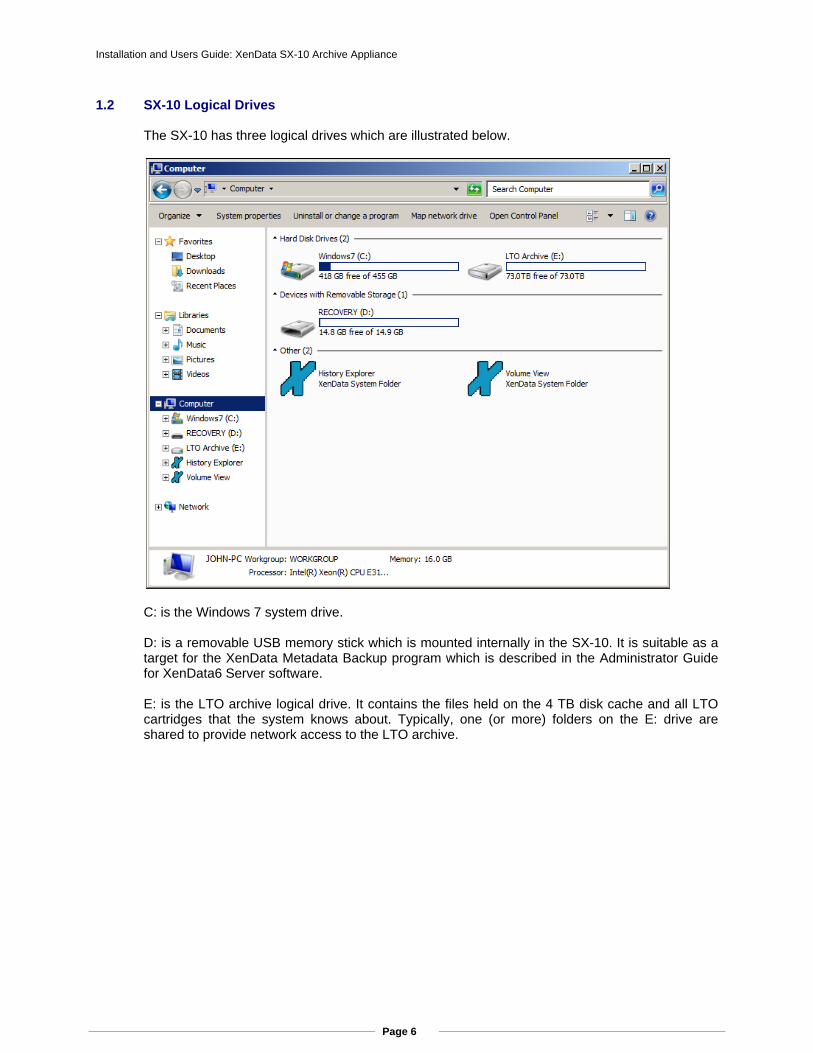
The SX-10 has three logical drives which are illustrated below.
C: is the Windows 7 system drive. D: is a removable USB memory stick which is mounted internally in the SX-10. It is suitable as a target for the XenData Metadata Backup program which is described in the Administrator Guide for XenData6 Server software. E: is the LTO archive logical drive. It contains the files held on the 4 TB disk cache and all LTO cartridges that the system knows about. Typically, one (or more) folders on the E: drive are shared to provide network access to the LTO archive.
Installation and Users Guide: XenData SX-10 Archive Appliance
Page 7
1.3 Specification
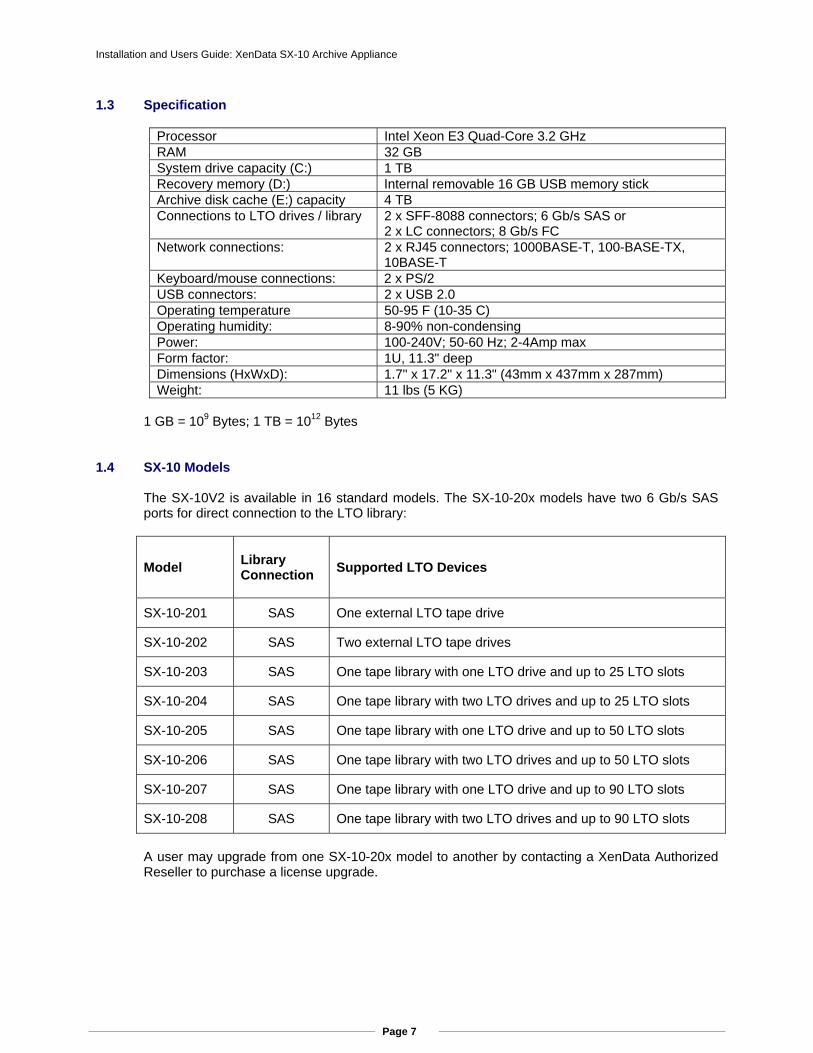
Processor Intel Xeon E3 Quad-Core 3.2 GHz RAM 32 GB System drive capacity (C:) 1 TB Recovery memory (D:) Internal removable 16 GB USB memory stick Archive disk cache (E:) capacity 4 TB Connections to LTO drives / library 2 x SFF-8088 connectors; 6 Gb/s SAS or
2 x LC connectors; 8 Gb/s FC Network connections: 2 x RJ45 connectors; 1000BASE-T, 100-BASE-TX,
10BASE-T Keyboard/mouse connections: 2 x PS/2 USB connectors: 2 x USB 2.0 Operating temperature 50-95 F (10-35 C) Operating humidity: 8-90% non-condensing Power: 100-240V; 50-60 Hz; 2-4Amp max Form factor: 1U, 11.3" deep Dimensions (HxWxD): 1.7" x 17.2" x 11.3" (43mm x 437mm x 287mm) Weight: 11 lbs (5 KG)
1 GB = 109 Bytes; 1 TB = 1012 Bytes
1.4 SX-10 Models
The SX-10V2 is available in 16 standard models. The SX-10-20x models have two 6 Gb/s SAS ports for direct connection to the LTO library:
Model
Library Connection
Supported LTO Devices
SX-10-201 SAS One external LTO tape drive
SX-10-202 SAS Two external LTO tape drives
SX-10-203 SAS One tape library with one LTO drive and up to 25 LTO slots
SX-10-204 SAS One tape library with two LTO drives and up to 25 LTO slots
SX-10-205 SAS One tape library with one LTO drive and up to 50 LTO slots
SX-10-206 SAS One tape library with two LTO drives and up to 50 LTO slots
SX-10-207 SAS One tape library with one LTO drive and up to 90 LTO slots
SX-10-208 SAS One tape library with two LTO drives and up to 90 LTO slots
A user may upgrade from one SX-10-20x model to another by contacting a XenData Authorized Reseller to purchase a license upgrade.

Installation and Users Guide: XenData SX-10 Archive Appliance
Page 8
The SX-10-21x models have two 8 Gb/s FC ports for direct connection to the LTO library:
Model
Library Connection
Supported LTO Devices
SX-10-211 FC One external LTO tape drive
SX-10-212 FC Two external LTO tape drives
SX-10-213 FC One tape library with one LTO drive and up to 25 LTO slots
SX-10-214 FC One tape library with two LTO drives and up to 25 LTO slots
SX-10-215 FC One tape library with one LTO drive and up to 50 LTO slots
SX-10-216 FC One tape library with two LTO drives and up to 50 LTO slots
SX-10-217 FC One tape library with one LTO drive and up to 90 LTO slots
SX-10-218 FC One tape library with two LTO drives and up to 90 LTO slots
A user may upgrade from one SX-10-21x model to another by contacting a XenData Authorized Reseller to purchase a license upgrade. For a list of supported LTO drives and tape libraries, please refer to the XenData web site at www.xendata.com.
All models support an unlimited number of offline LTO cartridges.
Installation and Users Guide: XenData SX-10 Archive Appliance
Page 9
Chapter 2. Control Panel and Connections 2.1 Front Control Panel
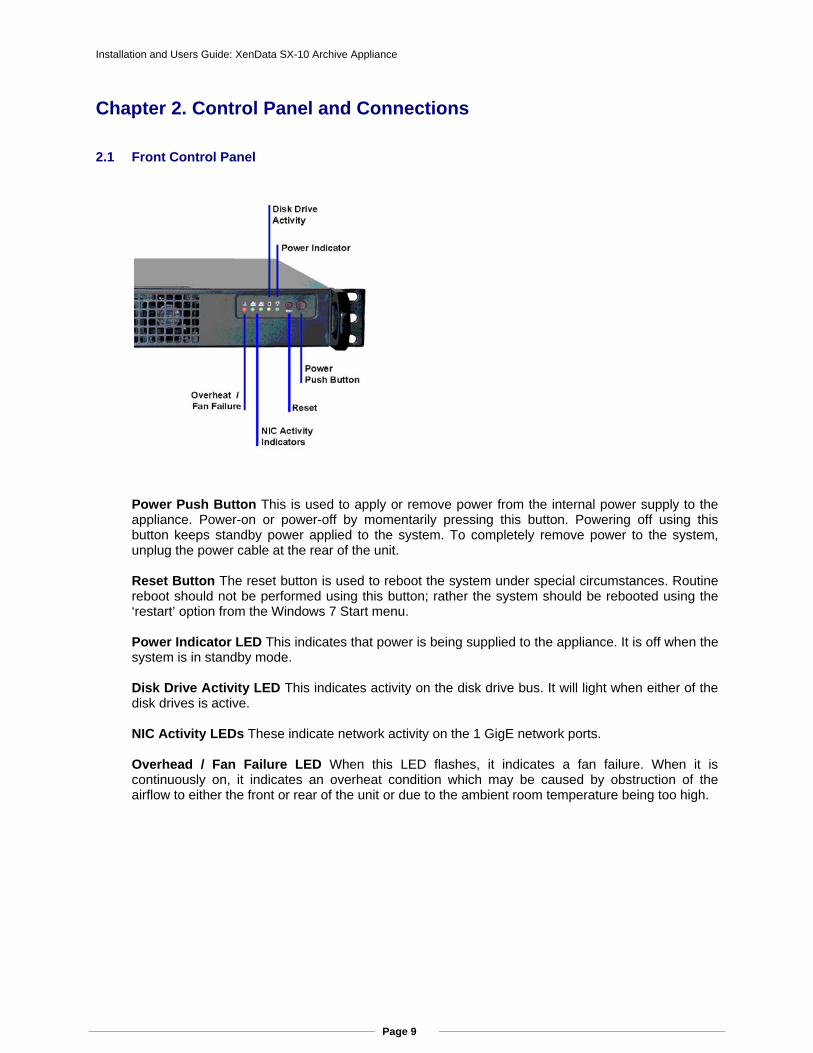
Power Push Button This is used to apply or remove power from the internal power supply to the appliance. Power-on or power-off by momentarily pressing this button. Powering off using this button keeps standby power applied to the system. To completely remove power to the system, unplug the power cable at the rear of the unit. Reset Button The reset button is used to reboot the system under special circumstances. Routine reboot should not be performed using this button; rather the system should be rebooted using the ‘restart’ option from the Windows 7 Start menu. Power Indicator LED This indicates that power is being supplied to the appliance. It is off when the system is in standby mode. Disk Drive Activity LED This indicates activity on the disk drive bus. It will light when either of the disk drives is active. NIC Activity LEDs These indicate network activity on the 1 GigE network ports. Overhead / Fan Failure LED When this LED flashes, it indicates a fan failure. When it is continuously on, it indicates an overheat condition which may be caused by obstruction of the airflow to either the front or rear of the unit or due to the ambient room temperature being too high.
Installation and Users Guide: XenData SX-10 Archive Appliance
Page 10
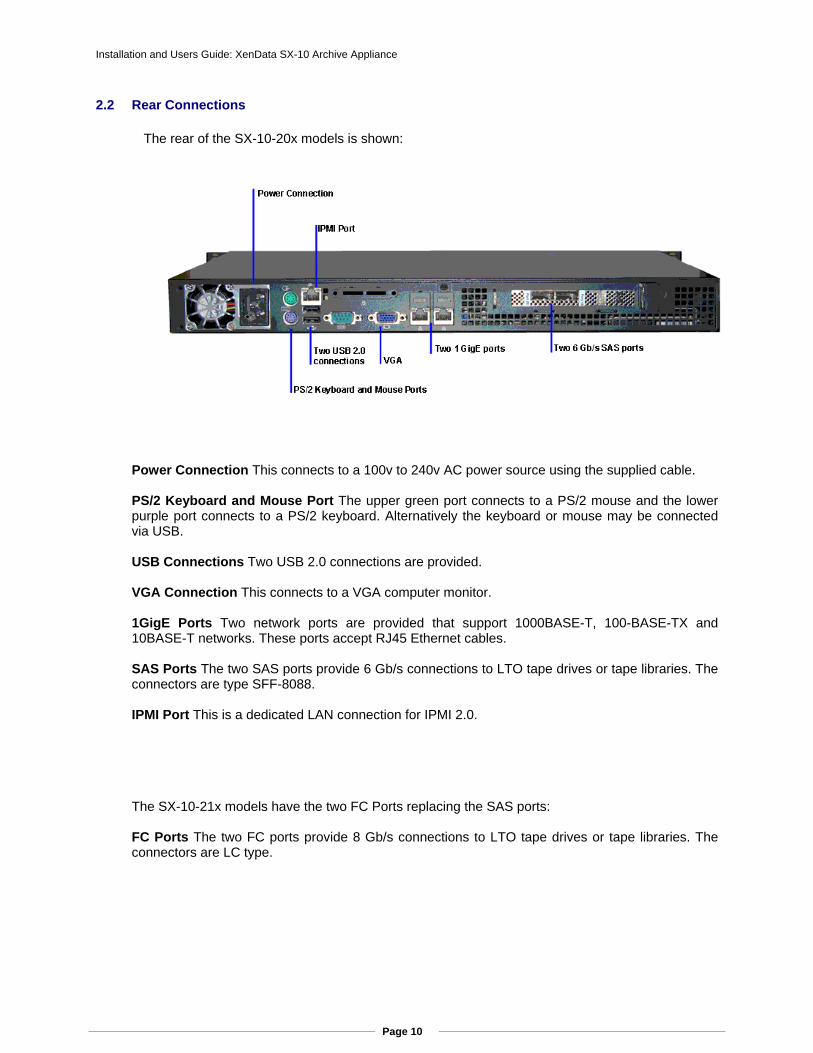
2.2 Rear Connections The rear of the SX-10-20x models is shown:
Power Connection This connects to a 100v to 240v AC power source using the supplied cable. PS/2 Keyboard and Mouse Port The upper green port connects to a PS/2 mouse and the lower purple port connects to a PS/2 keyboard. Alternatively the keyboard or mouse may be connected via USB. USB Connections Two USB 2.0 connections are provided. VGA Connection This connects to a VGA computer monitor. 1GigE Ports Two network ports are provided that support 1000BASE-T, 100-BASE-TX and 10BASE-T networks. These ports accept RJ45 Ethernet cables. SAS Ports The two SAS ports provide 6 Gb/s connections to LTO tape drives or tape libraries. The connectors are type SFF-8088. IPMI Port This is a dedicated LAN connection for IPMI 2.0. The SX-10-21x models have the two FC Ports replacing the SAS ports: FC Ports The two FC ports provide 8 Gb/s connections to LTO tape drives or tape libraries. The connectors are LC type.
Installation and Users Guide: XenData SX-10 Archive Appliance
Page 11
Chapter 3. Installation 3.1 Rack Mounting
The SX-10 may be mounted in a standard 19 inch rack. There is a wide range of rack units on the market which may mean that the assembly procedure will differ slightly. You should refer to the assembly instructions for the rack unit that you are using. Mount the SX-10 in a rack location that has good airflow to the rear and front of the unit. The mounting procedure is as follows. 1. Place four retained nuts in the rack to mate with the four screws supplied with the SX-10 and
ensure that the nuts and screws are compatible. 2. Align the holes of the SX-10 with the holes of the rack. 3. Insert and tighten the four screws.
3.2 Desktop Mounting
The SX-10 produces a low level of noise and is suitable for use in an office environment. If you wish to desktop mount the unit, attach the four rubber feet to the base of the unit.
3.3 Initial System Configuration
The initial system configuration is performed by following the steps described below. If you would like assistance from XenData Support, please contact us at [email protected] and schedule a time for assistance. We will ask you to perform steps 1 to 4 and will then make arrangements with you for remote access to the SX-10. 1. Connect all cables to the system, including keyboard and mouse, VGA monitor, network cable
that provides Internet connection, the LTO drive(s) or LTO tape library and power connections.
2. Power on the LTO drive(s) or tape library and wait for the device to come ready.
3. Power on the SX-10 using the power push button.
4. Logon using the following: User name: Admin Password: XDpassword1
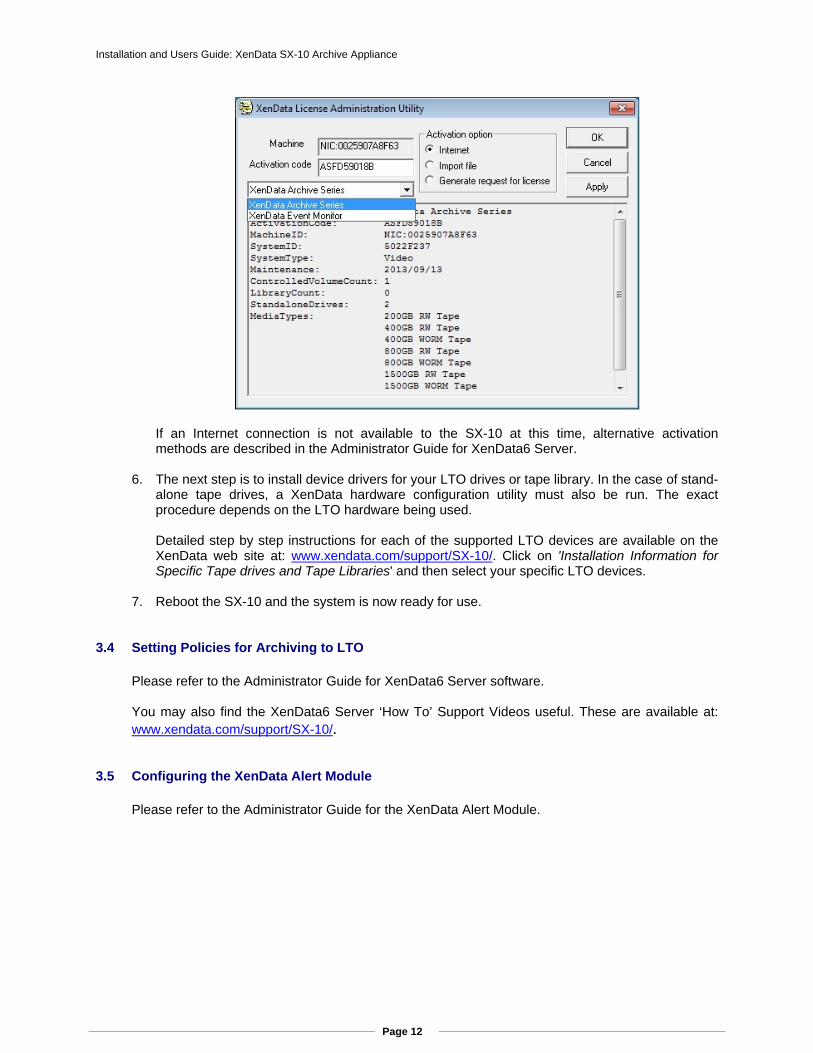
5. Launch the XenData License Administration utility from Start>All programs>XenData>XenData
License Administration. The system will have two activation codes when shipped from the factory. One code is termed ‘XenData Archive Series’ which is for the XenData6 Server software. The other is for the ‘XenData Event Monitor’ which is the server component of the XenData Alert Module. These must be activated before the system can be used. The easiest way to activate is by clicking ‘Apply’ when an Internet connection is present. This must be performed for both ‘XenData Archive Series’ and ‘XenData Event Monitor’ which are selected from the drop-down menu as illustrated below:
Installation and Users Guide: XenData SX-10 Archive Appliance
Page 12
If an Internet connection is not available to the SX-10 at this time, alternative activation methods are described in the Administrator Guide for XenData6 Server.
6. The next step is to install device drivers for your LTO drives or tape library. In the case of stand-
alone tape drives, a XenData hardware configuration utility must also be run. The exact procedure depends on the LTO hardware being used.
Detailed step by step instructions for each of the supported LTO devices are available on the XenData web site at: www.xendata.com/support/SX-10/. Click on 'Installation Information for Specific Tape drives and Tape Libraries' and then select your specific LTO devices.
7. Reboot the SX-10 and the system is now ready for use.
3.4 Setting Policies for Archiving to LTO
Please refer to the Administrator Guide for XenData6 Server software. You may also find the XenData6 Server ‘How To’ Support Videos useful. These are available at: www.xendata.com/support/SX-10/.
3.5 Configuring the XenData Alert Module
Please refer to the Administrator Guide for the XenData Alert Module.
Installation and Users Guide: XenData SX-10 Archive Appliance
Page 13
Chapter 4. Power-On and Power-Off Procedures 4.1 System Power-On
It is important that the LTO drive or tape library is powered on and is ready before the SX-10 boots. Please follow the procedure described below.
1. Power on the LTO tape drive or library and wait until it comes ready. 2. Power on the SX-10 using the power push button.
4.2 System Power-Off
For a system with one or two stand-alone LTO tape drives, please follow the procedure described below.
1. Ensure that all LTO drive write and read operations have completed. 2. Power off the SX-10 using ‘Shut down’ from the Start menu.
For a system with a tape library, please follow the procedure described below.
1. Ensure that all write and read operations to LTO have completed. 2. Ensure that there are no tape cartridges in any of the tape drives in the tape library. If
necessary wait until the drives unload automatically. (The XenData software, by default, will unload tape cartridges after 10 minutes of inactivity.)
3. Power off the SX-10 using ‘Shut down’ from the Start menu.
XenData, Inc., 2125 Oak Grove Road, Suite 100, Walnut Creek, 94598 California, USA Phone: +1 925 465 4300 Email: [email protected] Web Site: www.xendata.com