Embed Size (px)
DESCRIPTION
xCP tutorial
Citation preview
Getting Started with xCP 2.0
Tutorial
December 2012
XCP2.0
SELF-PACED TUTORIAL
XCP2.0 SELF-PACED TUTORIAL page 2
page 2
XCP2.0 SELF-PACED TUTORIAL page 3
page 3
Table of Contents
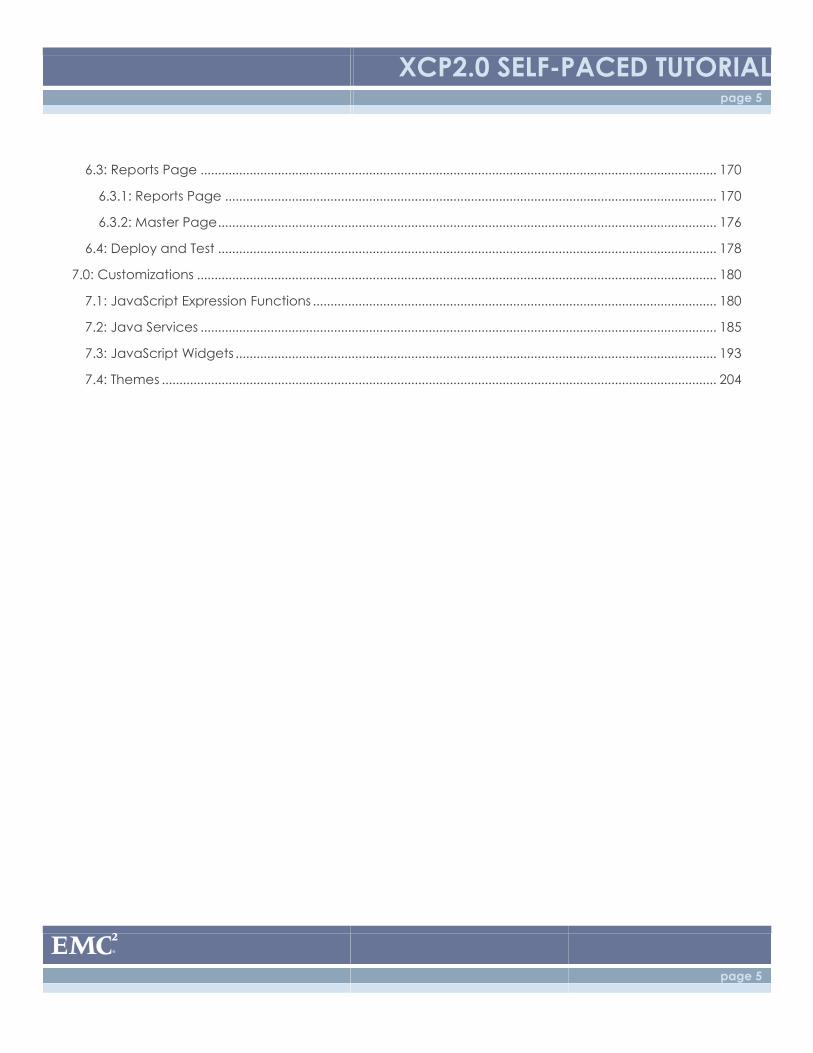
Overview ........................................................................................................................................................................... 6
Known Issues .................................................................................................................................................................... 7
1.0: Application Creation .............................................................................................................................................. 8
2.0: Policies .....................................................................................................................................................................11
2.1: Policy Model .......................................................................................................................................................11
2.2: Policy Pages ........................................................................................................................................................16
2.2.1: “Create Policy” Page .................................................................................................................................16
2.2.2: “Edit Policy” Page .......................................................................................................................................20
2.2.3: Policy Context Menu ..................................................................................................................................21
2.2.4: Policy Search Page ....................................................................................................................................22
2.3: Configuring the Master Page ..........................................................................................................................30
2.4: Deployment ........................................................................................................................................................34
2.5: Testing the Application: Policy Creation .......................................................................................................37
3.0: Vehicles ...................................................................................................................................................................41
3.1: Vehicle Make Picklist .........................................................................................................................................41
3.2: Vehicle Business Object ....................................................................................................................................44
3.3: Stateless Process for Create/Relate ...............................................................................................................46
3.4: Vehicle Real-Time Query ..................................................................................................................................55
3.5: Vehicle Pages .....................................................................................................................................................60
3.5.1: “Add Vehicle” Page ..................................................................................................................................60
3.5.2: Displaying Vehicles Related to a Policy .................................................................................................67
3.6: Testing the Application: Vehicle Creation and Policy Linking ..................................................................69
4.0: Claims.......................................................................................................................................................................72
4.1: Claim Status Picklist ............................................................................................................................................72
4.2: Claim Folder ........................................................................................................................................................73
4.3: Stateless Process for Create/Relate ...............................................................................................................75
4.4: Claim Real-Time Query .....................................................................................................................................83
XCP2.0 SELF-PACED TUTORIAL page 4
page 4
4.5: Claim Pages ........................................................................................................................................................87
4.5.1: “Add Claim” Page ......................................................................................................................................87
4.5.2: Displaying Claims Related to a Policy ....................................................................................................95
4.5.3: “View Claim” Page .....................................................................................................................................98
4.5.4: Claim Context Menu ............................................................................................................................... 101
4.5.5: Testing the Application: Create and View Claims ............................................................................ 101
4.6: Claim Process and UI...................................................................................................................................... 106
4.6.1: Claims Work Queue (DA) ....................................................................................................................... 106
4.6.2: Work Queue Parameter ......................................................................................................................... 116
4.6.3: Claim Process ........................................................................................................................................... 118
4.6.4: Claim Business Event ................................................................................................................................ 123
4.6.5: Task List ....................................................................................................................................................... 126
4.6.6: Adjudication Activity Page .................................................................................................................... 132
4.6.7: Testing the Application: Claim Creation ............................................................................................. 138
5.0: Supporting Documents ...................................................................................................................................... 146
5.1: Supporting Document Content Type ......................................................................................................... 146
5.1.1: Content Type ............................................................................................................................................ 146
5.1.2: “View” Page ............................................................................................................................................. 147
5.1.3: Context Menu ........................................................................................................................................... 148
5.2: Import Action Flow .......................................................................................................................................... 149
5.3: Content Search ............................................................................................................................................... 151
5.3.1: Full-Text Query ........................................................................................................................................... 151
5.3.2: Search Page ............................................................................................................................................. 153
5.4: Testing the Application: Supporting Documents ...................................................................................... 154
6.0: BAM Dashboard .................................................................................................................................................. 160
6.1: Claim Business Events ..................................................................................................................................... 160
6.2: Historical Queries ............................................................................................................................................. 162
6.2.1: Claim Historical Query – Number of claims by status ....................................................................... 162
6.2.2: Claim Historical Query – Average time for claim processing .......................................................... 166
XCP2.0 SELF-PACED TUTORIAL page 5
page 5
6.3: Reports Page ................................................................................................................................................... 170
6.3.1: Reports Page ............................................................................................................................................ 170
6.3.2: Master Page .............................................................................................................................................. 176
6.4: Deploy and Test .............................................................................................................................................. 178
7.0: Customizations .................................................................................................................................................... 180
7.1: JavaScript Expression Functions ................................................................................................................... 180
7.2: Java Services ................................................................................................................................................... 185
7.3: JavaScript Widgets ......................................................................................................................................... 193
7.4: Themes .............................................................................................................................................................. 204
XCP2.0 SELF-PACED TUTORIAL page 6
page 6
Overview
Welcome to the xCP 2.0 Self-Paced Tutorial!
Congratulations on downloading the new xCP Designer and xCP Runtime. xCP Designer is the new
unified tool to build xCP 2.0 applications. You may be familiar with Process Builder, Forms Builder,
Composer, Process Reporting Services and TaskSpace Configuration; well, xCP Designer is all of those
rolled into one…plus a lot more! It’s an entirely offline tool (you’ll notice that you won’t connect to a
repository until it’s time to do a deployment). You’ll also see our new xCP Runtime (which is replacing
TaskSpace in xCP 2.0). It’s new, it’s modern, and we think you’ll like both the look and feel as well as the
performance.
In order to introduce you to the software and some of the new concepts in it, this tutorial will have you
start from the very beginning – creating a new application.
In this guide, you are going to build a simple application, but we wanted you to get a good feeling for
what the new tool is like and what some of the important concepts are.
The premise for this guide is the beginnings of an auto insurance application. You’re going to start by
modeling two basic business object types (that’s xCP 2.0 parlance for “contentless objects”): a Policy
and a Vehicle. For each, you’ll create pages for creating and viewing, as well as pages to show lists of
each. You’ll also define a folder object type (Claim).
You’ll explore one of the new concepts in xCP 2.0: relationships. You will model a relationship between
Policies, Vehicles, and Claims – in the case, one-to-many relationships because policies can cover one
or more cars and/or claims. You’ll utilize stateless processes to perform the creation and the subsequent
relation of objects.
Later, you’ll add a picklist, a context menu, and a business event. You’ll also create a process that uses
a parameter for a work queue. The process will allow an adjudicator to make a decision on the claim
(approved or declined). For the process you will create a task list and task pages for each manual
activity.
You’ll define a content (document) type for Supporting Documentation. You’ll add discovered
metadata to the content type, which leverages the metadata extraction feature of Content
Intelligence Services. You’ll create a full-text query which showcases search facets. You’ll also create a
couple of BAM reports based on historical events.
Remember, you’re learning here. Experiment. Feel free to take advantage of rapid deployments –
deploy frequently to see how your changes work.
If you find a bug, please let us know as soon as possible through the appropriate channel.
XCP2.0 SELF-PACED TUTORIAL page 7
page 7
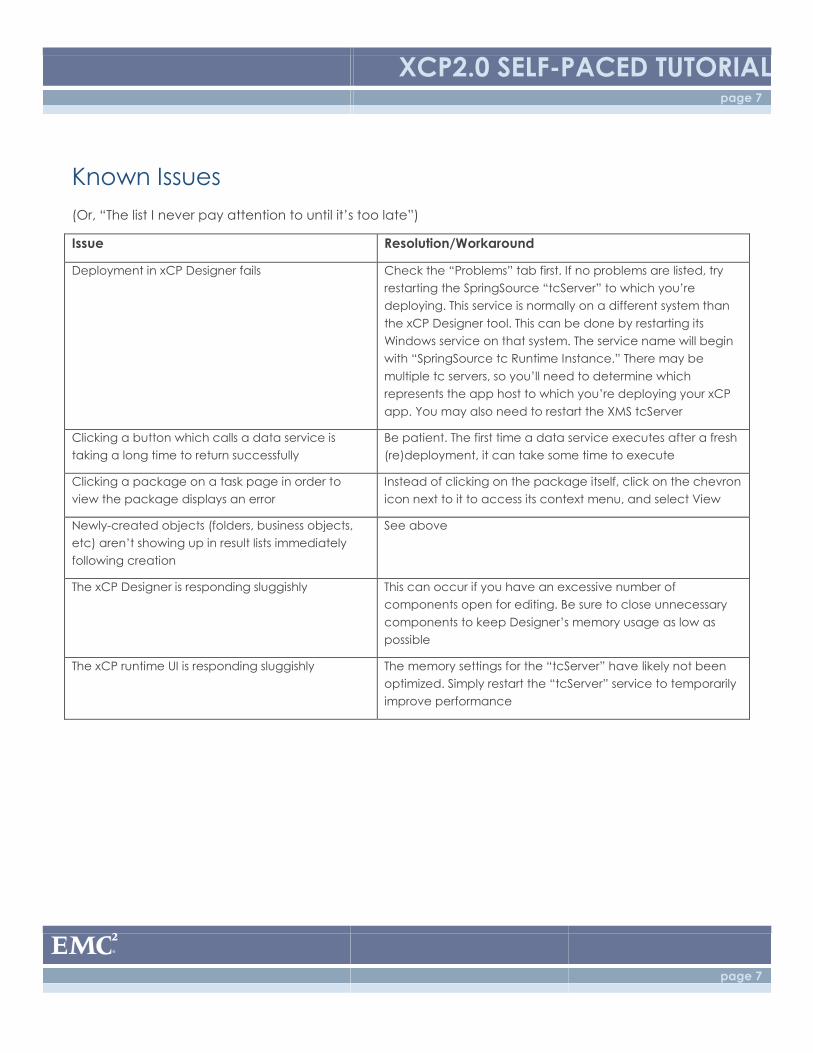
Known Issues
(Or, “The list I never pay attention to until it’s too late”)
Issue Resolution/Workaround
Deployment in xCP Designer fails Check the “Problems” tab first. If no problems are listed, try
restarting the SpringSource “tcServer” to which you’re
deploying. This service is normally on a different system than
the xCP Designer tool. This can be done by restarting its
Windows service on that system. The service name will begin
with “SpringSource tc Runtime Instance.” There may be
multiple tc servers, so you’ll need to determine which
represents the app host to which you’re deploying your xCP
app. You may also need to restart the XMS tcServer
Clicking a button which calls a data service is
taking a long time to return successfully
Be patient. The first time a data service executes after a fresh
(re)deployment, it can take some time to execute
Clicking a package on a task page in order to
view the package displays an error
Instead of clicking on the package itself, click on the chevron
icon next to it to access its context menu, and select View
Newly-created objects (folders, business objects,
etc) aren’t showing up in result lists immediately
following creation
See above
The xCP Designer is responding sluggishly This can occur if you have an excessive number of
components open for editing. Be sure to close unnecessary
components to keep Designer’s memory usage as low as
possible
The xCP runtime UI is responding sluggishly The memory settings for the “tcServer” have likely not been
optimized. Simply restart the “tcServer” service to temporarily
improve performance
XCP2.0 SELF-PACED TUTORIAL page 8
page 8
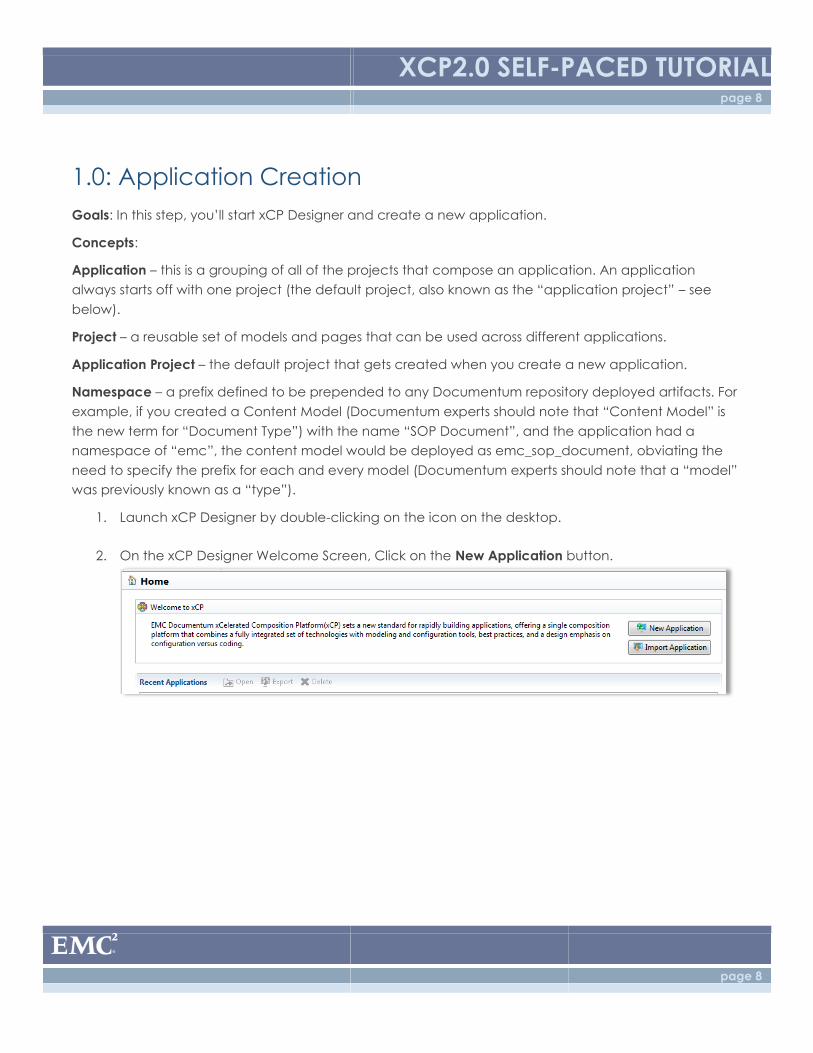
1.0: Application Creation
Goals: In this step, you’ll start xCP Designer and create a new application.
Concepts:
Application – this is a grouping of all of the projects that compose an application. An application
always starts off with one project (the default project, also known as the “application project” – see
below).
Project – a reusable set of models and pages that can be used across different applications.
Application Project – the default project that gets created when you create a new application.
Namespace – a prefix defined to be prepended to any Documentum repository deployed artifacts. For
example, if you created a Content Model (Documentum experts should note that “Content Model” is
the new term for “Document Type”) with the name “SOP Document”, and the application had a
namespace of “emc”, the content model would be deployed as emc_sop_document, obviating the
need to specify the prefix for each and every model (Documentum experts should note that a “model”
was previously known as a “type”).
1. Launch xCP Designer by double-clicking on the icon on the desktop.
2. On the xCP Designer Welcome Screen, Click on the New Application button.
XCP2.0 SELF-PACED TUTORIAL page 9
page 9
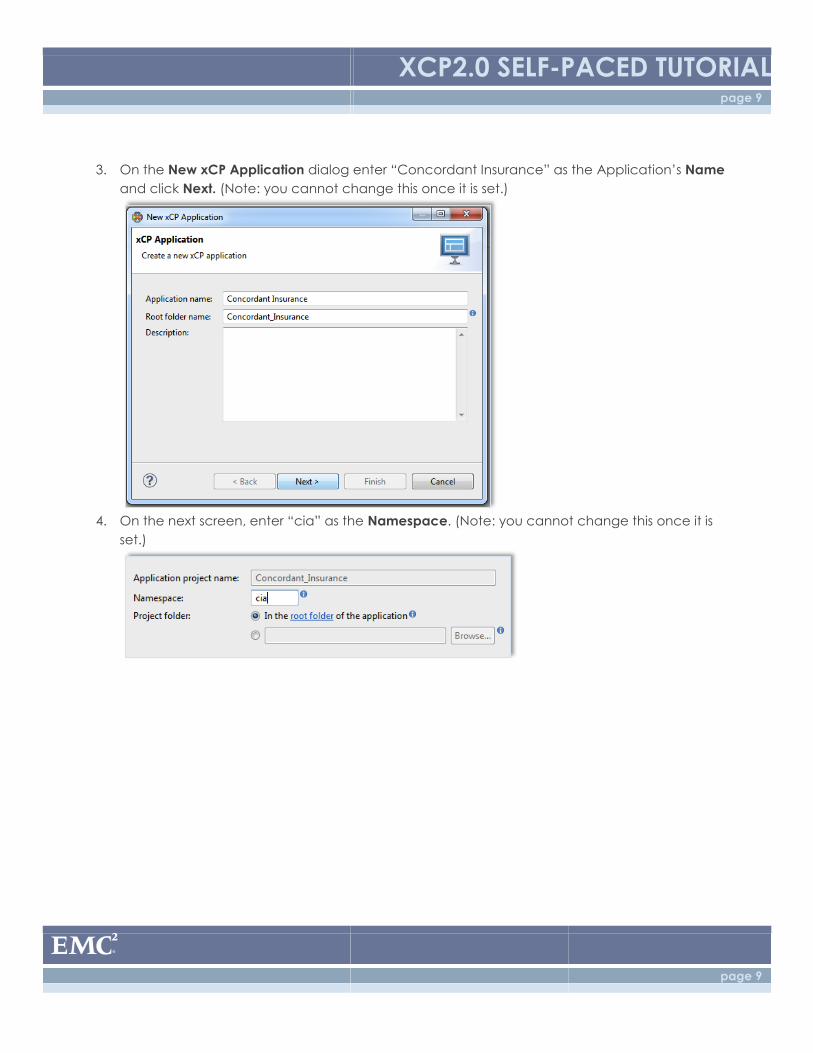
3. On the New xCP Application dialog enter “Concordant Insurance” as the Application’s Name
and click Next. (Note: you cannot change this once it is set.)
4. On the next screen, enter “cia” as the Namespace. (Note: you cannot change this once it is
set.)
XCP2.0 SELF-PACED TUTORIAL page 10
page 10
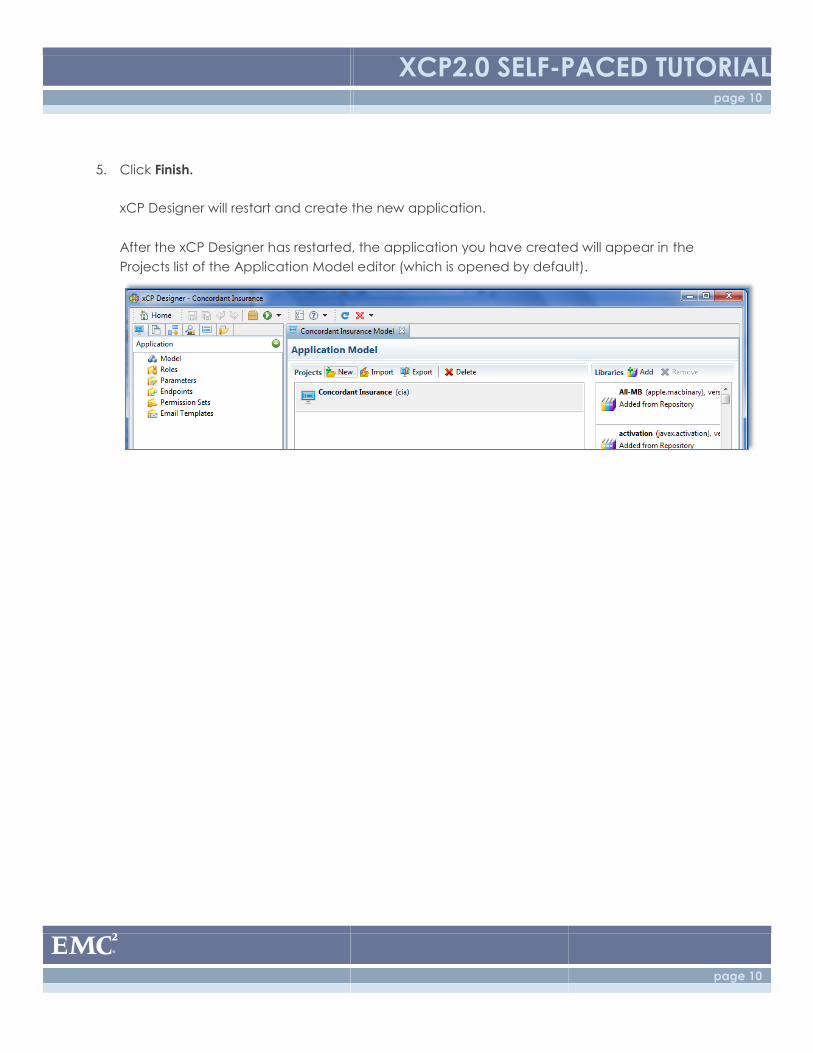
5. Click Finish.
xCP Designer will restart and create the new application.
After the xCP Designer has restarted, the application you have created will appear in the
Projects list of the Application Model editor (which is opened by default).
XCP2.0 SELF-PACED TUTORIAL page 11
page 11
2.0: Policies
2.1: Policy Model
Goals: Create the model that will represent a customer’s insurance policy in your application.
Concept:
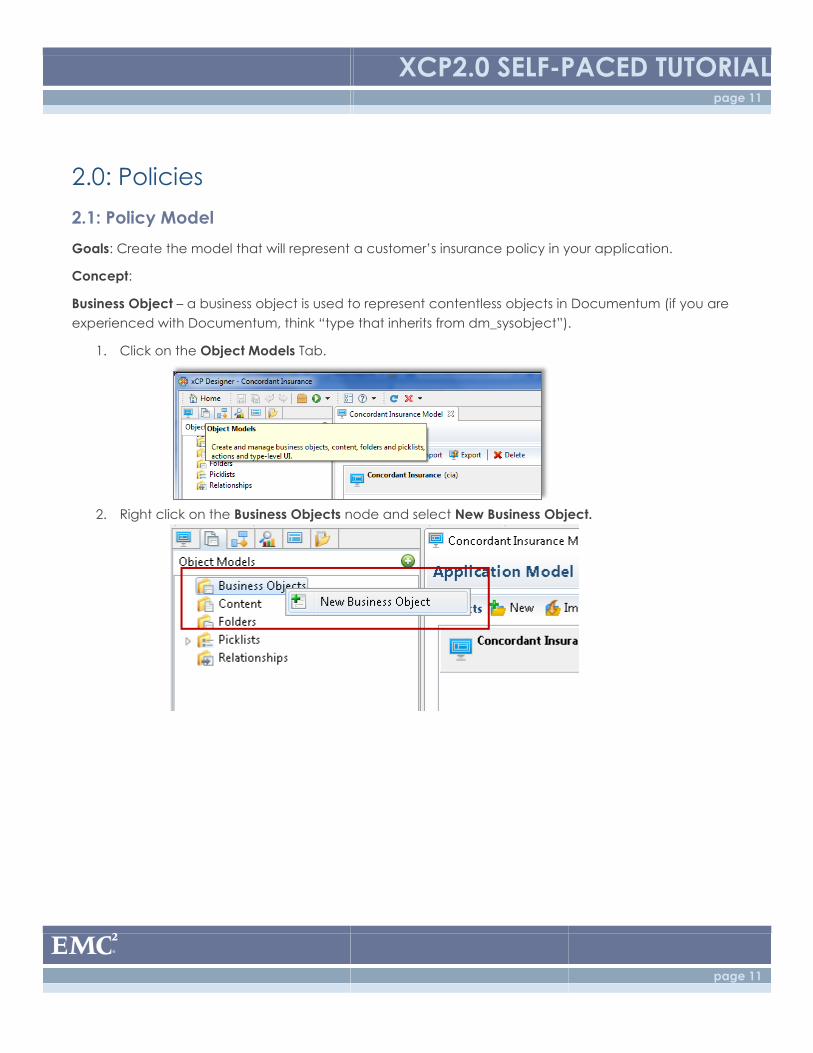
Business Object – a business object is used to represent contentless objects in Documentum (if you are
experienced with Documentum, think “type that inherits from dm_sysobject”).
1. Click on the Object Models Tab.
2. Right click on the Business Objects node and select New Business Object.
XCP2.0 SELF-PACED TUTORIAL page 12
page 12
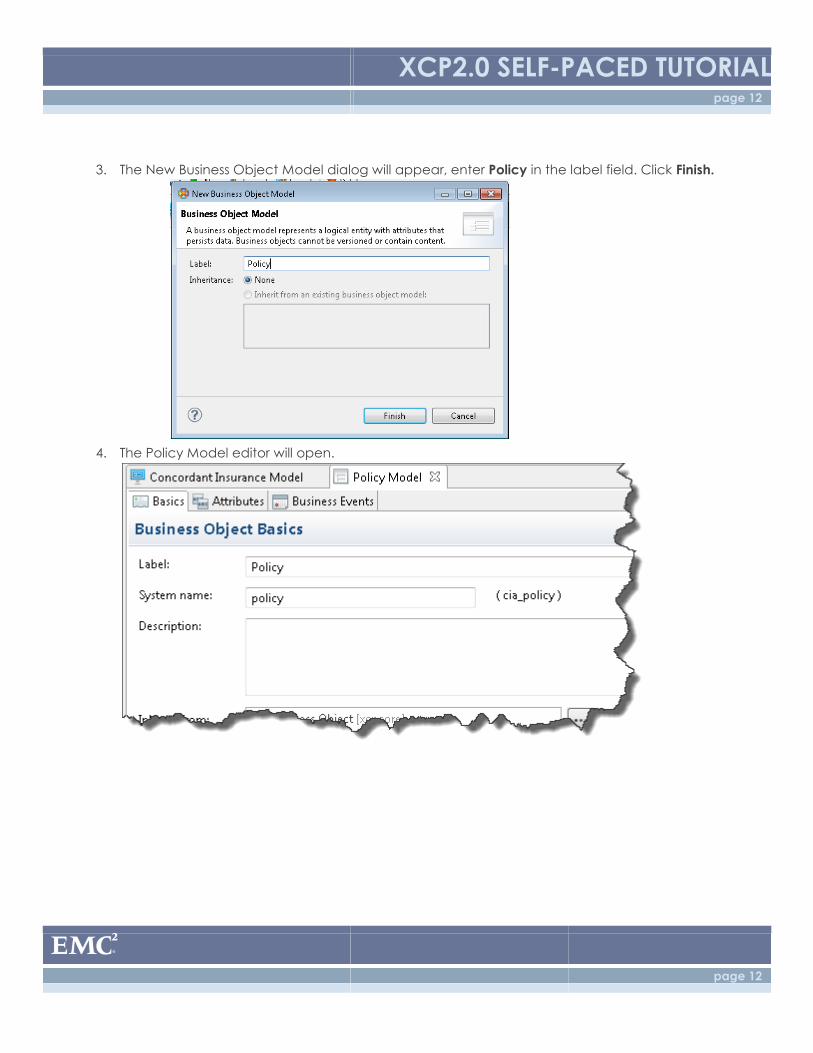
3. The New Business Object Model dialog will appear, enter Policy in the label field. Click Finish.
4. The Policy Model editor will open.
XCP2.0 SELF-PACED TUTORIAL page 13
page 13
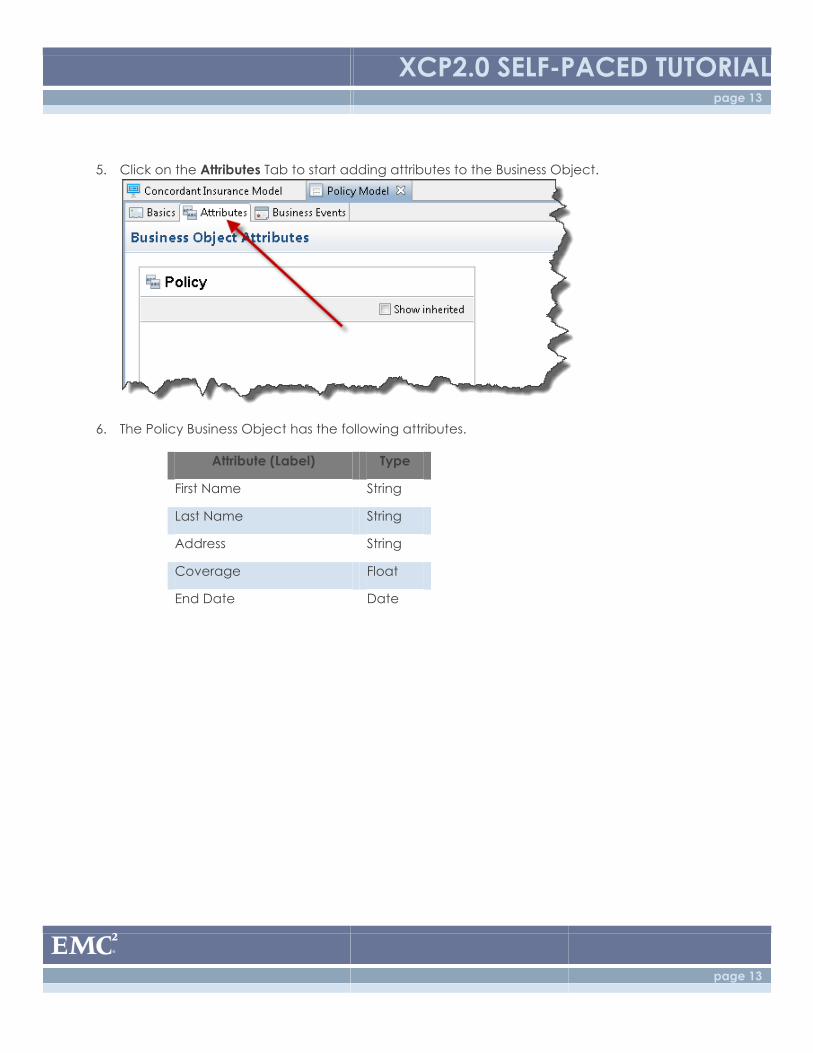
5. Click on the Attributes Tab to start adding attributes to the Business Object.
6. The Policy Business Object has the following attributes.
Attribute (Label) Type
First Name String
Last Name String
Address String
Coverage Float
End Date Date
XCP2.0 SELF-PACED TUTORIAL page 14
page 14
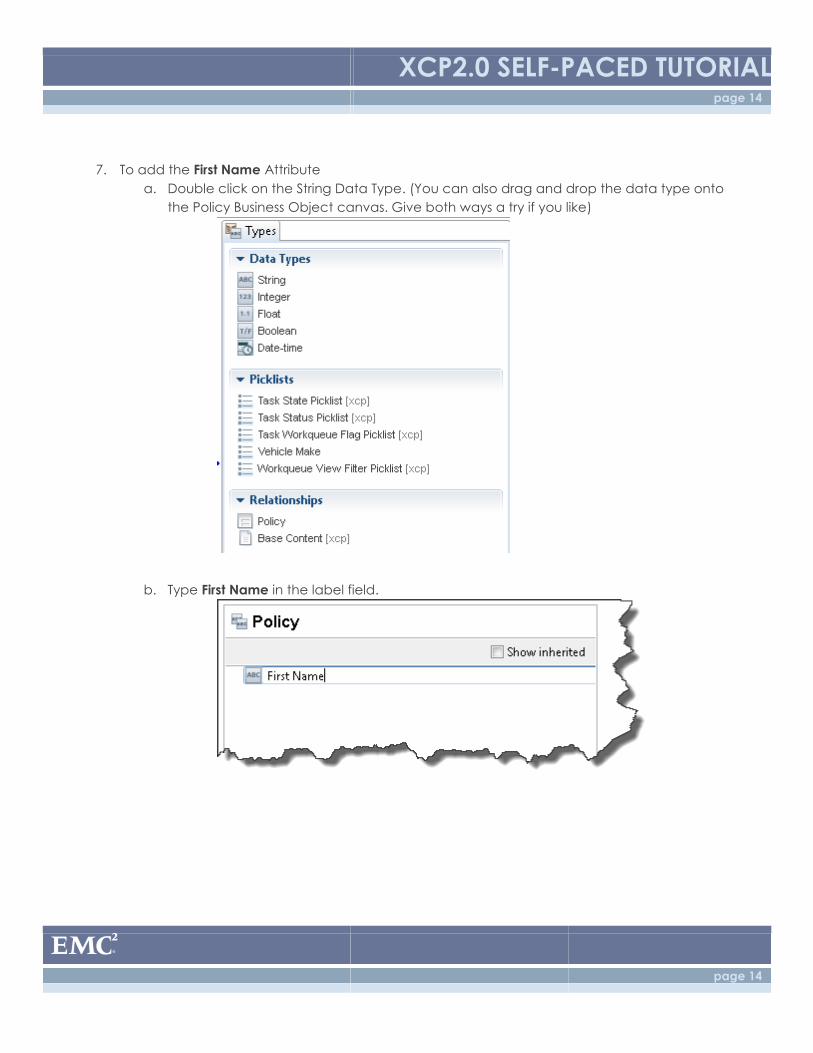
7. To add the First Name Attribute
a. Double click on the String Data Type. (You can also drag and drop the data type onto
the Policy Business Object canvas. Give both ways a try if you like)
b. Type First Name in the label field.
XCP2.0 SELF-PACED TUTORIAL page 15
page 15
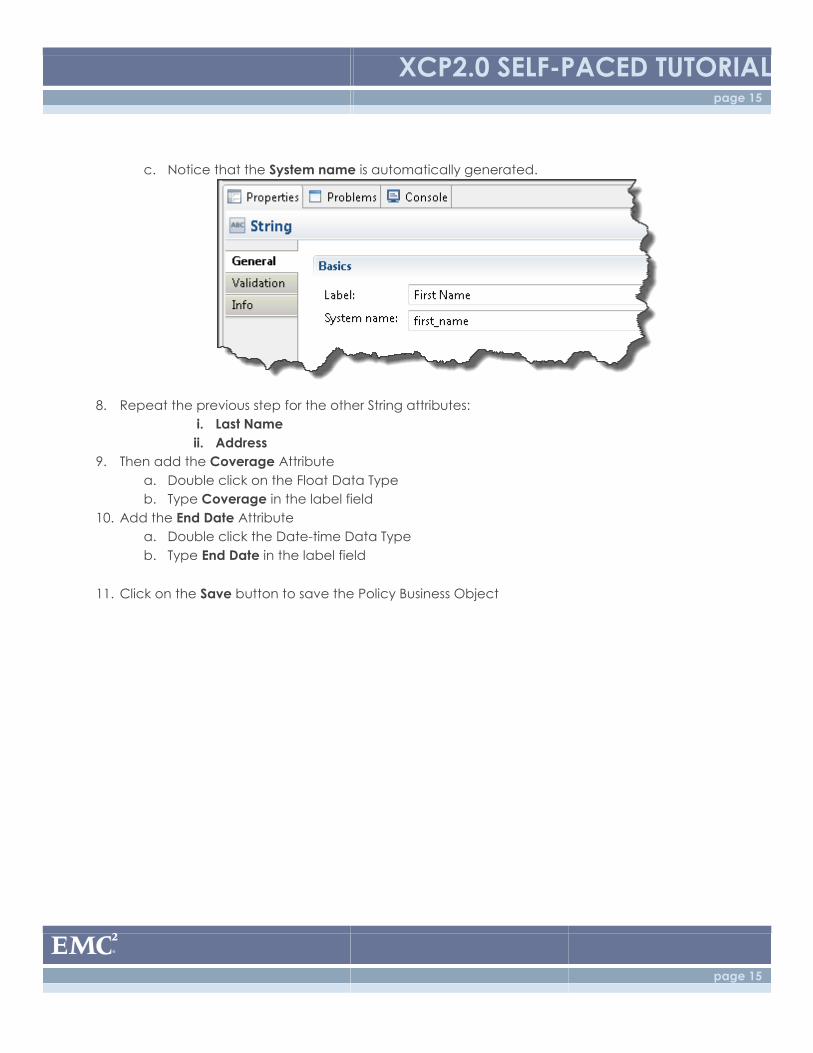
c. Notice that the System name is automatically generated.
8. Repeat the previous step for the other String attributes:
i. Last Name
ii. Address
9. Then add the Coverage Attribute
a. Double click on the Float Data Type
b. Type Coverage in the label field
10. Add the End Date Attribute
a. Double click the Date-time Data Type
b. Type End Date in the label field
11. Click on the Save button to save the Policy Business Object
XCP2.0 SELF-PACED TUTORIAL page 16
page 16
2.2: Policy Pages
Goals: Create pages that will allow users to add and edit policies in your application.
Concepts:
Object Model Pages – xCP applications can auto-generate pages for creating, editing and viewing
your business objects (contentless objects), content objects (documents), folders, etc. While in a
production application you would no doubt want to create your own look and feel, these pages help
you get started because they have widgets pre-selected and pre-bound to services. Later we will
create an “Application Page” which has a different purpose.
Data Services – Data Services represent out-of-the-box or generated services that can be invoked at
runtime. On pages, you can map data from widgets on a page as inputs to a data service. When you
modeled the Policy type, the system auto-generated services to create, update and delete policies.
Expressions – There are various places in an application where you might want to use some conditional
or other logic to determine whether to perform a particular action, or to compute a result based on
some inputs. These actions could include displaying or hiding a widget on a page, enabling or disabling
a widget on a page, computing a value to display on a page, determining whether to invoke a
business event or not, computing values to pass as inputs to a data service or process, determining
which flow to follow in a business process, determining the default value of an attribute, determining the
default location of an object and several other places as well. In xCP 2.0, we unified the language used
for these expressions and you will get to work with them in this section of the tutorial.
Everything modeled in the xCP Designer results in one or more RESTful services that will be deployed on
the app server and invoked at runtime.
2.2.1: “Create Policy” Page
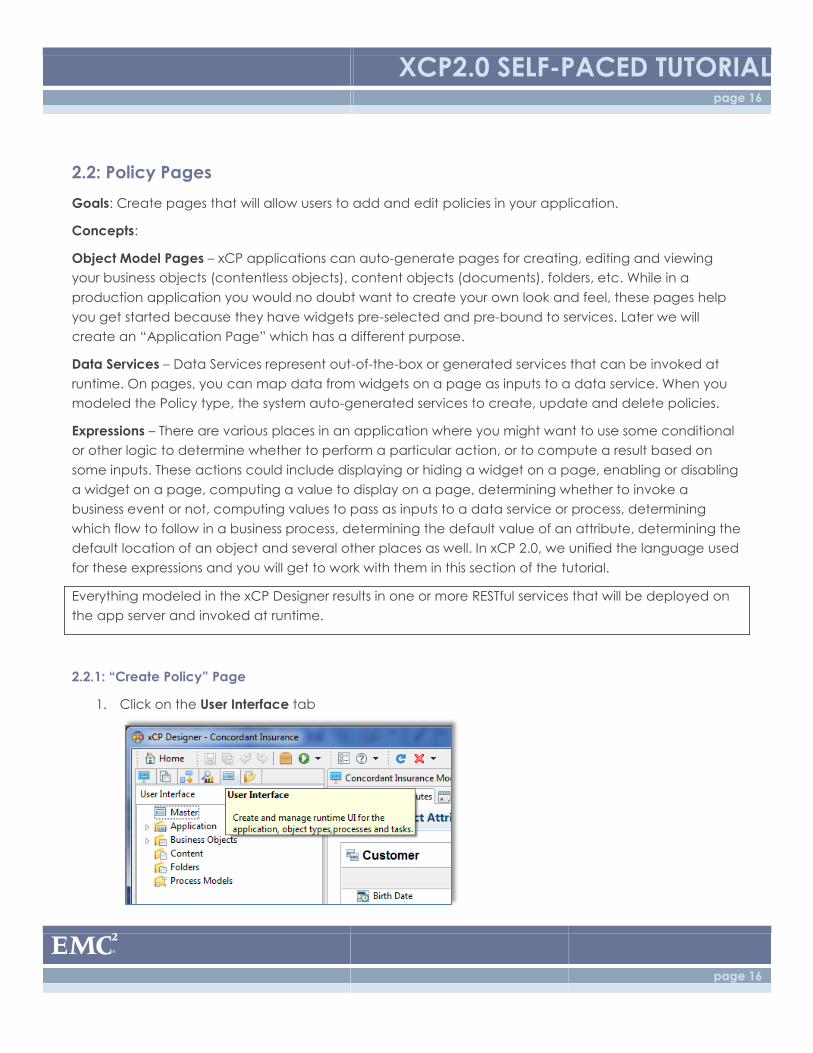
1. Click on the User Interface tab
XCP2.0 SELF-PACED TUTORIAL page 17
page 17
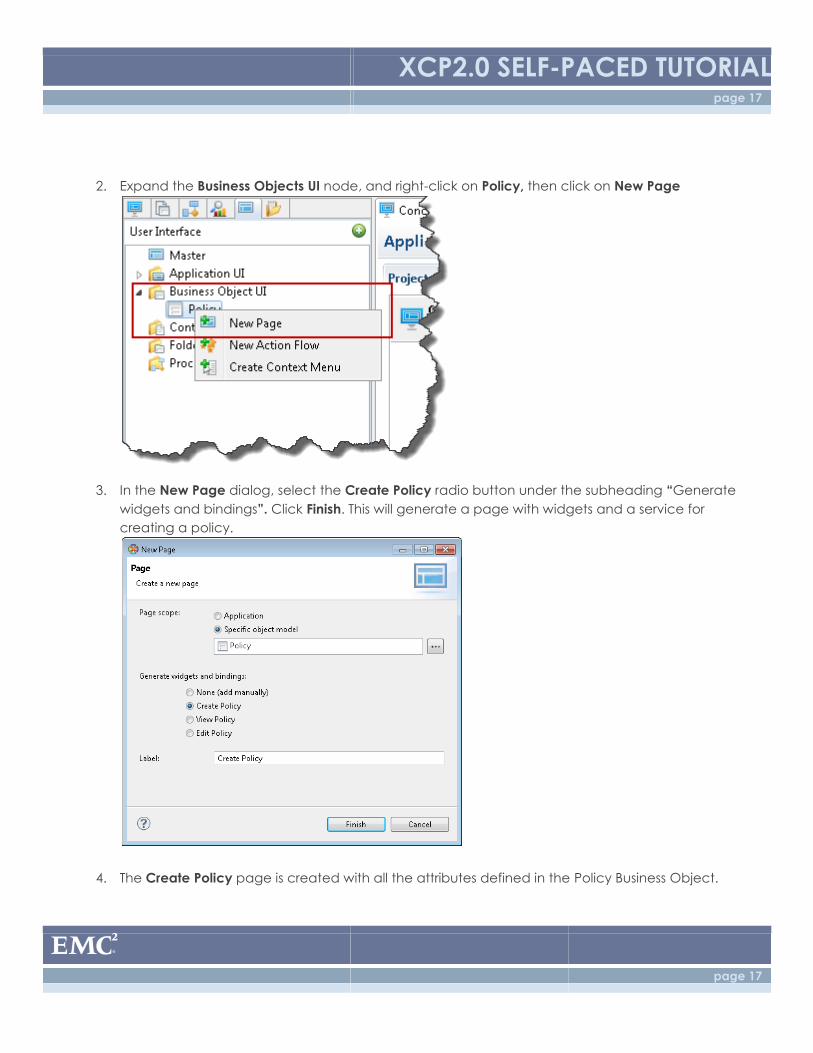
2. Expand the Business Objects UI node, and right-click on Policy, then click on New Page
3. In the New Page dialog, select the Create Policy radio button under the subheading “Generate
widgets and bindings”. Click Finish. This will generate a page with widgets and a service for
creating a policy.
4. The Create Policy page is created with all the attributes defined in the Policy Business Object.
XCP2.0 SELF-PACED TUTORIAL page 18
page 18
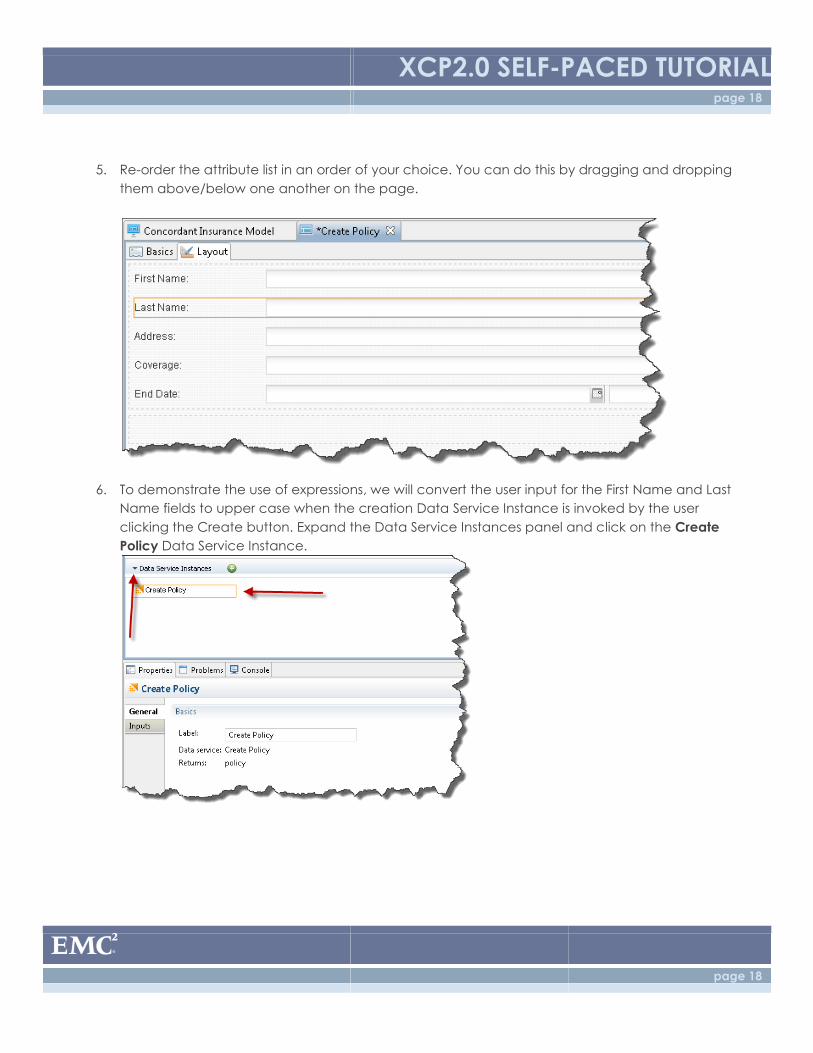
5. Re-order the attribute list in an order of your choice. You can do this by dragging and dropping
them above/below one another on the page.
6. To demonstrate the use of expressions, we will convert the user input for the First Name and Last
Name fields to upper case when the creation Data Service Instance is invoked by the user
clicking the Create button. Expand the Data Service Instances panel and click on the Create
Policy Data Service Instance.
XCP2.0 SELF-PACED TUTORIAL page 19
page 19
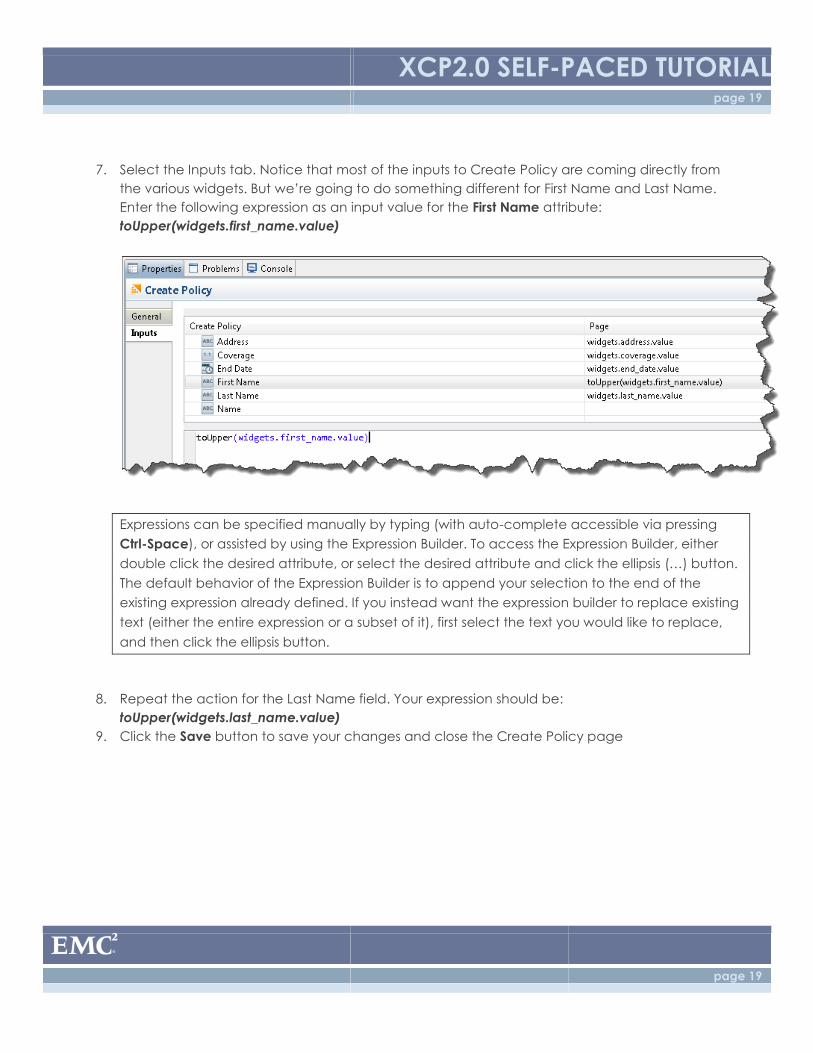
7. Select the Inputs tab. Notice that most of the inputs to Create Policy are coming directly from
the various widgets. But we’re going to do something different for First Name and Last Name.
Enter the following expression as an input value for the First Name attribute:
toUpper(widgets.first_name.value)
Expressions can be specified manually by typing (with auto-complete accessible via pressing
Ctrl-Space), or assisted by using the Expression Builder. To access the Expression Builder, either
double click the desired attribute, or select the desired attribute and click the ellipsis (…) button.
The default behavior of the Expression Builder is to append your selection to the end of the
existing expression already defined. If you instead want the expression builder to replace existing
text (either the entire expression or a subset of it), first select the text you would like to replace,
and then click the ellipsis button.
8. Repeat the action for the Last Name field. Your expression should be:
toUpper(widgets.last_name.value)
9. Click the Save button to save your changes and close the Create Policy page
XCP2.0 SELF-PACED TUTORIAL page 20
page 20
2.2.2: “Edit Policy” Page
Now we will create a page for editing existing policies within the system. This page will be accessed by
right-clicking a Policy object and leveraging its context menu, which will be created at a later step.
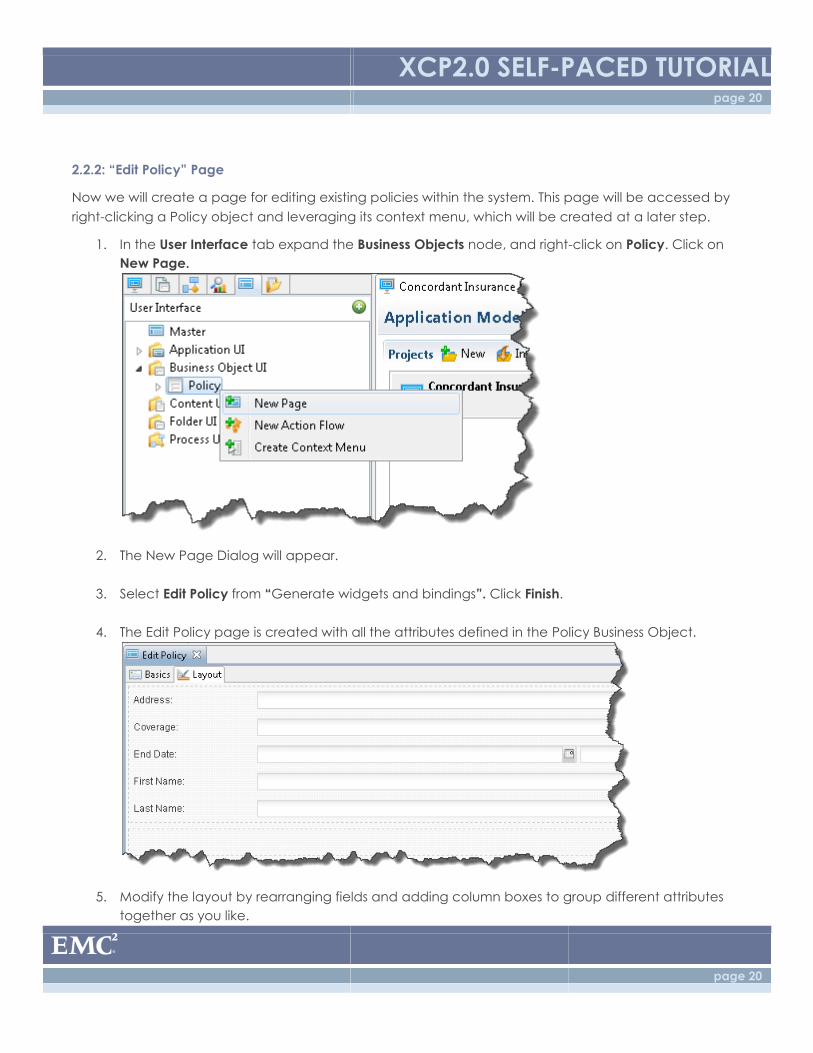
1. In the User Interface tab expand the Business Objects node, and right-click on Policy. Click on
New Page.
2. The New Page Dialog will appear.
3. Select Edit Policy from “Generate widgets and bindings”. Click Finish.
4. The Edit Policy page is created with all the attributes defined in the Policy Business Object.
5. Modify the layout by rearranging fields and adding column boxes to group different attributes
together as you like.
XCP2.0 SELF-PACED TUTORIAL page 21
page 21
6. Click the Save icon in the toolbar to save your changes. Alternatively, you can press Ctrl-S on the
keyboard. Then close the Edit Policy page.
2.2.3: Policy Context Menu
Creating a context menu for an object type makes that context menu accessible anywhere in the
runtime UI simply by right-clicking an object of that type. In some cases, a chevron icon will be
displayed next to the object to expose its context menu.
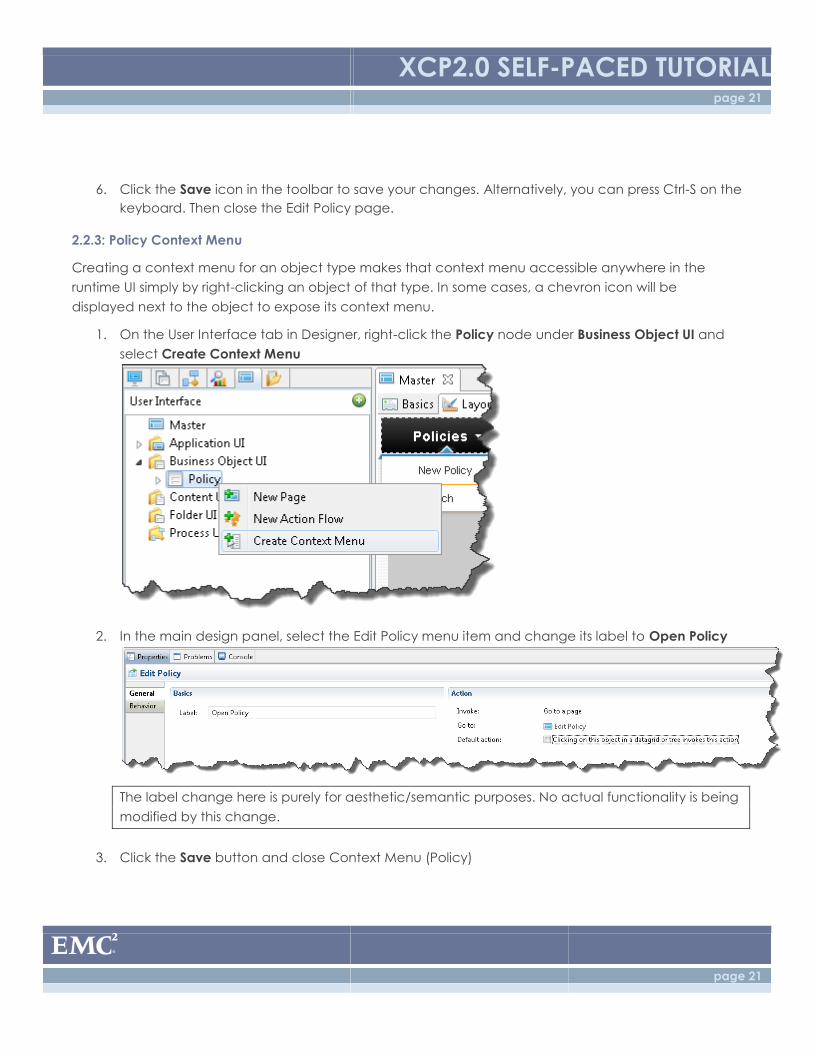
1. On the User Interface tab in Designer, right-click the Policy node under Business Object UI and
select Create Context Menu
2. In the main design panel, select the Edit Policy menu item and change its label to Open Policy
The label change here is purely for aesthetic/semantic purposes. No actual functionality is being
modified by this change.
3. Click the Save button and close Context Menu (Policy)
XCP2.0 SELF-PACED TUTORIAL page 22
page 22
2.2.4: Policy Search Page
Goals: Create a page for your application that will display a list of all policies and allow the user to filter
by last name.
Concepts:
Real-Time Query – a Real-Time Query represents a search of items in the Documentum repository. It has
outputs and can have inputs. (Seasoned Documentum developers may realize this is a GUI-driven way
of defining a DQL query, but don’t worry if you don’t know what that is.)
To add a list of policies on a page, first you have to create a Real-Time Query to return the list of policies.
Then, create a new page in your application and add that Real-Time Query to the page as a “Data
Service Instance.” Finally, add a Results List to the page and wire it to the Data Service Instance.
Application Page – thus far, the pages we’ve created have been Object Model Pages. Object Model
Pages only make sense in the context of an object – a Policy, a Vehicle, a document, a folder, etc.
They typically function to create, view, or edit instances to which they belong. An Application Page is
not tied to a specific object or object type, though it may interact with them. An Application Page can
have many functions, such as a search page for different types of content or process related data, a
report dashboard, a home page, etc. Below we will create an Application Page to serve as a search
page.
2.2.4.1 Policy Search Real-Time Query
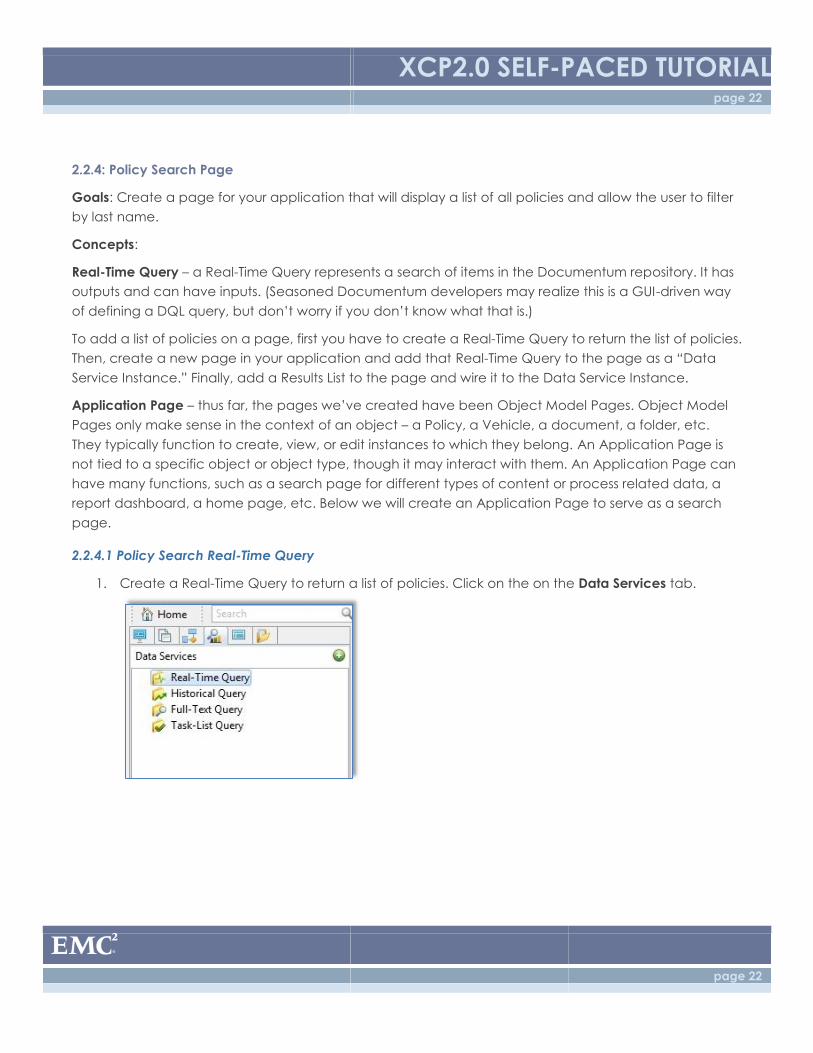
1. Create a Real-Time Query to return a list of policies. Click on the on the Data Services tab.
XCP2.0 SELF-PACED TUTORIAL page 23
page 23
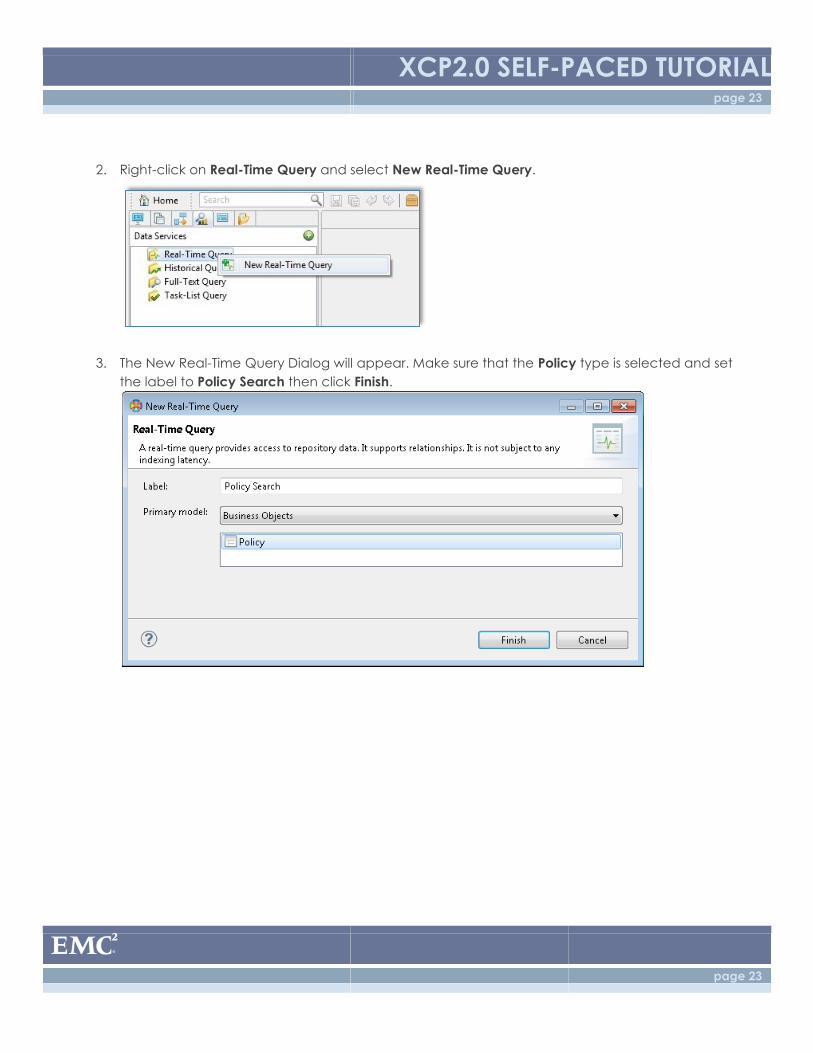
2. Right-click on Real-Time Query and select New Real-Time Query.
3. The New Real-Time Query Dialog will appear. Make sure that the Policy type is selected and set
the label to Policy Search then click Finish.
XCP2.0 SELF-PACED TUTORIAL page 24
page 24
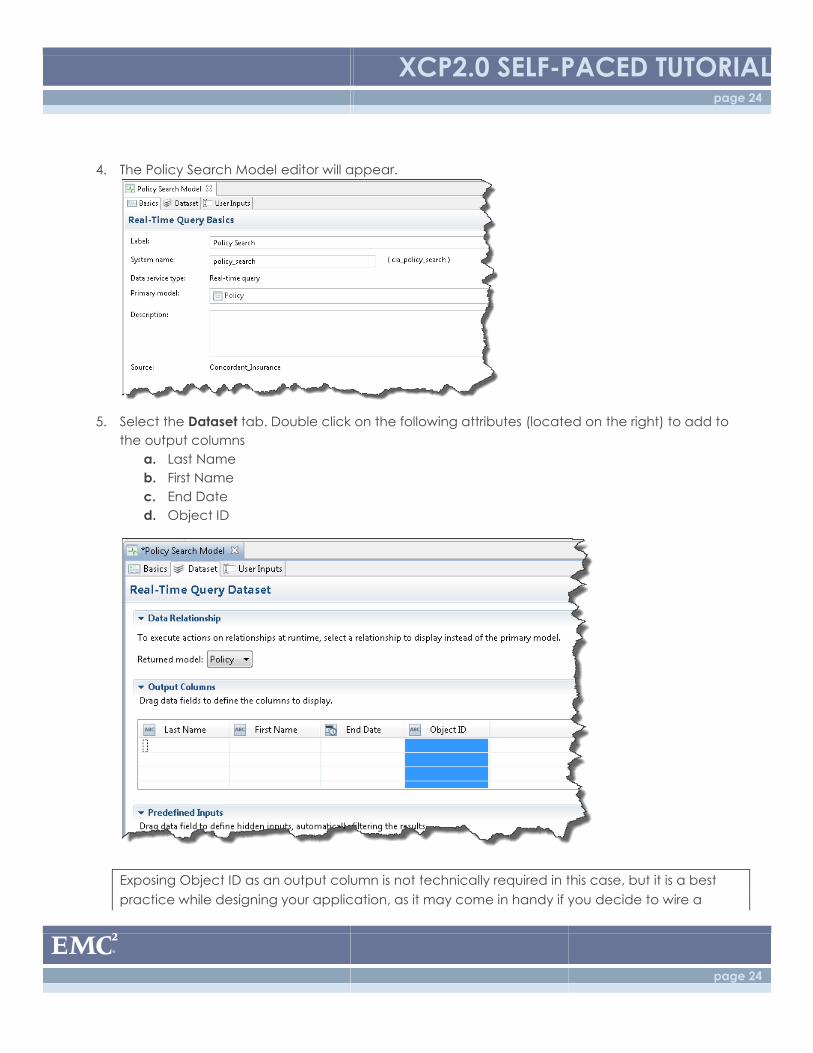
4. The Policy Search Model editor will appear.
5. Select the Dataset tab. Double click on the following attributes (located on the right) to add to
the output columns
a. Last Name
b. First Name
c. End Date
d. Object ID
Exposing Object ID as an output column is not technically required in this case, but it is a best
practice while designing your application, as it may come in handy if you decide to wire a
XCP2.0 SELF-PACED TUTORIAL page 25
page 25
comments widget or a viewer widget to the currently-selected item in a result list. You can
always remove it later, though you’ll have to update any result lists which depend on the query.
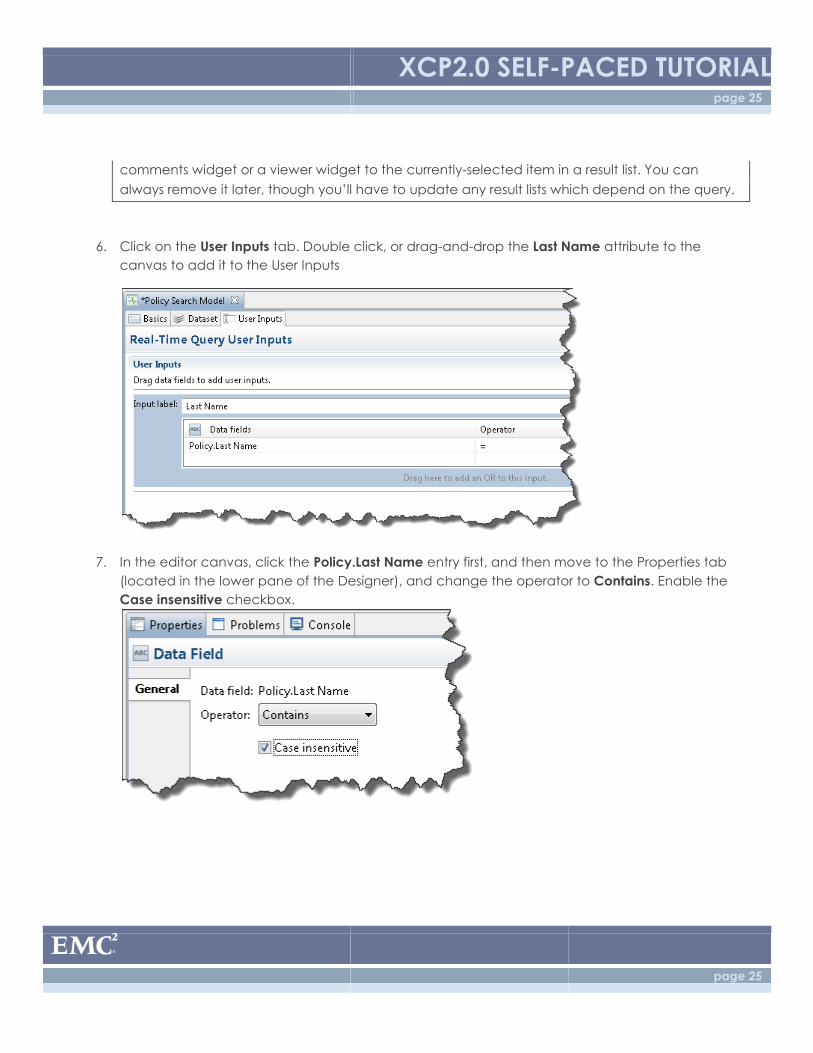
6. Click on the User Inputs tab. Double click, or drag-and-drop the Last Name attribute to the
canvas to add it to the User Inputs
7. In the editor canvas, click the Policy.Last Name entry first, and then move to the Properties tab
(located in the lower pane of the Designer), and change the operator to Contains. Enable the
Case insensitive checkbox.
XCP2.0 SELF-PACED TUTORIAL page 26
page 26
8. Click on the Save button to save your changes, and close the Policy Search Model
2.2.4.2 Policy Search Page
Now we will create a Policy Search page to display the results for the Real-Time Query you just created.
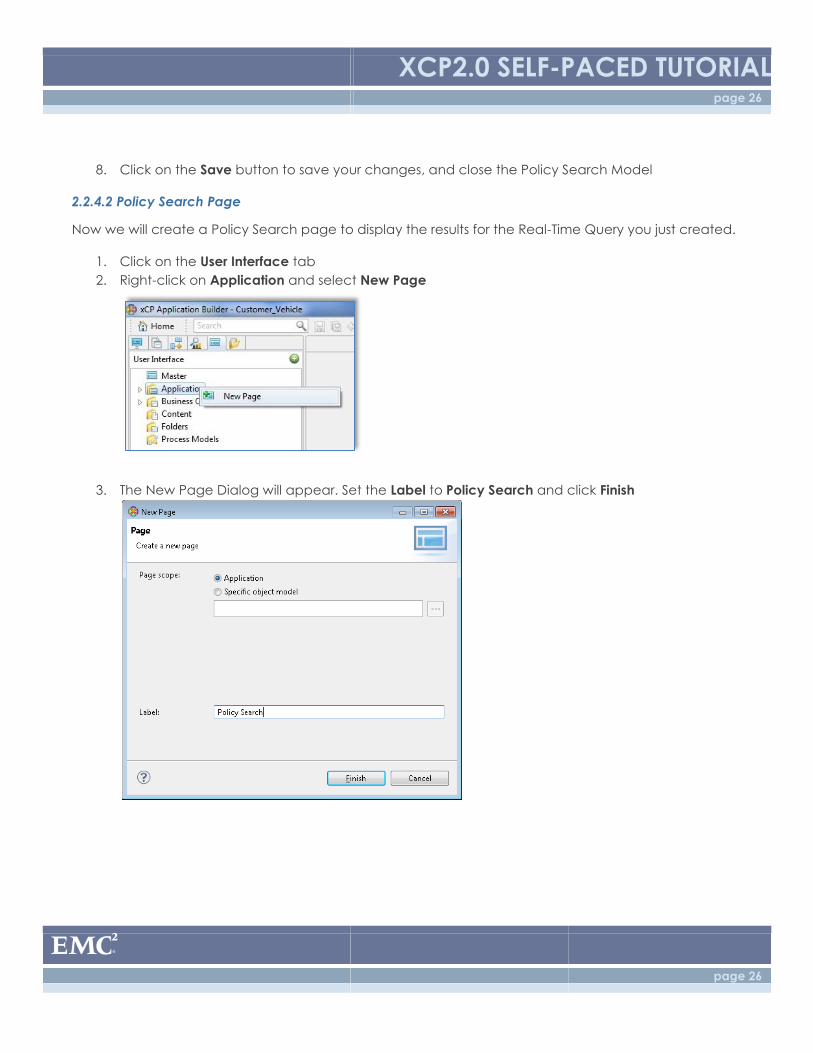
1. Click on the User Interface tab
2. Right-click on Application and select New Page
3. The New Page Dialog will appear. Set the Label to Policy Search and click Finish
XCP2.0 SELF-PACED TUTORIAL page 27
page 27
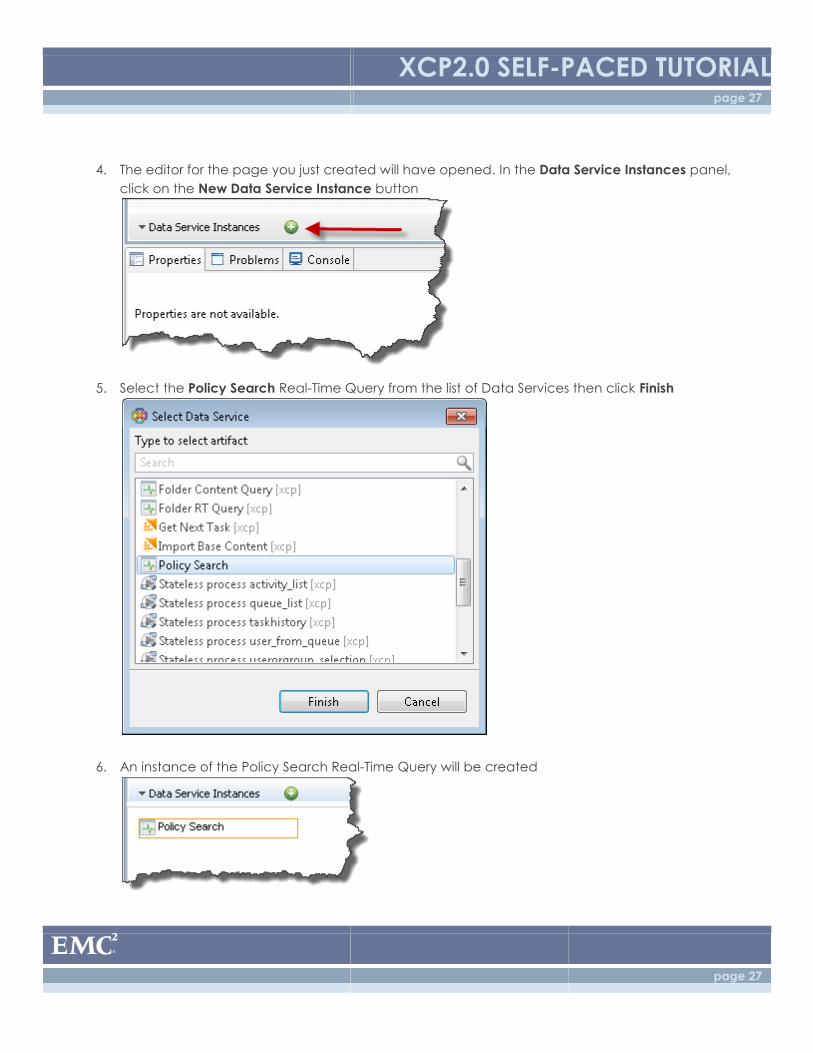
4. The editor for the page you just created will have opened. In the Data Service Instances panel,
click on the New Data Service Instance button
5. Select the Policy Search Real-Time Query from the list of Data Services then click Finish
6. An instance of the Policy Search Real-Time Query will be created
XCP2.0 SELF-PACED TUTORIAL page 28
page 28
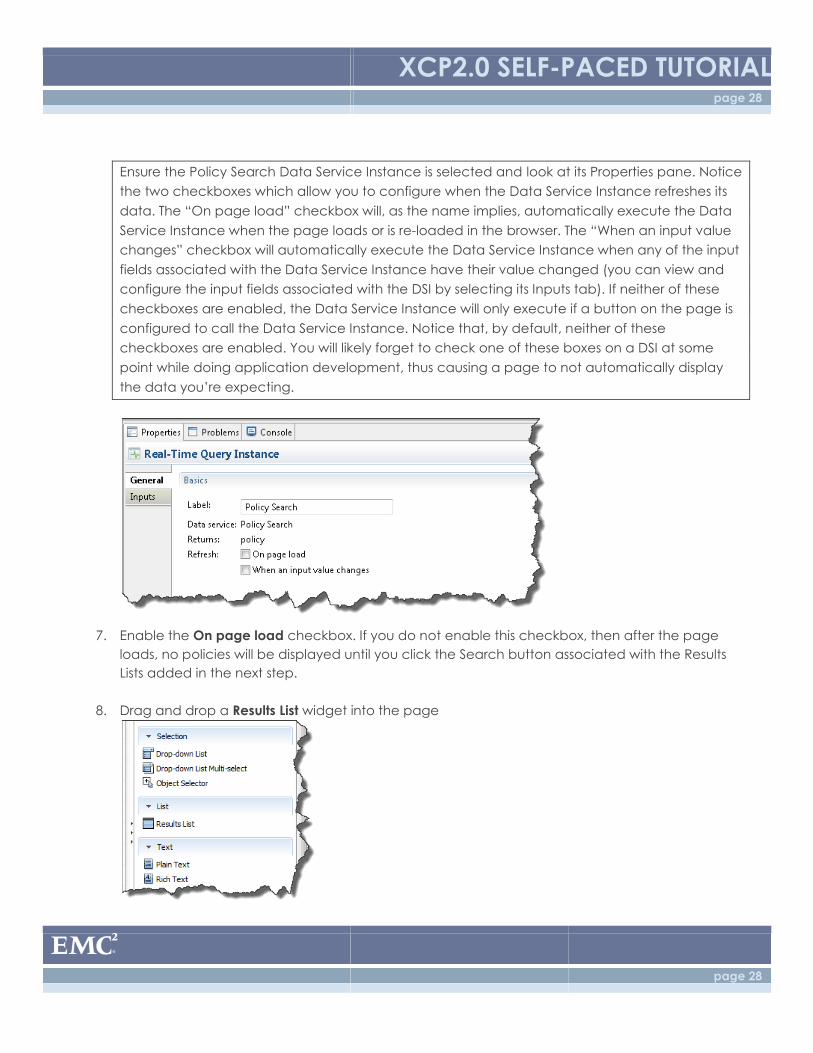
Ensure the Policy Search Data Service Instance is selected and look at its Properties pane. Notice
the two checkboxes which allow you to configure when the Data Service Instance refreshes its
data. The “On page load” checkbox will, as the name implies, automatically execute the Data
Service Instance when the page loads or is re-loaded in the browser. The “When an input value
changes” checkbox will automatically execute the Data Service Instance when any of the input
fields associated with the Data Service Instance have their value changed (you can view and
configure the input fields associated with the DSI by selecting its Inputs tab). If neither of these
checkboxes are enabled, the Data Service Instance will only execute if a button on the page is
configured to call the Data Service Instance. Notice that, by default, neither of these
checkboxes are enabled. You will likely forget to check one of these boxes on a DSI at some
point while doing application development, thus causing a page to not automatically display
the data you’re expecting.
7. Enable the On page load checkbox. If you do not enable this checkbox, then after the page
loads, no policies will be displayed until you click the Search button associated with the Results
Lists added in the next step.
8. Drag and drop a Results List widget into the page
XCP2.0 SELF-PACED TUTORIAL page 29
page 29
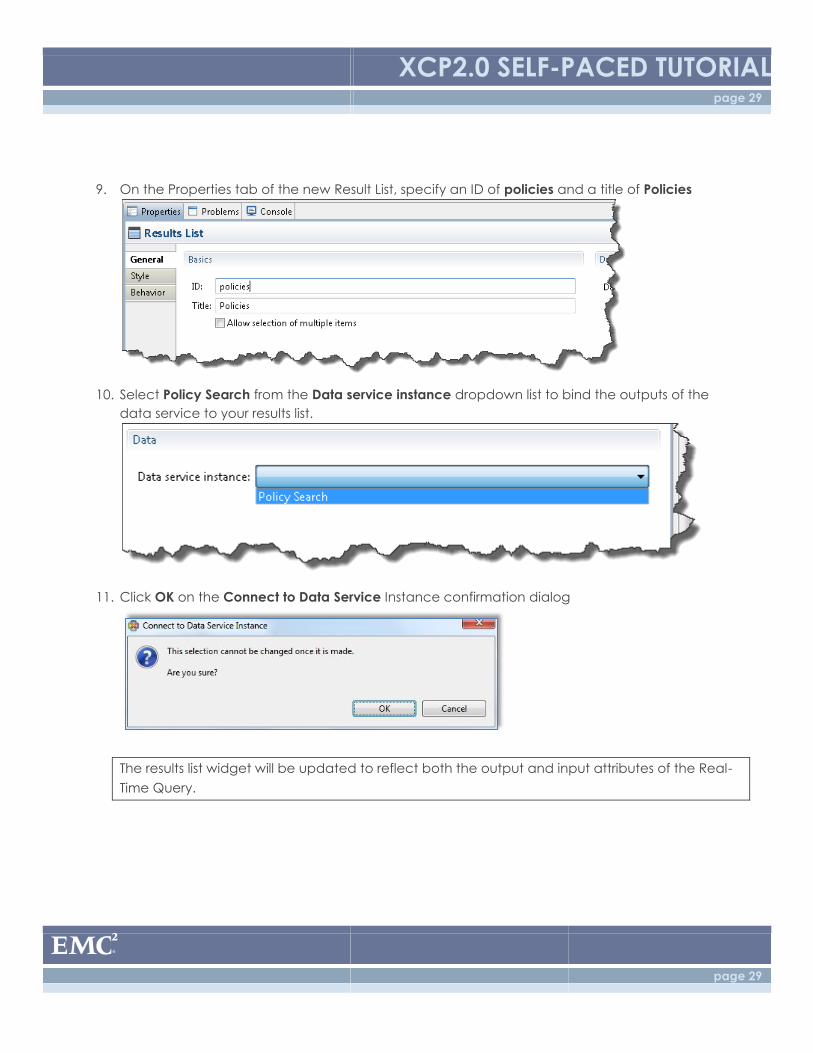
9. On the Properties tab of the new Result List, specify an ID of policies and a title of Policies
10. Select Policy Search from the Data service instance dropdown list to bind the outputs of the
data service to your results list.
11. Click OK on the Connect to Data Service Instance confirmation dialog
The results list widget will be updated to reflect both the output and input attributes of the Real-
Time Query.

XCP2.0 SELF-PACED TUTORIAL page 30
page 30
12. Click on the Save button to save your changes and close the Policy Search page
2.3: Configuring the Master Page
Goals: Wire menu items to your Policy Search page and your Create Policy page.
Concepts:
Application master page – a Master page is similar to a Slide Master page in PowerPoint—anything you
put on the master page will be on every page in your application. Commonly, headers (like a logo),
global navigation (like a menu bar) and footers (like copyright or contact information) are put on
master pages.
Application default page – the page that users first see when they log in to your application.
1. Click on the User Interface tab and double click on the Master page.
XCP2.0 SELF-PACED TUTORIAL page 31
page 31
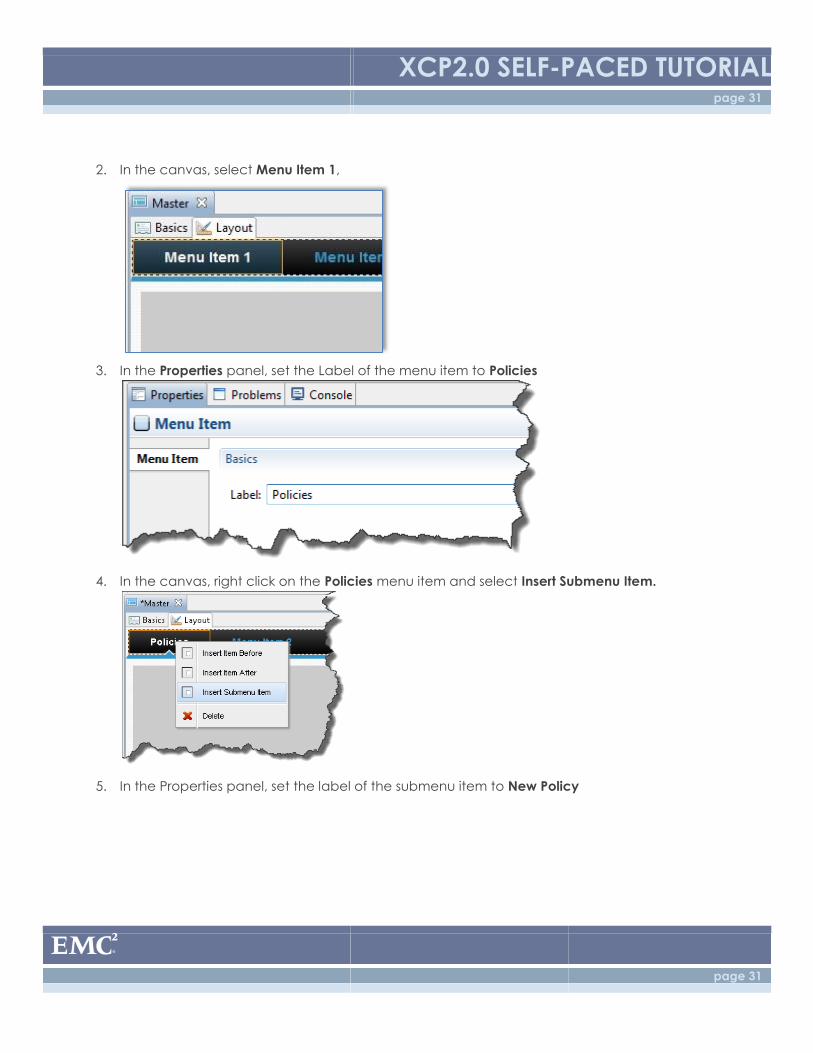
2. In the canvas, select Menu Item 1,
3. In the Properties panel, set the Label of the menu item to Policies
4. In the canvas, right click on the Policies menu item and select Insert Submenu Item.
5. In the Properties panel, set the label of the submenu item to New Policy
XCP2.0 SELF-PACED TUTORIAL page 32
page 32
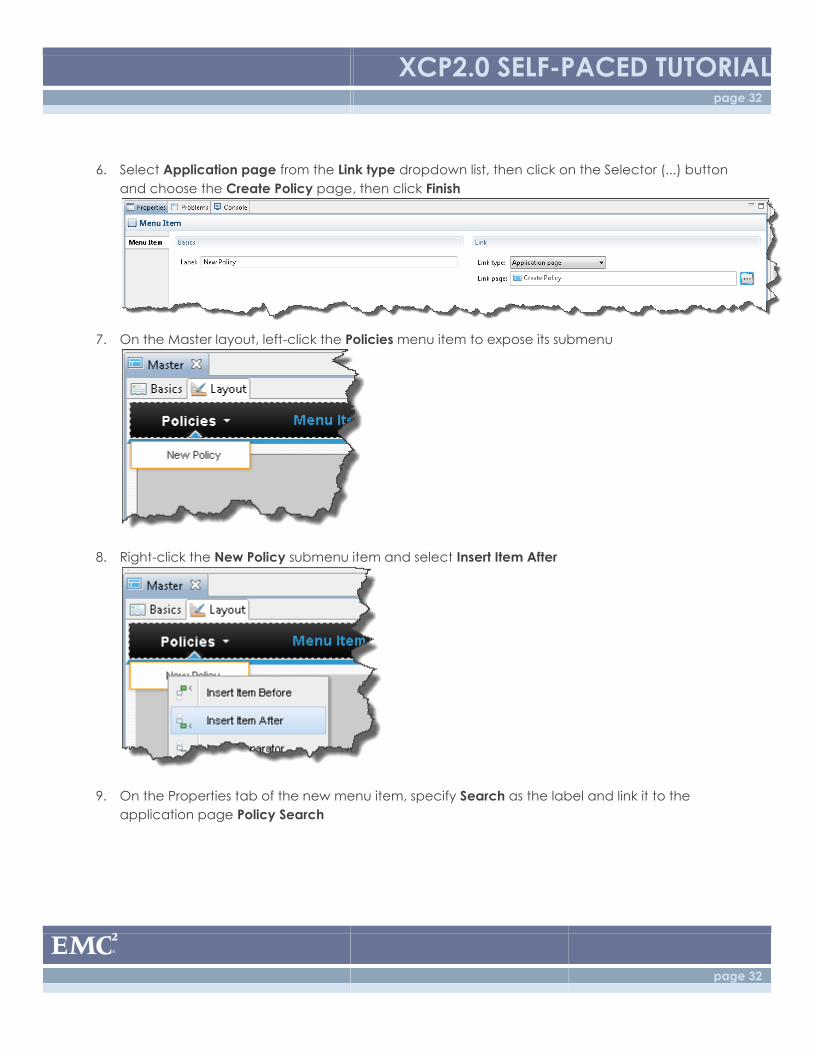
6. Select Application page from the Link type dropdown list, then click on the Selector (...) button
and choose the Create Policy page, then click Finish
7. On the Master layout, left-click the Policies menu item to expose its submenu
8. Right-click the New Policy submenu item and select Insert Item After
9. On the Properties tab of the new menu item, specify Search as the label and link it to the
application page Policy Search
XCP2.0 SELF-PACED TUTORIAL page 33
page 33
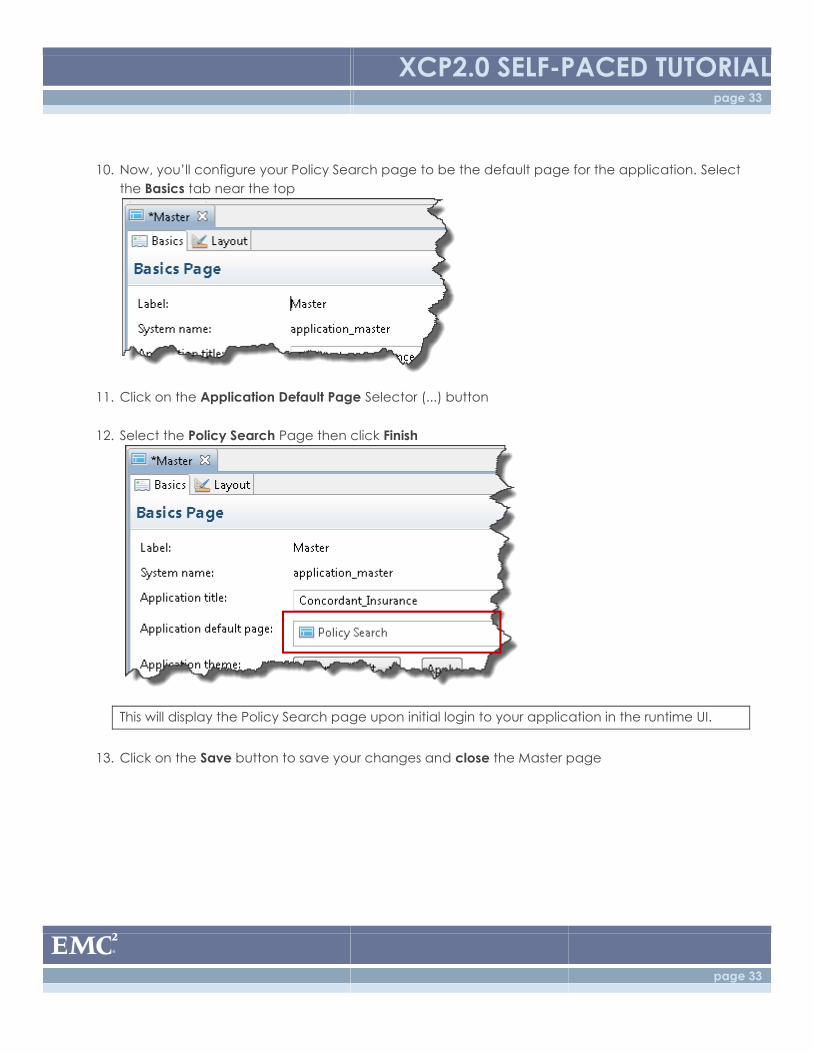
10. Now, you’ll configure your Policy Search page to be the default page for the application. Select
the Basics tab near the top
11. Click on the Application Default Page Selector (...) button
12. Select the Policy Search Page then click Finish
This will display the Policy Search page upon initial login to your application in the runtime UI.
13. Click on the Save button to save your changes and close the Master page
XCP2.0 SELF-PACED TUTORIAL page 34
page 34
2.4: Deployment
Goal: Now, you’ll get to deploy and run your application! First, you’ll review the configuration of a
deployment environment and a run configuration.
Concepts
Runtime environment - a Documentum Content Server and all other components necessary to run an
xCP application.
To make the setup of the environment quicker, we have already set up the environment for you.
Run configuration - a run configuration tells the xCP Designer how to do a deployment: which runtime
environment to use and which deployment options to use (in this tutorial, you’ll only be using the default
options).
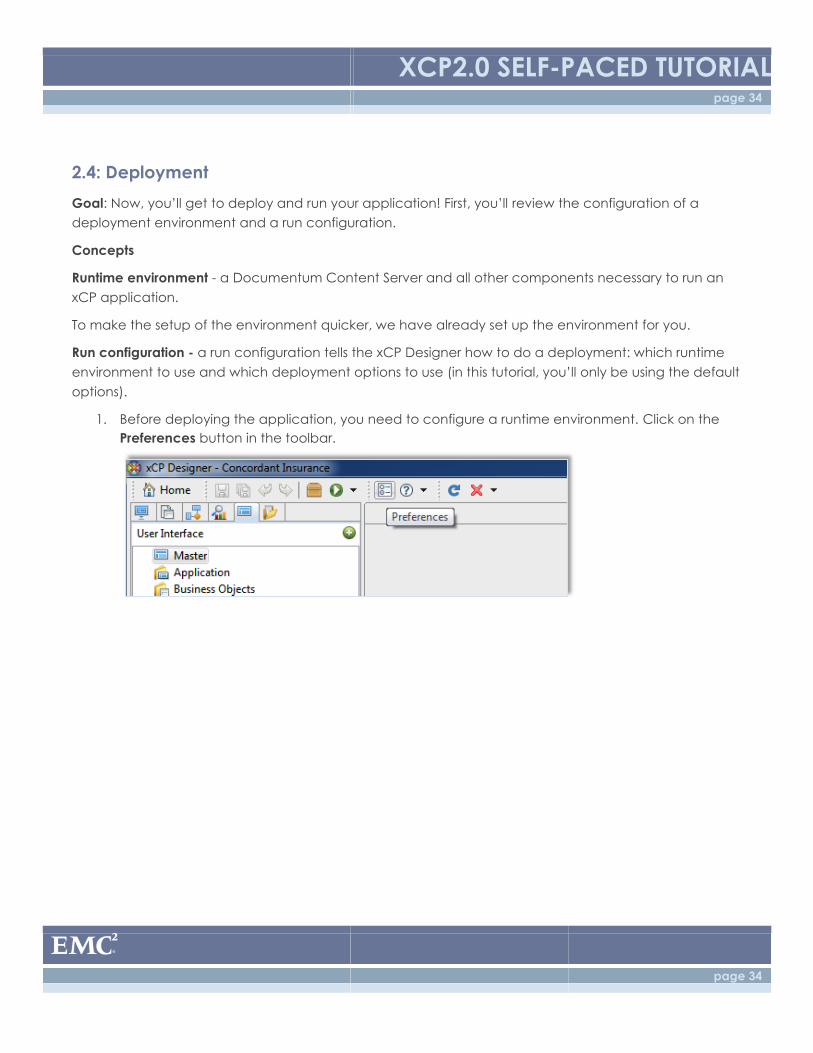
1. Before deploying the application, you need to configure a runtime environment. Click on the
Preferences button in the toolbar.
XCP2.0 SELF-PACED TUTORIAL page 35
page 35
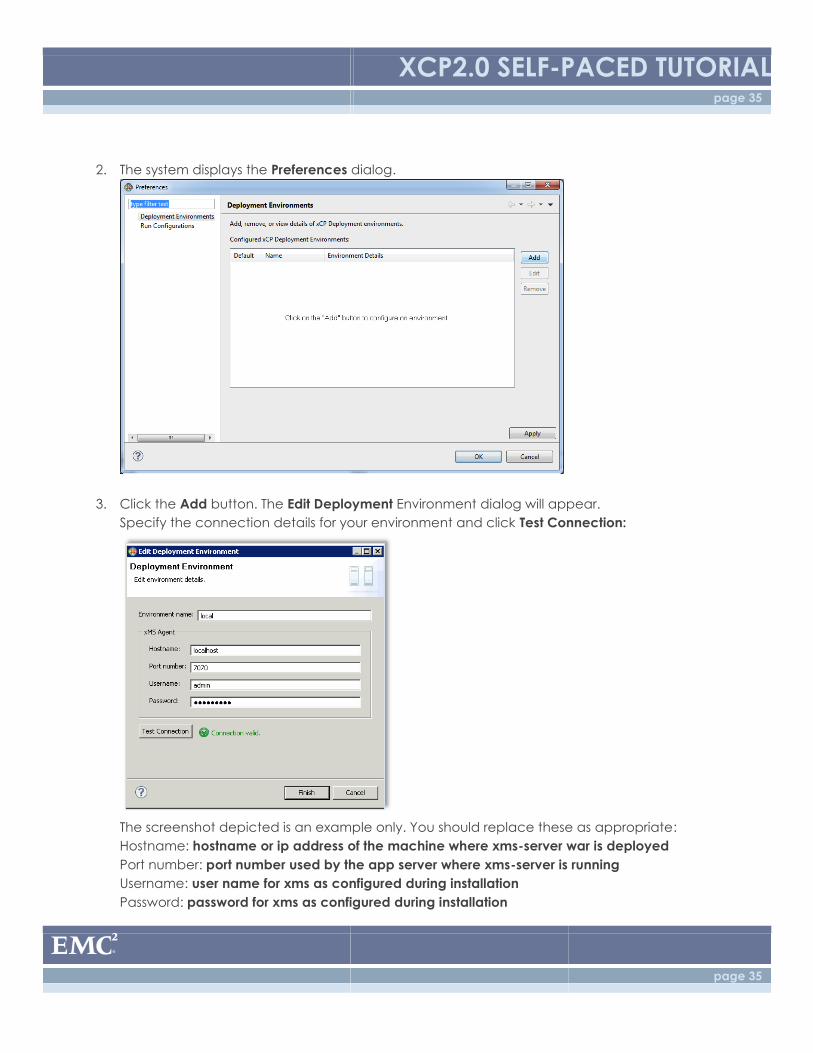
2. The system displays the Preferences dialog.
3. Click the Add button. The Edit Deployment Environment dialog will appear.
Specify the connection details for your environment and click Test Connection:
The screenshot depicted is an example only. You should replace these as appropriate:
Hostname: hostname or ip address of the machine where xms-server war is deployed
Port number: port number used by the app server where xms-server is running
Username: user name for xms as configured during installation
Password: password for xms as configured during installation
XCP2.0 SELF-PACED TUTORIAL page 36
page 36
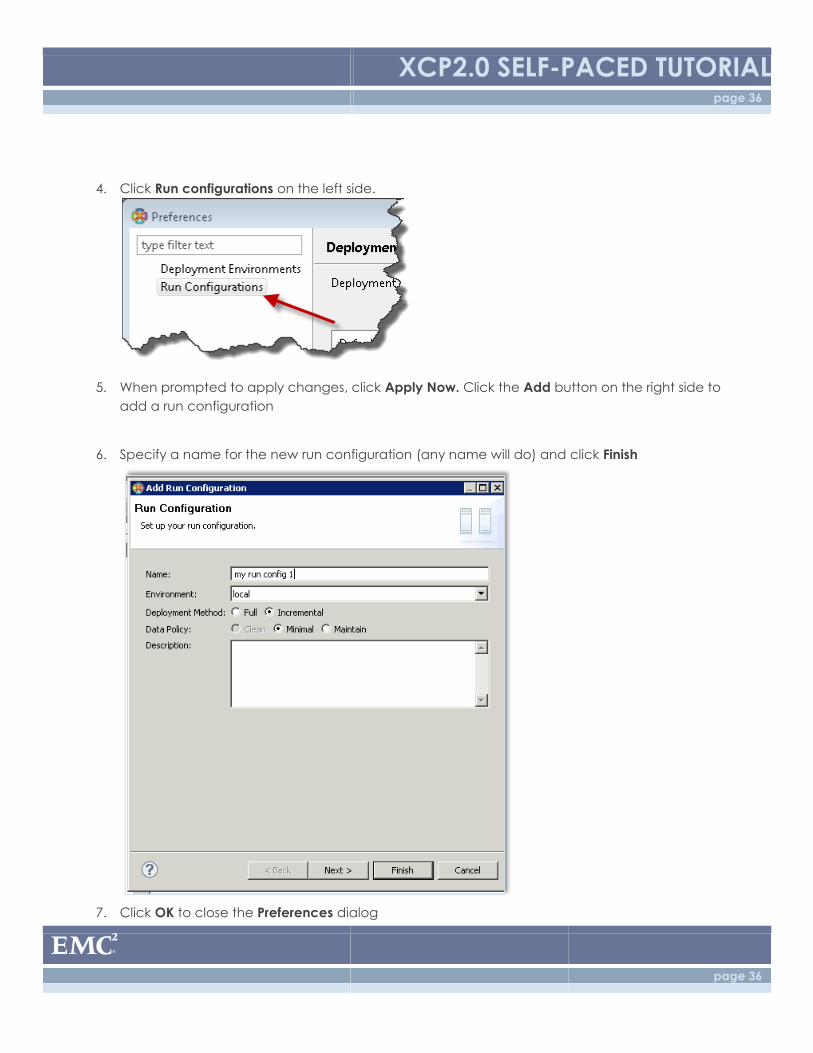
4. Click Run configurations on the left side.
5. When prompted to apply changes, click Apply Now. Click the Add button on the right side to
add a run configuration
6. Specify a name for the new run configuration (any name will do) and click Finish
7. Click OK to close the Preferences dialog
XCP2.0 SELF-PACED TUTORIAL page 37
page 37
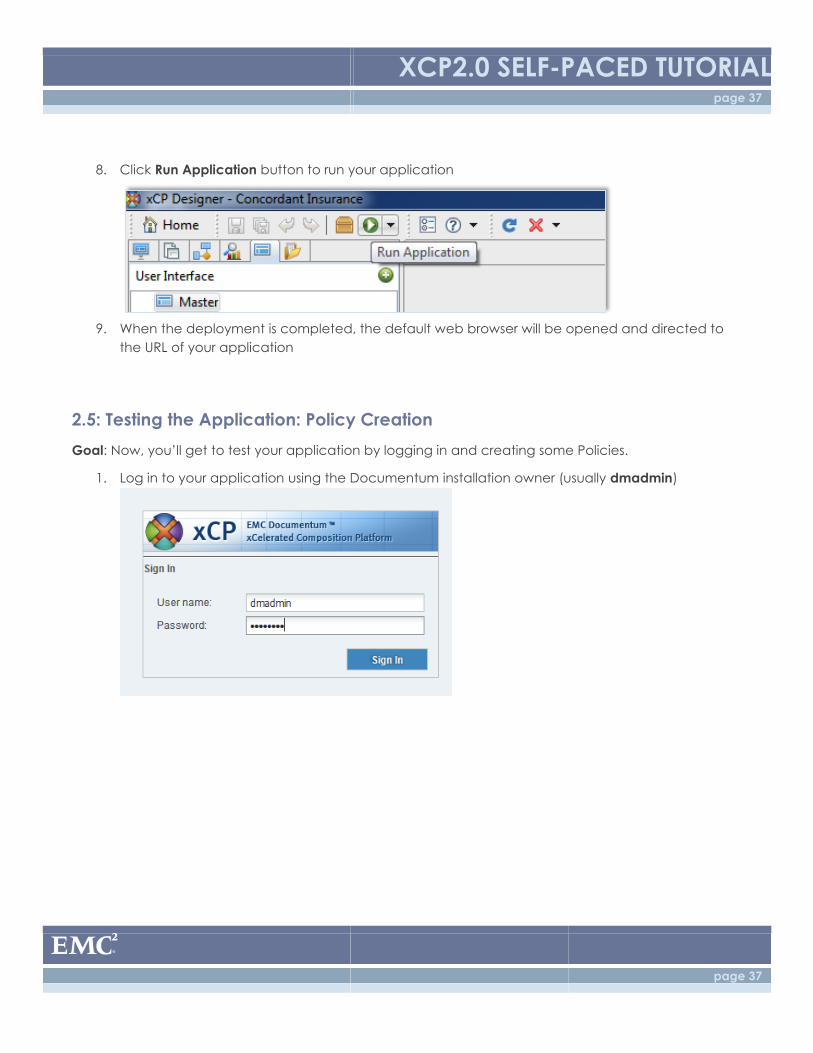
8. Click Run Application button to run your application
9. When the deployment is completed, the default web browser will be opened and directed to
the URL of your application
2.5: Testing the Application: Policy Creation
Goal: Now, you’ll get to test your application by logging in and creating some Policies.
1. Log in to your application using the Documentum installation owner (usually dmadmin)
XCP2.0 SELF-PACED TUTORIAL page 38
page 38
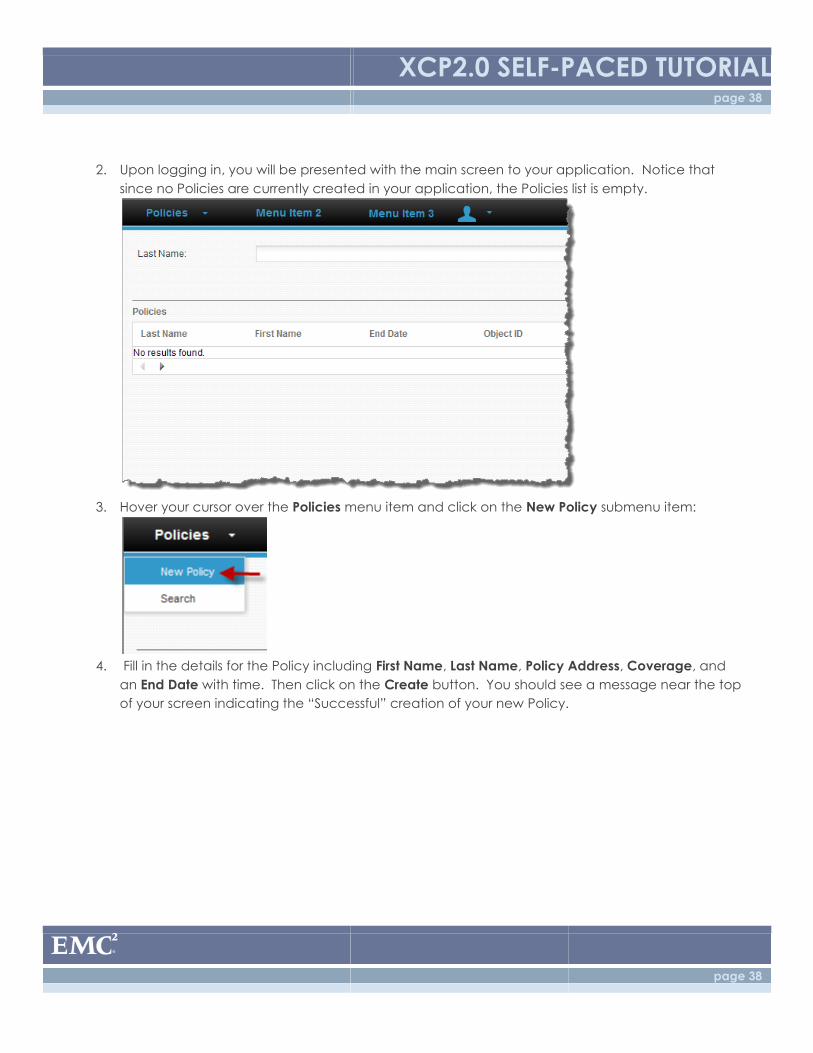
2. Upon logging in, you will be presented with the main screen to your application. Notice that
since no Policies are currently created in your application, the Policies list is empty.
3. Hover your cursor over the Policies menu item and click on the New Policy submenu item:
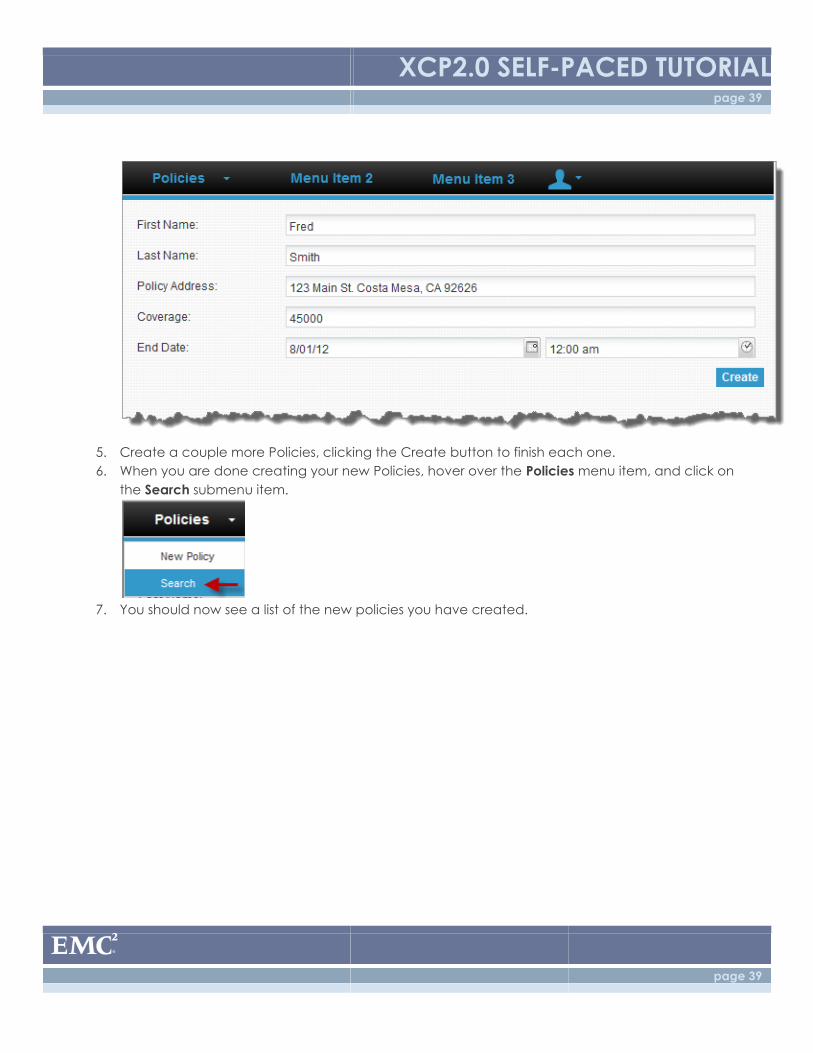
4. Fill in the details for the Policy including First Name, Last Name, Policy Address, Coverage, and
an End Date with time. Then click on the Create button. You should see a message near the top
of your screen indicating the “Successful” creation of your new Policy.
XCP2.0 SELF-PACED TUTORIAL page 39
page 39
5. Create a couple more Policies, clicking the Create button to finish each one.
6. When you are done creating your new Policies, hover over the Policies menu item, and click on
the Search submenu item.
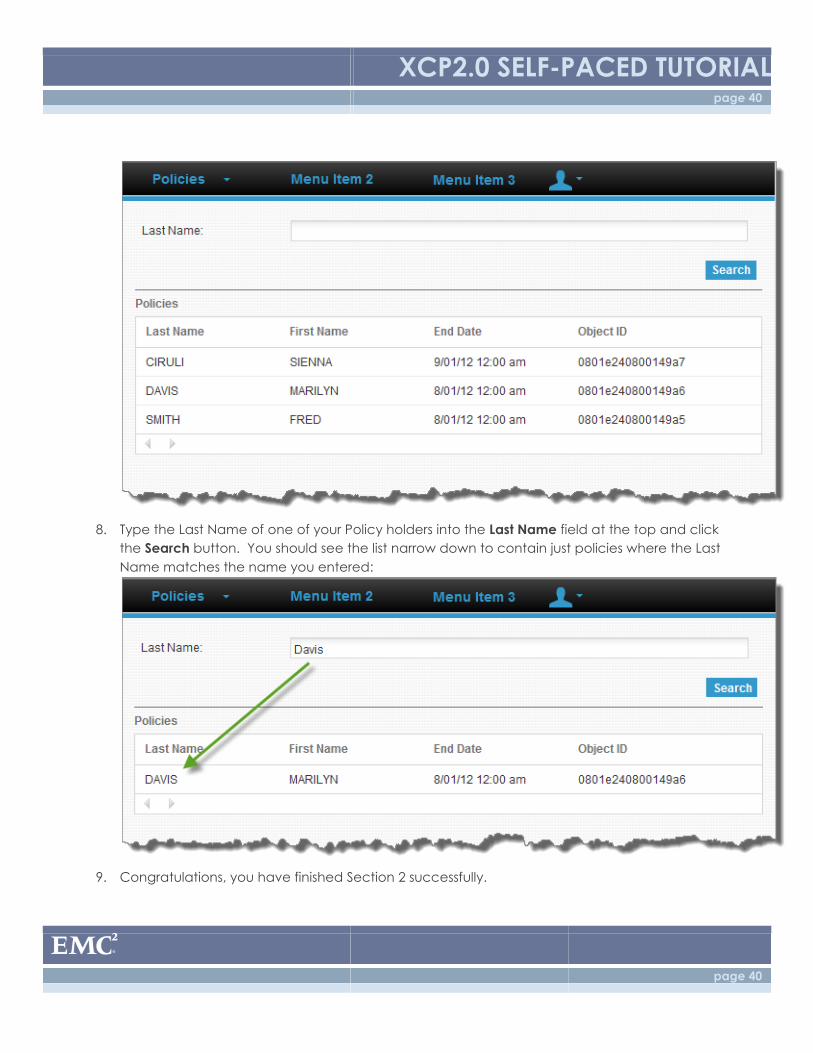
7. You should now see a list of the new policies you have created.
XCP2.0 SELF-PACED TUTORIAL page 40
page 40
8. Type the Last Name of one of your Policy holders into the Last Name field at the top and click
the Search button. You should see the list narrow down to contain just policies where the Last
Name matches the name you entered:
9. Congratulations, you have finished Section 2 successfully.
XCP2.0 SELF-PACED TUTORIAL page 41
page 41
3.0: Vehicles
Now we’ll add the ability to create vehicles and associate them with policies, using relationships.
3.1: Vehicle Make Picklist
Goals: You model a picklist, which is a static list of name/value pairs. Picklists can be used to populate
dropdowns, and can also be used when modeling your types (which you’ll do in the next step). This
picklist will be a fixed list of vehicle manufacturers when adding a vehicle to an insurance policy.
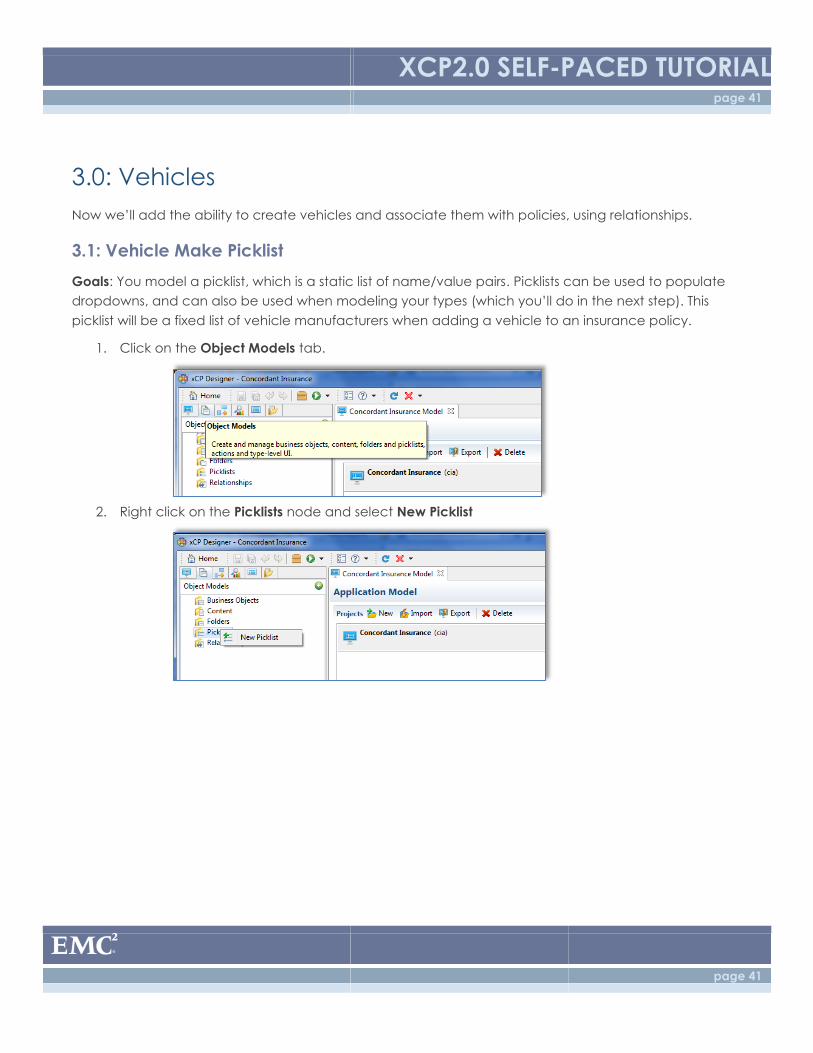
1. Click on the Object Models tab.
2. Right click on the Picklists node and select New Picklist
XCP2.0 SELF-PACED TUTORIAL page 42
page 42
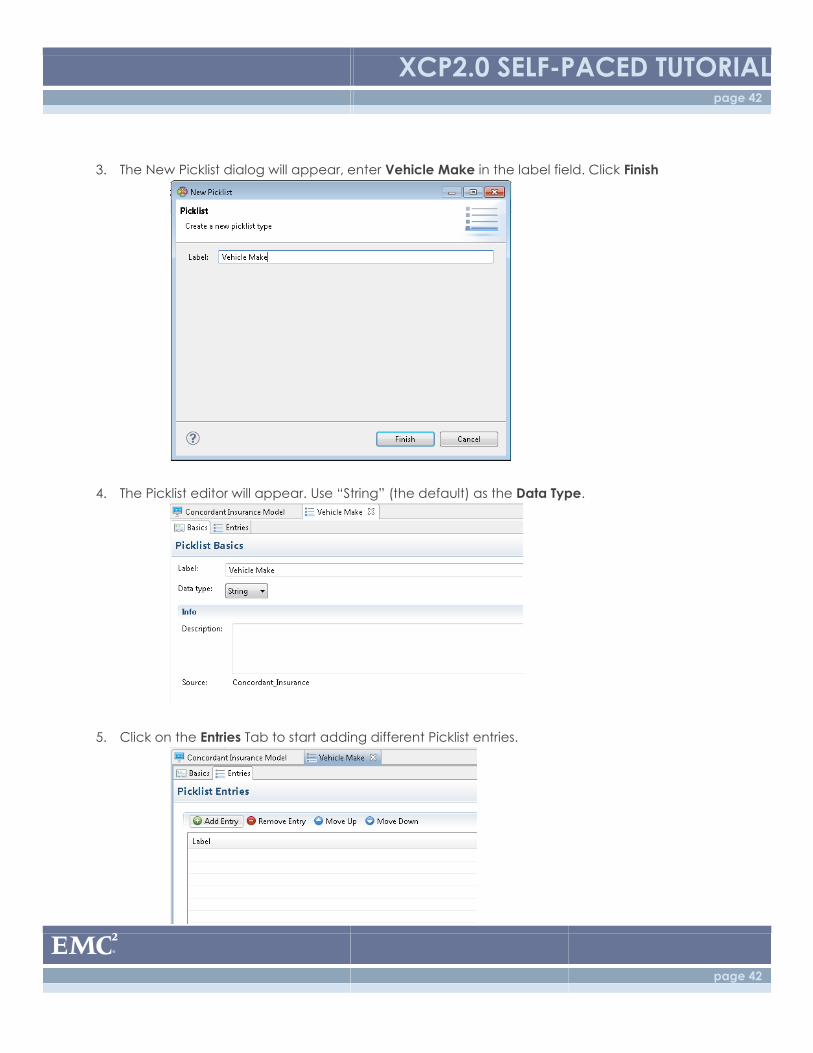
3. The New Picklist dialog will appear, enter Vehicle Make in the label field. Click Finish
4. The Picklist editor will appear. Use “String” (the default) as the Data Type.
5. Click on the Entries Tab to start adding different Picklist entries.
XCP2.0 SELF-PACED TUTORIAL page 43
page 43
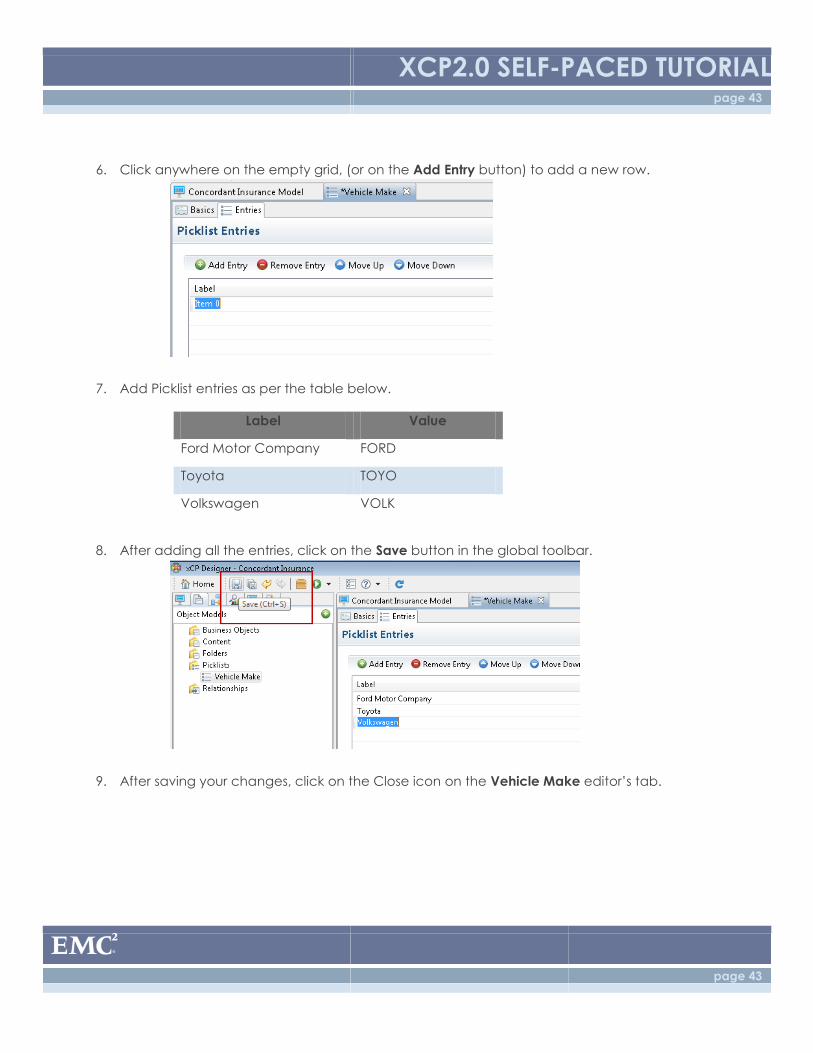
6. Click anywhere on the empty grid, (or on the Add Entry button) to add a new row.
7. Add Picklist entries as per the table below.
Label Value
Ford Motor Company FORD
Toyota TOYO
Volkswagen VOLK
8. After adding all the entries, click on the Save button in the global toolbar.
9. After saving your changes, click on the Close icon on the Vehicle Make editor’s tab.
XCP2.0 SELF-PACED TUTORIAL page 44
page 44
3.2: Vehicle Business Object
Goal : you will repeat many of the earlier steps in order to create a new business object to represent
vehicles in your application.
Concepts:
Relationships – A relationship allows you to model how types are related. Relationships can be one-way,
two-way, one-to-one, one-to-many, etc. Relationships can also have custom attributes defined.
1. Click on the Object Models tab.
2. Right click on the Business Objects node and select New Business Object
3. The New Business Object Model dialog will appear, enter Vehicle in the label field and click
Finish
4. The Vehicle Model editor will appear. Click on the Attributes Tab to start adding attributes to the
Business Object.
5. The Vehicle Business Object has the following attributes; add each of them.
Attribute (Label) Type
Make Picklist
Model String
Year Integer
VIN String
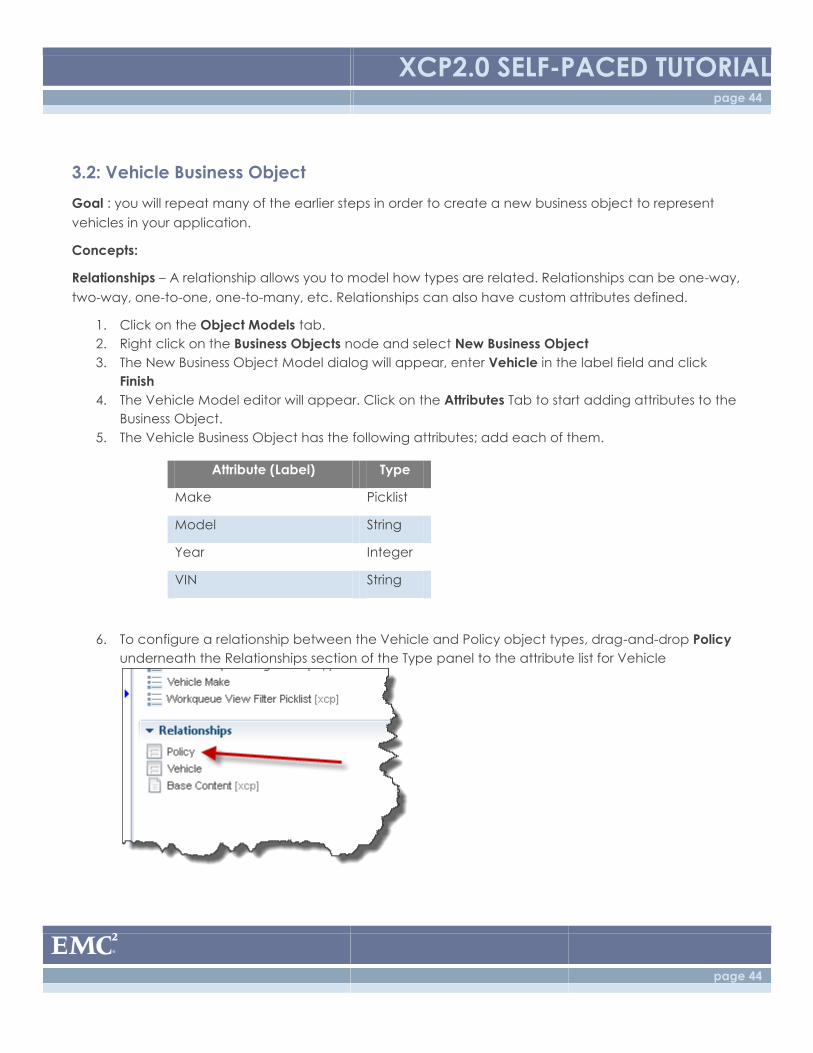
6. To configure a relationship between the Vehicle and Policy object types, drag-and-drop Policy
underneath the Relationships section of the Type panel to the attribute list for Vehicle
XCP2.0 SELF-PACED TUTORIAL page 45
page 45
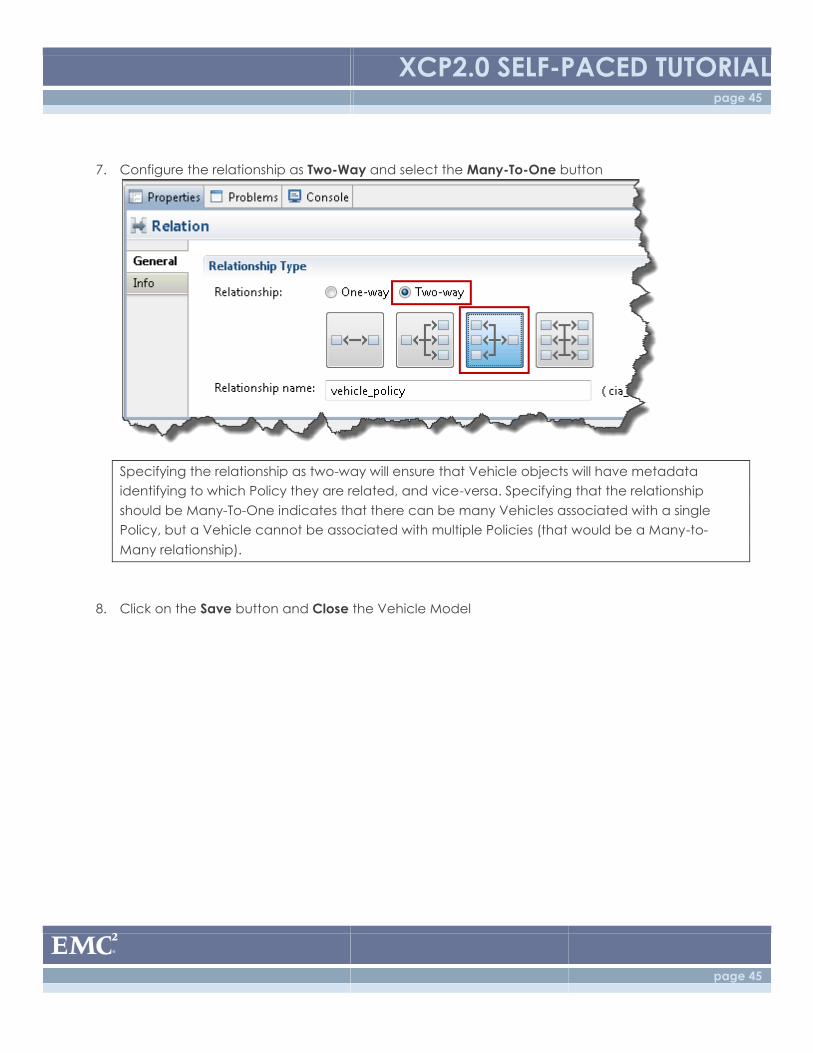
7. Configure the relationship as Two-Way and select the Many-To-One button
Specifying the relationship as two-way will ensure that Vehicle objects will have metadata
identifying to which Policy they are related, and vice-versa. Specifying that the relationship
should be Many-To-One indicates that there can be many Vehicles associated with a single
Policy, but a Vehicle cannot be associated with multiple Policies (that would be a Many-to-
Many relationship).
8. Click on the Save button and Close the Vehicle Model
XCP2.0 SELF-PACED TUTORIAL page 46
page 46
3.3: Stateless Process for Create/Relate
Concepts –
Stateless Process
A stateless process is a process whose state is not maintained in the database. It is executed
synchronously, and as such, can not involve any “human” tasks. All tasks must be automatic (though, a
stateless process can invoke a stateful/normal process which contains human tasks, though the stateless
process will not “wait” for the stateful process to complete). Stateless processes are incredibly powerful
in xCP 2.0, as they can be wired to UI widgets in the xCP runtime UI. Stateless processes replace the
need for things like custom Forms Adaptors, as instead of having to write code to execute as a result of
clicking a custom button, you instead define a stateless process with the desired functionality. Also, a
stateless process is executed similarly to a database transaction – by default, if any activity in the
process fails, any changes made to the Documentum database (such as the addition, modification, or
deletion of folders/documents/etc) will be “rolled back.”
As discussed in an earlier exercise, the intent is to never create a new vehicle without also relating it to a
policy. As a result, we will not be using the automatically-generated “Create” data service, as it does
not provide the ability to relate the newly-created vehicle to a policy. Instead, we will create our own
data service (using a 2-step stateless process) to both create and relate.
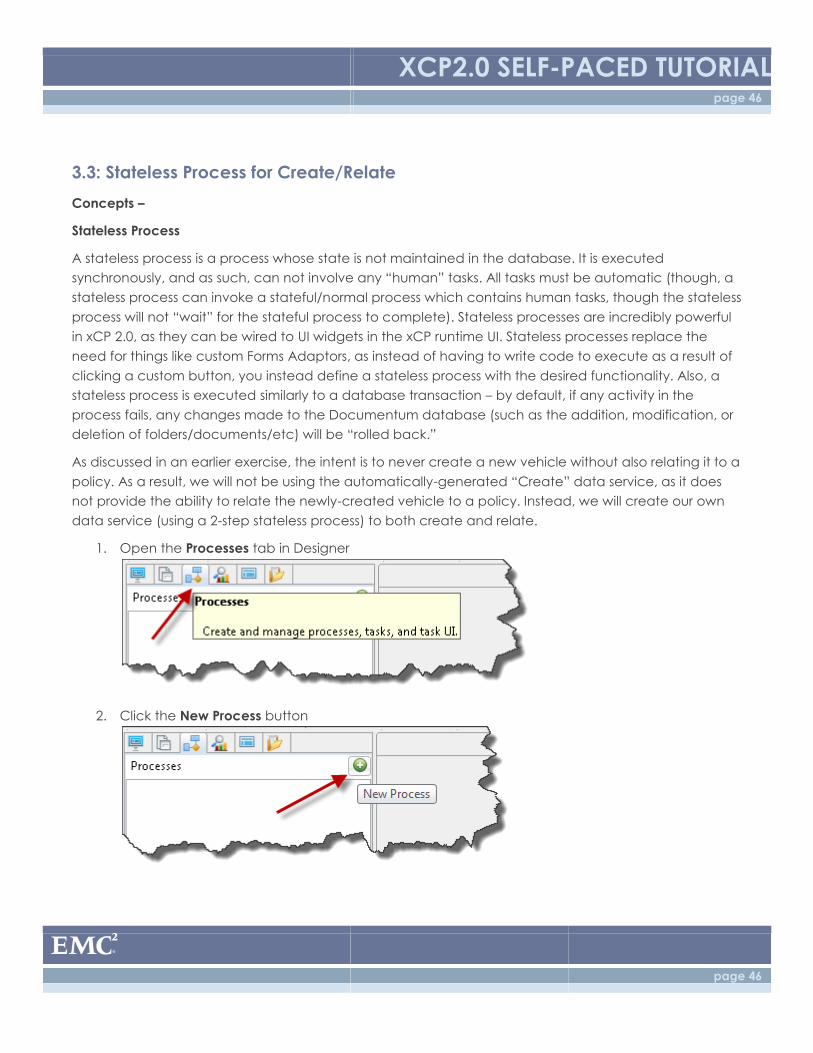
1. Open the Processes tab in Designer
2. Click the New Process button
XCP2.0 SELF-PACED TUTORIAL page 47
page 47
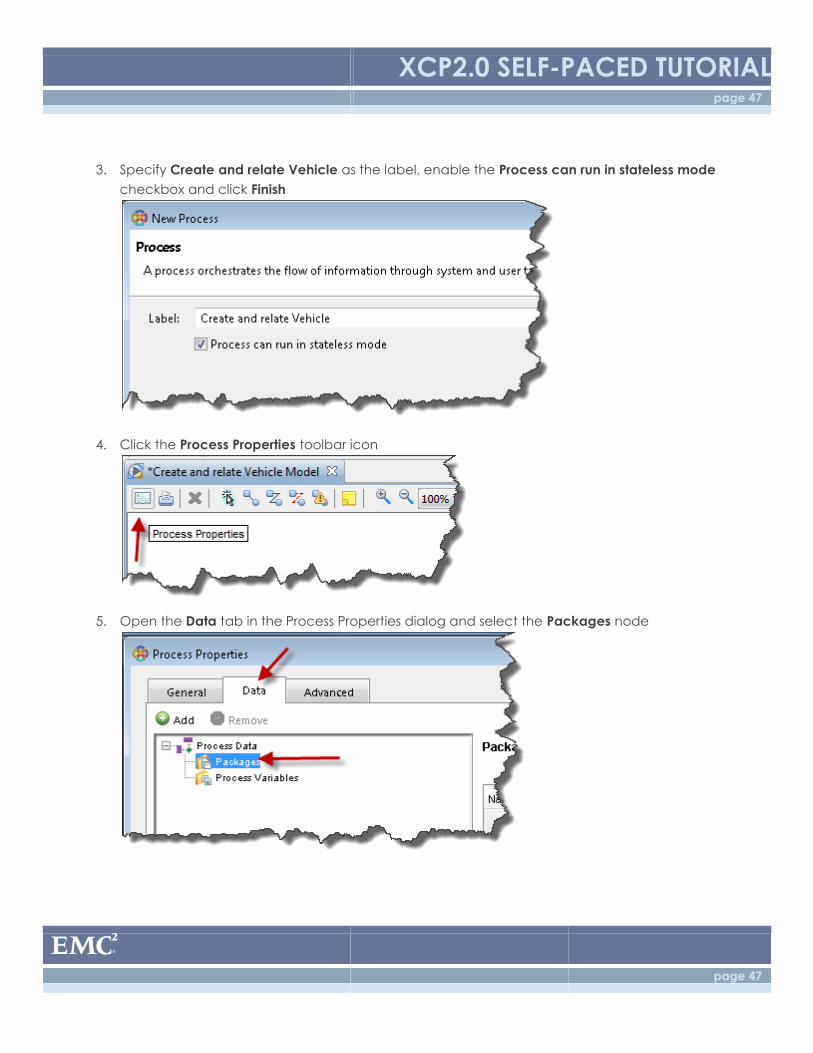
3. Specify Create and relate Vehicle as the label, enable the Process can run in stateless mode
checkbox and click Finish
4. Click the Process Properties toolbar icon
5. Open the Data tab in the Process Properties dialog and select the Packages node
XCP2.0 SELF-PACED TUTORIAL page 48
page 48
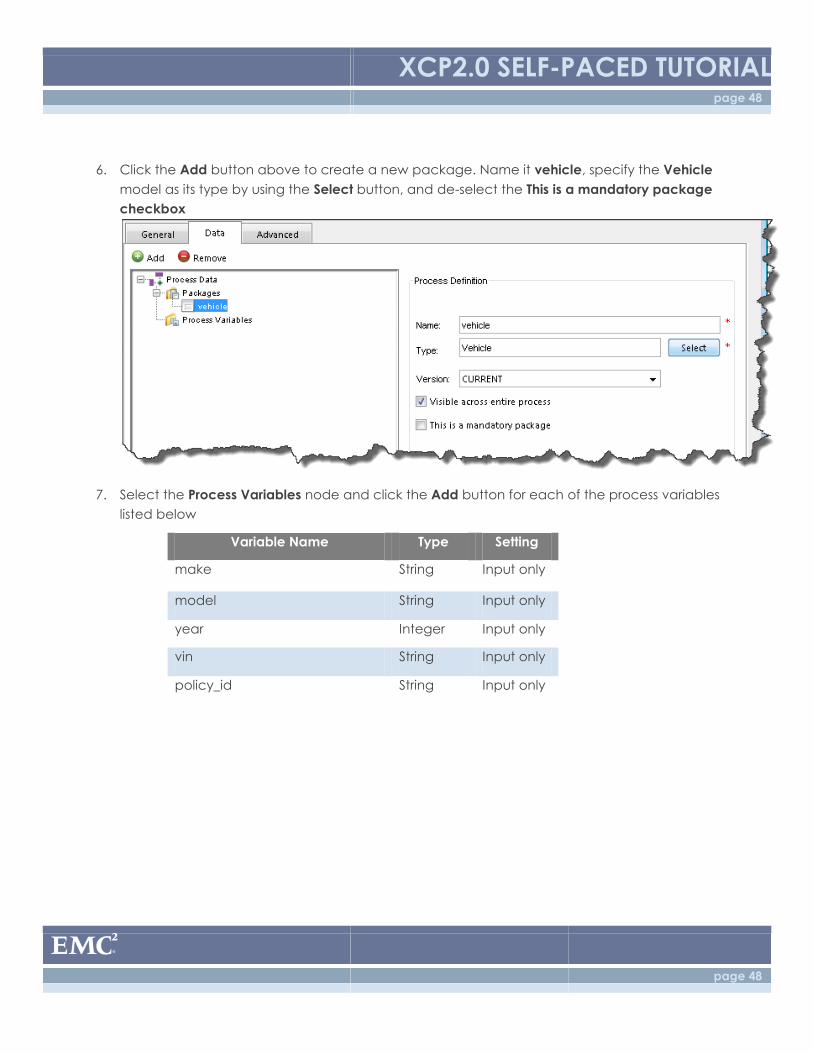
6. Click the Add button above to create a new package. Name it vehicle, specify the Vehicle
model as its type by using the Select button, and de-select the This is a mandatory package
checkbox
7. Select the Process Variables node and click the Add button for each of the process variables
listed below
Variable Name Type Setting
make String Input only
model String Input only
year Integer Input only
vin String Input only
policy_id String Input only
XCP2.0 SELF-PACED TUTORIAL page 49
page 49
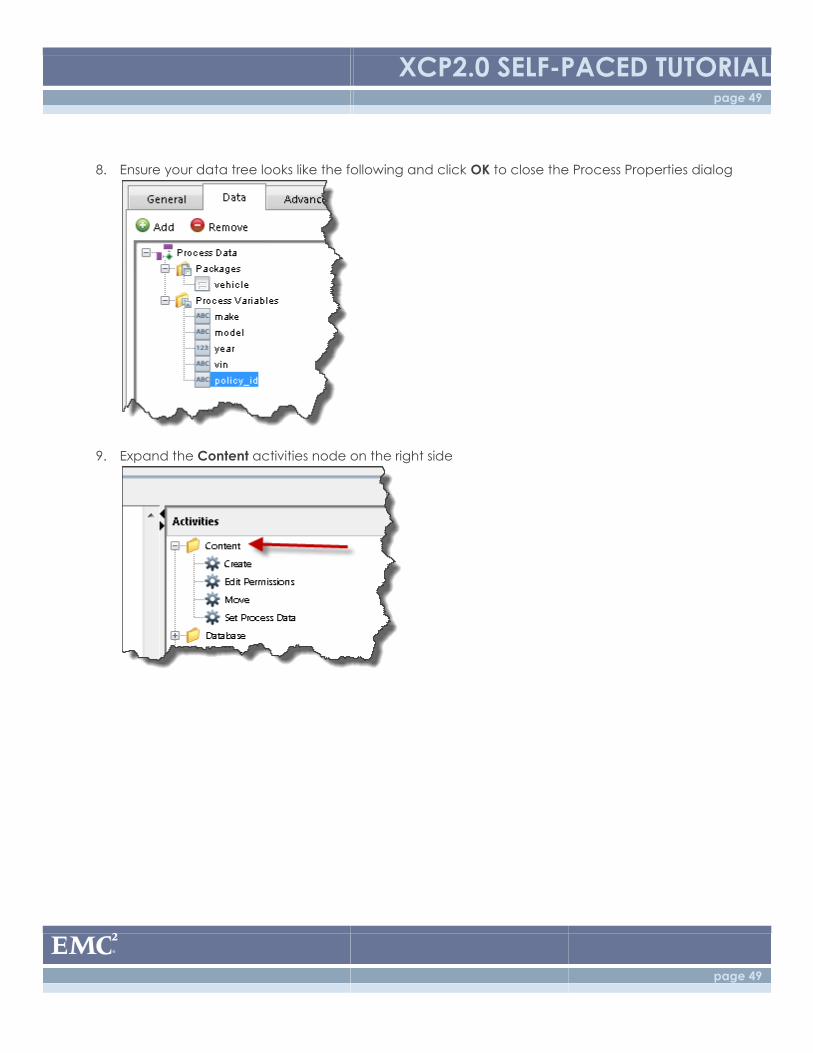
8. Ensure your data tree looks like the following and click OK to close the Process Properties dialog
9. Expand the Content activities node on the right side
XCP2.0 SELF-PACED TUTORIAL page 50
page 50
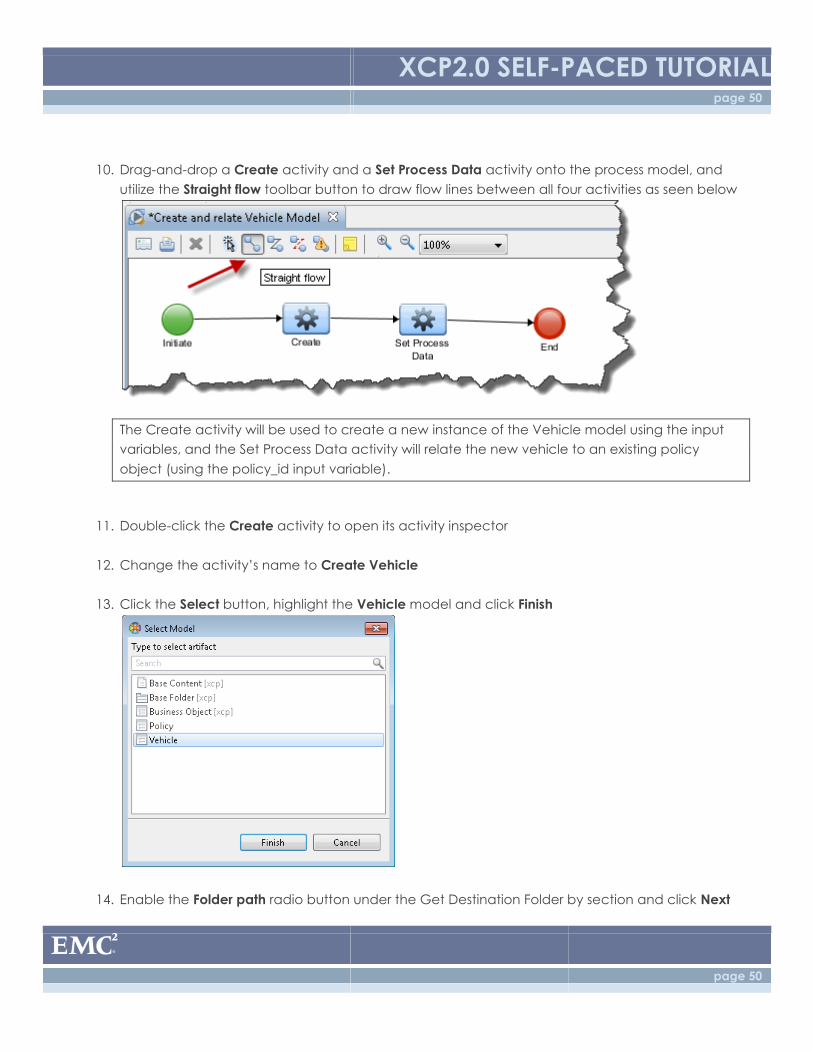
10. Drag-and-drop a Create activity and a Set Process Data activity onto the process model, and
utilize the Straight flow toolbar button to draw flow lines between all four activities as seen below
The Create activity will be used to create a new instance of the Vehicle model using the input
variables, and the Set Process Data activity will relate the new vehicle to an existing policy
object (using the policy_id input variable).
11. Double-click the Create activity to open its activity inspector
12. Change the activity’s name to Create Vehicle
13. Click the Select button, highlight the Vehicle model and click Finish
14. Enable the Folder path radio button under the Get Destination Folder by section and click Next
XCP2.0 SELF-PACED TUTORIAL page 51
page 51
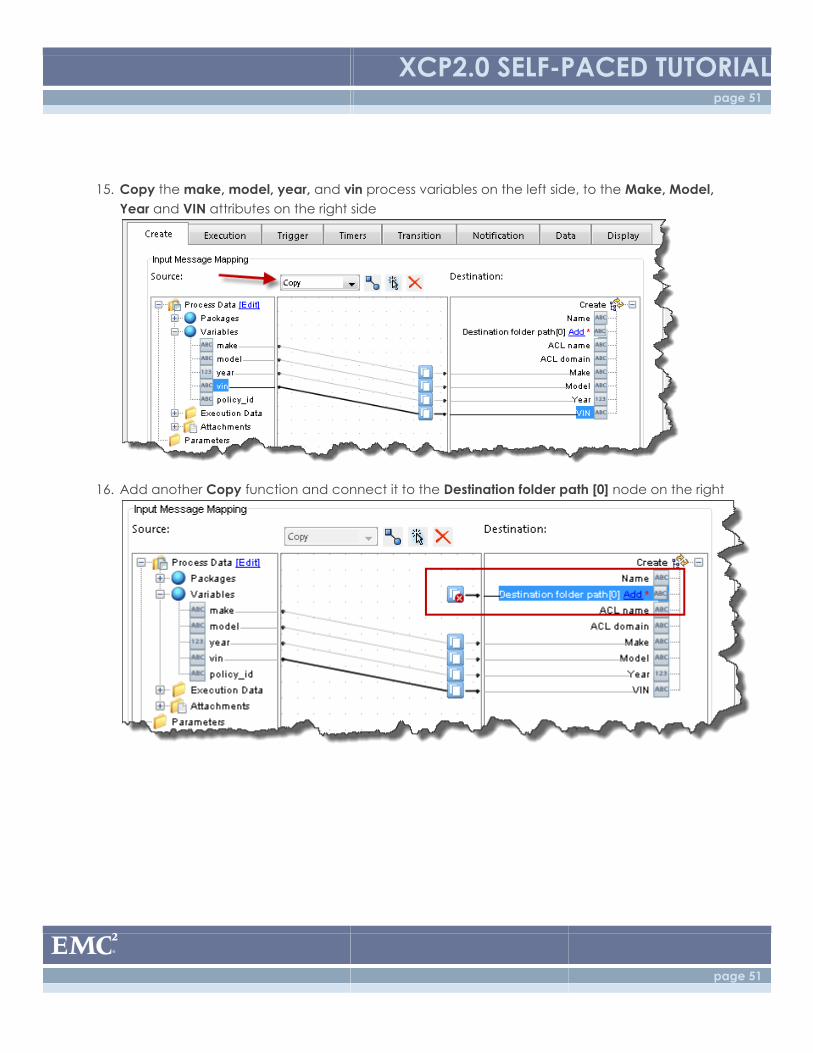
15. Copy the make, model, year, and vin process variables on the left side, to the Make, Model,
Year and VIN attributes on the right side
16. Add another Copy function and connect it to the Destination folder path [0] node on the right
XCP2.0 SELF-PACED TUTORIAL page 52
page 52
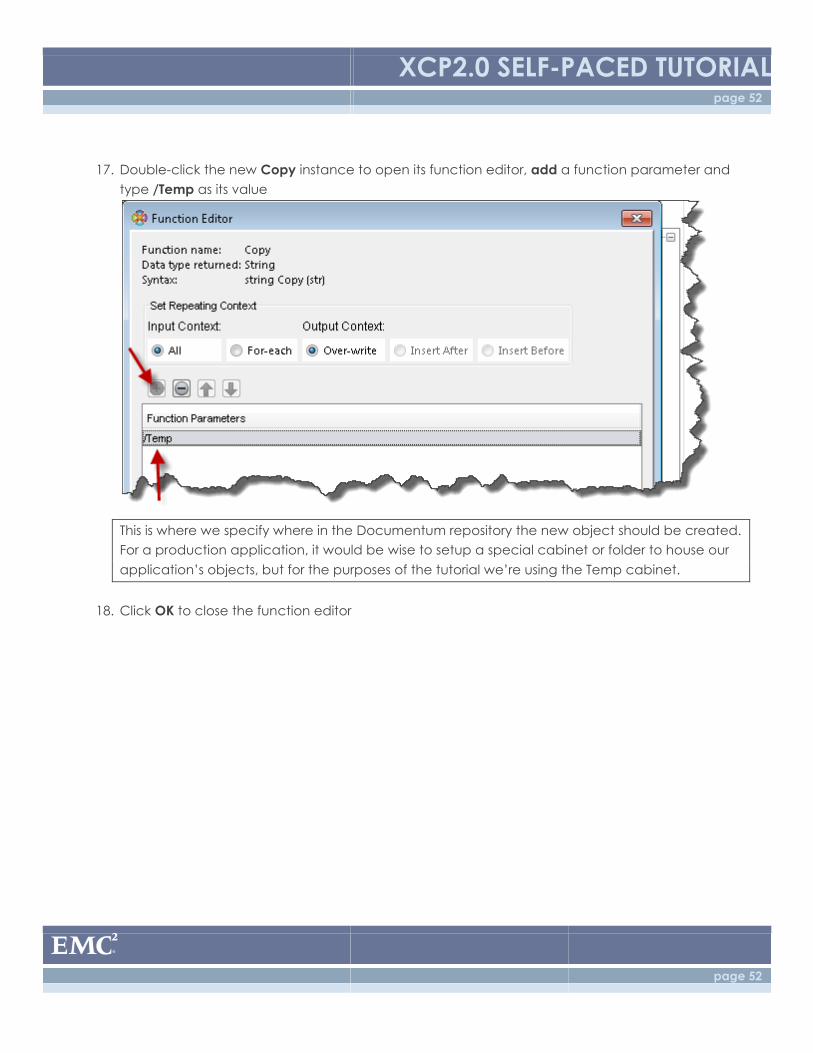
17. Double-click the new Copy instance to open its function editor, add a function parameter and
type /Temp as its value
This is where we specify where in the Documentum repository the new object should be created.
For a production application, it would be wise to setup a special cabinet or folder to house our
application’s objects, but for the purposes of the tutorial we’re using the Temp cabinet.
18. Click OK to close the function editor
XCP2.0 SELF-PACED TUTORIAL page 53
page 53
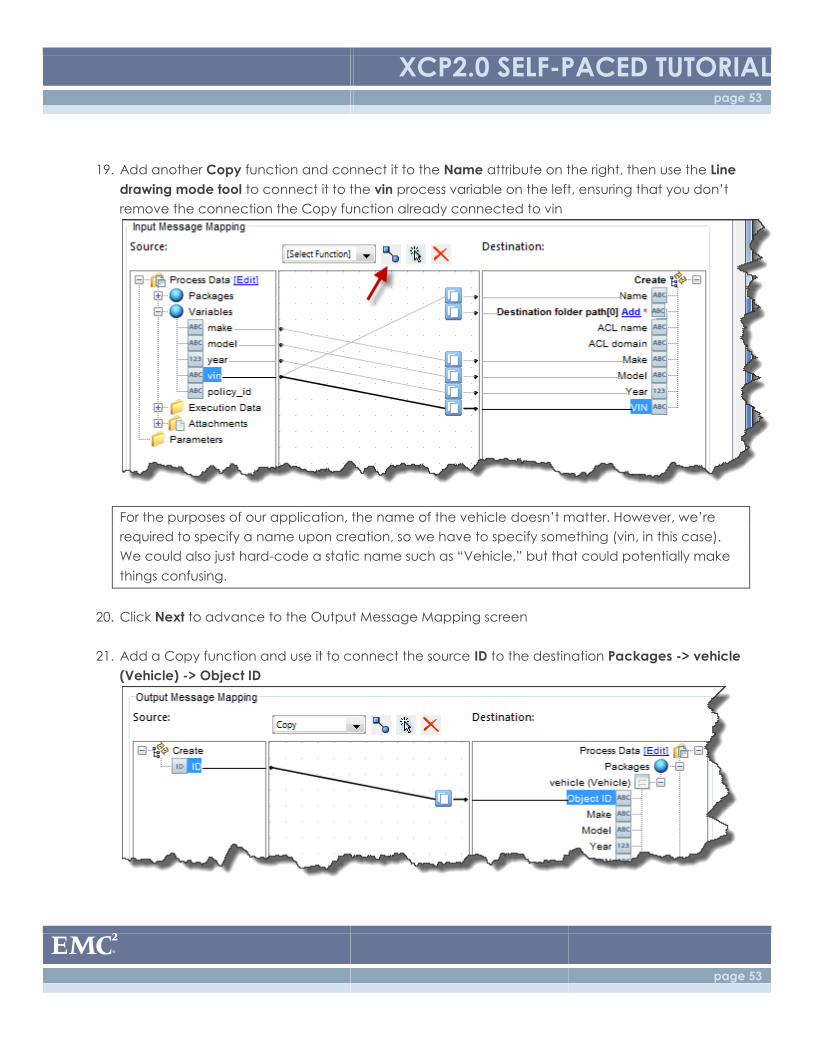
19. Add another Copy function and connect it to the Name attribute on the right, then use the Line
drawing mode tool to connect it to the vin process variable on the left, ensuring that you don’t
remove the connection the Copy function already connected to vin
For the purposes of our application, the name of the vehicle doesn’t matter. However, we’re
required to specify a name upon creation, so we have to specify something (vin, in this case).
We could also just hard-code a static name such as “Vehicle,” but that could potentially make
things confusing.
20. Click Next to advance to the Output Message Mapping screen
21. Add a Copy function and use it to connect the source ID to the destination Packages -> vehicle
(Vehicle) -> Object ID
XCP2.0 SELF-PACED TUTORIAL page 54
page 54
This “attaches” the newly-created vehicle object to our process’ vehicle package, so that we
may relate the vehicle to a policy in the following step.
22. Click OK to close the activity inspector
23. Double-click the Set Process Data activity to open its activity inspector
24. Rename the activity to Relate Vehicle to Policy
25. Use the copy function to link the policy_id process variable (left side) to Packages -> vehicle
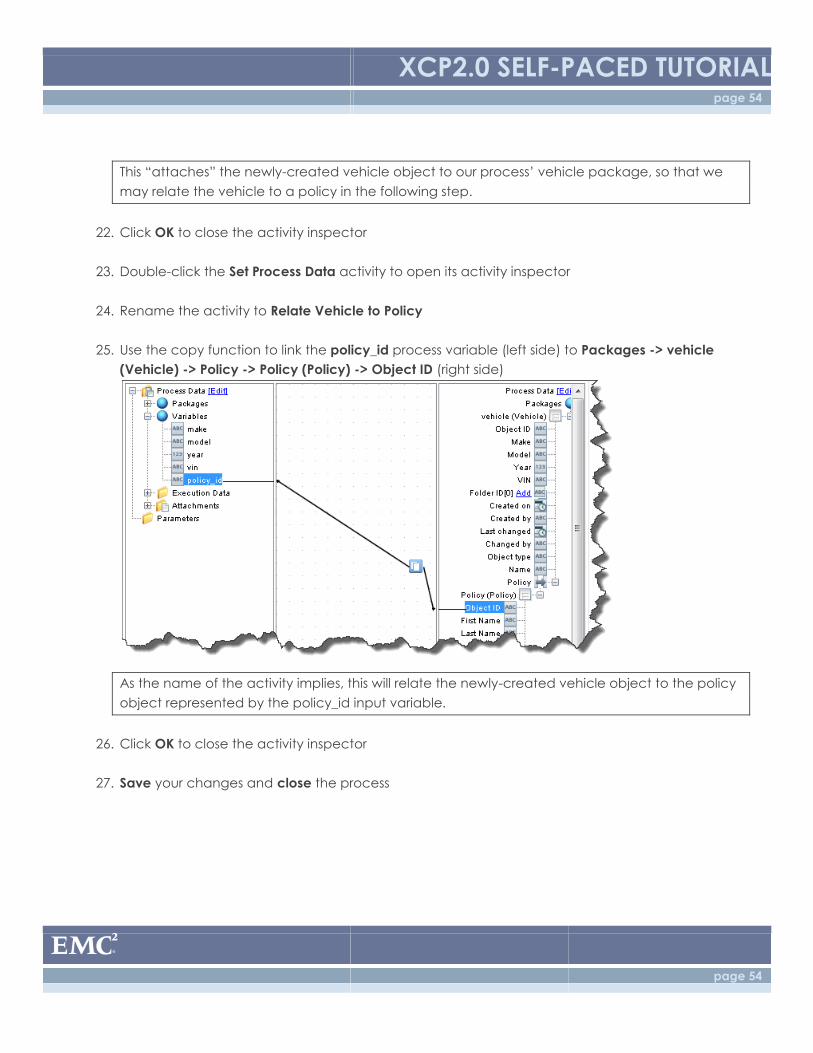
(Vehicle) -> Policy -> Policy (Policy) -> Object ID (right side)
As the name of the activity implies, this will relate the newly-created vehicle object to the policy
object represented by the policy_id input variable.
26. Click OK to close the activity inspector
27. Save your changes and close the process
XCP2.0 SELF-PACED TUTORIAL page 55
page 55
3.4: Vehicle Real-Time Query
This real-time query will be different from the one we defined for policies, as that real-time query was
designed to list all available policies, or search for policies based on last name. This real-time query will
be designed to list the vehicles associated with a given policy, so that we may display that list on the
“Edit Policy” page.
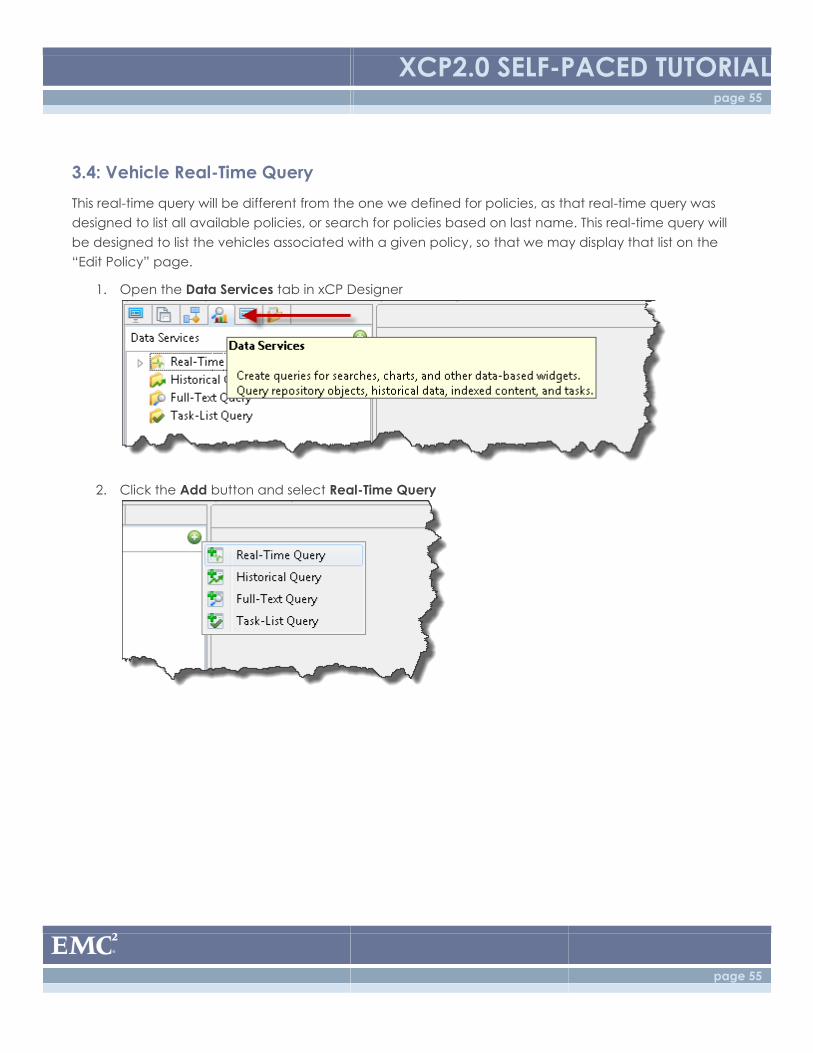
1. Open the Data Services tab in xCP Designer
2. Click the Add button and select Real-Time Query
XCP2.0 SELF-PACED TUTORIAL page 56
page 56
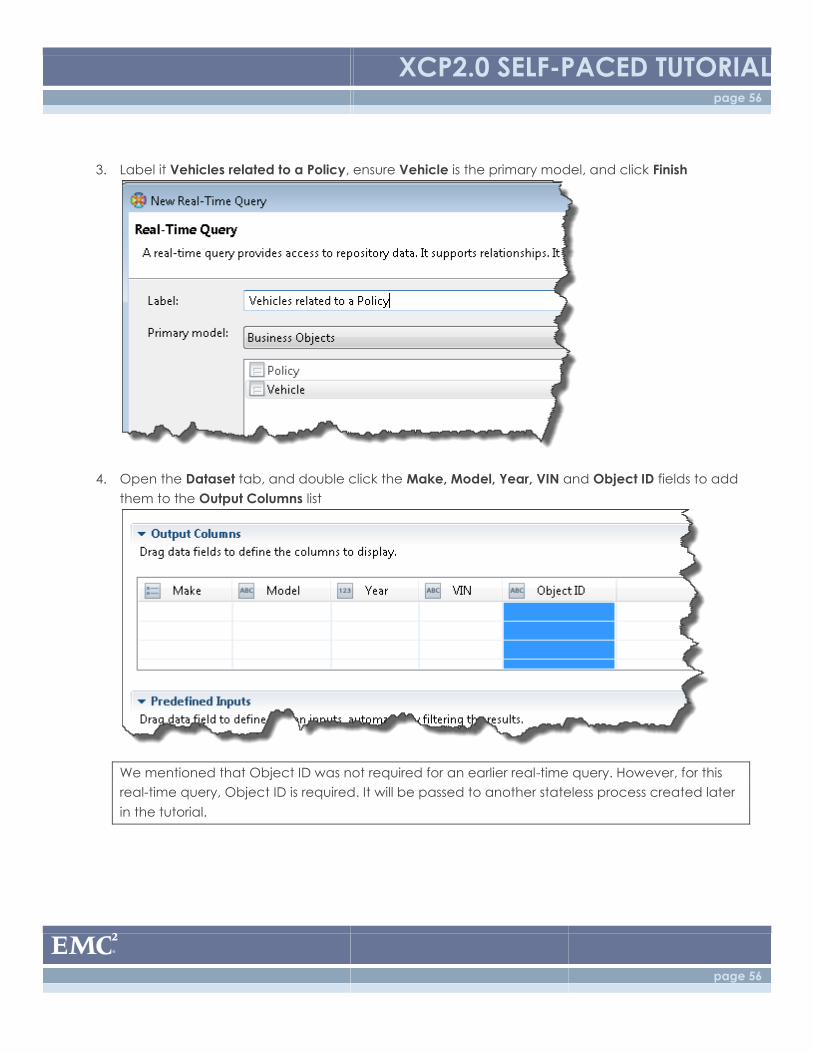
3. Label it Vehicles related to a Policy, ensure Vehicle is the primary model, and click Finish
4. Open the Dataset tab, and double click the Make, Model, Year, VIN and Object ID fields to add
them to the Output Columns list
We mentioned that Object ID was not required for an earlier real-time query. However, for this
real-time query, Object ID is required. It will be passed to another stateless process created later
in the tutorial.
XCP2.0 SELF-PACED TUTORIAL page 57
page 57
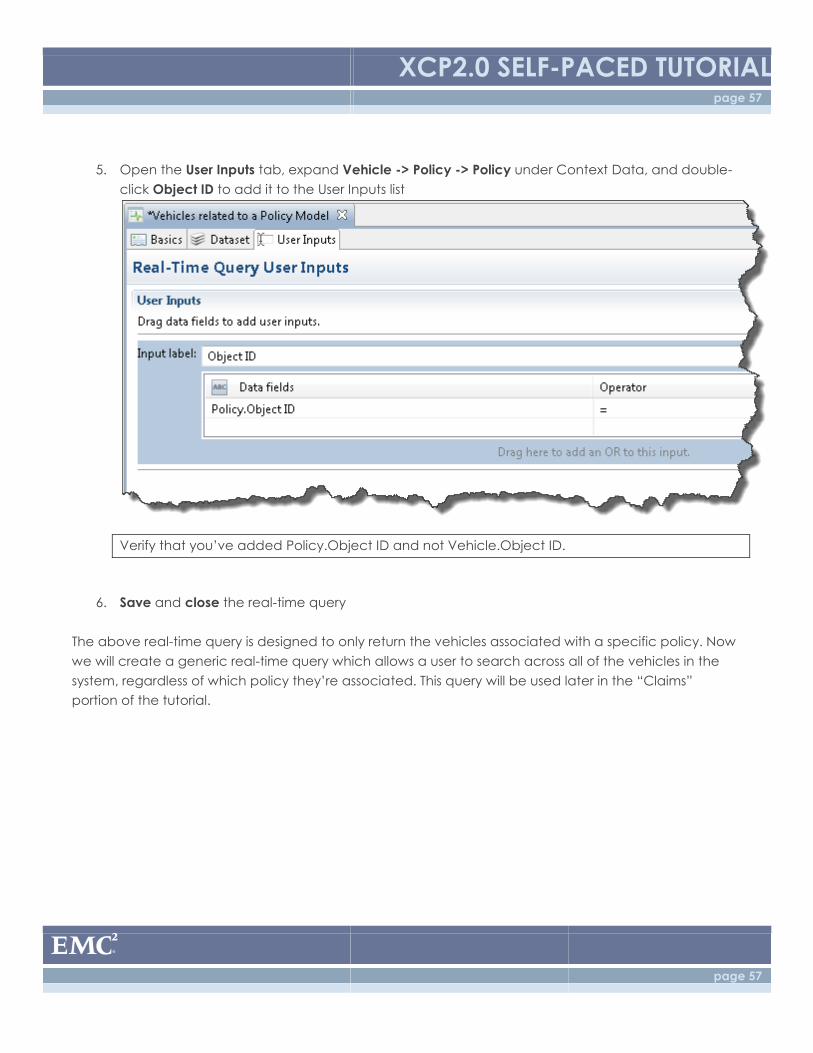
5. Open the User Inputs tab, expand Vehicle -> Policy -> Policy under Context Data, and double-
click Object ID to add it to the User Inputs list
Verify that you’ve added Policy.Object ID and not Vehicle.Object ID.
6. Save and close the real-time query
The above real-time query is designed to only return the vehicles associated with a specific policy. Now
we will create a generic real-time query which allows a user to search across all of the vehicles in the
system, regardless of which policy they’re associated. This query will be used later in the “Claims”
portion of the tutorial.
XCP2.0 SELF-PACED TUTORIAL page 58
page 58
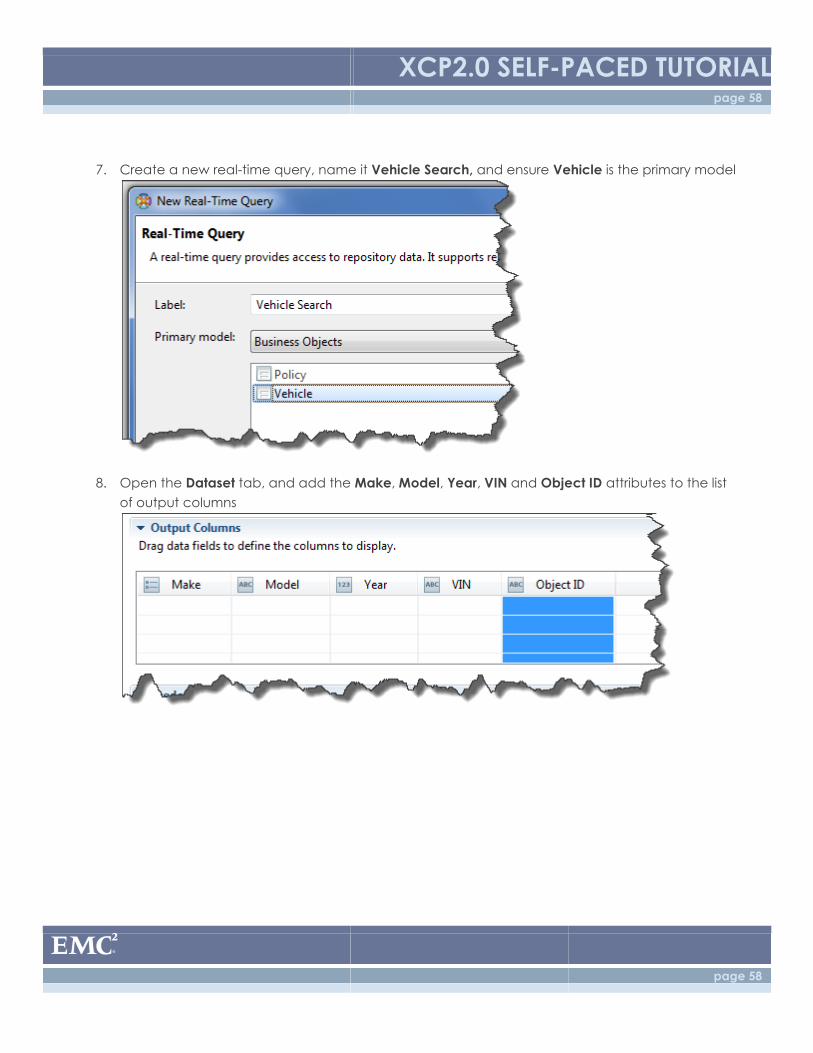
7. Create a new real-time query, name it Vehicle Search, and ensure Vehicle is the primary model
8. Open the Dataset tab, and add the Make, Model, Year, VIN and Object ID attributes to the list
of output columns
XCP2.0 SELF-PACED TUTORIAL page 59
page 59
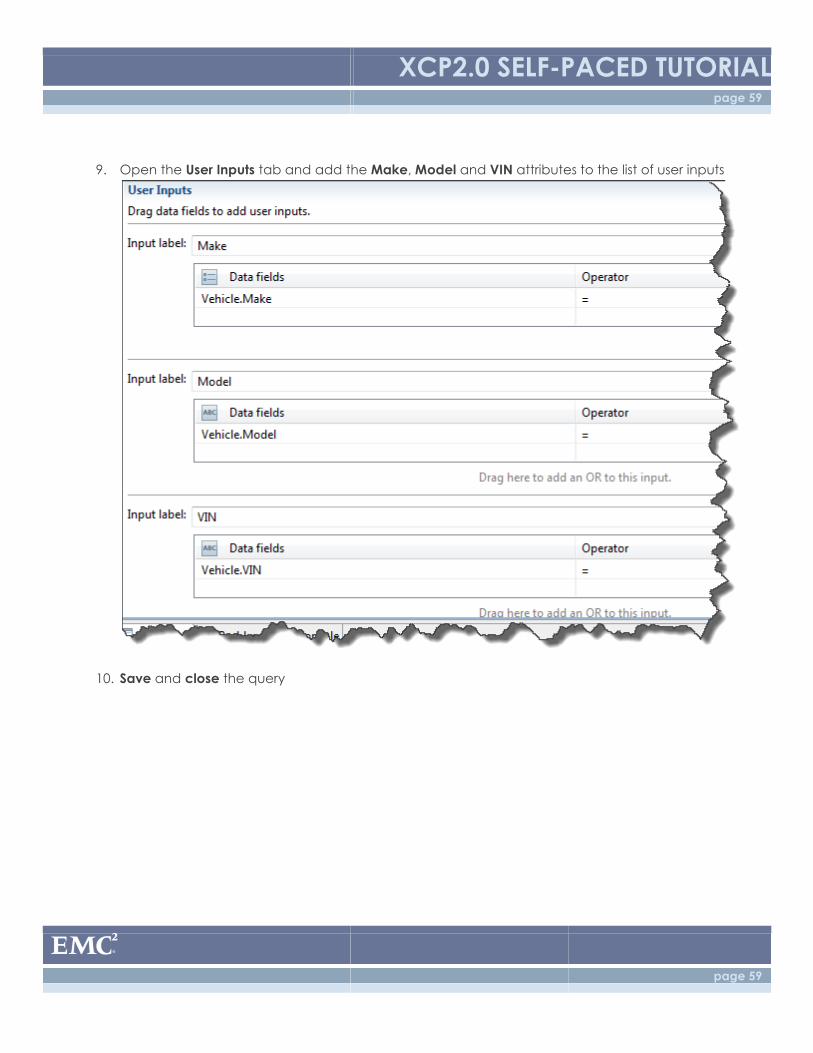
9. Open the User Inputs tab and add the Make, Model and VIN attributes to the list of user inputs
10. Save and close the query
XCP2.0 SELF-PACED TUTORIAL page 60
page 60
3.5: Vehicle Pages
Now we’ll create pages for adding vehicles. The steps for creating the “edit” page will be very similar to
what was done for policies, but the “create” page will be quite different.
3.5.1: “Add Vehicle” Page
In an earlier step, we setup a “create” page for policies by right-clicking the Policy node under Business
Object UI and selecting New Page. This is because policies are a “first class” object in our application.
We need be able to create policies without needing to setup any other objects first. However, in our
application, we do not want vehicles to be created in the same way (e.g., independently of any other
object). We want all vehicles to be associated with a policy from the beginning. There are multiple ways
of achieving this behavior, but in the steps below, we’ll be accomplishing this by defining our “create”
page for vehicles under the Policy Business Object UI, rather than under the Vehicle Business Object UI.
This will ensure that the “create” page for vehicles will only be accessible while in the context of an
existing policy.
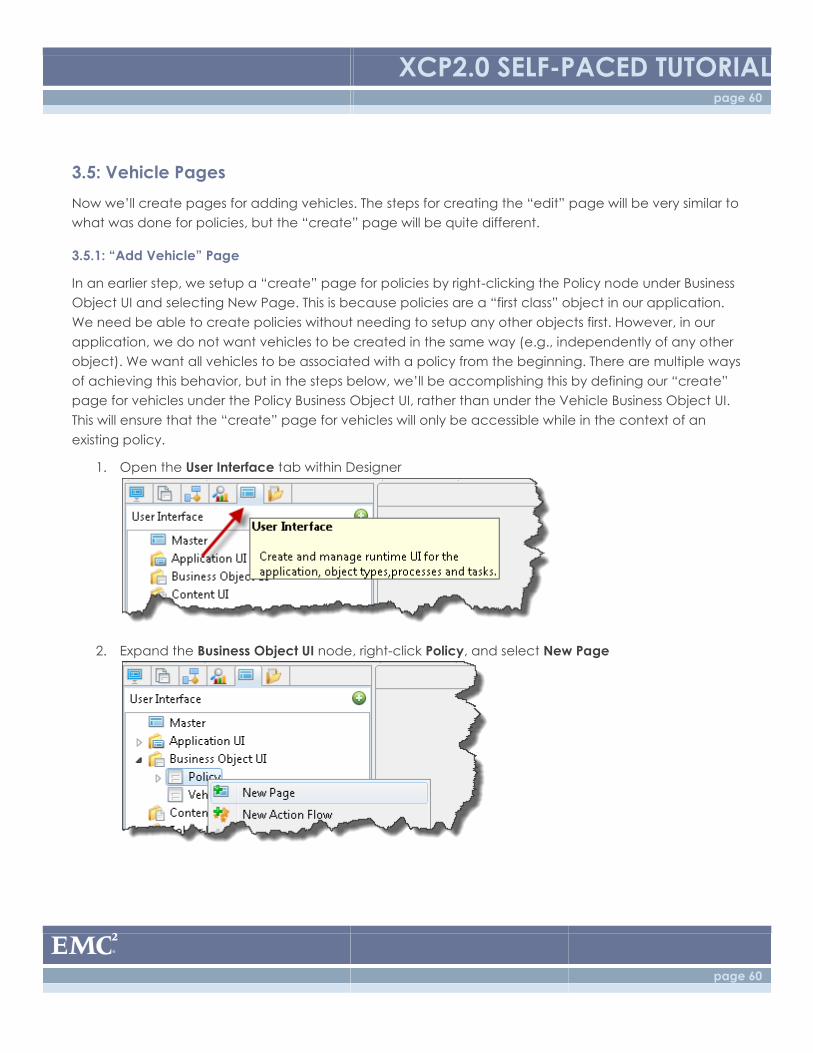
1. Open the User Interface tab within Designer
2. Expand the Business Object UI node, right-click Policy, and select New Page
XCP2.0 SELF-PACED TUTORIAL page 61
page 61
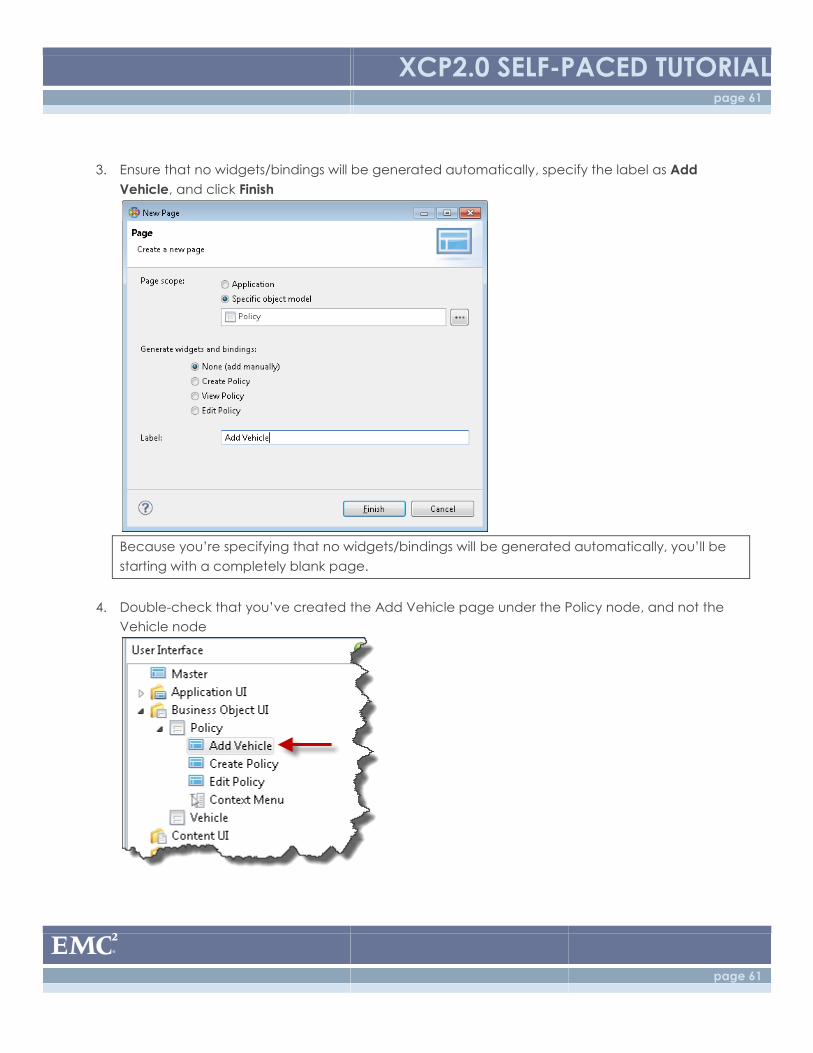
3. Ensure that no widgets/bindings will be generated automatically, specify the label as Add
Vehicle, and click Finish
Because you’re specifying that no widgets/bindings will be generated automatically, you’ll be
starting with a completely blank page.
4. Double-check that you’ve created the Add Vehicle page under the Policy node, and not the
Vehicle node
XCP2.0 SELF-PACED TUTORIAL page 62
page 62
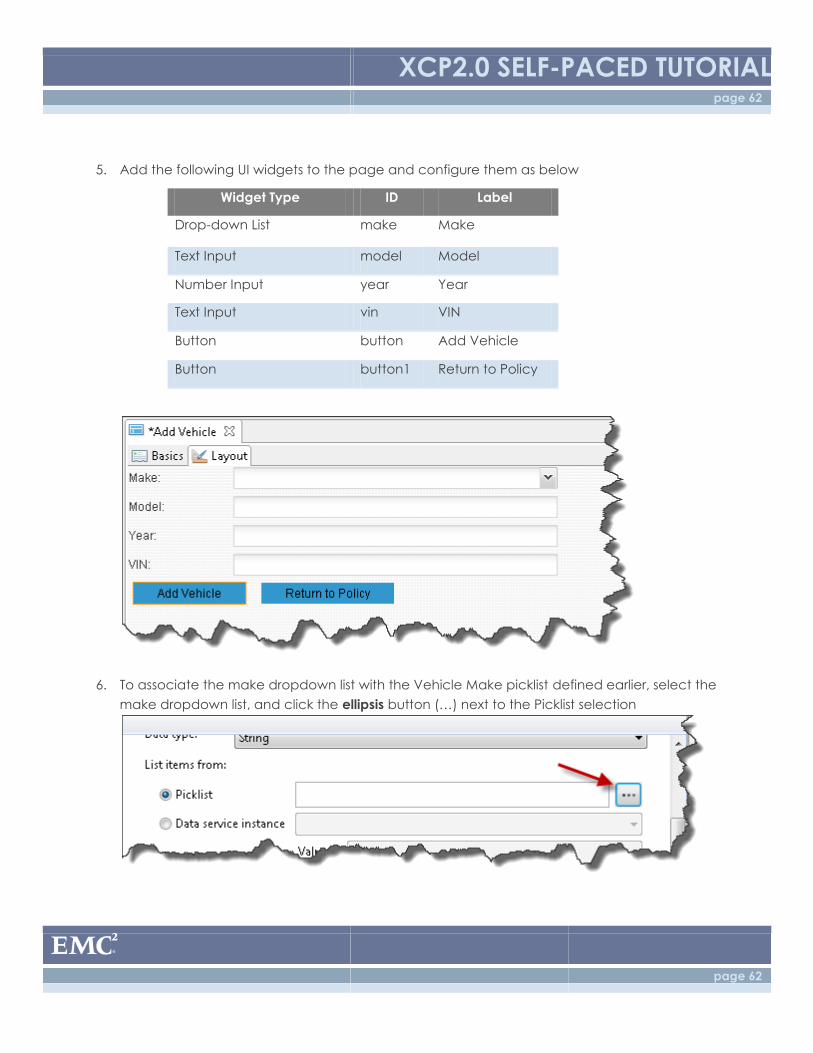
5. Add the following UI widgets to the page and configure them as below
Widget Type ID Label
Drop-down List make Make
Text Input model Model
Number Input year Year
Text Input vin VIN
Button button Add Vehicle
Button button1 Return to Policy
6. To associate the make dropdown list with the Vehicle Make picklist defined earlier, select the
make dropdown list, and click the ellipsis button (…) next to the Picklist selection
XCP2.0 SELF-PACED TUTORIAL page 63
page 63
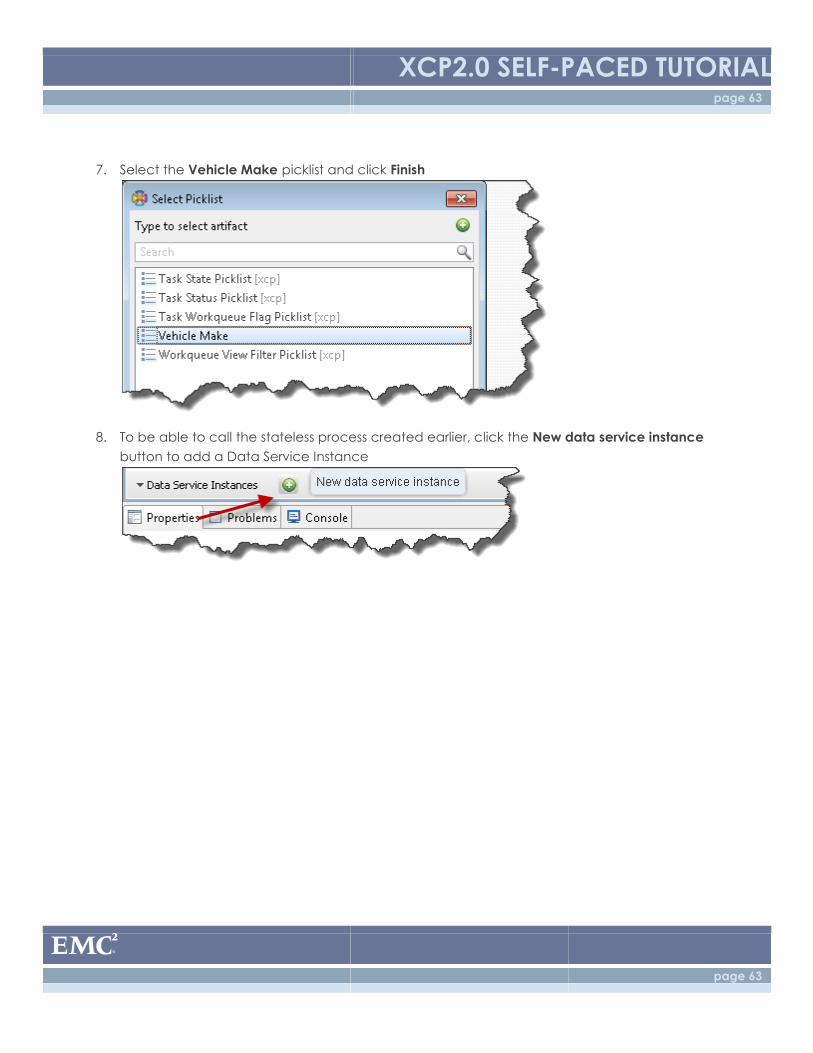
7. Select the Vehicle Make picklist and click Finish
8. To be able to call the stateless process created earlier, click the New data service instance
button to add a Data Service Instance
XCP2.0 SELF-PACED TUTORIAL page 64
page 64
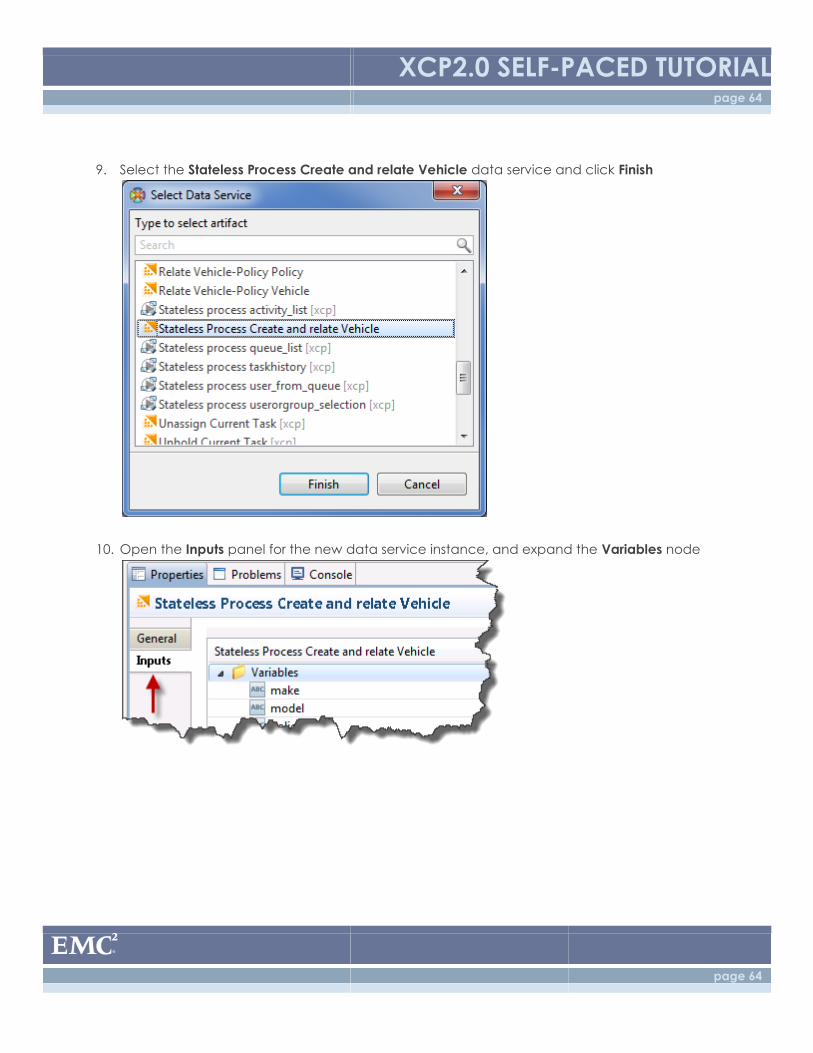
9. Select the Stateless Process Create and relate Vehicle data service and click Finish
10. Open the Inputs panel for the new data service instance, and expand the Variables node
XCP2.0 SELF-PACED TUTORIAL page 65
page 65
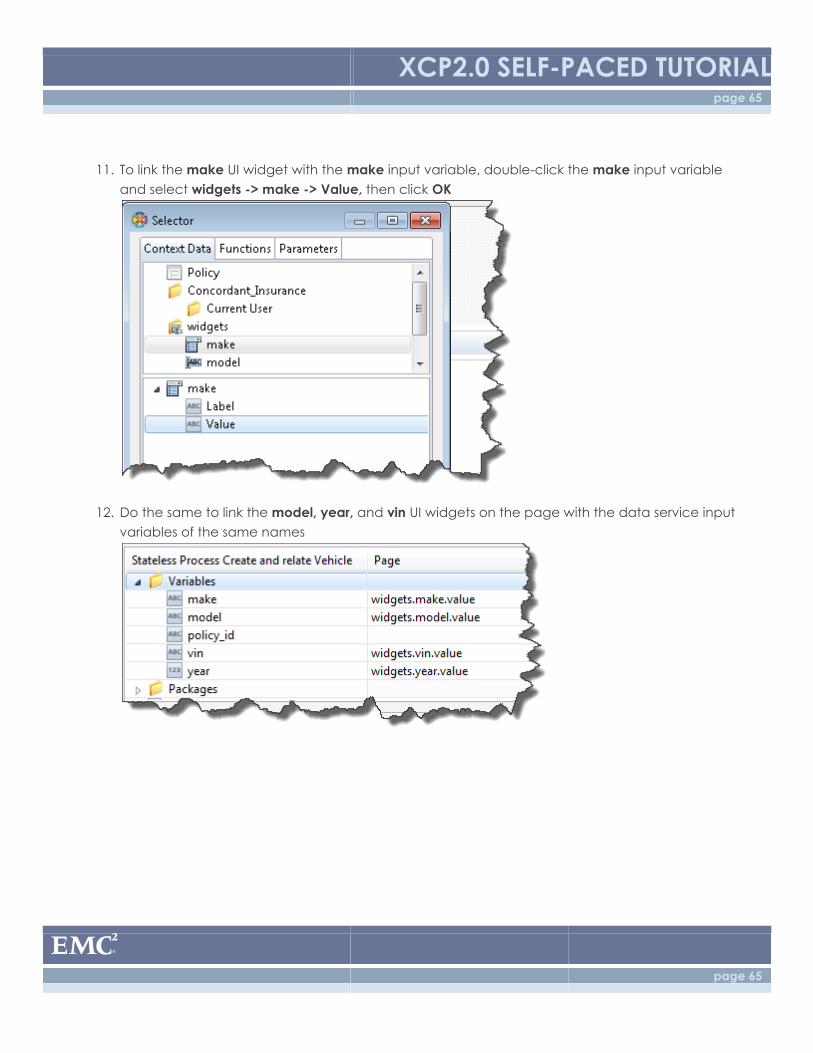
11. To link the make UI widget with the make input variable, double-click the make input variable
and select widgets -> make -> Value, then click OK
12. Do the same to link the model, year, and vin UI widgets on the page with the data service input
variables of the same names
XCP2.0 SELF-PACED TUTORIAL page 66
page 66
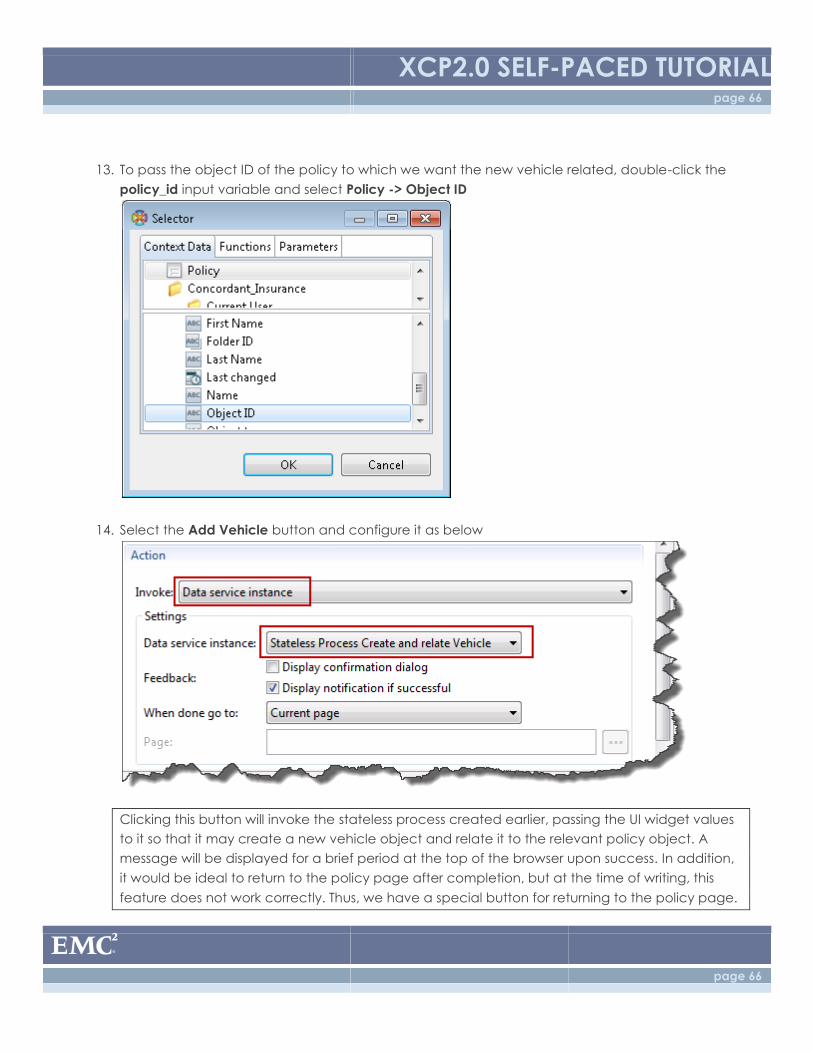
13. To pass the object ID of the policy to which we want the new vehicle related, double-click the
policy_id input variable and select Policy -> Object ID
14. Select the Add Vehicle button and configure it as below
Clicking this button will invoke the stateless process created earlier, passing the UI widget values
to it so that it may create a new vehicle object and relate it to the relevant policy object. A
message will be displayed for a brief period at the top of the browser upon success. In addition,
it would be ideal to return to the policy page after completion, but at the time of writing, this
feature does not work correctly. Thus, we have a special button for returning to the policy page.
XCP2.0 SELF-PACED TUTORIAL page 67
page 67
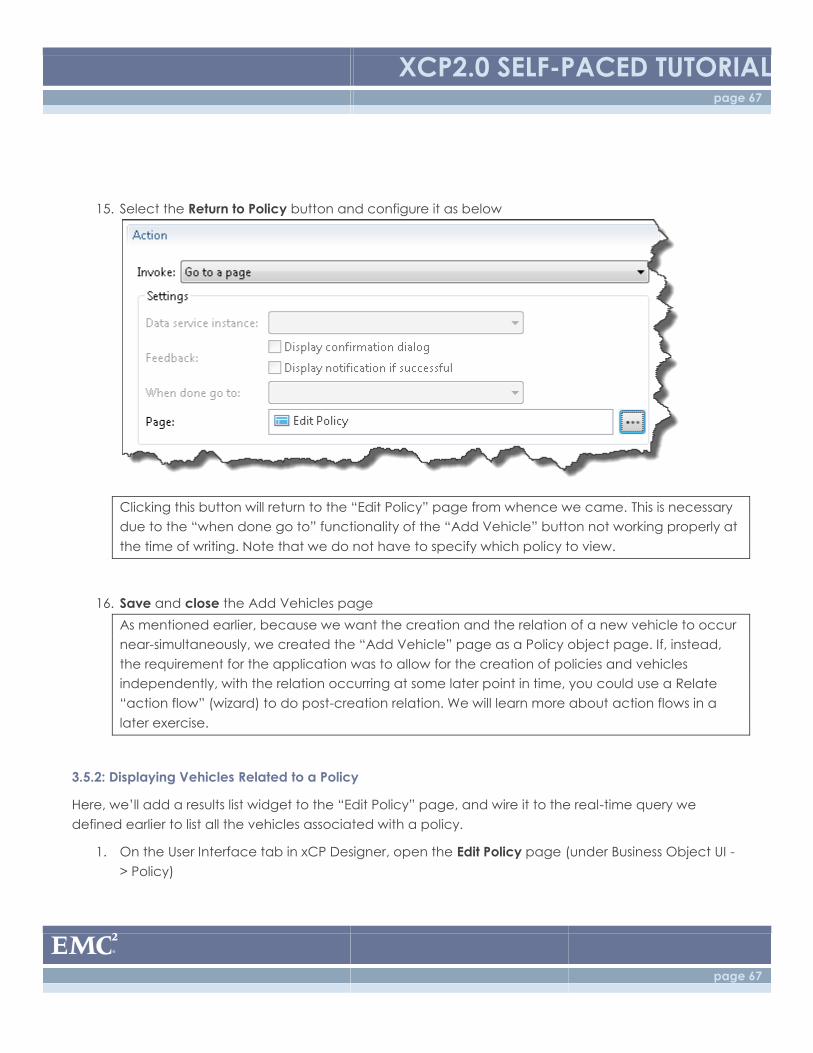
15. Select the Return to Policy button and configure it as below
Clicking this button will return to the “Edit Policy” page from whence we came. This is necessary
due to the “when done go to” functionality of the “Add Vehicle” button not working properly at
the time of writing. Note that we do not have to specify which policy to view.
16. Save and close the Add Vehicles page
As mentioned earlier, because we want the creation and the relation of a new vehicle to occur
near-simultaneously, we created the “Add Vehicle” page as a Policy object page. If, instead,
the requirement for the application was to allow for the creation of policies and vehicles
independently, with the relation occurring at some later point in time, you could use a Relate
“action flow” (wizard) to do post-creation relation. We will learn more about action flows in a
later exercise.
3.5.2: Displaying Vehicles Related to a Policy
Here, we’ll add a results list widget to the “Edit Policy” page, and wire it to the real-time query we
defined earlier to list all the vehicles associated with a policy.
1. On the User Interface tab in xCP Designer, open the Edit Policy page (under Business Object UI -
> Policy)
XCP2.0 SELF-PACED TUTORIAL page 68
page 68
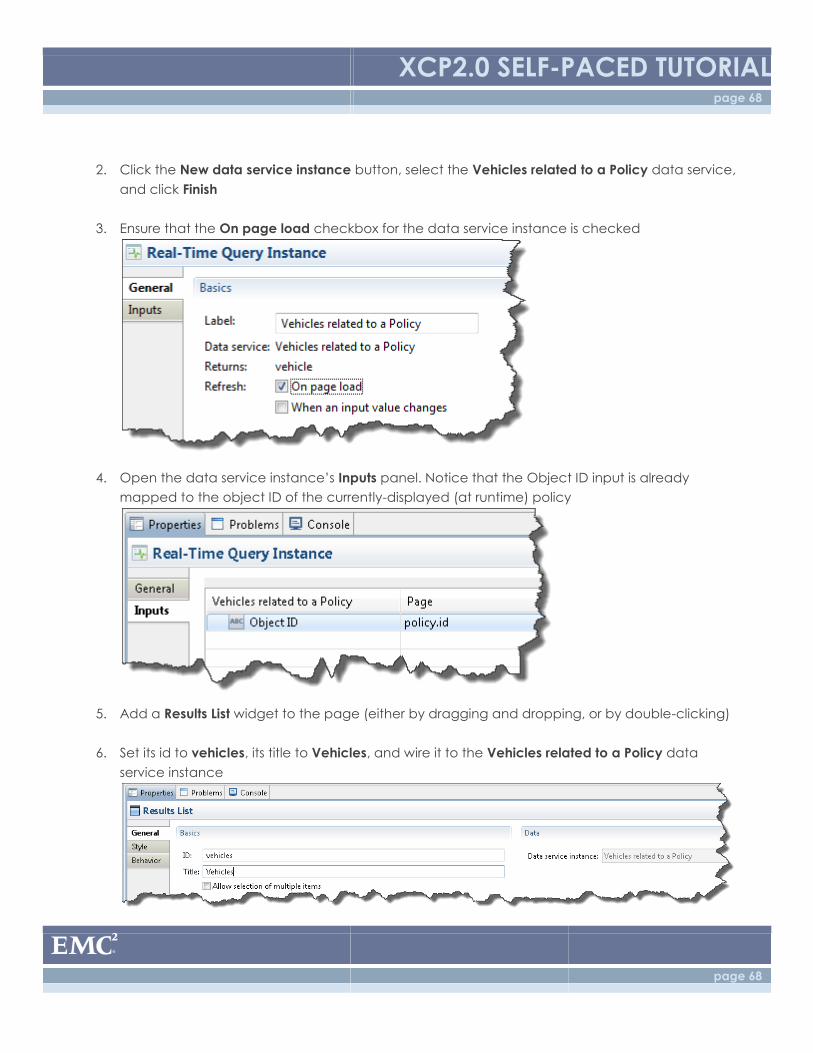
2. Click the New data service instance button, select the Vehicles related to a Policy data service,
and click Finish
3. Ensure that the On page load checkbox for the data service instance is checked
4. Open the data service instance’s Inputs panel. Notice that the Object ID input is already
mapped to the object ID of the currently-displayed (at runtime) policy
5. Add a Results List widget to the page (either by dragging and dropping, or by double-clicking)
6. Set its id to vehicles, its title to Vehicles, and wire it to the Vehicles related to a Policy data
service instance
XCP2.0 SELF-PACED TUTORIAL page 69
page 69
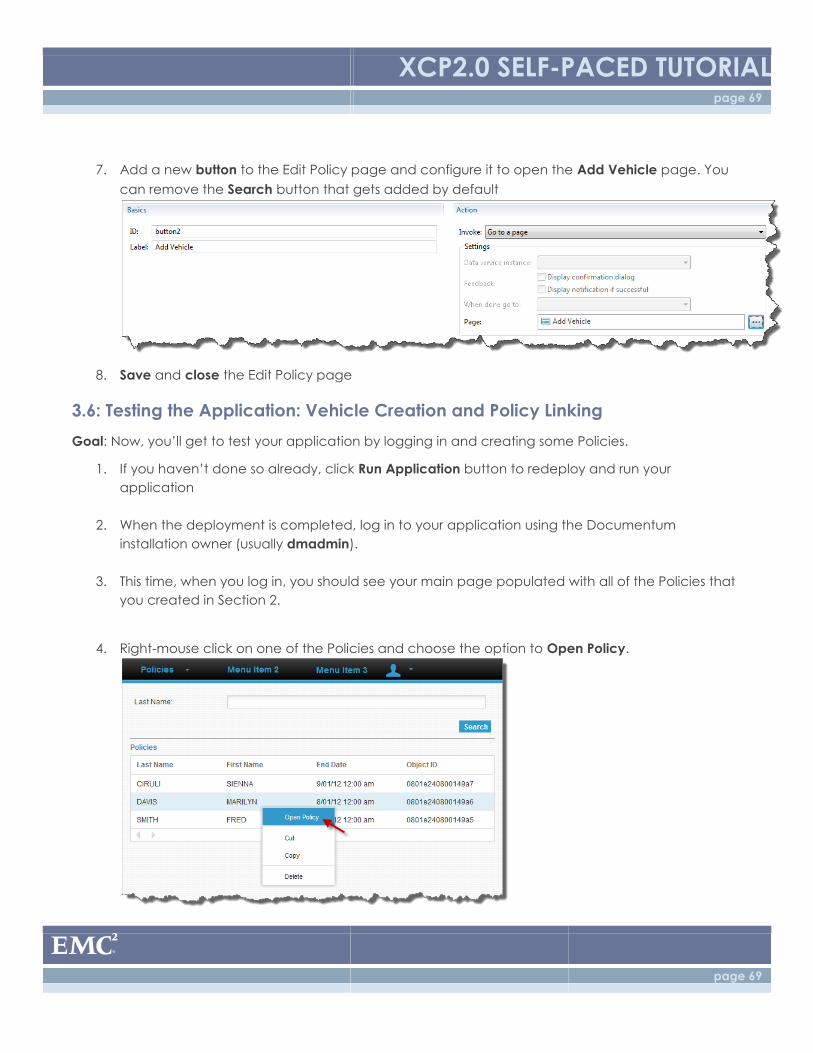
7. Add a new button to the Edit Policy page and configure it to open the Add Vehicle page. You
can remove the Search button that gets added by default
8. Save and close the Edit Policy page
3.6: Testing the Application: Vehicle Creation and Policy Linking
Goal: Now, you’ll get to test your application by logging in and creating some Policies.
1. If you haven’t done so already, click Run Application button to redeploy and run your
application
2. When the deployment is completed, log in to your application using the Documentum
installation owner (usually dmadmin).
3. This time, when you log in, you should see your main page populated with all of the Policies that
you created in Section 2.
4. Right-mouse click on one of the Policies and choose the option to Open Policy.
XCP2.0 SELF-PACED TUTORIAL page 70
page 70
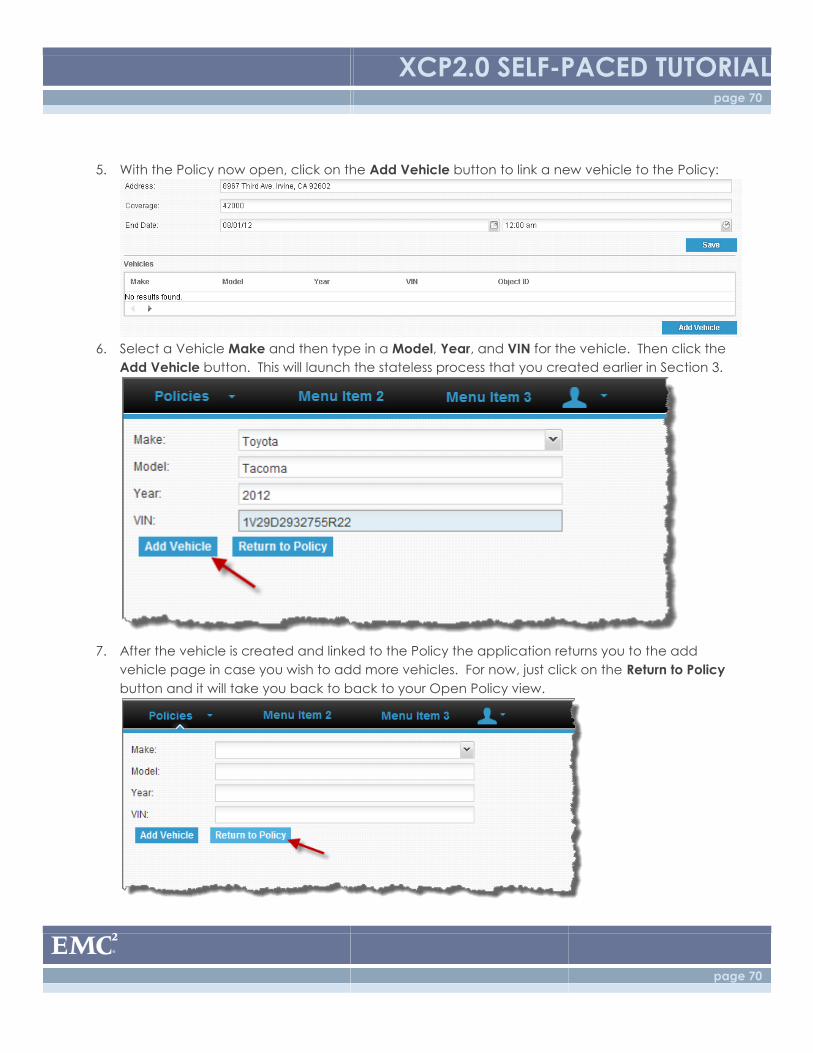
5. With the Policy now open, click on the Add Vehicle button to link a new vehicle to the Policy:
6. Select a Vehicle Make and then type in a Model, Year, and VIN for the vehicle. Then click the
Add Vehicle button. This will launch the stateless process that you created earlier in Section 3.
7. After the vehicle is created and linked to the Policy the application returns you to the add
vehicle page in case you wish to add more vehicles. For now, just click on the Return to Policy
button and it will take you back to back to your Open Policy view.
XCP2.0 SELF-PACED TUTORIAL page 71
page 71
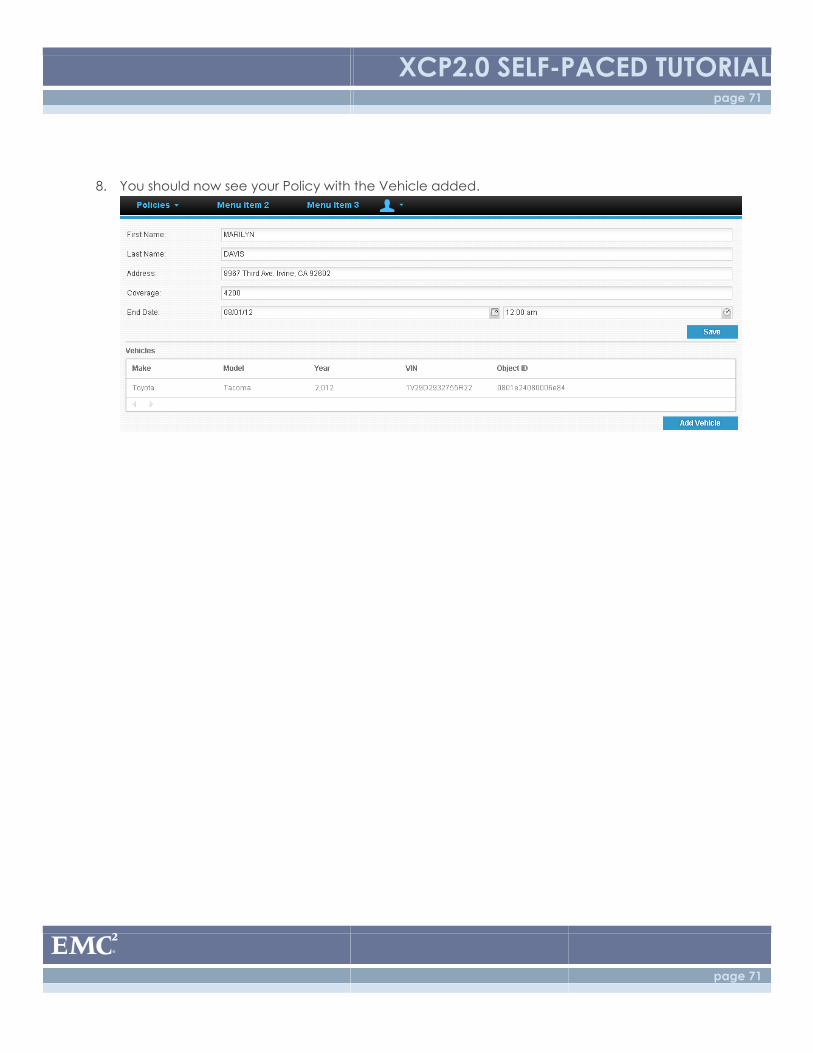
8. You should now see your Policy with the Vehicle added.
XCP2.0 SELF-PACED TUTORIAL page 72
page 72
4.0: Claims
Goals: Create a Folder type to represent claims against a policy and vehicle. The claim folder will have
metadata describing the claim, and it will provide as a container for any supporting documentation
related to the claim. A stateful process will also be defined for handling adjudication of the claim.
Concepts:
Stateful Process – A process whose state is maintained in the database. Any processes which require
manual tasks (as opposed to automatic tasks) must be defined as stateful. In previous releases of xCP
(prior to 6.7 SP1), all processes were stateful.
4.1: Claim Status Picklist
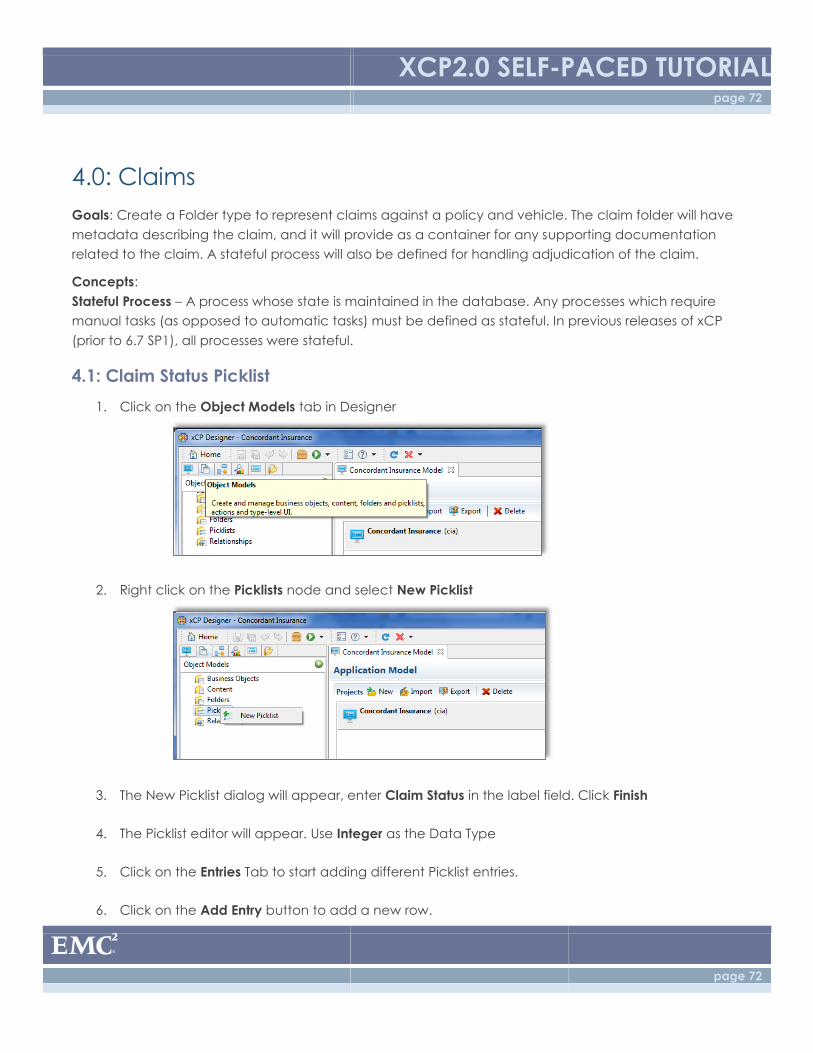
1. Click on the Object Models tab in Designer
2. Right click on the Picklists node and select New Picklist
3. The New Picklist dialog will appear, enter Claim Status in the label field. Click Finish
4. The Picklist editor will appear. Use Integer as the Data Type
5. Click on the Entries Tab to start adding different Picklist entries.
6. Click on the Add Entry button to add a new row.
XCP2.0 SELF-PACED TUTORIAL page 73
page 73
7. Add Picklist entries as per the table below.
Label Value
Processing 0
Approved 1
Denied 2
8. Save and close the picklist editor
4.2: Claim Folder
1. Click on the Object Models tab in Designer
2. Right click on Folders and select New Folder
3. Name the new folder type Claim and click Finish
4. The Claim Model editor will appear. Click on the Attributes Tab to start adding attributes to the
folder type
5. The Claim Folder has the following attributes; add each of them.
Attribute (Label) Type
Incident Date Date-time
Incident Location String
Amount Float
Vehicle in Motion Boolean
Status Picklist
XCP2.0 SELF-PACED TUTORIAL page 74
page 74
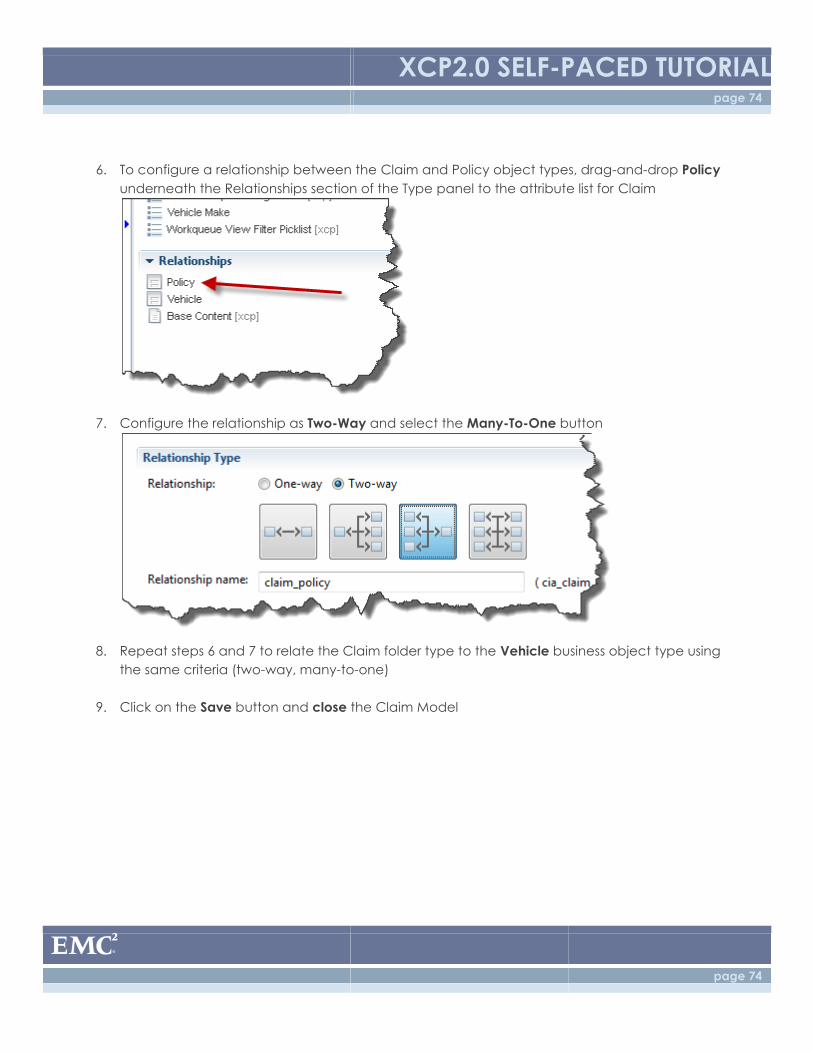
6. To configure a relationship between the Claim and Policy object types, drag-and-drop Policy
underneath the Relationships section of the Type panel to the attribute list for Claim
7. Configure the relationship as Two-Way and select the Many-To-One button
8. Repeat steps 6 and 7 to relate the Claim folder type to the Vehicle business object type using
the same criteria (two-way, many-to-one)
9. Click on the Save button and close the Claim Model
XCP2.0 SELF-PACED TUTORIAL page 75
page 75
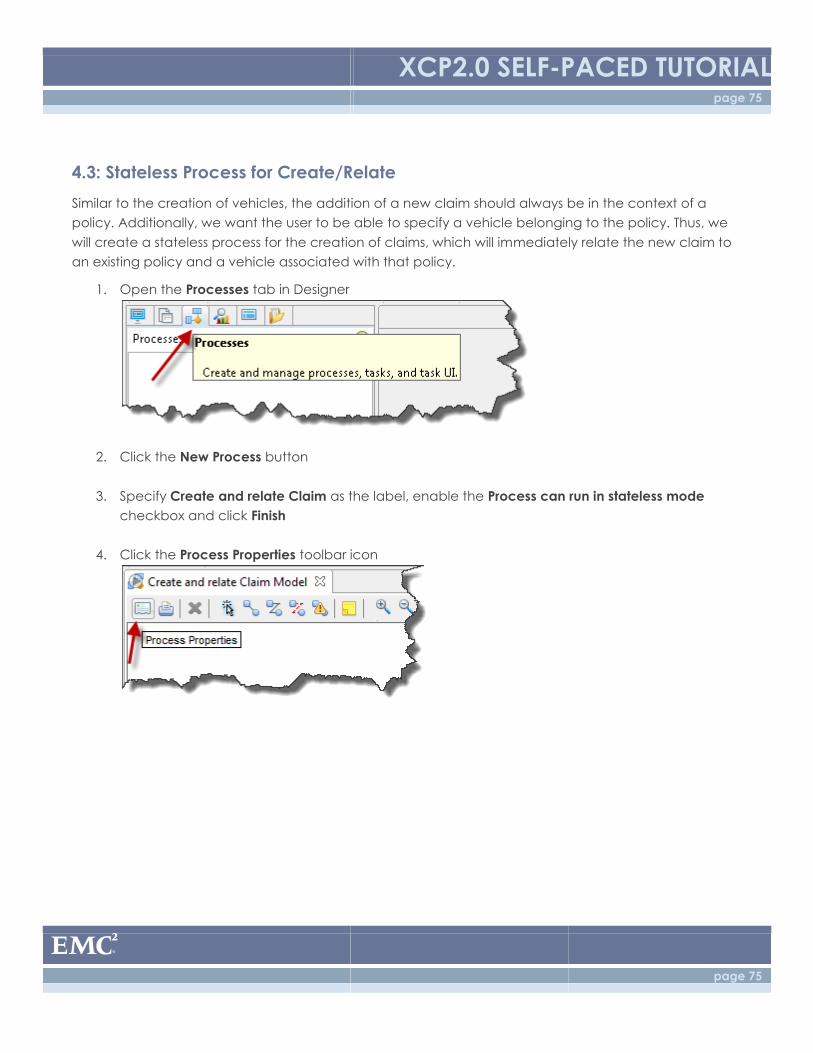
4.3: Stateless Process for Create/Relate
Similar to the creation of vehicles, the addition of a new claim should always be in the context of a
policy. Additionally, we want the user to be able to specify a vehicle belonging to the policy. Thus, we
will create a stateless process for the creation of claims, which will immediately relate the new claim to
an existing policy and a vehicle associated with that policy.
1. Open the Processes tab in Designer
2. Click the New Process button
3. Specify Create and relate Claim as the label, enable the Process can run in stateless mode
checkbox and click Finish
4. Click the Process Properties toolbar icon
XCP2.0 SELF-PACED TUTORIAL page 76
page 76
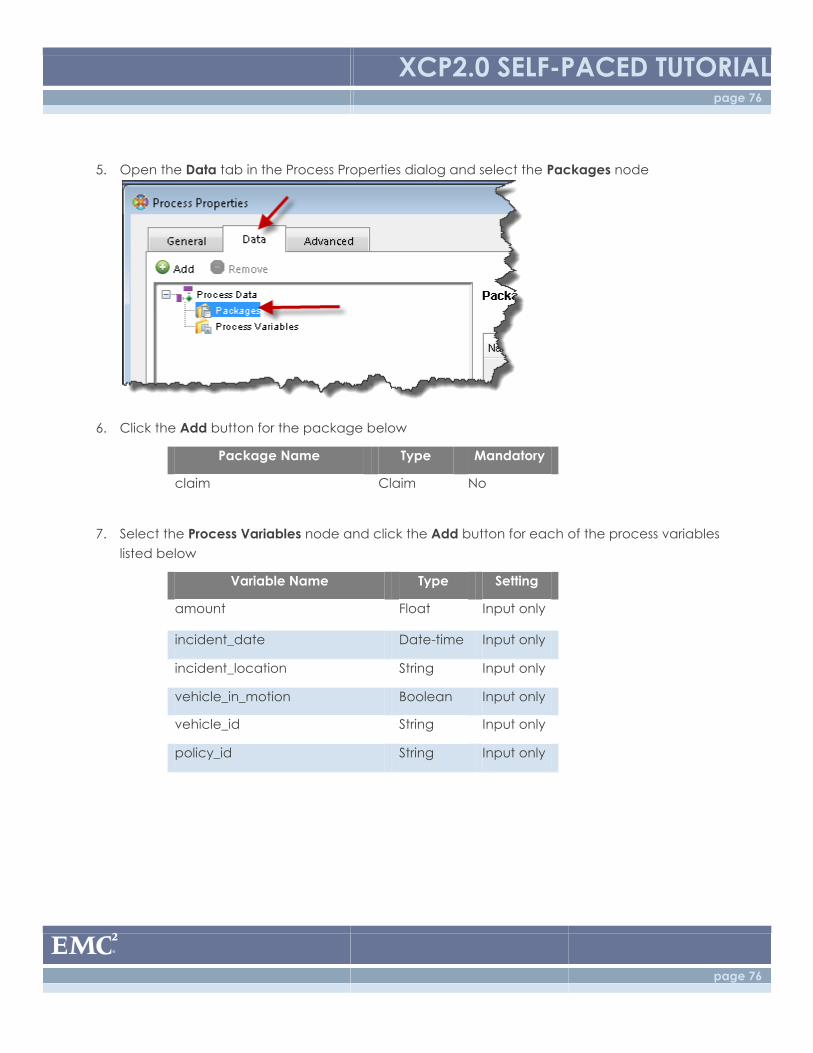
5. Open the Data tab in the Process Properties dialog and select the Packages node
6. Click the Add button for the package below
Package Name Type Mandatory
claim Claim No
7. Select the Process Variables node and click the Add button for each of the process variables
listed below
Variable Name Type Setting
amount Float Input only
incident_date Date-time Input only
incident_location String Input only
vehicle_in_motion Boolean Input only
vehicle_id String Input only
policy_id String Input only
XCP2.0 SELF-PACED TUTORIAL page 77
page 77
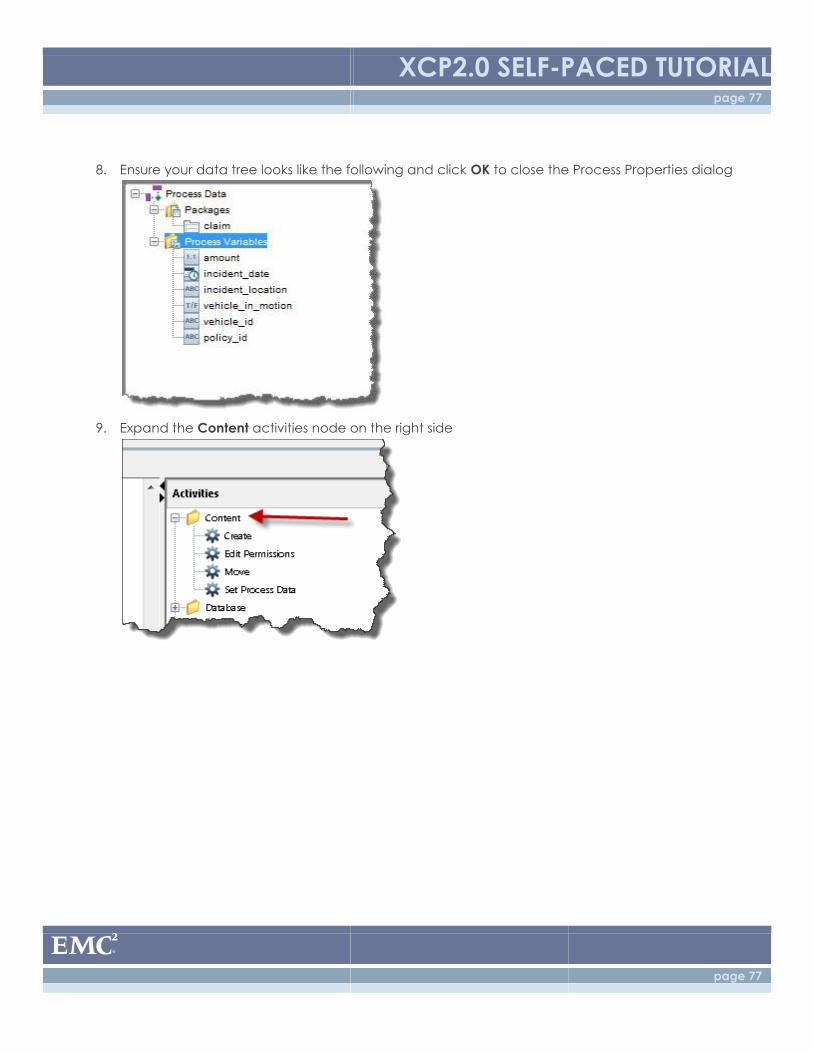
8. Ensure your data tree looks like the following and click OK to close the Process Properties dialog
9. Expand the Content activities node on the right side
XCP2.0 SELF-PACED TUTORIAL page 78
page 78
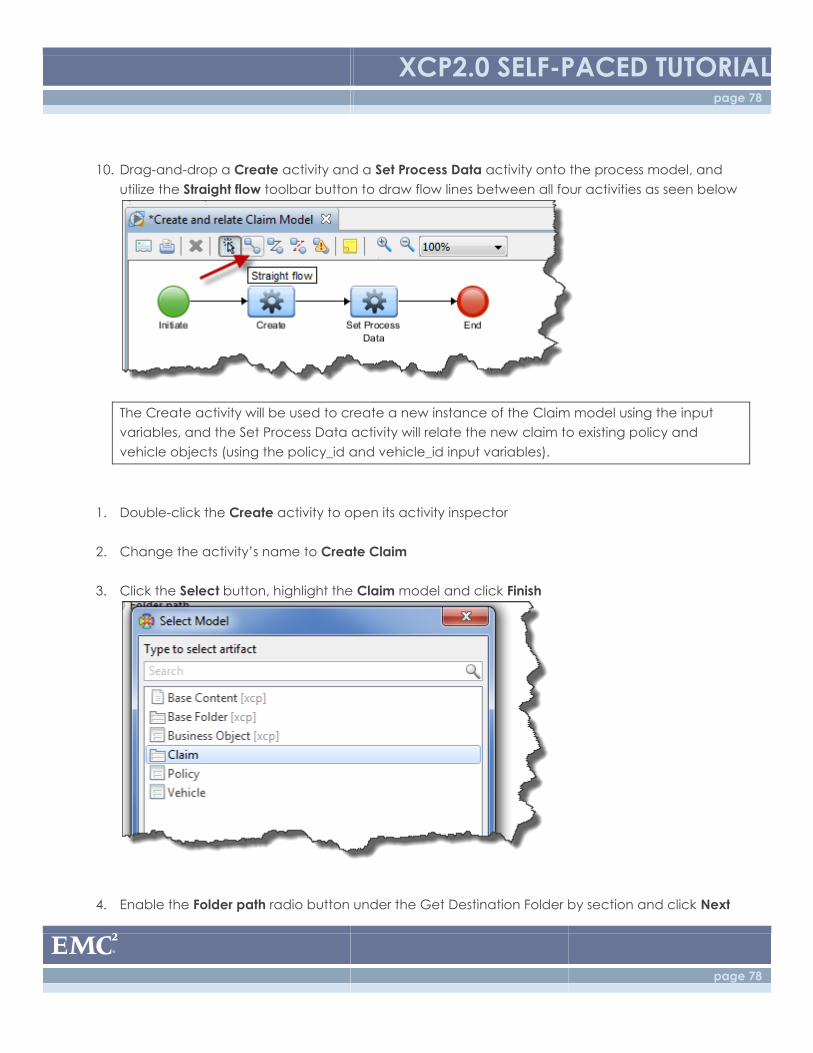
10. Drag-and-drop a Create activity and a Set Process Data activity onto the process model, and
utilize the Straight flow toolbar button to draw flow lines between all four activities as seen below
The Create activity will be used to create a new instance of the Claim model using the input
variables, and the Set Process Data activity will relate the new claim to existing policy and
vehicle objects (using the policy_id and vehicle_id input variables).
1. Double-click the Create activity to open its activity inspector
2. Change the activity’s name to Create Claim
3. Click the Select button, highlight the Claim model and click Finish
4. Enable the Folder path radio button under the Get Destination Folder by section and click Next
XCP2.0 SELF-PACED TUTORIAL page 79
page 79
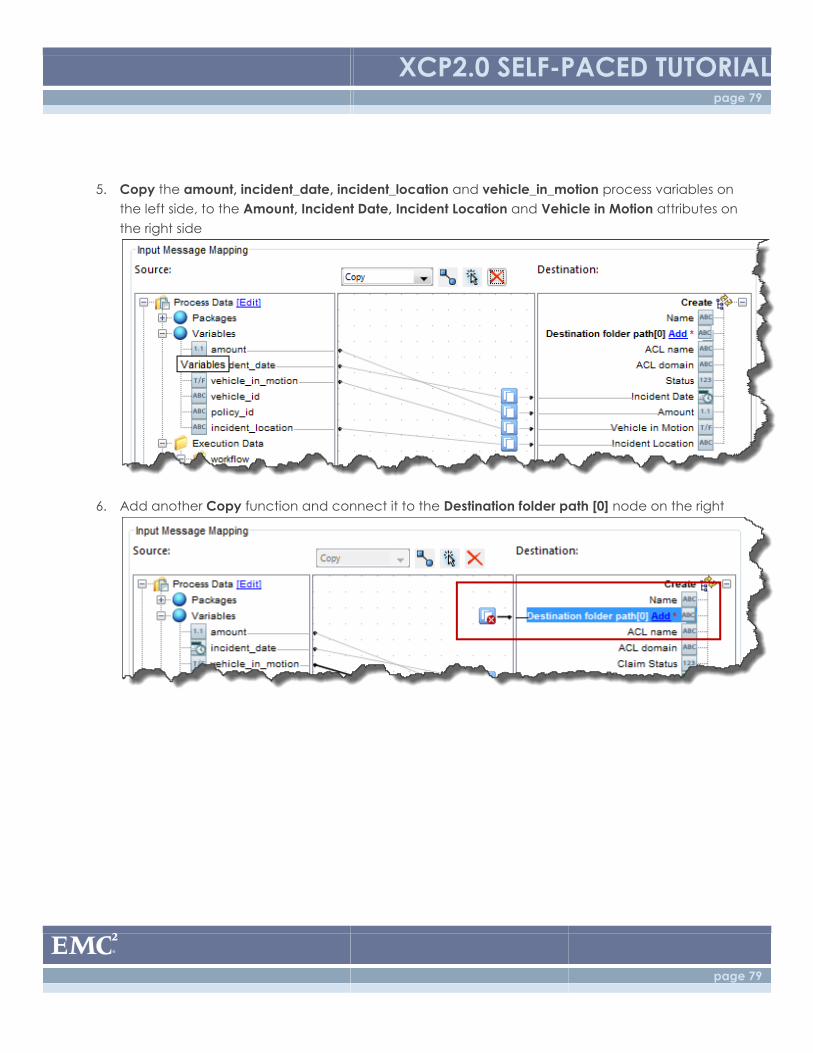
5. Copy the amount, incident_date, incident_location and vehicle_in_motion process variables on
the left side, to the Amount, Incident Date, Incident Location and Vehicle in Motion attributes on
the right side
6. Add another Copy function and connect it to the Destination folder path [0] node on the right
XCP2.0 SELF-PACED TUTORIAL page 80
page 80
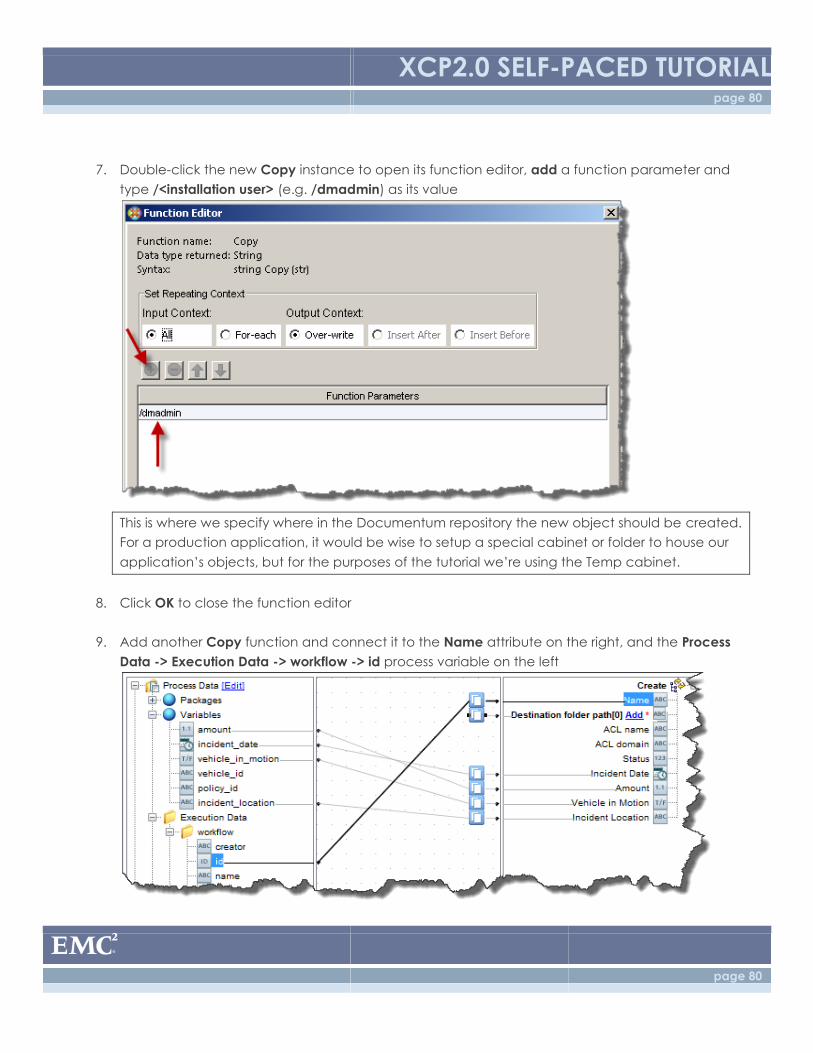
7. Double-click the new Copy instance to open its function editor, add a function parameter and
type /<installation user> (e.g. /dmadmin) as its value
This is where we specify where in the Documentum repository the new object should be created.
For a production application, it would be wise to setup a special cabinet or folder to house our
application’s objects, but for the purposes of the tutorial we’re using the Temp cabinet.
8. Click OK to close the function editor
9. Add another Copy function and connect it to the Name attribute on the right, and the Process
Data -> Execution Data -> workflow -> id process variable on the left
XCP2.0 SELF-PACED TUTORIAL page 81
page 81
For the purposes of our application, the name of the claim doesn’t matter. However, we’re
required to specify a name upon creation, so we have to specify something (workflow id, in this
case). We could also just hard-code a static name such as “Claim,” but that could potentially
make things confusing.
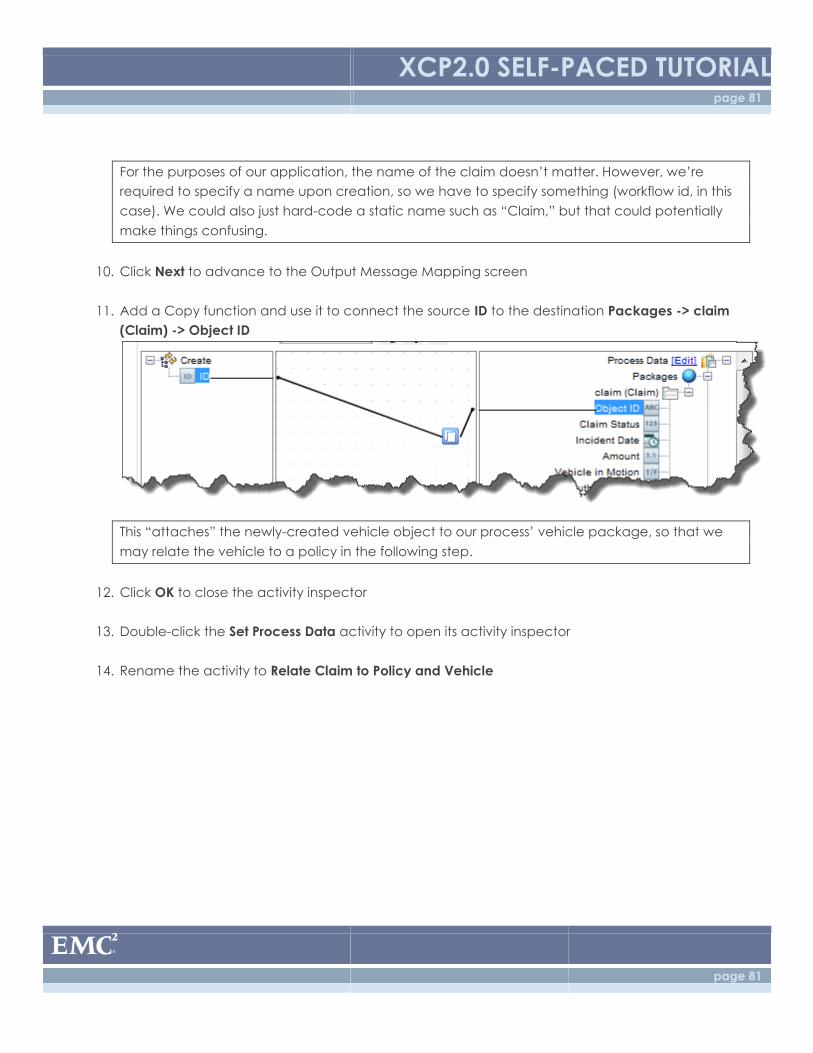
10. Click Next to advance to the Output Message Mapping screen
11. Add a Copy function and use it to connect the source ID to the destination Packages -> claim
(Claim) -> Object ID
This “attaches” the newly-created vehicle object to our process’ vehicle package, so that we
may relate the vehicle to a policy in the following step.
12. Click OK to close the activity inspector
13. Double-click the Set Process Data activity to open its activity inspector
14. Rename the activity to Relate Claim to Policy and Vehicle
XCP2.0 SELF-PACED TUTORIAL page 82
page 82
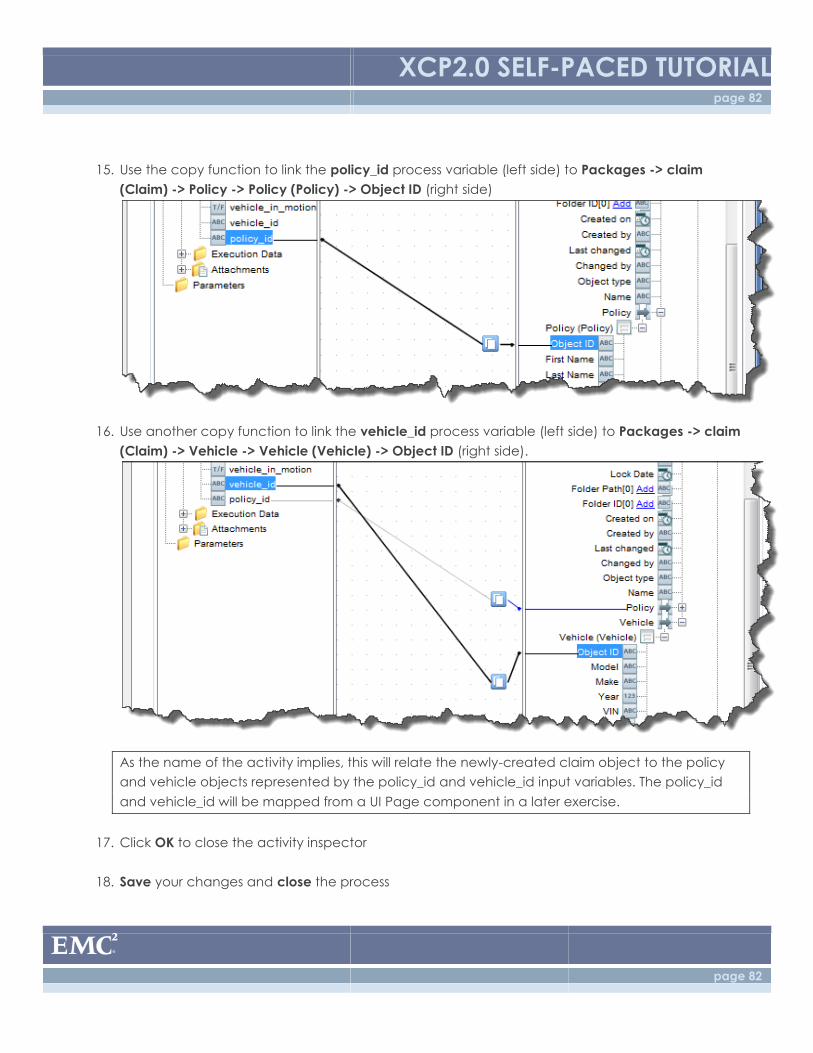
15. Use the copy function to link the policy_id process variable (left side) to Packages -> claim
(Claim) -> Policy -> Policy (Policy) -> Object ID (right side)
16. Use another copy function to link the vehicle_id process variable (left side) to Packages -> claim
(Claim) -> Vehicle -> Vehicle (Vehicle) -> Object ID (right side).
As the name of the activity implies, this will relate the newly-created claim object to the policy
and vehicle objects represented by the policy_id and vehicle_id input variables. The policy_id
and vehicle_id will be mapped from a UI Page component in a later exercise.
17. Click OK to close the activity inspector
18. Save your changes and close the process
XCP2.0 SELF-PACED TUTORIAL page 83
page 83
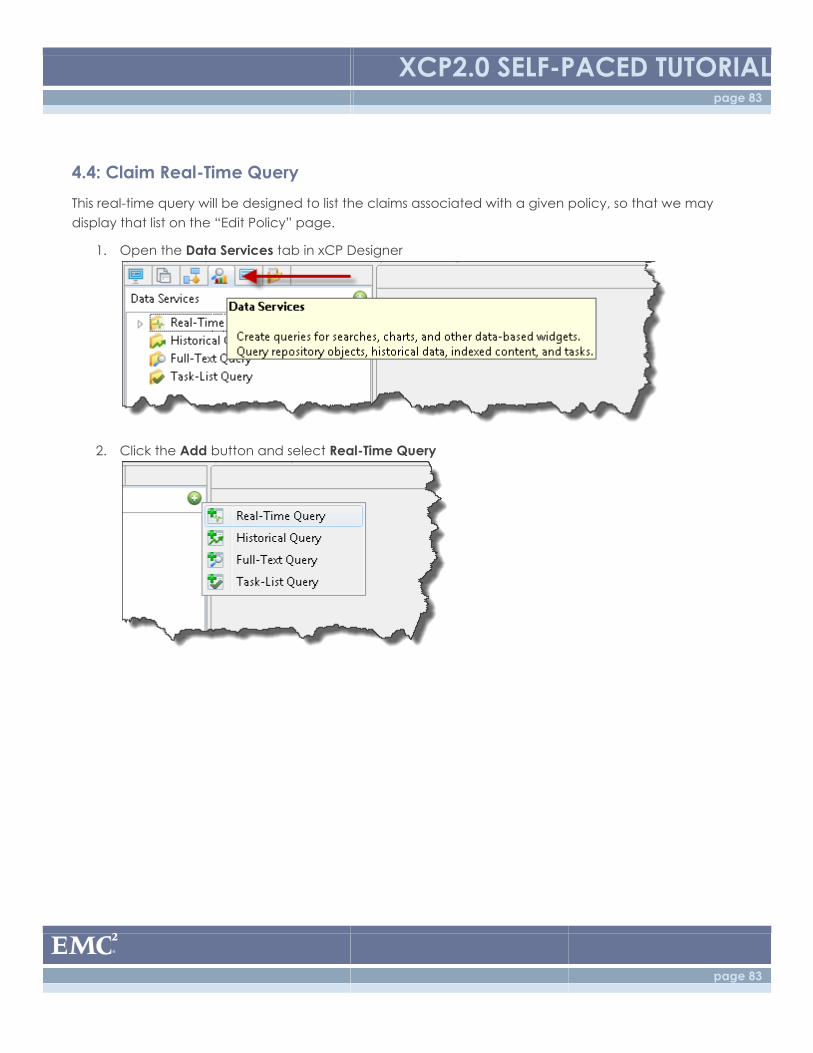
4.4: Claim Real-Time Query
This real-time query will be designed to list the claims associated with a given policy, so that we may
display that list on the “Edit Policy” page.
1. Open the Data Services tab in xCP Designer
2. Click the Add button and select Real-Time Query
XCP2.0 SELF-PACED TUTORIAL page 84
page 84
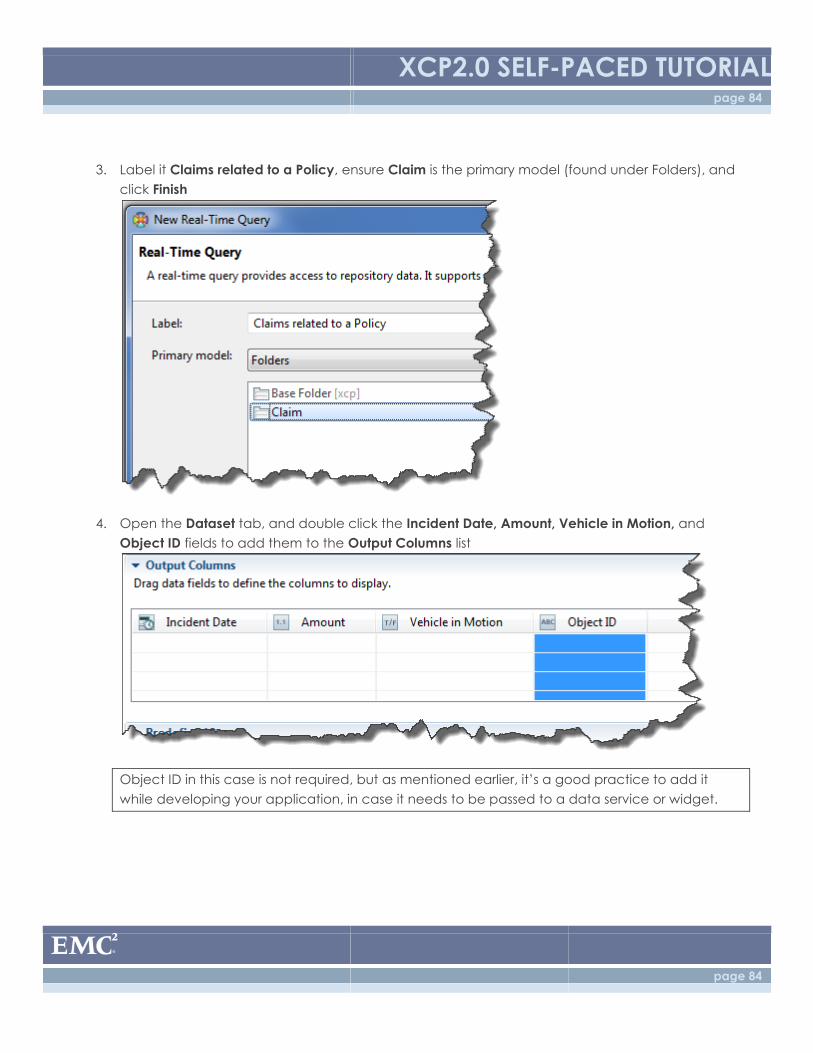
3. Label it Claims related to a Policy, ensure Claim is the primary model (found under Folders), and
click Finish
4. Open the Dataset tab, and double click the Incident Date, Amount, Vehicle in Motion, and
Object ID fields to add them to the Output Columns list
Object ID in this case is not required, but as mentioned earlier, it’s a good practice to add it
while developing your application, in case it needs to be passed to a data service or widget.
XCP2.0 SELF-PACED TUTORIAL page 85
page 85
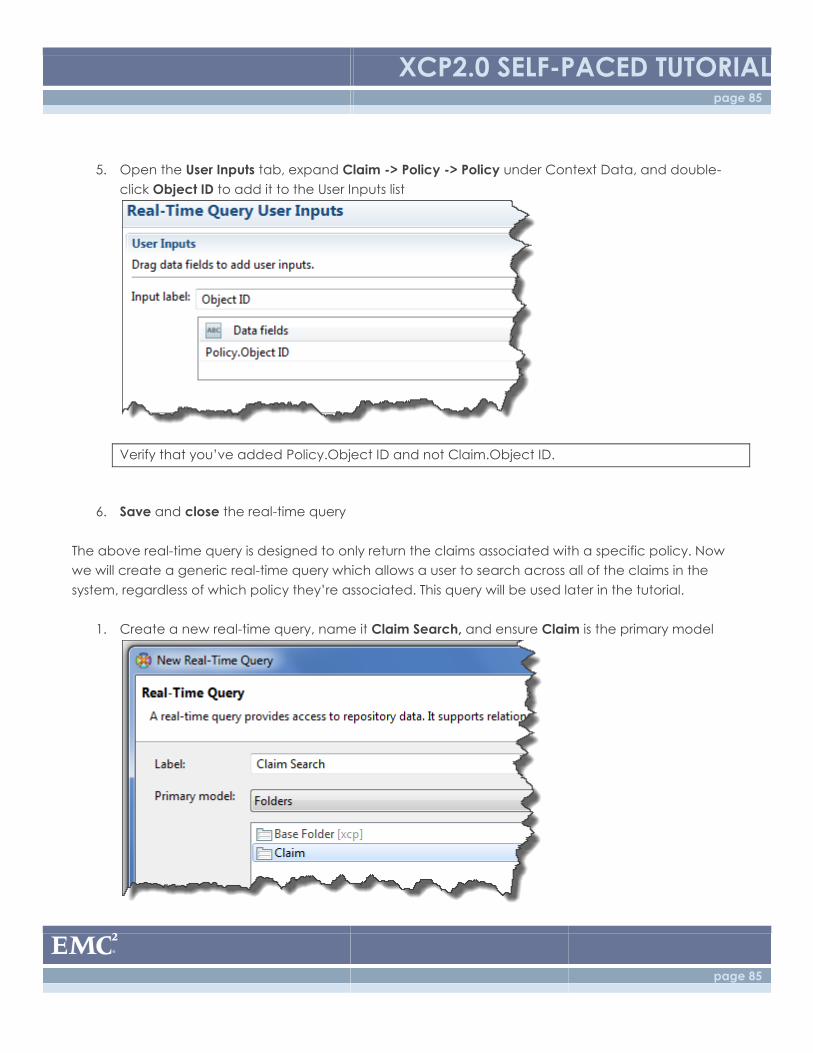
5. Open the User Inputs tab, expand Claim -> Policy -> Policy under Context Data, and double-
click Object ID to add it to the User Inputs list
Verify that you’ve added Policy.Object ID and not Claim.Object ID.
6. Save and close the real-time query
The above real-time query is designed to only return the claims associated with a specific policy. Now
we will create a generic real-time query which allows a user to search across all of the claims in the
system, regardless of which policy they’re associated. This query will be used later in the tutorial.
1. Create a new real-time query, name it Claim Search, and ensure Claim is the primary model
XCP2.0 SELF-PACED TUTORIAL page 86
page 86
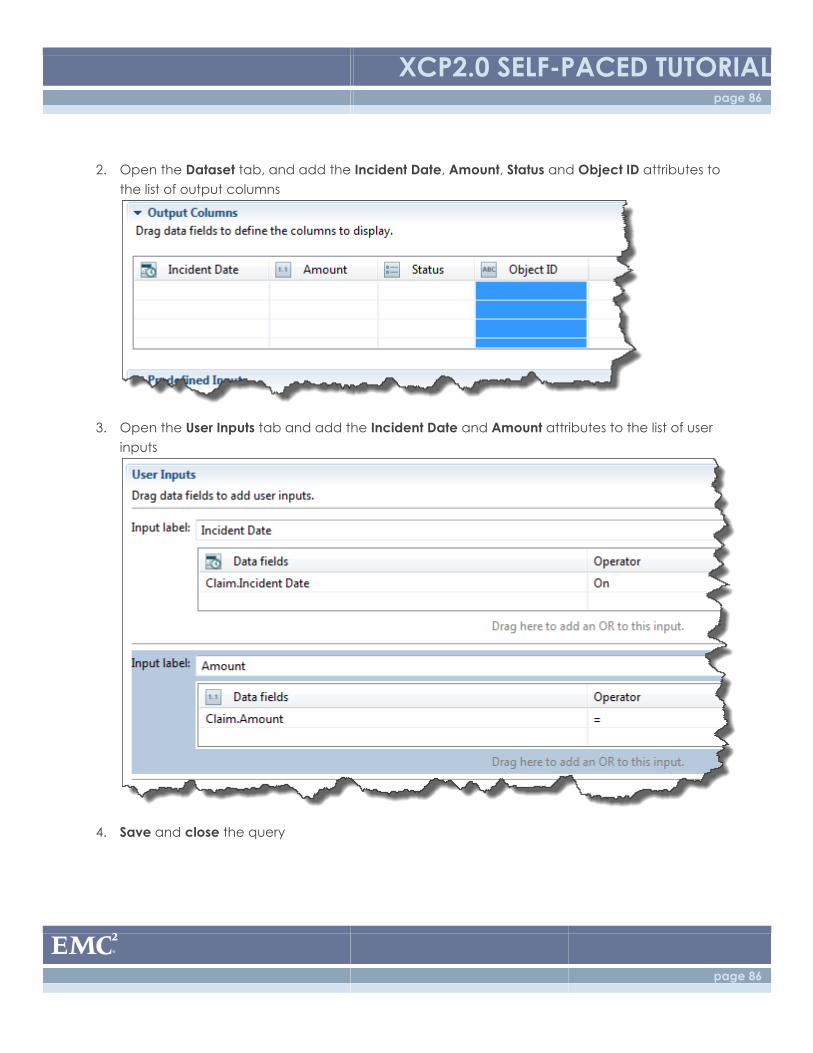
2. Open the Dataset tab, and add the Incident Date, Amount, Status and Object ID attributes to
the list of output columns
3. Open the User Inputs tab and add the Incident Date and Amount attributes to the list of user
inputs
4. Save and close the query
XCP2.0 SELF-PACED TUTORIAL page 87
page 87
4.5: Claim Pages
Now we’ll create pages for adding and viewing claims.
4.5.1: “Add Claim” Page
In an earlier step, we setup a “create” page for policies by right-clicking the Policy node under Business
Object UI and selecting New Page. This is because policies are a “first class” object in our application.
We need be able to create policies without needing to setup any other objects first. However, in our
application, we do not want claims to be created in the same way (e.g., independently of any other
object). We want all claims to be associated with a policy from the beginning. There are multiple ways
of achieving this behavior, but in the steps below, we’ll be accomplishing this by defining our “create”
page for claims under the Policy Business Object UI, rather than under the Claim Folder UI. This will
ensure that the “create” page for claims will only be accessible while in the context of an existing
policy.
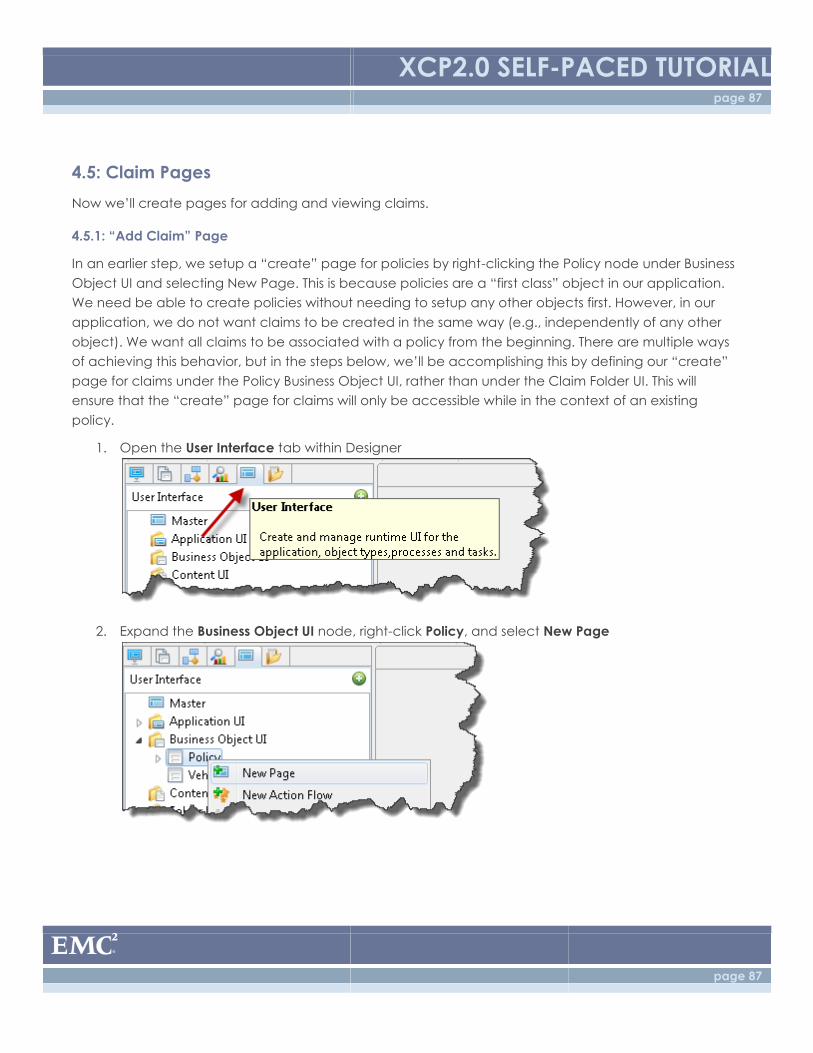
1. Open the User Interface tab within Designer
2. Expand the Business Object UI node, right-click Policy, and select New Page
XCP2.0 SELF-PACED TUTORIAL page 88
page 88
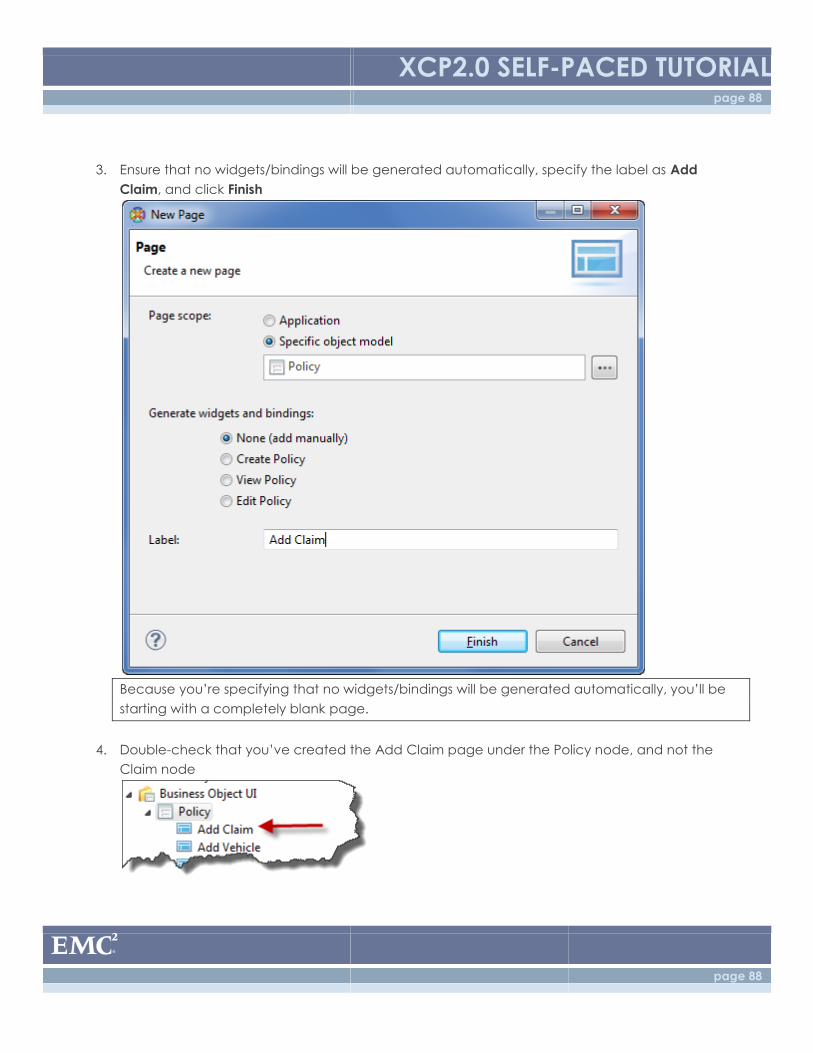
3. Ensure that no widgets/bindings will be generated automatically, specify the label as Add
Claim, and click Finish
Because you’re specifying that no widgets/bindings will be generated automatically, you’ll be
starting with a completely blank page.
4. Double-check that you’ve created the Add Claim page under the Policy node, and not the
Claim node
XCP2.0 SELF-PACED TUTORIAL page 89
page 89
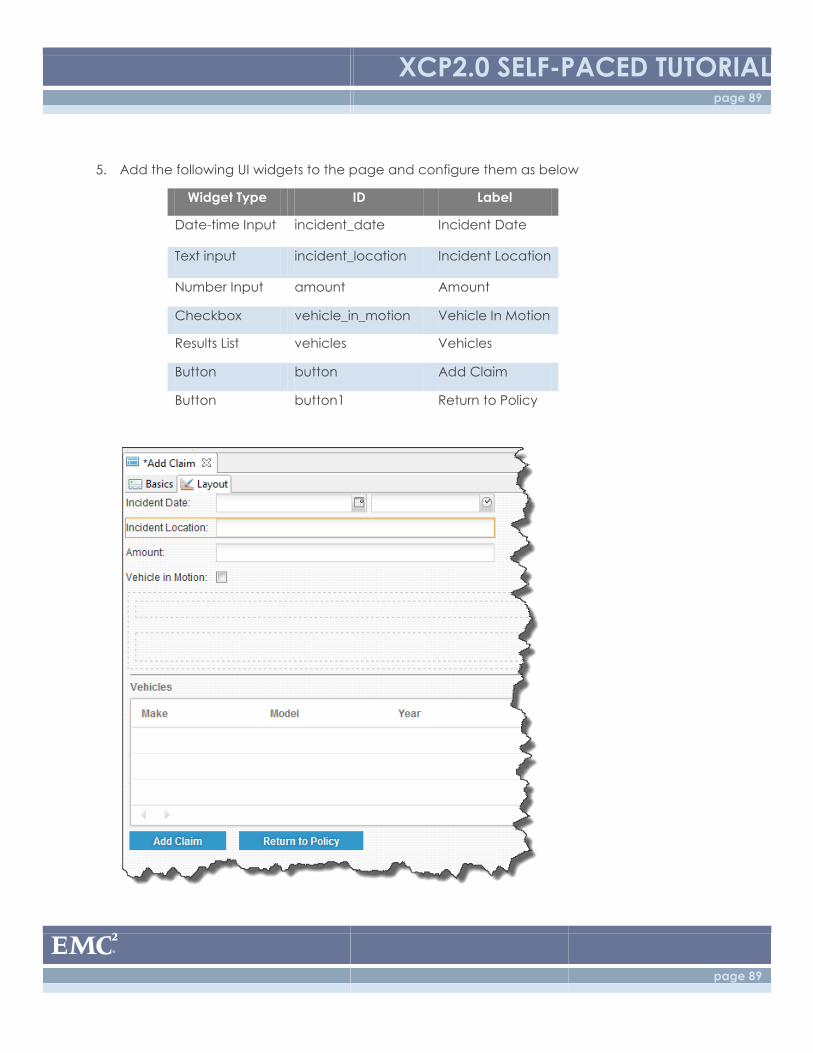
5. Add the following UI widgets to the page and configure them as below
Widget Type ID Label
Date-time Input incident_date Incident Date
Text input incident_location Incident Location
Number Input amount Amount
Checkbox vehicle_in_motion Vehicle In Motion
Results List vehicles Vehicles
Button button Add Claim
Button button1 Return to Policy
XCP2.0 SELF-PACED TUTORIAL page 90
page 90
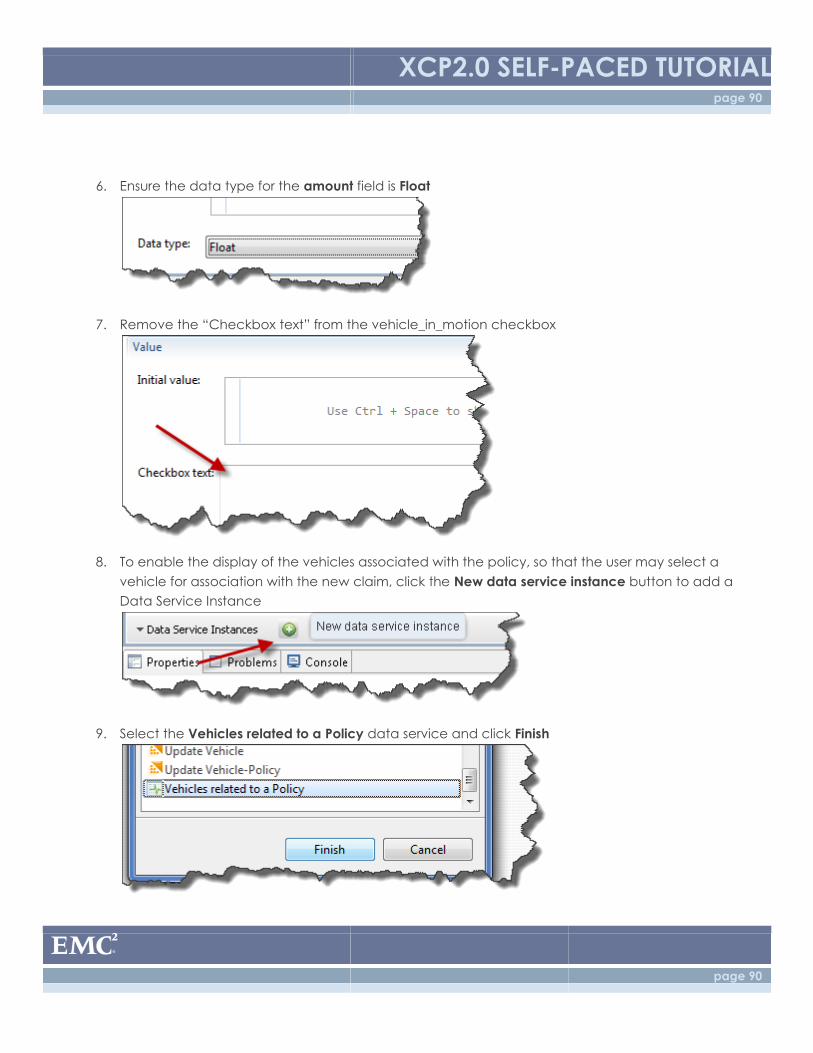
6. Ensure the data type for the amount field is Float
7. Remove the “Checkbox text” from the vehicle_in_motion checkbox
8. To enable the display of the vehicles associated with the policy, so that the user may select a
vehicle for association with the new claim, click the New data service instance button to add a
Data Service Instance
9. Select the Vehicles related to a Policy data service and click Finish
XCP2.0 SELF-PACED TUTORIAL page 91
page 91
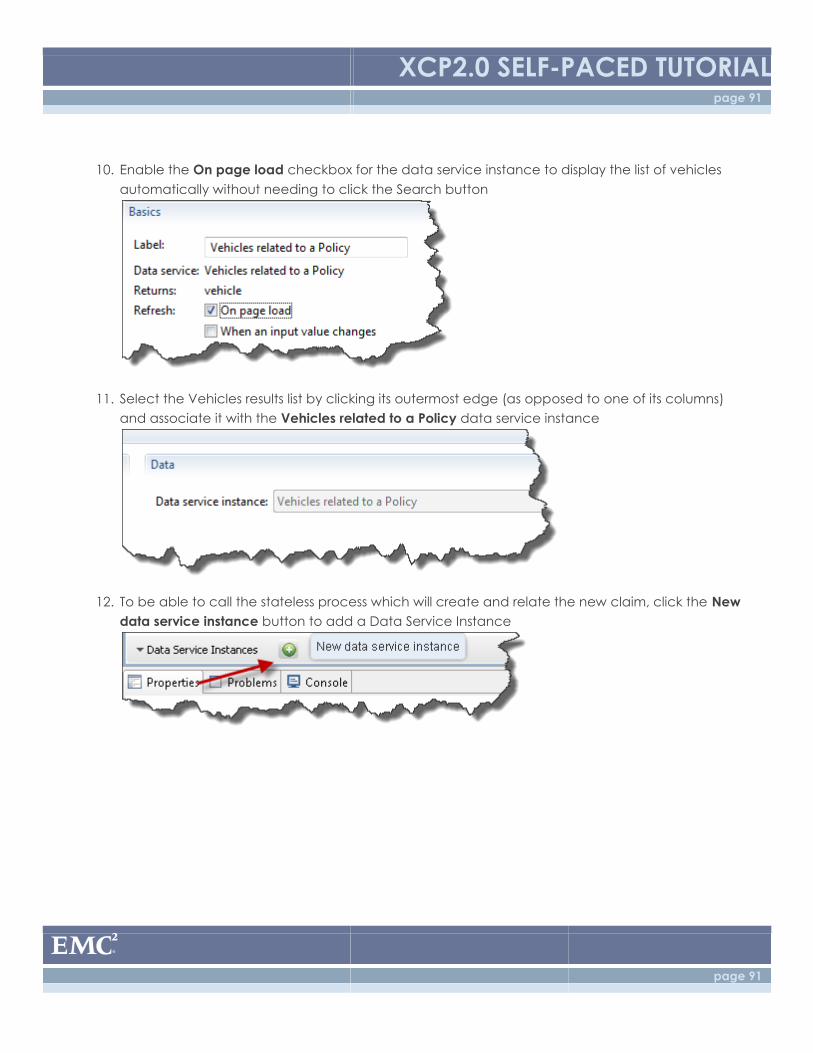
10. Enable the On page load checkbox for the data service instance to display the list of vehicles
automatically without needing to click the Search button
11. Select the Vehicles results list by clicking its outermost edge (as opposed to one of its columns)
and associate it with the Vehicles related to a Policy data service instance
12. To be able to call the stateless process which will create and relate the new claim, click the New
data service instance button to add a Data Service Instance
XCP2.0 SELF-PACED TUTORIAL page 92
page 92
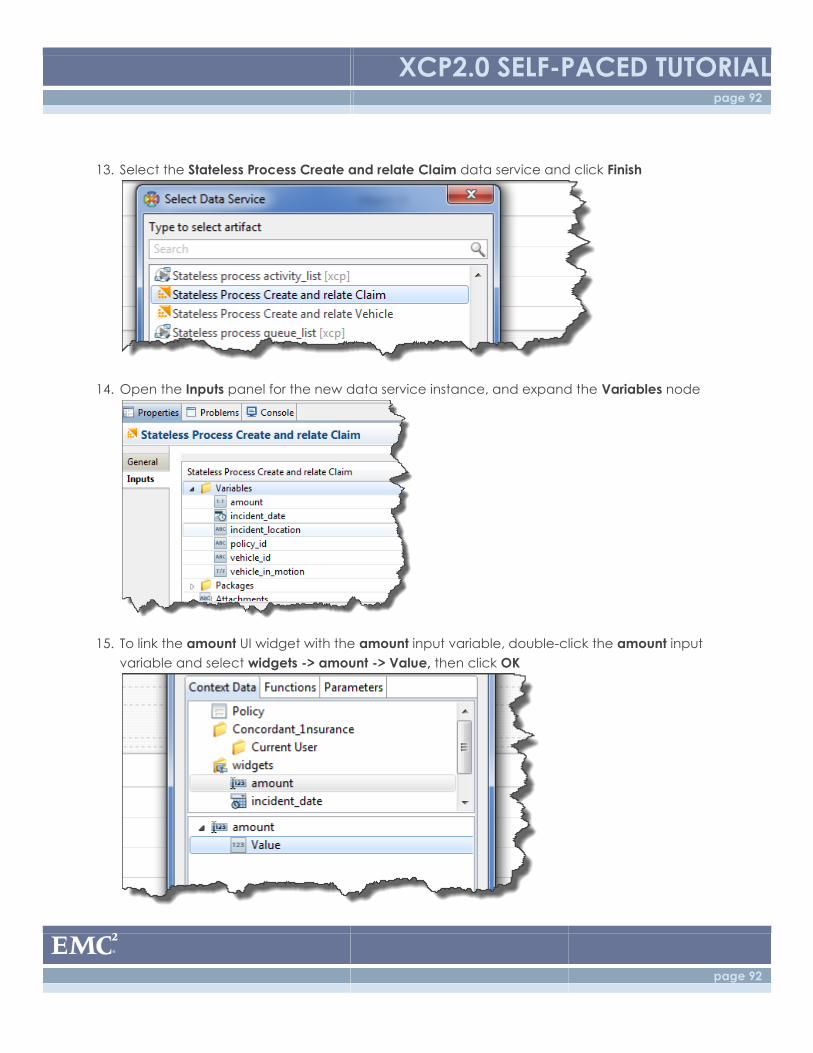
13. Select the Stateless Process Create and relate Claim data service and click Finish
14. Open the Inputs panel for the new data service instance, and expand the Variables node
15. To link the amount UI widget with the amount input variable, double-click the amount input
variable and select widgets -> amount -> Value, then click OK
XCP2.0 SELF-PACED TUTORIAL page 93
page 93
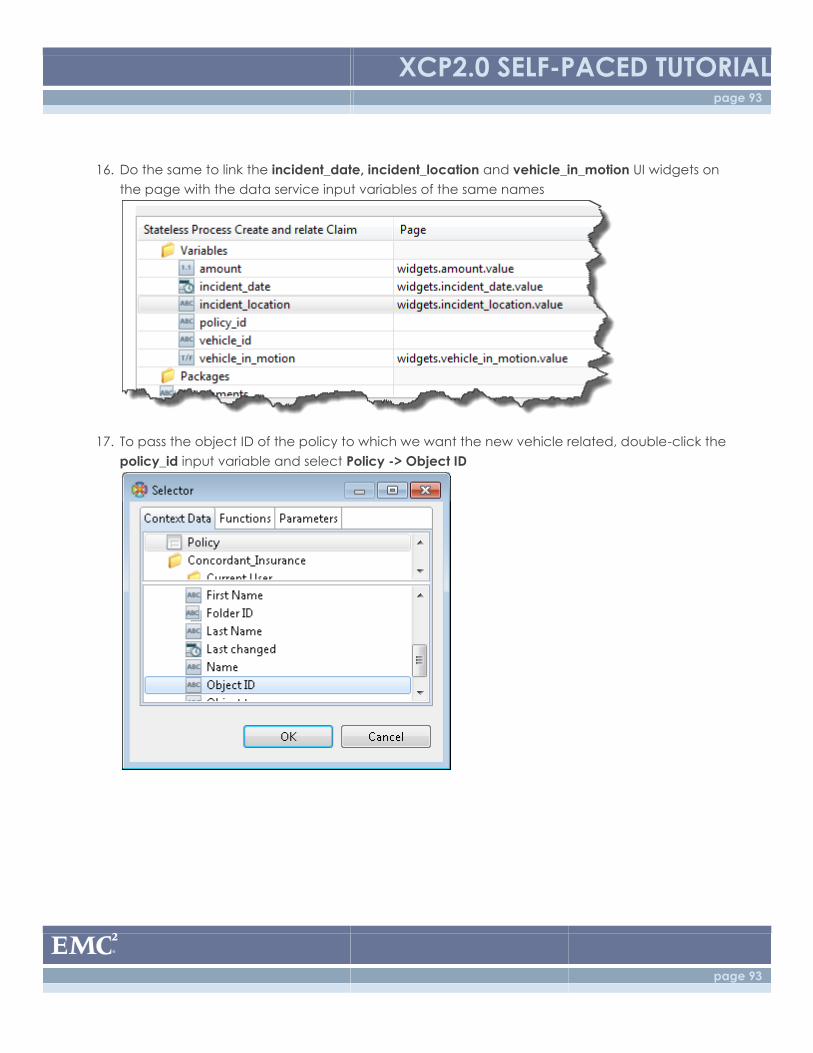
16. Do the same to link the incident_date, incident_location and vehicle_in_motion UI widgets on
the page with the data service input variables of the same names
17. To pass the object ID of the policy to which we want the new vehicle related, double-click the
policy_id input variable and select Policy -> Object ID
XCP2.0 SELF-PACED TUTORIAL page 94
page 94
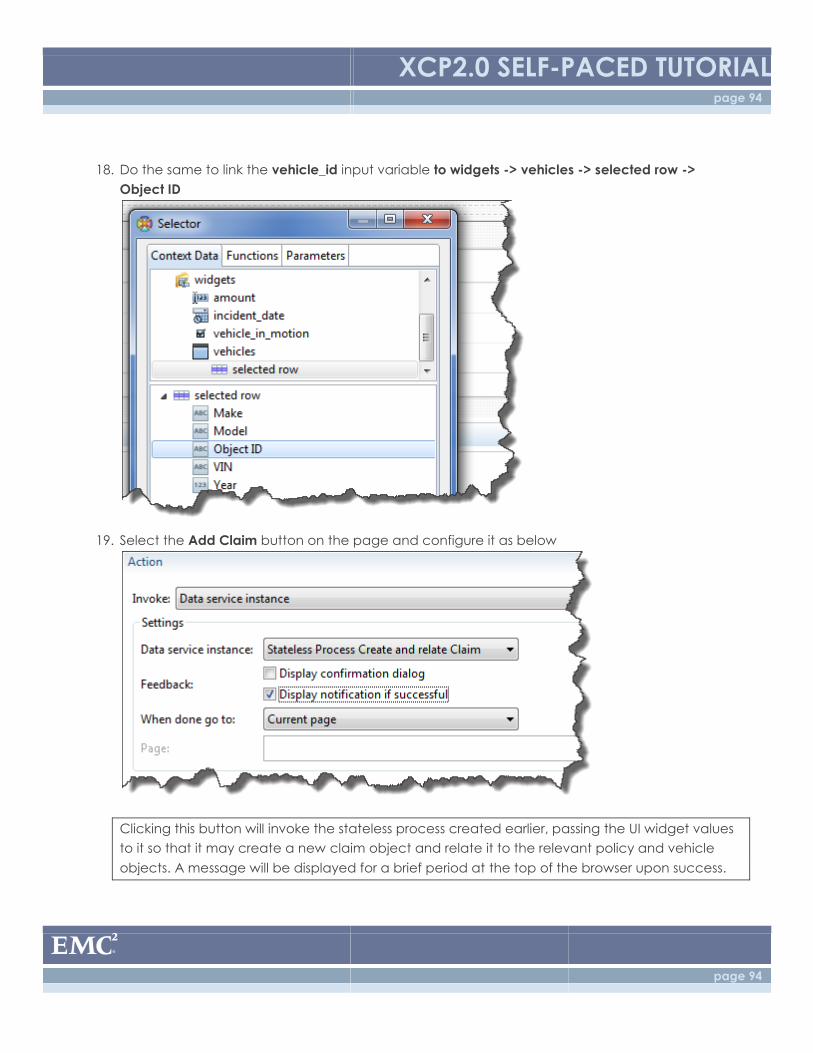
18. Do the same to link the vehicle_id input variable to widgets -> vehicles -> selected row ->
Object ID
19. Select the Add Claim button on the page and configure it as below
Clicking this button will invoke the stateless process created earlier, passing the UI widget values
to it so that it may create a new claim object and relate it to the relevant policy and vehicle
objects. A message will be displayed for a brief period at the top of the browser upon success.
XCP2.0 SELF-PACED TUTORIAL page 95
page 95
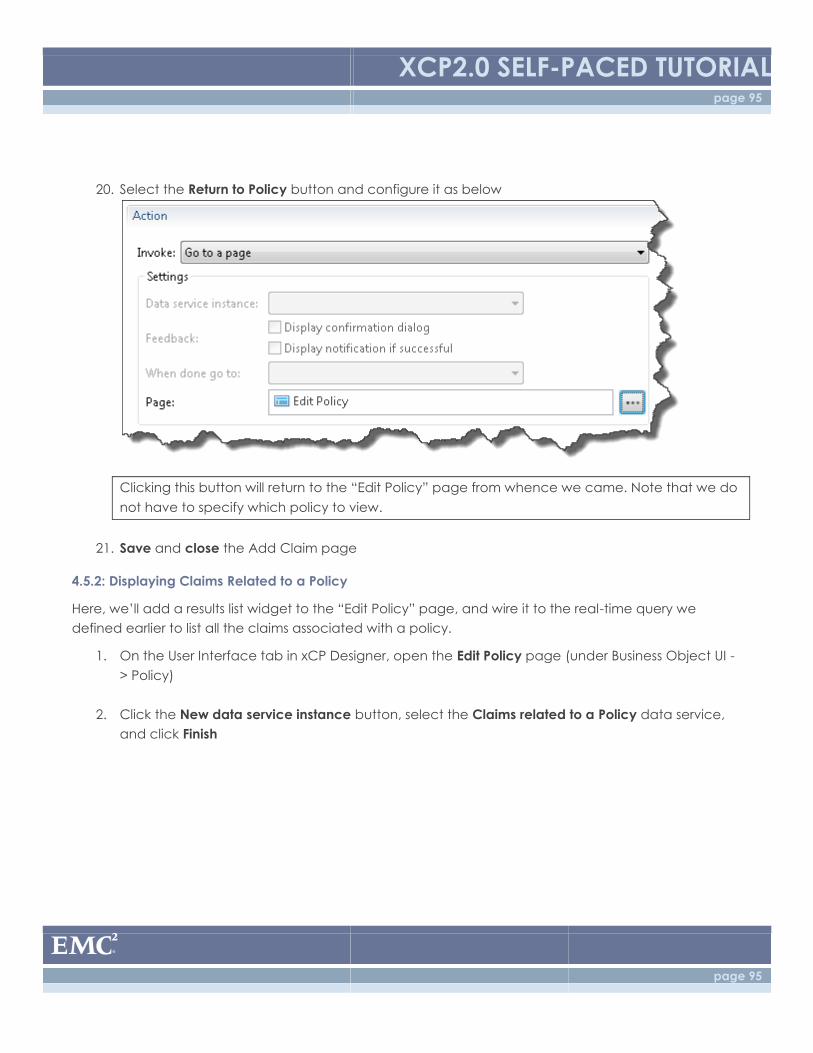
20. Select the Return to Policy button and configure it as below
Clicking this button will return to the “Edit Policy” page from whence we came. Note that we do
not have to specify which policy to view.
21. Save and close the Add Claim page
4.5.2: Displaying Claims Related to a Policy
Here, we’ll add a results list widget to the “Edit Policy” page, and wire it to the real-time query we
defined earlier to list all the claims associated with a policy.
1. On the User Interface tab in xCP Designer, open the Edit Policy page (under Business Object UI -
> Policy)
2. Click the New data service instance button, select the Claims related to a Policy data service,
and click Finish
XCP2.0 SELF-PACED TUTORIAL page 96
page 96
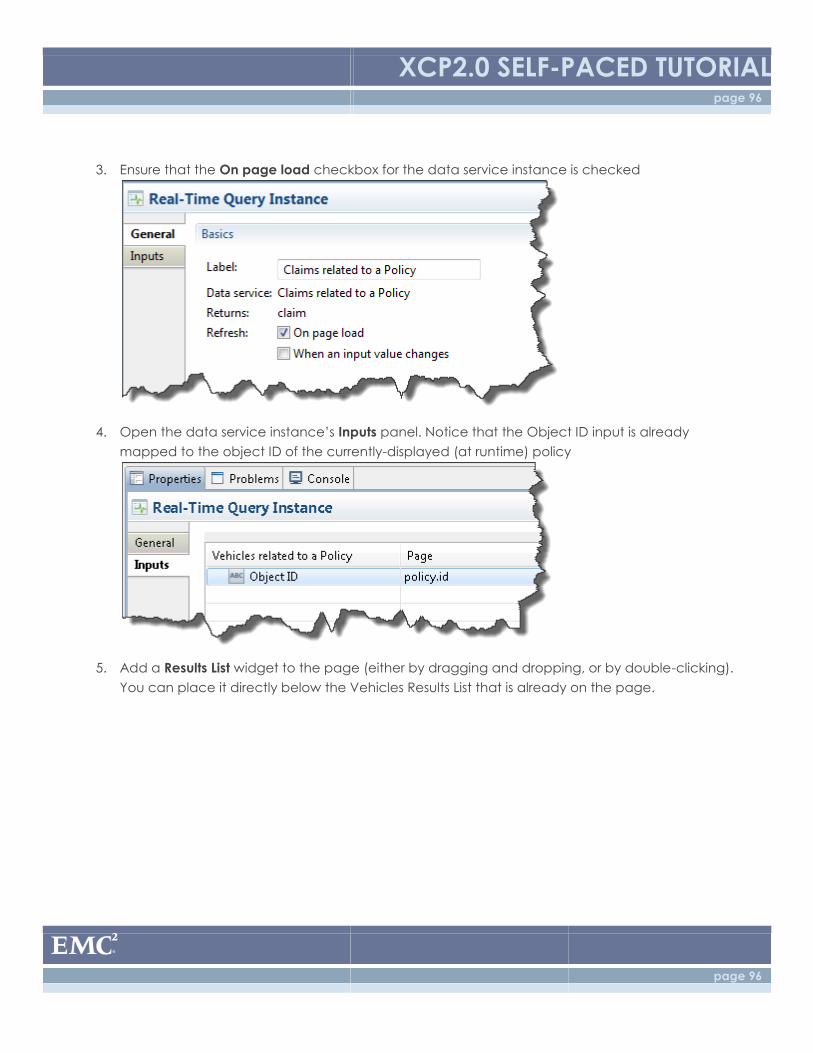
3. Ensure that the On page load checkbox for the data service instance is checked
4. Open the data service instance’s Inputs panel. Notice that the Object ID input is already
mapped to the object ID of the currently-displayed (at runtime) policy
5. Add a Results List widget to the page (either by dragging and dropping, or by double-clicking).
You can place it directly below the Vehicles Results List that is already on the page.
XCP2.0 SELF-PACED TUTORIAL page 97
page 97
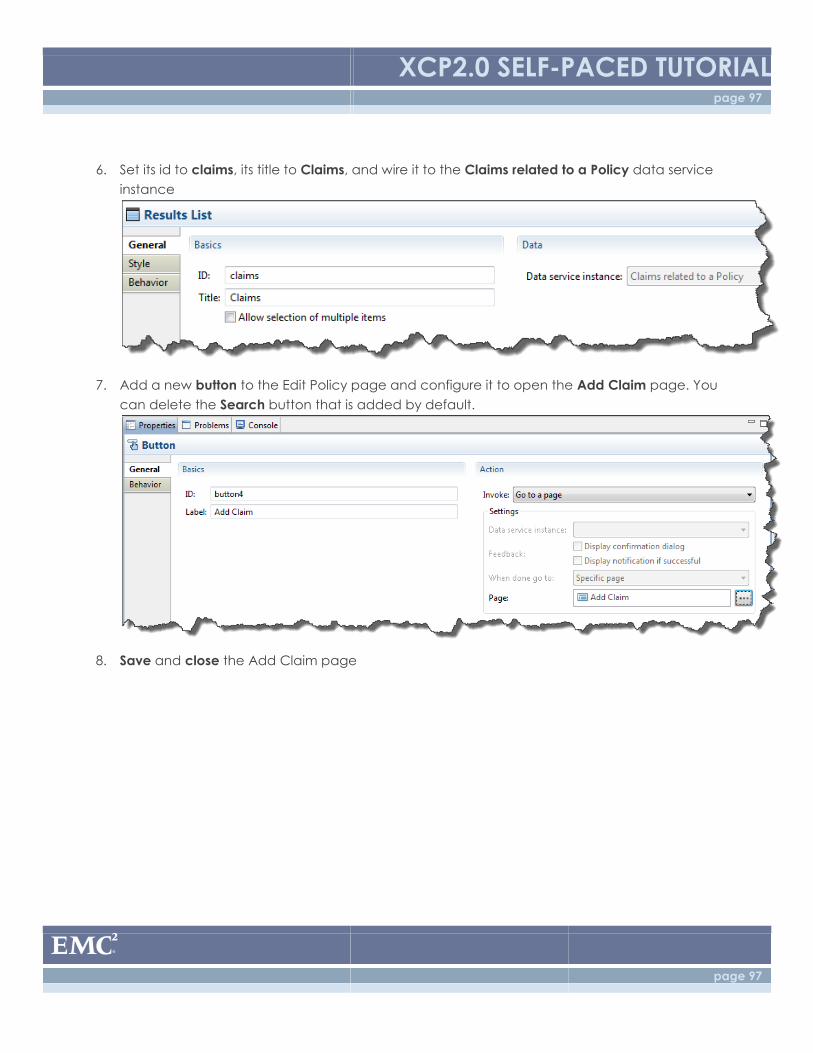
6. Set its id to claims, its title to Claims, and wire it to the Claims related to a Policy data service
instance
7. Add a new button to the Edit Policy page and configure it to open the Add Claim page. You
can delete the Search button that is added by default.
8. Save and close the Add Claim page
XCP2.0 SELF-PACED TUTORIAL page 98
page 98
4.5.3: “View Claim” Page
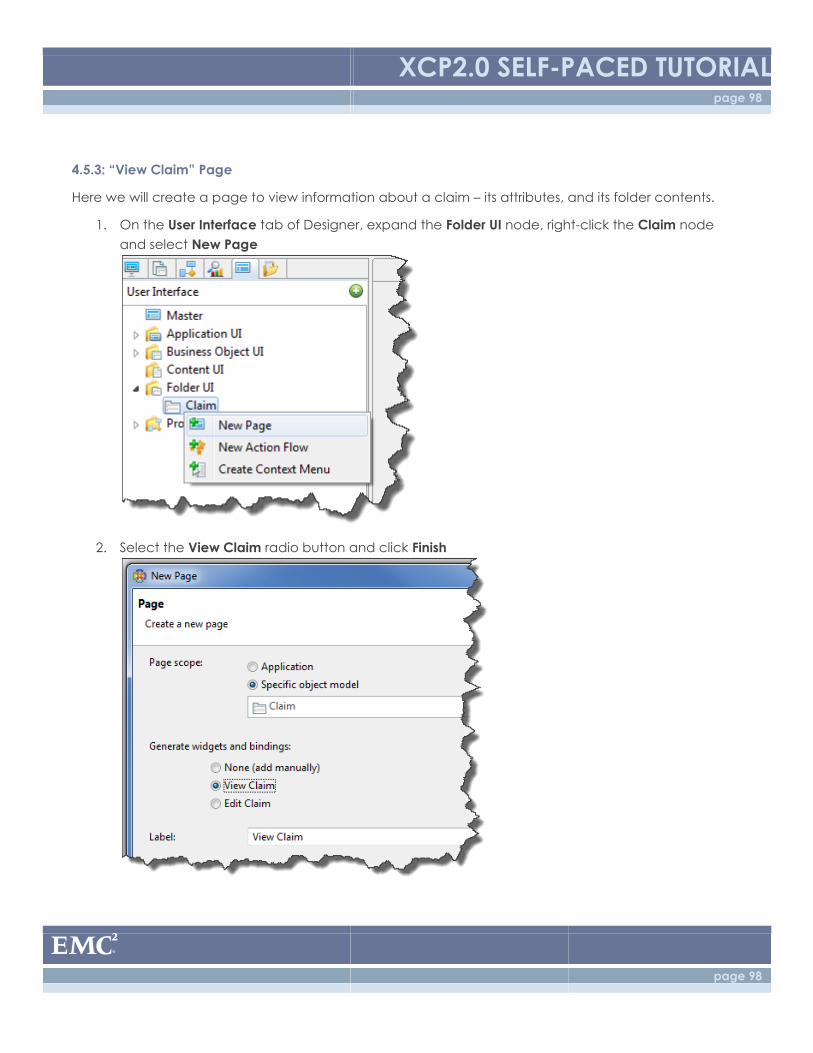
Here we will create a page to view information about a claim – its attributes, and its folder contents.
1. On the User Interface tab of Designer, expand the Folder UI node, right-click the Claim node
and select New Page
2. Select the View Claim radio button and click Finish
XCP2.0 SELF-PACED TUTORIAL page 99
page 99
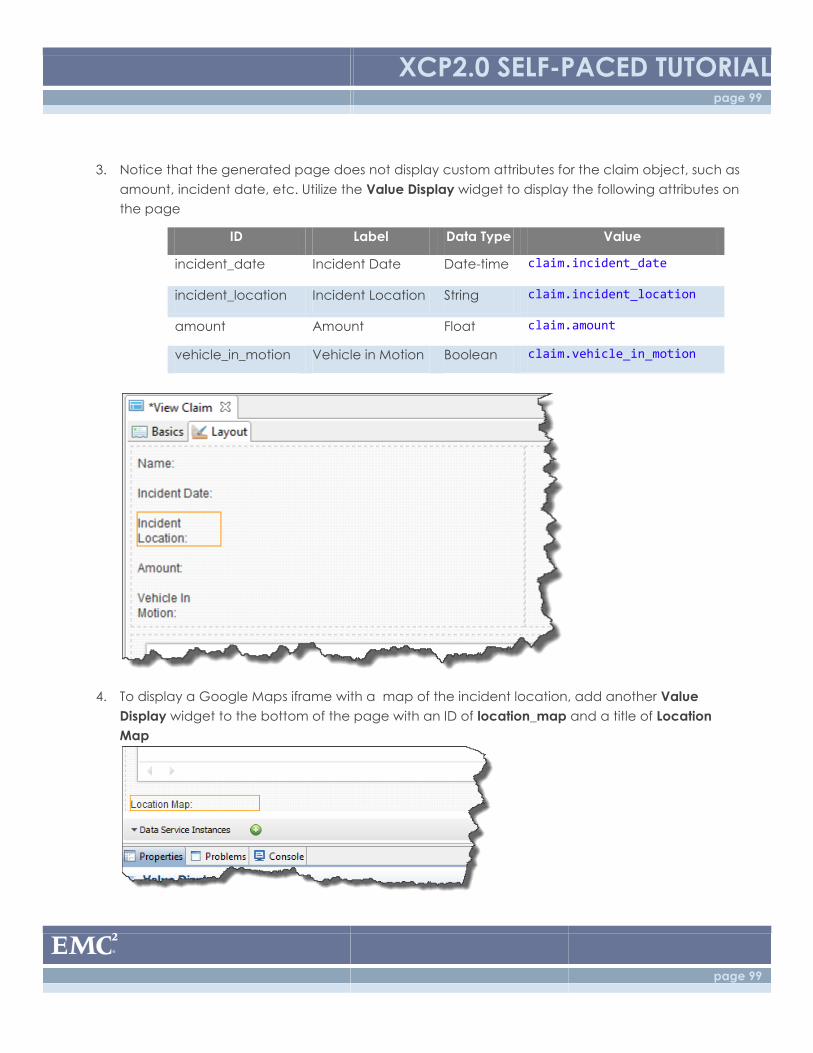
3. Notice that the generated page does not display custom attributes for the claim object, such as
amount, incident date, etc. Utilize the Value Display widget to display the following attributes on
the page
ID Label Data Type Value
incident_date Incident Date Date-time claim.incident_date
incident_location Incident Location String claim.incident_location
amount Amount Float claim.amount
vehicle_in_motion Vehicle in Motion Boolean claim.vehicle_in_motion
4. To display a Google Maps iframe with a map of the incident location, add another Value
Display widget to the bottom of the page with an ID of location_map and a title of Location
Map
XCP2.0 SELF-PACED TUTORIAL page 100
page 100
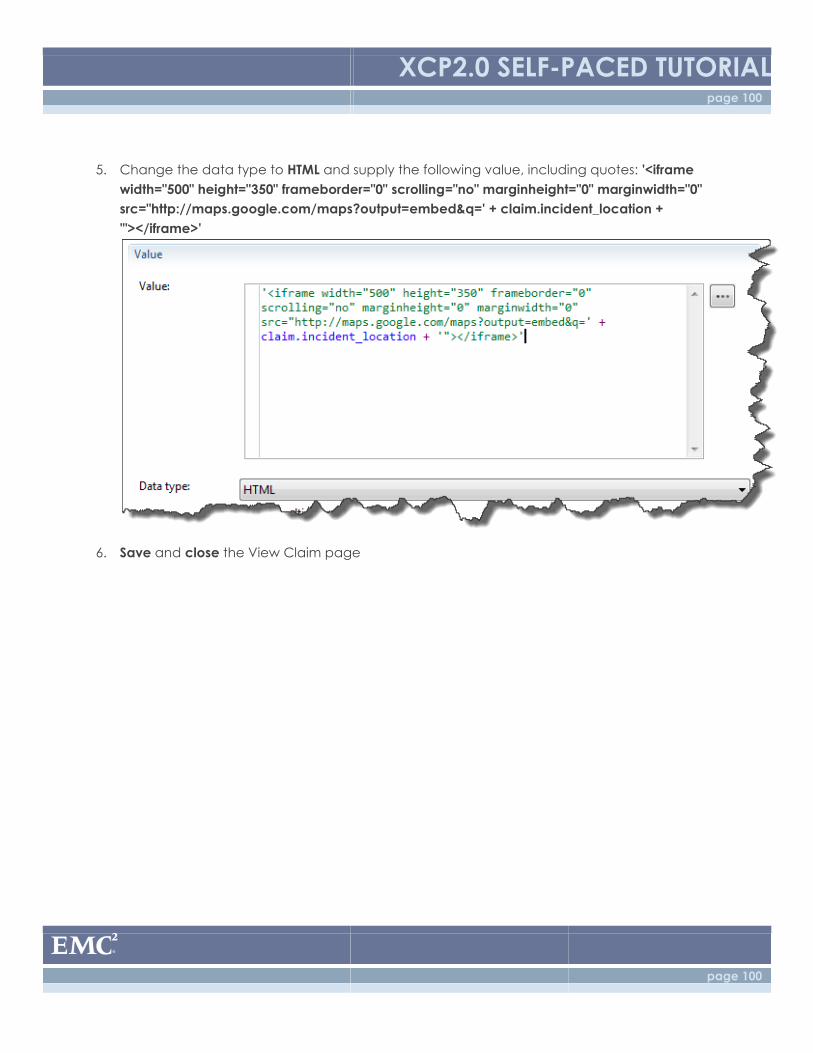
5. Change the data type to HTML and supply the following value, including quotes: '<iframe
width="500" height="350" frameborder="0" scrolling="no" marginheight="0" marginwidth="0"
src="http://maps.google.com/maps?output=embed&q=' + claim.incident_location +
'"></iframe>'
6. Save and close the View Claim page
XCP2.0 SELF-PACED TUTORIAL page 101
page 101
4.5.4: Claim Context Menu
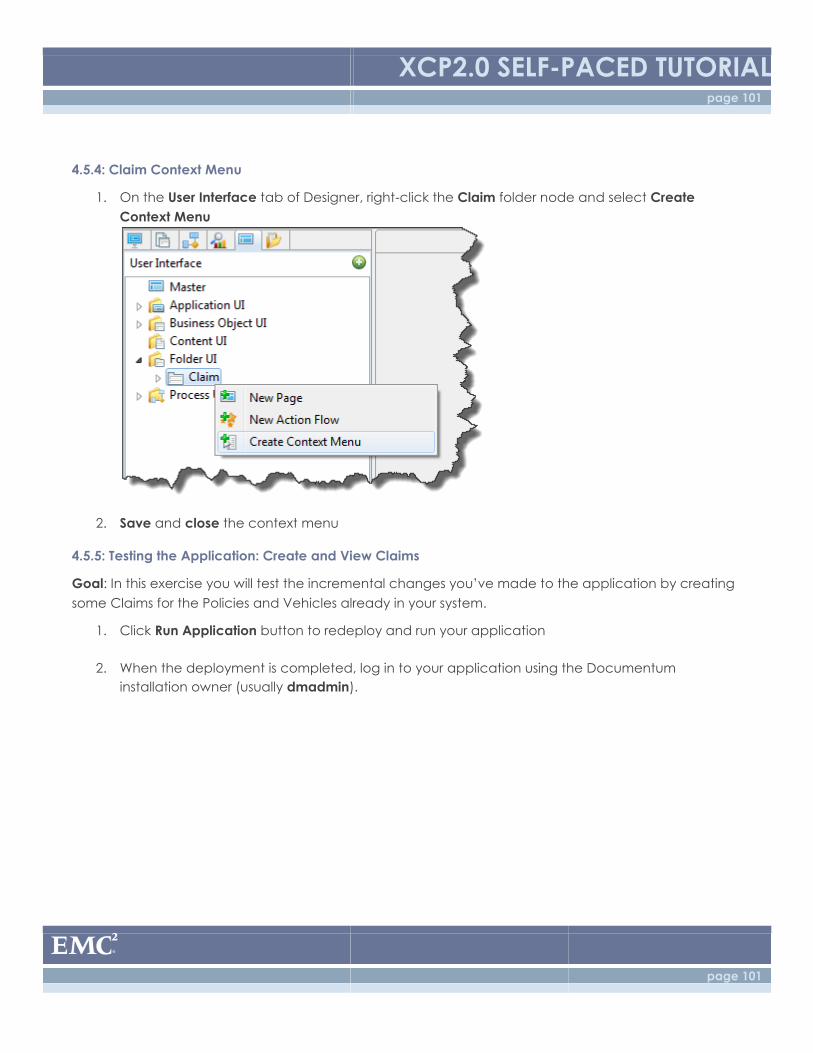
1. On the User Interface tab of Designer, right-click the Claim folder node and select Create
Context Menu
2. Save and close the context menu
4.5.5: Testing the Application: Create and View Claims
Goal: In this exercise you will test the incremental changes you’ve made to the application by creating
some Claims for the Policies and Vehicles already in your system.
1. Click Run Application button to redeploy and run your application
2. When the deployment is completed, log in to your application using the Documentum
installation owner (usually dmadmin).
XCP2.0 SELF-PACED TUTORIAL page 102
page 102
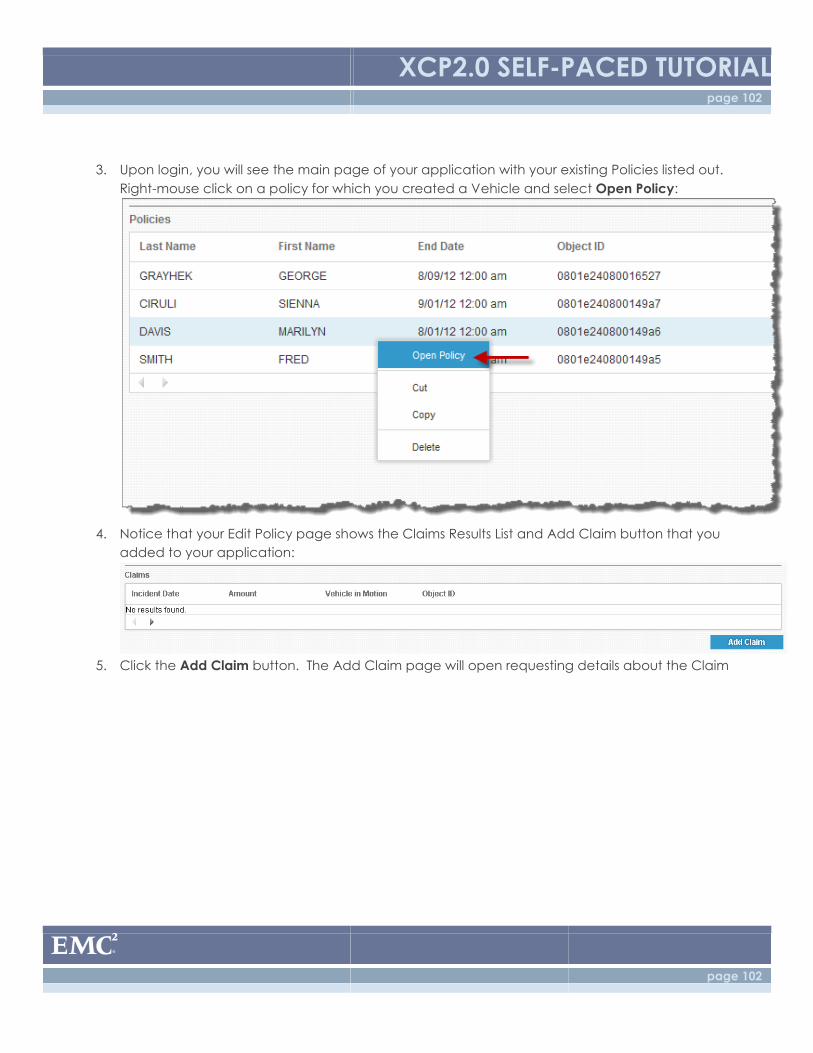
3. Upon login, you will see the main page of your application with your existing Policies listed out.
Right-mouse click on a policy for which you created a Vehicle and select Open Policy:
4. Notice that your Edit Policy page shows the Claims Results List and Add Claim button that you
added to your application:
5. Click the Add Claim button. The Add Claim page will open requesting details about the Claim
XCP2.0 SELF-PACED TUTORIAL page 103
page 103
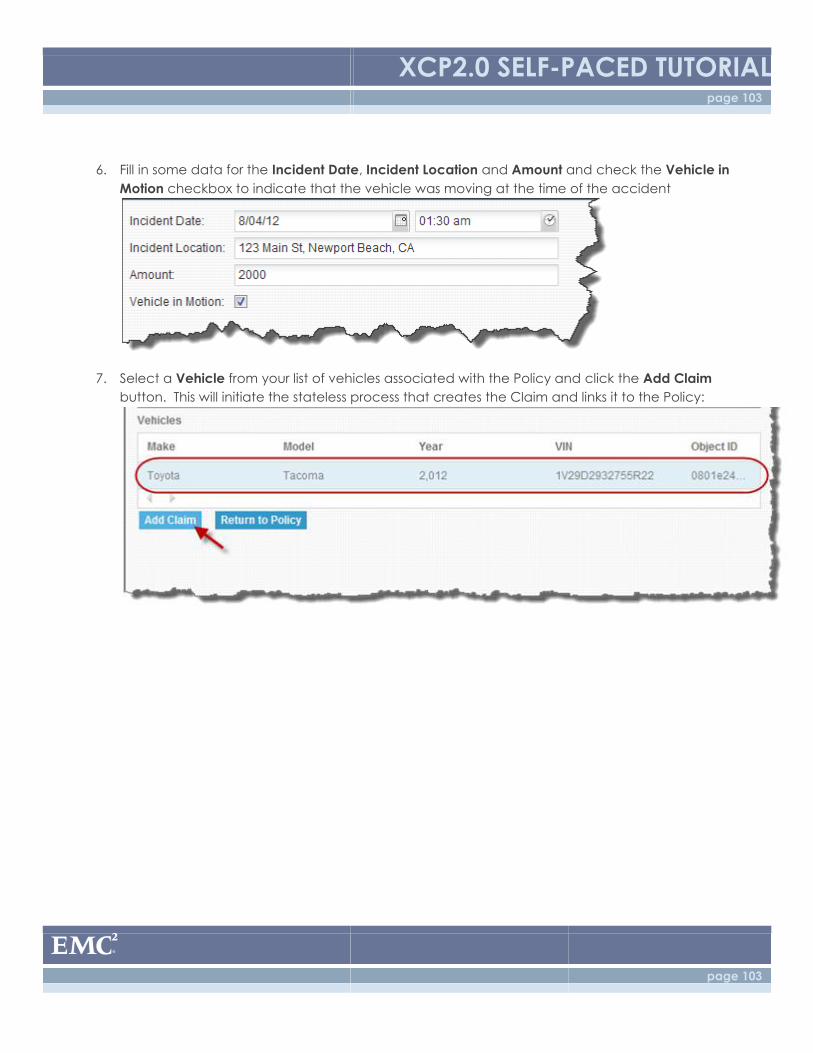
6. Fill in some data for the Incident Date, Incident Location and Amount and check the Vehicle in
Motion checkbox to indicate that the vehicle was moving at the time of the accident
7. Select a Vehicle from your list of vehicles associated with the Policy and click the Add Claim
button. This will initiate the stateless process that creates the Claim and links it to the Policy:

XCP2.0 SELF-PACED TUTORIAL page 104
page 104
8. Add any number of claims for any of the Vehicles on the Policy that you wish. When you are
done testing, click on the Return to Policy button. You should then see the Claims you created
on the Policy.
9. To make sure your Context Menu for Claims is working, right-mouse click on one of your claims
and select View Claim:
XCP2.0 SELF-PACED TUTORIAL page 105
page 105
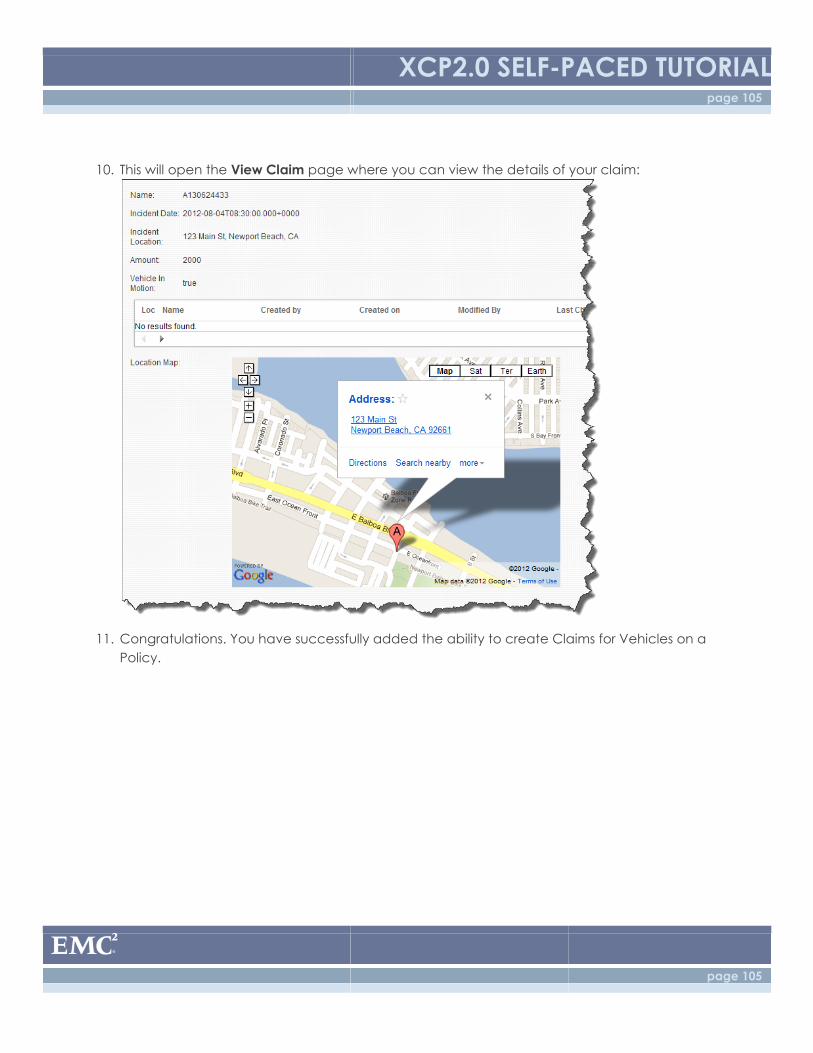
10. This will open the View Claim page where you can view the details of your claim:
11. Congratulations. You have successfully added the ability to create Claims for Vehicles on a
Policy.
XCP2.0 SELF-PACED TUTORIAL page 106
page 106
4.6: Claim Process and UI
4.6.1: Accessing DA so that you can set up Work Queues
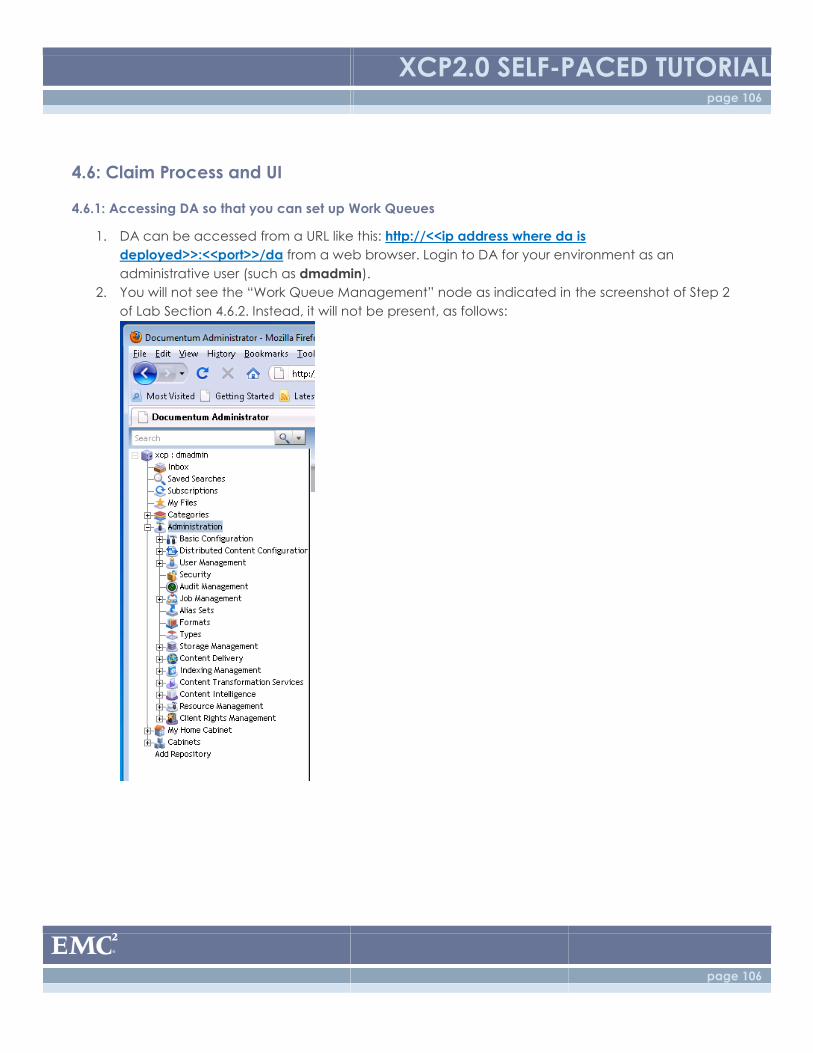
1. DA can be accessed from a URL like this: http://<<ip address where da is
deployed>>:<<port>>/da from a web browser. Login to DA for your environment as an
administrative user (such as dmadmin).
2. You will not see the “Work Queue Management” node as indicated in the screenshot of Step 2
of Lab Section 4.6.2. Instead, it will not be present, as follows:

XCP2.0 SELF-PACED TUTORIAL page 107
page 107
3. To enable it, dmadmin must be in the queue_admin group. Go to User Management > Roles.
4. Double click on queue_admin. You will see this screen:
XCP2.0 SELF-PACED TUTORIAL page 108
page 108
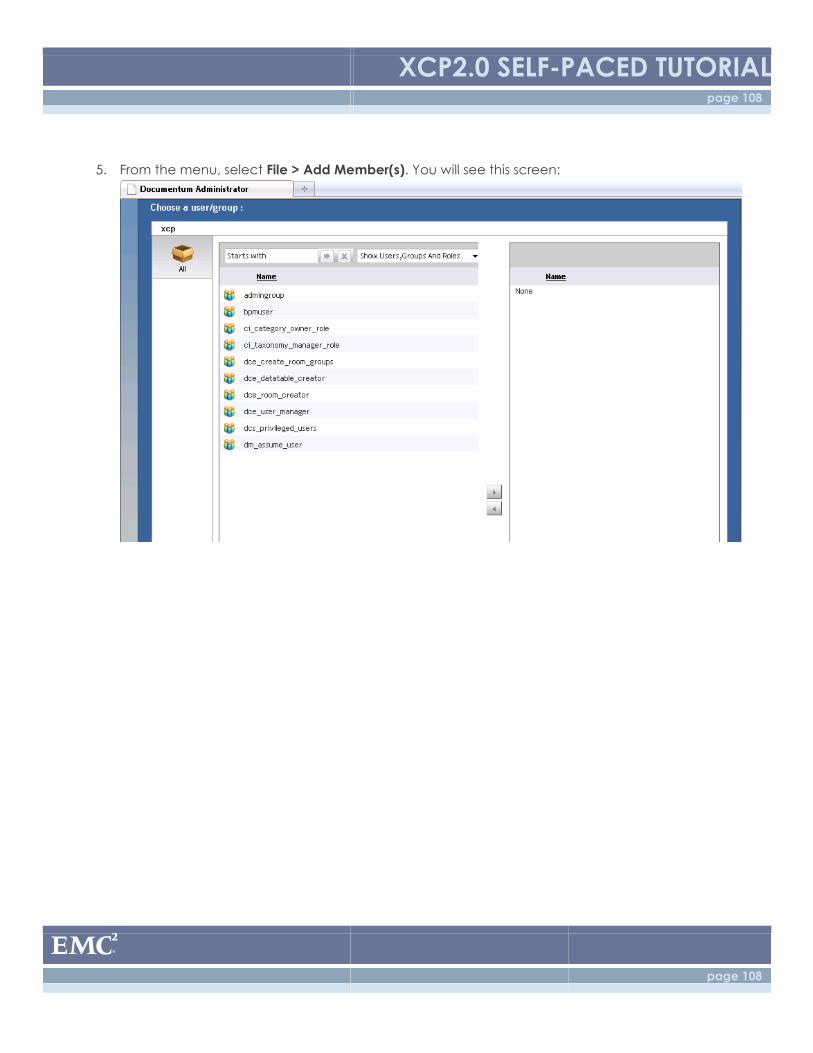
5. From the menu, select File > Add Member(s). You will see this screen:
XCP2.0 SELF-PACED TUTORIAL page 109
page 109
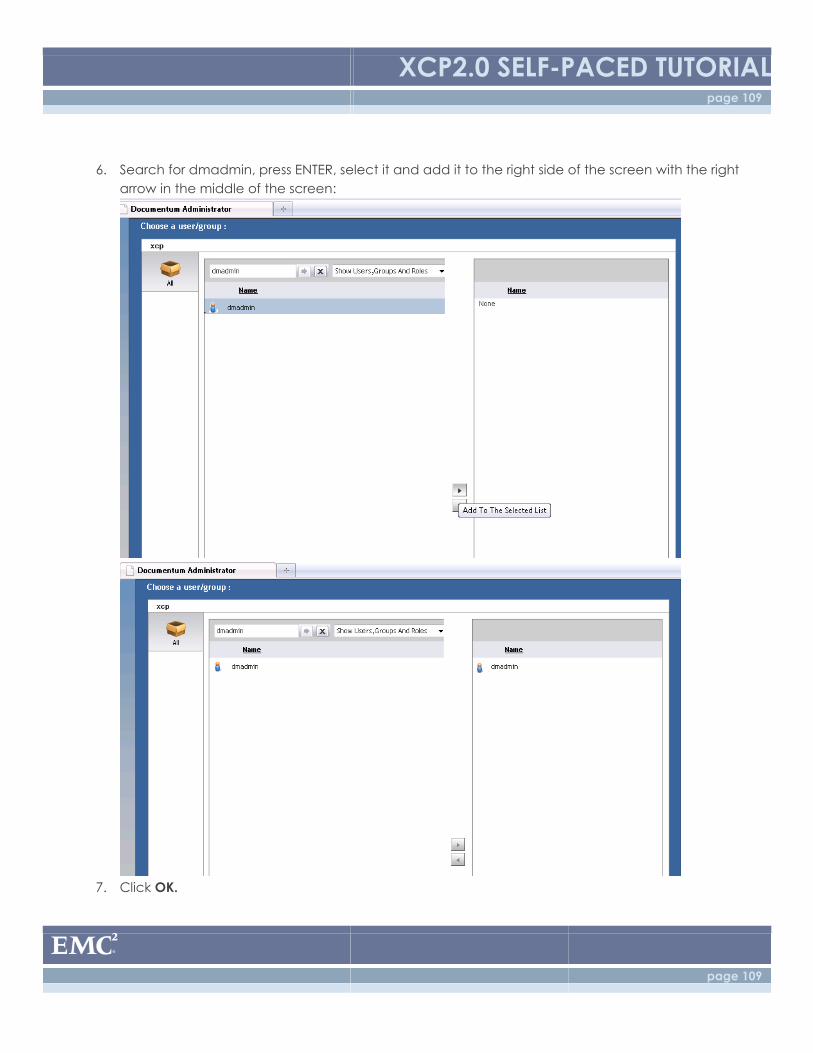
6. Search for dmadmin, press ENTER, select it and add it to the right side of the screen with the right
arrow in the middle of the screen:
7. Click OK.
XCP2.0 SELF-PACED TUTORIAL page 110
page 110
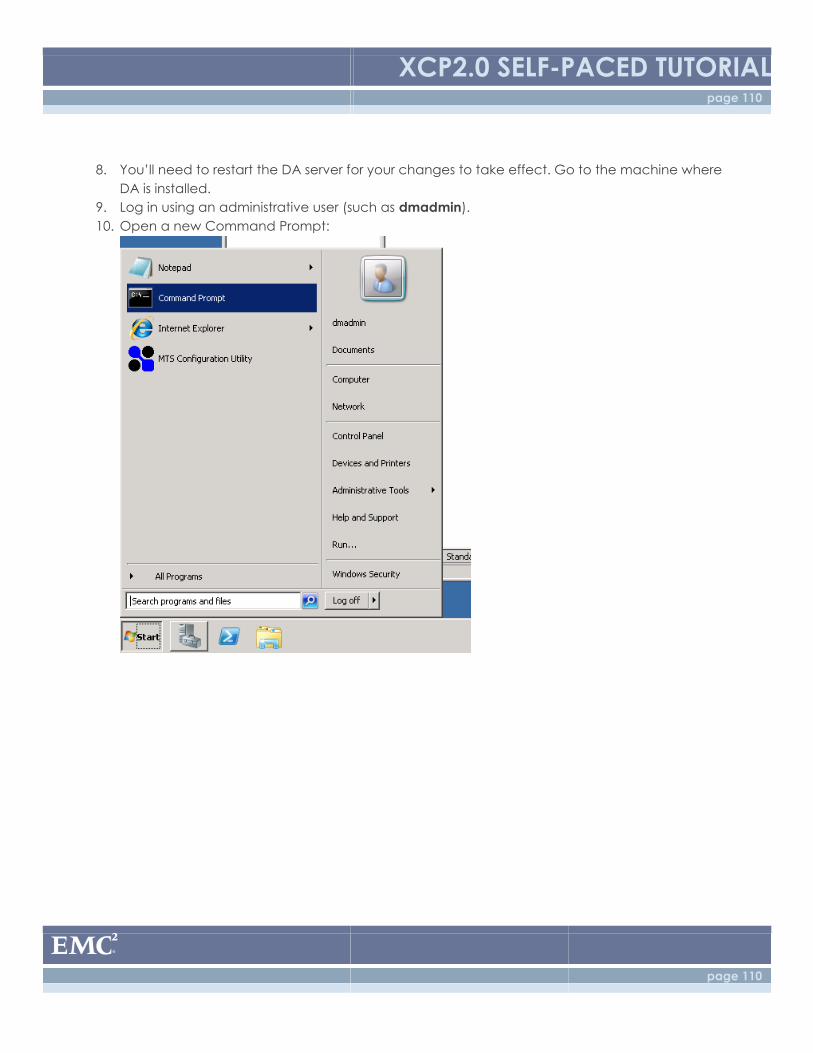
8. You’ll need to restart the DA server for your changes to take effect. Go to the machine where
DA is installed.
9. Log in using an administrative user (such as dmadmin).
10. Open a new Command Prompt:

XCP2.0 SELF-PACED TUTORIAL page 111
page 111
11. Type cd c:\tcserver, and press ENTER. (Note: you can restart the service if you have installed it
instead of steps 11-13.)
12. Type tcruntime-ctl.bat daserver stop and press ENTER.

XCP2.0 SELF-PACED TUTORIAL page 112
page 112
13. Now type tcruntime-ctl.bat daserver start and press ENTER.
14. Go back to your browser and clear your browser’s cache. Log in to DA again. You should now
see the Work Queue Management node enabled.

XCP2.0 SELF-PACED TUTORIAL page 113
page 113
4.6.2: Claims Work Queue (DA)
For this, you will need access to DA (Documentum Administrator). The URL for DA will look like this
http://<<ip address where da is deployed>>:<<port>>/da.
1. Login to DA for your environment as an administrative user (such as dmadmin)
2. Navigate to Administration -> Work Queue Management -> Policies -> Work Queue Policies
If the “Work Queue Management” node does not appear, ensure that the account you’re using
is added to the “queue_admin” role under “User Management.” After adding your user to that
role, you will likely need to restart the app server which hosts the DA web app before you see
the change. After this, you may see errors in your browser. If so, clean your browser cache,
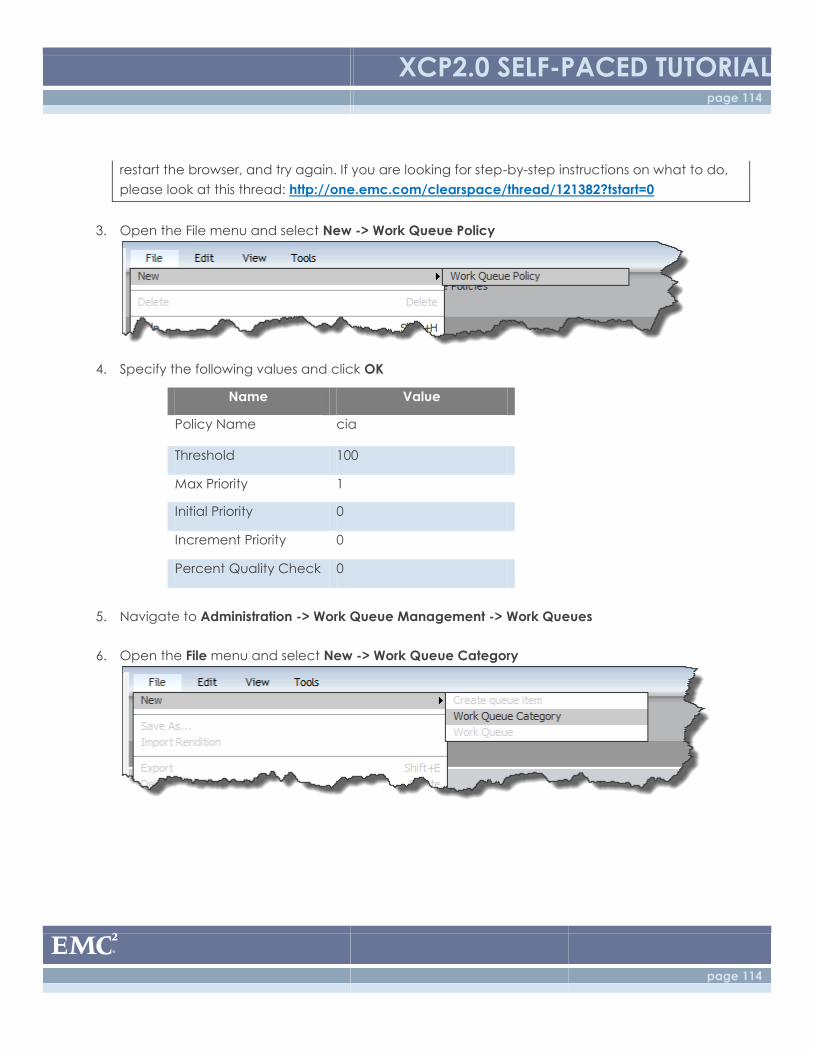
XCP2.0 SELF-PACED TUTORIAL page 114
page 114
restart the browser, and try again. If you are looking for step-by-step instructions on what to do,
please look at this thread: http://one.emc.com/clearspace/thread/121382?tstart=0
3. Open the File menu and select New -> Work Queue Policy
4. Specify the following values and click OK
Name Value
Policy Name cia
Threshold 100
Max Priority 1
Initial Priority 0
Increment Priority 0
Percent Quality Check 0
5. Navigate to Administration -> Work Queue Management -> Work Queues
6. Open the File menu and select New -> Work Queue Category
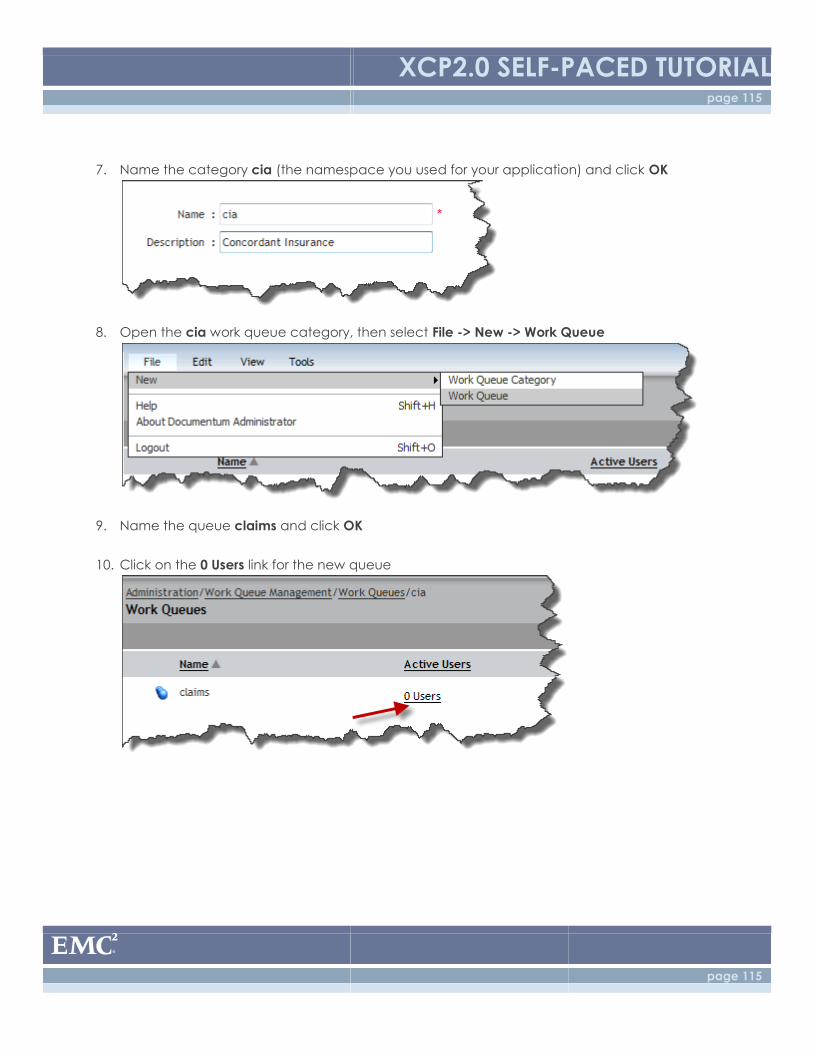
XCP2.0 SELF-PACED TUTORIAL page 115
page 115
7. Name the category cia (the namespace you used for your application) and click OK
8. Open the cia work queue category, then select File -> New -> Work Queue
9. Name the queue claims and click OK
10. Click on the 0 Users link for the new queue
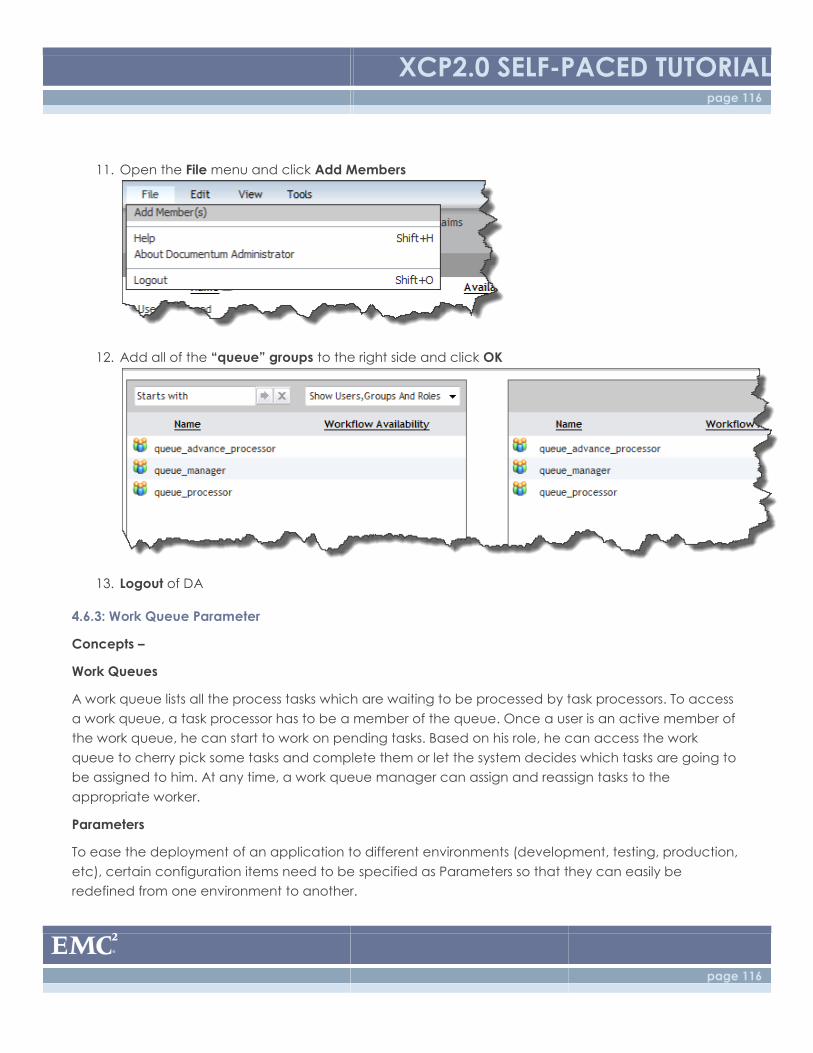
XCP2.0 SELF-PACED TUTORIAL page 116
page 116
11. Open the File menu and click Add Members
12. Add all of the “queue” groups to the right side and click OK
13. Logout of DA
4.6.3: Work Queue Parameter
Concepts –
Work Queues
A work queue lists all the process tasks which are waiting to be processed by task processors. To access
a work queue, a task processor has to be a member of the queue. Once a user is an active member of
the work queue, he can start to work on pending tasks. Based on his role, he can access the work
queue to cherry pick some tasks and complete them or let the system decides which tasks are going to
be assigned to him. At any time, a work queue manager can assign and reassign tasks to the
appropriate worker.
Parameters
To ease the deployment of an application to different environments (development, testing, production,
etc), certain configuration items need to be specified as Parameters so that they can easily be
redefined from one environment to another.
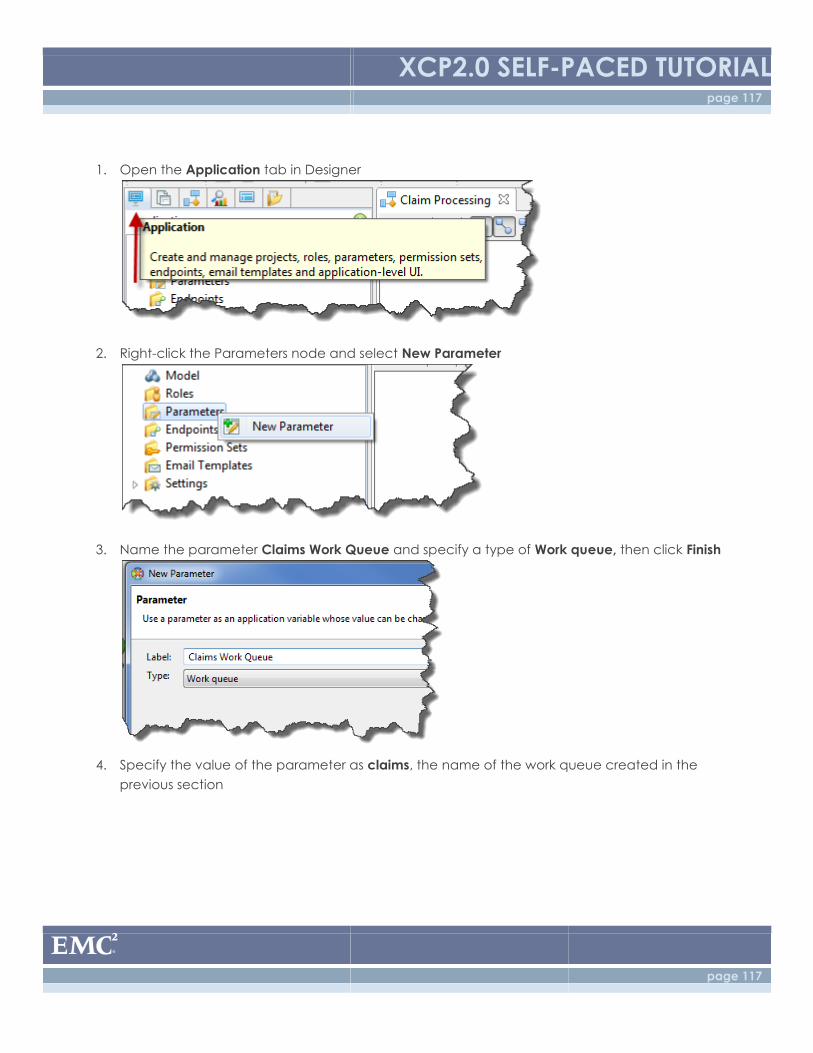
XCP2.0 SELF-PACED TUTORIAL page 117
page 117
1. Open the Application tab in Designer
2. Right-click the Parameters node and select New Parameter
3. Name the parameter Claims Work Queue and specify a type of Work queue, then click Finish
4. Specify the value of the parameter as claims, the name of the work queue created in the
previous section
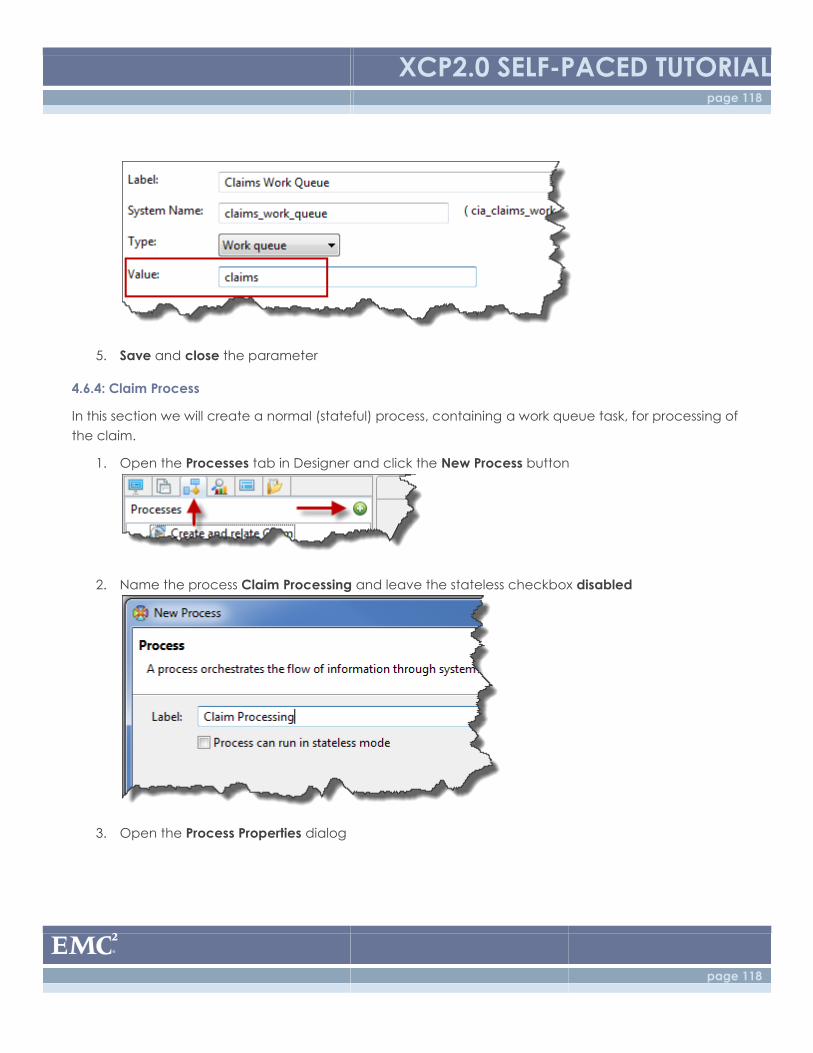
XCP2.0 SELF-PACED TUTORIAL page 118
page 118
5. Save and close the parameter
4.6.4: Claim Process
In this section we will create a normal (stateful) process, containing a work queue task, for processing of
the claim.
1. Open the Processes tab in Designer and click the New Process button
2. Name the process Claim Processing and leave the stateless checkbox disabled
3. Open the Process Properties dialog

XCP2.0 SELF-PACED TUTORIAL page 119
page 119
4. Open the Data tab and add the following packages
Package Name Type Mandatory
claim Claim Yes
policy Policy No
vehicle Vehicle No
There is no technical requirement to add the policy and vehicle packages here. They are simply
being added to more easily expose them to the claims agent who will be interacting with the
workflow.
5. Add the following process variable
Variable Name Type
response Integer
6. Ensure your process data looks like the following and then click OK to close the Process
Properties dialog
7. Add activities and flow lines to your process to match the screenshot below
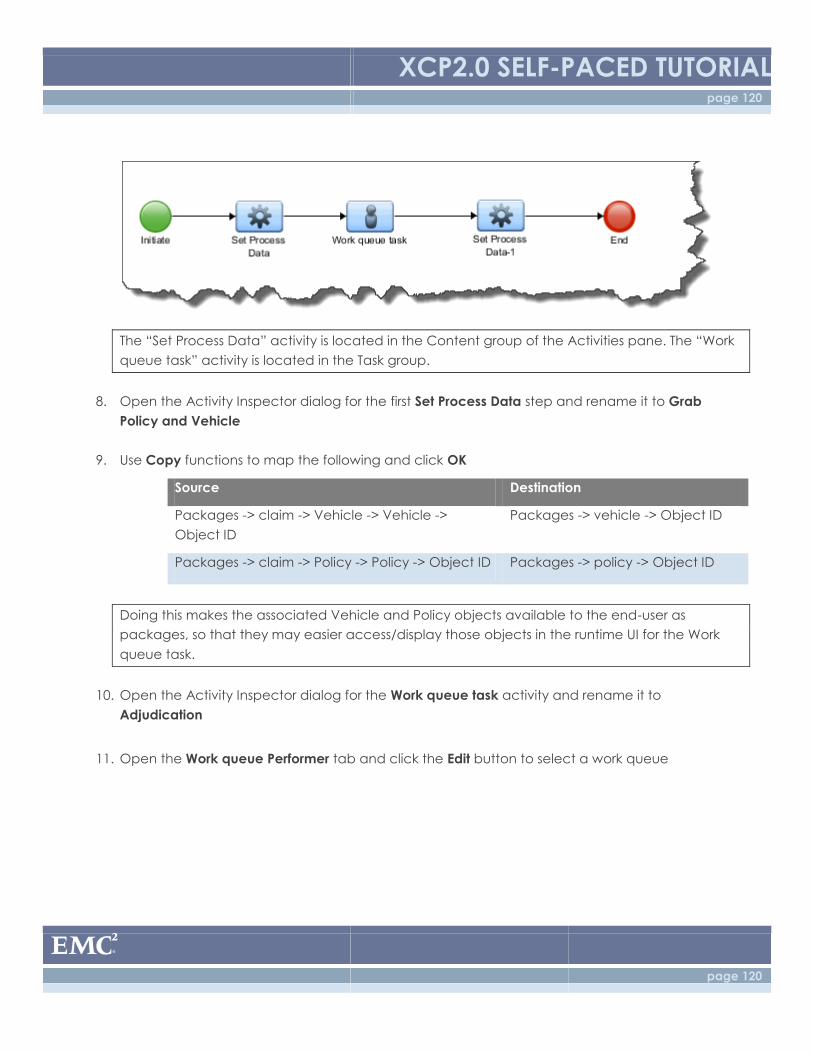
XCP2.0 SELF-PACED TUTORIAL page 120
page 120
The “Set Process Data” activity is located in the Content group of the Activities pane. The “Work
queue task” activity is located in the Task group.
8. Open the Activity Inspector dialog for the first Set Process Data step and rename it to Grab
Policy and Vehicle
9. Use Copy functions to map the following and click OK
Source Destination
Packages -> claim -> Vehicle -> Vehicle ->
Object ID
Packages -> vehicle -> Object ID
Packages -> claim -> Policy -> Policy -> Object ID Packages -> policy -> Object ID
Doing this makes the associated Vehicle and Policy objects available to the end-user as
packages, so that they may easier access/display those objects in the runtime UI for the Work
queue task.
10. Open the Activity Inspector dialog for the Work queue task activity and rename it to
Adjudication
11. Open the Work queue Performer tab and click the Edit button to select a work queue
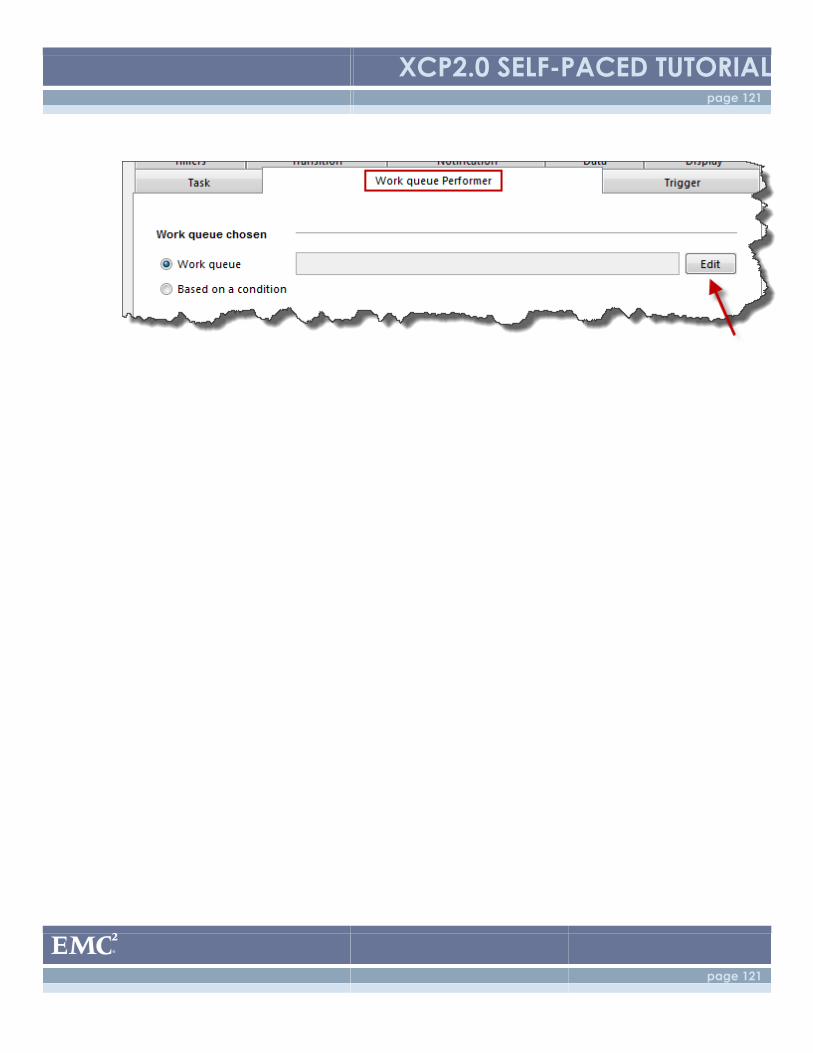
XCP2.0 SELF-PACED TUTORIAL page 121
page 121
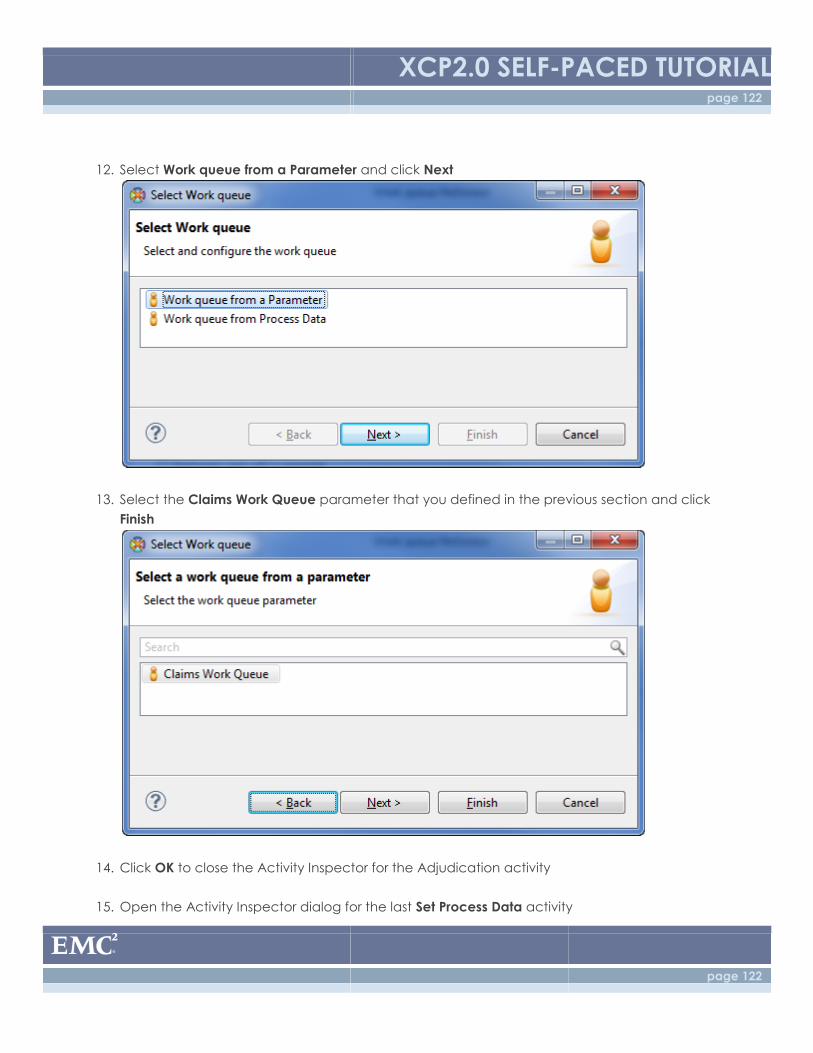
XCP2.0 SELF-PACED TUTORIAL page 122
page 122
12. Select Work queue from a Parameter and click Next
13. Select the Claims Work Queue parameter that you defined in the previous section and click
Finish
14. Click OK to close the Activity Inspector for the Adjudication activity
15. Open the Activity Inspector dialog for the last Set Process Data activity
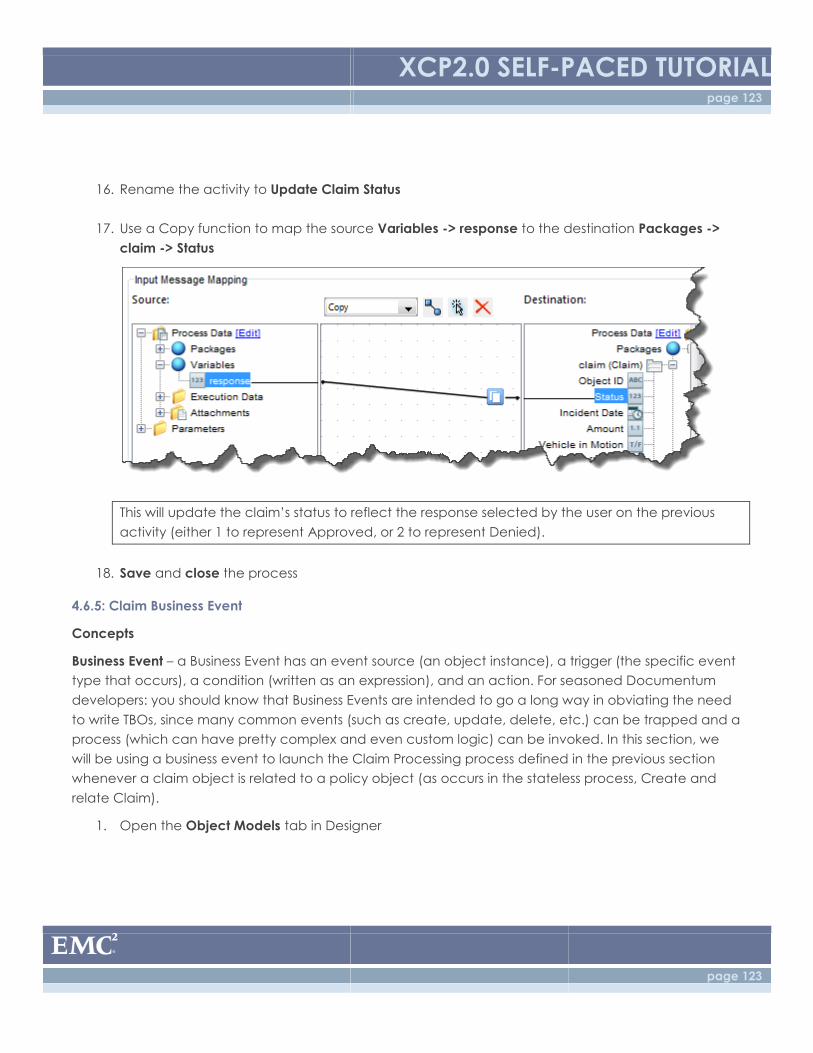
XCP2.0 SELF-PACED TUTORIAL page 123
page 123
16. Rename the activity to Update Claim Status
17. Use a Copy function to map the source Variables -> response to the destination Packages ->
claim -> Status
This will update the claim’s status to reflect the response selected by the user on the previous
activity (either 1 to represent Approved, or 2 to represent Denied).
18. Save and close the process
4.6.5: Claim Business Event
Concepts
Business Event – a Business Event has an event source (an object instance), a trigger (the specific event
type that occurs), a condition (written as an expression), and an action. For seasoned Documentum
developers: you should know that Business Events are intended to go a long way in obviating the need
to write TBOs, since many common events (such as create, update, delete, etc.) can be trapped and a
process (which can have pretty complex and even custom logic) can be invoked. In this section, we
will be using a business event to launch the Claim Processing process defined in the previous section
whenever a claim object is related to a policy object (as occurs in the stateless process, Create and
relate Claim).
1. Open the Object Models tab in Designer
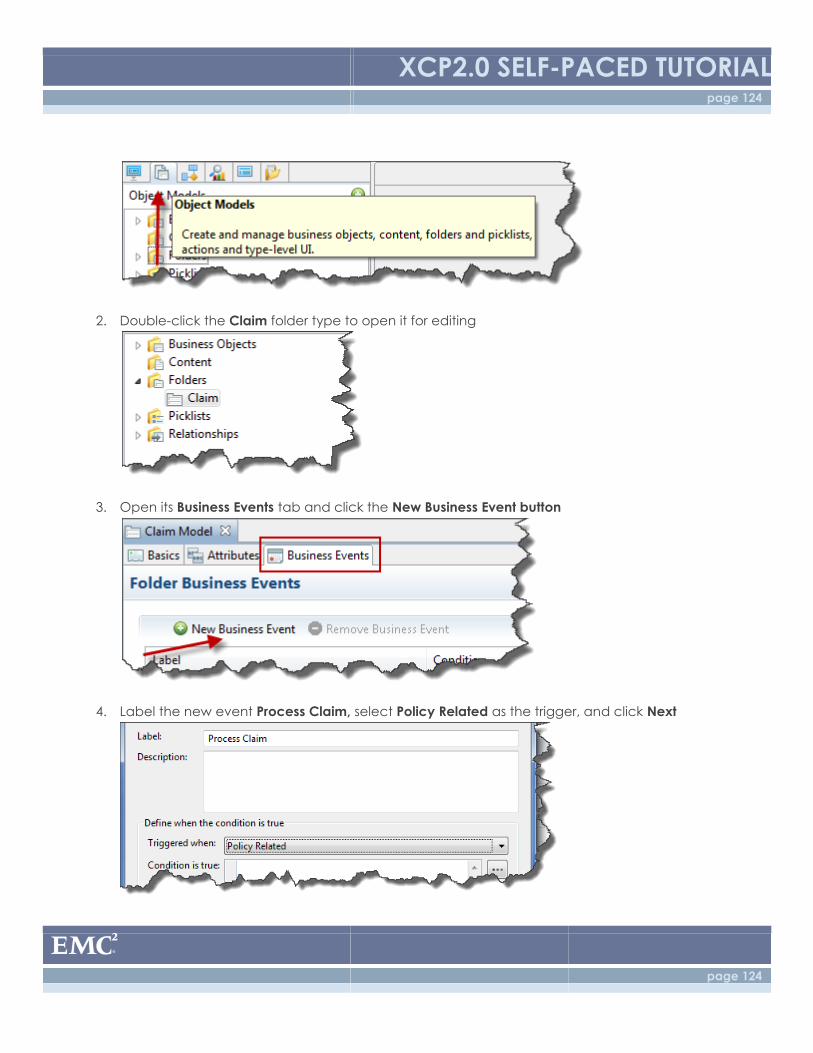
XCP2.0 SELF-PACED TUTORIAL page 124
page 124
2. Double-click the Claim folder type to open it for editing
3. Open its Business Events tab and click the New Business Event button
4. Label the new event Process Claim, select Policy Related as the trigger, and click Next
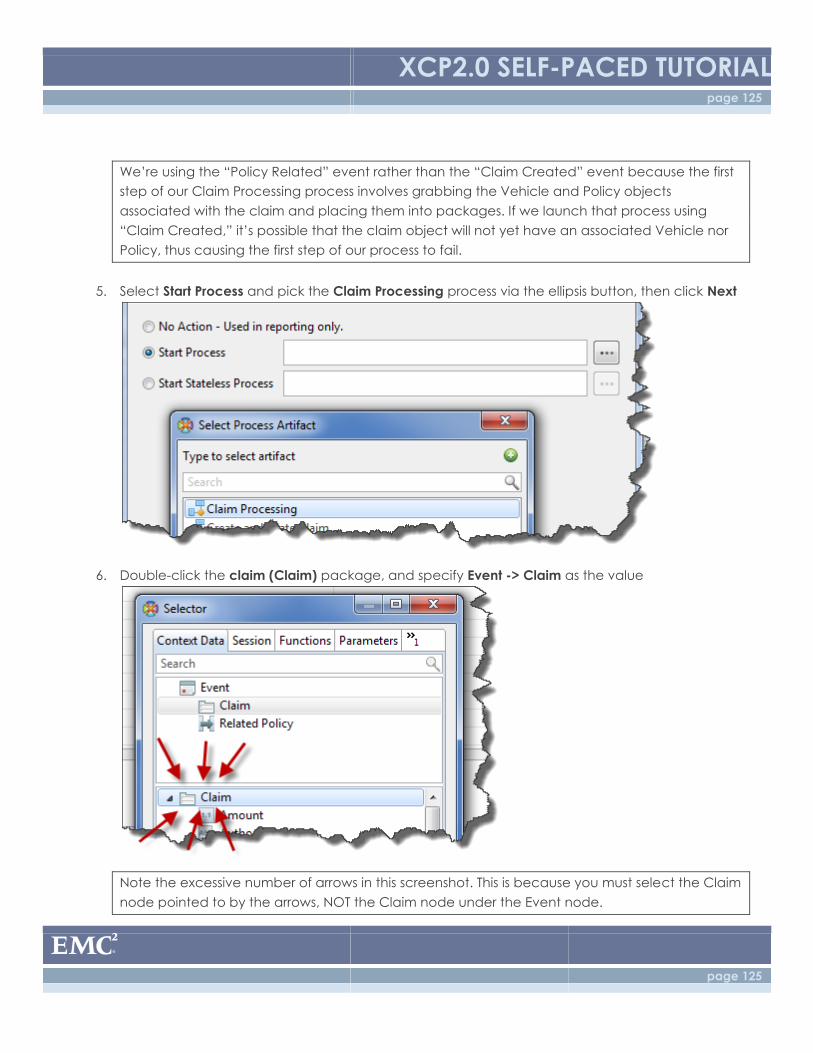
XCP2.0 SELF-PACED TUTORIAL page 125
page 125
We’re using the “Policy Related” event rather than the “Claim Created” event because the first
step of our Claim Processing process involves grabbing the Vehicle and Policy objects
associated with the claim and placing them into packages. If we launch that process using
“Claim Created,” it’s possible that the claim object will not yet have an associated Vehicle nor
Policy, thus causing the first step of our process to fail.
5. Select Start Process and pick the Claim Processing process via the ellipsis button, then click Next
6. Double-click the claim (Claim) package, and specify Event -> Claim as the value
Note the excessive number of arrows in this screenshot. This is because you must select the Claim
node pointed to by the arrows, NOT the Claim node under the Event node.
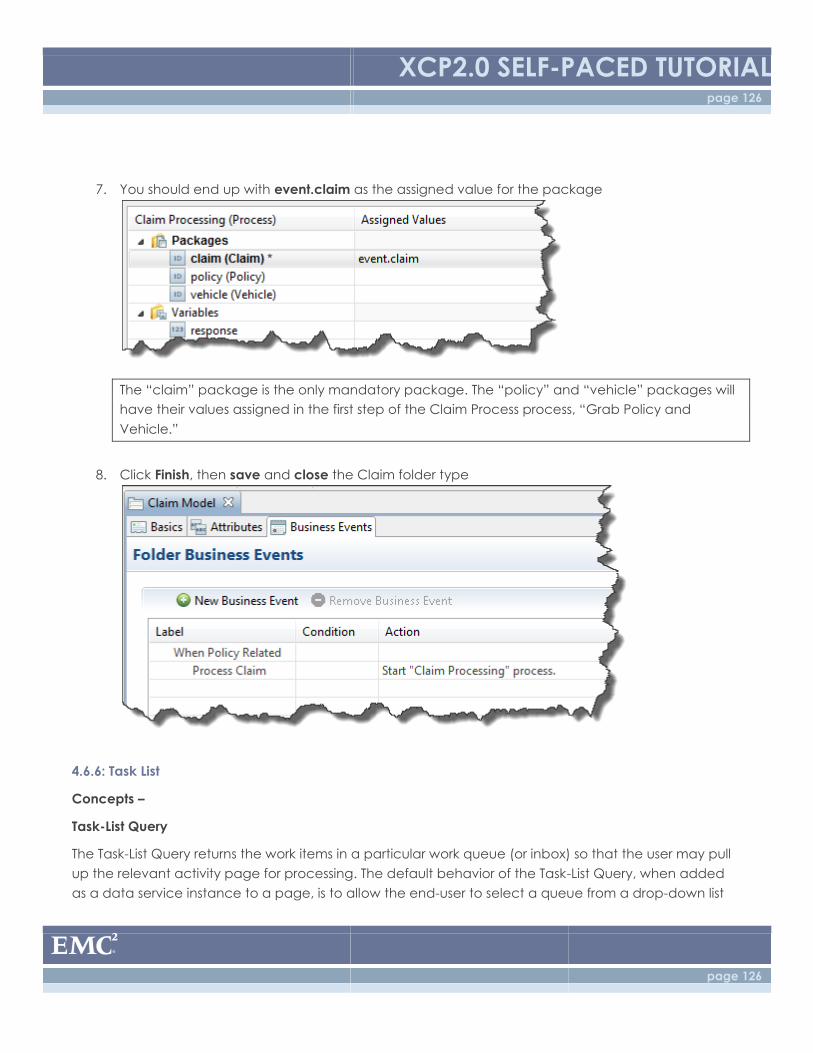
XCP2.0 SELF-PACED TUTORIAL page 126
page 126
7. You should end up with event.claim as the assigned value for the package
The “claim” package is the only mandatory package. The “policy” and “vehicle” packages will
have their values assigned in the first step of the Claim Process process, “Grab Policy and
Vehicle.”
8. Click Finish, then save and close the Claim folder type
4.6.6: Task List
Concepts –
Task-List Query
The Task-List Query returns the work items in a particular work queue (or inbox) so that the user may pull
up the relevant activity page for processing. The default behavior of the Task-List Query, when added
as a data service instance to a page, is to allow the end-user to select a queue from a drop-down list
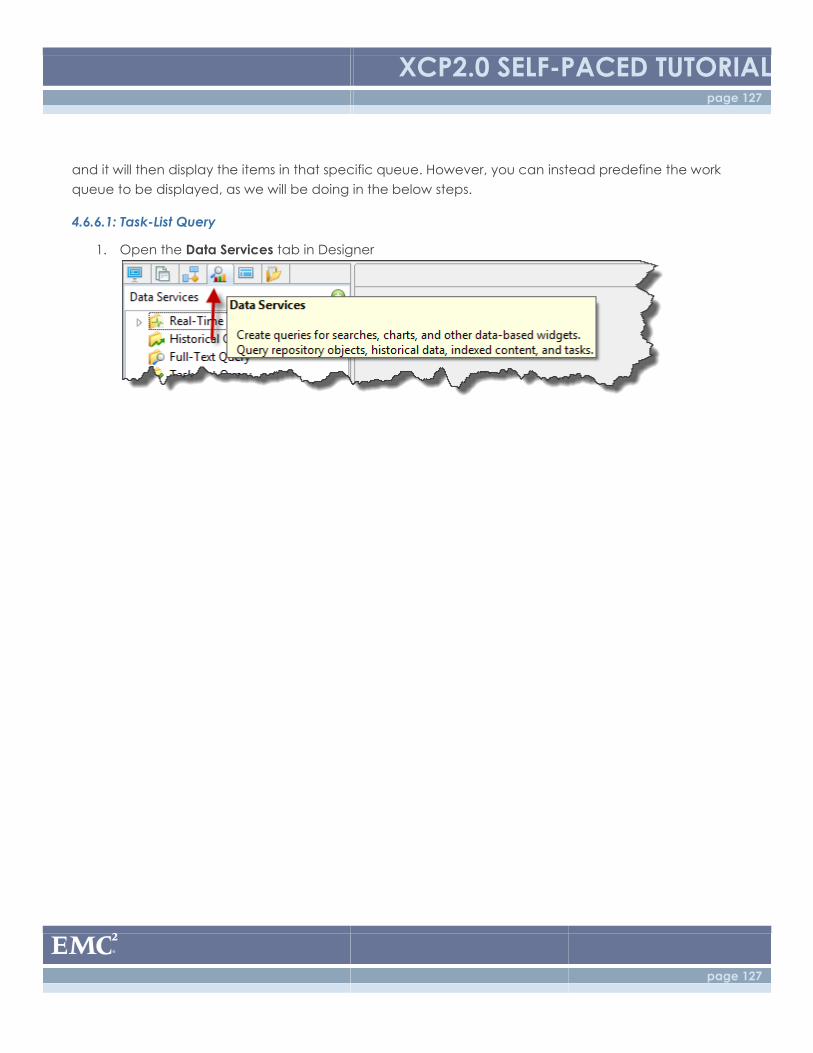
XCP2.0 SELF-PACED TUTORIAL page 127
page 127
and it will then display the items in that specific queue. However, you can instead predefine the work
queue to be displayed, as we will be doing in the below steps.
4.6.6.1: Task-List Query
1. Open the Data Services tab in Designer
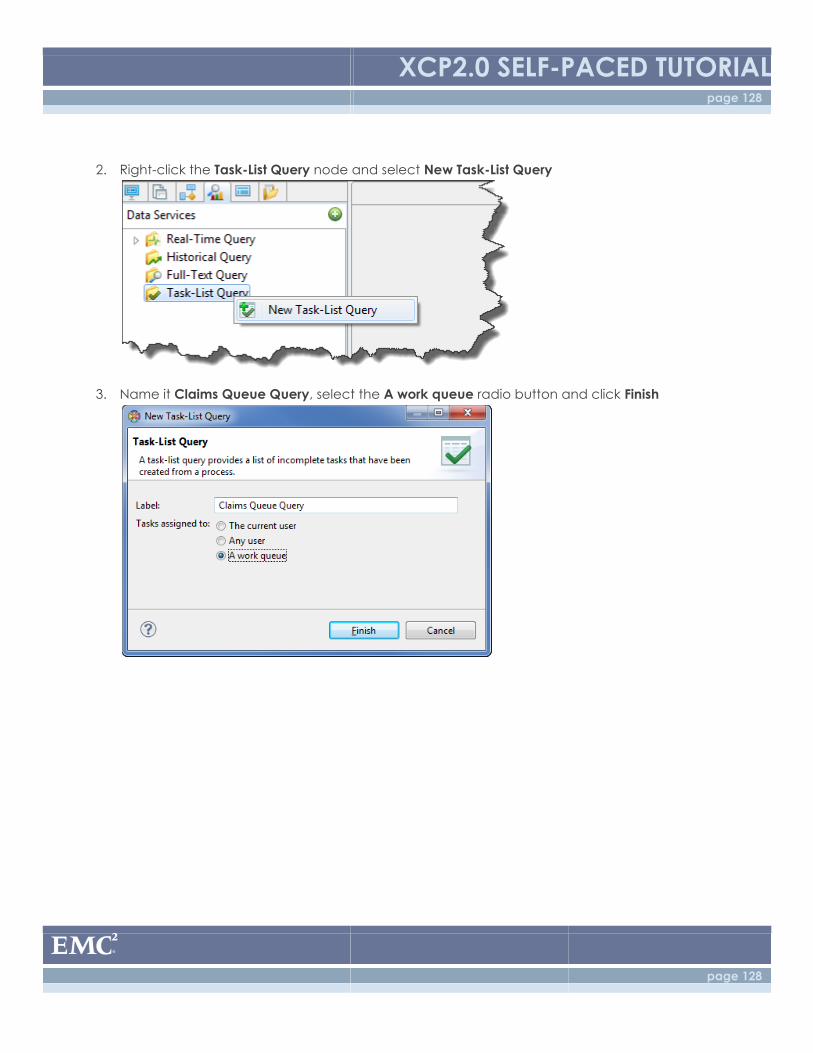
XCP2.0 SELF-PACED TUTORIAL page 128
page 128
2. Right-click the Task-List Query node and select New Task-List Query
3. Name it Claims Queue Query, select the A work queue radio button and click Finish
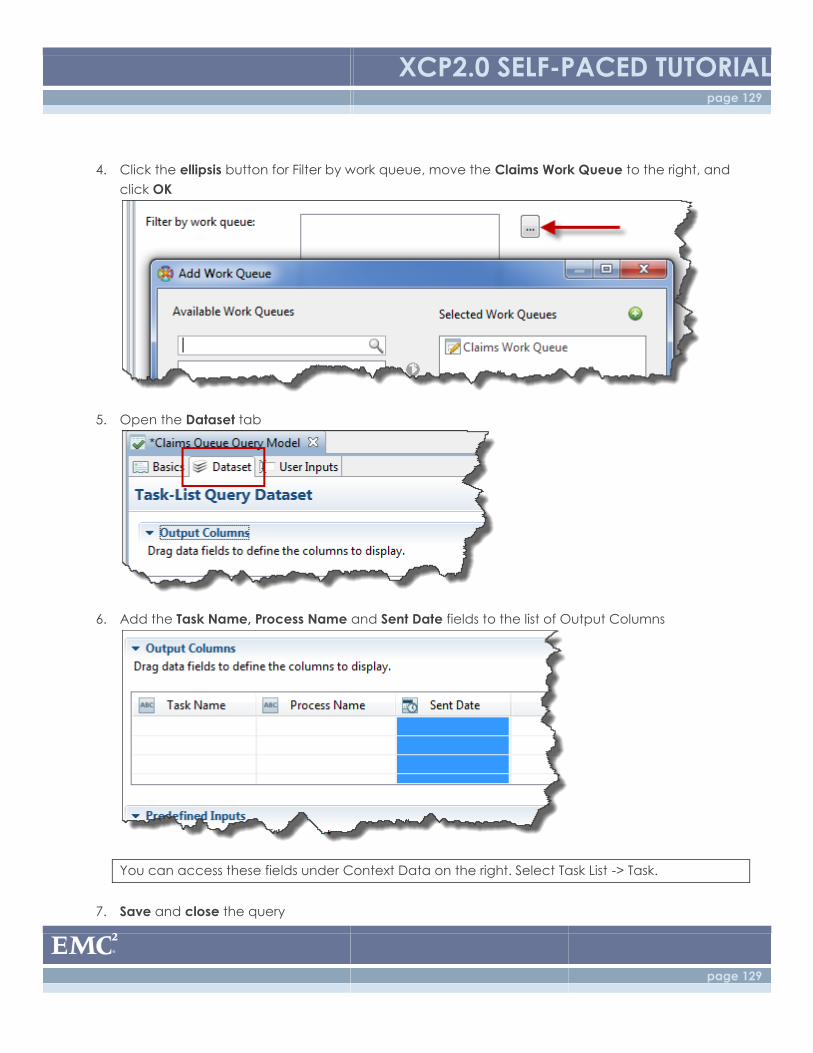
XCP2.0 SELF-PACED TUTORIAL page 129
page 129
4. Click the ellipsis button for Filter by work queue, move the Claims Work Queue to the right, and
click OK
5. Open the Dataset tab
6. Add the Task Name, Process Name and Sent Date fields to the list of Output Columns
You can access these fields under Context Data on the right. Select Task List -> Task.
7. Save and close the query
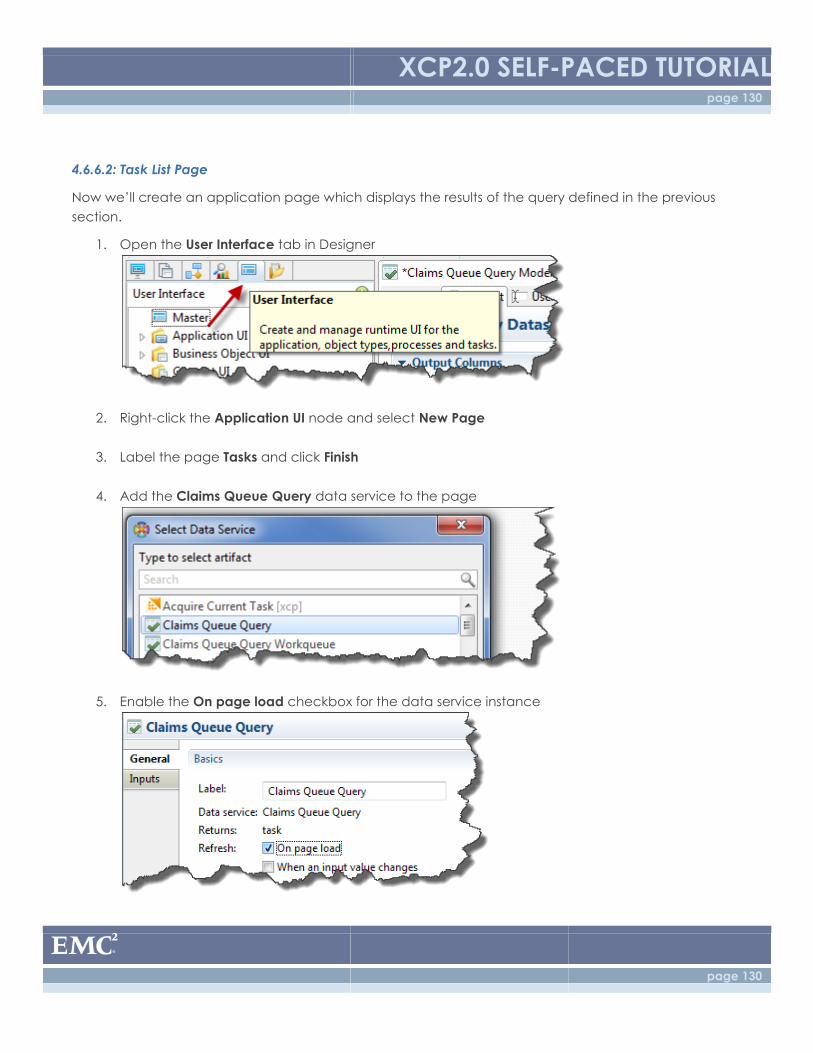
XCP2.0 SELF-PACED TUTORIAL page 130
page 130
4.6.6.2: Task List Page
Now we’ll create an application page which displays the results of the query defined in the previous
section.
1. Open the User Interface tab in Designer
2. Right-click the Application UI node and select New Page
3. Label the page Tasks and click Finish
4. Add the Claims Queue Query data service to the page
5. Enable the On page load checkbox for the data service instance
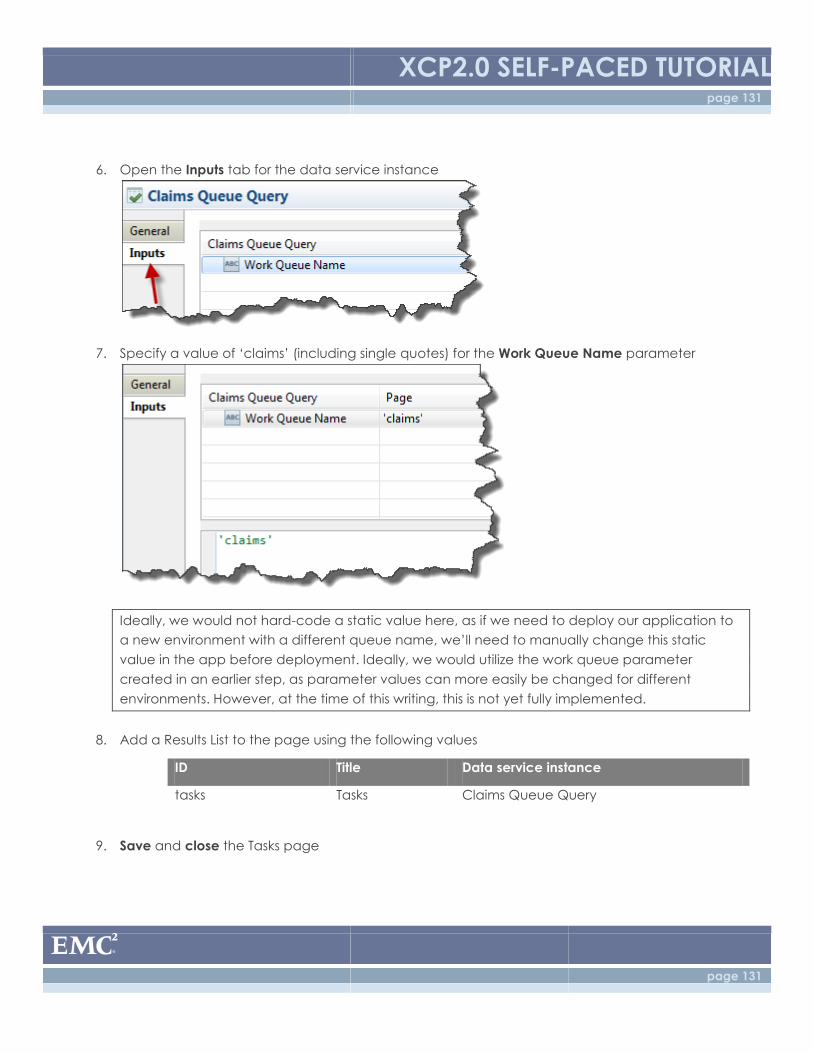
XCP2.0 SELF-PACED TUTORIAL page 131
page 131
6. Open the Inputs tab for the data service instance
7. Specify a value of ‘claims’ (including single quotes) for the Work Queue Name parameter
Ideally, we would not hard-code a static value here, as if we need to deploy our application to
a new environment with a different queue name, we’ll need to manually change this static
value in the app before deployment. Ideally, we would utilize the work queue parameter
created in an earlier step, as parameter values can more easily be changed for different
environments. However, at the time of this writing, this is not yet fully implemented.
8. Add a Results List to the page using the following values
ID Title Data service instance
tasks Tasks Claims Queue Query
9. Save and close the Tasks page
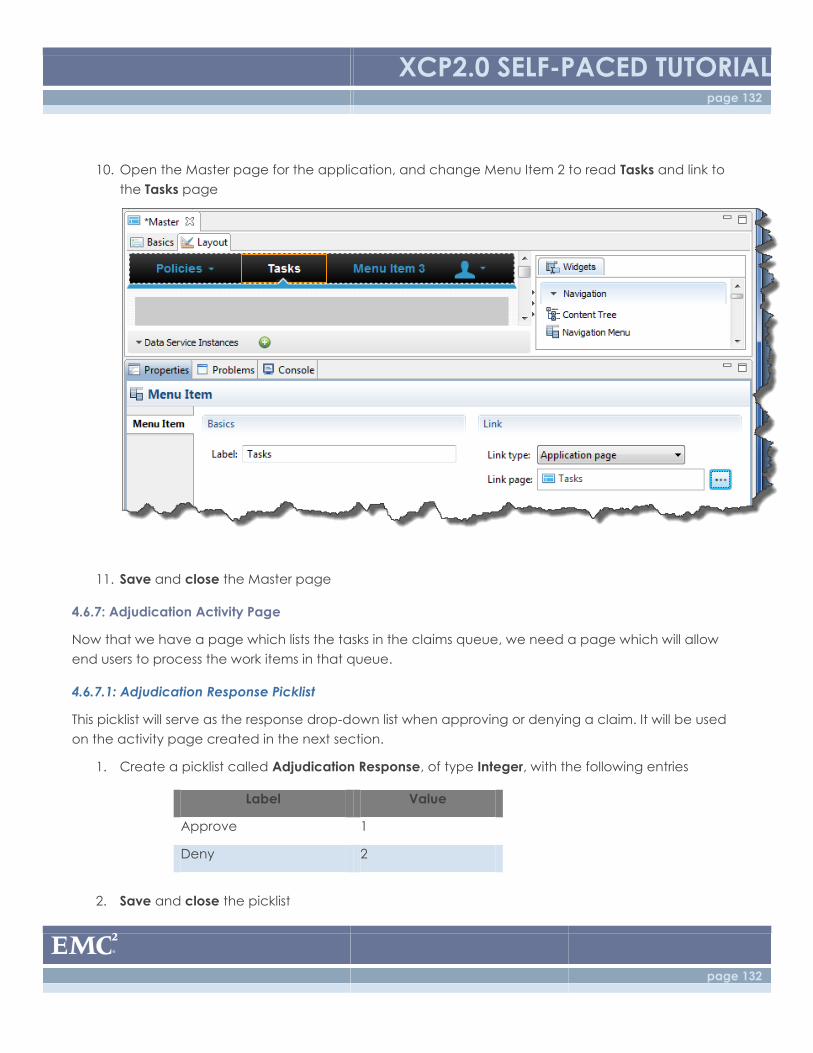
XCP2.0 SELF-PACED TUTORIAL page 132
page 132
10. Open the Master page for the application, and change Menu Item 2 to read Tasks and link to
the Tasks page
11. Save and close the Master page
4.6.7: Adjudication Activity Page
Now that we have a page which lists the tasks in the claims queue, we need a page which will allow
end users to process the work items in that queue.
4.6.7.1: Adjudication Response Picklist
This picklist will serve as the response drop-down list when approving or denying a claim. It will be used
on the activity page created in the next section.
1. Create a picklist called Adjudication Response, of type Integer, with the following entries
Label Value
Approve 1
Deny 2
2. Save and close the picklist
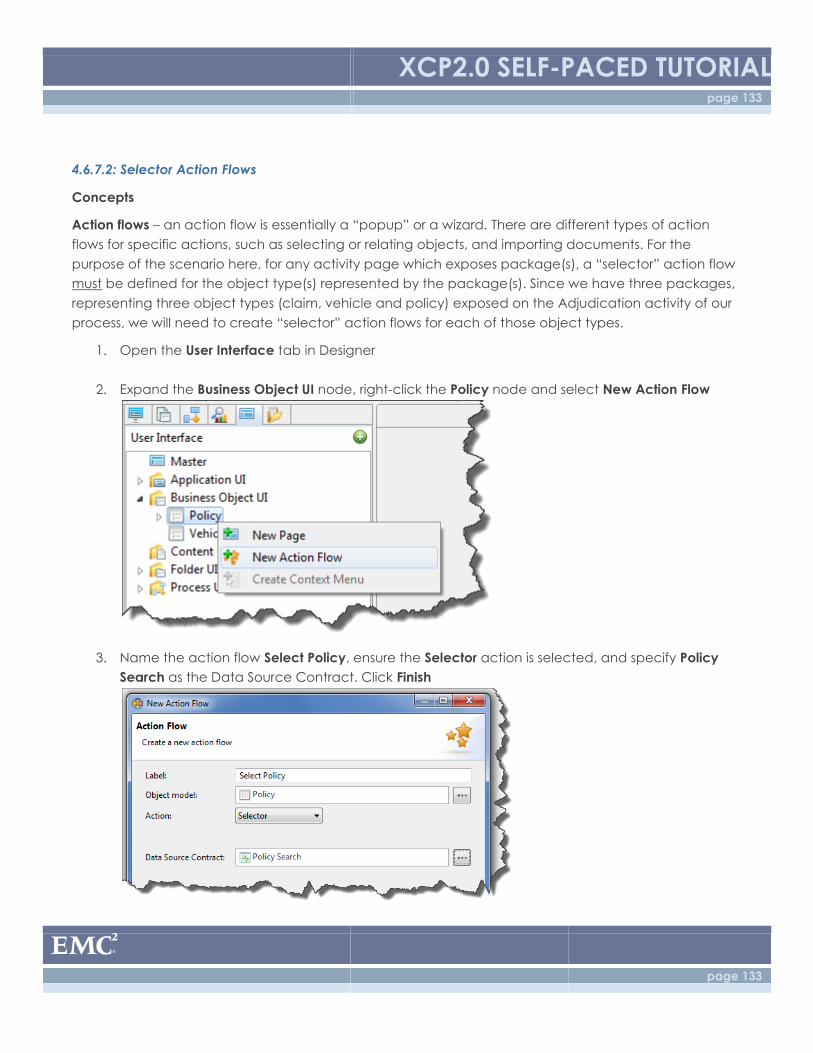
XCP2.0 SELF-PACED TUTORIAL page 133
page 133
4.6.7.2: Selector Action Flows
Concepts
Action flows – an action flow is essentially a “popup” or a wizard. There are different types of action
flows for specific actions, such as selecting or relating objects, and importing documents. For the
purpose of the scenario here, for any activity page which exposes package(s), a “selector” action flow
must be defined for the object type(s) represented by the package(s). Since we have three packages,
representing three object types (claim, vehicle and policy) exposed on the Adjudication activity of our
process, we will need to create “selector” action flows for each of those object types.
1. Open the User Interface tab in Designer
2. Expand the Business Object UI node, right-click the Policy node and select New Action Flow
3. Name the action flow Select Policy, ensure the Selector action is selected, and specify Policy
Search as the Data Source Contract. Click Finish
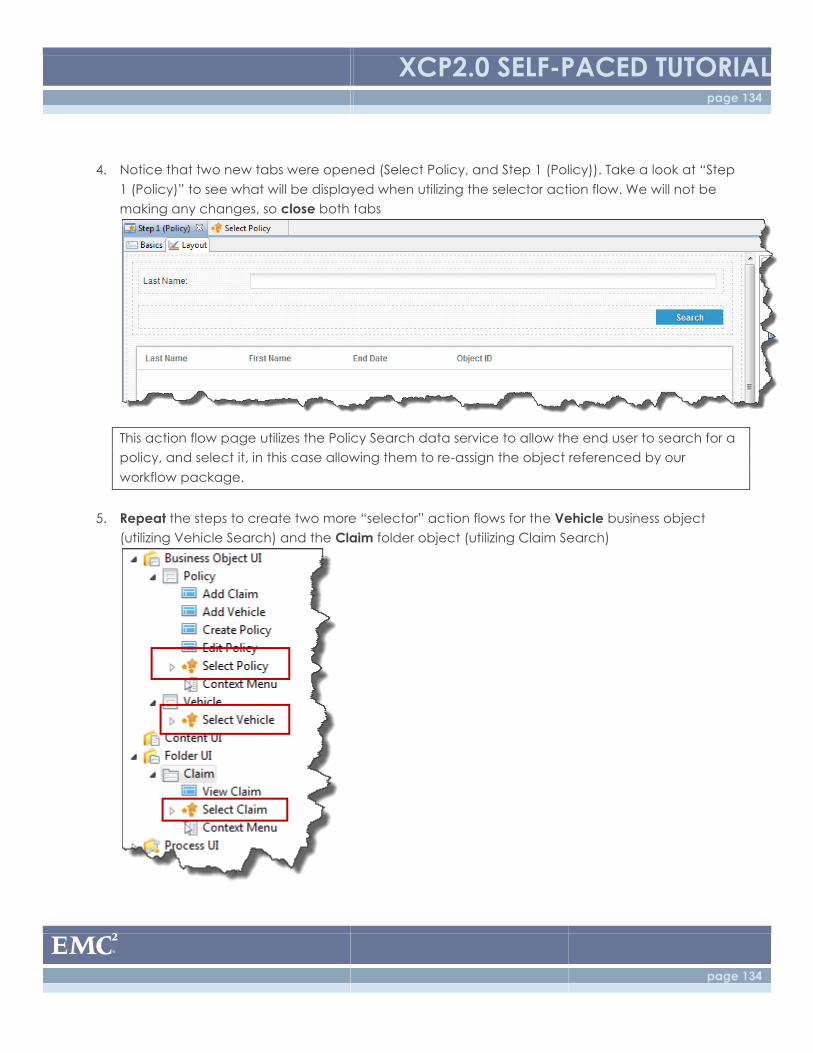
XCP2.0 SELF-PACED TUTORIAL page 134
page 134
4. Notice that two new tabs were opened (Select Policy, and Step 1 (Policy)). Take a look at “Step
1 (Policy)” to see what will be displayed when utilizing the selector action flow. We will not be
making any changes, so close both tabs
This action flow page utilizes the Policy Search data service to allow the end user to search for a
policy, and select it, in this case allowing them to re-assign the object referenced by our
workflow package.
5. Repeat the steps to create two more “selector” action flows for the Vehicle business object
(utilizing Vehicle Search) and the Claim folder object (utilizing Claim Search)
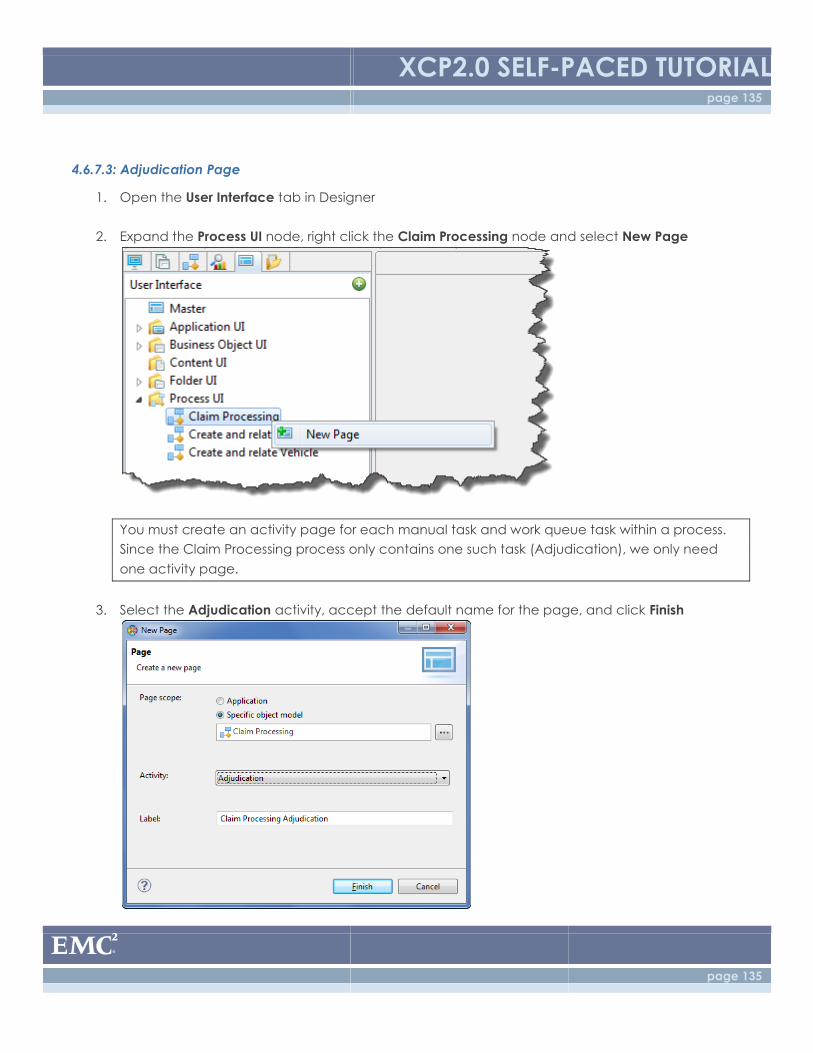
XCP2.0 SELF-PACED TUTORIAL page 135
page 135
4.6.7.3: Adjudication Page
1. Open the User Interface tab in Designer
2. Expand the Process UI node, right click the Claim Processing node and select New Page
You must create an activity page for each manual task and work queue task within a process.
Since the Claim Processing process only contains one such task (Adjudication), we only need
one activity page.
3. Select the Adjudication activity, accept the default name for the page, and click Finish
XCP2.0 SELF-PACED TUTORIAL page 136
page 136
4. Select the claim package on the page
5. In its Properties tab, specify Object ID for the display, and the Select Claim action flow below
Doing this tells the UI to use the Object ID of the claim object as its display attribute (which
admittedly isn’t a “pretty” thing to display), and also which action flow to utilize when trying to
re-assign the value of the claim package.
XCP2.0 SELF-PACED TUTORIAL page 137
page 137
6. Repeat the above steps for the policy (utilizing Last Name as the display) and vehicle (utilizing
Model as the display) packages on the page
7. Right-click and Delete the response input widget on the page, and add a Drop-down list in its
place
8. Specify the following values for the new drop-down list
Field Value
ID response
Label Response
Initial value claim_processing_adjudication.processVariables.response
Data type Integer
Picklist Adjudication Response
XCP2.0 SELF-PACED TUTORIAL page 138
page 138
9. Open the widget’s Behavior tab, and specify
claim_processing_adjudication.executionData.currenttask.performer !=
Concordant_1nsurance.user.userLoginName as the value for Disabled when
This makes the drop-down list widget effectively read-only when the task has not been acquired
by the currently logged-in user. Once the task has been acquired, normal behavior will be
enabled for the drop-down list.
10. Note that since we gave the drop-down list the same ID as the auto-generated number input
widget we deleted (response), we do not have to update any of the data service instances on
the page. If your drop-down list has an ID which differs at all from the name of the process
variable (response, if the directions were followed exactly), you will need to manually update
the input variables for a number of data service instances on the page.
11. Save and close the page
4.6.8: Testing the Application: Claim Creation
Goal: In this exercise you will test the incremental changes you’ve made to the application by creating
a Claim, ensuring the Claim Process initiates, and then participating in the Adjudication step.
1. Click Run Application button to redeploy and run your application
2. When the deployment is completed, log in to your application using the Documentum
installation owner (usually dmadmin).
3. Upon login, you will see the main page of your application with your existing Policies listed out.
Notice you have a new Tasks Menu Item on your Menu Bar.
XCP2.0 SELF-PACED TUTORIAL page 139
page 139
4. Click on the Tasks Menu Item:
5. There are currently no Adjudication tasks in your task list at the moment.
6. Click Policies Search on your Menu Bar to list the policies you have created. Right-mouse
click on one of your Policies and select Open Policy.
7. In the Claims section of your open policy, click the Add Claim button to initiate a new Claim.
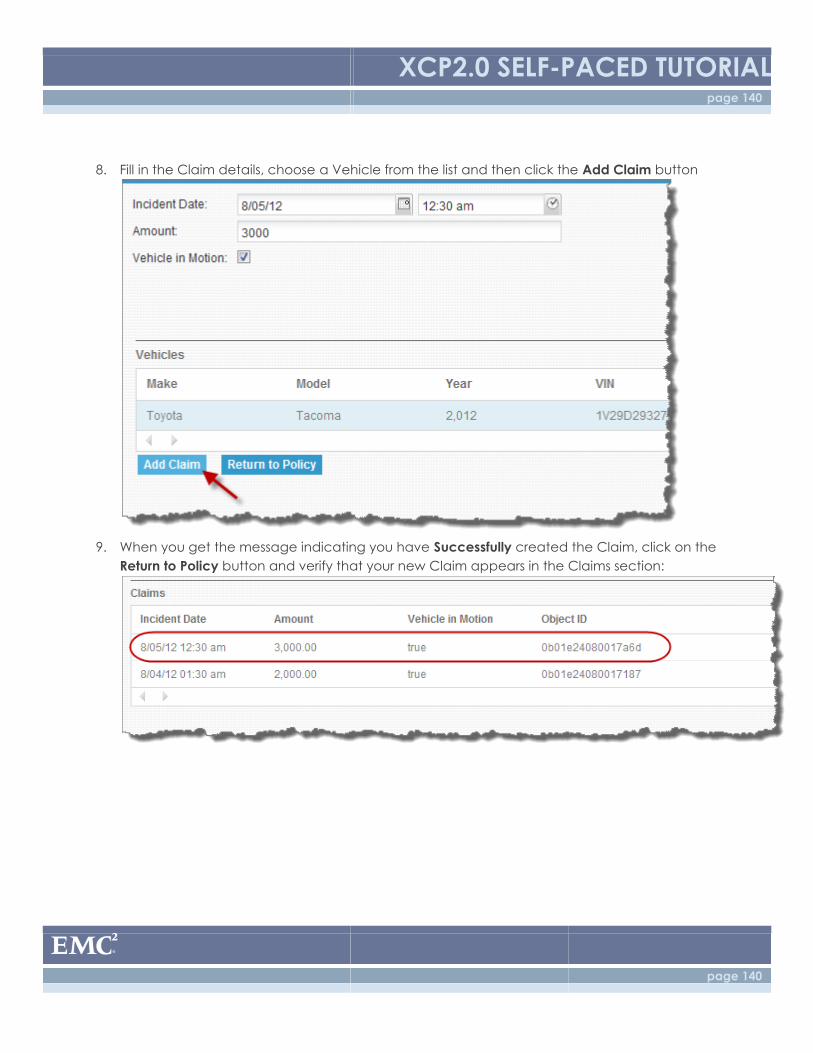
XCP2.0 SELF-PACED TUTORIAL page 140
page 140
8. Fill in the Claim details, choose a Vehicle from the list and then click the Add Claim button
9. When you get the message indicating you have Successfully created the Claim, click on the
Return to Policy button and verify that your new Claim appears in the Claims section:
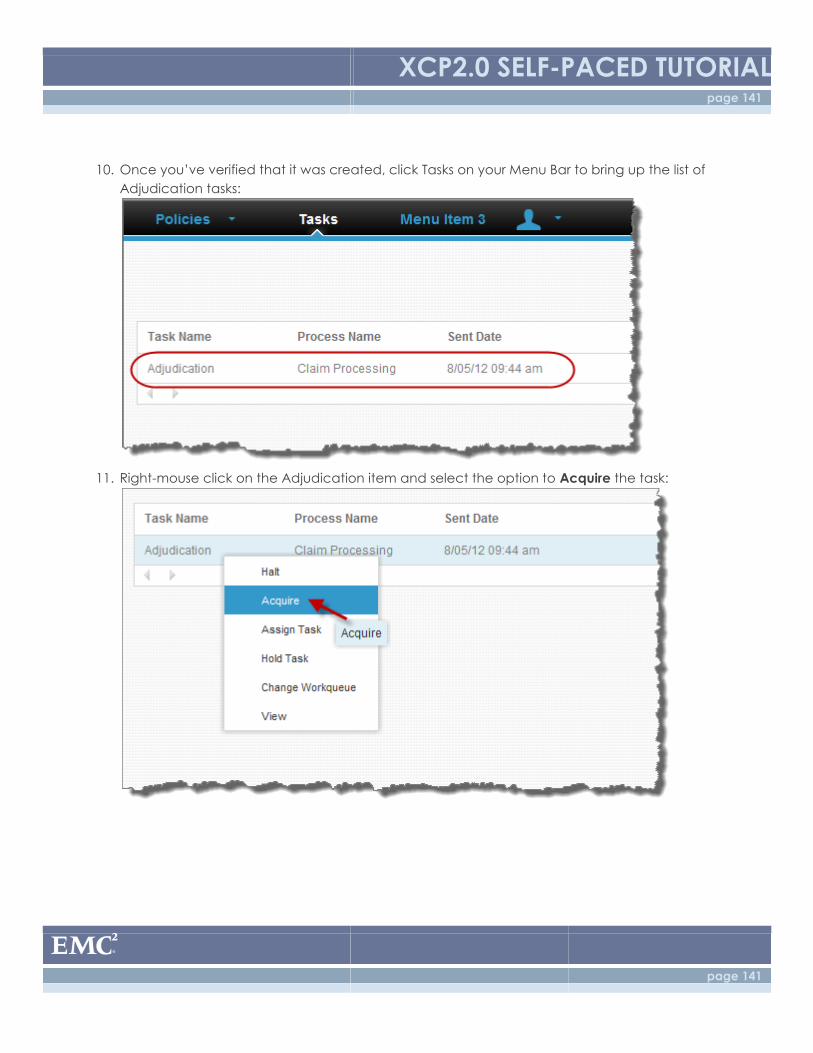
XCP2.0 SELF-PACED TUTORIAL page 141
page 141
10. Once you’ve verified that it was created, click Tasks on your Menu Bar to bring up the list of
Adjudication tasks:
11. Right-mouse click on the Adjudication item and select the option to Acquire the task:
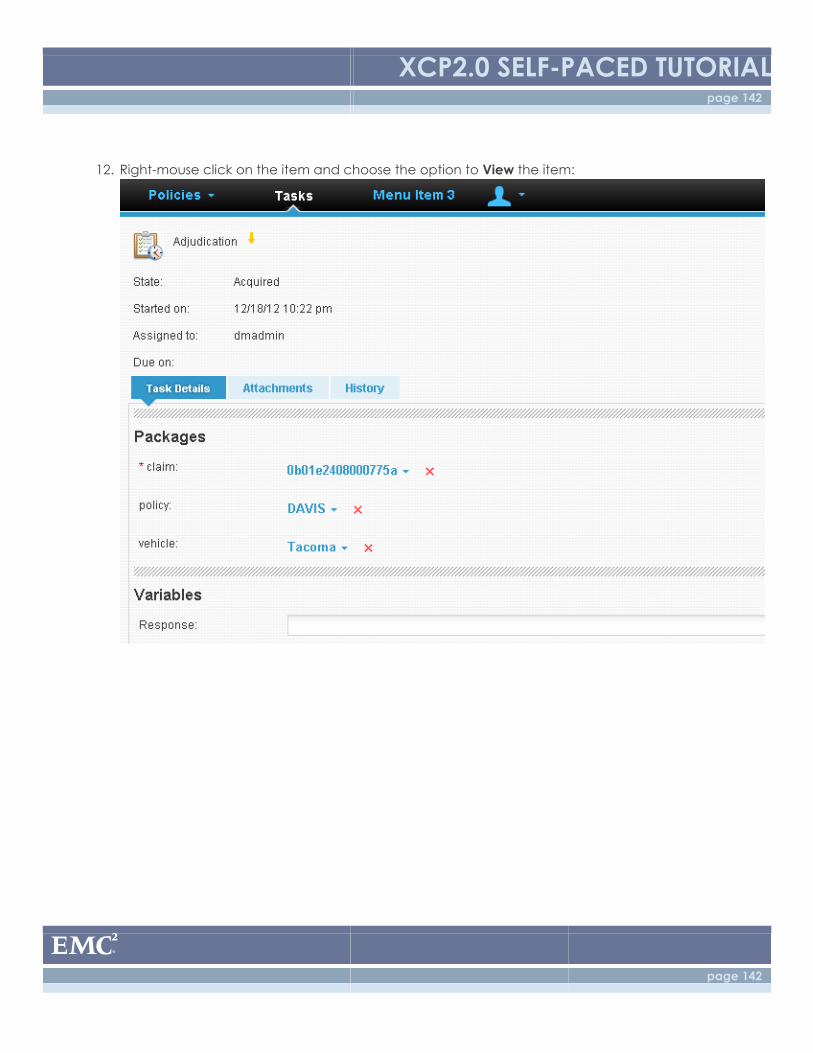
XCP2.0 SELF-PACED TUTORIAL page 142
page 142
12. Right-mouse click on the item and choose the option to View the item:
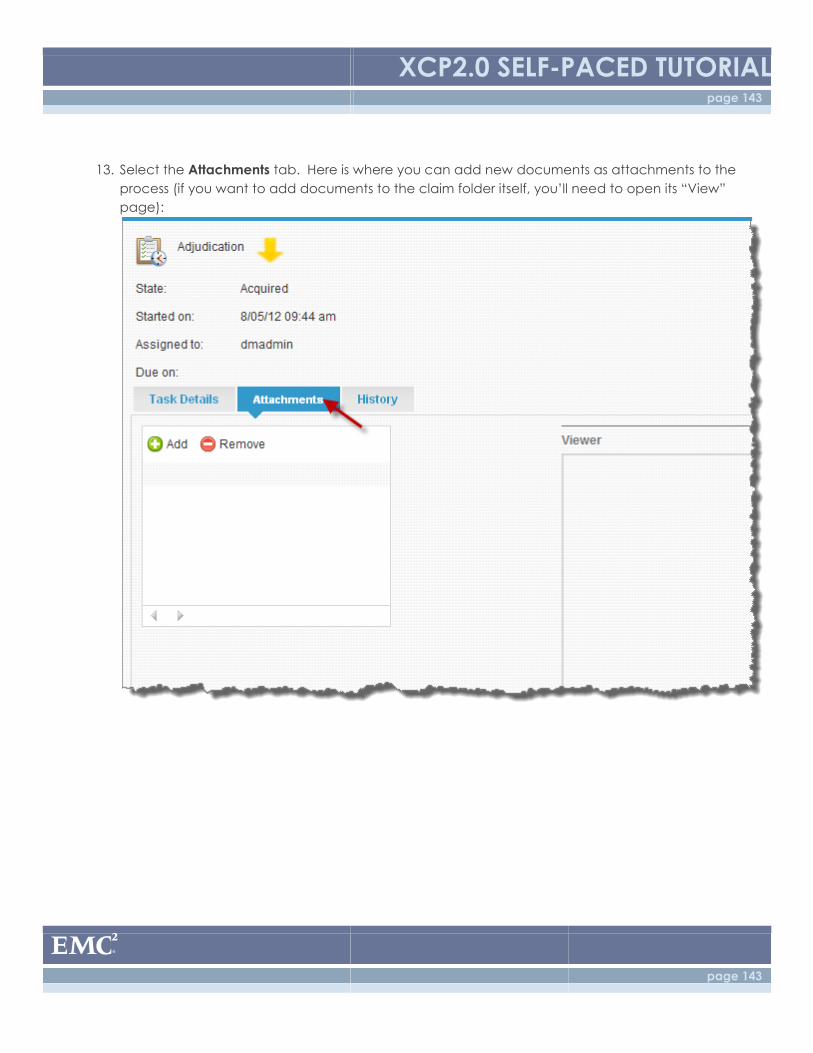
XCP2.0 SELF-PACED TUTORIAL page 143
page 143
13. Select the Attachments tab. Here is where you can add new documents as attachments to the
process (if you want to add documents to the claim folder itself, you’ll need to open its “View”
page):
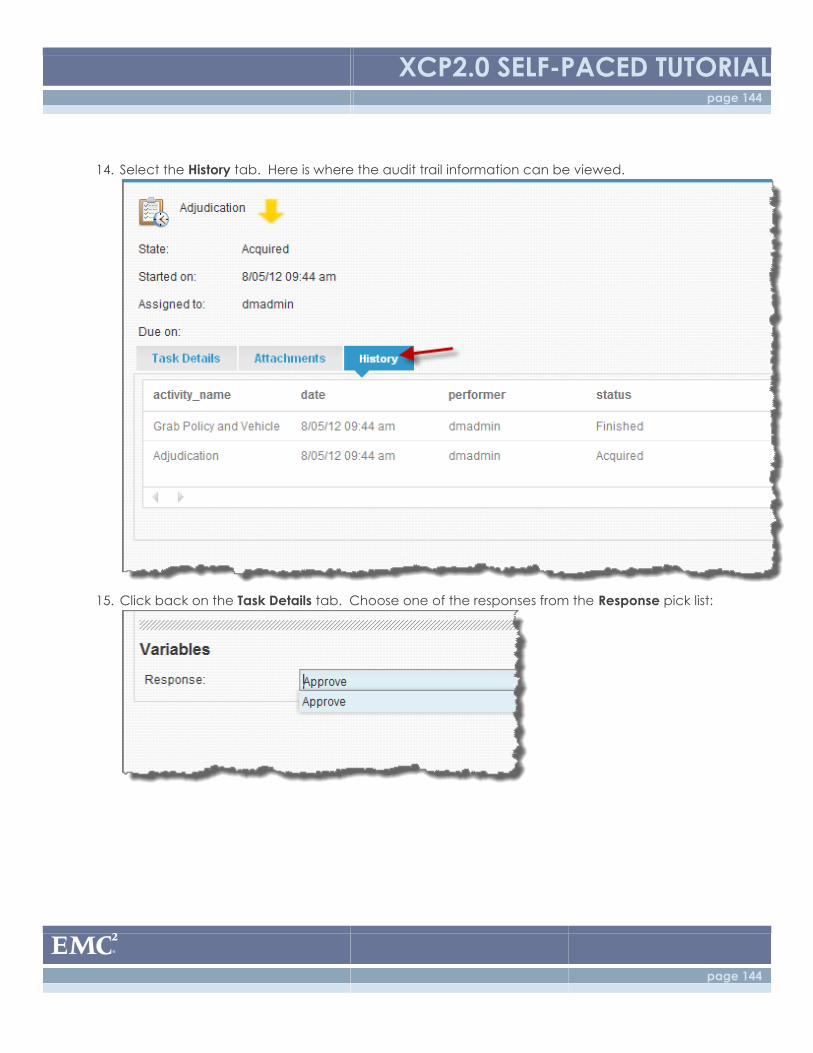
XCP2.0 SELF-PACED TUTORIAL page 144
page 144
14. Select the History tab. Here is where the audit trail information can be viewed.
15. Click back on the Task Details tab. Choose one of the responses from the Response pick list:
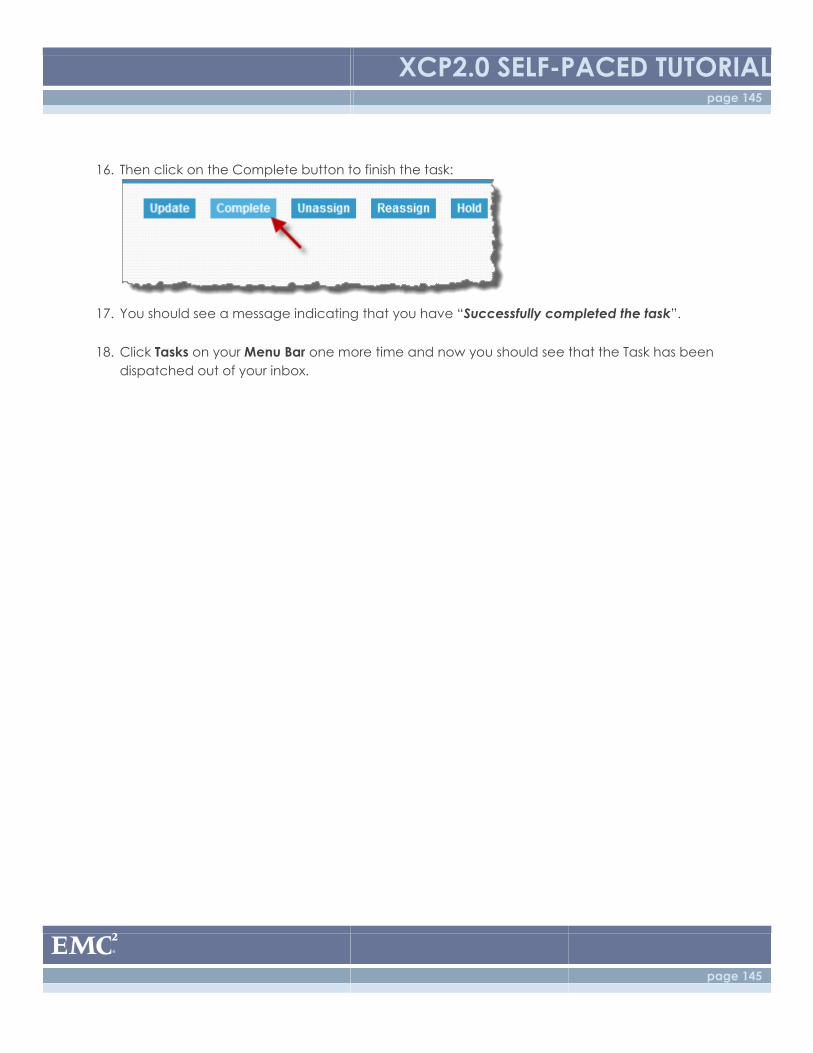
XCP2.0 SELF-PACED TUTORIAL page 145
page 145
16. Then click on the Complete button to finish the task:
17. You should see a message indicating that you have “Successfully completed the task”.
18. Click Tasks on your Menu Bar one more time and now you should see that the Task has been
dispatched out of your inbox.
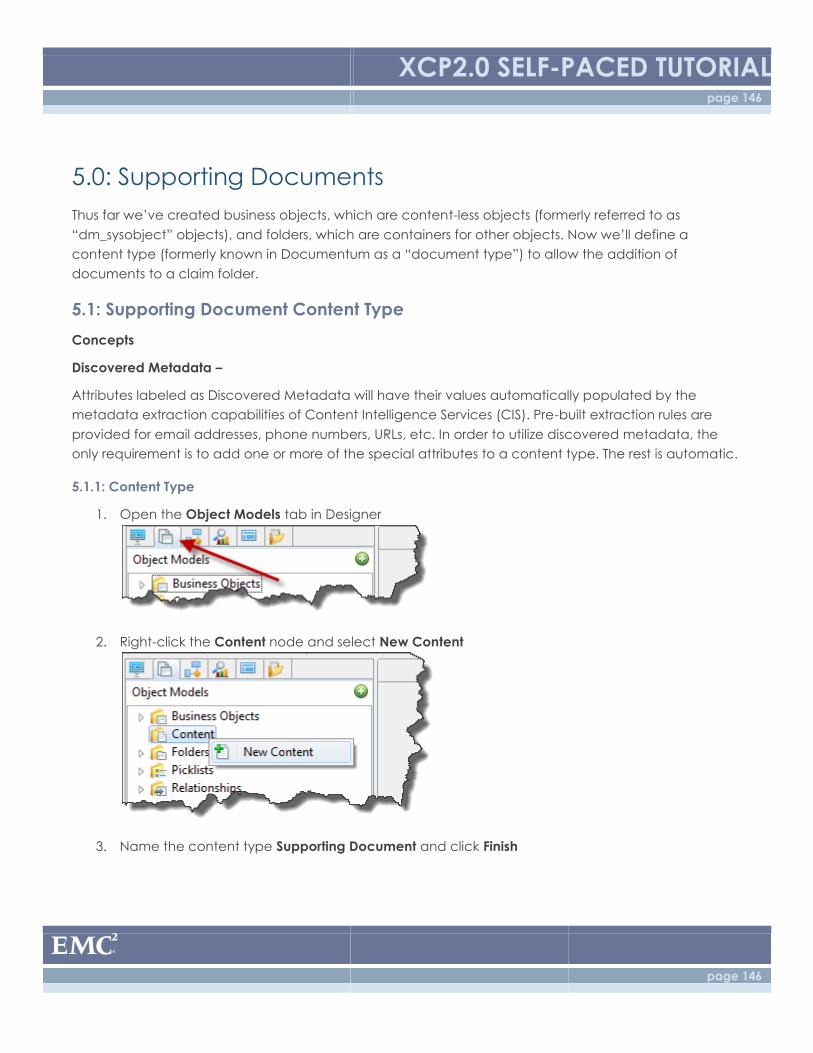
XCP2.0 SELF-PACED TUTORIAL page 146
page 146
5.0: Supporting Documents
Thus far we’ve created business objects, which are content-less objects (formerly referred to as
“dm_sysobject” objects), and folders, which are containers for other objects. Now we’ll define a
content type (formerly known in Documentum as a “document type”) to allow the addition of
documents to a claim folder.
5.1: Supporting Document Content Type
Concepts
Discovered Metadata –
Attributes labeled as Discovered Metadata will have their values automatically populated by the
metadata extraction capabilities of Content Intelligence Services (CIS). Pre-built extraction rules are
provided for email addresses, phone numbers, URLs, etc. In order to utilize discovered metadata, the
only requirement is to add one or more of the special attributes to a content type. The rest is automatic.
5.1.1: Content Type
1. Open the Object Models tab in Designer
2. Right-click the Content node and select New Content
3. Name the content type Supporting Document and click Finish
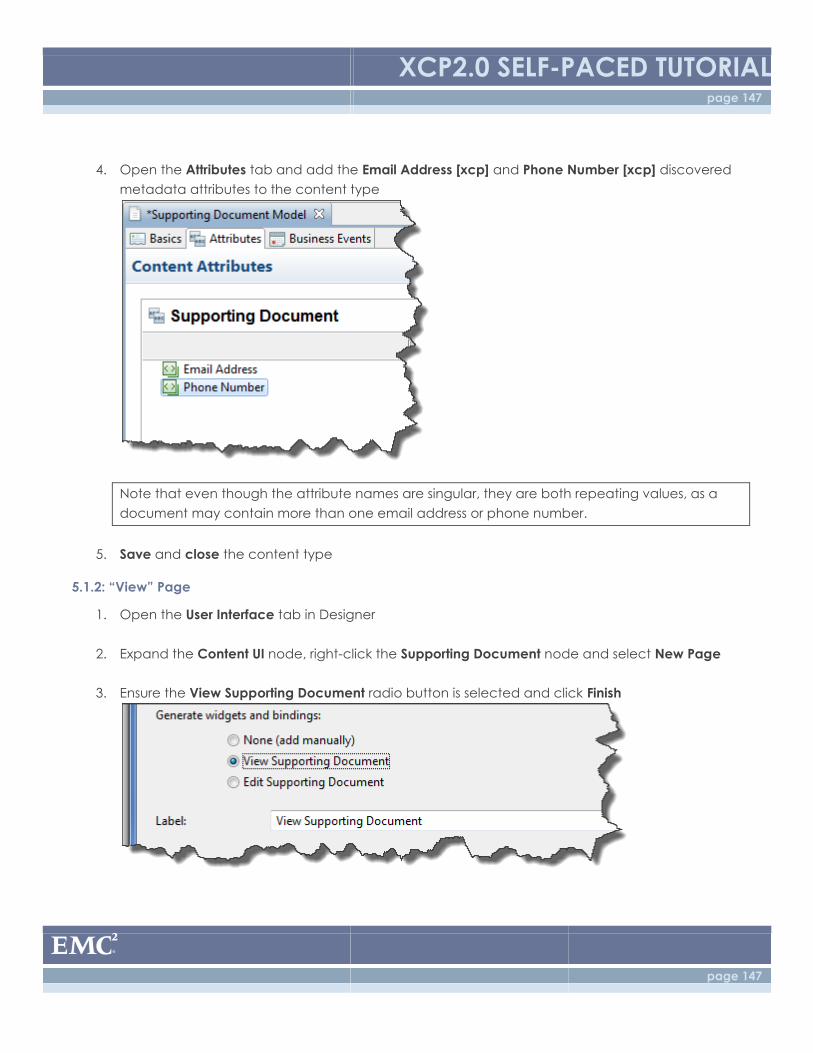
XCP2.0 SELF-PACED TUTORIAL page 147
page 147
4. Open the Attributes tab and add the Email Address [xcp] and Phone Number [xcp] discovered
metadata attributes to the content type
Note that even though the attribute names are singular, they are both repeating values, as a
document may contain more than one email address or phone number.
5. Save and close the content type
5.1.2: “View” Page
1. Open the User Interface tab in Designer
2. Expand the Content UI node, right-click the Supporting Document node and select New Page
3. Ensure the View Supporting Document radio button is selected and click Finish
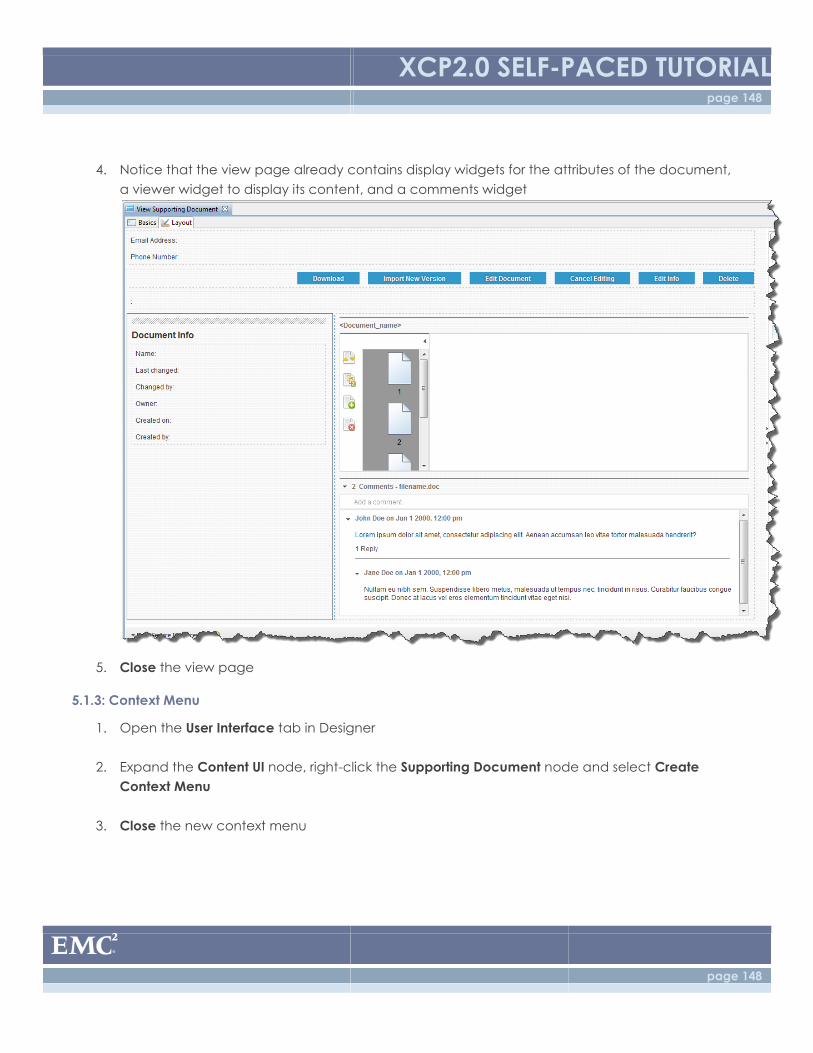
XCP2.0 SELF-PACED TUTORIAL page 148
page 148
4. Notice that the view page already contains display widgets for the attributes of the document,
a viewer widget to display its content, and a comments widget
5. Close the view page
5.1.3: Context Menu
1. Open the User Interface tab in Designer
2. Expand the Content UI node, right-click the Supporting Document node and select Create
Context Menu
3. Close the new context menu
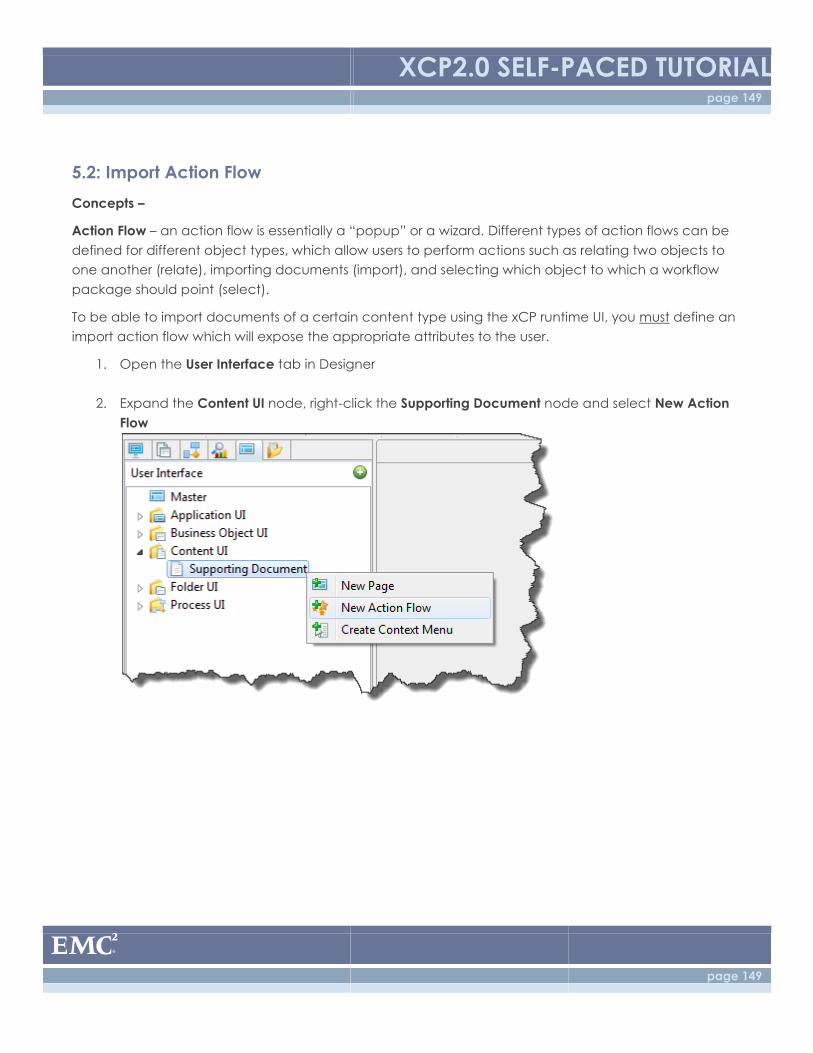
XCP2.0 SELF-PACED TUTORIAL page 149
page 149
5.2: Import Action Flow
Concepts –
Action Flow – an action flow is essentially a “popup” or a wizard. Different types of action flows can be
defined for different object types, which allow users to perform actions such as relating two objects to
one another (relate), importing documents (import), and selecting which object to which a workflow
package should point (select).
To be able to import documents of a certain content type using the xCP runtime UI, you must define an
import action flow which will expose the appropriate attributes to the user.
1. Open the User Interface tab in Designer
2. Expand the Content UI node, right-click the Supporting Document node and select New Action
Flow
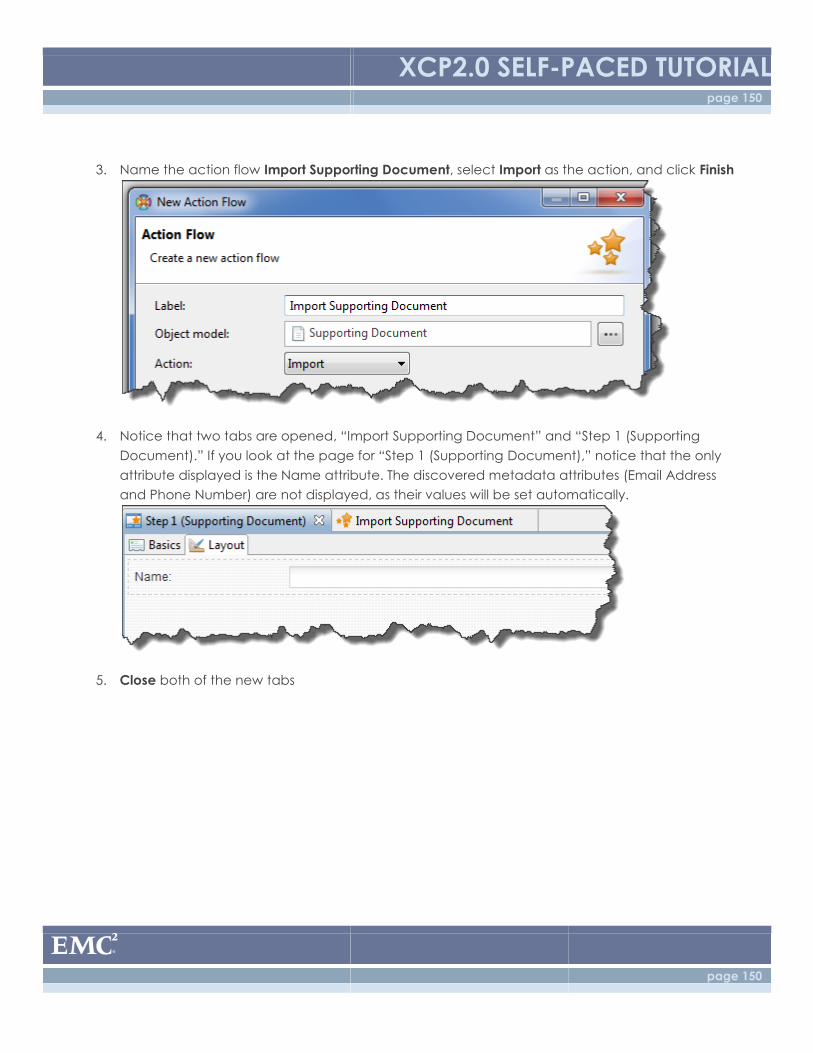
XCP2.0 SELF-PACED TUTORIAL page 150
page 150
3. Name the action flow Import Supporting Document, select Import as the action, and click Finish
4. Notice that two tabs are opened, “Import Supporting Document” and “Step 1 (Supporting
Document).” If you look at the page for “Step 1 (Supporting Document),” notice that the only
attribute displayed is the Name attribute. The discovered metadata attributes (Email Address
and Phone Number) are not displayed, as their values will be set automatically.
5. Close both of the new tabs
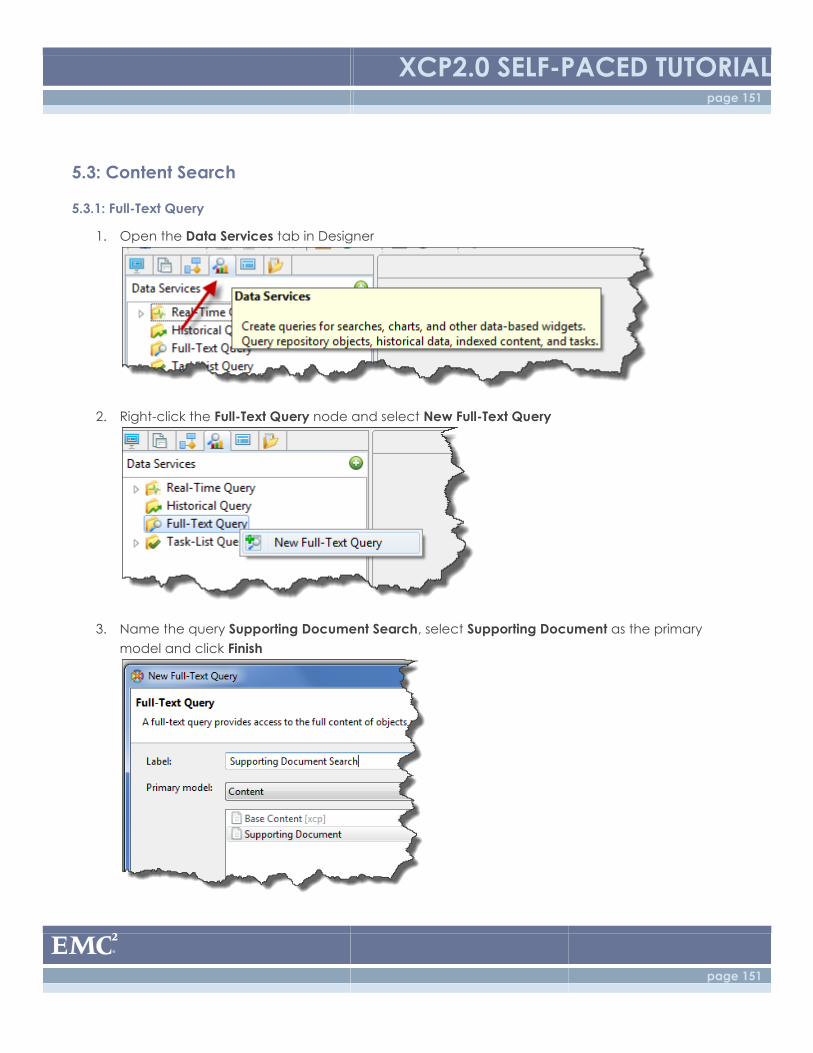
XCP2.0 SELF-PACED TUTORIAL page 151
page 151
5.3: Content Search
5.3.1: Full-Text Query
1. Open the Data Services tab in Designer
2. Right-click the Full-Text Query node and select New Full-Text Query
3. Name the query Supporting Document Search, select Supporting Document as the primary
model and click Finish
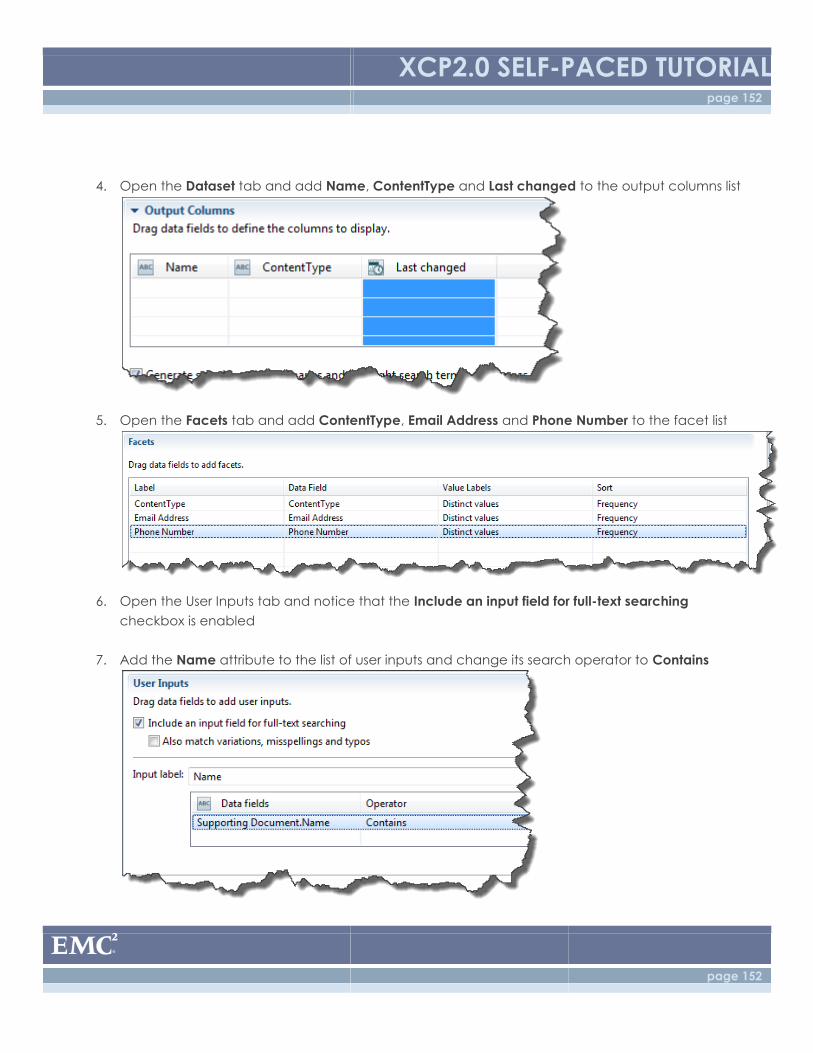
XCP2.0 SELF-PACED TUTORIAL page 152
page 152
4. Open the Dataset tab and add Name, ContentType and Last changed to the output columns list
5. Open the Facets tab and add ContentType, Email Address and Phone Number to the facet list
6. Open the User Inputs tab and notice that the Include an input field for full-text searching
checkbox is enabled
7. Add the Name attribute to the list of user inputs and change its search operator to Contains
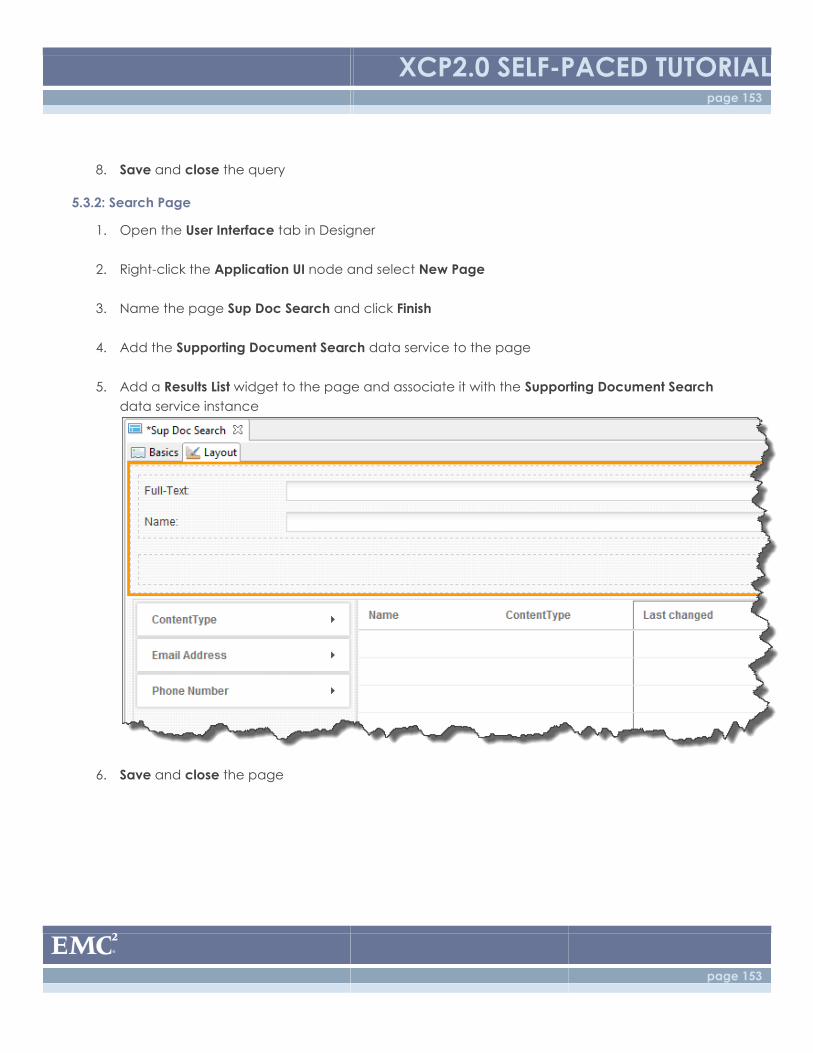
XCP2.0 SELF-PACED TUTORIAL page 153
page 153
8. Save and close the query
5.3.2: Search Page
1. Open the User Interface tab in Designer
2. Right-click the Application UI node and select New Page
3. Name the page Sup Doc Search and click Finish
4. Add the Supporting Document Search data service to the page
5. Add a Results List widget to the page and associate it with the Supporting Document Search
data service instance
6. Save and close the page
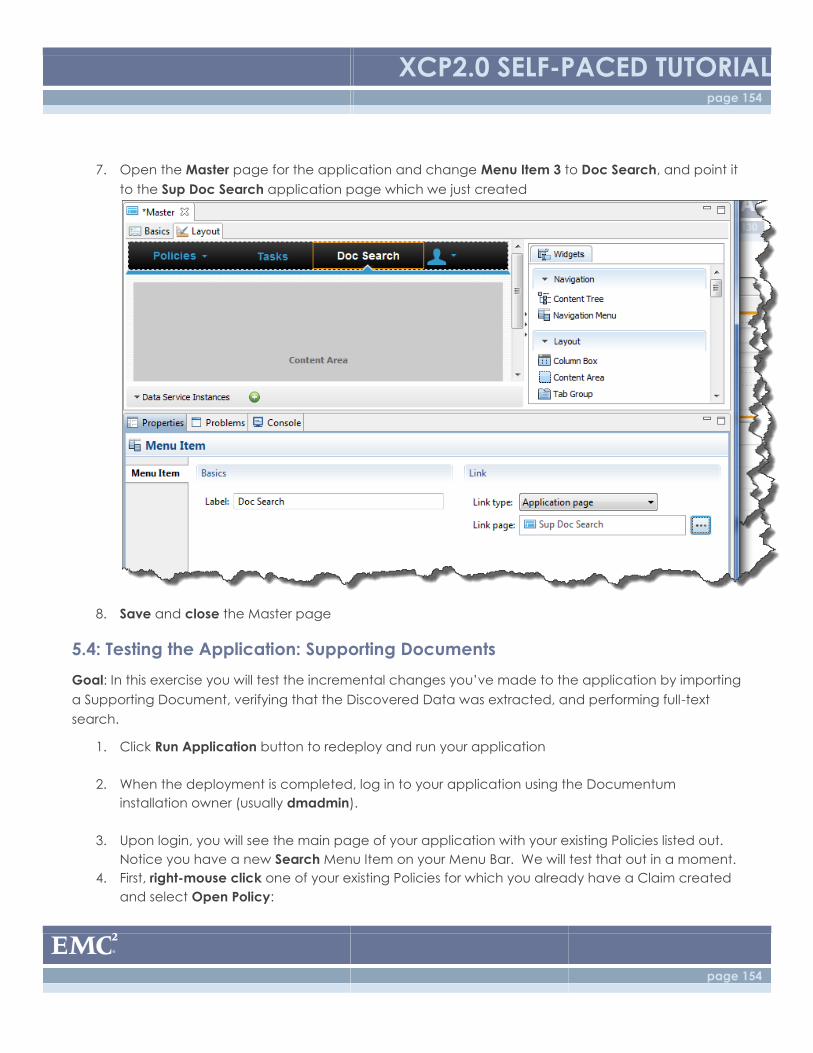
XCP2.0 SELF-PACED TUTORIAL page 154
page 154
7. Open the Master page for the application and change Menu Item 3 to Doc Search, and point it
to the Sup Doc Search application page which we just created
8. Save and close the Master page
5.4: Testing the Application: Supporting Documents
Goal: In this exercise you will test the incremental changes you’ve made to the application by importing
a Supporting Document, verifying that the Discovered Data was extracted, and performing full-text
search.
1. Click Run Application button to redeploy and run your application
2. When the deployment is completed, log in to your application using the Documentum
installation owner (usually dmadmin).
3. Upon login, you will see the main page of your application with your existing Policies listed out.
Notice you have a new Search Menu Item on your Menu Bar. We will test that out in a moment.
4. First, right-mouse click one of your existing Policies for which you already have a Claim created
and select Open Policy:
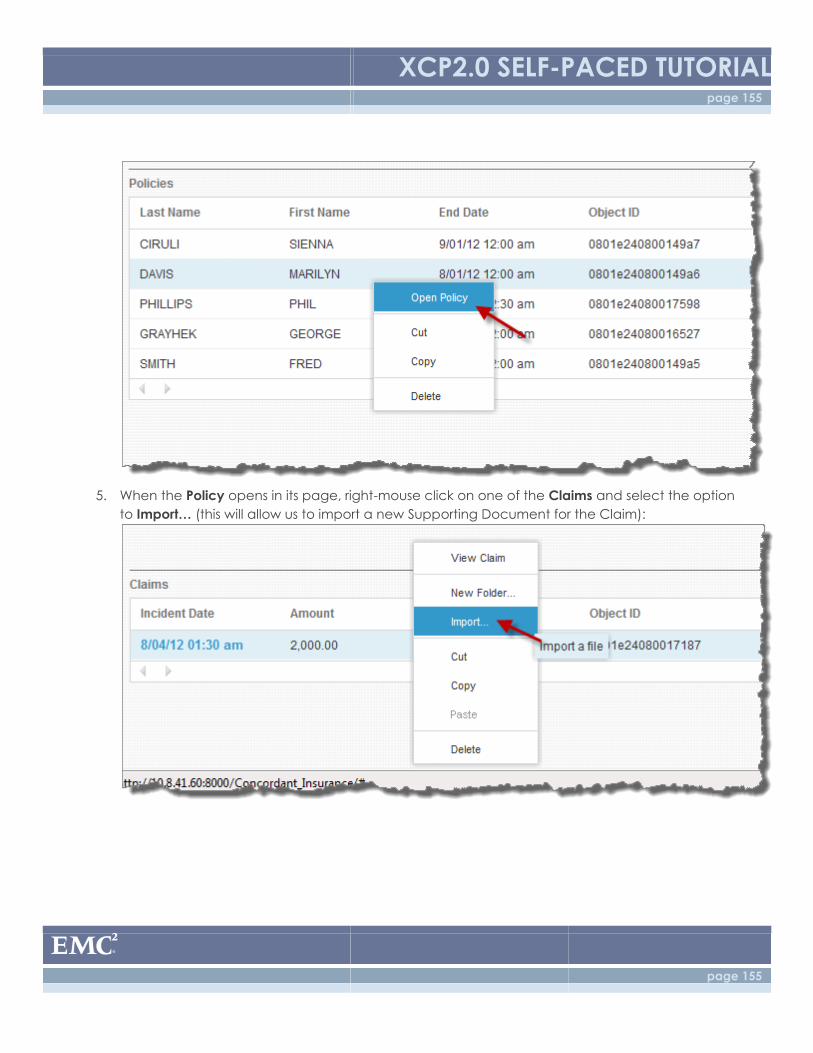
XCP2.0 SELF-PACED TUTORIAL page 155
page 155
5. When the Policy opens in its page, right-mouse click on one of the Claims and select the option
to Import… (this will allow us to import a new Supporting Document for the Claim):
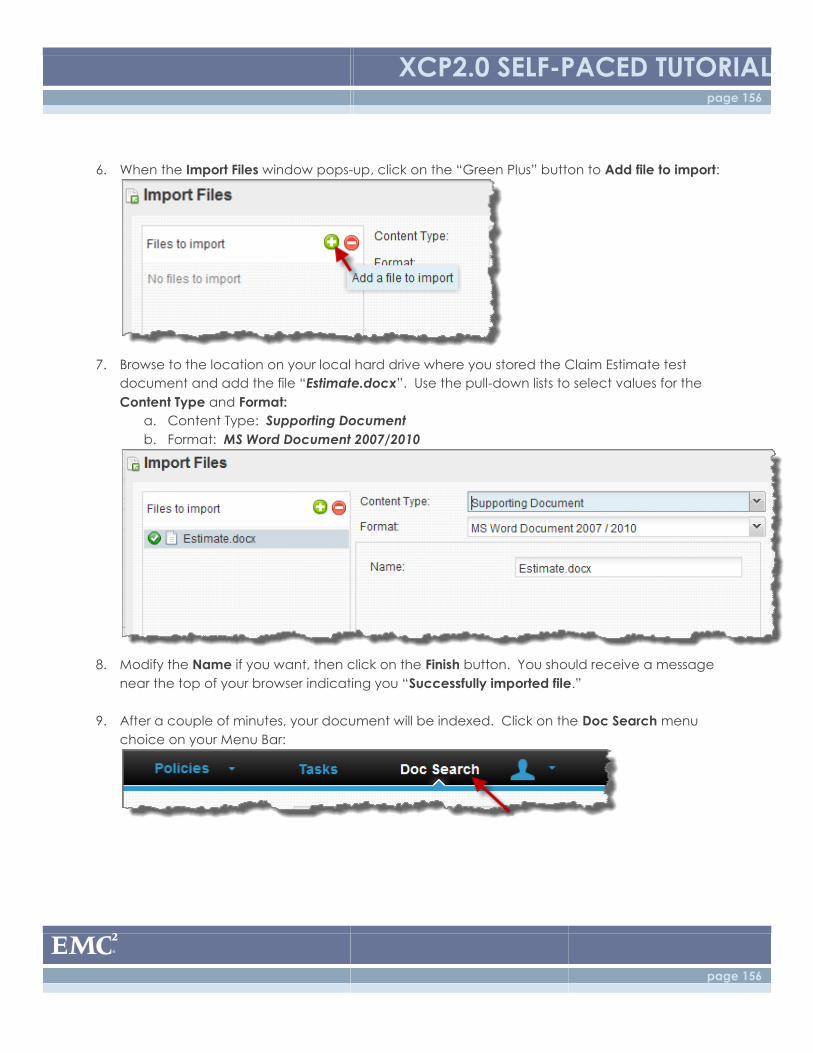
XCP2.0 SELF-PACED TUTORIAL page 156
page 156
6. When the Import Files window pops-up, click on the “Green Plus” button to Add file to import:
7. Browse to the location on your local hard drive where you stored the Claim Estimate test
document and add the file “Estimate.docx”. Use the pull-down lists to select values for the
Content Type and Format:
a. Content Type: Supporting Document
b. Format: MS Word Document 2007/2010
8. Modify the Name if you want, then click on the Finish button. You should receive a message
near the top of your browser indicating you “Successfully imported file.”
9. After a couple of minutes, your document will be indexed. Click on the Doc Search menu
choice on your Menu Bar:
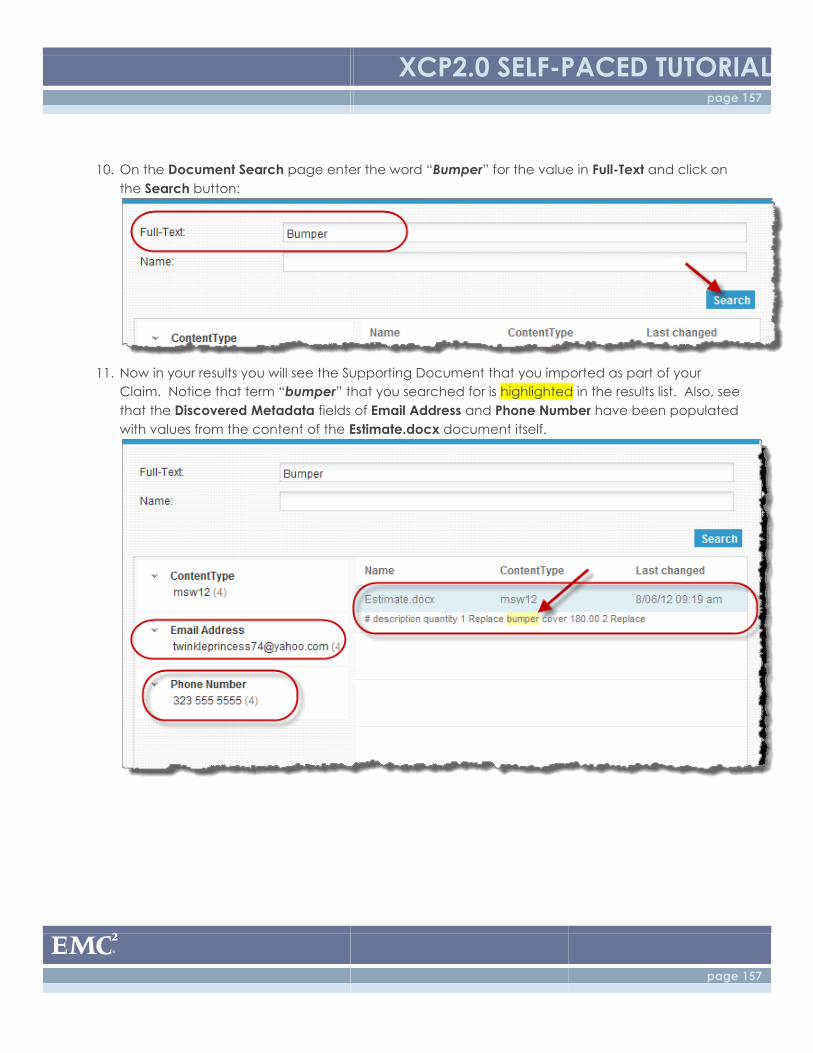
XCP2.0 SELF-PACED TUTORIAL page 157
page 157
10. On the Document Search page enter the word “Bumper” for the value in Full-Text and click on
the Search button:
11. Now in your results you will see the Supporting Document that you imported as part of your
Claim. Notice that term “bumper” that you searched for is highlighted in the results list. Also, see
that the Discovered Metadata fields of Email Address and Phone Number have been populated
with values from the content of the Estimate.docx document itself.
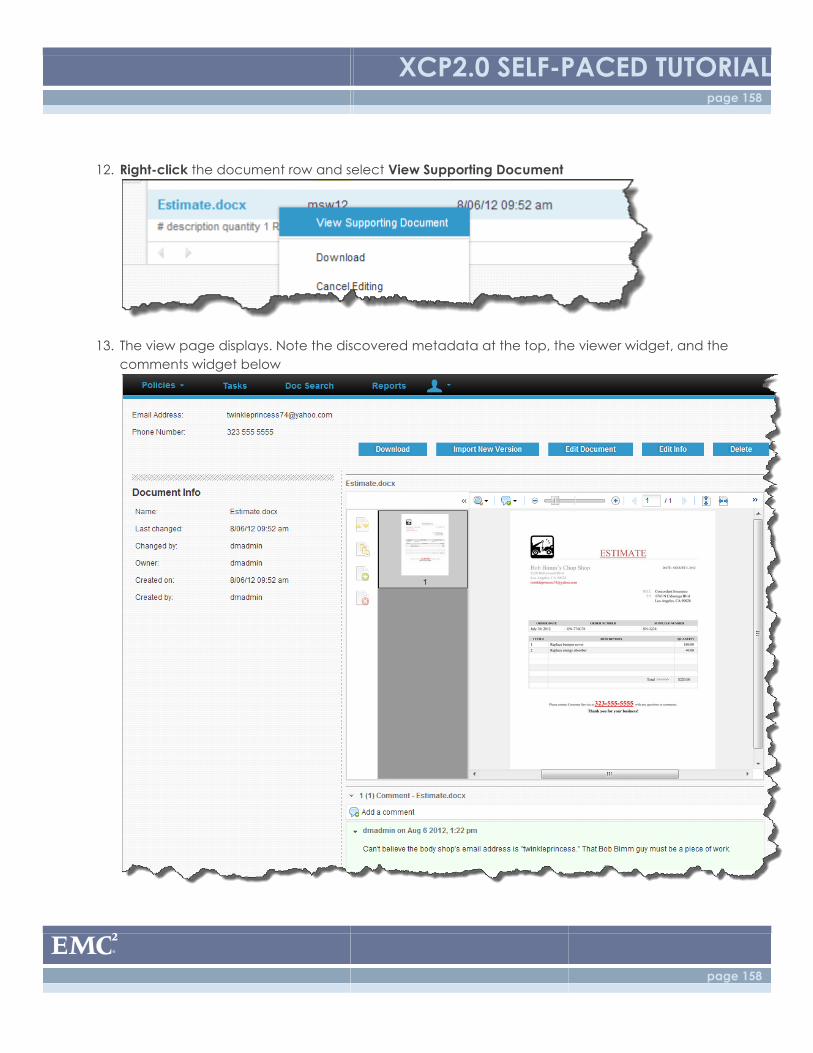
XCP2.0 SELF-PACED TUTORIAL page 158
page 158
12. Right-click the document row and select View Supporting Document
13. The view page displays. Note the discovered metadata at the top, the viewer widget, and the
comments widget below
XCP2.0 SELF-PACED TUTORIAL page 159
page 159
As you may have guessed, the viewer widget, comments widget, etc can ultimately be added
to any page, so long as you correctly wire them to an appropriate object ID.
14. Congratulations, you have successfully implemented Supporting Documents for your Insurance
application.
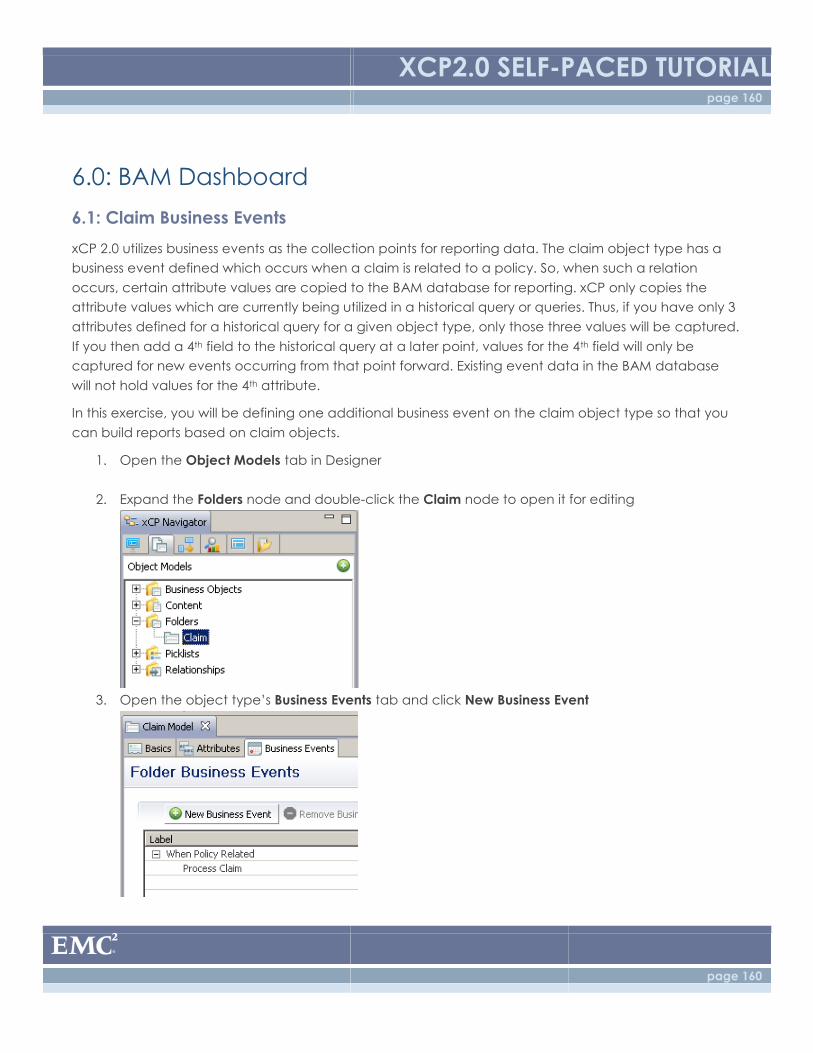
XCP2.0 SELF-PACED TUTORIAL page 160
page 160
6.0: BAM Dashboard
6.1: Claim Business Events
xCP 2.0 utilizes business events as the collection points for reporting data. The claim object type has a
business event defined which occurs when a claim is related to a policy. So, when such a relation
occurs, certain attribute values are copied to the BAM database for reporting. xCP only copies the
attribute values which are currently being utilized in a historical query or queries. Thus, if you have only 3
attributes defined for a historical query for a given object type, only those three values will be captured.
If you then add a 4th field to the historical query at a later point, values for the 4th field will only be
captured for new events occurring from that point forward. Existing event data in the BAM database
will not hold values for the 4th attribute.
In this exercise, you will be defining one additional business event on the claim object type so that you
can build reports based on claim objects.
1. Open the Object Models tab in Designer
2. Expand the Folders node and double-click the Claim node to open it for editing
3. Open the object type’s Business Events tab and click New Business Event
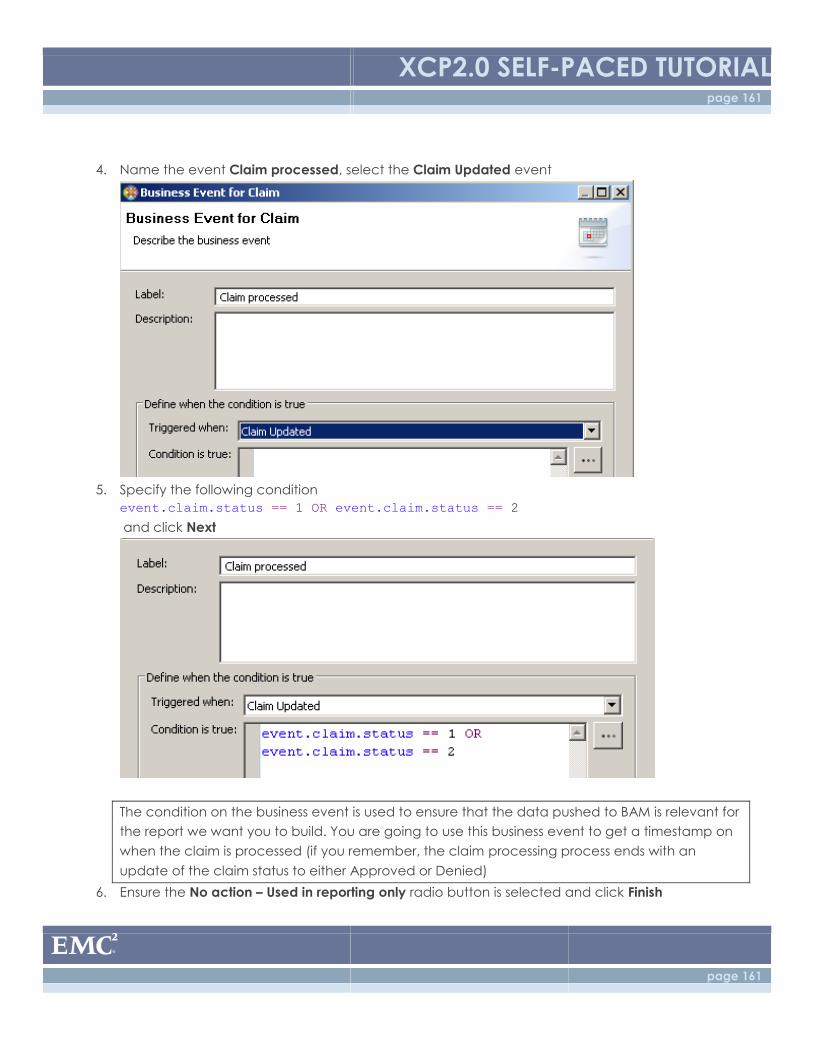
XCP2.0 SELF-PACED TUTORIAL page 161
page 161
4. Name the event Claim processed, select the Claim Updated event
5. Specify the following condition
event.claim.status == 1 OR event.claim.status == 2
and click Next
The condition on the business event is used to ensure that the data pushed to BAM is relevant for
the report we want you to build. You are going to use this business event to get a timestamp on
when the claim is processed (if you remember, the claim processing process ends with an
update of the claim status to either Approved or Denied)
6. Ensure the No action – Used in reporting only radio button is selected and click Finish
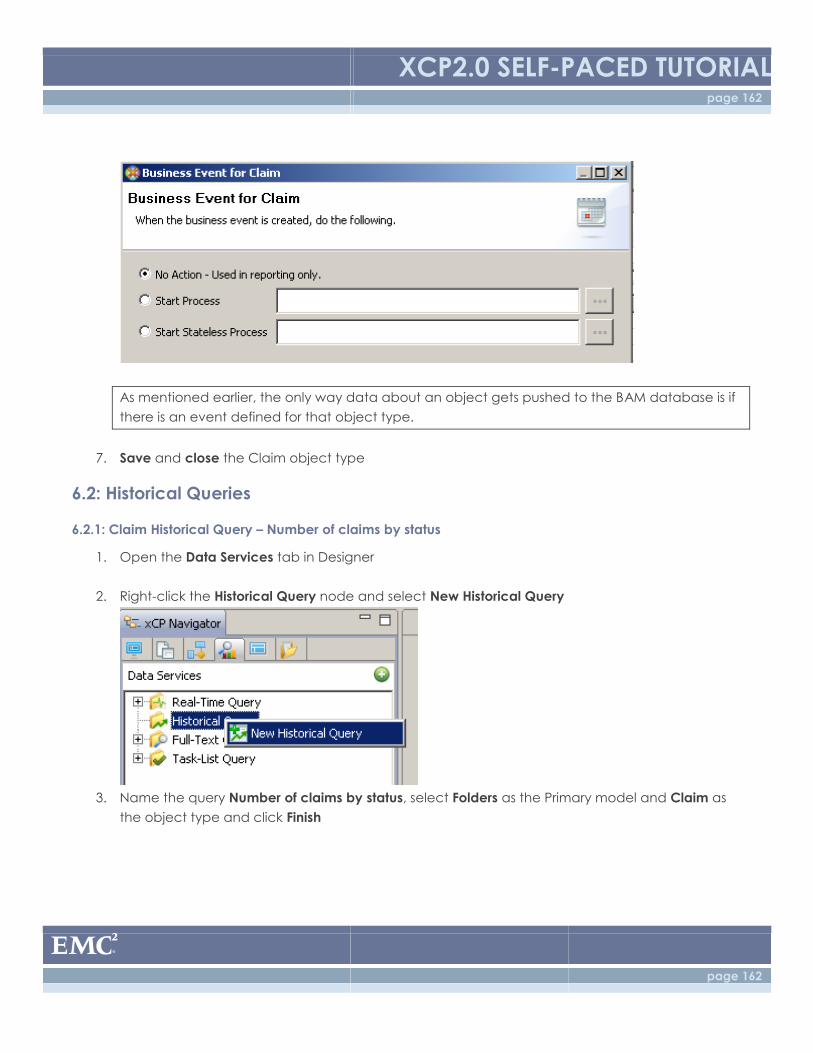
XCP2.0 SELF-PACED TUTORIAL page 162
page 162
As mentioned earlier, the only way data about an object gets pushed to the BAM database is if
there is an event defined for that object type.
7. Save and close the Claim object type
6.2: Historical Queries
6.2.1: Claim Historical Query – Number of claims by status
1. Open the Data Services tab in Designer
2. Right-click the Historical Query node and select New Historical Query
3. Name the query Number of claims by status, select Folders as the Primary model and Claim as
the object type and click Finish
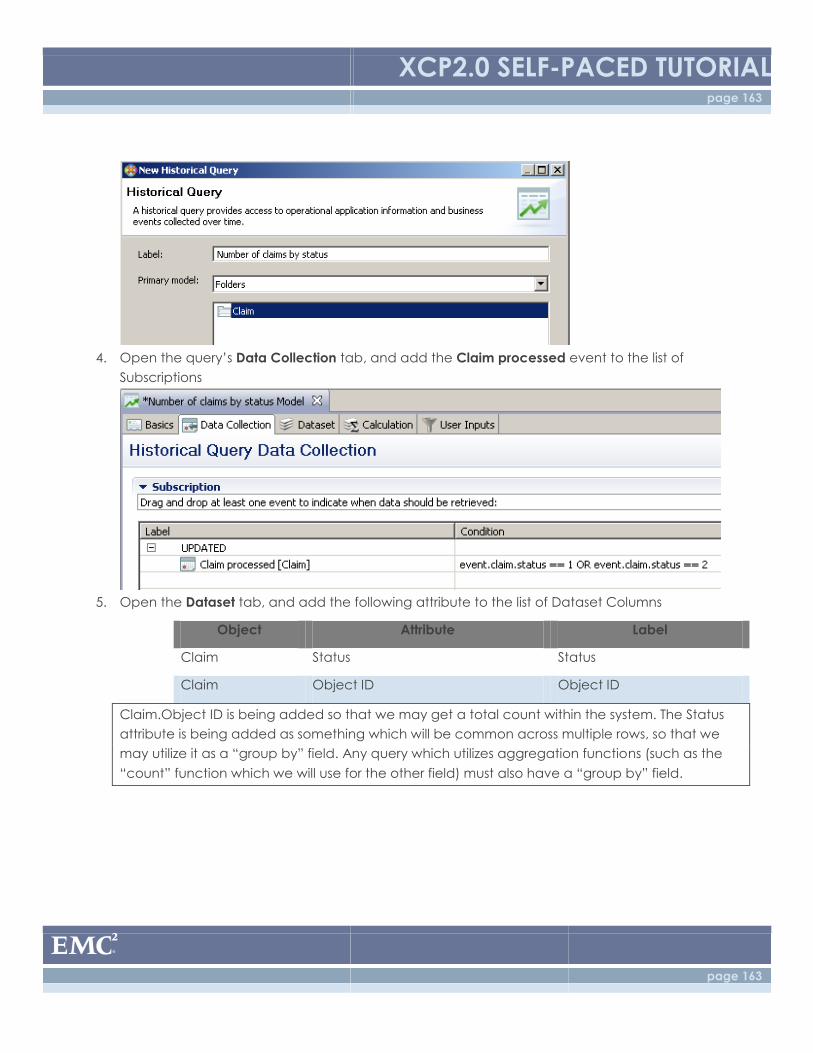
XCP2.0 SELF-PACED TUTORIAL page 163
page 163
4. Open the query’s Data Collection tab, and add the Claim processed event to the list of
Subscriptions
5. Open the Dataset tab, and add the following attribute to the list of Dataset Columns
Object Attribute Label
Claim Status Status
Claim Object ID Object ID
Claim.Object ID is being added so that we may get a total count within the system. The Status
attribute is being added as something which will be common across multiple rows, so that we
may utilize it as a “group by” field. Any query which utilizes aggregation functions (such as the
“count” function which we will use for the other field) must also have a “group by” field.
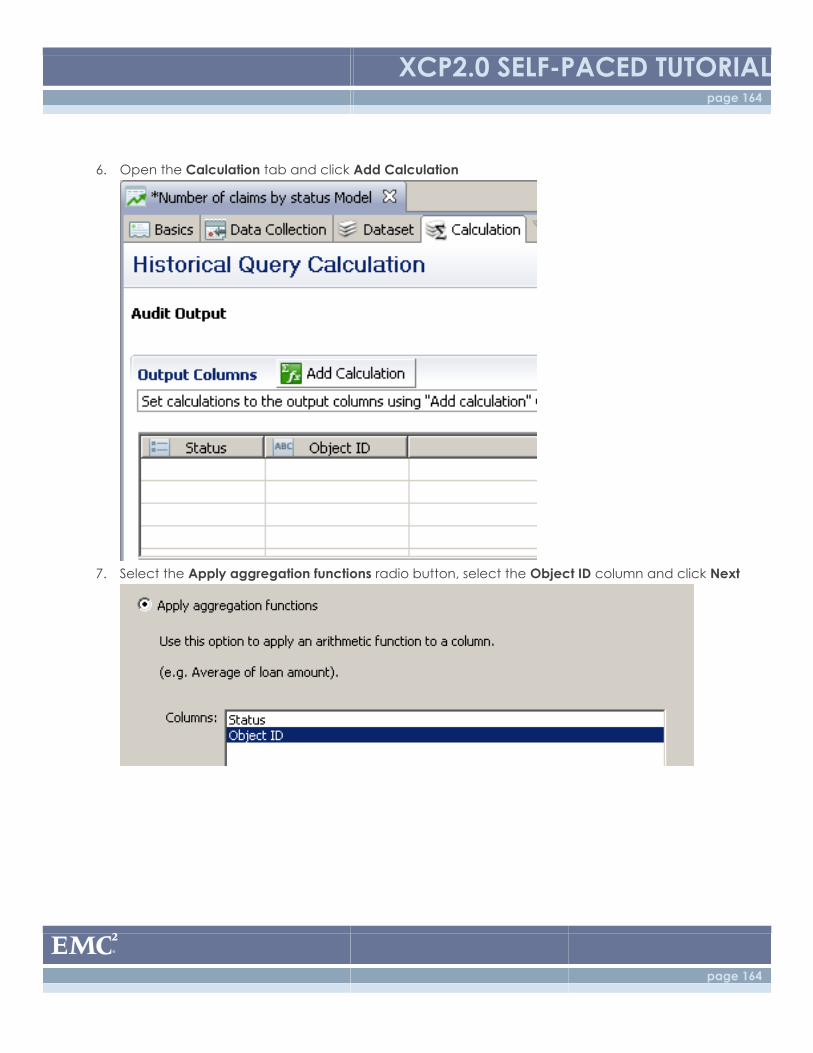
XCP2.0 SELF-PACED TUTORIAL page 164
page 164
6. Open the Calculation tab and click Add Calculation
7. Select the Apply aggregation functions radio button, select the Object ID column and click Next
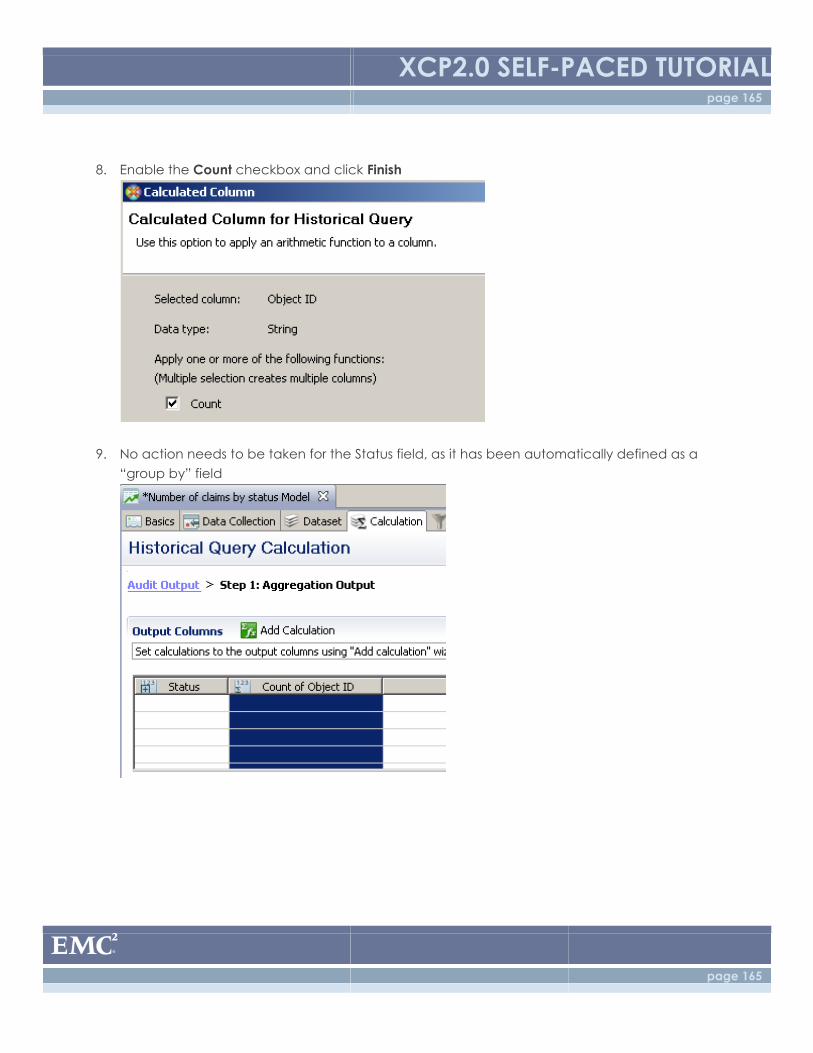
XCP2.0 SELF-PACED TUTORIAL page 165
page 165
8. Enable the Count checkbox and click Finish
9. No action needs to be taken for the Status field, as it has been automatically defined as a
“group by” field
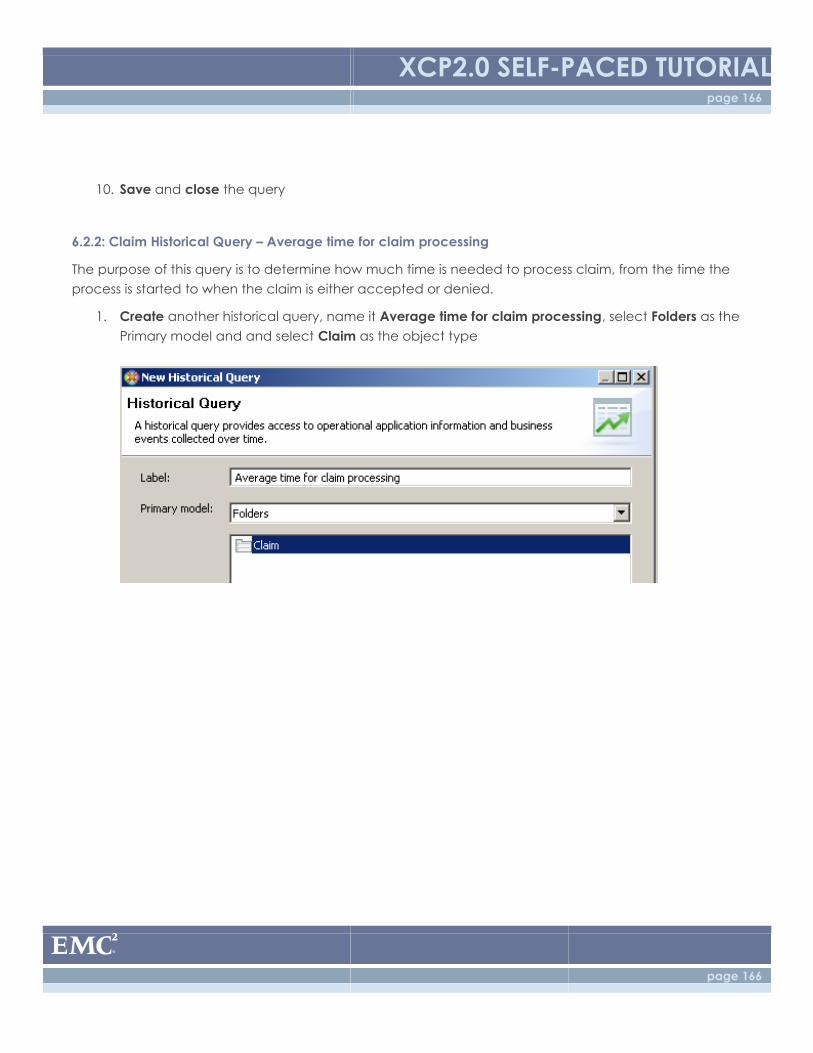
XCP2.0 SELF-PACED TUTORIAL page 166
page 166
10. Save and close the query
6.2.2: Claim Historical Query – Average time for claim processing
The purpose of this query is to determine how much time is needed to process claim, from the time the
process is started to when the claim is either accepted or denied.
1. Create another historical query, name it Average time for claim processing, select Folders as the
Primary model and and select Claim as the object type
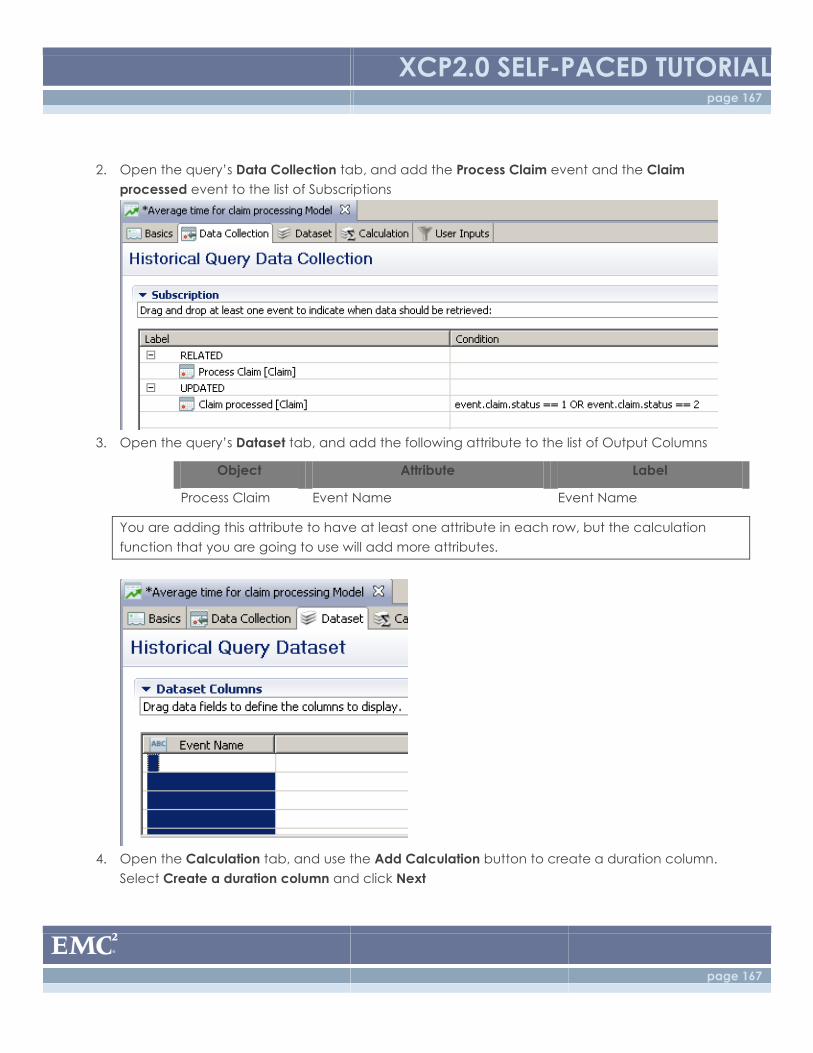
XCP2.0 SELF-PACED TUTORIAL page 167
page 167
2. Open the query’s Data Collection tab, and add the Process Claim event and the Claim
processed event to the list of Subscriptions
3. Open the query’s Dataset tab, and add the following attribute to the list of Output Columns
Object Attribute Label
Process Claim Event Name Event Name
You are adding this attribute to have at least one attribute in each row, but the calculation
function that you are going to use will add more attributes.
4. Open the Calculation tab, and use the Add Calculation button to create a duration column.
Select Create a duration column and click Next
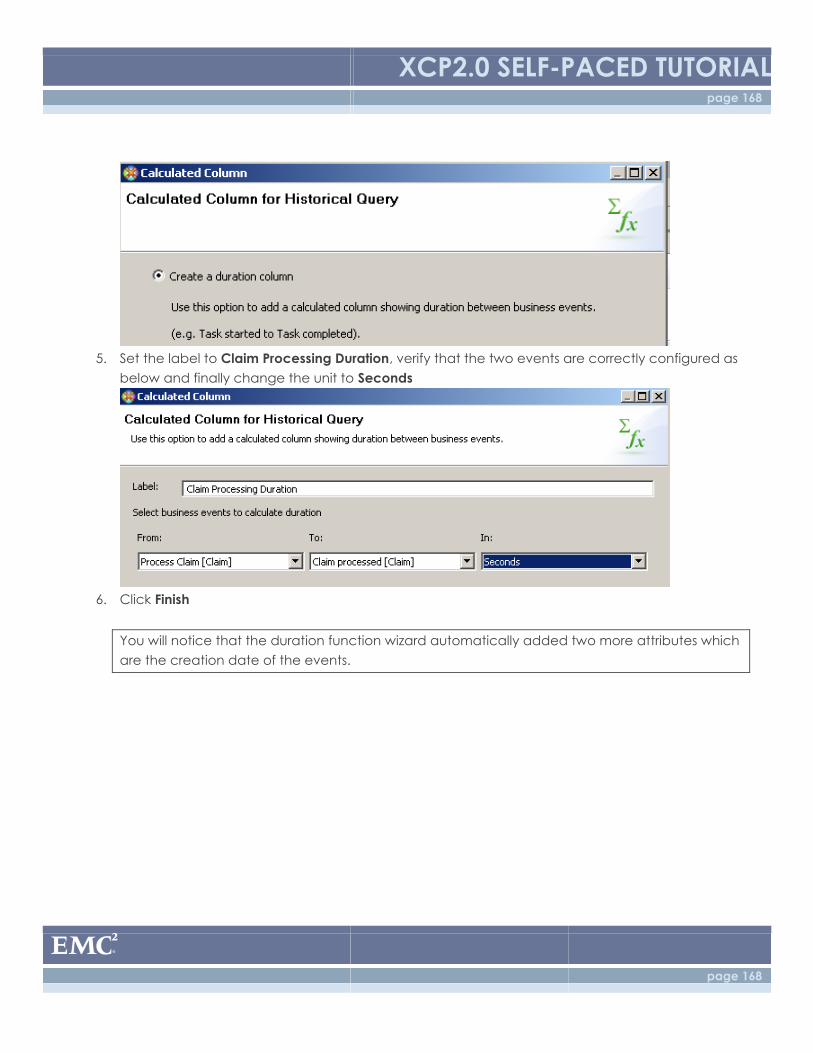
XCP2.0 SELF-PACED TUTORIAL page 168
page 168
5. Set the label to Claim Processing Duration, verify that the two events are correctly configured as
below and finally change the unit to Seconds
6. Click Finish
You will notice that the duration function wizard automatically added two more attributes which
are the creation date of the events.

XCP2.0 SELF-PACED TUTORIAL page 169
page 169
7. Add one more calculation by clicking on Add Calculation, select Apply aggregation functions,
choose the Claim Processing Duration column and click Next
8. Select the Average function and click Finish
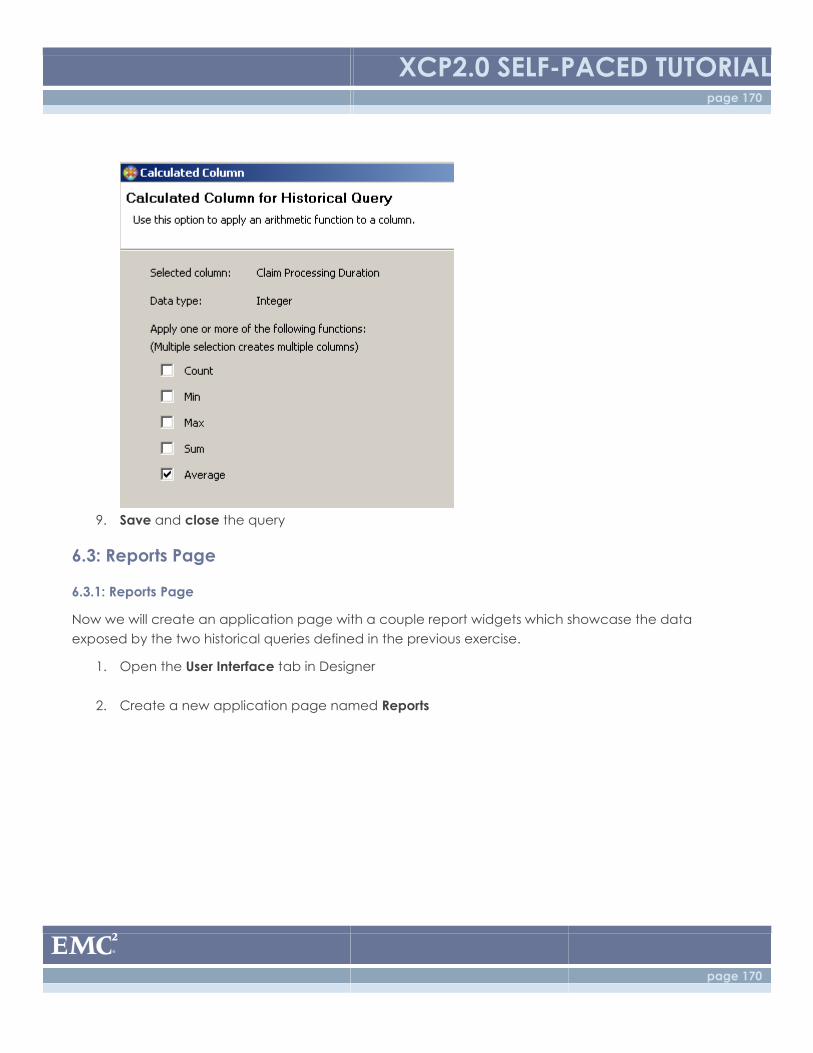
XCP2.0 SELF-PACED TUTORIAL page 170
page 170
9. Save and close the query
6.3: Reports Page
6.3.1: Reports Page
Now we will create an application page with a couple report widgets which showcase the data
exposed by the two historical queries defined in the previous exercise.
1. Open the User Interface tab in Designer
2. Create a new application page named Reports
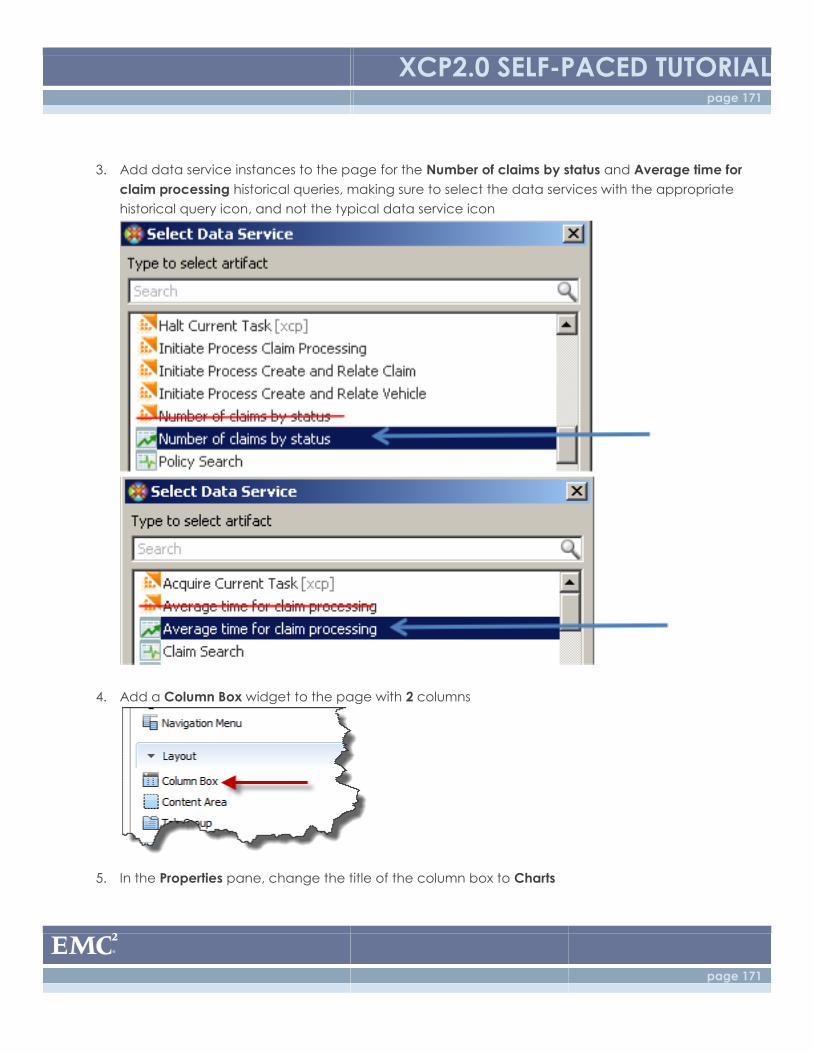
XCP2.0 SELF-PACED TUTORIAL page 171
page 171
3. Add data service instances to the page for the Number of claims by status and Average time for
claim processing historical queries, making sure to select the data services with the appropriate
historical query icon, and not the typical data service icon
4. Add a Column Box widget to the page with 2 columns
5. In the Properties pane, change the title of the column box to Charts
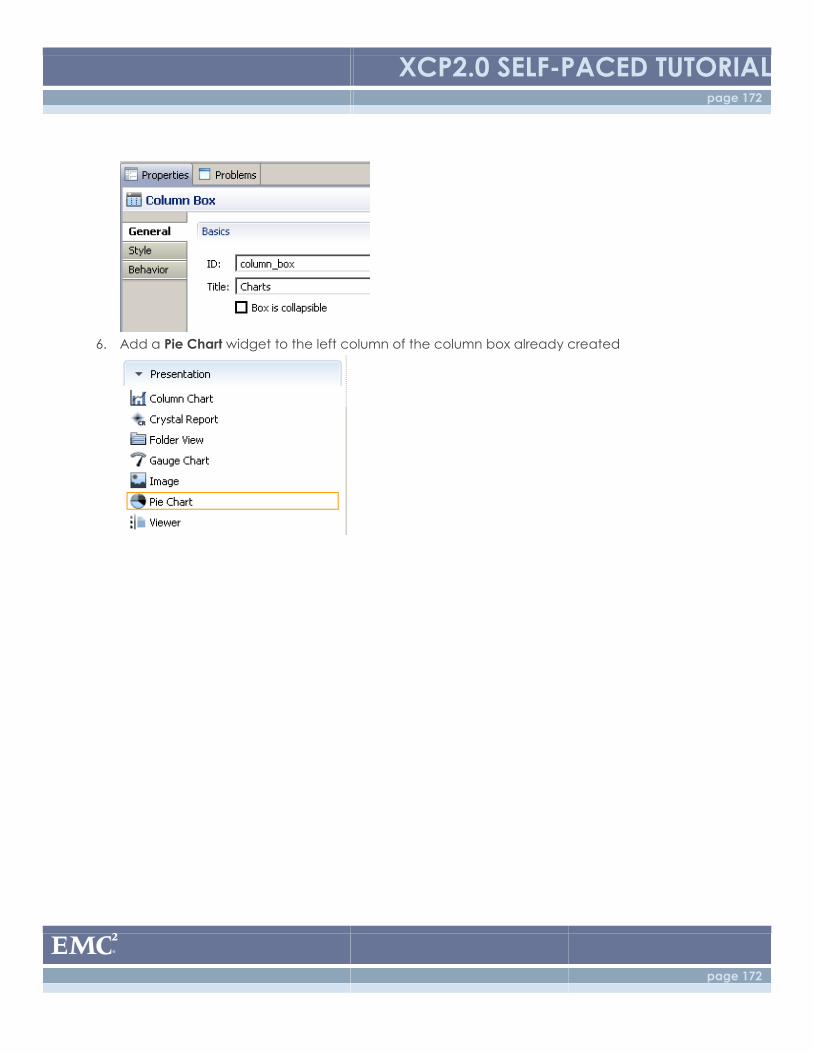
XCP2.0 SELF-PACED TUTORIAL page 172
page 172
6. Add a Pie Chart widget to the left column of the column box already created
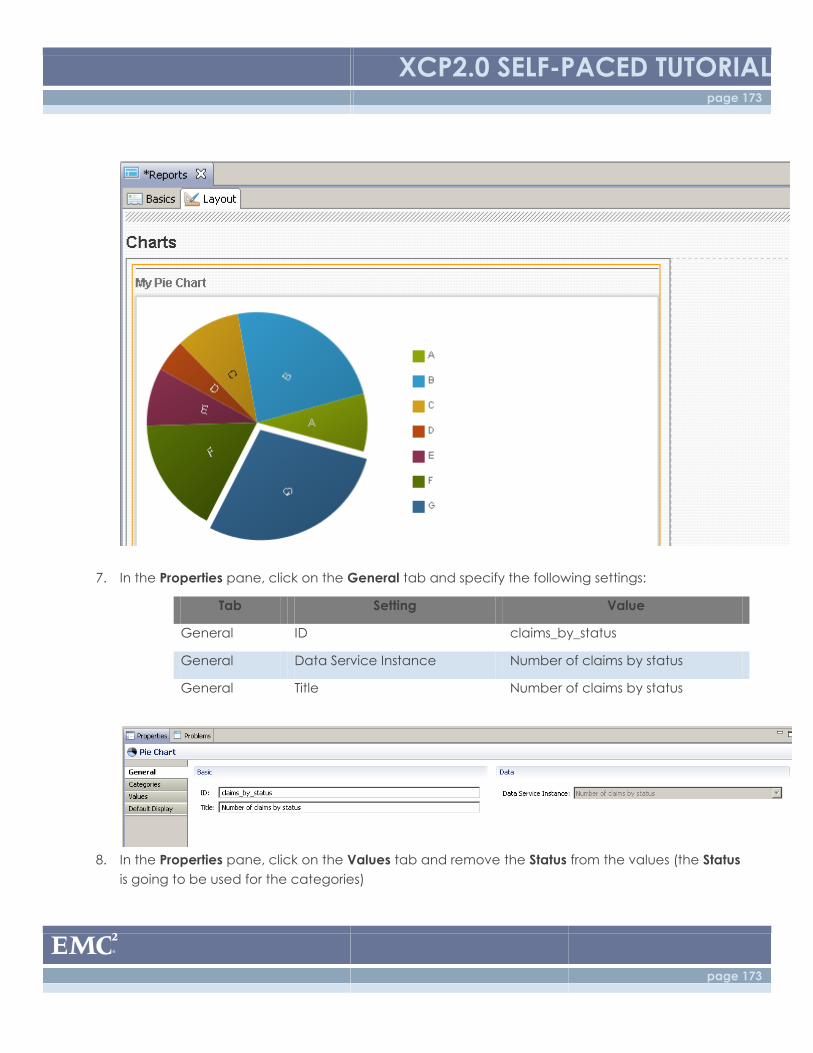
XCP2.0 SELF-PACED TUTORIAL page 173
page 173
7. In the Properties pane, click on the General tab and specify the following settings:
Tab Setting Value
General ID claims_by_status
General Data Service Instance Number of claims by status
General Title Number of claims by status
8. In the Properties pane, click on the Values tab and remove the Status from the values (the Status
is going to be used for the categories)
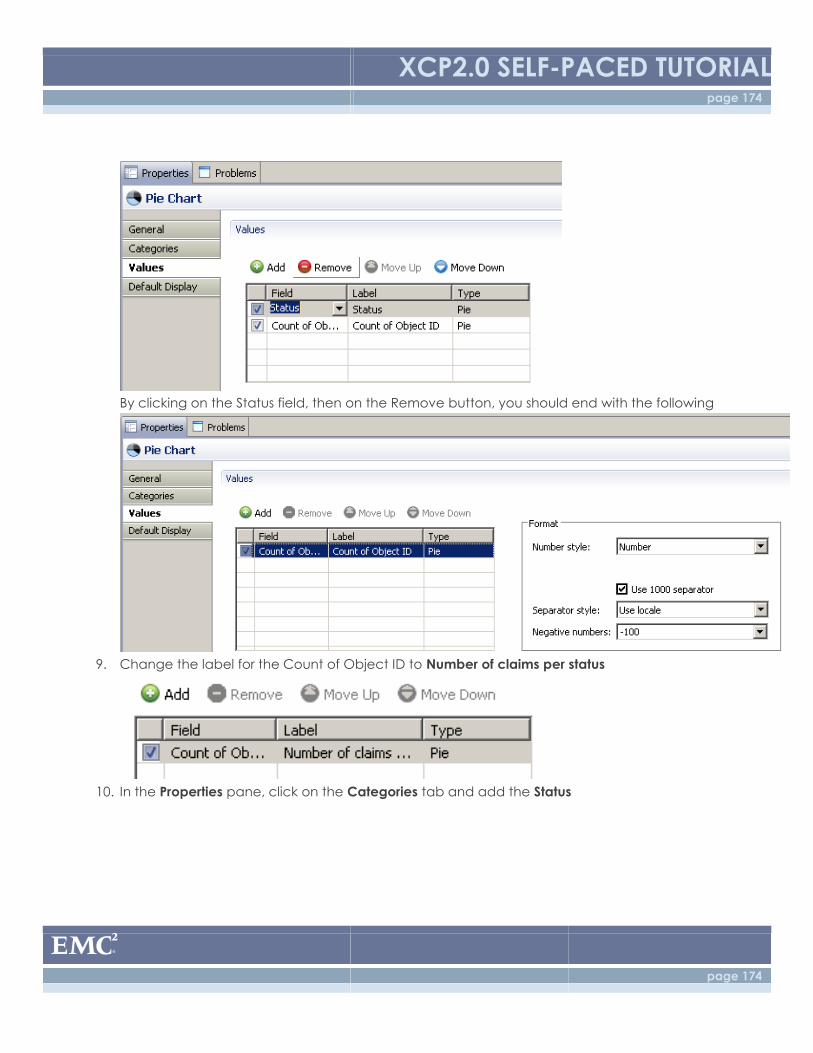
XCP2.0 SELF-PACED TUTORIAL page 174
page 174
By clicking on the Status field, then on the Remove button, you should end with the following
9. Change the label for the Count of Object ID to Number of claims per status
10. In the Properties pane, click on the Categories tab and add the Status
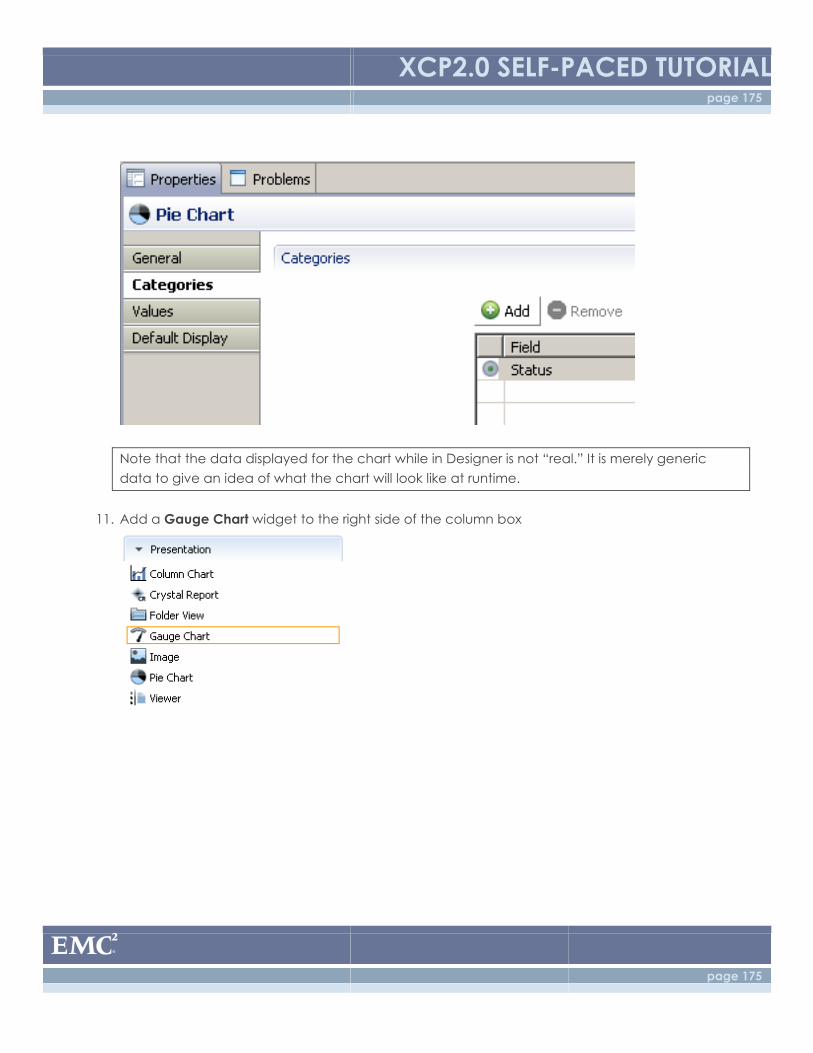
XCP2.0 SELF-PACED TUTORIAL page 175
page 175
Note that the data displayed for the chart while in Designer is not “real.” It is merely generic
data to give an idea of what the chart will look like at runtime.
11. Add a Gauge Chart widget to the right side of the column box
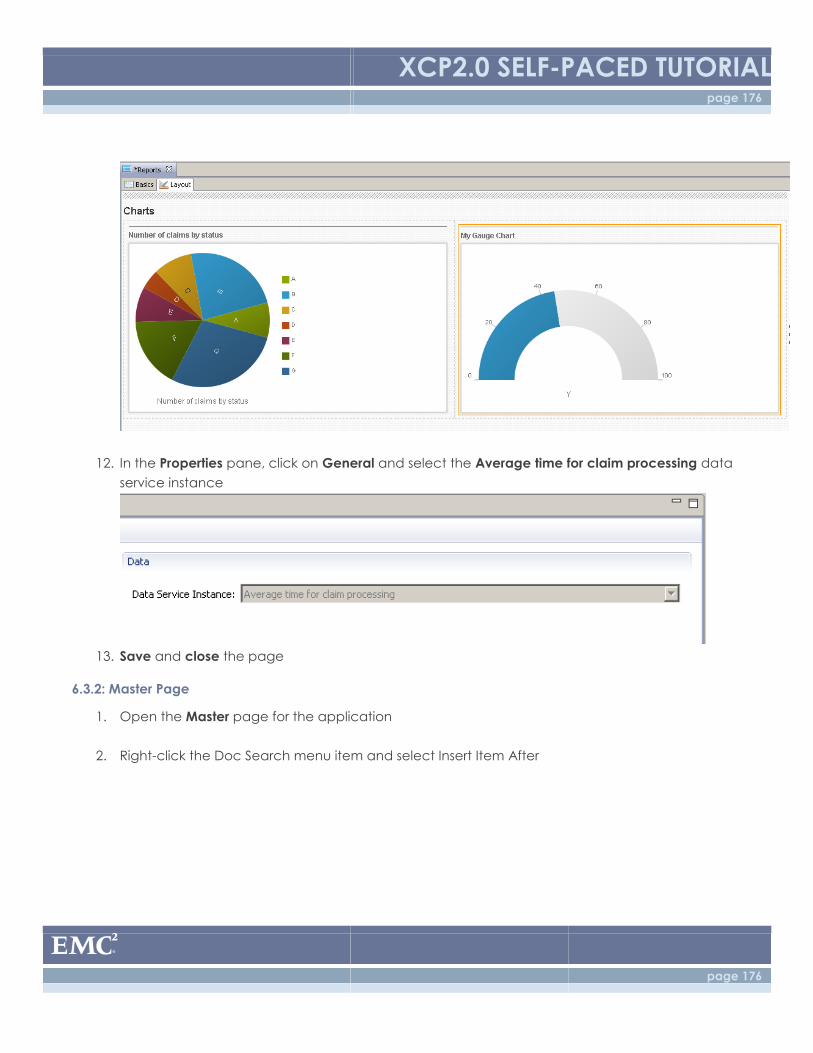
XCP2.0 SELF-PACED TUTORIAL page 176
page 176
12. In the Properties pane, click on General and select the Average time for claim processing data
service instance
13. Save and close the page
6.3.2: Master Page
1. Open the Master page for the application
2. Right-click the Doc Search menu item and select Insert Item After
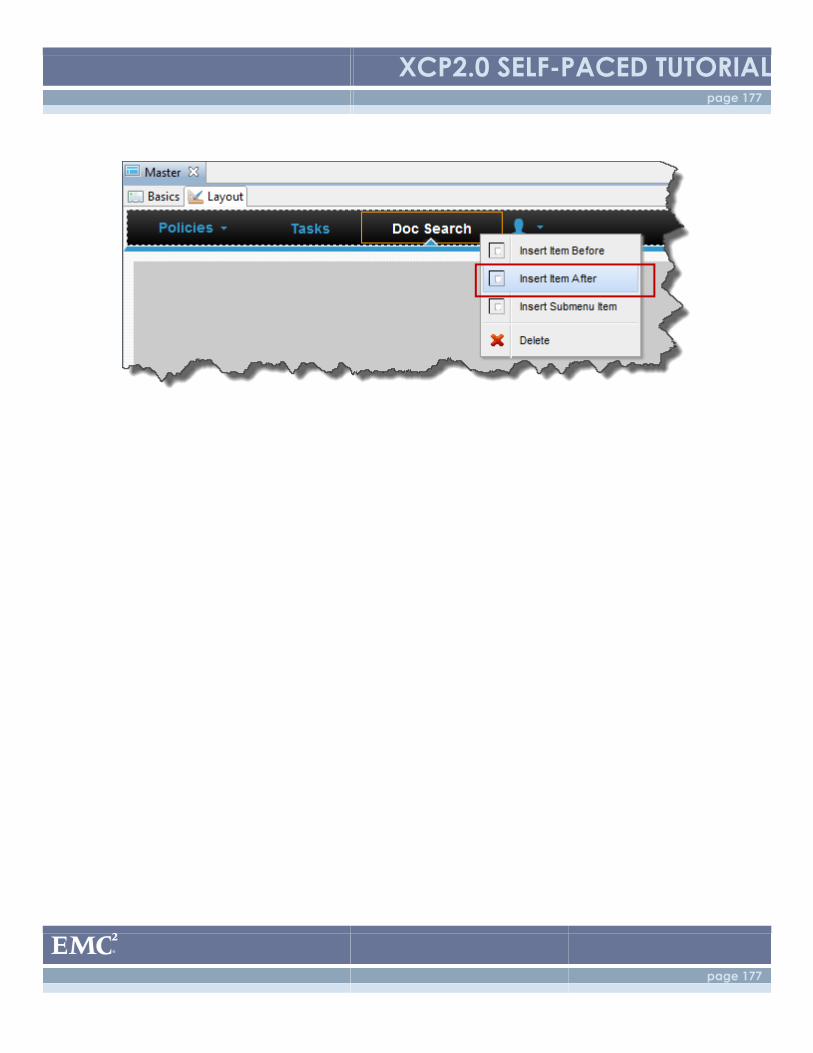
XCP2.0 SELF-PACED TUTORIAL page 177
page 177
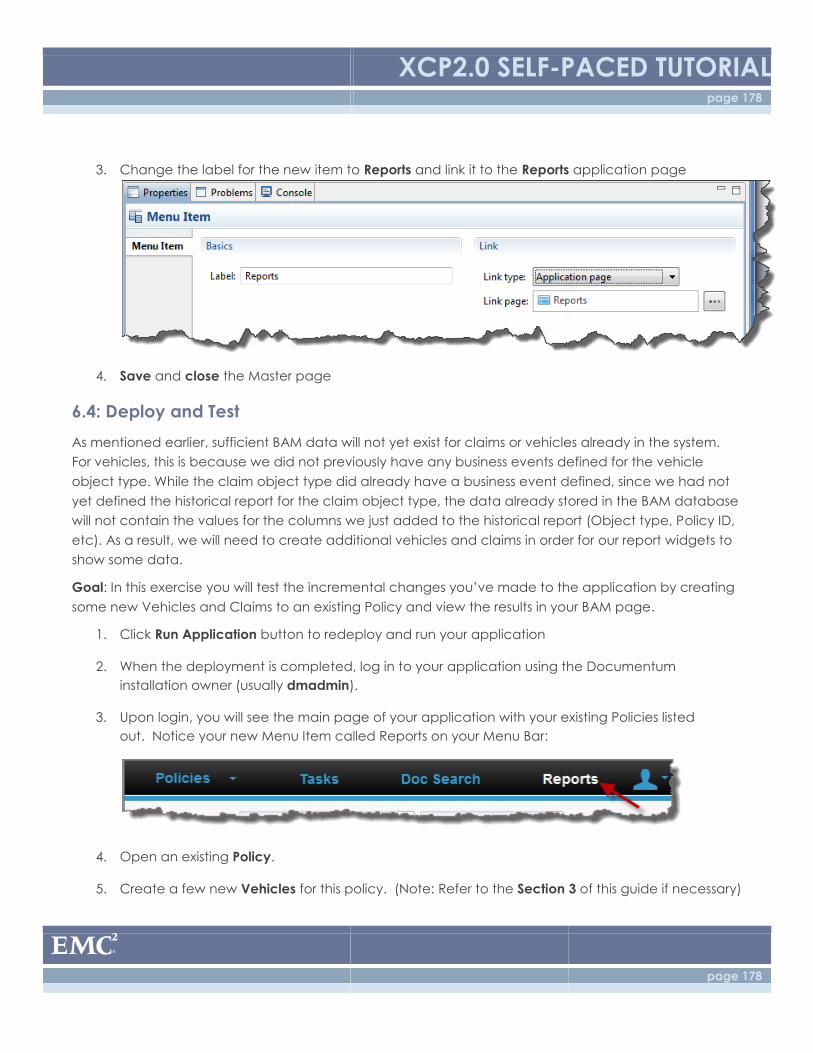
XCP2.0 SELF-PACED TUTORIAL page 178
page 178
3. Change the label for the new item to Reports and link it to the Reports application page
4. Save and close the Master page
6.4: Deploy and Test
As mentioned earlier, sufficient BAM data will not yet exist for claims or vehicles already in the system.
For vehicles, this is because we did not previously have any business events defined for the vehicle
object type. While the claim object type did already have a business event defined, since we had not
yet defined the historical report for the claim object type, the data already stored in the BAM database
will not contain the values for the columns we just added to the historical report (Object type, Policy ID,
etc). As a result, we will need to create additional vehicles and claims in order for our report widgets to
show some data.
Goal: In this exercise you will test the incremental changes you’ve made to the application by creating
some new Vehicles and Claims to an existing Policy and view the results in your BAM page.
1. Click Run Application button to redeploy and run your application
2. When the deployment is completed, log in to your application using the Documentum
installation owner (usually dmadmin).
3. Upon login, you will see the main page of your application with your existing Policies listed
out. Notice your new Menu Item called Reports on your Menu Bar:
4. Open an existing Policy.
5. Create a few new Vehicles for this policy. (Note: Refer to the Section 3 of this guide if necessary)
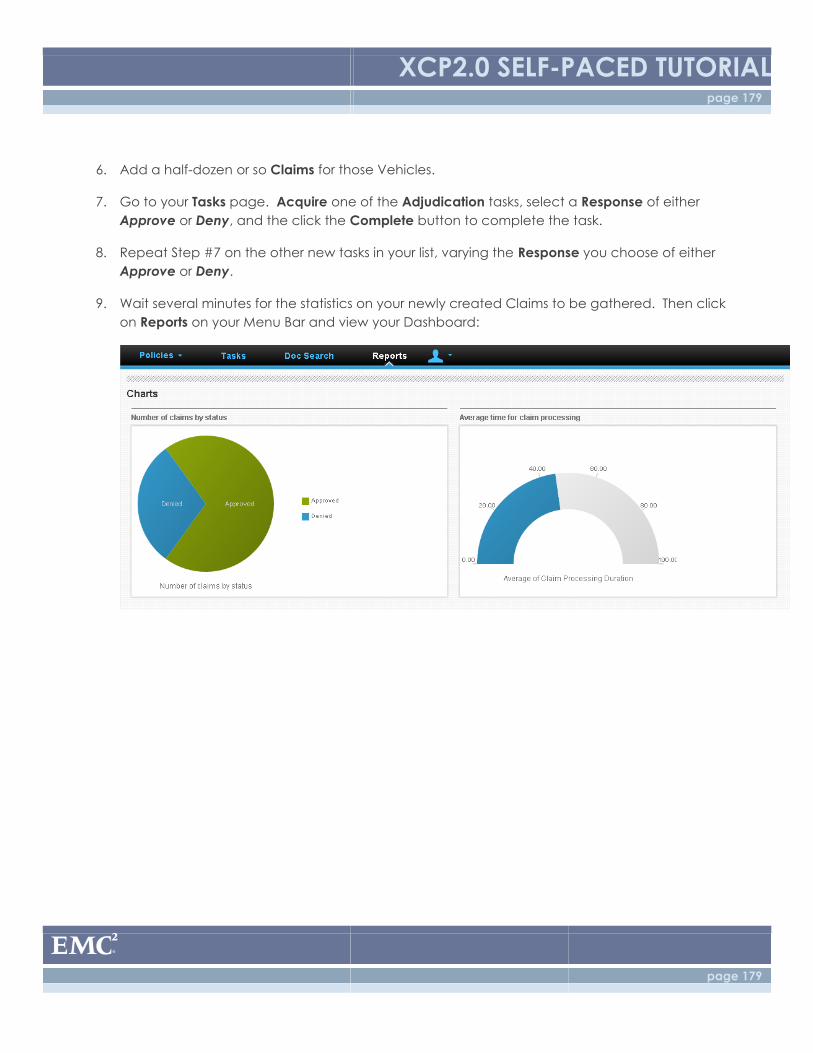
XCP2.0 SELF-PACED TUTORIAL page 179
page 179
6. Add a half-dozen or so Claims for those Vehicles.
7. Go to your Tasks page. Acquire one of the Adjudication tasks, select a Response of either
Approve or Deny, and the click the Complete button to complete the task.
8. Repeat Step #7 on the other new tasks in your list, varying the Response you choose of either
Approve or Deny.
9. Wait several minutes for the statistics on your newly created Claims to be gathered. Then click
on Reports on your Menu Bar and view your Dashboard:
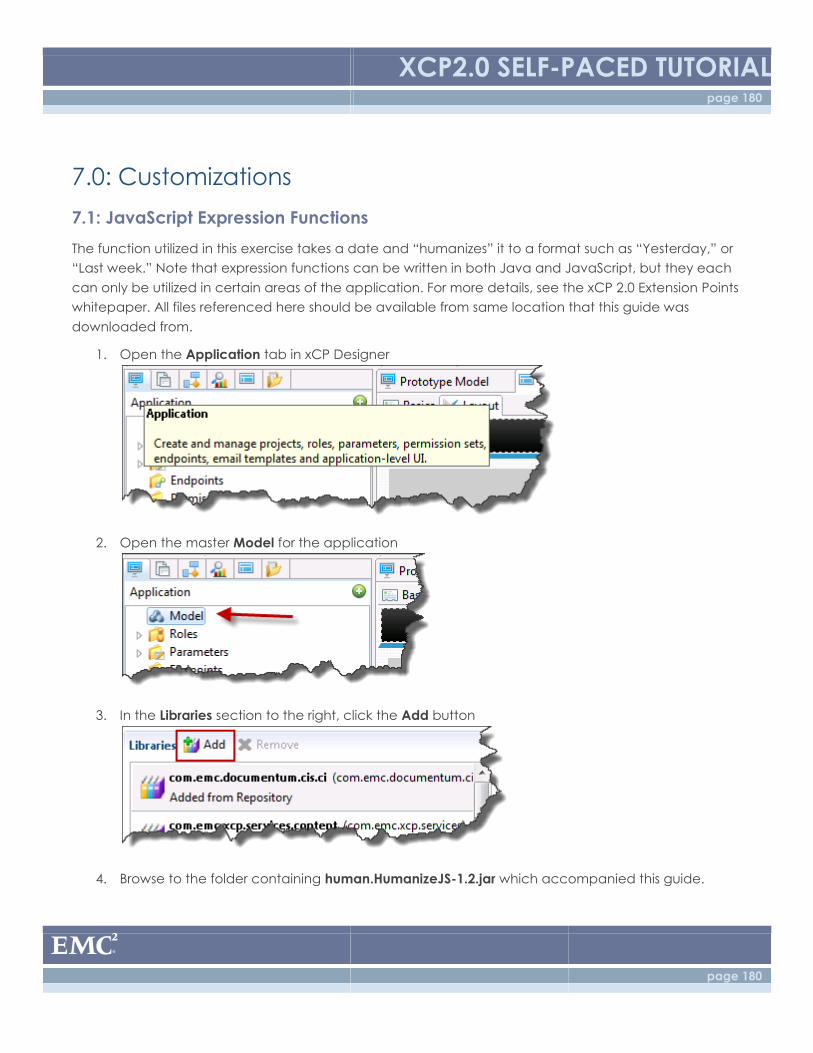
XCP2.0 SELF-PACED TUTORIAL page 180
page 180
7.0: Customizations
7.1: JavaScript Expression Functions
The function utilized in this exercise takes a date and “humanizes” it to a format such as “Yesterday,” or
“Last week.” Note that expression functions can be written in both Java and JavaScript, but they each
can only be utilized in certain areas of the application. For more details, see the xCP 2.0 Extension Points
whitepaper. All files referenced here should be available from same location that this guide was
downloaded from.
1. Open the Application tab in xCP Designer
2. Open the master Model for the application
3. In the Libraries section to the right, click the Add button
4. Browse to the folder containing human.HumanizeJS-1.2.jar which accompanied this guide.
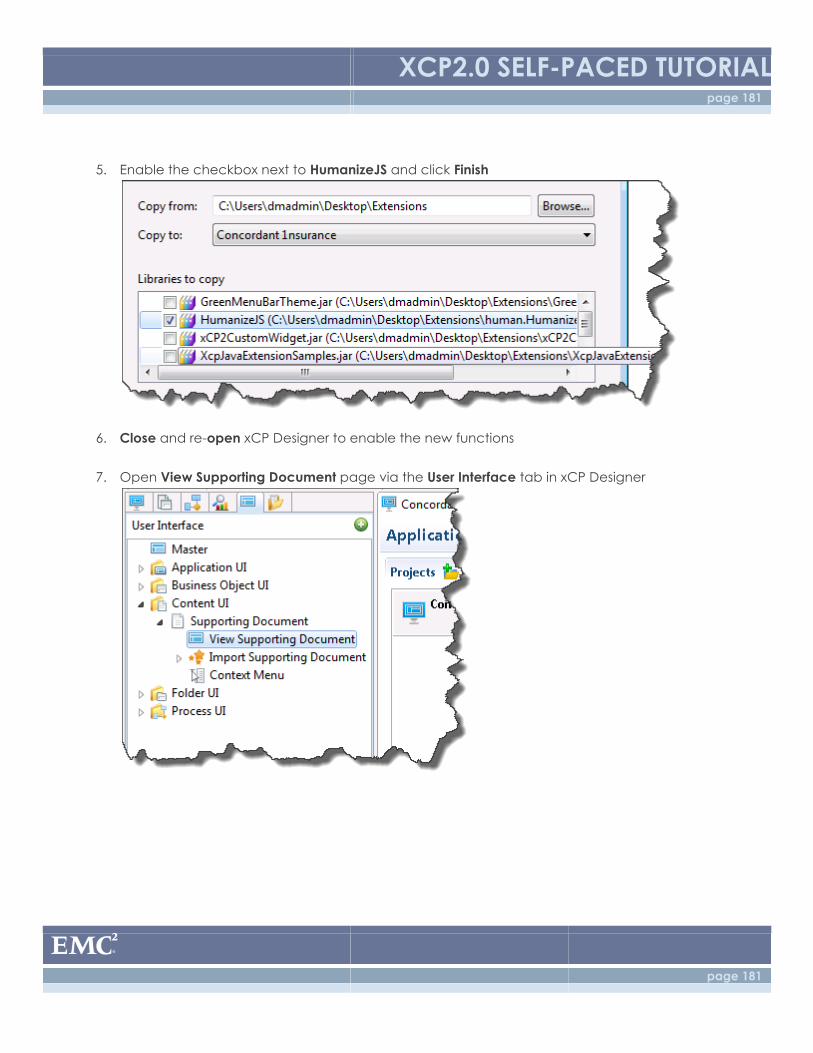
XCP2.0 SELF-PACED TUTORIAL page 181
page 181
5. Enable the checkbox next to HumanizeJS and click Finish
6. Close and re-open xCP Designer to enable the new functions
7. Open View Supporting Document page via the User Interface tab in xCP Designer
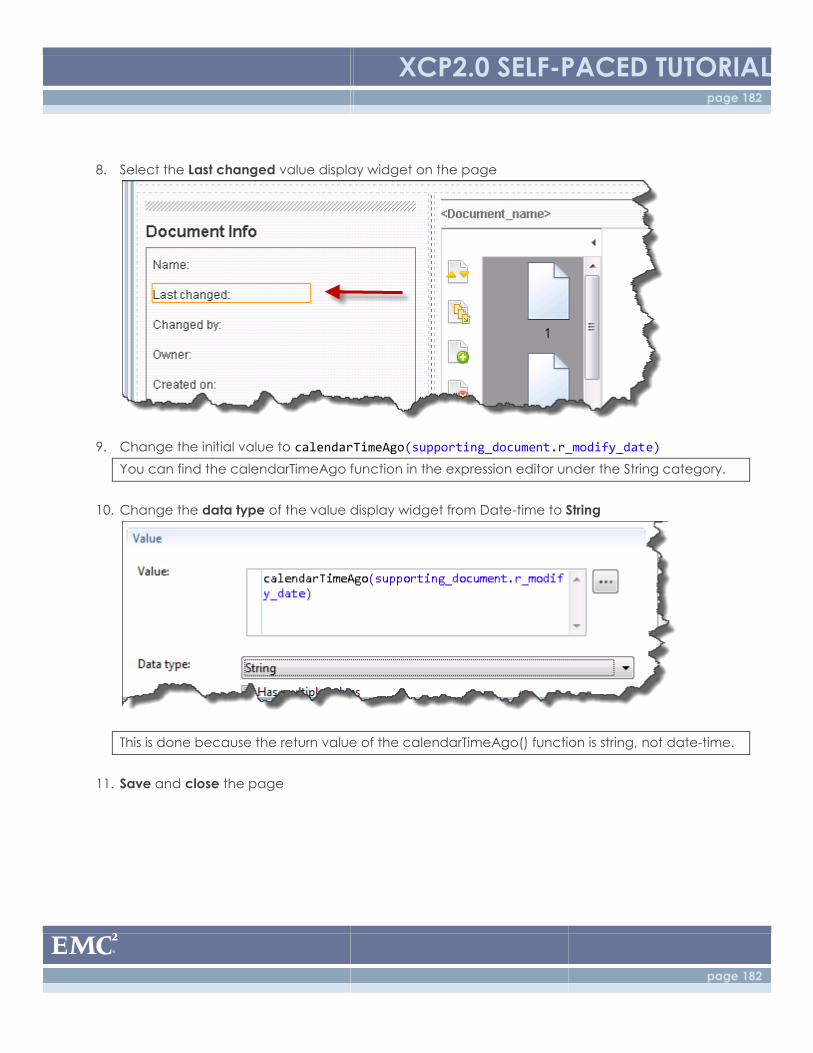
XCP2.0 SELF-PACED TUTORIAL page 182
page 182
8. Select the Last changed value display widget on the page
9. Change the initial value to calendarTimeAgo(supporting_document.r_modify_date)
You can find the calendarTimeAgo function in the expression editor under the String category.
10. Change the data type of the value display widget from Date-time to String
This is done because the return value of the calendarTimeAgo() function is string, not date-time.
11. Save and close the page
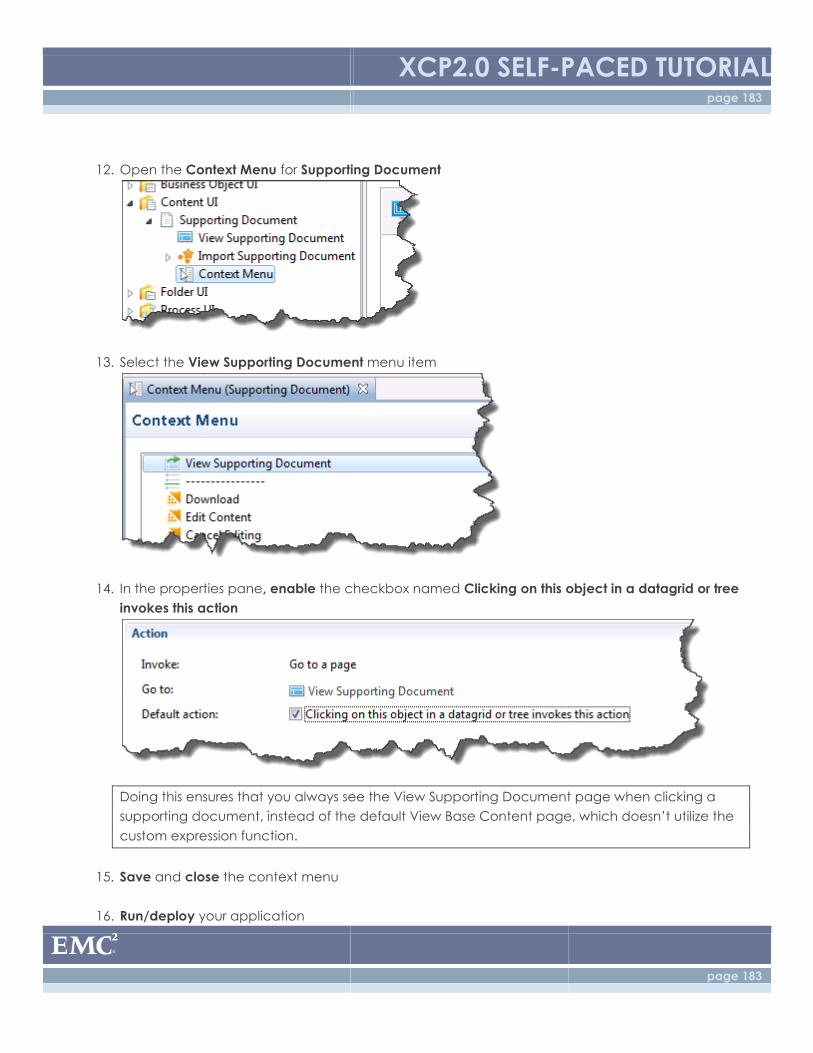
XCP2.0 SELF-PACED TUTORIAL page 183
page 183
12. Open the Context Menu for Supporting Document
13. Select the View Supporting Document menu item
14. In the properties pane, enable the checkbox named Clicking on this object in a datagrid or tree
invokes this action
Doing this ensures that you always see the View Supporting Document page when clicking a
supporting document, instead of the default View Base Content page, which doesn’t utilize the
custom expression function.
15. Save and close the context menu
16. Run/deploy your application
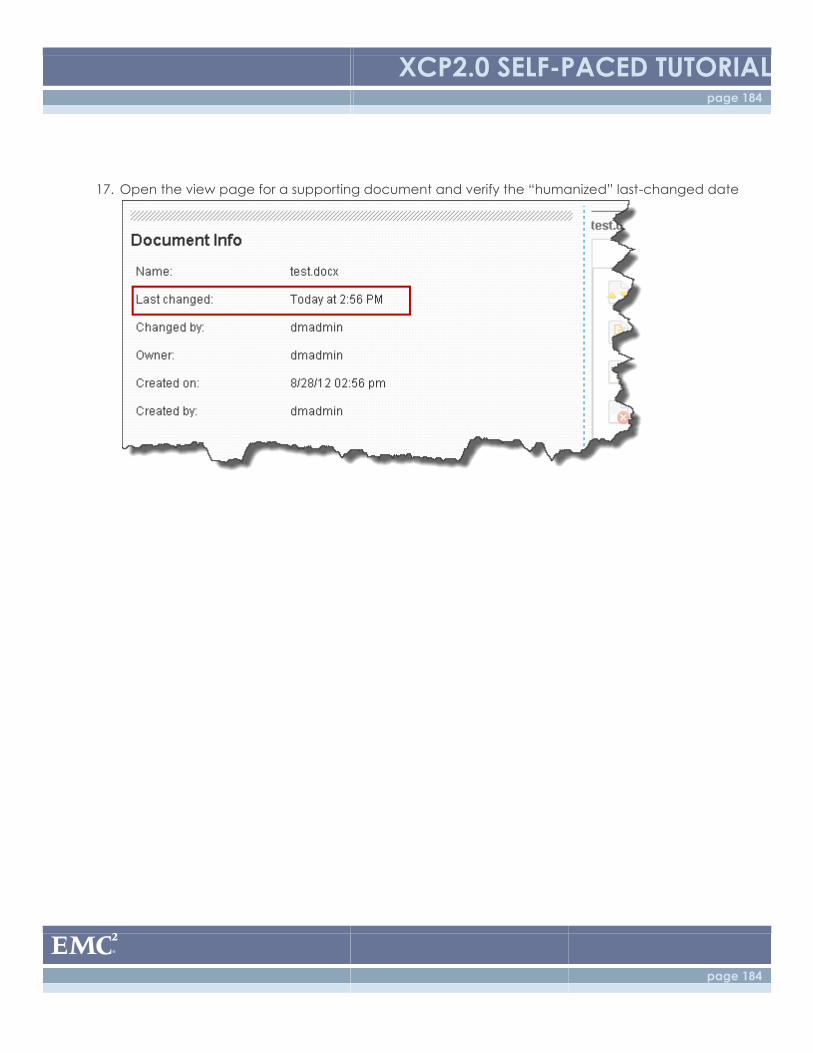
XCP2.0 SELF-PACED TUTORIAL page 184
page 184
17. Open the view page for a supporting document and verify the “humanized” last-changed date
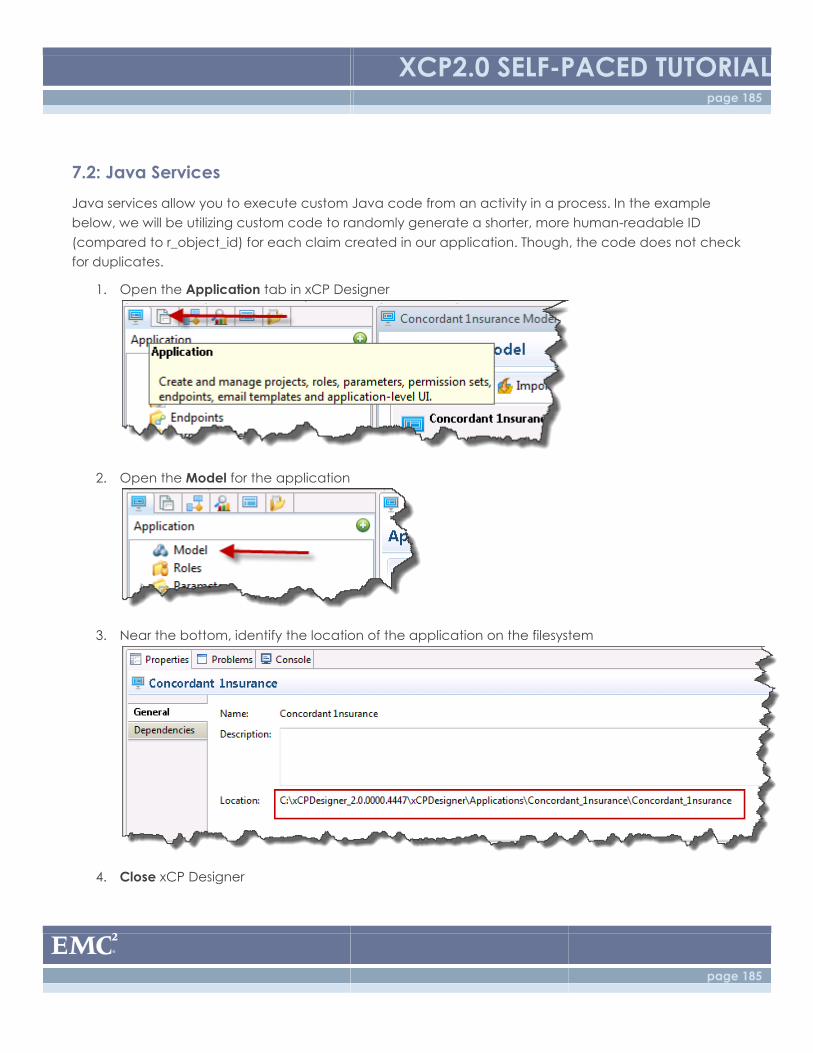
XCP2.0 SELF-PACED TUTORIAL page 185
page 185
7.2: Java Services
Java services allow you to execute custom Java code from an activity in a process. In the example
below, we will be utilizing custom code to randomly generate a shorter, more human-readable ID
(compared to r_object_id) for each claim created in our application. Though, the code does not check
for duplicates.
1. Open the Application tab in xCP Designer
2. Open the Model for the application
3. Near the bottom, identify the location of the application on the filesystem
4. Close xCP Designer
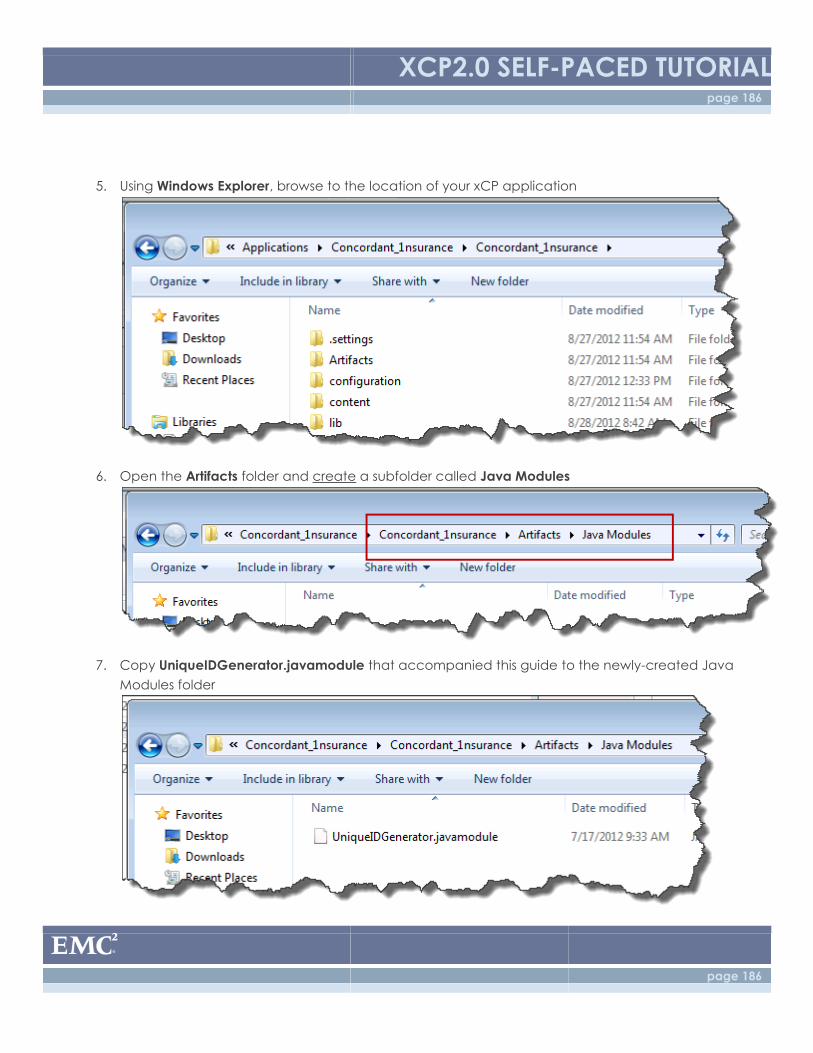
XCP2.0 SELF-PACED TUTORIAL page 186
page 186
5. Using Windows Explorer, browse to the location of your xCP application
6. Open the Artifacts folder and create a subfolder called Java Modules
7. Copy UniqueIDGenerator.javamodule that accompanied this guide to the newly-created Java
Modules folder
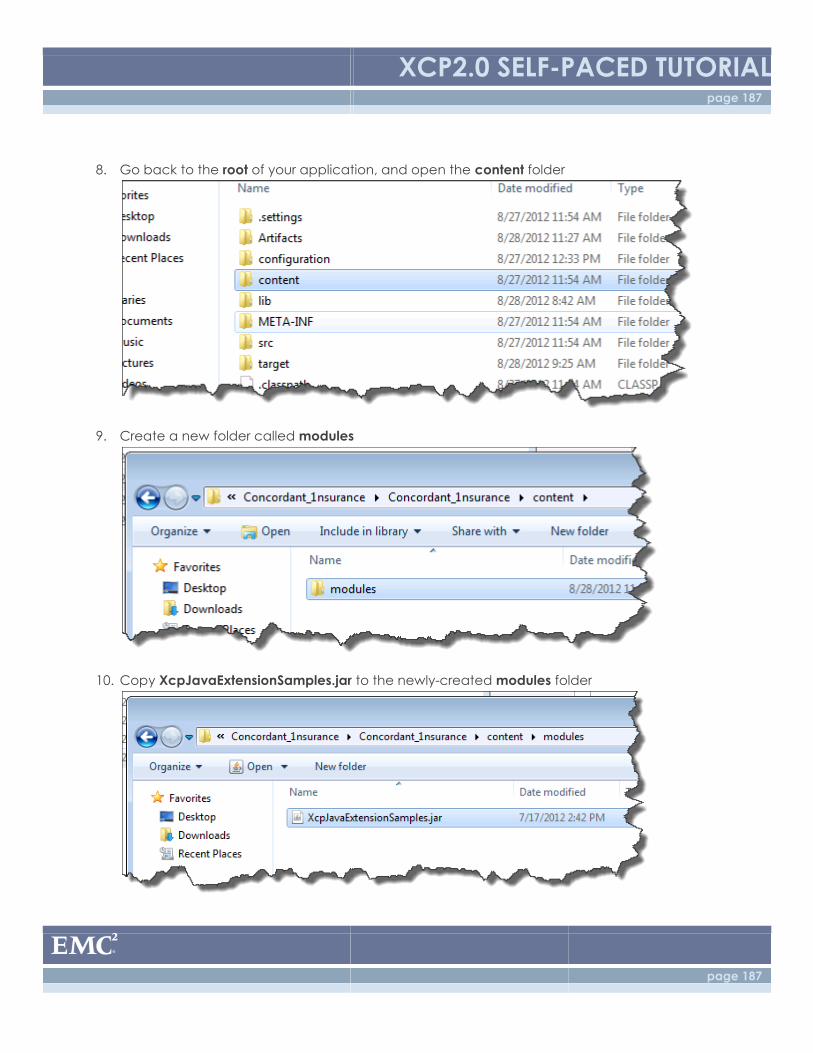
XCP2.0 SELF-PACED TUTORIAL page 187
page 187
8. Go back to the root of your application, and open the content folder
9. Create a new folder called modules
10. Copy XcpJavaExtensionSamples.jar to the newly-created modules folder
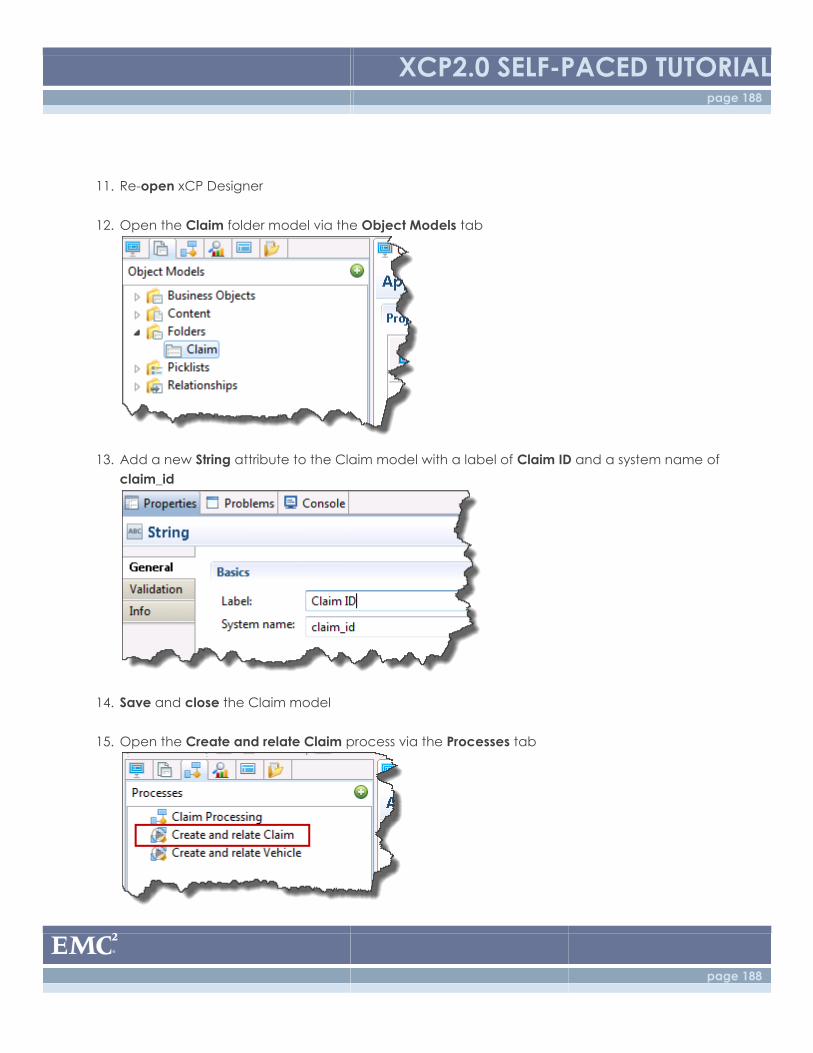
XCP2.0 SELF-PACED TUTORIAL page 188
page 188
11. Re-open xCP Designer
12. Open the Claim folder model via the Object Models tab
13. Add a new String attribute to the Claim model with a label of Claim ID and a system name of
claim_id
14. Save and close the Claim model
15. Open the Create and relate Claim process via the Processes tab
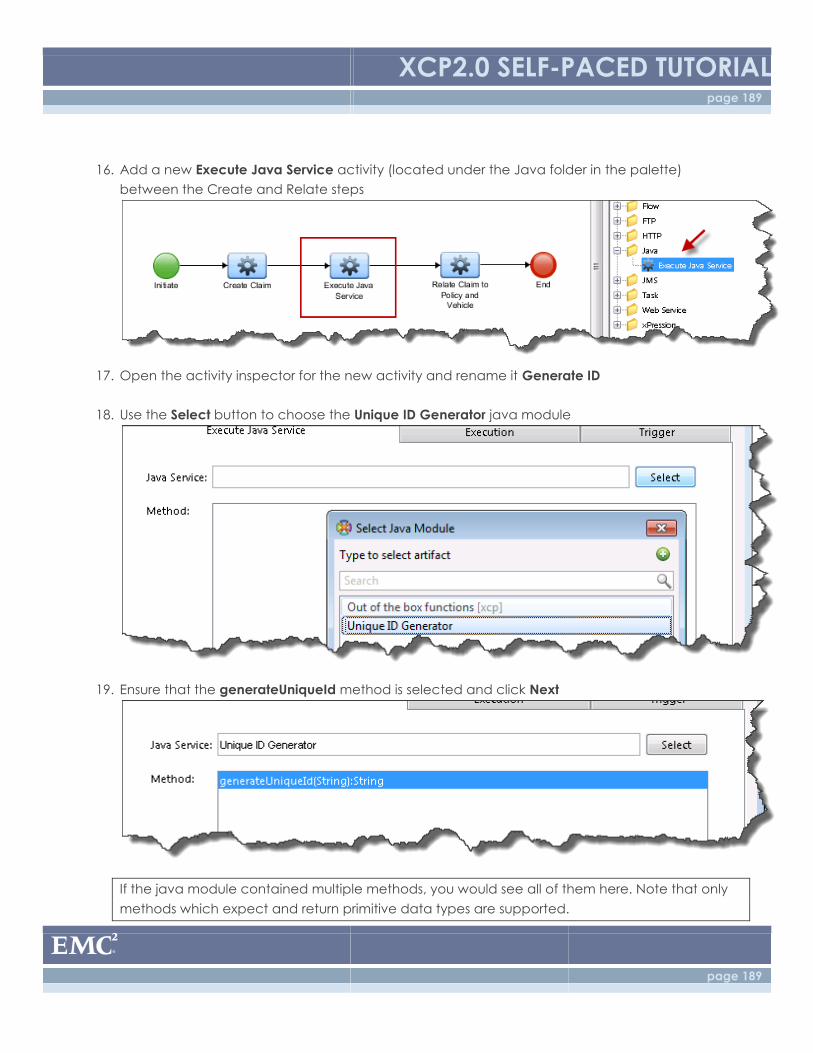
XCP2.0 SELF-PACED TUTORIAL page 189
page 189
16. Add a new Execute Java Service activity (located under the Java folder in the palette)
between the Create and Relate steps
17. Open the activity inspector for the new activity and rename it Generate ID
18. Use the Select button to choose the Unique ID Generator java module
19. Ensure that the generateUniqueId method is selected and click Next
If the java module contained multiple methods, you would see all of them here. Note that only
methods which expect and return primitive data types are supported.
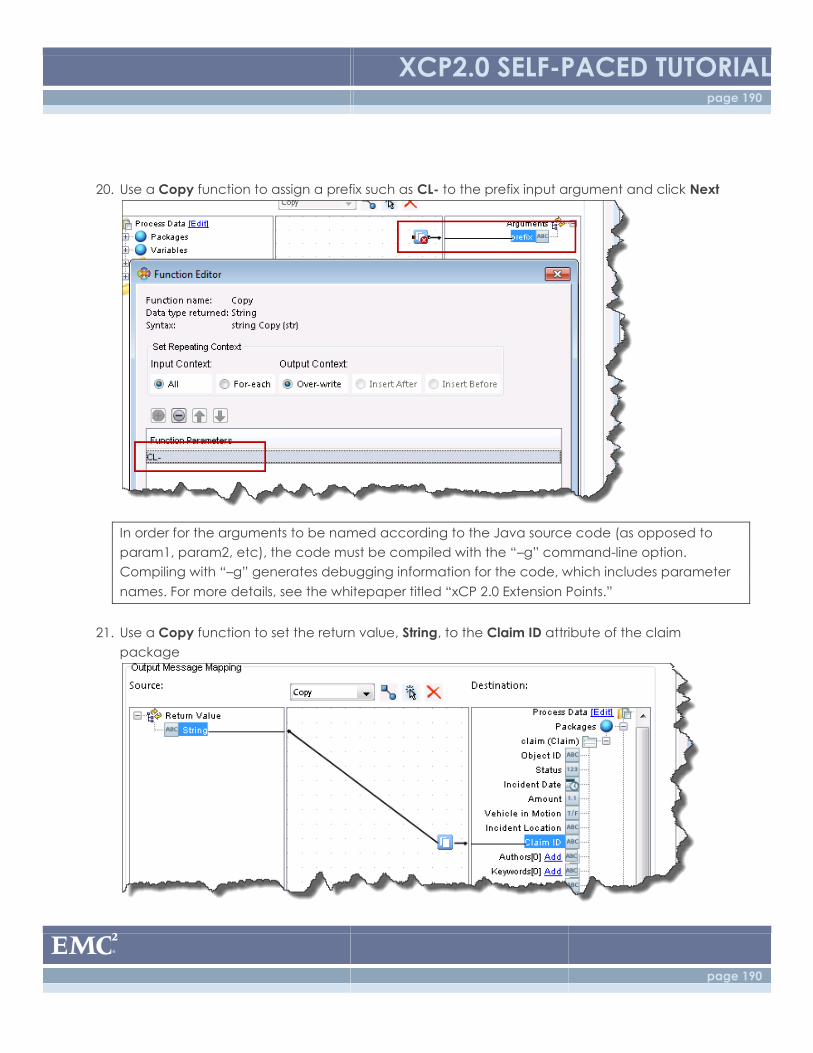
XCP2.0 SELF-PACED TUTORIAL page 190
page 190
20. Use a Copy function to assign a prefix such as CL- to the prefix input argument and click Next
In order for the arguments to be named according to the Java source code (as opposed to
param1, param2, etc), the code must be compiled with the “–g” command-line option.
Compiling with “–g” generates debugging information for the code, which includes parameter
names. For more details, see the whitepaper titled “xCP 2.0 Extension Points.”
21. Use a Copy function to set the return value, String, to the Claim ID attribute of the claim
package
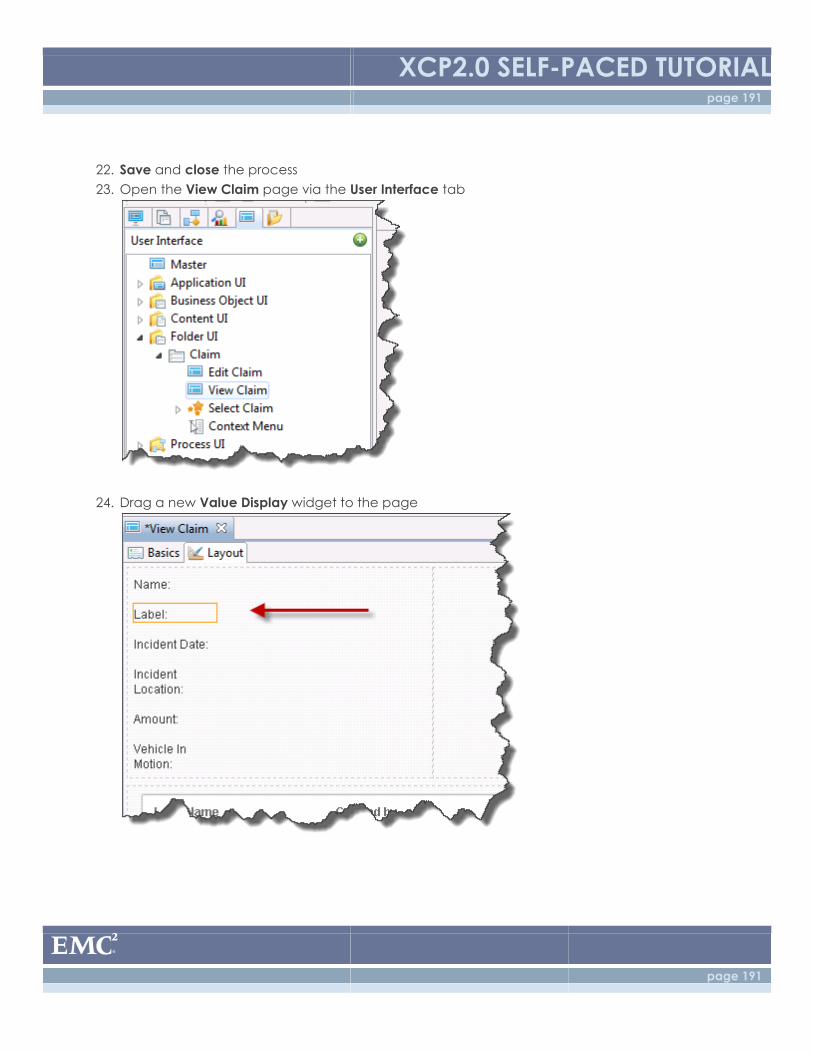
XCP2.0 SELF-PACED TUTORIAL page 191
page 191
22. Save and close the process
23. Open the View Claim page via the User Interface tab
24. Drag a new Value Display widget to the page
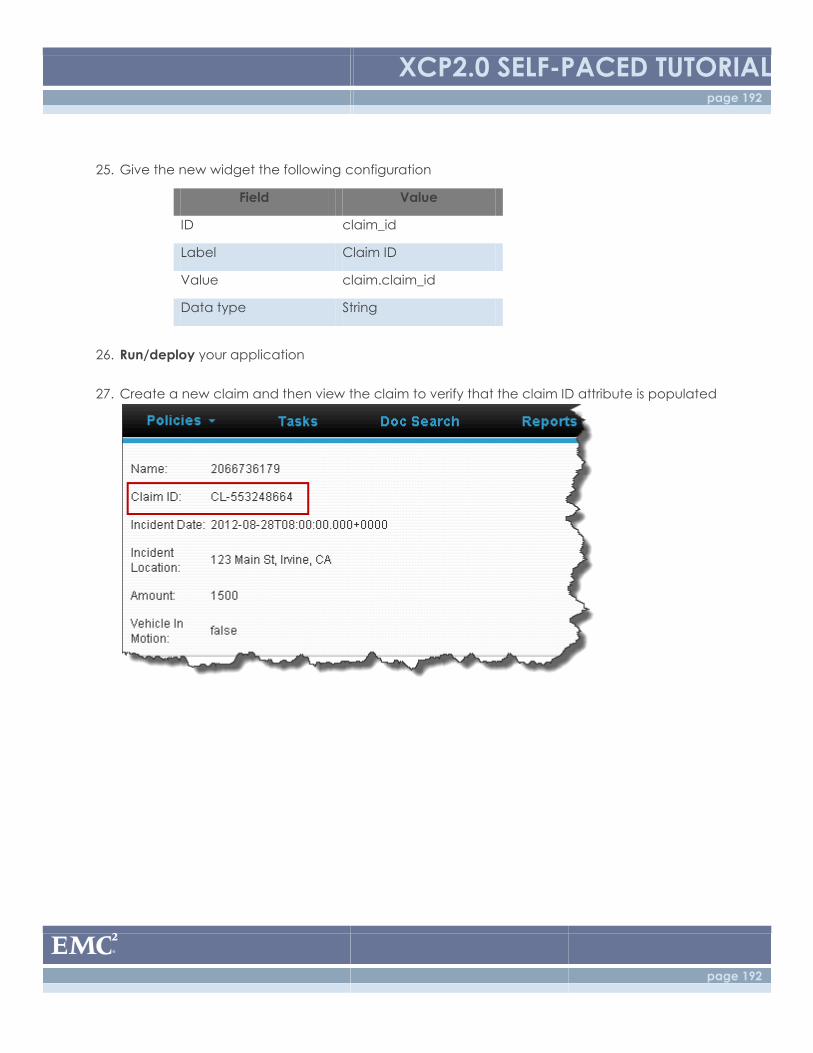
XCP2.0 SELF-PACED TUTORIAL page 192
page 192
25. Give the new widget the following configuration
Field Value
ID claim_id
Label Claim ID
Value claim.claim_id
Data type String
26. Run/deploy your application
27. Create a new claim and then view the claim to verify that the claim ID attribute is populated
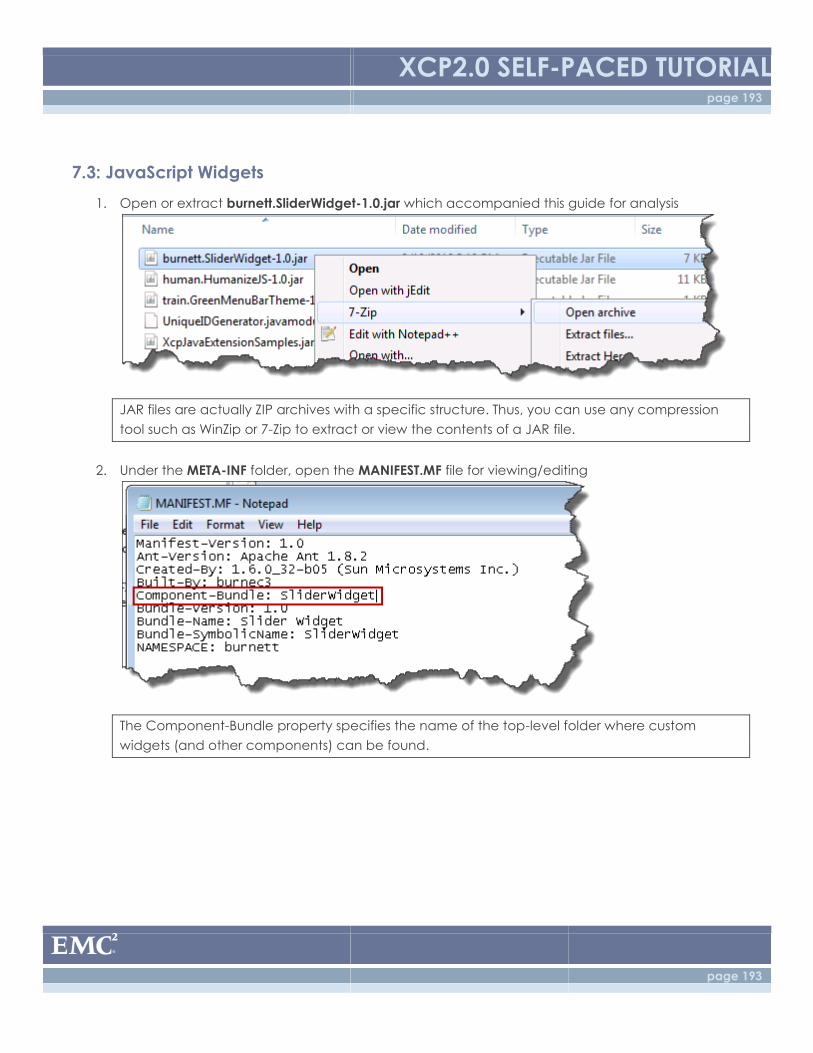
XCP2.0 SELF-PACED TUTORIAL page 193
page 193
7.3: JavaScript Widgets
1. Open or extract burnett.SliderWidget-1.0.jar which accompanied this guide for analysis
JAR files are actually ZIP archives with a specific structure. Thus, you can use any compression
tool such as WinZip or 7-Zip to extract or view the contents of a JAR file.
2. Under the META-INF folder, open the MANIFEST.MF file for viewing/editing
The Component-Bundle property specifies the name of the top-level folder where custom
widgets (and other components) can be found.
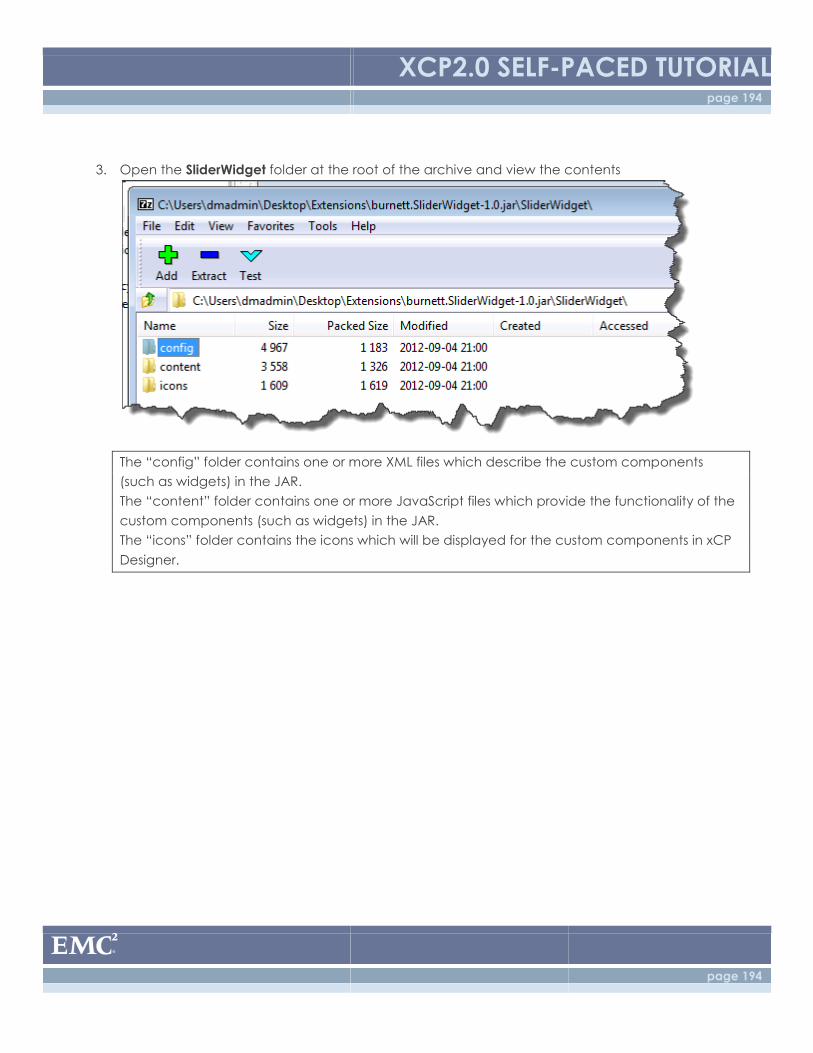
XCP2.0 SELF-PACED TUTORIAL page 194
page 194
3. Open the SliderWidget folder at the root of the archive and view the contents
The “config” folder contains one or more XML files which describe the custom components
(such as widgets) in the JAR.
The “content” folder contains one or more JavaScript files which provide the functionality of the
custom components (such as widgets) in the JAR.
The “icons” folder contains the icons which will be displayed for the custom components in xCP
Designer.
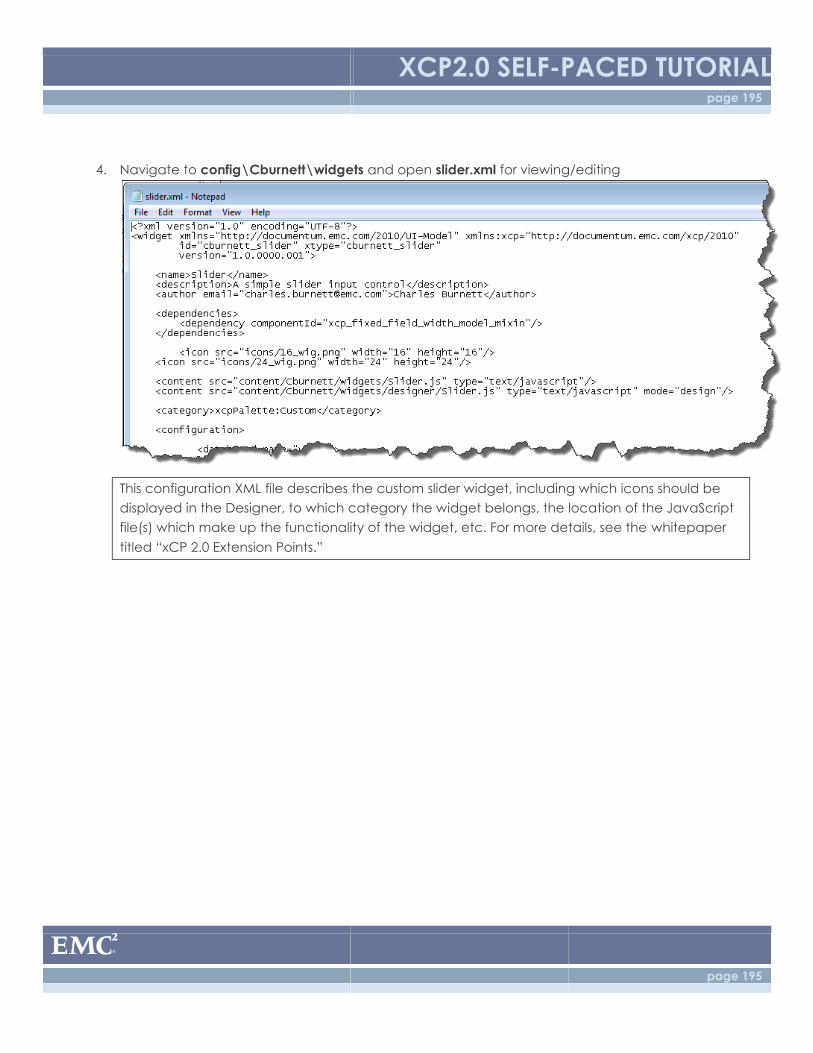
XCP2.0 SELF-PACED TUTORIAL page 195
page 195
4. Navigate to config\Cburnett\widgets and open slider.xml for viewing/editing
This configuration XML file describes the custom slider widget, including which icons should be
displayed in the Designer, to which category the widget belongs, the location of the JavaScript
file(s) which make up the functionality of the widget, etc. For more details, see the whitepaper
titled “xCP 2.0 Extension Points.”
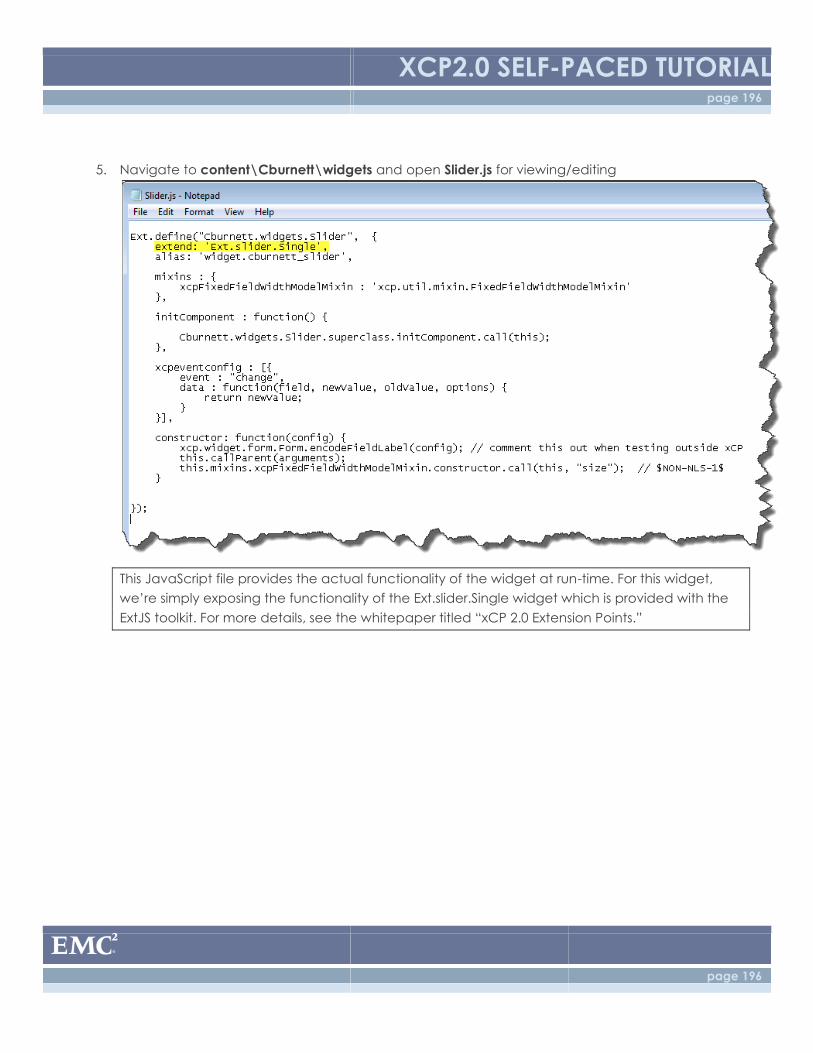
XCP2.0 SELF-PACED TUTORIAL page 196
page 196
5. Navigate to content\Cburnett\widgets and open Slider.js for viewing/editing
This JavaScript file provides the actual functionality of the widget at run-time. For this widget,
we’re simply exposing the functionality of the Ext.slider.Single widget which is provided with the
ExtJS toolkit. For more details, see the whitepaper titled “xCP 2.0 Extension Points.”
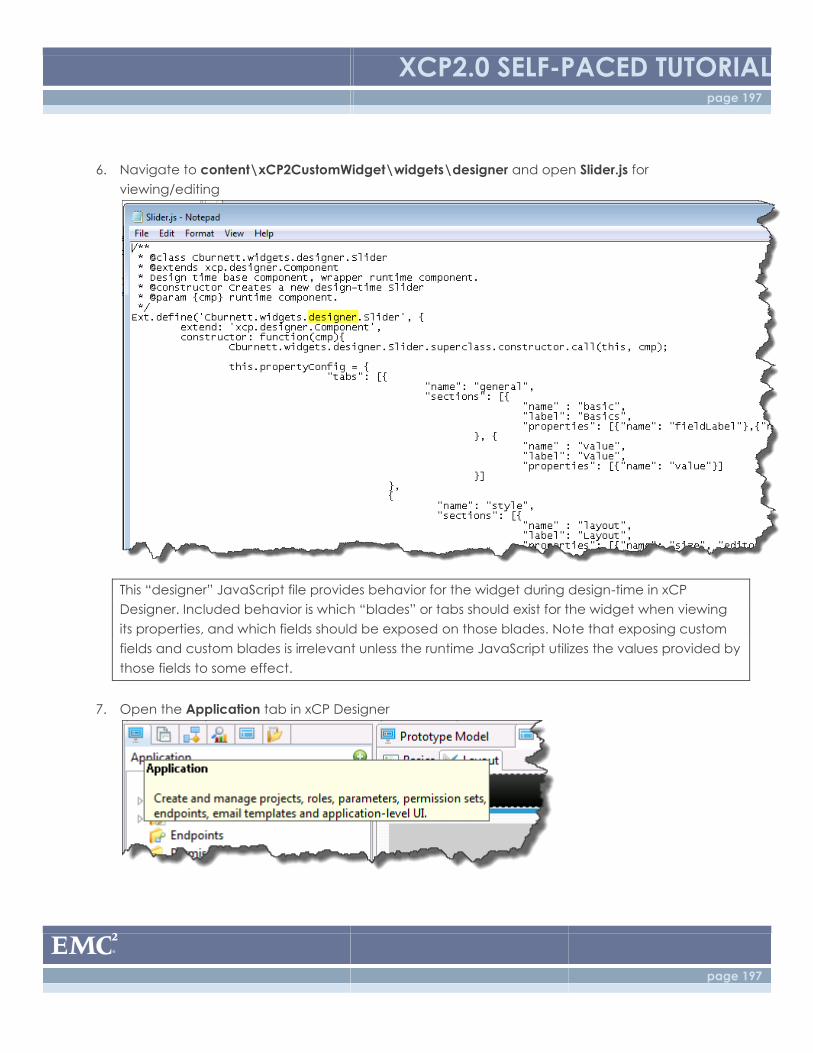
XCP2.0 SELF-PACED TUTORIAL page 197
page 197
6. Navigate to content\xCP2CustomWidget\widgets\designer and open Slider.js for
viewing/editing
This “designer” JavaScript file provides behavior for the widget during design-time in xCP
Designer. Included behavior is which “blades” or tabs should exist for the widget when viewing
its properties, and which fields should be exposed on those blades. Note that exposing custom
fields and custom blades is irrelevant unless the runtime JavaScript utilizes the values provided by
those fields to some effect.
7. Open the Application tab in xCP Designer

XCP2.0 SELF-PACED TUTORIAL page 198
page 198
8. Open the master Model for the application
9. In the Libraries section to the right, click the Add button
10. Select the folder containing burnett.SliderWidget-1.0.jar and click OK
11. Select the checkbox for SliderWidget and click Finish
12. Close and reopen xCP Designer for the new widget to be added to the palette
13. Open the User Interface tab in Designer

XCP2.0 SELF-PACED TUTORIAL page 199
page 199
14. Right-click the Vehicle node under Business Object UI and select New Page
15. Select the Edit Vehicle bindings and click Finish
16. Right-click the input control for Year and select Delete
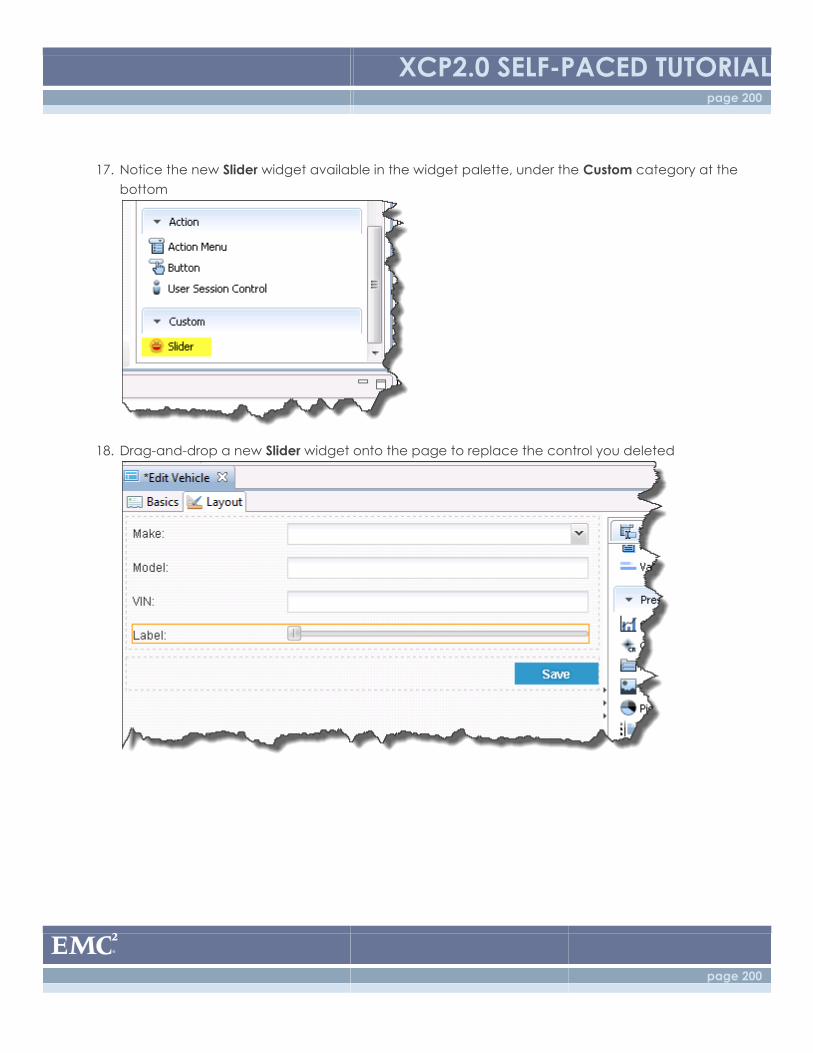
XCP2.0 SELF-PACED TUTORIAL page 200
page 200
17. Notice the new Slider widget available in the widget palette, under the Custom category at the
bottom
18. Drag-and-drop a new Slider widget onto the page to replace the control you deleted

XCP2.0 SELF-PACED TUTORIAL page 201
page 201
19. Specify the following properties for the slider widget
Field Value
ID year
Label Year
Minimum Value 1900
Maximum Value 2015
Value vehicle.year
20. Go to the Data Service Instances blade and select the Update Vehicle service.
21. Notice the binding to the input Year for the data service is blank because we deleted the
widget that it was previously bound to from the page. Add it back to reference the new slider
widget we added. Set the value to widgets.year.value
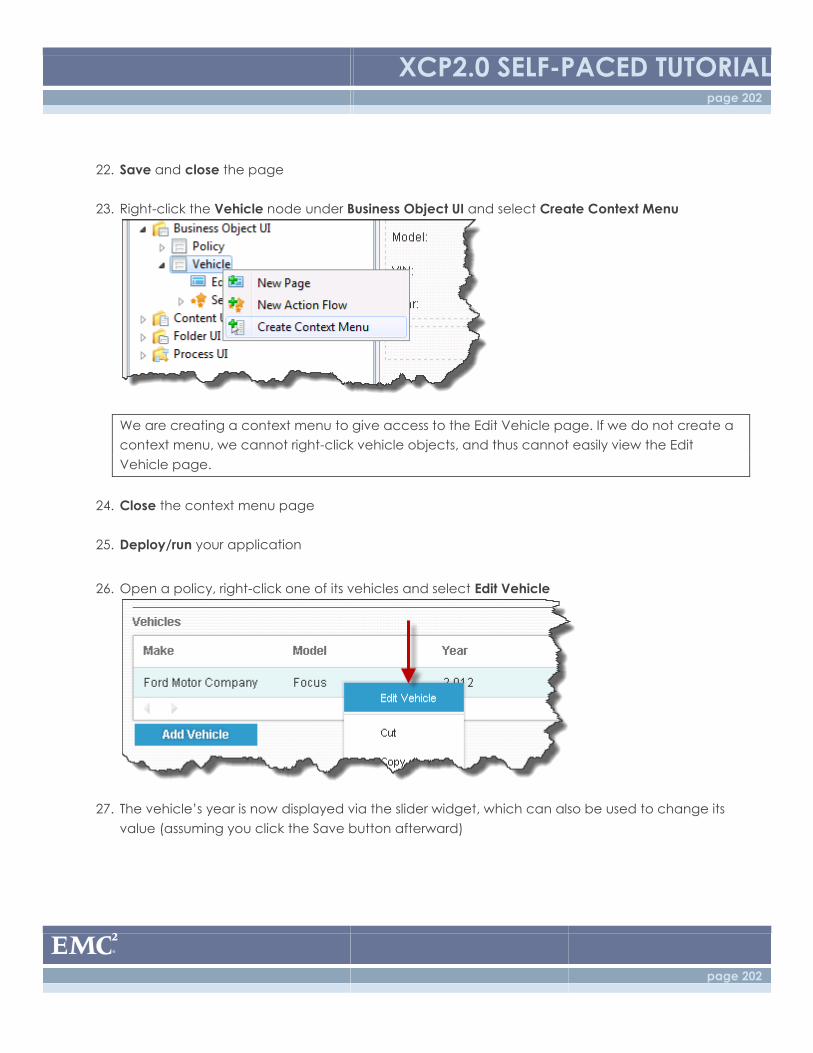
XCP2.0 SELF-PACED TUTORIAL page 202
page 202
22. Save and close the page
23. Right-click the Vehicle node under Business Object UI and select Create Context Menu
We are creating a context menu to give access to the Edit Vehicle page. If we do not create a
context menu, we cannot right-click vehicle objects, and thus cannot easily view the Edit
Vehicle page.
24. Close the context menu page
25. Deploy/run your application
26. Open a policy, right-click one of its vehicles and select Edit Vehicle
27. The vehicle’s year is now displayed via the slider widget, which can also be used to change its
value (assuming you click the Save button afterward)
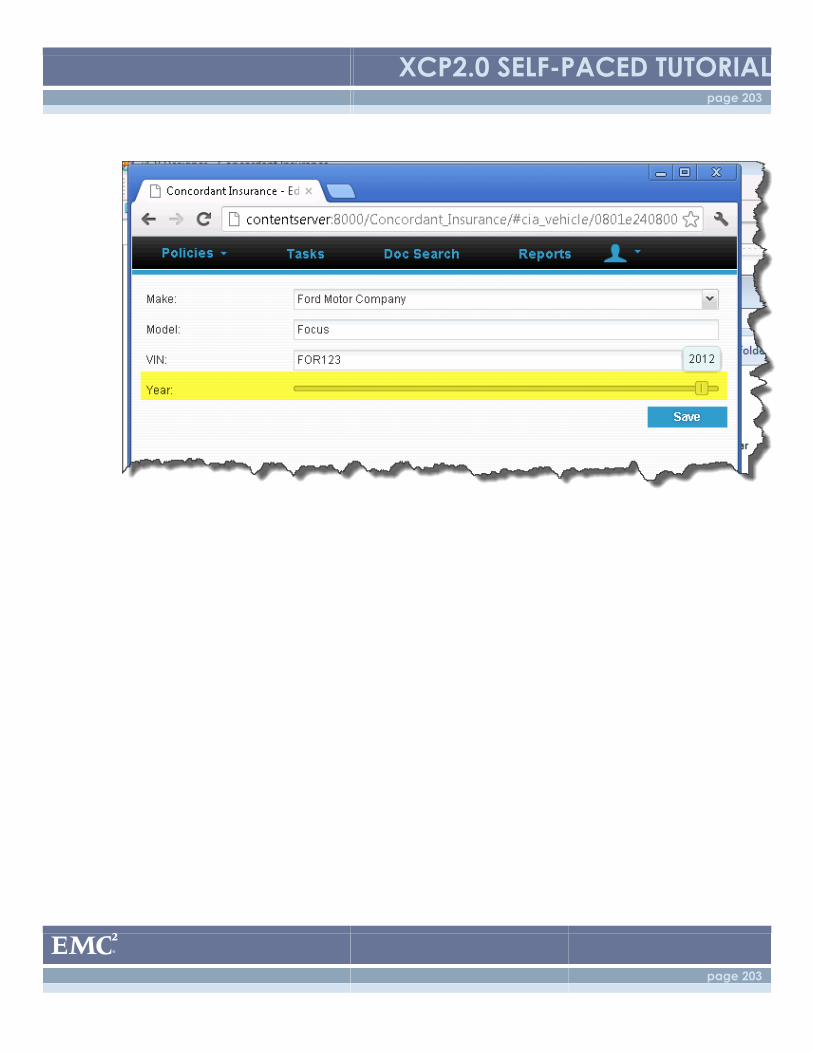
XCP2.0 SELF-PACED TUTORIAL page 203
page 203
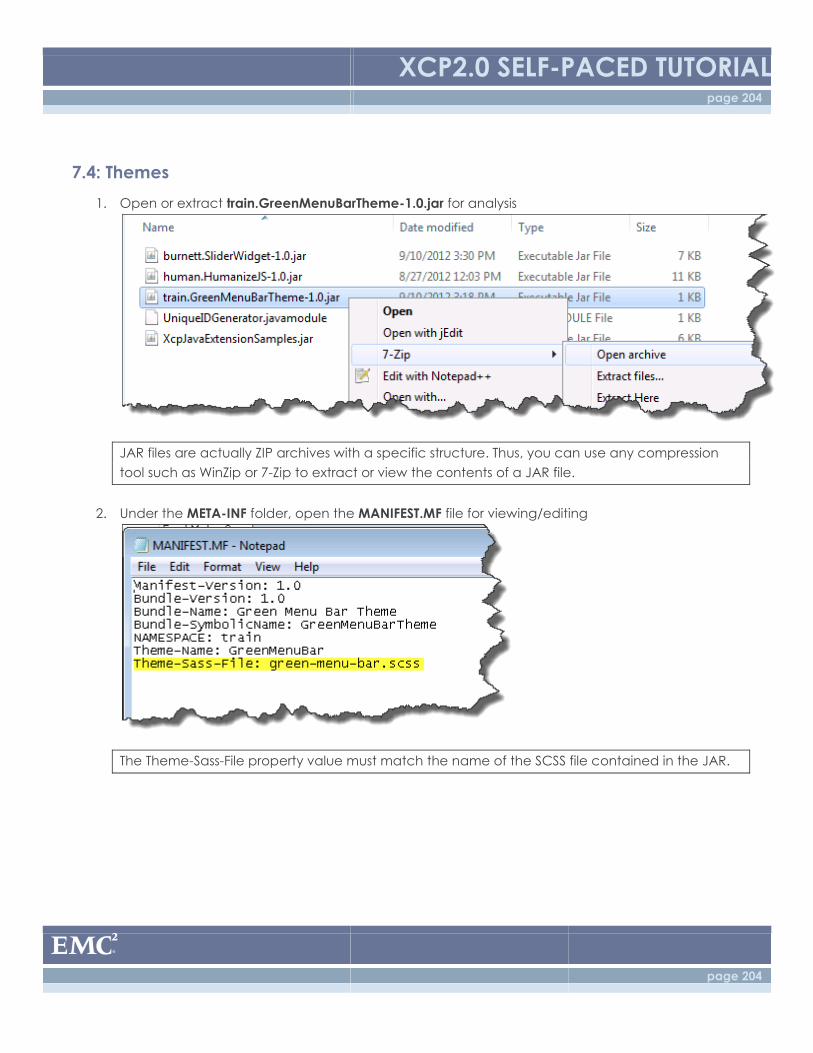
XCP2.0 SELF-PACED TUTORIAL page 204
page 204
7.4: Themes
1. Open or extract train.GreenMenuBarTheme-1.0.jar for analysis
JAR files are actually ZIP archives with a specific structure. Thus, you can use any compression
tool such as WinZip or 7-Zip to extract or view the contents of a JAR file.
2. Under the META-INF folder, open the MANIFEST.MF file for viewing/editing
The Theme-Sass-File property value must match the name of the SCSS file contained in the JAR.
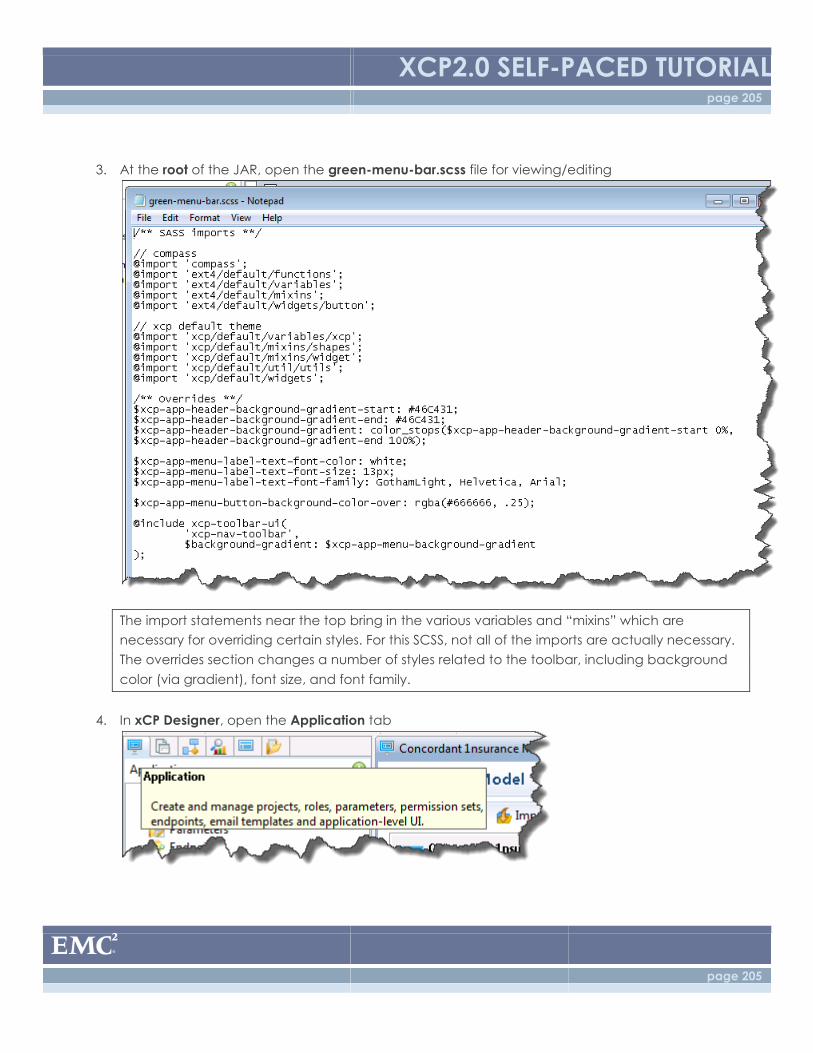
XCP2.0 SELF-PACED TUTORIAL page 205
page 205
3. At the root of the JAR, open the green-menu-bar.scss file for viewing/editing
The import statements near the top bring in the various variables and “mixins” which are
necessary for overriding certain styles. For this SCSS, not all of the imports are actually necessary.
The overrides section changes a number of styles related to the toolbar, including background
color (via gradient), font size, and font family.
4. In xCP Designer, open the Application tab
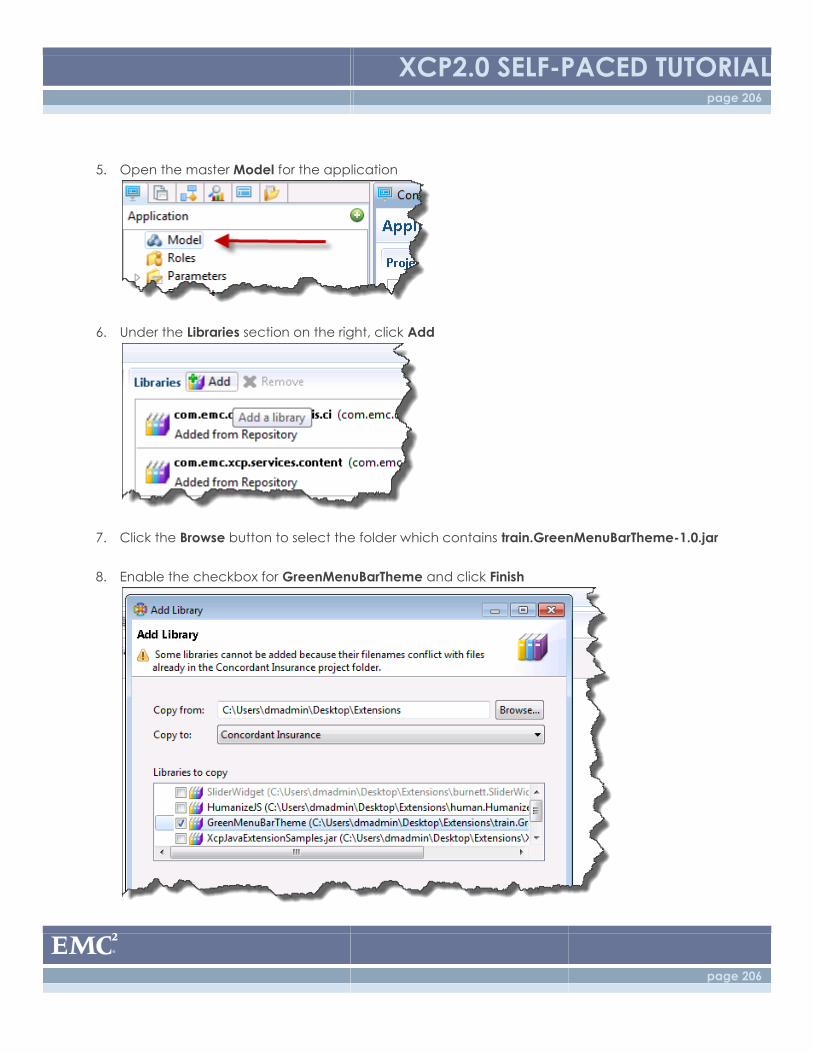
XCP2.0 SELF-PACED TUTORIAL page 206
page 206
5. Open the master Model for the application
6. Under the Libraries section on the right, click Add
7. Click the Browse button to select the folder which contains train.GreenMenuBarTheme-1.0.jar
8. Enable the checkbox for GreenMenuBarTheme and click Finish
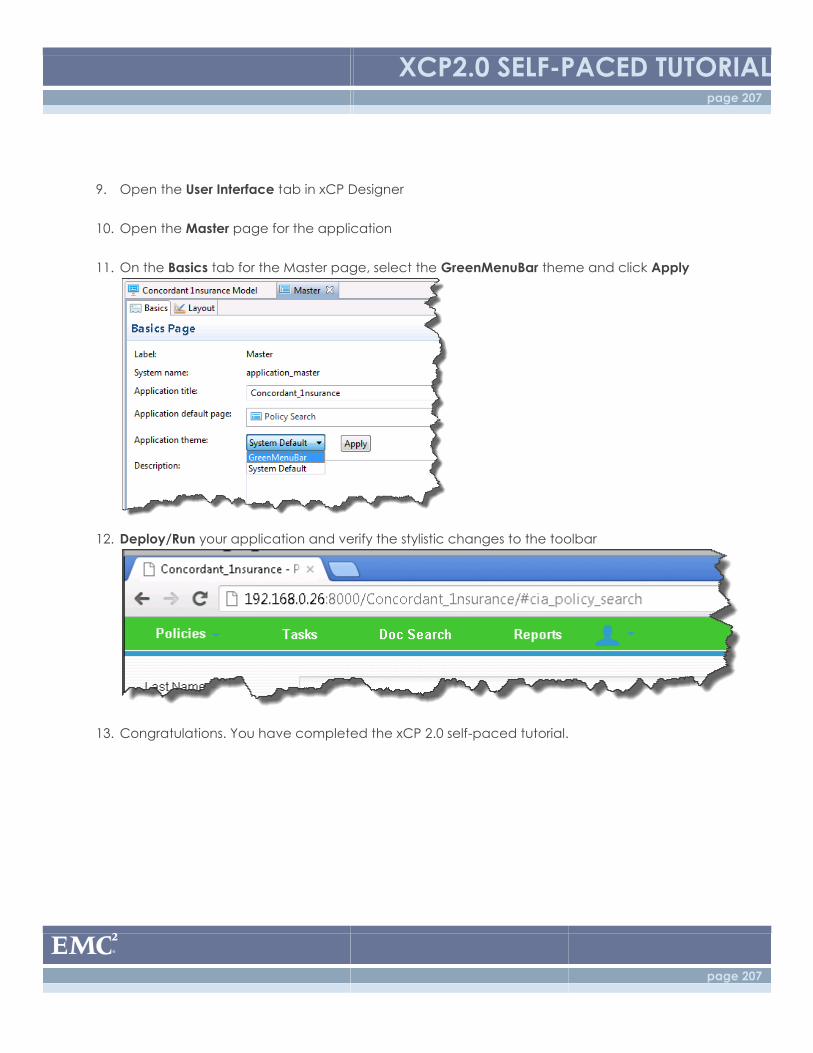
XCP2.0 SELF-PACED TUTORIAL page 207
page 207
9. Open the User Interface tab in xCP Designer
10. Open the Master page for the application
11. On the Basics tab for the Master page, select the GreenMenuBar theme and click Apply
12. Deploy/Run your application and verify the stylistic changes to the toolbar
13. Congratulations. You have completed the xCP 2.0 self-paced tutorial.