Embed Size (px)
Citation preview
IBM Maximo Asset ManagementVersion 7 Release 6
Workflow Implementation Guide
IBM

Note
Before using this information and the product it supports, read the information in “Notices” on page43.
Compilation date: June 2020© Copyright International Business Machines Corporation 2008, 2020.US Government Users Restricted Rights – Use, duplication or disclosure restricted by GSA ADP Schedule Contract withIBM Corp.
Contents
Chapter 1. Implementing workflow processes........................................................1Workflow overview.......................................................................................................................................1
Applications that are used with Workflow.............................................................................................1Workflow design process....................................................................................................................... 2
Configuring for Workflow........................................................................................................................... 20Configuration prerequisites................................................................................................................. 20Creating workflow processes...............................................................................................................22Testing workflow processes................................................................................................................ 29Modifying workflow processes............................................................................................................ 32Integrating workflow processes.......................................................................................................... 35Workflow/Inbox Assignments portlet................................................................................................. 39
Notices................................................................................................................43
iii

iv

Chapter 1. Implementing workflow processesWorkflow features let you automate repetitive business and record management processes. This providesa means for greater efficiency and accountability throughout your enterprise.
Workflow overviewYou use the Workflow application to plan, design, build, test, implement, and manage workflowprocesses. Workflow provides a means of electronically reproducing business processes so that they canbe applied to records.
With workflow, you can manage the movement of a record through a process from start to finish. You caninstruct individuals to act on records, specify delegates when workers are unavailable, ensure thatindividuals act in a timely manner, and ensure that an audit trail exists for each record and process.
Workflow is an integrated part of the software. Workflow processes and their supporting records are atthe system level in a multisite implementation. Workflow processes can be used for all organizations andsites. You can design processes or subprocesses that are specific to an organization or specific to a site,by using logical branching.
You can create a workflow process for any business object. Because all the applications are associatedwith product business objects and can run a customer Java™ class, you can build workflow processes forany application, including cloned and custom applications.
Workflow handles assignments in a flexible manner. You can specify assignee relationships forassignments to create groups of active assignments at run time. Assignees can receive notifications ofassignments in their Workflow Inbox or in their email inbox, eliminating the need for users to search fortheir assignments. Workers or administrators can reassign workflow tasks, stop a process instance, andremove a record from the control of Workflow. You can specify at what point in a process you want emailnotifications to be generated. Delegates can be specified when workers are unavailable.
A workflow process can run a program, such as a batch file or an .exe file that is stored on a local serverin the system directory. A workflow process for one type of record can start a process for another type ofrecord. For example, a service request can launch a process for an incident. A process can containsubprocesses. For example, for different subcategories of records, or records from different sites. When aprocess requires user interaction, the product can direct a user to a specific application, to a tab, or to anaction.
Applications that are used with WorkflowWorkflow is used with other applications that directly or indirectly support its functionality.
ActionsCreate and manage actions and action groups. Actions are associated with connection lines in aworkflow process and are triggered by the routing that moves a record from one node to another.
Communication TemplatesCreate and manage templates that the system uses when generating e-mail messages. Workflowuses communication templates for notifications.
EscalationsCreate and manage escalation processes. An escalation is a mechanism that can monitor time-sensitive records and key performance indicators, which can take actions or send notifications when arecord reaches a defined escalation point. Workflow can use escalations with task assignments.
Inbox/Assignments SetupConfigure the Workflow Inbox on the Start Center of a user.
PeopleCreate and manage records for individuals who are listed on records in any capacity. Workflow usesperson records when generating assignments and notifications.
© Copyright IBM Corp. 2008, 2020 1
Person GroupsCreate and manage records for groups of individuals. Workflow uses person group records whengenerating assignments and notifications.
RolesCreate and manage records for roles. All roles resolve to a person, a person group, or an e-mailaddress. All workflow assignments and notifications are made to roles.
Workflow AdministrationView and modify assignments and active instances of workflow processes.
Workflow DesignerCreate, view, and modify workflow processes.
Workflow InboxView and respond to workflow assignments. A workflow process routes assignments to users'inboxes.
Workflow design processWorkflow processes can be designed to incorporate the most effective ways of completing businesstasks. You can evaluate your current practices and determine how you can improve or standardize thembefore you design workflow processes.
When you create a workflow process, the product directs records through paths that you specify. Whenyou design a process, be sure to consider what can happen at each decision point and include all thepaths that a record can take. You could begin your workflow implementation with simple processes. Youcan always build in more complexity in a later revision.
To design optimum workflow processes, consider the following guidelines:
• Generic processes require less maintenance than highly specific ones. For example, you could modifyroles that resolve to an individual more frequently than roles that resolve to a person group.
• When designing processes, consider when you want the product to generate notifications. The productcan generate notifications when the following events occur in a process:
– A record reaches a decision point (node)– A record follows a specific path (connection line) in a process– Task assignments are made
• When designing processes, consider how you want to handle null values. A process could reach adecision point that evaluates data on the record and that data could be missing from the record.
• When a record takes the negative path, you can design the record so that it can be modified to take thepositive path. You could also design the record to exit the process permanently.
• If a record can go through a process again after it has been rejected, you can define a limit to thenumber of times a record can repeat the process.
• Try to avoid having separate groups of nodes and connection lines that perform the same function atdifferent points in a process. It is more efficient to reuse the same code through looping or throughcreating a subprocess.
• Simple processes involving a limited number of nodes are easier to troubleshoot and maintain. If thenumber of nodes in your process grows too large, you could break down the process into subprocesses.
• When writing Structured Query Language (SQL) statements, consider how the SQL syntax affects howthe product interprets the statements. The following examples demonstrate the use of the colon in SQLstatements:
– ASSETNUM - (without a colon) Instructs the product to go to the database for the asset record– ASSETNUM - (with a colon) Instructs the product to use the asset record in memory (the record
currently on the window)
2 IBM Maximo Asset Management : Workflow Implementation Guide

Business process analysesYour business practices encompass how you manage your enterprise. You can start the analyses of yourprocesses by collecting information about your enterprise. This information helps you to determine thetypes of processes that you could automate.
Enterprise analysis
Gather the following enterprise information to use when designing your workflow processes:
• If you have an organizational chart, review your organizational chart to see how your enterprise isorganized.
• If your enterprise is multinational, list the languages that are required for your workflow processes.• Collect the business process flows that document the business units of your organization. If there are
different process flows for the same organizations at various locations, gather those process flows.Compare the business practices at locations to find out if the differences are significant.
• Review the standard operating procedures, such as the International Organization for Standardization(ISO) 9000 quality management or the ISO 14000 procedures.
• Review the regulatory requirements for your industry and how they affect your business processes.• Review the policies that define who is responsible for creating budgets.• Review the policies that define financial approval limits and list the individuals who have the authority to
approve spending.• Research the types of records at your enterprise that require approval.• Review the policies that define the levels of approval that are required for each type of record.
Implementation analysis
Gather the following implementation information for use when designing your workflow processes:
• Determine the number of organizations and sites that exist for your enterprise. You create workflowprocesses at the system level. Find out if there are separate processes or subprocesses for differentorganizations or sites.
• Find out if you use the Integration Framework to integrate with any external systems.• Determine if any Maximo® product options have been purchased.• Research the applications that your enterprise has implemented.• Determine the types of records for which you use the software.• Find out if the system has been configured to generate records, such as inventory reorder records,
preventive maintenance work orders, and scheduled payment invoices.• Determine if your implementation uses Start Centers that do not include the Workflow Inbox. If users
cannot access the Inbox, you can design your workflow processes to send e-mail messages to notifyusers.
Process analysisInformation you collect about your processes can be formatted into a flowchart. A flowchart can help youto identify reusable elements, the beginning and the end of record life cycles, and the parts of the lifecycle that can be managed by a workflow process.
You could diagram your business process on paper, on a blackboard, or using a graphics softwareprogram to create a flowchart. Writing or diagramming a business practice helps you to analyze it. It alsoprovides you with a map of your process flows that you can use when you create a workflow process.Your goal is to produce a detailed diagram that shows all of the routes that a record can take through yourenterprise during its life cycle.
Your research must include the following information:
• The names of the people who interact with records during a process• The processes that are used to manage specific records
Chapter 1. Implementing workflow processes 3

• The records that enter the process, and where the records go when they exit the process• The records that are managed during a process• The length of time it takes for a record to go through a process• The parts of your current process that are working well and should be kept• The parts of your current process that are not working well and should be changed or removed
As you document your business process, make note of trouble spots, such as undocumented procedures,or different ways to complete the same task. Address these issues and refine your business processesbefore you create and implement a workflow process.
Workflow processes and user responsibilitiesWorkflow processes identify the people who create and who manage a record throughout its life cycle.Workflow processes also identify the types of records that are used.
In workflow processes, assignments are made to roles that represent either a single user or a group ofpeople. As you generate a list of persons associated with each process, consider whether you can createperson groups for people with similar job responsibilities, levels of authority, and security clearances.
To help you to identify the people, the roles, and the records that are involved in the workflow processesthat you create, compile the following information:
• Decide how people are going to be notified of workflow assignments. Users who are going to beassigned tasks must have user records.
• Generate a list of the people who must be notified of the progress of a record. The product can send e-mail messages to notify specific users. It is more efficient to create person records for all individualswho receive notifications.
• Identify the personnel who work on shifts.• Identify supervisors on person records for escalations and notifications.• Identify contract labor personnel if they are required to interact with a record in a workflow process.
Identify which contract workers have both person records and labor records.• Specify the level of security that applies to individuals in different roles in your enterprise. Decide which
applications and which actions personnel in each security group are allowed to view. When you designyour security groups and workflow processes, you must ensure that users in a particular role have thesecurity permissions they need to perform their assigned tasks.
Workflow tool palette buttonsWorkflow tool palette buttons provide visual indications of workflow application support and workflowprocess control. You use these icons to route workflow assignments and to complete workflowassignments.
When you add workflow support to an application, a Route button is added to the application toolbar. Twoicons exist for the Route toolbar button, to indicate whether a record is being used in a workflow process.You can customize the Route buttons. If multiple processes exist for an application, you can createdifferent buttons for each process.
Table 1. Route buttons
Icon File name Function
nav_icon_route.gif Indicates that the applicationsupports workflow. You can clickthe icon to route the currentrecord into a process.
4 IBM Maximo Asset Management : Workflow Implementation Guide
Table 1. Route buttons (continued)
Icon File name Function
nav_icon_route_active.gif Indicates that the current recordis under the control of one ormore workflow processes. Youcan click this toolbar button toperform one of the followingactions:
• Complete a workflowassignment.
• Route the record into anotherworkflow process.
Standards for graphic files
When you create customized images to use as toolbar buttons, create pairs of icons for each process.
The following standards are required for toolbar button images:
• Images must be Graphics Interchange Format (GIF) files. Use the GIF format for a transparentbackground for the icon image.
• Image resolution must be 72 DPI.• Image height for toolbar icons is 17 pixels. The width of the icon can vary from 12 to 26 pixels.• Copy the images for toolbar buttons to the following directory: <product directory>\applications\maximo\maximouiweb\webmodule \webclient\images
Elements of workflow processesYou use workflow processes to create steps to guide records for your business processes. You usenumerous elements when creating your workflow processes to achieve the business goals set out for yourenterprise.
Process nodesA node is a graphical element that represents a point in your business process. Nodes are added atspecific business process junctures to denote the entry of a record into the business process.
You can drag nodes from the palette onto the canvas. You can add any number of nodes to a process. If aprocess exceeds 50 - 100 nodes, consider breaking the process into subprocesses to simplifymanagement and maintenance.
As you drag each node onto the canvas, a name and a number are assigned to the node. The node namedescribes the type of node. The number indicates the order in which the node was added to the canvas.You can modify the name of a node when you configure the node properties.
Whenever possible, give nodes easy to understand labels. You can view node titles in the workflow map.
All nodes have properties, except for the start node and for the stop node. You configure nodes bymodifying the properties to match your business requirements. You specify properties for a node in theProperties window for the node. Each node must be configured individually. You can configure nodes atany point while you build a process, but as a best practice, configure nodes as you add them to thecanvas.
The Workflow Designer application includes the types of nodes that can represent various points in yourbusiness process. A node can be any of the following types:
Chapter 1. Implementing workflow processes 5
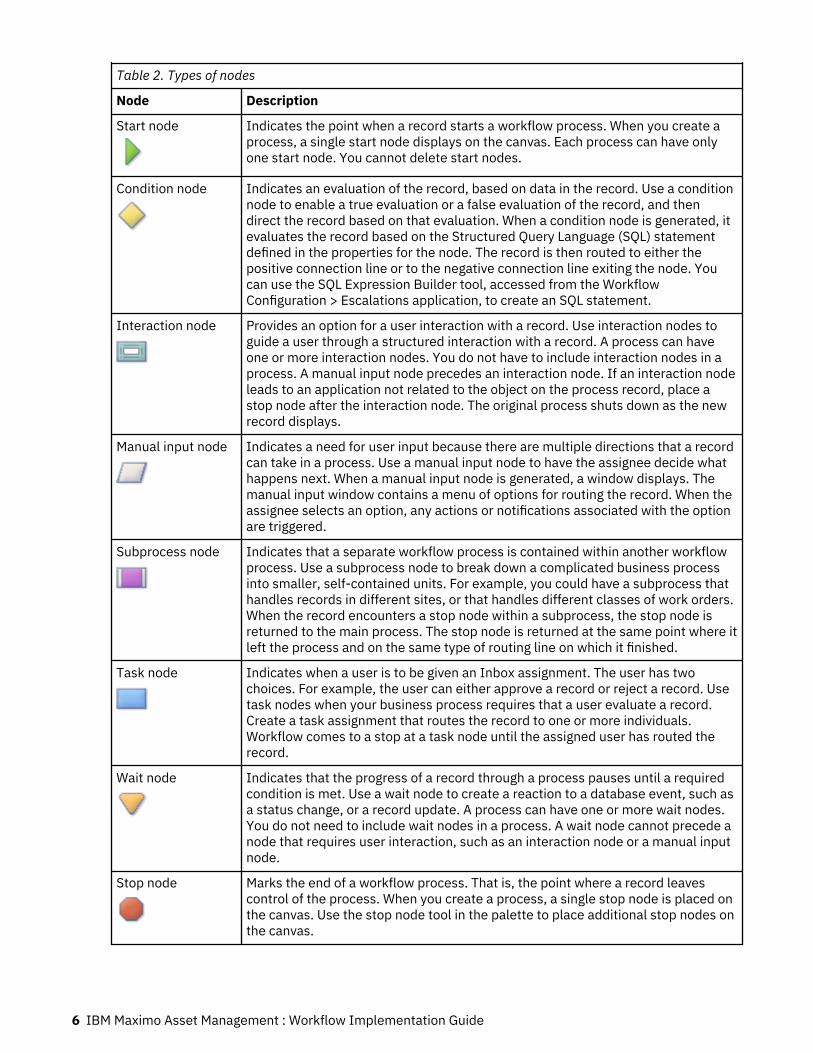
Table 2. Types of nodes
Node Description
Start node Indicates the point when a record starts a workflow process. When you create aprocess, a single start node displays on the canvas. Each process can have onlyone start node. You cannot delete start nodes.
Condition node Indicates an evaluation of the record, based on data in the record. Use a conditionnode to enable a true evaluation or a false evaluation of the record, and thendirect the record based on that evaluation. When a condition node is generated, itevaluates the record based on the Structured Query Language (SQL) statementdefined in the properties for the node. The record is then routed to either thepositive connection line or to the negative connection line exiting the node. Youcan use the SQL Expression Builder tool, accessed from the WorkflowConfiguration > Escalations application, to create an SQL statement.
Interaction node Provides an option for a user interaction with a record. Use interaction nodes toguide a user through a structured interaction with a record. A process can haveone or more interaction nodes. You do not have to include interaction nodes in aprocess. A manual input node precedes an interaction node. If an interaction nodeleads to an application not related to the object on the process record, place astop node after the interaction node. The original process shuts down as the newrecord displays.
Manual input node Indicates a need for user input because there are multiple directions that a recordcan take in a process. Use a manual input node to have the assignee decide whathappens next. When a manual input node is generated, a window displays. Themanual input window contains a menu of options for routing the record. When theassignee selects an option, any actions or notifications associated with the optionare triggered.
Subprocess node Indicates that a separate workflow process is contained within another workflowprocess. Use a subprocess node to break down a complicated business processinto smaller, self-contained units. For example, you could have a subprocess thathandles records in different sites, or that handles different classes of work orders.When the record encounters a stop node within a subprocess, the stop node isreturned to the main process. The stop node is returned at the same point where itleft the process and on the same type of routing line on which it finished.
Task node Indicates when a user is to be given an Inbox assignment. The user has twochoices. For example, the user can either approve a record or reject a record. Usetask nodes when your business process requires that a user evaluate a record.Create a task assignment that routes the record to one or more individuals.Workflow comes to a stop at a task node until the assigned user has routed therecord.
Wait node Indicates that the progress of a record through a process pauses until a requiredcondition is met. Use a wait node to create a reaction to a database event, such asa status change, or a record update. A process can have one or more wait nodes.You do not need to include wait nodes in a process. A wait node cannot precede anode that requires user interaction, such as an interaction node or a manual inputnode.
Stop node Marks the end of a workflow process. That is, the point where a record leavescontrol of the process. When you create a process, a single stop node is placed onthe canvas. Use the stop node tool in the palette to place additional stop nodes onthe canvas.
6 IBM Maximo Asset Management : Workflow Implementation Guide

Related tasksAdding nodes and connections linesYou create a workflow process by inserting nodes and connection lines on a workflow canvas.
Connection linesAll nodes in a workflow process, except for the start nodes and the stop nodes, must be connected to twoother nodes. You can draw positive and negative types of connections between nodes.
Positive connectionsA solid black line on the canvas represents a positive connection. A positive connection indicates apositive outcome. For example, an action was performed, a record was approved, or a record met the
condition specified by the node. Use the Connect Nodes tool to draw a positive line betweennodes.
Negative connectionsA dashed red line on the canvas represents a negative connection. A negative connection indicates anegative outcome. For example, a record was canceled, a record was rejected, or a record did not
meet the condition specified by the node. Use the Negative Connection tool to draw a negativeline between nodes.
Types of nodes and guidelines for connection lines
The following table describes the types of nodes and lists the guidelines for the connection lines that youcan draw between one node and another node:
Table 3. Node guidelines
Type ofnode
Description Linespermittedentering anode
Linespermittedor requiredexiting anode
Indicatesthe point
when arecord
starts aworkflow
process
. None. One positiveline is
required
.
Indicates anevaluation
of therecord,
based ondata in the
record
. One or morepositive
lines; one ormore
negativelines
. One positiveline and one
negativeline are
required
.
Provides anoption for a
userinteraction
with arecord
. One or morepositive
lines; one ormore
negativelines
. One positiveline is
permitted
.
Chapter 1. Implementing workflow processes 7

Table 3. Node guidelines (continued)
Type ofnode
Description Linespermittedentering anode
Linespermittedor requiredexiting anode
Indicates aneed for
user inputbecause
there aremultiple
directionsthat a
record cantake in aprocess
. One or morepositive
lines; one ormore
negativelines
. More thanone positive
line isrequired
. Negativeconnectionsexiting thenode are notallowed.
Indicatesthat a
separateworkflow
process iscontained
withinanother
workflowprocess
. One or morepositive
lines; one ormore
negativelines
. One positiveline and one
negativeline are
required
.
Indicateswhen a user
is to begiven an
Inboxassignment
. One or morepositive
lines; one ormore
negativelines
. One positiveline is
required;one
negativeline is
allowed
.
Indicatesthat the
progress ofa record
through aprocess
pauses untila required
condition ismet
. One or morepositive
lines; one ormore
negativelines
. One positiveline is
required
.
Marks theend of a
workflowprocess
. That is, thepoint wherea recordleavescontrol ofthe process.
One or morepositive
lines; one ormore
negativelines
. None.
8 IBM Maximo Asset Management : Workflow Implementation Guide
Person recordsYou use the People application to create, to modify, to view, and to delete records for individuals. ThePeople application stores information about individuals, such as users, laborers, asset owners, andsupervisors who receive workflow notifications.
A person record is a record for an individual whose name could appear as a text field value. Workflowassignments are made to roles. All roles resolve to a person, to a person group, or to an e-mail address.
The name of a person is used as the text field value in the Reported By field or in the Affected Personfield on a service request, in the Supervisor field on a labor record, or in a Ship To field or Bill ToAttention field on a purchasing record.
You must create a person record for any individual who is assigned tasks as part of a workflow process.When you create records in the Labor application and in the Users application, you must create a personrecord. Person records might have to be created for other individuals who do not have records in theLabor application or in the Users application.
Person records that you create for use as part of workflow processes must contain values in the followingfields:
SupervisorThe person who oversees or manages the individual. This information is used for escalations.
Primary EmailThe email address where notifications are sent.
Primary CalendarThe work calendar that the individual follows. This information is used when determining assignmentsand escalations.
Primary ShiftThe shift that the individual works. This information is used when determining assignments andescalations.
Workflow Email NotificationThe circumstances when the individual must receive email notifications for task assignments. Thedefault value is PROCESS.
Workflow DelegateThe person identifier of the individual designated to receive assignments when the primary individualis unavailable for an extended period (for example, on vacation or on sick leave)
Delegate From and Delegate ToThe time period when workflow processes must route assignment to the delegate. If these fields areempty, all workflow assignments are routed to the delegate.
For complete information on the People application, see the help for the People application in theKnowledge Center for your product.
Person groups and workflow assignmentsYou use the Person Groups application to specify that a group member for a specific organization or sitemust be used when making workflow assignments. Workflow assignments are made to roles.
Different workers can perform the same role on different shifts. Creating person groups for roles such as"supervisor" or "safety engineer" simplifies a workflow process. Creating person groups also reduces theneed for revisions as individuals move in and out of roles.
Workflow assignments are based on entries in the person group role record. If the Broadcast check box isselected on the role record, the task is assigned to all members of the person group. If the check box hasnot been selected, the product goes through the following steps to determine the appropriate role for thetask:
• The product checks for a person record with appropriate entries in the Calendar and Shift fields for theassignment, verifying the group members in the order specified by the Sequence field. If no sequencevalues are specified, the assignment is made to the first group member with an appropriate entry in the
Chapter 1. Implementing workflow processes 9
Calendar and Shift fields. The search logic depends on whether the workflow process is for anapplication at the site, the organization, or the system level.
– If the application is at the site level, the first check is for person records where the value in the Usefor Site field matches the site of the record in the workflow process. The next check is for personrecords where the value in the Use for Organization field matches the Site of the record in theworkflow process. The third check is for person records where there is no value in either the Use forSite field or the Use for Organization field.
– If the application is at the organization level, the product checks for person records where the valuein the Use for Organization field matches the organization of the record in the workflow process. Thenext check is for person records where there is no value in either the Use for Site field or the Use forOrganization field.
– If the application is at the system level, the product checks for person records where there is novalue in either the Use for Site field or the Use for Organization field.
• If there is no person whose Calendar and Shift entries match the assignment, the product checks for aperson record who is listed in the Site Default field. (This field is optional; you can specify a single sitedefault per site.)
• If no site default is specified, the product checks for a person record who is checked in theOrganization Default field. (This field is optional; you can specify only a single organization default perorganization.)
• If no organization default is specified, the Group Default person is assigned. By default, the first personadded to a person group becomes the group default, but you can modify this setting.
For complete information on the Person Groups application, see the help for the Person Groupsapplication in the Knowledge Center for your product.
Roles and role recordsYou use the Roles application to create role records. A role is a function within a business. A role canrepresent a specific job title (such as a department manager), an assigned duty (such as a watch officer),a class file, and a data set.
Workflow Inbox assignments and workflow notifications are always made to roles. All role records pointto one or more person identifiers. Role records can also point to a table and column in the database thatrepresent a person. When a role is encountered in a workflow process, it resolves the role to a persongroup or to an individual person record.
You use roles when you create and configure the following workflow elements:
• Communication templates (recipients)• Escalations• Negative connection lines (notifications)• Positive connection lines (notifications)• Manual Input nodes (notifications)• Task nodes (assignments and notifications)• Wait nodes (notifications)
By using role records instead of person records for assignments and notifications, you can create genericworkflow processes that require less maintenance as individuals move in and out of different roles withinyour company.
For complete information on the Roles application, see the help for the Roles application in theKnowledge Center for your product.
Communication templatesYou use the Communication Templates application to create and to manage templates that generateemail messages about the status of workflow records.
When you create a communication template, you can specify the following information:
10 IBM Maximo Asset Management : Workflow Implementation Guide

• The business object that the template can be used for• The applications where the template can be used• The address that the email must be sent from• The address that replies must be sent to• The subject line of the message• The body of the message• One or more recipients of the message. You can send messages to roles, persons, person groups, and
email addresses. You can specify whether each recipient must also receive a carbon copy (CC) or blindcarbon copy (BCC) of the message.
• Documents to include as attachments when the message is generated
You can use substitution variables when you create the subject line and the body of your message. Thelast memo substitution variable ensures that the last memo saved to the database displays in the list ofmemos. The current memo substitution variable ensures that the memo is available immediately. Whenan email is generated by using that template, it replaces the substitution variables from the template withthe corresponding values from the record.
For complete information about the Communication Templates application, see the help for theCommunication Templates application in the Knowledge Center for your product.
Related conceptsNotificationsYou use the Workflow Designer application to create notifications. A notification is an email message thatis generated by the progress of a record through a workflow process.
NotificationsYou use the Workflow Designer application to create notifications. A notification is an email message thatis generated by the progress of a record through a workflow process.
The Workflow Designer application uses communication templates for notifications. You use theCommunication Templates application to create and to manage the templates.
When you create communication templates for workflow notifications, you specify roles as the recipientsrather than persons or person groups. Many individuals come into contact with a record as it movesthrough its life cycle. Often these individuals need to know about the progress of a record. You can designyour workflow process to generate notifications as required by your business process. Notifications canbe made through email or through a pager, providing that your paging system supports email.
You can configure the following workflow components to generate notifications:
• Escalations• Negative connection lines• Positive connection lines• Manual input nodes• Task nodes• Wait nodes
You cannot modify a communication template in the Workflow Designer application. You must createseparate templates for your notification requirements.
Related conceptsCommunication templates
Chapter 1. Implementing workflow processes 11
You use the Communication Templates application to create and to manage templates that generateemail messages about the status of workflow records.
Escalations and action groupsYou use the Escalations application to create escalation records. You can use escalations to escalateworkflow assignments before they time out in the Inbox for the recipient.
When you assign specific steps in a workflow process to employees, those assignments display in theirInbox. If the assignments are not completed promptly, they time out in the Inboxes for the recipients.When this event happens, you can use escalations to assign the tasks to other people. Escalations help toget tasks completed on time and help to prevent work backlogs.
An action group is a type of action record that includes multiple actions and a sequence to use whenperforming the actions. Escalations are always associated with action groups.
You can associate an action group with an escalation in either of the following ways:
• You can create action groups using the Actions application and then click Detail Menu next to theAction Group field on the Actions sub tab to associate the action group with the escalation.
• You can create action groups in the Escalations application by clicking New Row on the Actions sub tab.When you create an action group in the Escalations application, the action group receives a generatedname. The actions receive assigned sequence numbers. The sequence numbers are based on the orderin which you add the actions to the group.
For complete information on the Escalations application, see the help for the Escalations application inthe Knowledge Center for your product.
Escalation pointsAn escalation point defines the attributes of a record that trigger an action. You can define one or moreescalation points for an escalation and specify one or more actions and notifications for each escalationpoint.
You can create the following categories of escalation points:
• Elapsed time since a past event - Compares the current date and time to the specified field thatrepresents an event in the past. You can select from a list of DATETYPE fields on the record (forexample, a Start Date on a workflow assignment, an Actual Start date on a work order, or a Status Dateon a record that includes status).
• Time until a future event - Compares the current date and time to the specified field that represents anevent in the future (for example, a Renewal Date on a contract, a Due Date on an invoice, or a TargetFinish date on a work order).
• Condition - Condition without a time measurement. If you want to trigger the actions and notificationsof an escalation based on a condition that does not have a time measurement, you can specify thecondition in the Escalation Point Condition field. You also can use the Condition field to specify that theescalation point must be applied to only the subset of records specified by the condition
Actions and action recordsWorkflow processes use actions to move records through a process and to trigger events, such as statuschanges. You define actions in the Actions application and then you reuse them in other workflowprocesses that you create.
You use actions when you create and configure the following Workflow elements:
• Escalations• Negative connection lines• Positive connection lines
For complete information on the Actions application, see the help for the Actions application in theKnowledge Center for your product.
Related tasksSpecifying the properties of actions
12 IBM Maximo Asset Management : Workflow Implementation Guide

You can specify the properties of an action. An action is an event that is triggered by the progress of arecord through a workflow process.
Action typesWhen you create an action record, you specify the action type to help determine what kind of action totake when the action is encountered in a process.
An action can be one of the following types:
APPACTIONUsed to specify that an application action be initiated. For this type of action, there must be values inthe Object and Value fields. When creating an APPACTION type action, you can specify one of thefollowing actions if it is available for the specified object:
• Apply SLA - Apply the specified service level agreement.• Create Change - Create a change work order.• Create Incident - Create an incident ticket.• Create Problem - Create a problem ticket.• Create Release - Create a release work order.• Create SR - Create a service request ticket.• Create WO - Create a work order.• WF Accept - Workflow auto-accept. Accepts the record and routes it to the positive path in the
workflow process.• WF Escalate - Escalate the record in the workflow process and reassigns the assignment to its
escalation role.• WF Initiate - Initiate a workflow process. This option requires a value in the Parameter/Attributefield.
• WF Reject - Workflow auto-reject. Rejects the record and routes it to the negative path in theworkflow process.
CHANGESTATUSUsed to specify that the status of a record changes. There must be a value in the Object field and astatus in the Value field for this type of action.
CUSTOMUsed to specify that a custom class file should run. There must be a value in the Object field and thename and path of a class file in the Value field for this type of action.
EXECUTABLEUsed to specify that a program on the server should run. For this type of action, the name of aprogram file must be in the Value field.
GROUPUsed to specify that the system should run the sequence of actions that you specify in the Memberstable window.
SETVALUEUsed to specify that the system should set the value of a specified field. For this type of action, valuesare required in the Object, Value, and Parameter/Attribute fields.
Related tasksSpecifying the properties of actions
Chapter 1. Implementing workflow processes 13

You can specify the properties of an action. An action is an event that is triggered by the progress of arecord through a workflow process.
Record routingActivating a workflow process indicates that the process is ready to have records routed through it.Before you activate a record, consider whether you want records to be routed into a process manually orautomatically.
A record can enter a workflow process by any of the following methods:
• When you click the Route button on the toolbar.• When you select the Route Workflow action.• When you create and save a record, the record is routed into the workflow process. You can set one
process per object to initiate automatically.• You can set workflow options in the Organizations application. These options specify that generated
records must be routed into a particular workflow process. You can specify a workflow process tomanage the following records:
– Work orders that are generated from a preventive maintenance record– Purchase requisitions that are generated through the inventory reorder process– Purchase orders that are generated through the inventory reorder process– Work orders that are generated when a purchase order for a rotating asset is approved
• A record can be routed from one workflow process to another in any of the following ways:
– With an interaction node– With a subprocess node– With a WFINITIATE action specified on a connection line leaving a node
• A record can be automatically routed into a process with an escalation action.
Domains for status synonymsIf your business processes for record approvals or for status changes involve multiple steps for eachapproval or status change, you can create synonym statuses that model those processes.
For example, your business process requires that three people review a record before it is consideredapproved. There is a single status for waiting for approval and a single status for approved. You can createsynonym statuses of waiting for approval that represent each of the preliminary approvals before therecord is considered approved.
You add synonym values to a value list in the Domains application in your nonproduction environment.Import the changes to your production environment.
Related conceptsSynonym statusesYou can create synonym statuses if your business processes for record approvals or for status changesinvolve multiple steps for each approval or status change.
Examples of workflow processesYou can use the Workflow application to manage records used in various business processes. Theexamples provided are basic because of the limited number of nodes that can be displayed.
The examples illustrate some of the capabilities of the Workflow application and must not be used in aproduction environment. The product demonstration database includes workflow processes that displaysimple processes.
14 IBM Maximo Asset Management : Workflow Implementation Guide

Example of a purchase requisition business processYou can create a workflow process to handle a purchase requisition. When you create a purchaserequisition, your supervisor must approve it.
When an approved purchase requisition reaches the purchasing department, a purchasing agentevaluates the record, and then performs one of the following steps:
• Rejects the requisition• Creates a request for quotation to receive bids for the purchase• Creates a purchase order from the requisition
The record then exits the workflow process for the purchase requisition.
For example, you can create a requisition such that if the total is less than $500, the requisition is routedto the purchasing department. If the requisition total exceeds $500, the requisition requires the approvalof the department manager before it can be routed to the purchasing department. If the requisition totalexceeds $1,000, the requisition requires the approval of a vice president before it can be routed to thepurchasing department. If the requisition total exceeds $5,000, the requisition requires the approval ofthe chief financial officer before it can be routed to the purchasing department.
The diagram that follows illustrates one way that you might map the preceding scenario. The nodes andthe connection lines in this example are arranged so that they are easy to see at a glance, but they can bearranged differently. You could add or remove stop nodes, and the workflow process would still illustratethe same business process.
Chapter 1. Implementing workflow processes 15

Figure 1. Example of a purchase requisition workflow process
Example of a service request business processA workflow process can be created to handle service requests. An enterprise uses the software forservice desk functions. The enterprise has designed a workflow process that guides a service desk agentthrough the initial steps of the record management process.
When a service desk agent takes an incoming telephone call, the agent creates a service request ticket torecord the interaction. The enterprise requires the agent to record the name of the caller and telephonenumber. The agent also must type a short description of the service request. For example, a request forinformation, maintenance, and a classification for the service request. Depending on the type of servicerequest, the agent also might type information about the asset or the location.
When the agent saves the service request ticket, the product starts the service request workflow process.The Manual Input window opens with the following options:
• I must type additional information regarding this service request.• I must type information about tickets or work orders related to this service request.
16 IBM Maximo Asset Management : Workflow Implementation Guide

• I must make an entry in the Work Log or Communications Log.• I have completed data entry for this ticket.
If the agent requests to type more information, either the Service Request tab, the Related Records tab,or the Log tab display, depending on which option the agent selected. When the agent indicates thecompletion of data entry for a service request, the product evaluates the data on the record.
If the agent has not provided asset or location data, the Manual Input window displays the followingoptions:
• Close ticket - informational call• Close ticket - unauthorized caller• Close ticket - misdirected call• Take no action
If an asset or a location is specified on the record, the Manual Input window opens with the followingoptions:
• Take Ownership of ticket (Take Ownership action)• Assign Ownership of ticket (Assign Ownership action)• Create Incident record (Create Incident action)• Create Problem record (Create Problem action)• Create Change work order for an IT asset. (Create Change action)• Create Work Order for a non-IT asset. (Create Work Order action)• Take no action on this ticket.
The following diagram illustrates one way that the preceding scenario might be mapped.
Chapter 1. Implementing workflow processes 17
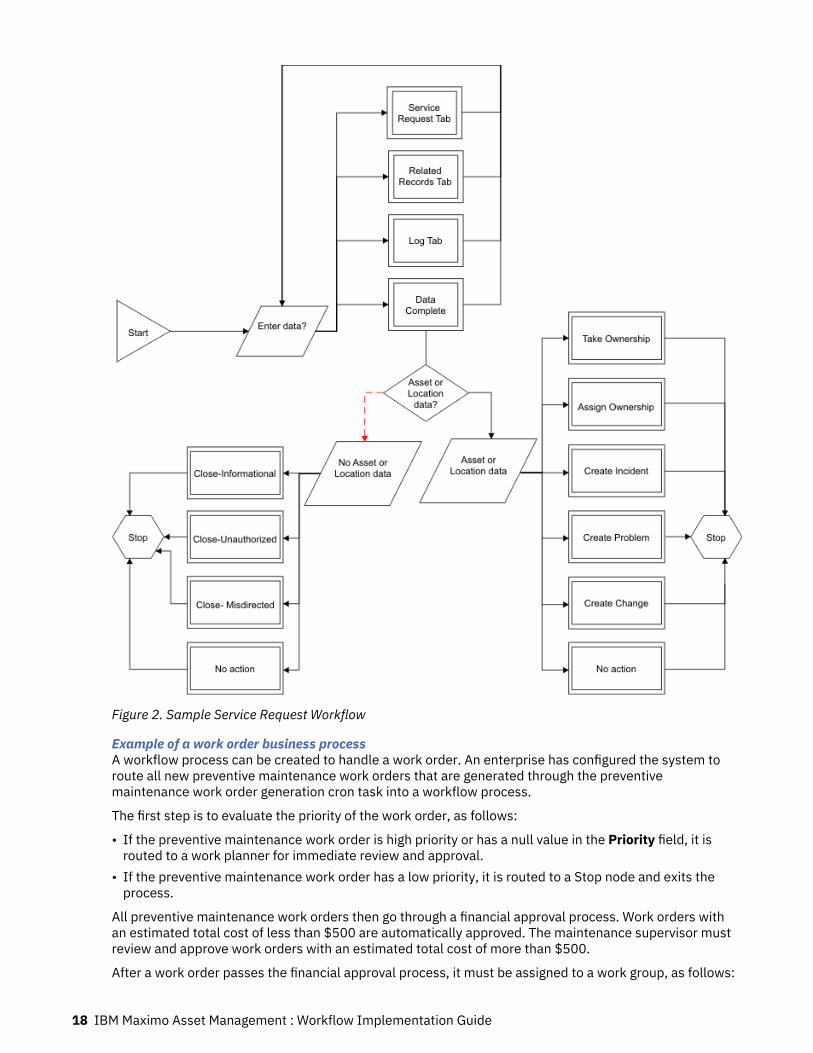
Figure 2. Sample Service Request Workflow
Example of a work order business processA workflow process can be created to handle a work order. An enterprise has configured the system toroute all new preventive maintenance work orders that are generated through the preventivemaintenance work order generation cron task into a workflow process.
The first step is to evaluate the priority of the work order, as follows:
• If the preventive maintenance work order is high priority or has a null value in the Priority field, it isrouted to a work planner for immediate review and approval.
• If the preventive maintenance work order has a low priority, it is routed to a Stop node and exits theprocess.
All preventive maintenance work orders then go through a financial approval process. Work orders withan estimated total cost of less than $500 are automatically approved. The maintenance supervisor mustreview and approve work orders with an estimated total cost of more than $500.
After a work order passes the financial approval process, it must be assigned to a work group, as follows:
18 IBM Maximo Asset Management : Workflow Implementation Guide

• If the preventive maintenance work order is for a vehicle, the system assigns it to the fleet maintenancegroup.
• If the preventive maintenance work order is for a building or location, the system assigns it to thefacilities maintenance group.
• The system assigns all other preventive maintenance work orders to the maintenance group.
After the system assigns the work order to a maintenance group, the work order exits the workflowprocess.
The following diagram illustrates one way that you might map the preceding scenario.
Figure 3. Example of a preventive maintenance work order workflow
Chapter 1. Implementing workflow processes 19

Configuring for WorkflowWorkflow applications require minimal configuration before you can create workflow processes.
Configuration prerequisitesThe Workflow Designer application requires a Java Virtual Machine (JVM) on the client workstation. If youdo not have a JVM installed, the product cannot display the Workflow canvas.
To design and create workflow processes, you must be familiar with the following tools, processes, andconcepts:
• The business processes for the enterprise• Product applications• Object structures and data relationships• Structured query language (SQL) statements and syntax
Workflow administrationYou use the Workflow Administration application to view and to manage active instances of workflowprocesses.
The Workflow Administration application contains a window that displays a row for each active instanceof a workflow process. A record can show up multiple times if it is controlled by multiple workflowinstances. You can see which version of a revised process was used to create each instance, the personidentifier of the individual who routed each record into Workflow, and the date and time that the processwas initiated.
The recordkey (for example, the work order number or the purchase order number) displays with the siteidentifier in the Owner Description field.
Related tasksConfiguring administrator email notificationsDuring the installation process, you type an email address for the workflow administrator. Theadministrator will receive system messages about errors.
Security permissions for workflow processesIf you design workflow processes, you must belong to a security group with security permissions.
Users are not automatically granted access to workflow actions. An administrator must use the SecurityGroups application to grant users security permissions to workflow actions. The workflow actions appearin the Security Groups application when you add workflow support to an application. You can grant usersaccess to actions before you activate a process.
Additionally, you require security permissions for the following applications:
• Actions• Communication Templates• Escalations• Inbox/Assignments Setup• People• Person Groups• Roles• Workflow Administration• Workflow Designer• Workflow Inbox (portlet)
If you or your group are responsible for testing workflow processes, you must have security permissionsfor other applications, depending on the processes that are being tested.
20 IBM Maximo Asset Management : Workflow Implementation Guide

Synonym statusesYou can create synonym statuses if your business processes for record approvals or for status changesinvolve multiple steps for each approval or status change.
For example, your business process might call for three different people to review a record before it isconsidered approved. There is a single status for waiting for approval and a single status for approved.You can create synonym statuses of waiting for approval that represent each of the preliminary approvalsbefore the record is considered approved.
You use the Domains application to add synonym values to a value list. For more information aboutcreating synonym statuses, see the Domains Help for this product.
Related conceptsDomains for status synonymsIf your business processes for record approvals or for status changes involve multiple steps for eachapproval or status change, you can create synonym statuses that model those processes.
Stopping instances of workflow processesWhen you route a record into a workflow process, an active instance of that process is created to managethat individual record. You can view and stop workflow processes for records for any Workflow-enabledapplication.
Before you beginThe application associated with the workflow process record must be enabled for Workflow.
About this taskWhen you stop a workflow process, you are only stopping the single instance of the workflow process thatcontrols a particular record. To deactivate a workflow process, use the Workflow Designer application.When you stop a process instance, the following tasks are performed:
• The record is removed from the control of the workflow process.• A transaction is written to the workflow history of the record. Workflow history remains with a record
permanently, even after the record has left the control of Workflow.• Specified notifications are sent to past assignees, current assignees, or both. You can use a
communication template to create a notification, or type the subject, message, and role recipientsmanually.
Procedure
1. To stop a workflow process, complete one of the following steps:
• In a Workflow-enabled application, display the record you want to remove from Workflow. Fromthe Select Action menu, choose Stop Workflow.
• In the Workflow Administration application, select the active process that you want to stop. ClickStop Process on the assignment line.
2. Optional: Create an email notification. The system defaults to the WFSTOP communication template.You can use the WFSTOP communication template to create the notification. You can also manuallyspecify the subject, message, and role recipients.
3. Click OK. The system stops the workflow process. The system also sends any notifications.
Related tasksDisabling workflow processes
Chapter 1. Implementing workflow processes 21

Disabling a process prevents new records from being routed into the workflow process. Disabling aprocess does not affect records that are under the control of the process.
Test environment designWorkflow processes are automated and can be complex. For this reason, you can create a testenvironment where you design and test processes without affecting records in your productionenvironment.
Design your test environment so that it is a copy of your production environment. Your test database mustinclude enough data and users so that you can thoroughly test each workflow process. You use theapplications in the Integration module to migrate a workflow process from your test environment to yourproduction environment.
Related informationIntegration framework overview
Creating workflow processesYou can create workflow processes that reflect your business processes. A workflow process defines theactions and notifications that can occur at different points in a business process.
About this task
A workflow process consists of the header information for the record, the nodes, the connection lines,and the properties specified for the nodes and the connection lines.
Procedure
1. On the toolbar of the Workflow Designer application, click New Process.2. In the Process field, type a name for the process.3. Optional: Type a description.4. In the Object field, type a value or click Select Value and select an object.5. Click Save Process.
What to do nextYou are now ready to use the canvas to add nodes and connection lines and to configure the properties ofeach of the elements of the process.
Specifying the properties of actionsYou can specify the properties of an action. An action is an event that is triggered by the progress of arecord through a workflow process.
About this taskTo trigger actions, you can configure the following workflow components:
• Negative connection lines• Positive connection lines
Procedure
1. From the List tab of the Workflow Designer application, select a process with properties to bemodified.
2. In the Actions window of the Process tab, click Edit Properties.3. In the Action field, specify a value.4. In the Instruction field, type text to describe to the run-time user what specific action occurs for
routing and manual inputs.5. Click Condition Expression Builder.
22 IBM Maximo Asset Management : Workflow Implementation Guide

6. Select the Custom Class check box to specify that a custom class file is used to evaluate the record.7. In the Communication Template field, specify a value.8. In the Send To field, specify a value.9. In the Subject field, type the subject of the notification e-mail.
10. In the Message field, type the message of the notification e-mail.11. Click OK and click Save Process.
Related conceptsAction typesWhen you create an action record, you specify the action type to help determine what kind of action totake when the action is encountered in a process.Actions and action recordsWorkflow processes use actions to move records through a process and to trigger events, such as statuschanges. You define actions in the Actions application and then you reuse them in other workflowprocesses that you create.
Specifying the properties of condition nodesA condition node indicates an evaluation of the record, based on data in the record. You use a conditionnode to have a true or false evaluation made on the record and then direct the progress of the recordbased on that evaluation.
About this task
When a condition node is encountered, the record is evaluated based on the Structured Query Language(SQL) statement defined in the node properties. The record is then routed to either the positive or the
negative connection line exiting the node. Use the Condition Node tool in the Workflow palette toplace a new condition node on the canvas. A workflow process can have one or more condition nodes, butyou do not have to include condition nodes in a process.
You can specify the following properties for condition nodes:Title
Type or modify the node name and description.Expression
Used to specify the SQL statement that tests one or more field values on the record. The productreturns either a true result or a false result. You can define a simple expression or a complexexpression, based on the needs of your business process. You can use substitution variables in theSQL expression. When the product encounters the condition node during a condition test, itsubstitutes values from the current record for the table and column information based upon thespecified substitution variables. Use the Expression Builder to create your SQL expression.
Custom ClassUsed to specify the custom class file that performs the condition test. Locate custom class files in theproduct directory.
Procedure
1. From the List tab of the Workflow Designer application, select a process with properties to bemodified.
2. From the Canvas tab, right-click the condition node and select Properties.3. Optional: Type a description.4. Click Condition Expression Builder.5. Select the Custom Class check box.6. Click OK and click Save Process.
Chapter 1. Implementing workflow processes 23

Specifying the properties of interaction nodesYou use interaction nodes to specify the actions that occur in a workflow process between differentapplications.
About this taskUse the Interaction Nodes Properties window to specify the following properties for interaction nodes:Application
Used to specify the application that displays.Tab
Used to specify the tab that displays. Use the tab identifier from the application presentation file asthe value for the tab name. You can view this information in Application Designer. Tab identifiers arenot in the database. You must specify tab names manually.
ActionUsed to specify an action that either displays or that is performed by the product. You can select fromactions available by means of a toolbar button or from the Select Action menu.
RelationUsed to create an interaction that leads to another application. The information in the Relation fielddetermines which record to display when the application opens.
ProcessUsed to specify an active workflow process for the specified application. The process starts on thecurrent record upon arrival in the target application.
Direction TitleUsed to specify the title of the message window that displays.
Direction BodyUsed to specify the text of the instructions that displays in a message window.
The absence of a title or the absence of a body does not create a window.
Procedure
1. From the List tab of the Workflow Designer application, select a process with properties to bemodified.
2. From the Canvas tab, right-click the interaction node and select Properties.3. Optional: Type a description.4. In the Application field, specify a value.5. In the Tab Name field, type the tab identifier from the XML presentation file.6. In the Action field, specify a value.7. In the Relation field, specify a value.8. In the Launch Process field, specify a value.9. In the Directions Title field, type the title of the message window.
10. In the Directions Body field, type the instructions that the product displays in the message window.11. Click OK and click Save Process.
Specifying the properties of manual input nodesYou use manual input nodes in a workflow process to designate options that users are presented withduring a workflow process.
About this taskUse the Manual Input Properties window to specify the following properties for manual input nodes:Title
Used to specify or modify the node name and the description.
24 IBM Maximo Asset Management : Workflow Implementation Guide
Display OneUsed to specify what the product does if a user has security permissions to only one specified option.
ActionsDisplays actions associated with the connection lines that exit from the node. Add rows to the Actionswindow by drawing connections that exit the node. You can type a number in the Sequence column tospecify the order in which options are presented to a user. The Instruction displays for each row inthe Manual Input window.
NotificationsUsed to specify any notifications that the product generates if the record travels through a connectionline that exits the node. You can use a communication template to create one or more notifications.You can also choose to specify the subject, message, and role recipients manually.
Procedure
1. From the List tab of the Workflow Designer application, select a process with properties to bemodified.
2. From the Canvas tab, right-click the manual input node and select Properties.3. Optional: Type a description.4. Select the Display One check box to specify the action that occurs when a user has security
permissions to one specified option.5. In the Action field, specify a value.6. In the Communication Template field, specify a value.7. In the Send To field, specify a value.8. In the Subject field, type the subject of the notification e-mail.9. In the Message field, type the message of the notification e-mail.
10. Click OK and click Save Process.
Specifying the properties of subprocess nodesYou can specify the properties for subprocess nodes. Subprocess nodes are processes that have beencreated to be used within a main workflow process.
About this taskUse the Subprocess Properties window to specify the following properties for subprocess nodes:Title
Used to specify or modify the node name and the description.Subprocess
Used to type the name and the description of a workflow process record. The subprocess must meetthe following criteria:
• The process must exist in the Workflow Designer application.• The process must be associated with the same object as the main process.• The process must be enabled, but not activated.
Procedure
1. From the List tab of the Workflow Designer application, select a process with properties to bemodified.
2. From the Canvas tab, right-click the subprocess node and select Properties.3. Optional: Type a description.4. In the Subprocess field, specify a value.
Chapter 1. Implementing workflow processes 25

5. Click OK and click Save Process.
Specifying the properties of task nodesA task node indicates when a user has two choices, such as approving or to rejecting a record. You usetask nodes when your business process requires you to evaluate the record. You also use task nodeswhen you want to create a task assignment that routes the record to one or more individuals.
About this taskUse the Task Node Properties window to specify the following properties for task nodes:Title
Used to specify or modify the node name and the description.Time Limit
Used to specify the time limit for the assignee to complete the task before it is escalated.Application
Used to specify which application the product uses to display the assigned record. Typically, theobject is associated with a single application. In some cases, such as in Quick Reporting and WorkOrder Tracking, an object can be associated with more than one application. It might, for example,represent a clone or even a new custom application on that table.
Display OneUsed to specify whether a single option is displayed when the user has security permissions to onlyone option.
• If the check box is selected, the product displays the single option in the Complete WorkflowAssignment window.
• If the check box is cleared, the product performs the action.
WF Task TypeUsed to add another task to the workflow process.
AssignmentsUsed to specify one or more roles to receive the task assignment. Specify at least one assignment pertask node. A task assignment can be designated to a role or to an assignee relationship.
NotificationsUsed to specify the notifications that the system generates as a record leaves the node. You can use acommunication template to create one or more notifications. Or, you can specify the subject,message, and role recipients manually.
Perform Accept ActionUsed to specify how the system routes the record when the assignment is made to a group.
• When any assignment is accepted - Used to specify that the system needs only one positive actionto route the record to the positive connection line.
• When all assignments are accepted - Used to specify that all assignees must select the positiveaction in order for the system to route the record to the positive connection line. If a single assigneeselects the negative option, the system routes the record to the negative connection line.
Procedure
1. From the List tab of the Workflow Designer application, select a process with properties to bemodified.
2. From the Canvas tab, right-click the task node and select Properties.3. Optional: Type a description.4. In the Application field, specify a value.5. In the Time Limit field, specify the time limit for the assignee to complete the task before it is
escalated.
26 IBM Maximo Asset Management : Workflow Implementation Guide
6. Select the Display One check box to specify what the system might do if the user has securitypermissions to only one specified option.
7. In the Assignments section, click New Row, and specify values for each of the fields that display.8. In the Notifications section, click New Row, and specify values for each of the fields that display.9. In the Perform Accept Action field, select one of the following options to specify how the record is
routed:a) When any assignment is accepted.b) When all assignments are accepted.
10. Click OK, and click Save Process.
Specifying the properties of wait nodesYou can specify the properties of wait nodes. Wait nodes specify that the process is halted until a specificevent occurs.
About this taskYou can specify the following properties for wait nodes:Title
Used to specify or modify the node name and the descriptionWait List
Used to specify one or more system events. The first event to occur triggers the record to resume itsprogress through the process. Event names consist of three or four lowercase words, delimited byperiods. For example, maximo.workorder.update or maximo.po.statuschange.appr.
• The first word is always maximo.• The second word is the name of the business object (MBO). For example, po.• The third word is one of the following words:
– statuschange. If the event is a change of status, the event name has a fourth part; either thename of a specific status, for example, appr, or * for any status change.
– update
NotificationsUsed to specify the notifications that the system should generate as a record leaves the node. You canuse a communication template to create one or more notifications. You can also specify the subject,the message, and the role recipients manually.
Procedure
1. From the List tab of the Workflow Designer application, select a process with properties to bemodified.
2. From the Canvas tab, right-click the wait node and select Properties.3. Optional: Type a description.4. In the Event field, type an event name.5. In the Communication Template field, specify a value.6. In the Send To field, specify a value.7. In the Subject field, type the subject of the notification email.8. In the Message field, type the message of the notification email.9. Click OK and click Save Process.
Chapter 1. Implementing workflow processes 27
Adding nodes and connections linesYou create a workflow process by inserting nodes and connection lines on a workflow canvas.
About this taskEach workflow process includes start nodes and stop nodes. Start nodes and stop nodes do not carryuser-defined information. The other types of nodes carry user-defined actions.
Procedure
1. Select one of the following options:Options Step
To create a workflow process Click Create a Workflow Process.
To configure a process that is enabled andactivated
Select the process you want to revise and clickCreate Revision.
2. To add a node, select one of the following options:To Add a Node Step
In the Canvas tab On the Workflow Designer toolbar, select Move/Add Nodes and drag the nodeonto the canvas.
In the Process tab Click New Node.
3. To edit the properties of the node, select one of the following options:Option Step
In the Canvas tab Double click the node, and edit the properties in the Condition Node Propertieswindow.
In the Process tab Click the Edit Properties icon.
4. Repeat step 2 to place other types of nodes onto the canvas.5. To reposition nodes, in the Canvas tab, drag the node you want to move.6. On the Workflow designer toolbar, select one of the following connection tools to create connection
lines between nodes:a) Click Connect Nodes to add a positive connection line.b) Click Connect Nodes with a Negative Action to add a negative connection line.
7. Click a node and drag the line to another node. Lines must travel from one node to another node. Thelines indicate the path for records to follow in the workflow process. The type of lines and the numberof lines you can draw from each node varies depending on the type of node.
8. Click Save Process.
What to do nextAfter adding nodes and connection lines, the next step is to validate the process to ensure its structuralintegrity.
Setting a workflow process to automatically initiateYou can specify that when a user creates and saves a new record in an application, the record isautomatically routed into a workflow process. Each object can have only a single process that isautomatically initiated.
Before you beginA process must be validated, enabled, and activated before you can set it to automatically initiate.
28 IBM Maximo Asset Management : Workflow Implementation Guide

About this task
This action only routes records created by users. Records that the product creates automatically (forexample, through a PM cron task or through the inventory reorder function) cannot be automaticallyrouted into a process through this method.
Procedure
1. In the Workflow Designer application, display an activated process record.2. Select the Set Process to Auto-Initiate action.
Setting processes to not auto-initiateYou can specify that when a record is created and saved in an application, the record is not routed into aworkflow process. Each object can have only a single process that is initiated automatically.
Procedure
1. In the Workflow Designer application, select the activated process record that you want to set to notauto-initiate.
2. Select the Set Process to Not Auto-Initiate action.3. Click Save Process.
Testing workflow processesYou test your workflow processes in a test environment by routing a record through each possible path.Perform these tests before you export your processes to your production environment to ensure that eachworkflow process accurately reflects your business process.
Workflow process testingDesign your test environment so that it is a copy of your production environment. Your test database mustinclude enough data and users so that you can thoroughly test each workflow process.
You use the applications in the Integration module to migrate a workflow process from your testenvironment to your production environment:
• Validate, enable, and activate each workflow process in a test environment that contains sufficientsample data to test the process. Set up your environment to include test users who can receiveassignments and notifications.
• Route records through all possible paths in the process, including all possible paths through anysubprocesses. You might create test plans to help you verify that you have tested all possible routes in aprocess.
• Verify that assignments appear in the Workflow Inbox for users, and that email notifications are beinggenerated.
• Determine whether the process is complete, or whether additional steps must be added.• Determine that you have configured the process to make the necessary assignments, notifications, and
so forth, that are required by your business process. If you have not configured the process, you mustmodify the process.
• Make any necessary additions, modifications, or deletions and retest the process.• Use the integration applications to export your tested processes from your test environment to your
production environment.
Validating workflow processesYou must validate workflow processes to verify the structural integrity of the process.
Before you beginIf you are validating a process that includes subprocesses, you must validate the subprocess recordsbefore you validate the main process.
Chapter 1. Implementing workflow processes 29

Procedure
1. From the List tab of the Workflow Designer application, select the process record that you want tovalidate.
2. Select the Validate Process action. If the process fails validation, a window displays that lists theerrors. If the process passes validation, a message displays in the navigation bar.
3. Click Save Process.
What to do nextYou are now ready to enable the workflow process. Enabling a process locks the process. To modify aprocess that has been locked, create a revision and make your changes to it.
Enabling workflow processesWorkflow process records are in a draft or a development stage until you enable the record. Enabling aprocess involves validating the structure of the process.
About this taskAfter you enable a process record, the record is locked, and it is ready for use.
Procedure
1. From the List tab of the Workflow Designer application, select the process record that you want toenable.
2. Select the Enable Process action.3. Click Close and click Save Process.
What to do nextTo make a workflow process record ready to use as a main process, you must activate the process.
Activating workflow processesYou activate workflow records before they can be routed into a workflow process.
About this taskWhen you activate a workflow process record, the following actions occur:
• The Workflow actions and buttons are added to the applications associated with the object if thoseapplications do not support workflow yet.
• The Active check box is selected to indicate that the record is currently being used to manage records.• When you activate a process revision, the previously active revision is deactivated. The product does
not disable the revision because active instances of the process might exist.
Procedure
1. From the List tab of the Workflow Designer application, select the process record that you want toactivate.
2. Select the Activate Process action. If the applications associated with the object already supportworkflow, a message displays in the navigation bar stating that the process has been activated.
3. Click OK.
Disabling workflow processesDisabling a process prevents new records from being routed into the workflow process. Disabling aprocess does not affect records that are under the control of the process.
Before you beginYou must use the Workflow Designer application to stop any active instances of the process.
30 IBM Maximo Asset Management : Workflow Implementation Guide
About this task
After a record is routed through an enabled process, the process cannot be deleted because otherrecords might be under the control of the process. When you enable a new process revision, the previousrevision is automatically disabled.
Procedure
1. From the List tab of the Workflow Designer application, display the record that you want to disable.2. Select the Disable Process action.
Related tasksStopping instances of workflow processesWhen you route a record into a workflow process, an active instance of that process is created to managethat individual record. You can view and stop workflow processes for records for any Workflow-enabledapplication.
Viewing workflow historyFor auditing purposes, a record is maintained of all records that are routed through a workflow process.You can view a list of all user-initiated actions in the workflow process, for example, routing a record intoa workflow process, or completing an assignment.
About this taskWhen a record routes through more than one workflow process, the workflow history is sorted by processname, then by transaction date.
To view workflow assignments, select the Workflow > View Workflow History action.
Results
Some transactions are performed automatically. The transactions that are performed automatically donot display even though they are recorded in the workflow history of the record in the database.
Viewing workflow assignments from a Workflow-enabled applicationThe Workflow Map shows a graphic of a workflow process, including its nodes and connection lines. Thecurrent location of the map in a process is highlighted by a box around the node. You can view theworkflow assignments for a record from within a workflow-enabled application. You use the WorkflowMap to see where your assignment falls in the context of the workflow process as a whole.
About this task
From the View Workflow Assignments window, you can perform the following tasks:
• View a list of the active workflow assignments for the record• View the workflow history for a record• View the workflow map for any processes that are currently managing the record.
To view workflow assignments, select the Workflow > View Workflow Assignments action.
Viewing a Workflow MapThe Workflow Map shows a graphic of a workflow process. You can use the Workflow Map to see whereyour assignment falls in the context of the process as a whole.
About this taskA workflow process consists of decision points, known as nodes, and connecting lines between thedecision points. The nodes indicate points in a process where a decision is made, and the connectionlines show the path that the record takes after a decision point. The current location of the map in theprocess is highlighted by a box around the node.
Chapter 1. Implementing workflow processes 31
Procedure
1. Select the Workflow > Workflow Map action from any workflow-enabled application. You can alsoaccess the Workflow Map from the View Assignments window.
2. If multiple workflow processes for the application exist, select the process from the Process Namemenu.
3. Click OK to close the workflow map.
Modifying workflow processesTesting your workflow processes might reveal areas for improvement, or over time your processes mightevolve due to changes in your business, increased efficiencies, and so on. You can add, modify, or deleteprocess elements at any time until the process has been enabled. Once a process has been enabled,create a revision of the process if you want to modify it.
Revising a processIf you want to modify a process after it is enabled and locked, you must create a revision of the process. Arevision of the process is required because other records might be under the control of this process.
About this task
You also can create a revision of a process that is not yet activated or enabled. Creating a revision doesnot deactivate or disable an activated or enabled process record. However, when you activate a newprocess revision, the previous revision is deactivated.
Procedure
1. In the Workflow Designer application, display the enabled process record.2. On the toolbar, click Create Process Revision.3. Make any necessary modifications to the process.4. Click Save Process.
What to do nextYou must validate, enable, and activate a process revision before it can be used to process records.
Synchronizing active workflow processesA workflow process can include one or more subprocesses. When you modify a subprocess, you mustupdate the main process so that it uses the revised subprocess. This process is known assynchronization.
Before you beginYou must enable the subprocess revisions before you can synchronize a workflow process.
Procedure
1. In the Workflow Designer application, select the main process record that you want to update.2. Select the Resynchronize an Active Process action.3. Click Save Process.
Viewing synchronized processesYou can view the name and the revision number of each subprocess associated with a main workflowprocess.
Before you beginThe main workflow process record must be activated before you can perform this action.
32 IBM Maximo Asset Management : Workflow Implementation Guide
Procedure
1. From the List tab of the Workflow Designer application, select the process record that you want toview.
2. Select the View Synchronized Processes action.3. Click OK.
Adding workflow support to applicationsWorkflow actions or buttons are not included with any of the applications when you install them. You canadd the workflow actions and buttons to an application without activating a process. For example, youcan make the actions and buttons visible for user training. You can also create customized toolbarbuttons before activating a process.
Before you beginUsers are not automatically granted access to workflow actions. An administrator must grant userssecurity permissions to workflow actions in the Security Groups application. The workflow actions appearin the Security Groups application after you add workflow support to an application. You can grant usersaccess to actions before you activate a process.
About this task
When you add workflow support to applications, the product performs the following tasks:
• Adds the Add a Route button to the application toolbar. To customize this button, click Edit WorkflowGo Buttons.
• Adds the following workflow-related actions to the Select Action menu for an application:
– Route Workflow– Stop Workflow– View Workflow History– View Workflow Assignments– View Workflow Map– Workflow Help
• Supplies the workflow options to all users in security groups with access to the target application.
The Add Workflow to Applications action does not validate, enable, or activate processes.
Procedure
1. From the List tab of the Workflow Designer application, select the process record to which you want toapply workflow.
2. From the Select Action menu, select Add Workflow to Applications.3. Save your changes.
ResultsThe Add Workflow Support to Applications window displays. If an application does not supportWorkflow, the Add Support checkbox displays. You can clear the Add Support checkbox for anapplication if you do not want to add workflow support to it.
Chapter 1. Implementing workflow processes 33
Adding toolbar buttons for active workflow processesIf multiple active processes exist for an object, you can use a single toolbar button for all active workflowprocesses.
About this taskThe Start Workflow window displays a menu of active processes from which to select. You can also addyour own toolbar buttons for different active processes. If you exceed the number of icons that can fit onthe toolbar, an arrow displays to indicate that a menu of options exists.
Procedure
1. In the Workflow Designer application, select a process record.2. Select the Edit Workflow GO Buttons action.3. Insert a row.4. Specify the application where the workflow process is initiated or routed.5. Specify the name of the workflow process.
If no process is specified, the user is prompted to select from active processes for the application orobject.
6. Specify a sequence value for the order of the Go Buttons.7. Add a description that acts as a tooltip for the button.8. Specify the name of the graphic file to use for the toolbar icon.
For example, specify nav_icon_route.gif.9. Specify the path and name of the graphic file to use for the toolbar icon when the process is active.
For example, specify nav_icon_route_active.gif.10. Click OK and then save the process.
Modifying toolbar buttons for active workflow processesYou can modify the toolbar buttons that are associated with an application at any time during the designprocess, or after a process activates.
Modify toolbar buttons for active processes in the same way that you add buttons for active processes.For more information about modifying buttons, see “Adding toolbar buttons for active workflowprocesses” on page 34.
Deleting workflow processesDepending upon your security permissions and whether records have been marked for deletion, you candelete records from both active and inactive workflow processes.
Setting security permissions for record deletionYou can give specific groups of users security permissions that allow them to delete records from activeworkflows.
Procedure
1. In the Security Groups application, select the security group on the List tab.2. On the Applications tab, select the Workflow Designer application record.3. In the Options for Workflow Designer table, select Grant Access for the following options:
a) Allow deletion of recordsb) Disallow deletions
4. Once you have saved the security group, log out and log in to ensure the security settings are applied.
34 IBM Maximo Asset Management : Workflow Implementation Guide
Deleting inactive workflow process recordsProcess records can be deleted if the process has not been activated or enabled, and no records havebeen routed through the process.
About this task
Procedure
1. In the Workflow Designer application, display the process record to delete.2. Select the Delete Process action.3. Click Yes to confirm the deletion.
Marking workflow process records for deletionYou can identify records that can be deleted when you create a workflow process. Records that have beenmarked can be deleted once the workflows they are part of have stopped.
About this taskThis action can be performed only by users with the appropriate security permissions.
Procedure
1. In the Workflow Designer application, select or create a workflow.2. Select the Allow deletion of records action.
Integrating workflow processesYou use workflow processes to perform tasks, to execute actions, and to send notifications. After youcreate workflow processes, you can test them in an environment other than your working environment tofine-tune their behavior. After you test the processes, you can integrate them into your workingenvironment.
Before you begin
The supporting data must be in place before you can integrate the workflow processes.
Exporting workflow actionsWhen you export workflow actions, you create a query to select records. The export performs thestandard outbound processing for the selected interface on the result set of the query.
About this task
If the standard processing runs classes or rules that exclude or that modify records or fields, you mightneed to create and use a new integration point that does not filter or modify records.
To export data, enable the applicable external system and interface. You do not have to enable theoutbound event listener.
Procedure
1. From the List tab of the External Systems application, select the system where you want to export adata file. EXTSYS1 is a default system that you can use to export workflow supporting data. You cancreate as many external systems as you need.
2. Click the Outbound Interfaces tab and select MXACTIONInterface.3. Click Data Export.4. In the Integration Point field of the Data Export window, type the name of the corresponding
integration point.5. Optional: In the Export Condition field, type a Structured Query Language (SQL) query statement. The
query must be against the primary (top-level) Maximo business object (MBO) in the integration object.
Chapter 1. Implementing workflow processes 35
a) To export all workflow-related actions, your query might read: action in (select actionfrom wfaction)
b) To export actions related to a single workflow process, your query might read: action in(select action from wfaction where processname = 'name' and processrev ='rev') To avoid processing problems due to the size of the XML transaction, use the ExportCondition field to filter out unnecessary records.
6. Click OK.
Exporting workflow communication templatesWhen you export workflow communication templates, you create a query to select records. The exportperforms the standard outbound processing for the selected interface on the result set of the query.
About this task
If the standard processing runs classes or rules that exclude or that modify records or fields, you mightneed to create and use a new integration point that does not filter or modify records.
To export data, you enable the applicable external system and interface. You do not have to enable theoutbound event listener.
Procedure
1. From the List tab of the External Systems application, select the system where you want to export adata file. EXTSYS1 is a default system to where you can export workflow supporting data. You cancreate as many external systems as you need.
2. Click the Outbound Interfaces tab and select the MXCTEMPLATEInterface that you want to export.3. Click Data Export.4. In the Integration Point field of the Data Export window, type the name of the corresponding
integration point.5. Optional: In the Export Condition field, type a Structured Query Language (SQL) query. The query
must be against the primary (top-level) Maximo business object (MBO) in the integration object.a) To export all workflow-related communication templates, your query might read: templateid in(select templateid from wfassignment)
b) To export communication templates related to a single workflow process, your query might read:templateid in (select templateid from wfassignment where processname ='name' and processrev = 'rev') To avoid processing problems due to the size of thetransaction, use the Export Condition field to filter out unnecessary records.
6. Click OK.
Exporting workflow rolesWhen you export workflow roles, you create a query to select records. The export performs the standardoutbound processing for the selected interface on the result set of the query.
About this task
If the standard processing runs classes or rules that exclude or that modify records or fields, you mightneed to create and use a new integration point that does not filter or modify records.
To export data, you must enable the applicable external system and interface. You do not have to enablethe outbound event listener.
Procedure
1. From the List tab of the External Systems application, select the system where you want to export adata file. EXTSYS1 is a default system to where you can export workflow supporting data. You cancreate as many external systems as you need.
2. Click the Outbound Interfaces tab and select the MXMAXROLEInterface that you want to export.
36 IBM Maximo Asset Management : Workflow Implementation Guide
3. Click Data Export.4. In the Integration Point field of the Data Export window, type the name of the corresponding
integration point.5. Optional: In the Export Condition field, type a Structured Query Language (SQL) query. The query
must be against the primary (top-level) Maximo business object (MBO) in the integration object.a) To export all workflow-related roles, your query might read: maxrole in (select roleidfrom wfassignment)
b) To export roles related to a single workflow process, your query might read: maxrole in(select roleid from wfassignment where processname = 'name' and processrev= 'rev') To avoid processing problems due to the size of the transaction, use the ExportCondition field to filter out unnecessary records.
6. Click OK.
Manipulating workflow supporting dataAfter exporting the workflow supporting data, you must manipulate the data to import it properly. Youchange the data to ensure that the data is imported from and to the correct places in your system, and toensure that the commands within the data are set to perform the correct procedures.
Procedure
1. Open the file that you exported from your test environment, such as mxaction. If you have notmodified the INTGLOBALDIR, the path for the file is: <drive_letter>:\<bea_folder>\user_projects\domains\mydomain\xmfiles
2. Locate the tag <SenderID>. Modify the data within the tag to be from EXTSYS1 to read:<SenderID>EXTSYS1</SenderID>.
3. Locate the tag <RecipientID>. Modify the data within the tag to be from MX, or from the VARVALUEspecified in the MAXVARS table for VARNAME MXSYSID by modifying it to read: <RecipientID>MX</RecipientID>.
4. Search the document to locate the parent tags, such as COMMTEMPLATE, MAXROLE, and ACTION.Replace these tags with <COMMTEMPLATE action = "">, <ACTION action = "">, and<MAXROLE action = "">. Adding the action = "" command tells the system to add or to replacethis action.
5. Save the file and place it in the folder of your working environment: <drive_letter>:\<bea_folder>\user_projects\domains\mydomain\load\xml
Importing workflow supporting dataThe Integration Framework can import a workflow process and its supporting data (including actions,roles, and communication templates).
Before you beginYour environment must be configured before you can import workflow supporting data. The Data Importfeature is available only for interfaces of the Notify operation type within an adapter.
To import data, the data must be in an Extensible Markup Language (XML) file. The format of the datamust be the same as the format of the table that corresponds to the interface.
About this taskYou can import data to build and test your process in a test environment, then you use the integrationframework to export the process to your production environment.
Procedure
1. From the List tab of the External Systems application, select the system where you want to importworkflow supporting data. EXTSYS1 is a default system that you can use to import workflowsupporting data.
2. Select the Data Import action.
Chapter 1. Implementing workflow processes 37

3. In the Data Import window, select XML File.4. In the Server Directory field, specify the location of the file. The default location of the file is:<global directory location>\load\xml.
5. In the File Name field, specify the name of the file.6. Click Import.
Exporting workflow processesYou can export the workflow processes that you have created.
Before you beginYou must first create your workflow processes and test them.
Procedure
1. From the List tab of the External Systems application, select the system where you want to export adata file. EXTSYS1 is a predefined destination where you can export workflow data. The System tabopens with all fields populated. You can create as many external systems as you need.
2. Click the Outbound Interfaces tab and select the interface that you want to export, MXWFInterface3. Click Data Export.4. In the Data Export window, choose one of the following options:
a) To export all workflow processes, click OK. All workflow processes are exported in a single XMLfile.
b) To restrict the output, and export only certain processes, add a Structured Query Language whereclause in the Export Condition field. For example, to export only the first revision of the WOSTATUSprocess, type PROCESSNAME='WOSTATUS' AND PROCESSREV ='1'.
5. Click OK. The workflow processes are exported to a single XML file.
What to do nextYou can now integrate the workflow processes into your working environment.Related informationIntegration framework overview
Manipulating workflow processesAfter you export a workflow process, you must manipulate it to import it properly. You manipulate orchange the process to ensure that the data is imported from and to the correct places in your system. Youalso manipulate it to ensure that the commands within the processes are set to perform the correctprocedures.
Procedure
1. Open the file that you exported from your test environment. If you have not modified theINTGLOBALDIR, the path for the file is: <global directory>:\xmfiles
2. Locate the tag <SenderID>. Modify the data within the tag to be from EXTSYS1 to read:<SenderID>EXTSYS1</SenderID>.
3. Locate the tag <RecipientID>. Modify the data within the tag to be from MX. You can also modify thedata within the tag from the VARVALUE specified in the MAXVARS table for VARNAME MXSYSID, asfollows: <RecipientID>MX</RecipientID>.
4. Search the XML document to locate the <WFPROCESS> and replace with <WFPROCESS> action ="" Adding the action = "" command tells the product to add or to replace this action.
5. Save the file and place it in the folder of your working environment: <global directorylocation>:\load\xml.
38 IBM Maximo Asset Management : Workflow Implementation Guide

Importing workflow processesYou use the integration framework to import a workflow process and its supporting data, such as actions,roles, and communication templates.
Before you beginYour environment must be configured before you can import workflow processes. The Data Importfeature is available only for interfaces of the Notify operation type within an adapter. For more informationabout configuring your environment, refer to the system administrator guide.
For every workflow process that you import, you must add workflow support to the associatedapplications after you activate the workflow process.
To import data, the data must be in an Extensible Markup Language (XML) file. The format of the datamust be the same as the format of the table that corresponds to the interface.
If your workflow process has subprocesses, you must activate the parent and child processes, and thenresynchronize the processes. Also, you must import any subprocesses to your workflow process beforeyou import the workflow process.
About this taskWhen you import a workflow process, you build and test your process in a test environment. After you testyour process, you use the integration framework to export the process to your production environment.
Procedure
1. From the List tab of the External Systems application, select the system that you want to import a datafile to. EXTSYS1 is a default system to which you can import workflow processes.
2. Select the Data Import action.3. In the Data Import window, select XML File.4. In the Server Directory field, specify the location of the file. The default location of the file is:<global directory location>\load\xml.
5. In the File Name field, specify the name of the file.6. Click Import.
Workflow/Inbox Assignments portletThe Workflow Inbox/Assignments is one of the portlets that might appear on your Start Center. If yourworkplace has implemented the Workflow feature, a list of your task assignments displays in the Inbox.
A task assignment is a record that is routed to you for action, based on the information contained in aworkflow process. The number of records in Inbox/Assignments displays in the top left corner of theportlet.
You use the Workflow Inbox to review assignments, to route assignments, and to complete assignments.You must complete the assignments before a record can move to the next step in a workflow process.
Configuring the Workflow InboxYou use the Workflow Inbox to review, to route, and to complete your task assignments. A taskassignment is a record that is routed to you for action, based on the information contained in a workflowprocess. Records that are listed in your Workflow Inbox are assigned to you.
Before you beginYou must have security permissions to configure the portlets that display on your Start Center, includingconfiguring the Workflow Inbox.
Chapter 1. Implementing workflow processes 39

About this task
The description that displays in the Inbox portlet is the description of the step from the workflow process,not the description of the record. For example, the description for a purchase order task might be"Supervisor approval."
Procedure
1. Click Edit Portlet (pencil icon) in the Inbox/Assignments header to display the Inbox/AssignmentsSetup application.
2. You can perform the following actions in the Inbox/Assignments Setup application:
• Change the display name of the portlet• Indicate how many rows to display in the portlet• Select the columns that are displayed in the portlet and modify their descriptions• Indicate the order that the columns are displayed by entering a value in the Order column
3. Click Finished.
What to do nextYou must complete the assignment in your Workflow Inbox before the record can move to the next step inthe workflow process.
Configuring administrator email notificationsDuring the installation process, you type an email address for the workflow administrator. Theadministrator will receive system messages about errors.
About this task
Successful delivery of free-form notifications depends on the value set for the mxe.workflow.adminproperty. Record the email address for the workflow administrator in the maximo.properties file. This fileis located in the following directory: <installation directory>\applications\maximo\properties, where <installation directory> is the directory into which you installed the product.
Procedure
1. Using a text editor, open the maximo.properties file .2. In the Workflow Related Properties section, locate the property named mxe.workflow.admin=.3. Type or modify the email address. For example: [email protected]. Save your changes.
Reassigning workflow assignmentsYou use the Workflow Administration application to reassign workflow task assignments. Sometimes, aworkflow task that has been assigned to an individual or to a group must be reassigned to someone else.
Procedure
1. From the View Active Assignments window of the Workflow Administration application, click View/Modify Active Assignments.
2. Click Reassign Assignment to reassign assignments.3. In the Person field of the Reassign window, type a person ID.4. Click OK to close the Reassign window, then click OK.
Related tasksSending reassignment notifications
40 IBM Maximo Asset Management : Workflow Implementation Guide

You can notify a person or a group of a workflow task reassignment.
Sending reassignment notificationsYou can notify a person or a group of a workflow task reassignment.
Procedure
1. In the Reassign window, click New Row.2. In the Send To field, specify the identifier for a person or click Detail Menu > Select Value and choose
a person record from the list.3. In the Subject field, type a subject for the e-mail message.4. In the Message field, type the text of the e-mail message.5. Click OK to close the Reassign window, then click OK.
Related tasksReassigning workflow assignmentsYou use the Workflow Administration application to reassign workflow task assignments. Sometimes, aworkflow task that has been assigned to an individual or to a group must be reassigned to someone else.
Completing workflow assignmentsYou can complete workflow assignments to complete a task and to route the task to the next assignee.You can view and edit memos that are entered by individuals who have previously reviewed the record orassignment. You can also write memos to task assignees.
Procedure
1. Perform one of the following actions:
• In the workflow inbox, select Route.• In a Workflow-enabled application, click Route Workflow.• In the Workflow window, click Complete an Assignment.
2. Select an action.3. In the Memo field, enter a memo value.4. Click Reassign, to assign the task to another individual.5. Click OK.
ResultsThe task is placed in the workflow inbox of the assigned person. The memo that you entered is added tothe record workflow history. The next person in the process flow can view your memo in the EarlierMemos table window
Deleting assignmentsYou can delete task assignments if a task node has more than one assignment and you want to make aparticular task assignment inactive.
About this task
All task nodes must have at least one task assignment. You cannot delete the last active assignment for agiven task.
Deleting an assignment changes the status of the task assignment record to inactive.
Procedure
1. If necessary, use the table filter to locate a process instance.2. In the Processes table window, click View/Modify Active Assignments.
Chapter 1. Implementing workflow processes 41

3. To delete an assignment, click Delete Assignment. The status of the task assignment is changed toinactive. The assignment record is removed from the View Active Assignments window.
4. Click OK to close the window.
42 IBM Maximo Asset Management : Workflow Implementation Guide

Notices
This information was developed for products and services offered in the US. This material might beavailable from IBM in other languages. However, you may be required to own a copy of the product orproduct version in that language in order to access it.
IBM may not offer the products, services, or features discussed in this document in other countries.Consult your local IBM representative for information on the products and services currently available inyour area. Any reference to an IBM product, program, or service is not intended to state or imply that onlythat IBM product, program, or service may be used. Any functionally equivalent product, program, orservice that does not infringe any IBM intellectual property right may be used instead. However, it is theuser's responsibility to evaluate and verify the operation of any non-IBM product, program, or service.
IBM may have patents or pending patent applications covering subject matter described in thisdocument. The furnishing of this document does not grant you any license to these patents. You can sendlicense inquiries, in writing, to:
IBM Director of LicensingIBM CorporationNorth Castle Drive, MD-NC119Armonk, NY 10504-1785US
For license inquiries regarding double-byte character set (DBCS) information, contact the IBM IntellectualProperty Department in your country or send inquiries, in writing, to:
Intellectual Property LicensingLegal and Intellectual Property LawIBM Japan Ltd.19-21, Nihonbashi-Hakozakicho, Chuo-kuTokyo 103-8510, Japan
INTERNATIONAL BUSINESS MACHINES CORPORATION PROVIDES THIS PUBLICATION "AS IS"WITHOUT WARRANTY OF ANY KIND, EITHER EXPRESS OR IMPLIED, INCLUDING, BUT NOT LIMITED TO,THE IMPLIED WARRANTIES OF NON-INFRINGEMENT, MERCHANTABILITY OR FITNESS FOR APARTICULAR PURPOSE. Some jurisdictions do not allow disclaimer of express or implied warranties incertain transactions, therefore, this statement may not apply to you.
This information could include technical inaccuracies or typographical errors. Changes are periodicallymade to the information herein; these changes will be incorporated in new editions of the publication.IBM may make improvements and/or changes in the product(s) and/or the program(s) described in thispublication at any time without notice.
Any references in this information to non-IBM websites are provided for convenience only and do not inany manner serve as an endorsement of those websites. The materials at those websites are not part ofthe materials for this IBM product and use of those websites is at your own risk.
IBM may use or distribute any of the information you provide in any way it believes appropriate withoutincurring any obligation to you.
Licensees of this program who wish to have information about it for the purpose of enabling: (i) theexchange of information between independently created programs and other programs (including thisone) and (ii) the mutual use of the information which has been exchanged, should contact:
IBM Director of LicensingIBM CorporationNorth Castle Drive, MD-NC119Armonk, NY 10504-1785US
© Copyright IBM Corp. 2008, 2020 43

Such information may be available, subject to appropriate terms and conditions, including in some cases,payment of a fee.
The licensed program described in this document and all licensed material available for it are provided byIBM under terms of the IBM Customer Agreement, IBM International Program License Agreement or anyequivalent agreement between us.
The performance data and client examples cited are presented for illustrative purposes only. Actualperformance results may vary depending on specific configurations and operating conditions.
Information concerning non-IBM products was obtained from the suppliers of those products, theirpublished announcements or other publicly available sources. IBM has not tested those products andcannot confirm the accuracy of performance, compatibility or any other claims related to non-IBMproducts. Questions on the capabilities of non-IBM products should be addressed to the suppliers ofthose products.
This information is for planning purposes only. The information herein is subject to change before theproducts described become available.
This information contains examples of data and reports used in daily business operations. To illustratethem as completely as possible, the examples include the names of individuals, companies, brands, andproducts. All of these names are fictitious and any similarity to actual people or business enterprises isentirely coincidental.
COPYRIGHT LICENSE:
This information contains sample application programs in source language, which illustrate programmingtechniques on various operating platforms. You may copy, modify, and distribute these sample programsin any form without payment to IBM, for the purposes of developing, using, marketing or distributingapplication programs conforming to the application programming interface for the operating platform forwhich the sample programs are written. These examples have not been thoroughly tested under allconditions. IBM, therefore, cannot guarantee or imply reliability, serviceability, or function of theseprograms. The sample programs are provided "AS IS", without warranty of any kind. IBM shall not beliable for any damages arising out of your use of the sample programs.
Trademarks
IBM, the IBM logo, and ibm.com are trademarks or registered trademarks of International BusinessMachines Corp., registered in many jurisdictions worldwide. Other product and service names might betrademarks of IBM or other companies. A current list of IBM trademarks is available on the web at"Copyright and trademark information" at www.ibm.com/legal/copytrade.shtml.
Java and all Java-based trademarks and logos are trademarks or registered trademarks of Oracle and/orits affiliates.
The registered trademark Linux® is used pursuant to a sublicense from the Linux Foundation, theexclusive licensee of Linus Torvalds, owner of the mark on a worldwide basis.
Microsoft, Windows, Windows NT, and the Windows logo are trademarks of Microsoft Corporation in theUnited States, other countries, or both.
UNIX is a registered trademark of The Open Group in the United States and other countries.
Other product and service names might be trademarks of IBM or other companies.
Terms and conditions for product documentation
Permissions for the use of these publications are granted subject to the following terms and conditions.
Applicability
These terms and conditions are in addition to any terms of use for the IBM website.
44 Notices

Personal use
You may reproduce these publications for your personal, noncommercial use provided that all proprietarynotices are preserved. You may not distribute, display or make derivative work of these publications, orany portion thereof, without the express consent of IBM.
Commercial use
You may reproduce, distribute and display these publications solely within your enterprise provided thatall proprietary notices are preserved. You may not make derivative works of these publications, orreproduce, distribute or display these publications or any portion thereof outside your enterprise, withoutthe express consent of IBM.
Rights
Except as expressly granted in this permission, no other permissions, licenses or rights are granted, eitherexpress or implied, to the publications or any information, data, software or other intellectual propertycontained therein.
IBM reserves the right to withdraw the permissions granted herein whenever, in its discretion, the use ofthe publications is detrimental to its interest or, as determined by IBM, the above instructions are notbeing properly followed.
You may not download, export or re-export this information except in full compliance with all applicablelaws and regulations, including all United States export laws and regulations.
IBM MAKES NO GUARANTEE ABOUT THE CONTENT OF THESE PUBLICATIONS. THE PUBLICATIONS AREPROVIDED "AS-IS" AND WITHOUT WARRANTY OF ANY KIND, EITHER EXPRESSED OR IMPLIED,INCLUDING BUT NOT LIMITED TO IMPLIED WARRANTIES OF MERCHANTABILITY, NON-INFRINGEMENT, AND FITNESS FOR A PARTICULAR PURPOSE.
IBM® Online Privacy Statement
IBM Software products, including software as service solutions, (“Software Offerings”) may use cookiesor other technologies to collect product usage information, to help improve the end user experience, totailor interactions with the end user or for other purposes. In many cases no personally identifiableinformation is collected by the Software Offerings. Some of our Software Offerings can help enable you tocollect personally identifiable information. If this Software Offering uses cookies to collect personallyidentifiable information, specific information about this offering’s use of cookies is set forth below.
Depending upon the configurations deployed, this Software Offering may use session and persistentcookies that collect each user’s name, user name, password, or other personally identifiable informationfor purposes of session management, authentication, single sign-on configuration or other usage trackingor functional purposes. These cookies can be disabled, but disabling them will also likely eliminate thefunctionality they enable.
If the configurations deployed for this Software Offering provide you as customer the ability to collectpersonally identifiable information from end users via cookies and other technologies, you should seekyour own legal advice about any laws applicable to such data collection, including any requirements fornotice and consent.
For more information about the use of various technologies, including cookies, for these purposes, seeIBM’s Privacy Policy at http://www.ibm.com/privacy and IBM's Online Privacy Statement at https://www.ibm.com/privacy/details/us/en/ in the section entitled “Cookies, Web Beacons and OtherTechnologies”.
Notices 45

46 IBM Maximo Asset Management : Workflow Implementation Guide


IBM®
Part Number:
(1P) P
/N: