Embed Size (px)
Citation preview
IBM Maximo Asset ManagementVersion 7 Release 5
Workflow Implementation Guide
���
NoteBefore using this information and the product it supports, read the information in “Notices” on page 47.
This edition applies to version 7, release 5, modification 0 of IBM® Maximo Asset Management and to allsubsequent releases and modifications until otherwise indicated in new editions.
© Copyright IBM Corporation 2008, 2013.US Government Users Restricted Rights – Use, duplication or disclosure restricted by GSA ADP Schedule Contractwith IBM Corp.
Contents
Implementing workflow processes . . . 1Workflow overview . . . . . . . . . . . . 1
Applications that are used with Workflow . . . 1Workflow design process . . . . . . . . . 2
Business process analyses . . . . . . . . 3Workflow tool palette buttons . . . . . . 5Elements of workflow processes . . . . . . 6Examples of workflow processes . . . . . 16
Configuring for Workflow . . . . . . . . . 21Configuration prerequisites . . . . . . . . 21
Workflow administration . . . . . . . . 21Security permissions for workflow processes 21Synonym statuses . . . . . . . . . . 22Stopping instances of workflow processes . . 22Test environment design . . . . . . . . 23
Creating workflow processes . . . . . . . 23Specifying the properties of actions . . . . 23Specifying the properties of condition nodes 24Specifying the properties of interaction nodes 25Specifying the properties of manual inputnodes . . . . . . . . . . . . . . 26Specifying the properties of subprocess nodes 27Specifying the properties of task nodes . . . 27Specifying the properties of wait nodes . . . 29Adding nodes and connections lines . . . . 29Setting a workflow process to automaticallyinitiate . . . . . . . . . . . . . . 30Setting processes to not auto-initiate . . . . 31
Testing workflow processes . . . . . . . . 31Workflow process testing . . . . . . . . 31Validating workflow processes . . . . . . 32Enabling workflow processes . . . . . . 32Activating workflow processes . . . . . . 32Disabling workflow processes . . . . . . 33
Viewing workflow history . . . . . . . 33Viewing workflow assignments from aWorkflow-enabled application . . . . . . 34Viewing a Workflow Map . . . . . . . 34
Modifying workflow processes . . . . . . . 34Creating process revisions . . . . . . . 35Synchronizing active workflow processes . . 35Viewing synchronized processes . . . . . 35Adding workflow support to applications . . 36Adding toolbar buttons for active workflowprocesses . . . . . . . . . . . . . 36Modifying toolbar buttons for active workflowprocesses . . . . . . . . . . . . . 37Deleting workflow processes . . . . . . 38
Integrating workflow processes . . . . . . . 38Exporting workflow actions . . . . . . . 39Exporting workflow communication templates 39Exporting workflow roles. . . . . . . . 40Manipulating workflow supporting data . . 41Importing workflow supporting data . . . . 41Exporting workflow processes . . . . . . 42Manipulating workflow processes . . . . . 42Importing workflow processes . . . . . . 43
Workflow/Inbox Assignments portlet. . . . . 43Configuring the Workflow Inbox . . . . . 44Configuring administrator e-mail notifications 44Reassigning workflow assignments . . . . 45Sending reassignment notifications . . . . 45Completing workflow assignments . . . . 45Deleting assignments . . . . . . . . . 46
Notices . . . . . . . . . . . . . . 47Trademarks . . . . . . . . . . . . . . 48
© Copyright IBM Corp. 2008, 2013 iii

iv Workflow Implementation Guide
Implementing workflow processes
Workflow features let you automate repetitive business and record managementprocesses. This provides a means for greater efficiency and accountabilitythroughout your enterprise.
Workflow overviewYou use the Workflow application to plan, design, build, test, implement, andmanage workflow processes. Workflow provides a means of electronicallyreproducing business processes so that they can be applied to records.
You can manage the movement of a record through a process from start to finish.You can instruct individuals to act on records, specify delegates when workers areunavailable, ensure that individuals act in a timely manner, and ensure that anaudit trail exists for each record and process.
Workflow is an integrated part of the software. Workflow processes and theirsupporting records are at the system level in a multisite implementation. Workflowprocesses can be used for all organizations and sites. You can design processes orsubprocesses that are specific to an organization or specific to a site, through theuse of logical branching.
You can create a workflow process for any business object. Because all theapplications are associated with Maximo® Asset Management business objects andcan run a customer Java™ class, you can build workflow processes for anyapplication, including cloned and custom applications.
Workflow handles assignments in a flexible manner. You can specify assigneerelationships for assignments to create groups of active assignments at runtime.Assignees can receive notifications of assignments in their Workflow Inbox or intheir e-mail inbox, eliminating the need for users to search for their assignments.Workers or administrators can reassign workflow tasks, stop a process instance,and remove a record from the control of Workflow. You can specify at what pointin a process you want e-mail notifications generated. Delegates can be specifiedwhen workers are unavailable.
A workflow process can run a program, such as a batch file or an .exe file, that isstored on a local server in the system directory. A workflow process for one type ofrecord can launch a process for another type of record. For example, a servicerequest can launch a process for an incident. A process can contain subprocesses.For example, for different subcategories of records, or records from different sites.When a process requires user interaction, the product can direct a user to a specificapplication, to a tab, or to an action.
Applications that are used with WorkflowWorkflow is used with other applications that directly or indirectly support itsfunctionality.
ActionsCreate and manage actions and action groups. Actions are associated withconnection lines in a workflow process and are triggered by the routingthat moves a record from one node to another.
© Copyright IBM Corp. 2008, 2013 1
Communication TemplatesCreate and manage templates that the system uses when generating e-mailmessages. Workflow uses communication templates for notifications.
EscalationsCreate and manage escalation processes. An escalation is a mechanism thatcan monitor time-sensitive records and key performance indicators, whichcan take actions or send notifications when a record reaches a definedescalation point. Workflow can use escalations with task assignments.
Inbox/Assignments SetupConfigure the Workflow Inbox on the Start Center of a user.
PeopleCreate and manage records for individuals who are listed on records inany capacity. Workflow uses person records when generating assignmentsand notifications.
Person GroupsCreate and manage records for groups of individuals. Workflow usesperson group records when generating assignments and notifications.
Roles Create and manage records for roles. All roles resolve to a person, a persongroup, or an e-mail address. All workflow assignments and notificationsare made to roles.
Workflow AdministrationView and modify assignments and active instances of workflow processes.
Workflow DesignerCreate, view, and modify workflow processes.
Workflow InboxView and respond to workflow assignments. A workflow process routesassignments to users' inboxes.
Workflow design processWorkflow processes can be designed to incorporate the most effective ways ofcompleting business tasks. You can evaluate your current practices and determinehow you can improve or standardize them before you design workflow processes.
When you create a workflow process, the product directs records through pathsthat you specify. When you design a process, be sure to consider what can happenat each decision point and include all the paths that a record can take. You couldbegin your workflow implementation with simple processes. You can always buildin more complexity in a later revision.
To design optimum workflow processes, consider the following guidelines:v Generic processes require less maintenance than highly specific ones. For
example, you could modify roles that resolve to an individual more frequentlythan roles that resolve to a person group.
v When designing processes, consider when you want the product to generatenotifications. The product can generate notifications when the following eventsoccur in a process:– A record reaches a decision point (node)– A record follows a specific path (connection line) in a process– Task assignments are made
2 Workflow Implementation Guide
v When designing processes, consider how you want to handle null values. Aprocess could reach a decision point that evaluates data on the record and thatdata could be missing from the record.
v When a record takes the negative path, you can design the record so that it canbe modified to take the positive path. You could also design the record to exitthe process permanently.
v If a record can go through a process again after it has been rejected, you candefine a limit to the number of times a record can repeat the process.
v Try to avoid having separate groups of nodes and connection lines that performthe same function at different points in a process. It is more efficient to reuse thesame code through looping or through creating a subprocess.
v Simple processes involving a limited number of nodes are easier to troubleshootand maintain. If the number of nodes in your process grows too large, you couldbreak down the process into subprocesses.
v When writing Structured Query Language (SQL) statements, consider how theSQL syntax affects how the product interprets the statements. The followingexamples demonstrate the use of the colon in SQL statements:– ASSETNUM - (without a colon) Instructs the product to go to the database
for the asset record– ASSETNUM - (with a colon) Instructs the product to use the asset record in
memory (the record currently on the window)
Business process analysesYour business practices encompass how you manage your enterprise. You can startthe analyses of your processes by collecting information about your enterprise.This information helps you to determine the types of processes that you couldautomate.
Enterprise analysis
Gather the following enterprise information to use when designing your workflowprocesses:v If you have an organizational chart, review your organizational chart to see how
your enterprise is organized.v If your enterprise is multinational, list the languages that are required for your
workflow processes.v Collect the business process flows that document the business units of your
organization. If there are different process flows for the same organizations atvarious locations, gather those process flows. Compare the business practices atlocations to find out if the differences are significant.
v Review the standard operating procedures, such as the InternationalOrganization for Standardization (ISO) 9000 quality management or the ISO14000 procedures.
v Review the regulatory requirements for your industry and how they affect yourbusiness processes.
v Review the policies that define who is responsible for creating budgets.v Review the policies that define financial approval limits and list the individuals
who have the authority to approve spending.v Research the types of records at your enterprise that require approval.v Review the policies that define the levels of approval that are required for each
type of record.
Implementing workflow processes 3
Implementation analysis
Gather the following implementation information for use when designing yourworkflow processes:v Determine the number of organizations and sites that exist for your enterprise.
You create workflow processes at the system level. Find out if there are separateprocesses or subprocesses for different organizations or sites.
v Find out if you use the Integration Framework to integrate with any externalsystems.
v Determine if any Maximo product options have been purchased.v Research the applications that your enterprise has implemented.v Determine the types of records for which you use the software.v Find out if the system has been configured to generate records, such as
inventory reorder records, preventive maintenance work orders, and scheduledpayment invoices.
v Determine if your implementation uses Start Centers that do not include theWorkflow Inbox. If users cannot access the Inbox, you can design your workflowprocesses to send e-mail messages to notify users.
Process analysis:
Information you collect about your processes can be formatted into a flowchart. Aflowchart can help you to identify reusable elements, the beginning and the end ofrecord life cycles, and the parts of the life cycle that can be managed by aworkflow process.
You could diagram your business process on paper, on a blackboard, or using agraphics software program to create a flowchart. Writing or diagramming abusiness practice helps you to analyze it. It also provides you with a map of yourprocess flows that you can use when you create a workflow process. Your goal isto produce a detailed diagram that shows all of the routes that a record can takethrough your enterprise during its life cycle.
Your research must include the following information:v The names of the people who interact with records during a processv The processes that are used to manage specific recordsv The records that enter the process, and where the records go when they exit the
processv The records that are managed during a processv The length of time it takes for a record to go through a processv The parts of your current process that are working well and should be keptv The parts of your current process that are not working well and should be
changed or removed
As you document your business process, make note of trouble spots, such asundocumented procedures, or different ways to complete the same task. Addressthese issues and refine your business processes before you create and implement aworkflow process.
4 Workflow Implementation Guide
Workflow processes and user responsibilities:
Workflow processes identify the people who create and who manage a recordthroughout its life cycle. Workflow processes also identify the types of records thatare used.
In workflow processes, assignments are made to roles that represent either a singleuser or a group of people. As you generate a list of persons associated with eachprocess, consider whether you can create person groups for people with similar jobresponsibilities, levels of authority, and security clearances.
To help you to identify the people, the roles, and the records that are involved inthe workflow processes that you create, compile the following information:v Decide how people are going to be notified of workflow assignments. Users who
are going to be assigned tasks must have user records.v Generate a list of the people who must be notified of the progress of a record.
The product can send e-mail messages to notify specific users. It is more efficientto create person records for all individuals who receive notifications.
v Identify the personnel who work on shifts.v Identify supervisors on person records for escalations and notifications.v Identify contract labor personnel if they are required to interact with a record in
a workflow process. Identify which contract workers have both person recordsand labor records.
v Specify the level of security that applies to individuals in different roles in yourenterprise. Decide which applications and which actions personnel in eachsecurity group are allowed to view. When you design your security groups andworkflow processes, you must ensure that users in a particular role have thesecurity permissions they need to perform their assigned tasks.
Workflow tool palette buttonsWorkflow tool palette buttons provide visual indications of workflow applicationsupport and workflow process control. You use these icons to route workflowassignments and to complete workflow assignments.
When you add workflow support to an application, a Route button is added to theapplication toolbar. Two icons exist for the Route toolbar button, to indicatewhether a record is being used in a workflow process. You can customize theRoute buttons. If multiple processes exist for an application, you can createdifferent buttons for each process.
Table 1. Route buttons
Icon File name Function
nav_icon_route.gif Indicates that the applicationsupports workflow. You canclick the icon to route thecurrent record into a process.
Implementing workflow processes 5
Table 1. Route buttons (continued)
Icon File name Function
nav_icon_route_active.gif Indicates that the currentrecord is under the control ofone or more workflowprocesses. You can click thistoolbar button to performone of the following actions:
v Complete a workflowassignment.
v Route the record intoanother workflow process.
Standards for graphic files
When you create customized images to use as toolbar buttons, create pairs of iconsfor each process.
The following standards are required for toolbar button images:v Images must be Graphics Interchange Format (GIF) files. Use the GIF format for
a transparent background for the icon image.v Image resolution must be 72 DPI.v Image height for toolbar icons is 17 pixels. The width of the icon can vary from
12 to 26 pixels.v Copy the images for toolbar buttons to the following directory: <product
directory>\applications\maximo\maximouiweb\webmodule \webclient\images
Elements of workflow processesYou use workflow processes to create steps to guide records for your businessprocesses. You use numerous elements when creating your workflow processes toachieve the business goals set out for your enterprise.
Process nodes:
A node is a graphical element that represents a point in your business process.Nodes are added at specific business process junctures to denote the entry of arecord into the business process.
You can drag nodes from the palette onto the canvas. You can add any number ofnodes to a process. If a process exceeds 50 - 100 nodes, consider breaking theprocess into subprocesses to simplify management and maintenance.
As you drag each node onto the canvas, a name and a number are assigned to thenode. The node name describes the type of node. The number indicates the orderin which the node was added to the canvas. You can modify the name of a nodewhen you configure the node properties.
Whenever possible, give nodes easy to understand labels. You can view node titlesin the workflow map.
All nodes have properties, except for the start node and for the stop node. Youconfigure nodes by modifying the properties to match your business requirements.You specify properties for a node in the Properties window for the node. Each
6 Workflow Implementation Guide
node must be configured individually. You can configure nodes at any point whileyou build a process, but as a best practice, configure nodes as you add them to thecanvas.
The Workflow Designer application includes the types of nodes that can representvarious points in your business process. A node can be any of the following types:
Table 2. Types of nodes
Node Description
Start node Indicates the point when a record starts a workflow process. When youcreate a process, a single start node displays on the canvas. Eachprocess can have only one start node. You cannot delete start nodes.
Condition node Indicates an evaluation of the record, based on data in the record. Usea condition node to enable a true evaluation or a false evaluation ofthe record, and then direct the record based on that evaluation. When acondition node is generated, it evaluates the record based on theStructured Query Language (SQL) statement defined in the propertiesfor the node. The record is then routed to either the positiveconnection line or to the negative connection line exiting the node. Youcan use the SQL Expression Builder tool, accessed from the WorkflowConfiguration > Escalations application, to create an SQL statement.
Interaction node Provides an option for a user interaction with a record. Use interactionnodes to guide a user through a structured interaction with a record. Aprocess can have one or more interaction nodes. You do not have toinclude interaction nodes in a process. A manual input node precedesan interaction node. If an interaction node leads to an application notrelated to the object on the process record, place a stop node after theinteraction node. The original process shuts down as the new recorddisplays.
Manual inputnode
Indicates a need for user input because there are multiple directionsthat a record can take in a process. Use a manual input node to havethe assignee decide what happens next. When a manual input node isgenerated, a window displays. The manual input window contains amenu of options for routing the record. When the assignee selects anoption, any actions or notifications associated with the option aretriggered.
Subprocess node Indicates that a separate workflow process is contained within anotherworkflow process. Use a subprocess node to break down a complicatedbusiness process into smaller, self-contained units. For example, youcould have a subprocess that handles records in different sites, or thathandles different classes of work orders. When the record encounters astop node within a subprocess, the stop node is returned to the mainprocess. The stop node is returned at the same point where it left theprocess and on the same type of routing line on which it finished.
Task node Indicates when a user is to be given an Inbox assignment. The user hastwo choices. For example, the user can either approve a record or rejecta record. Use task nodes when your business process requires that auser evaluate a record. Create a task assignment that routes the recordto one or more individuals. Workflow comes to a stop at a task nodeuntil the assigned user has routed the record.
Wait node Indicates that the progress of a record through a process pauses until arequired condition is met. Use a wait node to create a reaction to adatabase event, such as a status change, or a record update. A processcan have one or more wait nodes. You do not need to include waitnodes in a process. A wait node cannot precede a node that requiresuser interaction, such as an interaction node or a manual input node.
Implementing workflow processes 7
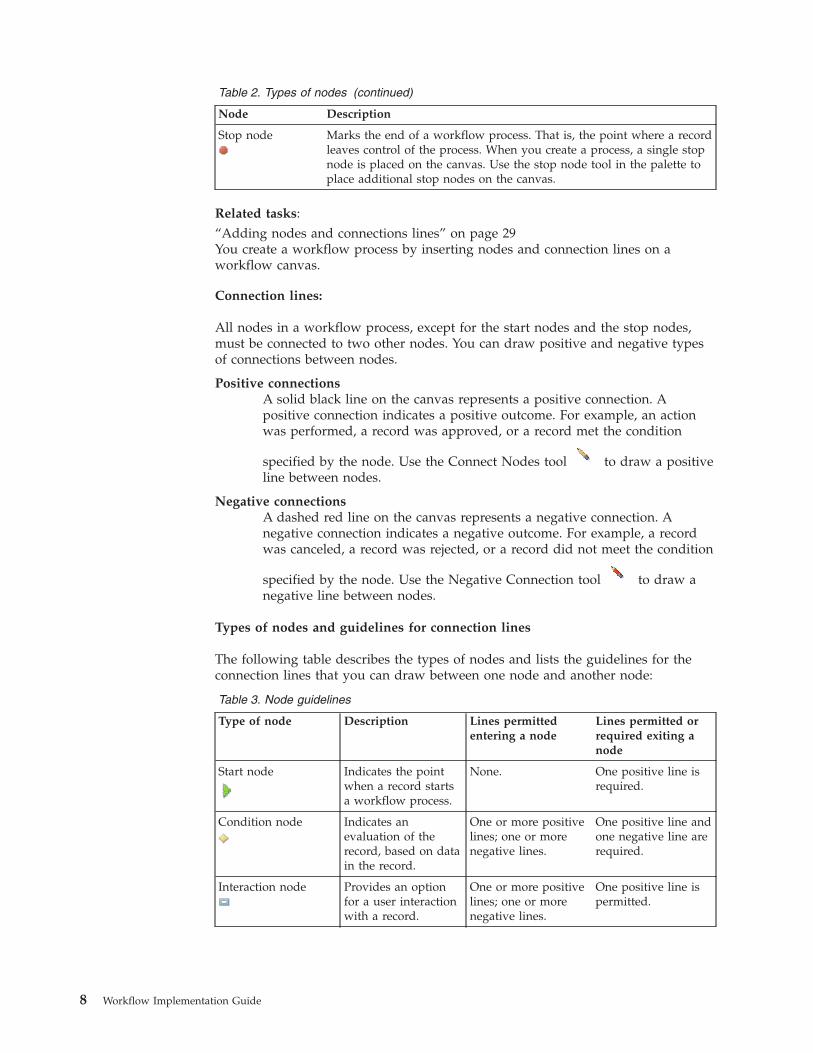
Table 2. Types of nodes (continued)
Node Description
Stop node Marks the end of a workflow process. That is, the point where a recordleaves control of the process. When you create a process, a single stopnode is placed on the canvas. Use the stop node tool in the palette toplace additional stop nodes on the canvas.
Related tasks:“Adding nodes and connections lines” on page 29You create a workflow process by inserting nodes and connection lines on aworkflow canvas.
Connection lines:
All nodes in a workflow process, except for the start nodes and the stop nodes,must be connected to two other nodes. You can draw positive and negative typesof connections between nodes.
Positive connectionsA solid black line on the canvas represents a positive connection. Apositive connection indicates a positive outcome. For example, an actionwas performed, a record was approved, or a record met the condition
specified by the node. Use the Connect Nodes tool to draw a positiveline between nodes.
Negative connectionsA dashed red line on the canvas represents a negative connection. Anegative connection indicates a negative outcome. For example, a recordwas canceled, a record was rejected, or a record did not meet the condition
specified by the node. Use the Negative Connection tool to draw anegative line between nodes.
Types of nodes and guidelines for connection lines
The following table describes the types of nodes and lists the guidelines for theconnection lines that you can draw between one node and another node:
Table 3. Node guidelines
Type of node Description Lines permittedentering a node
Lines permitted orrequired exiting anode
Start node Indicates the pointwhen a record startsa workflow process.
None. One positive line isrequired.
Condition node Indicates anevaluation of therecord, based on datain the record.
One or more positivelines; one or morenegative lines.
One positive line andone negative line arerequired.
Interaction node Provides an optionfor a user interactionwith a record.
One or more positivelines; one or morenegative lines.
One positive line ispermitted.
8 Workflow Implementation Guide
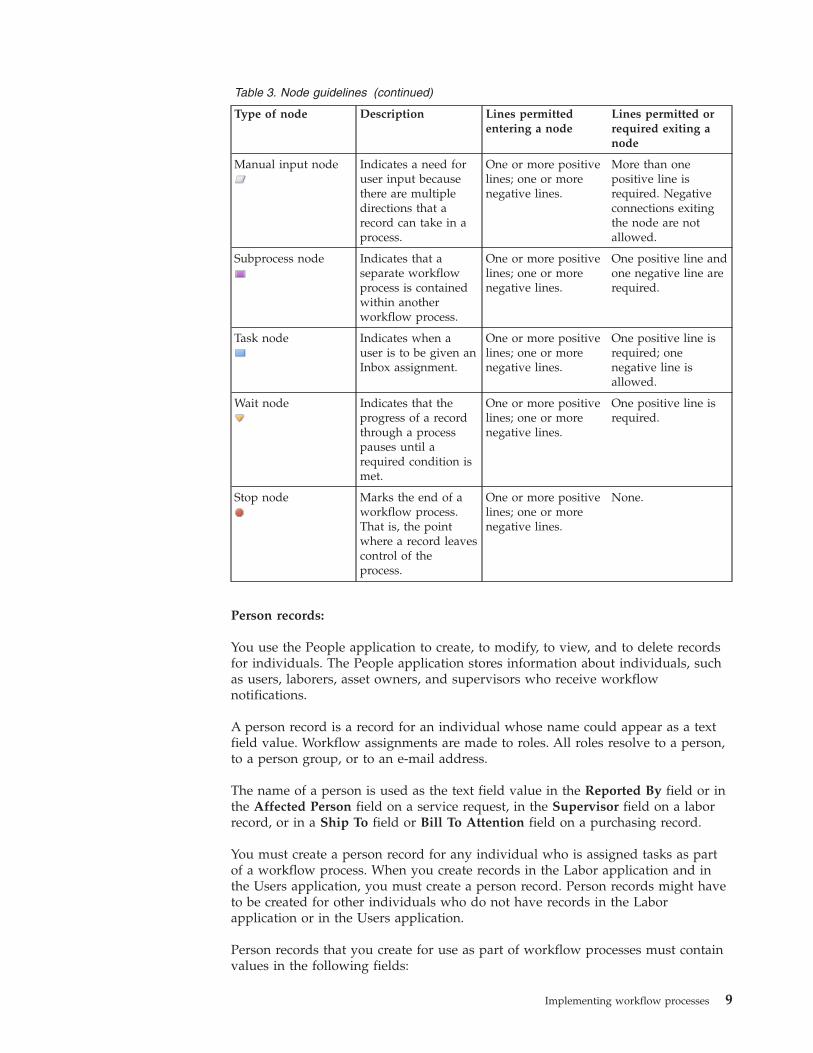
Table 3. Node guidelines (continued)
Type of node Description Lines permittedentering a node
Lines permitted orrequired exiting anode
Manual input node Indicates a need foruser input becausethere are multipledirections that arecord can take in aprocess.
One or more positivelines; one or morenegative lines.
More than onepositive line isrequired. Negativeconnections exitingthe node are notallowed.
Subprocess node Indicates that aseparate workflowprocess is containedwithin anotherworkflow process.
One or more positivelines; one or morenegative lines.
One positive line andone negative line arerequired.
Task node Indicates when auser is to be given anInbox assignment.
One or more positivelines; one or morenegative lines.
One positive line isrequired; onenegative line isallowed.
Wait node Indicates that theprogress of a recordthrough a processpauses until arequired condition ismet.
One or more positivelines; one or morenegative lines.
One positive line isrequired.
Stop node Marks the end of aworkflow process.That is, the pointwhere a record leavescontrol of theprocess.
One or more positivelines; one or morenegative lines.
None.
Person records:
You use the People application to create, to modify, to view, and to delete recordsfor individuals. The People application stores information about individuals, suchas users, laborers, asset owners, and supervisors who receive workflownotifications.
A person record is a record for an individual whose name could appear as a textfield value. Workflow assignments are made to roles. All roles resolve to a person,to a person group, or to an e-mail address.
The name of a person is used as the text field value in the Reported By field or inthe Affected Person field on a service request, in the Supervisor field on a laborrecord, or in a Ship To field or Bill To Attention field on a purchasing record.
You must create a person record for any individual who is assigned tasks as partof a workflow process. When you create records in the Labor application and inthe Users application, you must create a person record. Person records might haveto be created for other individuals who do not have records in the Laborapplication or in the Users application.
Person records that you create for use as part of workflow processes must containvalues in the following fields:
Implementing workflow processes 9
SupervisorThe person who oversees or manages the individual. This information isused for escalations.
Primary E-mailThe e-mail address where notifications are sent.
Primary CalendarThe work calendar that the individual follows. This information is usedwhen determining assignments and escalations.
Primary ShiftThe shift that the individual works. This information is used whendetermining assignments and escalations.
Workflow E-mail NotificationThe circumstances when the individual must receive e-mail notificationsfor task assignments. The default value is PROCESS.
Workflow DelegateThe person identifier of the individual designated to receive assignmentswhen the primary individual is unavailable for an extended period (forexample, on vacation or on sick leave)
Delegate From and Delegate ToThe time period when workflow processes must route assignment to thedelegate. If these fields are empty, all workflow assignments are routed tothe delegate.
For complete information on the People application, see the help for the Peopleapplication in the information center for your product.
Person groups and workflow assignments:
You use the Person Groups application to specify that a group member for aspecific organization or site must be used when making workflow assignments.Workflow assignments are made to roles.
Different workers can perform the same role on different shifts. Creating persongroups for roles such as "supervisor" or "safety engineer" simplifies a workflowprocess. Creating person groups also reduces the need for revisions as individualsmove in and out of roles.
Workflow assignments are based on entries in the person group role record. If theBroadcast check box is selected on the role record, the task is assigned to allmembers of the person group. If the check box has not been selected, the productgoes through the following steps to determine the appropriate role for the task:v The product checks for a person record with appropriate entries in the Calendar
and Shift fields for the assignment, verifying the group members in the orderspecified by the Sequence field. If no sequence values are specified, theassignment is made to the first group member with an appropriate entry in theCalendar and Shift fields. The search logic depends on whether the workflowprocess is for an application at the site, the organization, or the system level.– If the application is at the site level, the first check is for person records
where the value in the Use for Site field matches the site of the record in theworkflow process. The next check is for person records where the value in theUse for Organization field matches the Site of the record in the workflowprocess. The third check is for person records where there is no value ineither the Use for Site field or the Use for Organization field.
10 Workflow Implementation Guide
– If the application is at the organization level, the product checks for personrecords where the value in the Use for Organization field matches theorganization of the record in the workflow process. The next check is forperson records where there is no value in either the Use for Site field or theUse for Organization field.
– If the application is at the system level, the product checks for person recordswhere there is no value in either the Use for Site field or the Use forOrganization field.
v If there is no person whose Calendar and Shift entries match the assignment,the product checks for a person record who is listed in the Site Default field.(This field is optional; you can specify a single site default per site.)
v If no site default is specified, the product checks for a person record who ischecked in the Organization Default field. (This field is optional; you canspecify only a single organization default per organization.)
v If no organization default is specified, the Group Default person is assigned. Bydefault, the first person added to a person group becomes the group default, butyou can modify this setting.
For complete information on the Person Groups application, see the help for thePerson Groups application in the information center for your product.
Roles and role records:
You use the Roles application to create role records. A role is a function within abusiness. A role can represent a specific job title (such as a department manager),an assigned duty (such as a watch officer), a class file, and a data set.
Workflow Inbox assignments and workflow notifications are always made to roles.All role records point to one or more person identifiers. Role records can also pointto a table and column in the database that represent a person. When a role isencountered in a workflow process, it resolves the role to a person group or to anindividual person record.
You use roles when you create and configure the following workflow elements:v Communication templates (recipients)v Escalationsv Negative connection lines (notifications)v Positive connection lines (notifications)v Manual Input nodes (notifications)v Task nodes (assignments and notifications)v Wait nodes (notifications)
By using role records instead of person records for assignments and notifications,you can create generic workflow processes that require less maintenance asindividuals move in and out of different roles within your company.
For complete information on the Roles application, see the help for the Rolesapplication in the information center for your product.
Communication templates:
You use the Communication Templates application to create and to managetemplates that generate email messages about the status of workflow records.
Implementing workflow processes 11
When you create a communication template, you can specify the followinginformation:v The business object that the template can be used forv The applications where the template can be usedv The address that the email must be sent fromv The address that replies must be sent tov The subject line of the messagev The body of the messagev One or more recipients of the message. You can send messages to roles, persons,
person groups, and email addresses. You can specify whether each recipientmust also receive a carbon copy (CC) or blind carbon copy (BCC) of themessage.
v Documents to include as attachments when the message is generated
You can use substitution variables when you create the subject line and the bodyof your message. The last memo substitution variable ensures that the last memosaved to the database displays in the list of memos. The current memo substitutionvariable ensures that the memo is available immediately. When an email isgenerated by using that template, it replaces the substitution variables from thetemplate with the corresponding values from the record.
For complete information about the Communication Templates application, see thehelp for the Communication Templates application in the information center foryour product.Related concepts:“Notifications”You use the Workflow Designer application to create notifications. A notification isan e-mail message that is generated by the progress of a record through aworkflow process.
Notifications:
You use the Workflow Designer application to create notifications. A notification isan e-mail message that is generated by the progress of a record through aworkflow process.
The Workflow Designer application uses communication templates fornotifications. You use the Communication Templates application to create and tomanage the templates.
When you create communication templates for workflow notifications, you specifyroles as the recipients rather than persons or person groups. Many individualscome into contact with a record as it moves through its life cycle. Often theseindividuals need to know about the progress of a record. You can design yourworkflow process to generate notifications as required by your business process.Notifications can be made through e-mail or through a pager, providing that yourpaging system supports e-mail.
You can configure the following workflow components to generate notifications:v Escalationsv Negative connection linesv Positive connection linesv Manual input nodes
12 Workflow Implementation Guide
v Task nodesv Wait nodes
You cannot modify a communication template in the Workflow Designerapplication. You must create separate templates for your notification requirements.Related concepts:“Communication templates” on page 11You use the Communication Templates application to create and to managetemplates that generate email messages about the status of workflow records.
Escalations and action groups:
You use the Escalations application to create escalation records. You can useescalations to escalate workflow assignments before they time out in the Inbox forthe recipient.
When you assign specific steps in a workflow process to employees, thoseassignments display in their Inbox. If the assignments are not completed promptly,they time out in the Inboxes for the recipients. When this event happens, you canuse escalations to assign the tasks to other people. Escalations help to get taskscompleted on time and help to prevent work backlogs.
An action group is a type of action record that includes multiple actions and asequence to use when performing the actions. Escalations are always associatedwith action groups.
You can associate an action group with an escalation in either of the followingways:v You can create action groups using the Actions application and then click Detail
Menu next to the Action Group field on the Actions sub tab to associate theaction group with the escalation.
v You can create action groups in the Escalations application by clicking New Rowon the Actions sub tab. When you create an action group in the Escalationsapplication, the action group receives a generated name. The actions receiveassigned sequence numbers. The sequence numbers are based on the order inwhich you add the actions to the group.
For complete information on the Escalations application, see the help for theEscalations application in the information center for your product.
Escalation points:
An escalation point defines the attributes of a record that trigger an action. You candefine one or more escalation points for an escalation and specify one or moreactions and notifications for each escalation point.
You can create the following categories of escalation points:v Elapsed time since a past event - Compares the current date and time to the
specified field that represents an event in the past. You can select from a list ofDATETYPE fields on the record (for example, a Start Date on a workflowassignment, an Actual Start date on a work order, or a Status Date on a recordthat includes status).
Implementing workflow processes 13
v Time until a future event - Compares the current date and time to the specifiedfield that represents an event in the future (for example, a Renewal Date on acontract, a Due Date on an invoice, or a Target Finish date on a work order).
v Condition - Condition without a time measurement. If you want to trigger theactions and notifications of an escalation based on a condition that does nothave a time measurement, you can specify the condition in the Escalation PointCondition field. You also can use the Condition field to specify that theescalation point must be applied to only the subset of records specified by thecondition
Actions and action records:
Workflow processes use actions to move records through a process and to triggerevents, such as status changes. You define actions in the Actions application andthen you reuse them in other workflow processes that you create.
You use actions when you create and configure the following Workflow elements:v Escalationsv Negative connection linesv Positive connection lines
For complete information on the Actions application, see the help for the Actionsapplication in the information center for your product.Related tasks:“Specifying the properties of actions” on page 23You can specify the properties of an action. An action is an event that is triggeredby the progress of a record through a workflow process.
Action types:
When you create an action record, you specify the action type to help determinewhat kind of action to take when the action is encountered in a process.
An action can be one of the following types:
APPACTIONUsed to specify that an application action be initiated. For this type ofaction, there must be values in the Object and Value fields. When creatingan APPACTION type action, you can specify one of the following actions ifit is available for the specified object:v Apply SLA - Apply the specified service level agreement.v Create Change - Create a change work order.v Create Incident - Create an incident ticket.v Create Problem - Create a problem ticket.v Create Release - Create a release work order.v Create SR - Create a service request ticket.v Create WO - Create a work order.v WF Accept - Workflow auto-accept. Accepts the record and routes it to
the positive path in the workflow process.v WF Escalate - Escalate the record in the workflow process and reassigns
the assignment to its escalation role.v WF Initiate - Initiate a workflow process. This option requires a value in
the Parameter/Attribute field.
14 Workflow Implementation Guide
v WF Reject - Workflow auto-reject. Rejects the record and routes it to thenegative path in the workflow process.
CHANGESTATUSUsed to specify that the status of a record changes. There must be a valuein the Object field and a status in the Value field for this type of action.
CUSTOMUsed to specify that a custom class file should run. There must be a valuein the Object field and the name and path of a class file in the Value fieldfor this type of action.
EXECUTABLEUsed to specify that a program on the server should run. For this type ofaction, the name of a program file must be in the Value field.
GROUPUsed to specify that the system should run the sequence of actions thatyou specify in the Members table window.
SETVALUEUsed to specify that the system should set the value of a specified field.For this type of action, values are required in the Object, Value, andParameter/Attribute fields.
Related tasks:“Specifying the properties of actions” on page 23You can specify the properties of an action. An action is an event that is triggeredby the progress of a record through a workflow process.
Record routing:
Activating a workflow process indicates that the process is ready to have recordsrouted through it. Before you activate a record, consider whether you want recordsto be routed into a process manually or automatically.
A record can enter a workflow process by any of the following methods:v When you click the Route button on the toolbar.v When you select the Route Workflow action from the Select Action menu.v When you create and save a record, the record is routed into the workflow
process. You can set one process per object to initiate automatically.v You can set workflow options in the Organizations application. These options
specify that generated records must be routed into a particular workflowprocess. You can specify a workflow process to manage the following records:– Work orders that are generated from a preventive maintenance record– Purchase requisitions that are generated through the inventory reorder
process– Purchase orders that are generated through the inventory reorder process– Work orders that are generated when a purchase order for a rotating asset is
approvedv A record can be routed from one workflow process to another in any of the
following ways:– With an interaction node– With a subprocess node– With a WFINITIATE action specified on a connection line leaving a node
v A record can be automatically routed into a process with an escalation action.
Implementing workflow processes 15

Domains:
If your business processes for record approvals or for status changes involvemultiple steps for each approval or status change, you can create synonymstatuses.
For example, your business process might call for three different people to reviewa record before it is considered approved. There is a single status for waiting forapproval and a single status for approved. You can create synonym statuses ofwaiting for approval that represent each of the preliminary approvals before therecord is considered approved.
You use the Domains application to add synonym values to a value list.Related concepts:“Synonym statuses” on page 22You can create synonym statuses if your business processes for record approvals orfor status changes involve multiple steps for each approval or status change.
Examples of workflow processesYou can use the Workflow application to manage records used in various businessprocesses. The examples provided are basic because of the limited number ofnodes that can be displayed.
The examples illustrate some of the capabilities of the Workflow application andmust not be used in a production environment. The product demonstrationdatabase includes workflow processes that display simple processes.
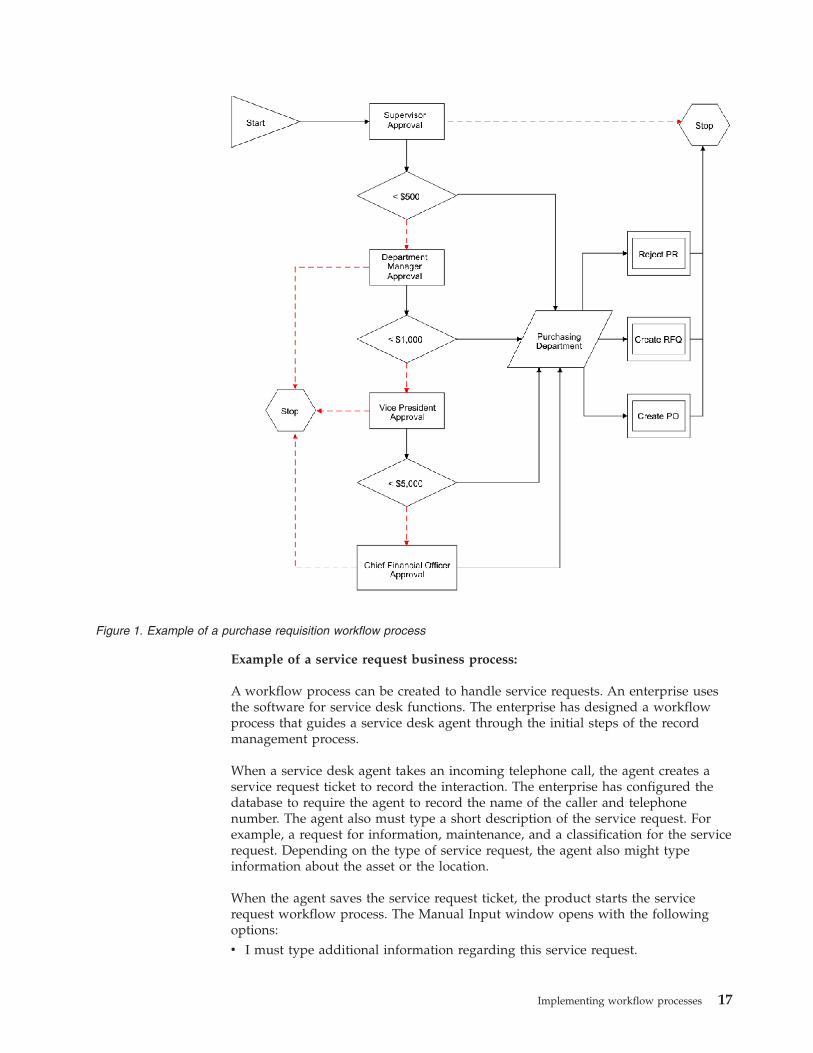
Example of a purchase requisition business process:
You can create a workflow process to handle a purchase requisition. When youcreate a purchase requisition, your supervisor must approve it.
When an approved purchase requisition reaches the purchasing department, apurchasing agent evaluates the record, and then performs one of the followingsteps:v Rejects the requisitionv Creates a request for quotation to receive bids for the purchasev Creates a purchase order from the requisition
The record then exits the workflow process for the purchase requisition.
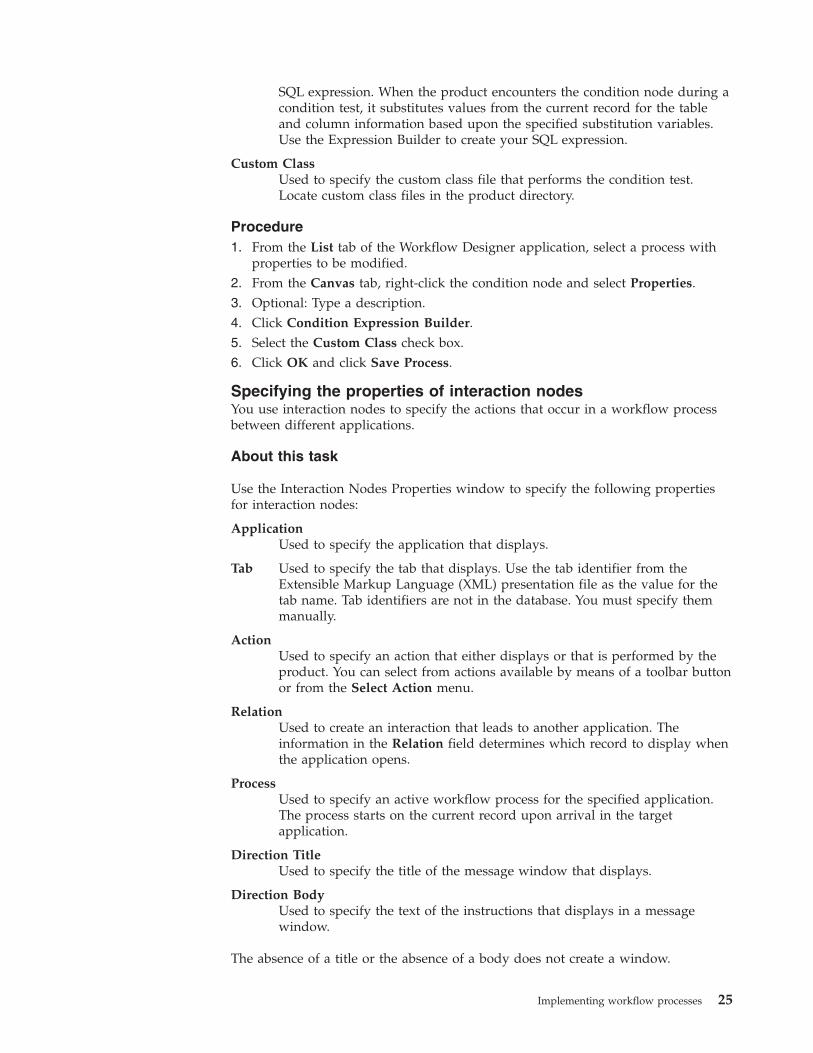
For example, you can create a requisition such that if the total is less than $500, therequisition is routed to the purchasing department. If the requisition total exceeds$500, the requisition requires the approval of the department manager before it canbe routed to the purchasing department. If the requisition total exceeds $1,000, therequisition requires the approval of a vice president before it can be routed to thepurchasing department. If the requisition total exceeds $5,000, the requisitionrequires the approval of the chief financial officer before it can be routed to thepurchasing department.
The diagram that follows illustrates one way that you might map the precedingscenario. The nodes and the connection lines in this example are arranged so thatthey are easy to see at a glance, but they can be arranged differently. You couldadd or remove stop nodes, and the workflow process would still illustrate thesame business process.
16 Workflow Implementation Guide
Example of a service request business process:
A workflow process can be created to handle service requests. An enterprise usesthe software for service desk functions. The enterprise has designed a workflowprocess that guides a service desk agent through the initial steps of the recordmanagement process.
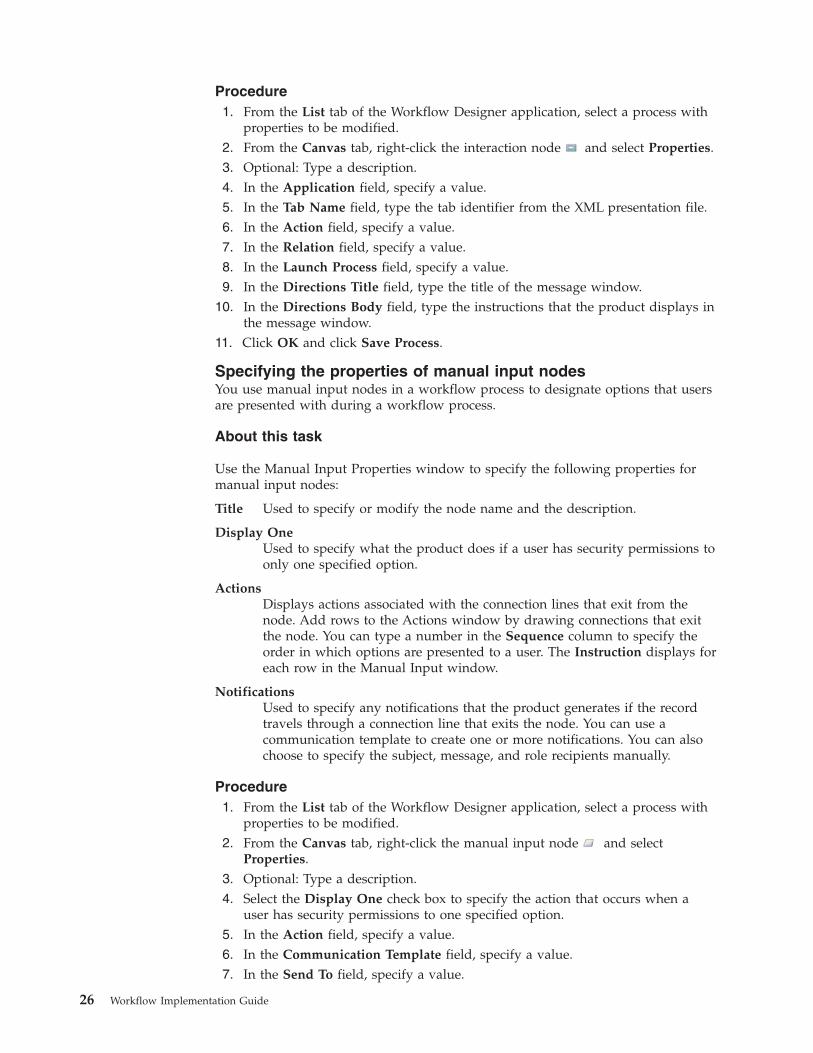
When a service desk agent takes an incoming telephone call, the agent creates aservice request ticket to record the interaction. The enterprise has configured thedatabase to require the agent to record the name of the caller and telephonenumber. The agent also must type a short description of the service request. Forexample, a request for information, maintenance, and a classification for the servicerequest. Depending on the type of service request, the agent also might typeinformation about the asset or the location.
When the agent saves the service request ticket, the product starts the servicerequest workflow process. The Manual Input window opens with the followingoptions:v I must type additional information regarding this service request.
Figure 1. Example of a purchase requisition workflow process
Implementing workflow processes 17
v I must type information about tickets or work orders related to this servicerequest.
v I must make an entry in the Work Log or Communications Log.v I have completed data entry for this ticket.
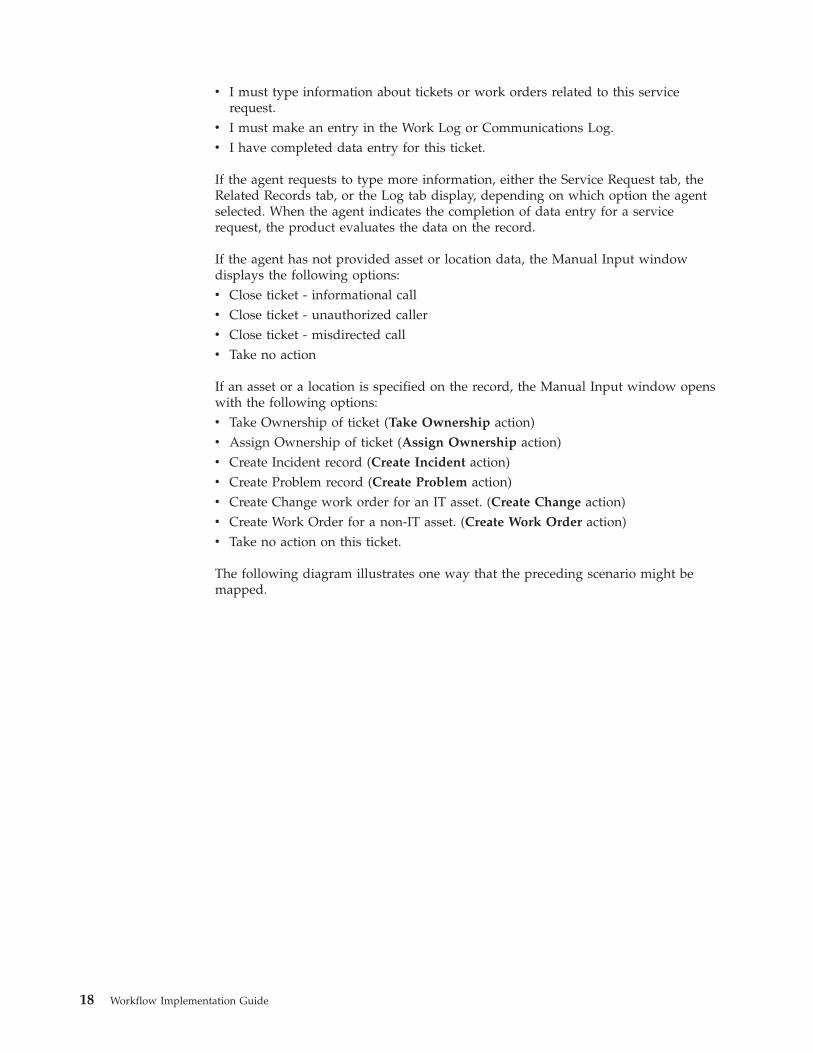
If the agent requests to type more information, either the Service Request tab, theRelated Records tab, or the Log tab display, depending on which option the agentselected. When the agent indicates the completion of data entry for a servicerequest, the product evaluates the data on the record.
If the agent has not provided asset or location data, the Manual Input windowdisplays the following options:v Close ticket - informational callv Close ticket - unauthorized callerv Close ticket - misdirected callv Take no action
If an asset or a location is specified on the record, the Manual Input window openswith the following options:v Take Ownership of ticket (Take Ownership action)v Assign Ownership of ticket (Assign Ownership action)v Create Incident record (Create Incident action)v Create Problem record (Create Problem action)v Create Change work order for an IT asset. (Create Change action)v Create Work Order for a non-IT asset. (Create Work Order action)v Take no action on this ticket.
The following diagram illustrates one way that the preceding scenario might bemapped.
18 Workflow Implementation Guide
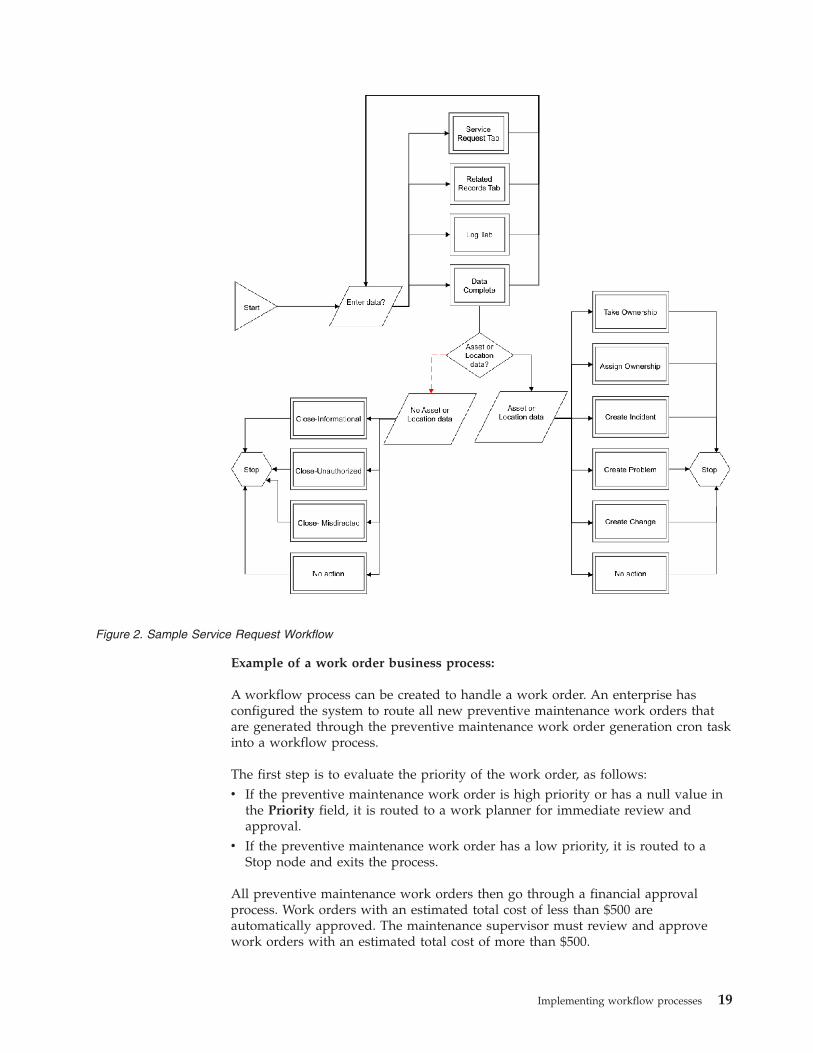
Example of a work order business process:
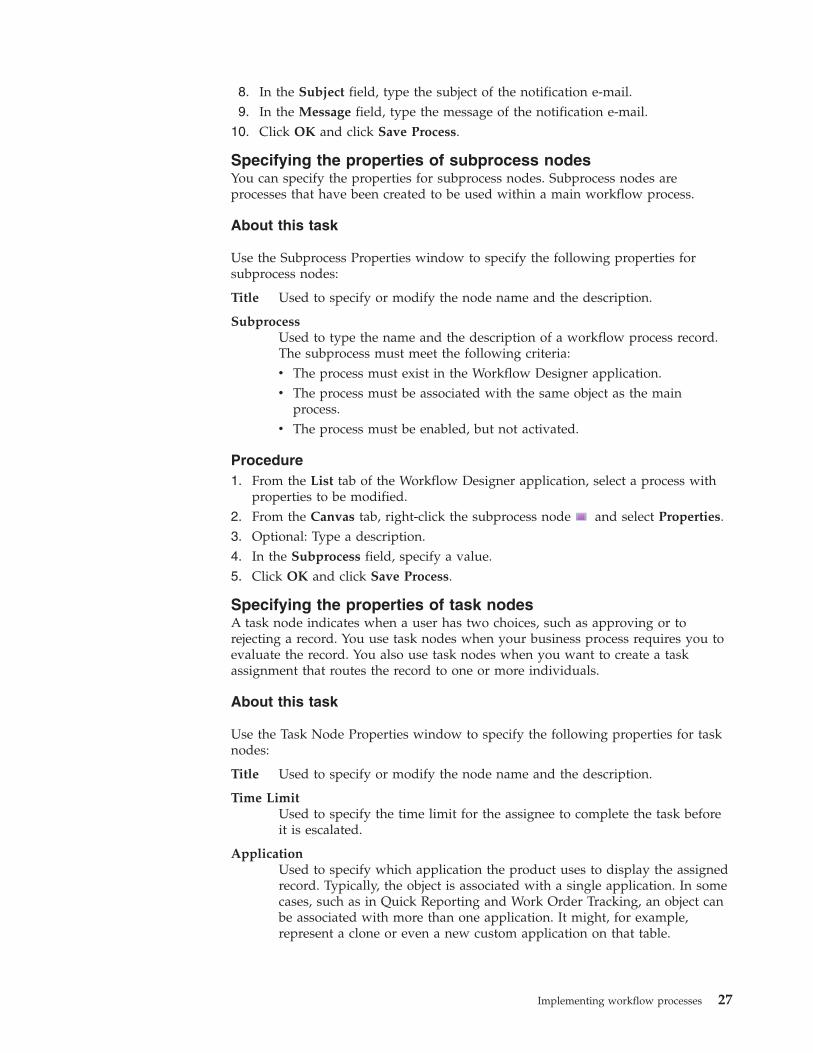
A workflow process can be created to handle a work order. An enterprise hasconfigured the system to route all new preventive maintenance work orders thatare generated through the preventive maintenance work order generation cron taskinto a workflow process.
The first step is to evaluate the priority of the work order, as follows:v If the preventive maintenance work order is high priority or has a null value in
the Priority field, it is routed to a work planner for immediate review andapproval.
v If the preventive maintenance work order has a low priority, it is routed to aStop node and exits the process.
All preventive maintenance work orders then go through a financial approvalprocess. Work orders with an estimated total cost of less than $500 areautomatically approved. The maintenance supervisor must review and approvework orders with an estimated total cost of more than $500.
Figure 2. Sample Service Request Workflow
Implementing workflow processes 19
After a work order passes the financial approval process, it must be assigned to awork group, as follows:v If the preventive maintenance work order is for a vehicle, the system assigns it
to the fleet maintenance group.v If the preventive maintenance work order is for a building or location, the
system assigns it to the facilities maintenance group.v The system assigns all other preventive maintenance work orders to the
maintenance group.
After the system assigns the work order to a maintenance group, the work orderexits the workflow process.
The following diagram illustrates one way that you might map the precedingscenario.
Figure 3. Example of a preventive maintenance work order workflow
20 Workflow Implementation Guide
Configuring for WorkflowWorkflow applications require minimal configuration before you can createworkflow processes.
Configuration prerequisitesThe Workflow Designer application requires a Java Virtual Machine (JVM) on theclient workstation. If you do not have a JVM installed, the product cannot displaythe Workflow canvas.
If you design and create workflow processes, you must be familiar with thefollowing tools, processes, and concepts:v The business processes for the enterprisev Asset Management applicationsv Databases and data relationshipsv Structured query language (SQL) statementsv SQL syntax required by your database
Workflow administrationYou use the Workflow Administration application to view and to manage activeinstances of workflow processes.
The Workflow Administration application contains a window that displays a rowfor each active instance of a workflow process. A record can show up multipletimes if it is controlled by multiple workflow instances. You can see which versionof a revised process was used to create each instance, the person identifier of theindividual who routed each record into Workflow, and the date and time that theprocess was initiated.
The recordkey (for example, the work order number or the purchase ordernumber) displays with the site identifier in the Owner Description field.
Security permissions for workflow processesIf you design workflow processes, you must belong to a security group withsecurity permissions.
Users are not automatically granted access to workflow actions. An administratormust use the Security Groups application to grant users security permissions toworkflow actions. The workflow actions appear in the Security Groups applicationwhen you add workflow support to an application. You can grant users access toactions before you activate a process.
Additionally, you require security permissions for the following applications:v Actionsv Communication Templatesv Escalationsv Inbox/Assignments Setupv Peoplev Person Groupsv Rolesv Workflow Administrationv Workflow Designer
Implementing workflow processes 21
v Workflow Inbox (portlet)
If you or your group are responsible for testing workflow processes, you musthave security permissions for other applications, depending on the processes thatare being tested.
Synonym statusesYou can create synonym statuses if your business processes for record approvals orfor status changes involve multiple steps for each approval or status change.
For example, your business process might call for three different people to reviewa record before it is considered approved. There is a single status for waiting forapproval and a single status for approved. You can create synonym statuses ofwaiting for approval that represent each of the preliminary approvals before therecord is considered approved.
You use the Domains application to add synonym values to a value list. For moreinformation about creating synonym statuses, see the Domains Help for thisproduct.Related concepts:“Domains” on page 16If your business processes for record approvals or for status changes involvemultiple steps for each approval or status change, you can create synonymstatuses.
Stopping instances of workflow processesWhen you route a record into a workflow process, an active instance of thatprocess is created to manage that individual record. You can view and stopworkflow processes for records for any Workflow-enabled application.
Before you begin
The application associated with the workflow process record must be enabled forWorkflow.
About this task
When you stop a workflow process, you are only stopping the single instance ofthe workflow process that controls a particular record. To deactivate a workflowprocess, use the Workflow Designer application. When you stop a process instance,the following tasks are performed:v The record is removed from the control of the workflow process.v A transaction is written to the workflow history of the record. Workflow history
remains with a record permanently, even after the record has left the control ofWorkflow.
v Specified notifications are sent to past assignees, current assignees, or both. Youcan use a communication template to create a notification, or type the subject,message, and role recipients manually.
Procedure1. To stop a workflow process, complete one of the following steps:
v In a Workflow-enabled application, display the record you want to removefrom Workflow. From the Select Action menu, choose Stop Workflow.
22 Workflow Implementation Guide
v In the Workflow Administration application, select the active process thatyou want to stop. Click Stop Process on the assignment line.
2. Optional: Create an e-mail notification. The system defaults to the WFSTOPcommunication template. You can use the WFSTOP communication template tocreate the notification. You can also manually specify the subject, message, androle recipients.
3. Click OK. The system stops the workflow process. The system also sends anynotifications.
Related tasks:“Disabling workflow processes” on page 33Disabling a process prevents new records from being routed into the workflowprocess. Disabling a process does not affect records that are under the control ofthe process.
Test environment designWorkflow processes are automated. For this reason, you can create a testenvironment where you design and test processes without affecting records in yourproduction environment.
Design your test environment so that it is a copy of your production environment.Your test database must include enough data and users so that you can thoroughlytest each workflow process. You use the applications in the Integration module tomigrate a workflow process from your test environment to your productionenvironment.
Creating workflow processesYou can create workflow processes that reflect your business processes. Aworkflow process defines the actions and notifications that can occur at differentpoints in a business process.
About this task
A workflow process consists of the header information for the record, the nodes,the connection lines, and the properties specified for the nodes and the connectionlines.
Procedure1. On the toolbar of the Workflow Designer application, click New Process.2. In the Process field, type a name for the process.3. Optional: Type a description.4. In the Object field, type a value or click Select Value and select an object.5. Click Save Process.
What to do next
You are now ready to use the canvas to add nodes and connection lines and toconfigure the properties of each of the elements of the process.
Specifying the properties of actionsYou can specify the properties of an action. An action is an event that is triggeredby the progress of a record through a workflow process.
Implementing workflow processes 23
About this task
To trigger actions, you can configure the following workflow components:v Negative connection linesv Positive connection lines
Procedure1. From the List tab of the Workflow Designer application, select a process with
properties to be modified.2. In the Actions window of the Process tab, click Edit Properties.3. In the Action field, specify a value.4. In the Instruction field, type text to describe to the run-time user what
specific action occurs for routing and manual inputs.5. Click Condition Expression Builder.6. Select the Custom Class check box to specify that a custom class file is used
to evaluate the record.7. In the Communication Template field, specify a value.8. In the Send To field, specify a value.9. In the Subject field, type the subject of the notification e-mail.
10. In the Message field, type the message of the notification e-mail.11. Click OK and click Save Process.Related concepts:“Action types” on page 14When you create an action record, you specify the action type to help determinewhat kind of action to take when the action is encountered in a process.“Actions and action records” on page 14Workflow processes use actions to move records through a process and to triggerevents, such as status changes. You define actions in the Actions application andthen you reuse them in other workflow processes that you create.
Specifying the properties of condition nodesA condition node indicates an evaluation of the record, based on data in therecord. You use a condition node to have a true or false evaluation made on therecord and then direct the progress of the record based on that evaluation.
About this task
When a condition node is encountered, the record is evaluated based on theStructured Query Language (SQL) statement defined in the node properties. Therecord is then routed to either the positive or the negative connection line exitingthe node. Use the Condition Node tool in the Workflow palette to place a newcondition node on the canvas. A workflow process can have one or more conditionnodes, but you do not have to include condition nodes in a process.
You can specify the following properties for condition nodes:
Title Type or modify the node name and description.
ExpressionUsed to specify the SQL statement that tests one or more field values onthe record. The product returns either a true result or a false result. Youcan define a simple expression or a complex expression, based on theneeds of your business process. You can use substitution variables in the
24 Workflow Implementation Guide
SQL expression. When the product encounters the condition node during acondition test, it substitutes values from the current record for the tableand column information based upon the specified substitution variables.Use the Expression Builder to create your SQL expression.
Custom ClassUsed to specify the custom class file that performs the condition test.Locate custom class files in the product directory.
Procedure1. From the List tab of the Workflow Designer application, select a process with
properties to be modified.2. From the Canvas tab, right-click the condition node and select Properties.3. Optional: Type a description.4. Click Condition Expression Builder.5. Select the Custom Class check box.6. Click OK and click Save Process.
Specifying the properties of interaction nodesYou use interaction nodes to specify the actions that occur in a workflow processbetween different applications.
About this task
Use the Interaction Nodes Properties window to specify the following propertiesfor interaction nodes:
ApplicationUsed to specify the application that displays.
Tab Used to specify the tab that displays. Use the tab identifier from theExtensible Markup Language (XML) presentation file as the value for thetab name. Tab identifiers are not in the database. You must specify themmanually.
ActionUsed to specify an action that either displays or that is performed by theproduct. You can select from actions available by means of a toolbar buttonor from the Select Action menu.
RelationUsed to create an interaction that leads to another application. Theinformation in the Relation field determines which record to display whenthe application opens.
ProcessUsed to specify an active workflow process for the specified application.The process starts on the current record upon arrival in the targetapplication.
Direction TitleUsed to specify the title of the message window that displays.
Direction BodyUsed to specify the text of the instructions that displays in a messagewindow.
The absence of a title or the absence of a body does not create a window.
Implementing workflow processes 25
Procedure1. From the List tab of the Workflow Designer application, select a process with
properties to be modified.2. From the Canvas tab, right-click the interaction node and select Properties.3. Optional: Type a description.4. In the Application field, specify a value.5. In the Tab Name field, type the tab identifier from the XML presentation file.6. In the Action field, specify a value.7. In the Relation field, specify a value.8. In the Launch Process field, specify a value.9. In the Directions Title field, type the title of the message window.
10. In the Directions Body field, type the instructions that the product displays inthe message window.
11. Click OK and click Save Process.
Specifying the properties of manual input nodesYou use manual input nodes in a workflow process to designate options that usersare presented with during a workflow process.
About this task
Use the Manual Input Properties window to specify the following properties formanual input nodes:
Title Used to specify or modify the node name and the description.
Display OneUsed to specify what the product does if a user has security permissions toonly one specified option.
ActionsDisplays actions associated with the connection lines that exit from thenode. Add rows to the Actions window by drawing connections that exitthe node. You can type a number in the Sequence column to specify theorder in which options are presented to a user. The Instruction displays foreach row in the Manual Input window.
NotificationsUsed to specify any notifications that the product generates if the recordtravels through a connection line that exits the node. You can use acommunication template to create one or more notifications. You can alsochoose to specify the subject, message, and role recipients manually.
Procedure1. From the List tab of the Workflow Designer application, select a process with
properties to be modified.2. From the Canvas tab, right-click the manual input node and select
Properties.3. Optional: Type a description.4. Select the Display One check box to specify the action that occurs when a
user has security permissions to one specified option.5. In the Action field, specify a value.6. In the Communication Template field, specify a value.7. In the Send To field, specify a value.
26 Workflow Implementation Guide
8. In the Subject field, type the subject of the notification e-mail.9. In the Message field, type the message of the notification e-mail.
10. Click OK and click Save Process.
Specifying the properties of subprocess nodesYou can specify the properties for subprocess nodes. Subprocess nodes areprocesses that have been created to be used within a main workflow process.
About this task
Use the Subprocess Properties window to specify the following properties forsubprocess nodes:
Title Used to specify or modify the node name and the description.
SubprocessUsed to type the name and the description of a workflow process record.The subprocess must meet the following criteria:v The process must exist in the Workflow Designer application.v The process must be associated with the same object as the main
process.v The process must be enabled, but not activated.
Procedure1. From the List tab of the Workflow Designer application, select a process with
properties to be modified.2. From the Canvas tab, right-click the subprocess node and select Properties.3. Optional: Type a description.4. In the Subprocess field, specify a value.5. Click OK and click Save Process.
Specifying the properties of task nodesA task node indicates when a user has two choices, such as approving or torejecting a record. You use task nodes when your business process requires you toevaluate the record. You also use task nodes when you want to create a taskassignment that routes the record to one or more individuals.
About this task
Use the Task Node Properties window to specify the following properties for tasknodes:
Title Used to specify or modify the node name and the description.
Time LimitUsed to specify the time limit for the assignee to complete the task beforeit is escalated.
ApplicationUsed to specify which application the product uses to display the assignedrecord. Typically, the object is associated with a single application. In somecases, such as in Quick Reporting and Work Order Tracking, an object canbe associated with more than one application. It might, for example,represent a clone or even a new custom application on that table.
Implementing workflow processes 27
Display OneUsed to specify whether a single option is displayed when the user hassecurity permissions to only one option.v If the check box is selected, the product displays the single option in the
Complete Workflow Assignment window.v If the check box is cleared, the product performs the action.
WF Task TypeUsed to add another task to the workflow process.
AssignmentsUsed to specify one or more roles to receive the task assignment. Specify atleast one assignment per task node. A task assignment can be designatedto a role or to an assignee relationship.
NotificationsUsed to specify the notifications that the system generates as a recordleaves the node. You can use a communication template to create one ormore notifications. Or, you can specify the subject, message, and rolerecipients manually.
Perform Accept ActionUsed to specify how the system routes the record when the assignment ismade to a group.v When any assignment is accepted - Used to specify that the system
needs only one positive action to route the record to the positiveconnection line.
v When all assignments are accepted - Used to specify that all assigneesmust select the positive action in order for the system to route the recordto the positive connection line. If a single assignee selects the negativeoption, the system routes the record to the negative connection line.
Procedure1. From the List tab of the Workflow Designer application, select a process with
properties to be modified.2. From the Canvas tab, right-click the task node and select Properties.3. Optional: Type a description.4. In the Application field, specify a value.5. In the Time Limit field, specify the time limit for the assignee to complete the
task before it is escalated.6. Select the Display One check box to specify what the system might do if the
user has security permissions to only one specified option.7. In the Assignments section, click New Row, and specify values for each of the
fields that display.8. In the Notifications section, click New Row, and specify values for each of the
fields that display.9. In the Perform Accept Action field, select one of the following options to
specify how the record is routed:a. When any assignment is accepted.b. When all assignments are accepted.
10. Click OK, and click Save Process.
28 Workflow Implementation Guide
Specifying the properties of wait nodesYou can specify the properties of wait nodes. Wait nodes specify that the process ishalted until a specific event occurs.
About this task
You can specify the following properties for wait nodes:
Title Used to specify or modify the node name and the description
Wait ListUsed to specify one or more system events. The first event to occurtriggers the record to resume its progress through the process. Event namesconsist of three or four lowercase words, delimited by periods. Forexample, maximo.workorder.update or maximo.po.statuschange.appr.v The first word is always maximo.v The second word is the name of the business object (MBO). For example,
po.v The third word is one of the following words:
– statuschange. If the event is a change of status, the event name has afourth part; either the name of a specific status, for example, appr, or* for any status change.
– update
NotificationsUsed to specify the notifications that the system should generate as arecord leaves the node. You can use a communication template to createone or more notifications. You can also specify the subject, the message,and the role recipients manually.
Procedure1. From the List tab of the Workflow Designer application, select a process with
properties to be modified.2. From the Canvas tab, right-click the wait node and select Properties.3. Optional: Type a description.4. In the Event field, type an event name.5. In the Communication Template field, specify a value.6. In the Send To field, specify a value.7. In the Subject field, type the subject of the notification email.8. In the Message field, type the message of the notification email.9. Click OK and click Save Process.
Adding nodes and connections linesYou create a workflow process by inserting nodes and connection lines on aworkflow canvas.
About this task
Each workflow process includes start nodes and stop nodes. Start nodes and stopnodes do not carry user-defined information. The other types of nodes carryuser-defined actions.
Implementing workflow processes 29
Procedure1. Select one of the following options:
Options Step
To create a workflow process Click Create a Workflow Process.
To configure a process that is enabled andactivated
Select the process you want to revise andclick Create Revision.
2. To add a node, select one of the following options:
To Add a Node Step
In the Canvas tab On the Workflow Designer toolbar, selectMove/Add Nodes and drag the node ontothe canvas.
In the Process tab Click New Node.
3. To edit the properties of the node, select one of the following options:
Option Step
In the Canvas tab Double click the node, and edit theproperties in the Condition Node Propertieswindow.
In the Process tab Click the Edit Properties icon.
4. Repeat step 2 to place other types of nodes onto the canvas.5. To reposition nodes, in the Canvas tab, drag the node you want to move.6. On the Workflow designer toolbar, select one of the following connection tools
to create connection lines between nodes:a. Click Connect Nodes to add a positive connection line.b. Click Connect Nodes with a Negative Action to add a negative connection
line.7. Click a node and drag the line to another node. Lines must travel from one
node to another node. The lines indicate the path for records to follow in theworkflow process. The type of lines and the number of lines you can drawfrom each node varies depending on the type of node.
8. Click Save Process.
What to do next
After adding nodes and connection lines, the next step is to validate the process toensure its structural integrity.
Setting a workflow process to automatically initiateYou can specify that when a user creates and saves a new record in an application,the record is automatically routed into a workflow process. Each object can haveonly a single process that is automatically initiated.
Before you begin
A process must be validated, enabled, and activated before you can set it toautomatically initiate.
30 Workflow Implementation Guide
About this task
This action only routes records created by users. Records that the product createsautomatically (for example, through a PM cron task or through the inventoryreorder function) cannot be automatically routed into a process through thismethod.
Procedure1. In the Workflow Designer application, display an activated process record.2. From the Select Action menu, select Set Process to Auto-Initiate.
Setting processes to not auto-initiateYou can specify that when a record is created and saved in an application, therecord is not routed into a workflow process. Each object can have only a singleprocess that is initiated automatically.
Procedure1. In the Workflow Designer application, select the activated process record that
you want to set to not auto-initiate.2. From the Select Action menu, select Set Process to Not Auto-Initiate.3. Click Save Process.
Testing workflow processesYou test your workflow processes in a test environment by routing a recordthrough each possible path. Perform these tests before you export your processesto your production environment to ensure that each workflow process accuratelyreflects your business process.
Workflow process testingDesign your test environment so that it is a copy of your production environment.Your test database must include enough data and users so that you can thoroughlytest each workflow process.
You use the applications in the Integration module to migrate a workflow processfrom your test environment to your production environment:v Validate, enable, and activate each workflow process in a test environment that
contains sufficient sample data to test the process. Your test environment mustinclude records for test users who can receive assignments and notifications.
v Route records through all possible paths in the process, including all possiblepaths through any subprocesses. You might want to create test plans to help youverify that you have tested all possible routes in a process.
v Verify that assignments appear in the Workflow Inbox for users, and that e-mailnotifications are being generated.
v Determine whether the process is complete, or whether additional steps must beadded.
v Determine that you have configured the process to make the necessaryassignments, notifications, and so forth, that are required by your businessprocess. If you have not configured the process, you must modify the process.
v Make any necessary additions, modifications, or deletions and retest the process.v Use the integration applications to export your tested processes from your test
environment to your production environment.
Implementing workflow processes 31
Validating workflow processesYou must validate workflow processes to verify the structural integrity of theprocess.
Before you begin
If you are validating a process that includes subprocesses, you must validate thesubprocess records before you validate the main process.
Procedure1. From the List tab of the Workflow Designer application, select the process
record that you want to validate.2. From the Select Action menu, select Validate Process. If the process fails
validation, a window displays that lists the errors. If the process passesvalidation, a message displays in the navigation bar.
3. Click Save Process.
What to do next
You are now ready to enable the workflow process. Enabling a process locks theprocess. To modify a process that has been locked, create a revision and make yourchanges to it.
Enabling workflow processesWorkflow process records are in a draft or a development stage until you enablethe record. Enabling a process involves validating the structure of the process.
About this task
After you enable a process record, the record is locked, and it is ready for use.
Procedure1. From the List tab of the Workflow Designer application, select the process
record that you want to enable.2. From the Select Action menu, select Enable Process.3. Click Close and click Save Process.
What to do next
To make a workflow process record ready to use as a main process, you mustactivate the process.
Activating workflow processesYou activate workflow records before they can be routed into a workflow process.
About this task
When you activate a workflow process record, the following actions occur:v The Workflow actions and buttons are added to the applications associated with
the object if those applications do not support workflow yet.v The Active check box is selected to indicate that the record is currently being
used to manage records.
32 Workflow Implementation Guide
v When you activate a process revision, the previously active revision isdeactivated. The product does not disable the revision because active instancesof the process might exist.
Procedure1. From the List tab of the Workflow Designer application, select the process
record that you want to activate.2. From the Select Action menu, select Activate Process. If the applications
associated with the object already support workflow, a message displays in thenavigation bar stating that the process has been activated.
3. Click OK.
Disabling workflow processesDisabling a process prevents new records from being routed into the workflowprocess. Disabling a process does not affect records that are under the control ofthe process.
Before you begin
You must use the Workflow Designer application to stop any active instances ofthe process.
About this task
After a record is routed through an enabled process, the process cannot be deletedbecause other records might be under the control of the process. When you enablea new process revision, the previous revision is automatically disabled.
Procedure1. From the List tab of the Workflow Designer application, display the record that
you want to disable.2. From the Select Action menu, select Disable Process.Related tasks:“Stopping instances of workflow processes” on page 22When you route a record into a workflow process, an active instance of thatprocess is created to manage that individual record. You can view and stopworkflow processes for records for any Workflow-enabled application.
Viewing workflow historyFor auditing purposes, a record is maintained of all records that are routedthrough a workflow process. You can view a list of all user-initiated actions in theworkflow process, for example, routing a record into a workflow process, orcompleting an assignment.
About this task
When a record routes through more than one workflow process, the workflowhistory is sorted by process name, then by transaction date.
To view workflow assignments, from the Select Action menu, click Workflow >View Workflow History.
Implementing workflow processes 33
Results
Some transactions are performed automatically. The transactions that areperformed automatically do not display even though they are recorded in theworkflow history of the record in the database.
Viewing workflow assignments from a Workflow-enabledapplicationThe Workflow Map shows a graphic of a workflow process, including its nodesand connection lines. The current location of the map in a process is highlighted bya box around the node. You can view the workflow assignments for a record fromwithin a workflow-enabled application. You use the Workflow Map to see whereyour assignment falls in the context of the workflow process as a whole.
About this task
From the View Workflow Assignments window, you can perform the followingtasks:v View a list of the active workflow assignments for the recordv View the workflow history for a recordv View the workflow map for any processes that are currently managing the
record.
To view workflow assignments, from the Select Action menu, click Workflow >View Workflow Assignments.
Viewing a Workflow MapThe Workflow Map shows a graphic of a workflow process. You can use theWorkflow Map to see where your assignment falls in the context of the process asa whole.
About this task
A workflow process consists of decision points, known as nodes, and connectinglines between the decision points. The nodes indicate points in a process where adecision is made, and the connection lines show the path that the record takes aftera decision point. The current location of the map in the process is highlighted by abox around the node.
Procedure1. Click Workflow > Workflow Map from the Select Action menu of any
workflow-enabled application. You can also access the Workflow Map from theView Assignments window.
2. If multiple workflow processes for the application exist, select the process fromthe Process Name menu.
3. Click OK to close the workflow map.
Modifying workflow processesTesting your workflow processes might reveal areas for improvement, or over timeyour processes might evolve due to changes in your business, increasedefficiencies, and so on. You can add, modify, or delete process elements at any timeuntil the process has been enabled. Once a process has been enabled, create arevision of the process if you want to modify it.
34 Workflow Implementation Guide
Creating process revisionsIf you want to modify a process after it is enabled and locked, you must create arevision of the process. A revision of the process is required because other recordsmight be under the control of this process.
About this task
You also can create a revision of a process that is not yet activated or enabled.Creating a revision does not deactivate or disable an activated or enabled processrecord. However, when you activate a new process revision, the previous revisionis automatically deactivated.
Procedure1. In the Workflow Designer application, display the enabled process record.2. On the toolbar, click Create Process Revision.3. Make any necessary modifications to the process.4. Click Save Process.
What to do next
You must validate, enable, and activate a process revision before it can be used toprocess records.
Synchronizing active workflow processesA workflow process can include one or more subprocesses. When you modify asubprocess, you must update the main process so that it uses the revisedsubprocess. This process is known as synchronization.
Before you begin
You must enable the subprocess revisions before you can synchronize a workflowprocess.
Procedure1. In the Workflow Designer application, select the main process record that you
want to update.2. From the Select Action menu, select Resynchronize an Active Process.3. Click Save Process.
Viewing synchronized processesYou can view the name and the revision number of each subprocess associatedwith a main workflow process.
Before you begin
The main workflow process record must be activated before you can perform thisaction.
Procedure1. From the List tab of the Workflow Designer application, select the process
record that you want to view.2. From the Select Action menu, select View Synchronized Processes.3. Click OK.
Implementing workflow processes 35
Adding workflow support to applicationsWorkflow actions or buttons are not included with any of the applications whenyou install them. You can add the workflow actions and buttons to an applicationwithout activating a process. For example, you can make the actions and buttonsvisible for user training. You can also create customized toolbar buttons beforeactivating a process.
Before you begin
Users are not automatically granted access to workflow actions. An administratormust use the Security Groups application to grant users security permissions toworkflow actions. The workflow actions appear in the Security Groups applicationwhen you add workflow support to an application. You can grant users access toactions before you activate a process.
About this task
When you add workflow support to applications, the product performs thefollowing tasks:v Adds the Add a Route button to the application toolbar. To customize this
button, click Edit Workflow Go Buttons.v Adds the following workflow-related actions to the Select Action menu for an
application:– Route Workflow– Stop Workflow– View Workflow History– View Workflow Assignments– View Workflow Map– Workflow Help
v Supplies the workflow options to all users in security groups with access to thetarget application.
The Add Workflow to Applications action does not validate, enable, or activateprocesses.
Procedure1. From the List tab of the Workflow Designer application, select the process
record to which you want to apply workflow.2. From the Select Action menu, select Add Workflow to Applications.3. Save your changes.
Results
The Add Workflow Support to Applications window displays. If an applicationdoes not support Workflow, the Add Support check box displays. You can clearthe Add Support check box for an application if you do not want to add workflowsupport to it.
Adding toolbar buttons for active workflow processesIf multiple active processes exist for an object, you can use a single toolbar buttonfor all active workflow processes.
36 Workflow Implementation Guide
About this task
The Start Workflow window displays a menu of active processes from which toselect. You can also add your own toolbar buttons for different active processes. Ifyou exceed the number of icons that can fit on the toolbar, an arrow displays toindicate that a menu of options exists.
Procedure1. In the Workflow Designer application, select a process record.2. From the Select Action menu, select Edit Workflow GO Buttons.3. Click New Row.4. In the Application field, specify a value.5. In the Process Name field, specify a value.6. In the Sequence field, specify a value to indicate the order of the Go Buttons.7. In the Description field, type a description.8. In the Toolbar Icon field, type the name of the graphic file to use for the
toolbar icon. For example, nav_icon_route.gif.9. In the Active Icon field, type the path and name of the graphic file to use for
the toolbar icon when the process is active. For example,nav_icon_route_active.gif.
10. Click OK, and click Save Process.
Modifying toolbar buttons for active workflow processesYou can modify the toolbar buttons that are associated with an application at anytime during the design process, or after a process activates.
Procedure1. In the Workflow Designer application, display a workflow process record.2. From the Select Action menu, select Edit Workflow GO Buttons.3. Select a row, click View Details, and modify the values in the following fields
as needed:v Application - Application that displays the button.v Process Name - If the button is for a specific process, enter the process name.
If you are creating a single button for all active processes, leave this fieldempty.
v Sequence - Type a number that indicates the order, from left to right, thatyou want the workflow buttons displayed on the toolbar. If you exceed thenumber of icons that can fit on the toolbar, the sequence number determinesthe order that each process displays in the menu.
v Description - Type a name for the button. When a user moves the cursorover the button, that name is displayed.
v Toolbar Icon - File name of the image that displays in the toolbar as theRoute button. For example, nav_icon_route.gif.
v Active Icon - File name of the image that displays in the toolbar to indicatethat the record is under the control of the workflow process. For example,nav_icon_route_active.gif.
4. Click OK.5. Click Save Process.
Implementing workflow processes 37
Deleting workflow processesDepending upon your security permissions and whether records have beenmarked for deletion, you can delete records from both active and inactiveworkflow processes.
Setting security permissions for record deletion:
You can give specific groups of users security permissions that allow them todelete records from active workflows.
Procedure
1. In the Security Groups application, select the security group on the List tab.2. On the Applications tab, select the Workflow Designer application record.3. In the Options for Workflow Designer table, select Grant Access for the
following options:a. Allow deletion of recordsb. Disallow deletions
4. Once you have saved the security group, log out and log in to ensure thesecurity settings are applied.
Deleting inactive workflow process records:
Process records can be deleted if the process has not been activated or enabled,and no records have been routed through the process.
Procedure
1. In the Workflow Designer application, display the process record to delete.2. From the Select Action menu, select Delete Process.3. Click Yes to confirm the deletion.
Marking workflow process records for deletion:
You can identify records that can be deleted when you create a workflow process.Records that have been marked can be deleted once the workflows they are part ofhave stopped.
About this task
This action can be performed only by users with the appropriate securitypermissions.
Procedure
1. In the Workflow Designer application, select or create a workflow.2. From the Select Action menu, select Allow deletion of records.
Integrating workflow processesYou use workflow processes to perform tasks, to execute actions, and to sendnotifications. After you create workflow processes, you can test them in anenvironment other than your working environment to fine-tune their behavior.After you test the processes, you can integrate them into your workingenvironment.
38 Workflow Implementation Guide
Before you begin
The supporting data must be in place before you can integrate the workflowprocesses.
Exporting workflow actionsWhen you export workflow actions, you create a query to select records. Theexport performs the standard outbound processing for the selected interface on theresult set of the query.
About this task
If the standard processing runs classes or rules that exclude or that modify recordsor fields, you might need to create and use a new integration point that does notfilter or modify records.
To export data, enable the applicable external system and interface. You do nothave to enable the outbound event listener.
Procedure1. From the List tab of the External Systems application, select the system where
you want to export a data file. EXTSYS1 is a default system that you can use toexport workflow supporting data. You can create as many external systems asyou need.
2. Click the Outbound Interfaces tab and select MXACTIONInterface.3. Click Data Export.4. In the Integration Point field of the Data Export window, type the name of the
corresponding integration point.5. Optional: In the Export Condition field, type a Structured Query Language
(SQL) query statement. The query must be against the primary (top-level)Maximo business object (MBO) in the integration object.a. To export all workflow-related actions, your query might read: action in
(select action from wfaction)
b. To export actions related to a single workflow process, your query mightread: action in (select action from wfaction where processname ='name' and processrev = 'rev') To avoid processing problems due to thesize of the XML transaction, use the Export Condition field to filter outunnecessary records.
6. Click OK.
Exporting workflow communication templatesWhen you export workflow communication templates, you create a query to selectrecords. The export performs the standard outbound processing for the selectedinterface on the result set of the query.
About this task
If the standard processing runs classes or rules that exclude or that modify recordsor fields, you might need to create and use a new integration point that does notfilter or modify records.
To export data, you enable the applicable external system and interface. You do nothave to enable the outbound event listener.
Implementing workflow processes 39
Procedure1. From the List tab of the External Systems application, select the system where
you want to export a data file. EXTSYS1 is a default system to where you canexport workflow supporting data. You can create as many external systems asyou need.
2. Click the Outbound Interfaces tab and select the MXCTEMPLATEInterfacethat you want to export.
3. Click Data Export.4. In the Integration Point field of the Data Export window, type the name of the
corresponding integration point.5. Optional: In the Export Condition field, type a Structured Query Language
(SQL) query. The query must be against the primary (top-level) Maximobusiness object (MBO) in the integration object.a. To export all workflow-related communication templates, your query might
read: templateid in (select templateid from wfassignment)
b. To export communication templates related to a single workflow process,your query might read: templateid in (select templateid fromwfassignment where processname = 'name' and processrev = 'rev') Toavoid processing problems due to the size of the transaction, use the ExportCondition field to filter out unnecessary records.
6. Click OK.
Exporting workflow rolesWhen you export workflow roles, you create a query to select records. The exportperforms the standard outbound processing for the selected interface on the resultset of the query.
About this task
If the standard processing runs classes or rules that exclude or that modify recordsor fields, you might need to create and use a new integration point that does notfilter or modify records.
To export data, you must enable the applicable external system and interface. Youdo not have to enable the outbound event listener.
Procedure1. From the List tab of the External Systems application, select the system where
you want to export a data file. EXTSYS1 is a default system to where you canexport workflow supporting data. You can create as many external systems asyou need.
2. Click the Outbound Interfaces tab and select the MXMAXROLEInterface thatyou want to export.
3. Click Data Export.4. In the Integration Point field of the Data Export window, type the name of the
corresponding integration point.5. Optional: In the Export Condition field, type a Structured Query Language
(SQL) query. The query must be against the primary (top-level) Maximobusiness object (MBO) in the integration object.a. To export all workflow-related roles, your query might read: maxrole in
(select roleid from wfassignment)
40 Workflow Implementation Guide
b. To export roles related to a single workflow process, your query might read:maxrole in (select roleid from wfassignment where processname ='name' and processrev = 'rev') To avoid processing problems due to thesize of the transaction, use the Export Condition field to filter outunnecessary records.
6. Click OK.
Manipulating workflow supporting dataAfter exporting the workflow supporting data, you must manipulate the data toimport it properly. You change the data to ensure that the data is imported fromand to the correct places in your system, and to ensure that the commands withinthe data are set to perform the correct procedures.
Procedure1. Open the file that you exported from your test environment, such as mxaction.
If you have not modified the INTGLOBALDIR, the path for the file is:<drive_letter>:\<bea_folder>\user_projects\domains\mydomain\xmfiles
2. Locate the tag <SenderID>. Modify the data within the tag to be from EXTSYS1to read: <SenderID>EXTSYS1</SenderID>.
3. Locate the tag <RecipientID>. Modify the data within the tag to be from MX, orfrom the VARVALUE specified in the MAXVARS table for VARNAMEMXSYSID by modifying it to read: <RecipientID>MX</RecipientID>.
4. Search the document to locate the parent tags, such as COMMTEMPLATE, MAXROLE,and ACTION. Replace these tags with <COMMTEMPLATE action = "">, <ACTIONaction = "">, and <MAXROLE action = "">. Adding the action = "" commandtells the system to add or to replace this action.
5. Save the file and place it in the folder of your working environment:<drive_letter>:\<bea_ folder>\user_projects\domains\mydomain\load\xml
Importing workflow supporting dataThe Integration Framework can import a workflow process and its supporting data(including actions, roles, and communication templates).
Before you begin
Your environment must be configured before you can import workflow supportingdata. The Data Import feature is available only for interfaces of the Notifyoperation type within an adapter.
To import data, the data must be in an Extensible Markup Language (XML) file.The format of the data must be the same as the format of the table thatcorresponds to the interface.
About this task
You can import data to build and test your process in a test environment, then youuse the integration framework to export the process to your productionenvironment.
Procedure1. From the List tab of the External Systems application, select the system where
you want to import workflow supporting data. EXTSYS1 is a default systemthat you can use to import workflow supporting data.
2. From the Select Action menu, select Data Import.
Implementing workflow processes 41
3. In the Data Import window, select XML File.4. In the Server Directory field, specify the location of the file. The default
location of the file is: <global directory location>\load\xml.5. In the File Name field, specify the name of the file.6. Click Import.
Exporting workflow processesYou can export the workflow processes that you have created.
Before you begin
You must first create your workflow processes and test them.
Procedure1. From the List tab of the External Systems application, select the system where
you want to export a data file. EXTSYS1 is a predefined destination where youcan export workflow data. The System tab opens with all fields populated. Youcan create as many external systems as you need.
2. Click the Outbound Interfaces tab and select the interface that you want toexport, MXWFInterface
3. Click Data Export.4. In the Data Export window, choose one of the following options:
a. To export all workflow processes, click OK. All workflow processes areexported in a single XML file.
b. To restrict the output, and export only certain processes, add a StructuredQuery Language where clause in the Export Condition field. For example,to export only the first revision of the WOSTATUS process, typePROCESSNAME='WOSTATUS' AND PROCESSREV ='1'.
5. Click OK. The workflow processes are exported to a single XML file.
What to do next
You can now integrate the workflow processes into your working environment.
Manipulating workflow processesAfter you export a workflow process, you must manipulate it to import it properly.You manipulate or change the process to ensure that the data is imported from andto the correct places in your system. You also manipulate it to ensure that thecommands within the processes are set to perform the correct procedures.
Procedure1. Open the file that you exported from your test environment. If you have not
modified the INTGLOBALDIR, the path for the file is: <globaldirectory>:\xmfiles
2. Locate the tag <SenderID>. Modify the data within the tag to be from EXTSYS1to read: <SenderID>EXTSYS1</SenderID>.
3. Locate the tag <RecipientID>. Modify the data within the tag to be from MX.You can also modify the data within the tag from the VARVALUE specified inthe MAXVARS table for VARNAME MXSYSID, as follows:<RecipientID>MX</RecipientID>.
4. Search the XML document to locate the <WFPROCESS> and replace with<WFPROCESS> action = "" Adding the action = "" command tells the productto add or to replace this action.
42 Workflow Implementation Guide
5. Save the file and place it in the folder of your working environment: <globaldirectory location>:\load\xml.
Importing workflow processesYou use the integration framework to import a workflow process and itssupporting data, such as actions, roles, and communication templates.
Before you begin
Your environment must be configured before you can import workflow processes.The Data Import feature is available only for interfaces of the Notify operationtype within an adapter. For more information about configuring your environment,refer to the system administrator guide.
For every workflow process that you import, you must add workflow support tothe associated applications after you activate the workflow process.
To import data, the data must be in an Extensible Markup Language (XML) file.The format of the data must be the same as the format of the table thatcorresponds to the interface.
If your workflow process has subprocesses, you must activate the parent and childprocesses, and then resynchronize the processes. Also, you must import anysubprocesses to your workflow process before you import the workflow process.
About this task
When you import a workflow process, you build and test your process in a testenvironment. After you test your process, you use the integration framework toexport the process to your production environment.
Procedure1. From the List tab of the External Systems application, select the system that
you want to import a data file to. EXTSYS1 is a default system to which youcan import workflow processes.
2. From the Select Action menu, select Data Import.3. In the Data Import window, select XML File.4. In the Server Directory field, specify the location of the file. The default
location of the file is: <global directory location>\load\xml.5. In the File Name field, specify the name of the file.6. Click Import.
Workflow/Inbox Assignments portletThe Workflow Inbox/Assignments is one of the portlets that might appear on yourStart Center. If your workplace has implemented the Workflow feature, a list ofyour task assignments displays in the Inbox.
A task assignment is a record that is routed to you for action, based on theinformation contained in a workflow process. The number of records inInbox/Assignments displays in the top left corner of the portlet.
You use the Workflow Inbox to review assignments, to route assignments, and tocomplete assignments. You must complete the assignments before a record canmove to the next step in a workflow process.
Implementing workflow processes 43
Configuring the Workflow InboxYou use the Workflow Inbox to review, to route, and to complete your taskassignments. A task assignment is a record that is routed to you for action, basedon the information contained in a workflow process. Records that are listed in yourWorkflow Inbox are assigned to you.
Before you begin
You must have security permissions to configure the portlets that display on yourStart Center, including configuring the Workflow Inbox.
About this task
The description that displays in the Inbox portlet is the description of the stepfrom the workflow process, not the description of the record. For example, thedescription for a purchase order task might be "Supervisor approval."
Procedure1. Click Edit Portlet (pencil icon) in the Inbox/Assignments header to display the
Inbox/Assignments Setup application.2. You can perform the following actions in the Inbox/Assignments Setup
application:v Change the display name of the portletv Indicate how many rows to display in the portletv Select the columns that are displayed in the portlet and modify their
descriptionsv Indicate the order that the columns are displayed by entering a value in the
Order column3. Click Finished.
What to do next
You must complete the assignment in your Workflow Inbox before the record canmove to the next step in the workflow process.
Configuring administrator e-mail notificationsDuring the installation process, you type an email address for the workflowadministrator. The administrator will receive system messages about errors.
About this task
Record the e-mail address for the workflow administrator in the maximo.propertiesfile. This file is located in the following directory: <installationdirectory>\applications\maximo\properties, where <installation directory> is thedirectory into which you installed the product.
Procedure1. Using a text editor, open the maximo.properties file .2. In the Workflow Related Properties section, locate the property named
mxe.workflow.admin=.3. Type or modify the e-mail address. For example:
4. Save your changes.
44 Workflow Implementation Guide
Reassigning workflow assignmentsYou use the Workflow Administration application to reassign workflow taskassignments. Sometimes, a workflow task that has been assigned to an individualor to a group must be reassigned to someone else.
Procedure1. From the View Active Assignments window of the Workflow Administration
application, click View/Modify Active Assignments.2. Click Reassign Assignment to reassign assignments.3. In the Person field of the Reassign window, type a person ID.4. Click OK to close the Reassign window, then click OK.Related tasks:“Sending reassignment notifications”You can notify a person or a group of a workflow task reassignment.
Sending reassignment notificationsYou can notify a person or a group of a workflow task reassignment.
Procedure1. In the Reassign window, click New Row.2. In the Send To field, specify the identifier for a person or click Detail Menu >
Select Value and choose a person record from the list.3. In the Subject field, type a subject for the e-mail message.4. In the Message field, type the text of the e-mail message.5. Click OK to close the Reassign window, then click OK.Related tasks:“Reassigning workflow assignments”You use the Workflow Administration application to reassign workflow taskassignments. Sometimes, a workflow task that has been assigned to an individualor to a group must be reassigned to someone else.
Completing workflow assignmentsYou can complete workflow assignments to complete a task and to route the taskto the next assignee. You can view and edit memos that are entered by individualswho have previously reviewed the record or assignment. You can also writememos to task assignees.
Procedure1. Perform one of the following actions:
v In the workflow inbox, select Route.v In a Workflow-enabled application, click Route Workflow.v In the Workflow window, click Complete an Assignment.
2. Select an action.3. In the Memo field, enter a memo value.4. Click Reassign, to assign the task to another individual.5. Click OK.
Results
The task is placed in the workflow inbox of the assigned person. The memo thatyou entered is added to the record workflow history. The next person in the
Implementing workflow processes 45
process flow can view your memo in the Earlier Memos table window
Deleting assignmentsYou can delete task assignments if a task node has more than one assignment andyou want to make a particular task assignment inactive.
About this task
All task nodes must have at least one task assignment. You cannot delete the lastactive assignment for a given task.
Deleting an assignment changes the status of the task assignment record toinactive.
Procedure1. If necessary, use the table filter to locate a process instance.2. In the Processes table window, click View/Modify Active Assignments.3. To delete an assignment, click Delete Assignment. The status of the task
assignment is changed to inactive. The assignment record is removed from theView Active Assignments window.
4. Click OK to close the window.
46 Workflow Implementation Guide
Notices
This information was developed for products and services offered in the U.S.A.
IBM may not offer the products, services, or features discussed in this document inother countries. Consult your local IBM representative for information on theproducts and services currently available in your area. Any reference to an IBMproduct, program, or service is not intended to state or imply that only that IBMproduct, program, or service may be used. Any functionally equivalent product,program, or service that does not infringe any IBM intellectual property right maybe used instead. However, it is the user's responsibility to evaluate and verify theoperation of any non-IBM product, program, or service.
IBM may have patents or pending patent applications covering subject matterdescribed in this document. The furnishing of this document does not grant youany license to these patents. You can send license inquiries, in writing, to:
IBM Director of LicensingIBM CorporationNorth Castle DriveArmonk, NY 10504-1785U.S.A.
For license inquiries regarding double-byte (DBCS) information, contact the IBMIntellectual Property Department in your country or send inquiries, in writing, to:
Intellectual Property LicensingLegal and Intellectual Property LawIBM Japan Ltd.1623-14, Shimotsuruma, Yamato-shiKanagawa 242-8502 Japan
The following paragraph does not apply to the United Kingdom or any othercountry where such provisions are inconsistent with local law: INTERNATIONALBUSINESS MACHINES CORPORATION PROVIDES THIS PUBLICATION "AS IS"WITHOUT WARRANTY OF ANY KIND, EITHER EXPRESS OR IMPLIED,INCLUDING, BUT NOT LIMITED TO, THE IMPLIED WARRANTIES OFNON-INFRINGEMENT, MERCHANTABILITY OR FITNESS FOR A PARTICULARPURPOSE. Some states do not allow disclaimer of express or implied warranties incertain transactions, therefore, this statement may not apply to you.
This information could include technical inaccuracies or typographical errors.Changes are periodically made to the information herein; these changes will beincorporated in new editions of the publication. IBM may make improvementsand/or changes in the product(s) and/or the program(s) described in thispublication at any time without notice.
Any references in this information to non-IBM Web sites are provided forconvenience only and do not in any manner serve as an endorsement of thosewebsites. The materials at those websites are not part of the materials for this IBMproduct and use of those websites is at your own risk.
© Copyright IBM Corp. 2008, 2013 47
IBM may use or distribute any of the information you supply in any way itbelieves appropriate without incurring any obligation to you.
Licensees of this program who wish to have information about it for the purposeof enabling: (i) the exchange of information between independently createdprograms and other programs (including this one) and (ii) the mutual use of theinformation which has been exchanged, should contact:
IBM Corporation2Z4A/10111400 Burnet RoadAustin, TX 78758 U.S.A.
Such information may be available, subject to appropriate terms and conditions,including in some cases, payment of a fee.
The licensed program described in this document and all licensed materialavailable for it are provided by IBM under terms of the IBM Customer Agreement,IBM International Program License Agreement or any equivalent agreementbetween us.
Information concerning non-IBM products was obtained from the suppliers ofthose products, their published announcements or other publicly available sources.IBM has not tested those products and cannot confirm the accuracy ofperformance, compatibility or any other claims related to non-IBM products.Questions on the capabilities of non-IBM products should be addressed to thesuppliers of those products.
This information contains examples of data and reports used in daily businessoperations. To illustrate them as completely as possible, the examples include thenames of individuals, companies, brands, and products. All of these names arefictitious and any similarity to the names and addresses used by an actual businessenterprise is entirely coincidental.
COPYRIGHT LICENSE:
This information contains sample application programs in source language, whichillustrate programming techniques on various operating platforms. You may copy,modify, and distribute these sample programs in any form without payment toIBM, for the purposes of developing, using, marketing or distributing applicationprograms conforming to the application programming interface for the operatingplatform for which the sample programs are written. These examples have notbeen thoroughly tested under all conditions. IBM, therefore, cannot guarantee orimply reliability, serviceability, or function of these programs. The sampleprograms are provided "AS IS", without warranty of any kind. IBM shall not beliable for any damages arising out of your use of the sample programs.
TrademarksIBM, the IBM logo, and ibm.com are trademarks or registered trademarks ofInternational Business Machines Corp., registered in many jurisdictions worldwide.Other product and service names might be trademarks of IBM or other companies.A current list of IBM trademarks is available on the Web at “Copyright andtrademark information” at www.ibm.com/legal/copytrade.shtml.
48 Workflow Implementation Guide
Java and all Java-based trademarks and logos are trademarks or registeredtrademarks of Oracle and/or its affiliates.
Linux is a registered trademark of Linus Torvalds in the United States, othercountries, or both.
Microsoft, Windows, and the Windows logo are trademarks of MicrosoftCorporation in the United States, other countries, or both.
UNIX is a registered trademark of The Open Group in the United States and othercountries.
Notices 49

50 Workflow Implementation Guide


����
Printed in USA