Embed Size (px)
Citation preview
7/28/2019 Woodworking Tips and Tricks
http://slidepdf.com/reader/full/woodworking-tips-and-tricks 1/19
Layout & Measuring
Large capacity calliper for big jobs
Use two "c-clamps" to clamp the legs of two 16" x 24" framing squares together
around/across the object to be measured. Following this procedure, you can even usethe scales to measure the distance directly.
Layout & Measuring
Transferring patterns for spindle turnings, legs, etc.
Attach a sheet of white paper (large enough for the pattern) temporarily to the wall.
Set the spindle you wish to duplicate vertically in front of the paper and very close to
it. Position a bright lamp in line with the spindle so it casts a sharp-edged shadowonto the paper. Adjust the distance between the lamp and the shadow to achieve the
sharpest shadow. Then, simply trace along the shadow with a pencil to transfer the
pattern.
Finishing
Particle-free smoother for wood finishes
Conventional abrasives and steel wools can, at times leave small abrasive particles or
steel fibres in critical wood finishes during the smoothing process. When smoothing a
finish that must be free of these particles, try using ScotchBrite pads, instead.
Sheet goods
Make-it-yourself carrying handle for sheet goods.
Cut a 1" x 1" rabbet along one edge of an 18" long piece of 2" x 2". Screw & glue
your 2" x 2" flush with the bottom (18") edge of an 18" long x 8" wide piece of 1/2"or 3/4" plywood. The connection of the two pieces of stock should create an "L" and
a 1" deep by 1" wide channel near the bottom of your plywood piece.
Near the opposite edge of your plywood piece, drill two 3/8" diameter holes, down
about 1" from its top edge and about 4" in from each end. Slip the two ends of a 30"
long piece of clothesline through these two holes and knot the ends to form a carrying
handle.
To carry your 4' x 8' sheet goods, simply set the edge of your sheet into the channel
formed by your plywood and 2" x 2", reach around and grab your rope handle and
carry.
7/28/2019 Woodworking Tips and Tricks
http://slidepdf.com/reader/full/woodworking-tips-and-tricks 2/19
7/28/2019 Woodworking Tips and Tricks
http://slidepdf.com/reader/full/woodworking-tips-and-tricks 3/19
Joinery
Fitting shelves tightly into dadoes
If you own a thickness planer, here's a simple but important tip for making tight-
fitting shelf-to-cabinet fits. ALWAYS cut the dado or groove that your shelf is to fitinto BEFORE you plane your lumber to thickness. By doing this, you can adjust your
shelf thickness slightly to form a snug fit in the groove or dado.
Miscellaneous tips
Re-gluing edge splinters on projects.
Use a heated clothing iron to set yellow wood glue quickly when repairing splintered
areas. Set the iron on medium heat and touch it to the glued splinter for no more than
30 seconds. Be careful not to get glue on your spouse's iron. A piece of brown paper grocery bag or a couple of thicknesses of cloth between the iron and the surface to be
glued will help prevent this problem.
Gluing, assembly fastening
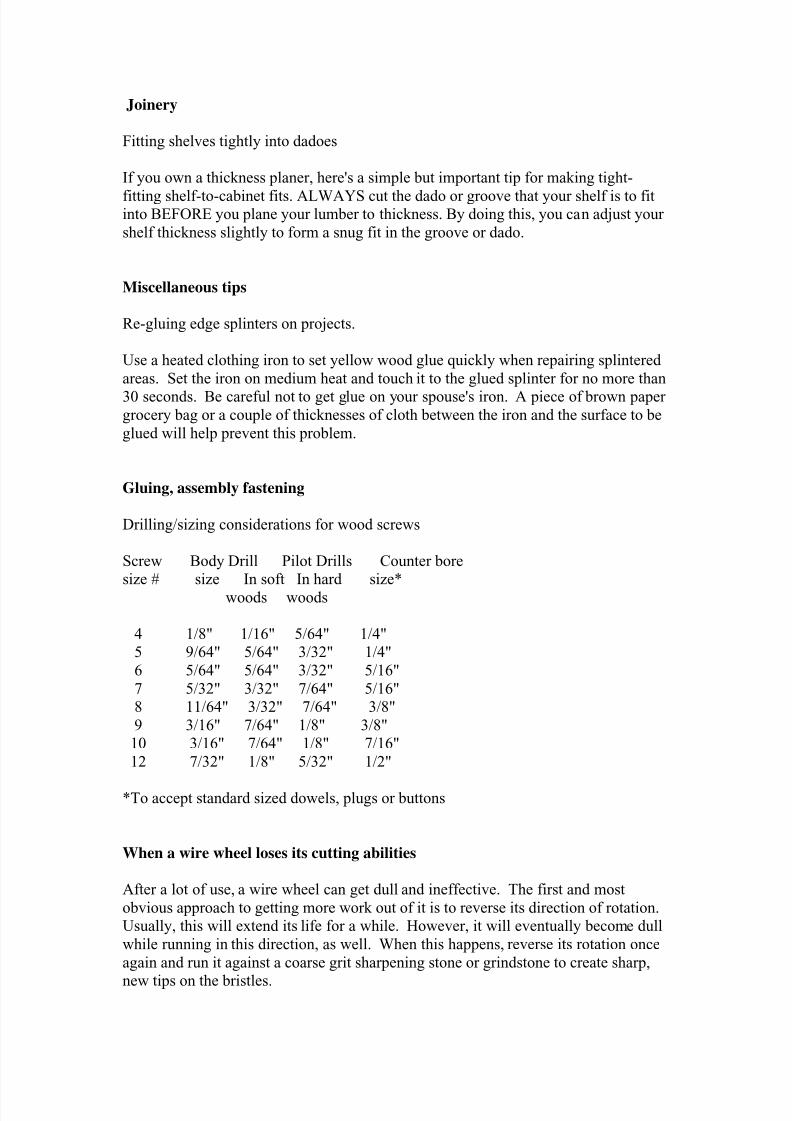
Drilling/sizing considerations for wood screws
Screw Body Drill Pilot Drills Counter bore
size # size In soft In hard size*
woods woods
4 1/8" 1/16" 5/64" 1/4"
5 9/64" 5/64" 3/32" 1/4"
6 5/64" 5/64" 3/32" 5/16"
7 5/32" 3/32" 7/64" 5/16"
8 11/64" 3/32" 7/64" 3/8"
9 3/16" 7/64" 1/8" 3/8"
10 3/16" 7/64" 1/8" 7/16"
12 7/32" 1/8" 5/32" 1/2"
*To accept standard sized dowels, plugs or buttons
When a wire wheel loses its cutting abilities
After a lot of use, a wire wheel can get dull and ineffective. The first and most
obvious approach to getting more work out of it is to reverse its direction of rotation.
Usually, this will extend its life for a while. However, it will eventually become dull
while running in this direction, as well. When this happens, reverse its rotation once
again and run it against a coarse grit sharpening stone or grindstone to create sharp,
new tips on the bristles.
7/28/2019 Woodworking Tips and Tricks
http://slidepdf.com/reader/full/woodworking-tips-and-tricks 4/19
Shop safety
Four table saw safety tips
1: Attach your push stick to the wall or the front of your saw with Velcro or sticky-
backed magnets so you can grab it quickly when needed.
2: ALWAYS use your saw guards and splitters to keep your hands clear of the blade
and prevent the saw kerf from closing up on the blade and causing a kickback.
3: Try to avoid cutting crooked or warped stock, as it is much more likely to twist and
bind during cutting.
4: When ripping, always be certain to feed your stock all the way past the blade until
the cut is complete to avoid kickbacks. Use a push stick to keep your hands clear of
the blade at all times.
Turning
Creating decorative burn lines on your spindle turnings -- without burning your
fingers
Holding a piece of thin wire or coat hanger against a rotating, turned spindle has
always been a great way to create darker accent lines around its circumference.
unfortunately, it's also often been a great way to scorch the old fingers, as well. Next
time, try replacing the blade on your coping saw or hacksaw with the wire. You'll get
better control and won't have to worry about burning your fingers.
Gluing, assembly fastening
Giving your nails an improved grip.
Any "old-timer" woodworker will tell you that rosin-coated nails have a grip that just
won't quit. Unfortunately, they're often tough to find.
To make your own, go to a local sporting goods store or bowling pro shop and buy a
small package of powdered rosin. Mix 8 tablespoons of powdered rosin with a pint
(16 ounces)of denatured alcohol and stir thoroughly until dissolved.
Drop in your nails and slosh them around a bit to coat them with the solution. Use a
magnet to remove them from the solution (or pour or scoop them out). Then, spread
them out onto a pile of old newspapers or rags and allow them to dry before use.
CAUTION: DO YOUR MIXING AND COATING OUTDOORS
IN A WELL-VENTILATED AREA THAT'S AWAY FROM ANYOPEN FLAMES.
7/28/2019 Woodworking Tips and Tricks
http://slidepdf.com/reader/full/woodworking-tips-and-tricks 5/19
Gluing / assembly / fastening
Clamping cauls that won't stick.
It's often a good idea to use wooden cauls (small, scrap blocks) between the jaws of your clamps and the surfaces they will grip to prevent marring. However, if you're
not careful, some "stray" glue could permanently fasten the cauls to your surface
during assembly. Here are four ways to prevent this from happening: 1) use wooden
cauls that have a polyurethane or other glossy finish on their surfaces 2) use 1/4" or
thicker plastic pieces as cauls 3) place a piece of waxed paper between your caul and
your work piece 4) wrap your caul in ordinary plastic kitchen wrap before use.
Gluing / assembly / fastening
Another "mashless" brad holder
Use a fine toothcomb to hold your brads while driving. Just slip the brad between the
comb teeth, move it into position and whack fearlessly away with your hammer!
Inexpensive beeswax
Woodworking stores and special shops can often charge a fortune for the beeswax
you use to lubricate wood screws, drawer glides, etc. Instead, visit your local home
centre and purchase a wax toilet bowl seal. They're usually made of beeswax and a
heckuva lot cheaper than the specialty stuff !
Finishing
Work piece holder
To hold your work piece off the bench surface during finishing and drying, try driving
4-penny finishing nails through small, 2" square by 1/4" to 1/2" thick blocks of wood
until their heads are flush with the surface. Then, turn them over on your bench top
and use them as "feet" to support your projects, suspended above your bench surfaceduring finishing.
Gluing / assembly / fastening
Ready-made door shims
The next time you're making cabinets with flush-fitting doors and need some shims to
hold them at a uniform clearance when positioning hinges, try using some "coin of the
realm". In particular, nickels, quarters, dimes or pennies.
7/28/2019 Woodworking Tips and Tricks
http://slidepdf.com/reader/full/woodworking-tips-and-tricks 6/19
They're carefully minted to be of a uniform thickness and chances are, you already
have some handy in your pocket or piggy bank !
Layout & Measuring
Marking Large Diameter Curves Or Arcs
Sometimes, it can be difficult to mark a large diameter curve or arc near the long edge
a narrow board -- since there's no place (on the same board) where you can centre a
string or compass. In those cases, an ordinary sash chain (or other small-linked chain)
can be used. Here's how: Drive a nail or brad into the face of your stock at either end
of your desired curve. Slip a chain link over the brads on either end and stand your
board on edge so gravity will cause your chain to droop. Adjust your chain by
changing the link on either end, allowing your arc to get larger or smaller. Once your
desired arc is attained, mark a dot on your stock at each link or two. Remove the
chain and your brads, then connect the dots.
Using A Router To Joint The Edges Of Long Boards
If you're joining a series of long boards together that may be too cumbersome to
handle on a short-bet jointer, try using your hand-held router and a 1/4" straight
bit. Start by laying all of your boards face down on your bench top or the floor
in their proper orientation.
Leaving about 3/16" between each pair of boards, screw a wooden cleat across the
backside of all boards, connecting them together at each end.
Turn your boards back over so they're face up and clamp a straightedge to them and
adjust it so that when your router base rides against it, your 1/4" bit lines up with the
first of your 3/16" wide spaces.
Turn on your router and make your cut, guiding your router base against the
straightedge, cutting a clean, straight edge on two opposing boards simultaneously.
Reposition your straightedge and repeat this process at the spaces between each pair
of boards.
Since each pair of mating boards is jointed at the same time, they'll fit together
perfectly every time...even if your straightedge isn't perfectly straight.
Jointing & Joinery
"Shrinking" Dowels or Biscuits That Fit Too Tightly
The next time you're having trouble getting a biscuit or dowel to slip into its intended
7/28/2019 Woodworking Tips and Tricks
http://slidepdf.com/reader/full/woodworking-tips-and-tricks 7/19
pocket or hole, don't reach for the sandpaper.
Although this method works great if you only have one or two biscuits or dowels, it
can be very time-consuming when you have a lot of them.
When you find yourself in this situation, just "cook" your biscuits or dowels in the
microwave for a few minutes. Chances are, they have enough residual moisture in
them that the heat will shrink them enough that they'll slip right into place with littleor no trouble.
Avoid Marring Work piece Surfaces
Even in the most well maintained shops, rough workbench surfaces (and metal filings
or shavings) can often create dents, scratches and other blemishes on the underside of
work pieces as they're being worked. To avoid this, it's always a good idea to cover
your bench surface with sheets of newspaper or brown Kraft or butcher's wrapping
paper before getting started. You might even look for an antique paper
dispenser/cutter at a flea market and mount it on the side of your bench end so youalways have a supply of paper for the job.
Router & Router Tables
Two Reasons NOT To Allow Router Bits To Bottom-Out In The Collet
First, bottomed-out bits will almost always make direct contact with the shaft of your
router's motor...transferring the heat created by cutting directly to your motor's shaft.
This will tend to shorten the lift of your router motor.
Second, if a bottomed-out bit seizes in the collet (which frequently happens), you'll
have to PULL it out with pliers, which can be difficult. If your bit isn't bottomed-out,
you can tap it with a piece of wood, freeing it from the collet much more easily.
Stopping Work piece Slippage When Crosscutting Or Cutting Mitres
Making an accurate crosscut or mitre cut can be difficult if your work piece is
slippingagainst the face of your mitre gauge during the cut. If you have a clampdown safety
grip, this will solve the problem in most cases.
But, what if your work piece is too thick to be gripped by such a device?
In these cases, it's a good idea to glue or double-stick tape a piece of sandpaper to the
face of your gauge to prevent this slippage. In fact, there are even special,
non-slip strips that have been made especially
for this job. The additional accuracy provided by this simple approach is especially
helpful when cutting mitres.
7/28/2019 Woodworking Tips and Tricks
http://slidepdf.com/reader/full/woodworking-tips-and-tricks 8/19
Lathe / Turning
Smooth Sanding Lathe Turnings
Most turners smooth their spindle turnings on the lathe with sandpaper or steel wool.
It just makes more sense to do it this way.However, unless you do it properly, you'll still have protruding wood fibres or
"whiskers" when you've finished.
The secret is to smooth your turning once in the same direction. Then, turn your
spindle around in the lathe, end-for-end (or reverse your lathe) and smooth it again
while it's turning in the opposite direction.
By following this procedure, these protruding fibres will be eliminated completely.
Clamps / Clamping
Giant, Make-It-Yourself "Clothespin" Clamps
Picture how a wooden clothespin is made.
Two pieces of wood with semi-circular cutouts that pivot on the "barrel" of a spring.
Now, imagine how you could duplicate this design to make some handy clamps. For
example, start with a piece of hardwood stock, 3/4" thick by 2" wide x 12" long. Lay
your stock on the bench top and drill a 1/2" hole through the 3/4" thickness, centred,
1" in from each side and about 4" from one end.
Next, rip your 2" wide piece in half from end-to-end, cutting through the centre of
your 1/2" hole. This will leave a semi-circular notch in each of your two jaw pieces.
Cut a piece of 3/4" diameter dowel rod to a length of 3/4". Position your dowel rod in
the semi-circular notches between the two jaw pieces to create a fulcrum point. Wrap
a large rubber band around the short, clamping ends to apply pressure. Simple.
Three Ways To Improve The "Glide" Of Machine Table Surfaces
1: Coat the table surfaces with paste-type furniture wax
2: Rub non-medicated talcum power into table surfaces with a cloth
3: Sprinkle cornstarch on table surfaces with a saltshaker.
Jointer & Thickness Planer
Eliminating Jointer/Planer Tear-Out
If you're experiencing tear-outs when jointing or planing cross-grained woods, here's
a trick worth remembering. Before making your pass over the knives, use a cloth or
sponge to apply a light coat of water, raising the wood grain slightly. Let your water soak in for a minute or two, then make a light 1/32"
7/28/2019 Woodworking Tips and Tricks
http://slidepdf.com/reader/full/woodworking-tips-and-tricks 9/19
or less pass across the machine. If you're still getting some tear-out, repeat the
process and allow the water to soak in for a little longer before trying again.
Gluing, Assembly & Fastening
Removing Stubborn Screws
Removing a stuck wood screw without damaging the head or breaking the screw off
inside its hole can, at times, be difficult. A well-known "old-timer's" trick for making
a simple task out of this otherwise difficult job is to first heat the head of the screw
with a soldering iron. In most cases, it will then back out easily with little or no
problem.
Layout and Measuring
An easy way to measure the distance between inside corners
The next time you need to measure the distance between two inside corners, try this
trick.
First, measure-off an even number of inches from one corner towards the centre of
your area and make a mark. It makes no difference how far you measure...1", 8", 18",
35", etc. Then, measure from the opposing corner to your mark and add the distance
of your first measurement.
Sanding
Make-it-yourself round-nose sander
Sometimes, you need a hemispherical-shaped sander for getting into rounded areas of
a project. This one can be made quite easily with a 3-1/2" long by 3/8" diameter
carriage bolt, a couple of nuts and washers, a 1/2" thick wooden disc, a child's sponge
rubber-filled ball cut in half and a piece of lightweight sandpaper cut into a disc with pie-shaped cuts made around the edges.
Make the wooden disc the same diameter as the diameter of your ball. Drill a 3/8"
hole in the centre and attach the 3/8" bolt to the disc with the washers & nuts. Cut off
the bolt head. Next, use hot melt glue to bond the hemispherical ball to the disc and
allow to dry. Stretch your sandpaper over the ball with the pie-shaped cuts
overlapping. Affix it to the edges of the wooden disc with staples or a hose clamp.
Chuck the end of the 3/8" bolt into your portable drill or drill press and go to work.
7/28/2019 Woodworking Tips and Tricks
http://slidepdf.com/reader/full/woodworking-tips-and-tricks 10/19
Bandsaw
Super-smooth resawing cuts
If you're trying to resaw thin strips of wood from not-too-thick stock (up to 3" or so)
with a 1/4" to 3/8" wide bandsaw blade and find that you're getting rough cutsurfaces...your problem is more than likely caused by the "set" in your blade's teeth.
You can solve this problem with the blade you have by squeezing the "set" out
of your blade's teeth using a set of smooth-jawed pliers or in the smooth, metal jaws
of a machinist's vice. By eliminating the "set", you'll have to feed your stock through
the cut more slowly, but your final results will be smoother.
Finishing
Two work piece-holders for finishing operations
1: For long, slender work pieces such as legs, etc., drive an open-ended screw hook
into one end of your project and use a wire or string to hang it from the ceiling joist
from a swivel-type plant hanger.
2: For flat work pieces, make long, T-shaped supports by cutting a rabbet down both
sides, along one edge of a 12" to 18" long piece of scrap wood...leaving a protruding
"tongue" down its length. Position this tongue against the edge of the piece to be
finished and attach it temporarily with a couple of brads.
These supports will act as "legs" to hold the surface of the piece to be finished off the
surface of your bench top during finishing.
Then, just flip your work piece over to finish the opposite side.
Miscellaneous Tips
Router bit, shaper cutter or moulding knife makes custom-shaped "hand scraper"
If you've just used your router, shaper or moulder to cut a profile in a work piece but
aren't quite satisfied with the smoothness of your final cut, remove the bit or cutter
from your power tool and use it as a profiled "hand scraper" to smooth-out your cut.
Clamping
Sandbag veneer press
When you need to apply thin veneer to a project surface, you can often hold it in
position while your glue sets up by placing pillowcases filled with (dry) sand on top
of the veneer.
7/28/2019 Woodworking Tips and Tricks
http://slidepdf.com/reader/full/woodworking-tips-and-tricks 11/19
Miscellaneous Tips
Attaining wrinkle-free felt drawer/box bottoms
Start by cutting a piece of cardboard to the bottom dimensions, less about 1/32". Lay a piece of felt on your bench top with the sized cardboard on top, positioned in one
corner.
Be sure your felt is large enough to extend about 1/2" beyond the two corner edges.
Cut the other two edges to the same 1/2" overlap with a SHARP artist's utility knife
and straightedge.
Next, cut a 45-degree notch out of the felt in each corner. Spread a strip of quick
setting craft-type glue around the edges of the cardboard and wrap your felt around
and into the glue strip, pulling all the wrinkles out as you go. Don't pull too tightly or
you'll "bow" the bottom.
Once everything's set up properly, apply a dab or two of glue to the backside of your
cardboard and drop it into position in your drawer or box bottom.
Sanders
Cotter-pin sander/polisher
The next time you need to sand the inside of a hole or a small radius, try this trick.
Slip a piece of sandpaper or steel wool through the two halves of a large cotter pin (at
the rounded end) so the abrasive extends about 1" beyond
each side of the pin. Chuck the pin into your portable drill or drill press and go to
work.
Jointer & Thickness Planer
Clean boards save knives
Dirt and grit on the surfaces of boards can dull planer or jointer knives quickly.
Before planning or jointing old or soiled boards, clean their surfaces thoroughly.Wipe dust, mud or soil off surfaces with a damp cloth and allow to dry. If you
suspect embedded grit such as sand or stones, wire brush all surfaces prior to planning
or jointing.
Radial Arm Saws
Matching kerfs make cleaner cuts
The saw kerf in the surface of a radial arm saw table controls the smoothness of the
cut you make. Over time, this kerf keeps getting wider and wider, thus providing less
back-up for your work piece and more splintering on each cut. You can solve this problem by filling the kerf with epoxy-based wood filler or auto body filler. Allow
7/28/2019 Woodworking Tips and Tricks
http://slidepdf.com/reader/full/woodworking-tips-and-tricks 12/19
the filler to dry and pass your saw's blade through it slowly, making a new kerf.
Sanders
Quicker replacement of palm/pad sander sheets
Cut a sheet of plywood that's the same overall size and thickness as the pad on your
sander.
Wrap your new sheet of sandpaper around the block and crease both ends of he paper
nicely over the block before installing it on your sander.
Finishing
Applying a finish to the inside of small, hollow bowls or vases
Instead of struggling with a tiny brush that will reach inside your vessel, try blowing itout thoroughly to remove all dust and chips.
Then, pour some finish into the vessel, slosh it around a bit to coat the sides evenly,
and pour the extra back into your container of finish.
Gluing, Assembly & Fastening
Router squeeze-out removal
The next time you're building a project with lots of assembly...and lots of potential
glue squeeze-out, try this trick. Attach two 1" wide strips of equal thickness clear
plastic or Lexan to opposing sides of your hand-held router base with double-stick
carpet tape. Insert a 3/8" or 1/2" straight bit into your router, adjust the depth-of cut
so your bit barely touches the wood surface, and run it across the squeeze-out areas,
removing it completely.
Sheet Goods
Splinter-free cuts on plywood
To prevent splintering when cutting plywood on a table saw, place the "god" side of
the plywood up on the table. Set your saw blade to make a cut about 1/8" deep on theunderside and make your first pass. Re-set your blade to cut through the plywood,
protruding about 1/4" above the surface and make the second and final pass.
Picture Framing
Saw table picture frame clamp
If you need a clamp for a small picture frame and don't have one handy, use your
table saw.
First, unplug your saw. Drop a 3" high piece of stock into your mitre gauge slot
(usually, these slots are 3/4" wide, so use 3/4" thick stock). Lower your saw blade below the table surface, cover your tabletop with waxed paper (to keep the glue off)
7/28/2019 Woodworking Tips and Tricks
http://slidepdf.com/reader/full/woodworking-tips-and-tricks 13/19
and place your frame between this protruding piece of stock and your rip fence. Slide
the fence in toward the protruding stock until it touches the ends of your frame pieces.
Apply glue to the corner joints and drop the opposing two pieces into position. Apply
pressure across these opposing pieces with bar clamps and allow your glue to set up.
Cutting & Sizing
Truing the edges of irregular boards
Often, we get boards where neither edge is straight and true...making it difficult to rip
to an accurate and consistent width. You can solve this problem by first attaching a
known straight-edged piece wood to the top surface of your stock near one edge with
a piece of double-stick carpet tape. Use a hand screw to apply momentary pressure at
various points along the taped edge to assure good adhesion.
Remove the hand screw and guide the straight-edged piece against your saw's rip
fence to true up the opposing edge. Remove the
taped-on strip, flip your stock over and rip the opposing edge straight and true.
Sanding
Attaching Abrasive Paper To Contoured Sanding Blocks
Sometimes, it's necessary to make specially contoured hand sanding blocks for
smoothing out the shaped edges of cabinets and furniture projects. Some examples
might be drop-leaf joints, ogees, beaded edges, etc. To do this, we have to make
"mirror-image" sanding blocks with coved or rounded-over edges. Once the block is
created, abrasive paper must be attached to it. Unfortunately, this paper can lose its
abrasive properties quickly and could require frequent replacement before the job's
done.
One way to solve this problem is to mount your abrasives to the blocks with special
"feathering disc adhesive" used by auto body repair technicians to hold abrasive discs
to air-powered rotary or block-type sanders.
Available at auto paint stores, this special adhesive remains tacky under use, allowing
the worn-out sandpaper to be removed and replaced a number of times.
Toy-Making
Creating Accurate Toy Wheels
Often, toy wheels can be made by simply slicing them off the ends of wooden
dowels. However, this process can sometimes yield wheels that are slightly "wedge-
shaped"...being thicker on one side than on another. This problem can be avoided by
making a simple cutting jig out of a block of wood. For example...if you're making
3/4" diameter wheels, drill a series of 3/4" diameter holes through the edge of a
2" x 6" piece of scrap stock...being certain your holes are perfectly perpendicular to
the edge. Insert 6" lengths of your 3/4" dowel rod into the holes, then saw through the
2" x 6" (and your dowel rods simultaneously) with your table saw. When finished,
simply pop the short lengths of dowel from their holes in the jig. They will be of
aconsistent thickness from side-to-side -- PLUS -- they will have smooth, splinter-freeedges, as well.
7/28/2019 Woodworking Tips and Tricks
http://slidepdf.com/reader/full/woodworking-tips-and-tricks 14/19
Miscellaneous Tips
Preventing File Tooth Clogging
If you're filing soft metals (such as aluminum) and resinous woods (such as pine), you
may find that the teeth of your file are clogging-up frequently. To avoid this, rub your file first with a piece or ordinary blackboard chalk.
Plastics
Smoothing The Edges Of Cut Plastics
Once you've cut the edges of Plexiglas, Lexan or similar plastics, you'll more than
likely discover that they're not as smooth and clear as they were before they were cut.
To remedy this problem, clamp your cut piece carefully in a vise with the cut edge
facing up.
Fire-up your propane torch and pass a flame lightly and quickly back-and-forth over the cut edge several times until your saw marks disappear. For best results, be sure
not to get your flame too close...or to dwell in any single spot for too long.
Shop Set-Up
"Hearing" The Phone Over Running Machinery
It's hard to hear the ring of a phone over the noise of operating woodworking
machinery. Your local Radio Shack store has a solution...in the form of a little device
they call a "Phone Flasher". Just attach it to any phone line and plug in a light. When
the phone rings, it will flash the light, alerting you to the ring.
Scroll Saw & Jigsaw
Convenient Blade Storage
Scroll Saw & Jigsaw blades can be conveniently stored in short lengths of small
diameter PVC pipe. Seal one end with a PVC cap and the other with a removable
cork. Use a marker to write blade sizes, etc. on the outsides of your pipes.
Sanders
A "Non-Skid Parking Lot" For Your Orbital
Or Pad Sander
Most power sanders won't come to an instantaneous stop when they're turned off.
As a result, when you flip them off and set them down on the benchtop, they could
easily scoot off the bench and onto the floor. By keeping a small piece of carpet on
your benchtop, you'll have a place to set your sander when you turn it off...without
fear of it scooting off the benchtop.
7/28/2019 Woodworking Tips and Tricks
http://slidepdf.com/reader/full/woodworking-tips-and-tricks 15/19
Gluing, Assembly & Fastening
Non-Clog Glue Bottle Tops
The tops of glue bottles are notorious for clogging-up after they've set for awhile.
To prevent this, replace your glue bottle "snouts" with those from dish detergent bottles -- the kind that pushes down to seal and pulls up to open.
Gluing, Assembly, Fastening
Soda Straw Glue Cleanup
To remove glue squeeze-out from an inside corner of an assembled project, try using
a plastic soda straw. Just force the straw into the corner and run it along the edge.
The open end will scoop-up the glue like "magic".
Clamps & Clamping
Improving the grip of wooden vise jaws
Grasping dowels, threaded rods, pipe and similar round objects in the jaws of a vise
without slipping or damaging the object you're holding can be tough. And, if the only
vise you own is a woodworker's vise, its smooth jaws make the job even tougher.
This problem can be solved by first inserting the object to be gripped into a piece of
rubber or plastic hose before grasping it in your vise. You can use garden
hose,surgical hose, automotive radiator hose, etc. Just match the hose size to the
object.
You'll get a great grip, won't damage the threads of your threaded rod and won't mar
the jaws of your wooden vise.
Miscellaneous Tips
Magnetic tool/accessory holder
Whether you're working with a Shopsmith MARK V or other brand of tool, it's
always handy to have your set-up tools (such as chuck keys,
Allen wrenches, etc.) nearby for changing bits, blades and similar set-ups. One way
to do this is to attach a strong magnet to the machine, near the area where these toolswill be used.
If your tool is made of aluminum or other non-magnetic materials, attach the magnet
with double-stick tape. Old loudspeaker magnets are great for this, as are some of the
new "rare Earth" magnets that are available at Radio Shack stores.
Hand Tools
Protecting the tips of chisels
Nicked chisel edges are worthless. To protect the sharpened tips of your bench
chisels, try cutting small slits in old, discarded tennis balls, racquet balls or handballs.Then, just insert the tips of your chisels into them to prevent those troublesome nicks.

7/28/2019 Woodworking Tips and Tricks
http://slidepdf.com/reader/full/woodworking-tips-and-tricks 16/19
Gluing, Assembly, Fastening
Pegboard nailing protectors
Cut 9" long x 1-1/2" wide strips of ordinary pegboard to use as protectors when
nailing project components together. Just drop one of the holes in the pegboard stripdown over the head of your nail and onto your workpiece surface before driving your
nail home. If you slip with the hammer, you'll hit the pegboard instead of your
workpiece surface.
Layout & Measuring
A time-saving tool-maker's trick
Tool & die makers use steel "one-two-three" blocks to save time on layouts and set-
ups.
These blocks are exactly 1" thick, 2" wide and 3" long. Woodworkers can also benefit from such blocks. Just make them out of hardwood such as maple or cherry
and keep them nearby for fast tool set-ups (such as setting rip fences) and layout jobs
(like marking off even distances for dowel holes, etc.
Hand Tools
Small, make-it-yourself nail-puller
Ordinary hammer claws are often just too big and cumbersome for removing small
brads, tacks or finishing nails. But you can make a claw that's perfect for the job by
using a small, triangular metal file to create a small "claw" in one of the regular claws
on your full-sized hammer. This will give you "a claw within a claw" that you can
use the next time you have to pull a small brad, nail or carpet tack.
Bandsaw
Make-it-yourself bandsaw tire cleaner
It's a fact that Bandsaw tires will last much longer if they're kept clean. You can make
a simple, self-cleaning system for your tires from a couple of old discarded
toothbrushes.Just cut the handles off to about 3" long, heat them up with a candle or torch and bend
them to a 90-degree angle. Then, simply screw them to the inside of your bandsaw's
"cabinet" so the bristles ride constantly against the tires' surfaces during
operation..."sweeping" the dust and debris off as you work.
Shop Set-Up
Rust preventative drawer liners
The number one enemy of hand tools is rust.
To keep rust to a minimum, line the bottoms of your bench and tool chest drawers
7/28/2019 Woodworking Tips and Tricks
http://slidepdf.com/reader/full/woodworking-tips-and-tricks 17/19
with scraps of short-pile carpet. Lightly coat the carpet with 10-weight machine oil or
WD-40. This will help minimize the dangers of rust on your tools.
Routers / Routing
How to make varying depth rabbets with asingle bit
You can easily adjust the cutting depth of your bearing-piloted rabbeting bit by
merely changing the diameter of the bearing pilot.
The outside diameters of the bearing pilots on different style bits can vary
significantly, while most of these bearings have the same center hole diameter. Just
switch to a larger O.D. bearing for a shallower rabbet....and a smaller O.D. bearing for
a deeper rabbet.
Gluing, Assembly, Fastening
Holding flat surfaces together during glue-ups
Often, two boards can slip & slide when they are clamped together, surface-to-
surface. One way to prevent this is to drive a couple of very small brads into the
surface of one board, then cut off their heads at a sharp angle, leaving about 1/16"
protruding above the board's surface...with a sharp point on each. Then, apply the
glue and lay the mating board in position on top and tap firmly with a wooden mallet
or the heel of your hand to "impale" the top board on the bottom one, preventing any
slippage.
Finishing
Spray bottle stain applicator
Spraying is a great way to apply an even coat of stain on a project. But, if you don't
have a compressor and sprayer system, what are you to do? Try using a squeeze-
handle-type plastic spray bottle like those that come filled with window cleaners,
cleaning detergents, etc.
They make a great applicator for stains, as well.
Gluing, Assembly, Fastening
Hand screw edging clamps
If you don't own a set of specialized, 3-way clamps for gluing solid wood edging to
countertops or plywood shelves, try this trick. Just use your wooden handscrews and
some 1" thick wooden wedges. Apply glue to your edging and place it in position.
Clamp a couple of handscrews to the shelf or countertop so their threaded screw rods
are 3/4" or so away from your edging material. Then, drive your wooden wedges
between the edging and these screw rods to force the edging against the shelf or top
while the glue sets-up.
7/28/2019 Woodworking Tips and Tricks
http://slidepdf.com/reader/full/woodworking-tips-and-tricks 18/19
Gluing, Assembly, Fastening
Gluing small, hard-to-clamp pieces
Sometimes, it's necessary to glue components together where a clamp just won't
reach. In these instances, try spreading your glue over all but one small spot on your mating pieces.
Allow the glue to set up for a couple of minutes, then apply a small dab of hot melt
glue in your "open" spot and press your pieces together until the hot melt sets-up.
Cutting & Sizing
Simple handsaw tricks
Handsaws will cut differently, depending on the angle at which they're held while you
make the cut. For fastest cutting, hold your saw perpendicular (at a 90-degree angle)
to the workpiece surface. Be aware that this technique will result in a fairly rough cut.For a smoother, general-purpose cut, hold your saw at a 45 to 50-degree angle. For the
smoothest cut, swing your saw to a shallow 15 to 20-degree angle to the workpiece
surface. This approach, will, however, require considerably more time to complete
your cut.
Sanding
Make-it-yourself contour hand sander
A deck (or two) of old playing cards can make a great contour sanding block for
moldings and shaped edges. Just wrap a piece of sandpaper around the long edge of
your deck(s) and grasp the opposing faces/backs. Press the deck edges into your
shaped edge and sand away. It's important that you use sandpaper with a thin, pliable
backing when performing this operation as stiff-backed papers won't conform
properly.
Routers / Routing
Super-smooth cutting router bits
The next time you need super-smooth edges on a shallow mortise or cut, try usingmetalworking end mills. They usually have four or more flutes and will therefore
produce very smooth edges when you're making shallow cuts. Be aware, however,
that their flutes are very shallow and not good for clearing out waste as they cut.
That's why they're best reserved for shallow cuts or final edge smoothing.
Hand Tools
Make a rasp from old saw blades
A fast-cutting wood rasp can be easily made from a series of old hacksaw blades. Just
alternate the direction of the teeth and bolt them together through their attachmentholes.

7/28/2019 Woodworking Tips and Tricks
http://slidepdf.com/reader/full/woodworking-tips-and-tricks 19/19
Use two to four blades to make a really narrow rasp for those tiny jobs....or an inch-
high stack (or even more) when you need a wide rasp for removing a lot of stock in
a hurry. For a handle, try wrapping one end with duct tape.