Embed Size (px)
Citation preview

Mac OS X ServerWiki Tools Deployment GuideVersion 10.6 Snow Leopard
Apple Inc. K
© 2009 Apple Inc. All rights reserved.The owner or authorized user of a valid copy of Mac OS X Server software may reproduce this publication for the purpose of learning to use such software. No part of this publication may be reproduced or transmitted for commercial purposes, such as selling copies of this publication or for providing paid-for support services.
Every effort has been made to ensure that the information in this manual is accurate. Apple Inc. is not responsible for printing or clerical errors.
Apple1 Infinite LoopCupertino, CA 95014408-996-1010www.apple.com
Use of the “keyboard” Apple logo (Option-Shift-K) for commercial purposes without the prior written consent of Apple may constitute trademark infringement and unfair competition in violation of federal and state laws.
Apple, the Apple logo, iCal, iPod, iPod touch, iTunes, Keynote, Leopard, Mac, Mac OS, Pages, QuickTime, and Safari are trademarks of Apple Inc., registered in the U.S. and other countries. Finder, iPhone, and Snow Leopard are trademarks of Apple Inc.
Adobe, the Adobe logo, Acrobat, the Acrobat logo, Distiller, PostScript, and the PostScript logo are trademarks or registered trademarks of Adobe Systems incorporated in the U.S. and/or other countries.
Other company and product names mentioned herein are trademarks of their respective companies. Mention of third-party products is for informational purposes only and constitutes neither an endorsement nor a recommendation. Apple assumes no responsibility with regard to the performance of these products.
019-1405/2009-08-01
7 Preface:� About This Guide7 What’s in This Guide8 Documentation Map9 Viewing PDF Guides Onscreen9 Printing PDF Guides10 Getting Additional Information
Part I:� Wiki Tools Walkthrough12 Chapter 1:� Overview of Wiki Tools12 Browser Requirements12 About Wikis13 About Blogs13 About Web Calendars14 About Mailing Lists
15 Chapter 2:� Using My Page16 About My Page17 Logging In and Logging Out18 Changing My Page Settings19 Changing Account Settings19 Changing Your Password20 Changing Your Mail Rules20 Setting Up Vacation Notices21 Customizing Your Personal Blog21 Choosing Who Can View Your Blog and Add Comments
23 Chapter 3:� Creating Wikis and Blogs23 About Administrators24 Creating a Wiki25 Deleting Wikis26 Changing Wiki Settings26 Changing General Wiki Settings
3
Contents
4 Contents
27 Enabling and Disabling Wiki Services28 Choosing Who Can Access a Wiki and Setting Access Permissions30 Adding a Custom Sidebar to the Wiki Homepage30 Changing Advanced Wiki Settings31 Creating a Personal Blog31 Deleting a Personal Blog
32 Chapter 4:� Working with Content32 Creating Wiki Pages and Blog Posts33 Deleting Wiki Pages or Blog Posts34 Editing Wiki or Blog Content34 Renaming Wiki Pages or Blog Posts35 Changing Paragraph Styles35 Changing List Styles and Indentation35 Changing Text Styles36 Adding or Removing Links to Other Pages37 Inserting Media39 Attaching Files39 Inserting and Editing Tables40 Viewing and Editing HTML Source41 Using a Blog Editing Application41 Viewing or Restoring Older Versions of a Page42 Adding or Removing Comments
43 Chapter 5:� Navigating Wiki Tools43 Understanding Access Control44 About Searching45 Searching Across a Single Wiki45 Searching Across Multiple Wikis46 Saving Your Search46 About Tags47 Adding or Removing Tags47 Viewing All Tags Used in a Wiki48 Editing and Removing Tags from a Wiki48 Viewing Favorite Pages50 Previewing Attachments with Quick Look
51 Chapter 6:� Keeping Up to Date51 Viewing Updates on My Page52 Watching Wikis and Blogs53 About RSS55 Subscribing to an RSS Feed

Contents 5
57 Chapter 7:� Using the Web Calendar57 Navigating through the Web Calendar58 Working with Calendars58 Creating and Deleting Calendars59 Renaming Calendars59 Applying Calendar Colors59 Showing and Hiding Calendars60 Working with Events60 Creating, Editing and Deleting Events60 Sending, Viewing, and Accepting or Rejecting Invitations61 Changing Event Details62 Changing Event Notes62 Rescheduling Events62 Viewing and Previewing Events63 Changing Calendar Settings64 Working with Web Calendars in iCal
65 Chapter 8:� Viewing Wiki Tools on iPhone or iPod touch65 About Using Wiki Tools on iPhone or iPod touch65 Viewing My Page on iPhone or iPod touch66 Viewing Wikis and Blogs on iPhone or iPod touch67 Viewing Group Calendar Events on iPhone or iPod touch67 Searching on iPhone or iPod touch67 Adding or Removing Tags on iPhone or iPod touch68 Adding or Removing Comments on iPhone or iPod touch68 Marking Pages with a Star on iPhone or iPod touch
Part II:� Deploying Wiki Tools70 Chapter 9:� Streamlining Projects70 Project Wiki Blueprint72 Creating Navigable Wikis73 Eliminating Duplicate Versions of Content74 Managing Project Personnel74 Parallelizing Effort75 Creating High-Level Views75 Reusing Information76 Keeping Interested Parties Aware of Project Updates
77 Chapter 10:� Improving Internal Documentation77 Internal Documentation Wiki Blueprint79 Choosing Which Documents to Convert to Wiki Format

6 Contents
79 Reducing the Need for Single Ownership80 Maintaining Documents in Wikis Instead of Word Processor Files
82 Chapter 11:� Communicating More Effectively with Wiki Tools83 Choosing the Right Method of Communication84 Problems with Email85 Eliminating Response Threads86 Reducing Spam86 Creating Navigable Information
87 Chapter 12:� Using Wiki Tools in the Classroom87 Classroom Wiki Blueprint92 Preventing Misinformation92 Creating Wiki Yearbooks92 Posting Assignments on a Wiki93 Posting Additional Information on a Wiki93 Using Wikis for Group Sign Up94 Using Wikis for Persistent Projects
95 Index

7
This guide provides a starting point for using wiki tools.
Mac OS X Server includes several web-based tools including wikis, blogs, web calendars, and mailing list archives. Collectively, these are referred to as wiki tools. You can use wiki tools to streamline projects, coordinate teams, and improve communication.
What’s in This GuideThis guide includes the following two parts:
Part  I, “Wiki Tools Walkthrough” describes everything you need to know about how to use wiki tools. You’ll learn how to create wikis and blogs, edit them, use tags, and browse wikis on your iPhone.
Part  II, “Deploying Wiki Tools” provides tips, strategies, and examples for using wiki tools to streamline projects, coordinate teams, and improve communication.
Note: Because Apple periodically releases new versions and updates to its software, images shown in this book may be different from what you see on your screen.
Pref
aceAbout This Guide
8 Preface About This Guide
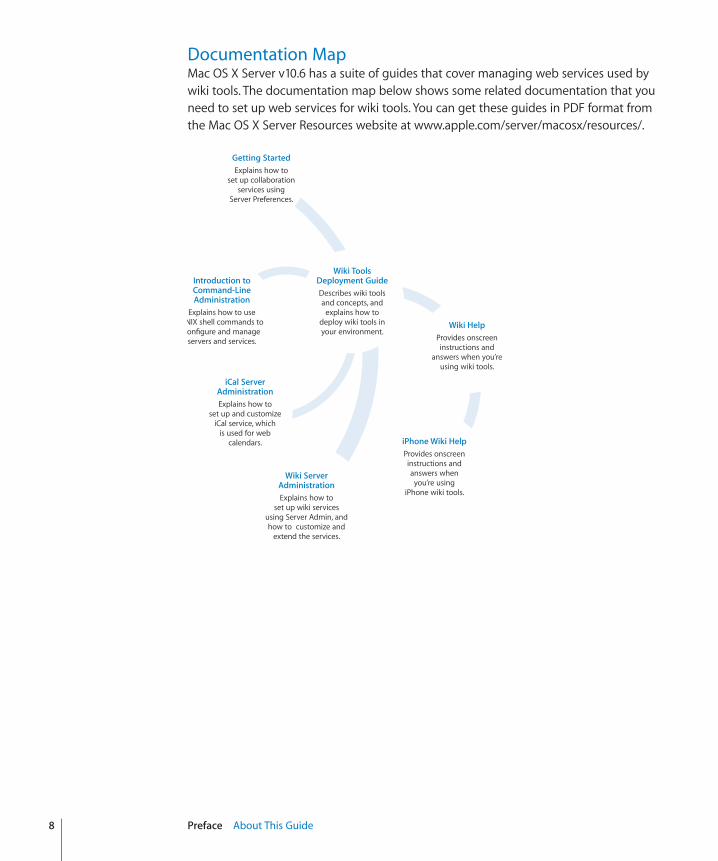
Documentation MapMac OS X Server v10.6 has a suite of guides that cover managing web services used by wiki tools. The documentation map below shows some related documentation that you need to set up web services for wiki tools. You can get these guides in PDF format from the Mac OS X Server Resources website at www.apple.com/server/macosx/resources/.
iCal ServerAdministrationExplains how to
set up and customizeiCal service, which
is used for webcalendars.
Introduction toCommand-LineAdministration
Explains how to useUNIX shell commands toconfigure and manage
servers and services.
Wiki ServerAdministrationExplains how to
set up wiki servicesusing Server Admin, andhow to customize and
extend the services.
Wiki ToolsDeployment GuideDescribes wiki toolsand concepts, and
explains how todeploy wiki tools inyour environment.
iPhone Wiki HelpProvides onscreeninstructions andanswers whenyou’re using
iPhone wiki tools.
Wiki HelpProvides onscreeninstructions and
answers when you’reusing wiki tools.
Getting StartedExplains how to
set up collaborationservices using
Server Preferences.
Preface About This Guide 9
Viewing PDF Guides OnscreenWhile reading this PDF:
Show bookmarks to see the guide’s outline, and click a bookmark to jump to the Âcorresponding section.
Search for a word or phrase to see a list of places where it appears in the guide. ÂClick a listed place to see the page where it occurs.
Click a cross-reference to jump to the referenced section. Click a web link to visit the Âwebsite in your browser.
Printing PDF GuidesIf you want to print this guide, you can take these steps to save paper and ink:
Save ink or toner by not printing the cover page. Â
Save color ink on a color printer by looking in the panes of the Print dialog for an Âoption to print in grays or black and white.
Reduce the bulk of the printed document and save paper by printing more than Âone page per sheet of paper. In the Print dialog, change Scale to 115%. Then choose Layout from the untitled pop-up menu. If your printer supports two-sided (duplex) printing, select one of the Two-Sided options. Otherwise, choose 2 from the Pages per Sheet pop-up menu, and optionally choose Single Hairline from the Border menu. (If you’re using Mac OS X v10.4 or earlier, the Scale setting is in the Page Setup dialog and the Layout settings are in the Print dialog.)
You may want to enlarge the printed pages even if you don’t print double sided, because the PDF page size is smaller than standard printer paper. In the Print dialog or Page Setup dialog, try changing Scale to 115%.
10 Preface About This Guide
Getting Additional InformationFor more information, consult these resources:
 Apple Support website (support.apple.com/)—access hundreds of articles from Apple’s support organization.
 Apple Discussions website (discussions.apple.com/)—share questions, knowledge, and advice.
 Apple Mailing Lists website (www.lists.apple.com/)—subscribe to mailing lists so you can communicate using email.
 Mac OS X Server website (www.apple.com/server/macosx/)—enter the gateway to extensive information about Mac OS X Server.

IPart I:� Wiki Tools Walkthrough
Find out about wiki tools and how to use them.
Chapter 1 Overview of Wiki Tools
Chapter 2 Using My Page
Chapter 3 Creating Wikis and Blogs
Chapter 4 Working with Content
Chapter 5 Navigating Wiki Tools
Chapter 6 Keeping Up to Date
Chapter 7 Using the Web Calendar
Chapter 8 Viewing Wiki Tools on iPhone or iPod touch
12
Learn about wiki tools.
Mac OS X Server v10.6 includes several web-based wiki tools that allow users to express themselves or to easily form, coordinate, and organize teams.
Browser RequirementsWiki content can be viewed in any web browser. However, to take advantage of certain features, such as editing wiki pages and viewing the updates list, your browser must support modern web technologies. Examples of modern browsers include:
Safari 3 or later Â
Firefox 3 or later Â
Internet Explorer 7 or later Â
About WikisA wiki is a web-based, collaborative editing environment for groups. Depending on how the wiki administrator sets permissions, anyone who can view wiki content can also add or edit content.
Wikis have several advantages over other tools:
Advantage Description
Fast and easy To edit wiki pages, click the Edit (pencil) button on a page you want to edit. Add content and use a simple toolbar to apply styles, add links to other sites, attach files, or insert media. You don’t need to learn additional tools.
Streamlined If you see a page you’d like to correct or add content to, you can change it yourself. With other tools, you’d need to find the owner of the content and describe the issue to the owner, and then the owner would need to change the content.
Customizable It’s easy to change how users navigate to information, through a broad or deep navigational hierarchy, or through tags.
1Overview of Wiki Tools
Chapter 1 Overview of Wiki Tools 13
Advantage Description
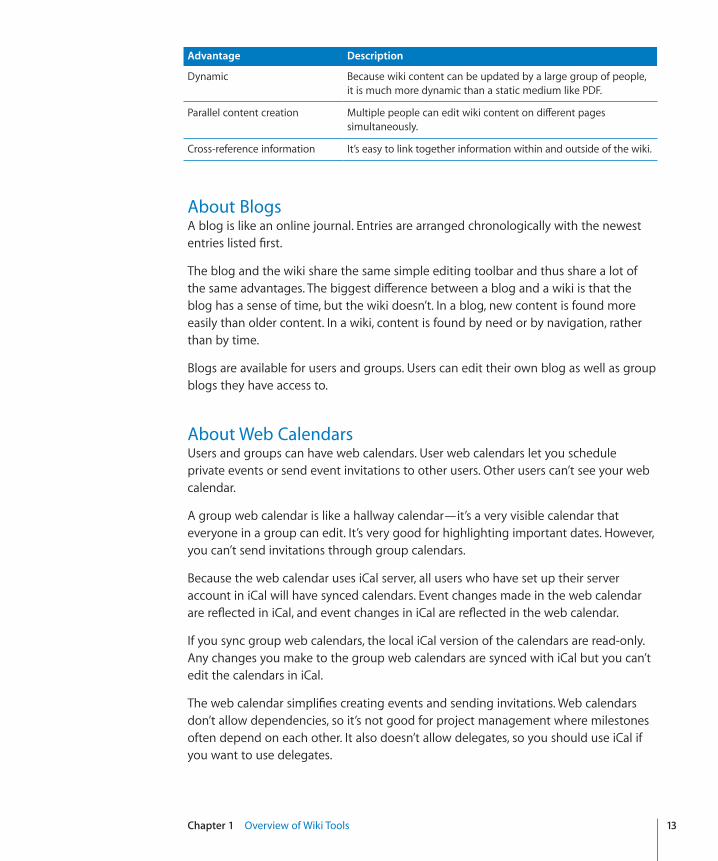
Dynamic Because wiki content can be updated by a large group of people, it is much more dynamic than a static medium like PDF.
Parallel content creation Multiple people can edit wiki content on different pages simultaneously.
Cross-reference information It’s easy to link together information within and outside of the wiki.
About BlogsA blog is like an online journal. Entries are arranged chronologically with the newest entries listed first.
The blog and the wiki share the same simple editing toolbar and thus share a lot of the same advantages. The biggest difference between a blog and a wiki is that the blog has a sense of time, but the wiki doesn’t. In a blog, new content is found more easily than older content. In a wiki, content is found by need or by navigation, rather than by time.
Blogs are available for users and groups. Users can edit their own blog as well as group blogs they have access to.
About Web CalendarsUsers and groups can have web calendars. User web calendars let you schedule private events or send event invitations to other users. Other users can’t see your web calendar.
A group web calendar is like a hallway calendar—it’s a very visible calendar that everyone in a group can edit. It’s very good for highlighting important dates. However, you can’t send invitations through group calendars.
Because the web calendar uses iCal server, all users who have set up their server account in iCal will have synced calendars. Event changes made in the web calendar are reflected in iCal, and event changes in iCal are reflected in the web calendar.
If you sync group web calendars, the local iCal version of the calendars are read-only. Any changes you make to the group web calendars are synced with iCal but you can’t edit the calendars in iCal.
The web calendar simplifies creating events and sending invitations. Web calendars don’t allow dependencies, so it’s not good for project management where milestones often depend on each other. It also doesn’t allow delegates, so you should use iCal if you want to use delegates.
About Mailing ListsEvery wiki group can have a logged mailing list. All mail sent to the group’s email address is archived in the mailing list. Unlike the wiki and blog, content in logged mailing lists can’t be changed or commented on. However, logged mail can be tagged, and because they each have a URL, you can link to them.
The group email address is groupname-wiki@serverurl.
For example, if your group’s name is Aardvark and the URL of your wiki server is www.example.com, the group email address is [email protected].
14 Chapter 1 Overview of Wiki Tools
15
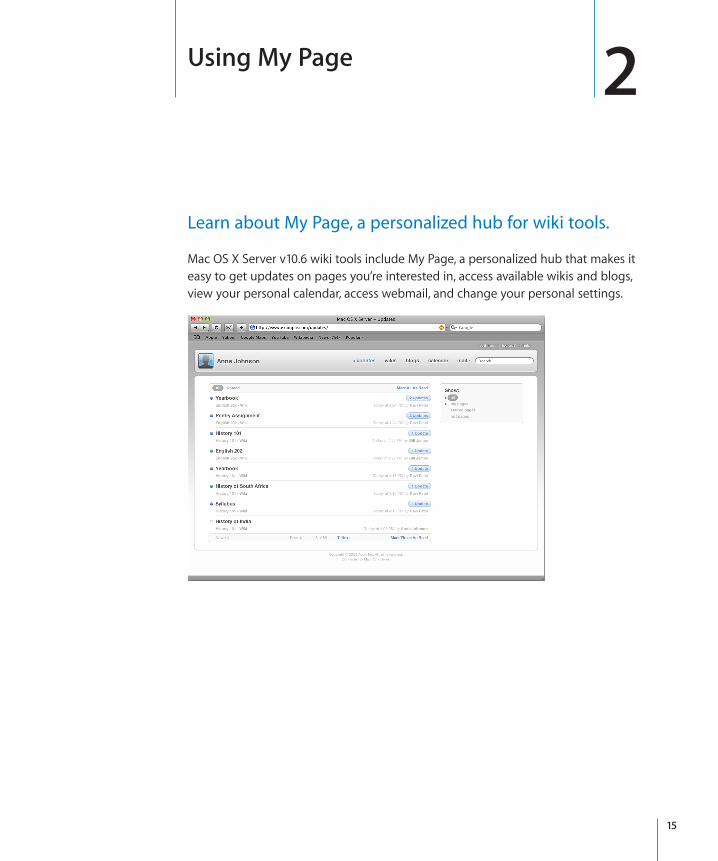
Learn about My Page, a personalized hub for wiki tools.
Mac OS X Server v10.6 wiki tools include My Page, a personalized hub that makes it easy to get updates on pages you’re interested in, access available wikis and blogs, view your personal calendar, access webmail, and change your personal settings.
2Using My Page
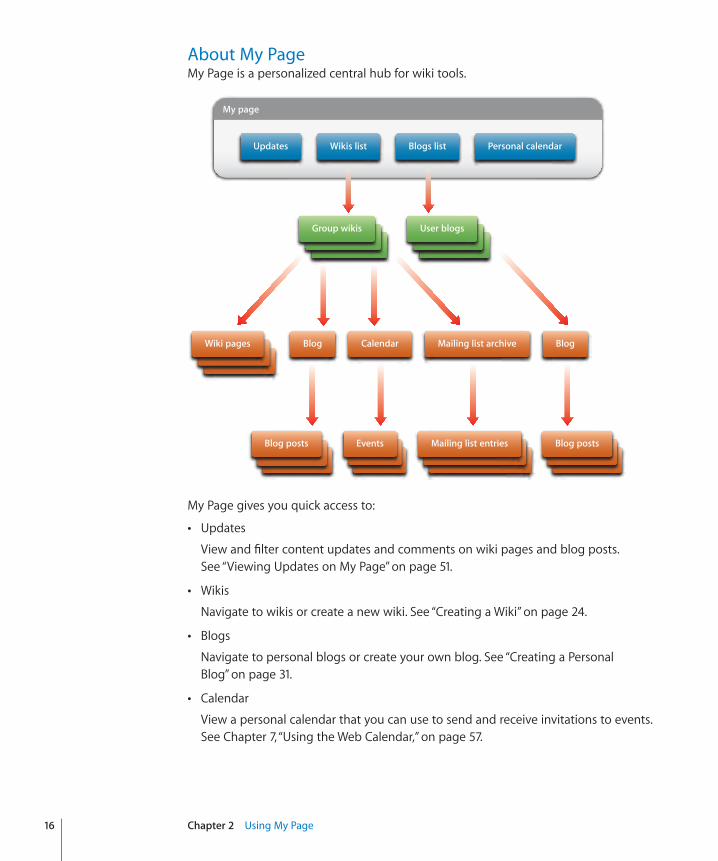
About My PageMy Page is a personalized central hub for wiki tools.
My page
Updates
Group wikis User blogs
Wikis list Blogs list Personal calendar
Wiki pages Blog Calendar Mailing list archive Blog
Blog posts Events Mailing list entries Blog posts
My Page gives you quick access to:
Updates Â
View and filter content updates and comments on wiki pages and blog posts. See “Viewing Updates on My Page” on page 51.
Wikis Â
Navigate to wikis or create a new wiki. See “Creating a Wiki” on page 24.
Blogs Â
Navigate to personal blogs or create your own blog. See “Creating a Personal Blog” on page 31.
Calendar Â
View a personal calendar that you can use to send and receive invitations to events. See Chapter 7, “Using the Web Calendar,” on page 57.
16 Chapter 2 Using My Page
Chapter 2 Using My Page 17
Mail Â
Access webmail. For information, click Help in webmail.
Search Â
Search content across all wikis and blogs you have access to. See “About Searching” on page 44.
Settings Â
Change account and personal blog settings. See “Changing My Page Settings” on page 18.
Logging In and Logging OutIf you’re not logged in, you only have access to publicly accessible wikis and blogs. You can search content across all publicly accessible wikis, but not private wikis or blogs.
Depending on the wiki or blog you’re viewing, unauthenticated users might not be able to add content or create pages, perform administrative functions, or add comments. The wiki or blog can also moderate comments from unauthenticated users. Unmoderated comments are invisible until they are approved.
In My Page, you can tell if you’re logged in because your account name appears at the upper left. If it says “Log in to my page,” you’re not logged in.
In a public wiki or blog, you can tell you’re logged in if a link named “Log Out (account name)” appears. If it says “Log In,” you’re not logged in.
When you access private wikis or blogs, you’re prompted to log in if you’re logged out or if the account you’re logged in as doesn’t have access to the wiki or blog.
To log in:� 1 In My Page, click “Log in to my page.”
In a public wiki or blog, click Log In.
If you open a private wiki, you’re prompted to log in.
2 Enter your user name and password.
3 If you want to remain logged in after you close your browser, select “Remember Me.”
4 Click Log In.
To log out:�In My Page, click “log out.” m
In a wiki or blog, click “Log Out ( m account name).”
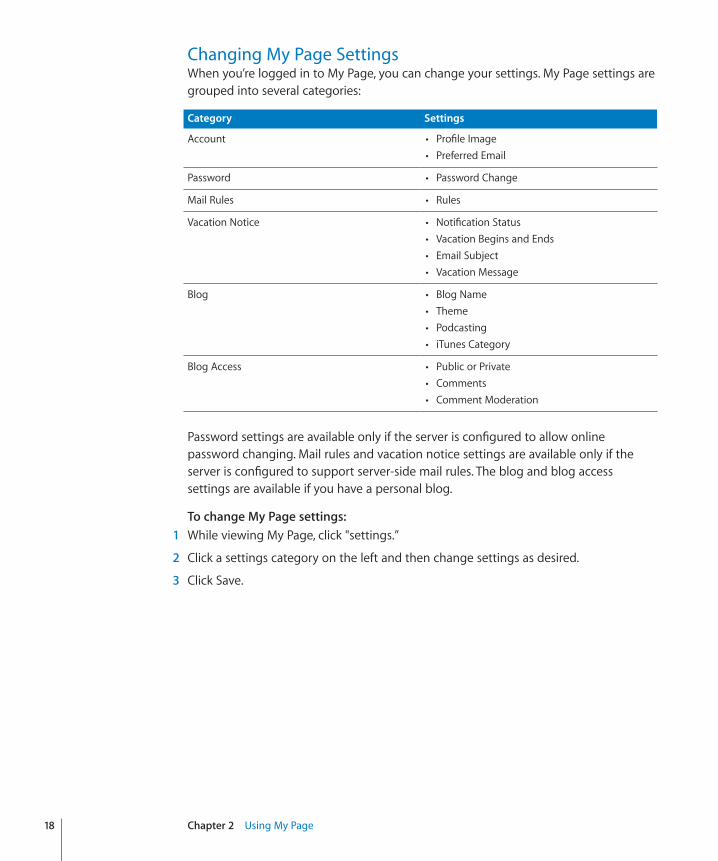
Changing My Page SettingsWhen you’re logged in to My Page, you can change your settings. My Page settings are grouped into several categories:
Category Settings
Account  Profile Image  Preferred Email
Password  Password Change
Mail Rules  Rules
Vacation Notice  Notification Status  Vacation Begins and Ends  Email Subject  Vacation Message
Blog  Blog Name  Theme  Podcasting  iTunes Category
Blog Access  Public or Private  Comments  Comment Moderation
Password settings are available only if the server is configured to allow online password changing. Mail rules and vacation notice settings are available only if the server is configured to support server-side mail rules. The blog and blog access settings are available if you have a personal blog.
To change My Page settings:� 1 While viewing My Page, click "settings.”
2 Click a settings category on the left and then change settings as desired.
3 Click Save.
18 Chapter 2 Using My Page
Chapter 2 Using My Page 19
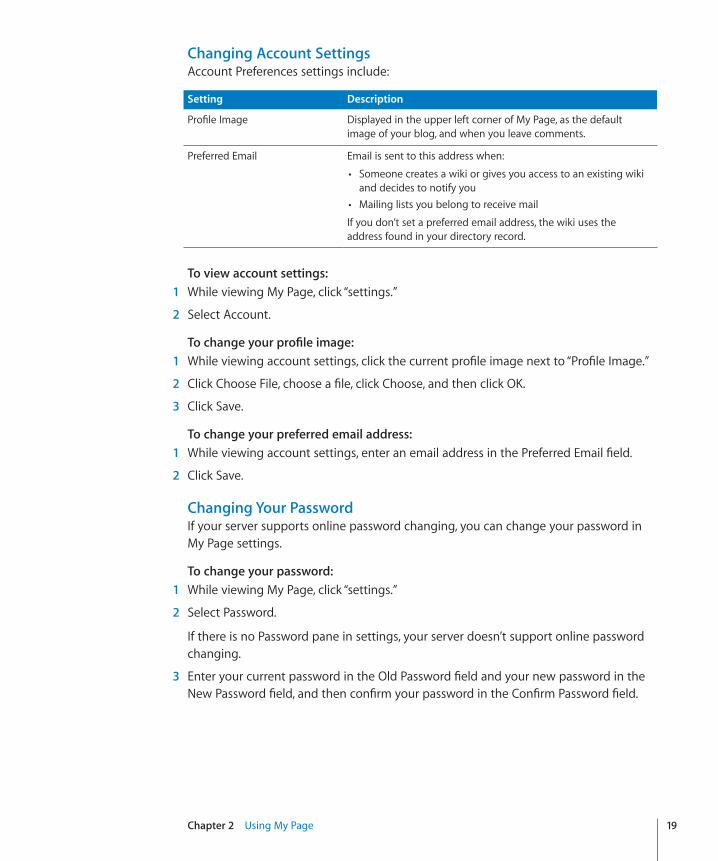
Changing Account SettingsAccount Preferences settings include:
Setting Description
Profile Image Displayed in the upper left corner of My Page, as the default image of your blog, and when you leave comments.
Preferred Email Email is sent to this address when:
 Someone creates a wiki or gives you access to an existing wiki and decides to notify you
 Mailing lists you belong to receive mail
If you don’t set a preferred email address, the wiki uses the address found in your directory record.
To view account settings:� 1 While viewing My Page, click “settings.”
2 Select Account.
To change your profile image: 1 While viewing account settings, click the current profile image next to “Profile Image.”
2 Click Choose File, choose a file, click Choose, and then click OK.
3 Click Save.
To change your preferred email address:� 1 While viewing account settings, enter an email address in the Preferred Email field.
2 Click Save.
Changing Your PasswordIf your server supports online password changing, you can change your password in My Page settings.
To change your password:� 1 While viewing My Page, click “settings.”
2 Select Password.
If there is no Password pane in settings, your server doesn’t support online password changing.
3 Enter your current password in the Old Password field and your new password in the New Password field, and then confirm your password in the Confirm Password field.
Changing Your Mail RulesIf your server is configured to support server-side mail rules, you can create mail rules to filter or transfer mail. For example, if you subscribe to mailing lists, you can have emails from them transfer into their own mail folder. You’ll still receive mailing list messages, but they won’t clutter your inbox.
To view mail rules:� 1 While viewing My Page, click “settings.”
2 Select Mail Rules.
To add mail rules:� 1 While viewing mail rules settings, use the If pop-up menus to choose criteria for
transferring or filtering received emails.
2 Choose a destination for the email from the “Transfer Email to” pop-up menu.
3 Click Add New Rule.
4 Click Save.
To delete mail rules:� 1 While viewing mail rules settings, click Delete next to rules you want to delete.
If no rules are shown, you don’t have mail rules.
2 Click Save.
Setting Up Vacation NoticesIf your server is configured to support server-side mail rules, you can set up vacation notices. If you enable vacation notices, if someone sends you an email during a specified period of time, an email is automatically sent to them. If they send you multiple emails in a day, they are sent a single vacation notice email that day.
If you’re away from your email for an extended period of time, setting up a vacation notice is a good way to inform people of your unavailability and your expected return date.
To set up a vacation notice:� 1 While viewing My Page, click “settings.”
2 Select Vacation Notice.
3 To enable vacation notices, for Enabled, select On; to disable vacation notices, select Off.
4 Click the date next to Vacation Begins and then select the date when notifications will start being sent.
5 Click the date next to Returning On and then select the date when notifications will stop being sent.
20 Chapter 2 Using My Page
Chapter 2 Using My Page 21
6 In the Email Subject field, enter the subject line of the email that will be sent.
7 In the Vacation Message area, enter the body of the email that will be sent.
8 Click Save.
Customizing Your Personal BlogIf you’ve already created a personal blog, you can use settings to change its name or theme and to enable podcasting.
To view blog settings:�While viewing My Page, click “settings” and then select Blog. m
While viewing your blog’s homepage, click Settings. m
To change your blog’s name:� 1 While viewing blog settings, edit the Blog Name field.
2 Click Save.
To change your blog’s theme:� 1 While viewing blog settings, click Change Theme.
2 Select a theme from the list.
3 If the theme includes a banner, you can upload a new banner by choosing Upload New from the Banner Image pop-up menu, then click Choose File, choose a file, and click Choose.
4 Click OK.
5 Click Save.
To enable podcasting:� 1 While viewing blog settings, select Enabled next to Podcasting.
2 Choose a category from the iTunes Category pop-up menu.
Categorized podcasts are more likely to be found than podcasts without a category.
3 Click Save.
Choosing Who Can View Your Blog and Add CommentsIf you’ve already created a personal blog, you can choose whether to make it publicly or privately accessible. If you make it publicly accessible, you can allow anyone to view it or restrict access to anyone who logs in. If you make it privately accessible, you can choose specific users or groups who are allowed to view it.
You can restrict who is allowed to add comments: anyone, authenticated users (anyone with an account on the server), or no one. You can also enable comment moderation for all comments or for anonymous comments. If comment moderation is enabled, unmoderated comments aren’t shown unless you approve the comments.
To view blog access settings:� 1 While viewing My Page, click “settings.”
2 Select Blog Access.
To make your blog publicly accessible:� 1 While viewing blog access settings, select “This blog can be read by anyone.”
2 If you want to restrict access to only those with accounts on the server, select “Users must log in to read.”
3 Click Save.
To make your blog privately accessible:� 1 While viewing blog access settings, select “This blog can only be read by the following
people and groups.”
2 For every person or group who you want to view your blog, enter their name in the field.
While you’re entering a name, the server checks for matching people or groups. If a match is found, select the match from the menu that appears. If no match is found, make sure you entered the name of the person or group correctly.
3 If you want to remove someone from the access list, hold the cursor over the name of the person or group and click Delete (X).
4 Click Save.
To enable comments:� 1 While viewing blog access settings, choose who is allowed to add comments in the
Comment pop-up menu.
2 Click Save.
To enable comment moderation:� 1 While viewing blog access settings, choose which type of comments should be
moderated in the Comment Moderation pop-up menu.
2 Click Save.
22 Chapter 2 Using My Page

23
Learn how to create and delete wikis and personal blogs.
Creating wikis and a personal blog is easy in wiki tools. After creating a wiki, you can choose who can view or edit it, and customize it to suit your team’s needs.
About AdministratorsPeople who can access a wiki or a blog fall into two categories: administrators and users. Each wiki or blog can have different access permissions, so you might be an administrator for a few wikis and a user for other wikis.
An administrator (also known as an admin) has privileges that users don’t. For example, an administrator can:
Change wiki settings such as: Â
Changing the wiki image (displayed at the upper left) Â
Renaming the wiki Â
Describing the wiki Â
Setting a contact email Â
Changing the wiki theme Â
Change which services are available Â
Enabling podcasting Â
Choosing who has access to the wiki and what level of access they have Â
Changing who can comment or moderate comments Â
Adding a sidebar to the homepage Â
Choosing which server address the wiki appears under Â
Edit the tags list Â
Remove other people’s comments Â
Permanently delete wiki pages or blog posts Â
3Creating Wikis and Blogs
There are two types of administrators: server administrator and individual wiki or blog administrator. A server administrator has administrative privileges for all wikis and blogs on the server. An individual wiki or blog administrator has administrative privileges for a specific wiki or blog.
Creating a WikiYour wiki server can allow anyone who has an account on the wiki server to create a wiki. It can also restrict who can create wikis to a specific group of people.
When you create a wiki, you become an administrator for that wiki and can then customize the wiki to suit your needs.
To create a wiki:� 1 While viewing My Page, click Wikis.
2 Click “Create a new Wiki.”
If this button isn’t shown, you can’t create a wiki on the server.
3 Enter a name and description for the wiki and click Create.
The line under the Wiki Name field shows a preview of the URL for the wiki. You can’t change this URL later, but you can rename the wiki. If you want a specific URL, enter a name that gives you the URL you want and rename the wiki later.
The description appears under the name of the wiki in the wiki list on My Page.
4 When prompted to choose a theme, select a theme and then click Next.
You can change the theme after creating the wiki.
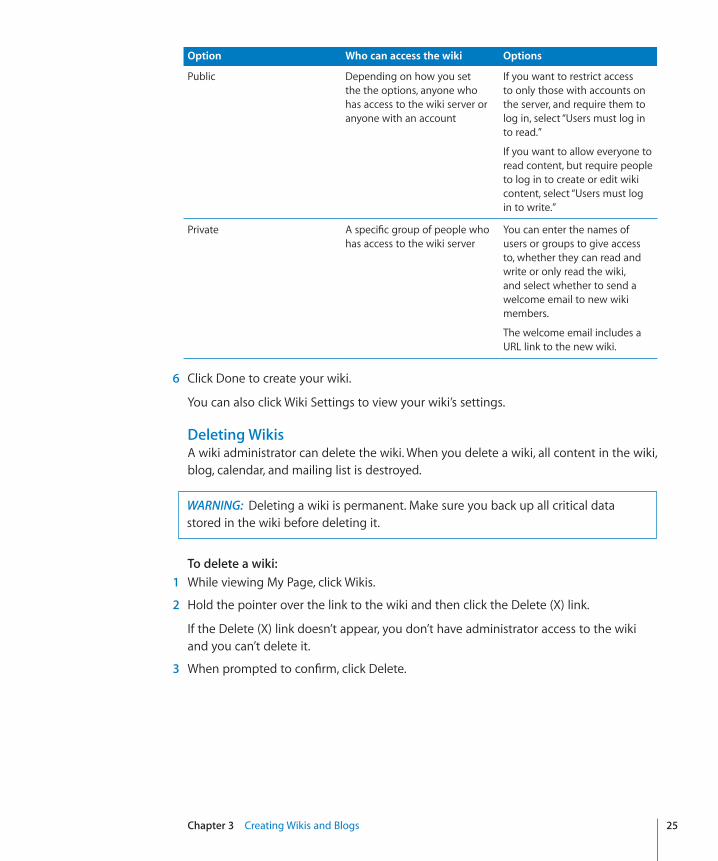
5 When prompted to set wiki access, select one of the following and then click Next:
24 Chapter 3 Creating Wikis and Blogs
Chapter 3 Creating Wikis and Blogs 25
Option Who can access the wiki Options
Public Depending on how you set the the options, anyone who has access to the wiki server or anyone with an account
If you want to restrict access to only those with accounts on the server, and require them to log in, select “Users must log in to read.”
If you want to allow everyone to read content, but require people to log in to create or edit wiki content, select “Users must log in to write.”
Private A specific group of people who has access to the wiki server
You can enter the names of users or groups to give access to, whether they can read and write or only read the wiki, and select whether to send a welcome email to new wiki members.
The welcome email includes a URL link to the new wiki.
6 Click Done to create your wiki.
You can also click Wiki Settings to view your wiki’s settings.
Deleting WikisA wiki administrator can delete the wiki. When you delete a wiki, all content in the wiki, blog, calendar, and mailing list is destroyed.
WARNING: Deleting a wiki is permanent. Make sure you back up all critical data stored in the wiki before deleting it.
To delete a wiki:� 1 While viewing My Page, click Wikis.
2 Hold the pointer over the link to the wiki and then click the Delete (X) link.
If the Delete (X) link doesn’t appear, you don’t have administrator access to the wiki and you can’t delete it.
3 When prompted to confirm, click Delete.
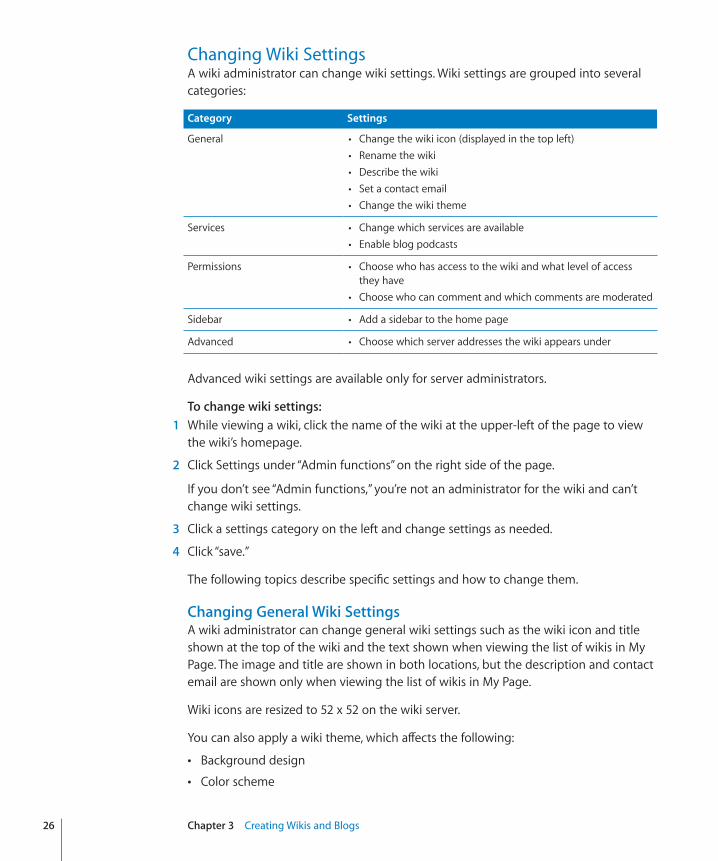
Changing Wiki SettingsA wiki administrator can change wiki settings. Wiki settings are grouped into several categories:
Category Settings
General  Change the wiki icon (displayed in the top left)  Rename the wiki  Describe the wiki  Set a contact email  Change the wiki theme
Services  Change which services are available  Enable blog podcasts
Permissions  Choose who has access to the wiki and what level of access they have
 Choose who can comment and which comments are moderated
Sidebar  Add a sidebar to the home page
Advanced  Choose which server addresses the wiki appears under
Advanced wiki settings are available only for server administrators.
To change wiki settings:� 1 While viewing a wiki, click the name of the wiki at the upper-left of the page to view
the wiki’s homepage.
2 Click Settings under “Admin functions” on the right side of the page.
If you don’t see “Admin functions,” you’re not an administrator for the wiki and can’t change wiki settings.
3 Click a settings category on the left and change settings as needed.
4 Click “save.”
The following topics describe specific settings and how to change them.
Changing General Wiki SettingsA wiki administrator can change general wiki settings such as the wiki icon and title shown at the top of the wiki and the text shown when viewing the list of wikis in My Page. The image and title are shown in both locations, but the description and contact email are shown only when viewing the list of wikis in My Page.
Wiki icons are resized to 52 x 52 on the wiki server.
You can also apply a wiki theme, which affects the following:
Background design Â
Color scheme Â
26 Chapter 3 Creating Wikis and Blogs
Chapter 3 Creating Wikis and Blogs 27
Font type, size, and spacing Â
Button and toolbar design Â
Layout Â
Banner image Â
Themes are separate from content. When you change a theme, you only change how content looks—not the content itself.
To view general wiki settings:�While viewing a wiki’s settings, click General. m
To change a wiki’s icon:� 1 While viewing a wiki’s general settings, click the image next to Wiki Icon.
2 Click Choose File, choose a file, click Choose, and then click OK.
3 Click Save.
To change a wiki’s name, description, or contact email:� 1 While viewing a wiki’s general settings, edit the Wiki Name, Description, or Contact
Email fields.
2 Click Save.
To change themes:� 1 While editing a wiki’s general settings, click Change Theme.
2 Select a theme, and click OK.
3 Click Save.
Enabling and Disabling Wiki ServicesA wiki administrator can change whether the blog, web calendar, and mailing list archive services are enabled or disabled for a wiki. You can’t disable the wiki service.
If you disable a service and later reenable it, your content is still there.
You can also enable podcasts for the wiki’s blog. Podcasts are downloadable radio- and TV-style shows. You can enable podcasts so that whenever you attach an audio or movie file to a new blog entry, it becomes available as a podcast. Any blog post with media can be subscribed to in iTunes.
To enable or disable wiki services:� 1 While viewing a wiki’s settings, click Services.
2 Select the services listed under “Group services” to enable them.
To disable them, deselect the services.
3 Click Save.
To enable blog podcasts:� 1 While editing a wiki’s settings, click Services.
2 Select “Blog.”
3 Select “Create a podcast for this wiki’s blog.”
4 In iTunes Category, choose the category for these podcasts in iTunes.
5 Click Save.
Choosing Who Can Access a Wiki and Setting Access PermissionsA wiki administrator can control access to a wiki by making it publicly or privately accessible.
If you make it publicly accessible, you can allow it to be viewed by anyone who can Âaccess the wiki server or only people who have a wiki server account. You can also allow pages to be created or edited by everyone with wiki server accounts or only specific people.
If you make a wiki privately accessible, you can allow particular individuals or groups Âto view your wiki content, and read or write content.
You can add users or groups as wiki administrators. Wiki administrators are allowed to read and write wiki content and change wiki settings.
You can restrict who is allowed to add comments: anyone, authenticated users (those with an account on the server), or no one. You can also enable comment moderation for all comments, or for anonymous comments. If you enable comment moderation, unmoderated comments aren’t shown unless a wiki administrator approves them.
To view wiki permissions:�While viewing a wiki’s settings, click Permissions. m
To make a wiki publicly accessible:� 1 While viewing the wiki’s permissions settings, select “This wiki can be read and edited
by anyone.”
2 If you want to restrict access to only those with accounts on the server and require them to log in, select “Users must log in to read.”
3 If you want to restrict content creation and editing to only those with accounts on the server, select “Users must log in to write.”
If you want to allow everyone with accounts on the server to create or edit wiki Âcontent, select “All authenticated users can write.”
If you want to restrict content creation and editing to specific people, select “Only Âthe following users and groups can write.”
In the Public field, enter the name of each person or group who you want to be able to view or edit the wiki.
28 Chapter 3 Creating Wikis and Blogs

Chapter 3 Creating Wikis and Blogs 29
When you enter a name, the server checks for matching people or groups. If a match is found, select the match from the menu that appears. If no match is found, make sure you entered the name correctly.
If you want to remove a person or group from the access list, hold the cursor over the name and click Delete (X).
4 Click Save.
To make a wiki privately accessible:� 1 While viewing the wiki’s permissions settings, select “This wiki can be read and edited
by only the following users and groups.”
2 In the Private field, enter the name of each person or group who you want to be able to view or edit the wiki.
When you enter a name, the server checks for matching people or groups. If a match is found, select the match from the menu that appears. If no match is found, make sure you entered the name correctly.
3 After adding a person or group to the access list, click the pop-up menu at the right of a name in the list and choose whether the person or group can read and write wiki content or only read wiki content.
4 If you want to remove a person or group from the access list, hold the cursor over the name and click Delete (X).
5 If you want the server to send an email notification to everyone with access to the wiki, select “Send welcome email to new members.”
6 Click Save.
To make someone a wiki administrator:� 1 While viewing the wiki’s permissions settings, enter in the Admins field the name of
each person or group who you want to be able to view or edit your wiki.
When you enter a name, the server checks for matching people or groups. If a match is found, select the match from the menu that appears. If no match is found, make sure you entered the name correctly.
2 If you want to remove a person or group from the admin list, hold the cursor over the name and click Delete (X).
3 Click Save.
To enable comments on a wiki:� 1 While viewing the wiki’s permissions settings, choose from the Comment pop-up
menu who is allowed to add comments.
2 Click Save.
To enable comment moderation on a wiki:� 1 While viewing the wiki’s permissions settings, choose from the Comment Moderation
pop-up menu which type of comments should be moderated.
2 Click Save.
Adding a Custom Sidebar to the Wiki HomepageSidebars are lists of recently updated pages shown on the wiki’s homepage. The default sidebars include:
Sidebar Description
What’s Hot Lists the most recently updated or new pages that are tagged with “hot,” in reverse chronological order.
Recent Changes Lists the most recently updated or new pages, in reverse chronological order.
A wiki administrator can add a custom sidebar that shows pages tagged with a specific tag, in reverse chronological order of when the pages were last edited. For example, you could create a custom sidebar named “Status Reports” of all pages tagged with “status.” Whenever someone creates or updates a page tagged with “status,” the sidebar lists the page.
To add a custom sidebar:� 1 While editing a wiki’s settings, click Sidebar.
2 In the Sidebar Title field, name the sidebar.
3 In the Search Tag field, enter the tag required for pages listed in the sidebar.
4 Click Save.
Changing Advanced Wiki SettingsIf your server supports multiple host names and you’re a server administrator, you can choose which host name your wiki responds to and whether it responds to multiple hostnames simultaneously.
For example, a server might support wikis at the urls www.example.com, wiki.example.com, and intranet.example.com. You can configure the wiki so it responds to any, all, or any combination of those URLs.
If you don’t choose a specific host name for the wiki, all eligible host names are used.
30 Chapter 3 Creating Wikis and Blogs

Chapter 3 Creating Wikis and Blogs 31
To choose specific host names used by the wiki: 1 While editing a wiki’s settings, click Advanced.
2 Choose “Specific host names” from the Virtual Hosts pop-up menu.
3 For every host name, enter it in the field.
4 If you want to remove a host name from the list, hold the cursor over the host name and click Delete (X).
You can’t delete the virtual host you’re currently using to access the wiki.
5 Click Save.
Creating a Personal BlogYour wiki server can allow anyone who has an account on the wiki server to create a personal blog. It can also restrict who can create blogs to a specific group of people.
When you create a blog, you become the administrator for that blog and can then customize it to suit your needs.
To create a personal blog:� 1 While viewing My Page, click Blogs.
2 Click “Create my Blog.”
If a My Blog link appears on the right side of the page, you’ve already created a blog.
If neither the button nor the My Blog link is shown, you can’t create a blog on the server.
Deleting a Personal BlogYou can delete your own blog. When you delete your blog, all content in the blog is destroyed.
WARNING: Deleting a blog is permanent. Make sure you back up all critical data stored in the blog before deleting it.
To delete a personal blog:� 1 While viewing My Page, click Blogs.
2 Hold the pointer over the link to the blog and then click the Delete (X) link.
If the Delete (X) link doesn’t appear, you don’t have administrator access to the blog, and you can’t delete it.
3 When prompted to confirm, click Delete.
32
Learn how to create content in wikis and blogs.
Wikis and blogs are powerful tools because they allow many users to contribute content. These tools have a simple yet full-featured toolbar that allows users of all skills to create rich, dynamic pages. After pages are created, other readers can add comments.
Creating Wiki Pages and Blog PostsYou can create wiki pages and blog posts using the same toolbar.
When creating wiki pages, be aware of whether you’re creating orphan pages or linked pages. When possible, create linked pages because they are easier for users to navigate to and find.
An orphan page is a wiki page that isn’t linked to from any other page. Because they’re not linked to, the only way you can navigate to these pages is to search for them. Blog entries that aren’t linked to from other pages aren’t considered orphan pages, because when you view the blog, you can see all of its entries with the newest entry first.
To create an orphan wiki page:� 1 While viewing a wiki page, click the Create Page (+) button in the toolbar.
2 Enter the name of the new page and click Create.
To create a linked wiki page:� 1 While viewing a wiki page from which you want to link to a new page, click the
Edit (pencil) button in the toolbar.
2 Position the insertion point where you want the link to appear on the page.
3 Click the Create Link (curved arrow) button and choose New Page.
4 Enter the name of the new page and click Create.
5 Click “save.”
4Working with Content
Chapter 4 Working with Content 33
To create a blog entry:� 1 When viewing the blog, click the Create Page (+) button in the toolbar.
2 Enter the name of the new entry and click Create.
Deleting Wiki Pages or Blog PostsWhen you delete a wiki page or blog post, the page remains on the server but its content is removed so the page doesn’t show up in search results. Because they stay on the server, you can restore deleted pages.
When you delete a page, the links to that page from other pages are not updated. When you navigate to a deleted page, the message “This page has been deleted” appears.
To delete a wiki page or blog post:� 1 While viewing a page, click the “Delete this page” (–) button.
2 If you’re an administrator for the wiki or blog, select Permanently Delete to permanently delete the page.
If you select Permanently Delete, the wiki page can’t be restored.
3 Click Delete.
To view a deleted page:� 1 While in a wiki, search for anything.
You can view deleted wiki pages and blog posts for the wiki you’re currently viewing. If you search while viewing My Page you can’t view deleted wiki pages and blog posts.
2 Click the Find Deleted Entries link on the right.
This lists all deleted pages.
3 Click the page you’d like to view.
4 Click the View Document History (>) button at the upper-left of the page, and select an entry.
If you restore the page, the most recent entry is the version of the page that will be restored.
To restore a deleted wiki page:�While viewing a deleted page, click the “Undelete page” link. m

Editing Wiki or Blog ContentWiki pages and blog entries share the same editing toolbar.
A B C D E F G H I J K
Element Action
A Renames wiki page or blog post
B Changes paragraph style
C Changes list style or indentation
D Changes text style
E Adds links to other pages
F Inserts media
G Attaches files
H Inserts tables
I Shows the HTML source so you can edit it
J Cancels changes
K Saves changes
To edit a wiki page or blog entry:� 1 When viewing a wiki page, click the Edit Page (pencil) button in the toolbar.
When viewing a blog, click the title of a blog entry and then click the Edit Page (pencil) button in the toolbar.
2 Add text or use the editing toolbar to change content.
3 Optionally, in the Comment field, enter a short description of changes you made to the page.
This text is added to the page history for the current page revision. Adding text here helps people track page changes.
4 Click “save.”
Renaming Wiki Pages or Blog PostsYou initially give a wiki page or a blog post its name when you create it. You can later change this name using the editing toolbar.
To rename a wiki page or blog post:�While editing a page, replace the current name of the page in the field on the left side m
of the toolbar with a new page name.
34 Chapter 4 Working with Content

Chapter 4 Working with Content 35
Changing Paragraph StylesA paragraph style includes font and spacing settings applied to an entire paragraph, not a text selection.
To apply a paragraph style:� 1 While editing a page, position the insertion point anywhere within a paragraph you’d
like to apply a paragraph style to.
You can also select multiple paragraphs. The selection can start anywhere in one paragraph and end anywhere in another.
2 Click the Paragraph Style (paragraph mark) button and then choose a paragraph style from pop-up menu.
After choosing a paragraph style, the selected paragraph changes to that style.
Changing List Styles and IndentationA list style includes whether a paragraph is in a bulleted or numbered list and whether it is indented. List styles apply to an entire paragraph, not a text selection.
To apply a list style or indent:� 1 While editing a page, position the insertion point anywhere in a paragraph you’d like
to apply a list style to.
You can also select multiple paragraphs. The selection can start anywhere in one paragraph and end anywhere in another.
2 Click the List Style (bulleted list) button and then choose a list style from pop-up menu.
After choosing a list style, the selected paragraph changes to that style.
To remove a list style:� 1 While editing a page, position the insertion point anywhere in a list.
You can also select multiple list paragraphs. The selection can start anywhere in one paragraph and end anywhere in another.
2 Click the List Style (bulleted list) button, and then choose the current style of the list you’re viewing.
For example, to change a bulleted list to a regular paragraph, you’d choose Bullets.
Changing Text StylesA text style specifies whether a selection of text is:
Plain (no style applied) Â
Bold Â
Italicized Â
Underlined Â
Colored Â
Highlighted Â
To apply a text style:� 1 While editing a page, select the text you want to style.
2 Click the Text Style (A) button and then choose a text style from the pop-up menu.
After choosing a text style, the selected text changes to that style.
To remove a text style:� 1 While editing a page, select the text you want to remove the style from.
2 Click the Text Style (A) button and then choose Plain.
After choosing Plain, all text styles applied to the selection are removed.
Adding or Removing Links to Other PagesThe editing toolbar allows you to easily add links to wiki pages, web pages, and email addresses.
After you link to a page, if that page’s URL changes, the link to the page doesn’t change with it.
To create a wiki page and link to it:� 1 While editing a page, either select text that you want to link to the new page, or
position the insertion point where you’d like to add the link.
If you select text, the selected text becomes the default name of the new page. If you don’t select text, the link to the page shows the page name.
2 Click the Create Link (curved arrow) button and then choose New Page.
3 Enter the name of the new page and click Create.
The new page is created with placeholder text. While viewing the page that has the link, click the link to view.
To link to an existing wiki page on the same wiki:� 1 While editing a page, either select text that you want to link to the page, or position
the insertion point where you’d like to add the link.
If you don’t select text, the link to the page shows the page name.
2 Click the Create Link (curved arrow) button.
3 If the name of the page that you want to link to is located under the divider, choose it to create the link.
The pages you’ve most recently edited are listed under the divider.
36 Chapter 4 Working with Content
Chapter 4 Working with Content 37
4 If the name of the page isn’t listed under the divider, choose Search, then, in the search field, enter text found in the page’s title or body.
5 When you find the page, select it and click Link.
To link to a web page or a wiki page on another wiki:� 1 While editing a page, either select text that you want to link to the page, or position
the insertion point where you’d like to add the link.
2 Click the Create Link (curved arrow) button and then choose Enter URL.
3 In the URL field, enter the URL of the page; then in the Link Text field, enter the text that you want shown in the link.
The Link Text field doesn’t appear if you select text for the link.
4 Click Link.
To link to an email address:� 1 While editing a page, either select text that you want to link to the page, or position
the insertion point where you’d like to add the link.
2 Click the Create Link (curved arrow) button and then choose Enter URL.
3 In the URL field, enter “mailto:” followed by an email address; then, in the Link Text field, enter the text you want show in the link.
The Link Text field doesn’t appear if you select text for the link.
4 Click Link.
To remove a link:� 1 While editing a page, select a link.
You can also select multiple links or paragraphs.
2 Click the Create Link (curved arrow) button and then choose Unlink.
Inserting MediaWiki pages and blog posts support media such as graphics, movies, and audio files.
When you insert a graphic, if the graphic is larger than the width of the content area, a thumbnail is created. When you click the thumbnail, a full-size graphic appears.
When you insert movie or audio files, the files are embedded in the page. This allows you to view the movie or listen to audio in the page without loading a separate player.
If you don’t want to embed media files, you can attach them instead. Attaching files makes it easier to download them.
The following file types are supported:
JPEG Â
PNG Â

GIF Â
QuickTime movie Â
MP3 audio Â
If you upload the following file types, the uploaded copy is converted to PNG format:
BMP Â
TIFF Â
PSD Â
DOC Â
RTF Â
PDF (first page only) Â
To embed media files: 1 While editing a page, position the insertion point where you’d like the media to
appear.
2 Click the Insert Media (musical staff and pictures) button.
3 Click Choose File, select a media file, and click Choose.
To upload several media files, select a zip file containing those media files. After transferring the zip file, the media files in the zip file are unarchived and inserted on the page.
4 In the Text Alternative field, enter a description of the media.
This text appears when you hover the mouse cursor over the embedded media. The text is used by screen readers.
5 Click an alignment option.
Several alignment options are available:
A B C D
Button Action
A Aligns the media at the left. Text appears at the right of the media.
B Centers the media on its own line.
C Aligns the media at the right. Text appears at the left of the media.
D Shows the media in running text.
6 Click Insert.
38 Chapter 4 Working with Content

Chapter 4 Working with Content 39
Attaching FilesThe best way to attach a file for downloading is to create an archive (zip) of the file before uploading it to the server. Folders and complex file formats such as applications and Keynote presentations must be archived before uploading.
To embed a media file such as a graphic, movie, or audio file so that people don’t need to download it first, click the Insert Media button instead of the Attach File button.
To create an archive:� 1 In Finder, select the files you want to compress.
2 Choose File > Compress, or click the Gear button and choose Compress.
To attach a file: 1 While editing a page, position the insertion point where you’d like the link to the file
to appear.
2 Click the Attach File (paperclip) button.
3 Click Choose File, select the file, and click Choose.
4 Click Attach.
Inserting and Editing TablesWiki pages and blog posts include an easy-to-use table editor.
To insert a table:� 1 While editing a page, position the insertion point where you’d like the table to appear.
The table uses the full width of the wiki page. If you insert a table mid-paragraph, the text on either side of the insertion point is located in paragraphs above and below the table.
2 Click the Insert Table (table) button.
3 Edit the table using the table editor that appears.
To edit a table:� 1 While editing a page, click a table.
2 In the table editor that appears, use the toolbar to change the table’s size or structure, and edit text in the cells.
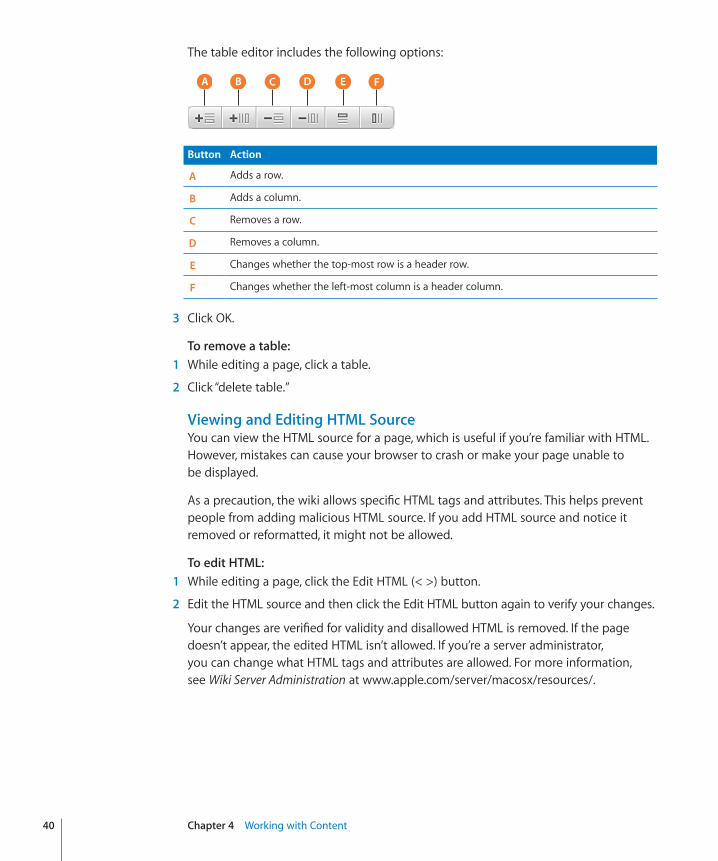
The table editor includes the following options:
A B C D E F
Button Action
A Adds a row.
B Adds a column.
C Removes a row.
D Removes a column.
E Changes whether the top-most row is a header row.
F Changes whether the left-most column is a header column.
3 Click OK.
To remove a table:� 1 While editing a page, click a table.
2 Click “delete table.”
Viewing and Editing HTML SourceYou can view the HTML source for a page, which is useful if you’re familiar with HTML. However, mistakes can cause your browser to crash or make your page unable to be displayed.
As a precaution, the wiki allows specific HTML tags and attributes. This helps prevent people from adding malicious HTML source. If you add HTML source and notice it removed or reformatted, it might not be allowed.
To edit HTML:� 1 While editing a page, click the Edit HTML (< >) button.
2 Edit the HTML source and then click the Edit HTML button again to verify your changes.
Your changes are verified for validity and disallowed HTML is removed. If the page doesn’t appear, the edited HTML isn’t allowed. If you’re a server administrator, you can change what HTML tags and attributes are allowed. For more information, see Wiki Server Administration at www.apple.com/server/macosx/resources/.
40 Chapter 4 Working with Content

Chapter 4 Working with Content 41
Using a Blog Editing ApplicationInstead of using the blog to create and edit blog posts, you can use desktop blog editing applications such as MarsEdit or ecto. These applications allow you to write content while you’re offline, and then upload when you connect to the blog server. Blog editing applications must be compatible with MetaWeblog API.
Configure your editor using the following information:
RPC access point: http:// Â serverDNSname/RPC2
User name or blog ID: Your user name or the name of your group Â
MarsEdit requires the following configuration:
RPC access point: http:// Â serverDNSname/RPC2
Blogid for user blogs: user/ Â username/weblog
Blogid for group blogs: groups/ Â groupname/weblog
For more information about MetaWeblog API, see RFC: MetaWeblog API at www.xmlrpc.com/metaWeblogApi.
Viewing or Restoring Older Versions of a PageEvery time someone edits and saves a wiki page or blog post, a version of the page is saved in the page’s history. Each version includes the following page information:
Content Â
Author Â
Date and time the page was saved Â
Version comment Â
Because every version of the page is saved, you can compare the current version of the page with older versions to see what changed. If you don’t like what changed, you can restore an older version of the page. If you restore an older version and later decide you prefer the newer version, the new version still exists, so you can restore it.
You can’t delete page versions. Because you can’t delete page versions, it isn’t possible for someone to edit the page without the page history tracking who changed the page and what they changed.
To view or restore previous versions of a page:� 1 While viewing a page, click the View Document History (>) button at the upper-left
of the page.
2 Select the version of the page you want to view.
To compare the currently viewed page version with the previous version, click Compare. New content is highlighted in blue, while removed content is highlighted in red with a strikethrough applied to the text.
To restore the currently viewed page version, click Restore and then click OK. The restored version becomes the active page version and is marked with the comment “Restored previous version date.”
Adding or Removing CommentsYou can add comments to wiki pages or blog posts. By commenting on a page, you can give feedback on a page without editing the page’s content. The text in your comment isn’t searched when you use the search field. However, when you leave a comment on a page, the page is listed in My Page updates and everyone watching the wiki or blog can view your comment.
Depending on wiki or blog settings and your access level to the wiki or blog, you may not be able to comment on a page, or your comments might be moderated. When a comment awaits moderation, it is invisible until an administrator approves it.
If you’re an administrator, you can remove anyone’s comments. If you’re not an administrator, you can remove only your own comments.
To view comments:�When viewing the blog, click the title of a blog post to view comments for that post. m
If you’re viewing the blog, you’ll see a “Filter by Date” area at the right of the blog posts. If you’re viewing a single post, you won’t see “Filter by Date” and you’ll see comments for the post.
To add a comment:� 1 While viewing a wiki page or blog post, click “Add a new comment.”
2 Enter your comment in the Comment field, and click “Save comment.”
To remove a comment:�Hold the pointer over the comment and then click the Delete (X) link. m
If the Delete (X) link doesn’t appear, you can’t delete the comment.
To moderate a comment:�Hold the pointer over the unmoderated comment and then do one of the following: m
To accept the comment, click Accept (checkmark). Â
To delete the comment, click Delete (X). Â
42 Chapter 4 Working with Content

43
Learn about searching and how to filter pages to show only those you are interested in.
In wiki tools, you can search single wikis or blogs, or you can search all the wikis and blogs you have access to. There are two key issues with searching:
You might not be searching using the same terminology as what appears in Âthe page
You might find matches for pages that happen to mention what you’re searching for Âbut might not focus on that subject
Wiki tools solves these issues with tags and stars.
Tags are short, descriptive words or phrases that classify and organize wiki pages, blog posts, or mailing list entries. Anyone can add a tag to a page. You can then filter search results using tags to find just the pages with content that focuses on what you’re interested in.
Stars are similar to bookmarks, in that they are a way to mark pages that you are interested in. Stars are not shared with other users. You can view starred pages or filter search results by starred pages. Regardless of how large wikis and blogs grow, you’ll be able to focus on just the pages you’re interested in.
Understanding Access ControlEvery wiki can have a specific group of people who can access it. This lets you set up a wiki structure that fits your organization’s security requirements.
For example, if you work in an organization with top-secret projects, you’d want each of those top-secret projects to have its own wiki. If you have departments where people in a department work on a few of those secret projects but not all of them, you’d give them access to the department wiki and specific project wikis.
When you add content to a wiki, make sure the content is appropriate for the people who can access the wiki.
5Navigating Wiki Tools
For example, if you added secret project information to a department wiki, everyone in the department could see the information, whereas people outside the department, who work on the secret project, don’t have access to the department wiki, and so they wouldn’t have access to the secret project content. When you have content that doesn’t fit current wikis, create a wiki for the content.
When using wikis, be aware of which wiki you’re currently viewing. When you search or use tags while viewing a wiki, you’ll find pages within that wiki but not in other wikis. However, if you’re viewing My Page, you can search or use tags for pages in all wikis you have access to.
About SearchingYou can search for text or tags on a single wiki or on multiple wikis. Searching across multiple wikis lists only pages that you have access to.
Text searching lists pages with the following types of matches:
Content Â
Title Â
Most recent author Â
Tag text Â
You can use advanced search features, such as quoting text, to get exact matches.
For example, if you search for “anne johnson” without quotes, you’ll find pages that include “anne” and “johnson” but not necessarily together. You might find pages with “Anne Smith” and “Mike Johnson.” However, this is useful if you search for “anne plan” and find all pages with both “anne” and “plan.” If you use “anne johnson” (in quotes) you’ll find pages without text between “anne” and “johnson.”
Usually, you tag a page when that page is about a specific subject. For example, if you have a page about planning that Anne works on, you’d tag it with “plan” and “anne.” When you search for the “anne” tag, you’ll find pages that specifically involve Anne, but not pages that just happen to mention her.
You can search for a combination of tags, like “anne” and “plan,” which would show pages that use both tags. This is an improvement over doing a text search for “anne plan” because you won’t find pages that just happen to mention “anne” and “plan.”
You can also combine a text search and tags. For example, let’s say Sunil doesn’t tag pages related to himself with “sunil” but he wants to find pages related to himself that also deal with Anne and planning. He could do a text search for “sunil” and then refine the results using the “anne” and “plan” tags.
44 Chapter 5 Navigating Wiki Tools
Chapter 5 Navigating Wiki Tools 45
After you find the pages you’re looking for, you can save your search criteria as a smart filter for future use. You can search on the smart filter, which can include text and tags, and then apply more tags to further filter the search results.
Searching Across a Single WikiSearching in a wiki lists pages in that wiki but doesn’t list matching pages located in other wikis.
To search for text in a wiki:� 1 While viewing a wiki, click the Search (magnifying glass) button.
2 Enter a phrase in the search field.
As you type, the search performs a quick search, listing the top five matches of the current phrase. If you see the page you’re looking for, select it. If you don’t see the page you’re looking for, press Enter to view the full list of search results.
To search for tags in a wiki:� 1 While viewing a wiki, click the Search (magnifying glass) button.
2 If the Recent Tags list has a tag you want to search for, select it; if not, enter a phrase in the search field or select Recent Changes.
Selecting Recent Changes lists all wiki pages, blog posts, and mailing list entries in reverse chronological order.
3 Select tags under the Tags list or in the “Filter by Tag” list.
Every tag you select filters the search by that tag in addition to the currently applied tag filters. Deselecting a tag stops filtering by that tag.
To filter by content type:While searching a wiki, under “Filter by Type,” click the type of content to view. m
Searching Across Multiple WikisSearching across multiple wikis lists only pages that you have access to.
To search for text in multiple wikis:�While viewing My Page, enter a phrase in the search field. m
As you type, the search lists all matches of the current phrase. If you see the page you’re looking for, select it. If you don’t see the page you’re looking for, press Enter to view the full list of search results.
To search for tags in multiple wikis:� 1 While viewing My Page, enter a phrase in the search field.
You can enter a tag in the search field and find all occurrences of that tag and of where that text appears in page content.
2 Select tags under the “Filter by Tag” list.
Every tag you select filters the search by that tag in addition to the currently applied tag filters. Deselecting a tag stops filtering by that tag.
To filter by content type:While searching multiple wikis, under “Filter by Type,” click the type of content to view. m
Saving Your SearchWhen you search multiple wikis, you can save your text-based and tag-based search criteria by creating a smart filter. You can combine smart filters and tags when searching. In the Updates page and on iPhone or iPod touch, you can filter updated pages by using smart filters.
To create a smart filter: 1 While viewing My Page, search for text or tags.
2 Under Search Summary, click “Save as a Smart Filter.”
To use a smart filter:While viewing the My Page search results page, select smart filters under the m
“Smart Filters” list.
To delete a smart filter:While viewing the My Page search results page, hold the mouse cursor over a m
smart filter and click Delete (X).
About TagsOne of the fastest, easiest, and most powerful ways to organize content is to use tags. Tags are short, descriptive words or phrases that classify and organize wiki pages, blog posts, or mailing list entries.
There are two types of tags: content tags and meta-information tags.
Content tags describe what a page is about. For example, if you have a department Âwiki where everyone has a page describing himself or herself, those pages should be tagged with “bio.” If you do a tag-based search for “bio,” you’d find all bio pages for everyone in the department. Similarly, if you had a project named “ProjectX,” you could tag all pages about ProjectX with the “ProjectX” tag.
Meta-information tags describe the page itself. For example, you could mark all Âimportant pages with “hot” and all pages that require review with “review.” This way you can quickly find pages that are important or require review.
46 Chapter 5 Navigating Wiki Tools
Chapter 5 Navigating Wiki Tools 47
There are advantages to using tags:
Searching text can produce results that happen to mention what you’re searching Âfor but aren’t necessarily about what you’re looking for. With tags, you’d tag only pages for a specific subject.
You can combine tags to find exactly what you’re looking for. For example if you’re Âworking on ProjectX and need to know everything important about it, you can do a search for the “ProjectX” and “hot” tags. Similarly, to find out everything in ProjectX that needed review, you’d search for the “ProjectX” and “review” tags. To find everything that’s related to ProjectX, is important, and needs review, then you’d search for all three tags.
You can turn a tag-based search into a very effective Really Simple Syndication Â(RSS) feed. When you subscribe to an RSS feed through an RSS browser such as Mail, you’re notified when a page in that feed is updated. If you subscribe to an RSS feed of the “ProjectX” tag, you’re notified when a page related to ProjectX is created or changed.
Adding or Removing TagsYou can easily add tags to wiki pages, blog posts, and mailing list entries.
When adding tags, be aware of the tags used in your wiki because tags are more effective when they aren’t duplicated. For example, it is better to have one “ProjectX” tag rather than “ProjectX” and “Project X” tags. Review similar pages to see how they’re tagged to get ideas for how to tag your page.
To add a tag to a page:�While viewing a wiki page, blog post, or mailing list entry, click the Add Tag (+) button m
next to “Tags” at the upper-left of the page and enter the tag.
As you type, the wiki tries to autocomplete your entry to match existing tags. If an existing tag matches what you want to add, select it.
If you’re viewing the blog or the mailing list, click the title of a blog post or mailing list entry to view it. You can’t apply tags when viewing several blog posts or mailing list entries.
To remove a tag from a page:�While viewing a wiki page, blog post, or mailing list entry, drag the tag away from the m
tag list and then release the mouse button.
While editing a wiki page or blog post, click the small X that appears when you move m
the pointer near the tag.
Viewing All Tags Used in a WikiHere are ways to view all tags used in a wiki.
To view all tags sorted by how frequently they’re used:�Click the Search (magnifying glass) button, leave the search field empty, and press Enter. m
The tags are listed on the right, with the number of times they’re used shown in parentheses.
To view all tags in alphabetical order:�Click the Search (magnifying glass) button and select “all tags.” m
Editing and Removing Tags from a WikiIf you’re an administrator for a wiki, you edit or remove existing tags.
When you edit a tag, you change all occurrences of that tag. For example, you can change all occurrences of the tag “Project X” to “ProjectX.”
When you remove a tag, you remove all occurrences of that tag. You can’t undo removing a tag so be careful.
To edit a tag:� 1 Click the Search (magnifying glass) button and select “all tags.”
2 Click the “Edit this group’s tags” (pencil) button.
If you’re asked to authenticate, you might not be an admin for the wiki.
3 Click a tag.
4 Edit the Tag Name field and then click Save.
5 When you finish, click “save” in the Edit Tags page.
To remove a tag:� 1 Click the Search (magnifying glass) button and select “all tags.”
2 Click the “Edit this group’s tags” (pencil) button.
If you’re asked to authenticate, you might not be an admin for the wiki.
3 Click a tag.
4 Remove all text in the Tag Name field and then click Delete.
5 When you finish, click “save” in the Edit Tags page.
Viewing Favorite PagesOne problem with having a lot of information online is that you need to keep track of many pages. The traditional solution is to bookmark all pages you’re interested in. There are problems with this solution:
You need to periodically review your bookmarked pages for updates. Â
You can’t search or filter just your bookmark collection. Â
48 Chapter 5 Navigating Wiki Tools
Chapter 5 Navigating Wiki Tools 49
You need to categorize or organize your bookmark collection; otherwise, having all Âbookmarks on a single level becomes cumbersome.
Wiki tools provide two improved solutions: tags and stars.
Tags are good ways to categorize pages containing similar types of information or content. You can perform a tag-based search and find everything strongly related to a topic or combination of topics. You can create an RSS feed of this tag-based search and then be notified when a tagged page is changed.
Stars are similar to a web-based bookmarking system, which unlike tags is not shared between users. Marking pages you’re interested in with stars allows you to easily search for content you’re interested in and receive notifications of page updates. Here are some things you can do:
Search for a combination of starred pages and tags or a text phrase. For example, Âif you searched for starred pages with the “plan” tag, you’d find all pages you’re interested in that deal with planning.
Create an RSS feed of your starred pages so you’re notified when a page you’re Âinterested in is changed. You can also create an RSS feed of a combination of starred pages and pages containing tags or a text phrase.
To star a page:�While viewing a wiki page or blog post, click the star icon at the left of the title. m
If you’re viewing multiple blog posts, click the title of a blog post to view it before clicking the star.
While viewing search results, click the star icon at the right of the result titles. m
A yellow star represents a starred page, and a translucent star represents a nonstarred page. Click a star to switch it between starred and nonstarred.
To view all starred pages:� 1 While viewing My Page, click Updates.
2 Under Show, click “starred pages.”
To search for starred pages:� 1 While viewing My Page, enter a text phrase in the search field.
You can leave the search field empty to show all pages you have access to.
2 In the Search Results page, click Starred.
3 Click the filters or sort order on the right to apply them.
Click the active sort order to switch between ascending and descending.
Every tag you select filters by that tag in addition to currently applied tag filters. Deselect a tag to stop filtering by that tag.
Previewing Attachments with Quick LookQuick Look allows you to preview a file without downloading. Quick Look previews are created when a file that can be represented as a series of images (such as a Pages document, a PDF, or a Keynote presentation) is attached to a wiki page or blog post.
When you view a Quick Look preview, you view the series of images created by the wiki server, not the actual file.
Although you can preview movies and audio in Quick Look, you can’t zoom, pan, or download them.
To preview an attachment with Quick Look:� 1 Click the Quick Look (eye) button next to the attachment.
If there is no Quick Look button, the attachment can’t be previewed.
2 Do the following:
To do this Do this
Change pages If a previewed attachment has multiple pages, click the page previews in the page browser on the left.
Resize the preview Click and drag the bottom right corner of the Quick Look window.
View the preview controls Make sure your web browser is the active window, then hold the cursor over the previewed attachment.
Zoom in View the preview controls and click the Zoom In button (outward facing arrows).
If the previewed attachment is zoomed in, the Zoom Out button replaces this button.
Zoom out View the preview controls and click the Zoom Out button (inward facing arrows).
If the previewed attachment is zoomed out, the Zoom In button replaces this button.
Refocus If a previewed attachment is too large for the Quick Look window, the cursor changes into a + shape with arrows facing four directions. Click and drag the mouse to refocus the preview.
Download an attachment View the preview controls and click the Download button (downward arrow pointing at a computer).
Clicking Download attempts to load the document in the web browser. If your web browser can’t load the attachment, it downloads it.
Stop previewing an attachment View the preview controls and click the Close (X) button.
50 Chapter 5 Navigating Wiki Tools
51
Learn how to keep up to date with content changes on wiki pages and blog posts.
Wiki tools provide two ways of showing changed and new wiki pages and blog posts:
My Page—The Updates page in My Page shows all updated wiki pages, blog Âposts, podcasts, and group mail for wikis and blogs you’re watching. You can filter these pages.
RSS—RSS feeds update you when pages are added or changed. You view RSS Âfeeds in a RSS viewer. This way you don’t need to view the wiki to find out when content changes.
Viewing Updates on My PageThe Updates page on My Page shows the most recently updated wiki pages, blog posts, podcasts, and mailing lists you have access to. This includes content updates and new comments. From this page you can view update summaries or page comments or you can click a page title to view the page.
The Updates page shows only wiki pages and blog posts from wikis and blogs you’re watching. You can set whether specific wikis and blogs are watched, so that the Updates page includes only updates from wikis and blogs you’re interested in.
For more information, see the next topic.
To view the Updates page:� 1 Navigate to My Page:
If you’re currently viewing a wiki page, click “my page.” Â
If you’re not sure where your wiki is located, call your help desk. Â
2 While viewing My Page, click Updates.
3 Log in if prompted.
6Keeping Up to Date
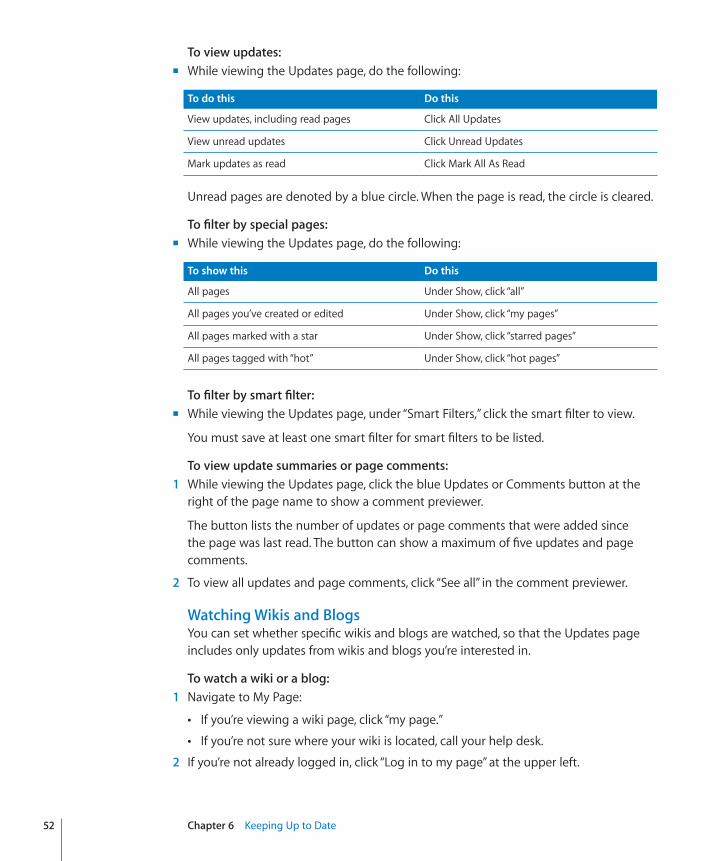
To view updates:�While viewing the Updates page, do the following: m
To do this Do this
View updates, including read pages Click All Updates
View unread updates Click Unread Updates
Mark updates as read Click Mark All As Read
Unread pages are denoted by a blue circle. When the page is read, the circle is cleared.
To filter by special pages:While viewing the Updates page, do the following: m
To show this Do this
All pages Under Show, click “all”
All pages you’ve created or edited Under Show, click “my pages”
All pages marked with a star Under Show, click “starred pages”
All pages tagged with “hot” Under Show, click “hot pages”
To filter by smart filter:While viewing the Updates page, under “Smart Filters,” click the smart filter to view. m
You must save at least one smart filter for smart filters to be listed.
To view update summaries or page comments:� 1 While viewing the Updates page, click the blue Updates or Comments button at the
right of the page name to show a comment previewer.
The button lists the number of updates or page comments that were added since the page was last read. The button can show a maximum of five updates and page comments.
2 To view all updates and page comments, click “See all” in the comment previewer.
Watching Wikis and BlogsYou can set whether specific wikis and blogs are watched, so that the Updates page includes only updates from wikis and blogs you’re interested in.
To watch a wiki or a blog:� 1 Navigate to My Page:
If you’re viewing a wiki page, click “my page.” Â
If you’re not sure where your wiki is located, call your help desk. Â
2 If you’re not already logged in, click “Log in to my page” at the upper left.
52 Chapter 6 Keeping Up to Date
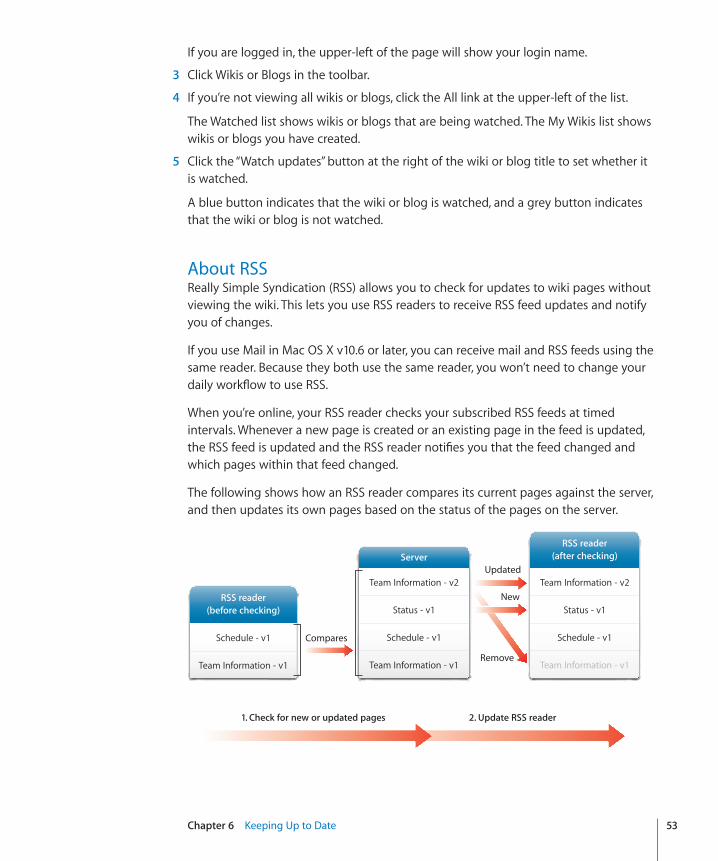
Chapter 6 Keeping Up to Date 53
If you are logged in, the upper-left of the page will show your login name.
3 Click Wikis or Blogs in the toolbar.
4 If you’re not viewing all wikis or blogs, click the All link at the upper-left of the list.
The Watched list shows wikis or blogs that are being watched. The My Wikis list shows wikis or blogs you have created.
5 Click the “Watch updates” button at the right of the wiki or blog title to set whether it is watched.
A blue button indicates that the wiki or blog is watched, and a grey button indicates that the wiki or blog is not watched.
About RSSReally Simple Syndication (RSS) allows you to check for updates to wiki pages without viewing the wiki. This lets you use RSS readers to receive RSS feed updates and notify you of changes.
If you use Mail in Mac OS X v10.6 or later, you can receive mail and RSS feeds using the same reader. Because they both use the same reader, you won’t need to change your daily workflow to use RSS.
When you’re online, your RSS reader checks your subscribed RSS feeds at timed intervals. Whenever a new page is created or an existing page in the feed is updated, the RSS feed is updated and the RSS reader notifies you that the feed changed and which pages within that feed changed.
The following shows how an RSS reader compares its current pages against the server, and then updates its own pages based on the status of the pages on the server.
Schedule - v1
Team Information - v1
RSS reader(before checking)
Team Information - v2
Status - v1
Schedule - v1
Team Information - v1
Server
Team Information - v2
Status - v1
Schedule - v1
Team Information - v1
RSS reader(after checking)
Compares
New
Updated
Remove
1. Check for new or updated pages 2. Update RSS reader

Traditionally, when someone updates a document, they attach that document to an email or upload it to a website and notify everyone that the document has been updated. RSS simplifies and streamlines this process by notifying people when content changes.
Whenever anyone—not just the original author, changes a page, anyone who’s interested in the page will have it in an RSS feed and will be notified that it’s changed. They can review the changed content, and refine it further without notifying everyone that they’ve changed the content again. RSS helps people focus on content and reduces the amount of time spent notifying people who might not be interested in the content thats changed:
Original author creates page
Original author sends out email notifyingeveryone of page location and RSS feeds
Group member reads page
Group member changes the page
RSS notifies everyone
54 Chapter 6 Keeping Up to Date
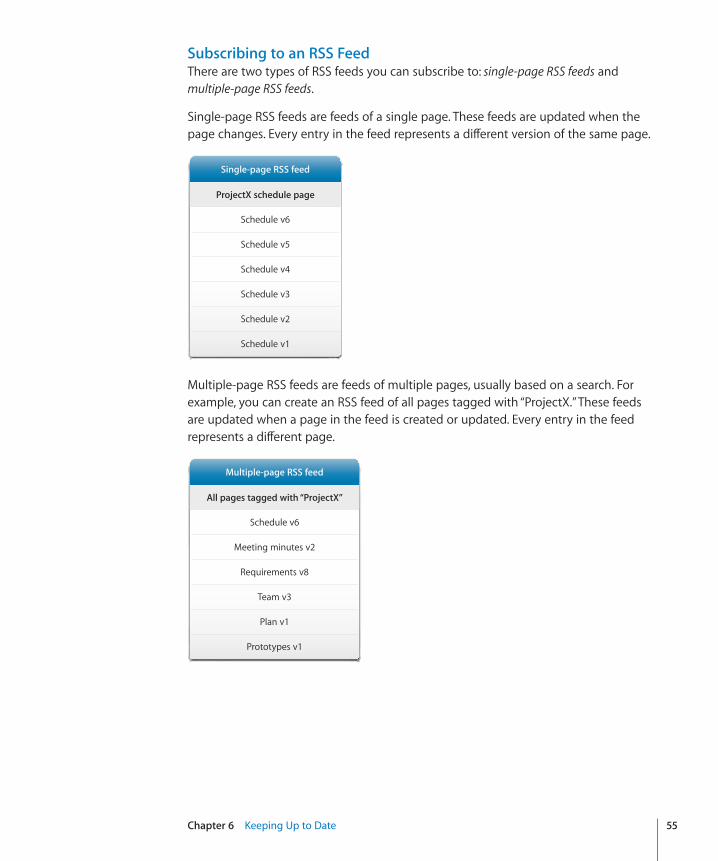
Chapter 6 Keeping Up to Date 55
Subscribing to an RSS FeedThere are two types of RSS feeds you can subscribe to: single-page RSS feeds and multiple-page RSS feeds.
Single-page RSS feeds are feeds of a single page. These feeds are updated when the page changes. Every entry in the feed represents a different version of the same page.
ProjectX schedule page
Schedule v6
Schedule v5
Schedule v4
Schedule v3
Schedule v2
Schedule v1
Single-page RSS feed
Multiple-page RSS feeds are feeds of multiple pages, usually based on a search. For example, you can create an RSS feed of all pages tagged with “ProjectX.” These feeds are updated when a page in the feed is created or updated. Every entry in the feed represents a different page.
All pages tagged with “ProjectX”
Schedule v6
Meeting minutes v2
Requirements v8
Team v3
Plan v1
Prototypes v1
Multiple-page RSS feed
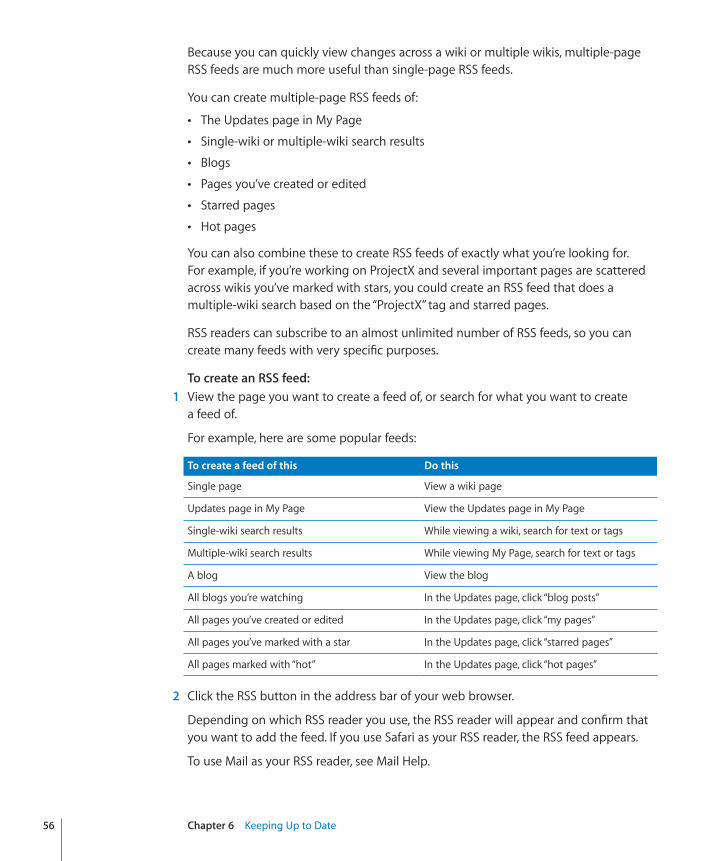
Because you can quickly view changes across a wiki or multiple wikis, multiple-page RSS feeds are much more useful than single-page RSS feeds.
You can create multiple-page RSS feeds of:
The Updates page in My Page Â
Single-wiki or multiple-wiki search results Â
Blogs Â
Pages you’ve created or edited Â
Starred pages Â
Hot pages Â
You can also combine these to create RSS feeds of exactly what you’re looking for. For example, if you’re working on ProjectX and several important pages are scattered across wikis you’ve marked with stars, you could create an RSS feed that does a multiple-wiki search based on the “ProjectX” tag and starred pages.
RSS readers can subscribe to an almost unlimited number of RSS feeds, so you can create many feeds with very specific purposes.
To create an RSS feed:� 1 View the page you want to create a feed of, or search for what you want to create
a feed of.
For example, here are some popular feeds:
To create a feed of this Do this
Single page View a wiki page
Updates page in My Page View the Updates page in My Page
Single-wiki search results While viewing a wiki, search for text or tags
Multiple-wiki search results While viewing My Page, search for text or tags
A blog View the blog
All blogs you’re watching In the Updates page, click “blog posts”
All pages you’ve created or edited In the Updates page, click “my pages”
All pages you’ve marked with a star In the Updates page, click “starred pages”
All pages marked with “hot” In the Updates page, click “hot pages”
2 Click the RSS button in the address bar of your web browser.
Depending on which RSS reader you use, the RSS reader will appear and confirm that you want to add the feed. If you use Safari as your RSS reader, the RSS feed appears.
To use Mail as your RSS reader, see Mail Help.
56 Chapter 6 Keeping Up to Date
57
Learn about the easy-to-use, highly functional web calendar included in wiki tools.
The web calendar allows you to easily schedule events for yourself or your group. As with iCal, you can create multiple calendars, invite people to events, repeat events, and add notes to events.
There are two types of web calendars: personal and group. You can send and receive event invitations through the personal calendar but not through the group calendar. Also, while anyone in a group can create or edit events in a group calendar, you can edit only events in your own personal calendar or event invitations you send to other people.
The web calendar uses iCal Server to store events and invitations. Because all calendar activity occurs on iCal Server, if you add your personal calendars as an account in another calendar client such as iCal, all of your personal calendars are synced automatically.
Navigating through the Web CalendarThe web calendar includes several navigation buttons and a minicalendar that make it easy to navigate months or weeks, or to return to today’s date.
To change the main calendar view:�Click “day,” “week,” or “month.” m
The Previous (left arrow) and Next (right arrow) buttons next to “day,” “week,” and “month” display the previous or next day, week, or month.
To view the minicalendar:�Click the Calendar (small calendar) button located between the New Calendar (+) and m
Notifications (envelope) buttons.
7Using the Web Calendar
To navigate to a specific date using the minicalendar:To change the minicalendar’s month, click the Previous (left arrow) or Next (right m
arrow) button next to the name of the month.
To view a specific day, click the day in the mini-calendar. m
The main calendar keeps its current view (day, week or month) but shows the selected date.
To change the minicalendar and the main calendar to show today:�Click “today.” m
Working with CalendarsYou can create multiple calendars for specific purposes. For example, you can have a calendar for work events and another calendar for personal events. Events added to one calendar aren’t added to the other. You can show or hide calendars so you can see events you’re interested in.
Creating and Deleting CalendarsYou can create or delete calendars. When you delete a calendar, you also delete all events in the calendar and decline any invitations you’ve received in the calendar. You can’t undo deleting a calendar so be careful.
To create a calendar:� 1 While viewing a personal or group calendar, click the Create Calendar (+) button.
2 Enter a name for the calendar in the Calendar Name field.
3 To change the calendar’s color, choose a different color from the Calendar Color pop-up menu.
4 Click Create.
To delete a calendar:� 1 While viewing a personal or group calendar, hold the mouse cursor over the calendar
you want to delete and then click the Information (i) button.
If you have only one calendar, you can’t delete it.
2 Click Delete and then click OK.
58 Chapter 7 Using the Web Calendar

Chapter 7 Using the Web Calendar 59
Renaming CalendarsYou can rename existing calendars.
To rename an existing calendar:� 1 While viewing a personal or group calendar, hold the mouse cursor over the calendar
you want to rename and then click the Information (i) button.
2 Enter a name for the calendar in the Calendar Name field.
3 Click Save.
Applying Calendar ColorsA calendar’s color affects the background color of all events in that calendar. You can choose from six colors:
Blue Â
Green Â
Red Â
Orange Â
Pink Â
Purple Â
If you add personal calendars to iCal, the calendars’ colors are used in iCal. If you change the calendars’ colors in iCal, the calendar colors in the web calendar change to match.
To apply a different calendar color: 1 While viewing a personal or group calendar, hold the mouse cursor over the calendar
that you want to apply a different color to and then click the Information (i) button.
2 Choose a different color from the Calendar Color pop-up menu.
3 Click Save.
Showing and Hiding CalendarsYou can view more than one calendar at the same time. You can also view specific calendars.
The color of the checkbox next to a calendar name represents the color of the calendar. All events in that calendar use that color.
To show a calendar:�Select the checkbox next to the calendar. m
To hide a calendar:�Deselect the checkbox next to the calendar. m
Working with EventsYou schedule timed events and all-day events in personal or group calendars. If you’re viewing your personal calendar, you can invite other people to your events.
Creating, Editing and Deleting EventsTimed events, such as meetings and appointments, take place during a specified period of time. You can create timed events in day view, week view, or month view, but they’re easier to create in week view.
All-day events are events that take an unspecified amount of time. They don’t necessarily take all day, and are often used as reminders (for example when to pay a bill). You can create all-day events in week view or month view.
To create an event:� 1 While viewing a personal or group calendar, select a calendar.
The event is created in the selected calendar.
2 To create a timed event in day view or week view, drag from the start time to the end time of the event.
To create an all-day event in week view, drag from the start date to the end date in the All Day area. If you’re in month view, drag from the start date to the end date. If you’re scheduling a single-day all-day event, click the day instead of dragging.
3 Change event details, invitees, or notes.
To edit an event:� 1 Click the event.
If the event details show “Invitation from,” you’re viewing an invitation, which can’t be edited.
2 Change event details, invitees, or notes.
To delete an event:� 1 While viewing a personal or group calendar, click an event.
2 Click Delete and then click OK.
For more information about changing event details, invitees, or notes, see the following topics.
Sending, Viewing, and Accepting or Rejecting InvitationsYou can send and receive event invitations while viewing your personal calendar. When you send an invitation, invitees are notified and can accept, tentatively accept (set status to “maybe”), or decline the invitation. If you update the event, invitees are notified of the change and can change the status of the event to accept, tentatively accept, or decline the changed event.
60 Chapter 7 Using the Web Calendar
Chapter 7 Using the Web Calendar 61
If you don’t set a status for an event, the event appears in the calendar with a dotted line border. Accepted and tentatively accepted events have solid border. Declined events are removed from the calendar.
To send invitations:� 1 While viewing a personal calendar, click an event.
2 Click “invitees;” then, in the invitees pane, enter an attendee’s name in the “Add attendee” field.
You can invite people but not groups.
As you type an attendee’s name, the calendar attempts to autocomplete the name. If you see the attendee in the list, click it. If the field doesn’t autocomplete, the invitee isn’t found and won’t be invited.
After adding an attendee, a new “Add attendee” field appears, allowing you to add more attendees.
3 Click OK.
To view event notifications:While viewing a personal calendar, click the Notifications (envelope) button. m
Notifications that haven’t been accepted or denied are listed in the Notifications area.
To accept, tentatively accept, or reject an event notification:While viewing event notifications, click a status button. m
To change an invitation’s status:�Click the event invitation, choose from the “my status” pop-up menu, and then click OK. m
Changing Event DetailsEvent details include the name and location of the event and when it is scheduled.
To change event details:� 1 Create or edit an event.
2 In the “general” pane of the event details, enter the name of the event in the “summary” field and the location of the event in the “location” field.
As you type a location, the calendar attempts to autocomplete the location with one that can be scheduled. If it can autocomplete the location, you’ll see if the location is available during the proposed time.
3 To change the start time or end time, edit the “start time” or “end time” fields.
4 To change the start date or end date of the event, click the date, and in the calendar that appears, click a date.
To view the previous month, click Previous (up arrow); to view the next month, click Next (down arrow).
5 To create an all-day event, select “All-Day (Banner) event.”
This disables the “start time” and “end time” fields.
6 To put the event in a different calendar, choose a different calendar from the “calendar” pop-up menu.
7 To repeat the event, choose an interval from the “repeat” pop-up menu.
To stop repeating the event after a specific number of times, choose After from the “end” pop-up menu and enter the number of times you want the event scheduled. To stop repeating the event on a specific date, choose “On date” from the “end” pop-up menu, click the date, and then choose the end date from the calendar.
8 Click OK.
Changing Event NotesEvent notes are shown when someone previews the event.
To change event notes:�While viewing event details, click “notes,” make changes, and then click OK. m
Rescheduling EventsYou can easily reschedule events. If you reschedule a recurring event, you’ll be asked if you want to change all occurrences of the event, or just the event you dragged or clicked.
To reschedule an event:�Do one of the following: m
Drag the event to the preferred time. Â
You can drag timed events in the day or week calendar views. You can drag all-day events in the week or month views.
Click the event and change the “start time” and “end time” fields, or click the date Âand in the calendar that appears, click a date.
Viewing and Previewing EventsWhen you view calendars, for each event you’ll see the event summary and the time it’s scheduled for. You can view or preview the event for more information, such as its location and any notes.
To view an event:�Click the event. m
To preview an event:�Place the pointer over the event and wait a few seconds. m
62 Chapter 7 Using the Web Calendar

Chapter 7 Using the Web Calendar 63
Changing Calendar SettingsThe web calendar includes the following settings:
Setting Description
Timezone Set this to your time zone. This setting affects the accuracy of the invitations you send and receive and the events listed.
For example if your time zone is set to Pacific Standard Time (PST) and you’re inviting someone using Eastern Standard Time (EST), an event you schedule for 4 p.m. PST is scheduled at 7 p.m. EST because of the time zone difference.
If you set the wrong time zone, all invitations you send and receive, and events listed in calendars will have the wrong times listed.
Availability Set this to show that you’re unavailable for event invitations any time that is outside of the specified range.
For example, if you set availability to weekdays from 8 a.m. to 6 p.m., people will see that you’re unavailable for invitations on weekends.
Start week on Set this to change the first day of the week listed in week view.
Web calendar settings are personal settings. If you edit settings while viewing a group calendar, you don’t change anyone else’s settings.
To change calendar settings:� 1 Do one of the following:
While viewing the calendar, click “settings.” Â
While viewing My Page, click “settings,” and then select Calendar. Â
2 Choose settings from the pop-up menus.
If you change your availability to Weekdays, you can enter your available range of time on weekdays in the two fields.
3 Click Save.

Working with Web Calendars in iCalYou can subscribe to user and group calendars in iCal. When you subscribe to calendars in iCal, the calendar stored in iCal is read-only. You can’t change events in iCal, but when events change on the wiki server, those events are updated in iCal.
If you have Mac OS X v10.6 or later installed, you can add your personal calendars as an account in iCal. You can’t add group calendars as an account. When you add personal calendars as an account, changes are synced between iCal and the wiki server. You can change an event in iCal and it’ll update the event in the wiki server, or if you change the event in the wiki server it’ll update the event in iCal.
To subscribe to a web calendar in iCal:� 1 While viewing a personal or group calendar, hold the mouse cursor over the calendar
you want to subscribe to and then click the Information (i) button.
2 Click “Subscribe in iCal.”
3 In iCal, click Subscribe.
4 When you’re asked to authenticate, enter your wiki account name and password.
To add your personal calendars as an account in iCal:� 1 Open iCal in Mac OS X v10.6 or later.
2 Choose iCal > Preferences.
3 In the Accounts pane, click Add (+).
4 Choose the CalDAV account type and enter the user name and password you use to log in to the wiki.
5 For server address, enter the URL of the wiki server (for example, wiki.example.com).
If the wiki server uses an external calendar server, you must enter the URL of the calendar server instead of the wiki server. If you can’t create an account using the wiki server information, contact a server administrator to find out if your wiki server uses an external calendar server.
6 Click Create and complete the setup assistant.
64 Chapter 7 Using the Web Calendar
65
You can view My Page, wiki pages, blog posts, and upcoming events on iPhone or iPod touch.
Wiki tools are streamlined when viewed on iPhone or iPod touch. You can easily find out what’s changed and comment on wiki pages and blog posts.
About Using Wiki Tools on iPhone or iPod touchA specialized version of My Page loads when you view wiki tools on iPhone or iPod touch. This version keeps you apprised of the latest content updates.
Similar to using wiki tools on the desktop, you can:
View My Page, wiki pages, blog posts, and group calendar events Â
Filter updates on My Page Â
Add or remove tags and comments Â
Perform multi-wiki text searches Â
Mark pages with a star Â
There are a few key differences:
You can’t create or edit wiki pages, blog posts, or events. Â
Blog posts are initially excerpted and can be tapped to be viewed in full. Â
Group calendar events are shown in a chronological list. Â
You can’t search using tags. Â
Viewing My Page on iPhone or iPod touchWhen you view My Page on iPhone or iPod touch, you can easily view recently updated or created wiki and blog pages, access wikis and blogs, view upcoming events, or search for content located in all wikis and blogs you have access to.
8Viewing Wiki Tools on iPhone or iPod touch
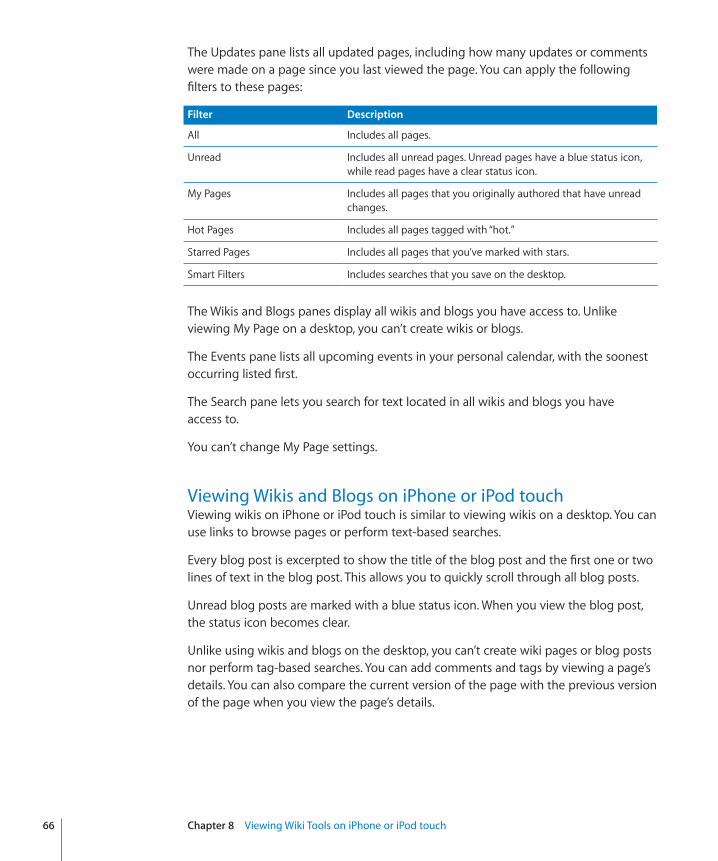
The Updates pane lists all updated pages, including how many updates or comments were made on a page since you last viewed the page. You can apply the following filters to these pages:
Filter Description
All Includes all pages.
Unread Includes all unread pages. Unread pages have a blue status icon, while read pages have a clear status icon.
My Pages Includes all pages that you originally authored that have unread changes.
Hot Pages Includes all pages tagged with “hot.”
Starred Pages Includes all pages that you’ve marked with stars.
Smart Filters Includes searches that you save on the desktop.
The Wikis and Blogs panes display all wikis and blogs you have access to. Unlike viewing My Page on a desktop, you can’t create wikis or blogs.
The Events pane lists all upcoming events in your personal calendar, with the soonest occurring listed first.
The Search pane lets you search for text located in all wikis and blogs you have access to.
You can’t change My Page settings.
Viewing Wikis and Blogs on iPhone or iPod touchViewing wikis on iPhone or iPod touch is similar to viewing wikis on a desktop. You can use links to browse pages or perform text-based searches.
Every blog post is excerpted to show the title of the blog post and the first one or two lines of text in the blog post. This allows you to quickly scroll through all blog posts.
Unread blog posts are marked with a blue status icon. When you view the blog post, the status icon becomes clear.
Unlike using wikis and blogs on the desktop, you can’t create wiki pages or blog posts nor perform tag-based searches. You can add comments and tags by viewing a page’s details. You can also compare the current version of the page with the previous version of the page when you view the page’s details.
66 Chapter 8 Viewing Wiki Tools on iPhone or iPod touch
Chapter 8 Viewing Wiki Tools on iPhone or iPod touch 67
Viewing Group Calendar Events on iPhone or iPod touchWhen you view events in a group calendar, you see a list of locations, note excerpts, dates, and starting times of upcoming events within the next two weeks with the soonest occurring event listed first.
The icon next to the event shows which calendar the event is in, so you can easily differentiate events in different calendars. When you view the details for an event, you’ll also see the full duration of the event and the full event note.
Unlike viewing events on the desktop, you can’t add or change events.
Searching on iPhone or iPod touchYou can search for a text phrase in wikis or blogs. If you search while viewing My Page, you search all wikis and blogs. If you search while viewing a wiki or a blog, you search only that wiki or blog.
Similar to viewing search results on the desktop, the search results pages shows the top 20 matches for your search and shows the title of the page and an excerpt of the first line or two of page content.
If you click a search result link, you see the full page. While viewing the full page, you can click the up and down arrows to view the full page of the previous or next search result.
Adding or Removing Tags on iPhone or iPod touchYou can easily add tags to wiki pages and blog posts.
When adding tags, be aware of what tags are used in your wiki because tags are more effective when they aren’t duplicated. For example, it is better to have a “ProjectX” tag rather than “ProjectX” and “Project X” tags. Review similar pages to see how they’re tagged to get ideas for how to tag your page.
To view tags:� 1 When viewing a wiki page or blog post, click Details.
If you’re already viewing the details, the Details button is replaced by a Hide button.
2 Click the Tags link.
To add a tag:� 1 While viewing a wiki page’s or blog post’s tags, click Add Tag (+).
2 Enter a tag in the field and click Add.
To remove a tag:� 1 While viewing a wiki page’s or blog post’s tags, click Delete a Tag.
2 Click Delete next to the tag you want to delete.
Adding or Removing Comments on iPhone or iPod touchYou can add comments to wiki pages or blog posts. By commenting on a page, you can give feedback on a page without editing the page’s content. The text in your comment isn’t searched when you use the search field.
Depending on wiki or blog settings and your access level to the wiki or blog, you might not be able to comment on a page, or your comments might be moderated. When a comment awaits moderation, it is invisible until an administrator approves it.
To view comments:� 1 When viewing a wiki page or blog post, click Details.
If you’re already viewing the details, the Details button is replaced by a Hide button.
2 Click the Comments link.
To add a comment:� 1 While viewing a wiki page’s or blog post’s comments, click Add Comment (+).
2 Enter your comment in the field and click Post.
To remove a comment:�While viewing a wiki page’s or blog post’s comments, click Delete next to comment m
you want to delete.
If you’re an administrator, you can remove anyone’s comments. If you’re not an administrator, you can remove only your own comments.
Marking Pages with a Star on iPhone or iPod touchYou can mark pages that you want to keep track of with a star. In the Updates pane of My Page, you can display updates to those pages marked with a star.
To mark a page with a star on iPhone or iPod touch:�While viewing a wiki page or blog post, click the star at the left of the title. m
While viewing search results, click the star at the left of the individual search result. m
68 Chapter 8 Viewing Wiki Tools on iPhone or iPod touch
IIPart II:� Deploying Wiki Tools
See examples of how wiki tools can expedite processes, organize teams, and reduce manual labor.
Chapter 9 Streamlining Projects
Chapter 10 Improving Internal Documentation
Chapter 11 Communicating More Effectively with Wiki Tools
Chapter 12 Using Wiki Tools in the Classroom
70
Learn how to streamline projects using wiki tools.
Wiki tools can streamline distribution of project information by acting as a hub for different types of project information, such as plans, requirements, meeting minutes, schedules, and prototypes.
By having a single hub for project information, you can:
Easily navigate and search for all project information Â
Reduce confusion by eliminating duplicate versions of project information Â
Create manageable project personnel lists Â
Enable parallel effort with multiple people working on different projects or the Âsame project
Create high-level and low-level views Â
Reuse and archive project information Â
Keep all interested parties informed of project updates Â
Project Wiki BlueprintEach project should have its own wiki. By having a dedicated wiki for the project, you can easily change who can access the project wiki.
You can point to pages within the project wiki from other wikis, such as departmental wikis. If your department doesn’t have confidential information in its wiki and people who require access to project information are allowed to view department wiki content, you can include project information in the department wiki instead of creating a wiki for it.
However, if you decide to change project access permissions later on, you can’t separate project wiki pages from the rest of the department wiki pages.
9Streamlining Projects
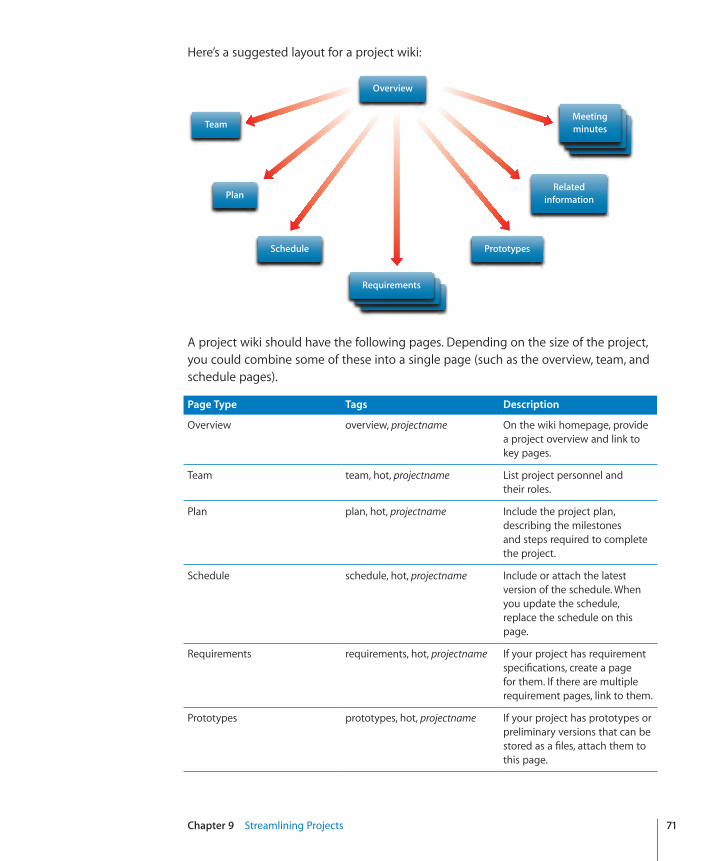
Chapter 9 Streamlining Projects 71
Here’s a suggested layout for a project wiki:
Overview
Team
Plan
Schedule
Requirements
Prototypes
Relatedinformation
Meetingminutes
A project wiki should have the following pages. Depending on the size of the project, you could combine some of these into a single page (such as the overview, team, and schedule pages).
Page Type Tags Description
Overview overview, projectname On the wiki homepage, provide a project overview and link to key pages.
Team team, hot, projectname List project personnel and their roles.
Plan plan, hot, projectname Include the project plan, describing the milestones and steps required to complete the project.
Schedule schedule, hot, projectname Include or attach the latest version of the schedule. When you update the schedule, replace the schedule on this page.
Requirements requirements, hot, projectname If your project has requirement specifications, create a page for them. If there are multiple requirement pages, link to them.
Prototypes prototypes, hot, projectname If your project has prototypes or preliminary versions that can be stored as a files, attach them to this page.
Page Type Tags Description
Related Information projectname If there are related pages on the wiki or on other wikis, you could create a page of links to them or include a list of links on your overview page.
Meeting Minutes minutes, projectname In the blog, post summaries of meetings.
By tagging all pages related to the project with “projectname,” when you search across all wikis, you can use the projectname tag to find pages related the project. By tagging key pages with “hot,” links to those pages appear on the wiki’s main page.
Creating Navigable WikisThere are two primary ways to navigate a wiki: browsing and searching. The effectiveness of these methods depends on how well users link related pages together and apply relevant tags. Wiki tools make it easy for users to link pages and add and remove tags.
The wiki server stores all of a group’s wiki pages in the same location. There’s no physical difference between a page that’s located 10 clicks deep in a wiki and one that’s linked to from the wiki’s homepage. Because of this, you can create as deep or as wide a navigation hierarchy as you’d like.
Changing hierarchies is as simple as cutting and pasting links from one wiki page to another. You don’t need to move files between folders.
There are two ways to search: with plain-text and with tags. Plain-text search searches across page title, content, last author, and tags. Tag-based search is more customizable and could be more useful if you apply tags to pages that highlight a specific topic.
For example, for a project’s schedule you’d tag that page with “schedule,” but you wouldn’t tag pages that mention schedules. This way if you do a tag-based search you can find pages that apply directly to the specific topic instead of just mentioning it.
You can use multiple tags to find just the page you’re looking for. Tag all pages related to various projects with their project name (ProjectX, ProjectY, and ProjectZ in our example) and tag all information deliverables with their type (schedule, team, plan, requirements).
72 Chapter 9 Streamlining Projects

Chapter 9 Streamlining Projects 73
If you wanted to find the schedule for ProjectZ and did a plain text search for “ProjectZ schedule,” you’d find all pages that mention ProjectZ and schedule. Using a tag-based search for “ProjectZ” will show you every page related to the ProjectZ project, which you can then filter by using the “schedule” tag. You can easily find the page you’re looking for without looking through a list of pages.
The following shows the results of two tag-based searches and how when you search using both tags, you find the page related to both topics.
ProjectZSchedule
ProjectZ Plan
ProjectZRequirements
ProjectZ Team
ProjectY Schedule
ProjectX Schedule
Pages with“ProjectZ” tag
Pages with“schedule” tag
You can mix and match tags and plain-text searches to find specific pages. For example, if you tag mailing list entries with their project name, you can later search for a phrase in those entries and filter the search using the project tag.
Eliminating Duplicate Versions of ContentOne problem with receiving project information through email is that as the project changes and evolves, old information is left in email. For example, if you’re working on a project named “ProjectX” that has gone through several schedule revisions, searching for “ProjectX schedule” in Mail results in finding several schedule-related emails.
Some of these emails might mention ProjectX and the schedule but not include the latest schedule, and some of them might include older versions of the schedule. Only one email may have the latest schedule. You might even receive the schedule in an email that doesn’t include the words “ProjectX” or “schedule,” in which case you won’t find the schedule.
You can solve these problems by giving every critical project information deliverable its own wiki page. As that information changes, the page is updated, not duplicated. When someone updates this page, everyone interested in the page is notified of the change through RSS or on My Page.
If you want to look at an old version of the schedule, you can view the page history and see a page version for every time someone updated the page. Because the page history shows when pages were changed, you can refer to the older versions of the schedule by the time and date shown in the page history.
Managing Project PersonnelOver a project’s lifespan, personnel might change or the responsibilities of the personnel might change. By adding a team page to a project wiki, you can inform everyone of who’s doing what on a team without sending out email announcements.
If someone assumes a new role, they can update the team page with their new role, which reduces the amount of work to maintain the page’s information.
Parallelizing EffortWikis parallelize effort by allowing many people to simultaneously edit many pages or continually refine content on the same page.
If a team is working on a number of projects, every team member can update pages pertaining to his or her projects without consulting a central person. The wiki eliminates the need for an information manager, someone who is knowledgeable about all projects and gathers information about them.
Every team is responsible for editing their project pages and all project pages are linked together by a hub page or by tags. The wiki becomes a self-sustaining system that doesn’t require a central person.
If several people are working on the same page, the wiki can help streamline and parallelize effort. When someone updates page content, the people who are interested in the page are notified that the page was updated through RSS or on My Page. When people make content updates, all interested parties are notified.
If two people edit a page simultaneously, the last person to save is notified that someone else saved the page first and the last person to save can overwrite the saved page or cancel his or her edits.
74 Chapter 9 Streamlining Projects
Chapter 9 Streamlining Projects 75
Creating High-Level ViewsPeople who manage many projects usually maintain a collection of spreadsheets with project lists and schedules, individual project plan documents sent in email, and prototypes or source files hosted on file servers.
Providing a high-level or low-level view of a project requires effort in pulling together information from a variety of sources and putting them in an organized, comprehensive package. By putting this information on the wiki, you can create a browsable, navigable series of pages to show information for many projects.
To create a high-level view, create a single page in a wiki that many people can access, with links to every project’s main page. Every project has its own wiki with a collection of pages with schedules, project plans, and prototypes. Because this is all in one place on the wiki, you can browse through the pages to find information about different projects.
Having a single linking page doesn’t expose projects with restricted access, because these projects are hosted on their own wikis with their own access privileges. When people click links to those pages, they’re asked to log in as someone with project access.
Reusing InformationIn file-based documents like PDFs, you reuse content by copying content from other documents or you reference the other document and provide information about how to find it.
There are several issues with copying content:
The information is no longer synced after you copy it. If the information changes, Âyou must update your copied content and the original document.
If the reader is familiar with the original content, the reader must still reread a copy Âof the content.
There are several issues with referencing other documents:
To reference another document, you must describe the name and location of the Âdocument and where in the document the content is located. If the referenced document is updated, the page number listed for the content can become incorrect.
If you link to a document on a website, the reader must switch between a PDF Âviewer and a web browser.

In a wiki, instead of copying content, you provide a link to the content. This solves all of the issues listed above:
Because a single page contains the information, there are no issues related to Âsyncing content.
If the reader is familiar with the page, they don’t need to reread the linked page. Â
Instead of providing detailed information about how to find a document, you can Âdirectly link to wiki pages or documents.
The reader remains in a web browser and can easily navigate between pages. Â
Keeping Interested Parties Aware of Project UpdatesIn a project that doesn’t use a wiki, project updates often come piecemeal in a variety of formats.
For example, the project team might discuss a schedule or personnel change. This change would be discussed at a meeting, transcribed in meeting minutes, and then emailed to all interested people. People who don’t attend the meeting will become aware of the change only if they receive and read the email.
There are several problems with this approach:
The person receiving the email might not be interested in the information. ÂThey could easily miss the information while looking for information they are interested in.
If someone becomes interested in the information after the meeting occurs, they Âmust search their inbox to find the latest version of the information. They could easily find outdated versions.
When you send the email, you might forget to include someone who is interested Âin the information.
Having a project wiki solves these issues. Instead of sending meeting minutes through email, post them to the blog. This way people can easily read all recent project changes by looking through the blog.
In addition to posting meeting minutes to the blog, update key wiki pages such as the schedule and personnel pages. If these pages are kept up to date, people don’t need to read the blog—instead, they can view the key pages when they need the information.
If everyone marks pages they’re interested in with a star, or keeps RSS feeds of them, they’ll be aware of all changes, so you won’t need to explicitly choose who to distribute information to when the project experiences a change.
76 Chapter 9 Streamlining Projects
77
Learn how wiki tools can help organize and distribute internal documentation, while making it easier to update.
Internal documentation includes documentation of internal tools or processes that aren’t made public. Because this documentation is internal and not public, it is usually not as well organized or updated as public documentation.
There are a few issues with traditional internal documentation:
Internal documentation is often low priority and tends to be less organized than Âformal documentation. As such, internal documentation might be in scattered locations, including file servers, intranets, and on local computers.
An internal document is often related to other internal documents, but because Âinternal documents are treated less formally, it’s hard to reference other documents.
Internal documents are often written by writers with different styles and tools. Â
Internal documentation isn’t tied to formal product releases and thus can go Âthrough cycles of heavy updating and inactivity.
It’s hard to search a suite of internal documents. Â
Internal documentation is used by many people in a company but only the original Âauthor can update it.
Authors of internal documentation usually write the documentation as a side Âproject, and their primary responsibility is elsewhere. If they are busy with their primary responsibility, they won’t have time to update internal documentation.
Internal Documentation Wiki BlueprintIdeally, all internal documentation should be hosted in a single wiki in wiki format. If internal documentation shouldn’t be available to everyone, these documents can be hosted on their own wikis.
10Improving Internal Documentation

Here’s a suggested layout for an internal documentation wiki:
Overview
PDFTable ofcontents
Content
Single-pagedocuments
Category
An internal documentation wiki should include the following pages:
Page Type Tags Description
Overview overview On the wiki’s main page, provide an overview of what people can find in the wiki and link to category pages.
Category categoryname If you have a variety of internal documentation, create pages that categorize the documents and link to them.
PDF PDF, documentname, categoryname
If you’re not converting an internal document to wiki format, you could attach a PDF to a page and link to that page from a category page.
By having the PDF on its own page, you can individually tag the PDF page, and people are notified when the PDF is updated by watching this page.
78 Chapter 10 Improving Internal Documentation
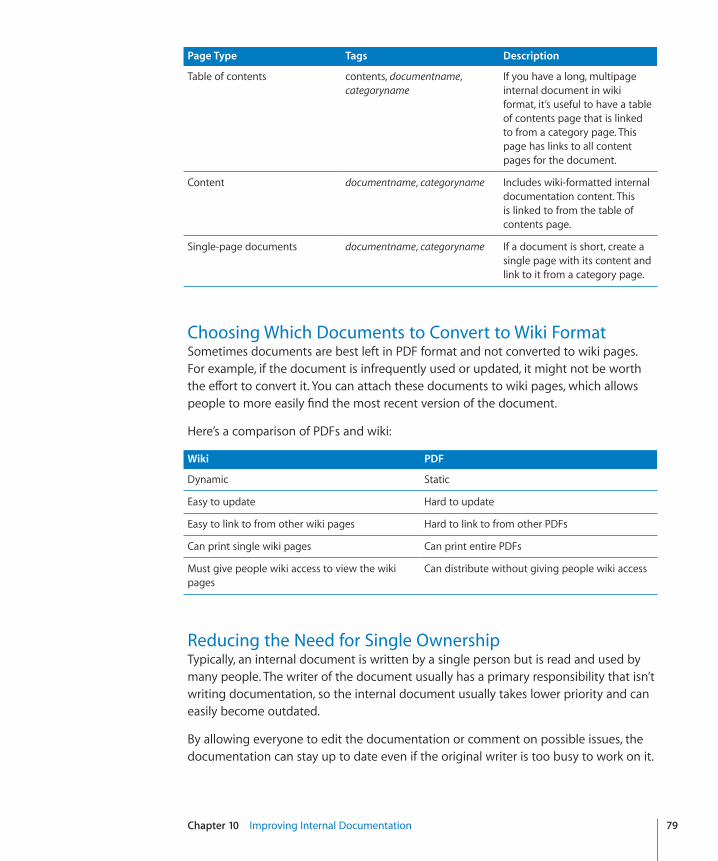
Chapter 10 Improving Internal Documentation 79
Page Type Tags Description
Table of contents contents, documentname, categoryname
If you have a long, multipage internal document in wiki format, it’s useful to have a table of contents page that is linked to from a category page. This page has links to all content pages for the document.
Content documentname, categoryname Includes wiki-formatted internal documentation content. This is linked to from the table of contents page.
Single-page documents documentname, categoryname If a document is short, create a single page with its content and link to it from a category page.
Choosing Which Documents to Convert to Wiki FormatSometimes documents are best left in PDF format and not converted to wiki pages. For example, if the document is infrequently used or updated, it might not be worth the effort to convert it. You can attach these documents to wiki pages, which allows people to more easily find the most recent version of the document.
Here’s a comparison of PDFs and wiki:
Wiki PDF
Dynamic Static
Easy to update Hard to update
Easy to link to from other wiki pages Hard to link to from other PDFs
Can print single wiki pages Can print entire PDFs
Must give people wiki access to view the wiki pages
Can distribute without giving people wiki access
Reducing the Need for Single OwnershipTypically, an internal document is written by a single person but is read and used by many people. The writer of the document usually has a primary responsibility that isn’t writing documentation, so the internal document usually takes lower priority and can easily become outdated.
By allowing everyone to edit the documentation or comment on possible issues, the documentation can stay up to date even if the original writer is too busy to work on it.

There are two issues with allowing everyone to edit content:
The author might want to be aware of content updates and suggested changes to Âhis or her content.
Some documents shouldn’t be edited by anyone but the author, or content updates Âshould go through a review process.
Wiki tools solves these issues.
To stay aware of pages you’ve written or are interested in, mark those pages with a star. You can search for all pages you’ve marked with a star and view updates and comments on these pages in My Page, or create an RSS feed so you’re notified when someone makes a change when you’re not looking at the wiki.
There are several solutions to making read-only content. You can leave a note at the top of the page, or in comments, saying not to update the page without permission. If you mark the page with a star, you’re notified if someone updates the page. You can then use the page history feature to revert to an older version of the page.
You could also host the content in its own wiki, give yourself admin privileges, and give everyone else reader privileges but allow them to make comments. This prevents people from changing your content but they can help you improve your content by leaving comments.
Maintaining Documents in Wikis Instead of Word Processor FilesMany single-ownership issues are tied to the idea of using word processors to create documentation. With a word processor, only a single individual should have ownership of source files; otherwise you could have multiple versions of a document. You could use a content management system to allow multiple authors and ensure that the source doesn’t split off into multiple documents.
It takes substantially more effort to use a combination of word processors, content management systems, and non-wiki distribution systems. The following require substantial effort:
You must train people to use content management systems. Â
When people find issues, they must describe the issue to the owner of the Âdocument, then the owner then must locate the document in the content management system, update it, and convert it to PDF.
If you distribute documents on webpages that don’t support RSS, owners must Ânotify everyone to download the new PDF from the website.
80 Chapter 10 Improving Internal Documentation
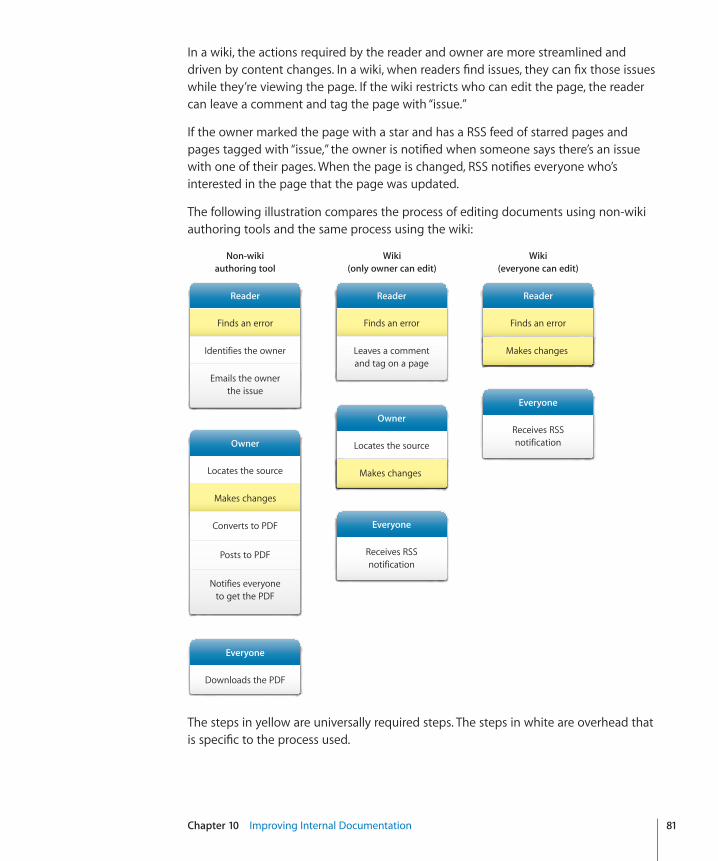
Chapter 10 Improving Internal Documentation 81
In a wiki, the actions required by the reader and owner are more streamlined and driven by content changes. In a wiki, when readers find issues, they can fix those issues while they’re viewing the page. If the wiki restricts who can edit the page, the reader can leave a comment and tag the page with “issue.”
If the owner marked the page with a star and has a RSS feed of starred pages and pages tagged with “issue,” the owner is notified when someone says there’s an issue with one of their pages. When the page is changed, RSS notifies everyone who’s interested in the page that the page was updated.
The following illustration compares the process of editing documents using non-wiki authoring tools and the same process using the wiki:
Finds an error
Makes changes
Reader
Receives RSSnotification
Everyone
Finds an error
Leaves a commentand tag on a page
Reader
Locates the source
Makes changes
Owner
Receives RSSnotification
Everyone
Finds an error
Identifies the owner
Emails the ownerthe issue
Reader
Non-wikiauthoring tool
Wiki(only owner can edit)
Wiki(everyone can edit)
Locates the source
Makes changes
Converts to PDF
Owner
Posts to PDF
Notifies everyoneto get the PDF
Downloads the PDF
Everyone
The steps in yellow are universally required steps. The steps in white are overhead that is specific to the process used.
82
Learn how to use wiki tools to communicate more effectively.
Wiki tools provide several new communication methods, which in some situations can be more effective that the communication methods you’re used to.
Some organizations use email as their primary communication method and use web communication only for organization-wide static information.
Because wiki tools are dynamic and content can be created and edited by anyone who has permission, you can expand how web communication is used and thereby limit the use of email to those situations where it’s appropriate.
11Communicating More Effectively with Wiki Tools
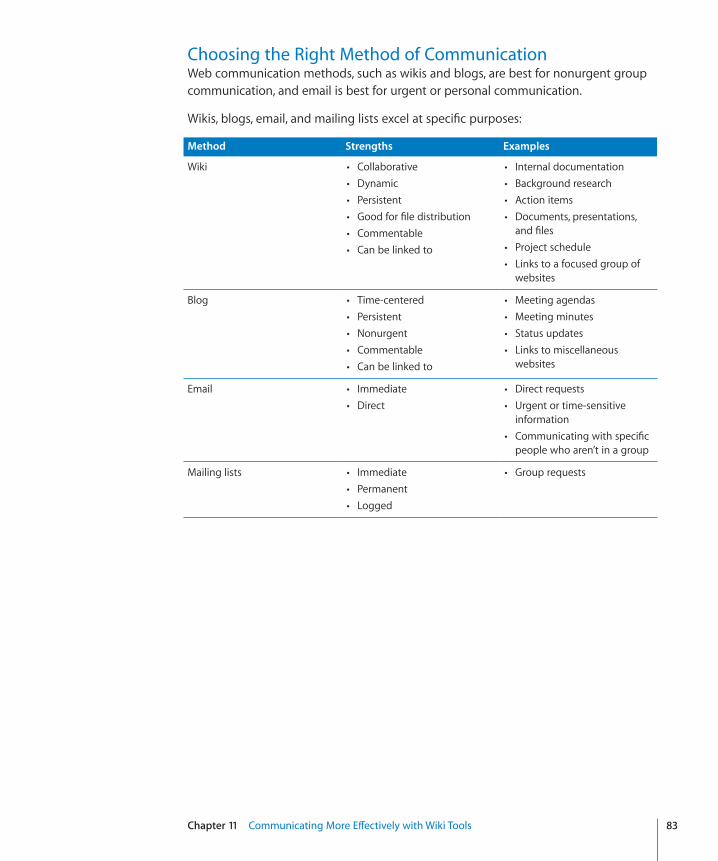
Chapter 11 Communicating More Effectively with Wiki Tools 83
Choosing the Right Method of CommunicationWeb communication methods, such as wikis and blogs, are best for nonurgent group communication, and email is best for urgent or personal communication.
Wikis, blogs, email, and mailing lists excel at specific purposes:
Method Strengths Examples
Wiki  Collaborative  Dynamic  Persistent  Good for file distribution  Commentable  Can be linked to
 Internal documentation  Background research  Action items  Documents, presentations,
and files  Project schedule  Links to a focused group of
websites
Blog  Time-centered  Persistent  Nonurgent  Commentable  Can be linked to
 Meeting agendas  Meeting minutes  Status updates  Links to miscellaneous
websites
Email  Immediate  Direct
 Direct requests  Urgent or time-sensitive
information  Communicating with specific
people who aren’t in a group
Mailing lists  Immediate  Permanent  Logged
 Group requests
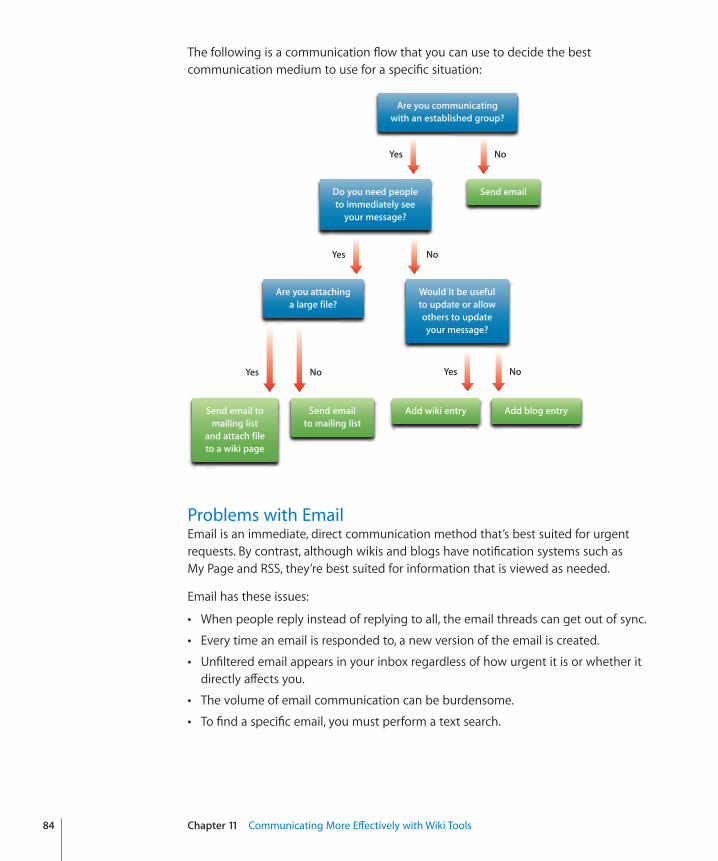
The following is a communication flow that you can use to decide the best communication medium to use for a specific situation:
Are you communicatingwith an established group?
Do you need peopleto immediately see
your message?
Send email
Are you attachinga large file?
Would it be usefulto update or allowothers to updateyour message?
Send email tomailing list
and attach fileto a wiki page
Send emailto mailing list
Add wiki entry Add blog entry
Yes No
Yes No
Yes NoYes No
Problems with EmailEmail is an immediate, direct communication method that’s best suited for urgent requests. By contrast, although wikis and blogs have notification systems such as My Page and RSS, they’re best suited for information that is viewed as needed.
Email has these issues:
When people reply instead of replying to all, the email threads can get out of sync. Â
Every time an email is responded to, a new version of the email is created. Â
Unfiltered email appears in your inbox regardless of how urgent it is or whether it Âdirectly affects you.
The volume of email communication can be burdensome. Â
To find a specific email, you must perform a text search. Â
84 Chapter 11 Communicating More Effectively with Wiki Tools
Chapter 11 Communicating More Effectively with Wiki Tools 85
Email isn’t a good medium for many types of communication. It’s not good for information that:
Persists over time Â
Can change Â
Has no immediate urgency Â
Instructions are an example of persistent, nonurgent, dynamic communication. If you send instructions to your department through email, you’ll face several issues:
When people join the department, you must find and then forward previous email Âto them.
If people find issues in your instructions, you must send another email or have your Âdepartment try to follow the response thread.
When people join the department, you must forward the response thread, which Âcan be confusing.
If there’s no urgency, people might skip the email and then when they search for it Âlater, they might see an outdated version of the instructions.
Posting instructions in a wiki page solves these issues.
Eliminating Response ThreadsIf you send an email to a group and someone in the group has an issue or comment related to your email, the commenter can either include or not include the group when sending feedback.
If the commenter includes the group, the email can turn into a lengthy, confusing discussion, at the end of which members of the group must find the email to follow, and then they must read through a series of replies. Every group member receives this full thread, even if some members aren’t interested.
If the commenter doesn’t include the group, the group doesn’t get the benefit of the discussion. Unless you send a new email to the group, only the commenter receives updated information.
Because of all the emails that are sent to the group, group members might look at different emails, which then adds to the confusion, and requires you to reexamine the thread to find the resolution.
By posting the information on a wiki, people can post questions about the content as comments, or if they see issues, they can update the content. Because this is all done on the wiki page, people aren’t sent emails, but if they’re interested in tracking the page, they can view updates in My Page or have an RSS feed of the page.
There is no confusion about which version of the content is accurate. If people have questions, they can review the page comments to see if their questions have been asked before.
Reducing SpamEmails are direct and immediate; email comes to you. Wikis and blogs are nonurgent; you view a wiki or blog when you need to. RSS and My Page notify you of wiki and blog changes, but neither is as urgent and direct as email.
One issue with having urgent and nonurgent information coming through email is that noncritical information could potentially mask critical information. By reducing emails to just those that are urgent and moving the rest to blog and wiki as appropriate, you can focus more efficiently on critical issues. When you don’t have critical issues, you can quickly scan through blog posts and new wiki pages.
Creating Navigable InformationUnlike email, content in wikis, blogs, and mailing lists can be tagged and linked to. After posting content in a wiki, people can update the content without sending email to everyone in the group.
If you tag content related to a specific project with the name of that project, you can do a single tag-based search to find everything related to that topic. If you instead used email to distribute information, you’d do a text search to find related content, but you’ll find email threads that mention the project or that have many responses, of which you want to know only the result. If the name of the project isn’t included in the email, you won’t find the email.
When new people join a group or a project, you can send them a collection of links to wiki pages, or a single link of a tag-based search of all pages they’re interested in.
For example, if you have a collection of orientation information for new employees, you could search for the “orientation” tag and send them the link to the search results. If you had this information in several emails, you’d have to search through your email and then individually forward emails.
86 Chapter 11 Communicating More Effectively with Wiki Tools

87
Learn how to implement wiki tools in the classroom.
Wiki tools aren’t just for helping organizations and professional teams—they can be used in classrooms.
Wikis can help organize student groups, distribute information in a browsable format, and support new types of projects that aren’t easily managed with traditional, paper-based tools.
Classroom Wiki BlueprintYou can set up wikis based on whether you want to stop students from editing specific pages such as the syllabus page, or whether you trust your students not to edit those pages.
If you want to stop students from editing specific pages, create two wikis for every class, one where students can just read content and post moderated comments, and another where students can write content and post unmoderated comments.
If you trust students not to edit specific pages, create a single wiki where students can read and write content and post comments. On pages that you don’t want them to edit, add a comment saying that students should not edit the page.
In both wiki setups, create a project wiki when you have a project that you’d like students from multiple classes to work on.
12Using Wiki Tools in the Classroom
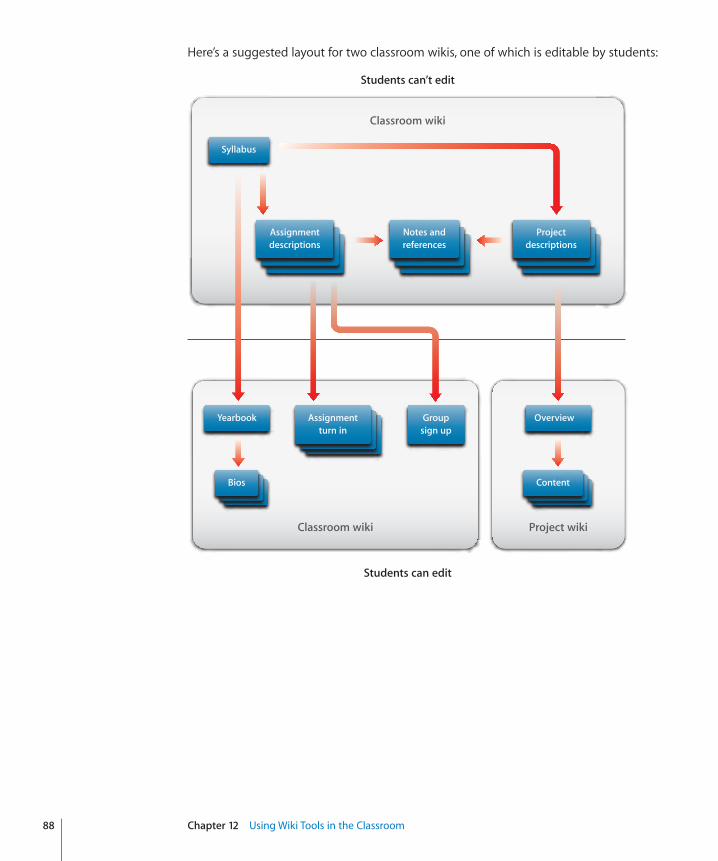
Here’s a suggested layout for two classroom wikis, one of which is editable by students:
Syllabus
Assignmentdescriptions
Notes andreferences
Projectdescriptions
Yearbook Overview
Content
Assignmentturn in
Groupsign up
Bios
Classroom wiki Project wiki
Classroom wiki
Students can’t edit
Students can edit
88 Chapter 12 Using Wiki Tools in the Classroom
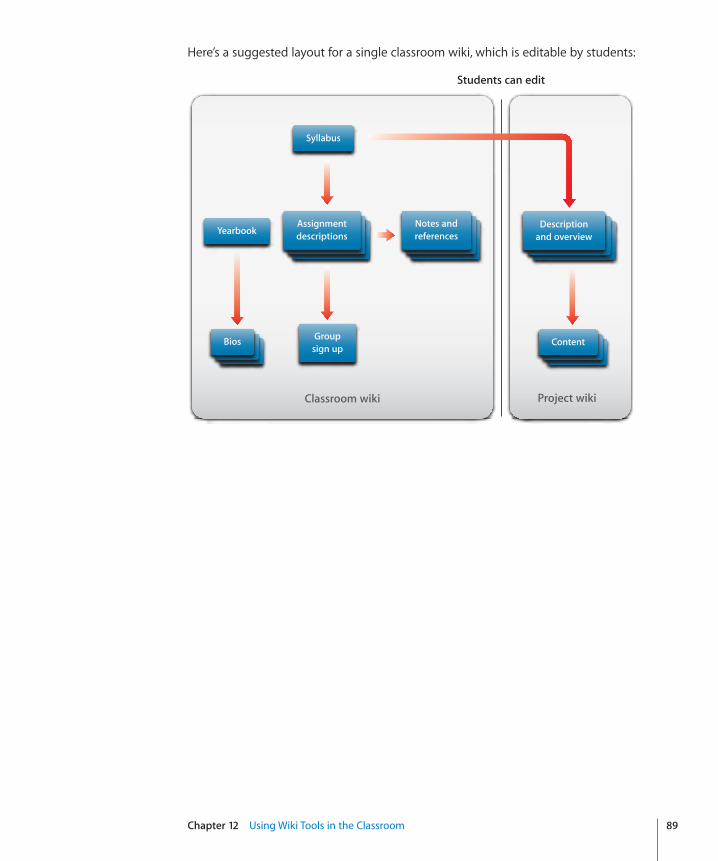
Chapter 12 Using Wiki Tools in the Classroom 89
Here’s a suggested layout for a single classroom wiki, which is editable by students:
Syllabus
Assignmentdescriptions
Notes andreferences
Descriptionand overviewYearbook
ContentGroupsign up
Bios
Project wikiClassroom wiki
Students can edit
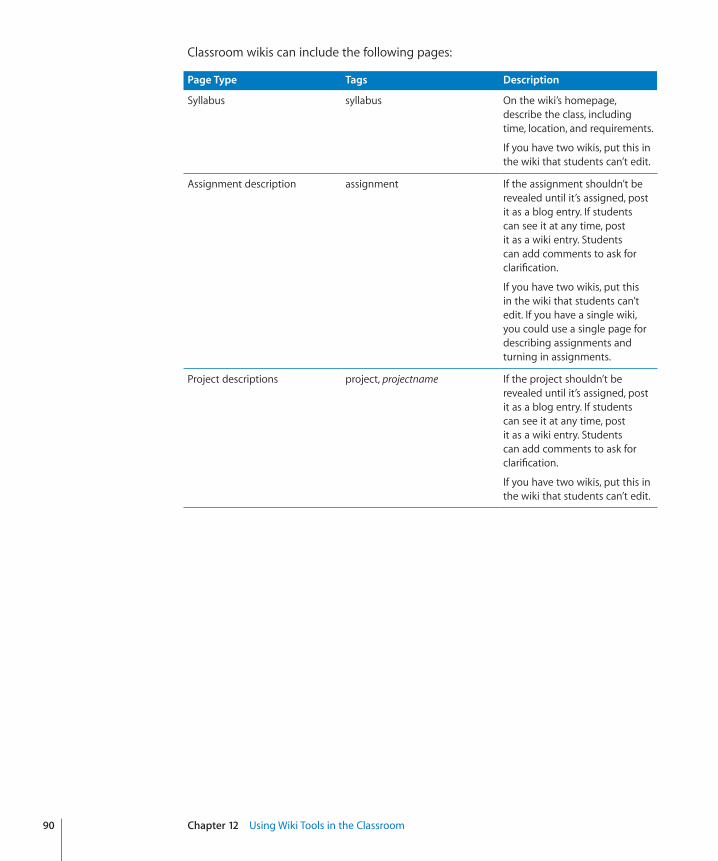
Classroom wikis can include the following pages:
Page Type Tags Description
Syllabus syllabus On the wiki’s homepage, describe the class, including time, location, and requirements.
If you have two wikis, put this in the wiki that students can’t edit.
Assignment description assignment If the assignment shouldn’t be revealed until it’s assigned, post it as a blog entry. If students can see it at any time, post it as a wiki entry. Students can add comments to ask for clarification.
If you have two wikis, put this in the wiki that students can’t edit. If you have a single wiki, you could use a single page for describing assignments and turning in assignments.
Project descriptions project, projectname If the project shouldn’t be revealed until it’s assigned, post it as a blog entry. If students can see it at any time, post it as a wiki entry. Students can add comments to ask for clarification.
If you have two wikis, put this in the wiki that students can’t edit.
90 Chapter 12 Using Wiki Tools in the Classroom
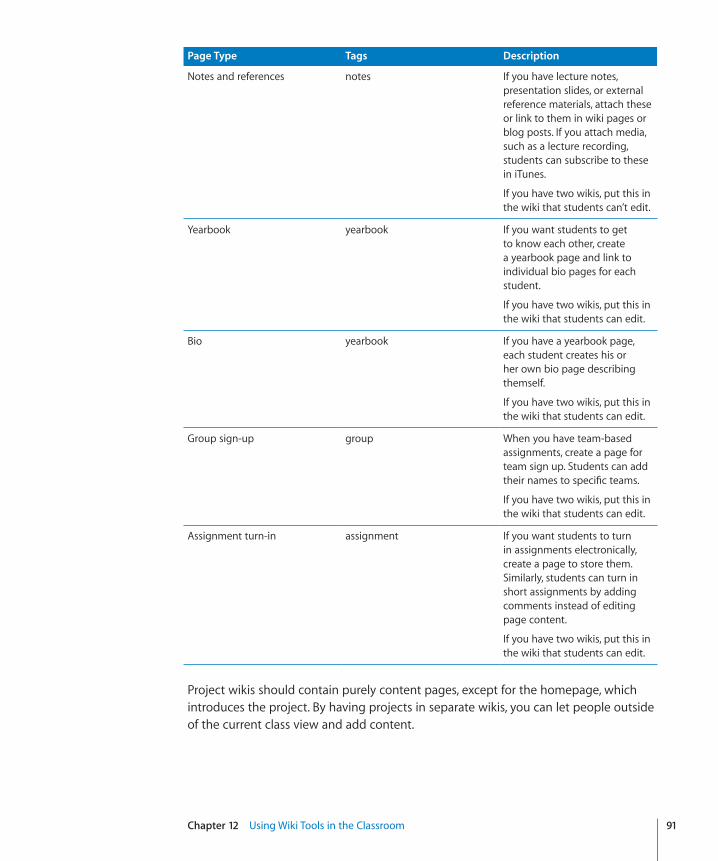
Chapter 12 Using Wiki Tools in the Classroom 91
Page Type Tags Description
Notes and references notes If you have lecture notes, presentation slides, or external reference materials, attach these or link to them in wiki pages or blog posts. If you attach media, such as a lecture recording, students can subscribe to these in iTunes.
If you have two wikis, put this in the wiki that students can’t edit.
Yearbook yearbook If you want students to get to know each other, create a yearbook page and link to individual bio pages for each student.
If you have two wikis, put this in the wiki that students can edit.
Bio yearbook If you have a yearbook page, each student creates his or her own bio page describing themself.
If you have two wikis, put this in the wiki that students can edit.
Group sign-up group When you have team-based assignments, create a page for team sign up. Students can add their names to specific teams.
If you have two wikis, put this in the wiki that students can edit.
Assignment turn-in assignment If you want students to turn in assignments electronically, create a page to store them. Similarly, students can turn in short assignments by adding comments instead of editing page content.
If you have two wikis, put this in the wiki that students can edit.
Project wikis should contain purely content pages, except for the homepage, which introduces the project. By having projects in separate wikis, you can let people outside of the current class view and add content.
Preventing MisinformationIf you use wikis to distribute and collect assignments, organize teams, and host information created by students about other students, you might think the wiki could become a hotbed for distribution of misinformation. However, wiki tools have several safeguards in place to prevent malicious editing.
One of the common misconceptions about using wikis and blogs is that anyone can edit or update information without consequence. In wiki tools, every time someone edits and saves a page, a new version of that page is created. The wiki saves previous versions and keeps track of who edited the page last and what they changed. If a student maliciously edits a page, you can find out who edited the page and what they changed. You can then revert the page to an older version.
To prevent students from changing critical information, create a wiki that gives read-only access to all students and comments moderated by you before they are published publicly. You could have the class syllabus and assignment descriptions on this wiki, but link to pages on a wiki students can edit, where students can post completed assignments for your review.
Creating Wiki YearbooksWhen young students enter a new class, a typical first exercise is to share information about themselves with all the other students so they learn each others’ names and become familiar with each other. You can use a wiki to achieve the same results and also add value.
To start, the teacher creates a class roster wiki page, listing everyone’s name. Every student would then create a biography page linked from their name on the roster page. In the biography pages, students describe themselves, including their favorite things to do, favorite foods, favorite movies. Afterwards, students can browse each others’ biographies and learn more about each other than can be gleaned from a short speech in class. This exercise gives students a chance to express themselves in a creative way and provides lasting value.
Later, you could create a yearbook by excerpting material from every student’s biography page. Better yet, allow the class roster and biography pages to serve as a dynamic electronic yearbook.
Posting Assignments on a WikiBecause a wiki is easy to use, it’s an excellent medium for distributing homework assignments. If a teacher reuses the same assignments for all classes, providing them on a wiki saves paper, reduces time and effort.
92 Chapter 12 Using Wiki Tools in the Classroom

Chapter 12 Using Wiki Tools in the Classroom 93
If students need clarification about an assignment, they can post comments on the assignment page, which can then be answered and read by all students. This prevents the teacher from individually answering questions or re-clarifying the assignment for other students.
If assignments are secret and not made public until they are assigned, teachers can create blog posts for assignments. Students can see questions other students ask, and you can save effort by copying the assignment text from the previous class’s blog and pasting it in a future class’s blog.
If assignments require short responses, post the assignment as wiki pages or blog posts and ask students to complete the assignment by adding a comment with their response.
This works well in collaborative classes where students can build on each other’s responses, or creative classes such as language arts, where assignments might require students to create poetry or prose. Students can learn from each others’ work.
Similarly, you can set up a wiki so that comments are moderated. You’d then approve the best entries from students and share those with the class.
Posting Additional Information on a WikiOver time, a class uses a large volume of materials. In a traditional classroom, this involves numerous printouts that students must organize and file in binders. Similarly, lessons must be transcribed in student notes, which also must be filed away.
You can use a wiki to create an organized system for class materials, and an online repository for audio lessons in podcast format. This reduces waste, provides students with information when they need it, and allows students to review old information even if they were absent from class, or if their own note taking or organization was inadequate.
Using Wikis for Group Sign UpWikis are a great medium for organizing and tracking voluntary teams. If you have an assignment that requires a class to split into several teams with a specific number of members in each, you can use the wiki to organize those teams.
Create a page listing the teams and, if available, include background information about the subject matter they’re working on.
You could add a table listing names and roles for each team so students know how many spots are open in the team and what role they’d play. Because students fill out the tables themselves, you don’t need to track the teams separately.

You can review the wiki page and quickly see who’s on the team and what role they play. Later, as students complete their assignments, you can link the assignments from the wiki page so students can easily see what they’ve worked on.
Ask students to tag the group projects with their names, so that later you can review everything the student worked on as part of a team.
Using Wikis for Persistent ProjectsYou can use wikis to create persistent projects, projects that last beyond a single semester or classroom.
For example, in a history class, you can create a class project where everyone works on a shared timeline. In the following semester, you can create a project where the class splits into teams and focuses on different areas of the timeline, building on the work of the initial class. Future semesters create more detailed information in the wiki, resulting in a detailed, rich timeline that isn’t possible in a single semester.
There are many issues with creating a cohesive, integrated, large scale, persistent deliverable in paper format:
Issue Paper Solution Wiki Solution
Access to previous students source materials
You must store accompanying source files for printed reports on a file server.
The content is the source.
Previously created material that gets lost
You must store backup copies of printed materials.
Content can’t be lost. If content is deleted, you can restore it.
Finding areas to improve or build on
You must read through volumes of material or rely on notes from previous students.
You can browse through content, looking for pages that don’t have much content.
Referencing previous work You must create a bibliographical reference for every reference.
You can create a link to other pages.
Combining work into a cohesive set
You must physically arrange reports in an order that makes sense.
You can link from related pages to created content.
94 Chapter 12 Using Wiki Tools in the Classroom

Aaccess
administrator 23blogs 21documentation 77iPhone and iPod touch 65, 66, 67passwords 18, 19permissions 23, 28user 23wiki 24, 28, 43
accounts, settings 19administrator 23, 29archive files 39attachments 39, 50audio files 37
Bblogs
content 32creating 23, 31definition 13deleting 31podcast enabling 28settings 18, 21See also posts, wiki tools
Ccalendars. See web calendarscomments
adding 42enabling 29iPhone and iPod touch 68moderation 21previewing 52removing 42
content tags 46
Ddocumentation 8, 9, 77, 79, 80
Eeducation, wiki tools in 87, 92, 93, 94email addresses 19, 37
email versus web communication 84, 85, 86See also mailing lists
embedding files 37events 60, 61, 62
Ffiles
archive 39media 37
filterssearch 46Updates page 52
finding. See searching
Ggroup web calendar 57, 67groups 64, 93
Hhomepage 30host name 31HTML (Hypertext Transfer Protocol) tags 40
IiCal 64icons, wiki 27images
inserting 37profile 19
invitations 60iPhone and iPod touch
blog posts 66comments 68My Page 65overview 65searching 67stars 68tags 67web calendars 67wiki pages 66
Llinks in wiki pages 36
Index
95
Inde
x
96 Index
list styles 35login and logout 17
MMac OS X Server, web calendars and iCal 64mail service, rules for 18, 20mailing lists 14media files 37meta-information tags 46minicalendar 57movies 37My Page
iPhone and iPod touch access 65login and logout 17overview 15settings 18, 19, 20, 21updating content from 51, 52
Nnaming conventions
web calendars 59wiki tool content 34
notes 62
Oorphan page 32
Ppages, wiki
attachments 50categorizing 48comments 42creating 32deleting 33duplicate content 73editing 34iPhone and iPod touch access 66links 36list styles 35media files 37, 39paragraph styles 35renaming 34restoring 41RSS feed 53, 55source code 40tables 39text styles 35updating 51, 76versus PDFs 79watching 52
paragraph styles 35passwords 18, 19PDFs versus wiki pages 79permissions 23, 28personal web calendar 57
podcasting 21, 28posts, blog
comments 42creating 32deleting 33editing 34, 41iPhone and iPod touch access 66list styles 35media files 37, 39paragraph styles 35renaming 34restoring 41RSS feed 53, 55source code 40tables 39text styles 35updating 51watching 52
private wiki 24, 28privileges, administrator 23profile image 19protocols, HTML 40public wiki 24, 28
QQuick Look 50
RReally Simple Syndication. See RSSrenaming
web calendars 59wiki tool content 34
RSS (Really Simple Syndication) 49, 53, 55
Ssearching
iPhone and iPod touch 67multiple wikis 45overview 44saved searches 46single wiki 45tags 46, 47, 48
security 18See also access
server administrator 24sidebars 30source code, accessing 40stars, wiki 43, 49, 68
Ttags, wiki
categorizing pages 48introduction 43iPhone and iPod touch access 67searching with 44, 45, 46, 47, 48

Index 97
text styles 35themes 27
Uupdating wiki content 51, 52, 53, 76users
access control 23web calendars 64
Vvacation notice 18, 20
Wwatching wiki content 52web calendars
colors 59creating 58deleting 58events 60, 61, 62hiding 59iCal 64multiple 58navigating 57overview 13, 57renaming 59settings 63showing 59
web communication 82, 83, 84, 85, 86weblogs. See blogswiki tools
categorizing pages 48classroom application 87, 92, 93, 94communication with 82, 83, 84, 85, 86disabling 27document organization 77, 79, 80enabling 27iPhone and iPod touch 65, 66, 67, 68navigating 43, 72overview 7, 12Quick Look 50reusing information 75searching 44, 45, 46, 47, 48streamlining projects 70, 74, 75updating content 51See also blogs, My Page, web calendars, wikis
wikisaccess control 24, 28, 43advantages 12content 32creating 23, 24definition 12deleting 25settings 26, 30sidebars 30See also pages
Yyearbooks, wiki 92


![IPv6 deployment update - start [APNIC TRAINING WIKI] · "IPv6 has emerged from the ‘Innovators’ and ‘Early Adoption’ stages of deployment, and is now in the ‘Early Majority](https://img.pdfslide.us/doc/110x75/5f0a848d7e708231d42c0658/ipv6-deployment-update-start-apnic-training-wiki-ipv6-has-emerged-from.jpg)


![IPv6 Deployment Workshop - start [APNIC TRAINING WIKI]](https://img.pdfslide.us/doc/110x75/61ef91c8b271cf72091a10a1/ipv6-deployment-workshop-start-apnic-training-wiki.jpg)