Embed Size (px)
Citation preview
1
What is Photo Story? Photo Story is Microsoft’s solution to digital storytelling in 5 easy steps. For those who want to cre-ate a basic multimedia movie without having to learn advanced video editing, Photo Story provides the perfect alternative while still allowing you to use the basics of any video: images, titles, music and narration.
Preparing Your Digital Story Before you start building your digital story, you will want to make sure you have all your pieces where you can access them easily. These are the items you will want to prepare beforehand:
• Images: Make sure they are digitized and in the JPEG (.jpg or .jpeg) format. Luckily, if you took your photos with a digital camera, chances are good that your pictures are already in the proper format. If not, you will need to convert them. Most image editing software will allow you to convert images in a variety of formats into JPEG.
If you already know how to use Photoshop or other image ed-
iting software, you may want to go ahead and do your image editing and adjustments be-fore importing into Photo Story. While you will have access to do some editing in Photo Story, the tools are not meant for more than the most basic edits like red-eye reduction and basic color correction.
• Music: Any background music you want to include should be digitized in an audio format
Photo Story recognizes: MP3, WAV or WMA (Windows Media Audio). If you have your music on a CD, you will need to rip it into one of these formats.
• Narrative: If you have narration you want to include and have access to a microphone that
plugs into a computer, write down your notes -- or, even better, your script -- before you start building your story. With an external microphone you will be able to add your audio using Photo Story’s built in recording feature.
Using Photo Story 3 Photo Story was made to be a very straightforward application; there are very few steps and there aren’t as many bells and whistles in it as some more advanced users would come to expect. The basic navigation for the steps in Photo Story are the Next and Back buttons that appear at the bot-tom of the window. You can navigate forward and backward in the 5-step process at any time giv-ing you unlimited flexibility while building your digital story. And while Microsoft has built in the fea-tures that they feel most people would use, feel free to skip any parts that you do not want to in-clude in your story. Along the way, you should also make sure to use the Save Project button at the bottom of the window. This will ensure that you do not lose any of your work should anything unexpected happen. Please note Save Project is different from Save your Story, the final step in the story creation proc-ess. Save Project saves the editable .wp3 project file while Save your Story is the exported, un-
Getting Photo Story 3 Photo Story 3 is now being offered to Windows XP users (and only XP users!) for free. You will also need to install Windows Media Player 10 and it is recommended that this be installed on your computer before you try to install Photo Story. Both can be downloaded directly from Microsoft’s website or through downloading services such as download.com.

2
editable, self-contained .wmv video file. The .wmv file is what users will click on to view your story, but you need to keep the .wp3 file to be able to return to your source story and make changes to it in the future. Welcome Screen When you start up Photo Story, the first screen you will see is the Welcome Screen (Fig. 1). From here you need to indicate what you want to do: start a new story, or edit or play an exist-ing one. If you select edit or play, you will need to locate the Photo Story file (should have a .wp3 extension) on your computer. If you return to this screen while another pro-ject is currently active, you will see a fourth op-tion asking if you want to continue working on the current story. If you decide not to continue, you will be prompted to save your work before your new activity begins, so you should never lose your work because you decided to start another project. Click the Next button to continue. Step 1: Import & Arrange Your Pictures The first screen you will use to build your story is the Import & Arrange Your Pictures screen (Fig. 2). Click on the Import Pictures button to start adding images to your digital story. You will get a File Browser window to let you locate the image files on your computer. You can select multiple pictures by holding down the Shift key on the keyboard and selecting a range of photos or by holding down the CTRL key as you se-lect individual photos. Click OK to import your photos directly to the timeline, which is visible be-neath the Image Viewer window. Normally, Photo Story will import your photos in the order you se-lected them. However, if you want to make a change to the picture order, you can rearrange them by clicking and dragging an image along the timeline or by highlighting it and using the Order Arrows to the right to move it back and forth. To remove a picture, highlight it, then hit the Delete key or the click on the X button to the right of the timeline. Step 1a: Editing Photos Directly under the Image Viewer, are some buttons for automatic image edits: Color Levels, Red Eye, and Ro-tate (Fig. 3). To apply these edits, click the button and the change should be immediately visible in the Image Viewer. Click the button again to remove the change.
Figure 1: Welcome Screen
Figure 2: Import & Arrange
Figure 3: Automatic Image Edit Buttons
3
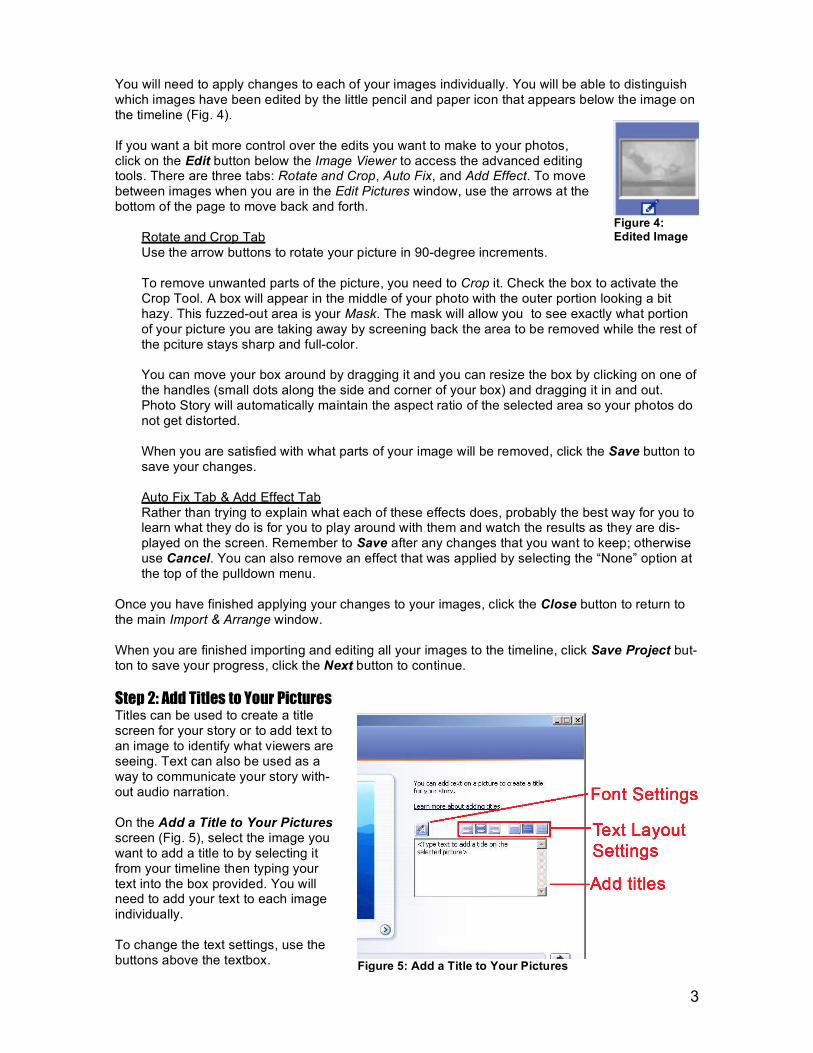
You will need to apply changes to each of your images individually. You will be able to distinguish which images have been edited by the little pencil and paper icon that appears below the image on the timeline (Fig. 4). If you want a bit more control over the edits you want to make to your photos, click on the Edit button below the Image Viewer to access the advanced editing tools. There are three tabs: Rotate and Crop, Auto Fix, and Add Effect. To move between images when you are in the Edit Pictures window, use the arrows at the bottom of the page to move back and forth.
Rotate and Crop Tab Use the arrow buttons to rotate your picture in 90-degree increments. To remove unwanted parts of the picture, you need to Crop it. Check the box to activate the Crop Tool. A box will appear in the middle of your photo with the outer portion looking a bit hazy. This fuzzed-out area is your Mask. The mask will allow you to see exactly what portion of your picture you are taking away by screening back the area to be removed while the rest of the pciture stays sharp and full-color. You can move your box around by dragging it and you can resize the box by clicking on one of the handles (small dots along the side and corner of your box) and dragging it in and out. Photo Story will automatically maintain the aspect ratio of the selected area so your photos do not get distorted. When you are satisfied with what parts of your image will be removed, click the Save button to save your changes. Auto Fix Tab & Add Effect Tab Rather than trying to explain what each of these effects does, probably the best way for you to learn what they do is for you to play around with them and watch the results as they are dis-played on the screen. Remember to Save after any changes that you want to keep; otherwise use Cancel. You can also remove an effect that was applied by selecting the “None” option at the top of the pulldown menu.
Once you have finished applying your changes to your images, click the Close button to return to the main Import & Arrange window. When you are finished importing and editing all your images to the timeline, click Save Project but-ton to save your progress, click the Next button to continue. Step 2: Add Titles to Your Pictures Titles can be used to create a title screen for your story or to add text to an image to identify what viewers are seeing. Text can also be used as a way to communicate your story with-out audio narration. On the Add a Title to Your Pictures screen (Fig. 5), select the image you want to add a title to by selecting it from your timeline then typing your text into the box provided. You will need to add your text to each image individually. To change the text settings, use the buttons above the textbox.
Figure 4: Edited Image
Figure 5: Add a Title to Your Pictures
4
• The Text Alignment buttons allows you to set how the text is aligned both horizontally and ver-tically on the image.
• The Select Font button lets you change the size,
font face, color and style of your title.
For ease of readability, you should try to use as large a font as you can fit on your image without distorting the visual. Also, try to select colors that are a contrast to the colors that appear in your image to make it easier for your viewers to read your text. For example, it’s often not advisable to use black text over a black-and-white image or blue over a picture of the sky.
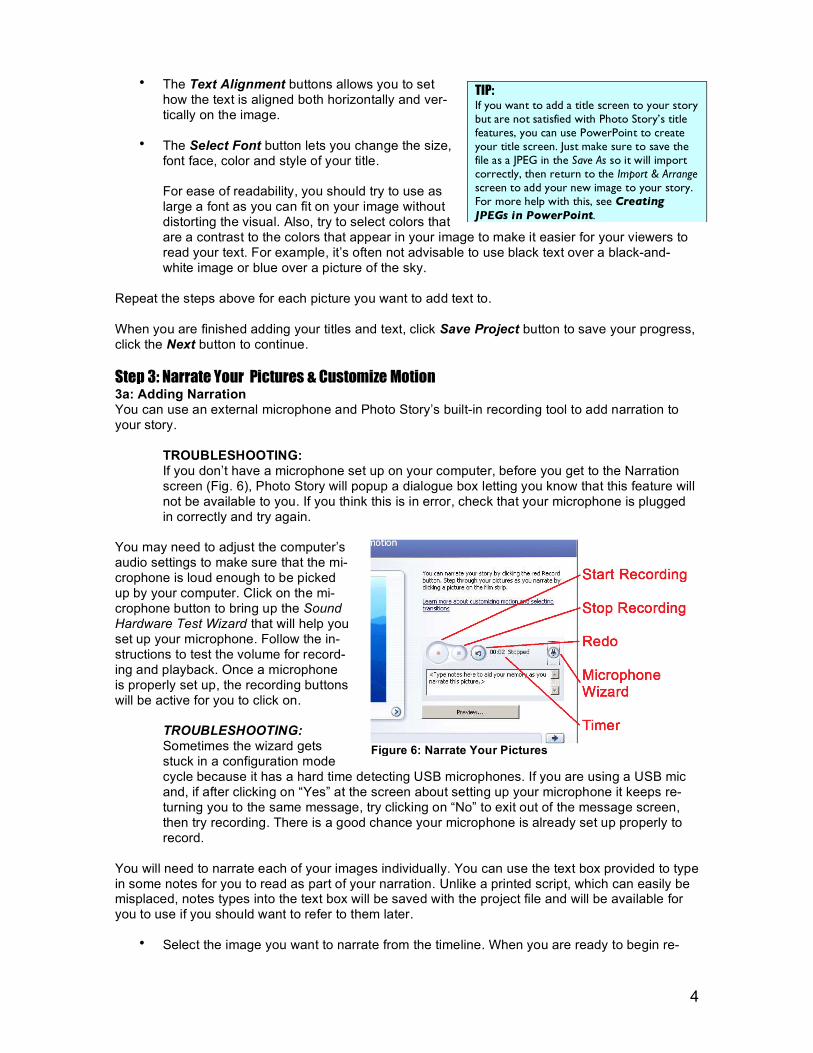
Repeat the steps above for each picture you want to add text to. When you are finished adding your titles and text, click Save Project button to save your progress, click the Next button to continue. Step 3: Narrate Your Pictures & Customize Motion 3a: Adding Narration You can use an external microphone and Photo Story’s built-in recording tool to add narration to your story.
TROUBLESHOOTING: If you don’t have a microphone set up on your computer, before you get to the Narration screen (Fig. 6), Photo Story will popup a dialogue box letting you know that this feature will not be available to you. If you think this is in error, check that your microphone is plugged in correctly and try again.
You may need to adjust the computer’s audio settings to make sure that the mi-crophone is loud enough to be picked up by your computer. Click on the mi-crophone button to bring up the Sound Hardware Test Wizard that will help you set up your microphone. Follow the in-structions to test the volume for record-ing and playback. Once a microphone is properly set up, the recording buttons will be active for you to click on.
TROUBLESHOOTING: Sometimes the wizard gets stuck in a configuration mode cycle because it has a hard time detecting USB microphones. If you are using a USB mic and, if after clicking on “Yes” at the screen about setting up your microphone it keeps re-turning you to the same message, try clicking on “No” to exit out of the message screen, then try recording. There is a good chance your microphone is already set up properly to record.
You will need to narrate each of your images individually. You can use the text box provided to type in some notes for you to read as part of your narration. Unlike a printed script, which can easily be misplaced, notes types into the text box will be saved with the project file and will be available for you to use if you should want to refer to them later.
• Select the image you want to narrate from the timeline. When you are ready to begin re-
TIP: If you want to add a title screen to your story but are not satisfied with Photo Story’s title features, you can use PowerPoint to create your title screen. Just make sure to save the file as a JPEG in the Save As so it will import correctly, then return to the Import & Arrange screen to add your new image to your story. For more help with this, see Creating JPEGs in PowerPoint.
Figure 6: Narrate Your Pictures
5
cording, click the large button with the red square in it to start. You should see the Timer running and the status change to “recording” when recording successfully. You can record up to 5 minutes of narration for each image.
• To stop recording, click the smaller button with the black square in it. The timer should stop
running and the status will display “stopped.”
• To preview how your audio sounds along with your visuals, click the Preview button. Photo Story will show you a real-time compilation of your story as it is currently stands.
• If you are not satisfied with your narration, you can re-record. To redo the recording, click
on the little curved arrow button next to the timer. Click on each image and repeat the steps above to record the narration for each of your images. 3b: Customizing Motion & Duration At this point, your story is about halfway done. To help make everything super-easy, Photo Story is going to automate set certain settings for you. These include:
• How long the photo appears on the screen (duration) • How the movie moves across and in and out, pans and zooms, of the image (motion) • What type of animation is going to be used between images (transition) • How long it takes for that transition to occur
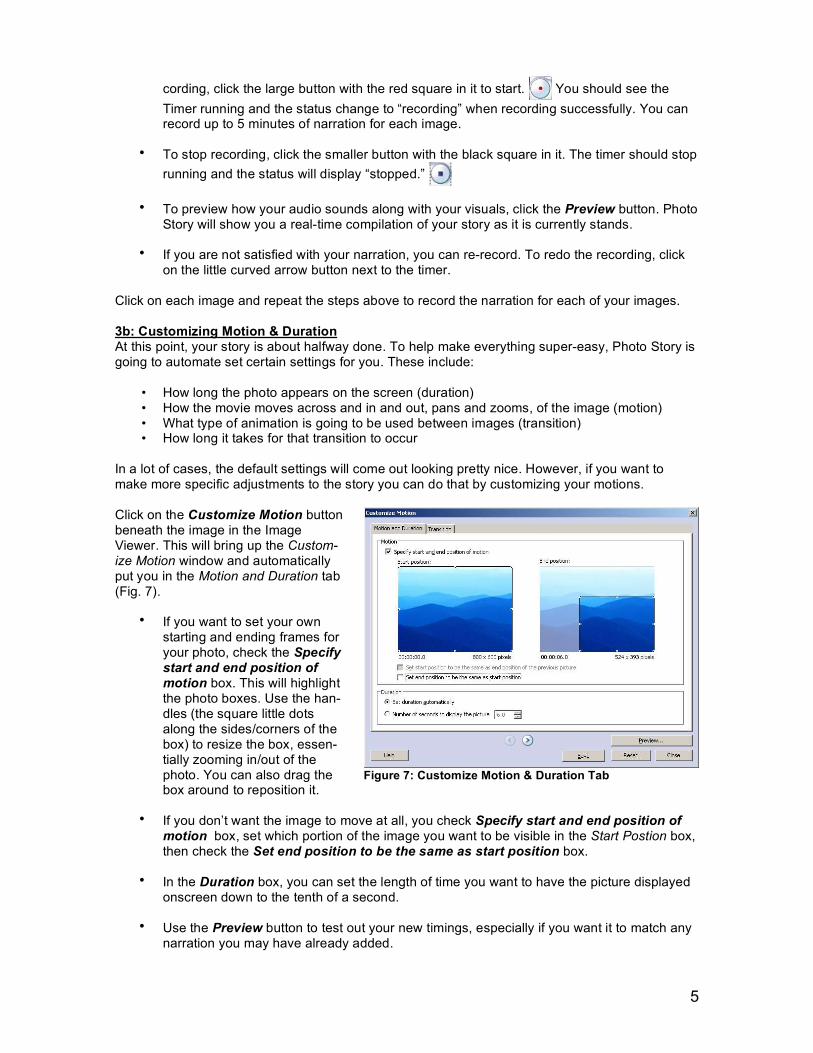
In a lot of cases, the default settings will come out looking pretty nice. However, if you want to make more specific adjustments to the story you can do that by customizing your motions. Click on the Customize Motion button beneath the image in the Image Viewer. This will bring up the Custom-ize Motion window and automatically put you in the Motion and Duration tab (Fig. 7).
• If you want to set your own starting and ending frames for your photo, check the Specify start and end position of motion box. This will highlight the photo boxes. Use the han-dles (the square little dots along the sides/corners of the box) to resize the box, essen-tially zooming in/out of the photo. You can also drag the box around to reposition it.
• If you don’t want the image to move at all, you check Specify start and end position of
motion box, set which portion of the image you want to be visible in the Start Postion box, then check the Set end position to be the same as start position box.
• In the Duration box, you can set the length of time you want to have the picture displayed
onscreen down to the tenth of a second.
• Use the Preview button to test out your new timings, especially if you want it to match any narration you may have already added.
Figure 7: Customize Motion & Duration Tab
6
• If you want to keep any of the new changes you have made for an individual image, click the Save button.
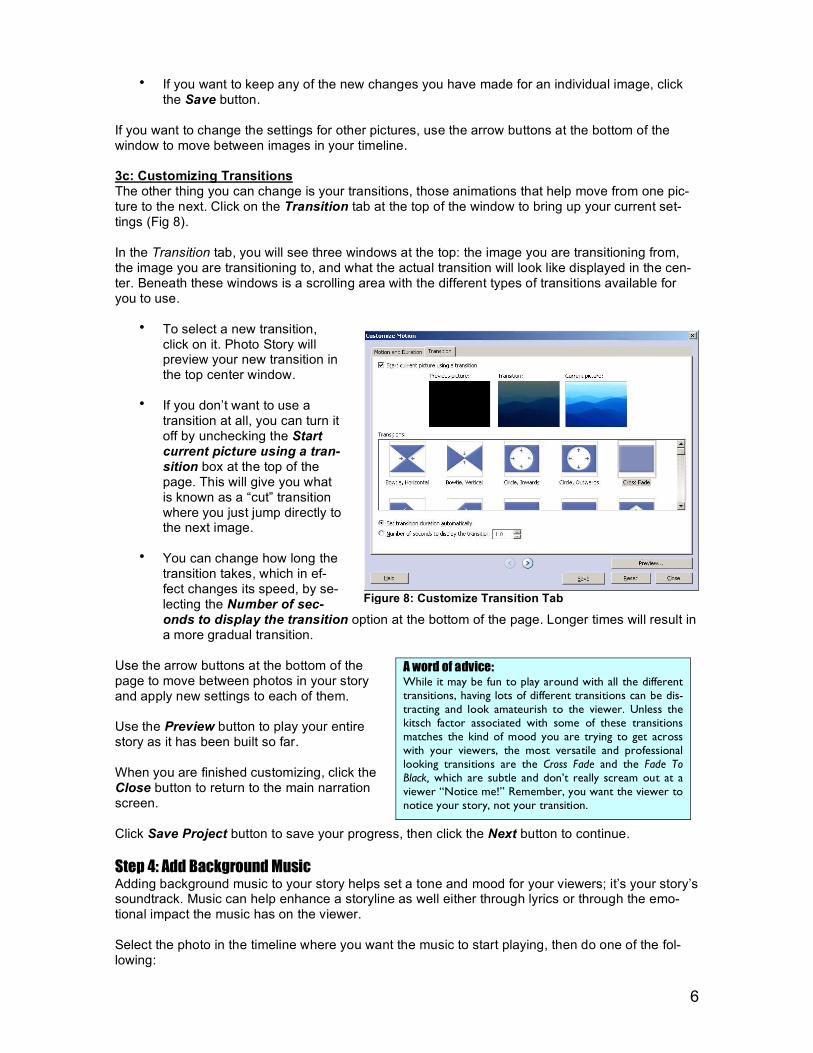
If you want to change the settings for other pictures, use the arrow buttons at the bottom of the window to move between images in your timeline. 3c: Customizing Transitions The other thing you can change is your transitions, those animations that help move from one pic-ture to the next. Click on the Transition tab at the top of the window to bring up your current set-tings (Fig 8). In the Transition tab, you will see three windows at the top: the image you are transitioning from, the image you are transitioning to, and what the actual transition will look like displayed in the cen-ter. Beneath these windows is a scrolling area with the different types of transitions available for you to use.
• To select a new transition, click on it. Photo Story will preview your new transition in the top center window.
• If you don’t want to use a
transition at all, you can turn it off by unchecking the Start current picture using a tran-sition box at the top of the page. This will give you what is known as a “cut” transition where you just jump directly to the next image.
• You can change how long the
transition takes, which in ef-fect changes its speed, by se-lecting the Number of sec-onds to display the transition option at the bottom of the page. Longer times will result in a more gradual transition.
Use the arrow buttons at the bottom of the page to move between photos in your story and apply new settings to each of them. Use the Preview button to play your entire story as it has been built so far. When you are finished customizing, click the Close button to return to the main narration screen. Click Save Project button to save your progress, then click the Next button to continue. Step 4: Add Background Music Adding background music to your story helps set a tone and mood for your viewers; it’s your story’s soundtrack. Music can help enhance a storyline as well either through lyrics or through the emo-tional impact the music has on the viewer. Select the photo in the timeline where you want the music to start playing, then do one of the fol-lowing:
Figure 8: Customize Transition Tab
A word of advice: While it may be fun to play around with all the different transitions, having lots of different transitions can be dis-tracting and look amateurish to the viewer. Unless the kitsch factor associated with some of these transitions matches the kind of mood you are trying to get across with your viewers, the most versatile and professional looking transitions are the Cross Fade and the Fade To Black, which are subtle and don’t really scream out at a viewer “Notice me!” Remember, you want the viewer to notice your story, not your transition.

7
• To use pre-recorded music you already have digitized in a recognizable format, click the
Select Music button to bring up a File Browser to locate the audio file on your computer. Photo Story will import the music into your story.
• To create your own mu-
sic using Photo Story’s built in tools, click on the Create Music button to bring up the custom music options (Fig. 10).
You can play around with the different genres and settings available until you create something that you like. You can pre-view what your new music sounds like by clicking the Play button. When you are done, click the OK button to add the audio to your story and return to the main Add Back-ground Music screen. The length of the audio will auto-matically be adjusted to run for the entire length of the story or until a new piece of music is cued up.
You can add new music to each photo by following the same procedures outlined above. When music is added, it is shown as a colored bar above the pictures for which it plays in the timeline. This lets you know where each music clip will run and when a new one will start up so you can keep track of what music you have included in your story.
• Use the Preview button to play your entire story as it appears so far. • You may find that you will need to adjust the volume of your background music to be able
to hear your narration. Use the Volume slider bar provided to adjust the volume level for each image.
When you are finished adding in your background music, click Save Project button to save your progress, then click the Next button to continue. Step 5: Save Story One of the limitations of Photo Story is it’s inability to export the final movie as anything other than a Windows Media Video (WMV) file that is readable only when using Windows Media Player 10. Because Windows Media Player 10 is only available for Windows XP users, that means that any-one using an older version of Windows (2000, ME, or 98) or anyone running an alternative operat-ing system (Mac or Linux users) will not be able to view your movie. The other problem with Photo Story’s export function is that while the most common way to dis-seminate a digital story is to stream it over the internet, Photo Story doesn’t include a way to save it for streaming.
Figure 9: Add Background Music
Figure 10: Create Music Window
8
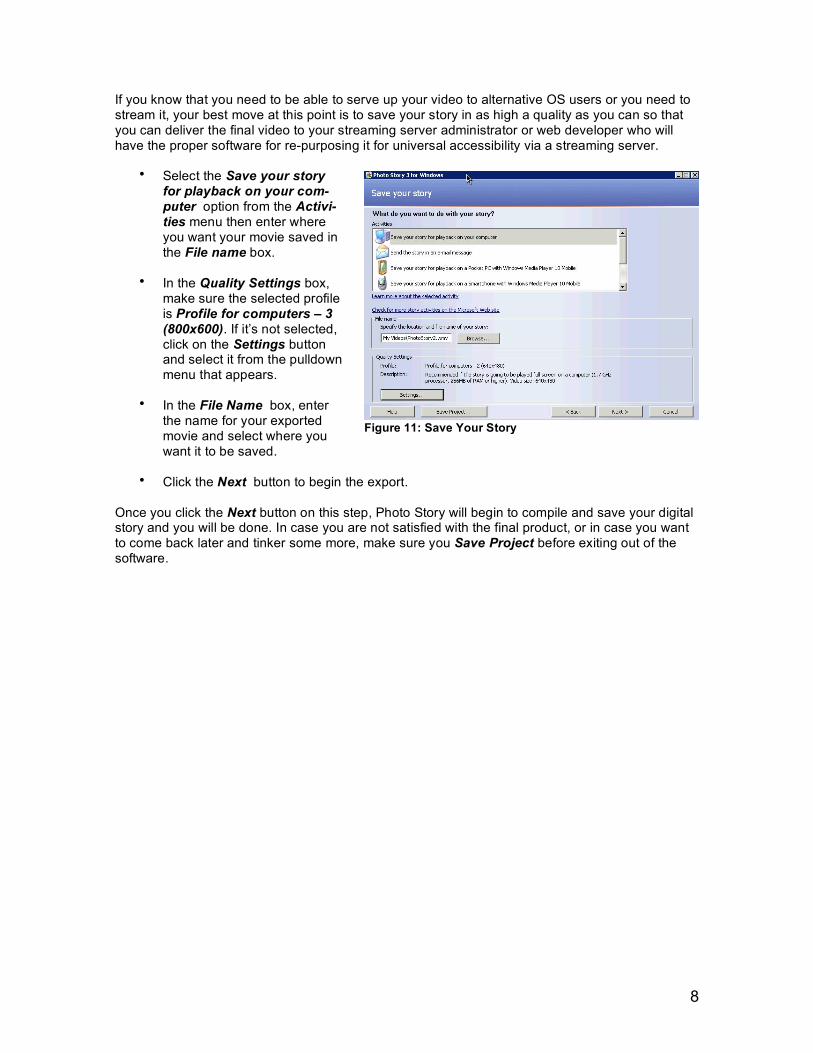
If you know that you need to be able to serve up your video to alternative OS users or you need to stream it, your best move at this point is to save your story in as high a quality as you can so that you can deliver the final video to your streaming server administrator or web developer who will have the proper software for re-purposing it for universal accessibility via a streaming server.
• Select the Save your story for playback on your com-puter option from the Activi-ties menu then enter where you want your movie saved in the File name box.
• In the Quality Settings box,
make sure the selected profile is Profile for computers – 3 (800x600). If it’s not selected, click on the Settings button and select it from the pulldown menu that appears.
• In the File Name box, enter
the name for your exported movie and select where you want it to be saved.
• Click the Next button to begin the export.
Once you click the Next button on this step, Photo Story will begin to compile and save your digital story and you will be done. In case you are not satisfied with the final product, or in case you want to come back later and tinker some more, make sure you Save Project before exiting out of the software.
Figure 11: Save Your Story