Embed Size (px)
Citation preview
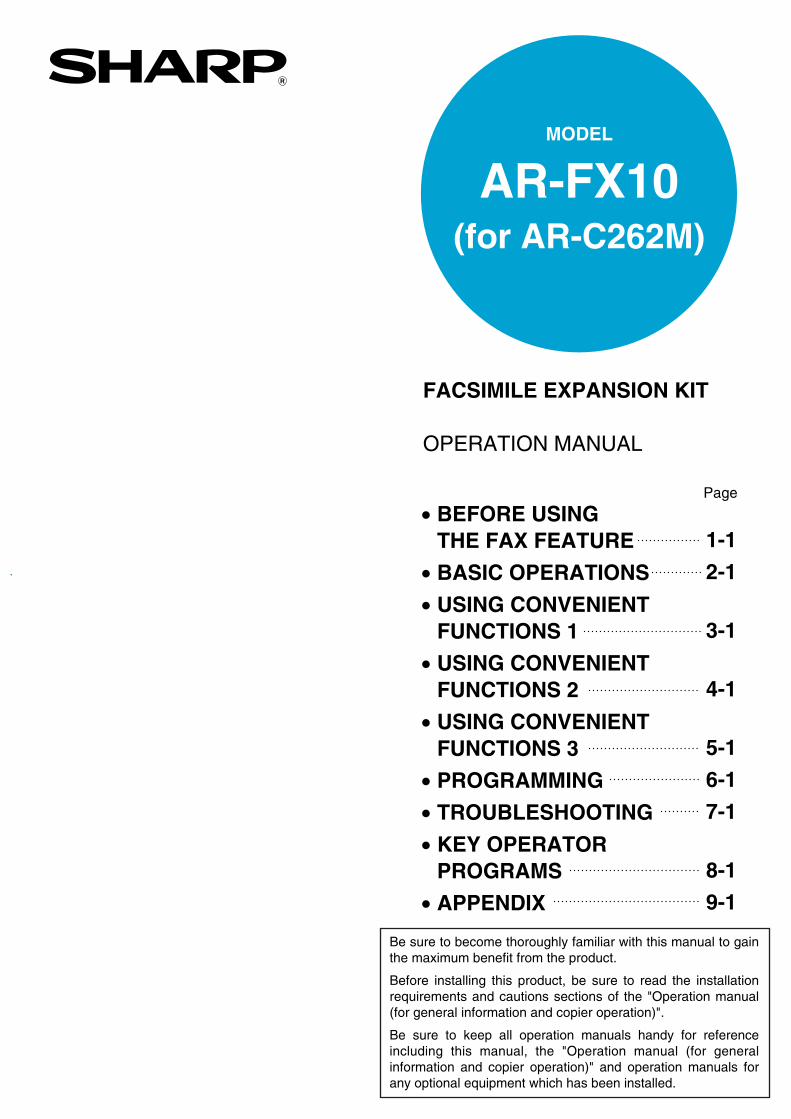
FACSIMILE EXPANSION KIT
OPERATION MANUAL
MODEL
AR-FX10(for AR-C262M)
• BEFORE USING THE FAX FEATURE
• BASIC OPERATIONS
• USING CONVENIENT FUNCTIONS 1
• USING CONVENIENT FUNCTIONS 2
• USING CONVENIENT FUNCTIONS 3
• PROGRAMMING
• TROUBLESHOOTING
• KEY OPERATOR PROGRAMS
• APPENDIX
1-1
2-1
3-1
4-1
5-1
6-1
7-1
8-1
9-1
Page
Be sure to become thoroughly familiar with this manual to gain the maximum benefit from the product.
Before installing this product, be sure to read the installation requirements and cautions sections of the "Operation manual (for general information and copier operation)".
Be sure to keep all operation manuals handy for reference including this manual, the "Operation manual (for general information and copier operation)" and operation manuals for any optional equipment which has been installed.
NAKS1CZZ
WhaleII_fax_ex.book 1 ページ 2004年9月21日 火曜日 午後1時9分
���� FAX interface cable and Line cable:These special accessories must be used with the device.
���� Notice for Users in Europe
This equipment works on the British analogue public switched telephone network.This equipment has been tested according to the pan-European TBR 21 regulation.It will operate on all analogue telephone networks which comply with the TBR 21.Please contact your dealer or network operator, if you are not sure whether your network operates according to TBR 21.
���� Important Notice for New Zealand UsersGeneral"The grant of a Telepermit for any item of terminal equipment indicates only that Telecom has accepted that theitem complies with minimum conditions for connection to its network. It indicates no endorsement of theproduct by Telecom, nor does it provide any sort of warranty. Above all, it provides no assurance that any itemwill work correctly in all respects with another item of Telepermitted equipment of a different make or model,nor does it imply that any product is compatible with all of Telecom's network services. In particular the higherspeeds which this modem is capable of, can only be achieved in ideal conditions."
"This equipment shall not be used in any manner which could constitute a nuisance to other Telecomcustomers."
This equipment shall not be set up to make automatic calls to the Telecom '111' Emergency Service.
To avoid telephone charges for local calls, be sure to store numbers "without" area code in your rapid or speeddial locations.
This equipment may not provide for the effective hand-over of a call to another device connected to the same line.
WARNING:
This is a Class A product. In a domestic environment this product may cause radio interference in which casethe user may be required to take adequate measures.
This equipment complies with the requirements of Directive 1999/5/EC.
Dieses Gerät entspricht den Anforderungen der EU-Richtlinie 1999/5/EG.
Cet appareil est conforme aux exigences de la directive 1999/5/CE.
Este aparato satisface las exigencias de las Directiva 1999/5/CE.
Quest'apparecchio è conforme ai requisiti delle direttiva 1999/5/CE.
Dit apparaat voldoet aan de eisen van de richtlijn 1999/5/EG.
Este equipamento obedece às exigências da directiva 1999/5/CE.
Denna utrustning uppfyller kraven enligt direktiv 1999/5/EC.
Dette udstyr overholder kravene i direktiv 1999/5/EF.
Dette produktet oppfyller kravene i direktiv 1999/5/EC.
Tämä laite täyttää direktiivi 1999/5/EY.
cover1-2.fm 2 ページ 2004年10月15日 金曜日 午前9時32分
0-1
INTRODUCTIONThank you for purchasing this product. This manual only explains the facsimile functions of the product. For safetyprecautions and general information on using the machine such as loading paper, clearing misfeeds, and handlingperipheral units, see the "Operation manual (for general information and copier operation)". For other functions, seethe following manuals as appropriate:Copier function: See "Operation manual (for general information and copier operation)".General and copier-related key operator programs: See the key operator's guide.Printer function: See "Operation manual (for printer)".Network scanner function: See "Operation manual (for network scanner)". (if the network scanner option isinstalled)The explanations in this manual assume that certain peripheral units are installed.
The display screens, messages, and key names shown in the manual may differ from those on the actual machinedue to product improvements and modifications.
WhaleII_fax_ex.book 1 ページ 2004年9月21日 火曜日 午後1時9分
0-2
CONTENTSPage
INTRODUCTION ........................................................ 0-1
TO USE THIS PRODUCT CORRECTLY AS AFACSIMILE................................................................. 0-4
� IMPORTANT SAFETY INFORMATION................ 0-5
� NOTICE FOR USERS IN AUSTRALIA AND NEW ZEALAND.............................................................. 0-5
CHAPTER 1BEFORE USING THE FAX FEATUREPOINTS TO CHECK AND PROGRAM AFTERINSTALLATION .......................................................... 1-2
CONNECTING AN EXTENSION PHONE .................. 1-2
� CONNECTING AN EXTENSION PHONE............. 1-2A LOOK AT THE OPERATION PANEL...................... 1-3
� FAX MODE (CONDITION SETTINGS SCREEN)..... 1-4
ORIGINALS ................................................................ 1-6
� ORIGINALS THAT CAN BE FAXED..................... 1-6LOADING A DOCUMENT........................................... 1-7
� USING THE REVERSING AUTOMATIC DOCUMENT FEEDER.......................................... 1-7
� USING THE DOCUMENT GLASS........................ 1-7
CHECKING THE SIZE OF A LOADED ORIGINAL .... 1-8� MANUALLY SETTING THE SCANNING SIZE ..... 1-8
SELECTING RESOLUTION AND EXPOSURE SETTINGS..... 1-9
� SELECTING THE RESOLUTION ......................... 1-9� SELECTING THE EXPOSURE............................. 1-10
CONVENIENT DIALING METHODS.......................... 1-11
CHAPTER 2BASIC OPERATIONSSENDING A FAX ........................................................ 2-2
� BASIC PROCEDURE FOR SENDING FAXES..... 2-2� TRANSMISSION BY AUTO-DIALING (ONE-
TOUCH DIALING AND GROUP DIALING)........... 2-3� FAXING A TWO-SIDED ORIGINAL...................... 2-4
PRIORITY TRANSMISSION OF A STORED JOB ..... 2-6
CANCELLING A FAX TRANSMISSION ..................... 2-6� CANCELLING ON-HOOK DIALING...................... 2-6
RECEIVING FAXES ................................................... 2-7
� RECEIVING A FAX ............................................... 2-7
CHAPTER 3USING CONVENIENT FUNCTIONS 1ADVANCED TRANSMISSION METHODS
Page
SENDING THE SAME DOCUMENT TO MULTIPLEDESTINATIONS IN A SINGLE OPERATION(BROADCAST TRANSMISSION) ............................... 3-2
� USING BROADCAST TRANSMISSION ............... 3-3
AUTOMATIC TRANSMISSION AT A SPECIFIEDTIME (TIMER TRANSMISSION)................................. 3-4
� SETTING UP A TIMER TRANSMISSION ............. 3-4TRANSMISSION AND RECEPTION USING THEPOLLING FUNCTION ................................................. 3-5
� USING THE POLLING FUNCTION....................... 3-6
� USING POLLING MEMORY ................................. 3-7
OWN NUMBER SENDING.......................................... 3-9
FAXING A DIVIDED ORIGINAL (DUAL PAGE SCAN) ........ 3-10PROGRAMMING FREQUENTLY USED OPERATIONS..... 3-11
� USING A PROGRAM ............................................ 3-11
TRANSFERRING RECEIVED FAXES TO ANOTHERMACHINE WHEN PRINTING IS NOT POSSIBLE(FORWARDING FUNCTION) ..................................... 3-12
� USING THE TRANSFER FUNCTION ................... 3-12
CHAPTER 4USING CONVENIENT FUNCTIONS 2TRANSMISSION USING F-CODESTRANSMISSION BETWEEN MACHINESSUPPORTING F-CODES ........................................... 4-2
� MEMORY BOXES AND SUB-ADDRESSES/PASSCODES REQUIRED FOR F-CODE TRANSMISSION................... 4-2
� ENTERING (DIALING) A FAX NUMBER WITH A SUB-ADDRESS AND PASSCODE ....................... 4-3
� CREATING A MEMORY BOX FOR F-CODE TRANSMISSION ................................................... 4-3
F-CODE POLLING MEMORY..................................... 4-4
� USING F-CODE POLLING MEMORY................... 4-4
� PROCEDURE FOR F-CODE POLLING................ 4-5F-CODE CONFIDENTIAL TRANSMISSION............... 4-6
� F-CODE CONFIDENTIAL TRANSMISSION ......... 4-6
� PRINTING A DOCUMENT RECEIVED TO AN F-CODE CONFIDENTIAL MEMORY BOX ............... 4-7
F-CODE RELAY BROADCAST TRANSMISSION...... 4-8� USING THE F-CODE RELAY BROADCAST
FUNCTION (your machine is the relay machine) .. 4-9� USING THE F-CODE RELAY REQUEST FUNCTION
(your machine requests a relay broadcast) ................ 4-9
WhaleII_fax_ex.book 2 ページ 2004年9月21日 火曜日 午後1時9分
CONTENTS
0-3
CHAPTER 5USING CONVENIENT FUNCTIONS 3CONVENIENT METHODS OF USE
PageUSING AN EXTENSION PHONE............................... 5-2
� SENDING A FAX AFTER TALKING (MANUAL TRANSMISSION)........................................................ 5-2
� USING AN EXTENSION PHONE TO RECEIVE A FAX .... 5-3
� RECEIVING A FAX AFTER TALKING (MANUAL RECEPTION) ........................................................ 5-4
CHAPTER 6PROGRAMMINGPROGRAMMING........................................................ 6-2
STORING, EDITING, AND DELETING AUTO DIALKEYS AND PROGRAMS............................................ 6-2
� STORING ONE-TOUCH KEYS............................. 6-3
� EDITING AND DELETING ONE-TOUCH KEYS... 6-5� STORING A GROUP KEY .................................... 6-6
� EDITING AND DELETING GROUP KEYS ........... 6-7
� STORING A PROGRAM....................................... 6-8� EDITING AND DELETING PROGRAMS .............. 6-8
STORING A GROUP INDEX...................................... 6-9
PROGRAMMING, EDITING, AND DELETING F-CODE MEMORY BOXES........................................... 6-10
� PROGRAMMING AN F-CODE MEMORY BOX.... 6-10� SETTING FOR F-CODE POLLING MEMORY
BOXES (POLLING TIMES)................................... 6-11� SETTING FOR F-CODE CONFIDENTIAL
TRANSMISSION MEMORY BOXES (PRINT PIN).... 6-12� SETTING FOR F-CODE RELAY BROADCAST
MEMORY BOXES (RECIPIENT) .......................... 6-13� EDITING AND DELETING A MEMORY BOX....... 6-14
PRINTING PROGRAMMED INFORMATION............. 6-14
ENTERING CHARACTERS........................................ 6-15
CHAPTER 7TROUBLESHOOTINGWHEN A TRANSACTION REPORT IS PRINTED...... 7-2VIEWING THE COMMUNICATION ACTIVITY REPORT..... 7-3
WHEN AN ALARM SOUNDS AND A WARNINGMESSAGE IS DISPLAYED......................................... 7-3
PROBLEMS AND SOLUTIONS.................................. 7-4
CHAPTER 8KEY OPERATOR PROGRAMS
Page
KEY OPERATOR PROGRAMS.................................. 8-2
� KEY OPERATOR PROGRAM LIST ...................... 8-2� USING THE KEY OPERATOR PROGRAMS........ 8-3
� EXPLANATION OF SETTING PROGRAMS......... 8-4
� FAX SETTINGS..................................................... 8-4� PRINTING OUT SETTINGS.................................. 8-12
CHAPTER 9APPENDIXSPECIFICATIONS ...................................................... 9-2
INDEX ......................................................................... 9-3
WhaleII_fax_ex.book 3 ページ 2004年9月21日 火曜日 午後1時9分
0-4
TO USE THIS PRODUCT CORRECTLY ASA FACSIMILESeveral points must be kept in mind when using this product as a facsimile. Please note the following:
���� Line connectionUse the telephone cable supplied to connect themachine to a telephone line. Insert the end of the linecord with the core into the LINE socket on themachine as shown. Insert the other end into thetelephone line socket.
In some countries, an adapter is required to connect thetelephone line cable to the wall telephone socket, asshown in the illustration.
���� Fax power switchWhen using the machine, be sure to keep the fax power switch turnedon at all times. The fax power switch must be turned on to receivefaxes at night or send timer transmission faxes at night.
���� Settings and programmingInformation about settings and programming that are required before the fax functionality can be used is locatedin "POINTS TO CHECK AND PROGRAM AFTER INSTALLATION" on page 1-2 of this manual. Please read thissection and perform the required settings and programming.
���� Lithium batteryA lithium battery inside the machine keeps key operator program settings for the fax function in memory.� When the battery dies, settings and programmed information will be lost. Be sure to keep a written record of
the settings and programmed information. (Refer to page 6-14.)� The life of the lithium battery is approximately 5 years if the main switch and fax power switch are kept
continually off.
���� Other information� If a thunderstorm occurs, we recommend that you unplug the power cord from the power outlet. Information
will be retained in memory even if the power cord is unplugged.
Core
Line socket
Adapter
Wall socket
For Australia
For New Zealand
For United Kingdom
OFF
Fax power switch
ON
WhaleII_fax_ex.book 4 ページ 2004年9月21日 火曜日 午後1時9分
TO USE THIS PRODUCT CORRECTLY AS A FACSIMILE
0-5
IMPORTANT SAFETY INFORMATION� If any of your telephone equipment is not operating properly, you should immediately remove it from your telephone
line, as it may cause harm to the telephone network.� The AC power outlet shall be installed near the equipment and shall be easily accessible.� Never install telephone wiring during a lightning storm.� Never install telephone jacks in wet locations unless the jack is specifically designed for wet locations.� Never touch uninsulated telephone wires or terminals unless the telephone line has been disconnected at the
network interface.� Use caution when installing or modifying telephone lines.� Avoid using a telephone (other than a cordless type) during an electrical storm. There may be a remote risk of
electric shock from lightning.� Do not use a telephone to report a gas leak in the vicinity of the leak.� Do not install or use the machine near water, or when you are wet. Take care not to spill any liquids on the machine.
NOTICE FOR USERS IN AUSTRALIA AND NEW ZEALANDYour fax machine and the telephone system
WARNING NOTICE:NO calls can be made to or from this fax during a mains power failure.
� This is a Class A product. In a domestic environment this product may cause radio interference in which case theuser may be required to take adequate measures.
WARNINGAustralian Communications Authority (ACA) regulations state that no unauthorised changes or modifications to thisequipment are permitted.
Note: Complies with the following standards,ACA TS001-1997, AS/NZS 60950:2000AS/ACIF S002:2001, NZ TELECOM and AS/NZS CISPR 22:2002
These limits are designed to provide reasonable protection against interference in an installation. This equipmentgenerates, uses and can radiate radio frequency energy and, if not installed and used in accordance with theinstructions, may cause interference. However, there is no guarantee that interference will not occur in a particularinstallation.
If this equipment does cause interference to radio or television reception, which can be determined by turning theequipment off and on, the user is encouraged to try to correct the interference by one or more of the followingmeasures:
� Reorient or relocate the receiving antenna.� Increase the separation between the equipment and the receiver.� Connect the equipment to an outlet on a different circuit to that which the receiver is connected.� Consult the dealer or an experienced radio/TV technician for help.
The Ringer Equivalence Number (REN) for this equipment is written on the A-Tick label.
Important safety informationIn Australia, installing or modifying telephone lines should only be done by an ACA licensed serviceman. In NewZealand, installing or modifying telephone lines should be done in accordance with Telecom wiring practices.
Whale_00.fm 5 ページ 2004年10月15日 金曜日 午前9時38分

WhaleII_fax_ex.book 6 ページ 2004年9月21日 火曜日 午後1時9分
1-1
CHAPTER 1BEFORE USING THE FAX
FEATUREThis chapter contains basic information about using the fax features ofthis product. Please read this chapter before using the fax features.
Page
POINTS TO CHECK AND PROGRAM AFTER INSTALLATION..............1-2CONNECTING AN EXTENSION PHONE ................................................1-2
� CONNECTING AN EXTENSION PHONE ...................................... 1-2
A LOOK AT THE OPERATION PANEL....................................................1-3� FAX MODE (CONDITION SETTINGS SCREEN)........................... 1-4
ORIGINALS ..............................................................................................1-6� ORIGINALS THAT CAN BE FAXED............................................... 1-6
LOADING A DOCUMENT.........................................................................1-7� USING THE REVERSING AUTOMATIC DOCUMENT FEEDER...... 1-7� USING THE DOCUMENT GLASS.................................................. 1-7
CHECKING THE SIZE OF A LOADED ORIGINAL...................................1-8� MANUALLY SETTING THE SCANNING SIZE............................... 1-8
SELECTING RESOLUTION AND EXPOSURE SETTINGS.....................1-9� SELECTING THE RESOLUTION ................................................... 1-9� SELECTING THE EXPOSURE....................................................... 1-10
CONVENIENT DIALING METHODS ........................................................1-11
WhaleII_fax_ex.book 1 ページ 2004年9月21日 火曜日 午後1時9分
1-2
POINTS TO CHECK AND PROGRAMAFTER INSTALLATIONAfter installing the unit and before using it as a fax machine, check the following points and program the requiredinformation.
���� Make sure the fax power switch is turned onIn addition to the main switch (see page 1-4 of the "Operation manual (for general information and copieroperation)"), the machine also has a fax power switch (see "Fax power switch" on page 0-4). When using themachine, be sure to keep the fax power switch turned on at all times.
���� Make sure the correct date and time have been setMake sure the correct date and time have been programmed in the unit (refer to page 2-13 of "Operation manual(for general information and copier operation)"). If the date and time are wrong, please correct them.It is important to set the correct date and time because they are used for such features as Timer Transmission(page 3-4).
���� Program the sender's name and sender's numberThe name and fax number of the user of the machine is programmed in "Own number and name set" (page8-5) in the key operator programs.The programmed name and number are printed at the top of each transmitted fax page. The sender's numberis also used as an identification number when you use the Polling function to request transmission from anotherfax machine (See "USING THE POLLING FUNCTION" on page 3-6).
CONNECTING AN EXTENSION PHONEYou can connect a telephone to the machine and use it as an extension phone to place and receive calls like any normalphone. When the other party has made the call, the extension phone can be used to activate fax reception. (remoteoperation)
CONNECTING AN EXTENSION PHONE1 Insert the end of the extension phone cord
into the extension phone socket on therear of the machine.
Make sure you hear a"click" sound indicatingthat the cord is securelyconnected.
NOTESYou can check your programmed name and number by printing out the Sender List. (Refer to "PRINTING OUTSETTINGS" page 8-12.)
NOTES� If you connect a combination telephone/answering machine to the machine, you will not be able to use the
answering machine function.� You can place calls from the phone even during a power failure.
Extensionphonesocket
NOTEIn New Zealand, not all standard telephones andanswering machines will respond to incomingringing when connected to the extension socket ofthe equipment.
WhaleII_fax_ex.book 2 ページ 2004年9月21日 火曜日 午後1時9分

1-3
1
A LOOK AT THE OPERATION PANELThe operation panel used for the fax function is described below.
Touch panel (following page)
• Messages and keys appear on the touch panel.Key input is accomplished by touching the keys.
• When a key in the touch panel is touched, a beepsounds and the key is highlighted.
• Keys that cannot be selected in a screen aregreyed out. If touched, a double-beep will soundto alert you that the key cannot be selected.
Mode select keys (page 2-2)
Use these keys to change modes.
[IMAGE SEND] key
Press to switch to fax mode. The initial screen offax mode will appear.When the network scanner option is installed,touch this key to return to the initial screen of faxmode or scanner mode, whichever mode wasselected last. (Pressing the [IMAGE SEND] key ina copy screen or printer screen returns you to theinitial screen of fax mode.) To switch to the initialscreen of fax mode from the initial screen ofscanner mode, touch the [SCANNER/FAX] key(see on page 1-4).
Numeric keys
Use to enter fax numbers, sub-addresses,passcodes, and numerical settings. (See"MEMORY BOXES ANDSUB-ADDRESSES/PASSCODES REQUIREDFOR F-CODE TRANSMISSION" on page 4-2.)On the model for Singapore, alphabets aredescribed on each numeric key.
[C] key (clear key)
Use to clear a mistake when entering fax numbers,sub-addresses, passcodes, and numericalsettings. One digit is cleared each time you pressthe key.When an original is being scanned, this key canalso be used to cancel scanning.
[CA] key (clear all key)
Use to cancel a transmission or programmingoperation. When this key is pressed, the operationis cancelled and you return to the initial screendescribed on the following page.This key is also used to cancel a resolution, papersize, or special function setting that was selectedwhen sending a fax.
[ ] key (page 5-4)
This is used to produce tone signals when you areon a pulse dial line.
[BLACK COPY START] key (page 2-3)
Press to begin scanning an original for faxtransmission.
[COLOUR COPY START] key
Not used when using the machine as a faxmachine. (For information on this key, see page1-8 of the "Operation manual (for generalinformation and copier operation)".)
1 2 3 4 5 6 9
7 8
1
2
3
8
4
5
6
7
8
9
NOTEFor the names and functions of the parts of the machine, see page 1-4 of the "Operation manual (for generalinformation and copier operation)".
Whale_01.fm 3 ページ 2004年10月15日 金曜日 午前9時41分
A LOOK AT THE OPERATION PANEL
1-4
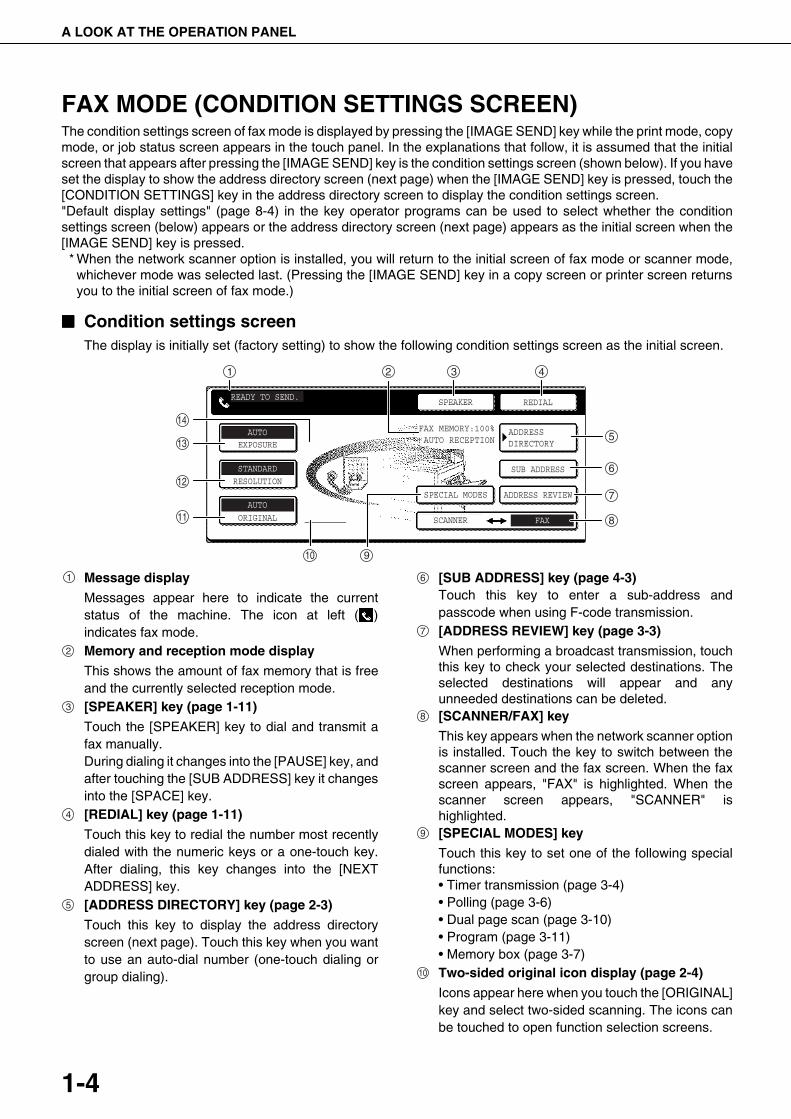
FAX MODE (CONDITION SETTINGS SCREEN)The condition settings screen of fax mode is displayed by pressing the [IMAGE SEND] key while the print mode, copymode, or job status screen appears in the touch panel. In the explanations that follow, it is assumed that the initialscreen that appears after pressing the [IMAGE SEND] key is the condition settings screen (shown below). If you haveset the display to show the address directory screen (next page) when the [IMAGE SEND] key is pressed, touch the[CONDITION SETTINGS] key in the address directory screen to display the condition settings screen."Default display settings" (page 8-4) in the key operator programs can be used to select whether the conditionsettings screen (below) appears or the address directory screen (next page) appears as the initial screen when the[IMAGE SEND] key is pressed.
* When the network scanner option is installed, you will return to the initial screen of fax mode or scanner mode,whichever mode was selected last. (Pressing the [IMAGE SEND] key in a copy screen or printer screen returnsyou to the initial screen of fax mode.)
���� Condition settings screenThe display is initially set (factory setting) to show the following condition settings screen as the initial screen.
Message display
Messages appear here to indicate the currentstatus of the machine. The icon at left ( )indicates fax mode.Memory and reception mode display
This shows the amount of fax memory that is freeand the currently selected reception mode.[SPEAKER] key (page 1-11)
Touch the [SPEAKER] key to dial and transmit afax manually.During dialing it changes into the [PAUSE] key, andafter touching the [SUB ADDRESS] key it changesinto the [SPACE] key.[REDIAL] key (page 1-11)
Touch this key to redial the number most recentlydialed with the numeric keys or a one-touch key.After dialing, this key changes into the [NEXTADDRESS] key.[ADDRESS DIRECTORY] key (page 2-3)
Touch this key to display the address directoryscreen (next page). Touch this key when you wantto use an auto-dial number (one-touch dialing orgroup dialing).
[SUB ADDRESS] key (page 4-3)Touch this key to enter a sub-address andpasscode when using F-code transmission.[ADDRESS REVIEW] key (page 3-3)
When performing a broadcast transmission, touchthis key to check your selected destinations. Theselected destinations will appear and anyunneeded destinations can be deleted.[SCANNER/FAX] key
This key appears when the network scanner optionis installed. Touch the key to switch between thescanner screen and the fax screen. When the faxscreen appears, "FAX" is highlighted. When thescanner screen appears, "SCANNER" ishighlighted.[SPECIAL MODES] key
Touch this key to set one of the following specialfunctions:• Timer transmission (page 3-4)• Polling (page 3-6)• Dual page scan (page 3-10)• Program (page 3-11)• Memory box (page 3-7)Two-sided original icon display (page 2-4)
Icons appear here when you touch the [ORIGINAL]key and select two-sided scanning. The icons canbe touched to open function selection screens.
ADDRESSDIRECTORY
AUTO
READY TO SEND.
ORIGINAL
STANDARD
RESOLUTION
AUTOEXPOSURE
SUB ADDRESS
ADDRESS REVIEWSPECIAL MODES
REDIALSPEAKER
FAX MEMORY:100%AUTO RECEPTION
SCANNER FAX
1 2 3 4
5
6
7
8
910
11
12
13
14
1
2
3
4
5
6
7
8
9
10
WhaleII_fax_ex.book 4 ページ 2004年9月21日 火曜日 午後1時9分
A LOOK AT THE OPERATION PANEL
1-5
1
[ORIGINAL] key (page 1-8)
Touch this key when you wish to manually set thesize of the original to be scanned or scan bothsides of the original.[RESOLUTION] key (page 1-9)Touch this key to change the resolution setting forthe original to be scanned. The selected resolutionsetting will be highlighted above the key. The initialfactory setting is [STANDARD].
[EXPOSURE] key (page 1-10)Touch this key to change the exposure setting forthe original to be scanned. The selected exposuresetting will be highlighted above the key. The initialfactory setting is [AUTO].Special function icon display (page 6-2 of"Operation manual (for general informationand copier operation)")When a special function such as polling or dualpage scan is selected, a special function iconappears here.
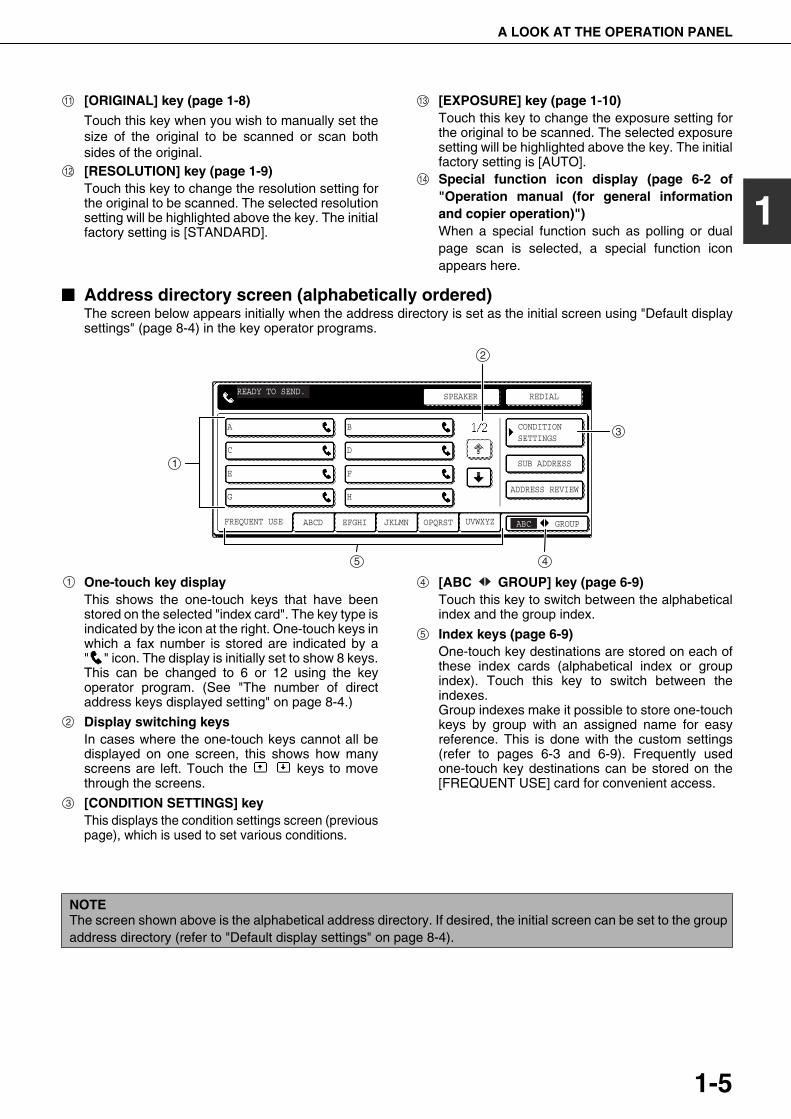
���� Address directory screen (alphabetically ordered)The screen below appears initially when the address directory is set as the initial screen using "Default displaysettings" (page 8-4) in the key operator programs.
One-touch key displayThis shows the one-touch keys that have beenstored on the selected "index card". The key type isindicated by the icon at the right. One-touch keys inwhich a fax number is stored are indicated by a" " icon. The display is initially set to show 8 keys.This can be changed to 6 or 12 using the keyoperator program. (See "The number of directaddress keys displayed setting" on page 8-4.)
Display switching keysIn cases where the one-touch keys cannot all bedisplayed on one screen, this shows how manyscreens are left. Touch the keys to movethrough the screens.
[CONDITION SETTINGS] keyThis displays the condition settings screen (previouspage), which is used to set various conditions.
[ABC GROUP] key (page 6-9)Touch this key to switch between the alphabeticalindex and the group index.
Index keys (page 6-9)One-touch key destinations are stored on each ofthese index cards (alphabetical index or groupindex). Touch this key to switch between theindexes.Group indexes make it possible to store one-touchkeys by group with an assigned name for easyreference. This is done with the custom settings(refer to pages 6-3 and 6-9). Frequently usedone-touch key destinations can be stored on the[FREQUENT USE] card for convenient access.
11
12
13
14
A
FREQUENT USE ABCD EFGHI JKLMN OPQRST UVWXYZ ABC GROUP
B
C D
E F
G H
CONDITIONSETTINGS
READY TO SEND.
SUB ADDRESS
ADDRESS REVIEW
REDIALSPEAKER
1
2
3
45
1
2
3
4
5
NOTEThe screen shown above is the alphabetical address directory. If desired, the initial screen can be set to the groupaddress directory (refer to "Default display settings" on page 8-4).
WhaleII_fax_ex.book 5 ページ 2004年9月21日 火曜日 午後1時9分
1-6
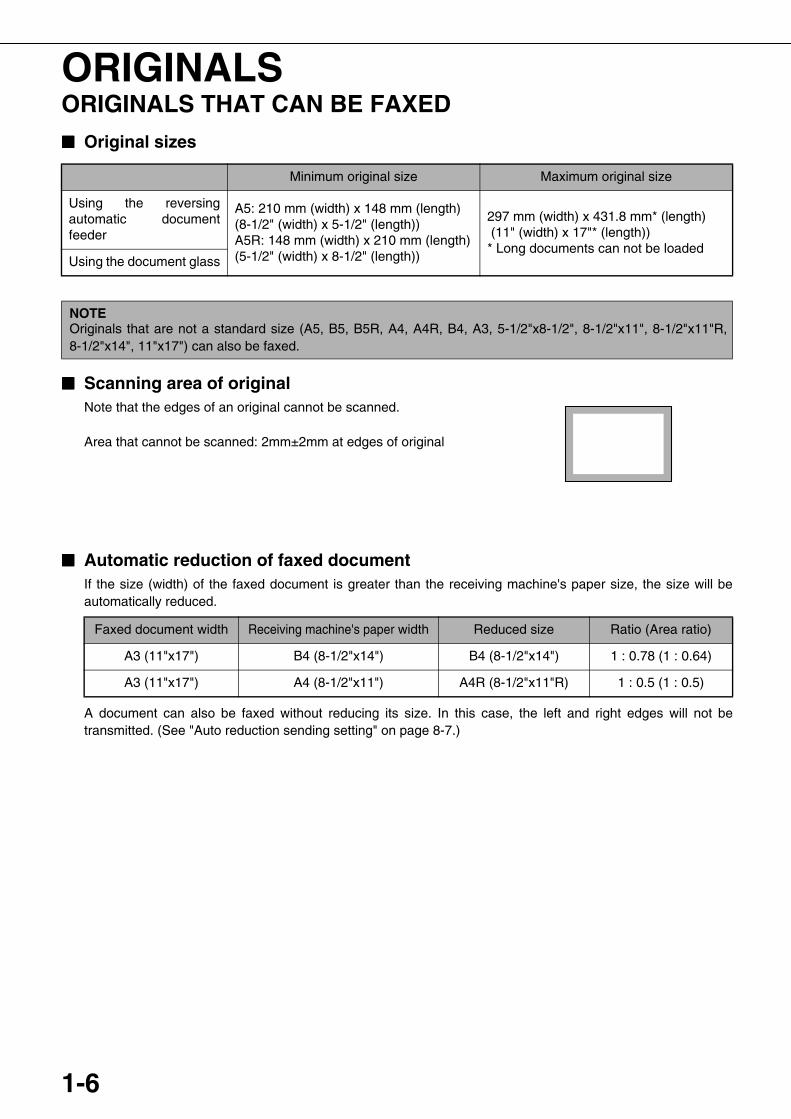
ORIGINALSORIGINALS THAT CAN BE FAXED���� Original sizes
���� Scanning area of originalNote that the edges of an original cannot be scanned.
Area that cannot be scanned: 2mm±2mm at edges of original
���� Automatic reduction of faxed documentIf the size (width) of the faxed document is greater than the receiving machine's paper size, the size will beautomatically reduced.
A document can also be faxed without reducing its size. In this case, the left and right edges will not betransmitted. (See "Auto reduction sending setting" on page 8-7.)
Minimum original size Maximum original size
Using the reversingautomatic documentfeeder
A5: 210 mm (width) x 148 mm (length)(8-1/2" (width) x 5-1/2" (length))A5R: 148 mm (width) x 210 mm (length)(5-1/2" (width) x 8-1/2" (length))
297 mm (width) x 431.8 mm* (length) (11" (width) x 17"* (length))* Long documents can not be loaded
Using the document glass
NOTEOriginals that are not a standard size (A5, B5, B5R, A4, A4R, B4, A3, 5-1/2"x8-1/2", 8-1/2"x11", 8-1/2"x11"R,8-1/2"x14", 11"x17") can also be faxed.
Faxed document width Receiving machine's paper width Reduced size Ratio (Area ratio)
A3 (11"x17") B4 (8-1/2"x14") B4 (8-1/2"x14") 1 : 0.78 (1 : 0.64)
A3 (11"x17") A4 (8-1/2"x11") A4R (8-1/2"x11"R) 1 : 0.5 (1 : 0.5)
WhaleII_fax_ex.book 6 ページ 2004年9月21日 火曜日 午後1時9分
1-7
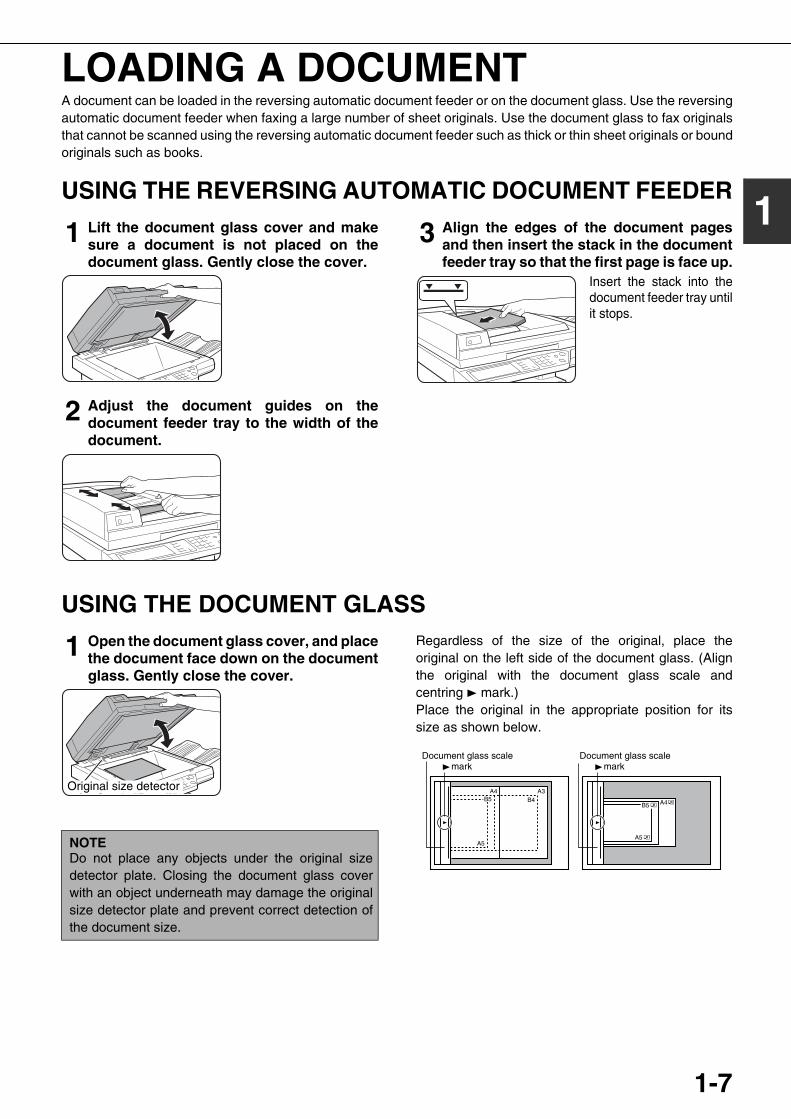
1
LOADING A DOCUMENTA document can be loaded in the reversing automatic document feeder or on the document glass. Use the reversingautomatic document feeder when faxing a large number of sheet originals. Use the document glass to fax originalsthat cannot be scanned using the reversing automatic document feeder such as thick or thin sheet originals or boundoriginals such as books.
USING THE REVERSING AUTOMATIC DOCUMENT FEEDER
1 Lift the document glass cover and makesure a document is not placed on thedocument glass. Gently close the cover.
2 Adjust the document guides on thedocument feeder tray to the width of thedocument.
3 Align the edges of the document pagesand then insert the stack in the documentfeeder tray so that the first page is face up.
Insert the stack into thedocument feeder tray untilit stops.
USING THE DOCUMENT GLASS
1 Open the document glass cover, and placethe document face down on the documentglass. Gently close the cover.
Regardless of the size of the original, place theoriginal on the left side of the document glass. (Alignthe original with the document glass scale andcentring mark.)Place the original in the appropriate position for itssize as shown below.
NOTEDo not place any objects under the original sizedetector plate. Closing the document glass coverwith an object underneath may damage the originalsize detector plate and prevent correct detection ofthe document size.
Original size detector
A5 R
A4 R
A4
A5
A3B4B5
B5 R
Document glass scalemark
Document glass scalemark
WhaleII_fax_ex.book 7 ページ 2004年9月21日 火曜日 午後1時9分
1-8
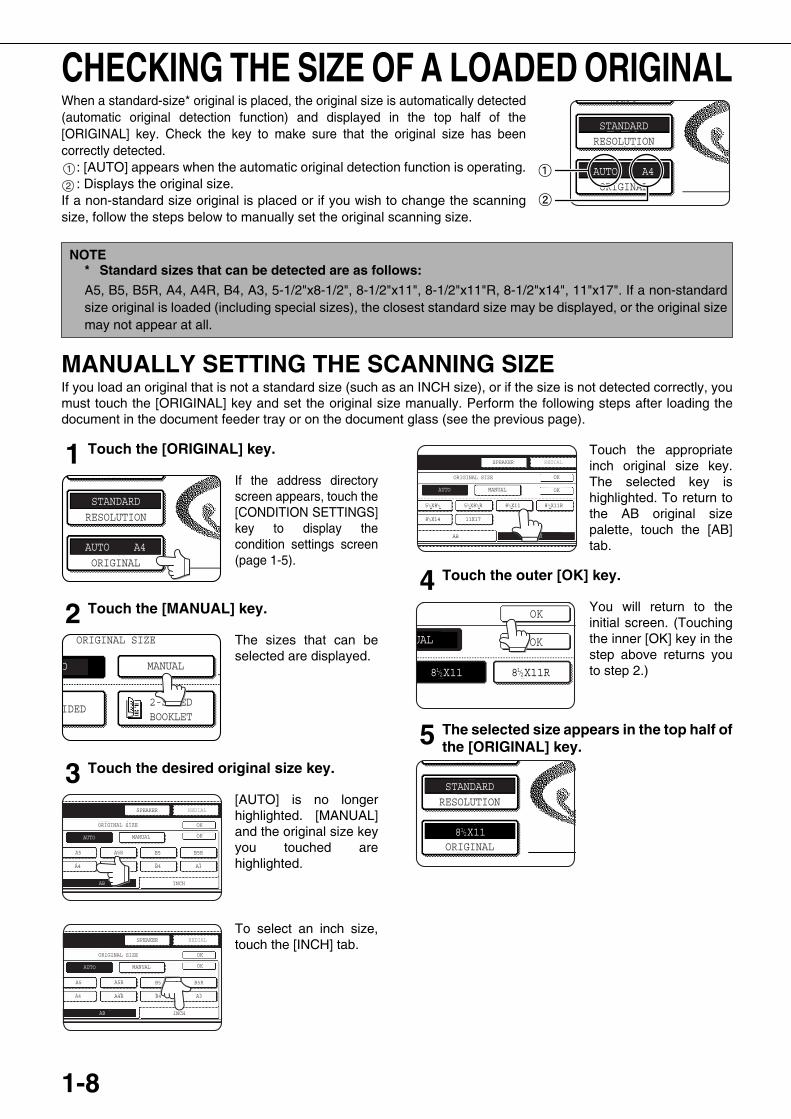
CHECKING THE SIZE OF A LOADED ORIGINALWhen a standard-size* original is placed, the original size is automatically detected(automatic original detection function) and displayed in the top half of the[ORIGINAL] key. Check the key to make sure that the original size has beencorrectly detected.
: [AUTO] appears when the automatic original detection function is operating.: Displays the original size.
If a non-standard size original is placed or if you wish to change the scanningsize, follow the steps below to manually set the original scanning size.
MANUALLY SETTING THE SCANNING SIZEIf you load an original that is not a standard size (such as an INCH size), or if the size is not detected correctly, youmust touch the [ORIGINAL] key and set the original size manually. Perform the following steps after loading thedocument in the document feeder tray or on the document glass (see the previous page).
1 Touch the [ORIGINAL] key.
If the address directoryscreen appears, touch the[CONDITION SETTINGS]key to display thecondition settings screen(page 1-5).
2 Touch the [MANUAL] key.
The sizes that can beselected are displayed.
3 Touch the desired original size key.
[AUTO] is no longerhighlighted. [MANUAL]and the original size keyyou touched arehighlighted.
To select an inch size,touch the [INCH] tab.
Touch the appropriateinch original size key.The selected key ishighlighted. To return tothe AB original sizepalette, touch the [AB]tab.
4 Touch the outer [OK] key.
You will return to theinitial screen. (Touchingthe inner [OK] key in thestep above returns youto step 2.)
5 The selected size appears in the top half ofthe [ORIGINAL] key.
NOTE* Standard sizes that can be detected are as follows:
A5, B5, B5R, A4, A4R, B4, A3, 5-1/2"x8-1/2", 8-1/2"x11", 8-1/2"x11"R, 8-1/2"x14", 11"x17". If a non-standardsize original is loaded (including special sizes), the closest standard size may be displayed, or the original sizemay not appear at all.
AUTO A4ORIGINAL
STANDARDRESOLUTION
1
2
AUTO A4ORIGINAL
STANDARD
RESOLUTION
MANUAL
ORIGINAL SIZE
O
2-SIDEDBOOKLET
IDED
OK
OK
ORIGINAL SIZE
SPEAKER REDIAL
MANUALAUTO
B4A4
A5 A5R
A4R
B5
A3
B5R
INCHAB
OK
OK
ORIGINAL SIZE
SPEAKER REDIAL
MANUALAUTO
B4A4
A5 A5R
A4R
B5
A3
B5R
INCHAB
SPEAKER REDIAL
OK
OK
ORIGINAL SIZE
MANUALAUTO
INCHAB
8 X111 / 2 8 X11R1 / 25 X8 R1 / 21 / 25 X8 1 / 2
1 / 2
8 X141 / 2 11X17
8 X11R1 / 2
OK
OKUAL
8 X111 / 2
ORIGINAL
STANDARDRESOLUTION
8 X111 / 2
WhaleII_fax_ex.book 8 ページ 2004年9月21日 火曜日 午後1時9分
1-9
1
SELECTING RESOLUTION AND EXPOSURE SETTINGSAfter loading an original, you can adjust the resolution and exposure settings to match the condition of the original--for example, if it has small or faint characters, or if it is a photo. After loading the original in fax mode, adjust thesettings as explained below.
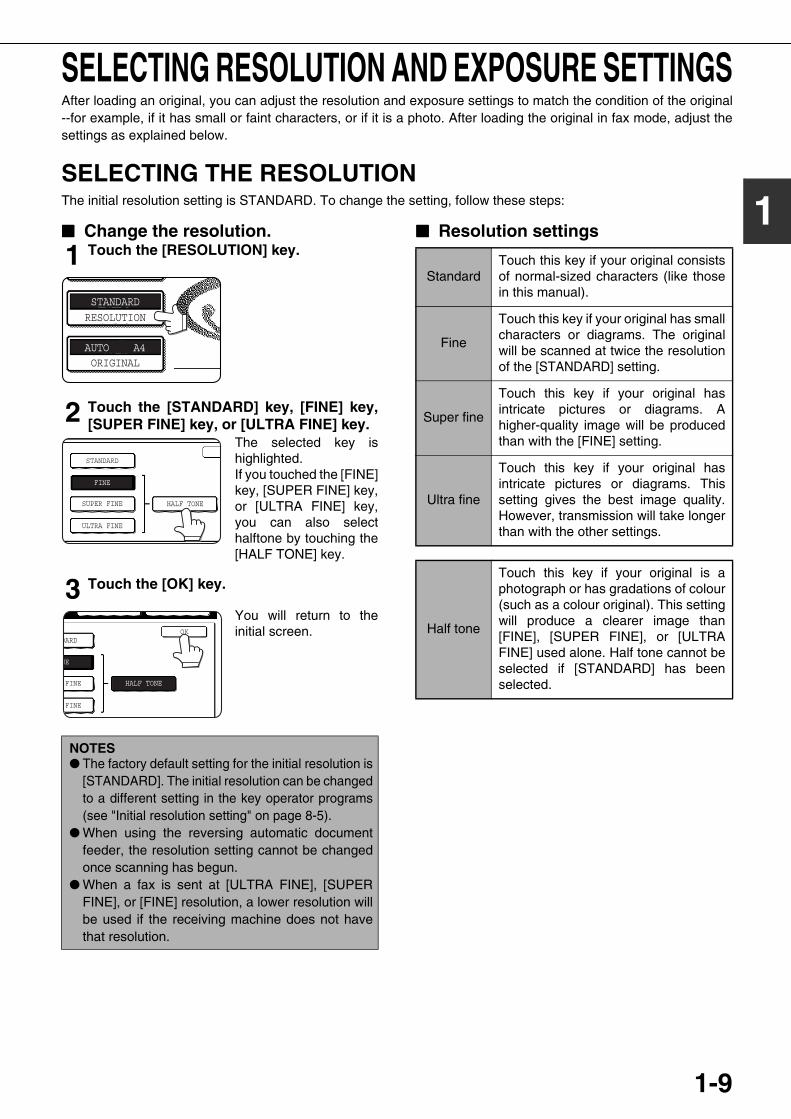
SELECTING THE RESOLUTIONThe initial resolution setting is STANDARD. To change the setting, follow these steps:
���� Change the resolution.
1 Touch the [RESOLUTION] key.
2 Touch the [STANDARD] key, [FINE] key,[SUPER FINE] key, or [ULTRA FINE] key.
The selected key ishighlighted.If you touched the [FINE]key, [SUPER FINE] key,or [ULTRA FINE] key,you can also selecthalftone by touching the[HALF TONE] key.
3 Touch the [OK] key.
You will return to theinitial screen.
���� Resolution settings
NOTES� The factory default setting for the initial resolution is
[STANDARD]. The initial resolution can be changedto a different setting in the key operator programs(see "Initial resolution setting" on page 8-5).
� When using the reversing automatic documentfeeder, the resolution setting cannot be changedonce scanning has begun.
� When a fax is sent at [ULTRA FINE], [SUPERFINE], or [FINE] resolution, a lower resolution willbe used if the receiving machine does not havethat resolution.
AUTO A4ORIGINAL
STANDARDRESOLUTION
STANDARD
FINE
SUPER FINE HALF TONE
ULTRA FINE
DARD
NE
FINE HALF TONE
OK
FINE
StandardTouch this key if your original consistsof normal-sized characters (like thosein this manual).
Fine
Touch this key if your original has smallcharacters or diagrams. The originalwill be scanned at twice the resolutionof the [STANDARD] setting.
Super fine
Touch this key if your original hasintricate pictures or diagrams. Ahigher-quality image will be producedthan with the [FINE] setting.
Ultra fine
Touch this key if your original hasintricate pictures or diagrams. Thissetting gives the best image quality.However, transmission will take longerthan with the other settings.
Half tone
Touch this key if your original is aphotograph or has gradations of colour(such as a colour original). This settingwill produce a clearer image than[FINE], [SUPER FINE], or [ULTRAFINE] used alone. Half tone cannot beselected if [STANDARD] has beenselected.
WhaleII_fax_ex.book 9 ページ 2004年9月21日 火曜日 午後1時9分
SELECTING RESOLUTION AND EXPOSURE SETTINGS
1-10
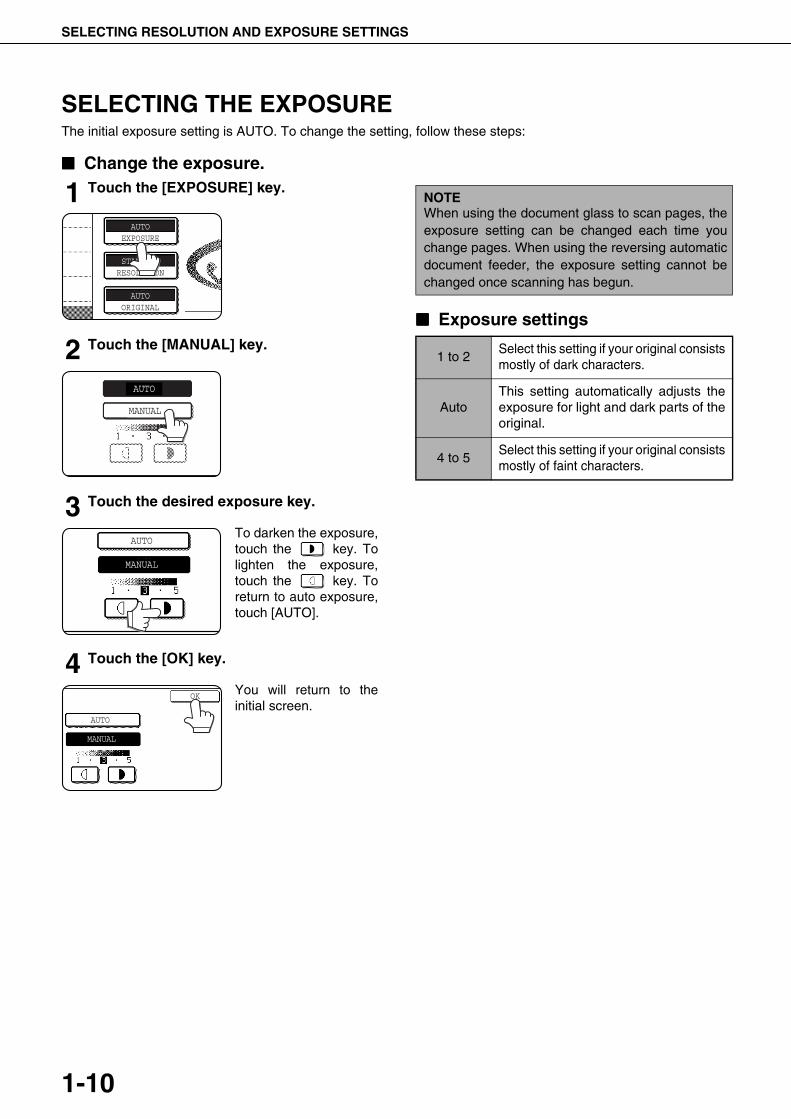
SELECTING THE EXPOSUREThe initial exposure setting is AUTO. To change the setting, follow these steps:
���� Change the exposure.
1 Touch the [EXPOSURE] key.
2 Touch the [MANUAL] key.
3 Touch the desired exposure key.
To darken the exposure,touch the key. Tolighten the exposure,touch the key. Toreturn to auto exposure,touch [AUTO].
4 Touch the [OK] key.
You will return to theinitial screen.
���� Exposure settings
AUTOEXPOSURE
STANDARDRESOLUTION
AUTOORIGINAL
AUTO
MANUAL
MANUAL
AUTO
MANUAL
AUTO
OK
NOTEWhen using the document glass to scan pages, theexposure setting can be changed each time youchange pages. When using the reversing automaticdocument feeder, the exposure setting cannot bechanged once scanning has begun.
1 to 2Select this setting if your original consistsmostly of dark characters.
AutoThis setting automatically adjusts theexposure for light and dark parts of theoriginal.
4 to 5Select this setting if your original consistsmostly of faint characters.
WhaleII_fax_ex.book 10 ページ 2004年9月21日 火曜日 午後1時9分
1-11
1
CONVENIENT DIALING METHODSThe fax function includes a convenient auto dial feature (one-touch dialing and group dialing). By programmingfrequently dialed numbers, you can call and send documents to these locations by means of a simple dialingoperation (refer to page 2-3). There are two types of auto-dialing: one-touch dialing and group dialing. To programauto-dial numbers, refer to pages 6-3, 6-6.
� One-touch dialingSimply press a one-touch key and then press the [BLACKCOPY START] key to dial the programmed location. Aname of up to 36 characters can be programmed for thelocation (a maximum of 18 characters are displayed).When using F-code transmission, a sub-address andpasscode can also be programmed (refer to page 4-2).
Touch the [ADDRESS DIRECTORY] key inthe initial screen to display the above screen.
� Group dialingMultiple one-touch dial locations can be programmed intoa single one-touch key. This is convenient for successivelysending a document to multiple locations.• Full fax numbers entered with the numeric keys cannot
be stored in a group key. First program the number in aone-touch key and then store it in a group key.
Touch the [ADDRESS DIRECTORY] key inthe initial screen to display the above screen.
� RedialingThe machine keeps the last fax number dialed with thenumeric keys in memory. You can redial the last numberdialed by simply touching the [REDIAL] key.
� On-hook dialingTouch the [SPEAKER] key, listen for the dial tone throughthe speaker, and then dial.• Faxes must be sent manually when using on-hook
dialing. (Refer to page 5-2.)• On-hook dialing is not possible using a one-touch key
that includes a sub-address and passcode, or a groupkey.
NOTES� A total of 500 one-touch dial and group keys can be programmed. (Refer to page 6-2.)� Programmed one-touch keys and group keys are stored on "index cards". A one-touch key or group key can be
easily accessed by touching the index key. (Refer to on page 1-5.) � To prevent calling or sending a fax to a wrong number, look carefully at the touch panel and make sure you
program the correct number when programming an auto-dial number. After storing a number, you can also printout the stored number (refer to page 6-14) to make sure it was stored correctly.
FREQUENT USE ABCD EFGHI JKLMN OPQRS
CORPO.TPS
SHARP GROUP
SHARP CORPORATION
No.001:SHARP CORPORATION0666211221
SHARP CORPORATION
FREQUENT USE ABCD EFGHI JKLMN OPQRST
CORPO.TPS
SHARP GROUP
No.005:SHARP GROUPGROUP:025
ADDRESSDIRECTORY
SUB ADDRESS
REDIALAKER
Y:100%EPTION
FAX MEMORY:100%AUTO RECEPTION
ADDRDIRE
SUB
RESPEAKER
5
WhaleII_fax_ex.book 11 ページ 2004年9月21日 火曜日 午後1時9分

WhaleII_fax_ex.book 12 ページ 2004年9月21日 火曜日 午後1時9分
2-1
CHAPTER 2BASIC OPERATIONS
This chapter explains basic operations such as sending and receivingfaxes.
Page
SENDING A FAX .................................................................................... 2-2� BASIC PROCEDURE FOR SENDING FAXES............................... 2-2� TRANSMISSION BY AUTO-DIALING (ONE-TOUCH DIALING
AND GROUP DIALING).................................................................. 2-3� FAXING A TWO-SIDED ORIGINAL................................................ 2-4
PRIORITY TRANSMISSION OF A STORED JOB ................................. 2-6
CANCELLING A FAX TRANSMISSION ................................................. 2-6� CANCELLING ON-HOOK DIALING................................................ 2-6
RECEIVING FAXES ............................................................................... 2-7� RECEIVING A FAX......................................................................... 2-7
WhaleII_fax_ex.book 1 ページ 2004年9月21日 火曜日 午後1時9分
2-2
SENDING A FAXBASIC PROCEDURE FOR SENDING FAXES1 Make sure the machine is in fax mode.
When the [IMAGESEND] key light is on,the machine is in faxmode. If the light is noton, press the [IMAGESEND] key.When the network
scanner option is installed, touch this key to returnto the initial screen of fax mode or scanner mode,whichever mode was selected last. To switch tofax mode from scanner mode, touch the[SCANNER/FAX] key (see on page 1-4).
2 Load the original.
�Using the reversing automatic document feeder:Page 1-7
�Using the document glass: Page 1-7
If you are using the document glass to sendmultiple pages, load the first page first.
3 Check the original size.
If the address directoryscreen appears, touchthe [CONDITIONSETTINGS] key todisplay the conditionsettings screen (page1-5).
If the original is not a standard size or the size wasnot detected correctly, touch the [ORIGINAL] keyto specify the original size. (See "MANUALLYSETTING THE SCANNING SIZE" on page 1-8.)
4 If needed, adjust the resolution setting.(Refer to page 1-9.)
5 If needed, adjust the exposure setting.(Refer to page 1-10.)
6 Dial the fax number.
The number that youentered appears in themessage display (See"Condition settingsscreen" on page 1-4.). Ifit is not correct, press the[C] key and re-enter the
number. You can also use the [REDIAL] key (page1-11) or an auto-dial number (following page).
Entering a pause.If you need to insert apause between digitswhen dialing out from aPBX or when dialing aninternational number,touch the [PAUSE] keyin the upper right cornerof the screen.
Each time you touch the [PAUSE] key, a hyphen("-") appears and a 2-second pause* is inserted.The [PAUSE] key is also be used to link numberstogether (this is called chain dialing). Enter anumber, touch the [PAUSE] key to enter a hyphen"-", and then enter another number with thenumeric keys or by pressing a one-touch key. Thelinked numbers will be dialed as one number.* The duration of each pause can be changed with
the key operator program. ("Pause time setting"on page 8-5.)
NOTE
You cannot load documents in both the documentfeeder tray and on the document glass and sendthem in a single fax transmission.
8
AUTO A4ORIGINAL
STANDARDRESOLUTION
EXPOSURE
AUTO A4ORIGINAL
STANDARDRESOLUTION
OSU
AUTO
ORIGINAL
STANDARD
RESOLUTION
AUTOEXPOSURE
ADDRESSDIRECTO
SUB ADD
NEXT ADDPAUSE
FAX MEMORY:100%AUTO RECEPTION
WhaleII_fax_ex.book 2 ページ 2004年9月21日 火曜日 午後1時9分
SENDING A FAX
2-3
2
7 Press the [BLACK COPY START] key.
Scanning begins.If there are no previousjobs in progress and theline is free, the machinewill dial the receivingmachine and begintransmission as soon asthe first page is
scanned. Transmission will take place while anyremaining pages are scanned (Quick on-linetransmission: see page 2-5).If there is a previously stored job or a job is inprogress, or if the line is being used, all pages ofthe document are scanned into memory andstored as a transmission job. (This is calledmemory transmission: the destination isautomatically called and the document transmittedafter previously stored jobs are completed.)If scanning is completed normally, the machinemakes a beep sound to inform you that thetransmission job is stored and "JOB STORED."appears in the message display.
7 Press the [BLACK COPY START] key.
The original is scannedand the [READ-END]key appears in the touchpanel.
8 If you have another page to scan, changepages and then press the [BLACK COPYSTART] key.Repeat this sequence until all pages have been scanned.You can change the resolution and exposure settings asneeded for each page (refer to pages 1-9 and 1-10).If the [BLACK COPY START] key is not pressed withinapproximately one minute, scanning will endautomatically and the transmission will be stored.
9 After the last page is scanned, touch the[READ-END] key.
The machine makes a beepsound to inform you that thetransmission job is storedand "JOB STORED."appears in the messagedisplay. (The destination isautomatically called and thedocument transmitted after
previously stored jobs are completed.) Open thedocument glass cover and remove the document.
TRANSMISSION BY AUTO-DIALING (ONE-TOUCH DIALING AND GROUP DIALING)To dial by touching an auto dial key (one touch key or group key) instead of pressing the numeric keys, follow thesteps below. To use an auto dial number, the name and fax number of the destination must first be stored. Forinformation on auto dial numbers, see page 1-11. To store an auto dial number, see pages 6-3 and 6-6.
1 Perform steps 1 through 5 of "BASIC PROCEDUREFOR SENDING FAXES" (previous page).
2 Touch the [ADDRESS DIRECTORY] key.
The address directoryscreen appears.This step is notnecessary if the addressdirectory alreadyappears. Go to step 3.
3 Touch the one-touch key for the desireddestination.
Refer to page 1-5 forinformation on using theaddress directory screen.The key you touched ishighlighted. If you touch thewrong key, touch the key againto cancel the selection. The keydisplay will return to normal.
4 Continue from step 7 of "BASIC PROCEDUREFOR SENDING FAXES" (see above).
Using the reversing automatic document feeder Using the document glass
READ-END
AL. (Pg.No.2)
ESS [READ-END]
NOTES���� Cancelling transmission
To cancel transmission while "SCANNING ORIGINAL." appears in the display or before the [READ-END] keyis touched, press the [C] key or the [CA] key. To cancel a transmission job that is already stored, press the [JOBSTATUS] key and cancel the job as explained on page 2-6.
� If the machine makes two beeps during or at the end of transmission and an error message appears in themessage display, refer to page 7-3 to fix the problem.
� If the power is turned off or a power failure occurs while a document is being scanned in the reversing automaticdocument feeder, the machine will stop and a document jam will occur. After power is restored, remove thedocument as explained on page 7-2 of "Operation manual (for general information and copier operation)".
� A job number appears in the screen together with "JOB STORED." when a transmission job is stored. If youmake a note of this number after performing a broadcast transmission, you can use the number to check theresults of the transmission for each destination in the transaction report or activity report.
ADDRESSDIRECTORY
SUB ADDRESS
REDIALAKER
RY:100%CEPTION FREQUENT USE ABCD EFGHI JKLMN OPQRS
CORPO.TPS
SHARP GROUP
S
SHARP CORPORATION
READY TO SEND.
WhaleII_fax_ex.book 3 ページ 2004年9月21日 火曜日 午後1時9分
SENDING A FAX
2-4
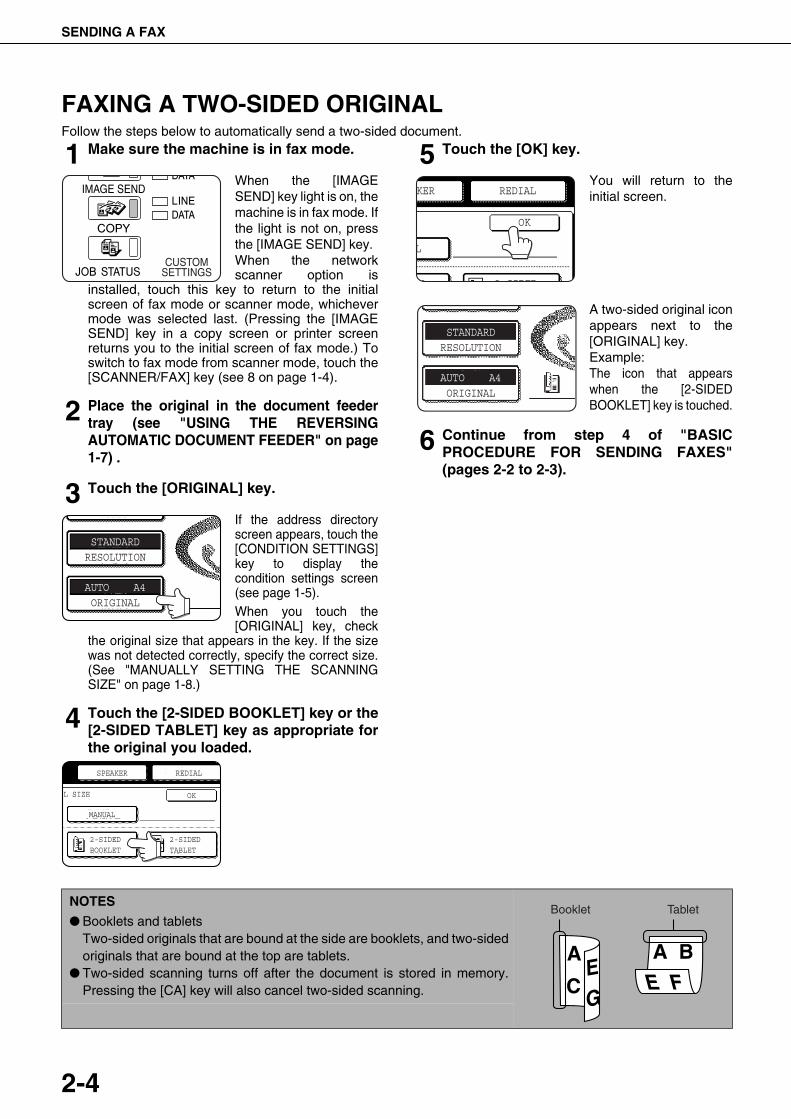
FAXING A TWO-SIDED ORIGINALFollow the steps below to automatically send a two-sided document.
1 Make sure the machine is in fax mode.
When the [IMAGESEND] key light is on, themachine is in fax mode. Ifthe light is not on, pressthe [IMAGE SEND] key.When the networkscanner option is
installed, touch this key to return to the initialscreen of fax mode or scanner mode, whichevermode was selected last. (Pressing the [IMAGESEND] key in a copy screen or printer screenreturns you to the initial screen of fax mode.) Toswitch to fax mode from scanner mode, touch the[SCANNER/FAX] key (see 8 on page 1-4).
2 Place the original in the document feedertray (see "USING THE REVERSINGAUTOMATIC DOCUMENT FEEDER" on page1-7) .
3 Touch the [ORIGINAL] key.
If the address directoryscreen appears, touch the[CONDITION SETTINGS]key to display thecondition settings screen(see page 1-5).When you touch the[ORIGINAL] key, check
the original size that appears in the key. If the sizewas not detected correctly, specify the correct size.(See "MANUALLY SETTING THE SCANNINGSIZE" on page 1-8.)
4 Touch the [2-SIDED BOOKLET] key or the[2-SIDED TABLET] key as appropriate forthe original you loaded.
5 Touch the [OK] key.
You will return to theinitial screen.
A two-sided original iconappears next to the[ORIGINAL] key.Example:The icon that appearswhen the [2-SIDEDBOOKLET] key is touched.
6 Continue from step 4 of "BASICPROCEDURE FOR SENDING FAXES"(pages 2-2 to 2-3).
AUTO A4ORIGINAL
STANDARDRESOLUTION
EXPOSURE
MANUAL
OK
2-SIDEDBOOKLET
2-SIDEDTABLET
SPEAKER REDIAL
L SIZE
REDIAL
OK
KER
ED 2 SIDED
L
AUTO A4ORIGINAL
STANDARDRESOLUTION
EXPOSURE
NOTES
� Booklets and tabletsTwo-sided originals that are bound at the side are booklets, and two-sidedoriginals that are bound at the top are tablets.
� Two-sided scanning turns off after the document is stored in memory.Pressing the [CA] key will also cancel two-sided scanning.
Booklet Tablet
WhaleII_fax_ex.book 4 ページ 2004年9月21日 火曜日 午後1時9分
SENDING A FAX
2-5
2
���� Quick On-lineWhen you use the reversing automatic document feeder to send a multi-page document and there are nopreviously stored jobs waiting or in progress (and the line is not being used), the machine dials the destinationafter the first page is scanned and begins transmitting scanned pages while the remaining pages are beingscanned. This transmission method is called Quick On-line. The messages "SCANNING ORIGINAL." and"SENDING." both appear until scanning of the final page is completed.If the receiving party is busy, the transmission will switch to a memory transmission. (Refer to the followingsection, "Storing transmission jobs (memory transmission)".)
���� Storing transmission jobs (memory transmission)When a document is sent from the document glass, or when the telephone line is in use, the document is scannedinto memory and then automatically transmitted after previously stored transmission jobs are completed. (Thisis called memory transmission.) This means that transmission jobs can be stored in memory by performing atransmission operation while the machine is occupied with another transmission/reception operation. This iscalled storing transmission, and up to 97 jobs can be stored in memory at once. After transmission, the scanneddocument data is cleared from memory.
���� If the receiving party is busyIf the receiving party is busy, the transmission is temporarily cancelled and then automatically re-attempted aftera brief interval (two attempts are made at intervals of 3 minutes*). If you do not want the machine to re-attemptthe transmission, press the [JOB STATUS] key and cancel the job (see the next page).*This setting can be changed with the key operator program (See "Recall in case of line busy" on page 8-8.).
���� If a transmission error occursIf an error occurs that prevents transmission or the receiving machine does not answer the call within 45seconds*, then transmission is stopped and then automatically re-attempted later. (two recall attempts are madeat an interval of 1 minute*) Automatic recalling can be stopped by pressing the [JOB STATUS] key and cancellingas explained on the following page. This machine also supports error correction mode (ECM) and is set to resendany part of a fax that is distorted due to noise on the line. (See "ECM" on page 8-6)* The settings can be changed in the key operator programs. (See "Call timer at memory sending" and "Recall
in case of communication error" on page 8-8).
���� Image rotationThe machine is initially set to rotate a vertically-placed ( ) document 90° so that it is oriented horizontally ( )before transmission (A4 (8-1/2"x11") originals are rotated to A4R (8-1/2"x11"R) and B5R or A5R (5-1/2"x8-1/2"R)originals are rotated to B5 or A5 (5-1/2"x8-1/2")). A4R (8-1/2"x11"R) originals and B5 or A5 (5-1/2"x8-1/2")originals are not rotated. If desired, you can turn this function off with the key operator program as explained in"Rotation sending setting." on page 8-7.
NOTES� The machine is initially set (factory setting) to perform Quick On-line transmission. If desired, you can turn off this
function with the key operator program (See "Quick on line sending" on page 8-8).� When a document is transmitted using the following methods, the job will be stored in memory (Quick On-line
transmission will not be performed):� Sending from the document glass � Broadcast transmission (page 3-2) � Timer transmission (page 3-4)� F-code transmission (Chapter 4)
NOTES� You can check transmission jobs stored in memory in the job status screen. (Refer to page 1-10 of "Operation
manual (for general information and copier operation)".)� If the memory becomes full while a document is being scanned, a message will appear in the display. You can
cancel the transmission by touching the [CANCEL] key, or send only the pages already scanned by touching the[SEND] key. The page that was being scanned when the memory became full will be cleared from memory. If thememory becomes full while scanning the first page of a document, the transmission job is automatically cancelled.
� The number of jobs that can be stored will depend on the number of pages in each job and the transmissionconditions. The number of storable jobs will increase if the optional expansion memory (AR-MM9) is installed.
NOTEPlace A5 (5-1/2"x 8-1/2") size originals so that they are oriented vertically ( ). If oriented horizontally, ( A5R(5-1/2"x 8-1/2"R) orientation), the original size will be detected as a different size, and thus it will be necessary totouch the [ORIGINAL] key and specify the correct original size (touch the [A5R] ([5-1/2"x 8-1/2"R]) key). (See"MANUALLY SETTING THE SCANNING SIZE" on page 1-8.)
Whale_02.fm 5 ページ 2004年9月21日 火曜日 午後9時24分
2-6
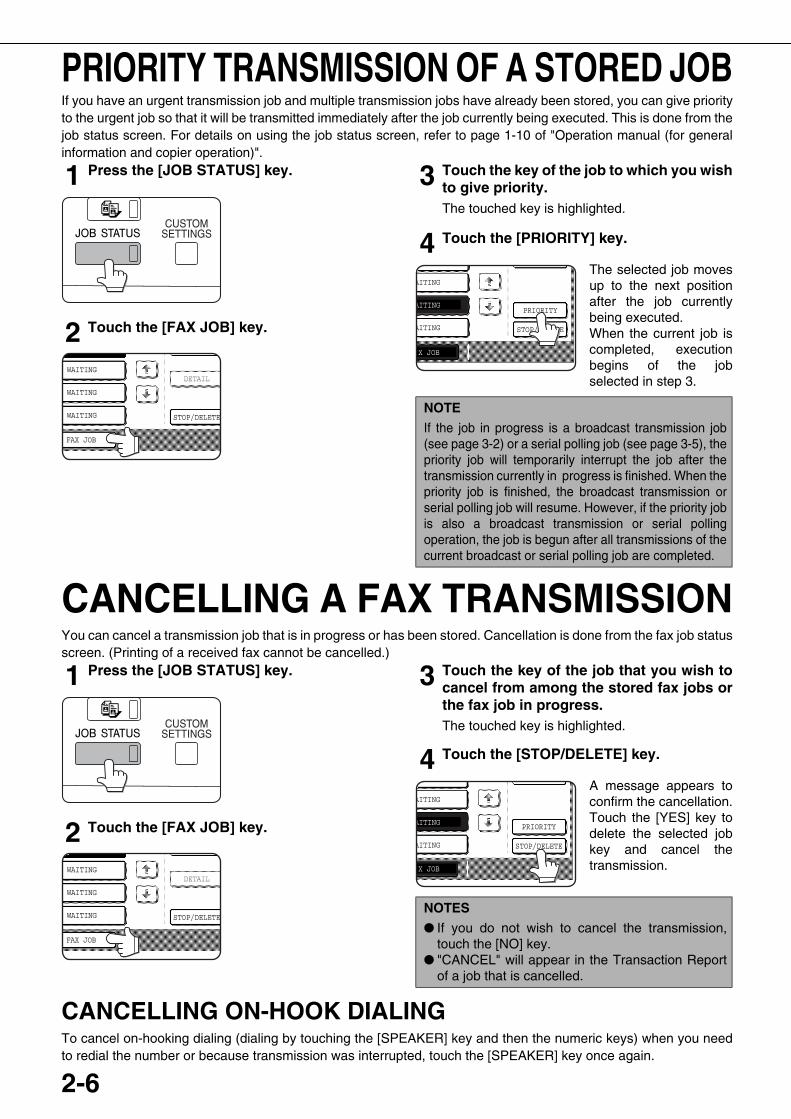
PRIORITY TRANSMISSION OF A STORED JOBIf you have an urgent transmission job and multiple transmission jobs have already been stored, you can give priorityto the urgent job so that it will be transmitted immediately after the job currently being executed. This is done from thejob status screen. For details on using the job status screen, refer to page 1-10 of "Operation manual (for generalinformation and copier operation)".
1 Press the [JOB STATUS] key.
2 Touch the [FAX JOB] key.
3 Touch the key of the job to which you wishto give priority.The touched key is highlighted.
4 Touch the [PRIORITY] key.
The selected job movesup to the next positionafter the job currentlybeing executed.When the current job iscompleted, executionbegins of the jobselected in step 3.
CANCELLING A FAX TRANSMISSIONYou can cancel a transmission job that is in progress or has been stored. Cancellation is done from the fax job statusscreen. (Printing of a received fax cannot be cancelled.)
1 Press the [JOB STATUS] key.
2 Touch the [FAX JOB] key.
3 Touch the key of the job that you wish tocancel from among the stored fax jobs orthe fax job in progress.The touched key is highlighted.
4 Touch the [STOP/DELETE] key.
A message appears toconfirm the cancellation.Touch the [YES] key todelete the selected jobkey and cancel thetransmission.
CANCELLING ON-HOOK DIALINGTo cancel on-hooking dialing (dialing by touching the [SPEAKER] key and then the numeric keys) when you needto redial the number or because transmission was interrupted, touch the [SPEAKER] key once again.
FAX JOB
DETAIL
STOP/DELETE
WAITING
WAITING
WAITINGNOTE
If the job in progress is a broadcast transmission job(see page 3-2) or a serial polling job (see page 3-5), thepriority job will temporarily interrupt the job after thetransmission currently in progress is finished. When thepriority job is finished, the broadcast transmission orserial polling job will resume. However, if the priority jobis also a broadcast transmission or serial pollingoperation, the job is begun after all transmissions of thecurrent broadcast or serial polling job are completed.
X JOB
PRIORITY
STOP/DELETE
AITING
AITING
AITING
FAX JOB
DETAIL
STOP/DELETE
WAITING
WAITING
WAITINGNOTES
� If you do not wish to cancel the transmission,touch the [NO] key.
� "CANCEL" will appear in the Transaction Reportof a job that is cancelled.
X JOB
PRIORITY
STOP/DELETE
AITING
AITING
AITING
WhaleII_fax_ex.book 6 ページ 2004年9月21日 火曜日 午後1時9分
2-7
2
RECEIVING FAXESWhen another fax machine sends a fax to your machine, your machine will ring*, automatically receive the fax, andbegin printing (this is called automatic reception).
RECEIVING A FAX1 The machine will ring* and reception will
automatically begin. 2 Reception ends.
When reception ends,the machine makes a"beep" sound.The received fax isdelivered to the top tray.
���� If received data cannot be printedIf the machine is out of paper or toner, or if a paper jam occurs or the machine isbusy printing a copy or print job, received faxes will be stored in memory untilprinting is possible. When printing is possible, the faxes will print automatically(however, if the machine has run out of paper, touch the [OK] key in the touchpanel after adding paper). When a received fax is stored in memory, the "DATA"light to the right of the [IMAGE SEND] key will blink.You can also use the transfer function to have another fax machine print thereceived data. (See "USING THE TRANSFER FUNCTION" on page 3-12.)
NOTES� You can store a transmission job while fax reception is in progress (See "Storing transmission jobs (memory
transmission)" on page 2-5.).� To receive faxes, sufficient paper must be loaded in the paper tray. Refer to pages 2-2 to 2-12 of the "Operation
manual (for general information and copier operation)" to load appropriate paper. Incoming faxes that are A4(8-1/2"x11") or B5 size will be automatically rotated to match the orientation of the paper, so there is no need toload both horizontally ( ) and vertically ( ) oriented A4 (8-1/2"x11") and B5 paper.However, if you receive a fax that is smaller than A4 (8-1/2"x11") or B5 size, the paper size used to print the faxwill depend on how the original was oriented (vertically or horizontally) in the sending fax machine.
*Number of rings
The machine has been set to ring twice before beginningautomatic reception. You can use the key operatorprogram to change the number of rings to any numberfrom 0 to 15*1. (See "Number of calls in auto reception" onpage 8-9.)If the number of rings is set to 0*2, the machine will receivefaxes without ringing.*1 The number varies by region.*2 In some regions "0" cannot be selected.
NOTES
� If the machine has multiple output trays, the keyoperator program can be used to change theoutput tray for fax reception (See "Output traysetting" on page 8-9.).
� Each fax is offset from the previous fax in theoutput tray to allow easy separation.
WhaleII_fax_ex.book 7 ページ 2004年9月21日 火曜日 午後1時9分

WhaleII_fax_ex.book 8 ページ 2004年9月21日 火曜日 午後1時9分
3-1
CHAPTER 3USING CONVENIENT FUNCTIONS 1ADVANCED TRANSMISSION METHODSThis chapter explains fax features for special situations and purposes.Please read those sections that are of interest to you.
Page
SENDING THE SAME DOCUMENT TO MULTIPLE DESTINATIONS INA SINGLE OPERATION (BROADCAST TRANSMISSION) ................... 3-2
� USING BROADCAST TRANSMISSION......................................... 3-3
AUTOMATIC TRANSMISSION AT A SPECIFIED TIME (TIMERTRANSMISSION) ................................................................................... 3-4
� SETTING UP A TIMER TRANSMISSION....................................... 3-4
TRANSMISSION AND RECEPTION USING THE POLLING FUNCTION ... 3-5� USING THE POLLING FUNCTION ................................................ 3-6� USING POLLING MEMORY........................................................... 3-7
OWN NUMBER SENDING ..................................................................... 3-9FAXING A DIVIDED ORIGINAL (DUAL PAGE SCAN)........................... 3-10
PROGRAMMING FREQUENTLY USED OPERATIONS ....................... 3-11� USING A PROGRAM...................................................................... 3-11
TRANSFERRING RECEIVED FAXES TO ANOTHER MACHINE WHEN
PRINTING IS NOT POSSIBLE (FORWARDING FUNCTION) ............... 3-12� USING THE TRANSFER FUNCTION............................................. 3-12
WhaleII_fax_ex.book 1 ページ 2004年9月21日 火曜日 午後1時9分
3-2
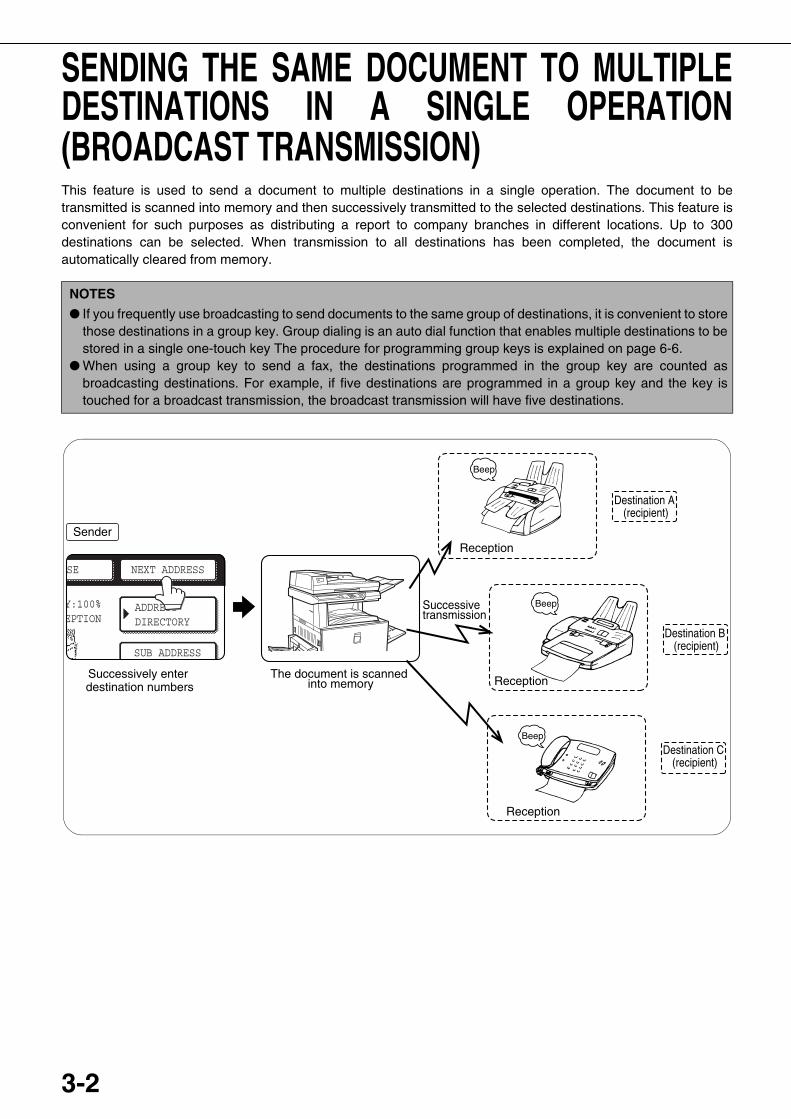
SENDING THE SAME DOCUMENT TO MULTIPLEDESTINATIONS IN A SINGLE OPERATION(BROADCAST TRANSMISSION)This feature is used to send a document to multiple destinations in a single operation. The document to betransmitted is scanned into memory and then successively transmitted to the selected destinations. This feature isconvenient for such purposes as distributing a report to company branches in different locations. Up to 300destinations can be selected. When transmission to all destinations has been completed, the document isautomatically cleared from memory.
NOTES
� If you frequently use broadcasting to send documents to the same group of destinations, it is convenient to storethose destinations in a group key. Group dialing is an auto dial function that enables multiple destinations to bestored in a single one-touch key The procedure for programming group keys is explained on page 6-6.
� When using a group key to send a fax, the destinations programmed in the group key are counted asbroadcasting destinations. For example, if five destinations are programmed in a group key and the key istouched for a broadcast transmission, the broadcast transmission will have five destinations.
ADDRESSDIRECTORY
SUB ADDRESS
NEXT ADDRESSUSE
Y:100%EPTION
The document is scanned into memory
Successive transmission
Sender
Successively enter destination numbers
Reception
Beep
Reception
Beep
Reception
Beep
Destination A (recipient)
Destination B (recipient)
Destination C (recipient)
WhaleII_fax_ex.book 2 ページ 2004年9月21日 火曜日 午後1時9分
SENDING THE SAME DOCUMENT TO MULTIPLE DESTINATIONS IN A SINGLE OPERATION (BROADCAST TRANSMISSION)
3-3
3
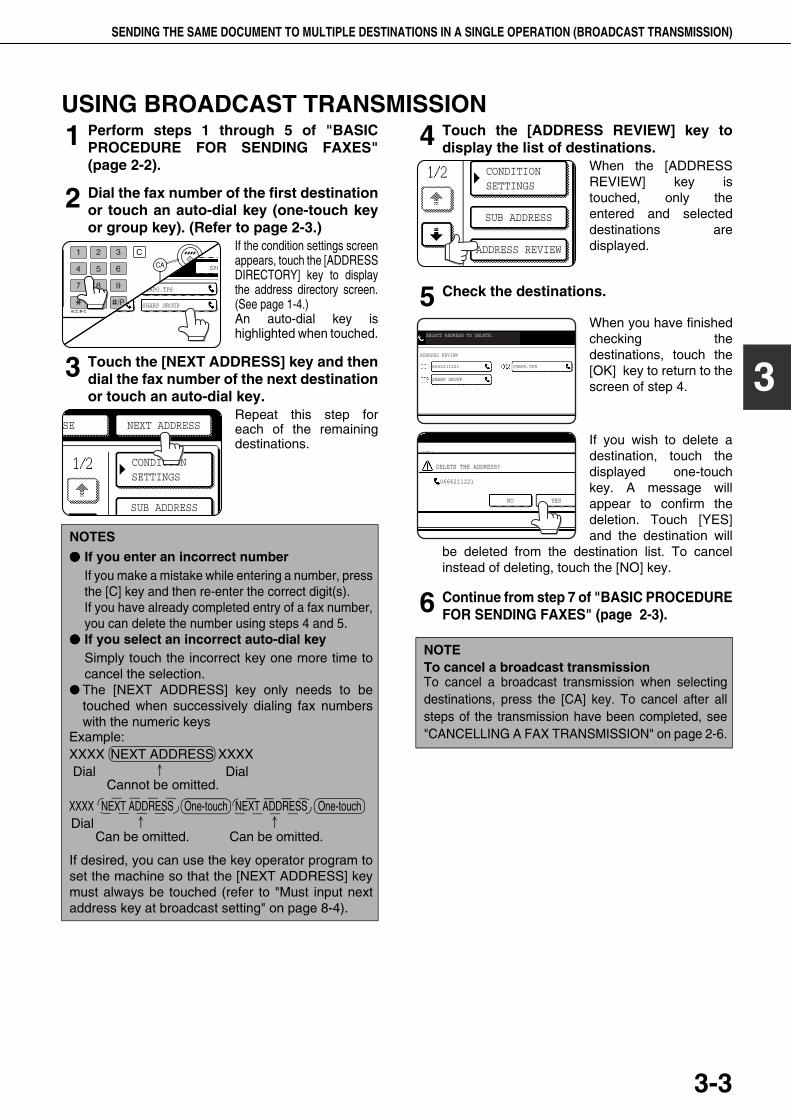
USING BROADCAST TRANSMISSION1 Perform steps 1 through 5 of "BASIC
PROCEDURE FOR SENDING FAXES"(page 2-2).
2 Dial the fax number of the first destinationor touch an auto-dial key (one-touch keyor group key). (Refer to page 2-3.)
If the condition settings screenappears, touch the [ADDRESSDIRECTORY] key to displaythe address directory screen.(See page 1-4.)An auto-dial key ishighlighted when touched.
3 Touch the [NEXT ADDRESS] key and thendial the fax number of the next destinationor touch an auto-dial key.
Repeat this step foreach of the remainingdestinations.
4 Touch the [ADDRESS REVIEW] key todisplay the list of destinations.
When the [ADDRESSREVIEW] key istouched, only theentered and selecteddestinations aredisplayed.
5 Check the destinations.
When you have finishedchecking thedestinations, touch the[OK] key to return to thescreen of step 4.
If you wish to delete adestination, touch thedisplayed one-touchkey. A message willappear to confirm thedeletion. Touch [YES]and the destination will
be deleted from the destination list. To cancelinstead of deleting, touch the [NO] key.
6 Continue from step 7 of "BASIC PROCEDUREFOR SENDING FAXES" (page 2-3).
NOTES
���� If you enter an incorrect numberIf you make a mistake while entering a number, pressthe [C] key and then re-enter the correct digit(s).If you have already completed entry of a fax number,you can delete the number using steps 4 and 5.
���� If you select an incorrect auto-dial keySimply touch the incorrect key one more time tocancel the selection.
� The [NEXT ADDRESS] key only needs to betouched when successively dialing fax numberswith the numeric keys
If desired, you can use the key operator program toset the machine so that the [NEXT ADDRESS] keymust always be touched (refer to "Must input nextaddress key at broadcast setting" on page 8-4).
CORPO.TPS
SHARP GROUP
SPE
CONDITIONSETTINGS
SUB ADDRESS
NEXT ADDRESSSE
Example:XXXX NEXT ADDRESS XXXXDial Dial
Cannot be omitted.
XXXX NEXT ADDRESS One-touch NEXT ADDRESS One-touchDial
Can be omitted. Can be omitted.
NOTETo cancel a broadcast transmissionTo cancel a broadcast transmission when selectingdestinations, press the [CA] key. To cancel after allsteps of the transmission have been completed, see"CANCELLING A FAX TRANSMISSION" on page 2-6.
CONDITIONSETTINGS
SUB ADDRESS
ADDRESS REVIEW
0666211221
ADDRESS REVIEW
SELECT ADDRESS TO DELETE.
CORPO.TPS
SHARP GROUP
YES
0666211221
DELETE THE ADDRESS?
NO
WhaleII_fax_ex.book 3 ページ 2004年9月21日 火曜日 午後1時9分
3-4
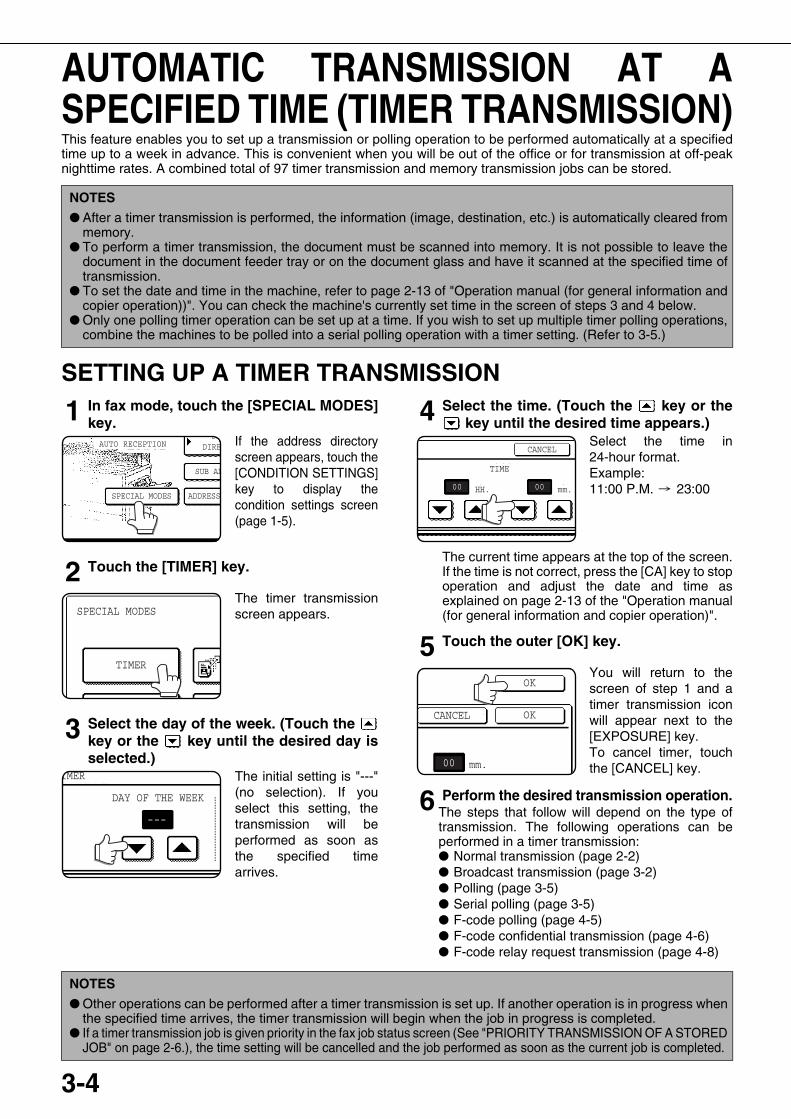
AUTOMATIC TRANSMISSION AT ASPECIFIED TIME (TIMER TRANSMISSION)This feature enables you to set up a transmission or polling operation to be performed automatically at a specifiedtime up to a week in advance. This is convenient when you will be out of the office or for transmission at off-peaknighttime rates. A combined total of 97 timer transmission and memory transmission jobs can be stored.
SETTING UP A TIMER TRANSMISSION
1 In fax mode, touch the [SPECIAL MODES]key.
If the address directoryscreen appears, touch the[CONDITION SETTINGS]key to display thecondition settings screen(page 1-5).
2 Touch the [TIMER] key.
The timer transmissionscreen appears.
3 Select the day of the week. (Touch the key or the key until the desired day isselected.)
The initial setting is "---"(no selection). If youselect this setting, thetransmission will beperformed as soon asthe specified timearrives.
4 Select the time. (Touch the key or the key until the desired time appears.)
Select the time in24-hour format.Example: 11:00 P.M. 23:00
The current time appears at the top of the screen.If the time is not correct, press the [CA] key to stopoperation and adjust the date and time asexplained on page 2-13 of the "Operation manual(for general information and copier operation)".
5 Touch the outer [OK] key.
You will return to thescreen of step 1 and atimer transmission iconwill appear next to the[EXPOSURE] key.To cancel timer, touchthe [CANCEL] key.
6 Perform the desired transmission operation.The steps that follow will depend on the type oftransmission. The following operations can beperformed in a timer transmission:� Normal transmission (page 2-2)� Broadcast transmission (page 3-2)� Polling (page 3-5)� Serial polling (page 3-5)� F-code polling (page 4-5)� F-code confidential transmission (page 4-6)� F-code relay request transmission (page 4-8)
NOTES
� After a timer transmission is performed, the information (image, destination, etc.) is automatically cleared frommemory.
� To perform a timer transmission, the document must be scanned into memory. It is not possible to leave thedocument in the document feeder tray or on the document glass and have it scanned at the specified time oftransmission.
� To set the date and time in the machine, refer to page 2-13 of "Operation manual (for general information andcopier operation))". You can check the machine's currently set time in the screen of steps 3 and 4 below.
� Only one polling timer operation can be set up at a time. If you wish to set up multiple timer polling operations,combine the machines to be polled into a serial polling operation with a timer setting. (Refer to 3-5.)
DDDIRE
SUB AD
ADDRESS SPECIAL MODES
AUTO RECEPTION
SPECIAL MODES
TIMER
DAY OF THE WEEK
IMER
0000
CANCEL
TIME
HH. mm.
OK
mm.00
OKCANCEL
NOTES
� Other operations can be performed after a timer transmission is set up. If another operation is in progress whenthe specified time arrives, the timer transmission will begin when the job in progress is completed.
� If a timer transmission job is given priority in the fax job status screen (See "PRIORITY TRANSMISSION OF A STOREDJOB" on page 2-6.), the time setting will be cancelled and the job performed as soon as the current job is completed.
WhaleII_fax_ex.book 4 ページ 2004年9月21日 火曜日 午後1時9分
3-5
3
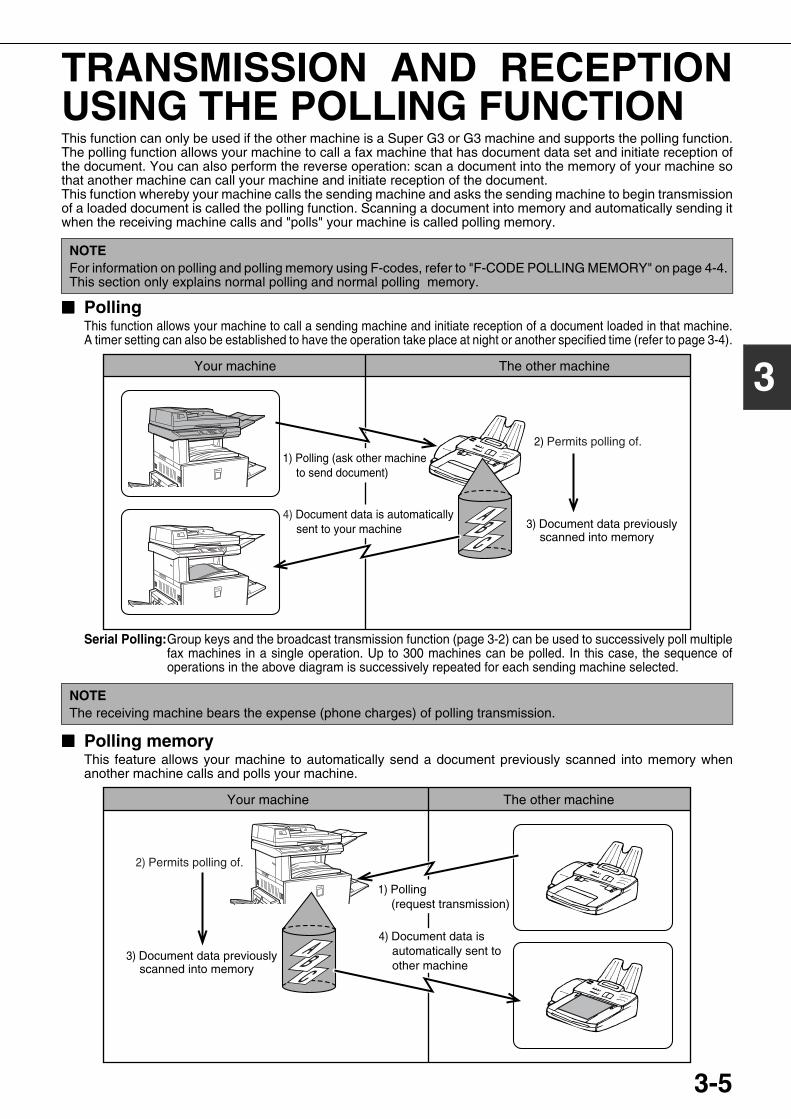
TRANSMISSION AND RECEPTIONUSING THE POLLING FUNCTIONThis function can only be used if the other machine is a Super G3 or G3 machine and supports the polling function.The polling function allows your machine to call a fax machine that has document data set and initiate reception ofthe document. You can also perform the reverse operation: scan a document into the memory of your machine sothat another machine can call your machine and initiate reception of the document.This function whereby your machine calls the sending machine and asks the sending machine to begin transmissionof a loaded document is called the polling function. Scanning a document into memory and automatically sending itwhen the receiving machine calls and "polls" your machine is called polling memory.
���� PollingThis function allows your machine to call a sending machine and initiate reception of a document loaded in that machine.A timer setting can also be established to have the operation take place at night or another specified time (refer to page 3-4).
Serial Polling:Group keys and the broadcast transmission function (page 3-2) can be used to successively poll multiplefax machines in a single operation. Up to 300 machines can be polled. In this case, the sequence ofoperations in the above diagram is successively repeated for each sending machine selected.
���� Polling memoryThis feature allows your machine to automatically send a document previously scanned into memory whenanother machine calls and polls your machine.
NOTEFor information on polling and polling memory using F-codes, refer to "F-CODE POLLING MEMORY" on page 4-4.This section only explains normal polling and normal polling memory.
The other machineYour machine
3) Document data previously scanned into memory
1) Polling (ask other machine to send document)
4) Document data is automatically sent to your machine
2) Permits polling of.
NOTEThe receiving machine bears the expense (phone charges) of polling transmission.
3) Document data previously scanned into memory
1) Polling (request transmission)
4) Document data is automatically sent to other machine
2) Permits polling of.
Your machine The other machine
WhaleII_fax_ex.book 5 ページ 2004年9月21日 火曜日 午後1時9分
TRANSMISSION AND RECEPTION USING THE POLLING FUNCTION
3-6
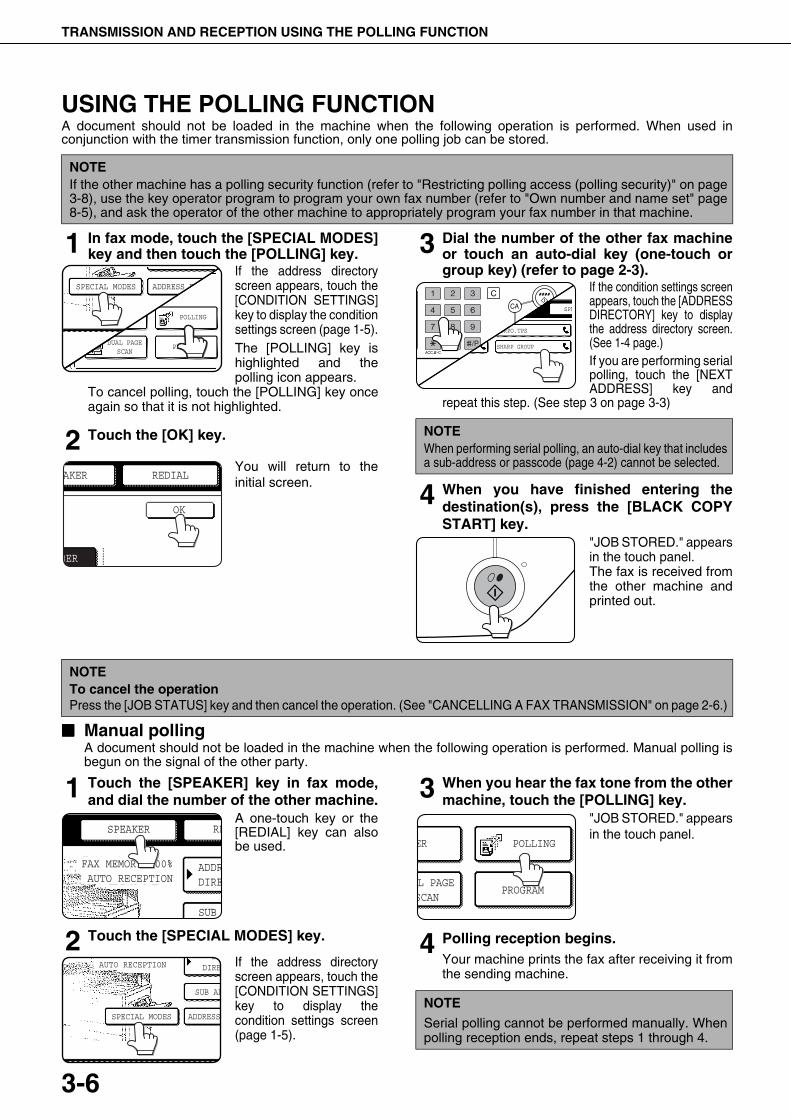
USING THE POLLING FUNCTIONA document should not be loaded in the machine when the following operation is performed. When used inconjunction with the timer transmission function, only one polling job can be stored.
1 In fax mode, touch the [SPECIAL MODES]key and then touch the [POLLING] key.
If the address directoryscreen appears, touch the[CONDITION SETTINGS]key to display the conditionsettings screen (page 1-5).The [POLLING] key ishighlighted and thepolling icon appears.
To cancel polling, touch the [POLLING] key onceagain so that it is not highlighted.
2 Touch the [OK] key.
You will return to theinitial screen.
3 Dial the number of the other fax machineor touch an auto-dial key (one-touch orgroup key) (refer to page 2-3).
If the condition settings screenappears, touch the [ADDRESSDIRECTORY] key to displaythe address directory screen.(See 1-4 page.)If you are performing serialpolling, touch the [NEXTADDRESS] key and
repeat this step. (See step 3 on page 3-3)
4 When you have finished entering thedestination(s), press the [BLACK COPYSTART] key.
"JOB STORED." appearsin the touch panel.The fax is received fromthe other machine andprinted out.
���� Manual pollingA document should not be loaded in the machine when the following operation is performed. Manual polling isbegun on the signal of the other party.
1 Touch the [SPEAKER] key in fax mode,and dial the number of the other machine.
A one-touch key or the[REDIAL] key can alsobe used.
2 Touch the [SPECIAL MODES] key.
If the address directoryscreen appears, touch the[CONDITION SETTINGS]key to display thecondition settings screen(page 1-5).
3 When you hear the fax tone from the othermachine, touch the [POLLING] key.
"JOB STORED." appearsin the touch panel.
4 Polling reception begins.Your machine prints the fax after receiving it fromthe sending machine.
NOTEIf the other machine has a polling security function (refer to "Restricting polling access (polling security)" on page3-8), use the key operator program to program your own fax number (refer to "Own number and name set" page8-5), and ask the operator of the other machine to appropriately program your fax number in that machine.
POLLING
PROGRAMDUAL PAGE
SCAN
ADDRESS REVIEWSPECIAL MODES
BER
OK
REDIALAKER
NOTEWhen performing serial polling, an auto-dial key that includesa sub-address or passcode (page 4-2) cannot be selected.
CORPO.TPS
SHARP GROUP
SPE
NOTETo cancel the operationPress the [JOB STATUS] key and then cancel the operation. (See "CANCELLING A FAX TRANSMISSION" on page 2-6.)
FAX MEMORY:100%AUTO RECEPTION
ADDRDIRE
SUB
RESPEAKER
DDDIRE
SUB AD
ADDRESS SPECIAL MODES
AUTO RECEPTION
NOTE
Serial polling cannot be performed manually. Whenpolling reception ends, repeat steps 1 through 4.
POLLINGER
PROGRAML PAGESCAN
WhaleII_fax_ex.book 6 ページ 2004年9月21日 火曜日 午後1時9分
TRANSMISSION AND RECEPTION USING THE POLLING FUNCTION
3-7
3
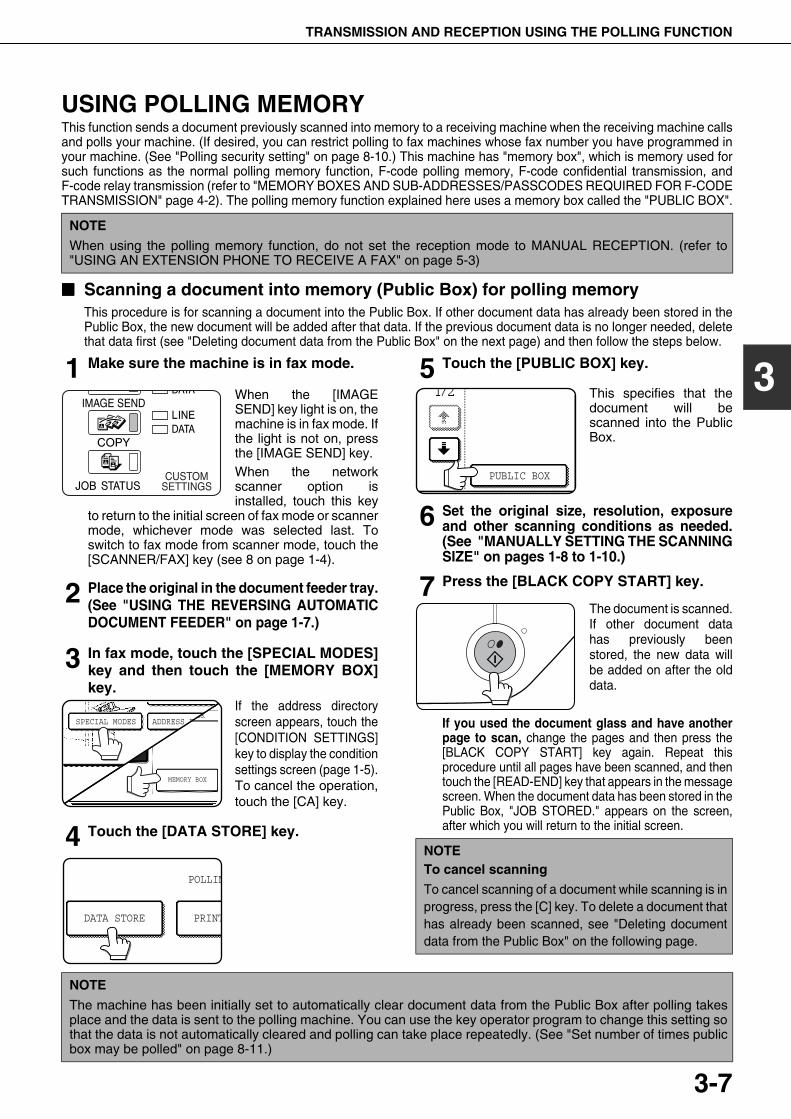
USING POLLING MEMORYThis function sends a document previously scanned into memory to a receiving machine when the receiving machine callsand polls your machine. (If desired, you can restrict polling to fax machines whose fax number you have programmed inyour machine. (See "Polling security setting" on page 8-10.) This machine has "memory box", which is memory used forsuch functions as the normal polling memory function, F-code polling memory, F-code confidential transmission, andF-code relay transmission (refer to "MEMORY BOXES AND SUB-ADDRESSES/PASSCODES REQUIRED FOR F-CODETRANSMISSION" page 4-2). The polling memory function explained here uses a memory box called the "PUBLIC BOX".
���� Scanning a document into memory (Public Box) for polling memoryThis procedure is for scanning a document into the Public Box. If other document data has already been stored in thePublic Box, the new document will be added after that data. If the previous document data is no longer needed, deletethat data first (see "Deleting document data from the Public Box" on the next page) and then follow the steps below.
1 Make sure the machine is in fax mode.
When the [IMAGESEND] key light is on, themachine is in fax mode. Ifthe light is not on, pressthe [IMAGE SEND] key.When the networkscanner option isinstalled, touch this key
to return to the initial screen of fax mode or scannermode, whichever mode was selected last. Toswitch to fax mode from scanner mode, touch the[SCANNER/FAX] key (see 8 on page 1-4).
2 Place the original in the document feeder tray.(See "USING THE REVERSING AUTOMATICDOCUMENT FEEDER" on page 1-7.)
3 In fax mode, touch the [SPECIAL MODES]key and then touch the [MEMORY BOX]key.
If the address directoryscreen appears, touch the[CONDITION SETTINGS]key to display the conditionsettings screen (page 1-5).To cancel the operation,touch the [CA] key.
4 Touch the [DATA STORE] key.
5 Touch the [PUBLIC BOX] key.
This specifies that thedocument will bescanned into the PublicBox.
6 Set the original size, resolution, exposureand other scanning conditions as needed.(See "MANUALLY SETTING THE SCANNINGSIZE" on pages 1-8 to 1-10.)
7 Press the [BLACK COPY START] key.
The document is scanned.If other document datahas previously beenstored, the new data willbe added on after the olddata.
If you used the document glass and have anotherpage to scan, change the pages and then press the[BLACK COPY START] key again. Repeat thisprocedure until all pages have been scanned, and thentouch the [READ-END] key that appears in the messagescreen. When the document data has been stored in thePublic Box, "JOB STORED." appears on the screen,after which you will return to the initial screen.
NOTE
When using the polling memory function, do not set the reception mode to MANUAL RECEPTION. (refer to"USING AN EXTENSION PHONE TO RECEIVE A FAX" on page 5-3)
OWN NUMBERSENDING
MEMORY BOX
OKADDRESS REVIEWSPECIAL MODES
POLLIN
DATA STORE PRINT
NOTETo cancel scanning
To cancel scanning of a document while scanning is inprogress, press the [C] key. To delete a document thathas already been scanned, see "Deleting documentdata from the Public Box" on the following page.
PUBLIC BOX
NOTE
The machine has been initially set to automatically clear document data from the Public Box after polling takesplace and the data is sent to the polling machine. You can use the key operator program to change this setting sothat the data is not automatically cleared and polling can take place repeatedly. (See "Set number of times publicbox may be polled" on page 8-11.)
WhaleII_fax_ex.book 7 ページ 2004年9月21日 火曜日 午後1時9分
TRANSMISSION AND RECEPTION USING THE POLLING FUNCTION
3-8
���� Printing document data in the Public BoxTo check a document that is stored in the public box, follow these steps to print it out.If no documents have been stored, the [PUBLIC BOX] key will be greyed out.
1 In fax mode, touch the [SPECIAL MODES]key and then touch the [MEMORY BOX]key.
If the address directoryscreen appears, touch the[CONDITION SETTINGS]key to display thecondition settings screen(page 1-5).
2 Touch the [PRINT DATA] key.
3 Touch the [PUBLIC BOX] key.
Touching the [CANCEL]key will return you to thescreen of step 2.
4 Press the [BLACK COPY START] key.
The message screenappears and the PublicBox data is stored as aprint job.To cancel printing, touchthe [CANCEL] key.
���� Deleting document data from the Public BoxThis procedure is used to delete document data from the Public Box when it is no longer needed.
1 In fax mode, touch the [SPECIAL MODES]key and then touch the [MEMORY BOX]key.
If the address directoryscreen appears, touch the[CONDITION SETTINGS]key to display thecondition settings screen(page 1-5).
2 Touch the [DELETE DATA] key.
3 Touch the [PUBLIC BOX] key.
The message screenappears.
4 Touch the [YES] key.
All data in the Public Boxis deleted and you returnto the screen of step 2.If you touch the [NO]key, you will return to thescreen of step 2 withoutdeleting the data.
���� Restricting polling access (polling security)If you wish to prevent unauthorised fax machines from polling your machine, turn on the polling security function. Whenthis function is turned on, polling permission will only be granted if the fax number of the polling machine (asprogrammed in that machine) matches one of the fax numbers you have programmed in your machine as passcodenumbers. Up to 10 fax numbers can be programmed as passcode numbers.
To turn on the polling security function and program passcode numbers, use the key operator program asexplained in "Passcode number setting" on page 8-10.
OWN NUMBERSENDING
MEMORY BOX
OKADDRESS REVIEWSPECIAL MODES
POLLING MEMORY
ORE PRINT DATA
PUBLIC BOX
OWN NUMBERSENDING
MEMORY BOX
OKADDRESS REVIEWSPECIAL MODES
MEMORY
DATA DELETE DATA
PUBLIC BOX
YES
PUBLIC BOX
DELETE THE DATA IN THE MEMORY BOX?
NO
NOTES
� If you do not use the polling security function, the document will be sent to any fax machine that polls you.� To use polling memory with polling security enabled, the sender's number of the polling machine must be
programmed in that machine and in your machine.
WhaleII_fax_ex.book 8 ページ 2004年9月21日 火曜日 午後1時9分
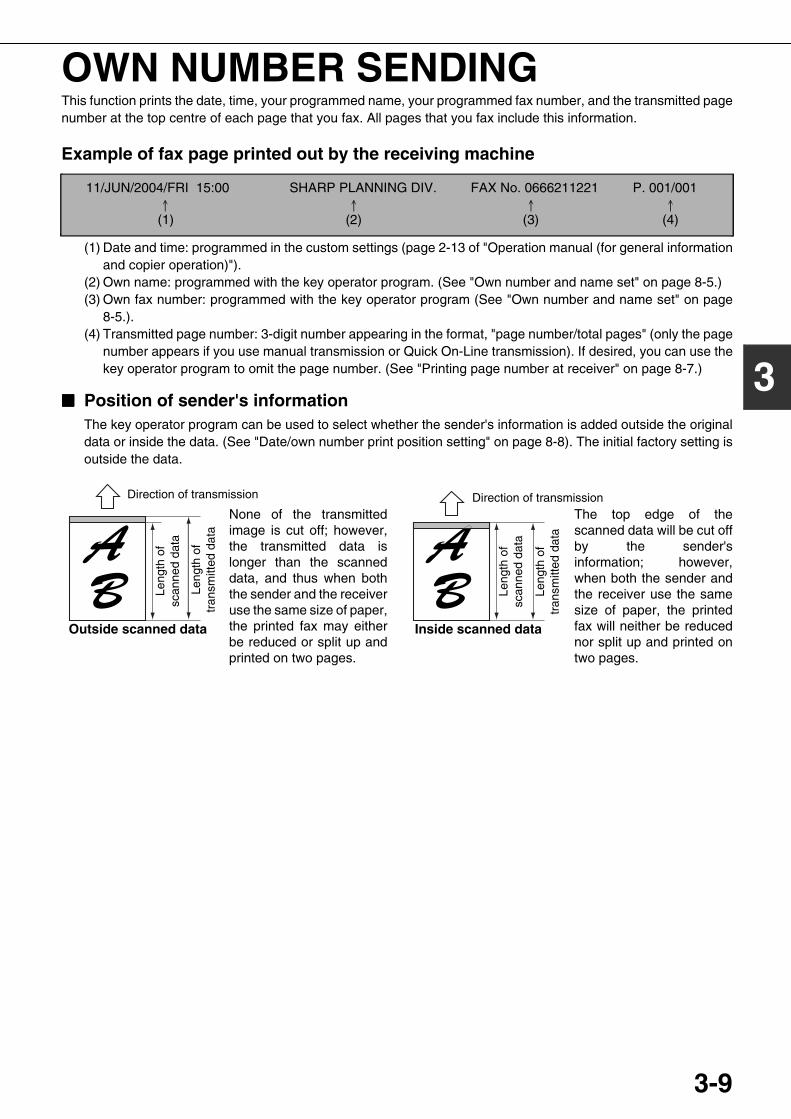
3-9
3
OWN NUMBER SENDINGThis function prints the date, time, your programmed name, your programmed fax number, and the transmitted pagenumber at the top centre of each page that you fax. All pages that you fax include this information.
Example of fax page printed out by the receiving machine
(1) Date and time: programmed in the custom settings (page 2-13 of "Operation manual (for general informationand copier operation)").
(2) Own name: programmed with the key operator program. (See "Own number and name set" on page 8-5.)(3) Own fax number: programmed with the key operator program (See "Own number and name set" on page
8-5.).(4) Transmitted page number: 3-digit number appearing in the format, "page number/total pages" (only the page
number appears if you use manual transmission or Quick On-Line transmission). If desired, you can use thekey operator program to omit the page number. (See "Printing page number at receiver" on page 8-7.)
���� Position of sender's informationThe key operator program can be used to select whether the sender's information is added outside the originaldata or inside the data. (See "Date/own number print position setting" on page 8-8). The initial factory setting isoutside the data.
11/JUN/2004/FRI 15:00 SHARP PLANNING DIV. FAX No. 0666211221 P. 001/001
(1) (2) (3) (4)
Direction of transmission
Leng
th o
fsc
anne
d da
ta
Leng
th o
ftr
ansm
itted
dat
a
Leng
th o
fsc
anne
d da
ta
Leng
th o
ftr
ansm
itted
dat
a
Direction of transmissionNone of the transmittedimage is cut off; however,the transmitted data islonger than the scanneddata, and thus when boththe sender and the receiveruse the same size of paper,the printed fax may eitherbe reduced or split up andprinted on two pages.
The top edge of thescanned data will be cut offby the sender'sinformation; however,when both the sender andthe receiver use the samesize of paper, the printedfax will neither be reducednor split up and printed ontwo pages.
Outside scanned data Inside scanned data
WhaleII_fax_ex.book 9 ページ 2004年9月21日 火曜日 午後1時9分
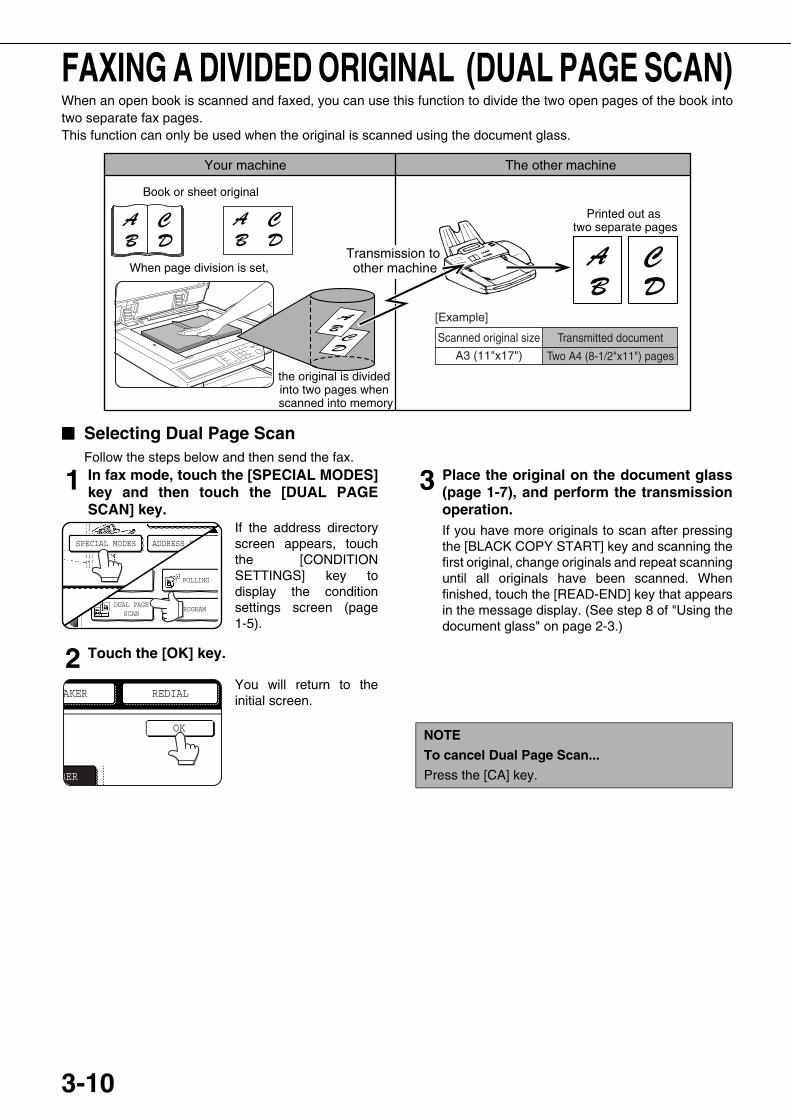
3-10
FAXING A DIVIDED ORIGINAL (DUAL PAGE SCAN)When an open book is scanned and faxed, you can use this function to divide the two open pages of the book intotwo separate fax pages.This function can only be used when the original is scanned using the document glass.
���� Selecting Dual Page ScanFollow the steps below and then send the fax.
1 In fax mode, touch the [SPECIAL MODES]key and then touch the [DUAL PAGESCAN] key.
If the address directoryscreen appears, touchthe [CONDITIONSETTINGS] key todisplay the conditionsettings screen (page1-5).
2 Touch the [OK] key.
You will return to theinitial screen.
3 Place the original on the document glass(page 1-7), and perform the transmissionoperation.If you have more originals to scan after pressingthe [BLACK COPY START] key and scanning thefirst original, change originals and repeat scanninguntil all originals have been scanned. Whenfinished, touch the [READ-END] key that appearsin the message display. (See step 8 of "Using thedocument glass" on page 2-3.)
Book or sheet original
When page division is set,
the original is divided into two pages when scanned into memory
Printed out as two separate pages
Your machine The other machine
Transmission to other machine
A3 (11"x17")
[Example]
Scanned original size Transmitted document
Two A4 (8-1/2"x11") pages
POLLING
PROGRAMDUAL PAGE
SCAN
ADDRESS REVIEWSPECIAL MODES
BER
OK
REDIALAKER
NOTE
To cancel Dual Page Scan...
Press the [CA] key.
WhaleII_fax_ex.book 10 ページ 2004年9月21日 火曜日 午後1時9分
3-11
3
PROGRAMMING FREQUENTLY USED OPERATIONSThis function allows you to store the steps of an operation, including the destination and scanning settings, into aprogram. This function is convenient when you frequently send documents, such as a daily report, to the samedestination. Up to eight programs can be stored.Programs can be stored using the custom settings, and a name up to 18 characters long can be assigned.For information on storing, editing, and deleting programs, refer to "STORING A PROGRAM", and "EDITINGAND DELETING PROGRAMS" on page 6-8.The following settings can be stored in a program:
� Destination fax number � Polling � Dual Page Scan � Resolution and exposureAuto-dial keys (one-touch or group keys) are used to store the destination fax number. A full number cannot beentered using the numeric keys. When storing a broadcast transmission or serial polling operation in a program, upto 300 destination fax numbers can be stored.
USING A PROGRAM1 In fax mode, load the document (page 1-7).
Do not load a documentif you are performing apolling operation.If you are going to use DualPage Scan (page 3-10),place the document on thedocument glass.
2 Touch the [SPECIAL MODES] key andthen the [PROGRAM] key.
If the address directoryscreen appears, touch the[CONDITION SETTINGS]key to display thecondition settings screen(page 1-5).
3 Touch the program key you wish toexecute. Make sure the key is highlightedand then touch the [OK] key.
The program key youtouched is selected andyou return to the screenof step 2.The [PROGRAM] key ishighlighted.
4 Touch the [OK] key.
You will return to theinitial screen.
5 If needed, set the original size and othersettings, and then press the [BLACKCOPY START] key.Transmission takes place according to theprogram.
NOTES
� A program differs from a timer transmission (page 3-4) in that it is not cleared from memory after transmissiontakes place. A program thus allows you to repeatedly perform the same type of transmission. Note, however,that programs do not allow you to establish a timer setting for transmission.
� With the exception of polling, reception operations cannot be stored in a program.
POLLING
PROGRAMDUAL PAGE
SCAN
ADDRESS REVIEWSPECIAL MODES
G.
RAM1
OK
NOTE
Select functions that cannot be stored in a programbefore you press the [BLACK COPY START] key instep 5. These functions include specifying theoriginal size (See "MANUALLY SETTING THESCANNING SIZE" on page 1-8.), two-sidedscanning (See "FAXING A TWO-SIDED ORIGINAL"on page 2-4.), and timer transmission. (See "TIMERTRANSMISSION" on page 3-4.)
BER
OK
REDIALAKER
WhaleII_fax_ex.book 11 ページ 2004年9月21日 火曜日 午後1時9分
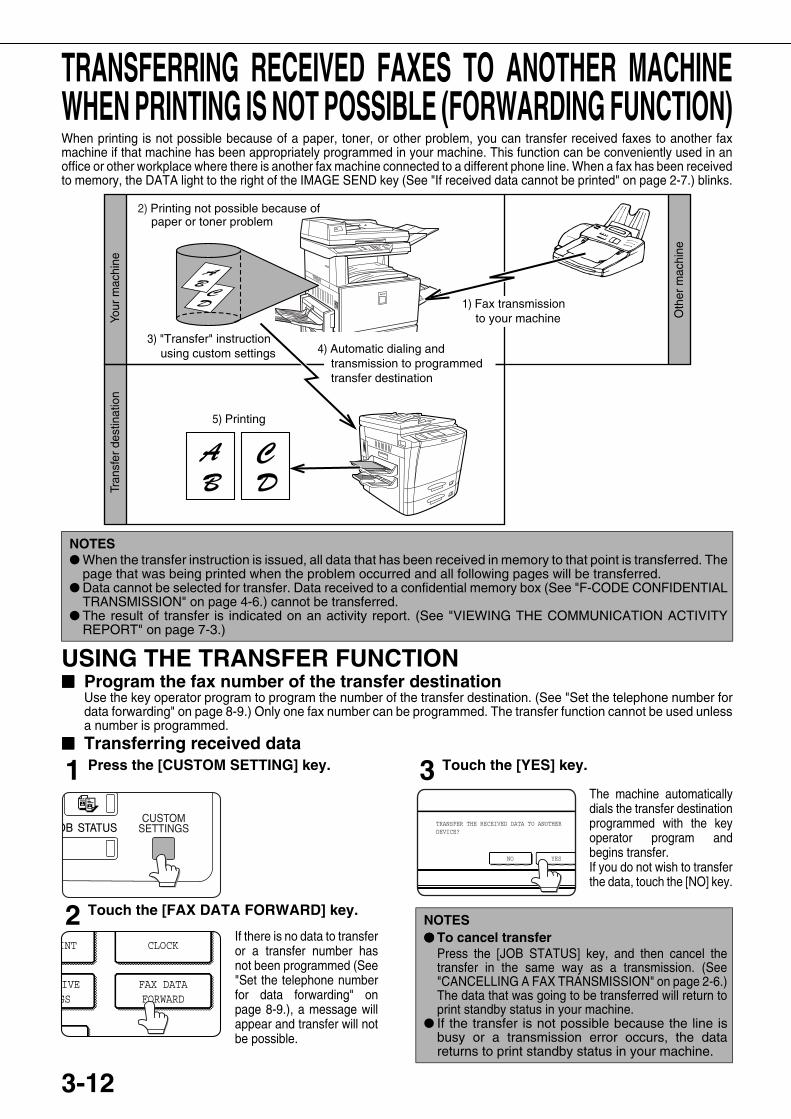
3-12
TRANSFERRING RECEIVED FAXES TO ANOTHER MACHINEWHEN PRINTING IS NOT POSSIBLE (FORWARDING FUNCTION)When printing is not possible because of a paper, toner, or other problem, you can transfer received faxes to another faxmachine if that machine has been appropriately programmed in your machine. This function can be conveniently used in anoffice or other workplace where there is another fax machine connected to a different phone line. When a fax has been receivedto memory, the DATA light to the right of the IMAGE SEND key (See "If received data cannot be printed" on page 2-7.) blinks.
USING THE TRANSFER FUNCTION���� Program the fax number of the transfer destination
Use the key operator program to program the number of the transfer destination. (See "Set the telephone number fordata forwarding" on page 8-9.) Only one fax number can be programmed. The transfer function cannot be used unlessa number is programmed.
���� Transferring received data
1 Press the [CUSTOM SETTING] key.
2 Touch the [FAX DATA FORWARD] key.
If there is no data to transferor a transfer number hasnot been programmed (See"Set the telephone numberfor data forwarding" onpage 8-9.), a message willappear and transfer will notbe possible.
3 Touch the [YES] key.
The machine automaticallydials the transfer destinationprogrammed with the keyoperator program andbegins transfer.If you do not wish to transferthe data, touch the [NO] key.
2) Printing not possible because of paper or toner problem
3) "Transfer" instruction using custom settings
5) Printing
Your
mac
hine
Oth
er m
achi
ne
Tran
sfer
des
tinat
ion
4) Automatic dialing and transmission to programmed transfer destination
1) Fax transmission to your machine
NOTES� When the transfer instruction is issued, all data that has been received in memory to that point is transferred. The
page that was being printed when the problem occurred and all following pages will be transferred.� Data cannot be selected for transfer. Data received to a confidential memory box (See "F-CODE CONFIDENTIAL
TRANSMISSION" on page 4-6.) cannot be transferred.� The result of transfer is indicated on an activity report. (See "VIEWING THE COMMUNICATION ACTIVITY
REPORT" on page 7-3.)
CLOCKINT
FAX DATAFORWARD
IVE GS
NOTES���� To cancel transfer
Press the [JOB STATUS] key, and then cancel thetransfer in the same way as a transmission. (See"CANCELLING A FAX TRANSMISSION" on page 2-6.)The data that was going to be transferred will return toprint standby status in your machine.
� If the transfer is not possible because the line isbusy or a transmission error occurs, the datareturns to print standby status in your machine.
YES
TRANSFER THE RECEIVED DATA TO ANOTHERDEVICE?
NO
WhaleII_fax_ex.book 12 ページ 2004年9月21日 火曜日 午後1時9分
4-1
CHAPTER 4USING CONVENIENT FUNCTIONS 2TRANSMISSION USING F-CODES
This chapter explains F-code transmission, which gives you a convenient meansof performing advanced operations such as relay broadcast transmission andconfidential transmission. Normally these functions require that the other faxmachine be a similar Sharp machine; however, F-code transmission enablesthese functions to be performed with any other machine that supports F-codetransmission. Please read those sections which are of interest to you.
PageTRANSMISSION BETWEEN MACHINES SUPPORTING F-CODES.... 4-2
� MEMORY BOXES AND SUB-ADDRESSES/PASSCODES
REQUIRED FOR F-CODE TRANSMISSION ..................................... 4-2� ENTERING (DIALING) A FAX NUMBER WITH A SUB-ADDRESS
AND PASSCODE ............................................................................... 4-3� CREATING A MEMORY BOX FOR F-CODE TRANSMISSION ........ 4-3
F-CODE POLLING MEMORY ................................................................ 4-4� USING F-CODE POLLING MEMORY................................................ 4-4� PROCEDURE FOR F-CODE POLLING............................................. 4-5
F-CODE CONFIDENTIAL TRANSMISSION........................................... 4-6� F-CODE CONFIDENTIAL TRANSMISSION ...................................... 4-6� PRINTING A DOCUMENT RECEIVED TO AN F-CODE
CONFIDENTIAL MEMORY BOX.......................................................... 4-7F-CODE RELAY BROADCAST TRANSMISSION.................................. 4-8
� USING THE F-CODE RELAY BROADCAST FUNCTION (your machine
is the relay machine) ............................................................................ 4-9� USING THE F-CODE RELAY REQUEST FUNCTION (your machine
requests a relay broadcast) .................................................................. 4-9
WhaleII_fax_ex.book 1 ページ 2004年9月21日 火曜日 午後1時9分
4-2
TRANSMISSION BETWEEN MACHINESSUPPORTING F-CODESThis machine supports the "F-code" standard as established by the ITU-T*.Operations such as relay broadcast transmission and confidential transmission previously could only be performed withanother Sharp fax machine; however, F-Code communication makes it possible to perform these operations with faxmachines of other manufacturers that support F-Code communication.Before using the functions explained in this chapter, make sure that the other fax machine supports F-Code communicationand has the same functions as your machine. (the other machine may use a different name for the function).
* The ITU-T is a United Nations organization that establishes communications standards. It is a department of the InternationalTelecommunication Union (ITU), which coordinates global telecommunications networks and services.
MEMORY BOXES AND SUB-ADDRESSES/PASSCODESREQUIRED FOR F-CODE TRANSMISSION"Memory boxes" can be created in the memory of fax machines that support F-Code communication. These boxes areused to store faxes received from other machines and documents to be transmitted when a polling request is received. Fax machines that support F-code transmission enable the creation of a "memory box" in the unit's memory. Up to100 memory boxes can be created for a variety of purposes, and a name can be assigned to each box. A "sub-address" that indicates the box's location in memory must be programmed, and if desired, a passcode can also beprogrammed to control access to the box. (A sub-address must be programmed, however, a passcode can beomitted.)
*The Public Box is used for normal serial polling (see "USING POLLING MEMORY" on page 3-7).
When communication occurs involving a memory box, the communication will only take place if the sub-address andpasscode that the other machine sends match the sub-address and passcode programmed in your machine for thatbox. Therefore, to allow communication, you must inform the other party of the sub-address and passcode of thememory box. Likewise, to send a document to a memory box in another machine or use polling to retrieve adocument from that memory box, you must know the sub-address and passcode of that memory box. (Box namesare used only to manage boxes in the machine; you do not need to inform the other party of a box name the otherparty only needs to know the sub-address and passcode.)This machine uses the term "sub-address" for the location of the memory box and the term "passcode" for theauthorization number of the memory box; however, the products of other manufacturers may use different terms.When asking the other party for a sub-address and passcode, you may find it useful to refer to the 3-characteralphabetical terminology used by the ITU-T.
This machine ITU-T
F-code polling memory box F-code Confidential box F-code Relay Broadcast Function
Sub-address SEP SUB SUB
Passcode PWD SID SID
0001SHARP
11245Document
Group 1
7732123
3321 1115
7732123
7732123
Product Planning Dept.
1115
Product Planning Dept.
3333Department
Manager
11111111
4444
Public Box*
123456
010Section Manager
Reports
MEMORYSub-address (location in memory)Select any number up to 20 digits.
Box name (used to manage boxes in your machine)Select a name of up to 18 characters.
Passcode (key)Select any number up to 20 digits. (Not required)
1115
Product Planning Dept.
WhaleII_fax_ex.book 2 ページ 2004年9月21日 火曜日 午後1時9分
TRANSMISSION BETWEEN MACHINES SUPPORTING F-CODES
4-3
4
ENTERING (DIALING) A FAX NUMBER WITH A SUB-ADDRESS AND PASSCODEWhen transmitting to a memory box in another fax machine, the sub-address and passcode must be entered afterthe other machine's fax number. Enter the other machine's fax number as explained for a normal transmission (page2-2) or for a polling operation (see "USING THE POLLING FUNCTION" on page 3-6), and then enter the sub-addressand passcode as follows:
1 Dial the fax number of the other machine,or touch a one-touch key.
If the condition settingsscreen appears, touchthe [ADDRESSDIRECTORY] key todisplay the addressdirectory screen (refer topage 1-4).
If the sub-address and passcode have beenprogrammed into the one-touch key, the followingsteps are not needed.
2 Touch the [SUB ADDRESS] key.
When the [SUBADDRESS] key istouched, a slash "/"appears at the end of thefax number. If you makea mistake, press the [C]key to clear the mistake.
3 Use the numeric keys to enter the sub-address of the other machine's memorybox (max. 20 digits)
If you make a mistake,press the [C] key and re-enter the correct digit(s).
4 Touch the [SUB ADDRESS] key onceagain.A slash "/" appears at the end of the sub-address.
5 Use the numeric keys to enter thepasscode of the other machine's memorybox (max. 20 digits)If a passcode has not been established for theother box, this step is not necessary.
CREATING A MEMORY BOX FOR F-CODE TRANSMISSIONOperations that use F-Code memory boxes include F-Code polling memory (following page), F-Code confidentialtransmission (page 4-6), and F-Code relay broadcast transmission (page 4-8). To perform these operations, amemory box for each type of transmission must be created.Memory boxes are created in the custom settings. Up to 100 boxes can be created.
The information programmed in each memory box varies slightly depending on the type ofoperation. Refer to pages 6-10 to 6-14 for the procedures for creating, editing, and deletingmemory boxes.After you have programmed a memory box, inform the other party of the box's sub-address and passcode.
CORPO.TPS
SHARP GROUP
SPE
CONDITIONSETTINGS
SUB ADDRESS
ADDRESS REVIEW
NOTES� You can program a sub-address and passcode into a one-touch key along with the fax number (refer to page 6-
3 to 6-4).� Manual transmission (on-hook dialing) using a sub-address and passcode is not possible.
NOTEIf you attempt to create a box when 100 boxes have already been created, a message will appear and you will notbe able to create the box. First delete an unused box (See "EDITING AND DELETING A MEMORY BOX" on page6-14.), and then create the new box.
WhaleII_fax_ex.book 3 ページ 2004年9月21日 火曜日 午後1時9分

4-4
F-CODE POLLING MEMORYF-code polling memory allows one fax machine to call another fax machine and activate reception of a documentthat has been scanned into the other machine's F-code polling memory box. Calling another machine andactivating reception is called F-code polling, and scanning a document into a memory box for another machine toretrieve by polling is called F-code polling memory. This function is approximately the same as normal pollingexplained on page 3-5; however, it uses an F-code polling memory box and is always protected by means of thesub-address and passcode.
���� How F-code polling memory works
F-code polling is when your machine calls another machine and retrieves a document that was scanned into thepolling memory box of that machine (the reverse of the above diagram).
USING F-CODE POLLING MEMORYIn order for another machine to retrieve a document from your machine, you must first scan the document into theF-code polling memory box.You can check scanned document data by printing it out (refer to "Checking and clearing document data in amemory box" on the following page).
���� Scanning a document into an F-code polling memory boxThe procedure for scanning a document into an F-Code polling memory box (page 6-10) is similar to the procedurefor scanning a document into the polling memory public box. Instead of touching the [PUBLIC BOX] key in step 5of "Scanning a document into memory (Public Box) for polling memory" on page 3-7, touch the key of the memorybox into which you wish to scan the document. If document data has already been stored in that box, a newdocument data will be added on to the existing data. If you no longer need the existing data, delete it as explainedin "Checking and clearing document data in a memory box" on the following page.
When you touch the memory box into which you wish to scan the document, thekey is highlighted and selected as the scanning destination.
NOTES� To perform polling or polling memory without using an F-code, refer to page 3-5.� To create an F-code memory box for polling memory, refer to page 6-10 and "Polling times" on page 6-11.� Unlike normal polling, the other machine's fax number is not programmed as a passcode for F-code polling
memory. The sub-address and passcode of the polling memory box are always used for polling security.� The receiving machine bears the expense (phone charges) of the transmission.
NOTEWhen using F-code polling memory, do not set the reception mode to manual reception.
NOTEWhen creating the memory box, you can select whether to have the scanneddocument data automatically cleared after polling, or left it in the box to allowrepeated polling.
3) Polling memory box opens
1) F-code polling (transmission request) Sub-address and passcode are transmitted to your machine
4) Automatic transmission of document data to other machine
2) Check sub-address and passcode
Your machine The other machine
Product Planning
Do
not m
atch
Mat
ch
Sub-address
Passcode
MARKETING GROUP
SHARP BRANCH EX
PUBLIC BOX
CANC
WhaleII_fax_ex.book 4 ページ 2004年9月21日 火曜日 午後1時9分
F-CODE POLLING MEMORY
4-5
4
���� Checking and clearing document data in a memory boxThe procedure for checking document data in an F-code polling memory box by printing it and the procedure forclearing data from a box are almost the same as the procedures for printing and clearing document data from thePublic Box. Instead of touching the [PUBLIC BOX] key in step 3 of "Printing document data in the Public Box" or "Deletingdocument data from the Public Box" on page 3-8, touch the key of the desired memory box.
If a document icon ( ) appears to the right of a memory box key, document datahas been stored in that box and you can print it out.However, the contents cannot be printed or deleted while the memory box is beingused for transmission.
PROCEDURE FOR F-CODE POLLINGMake sure that a document has not been loaded in the document feeder tray or on the document glass, and thenfollow the steps below.
1 In fax mode, touch the [SPECIAL MODES]key and then the [POLLING] key.
If the address directoryscreen appears, touch the[CONDITION SETTINGS]key to display thecondition settings screen(page 1-5).
The [POLLING] key ishighlighted and the polling icon appears.
To cancel polling, touch the [POLLING] key onceagain so that it is not highlighted.
2 Touch the [OK] key.
You will return to theinitial screen.
3 Enter the fax number, sub-address, andpasscode of the other fax machine.
To use a one-touch key,touch the [ADDRESSDIRECTORY] key todisplay the addressdirectory.
Refer to steps 2 through5 of "ENTERING
(DIALING) A FAX NUMBER WITH A SUB-ADDRESS AND PASSCODE" on page 4-3 for theprocedure for entering sub-addresses andpasscodes.
4 Press the [BLACK COPY START] key.
"JOB STORED." appearson the screen.After communicating withthe other machine, yourmachine prints thereceived document data.
NOTES� You must know the sub-address (SEP) and passcode (PWD) of the other machine's F-code polling memory box.� Serial polling (selecting multiple fax machines to be polled using a group key or by touching the [NEXT
ADDRESS] key) is not possible with F-code polling.
TA
MARKETING GROUP
PUBLIC
SHARP BRANCH EX
POLLING
PROGRAMDUAL PAGE
SCAN
ADDRESS REVIEWSPECIAL MODES
OK
REDIALAKER
CORPO.TPS
SHARP GROUP
SPE
NOTES� Cancelling a transmission
Press the [JOB STATUS] and cancel the transmission in the same way as when cancelling a stored transmission.(See "CANCELLING A FAX TRANSMISSION" on page 2-6.)
� Only one F-code polling timer operation can be stored (see page 3-4).
WhaleII_fax_ex.book 5 ページ 2004年9月21日 火曜日 午後1時9分

4-6
F-CODE CONFIDENTIAL TRANSMISSIONF-Code confidential transmission provides a secure means of faxing confidential documents. The sub-address andpasscode programmed in the memory box restrict the recipients of the fax, and once received in the memory box,the fax can only be printed by someone who knows the print passcode (PRINT PIN. see page 6-12).This function is convenient when sending important documents that you only want a specific person to see, or whenmultiple departments share a single fax machine.
As the above diagram shows, receiving document data to the machine's F-code confidential memory box iscalled F-code confidential reception, and sending document data to another machine's F-code confidentialmemory box is called F-code confidential transmission.
F-CODE CONFIDENTIAL TRANSMISSIONF-code confidential transmission is performed in the same way as a normal transmission (refer to chapter 2);however, you must enter the sub-address (SUB) and passcode (SID) after the fax number of the other machine. (Youcan omit the passcode if the other machine does not use a passcode.)For the procedure for entering sub-addresses and passcodes, see "ENTERING (DIALING) A FAX NUMBER WITHA SUB-ADDRESS AND PASSCODE" on page 4-3.F-code confidential reception is performed in the same way as normal reception (see chapter 2); however, you mustinform the other party of the sub-address (SUB) and passcode (SID) of your confidential memory box. (If a passcodeis not programmed in the confidential memory box, only inform the other party of the sub-address (SUB).)
NOTES� This machine does not support Sharp's previous confidential transmission function, which uses the programmed
sender's fax number and ID code.� Refer to pages 6-10 through 6-14 for the procedures for creating, editing, and deleting F-code confidential
memory boxes.� Take care not to forget the print PIN. programmed in the F-code confidential memory box. If you forget the
passcode, consult your dealer.
NOTEAn F-code confidential transmission can be used in combination with the broadcast transmission function (page 3-2) or timer transmission function (page 3-4), and can be stored in a program (page 6-8).
3) Data is read into the confidential memory box (reception is permitted)
1) Document data, together with a sub-address and passcode, are sent to your machine.
4-1) Enter print PIN. (4-digit number)
4-2) Data is only printed if correct passcode is entered.
Your machine
When data is printed
The other machine
MARK
Sub-address
Passcode
MARK
Mat
ch
Do
not m
atch
2) Check sub-address and passcode
WhaleII_fax_ex.book 6 ページ 2004年9月21日 火曜日 午後1時9分
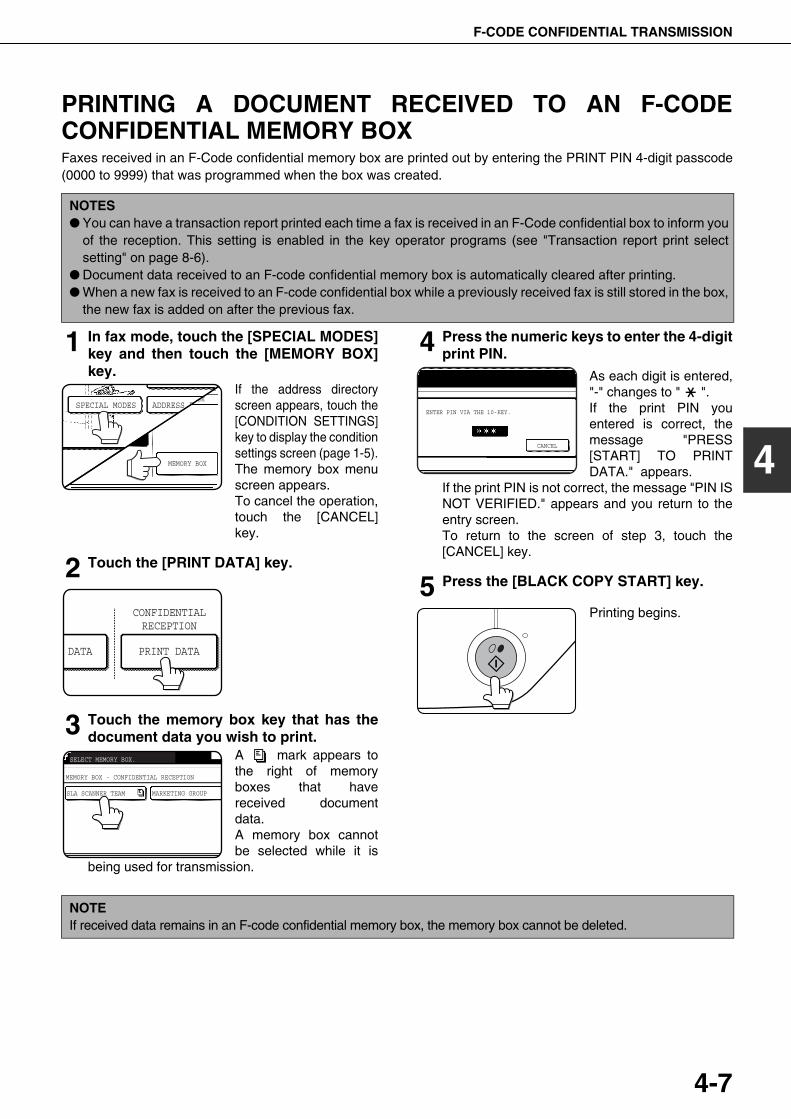
F-CODE CONFIDENTIAL TRANSMISSION
4-7
4
PRINTING A DOCUMENT RECEIVED TO AN F-CODECONFIDENTIAL MEMORY BOXFaxes received in an F-Code confidential memory box are printed out by entering the PRINT PIN 4-digit passcode(0000 to 9999) that was programmed when the box was created.
1 In fax mode, touch the [SPECIAL MODES]key and then touch the [MEMORY BOX]key.
If the address directoryscreen appears, touch the[CONDITION SETTINGS]key to display the conditionsettings screen (page 1-5).The memory box menuscreen appears.To cancel the operation,touch the [CANCEL]key.
2 Touch the [PRINT DATA] key.
3 Touch the memory box key that has thedocument data you wish to print.
A mark appears tothe right of memoryboxes that havereceived documentdata.A memory box cannotbe selected while it is
being used for transmission.
4 Press the numeric keys to enter the 4-digitprint PIN.
As each digit is entered,"-" changes to " ".If the print PIN youentered is correct, themessage "PRESS[START] TO PRINTDATA." appears.
If the print PIN is not correct, the message "PIN ISNOT VERIFIED." appears and you return to theentry screen.To return to the screen of step 3, touch the[CANCEL] key.
5 Press the [BLACK COPY START] key.
Printing begins.
NOTES� You can have a transaction report printed each time a fax is received in an F-Code confidential box to inform you
of the reception. This setting is enabled in the key operator programs (see "Transaction report print selectsetting" on page 8-6).
� Document data received to an F-code confidential memory box is automatically cleared after printing.� When a new fax is received to an F-code confidential box while a previously received fax is still stored in the box,
the new fax is added on after the previous fax.
OK
MEMORY BOX
ADDRESS REVIEWSPECIAL MODES
CONFIDENTIALRECEPTION
DATA PRINT DATA
MEMORY BOX - CONFIDENTIAL RECEPTION
SLA SCANNER TEAM MARKETING GROUP
SLA SCANNER TEAM SHARP BRANCH EX
SELECT MEMORY BOX.
CANCEL
ENTER PIN VIA THE 10-KEY.
NOTEIf received data remains in an F-code confidential memory box, the memory box cannot be deleted.
WhaleII_fax_ex.book 7 ページ 2004年9月21日 火曜日 午後1時9分
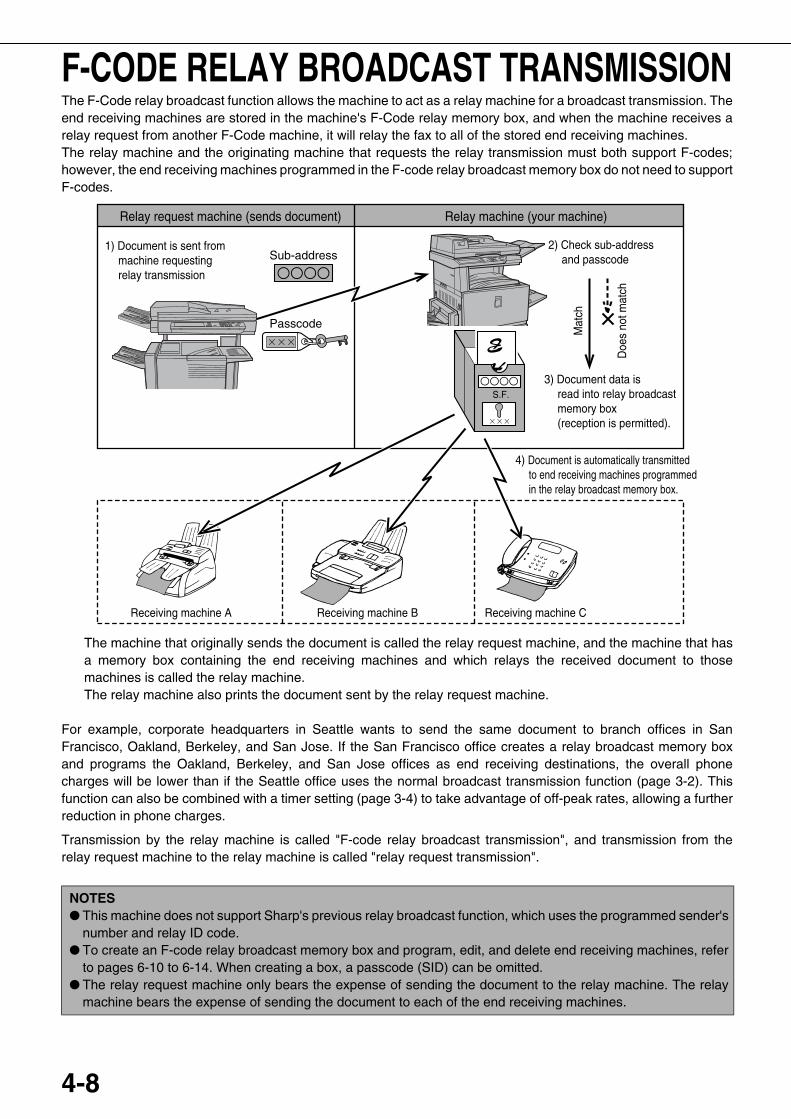
4-8
F-CODE RELAY BROADCAST TRANSMISSIONThe F-Code relay broadcast function allows the machine to act as a relay machine for a broadcast transmission. Theend receiving machines are stored in the machine's F-Code relay memory box, and when the machine receives arelay request from another F-Code machine, it will relay the fax to all of the stored end receiving machines.The relay machine and the originating machine that requests the relay transmission must both support F-codes;however, the end receiving machines programmed in the F-code relay broadcast memory box do not need to supportF-codes.
The machine that originally sends the document is called the relay request machine, and the machine that hasa memory box containing the end receiving machines and which relays the received document to thosemachines is called the relay machine.The relay machine also prints the document sent by the relay request machine.
For example, corporate headquarters in Seattle wants to send the same document to branch offices in SanFrancisco, Oakland, Berkeley, and San Jose. If the San Francisco office creates a relay broadcast memory boxand programs the Oakland, Berkeley, and San Jose offices as end receiving destinations, the overall phonecharges will be lower than if the Seattle office uses the normal broadcast transmission function (page 3-2). Thisfunction can also be combined with a timer setting (page 3-4) to take advantage of off-peak rates, allowing a furtherreduction in phone charges.
Transmission by the relay machine is called "F-code relay broadcast transmission", and transmission from therelay request machine to the relay machine is called "relay request transmission".
NOTES� This machine does not support Sharp's previous relay broadcast function, which uses the programmed sender's
number and relay ID code.� To create an F-code relay broadcast memory box and program, edit, and delete end receiving machines, refer
to pages 6-10 to 6-14. When creating a box, a passcode (SID) can be omitted.� The relay request machine only bears the expense of sending the document to the relay machine. The relay
machine bears the expense of sending the document to each of the end receiving machines.
S.F.
Receiving machine A Receiving machine B Receiving machine C
3) Document data is read into relay broadcast memory box (reception is permitted).
4) Document is automatically transmitted to end receiving machines programmed in the relay broadcast memory box.
1) Document is sent from machine requesting relay transmission
Relay machine (your machine)Relay request machine (sends document)
Passcode
Mat
ch
Doe
s no
t mat
ch
Sub-address2) Check sub-address
and passcode
WhaleII_fax_ex.book 8 ページ 2004年9月21日 火曜日 午後1時9分
F-CODE RELAY BROADCAST TRANSMISSION
4-9
4
USING THE F-CODE RELAY BROADCAST FUNCTION(your machine is the relay machine)When a document is received from a relay request machine, the F-code relay broadcast function transmits thedocument to the end receiving machines using a memory box only if the sub-address and passcode sent by therelay request machine are correct.Refer to pages 6-10 through 6-14 for the procedures for creating, editing, and deleting memory boxes. Up to 30 end receiving machines (30 one-touch keys or group keys) can be programmed in the F-code relaybroadcast memory box.A document received from a relay request machine is initially stored in the memory box of your machine. Yourmachine (the relay machine) also prints the document, thus the document is first stored as a print job and then astransmission jobs to each of the programmed end receiving machines. The document data is automatically clearedafter transmission to all end receiving machines is completed.
USING THE F-CODE RELAY REQUEST FUNCTION(your machine requests a relay broadcast)Ask the operator of the other F-Code machine (the relay machine) to create an F-Code relay broadcast memorybox that contains the end receiving machines to which you wish to send a fax, and ask for the sub-address (SUB)and passcode (SID) of that box.When you dial the relay machine to send the fax, enter the sub-address and passcode after the fax number. Thefax will be stored in the relay machine's memory box, and the relay machine will call each of the programmed endreceiving machines and relay the fax to those machines. (If a passcode (SID) is not programmed in the memorybox , enter only the sub-address when dialing.)Aside from the method of dialing the relay machine, the transmission procedure is the same as for anormal transmission (refer to chapter 2).Refer to "ENTERING (DIALING) A FAX NUMBER WITH A SUB-ADDRESS AND PASSCODE" on page 4-3 forthe procedure for entering a sub-address and passcode after the fax number of the other machine.
NOTEEnd receiving machines are programmed using auto-dial keys (one-touch keys or group keys). If you need toprogram an end receiving machine that has not been programmed in a one-touch key, program the number in aone-touch key first and then create the memory box.
WhaleII_fax_ex.book 9 ページ 2004年9月21日 火曜日 午後1時9分

WhaleII_fax_ex.book 10 ページ 2004年9月21日 火曜日 午後1時9分
5-1
CHAPTER 5USING CONVENIENT FUNCTIONS 3CONVENIENT METHODS OF USE
This chapter explains functions that widen the scope of use of the faxmachine. Please read those sections that are of interest to you.
Page
USING AN EXTENSION PHONE ........................................................... 5-2� SENDING A FAX AFTER TALKING (MANUAL TRANSMISSION)...... 5-2� USING AN EXTENSION PHONE TO RECEIVE A FAX................. 5-3� RECEIVING A FAX AFTER TALKING (MANUAL RECEPTION) ... 5-4
WhaleII_fax_ex.book 1 ページ 2004年9月21日 火曜日 午後1時9分
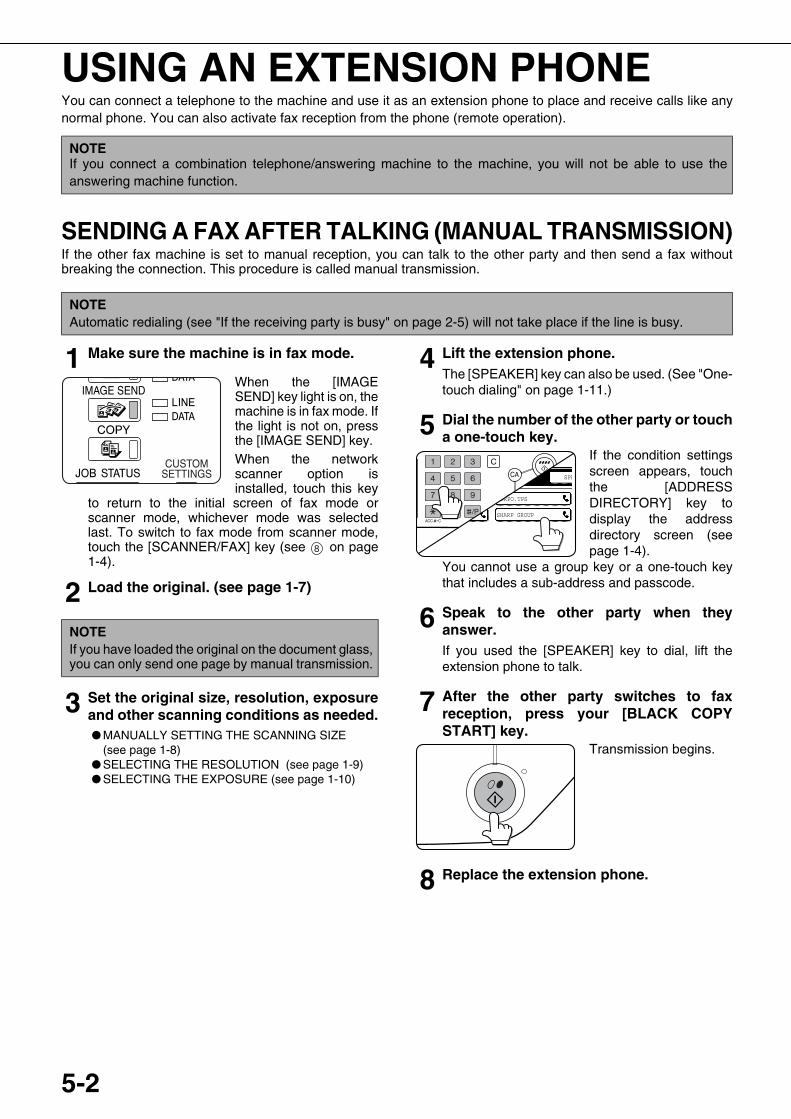
5-2
USING AN EXTENSION PHONEYou can connect a telephone to the machine and use it as an extension phone to place and receive calls like anynormal phone. You can also activate fax reception from the phone (remote operation).
SENDING A FAX AFTER TALKING (MANUAL TRANSMISSION)If the other fax machine is set to manual reception, you can talk to the other party and then send a fax withoutbreaking the connection. This procedure is called manual transmission.
1 Make sure the machine is in fax mode.
When the [IMAGESEND] key light is on, themachine is in fax mode. Ifthe light is not on, pressthe [IMAGE SEND] key.When the networkscanner option isinstalled, touch this key
to return to the initial screen of fax mode orscanner mode, whichever mode was selectedlast. To switch to fax mode from scanner mode,touch the [SCANNER/FAX] key (see on page1-4).
2 Load the original. (see page 1-7)
3 Set the original size, resolution, exposureand other scanning conditions as needed.� MANUALLY SETTING THE SCANNING SIZE
(see page 1-8)� SELECTING THE RESOLUTION (see page 1-9)� SELECTING THE EXPOSURE (see page 1-10)
4 Lift the extension phone.The [SPEAKER] key can also be used. (See "One-touch dialing" on page 1-11.)
5 Dial the number of the other party or toucha one-touch key.
If the condition settingsscreen appears, touchthe [ADDRESSDIRECTORY] key todisplay the addressdirectory screen (seepage 1-4).
You cannot use a group key or a one-touch keythat includes a sub-address and passcode.
6 Speak to the other party when theyanswer.If you used the [SPEAKER] key to dial, lift theextension phone to talk.
7 After the other party switches to faxreception, press your [BLACK COPYSTART] key.
Transmission begins.
8 Replace the extension phone.
NOTEIf you connect a combination telephone/answering machine to the machine, you will not be able to use theanswering machine function.
NOTEAutomatic redialing (see "If the receiving party is busy" on page 2-5) will not take place if the line is busy.
NOTEIf you have loaded the original on the document glass,you can only send one page by manual transmission.
8
CORPO.TPS
SHARP GROUP
SPE
WhaleII_fax_ex.book 2 ページ 2004年9月21日 火曜日 午後1時9分
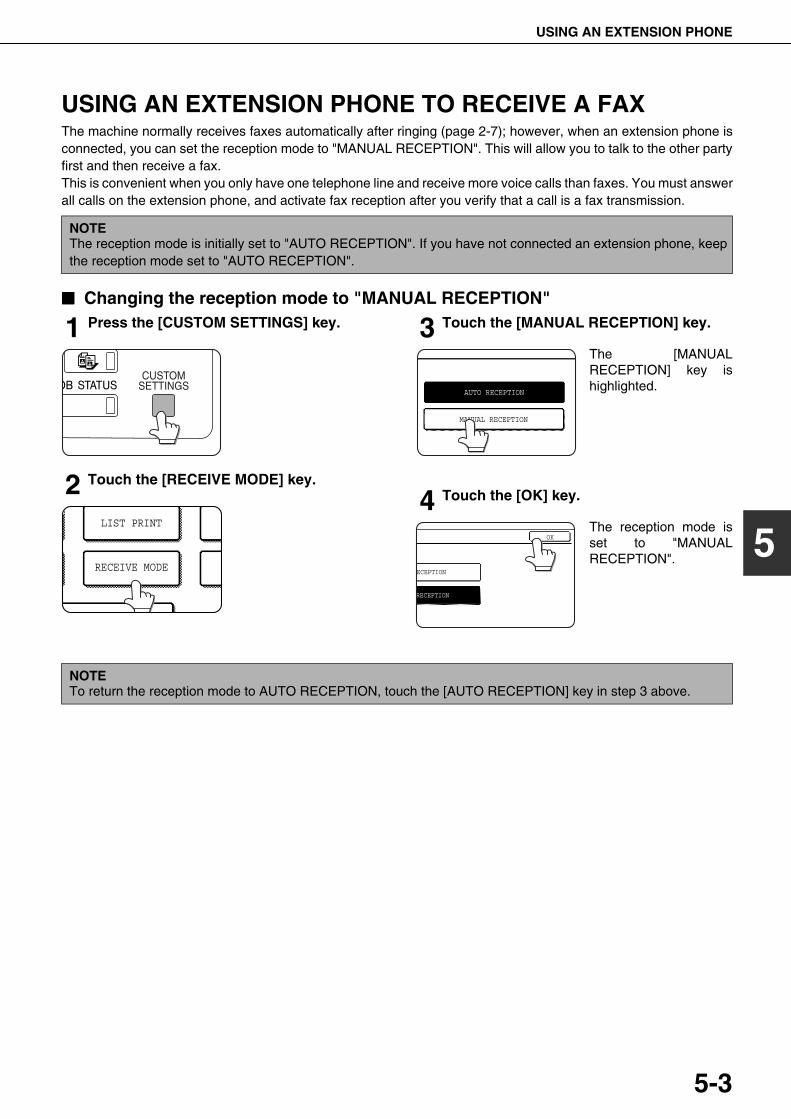
USING AN EXTENSION PHONE
5-3
5
USING AN EXTENSION PHONE TO RECEIVE A FAXThe machine normally receives faxes automatically after ringing (page 2-7); however, when an extension phone isconnected, you can set the reception mode to "MANUAL RECEPTION". This will allow you to talk to the other partyfirst and then receive a fax.This is convenient when you only have one telephone line and receive more voice calls than faxes. You must answerall calls on the extension phone, and activate fax reception after you verify that a call is a fax transmission.
���� Changing the reception mode to "MANUAL RECEPTION"
1 Press the [CUSTOM SETTINGS] key.
2 Touch the [RECEIVE MODE] key.
3 Touch the [MANUAL RECEPTION] key.
The [MANUALRECEPTION] key ishighlighted.
4 Touch the [OK] key.
The reception mode isset to "MANUALRECEPTION".
NOTEThe reception mode is initially set to "AUTO RECEPTION". If you have not connected an extension phone, keepthe reception mode set to "AUTO RECEPTION".
LIST PRINT
RECEIVE MODE
AUTO RECEPTION
MANUAL RECEPTION
RECEPTION
RECEPTION
OK
NOTETo return the reception mode to AUTO RECEPTION, touch the [AUTO RECEPTION] key in step 3 above.
WhaleII_fax_ex.book 3 ページ 2004年9月21日 火曜日 午後1時9分
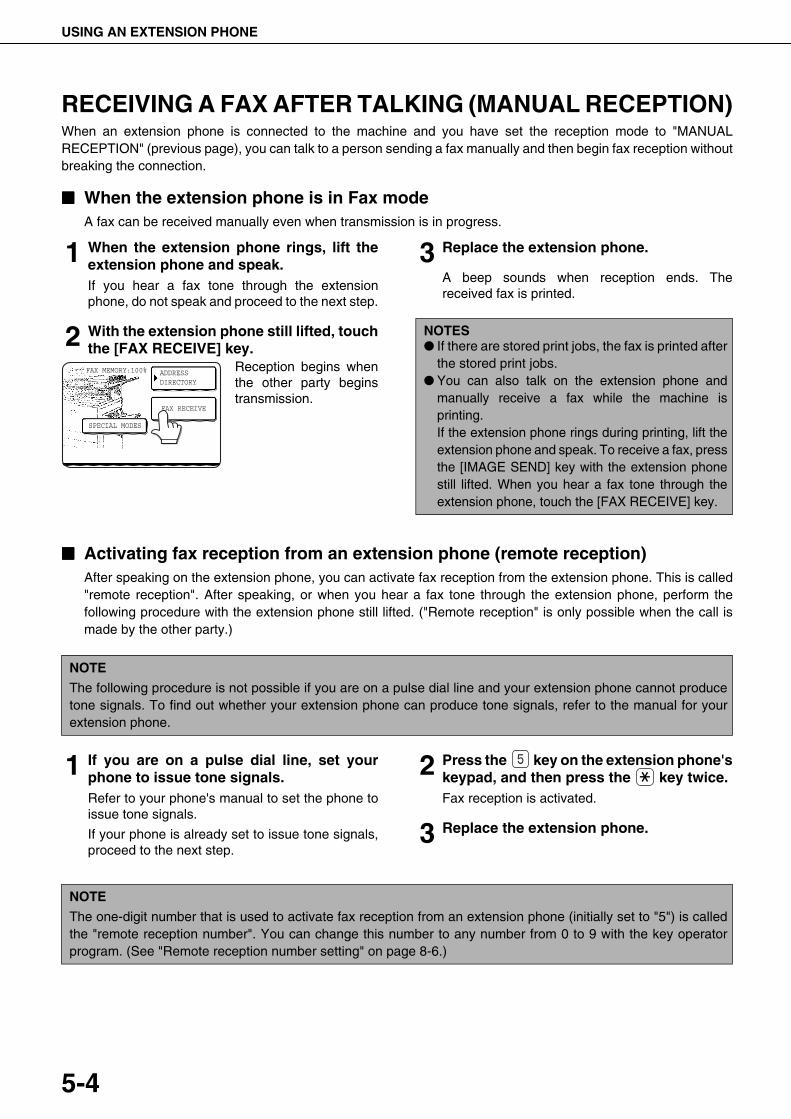
USING AN EXTENSION PHONE
5-4
RECEIVING A FAX AFTER TALKING (MANUAL RECEPTION)When an extension phone is connected to the machine and you have set the reception mode to "MANUALRECEPTION" (previous page), you can talk to a person sending a fax manually and then begin fax reception withoutbreaking the connection.
���� When the extension phone is in Fax modeA fax can be received manually even when transmission is in progress.
1 When the extension phone rings, lift theextension phone and speak.If you hear a fax tone through the extensionphone, do not speak and proceed to the next step.
2 With the extension phone still lifted, touchthe [FAX RECEIVE] key.
Reception begins whenthe other party beginstransmission.
3 Replace the extension phone.
A beep sounds when reception ends. Thereceived fax is printed.
���� Activating fax reception from an extension phone (remote reception)After speaking on the extension phone, you can activate fax reception from the extension phone. This is called"remote reception". After speaking, or when you hear a fax tone through the extension phone, perform thefollowing procedure with the extension phone still lifted. ("Remote reception" is only possible when the call ismade by the other party.)
1 If you are on a pulse dial line, set yourphone to issue tone signals.Refer to your phone's manual to set the phone toissue tone signals.
If your phone is already set to issue tone signals,proceed to the next step.
2 Press the key on the extension phone'skeypad, and then press the key twice.Fax reception is activated.
3 Replace the extension phone.
FAX RECEIVE
SPECIAL MODES
ADDRESSDIRECTORY
FAX MEMORY:100%
NOTES� If there are stored print jobs, the fax is printed after
the stored print jobs.� You can also talk on the extension phone and
manually receive a fax while the machine isprinting.If the extension phone rings during printing, lift theextension phone and speak. To receive a fax, pressthe [IMAGE SEND] key with the extension phonestill lifted. When you hear a fax tone through theextension phone, touch the [FAX RECEIVE] key.
NOTE
The following procedure is not possible if you are on a pulse dial line and your extension phone cannot producetone signals. To find out whether your extension phone can produce tone signals, refer to the manual for yourextension phone.
NOTE
The one-digit number that is used to activate fax reception from an extension phone (initially set to "5") is calledthe "remote reception number". You can change this number to any number from 0 to 9 with the key operatorprogram. (See "Remote reception number setting" on page 8-6.)
WhaleII_fax_ex.book 4 ページ 2004年9月21日 火曜日 午後1時9分
6-1
CHAPTER 6PROGRAMMING
This chapter explains the procedures for programming and theinformation programmed in auto dial keys (one-touch and group keys),programs, user indexes, and memory boxes.
Page
PROGRAMMING .................................................................................... 6-2STORING, EDITING, AND DELETING AUTO DIAL KEYS AND
PROGRAMS ........................................................................................... 6-2� STORING ONE-TOUCH KEYS ...................................................... 6-3� EDITING AND DELETING ONE-TOUCH KEYS............................. 6-5� STORING A GROUP KEY.............................................................. 6-6� EDITING AND DELETING GROUP KEYS ..................................... 6-7� STORING A PROGRAM................................................................. 6-8� EDITING AND DELETING PROGRAMS........................................ 6-8
STORING A GROUP INDEX .................................................................. 6-9PROGRAMMING, EDITING, AND DELETING F-CODE MEMORY
BOXES.................................................................................................... 6-10� PROGRAMMING AN F-CODE MEMORY BOX.............................. 6-10� SETTING FOR F-CODE POLLING MEMORY BOXES (POLLING
TIMES)...............................................................................................6-11� SETTING FOR F-CODE CONFIDENTIAL TRANSMISSION
MEMORY BOXES (PRINT PIN) .......................................................6-12� SETTING FOR F-CODE RELAY BROADCAST MEMORY BOXES
(RECIPIENT) .....................................................................................6-13� EDITING AND DELETING A MEMORY BOX................................. 6-14
PRINTING PROGRAMMED INFORMATION ......................................... 6-14
ENTERING CHARACTERS.................................................................... 6-15
WhaleII_fax_ex.book 1 ページ 2004年9月21日 火曜日 午後1時9分
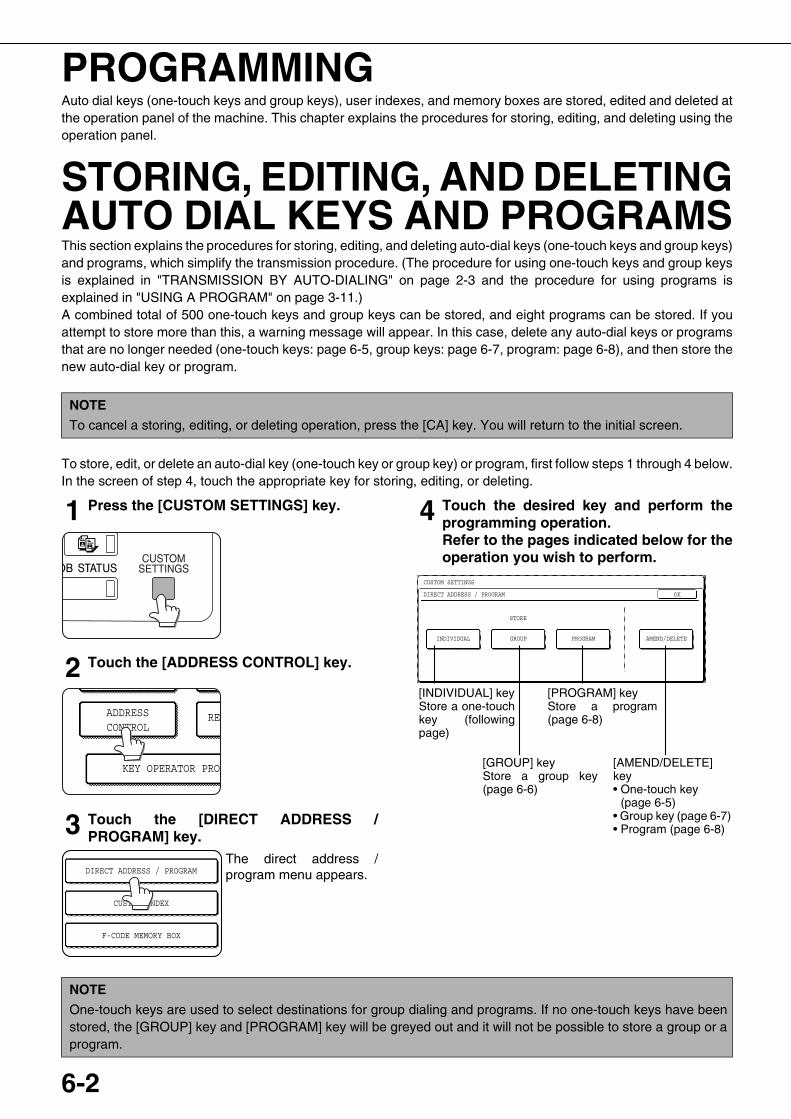
6-2
PROGRAMMINGAuto dial keys (one-touch keys and group keys), user indexes, and memory boxes are stored, edited and deleted atthe operation panel of the machine. This chapter explains the procedures for storing, editing, and deleting using theoperation panel.
STORING, EDITING, AND DELETINGAUTO DIAL KEYS AND PROGRAMSThis section explains the procedures for storing, editing, and deleting auto-dial keys (one-touch keys and group keys)and programs, which simplify the transmission procedure. (The procedure for using one-touch keys and group keysis explained in "TRANSMISSION BY AUTO-DIALING" on page 2-3 and the procedure for using programs isexplained in "USING A PROGRAM" on page 3-11.)A combined total of 500 one-touch keys and group keys can be stored, and eight programs can be stored. If youattempt to store more than this, a warning message will appear. In this case, delete any auto-dial keys or programsthat are no longer needed (one-touch keys: page 6-5, group keys: page 6-7, program: page 6-8), and then store thenew auto-dial key or program.
To store, edit, or delete an auto-dial key (one-touch key or group key) or program, first follow steps 1 through 4 below.In the screen of step 4, touch the appropriate key for storing, editing, or deleting.
1 Press the [CUSTOM SETTINGS] key.
2 Touch the [ADDRESS CONTROL] key.
3 Touch the [DIRECT ADDRESS /PROGRAM] key.
The direct address /program menu appears.
4 Touch the desired key and perform theprogramming operation.Refer to the pages indicated below for theoperation you wish to perform.
NOTE
To cancel a storing, editing, or deleting operation, press the [CA] key. You will return to the initial screen.
KEY OPERATOR PROG
ADDRESSCONTROL
REC
DIRECT ADDRESS / PROGRAM
CUSTOM INDEX
F-CODE MEMORY BOX
CUSTOM SETTINGS
DIRECT ADDRESS / PROGRAM
INDIVIDUAL GROUP
STORE
OK
PROGRAM AMEND/DELETE
[INDIVIDUAL] keyStore a one-touchkey (followingpage)
[PROGRAM] keyStore a program(page 6-8)
[GROUP] keyStore a group key(page 6-6)
[AMEND/DELETE]key• One-touch key
(page 6-5)• Group key (page 6-7)• Program (page 6-8)
NOTE
One-touch keys are used to select destinations for group dialing and programs. If no one-touch keys have beenstored, the [GROUP] key and [PROGRAM] key will be greyed out and it will not be possible to store a group or aprogram.
WhaleII_fax_ex.book 2 ページ 2004年9月21日 火曜日 午後1時9分
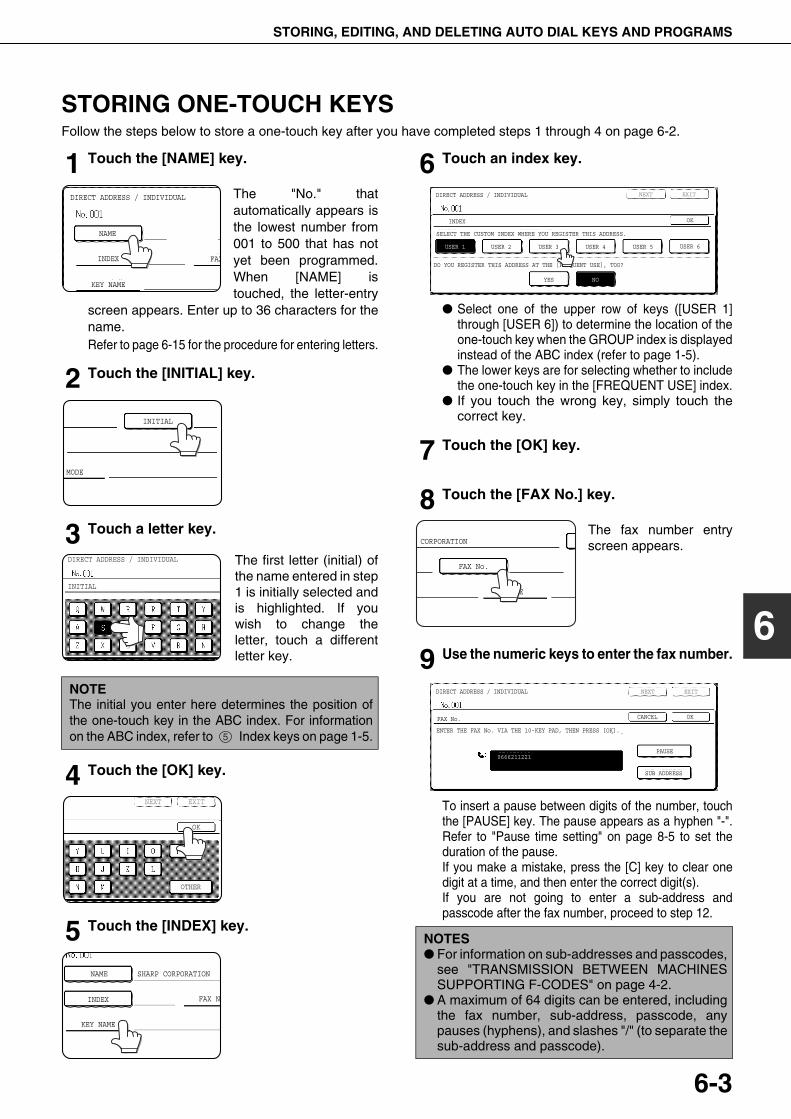
STORING, EDITING, AND DELETING AUTO DIAL KEYS AND PROGRAMS
6-3
6
STORING ONE-TOUCH KEYSFollow the steps below to store a one-touch key after you have completed steps 1 through 4 on page 6-2.
1 Touch the [NAME] key.
The "No." thatautomatically appears isthe lowest number from001 to 500 that has notyet been programmed.When [NAME] istouched, the letter-entry
screen appears. Enter up to 36 characters for thename.Refer to page 6-15 for the procedure for entering letters.
2 Touch the [INITIAL] key.
3 Touch a letter key.
The first letter (initial) ofthe name entered in step1 is initially selected andis highlighted. If youwish to change theletter, touch a differentletter key.
4 Touch the [OK] key.
5 Touch the [INDEX] key.
6 Touch an index key.
� Select one of the upper row of keys ([USER 1]through [USER 6]) to determine the location of theone-touch key when the GROUP index is displayedinstead of the ABC index (refer to page 1-5).
� The lower keys are for selecting whether to includethe one-touch key in the [FREQUENT USE] index.
� If you touch the wrong key, simply touch thecorrect key.
7 Touch the [OK] key.
8 Touch the [FAX No.] key.
The fax number entryscreen appears.
9 Use the numeric keys to enter the fax number.
To insert a pause between digits of the number, touchthe [PAUSE] key. The pause appears as a hyphen "-".Refer to "Pause time setting" on page 8-5 to set theduration of the pause.If you make a mistake, press the [C] key to clear onedigit at a time, and then enter the correct digit(s).If you are not going to enter a sub-address andpasscode after the fax number, proceed to step 12.
NOTEThe initial you enter here determines the position ofthe one-touch key in the ABC index. For informationon the ABC index, refer to Index keys on page 1-5.
DIRECT ADDRESS / INDIVIDUAL
NAME
INDEX
KEY NAME
FAX
INITIAL
MODE
INITIAL
DIRECT ADDRESS / INDIVIDUAL
5
NEXT EXIT
OK
OTHER
NAME SHARP CORPORATION
INDEX FAX No
KEY NAME
NOTES� For information on sub-addresses and passcodes,
see "TRANSMISSION BETWEEN MACHINESSUPPORTING F-CODES" on page 4-2.
� A maximum of 64 digits can be entered, includingthe fax number, sub-address, passcode, anypauses (hyphens), and slashes "/" (to separate thesub-address and passcode).
DIRECT ADDRESS / INDIVIDUAL NEXT EXIT
INDEX
USER 1 USER 2
YES NO
USER 3 USER 4 USER 5 USER 6
OK
SELECT THE CUSTOM INDEX WHERE YOU REGISTER THIS ADDRESS.
DO YOU REGISTER THIS ADDRESS AT THE [FREQUENT USE], TOO?
CORPORATION
FAX No.
MODE
DIRECT ADDRESS / INDIVIDUAL NEXT EXIT
FAX No.
ENTER THE FAX No. VIA THE 10-KEY PAD, THEN PRESS [OK].
0666211221
OKCANCEL
PAUSE
SUB ADDRESS
WhaleII_fax_ex.book 3 ページ 2004年9月21日 火曜日 午後1時9分
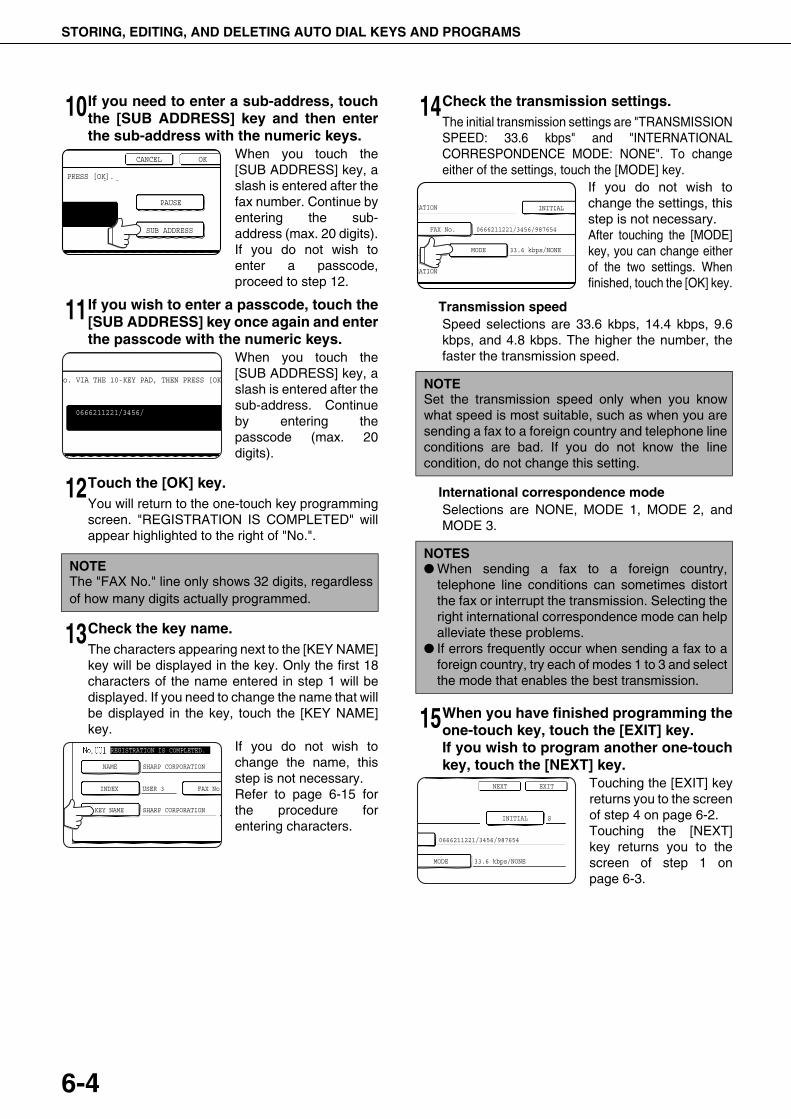
STORING, EDITING, AND DELETING AUTO DIAL KEYS AND PROGRAMS
6-4
10If you need to enter a sub-address, touchthe [SUB ADDRESS] key and then enterthe sub-address with the numeric keys.
When you touch the[SUB ADDRESS] key, aslash is entered after thefax number. Continue byentering the sub-address (max. 20 digits).If you do not wish toenter a passcode,proceed to step 12.
11If you wish to enter a passcode, touch the[SUB ADDRESS] key once again and enterthe passcode with the numeric keys.
When you touch the[SUB ADDRESS] key, aslash is entered after thesub-address. Continueby entering thepasscode (max. 20digits).
12Touch the [OK] key.You will return to the one-touch key programmingscreen. "REGISTRATION IS COMPLETED" willappear highlighted to the right of "No.".
13Check the key name.The characters appearing next to the [KEY NAME]key will be displayed in the key. Only the first 18characters of the name entered in step 1 will bedisplayed. If you need to change the name that willbe displayed in the key, touch the [KEY NAME]key.
If you do not wish tochange the name, thisstep is not necessary.Refer to page 6-15 forthe procedure forentering characters.
14Check the transmission settings.The initial transmission settings are "TRANSMISSIONSPEED: 33.6 kbps" and "INTERNATIONALCORRESPONDENCE MODE: NONE". To changeeither of the settings, touch the [MODE] key.
If you do not wish tochange the settings, thisstep is not necessary.After touching the [MODE]key, you can change eitherof the two settings. Whenfinished, touch the [OK] key.
Transmission speedSpeed selections are 33.6 kbps, 14.4 kbps, 9.6kbps, and 4.8 kbps. The higher the number, thefaster the transmission speed.
International correspondence modeSelections are NONE, MODE 1, MODE 2, andMODE 3.
15When you have finished programming theone-touch key, touch the [EXIT] key.If you wish to program another one-touchkey, touch the [NEXT] key.
Touching the [EXIT] keyreturns you to the screenof step 4 on page 6-2.Touching the [NEXT]key returns you to thescreen of step 1 onpage 6-3.
NOTEThe "FAX No." line only shows 32 digits, regardlessof how many digits actually programmed.
N PRESS [OK].
OKCANCEL
PAUSE
SUB ADDRESS
No. VIA THE 10-KEY PAD, THEN PRESS [OK
0666211221/3456/
NAME SHARP CORPORATION
INDEX USER 3 FAX No.
KEY NAME SHARP CORPORATION
REGISTRATION IS COMPLETED.
NOTESet the transmission speed only when you knowwhat speed is most suitable, such as when you aresending a fax to a foreign country and telephone lineconditions are bad. If you do not know the linecondition, do not change this setting.
NOTES� When sending a fax to a foreign country,
telephone line conditions can sometimes distortthe fax or interrupt the transmission. Selecting theright international correspondence mode can helpalleviate these problems.
� If errors frequently occur when sending a fax to aforeign country, try each of modes 1 to 3 and selectthe mode that enables the best transmission.
RATION INITIAL
0666211221/3456/987654FAX No.
RATION
33.6 kbps/NONEMODE
SINITIAL
NEXT EXIT
0666211221/3456/987654.
33.6 kbps/NONEMODE
WhaleII_fax_ex.book 4 ページ 2004年9月21日 火曜日 午後1時9分

STORING, EDITING, AND DELETING AUTO DIAL KEYS AND PROGRAMS
6-5
6
EDITING AND DELETING ONE-TOUCH KEYSIf you wish to delete a one-touch key or change the fax number, name, or other information programmed in a one-touch key, follow steps 1 through 3 on page 6-2 and then perform the following procedure.
1 Touch the [AMEND/DELETE] key.
2 Touch the one-touch key that you wish toedit or delete.
� To edit a one-touch key, follow steps 3 and 4.� To delete a one-touch key, follow steps 5 and 6.� When you have finished editing or deleting, touch the
[EXIT] key.
3 Touch the key corresponding to theinformation you wish to change (changethe information in the same way as youstored the information on page 6-3).
4 Make sure that your changes are correct,and then touch the [EXIT] key.
You will return to thescreen of step 2.If you wish to changeanother one-touch key,repeat steps 2 through4.
5 Touch the [DELETE] key.
6 Touch the [YES] key.
You will return to thescreen of step 2.If you wish to deleteanother one-touch key,repeat steps 2, 5, and 6.
AMEND/DELETE
DIRECT ADDRESS / AMEND/DELETE
SELECT ADDRESS TO AMEND/DELETE.
EXIT
SHARP CORPORATION
FREQUENT USE ABCD EFGHI JKLMN OPQRST UVWXYZ ABC GROUP
CORPO.TPS
SHARP GROUP D
E F
G H
PROGRAM
DIRECT ADDRESS / AMEND/DELETE
NAME SHARP CORPORATION SINITIAL
DELETE EXIT
INDEX USER 3 0666211221/3456/987654FAX No.
KEY NAME SHARP CORPORATION 33.6 kbps/NONEMODE
SINITIAL
DELETE EXIT
SINITIAL
DELETE EXIT
DELETE THE ADDRESS?
SHARP CORPORATION
NO YES
NOTE
If you cannot edit or delete a one-touch keyIf you attempt to edit or delete a one-touch key in the following situations, a warning message will appear andediting/deletion will not be possible.� The one-touch key you wish to edit or delete is currently being used for transmission or is used in a currently
stored transmission job (including a timer transmission). (See "CANCELLING A FAX TRANSMISSION" on page2-6.)
� The one-touch key is included in a group key. (See "EDITING AND DELETING GROUP KEYS" on page 6-7.)� The one-touch key is included in a group of end receiving machines for an F-code relay broadcast operation.
(See "EDITING AND DELETING A MEMORY BOX" on page 6-14.)� The one-touch key is included in a program. (See "EDITING AND DELETING PROGRAMS" on page 6-8.)If the key is being used for a transmission currently in progress or a stored transmission, cancel the transmissionor wait until it is completed and then change or delete the key. If the key is included in a group, delete the key fromthe group and then change or delete it.
WhaleII_fax_ex.book 5 ページ 2004年9月21日 火曜日 午後1時9分
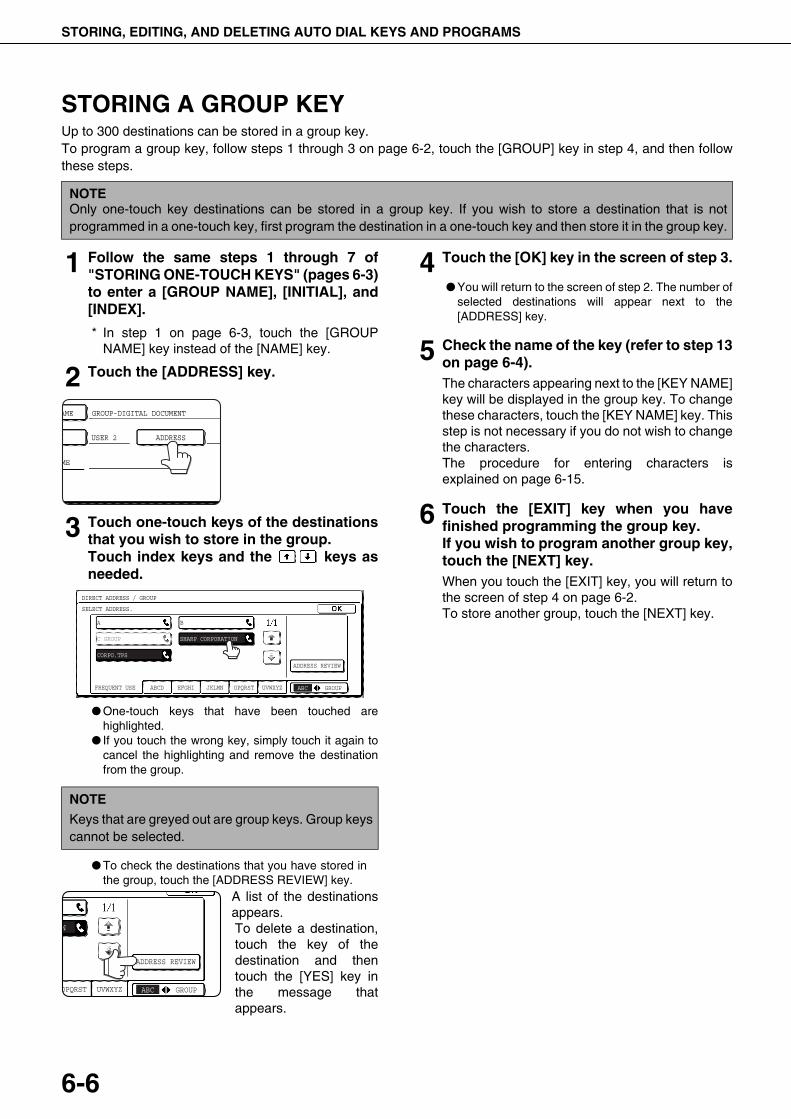
STORING, EDITING, AND DELETING AUTO DIAL KEYS AND PROGRAMS
6-6
STORING A GROUP KEYUp to 300 destinations can be stored in a group key.To program a group key, follow steps 1 through 3 on page 6-2, touch the [GROUP] key in step 4, and then followthese steps.
1 Follow the same steps 1 through 7 of"STORING ONE-TOUCH KEYS" (pages 6-3)to enter a [GROUP NAME], [INITIAL], and[INDEX].
* In step 1 on page 6-3, touch the [GROUPNAME] key instead of the [NAME] key.
2 Touch the [ADDRESS] key.
3 Touch one-touch keys of the destinationsthat you wish to store in the group.Touch index keys and the keys asneeded.
� One-touch keys that have been touched arehighlighted.
� If you touch the wrong key, simply touch it again tocancel the highlighting and remove the destinationfrom the group.
� To check the destinations that you have stored inthe group, touch the [ADDRESS REVIEW] key.
A list of the destinationsappears.To delete a destination,touch the key of thedestination and thentouch the [YES] key inthe message thatappears.
4 Touch the [OK] key in the screen of step 3.
� You will return to the screen of step 2. The number ofselected destinations will appear next to the[ADDRESS] key.
5 Check the name of the key (refer to step 13on page 6-4).The characters appearing next to the [KEY NAME]key will be displayed in the group key. To changethese characters, touch the [KEY NAME] key. Thisstep is not necessary if you do not wish to changethe characters.The procedure for entering characters isexplained on page 6-15.
6 Touch the [EXIT] key when you havefinished programming the group key.If you wish to program another group key,touch the [NEXT] key.When you touch the [EXIT] key, you will return tothe screen of step 4 on page 6-2.To store another group, touch the [NEXT] key.
NOTEOnly one-touch key destinations can be stored in a group key. If you wish to store a destination that is notprogrammed in a one-touch key, first program the destination in a one-touch key and then store it in the group key.
NOTE
Keys that are greyed out are group keys. Group keyscannot be selected.
AME GROUP-DIGITAL DOCUMENT
X USER 2 ADDRESS
ME
DIRECT ADDRESS / GROUP
SELECT ADDRESS.
A
FREQUENT USE ABCD EFGHI JKLMN OPQRST UVWXYZ ABC GROUP
B
C GROUP SHARP CORPORATION
CORPO.TPS
ADDRESS REVIEW
OPQRST UVWXYZ ABC GROUP
N
ADDRESS REVIEW
WhaleII_fax_ex.book 6 ページ 2004年9月21日 火曜日 午後1時9分
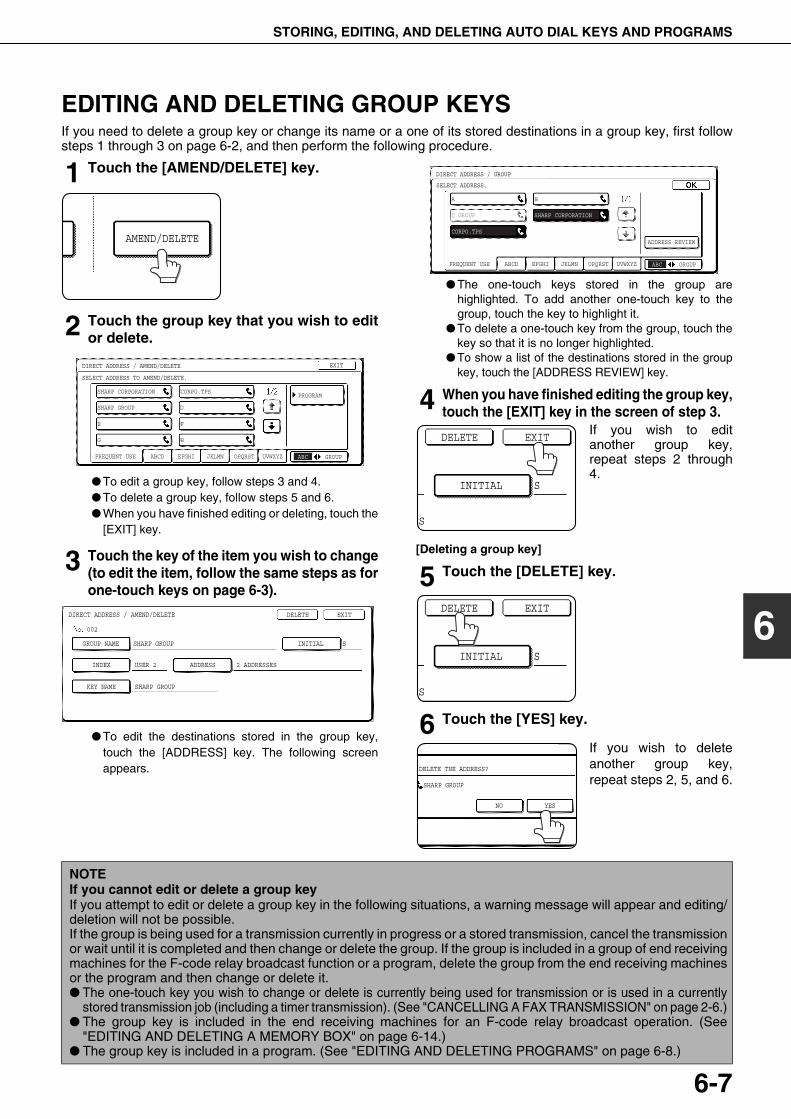
STORING, EDITING, AND DELETING AUTO DIAL KEYS AND PROGRAMS
6-7
6
EDITING AND DELETING GROUP KEYSIf you need to delete a group key or change its name or a one of its stored destinations in a group key, first followsteps 1 through 3 on page 6-2, and then perform the following procedure.
1 Touch the [AMEND/DELETE] key.
2 Touch the group key that you wish to editor delete.
� To edit a group key, follow steps 3 and 4.� To delete a group key, follow steps 5 and 6.� When you have finished editing or deleting, touch the
[EXIT] key.
3 Touch the key of the item you wish to change(to edit the item, follow the same steps as forone-touch keys on page 6-3).
.
� To edit the destinations stored in the group key,touch the [ADDRESS] key. The following screenappears.
� The one-touch keys stored in the group arehighlighted. To add another one-touch key to thegroup, touch the key to highlight it.
� To delete a one-touch key from the group, touch thekey so that it is no longer highlighted.
� To show a list of the destinations stored in the groupkey, touch the [ADDRESS REVIEW] key.
4 When you have finished editing the group key,touch the [EXIT] key in the screen of step 3.
If you wish to editanother group key,repeat steps 2 through4.
[Deleting a group key]
5 Touch the [DELETE] key.
6 Touch the [YES] key.
If you wish to deleteanother group key,repeat steps 2, 5, and 6.
AMEND/DELETE
DIRECT ADDRESS / AMEND/DELETE
SELECT ADDRESS TO AMEND/DELETE.
EXIT
SHARP CORPORATION
FREQUENT USE ABCD EFGHI JKLMN OPQRST UVWXYZ ABC GROUP
CORPO.TPS
SHARP GROUP D
E F
G H
PROGRAM
DIRECT ADDRESS / AMEND/DELETE
GROUP NAME SHARP GROUP
002
SINITIAL
DELETE EXIT
INDEX USER 2 2 ADDRESSESADDRESS
KEY NAME SHARP GROUP
DIRECT ADDRESS / GROUP
SELECT ADDRESS.
A
FREQUENT USE ABCD EFGHI JKLMN OPQRST UVWXYZ ABC GROUP
B
C GROUP SHARP CORPORATION
CORPO.TPS
ADDRESS REVIEW
SINITIAL
DELETE EXIT
ES
SINITIAL
DELETE EXIT
ES
DELETE THE ADDRESS?
SHARP GROUP
NO YES
NOTEIf you cannot edit or delete a group keyIf you attempt to edit or delete a group key in the following situations, a warning message will appear and editing/deletion will not be possible.If the group is being used for a transmission currently in progress or a stored transmission, cancel the transmissionor wait until it is completed and then change or delete the group. If the group is included in a group of end receivingmachines for the F-code relay broadcast function or a program, delete the group from the end receiving machinesor the program and then change or delete it.� The one-touch key you wish to change or delete is currently being used for transmission or is used in a currently
stored transmission job (including a timer transmission). (See "CANCELLING A FAX TRANSMISSION" on page 2-6.)� The group key is included in the end receiving machines for an F-code relay broadcast operation. (See
"EDITING AND DELETING A MEMORY BOX" on page 6-14.)� The group key is included in a program. (See "EDITING AND DELETING PROGRAMS" on page 6-8.)
WhaleII_fax_ex.book 7 ページ 2004年9月21日 火曜日 午後1時9分
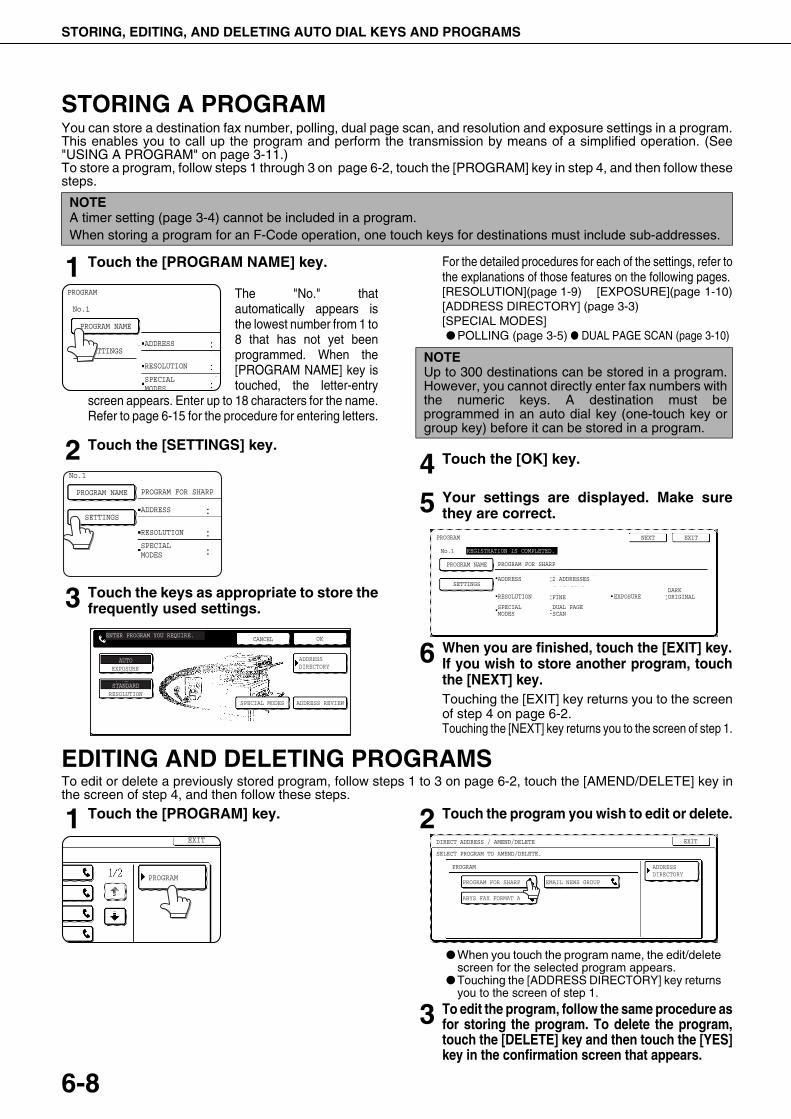
STORING, EDITING, AND DELETING AUTO DIAL KEYS AND PROGRAMS
6-8
STORING A PROGRAMYou can store a destination fax number, polling, dual page scan, and resolution and exposure settings in a program.This enables you to call up the program and perform the transmission by means of a simplified operation. (See"USING A PROGRAM" on page 3-11.)To store a program, follow steps 1 through 3 on page 6-2, touch the [PROGRAM] key in step 4, and then follow thesesteps.
1 Touch the [PROGRAM NAME] key.
The "No." thatautomatically appears isthe lowest number from 1 to8 that has not yet beenprogrammed. When the[PROGRAM NAME] key istouched, the letter-entry
screen appears. Enter up to 18 characters for the name.Refer to page 6-15 for the procedure for entering letters.
2 Touch the [SETTINGS] key.
3 Touch the keys as appropriate to store thefrequently used settings.
For the detailed procedures for each of the settings, refer tothe explanations of those features on the following pages.[RESOLUTION](page 1-9) [EXPOSURE](page 1-10)[ADDRESS DIRECTORY] (page 3-3)[SPECIAL MODES]� POLLING (page 3-5) � DUAL PAGE SCAN (page 3-10)
4 Touch the [OK] key.
5 Your settings are displayed. Make surethey are correct.
6 When you are finished, touch the [EXIT] key.If you wish to store another program, touchthe [NEXT] key.Touching the [EXIT] key returns you to the screenof step 4 on page 6-2.Touching the [NEXT] key returns you to the screen of step 1.
EDITING AND DELETING PROGRAMSTo edit or delete a previously stored program, follow steps 1 to 3 on page 6-2, touch the [AMEND/DELETE] key inthe screen of step 4, and then follow these steps.
1 Touch the [PROGRAM] key. 2 Touch the program you wish to edit or delete.
� When you touch the program name, the edit/deletescreen for the selected program appears.
� Touching the [ADDRESS DIRECTORY] key returnsyou to the screen of step 1.
3 To edit the program, follow the same procedure asfor storing the program. To delete the program,touch the [DELETE] key and then touch the [YES]key in the confirmation screen that appears.
NOTEA timer setting (page 3-4) cannot be included in a program.When storing a program for an F-Code operation, one touch keys for destinations must include sub-addresses.
PROGRAM
PROGRAM NAME
SETTINGSADDRESS
RESOLUTION
SPECIAL MODES
No.1
PROGRAM NAME
SETTINGSADDRESS
PROGRAM FOR SHARP
RESOLUTION
SPECIAL MODES
No.1
CANCEL OK
SPECIAL MODES
ADDRESSDIRECTORY
ENTER PROGRAM YOU REQUIRE.
STANDARDRESOLUTION
AUTOEXPOSURE
ADDRESS REVIEW
NOTEUp to 300 destinations can be stored in a program.However, you cannot directly enter fax numbers withthe numeric keys. A destination must beprogrammed in an auto dial key (one-touch key orgroup key) before it can be stored in a program.
PROGRAM
PROGRAM NAME
SETTINGSADDRESS 2 ADDRESSES
FINE
REGISTRATION IS COMPLETED.
PROGRAM FOR SHARP
RESOLUTION EXPOSUREDARK ORIGINAL
SPECIAL MODES
DUAL PAGESCAN
No.1
NEXT EXIT
EXIT
PROGRAM
DIRECT ADDRESS / AMEND/DELETE
PROGRAM
SELECT PROGRAM TO AMEND/DELETE.
EXIT
PROGRAM FOR SHARP EMAIL NEWS GROUP
ABYS FAX FORMAT A
ADDRESS DIRECTORY
WhaleII_fax_ex.book 8 ページ 2004年9月21日 火曜日 午後1時9分
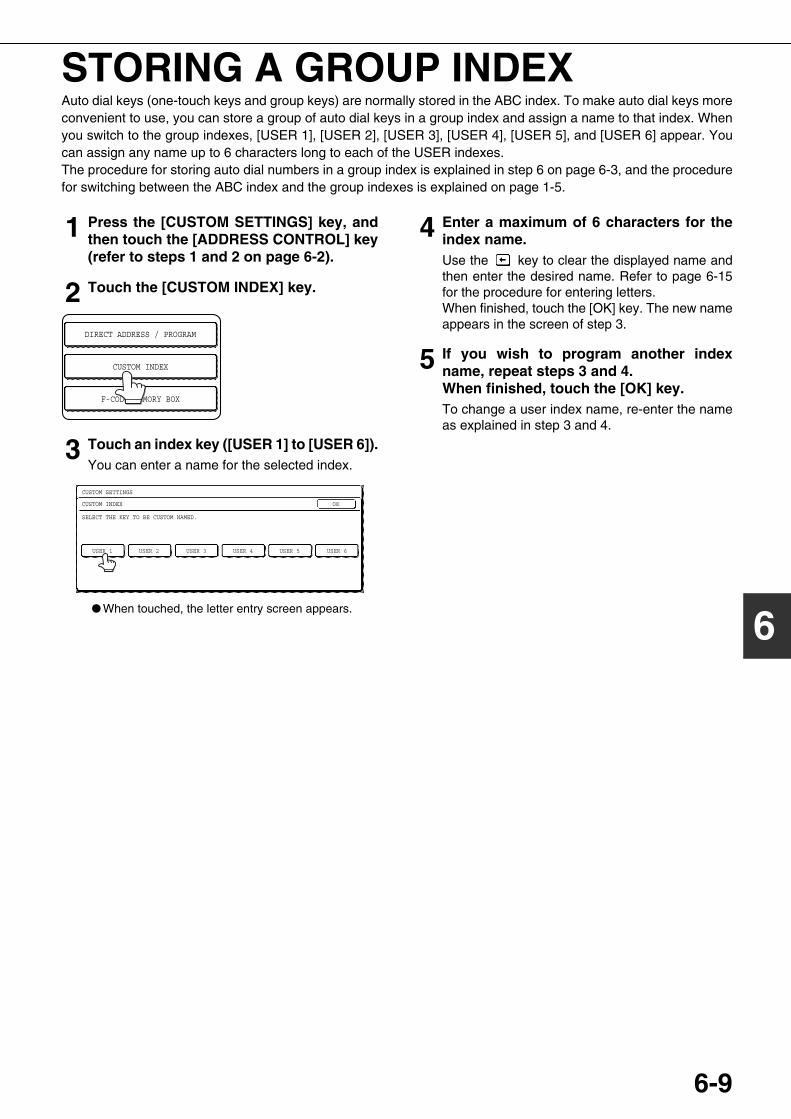
6-9
6
STORING A GROUP INDEXAuto dial keys (one-touch keys and group keys) are normally stored in the ABC index. To make auto dial keys moreconvenient to use, you can store a group of auto dial keys in a group index and assign a name to that index. Whenyou switch to the group indexes, [USER 1], [USER 2], [USER 3], [USER 4], [USER 5], and [USER 6] appear. Youcan assign any name up to 6 characters long to each of the USER indexes.The procedure for storing auto dial numbers in a group index is explained in step 6 on page 6-3, and the procedurefor switching between the ABC index and the group indexes is explained on page 1-5.
1 Press the [CUSTOM SETTINGS] key, andthen touch the [ADDRESS CONTROL] key(refer to steps 1 and 2 on page 6-2).
2 Touch the [CUSTOM INDEX] key.
3 Touch an index key ([USER 1] to [USER 6]).You can enter a name for the selected index.
� When touched, the letter entry screen appears.
4 Enter a maximum of 6 characters for theindex name.Use the key to clear the displayed name andthen enter the desired name. Refer to page 6-15for the procedure for entering letters.When finished, touch the [OK] key. The new nameappears in the screen of step 3.
5 If you wish to program another indexname, repeat steps 3 and 4.When finished, touch the [OK] key.To change a user index name, re-enter the nameas explained in step 3 and 4.
DIRECT ADDRESS / PROGRAM
CUSTOM INDEX
F-CODE MEMORY BOX
CUSTOM SETTINGS
CUSTOM INDEX
SELECT THE KEY TO BE CUSTOM NAMED.
OK
USER 1 USER 2 USER 3 USER 4 USER 5 USER 6
WhaleII_fax_ex.book 9 ページ 2004年9月21日 火曜日 午後1時9分
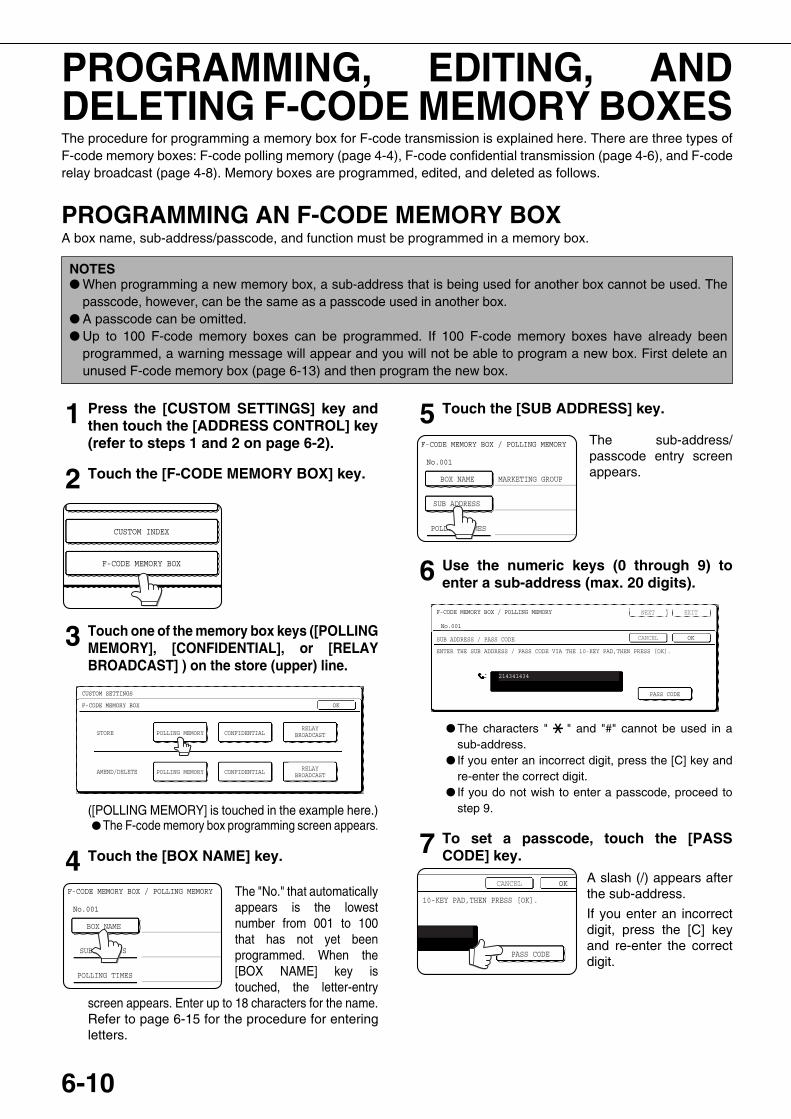
6-10
PROGRAMMING, EDITING, ANDDELETING F-CODE MEMORY BOXESThe procedure for programming a memory box for F-code transmission is explained here. There are three types ofF-code memory boxes: F-code polling memory (page 4-4), F-code confidential transmission (page 4-6), and F-coderelay broadcast (page 4-8). Memory boxes are programmed, edited, and deleted as follows.
PROGRAMMING AN F-CODE MEMORY BOXA box name, sub-address/passcode, and function must be programmed in a memory box.
1 Press the [CUSTOM SETTINGS] key andthen touch the [ADDRESS CONTROL] key(refer to steps 1 and 2 on page 6-2).
2 Touch the [F-CODE MEMORY BOX] key.
3 Touch one of the memory box keys ([POLLINGMEMORY], [CONFIDENTIAL], or [RELAYBROADCAST] ) on the store (upper) line.
([POLLING MEMORY] is touched in the example here.)� The F-code memory box programming screen appears.
4 Touch the [BOX NAME] key.
The "No." that automaticallyappears is the lowestnumber from 001 to 100that has not yet beenprogrammed. When the[BOX NAME] key istouched, the letter-entry
screen appears. Enter up to 18 characters for the name.Refer to page 6-15 for the procedure for enteringletters.
5 Touch the [SUB ADDRESS] key.
The sub-address/passcode entry screenappears.
6 Use the numeric keys (0 through 9) toenter a sub-address (max. 20 digits).
� The characters " " and "#" cannot be used in asub-address.
� If you enter an incorrect digit, press the [C] key andre-enter the correct digit.
� If you do not wish to enter a passcode, proceed tostep 9.
7 To set a passcode, touch the [PASSCODE] key.
A slash (/) appears afterthe sub-address.
If you enter an incorrectdigit, press the [C] keyand re-enter the correctdigit.
NOTES� When programming a new memory box, a sub-address that is being used for another box cannot be used. The
passcode, however, can be the same as a passcode used in another box.� A passcode can be omitted.� Up to 100 F-code memory boxes can be programmed. If 100 F-code memory boxes have already been
programmed, a warning message will appear and you will not be able to program a new box. First delete anunused F-code memory box (page 6-13) and then program the new box.
F-CODE MEMORY BOX
CUSTOM INDEX
POLLING MEMORY CONFIDENTIALRELAY
BROADCAST
POLLING MEMORY CONFIDENTIAL RELAYBROADCAST
CUSTOM SETTINGS
F-CODE MEMORY BOX OK
STORE
AMEND/DELETE
F-CODE MEMORY BOX / POLLING MEMORY
No.001
SUB ADDRESS
BOX NAME
POLLING TIMES
F-CODE MEMORY BOX / POLLING MEMORY
No.001
SUB ADDRESS
BOX NAME MARKETING GROUP
POLLING TIMES
F-CODE MEMORY BOX / POLLING MEMORY
No.001
EXITNEXT
OKCANCEL
ENTER THE SUB ADDRESS / PASS CODE VIA THE 10-KEY PAD,THEN PRESS [OK].
214341434
PASS CODE
SUB ADDRESS / PASS CODE
OKCANCEL
E 10-KEY PAD,THEN PRESS [OK].
PASS CODE
WhaleII_fax_ex.book 10 ページ 2004年9月21日 火曜日 午後1時9分
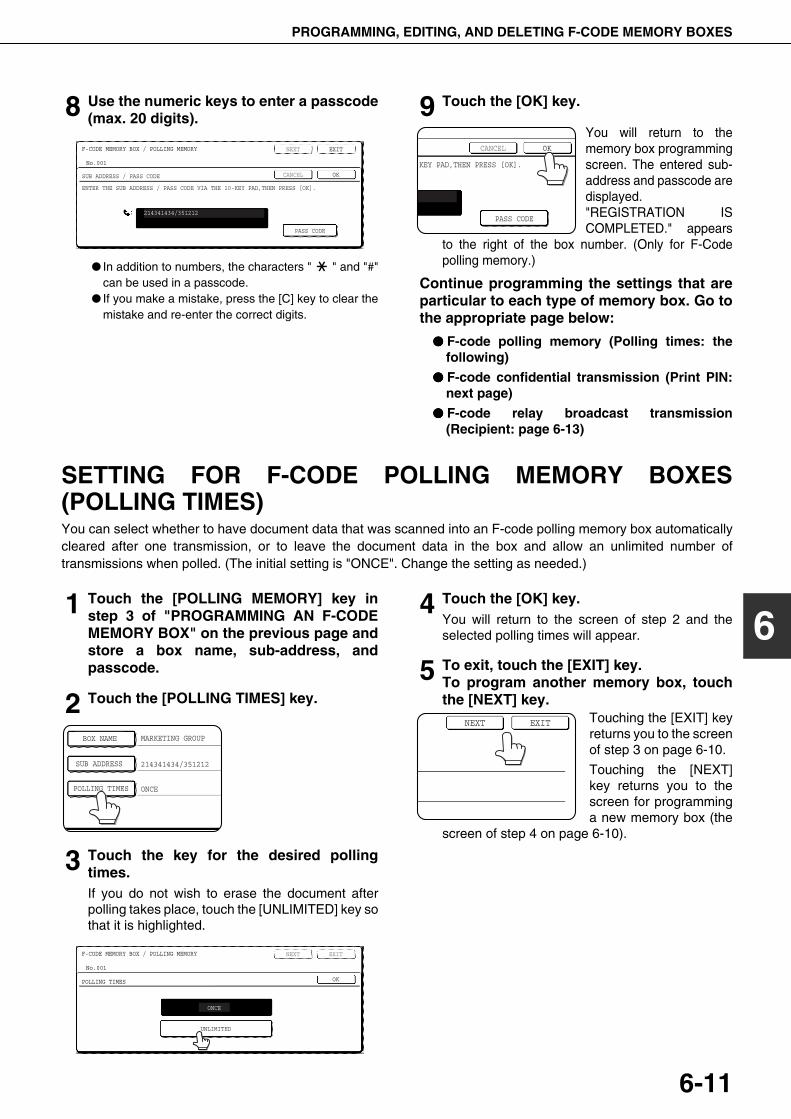
PROGRAMMING, EDITING, AND DELETING F-CODE MEMORY BOXES
6-11
6
8 Use the numeric keys to enter a passcode(max. 20 digits).
� In addition to numbers, the characters " " and "#"can be used in a passcode.
� If you make a mistake, press the [C] key to clear themistake and re-enter the correct digits.
9 Touch the [OK] key.
You will return to thememory box programmingscreen. The entered sub-address and passcode aredisplayed."REGISTRATION ISCOMPLETED." appears
to the right of the box number. (Only for F-Codepolling memory.)
Continue programming the settings that areparticular to each type of memory box. Go tothe appropriate page below:
���� F-code polling memory (Polling times: thefollowing)
���� F-code confidential transmission (Print PIN:next page)
���� F-code relay broadcast transmission(Recipient: page 6-13)
SETTING FOR F-CODE POLLING MEMORY BOXES(POLLING TIMES)You can select whether to have document data that was scanned into an F-code polling memory box automaticallycleared after one transmission, or to leave the document data in the box and allow an unlimited number oftransmissions when polled. (The initial setting is "ONCE". Change the setting as needed.)
1 Touch the [POLLING MEMORY] key instep 3 of "PROGRAMMING AN F-CODEMEMORY BOX" on the previous page andstore a box name, sub-address, andpasscode.
2 Touch the [POLLING TIMES] key.
3 Touch the key for the desired pollingtimes.If you do not wish to erase the document afterpolling takes place, touch the [UNLIMITED] key sothat it is highlighted.
4 Touch the [OK] key.You will return to the screen of step 2 and theselected polling times will appear.
5 To exit, touch the [EXIT] key.To program another memory box, touchthe [NEXT] key.
Touching the [EXIT] keyreturns you to the screenof step 3 on page 6-10.
Touching the [NEXT]key returns you to thescreen for programminga new memory box (the
screen of step 4 on page 6-10).
F-CODE MEMORY BOX / POLLING MEMORY
No.001
EXITNEXT
OKCANCEL
ENTER THE SUB ADDRESS / PASS CODE VIA THE 10-KEY PAD,THEN PRESS [OK].
214341434/351212
PASS CODE
SUB ADDRESS / PASS CODE
OKCANCEL
-KEY PAD,THEN PRESS [OK].
PASS CODE
SUB ADDRESS
BOX NAME MARKETING GROUP
ONCE
214341434/351212
POLLING TIMES
F-CODE MEMORY BOX / POLLING MEMORY
POLLING TIMES
No.001
ONCE
UNLIMITED
EXIT
OK
NEXT
EXITNEXT
WhaleII_fax_ex.book 11 ページ 2004年9月21日 火曜日 午後1時9分
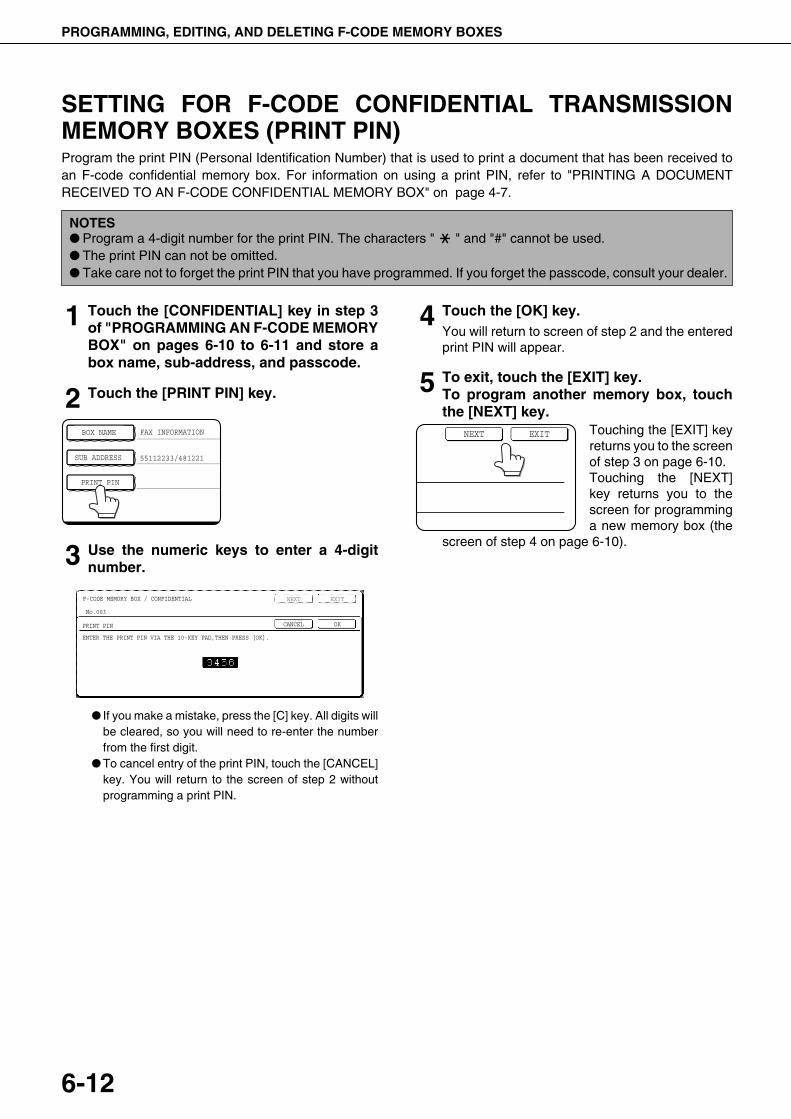
PROGRAMMING, EDITING, AND DELETING F-CODE MEMORY BOXES
6-12
SETTING FOR F-CODE CONFIDENTIAL TRANSMISSIONMEMORY BOXES (PRINT PIN)Program the print PIN (Personal Identification Number) that is used to print a document that has been received toan F-code confidential memory box. For information on using a print PIN, refer to "PRINTING A DOCUMENTRECEIVED TO AN F-CODE CONFIDENTIAL MEMORY BOX" on page 4-7.
1 Touch the [CONFIDENTIAL] key in step 3of "PROGRAMMING AN F-CODE MEMORYBOX" on pages 6-10 to 6-11 and store abox name, sub-address, and passcode.
2 Touch the [PRINT PIN] key.
3 Use the numeric keys to enter a 4-digitnumber.
� If you make a mistake, press the [C] key. All digits willbe cleared, so you will need to re-enter the numberfrom the first digit.
� To cancel entry of the print PIN, touch the [CANCEL]key. You will return to the screen of step 2 withoutprogramming a print PIN.
4 Touch the [OK] key.You will return to screen of step 2 and the enteredprint PIN will appear.
5 To exit, touch the [EXIT] key.To program another memory box, touchthe [NEXT] key.
Touching the [EXIT] keyreturns you to the screenof step 3 on page 6-10.Touching the [NEXT]key returns you to thescreen for programminga new memory box (the
screen of step 4 on page 6-10).
NOTES� Program a 4-digit number for the print PIN. The characters " " and "#" cannot be used.� The print PIN can not be omitted.� Take care not to forget the print PIN that you have programmed. If you forget the passcode, consult your dealer.
SUB ADDRESS
BOX NAME FAX INFORMATION
55112233/481221
PRINT PIN
F-CODE MEMORY BOX / CONFIDENTIAL
PRINT PIN
ENTER THE PRINT PIN VIA THE 10-KEY PAD,THEN PRESS [OK].
No.003
EXIT
OKCANCEL
NEXT
EXITNEXT
WhaleII_fax_ex.book 12 ページ 2004年9月21日 火曜日 午後1時9分
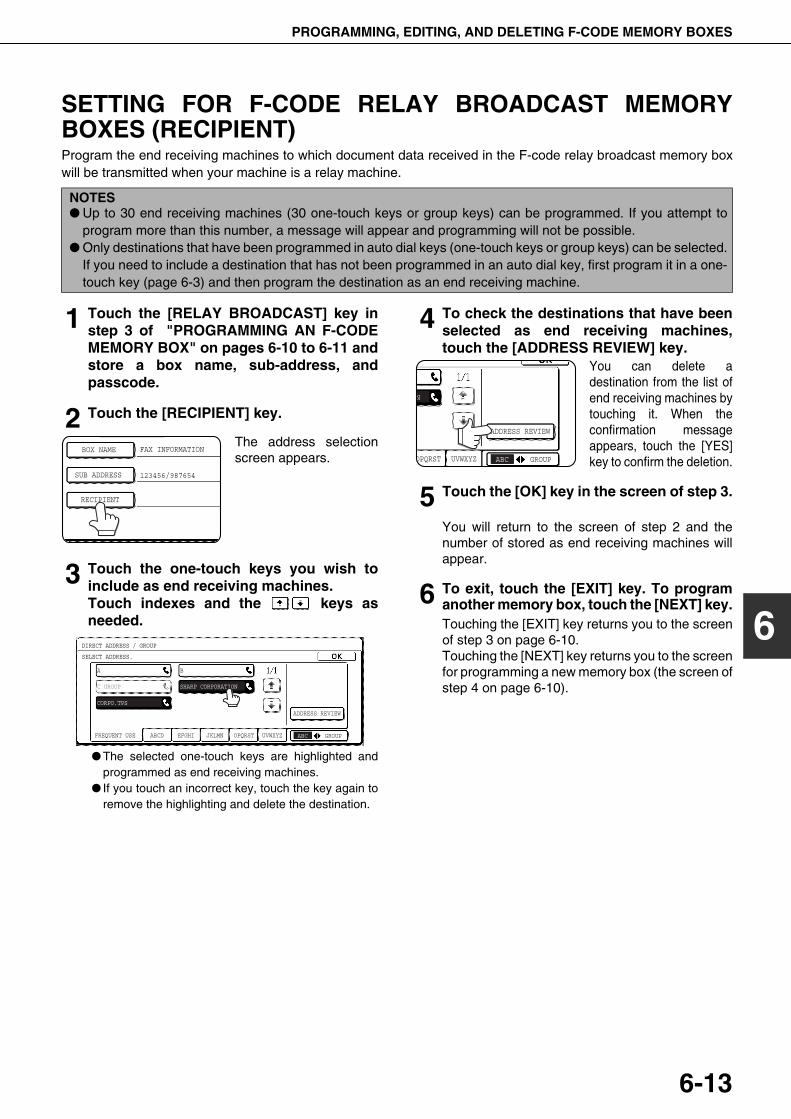
PROGRAMMING, EDITING, AND DELETING F-CODE MEMORY BOXES
6-13
6
SETTING FOR F-CODE RELAY BROADCAST MEMORYBOXES (RECIPIENT)Program the end receiving machines to which document data received in the F-code relay broadcast memory boxwill be transmitted when your machine is a relay machine.
1 Touch the [RELAY BROADCAST] key instep 3 of "PROGRAMMING AN F-CODEMEMORY BOX" on pages 6-10 to 6-11 andstore a box name, sub-address, andpasscode.
2 Touch the [RECIPIENT] key.
The address selectionscreen appears.
3 Touch the one-touch keys you wish toinclude as end receiving machines.Touch indexes and the keys asneeded.
� The selected one-touch keys are highlighted andprogrammed as end receiving machines.
� If you touch an incorrect key, touch the key again toremove the highlighting and delete the destination.
4 To check the destinations that have beenselected as end receiving machines,touch the [ADDRESS REVIEW] key.
You can delete adestination from the list ofend receiving machines bytouching it. When theconfirmation messageappears, touch the [YES]key to confirm the deletion.
5 Touch the [OK] key in the screen of step 3.
You will return to the screen of step 2 and thenumber of stored as end receiving machines willappear.
6 To exit, touch the [EXIT] key. To programanother memory box, touch the [NEXT] key.Touching the [EXIT] key returns you to the screenof step 3 on page 6-10.Touching the [NEXT] key returns you to the screenfor programming a new memory box (the screen ofstep 4 on page 6-10).
NOTES� Up to 30 end receiving machines (30 one-touch keys or group keys) can be programmed. If you attempt to
program more than this number, a message will appear and programming will not be possible.� Only destinations that have been programmed in auto dial keys (one-touch keys or group keys) can be selected.
If you need to include a destination that has not been programmed in an auto dial key, first program it in a one-touch key (page 6-3) and then program the destination as an end receiving machine.
SUB ADDRESS
BOX NAME FAX INFORMATION
123456/987654
RECIPIENT
DIRECT ADDRESS / GROUP
SELECT ADDRESS.
A
FREQUENT USE ABCD EFGHI JKLMN OPQRST UVWXYZ ABC GROUP
B
C GROUP SHARP CORPORATION
CORPO.TPS
ADDRESS REVIEW
OPQRST UVWXYZ ABC GROUP
N
ADDRESS REVIEW
WhaleII_fax_ex.book 13 ページ 2004年9月21日 火曜日 午後1時9分
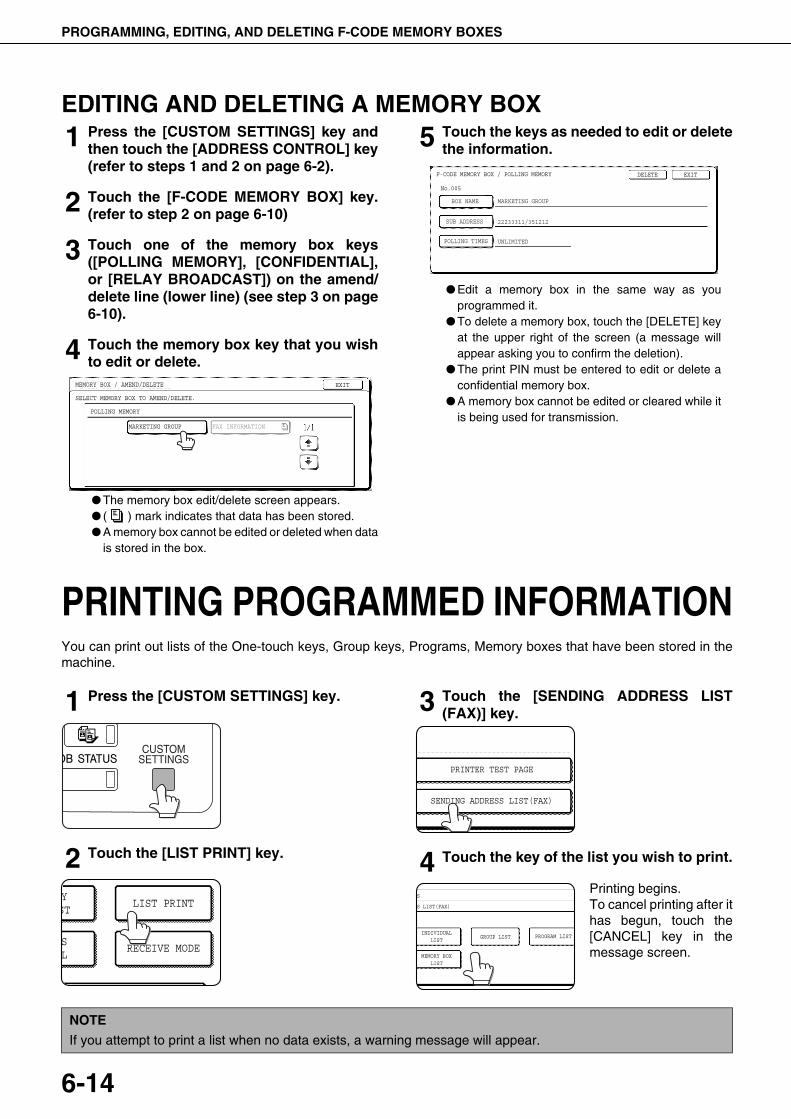
PRINTING PROGRAMMED INFORMATION
6-14
EDITING AND DELETING A MEMORY BOX1 Press the [CUSTOM SETTINGS] key and
then touch the [ADDRESS CONTROL] key(refer to steps 1 and 2 on page 6-2).
2 Touch the [F-CODE MEMORY BOX] key.(refer to step 2 on page 6-10)
3 Touch one of the memory box keys([POLLING MEMORY], [CONFIDENTIAL],or [RELAY BROADCAST]) on the amend/delete line (lower line) (see step 3 on page6-10).
4 Touch the memory box key that you wishto edit or delete.
� The memory box edit/delete screen appears.� ( ) mark indicates that data has been stored.� A memory box cannot be edited or deleted when data
is stored in the box.
5 Touch the keys as needed to edit or deletethe information.
� Edit a memory box in the same way as youprogrammed it.
� To delete a memory box, touch the [DELETE] keyat the upper right of the screen (a message willappear asking you to confirm the deletion).
� The print PIN must be entered to edit or delete aconfidential memory box.
� A memory box cannot be edited or cleared while itis being used for transmission.
PRINTING PROGRAMMED INFORMATIONYou can print out lists of the One-touch keys, Group keys, Programs, Memory boxes that have been stored in themachine.
1 Press the [CUSTOM SETTINGS] key.
2 Touch the [LIST PRINT] key.
3 Touch the [SENDING ADDRESS LIST(FAX)] key.
4 Touch the key of the list you wish to print.
Printing begins.To cancel printing after ithas begun, touch the[CANCEL] key in themessage screen.
MEMORY BOX / AMEND/DELETE
SELECT MEMORY BOX TO AMEND/DELETE.
POLLING MEMORY
MARKETING GROUP FAX INFORMATION
EXIT
F-CODE MEMORY BOX / POLLING MEMORY
No.005
SUB ADDRESS
BOX NAME MARKETING GROUP
UNLIMITED
22233311/351212
POLLING TIMES
EXITDELETE
YST
SL
LIST PRINT
RECEIVE MODE
SENDING ADDRESS LIST(FAX)
PRINTER TEST PAGE
GS
S LIST(FAX)
INDIVIDUALLIST
GROUP LIST PROGRAM LIST
MEMORY BOXLIST
NOTE
If you attempt to print a list when no data exists, a warning message will appear.
PROGRAMMING, EDITING, AND DELETING F-CODE MEMORY BOXES
WhaleII_fax_ex.book 14 ページ 2004年9月21日 火曜日 午後1時9分
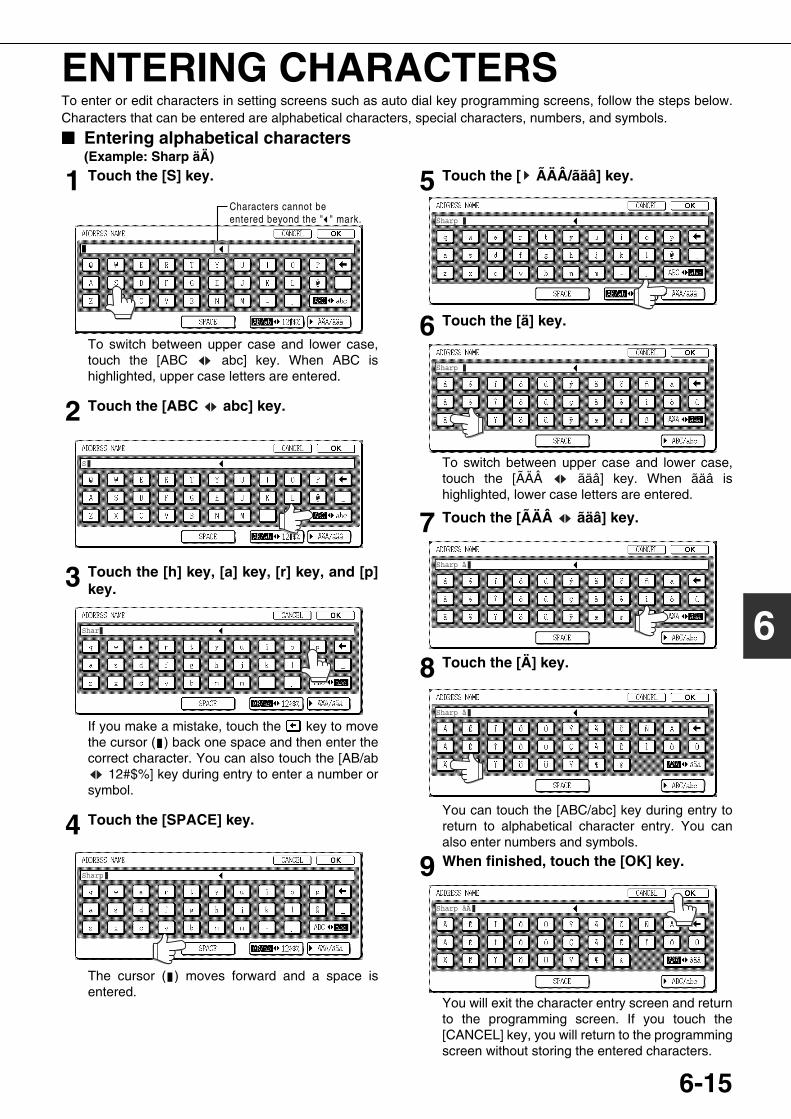
6-15
6
ENTERING CHARACTERSTo enter or edit characters in setting screens such as auto dial key programming screens, follow the steps below.Characters that can be entered are alphabetical characters, special characters, numbers, and symbols.
���� Entering alphabetical characters(Example: Sharp äÄ)
1 Touch the [S] key.
To switch between upper case and lower case,touch the [ABC abc] key. When ABC ishighlighted, upper case letters are entered.
2 Touch the [ABC abc] key.
3 Touch the [h] key, [a] key, [r] key, and [p]key.
If you make a mistake, touch the key to movethe cursor ( ) back one space and then enter thecorrect character. You can also touch the [AB/ab
12#$%] key during entry to enter a number orsymbol.
4 Touch the [SPACE] key.
The cursor ( ) moves forward and a space isentered.
5 Touch the [ ÃÄÂ/ãäâ] key.
6 Touch the [ä] key.
To switch between upper case and lower case,touch the [ÃÄÂ ãäâ] key. When ãäâ ishighlighted, lower case letters are entered.
7 Touch the [ÃÄÂ ãäâ] key.
8 Touch the [Ä] key.
You can touch the [ABC/abc] key during entry toreturn to alphabetical character entry. You canalso enter numbers and symbols.
9 When finished, touch the [OK] key.
You will exit the character entry screen and returnto the programming screen. If you touch the[CANCEL] key, you will return to the programmingscreen without storing the entered characters.
Characters cannot be entered beyond the " " mark.
S
Shar
Sharp
Sharp
Sharp
Sharp ä
Sharp ä
Sharp äÄ
WhaleII_fax_ex.book 15 ページ 2004年9月21日 火曜日 午後1時9分
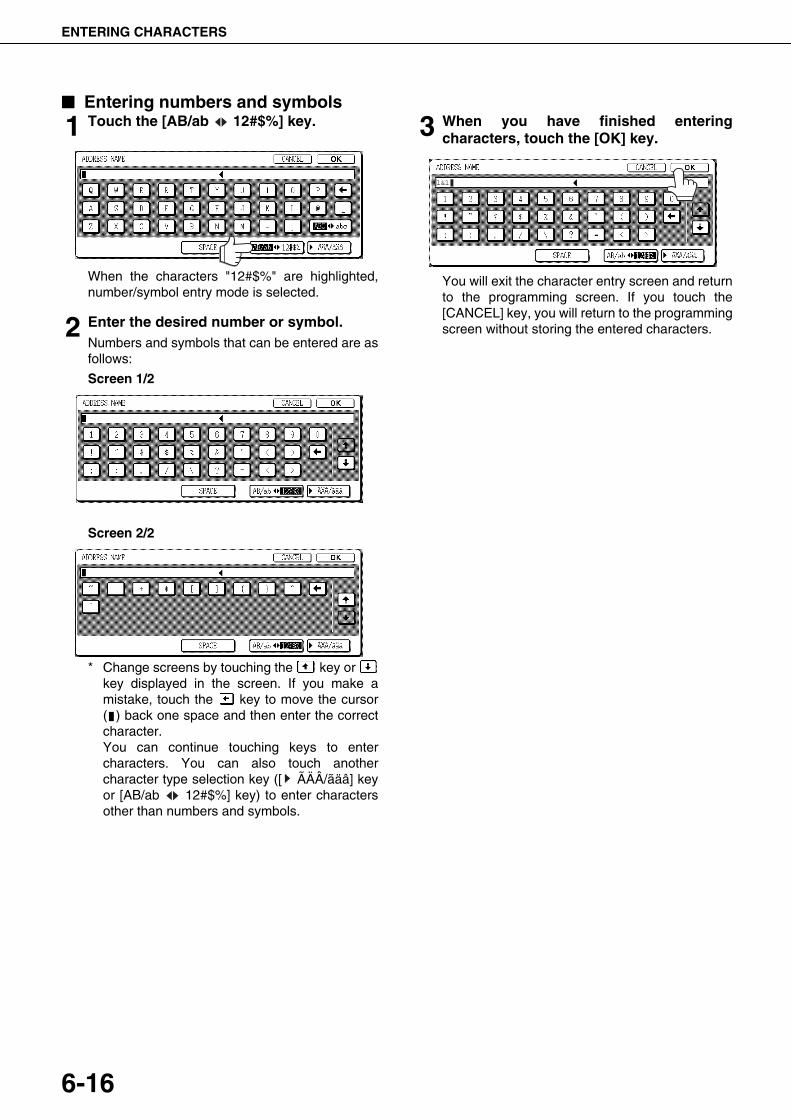
ENTERING CHARACTERS
6-16
���� Entering numbers and symbols
1 Touch the [AB/ab 12#$%] key.
When the characters "12#$%" are highlighted,number/symbol entry mode is selected.
2 Enter the desired number or symbol.Numbers and symbols that can be entered are asfollows:
Screen 1/2
Screen 2/2
* Change screens by touching the key or key displayed in the screen. If you make amistake, touch the key to move the cursor( ) back one space and then enter the correctcharacter.You can continue touching keys to entercharacters. You can also touch anothercharacter type selection key ([ ÃÄÂ/ãäâ] keyor [AB/ab 12#$%] key) to enter charactersother than numbers and symbols.
3 When you have finished enteringcharacters, touch the [OK] key.
You will exit the character entry screen and returnto the programming screen. If you touch the[CANCEL] key, you will return to the programmingscreen without storing the entered characters.
1&1
WhaleII_fax_ex.book 16 ページ 2004年9月21日 火曜日 午後1時9分
7-1
CHAPTER 7TROUBLESHOOTING
This chapter contains information to help you make efficient use of thefax features of the machine, including solutions to common problems.
Page
WHEN A TRANSACTION REPORT IS PRINTED.................................. 7-2VIEWING THE COMMUNICATION ACTIVITY REPORT....................... 7-3
WHEN AN ALARM SOUNDS AND A WARNING MESSAGE IS
DISPLAYED............................................................................................ 7-3PROBLEMS AND SOLUTIONS.............................................................. 7-4
WhaleII_fax_ex.book 1 ページ 2004年9月21日 火曜日 午後1時9分
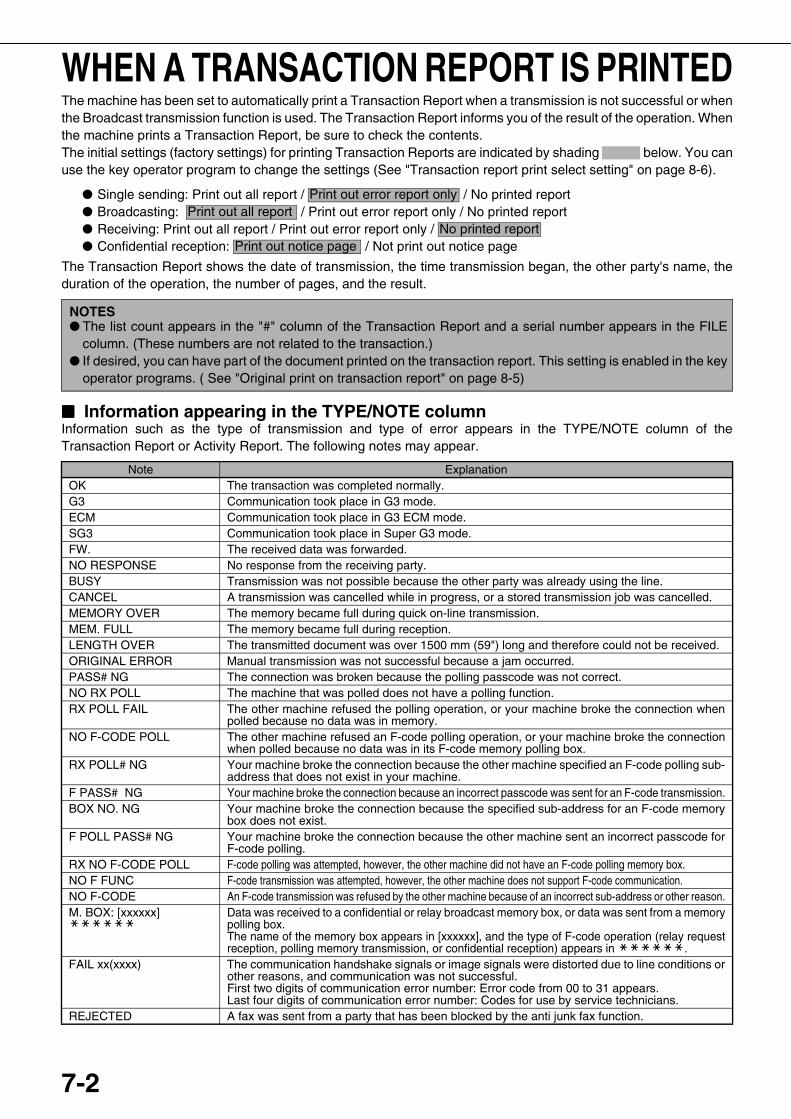
7-2
WHEN A TRANSACTION REPORT IS PRINTEDThe machine has been set to automatically print a Transaction Report when a transmission is not successful or whenthe Broadcast transmission function is used. The Transaction Report informs you of the result of the operation. Whenthe machine prints a Transaction Report, be sure to check the contents.The initial settings (factory settings) for printing Transaction Reports are indicated by shading below. You canuse the key operator program to change the settings (See "Transaction report print select setting" on page 8-6).
The Transaction Report shows the date of transmission, the time transmission began, the other party's name, theduration of the operation, the number of pages, and the result.
���� Information appearing in the TYPE/NOTE columnInformation such as the type of transmission and type of error appears in the TYPE/NOTE column of theTransaction Report or Activity Report. The following notes may appear.
NOTES� The list count appears in the "#" column of the Transaction Report and a serial number appears in the FILE
column. (These numbers are not related to the transaction.)� If desired, you can have part of the document printed on the transaction report. This setting is enabled in the key
operator programs. ( See "Original print on transaction report" on page 8-5)
Note ExplanationOK The transaction was completed normally.G3 Communication took place in G3 mode.ECM Communication took place in G3 ECM mode.SG3 Communication took place in Super G3 mode.FW. The received data was forwarded.NO RESPONSE No response from the receiving party.BUSY Transmission was not possible because the other party was already using the line.CANCEL A transmission was cancelled while in progress, or a stored transmission job was cancelled.MEMORY OVER The memory became full during quick on-line transmission.MEM. FULL The memory became full during reception.LENGTH OVER The transmitted document was over 1500 mm (59") long and therefore could not be received.ORIGINAL ERROR Manual transmission was not successful because a jam occurred.PASS# NG The connection was broken because the polling passcode was not correct.NO RX POLL The machine that was polled does not have a polling function.RX POLL FAIL The other machine refused the polling operation, or your machine broke the connection when
polled because no data was in memory.NO F-CODE POLL The other machine refused an F-code polling operation, or your machine broke the connection
when polled because no data was in its F-code memory polling box.RX POLL# NG Your machine broke the connection because the other machine specified an F-code polling sub-
address that does not exist in your machine.F PASS# NG Your machine broke the connection because an incorrect passcode was sent for an F-code transmission.BOX NO. NG Your machine broke the connection because the specified sub-address for an F-code memory
box does not exist.F POLL PASS# NG Your machine broke the connection because the other machine sent an incorrect passcode for
F-code polling.RX NO F-CODE POLL F-code polling was attempted, however, the other machine did not have an F-code polling memory box.NO F FUNC F-code transmission was attempted, however, the other machine does not support F-code communication.NO F-CODE An F-code transmission was refused by the other machine because of an incorrect sub-address or other reason.M. BOX: [xxxxxx] Data was received to a confidential or relay broadcast memory box, or data was sent from a memory
polling box.The name of the memory box appears in [xxxxxx], and the type of F-code operation (relay requestreception, polling memory transmission, or confidential reception) appears in .
FAIL xx(xxxx) The communication handshake signals or image signals were distorted due to line conditions orother reasons, and communication was not successful.First two digits of communication error number: Error code from 00 to 31 appears.Last four digits of communication error number: Codes for use by service technicians.
REJECTED A fax was sent from a party that has been blocked by the anti junk fax function.
� Single sending: Print out all report / / No printed report� Broadcasting: / Print out error report only / No printed report� Receiving: Print out all report / Print out error report only / � Confidential reception: / Not print out notice page
Print out error report onlyPrint out all report
No printed reportPrint out notice page
WhaleII_fax_ex.book 2 ページ 2004年9月21日 火曜日 午後1時9分
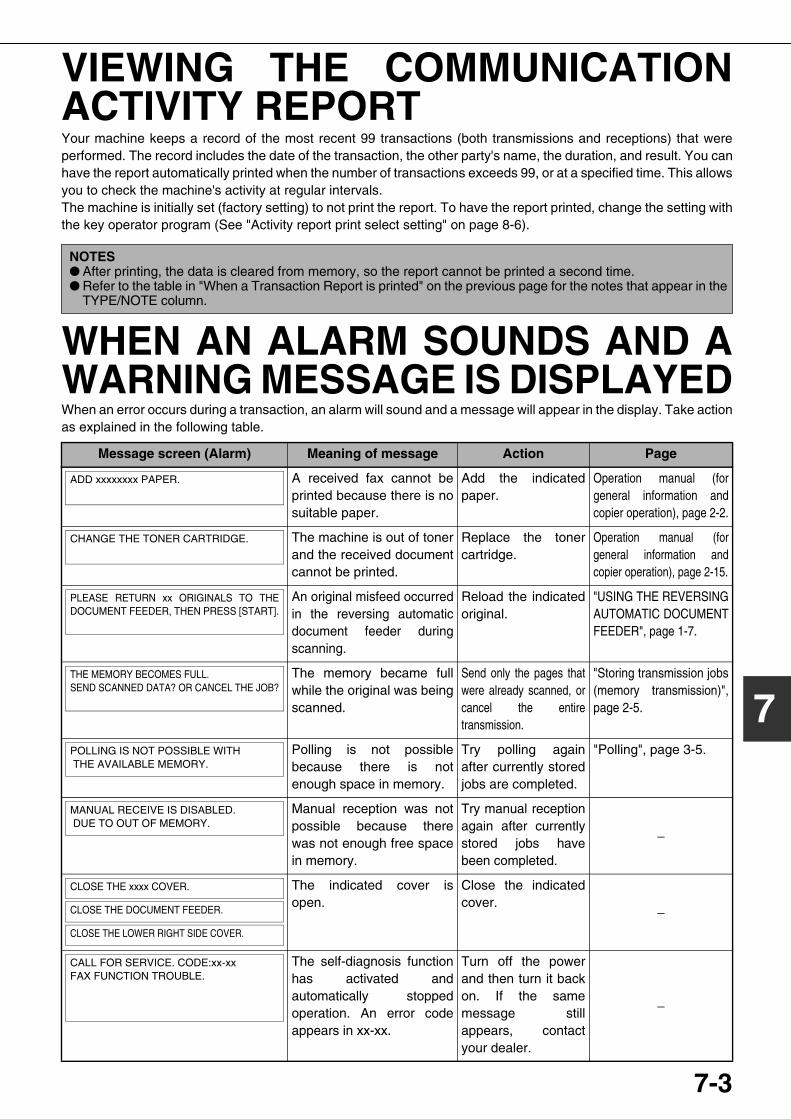
7-3
7
VIEWING THE COMMUNICATIONACTIVITY REPORTYour machine keeps a record of the most recent 99 transactions (both transmissions and receptions) that wereperformed. The record includes the date of the transaction, the other party's name, the duration, and result. You canhave the report automatically printed when the number of transactions exceeds 99, or at a specified time. This allowsyou to check the machine's activity at regular intervals.The machine is initially set (factory setting) to not print the report. To have the report printed, change the setting withthe key operator program (See "Activity report print select setting" on page 8-6).
WHEN AN ALARM SOUNDS AND AWARNING MESSAGE IS DISPLAYEDWhen an error occurs during a transaction, an alarm will sound and a message will appear in the display. Take actionas explained in the following table.
NOTES� After printing, the data is cleared from memory, so the report cannot be printed a second time.� Refer to the table in "When a Transaction Report is printed" on the previous page for the notes that appear in the
TYPE/NOTE column.
Message screen (Alarm) Meaning of message Action Page
A received fax cannot beprinted because there is nosuitable paper.
Add the indicatedpaper.
Operation manual (forgeneral information andcopier operation), page 2-2.
The machine is out of tonerand the received documentcannot be printed.
Replace the tonercartridge.
Operation manual (forgeneral information andcopier operation), page 2-15.
An original misfeed occurredin the reversing automaticdocument feeder duringscanning.
Reload the indicatedoriginal.
"USING THE REVERSINGAUTOMATIC DOCUMENTFEEDER", page 1-7.
The memory became fullwhile the original was beingscanned.
Send only the pages thatwere already scanned, orcancel the entiretransmission.
"Storing transmission jobs(memory transmission)",page 2-5.
Polling is not possiblebecause there is notenough space in memory.
Try polling againafter currently storedjobs are completed.
"Polling", page 3-5.
Manual reception was notpossible because therewas not enough free spacein memory.
Try manual receptionagain after currentlystored jobs havebeen completed.
_
The indicated cover isopen.
Close the indicatedcover. _
The self-diagnosis functionhas activated andautomatically stoppedoperation. An error codeappears in xx-xx.
Turn off the powerand then turn it backon. If the samemessage stillappears, contactyour dealer.
_
ADD xxxxxxxx PAPER.
CHANGE THE TONER CARTRIDGE.
PLEASE RETURN xx ORIGINALS TO THEDOCUMENT FEEDER, THEN PRESS [START].
THE MEMORY BECOMES FULL.SEND SCANNED DATA? OR CANCEL THE JOB?
POLLING IS NOT POSSIBLE WITH THE AVAILABLE MEMORY.
MANUAL RECEIVE IS DISABLED. DUE TO OUT OF MEMORY.
CLOSE THE xxxx COVER.
CLOSE THE DOCUMENT FEEDER.
CLOSE THE LOWER RIGHT SIDE COVER.
CALL FOR SERVICE. CODE:xx-xxFAX FUNCTION TROUBLE.
WhaleII_fax_ex.book 3 ページ 2004年9月21日 火曜日 午後1時9分

7-4
PROBLEMS AND SOLUTIONSIf you experience a problem with the fax function, first check the following table. If you cannot solve the problem usingthe following table, see chapter 7 of the Operation Manual (for general information and copier operation).
Problem Check Solution Page
The machine does notoperate.
Is the fax power switch turnedon?
Turn on the fax powerswitch.
"Fax power switch", page0-4.
Dialing is not possible. Is the telephone line properlyconnected?
Check the connections. "Line connection", page0-4.
Is the main switch turned on? Turn the main switch on. Operation manual (forgeneral information andcopier operation), page 1-4.
Is the machine in fax mode? Press the [IMAGE SEND]key to set the machine tofax mode.
"BASIC PROCEDUREFOR SENDING FAXES",page 2-2.
The receiving machinedoes not receive yourfax.
Does the receiving fax machinehave paper?
Check with the operator ofthe receiving machine.
_
Does the receiving machinesupport G3 transmission?
Are the sub-address andpasscode correct?
Is the receiving machine ready toreceive?
Was the original size detectedcorrectly?
Check the transmittablesizes.
"CHECKING THE SIZEOF A LOADEDORIGINAL", page 1-8.
The transmitted imageprints out blank at thereceiving side.
Was the original placed so thatthe correct side is scanned?
Make sure the original isplaced so that the correctside is scanned.
"LOADING ADOCUMENT", page 1-7.
If the receiving machine is usingthermal paper, was the thermalpaper loaded with the wrong sideout?
Check with the operator ofthe other machine. _
The transmitted imageis distorted.
Were line conditions poor due tothunder or another reason?
Try the transmission again. _
Were the resolution andexposure settings suitable?
Check the resolution andexposure settings.
"SELECTING RESOLUTIONAND EXPOSURE SETTINGS",pages 1-9 and 1-10.
Transmission does nottake place at thespecified time.
Is the machine's clock set to thecorrect time?
Set the clock to the correcttime.
Operation manual (forgeneral information andcopier operation), page 2-13.
WhaleII_fax_ex.book 4 ページ 2004年9月21日 火曜日 午後1時9分
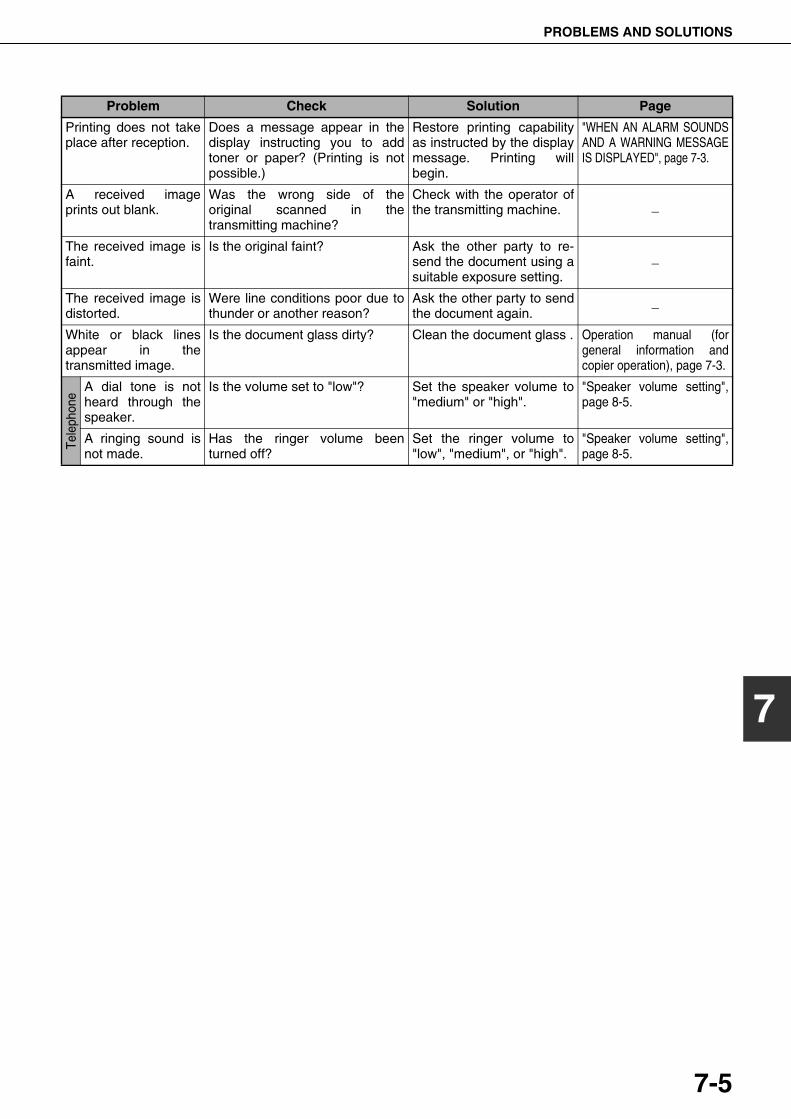
PROBLEMS AND SOLUTIONS
7-5
7
Printing does not takeplace after reception.
Does a message appear in thedisplay instructing you to addtoner or paper? (Printing is notpossible.)
Restore printing capabilityas instructed by the displaymessage. Printing willbegin.
"WHEN AN ALARM SOUNDSAND A WARNING MESSAGEIS DISPLAYED", page 7-3.
A received imageprints out blank.
Was the wrong side of theoriginal scanned in thetransmitting machine?
Check with the operator ofthe transmitting machine. _
The received image isfaint.
Is the original faint? Ask the other party to re-send the document using asuitable exposure setting.
_
The received image isdistorted.
Were line conditions poor due tothunder or another reason?
Ask the other party to sendthe document again.
_
White or black linesappear in thetransmitted image.
Is the document glass dirty? Clean the document glass . Operation manual (forgeneral information andcopier operation), page 7-3.
Tele
phon
e
A dial tone is notheard through thespeaker.
Is the volume set to "low"? Set the speaker volume to"medium" or "high".
"Speaker volume setting",page 8-5.
A ringing sound isnot made.
Has the ringer volume beenturned off?
Set the ringer volume to"low", "medium", or "high".
"Speaker volume setting",page 8-5.
Problem Check Solution Page
WhaleII_fax_ex.book 5 ページ 2004年9月21日 火曜日 午後1時9分

WhaleII_fax_ex.book 6 ページ 2004年9月21日 火曜日 午後1時9分
8-1
CHAPTER 8KEY OPERATOR
PROGRAMSThis chapter explains the key operator programs for the fax function thatare used by the administrator of the machine. The administrator of themachine should read this chapter carefully to ensure correct use of theprograms.
Page
KEY OPERATOR PROGRAMS.............................................................. 8-2� KEY OPERATOR PROGRAM LIST................................................ 8-2� USING THE KEY OPERATOR PROGRAMS ................................. 8-3� EXPLANATION OF SETTING PROGRAMS .................................. 8-4� FAX SETTINGS .............................................................................. 8-4� PRINTING OUT SETTINGS ........................................................... 8-12
WhaleII_fax_ex.book 1 ページ 2004年9月21日 火曜日 午後1時9分
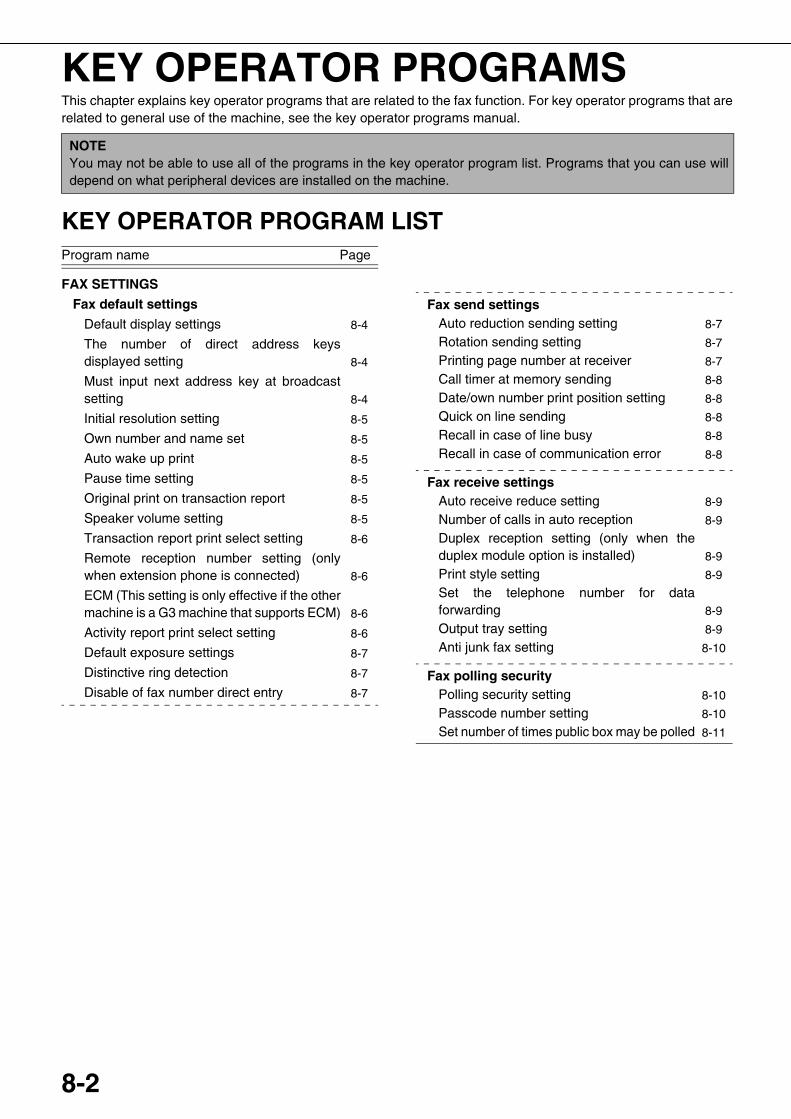
8-2
KEY OPERATOR PROGRAMSThis chapter explains key operator programs that are related to the fax function. For key operator programs that arerelated to general use of the machine, see the key operator programs manual.
KEY OPERATOR PROGRAM LIST
NOTEYou may not be able to use all of the programs in the key operator program list. Programs that you can use willdepend on what peripheral devices are installed on the machine.
Program name Page
FAX SETTINGS
Fax default settings
Default display settings 8-4
The number of direct address keysdisplayed setting 8-4
Must input next address key at broadcastsetting 8-4
Initial resolution setting 8-5
Own number and name set 8-5
Auto wake up print 8-5
Pause time setting 8-5
Original print on transaction report 8-5
Speaker volume setting 8-5
Transaction report print select setting 8-6
Remote reception number setting (onlywhen extension phone is connected) 8-6
ECM (This setting is only effective if the othermachine is a G3 machine that supports ECM) 8-6
Activity report print select setting 8-6
Default exposure settings 8-7
Distinctive ring detection 8-7
Disable of fax number direct entry 8-7
Fax send settingsAuto reduction sending setting 8-7
Rotation sending setting 8-7
Printing page number at receiver 8-7
Call timer at memory sending 8-8
Date/own number print position setting 8-8
Quick on line sending 8-8
Recall in case of line busy 8-8
Recall in case of communication error 8-8
Fax receive settingsAuto receive reduce setting 8-9
Number of calls in auto reception 8-9
Duplex reception setting (only when theduplex module option is installed) 8-9
Print style setting 8-9
Set the telephone number for dataforwarding 8-9
Output tray setting 8-9
Anti junk fax setting 8-10
Fax polling securityPolling security setting 8-10
Passcode number setting 8-10
Set number of times public box may be polled 8-11
WhaleII_fax_ex.book 2 ページ 2004年9月21日 火曜日 午後1時9分

KEY OPERATOR PROGRAMS
8-3
8
USING THE KEY OPERATOR PROGRAMSFollow these steps to configure the settings in the key operator programs.
1 Press the [CUSTOM SETTINGS] key.
2 Touch the [KEY OPERATOR PROGRAMS]key.
3 Use the numeric keys to enter the five-digitkey operator code number.
For the factory defaultsetting for the keyoperator code number,see page 3 of the keyoperator's guide.
4 Touch the [FAX SETTINGS] key.
5 Select the desired program and configurethe setting.Page 8-2 shows the programs that can be selected.The settings for each of the programs are explainedon the following pages.
6 Press the [CA] key to exit the program.
���� Supplementary explanation of key operation for key operator programs
A When a key that appears in the form is touched, the setting screen of that key will appear.B Check mark boxes are touch keys that show the status of selections. A box with a check mark means the
function is "on" (enabled) and an unchecked box means the function is "off" (disabled). The on/off statuschanges each time the box is touched.
C If the settings continue on the following screen(s), touch the and keys to move back and forth throughthe screens. To return to the category selection screen, touch the [OK] key.
D The currently set numerical value is displayed.E Numerical values can be set by touching the and keys.
LIST PRINDISPLAY CONTRAST
RECEIVE MOADDRESSCONTROL
KEY OPERATOR PROGRAMS
KEY OPERATOR CODE
N/W SCANNERSETTINGS
PRODUCT KEY
OPERATIONSETTINGS
DEVICE CONTROL
FAX SETTINGS
15 (1 15)KEY OPERATOR PROGRAMS
FAX DEFAULT SETTINGS
1/3
OWN NUMBER AND NAME SET
INITIAL RESOLUTION SETTING MUST INPUT NEXT ADDRESSKEY AT BROADCAST SETTING
OK
DEFAULT DISPLAY SETTINGSTHE NUMBER OF DIRECT ADDRESS
KEYS DISPLAYED SETTING 6A
B C
D E
The following types of entry keys mayappear in the screens.
XXX
WhaleII_fax_ex.book 3 ページ 2004年9月21日 火曜日 午後1時9分

KEY OPERATOR PROGRAMS
8-4
EXPLANATION OF SETTING PROGRAMSThe key operator programs for the fax function of the machine are explained here.For key operator programs that are related to the copy function and general use of the machine, see the keyoperator's guide. For programs related to the printer and network scanner functions, see the corresponding manuals.
FAX SETTINGS���� Fax default settingsThe default fax settings can be changed as needed tobetter suit the needs of your workplace.The "Fax default settings" are as follows:
� Default display settings� The number of direct address keys displayed setting� Must input next address key at broadcast setting� Initial resolution setting� Own number and name set� Auto wake up print� Pause time setting� Original print on transaction report� Speaker volume setting� Transaction report print select setting� Remote reception number setting (only when
extension phone is connected)� ECM (This setting is only effective if the other
machine is a G3 machine that supports ECM)� Activity report print select setting� Default exposure settings� Distinctive ring detection� Disable of fax number direct entry
Default display settingsYou can select the initial display that appears whenyou press the [IMAGE SEND] key to change to faxmode or when you press the [CA] key in fax mode.Normally the initial display is set to the conditionsettings screen (page 1-4).
� Condition settings screen� Address directory (ABC)� Address directory (Group)
When an address directory (ABC or Group) isselected, the selected index of that address directoryscreen (page 1-5) is set as the initial screen.
The number of direct address keysdisplayed setting
The number of one-touch keys displayed in eachaddress directory screen can be changed from 8(the normal setting) to 6 or 12.Touch 6, 8, or 12 to select the desired number.
Must input next address key atbroadcast setting
You can select whether the [NEXT ADDRESS] keymust be touched before entering the nextdestination when performing a broadcasttransmission (page 3-2). Normally the machine isset so that touching the [NEXT ADDRESS] key canbe omitted except when the numeric keys are usedto enter one full fax number after another full faxnumber.
Example: Normal setting (factory setting)
If the box is checked, it will no longer be possible toomit the [NEXT ADDRESS] key as shown in theabove example. Even if the next destination to beentered is a one-touch key, the [NEXT ADDRESS]key must be touched before the one-touch key canbe entered. If an operator attempts to enter thenext destination without touching the [NEXTADDRESS] key, a double-beep alarm will soundand the entry will be rejected.
NOTESettings established with the key operator programs can be verified by printing them out (page 8-12).
NOTE
For the key name that appears in each one-touchkey, a maximum of 18 characters can appear whenthe number of one-touch keys displayed is set to 6 or8. A maximum of 10 characters can appear when thenumber of one-touch keys displayed is set to 12.
XXXX NEXT ADDRESS One-touch NEXT ADDRESS One-touch
Dial
Can be omitted Can be omitted
XXXX NEXT ADDRESS XXXX
Dial Dial
Cannot be omitted.
WhaleII_fax_ex.book 4 ページ 2004年9月21日 火曜日 午後1時9分
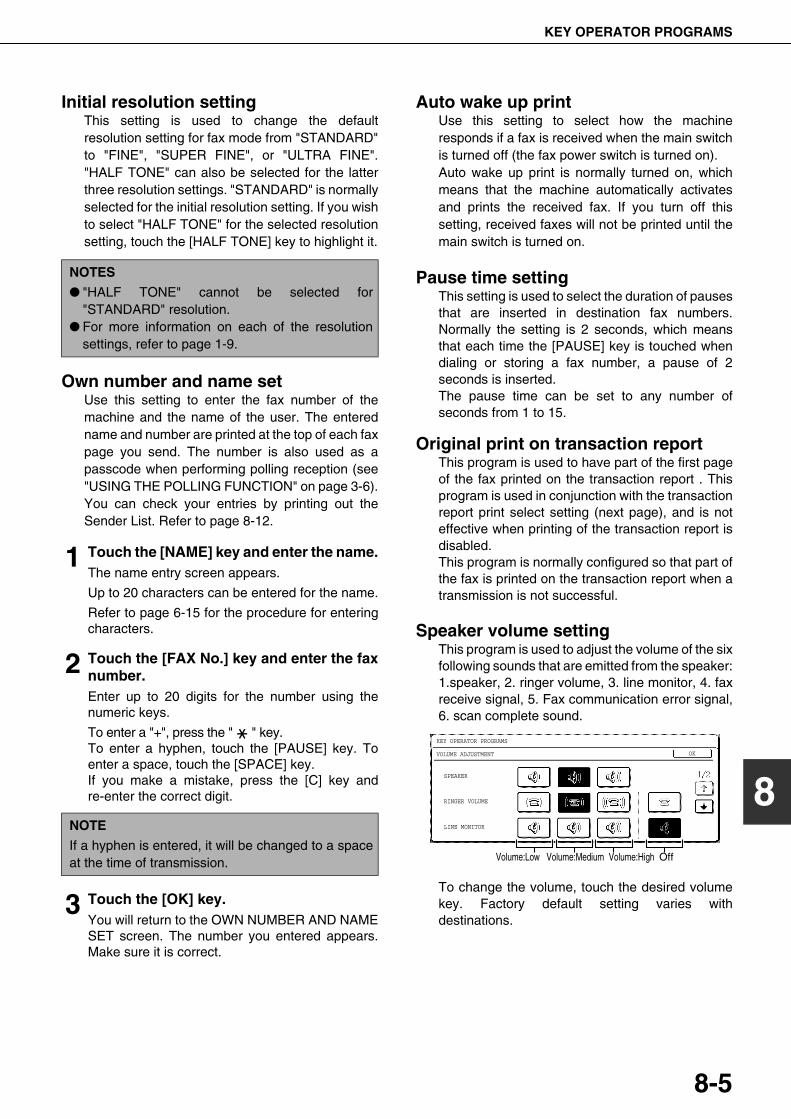
KEY OPERATOR PROGRAMS
8-5
8
Initial resolution settingThis setting is used to change the defaultresolution setting for fax mode from "STANDARD"to "FINE", "SUPER FINE", or "ULTRA FINE"."HALF TONE" can also be selected for the latterthree resolution settings. "STANDARD" is normallyselected for the initial resolution setting. If you wishto select "HALF TONE" for the selected resolutionsetting, touch the [HALF TONE] key to highlight it.
Own number and name setUse this setting to enter the fax number of themachine and the name of the user. The enteredname and number are printed at the top of each faxpage you send. The number is also used as apasscode when performing polling reception (see"USING THE POLLING FUNCTION" on page 3-6).You can check your entries by printing out theSender List. Refer to page 8-12.
1 Touch the [NAME] key and enter the name.The name entry screen appears.
Up to 20 characters can be entered for the name.
Refer to page 6-15 for the procedure for enteringcharacters.
2 Touch the [FAX No.] key and enter the faxnumber.Enter up to 20 digits for the number using thenumeric keys.
To enter a "+", press the " " key.To enter a hyphen, touch the [PAUSE] key. Toenter a space, touch the [SPACE] key.If you make a mistake, press the [C] key andre-enter the correct digit.
3 Touch the [OK] key.You will return to the OWN NUMBER AND NAMESET screen. The number you entered appears.Make sure it is correct.
Auto wake up printUse this setting to select how the machineresponds if a fax is received when the main switchis turned off (the fax power switch is turned on).Auto wake up print is normally turned on, whichmeans that the machine automatically activatesand prints the received fax. If you turn off thissetting, received faxes will not be printed until themain switch is turned on.
Pause time settingThis setting is used to select the duration of pausesthat are inserted in destination fax numbers.Normally the setting is 2 seconds, which meansthat each time the [PAUSE] key is touched whendialing or storing a fax number, a pause of 2seconds is inserted.The pause time can be set to any number ofseconds from 1 to 15.
Original print on transaction reportThis program is used to have part of the first pageof the fax printed on the transaction report . Thisprogram is used in conjunction with the transactionreport print select setting (next page), and is noteffective when printing of the transaction report isdisabled.This program is normally configured so that part ofthe fax is printed on the transaction report when atransmission is not successful.
Speaker volume settingThis program is used to adjust the volume of the sixfollowing sounds that are emitted from the speaker:1.speaker, 2. ringer volume, 3. line monitor, 4. faxreceive signal, 5. Fax communication error signal,6. scan complete sound.
To change the volume, touch the desired volumekey. Factory default setting varies withdestinations.
NOTES
� "HALF TONE" cannot be selected for"STANDARD" resolution.
� For more information on each of the resolutionsettings, refer to page 1-9.
NOTE
If a hyphen is entered, it will be changed to a spaceat the time of transmission.
KEY OPERATOR PROGRAMS
VOLUME ADJUSTMENT
SPEAKER
RINGER VOLUME
LINE MONITOR
OK
Volume:HighVolume:Low Volume:Medium Off
WhaleII_fax_ex.book 5 ページ 2004年9月21日 火曜日 午後1時9分
KEY OPERATOR PROGRAMS
8-6
Transaction report print select settingThis program is used to select the condition forprinting a transaction report. The condition is setseparately for normal transmission, broadcasttransmission, reception, and confidential reception.
Touch the key to display the next two settings. Select theprint conditions for receptions and confidential receptions.
The normal settings are indicated by shading above.
Remote reception number setting(only when extension phone is connected)
When a call is received (not made) on an extensionphone connected to the machine, fax reception canbe activated by entering a one-digit number andpressing " " twice on the phone's keypad. Thisnumber is called the remote reception number, andyou can set it to any number from "0" to "9". Thenumber is normally set to "5".
ECM(This setting is only effective if the other machineis a G3 machine that supports ECM)
Line conditions can sometimes distort atransmitted fax image. When ECM (ErrorCorrection Mode) is turned on, pages that aredistorted are automatically re-transmitted. Thissetting is initially turned on. If turned off, distortedimages will be transmitted without being corrected.
Activity report print select settingThis program is used to have the activity reportstored in the machine's memory printed out atregular intervals.You can choose to have the report automaticallyprinted each time the number of storedtransactions exceeds 99, or have the report printedat a specified time every day (only once per day).The report is normally set to not print out. Select"AUTO PRINT AT MEMORY FULL" to have thereport automatically printed when the number ofstored transactions (the combined total oftransmissions and receptions) exceeds 99.If you select the "PRINT DAILY AT DESIGNATEDTIME" checkbox, "HOUR" and "MINUTE" keys willappear to the right to let you specify the time.
Touch the "HOUR" and "MINUTE" keys and then set thehour by touching the and keys. Set the minutein the same way. When finished, touch the [OK] key.
NOTE
If the other machine supports Super G3, ECM willfunction regardless of the setting.
SINGLE SENDING BROADCASTING
PRINT OUT ALL REPORT
PRINT OUT ERROR REPORT ONLY
NO PRINTED REPORT
PRINT OUT ALL REPORT
PRINT OUT ERROR REPORT ONLY
NO PRINTED REPORT
RECEIVING CONFIDENTIAL RECEPTION
PRINT OUT ALL REPORT
PRINT OUT ERROR REPORT ONLY
NO PRINTED REPORT
PRINT OUT NOTICE PAGE
NOT PRINT OUT NOTICE PAGE
NOTES
� If you only select the "PRINT DAILY ATDESIGNATED TIME" setting and the number ofrecorded transactions exceeds 99 before thespecified time, each new transaction will deletethe oldest transaction (the oldest transaction willnot be printed).
� The activity report can also be printed out manually(see "PRINTING OUT SETTINGS" on page 8-12).
KEY OPERATOR PROGRAMS
ACTIVITY REPORT PRINT SELECT SETTING
AUTO PRINT AT MEMORY FULL
PRINT DAILY AT DESIGNATED TIME
OK
HOUR MINUTE
13 01
WhaleII_fax_ex.book 6 ページ 2004年9月21日 火曜日 午後1時9分
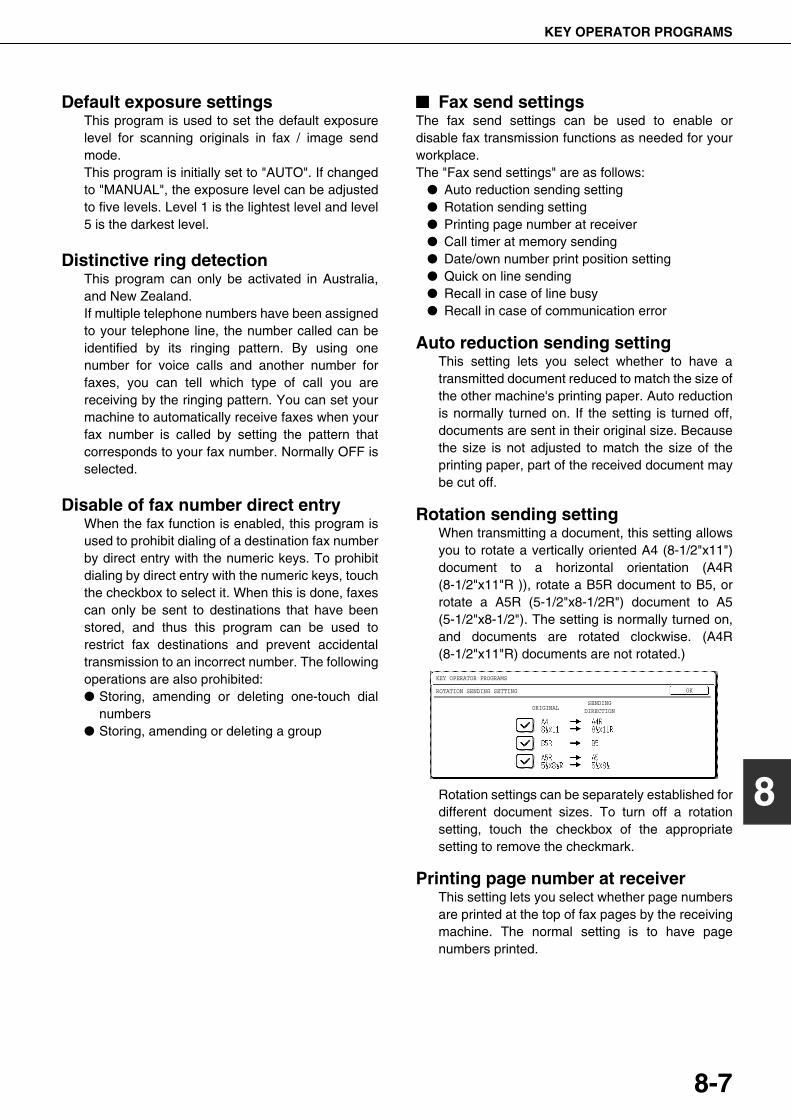
KEY OPERATOR PROGRAMS
8-7
8
Default exposure settingsThis program is used to set the default exposurelevel for scanning originals in fax / image sendmode.This program is initially set to "AUTO". If changedto "MANUAL", the exposure level can be adjustedto five levels. Level 1 is the lightest level and level5 is the darkest level.
Distinctive ring detectionThis program can only be activated in Australia,and New Zealand.If multiple telephone numbers have been assignedto your telephone line, the number called can beidentified by its ringing pattern. By using onenumber for voice calls and another number forfaxes, you can tell which type of call you arereceiving by the ringing pattern. You can set yourmachine to automatically receive faxes when yourfax number is called by setting the pattern thatcorresponds to your fax number. Normally OFF isselected.
Disable of fax number direct entryWhen the fax function is enabled, this program isused to prohibit dialing of a destination fax numberby direct entry with the numeric keys. To prohibitdialing by direct entry with the numeric keys, touchthe checkbox to select it. When this is done, faxescan only be sent to destinations that have beenstored, and thus this program can be used torestrict fax destinations and prevent accidentaltransmission to an incorrect number. The followingoperations are also prohibited:� Storing, amending or deleting one-touch dial
numbers� Storing, amending or deleting a group
���� Fax send settingsThe fax send settings can be used to enable ordisable fax transmission functions as needed for yourworkplace.The "Fax send settings" are as follows:
� Auto reduction sending setting� Rotation sending setting� Printing page number at receiver� Call timer at memory sending� Date/own number print position setting� Quick on line sending� Recall in case of line busy� Recall in case of communication error
Auto reduction sending settingThis setting lets you select whether to have atransmitted document reduced to match the size ofthe other machine's printing paper. Auto reductionis normally turned on. If the setting is turned off,documents are sent in their original size. Becausethe size is not adjusted to match the size of theprinting paper, part of the received document maybe cut off.
Rotation sending settingWhen transmitting a document, this setting allowsyou to rotate a vertically oriented A4 (8-1/2"x11")document to a horizontal orientation (A4R(8-1/2"x11"R )), rotate a B5R document to B5, orrotate a A5R (5-1/2"x8-1/2R") document to A5(5-1/2"x8-1/2"). The setting is normally turned on,and documents are rotated clockwise. (A4R(8-1/2"x11"R) documents are not rotated.)
Rotation settings can be separately established fordifferent document sizes. To turn off a rotationsetting, touch the checkbox of the appropriatesetting to remove the checkmark.
Printing page number at receiverThis setting lets you select whether page numbersare printed at the top of fax pages by the receivingmachine. The normal setting is to have pagenumbers printed.
KEY OPERATOR PROGRAMS
ROTATION SENDING SETTING
ORIGINALSENDING
DIRECTION
OK
WhaleII_fax_ex.book 7 ページ 2004年9月21日 火曜日 午後1時9分
KEY OPERATOR PROGRAMS
8-8
Call timer at memory sendingWhen sending a fax by automatic transmission(See "Storing transmission jobs (memorytransmission)" on page 2-5.), this setting lets youselect the amount of time that the machine waitsbefore breaking the connection when the othermachine does not respond to your machine'scalling tone. If the other machine does not respondwithin this set time, your machine will automaticallybreak the connection. Time selections are 30seconds, 45 seconds, and 60 seconds. This settingis normally set to 45 seconds.
Date/own number print position settingThis setting lets you select the position (inside oroutside the original image) of the sender's nameand number that are printed at the top of each faxpage you send. Normally [OUTSIDE THEORIGINAL IMAGE] is selected. To have your nameand number printed inside the original image, select[INSIDE THE ORIGINAL IMAGE] key. For moredetailed information on the position of each setting,refer to "Position of sender's information" on page3-9.
Quick on line sendingWhen this setting is turned on, the machine will callthe other machine and start transmitting thedocument as soon as the first page is scanned.Transmission therefore takes place at the sametime as any further pages are being scanned.Normally this setting is turned on.If you turn the setting off, transmission will notbegin until all pages of the document have beenscanned. Note that this setting does not apply tomanual transmission. (See "Storing transmissionjobs (memory transmission)" on page 2-5.)
Recall in case of line busyWhen sending a document, this setting is used toselect whether your machine will automaticallyre-attempt the call when the other machine fails toanswer or the line is busy.Normally the machine is set to make 2 recallattempts at intervals of 3 minutes.The number of recall attempts and the intervalbetween attempts that can be set in each countryare shown in the following table.Country Differentiation Table
If you do not want recalling to take place, touch the[TURN OFF RECALL] checkbox so that acheckmark appears.
Recall in case of communication errorWhen sending a document, this setting is used toselect whether your machine will re-attempt the call ifthe transmission fails.Normally the machine is set to make 1* recallattempt at intervals of 1 minute.* Note that in Singapore, the machine is normally
set to make 2 recall attemts.The number of recall attempts and the intervalbetween attempts that can be set in each countryare shown in the following table.Country Differentiation Table
If you do not want recalling to take place, touch the [TURNOFF RECALL] checkbox so that a checkmark appears.
United KingdomAustralia, NewZealand andSingapore
The number of recallattempts
1 to 10 1 to 9
The intervalbetween attempts
any number of minutes from 1 to 15
NOTE
Even if this setting is turned on, your machine will notre-attempt the call when a document is sent by manualtransmission. (See "MANUAL TRANSMISSION" onpage 5-2.)
United KingdomAustralia, NewZealand andSingapore
The number of recallattempts
1 to 5 1 to 9
The intervalbetween attempts
any number of minutes from 1 to 15
NOTE
Even if this setting is turned on, your machine will notre-attempt the call when a document is sent by manualtransmission. (See "MANUAL TRANSMISSION" onpage 5-2.)
Whale_08.fm 8 ページ 2004年10月15日 金曜日 午前10時24分
KEY OPERATOR PROGRAMS
8-9
8
���� Fax receive settingsThe receive settings allow you to adjust certainparameters for receiving faxes to better suit your needs.Settings that can be adjusted depend on theperipheral devices installed.The "Fax receive settings" are as follows:
� Auto receive reduce setting� Number of calls in auto reception� Duplex reception setting (only when the duplex
module option is installed)� Print style setting� Set the telephone number for data forwarding� Output tray setting� Anti junk fax setting
Auto receive reduce settingWhen you receive a fax that includes the sender'sname, sender's number, and other printedinformation, the received image will be slightlylarger than the standard size*. This setting lets youselect whether or not the received image isautomatically reduced before printing to fit thestandard size. Normally automatic reduction isenabled.
* Standard sizes are sizes such as A4 and B5(8-1/2"x11" and 8-1/2"x5-1/2").
Number of calls in auto receptionThis setting is used to select the number of rings onwhich the machine automatically receives a calland begins fax reception when the reception modeis set to auto. (See "RECEIVING A FAX" on page2-7.) Normally this setting is selected to "2".The number of rings that can be set in each countryare shown in the following table.
Country Differentiation Table
Duplex reception setting(only when the duplex module option is installed)
When the duplex module is installed, you can usethis setting to select whether received documentsare printed on both sides of the paper. Normallythis setting is turned off. If turned on, receiveddocuments will be printed on both sides of thepaper whenever the received document consists oftwo or more pages of the same paper size.
Print style settingThis setting determines the selection condition forpaper when printing received documents. Selectone of the three conditions below. AUTO SIZESELECT is normally selected.� PRINT ACTUAL SIZE CUT OFF DISABLED
The received fax image is printed at its actualsize (without dividing it onto multiple sheets ofpaper). If the same size of paper or larger paperis not loaded, the fax will be received in memoryand will not be printed until a suitable size ofpaper is loaded.
� PRINT ACTUAL SIZE CUT OFF ENABLEDEach received image is printed at actual size. Ifnecessary, the image is split onto multiplesheets of paper.
� AUTO SIZE SELECTEach received image is printed at actual sizewhen possible. When not possible, the image isautomatically reduced before printing.
Set the telephone number for dataforwarding
When a problem prevents the machine from printinga received fax, the transfer function (page 3-12) canbe used to forward the received fax to another faxmachine. Use this setting to program the fax numberof the destination fax machine. Only one fax numbercan be programmed (maximum of 64 digits).If you wish to specify an F-code confidential memorybox in the destination machine, touch the [SUBADDRESS] key after entering the fax number to entera slash "/", and then enter the sub-address. Enter apasscode as well if needed. (See steps 9 to 12 of"STORING ONE-TOUCH KEYS" on pages 6-3 to6-4.)
Output tray settingThis setting is used to select the output tray forreceived faxes. The trays that can be selected willvary depending on what peripheral devices havebeen installed.
NOTE
If auto receive reduce is disabled, an image largerthan the standard size will be cut off. However, theimage is clearer because it is printed at the samesize as the original.
United Kingdom
Australia and New Zealand
Singapore
0 to 9 2 to 4 0 to 3
NOTE
If you select "0" for the number of rings, the machinewill immediately answer and begin fax receptionwithout ringing in auto reception mode.However, do not select "0" when an extension phoneis connected to the machine.When "0" is selected, the extension phone cannot beused to make a call.
Whale_08.fm 9 ページ 2004年10月15日 金曜日 午前10時24分
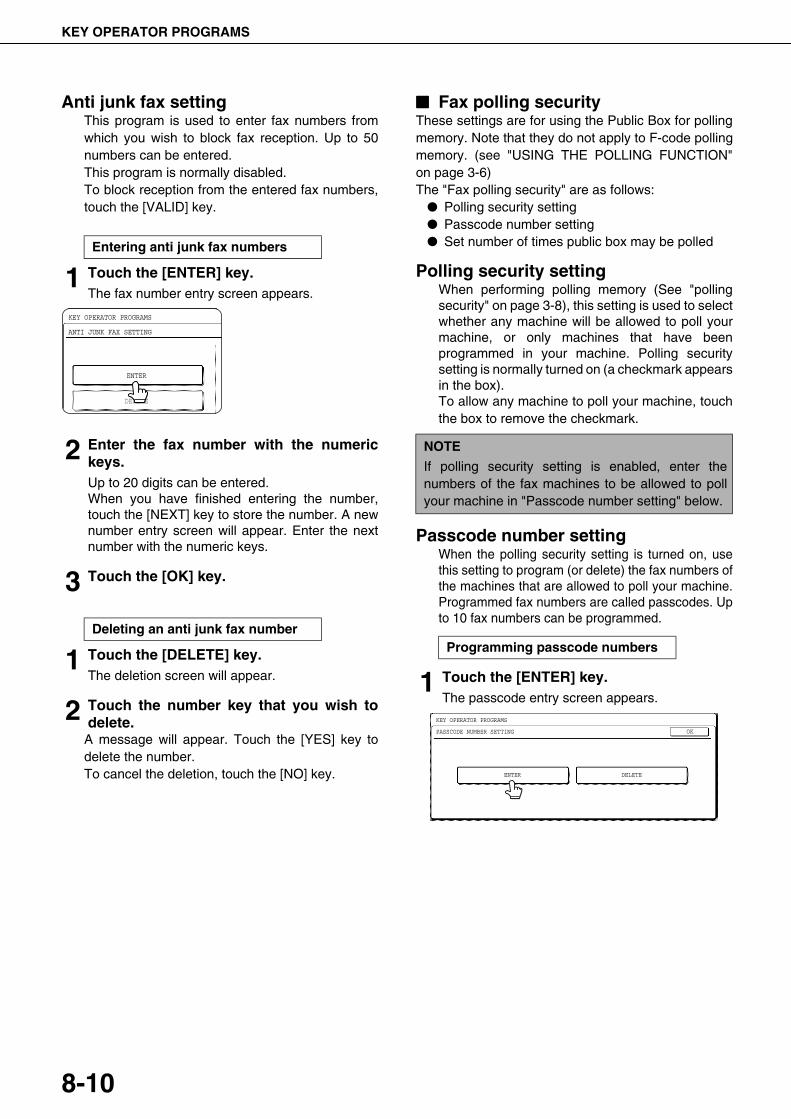
KEY OPERATOR PROGRAMS
8-10
Anti junk fax settingThis program is used to enter fax numbers fromwhich you wish to block fax reception. Up to 50numbers can be entered.This program is normally disabled.To block reception from the entered fax numbers,touch the [VALID] key.
1 Touch the [ENTER] key.The fax number entry screen appears.
2 Enter the fax number with the numerickeys.Up to 20 digits can be entered.When you have finished entering the number,touch the [NEXT] key to store the number. A newnumber entry screen will appear. Enter the nextnumber with the numeric keys.
3 Touch the [OK] key.
1 Touch the [DELETE] key.The deletion screen will appear.
2 Touch the number key that you wish todelete.
A message will appear. Touch the [YES] key todelete the number.To cancel the deletion, touch the [NO] key.
���� Fax polling securityThese settings are for using the Public Box for pollingmemory. Note that they do not apply to F-code pollingmemory. (see "USING THE POLLING FUNCTION"on page 3-6)The "Fax polling security" are as follows:
� Polling security setting� Passcode number setting� Set number of times public box may be polled
Polling security settingWhen performing polling memory (See "pollingsecurity" on page 3-8), this setting is used to selectwhether any machine will be allowed to poll yourmachine, or only machines that have beenprogrammed in your machine. Polling securitysetting is normally turned on (a checkmark appearsin the box).To allow any machine to poll your machine, touchthe box to remove the checkmark.
Passcode number settingWhen the polling security setting is turned on, usethis setting to program (or delete) the fax numbers ofthe machines that are allowed to poll your machine.Programmed fax numbers are called passcodes. Upto 10 fax numbers can be programmed.
1 Touch the [ENTER] key.The passcode entry screen appears.
Entering anti junk fax numbers
Deleting an anti junk fax number
KEY OPERATOR PROGRAMS
ANTI JUNK FAX SETTING
ENTER
DEKETE
NOTE
If polling security setting is enabled, enter thenumbers of the fax machines to be allowed to pollyour machine in "Passcode number setting" below.
Programming passcode numbers
KEY OPERATOR PROGRAMS
PASSCODE NUMBER SETTING
ENTER DELETE
OK
WhaleII_fax_ex.book 10 ページ 2004年9月21日 火曜日 午後1時9分
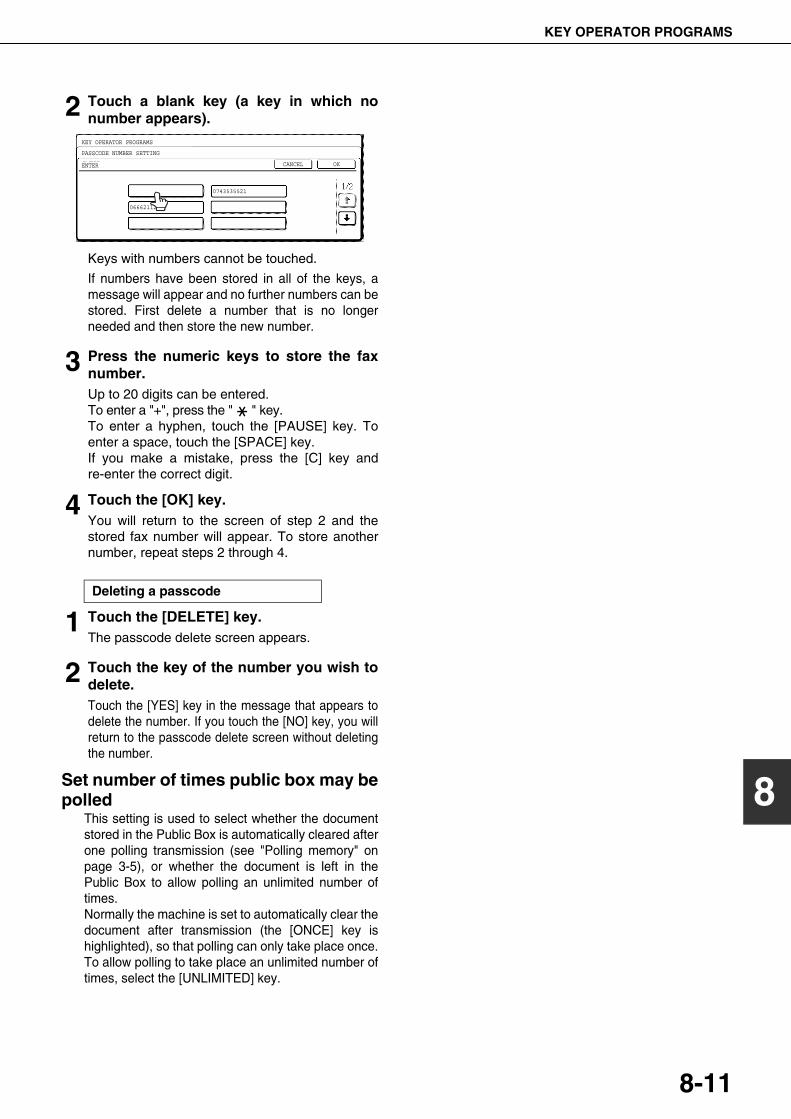
KEY OPERATOR PROGRAMS
8-11
8
2 Touch a blank key (a key in which nonumber appears).
Keys with numbers cannot be touched.
If numbers have been stored in all of the keys, amessage will appear and no further numbers can bestored. First delete a number that is no longerneeded and then store the new number.
3 Press the numeric keys to store the faxnumber.Up to 20 digits can be entered.To enter a "+", press the " " key.To enter a hyphen, touch the [PAUSE] key. Toenter a space, touch the [SPACE] key.If you make a mistake, press the [C] key andre-enter the correct digit.
4 Touch the [OK] key.You will return to the screen of step 2 and thestored fax number will appear. To store anothernumber, repeat steps 2 through 4.
1 Touch the [DELETE] key.The passcode delete screen appears.
2 Touch the key of the number you wish todelete.Touch the [YES] key in the message that appears todelete the number. If you touch the [NO] key, you willreturn to the passcode delete screen without deletingthe number.
Set number of times public box may bepolled
This setting is used to select whether the documentstored in the Public Box is automatically cleared afterone polling transmission (see "Polling memory" onpage 3-5), or whether the document is left in thePublic Box to allow polling an unlimited number oftimes.Normally the machine is set to automatically clear thedocument after transmission (the [ONCE] key ishighlighted), so that polling can only take place once.To allow polling to take place an unlimited number oftimes, select the [UNLIMITED] key.
Deleting a passcode
KEY OPERATOR PROGRAMS
PASSCODE NUMBER SETTING
ENTER
0666211221
0743535521
OKCANCEL
WhaleII_fax_ex.book 11 ページ 2004年9月21日 火曜日 午後1時9分
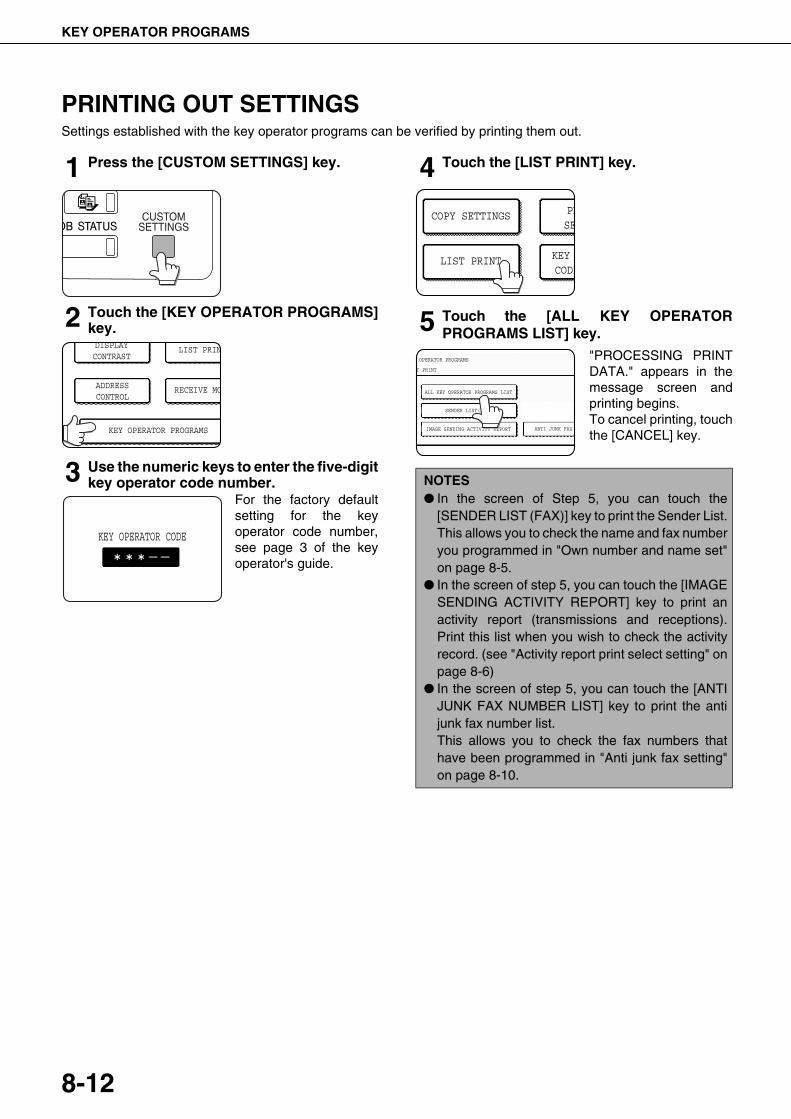
KEY OPERATOR PROGRAMS
8-12
PRINTING OUT SETTINGSSettings established with the key operator programs can be verified by printing them out.
1 Press the [CUSTOM SETTINGS] key.
2 Touch the [KEY OPERATOR PROGRAMS]key.
3 Use the numeric keys to enter the five-digitkey operator code number.
For the factory defaultsetting for the keyoperator code number,see page 3 of the keyoperator's guide.
4 Touch the [LIST PRINT] key.
5 Touch the [ALL KEY OPERATORPROGRAMS LIST] key.
"PROCESSING PRINTDATA." appears in themessage screen andprinting begins.To cancel printing, touchthe [CANCEL] key.
LIST PRINDISPLAY CONTRAST
RECEIVE MOADDRESSCONTROL
KEY OPERATOR PROGRAMS
KEY OPERATOR CODE
NOTES� In the screen of Step 5, you can touch the
[SENDER LIST (FAX)] key to print the Sender List.This allows you to check the name and fax numberyou programmed in "Own number and name set"on page 8-5.
� In the screen of step 5, you can touch the [IMAGESENDING ACTIVITY REPORT] key to print anactivity report (transmissions and receptions).Print this list when you wish to check the activityrecord. (see "Activity report print select setting" onpage 8-6)
� In the screen of step 5, you can touch the [ANTIJUNK FAX NUMBER LIST] key to print the antijunk fax number list.This allows you to check the fax numbers thathave been programmed in "Anti junk fax setting"on page 8-10.
COPY SETTINGS
LIST PRINT
PRSE
KEY CODE
IMAGE SENDING ACTIVITY REPORT ANTI JUNK FAX
SENDER LIST(FAX)
ALL KEY OPERATOR PROGRAMS LIST
OPERATOR PROGRAMS
T PRINT
WhaleII_fax_ex.book 12 ページ 2004年9月21日 火曜日 午後1時9分

9-1
CHAPTER 9APPENDIX
This chapter contains reference information regarding the fax featuresof the machine.
Page
SPECIFICATIONS .................................................................................. 9-2INDEX ..................................................................................................... 9-3
WhaleII_fax_ex.book 1 ページ 2004年9月21日 火曜日 午後1時9分

9-2
SPECIFICATIONSFor information on power requirements, power consumption, dimensions, weight, and other specifications that arecommon to all features of the machine, refer to page 8-2 of "Operation manual (for general information and copieroperation)".
*1 Transmission speed is for an A4 or 8-1/2"x11" document with approximately 700 characters at standardresolution (8x3.85 lines/mm) sent in high speed mode (33.6 kbps (JBIG) or 14.4 kbps (MMR)). This is only thetime required to transmit the image information; the time required to send protocol signals is not included.Actual transmission times will vary depending on the contents of the document, the receiving machine type,and telephone line conditions.
*2 Image memory can be expanded by installing the optional fax expansion memory (AR-MM9).
Applicable telephone line Public switched telephone network
Compression method MH, MR, MMR, JBIG
Transmission modes Super G3, G3 (the machine can only send faxes to and receive faxes frommachines that support G3 or Super G3)
Scanning method CCD flatbed scanning
Scanning resolution(Supports ITU-T standards)
8 x 3.85 lines/mm (Standard)8 x 7.7 lines/mm (Fine, Fine-Halftone)8 x 15.4 lines/mm (Super Fine, Super Fine - Halftone)16 x 15.4 lines/mm (Ultra Fine, Ultra Fine - Halftone)
Printing method Electrophotographic system (LED head system)
Transmission speed 33.6 kbps 2.4 kbps Automatic fallback
Transmission time *1 2 seconds (Super G3 mode / 33.6 kbps, JBIG),6 seconds (G3 ECM mode / 14.4 kbps, MMR)
Paper sizes A3, B4, A4, B5, A5, 11"x17" to 5-1/2"x8-1/2"
Effective print width 293 mm max. (A3 printing) or 11.5" max. (11"x17" printing)
Input document size A3 to A5 or 11"x17" to 5-1/2"x8-1/2" (A5 or 5-1/2"x8-1/2": Vertically-orientedfeeding)* Refer to "Image rotation" page 2-5 for transmission of A5 (5-1/2"x8-1/2") size
documents.
Effective scanning width 297 mm (11.7") maximum
Halftone transmission Yes (256 levels)
Contrast adjustment Automatic (5 levels by manual adjustment)
Extension telephone connection Possible (1 telephone)
Auto dialing Combined total of 500 one-touch and group keys, redialing (automatic)
Timer transmission Yes
Program function Yes (8 programs)
F-code support Yes (can transmit and receive SUB/SEP (sub-address) and SID/PWD(passcode) signals)
Image memory 2 MB *2
Error Correction Mode (ECM) Yes
Some discrepancies may exist in the illustrations and content due to improvements to the machine.
WhaleII_fax_ex.book 2 ページ 2004年9月21日 火曜日 午後1時9分
9-3
9
INDEX���� AActivity report print select setting ........................... 8-6Address directory ............................................ 1-4, 2-3Address directory screen ....................................... 1-5Address review................................................ 1-4, 3-3Alarm...................................................................... 7-3Anti junk fax setting .............................................. 8-10Auto receive reduce setting.................................... 8-9Auto reduction sending setting............................... 8-7Auto wake up print ................................................. 8-5Auto-dialing ................................................... 1-11, 2-3Automatic reduction ............................................... 1-6
���� BBroadcast transmission................................ 3-2 to 3-3
���� CCall timer at memory sending ................................ 8-8Cancelling
-F-code polling .................................................... 4-5-Polling ................................................................ 3-6-Scanning a document into memory (Public Box) for polling memory ............................................. 3-7
-Transfer............................................................ 3-12-Transmission...................................................... 2-6
Condition settings screen-Address directory screen ................................... 1-5-Condition settings screen................................... 1-4
Condition settings................................................... 1-5Connecting an extension phone............................. 1-2Contents....................................................... 0-2 to 0-3
���� Ddate and time ......................................................... 1-2Date/own number print position setting.................. 8-8Default display settings .......................................... 8-4Default exposure settings....................................... 8-7Deleting a passcode............................................. 8-11Deleting document data
-F-code polling memory box................................ 4-5-Public Box.......................................................... 3-8
Disable of fax number direct entry ......................... 8-7Display switching.................................................... 1-5Distinctive ring detection ........................................ 8-7Document glass ..................................................... 1-7Dual page scan .................................................... 3-10Duplex reception setting......................................... 8-9
���� EECM ....................................................................... 8-6Editing and deleting
-F-code memory box........................................ 6-14-Group keys......................................................... 6-7-One-touch keys.................................................. 6-5-Programs ........................................................... 6-8
Explanation of key operator programs ................... 8-4Extension phone .................................................... 5-2
���� FFax default settings ................................................ 8-4Fax mode ........................................................ 1-4, 2-2Fax polling security .............................................. 8-10Fax power switch ............................................ 0-4, 1-2Fax receive settings ............................................... 8-9Fax send settings ................................................... 8-7Faxing a two-sided original .................................... 2-4F-code confidential transmission............................ 4-6F-code polling......................................................... 4-5F-code polling memory........................................... 4-4F-code relay broadcast function............................. 4-9F-code relay broadcast transmission ..................... 4-8F-code relay request function................................ 4-9F-code transmission............................................... 4-2Forwarding function.............................................. 3-12
���� GGroup dialing.......................................1-11, 6-6 to 6-7
���� IIf received data cannot be printed.......................... 2-7Image memory ....................................................... 9-2Image rotation ........................................................ 2-5Index ............................................................... 1-5, 6-9Initial resolution setting........................................... 8-5
���� KKey operator programs .......................................... 8-2
���� LLine connection ...................................................... 0-4Lithium battery........................................................ 0-4Loading a document............................................... 1-7
���� Mmemory box ........................................................... 4-2Must input next address key at broadcast setting .. 8-4
���� NNumber of calls in auto reception........................... 8-9
���� OOne-touch dialing .......................................... 1-11, 2-3One-touch key display............................................ 1-5One-touch keys ............................................ 6-3 to 6-5On-hook dialing .................................................... 1-11Operation panel...................................................... 1-3Original print on transaction report ......................... 8-5Original sizes.......................................................... 1-6Output tray setting.................................................. 8-9Own number and name set .................................... 8-5Own number sending ............................................. 3-9
WhaleII_fax_ex.book 3 ページ 2004年9月21日 火曜日 午後1時9分
INDEX
9-4
���� PPasscode ..................................................... 4-2 to 4-3Passcode number setting..................................... 8-10Pause ..................................................................... 2-2Pause time setting.................................................. 8-5Polling function............................................. 3-5 to 3-8
-F-code polling .................................................... 4-5-F-code polling memory ...................................... 4-4-Manual polling.................................................... 3-6-Polling memory ........................................... 3-5, 3-7
Polling security ....................................................... 3-8Polling security setting ......................................... 8-10Polling times......................................................... 6-11Print
-Communication activity report............................ 7-3-F-code confidential memory box........................ 4-7-F-code polling memory box................................ 4-5-Key operator program...................................... 8-12-Programmed information ................................. 6-14-Public box .......................................................... 3-8-Transaction report.............................................. 7-2
Print PIN............................................................... 6-12Print style setting.................................................... 8-9Printing page number at receiver ........................... 8-7Priority transmission............................................... 2-6Problems and solutions.......................................... 7-4Program ........................................................ 3-11, 6-8Programming/storing
-F-code confidential transmission memory box .6-10, 6-12-F-code polling memory box ........................ 6-10, 6-11-F-code relay broadcast memory box......... 6-10, 6-13-Group index ....................................................... 6-9-Group key .......................................................... 6-6-One-touch key.......................................... 6-3 to 6-4-Program ............................................................. 6-8-Programming frequently used operations ........ 3-11-Public box .........................................3-7 to 3-8, 4-2
���� QQuick on-line .......................................................... 2-5Quick on line sending............................................. 8-8
���� RRead-end ............................................................... 2-3Recall in case of communication error ................... 8-8Recall in case of line busy...................................... 8-8Receiving party is busy .......................................... 2-5Reception
-Automatic reception ........................................... 2-7-Manual reception ........................................ 5-3, 5-4-Remote reception............................................... 5-4
Recipient .............................................................. 6-13Redial ..................................................................... 1-4Redialing .............................................................. 1-11Relay machine ............................................. 4-8 to 4-9Relay request machine ................................ 4-8 to 4-9Remote reception................................................... 5-4Remote reception number setting .......................... 8-6Rotation sending setting......................................... 8-7
���� SSelecting the exposure......................................... 1-10Selecting the resolution.......................................... 1-9Sender's name ....................................................... 1-2Sender's number .................................................... 1-2Sending .................................................................. 2-2
-Auto-dialing ........................................................ 2-3-Broadcast transmission...................................... 3-2-Cancelling .......................................................... 2-6-Dual page scan ................................................ 3-10-F-code transmission........................................... 4-2-Image rotation .................................................... 2-5-Manual transmission .......................................... 5-2-Own number sending......................................... 3-9-Priority transmission........................................... 2-6-Quick On-line ..................................................... 2-5-Storing transmission jobs (memory transmission)... 2-5-Timer.................................................................. 3-4-Two-sided original.............................................. 2-4
Set number of times public box may be polled..... 8-11Set the telephone number for data forwarding....... 8-9Size of a loaded original ......................................... 1-8Speaker.................................................................. 1-4Speaker volume settings........................................ 8-5Special modes........................................................ 1-4
-Dual page scan ................................................ 3-10-Memory box ............................................. 3-7 to 3-8-Own number sending......................................... 3-9-Polling ................................................................ 3-6-Program ........................................................... 3-11-Timer transmission............................................. 3-4
Specifications ......................................................... 9-2Storing transmission jobs ....................................... 2-5Sub address ........................................................... 1-4Sub-address................................................. 4-2 to 4-3
���� TThe number of direct address keys displayed setting .................................................... 8-4Timer transmission................................................. 3-4Touch panel ........................................................... 1-3Transaction report .................................................. 7-2Transaction report print select setting .................... 8-6Transmission error ................................................. 2-5TYPE/NOTE column .............................................. 7-2
���� UUsing an extension phone...................................... 5-3
���� VViewing the communication activity report ............. 7-3
���� WWarning message .................................................. 7-3
WhaleII_fax_ex.book 4 ページ 2004年9月21日 火曜日 午後1時9分

Memo
Whale_09.fm 5 ページ 2004年9月22日 水曜日 午後5時46分

Whale_09.fm 6 ページ 2004年9月22日 水曜日 午後5時46分
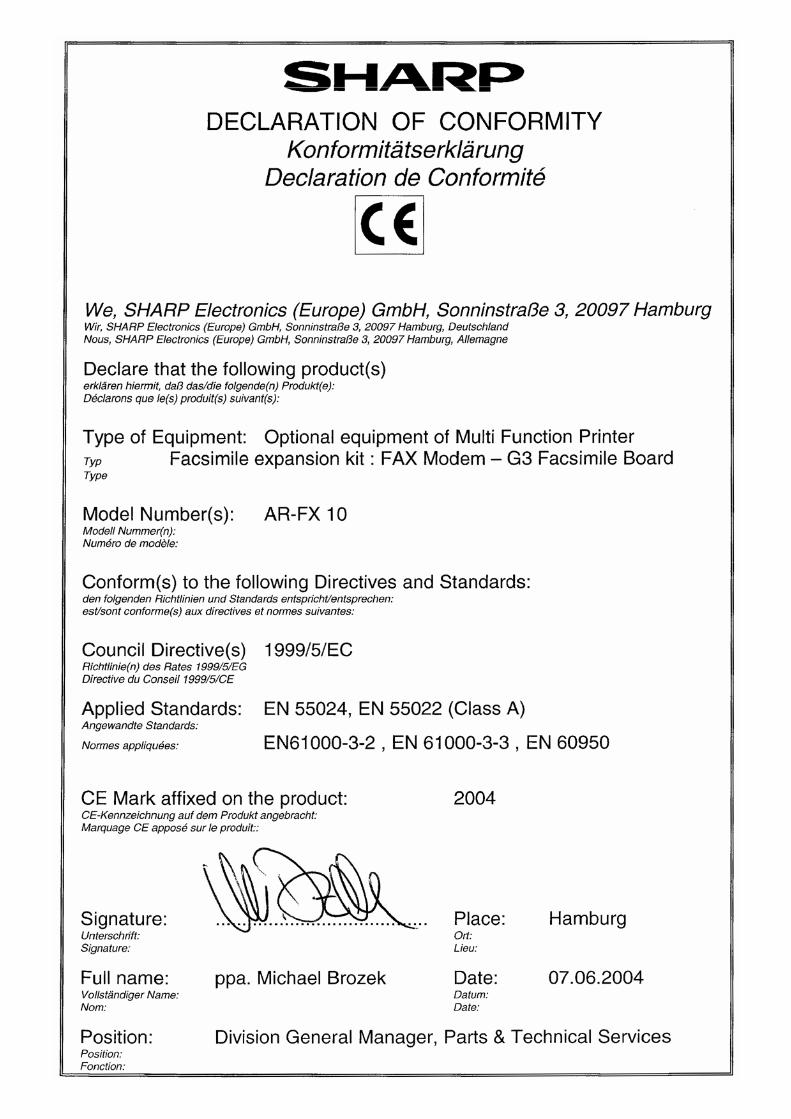
WhaleII_fax_ex.book 1 ページ 2004年10月25日 月曜日 午後3時28分

PRINTED IN CHINA2004K KS1TINSE2937FCZZ
AR-FX10 (for AR-C262M)
This manual has been printed using a vegetable-based soy oil ink to help protect the environment.Printed on 100% post-consumer recycled paper
SHARP CORPORATION
WhaleII_fax_ex.book 2 ページ 2004年10月25日 月曜日 午後3時28分