Embed Size (px)
Citation preview
SAFETY ADVICE � Be careful when working on heated up engines – risk of burn! � Be careful when working on running engines – loose clothing, tools and other
thing might be caught up in revolving parts of the engine and cause sever injuries.
� Remove the ignition key and the negative terminal of the car’s battery so that you avoid an unintended ignition of the engine.
� Always consult specific servicing handbooks for detailed information about check operations and technical data concerning the assembly and disassembly of the clutch unit.
� Always obey the instructions of the vehicle manufacturer.
TOOLS
Pullerto be used as OEM T10373
Support bridge to be used as OEM T10323
Slip gauge to be used as OEM T10374
VW, AUDI 7 - SPEED
DSG CLUTCH INSTALLER & REMOVER CT0050
GENERAL This repair kit is needed for servicing clutches in the following car types: VW Golf (since 2004), Golf Plus (since 2005) with 7-drive transmission (Code 0AM), Audi A3 (since 2004) with 7-drive transmission (Code 0AM) and Touareg (since 2003) with 6-drive transmission (Code 08D).
www.cannontools.co.ukCANNON TOOLS LTD Add: 20 station road, Rowley Regis, west midlands,B65 0JU.U.K.
INSTRUCTION
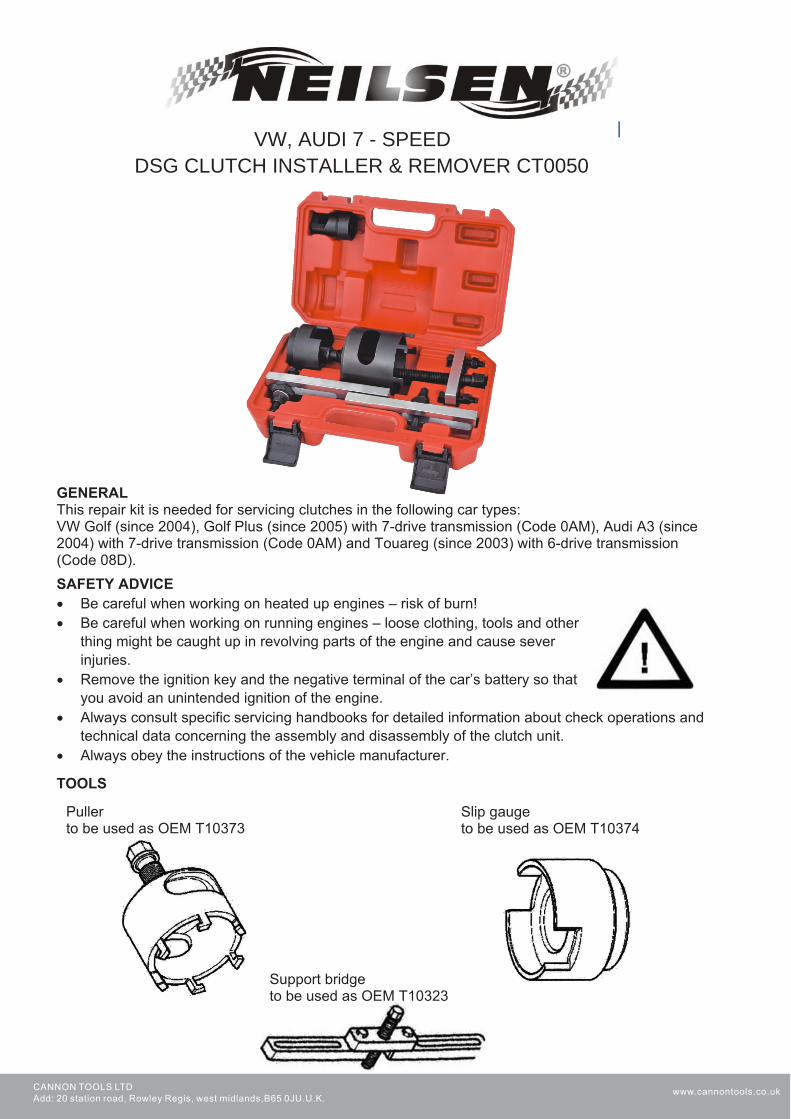
Support bridge
1. Remove clutch hub. 2. Disassemble lock ring of the clutch (this might be
difficult because the clutch is under strong tension 3. Release the clutch by using the support bridge as
shown in the picture.
Puller
4. After the disassembly of the lock ring you can attach the puller as shown and disassemble the clutch by turning the puller spindle.
Slip gauge
5. You can adjust the position of the engaging bearings by using the slip gauge. Use a depth gauge for measuring. For exact dimensions and detailed information about how to do it, consult the manufacturer’s handbook.
www.cannontools.co.ukCANNON TOOLS LTD Add: 20 station road, Rowley Regis, west midlands,B65 0JU.U.K.
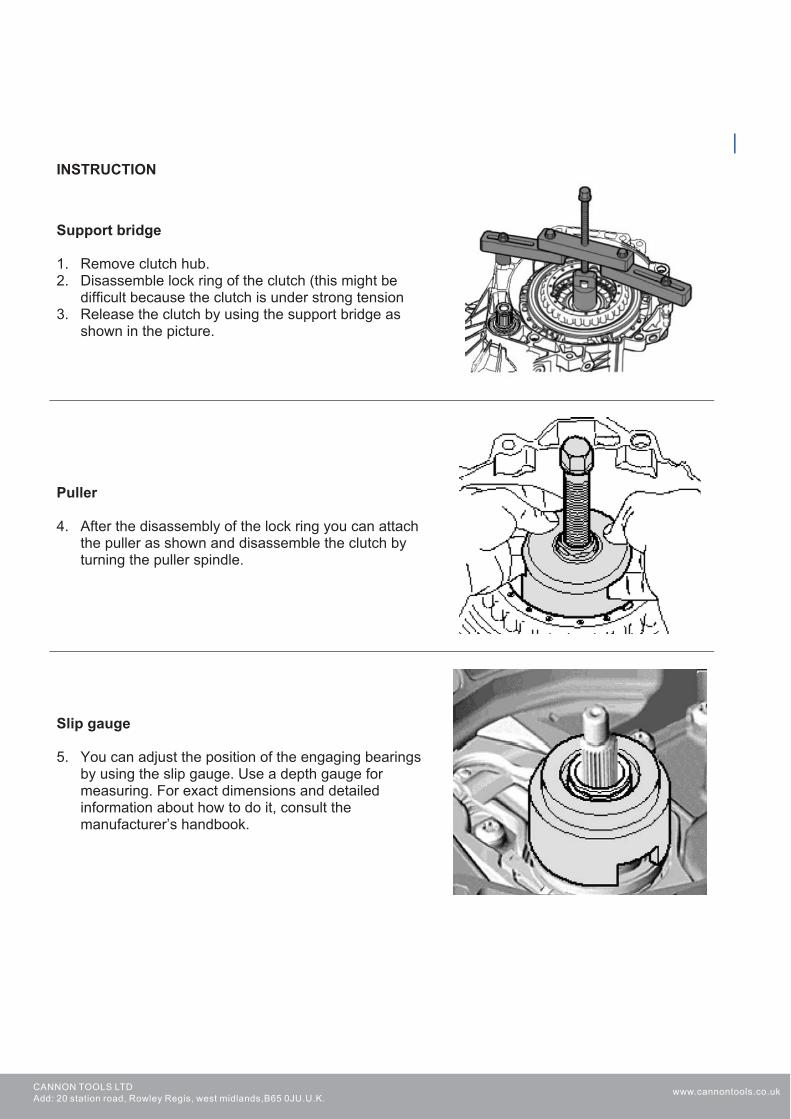
ADJUSTMENT Adjust position of the engaging bearings.
It is necessary to adjust the position of the engaging bearings after replacing the engaging bearings, the starting lever or the starting lever seating.
The locating face (gearbox/motor) has to be completely level in order to make sure for a good rest for the ruler.
Installation of the two starting levers and their engaging bearings.
Place the 1.4 millimeter thick dial on each bearing (arrow).
As there are 2 clutches, there will be 2 steps of adjusting them. You will be doing several measurements while carrying out this operation.Each measurement requires different preparations and a few simple calculations. Please strictly follow these operating sequences.
You will start with the big engaging bearing for clutch 1 (K1).
First measurement for (K1)
Remove the small engaging bearing with the 1.4 millimeter thick dial.
Place the slip gauge on the big engaging bearing. Exert some pressure on the slip gauge and rotate it to make sure for the correct seating of the slip gauge on the bearing. (Endmaß = slip gauge)
www.cannontools.co.ukCANNON TOOLS LTD Add: 20 station road, Rowley Regis, west midlands,B65 0JU.U.K.
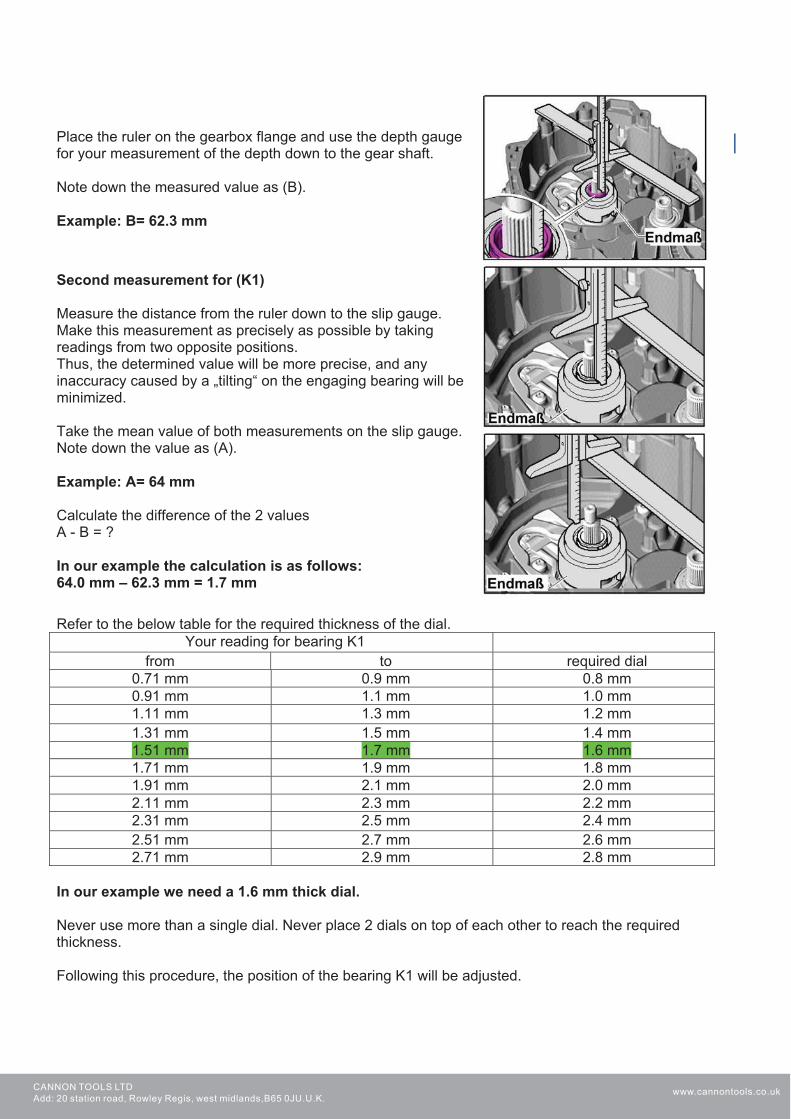
Place the ruler on the gearbox flange and use the depth gauge for your measurement of the depth down to the gear shaft.
Note down the measured value as (B).
Example: B= 62.3 mm
Second measurement for (K1)
Measure the distance from the ruler down to the slip gauge. Make this measurement as precisely as possible by taking readings from two opposite positions. Thus, the determined value will be more precise, and any inaccuracy caused by a „tilting“ on the engaging bearing will be minimized.
Take the mean value of both measurements on the slip gauge. Note down the value as (A).
Example: A= 64 mm
Calculate the difference of the 2 values A - B = ?
In our example the calculation is as follows: 64.0 mm – 62.3 mm = 1.7 mm
Refer to the below table for the required thickness of the dial. Your reading for bearing K1
from to required dial0.71 mm 0.9 mm 0.8 mm 0.91 mm 1.1 mm 1.0 mm 1.11 mm 1.3 mm 1.2 mm 1.31 mm 1.5 mm 1.4 mm 1.51 mm 1.7 mm 1.6 mm 1.71 mm 1.9 mm 1.8 mm 1.91 mm 2.1 mm 2.0 mm 2.11 mm 2.3 mm 2.2 mm 2.31 mm 2.5 mm 2.4 mm 2.51 mm 2.7 mm 2.6 mm 2.71 mm 2.9 mm 2.8 mm
In our example we need a 1.6 mm thick dial.
Never use more than a single dial. Never place 2 dials on top of each other to reach the required thickness.
Following this procedure, the position of the bearing K1 will be adjusted.
www.cannontools.co.ukCANNON TOOLS LTD Add: 20 station road, Rowley Regis, west midlands,B65 0JU.U.K.
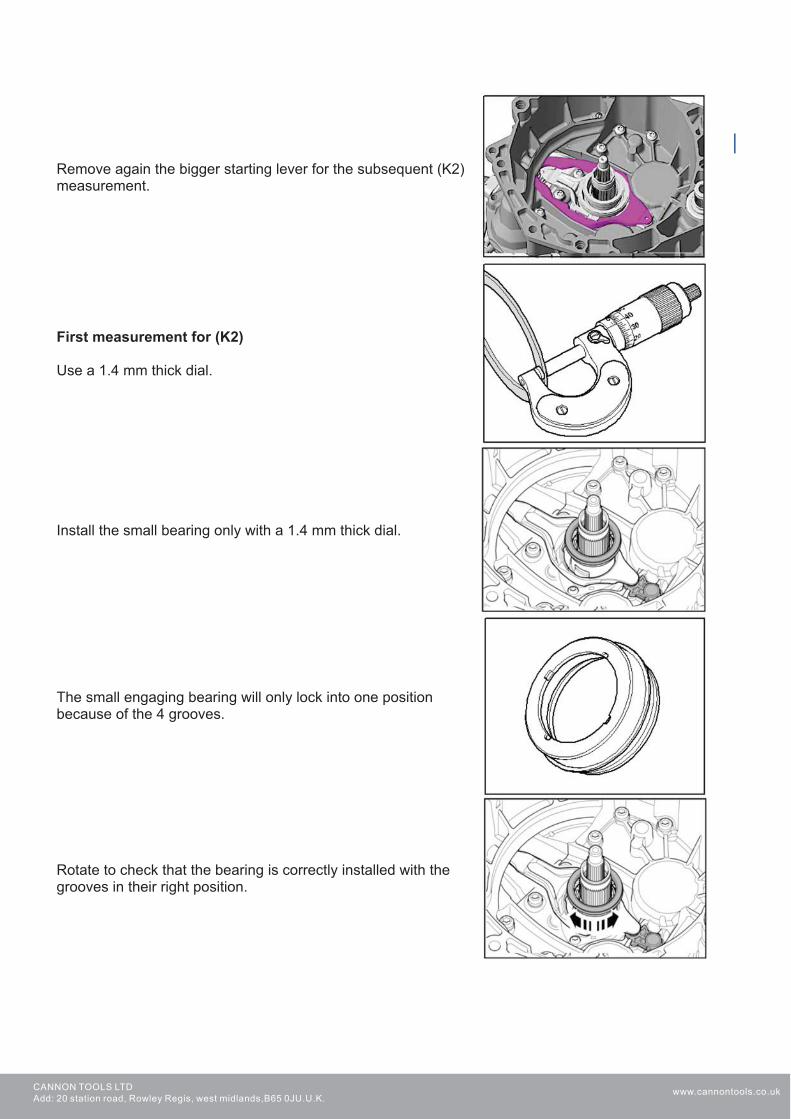
Remove again the bigger starting lever for the subsequent (K2) measurement.
First measurement for (K2)
Use a 1.4 mm thick dial.
Install the small bearing only with a 1.4 mm thick dial.
The small engaging bearing will only lock into one position because of the 4 grooves.
Rotate to check that the bearing is correctly installed with the grooves in their right position.
www.cannontools.co.ukCANNON TOOLS LTD Add: 20 station road, Rowley Regis, west midlands,B65 0JU.U.K.
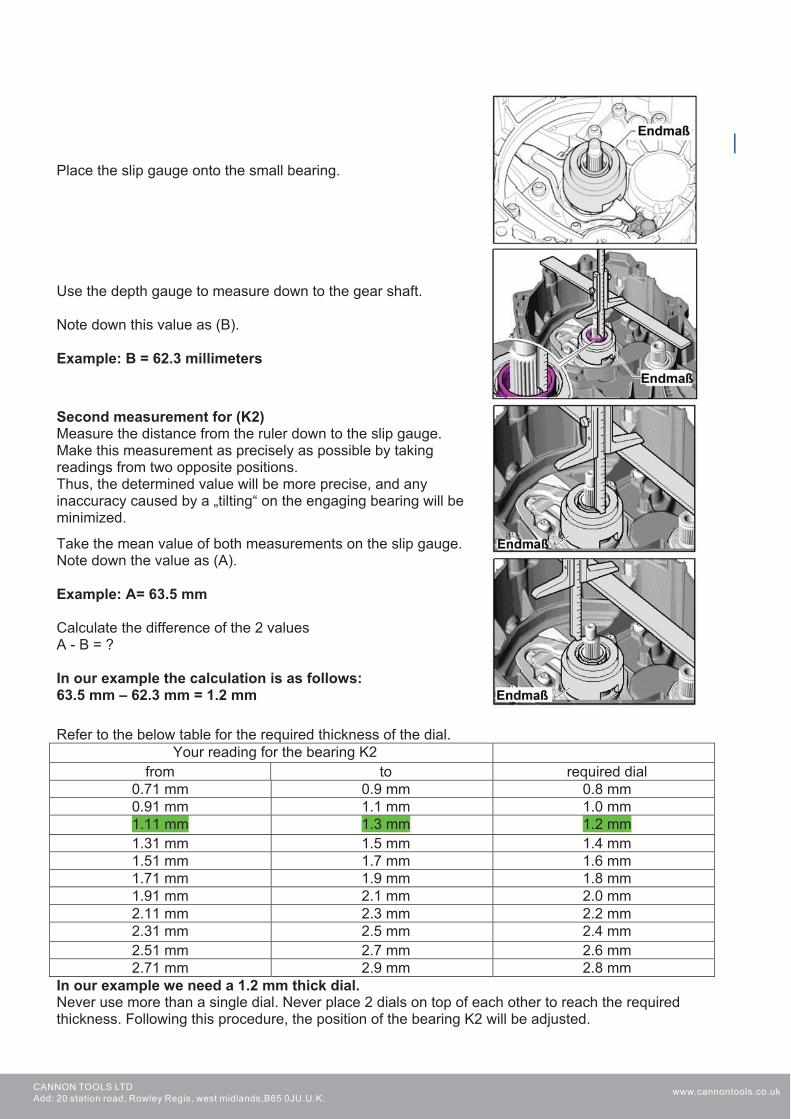
Place the slip gauge onto the small bearing.
Use the depth gauge to measure down to the gear shaft.
Note down this value as (B).
Example: B = 62.3 millimeters
Second measurement for (K2) Measure the distance from the ruler down to the slip gauge. Make this measurement as precisely as possible by taking readings from two opposite positions. Thus, the determined value will be more precise, and any inaccuracy caused by a „tilting“ on the engaging bearing will be minimized.
Take the mean value of both measurements on the slip gauge. Note down the value as (A).
Example: A= 63.5 mm
Calculate the difference of the 2 values A - B = ?
In our example the calculation is as follows: 63.5 mm – 62.3 mm = 1.2 mm
Refer to the below table for the required thickness of the dial. Your reading for the bearing K2
from to required dial0.71 mm 0.9 mm 0.8 mm 0.91 mm 1.1 mm 1.0 mm 1.11 mm 1.3 mm 1.2 mm 1.31 mm 1.5 mm 1.4 mm 1.51 mm 1.7 mm 1.6 mm 1.71 mm 1.9 mm 1.8 mm 1.91 mm 2.1 mm 2.0 mm 2.11 mm 2.3 mm 2.2 mm 2.31 mm 2.5 mm 2.4 mm 2.51 mm 2.7 mm 2.6 mm 2.71 mm 2.9 mm 2.8 mm
In our example we need a 1.2 mm thick dial. Never use more than a single dial. Never place 2 dials on top of each other to reach the required thickness. Following this procedure, the position of the bearing K2 will be adjusted.
www.cannontools.co.ukCANNON TOOLS LTD Add: 20 station road, Rowley Regis, west midlands,B65 0JU.U.K.

www.cannontools.co.ukCANNON TOOLS LTD Add: 20 station road, Rowley Regis, west midlands,B65 0JU.U.K.

www.cannontools.co.ukCANNON TOOLS LTD Add: 20 station road, Rowley Regis, west midlands,B65 0JU.U.K.