Embed Size (px)
Citation preview

Transmission identification
The "6 Spd. Direct Shift Automatic Transmission 02E Front Wheel Drive" is installed in the Jetta 2005 . Allocation 00-4, Code letters, assembly allocation, ratios, equipment .
Location on transmission
Transmission code letters are located at top on transmission, in the area of oil cooler.
Example for one transmission:
HLH = Transmission code letters
13.08.04 = Production date 13th August 2004
14 = Plant code
06:32 = Time
0011 = Serial number
The transmission code letters are also listed on the vehicle data plates.
Note:
If the data plate is not available, a different transmission was accidentally installed or there is no definite way to identify the installed transmission, read the transmission code letters directly from the
Volkswagen Jetta 2005->(A5)
transmission 00-1, Transmission code, reading .
Transmission code, reading
Short description
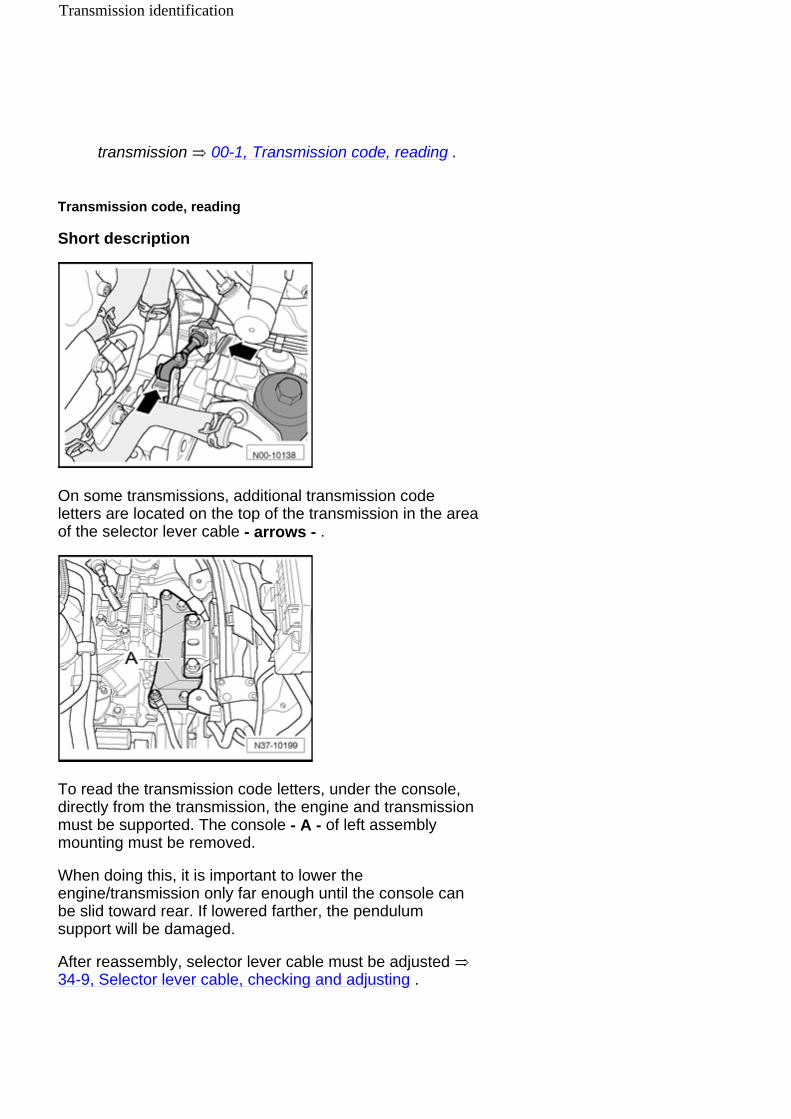
On some transmissions, additional transmission code letters are located on the top of the transmission in the area of the selector lever cable - arrows - .
To read the transmission code letters, under the console, directly from the transmission, the engine and transmission must be supported. The console - A - of left assembly mounting must be removed.
When doing this, it is important to lower the engine/transmission only far enough until the console can be slid toward rear. If lowered farther, the pendulum support will be damaged.
After reassembly, selector lever cable must be adjusted 34-9, Selector lever cable, checking and adjusting .
Transmission identification
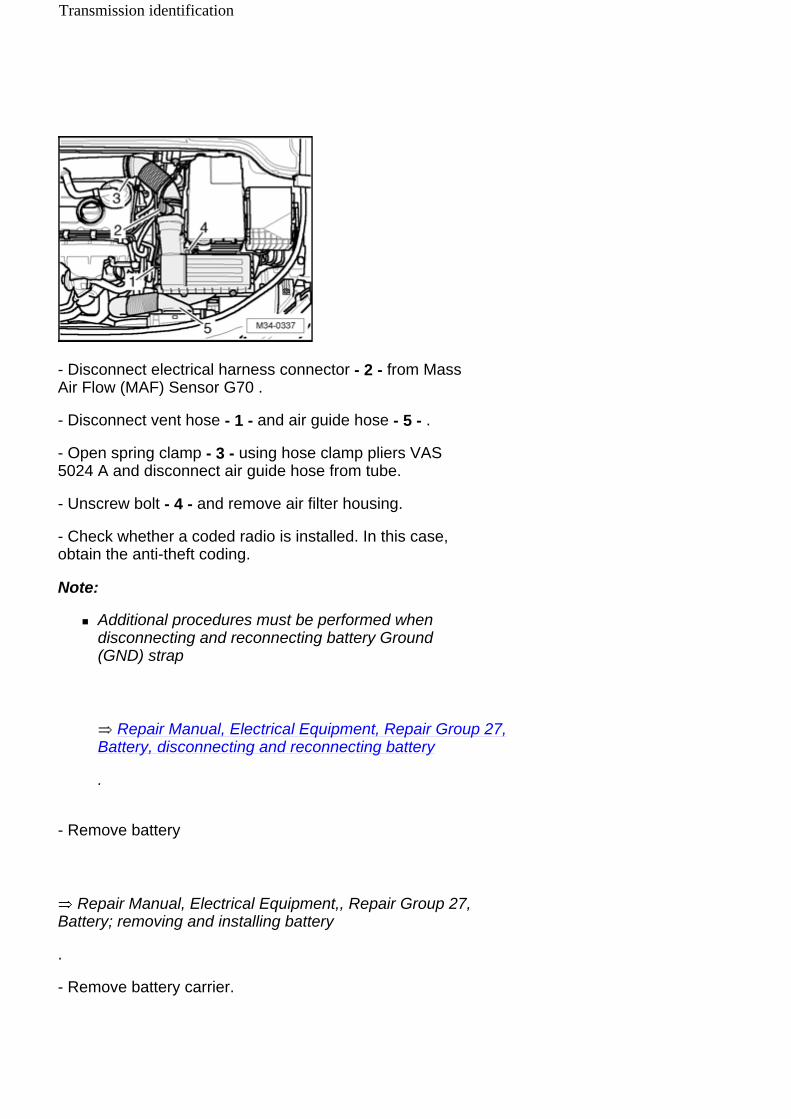
- Disconnect electrical harness connector - 2 - from Mass Air Flow (MAF) Sensor G70 .
- Disconnect vent hose - 1 - and air guide hose - 5 - .
- Open spring clamp - 3 - using hose clamp pliers VAS 5024 A and disconnect air guide hose from tube.
- Unscrew bolt - 4 - and remove air filter housing.
- Check whether a coded radio is installed. In this case, obtain the anti-theft coding.
Note:
Additional procedures must be performed when disconnecting and reconnecting battery Ground (GND) strap
.
Repair Manual, Electrical Equipment, Repair Group 27, Battery, disconnecting and reconnecting battery
- Remove battery
.
Repair Manual, Electrical Equipment,, Repair Group 27, Battery; removing and installing battery
- Remove battery carrier.
Transmission identification

- Place engine support bridge 10-222 A with adapters 10-222 A/8 and adapter 10-222 A/3 in front of gas-filled strut for hood.
- If hose and cable connections are found in the area of engine lifting eyes for engine support bridge 10-222 A , they must be removed now.
- Engage spindles 10-222 A/10 of engine support bridge on left and right engine lifting eyelets and support engine with transmission. Do not lift up.
- Remove all bolts - 1 - and - 2 - of console - A - .
Bolts must be replaced.
Carefully lower engine with transmission via both spindles by 2 rotations, alternating sides.
Transmission identification
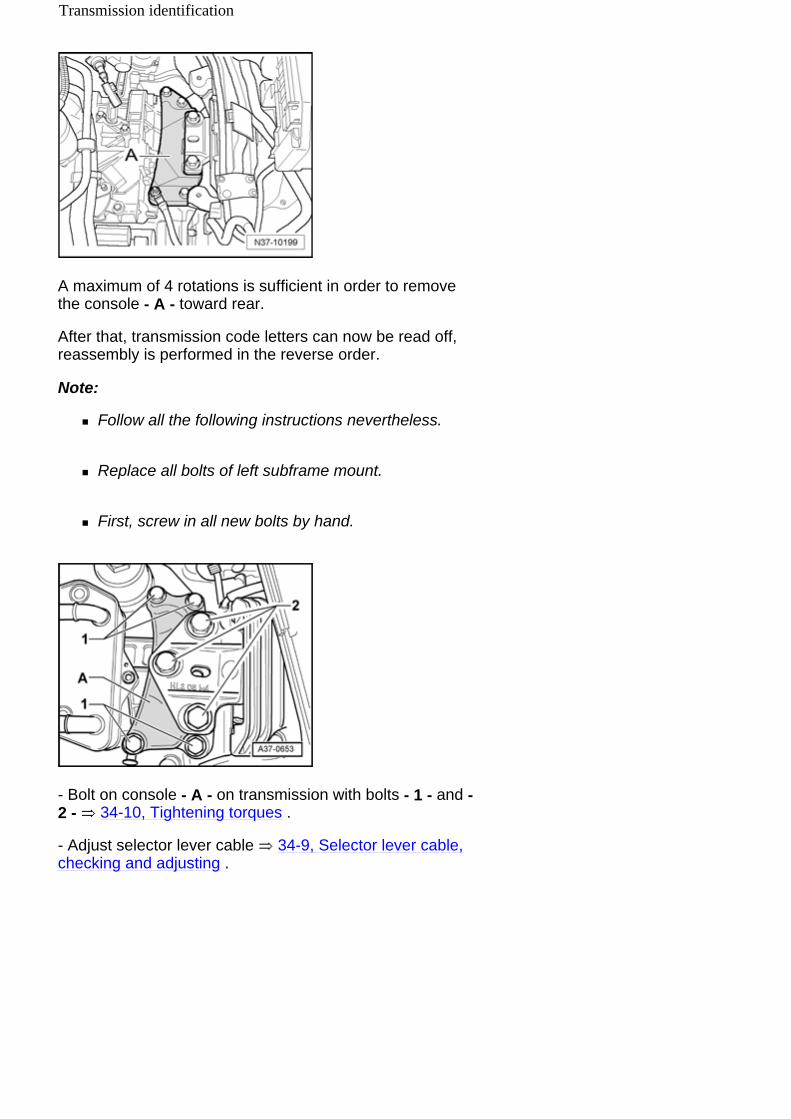
A maximum of 4 rotations is sufficient in order to remove the console - A - toward rear.
After that, transmission code letters can now be read off, reassembly is performed in the reverse order.
Note:
Follow all the following instructions nevertheless.
Replace all bolts of left subframe mount.
First, screw in all new bolts by hand.
- Bolt on console - A - on transmission with bolts - 1 - and - 2 - 34-10, Tightening torques .
- Adjust selector lever cable 34-9, Selector lever cable, checking and adjusting .
Transmission identification
00 - 2
Notes for "6 Spd. Direct Shift Automatic Transmission 02E Front Wheel Drive"
For detailed information regarding functions of "6 Spd. Direct Shift Automatic Transmission 02E Front Wheel Drive" , refer to
Self-study program no. 308 Direct Shift Transmission 02E .
Information can also be obtained via CD-ROM Multimedia Training; Direct Shift Transmission .
Transmission
The "6 Spd. Direct Shift Automatic Transmission 02E Front Wheel Drive" is also called a double-clutch transmission. Engine torque is transferred to transmission via the dual-mass flywheel. Transmission is constructed as a 6-speed manual transmission. Alternating hydraulic actuation of the two wet multi-plate clutches permits operation similar to that of an automatic transmission, i.e. the gears are engaged automatically or manually via the Tiptronic mode. A clutch pedal is not installed.
Safety functions of Mechatronic unit
If individual or several components or sensors fail, Direct Shift Gearbox (DSG) Mechatronic unit J743 activates the corresponding substitute functions or emergency running program. This ensures non-destructive operation of the transmission with respective implications on shift function and quality.
Shift mechanism
The selector lever position is no longer transferred mechanically via selector lever cable and Multi-Function Transmission Range (TR) Switch -F125- as with the automatic transmission. Selector lever positions or gear shifts are transferred via a separate control module in shift mechanism via CAN-Bus to the transmission control module . Gear shift occurs without a cable as well. Only in selector lever position "P" is the parking lock selected mechanically via the selector lever cable.
Shift point change when driving up- or downhill ranges
At uphill or downhill ranges, the shifts are automatically selected dependent on the accelerator pedal position and vehicle speed via additional shift characteristics maps.
Shift characteristics map for extreme uphill driving is adapted to the engine performance
Notes for 6 Spd. Direct Shift Automatic Transmission 02E Front Wheel Drive
Shift characteristics map for extreme downhill driving is adapted to the braking effect of the engine
Direct gear selection by way of the Tiptronic function permits utilization of engine braking action with a specific gear engaged, e.g. on a downhill gradient with a trailer.
Guided Fault Finding, Vehicle On Board Diagnostic (OBD) and Test Instruments
Before performing service work on the automatic transmission, cause of damage must be exactly determined via "Guided Fault Finding" .
"Guided Fault Finding" is performed using Vehicle Diagnosis, Testing and Information System VAS 5051 .
Notes for 6 Spd. Direct Shift Automatic Transmission 02E Front Wheel Drive

00 - 3
Capacities
Capacities 6 Spd. Direct Shift Automatic Transmission 02E Front Wheel Drive
New filling 7.2 L
Replacement in service department
approx. 5.2 L
Change interval Repair Manual, Maintenance
Lubricant Transmission oil for Direct Shift Transmission 02E Electronic Replacement Parts Catalog "ETKA"
Capacities

Code letters, assembly allocation, ratios, equipment
Direct shift transmission 02E - 6-speed
Transmission Code letters GAY GKF GPU
Manufactured from to
05.05 05.05
05.05 05.05
05.05 05.05
Allocation Model Jetta 2005 Jetta 2005 Jetta 2005
Engine 1.9 L -74 kW Turbo-Diesel 1.9 L -77 kW Turbo-Diesel
2.0 L - 100 kW Turbo-Diesel,
2.0 L - 103 kW Turbo-Diesel
2.0 L - 100 kW Turbo-Diesel,
2.0 L - 103 kW Turbo-Diesel
Ratio: Z 2 : Z
1 Final drive 1 for 1st to 4th gear
70 : 16 = 4,375 69 : 17 = 4,059 69 : 17 = 4,059
Final drive 2 for 5th/6th and reverse gear
70 : 21 = 3,333 69 : 22 = 3,136 69 : 22 = 3,136
1. Gear 45 : 13 = 3,462 45 : 13 = 3,462 45 : 13 = 3,462
2. Gear 41 : 20 = 2,050 41 : 20 = 2,050 41 : 20 = 2,050
3. Gear 39 : 30 = 1,300 39 : 30 = 1,300 39 : 30 = 1,300
4. Gear 37 : 41 = 0,902 37 : 42 = 0,881 37 : 42 = 0,881
5. Gear 32 : 35 = 0,914 32 : 35 = 0,914 32 : 35 = 0,914
6. Gear 31 : 41 = 0,756 31 : 42 = 0,738 31 : 42 = 0,738
Reverse Gear 33 : 13 x 22 : 14 = 3,989
33 : 13 x 22 : 14 = 3,989
33 : 13 x 22 : 14 = 3,989
Direct shift transmission 02E - 6-speed
Transmission Code letters GPV GPW GYM
Manufactured from to
05.05 05.05
05.05 05.05
05.05 05.05
Allocation Model Jetta 2005 Jetta 2005 Jetta 2005
Engine 1.9 L -74 kW Turbo-Diesel 1.9 L -77 kW Turbo-Diesel
1.9 L -74 kW Turbo-Diesel 1.9 L -77 kW Turbo-Diesel
2.0 L - 100 kW Turbo-Diesel,
2.0 L - 103 kW Turbo-Diesel
Ratio: Z 2 : Z
1 Final drive 1 for 1st to 4th gear
70 : 16 = 4,375 70 : 16 = 4,375 69 : 17 = 4,059
Final drive 2 for 5th/6th and reverse gear
70 : 21 = 3,333 70 : 21 = 3,333 69 : 22 = 3,136
1. Gear 45 : 13 = 3,462 45 : 13 = 3,462 45 : 13 = 3,462
2. Gear 41 : 20 = 2,050 41 : 20 = 2,050 41 : 20 = 2,050
3. Gear 39 : 30 = 1,300 39 : 30 = 1,300 39 : 30 = 1,300
Volkswagen Technical Site: http://volkswagen.msk.ru http://vwts.info http://vwts.ru огромный архив документации по автомобилям Volkswagen, Skoda, Seat, Audi

4. Gear 37 : 41 = 0,902 37 : 41 = 0,902 37 : 42 = 0,881
5. Gear 32 : 35 = 0,914 32 : 35 = 0,914 32 : 35 = 0,914
6. Gear 31 : 41 = 0,756 31 : 41 = 0,756 31 : 42 = 0,738
Reverse Gear 33 : 13 x 22 : 14 = 3,989
33 : 13 x 22 : 14 = 3,989
33 : 13 x 22 : 14 = 3,989
Direct shift transmission 02E - 6-speed
Transmission Code letters GYN GYQ GYR
Manufactured from to
05.05 05.05
11.04 02.05
05.05
Allocation Model Jetta 2005 Jetta 2005 Jetta 2005
Engine 2.0 L - 100 kW Turbo-Diesel,
2.0 L - 103 kW Turbo-Diesel
1.9 L -77 kW Turbo-Diesel
1.9 L -74 kW Turbo-Diesel 1.9 L -77 kW Turbo-Diesel
Ratio: Z 2 : Z
1 Final drive 1 for 1st to 4th gear
69 : 17 = 4,059 70 : 16 = 4,375 70 : 16 = 4,375
Final drive 2 for 5th/6th and reverse gear
69 : 22 = 3,136 70 : 21 = 3,333 70 : 21 = 3,333
1. Gear 45 : 13 = 3,462 45 : 13 = 3,462 45 : 13 = 3,462
2. Gear 41 : 20 = 2,050 41 : 20 = 2,050 41 : 20 = 2,050
3. Gear 39 : 30 = 1,300 39 : 30 = 1,300 39 : 30 = 1,300
4. Gear 37 : 42 = 0,881 37 : 41 = 0,902 37 : 41 = 0,902
5. Gear 32 : 35 = 0,914 32 : 35 = 0,914 32 : 35 = 0,914
6. Gear 31 : 42 = 0,738 31 : 41 = 0,756 31 : 41 = 0,756
Reverse Gear 33 : 13 x 22 : 14 = 3,989
33 : 13 x 22 : 14 = 3,989
33 : 13 x 22 : 14 = 3,989
Direct shift transmission 02E - 6-speed
Transmission Code letters HBP HBQ HFQ
Manufactured from to
05.05 05.05
05.05 05.05
05.05 07.05
Allocation Model Jetta 2005 Jetta 2005 Jetta 2005
Engine 2.0 L -100 kW Turbo-Diesel
1.9 L -74 kW Turbo-Diesel 1.9 L -77 kW Turbo-Diesel
2.0 L - 100 kW Turbo-Diesel,
2.0 L - 103 kW Turbo-Diesel
Ratio: Z 2 : Z
1 Final drive 1 for 1st to 4th gear
70 : 17 = 4,118 69 : 17 = 4,059 70 : 17 = 4,118
Final drive 2 for 5th/6th and reverse gear
70 : 23 = 3,043 69 : 22 = 3,136 70 : 23 = 3,043
1. Gear 45 : 13 = 3,462 45 : 13 = 3,462 45 : 13 = 3,462
2. Gear 41 : 20 = 2,050 43 : 20 = 2,150 41 : 20 = 2,050
Code letters, assembly allocation, ratios, equipment

3. Gear 39 : 30 = 1,300 41 : 28 = 1,464 39 : 30 = 1,300
4. Gear 37 : 41 = 0,902 41 : 38 = 1,079 37 : 41 = 0,902
5. Gear 32 : 35 = 0,914 35 : 32 = 1,094 32 : 35 = 0,914
6. Gear 31 : 41 = 0,756 35 : 38 = 0,921 31 : 41 = 0,756
Reverse Gear 33 : 13 x 22 : 14 = 3,989
33 : 13 x 22 : 14 = 3,989
33 : 13 x 22 : 14 = 3,989
Direct shift transmission 02E - 6-speed
Transmission Code letters HJQ HLE HLF
Manufactured from to
05.05 05.05 05.05
05.05 05.05
Allocation Model Jetta 2005 Jetta 2005 Jetta 2005
Engine 2.0 L - 100 kW Turbo-Diesel,
2.0 L - 103 kW Turbo-Diesel
2.0 L -100 kW Turbo-Diesel
2.0 L - 100 kW Turbo-Diesel,
2.0 L - 103 kW Turbo-Diesel
Ratio: Z 2 : Z
1 Final drive 1 for 1st to 4th gear
69 : 17 = 4,059 70 : 17 = 4,118 69 : 17 = 4,059
Final drive 2 for 5th/6th and reverse gear
69 : 22 = 3,136 70 : 23 = 3,043 69 : 22 = 3,136
1. Gear 45 : 13 = 3,462 45 : 13 = 3,462 45 : 13 = 3,462
2. Gear 41 : 20 = 2,050 41 : 20 = 2,050 41 : 20 = 2,050
3. Gear 39 : 30 = 1,300 39 : 30 = 1,300 39 : 30 = 1,300
4. Gear 37 : 42 = 0,881 37 : 41 = 0,902 37 : 42 = 0,881
5. Gear 32 : 35 = 0,914 32 : 35 = 0,914 32 : 35 = 0,914
6. Gear 31 : 42 = 0,738 31 : 41 = 0,756 31 : 42 = 0,738
Reverse Gear 33 : 13 x 22 : 14 = 3,989
33 : 13 x 22 : 14 = 3,989
33 : 13 x 22 : 14 = 3,989
Direct shift transmission 02E - 6-speed
Transmission Code letters HLH HQF HQH
Manufactured from to
02.05 07.05
05.05 07.05
07.05
Allocation Model Jetta 2005 Jetta 2005 Jetta 2005
Engine 1.9 L -74 kW Turbo-Diesel 1.9 L -77 kW Turbo-Diesel
2.0 L - 100 kW Turbo-Diesel,
2.0 L - 103 kW Turbo-Diesel
1.9 L -74 kW Turbo-Diesel
Ratio: Z 2 : Z
1 Final drive 1 for 1st to 4th gear
70 : 16 = 4,375 70 : 17 = 4,118 70 : 16 = 4,375
Final drive 2 for 5th/6th and reverse gear
70 : 21 = 3,333 70 : 23 = 3,043 70 : 21 = 3,333
1. Gear 45 : 13 = 3,462 45 : 13 = 3,462 45 : 13 = 3,462
Code letters, assembly allocation, ratios, equipment

2. Gear 41 : 20 = 2,050 41 : 20 = 2,050 41 : 20 = 2,050
3. Gear 39 : 30 = 1,300 39 : 30 = 1,300 39 : 30 = 1,300
4. Gear 37 : 41 = 0,902 37 : 41 = 0,902 37 : 41 = 0,902
5. Gear 32 : 35 = 0,914 32 : 35 = 0,914 32 : 35 = 0,914
6. Gear 31 : 41 = 0,756 31 : 41 = 0,756 31 : 41 = 0,756
Reverse Gear 33 : 13 x 22 : 14 = 3,989
33 : 13 x 22 : 14 = 3,989
33 : 13 x 22 : 14 = 3,989
Direct shift transmission 02E - 6-speed
Transmission Code letters HQK HQL HQN
Manufactured from to
05.05 05.05
07.05 02.05
Allocation Model Jetta 2005 Jetta 2005 Jetta 2005
Engine 1.9 L -74 kW Turbo-Diesel 1.9 L -77 kW Turbo-Diesel
2.0 L - 100 kW Turbo-Diesel,
2.0 L - 103 kW Turbo-Diesel
1.9 L -74 kW Turbo-Diesel 1.9 L -77 kW Turbo-Diesel
Ratio: Z 2 : Z
1 Final drive 1 for 1st to 4th gear
69 : 17 = 4,059 70 : 17 = 4,118 70 : 16 = 4,375
Final drive 2 for 5th/6th and reverse gear
69 : 22 = 3,136 70 : 23 = 3,043 70 : 21 = 3,333
1. Gear 45 : 13 = 3,462 45 : 13 = 3,462 45 : 13 = 3,462
2. Gear 43 : 20 = 2,150 41 : 20 = 2,050 41 : 20 = 2,050
3. Gear 41 : 28 = 1,464 39 : 30 = 1,300 39 : 30 = 1,300
4. Gear 41 : 38 = 1,079 37 : 41 = 0,902 37 : 41 = 0,902
5. Gear 35 : 32 = 1,094 32 : 35 = 0,914 32 : 35 = 0,914
6. Gear 35 : 38 = 0,921 31 : 41 = 0,756 31 : 41 = 0,756
Reverse Gear 33 : 13 x 22 : 14 = 3,989
33 : 13 x 22 : 14 = 3,989
33 : 13 x 22 : 14 = 3,989
Direct shift transmission 02E - 6-speed
Transmission Code letters HQQ HRW HTB
Manufactured from to
05.05 07.05
05.05 07.05
07.06
Allocation Model Jetta 2005 Jetta 2005 Jetta 2005
Engine 1.9 L -74 kW Turbo-Diesel 1.9 L -77 kW Turbo-Diesel
2.0 L - 147 kW Turbo-FSI
2.0 L - 100 kW Turbo-Diesel,
2.0 L - 103 kW Turbo-Diesel
Ratio: Z 2 : Z
1 Final drive 1 for 1st to 4th gear
69 : 17 = 4,059 69 : 17 = 4,059 70 : 17 = 4,118
Final drive 2 for 5th/6th and reverse gear
69 : 22 = 3,136 69 : 22 = 3,136 70 : 23 = 3,043
Code letters, assembly allocation, ratios, equipment
1. Gear 45 : 13 = 3,462 45 : 13 = 3,462 45 : 13 = 3,462
2. Gear 43 : 20 = 2,150 43 : 20 = 2,150 41 : 20 = 2,050
3. Gear 41 : 28 = 1,464 41 : 28 = 1,464 39 : 30 = 1,300
4. Gear 41 : 38 = 1,079 41 : 38 = 1,079 37 : 41 = 0,902
5. Gear 35 : 32 = 1,094 35 : 32 = 1,094 32 : 35 = 0,914
6. Gear 35 : 38 = 0,921 35 : 38 = 0,921 31 : 41 = 0,756
Reverse Gear 33 : 13 x 22 : 14 = 3,989
33 : 13 x 22 : 14 = 3,989
33 : 13 x 22 : 14 = 3,989
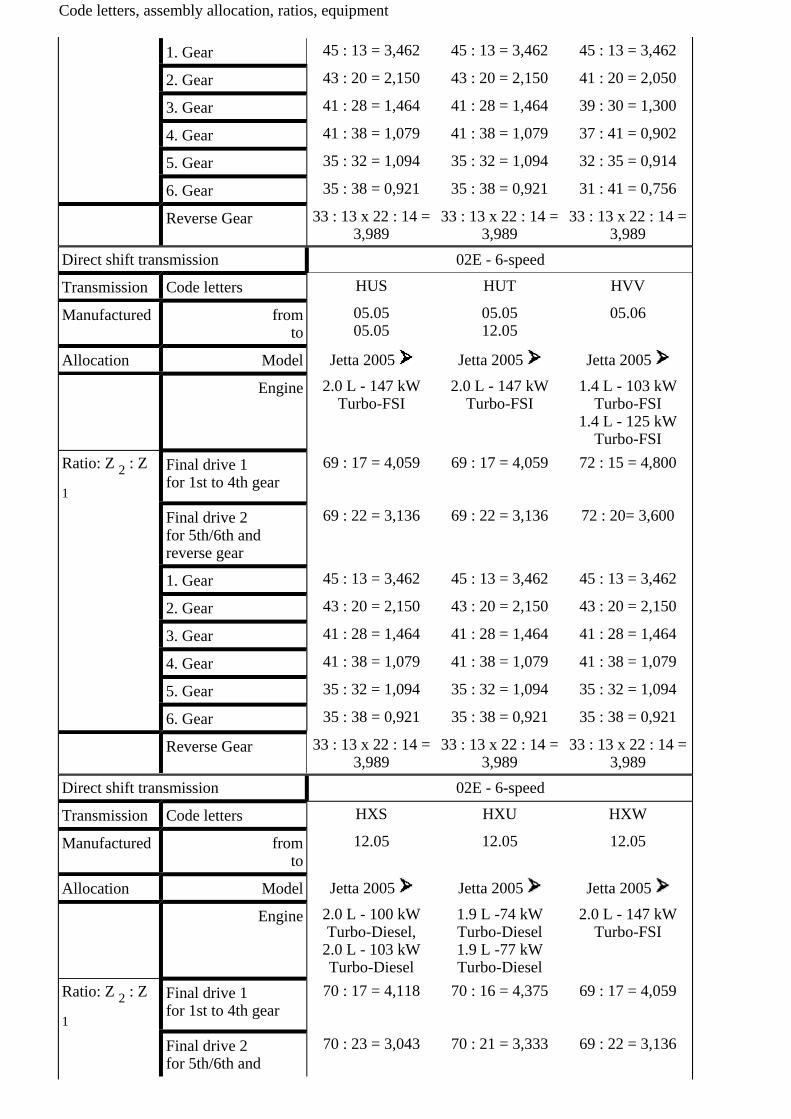
Direct shift transmission 02E - 6-speed
Transmission Code letters HUS HUT HVV
Manufactured from to
05.05 05.05
05.05 12.05
05.06
Allocation Model Jetta 2005 Jetta 2005 Jetta 2005
Engine 2.0 L - 147 kW Turbo-FSI
2.0 L - 147 kW Turbo-FSI
1.4 L - 103 kW Turbo-FSI
1.4 L - 125 kW Turbo-FSI
Ratio: Z 2 : Z
1 Final drive 1 for 1st to 4th gear
69 : 17 = 4,059 69 : 17 = 4,059 72 : 15 = 4,800
Final drive 2 for 5th/6th and reverse gear
69 : 22 = 3,136 69 : 22 = 3,136 72 : 20= 3,600
1. Gear 45 : 13 = 3,462 45 : 13 = 3,462 45 : 13 = 3,462
2. Gear 43 : 20 = 2,150 43 : 20 = 2,150 43 : 20 = 2,150
3. Gear 41 : 28 = 1,464 41 : 28 = 1,464 41 : 28 = 1,464
4. Gear 41 : 38 = 1,079 41 : 38 = 1,079 41 : 38 = 1,079
5. Gear 35 : 32 = 1,094 35 : 32 = 1,094 35 : 32 = 1,094
6. Gear 35 : 38 = 0,921 35 : 38 = 0,921 35 : 38 = 0,921
Reverse Gear 33 : 13 x 22 : 14 = 3,989
33 : 13 x 22 : 14 = 3,989
33 : 13 x 22 : 14 = 3,989
Direct shift transmission 02E - 6-speed
Transmission Code letters HXS HXU HXW
Manufactured from to
12.05 12.05 12.05
Allocation Model Jetta 2005 Jetta 2005 Jetta 2005
Engine 2.0 L - 100 kW Turbo-Diesel,
2.0 L - 103 kW Turbo-Diesel
1.9 L -74 kW Turbo-Diesel 1.9 L -77 kW Turbo-Diesel
2.0 L - 147 kW Turbo-FSI
Ratio: Z 2 : Z
1 Final drive 1 for 1st to 4th gear
70 : 17 = 4,118 70 : 16 = 4,375 69 : 17 = 4,059
Final drive 2 for 5th/6th and
70 : 23 = 3,043 70 : 21 = 3,333 69 : 22 = 3,136
Code letters, assembly allocation, ratios, equipment

reverse gear 1. Gear 45 : 13 = 3,462 45 : 13 = 3,462 45 : 13 = 3,462
2. Gear 41 : 20 = 2,050 41 : 20 = 2,050 43 : 20 = 2,150
3. Gear 39 : 30 = 1,300 39 : 30 = 1,300 41 : 28 = 1,464
4. Gear 37 : 41 = 0,902 37 : 41 = 0,902 41 : 38 = 1,079
5. Gear 32 : 35 = 0,914 32 : 35 = 0,914 35 : 32 = 1,094
6. Gear 31 : 41 = 0,756 31 : 41 = 0,756 35 : 38 = 0,921
Reverse Gear 33 : 13 x 22 : 14 = 3,989
33 : 13 x 22 : 14 = 3,989
33 : 13 x 22 : 14 = 3,989
Direct shift transmission 02E - 6-speed
Transmission Code letters HYC
Manufactured from to
07.06
Allocation Model Jetta 2005 Jetta 2005
Jetta 2005
Engine 2.0 L - 100 kW Turbo-Diesel,
2.0 L - 103 kW Turbo-Diesel
Ratio: Z 2 : Z 1 Final drive 1 for 1st to 4th gear
70 : 17 = 4,118
Final drive 2 for 5th/6th and reverse gear
70 : 23 = 3,043
1. Gear 45 : 13 = 3,462
2. Gear 41 : 20 = 2,050
3. Gear 39 : 30 = 1,300
4. Gear 37 : 41 = 0,902
5. Gear 32 : 35 = 0,914
6. Gear 31 : 41 = 0,756
Reverse Gear 33 : 13 x 22 : 14 = 3,989
Code letters, assembly allocation, ratios, equipment

00 - 5
Code letters, assembly allocation, ratios, equipment
Calculation of transmission ratios "i"
Example:
6. Gear Final drive
Drive gear ZG 1 = 41 ZA 1 = 21
Driven gear ZG 2 = 31 ZA 2 = 70
i = Z 2 : Z 1 )
i G = gear ratio = ZG 2 : ZG 1 = 31 : 41 = 0,756
i A = axle ratio = ZA 2 : ZA 1 = 70 : 21 = 3,333
i total = overall ratio
= i G x i A = 0.756 x 3.333 = 2,52
) Z 1 = no. of teeth drive gear, Z 2 = no. of teeth driven gear
Code letters, assembly allocation, ratios, equipment
General Repair Notes
The maximum possible care, cleanliness and proper tools are essential to ensure satisfactory and successful transmission repairs. The usual basic safety precautions also apply when carrying out vehicle repairs.
A number of generally applicable instructions for individual repair procedures, which are otherwise mentioned at various points in the Repair Manual, are summarized here. They apply to this Repair Manual.
Special tools and equipment
A complete list of special tools and equipment used in this repair manual is listed before each repair description and in: "Special tools catalog" .
Notes for tow starting and towing
Caution!
When towing the vehicle, selector lever must be in position "N" and the vehicle must not be towed for more than 50 km and no faster than 50 km/h, since the transmission will otherwise be destroyed.
Note:
Tow-starting the engine, e.g. when the battery is too weak or the starter is defective, is not possible.
Transmission components, overview
General Repair Notes

Filter
Transmission Input Speed (RPM) Sensor G182 and Clutch Oil Temperature Sensor G509
Transmission oil pump
cover for transmission oil pump
Drain plug
Check plug
Direct Shift Gearbox (DSG) Mechatronic unit J743
Oil pan
cover (sealing cover) for clutch
Clutch
Transmission oil cooler
Rules for cleanliness
General Repair Notes

Thoroughly clean all connections and the surrounding area before disconnecting.
Only install clean components: Only unpack replacement parts immediately prior to installation.
Always replace paper seals. Remove old seal completely and thoroughly clean sealing surfaces.
Place removed parts on clean surface and cover them so they do not become soiled. Use foils and paper. Use lint-free cloths only!
Carefully cover over opened components or seal, if repairs are not carried out immediately.
Transmission
If covers are unscrewed from transmission or transmission has no oil, do not run engine and do not tow vehicle.
When installing transmission, make sure centering sleeves are correctly seated between engine and transmission.
Only install clean components: Only unpack replacement parts immediately prior to installation.
If transmission was replaced, oil level must be checked.
Mechatronic unit unit
Mechatronic unit is to be allocated to transmission code letters Electronic Replacement Parts Catalog "ETKA" .
Electrical components
When touching a metal object, it may cause an electrostatic discharge. The reason for this is the electrostatic charge of the human body. This charge can lead to functional problems by touching the electrical components of the transmission and selector lever mechanism.
General Repair Notes

- Touch a grounded object, e.g. a water tube or a lifting platform, before working on the electrical components!
- Do not make direct contact on connector terminals.
Transmission oil and filter
Caution!
Handle the oil very carefully. Dispose of drained oil in an appropriate manner.
Shake oil bottle before opening.
Do not mix additives into the oil, do not add a different oil as well.
For every oil change, filter must be replaced as well.
Drained oil must not be reused.
Always use only transmission oil for direct shift transmission Electronic Replacement Parts
General Repair Notes
Catalog "ETKA" .
Oil level in transmission and in final drive are checked and filled together.
Gaskets and sealing rings
Always replace O-rings, gaskets and seals.
After removing gaskets and seals, always inspect the contact surfaces at housing or shaft for burrs and damage and repair them.
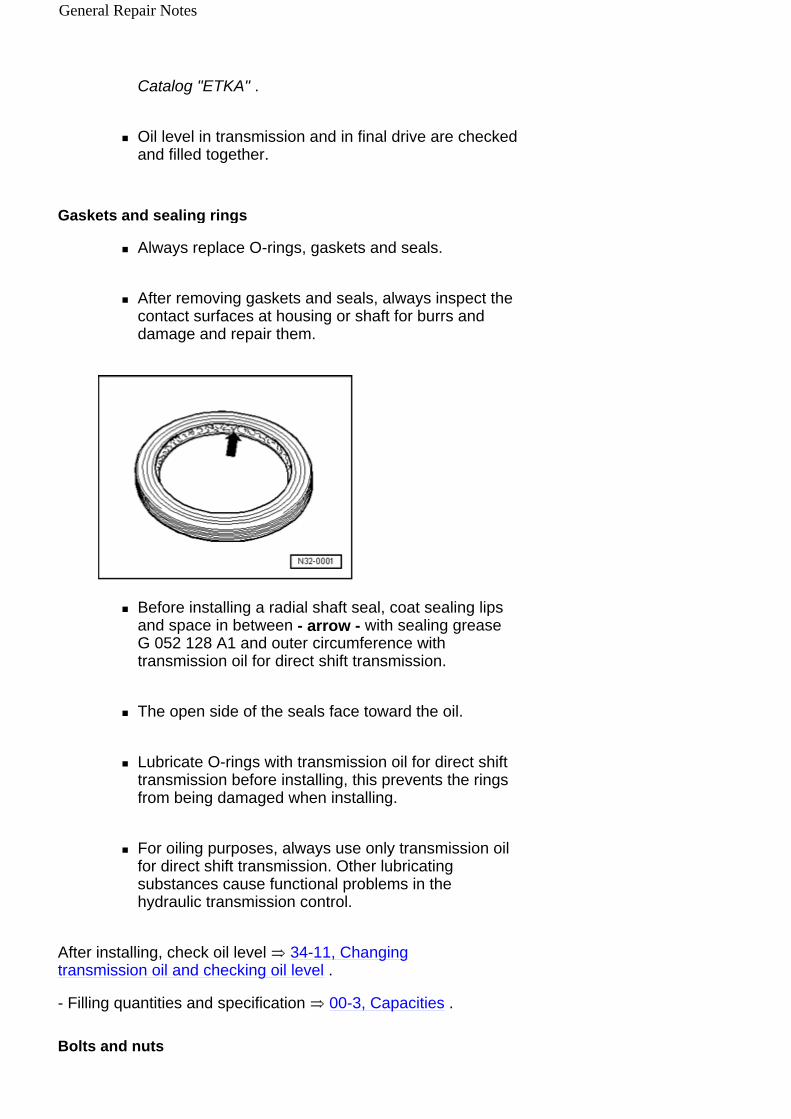
Before installing a radial shaft seal, coat sealing lips and space in between - arrow - with sealing grease G 052 128 A1 and outer circumference with transmission oil for direct shift transmission.
The open side of the seals face toward the oil.
Lubricate O-rings with transmission oil for direct shift transmission before installing, this prevents the rings from being damaged when installing.
For oiling purposes, always use only transmission oil for direct shift transmission. Other lubricating substances cause functional problems in the hydraulic transmission control.
After installing, check oil level 34-11, Changing transmission oil and checking oil level .
- Filling quantities and specification 00-3, Capacities .
Bolts and nuts
General Repair Notes

Loosen and tighten bolts or nuts for securing covers and housings in diagonal sequence.
Do not distort especially delicate parts, e.g. Mechatronic unit unit, and loosen and tighten in stages in a diagonal sequence
The tightening torques stated apply to non-oiled nuts and bolts.
Using a wire brush, clean threads of bolts which are secured with locking compound. Then install bolts with locking fluid AMV 185 100 A1 .
All threaded bores in which self-locking bolts are threaded must be cleaned of remaining locking fluid using a tap. Otherwise there is danger that the bolts may shear when removed again.
Always replace self-locking nuts and bolts.
Locking elements
Do not over-stretch circlip, replace if necessary.
Securing rings must be fully seated in groove.
Guided Fault Finding, Vehicle On Board Diagnostic (OBD) and Test Instruments
General Repair Notes
Before performing service work on the transmission, cause of damage must be determined as exactly as possible via "Guided Fault Finding" .
"Guided Fault Finding" is performed using Vehicle Diagnosis, Testing and Information System VAS 5051 .
General Repair Notes

30 - 1
Clutch components
Notes
Clutches of Direct Shift Gearbox always contain at least two clutch packs, which is why it is described as a "double clutch" .
The outer, larger disc pack is named "K1" (Clutch 1). Reverse gear and gears "1" , "3" and "5" are shifted via "K1" .
Gears "2" , "4" and "6" are shifted via the inner, smaller disc pack "K2" .
Assembling the clutch requires special care because all components were calibrated to each other by the manufacturer. When assembling, if position of parts in relation to each other are turnd, imbalance occurs to burden shifting comfort.
To avoid the risk of turning parts from one another in the first place, it is shown here how the clutch is assembled in the transmission housing and installed.
Overview
Note :
Observe notes for direct shift transmission 02E 00-2, Notes for 6 Spd. Direct Shift Automatic Transmission 02E Front Wheel Drive .
Observe general repair notes and rules of cleanliness for working on the transmission 00-6, General Repair Notes .
In case components of the clutch slip out or the clutch pack carrier is lifted up, then use light rotating motions to reposition the large, and if necessary the small, clutch pack carrier in all of the inner clutches.
The clutch cover, especially, must always be installed in the same position, as it was when the new clutch was "delivered" 30-2, Installing .
Clutch components

Circlip
Large clutch pack carrier
Do not remove
Double clutch housing
With assembled clutch "K2"
Seal
4x
Outer clutch disc
4x
Caution!
Avoid removing or lifting up the clutch pack carrier. Not even slightly! The clutch discs could turn themselves.
Clutch components

Inner clutch disc
4x
Thrust washer
Circlip
In case the circlip has been removed to install new clutch discs, use a new circlip of same thickness
Clutch cover
Circlip
Always replace
Re-determine thickness 30-2, Clutch, installing and adjusting
Clutch components
30 - 2
Clutch, removing and installing
Before clutch can be removed, the cover (end cover) for clutch must be removed 30-2, Clutch cover (end cover), removing and installing .
Clutch cover (end cover), removing and installing
Removing
Note:
Observe notes for Direct-Shift Transmission 02E 00-2, Notes for 6 Spd. Direct Shift Automatic Transmission 02E Front Wheel Drive .
Observe general repair notes and rules of cleanliness for working on the transmission 00-6, General Repair Notes .
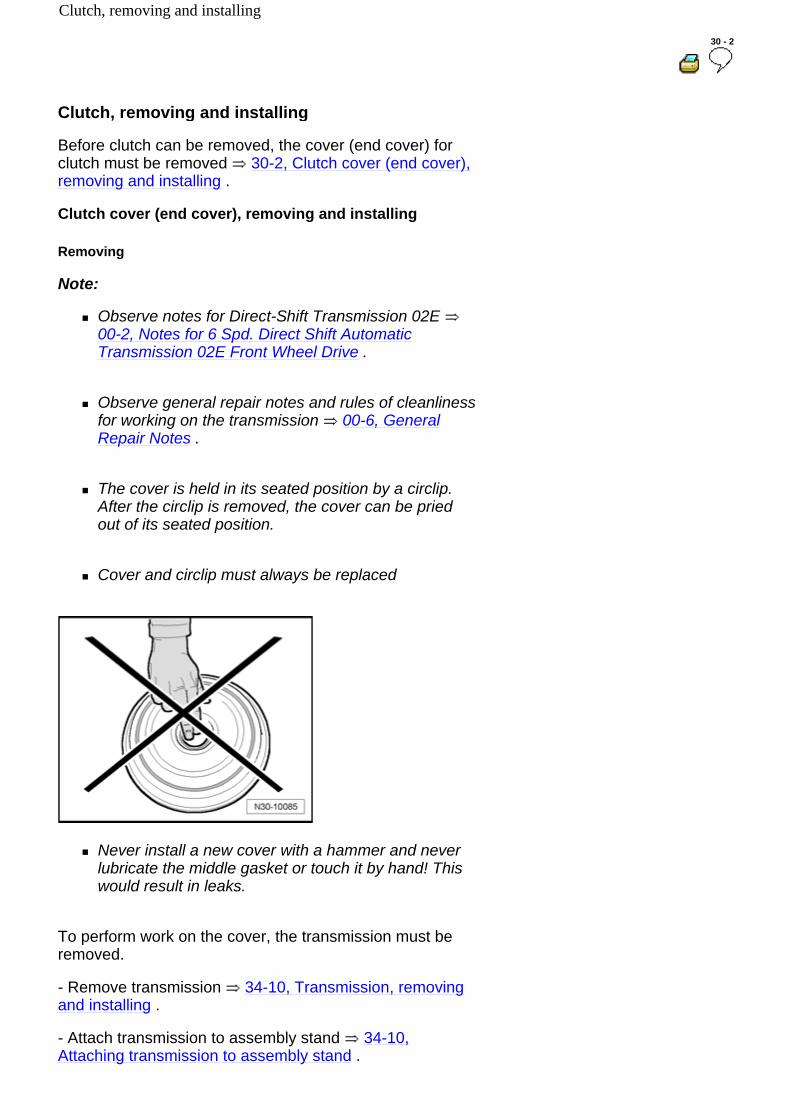
The cover is held in its seated position by a circlip. After the circlip is removed, the cover can be pried out of its seated position.
Cover and circlip must always be replaced
Never install a new cover with a hammer and never lubricate the middle gasket or touch it by hand! This would result in leaks.
To perform work on the cover, the transmission must be removed.
- Remove transmission 34-10, Transmission, removing and installing .
- Attach transmission to assembly stand 34-10, Attaching transmission to assembly stand .
Clutch, removing and installing
Warning!
Wear protective glasses.
Wear protective gloves.
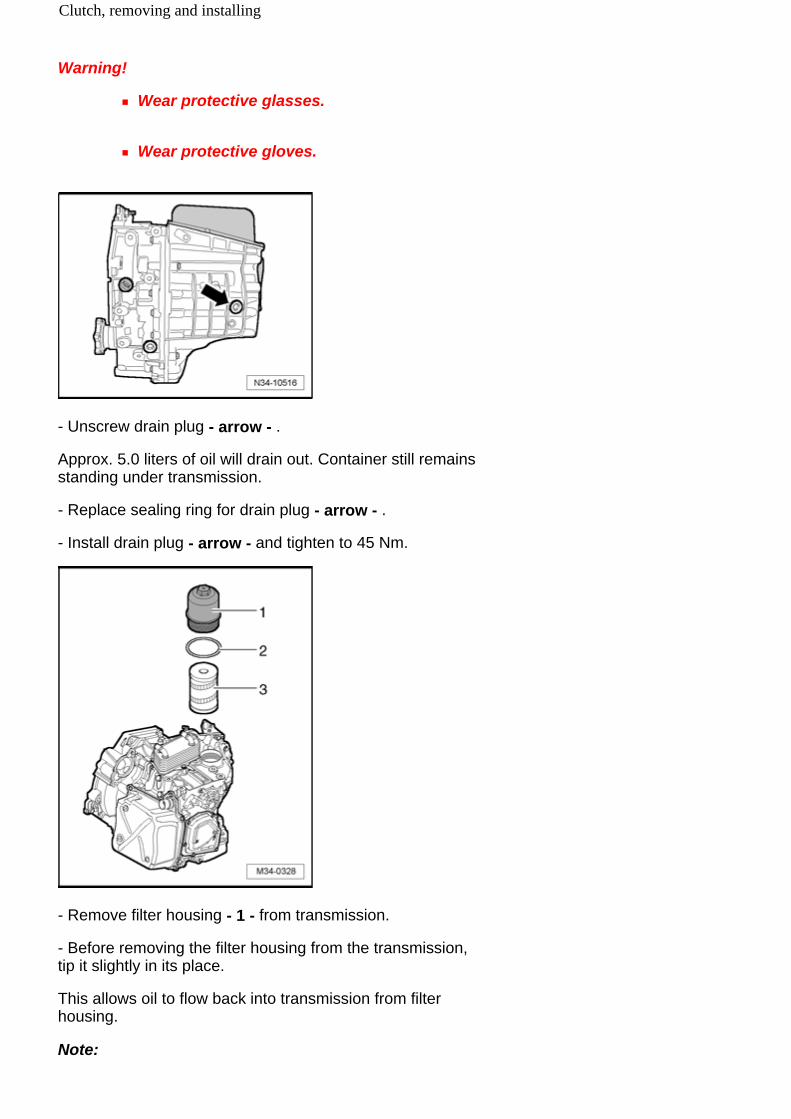
- Unscrew drain plug - arrow - .
Approx. 5.0 liters of oil will drain out. Container still remains standing under transmission.
- Replace sealing ring for drain plug - arrow - .
- Install drain plug - arrow - and tighten to 45 Nm.
- Remove filter housing - 1 - from transmission.
- Before removing the filter housing from the transmission, tip it slightly in its place.
This allows oil to flow back into transmission from filter housing.
Note:
Clutch, removing and installing

Always replace O-ring - 2 - .
- Remove filter - 3 - .
- Coat new O-ring - 2 - with transmission oil.
- Coat O-ring in intake collar - arrow - of new filter with transmission oil.
- install new filter with intake collar - arrow - downward and tighten filter housing to 20 Nm.
- After performing repairs, the filter does not need to be changed again when filling with oil.
- Remove circlip from cover.
cover can be pried out using a screwdriver.
Install new cover only 30-2, Installing .
Installing
Note:
Cover and circlip must always be replaced.
Never install a new cover with a hammer and never lubricate the middle gasket or touch it by hand!
Caution!
Clutch, removing and installing
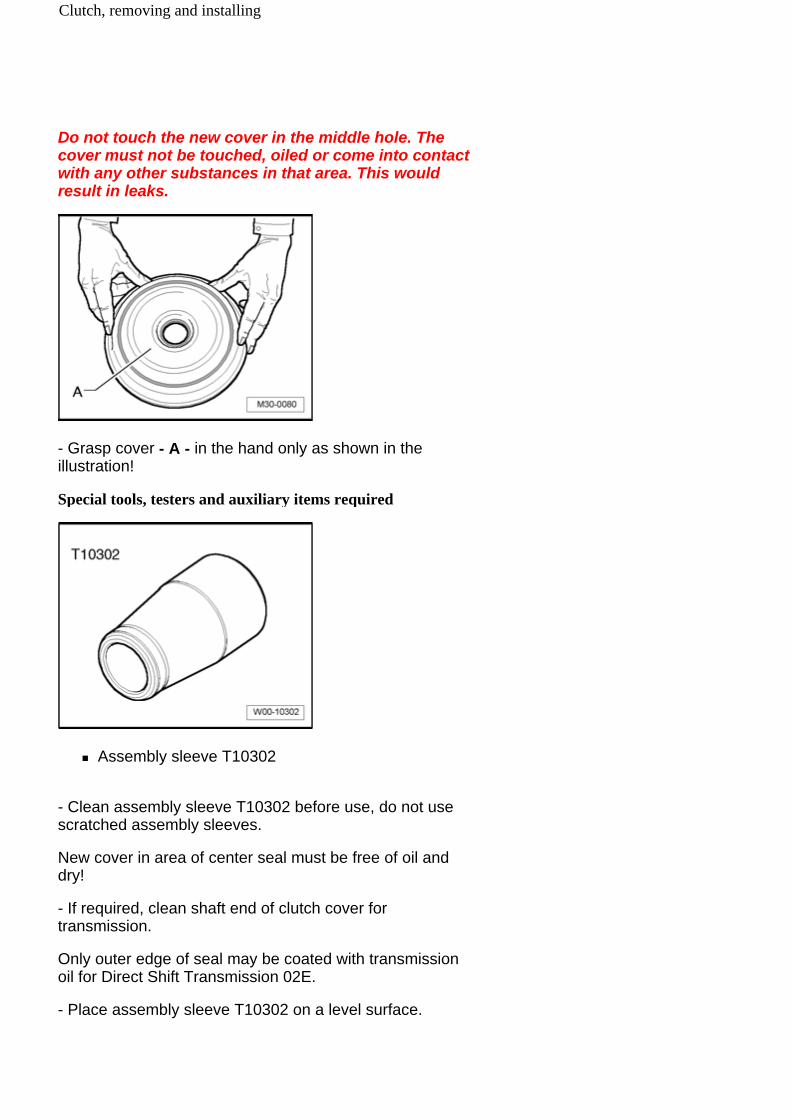
Do not touch the new cover in the middle hole. The cover must not be touched, oiled or come into contact with any other substances in that area. This would result in leaks.
- Grasp cover - A - in the hand only as shown in the illustration!
Special tools, testers and auxiliary items required
Assembly sleeve T10302
- Clean assembly sleeve T10302 before use, do not use scratched assembly sleeves.
New cover in area of center seal must be free of oil and dry!
- If required, clean shaft end of clutch cover for transmission.
Only outer edge of seal may be coated with transmission oil for Direct Shift Transmission 02E.
- Place assembly sleeve T10302 on a level surface.
Clutch, removing and installing

Center seal - B - of new cover - A - must now be "pre-formed" :
- Guide it horizontally and evenly over the entire assembly sleeve T10302 . This sets the sealing lips in installation position.
- Now remove assembly sleeve T10302 upward from cover and place assembly sleeve on shaft end of clutch cover for transmission.
- Guide cover - A - horizontally over assembly sleeve T10302 and press into place uniformly.
Caution!
Use caution when handling. Any type of impact - even very lightly - on the cover will surely result in leaks.
Clutch, removing and installing

It is possible to pry the cover into its place - arrow - carefully using a screwdriver - 1 - , until the new securing ring can be installed.
- Install new securing ring.
Clutch, removing
In order to remove and install the clutch, transmission must be secured firmly in vertical position on assembly stand.
- Remove clutch cover 30-2, Clutch cover (end cover), removing and installing
- Remove securing ring - arrow - for clutch cover - 1 - .
- Remove clutch cover from clutch.
- Remove securing ring - arrow - .
Clutch, removing and installing
Note:
When installing, this circlip must later be replaced and be measured.
Carefully remove the clutch. Make sure that the clutch pack carrier or other parts of the clutch do not fall out; for this reason, do not turn over the clutch!
If this has happened however, components can be assembled according to overview of clutch pack carrier 30-1, Overview .
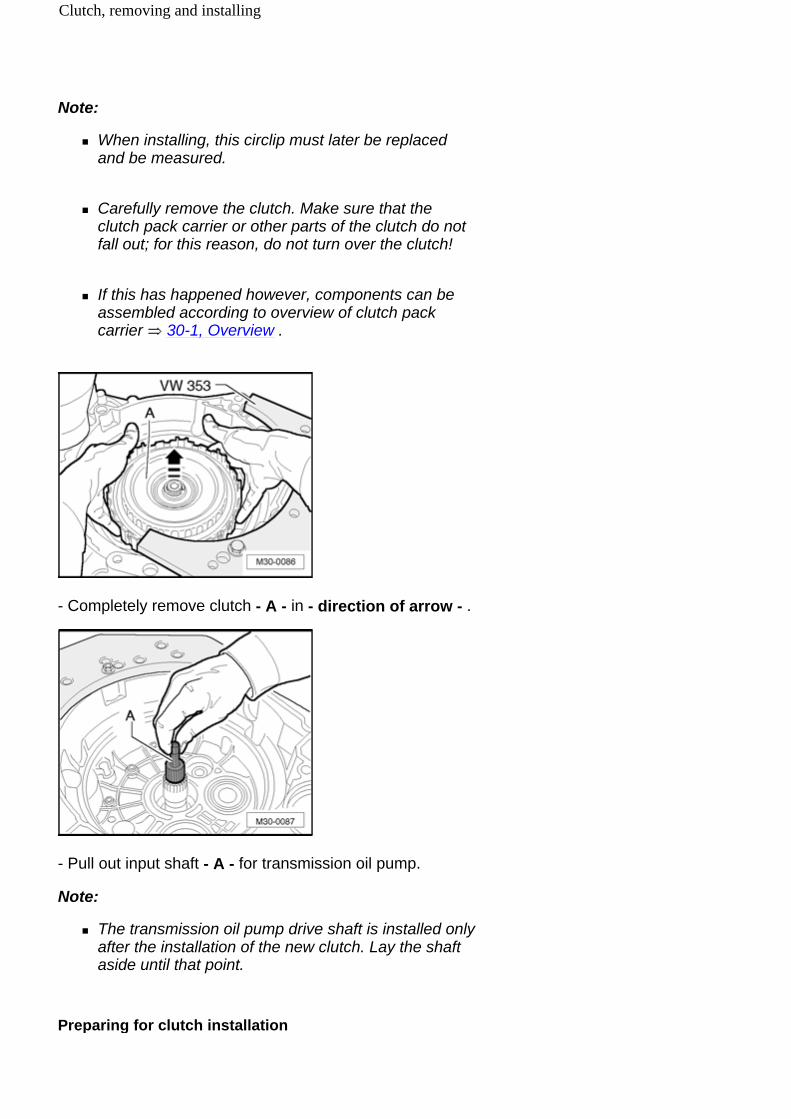
- Completely remove clutch - A - in - direction of arrow - .
- Pull out input shaft - A - for transmission oil pump.
Note:
The transmission oil pump drive shaft is installed only after the installation of the new clutch. Lay the shaft aside until that point.
Preparing for clutch installation
Clutch, removing and installing

Clutch as replacement part
Clutch
Clutch cover of a new clutch is not secure by a securing ring Item - 5 - . It sits slightly "taut" in clutch. Parts of clutch should be prevented from falling out during transport. It can be removed with some caution.
Ten securing rings
Rings have varying thickness. They are stepped in 0.1-mm increments.
For this, please observe instructions in 30-2, Clutch, installing and adjusting .
Cover (end cover) for clutch
Clutch, removing and installing
Make sure that inner sealing lip is not damaged 30-2, Installing
Securing ring
For cover (sealing cover)
Securing ring
For clutch cover
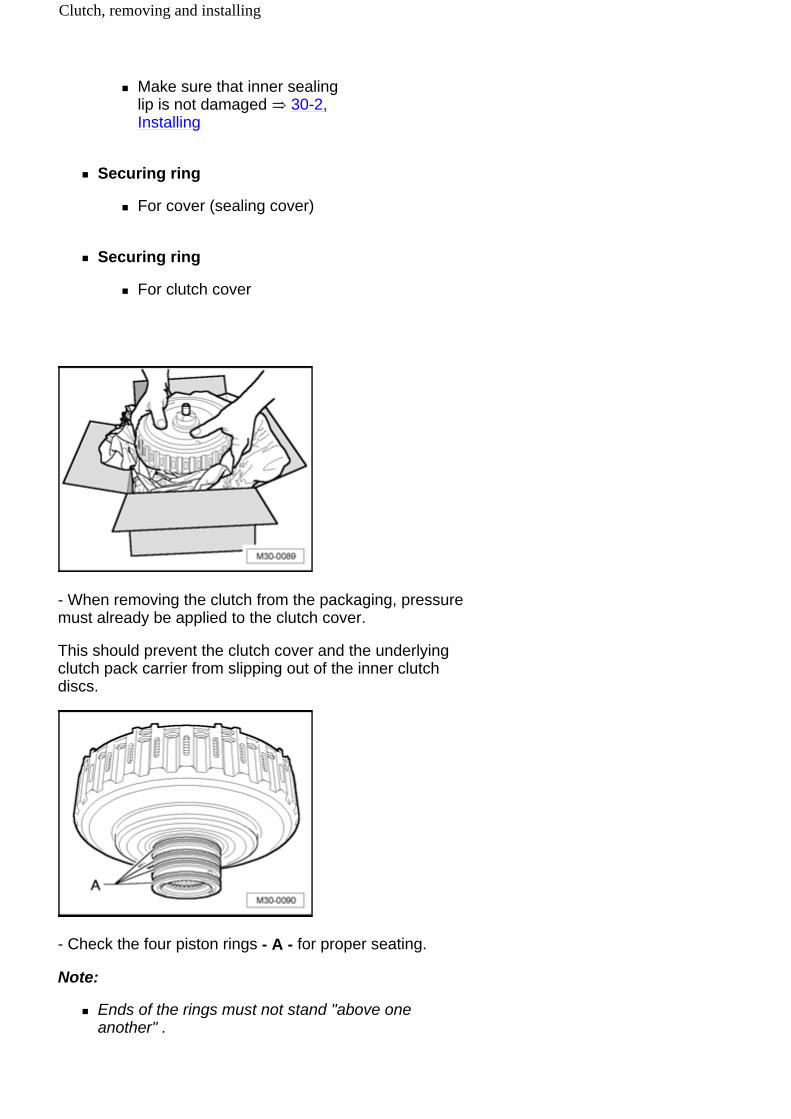
- When removing the clutch from the packaging, pressure must already be applied to the clutch cover.
This should prevent the clutch cover and the underlying clutch pack carrier from slipping out of the inner clutch discs.
- Check the four piston rings - A - for proper seating.
Note:
Ends of the rings must not stand "above one another" .
Clutch, removing and installing
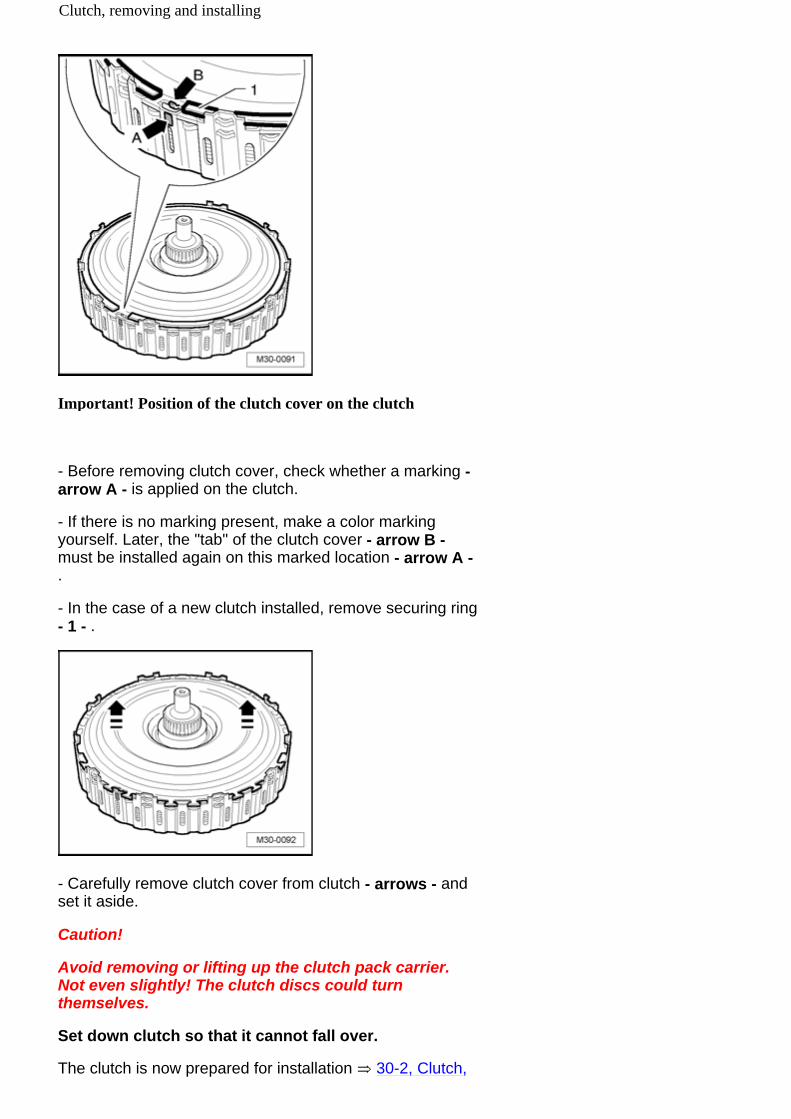
Important! Position of the clutch cover on the clutch
- Before removing clutch cover, check whether a marking - arrow A - is applied on the clutch.
- If there is no marking present, make a color marking yourself. Later, the "tab" of the clutch cover - arrow B - must be installed again on this marked location - arrow A - .
- In the case of a new clutch installed, remove securing ring - 1 - .
- Carefully remove clutch cover from clutch - arrows - and set it aside.
Caution!
Avoid removing or lifting up the clutch pack carrier. Not even slightly! The clutch discs could turn themselves.
Set down clutch so that it cannot fall over.
The clutch is now prepared for installation 30-2, Clutch,
Clutch, removing and installing

installing and adjusting .
Clutch, installing and adjusting
Caution!
Avoid removing or lifting up the clutch pack carrier. Not even slightly! The clutch discs could turn themselves..
Note:
The transmission must be positioned vertically in the assembly stand and the opening for the clutch must be facing upward. This is the only position in which the clutch axial play can later be adjusted without complications. .
TThe transmission must be very tightly secured in the assembly stand assembly stand 34-10, Attaching transmission to assembly stand . It must not be turnd.
In the clutch, the large clutch pack carrier is installed into all clutch discs, and must not be slip out of the bottom clutch disc.
Input shaft of transmission oil pump has been removed.
Special tools, testers and auxiliary items required
Retaining bolts T10303
Clutch, removing and installing

Dial gauge holder VW 387
Dial gauge
- First, place retaining bolt T10303 on to seat - arrow - of cover (end cover).
- Then, carefully install clutch - direction of arrow - , do not let it drop in.
Clutch, removing and installing

Retaining bolt T10303 must be held in place by a second technician when doing this.
Retaining bolt T10303 remains there until the clutch cover is installed.
- Determine the ring with 2 mm thickness - arrow - from all supplied securing rings and install it temporarily.
Before this ring is removed again, two measurements must be performed first.
First measurement:
Retaining bolt T10303 remains installed!
- Screw universal dial gauge holder VW 387 on to transmission flange.
Clutch, removing and installing

- Place plunger of dial gauge on to transmission input shaft.
- Set dial gauge to "0" with pre-load.
- Lift clutch upward until it stops and note the measurement result.
Second measurement:
Retaining bolt T10303 remains installed!
- Place gauge plunger onto tab of large clutch pack carrier.
Note:
The plunger must not sit on the circlip.
- Reset dial gauge to "0" with pre-load.
Clutch, removing and installing

- Lift clutch upward again to stop and note this result as well.
The calculation will be made to determine which of the remaining nine circlips will be finally installed:
- For this, use this formula:
Second measurement minus first measurement plus 1.85 mm = thickness of ring to be installed.
- Note this result.
The nine remaining securing rings are stepped in 0.1 mm increments.
- Measure all rings and then determine the ring which matches your result.
- Remove the 2 millimeter thick ring and replace with the determined ring.
- install input shaft for transmission oil pump, turn slightly in - direction of arrow - when doing this.
- install clutch cover so that tab - arrow B - coincides with marking - arrow A - .
Clutch, removing and installing

- Place new securing ring - 1 - into clutch.
- Remove retaining bolt T10303 .
- Install cover (sealing cover) for clutch 30-2, Installing .
This concludes the installation, the clutch is correctly adjusted.
After installing transmission:
- Perform basic calibration of Direct Shift Gearbox (DSG) Mechatronic unit J743 using Vehicle Diagnosis, Testing and Information System VAS 5051 .
Clutch, removing and installing
34 - 1
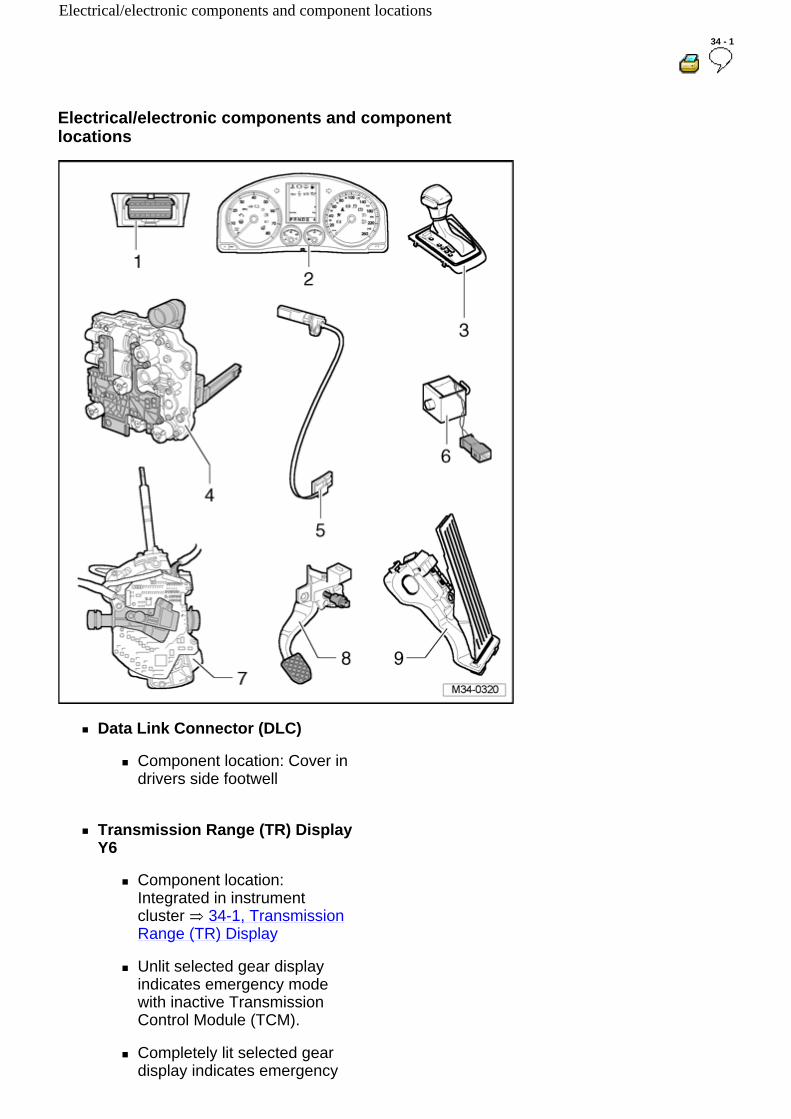
Electrical/electronic components and component locations
Data Link Connector (DLC)
Component location: Cover in drivers side footwell
Transmission Range (TR) Display Y6
Component location: Integrated in instrument cluster 34-1, Transmission Range (TR) Display
Unlit selected gear display indicates emergency mode with inactive Transmission Control Module (TCM).
Completely lit selected gear display indicates emergency
Electrical/electronic components and component locations

mode with active Transmission Control Module (TCM).
Can only be replaced together with instrument cluster
Cover of shift mechanism with Selector Lever Scale Illumination L101
Selector Lever Scale Illumination L101 is integrated in frame of cover; component location 34-1, Slector Lever Scale Illumination
Selector Lever Scale Illumination L101 is checked via On Board Diagnostic (OBD).
Removing and installing 34-9, Selector mechanism handle and cover, removing and installing
Check harness connector 34-9, Checking harness connectors on selector mechanism .
Direct Shift Gearbox (DSG) Mechatronic unit J743
Component location 34-1, Direct Shift Gearbox (DSG) Mechatronic unit
Checked electrically via On Board Diagnostic (OBD)
Removing and installing 34-4, Direct Shift Gearbox (DSG) Mechatronic unit J743 , removing and installing .
Transmission Input Speed (RPM) Sensor G182 and Clutch Oil Temperature Sensor G509
Repair Manual, Electrical Equipment, Repair Group 90, Instrument cluster; removing and installing instrument cluster
Electrical/electronic components and component locations

Component location 34-1, /
Checked electrically via On Board Diagnostic (OBD)
Before sensor can be removed, Direct Shift Gearbox (DSG) Mechatronic unit J743 must be removed 34-4, Direct Shift Gearbox (DSG) Mechatronic unit J743 , removing and installing
Removing and installing 34-5, Sensor, removing and installing .
Shift Lock Solenoid N110
Component location 34-1, Shift Lock Solenoid
Checked electrically via On Board Diagnostic (OBD)
Check harness connector 34-9, Checking harness connectors on selector mechanism .
The Shift Lock Solenoid N110 is integrated in selector mechanism. Removal and installation is only possible in conjunction with selector mechanism 34-9, Selector mechanism, removing and installing .
Selector Lever E313 with Tiptronic Switch F189 , Selector Lever Sensor System Control Module J587 and Selector Lever Park Position Lock Switch F319
Component location 34-1, with
Checked electrically via On Board Diagnostic (OBD)
Tiptronic Switch F189 , Selector Lever Sensor System Control Module J587 and Selector Lever Park Position Lock Switch F319 are integrated in selector
Electrical/electronic components and component locations

mechanism.
Components cannot be replaced separately. Removal and installation is only possible in conjunction with selector mechanism 34-9, Selector mechanism, removing and installing .
Check harness connector 34-9, Checking harness connectors on selector mechanism .
Brake light switch F
Component location 34-1, Brake light switch
Signal transfer from engine control module to transmission control module via CAN-Bus
Checked electrically via On Board Diagnostic (OBD)
Removing and installing
Kick Down Switch F8
Component location 34-1, Kick Down Switch
Signal transfer from engine control module to transmission control module via CAN-Bus
Checked electrically via On Board Diagnostic (OBD)
Removing and installing
Repair Manual, Brake System, Repair Group 46, Brake pedal assembly overview; removing and installing brake light switch
Repair Manual, Corresponding engine, Repair Group 20, Electronic Power Control (EPC)
Electrical/electronic components and component locations

Transmission Range (TR) Display Y6
Component location: Transmission Range (TR) Display Y6 - arrow - is located in the instrument cluster.
Slector Lever Scale Illumination L101
Component location: Slector Lever Scale Illumination L101 - 1 - is integrated on underside of frame for cover - 2 - .
Electrical/electronic components and component locations
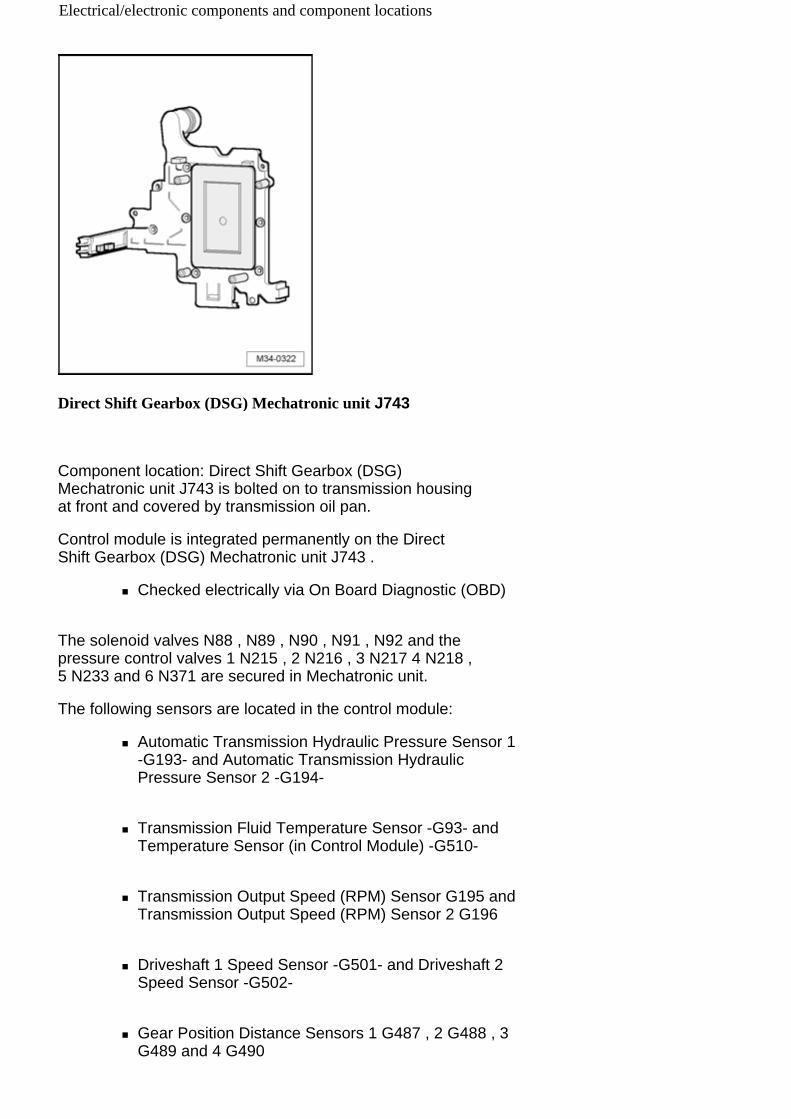
Direct Shift Gearbox (DSG) Mechatronic unit J743
Component location: Direct Shift Gearbox (DSG) Mechatronic unit J743 is bolted on to transmission housing at front and covered by transmission oil pan.
Control module is integrated permanently on the Direct Shift Gearbox (DSG) Mechatronic unit J743 .
Checked electrically via On Board Diagnostic (OBD)
The solenoid valves N88 , N89 , N90 , N91 , N92 and the pressure control valves 1 N215 , 2 N216 , 3 N217 4 N218 , 5 N233 and 6 N371 are secured in Mechatronic unit.
The following sensors are located in the control module:
Automatic Transmission Hydraulic Pressure Sensor 1 -G193- and Automatic Transmission Hydraulic Pressure Sensor 2 -G194-
Transmission Fluid Temperature Sensor -G93- and Temperature Sensor (in Control Module) -G510-
Transmission Output Speed (RPM) Sensor G195 and Transmission Output Speed (RPM) Sensor 2 G196
Driveshaft 1 Speed Sensor -G501- and Driveshaft 2 Speed Sensor -G502-
Gear Position Distance Sensors 1 G487 , 2 G488 , 3 G489 and 4 G490
Electrical/electronic components and component locations
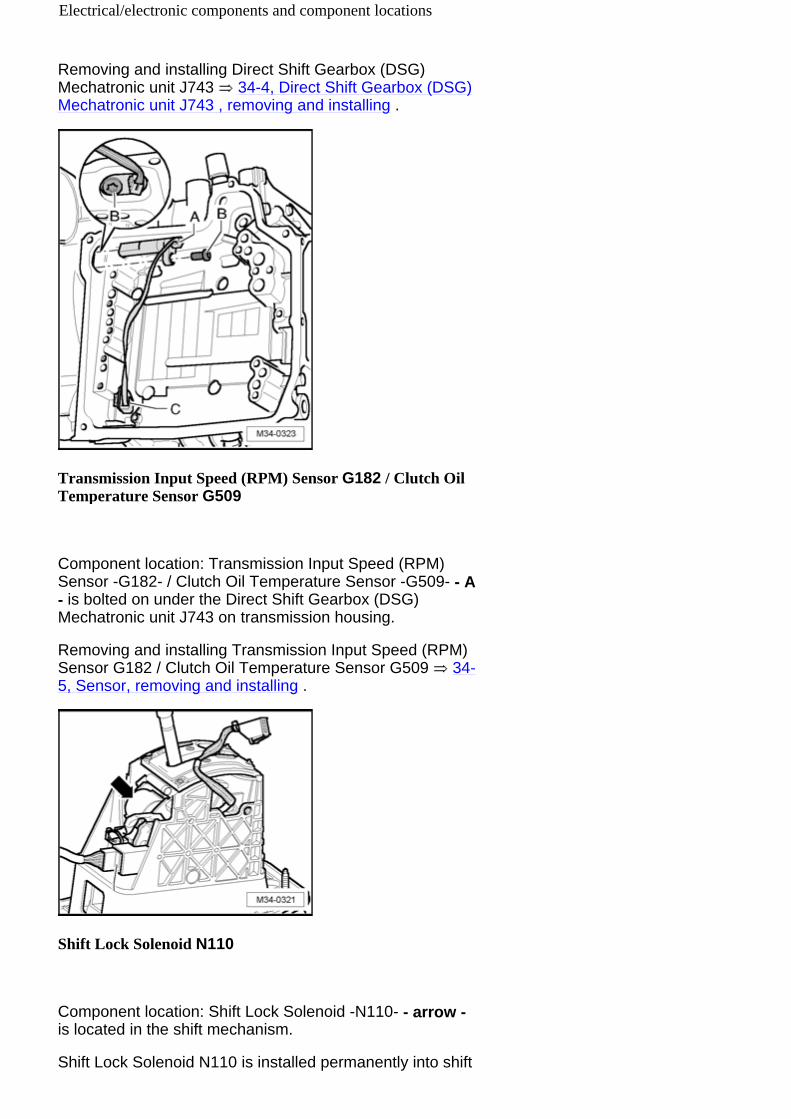
Removing and installing Direct Shift Gearbox (DSG) Mechatronic unit J743 34-4, Direct Shift Gearbox (DSG) Mechatronic unit J743 , removing and installing .
Transmission Input Speed (RPM) Sensor G182 / Clutch Oil Temperature Sensor G509
Component location: Transmission Input Speed (RPM) Sensor -G182- / Clutch Oil Temperature Sensor -G509- - A - is bolted on under the Direct Shift Gearbox (DSG) Mechatronic unit J743 on transmission housing.
Removing and installing Transmission Input Speed (RPM) Sensor G182 / Clutch Oil Temperature Sensor G509 34-5, Sensor, removing and installing .
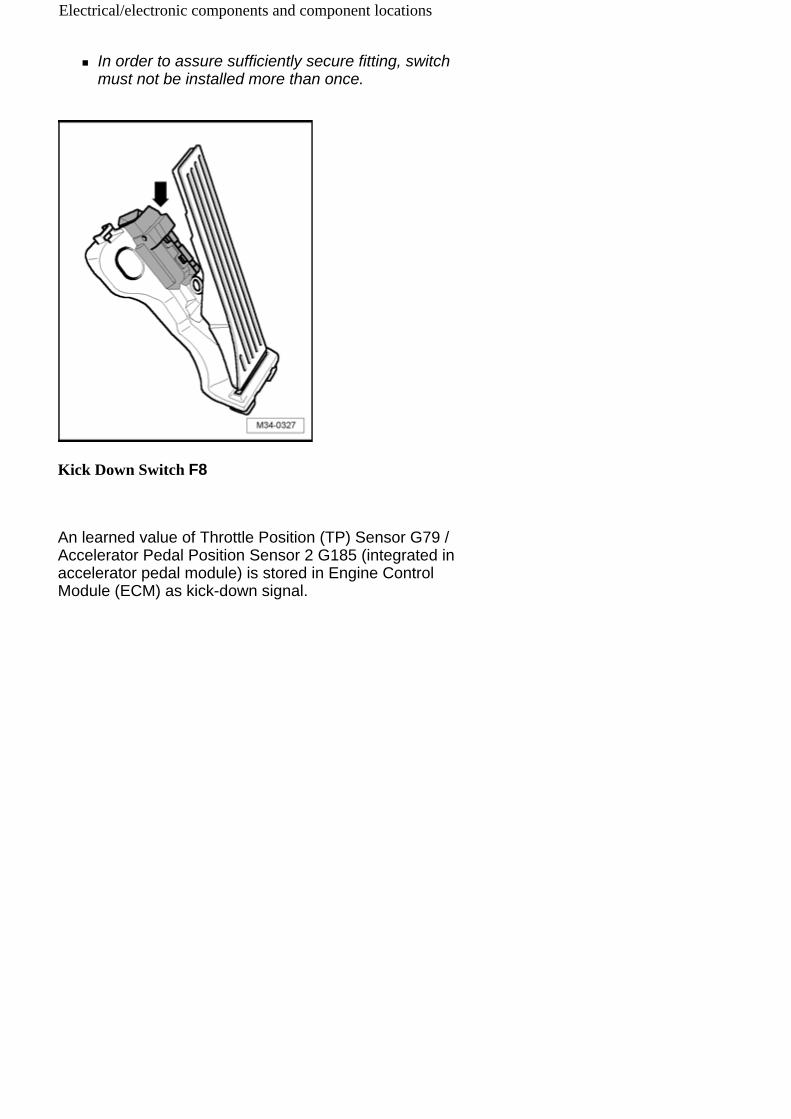
Shift Lock Solenoid N110
Component location: Shift Lock Solenoid -N110- - arrow - is located in the shift mechanism.
Shift Lock Solenoid N110 is installed permanently into shift
Electrical/electronic components and component locations

mechanism and cannot be replaced individually. Removal and installation is only possible in conjunction with selector mechanism 34-9, Selector mechanism, removing and installing .
Selector Lever E313 with Tiptronic Switch F189 , Selector Lever Sensor System Control Module J587 and Selector Lever Park Position Lock Switch F319
Component location: The Selector Lever E313 is integrated in selector mechanism.
Tiptronic Switch F189 , Selector Lever Sensor System Control Module -J587- and Selector Lever Park Position Lock Switch -F319- are integrated in circuit board - arrow - of selector mechanism.
Components cannot be replaced separately. Removal and installation is only possible in conjunction with selector mechanism 34-9, Selector mechanism, removing and installing .
Brake light switch F
Component location: Brake Light Switch F - arrow - is located in foot pedal assembly.
Note:
Electrical/electronic components and component locations
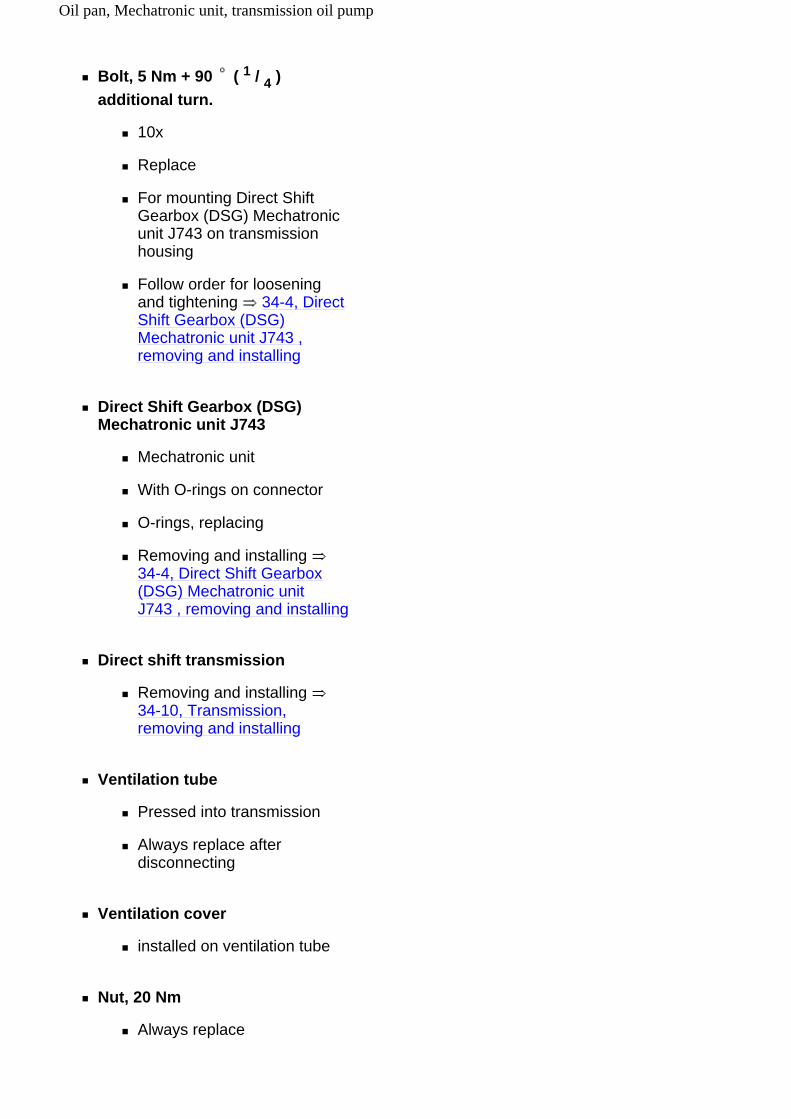
In order to assure sufficiently secure fitting, switch must not be installed more than once.
Kick Down Switch F8
An learned value of Throttle Position (TP) Sensor G79 / Accelerator Pedal Position Sensor 2 G185 (integrated in accelerator pedal module) is stored in Engine Control Module (ECM) as kick-down signal.
Electrical/electronic components and component locations

Oil pan, Mechatronic unit, transmission oil pump
Component overview
Oil pan
Removing and installing 34-3, Oil pan, removing and installing
Bolt, 10 Nm
Replace
5x
For mounting oil pan with oil pan gasket to transmission housing.
Gasket
Replace
Oil pan, Mechatronic unit, transmission oil pump
Volkswagen Technical Site: http://volkswagen.msk.ru http://vwts.info http://vwts.ru огромный архив документации по автомобилям Volkswagen, Skoda, Seat, Audi
Bolt, 5 Nm + 90 ( 1 / 4 ) additional turn.
10x
Replace
For mounting Direct Shift Gearbox (DSG) Mechatronic unit J743 on transmission housing
Follow order for loosening and tightening 34-4, Direct Shift Gearbox (DSG) Mechatronic unit J743 , removing and installing
Direct Shift Gearbox (DSG) Mechatronic unit J743
Mechatronic unit
With O-rings on connector
O-rings, replacing
Removing and installing 34-4, Direct Shift Gearbox (DSG) Mechatronic unit J743 , removing and installing
Direct shift transmission
Removing and installing 34-10, Transmission, removing and installing
Ventilation tube
Pressed into transmission
Always replace after disconnecting
Ventilation cover
installed on ventilation tube
Nut, 20 Nm
Always replace
Oil pan, Mechatronic unit, transmission oil pump
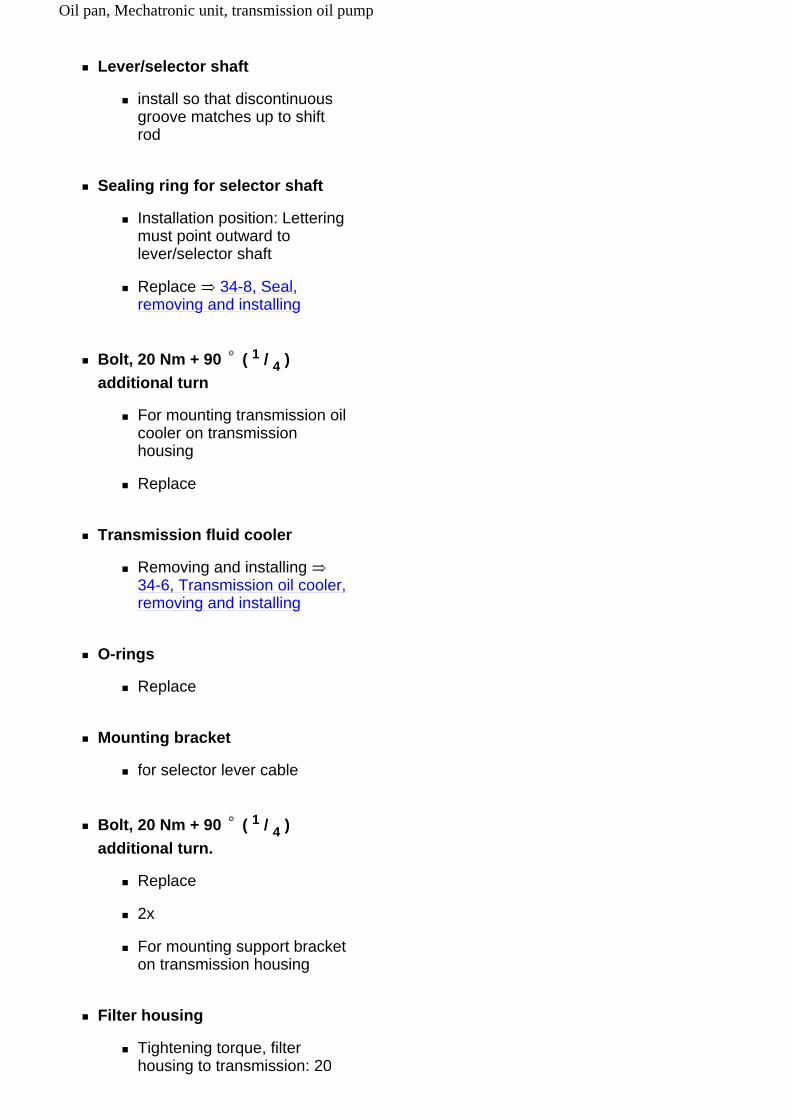
Lever/selector shaft
install so that discontinuous groove matches up to shift rod
Sealing ring for selector shaft
Installation position: Lettering must point outward to lever/selector shaft
Replace 34-8, Seal, removing and installing
Bolt, 20 Nm + 90 ( 1 / 4 ) additional turn
For mounting transmission oil cooler on transmission housing
Replace
Transmission fluid cooler
Removing and installing 34-6, Transmission oil cooler, removing and installing
O-rings
Replace
Mounting bracket
for selector lever cable
Bolt, 20 Nm + 90 ( 1 / 4 ) additional turn.
Replace
2x
For mounting support bracket on transmission housing
Filter housing
Tightening torque, filter housing to transmission: 20
Oil pan, Mechatronic unit, transmission oil pump
Nm
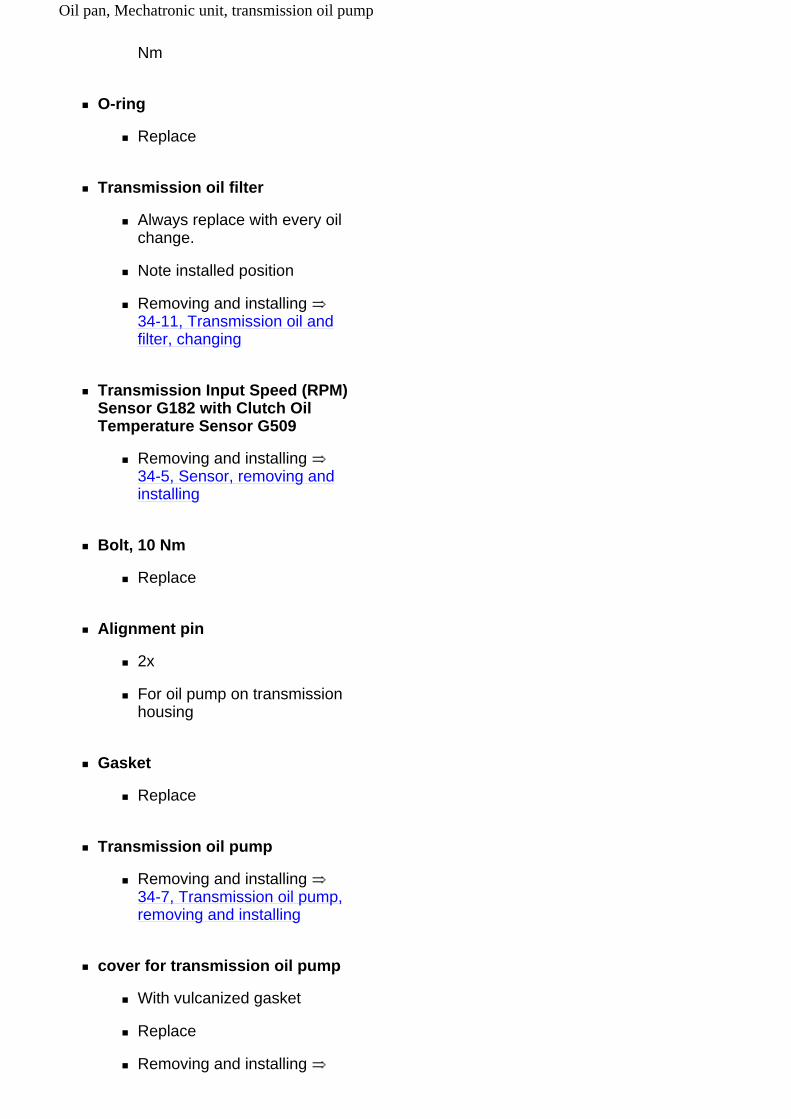
O-ring
Replace
Transmission oil filter
Always replace with every oil change.
Note installed position
Removing and installing 34-11, Transmission oil and filter, changing
Transmission Input Speed (RPM) Sensor G182 with Clutch Oil Temperature Sensor G509
Removing and installing 34-5, Sensor, removing and installing
Bolt, 10 Nm
Replace
Alignment pin
2x
For oil pump on transmission housing
Gasket
Replace
Transmission oil pump
Removing and installing 34-7, Transmission oil pump, removing and installing
cover for transmission oil pump
With vulcanized gasket
Replace
Removing and installing
Oil pan, Mechatronic unit, transmission oil pump
34-7, Transmission oil pump, removing and installing
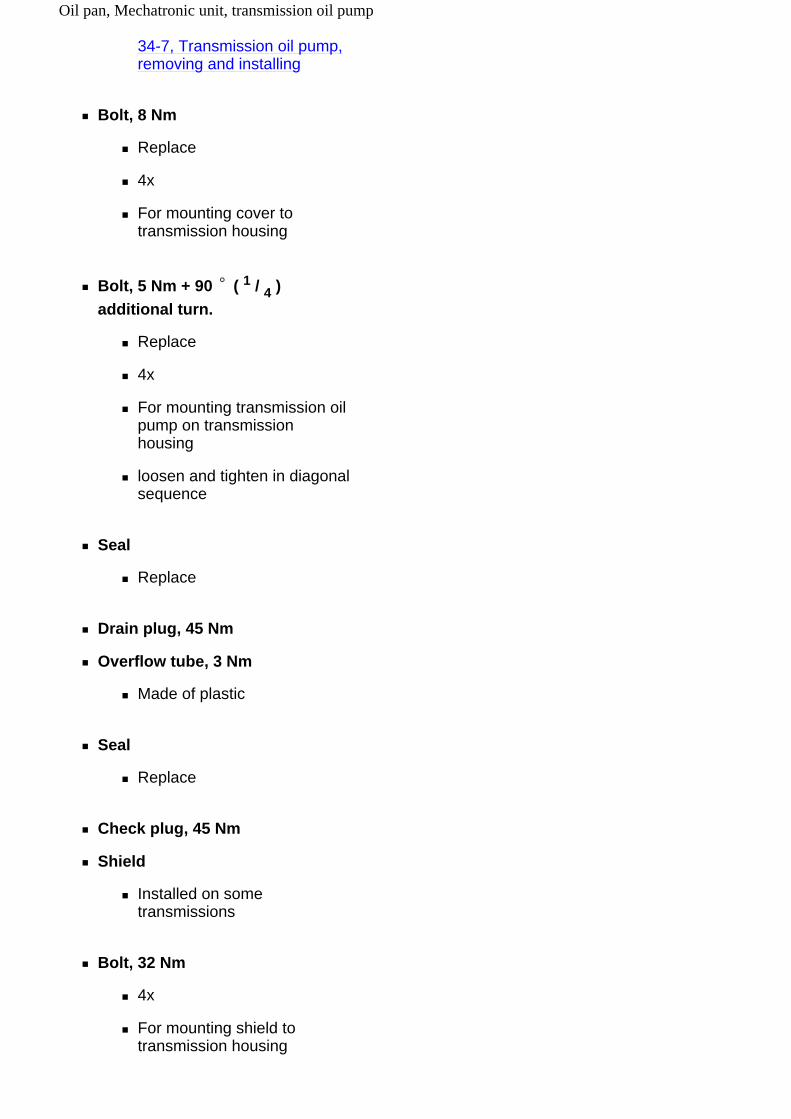
Bolt, 8 Nm
Replace
4x
For mounting cover to transmission housing
Bolt, 5 Nm + 90 ( 1 / 4 ) additional turn.
Replace
4x
For mounting transmission oil pump on transmission housing
loosen and tighten in diagonal sequence
Seal
Replace
Drain plug, 45 Nm
Overflow tube, 3 Nm
Made of plastic
Seal
Replace
Check plug, 45 Nm
Shield
Installed on some transmissions
Bolt, 32 Nm
4x
For mounting shield to transmission housing
Oil pan, Mechatronic unit, transmission oil pump

Oil pan, Mechatronic unit, transmission oil pump

34 - 3
Oil pan, removing and installing
Oil pan, removing and installing
Special tools, testers and auxiliary items required
Torque wrench V.A.G 1331
Drip tray for workshop crane VAS 6208
Protective glasses
Removing
Caution!
Never run engine and do not tow vehicle with oil pan removed or without the transmission fluid filled up.
Note:
Observe notes for Direct-Shift Transmission 02E 00-2, Notes for 6 Spd. Direct Shift Automatic Transmission 02E Front Wheel Drive .
Observe general repair notes and rules of cleanliness for working on the transmission 00-6, General
Oil pan, removing and installing

Repair Notes .
Coat O-rings and sealing rings with transmission oil. Other lubricating substances lead to functional problems in the hydraulic transmission control.
Additional work must be performed when disconnecting and reconnecting battery Ground (GND) strap
.
Repair Manual, Electrical Equipment, Repair Group 27, Battery, disconnecting and reconnecting battery
Engine switched off.
- First determine whether a coded radio is installed. In this case, determine the anti-theft coding.
- With ignition switched off, disconnect Battery Ground (GND) wire
.
Repair Manual, Electrical Equipment, Repair Group 27, disconnecting and connecting batteries
- Remove noise insulation
Repair Manual, Body Exterior, Repair Group 50, Body front, Noise Insulation - assembly overview
Oil pan, removing and installing
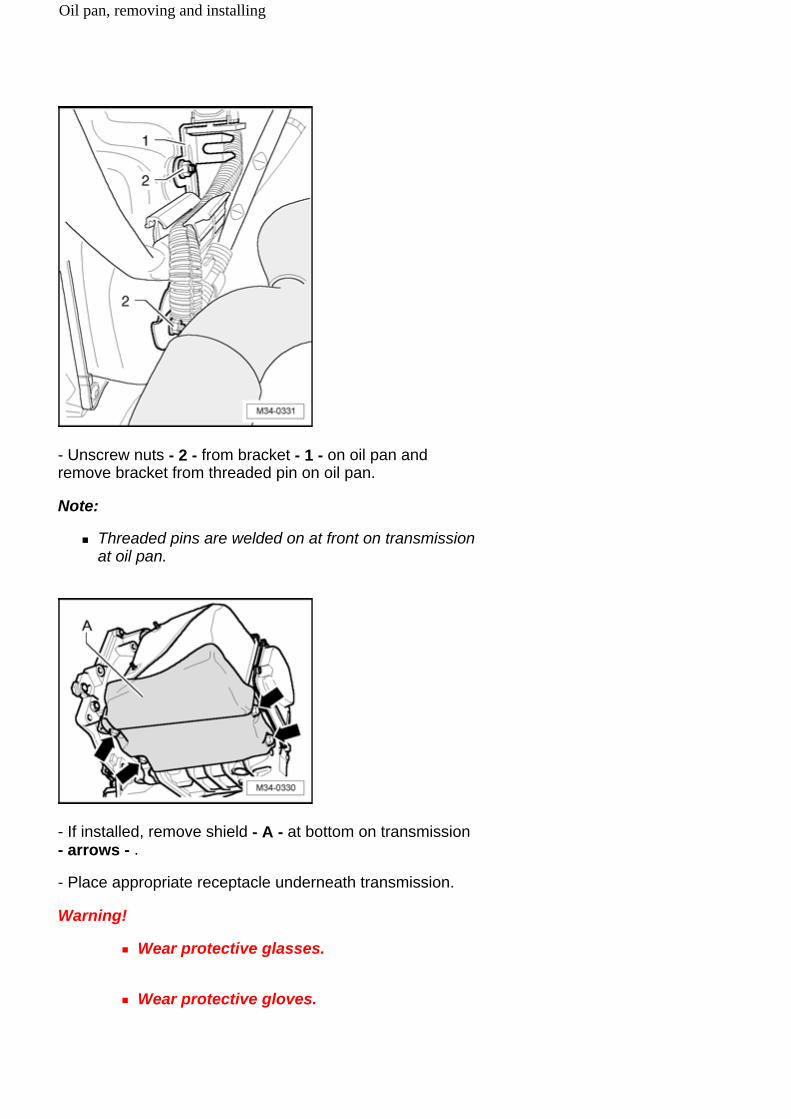
- Unscrew nuts - 2 - from bracket - 1 - on oil pan and remove bracket from threaded pin on oil pan.
Note:
Threaded pins are welded on at front on transmission at oil pan.
- If installed, remove shield - A - at bottom on transmission - arrows - .
- Place appropriate receptacle underneath transmission.
Warning!
Wear protective glasses.
Wear protective gloves.
Oil pan, removing and installing

- Unscrew drain plug - A - .
Approx. 5.0 liters of oil will drain out. Container remains standing under transmission.
- Replace sealing ring for drain plug - A - .
- Screw in drain plug - A - and tighten to 45 Nm.
- turn bayonet connection - 1 - of connector counterclockwise and disconnect connector from transmission.
- Grasp with hand (without gloves) on to vehicle Ground (GND) so that you are electrostatically discharged.
Caution!
Only touch or remove Direct Shift Gearbox (DSG) Mechatronic unit J743 after you have been electrostatically discharged on a grounded object beforehand, e.g. skin contacts vehicle Ground (GND).
Connector terminals of transmission connector must not be touch by hand under any circumstances because control module and therefore Mechatronic unit may be destroyed by static discharge.
Oil pan, removing and installing

- Loosen bolts - arrows - of oil pan - A - in diagonal sequence and remove.
Note:
Some transmission oil remains in the oil pan because not all of it can drain out.
- Remove oil pan together with oil pan gasket.
- Always replace oil pan gasket.
Installing
Installation is performed in the reverse order of removal. Note the following:
- Replace both O-rings - arrows - on connection of Mechatronic unit.
- Coat O-rings with transmission oil for direct shift transmission.
- Clean sealing surfaces and eliminate oil residue.
- Make sure new oil pan gasket is seated correctly.
Oil pan, removing and installing

- Place oil pan on. Do not pinch lines when doing this.
- Screw in new bolts for oil pan and tighten in stages to 10 Nm in diagonal sequence.
- Change gear oil 34-11, Transmission oil and filter for Direct Shift Transmission (DSG), changing and checking oil level .
Check plug seal must be replaced after checking transmission oil.
- Install noise insulation
Repair Manual, Body Exterior, Repair Group 50, Body front, Noise Insulation - assembly overview
- Connect battery
Repair Manual, Electrical Equipment, Repair Group 27, disconnecting and connecting battery
Oil pan, removing and installing

34 - 4
Direct Shift Gearbox (DSG) Mechatronic unit J743 , removing and installing
Direct Shift Gearbox (DSG) Mechatronic unit J743 , removing and installing
Special tools, testers and auxiliary items required
Torque wrench V.A.G 1331
Drip tray for workshop crane VAS 6208
Removing
Caution!
Never run engine and do not tow vehicle with oil pan removed or without the transmission fluid filled up.
Note:
Observe notes for Direct-Shift Transmission 02E 00-2, Notes for 6 Spd. Direct Shift Automatic Transmission 02E Front Wheel Drive .
Observe general repair notes and rules of cleanliness for working on the transmission 00-6, General Repair Notes .
Direct Shift Gearbox (DSG) Mechatronic unit J743 , removing and installing

Additional work must be performed when disconnecting and reconnecting battery Ground (GND) strap
.
Repair Manual, Electrical Equipment, Repair Group 27, Battery, disconnecting and reconnecting battery
If Mechatronic unit is to be replaced with transmission removed, transmission must be secured to assembly stand
34-10, Attaching transmission to assembly stand .
- Move selector lever to position "P" .
- First determine whether a coded radio is installed. In this case, determine the anti-theft coding.
- With ignition switched off, disconnect Battery Ground (GND) wire
.
Repair Manual, Electrical Equipment, Repair Group 27, disconnecting and connecting battery
- turn bayonet connection - 1 - of connector counterclockwise and disconnect connector from transmission.
- Remove noise insulation
Repair Manual, Body Exterior, Repair Group 50, Body front, Noise Insulation - assembly overview
Direct Shift Gearbox (DSG) Mechatronic unit J743 , removing and installing

- If installed, remove shield - A - at bottom on transmission - arrows - .
- If present, remove connecting hose between charge air cooler and charge air tube
.
Repair Manual, Engine, Repair Group 21,
- Unscrew nuts - 2 - from bracket - 1 - on oil pan and remove bracket from threaded pin on oil pan.
Note:
Threaded pins are welded on at front on transmission at oil pan.
- Place lines upward in area of oil pan and tie securely.
- Place appropriate receptacle underneath transmission.
Direct Shift Gearbox (DSG) Mechatronic unit J743 , removing and installing

- Unscrew drain plug - A - .
Approx. 5.0 liters of oil will drain out. Container still remains standing under transmission.
- Replace sealing ring for drain plug - A - .
- Screw in drain plug - A - and tighten to 45 Nm.
- Unscrew bolts - arrows - and remove cover for transmission oil pump - A - .
Caution!
Only touch or remove Direct Shift Gearbox (DSG) Mechatronic unit J743 after you have been electrostatically discharged on a grounded object beforehand, e.g. skin contacts vehicle Ground (GND).
Connector terminals of transmission connector must not be touch by hand under any circumstances because control module and therefore Mechatronic unit may be destroyed by static discharge.
Direct Shift Gearbox (DSG) Mechatronic unit J743 , removing and installing

- Loosen bolts - arrows - of oil pan - A - in diagonal sequence and remove.
Note:
Some transmission oil remains in the oil pan because not all of it can drain out.
- Remove oil pan together with oil pan gasket.
- Always replace oil pan gasket.
cover for transmission oil pump and oil pan bolts must always be replaced.
Caution!
If cover for transmission oil pump is not removed, the long Transmission Output Speed (RPM) Sensor G195 / Transmission Output Speed (RPM) Sensor 2 G196 on the rear side will be damaged when removing Direct Shift Gearbox (DSG) Mechatronic unit J743 .
- Carefully release connector of Transmission Input Speed (RPM) Sensor G182 with Clutch Oil Temperature Sensor G509 using a small screwdriver - 1 - and simultaneously
Direct Shift Gearbox (DSG) Mechatronic unit J743 , removing and installing
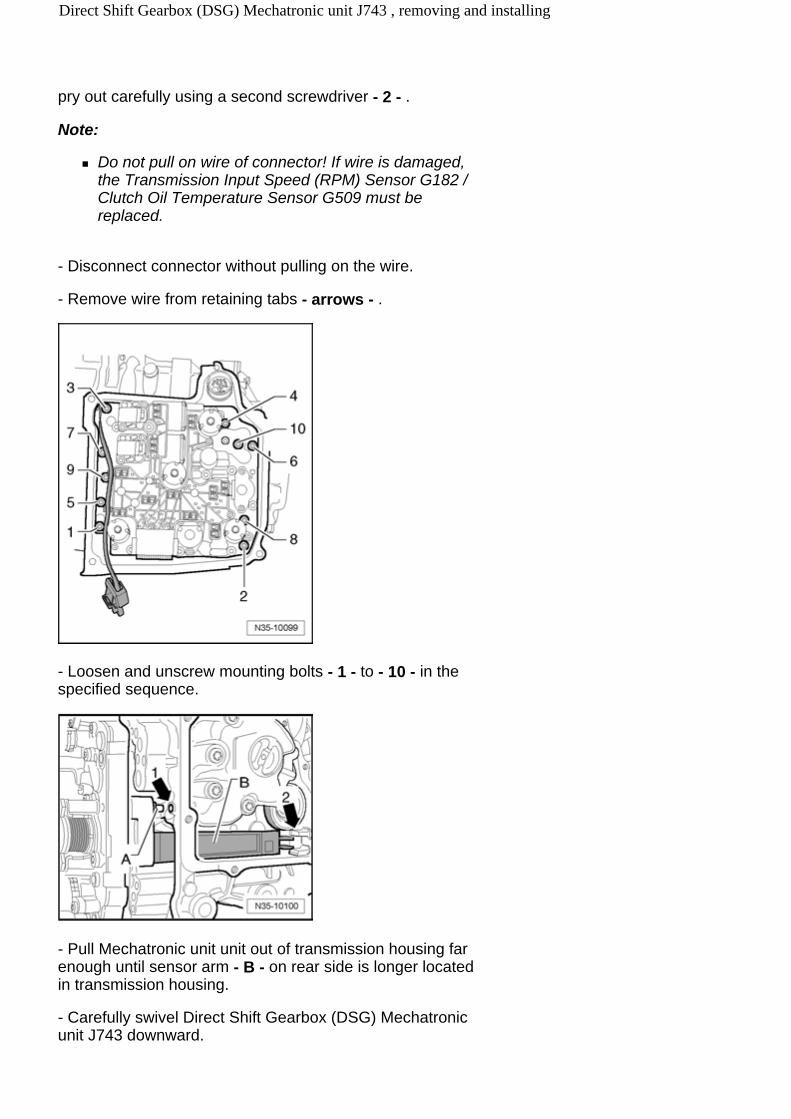
pry out carefully using a second screwdriver - 2 - .
Note:
Do not pull on wire of connector! If wire is damaged, the Transmission Input Speed (RPM) Sensor G182 / Clutch Oil Temperature Sensor G509 must be replaced.
- Disconnect connector without pulling on the wire.
- Remove wire from retaining tabs - arrows - .
- Loosen and unscrew mounting bolts - 1 - to - 10 - in the specified sequence.
- Pull Mechatronic unit unit out of transmission housing far enough until sensor arm - B - on rear side is longer located in transmission housing.
- Carefully swivel Direct Shift Gearbox (DSG) Mechatronic unit J743 downward.
Direct Shift Gearbox (DSG) Mechatronic unit J743 , removing and installing

- Remove Direct Shift Gearbox (DSG) Mechatronic unit J743 .
Caution!
Never lift up Mechatronic unit unit on sensor arm or set it down on it.
- Transport and store Mechatronic unit as depicted in the illustration.
Direct Shift Gearbox (DSG) Mechatronic unit J743 , removing and installing

When handling Mechatronic unit, pay special attention to the long sensor arm - arrow - .
Installing
- Before installation, ensure that Transmission Input Speed (RPM) Sensor G182 and Clutch Oil Temperature Sensor G509 are installed.
If sensor arm - arrow - is damaged, the Mechatronic unit must be replaced.
Direct Shift Gearbox (DSG) Mechatronic unit J743 , removing and installing

- Carefully place Direct Shift Gearbox (DSG) Mechatronic unit J743 into transmission housing.
- Make sure alignment pin - A - in transmission housing - arrow 1 - and sensor arm - B - in guide - arrow 2 - are seated correctly on transmission housing.
Note:
Do not pinch wire of Transmission Input Speed (RPM) Sensor G182 and of Clutch Oil Temperature Sensor G509 .
Direct Shift Gearbox (DSG) Mechatronic unit J743 , removing and installing
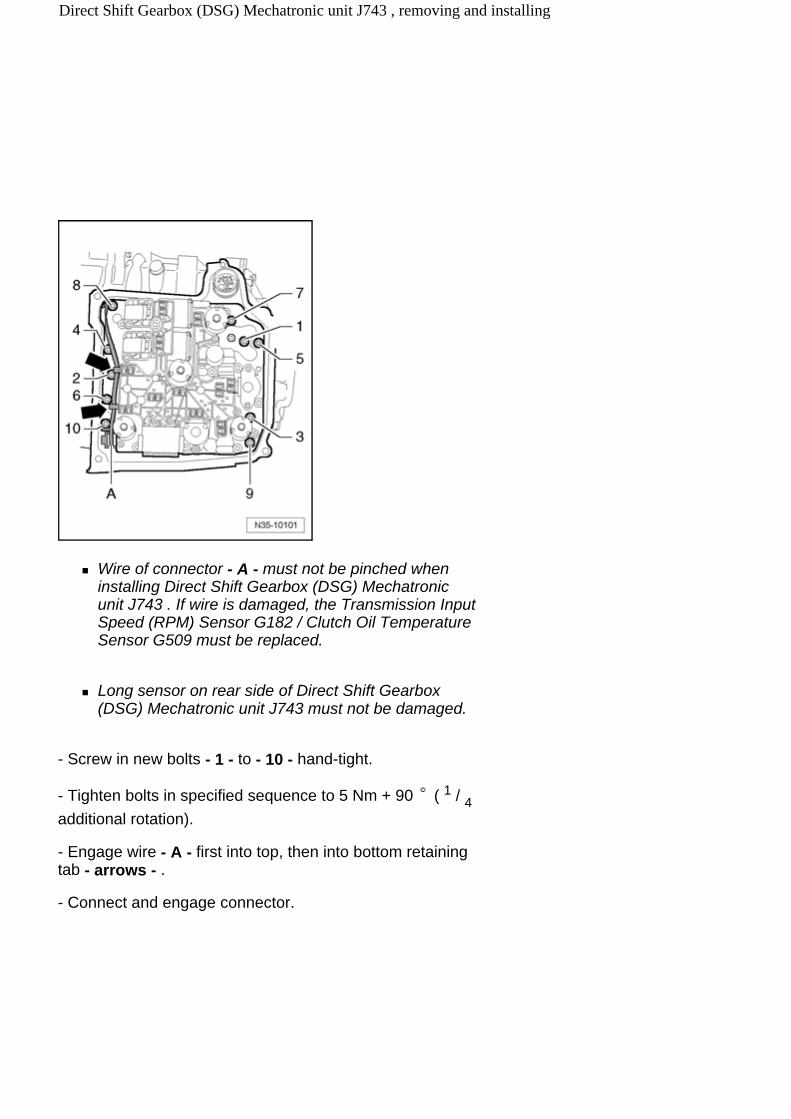
Wire of connector - A - must not be pinched when installing Direct Shift Gearbox (DSG) Mechatronic unit J743 . If wire is damaged, the Transmission Input Speed (RPM) Sensor G182 / Clutch Oil Temperature Sensor G509 must be replaced.
Long sensor on rear side of Direct Shift Gearbox (DSG) Mechatronic unit J743 must not be damaged.
- Screw in new bolts - 1 - to - 10 - hand-tight.
- Tighten bolts in specified sequence to 5 Nm + 90 ( 1 / 4 additional rotation).
- Engage wire - A - first into top, then into bottom retaining tab - arrows - .
- Connect and engage connector.
Direct Shift Gearbox (DSG) Mechatronic unit J743 , removing and installing
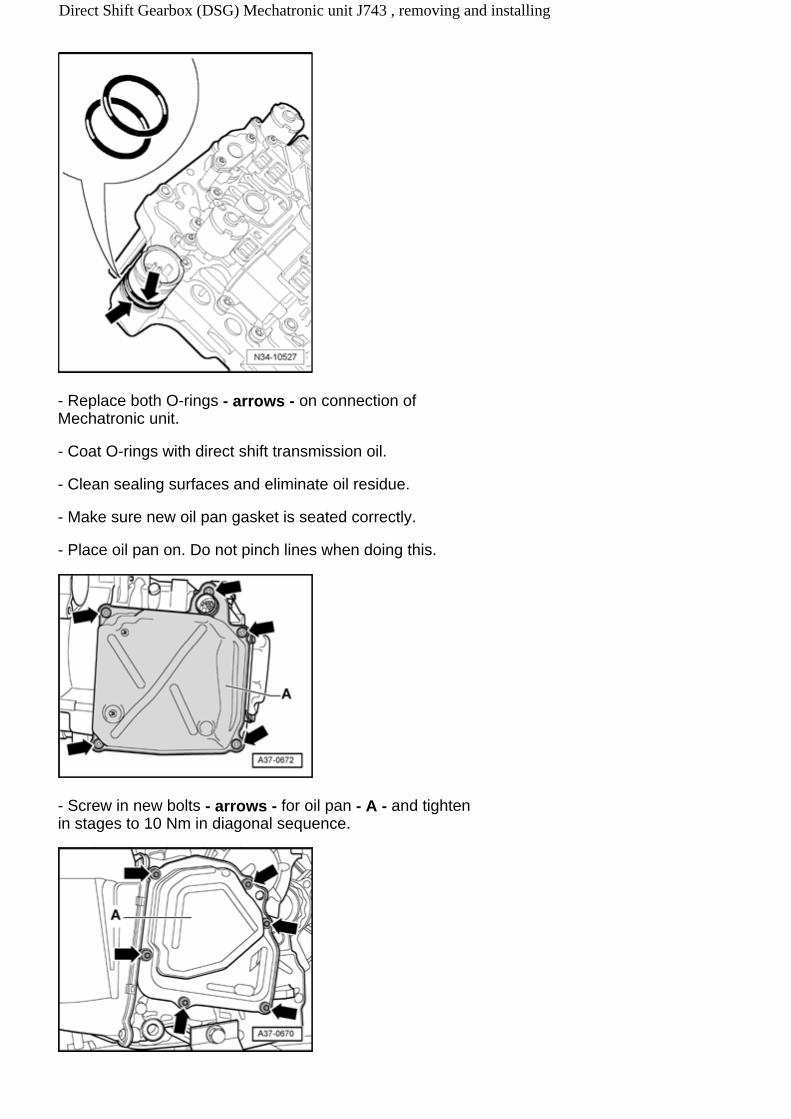
- Replace both O-rings - arrows - on connection of Mechatronic unit.
- Coat O-rings with direct shift transmission oil.
- Clean sealing surfaces and eliminate oil residue.
- Make sure new oil pan gasket is seated correctly.
- Place oil pan on. Do not pinch lines when doing this.
- Screw in new bolts - arrows - for oil pan - A - and tighten in stages to 10 Nm in diagonal sequence.
Direct Shift Gearbox (DSG) Mechatronic unit J743 , removing and installing
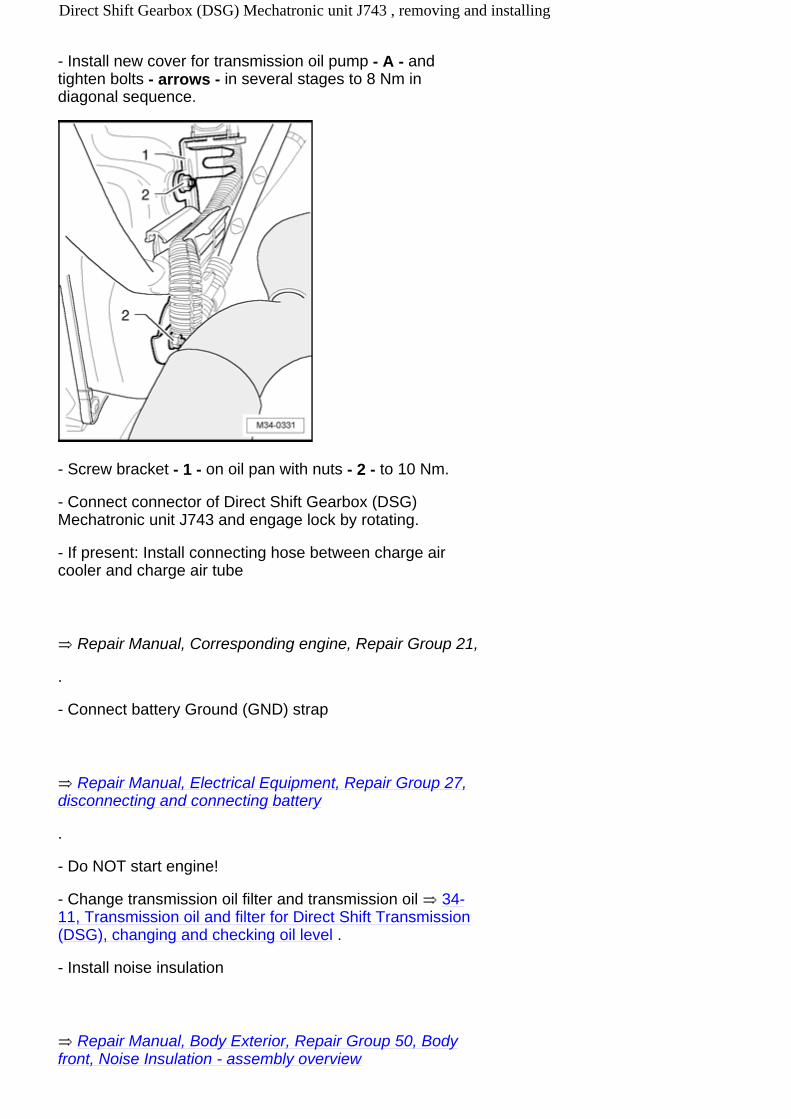
- Install new cover for transmission oil pump - A - and tighten bolts - arrows - in several stages to 8 Nm in diagonal sequence.
- Screw bracket - 1 - on oil pan with nuts - 2 - to 10 Nm.
- Connect connector of Direct Shift Gearbox (DSG) Mechatronic unit J743 and engage lock by rotating.
- If present: Install connecting hose between charge air cooler and charge air tube
.
Repair Manual, Corresponding engine, Repair Group 21,
- Connect battery Ground (GND) strap
.
Repair Manual, Electrical Equipment, Repair Group 27, disconnecting and connecting battery
- Do NOT start engine!
- Change transmission oil filter and transmission oil 34-11, Transmission oil and filter for Direct Shift Transmission (DSG), changing and checking oil level .
- Install noise insulation
Repair Manual, Body Exterior, Repair Group 50, Body front, Noise Insulation - assembly overview
Direct Shift Gearbox (DSG) Mechatronic unit J743 , removing and installing

- Perform basic calibration of Direct Shift Gearbox (DSG) Mechatronic unit J743 using Vehicle Diagnosis, Testing and Information System VAS 5051 .
Direct Shift Gearbox (DSG) Mechatronic unit J743 , removing and installing
34 - 5
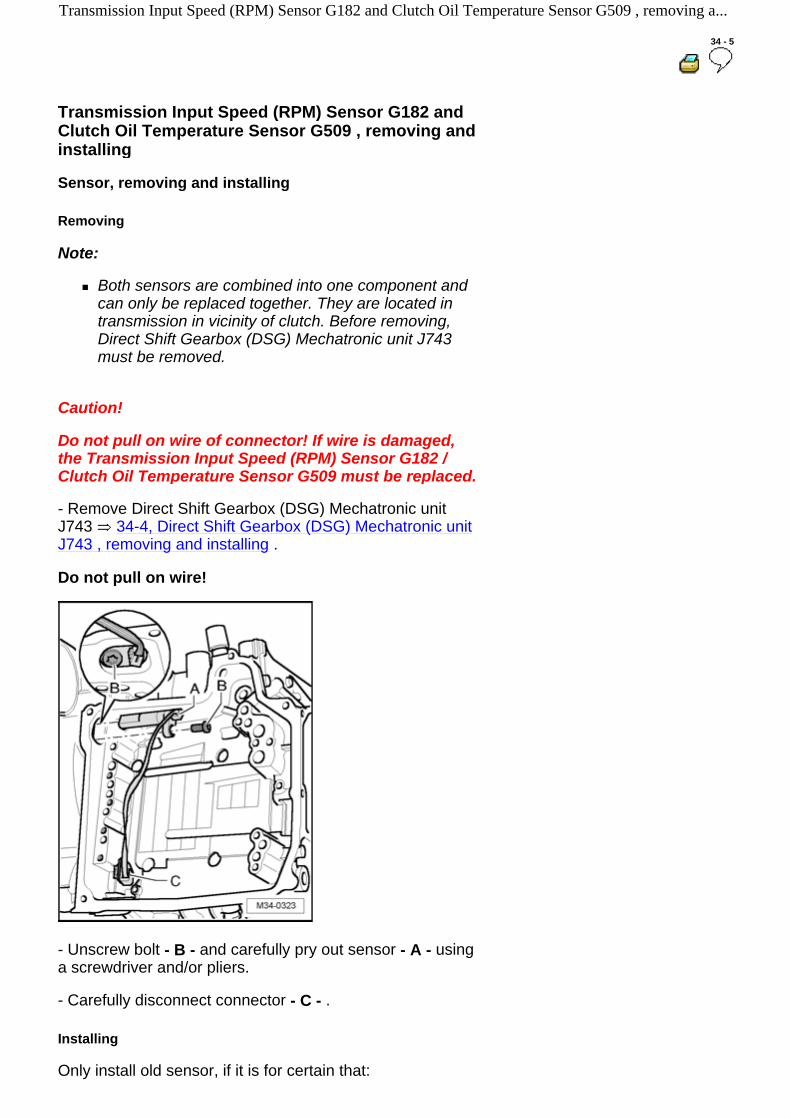
Transmission Input Speed (RPM) Sensor G182 and Clutch Oil Temperature Sensor G509 , removing and installing
Sensor, removing and installing
Removing
Note:
Both sensors are combined into one component and can only be replaced together. They are located in transmission in vicinity of clutch. Before removing, Direct Shift Gearbox (DSG) Mechatronic unit J743 must be removed.
Caution!
Do not pull on wire of connector! If wire is damaged, the Transmission Input Speed (RPM) Sensor G182 / Clutch Oil Temperature Sensor G509 must be replaced.
- Remove Direct Shift Gearbox (DSG) Mechatronic unit J743 34-4, Direct Shift Gearbox (DSG) Mechatronic unit J743 , removing and installing .
Do not pull on wire!
- Unscrew bolt - B - and carefully pry out sensor - A - using a screwdriver and/or pliers.
- Carefully disconnect connector - C - .
Installing
Only install old sensor, if it is for certain that:
Transmission Input Speed (RPM) Sensor G182 and Clutch Oil Temperature Sensor G509 , removing a...

Sensor functions properly.
Its wire was not pulled during removal.
- Coat sensor with transmission oil for Direct Shift Gearbox and install.
- Tighten bolt - B - to 10 Nm.
- Install Direct Shift Gearbox (DSG) Mechatronic unit J743 34-4, Direct Shift Gearbox (DSG) Mechatronic unit
J743 , removing and installing .
Transmission Input Speed (RPM) Sensor G182 and Clutch Oil Temperature Sensor G509 , removing a...

34 - 6
Transmission oil cooler, removing and installing
Transmission oil cooler, removing and installing
Special tools, testers and auxiliary items required
Hose clamps up to Ø 25 mm 3094
Torque wrench V.A.G 1331
Pliers for spring-type clamps VAS 5024 A
Removing
Note:
Observe notes for Direct-Shift Transmission 02E 00-2, Notes for 6 Spd. Direct Shift Automatic
Transmission oil cooler, removing and installing

Transmission 02E Front Wheel Drive .
Observe general repair notes and rules of cleanliness for working on the transmission 00-6, General Repair Notes .
Additional work must be performed when disconnecting and reconnecting battery
.
Repair Manual, Electrical Equipment, Repair Group 27, Battery, disconnecting and reconnecting battery
- Place selector lever in position "P" .
- Check whether a coded radio is installed. If this is the case obtain anti-theft coding..
- Remove engine cover
.
Repair Manual, Corresponding engine, Repair Group 10, removing and installing engine; removing engine
- Disconnect electrical harness connector - 2 - from Mass Air Flow (MAF) Sensor G70 .
- Disconnect vent hose - 1 - and air guide hose - 5 - .
- Open spring clamp - 3 - using hose clamp pliers VAS 5024 A and disconnect air guide hose from tube.
- Unscrew bolt - 4 - and remove air filter housing.
- Remove battery
Transmission oil cooler, removing and installing
.
Repair Manual, Electrical Equipment,, Repair Group 27, Battery; removing and installing battery
- Remove battery carrier.
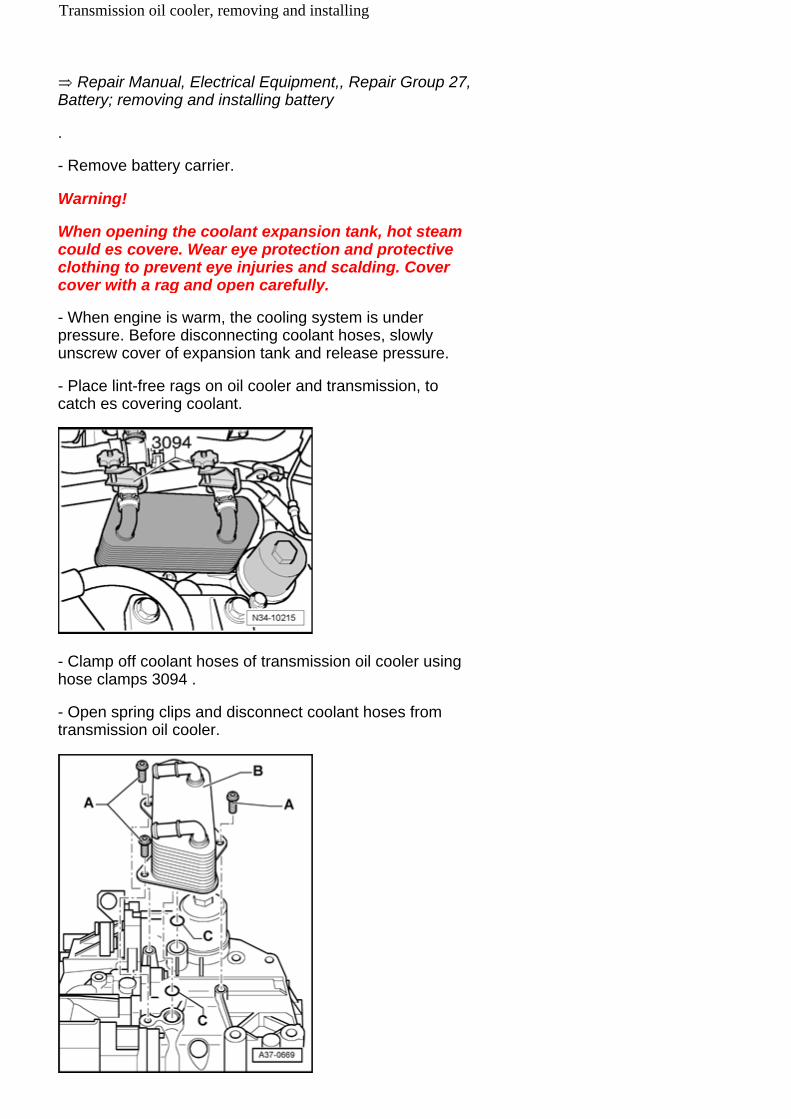
Warning!
When opening the coolant expansion tank, hot steam could es covere. Wear eye protection and protective clothing to prevent eye injuries and scalding. Cover cover with a rag and open carefully.
- When engine is warm, the cooling system is under pressure. Before disconnecting coolant hoses, slowly unscrew cover of expansion tank and release pressure.
- Place lint-free rags on oil cooler and transmission, to catch es covering coolant.
- Clamp off coolant hoses of transmission oil cooler using hose clamps 3094 .
- Open spring clips and disconnect coolant hoses from transmission oil cooler.
Transmission oil cooler, removing and installing
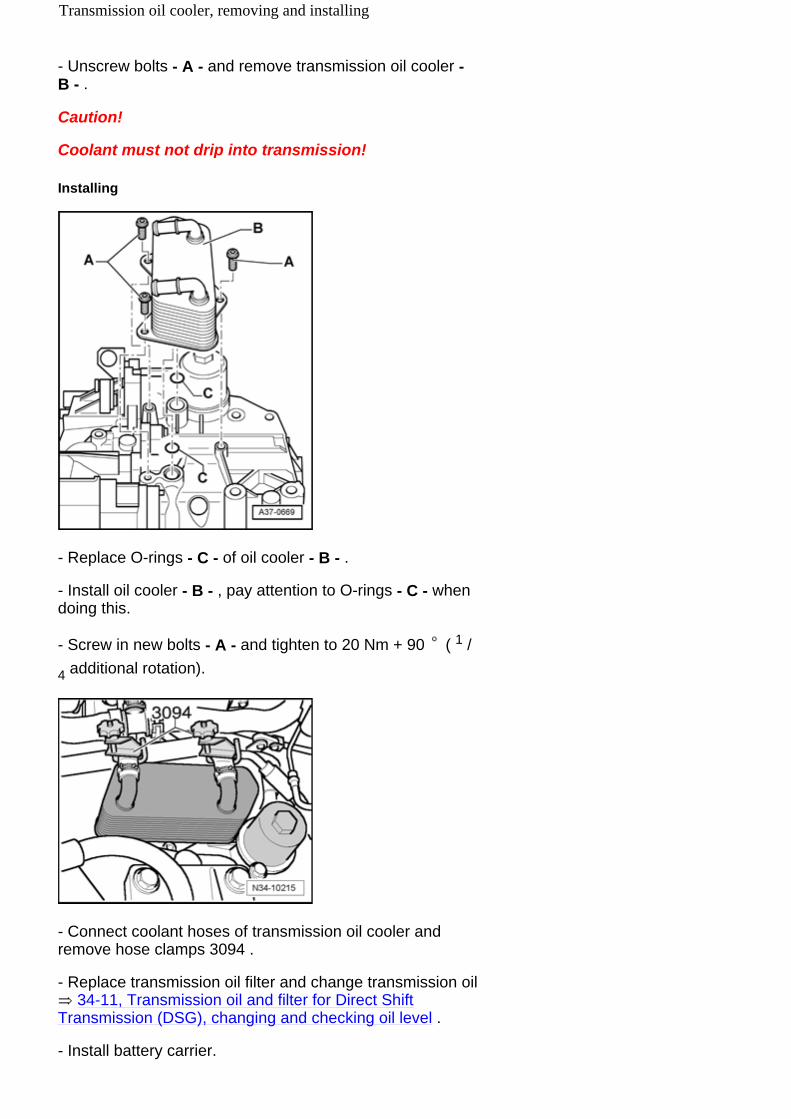
- Unscrew bolts - A - and remove transmission oil cooler - B - .
Caution!
Coolant must not drip into transmission!
Installing
- Replace O-rings - C - of oil cooler - B - .
- Install oil cooler - B - , pay attention to O-rings - C - when doing this.
- Screw in new bolts - A - and tighten to 20 Nm + 90 ( 1 /
4 additional rotation).
- Connect coolant hoses of transmission oil cooler and remove hose clamps 3094 .
- Replace transmission oil filter and change transmission oil 34-11, Transmission oil and filter for Direct Shift
Transmission (DSG), changing and checking oil level .
- Install battery carrier.
Transmission oil cooler, removing and installing

- Install battery
.
Repair Manual, Electrical Equipment, Repair Group 27, battery; removing and installing battery
- Install air filter housing and connect harness connector - 2 - to Mass Air Flow (MAF) Sensor G70 .
- Connect vent hose - 1 - and air guide hose - 5 - .
- Connect air guide hose and secure spring clip - 3 - using spring clip pliers VAS 5024 A .
- Checking coolant level and adding coolant if necessary
.
Repair Manual, Corresponding engine, Repair Group 19,
Caution!
Do not start engine during coolant level test if there is still no transmission oil filling.
Transmission oil cooler, removing and installing

34 - 7
Transmission oil pump, removing and installing
Transmission oil pump, removing and installing
Special tools, testers and auxiliary items required
Torque wrench V.A.G 1331
Drip tray for workshop crane VAS 6208
Removing
Caution!
Never run engine and do not tow vehicle with oil pan removed or without the transmission fluid filled up.
Note:
Observe notes for Direct-Shift Transmission 02E 00-2, Notes for 6 Spd. Direct Shift Automatic Transmission 02E Front Wheel Drive .
Observe general repair notes and rules of cleanliness for working on the transmission 00-6, General Repair Notes .
Transmission oil pump, removing and installing

- Remove noise insulation
Repair Manual, Body Exterior, Repair Group 50, Body front, Noise Insulation - assembly overview
- Remove left front wheel.
- If installed, remove shield - A - at bottom on transmission - arrows - .
- Unscrew bolts - 1 - to - 3 - and remove cover for left wheel housing liner.
- Place appropriate receptacle underneath transmission.
Warning!
Wear protective glasses.
Wear protective gloves.
Transmission oil pump, removing and installing

- Unscrew drain plug - A - .
Approx. 5.0 liters of oil will drain out. Container still remains standing under transmission.
- Replace sealing ring for drain plug - A - .
- Screw in drain plug - A - and tighten to 45 Nm.
- Unscrew bolts - arrows - and remove cover for transmission oil pump - A - .
Oil is still located in cover for transmission oil pump.
- Unscrew bolts - arrows - and remove transmission oil pump - 1 - from alignment pins and input shaft for transmission oil pump.
Installing
Transmission oil pump, removing and installing
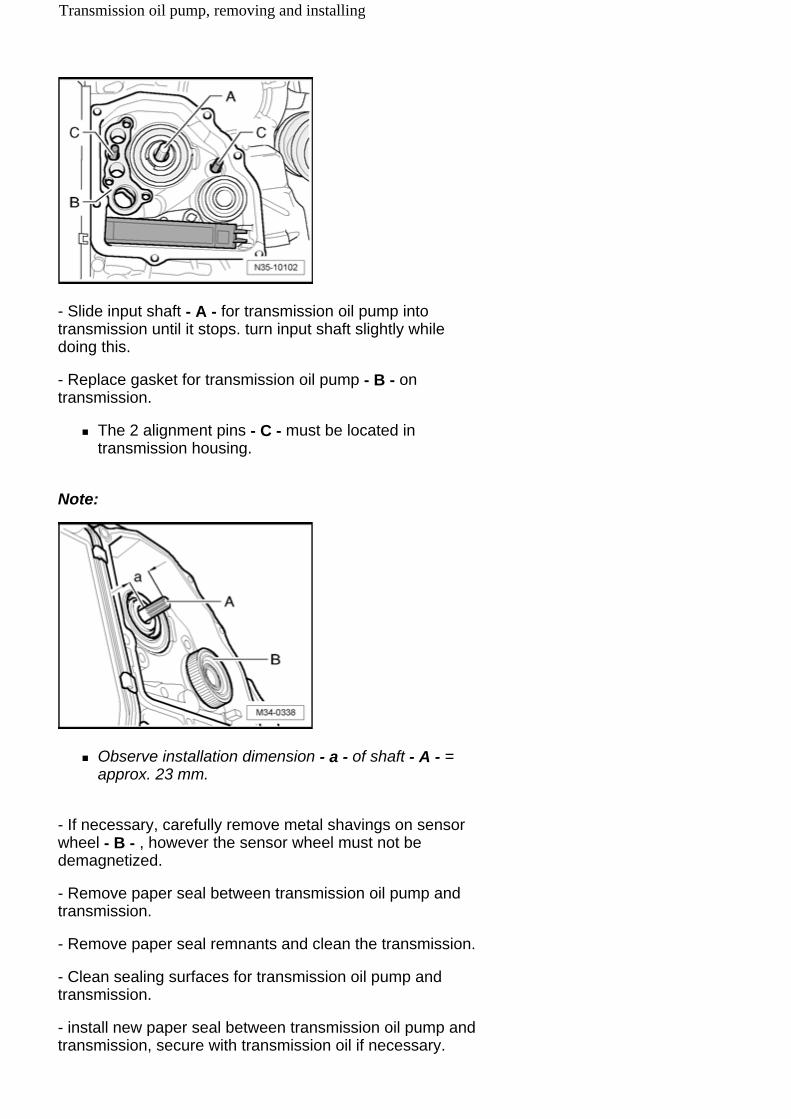
- Slide input shaft - A - for transmission oil pump into transmission until it stops. turn input shaft slightly while doing this.
- Replace gasket for transmission oil pump - B - on transmission.
The 2 alignment pins - C - must be located in transmission housing.
Note:
Observe installation dimension - a - of shaft - A - = approx. 23 mm.
- If necessary, carefully remove metal shavings on sensor wheel - B - , however the sensor wheel must not be demagnetized.
- Remove paper seal between transmission oil pump and transmission.
- Remove paper seal remnants and clean the transmission.
- Clean sealing surfaces for transmission oil pump and transmission.
- install new paper seal between transmission oil pump and transmission, secure with transmission oil if necessary.
Transmission oil pump, removing and installing

- Slide transmission oil pump - 1 - on to input shaft, pay attention to splines of oil pump/input shaft when doing this.
- Also make sure that transmission oil pump - 1 - is seated correctly on alignment pins of transmission housing.
- Screw in new bolts - arrows - hand-tight and then tighten to 5 Nm + 90 ( 1 / 4 additional rotation) in diagonal sequence.
- Put on new cover for transmission oil pump - A - and tighten new bolts - arrows - in several stages to 8 Nm in diagonal sequence.
- Change transmission oil filter and transmission oil 34-11, Transmission oil and filter for Direct Shift Transmission (DSG), changing and checking oil level .
- Install cover for left wheel housing liner.
- Install noise insulation
Repair Manual, Body Exterior, Repair Group 50, Body front, Noise Insulation - assembly overview
- Install wheel
Repair Manual, Suspension, Wheels, Steering, Repair
Transmission oil pump, removing and installing

.
Group 44,
Transmission oil pump, removing and installing

34 - 8
Selector shaft lever seal, replacing
Special tools, testers and auxiliary items required
Tube VW 423
Torque wrench V.A.G 1331
Pulling hook T20143/2
Seal, removing and installing
Removing
- Remove selector lever cable from transmission 34-9, Selector mechanism, removing and installing .
Selector shaft lever seal, replacing
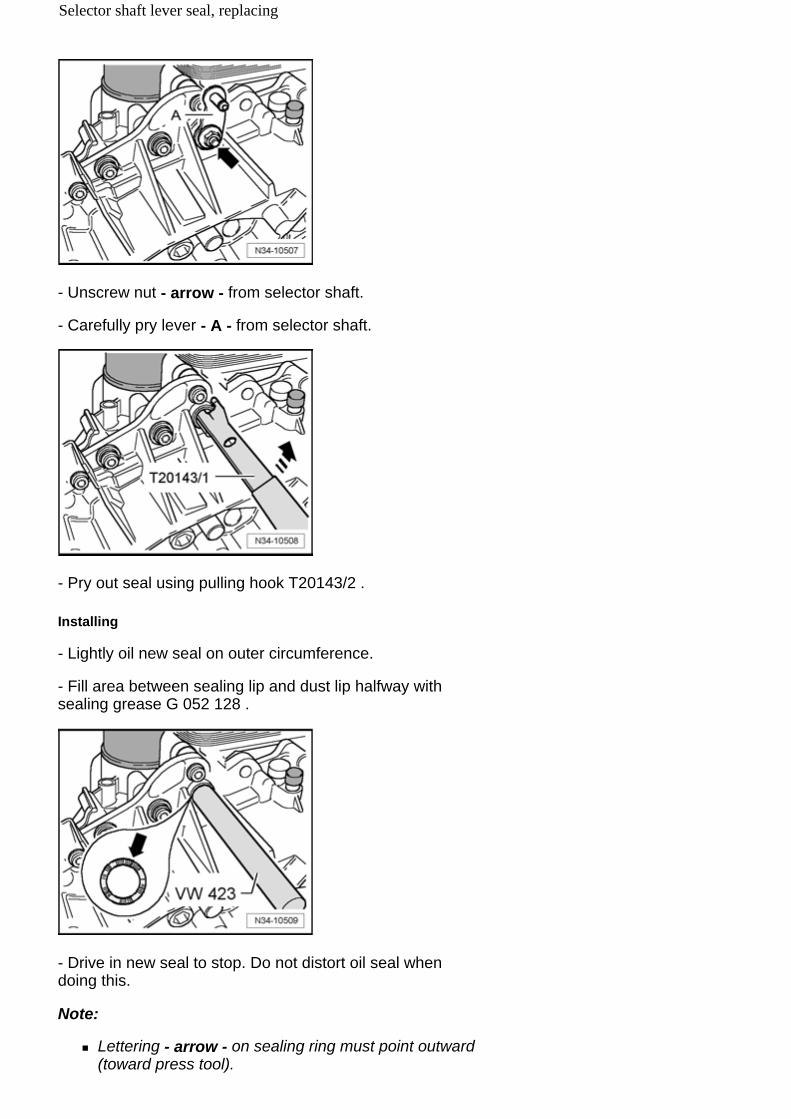
- Unscrew nut - arrow - from selector shaft.
- Carefully pry lever - A - from selector shaft.
- Pry out seal using pulling hook T20143/2 .
Installing
- Lightly oil new seal on outer circumference.
- Fill area between sealing lip and dust lip halfway with sealing grease G 052 128 .
- Drive in new seal to stop. Do not distort oil seal when doing this.
Note:
Lettering - arrow - on sealing ring must point outward (toward press tool).
Selector shaft lever seal, replacing

Lever of selector shaft fits on to splines only in one position.
- Install lever and tighten to 20 Nm.
- Install selector lever cable on transmission 34-9, Selector mechanism, removing and installing and adjust 34-9, Adjusting .
Selector shaft lever seal, replacing

34 - 9
Selector mechanism
Warning!
Shift selector lever into position "P" and engage parking brake before working with the engine running.
Selector mechanism, checking
In selector lever positions "S" , "D" , "R" and in Tiptronic position, the starter motor will not operate.
For speeds exceeding 5 km/h and shifting into selector lever position "N" , the shift lock solenoid must not engage to lock the selector lever. Selector lever can be shifted into a driving mode.
For speeds below 5 km/h (almost standstill) and shifting into selector lever position "N" , the shift lock solenoid must only engage after approx. 1 second. Selector lever can only be shifted out of position "N" with the brake pedal operated.
Selector lever in position "P" , button pressed on selector lever and ignition switched on
Brake pedal is not being operated
Selector lever is locked and cannot be switched out of position "P" with button pressed. Shift lock solenoid is locking the selector lever.
Brake pedal is being operated
Shift lock solenoid enables the selector lever. Selecting a driving mode is possible. Switch selector lever slowly through from "P" to "R, N, D, S" ; while doing this check whether selector lever position in instrument panel install matches the selector lever position.
Selector lever in position "N" , button pressed on selector lever and ignition switched on
Brake pedal is not being operated
Selector lever is locked and cannot be switched out of position "N" with button pressed. Shift lock solenoid is locking the selector lever.
Brake pedal is being operated
Selector mechanism
Shift lock solenoid enables the selector lever. Selecting a driving mode is possible.
Note:
Shifting from position "N" to "D" with brake pedal operated is also possible without pressing button on selector lever. However, from position "N" to "R" the button on selector lever must also be pressed.
Selector lever in position "D" , ignition switched on
Selector lever is locked and cannot be shifted from position "D" to position "S" .
Press the button on selector lever
Selector lever is released and can be shifted from position "D" to position "S" .
Move selector lever into Tiptronic gate .
The illumination of the "D" symbol must go out in selector lever display and the "+" and "-" symbols must light up.
The selector lever display in instrument panel install must change from "P R N D S" to "6 5 4 3 2 1" when selector lever is moved in Tiptronic gate.
Shift selector lever in Tiptronic gate to "+" and "" .
The display "6 5 4 3 2 1" in instrument cluster must indicate (change) accordingly a gear higher or lower when shifting selector lever to "+" or "" .
- Check and adjust selector lever cable 34-9, Selector lever cable, checking and adjusting .
- Check ignition key removal lock 34-9, Ignition key removal lock, checking function .
Transmission Range (TR) Selector Lever Display
Simultaneous lighting of all segments of Transmission Range (TR) selector lever display indicates transmission in emergency running mode.
Selector lever cable, checking and adjusting
Special tools, testers and auxiliary items required
Selector mechanism

Torque wrench V.A.G 1410
Pliers for spring-type clamps VAS 5024 A
Checking
- Place selector lever in position "P" .
- Switch ignition off.
- Remove engine cover
.
Repair Manual, Corresponding engine, Repair Group 10, removing and installing engine; removing engine
Selector mechanism

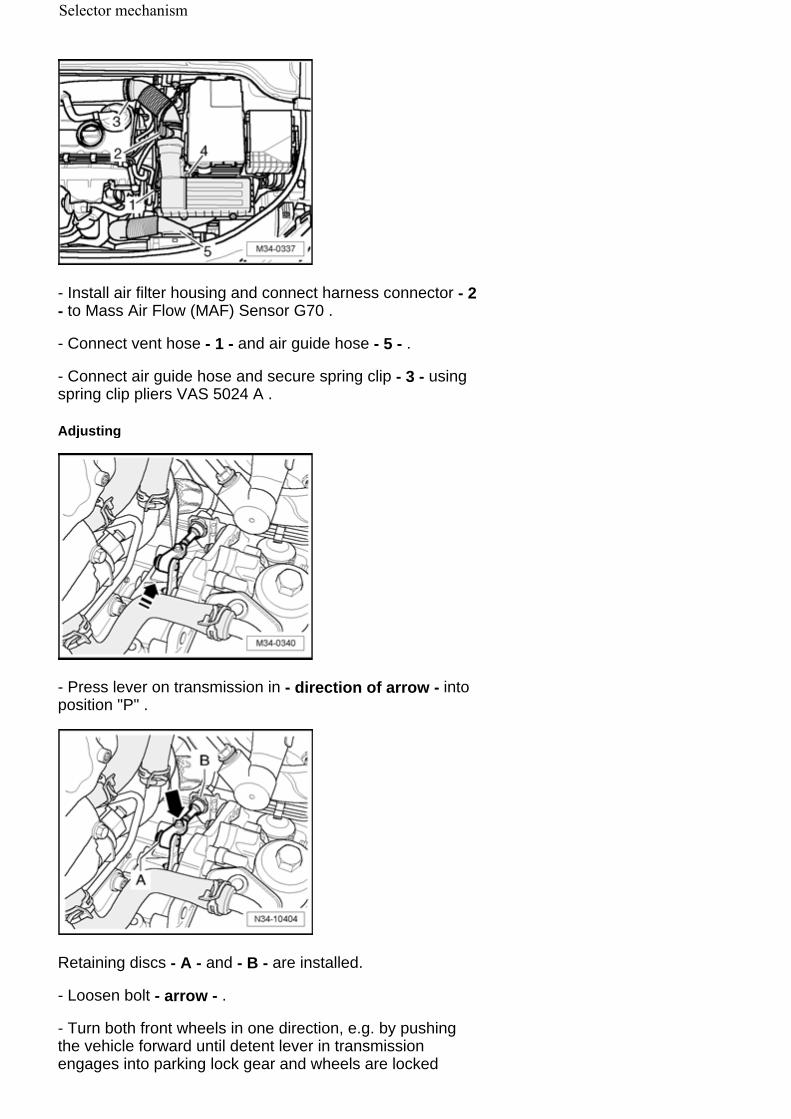
- Disconnect electrical harness connector - 2 - from Mass Air Flow (MAF) Sensor G70 .
- Disconnect vent hose - 1 - and air guide hose - 5 - .
- Open spring clamp - 3 - using hose clamp pliers VAS 5024 A and disconnect air guide hose from tube.
- Unscrew bolt - 4 - and remove air filter housing.
- Release retaining disc - A - and remove upward.
- remove retaining disc - B - upward.
- Press off selector lever cable from lever/selector shaft and set it on top.
- Set down the selector lever cable so that the end can move freely.
Note:
Do not bend or kink selector lever cable.
- Shift selector lever from "P" to "S" .
- Check protective sleeve on selector lever cable for damage on selector mechanism at front, replace cable if necessary.
Selector mechanism and selector lever cable must have freedom of movement during shifting, if necessary, replace selector lever cable 34-9, Selector lever cable, removing and installing or service selector mechanism 34-9, Selector mechanism, assembly overview .
Do not grease ball socket of selector lever cable and lever/selector shaft.
- Carefully press selector lever cable onto lever/selector shaft.
- install new retaining discs up to stop and engage.
Selector mechanism
- Install air filter housing and connect harness connector - 2 - to Mass Air Flow (MAF) Sensor G70 .
- Connect vent hose - 1 - and air guide hose - 5 - .
- Connect air guide hose and secure spring clip - 3 - using spring clip pliers VAS 5024 A .
Adjusting
- Press lever on transmission in - direction of arrow - into position "P" .
Retaining discs - A - and - B - are installed.
- Loosen bolt - arrow - .
- Turn both front wheels in one direction, e.g. by pushing the vehicle forward until detent lever in transmission engages into parking lock gear and wheels are locked
Selector mechanism

(cannot be turned together in one direction).
Note:
The selector lever must remain in position "P" with bolt - arrow - loosened, otherwise the setting is not correct.
- Carefully move selector lever lightly toward front and rear without shifting into another selector lever position.
- Tighten bolt - arrow - gently to 13 Nm.
Note:
When tightening bolt - arrow - , make sure that selector lever cable is not slid even once.
Checking adjustment of selector lever cable
- Pull selector lever out of position "P" with button pressed approx. 5 mm toward rear and hold, do not shift into "R" .
- Release selector lever.
Selector lever must spring back into position "P" automatically.
- Adjust selector lever if necessary Topic 34-9 .
- Place selector lever in position "N" .
- Pull selector lever out of position "N" with button pressed approx. 5 mm toward rear and hold, do not shift into "D" .
- Release selector lever.
Selector lever must spring back into position "N" automatically.
- Adjust selector lever if necessary Topic 34-9 .
- Press selector lever out of position "N" with button pressed approx. 5 mm toward front and hold, do not shift into "R" .
- Release selector lever.
Selector lever must spring back into position "N" automatically.
- Adjust selector lever if necessary Topic 34-9 .
- Check shift mechanism 34-9, Selector mechanism, checking .
Selector mechanism

- Install air filter housing and connect harness connector - 2 - to Mass Air Flow (MAF) Sensor G70 .
- Connect vent hose - 1 - and air guide hose - 5 - .
- Connect air guide hose and secure spring clip - 3 - using spring clip pliers VAS 5024 A .
- Install engine cover
.
Repair Manual, Corresponding engine, Repair Group 10, removing and installing engine
Ignition key removal lock, checking function
Start ↓ ↓
- Place selector lever in position "P" .
- Switch ignition off.
- Remove ignition key.
↓ ↓ ↓
Can selector lever be switched out of "P" with lock button pressed?
Yes
Testing Shift Lock Solenoid N110 in function "Guided Fault Finding" using Vehicle Diagnosis, Testing and Information System VAS 5051 .
↓
No
↓
Selector mechanism
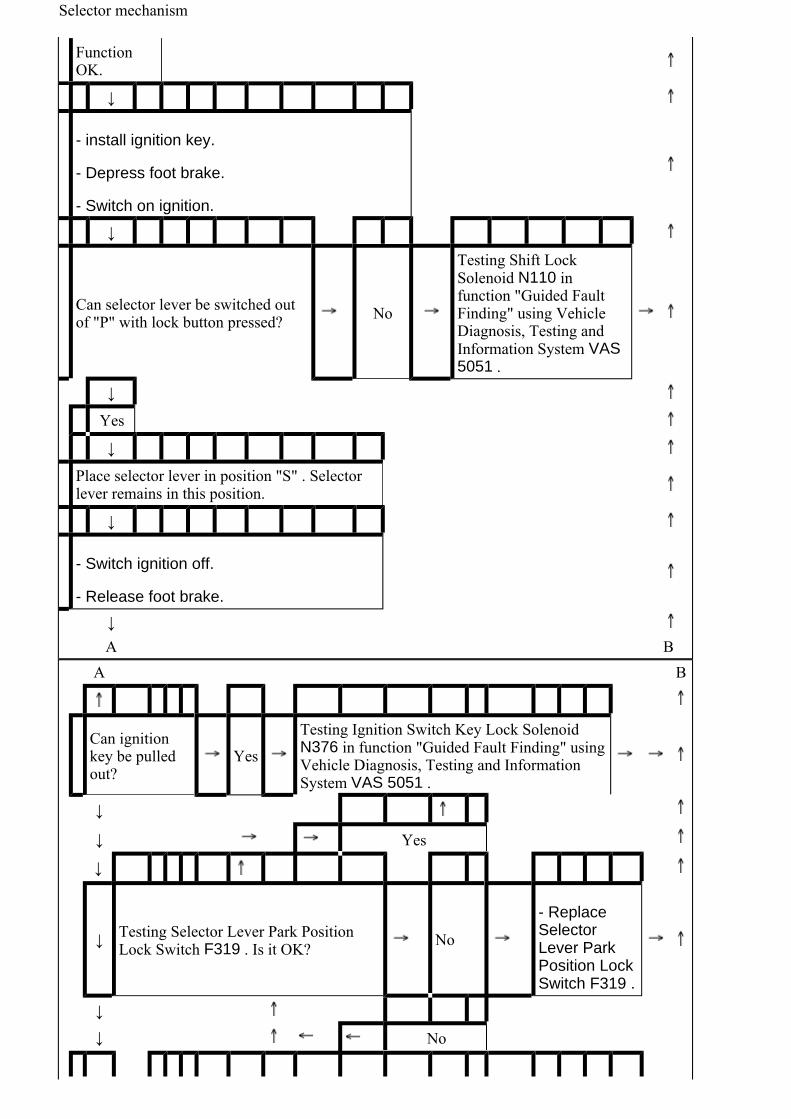
Function OK.
↓
- install ignition key.
- Depress foot brake.
- Switch on ignition.
↓
Can selector lever be switched out of "P" with lock button pressed? No
Testing Shift Lock Solenoid N110 in function "Guided Fault Finding" using Vehicle Diagnosis, Testing and Information System VAS 5051 .
↓
Yes
↓
Place selector lever in position "S" . Selector lever remains in this position.
↓
- Switch ignition off.
- Release foot brake.
↓ A B
A B
Can ignition key be pulled out?
Yes
Testing Ignition Switch Key Lock Solenoid N376 in function "Guided Fault Finding" using Vehicle Diagnosis, Testing and Information System VAS 5051 .
↓
↓ Yes
↓
↓ Testing Selector Lever Park Position Lock Switch F319 . Is it OK? No
- Replace Selector Lever Park Position Lock Switch F319 .
↓
↓ No
Selector mechanism
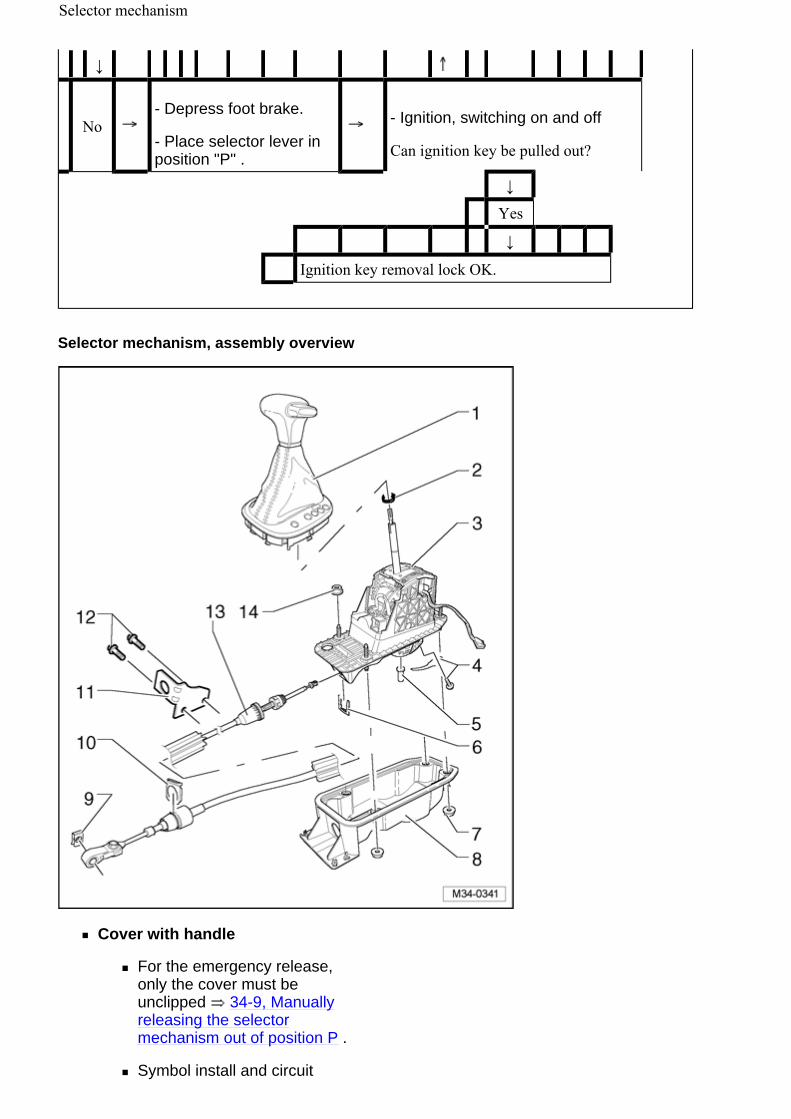
↓
No - Depress foot brake.
- Place selector lever in position "P" .
- Ignition, switching on and off
Can ignition key be pulled out?
↓
Yes
↓
Ignition key removal lock OK.
Selector mechanism, assembly overview
Cover with handle
For the emergency release, only the cover must be unclipped 34-9, Manually releasing the selector mechanism out of position P .
Symbol install and circuit
Selector mechanism

board with Slector Lever Scale Illumination L101 are integrated in the cover.
Removing 34-9, Selector mechanism handle and cover, removing and installing
Check harness connector 34-9, Checking harness connectors on selector mechanism .
Clamp
Replace
Tension using hose clamp pliers V.A.G 1275
Selector lever and selector mechanism
With Shift Lock Solenoid N110
Emergency release 34-9, Manually releasing the selector mechanism out of position P .
Check harness connector 34-9, Checking harness connectors on selector mechanism .
Short description for removal and installation:
- Remove center console.
- Remove cable from transmission 34-9, Selector lever cable, removing and installing .
- Remove catalytic converter and disengage center muffler from bracket.
- Remove heat shield beneath vehicle.
- Adjust selector lever cable after installing 34-9, Selector lever cable, checking and adjusting .
Selector mechanism

Bolt with spring, 3 Nm
Pin
Removing 34-9, Selector lever cable, removing and installing
Do not lubricate
Locking washer
Always replace after removing
Nut, 9 Nm
4x
Selector housing
with seal
Locking washer
Always replace after removing
Make sure it engages when installing
Locking washer
Always replace after removing
Mounting bracket
for selector lever cable
Bolt, 20 Nm + 90 ( 1 / 4 ) additional turn.
Replace
2x
For mounting support bracket on transmission housing
Selector lever cable
Selector lever cable is not greased.
Selector mechanism

Removing and installing 34-9, Selector lever cable, removing and installing
Checking and adjusting 34-9, Selector lever cable, checking and adjusting
Nut, 9 Nm
4x
Selector mechanism handle and cover, removing and installing
Removing
- Pry cover - 1 - out of center console - arrows - .
- Pull out button - 2 - over its press point in - direction of arrow - and secure it using a cable tie or a suitable wire.
This prevents the button from being pressed into the handle unintentionally.
Selector mechanism

- Disconnect harness connector - 1 - from circuit board of cover.
- When doing this, counter hold at circuit board - arrow - .
- Fold boot upward.
- Press retainers - 1 - on the sides inward - arrows - and slide it then upward in - direction of arrow - .
- Now remove selector lever handle.
Installing
Installation is performed in the reverse order of removal. Note the following:
If button should be pressed in with the handle removed, then pull out button past its press point and secure it using a cable tie or a suitable wire.
Before installing handle, make sure that lock stands at upper stop.
- Install handle with cover on to selector lever and press on to selector lever until it stops.
Note:
A second engaging must be noticeable when pressing down the handle.
Selector mechanism

- Press lock - 1 - downward far enough until it engages - arrows - .
Note:
Check immediately whether the handle is secured correctly. Lock - 1 - must stand only a few millimeters over the selector lever.
- Connect connector to circuit board, remove cable tie/wire from button on handle and slide it past the press point into handle.
- Install cover in center console. To do so, press cover first at front at ashtray/storage compartment and then at rear into retainers in center console.
Selector mechanism, removing and installing
Special tools, testers and auxiliary items required
Torque wrench V.A.G 1331
Selector mechanism

Pliers for spring-type clamps VAS 5024 A
Removing
- Place selector lever in position "P" .
- Switch ignition off.
Note:
Additional work must be performed when disconnecting and reconnecting battery Ground (GND) strap
.
Repair Manual, Electrical Equipment, Repair Group 27, Battery, disconnecting and reconnecting battery
- First check whether a coded radio is installed. If this is the case obtain anti-theft coding.
- With ignition switched off, disconnect Battery Ground (GND) wire
.
Repair Manual, Electrical Equipment, Repair Group 27, disconnecting and connecting batteries
- Remove handle and cover for selector mechanism 34-9, Selector mechanism handle and cover, removing and installing .
- Remove center console and air guide
Repair Manual, Body Interior, Repair Group 68, storage
Selector mechanism
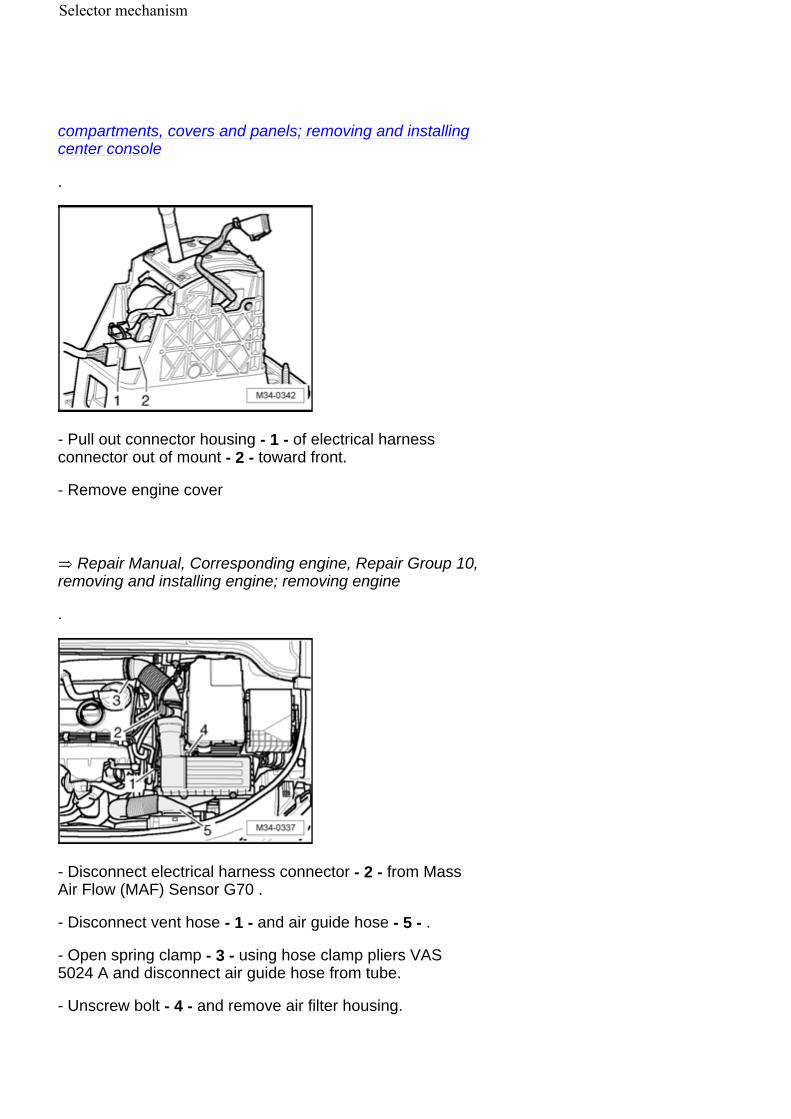
.
compartments, covers and panels; removing and installing center console
- Pull out connector housing - 1 - of electrical harness connector out of mount - 2 - toward front.
- Remove engine cover
.
Repair Manual, Corresponding engine, Repair Group 10, removing and installing engine; removing engine
- Disconnect electrical harness connector - 2 - from Mass Air Flow (MAF) Sensor G70 .
- Disconnect vent hose - 1 - and air guide hose - 5 - .
- Open spring clamp - 3 - using hose clamp pliers VAS 5024 A and disconnect air guide hose from tube.
- Unscrew bolt - 4 - and remove air filter housing.
Selector mechanism
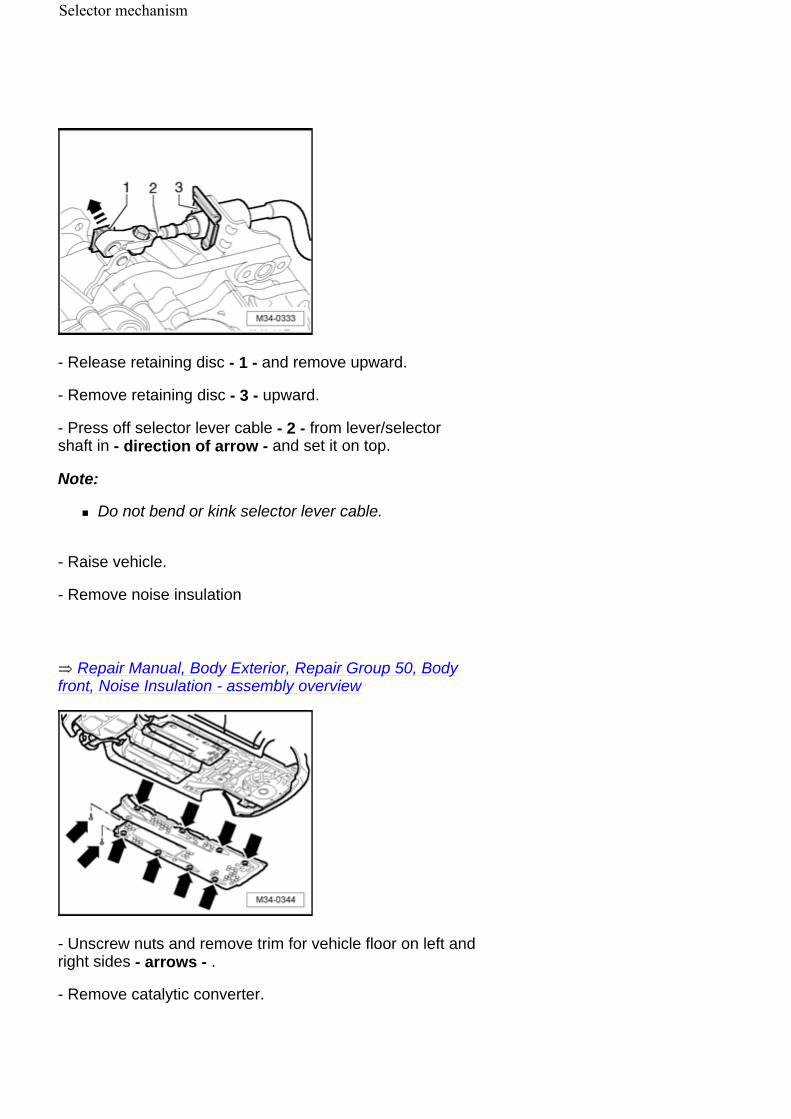
- Release retaining disc - 1 - and remove upward.
- Remove retaining disc - 3 - upward.
- Press off selector lever cable - 2 - from lever/selector shaft in - direction of arrow - and set it on top.
Note:
Do not bend or kink selector lever cable.
- Raise vehicle.
- Remove noise insulation
Repair Manual, Body Exterior, Repair Group 50, Body front, Noise Insulation - assembly overview
- Unscrew nuts and remove trim for vehicle floor on left and right sides - arrows - .
- Remove catalytic converter.
Selector mechanism
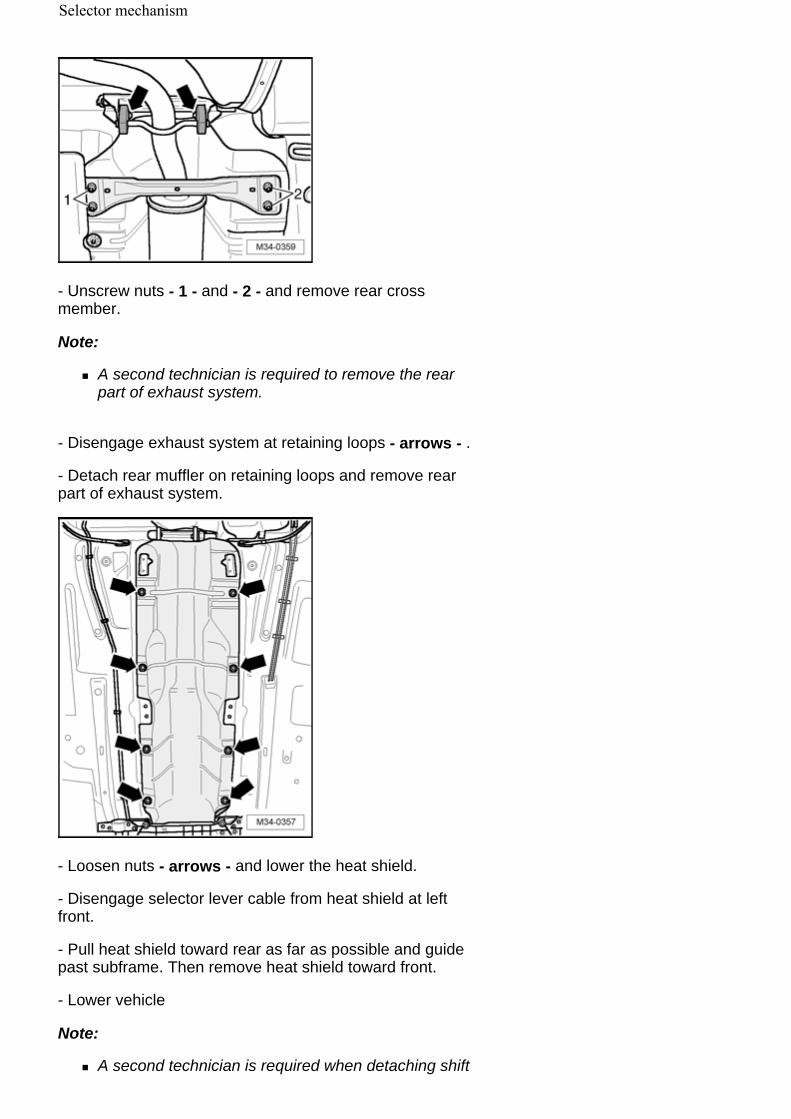
- Unscrew nuts - 1 - and - 2 - and remove rear cross member.
Note:
A second technician is required to remove the rear part of exhaust system.
- Disengage exhaust system at retaining loops - arrows - .
- Detach rear muffler on retaining loops and remove rear part of exhaust system.
- Loosen nuts - arrows - and lower the heat shield.
- Disengage selector lever cable from heat shield at left front.
- Pull heat shield toward rear as far as possible and guide past subframe. Then remove heat shield toward front.
- Lower vehicle
Note:
A second technician is required when detaching shift
Selector mechanism

mechanism below vehicle.
- Remove nuts - 1 - and - 2 - .
- Remove selector mechanism downward together with selector lever cable.
Note:
Do not bend or kink selector lever cable.
Selector mechanism can also be replaced without selector lever cable, disconnect selector lever cable from selector mechanism to do so. Remove selector lever cable 34-9, Selector lever cable, removing and installing .
Installing
Installation is performed in the reverse order of removal. Note the following:
Tightening torques of bolts and nuts as well as specifications whether bolts and nuts are to be replaced 34-9, Selector mechanism, assembly overview .
Note:
Do not bend or kink selector lever cable.
- install selector mechanism and tighten rear nuts - 1 -
Selector mechanism

hand-tight.
- Connect brace for center console - 3 - on to selector mechanism as depicted in the illustration.
- Tighten nuts - 1 - and - 2 - .
Harness connector - 1 - must not be connected when connector housing - 2 - is engaged in selector mechanism. By connecting (high resistance by spring), the locking mechanism breaks off from connector housing.
- Connect connector - 1 - and connector housing - 2 - and then engage into selector mechanism.
- Install air guide and center console
.
Repair Manual, Body Interior, Repair Group 68, storage compartments, covers and panels; removing and installing center console
- Install handle and cover for selector mechanism 34-9, Selector mechanism handle and cover, removing and installing .
- Connect battery Ground (GND) strap
.
Repair Manual, Electrical Equipment, Repair Group 27, disconnecting and connecting battery
- Ignition key removal lock, checking function 34-9, Ignition key removal lock, checking function .
- Adjust selector lever cable 34-9, Selector lever cable, checking and adjusting .
Selector mechanism

- Install air filter housing and connect harness connector - 2 - to Mass Air Flow (MAF) Sensor G70 .
- Connect vent hose - 1 - and air guide hose - 5 - .
- Connect air guide hose and secure spring clip - 3 - using spring clip pliers VAS 5024 A .
- Check shift mechanism 34-9, Selector mechanism, checking .
- Install heat shield and trim for vehicle floor
.
Repair Manual, Body Exterior, Repair Group 66, Exterior equipment
- Install exhaust system and align it free of tension
.
Repair Manual, Corresponding engine, Repair Group 26,
- Install noise insulation
Repair Manual, Body Exterior, Repair Group 50, Body front, Noise Insulation - assembly overview
Selector lever cable, removing and installing
Special tools, testers and auxiliary items required
Selector mechanism

Torque wrench V.A.G 1331
Pliers for spring-type clamps VAS 5024 A
Removing
- Place selector lever in position "P" .
- Switch ignition off.
- Remove cover for selector mechanism 34-9, Selector mechanism handle and cover, removing and installing .
- Remove engine cover
.
Repair Manual, Corresponding engine, Repair Group 10, removing and installing engine; removing engine
Selector mechanism

- Disconnect electrical harness connector - 2 - from Mass Air Flow (MAF) Sensor G70 .
- Disconnect vent hose - 1 - and air guide hose - 5 - .
- Open spring clamp - 3 - using hose clamp pliers VAS 5024 A and disconnect air guide hose from tube.
- Unscrew bolt - 4 - and remove air filter housing.
- Release retaining disc - 1 - and remove upward.
- Remove retaining disc - 3 - upward.
- Press off selector lever cable - 2 - from lever/selector shaft in - direction of arrow - and set it on top.
Note:
Do not bend or kink selector lever cable.
- Raise vehicle.
- Remove noise insulation
Repair Manual, Body Exterior, Repair Group 50, Body front, Noise Insulation - assembly overview
Selector mechanism
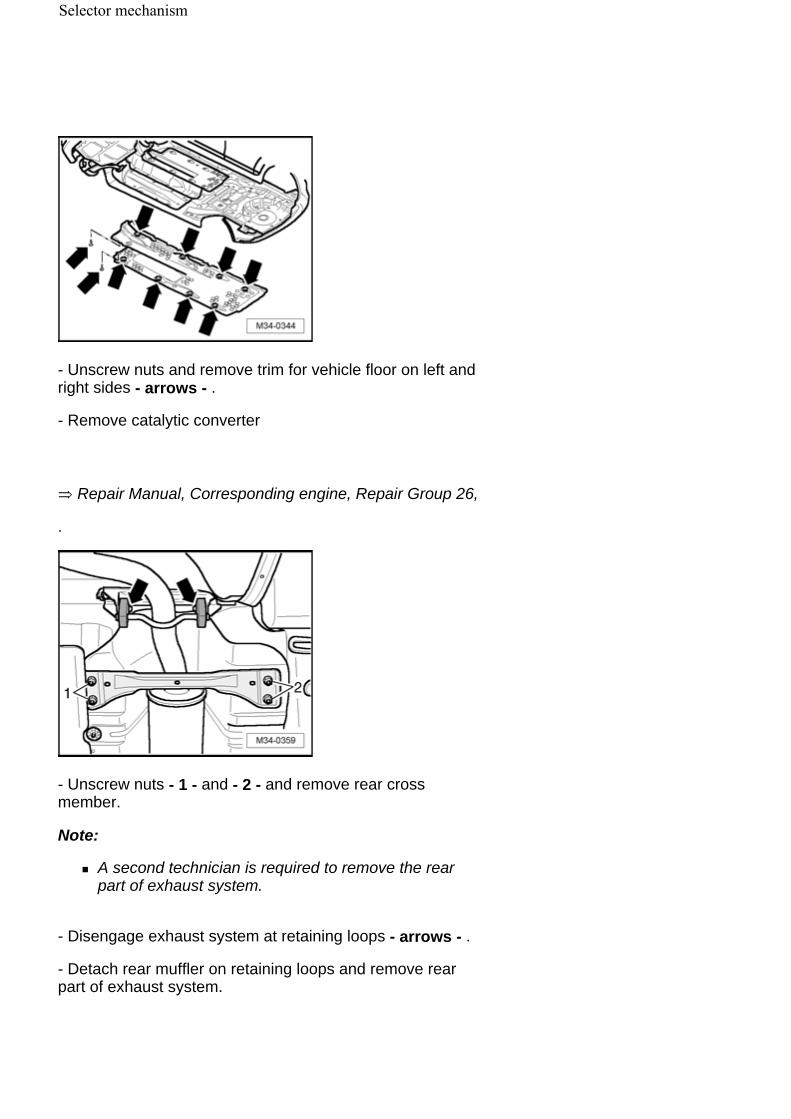
- Unscrew nuts and remove trim for vehicle floor on left and right sides - arrows - .
- Remove catalytic converter
.
Repair Manual, Corresponding engine, Repair Group 26,
- Unscrew nuts - 1 - and - 2 - and remove rear cross member.
Note:
A second technician is required to remove the rear part of exhaust system.
- Disengage exhaust system at retaining loops - arrows - .
- Detach rear muffler on retaining loops and remove rear part of exhaust system.
Selector mechanism

- Loosen nuts - arrows - and lower the heat shield.
- Disengage selector lever cable from heat shield at left front.
- Pull heat shield toward rear as far as possible and guide past subframe. Then remove heat shield toward front.
Selector mechanism

- Remove nuts - 1 - and slide shift mechanism housing - 2 - as far as possible forward on selector lever cable.
Caution!
Always make sure that securing tab moves only a maximum of 5 mm in - direction of arrow A - . If this value is exceeded, there is the risk that the securing tab will break off. Then the complete selector mechanism must be replaced.
- Pull securing tab - 3 - gently in - direction of arrow A - (max. 5 mm).
- Using a screwdriver, press out bolt - 4 - in - direction of arrow B - .
Note :
Bolt may slip out of its guide when pressing out. It must then be installed again in the same place for the installation.
- Remove locking washer - 5 - .
- Remove selector lever cable.
Installing
Installation is performed in the reverse order of removal. Note the following:
Note:
Check protective sleeve of selector lever cable for damage, protective sleeve can only be replaced together with selector lever cable.
Check protective sleeve for correct seating and do not install protective sleeve twisted.
Tightening torques of bolts and nuts as well as specifications whether bolts and nuts are to be replaced 34-9, Selector mechanism, assembly overview .
- Place selector lever in position "P" .
Do not grease ball socket of selector lever cable and ball head/selector lever.
- Guide selector lever cable with protective sleeve into cover. Do not damage protective sleeve when doing this.
Selector mechanism

- Slide shift mechanism housing - 2 - forward as far as possible on selector lever.
Do not grease bolt - 4 - .
- install bolt - 4 - only in upper section of mount.
- Slide selector lever cable into mount.
Caution!
Always make sure that securing tab moves only a maximum of 5 mm in - direction of arrow A - . If this value is exceeded, there is the risk that the securing tab will break off. Then the complete selector mechanism must be replaced.
- Pull securing tab - 3 - gently in - direction of arrow A - (max. 5 mm).
- Move selector lever cable slightly toward front and rear in alternation. When doing this, press bolt - 4 - downward by
Selector mechanism

hand simultaneously.
- Install new locking washer - 5 - .
- Tighten nuts - 1 - .
Caution!
Do not touch circuit board of selector mechanism with the fingers under any circumstances, since the electrical components on the circuit board may be destroyed by static discharge.
Circuit board can only be replaced together with selector mechanism!
- Carefully press selector lever cable - 2 - on to lever/selector shaft on transmission in opposite - direction of arrow - .
- install retaining disc - 1 - up to stop and engage.
- Install a new retaining disc - 3 - .
- Shift selector lever from "P" to "S" .
Shift mechanism and selector lever cable must have freedom of movement during this, if necessary, replace selector lever cable or service shift mechanism.
- Place selector lever in position "P" .
- Install heat shield and trim for vehicle floor
.
Repair Manual, Body Exterior, Repair Group 66, Exterior equipment
- Install exhaust system and align it free of tension
Selector mechanism
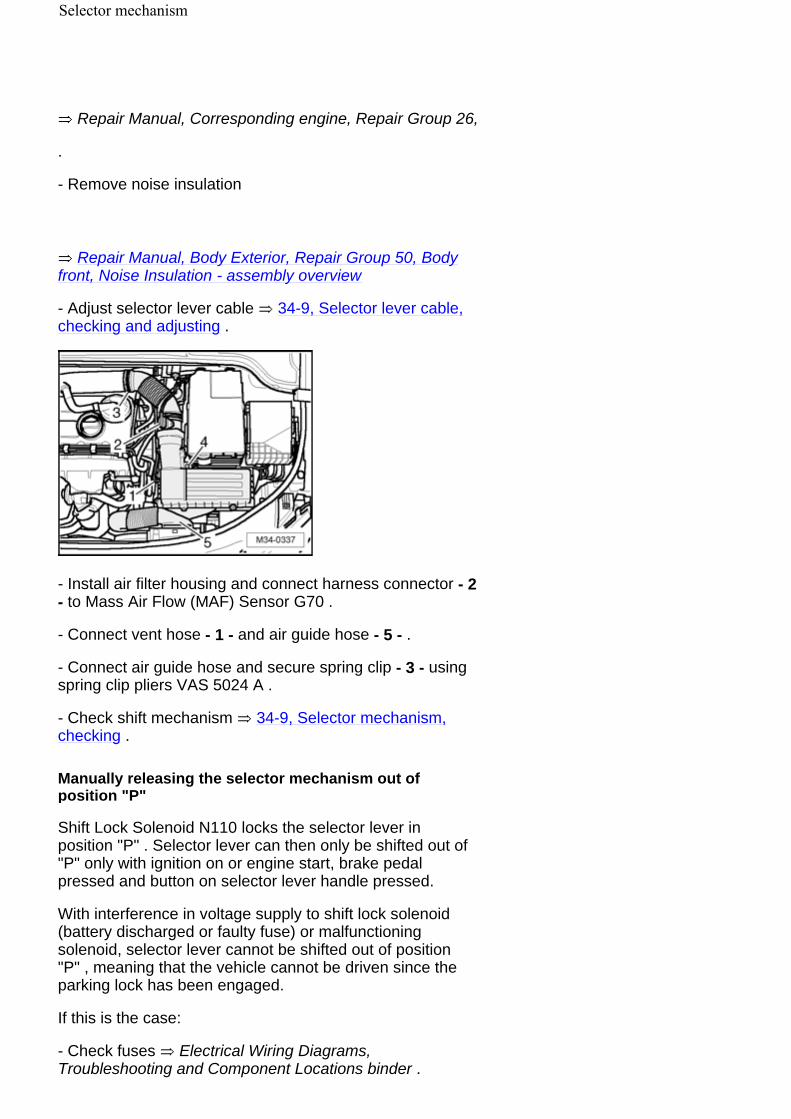
.
Repair Manual, Corresponding engine, Repair Group 26,
- Remove noise insulation
Repair Manual, Body Exterior, Repair Group 50, Body front, Noise Insulation - assembly overview
- Adjust selector lever cable 34-9, Selector lever cable, checking and adjusting .
- Install air filter housing and connect harness connector - 2 - to Mass Air Flow (MAF) Sensor G70 .
- Connect vent hose - 1 - and air guide hose - 5 - .
- Connect air guide hose and secure spring clip - 3 - using spring clip pliers VAS 5024 A .
- Check shift mechanism 34-9, Selector mechanism, checking .
Manually releasing the selector mechanism out of position "P"
Shift Lock Solenoid N110 locks the selector lever in position "P" . Selector lever can then only be shifted out of "P" only with ignition on or engine start, brake pedal pressed and button on selector lever handle pressed.
With interference in voltage supply to shift lock solenoid (battery discharged or faulty fuse) or malfunctioning solenoid, selector lever cannot be shifted out of position "P" , meaning that the vehicle cannot be driven since the parking lock has been engaged.
If this is the case:
- Check fuses Electrical Wiring Diagrams, Troubleshooting and Component Locations binder .
Selector mechanism

- Check battery voltage
.
Repair Manual, Electrical Equipment, Repair Group 27, Checking battery
If selector lever cannot be shifted out of position "P" despite testing, emergency release of the solenoid can be performed. If selector lever is shifted back into position "P" afterward, it is however locked again in position "P" .
Performing manual release
Do not remove handle.
- Unclip shift cover and hold to the side.
- Operate brake or activate parking brake.
- Press on yellow plastic piece in - direction of arrow - .
- Now press button on selector lever handle and shift selector lever out of position "P" .
Note:
If selector lever is shifted back into position "P" afterward, it is locked mechanically by shift lock solenoid again in position "P" .
Tiptronic Switch F189 , removing and installing
Tiptronic Switch F189 is integrated permanently in selector mechanism and cannot be replaced separately. If Tiptronic Switch F189 is malfunctioning, selector mechanism must be replaced 34-9, Selector mechanism, removing and installing .
Shift Lock Solenoid N110 removing and installing
Shift Lock Solenoid N110 is integrated permanently in
Selector mechanism
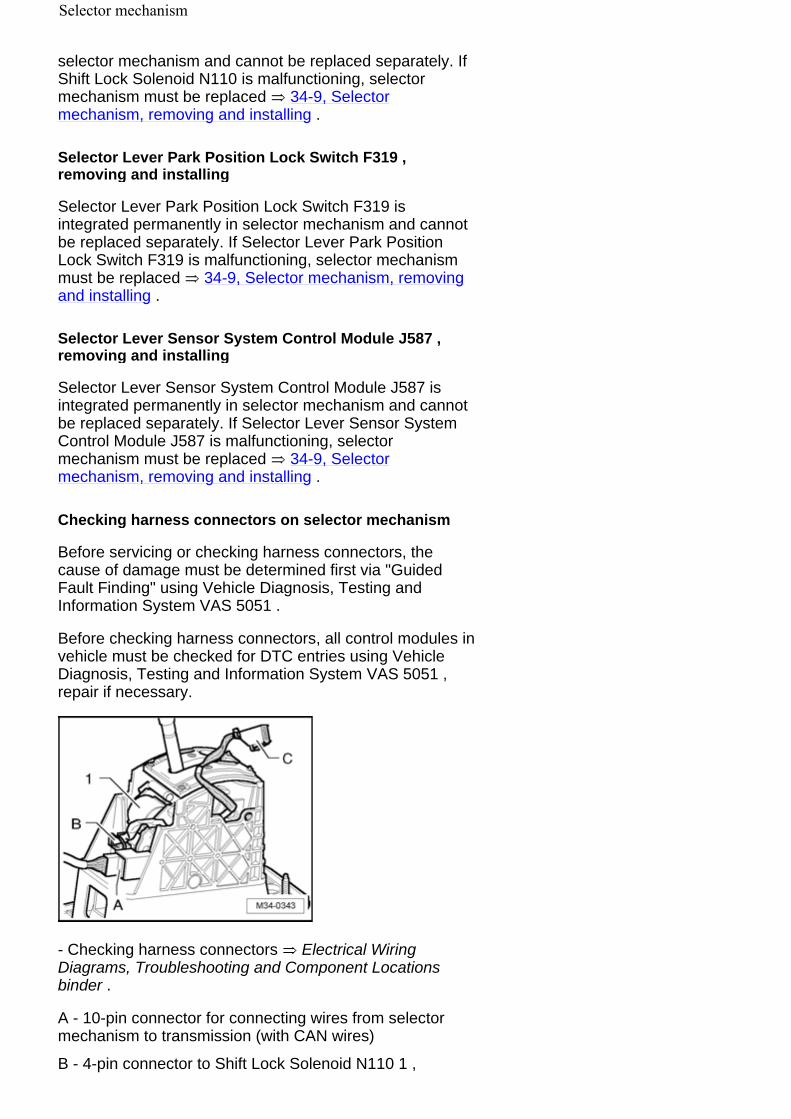
selector mechanism and cannot be replaced separately. If Shift Lock Solenoid N110 is malfunctioning, selector mechanism must be replaced 34-9, Selector mechanism, removing and installing .
Selector Lever Park Position Lock Switch F319 , removing and installing
Selector Lever Park Position Lock Switch F319 is integrated permanently in selector mechanism and cannot be replaced separately. If Selector Lever Park Position Lock Switch F319 is malfunctioning, selector mechanism must be replaced 34-9, Selector mechanism, removing and installing .
Selector Lever Sensor System Control Module J587 , removing and installing
Selector Lever Sensor System Control Module J587 is integrated permanently in selector mechanism and cannot be replaced separately. If Selector Lever Sensor System Control Module J587 is malfunctioning, selector mechanism must be replaced 34-9, Selector mechanism, removing and installing .
Checking harness connectors on selector mechanism
Before servicing or checking harness connectors, the cause of damage must be determined first via "Guided Fault Finding" using Vehicle Diagnosis, Testing and Information System VAS 5051 .
Before checking harness connectors, all control modules in vehicle must be checked for DTC entries using Vehicle Diagnosis, Testing and Information System VAS 5051 , repair if necessary.
- Checking harness connectors Electrical Wiring Diagrams, Troubleshooting and Component Locations binder .
A - 10-pin connector for connecting wires from selector mechanism to transmission (with CAN wires)
B - 4-pin connector to Shift Lock Solenoid N110 1 ,
Selector mechanism

Selector Lever Sensor System Control Module J587 and Selector Lever Park Position Lock Switch F319
C - 10-pin connector to Slector Lever Scale Illumination L101 in selector mechanism cover
Selector mechanism

34 - 10
Transmission, removing and installing
Special tools, testers and auxiliary items required
Engine support bridge 10-222 A
Adapter 10-222 A/8
Hose clamps up to Ø 25 mm 3094
Transmission support 3282
Pin 3282/29
Mount 3282/52
Security mount 3282/59
Transmission, removing and installing
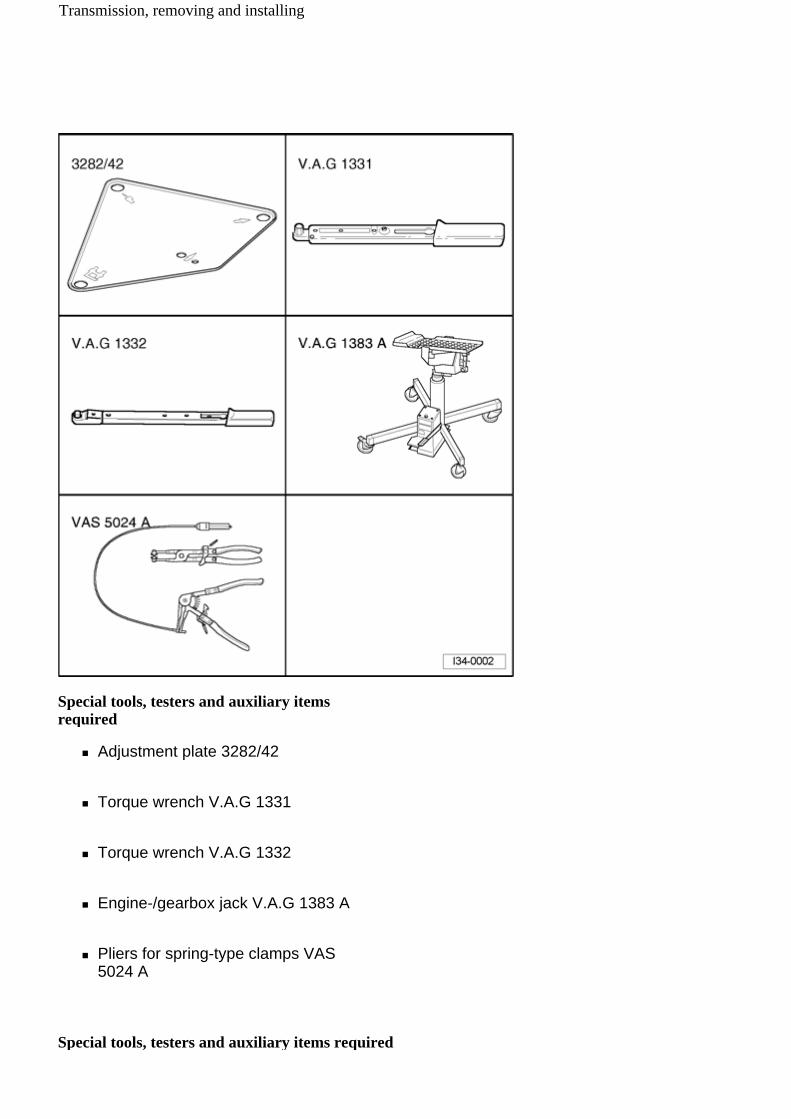
Special tools, testers and auxiliary items required
Adjustment plate 3282/42
Torque wrench V.A.G 1331
Torque wrench V.A.G 1332
Engine-/gearbox jack V.A.G 1383 A
Pliers for spring-type clamps VAS 5024 A
Special tools, testers and auxiliary items required
Transmission, removing and installing

Socket T10035
High temperature grease G 052 133 A2
Grease G 000 100
Transmission, removing
Note:
Observe notes for Direct-Shift Transmission 02E 00-2, Notes for 6 Spd. Direct Shift Automatic Transmission 02E Front Wheel Drive .
Observe general repair notes and rules of cleanliness for working on the transmission 00-6, General Repair Notes .
All cable ties opened or cut during transmission removal must be reinstalled at the same locations.
Additional work must be performed when disconnecting and reconnecting battery
.
Repair Manual, Electrical Equipment, Repair Group 27, Battery, disconnecting and reconnecting battery
- Check whether a coded radio is installed. If this is the case obtain anti-theft coding.
- Place selector lever in position "P" .
- Remove engine cover
Transmission, removing and installing

.
Repair Manual, Corresponding engine, Repair Group 10, removing and installing engine; removing engine
Note:
All cable ties opened or cut during transmission removal must be reinstalled at the same locations.
- Disconnect electrical harness connector - 2 - from Mass Air Flow (MAF) Sensor G70 .
- Disconnect vent hose - 1 - and air guide hose - 5 - .
- Open spring clamp - 3 - using hose clamp pliers VAS 5024 A and disconnect air guide hose from tube.
- Unscrew bolt - 4 - and remove air filter housing.
- Remove battery
.
Repair Manual, Electrical Equipment,, Repair Group 27, Battery; removing and installing battery
- Remove battery carrier.
Do not loosen bolt - B - .
Transmission, removing and installing
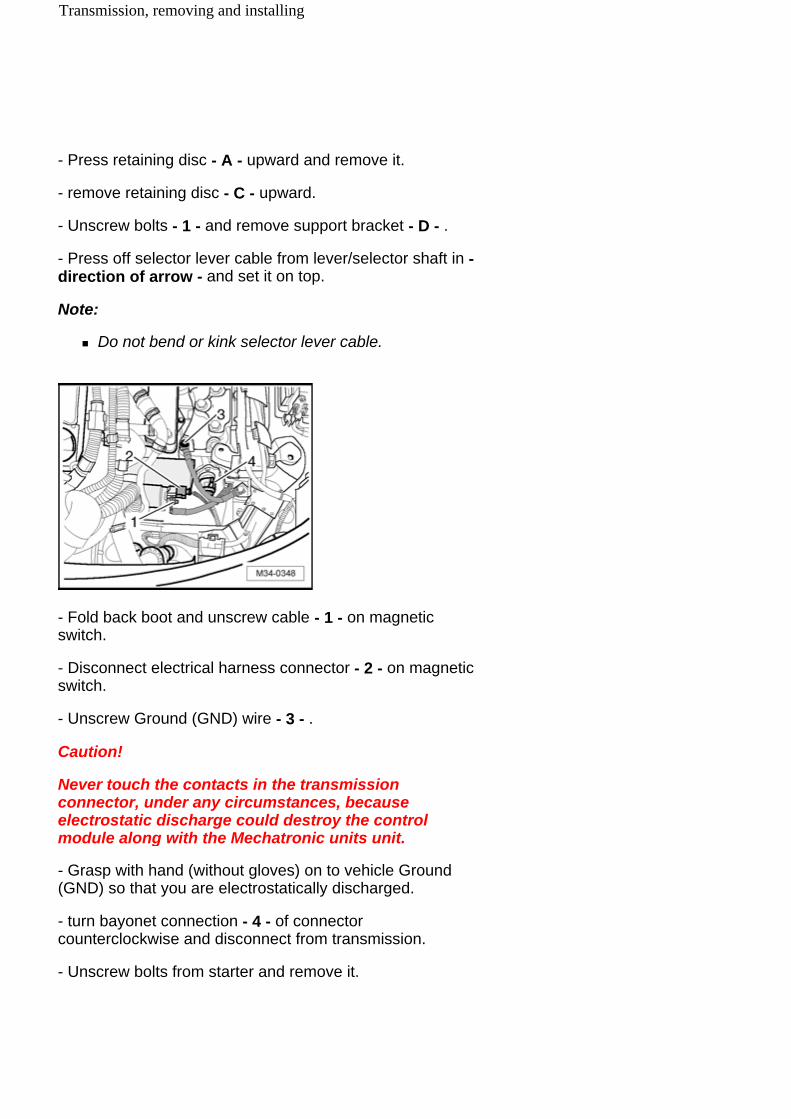
- Press retaining disc - A - upward and remove it.
- remove retaining disc - C - upward.
- Unscrew bolts - 1 - and remove support bracket - D - .
- Press off selector lever cable from lever/selector shaft in - direction of arrow - and set it on top.
Note:
Do not bend or kink selector lever cable.
- Fold back boot and unscrew cable - 1 - on magnetic switch.
- Disconnect electrical harness connector - 2 - on magnetic switch.
- Unscrew Ground (GND) wire - 3 - .
Caution!
Never touch the contacts in the transmission connector, under any circumstances, because electrostatic discharge could destroy the control module along with the Mechatronic units unit.
- Grasp with hand (without gloves) on to vehicle Ground (GND) so that you are electrostatically discharged.
- turn bayonet connection - 4 - of connector counterclockwise and disconnect from transmission.
- Unscrew bolts from starter and remove it.
Transmission, removing and installing

- Remove all engine/transmission connecting bolts - 1 - to - 4 - accessible from above. To do so, use socket install T10035 .
Warning!
When opening the coolant expansion tank, hot steam could es covere. Wear eye protection and protective clothing to prevent eye injuries and scalding. Cover cover with a rag and open carefully.
- The cooling system is under pressure when engine is warm. Before clamping off coolant hoses, slowly unscrew sealing cover from expansion tank and dissipate pressure.
- Place lint-free cloth on to transmission oil cooler and transmission to absorb exiting coolant.
- Clamp off coolant hoses of transmission oil cooler using hose clamps 3094 .
- Open spring clips and disconnect coolant hoses from transmission oil cooler.
- Plug transmission oil cooler with clean plug.
Transmission, removing and installing
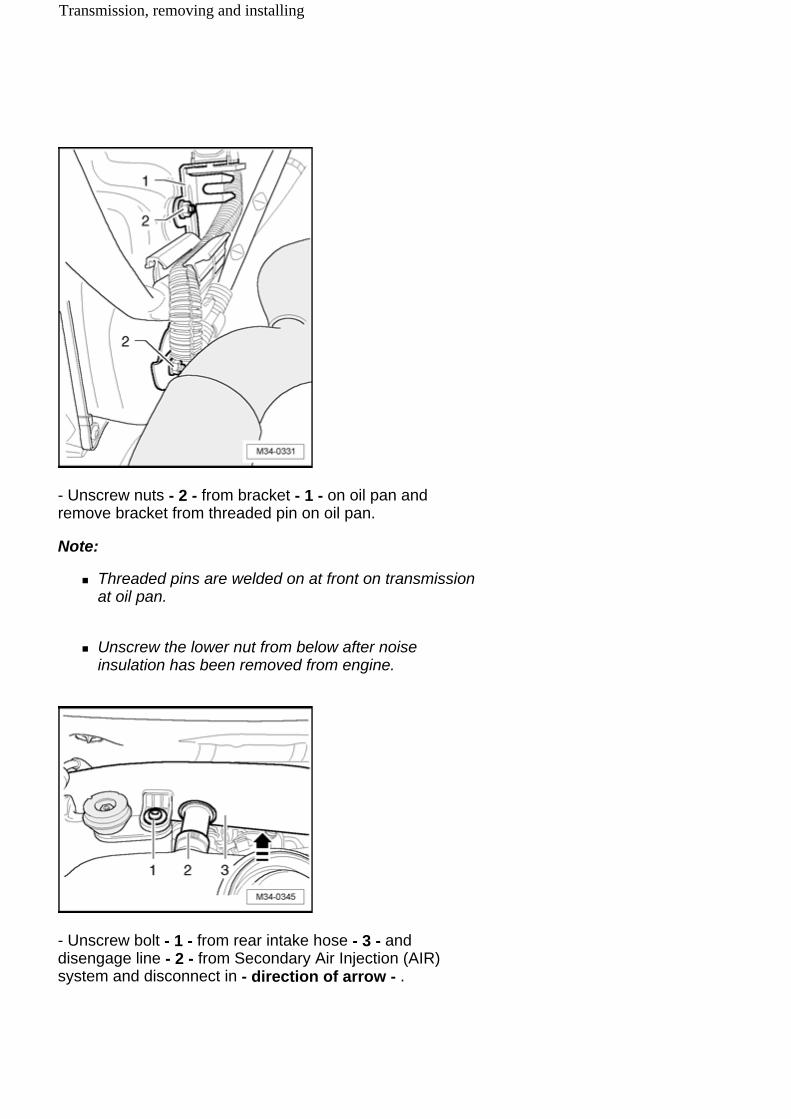
- Unscrew nuts - 2 - from bracket - 1 - on oil pan and remove bracket from threaded pin on oil pan.
Note:
Threaded pins are welded on at front on transmission at oil pan.
Unscrew the lower nut from below after noise insulation has been removed from engine.
- Unscrew bolt - 1 - from rear intake hose - 3 - and disengage line - 2 - from Secondary Air Injection (AIR) system and disconnect in - direction of arrow - .
Transmission, removing and installing

- Remove bracket for coolant lines and fuel on valve cover. Loosen bolts - 1 - to do so.
- Remove fuel hose - 2 - on tandem pump. Absorb exiting fuel with a rag.
- Seal fuel hose - 2 - and tandem pump with clean plugs.
- Unscrew bolts - 3 - and - 5 - and remove bracket - 4 - .
- Place engine support bridge 10-222 A with adapters 10-222 A/8 and adapter 10-222 A/3 in front of gas-filled strut for hood.
- If hose- and cable connections are found in the area of engine lifting eyes for engine support bridge 10-222 A , they must be removed now.
- Engage spindles 10-222 A/10 of engine support bridge on left and right engine lifting eyelets and support engine with transmission.
- Clamp engine using spindles, do not raise.
- Remove noise insulation
Transmission, removing and installing

Repair Manual, Body Exterior, Repair Group 50, Body
front, Noise Insulation - assembly overview
- Release connector coupling by pulling locking clip - arrow - .
- Disconnect hose/tube without tools.
- Remove air guide hose - 2 - . To do so, lift retaining clips - 1 - slightly and disconnect air guide hose from tubes.
- Remove right air guide hose. To do so, lift retaining clips - arrows - slightly and disconnect air guide hose from tubes.
Transmission, removing and installing

- If installed, remove shield - A - at bottom on transmission - arrows - .
- Unscrew bolt - 1 - and remove small cover plate - 2 - for flywheel.
- Unbolt brace for front exhaust tube - arrows - .
- Remove catalytic converter
.
Repair Manual, Corresponding engine, Repair Group 26,
Transmission, removing and installing

- Disconnect electrical harness connector - 1 - on Oil Level Thermal Sensor G266 .
- Unclip wiring harness from bracket - 2 - .
- Remove bolts - arrows - .
Note:
Pendulum support is removed with the subframe.
- Remove left front wheel.
- Unscrew bolts - 1 - to - 3 - and remove cover for left wheel housing liner.
- Remove left drive axle
Transmission, removing and installing

.
Repair Manual, Suspension, Wheels, Steering, Repair Group 40, Servicing drive axles; removing and installing drive axles
- If present, disconnect electrical harness connector - 2 - at Left Front Level Control System Sensor G78 .
- Remove bolt - 1 - .
- Remove subframe with left control arm and left console
.
Repair Manual, Suspension, Wheels, Steering, Repair Group 40, Assembly overview: Subframe, anti roll bar, control arm; removing and installing subframe
Caution!
Locating pins T10096 must be used to remove console for transverse link, since then an axle alignment must
Transmission, removing and installing

be performed otherwise.
- Remove bolts - 1 - and - 2 - .
- Lower engine/transmission assembly on spindle of engine support bridge 10-222 A approximately 2 rotations each on alternating sides.
- Lower engine/transmission assembly approx. 4 rotations.
- Remove console - A - .
- Lower engine/transmission assembly on spindle of engine support bridge 10-222 A evenly on alternating sides until dimension - a - is reached between transmission housing and transmission bearing.
Dimension - a - = 100 110 mm
To remove direct shift transmission 02E, transmission support 3282 is aligned using adjustment plate 3282/42 and attached to engine/transmission jack V.A.G 1383 A .
Transmission, removing and installing

- Align transmission support arms to correspond with the holes in Adjustment Plate 3282/42 .
- Screw in attachments as depicted on adjustment plate 3282/42 .
- Place engine/transmission jack V.A.G 1383 A under vehicle. Arrow symbol on adjustment plate 3282/42 points in the direction of travel.
- Align transmission support 3282 parallel to transmission.
- Secure support to transmission with bolt - 1 - .
- Screw bolt 3282/29 into transmission.
- install security mount - 2 - into transmission and secure by tightening nut.
- Support transmission from below by lifting engine/transmission jack V.A.G 1383 A .
- Remove the remaining connecting bolts for engine/transmission - 5 - and - 6 - .
- Press off transmission from alignment bushings - A - .
Transmission, removing and installing

- Pull transmission slightly off engine.
- Pull anti roll bar and steering gear toward rear and guide the right flanged shaft of transmission past on flywheel.
- Carefully lower transmission slightly using engine/transmission jack V.A.G 1383 A .
- Change position of transmission by lowering via the spindles of transmission support 3282 .
Transport transmission 34-10, Transporting the transmission .
Attach transmission to assembly stand 34-10, Attaching transmission to assembly stand .
Transporting the transmission
A part of the engine sling 3282 can be used to transport the direct shift transmission as well as to align the transmission support 2024 A .
- Engage workshop crane VAS 6100 in conjunction with a shackle 10-222A/12 into engine sling 2024 A .
Transmission can also be transported using transmission support jig 3336 .
Attaching transmission to assembly stand
Transmission, removing and installing
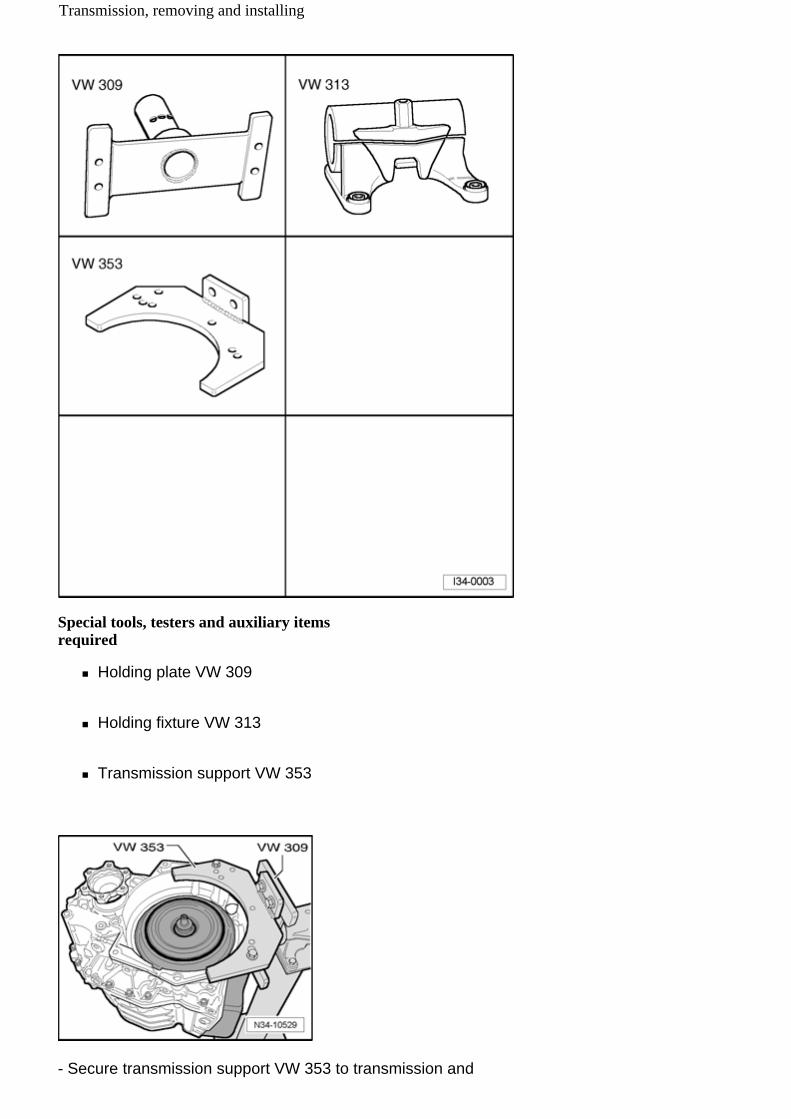
Special tools, testers and auxiliary items required
Holding plate VW 309
Holding fixture VW 313
Transmission support VW 353
- Secure transmission support VW 353 to transmission and
Transmission, removing and installing
to holding plate VW 309 .
- Secure transmission using transmission support and holding plate in holding fixture VW 313 .
Warning!
The center of gravity of the transmission is located outside the turning center at holding fixture. To turn the transmission, a second technician must hold the transmission housing to prevent back-swing.
Note:
Venting for the transmission housing must be closed before turning a filled transmission on the assembly stand so that the clutch faces upward.
Transmission, installing
Installation is performed in the reverse order of removal. Note the following:
Note:
Replace self-locking nuts and bolts during assembly work.
Always replace bolts that are secured with tightening torque as well as securing elements, O-rings and gaskets.
Secure all hose connections using hose clamps appropriate for the model type Electronic Parts Catalog "ETKA" .
All cable ties opened or cut during engine removal must be reinstalled at the same locations during installation.
Lightly grease input shaft end with high temperature grease G 052 133 A2 .
Clean input shaft splines and hub splines, remove corrosion and apply only a very thin coating of lubricating grease G 000 100 on splines. Always remove excessively applied grease.
Transmission, removing and installing
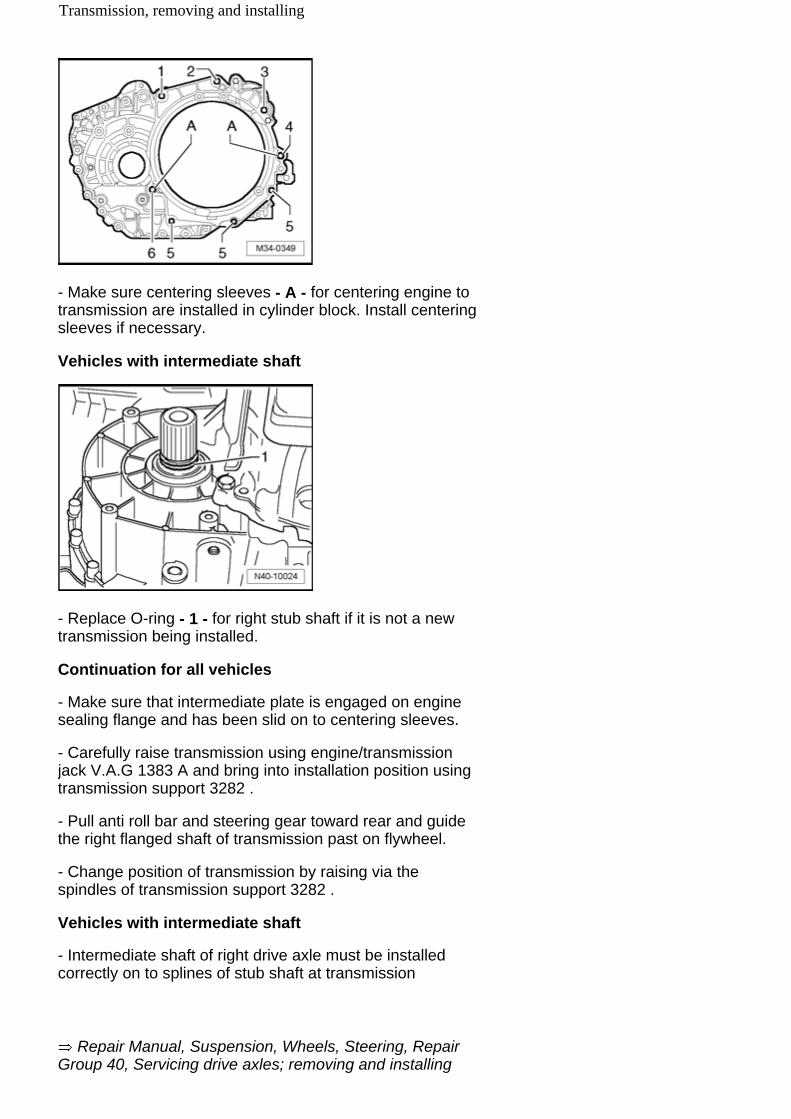
- Make sure centering sleeves - A - for centering engine to transmission are installed in cylinder block. Install centering sleeves if necessary.
Vehicles with intermediate shaft
- Replace O-ring - 1 - for right stub shaft if it is not a new transmission being installed.
Continuation for all vehicles
- Make sure that intermediate plate is engaged on engine sealing flange and has been slid on to centering sleeves.
- Carefully raise transmission using engine/transmission jack V.A.G 1383 A and bring into installation position using transmission support 3282 .
- Pull anti roll bar and steering gear toward rear and guide the right flanged shaft of transmission past on flywheel.
- Change position of transmission by raising via the spindles of transmission support 3282 .
Vehicles with intermediate shaft
- Intermediate shaft of right drive axle must be installed correctly on to splines of stub shaft at transmission
Repair Manual, Suspension, Wheels, Steering, Repair Group 40, Servicing drive axles; removing and installing
Transmission, removing and installing
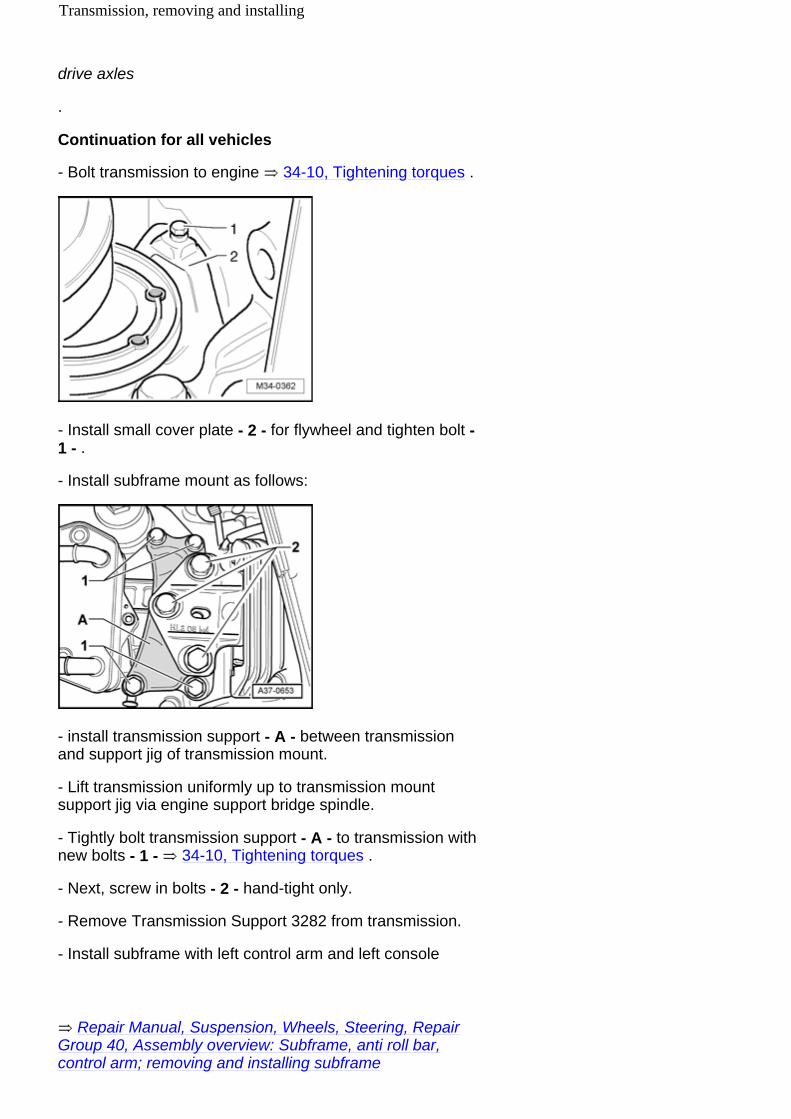
.
drive axles
Continuation for all vehicles
- Bolt transmission to engine 34-10, Tightening torques .
- Install small cover plate - 2 - for flywheel and tighten bolt - 1 - .
- Install subframe mount as follows:
- install transmission support - A - between transmission and support jig of transmission mount.
- Lift transmission uniformly up to transmission mount support jig via engine support bridge spindle.
- Tightly bolt transmission support - A - to transmission with new bolts - 1 - 34-10, Tightening torques .
- Next, screw in bolts - 2 - hand-tight only.
- Remove Transmission Support 3282 from transmission.
- Install subframe with left control arm and left console
Repair Manual, Suspension, Wheels, Steering, Repair Group 40, Assembly overview: Subframe, anti roll bar, control arm; removing and installing subframe
Transmission, removing and installing
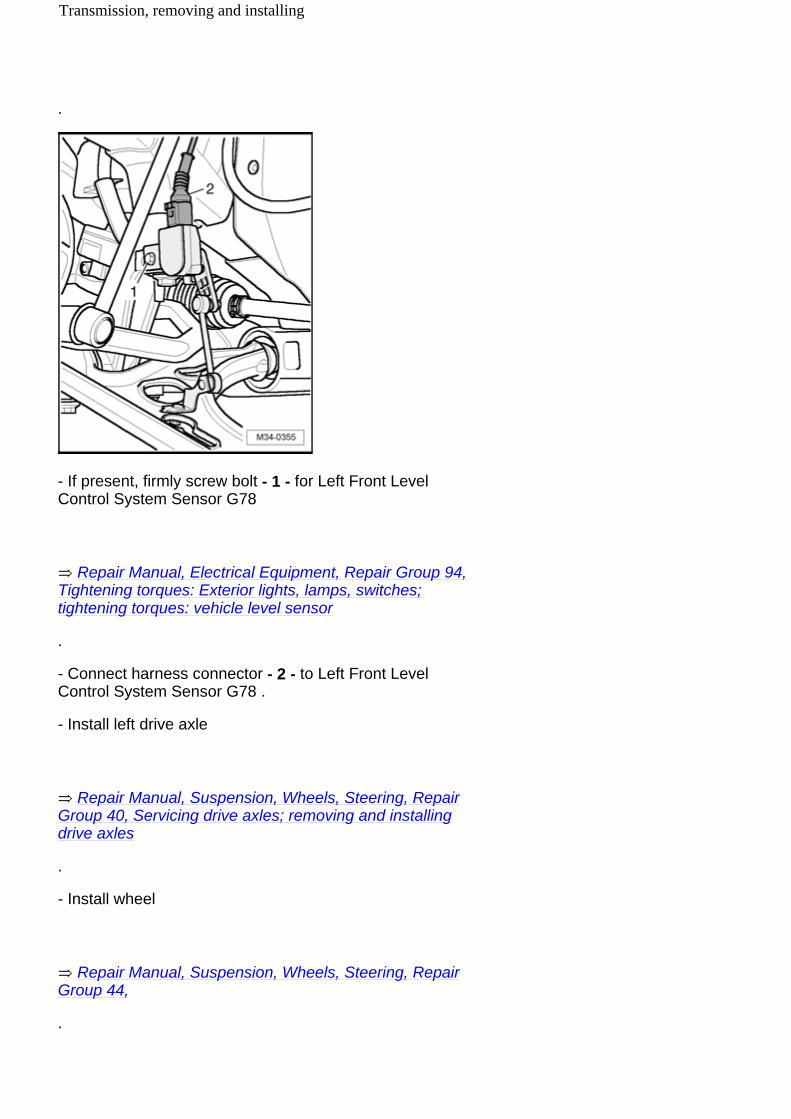
.
- If present, firmly screw bolt - 1 - for Left Front Level Control System Sensor G78
.
Repair Manual, Electrical Equipment, Repair Group 94, Tightening torques: Exterior lights, lamps, switches; tightening torques: vehicle level sensor
- Connect harness connector - 2 - to Left Front Level Control System Sensor G78 .
- Install left drive axle
.
Repair Manual, Suspension, Wheels, Steering, Repair Group 40, Servicing drive axles; removing and installing drive axles
- Install wheel
.
Repair Manual, Suspension, Wheels, Steering, Repair Group 44,
Transmission, removing and installing
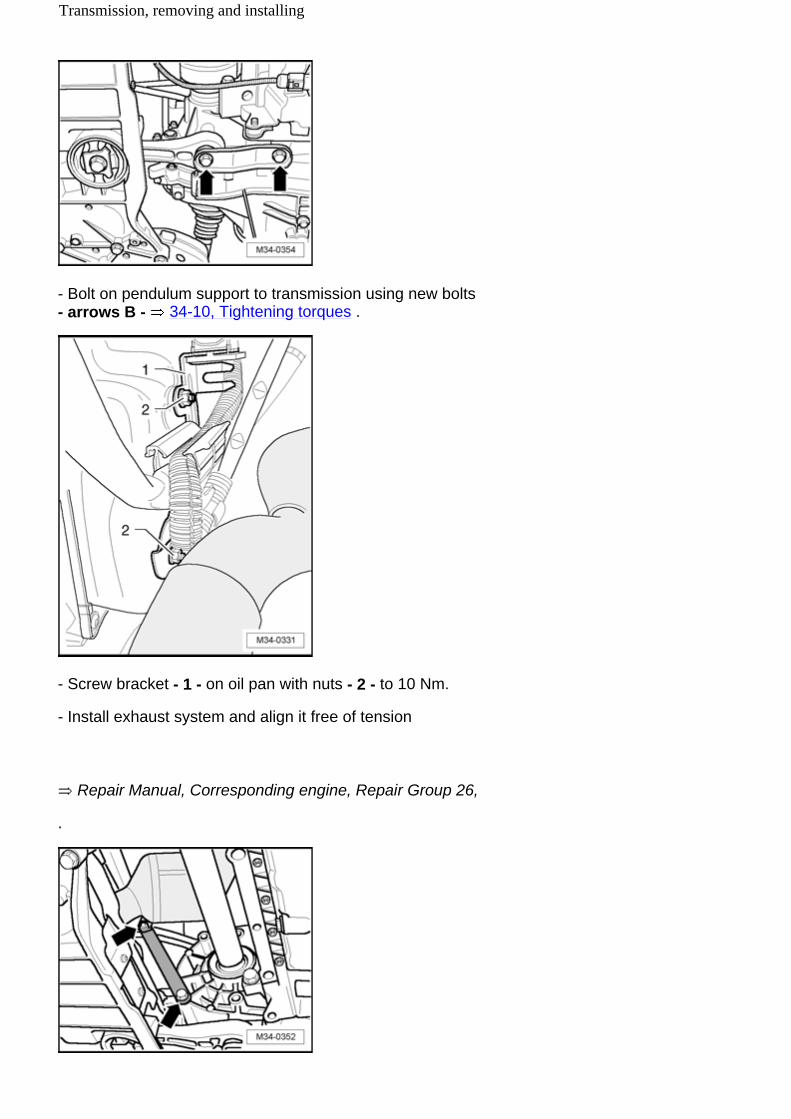
- Bolt on pendulum support to transmission using new bolts - arrows B - 34-10, Tightening torques .
- Screw bracket - 1 - on oil pan with nuts - 2 - to 10 Nm.
- Install exhaust system and align it free of tension
.
Repair Manual, Corresponding engine, Repair Group 26,
Transmission, removing and installing

- Bolt on brace for front exhaust tube - arrows - .
- Connect harness connector - 1 - to Oil Level Thermal Sensor G266 .
- Clip wiring harness into bracket - 2 - .
- If present, install shield - A - at bottom on transmission - arrows - .
Note:
Use lubricant (water with no additives) for the assembly as necessary. Do not use oil-based lubricants.
Hose connections of charge air system are secured by connector couplings. For connector couplings, always note the following point:
Transmission, removing and installing
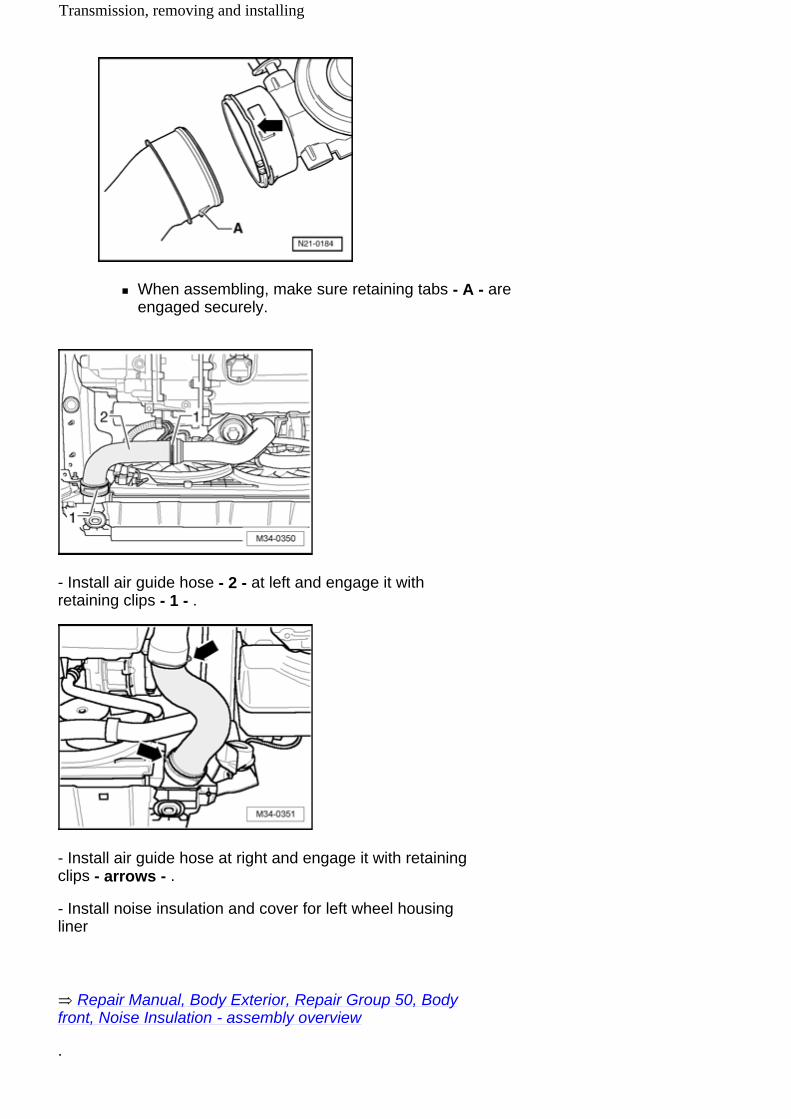
When assembling, make sure retaining tabs - A - are engaged securely.
- Install air guide hose - 2 - at left and engage it with retaining clips - 1 - .
- Install air guide hose at right and engage it with retaining clips - arrows - .
- Install noise insulation and cover for left wheel housing liner
.
Repair Manual, Body Exterior, Repair Group 50, Body front, Noise Insulation - assembly overview
Transmission, removing and installing

- Check adjustment of subframe mount
.
Repair Manual, Corresponding engine, Repair Group 10,
- Tighten bolts for transmission support 34-10, Tightening torques .
- Install starter
.
Repair Manual, Electrical Equipment,, Repair Group 27, Starter; removing and installing starter
- Install electrical harness connector - 2 - and Ground (GND) wire - 3 - .
Note:
Do not bend or kink selector lever cable.
- Attach support bracket - D - and tighten with bolts - 1 - 34-2, Component overview .
- Connect selector lever cable to lever/selector shaft in opposite - direction of arrow - .
Transmission, removing and installing

- Secure selector lever cable with new retaining discs - A - and - C - .
- Check adjustment of selector lever cable and adjust if necessary 34-9, Selector lever cable, checking and adjusting .
- install bracket - 4 - and bolt tightly with bolts - 3 - and - 5 - .
- Install fuel hose - 2 - on tandem pump.
- Install bracket for coolant and fuel lines on valve cover and tighten bolts - 1 - .
- Install battery carrier.
- Install rear intake hose - 3 - and connect in opposite - direction of arrow - to line - 2 - and engage.
- Tighten bolt - 1 - .
Transmission, removing and installing

- Connect coolant hoses of transmission oil cooler and remove hose clamps 3094 .
- Install battery
.
Repair Manual, Electrical Equipment,, Repair Group 27, Battery; removing and installing battery
- Install air filter housing and connect harness connector - 2 - to Mass Air Flow (MAF) Sensor G70 .
- Connect vent hose - 1 - and air guide hose - 5 - .
- Connect air guide hose and secure spring clip - 3 - using spring clip pliers VAS 5024 A .
- Check transmission oil level, top off if necessary 34-11, Changing transmission oil and checking oil level .
Tightening torques
Transmission, removing and installing

Engine/transmission mount
Item no. Bolt Nm
1, 2, 3 M12x55 80
4, 6 M12x70 80
5 M10x50 40
A Dowel sleeves
Transmission subframe mount
A - 40 Nm + 90 ( 1 / 4 additional rotation) - replace
B - 60 Nm + 90 ( 1 / 4 additional rotation) - replace
Pendulum supports
Transmission, removing and installing

A - 40 Nm + 90 ( 1 / 4 additional rotation) - replace
B -100 Nm + 90 ( 1 / 4 additional rotation) - replace
Sequence for removing and installing
Removing: Unscrew bolt - B - first, then bolts - A - .
Installing: Tighten bolts - A - first, then bolt - B - .
Transmission, removing and installing
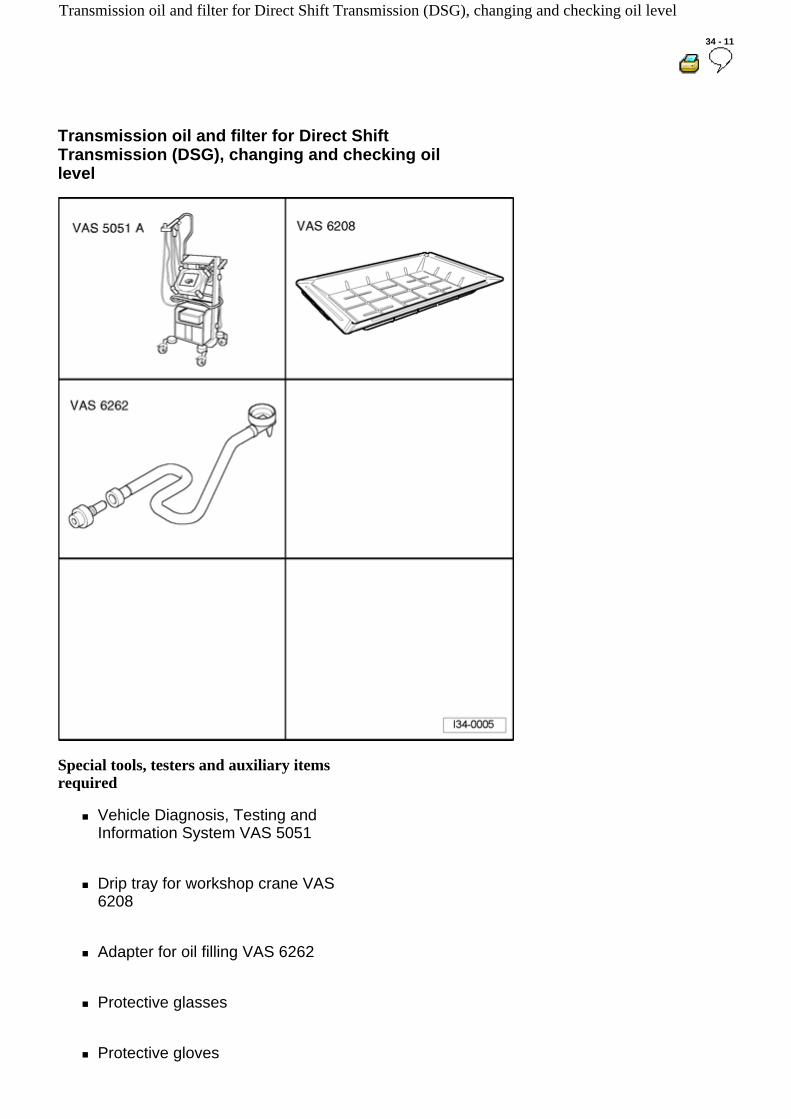
34 - 11
Transmission oil and filter for Direct Shift Transmission (DSG), changing and checking oil level
Special tools, testers and auxiliary items required
Vehicle Diagnosis, Testing and Information System VAS 5051
Drip tray for workshop crane VAS 6208
Adapter for oil filling VAS 6262
Protective glasses
Protective gloves
Transmission oil and filter for Direct Shift Transmission (DSG), changing and checking oil level
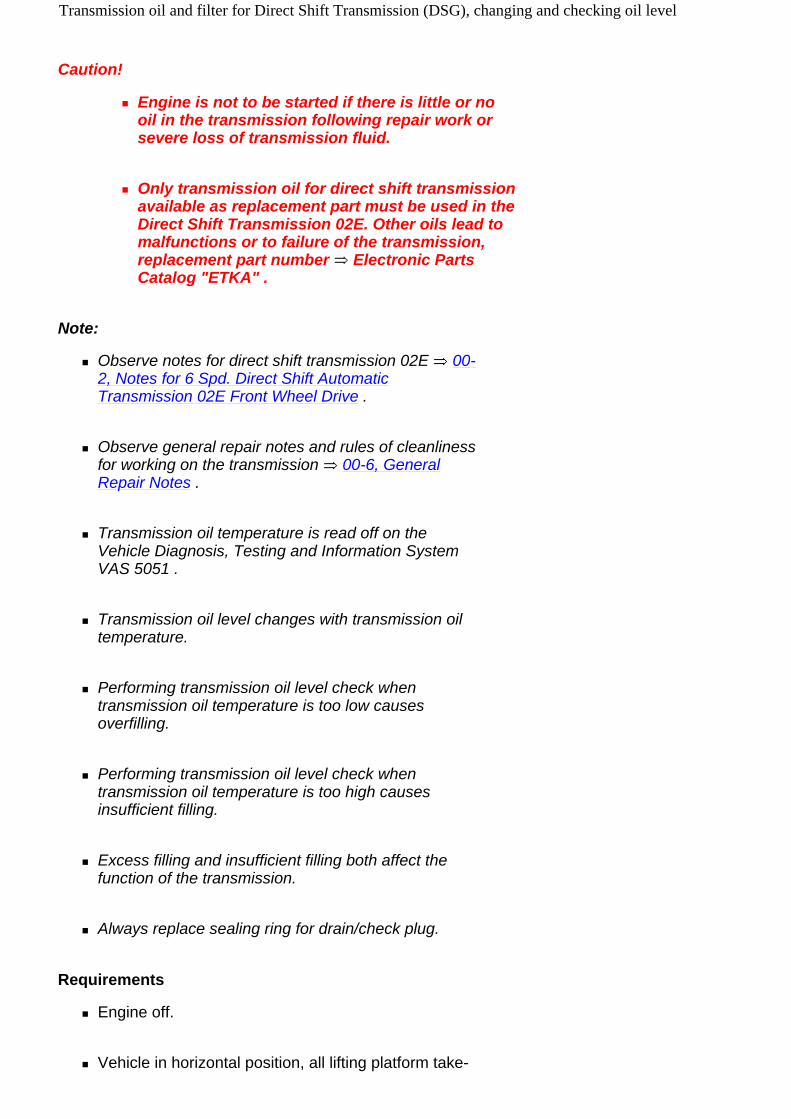
Caution!
Engine is not to be started if there is little or no oil in the transmission following repair work or severe loss of transmission fluid.
Only transmission oil for direct shift transmission available as replacement part must be used in the Direct Shift Transmission 02E. Other oils lead to malfunctions or to failure of the transmission, replacement part number Electronic Parts Catalog "ETKA" .
Note:
Observe notes for direct shift transmission 02E 00-2, Notes for 6 Spd. Direct Shift Automatic Transmission 02E Front Wheel Drive .
Observe general repair notes and rules of cleanliness for working on the transmission 00-6, General Repair Notes .
Transmission oil temperature is read off on the Vehicle Diagnosis, Testing and Information System VAS 5051 .
Transmission oil level changes with transmission oil temperature.
Performing transmission oil level check when transmission oil temperature is too low causes overfilling.
Performing transmission oil level check when transmission oil temperature is too high causes insufficient filling.
Excess filling and insufficient filling both affect the function of the transmission.
Always replace sealing ring for drain/check plug.
Requirements
Engine off.
Vehicle in horizontal position, all lifting platform take-
Transmission oil and filter for Direct Shift Transmission (DSG), changing and checking oil level
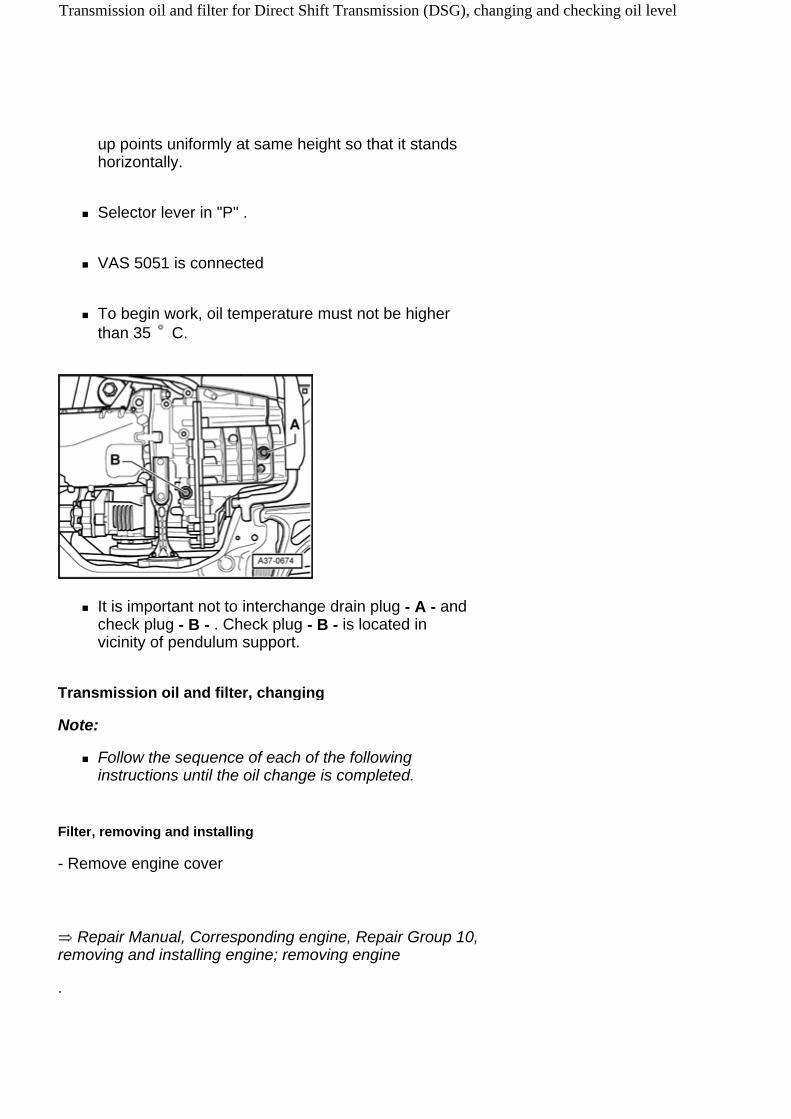
up points uniformly at same height so that it stands horizontally.
Selector lever in "P" .
VAS 5051 is connected
To begin work, oil temperature must not be higher than 35 C.
It is important not to interchange drain plug - A - and check plug - B - . Check plug - B - is located in vicinity of pendulum support.
Transmission oil and filter, changing
Note:
Follow the sequence of each of the following instructions until the oil change is completed.
Filter, removing and installing
- Remove engine cover
.
Repair Manual, Corresponding engine, Repair Group 10, removing and installing engine; removing engine
Transmission oil and filter for Direct Shift Transmission (DSG), changing and checking oil level

- Disconnect electrical harness connector - 2 - from Mass Air Flow (MAF) Sensor G70 .
- Disconnect vent hose - 1 - and air guide hose - 5 - .
- Open spring clamp - 3 - using hose clamp pliers VAS 5024 A and disconnect air guide hose from tube.
- Unscrew bolt - 4 - and remove air filter housing.
- Raise vehicle.
- Remove noise insulation
Repair Manual, Body Exterior, Repair Group 50, Body front, Noise Insulation - assembly overview
- Place appropriate receptacle underneath transmission.
- Lower the vehicle.
- Unbolt filter housing - 1 - from transmission.
- Before removing filter housing from transmission, tip it slightly in its seating.
Transmission oil and filter for Direct Shift Transmission (DSG), changing and checking oil level

This allows oil to flow back into transmission from filter housing.
Note:
Always replace O-ring - 2 - .
- Remove filter - 3 - .
- Coat new O-ring - 2 - with transmission oil.
- Coat O-ring in suction collar - arrow - of new filter with transmission oil.
- install new filter with suction collar - arrow - downward and tighten filter housing to 20 Nm.
- Install air filter housing and connect harness connector - 2 - to Mass Air Flow (MAF) Sensor G70 .
- Connect vent hose - 1 - and air guide hose - 5 - .
- Connect air guide hose and secure spring clip - 3 - using spring clip pliers VAS 5024 A .
Changing transmission oil and checking oil level
- Raise vehicle.
Transmission oil and filter for Direct Shift Transmission (DSG), changing and checking oil level
Volkswagen Technical Site: http://volkswagen.msk.ru http://vwts.info http://vwts.ru огромный архив документации по автомобилям Volkswagen, Skoda, Seat, Audi
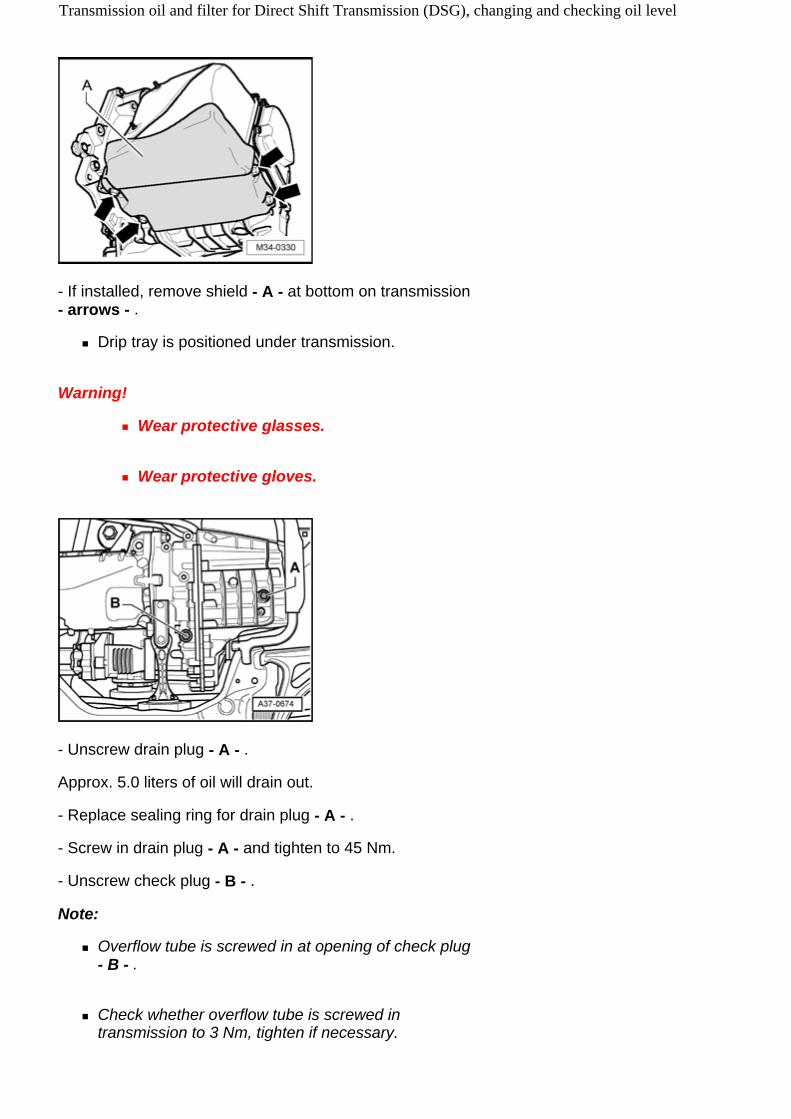
- If installed, remove shield - A - at bottom on transmission - arrows - .
Drip tray is positioned under transmission.
Warning!
Wear protective glasses.
Wear protective gloves.
- Unscrew drain plug - A - .
Approx. 5.0 liters of oil will drain out.
- Replace sealing ring for drain plug - A - .
- Screw in drain plug - A - and tighten to 45 Nm.
- Unscrew check plug - B - .
Note:
Overflow tube is screwed in at opening of check plug - B - .
Check whether overflow tube is screwed in transmission to 3 Nm, tighten if necessary.
Transmission oil and filter for Direct Shift Transmission (DSG), changing and checking oil level

Overflow tube has an 8 mm interior hex head.
The length of the overflow tube determines the oil level in the transmission. When replacing, allocate via replacement part number in Electronic Parts Catalog "ETKA" .
- Shake oil containers before opening.
Caution!
Filler hose and adapter VAS 6262 must be clean and transmission oil must not be mixed with other oils!
- Screw in adapter - A - of VAS 6262 into opening for check plug hand-tight.
To change bottles, shut-off valve can be closed or oil filler adapter VAS 6262 can be held higher than the transmission.
- Pour in 5.5 liters transmission oil for direct shift transmission via the adapter VAS 6262 .
- Read off transmission oil temperature indicated in display field of VAS 5051 .
- Start engine.
- Depress brakes and select each selector lever position for approx. 3 seconds. Move selector lever back into "P" .
Do not turn off engine!
Warning!
When working in vicinity of cooler, always ensure clearance to fan - danger of injury!
Fan can only switch on by itself.
Transmission oil and filter for Direct Shift Transmission (DSG), changing and checking oil level
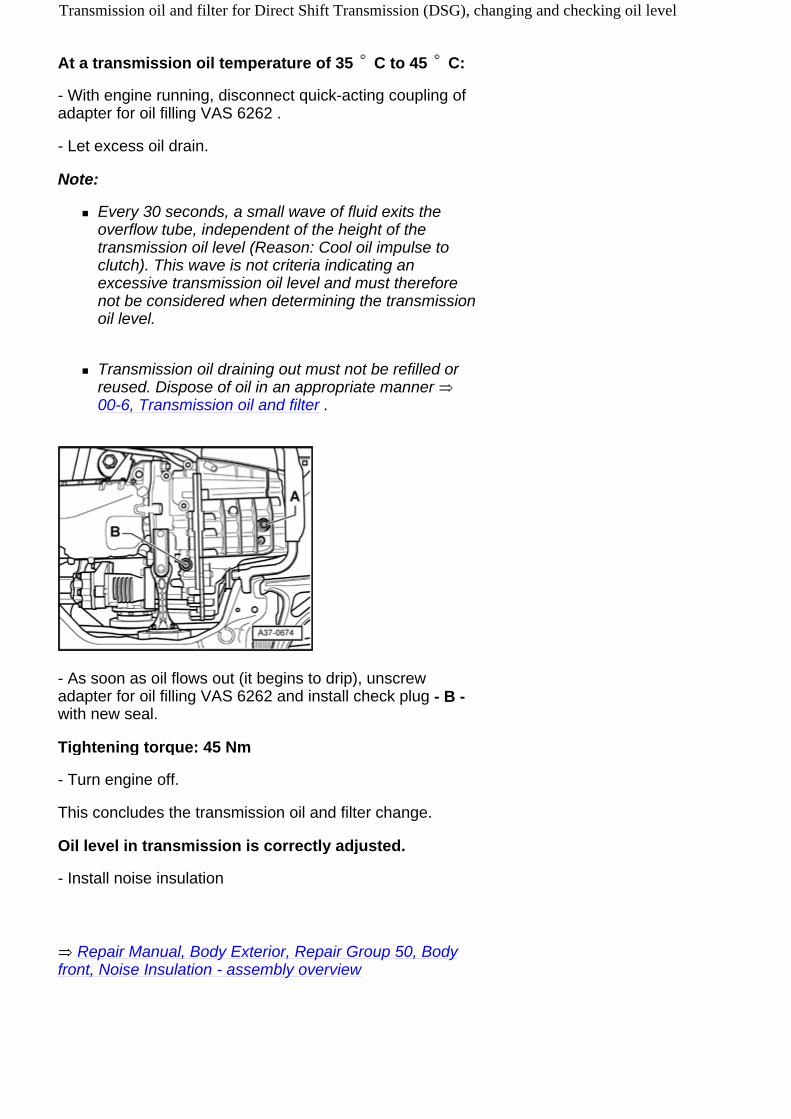
At a transmission oil temperature of 35 C to 45 C:
- With engine running, disconnect quick-acting coupling of adapter for oil filling VAS 6262 .
- Let excess oil drain.
Note:
Every 30 seconds, a small wave of fluid exits the overflow tube, independent of the height of the transmission oil level (Reason: Cool oil impulse to clutch). This wave is not criteria indicating an excessive transmission oil level and must therefore not be considered when determining the transmission oil level.
Transmission oil draining out must not be refilled or reused. Dispose of oil in an appropriate manner 00-6, Transmission oil and filter .
- As soon as oil flows out (it begins to drip), unscrew adapter for oil filling VAS 6262 and install check plug - B - with new seal.
Tightening torque: 45 Nm
- Turn engine off.
This concludes the transmission oil and filter change.
Oil level in transmission is correctly adjusted.
- Install noise insulation
Repair Manual, Body Exterior, Repair Group 50, Body front, Noise Insulation - assembly overview
Transmission oil and filter for Direct Shift Transmission (DSG), changing and checking oil level

35 - 1
Wheels and shafts
No repairs are performed on the wheels and shafts at this time.
Wheels and shafts

39 - 1
Sealing rings for flange shaft or stub shaft, replacing
Sealing rings, assembly overview
Right seal
for right drive flange
Replace 39-1, Sealing rings for flange shaft or stub shaft on right side, replacing
Right drive flange
Conical head bolt, 30 Nm
Replace
Right stub shaft
seal
Sealing rings for flange shaft or stub shaft, replacing

For left flanged shaft
Replace 39-1, Replace sealing ring for left drive flange
Left drive flange
Conical head bolt, 30 Nm
Replace
Replace sealing ring for left drive flange
Special tools, testers and auxiliary items required
Slide hammer VW 771
Pulling hook VW 771/37
Sealing rings for flange shaft or stub shaft, replacing

Thrust piece 3305
Torque wrench V.A.G 1331
Torque wrench V.A.G 1332
Sealing grease G 052 128 A1
Special tools, testers and auxiliary items required
Drip tray for workshop crane VAS 6208
Removing
- Remove left wheel.
- Remove noise insulation
Repair Manual, Body Exterior, Repair Group 50, Body front, Noise Insulation - assembly overview
- Remove left front wheelhousing liner
.
Repair Manual, Body Exterior, Repair Group 66, Wheelhousing liner; removing and installing front wheelhousing liner
- Remove left drive axle
Repair Manual, Suspension, Wheels, Steering, Repair Group 40, Servicing drive axles; removing and installing
Sealing rings for flange shaft or stub shaft, replacing

.
drive axles
- Place appropriate receptacle underneath transmission.
- Unscrew mounting bolt for flange shaft. To do so, screw two bolts into flange and counterhold flange shaft using pry bar.
- Pull out flange shaft together with compression spring.
- Pull out seal for flange shaft using slide hammer VW 771 and pull hook VW 771/37 .
Installing
- Lightly oil new sealing ring on outer circumference.
- Fill area between sealing lip and dust lip halfway with sealing grease G 052 128 .
Sealing rings for flange shaft or stub shaft, replacing

- Drive in new sealing ring to stop using thrust piece 3305 . Do not distort sealing ring when doing this.
- install drive flange.
- Secure flange shaft with new conical head bolt and tighten to 30 Nm.
- Install left drive axle
.
Repair Manual, Suspension, Wheels, Steering, Repair Group 40, Servicing drive axles; removing and installing drive axles
- Install left front wheelhousing liner
.
Repair Manual, Body Exterior, Repair Group 66, Wheelhousing liner, removing and installing; front wheelhousing liner
- Install left wheel
.
Repair Manual, Suspension, Wheels, Steering, Repair Group 44,
- Replace transmission oil filter and change transmission oil 34-11, Transmission oil and filter for Direct Shift
Transmission (DSG), changing and checking oil level .
- Install noise insulation
Sealing rings for flange shaft or stub shaft, replacing

Repair Manual, Body Exterior, Repair Group 50, Body front, Noise Insulation - assembly overview
Sealing rings for flange shaft or stub shaft on right side, replacing
Special tools, testers and auxiliary items required
Seal driver-frt wheel bearing 3158
Torque wrench V.A.G 1331
Torque wrench V.A.G 1332
Drip tray for workshop crane VAS 6208
Pulling hook T20143/2
Sealing grease G 052 128 A1
Sealing rings for flange shaft or stub shaft, replacing

Grease for clutch disc splines G 000 100
Removing
- Remove right wheel.
- Remove noise insulation
Repair Manual, Body Exterior, Repair Group 50, Body front, Noise Insulation - assembly overview
- Remove right drive axle
.
Repair Manual, Suspension, Wheels, Steering, Repair Group 40, Servicing drive axles; removing and installing drive axles
Vehicles with intermediate shaft
- After removing right drive axle - A - , unscrew intermediate shaft - B - from mounting bracket - C - - arrows - and remove from transmission stub shaft.
Vehicles with flange shaft
Sealing rings for flange shaft or stub shaft, replacing
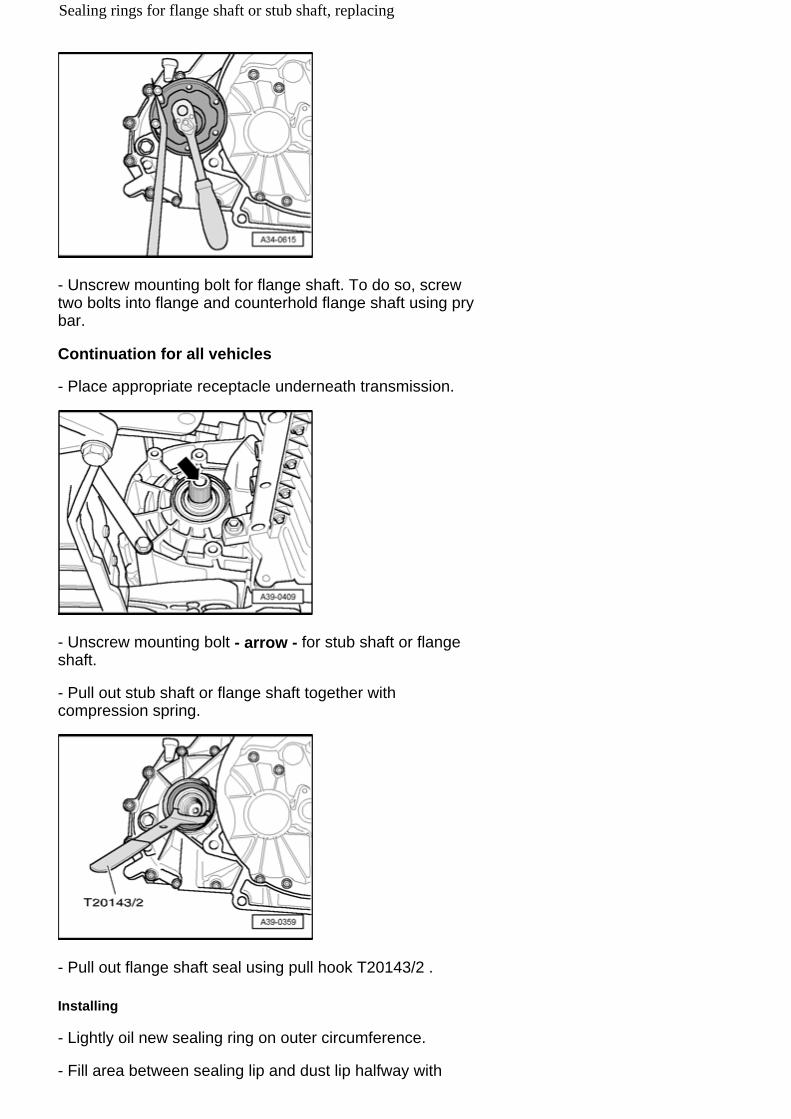
- Unscrew mounting bolt for flange shaft. To do so, screw two bolts into flange and counterhold flange shaft using pry bar.
Continuation for all vehicles
- Place appropriate receptacle underneath transmission.
- Unscrew mounting bolt - arrow - for stub shaft or flange shaft.
- Pull out stub shaft or flange shaft together with compression spring.
- Pull out flange shaft seal using pull hook T20143/2 .
Installing
- Lightly oil new sealing ring on outer circumference.
- Fill area between sealing lip and dust lip halfway with
Sealing rings for flange shaft or stub shaft, replacing

sealing grease G 052 128 .
- Drive in new sealing ring to stop using drift sleeve 3158 . Do not distort sealing ring when doing this.
- install stub shaft or flange shaft.
- Screw in new conical head bolt for securing stub shaft or flange shaft and tighten to 30 Nm.
Vehicles with intermediate shaft
- Replace O-ring - 1 - for stub shaft.
- Grease splines on stub shaft using grease for clutch disc splines G 000 100 .
- Guide intermediate shaft - B - through mounting bracket - C - on to transmission stub shaft.
- Tightly bolt intermediate shaft to mounting bracket to
Sealing rings for flange shaft or stub shaft, replacing

tightening torque - arrows -
.
Repair Manual, Suspension, Repair Group 40,
Continuation for all vehicles
- Install right drive axle
.
Repair Manual, Suspension, Wheels, Steering, Repair Group 40, Servicing drive axles; removing and installing drive axles
- Install right wheel
.
Repair Manual, Suspension, Wheels, Steering, Repair Group 44,
- Replace transmission oil filter and change transmission oil 34-11, Transmission oil and filter for Direct Shift
Transmission (DSG), changing and checking oil level .
- Install noise insulation
.
Repair Manual, Body Exterior, Repair Group 66, Wheelhousing liner, removing and installing; front wheelhousing liner
Sealing rings for flange shaft or stub shaft, replacing